

Page 1

FREEWAVE
PLUS
USER MANUAL
Page 2

2
INTRODUCTION
Thank you for cho osing the Vello
FreeWave Plus Wirel ess Rem ote Shu tter
Relea se. Thi s device t riggers you r
camer a in eit her wired or wir eless m ode,
allowi ng you to tr ip the shutte r with out
distu rbing t he came ra. I t’s ideal f or tak ing
pictu res of subject s that ar e dicu lt
to appr oach, s uch as wildlife. It als o
eliminates vibrations caused by pressing
your camera’s shu tter r elea se butt on
durin g macro, close -up, an d long- expo sure
photography. The four- secon d delay
funct ion is great for se lf-p ortr aits .
The FreeWave Plus does
not require line-of-sight
alignment , as its r adio
waves pa ss thro ugh and
around o bjects such a s
walls, windows, and floors.
You can even tr igge r your
camera around corners.
The FreeWave Plus use s the 2 .4GHz
wirel ess fre quenc y for ext ended
range and reduced interference.
Your Vello FreeWave Pl us
Wireless Remote Shutter Release
Kit contains:
Wireless Transmitter
Wireless Receiver
Camera Release Cable
4 AA A Batt eries
Page 3

3
KEY FEATURES
2.4GHz Radio Frequency: Reduced
inter feren ce and imp roved wi reless
signal quality.
Extended Range: up to 00m ( 320 ft .)
16 Possible Channels: One transmitter
can tri gger m ultipl e receiv ers.
Built-in Antenna: Destruction-proof
internal antenna.
Dual-function Release: Press ha lfwa y to
focus; p ress ful ly to tri gger s hutte r.
Delayed Release: Four-seco nd delay
funct ion give s you extr a time to g et
in position.
Multi-exposure: Take multipl e shots w ith
one pres s of the tr igge r.
Long Exposure: Control th e leng th of the
exposure remotely.
Multi-function: Trigger yo ur came ra
wirele ssly or w ired. W ired tr igger ing
works e ven if the b atter y is dead or
missing.
Ver sa ti le: One rec eiver wo rks wi th dozen s
of came ra mode ls. Ju st swap o ut the
camera release cable.
LED indicators: Confirm pr e-foc us and
expos ure duri ng wire less mod e.
Page 4
4
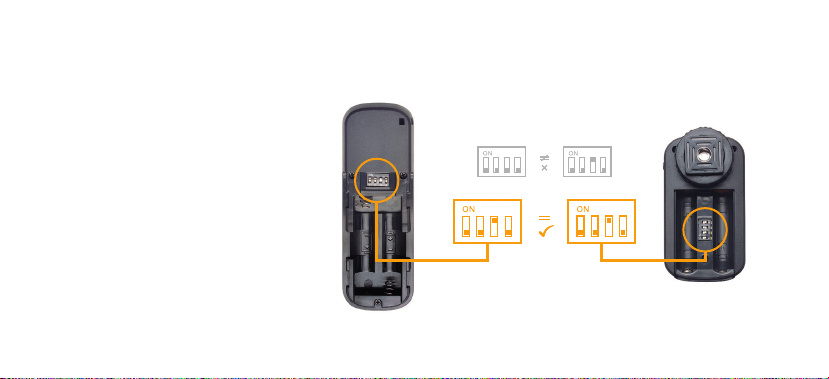
BEFORE YOU BEGIN
Set the D IP swi tch loc ated in th e batte ry
compartment of the Transmitter and
Receive r. The DIP sw itche s set a di erent
radio f requen cy for ea ch Transm itter/
Receive r pair, so tha t multip le sets o f the
FreeWave Plu s can be us ed simul tane ously.
You can use a pe n to set the D IP swi tches
to your de sired co de. Any co mbina tion
will wor k so long a s the swi tches a re set
identi cally i n both th e Transmit ter and
Receive r of a sing le FreeWave Pl us set. A
total o f 6 diere nt comb inatio ns can be
selected.
Inser t 2 AA b atter ies int o both the
Transmit ter an d Receive r.
Page 5

5
SAFETY WARNINGS
• There a re no use r-ser vice able pa rts
inside t he devi ces. Do n ot atte mpt to
disassemble or perform any
unauthorized modification.
• Do not op erate the FreeWave P lus in
the pre sence of fl amma ble ga s or vapo rs.
• Do not ha ndle wi th wet ha nds or
immer se in or ex pose to w ater or r ain.
Failu re to obse rve th is prec aution could
result in fire or el ectr ic shoc k.
• Keep out of the reach of chi ldren . This
device c ontai ns smal l parts whic h may
pose a cho king h azar d.
• Obser ve caution when handli ng
batte ries . Batt eries may leak o r expl ode
if improperl y handl ed. Use o nly the
batte ries listed in this ma nual. M ake
cert ain to al ign bat teri es with c orrec t
polarity.
• Batt erie s are pron e to leak age wh en full y
disch arged . To avoid damage to the
produc t, be s ure to remove the ba tter ies
when le aving the produ ct unattend ed for
prolon ged per iods or w hen no c harge
remains.
• Do not use or leave the devices in
condit ions of e xtreme heat , severe c old,
or high humidity.
• Turn o the ca mera’s power befo re
inser ting or removi ng the re mote cor d.
• Dispose used batteries, packaging,
and old devices i n accord ance wi th
appropriate local environmental
regulations.
Page 6
6
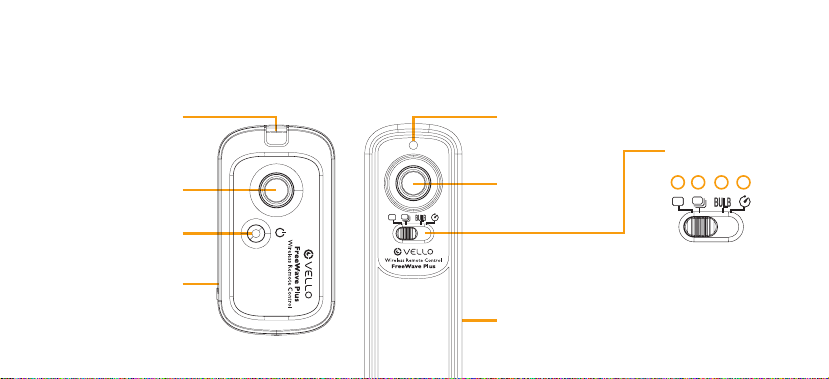
FEATURES DIAGRAM
Confirmation LED
Receiver
Shutter Button
Power Bu tton
Battery Compartment
Confirmation LED
Power Bu tton
Transmitter
Battery Compartment
Mode Selector
2 3 4
Single Shot
2 Continuous Shooting
3 Bulb Shooting
4 Self Timer
Page 7

7
POWERING ON & OFF
Tur n ON the Receiver: Press and hold
the Powe r butt on for 2 seconds. T he
LED wil l flash re d at 2 seco nd interval s to
indicate that t he rece iver is wo rkin g.
To power down after u se, Pre ss and ho ld the
Power b utto n for 2 seconds . The LED will
flash 4 ti mes in quick suc cessio n, to ind icate
that it i s poweri ng o.
There i s no need fo r a power b utton
on the transmitter. The Transmitter
is always ready to fire and u ses powe r
only wh en you pre ss the fo cus/sh utte r
release button.
Press and hold the
Power button for 2 seconds
to power up the Receiver.
Page 8

8
MOUNTING THE RECEIVER
If usin g the Fre eWave wirelessly, mo unt
the Rece iver on yo ur camera’s hot sh oe,
facing forw ards or b ackw ards.
If your c amer a’s hot shoe is in use, yo u
can use a n access ory sh oe to attach th e
Receiver to your c amer a, tr ipod, o r other
suitable surface.
With you r came ra and Re ceiver OFF,
connect the sh utte r relea se cabl e’s
sub- mini plug end to the Recei ver, and
the oth er end to yo ur camera’s shutter
relea se jack . Power up y our cam era an d
Re ce i ve r.
Page 9

9
SINGLE SHOTS | WIRELESS
1. Turn on the Rece iver by pr essin g and
holding the Power but ton unt il the
LED lig hts up.
2. Set the Transmit ter to Single Shot.
3. Set your cam era to t he Single Shot
setting.
4. Pres s and hold the Transm itte r’s
shutter rele ase bu tton h alfw ay to wake
or focus y our cam era (if s et to Aut o
Focus).The LED will turn green.
5. Fully depr ess the s hutter button on the
Transmitter. The LE D will tu rn red an d
the shu tter w ill be tr igge red.
Page 10

0
FOUR SECOND DELAY | WIRELESS
1. Turn on the Re ceive r by pressing and
holding the Power but ton unt il the
LED lig hts up.
2. Set the Trans mitter to Self Timer
mode.
3. Set your c amer a to the Single Shot
setting.
4. Press and hold the Tra nsmit ter’s
shutter rele ase bu tton h alfw ay to wake
or focus y our cam era (if s et to Aut o
Focus). The LED will turn green.
5. Fully de press t he shut ter bu tton on
the Transmitte r. The LED will turn re d
and the shutte r will be t riggered af ter a
four-second delay.
Page 11

CONTINUOUS MODE | WIRELESS
1. Turn on the Re ceive r by pressing and
holding the Power but ton unt il the
LED lig hts up.
2. Set the Trans mitter to Bulb mode.
3. Set your c amer a to the Continuous
Shots setting.
4. Press and hold the Tra nsmit ter’s
shutter rele ase bu tton h alfw ay to wake
or focus y our cam era (if s et to Aut o
Focus).The LED will turn green.
5. A full press of the Tran smit ter’s shu tter
button will trigger the ca mera t o take
contin uous ph otos un til you ha lf pres s
or fully press the shut ter button ag ain.
Page 12

2
CONTINUOUS MODE AT SECOND INTERVALS | WIRELESS
1. Turn on the Re ceive r by pressing and
holdin g the Powe r button until t he LED
light s up.
2. Set the tr ansmi tter t o Continuous
Shooting.
3. Set your c amer a to the Single Shot
setting.
4. Press and hold the Tra nsmit ter’s
shutter rele ase bu tton h alfw ay to wake
or focus y our cam era (if s et to Aut o
Focus). The LED will turn green.
5. A full press of the Tran smit ter’s
shutter but ton will trig ger the camer a
to take continuous photos at 1 second
inter vals until you relea se the shu tter
button.
Page 13

3
BULB MODE (LONG EXPOSURE) | WIRELESS
1. Turn on the Re ceive r by pressing and
holdin g the Powe r button until t he LED
light s up.
2. Set the Trans mitter to Bulb Shooting.
3. Set your c amer a to the Bulb setting.
4. Press and hold the Tra nsmit ter’s
shutter rele ase bu tton h alfw ay to wake
or focus y our cam era (if s et to Aut o
Focus). The LED will turn green.
5. Fully de press t he Transm itter’s shutter
button. The L ED on the Tra nsmit ter
will fla sh red an d the LED o n the
receiver will t urn solid red. Th e shut ter
will remain open until you half -press or
fully press the shutt er but ton ag ain.
Page 14

4
SINGLE SHOTS | WIRED
The FreeWave Plus Rec eiver c an also
be used a s a wired , o-camer a shut ter
release.
With you r came ra and re ceive r OFF,
connect the sh utte r relea se cabl e’s
miniplug end to t he Receiver and t he othe r
end to you r came ra’s shut ter rel ease ja ck.
Power up yo ur came ra. T he Recei ver
does no t need to b e on, bu t becau se the
Receiver does n ot need p ower in wi red
mode, t he LED w ill not li ght up.
1. Pres s and hold the Rece iver’s sh utte r
relea se but ton hal fway t o wake or fo cus
your camera (i f set to Au to Focu s).
The confirmat ion LED w ill not display,
so be sure t o manua lly foc us or all ow
the cam era to A uto Foc us without
confirmation.
2. Fully pres s the shu tter b utto n on the
Receiver. The shut ter will be triggere d.
Page 15

5
CONTINUOUS MODE | WIRED
1. Set yo ur came ra to th e Continuous
Shots setting.
2. Press and hold the Re ceiver ’s shutt er
relea se but ton hal fway t o wake or fo cus
your camera (i f set to Au to Focu s).
The confirmat ion LED w ill not display,
so be sure t o manua lly foc us or all ow
the cam era to A uto Foc us without
confirmation.
3. A full press of the Re ceiver’s shutter
button will trigger the ca mera t o take
contin uous ph otos un til you re lease t he
shutter button.
Page 16
6
BULB MODE (LONG EXPOSURE) | WIRED
1. Set yo ur came ra to Bulb mode.
2. Press and hold the Re ceiver ’s shutt er
relea se but ton hal fway t o wake or fo cus
your camera (i f set to Au to Focu s).
The confirmat ion LED w ill not display,
so be sure t o manua lly foc us or all ow
the cam era to A uto Foc us without
confirmation.
3. Press an d hold th e Receiver’s shut ter
button. The s hutte r will re main open
until the shut ter button is r eleased.
Page 17

7
SPECIFICATIONS & TROUBLESHOOTING
Transmitter Receiver
Power 2 x AA A 2 x AA A
Battery Life 3 Ye ar s 300 Hours
Channels 6 Channels
Range 00m ( 320 ft .) with no o bstr uctio ns
Frequency 2.4 GH z
Confirmation LEDs 2 Color
Shutter Modes
Singl e Shot , 4- Secon d Delay, Co ntinuo us,
-Second Cont inuou s, & Bul b
Troubleshooting
Problems wit h the Fre eWave Plus ca n usually be
trace d to the followin g most common causes.
Perfo rm the fo llowin g steps to diag nose and
correct the problem:
• Check t hat the s hutter rele ase cab le is in go od
condition and is properly connected.
• Make sure that th e Receiver is powe red on.
• Remove th e batt eries f rom the Transmit ter and
Receiver, and chan ge the ch annel by rearr angin g
the DIP switc hes to a di eren t combi nation,
taki ng care t o ensure that both the Trans mitt er
and Rece iver are set iden tical ly.
Page 18

8
FCC COMPLIANCE
This dev ice com plies w ith Part 5 of the
FCC Rule s. Ope ratio n is subject to th e
following two conditions:
1. This d evice may not cause harm ful
interference
2. This devic e must accept any
interference received, including
inter fere nce that may caus e undes ired
operation.
Page 19

9
ONE-YEAR LIMITED WARRANTY
This VE LLO produ ct is wa rrant ed to the
origin al purc haser t o be free fro m defec ts
in mate rials an d workm anshi p under no rmal
consum er use for a p eriod o f one () year fro m
the orig inal pu rchase d ate or th irty ( 30) days
afte r replac ement , which ever occu rs late r. The
warranty provider’s responsibility with respect
to this li mited w arran ty sha ll be limi ted sole ly
to repai r or repl acemen t, at th e provide r’s
discre tion, o f any produ ct that f ails du ring
norma l use of thi s produc t in its in tende d
manne r and in its i ntend ed envir onment .
Inope rabil ity of th e produc t or par t(s) shall b e
deter mined by t he warr anty p rovide r. If the
product has been discontinued, the warranty
provide r reser ves the right to re place it w ith a
model of equivalent quality and function.
This wa rrant y does not cover da mage or
defec t caused b y misuse , negle ct, ac cident ,
alteration, abuse, improper installation
or maint enanc e. EXCE PT AS PROV IDED
HERE IN, TH E WARRA NTY P ROVIDER
MAKE S NEITH ER ANY E XPRE SS
WARRANTIES NOR ANY IMPLIED
WARRA NTIES , INCLUDIN G BUT NOT
LIMI TED TO ANY I MPLI ED WARR ANT Y
OF MERC HANTABI LIT Y OR FITN ESS FO R
A PARTICU LAR PU RPOSE. Thi s warr anty
provide s you wit h specifi c lega l rights , and you
may also h ave addit ional ri ghts th at var y from
state t o state .
To obtain wa rran ty cover age, co ntact t he
Vello Cust omer Se rvic e Depar tmen t to obta in
a return m ercha ndise au thori zation ( “RMA”)
numbe r, and return t he defe ctive pro duct to
Vello alon g with th e RMA num ber and p roof of
purcha se. Sh ipment o f the defe ctive p roduct i s
at the pur chase r’s own risk a nd expe nse.
For more i nform ation or t o arran ge serv ice,
visit w ww.vello gear.com or c all Cus tomer
Serv ice at 22- 594-2 353.
Produc t warr anty p rovided b y the Gra dus
Group.
www.gradusgrou p.com
VELLO is a r egiste red tr ademar k of the
Gradu s Group. © 2 04 Grad us Grou p LLC. All
Rights Reserved.
Page 20

All other trademarks are the property of their respective owners.
© 204 Gradus Group LLC. All Rights Reserved. GG2
 Loading...