

Page 1

FREEWAVE
FUSION PRO
USER MANUAL
Page 2

2
Thank you for cho osing t he Vello
FreeWave Fus ion Pro W irele ss Shu tter/
Flash /Grou ping Re mote. This dev ice
trig gers o -camer a light s remot ely fro m
up to 60 0 feet (183m) aw ay.
With it s multiple groups fe ature , you can
easil y configure up to three d iere nt ligh t
groups, whic h can be t rig gered i ndividuall y
or simultane ousl y, for a total of seven
dier ent com binat ions. (Simultaneous
trig gering of multiple li ght gro ups requires
additi onal FreeWave Fusi on Pro Re ceivers,
availa ble for pu rcha se separatel y.)
Additi onall y, the FreeWave F usion P ro
incorp orat es the co nveniences of a
wirel ess shu tter r elea se, allowing y ou to
trip th e shut ter wit hout distur bing th e
camer a. It ’s ideal for tak ing pic tures o f
subjects th at are di cult to appr oach, s uch
as wild life. I t also e limin ates vi brat ions
caused by pressing your c amer a’s shutte r
relea se but ton dur ing mac ro, clos e-up, and
long-exposure photography.
The FreeWave F usion P ro Transmi tter
features a hot shoe mount that s uppor ts
through-the-lens (TTL) data pass-through.
With th e Transmi tter m ounted onto yo ur
camer a, yo u can mou nt your c ompat ible
flash direct ly onto the Trans mitter,
allowi ng your ca mera t o set the
appropriate flash level automatically
The FreeWave Fusion P ro doe s not
require line -of- sight a lignm ent , as its r adio
waves pa ss through an d around o bjec ts
such as w alls , windo ws, and floors .
INTRODUCTION
Page 3

2.4GHz Radio Frequency: Reduced
inter fere nce and im proved w irele ss
signal quality.
Extended Range: up to 600 f eet (183m)
Multi-Purpose: Use as an ind ividu al or
group w ireles s flash t rigg er, and/or a s a
shutt er rele ase rem ote tr igge r.
Multiple Groups: Configure u p to thre e
dier ent ligh t group s and up to s even
dierent group combinations.
Flash S ync Sp eed of up t o 1/200s: Tak e
advan tage of s ync sp eeds th at matc h the
ratin g of your ca mera a ll the wa y up to
1/200 s (on compa tible c amer as only) .
Flash Wake-Up: Wake -up fu nctio n in TTL-
compatible flash units.
Ver sati le: One Re ceiver w orks w ith mul tiple
camer a and lig ht mode ls. Ju st swa p out
the conn ecti ng cabl es.
Dual -Fun ction S hut ter Rel ease B utto n:
Press h alfw ay to focu s; pres s fully t o
trigger shutter.
LED Ind icato rs: Co nfirm pr e-fo cus, sh utte r
relea se, fla sh wake -up, a nd flas h trig ger
in wirel ess mod e.
TTL Pas s-Throug h: The Tran smitt er let s
TTL da ta tra nsfer f rom your c amer a
to your co mpatib le flas h, allo wing you r
camer a to set t he appr opria te flash l evel
autom atica lly, in conj uncti on wit h its
TTL me terin g syste m.
KEY FEATURES
Your Vello FreeWave Fus ion Pro Wireless
Shutter/Flash/Grouping Remote Kit
contains:
Wireless Transmitter
Wireless Receiver
Shutt er Release Ca ble
3.5 mm M ini to 3 .5 mm Mini
Studio Tri gger Cable (3.5 mm Mi ni to ¼″ Phono)
4 AA A Batt erie s
2 Hot Shoe Protector s
Receiver Holder
Page 4

4
The FreeWave Fusion P ro Transm itte r
features a hot shoe mount that s uppor ts
TTL da ta pas s-th rough , allow ing you r
camer a to set t he app ropri ate fla sh level
autom atica lly, in con junc tion wi th its
TTL me tering syst em. In o rder to t ake
advan tage o f the TT L featu re, you w ill
need fu ll TTL s uppor t via your cam era ,
and a compatible flash.
When transmitting dat a to the fl ash
or stud io light in any way o ther than
the Transmitter’s hot sh oe moun t,
we recom mend us ing a ful ly manually -
contro lled fl ash. B ecau se thes e metho ds
do not tr ansm it TTL setti ngs, you will
need to set the power out put ma nuall y.
The FreeWave Fusion P ro is com patib le
with mo st cam eras, flas h units, and st udio
light s. However, for TTL p ass- throu gh
via the Transmit ter, flash w ake- up
funct ional ity, and /or high s hutt er spe eds,
you will n eed ful l TTL su ppor t via yo ur
camer a, fl ash, a nd FreeWave Fu sion P ro
trigger.
For ins tance, if you h ave a Cano n came ra
and you’d like to t ake adv anta ge of the
COMPATIBLE DEVICES
flash w ake-up featu re, you w ill nee d a
Canon c amer a with T TL me tering, a
compatible C anon fla sh whi ch supp ort s
TTL , and a de dicat ed Can on-c ompat ible
FreeWave Fus ion Pro fl ash tr igger.
Simil arly, if yo u have a Niko n came ra and
you’d like to take advan tage of the flash
wake- up feature, yo u will ne ed a Nikon
camer a wit h TTL me teri ng, a com patible
Nikon fla sh whi ch supp ort s TTL , and a
dedic ated Ni kon-c ompat ible Fre eWave
Fusion Pro flash trig ger.
Page 5

5
• Ther e are no user-se rviceabl e parts
inside t he devi ces. Do not att empt t o
disas semb le or per form any
unauthorized modification.
• Do not o pera te the FreeWave Fusion
Pro in the prese nce of fla mmab le gas o r
vapors.
• Do not h andle w ith wet h ands o r
immer se in or expose t o water o r rain .
Failu re to obse rve this precauti on could
result in fire or e lect ric sho ck.
• Keep ou t of the re ach of c hildren. Thi s
device c ontains sma ll par ts whi ch may
pose a cho king h aza rd.
• Obse rve ca ution w hen ha ndlin g
batte ries . Bat terie s may leak or exp lode
if improperl y hand led. Use only the
batte ries l isted i n this ma nual . Make
cert ain to align ba tter ies with corr ect
polarity.
• Bat teries are prone to le akag e when
fully di scharged. To avoid d amage t o the
produ ct, b e sure t o remove the bat ter ies
when le aving th e produ ct unattend ed for
prolon ged periods o r when no charg e
remains.
• Do not u se or leave t he devi ces in
condit ions of e xtre me heat, seve re cold ,
or high humidity.
• Turn o the c amer a’s power be fore
inser ting o r remov ing the re mote cord.
• Disp ose of used batt erie s, pac kagi ng,
and old devices i n accord ance w ith
appropriate local environmental
regulations.
SAFETY WARNINGS
Page 6
6
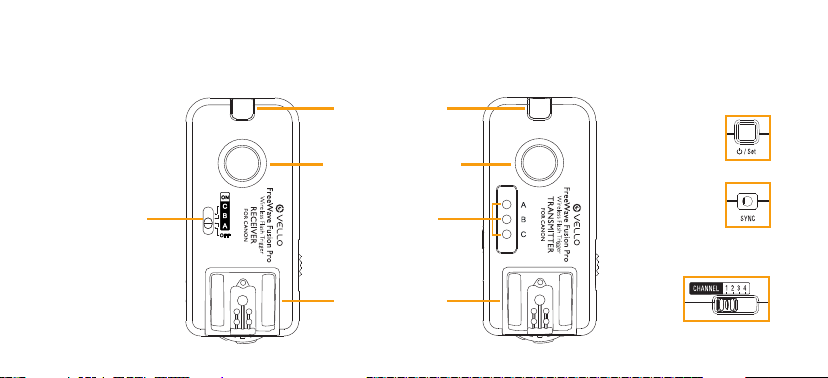
FEATURES DIAGRAM
Hot Sho e Moun t
Shut ter Rel ease B utto n
Group I ndica tor
Receiver
Tra n smi t te r
Power /
(Group) Switch
Confir matio n LED
Channel Switch
3.5 mm
Output Jack
Power /
Setting Button
Page 7
7
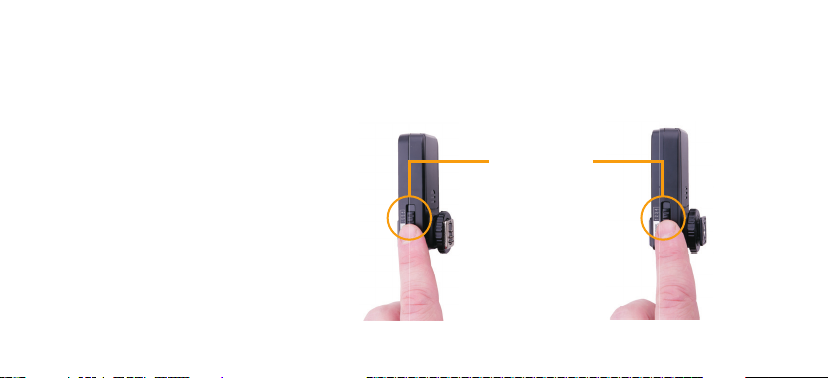
Set the c hann el swi tch loc ated on t he side
of the Transmitter and Re ceive r.
The cha nnel switch es set a diere nt rad io
frequency fo r each Transmit ter/R eceiver
set, s o that mu ltipl e sets of t he FreeWave
Fusion Pro and /or additiona l Fusio n Pro
Receivers ca n be used s imult aneo usly.
You can set th e chann el swi tche s to your
desired code; A ny comb inati on will w ork
so long a s the swi tche s are set identi cally
for both the Trans mitter and Receiver (s)
of a singl e FreeWave Fu sion Pr o set.
Inser t 2 AA A batteries i n the Rec eiver a nd
in the Transmitter.
BEFORE YOU BEGIN
Identical Channel
ReceiverTra n smi t te r
Page 8

8
Turn ON the Re ceive r:
Slide t he Grou p Switc h to eit her A , B, or
C and the unit wil l power up . The LE D will
flash re d at 2 seco nd inte rva ls to ind icate
that th e Receiver is wor king.
To power down after u se, slide the G roup
Switc h back to t he O po sitio n.
Turn ON the Transmit ter:
Press a nd hold t he power b utton for 2
second s to powe r up the Tran smit ter.
The Gro up Indi cator l ight will turn on and
show the c urrently se lected group. The
Group i ndica tor lig ht will t urn o af ter 2
second s and the Transmi tter w ill ent er
Stand by mode .
To power down after u se, press and h old
the powe r butt on for 2 se conds . The LE D
at the top of the unit will fl ash 4 ti mes at
half- secon d inter val s to indi cate th at it is
powering down.
POWERING UP
Page 9

9
1. Wi th your c amer a and Receiver o ,
loosen the Transmitter’s hot sh oe
locki ng ring .
2. Insert t he Transm itte r’s hot sho e into
the cam era’s hot s hoe mou nt.
3. Tig hten t he hot sh oe lock ing ri ng until
secure.
MOUNTING THE TRANSMITTER
Page 10

10
Mount t he rece iver on your tri pod
or stand via on e of the t wo provid ed
mounting options:
1. Threaded socke t for a st andar d ¼″
screw mo unt
2. Accessory shoe (cold shoe) foot
MOUNTING THE RECEIVER
Page 11

11
Conne cting t o a Flas h Unit :
1. Sw itch t he flas h’s lockin g swit ch to the
unlock position
2. Inser t the flash’s hot sh oe foot into
the Transmitter or Rece iver ’s hot shoe
mount
3. Swi tch the fl ash’s loc king s witc h to the
locked position
Conne cting t o a Stud io Ligh t
You will need to use the included Studio
Trigger C able to connect the Re ceive r to
a studio light .
1. Plug the 3.5 mm en d of the cable in to
the Rece iver ’s output j ack.
2. Plug the 3 .5 mm e nd of the c able in to
the stu dio light remo te jack
3. If yo ur stud io ligh t has a ¼″ phono jack ,
it will n eed to be c onnec ted us ing the
included 3. 5 mm to ¼″ phono cable.
CONNECTING THE LIGHTS
Page 12

12
Slide t he Recei ver’s Group/Power swi tch
to eith er A, B, or C . To assign mu ltiple
Receivers to the same fl ash gr oup, si mply
selec t the sa me grou p lett er for ea ch
Receiver in the fl ash gr oup.
The LED a t the top o f the Receiver w ill
flash re d to confi rm tha t the powe r is on.
Tip: You can combi ne studio lig hts
and speedlig hts within the sam e flash gr oup.
(Be aware of the i ndependent recy cling time
of each flash to ensure a ll flash units are
ready t o fire).
SETTING THE GROUPS
Page 13

13
1. Gently p ress the Grou p/Powe r butt on
on the Transmitter. The group indicator
LED(s) wil l light u p to indicate wh ich
groups are cur rentl y selec ted.
2. To change gro up sele ctions, pre ss
the Gro up/Pow er but ton ag ain. Ke ep
pressing the G roup/ Power bu tton t o
cycle t hrough all the G roup op tions : A
only; B o nly; C o nly; A , B and C; A a nd
B; A and C; B a nd C.
3. To see whi ch grou ps are cu rrent ly
selec ted at an y time, gentl y press t he
Group /Power b utto n. The G roup
indicator lig ht will turn o a fter 2
second s. Howe ver, even af ter powe ring
down, t he tra nsmitter w ill rem ember
the las t group selec ted.
4. To verify light and group s elec tion,
press t he shut ter re leas e butt on on
eithe r the ca mera o r the Fre eWave Pro
Transmitter h alfway. The LE D at the
top of th e Receiv er will t urn gre en on
each cu rrent ly selected Receiver.
SELECTING THE GROUPS
Page 14

14
1. Co nfirm t hat the power on yo ur
camer a, Tran smit ter, and Rec eiver i s
turned on.
2. If your fla sh has a w ake- up function:
Press t he shut ter button on the ca mera
half way to wa ke your fla sh.
3. If yo ur flash does no t have a wake -
up func tion, you may be a ble to tu rn
o slee p mode: Refer to yo ur flas h’s
manua l to find ou t if you can turn o
sleep m ode and for inst ruct ions.
4. Fully press t he shut ter bu tton on
your camera . All lights co nnec ted to
Receivers in the currently s elec ted
group w ill fire .
Note: When transmit ting d ata to the flash
or stud io light through anyt hing ot her
than th e Transmi tter ’s hot sho e mount ,
we recom mend us ing a ful ly manually contro lled fl ash. B ecau se thes e metho ds
do not tr ansm it TTL setti ngs, you will
need to set the power out put ma nuall y.
USING THE FLASH TRIGGER
Page 15

15
Conne cting t he Ca mera :
To use the remo te shutter re leas e
funct ion, yo u will ne ed to use t he incl uded
Fusion Pro shu tter release cabl e.
1. Plug the 3.5 mm e nd of the c able into
the Rece iver.
2. Plug the ot her end o f the ca ble int o
your camera’s shutte r relea se ter minal .
3. Mount the Recei ver on you r came ra’s
hot shoe facing forw ards or back wards.
If you are u sing yo ur camera’s hot shoe,
you can use an acce ssor y shoe to attach
the Rece iver to your cam era , trip od, or
other suitable surface.
Note: I f you are m ounti ng a flas h on
your camera , moun t the fla sh dire ctly
on your ca mer a’s hot shoe . The Fusion
Pro Rece iver ca n be mounted on a
straight br acket . DO NOT MO UNT THE
FLA SH ON TO P OF THE F USI ON PRO
RECEI VER si nce the Receive r does n ot
send TTL sign als to th e flash .
USING THE FREEWAVE FUSION PRO AS A REMOTE SHUTTER RELEASE
Page 16

16
1. Turn on the Rec eiver by slidin g the
Group /Power s witc h to any pos ition
other t han O .
2. Set your ca mera t o the sin gle- shot
setting.
3. Press an d hold th e Transmi tter ’s
shutter rel ease bu tton half way to
wake or fo cus your c amer a (if set t o
Auto Fo cus). The L ED will turn gr een.
4. Fully depress t he shut ter bu tton o n the
Transmitter. The L ED will t urn red a nd
the shu tter w ill be tr iggered.
REMOTE SHUTTER RELEASE | SINGLE SHOTS
Page 17

17
1. Turn on the Rec eiver by slidin g the
Group /Power s witc h to any pos ition
other t han O .
2. Set your ca mera t o the con tinuo us
shooting mode.
4. A full pres s of the Tran smit ter’s shutte r
button will t rigg er the camer a to take
contin uous photos until you release the
shutter but ton.
3. Press an d hold th e Transmi tter ’s
shutt er release bu tton h alf way to wa ke
or focus y our cam era (i f set to Au to
Focus). T he LED will tur n green .
REMOTE SHUTTER RELEASE | CONTINUOUS MODE
Page 18

18
1. Turn on the Rec eiver by slidin g the
Group /Power s witc h to any pos ition
other t han O .
2. Set your ca mera t o the delay/self-timer
setting.
3. Press an d hold th e Transmi tter ’s
shutter rel ease bu tton half way to
wake or fo cus your c amer a (if set t o
Auto Fo cus). The L ED will turn gr een.
4. Fully depress t he shut ter bu tton o n the
Transmitter. The L ED will t urn red a nd
the shu tter w ill be tr iggered af ter th e
pre- set del ay set in yo ur camera.
REMOTE SHUTTER RELEASE | SELF-TIMER MODE
Page 19

19
1. Turn on the Rec eiver by slidin g the
Group /Power s witc h to any pos ition
other t han O .
2. Set your ca mera t o the bul b sett ing.
3. Press an d hold th e Transmi tter ’s
shutter rel ease bu tton half way to
wake or fo cus your c amer a (if set t o
Auto Fo cus). The L ED will turn gr een.
4. Press and hold the Transmitter ’s
shutter but ton. T he shu tter w ill rem ain
open un til you re leas e the shu tter
button.
REMOTE SHUTTER RELEASE | BULB MODE (LONG EXPOSURE)
Page 20

20
Please see the i nclud ed compatibility s heet
for a list o f compatible t rig ger ca bles from
the Gradus Group.
CAMERA RELEASE CABLES
Page 21

21
Transmitter Receiver
Power
2 AA A 2 AA A
Batt ery Li fe* 5 Years 250 Hou rs
Channel Settings 4 possib le chan nels
Range
600 f t. (183m) with no obstructions
Frequency 2.4 GH z
Confirmation LEDs 2 Color
Transmitter Receiver
Flash Trig ger
Groups
7 possib le grou ps:
A, B , C, AB C, AB , AC, B C
Light s per Gro up Unlimited
Shut ter Mod es
(setti ngs con trol led
by camera)
Singl e Shot , Conti nuous ,
Self-Ti mer, & Bulb
SPECIFICATIONS
* In standby mod e.
Page 22

22
Problems with the FreeWave Fusion Pro
can usu ally be trace d to the fo llowing
most common ca uses. Perfo rm the
follow ing ste ps to diagnos e and cor rect
the problem:
Check t he cont act be twee n the lig ht’s hot
shoe foo t and the R eceiver’s hot sh oe.
Make sur e the lig ht’s lock ing sw itch is s et
to the lo ck posi tion.
Check t hat the s hutt er release cable an d/
or stud io light cable a re in goo d condi tion
and properly connected.
Make sur e that th e Receiver is powe red
on and at the correct set ting.
Remove th e batt erie s from the
Transmitter a nd Recei ver and c hange t he
chann el by swi tching the ch annel s witc hes
to a die rent co mbina tion, taki ng care
to ensu re that b oth the Tra nsmitter and
Receiver are se t ident icall y.
If you en count er any interf erenc e on the
initi al setting, t ry ch angin g the channel
by choos ing a di erent chann el swi tch
combination.
When using the F reeWave Fus ion Pro a s
a shutter rel ease , you may no t be able
to rele ase the s hutt er on you r came ra if
the len s is set to A uto Focus and c annot
focus on t he subj ect . Switc h your ca mera
to manu al focu s to ensu re prop er shu tter
release.
TROUBLESHOOTING
Page 23

23
This eq uipme nt generates, use s, and
can radiate r adio fr equen cy ene rgy, and
if not in stalled and u sed in acc ordan ce
with th e inst ruct ions, m ay caus e harm ful
inter fere nce to r adio com munic ation s.
This eq uipme nt has b een te sted and
found to c omply w ith th e limit s for a
Class B d igit al devi ce purs uant t o Par t
15 of the FCC Rules. Th ese lim its are
desig nated t o provid e reasonabl e
protection a gain st har mful in ter feren ce
in a resid enti al inst alla tion.
There i s no guarante e that i nter fere nce
will not occur in a p art icula r inst allat ion.
If this e quip ment do es cau se harmful
inter fere nce to r adio or television
reception, w hich c an be det ermi ned by
turni ng the eq uipme nt ON or O FF, the
user is e ncour aged t o try to corre ct
the interfe rence by one or mo re of the
follow ing mea sures:
1. Reorie nt or relocat e the receivin g
antenna;
2. Increas e the dis tanc e betw een the
equip ment and the receiver.
This dev ice com plies w ith Pa rt
15,
Subpa rt B , Clas s B of the FCC Rules .
Oper ation i s subje ct to the follow ing
two cond itions:
1. This dev ice may no t cause
harmf ul inte rfe rence .
2. This devic e must ac cept an y
interference received, including
inter fere nce tha t may cau se
undesired operation.
Any cha nges or m odifications (incl uding
the ant enna) m ade to th is devi ce that
are not e xpres sly ap proved by t he
manuf actu rer may vo id the us er’s
autho rity t o oper ate the e quip ment .
FCC COMPLIANCE
Page 24

Limited One-Year Warranty
Vello provides a limited warranty that this product is free from defects in materials and workmanship to the
original purchaser under normal use for a period of one (1) year from the original purchase date,
or thirty (30) days after replacement whichever occurs later. Vello's responsibility with respect to
this limited warranty shall be limited solely to repair or replacement, at its option, of any product
which fails during normal consumer use. This warranty does not extend to damage or failure
which results from misuse, neglect, accident, alteration, abuse, improper installation or maintenance. EXCEPT
AS PROVIDED HEREIN, VELLO MAKES NEITHER ANY EXPRESS WARRANTIES NOR ANY IMPLIED
WARRANTIES. INCLUDING BUT NOT LIMITED TO ANY IMPLIED WARRANTY OF MERCHANTABILITY
OR FITNESS FOR A PARTICULAR PURPOSE. To obtain a replacement during the time of this warranty please
return the defective Item with proof of purchase along with an RMA number to the place of purchase. This
warranty gives you specific legal rights, and you may also have other rights which vary from state to state.
© Copyright 2013 Gr adus G roup
 Loading...