

Page 1
FREEWAVE
MICRO
WIRELESS REMOTE
SHUTTER RELEASE
USER’S MANUAL
E
E
Page 2

INTRODUCTION
2
Thank you for ch oosin g the
Vello FreeWave Micro Wirele ss
Remote Shut ter Re leas e for
Nikon. This co mpac t set include s
a small t ran smit ter an d a lowprofile receiver t hat sits dire ctl y
on the 10-pin remote terminal—
it doesn’t requ ire a cable or take
up spac e on the h ot shoe . The
FreeWave Micro wire less ly
trig gers t he shu tte r of your N ikon
DSLR c amer a from a dista nce of
approx imat ely 30 0′ so t hat you
can shoot act ion wh ile kee ping
your dis tance from t he cam era
setup . You can use a ny one of
16 selec tabl e radi o frequenci es
(chann els) —th is ens ures that you
have a cle ar cha nnel for operating
your camera even if ot her
wirel ess dev ices a re oper ating in
the same area.
The FreeWave Micro trans mitter
and receiver fi t easi ly int o a shir t
pocket—toget her they weig h
only 1.1 oz. The tr ansm itt er
oper ates using on e AA A bat ter y.
The receiver i s powere d by the
camera.
Using t he FreeWave M icro, you
can activate autofocus, tri gge r the
shut ter, and op en and c lose the
shut ter wh en your c amer a is in
Bulb exposu re mode . A shoo ting
alarm LED on t he transmi tte r
blink s red each tim e a pict ure is
taken, so that you’ll always know
the exposure was made.
The FreeWave Micro also allows
you to ta ke phot ogra phs wi thou t
touch ing your came ra— a gre at
advan tage when doing cl ose- up
or macro photo grap hy, or whe n
you’re usi ng long e xpos ures.
Using t he FreeWave M icro, you
won’t risk accidentally mov ing
your camer a.
Page 3

Smal l, Lig htwe ight Remote C ontr ol: compatible
with N ikon DS LRs with a 10-pin remote
terminal.
2.4 G Hz Radio Fre quen cy: reduced interference
and improved wireless signal quality.
Extended Range: operates at up to 328′ (100 m),
depending on conditions.
16 Channels : oper ates w itho ut interferenc e from
other wireless devices.
Built-In Antenna: improves recep tion o f recei ver.
Dual -Fu nction Rel ease: pres s rele ase bu tton
half way to a ctiv ate au tofocus; pre ss ful ly to tr ip
the shutter.
Shut ter Trigger Con firmation: The red led O N
light o n the tr ansmitt er lights up e ach ti me the
camera shu tter is rele ased , provi ding visual
confirma tion t hat a photogr aph has bee n take n.
Bulb Mode Releas e: whe n the ca mera is in Bulb
mode, the Fre eWave Micro remote control
can open the shutt er at th e beginning o f the
expos ure and c lose the shut ter at the end of the
exposure.
LED In dicators : LEDs indicate Focus, Shutter, and
Shooting Confirmation.
Works in E xtr eme Tempe ratu res: operates in
temperatures from -4° to 122° F (-20° to 5 0°C).
KEY FEATURES
3
Page 4

• There are no user-se rvi ceable par ts in side the
device s. Do no t attempt to disa ssemble or pe rform
any unauthorized modifi cation.
• Do not opera te in th e prese nce of fl amma ble ga s
or vapors.
• Do not h andle with we t hand s or immerse in or
expos e to wat er or ra in. Fa ilure t o observe th is
preca ution can result in fi re or ele ctric shoc k.
• Obse rve cautio n when h andling bat ter ies. B att eries
may lea k or explode if improperly handl ed. Use
only the batteries listed in this manual. Make
cert ain to align b atteries with co rrec t polarity.
• Bat teri es are prone to leaka ge whe n fully
disch arged. To avoid damage to the product, be
sure to re move the batt erie s when leaving the
product unatten ded for prolon ged periods or
when no c harg e remains.
• Do not use or leave the dev ices in conditions o f
extre me heat, severe col d, or high humi dity.
• Disp ose of used bat teries, p acka ging , and old
device s in accordan ce with appro priate loc al
environmental regulations.
• Do not attem pt to di sassembl e or rep air the
equip ment —d oing so w ill void the wa rranty, and
Vello wil l not be re spon sible for any damage.
• Handle the u nit wi th car e.
• Keep out of the r each o f child ren. T his dev ice
contains sm all pa rts w hich m ay pose a choking
hazard.
• Make sure the i tem is i ntact and that there are no
missing parts.
• All ph otos are for illustrative purp oses on ly.
• Please rea d and fol low the se ins truc tion s and kee p
this manual in a safe p lace .
PRECAUTIONS
4
Page 5
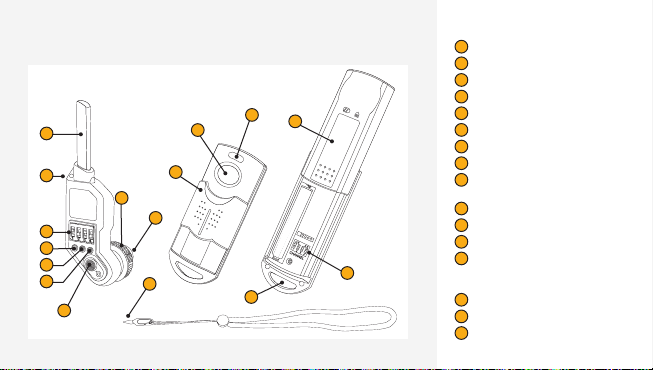
FEATURES DIAGRAM
Receiver
1
Antenna
2
Lanyard hook
3
16-channel switch
4
Power LED
5
Focus LE D
6
Shutter LED
7
Power switch
8
Lockin g whee l
9
10 pin conne ctio n to the
camera.
10
Channe l sele ctio n pin
11
Protective sliding cover
12
Shutter release button
13
LED Indi cato r
Focus —vivid b lue / Sh ut ter —d im
blue / S hooting ala rm —r ed
14
Batte ry compar tme nt door
15
Strap hook
16
16-channel switch
5
Tra nsm itt er
Lanyard
7
4
6
5
3
1
14
2
8
9
10
13
12
11
16
15
Page 6
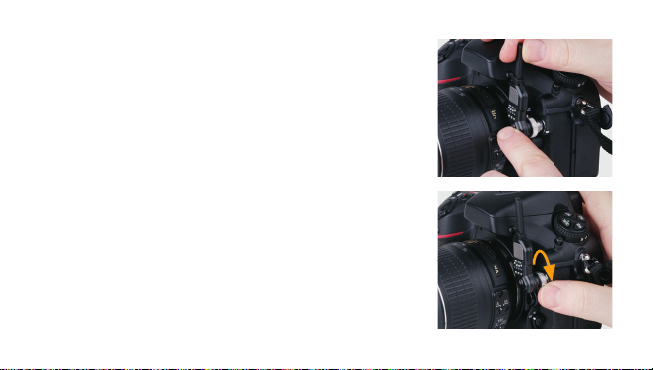
Sett ing Up t he Receiver
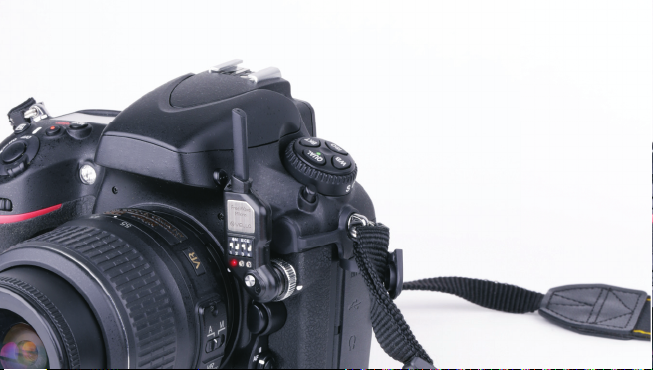
The camera must have a 10-pin
remot e term inal in order t o
connect wit h the FreeWave Micro
Wireless Rec eiver. Please se e
the com pati ble ca mera l ist on
page 12.
1. I nser t the socket of the
recei ver, with t he ant enna
point ed up, into th e came ra’s
10-pin remo te ter mina l.
INSTRUCTIONS
2. Turn the rece iver slight ly
until you feel t hat it’s seat ed
properly in t he ter minal.
3. Whe n you have correc tly
align ed the receiver wit h the
10-pin remo te ter mina l, tur n
the loc king w heel clock wise
until t he receiver i s secur ely
connected t o the camer a.
To get the mos t from your FreeWave Micro Wir eles s Remot e Cont rol,
please read t his ma nual .
6
Page 7
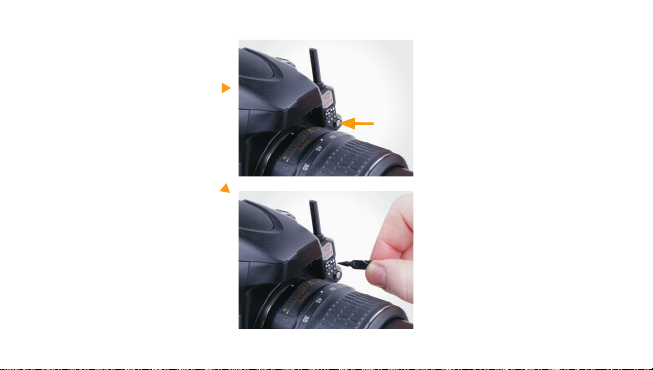
4. Turn the re ceive r on by
press ing the power bu tto n.
5. The re d Power LE D on the
recei ver wil l blink on and of f
when the rece iver is c onnected
properly to t he cam era .
6. Ensu re tha t the receiver is set
to the s ame ch annel as the
transmitter.
7. To turn th e receiver of f, pre ss
the powe r swit ch and h old it
for app roximately one second.
The red Power LED w ill turn
off.
Note: The recei ver will ente r
sleep mode af ter i t has be en on
for two h ours without being
activated. When the receiver is in
sleep mode, press t he On sw itch
to resume operation.
7
Page 8
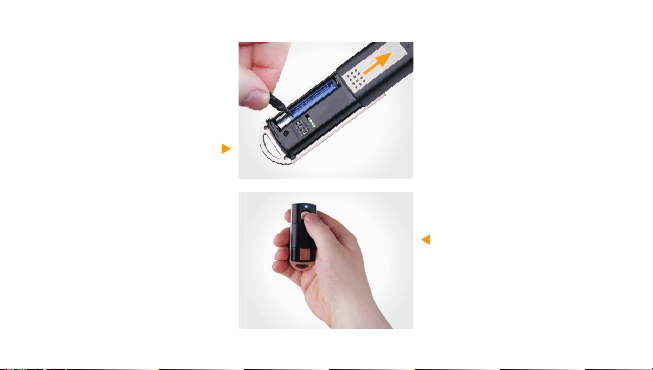
Sett ing Up t he Trans mitter
Plea se follow thes e directions to
set up the tra nsmitter.
1. P ress down on th e knur led
area on t he bac k of the
tran smit ter and slide open t he
batt ery c hamb er cover.
2. Insta ll one A AA batt ery in the
batt ery c hamb er, ensur ing th at
the pol arit y is cor rect .
3. Using the includ ed cha nnel
selec tion p in (att ache d to the
lanya rd), se lect t he channel
using t he selecto r next t o the
batt ery. Be sure th e channel
matches the channel set ting on
the rec eiver.
4. Slide the batter y cha mber
cover closed.
5. To activ ate autofoc us, pr ess
the shu tte r button on t he
tran smit ter halfway down.
When au tofo cus is e ngag ed,
the ind icat or LED w ill become
a vivid b lue col or.
6. To trigg er the s hutter and
take a ph otograph , pres s the
shut ter bu tton all the w ay
down. W hen the shut ter is
enga ged, t he indicato r LED will
turn a di m blue color.
8
Page 9
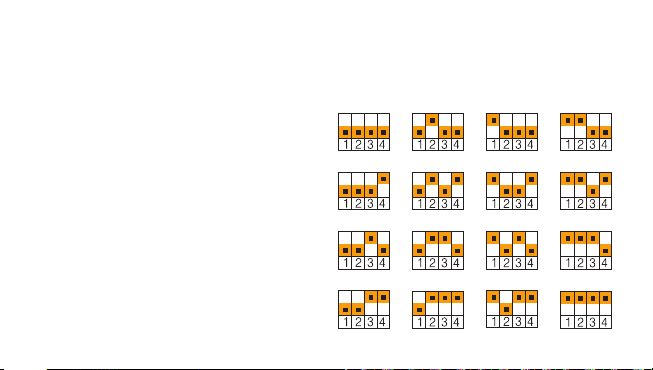
There are 16 radio f requencie s (channels) ava ilab le
on the trans mitter and t he receiver. Be sure to se t
the same channel on the tr ansm itter and the rece iver.
This al lows you t o use th e Freew ave Micro Wirel ess
Remote Control wit hout inter fere nce fro m othe r
devices usin g radi o frequ enci es in th e same a rea. The
channel sel ection pin attached to the include d lany ard
helps you to adj ust th e chan nels . Plea se refer to th e
channel lis t below for informat ion about settin g the
channels.
Note: Be sure to m aint ain a minimum d istance of 2 0″
(50 cm) betwee n the tr ansmitt er and receiver duri ng
oper ation t o preve nt anti-R F interference .
SETTING THE CHANNEL
Availa ble Channels
9
A
E
I
M
N
B
F
J
C
G
K
O
D
H
L
P
Page 10

USING THE FREEWAVE MICRO WIRELESS REMOTE SHUTTER RELEASE FOR NIKON
10
After you at tach t he receiver t o
your camera , you ca n use th e
FreeWave Micro to ac tiva te the
autof ocus function, to release the
shut ter, and to o perate the Bulb
mode on yo ur cam era .
To operate the autofoc us function
on your camer a, pre ss the s hutter
butt on on th e transmitter h alf way
down. W hen the auto focus is
enga ged, t he blue LED on t he
tran smit ter and the bl ue LED
on the re ceive r will b oth light
up. To take a ph otograph , press
the shu tte r button all t he way
down. T he red LE D on the
recei ver and t he red shooti ng
alarm LED on t he transmi tte r
will light up to confirm that the
recei ver is fu ncti oning and that
it has t riggered t he shu tter in
the camera . The co nfirmation
light m ay not bl ink at the prec ise
momen t that t he pho togr aph
is taken.
To use the FreeWave Micro with
the Bu lb mode o n your ca mera,
first se t your camer a to Bul b
mode. Then, press t he shu tter
butt on on th e transmitter a nd
hold it u ntil t he blue LED on t he
tran smit ter turns of f. A blue LED
and a red LED on th e receiver will
light u p, signalin g that t he shu tter
of the camer a is ope n. Whe n
you want to close the sh utter,
press t he shu tter butt on on th e
tran smit ter again. The blu e and
red lights on t he rece iver will go
out, signa ling t hat th e shut ter
has closed.
Page 11
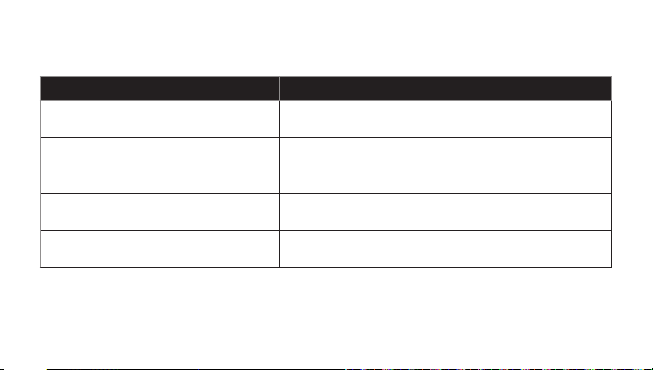
TROUBLESHOOTING
Transmitter Receiver
Transmitter light does not blink Insert a fresh battery into the battery chamber, ensuring that the
polarity is correct.
Transmitter light blinks, but receiver light does
not blink
Check to be sure that the power switch for the receiver is in the
On position.
Ensure that the receiver and transmitter are set to the same channel.
Status LED on transmitter blinks at incorrect
times
Insert a fresh battery into the battery chamber, ensuring that the
polarity is correct.
Status LED on the receiver blinks, but the
camera doesn’t operate
Remove receiver from camera and reinstall it, ensuring that it’s
securely attached.
11
Page 12
Nikon® D80 0 / D700 / D30 0 / D300s / D20 0 / D100
(bat tery grip re quire d) / D3 / D3s / D3x / D2
D2x / D2H s / D2H / D1H / D1
COMPATIBLE CAMERAS
12
Page 13
SPECIFICATIONS
- Transmitter Receiver
Frequency
2.427 GHz to 2.457 GHz
Channels
16
Maximum Range
328′ (100 m)
Battery
1x AAA
Powered by camera
Operating Temperature Range
-4 to 122°F (-20 to 50°C)
Dimensions
2.83 × 0.86 × 0.90″
(82 × 34 × 17 mm)
2.75 × 1.33 × 0.67″
(70 × 22 × 23 mm)
Weight
0.7 oz. (19.8 g) without battery 0.4 oz. (11.3 g)
Total Weight
1.5 oz. (42.5 g)
13
Page 14

This eq uipm ent ge nera tes, u ses, and can radiate
radio f requency e nerg y, and, i f not in stalled and
used in accordance wi th the instruct ions , may cau se
harmful int erf erence to rad io communic ations. This
equip ment h as been tes ted and found t o compl y with
the lim its fo r a Clas s B digi tal de vice pu rsua nt to Pa rt
15 of the FCC Rules . These limit s are de sign ated
to provi de rea sonable protect ion ag ains t harmful
inter ference in a r esidenti al install ation.
There i s no guarant ee that inte rference w ill not
occur in a particul ar ins tall atio n. If this equipme nt
does cause ha rmfu l interference t o radio or
telev ision r ecep tion , which can be deter mined
by turning the equip ment O N or OFF, the user i s
encourage d to tr y to correct the inte rfe rence by one
or more of t he fol lowing meas ures:
1. Re orie nt or relocat e the re ceiving ant enna ;
2. Increase the d ist ance be tween the e quipment and
the rec eiver.
This device complie s with Part 15, Subpart B, Class B
of the FCC Rules .
Oper ation is subject to t he following two con ditions:
1. T his dev ice may n ot cause harm ful in terferen ce.
2. This device mus t accept any interferen ce rece ived ,
inclu ding in ter fere nce th at may cause und esired
operation.
Any cha nges or modifi cati ons (in cluding the antenna)
made to t his device that are not expr essl y approved
by the ma nufactur er may voi d the us er’s aut hori ty to
oper ate the equipment.
FCC COMPLIANCE
14
Page 15

Vello prov ides a limite d warr ant y that this product is free f rom def ect s in materia ls and workma nshi p to the
origi nal purchaser under normal use f or a period of on e (1) year from t he original purch ase date, or t hir ty (30)
days af ter re plac emen t whic hever occurs l ater. Vello’s respon sibility w ith re spec t to this limi ted wa rranty sh all
be limi ted solely to repai r or replacem ent , at its optio n, of any product which fails during nor mal con sume r use.
This warranty do es not e xten d to dam age or f ailure whic h resul ts fro m misuse, neglect, acc iden t, al teration ,
abuse , improper insta llat ion or ma inte nance. EXC EPT A S PROVIDED HEREI N, Vell o MAKES NEITHE R ANY
EXPRESS WARRANTIES NOR A NY IM PLIED WARR ANT IES . INCLUDI NG BUT NOT LIM ITED TO A NY
IMPL IED WAR RA NTY O F MERC HANTAB ILIT Y OR FITNE SS FOR A PARTICU LA R PURPOSE .
To obtain a replacemen t duri ng the t ime of t his warran ty please re turn t he def ective Ite m with proof of
purch ase along wit h an RMA number to the place o f purch ase. This warranty gi ves you s pecific leg al rights, a nd
you may al so have ot her ri ghts w hich v ary from state to state .
WARRANTY
15
Page 16

© Copyright 2013 Gr adus G roup.
All oth er trad emarks are th e proper ty of their res pective owner s
www.vellogear.com
 Loading...