

Page 1
UNIVERSAL
INFLATABLE
SOFTBOX
FOR PORTABLE FLASHES
Page 2
INTRODUCTION
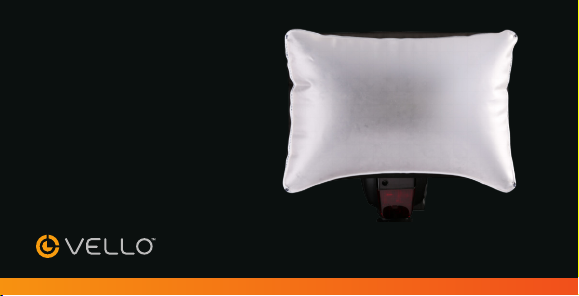
Thank you for choosing
the Vello FD-900 Universal
Inflatable Softbox. This
light-modifying accessory
is designed to diuse the
light fired from on-camera
hot-shoe flashes, creating
an enhanced and softened
quality to the speedlight’s
2
output. The inflatable softbox
is highly portable and able to
fold and fit into a very small
form. Additionally, the setup
and breakdown takes less
than a minute to complete,
creating a reliable addition for
on-the-go photographers.
Page 3

FEATURES SPECIFICATIONS
• Softens and diuses light
• Reduces shadows and
hotspots
• Inflatable and highly
portable
• Allows for the functionality
of the auto-focus assist
beam
Dimensions
(inflated)
Weight 2. oz. (59.5 g)
5.9" × 8.4" × 6.75"
(4.9 × 2.3 × 7. cm)
3
Page 4

PRECAUTIONS
• Please read and follow these
instructions and keep this
manual in a safe place.
• Ensure not to over-inflate.
• Do not use this item as a
flotation device.
• Handle this product with
care.
4
• Do not puncture.
• Keep this product away
from water and any
flammable gases or liquids.
• Do not stare at the lights
when they are powered on.
• Clean this product with
only a soft, dry cloth.
• Keep this product away
from children.
• Make sure everything is
secure before proceeding.
• All photos are for
illustrative purposes only.
Page 5

OVERVIEW
Front Back
Flash-head
Opening
Diusing Surface
Inflation Valve
Draw String
5
Page 6

SETUP
. Flatten the deflated softbox.
2. Lift the plug o the inflation
valve and inflate the softbox
by pinching the base of the
valve and blowing into the
opening.
3. Once the softbox can
support itself securely, plug
the inflation valve.
6
4. Loosen the draw string on
the flash-head opening.
5. Insert the flash head into
the opening and tighten the
draw string until secure.
Page 7

BREAKDOWN
. Loosen the draw string on
the flash-head opening.
2. Remove the flash from the
flash-head opening.
3. Unplug the inflation valve
and deflate the softbox by
pinching the base of the
valve and applying light
pressure to the unit.
4. Flatten the softbox and
store for later use.
7
Page 8

SETUP FOR SMALLER FLASHES
To accommodate smaller
flash heads, the included
rubber tension band can
be used to secure your
flash to the softbox.
8
. Inflate the diuser by
pinching the base of the
inflation valve and blowing
into the opening. Plug the
inflation valve once the
diuser is fully inflated.
2. Slide the tension band over
the flash head and position
it by the tilt joint.
Page 9

3. Place the softbox’s opening
over the head of your flash
and tighten the drawstring.
4. Pull the tension band over
the flash head opening
material to secure the
softbox.
5. To disassemble the diuser,
remove the tension band
from over the flash head
and follow the “Breakdown”
instructions (page 7).
9
Page 10

90-DAY LIMITED WARRANTY
This VELLO product is warranted to the original purchaser to be free from defects in materials and workmanship
under normal consumer use for a period of ninety (90) days from the original purchase date or thirty (30) days
after replacement, whichever occurs later. The warranty provider’s responsibility with respect to this limited
warranty shall be limited solely to repair or replacement, at the provider’s discretion, of any product that fails
during normal use of this product in its intended manner and in its intended environment. Inoperability of
the product or part(s) shall be determined by the warranty provider. If the product has been discontinued,
the warranty provider reserves the right to replace it with a model of equivalent quality and function.
This warranty does not cover damage or defect caused by misuse, neglect, accident, alteration, abuse, improper
installation or maintenance. EXCEPT AS PROVIDED HEREIN, THE WARRANTY PROVIDER MAKES NEITHER
ANY EXPRESS WARRANTIES NOR ANY IMPLIED WARRANTIES, INCLUDING BUT NOT LIMITED TO ANY
IMPLIED WARRANTY OF MERCHANTABILITY OR FITNESS FOR A PARTICULAR PURPOSE. This warranty
provides you with specific legal rights, and you may also have additional rights that vary from state to state.
0
Page 11

To obtain warranty coverage, contact the Vello Customer Service Department to obtain a return merchandise
authorization (“RMA”) number, and return the defective product to Vello along with the RMA number and
proof of purchase. Shipment of the defective product is at the purchaser’s own risk and expense.
For more information or to arrange service, visit www.vellogear.com or call Customer Service at 22-594-2353.
Product warranty provided by the Gradus Group.
www.gradusgroup.com
VELLO is a registered trademark of the Gradus Group.
© 205 Gradus Group LLC. All Rights Reserved.
Page 12

www.vellogear.com
All other trademarks are the property
of their respective owners.
GG3
 Loading...