

Page 1
EXTENDÁ
USER MANUAL
1
Page 2
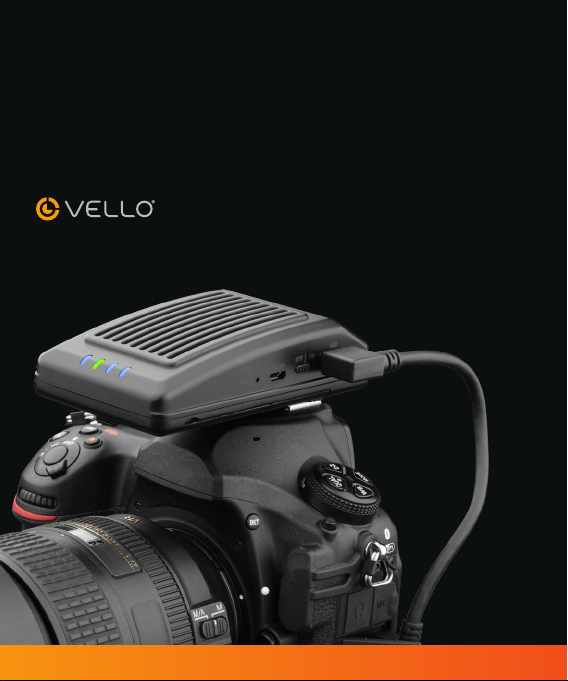
THANK YOU FOR CHOOSING VELLO
The Extendá is a Wi-Fi DSLR remote which provides wireless camera control
from your smartphone, tablet, PC, or Mac. You can take a photograph, start
and stop video, or alter most camera settings using your portable device.
In addition to streaming the images to clients, you can safely back up your
photos by uploading them directly to iCloud or Dropbox while you shoot.
TABLE OF CONTENTS
LW-100 Overview .........................................3
LW-500 Overview .........................................4
App Screen Overview ..................................5
Charging the Extendá .................................. 6
Charging Other Devices ............................. 6
Replacing the LW-500’s Battery .................6
Extendá Setup ................................................ 7
Connect to Wi-Fi hotspot ..........................8
Remote Capture ...........................................9
Camera Settings ..........................................10
Live View
Grid
White Balance
Quality
Metering Mode
...............................................11
........................................................14
........................................15
.....................................................16
......................................17
Video
Time Lapse
Focus Stack
Advanced Bracketing
Auto View
Browse
Settings
Appendix A .................................................25
Appendix B ..................................................26
Precautions ...................................................27
FCC Statement............................................27
Firmware Updates ......................................28
Troubleshooting ..........................................28
Specifications ...............................................29
One-Year Limited Warranty .....................30
...................................................18
.............................................19
...........................................20
.........................21
..............................................22
....................................................23
.....................................................24
2
Page 3

1
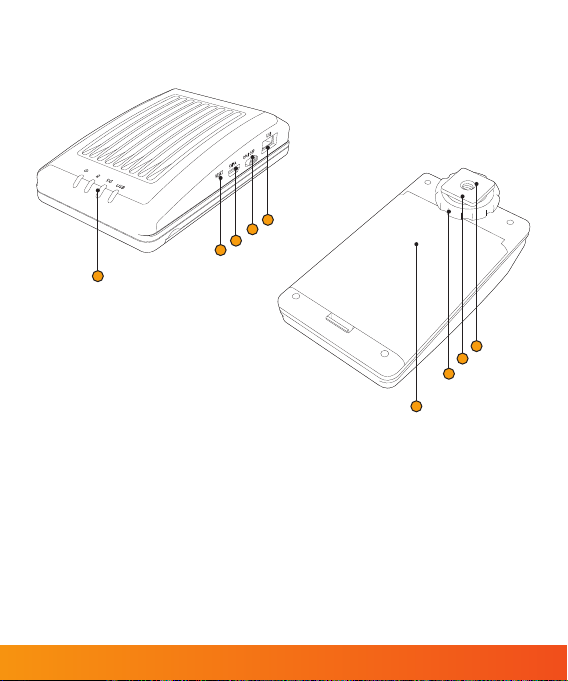
LW-100 OVERVIEW
3
2
8
4
6
5
7
Remote
1. Status LEDs
2. Battery charging port
3. Reset button
4. Lanyard port
5. 1/4˝-20 tripod mount
6. Power switch
7. Standard-A USB port
8. Ethernet/network port
Also Included
• Micro-B USB cable
• Mini-B USB cable
• Hot-shoe to 1/4˝-20 male post adapter
• Lanyard
3
Page 4
1
LW-500 OVERVIEW
5
4
3
2
9
8
7
6
Remote
1. Status LEDs
2. Reset button
3. Battery charging port
4. Power switch
5. Standard-A USB port
6. Battery compartment
7. Wheel lock
8. Shoe-mount
9. 1/4”-20 mounting socket
Also Included
• Mini-B USB cable
• Micro-B USB cable
• USB 3.0 cable
• Rechargeable lithium-ion battery
4
Page 5
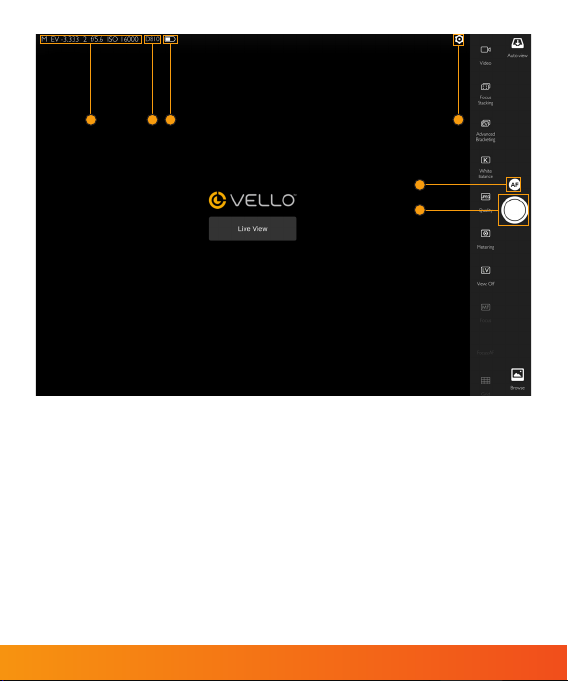
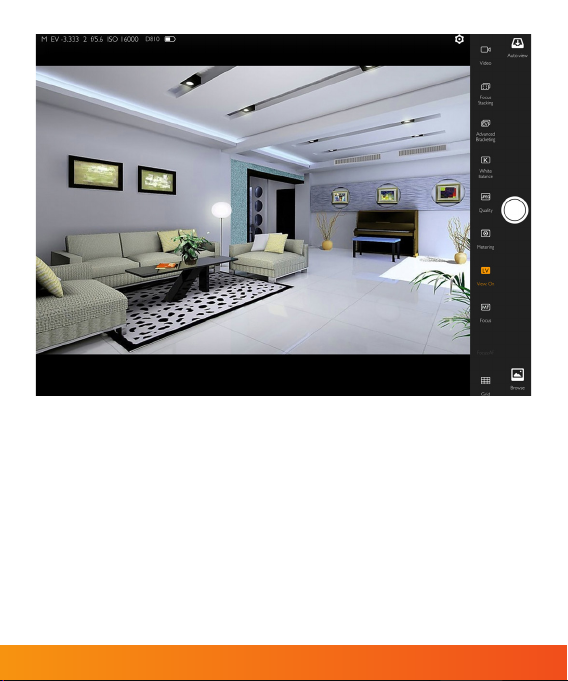
APP SCREEN OVERVIEW
Remote
1. Camera Settings
2. Camera
3. Camera Battery Status
41 2 3
5
6
4. App Settings
5. Auto Foucus (Sony Only)
6. Shutter Button
5
Page 6
CHARGING THE EXTENDÁ
Use the Micro-B USB cable to connect the Extendá to a power
source, such as a USB power adapter or powered USB port.
LW-100
• Battery status:
Turns orange when the battery power
is low.
• Battery charging status:
Orange when the battery is charging.
CHARGING OTHER DEVICES
You can charge devices, such as a
smartphone, by using a compatible
USB cable to connect your mobile
device to the Extendá’s USB port
while the Extendá is turned on.
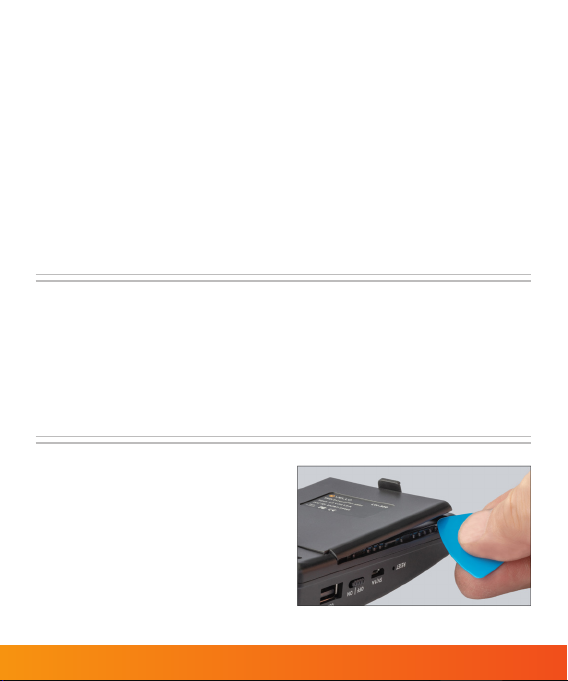
REPLACING THE LW-500’S
RECHARGEABLE BATTERY
1. Pull down on the battery
compartment cover’s latch.
2. Insert a screwdriver or included pick
into the notches, and pry open the
compartment cover.
LW-500
• Battery status:
Flashes red when battery power is low.
Orange when the battery is charging.
Green when the battery is fully
charged.
6
Page 7
EXTENDÁ SETUP
Install the Extendá app
You will need to install the Extendá
app onto your mobile device (iOS
or Android
PC computer (Mac OS X 10.10 and
above or Windows
™
4.0 and above) or Mac or
®
XP and above).
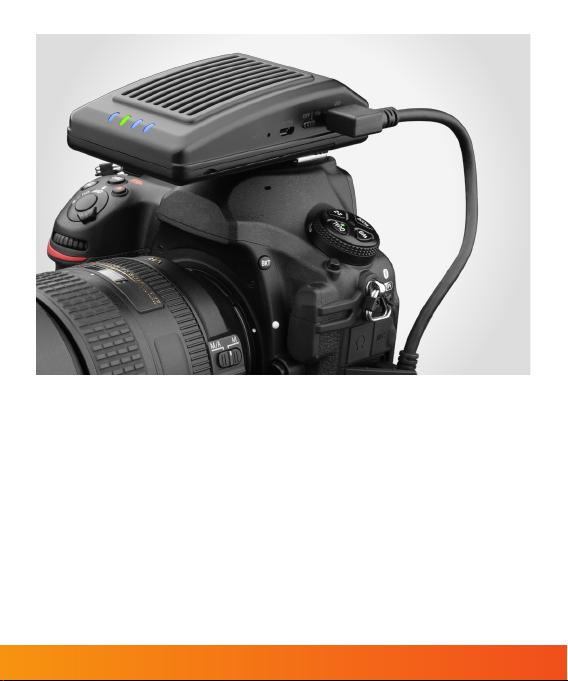
1. Mount the Extendá onto your
camera. For Sony users, read through
Appendix A to set up your camera
before proceeding.
®
8.0
2. Use a compatible USB cable to
connect the Extendá’s USB port to
your camera’s USB/AV port.
3. Turn the Extendá and your camera on.
Note: Some cameras use specific cables for
this operation, which are not supplied.
7
Page 8
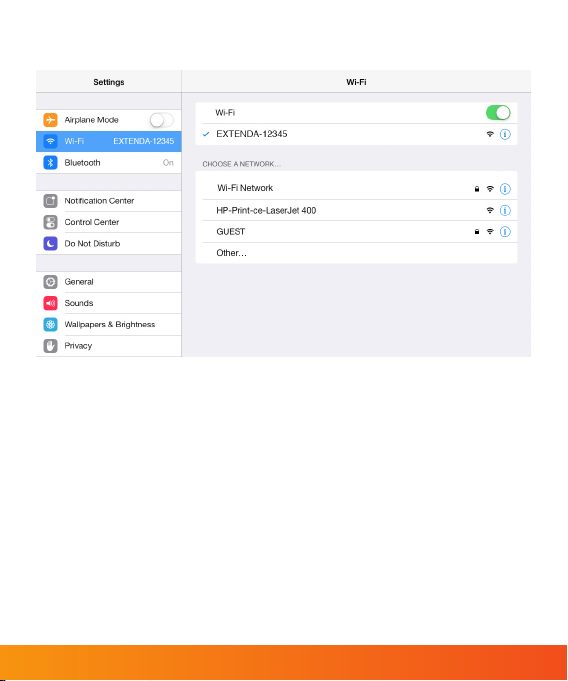
CONNECT TO THE
EXTENDÁ WI-FI HOTSPOT
System status indicator:
LW-100: Flashing green when the
Extendá is creating a Wi-Fi hotspot. Solid
green when the hotspot is established.
LW-500: 5G flashes blue when the
Extendá is creating a Wi-Fi hotspot. Solid
blue when the hotspot is established.
1. After turning on the Extendá, wait for
the system status indicator light to
turn solid.
2. Connect to the Extendá Wi-Fi hotspot
[Extendá-XXXX] in your device
settings.
Launch the Extendá app on your device.
Important: Please visit Vellogear.com to
check the compatible Extendá features with
your specific camera model.
8
Page 9
REMOTE CAPTURE
The essential feature of the
Extendá is wirelessly capturing
photos from your own device.
1. Set up your shot with your camera,
and make sure everything is in focus.
2. Select the shutter release button to
take a picture.
9
Page 10

CAMERA SETTINGS
You can alter your camera’s shooting
modes and exposure settings, such
as aperture, ISO, shutter speed,
and exposure compensation.
Some cameras have the ability to change
shooting modes.
Note: Exposure step 0.5 is not supported
with Sony cameras.
10
Page 11

LIVE VIEW
Live view shows what the camera is
shooting in real time on the screen
of your device. Your device’s screen
is usually larger than the one on
your camera; this allows you to view
the image with greater detail.
Note: Select Canon cameras will exit
Live View after each shot. To work
continuously in Live View, disable image
preview from your camera’s menu.
on the toolbar to
Select
switch into live viewing.
11
Page 12

Touch Focus
Touch focus makes it easy to choose a
focus point for the camera by touching
an area on the screen of your device.
(Not available for Sony cameras.)
Select anywhere on the screen of your
mobile device to select a focus point.
Note: If you are using a Canon camera, be
sure to enable Live View Shooting from the
camera’s menu.
If you are using a Nikon camera,
touch focus will not work if the AF
area is set to Face Detection or
Continuous Servo AF (AF-C).
12
Page 13

Pinch to Zoom Manual Focus
Pinch to zoom allows you to use
two fingers on your screen, and
zoom in and out while previewing
images. This is handy when you need
to make sure that everything is in
focus. (Not available during video
The manual focus feature allows you
to adjust the focal plane forward or
backward. The depth of the focal
plane varies depending on focal length,
distance to subject, and aperture.
(Not available for Sony cameras.)
recording or on Sony cameras.)
13
Page 14

GRID
Displays a rule-of-thirds grid over the main picture view.
14
Page 15

WHITE BALANCE
White balance is used to match
you cameras, color profile to the
utilized light source. The goal is
to render more realistic (natural)
colors in your photo or video.
1. Select White Balance to open the
menu.
2. Choose your setting while viewing the
change in realtime.
15
Page 16

QUALITY
Choose either JPEG or RAW image
files with highest image quality
(largest file size) to lowest image
quality (smallest file size).
1. Select Quality from the settings area.
2. Choose a quality setting.
16
Page 17

METERING MODE
Metering allows the camera to
evaluate exposure by prioritizing
parts of the image.
1. Select Metering from the settings area.
2. Choose the metering mode.
Note: This is not available on select Canon
cameras while in Live View.
17
Page 18

VIDEO
Start and stop video while viewing the
footage in real time on your mobile
device or computer. On select cameras,
it may be necessary to physically
switch your camera into video mode.
(Not available for Sony cameras.)
18
Page 19

TIME LAPSE
Using the Time Laps mode allows you
to delay the camera’s shutter by either
5 or 10 seconds. This is ideal for selfies,
group shots, and other photos when you
need to be in front of your camera. In
Advanced mode, you can take a series of
photos, choosing the start time, interval
between exposures, and picture count.
• Start time: This is a delay until the
start of the sequence.
• Shooting interval: Amount of time
between each exposure.
• Shooting count: Number of
exposures in the sequence.
• Bulb: Used for exposures longer than
1 second. Note: You must set your
camera to Bulb mode.
• Bulb time: Duration that the shutter
will remain open during Bulb exposure.
• Start: Initiates your photo sequence.
19
Page 20

FOCUS STACK
Focus stacking allows you to take a
series of photos to combine later in
post-processing and create an image
with an expanded depth of field.
(Not available for Sony cameras.)
• Step Size: Choose the size of the
focal steps.
• Forward / Backward count: Set the
number of images that will be shot in
front of and behind your starting point
of focus.
• Start: Begins the sequence.
20
Page 21

ADVANCED BRACKETING
(Bracket Exposure in Android)
Advanced bracketing can be used
to generate a series of photos of
varying exposures. You can set
bracketing for shutter speed, aperture,
and ISO. The camera must be in
manual mode to use this feature.
• Start From: This will be the starting
value for the bracketed exposures.
• Step Size: Determine which values
will be captured for the subsequent
bracketed shots.
• Property: Choose shutter speed,
aperture, or ISO for the bracketing
series.
• Frame Count: Choose the number
of shots for the bracket series.
21
Page 22

AUTO VIEW
Take a picture with your camera, and
display the image on your device after
it’s taken. Use this to stream the photos
to clients live while on a shoot. Image
transfer speeds will vary. For Sony
cameras, the photos will be saved on your
device, and not on the camera’s memory
card, except for the a6500 and a9.
• Share
: Save the selected
image(s) to your device’s internal
storage, and share via text
message, email, or social media.
: Display exif data such
• Info
as exposure settings, date/
time, and histogram.
Use pinch-to-zoom to make
sure everything is in focus after
you have taken the shot.
Note: If you’re using a Sony camera,
see Appendix B to transfer JPEG
and save RAW on the SD card
(supported by a6500 and a9).
22
Page 23

BROWSE
Browsing allows you to view and select
the photos that are on your camera
so you can save, delete, or share your
photos, and use pinch-to-zoom to
make sure everything is in focus. You
can also view each picture’s exif data,
like exposure settings, histogram, or
date and time. (For Sony users, follow
the instructions in Appendix A to
set your camera to MTP mode.)
• Select: Choose one or multiple
photos in your library.
After you have selected your photos,
choose from the following options:
• Save/Share: Save the selected
image(s) to your devices internal
storage and share via text message,
email, or social media.
• Delete: Erase the image(s) from your
camera’s media storage.
• Info: Display exif data such as
exposure settings, date/time, and
histogram.
23
Page 24

SETTINGS
• Connect to Extendá: Allows
connection to dierent Extendá
networks if you have multiple setups.
• Connection Mode:
AP (Access Point): The Extendá
acts as the host for a Wi-Fi access
point for device connection.
BP (Bridge Port): The Extendá acts
as a Wi-Fi device that connects to a
router joining an existing network.
This allows you to use the Extendá
and internet at the same time, so
you can upload or backup photos to
iCloud or Dropbox while shooting.
• Access Password: Set up a password
for the Extendá app, then restart the
Extendá device.
• Network Settings: Choose between
a wireless network or LAN. Select
a wireless network to connect your
device via Wi-Fi. Select LAN if your
computer has a wired Ethernet
connection. (Not available with the
LW-500)
SSID: Change the Extendá’s SSID
network name.
Password: Set a password for
network access.
Channel: Set the network operating
channel.
• Confirm Photo: Allows you to
confirm a photo after it’s taken in the
Autoview mode.
• Auto Download: Automatically
downloads the photos to your device
when shooting. (Sony only)
• Transfer Settings: Select transfer file
types and settings.
• Camera Information: Shows
camera model and lens in use.
• Print Settings: Shows printer server
address.
• Help: Displays address of the manual.
• About: Information about software,
firmware and manual versions, and
Vello information.
24
Page 25

APPENDIX A: SONY
CAMERA SETUP
Extendá supports PC Remote and MTP
modes on your Sony camera. PC Remote
mode allows you to use Live View, change
settings remotely, use wireless transmit,
and tether. MTP mode provides access
to browse your photos on the camera’s
media storage. You will need to reinsert
the Micro USB cable when you switch
between PC Remote and MTP modes.
PC Remote mode:
1. Go to your camera’s settings menu.
2. Select USB Connection, and set it to
PC Remote.
3. Connect the Micro USB cable to your
camera’s port and the Extendá.
Photos will save to your device, but will
not be saved on the camera’s memory
card except for the a6500 and a9.
MTP mode:
1. Go to your camera’s settings menu.
2. Select USB Connection, and set it
to MTP.
3. Connect the Micro USB cable to your
camera’s port and the Extendá.
25
Page 26

APPENDIX B:
SONY CAMERA JPEG/RAW FILE
TRANSFER INSTRUCTIONS
1. Press the camera’s menu button.
2. Set the quality to RAW & JPEG.
3. Select the PC Remote Settings.
Set Still Img. Save Dest. to PC+Camera,
and RAW+J PC Save Img to JPEG Only.
This will save the RAW file in camera
and the JPEG on your device.
26
Page 27

PRECAUTIONS
• Keep this product away from water and any flammable gases or liquids.
• Do not expose this product to humidity or extreme heat or cold.
• Make sure this product is powered o when plugging it into a power source.
• Use only the correct, recommended voltage.
• Do not attempt to disassemble or repair this product.
• Handle this product with care.
• Clean with only a soft, dry cloth.
• Keep this product away from children.
• Make sure that this product is intact and that there are no missing parts.
• All images are for illustrative purposes only.
FCC STATEMENT
This device complies with Part 15 of the FCC Rules.
Operation is subject to the following two conditions:
1. This device may not cause harmful interference, and
2. This device must accept any interference received, including interference that may
cause undesired operation.
27
Page 28

FIRMWARE UPDATES
The Extendá mobile app automatically
checks for firmware updates. If new
firmware is available, the Extendá
mobile app will start the update wizard.
Follow the instructions provided by
the wizard to update the firmware.
For Mac/PC users, check
vellogear.com for firmware updates.
TROUBLESHOOTING
Problem Solution
I don’t see the Extendá
network on my device.
The Extendá app won’t
connect to my camera.
Make sure the Extendá device is on
and has established an ad-hoc network
before trying to connect. The system
status indicator will turn solid green.
Wait for the Extendá device to
establish an ad-hoc network before
starting the app. The system status
indicator will turn solid green.
28
Page 29

SPECIFICATIONS
LW-100
Wi-Fi Ad-hoc network with 802.11AC support
Range 164 ft. (50 m) 196.9 ft. (60 m)
Signal bandwidth 2.4 GHz 5.8 GHz
Controls
Live view, Photo capture, Movie recording (with
focusing), Intervalometer, Bulb, Shutter speed,
Aperture, ISO, Metering mode, Drive/shooting
mode (Nikon only), White balance, Image format,
Exposure compensation, Exposure bracketing,
Focus stacking, Touch focus, Touch zoom
Image format JPEG, RAW
Interface Standard-A USB
®
Software
requirements
Battery
8.0 and above, Android™ 4.0 and above, Mac
iOS
OS X 10.10 and above, Windows
3.7 V/1800 mAh
rechargeable battery
Battery Watt Hours 12.2 Wh
Battery life Up to 6 hr. Up to 3 hr.
Input power 5 V/1 A
Dimensions
(H × W × D)
Weight
1 × 1.7 × 3.5 in.
(2.5 × 4.3 × 9 cm)
3.5 oz. (100 g)
with adapter
LW-500
®
XP and above
3.8 V/ 3200 mAh
rechargeable battery
1.6 × 2.5 × 4.2 in.
(4 × 6.4 × 10.6 cm)
12.6 oz. (356 g)
29
Page 30

ONE-YEAR LIMITED WARRANTY
This VELLO product is warranted to the original purchaser to be free from defects
in materials and workmanship under normal consumer use for a period of one (1)
year from the original purchase date or thirty (30) days after replacement, whichever
occurs later. The warranty provider’s responsibility with respect to this limited warranty
shall be limited solely to repair or replacement, at the provider’s discretion, of any
product that fails during normal use of this product in its intended manner and in its
intended environment. Inoperability of the product or part(s) shall be determined by the
warranty provider. If the product has been discontinued, the warranty provider reserves
the right to replace it with a model of equivalent quality and function.
This warranty does not cover damage or defect caused by misuse, neglect, accident,
alteration, abuse, improper installation or maintenance. EXCEPT AS PROVIDED
HEREIN, THE WARRANTY PROVIDER MAKES NEITHER ANY EXPRESS
WARRANTIES NOR ANY IMPLIED WARRANTIES, INCLUDING BUT NOT
LIMITED TO ANY IMPLIED WARRANTY OF MERCHANTABILITY OR FITNESS
FOR A PARTICULAR PURPOSE. This warranty provides you with specific legal rights,
and you may also have additional rights that vary from state to state.
To obtain warranty coverage, contact the Vello Customer Service Department to
obtain a return merchandise authorization (“RMA”) number, and return the defective
product to Vello along with the RMA number and proof of purchase. Shipment of the
defective product is at the purchaser’s own risk and expense.
For more information or to arrange service, visit www.vellogear.com or call Customer Service
at 212-594-2353.
Product warranty provided by the Gradus Group.
www.gradusgroup.com
VELLO is a registered trademark of the Gradus Group.
© 2019 Gradus Group LLC. All Rights Reserved.
vellogear.com
30
GG2
 Loading...