

Page 1

BG-P1
BAT T ERY GRIP
Designed For The Panasonic
Lumix GH3 and GH4
Page 2

Introduction
The BG-P1 accepts a DMW-BLF19PP battery to
effectively double the runtime of your Panasonic
Lumix GH3 or GH4 camera, making it easier to shoot
for longer durations without replacing your camera’s
batteries.
The BG-P1 attaches securely to your camera’s 1/4"-20
tripod socket, as nonslip rubber enhances your grip and
handling when shooting in a vertical position. Alternate
shutter-release, white balance, ISO, EV, and Fn bu ttons,
plus front and rear command dials, make it comfortable
to shoot in portrait orientation, so you won’t have to
twist your arm to get the right shot.
Please read through this
entire manual before using the
BG- P1 battery grip.
2
Page 3

Precautions
1. The BG -P1 should be us ed with only th e compatible
devices and bat teries specif ied in this manual.
2. Cover the power terminal with the contact
cap when the BG -P1 is not in use. This prevents
electrical shor ts caused by metal object s touching
the power terminals.
3. If you notice smoke, an unusual smell, or noise
coming from the bat tery pack, discontinue use
immediately. Remove the bat ter y and contact the
Vello Customer Service Department.
4. Keep this product away from water and any
flammable gases or liquids.
5. Install batteries in the proper orientation. Installing
batteries in the reverse orientation can c ause them
to leak, overheat, or explode.
6. Do not attempt to disassemble or repair this
product.
7. Clean this produc t with only a sof t, dr y cloth.
8. Keep this product away from children.
9. Make sure that this produc t is intact and that there
are no missing par ts .
10. To avoid damage to this product, be careful not
to overtighten or improperly thread any of the
threaded fittings.
11. Remove the battery from the grip before long-
term storage .
12 . All photos are for illus trative purposes only.
3
OVERVIEW INTRODUCTIONASSEMBLYOP ER AT I ON
Page 4
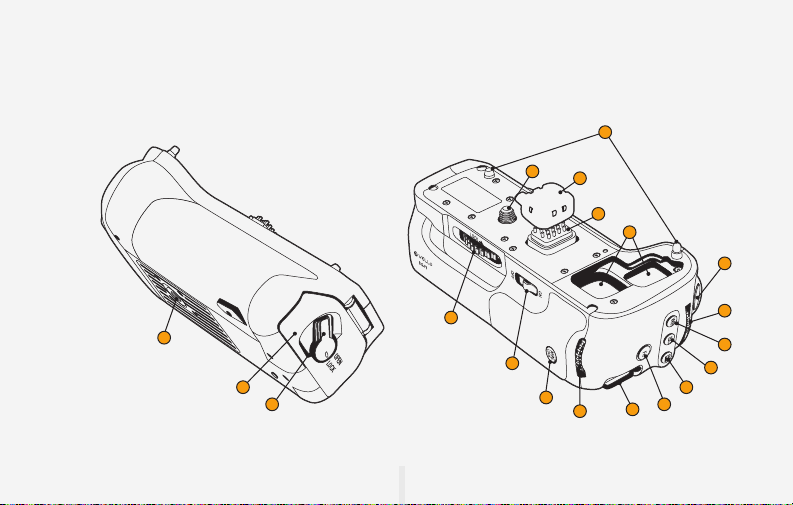
Overview
12
13
14
15
16
1
11
17
10
18
19
9
8
6
7
2
3
4
5
4
Page 5

1
Shutter release button*
8
Rear command dial*
13
Mounting screw
Two-stage shutter release.
2
Front command dial*
3
White-balance button*
4
ISO button*
5
EV button*
6
Fn button
7
Strap mount
9
AF/AE lock button*
10
On/o switch
Activates the BG-P1’s controls. Your
camer a will continue to draw power
from the BG -P1 when the s witch is in
the Off position. The on/off switch is
not a power s witch.
11
Locking wheel
12
Mounting pins
14
Contact cap
15
Terminal contacts
16
Contact cap compartments
17
Tripod socket
18
Battery chamber
Accepts one DMW-BLF19PP battery.
19
Battery chamber latch
* These controls perform the same function as their on-camera equivalents and are affected by changes to the Custom Set tings menu.
See your camera manual for details.
5
OVERVIEW INTRODUCTIONASSEMBLYOP ER ATIO N
Page 6

Attaching The Grip
1. Make sure your camera is
turned o ff.
2. Remove the middle rubber
contac t cap from the
bottom of your ca mera
and the plastic contact cap
from the grip, and store
them in the corresponding
contact cap compartments
in the bat ter y grip.
6
3. Align the grip’s mounting
screw, mounting pins,
and contacts with their
counterparts in your
camer a, and inser t the grip
into the camera.
Page 7

OVERVIEW INTRODUCTIONASSEMBLYOP ER ATIO N
4. Rotate the grip’s locking
wheel in the direc tion of
the arrow until the grip is
firmly att ached. Be careful
not to overtighten.
Tip: If you plan to use a single battery, we recommend inserting the battery into
the grip (see Inserting a Battery on page 8) rather than into your camera. This
way, you will be able to access the batter y while the grip is installed.
7
Page 8

Inserting A Battery
1. Slide the battery
compartment latch
to the Open position.
The chamber door will
automatically open.
2. Insert the battery all
the way into the bat tery
chamber, until the bat tery
locks into place.
Note: If the battery is not in the
correct orientation, you won’t
be able to insert it all the way,
and the battery will not lock into
place.
8
3. Close the bat tery chamber
door and slide the latch to
the Lock position.
Page 9

OVERVIEW INTRODUCTIONASSEMBLYOP ER ATIO N
4. To remove the ba ttery,
open the battery chamber
and pull the relea se lever.
Note: When using two batteries, one installed in the camera and one in the grip,
you can program your camera to draw power from one batter y before the other.
For more information on this feature, refer to your camera’s instruction manual.
9
Page 10

Using The Grip
All the controls on the BG- P1 will perform the same functions as the corresponding controls on your camera. For
more information on their specific functions, refer to your camera’s instruc tion manual.
The BG-P1’s controls are ideal for shooting in portr ait orientation and will work with your camera even if there is no
battery installed in the grip. To activate the controls on the BG -P1, slide the on/o switch to the On position.
Deactivating the BG-P1’s controls is ideal for shooting in landscape orientation, when you may inadvertently press
one of the gr ip’s but tons. To deac tivate the controls, slide the on/o switch to the O position.
Note: The BG-P1’s on/off switch will deactivate only the grip’s controls. It will not turn off your camera or prevent it from
drawing power from the BG- P1 if it is set to do so. To turn off your camera, use your camera’s power switch.
10
Page 11

Specifications
Power So urce One DM W-BL F19PP bat tery
Operating Temperature 32°F–104°F (0°C– 40°C)
Operating Humidity Range ≤85%
Dime nsio ns (W × H × L) 5.1" × 1.6" × 2.5" (13 × 4 × 6.3 cm)
Weig ht Without bat ter y: 6.6 oz. (188 g)
With battery: 9.4 oz. (267 g)
OVERVIEW INTRODUCTIONASSEMBLYOP ER ATIO N
11
Page 12

ONE-YEAR LIMITED WARRANTY
This VELLO product is warranted to the original purchaser to be free from defects in materials and workmanship under normal consumer use
for a period of one (1) year from the original purchase date or thirty (30) days after replacement, whichever occurs later. The warranty provider’s
responsibility with respect to this limited warranty shall be limited solely to repair or replacement, at the provider’s discretion, of any product
that fails during normal use of this product in its intended manner and in its intended environment. Inoperability of the product or part(s) shall
be determined by the warranty provider. If the product has been discontinued, the warranty provider reserves the right to replace it with a
model of equivalent quality and function.
This warranty does not cover damage or defect caused by misuse, neglect, accident, alteration, abuse, improper installation or maintenance.
EXCEPT AS PROVIDED HEREIN, THE WARRANTY PROVIDER MAKES NEITHER ANY EXPRESS WARRANTIES NOR ANY IMPLIED
WARRANTIES, INCLUDING BUT NOT LIMITED TO ANY IMPLIED WARRANTY OF MERCHANTABILITY OR FITNESS FOR A
PARTICULAR PURPOSE. This warranty provides you with specific legal rights, and you may also have additional rights that vary from state to
state.
To obtain warranty coverage, contact the Vello Customer Service Department to obtain a return merchandise authorization (“RMA”) number,
and return the defective product to Vello along with the RMA number and proof of purchase. Shipment of the defective product is at the
purchaser’s own risk and expense.
For more information or to arrange service, visit www.vellogear.com or call Customer Service at 212-594-2353.
Product warranty provided by the Gradus Group.
www.gradusgroup.com
VELLO is a registered trademark of the Gradus Group. © 2014 Gradus Group LLC. All Rights Reserved.
www.vellogear.com
All other trademarks are the property of their respective owners
© Copyright 2014 Gradus Group LLC
GG2
 Loading...