

Page 1

BG-N0
BAT T ERY GRIP
Designed for the Nikon
D600 and D60 SLR Camera
Page 2

Introduction
Thank you for choosing Vello and congratulations
on your new BG-N0 batter y grip purchase. Enjoy
the many benefi ts that a battery grip offers , such as
extended shooting time and more control and comfor t
when shooting in a vertical (portrait) orientation.
The Vello BG -N0 is compat ible wit h the Nikon D60 0 and
D60 DSLR cameras. The BG-N0 accepts one Nikon
EN-EL5 rechargeable batter y, in addition to the
camera’s internal battery. Six AA batteries (alkaline,
Ni-MH , lithium, or nickel-manganese) can be used
inste ad for add ed convenience. T he BG-N0 is equipped
with an alternate shu tter-relea se button, AE-L/AF-L
button, mul ti selector, and main and sub-command dials
for shooting in a vertical position.
Please read through this entire manual before
using the BG- N10 battery grip.
2
Page 3

Precautions
1. The BG-N0 should only be used with compatible
devices specified in this manual.
2. Use only with batteries and battery holders
recommended in this manual. The BG-N0 ca n not
be used wi th other batteries or battery holders.
3. When the BG-N0 is not at tached to the c amera,
cover the power terminal wi th the contac t cap. This
prevent s elec trical shor ts caused by metal coming
into contact with the power terminals.
4. When the bat tery holder is removed from the
grip, remove the batteries or place the holder in
a container to prevent electrical shorts caused by
contact with other metal objects.
5. The memory card access lamp may light up
tempor arily w hen the BG-N0 is mounted or
removed from the camera . This is part of the
normal operation.
6. If you notice smoke, noise, or an unusual smell from
the bat tery pack, discontinue use immedia tely.
Remove the batteries and take the device to a Vello
authorized reseller.
7. The BG-N0 does not have a power switch.
Instead, use the camera power switch to turn the
power on or off.
8. The battery level may not display properly if
batteries are inser ted before mounting the grip.
9. Remove bat teries from the grip when not in use .
10. Do not at tempt to disassemble.
11. Avoid water or extreme humidity and keep in a dry
and cool place.
12 . Keep out of reach of children.
3
OVERVIEW INTRODUCTIONASSEMBLYOP ER AT I ON
Page 4
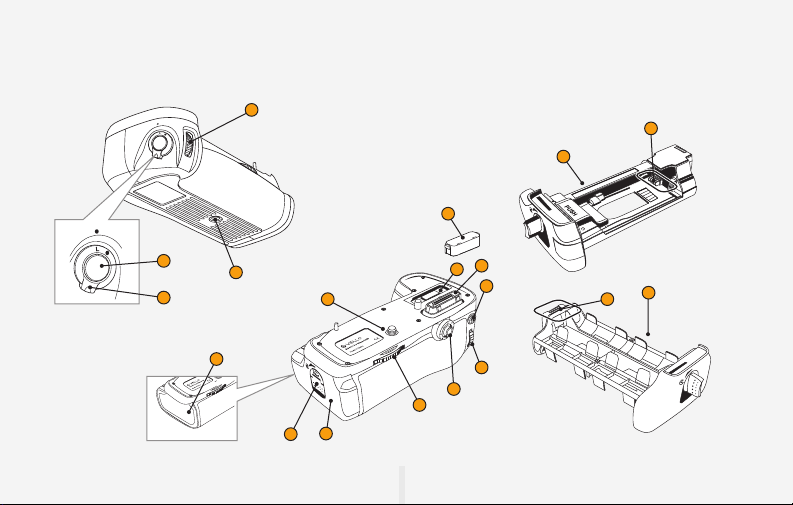
Overview
1
16
6
2
3
4
5
15
12
13
14
8
7
9
10
11
17
18
19
4
Page 5
1
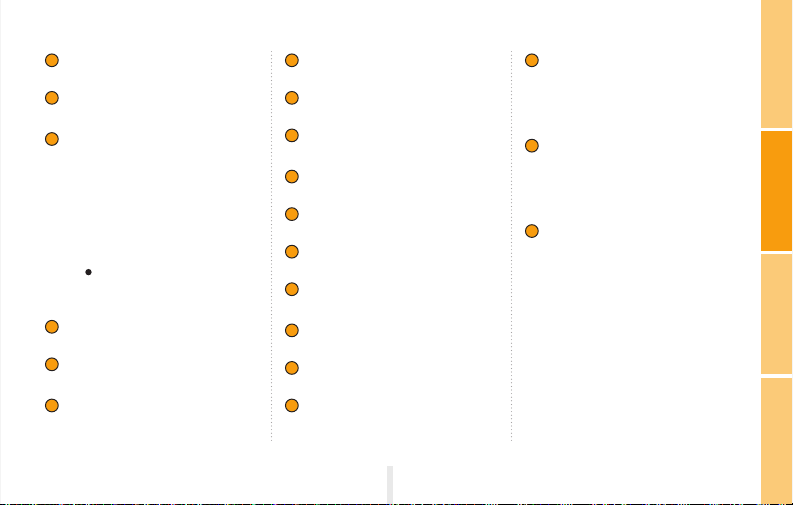
Sub-Command Dial *
2
Shutter-Release Button *
3
Control Lock Switch
To prevent accidental triggering, the
control lock switch locks the shutterrelease but ton, AE-L/AF-L but ton,
multi selector dial, as well as the main
and sub-command dials on the BG N0. Unlock prior to use by switching
to the position. The control lock is
not a power s witch.
4
Tripod Socket
5
Mounting Screw
6
Contact Cap
7
Camera Contact Cover Holder
8
Power/Signal Contacts
9
AE-L/AF-L Button *
10
Main Command Dial *
11
Multi Selector *
12
Locking Wheel
13
Battery Chamber Cover
14
Battery Chamber Latch
15
Battery Chamber
16
EN-EL5 Battery Holder
Holder for Nikon EN-EL5 bat tery.
5
17
Power Terminals
(EN-EL5 Battery Holder)
18
AA Battery Holder
Holds six AA batteries.
19
Power Terminals
(AA Battery Holder)
* These controls perform the same
functions as their on-camera equivalents
and are affected by changes to the
Custom Settings menu. See camera
manual for details.
OVERVIEW INTRODUCTIONASSEMBLYOP ER ATIO N
Page 6
Attaching The Grip
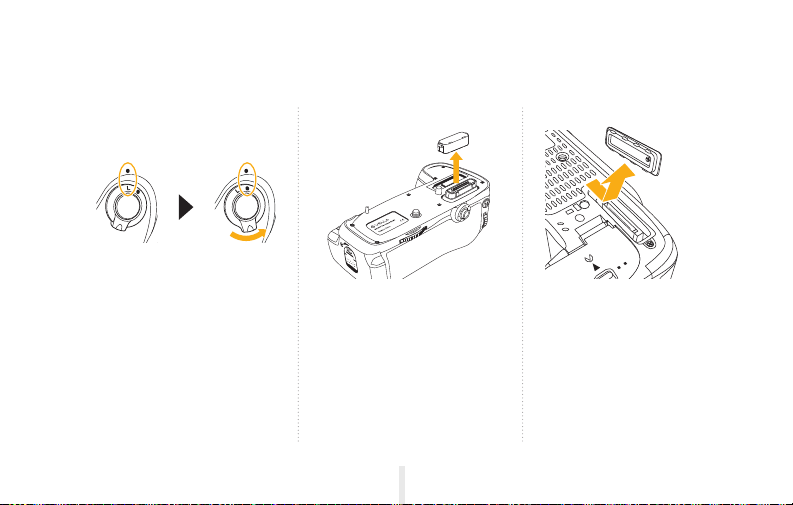
1. Ensure that the power is
turned off on the camera
and that the Control Lock
on the BG -N0 is in the L
position before attaching
the grip.
2. Remove the contact cap
from the BG -N0 bat tery
grip. When the BG N0 is not att ached to
the camera, replace the
contac t cap to protec t the
contacts.
6
3. The contacts for the BG-
N0 are on the bottom
of the camera where they
are protected by a contact
cover. Remove the contact
cover before mounting the
grip.
Page 7
OVERVIEW INTRODUCTIONASSEMBLYOP ER ATIO N
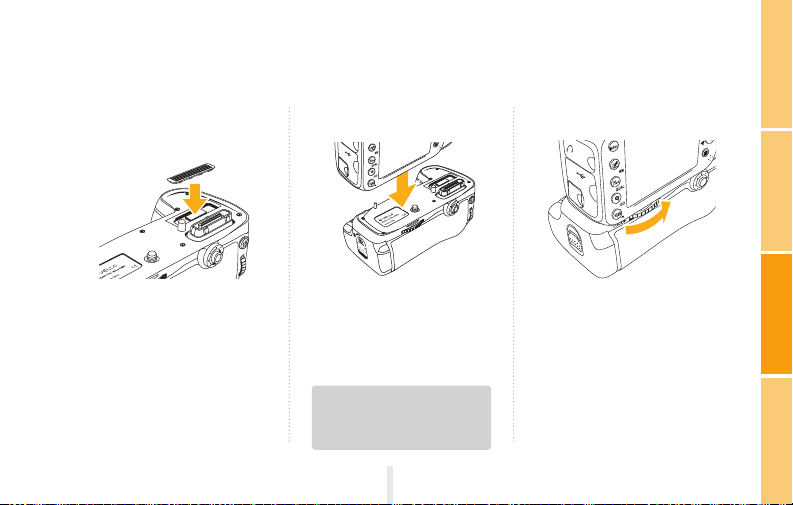
4. To prevent loss, place the
camer a contact cover in
the contact cover holder
on the BG-N0.
5. Connect the BG-N0
grip to the camer a
while aligning the grip’s
mounting screw with the
camera’s tripod socket.
It is not necessar y to remove the
battery from the camera before
mounting the grip.
7
6. Rotate the attachment
wheel in the direc tion
shown by the LOCK arrow
until it is firmly tightened.
Page 8
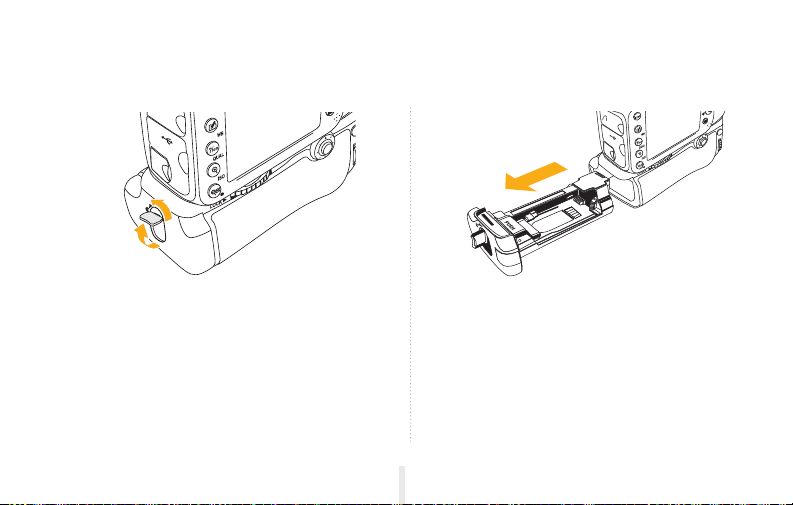
Inserting Batteries
1. Ensure that the power is turned off on the
camera and the Control Lock on the BG-N0
is in the L position. Turn the battery-chamber
latch counterclockwise to open the bat tery
chamber door.
2. Remove the bat tery holder from the BG- N0
grip. The EN-EL5 battery holder comes preinstalled.
8
Page 9
OVERVIEW INTRODUCTIONASSEMBLYOP ER ATIO N
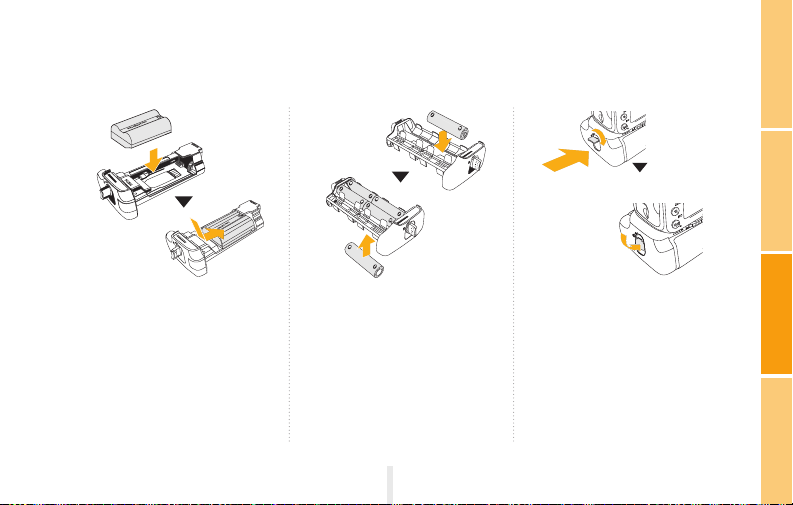
3. Nikon EN- EL5 Battery:
Matching the indentations
on the bat ter y with the
EN-EL5 holder, press the
battery down and slide it in
the direction of the arrow
until the power terminals
click into place.
4. AA Batteries: Place Six
AA bat teries of the same
type in the AA battery
holder a s shown , while
ensuring that they are in
the correct orientation.
9
5. Insert the battery holder
into the grip. Close the
battery chamber and then
turn the latch clockwise
to lock. Turn the camera
on and check the batter y
level in the control panel
or viewfinder.
Page 10
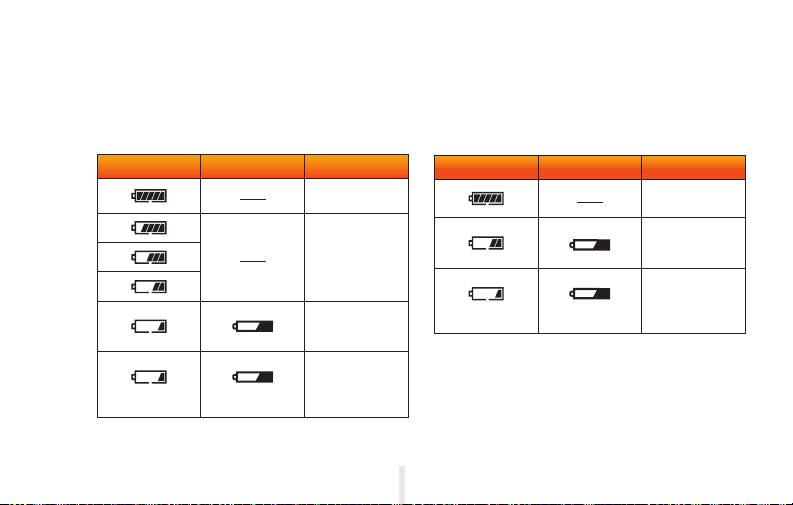
Battery Info
The camera displays the following battery levels.
Nikon EN -EL5 Batter y:
Control Panel Viewfinder Description
(blinking)
(blinking)
Battery fully
charged.
Battery partially
discharged.
Low bat tery.
Prepare spare
batteries.
Battery
exhausted.
Shut ter release is
disabled.
0
AA Batteries:
Control Panel Viewfinder Description
Batteries fully
charged.
Low bat tery
power. Prepare
spare batteries.
Batteries
exhausted.
(blinking)
(blinking)
Shut ter release is
disabled.
Page 11
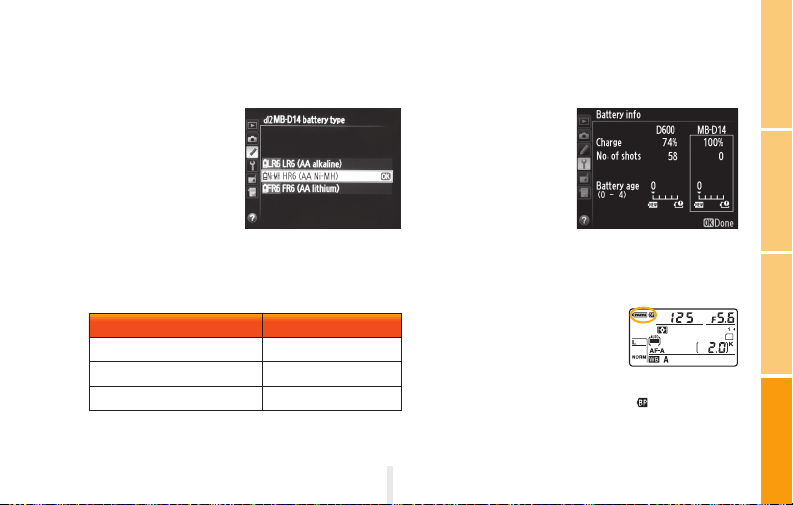
AA Battery Setting s
To ensure that the
camer a shows the
correc t bat tery level
when AA batteries
are used, choose the
appropriate setting in
the Custom Set tings
menu (Group “d”).
Nikon Rechargeable
Batteries
The camera can display
information (including
calibration information)
for Nikon EN- EL5
batteries via the Batter y
Info option in the
Setup Me nu. For A A bat teries, only battery levels are
displayed.
OVERVIEW INTRODUCTIONASSEMBLYOP ER ATIO N
Ba tte ry Ty pe Menu Option To Select
AA alk aline ( LR6) LR6 (AA alk aline)
AA Ni- MH (HR6)
AA Li thium (FR6) FR6 (AA lithium)
HR6 (AA Ni- MH)
Note: The menu screens on this page are from the D600.
Battery Order
Set the order in which the
internal camera and B G-N0
batteries are used via the
Custom Settings menu (Group “d”). When the camera
is drawing power from the BG -N0, a icon is displayed
in the control panel.
Page 12
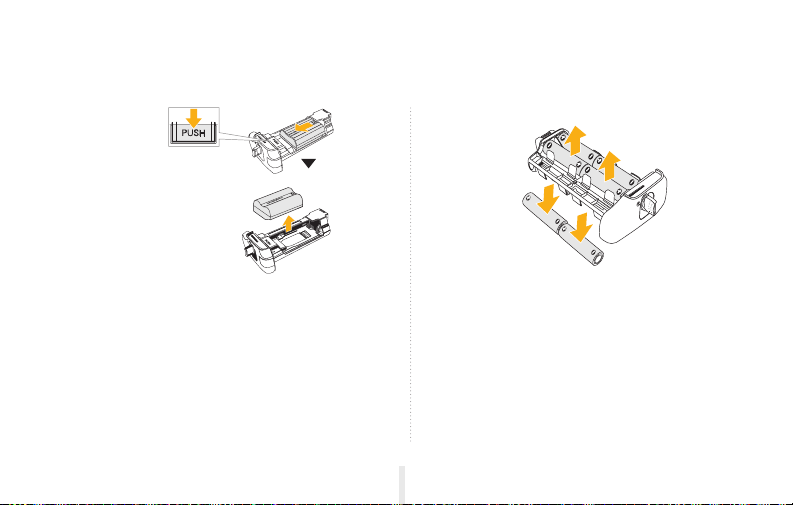
Removing The Batteries
1. EN - E L5 Battery Holder: While pressing and
holding the PUSH button on the holder, slide
the bat tery toward the but ton and lift up to
remove.
12
2. AA Battery Holder: Remove the batteries
one row at a time (as shown). Be sure that the
batteries do not drop during this process.
Page 13

Battery & Power
EN-EL5 Batteries
At low temperatures of about 50° F (0° C) and below, Nikon EN -EL5 batteries will decrease in per formance.
Warming up a cold bat tery can recover some of the lost charge. AA batteries have lower capacity and per formance
at low temperatures.
AA Batteries
In most cases , a Nikon EN-EL5 battery will provide better performance than AA ba tteries when used in the Vello
BG-N0. AA LR6 alkaline batteries have limited capacity. Performance of A A batteries decrea ses significantly at
temper atures below 68 °F (20 °C) and is therefore not recommended.
Remove the batteries when the B G - N10 is not in use.
3
OVERVIEW INTRODUCTIONASSEMBLYOP ER ATIO N
Page 14
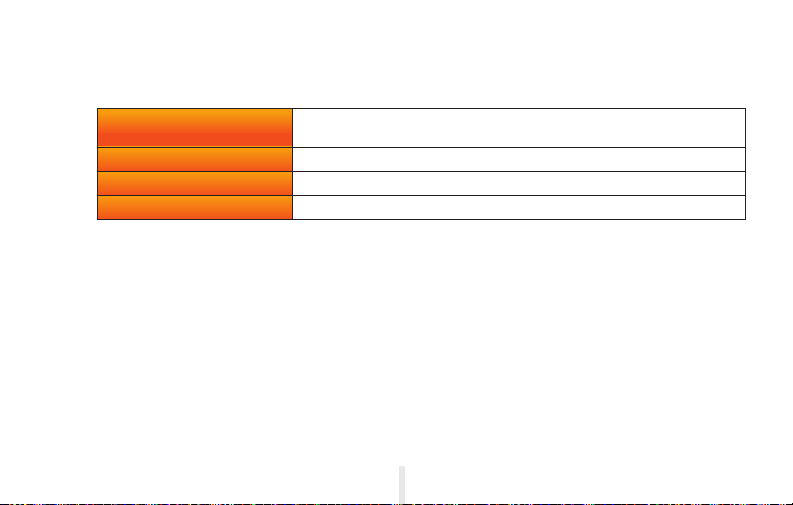
Specifications
Power Source One EN- EL5 rechargea ble Li-ion ba tter y or six LR6
Operating Temperature 32 – 04 °F (0 – 40 °C)
Dimensions 5.3 × .8 × 3. in. (35 × 45 × 78 mm)
Weig ht 272.2 g (9.6 oz.) wit h EN-EL5 bat tery holder (exclu ding ba tter y)
Specifications and design are subjec t to change wi thout notice.
Alkal ine, HR6 N i-MH o r FR6 Lith ium AA b atte ries
4
Page 15

ONE-YEAR LIMITED WARRANTY
Vello provides a limited warranty to the original purchaser that this product is free from defects in materials and
workmanship under normal consumer use for a period of one () year from the original purchase date or thirty (30) days
after replacement, whichever occurs later. Vello’s responsibility with respect to this limited warranty shall be limited solely
to repair or replacement, at Vello’s discretion, of any product that fails during normal consumer use. Inoperability of the
product or part(s) shall be determined by Vello. If the product has been discontinued, we reserve the right to replace it with
a model of equivalent quality and function.
To obtain warranty coverage, contact Vello to obtain a return merchandise authorization (“RMA”) number, and return the
defective product to Vello, along with the RMA number and proof of purchase. Shipment of the defective product is at the
purchaser’s own risk.
This warranty does not cover damage or defect caused by misuse, neglect, accident, alteration, abuse, improper installation
or maintenance. EXCEPT AS PROVIDED HEREIN, VELLO MAKES NEITHER ANY EXPRESS WARRANTIES NOR ANY
IMPLIED WARRANTIES, INCLUDING BUT NOT LIMITED TO ANY IMPLIED WARRANTY OF MERCHANTABILITY
OR FITNESS FOR A PARTICULAR PURPOSE. This warranty provides you with specific legal rights, and you may also have
additional rights that vary from state to state.
Page 16

www.vellogear.com
All other trademarks are the property of their respective owners
© Copyright 203 Gradus Group
 Loading...