

Page 1
K
K
H
U
E
M
E
A
N
0
I
N
U
I
D
A
0
WMÉ
0
4
0
T
C
V
R
L
T
T
O
R
O
VD
SMO
ROO
MAC
MÁQ
NEB
L40
E MACH
MACHI
INE À F
INA DE
LMASCH
SM
NE - 40
E - 400
E - 4
HUMO -
NE - 40
W - WI
- MET
0W - A
00W - C
W - MIT
H CONT
ONTROL
EC CON
ON CON
CONTR
OLLER
ER
RÔLEU
ROLAD
LLER
USER
GEBRU
NOTIC
MANU
BEDIE
ANUAL
IKERSHAN
D’EMPLOI
L DEL USU
UNGSANLE
LEIDING
RIO
ITUNG
3
6
9
1
2
1
5
Page 2
0
0
a
VDL40
SM
13.09.2011
2
©Vellem
n nv
Page 3
r
e
a
o
M
n
e
a
d
a
e
e
u
n
o
p
p
a
e
n
k
c
m
a
h
n
e
e
n
e
u
o
e
t
e
c
u
a
d
c
e
g
d
r
a
c
a
a
c
a
e
n
s
e
e
e
f
s
t
a
P
n
d
s
n
r
e
r
b
r
r
i
m
n
o
f
t
s
f
o
0
m
p
m
t
h
o
s
a
w
e
e
t
r
g
f
o
n
n
e
e
r
p
b
c
e
h
e
c
e
i
r
d
t
e
t
e
h
/
r
a
f
r
i
n
e
m
i
d
h
b
p
r
e
r
c
s
b
a
c
a
u
n
u
v
t
n
i
u
VDL40
SM
1. Int
To all r
Import
Thank y
service.
dealer a
2. Saf
• Dam
the
• A qu
• Do n
Prot
• This
quali
• Mak
man
• Do n
whe
• Disc
the
• Note
• Kee
• Do n
• Use
• Mak
3. Ge
• This
only
• Smo
their
• Do n
• Sele
mini
• Use
over
• Fami
by u
of th
13.09.201
oduction
sidents of th
nt environme
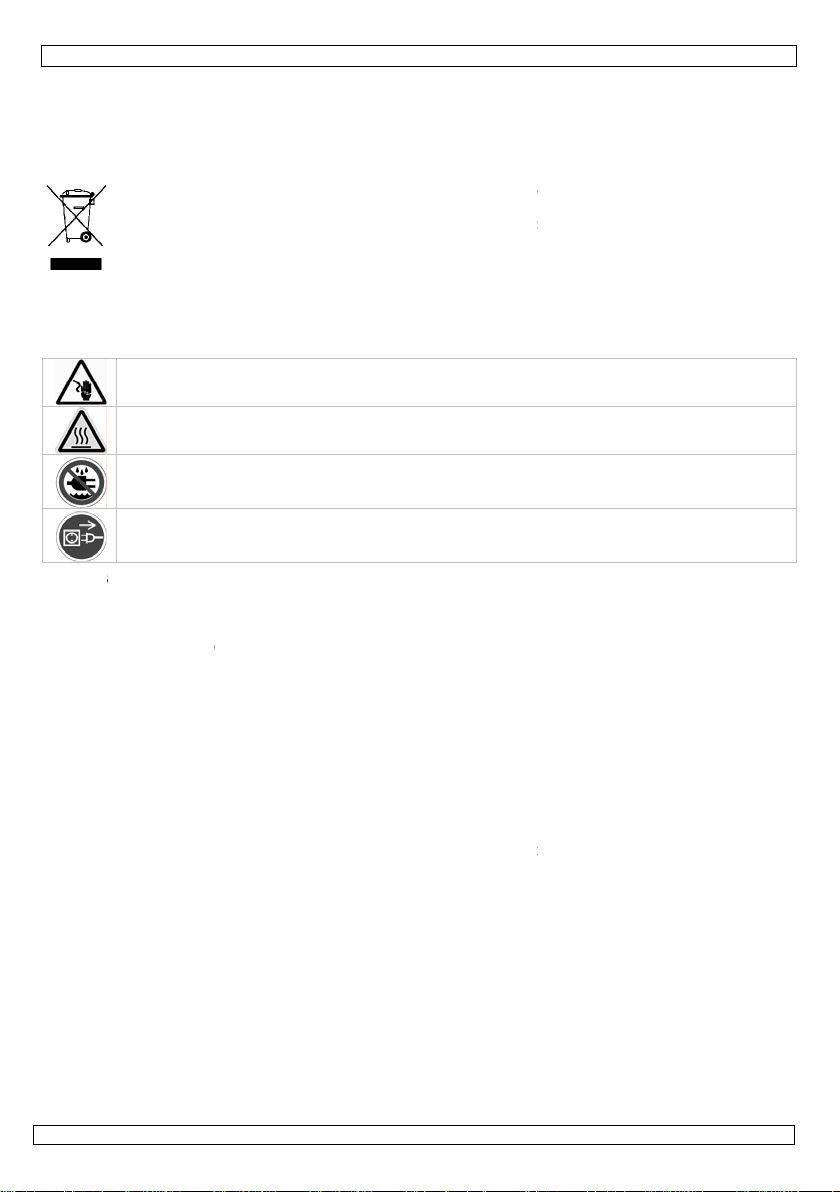
This symbol o
could harm th
waste; it shoul
to your distrib
If in doubt, c
u for buying th
ake sure that
d postpone inst
ty Instru
Be very caref
electroshocks
Do not touch
Keep this dev
Unplug the m
ge caused by
ealer will not a
lified technicia
ot switch the d
ct the device a
device falls un
fied person car
sure that the
al.
ot crimp the po
damaged.
nnect the devi
lug only.
that damage c
the device aw
ot aim the devi
dapted smoke
sure there is
eral Guid
device is desig
be used indoor
e machines ar
lives.
ot shake the d
t a location wh
um distance o
n appropriate
ead.
liarise yourself
qualified peopl
device.
1
European Un
ntal informati
the device or
environment.
d be taken to a
tor or to a loc
ntact your lo
VDL400SM!
he device was
allation of this
tions
l during the in
.
the device duri
ice away from
ains lead befor
isregard of ce
cept responsi
n should install
vice on immed
ainst damage
er protection cl
y out the elect
vailable voltag
wer cord and p
e from the ma
used by user
y from childre
e at anyone.
liquid only and
lways enough l
lines
ed for professi
with an altern
not designed
vice. Avoid bru
re the device i
0.5m between
afety cable to
with the functi
e. Any damage
User m
ion
on about this
he package ind
Do not dispose
specialised co
l recycling serv
cal waste dis
lease read the
ot damaged in
evice.
tallation: touc
g operation as
ain and moistu
opening the h
tain guidelines
ility for any en
and service thi
iately after it h
by leaving it s
ass I. It is ther
ic connection.
e does not exc
otect it agains
ns to clean it o
odifications to
and unauthori
don't pour hot
iquid in the tan
nal use on sta
ating current o
or permanent
e force when i
protected agai
the device and
ix the device (
ns of the devic
that may occu
3
anual
product
icates that dis
of the unit (or
pany for recy
ice. Respect th
osal authoriti
anual thoroug
ransit. If the d
ing live wires
the housing h
re.
using.
in this manual
uing defects o
s device.
s been expose
itched off until
fore essential
ed the voltage
damage. Hav
when it is not
the device are
sed users.
liquid into the
k to keep the d
e, in discos, t
max. 230VAC
peration: regu
stalling or ope
st extreme he
any nearby sur
.g. VDLSC7 o
before actuall
will most prob
osal of the dev
atteries) as u
ling. This devic
local environ
es.
ly before bring
vice is damage
an cause life-t
ats up.
s not covered
problems.
to changes in
it has reached
hat the device
stated in the s
an authorised
in use. Handle
not covered by
ank.
vice from ove
eatres, etc. Th
50Hz.
lar operation b
ating the devi
t, dust and moi
ace or passer VDLSC8) whe
y using it. Do n
ably be due to
ce after its life
sorted municip
should be ret
ental rules.
ng this device i
, contact your
reatening
y the warranty
temperature.
room temperat
be earthed. Ha
ecifications of
dealer replace i
the power cord
the warranty.
heating.
VDL400SM s
eaks will prolo
e.
ture. Ensure a
y.
n mounted
ot allow operat
unprofessional
©Vellem
ycle
l
rned
to
and
re.
e a
his
t
by
hould
g
on
se
n nv
Page 4

VDL400SM
r
• Use the original packaging if the device is to be transported.
• All modifications of the device are forbidden for safety reasons.
• Only use the device for its intended purpose. Other uses may lead to short circuits, burns,
electroshocks etc. Using the device in an unauthorised way will void the war ranty.
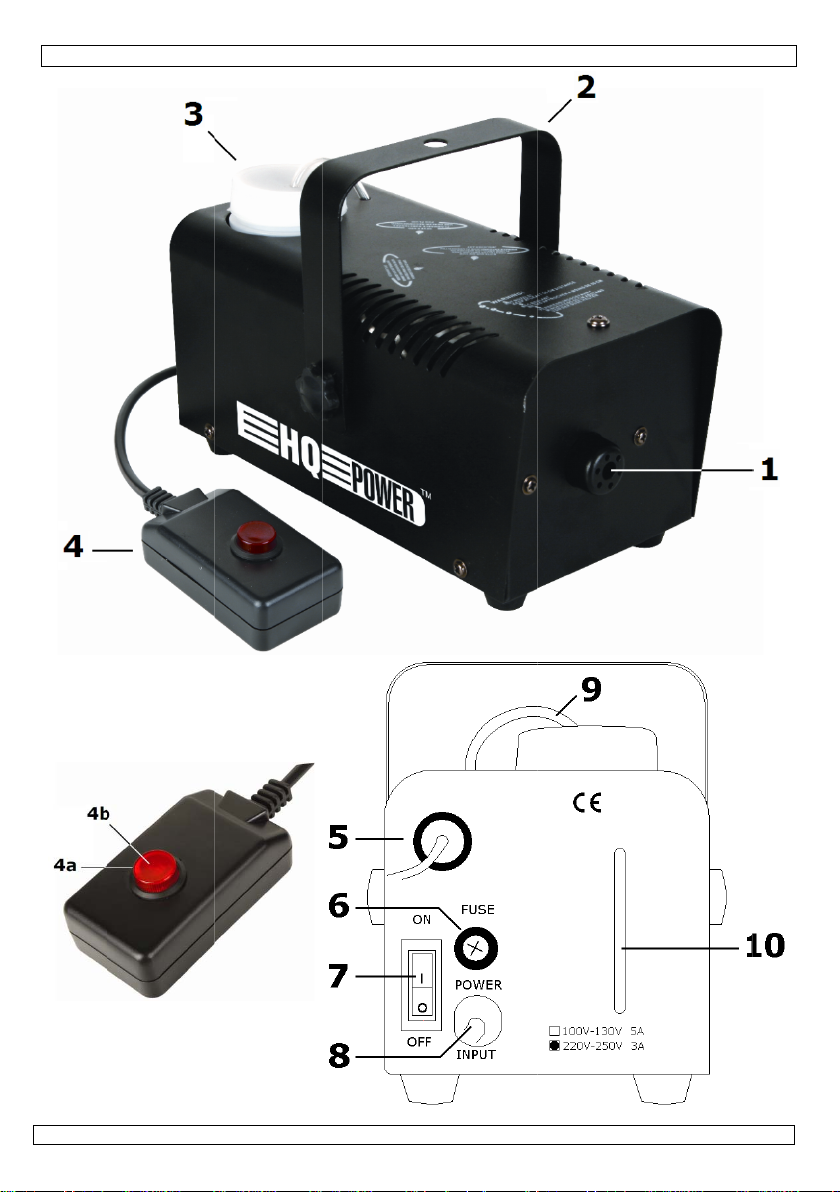
4. Description
Refer to the illustrations on page 2.
1 nozzle 5 controller input
2 mounting bracket 6 fuse holder
3 liquid tank with screw cap 7 power ON/OFF switch
controlle
4
8 power cord
4a smoke generation button 9 feeder tube
4b indicator light 10 liquid level window
5. Installation
Refer to the illustrations on page 2 of this manual.
a) Smoke Liquid
• Unplug the device [8] before filling the tank [3].
• Only use non-inflammable water-based smoke fluid without oil or grease, such as VDLSL1 (1
litre), VDLSL5 (5 litres), or VDLSL5H (5 litres high density smoke liquid).
• Non-recommended smoke liquid may damage the machine and void the warranty.
1. Unplug the device from the mains [8].
2. Unscrew the cap from the tank [3].
3. Carefully pour smoke liquid into the tank (do not overfill it!!).
4. Close the screw cap firmly.
5. Gently slide the feeder tube [9] into the reservoir until the tip touches the bottom.
Remark: Do not operate the device when the tank [3] is open.
b) Fuse
• Only fit or replace a fuse when the device is unplugged from the mains.
• Replace a blown fuse with a fuse of the same type and rating (see “8. Technical
Specifications”):
1. Unplug the device from the mains [8].
2. Unscrew the fuse holder [6] at the back with an appropriate screwdriver.
3. Remove the old fuse and install a new one.
4. Replace the fuse holder [6] and fasten it with the screwdriver.
c) Mounting the device
Note: when mounting the device under an angle, do not fill the tank [3[ completely to avoid spilling
liquid from the tank into the machine.
• Have the device installed by a qualified person, respecting EN 60598-2-17 and all other applicable
norms.
• The construction to which the device is attached should be able to support 10 times the weight of
the device for one hour without deformation.
• The installation must always be secured with a secondary attachment e.g. a safety cable (e.g.
VDLSC7 or VDLSC8).
• Never stand directly below the device when it is b eing mounted, r emoved or serviced. Have a
qualified technician check the device once a year and once before you bring it into service.
• Install the device in a location with few passers-by that is inaccessible to unauthorised persons.
• Overhead mounting requires extensive experience: calculating workload limits, determining the
installation material to be used… Have the material and the device itself checked regularly. Do not
attempt to install the device yourself if you lack these qualifications as improper installation may
result in injuries .
• Make sure there is no flammable material within a 50cm radius of the device.
• Have a qualified electrician carry out the electric connection.
• Connect the device to the mains with the power plug [6]
• The installation has to be approved by an expert before the device is taken into service.
. Don’t connect it to a dimming pack.
13.09.2011 ©Velleman nv
4
Page 5
VDL400SM
6. Use
Refer to the illustrations on page 2 of this manual.
• Connect the device to the mains [6] and flick the power switch [7] at the back of the device to ON.
After the warm-up time (approx. 4 minutes) the device is ready for use. The red indicator light [4b]
is now lit.
• Activate/deactivate the smoke output with the push button [4a].
• It may happen that the standby lamp on the controller [4] is off and the smoke emission stops, even
while you are holding the button. In this case the device is warming up again and will be ready to
resume operation in a few minutes' time. This process guarantees an appropriate vaporisation
temperature and the best smoke emission possible.
7. Cleaning and Maintenance
1. All screws should be tightened and free of corrosion.
2. Mechanically moving parts must not show any signs of wear and tear.
3. The electric power su pply cables must not show any damage. Have a qualified technician maintain
the device.
4. Disconnect the device from the mains prior to maintenance activities.
5. Wipe the device regularly with a moist, lint-free cloth. Do not use alcohol or solvents.
6. There are no user-serviceable parts, apart from the fuse (see “5. Installation”).
7. Contact your dealer for spare parts if necessary.
8. Clean the heating element after every 30 hours of use with a special cleaning liquid available from
your dealer. Fill the tank with the cleaning liquid and let the machine run for a while. When the
device is cleaned, remove the remaining cleaning liquid and rinse the tank thoroughly with distilled
water. Never use regular water for cleaning or rinsing!
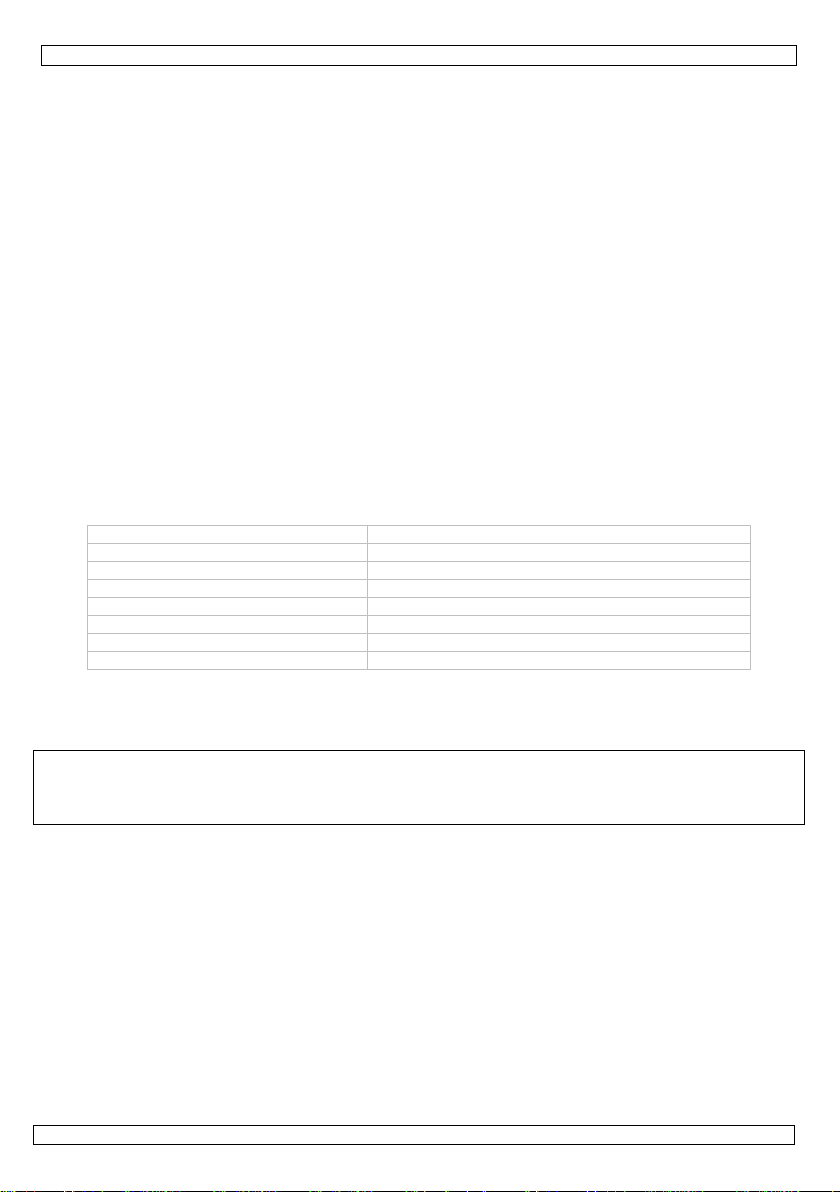
8. Technical Specifications
power supply max. 230Vac/50Hz
power consumption max. 400W
fuse F 3A, 250VAC (5 x 20mm) (order code FF3N)
smoke output 70m³/min
warm-up time approx. 4 minutes
tank capacity 0.3 litres
dimensions 230 x 110 x 110mm (without bracket)
weight 1.6kg
Use this device with original accessories only. Velleman nv cannot be held responsible in the
event of damage or injury resulted from (incorrect) use of this device. For more info
concerning this product and the latest version of this manual, please visit our website
www.hqpower.eu. The information in this manual is subject to change without prior notice.
© COPYRIGHT NOTICE
The copyright to this manual is owned by Velleman nv. All worldwide rights reserved.
No part of this manual or may be copied, reproduced, translated or reduced to any electronic medium or
otherwise without the prior written consent of the copyright holder.
13.09.2011 ©Velleman nv
5
Page 6
e
e
v
o
e
r
l
a
a
b
t
o
h
d
o
t
u
n
d
t
r
v
e
o
t
k
e
t
v
f
o
n
e
n
t
c
!
d
t
h
s
s
v
e
r
e
m
e
s
m
e
n
d
e
s
h
r
n
n
r
e
e
f
h
n
e
p
d
r
n
e
e
g
m
s
t
t
b
s
n
v
r
0
o
e
k
e
t
t
v
n
b
g
s
e
o
e
c
w
a
d
e
n
e
m
e
k
e
w
c
m
o
e
e
r
e
a
e
h
e
d
n
t
e
t
h
n
e
i
m
n
t
p
e
e
a
v
d
i
n
m
r
t
d
e
e
,
V
k
b
a
o
n
r
t
g
s
m
d
t
e
t
d
VDL40
SM
1. Inl
Aan all
Belangr
Hebt u
Dank u v
toestel ni
uw deale
2. Vei
• De g
uw d
verb
• Laat
• Om
bloo
is.
• Dit t
gesc
• De b
han
• De v
plaa
• Trek
gebr
• Scha
gara
• Hou
• Rich
• Geb
• Zorg
over
3. Alg
• Dit t
toes
• Roo
lang
• Schu
toes
iding
ingezetenen
ijke milieu-in
Dit symbool
weggeworpe
batterijen) ni
terechtkome
recyclagepun
ragen, conta
or uw aankoop
t werd bescha
.
igheidsins
Wees voorzic
elektroshock
Raak het toe
Bescherm dit
Verzeker u er
openen.
rantie geldt ni
ealer zal de ve
nd mee houde
een geschoold
eschadiging te
gesteld aan te
estel valt ond
oolde technicu
eschikbare net
leiding.
edingskabel
sen.
de stekker uit h
ikt.
de door wijzigi
tie.
dit toestel uit
het toestel nie
uik enkel aang
ervoor dat er
erhitten.
mene Ric
estel is ontwo
el enkel binne
machines zijn
r meegaan.
d het toestel ni
el.
Geb
an de Europ
ormatie betr
p het toestel o
, dit toestel sc
t bij het gewo
voor recyclag
brengen. Res
teer dan de p
Lees deze han
igd tijdens het t
ructies
tig bij de insta
te vermijden.
tel niet aan wa
toestel tegen r
an dat het toe
t voor schade
antwoordelijkh
n.
technicus dit t
vermijden, ma
peratuurscho
r bescherming
s moet de elek
panning mag n
ag niet omgepl
t stopcontact (
gen die de ge
e buurt van ki
t naar omstand
paste rookvloe
teeds voldoend
tlijnen
pen voor profe
shuis gebruike
iet ontworpen
et dooreen. Ve
uikersh
se Unie
ffende dit pr
de verpakking
ade kan toebr
e huishoudelij
. U moet dit to
ecteer de plaa
laatselijke au
leiding grondig
ansport. Zo ja,
llatie: raak gee
neer het in ge
gen en vochti
stel niet aange
door het neger
id afwijzen vo
oestel installer
u het toestel
melingen. Wa
klasse I, wat
rische aansluiti
iet hoger zijn d
ooid of bescha
rek nooit aan d
ruiker heeft aa
nderen en onb
ers.
istof en verwar
e vloeistof in d
sioneel gebrui
met een wiss
oor continue
mijd brute kra
andleidi
duct
geeft aan dat,
ngen aan het
e afval; het m
stel naar uw v
selijke milieuw
oriteiten bet
oor u het toest
stel dan de inst
kabels aan di
ruik is: de be
heid.
loten is op een
n van bepaald
r defecten of p
n en onderhou
niet inschakele
ht tot het toes
il zeggen dat h
ng verzorgen.
n de spanning
igd zijn. Laat u
kabel!) voorda
gebracht aan
voegden.
de vloeistof
tank zit; zoni
op podia, in d
lspanning van
erking: regelm
ht tijdens de i
ng
als het na zijn l
ilieu. Gooi dit
et bij een ges
rdeler of naar
tgeving.
effende de ve
l in gebruik ne
llatie van het to
onder stroom
uizing wordt w
stroombron al
richtlijnen in
roblemen die h
en.
onmiddellijk
el op kamerte
t toestel geaa
in de specifica
w dealer zo no
u het toestel re
et toestel vall
iet.
t zou het toest
sco's, theaters
aximum 230
atige onderbre
stallatie en de
evenscyclus w
oestel (en eve
ecialiseerd bed
een lokaal
rwijdering.
mt. Ga na of he
stel uit en raad
staan om dode
rm.
orens het te
eze handleidin
er rechtstreek
adat het werd
peratuur geko
d moet zijn. Ee
ies achteraan
ig een nieuwe
inigt en als u he
n niet onder d
l kunnen
enz. U mag di
AC/50Hz.
ingen doen ze
ediening van
rdt
tuele
ijf
pleeg
lijke
en
en
n
e
kabel
niet
it
13.09.201
1
6
©Vellem
n nv
Page 7

VDL400SM
k
r
• Installeer het toestel waar het niet is blootgesteld aan extreme temperaturen, vochtigheid en stof.
Zorg voor een minimumafstand van 50 cm tussen het toestel en de dichtstbijzijnde muren of
personen.
• Maak het toestel vast met een geschikte veiligheidskabel (bv. VDLSC7 of VDLSC8) bij montage in
de hoogte.
• Leer eerst de functies van het toestel kennen voor u het gaat gebruiken. Ongeschoolde personen
mogen dit toestel niet gebruiken. Meestal is beschadiging het gevolg van onprofessioneel gebruik.
• Gebruik de oorspronkelijke verpakking wanneer u het toestel vervoert.
• Om veiligheidsredenen mag de gebruiker geen wijzigingen aanbrengen aan het toestel.
• Gebruik het toestel enkel waarvoor het gemaakt is. Andere toepassingen kunnen leiden tot
kortsluitingen, brandwonden, elektrische schokken enz. Bij onoordeelkundig gebruik vervalt de
garantie.
4. Beschrijving
Raadpleeg de afbeeldingen op pagina 2.
1 mondstu
2 montagebeugel 6 zekeringhouder
3 reservoir met schroefdop 7 AAN/UIT schakelaar
controlle
4
5 aansluiting controller
8 aansluitsnoer
4a drukknop voor rookproductie 9 leiding voor rookvloeistof
4b controlelampjes 10 controlevenster vloeistofniveau
5. Installatie
Raadpleeg de figuren op pagina 2 van deze handleiding.
a) Rookvloeistof
• Koppel het toestel los van het net [8] voor u de tank [3] bijvult.
• Gebruik enkel niet ontvlambare rookvloeistof op waterbasis, dus zonder olie of vetstof, bijvoorbeeld
VDLSL1 (1 liter), VDLSL5 (5 liter), of VDLSL5H (5 liter rookvloeistof met hoge dichtheid).
• Bij gebruik van niet aanbevolen rookvloeistof kan het toestel beschadiging oplopen en vervalt de
garantie.
1. Koppel het toestel los van het lichtnet [8].
2. Schroef de dop van het reservoir [3].
3. Giet voorzichtig rookvloeistof in het reservoir (giet er niet te veel vloeistof in!).
4. Schroef de dop terug op het reservoir.
5. Schuif voorzichtig de leiding [9] in het reservoir zodat de tip de bodem raakt.
Opmerking: Stel het toestel niet in werking wanneer het reservoir [3] open is.
b) Zekering
• U mag een zekering enkel plaatsen of vervangen wanneer het toestel niet is aan gesloten op het
lichtnet.
• Vervang een gesprongen zekering door een zekering van hetzelfde type en met dezelfde
specificaties (zie “8. Technische specificaties”). Ga als volgt te werk:
1. Koppel het toestel los van het lichtnet [8].
2. Verwijder de zekeringhouder [6] op het achterpaneel met een geschikte schroevendraaier.
3. Verwijder de oude zekering en breng de nieuwe in.
4. Plaats de zekeringhouder [6] weer in de behuizing en zet hem vast met de schroevendraaier.
c) Toestel monteren
Opmerking: vul het reservoir [8] niet volledig bij het monteren van het toestel onder een hoek, om
te vermijden dat vloeistof uit het reservoir in het toestel lekt.
• Laat een geschoolde technicus dit toestel installeren conform EN 60598-2-17 en andere toepasselijke
normen.
• De constructie waaraan het toestel wordt bevestigd, moet gedurende 1 uur 10 x het gewicht van dit
toestel kunnen dragen zonder te vervormen.
• Maak het toestel ook vast met een veiligheidskabel (bv. VDLSC7 of VDLSC8).
• Sta nooit recht onder het toestel wanneer u het monteert, verwijdert of schoonveegt. Laat het toestel
controleren door een geschoolde technicus voor u het in gebruik neemt en laat het 1 x per jaar
volledig nakijken.
• Installeer dit toestel op een plaats waar niemand langs moet lopen, kan neerzitten of het toestel kan
aanraken.
13.09.2011 ©Velleman nv
7
Page 8

VDL400SM
• Een degelijke praktijkervaring is vereist voor de plaatsing van dit toestel. U moet de
maximumbelasting van de draagconstructie kunnen berekenen, weten welk constructiemateriaal u
kunt gebruiken en u moet het gebruikte materiaal en het toestel af en toe laten nakijken. Monteer
het toestel niet zelf indien u er geen ervaring mee heeft. Een slechte montage kan leiden tot
verwondingen.
• Verwijder alle brandbaar materiaal in een straal van 50cm rond het toestel.
• Een geschoolde elektricien moet het toestel aansluiten.
• Sluit het toestel via de stekker aan op het lichtnet [8]. Sluit het niet aan op een dimmerpack.
• De installatie moet voor het eerste gebruik gekeurd worden door een expert.
6. Gebruik
Raadpleeg de figuren op pagina 2 van deze handleiding.
• Sluit het toestel aan op het lichtnet [8] en zet de stroomschakelaar [7] achteraan het toestel op ON.
Na de opwarmtijd (± 4 minuten) is het toestel klaar voor gebruik. Het rode waaklampje [4b] licht nu
op.
• Start/stop de rookproductie met de drukknop [4a].
• Soms zal het waaklampje op de controller [4] uitgaan en zal de rookproductie stoppen terwijl u de
knop ingedrukt houdt. Dit betekent dat het toestel extra moet opwarmen en na een paar minuten
klaar zal zijn. Zo bent u zeker van een aangepaste verdampingstemperatuur en de best mogelijke
rookontwikkeling.
7. Reiniging en onderhoud
1. Alle gebruikte schroev en moeten goed zijn aangespannen en mogen geen sporen van roest vertonen.
2. Mechanisch bewegende delen mogen geen sporen van slijtage vertonen en mogen ni et onregelmatig
bewegen.
3. De voedingskabels mogen ni et beschadigd zijn. Laat het toestel onderhouden door een geschoolde
technicus.
4. Ontkoppel het toestel van het lichtnet voor u aan onderhoudswerkzaamheden begint.
5. Maak het toestel geregeld schoon met een vochtige, niet pluizend e doek. Gebruik geen alcohol of
solvent.
6. De gebruiker mag geen onderdelen vervangen, behalve de zekering (zie “5. Installatie”).
7. Bestel eventuele reserveonderdelen bij uw plaatselijke verdeler.
8. Reinig het verwarmingselement iedere 30 werkuren met een speciale reinigingsvloeistof, verkrijgbaar
bij uw verdeler. Vul het reservoir met de reinigingsvloeistof en zet het toestel een tijdje in werking. Als
het toestel gereinigd is, verwijder dan de rest van de reinigingsvloeistof en spoel h et reservoir grondig
na met gedistilleerd water. Gebruik nooit gewoon water om te reinigen of te spoelen!
8. Technische specificaties
voeding max. 230VAC/50Hz
verbruik max. 400W
zekering F 3A, 250VAC (5 x 20mm) (bestelcode FF3N)
rookproductie 70m³/min
opwarmtijd ongeveer 4 minuten
inhoud reser voir 0.3 liter
afmetingen 230 x 110 x 110mm (zonder beugel)
gewicht 1.6kg
Gebruik dit toestel enkel met originele accessoires. Velleman nv is niet aansprakelijk voor
schade of kwetsuren bij (verkeerd) gebruik van dit toestel. Voor meer informatie over dit
product en de laatste versie van deze handleiding, zie www.hqpower.eu. De informatie in deze
handleiding kan te allen tijde worden gewijzigd zonder voorafgaande kennisgeving.
© AUTEURSRECHT
Velleman nv heeft het auteursrecht voor deze handleiding. Alle wereldwijde rechten
voorbehouden. Het is niet toegestaan om deze handleiding of gedeelten ervan over te nemen, te
kopiëren, te vertalen, te bewerken en op te slaan op een elektronisch medium zonder voorafgaande
schriftelijke toestemming van de rechthebbende.
13.09.2011 ©Velleman nv
8
Page 9

r
i
o
a
.
a
u
e
m
a
e
c
â
u
r
d
n
i
s
h
e
a
l
V
o
e
i
i
r
à
n
s
e
d
Ê
l
e
p
e
p
e
i
p
t
e
d
e
0
a
t
n
e
é
a
N
n
e
j
e
u
t
s
s
é
s
p
d
r
r
x
e
a
a
s
s
s
a
u
u
u
a
e
n
e
0
’
s
d
j
p
é
d
é
n
e
u
v
i
o
e
s
v
a
,
o
l
à
s
u
a
o
e
c
p
p
e
c
n
e
e
.
e
e
e
l
e
s
c
e
s
a
s
m
s
e
n
e
t
o
m
n
'
A
t
a
c
e
d
1. Int
Aux rés
Des inf
Si vous
Nous vou
l'appare il
transport
2. Pre
oduction
dents de l'Un
rmations env
Ce symbole s
nuire à l'envi
ménagers ; il
cet appareil
environneme
vez des que
s remercions de
Vérifiez l’état d
.
scriptions
tre prudent
mortels.
Ne pas touch
on Européen
ronnemental
ur l'appareil ou
onnement. Ne
doit arriver ch
votre revende
tale locale.
tions, contac
votre achat ! Li
l’appareil. Con
e sécurit
ors de l’installa
r l’appareil lor
VDL40
otice d
e
s importante
l'emballage in
etez pas cet a
z une firme sp
r ou un point
ez les autorit
ez attentivem e
ultez votre rev
tion : toucher
qu’il est en ser
SM
emploi
concernant
ique que, si l'a
pareil (et des
cialisée pour r
e recyclage lo
s locales pou
t le présent ma
ndeur si l’appar
n câble sous t
ice : le boîtier
e produit
pareil est jeté
iles éventuelle
cyclage. Vous
al. Respectez l
r élimination.
uel avant la mi
il a été endom
nsion peut cau
chauffe !
après sa vie, il
) parmi les dé
êtes tenu à por
législation
e en service de
agé pendant le
er des électroc
peut
hets
ter
hocs
• La g
man
résul
• Un t
• Ne b
dom
• Cet
terre
• La t
noti
• Le c
reno
• Déb
pas l
• Les
gara
• Gard
• Ne d
• Utili
• Assu
surc
3. Dir
• Cet
Emp
230
• Une
prol
• Evit
l'opé
Protéger l’ap
Débrancher l
rantie ne s'ap
el et votre rev
tent.
chnicien qualif
ranchez pas l'a
ages, attende
ppareil fait par
. Un technicien
nsion réseau n
e.
ble d'alimentat
veler le câble
anchez l’appar
e câble.
ommages occa
tie.
ez votreVDL4
rigez pas l'app
ez uniquement
rez-vous du fai
auffer.
ctives gé
ppareil est dév
oyez cet appar
CA/50Hz.
machine à fum
ngeront sa vie.
z de secouer l'
ration.
areil contre la
câble d'alimen
lique pas aux
ndeur décline
é doit s'occupe
pareil après e
z jusqu’à ce qu
ie de la classe
qualifié doit ét
peut pas dép
ion ne peut pa
'alimentation
il s’il n’est pas
sionnés par de
0SM hors de l
reil vers quelq
un liquide de f
qu'il y a toujo
érales
eloppé pour us
il à l'intérieur
e n’est pas co
ppareil et trait
luie et l’humid
tation avant d'
ommages surv
a toute respon
de l'installatio
position à des
l'appareil ait
de protection I
blir la connexi
sser la tension
être replissé o
i nécessaire.
utilisé ou pour
modifications
portée de per
'un.
mée approprié
rs assez de liq
ge professionn
t uniquement
çue pour une
z l'appareil av
té.
uvrir le boîtier
nus en néglig
abilité pour les
n et de l’entreti
ariations de te
tteint la tempé
ce qui impliqu
n électrique.
mentionnée da
u endommagé.
e nettoyer. Tir
l'appareil par
onnes non qua
et ne le chauff
ide dans le ré
el dans des dis
vec une sourc
pération contin
c circonspectio
ant certaines d
problèmes et l
en.
mpérature. Afi
rature ambiant
que l'appareil
ns les spécifica
Demandez à v
z la fiche pour
le client, ne to
ifiées et de jeu
z pas.
ervoir ; sinon l
othèques, des
de courant C
ue. Des pauses
n pendant l'ins
irectives de ce
s défauts qui
d’éviter des
avant de l'util
doit être mis à
ions à la fin de
tre revendeur
le débrancher ;
bent pas sous
es enfants.
appareil peut
théâtres, etc.
de max.
régulières
allation et
n
iser.
la
la
e
non
la
13.09.201
1
9
©Vellem
n nv
Page 10

VDL400SM
r
• Choisissez un lieu de montage où l’appareil sera protégé contre la poussière, l’ hum idit é et des
températures extrêmes. Respectez une distanc e minimum de 0.5m entre l’appareil et toute surface
ou personne circonvoisine.
• Fixez l’appareil à l’aide d’un câble de sécurité adéquat (p.ex. VDLSC7 ou VDLSC8) par l'anneau de
sécurité lors de montage en hauteur.
• Familiarisez-vous avec le fonctionnement de l'appareil avant de l’utiliser. Ne permettez pas aux
personnes non qualifiées d'opérer cet appareil. La plupart des dégâts sont caus és par un usage non
professionnel.
• Transportez l'appareil dans son emballage originel.
• Toute modification de l’appareil est interdite pour des raisons de sécurité.
• N’utilisez votre VDL400SM qu’à sa fonction prévue. Tout autre usage peut causer des courts-
circuits, des brûlures, des électrochocs etc. Un usage impropre annule d'office la garantie.
4. Description
Voir les illustrations à la page 2 de ce mode d’emploi.
1 embout 5 connexion contrôleur
2 support de montage 6 porte-fusible
3 réservoir avec bouchon à vis 7 interrupteur ON/OFF
cont
4
ôleur 8 cordon d’alimentation
4a bouton pour la production de fumée 9 conduit de liquide à fumée
4b voyants 10 fenêtre de contrôle du niveau de liquide
5. Installation
Voir les illustrations à la page 2 de ce mode d’emploi.
a) Liquide de fumée
• Déconnectez l'appareil du réseau [8] avant de remplir le réservoir [3].
• Utilisez un liquide à fumée ininflammable à base d'eau et sans huile ou graisse, comme VDLSL1 (1
litre), VDLSL5 (5 litres), ou VDLSL5H (5 litres de liquide à fumée à haute densité).
• Utiliser un liquide de fumée non recommandée peut endommager l'appareil et annule la garantie.
1. Débranchez l'appareil du réseau électrique [8].
2. Dévissez le bouchon du réservoir [3].
3. Versez prudemment du liquide de fumée dans le réservoir (n'ajoutez pas trop de liquide!).
4. Remettez le bouchon et serrez-le.
5. Glissez prudemment le conduit [9] dans le réservoir de sorte que la pointe touche le fond.
Remarque: Il est interdit d’activer l’appareil si le réservoir est ouvert.
b) Fusible
• Débranchez l’appareil du réseau électrique avant de remplacer un fusible.
• Remplacez un fusible sauté par un exemplaire identique (voir "8. Spécifications techniques"):
1. Débranchez l'appareil du réseau électrique [8].
2. Dévissez le porte-fusible [6] du dos de l’appareil avec un tournevis approprié.
3. Enlevez l’ancien fusible et remplacez-le.
4. Remettez le porte-fusible [6] et serrez-le avec le tournevis.
c) Montage de l’appareil
Remarque: en cas de montage de l’appareil en angle, ne remplissez pas le réservoir à ras bords
pour éviter que du liquide coule dans le réservoir.
• Un technicien qualifié doit installer l’appareil en respectant EN 60598-2-17 et toute autre norme
applicable.
• La construction portante de l’appareil doit être capable de supporter 10 x le poids de l’appareil
pendant une heure, sans qu’une déformation de la construction en résulte.
• Fixez votre VDL400SM à l’aide d’un câble de sécurité (p.ex. VDLSC7 ou VDLSC8).
• Evitez de vous positionner en dessous de l’appareil pour l’enlever ou lors du montage ou du
nettoyage. Un technicien qualifié doit réviser l’appareil avant la mise en service. Organisez une
révision minutieuse annuelle.
• Installez l’appareil à un endroit où personne ne peut passer ou s’asseoir et où personne ne peut le
toucher.
• L’installation de cet appareil exige une solide expérience pratique : le calcul de la charge max. de la
construction, les matériaux d’installation requis etc. De temps en te mps, un technicien qualifié doit
vérifier la construction portante et l’appareil même. N’essayez pas d’installer cet appare il vous-
[8]
13.09.2011 ©Velleman nv
10
Page 11

VDL400SM
même si vous n’ avez pas les qualifications requises ; une installation incorrecte peut entraîner des
blessures.
• Enlevez tout matériau inflammable dans un rayon de 50cm autour de l’appareil.
• Un électricien qualifié doit établir la connexion électrique.
• Branchez l’appar eil sur le r ése au él ect riqu e [8 ] pa r la f iche d’ alimen tat ion. Ne le b ran chez pas s ur un
bloc de puissance.
• Un expert doit approuver l’installation avant qu’elle puisse être prise en service.
6. Emploi
Voir les illustrations à la page 2 de ce notice d’emploi.
• Branchez l'appareil sur le réseau électrique [8] et mettez l'interrupteur [7] au dos de l'appareil sur
ON. Après le délai de chauffe (±. 4 minutes) l'appareil est prêt à l'emploi. Le voyant rouge [4b]
s'allume.
• Démarrez/arrêtez la production de fumée avec le bouton-poussoir [4a].
• Il est possible que le voyant [4] sur le contrôleur s’éteigne et l'émission de fumée s'arrête pendant
que vous gardez le bouton enfoncé. Cela si gnifie que l'appareil doit réchauffer pendant quelques
minutes. Ce processus garantit une température de vaporisation appropriée et la meilleure émission
de fumée possible.
7. Nettoyage et entretien
1. Serrez les écrous et les vis et vérifiez qu'ils ne rouillent pas.
2. Les parties mécaniques mobiles ne peuvent pas être usées ou bouger de manière irrégulière.
3. Les câbles d'alimentation ne peuvent pas être endommagés. Un technicien qualifié doit entretenir
l’appareil.
4. Débranchez l'appareil avant de le nettoyer.
5. Essuyez l'appareil régulièrement avec un chiffon humide non pelucheux. Evitez l'usage d'alcool et de
solvants.
6. Il n’y a pas de parties maintenables par l’utilisateur, à part le fusible (voir "5. Installation").
7. Commandez des pièc es de rechange éventuelles chez votre revend eur.
8. Nettoyez l'élément de chauffage après 30 heures d'utilisa tio n av ec un liquide de ne tto yage spéc iale, en
vente chez votre distribute ur loc al. Rem pliss ez le r éser voir avec le liquid e de ne tto ya ge et fa ites marc her
l'appareil pendant un certa in te mps. Q uan d l'ap pa reil est nett oyé, en levez le liqu ide de ne tto yage rest ant
du réservoir et rincez-le profondément avec de l'eau distillée. N'utilisez jamais de l' eau rég ulière p our
nettoyer ou rincer l'appareil!
8. Spécifications techniques
alimentation 230VCA/50Hz max.
consommation 400W max.
fusible F 3A, 250VAC (5 x 20mm) (référence FF3N)
production de fumée 70m³/min
temps de chauffe environ 4 minutes
capacité du réservoir 0.3 litres
dimensions 230 x 110 x 110mm (sans support)
poids 1.6kg
N’employer cet appareil qu’avec des accessoires d’origine. SA Velleman ne sera aucunement
responsable de dommages ou lésions survenus à un usage (incorrect) de cet appareil. Pour
plus d’information concernant cet article et la dernière version de cette notice, visiter notre
site web www.hqpower.eu. Toutes les informations présentées dans cette notice peuvent être
modifiées sans notification préalable.
© DROITS D’AUTEUR
SA Velleman est l’ayant droit des droits d’auteur pour cette notice. Tous droits mondiaux
réservés.
Toute reproduction, traduction, copie ou diffusion, intégrale ou partielle, du contenu de cette notice par
quelque procédé ou sur tout support électronique que se so it est in t er d ite sans l’accord préala b le écrit de
l’ayant droit.
13.09.2011 ©Velleman nv
11
Page 12

r
u
a
a
o
t
n
t
f
n
r
a
i
c
r
s
n
a
c
t
n
c
a
c
e
c
p
n
e
a
e
l
d
e
a
o
m
c
é
t
e
e
e
e
p
n
y
r
e
a
p
E
a
n
a
e
e
o
o
m
t
r
e
d
ó
e
u
e
e
x
v
n
y
d
n
c
n
p
c
a
ó
n
s
d
r
0
e
a
z
o
n
e
e
d
d
o
u
r
r
r
d
n
l
n
a
t
t
o
L
o
e
e
u
t
s
d
n
i
e
a
e
a
d
o
r
p
d
u
d
ó
u
8
s
t
e
c
v
e
E
a
s
r
m
p
o
g
p
0
p
ó
d
e
m
a
o
e
s
h
c
r
e
e
0
a
o
i
1. Int
A los ci
Import
Si tiene
¡Gracias
montarl
es el cas
2. Ins
oducción
dadanos de l
ntes informa
Este símbolo
dañar el med
doméstica; d
distribuidor o
ambiente.
dudas, conta
por haber com
. Verifique si el
, no conecte e
trucciones
Cuidado dura
con un voltaj
¡No toque el
M
Unión Europ
iones sobre
en este aparat
io ambiente. N
be ir a una e
a la unidad de
te con las au
rado la VDL40
aparato ha suf
l aparato a la r
de seguri
te la instalaci
peligroso.
parato durant
VDL40
nual de
a
l medio ambi
o el embalaje
tire este apar
presa especiali
reciclaje local.
oridades loca
0SM! Lea cuida
ido algún dañ
d y póngase e
ad
n: puede sufrir
su operación:
SM
l usuari
nte concerni
indica que, s i ti
to (ni las pilas
ada en reciclaj
Respete las ley
les para resid
dosamente las
en el transpor
contacto con
una peligrosa
la caja se calie
nte este prod
ra las muestra
eventuales) en
e. Devuelva es
s locales en re
os.
instrucciones d
e antes de la p
u distribuidor.
escarga eléctri
ta!
ucto
inservibles, p
la basura
e aparato a su
lación con el m
l manual ante
uesta en marc
a al tocar los
drían
dio
de
a. Si
ables
• Daños
y su d
• La ins
• No co
apara
• Este a
tierra.
• Asegú
• No apl
super
• Desco
limpia
• Los d
• Mante
• No dir
• Utilice
• Asegú
sobre
3. No
• Este a
sólo e
uso e
• No ha
la vid
• No agi
• Selec
Respe
cerca
• Fije el
de la
No exponga
Desconecte e
causados por
istribuidor no s
alación y el m
ecte el aparat
o llegue a la te
parato pertene
La conexión el
rese de que la
aste el cable d
icie afilada. Si
ecte siempre
lo. Tire siempr
ños causados
nga la VDL400
ja el aparato e
sólo un líquido
rese de que ha
alentarse.
mas gene
parato es un ef
tá permitida p
interiores.
sido diseñada
de la VDL400
te el aparato.
ione un lugar d
e una distanci
as.
aparato con u
abeza.
ste equipo a ll
cable de alim
escuido de las
rá responsabl
ntenimiento de
si ha estado e
peratura amb
e a la clase de
ctrica debe lle
ensión de red
alimentación
s necesario, pi
l aparato si no
del enchufe p
or modificacio
SM lejos del al
dirección a u
de humo apro
a siempre sufi
ales
cto de luz par
ra una conexi
ara un uso ini
SM.
vite usar exce
e montaje don
de mín. 50cm
cable de segu
via o humedad
ntación de la r
instrucciones d
de ningún dañ
ben ser realiza
puesto a gran
iente.
protección I. P
arla a cabo un
o sea mayor q
protéjalo cont
a a su distribu
va a usarlo du
ara desconecta
es no autoriza
ance de perso
a persona.
iado y no lo ca
iente líquido e
uso profesion
n con una fuen
terrumpido. In
iva fuerza dura
e el aparato n
entre el aparat
idad (p.ej. VD
.
d antes de abr
seguridad de
o u otros probl
os por person
es cambios de
r lo tanto, es
técnico cualific
e la tensión in
a posibles dañ
idor reemplaza
ante un largo
el cable de re
as, no están c
as no capacita
iente.
el depósito; si
l en una discot
e de corriente
roduzca frecue
nte la instalaci
esté expuesto
o y cualquier s
SC7 o VDLSC
r la caja.
este manual in
mas resultant
l especializado.
temperatura.
sencial que el
do.
icada en las e
s causados po
el cable de ali
eriodo de tiem
, nunca del pr
biertos por la
as y niños.
no el aparato
eca, un teatro,
CA de máx. 23
ntemente una
n y la reparaci
a polvo, hume
perficie o las p
) en caso de
alidarán su ga
s.
spere hasta qu
parato esté pu
pecificaciones.
algún tipo de
entación.
o o antes de
pio cable.
arantía.
odría
etc. La VDL40
VCA/50Hz y p
ausa para prol
n.
ad y calor extr
rsonas más
ontaje por enc
antía
el
sto a
SM
ra el
ngar
emo.
ma
13.09.201
1
12
©Vellem
n nv
Page 13

VDL400SM
r
r
• Familiarícese con el funcionamiento del aparato. Sólo personas cualificadas pueden manejar este
aparato. La mayoría de los daños son causados por un uso inadecuado.
• Transporte el aparato en su embalaje original.
• Por razones de seguridad, las modificaciones no autorizadas del aparato están p rohibidas.
• Utilice sólo la VDL400SM para aplicaciones descritas en este manual a fin de evitar p.ej.
cortocircuitos, quemaduras, descargas eléctricas, explosión de la lámpara, etc. Un uso desauto rizado
puede causar daños y anula la garantía completamente.
4. Descripción
Véase las figuras en la página 2.
1 boquilla 5 conexión para el controlado
2 soporte de montaje 6 portafusibles
3 depósito con tapón de rosca 7 interruptor ON/OFF
controlado
4a interruptor para la producción de humo 9 tubo para el líquido de humo
4
4b
8 cable de red
lámpara piloto
ventana de control para el nivel del
10
líquido
5. Instalación
Véase las figuras en la página 2 de este manual del usuario.
a) Líquido de humo
• Desconecte el aparato de la red antes de rellenar el depósito.
• Use un líquido de humo no inflamable a base de agua y sin aceite o grasa, como VDLSL1 (1 litro),
VDLSL5 (5 litros), o VDLSL5H (5 litros de líquido de humo con alta densidad).
• Utilizar un líquido de humo no recomendado podría dañar el aparato y anularía la garantía.
1. Desconecte el aparato de la red eléctrica [8].
2. Desatornille el tapón del depósito [3].
3. Eche el líquido de humo cuidados amente en el depósito; no sobrepase la indicación "Ma ximum" en la
parte superior del aparato (¡no añada demasiado líquido!).
4. Vuelva a poner el tapón y atorníllelo.
5. Introduzca el tubo [9] cuidadosamente en el depósito hasta que la punta toque el fondo del tanque.
Observación: ¡No use este aparato con el depósito [3] abierto!
b) Fusible
• Desconecte el aparato de la red [8] antes de reemplazar un fusible.
• Si se funde una lámpara, es posible que se deba también reemplazar el fusible en el panel trasero.
• Reemplace un fusible fundido por otro del mismo tipo (véase "8. Especificaciones"):
1. Desatornille la tapa del portafus ibles [6] en el panel trasero con un destornillador adecuado.
2. Quite el fusible fundido y reemplácelo.
3. Vuelva la tapa [6] en su lugar y atorníllela.
c) Instalación del aparato
Observación: Para evitar que el líquido se derrame, no rellene el depósito [3] completamente al
montar el dispositivo bajo un ángulo.
• Respete la directiva EN 60598-2-17 y toda norma nacional antes de instalar el aparato. La instalación
debe ser realizada por un técnico especializado.
• El soporte donde irá el aparato, debe ser capaz de sostener 10 veces el peso de éste durante una
hora, sin que se produzca una deformación de dicho soporte.
• Siempre fije la VDL400SM con un cable de seguridad (p.ej. VDLSC7 o VDLSC8).
• Evite ponerse debajo del aparato durante el montaje, la limpieza, etc. Un técnico especializado debe
revisar el aparato antes de la puesta en marcha. Después, debe rev isarl o una vez al año.
• Instale el aparato fuera del alcance de personas no autorizadas y en un lugar con poca gente.
• La instalación de este aparato exige una sólida experiencia práctica: debe poder calcular la carga máx.
del soporte, debe conocer los materiales necesarios para la instalación, et c. De vez en cuando, una
verificación de la estructura y del aparato mismo debe ser llevada a cabo por un técnico especializado.
No intente instalar este aparato si no está suficientemente cualificado; una instalación incorrecta
puede causar lesiones.
• Quite todo material inflamable en un radio de 50cm alrededor del aparato.
• Pregunte a un electricista cómo hacer la conexión eléctrica.
13.09.2011 ©Velleman nv
13
Page 14

VDL400SM
• Conecte el aparato a la red eléctrica con la conexión de alimentación [8]. Normalmente, no se
conectan efectos luminosos a dimmer packs (reguladores).
• Un experto debe probar la instalación antes de la puesta en marcha.
6. Uso
Véase las figuras en la página 2 de este manual del usuario.
• Conecte el aparato a la red eléctrica [8] y coloque el interruptor [7] en la parte posterior de l aparato
en la posición ON. Después del tiempo de calentamiento (± 4 minutos), el aparato está listo para
utilizar. La lámpara piloto rojo se ilumina.
• Active/desactive la producción de humo con el pulsador [4a].
• Es posible qu e la lámpara piloto del controlador [4] se desactive y la em is ión de humo pare mientras
mantiene pulsado el botón. Esto significa que el aparato debe calentarse durante algunos minutos. Este
procedimiento garantiza una temperatura de evaporación apropiada y una mejor emisión de humo.
7. Limpieza y mantenimiento
1. Apriete bien las tuercas y los tornillos y verifique que no hay señales de oxidación.
2. Las partes móviles no pued en mostrar ningún rastro de desgaste y deben estar bien equilibra das.
3. No dañe los cables de alimentación. Contacte con un técnico especializado para instalar el aparato.
4. Desconecte el aparato de toda fuente antes de limpiarlo.
5. Limpie el aparato regularmente con un paño húmedo y sin pelusas. Evite el uso de alcohol y de
disolventes.
6. El usuario no habrá de efectua r el mantenimiento de ninguna pieza salvo los fusibles (véase "5.
Instalación"). El mantenimiento debe llevarse a cabo por personal especializado
7. Contacte con su distribuidor si necesita piezas de recambio.
8. Limpie el elemento calentador después de 30 horas de uso con un líquido de limpieza especial, que se
puede comprar en la tienda de su distribuidor local. Rellene el depósito con el líquido de limpieza y haga
funcionar el aparato durante un cierto tiempo. Si el aparato está limpio, saque el líquido de limpieza
restante del depósito y enjuáguelo a fondo con agua destilada. ¡Nunca utilice a gu a nor ma l par a limp iar o
enjuagar el aparato!
8. Especificaciones
alimentación máx. 230VAC/50Hz
consumo máx. 400W
fusible F 3A, 250VAC (5 x 20mm) (referencia FF3N)
volumen de salida de humo 70m³/min
tiempo de calentamiento ± 4 minutos
capacidad del depósito 0.3 litros
dimensiones 230 x 110 x 110mm (sin soporte de montaje)
peso 1.6kg
Utilice este aparato sólo con los accesorios originales. Velleman nv no será responsable de
daños ni lesiones causados por un uso (indebido) de este aparato. Para más información sobre
este producto y la versión más reciente de este manual del usuario, visite nuestra página web
www.hqpower.eu. Se pueden modificar las especificaciones y el contenido de este manual sin
previo aviso.
© DERECHOS DE AUTOR
Velleman nv dispone de los derechos de autor para este manual del usuario. Todos los
derechos mundiales reservados. Está estrictamente prohibido reproducir, traduc ir , copiar, editar y
guardar este manual del usuario o partes de ello sin previo permiso escrito del derecho habiente.
13.09.2011 ©Velleman nv
14
Page 15

f
E
e
e
w
g
c
h
t
e
c
u
e
w
r
n
e
t
n
l
t
u
n
n
g
s
e
a
s
0
e
e
r
r
o
c
v
B
e
p
n
e
n
n
s
g
d
c
u
ä
t
k
h
t
r
i
n
c
n
d
t
m
c
e
e
ü
d
n
e
u
n
a
e
a
L
,
c
k
F
f
a
n
ä
e
u
F
d
t
c
m
s
e
g
r
n
ä
m
0
gs
u
m
a
e
w
o
c
a
g
d
h
c
d
e
n
t
t
a
d
n
o
e
n
z
m
e
n
n
e
e
e
K
.
n
e
m
a
e
s
V
f
h
h
t
e
n
e
z
C
m
h
E
E
y
n
ö
g
a
t
e
e
e
m
u
s
t
n
t
n
a
n
a
s
i
d
n
e
g
u
u
e
e
d
H
u
Be
VDL40
ienun
SM
anleitu
1. Ein
An alle
Wichtig
retourni
Falls Z
Wir beda
sorgfälti
Gerät ni
2. Sic
• Bei Sc
Garan
• Install
• Nehm
gebra
hat.
• Der A
geerd
• Verge
besch
• Achte
kann.
• Trenn
Netzs
• Blicke
ausge
• Beach
nicht
• Halte
• Richte
• Verwe
• Achte
überhi
3. All
• Diese
Theat
zugel
• Diese
VDL4
• Verm
des G
ührung
inwohner de
Umweltinfo
Dieses Symb
Produktes na
Einheit (oder
verwendeten
werden. Dies
rt werden. Res
eifel bestehe
nken uns für d
durch. Überpr
ht in Betrieb u
erheitshi
Seien Sie vor
einen lebens
Berühren Sie
Schützen Sie
Trennen Sie
häden, die dur
ieanspruch. Fü
ation und Wart
n Sie das Ger
ht wurde. Lass
fbau des Gerä
t sein. Der ele
issern Sie sic
ieben im Punk
Sie darauf, da
Bei Beschädigu
n Sie das Gerä
ecker an der G
Sie niemals d
öst werden kö
en Sie, dass S
nter den Gara
Sie Kinder un
n Sie das Gerä
nden Sie nur e
Sie darauf, da
tzen.
emeine Ri
Gerät ist eine
r, usw. Die VD
ssen und wurd
Gerät eignet s
0SM erhöht w
iden Sie Ersch
rätes.
Europäische
mationen üb
l auf dem Prod
h seinem Lebe
erwendeten B
atterien müss
Einheit muss
ektieren Sie di
, wenden Sie
n Kauf der VD
üfen Sie zuerst
d setzen Sie si
weise
ichtig bei der I
efährlichen ele
das Gerät niem
das Gerät vor
as Gerät vor Ö
h Nichtbeachtu
r daraus resulti
ng sind einer
t nicht sofort i
en Sie das Ger
es entspricht d
trische Anschl
, dass die anzu
8 “Technische
ss die Netzleitu
ngen soll eine
t bei Nichtbenu
ifffläche an un
rekt in die Lich
nen.
häden, die dur
tieanspruch fal
Unbefugte vo
nicht auf Men
pfohlene Neb
ss sich immer
htlinien
Lichtsteuerung
L400SM ist nu
ausschließlich
ich nicht für la
nn Sie regelm
tterungen. Ver
Union
r dieses Prod
kt oder der Ve
szyklus der U
tterien) nicht
n von einer sp
n den Händler
e örtlichen Um
sich für Ents
400SM! Lesen
ob Transports
h mit Ihrem F
nstallation: Fas
trischen Schla
als während de
euchtigkeit un
fnen vom Netz
ng der Bedienu
erende Folgesc
utorisierten Fa
Betrieb, nach
t solange ausg
r Schutzklasse
ss darf nur vo
schließende Ne
Daten“.
ng nicht geque
achkraft das K
tzung und vor j
ziehen Sie nie
quelle da bei e
h manuelle Ve
len.
Gerät fern.
chen.
lflüssigke it un
enügend Fluid
für den profess
für den Anschl
zur Verwendu
gen Gebrauch
ßig eine Pause
eiden Sie roh
kt
rpackung zeigt
welt Schaden
ls unsortiertes
zialisierten Fir
oder ein örtlich
eltvorschrifte
rgungsrichtli
Sie diese Bedi
häden vorlieg
chhändler in V
sen Sie keine
zu vermeiden
s Betriebes, de
Nässe.
.
ngsanleitung v
äden übernim
hkraft vorbeh
em es von ein
schaltet, bis e
I. Gemäß den
einer Fachkra
zspannung nic
scht oder durc
bel ersetzen.
eder Reinigung
an der Netzlei
mpfindlichen M
ränderungen a
erwärmen Sie
im Tank befind
ionellen Einsat
uss an einen A
g in Innenräu
hne Unterbrec
einlegen.
Gewalt währe
an, dass die En
ufügen kann.
Hausmüll; die
a zwecks Rec
s Recycling-U
.
ien an Ihre
nungsanleitun
n. In diesem F
rbindung.
abel an, die un
n das Gehäus
rursacht werd
t der Herstell
lten.
m kalten in ein
die Zimmerte
orschriften m
t durchgeführt
t höher ist als
scharfe Kante
vom Netz. Fas
ung.
nschen epilep
diesem Gerät
die Flüssigkeit
t.; sonst könn
auf Bühnen, i
-Strom von m
en konzipiert.
ung. Die Lebe
nd der Installat
tsorgung diese
ntsorgen Sie d
inheit oder
cling entsorgt
ternehmen
rtliche Behör
vor Inbetrieb
ll, nehmen Sie
er Strom steh
erhitzt sich!
n, erlischt der
r keine Haftun
en warmen Ra
peratur erreic
ss das Gerät
erden.
die Netzspann
n beschädigt w
en Sie dazu d
ische Anfälle
verursacht wer
ie.
e das Gerät
Discotheken,
x. 230Vac/50
sdauer der
ion und Bedien
e
e.
ahme
das
n um
.
m
ht
ng
rden
n
en,
z
ng
13.09.201
1
15
©Vellem
n nv
Page 16

VDL400SM
k
r
• Achten Sie bei der Wahl des Installationsortes darauf, dass das Gerät keinem Staub, keiner
Feuchtigkeit und extremen Temperaturen ausgesetzt wird. Sorgen Si e f ü r ei n e n A b s t an d v o n mi n im a l
50cm zwischen dem Gerät und einer nahe gelegenen Oberfläche oder einem Vorübergehenden.
• Sichern Sie das Gerät mit einem geeigneten Sicherheitsfangseil (z.B. VDLSC7 oder VDLSC8) bei
Höhenmontage.
• Nehmen Sie das Gerät erst in Betrieb, nachdem Sie sich mit seinen Funktionen vertraut gemacht
haben. Lassen Sie das Gerät nicht von Personen bedienen, die sich nicht mit dem Gerät auskennen.
Meist ist die Beschädigung des Gerätes das Ergebnis von unfachmännischer Bedienung.
• Verwenden Sie die Originalverpackung, wenn das Gerät transportiert werden soll.
• Eigenmächtige Veränderungen sind aus Sicherheitsgründen verboten.
• Verwenden Sie das Gerät nur für Anwendungen beschrieben in dieser Bedienungsanleitung sonst
kann dies zu Schäden am Produkt führen und erlischt der Garantieanspruch. Jede andere Verwendung
ist mit Gefahren wie Kurzschluss, Brandwunden, elektrischem Schlag, Lampen exp lo s ion , usw.
verbunden.
4. Beschreibung
Siehe Abbildungen auf Seite 2.
1 Mundstüc
2 Halterung 6 Sicherungshalter
3 Behälter mit Schraubdeckel 7 ON/OFF-Schalter
Controlle
4
4a Drücktaste für den Nebelausstoß 9 Leitung für Nebelfluid
4b Kontrolllampe 10 Kontrollfenster Flüssigkeitspegel
5 Anschluss Controller
8 Netzkabel
5. Installation
Siehe Abbildungen, Seite 2 dieser Bedienungsanleitung.
a) Nebelfluid
• Trennen Sie das Gerät vor dem Befüllen des Tanks vom Netz [8].
• Verwenden Sie nur nicht entflammbares Nebelfluid auf Wasserbasis, also ohne Öl oder Fett, z.B.
VDLSL1 (1 Liter), VDLSL5 (5 Liter), oder VDLSL5H (5 Liter Nebelfluid mit hoher Dichte).
• Bei Verwendung nicht empfohlener Nebelflüssigkeit könnte das Gerät beschädigt werden und erlischt
den Garantieanspruch.
1. Trennen Sie das Gerät von der Netzspannung [8].
2. Schrauben Sie den Tankdeckel [3] auf.
3. Gießen Sie die Nebelflüssigkeit vorsichtig in den Tank (gießen Sie nicht zu viel ein!).
4. Schrauben Sie den Deckel [3] wieder fest auf den Tank.
5. Stecken Sie die Leitung [9] vorsichtig in den Tank bis die Spitze den Boden berührt.
Bemerkung: Schalten Sie das Gerät niemals ein, ohne vorher den Tank [3] geschlossen zu
haben.
b) Sicherung
• Trennen Sie das Gerät vor dem Sicherungswechsel von der Netzspannung [8].
• Ersetzen Sie eine Sicherung nur durch eine Sicherung gleichen Typs (siehe “8. Technische Daten”).
Vorgehensweise:
1. Trennen Sie das Gerät vo m Netz [8].
2. Schrauben Sie den Sicherungshalter [6] auf der Rückseite mit einem geeigneten Schraubendreher
los.
3. Entfernen Sie die defekte Sicherung und setzen Sie eine neue Sicherung gleichen Typs ein.
4. Setzen Sie den S icherungshalter [6] vorsichtig wieder auf und schrauben Sie ihn wieder fest.
c) Das Gerät installieren
Bemerkung: Füllen Sie den Behälter [3] beim Montieren unter einem Winkel nicht völlig, um zu
vermeiden, dass Flüssigkeit aus dem Behälter sickert.
• Betrachten Sie erst den Inhalt der Richtlinie EN 60598-2-17 und die (eventuellen) nationalen Normen
ehe Sie das Gerät installieren. Die Installation darf nur von einer Fachkraft durchgeführt werden.
• Die Tragkonstruktion für das Gerät muss während 1 Stunde 10 x das erforderliche Gewicht tragen
können, ohne dass die Konstruktion sich dadurch verformt.
• Das Gerät muss ebenfalls ein geeignetes Sicherheitsfangseil haben (z.B VDLSC7 oder VDLSC8).
• Achten Sie bei der Montage, beim Abbau und bei der Durchführun g von Servicearbeiten darauf, dass
der Bereich unterhalb des Montageortes abgesperrt ist. Lassen Sie die Installation vor Inbetriebnahme
13.09.2011 ©Velleman nv
16
Page 17

VDL400SM
von einer Fachkraft kontrollieren. Lassen Sie das Gerät auch 1 x pro Jahr nachsehen.
• Montieren Sie das Gerät an einem Ort, wo niemand es berüh ren kann und wo wenige Leute
vorübergehen.
• Eine gründliche praktische Erfahrung ist für die Installation des Gerätes notwendig : Sie müssen die max.
Belastung der Tragkonstruktion berechnen können, wissen welches Konstruktionsmaterial Sie verwenden
dürfen. Außerdem müssen Sie das verwendete Material und das Gerät regelmäßig nachsehen lassen.
Montieren Sie das Gerät nie selber wenn Sie damit keine Erfahrung haben. Eine schlechte Montage kann
Verletzungen verursachen.
• Entfernen Sie alle entflammbaren Materialen in einem Abstand von 50cm.
• Der elektrische Anschluss darf nur von einer Fachkraft durchgeführt werden.
• Schließen Sie das Gerät über den Stecker [8] an das Netz an. Lichteffekte sollten im Allgemeinen nicht
über Dimmerpacks geschaltet werden.
• Die Installation muss vor Inbetriebnahme von einem Experten genehmigt werd en.
6. Anwendung
Siehe Abbildungen, Seite 2 dieser Bedienungsanleitung.
• Schließen Sie das Gerät an die Netzspannung an [6] und stellen Sie den ON/OFF-Schalter [7] auf ON.
Nach der Aufwärmzeit (± 4 Minuten) ist das Gerät gebrauchsfertig. Die rote Anzeigelampe leuchtet
nun.
• Starten/stoppen Sie den Nebelausstoß mit der Drucktaste [4a].
• Manchmal wird die Kontrolllampe auf dem Controller erlischt und der Nebelausstoß aufhören obwohl
Sie die Taste gedrückt halten. Dies bedeutet, dass das Gerät sich aufwärmt und nach 1 oder zwei
Minuten wieder fertig sein wird. So gibt es immer eine optimale Verdampfungstemperatur und erzeugt
das Gerät den möglichst besten Nebel.
7. Reinigung und Wartung
1. Alle verwendeten Schrauben müssen fest angespannt werden und dürfen keine Rostspuren zeigen.
2. Die mechanisch bewegenden Teile dürfen keinen Verschleiß aufweisen.
3. Sorgen Sie dafür, dass die Netzkabel nicht beschädigt werden. Lassen Sie das Gerät von einer
Fachkraft installieren.
4. Trennen Sie das Gerät vom Netz ehe Sie mit den Servicearbeiten anfangen.
5. Verwenden Sie z ur Reinigung ein feuchtes, fusselfreies Tuch. Verwenden Sie auf keinen Fall Alkohol
oder irgendwelc h e Lös u n g smittel.
6. Außer Lampen und Sicherung gibt es keine zu wartenden Teile (siehe “5. Installation”).
7. Bestellen Sie eventuelle Ersatzunterteile bei Ihrem Fachhändler.
8. Reinigen Sie das Heizel ement alle 30 Betriebsstunden mit einer speziellen Reinigungsflüssigkeit, die im
Fachhandel erhältlich ist. Befüllen Sie den Tank mit Reinigungsflüssigkeit und schalten Sie das Gerät
einige Zeit ein. Wenn das Ger ä t g er einigt ist, entfernen S ie da nn die r estliche Reinigung sflüssigkeit
und spülen Sie den Tank gründlich mit destilliertem Wasser durch. Verwenden Sie zum Reinigen oder
spülen nie normales Wasser!
8. Technische Daten
Spannungsversorgung max. 230VAC/50Hz
Verbrauch max. 400W
Sicherung F 3A, 250VAC (5 x 20mm) (Best.-Nr. FF3N)
Nebelausstoß 70m³/min
Aufheizzeit etwa 4 Minuten
Tankinhalt 0.3 Liter
Abmessungen 230 x 110 x 110mm (ohne Montagebügel)
Gewicht 1.6kg
Verwenden Sie dieses Gerät nur mit originellen Zubehörteilen. Velleman nv übernimmt keine
Haftung für Schaden oder Verletzungen bei (falscher) Anwendung dieses Gerätes. Für mehr
Informationen zu diesem Produkt und die neueste Version dieser Bedienungsanleitung, siehe
www.hqpower.eu. Alle Änderungen ohne vorherige Ankündigung vorbehalten.
© URHEBERRECHT
Velleman nv besitzt das Urheberrecht für diese Bedienungsanleitung. Alle weltweiten Rechte
vorbehalten. Ohne vorherige schriftliche Genehmigung des Urhebers ist es nicht gestattet, diese
Bedienungsanleitung ganz oder in Teilen zu reproduzieren, zu kopieren, zu übersetzen, zu bearbeiten
oder zu speichern.
13.09.2011 ©Velleman nv
17
Page 18

®
Velleman
Service and Quality Warranty
®
Velleman
has over 35 years of experience in the electronics world
and distributes its products in more than 85 countries.
All our products fulfil strict quality requirements and legal
stipulations in the EU. In order to ensure the quality, our products
regularly go through an extra quality check, both by an internal
quality department and by specialized external organisations. If, all
precautionary measures notwithstanding, problems should occur,
please make appeal to our warranty (see guarantee conditions).
General Warranty Conditions Concerning Consumer Products
(for EU):
• All consumer products are subject to a 24-month warranty on
production flaws and defective material as from the original date of
purchase.
®
• Velleman
article, or to refund the retail value totally or partially when the
complaint is valid and a free repair or replacement of the article is
impossible, or if the expenses are out of proportion.
You will be delivered a replacing article or a refund at the value of
100% of the purchase price in case of a flaw occurred in the first
year after the date of purchase and delivery, or a replacing article at
50% of the purchase price or a refund at the value of 50% of the
retail value in case of a flaw occurred in th e second year after the
date of purchase and delivery.
• Not covered by warranty:
- all direct or indirect damage caused after delivery to the article
(e.g. by oxidation, shocks, falls, dust, dirt, humidity...), and by the
article, as well as its contents (e.g. data loss), compensation for loss
of profits;
- frequently replaced consumable goods, parts or accessories such as
batteries, lamps, rubber parts, drive belts... (unlimited list);
- flaws resulting from fire, water damage, lightning, accident, natural
disaster, etc.;
- flaws caused deliberately, negligently or resulting from improper
handling, negligent maintenance, abusive use or use contrary to the
manufacturer’s instructions;
- damage caused by a commercial, professional or collective use of
the article (the warranty validity will be reduced to six (6) months
when the article is used professionally);
- damage resulting from an inappropriate packing and shipping of
the article;
- all damage caused by modification, repair or alteration performed
by a third party without written permission by Velleman
• Articles to be repaired must be delivered to your Velleman
solidly packed (preferably in the original packaging), and be
completed with the original receipt of purchase and a clear flaw
description.
• Hint: In order to save on cost and time, please reread the manual
and check if the flaw is caused by obvious causes prior to presenting
the article for repair. Note that returning a non-defective article can
also involve handling costs.
• Repairs occurring after warranty expiration are subject to shipping
costs.
• The above conditions are without prejudice to all commercial
warranties.
The above enumeration is subject to modification according to the
article (see article’s manual).
Velleman
Velleman
verdeelt in meer dan 85 landen.
Al onze producten beantwoorden aan strikte kwaliteitseisen en aan
de wettelijke bepalingen geldig in de EU. Om de kwaliteit te
waarborgen, ondergaan onze producten op regelmatige tijdstippen
een extra kwaliteitscontrole, zowel door onze eigen kwaliteitsafdeling
als door externe gespecialiseerde organisaties. Mocht er ondanks
deze voorzorgen toch een probleem optreden, dan kunt u steeds een
beroep doen op onze waarborg (zie waarborgvoorwaarden).
Algemene waarborgvoorwaarden consumentengoederen
(voor Europese Unie):
• Op alle consumentengoederen geldt een garantieperiode van 24
maanden op productie- en materiaalfouten en dit vanaf de
oorspronkelijke aankoopdatum.
• Indien de klacht gegrond is en een gratis reparatie of vervanging
van een artikel onmogelijk is of indien de kosten hiervoor buiten
verhouding zijn, kan Velleman
te vervangen door een gelijkwaardig artikel of de aankoopsom van
het artikel gedeeltelijk of volledig terug te betalen. In dat geval krijgt
u een vervangend product of terugbetaling ter waarde van 100% van
de aankoopsom bij ontdekking van een gebrek tot één jaar na
aankoop en levering, of een vervangend product tegen 50% van de
kostprijs of terugbetaling van 50% bij ontdekking na één jaar tot 2
jaar.
• Valt niet onder waarborg:
- alle rechtstreekse of onrechtstreekse schade na de levering
veroorzaakt aan het toestel (bv. door oxidatie, schokken, val, stof,
can decide to replace an article with an equivalent
®
service- en kwaliteitsgarantie
®
heeft ruim 35 jaar ervaring in de elektronicawereld en
®
.
®
dealer,
®
beslissen het desbetreffende artikel
vuil, vocht...), en door het toestel, alsook zijn inhoud (bv. verlies van
data), vergoeding voor eventuele winstderving.
- verbruiksgoederen, onderdelen of hulpstukken die regelmatig
dienen te worden vervangen, zoals bv. batterijen, lampen, rubberen
onderdelen, aandrijfriemen... (onbeperkte lijst).
- defecten ten gevolge van brand, waterschade, bliksem, ongevallen,
natuurrampen, enz.
- defecten veroorzaakt door opzet, nalatigheid of door een
onoordeelkundige behandeling, slecht onderhoud of abnormaal
gebruik of gebruik van het toestel strijdig met de voorschriften van
de fabrikant.
- schade ten gevolge van een commercieel, professioneel of collectief
gebruik van het apparaat (bij professioneel gebruik wordt de
garantieperiode herleid tot 6 maand).
- schade veroorzaakt door onvoldoende bescherming bij transport
van het apparaat.
- alle schade door wijzigingen, reparaties of modificaties uitgevoerd
door derden zonder toestemming van Velleman
• Toestellen dienen ter reparatie aangeboden te worden bij uw
®
-verdeler. Het toestel dient vergezeld te zijn van het
Velleman
oorspronkelijke aankoopbewijs. Zorg voor een degelijke verpakking
(bij voorkeur de originele verpakking) en voeg een duidelijke
foutomschrijving bij.
• Tip: alvorens het toestel voor reparatie aan te bieden, kijk nog
eens na of er geen voor de hand liggende reden is waarom het
toestel niet naar behoren werkt (zie handleiding). Op deze wijze kunt
u kosten en tijd besparen. Denk eraan dat er ook voor niet-defecte
toestellen een kost voor controle aangerekend kan worden.
• Bij reparaties buiten de waarborgperiode zullen transportkosten
aangerekend worden.
• Elke commerciële garantie laat deze rechten onverminderd.
Bovenstaande opsomming kan eventueel aangep ast worden
naargelang de aard van het product (zie handleiding van het
betreffende product).
Garantie de service et de qualité Velleman
®
jouit d’une expérience de plus de 35 ans dans le monde
Velleman
de l’électronique avec une distribution dans plus de 85 pays.
Tous nos produits répondent à des exigences de qualité rigoureuses
et à des dispositions légales en vigueur dans l’UE. Afin de garantir la
qualité, nous soumettons régulièrement nos produits à des contrôles
de qualité supplémentaires, tant par notre propre service qualité que
par un service qualité externe. Dans le cas improbable d’un défaut
malgré toutes les précautions, il est possible d’invoquer notre
garantie (voir les conditions de garantie).
Conditions générales concernant la garantie sur les produits
grand public (pour l’UE) :
• tout produit grand public est garanti 24 mois contre tout vice de
production ou de matériaux à dater du jour d’acquisition effective ;
• si la plainte est justifiée et que la rép aration ou le remplacement
d’un article est jugé impossible, ou lorsque les coûts s’avèrent
disproportionnés, Velleman
un article équivalent ou à rembourser la totalité ou une partie du prix
d’achat. Le cas échéant, il vous sera consenti un article de
remplacement ou le remboursement complet du prix d’achat lors
d’un défaut dans un délai de 1 an après l’achat et la livraison, ou un
article de remplacement moyennant 50% du prix d’achat ou le
remboursement de 50% du prix d’achat lors d’un défaut après 1 à 2
ans.
• sont par conséquent exclus :
- tout dommage direct ou indirect survenu à l’article après livraison
(p.ex. dommage lié à l’oxydation, choc, chute, poussière, sable,
impureté…) et provoqué par l’appareil, ainsi que son contenu (p.ex.
perte de données) et une indemnisation éventuelle pour perte de
revenus ;
- tout bien de consommation ou accessoire, ou pièce qui nécessite un
remplacement régulier comme p.ex. piles, ampoules, pièces en
caoutchouc, courroies… (liste illimitée) ;
- tout dommage qui résulte d’un incendie, de la foudre, d’un
accident, d’une catastrophe naturelle, etc. ;
- tout dommage provoqué par une négligence, volontaire ou non,
une utilisation ou un entretien incorrect, ou une utilisation de
l’appareil contraire aux prescriptions du fabricant ;
- tout dommage à cause d’une utilisation commerciale,
professionnelle ou collective de l’appareil (la période de garantie sera
réduite à 6 mois lors d’une utilisation professionnelle) ;
- tout dommage à l’appare il qui résulte d’une utilisation incorrecte ou
différente que celle pour laquelle il a été initialement prévu comme
décrit dans la notice ;
- tout dommage engendré par un retour de l’appareil emballé dans
un conditionnement non ou insuffisamment protégé ;
- toute réparation ou modification effectuée par une tierce personne
sans l’autorisation explicite de SA Velleman
- frais de transport de et vers Velleman
couvert sous la garantie.
• toute réparation sera fournie par l’endroit de l’achat. L’appareil doit
nécessairement être accompagné du bon d’achat d’origine et être
®
s’autorise à remplacer ledit article par
®
.
®
®
;
®
si l’appareil n’est plus
Page 19

dûment conditionné (de préférence dans l’emballage d’origine avec
mention du défaut) ;
• conseil : il est conseillé de consulter la notice et de contrôler
câbles, piles, etc. avant de retourner l’appareil. Un appareil retourné
jugé défectueux qui s’avère en bon état de marche pourra faire
l’objet d’une note de frais à charge du consommateur ;
• une réparation effectuée en-dehors de la période de garantie fera
l’objet de frais de transport ;
• toute garantie commerciale ne porte pas atteinte aux conditions
susmentionnées.
La liste susmentionnée peut être sujette à une
complémentation selon le type de l’article et être mentionnée
dans la notice d’emploi.
Garantía de servicio y calidad Velleman
®
disfruta de una experiencia de más de 35 años en el
Velleman
mundo de la electrónica con una distribución en más de 85 países.
Todos nuestros productos responden a normas de calidad rigurosas y
disposiciones legales vigentes en la UE. Para garantizar la calidad,
sometimos nuestros productos regularmente a controles de calidad
adicionales, tanto por nuestro propio servicio de c alidad como por un
servicio de calidad externo. En el caso improbable de que surgieran
problemas a pesar de todas las precauciones, es posible apelar a
nuestra garantía (véase las condiciones de garantía).
Condiciones generales referentes a la garantía sobre
productos de venta al público (para la Unión Europea):
• Todos los productos de venta al público tienen un período de
garantía de 24 meses contra errores de producción o errores en
materiales desde la adquisición original;
• Si la queja está fundada y si la reparación o la sustitución de un
artículo es imposible, o si los gastos son desproporcionados,
®
autoriza reemplazar el artículo por un artículo equivalente
Velleman
o reembolsar la totalidad o una parte del precio de compra. En este
caso, recibirá un artículo de recambio o el reembolso completo del
precio de compra al descubrir un defecto hasta un año después de la
compra y la entrega, o un artículo de recambio al 50% del precio de
compra o la sustitución de u n 50% del precio de compra al descubrir
un defecto después de 1 a 2 años.
• Por consiguiente, están excluidos entre otras cosas:
- todos los daños causados directamente o indirectamente al aparato
y su contenido después de la entrega (p.ej. por oxidación, choques,
caída,...) y causados por el aparato, al igual que el contenido (p.ej.
pérdida de datos) y una indemnización eventual para falta de
ganancias;
- partes o accesorios que deban ser reemplazados regularmente,
como por ejemplo baterías, lámparas, partes de goma... (lista
ilimitada);
- defectos causados por un incendio, daños causados por el agua,
rayos, accidentes, catástrofes naturales, etc.;
- defectos causados a conciencia, descuido o por malos tratos, un
mantenimiento inapropiado o un uso anormal del aparato contrario a
las instrucciones del fab ricante;
- daños causados por un uso comercial, profesional o colectivo de l
aparato (el período de garantía se reducirá a 6 meses con uso
profesional);
- daños causados por un uso incorrecto o un uso ajeno al que está
previsto el producto inicialmente como está descrito en el manual del
usuario;
- daños causados por una protección insuficiente al transportar el
aparato.
- daños causados por reparaciones o modificaciones efectuadas por
una tercera persona sin la autorización explicita de SA Velleman
- se calcula gastos de transporte de y a Velleman
no está cubierto por la garantía.
• Cualquier reparación se efectuará por el lugar de compra. Devuelva
el aparato con la factura de compra original y transpórtelo en un
embalaje sólid o (preferentemente el embala je original). Incluya
también una buena descripción del defecto;
• Consejo: Lea el manual del us uario y controle los cables, las pilas,
etc. antes de devolver el aparato. Si no se encuentra un defecto en
el artículo los gastos podrían correr a cargo del cliente;
• Los gastos de transporte correrán a carga del cliente para una
reparación efectuada fuera del periodo de garantía.
• Cualquier gesto comercial no disminuye estos derechos.
La lista previamente mencionada puede ser adaptada segú n el
tipo de artículo (véase el manual del usuario del artículo en
cuestión)
®
®
si el aparato ya
®
;
®
Service- und Qualitätsgarantie
Velleman
®
Velleman
hat gut 35 Jahre Erfahrung in der Elektronikwelt und
vertreibt seine Produkte in über 85 Ländern.
Alle Produkte entsprechen den strengen Qualitätsforderunge n und
gesetzlichen Anforderungen in der EU. Um die Qualität zu
gewährleisten werden unsere Produkte regelmäßig einer zusätzlichen
Qualitätskontrolle unterworfen, sowohl von unserer eigenen
Qualitätsabteilung als auch von externen spezialisierten
Organisationen. Sollten, trotz aller Vorsichtsmaßnahmen, Probleme
auftreten, nehmen Sie bitte die Garantie in Anspruch (siehe
Garantiebedingungen).
Allgemeine Garantiebedingungen in Bezug auf Ko nsumgüter
(für die Europäische Union):
• Alle Produkte haben für Material- oder Herstellungsfehler eine
Garantieperiode von 24 Monaten ab Verkaufsdatum.
• Wenn die Klage berechtigt ist und falls eine kostenlose Reparatur
oder ein Austausch des Gerätes unmöglicht ist, oder wenn die Kosten
dafür unverhältnismäßig sind, kann Velleman® sich darüber
entscheiden, dieses Produkt durch ein gleiches Produkt zu ersetzen
oder die Kaufsumme ganz oder teilweise zurückzuzahlen. In diesem
Fall erhalten Sie ein Ersatzprodukt oder eine Rückzahlung im Werte
von 100% der Kaufsumme im Falle eines Defektes bis zu 1 Jahr nach
Kauf oder Lieferung, oder Sie bekommen ein Ersatzprodukt im Werte
von 50% der Kaufsumme oder eine Rückzahlung im Werte von 50 %
im Falle eines Defektes im zweiten Jahr.
• Von der Garantie ausgeschlossen sind:
- alle direkten oder indirekten Schäden, die nach Lieferung am Gerät
und durch das Gerät verursacht werden (z.B. Oxidation, Stöße, Fall,
Staub, Schmutz, Feuchtigkeit, ...), sowie auch der Inhalt (z.B.
Datenverlust), Entschädigung für eventuellen Gewinnausfall.
- Verbrauchsgüter, Teile oder Zubehörteile, die regelmäßig
ausgewechselt werden, wie z.B. Batterien, Lampen, Gummiteile,
Treibriemen, usw. (unbeschränkte Liste).
- Schäden verursacht durch Brandschaden, Wasserschaden, Blitz,
Unfälle, Naturkatastrophen, usw.
- Schäden verursacht durch absichtliche, nachlässige oder
unsachgemäße Anwendung, schlechte Wartung, zweckentfremdete
Anwendung oder Nichtbeachtung von Benutzerhinweisen in der
Bedienungsanleitung.
- Schäden infolge einer kommerziellen, professionellen oder
kollektiven Anwendung des Gerätes (bei gewerblicher Anwendung
wird die Garantieperiode auf 6 Monate zurückgeführt).
- Schäden verursacht durch eine unsachgemäße Verpackung und
unsachgemäßen Transport des Gerätes.
- alle Schäden verursacht durch unautorisierte Änderungen,
Reparaturen oder Modifikationen, die von einem Dritten ohne
Erlaubnis von Velleman
• Im Fall einer Reparatur, wenden Sie sich an Ihren Velleman
Verteiler. Legen Sie das Produkt ordnungsgemäß verpackt
(vorzugsweise die Originalverpackung) und mit dem OriginalKaufbeleg vor. Fügen Sie eine deutliche Fehlerumschreibung hinzu.
• Hinweis: Um Kosten und Zeit zu sparen, lesen Sie die
Bedienungsanleitung nochmals und überprüfen Sie, ob es keinen auf
de Hand liegenden Grund gibt, ehe Sie das Gerät zur Reparatur
zurückschicken. Stellt sich bei der Überprüfung des Geräts heraus,
dass kein Geräteschaden vorliegt, könnte dem Kunden eine
Untersuchungspauschale berechnet.
• Für Reparaturen nach Ablauf der Garantiefrist werden
Transportkosten berechnet.
• Jede kommerzielle Garantie lässt diese Rechte unberührt.
Die oben stehende Aufzählung kann eventuell angepasst
werden gemäß der Art des Produktes (siehe
Bedienungsanleitung des Gerätes).
®
vorgenommen werden.
®
-
 Loading...