

Page 1

1
CAMSETW9 - KIT WITH 2 WIRELESS OUTDOOR COLOUR CAMERAS
0678
Referencia Electrónica Embajadores: CM21009
1. Introduction
To all residents of the European Union
Important environmental information about this product
This symbol on the device or the package indicates that disposal of the device after its lifecycle could harm
the environment.
Do not dispose of the unit (or batteries) as unsorted municipal waste; it should be taken to a specialised
company for recycling.
This device should be returned to your distributor or to a local recycling service.
Respect the local environmental rules.
If in doubt, contact your local waste disposal authorities.
Thank you for buying the CAMSETW9! Please read the manual thoroughly before bringing this device into service. If
the device was damaged in transit, don't install or use it and contact your dealer.
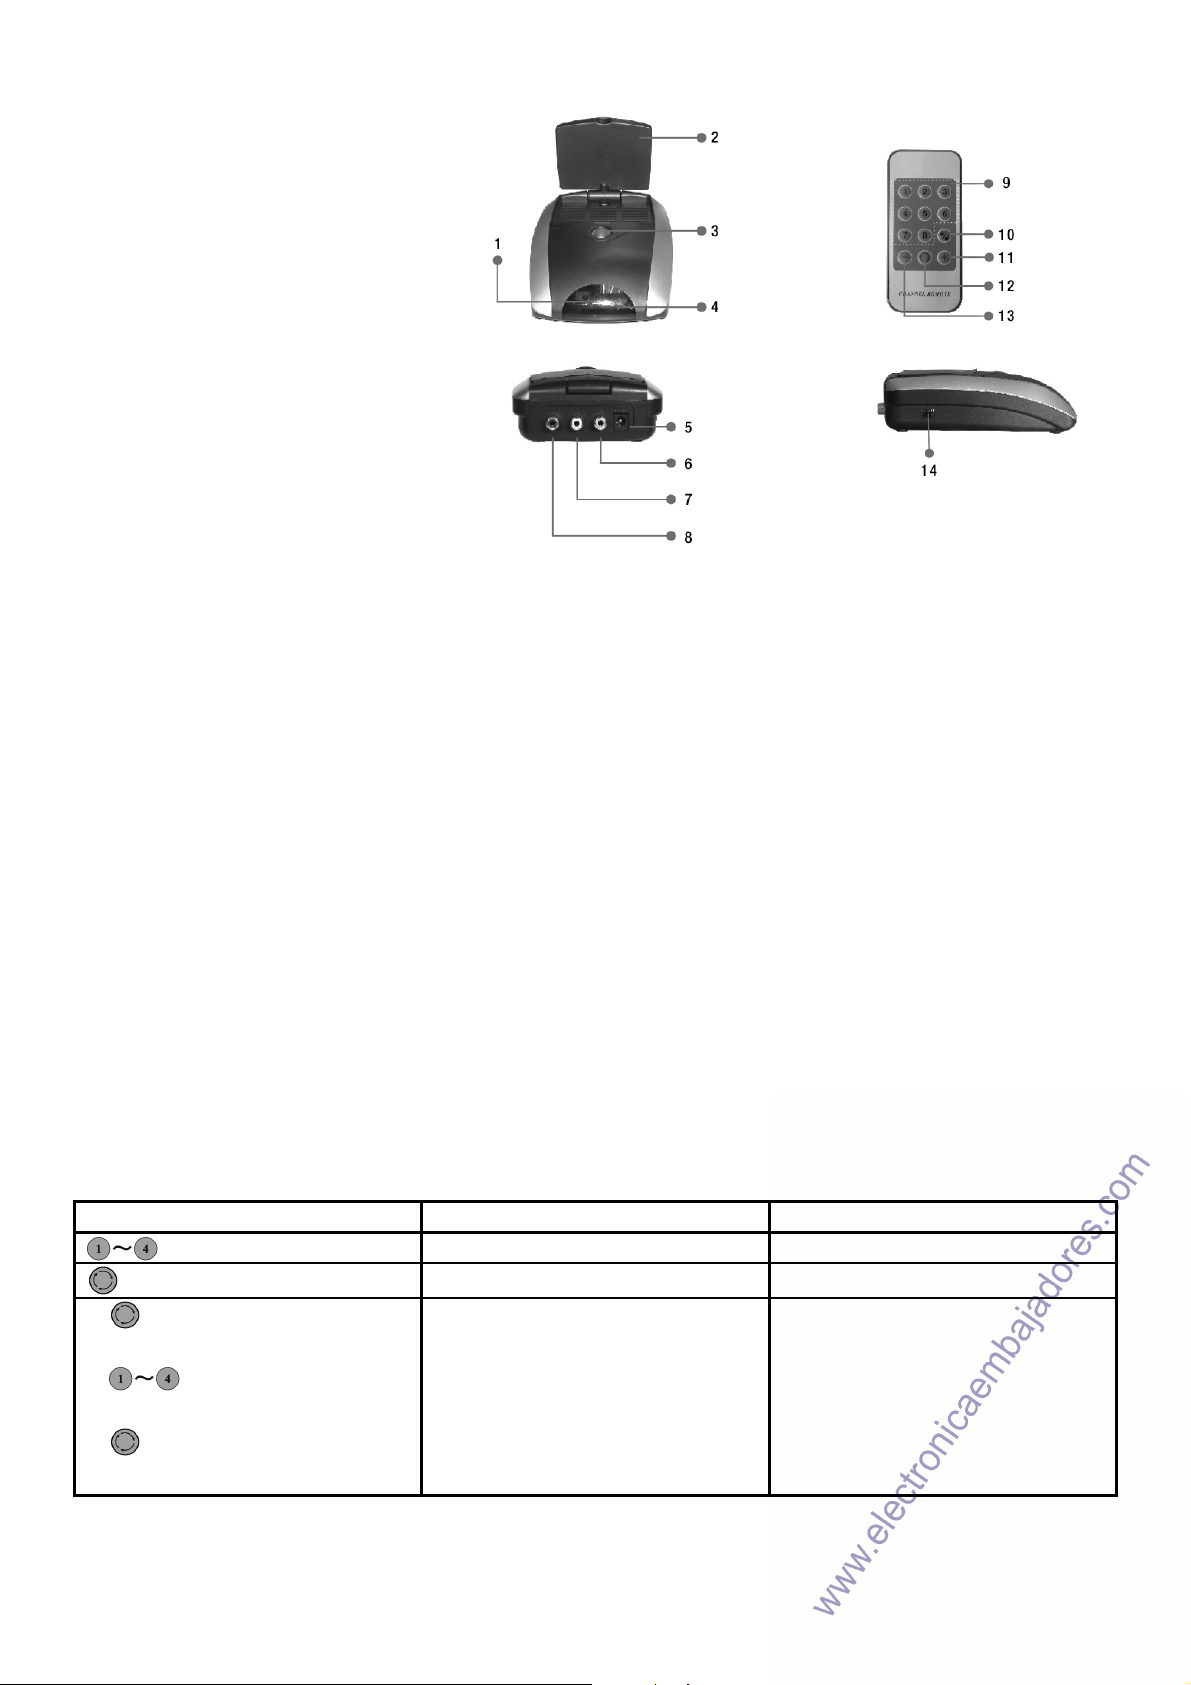
2. Contents (fig. 1)
1. 2 x 2.4GHz wireless camera
2. remote controller for receiver
3. 2.4GHz wireless receiver
4. 2 x adapter for camera
5. A/V cable
3. Connection Diagram (fig. 2)
1. camera adapter
2. camera
3. receiver adapter
4. receiver
5. monitor/TV
6. A/V (L&R) output
4. Description Camera (fig. 3)
1. lens
2. antenna
3. power jack
4. universal bracket
CAMSETW9 VELLEMAN
Page 2
2
5. Description Receiver (fig. 4)
1. IR signal receiving window
2. antenna
3. channel button
4. LED channel display
5. power jack
6. video output
7. audio output (L)
8. audio output (R)
9. channel number (1-4)
10. lock/unlock key
11. channel +
12. loop key
13. channel –
14. power switch
6. Installation
1.
Put the camera in the desired location and then adjust the angle.
2. Connect the adapter to each camera.
3.
Connect the receiver to a monitor/TV with the A/V cable (yellow for video, red and white for audio).
4. Connect the adapter (DC 12V 300mA) to the receiver. Slide the power switch to the ON position. The power
indicator lights.
5.
Switch on the monitor/TV and select A/V mode.
6. Use the channel button to s
now displayed on the monitor/TV.
7. Rotate the lens for optimum focus.
8.
Adjust the brightness, contrast and colour of the monitor/TV and the direction of the receiver's antenna.
9. Remove the battery insulator from the remote controller; pull out the battery tray and then load one button cell
(type CR2025) correctly. You can operate the receiver with the remote control.
et the same channel on the receiver as on the camera. The picture of the cameras is
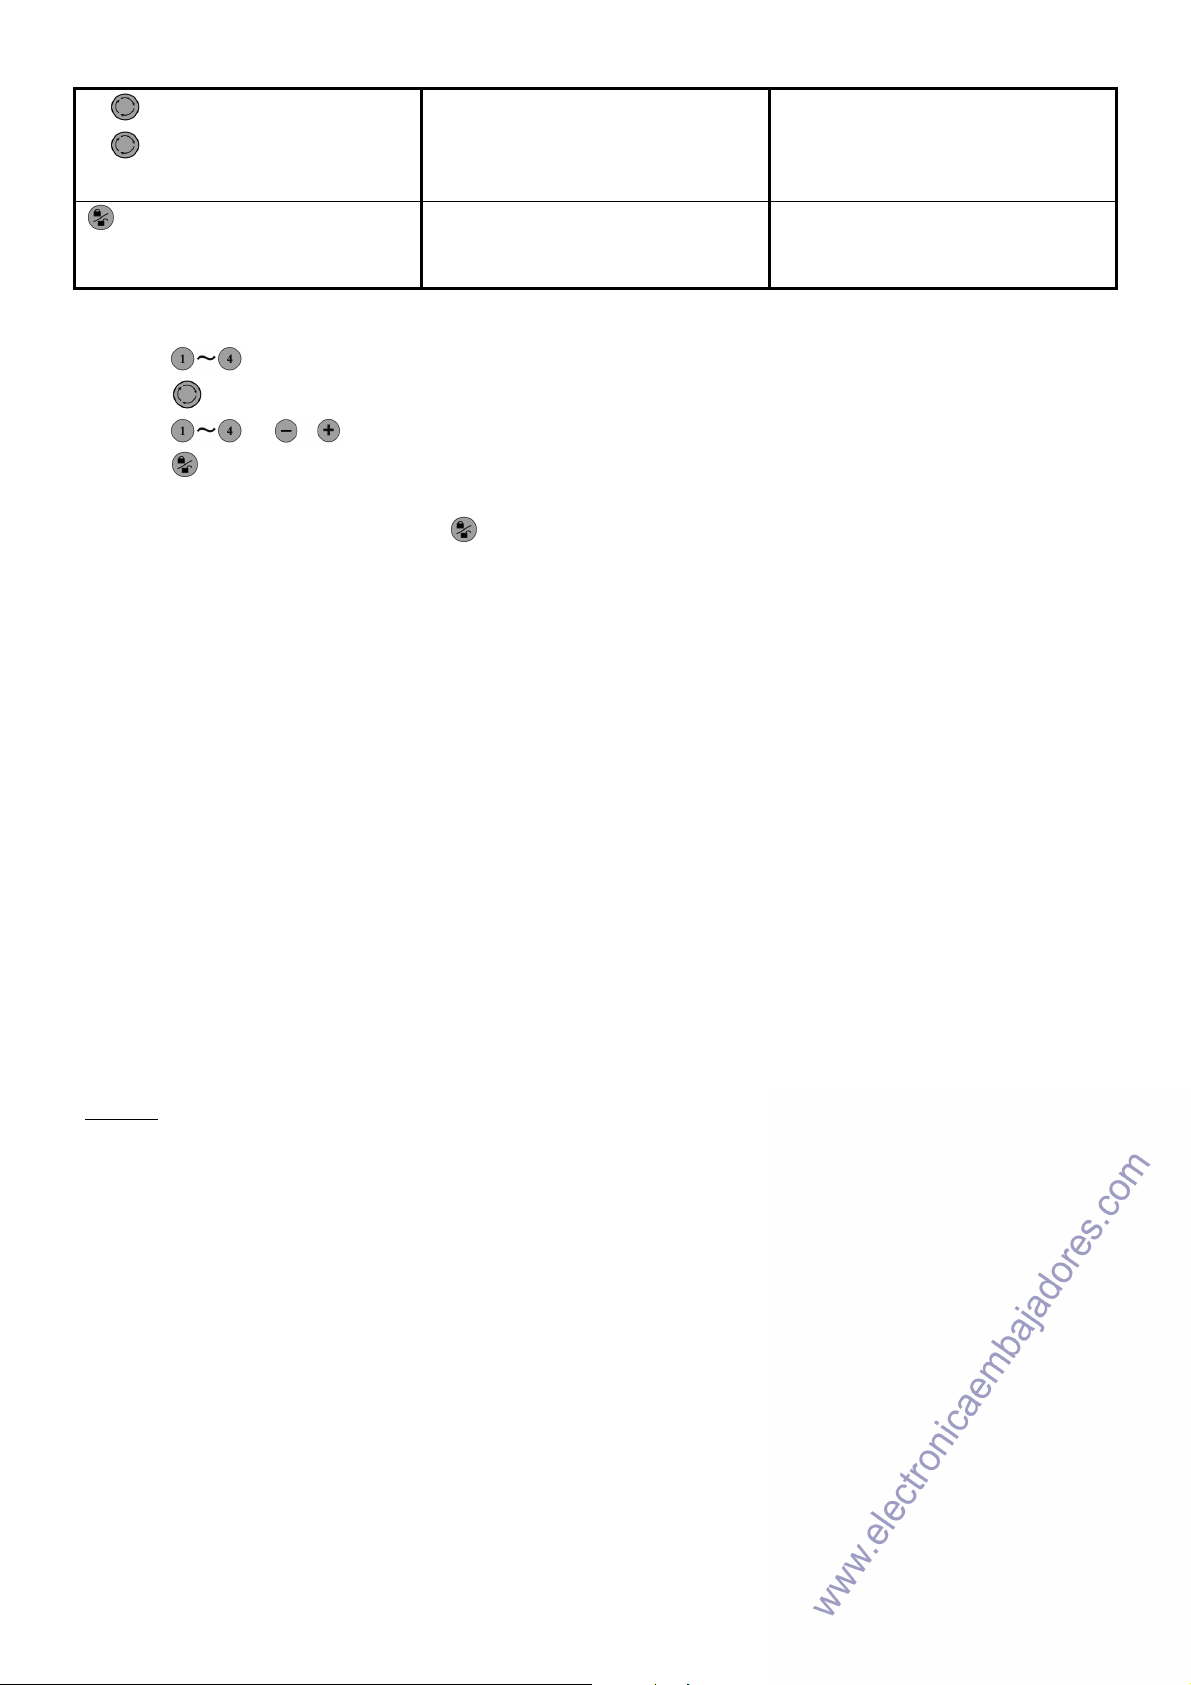
7. Operation
a) Channel button on receiver
CH1
→ CH2 → CH3 → CH4 → Channel loop → CH1
b) IR remote control
Keys Functions Operation & display
individual channel selection
channel up or down
scanning for specific channels
1. Press loop key once to start
L
setting, "
L" flashes
LL
2. Press keys 1 – 4 to enter two or
more channels to be looped
3. Press loop key again to confirm
and scanning begins
1.
2.
3.
CAMSETW9 VELLEMAN
Page 3
3
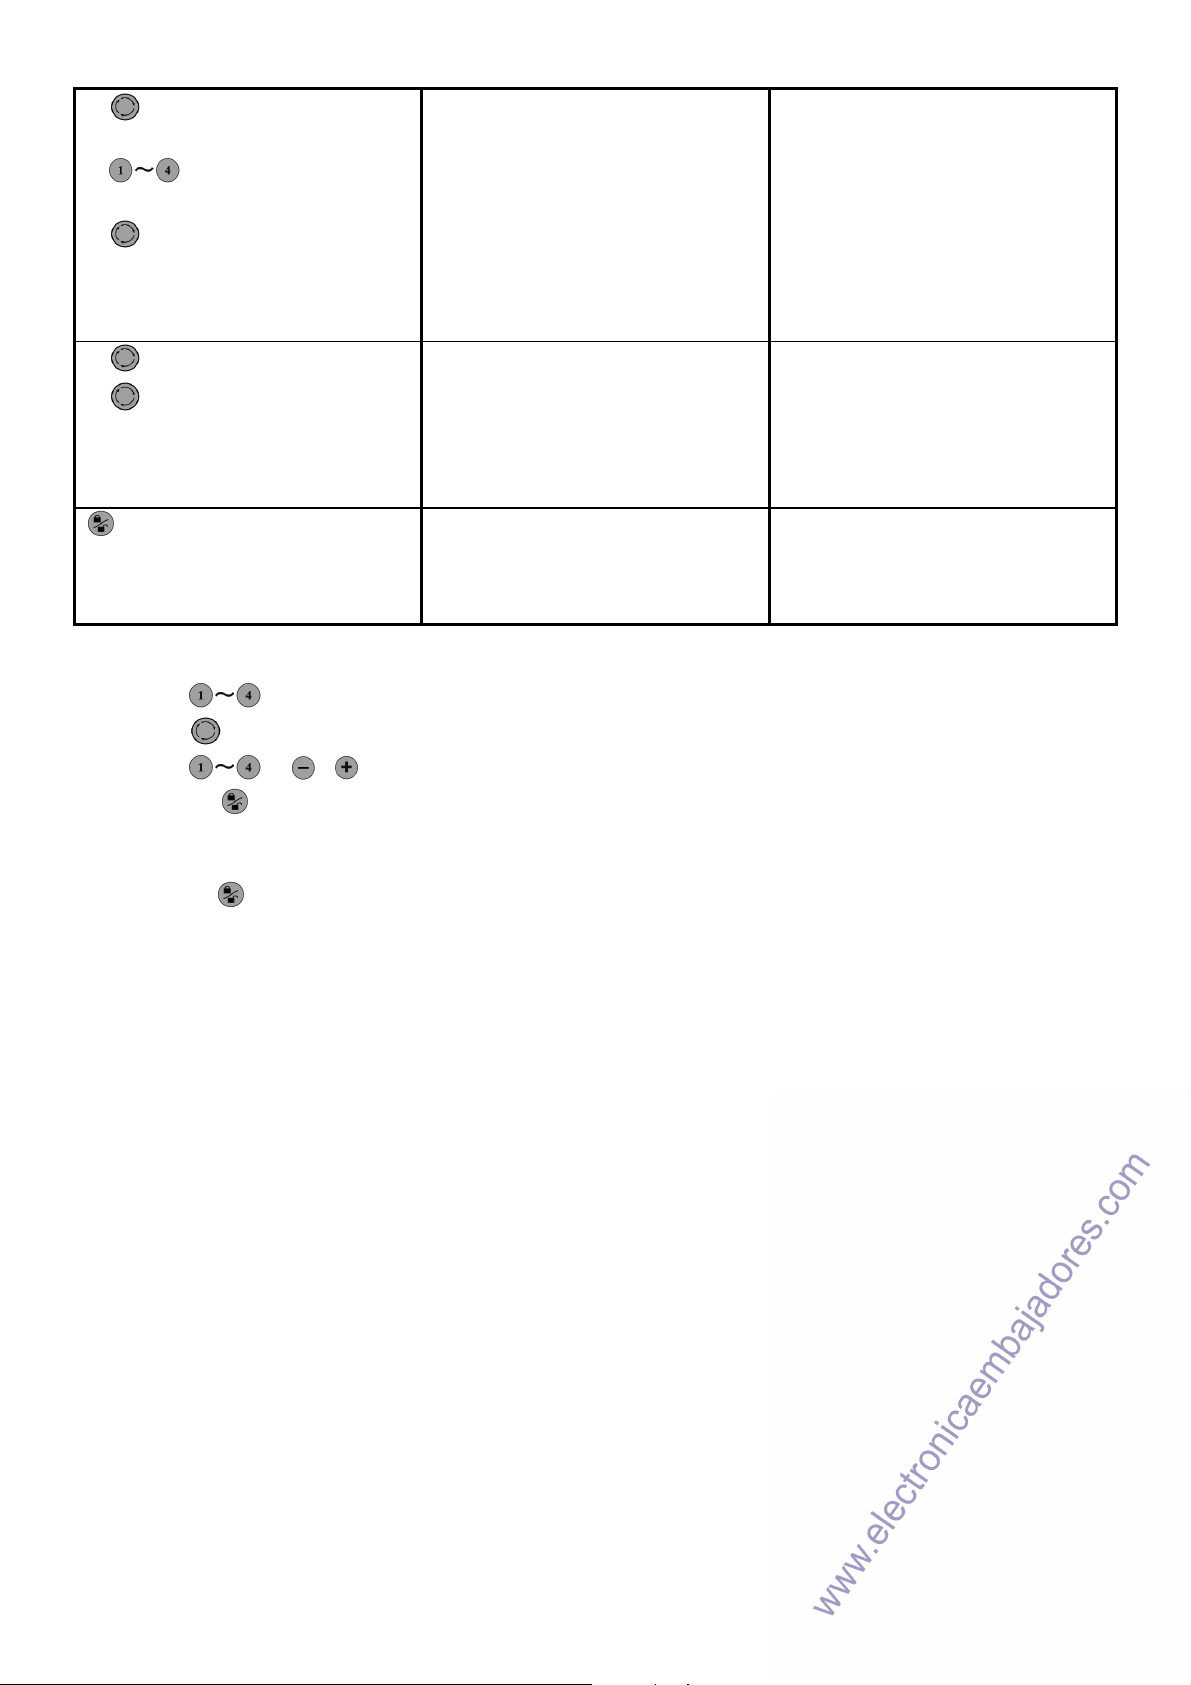
1.
2.
Remarks:
• Press
to select one channel.
scanning for all available channels
lock or unlock the keys of the remote
control
1. Press loop key once to start
2. Press loop key again to confirm
and scanning begins
In normal mode, press once to lock,
"
d" flashes; press again to unlock, "e"
flashes
• Press
• Press
• Press
from other IR remote controls. The icon "
when the remote is locked. Just press
to scan channels automatically
or to stop scanning the channels.
once after the setting is done to lock the remote control against unintentional touching or interference
d" is now displayed; The keys on the remote control no longer work
to unlock the remote again ("e" is displayed).
8. Camera Channel Set-up
The channel number for the camera is printed on the camera. Use the channel button to select the same channel for
the receiver as for the camera. The image is now displayed on the TV.
9. General Guidelines
• Protect the device against water and don't put objects containing water (e.g. vases) on top of the device
•
Turn off the camera/receiver if the system is not in use.
•
Use the adapter to connect /disconnect the device with/from the mains.
•
Do not cut off the DC power cable to try and use it with a different power source
10.Specifications
Operating temperature -10
Storage temperature -30
Operating humidity 85%RH
Camera
Imaging sensor CMOS
Total pixels 628 x 582 (PAL); 510 x 492 (NTSC)
Viewing angle 62°
Transmission frequency 2.400 to 2.483MHz
Transmission power 10mW/CE; 2mW/FCC
Modulation type FM
Bandwidth 18MHz
Power supply 8V DC
Effective range (line of sight) 100m
Consumption current 80mA & 120mA (IR ON)
Night vision range 7m
Dimensions (W x D x H) Ø 44 x 56mm (without bracket)
Weight 220g
to +50°C/ +14 to +122°F
to +85°C/ -22 to +185°F
CAMSETW9 VELLEMAN
Page 4

4
Receiver
Referencia Electrónica Embajadores: CM21009
Reception frequency 2.400 to 2.483MHz
Intermediate frequency 480MHz
Demodulation type FM
Receiving sensitivity ≤ -85dBm
Video output level 1Vp-p@75 ohm, S/N>38dB
Audio output level 1Vp-p@600 ohm
Power supply +12V DC
Consumption current 250mA
Dimensions (W x D x H) 106 x 150 x 43mm (without antenna)
Weight 250g
Channel frequency: CH1=2,414MHz; CH2=2,432MHz; CH3=2,450MHz; CH4=2,468MHz
Actual transmission range may vary according to weather, location, interference or building construction.
The information in this manual is subject to change without prior notice.
CAMSETW9 – KIT MET 2 DRAADLOZE KLEUREN BUITENCAMERA'S
1. Inleiding
Aan alle ingezetenen van de Europese Unie
Belangrijke milieu-informatie betreffende dit product
Dit symbool op het toestel of de verpakking geeft aan dat, als het na zijn levenscyclus wordt weggeworpen,
dit toestel schade kan toebrengen aan het milieu.
Gooi dit toestel (en eventuele batterijen) niet bij het gewone huishoudelijke afval; het moet bij een
gespecialiseerd bedrijf terechtkomen voor recyclage.
U moet dit toestel naar uw verdeler of naar een lokaal recyclagepunt brengen.
Respecteer de plaatselijke milieuwetgeving.
Hebt u vragen, contacteer dan de plaatselijke autoriteiten inzake verwijdering.
Dank u voor uw aankoop! Lees deze handleiding grondig voor u het toestel in gebruik neemt. Werd het toestel
beschadigd tijdens het transport, installeer het dan niet en raadpleeg uw dealer.
2. Inhoud (zie fig. 1)
1. 2 x draadloze camera 2.4GHz
2. afstandsbediening voor ontvanger
3. 2.4GHz draadloze ontvanger
4. 2 x adapter voor camera
5. A/V kabel
3. Aansluitdiagram (zie fig. 2)
1. adapter voor camera
2. camera
3. adapter voor ontvanger
4. ontvanger
5. monitor/TV
6. A/V (L&R) uitgang
CAMSETW9 VELLEMAN
Page 5

5
4. Beschrijving camera (zie fig. 3)
1. lens
2. antenne
3. voedingsplug
4. universele beugel
5. Beschrijving ontvanger (zie fig. 4)
1. venster voor IR signaal
2. antenne
3. kanaalknop
4. LED kanaaldisplay
5. voedingsaansluiting
6. video-uitgang
7. audio-uitgang (L)
8. audio-uitgang (R)
9. kanaalnummer (1-4)
10. vergrendelings-/ontgrendelingstoets
11. kanaal +
12. loop-toets
13. kanaal –
14. voedingsschakelaar
6. Installatie
1.
Plaats de camera op de gewenste plaats en stel de hoek in.
2. Sluit de adapter aan op elke camera.
3.
Sluit de ontvanger aan op een monitor/TV met de A/V kabel (geel voor video, rood en wit voor audio).
4. Sluit de adapter (DC 12V 300mA) aan op de ontvanger. Stel de voedingsschakelaar in de ON stand. De
voedingsindicator licht op.
5.
Schakel de monitor/TV in en selecteer A/V mode.
6. Stel met de kanaalknop hetzelfde kanaal in op de camera en de ontvanger
weergegeven op de TV/monitor.
7. Draai aan de lens om de focus te regelen.
8.
Regel de helderheid, het contrast en de kleuren van de monitor /TV en oriënteer de antenne van de ontvanger.
9. Verwijder de batterij-isolator van de afstandsbediening; open de batterijlader en breng een knoopcel type CR2025
in. U kunt de ontvanger bedienen met de afstandsbediening.
.Het beeld van de camera's wordt nu
7. Bediening
a) Kanaalknop op ontvanger
CH1
→ CH2 → CH3 → CH4 → Kanaallus → CH1
b) IR afstandsbediening
Knoppen Functie Bediening & display
1 enkel kanaal kiezen
volgende of vorige kanaal
CAMSETW9 VELLEMAN
Page 6
6
1.
2.
3.
1.
2.
Opmerkingen:
• Druk op
scannen voor specifieke kanalen
scannen voor alle beschikbare
kanalen
de knoppen van de
afstandsbediening
vergrendelen/ontgrendelen
om 1 kanaal te selecteren.
1. Druk de loop-toets 1 x in om het
L
instellen te beginnen, "
L" knippert
LL
2. Druk op knoppen 1 – 4 om twee of
meer kanalen in te geven voor de
lus
3. Druk de loop-toets nog eens in om
te bevestigen en het scannen
begint
1. Druk de loop-toets 1 x in om te
beginnen
2. Druk nog een keer op de looptoets om te bevestigen en het
scannen begint
In normale mode: druk 1 x om te
vergrendelen ("
opnieuw om te ontgrendelen ("
d" knippert); druk
e"
knippert)
• Druk op
• Druk op
• Druk 1 x op
om de kanalen automatisch te scannen
of om te stoppen met scannen.
na het instellen om de afstandsbediening te vergrendelen. Zo kunt u de knoppen niet onopzettelijk
indrukken en beschermt u de afstandsbediening tegen storing door andere IR afstandsbedieningen. Het icoontje
"
d" wordt nu weergegeven. De knoppen werken niet meer wanneer de afstandsbediening is vergrendeld. Druk
gewoon op
om de knoppen weer te ontgrendelen ("e" wordt weergegeven).
8. Instelling kanaal
Het kanaalnummer van de camera staat aangegeven op de camera. Stel hetzelfde kanaal in op de ontvanger met de
kanaalknop. Het beeld verschijnt nu op de TV.
9. Algemene richtlijnen
• Bescherm het toestel tegen water en plaats geen vazen e.d. bovenop het toestel
•
Schakel de camera/ontvanger uit wanneer u het systeem niet gebruikt.
•
Gebruik de adapter om het toestel aan te sluiten op/los te koppelen van het lichtnet.
•
Snijd de DC voedingskabel niet af om hem te gebruiken met een andere voedingsbron
10.Specificaties
Werktemperatuur -10
Opslagtemperatuur -30
Relatieve vochtigheid 85%RH
tot +50°C/ +14 tot +122°F
tot +85°C/ -22 tot +185°F
CAMSETW9 VELLEMAN
Page 7

7
Camera
Referencia Electrónica Embajadores: CM21009
Beeldsensor CMOS
Totaal aantal pixels 628 x 582 (PAL); 510 x 492 (NTSC)
Gezichtshoek 62°
Zendfrequentie 2.400 tot 2.483MHz
Zendvermogen 10mW/CE; 2mW/FCC
Modulatietype FM
Bandbreedte 18MHz
Voeding 8V DC
Effectief bereik (ononderbroken gezichtslijn) 100m
Stroomverbruik 80mA & 120mA (IR ON)
Bereik nachtzicht 7m
Afmetingen (B x D x H) Ø 44 x 56mm (zonder beugel)
Gewicht 220g
Ontvanger
Ontvangstfrequentie 2.400 tot 2.483MHz
Middenfrequentie 480MHz
Demodulatietype FM
Ontvangstgevoeligheid ≤ -85dBm
Uitgangsniveau video 1Vp-p@75 ohm, S/N>38dB
Uitgangsniveau audio 1Vp-p@600 ohm
Voeding +12V DC
Stroomverbruik 250mA
Afmetingen (B x D x H) 106 x 150 x 43mm (zonder antenne)
Gewicht 250g
Kanaalfrequentie: kanaal 1 = 2.414MHz; kanaal 2 = 2.432MHz; kanaal 3 = 2.450MHz; kanaal 4 = 2.468MHz
Het eigenlijke zendbereik kan variëren naargelang het weer, de plaats, storing of obstakels.
De informatie in deze handleiding kan te allen tijde worden gewijzigd zonder voorafgaande kennisgeving.
CAMSETW9 – ENSEMBLE 2 CAMERAS COULEUR EXTERIEUR SANS FIL
1. Introduction
Aux résidents de l'Union Européenne
Des informations environnementales importantes concernant ce produit
Ce symbole sur l'appareil ou l'emballage indique que, si l'appareil est jeté après sa vie, il peut nuire à
l'environnement.
Ne jetez pas cet appareil (et des piles éventuelles) parmi les déchets ménagers; il doit arriver chez une firme
spécialisée pour recyclage.
Vous êtes tenu à porter cet appareil à votre revendeur ou un point de recyclage local.
Respectez la législation environnementale locale.
Si vous avez des questions, contactez les autorités locales pour élimination.
Nous vous remercions de votre achat ! Lisez attentivement la présente notice avant la mise en service de l'appareil.
Si l’appareil a été endommagé pendant le transport, ne l'installez pas et consultez votre revendeur.
CAMSETW9 VELLEMAN
Page 8

8
2. Contenu (voir ill. 1)
1. 2 x caméra sans fil 2.4GHz
2. télécommande pour récepteur
3. récepteur sans fil 2.4GHz
4. 2 x adaptateur pour caméra
5. câble A/V
3. Schéma de câblage (voir ill. 2)
1. adaptateur pour caméra
2. caméra
3. adaptateur pour récepteur
4. récepteur
5. moniteur/TV
6. sortie A/V (L&R)
4. Description caméra (voir ill. 3)
1. lentille
2. antenne
3. connexion d'alimentation
4. support universel
5. Description récepteur (voir ill. 4)
1. fenêtre pour signal IR
2. antenne
3. sélecteur de canal
4. LED d'affichage de canal
5. connexion d'alimentation
6. sortie vidéo
7. sortie audio (L)
8. sortie audio (R)
9. numéro de canal (1-4)
10. bouton de (dé)verrouillage
11. canal +
12. bouton "loop" (boucle)
13. canal –
14. interrupteur d'alimentation
6. Installation
1.
Installez la caméra à l'endroit de votre choix et réglez l'angle.
2. Connectez l'adaptateur avec chaque caméra.
3.
Connectez le récepteur avec un moniteur/TV à l'aide d'un câble A/V (jaune pour vidéo, rouge et blanc pour audio).
4. Connectez l'adaptateur (CC 12V 300mA) avec le récepteur. Mettez l'interrupteur d'alimentation dans la position
ON
. L'indicateur d'alimentation s'allume.
5.
Branchez le moniteur/TV et sélectionnez le mode A/V.
6. Sélectionnez le même canal pour la caméra et le récepteur avec le sélecteur de canal
alors affichée sur l'écran de la télé.
7. Réglez la focale avec la lentille.
Réglez la clarté, le contraste et les couleurs du moniteur / de la télé et orientez l'antenne du récepteur.
8.
9. Enlevez l'isolation de la pile de la télécommande; ouvrez le compartiment de la pile et insérez un pile-bouton type
CR2025. Il est possible d'opérer le récepteur avec la télécommande.
. L'image des caméras est
CAMSETW9 VELLEMAN
Page 9

9
7. Opération
a) Bouton de canal du récepteur
CH1
→ CH2 → CH3 → CH4 → Boucle → CH1
b) Télécommande IR
Boutons Fonction Opération & affichage
1.
2.
3.
1.
2.
Remarques :
• Pressez
pour sélectionner canal 1.
choisir 1 seul canal
canal suivant ou précédent
balayer pour des canaux spécifiques
balayer pour tous les canaux
disponibles
verrouiller/déverrouiller les boutons
de la télécommande
1. Pressez le bouton 'loop' (boucle) 1
L
x pour commencer le réglage, "
clignote
2. Formez une boucle d'au moins 2
canaux en pressant les boutons 1
– 4
3. Confirmez avec le bouton loop.
L'appareil commence à balayer.
L"
LL
1. Pressez le bouton loop 1 x pour
commencer
2. Confirmez avec le bouton loop.
L'appareil commence à balayer.
Dans le mode normal: pressez 1 x
pour verrouiller ("
d" clignote);
pressez de nouveau pour
déverrouiller ("
e" clignote)
• Pressez
• Pressez
• Pressez
involontaire et les interférences par d'autres télécommandes IR. Le symbole "
marchent plus quand la télécommande est verrouillée. Pressez
pour balayer les canaux automatiquement
ou pour arrêter le balayage.
1 x après le réglage pour verrouiller les touches. L'appareil est alors protégé contre l'usage
d" est affiché. Les boutons ne
pour déverrouiller les touches ("e" est
affiché).
8. Instaurer le canal
Le numéro de canal de la caméra est imprimé sur la caméra. Réglez le récepteur sur le même canal que la caméra
avec le sélecteur de canal. L'image sera affichée sur l'écran de la télé.
9. Directives générales
• Ne placez aucun objet (p. ex. un vase) sur l'appareil et protégez-le contre les projections d'eau
•
Désactivez la caméra/le récepteur quand vous n'utilisez pas le système.
•
L'adaptateur sert à connecter l'appareil au réseau / déconnecter l'appareil du réseau.
•
Ne coupez pas le câble CC pour l'utiliser avec une autre source d'alimentation
CAMSETW9 VELLEMAN
Page 10

10
10.Spécifications
Referencia Electrónica Embajadores: CM21009
Température de travail -10
Température de stockage -30
Humidité relative 85%RH
Caméra
Capteur d'image CMOS
Nombre de pixels 628 x 582 (PAL) ; 510 x 492 (NTSC)
Angle de vue 62°
Fréquence d'émission 2.400 à 2.483MHz
Puissance d'émission 10mW/CE ; 2mW/FCC
Type de modulation FM
Largeur de bande 18MHz
Alimentation 8V CC
Plage effective (rayon visuel sans obstacles) 100m
Consommation de courant 80mA & 120mA (IR ON)
Portée de la vision nocturne 7m
Dimensions (La x D x H) Ø 44 x 56mm (sans support)
Poids 220g
Récepteur
Fréquence de réception 2.400 à 2.483MHz
Fréquence intermédiaire 480MHz
Type de démodulation FM
Sensibilité de réception ≤ -85dBm
Niveau de sortie vidéo 1Vp-p@75 ohm, S/N>38dB
Niveau de sortie audio 1Vp-p@600 ohm
Alimentation +12V CC
Consommation de courant 250mA
Dimensions (La x D x H) 106 x 150 x 43mm (sans antenne)
Poids 250g
Fréquence de canal : canal 1 = 2.414MHz ; canal 2 = 2.432MHz ; canal 3 = 2.450MHz ; canal 4 = 2.468MHz
La plage d'émission effective dépend des circonstances météorologiques, l'endroit, les obstacles et le brouillage.
Toutes les informations présentées dans cette notice peuvent être modifiées sans notification préalable.
à +50°C/ +14 à +122°F
à +85°C/ -22 à +185°F
CAMSETW9 - JUEGO CON 2 CÁMARAS COLOR INALÁMBRICAS PARA EXTERIORES
1. Introducción
A los ciudadanos de la Unión Europea
Importantes informaciones sobre el medio ambiente concerniente a este producto
Este símbolo en este aparato o el embalaje indica que, si tira las muestras inservibles, podrían dañar el
medio ambiente.
No tire este aparato (ni las pilas, si las hubiera) en la basura doméstica; debe ir a una empresa
especializada en reciclaje. Devuelva este aparato a su distribuidor o a la unidad de reciclaje local.
Respete las leyes locales en relación con el medio ambiente.
Si tiene dudas, contacte con las autoridades locales para residuos.
CAMSETW9 VELLEMAN
Page 11

11
¡Gracias por haber comprado el CAMSETW9! Lea atentamente las instrucciones del manual antes de utilizarlo.
Si el aparato ha sufrido algún daño en el transporte no lo instale y póngase en contacto con su distribuidor.
2. Contenido (véase fig. 1)
1) 2 x cámara inalámbrica 2.4GHz
2) mando a distancia para receptor
3) receptor inalámbrico 2.4GHz
4) 2 x adaptador para cámara
5) cable A/V
3. Esquema de cableado (véase fig. 2)
1. adaptador para cámara
2. cámara
3. adaptador para receptor
4. receptor
5. monitor/TV
6. salida A/V (L&R)
4. Descripción cámara (véase fig. 3)
1. óptica
2. antena
3. conexión de alimentación
4. soporte universal
5. Descripción receptor (véase fig. 4)
1. pantalla para la señal IR
2. antena
3. selector de canal
4. LED de visualización del canal
5. conexión de alimentación
6. salida de vídeo
7. salida de audio (L)
8. salida de audio (R)
9. número de canal (1-4)
10. botón de (des)bloqueo
11. canal +
12. botón "loop" (bucle)
13. canal –
14. interruptor de alimentación
6. Instalación
1.
Instale la cámara en el lugar deseado y ajuste el ángulo.
2. Conecte el adaptador a cada cámara.
3.
Conecte el receptor con un cable A/V (amarillo para vídeo y rojo para audio) a un monitor/TV).
4. Conecte el adaptador (CC 12V 300mA) al receptor. Ponga el interruptor de alimentación en la posición ON. El
indicador de alimentación se ilumina.
5.
Conecte el monitor/TV y seleccione el modo A/V.
CAMSETW9 VELLEMAN
Page 12

12
6. Seleccione el mismo canal para la cámara y el receptor con el selector de canal .La imagen de las cámaras se
visualiza ahora en la pantalla de la TV.
7. Gire la óptica para ajustar el foco.
8.
Ajuste el brillo, el contraste y los colores del monitor / de la TV y oriente la antena del receptor.
9. Quite aislador de batería del mando a distancia; abra el compartimiento de pilas e introduzca un pila de botón del
tipo CR2025. Es posible controlar el receptor con el mando a distancia.
7. Funcionamiento
a) Botón de canal del receptor
CH1
→ CH2 → CH3 → CH4 → Bucle → CH1
b) Mando a distancia IR
Botones Función Funcionamiento & visualización
seleccionar 1 solo canal
canal siguiente o anterior
Explorar para canales específicos
Explorar para todos los canales
disponibles
Bloquear/desbloquear los botones
del mando a distancia
1. Pulse el botón 'loop' (bucle) 1 x
L
para empezar el ajuste, "
L"
LL
parpadea
2. Forme un bucle de mín. 2 canales
al pulsar los botones 1 – 4
3. Confirme con el botón ‘loop’. El
aparato empieza a explorar.
1. Pulse el botón 'loop' 1 x para
empezar
2. Confirme con el botón ‘loop’. El
aparato empieza a explorar.
En el modo normal: pulse 1 x para
bloquear ("
pulsar para desbloquear ("
d" parpadea); vuelva a
e"
parpadea)
1.
2.
3.
1.
2.
Notas:
• Pulse
para seleccionar canal 1.
• Pulse
• Pulse
• Pulse
involuntario y las interferencias de otros mandos a distancia IR. El símbolo "
funcionarán si el mando a distancia está bloqueado. Pulse
para explorar los canales automáticamente
o para desactivar la exploración.
1 x después del ajuste para bloquear las teclas. El aparato está ahora protegido contra el uso
d" se visualiza. Los botones ya no
para desbloquear las teclas ("e" se visualiza).
8. Seleccionar el canal
El número de canal de la cámara está en la cámara. Ponga el receptor con el selector de canal en el mismo canal
que la cámara. La imagen se visualizará en la pantalla de la TV.
CAMSETW9 VELLEMAN
Page 13

13
9. Normas generales
• No ponga ningún objeto (p. ej. un jarrón) encima del aparato y protéjalo contra agua.
•
Desactive la cámara/el receptor si no utiliza el sistema.
•
El adaptador sirve para conectar el aparato a la red / desconectar el aparato de la red.
•
No corte el cable CC para utilizarlo con una otra fuente de alimentación
9. Especificaciones
Temperatura de funcionamiento de -10
Temperatura de almacenamiento de -30
Humedad relativa 85%RH
Cámara
Sensor de imagen CMOS
Número de píxeles 628 x 582 (PAL); 510 x 492 (NTSC)
Ángulo de visión 62°
Frecuencia de emisión de 2.400 a 2.483MHz
Potencia de emisión 10mW/CE; 2mW/FCC
Tipo de modulación FM
Ancho de banda 18MHz
Alimentación 8V CC
Rango efectivo (rayo visual sin obstáculos) 100m
Consumo de corriente 80mA & 120mA (IR ON)
Alcance del rango nocturno 7m
Dimensiones (An x P x Al) Ø 44 x 56mm (sin soporte)
Peso 220g
Receptor
Frecuencia de recepción de 2.400 a 2.483MHz
Frecuencia intermedia 480MHz
Tipo de demodulación FM
Sensibilidad de recepción ≤ -85dBm
Nivel de salida vídeo 1Vp-p@75 ohm, S/N>38dB
Nivel de salida audio 1Vp-p@600 ohm
Alimentación +12V CC
Consumo de corriente 250mA
Dimensiones (An x P x Al) 106 x 150 x 43mm (sin antena)
Peso 250g
Frecuencia del canal: canal 1 = 2.414MHz; canal 2 = 2.432MHz; canal 3 = 2.450MHz; canal 4 = 2.468MHz
El rango de emisión efectivo depende de las circunstancias meteorológicas, el lugar, los obstáculos y las
interferencias.
Se pueden modificar las especificaciones y el contenido de este manual sin previo aviso.
a +50°C/ de +14 a +122°F
a +85°C/ de -22 a +185°F
CAMSETW9 VELLEMAN
Page 14

14
CAMSETW9 – WETTERFESTES TAG/NACHT-MULTIKAMERASET
Referencia Electrónica Embajadores: CM21009
1. Einführung
An alle Einwohner der Europäischen Union
Wichtige Umweltinformationen über dieses Produkt
Dieses Symbol auf dem Produkt oder der Verpackung zeigt an, dass die Entsorgung dieses Produktes nach
seinem Lebenszyklus der Umwelt Schaden zufügen kann.
Entsorgen Sie die Einheit (oder verwendeten Batterien) nicht als unsortiertes Hausmüll; die Einheit oder
verwendeten Batterien müssen von einer spezialisierten Firma zwecks Recycling entsorgt werden.
Diese Einheit muss an den Händler oder ein örtliches Recycling-Unternehmen retourniert werden.
Respektieren Sie die örtlichen Umweltvorschriften.
Falls Zweifel bestehen, wenden Sie sich für Entsorgungsrichtlinien an Ihre örtliche Behörde.
Danke für den Kauf der CAMSETW9! Lesen Sie Ihre Bedienungsanleitung sorgfältig durch. Überprüfen sie, ob
Transportschäden vorliegen. Sollte dies der Fall sein, verwenden Sie das Gerät nicht und wenden Sie sich an Ihren
Händler.
2. Lieferumfang (Siehe Abb. 1)
1) 2 x drahtlose Kamera 2.4GHz
2) Fernbedienung für Empfänger
3) 2.4GHz drahtloser Empfänger
4) 2 x Netzgerät für Kamera
5) A/V-Kabel
3. Anschlussdiagramm (siehe Abb. 2)
1. Netzgerät für Kamera
2. Kamera
3. Netzgerät für Empfänger
4. Empfänger
5. Monitor/TV
6. A/V (L&R)-Ausgang
4. Beschreibung (siehe Abb. 3)
1. Antenne
2. IR-LEDs
3. Objektiv
4. Universalbügel
5. Beschreibung Empfänger (siehe Abb. 4)
1. Fenster für IR-Signal
2. Antenne
3. Kanaltaste
4. LED-Kanaldisplay
5. Anschluss Stromversorgung
6. Video-Ausgang
7. Audio-Ausgang (L)
8. Audio-Ausgang (R)
CAMSETW9 VELLEMAN
Page 15

15
9. Kanalnummer (1-4)
10. Verriegelungs-/Entriegelungstaste
11. Kanal +
12. Loop-Taste
13. Kanal –
14. Stromschalter
6. Installation
1. Installieren Sie die Kamera an der gewünschten Stelle und stellen Sie den Winkel ein
.
2. Schließen Sie das Netzgerät an jede Kamera an.
3. Schließen Sie den Empfänger an einen M
onitor/Fernseher mit dem A/V-Kabel an (gelb für Video, rot und weiß für
Audio.
4. Schließen Sie das Netzgerät (DC 12V 300mA) an den Empfänger an. Stellen Sie den Stromschalter in die ON-
Position
5. Schalten Sie den M
6. Stellen Sie mit der Kanaltaste denselben Kanal bei Kamera und Empfänger
. Die Stromanzeige leuchtet auf.
onitor/Fernseher ein und wählen Sie den A/V-Modus.
. Das Bild der Kameras wird auf dem
Fernseher/Monitor gezeigt.
7. Drehen Sie das Objektiv, sodass Sie eine optimale Fokussierung bekommen.
8. Regeln Sie die Helligkeit, den Kontrast und die Farben des M
onitor/Fernsehers.
9. Entfernen Sie die Batterie-Isolierung der Fernbedienung; öffnen Sie das Batterieladegerät und legen Sie eine
CR2025-Knopfzelle ein. Sie können den Empfänger mit der Fernbedienung bedienen.
7. Bedienung
a) Kanaltaste auf Empfänger
CH1
→ CH2 → CH3 → CH4 → Kanalschleife → CH1
b) IR-Fernbedienung
Tasten Funktion Bedienung & Display
1 Kanal wählen
vorigen oder nächsten Kanal
spezifische Kanäle suchen
Scannen für alle Verfügbare Kanäle
die Tasten der Fernbedienung
sperren/entsperren
1. Drücken Sie die Looptaste 1 x
L
zum Einstellen, "
L" blinkt.
LL
2. Drücken Sie die Tasten 1 – 4 um
zwei oder mehr Kanäle für die
Schleife einzugeben.
3. Drücken Sie nochmals die
Looptaste zum Bestätigen. Das
Scannen wird anfangen.
1. Drücken Sie die Looptaste 1 x
zum Anfangen
2. Drücken Sie nochmals die
Looptaste zum Bestätigen. Das
Scannen wird anfangen.
In normalem Modus: drücken Sie 1 x
zum Sperren ("
erneut zum Entsperren ("
d" blinkt); drücken Sie
e" blinkt)
1.
2.
3.
1.
2.
CAMSETW9 VELLEMAN
Page 16

16
Bemerkung:
• Drücken Sie
um 1 Kanal zu selektieren.
• Drücken Sie
• Drücken Sie
• Drücken Sie 1 x
von anderen nach dem Einstellen um die Fernbedienung zu sperren. So schützen Sie auch Ihre Fernbedienung
vor Störung von anderen IR-Fernbedienungen. Das Symbol "
wenn die Fernbedienung gesperrt ist. Drücken Sie einfach
gezeigt).
um die Kanäle automatisch zu scannen.
oder um mit Scannen aufzuhören.
. So können Sie die Tasten nicht unabsichtlich drücken und schützen Sie die Fernbedienung
d" wird jetzt gezeigt. Die Tasten funktionieren nicht
um die Tasten erneut zu entsperren ("e" wird
8. Einstellung
Die Kanalnummer der Kamera wird auf der Kamera erwähnt. Stellen denselben Kanal auf dem Empfänger ein mit
der Kanaltaste. Das Bild erscheint jetzt auf dem Fernseher.
9. Allgemeine Richtlinien
• Schutzen Sie das Gerät vor Wasser und stellen Sie keine Vasen auf das Gerät.
•
Schalten Sie die Kamera/den Empfänger aus wenn Sie das Gerät nicht verwenden.
•
Verwenden Sie das Netzgerät um das Gerät an das/vom Lichtnetz anzuschließen/zu trennen.
•
Schneiden Sie das DC-Stromversorgungskabel nicht ab um es mit einer anderen Stromquelle zu verwenden.
10. Technische Daten
Betriebstemperatur -10
Lagertemperatur -30
Relative Feuchte 85%RH
Kamera
Bildsensor CMOS
Gesamte Pixelanzahl 628 x 582 (PAL); 510 x 492 (NTSC)
Winkel 62°
Sendefrequenz 2.400 bis 2.483MHz
Sendeleistung 10mW/CE; 2mW/FCC
Modulationstyp FM
Bandbreite 18MHz
Stromversorgung 8V DC
Effektiver Bereich (ohne Hindernisse) 100m
Stromverbrauch 80mA & 120mA (IR ON)
Reichweite Nachtsicht 7m
Abmessungen (B x D x H) Ø 44 x 56mm (ohne Bügel)
Gewicht 220g
Empfänger
Empfangsfrequenz 2.400 bis 2.483MHz
Mittenfrequenz 480MHz
Demodulationstyp FM
Empfangsempfindlichkeit ≤ -85dBm
Ausgangsleistung Video 1Vp-p@75 Ohm, S/N>38dB
bis +50°C/ +14 bis +122°F
bis +85°C/ -22 bis +185°F
CAMSETW9 VELLEMAN
Page 17

17
Ausgangsleistung Audio 1Vp-p@600 Ohm
0
678
Stromversorgung +12V DC
Stromverbrauch 250mA
Abmessungen (B x T x H) 106 x 150 x 43mm (ohne Antenne)
Gewicht 250g
Kanalfrequenz: Kanal 1 = 2.414MHz; Kanal 2 = 2.432MHz; Kanal 3 = 2.450MHz; Kanal 4 = 2.468MHz
Der eigentliche Sendebereich variiert je nach Wetter, Ort, Störung oder Hindernissen.
Alle Änderungen vorbehalten.
R&TTE Declaration of Conformity
R&TTE Verklaring van overeenstemming
Déclaration de conformité R&TTE
R&TTE Konformitätserklärung
Declaración de conformidad R&TTE
We / wij / nous / Wir / Nostros
Velleman Components NV
Legen Heirweg, 33
9890 Gavere (België)
Declare on our own responsibility that the finished product(s) :
Verklaren op eigen verantwoordelijkheid dat het afgewerkte product :
Déclarons sous notre propre responsabilité que le produit fini :
Erklären voll verantwortlich dass nachfolgendes Produkt :
Declaramos bajo nuestra sola responsabilidad que el producto mencionado a continuación :
Brand / merk / marque / Marke / marca :
VELLEMAN
Trade name / handelsnaam / denomination commerciale / Markenname / denominación commercial :
KIT WITH 2 WIRELESS OUTDOOR COLOUR CAMERA’S
Type or model / type of model / type ou modèle / Typ oder Modell / tipo o modelo :
CAMSETW9
constituting the subject of this declaration, conforms with the essential requirements and
other relevant stipulations of the R&TTE Directive (1999/5/EC).
die het voorwerp uitmaakt van deze verklaring, voldoet aan de essentiële vereisten en
andere relevante bepalingen van de R&TTE Richtlijn (1999/5/EC).
CAMSETW9 VELLEMAN
Page 18

18
faisant l’objet de la présente déclaration, satisfait aux exigences essentielles et toute
autre stipulation pertinente de la directive R&TTE Directive (1999/5/EC).
auf das sich diese Erklärung bezieht, den grundlegenden Anforderungen und anderen
relevanten Vereinbarungen der R&TTE-Richtlinie (1999/5/EC) entspricht.
cumple los requisitos esenciales y las otras estipulaciones relevantes de la Directiva
R&TTE (1999/5/EC).
The product conforms to the following norm(s) and/or one or several other normative
documents:
Het product voldoet aan de volgende norm(en) en/of meerdere andere normgevende
documenten:
Le produit est conforme à la norme suivante / aux normes suivantes et/ou à plusieurs autres
documents normatifs:
Das Produkt entspricht den folgenden Normen und/oder anderen normativen Dokumenten:
Es conforme a la(s) siguiente(s) norma(s) y/o a uno o varios otros documentos normativos:
EMC : ETS 301 489-1 v1.3.1 : 2001
LVD: EN 60950 : 2002
R&TTE: EN 300 440-1 v1.3.1 : 2001
Technical data are available and can be obtained from :
Les données techniques sont disponibles et peuvent être obtenues chez :
Technische gegevens zijn beschikbaar en kunnen worden aangevraagd bij :
Die technische Dokumentation zu den oben gennanten Produkten wird geführt bei:
Los datos técnicos están disponibles y pueden ser solicitados a:
Velleman Components NV
Legen Heirweg, 33
9890 Gavere (België)
Place and date of issue / Plaats en datum van uitgifte / Place et date d’émission / Ort und
Datum der Ausstellung / Lugar y fecha de emisión :
Gavere, 17/05/2006
Authorised signatory for the company / Bevoegde ondertekenaar voor de firma / Signataire
autorisé(e) de la société / bevollmächtigte Person/ Respabonsle de la empresa:
Mr. Luc De Meyer - Purchasing Manager
According to R&TTE Directive 1999/5/EC
BE √ DK √ EL √ ES √ FR √
IE √ IT √ LU √ NL √ AT √
PT √ FI √ SE √ UK √ NO √
DE √ CH √ LI √ BG √ CY √
EE √ HU √ IS √ LV √ CZ √
LT √ SI √
CAMSETW9 VELLEMAN
 Loading...