

Page 1
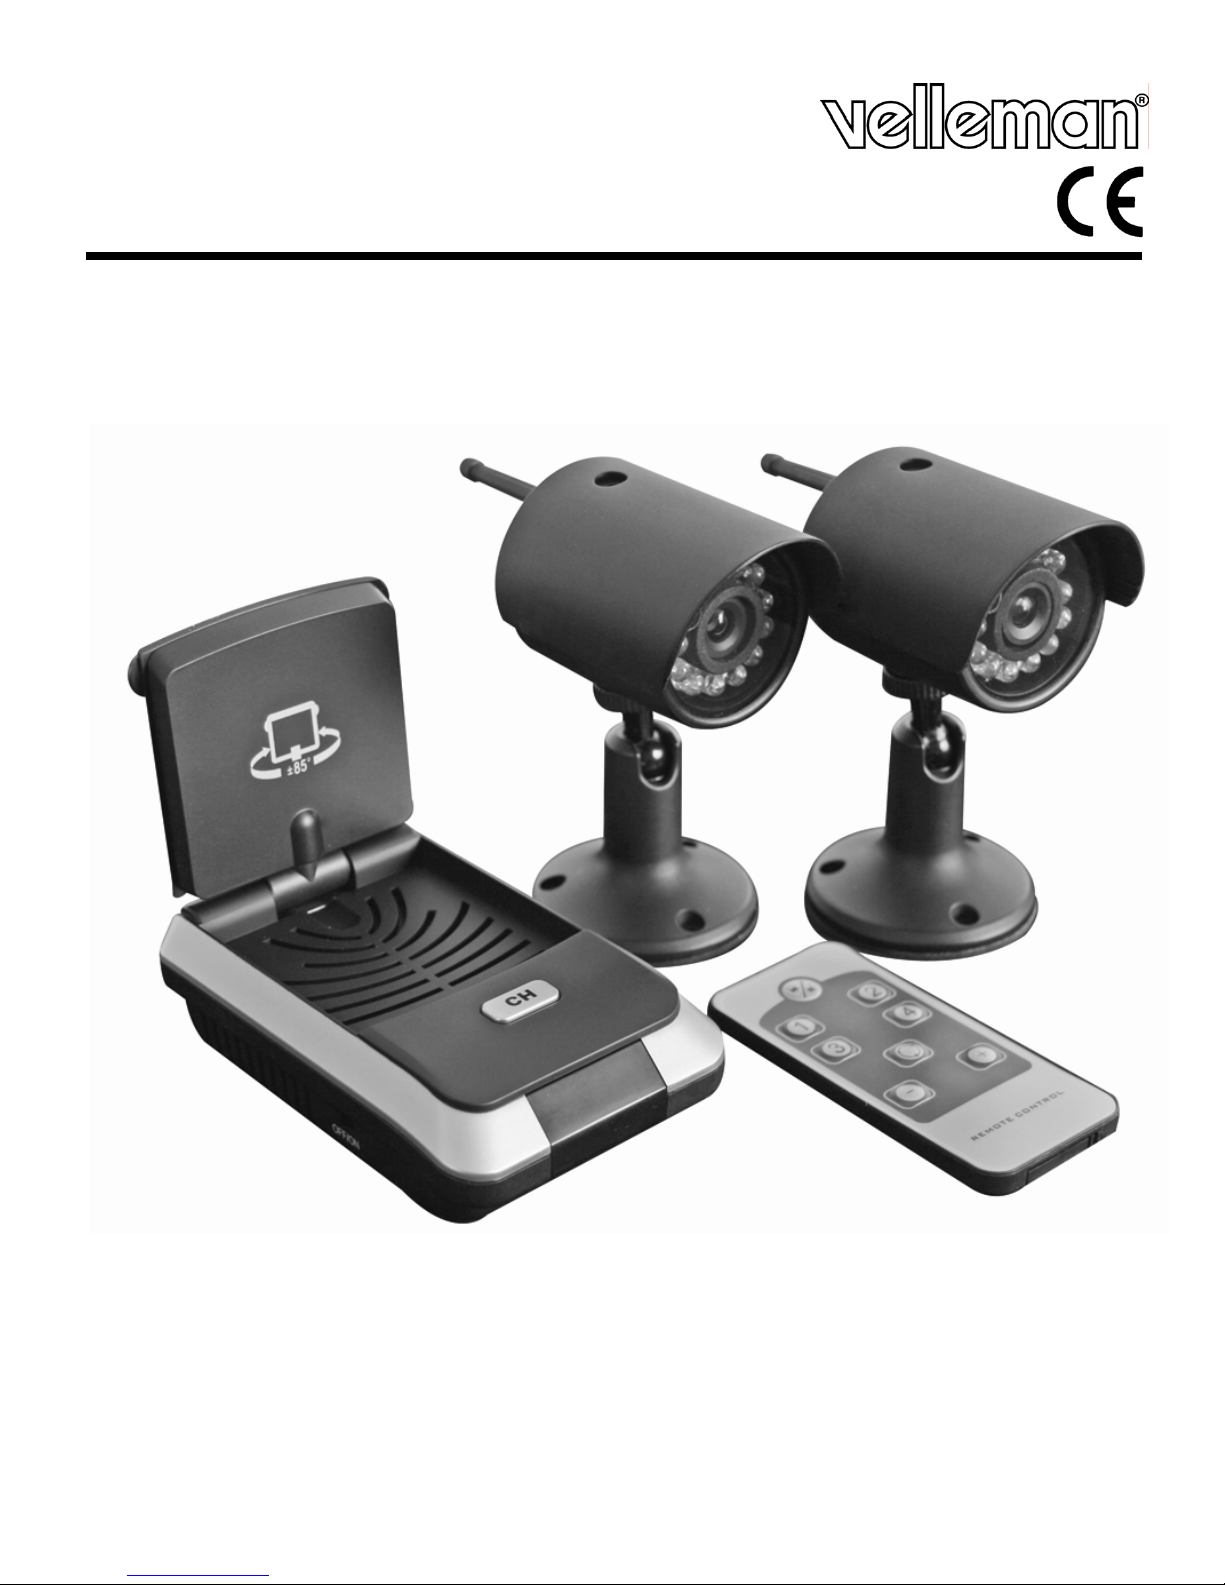
CAMSETW16
OUTDOOR COLOUR CAMERA KIT WITH 2 CAMERAS
KIT MET 2 KLEUREN BUITENCAMERA'S
ENSEMBLE 2 CAMÉRAS COULEURS D'EXTÉRIEUR
BAUSATZ MIT 2 FARBKAMERAS FÜR ANWENDUNG IM AUßENBEREICH
JUEGO CON 2 CÁMARAS COLOR PARA USO EN EXTERIORES
USER MANUAL 3
GEBRUIKERSHANDLEIDING 8
NOTICE D’EMPLOI 13
MANUAL DEL USUARIO 18
BEDIENUNGSANLEITUNG 23
Page 2

Page 3

CAMSETW16
USER MANUAL
1. Introduction
To all residents of the European Union
Important environmental information about this product
This symbol on the device or the package indicates that disposal of the device after
its lifecycle could harm the environment.
Do not dispose of the unit (or batteries) as unsorted municipal waste; it should be
taken to a specialized company for recycling.
This device should be returned to your distributor or to a local recycling service.
Respect the local environmental rules.
If in doubt, contact your local waste disposal authorities.
Thank you for choosing Velleman! Please read the manual thoroughly before bringing this
device into service. If the device was damaged in transit, don't install or use it and contact
your dealer.
2.
Safety Instructions
Keep the device away from children and unauthorized users.
Keep the receiver away from rain, moisture, splashing or dripping liquids. Never
put objects filled with liquid on top of or close to the device.
DO NOT disassemble or open the cover(s). No user-serviceable parts inside.
Refer to an authorized dealer for service and/or spare parts.
• Damage caused by disregard of certain guidelines in this manual is not covered by the
warranty and the dealer will not accept responsibility for any ensuing defects or problems.
• Note that damage caused by user modifications to the device is not covered by the
warranty.
3.
• Protect this device from shocks and abuse. Avoid brute force when operating the device.
• Protect the device against extreme heat (e.g. electrical heater, direct sunlight …) and dust.
• Install the device in location away from magnetic objects and chemicals. Allow sufficient
ventilation, but avoid placed with rapidly changing environmental conditions. Do not mount
the device inside metal enclosures (e.g. cabinet, elevator …).
• Familiarise yourself with the functions of the device before actually using it.
• All modifications of the device are forbidden for safety reasons.
• Only use the device for its intended purpose. Using the device in an unauthorised way will
void the warranty.
General Guidelines
4.
Notices
• This product may cause interference with other wireless equipment that operate at
2.4GHz.
This product complies with standards including LVD Directive 73/23/EEC; EMC Directive
•
89/336/EEC and R&TTE Directive 1999/5/EC.
00 (12/08/2008)
3
Page 4

CAMSETW16
5. Restrictions
• DO NOT use this product to violate privacy laws or perform other illegal activities.
• DO NOT use this product near medical equipment e.g. pacemakers. Keep at least 0.5m
clearance as radio waves might influence medical devices.
Features
6.
• weatherproof (IP54), especially suitable for outdoor home and business security
monitoring
• 12 IR LEDs for night vision
• 4 channels adjustable by setting dipswitches
• built-in microphone for audio monitoring
• manual and automatic channel scan
• transmitting range (depending on the surroundings): ±100 m without obstacles
• content:
2x camera + mounting hardware
1x receiver + antenna
1x AV cable
3x voltage adapter
1x channel pick tool
1x user manual
7.
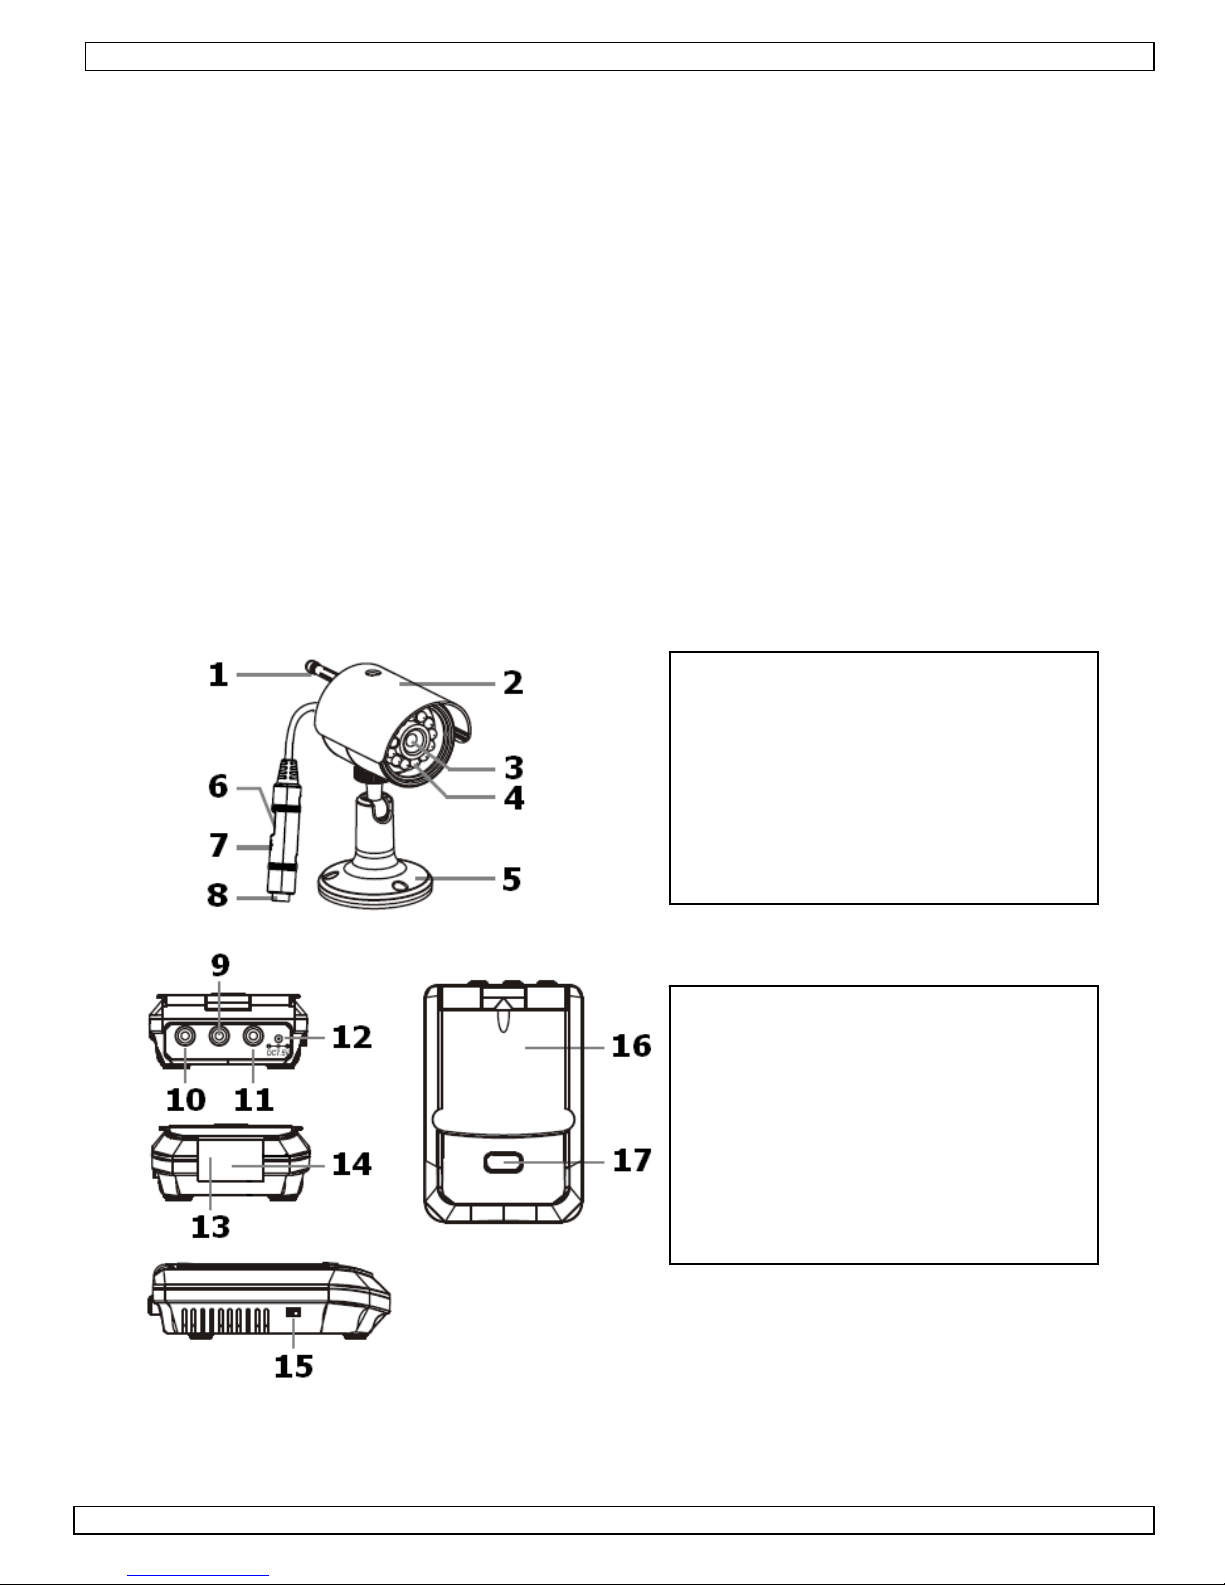
Overview
Camera
1. Antenna
2. Hood
3. Lens
4. IR lights
5. Universal bracket
6. Channel switch
7. Microphone hole
8. DC power jack
Receiver
9. Audio output (L)
10. Audio output (R)
11. Video output
12. DC power jack
13. IR receiver
14. Channel display (LED)
15. Power switch
16. Antenna
17. Channel button
00 (12/08/2008)
4
Page 5
CAMSETW16
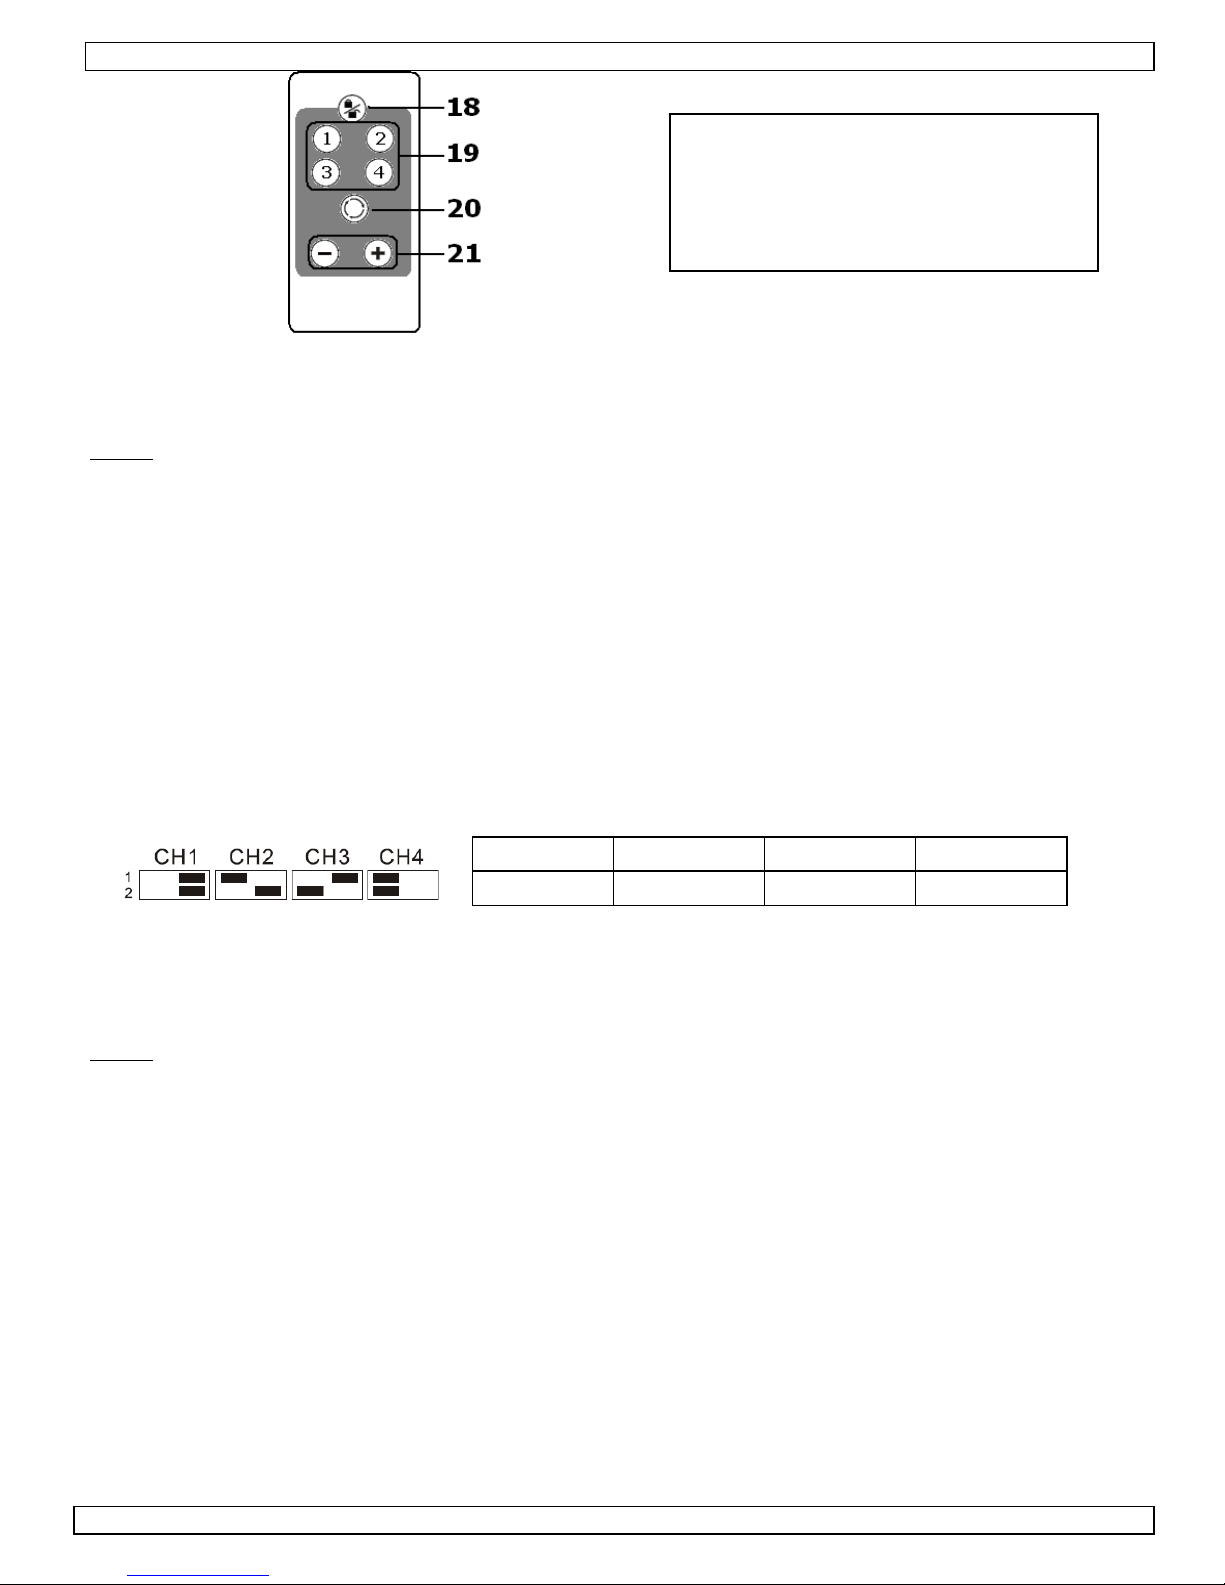
Remote
18. Lock/unlock key
19. Channel selectors
20. Loop key
21. Channel up/down key
8. Mounting
• The camera can be mounted against the wall or the ceiling or simply placed on a desktop
using the universal bracket (5).
Note:
of the camera and slide forward until the holes in the hood (2) and camera are in line.
the hood (2) can be removed by sliding it forward. To remount, start at the rear end
• When mounted on the ceiling, the universal bracket must be place on the top of the
camera (closest to antenna (1)). To do this, unscrew the universal bracket (5) from the
housing and screw it in the opening on top of the camera.
• The receiver should be placed horizontally antenna pointing upwards. The antenna can be
rotated to improve signal reception.
9.
Operation
• Mount the camera in a location that needs to be monitored.
• Apply power to the camera. Insert the jack from the adapter into the DC power jack (8)
of the camera.
• When necessary (interference with other devices occurs or multiple cameras are used),
set the channel by opening the channel switch cover (6). There are 4 channels possible,
default channel is 1. Close the switch cover (6) after setting the switches.
Channel 1 Channel 2 Channel 3 Channel 4
2,414MHz 2,432MHz 2,450MHz 2,468MHz
• Point the antenna (16) of the receiver upwards. The antenna can be rotated in either
direction. Do not force the antenna.
• Connect the receiver to a monitor or TV via the video and audio output jacks (9, 10 &
11).
Note:
YELLOW plug = video, RED plug = audio (R), WHITE plug = audio (L)
• Connect the DC power adapter to the DC power jack (12).
• Switch the power ON/OFF switch (15) to the ON-position.
• Power on the monitor or TV and select AV mode.
• The system is capable to support 4 cameras at the same time. Select the channel via the
channel select button (17). The current channel is indicated in the channel display (14).
• Press and hold the channel select button (17) for 3 seconds to go in loop mode; every
channel will be shown for 5 seconds.
• Adjust the brightness, contrast and colour settings of the monitor or TV to get the best
display result. Changing receiver and/or antenna location might improve the image.
• In dark environmental conditions, the built-in Infra-Red lights (4) will automatically
become active. In this night vision mode, the image will become monochrome (black and
white). The night vision range is limited to 7m.
• Use of the remote control:
00 (12/08/2008)
5
Page 6
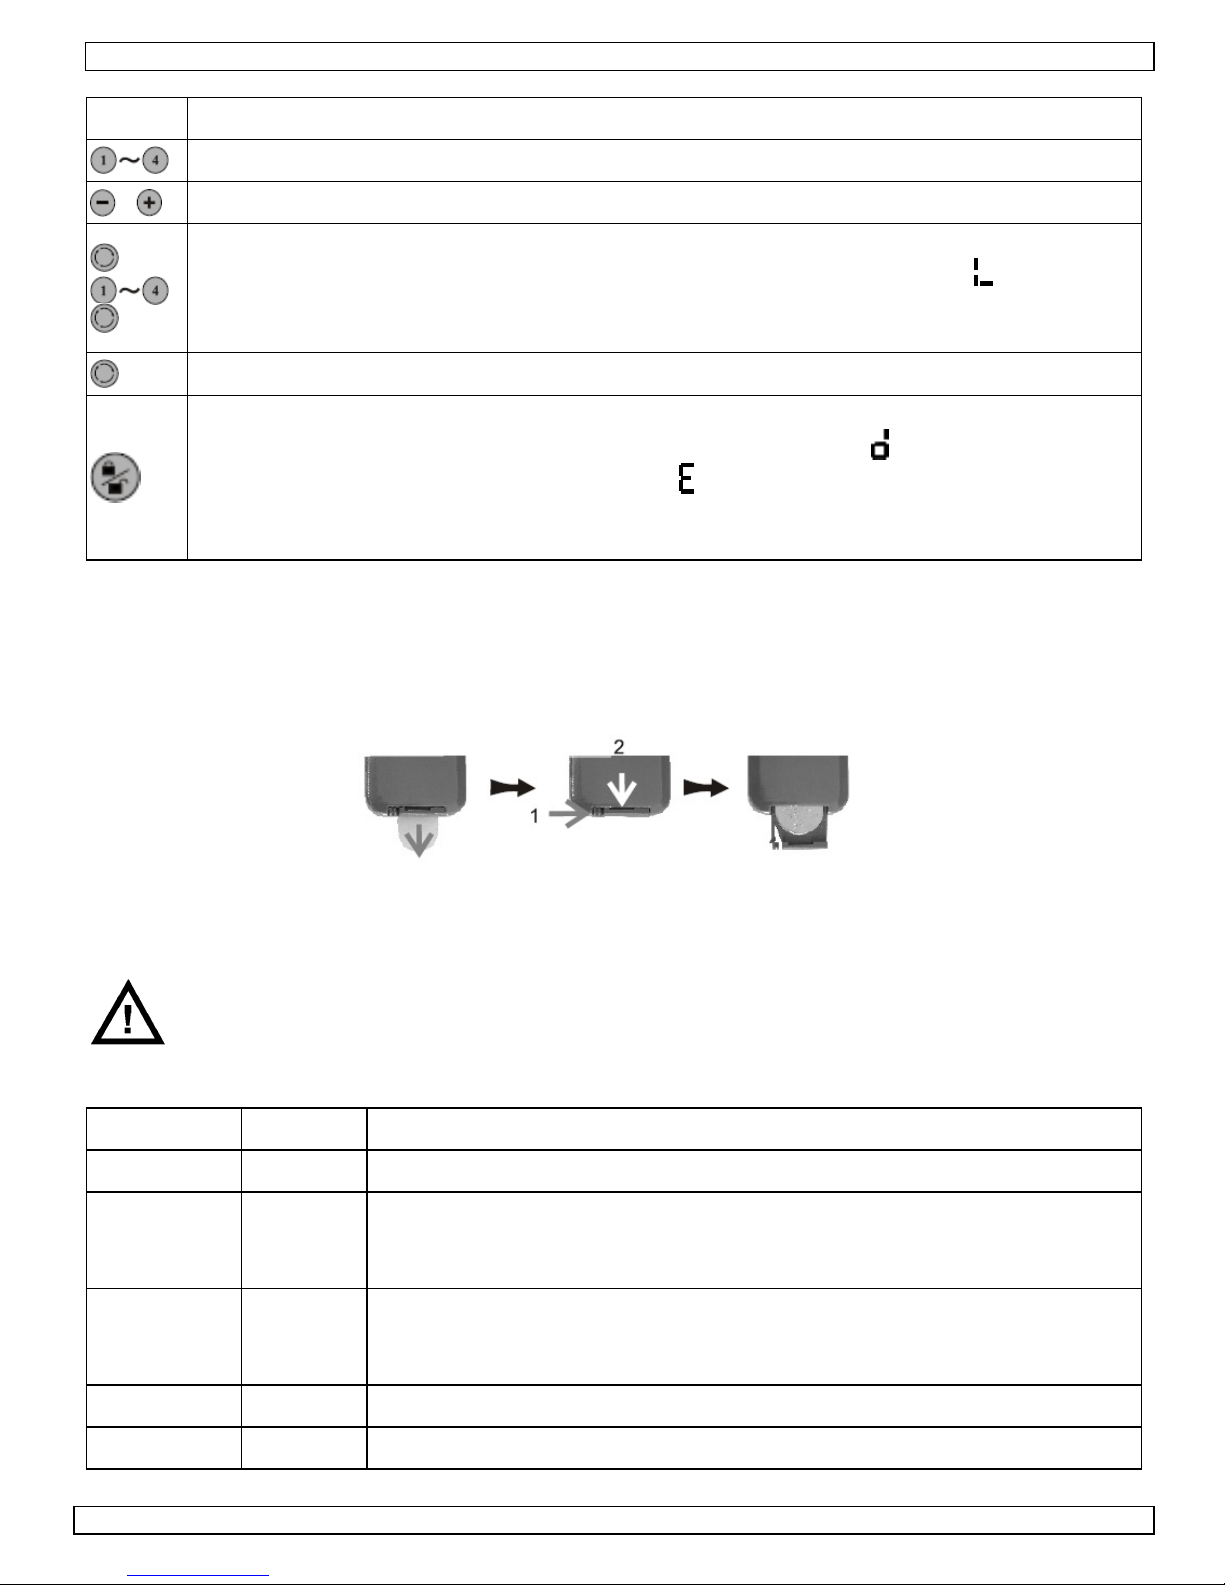
Keys Function
Select channel keys (19)
Press ‘+’ to show next channel, ‘-’ to show previous channel (21)
CAMSETW16
10. Battery
Initialize loop:
1. In normal mode, press and hold the loop key (20) for 3 seconds. ‘
2. Press the channel selectors to indicate which channels need to be looped
3. Press the loop key (20) again to save the set-up. Scanning begins
Press the loop key (20) to start scanning all channels
Lock/Unlock the remote control to avoid accidental touches or interference from
other IR controllers. To lock, press the lock key (18) once (‘
±1s), to unlock, press the lock key again (‘
When the remote control is locked, the cannel button (17) on the receiver still
works.
’ is displayed for ±1s).
’ is displayed for
’ flashes
• The remote control is battery operated. Before first use, remove the battery protection
tape.
• To replace the battery, face the back of the remote control, push the small tab (1) to the
right and pull down (2, see image below). The battery cover slides out of the remote
control.
• Replace the old battery with a new lithium battery type CR2025. Make sure to use the
correct polarity.
• Removing the battery when the device is not in use will extend the lifetime.
• Do not attempt to recharge batteries and do not throw them in fire as they may explode.
WARNING: handle Lithium batteries with care, observe warnings on
battery casing. Dispose of batteries in accordance with local regulations.
Keep the battery away from children.
11.
Troubleshooting
Image Sound Possible reason/solution
No No Check power supply on camera and receiver.
Check whether camera and receiver are on the same channel.
Snow Noisy
Ghost image Normal
No colour Normal TV system mismatch (PAL/NTSC), or night vision enabled
Check whether the distance between camera and receiver is within
limits.
Possible interference with other devices.
Check whether the distance between camera and receiver is within
limits.
Normal Noisy Possible interference with other devices.
00 (12/08/2008)
6
Page 7

CAMSETW16
12. Technical specifications
Camera
channels 4 (selectable)
sensor CMOS
resolution 628 x 582 (PAL) / 510 x 492 (NTSC)
TV lines 380
viewing angle 55°
Night vision range 7m
Automatic Gain Control (AGC)
Auto White Balance (AWB)
✓
✓
S/N ratio (AGC off) 40dB
min. illumination 5 lux (F1.2)
transmission frequency 2,400MHz – 2,483MHz
transmission power 10mW
modulation type FM
bandwidth 18MHz
power supply 8VDC / 300mA (adapter incl.)
current consumption max. 80mA / 200mA (IR on)
Weatherproof level IP54 (main body)
dimensions Ø 49 x 52.5mm (main body)
weight ±110g
Receiver
channels
video output level 1.0 Vpp / 75Ω (mini jack)
audio output level 1.2 Vpp / 10KΩ (mini jack)
antenna impedance 50Ω (SMA connector)
sensitivity < -85dBm
power supply 8VDC / 300mA (adapter incl.)
current consumption 200mA
dimensions 91 x 70 x 12.5mm (main body)
weight ±130g
General
operating temperature -10°C~+50°C / +14°F~+122°F
storage temperature -20°C~+60°C / -4°F~+140°F
storage humidity <85% RH
Use this device with original accessories only. Velleman nv cannot be held
responsible in the event of damage or injury resulted from (incorrect) use of this
device.
For more info concerning this product, please visit our website www.velleman.eu.
The information in this manual is subject to change without prior notice.
00 (12/08/2008)
7
Page 8
CAMSETW16
GEBRUIKERSHANDLEIDING
1. Inleiding
Aan alle ingezetenen van de Europese Unie
Belangrijke milieu-informatie betreffende dit product
Dit symbool op het toestel of de verpakking geeft aan dat, als het na zijn
levenscyclus wordt weggeworpen, dit toestel schade kan toebrengen aan het
milieu. Gooi dit toestel (en eventuele batterijen) niet bij het gewone
huishoudelijke afval; het moet bij een gespecialiseerd bedrijf terechtkomen voor
recyclage. U moet dit toestel naar uw verdeler of naar een lokaal recyclagepunt
brengen. Respecteer de plaatselijke milieuwetgeving.
Hebt u vragen, contacteer dan de plaatselijke autoriteiten inzake verwijdering.
Dank u voor uw aankoop! Lees deze handleiding grondig voor u het toestel in gebruik
neemt. Werd het toestel beschadigd tijdens het transport, installeer het dan niet en
raadpleeg uw dealer.
2.
Veiligheidsinstructies
Houd dit toestel uit de buurt van kinderen en onbevoegden.
Houd de ontvanger uit de buurt van opspattende en druppelende vloeistoffen.
Plaats geen objecten gevuld met vloeistof op het toestel.
Open de behuizing NOOIT. De gebruiker mag geen onderdelen vervangen.
Bestel eventuele reserveonderdelen bij uw dealer.
• De garantie geldt niet voor schade door het negeren van bepaalde richtlijnen in deze
handleiding en uw dealer zal de verantwoordelijkheid afwijzen voor defecten of problemen
die hier rechtstreeks verband mee houden.
• Schade door wijzigingen die de gebruiker heeft aangebracht aan het toestel vallen niet
onder de garantie.
3.
• Bescherm dit toestel tegen schokken. Vermijd brute kracht tijdens de bediening van dit
toestel.
• Bescherm dit toestel tegen extreme temperaturen, stof en vochtigheid.
• Installeer de camera in een stabiele, goed geventileerde ruimte zonder magnetische
objecten en chemische producten. Installeer de camera niet in een metalen behuizing.
• Leer eerst de functies van het toestel kennen voor u het gaat gebruiken.
• Om veiligheidsredenen mag de gebruiker geen wijzigingen aanbrengen aan het toestel.
• Gebruik het toestel enkel waarvoor het gemaakt is. Bij onoordeelkundig gebruik vervalt
de garantie.
Algemene richtlijnen
4.
Opmerkingen
• Dit toestel kan onderhevig zijn aan storingen indien gebruikt in de buurt van andere
draadloze apparatuur aan 2,4 GHz.
Dit product voldoet aan de richtlijn LVD 73/23/EEC, EMC 89/336/EEC en R&TTE
•
1999/5/EC.
00 (12/08/2008)
8
Page 9
CAMSETW16
5. Beperkingen
• Respecteer de privacy en vermijd illegale activiteiten bij gebruik van deze camera.
• Gebruik deze camera NOOIT in de buurt van medische apparatuur, bv. pacemakers. Houd
de camera op een minimale afstand van 0,5 m om radiostoringen te vermijden.
Eigenschappen
6.
• weerbestendig (IP54), uiterst geschikt voor het bewaken van een kantoorgebouw of uw
huis
• nachtzicht dankzij 12 infraroodleds
• 4 kanalen, aan te passen via DIP-schakelaars
• ingebouwde microfoon voor geluidsmonitoring
• manuele en automatische kanaalscan
• zendbereik (volgens omstandigheden): ± 100 m zonder obstakels
• inhoud: 2x camera + montageaccessoires
1x ontvanger + antenne
1x AV-kabel
3x voedingsadapter
1x hulpstuk
1x gebruikershandleiding
7.
Omschrijving
Camera
1. antenne
2. beschermkap
3. lens
4. IR-verlichting
5. universele houder
6. kanaalschakelaar
7. microfoon
8. voedingsingang
Ontvanger
9. audio-ingang (L)
10. audio-ingang (R)
11. video-ingang
12. voedingsingang
13. IR-ontvanger
14. ledaanduiding
15. voedingsschakelaar
16. antenne
17. kanaalschakelaar
00 (12/08/2008)
9
Page 10

CAMSETW16
Afstandsbediening
18. ontgrendeling/vergrendeling
19. kanalen
20. lusmodus
21. vorig/volgend kanaal
8. Montage
• Plaats de camera op de voet (5) of monteer hem aan de muur of aan het plafond.
Opmerking
langs achteren op de camera tot de gaten in de kap (2) en de camera overeenkomen.
: Verwijder de beschermkap (2) door deze naar voren te schuiven. Schuif de kap
• Plaats, indien u de camera aan het plafond wenst te installeren, het statief aan de
bovenkant van de camera (het dichtst bij de antenne (1)). Ga als volgt te werk: draai de
universele houder (5) van de behuizing en bevestig hem bovenaan de camera.
• Plaats de ontvanger horizontaal, de antenne naar boven gericht.
9.
Gebruik
• Kies een geschikte montageplaats en installeer de camera.
• Zet de camera onder stroom. Koppel de meegeleverde voedingsadapter aan de camera
via de voedingsingang (8).
• Indien nodig (storing indien er meerdere camera’s gebruikt worden), selecteer het kanaal
via de kanaalschakelaar (6). Er zijn 4 kanalen beschikbaar, standaardkanaal is kanaal 1:
Kanaal 1 Kanaal 2 Kanaal 3 Kanaal 4
2.414 MHz 2.432 MHz 2.450 MHz 2.468 MHz
• Draai de antenne (16) voorzichtig en richt naar boven.
• Koppel de ontvanger aan een monitor of tv-toestel via de AV-uitgang (9, 10 & 11).
Opmerking
: GELE plug = video, RODE plug = audio ®, WITTE plug = audio (L)
• Sluit de meegeleverde voedingsadapter aan de ontvanger via de voedingsingang (12).
• Plaats de ON/OFF-schakelaar (15) op ON.
• Schakel de monitor of het televisietoestel in en selecteer het AV-kanaal.
• U kunt tot 4 camera’s op de ontvanger aansluiten. Selecteer het kanaal via de
kanaalschakelaar (17). Het geselecteerde kanaal wordt op de display (14) weergegeven.
• Houd de kanaalschakelaar (17) gedurende 3 seconden ingedrukt om de lusmodus in te
schakelen; elk kanaal blijft beurtelings gedurende 5 seconden actief.
• Regel de helderheid, het contrast en de kleurschakering bij op de monitor of het tv-
toestel. Verplaats eventueel de camera en/of de ontvanger voor betere resultaten.
• In een donkere omgeving schakelt de camera automatisch de IR-leds (4) in. Merk op dat
het beeld naar zwart-witbeeld overschakelt. Het bereik bedraagt 7 m.
• Omschrijving van de afstandsbediening:
00 (12/08/2008)
10
Page 11

Toets Functie
Kanaaltoets (19)
Druk op ‘+’ om het volgende kanaal weer te geven, ‘-’ om het vorige kanaal weer
te geven (21)
CAMSETW16
10. Batterij
Lusmodus:
1. In normale modus, houd 3 seconden ingedrukt. ‘
2. Druk op kanaaltoets en selecteer welk kanaal in de lus geplaatst wordt.
3. Druk opnieuw in om instelling te bewaren. Scanning begint.
Druk in om alle kanalen af te scannen.
Vergrendel/ontgrendel de toetsen. Vergrendel door de toets (18) eenmaal in te
drukken (‘
drukken (‘
afstandsbediening kunt u de kanalen selecteren via de kanaalschakelaar (17) op
de ontvanger.
’ wordt gedurende ± 1s weergegeven). Ontgrendel door de toets in te
’ wordt gedurende ± 1s weergegeven). Met een vergrendelde
’ verschijnt op de display.
• Verwijder de beschermfolie.
• Draai de afstandsbediening om, druk het lipje (1) naar rechts en duw naar beneden (2,
zie fig.). Trek vervolgens de batterijhouder uit de afstandsbediening.
• Vervang de batterij door een nieuwe lithiumbatterij type CR2025. Respecteer de
polariteit.
• Verwijder de batterij wanneer u de afstandsbediening niet gebruikt.
• Lithiumbatterijen zijn niet herlaadbaar. Gooi oude batterijen nooit in het vuur.
LET OP: Houd de batterijen uit de buurt van kinderen.
11. Problemen en oplossingen
Beeld Geluid Mogelijke oorzaak/oplossing
Neen Neen Controleer de voeding naar de camera en de ontvanger.
Sneeuw Ruis
Storing Normaal Regel de cameralens bij.
Dubbel-
beeld
Geen
kleur
Normaal Ruis Mogelijke storing met andere apparatuur.
Normaal
Normaal Incompatibiliteit met tv-systeem (PAL/NTSC).
Controleer of de camera en de ontvanger op hetzelfde kanaal ingesteld
staan. Controleer de afstand tussen camera en ontvanger.
Mogelijke storing met andere apparatuur.
Controleer de afstand tussen camera en ontvanger.
00 (12/08/2008)
11
Page 12

CAMSETW16
12. Technische specificaties
Camera
kanalen 4 (selecteerbaar)
sensor CMOS
resolutie 628 x 582 (PAL) / 510 x 492 (NTSC)
tv-lijnen 380
kijkhoek 55°
bereik nachtzicht 7 m
automatische gainregeling (AGC)
automatische witbalans (AWB)
✓
✓
S/R-verhouding (AGC uit) 40 dB
min. verlichting 5 lux (F1.2)
zendfrequentie 2.400 MHz – 2.483 MHz
zendsterkte 10 mW
modulatietype FM
bandbreedte 18 MHz
voeding 8VDC / 300mA (voedingsadapter meegelev.)
verbruik max. 80 mA / 200 mA (IR aan)
beschermingsgraad IP54 (behuizing)
afmetingen Ø 49 x 52.5 mm (behuizing)
gewicht ± 110 g
Ontvanger
kanalen 4
uitgangsniveau video 1.0 Vpp / 75 Ω (mini-jack)
uitgangsniveau audio 1.2 Vpp / 10k Ω (mini-jack)
impedantie antenne 50 Ω (SMA-connector)
gevoeligheid < -85 dBm
voeding 8VDC / 300mA (voedingsadapter meegelev.)
verbruik 200 mA
afmetingen 91 x 70 x 12.5 mm (behuizing)
gewicht ± 130 g
Algemeen
werktemperatuur -10°C~+50°C / +14°F~+122°F
opslagtemperatuur -20°C~+60°C / -4°F~+140°F
vochtigheidsgraad bij opslag < 85 % RH
Gebruik dit toestel enkel met originele accessoires. Velleman nv is niet
aansprakelijk voor schade of kwetsuren bij (verkeerd) gebruik van dit toestel.
Voor meer informatie over dit product, zie www.velleman.eu
. De informatie in
deze handleiding kan te allen tijde worden gewijzigd zonder voorafgaande
kennisgeving.
00 (12/08/2008)
12
Page 13

CAMSETW16
NOTICE D’EMPLOI
1. Introduction
Aux résidents de l'Union européenne
Des informations environnementales importantes concernant ce produit
Ce symbole sur l'appareil ou l'emballage indique que l’élimination d’un appareil en
fin de vie peut polluer l'environnement. Ne pas jeter un appareil électrique ou
électronique (et des piles éventuelles) parmi les déchets municipaux non sujets au
tri sélectif ; une déchèterie traitera l’appareil en question. Renvoyer les
équipements usagés à votre fournisseur ou à un service de recyclage local. Il
convient de respecter la réglementation locale relative à la protection de l’environnement.
En cas de questions, contacter les autorités locales pour élimination.
Nous vous remercions de votre achat ! Lire la présente notice attentivement avant la mise
en service de l’appareil. Si l’appareil a été endommagé pendant le transport, ne pas
l’installer et consulter votre revendeur.
2.
Prescriptions de sécurité
Garder la caméra hors de la portée de personnes non qualifiées et de
jeunes enfants.
Tenir le récepteur à l’écart d’éclaboussures et de jaillissements. Ne jamais placer
d’objet contenant un liquide sur l’appareil.
NE JAMAIS ouvrir le boîtier. Il n’y a aucune pièce maintenable par l’utilisateur.
Commander des pièces de rechange éventuelles chez votre revendeur.
• La garantie ne s’applique pas aux dommages survenus en négligeant certaines directives
de cette notice et votre revendeur déclinera toute responsabilité pour les problèmes et les
défauts qui en résultent.
• Les dommages occasionnés par des modifications à l’appareil par le client ne tombent pas
sous la garantie.
3.
• Protéger l’appareil contre les chocs et le traiter avec circonspection pendant l’installation
et l’opération.
• Tenir le thermomètre à l’écart de la poussière, l’humidité et des températures extrêmes.
• Installer la caméra dans un endroit stable et bien ventilé et tenir à l’écart d’objets
magnétiques et de produits chimiques. Ne pas installer l’appareil dans un boîtier métallique.
• Se familiariser avec le fonctionnement de l’appareil avant de l’utiliser.
Toute modification de l’appareil est interdite pour des raisons de sécurité.
• N’utiliser le thermomètre qu’à sa fonction prévue. Tout autre usage peut causer des
courts-circuits, des brûlures, des électrochocs, etc. Un usage impropre annule d'office la
garantie.
Directives générales
4.
Remarque
• Il y a possibilité d’interférence lors d’une utilisation en présence d’autres appareils
2,4 GHz.
• Cet ensemble est conforme aux normes LVD 73/23/EEC, EMC 89/336/EEC et R&TTE
1999/5/EC.
00 (12/08/2008)
13
Page 14

CAMSETW16
5. Restrictions
• Respecter l’intimité et la législation concernant le placement d’une caméra.
• Éviter l’utilisation de la caméra à proximité d’équipement médical. Tenir à une distance
minimale de 0,5 m afin d’éviter tout risque d’interférence.
Caractéristiques
6.
• résiste aux intempéries (IP54), convient pour le monitorage d'un bureau ou de votre
maison
• vision nocturne grâce aux 12 LED IR
• 4 canaux réglables via interrupteurs DIP
• microphone intégré pour un monitorage audio
• balayages des canaux manuel et automatique
• portée de transmission (selon les conditions) : ± 100 m sans obstacles
• contenu : 2x caméra + accessoires de montage
1x récepteur + antenne
1x câble AV
3x adaptateur secteur
1x accessoire
1x notice d’emploi
7.
Description
Caméra
1. antenne
2. pare-soleil
3. objectif
4. éclairement IR
5. support universel
6. sélection du canal
7. microphone
8. prise d’alimentation
Récepteur
9. sortie audio (L)
10. sortie audio (R)
11. sortie vidéo
12. prise d’alimentation
13. récepteur IR
14. indication DEL
15. interrupteur marche/arrêt
16. antenne
17. sélection du canal
00 (12/08/2008)
14
Page 15

CAMSETW16
Télécommande
18. verrouillage/déverrouillage
19. canaux
20. boucle
21. canal précédent/suivant
8. Montage
• La caméra se prête à une installation murale ou au plafond à l’aide du support universel
(5), ou à une pose libre.
Remarque
ver l’avant depuis l’arrière de la caméra jusqu’à ce que les trous dans le pare-soleil
s’alignent avec ceux de la caméra.
: Retirer le pare-soleil (2) en le glissant vers l’avant. Remontez-le en le glissant
• Pour une installation au plafond, placer le support sur la partie supérieure de la caméra
(la partie prêt de l’antenne (1)). Desserrer le support universel (5) et le visser dans la
partie supérieure de la caméra.
• Placer le récepteur de manière horizontale, l’antenne pointée vers le haut.
9.
Emploi
• Choisir un emplacement et installer la caméra.
• Alimenter la caméra en insérant la fiche de l’adaptateur secteur dans la prise
d’alimentation (8) de la caméra.
• Sélectionner le canal (6). La camera est équipée de 4 canaux, le canal n° 1 est le canal
par défaut :
Canal 1 Canal 2 Canal 3 Canal 4
2.414 MHz 2.432 MHz 2.450 MHz 2.468 MHz
• Tourner l’antenne (16) du récepteur et le pointer vers le haut.
• Raccorder le récepteur à un moniteur ou un téléviseur depuis la sortie AV (9, 10 & 11).
Remarque
: Fiche JAUNE = vidéo, fiche ROUGE = audio (R), fiche BLANCHE = audio (L).
• Insérer la fiche de l’adaptateur secteur inclus à la prise d’alimentation (12).
• Placer l’interrupteur ON/OFF (15) sur ON.
• Allumer le moniteur ou le téléviseur et sélectionner le canal AV.
• Le récepteur peut accueillir jusqu’à 4 caméras. Sélectionner le canal à l’aide du sélecteur
(17). Le canal sélectionné est affiché sur l’afficheur (14).
• Maintenir enfoncé le sélecteur de canal (17) pendant 3 secondes pour passer en mode
boucle – chaque canal sera alternativement activé pendant 5 secondes.
• Ajuster la clarté, le contraste et la nuance depuis le moniteur ou le téléviseur si
nécessaire. Déplacer le récepteur et/ou l’antenne pour améliorer la réception.
• Dans un environnement sombre, la caméra enclenche automatiquement l’éclairement IR
(4). La vision nocturne n’offre une image qu’en noir et blanc (portée de 7 m).
• Description de la télécommande :
00 (12/08/2008)
15
Page 16

CAMSETW16
Touche
10. Alimentation de la télécommande
Fonction
Canal (19)
Enfoncer +/- pour sélectionner le canal suivant/précédent (21)
Boucle :
1. Mode normal : maintenir enfoncé la touche pendant 3 secondes.
2. Sélectionner les canaux à insérer dans la boucle à l’aide des touches.
3. Renfoncer la touche pour sauvegarder et pour démarrer le balayage.
Enfoncer la touche pour démarrer le balayage des canaux.
Verrouillage/déverrouillage du clavier de la télécommande. Verrouiller en enfonçant
la touche ( s’affiche pendant ± 1s) ; déverrouiller en renfonçant la touche (
s’affiche pendant ± 1s). Utiliser le sélecteur de canal (17) sur le récepteur lorsque
le clavier est verrouillé.
clignote.
• La télécommande est alimentée par une pile au lithium. Retirer la languette de protection
avant emploi.
• Tourner la télécommande, la face arrière vers le haut, enfoncer l’onglet (1) vers la droite
et pousser vers le bas (2, voir ill.). Tirer le porte-pile hors de la télécommande.
• Remplacer la pile par une pile au lithium type CR2025 et insérer en respectant la polarité.
• Retirer la pile lorsque la télécommande n’est pas employée.
• Ne jamais recharger une pile au lithium. Ne pas jeter une pile au feu.
ATTENTION : Tenir les piles à l’écart des enfants.
11. Problèmes et solutions
Image Son Problème/solution
Non Non Contrôler l’alimentation vers la caméra et le récepteur.
Neige Distorsion
Image
brouillée
Image
fantôme
Pas de
couleur
Normal Distorsion Possibilité d’interférence avec d’autres appareils.
Normal Ajuster l’objectif de la caméra.
Normal
Normal Incompatibilité du système (PAL/NTSC).
Sélectionner le même canal sur la camera et le récepteur. Vérifier la
distance entre la caméra et le récepteur.
Possibilité d’interférence avec d’autres appareils. Vérifier la distance
entre la caméra et le récepteur.
00 (12/08/2008)
16
Page 17

CAMSETW16
12. Spécifications techniques
Caméra
canaux 4 (sélectionnable)
capteur CMOS
résolution 628 x 582 (PAL) / 510 x 492 (NTSC)
lignes TV 380
angle de vue 55°
portée vision nocturne 7 m
réglage de gain automatique (AGC)
balance des blancs automatique (AWB)
✓
✓
rapport S/B (AGC éteint) 40 dB
éclairement min. 5 lux (F1.2)
fréquence de transmission 2.400 MHz – 2.483 MHz
puissance de transmission 10 mW
type de modulation FM
largeur de bande 18 MHz
alimentation 8VCC / 300mA (adaptateur incl.)
consommation max. 80 mA / 200 mA (IR allumé)
indice de protection IP54 (boîtier)
dimensions Ø 49 x 52.5 mm (boîtier)
poids ± 110 g
Récepteur
canaux 4
niveau de sortie vidéo 1.0 Vpp / 75 Ω (mini-jack)
niveau de sortie audio 1.2 Vpp / 10k Ω (mini-jack)
impédance de l’antenne 50 Ω (connecteur SMA)
sensibilité < -85 dBm
alimentation 8VCC / 300mA (adaptateur incl.)
consommation 200mA
dimensions 91 x 70 x 12.5 mm (boîtier)
poids ± 130g
Général
température de service -10°C~+50°C / +14°F~+122°F
température de stockage -20°C~+60°C / -4°F~+140°F
taux d'humidité lors du stockage < 85 % RH
N’employer cet appareil qu’avec des accessoires d’origine. SA Velleman ne sera
aucunement responsable de dommages ou lésions survenus à un usage (incorrect)
de cet appareil. Pour plus d’information concernant cet article, visitez notre site
web www.velleman.eu
. Toutes les informations présentées dans cette notice
peuvent être modifiées sans notification préalable.
00 (12/08/2008)
17
Page 18

CAMSETW16
MANUAL DEL USUARIO
1. Introducción
A los ciudadanos de la Unión Europea
Importantes informaciones sobre el medio ambiente concerniente a este producto
Este símbolo en este aparato o el embalaje indica que, si tira las muestras
inservibles, podrían dañar el medio ambiente. No tire este aparato (ni las pilas, si
las hubiera) en la basura doméstica; debe ir a una empresa especializada en
reciclaje. Devuelva este aparato a su distribuidor o a la unidad de reciclaje local.
Respete las leyes locales en relación con el medio ambiente.
Si tiene dudas, contacte con las autoridades locales para residuos.
¡Gracias por haber comprado el CAMSETW16! Lea atentamente las instrucciones del
manual antes de usarlo. Si el aparato ha sufrido algún daño en el transporte no lo instale y
póngase en contacto con su distribuidor.
2.
Instrucciones de seguridad
Mantenga el aparato lejos del alcance de personas no capacitadas y
niños.
SÓLO PARA EL USO EN INTERIORES. No exponga este equipo a ningún tipo
de salpicadura o goteo.
NUNCA abra la caja. El usuario no habrá de efectuar el mantenimiento de
ninguna pieza. Contacte con su distribuidor si necesita piezas de recambio.
• Daños causados por descuido de las instrucciones de seguridad de este manual
invalidarán su garantía y su distribuidor no será responsable de ningún daño u otros
problemas resultantes.
• Los daños causados por modificaciones no autorizadas, no están cubiertos por la garantía.
3.
Normas generales
• No agite el aparato. Evite usar excesiva fuerza durante el manejo y la instalación.
• No exponga este aparato a polvo, humedad y temperaturas extremas.
• Instale la cámara en un lugar estable y bien aireado y manténgala lejos del alcance de
objetos magnéticos y productos químicos. No la instale en una caja metálica.
• Familiarícese con el funcionamiento del aparato antes de utilizarlo.
• Por razones de seguridad, las modificaciones no autorizadas del aparato están prohibidas.
• Utilice sólo el aparato para las aplicaciones descritas en este manual a fin de evitar p.ej.
cortocircuitos, quemaduras, descargas eléctricas, explosión de la lámpara, etc. Un uso
desautorizado puede causar daños y anula la garantía completamente.
4.
Nota
• Este aparato puede causar interferencias con otros aparatos que funcionan a 2,4 GHz.
• Este aparato cumple con las normas LVD 73/23/EEC, EMC 89/336/EEC y R&TTE 1999/5/EC.
00 (12/08/2008)
18
Page 19

CAMSETW16
5. Restricciones
• Respete la intimidad y evite actividades ilegales al utilizar esta cámara.
• No utilice la cámara cerca de equipo médico, p.ej. marcapasos. Mantenga una distancia
mínima de 0,5m para evitar cualquier riesgo de interferencias.
Características
6.
• resistente a la intemperie (IP54), apto para vigilar un edificio de oficinas o su casa
• visión nocturna gracias a los 12 LEDs IR
• 4 canales, ajustables por interruptores DIP
• micrófono incorporado para una vigilancia audio
• exploración manual y automático de los canales
• alcance de la transmisión (según el entorno): ± 100m sin obstáculos
• incluye : 2x cámara + accesorios de montaje
1x receptor + antena
1x cable AV
3x adaptador de red
1x accesorio
1x manual del usuario
7.
Descripción
Cámara
1. antena
2. tapa protectora
3. óptica
4. iluminación IR
5. soporte universal
6. selección del canal
7. micrófono
8. entrada de alimentación
Receptor
9. salida audio (L)
10. salida audio (R)
11. salida vídeo
12. entrada de alimentación
13. receptor IR
14. indicación LED
15. interruptor ON/OFF
16. antena
17. selección del canal
00 (12/08/2008)
19
Page 20

CAMSETW16
Mando a distancia
18. bloqueo/desbloqueo
19. canales
20. bucle
21. canal anterior/siguiente
8. Montaje
• La cámara es apta para un montaje mural, una fijación al techo o utilice el soporte
universal (5).
Nota
: Quite la tapa protectora (2) al deslizarla hacia adelante. Para volver a ponerla,
deslícela hacia adelante desde la parte trasera de la cámara hasta que los agujeros de la
tapa protectora coincidan con los de la cámara.
• Para una fijación al techo, ponga el soporte en la parte superior de la cámara (lo más
cerca de la antena (1)). Desatornille el soporte universal (5) y atorníllelo en la parte
superior de la cámara.
• Ponga el receptor de manera horizontal con la antena dirigida hacia arriba.
9.
Uso
• Seleccione un lugar de montaje e instale la cámara.
• Alimente la cámara al introducir el conector del adaptador de red en la entrada de
alimentación (8) de la cámara.
• Seleccione el canal (6). La cámara está equipado con 4 canales: canal n° 1 es el canal
estándar:
Canal 1 Canal 2 Canal 3 Canal 4
2.414 MHz 2.432 MHz 2.450 MHz 2.468 MHz
• Gire la antena (16) del receptor y apúntelo hacia arriba.
• Conecte el receptor por la salida AV (9, 10 & 11) a un monitor o un televisor.
Nota
: Conector AMARILLO = vídeo, conector ROJO = audio (R), conector BLANCO = audio
(L).
• Introduzca el conector del adaptador de red (incl.) en la entrada de alimentación (12).
• Ponga el interruptor ON/OFF (15) en la posición ON.
• Active el monitor o el televisor y seleccione el canal AV.
• Es posible conectar hasta 4 cámaras al receptor. Seleccione el canal con el selector (17).
El canal seleccionado se visualiza en la pantalla (14).
• Mantenga pulsado el selector de canal (17) durante 3 secondes entrar en el modo bucle –
cada canal se activará alternativamente durante 5 segundos.
• Ajuste el brillo, el contraste y el tono con el monitor o el televisor si fuera necesario.
Desplace el receptor y/o la antena para mejorar la recepción.
• En un entorno oscuro, la cámara activa automáticamente la iluminación IR (4). La visión
nocturna ofrece sólo una imagen blanco/negro (alcance de 7 m).
• Descripción del mando a distancia:
00 (12/08/2008)
20
Page 21

Tecla Función
Canal (19)
Pulse +/- para seleccionar el canal siguiente/anterior (21)
CAMSETW16
10. Alimentación del mando a distancia
Bucle:
1. Modo normal: Mantenga pulsada la tecla durante 3 segundos.
2. Seleccione los canales que quiere introducir en el bucle con las teclas.
3. Vuelva a pulsar la tecla para guardar y activar la exploración.
Pulse la tecla para activar la exploración de los canales.
Bloqueo/desbloqueo del teclado del mando a distancia. Bloquee al pulsar la tecla
se visualiza ± 1s); desbloquee al volver a pulsar la tecla ( se visualiza ± 1s).
(
Utilice el selector de canal (17) del receptor si el teclado está bloqueado.
parpadea.
• El mando a distancia funciona con una pila de litio. Quite la película de protección antes
del uso.
• Gire el mando a distancia, la parte trasera hacia arriba, mueve la lengüeta (1) hacia la
derecha y empuje hacia abajo (2, véase fig.). Tire del portapilas fuera del mando a
distancia.
• Reemplace la pila por una pila de litio del tipo CR2025. Respete la polaridad.
• Saque la pila si no utiliza el mando a distancia.
• Nunca recargue una pila de litio. No eche la pila al fuego.
¡OJO! : Mantenga las pilas lejos del alcance de niños.
11. Solución de problemas
Imagen Sonido Problema/solución
No No Controle la alimentación a la cámara y el receptor.
Nieve Distorsión
Imagen
no
nítida
Imagen
doble
No hay
color
Normal Distorsión Posibilidad de interferencias con otros aparatos.
00 (12/08/2008)
Normal Ajuste la óptica de la cámara.
Normal
Normal Incompatibilidad del sistema (PAL/NTSC).
Seleccione el mismo canal en la cámara y el receptor. Controle la
distancia entre la cámara y el receptor.
Posibilidad de interferencias con otros aparatos. Controle la distancia
entre la cámara y el receptor.
21
Page 22

CAMSETW16
12. Especificaciones
Cámara
canales 4 (seleccionable)
sensor CMOS
resolución 628 x 582 (PAL) / 510 x 492 (NTSC)
líneas TV 380
ángulo de visión 55°
alcance visión nocturna 7 m
control automático de ganancia (AGC)
balance automático de blancos (AWB)
✓
✓
relación señal / ruido (sin AGC) 40 dB
iluminación mínima 5 lux (F1.2)
frecuencia de transmisión 2.400 MHz – 2.483 MHz
potencia de transmisión 10 mW
tipo de modulación FM
ancho de banda 18 MHz
alimentación 8 VDC / 300 mA (adaptador incl.)
consumo máx. 80 mA / 200 mA (IR activado)
grado de protección IP IP54 (boîtier)
dimensiones Ø 49 x 52.5 mm (carcasa)
peso ± 110 g
Receptor
canales 4
nivel de salida de vídeo 1.0 Vpp / 75 Ω (mini jack)
nivel de salida de audio 1.2 Vpp / 10k Ω (mini jack)
impedancia de la antena 50 Ω (conector SMA)
sensibilidad < -85 dBm
alimentación 8 VDC / 300 mA (adaptador incl.)
consumo 200 mA
dimensiones 91 x 70 x 12.5 mm (carcasa)
peso ± 130 g
General
temperatura de funcionamiento -10°C~+50°C / +14°F~+122°F
temperatura de almacenamiento -20°C~+60°C / -4°F~+140°F
humedad durante el almacenamiento < 85 % RH
Utilice este aparato sólo con los accesorios originales. Velleman Spain SL no será
responsable de daños ni lesiones causados por un uso (indebido) de este aparato.
Para más información sobre este producto, visite nuestra página web
www.velleman.eu. Se pueden modificar las especificaciones y el contenido de este
manual sin previo aviso.
00 (12/08/2008)
22
Page 23

CAMSETW16
BEDIENUNGSANLEITUNG
1. Einführung
An alle Einwohner der Europäischen Union
Wichtige Umweltinformationen über dieses Produkt
Dieses Symbol auf dem Produkt oder der Verpackung zeigt an, dass die
Entsorgung dieses Produktes nach seinem Lebenszyklus der Umwelt Schaden
zufügen kann. Entsorgen Sie die Einheit (oder verwendeten Batterien) nicht als
unsortiertes Hausmüll; die Einheit oder verwendeten Batterien müssen von einer
spezialisierten Firma zwecks Recycling entsorgt werden. Diese Einheit muss an
den Händler oder ein örtliches Recycling-Unternehmen retourniert werden.
Respektieren Sie die örtlichen Umweltvorschriften.
Falls Zweifel bestehen, wenden Sie sich für Entsorgungsrichtlinien an Ihre örtliche
Behörde.
Wir bedanken uns für den Kauf des CAMSETW16! Lesen Sie diese Bedienungsanleitung vor
Inbetriebnahme sorgfältig durch. Überprüfen Sie, ob Transportschäden vorliegen. Sollte dies
der Fall sein, verwenden Sie das Gerät nicht und wenden Sie sich an Ihren Händler.
2.
Sicherheitshinweise
Halten Sie Kinder und Unbefugte vom Gerät fern.
NUR FÜR DIE ANWENDUNG IM INNENBEREICH. Setzen Sie das Gerät keiner
Flüssigkeit wie z.B. Tropf- oder Spritzwasser, aus. Stellen Sie keine mit
Flüssigkeit befüllten Gegenstände auf das Gerät.
Öffnen Sie das Gerät NIE. Es gibt keine zu wartenden Teile. Bestellen Sie
eventuelle Ersatzteile bei Ihrem Fachhändler.
• Bei Schäden, die durch Nichtbeachtung der Bedienungsanleitung verursacht werden,
erlischt der Garantieanspruch. Für daraus resultierende Folgeschäden übernimmt der
Hersteller keine Haftung.
• Bei Schäden verursacht durch eigenmächtige Änderungen erlischt der Garantieanspruch.
3.
Allgemeine Richtlinien
• Vermeiden Sie Erschütterungen. Vermeiden Sie rohe Gewalt während der Installation und
Bedienung des Gerätes.
• Schützen Sie das Gerät vor extreme Temperaturen, Staub und Feuchte.
• Installieren Sie die Kamera in einem stabilen, gut gelüfteten Raum ohne magnetische
Gegenstände und chemische Produkte. Installieren Sie die Kamera nie in einem
Metallgehäuse.
• Nehmen Sie das Gerät erst in Betrieb, nachdem Sie sich mit seinen Funktionen vertraut
gemacht haben.
• Eigenmächtige Veränderungen sind aus Sicherheitsgründen verboten.
• Verwenden Sie das Gerät nur für Anwendungen beschrieben in dieser
Bedienungsanleitung sonst kann dies zu Schäden am Produkt führen und erlischt der
Garantieanspruch.
00 (12/08/2008)
23
Page 24

CAMSETW16
4. Bemerkungen
• Es können Störungen auftreten wenn das Gerät in der Nähe von anderen drahtlosen
Geräten, die mit 2,4 GHz funktionieren, verwendet wird.
Dieses Gerät entspricht den Normen LVD 73/23/EEC; EMC 89/336/EEC und R&TTE
•
1999/5/EC.
5. Beschränkungen
• Respektieren Sie die Privatsphäre und vermeiden Sie illegale Aktivitäten bei Anwendung
dieser Kamera.
• Verwenden Sie diese Kamera NIE in der Nähe von medizinischen Geräten, z.B.
Pacemaker. Halten Sie die Kamera in einem Abstand von mindestens 0,5m, um
Störungen zu vermeiden.
6.
Eigenschaften
• wetterfest (IP54), eignet sich sehr zum Überwachen von Bürogebäuden oder Ihrem Haus
• Nachtsicht dank der 12 IR-LEDs
• 4 Kanäle, einstellbar über DIP-Schalter
• eingebautes Mikrofon für Audioüberwachung
• manuelle und automatische Kanalabtastung
• Sendebereich (gemäß der Umgebung): ± 100m im Freifeld
• Lieferumfang: 2x Kamera + Montagezubehör
1x Empfänger + Antenne
1x AV-Kabel
3x Netzteil
1x Zubehörteil
1x Bedienungsanleitung
7.
Umschreibung
Kamera
1. Antenne
2. Schutzkappe
3. Objektiv
4. IR-Beleuchtung
5. Universalhalter
6. Kanalschalter
7. Mikrofon
8. Stromversorgungseingang
Empfänger
9. Audio-Eingang (L)
10. Audio-Eingang (R)
11. Video-Eingang
12. Stromversorgungseingang
13. IR-Empfänger
14. LED-Anzeige
15. EIN/AUS-Schalter
16. Antenne
17. Kanalschalter
00 (12/08/2008)
24
Page 25

CAMSETW16
Fernbedienung
18. Entriegelung/Verriegelung
19. Kanäle
20. Schleifenmodus
21. voriger/nächster Kanal
8. Montage
• Befestigen Sie die Kamera am Universalhalter (5). Die Kamera eignet sich ebenfalls für
Wand- oder Deckenmontage.
Bemerkung
Schieben Sie die Schutzkappe über die Hinterseite der Kamera nach vorne bis die Löcher
der Schutzkappe (2) und der Kamera übereinstimmen.
: Entfernen Sie die Schutzkappe (2) indem Sie diese nach vorne schieben.
• Befestigen Sie den Universalhalter (bei Deckenmontage) an der Oberseite der Kamera
(möglichst dicht bei der Antenne (1)). Gehen Sie vor wie folgt: drehen Sie den
Universalhalter (5) des Gehäuse und befestigen Sie ihn an der Oberseite der Kamera.
• Stellen Sie den Empfänger horizontal, die Antenne nach oben gerichtet.
9.
Anwendung
• Wählen Sie einen geeigneten Montageort und installieren Sie die Kamera.
• Schalten Sie die Kamera ein. Verbinden Sie das mitgeliefert Netzteil über den
Stromversorgungseingang (8) mit der Kamera.
• Wenn nötig (Störung wenn mehrere Kameras verwendet werden), wählen Sie den Kanal
über den Wählschalter (6). Es gibt 4 Kanäle, Standardkanal ist Kanal 1:
Kanal 1 Kanal 2 Kanal 3 Kanal 4
2.414 MHz 2.432 MHz 2.450 MHz 2.468 MHz
• Drehen Sie die Antenne (16) vorsichtig und richten Sie nach oben.
• Verbinden Sie den Empfänger über den AV-Ausgang (9, 10 & 11) mit einem Monitor oder
Fernseher.
Bemerkung
= Audio (L)
: GELBER Anschluss = Video, ROTER Anschluss = Audio (R), WEIßER Anschluss
• Verbinden Sie das mitgelieferte Netzteil über den Stromversorgungseingang (12) mit dem
Empfänger.
• Stellen Sie den EIN/AUS-Schalter (15) auf ON.
• Schalten Sie den Monitor oder Fernseher ein und wählen Sie den AV-Kanal.
• Sie können bis zu 4 Kameras an den Empfänger anschließen. Wählen Sie den Kanal über
den Wählschalter (17). Der ausgewählte Kanal wird über die LEDs (14) angezeigt.
• Halten Sie den Kanalschalter (17) 3 Sekunden gedrückt, um den Schleifenmodus
einzuschalten; jeder Kanal bleibt
abwechselnd 5 Sekunden aktiv.
• Regeln Sie die Helligkeit, den Kontrast und den Farbton über den Monitor oder den
Fernseher. Verstellen Sie, wenn nötig, die Kamera und/oder den Empfänger für bessere
Ergebnisse.
• In einer dunklen Umgebung schaltet die Kamera automatisch die IR-LEDs (4) ein.
Beachten Sie, dass das Bild auf Schwarz-Weiß-Bild umschaltet. Der Bereich ist 7m.
• Umschreibung der Fernbedienung:
00 (12/08/2008)
25
Page 26

Taste Funktion
Kanaltaste (19)
Drücken Sie ‘+’ um den nächsten Kanal anzuzeigen, ‘-’ um den vorigen Kanal
anzuzeigen (21)
Schleifenmodus:
1. Im normalen Modus, halten Sie 3 Sekunden gedrückt. ‘
2. Drücken Sie Kanaltaste wählen Sie jeden Kanal, den Sie in der Schleife haben
möchten.
3. Drücken Sie wieder, um die Einstellung zu speichern. Die Abtastung beginnt.
CAMSETW16
’ erscheint im Display.
Drücken Sie, um alle Kanäle zu scannen.
Verriegeln/entriegeln Sie die Tasten. Verriegeln Sie, indem Sie die Taste (18)
einmal drücken (‘
drücken (‘
’ wird ± 1s angezeigt). Mit einer verriegelten Fernbedienung können Sie
’ wird ± 1s angezeigt). Entriegeln Sie, indem Sie die Taste
die Kanäle über den Kanalschalter (17) des Empfängers wählen.
10. Batterie
• Entfernen Sie die Schutzfolie.
• Drehen Sie die Fernbedienung um, drücken Sie die Lasche (1) nach rechts und schieben
Sie nach unten (2, siehe Abb.). Ziehen Sie danach den Batteriehalter aus der
Fernbedienung.
• Ersetzen Sie die alte Batterie durch eine neue Lithiumbatterie Typ CR2025. Beachten Sie
die Polarität.
• Entfernen Sie die Batterie wenn Sie die Fernbedienung nicht verwenden.
• Lithiumbatterien sind nicht wieder aufladbar. Werfen Sie alte Batterien nicht ins Feuer.
ACHTUNG: Halten Sie die Batterien von Kindern fern.
11.
Problemlösung
Bild Ton Mögliche Ursache/Lösung
Nein Nein
Überprüfen Sie die Stromversorgung zur Kamera und zum
Empfänger.
Überprüfen Sie, ob die Kamera und der Empfänger im selben Kanal
Schnee Geräusch
eingestellt worden sind. Überprüfen Sie den Abstand zwischen
Kamera und Empfänger.
Unscharfes
Bild
Doppeltes
Bild
Keine
Farbe
Normal Regeln Sie das Objektiv.
Normal
Mögliche Störung mit anderen Geräten.
Überprüfen Sie den Abstand zwischen Kamera und Empfänger.
Normal Inkompatibilität mit TV-System (PAL/NTSC).
Normal Geräusch Mögliche Störung mit anderen Geräten.
00 (12/08/2008)
26
Page 27

CAMSETW16
12. Technische Daten
Kamera
Kanäle 4 (wählbar)
Sensor CMOS
Auflösung 628 x 582 (PAL) / 510 x 492 (NTSC)
TV-Zeilen 380
Blickwinkel 55°
Bereich Nachtsicht 7 m
automatische
✓
Verstärkungsregelung (AGC)
automatischer Weißabgleich (AWB)
Signal-/Rauschabstand (ohne
✓
40 dB
AGC)
minimale Lichtstärke 5 lux (F1.2)
Sendefrequenz 2.400 MHz – 2.483 MHz
Sendeleistung 10 mW
Modulation FM
Bandbreite 18 MHz
Stromversorgung 8 VDC / 300 mA(Netzteil mitgeliefert)
Stromverbrauch max. 80 mA / 200 mA (IR ein)
IP-Schutzart IP54 (Gehäuse)
Abmessungen Ø 49 x 52.5 mm (Gehäuse)
Gewicht ± 110 g
Empfänger
Kanäle 4
Video-Ausgangspegel 1.0 Vpp / 75 Ω (Mini-Anschluss)
Audio-Ausgangspegel 1.2 Vpp / 10k Ω (Mini-Anschluss)
Antennenimpedanz 50 Ω (SMA-Anschluss)
Empfindlichkeit < -85 dBm
Stromversorgung 8 VDC / 300mA (Netzteil mitgeliefert)
Stromverbrauch 200 mA
Abmessungen 91 x 70 x 12.5 mm (Gehäuse)
Gewicht ± 130 g
Allgemein
Betriebstemperatur -10°C~+50°C / +14°F~+122°F
Lagertemperatur -20°C~+60°C / -4°F~+140°F
Feuchtigkeitsgrad beim Lagern < 85 % RH
Verwenden Sie dieses Gerät nur mit originellen Zubehörteilen. Velleman NV
übernimmt keine Haftung für Schaden oder Verletzungen bei (falscher)
Anwendung dieses Gerätes. Für mehr Informationen zu diesem Produkt, siehe
www.velleman.eu. Alle Änderungen ohne vorherige Ankündigung vorbehalten.
00 (12/08/2008)
27
 Loading...