

Page 1

VX565D Instruction Manual
Quick Start Guide
Not all features listed in this QSG
are available on all models.
THIS PACKAGE CONTAINS
Power/Speaker Harness x 1
Remote control x 1
Mounting Screws x 4
Screw Covers
User's Manual x 1
x 2
www.velextech.com
Page 2
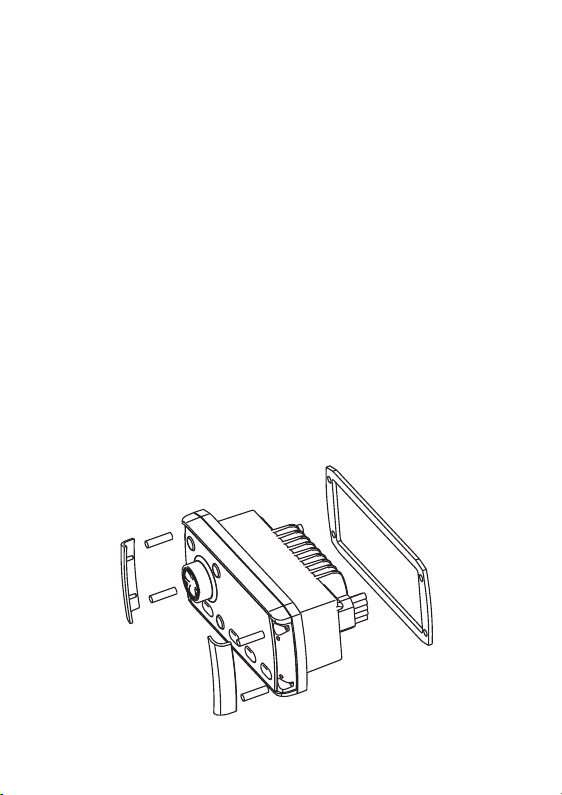
Installation the radio
Mounting the unit
Important! If any modification to the vessel is required, such as drilling holes, Velex
recommends that you consult with your boat dealer or manufacturer beforehand.
1.Create mounting hole for product and drill screw pilot holes. Refer to mounting
template included.
2.Fit mounting gasket.
3.Insert the unit into the mounting hole.
4.Use the supplied 4 x self tapping screws, to fix the unit into position.
5.Attach screw covers.
Note: Appropriate mounting is very important to ensure correct operation. Select a
location that allows both free/ open airflow around rear of chassis, whilst minimizing
exposure to moisture. Allow adequate room at the rear of the unit for the cable
looms (approx. 50mm or 2”)
The heatsink must not be mounted on more than a 45 degree angle from the
horizontal plain. Failure to following restrictions could void your warranty.
Figure 1 – Locating the VX565D unit into the mounting panel
Page 3
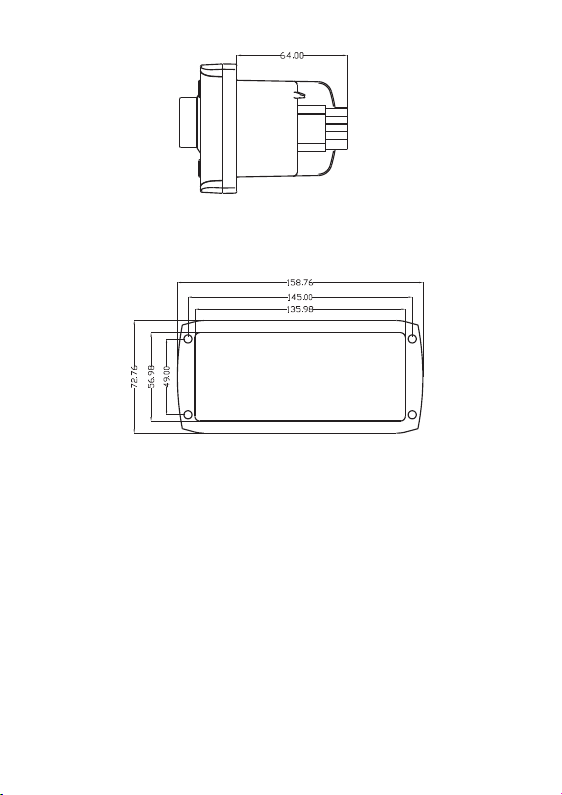
Caution! These images are not to scale, Dimension are shown in millimeters(mm)
and inches(“).
Mounting Cut Out Diagram
Figure 3- Cutting size diagram for installing the VX565D unit ( not to scale)
A 1:1 scale mounting diagram is provided in the box.
INSTALLION WARNING
Caution! The VX565D is designed for vessel with 12V DC negative ground electrical system.
Ensure the marine vessel's +12V lead is removed from the battery before any equipment is
connected.
Investigate the marine vessel's fuel tanks and electrical wiring locations before you begin
installation.
Ensure all wiring is protected to avoid damage.
When wiring the VX565D, ensure that the wires are away from sharp objects and that rubber
grommets and insulated bungs are used when routing the wiring. Ensure that when
connecting the wires to the speakers and audio system. The terminals and connections are
protected from shorting to each other.
Note: Ensure the Aerial cable is routed away from any power cables, and is the minimal
length, as long cable runs will affect AM reception performance.
For optimum radio reception, please ensure you use an independent FM marine antenna
and a separate DAB+ antenna with SMB connector (FM and DAB+ antenna are not included).
Page 4
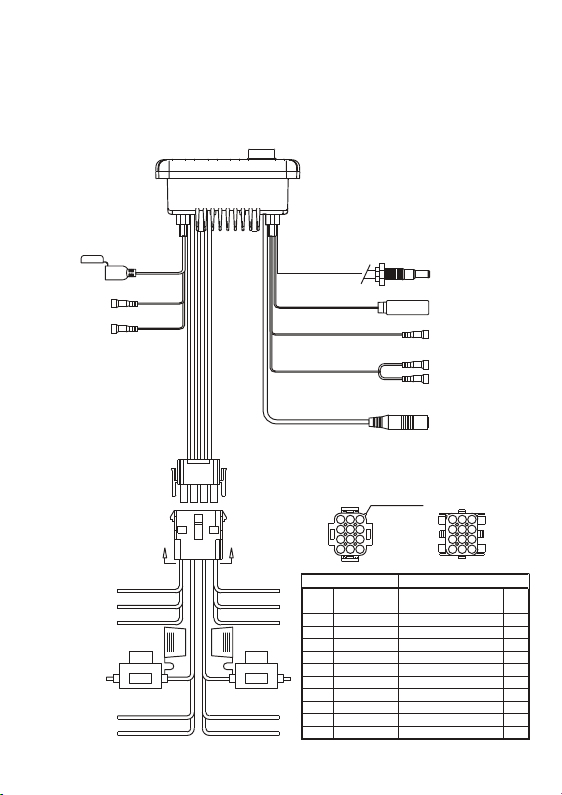
WIRING DIAGRAM
Connections and cables on the VX565D are described below.
USB
YELLOW VIDEO IN
YELLOW VIDEO OUT
BLACK
BLACK
BROWN
BLACK
PURPLE/BLACK
PURPLE
3A FUSE
OUT
IN
FILTER &
FUSE BOX
YELLOW
GREY/BLACK
GREY
DAB ANTENNA (SMB)
BLACK
GREEN
GREY
BLACK
RADIO ANTENNA
GREEN SUB-W OUT
RED REAR LINE OUT R
WHITE REAR LINE OUT L
REAR LINE OUT
ORIENTATION
2
3
1
6
4
5
8
9
B
B
BLUE
GREEN/BLACK
GREEN
10A FUSE
IN
FILTER &
FUSE BOX
RED
WHITE/BLACK
WHITE
OUT
7
12
10
11
SECTION A-A
WIRE COLOR WIRE DEFINITION
PIN NO.
GREEN
1
GREEN/BLACK
2
BLUE AUTO ANT
3
4
WHITE
5
WHITE/BLACK
RED
6
7
GREY
GREY/BLACK
8
9
YELLOW
10
PURPLE
11
PURPLE/BLACK
12
BLACK GROUND (-)
2
3
1
6
4
5
8
9
7
12
10
11
SECTION B-B
SPEAKER REAR LEFT (+)
SPEAKER REAR LEFT (-)
SPEAKER FRONT LEFT (+)
SPEAKER FRONT LEFT (-)
REMOTE (+)
SPEAKER FRONT RIGHT (+)
SPEAKER FRONT RIGHT (-)
ACC (+12V)
SPEAKER REAR RIGHT (+)
SPEAKER REAR RIGHT (-)
AWG
20
20
20
20
20
16
20
20
20
20
20
16
Page 5
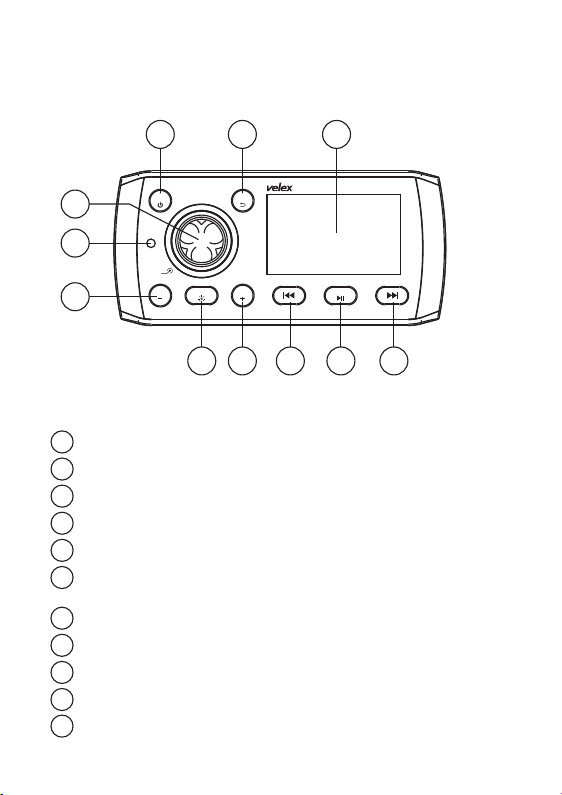
Control Locations - Receiver
23
5
SRC
MENU
10
VX-565D
11
SEL
MUTE BND
1
Next Preset Stations ( Radio –AM/ FM/DAB+ )
1
MENU / Return
2
Source / Power
3
Previous Preset Stations (Radio –AM/FM/DAB+)
4
VOL Knob (Rotate) / Confirm (Press)
5
Play / Pause | Band (Radio) | Video I/O Switch (Press
6
CH
and Hold While Playing Video)
MUTE / Button Backlight dim
7
Tune Up / Ne xt Track
8
Tune Dow n / Previ ous Trac k
9
TFT Display
10
Infra red wireless remote
11
CH
4
67 9 8
Page 6
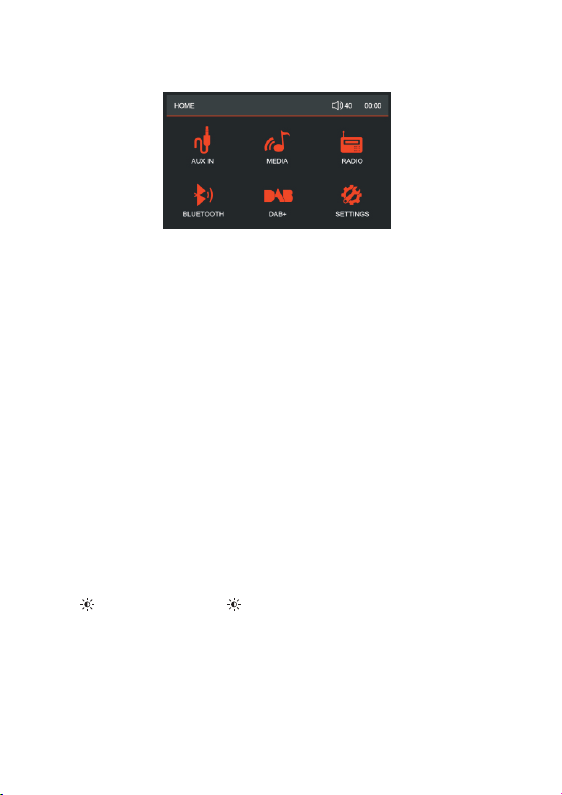
General Operation
Power on/off – Press the '' button to turn the unit on. Press and hold '' to turn unit off.
Changing Modes – Press 'SRC' button to switch between Radio, AUX IN, Bluetooth
Music, Media (USB),DAB+ modes. .
MENU – Press MENU button and use the Volume Knob to select between MEDIA,
RADIO, BLUETOOTH, AUX IN, SETTINGS. Short Press the Volume Knob to confirm
the selection.
Settings – Select 'SETTINGS' from MENU to set System time, Time format (12/24
hours), Language, Radio Region (Europe/American), Restore Factory Setting,
Software Version.
Volume – Rotate the Volume Knob to adjust volume (AUX IN/MEDIA/RADIO/BT
/DAB+ modes)
When the volume level interface is still on display, quick press the Volume Knob to
enter settings for BAS, MID, TREB, BAL, FAD, SUB, LOUD OFF, EQ in sequence,
then rotate the Volume Knob to set the required level. Use MENU/RETURN button to
quit setting or wait for time out to return to the previous status.
MUTE / ' Long press 'MUTE/ ' to dim/resume the back light
Page 7
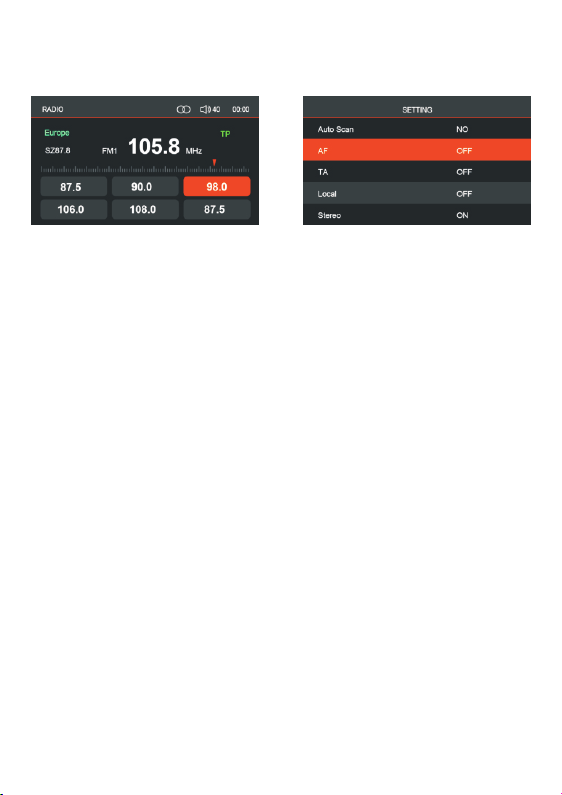
Radio Operation
Seek Tuning – Press and hold << or >> for more than 1 second to seek the next
strong station.
Manual Tuning – Press << or >> momentarily to move radio frequency up or down
one step at a time.
Auto Programming of Radio Station – Long press MENU buttonto activate Radio
Setting, select AUTOSCAN and YES, VX565 will commence searching the band
for radio stations and automatically stored in the available preset memory location.
The new stations will replace any stations previously stored in that band.
Band – Press BND >II to select between FM1, FM2, FM3. Up to six presets can
be programmed for each b and. Enab ling up to 18FM stations to be s tore d in
memory.
Recalling Presets – Press the CH+/CH- button to cycle through the 1-6 presets in
the current band.
Lon g pre ss 'MENU' but ton t o act ivate Radio S etti ng (A UTOS CAN, LOC/DX,
STEREO, RDS TA/AF)
RDS AF/TA function
AF on/off ON: The unit will search for another station with stronger
signal, but with the same program identifi cation as
the current station automatically.
OFF: Turn off AF function
TA On/Off ON: When there is traffic announcement, unit will
automatically switch to the tuner mode (regardless
of th e current mode) and begins to b roadcast the
announcement
OFF: Traffic announcement does not cut in;
Page 8

MP3 / WMA Operation
When an USB stick is plugged in, VX565D start to play the audios from the first
location.
If user want to play MOVIE/PHOTO on the USB stick, press MENU then enter
MED IA sel ection, MUSI C/MOVIE/PHO TO wi ll be display ed on LCD scre en,
rotate the VOL Knob to make choice.
Pause – To pause the audio/video, press the >II button once.
Press the >II buttonagain to resume playing.
Track Select – Press >> to skip to the beginning of the next s ong.
Press << to skip to the beginning of the previous song.–
Short press VOL Knob and the song list will be displayed on the screen, rotate
the Vol Knob to select the desired song and press 'VOL' to confirm the selection.
Rotate the Vol ume Knob to adjust vo lume, when the volume level interface is
still on displ ay, quick pre ss th e Volum e Knob to enter s ettings for BAS , MID,
TREB, BAL, FAD, SUB, LOUD OFF, EQ in sequence, then rotate the Volume
Knob to set the required level . Use MENU/RETURN button to quit setting, or
wait for time out to return to the previous status.
Fast Forward and Reverse – Press and hold >> or << to fast forward or reverse
a track.
Page 9
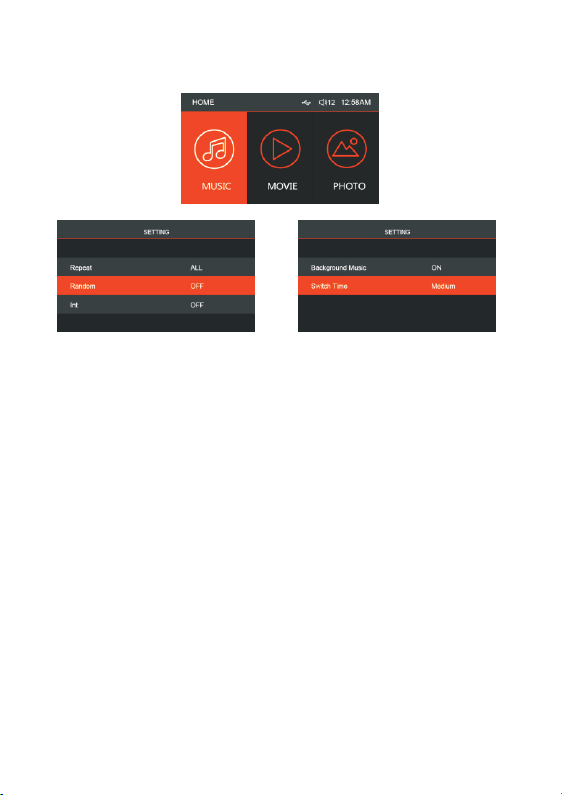
MUSIC/VIDEO/PHOTO Operation
When an USB stick is plugged in, VX565D will auto detect the audio files and start
to play from the first location.
When VX565D is playing audio, press and hold the VOL knob for 1 second, MUSIC
/VIDEO/PHOTO selection will be toggled, rotate and press the VOL Knob to confirm
the selection.
Or press MENU button and select MEDIA, MUSIC/VIDEO/PHOTO selection will
be triggered, rotate and press the VOL knob to confirm the selection.
When VIDEO is selected, short press VOL knob and the video list will be displayed
on the screen, rotate the VOL knob to select the desired video and press 'VOL' to
confirm the selection.
Rotate the Volume Knob to adjust volume, when the volume level interface is still
on display, quick press the Volume Knob to enter settings for BAS, MID, TREB,
BAL, FAD, SUB, LOUD OFF, EQ in sequence, then rotate the Volume Knob to set
the required level. Use MENU/RETURN button to quit setting, or wait for time out
to return to the previous status.
Rear view camera installation, power up camera and connect it to 'video'
in cable. Then go to the AUX mode to check the rear view video.
When PHOTO is selected, VX565D will automatically display the photos by slide
show.
Long press 'MENU' button to activate MEDIA settings. (REPEAT/RANDOM/INT for
Music and Movie, Back Ground Music on/off and slide show time setting for Photo)
Page 10
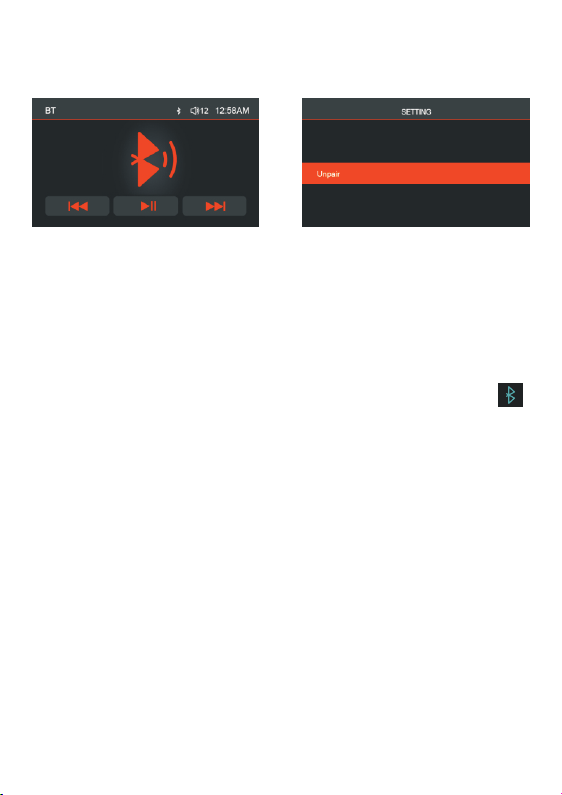
Bluetooth Operation
Preparation – Before using a Bluetooth device, it must be paired and connected.
Ensure that Bluetooth is activ ated on your device before beginning the pairing
process.
Activate the Bluetooth on your smartphone to search for new devices. Connect
with the device name 'VX565' when founded. Once pairing is successful, ' '
icon on the top title will change into blue color which means 'device paired'.
Note: The head unit can be in any mode of operation when pairing is performed.
After paired, select BT mode from MENU, BT music interface will be displayed
on screen, now select and play your desired music on your smart phone or media
player.
The head unit supports A2DP wireless streaming audio from a Bluetooth mobile
device directly to your head unit. The following function can be used to control the
music:
Press >> to skip to the next available audio track.
Press << to skip to the previous audio track.
Press >/II to toggle between play and pause during playback.
Lon g press 'MENU' but ton to activa te th e 'UNPAIR' sett ing, which en able to
unpair the current Bluetooth.
Page 11
DAB+ Operation
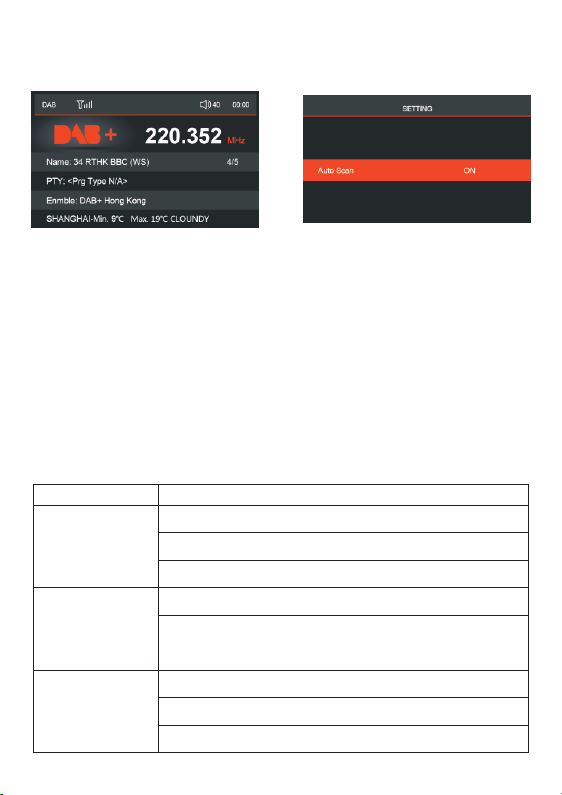
Select DAB+ from MENU or press SRC button to switch to DAB+ mode, VX565D
will auto mati cally scan for local digit al station s. This pro cess may ta ke a few
seconds depending on the numbers of stations available. As DAB+ stations are
fou nd, they will be a utomaticall y stored into the DAB band memo ries. On ce
scanning is complete, VX565D will begi n playing the station store d in the first
memory location. And the station info will be displayed on the screen.
Tuning DAB stations
Press CH+ or CH- button to tune to next/previous DAB station.
Auto Programming Station
Long press'MENU' button and select 'AUTOSCAN'–'YES'to manually force a new
station search.
Long press 'MENU' button to activate DAB+ settings. (AUTOSCAN)
Trouble Shooting
ISSUE
Unit will not turn
on (no power)
Unit has power
(but no sound)
Unit blows fuses
OPTIONS
Cause: Yellow/red wire not connected or incorrect voltage
Action: Check connections for proper voltage (11-16V DC)
Cause: Black wire not connected
Action: Check connection to ground
Cause: Fuse blown
Action: Replace the fuse
Cause: Speaker wire not connected
Action: Check connections at speakers
Cause: One or more speaker wires touching each other
or touching chassis ground
Action: Insulate all bare speaker wires from each other
and chassis ground
Cause: Yellow/red wire touching chassis ground
Action: Check for pinched wire
Cause: Speaker wires touching chassis ground
Action: Check for pinched wire
Cause: Incorrect fuse rating
Action: Use fuse with correct rating
Page 12

Specifications
General
Power supply requirements: DC 12V Negative Ground
Load impedance: 4 Ohms/channel
Maximum output power: 40W x 4 (CH)
Operate temperature: -10-50℃
MUTLIMEDIA SUPPORT
AUDIO FORMAT: MP3/WMA/OGG/FLAC/APE/AAC/AC3
VIDEO FORMAT: MPEG 1/ MPEG 2/ MPEG 4-XVID/DIVX/H.264/H.263/WMV9/RMVB
PHOTO: JPEG/BMP
FM Tuner: Tuning range: 87.9MHz-107.9MHz (USA)
87.5MHz-108MHZ (EUR)
DAB+: Tuning rage: BAND III 174-240 MHz
USB playback
Signal to Noise Ratio: 55dB
Frequency Response: 20Hz- 20KHz
A/D Conversion Filter: 16BIT
USB Storage Capacity: 16GB Max
Bluetooth
Version: 4.0
*Note: Specification may change without notice.
 Loading...