

Page 1

Thank you for purchasing this
VX502 Bluetooth Amplifier
Please read through these instructions carefully so you will know how to
operate your model properly.
After you have finished reading the instructions, keep this document in a
safe place for future reference.
THIS PACKAGE CONTAINS
1-VX502 Bluetooth 4-CH Amplifier
1-Multi-Function Controller
1-Flush Mount Bezel
1-Handleber Mounting Bracket & Hardware Kit
1-Power Harness
1-User Manual
Page 2
BEFORE YOU START
IMPORTANT SAFETY PRECAUTIONS
BE SURE TO OBSERVE THE FOLLOWING GUIDELINES:
- Do not turn up the volume so high that you can't hear what's around you.
- Use caution or temporarily discontinue use in potentially hazardous situations.
Do not operate mobile video equipment while driving a motorized vehicle - safe
driving and safety consideration of others should always be your highest priority.
Set your volume control at a low setting, then slowly increase the sound until you
can hear it comfortably without distortion, or ear discomfort.
In the event you should notice smoke, strange noises or odor from this product,
or any other abnormal signs, immediately turn off the power and consult technician.
Using this product in this condition may result in permanent damage to the system.
INSTALLATION PRECAUTIONS
WARNING Always consult with a professional installer
Do not attempt to install or service this product by yourself. Installation or servicing
of this product by persons without professional training and experience in electronic
equipment and motorized vehicle accessories may be dangerous and could expose
you to the risk of electric shock, injury or other hazards.
VX502 should be powered directly to a vehicle battery
When wiring directly to vehicle battery, be sure to disconnect the batteries negative
terminal wire before starting any wiring procedures, if extending the main power wire,
it is suggested that an optional fuse and fuse holder (not included) with minimum
rating of 20 Amperes be in-line with the positive battery terminal.
The ground cable length should not exceed 18-inches (See wiring diagram PG 4)
The VX502 has a weather resistant design, it should not be submerged in or under
water under any circumstances
Use only the installation parts provided with the VX502
CAUTIONS!! Using other mounting methods may void this warranty
2
Page 3
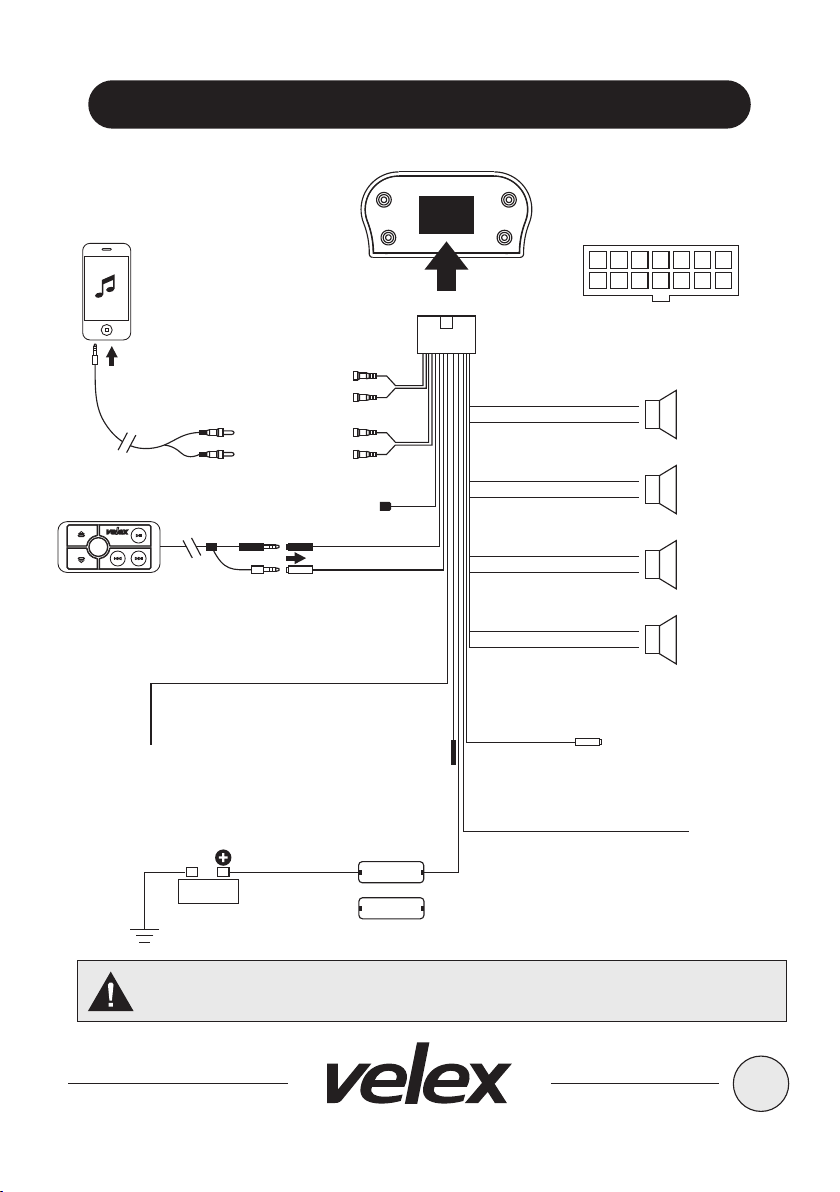
RCA TO 3.5mm
NOT INCLUDED
REMOTE
CONTROL
VX502
SRC
DIRECT BATTERY
WIRING CIRCUIT
ADAPTOR
(R) OUTPUT RED
(L) OUTPUT WHITE
(R) INPUT RED
(L) INPUT WHITE
OPTIONAL BACKLIGHTING
ON/OFF CONTROL
(DOT NOT GROUND OR
CONNECT TO +12V)
CHASSIS
GROUND
PIONT
PRE-AMP OUTPUT
INSERT
ORANGE
BLACK
WIRE DIAGRAM
GRAY
AUX INPUT
BLK
USB CHARGING
(1A MAX)
PINK
ANTENNA
(DO NOT CUT)
+12V YELLOW
BATTERY
1
4-OHM
SPEAKERS
WHITE
WHITE/BLK
GRAY
GRAY/BLK
GREEN
GREEN/BLK
VIOLET
VIOLET/BLK
+12V BLUE
+
-
+
-
+
-
+
-
REMOTE OUT
(500mA MAX)
+12V RED IGNITION
14
LEFT
CHANNEL 1
RIGHT
CHANNEL 1
LEFT
CHANNEL 2
RIGHT
CHANNEL 2
CHASSIS
GROUND
POINT
BATTERY
15 AMP
15 AMP
FUSE REPLACEMENT
CAUTION!! Do not ground or short the PINK antenna wire
3
Page 4
BEFORE INSTALLING THIS PRODUCT
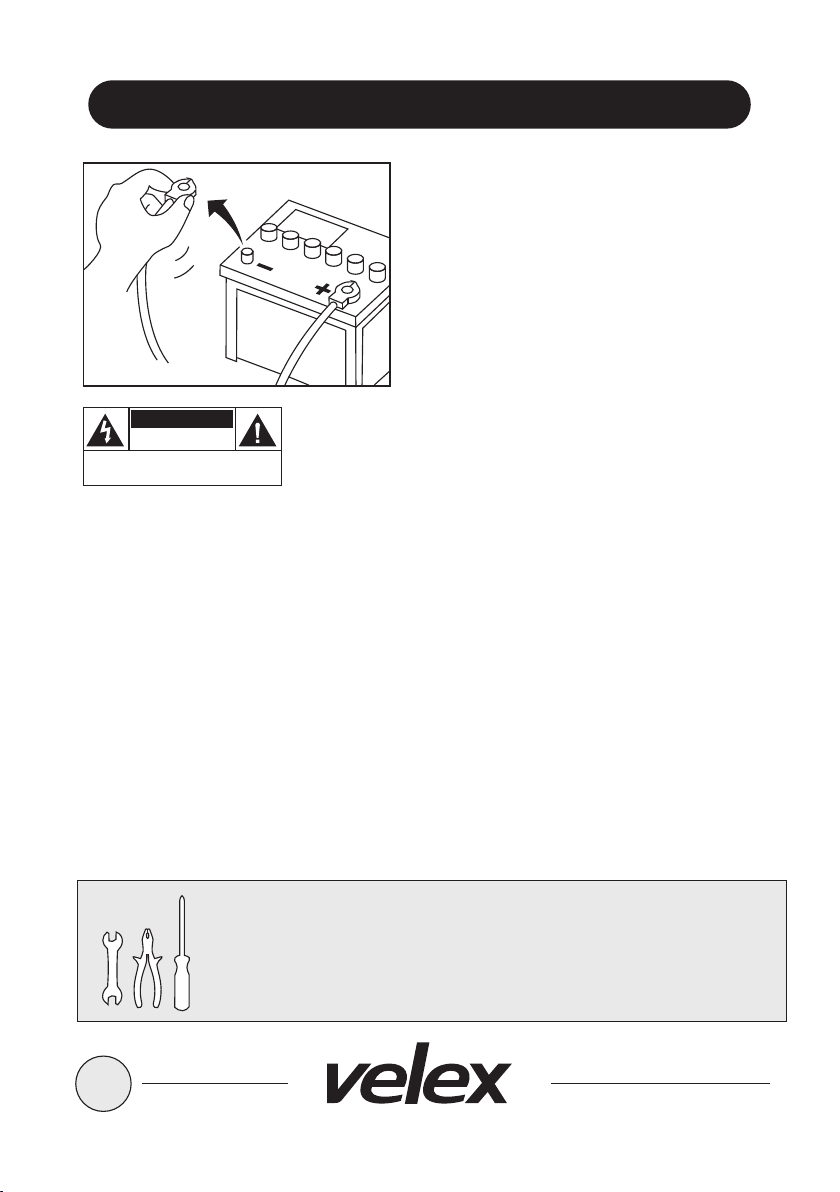
To avoid potential shorts in the
electrical system, be sure to disconnect
the (-) battery cable before installation.
Use this unit with a 12-volt battery and
negative grounding only. Failure to do so
may result in a fire or malfunction.
CAUTION
RISK OF ELECTRIC SHOCK
CAUTION: TO REDUCE THE RISK OF ELECTRIC SHOCK DO NOT
REMOVE COVER (OR BACK). NO USER-SERVICEABLE PARTS
INSIDE. REFER SERVICING TO QUALIFIED SERVICE PERSONNEL.
DO NOT OPEN
To avoid short-circuiting, cover any disconnected lead with insulating tape. It is
especially important to insulate any unused wires, which if left uncovered may
cause a short circuit. When connecting other devices to this product, refer to the
manual for the product to be connected. The black cable is ground, make sure to
connect the ground wire first.
Ensure that the ground cable is properly connected to metal parts of the vehicles
body frame or direct to the battery if your vehicle does not have a grounded
chassis frame. The ground cable of this units power amp and a second powered
system must be connected to the frame separately with different screws. If the
screw for the ground wire loosens or falls out, it could result in fire or malfunction.
When replacing the fuse, be sure to only use a fuse of the
rating specified on this product.
4
TOOLS NEEDED:
-Wrench and/or Pliers
-#2 Philips screwdriver
-Crimp tool
-Electrical tape
Page 5
SUGGESTED MOUNTING METHODS
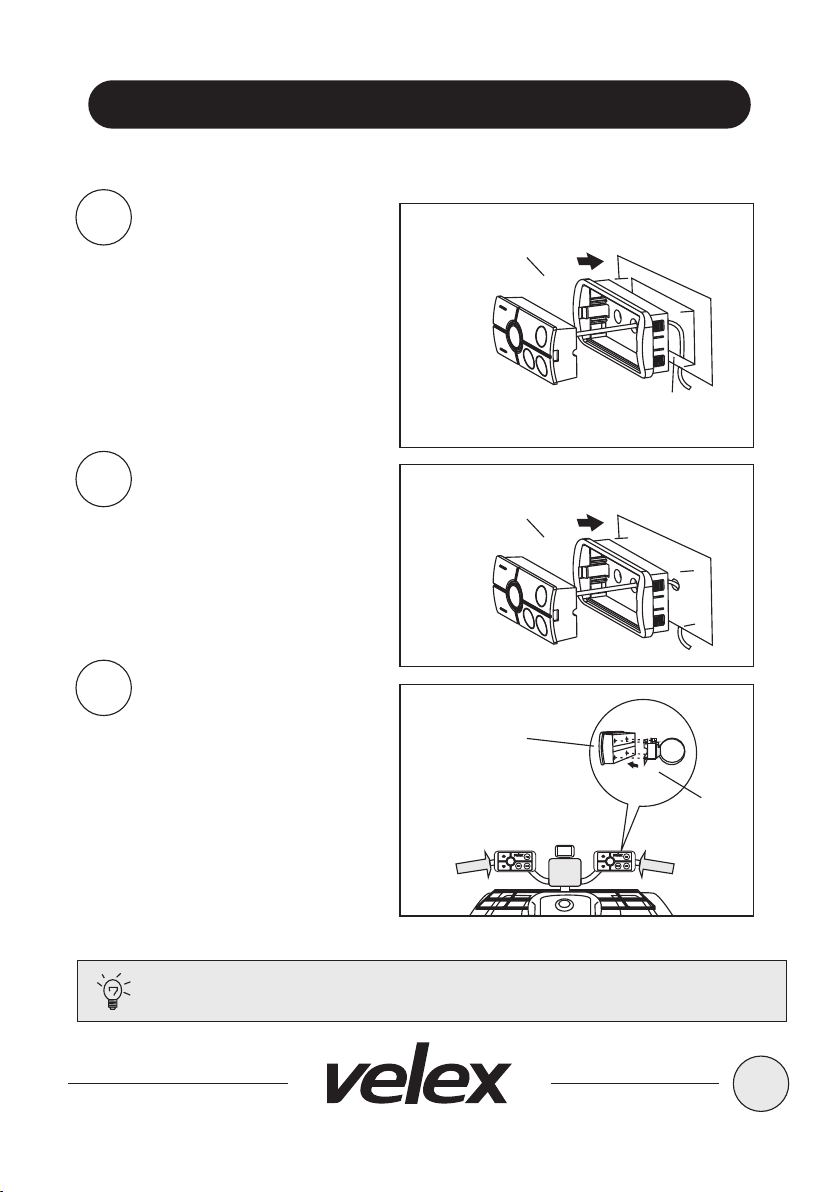
The VX502 can mounted in three different configurations:
Flush Mount
1
The flush mount quick mount
bezel requires no screws
Use cutout dimensions:
3-3/16” W x 1-11/16” H
(82mm x 43mm)
Surface Mount
2
The flush mount bezel has
two recessed screw holes to
facilitate the included two
oval-head screws.
HANDLEBAR
3
MOUNT
Use provided pan-head
screws and stainless steel
clamp, there are three
mounting variations to secure
the stainless steel clamp, try
the best one for your
application, securely tighten
the stainless clamp to fit your
application.
MULTI-FUNCTION
CONTROLLER
UNIT
MULTI-FUNCTION
CONTROLLER
UNIT
MULTI-FUNCTION
CONTROLLER
UNIT
LEFT RIGHTor
VX502
SRC
CUTOUT
HOLE
HANDLEBAR
CLAMP
VX502
SRC
Tips:
To release the VX502 controller from the mounting bezel, insert
a small jewelers screwdriver into the left/right slots of the bezel.
5
Page 6
GETTING STARTED
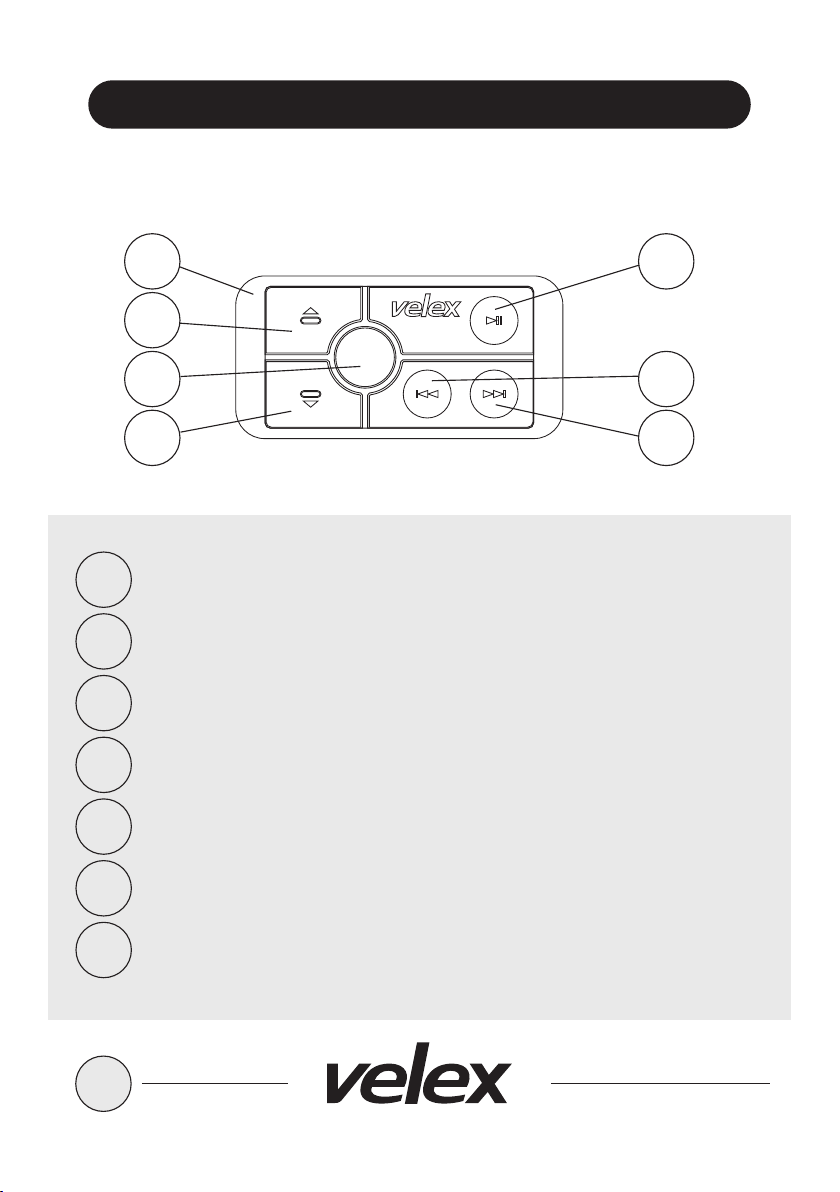
GETTING TO KNOW YOUR
Vx502 MULTIFUNCTION CONTROLLER (MFC)
1
3
SRC
VX502
2
6
MFC-MULTIFUNCTIONAL CONTORLLER
1
SRC PURPLE = AUX IN / RED = USB MODE = BLUETOOTH
2
VOLUME UP
3
NEXT TRACK / FAST FORWARD
4
PLAY / PAUSE
5
5
7
4
VOLUME DOWN
6
PREVIOUS TRACK / FAST REWIND
7
6
Page 7
BLUETOOTH OPERATION
VX502
SRC
2
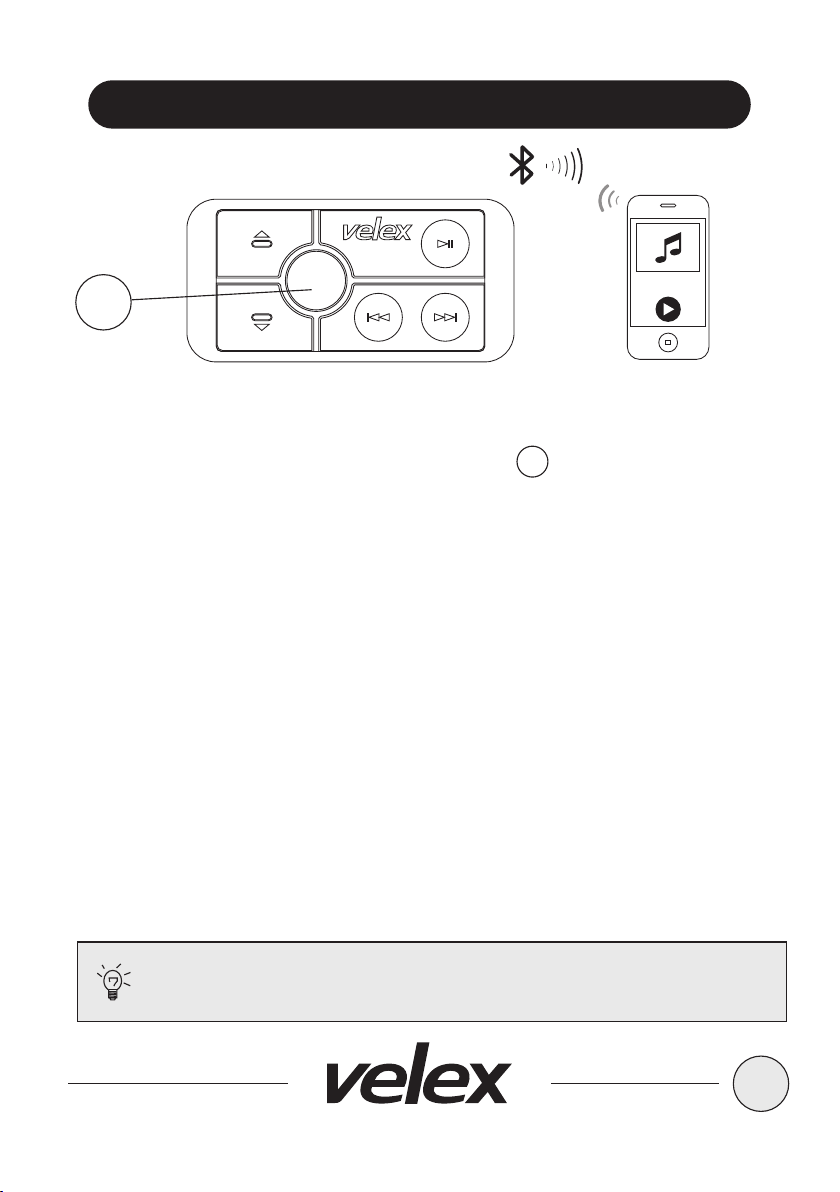
PAIRING & DISCOVERING A NEW BLUETOOTH CONNECTION
1. Power on the VX502 by short press the SRC button, the Bluetooth blue
LED will be switched on, a confirmation tone will be heard, signaling that VX502
is now ready for Bluetooth pairing.
2. Now that the VX502 (VELEX) is in pairing mode:
Android users:
a. Go into the Setting Menu of your device.
b. Enter the Bluetooth Menu and press SCAN.
c. VX502 (VELEX) will now be display under AVAILABLE DEVICES.
d. If prompted, enter passcode: “0000".
IOS users:
a. Go into the Setting Menu of your device.
b. Enter the Bluetooth Menu.
c. VX502 (VELEX) will now be display.
d. If prompted, enter passcode: “0000".
3. If the VX502 is not seen, repeat the above steps to refresh the “Device List”.
4. When the connection is successful, you are now ready to steam music from
your devices favorite media player to the VX502.
5. Press and hold SRC button to power off VX502.
Tips:
To avoid battery exhaustion be sure to run the vehicles engine
while using this product. Using this product without running the
engine can drain the battery.
2
7
Page 8
BLUETOOTH OPERATION
VX502
SRC
2
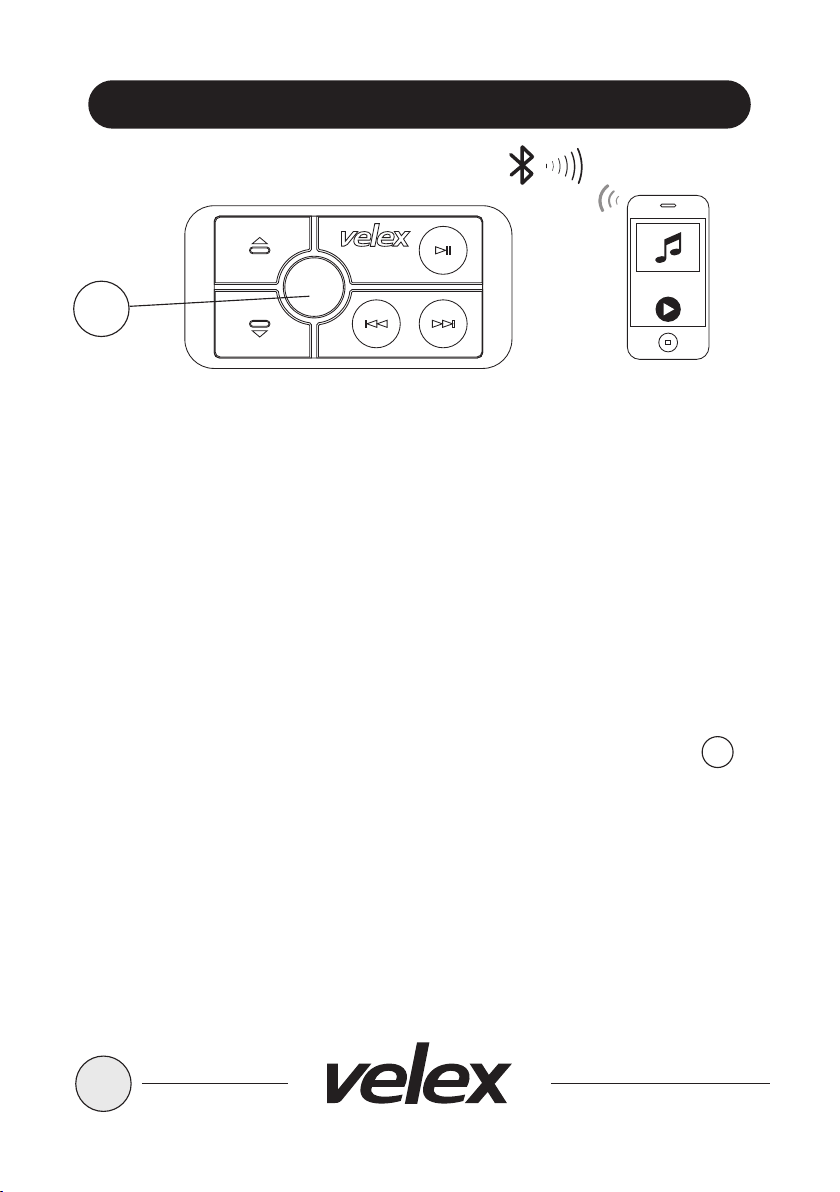
RECONNECTION
1. Power on the VX502 and your last paired Bluetooth Device;
2. The unit will now automatically reconnect;
3. If your device was previous paired with VX502, but it wasn't the last paired
device:
a.Ensure no other devices are currently paired
b.Enter the Bluetooth Menu on your device being paired
c.VX502 will display under AVAILABLE DEVICES
d.Choose the VX502 to reconnect
4. If the device is out of range from VX502, it will disconnect automatically:
a.To reconnect once device is back in range, press the Power
button once
b.The VX502 will now reconnect to the device, a confirmation tone will
be heard from the speakers.
2
8
Page 9
STREAMING MUSIC
5
3
SRC
2
6
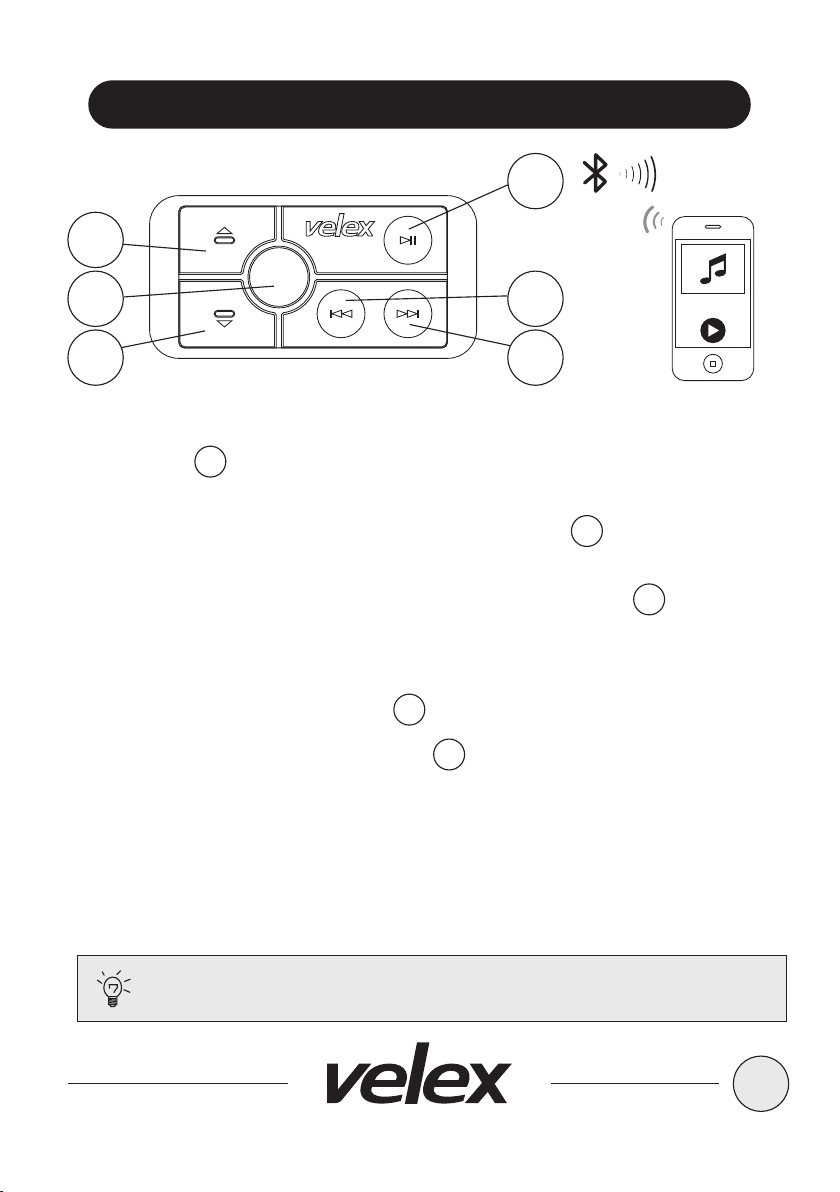
MULTIFUNCTIONAL CONTROLLER BLUETOOTH OPERATION
1. Press the PLAY/PAUSE, once to start playing music or press the PLAY
button from your device touch screen, pressing again to PAUSE
2. To skip songs or advance, press the NEXT TRACK button, press and
hold to FAST FORWARD
3. To select the previous song, press the PREVIOUS TRACK button,
press and hold to FAST REWIND
VOLUME CONTROL
1. To raise the VOLUME press UP button
2. To lower the VOLUME press DOWN button
5
VX502
7
4
4
7
3
6
Tips:
Turn the BLUETOOTH volume level on your device to its 100%
level
9
Page 10
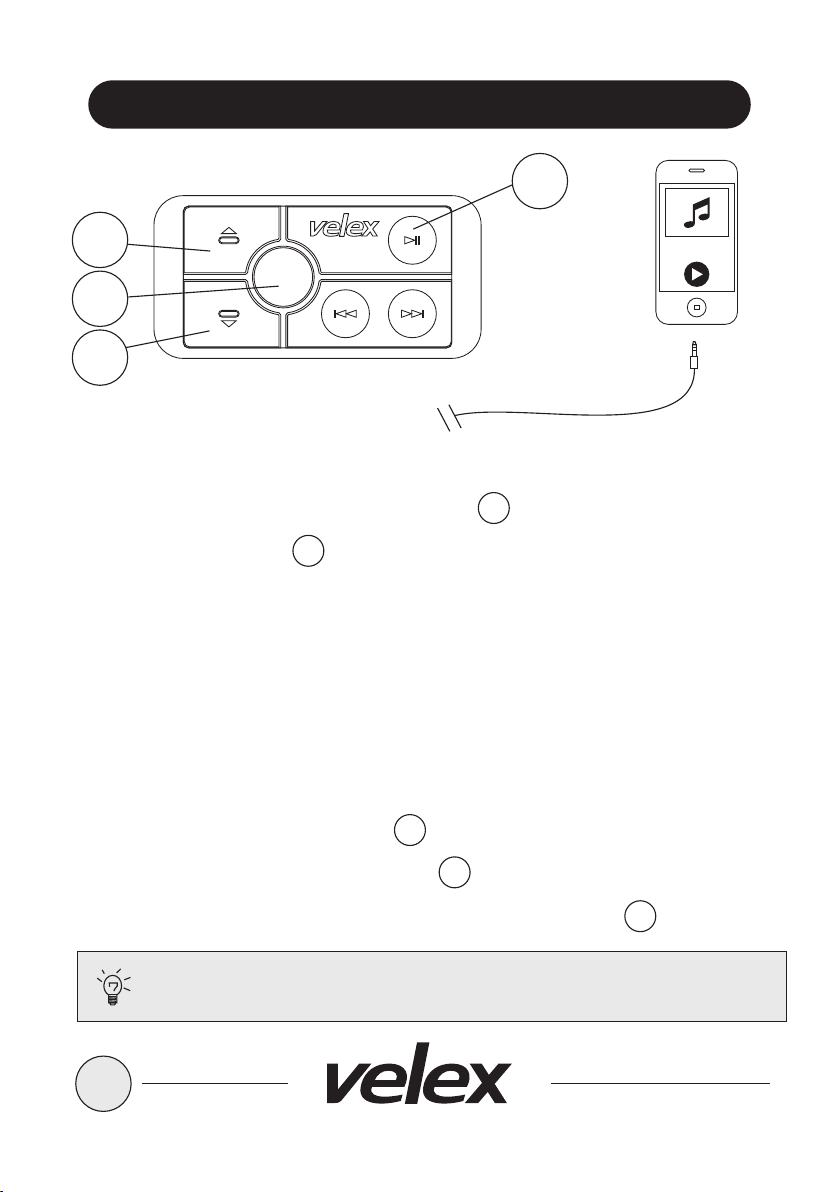
AUX-INPUT
5
3
SRC
VX502
2
YOUR DEVICE
6
AUX-IN OPERATION
VX502 can play audio from any device that has a pair of RCA output
1. Power on the VX502 by short press SRC button
2. Short press the SRC button again once, the controller LED lighting will
change to RED, indicating the system is in AUX-IN mode.
3. Bluetooth devices will remain paired even in AUX-IN MODE
4. Connect the integrated RCA AUX-IN cable on the amplifier (if you have a
3.5mm jack device, please use the 3.5mm to RCA adaptor, 3.5mm to RCA
adaptor is not included)
5. Route the audio wires back to a convenient storage place, secure your device.
VOLUME CONTROL
2
2
1. To raise the VOLUME press UP button
2. To lower the VOLUME press DOWN button
3. To MUTE / UN-MUTE the VOLUME press PLAY / PAUSE button
Tips:
Turn the HEADPHONE volume level on your device to its 100%
level
3
6
5
10
Page 11
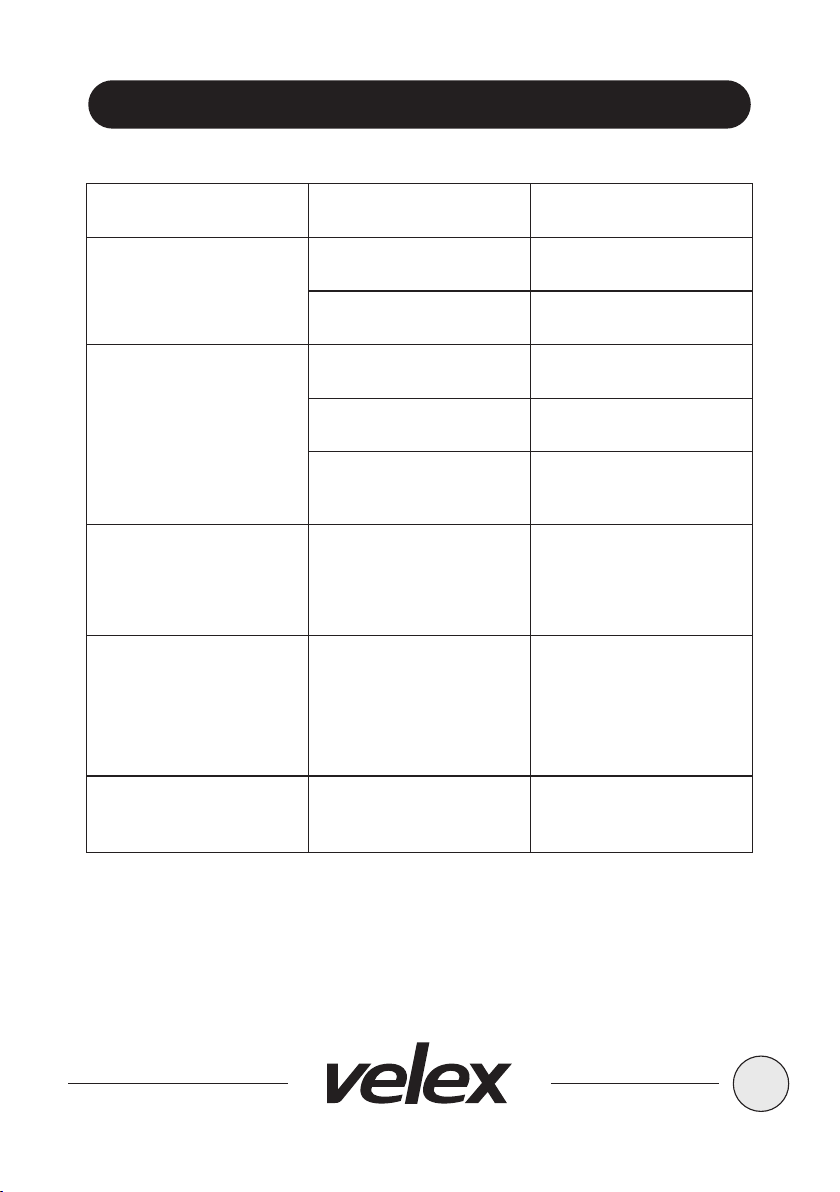
TROUBLE SHOOTING GUIDE
TROUBLE CAUSE SOLUTION
Unit will not turn on
Can not pair Bluetooth
The audio quality is poor
after connection with a
Bluetooth enabled device
Unit has become
unresponsive
The fuse is blown
Ignition not engaged
Blown speaker
Volume is low / muted
Device is paused or muted
The Bluetooth function of the
device is not enabled
The Bluetooth reception is
poor
Power glitch or interference
Check / replace the fuse
Turn ignition to on position
Replace faulty speaker
Press the volume level up
Check your devices playing /
volume statusNo sound is heard
Refer to the user manual of
the device for how to enable
the Bluetooth function
Move the device closer to the
audio system or remove any
obstacle between the device
and the systems antenna
Disconnect power for 10
seconds to reset
11
Page 12
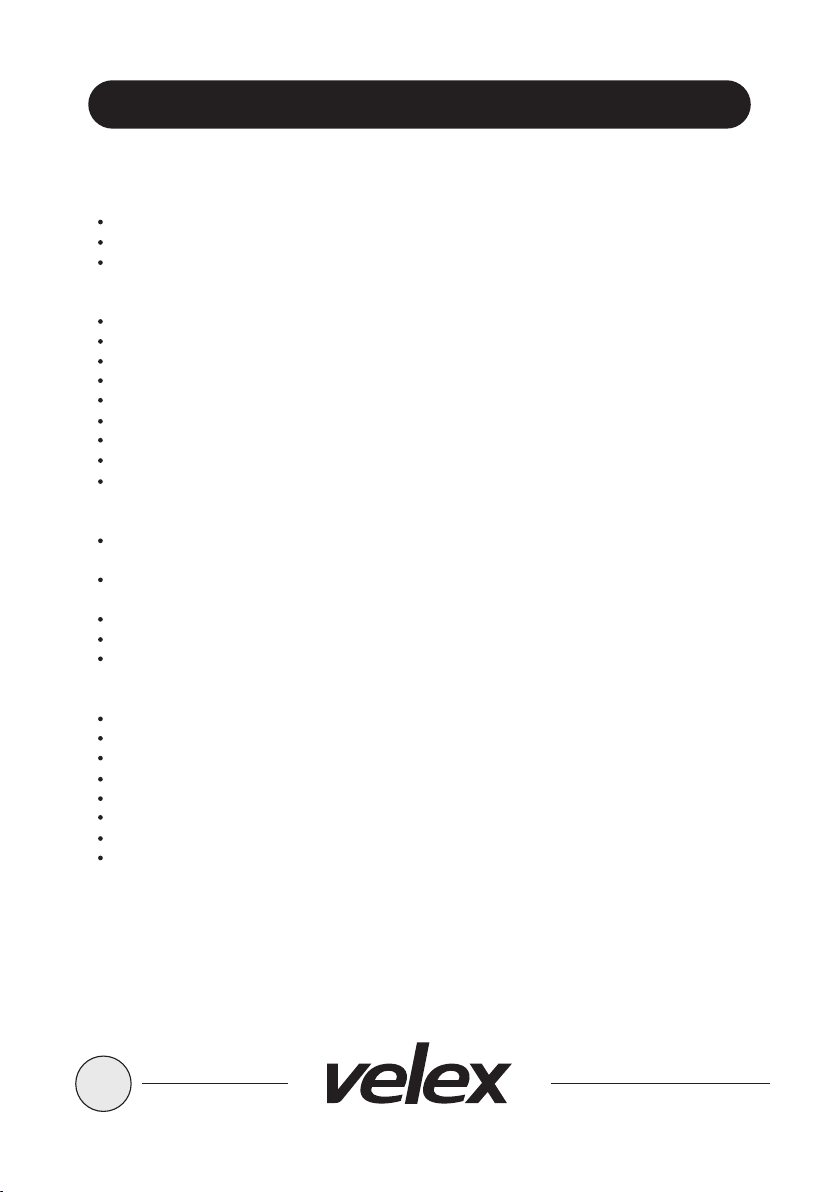
SPECIFICATIONS
BLUETOOTH
BT: 3.0
BT Range: 33FT / 10 M (CLASS 2)
BT Profiles: A2DP
AMPLIFIER
Channels: 4
MAX Continuous Output: 500W (All channel driven)
PEAK Power Rating
4 Ohm: 125W / channel
RMS Total Power Output: 150W
Class AB
Frequency response: 20-25KHz
4 Ohm stable
Input impedance: 22K Ohm
CHASSIS
Dimension: W x L x H
99 x 203 x 50 mm
Controller Dimensions W x L x H
47 x 95 x 22 mm
Controller cable length: 5m
Backlight illumination control wire
Quick connect Molex power harness
GENERNAL
Power source: 14.4VDC (10.8 16V Allowable)
Grounding System: Negative type
Maximum Current Consumption: 15A
3-way protection circuitry (thermal, overload, and speaker short protection)
USB output voltage: 5VDC @1A
Unit weight: 2.08lbs / 0.94kgs
Storage Temperature: 5 F to 113 F / - 15 to 45 degree
Replacement Fuse: 15A
(Replace with ATO Fuse Type Only).
12
 Loading...