

Page 1

VX163/VX163D Instruction Manual
Quick Start Guide
For Gauge Hole Receivers
Not all features listed in this QSG
are available on all models.
THIS PACKAGE CONTAINS
Marine Media Player with Bluetooth x 1
U mounting bracket (Pre-installed) x 1
Screw Posts (Pre-installed) x 2
Hex Nuts (Pre-installed) x 2
User Manual x 1
www.velextech.com
Page 2
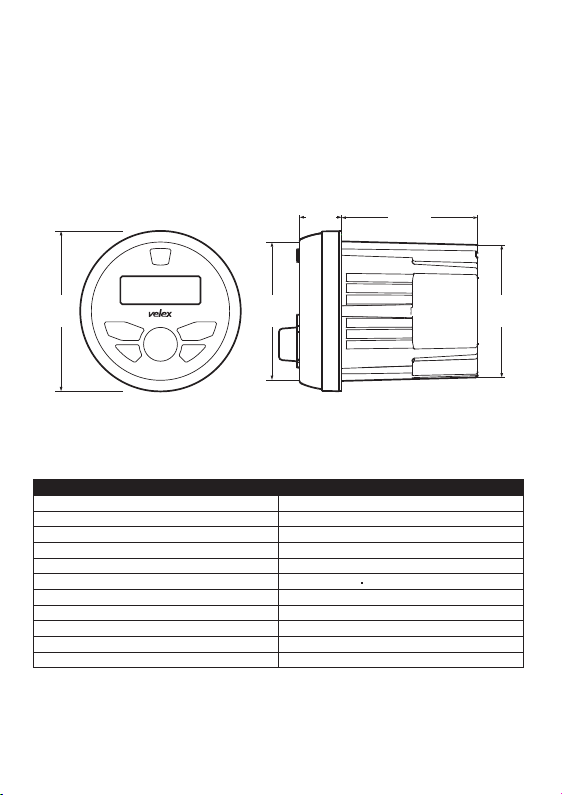
Mounting &Wiring
Please read entire manual before installation.
Before You Start
Disconnect negative battery terminal. Consult a qualified technician for instruction.
Avoid installing the unit where it would be subject to high temperatures, such as
from direct sunlight, or where it would be subject to dust, dirt or excessive vibration.
0.98"
(25mm)
DIA
3.17"
(80.5mm)
DIA
3.5"
(89mm)
DIA
Getting Started
Once a suitable location has been decided, drill the hole and secure the stereo
using the metal mounting bracket.
Color Connection
Red 12V Ignition / Accessory
Yellow Battery
Black Ground
Grey Right Front (+)
Grey/Black Right Front(-)
White Left Front (+)
White/Black Left Front (-)
Violet Right Rear(+)
Violet/Black Right Rear(-)
Green Left Rear(+)
Green/Black Left Rear(-)
Tip: When a suitable ground wire is not present in the vehicle wiring harness.
Connect the black ground wire to the vehicle chassis.
Fuse: When replacing the fuse, make sure new fuse is the correct type and
amperage. Using an incorrect fuse could damage the radio.
3.1"
(79mm)
DIA
3.15"
(80mm)
DIA
Page 3
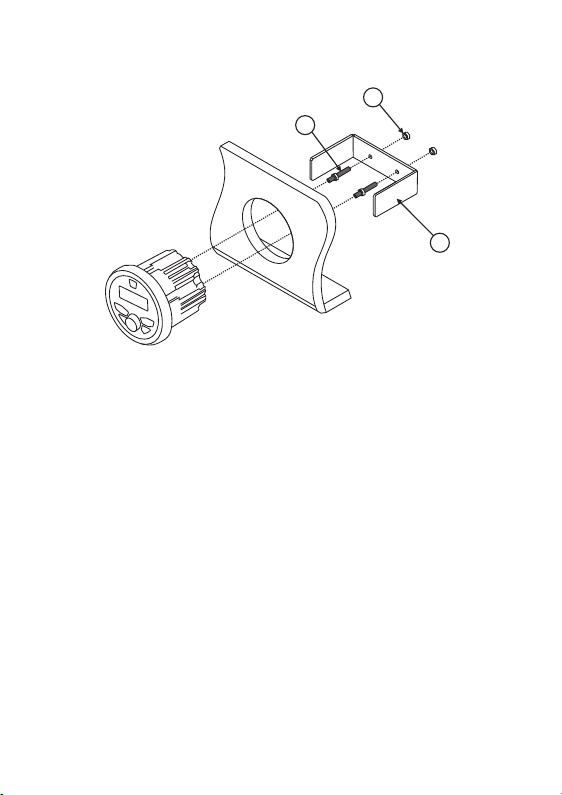
Installation
C
A
3 Inch Hole
B
Mounting the Radio
1.Choose a mounting location on the dash board or instrument panel that will allow
room behind to run radio cables to the power source. Consider how you will use
the AUX IN, LINE OUT and USB connectors and route the appropriate extension
cables to an accessible area.
2.Cut a hole (Diameter: 80mm/3.15 inch)in the dash board using the template
provided on page 8. At least 3.5 inch depth is needed to mount the radio.
IMPORTANT! Do not mount this unit where it can be submerged in water.
3.Attach the included screw posts (A) to the back of the radio.
4.Place the radio in front of the dashboard opening so the wiring can be brought
through the opening.
5.After completing the wiring connections(page 2), turn the radio on to confirm
operation (vehicle accessary switch must be on). If the radio does not operate.
Recheck all wiring until the problem is corrected. Once proper operation is
achieved, turn the accessory switch off and proceed with final mounting of the
radio. Refer to the wiring diagram.
NOTE: Before final installation, test the wiring connections to make sure the unit
is connected properly and the system works.
6.Insert the radio into the mounting hole.
7.Place the 'U' bracket (B) over the screw posts and secure the radio to the dash
using the included hex nuts (C).
Page 4
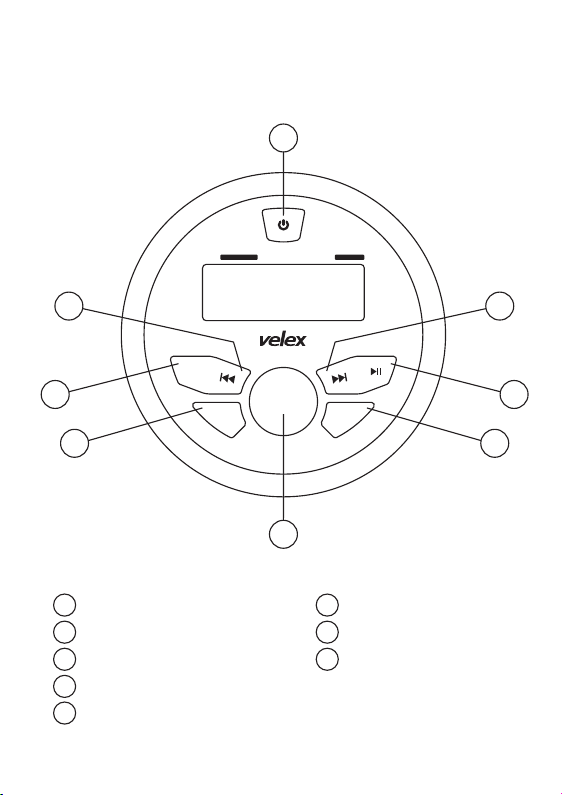
Control Locations - Receiver
1
WATERPROOF 60W x 4 CH
IPX6
3
SRC
6
BAND PRES
7
5
Power
1
Tune Up/Next Track
2
Tune Down/Previous Track
3
Play/Pause
4
Volume knob (Rotate) / SEL/Confirm (Press)
5
6
7
8
2
4
8
Source
Band
Preset
Page 5
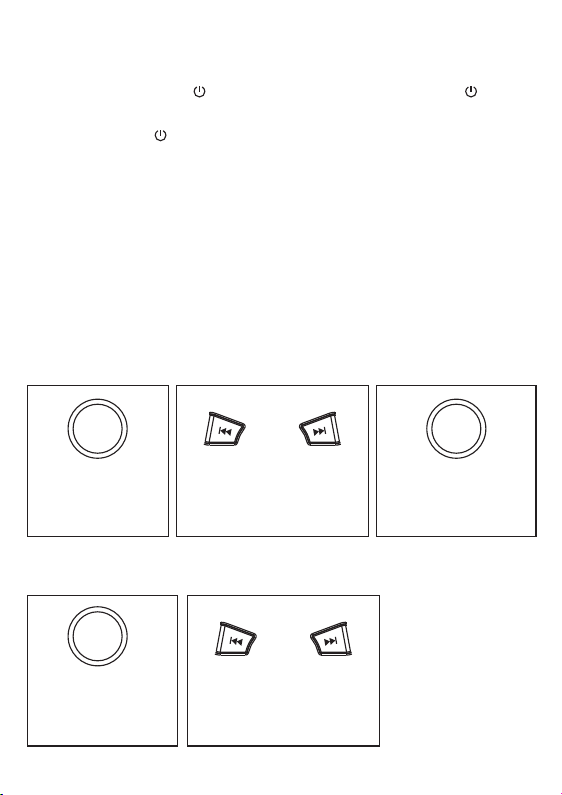
General Operation
Power on/off -- Press the ' ' button to turn the unit on. Short press
to turn the unit off.
Brightness -- Press ' ' to adjust the back light brightness ( High / Medium / Off).
Changing Modes -- Press SRC to select between AM/FM, USB, Auxiliary and
Bluetooth Music. Modes of operation are shown in the display.
Volume -- Adjust volume by rotating the volume knob.
Mute -- Press '>II' to silence the audio. Press '>II' again to resume listening at
previous selected volume.
Auxiliary InputsInsert a 3.5mm connector in the AUX port, the other end of 3.5mm
connector to the headphone output of an audio device (3.5 mm audio cable sold
separately ).
' ' again
Audio setting
Short press 'SEL' to
enter into AUDIO
SETTING
Navigate between XBASS/
BASS / TREBLE / BALANCE
/ FADER
Rotate the volume knob
to select between EQ
USER/JAZZ/POP/
CLASS/ROCK
System setting
Press and hold 'SEL'
to enter into SYSTEM
SETTING
Navigate between BEEP /
RESET / ABOUT / TIME
Page 6
AM/FM Tuner Operation
1. Press the SRC button to select TUNER
2. Press >II button to MUTE, press again to UNMUTE
3. To manual adjust frequency press >>I or |<<
4. Press the PRESET button to recall PRESETS 1-6
5. Press BAND to switch between FM1, FM2, FM3, MW1, MW2, WB;
Tuner Function Setting
PRES
Press and hold
'PRESET' to enter
into Tuner function
mode
Rotate the volume
knob to select option
(A-store skip this step)
Navigate between AUTO
STORE / M STORE/ LOCAL
/ AREA / RDS / AF / TA
/ PTY
Press >|| button to confirm
the selection (A-store skip
this step)
Press to enter setting
A – STORE: Automatic search the strong radio stations and store them into PRESET.
M- STORE: Manual Store the Radio Station, tune to the favorite station, activate the
M-STORE, the PRESET number will flashing on the LCD display, use the VOL+/VOLbutton to adjust to your desired PRESET number ( P1 - P18 ) , then press >II button
to manually save the station.
LOCAL - ON/OFF.
AREA - Select between EUROPE / AUST / USA frequency.
RDS - ON/OFF; AF / TA / PTY – ON/OFF.
Page 7

USB Operation (MP3/WMA)
Playing MP3/WMA Files To play MP3/WMA files, insert a USB device
(not supplied) containing MP3/WMA files.
Track Select - Press >> to skip to the beginning of the next track.
- Press << to return to the beginning of the previous track. Press and
Pause
Press >II button to temporarily stop playback.
Press >II button again to resume playback.
Fast forward and reverse
Press and hold >> or << to fast forward or reverse a track.
Folder Search
Short press BND button, 'ROOT' display on the screen, enable to select between
folders.
Short press >> or << button ( or Rotate the VOL knob ) to select folders;
Short press >II button to enter into the selected folder;
After select the folder, press >> or << button ( or Rotate the VOL knob) to select
the songs;
Short press >II button to play the selected song;
Short press PRESET button to activate 'RDM ALL(Random)' - 'RPT ALL(Repeat)
' - 'RPT SONG' and 'RPT FLD' function.
Bluetooth Operation
Preparation-Before using a Bluetooth device, it must be paired and connected.
Ensure that Bluetooth is activated on your device before beginning the pairing
process.
Pairing
To pair your smart phone to VX163, press the SRC button to select 'BT
AUDIO' mode, the 'Bluetooth' icon will be flashingon the LCD screen.
Activate the Bluetooth on your smartphone to search for new devices. Connect
with the device name ' VX163 ' when found. (If pin number is required by smart
phone, please enter '0000'). Once pairing is successful, 'Bluetooth' icon will be
displayed on the screen.
Press >> or << button to select next or previous track.
Press >II button to pause or continue play back.
While BT mode, Long press 'Band' button to force disconnect the current
Bluetooth connection.
Page 8

DAB Operation (available for VX163D only)
Note: DAB+ ( Digital Audio Broadcasting) is only available for some European countries and Australia where has
the Digital Radio Broadcasting.
Press SRC button to switch to DAB+ mode, VX163D will automatically scan for
local digital stations. This process may take a few seconds depending on the
numbers of available stations. As DAB+ stations are found, they will be automatically
stored into the DAB+ band memories. Once scanning is complete, VX163D will
begin playing the station stored in the first memory location. And the station will
be displayed on the screen.
Tuning DAB+ stations
Press I<< or >>I button to tune to previous / next DAB+ station.
A – STORE: Long press BAND button for automatically scan and save the
stations.
Specifications
General
Power supply requirements: DC 12V Negative Ground
Load impedance: 4-8 Ohms/channel
Maximum output power: 40W x 4 (CH)
Operate temperature: -10-50℃
FM Tuner: Tuning range: 87.9MHz-107.9MHz (USA)
87.5MHz-108MHZ (EUR)
AM Tuner: Tuning range: 530KHz-1710 KHz (USA)
522KHz-1620 KHz (EUR)
DAB+ (VX150D only) Tuning Range: BAND III 174-240 Mhz
USB playback
Signal to Noise Ratio: 55dB
Frequency Response: 50Hz- 20KHz
A/D Conversion Filter: 16BIT
USB Storage Capacity: 16GB Max
Bluetooth
Version: 3.0
*Note: Specification may change without notice.
Page 9
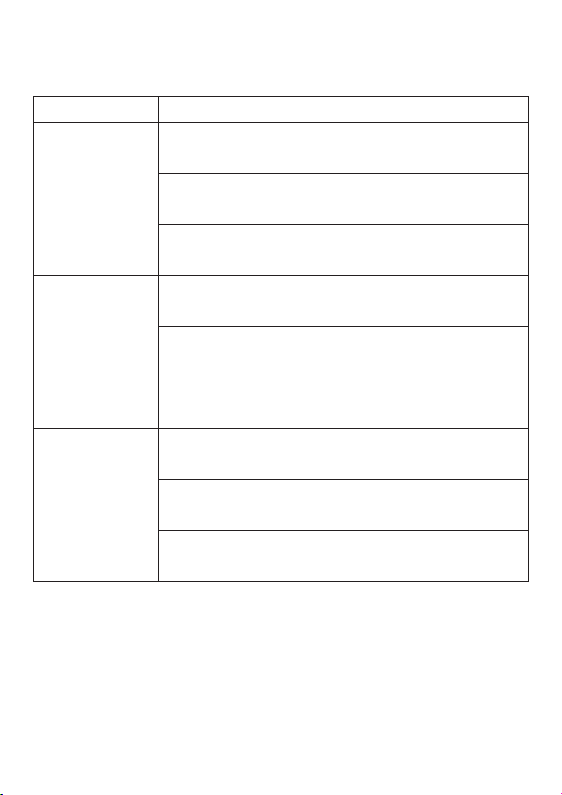
ISSUE
Trouble Shooting
OPTIONS
Cause: Yellow/red wire not connected or incorrect voltage
Action: Check connections for proper voltage (11-16V DC)
Unit will not turn
on (no power)
Unit has power
(but no sound)
Unit blows fuses
Cause: Black wire not connected
Action: Check connection to ground
Cause: Fuse blown
Action: Replace the fuse
Cause: Speaker wire not connected
Action: Check connections at speakers
Cause: One or more speaker wires touching each other
or touching chassis ground
Action: Insulate all bare speaker wires from each other
and chassis ground
Cause: Yellow/red wire touching chassis ground
Action: Check for pinched wire
Cause: Speaker wires touching chassis ground
Action: Check for pinched wire
Cause: Incorrect fuse rating
Action: Use fuse with correct rating
Page 10
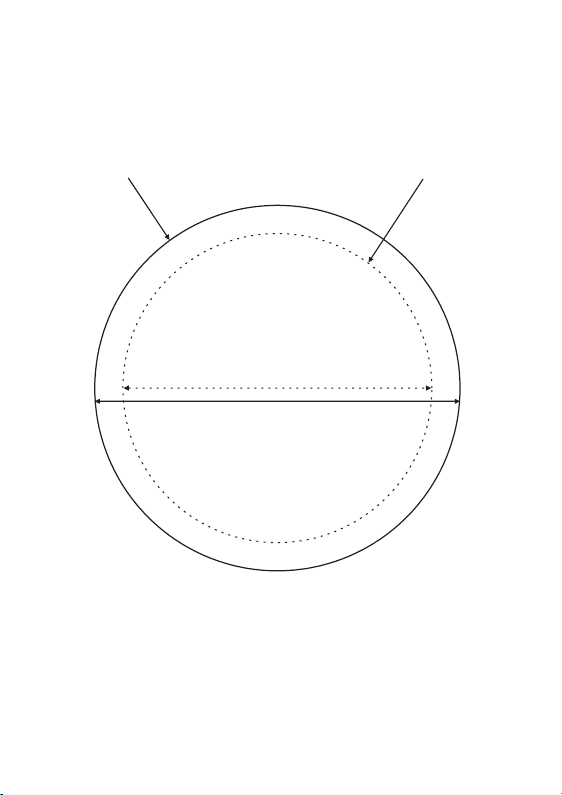
Cutting Template
Outer edge of stereo
(Push out)
80mm
105mm
Mounting hole
(Push out)
 Loading...