

VELAB, Co. 2017 1 Rev. 1 | Nov_2017
OPERATING MANUAL COMPACT SCALE
VE-K IP68 SERIES
Revision 1.1 / July 2017
Please take the time to read the operating instructions before using the product and save it for future
reference.

VELAB, Co. 2017 2 Rev. 1 | Nov_2017
TABLE OF CONTENTS
1 INTRODUCTION ................................................................................................................................. 3
1.1 Safety Precautions ............................................................................................................................. 3
1.2 Avoid Installing in the following Locations ........................................................................................ 3
1.3 Product Features ............................................................................................................................... 4
2 TECHNICAL SPECIFITATIONS ............................................................................................................. 4
3 OPERATING PANEL AND KEY FUNCTION DEFINITION ....................................................................... 5
3.1 Key Definition .................................................................................................................................... 5
4 ATTENTION BEFORE USE ................................................................................................................... 5
4.1 Conventional Attention ..................................................................................................................... 5
4.2 Attention Before Use ......................................................................................................................... 5
5 INSTALLATION ................................................................................................................................... 6
5.1 Unit Installation ................................................................................................................................. 6
6 OPERATION ....................................................................................................................................... 6
6.1 Switch ON Scale ................................................................................................................................. 6
6.2 Unit Conversion ................................................................................................................................. 6
6.3 Parts Counting ................................................................................................................................... 6
6.4 Setting Upper and Lower Limit. ......................................................................................................... 6
7 FUNCTION SETTINGS ......................................................................................................................... 7
7.1 Using the Function Settings ............................................................................................................... 7
8 TROUBLESHOOTING .......................................................................................................................... 7
9 WARRANTY INFORMATION ............................................................................................................... 8
10 © COPYRIGHT INFORMATION .......................................................................................................... 8
VELAB, Co. 2017 3 Rev. 1 | Nov_2017
1 INTRODUCTION
Thank you for purchasing a VE-K waterproof scale from VELAB, Co. Throughout the use of this product,
you will fully realize the quality and reliability the VE-K series offers will meet all your requirements.
If you have any questions or suggestions regarding this line of products, please free to contact us.
1.1 Safety Precautions
Please use the following safety precautions when operating VELAB, Co. products.
• Verify that the AC adapter input voltage matches the local AC power supply.
• When installing and dismantling the balance, make sure the power is off
• Use the balance in the correct environment only, operational temperature is 10°C to -40°C
• Avoid air currents and vibration
• Don't operate the balance in a harmful environment
• Don't drop object to the scale
• Don't transport or support the balance by its pan
• Service should be performed only by authorized personnel.
• Before using the balance, you should let it warm-up 20-30 minutes
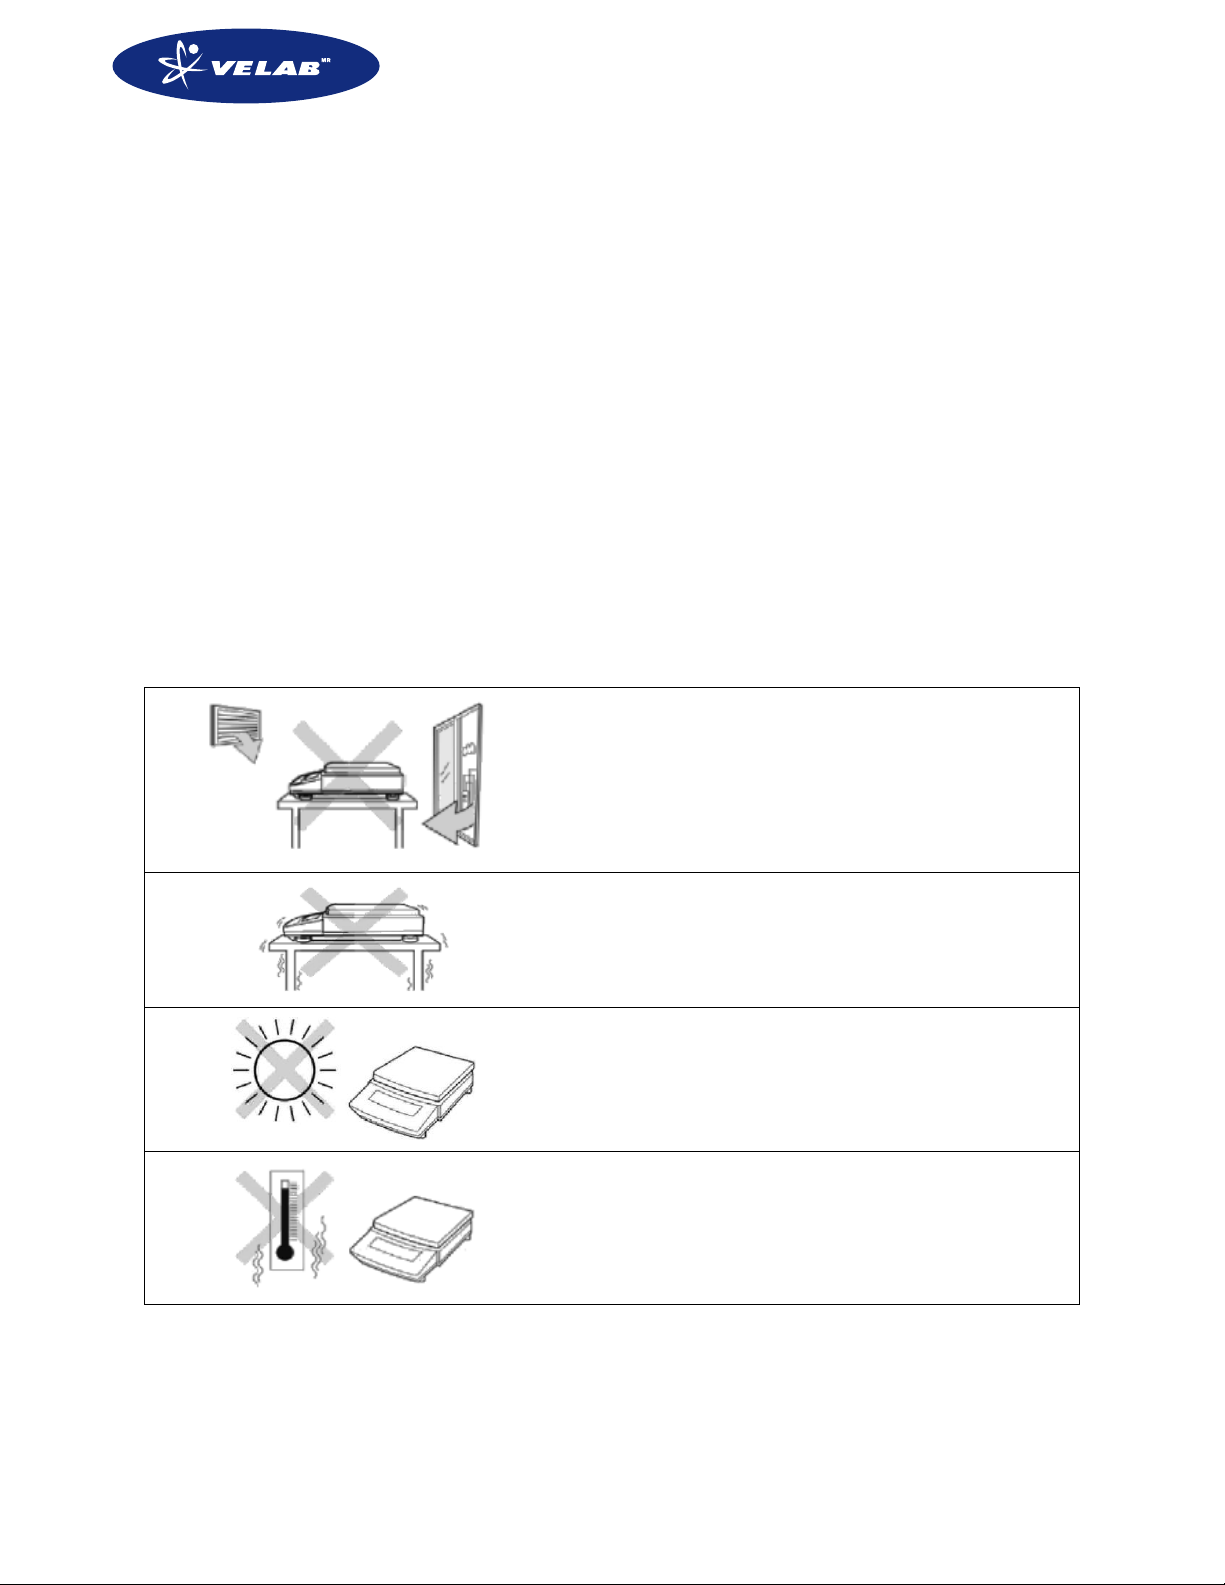
1.2 Avoid Installing in the following Locations
Assure that the stability and reliability are consistent and avoid the following:
Avoid areas with air currents (air-condition
vents or window)
Avoid areas that can cause vibration
Avoid direct sunlight
Avoid excessive high temperature

VELAB, Co. 2017 4 Rev. 1 | Nov_2017
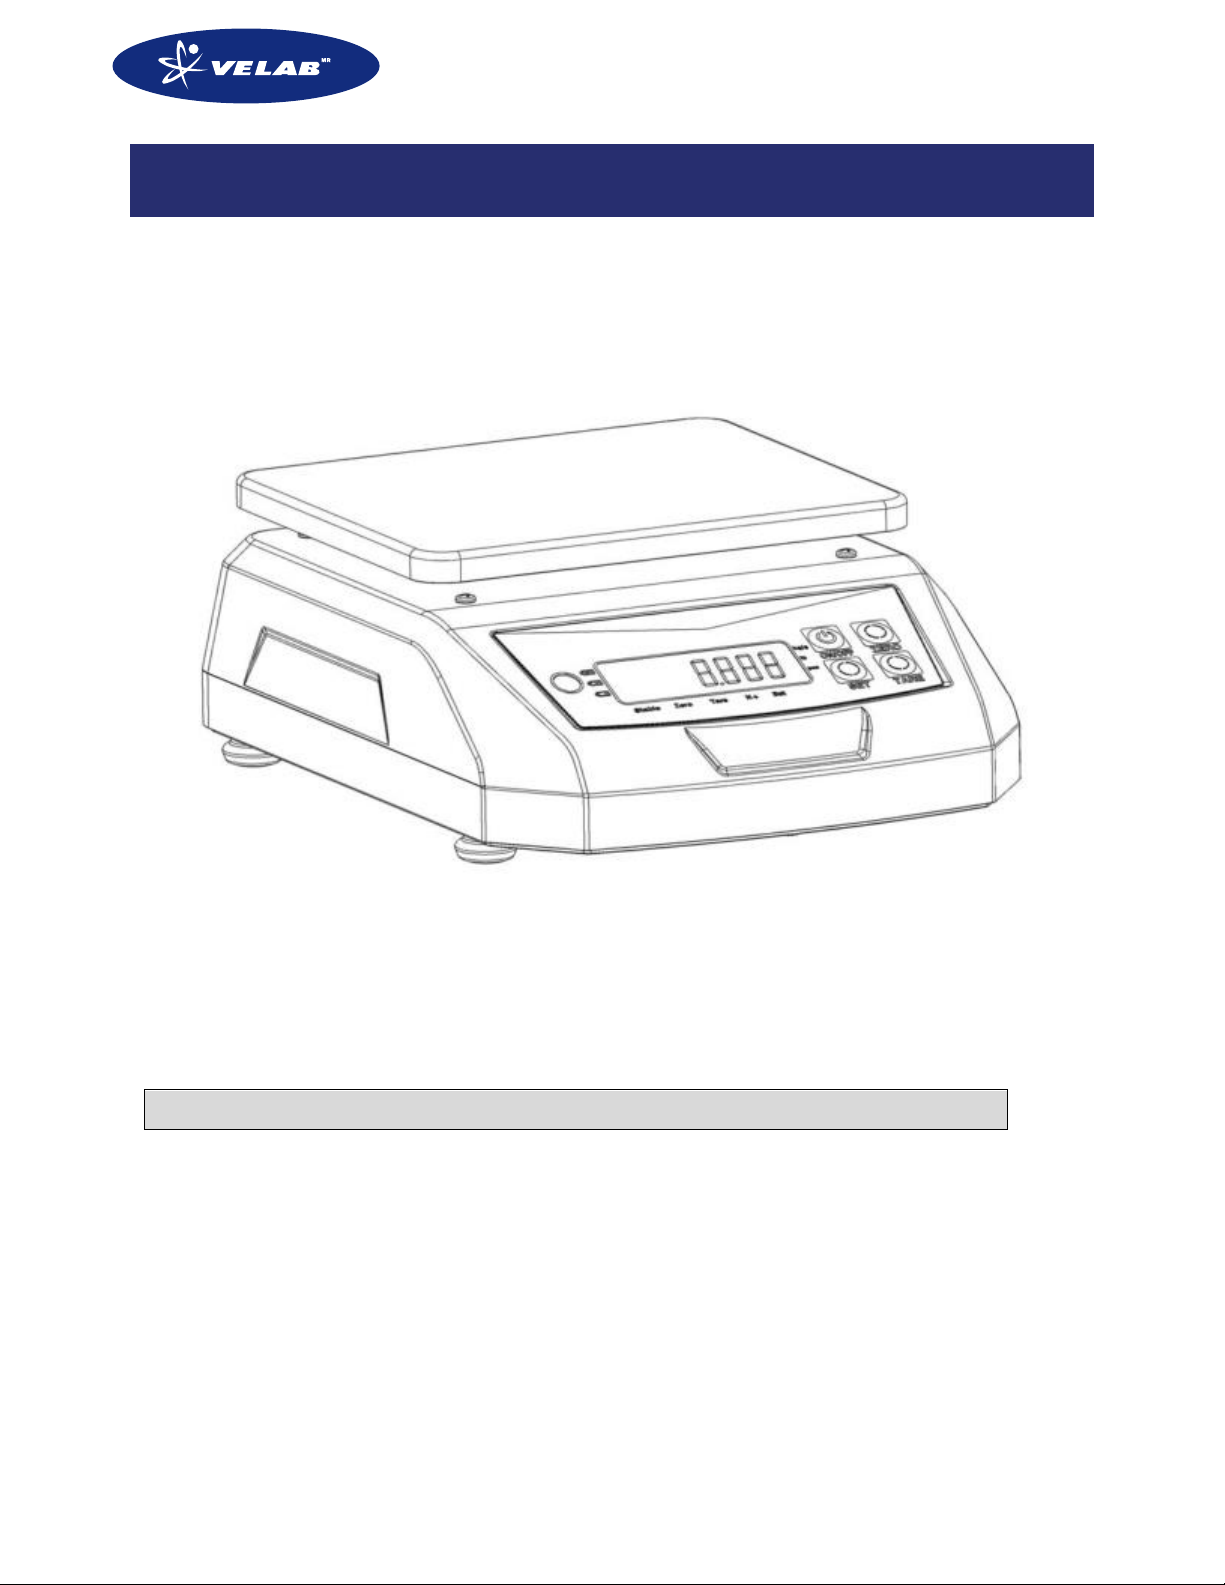
1.3 Product Features
1. Modern appearance and powerful functionality
2. High quality 304 stainless steel construction for easy cleaning
3. Large LCD display, is easily visible
4. Quick operation & response times
5. Weighing units: g, kg, oz, lb
6. Full range taring function
7. IP 68 protection against water and dust
8. AC/DC multiple function, rechargeable battery
2 TECHNICAL SPECIFITATIONS
TECHNICAL DATA
VE-3K1
VE-6K2
VE-15K5
VE-30K10
Capacity
3kg / 7lb
6kg / 13lb
15kg / 33lb
30kg / 66lb
Readability
1g / 0.002lb
2g / 0.005lb
5g / 0.01lb
10g / 0.02lb
Repeatability
1g
2g
5g
10g
Linearity
1g
2g
5g
10g
Weighing Plate Dimensions
225 x 185mm / 8.9” x 7.3”
Large Backlit LCD Display
Digit height 22mm / 0.9”
Weighing Units
g, kg / oz, lb
Calibration
External Calibration
Stabilization Time
2 seconds
Power Supply
12V DC 50/60Hz 1000mA / Internal rechargeable battery
Operating Temperature
5° C – 40° C
IP Protection
IP68
Housing
Stainless Steel (304 grade)
Overall Dimensions
240 x 130 x 30mm / 9.4” x 5.1” x 1.2” (wxdxh)
Weight
5.5kg / 12lbs

VELAB, Co. 2017 5 Rev. 1 | Nov_2017
3 OPERATING PANEL AND KEY FUNCTION DEFINITION
3.1 Key Definition
KEY/BUTTON
FUNCTION
FUNCTION DESCRIPTION
Press for app. 3 seconds
Tares the balance
Sets the display to zero
---
Press for app. 3 seconds
In weighing mode, press the key
to tum on/off the
Turns balance ON or OFF
---
4 ATTENTION BEFORE USE
4.1 Conventional Attention
1. In order to operate the scale correctly, please take the time to completely read the instruction manual
before using the unit.
2. Keep the scale clean and recharge the battery once every three months if the product is not in use for
a long period of time.
4.2 Attention Before Use
1. Place the scale on a clean, sturdy flat surface to avoid vibrations, heat sources, or rapid temperature
changes. Adjust the 4 leveling feet so that the leveling bubble is centered in the circle. Be sure the scale
is level each time its location is changed.
Air level setting
2. Connect the AC adapter to the power supply and avoid interference from other devices plugged in.

VELAB, Co. 2017 6 Rev. 1 | Nov_2017
3. Do not place any load on the pan when you turn the scale on.
4. Let the scale warm up for at least 5 minutes before use.
5. For weighing accuracy, the center of gravity of the object should be placed in the center of the pan,
away from the edge of pan.
WARNING: Do not charge scale while in water or wet conditions of use!
5 INSTALLATION
5.1 Unit Installation
1. Contents in Box
- Scale
- Instruction manual
- Stainless steel pan
- Packing Foam
6 OPERATION
6.1 Switch ON Scale
Press the key to switch the scale on. The LED display will light up and count backward from 999999
to 000000. Then the display will show the model and voltage of battery and will enter weighing mode.
6.2 Unit Conversion
Press the key for 3 seconds to change the weighing units to either kg, g /lb, oz, pcs.
6.3 Parts Counting
Press the key for 3 seconds until the LED display shows {SP=5}, and place the sample on the
weighing pan, then press key to select the sample number 5, 10, 20, 50, 100, 200, 500, press
key to display the sample number.
6.4 Setting Upper and Lower Limit.
In weighing mode, to access the high and low limit function, press the key for 3 seconds, the LED
display will show {SET-HI}, press the key to enter higher limit settings: press key to change
number, press key to move position. To set the lower limit, press the key until the LED display
shows {SET-LO}, press the key to enter the lower limit settings, press key to change the number,
press key to move position. To set the limit press the key until the LED display shows {SET-Li},
press the key once more to confirm the settings.
To set the stable alarm settings, press the key until the LED display shows {SET -CK}, press the
key to enter stable mode settings. Press key to select, stable alarm {Lim-St} or unstable alarm {Lim-

VELAB, Co. 2017 7 Rev. 1 | Nov_2017
uS}, press key to set and display {Lim-BZ}. Press the key to enter acoustic alarm settings, press
the key to select, alarm/buzzer {Lim-BZ} or no buzzer tweet {Lim-Mu}, press the key to set and
return to normal weighing mode.
7 FUNCTION SETTINGS
7.1 Using the Function Settings
In weighting mode, press and hold the key to enter user functions settings, the LED display will
show {SPED-X}, then press the key to set weighing speed, {SPED –F} for fast weighing speed, {SPED-
M} for medium weighing speed and {SPED-S} for slow weighing speed.
To set the anti-shaking filters, press the key, the LED display will show {AJ-X}, press the key to
set anti-shaking function. “AJ0-AJ9 express that 0-9d division are locked”, then press the key to
display {APF-XX}.
To set the auto-power off time function, press the key the LED display will show {APF-0} = no power
off, {APF-30} = 30min. power off and {APF-60} = 60 min. power off.
To set the power saving mode function, press the Key until the LED display shows {PS-XXX} and
press the key to set power saving mode: {PS-on} = power saving mode is turned on and {PS-off} =
power saving mode is turned off, then press the key to display: {Save-Y} = save the unit when turned
on and {Save –N} = don’t save the unit when turned on.
Then press the key to return weighing mode.
8 TROUBLESHOOTING
ERROR
SOLUTION
Low voltage lamp flicker
Recharge the battery
Display B-Err
Recharge the battery
O-load
Overload, loss weight
O-zero
Exceed initial zero, modify settings or remove objects from pan
Err 1
Check setting on balance

VELAB, Co. 2017 8 Rev. 1 | Nov_2017
9 WARRANTY INFORMATION
VELAB, Co. offers Limited Warranty (Parts and Labor) for components that fail due to defects in
materials or assembly. The guarantee starts from the delivery date.
During the warranty period, if any repair is necessary, the customer must inform the supplier or VELAB,
Co. The company or its authorized technician reserves the right to repair or replace any component at
its own discretion. Any shipping costs involved in sending defective units to a repair center are the
responsibility of customers.
The warrantee will be canceled if the equipment is not returned in the original packaging and the
correct processed claim documentation. All claims are the sole discretion of VELAB, Co.
This warranty does not cover equipment with defects or poor performance caused by abuse, accidental
damage, exposure to radioactive or corrosive materials, negligence, defective installation, unauthorized
modifications, repair or failure to follow the requirements and recommendations stated in user manual.
Repairs carried out under the warranty do not extend the warranty period. Components removed during
warranty repairs become the property of the company.
10 © COPYRIGHT INFORMATION
© Copyright of VELAB, Co., all rights reserved. This publication may “NOT” be reprinted or translated in
any form or through any means without prior permission of VELAB, Co.
VELAB, Co. reserves the right to make changes in the technology, features, specifications and design of
its equipment without prior notice.
All information contained in this publication is up to date, complete and accurate VELAB, Co. is not
responsible for interpretation errors that may result from reading the material stated on this document.
VELAB CO.
2212 Ithaca Ave. Suite 40
Mc Allen, TX, 78501
USA
Tel: +1 956.429.3410
Fax: +1 956.429.3410
E-mail: sales@velab.net
 Loading...