

Montaj ve
TR
Kullanım Kılavuzu
Installation and
EN
Operating Instructions
Montage und
DE
Gebrauchsanleitung
Üç Fazlı Elektronik Ani Su Isıtıcı
Dreiphasiger Durchlauferhitzer
Three Phase Electronic
Instant Water Heater
TR
-2-
Cihazın montajı (su ve elektrik bağlantısı), ilk kez çalıştırma
işlemi ve bakımı yetkili bir teknisyen tarafından bu kılavuzda
belirtilen talimatlara uygun olarak yapılmalıdır!
Veito üç fazlı elektronik ani su ısıtıcıyı tercih ettiğiniz için teşekkür ederiz.
Bu kılavuz BLUE S üç fazlı elektronik ani su ısıtıcıları için gerekli bütün
montaj ve kullanma talimatlarını içerir.
Cihazın montajı, ilk kez çalıştırma işlemi ve bakımı uygulanabilir
standartlardan ve montaj düzenlemelerinden sorumlu olacak yetkili bir
teknisyen tarafından yapılmalıdır.
Montaj esnasında gösterilecek itina, cihazınıza uzun ve sorunsuz bir
çalışma ömrü sağlayacaktır. Verilen talimatlar doğru uygulanmadığı
takdirde oluşabilecek zararlardan firmamız sorumlu değildir.
Cihazın montajında ve kullanımından
önce lütfen bu talimatların hepsini
dikkatlice okuyunuz ve sonraki
kullanımlar için aklınızda tutunuz.
Lütfen bu kitabı gelecekte kullanılacak
bir referans olarak saklayınız.
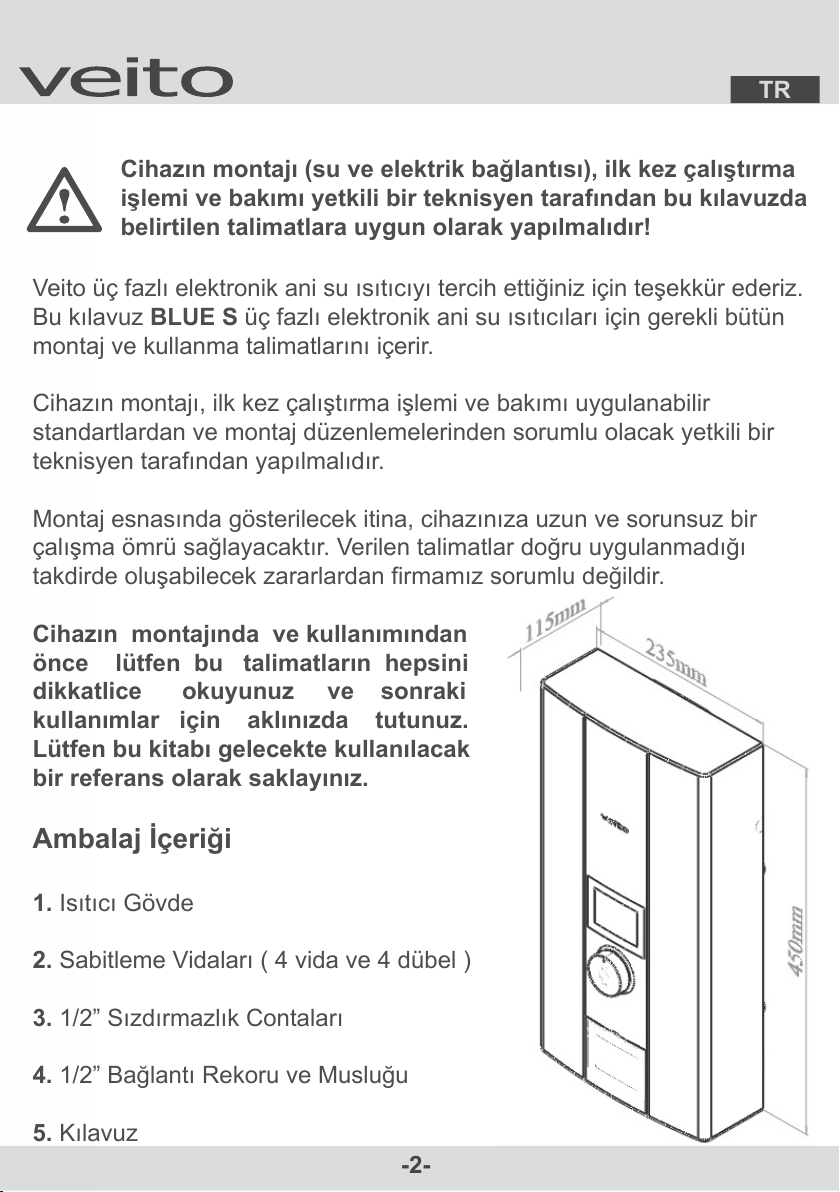
Ambalaj İçeriği
1. Isıtıcı Gövde
2. Sabitleme Vidaları ( 4 vida ve 4 dübel )
3. 1/2” Sızdırmazlık Contaları
4. 1/2” Bağlantı Rekoru ve Musluğu
5. Kılavuz
TR
-3-
Cihazın Tanımı
Üç fazlı elektronik ani su ısıtıcısı, sadece kapalı (basınçlı) tesisat
bağlantıları için uygundur.
Sıcak su musluğu açıldığında, ani su ısıtıcısı çalışır ve suyu ısıtır. Sıcak su
musluğu kapatıldığında, cihaz da tekrar kapanır. Cihaz suyu içinden
geçerken ısıtır.
Cihaz, önceden ısıtılmış suyla çalıştırılamaz, aksi halde yüksek sıcaklık
sigortası atar (Güneş enerji sistemleri ile birlikte kullanım için lütfen ilgili
bölüme göz atınız).
Güvenlik Uyarıları
Bu cihaz, evsel kullanım veya evsel kullanıma benzeyen ancak edüstriyel
olmayan; örneğin dükkanların, büroların ve diğer mesleki işletmelerin ortak
hizmet mutfaklarında ve ayrıca pansiyonların, küçük otellerin ve benzeri
ikamet donanımlarının banyolarında kullanım için uygundur.
Montaj işlemine başlamadan önce suyu ve elektriği kesiniz.
Cihaza gelen elektrik akımını kesmeden, cihazın kapağını kesinlikle
açmayınız.
Doğru şekilde montajı yapılmamış ve tam olarak sağlıklı çalışmayan
cihazı kullanmayınız.
İlk kullanımdan önce cihaz tamamen su ile doldurulmalıdır. Cihazın suyu
herhangi bir sebeple boşaltılırsa (su tesisatında yapılan çalışma, donma
riskine karşı, tamirat, bakım vb.) cihaz çalıştırılmadan önce tekrar su ile
tamamen doldurulmalıdır.

TR
-4-
Yasal talimatlara, elektrik ve su dağıtım kurumlarının bağlantı koşullarına
uyulmalıdır. Gerek cihazın kendisinde gerekse elektrik ya da su
bağlantısında kesinlikle teknik bir değişiklik yapılamaz.
Kurulum yerinde, kontak açıklığı en az 3 mm olan tam kutuplu bir kesme
şalteri monte edilmiş olmalıdır.
Ani su ısıtıcısı, koruma sınıfı I olan bir cihazdır ve topraklamalı kabloyla
bağlanmalıdır.
Elektrik ve su tesisatında risk oluşturabilecek bağlantılardan ve
malzemelerden sakınınız.
Bu cihaz sürekli olarak sabit döşenmiş tesisatlara bağlanmalıdır. Kablo
kesiti, kurulu olan güce uygun olmalıdır.
Topraklamalı su tesisatları, bir topraklama hattının yerini alamaz.
Montajdan sonra, elektrik ileten parçalar temas edilemeyecek şekilde
korumalı olmalıdır.
Cihaz bir müddet kullanıldığında bağlantıların çok sıcak olabileceğine
dikkat ediniz.
Don olayı esnasında ya da ihtimalinde cihazı kullanmayınız. Cihaz
kullanılmadan önce su tamamen akışkan hale gelmelidir.
Demonte edilen cihaz, içinde su kalması nedeniyle donma tehlikesinden
uzak saklanmalı ve asla dona maruz kalmamalıdır.
Ani su ısıtıcısı, donma tehlikesi olmayan bir yerde tesis
edilmelidir.
TR
-5-
Montaj sırasında doğru yerleştirilmeyen ön kapak nedeniyle ya da herhangi
bir şekilde cihazın içerisine su girerse cihazı kullanmayınız.
Cihazda herhangi bir problem oluşması halinde hemen sigortasını
kapatınız.
Cihazda herhangi bir su sızıntısı olması halinde hemen suyu kesiniz.
Tehlikenin önlenmesi için, tamir işleri sadece bir teknisyen tarafından
gerçekleştirilmelidir.
Giriş suyu filtresi belli aralıklarla temizlenmeli ya da üretici tarafından
tavsiye edilen yenisi ile değiştirilmelidir.
Bu cihaz fiziken yetersiz, algılamada zorluk çeken veya zihinsel özürlü
kişilerce (8 yaş altındaki çocuklar da dahil) veya onların güvenliğinden
sorumlu bir kişinin gözetimi altında olmaksızın; veya cihazın kullanımı ile
ilgili talimatlar hakkında deneyimsiz ve bilgisiz kişilerce kullanıma uygun
değildir.
Dikkat edilmelidir ki 43 °C’nin üzerindeki su sıcaklıkları özellikle çocuklar
için yüksek sıcaklık olarak algılanır ve yanma hissine sebep olabilir.
Çocukları cihazdan uzak tutun.
Cihazla oynamalarını önlemek için, çocukların dikkatini çekin.
Cihazın temizliği ve kullanıcı bakımı çocuklar tarafından gözetmen
bulunmadan yapılmamalıdır.
TR
-6-
Cihazın Montajı
Montajdan önce su besleme hattını kapatın. Elektrik bağlantı
kablosunda elektrik akımı kesilmiş olmalıdır. Sigortaları yerinden
sökün veya kapatın.
Yasal talimatlara, elektrik ve su dağıtım kurumlarının bağlantı koşullarına
ve cihazın üzerinde bulunan etikette belirtilen özellikler ve teknik değerlere
uyulmalıdır.
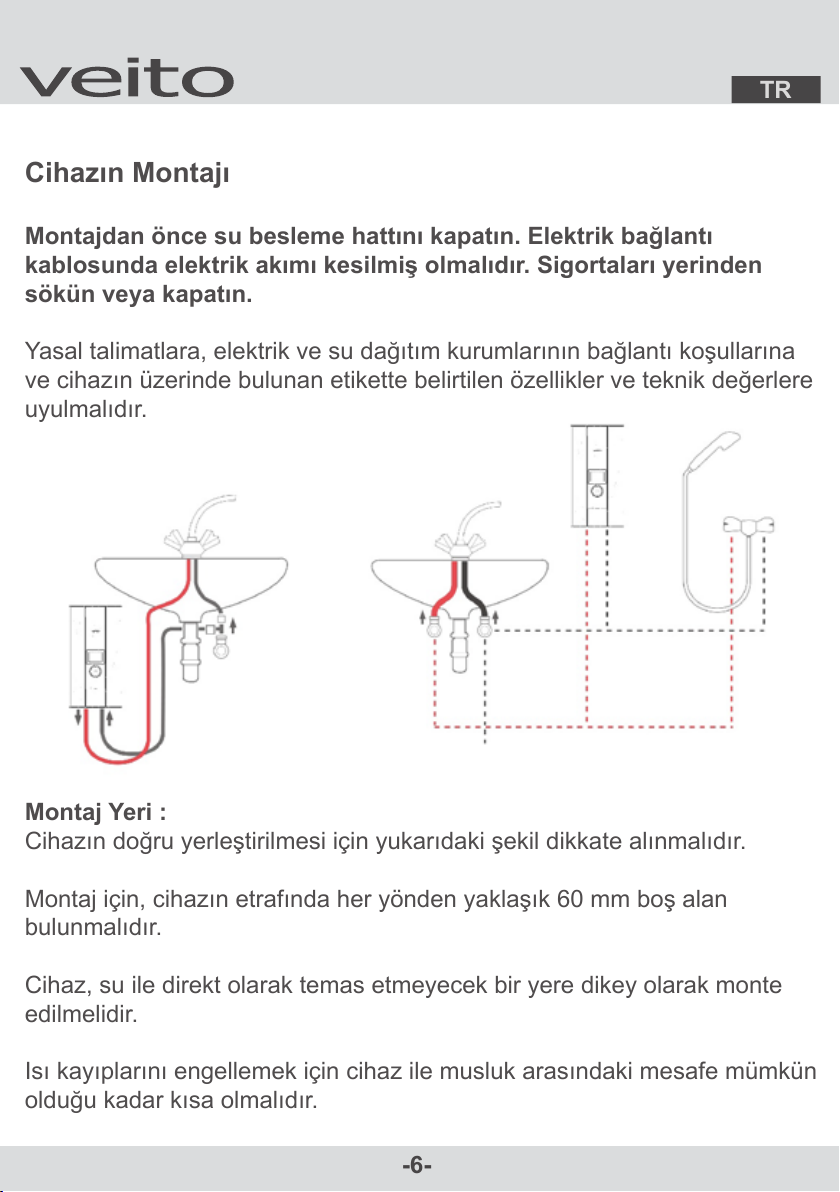
Montaj Yeri :
Cihazın doğru yerleştirilmesi için yukarıdaki şekil dikkate alınmalıdır.
Montaj için, cihazın etrafında her yönden yaklaşık 60 mm boş alan
bulunmalıdır.
Cihaz, su ile direkt olarak temas etmeyecek bir yere dikey olarak monte
edilmelidir.
Isı kayıplarını engellemek için cihaz ile musluk arasındaki mesafe mümkün
olduğu kadar kısa olmalıdır.
Cihazın bakım ve onarımı için su tesisatının uygun bir yerine cihazın giriş
suyunu kapatacak şekilde ilave bir vana (su montaj düzenlemelerine uygun
olacak şekilde) bağlanmalıdır.
Cihaz sadece, elektrik direnci 15°C’de ≥ 1300 Ωcm olan suların ısıtılması
için onaylanmıştır. Suyunuzun elektrik direnci, yetkili su dağıtım
kurumundan öğrenilebilir.
Cihaz ile birlikte verilen su giriş musluğu, su çıkış rekoru ve sızdırmazlık
contaları, cihazın kapalı devre tesisata montajı esnasında kesinlikle
kullanılmalıdır! Bağlantıların hiçbirinde sızdırmazlık amacıyla farklı conta
malzemeleri kullanmayınız.
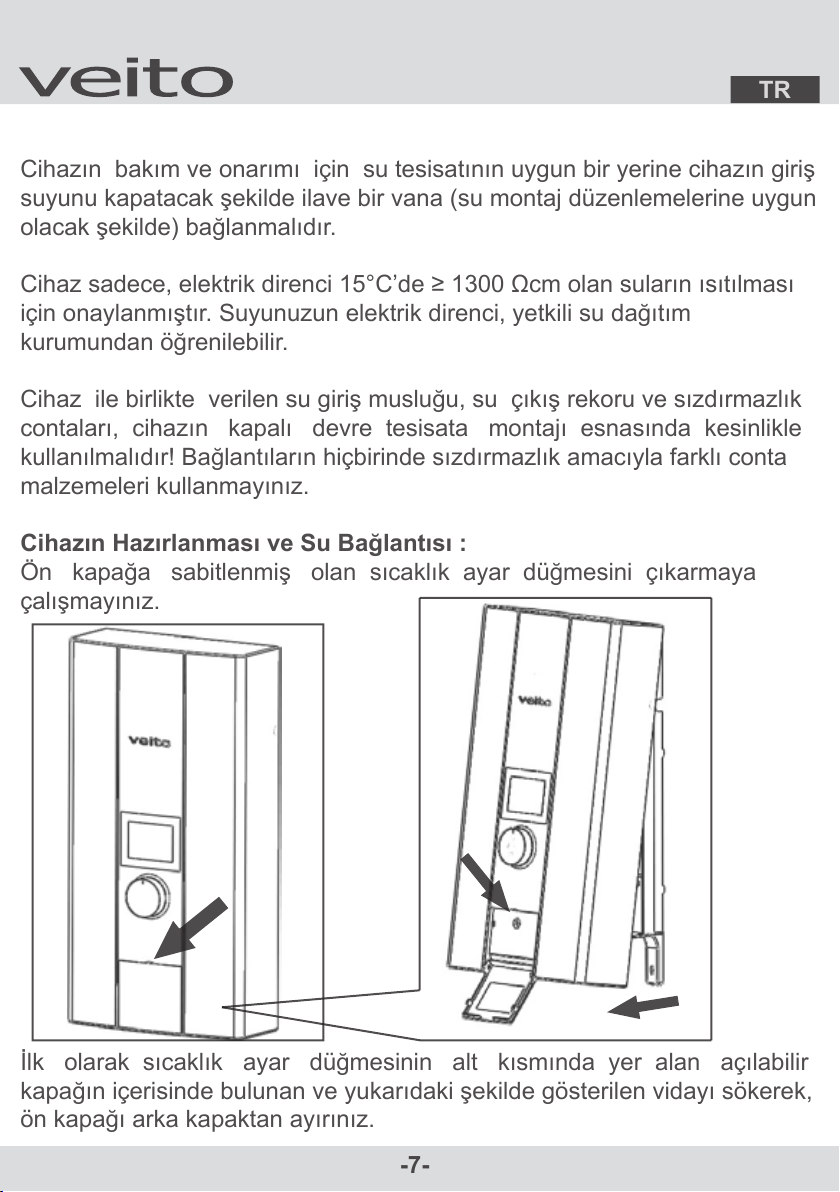
Cihazın Hazırlanması ve Su Bağlantısı :
Ön kapağa sabitlenmiş olan sıcaklık ayar düğmesini çıkarmaya
çalışmayınız.
İlk olarak sıcaklık ayar düğmesinin alt kısmında yer alan açılabilir
kapağın içerisinde bulunan ve yukarıdaki şekilde gösterilen vidayı sökerek,
ön kapağı arka kapaktan ayırınız.
TR
-7-TR-8-
Cihazın bağlanacağı kapalı devre tesisatın soğuk su hattı ve sıcak su hattı
bağlantılarını montaj işlemi için hazır hale getiriniz. Eğer varsa bağlantı
uçlarında yer alan kör tapaları sökünüz. Su şebekesini cihazın su girişine
bağlamadan önce yabancı maddeleri sistemden temizleyiniz. Bu işlem su
şebekesine bir hortum bağlandıktan sonra suyun bir müddet akıtılmasıyla
sağlanabilir.
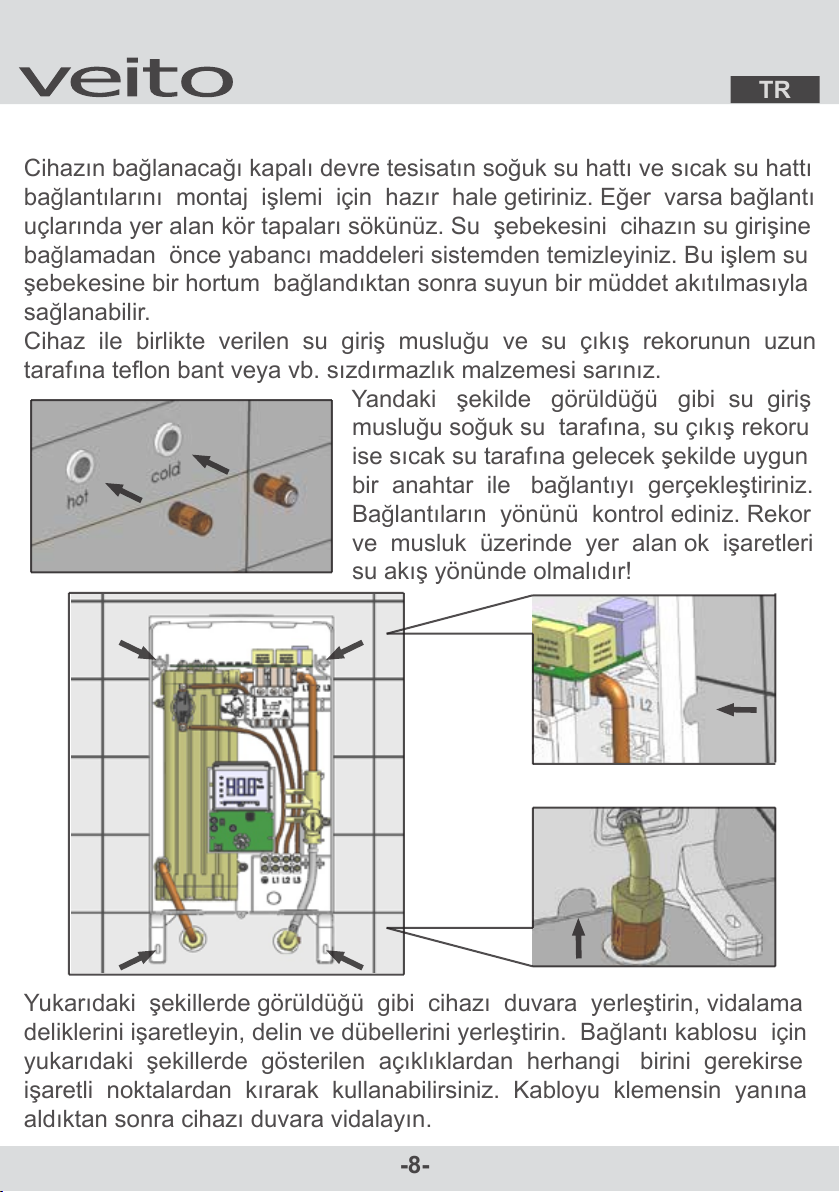
Cihaz ile birlikte verilen su giriş musluğu ve su çıkış rekorunun uzun
tarafına teflon bant veya vb. sızdırmazlık malzemesi sarınız.
Yandaki şekilde görüldüğü gibi su giriş
musluğu soğuk su tarafına, su çıkış rekoru
ise sıcak su tarafına gelecek şekilde uygun
bir anahtar ile bağlantıyı gerçekleştiriniz.
Bağlantıların yönünü kontrol ediniz. Rekor
ve musluk üzerinde yer alan ok işaretleri
su akış yönünde olmalıdır!
Yukarıdaki şekillerde görüldüğü gibi cihazı duvara yerleştirin, vidalama
deliklerini işaretleyin, delin ve dübellerini yerleştirin. Bağlantı kablosu için
yukarıdaki şekillerde gösterilen açıklıklardan herhangi birini gerekirse
işaretli noktalardan kırarak kullanabilirsiniz. Kabloyu klemensin yanına
aldıktan sonra cihazı duvara vidalayın.
TR
-9-
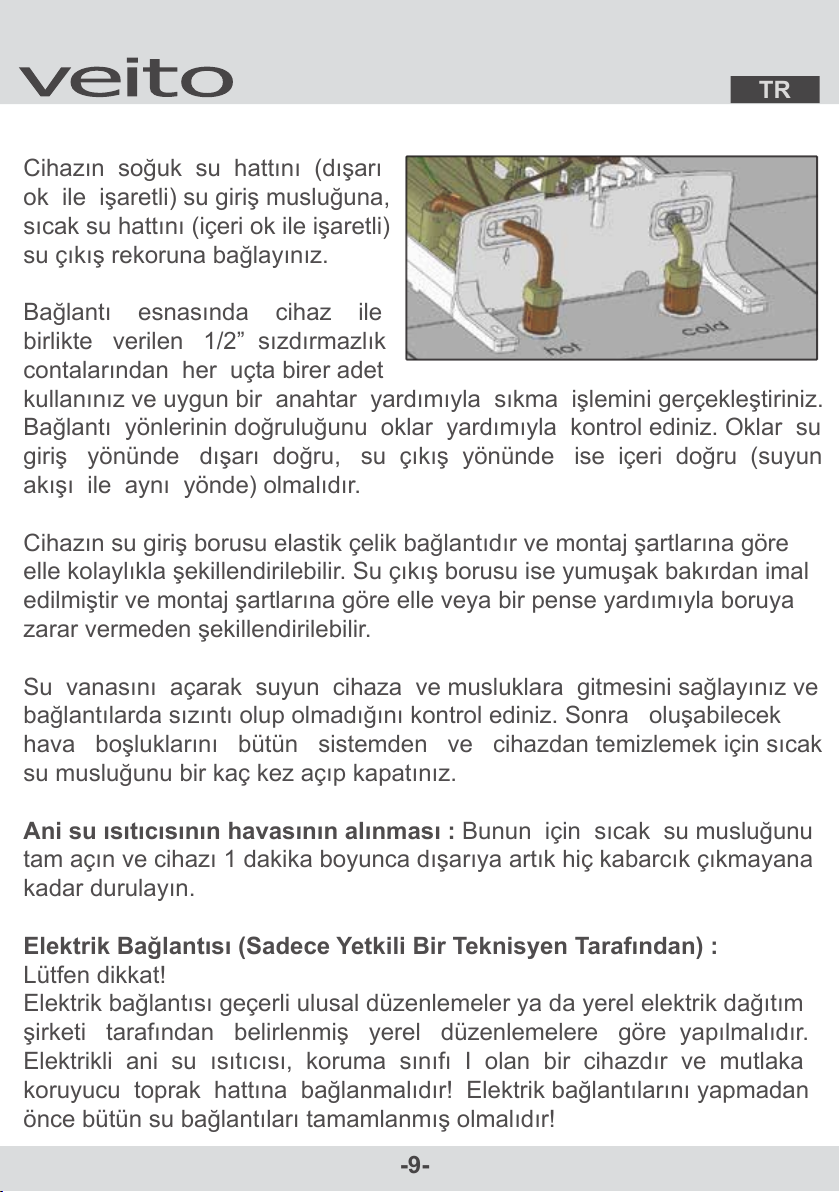
Cihazın soğuk su hattını (dışarı
ok ile işaretli) su giriş musluğuna,
sıcak su hattını (içeri ok ile işaretli)
su çıkış rekoruna bağlayınız.
Bağlantı esnasında cihaz ile
birlikte verilen 1/2” sızdırmazlık
contalarından her uçta birer adet
kullanınız ve uygun bir anahtar yardımıyla sıkma işlemini gerçekleştiriniz.
Bağlantı yönlerinin doğruluğunu oklar yardımıyla kontrol ediniz. Oklar su
giriş yönünde dışarı doğru, su çıkış yönünde ise içeri doğru (suyun
akışı ile aynı yönde) olmalıdır.
Cihazın su giriş borusu elastik çelik bağlantıdır ve montaj şartlarına göre
elle kolaylıkla şekillendirilebilir. Su çıkış borusu ise yumuşak bakırdan imal
edilmiştir ve montaj şartlarına göre elle veya bir pense yardımıyla boruya
zarar vermeden şekillendirilebilir.
Su vanasını açarak suyun cihaza ve musluklara gitmesini sağlayınız ve
bağlantılarda sızıntı olup olmadığını kontrol ediniz. Sonra oluşabilecek
hava boşluklarını bütün sistemden ve cihazdan temizlemek için sıcak
su musluğunu bir kaç kez açıp kapatınız.
Ani su ısıtıcısının havasının alınması : Bunun için sıcak su musluğunu
tam açın ve cihazı 1 dakika boyunca dışarıya artık hiç kabarcık çıkmayana
kadar durulayın.
Elektrik Bağlantısı (Sadece Yetkili Bir Teknisyen Tarafından) :
Lütfen dikkat!
Elektrik bağlantısı geçerli ulusal düzenlemeler ya da yerel elektrik dağıtım
şirketi tarafından belirlenmiş yerel düzenlemelere göre yapılmalıdır.
Elektrikli ani su ısıtıcısı, koruma sınıfı I olan bir cihazdır ve mutlaka
koruyucu toprak hattına bağlanmalıdır! Elektrik bağlantılarını yapmadan
önce bütün su bağlantıları tamamlanmış olmalıdır!
TR
-10-
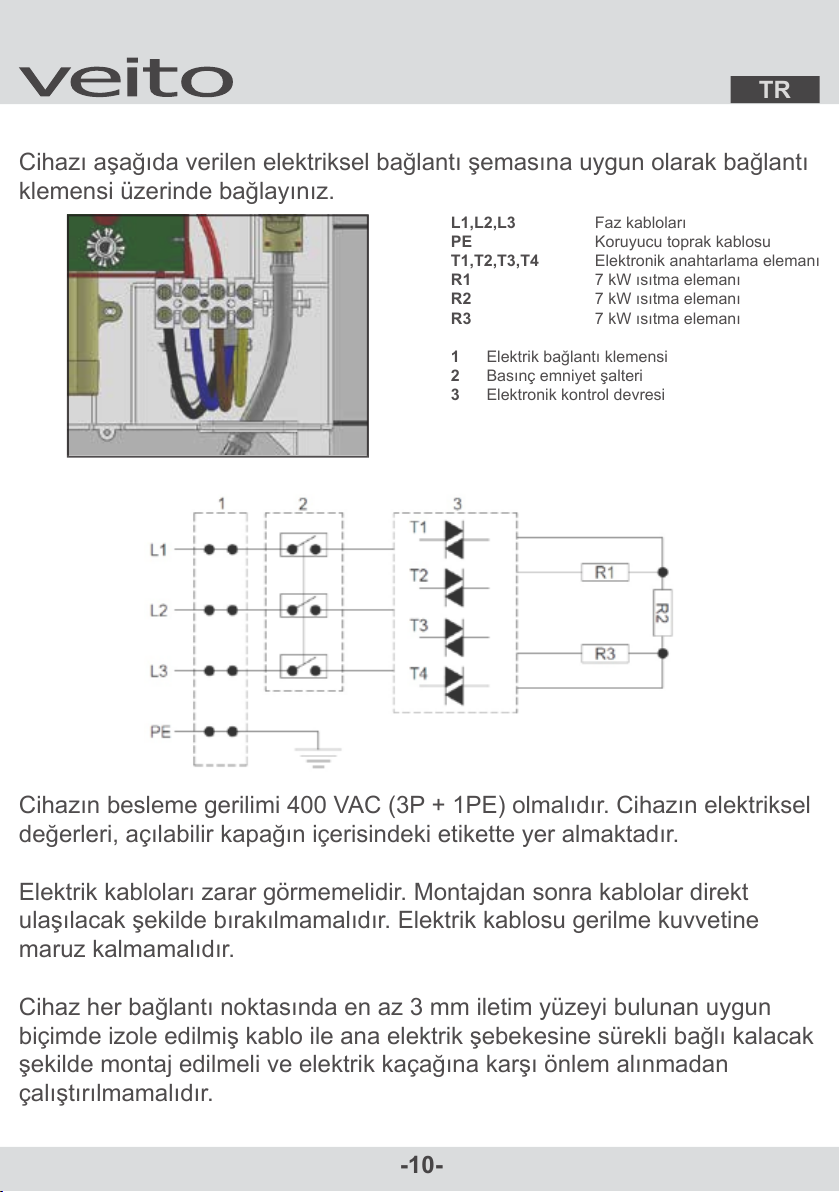
Cihazı aşağıda verilen elektriksel bağlantı şemasına uygun olarak bağlantı
klemensi üzerinde bağlayınız.
L1,L2,L3 Faz kabloları
PE Koruyucu toprak kablosu
T1,T2,T3,T4 Elektronik anahtarlama elemanı
R1 7 kW ısıtma elemanı
R2 7 kW ısıtma elemanı
R3 7 kW ısıtma elemanı
1 Elektrik bağlantı klemensi
2 Basınç emniyet şalteri
3 Elektronik kontrol devresi
Cihazın besleme gerilimi 400 VAC (3P + 1PE) olmalıdır. Cihazın elektriksel
değerleri, açılabilir kapağın içerisindeki etikette yer almaktadır.
Elektrik kabloları zarar görmemelidir. Montajdan sonra kablolar direkt
ulaşılacak şekilde bırakılmamalıdır. Elektrik kablosu gerilme kuvvetine
maruz kalmamalıdır.
Cihaz her bağlantı noktasında en az 3 mm iletim yüzeyi bulunan uygun
biçimde izole edilmiş kablo ile ana elektrik şebekesine sürekli bağlı kalacak
şekilde montaj edilmeli ve elektrik kaçağına karşı önlem alınmadan
çalıştırılmamalıdır.
TR
-11-
Elektrik kaynağı, cihazı ve varolan devreleri besleyecek kapasitede olmalıdır.
Cihazı korumak için elektrik besleme hattına cihazın akımıyla orantılı bir
sigorta bağlanmalıdır.
Sigorta panosunda 40A ya da daha yüksek bir ana sigorta ve cihazın
bağlanacağı bağımsız bir sigorta hattı olup olmadığını kontrol ediniz. Eğer
sigorta panosu 40A’den daha düşük bir ana sigortaya sahipse ya da panoda
bağlanabileceği bağımsız bir sigorta hattı yoksa elektrik montajının
yapılabilmesi için montaj yerinin elektrik tesisatına ya da doğrudan cihazın
kendisine yeni bir hat döşenmeli ve sigorta ile emniyetlenmelidir.
Cihaz kendi bağımsız elektrik hattına bağlanmalı; aydınlatma, zil ya da fırın
hattına bağlanmamalıdır.
Koruyucu topraklama hattı montaj yerindeki diğer cihazların açıktaki metal
parçalarına ve cihazın montaj edildiği topraklama hattına TSE standartlarına
uyulacak şekilde bağlanmalıdır.
Cihazdan maksimum verim elde edebilmek için sigorta panosu ile cihaz
arasındaki en kısa kablo mesafesi kullanılmalıdır. Kablo boyu ayrıca devre
kesme zamanı ve sıcaklık sınırlamaları bakımından da önem taşır. Akım
gereksinimi, voltaj düşümü ve kablo kesiti açısından oluşturulacak olan bir
hat kombinasyonunda izin verilen bir maksimum kablo boyu sınırlaması
vardır.
Kablolar ısıl izolasyon ile çevrelenmiş, duvar içerisinden döşenmiş, sıcaklığı
30°C’den yüksek olan bir yerden geçirilmiş ya da birbirine burularak
bağlanmışsa, kablodan geçen akım miktarı azaltılır. Aynı akım değerlerini
sağlamak için ise daha büyük bir kablo kesiti seçilmesi gerekir.
Kullanılacak kablo kesitinin cihazın gücüyle orantılı olması gerektiği göz
önünde bulundurularak cihazın montajında minimum 4 x 2,5 mm² kablo
kullanılması tavsiye edilir.

TR
-12-
Birçok durumda doğru kablo kesiti ve boyunun tespiti için yetkili bir elektrikçi
tarafından montaj yerinin incelenmesi gerekir.
Herhangi bir elektrik bağlantısı yapmadan önce hiçbir terminalde elektrik
olmadığını kontrol ediniz.
Herhangi bir şüphede sigorta panosundan ana elektrik akımını kesiniz.
Uygun bir araç kullanarak elektrik kablosunun dışındaki izoleyi yaklaşık 5 cm
ve bağlantı kablolarını yaklaşık 1 cm uzunlukta sıyırınız. Bu işlemi yaparken
elektrik kablosu zarar görmemelidir.
Elektrik kablosunu cihazın kablo girişlerinin birinden içeriye sokunuz ve
uçlarını klemensin yanına getiriniz. Bağlantı kablolarını elektrik bağlantı
terminallerine elektrik bağlantı şemasına göre dikkatlice bağlayınız.
Bağlantı klemenslerinin vidalarını tamamen sıkınız ve kablo izolelerinin
bağlantı vidalarının altında kalmamasına dikkat ediniz. Gevşek bağlantılar
kablonun ısınmasına sebep olabilir.
Elektrik kablosu gerek duvardaki yerleşimi ve gerekse korunması
bakımından TSE standartlarına uyularak emniyetlenmelidir.
Her elektrikli cihazda olduğu gibi kullanım ve yaşlanma sonucu oluşabilecek
zayıflamalar nedeniyle cihaz ve montajı en az iki yıl ara ile yetkili bir elektrikçi
tarafından kontrol edilmelidir.
Cihazın ön kapağı kapatılıncaya kadar elektriğini açmayınız.
Emniyet açısından cihazın basınç emniyet şalteri fabrika çıkışında kapalı
olarak konumlandırılmıştır. Cihazın ön kapağını kapatmadan önce basınç
emniyet şalteri mutlaka açılmalıdır. Aksi takdirde cihaz ısıtma işlemini
gerçekleştiremez!
TR
-13-
Basınç Emniyet Şalterini Açma ve İlk Çalıştırma
Cihazın zarar görmesini engellemek için yapılması gereken ilk işlem, sıcak
su musluğunu açarak cihaz içinde olabilecek kalıntıları temizlemek ve ısıtma
elemanları çalışmaya başlamadan önce cihazı tamamen su ile doldurmaktır.
Bu işlem sırasında basınç şalteri kapalı konumda olmalıdır. Giriş suyu
vanasını açtıktan sonra sıcak su musluğunu açınız ve düzenli şekilde su
akışı oluncaya kadar bekleyiniz. Hava ve yabancı maddelerden arınmış
suyun düzgün akışı yaklaşık 1 dakika sonra sağlanacaktır. Sonra bütün
hava boşluklarının sistemden ve cihazdan tamamen temizlenmesi için sıcak
su musluğunu birkaç kez açıp kapatınız.
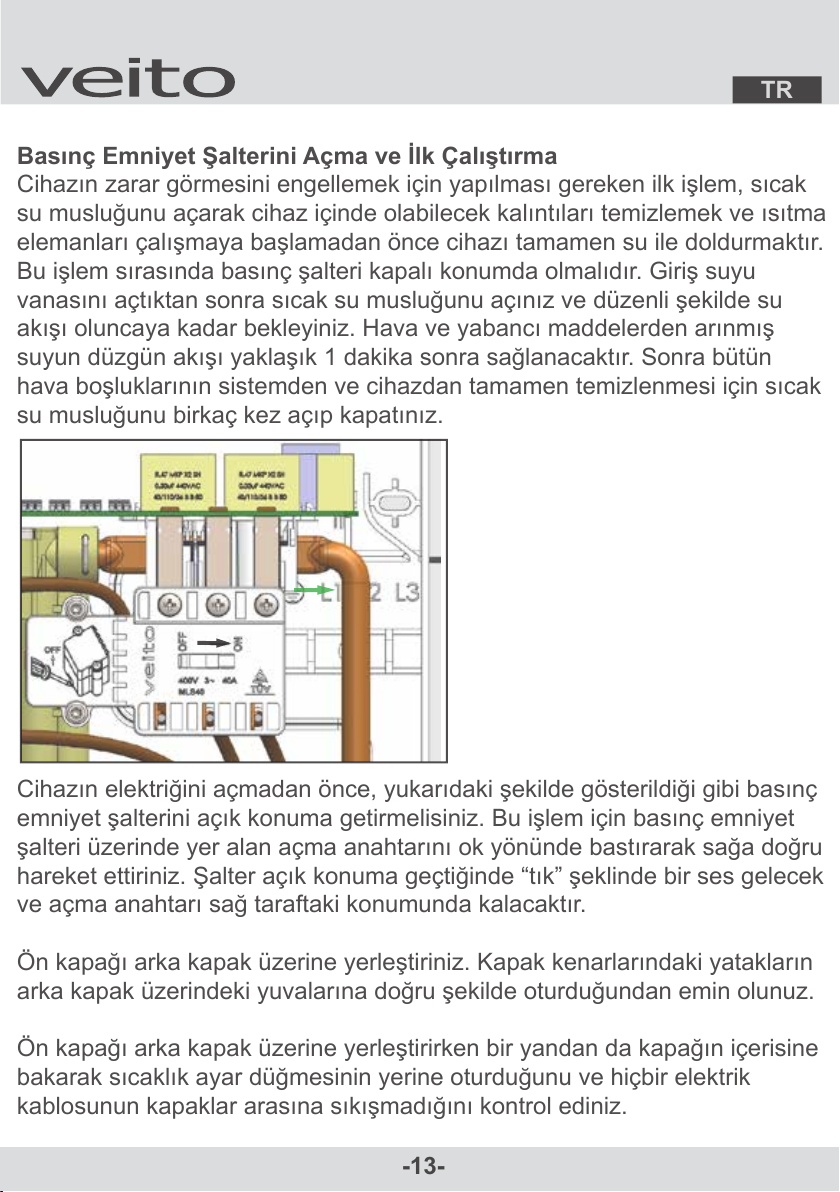
Cihazın elektriğini açmadan önce, yukarıdaki şekilde gösterildiği gibi basınç
emniyet şalterini açık konuma getirmelisiniz. Bu işlem için basınç emniyet
şalteri üzerinde yer alan açma anahtarını ok yönünde bastırarak sağa doğru
hareket ettiriniz. Şalter açık konuma geçtiğinde “tık” şeklinde bir ses gelecek
ve açma anahtarı sağ taraftaki konumunda kalacaktır.
Ön kapağı arka kapak üzerine yerleştiriniz. Kapak kenarlarındaki yatakların
arka kapak üzerindeki yuvalarına doğru şekilde oturduğundan emin olunuz.
Ön kapağı arka kapak üzerine yerleştirirken bir yandan da kapağın içerisine
bakarak sıcaklık ayar düğmesinin yerine oturduğunu ve hiçbir elektrik
kablosunun kapaklar arasına sıkışmadığını kontrol ediniz.

TR
-14-
Eğer gerekli ise sıcaklık ayar düğmesini çeviriniz. Ön kapağı yerleştirip
bağlantı vidasını sıkınız. Cihazın elektriğini açmadan önce sıcak su
musluğunu kapatınız. Cihazın elektriğini açınız. Sıcaklık ayar düğmesi ile
çıkış suyu sıcaklığını LCD ekrandan istediğiniz değere getirip cihazı
kullanılmaya hazır hale getirebilirsiniz.
Sıcak su musluğunu açarak cihazın fonksiyonlarını kontrol ediniz, bu
kullanım talimatlarını kullanıcıya vererek cihazın nasıl çalıştığını açıklayınız.
Çok düşük debi nedeniyle cihaz çalışmaya başlamıyorsa tesisatınızın su
basıncını kontrol ediniz veya tesisatta başka bir problem bulunup
bulunmadığını yetkili bir teknisyene kontrol ettiriniz.
Sıcaklığın Kontrolü
Sıcak su musluğu açılır açılmaz cihaz otomatik olarak çalışır ve giriş suyu
basıncı minimum seviyenin altına düşerse ya da sıcak su musluğu
kapatılırsa cihaz otomatik olarak çalışmayı durdurur. Elektrikli ani su ısıtıcı
içinden geçen suyu direkt olarak istenilen derecede ısıtır ve bu esnada
sadece elektrik enerjisi tüketir.
Su sıcaklığı giriş suyu sıcaklığına, cihazın gücüne ve suyun akış miktarına
bağlıdır. İstenilen su sıcaklığı, sıcaklık ayar düğmesi aracılığı ile
değiştirilerek ayarlanır. Ayrıca su akış miktarı azaltılarak sıcaklık yükseltilir
ya da bu işlemin tersi uygulanarak sıcaklık düşürülür. Su akış miktarını
aşağıdaki şekilde görüldüğü gibi cihazın su giriş musluğu üzerinde yer alan
tornavida ağızlı kısımdan düz bir tornavida ile ayarlayabilirsiniz.
TR
-15-
Eğer cihaz aynı anda iki ya da daha fazla sayıdaki musluğu besliyorsa çıkış
suyu bu musluklar arasında paylaştırılacaktır. Kış zamanı, düşük giriş suyu
sıcaklığı nedeniyle istenilen çıkış suyu sıcaklığına erişilemeyebilir.
Termal Devre Kesici
Normal kullanım esnasında ya da cihaz kullanılmıyorken su sıcaklığının
şebekeden veya cihazdan kaynaklanan bir nedenle aşırı olarak yükselmesi
sonucunda termal devre kesici devreye girerek cihazı besleyen fazlardan
birini keserek sistemi koruma altına almaya çalışır. Termal devre kesicinin
cihazın elektriğini kesmesi servis gerektiren bir durumdur ve bu nedenle
yetkili bir servis tarafından cihazın kontrol edilmesi gerekir. Tüm arıza
nedenleri ortadan kaldırıldıktan sonra termal devre kesici üzerinde yer alan
açma butonu aracılığı ile yeniden devreye alınarak cihazın ısıtmaya devam
etmesi sağlanır.
Basınç Emniyet Şalteri
Normal kullanım esnasında ya da cihaz kullanılmıyorken su basıncının
şebekeden veya cihazdan kaynaklanan bir nedenle aşırı olarak yükselmesi
sonucunda basınç emniyet şalteri devreye girerek cihazın tüm elektriğini
keser. Basınç emniyet şalterinin otomatik olarak cihazın tüm elektriğini
kesmesi servis gerektiren bir durumdur ve bu nedenle yetkili bir servis
tarafından cihazın kontrol edilmesi gerekir. Tüm arıza nedenleri ortadan
kaldırıldıktan sonra basınç emniyet şalteri üzerinde yer alan açma anahtarı
aracılığı ile yeniden açılarak cihazın ısıtmaya devam etmesi sağlanır.
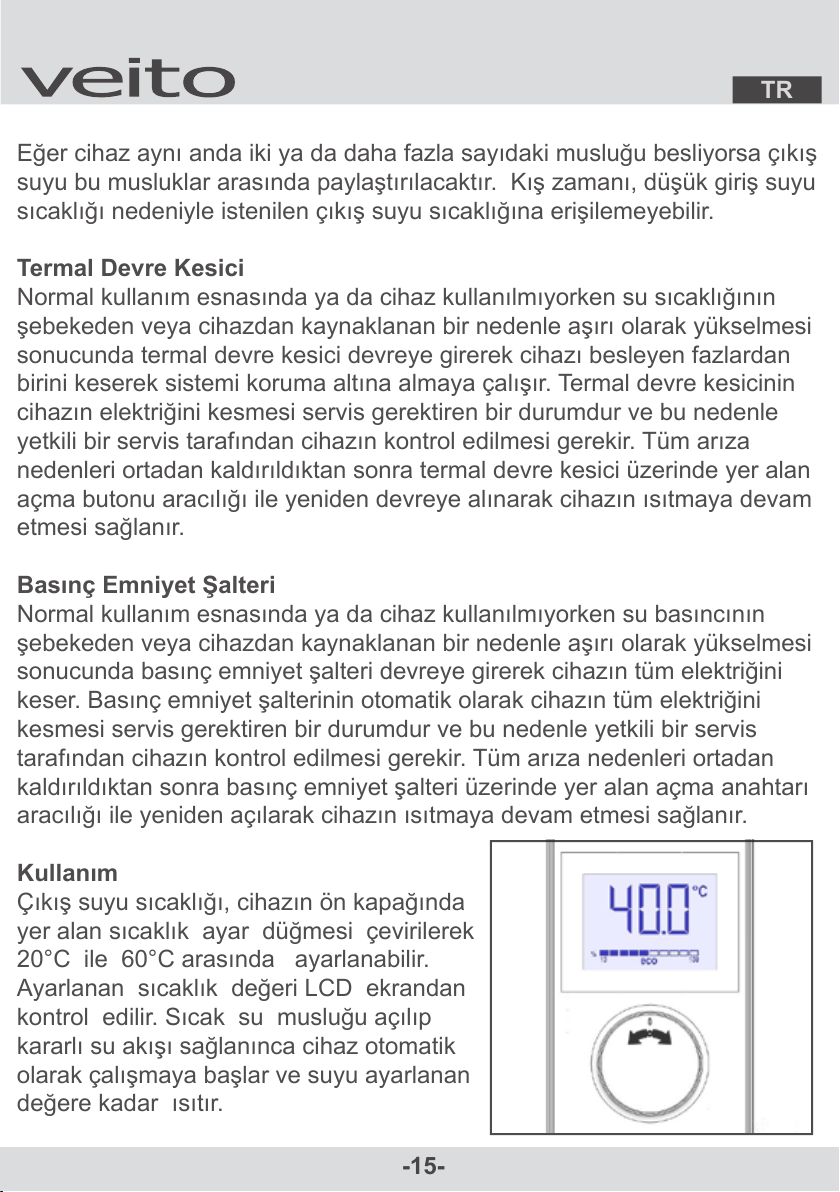
Kullanım
Çıkış suyu sıcaklığı, cihazın ön kapağında
yer alan sıcaklık ayar düğmesi çevirilerek
20°C ile 60°C arasında ayarlanabilir.
Ayarlanan sıcaklık değeri LCD ekrandan
kontrol edilir. Sıcak su musluğu açılıp
kararlı su akışı sağlanınca cihaz otomatik
olarak çalışmaya başlar ve suyu ayarlanan
değere kadar ısıtır.
TR
-16-
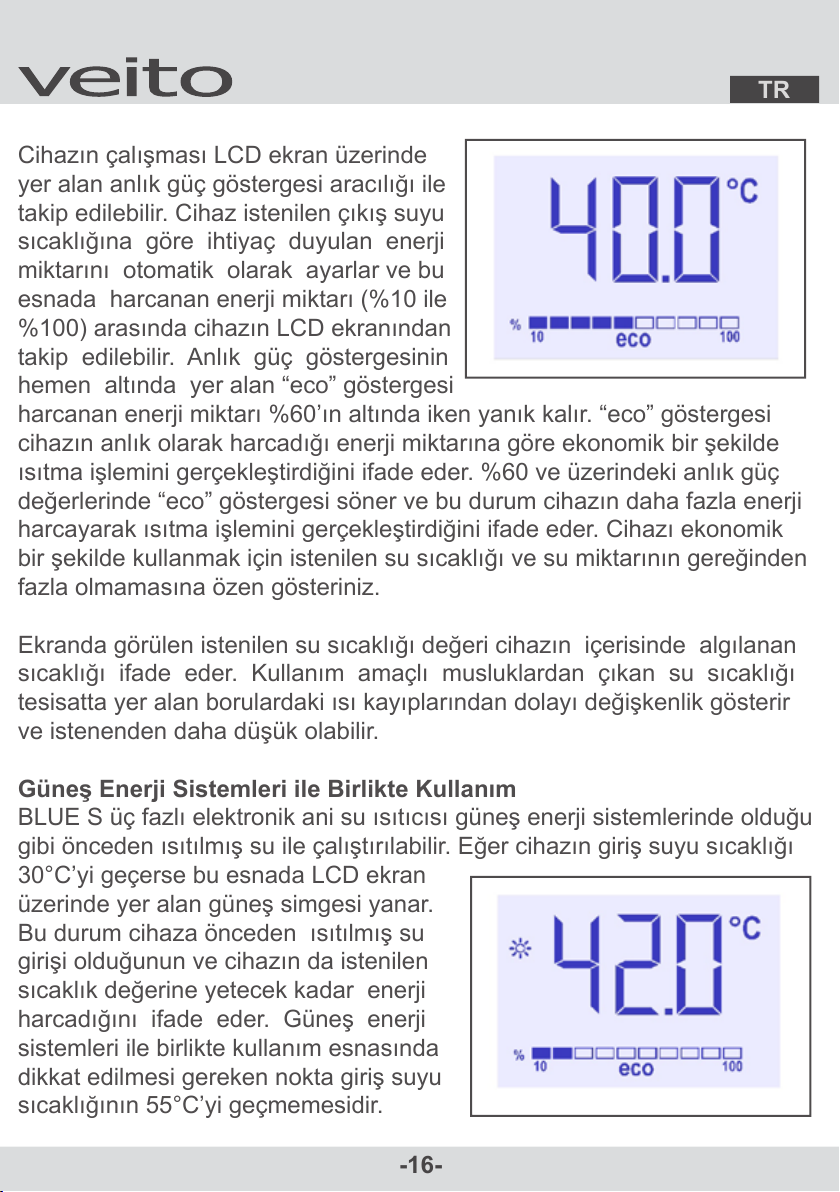
Cihazın çalışması LCD ekran üzerinde
yer alan anlık güç göstergesi aracılığı ile
takip edilebilir. Cihaz istenilen çıkış suyu
sıcaklığına göre ihtiyaç duyulan enerji
miktarını otomatik olarak ayarlar ve bu
esnada harcanan enerji miktarı (%10 ile
%100) arasında cihazın LCD ekranından
takip edilebilir. Anlık güç göstergesinin
hemen altında yer alan “eco” göstergesi
harcanan enerji miktarı %60’ın altında iken yanık kalır. “eco” göstergesi
cihazın anlık olarak harcadığı enerji miktarına göre ekonomik bir şekilde
ısıtma işlemini gerçekleştirdiğini ifade eder. %60 ve üzerindeki anlık güç
değerlerinde “eco” göstergesi söner ve bu durum cihazın daha fazla enerji
harcayarak ısıtma işlemini gerçekleştirdiğini ifade eder. Cihazı ekonomik
bir şekilde kullanmak için istenilen su sıcaklığı ve su miktarının gereğinden
fazla olmamasına özen gösteriniz.
Ekranda görülen istenilen su sıcaklığı değeri cihazın içerisinde algılanan
sıcaklığı ifade eder. Kullanım amaçlı musluklardan çıkan su sıcaklığı
tesisatta yer alan borulardaki ısı kayıplarından dolayı değişkenlik gösterir
ve istenenden daha düşük olabilir.
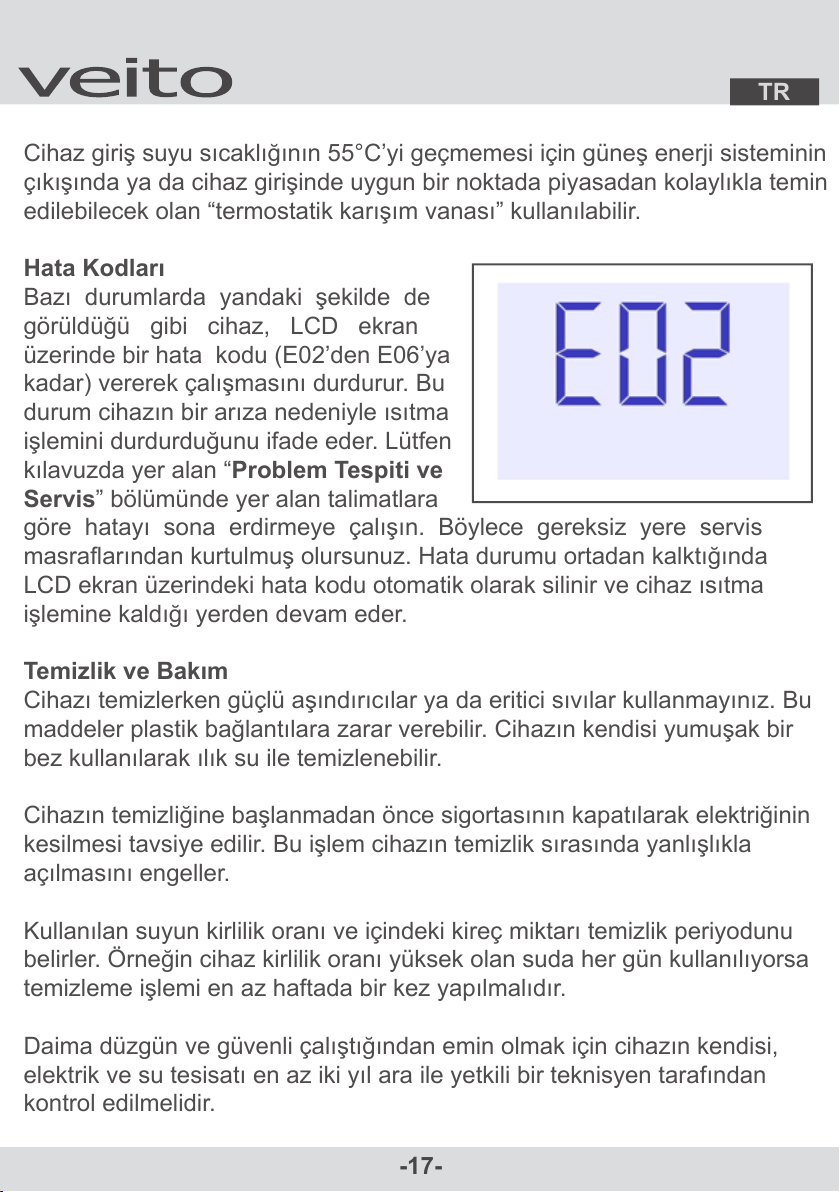
Güneş Enerji Sistemleri ile Birlikte Kullanım
BLUE S üç fazlı elektronik ani su ısıtıcısı güneş enerji sistemlerinde olduğu
gibi önceden ısıtılmış su ile çalıştırılabilir. Eğer cihazın giriş suyu sıcaklığı
30°C’yi geçerse bu esnada LCD ekran
üzerinde yer alan güneş simgesi yanar.
Bu durum cihaza önceden ısıtılmış su
girişi olduğunun ve cihazın da istenilen
sıcaklık değerine yetecek kadar enerji
harcadığını ifade eder. Güneş enerji
sistemleri ile birlikte kullanım esnasında
dikkat edilmesi gereken nokta giriş suyu
sıcaklığının 55°C’yi geçmemesidir.
TR
-17-
Cihaz giriş suyu sıcaklığının 55°C’yi geçmemesi için güneş enerji sisteminin
çıkışında ya da cihaz girişinde uygun bir noktada piyasadan kolaylıkla temin
edilebilecek olan “termostatik karışım vanası” kullanılabilir.
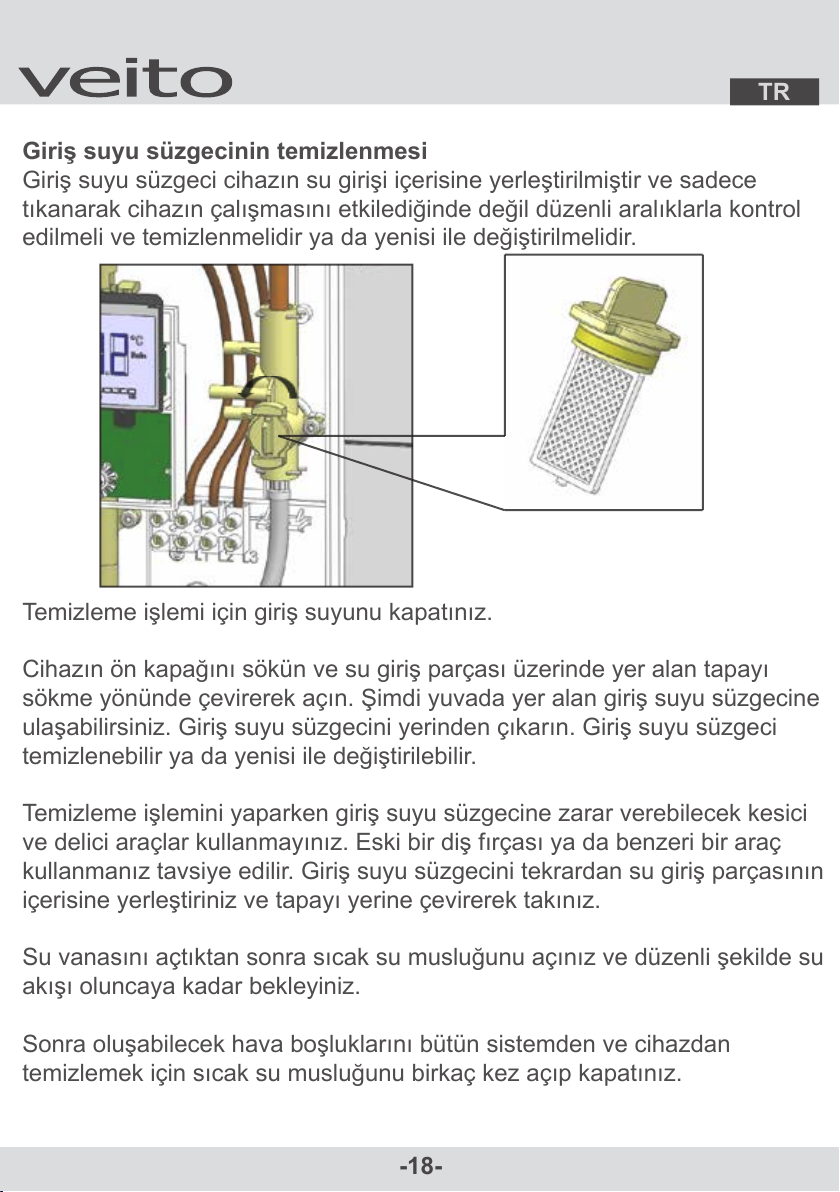
Hata Kodları
Bazı durumlarda yandaki şekilde de
görüldüğü gibi cihaz, LCD ekran
üzerinde bir hata kodu (E02’den E06’ya
kadar) vererek çalışmasını durdurur. Bu
durum cihazın bir arıza nedeniyle ısıtma
işlemini durdurduğunu ifade eder. Lütfen
kılavuzda yer alan “Problem Tespiti ve
Servis” bölümünde yer alan talimatlara
göre hatayı sona erdirmeye çalışın. Böylece gereksiz yere servis
masraflarından kurtulmuş olursunuz. Hata durumu ortadan kalktığında
LCD ekran üzerindeki hata kodu otomatik olarak silinir ve cihaz ısıtma
işlemine kaldığı yerden devam eder.
Temizlik ve Bakım
Cihazı temizlerken güçlü aşındırıcılar ya da eritici sıvılar kullanmayınız. Bu
maddeler plastik bağlantılara zarar verebilir. Cihazın kendisi yumuşak bir
bez kullanılarak ılık su ile temizlenebilir.
Cihazın temizliğine başlanmadan önce sigortasının kapatılarak elektriğinin
kesilmesi tavsiye edilir. Bu işlem cihazın temizlik sırasında yanlışlıkla
açılmasını engeller.
Kullanılan suyun kirlilik oranı ve içindeki kireç miktarı temizlik periyodunu
belirler. Örneğin cihaz kirlilik oranı yüksek olan suda her gün kullanılıyorsa
temizleme işlemi en az haftada bir kez yapılmalıdır.
Daima düzgün ve güvenli çalıştığından emin olmak için cihazın kendisi,
elektrik ve su tesisatı en az iki yıl ara ile yetkili bir teknisyen tarafından
kontrol edilmelidir.
TR
-18-
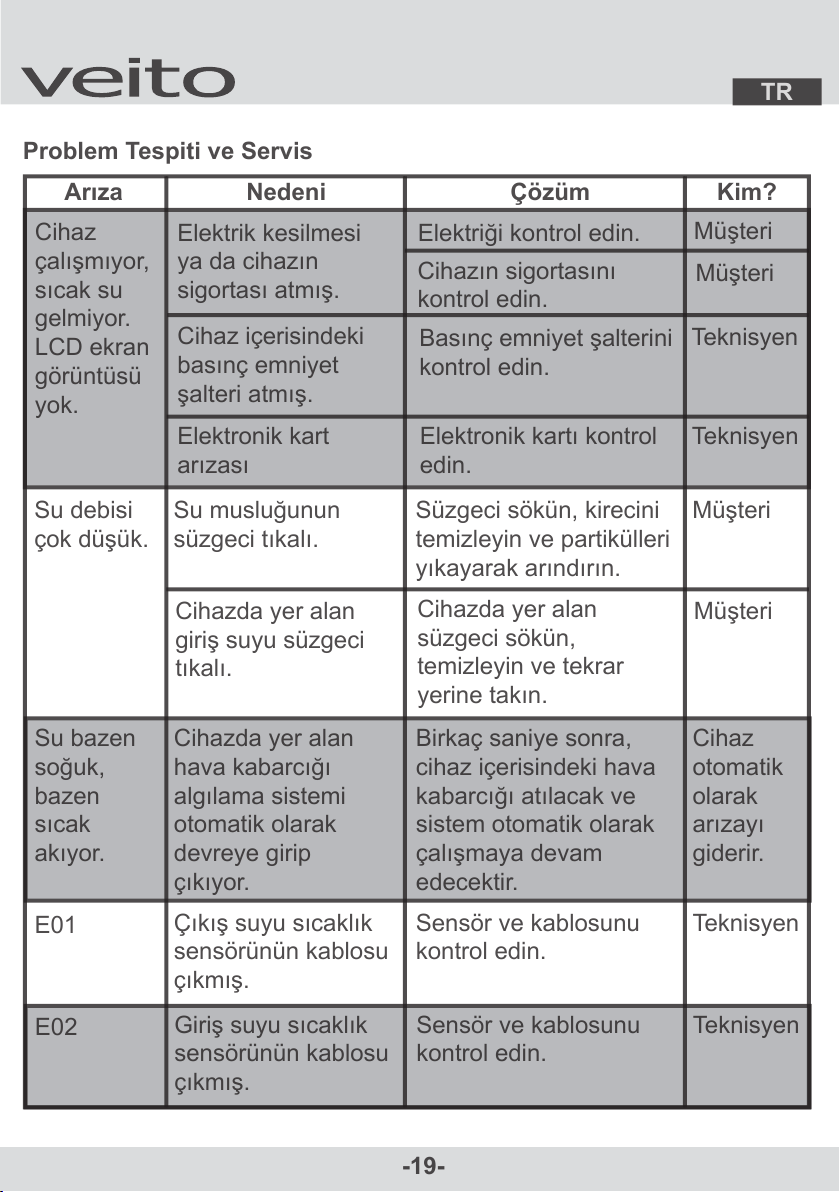
Giriş suyu süzgecinin temizlenmesi
Giriş suyu süzgeci cihazın su girişi içerisine yerleştirilmiştir ve sadece
tıkanarak cihazın çalışmasını etkilediğinde değil düzenli aralıklarla kontrol
edilmeli ve temizlenmelidir ya da yenisi ile değiştirilmelidir.
Temizleme işlemi için giriş suyunu kapatınız.
Cihazın ön kapağını sökün ve su giriş parçası üzerinde yer alan tapayı
sökme yönünde çevirerek açın. Şimdi yuvada yer alan giriş suyu süzgecine
ulaşabilirsiniz. Giriş suyu süzgecini yerinden çıkarın. Giriş suyu süzgeci
temizlenebilir ya da yenisi ile değiştirilebilir.
Temizleme işlemini yaparken giriş suyu süzgecine zarar verebilecek kesici
ve delici araçlar kullanmayınız. Eski bir diş fırçası ya da benzeri bir araç
kullanmanız tavsiye edilir. Giriş suyu süzgecini tekrardan su giriş parçasının
içerisine yerleştiriniz ve tapayı yerine çevirerek takınız.
Su vanasını açtıktan sonra sıcak su musluğunu açınız ve düzenli şekilde su
akışı oluncaya kadar bekleyiniz.
Sonra oluşabilecek hava boşluklarını bütün sistemden ve cihazdan
temizlemek için sıcak su musluğunu birkaç kez açıp kapatınız.
TR
-19-
Problem Tespiti ve Servis
Arıza
Nedeni
Çözüm
Kim?
Cihaz
çalışmıyor,
sıcak su
gelmiyor.
LCD ekran
görüntüsü
yok.
Cihaz içerisindeki
basınç emniyet
şalteri atmış.
Elektrik kesilmesi
ya da cihazın
sigortası atmış.
Basınç emniyet şalterini
kontrol edin.
Teknisyen
Elektriği kontrol edin.
Müşteri
Su debisi
çok düşük.
Su musluğunun
süzgeci tıkalı.
Süzgeci sökün, kirecini
temizleyin ve partikülleri
yıkayarak arındırın.
Müşteri
Elektronik kart
arızası
Elektronik kartı kontrol
edin.
Teknisyen
Cihazda yer alan
giriş suyu süzgeci
tıkalı.
Cihazda yer alan
süzgeci sökün,
temizleyin ve tekrar
yerine takın.
Müşteri
Cihazın sigortasını
kontrol edin.
Müşteri
Su bazen
soğuk,
bazen
sıcak
akıyor.
Cihazda yer alan
hava kabarcığı
algılama sistemi
otomatik olarak
devreye girip
çıkıyor.
Birkaç saniye sonra,
cihaz içerisindeki hava
kabarcığı atılacak ve
sistem otomatik olarak
çalışmaya devam
edecektir.
Cihaz
otomatik
olarak
arızayı
giderir.
E01
Çıkış suyu sıcaklık
sensörünün kablosu
çıkmış.
Sensör ve kablosunu
kontrol edin.
Teknisyen
E02
Giriş suyu sıcaklık
sensörünün kablosu
çıkmış.
Sensör ve kablosunu
kontrol edin.
Teknisyen
Müşteri için
Lütfen güvenlik uyarılarını okuyun ve dikkate alın. Asla cihazı dona maruz
bırakmayın. Müşteri hizmetlerini aradığınızda, lütfen cihazın bilgi etiketinde
yer alan ve B21 ile başlayan seri numaralarını müşteri temsilcimize
bildiriniz. Bu etiketi ani su ısıtıcısının ön tarafındaki açılabilir kapağın
içerisinde bulabilirsiniz.
TR
-20-
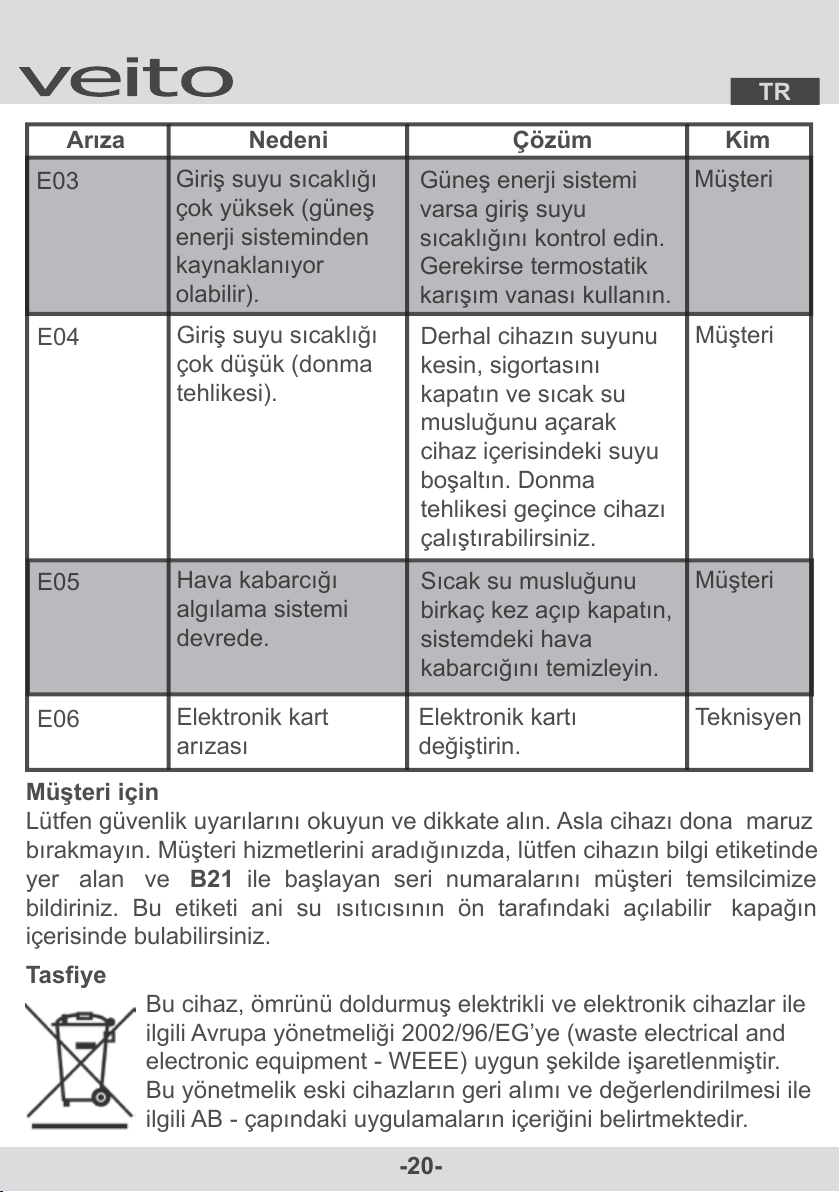
Arıza
Nedeni
Çözüm
Kim
E06
Elektronik kart
arızası
Elektronik kartı
değiştirin.
Teknisyen
E03
Giriş suyu sıcaklığı
çok yüksek (güneş
enerji sisteminden
kaynaklanıyor
olabilir).
Müşteri
Güneş enerji sistemi
varsa giriş suyu
sıcaklığını kontrol edin.
Gerekirse termostatik
karışım vanası kullanın.
E04
Giriş suyu sıcaklığı
çok düşük (donma
tehlikesi).
Müşteri
Derhal cihazın suyunu
kesin, sigortasını
kapatın ve sıcak su
musluğunu açarak
cihaz içerisindeki suyu
boşaltın. Donma
tehlikesi geçince cihazı
çalıştırabilirsiniz.
E05
Hava kabarcığı
algılama sistemi
devrede.
Müşteri
Sıcak su musluğunu
birkaç kez açıp kapatın,
sistemdeki hava
kabarcığını temizleyin.
Tasfiye
Bu cihaz, ömrünü doldurmuş elektrikli ve elektronik cihazlar ile
ilgili Avrupa yönetmeliği 2002/96/EG’ye (waste electrical and
electronic equipment - WEEE) uygun şekilde işaretlenmiştir.
Bu yönetmelik eski cihazların geri alımı ve değerlendirilmesi ile
ilgili AB - çapındaki uygulamaların içeriğini belirtmektedir.

TR
-21-
Elektrik bağlantısı
400 V 50/60 Hz
3P + 1PE
Teknik Özellikler
MODEL
BLUE S
Güç
18 / 21 kW
Minimum kablo
kesiti
4 mm
2
Sigorta akımı
32 A
Su bağlantısı
G 1/2
Isıtma sistemi
Çıplak Tel Rezistans
15 °C giriş suyundaki
maksimum sıcak su
kapasitesi
15 °C’den 45 °C’ye ----------> 8,0 l/dak
15 °C’den 60 °C’ye ----------> 6,0 l/dak
Çalıştırma basıncı
0,05 MPa ( 0,5 bar )
Beyan basıncı
1 MPa ( 10 bar )
Kullanıldığı suyun
15 °C’deki spesifik
elektrik direnci
≥ 1300 Ωcm
Net Ağırlık
3,5 kg
Koruma sınıfı / tipi
1 / IP25
Garanti
Bu cihaz için, cihazın satın alındığı ülkedeki temsilciliğimiz tarafından
yayınlanmış olan garanti koşulları geçerlidir. Her türlü değişiklik hakları
saklıdır.

EN
-22-
Installation of the device (water and electricity connection),
first start-up and maintenance must be carried out by a
qualified technician in accordance with the instructions in
this manual!
Thank you for choosing the Veito three-phase electronic instantaneous
water heater. This guide contains all the installation and operating
instructions required for the BLUE S three-phase electronic flash water
heaters.
The installation of the device must be done by a qualified technician who
is responsible for the first time operation and maintenance of the
applicable standards and installation regulations.
During installation, care will be taken to ensure a long and trouble-free
working life. Our company is not responsible for damages that may occur
if the given instructions are not applied correctly.
Please read these instructions carefully
before installing and using the device
and keep in mind for future use. Please
keep this book as a reference for future
use.
Packaging Content
1. Heater Housing
2. Fixing Screws (4 screws and 4 plugs)
3. 1/2 "Sealing Gasket
4. 1/2 "Connection Record and Tap
5. Guide

Cihazın Tanımı
Üç fazlı elektronik ani su ısıtıcısı, sadece kapalı (basınçlı) tesisat
bağlantıları için uygundur.
Sıcak su musluğu açıldığında, ani su ısıtıcısı çalışır ve suyu ısıtır. Sıcak su
musluğu kapatıldığında, cihaz da tekrar kapanır. Cihaz suyu içinden
geçerken ısıtır.
Cihaz, önceden ısıtılmış suyla çalıştırılamaz, aksi halde yüksek sıcaklık
sigortası atar (Güneş enerji sistemleri ile birlikte kullanım için lütfen ilgili
bölüme göz atınız).
Güvenlik Uyarıları
Bu cihaz, evsel kullanım veya evsel kullanıma benzeyen ancak edüstriyel
olmayan; örneğin dükkanların, büroların ve diğer mesleki işletmelerin ortak
hizmet mutfaklarında ve ayrıca pansiyonların, küçük otellerin ve benzeri
ikamet donanımlarının banyolarında kullanım için uygundur.
Montaj işlemine başlamadan önce suyu ve elektriği kesiniz.
Cihaza gelen elektrik akımını kesmeden, cihazın kapağını kesinlikle
açmayınız.
Doğru şekilde montajı yapılmamış ve tam olarak sağlıklı çalışmayan
cihazı kullanmayınız.
İlk kullanımdan önce cihaz tamamen su ile doldurulmalıdır. Cihazın suyu
herhangi bir sebeple boşaltılırsa (su tesisatında yapılan çalışma, donma
riskine karşı, tamirat, bakım vb.) cihaz çalıştırılmadan önce tekrar su ile
tamamen doldurulmalıdır.
EN
-23-
Device Description
The three-phase electronic sprinkler is only suitable for closed
(pressurized) installation connections.
When the hot water tap opens, the sudden water heater runs and warms
the water. When the hot water tap is turned off, the device switches off
again. The device heats when water passes through it.
The device cannot be operated with preheated water, otherwise high
temperature fuse is blown (please check the respective compartment for
use with solar energy systems).
Security Alerts
This device is not intended for industrial use or residential use but is non-
industrial; For example in the common service kitchens of shops, offices
and other professional establishments, as well as in the bathrooms of
pensions, small flats and similar residential facilities.
Cut off the water and electricity before starting the assembly process.
Do not open the cover of the device without interrupting the flow of
electricity to the device.
Do not use the device that is not correctly assembled and not functioning
properly.
Before first use, the device must be completely filled with water. If the
water of the device is emptied for any reason (working in water installation,
risk of freezing, repair, maintenance, etc.), it must be completely filled with
water again before starting the device.

EN
-24-
Regulatory instructions should be followed for the connection conditions
of electricity and water distribution facilities. There is absolutely no
technical change in the electrical or water connection of the device itself.
At the installation site, a full-pole cutter with a contact gap of at least
3 mm should be installed.
Instant water heater is a device with protection class I and must be
connected with a grounded cable.
We strongly recommend that you avoid electrical and / or plumbing
connections and materials.
This device must be permanently connected to fixed installations. The
cable cutout must match the installed one.
Grounded water installations cannot take the place of an earthling
line.
After assembly, the electrically conductive parts must be protected so
that they can not be touched.
Note that the connections may be too hot when the device is used for a
while.
Do not use the device during or during a frost event. The water must be
completely fluid before the device is used.
The disassembled device must be stored away from the risk of freezing
due to water remaining inside it and never exposed to frost.
Sudden water heater should be installed in a place free
from frost.

EN
-25-
Do not use the device if it gets into the device due to a front door that is
not correctly positioned during installation or in any way.
In the event of any problem with the device, immediately switch off the
fuse.
If there is any water leakage in the device, immediately cut off the water.
Repair work must be carried out by a technician only in order to
prevent danger.
The inlet water filter should be cleaned at regular intervals or replaced
with a new one recommended by the manufacturer.
This device is not physically inadequate, difficult to perceive or mentally
handicapped (including children under the age of eight) or under the
supervision of someone responsible for their safety; or instructions on the
use of the device are not suitable for use by inexperienced and
uninformed persons.
It should be noted that water temperatures above 43 ° C are perceived as
high temperatures, especially for children, and may cause a burning
sensation.
Keep children away from the device.
Take care of the children to prevent them from playing with the console.
Cleaning of the device and maintenance of the user should not be done
by the children without supervision.

EN
-26-
Device Installation
Close the water supply line before installation. The electrical
connection must be disconnected from the power supply. Dismantle
or close the fuses.
The legal requirements must be adhered to the connection conditions of
the electricity and water distribution facilities and the specifications and
technical values stated on the device.
Installation Location:
The above figure should be taken into consideration for correct positioning
of the device.
For installation, there must be approximately 60 mm of free space around
each side of the device.
The device should be installed vertically so that it will not come into direct
contact with water.
The distance between the device and the tap must be as short as
possible to prevent heat losses.

For maintenance and repair of the device, an additional valve (as
appropriate to the water installation regulations) must be connected to a
suitable place in the water installation to close the inlet water of the device.
The device is only approved for heating water with electrical resistance ≥
1300 Ωcm at 15 ° C. Your water's electrical resistance can be learned from
the authorized water distribution agency.
The water inlet tap, water outlet and sealing rings supplied with the device
must be used during installation of the device in closed circuit installation!
Do not use different sealing materials for sealing in any of the connections.
Device Preparation and Water Connection:
Do not attempt to remove the temperature setting knob which is fixed to
the front cover.
First, separate the front cover from the rear door by removing the screw
shown in the figure above, which is located in the open cover at the bottom
of the temperature control knob.
EN
-27-

EN
-28-
Prepare the cold water line and hot water line connections of the closed
loop installation for the device to be installed. If so, remove the blind plugs
from the connectors. Before connecting the water mains to the water inlet
of the device, clean foreign matter from the system. This can be done by
draining the water for a while after connecting a hose to the water main.
Teflon tape or the like on the long side of the water inlet tap and water
outlet recorder supplied with the device and seal the sealant.
As shown in the figure on the right, connect
the water inlet tap to the cold water side and
the water outlet record to the hot water side.
Check the directions of the connections. The
arrows on the record and the tap must be in
the direction of the water flow!
Place the device in the wall as shown above, mark the screw holes, drill
and insert the anchors. You can use any of the openings shown in the
figures above for the connection cable by breaking it from the marked
points if necessary. Screw the device into the wall after taking the cable to
the side of the terminal.

EN
-29-
Connect the device's cold water
line (marked with the arrow) to the
water inlet tap, the hot water line
(marked with the arrow) to the
water outlet record.
During connection, use 1/2 "seals
which are supplied with the device,
one at each end and perform the tightening with a suitable key. Use the
arrows to check the correctness of the connection directions. The arrows
should be pointing outwards in the water inlet direction and inward (in the
same direction as the water flow) in the water outlet direction.
The water inlet pipe of the device is elastic steel connection and can be
easily hand shaped according to the mounting conditions. The water outlet
pipe is made of soft copper and can be shaped by hand or by means of a
pliers without damaging the pipe according to the mounting conditions.
Open the water valve to let the water go to the device and taps and check
for leaks at the connections. Then open and close the hot water tap a few
times to clear any air gaps that may occur from the system and the device.
Take the air of the sudden water heater: Open the hot water tap for this
and rinse the device for 1 minute until no more bubbles come out.
Electrical Connection (By a Qualified Technician Only):
Attention please!
The electrical connection must be made according to national regulations
or local ordinances set by the local electricity distribution company. The
electric spark heater is a device with a protection class I and must be
connected to a protective earth line! All water connections must be
completed before the electrical connections are made!

EN
-30-
Connect the device on the connection terminal according to the following
electrical connection diagram.
L1, L2, L3 Phase Wiring
PE Protective Earth Cable
T1, T2, T3, T4 Electronic switching element
R1, R2, R3 7kW heating element
1 Electrical connection terminal
2 Pressure safety switchgear
3 Electronic control circuit
The supply voltage of the device should be 400 VAC (3P + 1PE). The
electrical values of the device are located in the enclosed enclosure.
Electrical wiring should not be damaged. After installation, the cables
should not be left in direct reach. The electric wire should not be subjected
to tensile force.
The device shall be fitted with a suitably insulated cable of at least 3 mm
in each connection point, permanently connected to the mains and shall
not be operated without precautions against electrical leakage.

EN
-31-
The electrical supply must be at the capacity to supply the device and
existing circuits. To protect the device, a fuse proportional to the current of
the device must be connected to the power supply line.
Check the fuse box for a main fuse of 40A or higher and an independent
fuse to connect the device. If the fuse panel has a main fuse lower than
40A or there is no independent fuse line to be connected to the pan, a new
line should be laid on the installation site's electrical installation or directly
to the device itself and secured with a fuse so that the electrical installation
can be done.
The device must be connected to its own independent power line; Lighting,
bell or oven line.
The protective earth wire must be connected to the exposed metal parts of
the other devices at the installation site and to the grounding line where the
device is installed in compliance with TSE standards.
The shortest cable distance between the fuse panel and the device must be
used to obtain maximum efficiency from the device. The cable length is also
important in terms of circuit break time and temperature limitations. There
is an allowable maximum cable length limitation in the combination of
current requirement, voltage drop and a line to be formed at the cable
crossing angle.
If the cords are surrounded by thermal insulation, are installed inside a wall,
passed at a temperature higher than 30 ° C, or are twisted together, the
amount of current passing through the cable is reduced. To obtain the same
current values, a larger cable cross section must be selected.
It is recommended to use a minimum 4 x 2.5 mm² cable for installation of
the device, considering that the cable cross section to be used must be
proportional to the power of the device.

EN
-32-
In many cases, the installation site must be inspected by a qualified
electrician for accurate cable section and neck inspection.
Before making any electrical connections, check that no terminals are
powered.
In any doubt, cut off the main electricity from the fuse box.
Using a suitable tool, strip about 5 cm from the outside of the power cable
and about 1 cm from the connecting cables. When doing this, the electrical
cable should not be damaged.
Insert the electric wire through one of the cable entries of the device and
bring the ends to the side of the terminal. Carefully connect the connection
cables to the electrical connection terminals according to the electrical
connection diagram.
Make sure that the screws of the connection terminals are completely
tightened and that they are not under the connecting screws of the cable
insulation. Loose connections may cause the cable to overheat.
The electrical cable must be secured in accordance with TSE standards in
terms of wall location and protection.
The device and its installation must be checked by a qualified electrician at
least every two years due to weaknesses such as in every electric device
that may result in use and aging.
Do not open the device until the front cover is closed.
For safety reasons, the pressure safety switch of the device is positioned
closed at the factory. The pressure safety switch must be turned on before
closing the front cover of the device. Otherwise the device will not be able
to heat up!

EN
-33-
Opening the Pressure Relief Switch and Initial Operation
The first thing to do to prevent damage to the device is to open the hot
water tap to clean any residues in the device and to completely fill the
device with water before the heating elements start working. During this
operation the pressure switch must be in the off position. After opening the
inlet water valve, open the hot water tap and wait until there is a regular
flow of water. Proper flow of water free from air and foreign matter will be
provided after about 1 minute. Then open and close the hot water tap
several times so that all air gaps are completely removed from the system
and the device.
Before switching on the device, you must switch on the pressure relief
switch as shown above. To do this, press the release switch on the
pressure safety switch in the direction of the arrow and move it to the right.
When the switch is in the open position, a "click" sound will be heard and
the unlocking switch will remain on the right side.
Place the front cover on the back cover. Make sure that the beds on the
sides of the door are correctly seated in the slots on the back cover.
While inserting the front cover on the back cover, look inside the cover and
check that the temperature adjustment knob is seated in place and that no
electrical wires are caught between the covers.

EN
-34-
If necessary, turn the temperature setting knob. Insert the front cover and
tighten the connection screw. Switch off the hot water tap before switching
on the device. Turn on the device. With the temperature control knob, you
can bring the output water temperature to the desired value on the LCD
screen and make the device ready for use.
Check the functions of the device by opening the hot water tap and explain
how the device works by giving these instructions to the user. If the device
does not start to operate due to a very low flow rate, check the water
pressure of your installation or have a qualified technician check for other
problems with the installation.
Temperature Control
The hot water tap opens automatically and the device automatically stops
running if the inlet water falls below the minimum level or the hot water tap
is turned off. The electric instantaneous water heater heats the water
passing through it directly at the desired level and only electricity energy is
consumed at that time.
The water temperature depends on the inlet water temperature, the power
of the device and the flow rate of the water. The desired water temperature
is adjusted by changing the temperature via the temperature adjustment
knob. In addition, the temperature is raised by reducing the amount of water
flow or by applying the opposite of this process. You can adjust the amount
of water flow with a flat screwdriver from the screwdriver section located on
the water inlet tap of the device as shown below.

EN
-35-
If the device feeds two or more taps at the same time, the outlet water will
be distributed among these taps. Desired outlet water temperature may not
be reached due to winter time, low inlet water temperature.
Thermal Circuit Breaker
During normal use or while the device is not being used, as the temperature
of the water rises excessively due to a cause from the network or the device,
the thermal camber breaker tries to protect the system by interrupting one of
the phases feeding the device. Thermal shutdown of the device is a
condition that requires interruption of service and must be controlled by an
authorized service. After all the causes of failure are removed from the
center, the thermal circuit breaker is re-energized via the opening button on
the circuit breaker and the device is allowed to continue heating.
Pressure Safety Shaker
During normal use or while the device is not being used, the pressure safety
switch is switched on as a result of the water pressure rises excessively due
to a cause either from the network or from the device, cutting off all the
electricity of the device. The pressure safety switch automatically cuts off all
electrical power of the device, which is a condition that requires servicing
and must be checked by an authorized service. After all causes of failure
have been removed from the center, the pressure is re-opened via the trip
switch located on the safety switch, allowing the device to continue heating.
Use
The outlet water temperature can be
adjusted between 20 ° C and 60 ° C by
turning the temperature knob located on
the front cover of the device. The set
temperature value is controlled from the
LCD screen. When the hot water tap is
opened and the steady water flow is
ensured, the device starts to work
automatically and warms the water to the
set value.

EN
-36-
The operation of the device can be
monitored via the instant power indicator
on the LCD screen. The device
automatically adjusts the amount of
energy needed according to the desired
outlet water temperature and the amount
of energy consumed during this time
(between 10% and 100%) can be
monitored from the LCD screen of the
device. The "eco" indicator located just below the instant power indicator
remains on when the amount of energy spent is below 60%. The "eco"
indicator indicates that the device performs the heating operation
economically according to the amount of energy that it spends instantly.
The "eco" indicator goes off at instantaneous power values of 60% and
above, indicating that the device is heating up with more energy. To use the
device economically, make sure that the desired water temperature and
water volume are not exceeded.
The water temperature displayed on the screen indicates the temperature
sensed inside the device. The water temperature from the utility taps varies
due to the heat losses in the piping in the installation and may be lower than
desired.
Use with Solar Energy Systems
The BLUE S three-phase electronic flash heater can be operated with
preheated water as well as in solar power
systems. If the inlet water temperature of
the device exceeds 30 ° C, the sun
symbol on the LCD screen will light up.
This means that the device is preheated
water inlet and that the device is
consuming enough energy to reach the
desired temperature value. The point to
note when using solar energy systems is
that the inlet water temperature does not exceed 55 ° C.

EN
-37-
A "thermostatic mixing valve", which can be easily supplied at the point of
entry of the solar power system or at the point of entry of the device at an
appropriate point, can be used so that the inlet water temperature does not
exceed 55 ° C.
Error Codes
In some cases, the device will stop
functioning by giving an error code
(from E02 to E06) on the LCD screen as
shown on the side. This means that the
device has stopped heating due to a
malfunction. Please try to end the error
according to the instructions in the
"Problem Detection and Service" section of the manual. So you get rid of
unnecessary service costs. When the error status is cleared, the error code
on the LCD screen is automatically cleared and the device continues from
where it was left to heat up.
Cleaning and Maintenance
When cleaning the device, do not use strong abrasives or solvents. These
materials may damage the plastic connections. The device itself can be
cleaned with warm water using a soft cloth.
Before starting to clean the device it is advised to switch off the fuse and
switch off the electricity. This prevents the device from being opened
accidentally during cleaning.
The rate of contamination of the water used and the amount of lime in it
determines the cleaning period. For example, if the device is used daily in
high pollution water, cleaning should be done at least once a week.
The device itself must be checked by a qualified technician for at least two
years in order to ensure proper and safe operation.

EN
-38-
Cleaning the inlet water strainer
The inlet water is placed in the water inlet of the strainer's device and
should be checked and cleaned at regular intervals, not just because it is
clogged by the device's operation, or should be replaced with a new one.
Turn off the inlet water for cleaning.
Unscrew the front cover of the device and open the plug on the water inlet
by turning it in the disassembly direction. You can now access the inlet
water strainer in the nest. Remove the inlet water strainer from its place.
The inlet water strainer can be cleaned or replaced with a new one.
Do not use cutting and drilling tools which can damage the inlet water
strainer while cleaning. It is recommended that you use an old toothbrush
or similar tool. Place the inlet water strainer back into the water inlet and
screw it in place.
After opening the water valve, open the hot water tap and wait until there is
a regular flow of water.
Then open and close the hot water tap several times to clear the air gaps
that may occur from the system and the device.

EN
-39-
Problem Detection and Service
Malfunction
Reason
Solution
Who?
The device
is not
working, no
hot water.
No LCD
screen
display.
Pressure safety
circuit breaker broke
down in the device.
Electricity cut or fuse
blown out of the
device.
Check the pressure
safety switch.
Technician
Check the electricity.
Customer
The water
flow is too
low.
The tap of the water
tap is clogged.
Remove the strainer,
clean the lime and purify
the particles by washing.
Customer
Electronic card
failure
Check the electronic
card.
Technician
The inlet water filter
in the device is
blocked.
Rinse, clean and
reinstall the strainer in
the device.
Customer
Check the fuse of the
device.
Customer
The water
is
sometimes
cold,
sometimes
hot.
The air bubble
detection system in
the device
automatically
switches on and off.
After a few seconds, the
air bubbles in the device
will be poured and the
system will continue to
run automatically.
The
device
automati-
cally
clears the
fault.
E01
The outlet water
temperature sensor
is out of line.
Check the sensor and
the cable.
Technician
E02
The inlet water
temperature sensor's
wiring is out.
Check the sensor and
the cable.
Technician

For the customer
Please read and observe safety warnings. Never expose the device to
frost. If you are calling customer service, please inform our customer
representative of the serial numbers starting with B21 on the device's
information label. You can find this label in the openable cover on the front
of the instantaneous water heater.
EN
-40-
E06
Electronic card
failure
Change the electronic
card.
Technician
E03
The inlet water
temperature is too
high (may be due to
solar energy
system).
Customer
The inlet water
temperature is too high
(may be due to solar
energy system).
E04
Entry water
temperature is too
low (danger of
frost).
Customer
Immediately turn off the
water in the device, turn
off the fuse and open
the hot water tap to
drain the water inside
the device. You may run
the device after it is
frozen.
E05
Air bubble detection
system is on.
Customer
Open and close the hot
water tap several times,
clean the air bubble in
the system.
Liquidation: This device has been marked according to the European
Directive 2002/96 / EEC (waste electrical and electronic
equipment - WEEE) for electrical and electronic equipment
which has fulfilled its life. This regulation specifies the content
of EU - wide applications for retrocession and evaluation of
old devices.
Malfunction
Reason
Solution
Who?

EN
-41-
Electric connection
400 V 50/60 Hz
3P + 1PE
Technical Specifications
MODEL
BLUE S
Power
18 / 21 kW
Minimum cable
section
4 mm
2
Insurance current
32 A
Water connection
G 1/2
Heating system
Bare Wire Resistance
Maximum hot water
capacity in inlet
water at 15 ° C
15 °C’den 45 °C’ye ----------> 8,0 l/dak
15 °C’den 60 °C’ye ----------> 6,0 l/dak
Operating pressure
0,05 MPa ( 0,5 bar )
Declaration pressure
1 MPa ( 10 bar )
Specific electrical
resistance at 15 ° C
≥ 1300 Ωcm
Net weight
3,5 kg
Protection class/type
1 / IP25
Warranty
For this device, the warranty conditions published by our country
representative in the country of purchase are valid. All rights reserved.

DE
-42-
Die Montage (Anschluss an Wasser und Strom) und die
Inbetriebnahme muss durch einem Fachmann, entsprechend
den Anweisungen in dieser Anleitung geschehen!
Vielen Dank für den Kauf eines Veito Durchlauferhitzers. Diese Anleitung
enthält alle Montage- und Gebrauchsanweisungen für den BLUE S
dreiphasigen Durchlauferhitzer.
Die Montage, die Inbetriebnahme und die Wartung haben durch einem
autorisiertem Techniker zu erfolgen.
Eine sorgfältige Montage sorgt vor allem für ein langes und problemloses
Betriebsleben Ihres Geräts. Bei Schäden die durch nicht Einhaltung der
Anweisungen entstehen übernehmen wir keine Haftung.
Bitte lesen Sie vor der Montage alle
Anweisungen sorgfältig durch und
behalten Sie sie im Kopf für die nächsten
Anwendungen. Bitte bewahren Sie das
Heft als eine zukünftige Referenz auf.
Packungsinhalt:
1. Heizkörper
2. Montageschrauben (jeweils 4 Schrauben
und Dübel)
3. ½ Inch Dichtungen
4. ½ Inch Connector und Hahn
5. Montage- und Gebrauchsanleitung

The three-phase electronic sprinkler is only suitable for closed
(pressurized) installation connections.
When the hot water tap opens, the sudden water heater runs and warms
the water. When the hot water tap is turned off, the device switches off
again. The device heats when water passes through it.
The device cannot be operated with preheated water, otherwise high
temperature fuse is blown (please check the respective compartment for
use with solar energy systems).
Security Alerts
This device is not intended for industrial use or residential use but is non-
industrial; For example in the common service kitchens of shops, offices
and other professional establishments, as well as in the bathrooms of
pensions, small flats and similar residential facilities.
Cut off the water and electricity before starting the assembly process.
Do not open the cover of the device without interrupting the flow of
electricity to the device.
Do not use the device that is not correctly assembled and not functioning
properly.
Before first use, the device must be completely filled with water. If the
water of the device is emptied for any reason (working in water installation,
risk of freezing, repair, maintenance, etc.), it must be completely filled with
water again before starting the device.
DE
-43-
Definition des Geräts
Der dreiphasige Durchlauferhitzer ist nur für geschlossene (mit Druck)
Leitungen geeignet.
Wenn der Wasserhahn für Warmwasser aufgedreht wird startet der
Durchlauferhitzer sein Betrieb und erhitzt das Wasser. Sobald der
Wasserhahn wieder zugedreht wird stellt er seinen Betrieb wieder ein. Das
Wasser wird bei dem Durchlaufen durch das Gerät erhitzt.
Das Gerät darf nicht mit bereits erwärmtes Wasser betrieben werden da
sonst die Sicherung für Überhitzung ausgelöst werden kann (für den
Betrieb mit solarthermische Anlagen lesen Sie bitte das entsprechende
Kapitel).
Sicherheitswarnungen
Dieses Gerät ist für den häuslichen Gebrauch oder für den Betrieb in
nicht-industriellen Küchen von Betrieben wie Büros und Läden sowie in
Badezimmer von Pensionen und kleinen Hotels geeignet.
Vor der Montage stellen Sie bitte die Wasser- und Stromversorgung ab.
Öffnen Sie das Gerät auf keinem Fall bevor Sie nicht die
Stromversorgung unterbrochen haben.
Benutzen Sie kein Gerät, das nicht richtig installiert wurde oder nicht
ordnungsgemäß funktioniert.
Vor der Inbetriebnahme muss das Gerät mit Wasser gefüllt werden. Falls
das Wasser aus irgendwelchem Grund entleert wird (eine Arbeit an der
Wasserleitung, gegen Frost, Reparatur, Wartung usw.), muss das Gerät
vor der Wiederinbetriebnahme wieder mit Wasser aufgefüllt werden.

Regulatory instructions should be followed for the connection conditions
of electricity and water distribution facilities. There is absolutely no
technical change in the electrical or water connection of the device itself.
At the installation site, a full-pole cutter with a contact gap of at least
3 mm should be installed.
Instant water heater is a device with protection class I and must be
connected with a grounded cable.
We strongly recommend that you avoid electrical and / or plumbing
connections and materials.
This device must be permanently connected to fixed installations. The
cable cutout must match the installed one.
Grounded water installations cannot take the place of an earthling
line.
After assembly, the electrically conductive parts must be protected so
that they can not be touched.
Note that the connections may be too hot when the device is used for a
while.
Do not use the device during or during a frost event. The water must be
completely fluid before the device is used.
The disassembled device must be stored away from the risk of freezing
due to water remaining inside it and never exposed to frost.
DE
-44-
Gesetzliche Bestimmungen sowie Bedingungen von Strom- und
Wasserwerke müssen eingehalten werden. Es dürfen keine technischen
Veränderungen am Gerät selbst oder an den Strom- und/oder
Wasserverbindungen vorgenommen werden.
Um die einschlägigen Sicherheitsvorschriften zu erfüllen muss
installationsseitig ein allpoliger Trennschalter mit einer Kontaktöffnung
von mindestens 3mm vorgesehen werden.
Der Durchlauferhitzer ist ein Gerät der Schutzklasse I und muss an
geerdete Kabel angeschlossen werden.
Vermeiden Sie Verbindungen und Materialien an der Strom- und/oder
Wasserleitung welche ein Risiko darstellen können.
Das Gerät ist an eine dauerhafte Leitung anzuschließen. Der Kabel-
Querschnitt muss der installierten Stromleistung entsprechen.
Geerdete Wasserleitungen ersetzen nicht eine Erdungsleitung.
Nach der Montage müssen alle stromleitende Teile gegen einen Kontakt
geschützt sein.
Bitte beachten Sie, dass nachdem das Gerät für eine Zeit betrieben wird,
die Verbindungen extrem Heiß sein können.
Verwenden Sie das Gerät nicht bei Frost oder Frostgefahr. Vor Betrieb
muss das Wasser völlig flüssig sein. Abmontierte Geräte, müssen so
gelagert werden, dass sie vor Frost geschützt sind, da das Gerät
Restwasser beinhaltet. Ihr gerät darf nie Frost ausgesetzt sein.
Der Durchlauferhitzer muss an einem Ort ohne Frostgefahr
installiert werden.

DE
-45-
Benutzen Sie das Gerät nicht, falls durch die nicht richtig angebrachte
Frontabdeckung während der Montage oder aus irgend einem anderen
Grund Wasser ins Gerät eingedrungen ist.
Bei irgendeinem Problem mit dem Gerät schalten Sie sofort die Sicherung
ab.
Bei irgendeinem durchdringen von Wasser ins Gerät, unterbrechen Sie
sofort die Wasserzufuhr.
Um jegliche Gefahren zu vermeiden, sind Reparaturarbeiten
ausschließlich durch einem Fachmann auszuführen!
Der Wasserzuflussfilter muss in regelmäßigen Abständen gereinigt oder
durch einen, vom Hersteller empfohlenem neuen Filter ersetzt werden.
Das Gerät darf nicht von Personen ohne ausreichender physischer Kraft,
Personen mit einer eingeschränkten Wahrnehmung oder geistig
behinderten Personen (einschließlich Kinder unter 8 Jahren) ohne
Betreuung betrieben werden. Außerdem ist das Gerät nicht geeignet für
den Betrieb durch Personen welche keine Erfahrungen mit der
Betriebsanleitung gemacht haben und den Inhalt der Anleitung nicht
kennen.
Es muss beachtet werden, dass Temperaturen über 43 °C besonders von
Kindern als heiß empfunden werden und bei ihnen ein Verbrühungsgefühl
hervorbringen können.
Halten Sie Kinder fern vom Gerät.
Um zu verhindern, dass Kinder mit dem Gerät spielen, lenken Sie ihre
Aufmerksamkeit ab. Die Reinigung und Pflege dürfen nicht von Kindern
ohne Betreuung durchgeführt werden.

DE
-46-
Montage des Geräts:
Vor der Montage unterbrechen Sie die Wasserzufuhr. Die
Stromzufuhr am Verbindungskabel muss ebenfalls unterbrochen
sein. Schrauben Sie Sicherungen aus oder schalten Sie sie ab.
Gesetzliche Vorschriften, Bedingungen der Strom- und Wasserwerke
sowie technische Angaben auf dem Aufkleber auf dem Gerät, sind
einzuhalten.
Montageort:
Um das Gerät richtig zu platzieren muss die oben dargestellte Abbildung
beachtet werden.
Bei der Montage ist ein Freiraum von jeweils 60 Millimetern an beiden
Seiten sowie oberhalb und unterhalb der Geräts erforderlich.
Das Gerät muss vertikal montiert werden, sodass es keinen direkten
Kontakt zu Wasser hat.
Um Hitzeverlust zu vermeiden muss der Abstand zwischen Gerät und
Wasserhahn so kurz wie möglich sein.

For maintenance and repair of the device, an additional valve (as
appropriate to the water installation regulations) must be connected to a
suitable place in the water installation to close the inlet water of the device.
The device is only approved for heating water with electrical resistance ≥
1300 Ωcm at 15 ° C. Your water's electrical resistance can be learned from
the authorized water distribution agency.
The water inlet tap, water outlet and sealing rings supplied with the device
must be used during installation of the device in closed circuit installation!
Do not use different sealing materials for sealing in any of the connections.
Device Preparation and Water Connection:
Do not attempt to remove the temperature setting knob which is fixed to
the front cover.
First, separate the front cover from the rear door by removing the screw
shown in the figure above, which is located in the open cover at the bottom
of the temperature control knob.
Um die Wartung und Reparatur zu ermöglichen sollte an einer geeigneten
Stelle der Wasserleitung ein zusätzliches Ventil (geeignet für
Wasserinstallationsregelung) installiert werden um die Wasserzufuhr zu
unterbrechen.
Das Gerät ist nur für Wasser mit einem elektrischem Widerstand von ≥
1300 Ωcm bei 15 °C zugelassen. Sie können sich über dem elektrischem
Widerstand ihres Wassers bei Ihrem Wasserversorger erkunden. Die mit
dem Gerät gelieferte Dichtungen, Hahn und Connector müssen bei der
Montage an der geschlossenen Leitung auf jeden Fall verwendet werden!
Verwenden Sie bei den Verbindungen auf keinen Fall andere
Dichtungsmaterialien.
Vorbereitung des Geräts und Wasserverbindung:
Versuchen Sie nicht den an der Frontabdeckung fixierten Temperaturregler
abzumontieren.
Lösen Sie zuerst, wie oben angezeigt, die Schraube die sich unter der
Klappe unterhalb des Temperaturreglers befindet und trennen Sie die
Frontabdeckung von der Rückabdeckung.
DE
-47-

DE
-48-
Bereiten Sie die Verbindungen der Warm- und Kaltwasserleitung für die
Montage vor. Entfernen Sie gegebenenfalls die Verschlussstopfen.
Entfernen Sie Fremdkörper aus dem System bevor Sie das Gerät an die
Wasserzufuhr anschließen. Dies kann gemacht werden, indem Sie einen
Schlauch an die Wasserleitung anschließen und das Wasser eine Zeit lang
fließen lassen. Umwickeln Sie die längere Seite des Connectors und des
Wasserzufuhrhahns mit einem Teflon-Dichtungsband oder ähnliches
Dichtungsmaterial. Wie in der Abbildung nebenan dargestellt, wird die
Wasserverbindung mit Hilfe eines
geeigneten Schraubschlüssels hergestellt
indem der Connector an die Warmwasser-
leitung und der Wasserzufuhrhahn an die
Kaltwasserleitung angeschlossen wird.
Überprüfen Sie die Richtung der
Verbindungen. Der Pfeil auf dem Connector
und auf dem Hahn zeigen die Durchflussrichtung.
Wie in der Abbildung oben dargestellt, Platzieren Sie das Gerät an der
Wand. Markieren Sie die Schraublöcher. Bohren Sie Löcher in die Wand
und setzen Sie die Dübel ein. Für den Verbindungskabel können Sie
gegebenenfalls eine der oben Angezeigten Stellen entlang der Markierung
ausbrechen. Nachdem Sie das Verbindungskabel in die Nähe der Klemme
gebracht haben, montieren sie das Gerät an die Wand.

DE
-49-
Schließen Sie die Kaltwasserleitung
an den Wasserzuflusshahn
(Pfeil nach außen) und die
Warmwasserleitung an den
Connector (Pfeil nach innen) an.
Bitte verwenden Sie bei der
Verbindung jeweils eine der
mitgelieferten ½-Inch-Dichtungen an jedem Ende. Ziehen sie die Muttern
mit einem entsprechendem Schraubschlüssel an. Überprüfen Sie die
richtige Anschlussrichtung anhand der Pfeile. Der Pfeil bei der
Wasserzufuhr sollte nach außen zeigen, und bei der Wasserausfuhr nach
innen (also in der Durchflussrichtung).
Das Wasserzufuhrrohr ist aus elastischem Stahl und kann je nach
Montagebedingungen leicht mit der Hand verbogen werden. Das
Wasserausflussrohr ist aus weichem Kupfer und kann per Hand oder mit
Hilfe einer Zange verbogen werden ohne es zu beschädigen.
Öffnen Sie das Ventil und lassen Sie Wasser in das Gerät einlaufen.
Kontrollieren Sie die Verbindungen auf eventuelle undichte Stellen. Um
Wasserblasen die Später entstehen können aus dem Gerät und aus dem
gesamten System zu entfernen, drehen Sie den Warmwasserhahn
mehrmals auf und ab.
Den Durchlauferhitzer entlüften: Drehen Sie den Warmwasserhahn
komplett auf und lassen Sie für ca. 1 Minute Wasser durch das Gerät
laufen bis keine Luftblasen mehr austreten.
Stromverbindung (Ausschließlich durch einem Fachmann):
ACHTUNG!
Die Stromverbindung hat entsprechend nationaler Regelungen oder
Bestimmungen der Stromwerke zu erfolgen. Der elektrische Durchlaufer-
hitzer ist ein Gerät der Schutzklasse I und muss auf jeden Fall an eine
Erdungsleitung angeschlossen werden! Alle Wasseranschlüsse müssen
vor dem Anschließen an Strom bereits hergestellt sein!

DE
-50-
Verbinden sie das Gerät über die Verbindungsklemme, entsprechend des
folgenden Verbindungschemas, an Strom an.
L1, L2, L3 Phasen
PE Erdungsleitung
T1, T2, T3, T4 Elektronische Lastschalter
R1, R2, R3 7kW Heizelemente
1 Stromverbindungsklemme
2 Druck Sicherungsschalter
3 Elektronischer Steuerkreis
Die Betriebsspannung muss 400 VAC (3P + 1PE) sein. Elektrische Werte
des Geräts sind dem Aufkleber unter der Frontabdeckung zu entnehmen.
Stromkabel dürfen nicht beschädigt werden. Sie dürfen nach der Montage
nicht frei zugänglich sein. Die Kabel dürfen auch keiner mechanischen
Spannungen ausgesetzt sein.
Das Gerät muss so Montiert werden, dass es an jeder Verbindungsstelle,
durch einen mindestens 3 mm starkem und fachgerecht isoliertem
Stromkabel, dauerhaft an die Stromleitung angeschlossen ist. Das Gerät
sollte nicht ohne Maßnahmen gegen eventuelle elektrische Lecks betrieben
werden.

DE
-51-
Die Stromquelle muss stark genug sein um die vorhandenen
Stromkreisläufe zu speisen. Um das Gerät zu schützen sollte an die
speisende Stromleitung eine, der Stromstärke des Geräts entsprechende
Sicherung angebracht werden.
Bitte kontrollieren Sie ob im Sicherungskasten eine separate Leitung für
eine Sicherung mit 40 A und höher vorhanden ist. Falls die Hauptsicherung
schwächer ist als 40 A oder im Sicherungskasten keine separate Leitung
vorhanden ist, so ist für die Montage, eine neue Leitung entweder zur
Stromanlage des Montageortes oder direkt zum Gerät zu legen.
Das Gerät ist an eine unabhängige Stromleitung zu verbinden und nicht an
die Leitungen für Licht, Türschelle oder Backofen.
Die Erdungsleitung ist an die Erdungsleitung des Geräts und an offenen
Metallteilen anderer Geräte am Montageort, entsprechend der Standards
anzuschließen.
Um die maximale Leistung zu erzielen, sollte die Kabelentfernung vom
Sicherungskasten zum Gerät so kurz wie möglich gehalten werden. Die
Kabellänge ist auch bezüglich der Cut-Off-Zeit und Temperaturbegrenzun-
gen von Bedeutung. Bei einer Leitungskombination bezüglich Bedarf an
Stromstärke, Spannung und Kabelquerschnitt, besteht eine Begrenzung für
die maximale Kabellänge.
Falls die Kabel wärmeisoliert sind, innerhalb der Wand gelegt sind, durch
eine Stelle gelegt sind die eine Temperatur von über 30 °C vorweist oder
miteinander verflochten sind, so wird die Stromstärke reduziert. Um die
gleiche Stromstärke zu erreichen müssen Kabel mit einem größeren
Querschnitt eingesetzt werden.
Wenn man beachtet, dass der Kabelquerschnitt entsprechend der Leistung
des Geräts sein muss, so wird empfohlen 4 x 2,5 mm² Kabel einzusetzen.

DE
-52-
In den meisten Fällen muss der Elektriker den Montageort begutachten um
die richtige Wahl bezüglich Kabellänge und -Querschnitt treffen zu können.
Bevor Sie irgendeine Stromverbindung herstellen, vergewissern Sie sich,
dass an keinem Ende Strom vorhanden ist.
Bei Verdacht schalten sie die Hauptsicherung im Sicherungskasten ab.
Entfernen Sie die Isolierung des Stromkabels um ca. 5 cm, und der
Verbindungskabel um ca. 1 cm unter Einsatz einer Abisolierungszange –
ohne dabei den Stromkabel zu beschädigen.
Führen Sie den Stromkabel durch einer der Kabeleingänge des Geräts und
bringen Sie seine Enden an die Klemme. Verbinden Sie die
Verbindungskabel sorgfältig mit den Verbindungsterminals entsprechend
des Verbindungschemas.
Ziehen Sie die Schrauben an der Klemme an und achten Sie darauf, dass
die Kabelisolierung nicht unter den Verbindungsschrauben geraten. Lose
Verbindungen können zur Überhitzung der Kabel führen.
Der Stromkabel muss bezüglich seiner Unterbringung an der Wand, sowie
seines Schutzes den TSE-Standards entsprechen.
Wie bei jedem elektrischem Gerät, sollte der Durchlauferhitzer alle zwei
Jahre von einem Elektriker auf mit der Zeit entstehende Schwächen
überprüft werden.
Schalten Sie den Strom nicht an bevor die Frontabdeckung geschlossen ist.
Aus Sicherheitsgründen ist der Drucksicherungsschalter als
Werkseinstellung ausgeschaltet. Schalten Sie den Drucksicherungsschalter
auf jeden Fall ein bevor Sie die Frontabdeckung schließen, da der
Durchlauferhitzer sonst kein Wasser erhitzen wird!

DE
-53-
Anschaltung des Drucksicherungsschalters und Inbetriebnahme
Das erste was Sie machen müssen, um Ihr Gerät von Schäden zu schützen
ist eventuelle Reste im Gerät zu reinigen und das Gerät vor Inbetriebnahme
der Heizelemente mit Wasser aufzufüllen indem Sie den Warmwasserhahn
aufdrehen. Während dieser Prozedur sollte der Drucksicherungsschalter
abgeschaltet sein. Drehen Sie den Warmwasserhahn auf nachdem Sie das
Wasserzufuhrventil geöffnet haben. Warten Sie bis das Wasser regelmäßig
durch das Gerät fließt. Es wird ca. 1 Minute dauern bis das Wasser frei von
Luft und eventuellen Fremdkörpern fließt. Drehen Sie den Warmwasserhahn
mehrmals ab und auf um das Gerät und das System von restlichen
Luftblasen komplett zu befreien.
Bevor Sie das Gerät mit Strom speisen muss der Drucksicherungsschalter
eingeschaltet werden. Drücken und schieben Sie dafür den Schalter in
Pfeilrichtung nach rechts. Der Schalter wird mit einem Klicken einrasten
sobald er eingeschaltet ist.
Platzieren Sie die Frontabdeckung auf der Rückabdeckung und
vergewissern Sie sich, dass die Plastikdübel der Frontabdeckung mit den
Randvertiefungen der Rückabdeckung in Deckung gebracht sind.
Während Sie die Frontabdeckung aufsetzen überprüfen Sie einerseits auch,
ob der Temperaturregler richtig aufsitzt und keine Kabel zwischen den
Abdeckungen eingeklemmt ist.

DE
-54-
Drehen Sie gegebenenfalls am Temperaturregler. Setzen Sie die
Frontabdeckung auf und ziehen Sie die Schraube an. Drehen Sie den
Wasserhahn ab bevor Sie das Gerät mit Strom speisen. Schalten Sie den
Strom ein. Stellen Sie die gewünschte Warmwassertemperatur, welche auf
dem LCD-Bildschirm angezeigt wird, mit dem Regler ein, sodass Ihr Gerät
bereit ist für den Betrieb. Drehen Sie den Warmwasserhahn auf um die
Funktionalität des Geräts zu überprüfen. Geben Sie diese
Gebrauchsanweisung an der/dem BenutzerIn weiter und erklären ihr/ihm
wie das Gerät funktioniert. Falls das Gerät, aufgrund von niedrigem
Wasserdruck nicht funktioniert, so überprüfen Sie den Wasserdruck in der
Rohrleitung und lassen Sie die Rohrleitung von einem entsprechenden
Fachmann auf andere Mängel überprüfen.
Kontrolle der Temperatur
Das Gerät fängt automatisch an zu funktionieren sobald der
Warmwasserhahn aufgedreht wird und stellt seinen Betrieb automatisch ein
sobald der Wasserdruck unter einem Minimum gesunken oder der
Warmwasserhahn wieder abgedreht ist. Der Durchlauferhitzer erhitzt das
durchlaufende Wasser direkt auf die gewünschte Temperatur und verbraucht
dafür nur elektrische Energie.
Die Wassertemperatur hängt von der Temperatur des Eintretenden Wassers,
Leistung des Geräts und Menge des durchfließenden Wassers ab. Die
gewünschte Wassertemperatur wird durch den Temperaturregler eingestellt.
Außerdem wird die Temperatur durch Reduzierung des Wasserflusses
erhöht und umgekehrt, durch Erhöhung des Wasserflusses reduziert. Den
Wasserfluss können Sie wie in der Abbildung dargestellt am
Wasserzufuhrhahn mit einem Schraubenzieher einstellen.

DE
-55-
Eine Erhöhung der Wassertemperatur während des normalen Betriebs
deutet mit hoher Wahrscheinlichkeit auf den niedrigen Wasserdruck bei der
Zufuhr. Falls das Gerät gleichzeitig mehrere Warmwasserhähne bedient, so
wird das erhitzte Wasser unter diesen Hähnen aufgeteilt. Im Winter, bei
niedrigen Temperaturen der Wasserzufuhr könnte die gewünschte
Wassertemperatur nicht erreicht werden.
Thermoschalter
Der Thermoschalter schützt das Gerät in dem er den Stromkreis unterbricht
sobald die Temperatur im Gerät übermäßig steigt – sei es durch die
Wasserzufuhr oder aus einem anderen Grund. Die Unterbrechung des
Stromkreises durch den Thermoschalter macht eine Kontrolle durch den
autorisierten Kundendienst erforderlich. Nachdem alle Fehlerquellen
behoben sind, kann der Thermoschalter, durch dem auf ihm befindlichem
Knopf wieder eingeschaltet und das Gerät wieder betrieben werden.
Drucksicherungsschalter
Falls während des normalen Betriebs oder beim nicht eingeschaltetem
Gerät, der Wasserdruck aus irgendeinem Grund extrem steigt, so wird der
Drucksicherungsschalter ausgelöst und die Stromzufuhr zum Gerät
unterbrochen. Die Unterbrechung des Stromkreises durch den
Drucksicherungsschalter macht eine Kontrolle durch den autorisierten
Kundendienst erforderlich. Nachdem alle Fehlerquellen behoben sind, kann
der Drucksicherungsschalter, durch dem auf ihm befindlichem Schalter
wieder eingeschaltet und das Gerät wieder betrieben werden.
Betrieb
Die Wassertemperatur kann durch Drehen
des Reglers an der Vorderseite von 20 °C
bis 60 °C eingestellt werden. Die eingestellte
Temperatur kann an der LCD-Anzeige
überprüft werden. Sobald der Wasserhahn
aufgedreht wird und ein konstanter
Wasserfluss erreicht wird geht das Gerät
automatisch in Betrieb und erhitzt das
Wasser bis zur gewünschten Temperatur.

DE
-56-
Der Betrieb des Geräts kann anhand des
aktuellen Energieverbrauch am LCD-
Bildschirm verfolgt werden. Das Gerät
stellt die erforderliche Leistung,
entsprechend der gewünschten
Wassertemperatur automatisch ein. Die
dabei verbrauchte Energie können Sie
am LCD-Bildschirm verfolgen (von 10%
bis 100%). Die „eco“-Anzeige unter der
Leistungsanzeige brennt solange die verbrauchte Energie unter 60% ist.
Die „eco“-Anzeige besagt, dass das Gerät seine Heizfunktion anhand des
aktuellen Energieverbrauchs ökonomisch ausübt. Die „eco“-Anzeige erlischt
sobald der Energieverbrauch über 60% ist. Dies besagt, dass das Gerät für
die Erhitzung des Wassers mehr Energie verbraucht. Um das Gerät
ökonomisch zu verwenden, achten Sie darauf, dass die gewünschte
Wassermenge und Wassertemperatur nicht höher sind als erforderlich.
Die andere Temperaturanzeige auf dem LCD-Bildschirm zeigt die
wahrgenommene Wassertemperatur innerhalb des Geräts an. Das aus
dem Warmwasserhahn austretende Wasser kann, aufgrund von
Temperaturverlusten in der Wasserleitung Schwankungen aufweisen und
nicht der gewünschten Wassertemperatur entsprechen.
Betrieb mit einer solarthermischen Anlage
Der BLUE S dreiphasiger Durchlauferhitzer kann mit im Voraus erwärmtem
Wasser (z.B. durch eine solarthermische
Anlage) betrieben werden. Falls die
Wassertemperatur des eingespeisten
Wassers über 30 °C ist, so leuchtet das
Sonnensymbol auf der LCD-Anzeige auf.
Dies Besagt, dass das Gerät mit im
Voraus erwärmtem Wasser gespeist wird
und das Gerät ausreichende Energie
verbraucht um die gewünschte
Wassertemperatur zu erreichen.

DE
-57-
Bei dem Betrieb mit solarthermischen Anlagen ist zu beachten, dass die
Wassertemperatur des in das Gerät eingeführte Wassers nicht 55 °C
übersteigen darf. Um zu verhindern, dass die Wassertemperatur 55 °C
übersteigt, kann am Ausgang der solarthermischen Anlage oder an einer
anderen geeigneten Stelle ein “Thermostatisches Mischventil“ angebracht
werden.
Fehlercodes
In manchen Fällen stellt das Gerät den
Betrieb ein und zeigt, wie auf der
Abbildung nebenan zu sehen, ein
Fehlercode auf dem LCD-Bildschirm an.
Dies besagt, dass das Gerät den Betrieb
aufgrund eines Problems eingestellt hat.
Bitte versuchen Sie die Fehler anhand der Anweisungen im Kapitel
“Problembehebung und Kundendienst“ zu beheben. So können unnötige
Reparaturkosten vermieden werden. Sobald die Fehler behoben sind,
erlischt auch die Fehleranzeige auf dem LCD-Bildschirm und das Gerät
geht in den normalen Betrieb über.
Reinigung und Wartung
Benutzen Sie keine starken Scheuermittel und/oder solvente Flüssigkeiten
bei der Reinigung. Solche Mittel können die Plastikteile des Geräts
beschädigen. Das Gerät kann mit einem weichen Tuch und lauwarmem
Wasser gereinigt werden. Es wird empfohlen vor der Reinigung die
Stromsicherung abzuschalten. Dies verhindert, dass das Gerät bei der
Reinigung aus Versehen angeschaltet wird.
Der Schmutzigkeitsgrad des verwendeten Wassers und sein Kalkgehalt
bestimmen die Reinigungsabstände. Zum Beispiel falls das Gerät jeden
Tag mit schmutzigem Wasser verwendet wird, so sollte es mindestens
einmal wöchentlich gereinigt werden.
Um den regelmäßigen und sicheren Betrieb zu gewährleisten sollte das
Gerät selbst sowie die Strom und Wasserleitungen alle zwei Jahre von
einem Techniker gewartet werden.

DE
-58-
Reinigung des Wasserzufuhrfilters
Der Wasserzufuhrfilter befindet sich im Bereich der Wasserzufuhr und
sollte nicht nur bei Vorhandensein eines Problems, sondern regelmäßig
überprüft und gereinigt oder durch einem Neuen ersetzt werden.
Um den Filter zu reinigen drehen Sie die Zufuhrleitung ab.
Montieren Sie die Frontabdeckung des Geräts ab und schrauben Sie den
Verschlussstopfen der Wasserzufuhr ab. Entfernen Sie den
Wasserzufuhrfilter von seinem Platz. Sie können ihn reinigen oder
gegebenenfalls austauschen.
Benutzen Sie bei der Reinigung des Filters keine scharfen Gegenstände
die ihn beschädigen können. Es wird empfohlen eine alte Zahnbürste oder
Ähnliches zu verwenden. Setzen Sie den Filter wieder ein und schrauben
Sie den Verschlussstopfen ein.
Nachdem Sie das Wasserventil wieder aufgedreht haben, drehen sie den
Warmwasserhahn auf und warten bis ein regelmäßiger Wasserfluss
vorhanden ist.
Um dann eventuelle Luftblasen aus dem Gerät und aus dem gesamten
System zu entfernen, drehen Sie bitte den Warmwasserhahn mehrmals ab
und wieder auf.

DE
-59-
Problembehebung und Kundendienst
Störung
Grund
Lösung
Wer?
Das Gerät
funktioniert
nicht, es
tritt kein
Warmwasser
aus Keine
LCD
Anzeige
Der Drucksicherungs
schalter im Gerät
wurde ausgelöst.
Kein Strom oder
Sicherung ausgelöst.
Kontrollieren Sie den
Drucksicherungsschalter.
Techniker
Kontrollieren Sie den Strom
Kunde
Wasserfluss
sehr niedrig
Filter des
Wasserhahns
verstopft.
Bauen Sie den Filter aus,
entkalken und reinigen
Sie ihn mit Wasser.
Kunde
Störung an der
elektronischen Karte
Kontrollieren Sie die
elektronische Karte.
Der Wasserzufuhrfilter
am Gerät verstopft.
Bauen Sie den Filter aus,
reinigen und bauen Sie
ihn wieder ein.
Kunde
Kontrollieren Sie die
Sicherung.
Das Wasser
fließt
abwechselnd
warm und
kalt.
Durch eine Luftblase
wird das
Temperatur-
wahrnehmungssystem
ein und ausgeschaltet.
Nach ein Paar Sekunden
wird die Luftblase aus dem
System entfernt und das
Gerät nimmt seinen
normalen Betrieb wieder
auf.
Das Gerät
behebt
das
Problem
automatisch
E01
Der Kabel des
Temperatursensors für
das austretende
Wasser ist lose
Überprüfen Sie den
Sensor und seinen Kabel.
Techniker
E02
Der Kabel des
Temperatursensors für
die Wasserzufuhr ist
lose
Überprüfen Sie den
Sensor und seinen Kabel.
Techniker
Kunde
Techniker

Für den Kunden
Bitte lesen Sie alle Sicherheitshinweise sorgfältig durch und beachten Sie
sie. Setzen Sie das Gerät niemals der Frostgefahr aus. Wenn Sie sich
beim Kundendienst melden, geben Sie bitte die Seriennummer an welche
auf dem Gerätaufkleber zu finden ist und mit B21 beginnt. Sie finden den
Aufkleber unter der Klappe welche sich auf der Frontabdeckung befindet.
DE
-60-
E06
Elektronische Karte
defekt.
Tauschen Sie die
elektronische Karte aus.
Techniker
E03
Temperatur des
eintretenden Wassers
ist zu hoch (evtl. Durch
die solarthermische
Anlage).
Kunde
Falls Sie eine
solarthermische Anlage
besitzen so überprüfen Sie
die Wassertemperatur.
Gegebenenfalls setzen
Sie ein thermostatisches.
E04
Wasserzufuhr-
temperatur zu niedrig
(Frostgefahr).
Kunde
Unterbrechen Sie sofort
die Wasserzufuhr.
Schalten Sie die
Stromsicherung ab und
entfernen Sie das Wasser
im Gerät indem Sie den
Warmwasserhahn
aufdrehen.
E05
Luftblasenwahrneh-
mungssystem aktiviert.
Kunde
Drehen Sie den
Warmwasserhahn
mehrmals auf und ab,
sodass die Luftblase im
System entfernt wird.
Entsorgung
Das Gerät ist entsprechend der Richtlinie 2012/19/EU über
Elektro- und Elektronik-Altgeräte markiert. Diese Richtlinie legt
Mindestnormen für die Behandlung von Elektro- und Elektronik-
Altgeräten in der EU fest.
Störung
Grund
Lösung
Wer?

DE
-61-
Stromverbindung
400 V 50/60 Hz
3P + 1PE
Technische Eigenschaften
MODEL
BLUE S
Leistung
18 / 21 kW
Mindestquerschnitt
des Kabels
4 mm
2
Sicherungsstärke
32 A
Wasserverbindung
G 1/2
Erwärmungssystem
Drahtwiderstand
Maximale
Warmwasserkapazität
bei Wasser mit 15 °C
Temperatur
15 °C’den 45 °C’ye ----------> 8,0 l/dak
15 °C’den 60 °C’ye ----------> 6,0 l/dak
Betriebsdruck
0,05 MPa ( 0,5 bar )
Maximaler Druck
1 MPa ( 10 bar )
Elektrischer Widerstand
des Wassers bei 15 °C
≥ 1300 Ωcm
Netto Gewicht
3,5 kg
Schutzklasse / Typ
1 / IP25
Gewährleistung
Für dieses Gerät gelten die Gewährleistungsbedingungen welche durch
unserem Vertreter in Ihrem Land veröffentlicht wurde. Änderungen sind
vorbehalten.


 Loading...