

Page 1
Betriebsanleitung
Operating Instructions
Bügler HP 2003
VEIT 2181/2182
HP 2003 Iron
Pressing for Excellence
Page 2

Bügler HP 2003 VEIT 2181/2182
VEIT 2181/2182 HP 2003 Iron
17.09.2009 2
VEIT GmbH
Justus-von-Liebig-Str. 15
D - 86899 Landsberg am Lech
Germany
Phone +49 (81 91) 479 0
Fax +49 (81 91) 479 149
www.veit-group.com
Service Hotline
Germany: +49 (81 91) 479 133
Europe: +49 (81 91) 479 252
America: +1 (770) 868 8060
Asia: +852 2111 9795
Ersatzteile/Spare parts
Vertrieb/Sales +49 (8191) 479 176
Vertrieb Textilpflege/ +49 (8191) 479 129
Sales Textile care
Page 3

Bügler HP 2003 VEIT 2181/2182
VEIT 2181/2182 HP 2003 Iron
17.09.2009 3
Inhaltsverzeichnis / Table of Contents:
1 Aufbau- und Betriebsanleitung / Assembly and
Operating Instructions 4
1.1 Bildbeschreibung / Description 4
1.2 Warnhinweise / Warnings 4
1.3 Aufbauanleitung Bügler 2181 / Assembly Instructions of the VEIT 2181 Iron 5
1.4 Inbetriebnahme Bügler 2181 / Starting Operation of the VEIT 2181 Iron 5
1.5 Hinweis / Notice 5
1.5.1 Anzeigen am Display in der Hauptebene / Indications on the screen 5
1.6 Aufbauanleitung Bügler 2182 / Assembly Instructions of the VEIT 2182 Iron 6
1.7 Inbetriebnahme Bügler 2182 / Starting Operation of the VEIT 2182 Iron 6
1.8 Bügeln / Ironing 7
1.9 Pausen und Außerbetriebnahme / Breaks and Finishing Operation 7
1.10 Pflege / Maintenance 7
1.11 Garantie / Warranty 8
1.12 Büglerreparaturen / Iron Repairs 8
2 Ersatzteillisten und Zeichnungen / Spare Parts Lists
and Drawings 9
2.1 Ersatzteile Bügler HP 2003 / Spare Parts HP 2003 Iron 9
2.2 Ersatzteile Veitronic HP 2003 / Spare Parts Veitronic HP 2003 11
3 Schaltpläne / Circuit Diagrams 13
3.1 Schaltplan Bügler HP 2003 / Circuit Diagram HP 2003 Iron 13
3.2 Schaltplan Veitronic HP 2003 / Circuit Diagram Veitronic HP 2003 14
4 EG-Konformitätserklärung / EC Declaration of
Conformity 15
Page 4
Bügler HP 2003 VEIT 2181/2182
VEIT 2181/2182 HP 2003 Iron
17.09.2009 4
1 Aufbau- und Betriebsanleitung / Assembly and Operating Instructions
1.1 Bildbeschreibung / Description
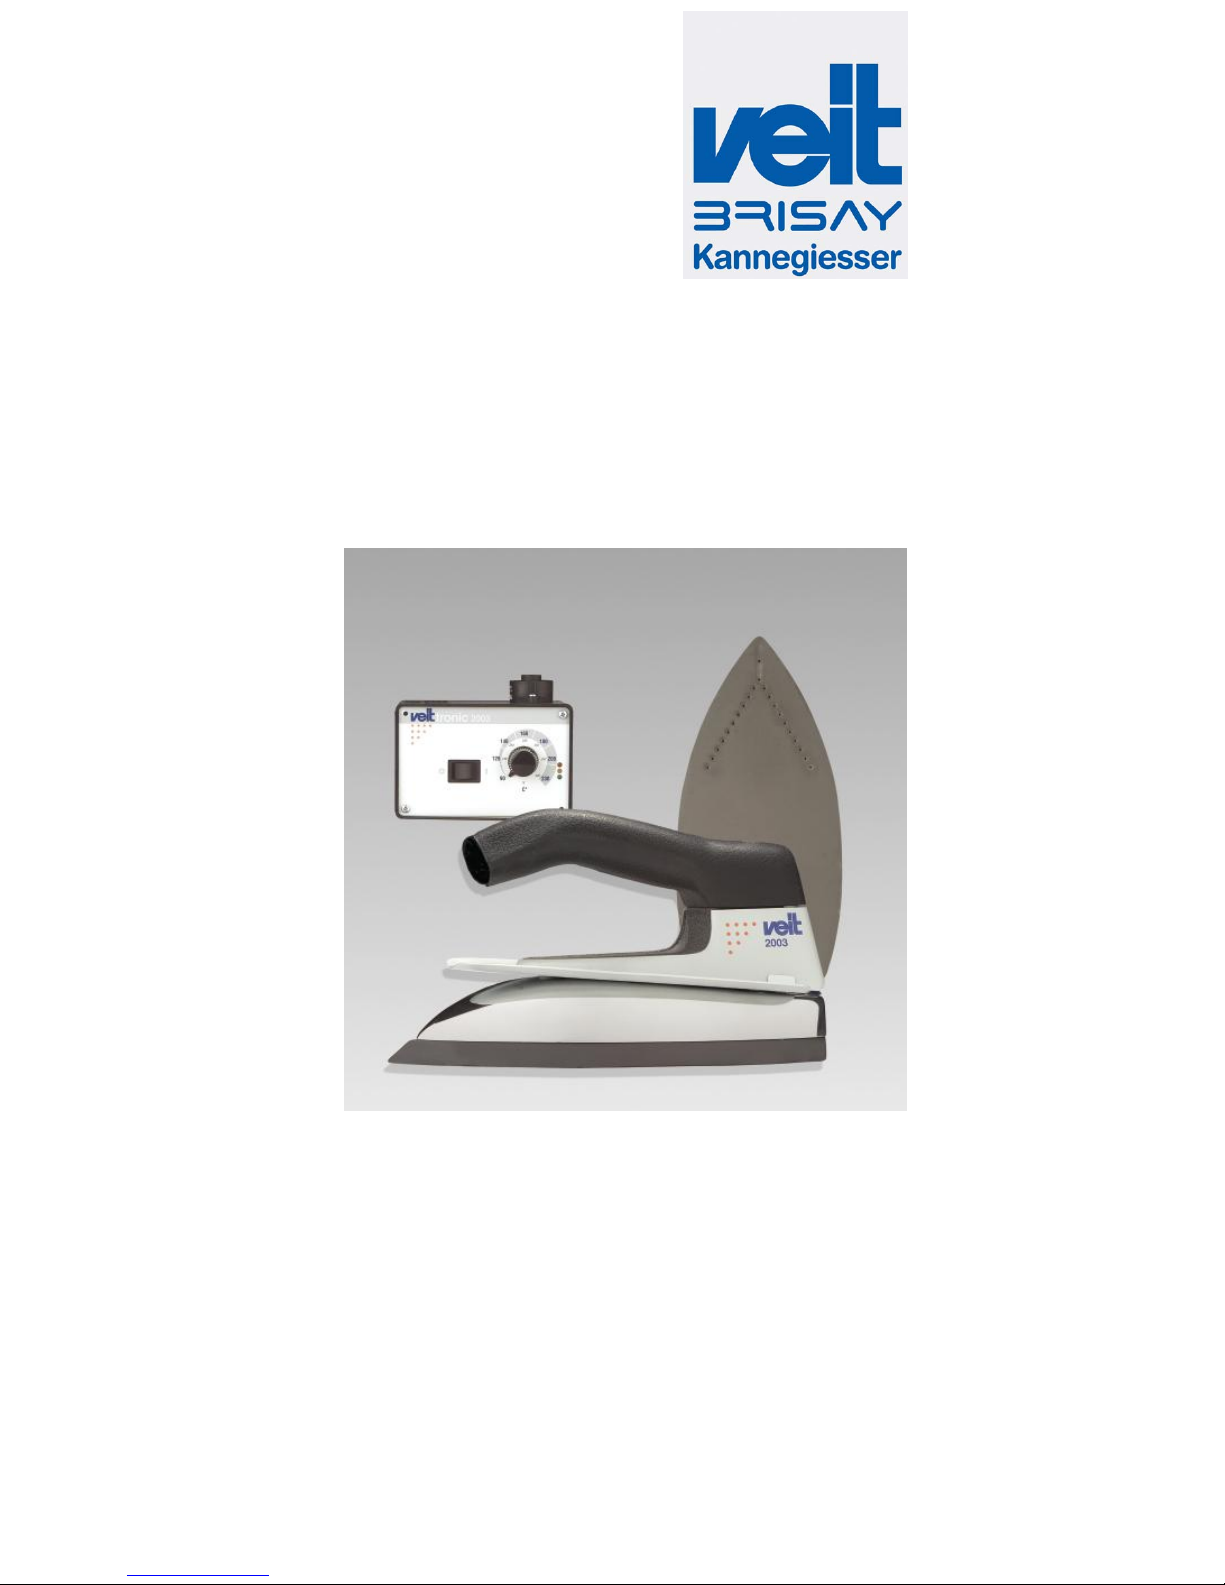
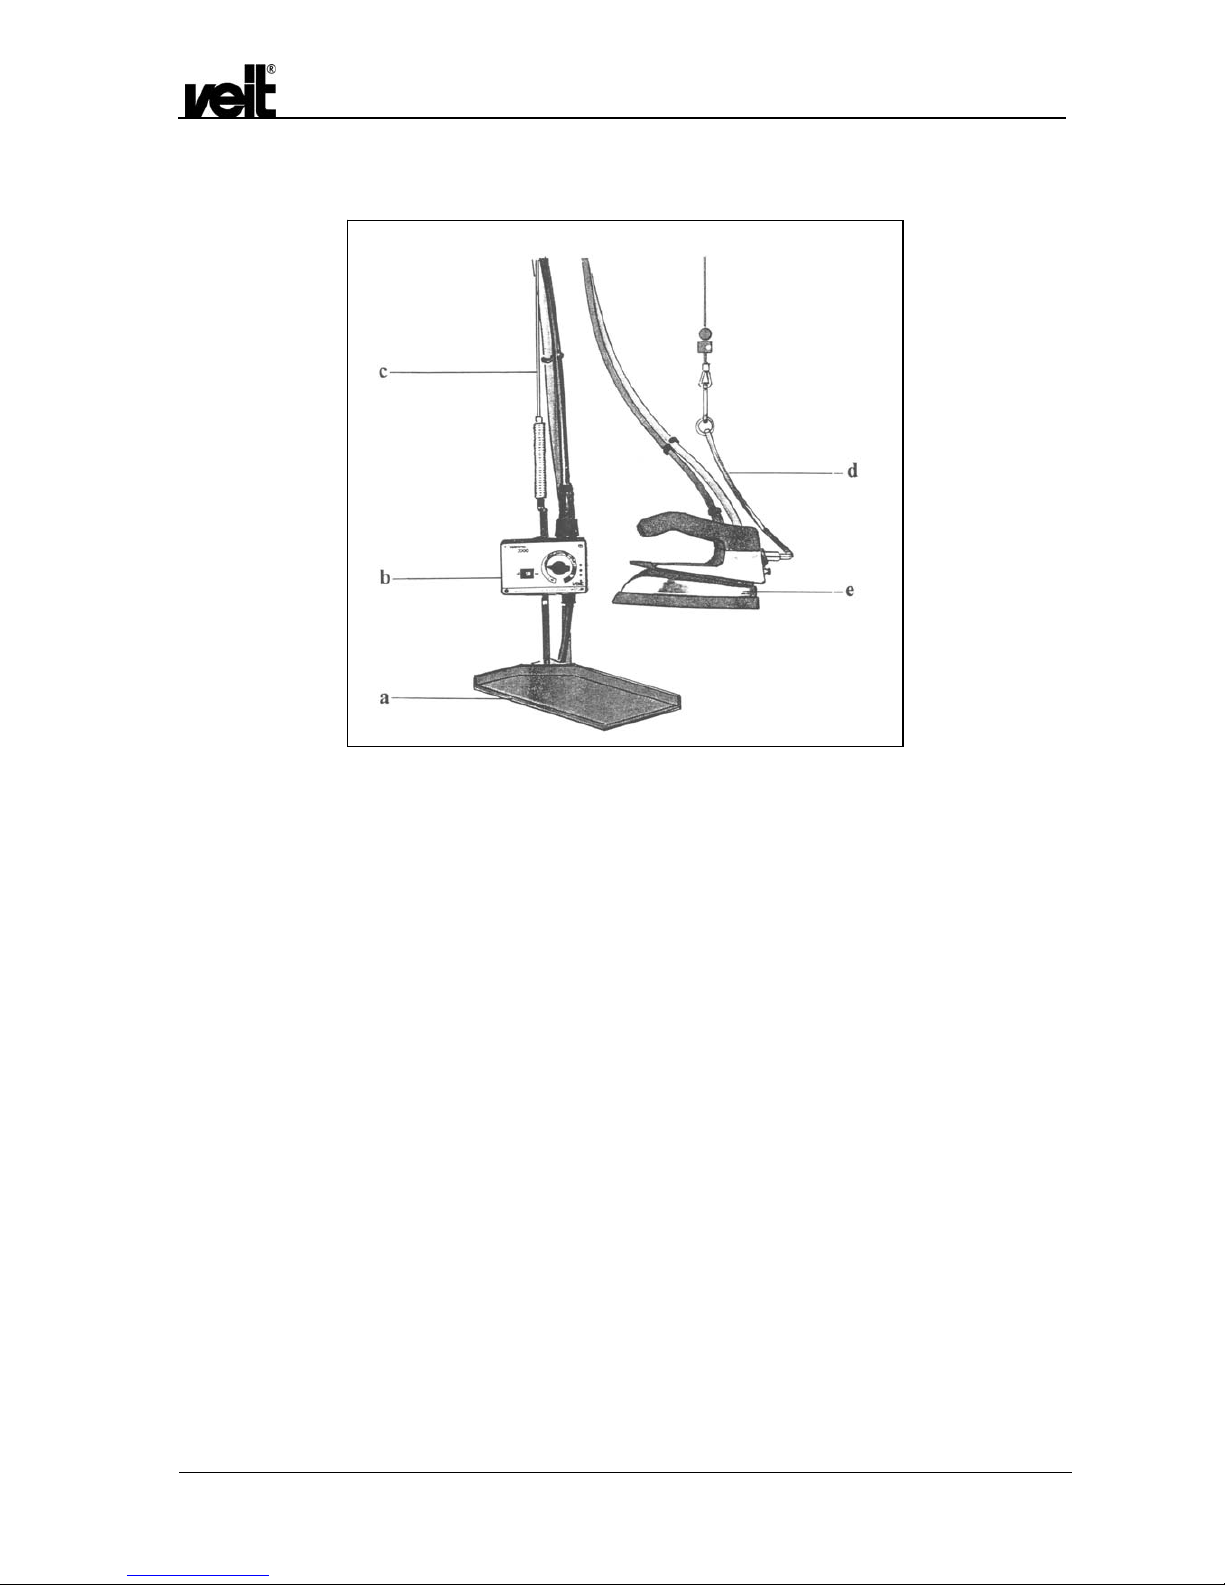
a) Büglerabstellfläche mit Veit-Silikon-Abstellplatte
b) Veitronic 2003 montiert (nur beim Bügler 2182)
c) Veitronic-Peitsche
d) Schwenkbügel für Büglerschwebe
e) Hochdruckbügler VEIT HP 2003
a) Iron rest with VEIT silicone plate
b) Veitronic 2003 assembled (only at the 2182 iron)
c) Veitronic-hose and cable support
d) Swivel bow for iron gantry
e) VEIT HP 2003 high pressure iron
1.2 Warnhinweise / Warnings
Störungen an der elektrischen Anlage dürfen nur durch
elektrotechnisch qualifiziertes Personal behoben werden.
Vor Öffnen des Gerätes muss das Gerät von der
Spannungsversorgung getrennt werden.
Den Bügler während des Betriebs nicht unbeobachtet
lassen!
Der Bügler darf nur auf dafür vorgesehene stabile und
temperaturfeste Abstellflächen gestellt werden.
Der Bügler darf nicht benutzt werden, wenn er sichtbare
Beschädigungen oder Undichtigkeiten aufweist.
Falsch eingestellte Temperaturen können das Bügelgut
beschädigen.
Electrical faults must only be repaired by authorized
personnel.
Before opening the unit, disconnect the unit from the
power supply.
Don’t leave the unit unattended when it is connected with
the mains supply.
The iron must only be put down on the iron rest which is
intended for it. The iron rest must be solid and
temperature-resistant.
Do not use iron if it has visible damages or leakages.
Wrongly adjusted temperatures may damage the garment.
Page 5
Bügler HP 2003 VEIT 2181/2182
VEIT 2181/2182 HP 2003 Iron
17.09.2009 5
1.3 Aufbauanleitung Bügler 2181 / Assembly Instructions of the VEIT 2181 Iron
Die Büglerpeitsche wird am Büglerabstellplatz in die dafür
vorgesehene Bohrung eingesteckt bzw. eingedreht und mit der
Mutter von unten festgeschraubt bzw. von oben mit der
Kontermutter in der richtigen Position fixiert.
Das Anschlusskabel mit 6-poligem Kabelstecker wird an die
6-polige Kabeldose der Elektro-Box am Bügeltisch
angeschlossen.
Der Hochdruckbügler VEIT HP 2003 wird auf den BüglerAbstellplatz gestellt.
Der Hochdruckdampfschlauch des HP 2003 mit der 3/8“Anschlußverschraubung wird nun mit dem Dampfgeber
verbunden. Der zulässige Dampfdruck darf 5 bar nicht
überschreiten.
Am Ende der Bügelpeitsche wird der Federbügel eingehängt,
der den Dampfschlauch mit dem Kabel trägt.
Fix the hose and cable support to the iron rest by securing it with
nut and union into the appropriate hole.
The 6-pin plug on the connecting cable should be fitted to
the 6-pin socket of the electronic box at the ironing table.
Place the HP 2003 high-pressure iron onto the iron rest.
The high-pressure steam hose on the HP 2003 iron has a
3/8" coupling which is to be connected to the steam supply.
The steam pressure must not exceed 5 bars.
Now fix the spiral holding the steam hose and the cable, to the
end of the hose and cable support.
1.4 Inbetriebnahme Bügler 2181 / Starting Operation of the VEIT 2181 Iron
Vor Inbetriebnahme prüfen Sie bitte den Anschluss des 4poligen Steckers der Elektro-Box vom Bügeltisch, am
Dampfgeber (Kondensor, Steam-Adapter oder
Dampferzeuger).
Siehe auch Aufbauanleitung Bügeltische.
Schalten Sie den Hauptschalter am Grundgerät des
Bügeltisches ein. Die grüne Kontroll-Lampe muss aufleuchten,
ansonsten ist die Stromzufuhr zu dem Bügeltisch zu prüfen.
Am Abwindkamin mit Display (bzw. am Gehäuse mit Display)
erscheint für ca. 5 Sekunden „Verschmutzungsanzeige“ bzw.
„Fläche reinigen“.
Die Anzeige am Display schaltet dann automatisch in die Ebene
1 (Hauptebene).
Sollte dies nicht der Fall sein, dann siehe Programmieranleitung
4440; „Einschaltebene 1“ bzw. „Einschaltebene 2“.
Before starting, check that the 4-pin plug of the electronic
box on the ironing table is properly connected to the steam
supply (condensor, steam adaptor or steam generator).
See also the assembly instructions for the ironing tables.
Switch on the main switch on the base unit of the ironing table.
The green indicator lamp should light up. If it does not, check the
power supply to the ironing table.
The screen on the air-vent chimney (or on the casing) will show
"fouling" or "clean table" for about 5 seconds.
The screen will automatically switch to level 1 (main level).
If it does not, read the programming instructions 4440; "switching
level 1" or "switching level 2".
1.5 Hinweis / Notice
Erfolgt der Sprung in die Hauptebene nicht automatisch, wird bei
Betätigung der Taste (+) angenommen, dass die Gebläsespirale
gereinigt wurde und es erfolgt dennoch der Sprung in die
Hauptebene.
If not switching automatically to main level, actuate the (+) key;
this assumes that the fan spiral was cleaned and the screen will
switch to main level.
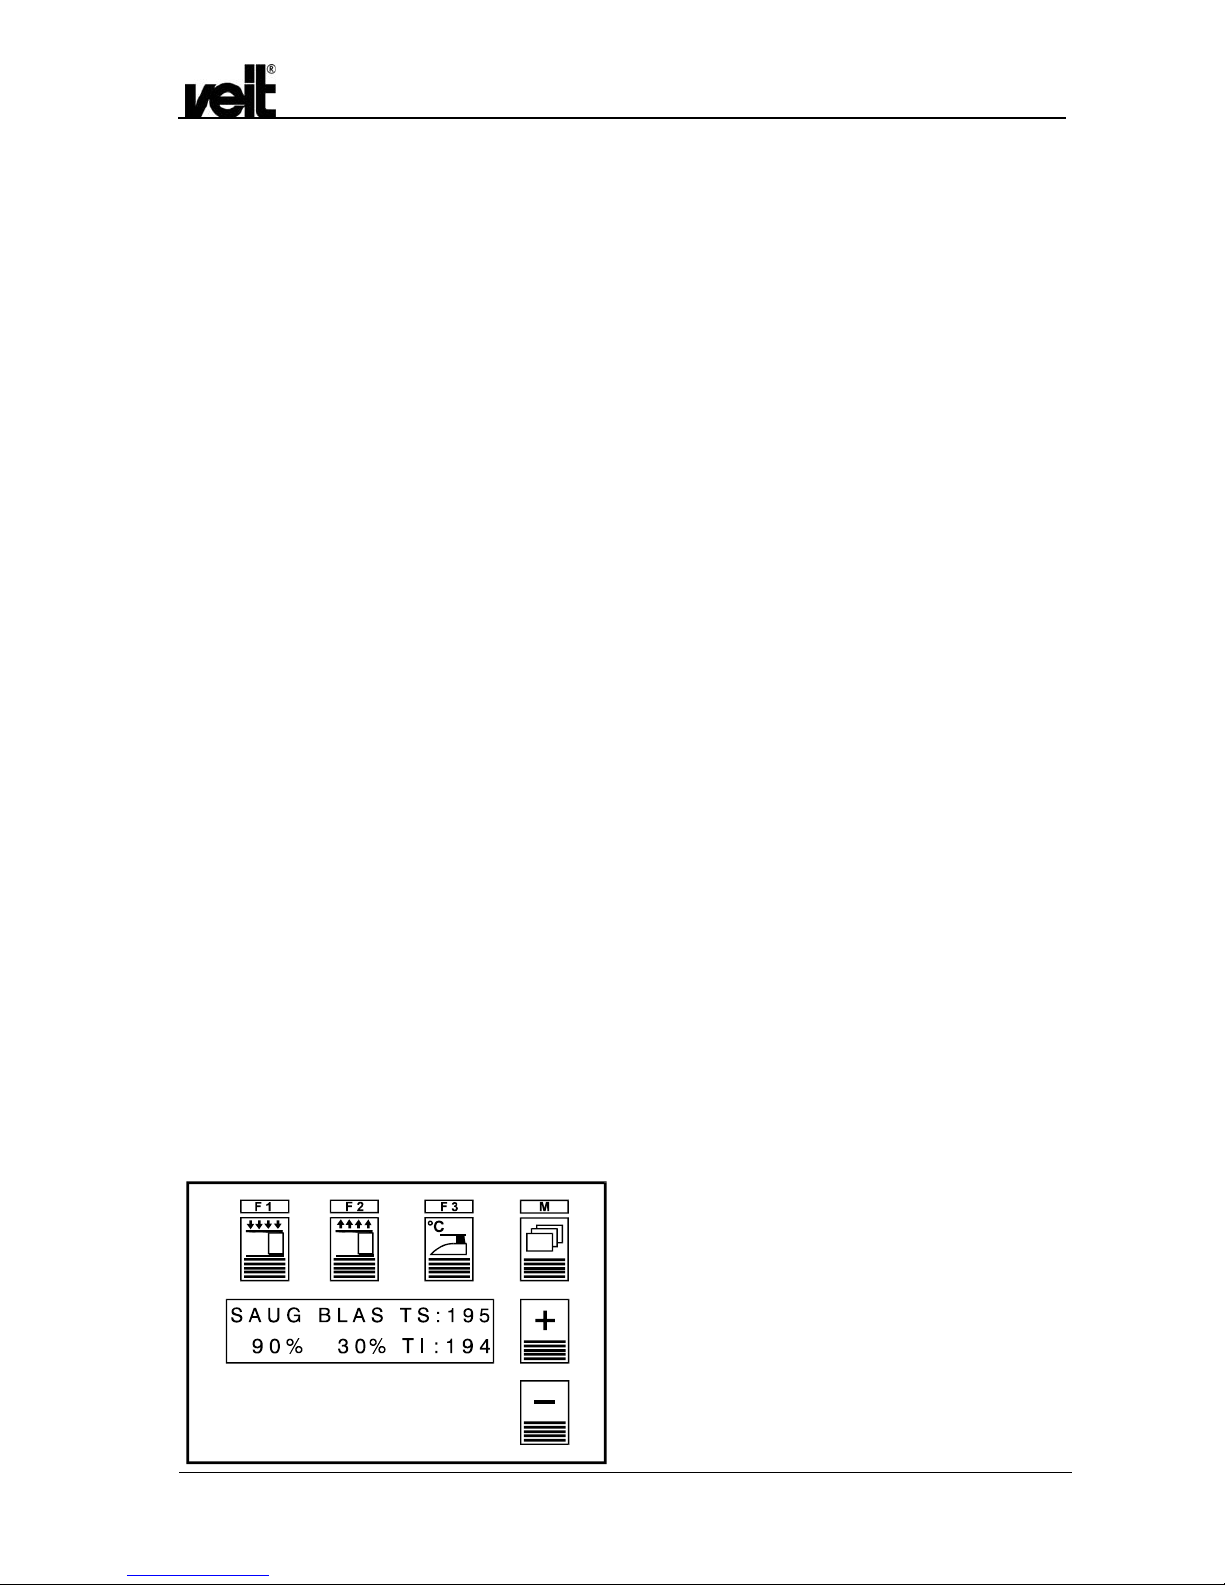
1.5.1 Anzeigen am Display in der Hauptebene / Indications on the screen
Page 6

Bügler HP 2003 VEIT 2181/2182
VEIT 2181/2182 HP 2003 Iron
17.09.2009 6
Ebene 1: Level 1:
Links: „SAUG“: Luftmengen-Sollwert für Saugen (in %)
left: „SUCT“: Air volume suction setting (in %)
Mitte: „BLAS“: Luftmengen-Sollwert für Blasen (in %)
middle: „BLOW“: blowing setting(in %)
Rechts: „TS“: Temperatur-Sollwert des Bügeleisens
(in °C)
right: „TS“: Iron temperature setting (in %)
„TI“: Temperatur-Istwert des Bügeleisens (in
°C) gemessen an der Büglersohle bei
frei konvektionierender Luft (20 °C)
„TA“
Actual iron temperature (in
°
C)
measured at the soleplate assuming
freely circulating air at 20
°
C
Taste F3 drücken bis „TS“ blinkt.
Mit der <+> und <-> Taste kann der Temperatur-Sollwert in 5 °C-
Schritten zwischen
90 °C und 230 °C eingestellt werden.
Der Hochdruckbügler Veit HP 2003 ist nun betriebsbereit.
Press F3 until "TS" flashes.
Adjust the temperature setting by using the <+> and <->keys.
The settings are in steps of 5°C in the range 90°C - 230°C.
The VEIT HP 2003 high-pressure iron is now ready for operation.
1.6 Aufbauanleitung Bügler 2182 / Assembly Instructions of the VEIT 2182 Iron
Die Montage der Büglerpeitsche, der Anschluss sowie das
Befestigen des Büglerdampfschlauches erfolgt sinngemäß wie
beim Bügler 2181.
Das Bügler-Kabel wird durch den 6-poligen Stecker mit der
Veitronic 2003 verbunden.
Die Veitronic 2003 ist zur Befestigung an der Veitronic-Peitsche
vorbereitet. Sie wird mit einem Klemmteil innerhalb der Uförmigen Biegung montiert.
Das Anschlusskabel der Veitronic 2003 wird mit dem 4-poligen
Kabelstecker an der 4-poligen Kabeldose am Dampfgeber
(Kondensor, Steam-Adapter oder Dampferzeuger)
angeschlossen.
For the assembly of the hose and cable support, for connecting
and fastening the iron steam hose see the assembly instructions
of VEIT 2181 iron.
The 6-pin plug on the iron-cable should be connected to the
Veitronic 2003.
The Veitronic 2003 is prepared to be fastened to the Veitronichose and cable support. It will be fixed with a clamping unit in the
U-shaped bend.
The 4-pin plug on the connecting cable of the Veitronic 2003
should be fitted to the 4-pole socket of the steam supply
(condensor, steam adaptor or steam generator).
1.7 Inbetriebnahme Bügler 2182 / Starting Operation of the VEIT 2182 Iron
Schalten Sie den Hauptschalter an der Veitronic 2003 ein. Die
gelbe Kontroll-Lampe muss aufleuchten, ansonsten ist die
Stromzufuhr vom Anschluss des Dampfgebers zu prüfen.
Stellen Sie den Temperatur-Wählknopf auf den gewünschten
Skalenwert ein. Die gelbe Kontroll-Lampe brennt so lange, bis
der Bügler die vorgewählte Temperatur erreicht hat.
Wenn die vorgewählte Temperatur erreicht ist, leuchtet die
grüne Kontroll-Lampe auf und zeigt an, dass mit dem Bügeln
begonnen werden kann.
Schaltet die Anzeige während des Bügelns auf die gelbe
Kontroll-Lampe um, heizt der Bügler nach. Es kann aber
weitergearbeitet werden.
Wird der aufgeheizte Bügler auf eine niedrigere Temperatur
zurückgestellt, ist die Büglertemperatur zunächst zu hoch
gegenüber dem neuen Skalenwert. Die grüne Lampe erlischt
und die rote Kontroll-Lampe brennt, bis der Bügler auf die
eingestellte Temperatur abgekühlt ist.
Switch on the main switch on the Veitronic 2003. The yellow
indicator lamp should light up. If it does not, check the power
supply to the steam supply.
Set the required temperature by turning the temperature knob.
The yellow indicator lamp lights up until the required
temperature is reached.
When the preselected temperature is reached, the green
indicator lamp should light up, showing that ironing can be
started.
If the indicator turns back to yellow during ironing, the iron is
post heating. Work can be continued.
If the temperature is reduced by turning the knob, the iron
temperature is higher than the indicated temperature in that
moment. The green indicator lamp extinguishes and the red
lamp lights up until the iron cooled down and reached the
required temperature.
Page 7

Bügler HP 2003 VEIT 2181/2182
VEIT 2181/2182 HP 2003 Iron
17.09.2009 7
1.8 Bügeln / Ironing
Zum Bügeln mit Dampf sollte die Mindesttemperatur bei ca.
135°C liegen.
Die Dampfabgabe wird durch Daumendruck auf den unsichtbar
im Handgriff eingebauten Kontakter ausgelöst. Sie sollte in
kurzen Intervallen unterbrochen werden, damit nicht unnötig viel
Dampf in das Bügelgut gelangt, was das Bügelergebnis
verschlechtert. Es reicht aus, die vorgewählte Temperatur nur
dann zu verändern, wenn stark unterschiedliches Bügelgut zu
verarbeiten ist.
For steam ironing the temperature should be min. 135°C.
Steam is released by using the thumb to press the contactor in
the handle. It is advisable to have short pauses because too
much steam on the garments leads to poor finishing. Only
change the set temperature, when the fabric of the garment is
different.
Dampf- und Stromverbrauch sind abhängig:
• vom persönlichen Arbeitsrhythmus
• von den Absaugleistungen und -zeiten des
Bügeltisches
• von der Dampfversorgung, die oft großen
Schwankungen unterliegt und
• von der Verwendung von Büglersohlen (Antiglanzoder Sicherheitssohlen),
welche die Kontakttemperatur zum Bügelgut
vermindern.
Steam and power consumption depend on:
• the individual's working rhythm
• the use of suction on the ironing table
• variations in the supply of steam
• iron soles (anti-shine or safety iron soles), which reduce the
temperature.
Zu Arbeitsbeginn und nach Pausen von mehr als 5 Minuten
empfiehlt es sich, zunächst den Dampf frei abzublasen, um
eventuell im Schlauch gebildetes Kondensat auszusprühen.
Insbesonders bei niedrig eingestellter Temperatur sollte dies
beachtet werden.
It is advisable to release steam - especially when operating at
low temperatures - when starting and after breaks of more than 5
minutes so as to remove any condensate from the steam hose.
1.9 Pausen und Außerbetriebnahme / Breaks and Finishing Operation
Das Gerät darf nicht unbeobachtet gelassen werden,
solange es am Netz angeschlossen ist. Um jede Gefahr
auszuschließen, sollte der Bügler am Hauptschalter des
Grundgerätes bzw. an der Veitronic ausgeschaltet we rden.
Dadurch sparen Sie auch Energie.
Don't leave the unit unattended when it is connected with
the mains supply. Switch off the main switch (o n the base
module or on the Veitronic); this avoids any danger and
saves energy.
1.10 Pflege / Maintenance
Staub und Faserrückstände in Verbindung mit Wärme und
Dampf führen zu Verschmutzungen und Verkrustungen, die Sie
täglich entfernen sollten. Zur gründlichen Reinigung empfehlen
wir unser seit Jahren bewährtes Bügler-Pflegeprogramm.
Die Veitronic 2003 sollte ebenfalls täglich von Staub und
Faserrückständen befreit werden.
The iron becomes dirty through the effect of heat and steam on
dust and fluff. We therefore advise daily cleaning and for
intensive cleaning we recommend the VEIT range of cleaning
products.
We also advise daily cleaning of the Veitronic 2003.
Page 8

Bügler HP 2003 VEIT 2181/2182
VEIT 2181/2182 HP 2003 Iron
17.09.2009 8
1.11 Garantie / Warranty
Für den Hochdruckbügler VEIT HP 2003 leisten wir eine 12monatige Garantie.
Die Garantie bezieht sich nicht auf normalen Verschleiß. Der
Garantieanspruch erlischt bei unsachgemäßer Behandlung oder
Handhabung, ebenso wie bei unsachgemäßem oder
unerlaubtem Selbsteingriff. Die Garantieleistung beinhaltet keine
Transportkosten.
There is a 12 months warranty on the VEIT HP 2003 highpressure steam iron.
We cannot give a warranty against normal wear and tear, faulty
handling and inexpert or unauthorised repair. The warranty
excludes delivery charges.
Folgende Arbeiten können Sie ohne Garantieverlust selbst
durchführen:
1. Schrauben nachziehen,
2. Bügler-Griff auswechseln,
3. Dampfkontakter auswechseln,
4. Schäden am Dampfzuleitungsschlauch beheben,
5. Schwenkbügel montieren,
6. Feinsicherung 6,3 AF an der E-Box/Grundgerät oder in der
Veitronic 2003 auswechseln.
The following repairs, which you can do yourself, do not affect
your warranty claim:
1. Fastening screws.
2. Replacing the iron handle.
3. Replacing the contactor.
4. Repair of any damage to the steam hose.
5. Assembly of the swivel-bow.
6. Replacement of 6.3 A fine fuse in the electric box/base unit
or in the Veitronic 2003.
Achtung:
Bei allen Wartungs- oder Reparaturarbeiten ist der Bügler
elektrisch von der Elektro-Box des Bügeltisches bzw. von
der Veitronic 2003 und vom Dampfgeber zu trennen.
Hinweis:
Bei der Veitronic befindet sich die Feinsicherung 6,3 AF auf
der Platine im Gehäuse (Pos. 8). Zum Wechseln der
Feinsicherung Veitronic vom Netz trennen.
Wenn die Netzanschlussleitung beschädigt ist, muss sie
durch den VEIT Kundendienst oder eine ähnlich qualifizierte
Person ersetzt werden, um Gefährdungen zu vermeiden.
Eine beschädigte Anschlussleitung darf nur durch die
Original VEIT-Anschlussleitung ersetzt werden, siehe
Ersatzteilliste.
Caution!
Whenever carrying out maintenance or repair work,
disconnect the iron from the electric box on the ironing
table or from the Veitronic 2003 and disconnect the steam
supply.
Note:
At the Veitronic, the fine fuse 6.3 AF is located on the pc-
board in the casing (see pos. 8). Disconnect the Veitronic
from the power supply before replacing the fine fuse.
A damaged connection cable must only be replaced by a
VEIT technician or a similar qualified person to avoid an
accident.
A damaged connection cable must only be replaced by an
original VEIT connection cable, see spare parts list.
1.12 Büglerreparaturen / Iron Repairs
Büglerreparaturen erfolgen ausschließlich in unserem ReparaturBetrieb.
Bitte senden Sie reparaturbedürftige VEIT-Bügler an
nachstehende Adresse:
VEIT - Reparaturservice
Justus-von-Liebig-Straße 15
D-86899 Landsberg am Lech
(Information: Tel. +49 (81 91) 479 123)
oder an die für Sie zuständige Auslandsvertretung.
Im Garantiefall schicken Sie das Gerät zusammen mit der
Rechnung zurück.
Repairs are the exclusive responsibility of our service
department.
Please send any VEIT iron needing repair to the following
address:
VEIT - Reparaturservice
Justus-von-Liebig-Straße 15
D-86899 Landsberg a. Lech
(For information, call +49 (81 91) 479 252)
Or send it to your local VEIT agency.
For any warranty repair, please enclose invoice.
Page 9

Bügler HP 2003 VEIT 2181/2182
VEIT 2181/2182 HP 2003 Iron
17.09.2009 9
2 Ersatzteillisten und Zeichnungen / Spare Parts Lists and Drawings
2.1 Ersatzteile Bügler HP 2003 / Spare Parts HP 2003 Iron
12
Page 10

Bügler HP 2003 VEIT 2181/2182
VEIT 2181/2182 HP 2003 Iron
17.09.2009 10
Pos. Artikel-Nr.
Article Number
Benennung Designation
2182 121 822 000 0 Bügler HP 2003 mit Veitronic 2003 bestehend
aus:
HP 2003 iron with Veitronic 2003 consisting of:
2181 121 812 000 0 Bügler HP 2003 ohne Veitronic 2003 Version 2
HP 2003 iron Version 2 without Veitronic 2003
179 252 004 0 Veitronic kpl. 230 V HP 2003
Veitronic cpl. 230 V HP 2003
Bügler-Ersatzteile Iron Spare Parts
01 421 302 009 0 PUR-Griff kpl.
PUR-handle cpl.
02 421 302 017 0 Kontakter kpl.
contactor cpl.
02a 421 312 550 0 PUR-Griff mit Kontakter
PUR-handle with contactor
03 421 812 105 0 Griffträger kpl. 2003
handle base cpl. 2003
04 421 302 004 0 Klemmleiste 6-fach kpl.
terminal strip 6-core cpl.
05 421 812 107 0 Temperaturfühler Bügler ETL
temperature sensor iron
06 421 812 104 0 Temperatursicherung III HP 2003
temperature fuse III HP 2003
07 421 852 039 0 Anschlussdraht 160
Lead 160
09 421 812 007 0 Sohle kpl. beschichtet HP 2003
Sole cpl. coated HP 2003
10 421 282 012 0 Einschraubschlauchtülle kpl. m. Prallscheibe
screwable hose nozzle
11 421 812 006 0 Schlauch HP (Teflonseele) 3,2 m
Hose HP (teflon core) 3.2 m
12 219 111 011 0 Schlauchklammernset für Bügler
Set – hose clamps for iron HP 2003
13 421 712 000 0 Anschlusskabel 6-polig kpl. m. Kabelstecker
und Kabeltülle
6-core connection cable cpl. with plug and
cable bushing
14 421 301 008 0 Kabeltülle
cable bushing
15 219 111 006 G Schlauchklemmen Gr.8-12 (4 Stück)
jubilee clip size 8-12 (4 pcs.)
16 431 002 009 0 Schlauchtülle Dm 5x33 + Mutter R 3/8“ Ms
hose nozzle dia 5x33 + screw nut R3/8“ brass
Zubehör-Ersatzteile Accessories Spare Parts
20 212 012 007 0 Veitronic-Peitsche
Veitronic hose + cable support
21 421 812 102 0 Schwenkbügel kpl.
swivel bow cpl.
211 101 034 0 Teflon-Rahmensohle blau
Teflon frame sole blue
211 101 036 0 Teflon-Rahmensohle weiß
Teflon frame sole white
221 150 000 0 Pflege-Set
cleaning kit
421 812 108 0 Schraubenset HP 2003
screws set HP 2003
Page 11

Bügler HP 2003 VEIT 2181/2182
VEIT 2181/2182 HP 2003 Iron
17.09.2009 11
2.2 Ersatzteile Veitronic HP 2003 / Spare Parts Veitronic HP 2003
Page 12

Bügler HP 2003 VEIT 2181/2182
VEIT 2181/2182 HP 2003 Iron
17.09.2009 12
Pos. Artikel-Nr.
Article Number
Benennung Designation
179 252 004 0 Veitronic kpl. 230 V HP 2003
Veitronic cpl. 230 V HP 2003
01 479 252 006 0 Gerätedose 6-polig kpl. m. Anschlusslitzen
socket 6-core cpl. with strands
02 479 252 007 0 Kunststoffgehäuse II mit Makrolonplatte
plastic casing II with makrolonplate
03 923 033 001 0 Zugentlastung USR 400
strain relief USR 400
04 440 000 036 0 Kleinstecker 4-polig
small plug 4-core
05 479 252 000 0 Anschlusskabel kpl. Veitronic HD/HN
connection cable cpl. Veitronic HD/HN
06 479 141 005 0 Klemmschieber
clamping bar
07 479 251 009 0 Drehknopf / Veitronic 2003
turning knob / Veitronic 2003
08 125 973 Feinsicherung 6,3 A F5x20 m Löschpulver
(10 Stück)
fine fuse 6.3 A F5x20 with dry powder
(10 pcs.)
09 479 251 016 0 Frontplatte / Veitronic 2003 - 230°C – V1
front plate / Veitronic 2003 - 230°C – V1
10 479 252 009 0 Platine 230V HD/HN/ND 230°C
PC-board 230V HD/HN/ND 230°C
11 479 251 014 0 Halteblech / Platine
holding sheet metal / PC-board
479 251 012 0 Triac T/C 246 D / Veitronic 2003
Triac T/C 246 D / Veitronic 2003
479 251 015 0 Regler Veitronic 2003 IC U217B
Control / Veitronic 2003 IC U217B
Page 13
Bügler HP 2003 VEIT 2181/2182
VEIT 2181/2182 HP 2003 Iron
17.09.2009 13
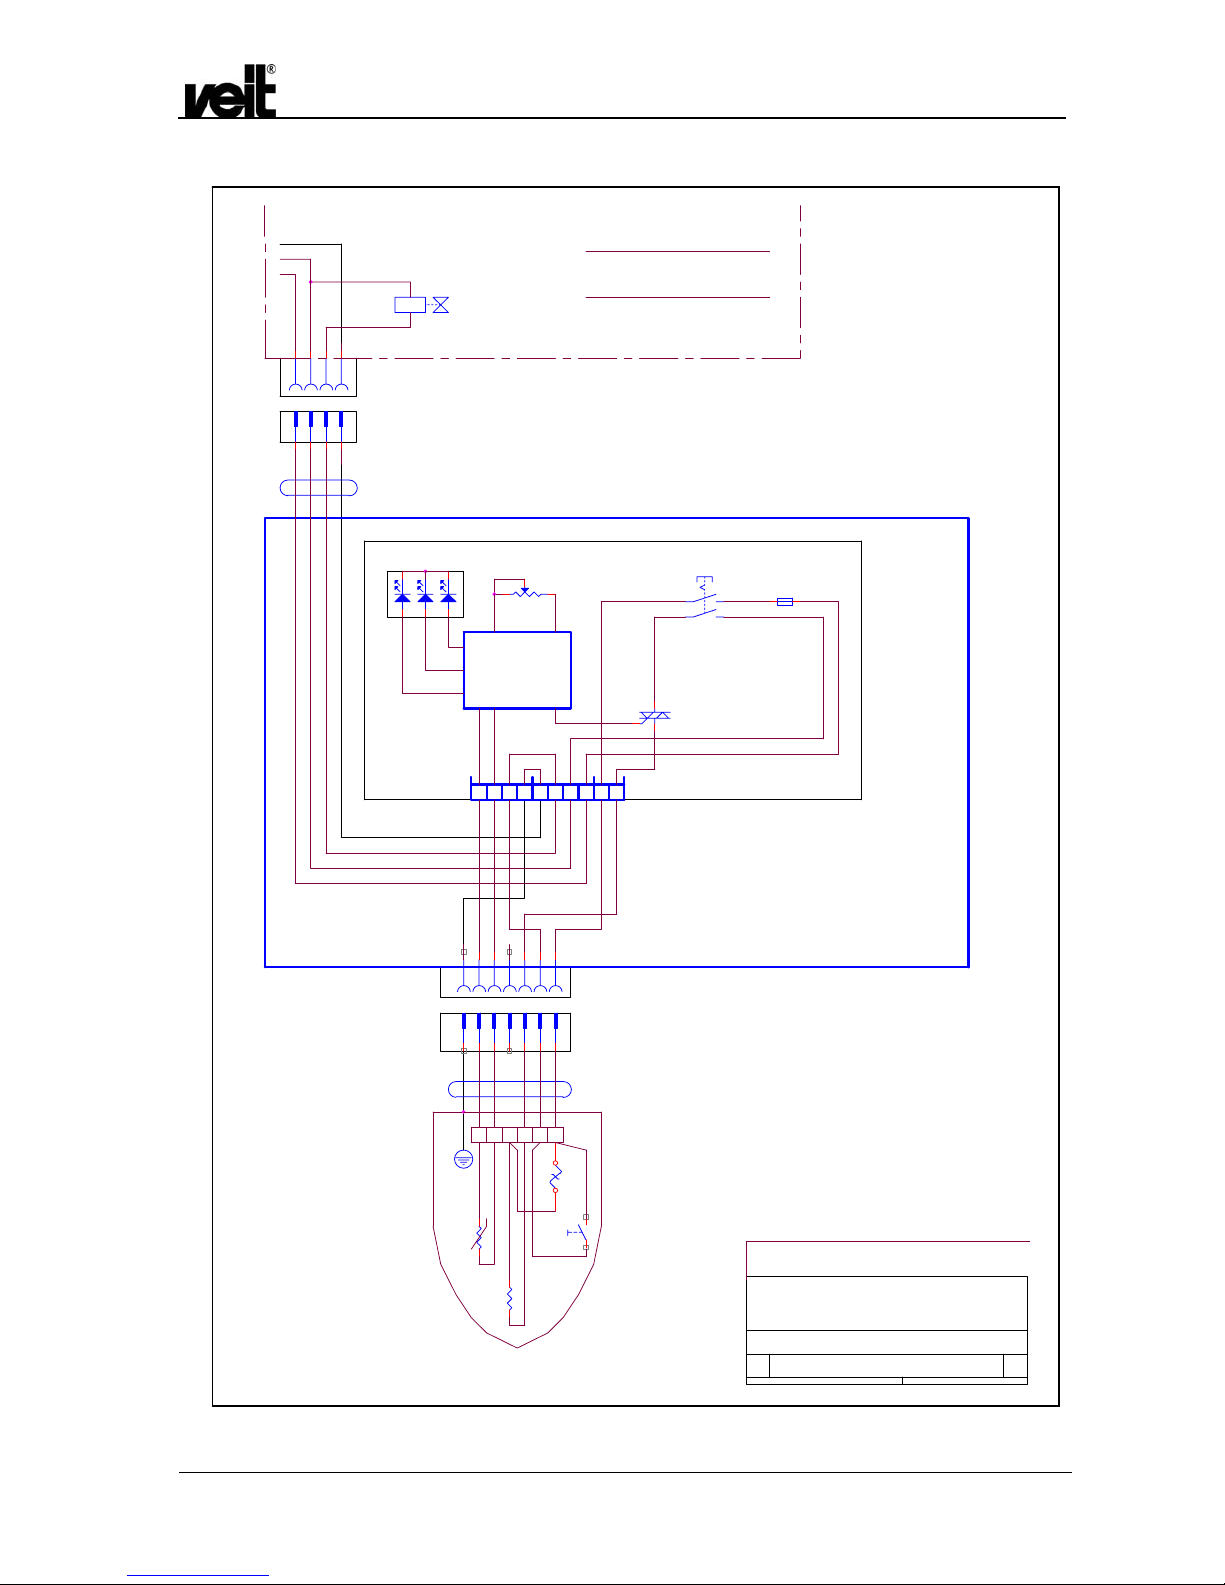
3 Schaltpläne / Circuit Diagrams
3.1 Schaltplan Bügler HP 2003 / Circuit Diagram HP 2003 Iron
Page 14
Bügler HP 2003 VEIT 2181/2182
VEIT 2181/2182 HP 2003 Iron
17.09.2009 14
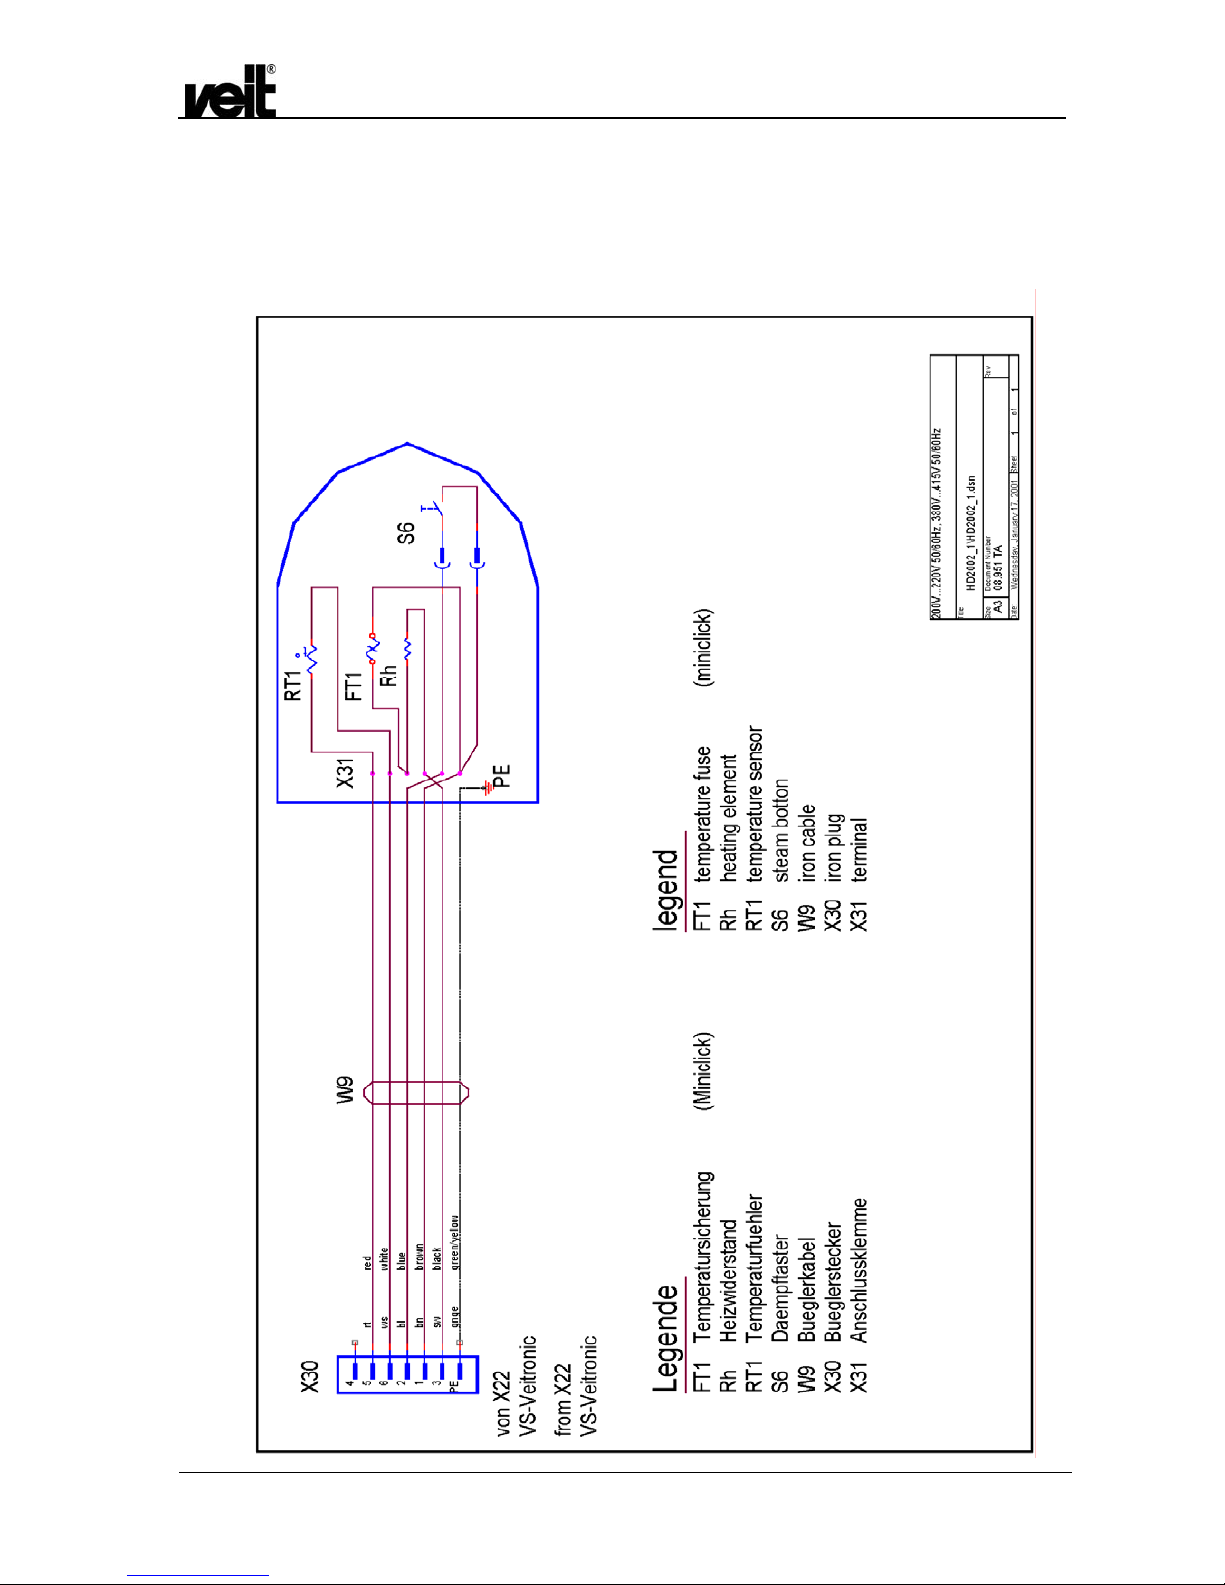
3.2 Schaltplan Veitronic HP 2003 / Circuit Diagram Veitronic HP 2003
HD2002\HD2002_1.SCH
VEIT 2172 / 2192
TA 05.961
Schaltplan fuer Veitronic kpl. 230V HD2002 II
circuit diagram for
Veitronic kpl. 230V HD2002 II
A3
11Wednesday, January 17, 2001
Title
Size Document Number Rev
Date: Sheet
of
X10
W1
S6
456123
FFD L1SLSL H HDN
Steuerung
Platine
Gehaeuse
X30
ws rt bl gngegngebl sw br br sw
PE
gn
ge
13562
br swbl gn
ge
132PE
PE654321
4
ws rt bl brsw
gngews rt sw bl br
W9
Veitronic
Dampferzeuger
PE123
PE
N
L1
V1
rt ge gr
S1
F1
R1
Y1
Legende
Buegler
iron
legend
casing
rot
gelb
gruen
Aufheizen
Temperatur erreicht
steam generator
Veitronic
red
yellow
green
heating
temperature reached
Abkuehlen cooling
red yel
printed circuit board
Veitronic
S1
V1
R1
F1
W1
X1
X21
X1
Buegler
S6
Rh
X30
W9
V2
V2
Temperaturfuehler
Sicherung
Heizung
Bueglerkabel
Bueglerstecker
X20
X21
X10
Y1
X20
Veitronic
S1
V1
R1
F1
W1
X1
X21
V2
steam generator
X10
Y1
X20
iron
Dampferzeuger
Steckbuchse
Netzanschlusskabel
Geraeteschalter
Triac triac
Kontrollanzeige
Klemmleiste
Stecker
fuse
main switch
plug
socket
mains cable
temperature sensor
steam key button
cable of the iron
plug of the iron
Steckbuchse
socket
LED-Anzeige : LED indication :
colour legend :
ws
rt
bl
gnge
sw
br
white
red
blue
green-yellow
black
brown
gre
control
control indication
terminal strip
heating element
Magnetventil Daempfen
Potentiometer
Sollwert-
potentiometer
nominal value
Temperatursicherung temperature fuse
steaming
solenoid valve
Art.-No.: 179 252 002 0
Kondensor
condensor
Steam-Adapter
steam adapter
connection to :
Anschluss an :
Veitronic kpl. 230V HD2000 II
HD2002 II 2172 / HN2002 II 2192
RT1
RT1
Miniclick miniclick
Daempf-Taster
X31
X31 Anschlussklemme terminal
FT1
S6
Rh
X30
W9
RT1
X31
FT1
FT1
Rh
Page 15

Bügler HP 2003 VEIT 2181/2182
VEIT 2181/2182 HP 2003 Iron
17.09.2009 15
4 EG-Konformitätserklärung / EC Declaration of Conformity
 Loading...