

Page 1
Color TFT LCD Monitor
®
The Art of Surveillance
User Manual
Page 2

Table of contents
Safety Information---------------------------------------------------- 1- 3
Accessories----------------------------------------------------------------3
Installation---------------------------------------------------------------3~4
Connecting the Monitor---------------------------------------------4~5
Viewing the control panel--------------------------------------------5
Remote control-----------------------------------------------------------6
General Specifications---------------------------------------------7~9
Basic OSD Setup
OSD setup under VGA input mode-----------------------------------10~13
OSD setup under BNC(AV)/S-V input mode-----------------14~15
Important Safety Information
Read and understand all safety information before using this product.
Follow all instructions marked on the product and described in this
document. Pay close attention to the following installation warnings and
safety precautions.
Intended Use
This monitor was designed for AV or BNC input and tested to replace an
existing monitor. These monitors are intended for indoor use only and are
not designed for use in hazardous locations.
Explanation of Signal Word Consequences
DANGER: To avoid the risk of fire and/or explosion which will result
in serious injury or death: Do not install or use this product in a
hazardous location.
WARNING:To avoid the risk of fire which could result in serious injury
or death:Do not remove the cover or back of the monitor.
CAUTION:To avoid the risk of electric shock which could result in
serious injury or death:
•This device must be operated with the original power supply,
•Do not use a damaged power supply.
•Do not use a power cord that is frayed or otherwise damaged.
CAUTION:To avoid the risk of electric shock which may result in
minor or moderate injury:
•The socket-outlet should be installed near the equipment and should be
easily accessible.
•Use a power cable that is properly grounded. Always use the appropriate
AC cord certified for the individual country. Some examples are listed
below:
•Do not service the monitor Do not remove the cover or back of the
monitor.There are no user serviceable parts inside. Refer all servicing to
qualified service personnel. The backlight inverter output is at high
voltage.
•Do not use non-conforming replacement parts.
1
Page 3
•Do not expose the monitor to rain or other sources of water,steam,or
moisture.
•Do not place foreign objects on the monitor or its cables.
CAUTION: To avoid the risk of minor or moderate personal injury or
damage to the monitor:
• Never wall-mount the monitor without the locking mechanism in place.
• Use an anchoring system appropriate for the weight of the product.
• Consult a construction professional before attempting to hang the unit on
the wall.
To avoid the risk of glass breakage which may result in minor or
moderate injury:
• Handle the monitor with care to avoid breaking the touch screen sensor.
The display contains glass parts. Dropping the display may cause the
glass parts to break.
• Do not place foreign objects on the monitor.
Important Notes:
•Plug powercord into appropriate power source & a grounded receptacle.
•When unplugging power supply cord, pull on plug not cord.
•Do not connect or disconnect this product during an electrical storm.
•Install the display in a well-ventilated area. Always maintain adequate
ventilation to protect the display from overheating and to ensure reliable
and continued operation.
•Do not expose this display to heat. Passive heat may cause damage to
the case and other parts.
•Do not install this display in areas where extreme vibrations may be
generated.For example, nearby manufacturing equipment may produce
strong vibrations. The vibrations may cause the display to exhibit picture
discoloration or poor video quality.
•Product weight varies from 10 to 24 pounds depending on the packaging,
use caution when lifting.
• Ensure that metal does not contact the touch screen.
To avoid ergonomic concerns:
Do not install the monitor in a manner or location with awkward
accessibility.Extended use may result in muscle, tendon, or fixed posture
strains. It is recommended you take periodic breaks from continuous use.
CAUTION:To avoid the risk of electric shock which may result in
minor or moderate injury:
Liquid is spilled into the product or the product is exposed to rain or water.
The product does not operate properly when operating instructions are
followed.
•The product has been dropped or the case has been damaged.
•The product shows a distinct change in performance, indicating a need
for service.
Accessories
Please check the following listed accessories before installation:
Power cord 1 pcs
Power adapter 1 pcs
VGA cable 1 pcs
Audio cable 1 pcs
User manual 1pcs
Remote control 1 pcs
Installation
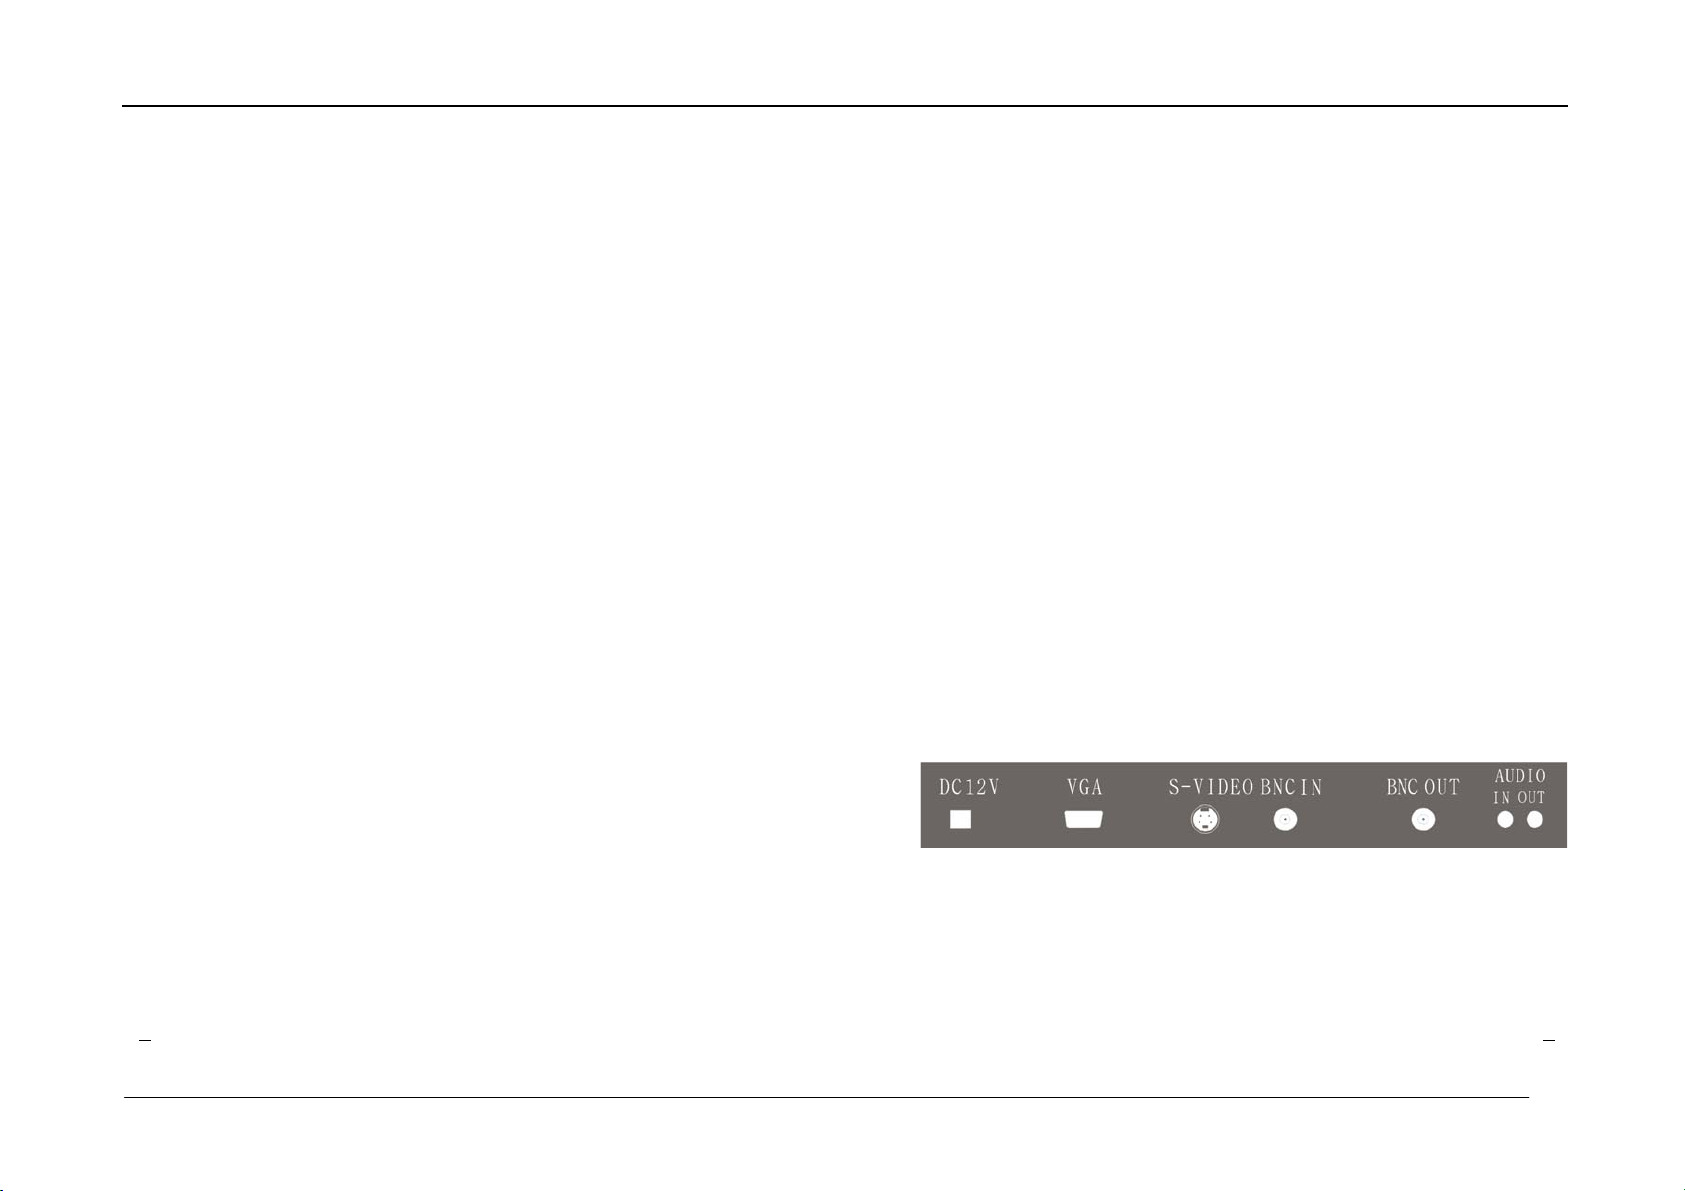
Viewing the connection panel
fig.1
(1) VGA : Plug the D-type15 pin VGA interface into the VGA video
Interface of the Application, and the other end into the LCD
monitor’s VGA connector.Fasten the screw.
(2) S-Video :Plug the SV signals from DVR or other equipments to the
monitor through s-video cable.
3 2
Page 4

(3) BNC IN: Connect a device that has composite video output with
BNC connector, such as a DVR or Camera.
(4) BNC OUT: Loop through of the BNC IN connector.
(5) AUDIO IN:Input the audio signal from the application to monitor
through audio cable under VGA or Video channel.
(6)AUDIO OUT:Audio signal loop through..
Connecting the Monitor
When choosing your workspace, select a sturdy, level surface. Also, make
sure you can easily access the back of the monitor. Easy access helps
ensure a smooth setup of the monitor.
Note: Before setting up your monitor, refer to the Important Safety
Information section at the beginning of this document.
1.Turn off your device.You should always turn off the device
Before connecting or disconnecting any device.
2. Connect one end of the VGA cable to the VGA connector on the monitor.
Connect the other end to your application’s VGA connector
3. Connect one end of the audio cable to the monitor. Connect the other
end to an available port on your application.
4. Connect one end of the coaxial cable to the monitor BNC in connector .
Connect the other end to DVR or other equirpment.
5. IF you would like to connect your video source to another monitor or
device, you can use the BNC out connector
NOTE:the BNC out connector is auto terminated ,Do not connect a
cable to the BNC out unless it is connected to a terminated device
because it will cause poor quality video
6. Plug the AC/DC power supply into the monitor. Be sure to use the
original power adapter included with the monitor.
7. Connect the power cable to the adapter.
Note:the BNC out、S-video and VGA connectors can be connected to
one single monitors for simultaneous operation
Viewing the control panel
1.Buttons on the lower-right part of the panel
SOURCE MENU + - POWER
The buttons on the lower-right panel control your montor’s basic
features,including the on-screen menu,to use the more advanced
features,you must use the remote control.
POWER press to turn the monitor on and off.
SOURCE: Accesses the available video input signals (VGA、AV、S-
VIDEO)
MENU: Brings up the MONITOR Main menu. When in the menu system,
displays sub-menus and selects highlighted items.
+: Increases the volume. In the MONITOR menu system, acts like the
right arrow button >on the remote control and adjusts menu controls.
- :Decreases the volume. In the MONITOR menu system, acts like the
left arrow button< on the remote control and adjusts menu controls.
POWER INDICATOR
Blinks and turns off when the power is on and the lights up in stand-by
mode
REMOTER CONTROL sensor
Aim the remote control towards the spot on the monitor
5 4
Page 5

2. Remote Control
A
A
A
General Specifications
POWER
PIP
POP
MUTE
0~9
∧、∨
MENU
< 、>
INPUT
INFO
P.M
S.M
EXIT
On/off the monitor
unavilable
unavilable..
Press to temporarily cut off
the sound
Only available when inputting
numbers
Turns Up and down highlight
icon,
Display the main on-screen
menu
Press to increase or decrease
the volume
In the on-screen menu,press
the”>”button and enter to
select on-screen menu items
and change menu values,
Press to display and select
the available video source
Press to display information
on the monitor screen
Picture mode option
Sound mode option
Press to exit the menu
Model No. VLCD-15 VLCD-17
Panel Type 15" a-si TFT active matrix 17" a-si TFT active matrix
Display Area (H×V) 304.128×228.096
Pixel Pitch(mm) 0.297(H)×0.297(V) 0.264(H)×0.264(V)
Color 16,2M 16,7M
Best Resolution 1024 x 768 1280 x 1024
Brightness( typ.) 270 cd/m2 300 cd/m
Contrast Ratio( typ.) 500:1 800:1
Viewing Angle( typ.) 75/75/70/60 80/80/80/80
Response Time(optional) 8ms
OSD Language(option)
Work temperature
Work Humidity 20%-70% 20%-70%
Interface
Power consumption <25W <30W
Power Input
Packing Dimension 410×142×410mm 450×150×450mm
English, French, German,
Spanish. Chinese etc.
0-50℃ 0-50℃
BNC(In/out)
Audio(in/out)
DC VGA ,S-VIDEO
C100-240V 50/60Hz
337.920 × 270.336
3:4 3:4 oitaR tceps
2
6ms
English, French, German,
Spanish. Chinese etc.
BNC(In/out)
Audio(in/out)
DC VGA ,S-VIDEO
C100-240V 50/60Hz
6
7
Page 6

A
A
A
A
A
A
Model No. 17.1inch 19inch Model No.
Panel Type 17.1" a-si TFT active matrix 19" a-si TFT active matrix Panel Type 20" a-si TFT active matrix 22" a-si TFT active matrix
Display Area (H×V) 367.2×229.5 376.32×301.056 Display Area (H×V) 408.24×306.18 473.76× 296.1
spect Ratio 16:10 4:3
Pixel Pitch(mm) 0.255(H)×0.255(V) 0.294(H)×0.294(V) Pixel Pitch(mm) 0.2916(H)×0.2916 (V) 0.282(H)×0.282(V)
Color 16,2M 16,7M Color 16,2M 16,7M
Best Resolution 1440 x 900 1280 x 1024 Best Resolution 1400 x 1050 1680×1050
Brightness( typ.) 385 cd/m2 300 cd/m2 Brightness( typ.) 300 cd/m2 300 cd/m2
Contrast Ratio( typ.) 400:1 800:1 Contrast Ratio( typ.) 700:1 1000:1
Viewing Angle( typ.) 70/70/60/60 75/75/75/75 Viewing Angle( typ.) 70/80/70/80 70/80/70/80
Response
Time(optional)
OSD Language(option)
Work temperature 0-50℃ 0-50℃ Work temperature 0-50℃ 0-50℃
Work Humidity 20%-70% 20%-70% Work Humidity 20%-70% 20%-70%
Interface
16ms
English, French, German,
Spanish. Chinese etc.
BNC(In/out)
Audio(in/out)
DC VGA ,S-VIDEO
6ms
English, French, German, Spanish.
Chinese etc.
BNC(In/out)
Audio(in/out)
DC VGA ,S-VIDEO
spect Ratio 4:3
Response
Time(optional)
OSD
Language(option)
Input
Terminal(optional)
20.1inch
6ms
English, French, German,
Spanish. Chinese etc.
BNC(In/out)
Audio(in/out)
DC VGA ,S-VIDEO
22inch
16:10
5ms
English, French, German,
Spanish. Chinese etc.
BNC(In/out)
Audio(in/out)
DC VGA ,S-VIDEO
Power consumption <30W <40W Power consumption <60W <60W
Power Input
Packing Dimension 450×150×450mm 480×165×500mm Dimension 530×150×460mm 585×175×495mm
C100-240V 50/60Hz
C100-240V 50/60Hz Power Input
C100-240V 50/60Hz
C100-240V 50/60Hz
9 8
Page 7

Basic OSD setup
1. OSD setup under VGA input mode
Main Menu
Color
Pressing MENU will pull up the On
Screen Display (OSD) menu
1.Press +(∧)、and -(∨)to select
the different option,
Press MENU again to enter sub
menu
2.EXIT:Exits the OSD menu
Enter “Color” setup interface in the
main menu.
1.CONTRAST、BRIGHTNESS
Selecting the Contrast option
increases (+) or decreases (-) the
strength (lightness or dimness) of the
image. Adjust the contrast using the /left and +/right arrow buttons,and
press MENU to confirm the new
setting.
2.Contrast and brightness: 0-100.
Color adjust : Red. Green. Blue
Color temp: 9300. 6500. 5800.
sRGB.USER
3.Select “Exit” to exit
Image Setting
Enter “Image Setting” setup
interface in the main menu.
1.CLOCK:
If the clock setting of your image
is not fine-tuned, you may
observe periodic vertical bars of
video noise on your image. These
bars of noise are usually adjusted
out when an Auto Configuration is
performed. If the bars of noise are
still present, this setting can be
adjuste manually. Adjust this
setting so that either the vertical
bars of noise are replaced by an
even amount of noise across the
whole screen, or the noise
disappears completely.
If you do an Auto seting, the
monitor will try to find the best
Clock/Phase setting. If you are not
satisfied with the auto adjustment,
fine-tune the clock manually as
described above.
2.clock adjust from 0 to100
phase :0-63.
3.Select “Exit” to exit.
11 10
Page 8

Position
OSD menu
12
Enter “Position” setup interface in
the main menu.
1. Press + and -to select the
desired option and then Press
MENU to enter this item.
2.H position:Moves image
horizontally on screen either left
(-) or right (+).
3. V position : Moves images
vertically on screen left (-) or
right (+).
4.Auto adjust:automatically adjust
image clock ,phase,H-position Vposition settings
5.Select “Exit” to exit.
Enter “OSD Menu” setup interface
in the main menu.
1. Adjust the OSD image
horizontally or vertically by
pressing the +(>)or-
(<)button. H-position moves the
OSD position left or right. Vposition moves the OSD position
up or down.
2.OSD H/V pos : 0-200 、
OSD timer:0-27
3.Select “Exit” to exit.
Misc
Enter “Misc.” setup interface in the
main menu.
1.Volume: turn up or turn down the
volume by pressing either left (-)
or right (+).
2. LANGUAGE
Select a language among English,
German, French, Spanish,
Simplified Chinese and Traditional
Chinese.
3.Reset
Resets the control functions back to
the original factory preset values. In
order for the Recall function to work,
the timing must fall under one of the
factory preset timing
modes.position.
4.EXIT:
Exits the OSD menu
Page 9

2. OSD setup under BNC(AV) / SV input mode
Color
Color setting
Pressing MENU will pull up the On
Screen Display (OSD) menu
1.Color setting
2.Osd menu
3.Misc
4.Exit
Enter “Color setting” item
1.contrast 、brightness 、saturation
Selecting the Contrast option
increases (+) or decreases (-) the
strength (lightness or dimness) of
the image. Adjust the contrast using
the - / left and + / right arrow ,
press MENU to confirm the new
setting.
2. Contrast , brightness ,saturation:
0-100.
Sharpness:0-4
3. Select “Exit” to exit
Enter “OSD Menu” setup interface
in the main menu.
1. Adjust the OSD image
horizontally or vertically by
pressing the +(>)or-
(<)button. H-position moves
the OSD position left or right.
V-position moves the OSD
position up or down.
2.OSD H/V pos : 0-200
OSD timer:0-27
MISC
3.Exit the osd menu
Enter “Misc.” setup interface in the
main menu.
1. Volume: turn up or turn down
the volume by pressing either left
(-) or right (+).
2. LANGUAGE:Select a language
among English, French, Spanish,
German Simplified Chinese and
Traditional Chinese.
3.Reset: Resets the control
functions back to the original
factory preset values. In order for
the Recall function to work, the
timing must fall under one of the
factory preset timing modes.
4. EXIT:Exits the OSD menu
 Loading...