

Page 1
1
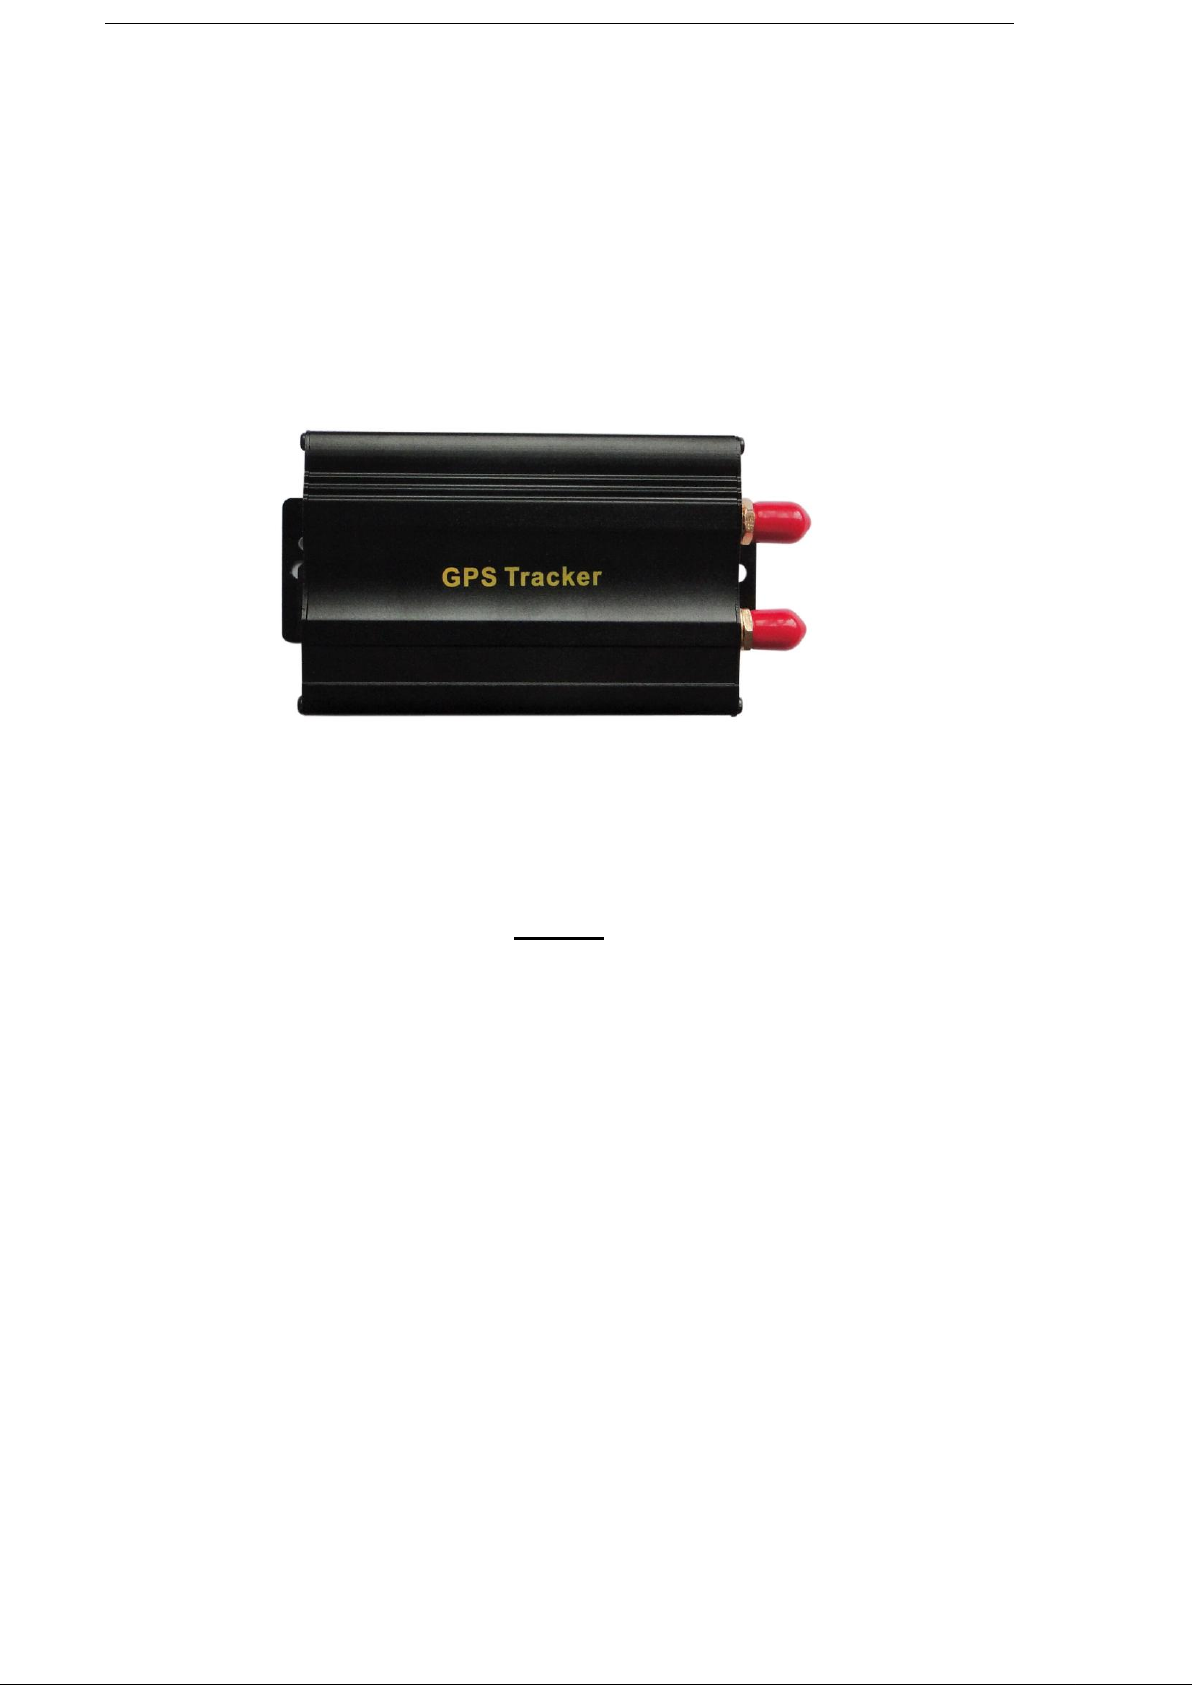
GSM/GPRS/GPS Vehicle Tracker
Model A/B User Manual
Preface
Thank you for purchasing the tracker. This manual shows how to operate the
device smoothly and correctly. Make sure to read this manual carefully before
using this product. Please note that specification and information are subject to
changes without prior notice in this manual.
Any change will be integrated in the latest release. The manufacturer assumes
no responsibility for any errors or omissions in this document.
Page 2

2
Contents
1. Function Introduction ......................................................................................................................................... 4
2. Applications ........................................................................................................................................................ 5
3. Hardware Description ......................................................................................................................................... 5
4. Accessories ......................................................................................................................................................... 6
5.Specifications .................................................................................................................................................... 7
6. Operating Instructions......................................................................................................................................... 7
6.1 Terminal Installation .................................................................................................................................... 8
6.2 SIM CARD Installations .............................................................................................................................. 9
6.3 Turn on the Tracker Device. ......................................................................................................................... 9
6.4 GSM/GPS LED Indicator ........................................................................................................................... 10
6.5 Initialization ............................................................................................................................................... 10
6.6 Change Password ....................................................................................................................................... 10
6.7 Authorization .............................................................................................................................................. 11
6.8 Single Locating........................................................................................................................................... 12
6.9 Auto track continuously ............................................................................................................................. 12
6.9.1 Track with limited times upon time interval: ...................................................................................... 12
6.9.2 Track with unlimited times upon time interval: .................................................................................. 13
6.9.3 Smart track upon time and distance interval: ...................................................................................... 13
6.10 Turning points update automatically ........................................................................................................ 14
6.11 GPS drift suppression ............................................................................................................................... 14
6.12 Exact street address .................................................................................................................................. 14
6.13 Location based service (LBS) / Cell-ID Locating. ................................................................................... 15
6.14 Monitor ..................................................................................................................................................... 15
6.15 Data logging ............................................................................................................................................. 16
6.16 Data Load ................................................................................................................................................. 17
6.17 Forward the third parties’ message ........................................................................................................... 17
6.18 SIM card Balance Inquiry ........................................................................................................................ 17
6.19. Alarms ..................................................................................................................................................... 18
6.19.1 Low battery alarm ............................................................................................................................. 18
6.19.2 Power off alarm ................................................................................................................................. 18
6.19.3. GPS blind Spot alert ......................................................................................................................... 19
6.19.4 SOS ................................................................................................................................................... 19
Page 3

3
6.19.5 Geo-fence .......................................................................................................................................... 19
6.19.6 Multi-area management..................................................................................................................... 20
6.19.7 Movement alarm ............................................................................................................................... 21
6.19.8 Over speed alarm............................................................................................................................... 22
6.19.9 Accident alarm (Option): .................................................................................................................. 22
6.19.10 ACC working alarm ........................................................................................................................ 22
6.19.11. Fuel alarm ...................................................................................................................................... 23
6.20 Cut off the Oil and Power System ............................................................................................................ 23
6.21 Arm........................................................................................................................................................... 24
6.22 Disarm ...................................................................................................................................................... 24
6.23 Function of Remote Controller (Option, for model B ONLY)............................................................. 25
6.24. Alarms under Arm State .......................................................................................................................... 25
6.24.1 Door alarm ........................................................................................................................................ 25
6.24.2 Shock Sensor alarm ........................................................................................................................... 25
6.24.3 ACC alarm ........................................................................................................................................ 26
6.25. Silent Mode ............................................................................................................................................. 26
6.26. Alarm without GSM network service ...................................................................................................... 27
6.27 Check the Vehicle State............................................................................................................................ 27
6.28 Reset Hardware ........................................................................................................................................ 27
6.29 Sleep Mode ............................................................................................................................................... 28
6.30 Check IMEI .............................................................................................................................................. 28
6.31 Terminal (local) Time Setting .................................................................................................................. 28
6.32 TCP/UDP switch ...................................................................................................................................... 28
6.33 Configure parameters by USB.................................................................................................................. 28
6.34 GPRS Setting............................................................................................................................................ 29
6.35 Less GPRS traffic ..................................................................................................................................... 31
6.36 Activate "Fuel" value in GPRS data ......................................................................................................... 31
6.37 Web platform and mobile APP instructions ............................................................................................. 31
7. Cautions ........................................................................................................................................................ 32
8. Faults & the Solutions................................................................................................................................... 33
Page 4

4
1. Function Introduction
1.1 This tracker is a new product based on the GSM / GPRS network and GPS
satellite positioning system, which set multiple functions of security,
positioning, monitoring surveillance, emergency alarms and tracking in its
entirety. It can track and monitor remote target by SMS or internet.
1.2 Features
1.2.1 Support both GPS & LBS (Location based service).
1.2.2 Support SMS/GPRS/Internet Network data transmission
1.2.3 Support GPRS on-line and GPRS re-connected automatically if
GPRS drops
1.2.4 Support SMS / GPRS dual-mode switching
1.2.5 Support configuration by remote terminal.
Page 5
5
1.2.6 Support for point-to-point, point to group, group-to-group
monitoring.
1.2.7 Set multiple functions of security, positioning, monitoring surveillance,
emergency alarms and tracking in its entirety.
2. Applications
Used widely for vehicle and other moving objects tracking.
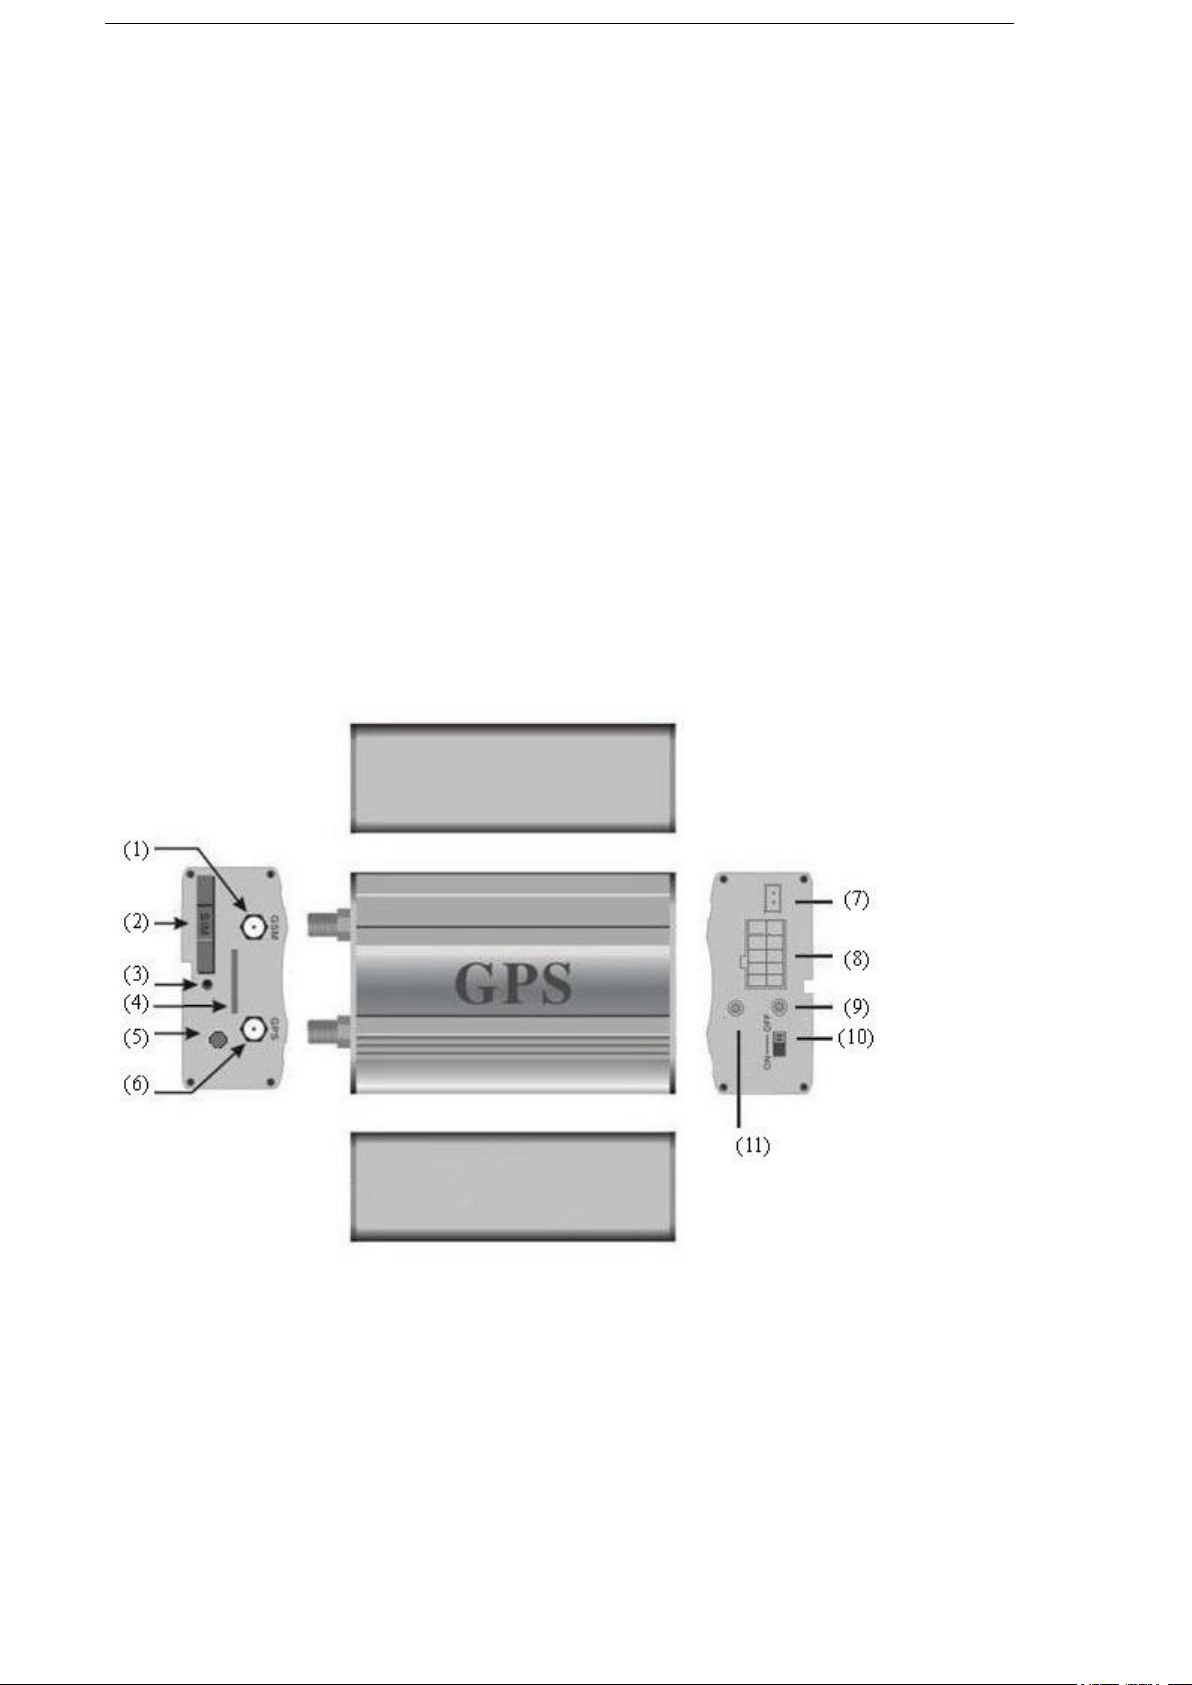
3. Hardware Description
① GSM Antenna connector ⑦ Shock sensor port
② SIM card slot ⑧ Harness Port
Page 6
6
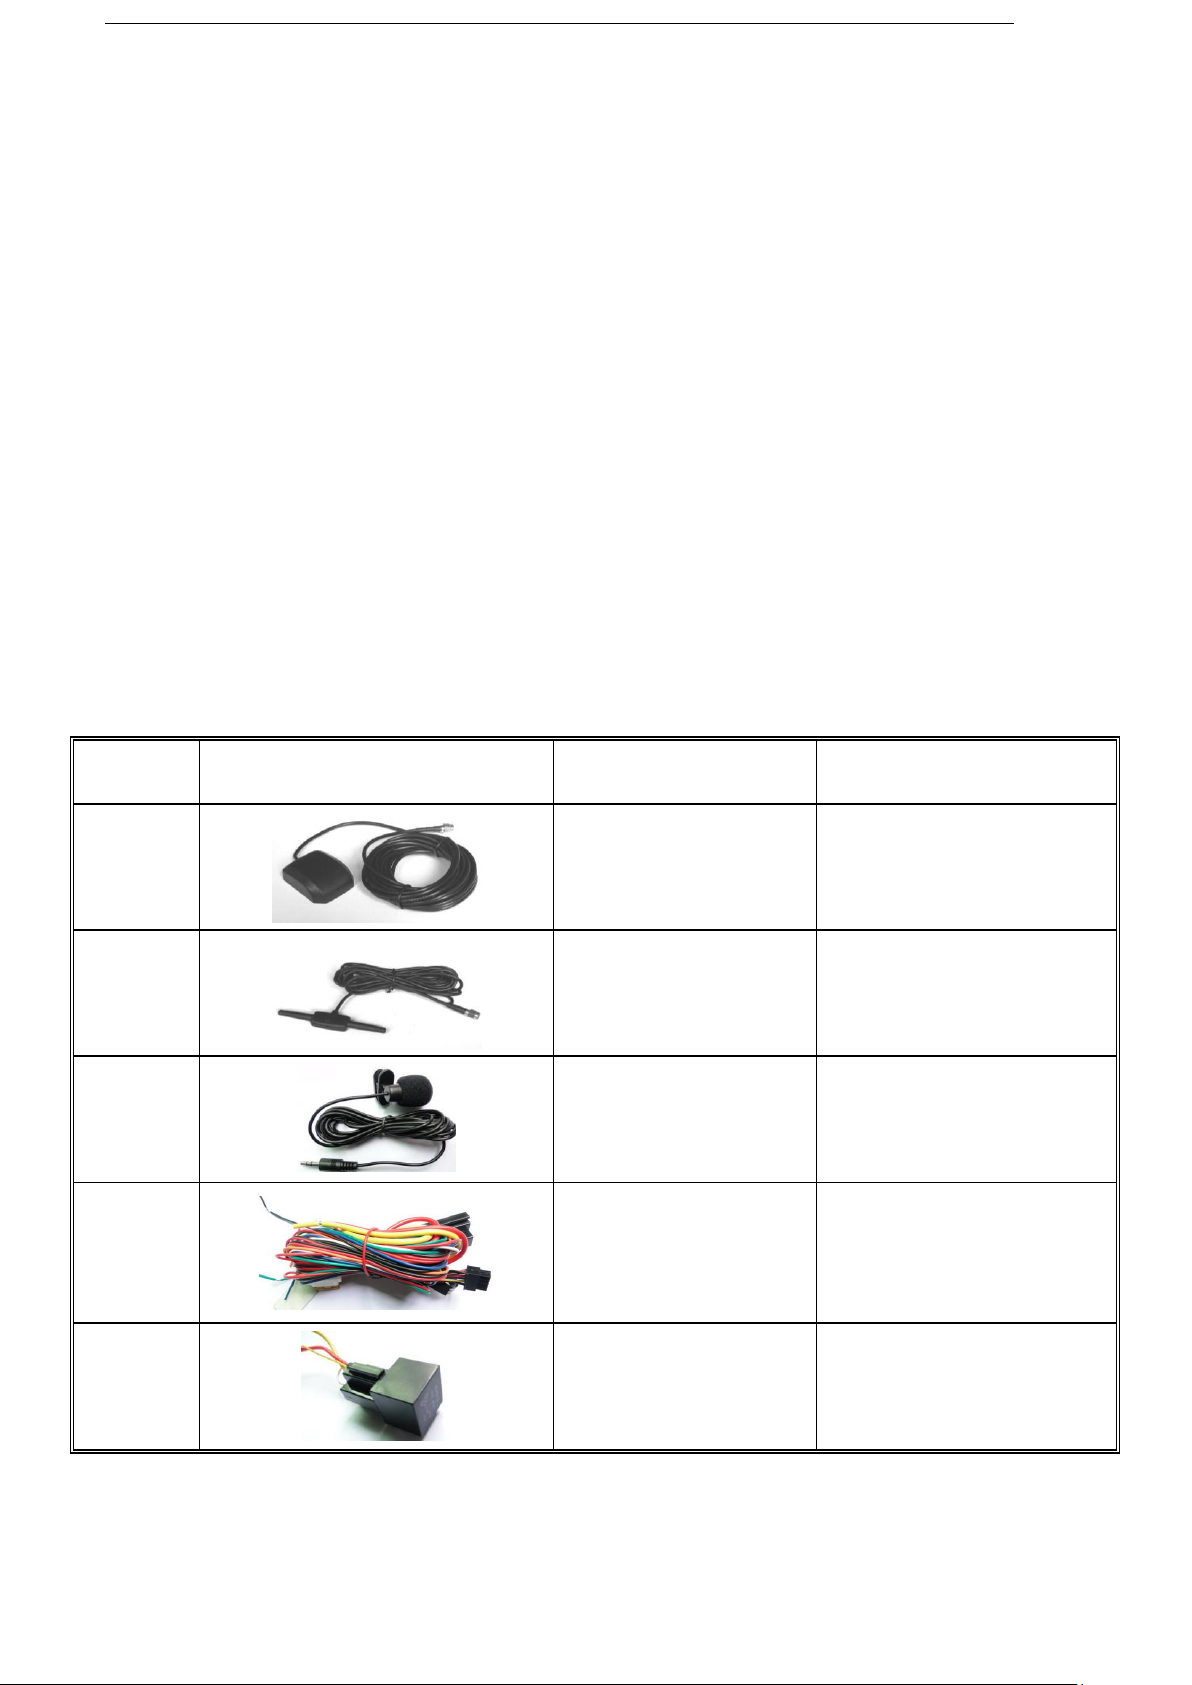
NO.
PHOTOES
NAME
NOTE
1 GPS Antenna
2 meters
2 GSM Antenna
2 meters
3 Microphone
1.5 meters
4 Harness
10PIN
5 Relay
12V/40A to 24V/40A
according to vehicles
③ SIM card slot Pop-up switch ⑨ GSM/GPS LED
④ MicroSD slot ⑩ Backup battery switch
⑤ Monitor microphone jack
11 Remote controller antenna
○
⑥ GPS Antenna connector (Optional for Model B only)
4. Accessories
Page 7
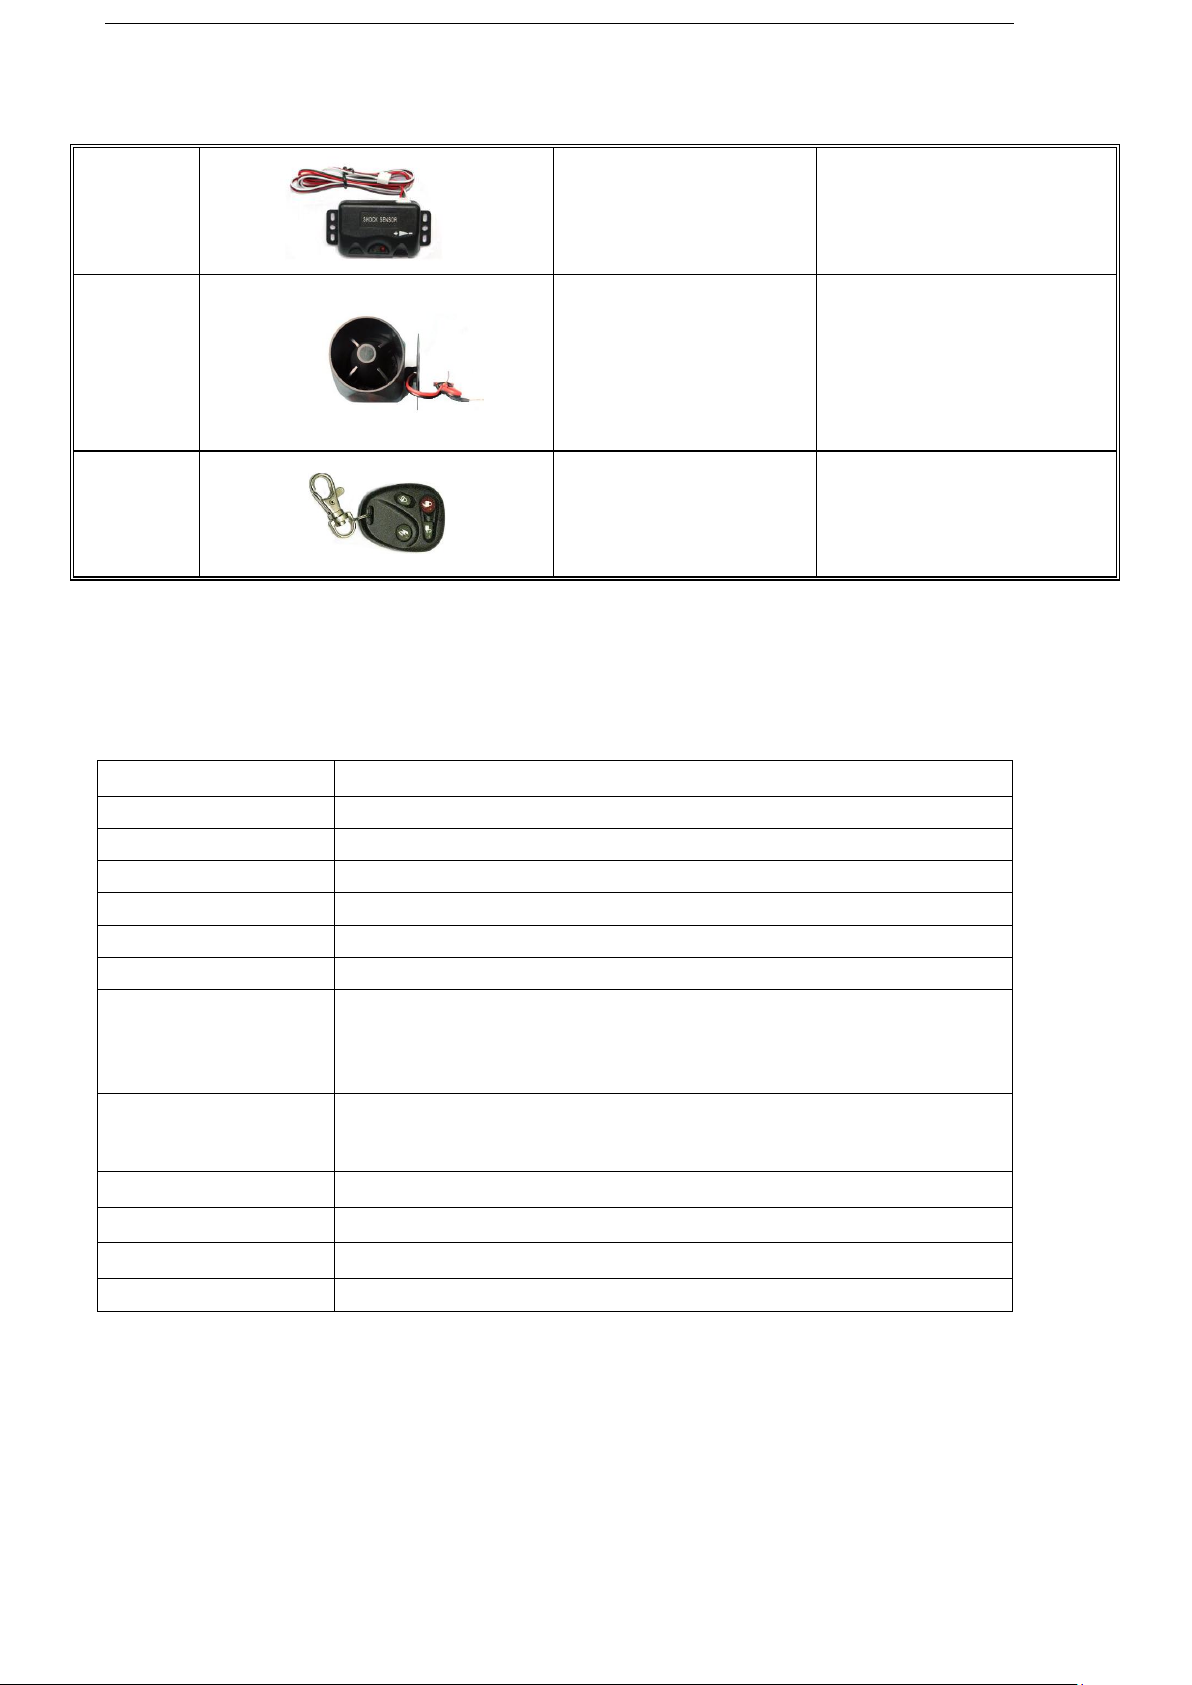
7
6
Shock sensor
Option for both model A
and B
7
Siren
Option for both model A
and B
8
Remote controller
Option for model B
ONLY
Content
specifications
DIM.
83*54*26mm
Weight
120g
Network
GSM/GPRS
Band
850/900/1800/1900Mhz
GPS Sensitivity
-159dBm
GPS Accuracy
5m
GPS Start time
Cold status 45s
Warm status 35s
Hot status 1s
Voltage of car power
system
12 V -24V
Backup battery
Chargeable 3.7V500mAh Polymer Li-Battery
Storage Temp.
-40°C to +85°C
Operation Temp.
-20°C to +65°C
Humidity
5%--95% non-condensing
5.Specifications
6. Operating Instructions
Page 8
8
6.1 Terminal Installation
6.1.1 Please ask the qualified engineers to install it.
6.1.2 Do not install it in an environment which is over GSM performance index,
and please pay attention to fix the antennas in an appropriate position
with good signals.
6.1.3 Pay attention to make installation location preventing water and dust.
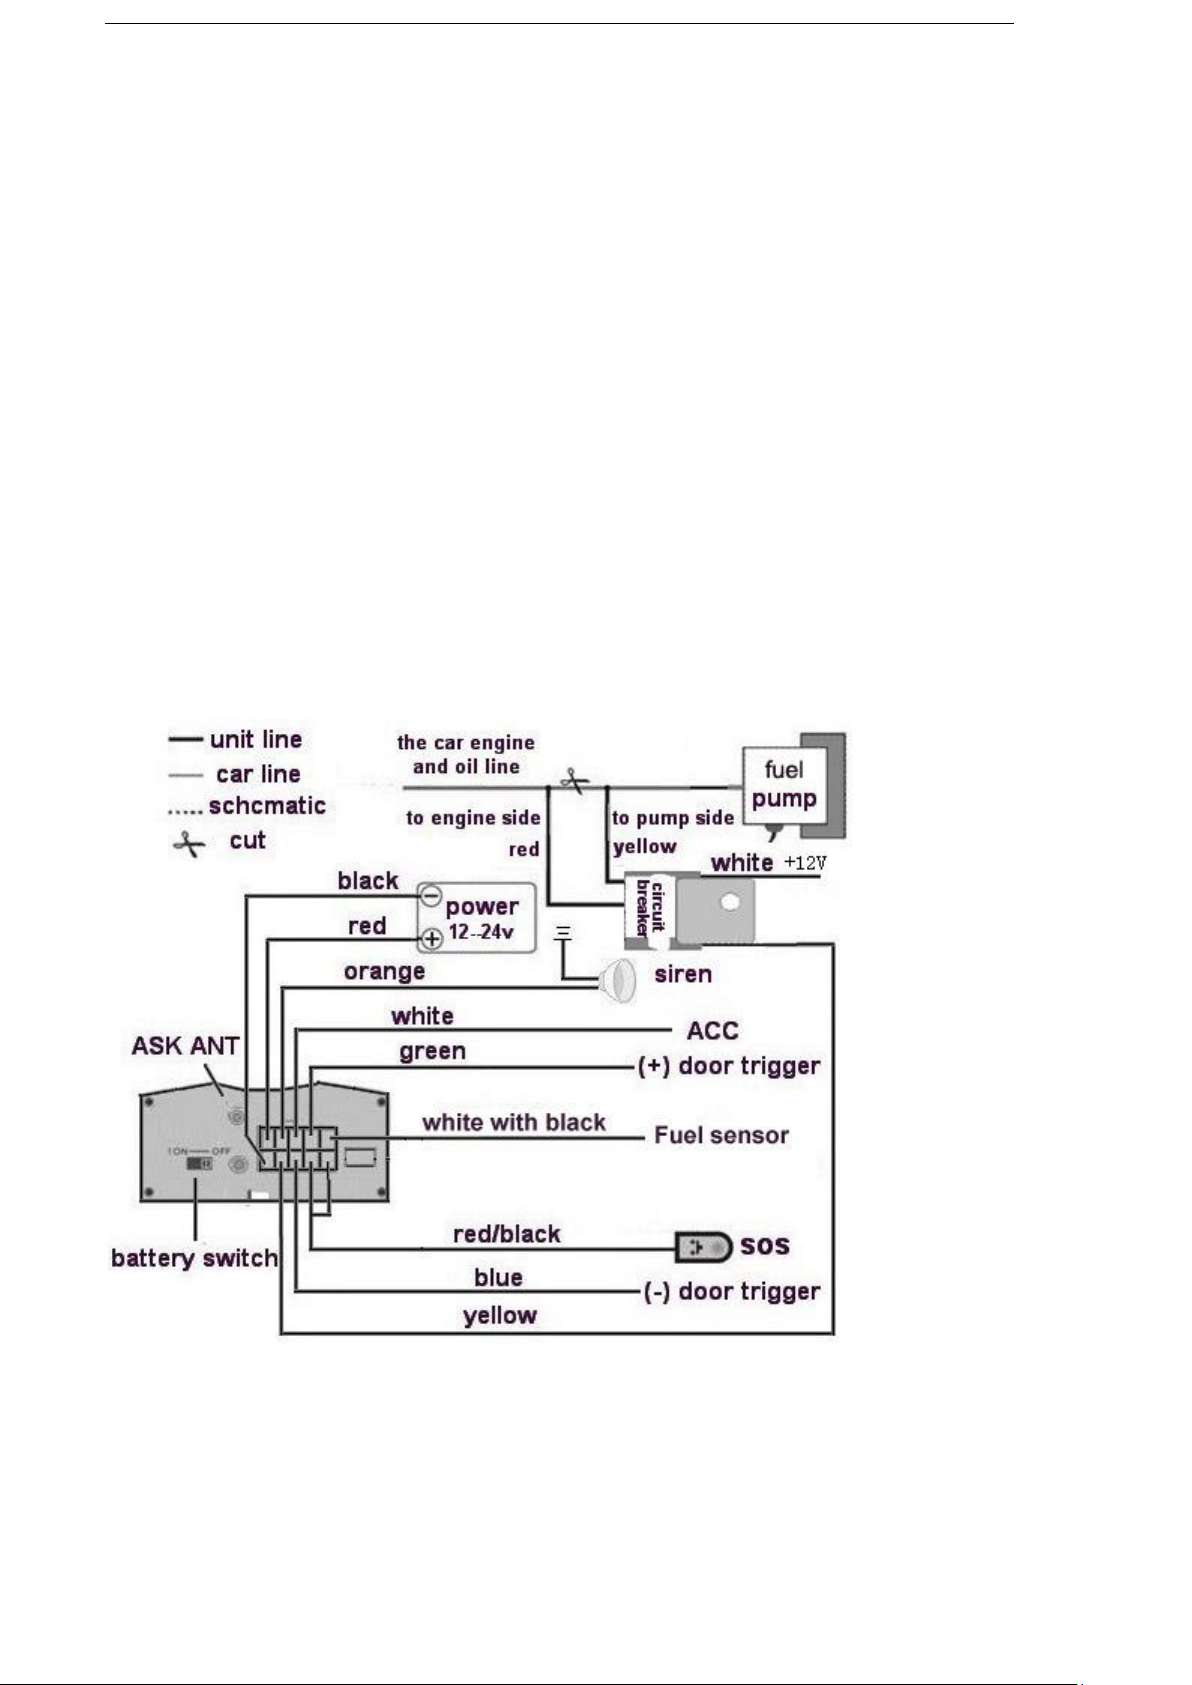
6.1.4 Find the 10 PIN harness and insert it into the corresponding holes of the
products, and connect the wires with the original car circuit showing
below:
Wiring diagram
Note: The orange wire can be connected to the original car horn; it can also
be connected to the siren you buy with the tracker. (Siren is Option)
Page 9

9
6.1.5 Knowing about the type of the door trigger is positive or negative trigger.
Please connect the green wire to the door control circuit if it is positive,
and connect blue wire if it is negative.
6.1.6 Please put SOS button at the place driver can touch.
6.1.7 Insert the shock sensor plug into the sensor jack. (Shock sensor is Option)
6.1.8 Insert the external monitor Microphone into the monitor jack.
6.1.9 Connect the GPS and GSM antenna to the right connector, and find an
appropriate place and fix the antennas to make sure it receive signals well.
6.2 SIM CARD Installations
6.2.1 Use a tweezers or a sharp thing to touch the SIM CARD popup switch, the
SIM CARD slot will pop up, take out the SIM card slot and put SIM card
in it. And then put the SIM card slot back to its original position after
confirm the SIM card in the right place.
6.2.2 Please make sure the SIM card is for GSM network and able to execute
the function of incoming calls display, no calls can be diverted and the
PIN code is locked. The SMS format must be TXT format, and can’t
recognize the PDU format.
6.3 Turn on the Tracker Device.
6.3.1 Connect the positive and negative wire, red and black ones, with 12V or
24V car power system, wait for 1 minute after connecting power to wait
tracker works normal, and then turn on the backup battery switch.
Page 10

10
6.4 GSM/GPS LED Indicator
6.4.1 Red LED indicator on: No GSM network signals.
6.4.2 Red LED indicator flashes fast (one time each second): GSM Network
signal is normally, and tracker works under GSM mode.
6.4.3 Red LED indicator flashes slowly (one time each three second): Tracker
works under GPRS mode.
6.4.4 Green LED indicator on: GPS signal is normal.
6.4.5 Green LED indicator off: No GPS signals.
6.5 Initialization
Send SMS “begin+password” to the unit, it will reply “begin ok” and
initialize all the settings to default factory settings. ( default password:
123456)
For example: send SMS “begin123456”, it will reply “begin ok”. (No
quotation marks“” when sending all the SMS)
6.6 Change Password
6.6.1 Send SMS “ password+old password+space+new password” to the unit to
change the password.
For example: send SMS “password123456 888888” to the unit. If
succeeded, “password ok” will reply to your cell phone from the device
tracker.
Page 11

11
6.6.2 Be sure to keep the new password in mind, you have to upload the
software to restore the original setting in case of losing the new password.
6.6.3 Attention: Make sure the new password is in 6 digits Arabic numbers, or
else the tracker cannot recognize the password.
6.6.4 When reading this user manual, you will notice that we have used "+" and "space" between some
words;"+" between two words means they should be written together as one word and "space"
between two words means you should leave one character space between two words.
6.7 Authorization
You must setup the authorized phone number before using SOS, geo-fence
alarm, etc. Up to 5 numbers can be authorized.
6.7.1 Call the tracker for 10 times continuously and get its position, then it will
save the cell phone number as the authorized number automatically. and
reply “add master ok”.
6.7.2 Authorization: Send SMS “admin+password+space+cell phone number”
to set up an authorized number, the other authorized numbers should be set
by the first authorized number, if the number is successfully authorized, the
unit will reply “ admin OK” by SMS.
6.7.3 Delete authorization: Send SMS “noadmin+password+space+authorized
number” to delete the authorized number.
6.7.4 If you want to track the target when it enters into another country, you must add the country code
before the cell phone number. You should authorize your number in international format as follows:
Page 12
12
“admin123456 008613322221111” to tracker to set 13322221111 as an authorized number.
6.8 Single Locating
6.8.1 If there aren’t any authorized number set-up, it will reply all calls with a
location report; if there are authorized numbers set-up, then it will not
respond when an unauthorized number calls it.
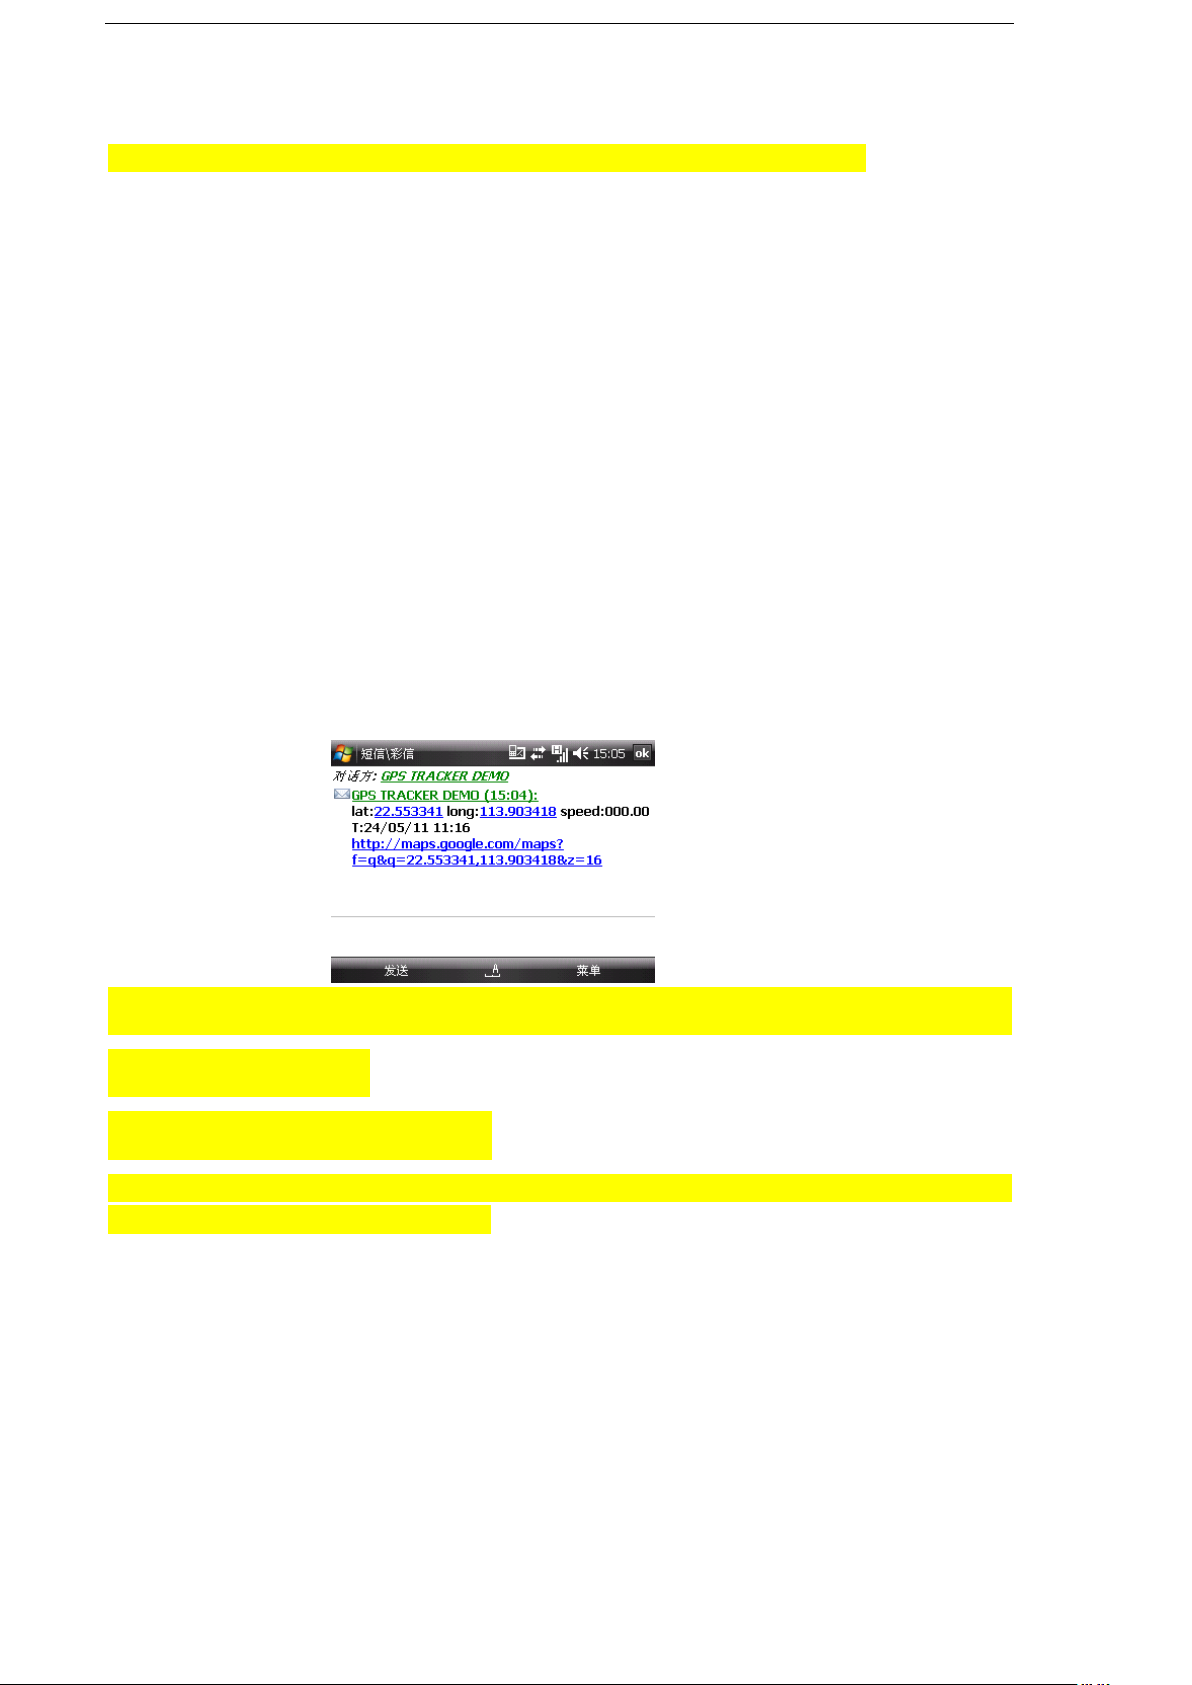
6.8.2 If you call it from authorized phone number, it will hang up and report a
real-time location as below:
*When lost fix to satellites, it will track by LBS / CELL-ID. And the SMS will
include two positions:
- GPS coordinates of the last known position.
-LAC code. Open www.gpstrackerxy.com find “manual track”, and put the received code in LAC and
Cell-ID fields to location by LBS technology.
6.9 Auto track continuously
6.9.1 Track with limited times upon time interval:
Send SMS command “fix030s005n +password” to the tracker device, it
Page 13

13
will report the latitude & longitude at intervals of 30 seconds for 5 times.
(s:second, m:minute, h:hour). This command set must be in 3 digits and the
maximum value is 255.
e.g. fix030s005n123456
6.9.2 Track with unlimited times upon time interval:
Send SMS “fix030s***n+password” to the tracker device, it will reply the
latitude & longitude continuously at interval of 30 seconds.
Note: the interval must not less than 20s.
e.g. fix030s***n123456
6.9.3 Smart track upon time and distance interval:
6.9.3.1 Please set "track with unlimited times upon time interval" before this
function, and send "distance+password+space+distance", tracker will
reply "Distance ok", and then tracker will locate upon both the pre-set
time and distance.
e.g. Send "distance123456 0050", it means distance is 50 meters; the
number must be 4 digits Arabic numbers.
6.9.3.2 Set this function on web server: Set time interval first and then distance
interval, tracker will locate upon the time and distance.
6.9.4 Cancel: Send SMS “nofix+password” to the tracker device to cancel the
“auto track”.
e.g. nofix123456
Page 14

14
6.10 Turning points update automatically
6.10.1 The tracker will update the positions automatically to web server
once the vehicle changing driving direction over pre set angle value to form
a smooth trajectory consistent with the actual road, this function is only
effective in GPRS mode.
6.10.2 Send "angle+password+space+angle" to tracker, it will reply" angle ok".
e.g. angle123456 040
6.10.3 The angle must be 3 digits Arabic numbers, default angle value is 30
degree.
6.11 GPS drift suppression
6.11.1 This function is deactivated as default, send "suppress+password" to
tracker, it will reply" suppress drift ok". The GPS data stop updating if
vehicle is not driving (ACC is OFF) and latitude and longitude always
keep same, and GPS data updates automatically when vehicle is moving.
e.g. suppress123456
6.11.2 Cancel: send "nosuppress+password" to tracker, it will reply" nosuppress
ok ".
e.g. nosuppress123456
6.12 Exact street address
6.12.1 You must set up the APN of your local GSM network for the SIM card in
tracker first before using this function, if there is user name and
Page 15

15
password for GPRS login, Please refer to 6.34.1 and 6.34.2 to configure
the APN, user name and password for GPRS login.
6.12.2 After configure the APN, send "address+password" to device, it will
reply SMS including real street/address name. For example: No.113,
Guankou 2nd Rd, Nantou, Nanshan district, Shenzhen, Guangdong,
china.
e.g. address123456
6.13 Location based service (LBS) / Cell-ID Locating.
If the tracker cannot establish a solid GPS Fix, it will calculate its location using Cell-ID GSM
locating, Location reports will include the GPS coordinates of the last known positions as well as a
LAC code, Entering the LAC code to the “Manual Track” menu of web tracking platform
www.gpstrackerxy.com will enable you to see the tracker’s current location. You can also send
command “address+password” to the tracker to request exact address, track will automatically
switch to tracking by LBS in GPRS mode. Accuracy of LBS depends on the distance to the nearest
GSM Network Cell Tower or Base Station.
Note: This feature can be used normally in most areas according to the signal of GSM network. It may not
be available in some areas.
6.14 Monitor
6.14.1 The command to switch between Track and Monitor are “tracker” and
“monitor”.
6.14.2 The default mode is “track” (Track mode).
6.14.3 Send SMS “monitor+password” to the unit, and it will reply “monitor
ok!” and switch to “monitor” mode.
e.g. monitor123456
6.14.4 Send SMS “tracker+password” to the unit, it will reply “tracker ok!” and
Page 16

16
restore to “track” mode.
e.g. tracker123456
6.15 Data logging
6.15.1 Auto logging:When the tracker device lost GSM signals or fall offline
from GPRS, tracker will log the tracking position and alerts automatically
in the SD card on the basis of the pre-set condition, when GSM signals
get back, all the event alerts will be auto-sent to the authorized numbers
or monitoring platform (server), but the logged tracking data should be
loaded to the monitoring platform via SMS command.
6.15.2 Logging upon times: Send SMS: “save030s005n+password” to the
tracker unit, it will reply “save ok”, and will log the lat, long locations
every 30 seconds for 5 times. (S: second, m: minute; h: hour).
6.15.3 Multi-logging:Send SMS:”save030s***n+password” to tracker device,
it will reply “save ok”.
6.15.4 Logging Clearance: send SMS: “clear+password” to tracker device, it
will reply “clear ok”.
6.15.5 Cancel logging: Send SMS “nosave+password”, e.g. nosave123456
6.15.6 Logging Volume: It depends on the capacity of the SD card inserted in
the tracker device.
6.15.7 The logged data in SD card can be copied to computers through card
reader, and then the data route can be checked by importing data in the
menu “Data Import” of web platform www.gpstrackerxy.com
Page 17

17
6.16 Data Load
6.16.1 Current date Load: Send SMS: “load+ password” to tracker device, it
will reply: “load ok” if the device is working well under GPRS mode; if
not, it will reply “load fail! Please check gprs” that means device does not
work under GPRS mode.
6.16.2 Specified date Load: Send SMS: “load+ password+ space+ year month
date” to tracker device, it will reply: “load ok” and load the tracking data
to the monitoring platform upon the valid time you choose. For Example:
send SMS: “load123456 20110425” to the tracker device, means to load
the tracking data of 25th April 2011 to monitoring platform.
6.17 Forward the third parties’ message
6.17.1 Send SMS "forward+password+space+third parties phone number" from
authorized phone number, tracker will reply"forward ok", and supports 1
third parties phone numbers at most.
For example, set the phone number of the service provider of the SIM card
in the tracker, when charge remind message coming in, tracker will
forward it to authorized phone number.
6.17.2 Cancel: Send SMS command "noforward+password".
6.18 SIM card Balance Inquiry
Send SMS command "balance+password+space+carrier’s phone
Page 18
18
Send balance back
Mobile
balance123456 10086 ye
Tracker
Received and execute
Send ye out to 10086
10086(China mobile)
Received ye from number in
the tracker and process
Received Balance message
Forward balance message to mobile
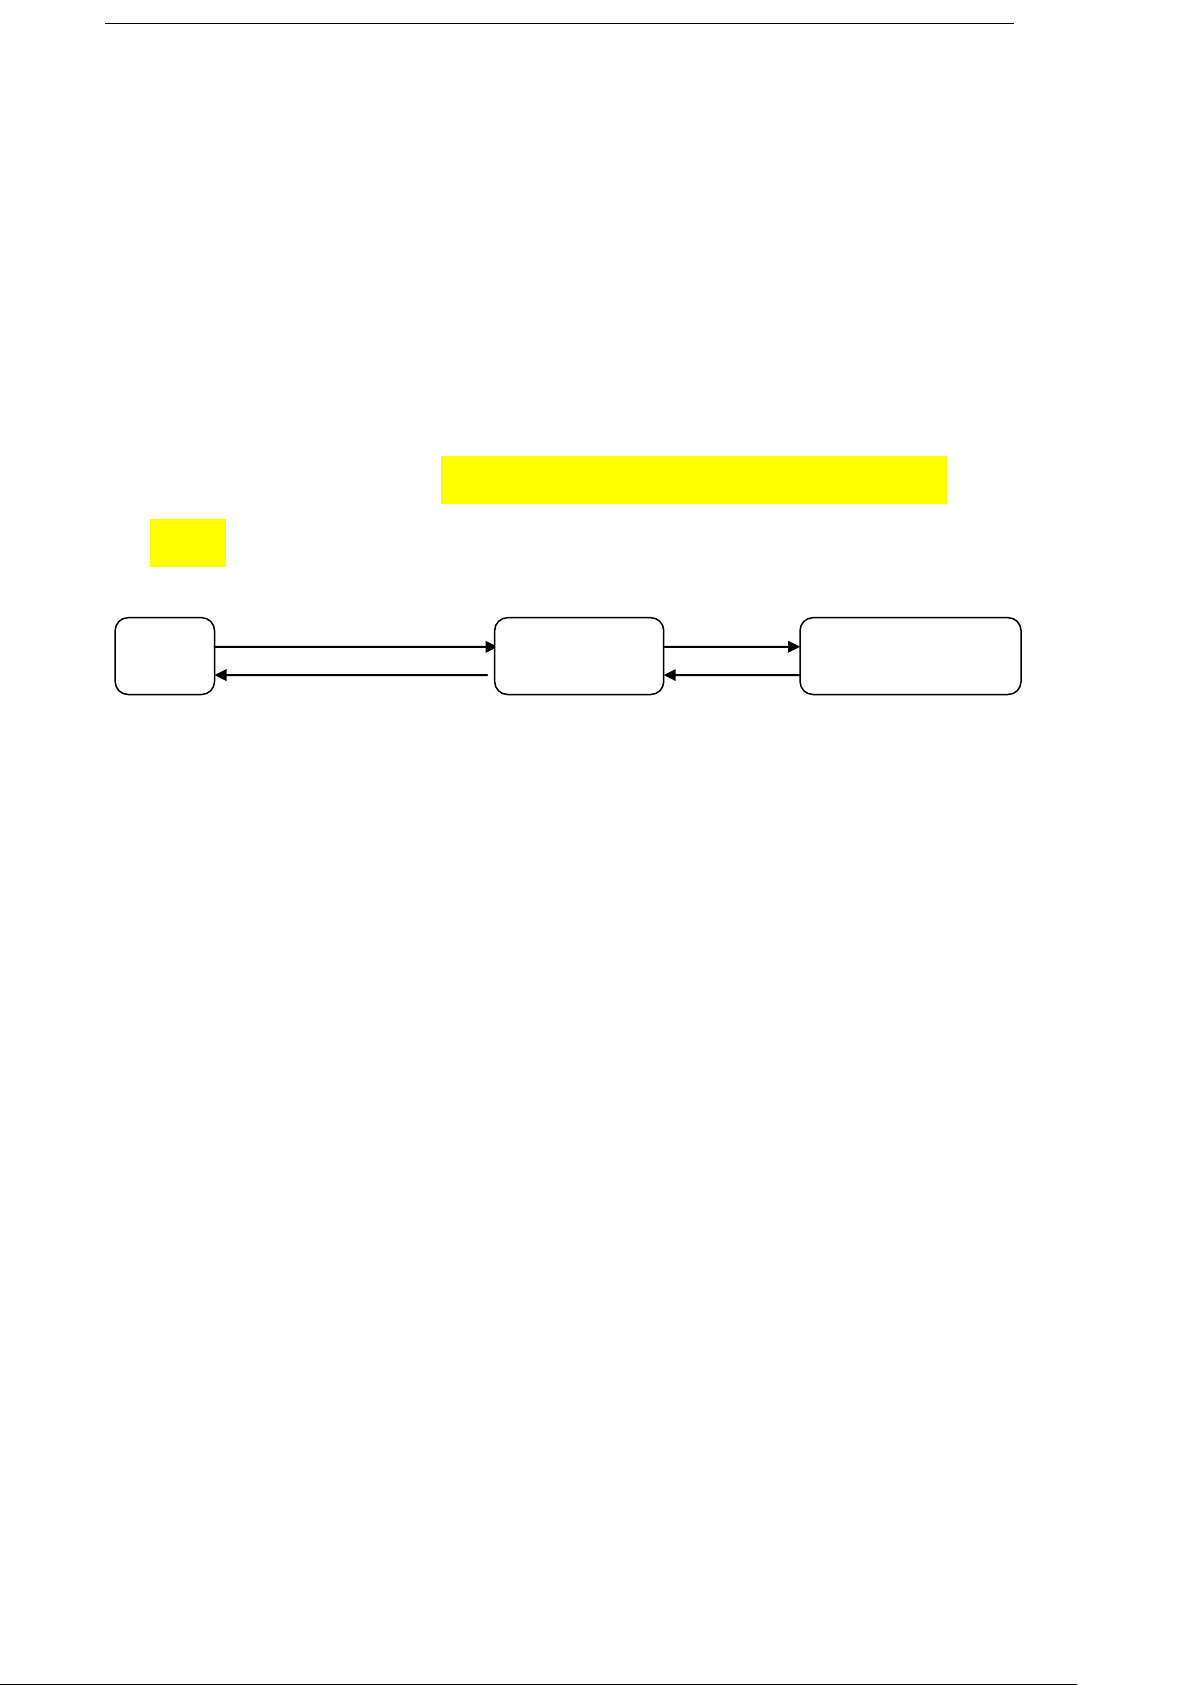
number+space+code" to tracker, it will forward the code to carrier’s phone
number and return the balance message received from carrier’s phone
number.
Take china mobile for example, china mobile is one of carrier in china,
mobile users can send “ye” to china mobile number 10086, and 10086 will
send user’s balance back, following is an illustration how this function
works.
6.19. Alarms
6.19.1 Low battery alarm
6.19.1.1 Send SMS “lowbattery+password+space+on”, it will send SMS “low
battery+latitude/longitude” to authorized numbers 2 times in total in 15 minutes
interval when voltage of battery is going to be about 3.55V.
6.19.1.2 This function activates as default, send SMS
“lowbattery+password+space+off” to deactivate.
6.19.2 Power off alarm
6.19.2.1 Send “ extpower+password+space+on” to activate, it will send SMS “power
alarm+latitude/longtitude” to authorized numbers every 3 minutes when external power is cut
off.
6.19.2.2 This function activates as default.
Cancel: Send SMS “ extpower+password+space+off” to deactivate it.
Page 19

19
6.19.3. GPS blind Spot alert
6.19.3.1 This function deactivates as default, send SMS “gpssignal+password+space+on”, it
will send alert SMS “no gps+last valid latitude/longitude before lost signal”
6.19.3.2 Send SMS “gpssignal+password+space+off” to deactivate.
6.19.4 SOS
Long Press the SOS button for 3 seconds(For model B, press button on
remote controller for 3 seconds), the tracker device will send SMS “help
me!+lat./long.” to all the authorized numbers at interval of 3 minutes. It
will stop sending such a SMS when any authorized number reply SMS
“help me!” to the tracker.
6.19.5 Geo-fence
Set up a geo-fence for the tracker device to restrict its movements within a
district. The unit will send SMS to the authorized numbers when it goes out
of this district.
Set up: When the unit stays immobile in a place for 3-10 minutes, the user
can send
SMS“stockade+password+space+latitude,longitude;latitude,longitude” to
unit to set the restricted district. In case of breach, it will send SMS
“stockade!+ latitude & longitude” to the authorized numbers at interval of 3
minutes.
Page 20

20
Remark: The first latitude & longitude is coordinate of the top left corner of
the Geo-fence, while the second latitude & longitude is the coordinate of the
bottom right corner, it will alarm at interval of 3 minutes.
Cancel: Send SMS “nostockade+password” to deactivate this function.
6.19.6 Multi-area management
6.19.6.1 Set Area
Send SMS command
"area+password+space+latitude,longitude+space+areaname,distanceM" to
tracker(distance unit: M for meter, K for kilometer), it will reply "area01
ok".
Example: Send "area123456 22.353648,113.543678 school,800M".
Note: 5 areas at most and the distance between two points can't be less than
the total distance in the 2 commands, and different areas can't cover each
other.
6.19.6.2 Delete areas
Send SMS command:"noarea+password+space+area name", tracker will
reply:"noarea ok".
6.19.6.3 Rename and set distance
Send SMS command "rename+password+space+old name;new
Page 21

21
name,distanceM" to tracker, if name is not repeated and area doesn't cover
others, it will reply "rename ok!" for successful configuration.
Example: Send"rename123456 area01;school,800M", it means the new area
name is "school", and covers area of a radius of 800 meters.
6.19.6.4 Activate multi-area management
Send SMS command "area+password+space+on" to tracker, it will reply
"Area on ok!", when tracker enter the pre set area, it will send SMS "area
name+latitude & longitude" to all the authorized phone number, and send
same SMS when goes out of the area.
6.19.6.5 Deactivate Multi-area management
Send SMS command "area+password+space+off" to tracker, it will
reply"area off ok!"
6.19.7 Movement alarm
6.19.7.1 Set up: when the unit stays immobile in a place for 3-10 minutes with
GPS signal reception, the user can send
SMS“move+password+space+0200” to the tracker (Suppose area of a
radius of 200 meters, it supports 4 digits at most. Unit: Meter). It will
reply “move OK”. In case of such a movement (the default distance is
200m), it will send SMS “Move+ latitude & longitude” to the authorized
numbers at interval of 3 minutes.
Page 22

22
6.19.7.2 Cancel: Send SMS “nomove+password” to deactivate the movement
alarm.
6.19.8 Over speed alarm
Set up: Send SMS “speed+password+space+080” to the unit (suppose the
speed is 80km/h), and it will reply “speed OK!”. When the target moves
exceeding 80km/h, the unit will send SMS “speed+080!+ latitude &
longitude” to the authorized numbers at interval of 3 minutes.
Cancel: Send SMS “nospeed+password” to deactivate the overspeed alarm.
Remark: The recommended speed should be not less than 30km/h. For below
that rate, it will be effected the accuracy by GPS signals drift etc.
6.19.9 Accident alarm (Option):
When tracker detects accident occurred (severe impact), it will send "
Accident! + latitude & longitude " to all authorized phone numbers.
6.19.10 ACC working alarm
6.19.10.1 This function is disabled as default. To active this functions, send
"ACC+password" to tracker, it will reply "ACC ok". And tracker will send
"ACC on+latitude & longitude" to authorized numbers when detect ignition
action, that means the vehicle has been started; and tracker will send “ACC
Page 23

23
off+latitude & longitude" to authorized numbers, that means ACC off.
6.19.10.2 Send "noACC+password" to disabled this function, tracker will reply
"noACC ok".
6.19.10.3 This configuration can only enable and disable the alarm to authorized
numbers; it will send to web server automatically in GPRS mode and can't
be disabled.
6.19.11. Fuel alarm
6.19.11.1 When the fuel consumption exceeds the normal standards during driving, or oil
theft/leakage when the vehicle is stopped, the tracker will send "oil: xx% + Geo-info" to
the authorized number at interval of 3 minutes. The horn beeps 30S.
6.19.11.2 Cancel: Send SMS command “ nooil+password” to tracker.
6.20 Cut off the Oil and Power System
6.20.1 Send command “stop+password” to tracker, tracker will execute it and reply “Stop
engine Succeed”. And it will remain immobile state until next command to resume.
6.20.2 Stop mode
6.20.2.1Execute immediately: Send command “quickstop+password” to tracker, it will reply
“quickstop OK”. Then tracker will stop the car immediately after “stop” command.
6.20.2.2 Execute depends on speed(Default mode): Send command “noquickstop+password”
to tracker, It will reply “noquickstop OK”, Then the tracker won’t stop the car
immediately after “stop” command, instead, it will reply “it will be executed after
speed less than 20KM/H”, and stop the car when the speed is less than 20KM/H.
6.20.3 Resume the Oil and Power System
Send “resume+password" to tracker, it will reply "Resume engine succeed",
Page 24

24
that means vehicle has resume the oil supply.
6.21 Arm
6.21.1 Set up arm by SMS
Send SMS command “arm+password” to the tracker device in the vehicle. It
will reply “Tracker is activated” in both armed and disarmed state, and the
SMS command will make the tracker device enter into armed state if the
unit currently disarmed.
User must stop the engine, (that is ACC is lower voltage).Sending SMS
“arm+password” when close the door and left. You will set up arm status
fail if the engine is turned on (the ACC is high voltage), it will reply “set up
fail! pls turn off ACC”
6.21.2 Set up arm by remote controller (Option, for model B ONLY)
Press button on the remote controller for 0.5 seconds, the car enters
into armed state and the siren will beep one time, no SMS reply.
6.22 Disarm
6.22.1 Disarm by SMS
Send SMS command "disarm + password" to the tracker device in the
vehicle, It will reply “Tracker is deactivated” in both armed and disarmed
state, and the SMS command will make the tracker device enter into
disarmed state if the unit currently armed.
It won’t alarm if the door is open and sensor is vibrated and the engine is
started when deactivated this arm function.
Page 25
25
Button
Function
Descriptions
ARM
Press for 0.5 second, the siren will beep one time.
DISARM
Press for 0.5 second, the siren will beep two times.
ARM & Silent
mode
Press for 0.5 second when it is in disarm state, the siren will
beep three times. No voice from siren when alarm triggered and quit from
siren mode automatically when disarm.
SOS
Press for 3 seconds, Tracker will send SOS alert to authorized phone numbers
without voice.
Deterrence/car
search
Press for 0.5 second when it is in arm state, siren will beep 10 seconds, press
disarm button to quit.
6.22.2 Disarm by remote controller (Option, for model B ONLY)
Press button on the remote controller, the car enters into disarm state,
and the siren will beep two times, no SMS reply.
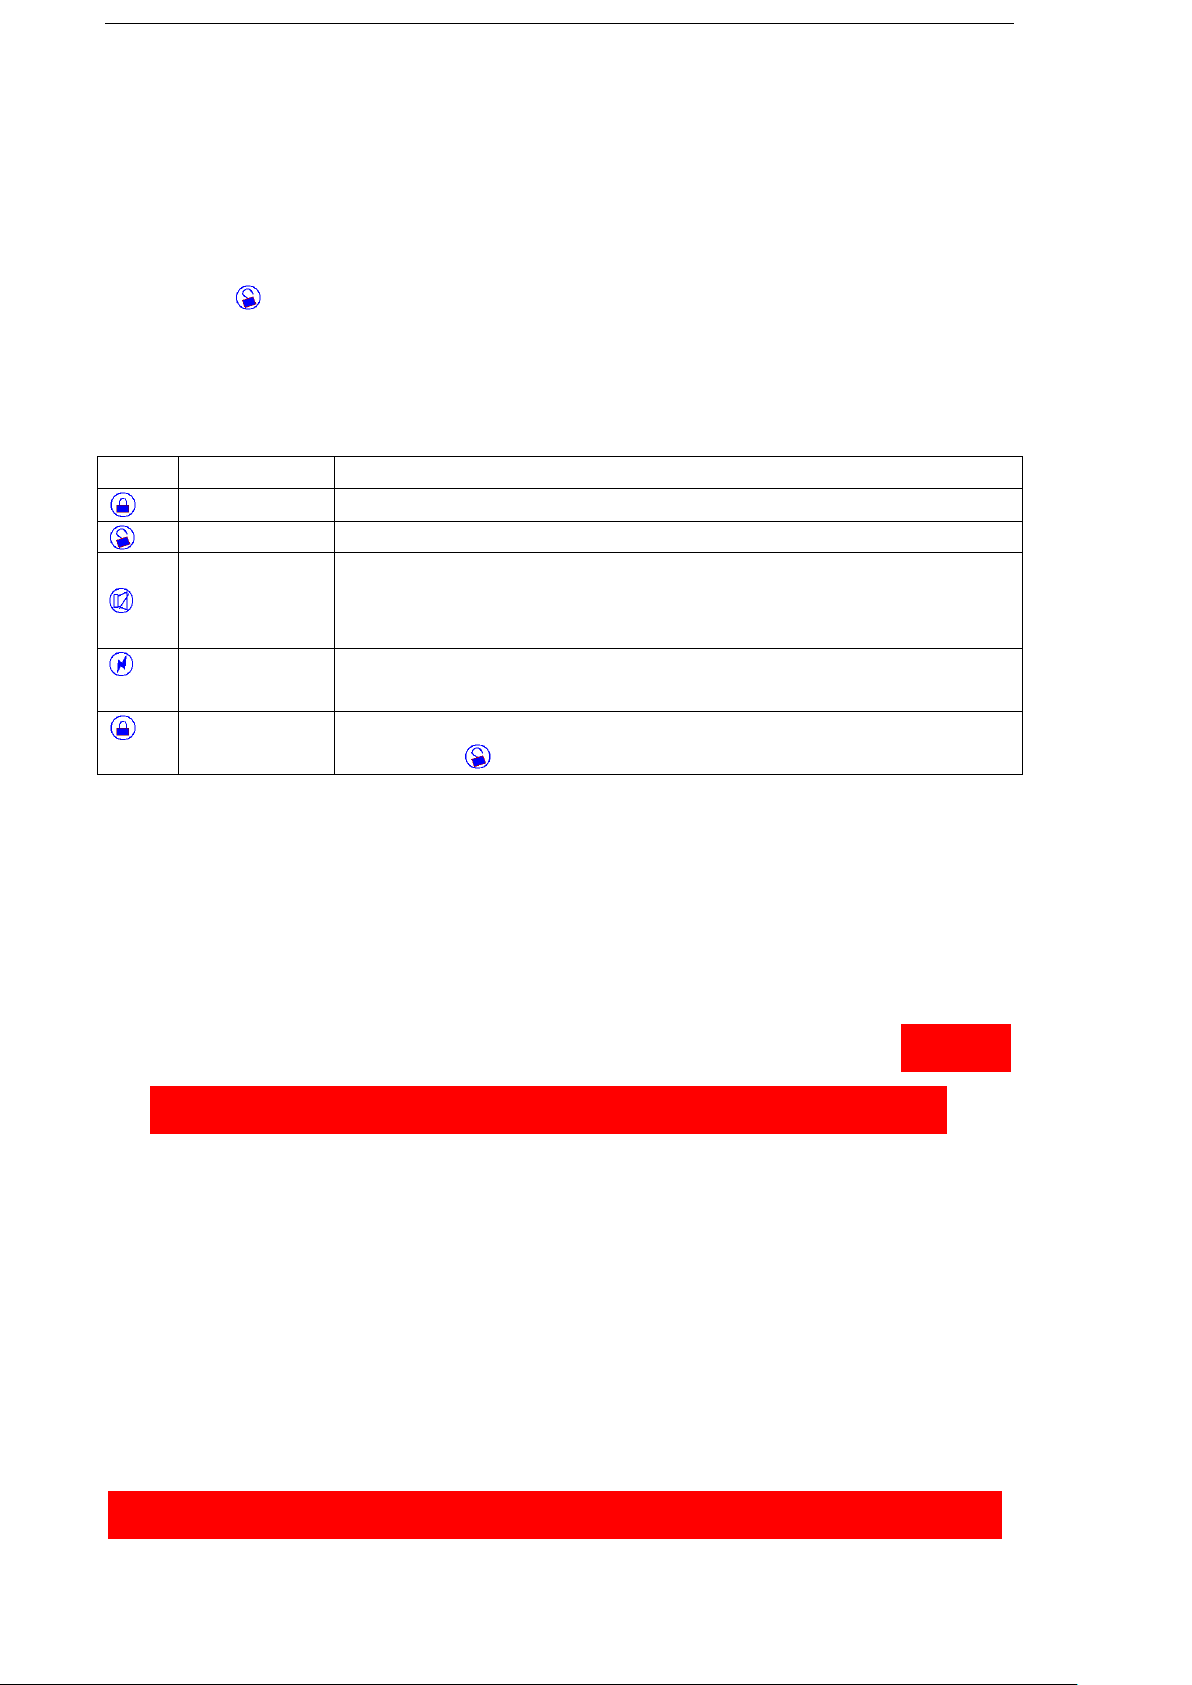
6.23 Function of Remote Controller (Option, for model B ONLY)
6.24. Alarms under Arm State
6.24.1 Door alarm
The unit will send SMS “Door alarm+lat/long” to the authorized number at
interval of 3 minutes when the door of the car opens in arm status; Siren will
be sound for 20 seconds, and repeat again after stop 20 seconds, send
“disarm+password” to stop it.
6.24.2 Shock Sensor alarm
The unit will send SMS “Sensor alarm+lat/long” to the authorized number at
interval of 3 minutes when the sensor is triggered in arm status;
The vibration is detected in the 1st and 2nd 5 seconds, the alarm siren sounds 5
Page 26

26
seconds each time, starting from the 3rd time, alarm siren sounds for 10 seconds,
send “disarm+password” to stop it.
6.24.3 ACC alarm
The unit will send SMS “ACC alarm+lat/long” to the authorized number in
at interval of 3 minutes when the engine of the car is turned on, that is the
key is rotated to ACC.ON position to start the car in arm state; Siren will be
sound for 20 seconds, and repeat again after stop 20 seconds, send
“disarm+password” to stop it.
6.25. Silent Mode
6.25.1 Set up silent mode by SMS
Send SMS “silent+password” to tracker device, it will reply “silent ok!”. It
means tracker device enters into silent mode, siren won’t be sound after
alarm is triggered, but tracker will send alarm SMS to authorized number.
Quit silent mode send disarm command “disarm+password” .
6.25.2 Set up silent mode by remote controller (Option, for model B ONLY)
Silent mode Press in disarm state for 0.5 second, the siren will
beep one time, It means tracker device enters into silent
mode, siren won’t be sound after alarm is triggered, but
tracker will send alarm SMS to authorized numbers.
Page 27

27
Quit silent mode Press to quit
6.26. Alarm without GSM network service
When the car is in the place without GSM network service, siren will be
sound under non-silent mode if alarm is triggered (door, sensor, ACC),
but no SMS alarm will send to authorized number.
6.27 Check the Vehicle State.
Send SMS command “check+password” to the tracker device in the vehicle,
It will reply the status of the power, battery, GPS, ACC, door, GSM signal.
For example: Send SMS “check123456” to the tracker device in the vehicle,
It will reply following SMS.
Power: ON/OFF
Battery: 100%
GPRS: ON/OFF
GPS: OK/NO GPS
ACC: OFF/ON
Door: OFF/ON
GSM Signal: 1-32(performance). Note: The higher digit it shows; the
stronger of GSM signals it receives.
6.28 Reset Hardware
6.28.1 SMS Reset
Send SMS “reset+password” to tracker device to reset the GSM module
and GPS module of the tracker device, it will reply “reset ok”.
Page 28

28
6.29 Sleep Mode
6.29.1 This function is deactivated as default, send “sleep+password+space+on”,
tracker will reply “sleep on ok”. When vehicle is not driving (ACC is OFF), GSM
module fall asleep; GPS module shut off; and tracker works in low power consumption.
Calling, SMS command and any triggered alarm can awake it.
6.29.2 Cancel: Send “sleep+password+space+off”, tracker will reply “sleep off ok”,
then tracker won’t sleep, GSM and GPS works all the time.
6.30 Check IMEI
Send SMS command "imei+password" to the unit. E.g. Send SMS
command "imei123456" to the tracker device, an IMEI number in 15 digits
will reply to your cell phone.
6.31 Terminal (local) Time Setting
6.31.1 Send SMS command “time+space+zone+password+space+time” to the
tracker unit, If succeed, It will reply “time OK”
6.31.2 For example: Send SMS “time zone123456 8”, 8 is Chinese time zone, If
your country time zone is minus, send SMS “time zone123456 -8”.
6.32 TCP/UDP switch
Command:"gprs+password,1,1" switch to UDP mode.
Command: "gprs+password,0,0" switch back to TCP mode, this is the
default mode.
6.33 Configure parameters by USB
Connect tracker to computer with the optional USB cable, open the
memory of the tracker, find and open the initial configuration file with
notepad , operate according the instructions.
Note: Correct password is need every time you configure the tracker.
Page 29

29
6.34 GPRS Setting
User must send SMS via cell phone to set up APN, IP and port before
starting tracking by GPRS.
6.34.1 Configure APN
6.34.1.1 APN standards for Access Point Name and differs from country to
country. For more information about your local APN, please inquire with
your local GPRS network operator.
6.34.1.2 Text the tracker a SMS “APN+password + Space + your local APN”
via a cell phone and if succeeded, the tracker will return the message
“APN OK”.
6.34.1.3 E.g. Send SMS command “APN123456 CMNET”. If succeeded, “APN
OK” is returned by the tracker in SMS.
Notes: 123456 refer to password of tracker and CMNET is the APN of
one of china GPRS Network Operator (China mobile).
6.34.2 GPRS User Name and password Setup
6.34.2.1 In most countries, the user name and password involving GPRS login
are not compulsorily necessary, therefore, the entry can be skipped. For
those countries requiring user name and password, please configure as
following:
Page 30

30
6.34.2.2 Send SMS “up+password+space+user+space+password”If succeeded,
“user, password ok!” is returned by the tracker in SMS.
6.34.2.3 For instance, send SMS “up123456 jonnes 666666” to the tracker, and
if succeeded, the tracker returns “user, password OK”
Note: 123456 is tracker device password, jonnes is the user name for
GPRS login, 666666 is the password for GPRS login.
6.34.3 IP and Port Setup
6.34.3.1. Send SMS as below via a cell phone:
adminip+password+Space+IPAddress+Space+Port Number. If
succeeded, “adminip OK” is returned by the device in SMS.
6.34.3.2 E.g. Send SMS command “adminip123456 202.104.150.75 9000” to
the tracker device, If succeeded, “adminip OK” is returned by the
device in SMS. ( 123456 is default password,202.104.150.75 is IP,
9000 is port).
6.34.4 Switch to GPRS mode
6.34.4.1 The default mode is “SMS”
6.34.4.2 Send SMS “GPRS+password” to the unit, and it will reply “GPRS ok!”
it means tracker device has switched to “GPRS” mode.
6.34.4.3 Send SMS “SMS+password” to the unit, it will reply “SMS ok!” and
restore to “SMS” mode.
Page 31

31
6.35 Less GPRS traffic
6.35.1 Tracker will change to less GPRS traffic mode after parking 5 minutes
(ACC is OFF), GPRS disconnect and connect again when alarm being
triggered or vehicle starts driving.
6.35.2 Activate this function: Send "less gprs123456 on", tracker will reply "less
gprs on ok".
6.35.3 Deactivate this function: Send "less gprs123456 off", tracker will reply"
less gprs off ok".
Note: 123456 is the password of tracker, and replace it with the new if
you have changed.
6.36 Activate "Fuel" value in GPRS data
The default format of GPRS data doesn't include "Fuel" value,if
you need "Fuel"value, please send protocol+password 18 to tracker, if
succeed, it wil reply "protocol 18 ok"; send protocol+password 12 to
change back to default mode, if succeed, it will reply "protocol 12 ok".
6.37 Web platform and mobile APP instructions
You must register your account at www.gpstrackerxy.com before using the web service and
the mobile APP, The user id and password for web platform and mobile APP is same.
6.37.1 Login www.gpstrackerxy.com, and choose the server to register to.
6.37.2 Filling the user id you like, password and the 15 digits IMEI of the tracker to complete
the registration.
6.37.3 Login your account and you will see your tracker appears in the terminal list, but the
status is offline (grey color). If you want to track more than one tracker in the same
account, please click “system settings” “terminal management” to add more
Page 32

32
trackers.
6.37.4 Configure your tracker to web platform to track it online
Step I: Configure APN, please refers to 6.34.1
Step II: Configure user name and password of gprs, please refers to 6.34.2
Step III: Configure IP and port, please use the corresponding IP and port of the server
you choose, refers to 6.34.3 for details.
Step IV: Switch to GPRS mode, please refers to 6.34.4
Please wait about 1 minute after received “GPRS Ok”, then you will see you
tracker become online (Green color), and now you can click the commands
menu on the web platform or Mobile APP to configure the trackers.
7. Cautions
Please comply with the instructions to extend the unit life:
1. Keep the unit dry. Any liquid, i.e. rain, moisture, may destroy or damage the
inside circuitry.
2. Don’t use & store the unit in dusty places.
3. Don’t put the unit in overheated or overcooled places.
4. Handle carefully. Don’t vibrate or shake it violently.
5. Clear the unit with a piece of dry cloth. Don’t clean in chemicals, detergent.
6. Don’t paint the unit, this may cause some foreign materials left in between the
parts.
7. Don’t disassemble or refit the unit.
8. Please read the user manual carefully before installation and operation, learn
something more about the voltage range. Otherwise, it won’t work properly
or destroy the product.
Page 33
Faults
Solution
Startup Fail
Please check out the power wiring in correct place.
Call Fail
Check the GSM antenna connected. Check whether
the SIM card in place. Check whether the normal power
supply voltage.
Hang up Fail
In existence of an authorized number, an unauthorized
number dials up the unit. Please initialize the unit and
re-set up the authorized numbers.
Monitor Fail
Check if the authorized number is setup
Location report in
digits of zeros.
Check out if the GPS external antenna well.
8. Faults & the Solutions
33
 Loading...