

Page 1

TABLE OF CONTENTS
Safety Information 1
Table of Contents 2
Notice 3
Scooter Diagram 4
Setup Guide 5-9
Charging Instructions 10
Pre-Ride Checklist 11
Specifications 12
Trouble Shooting 13-14
Maintenance Schedule 15-18
Limited Warranty 19-22
Page 2

NOTICE
YOUR INSURANCE POLICIES MAY
NOT PROVIDE COVERAGE FOR
ACCIDENTS INVOLVING THE USE OF
THIS SCOOTER. TO DETERMINE IF
COVERAGE IS PROVIDED, YOU
SHOULD CONTACT YOUR
INSURANCE COMPANY.
Page 3
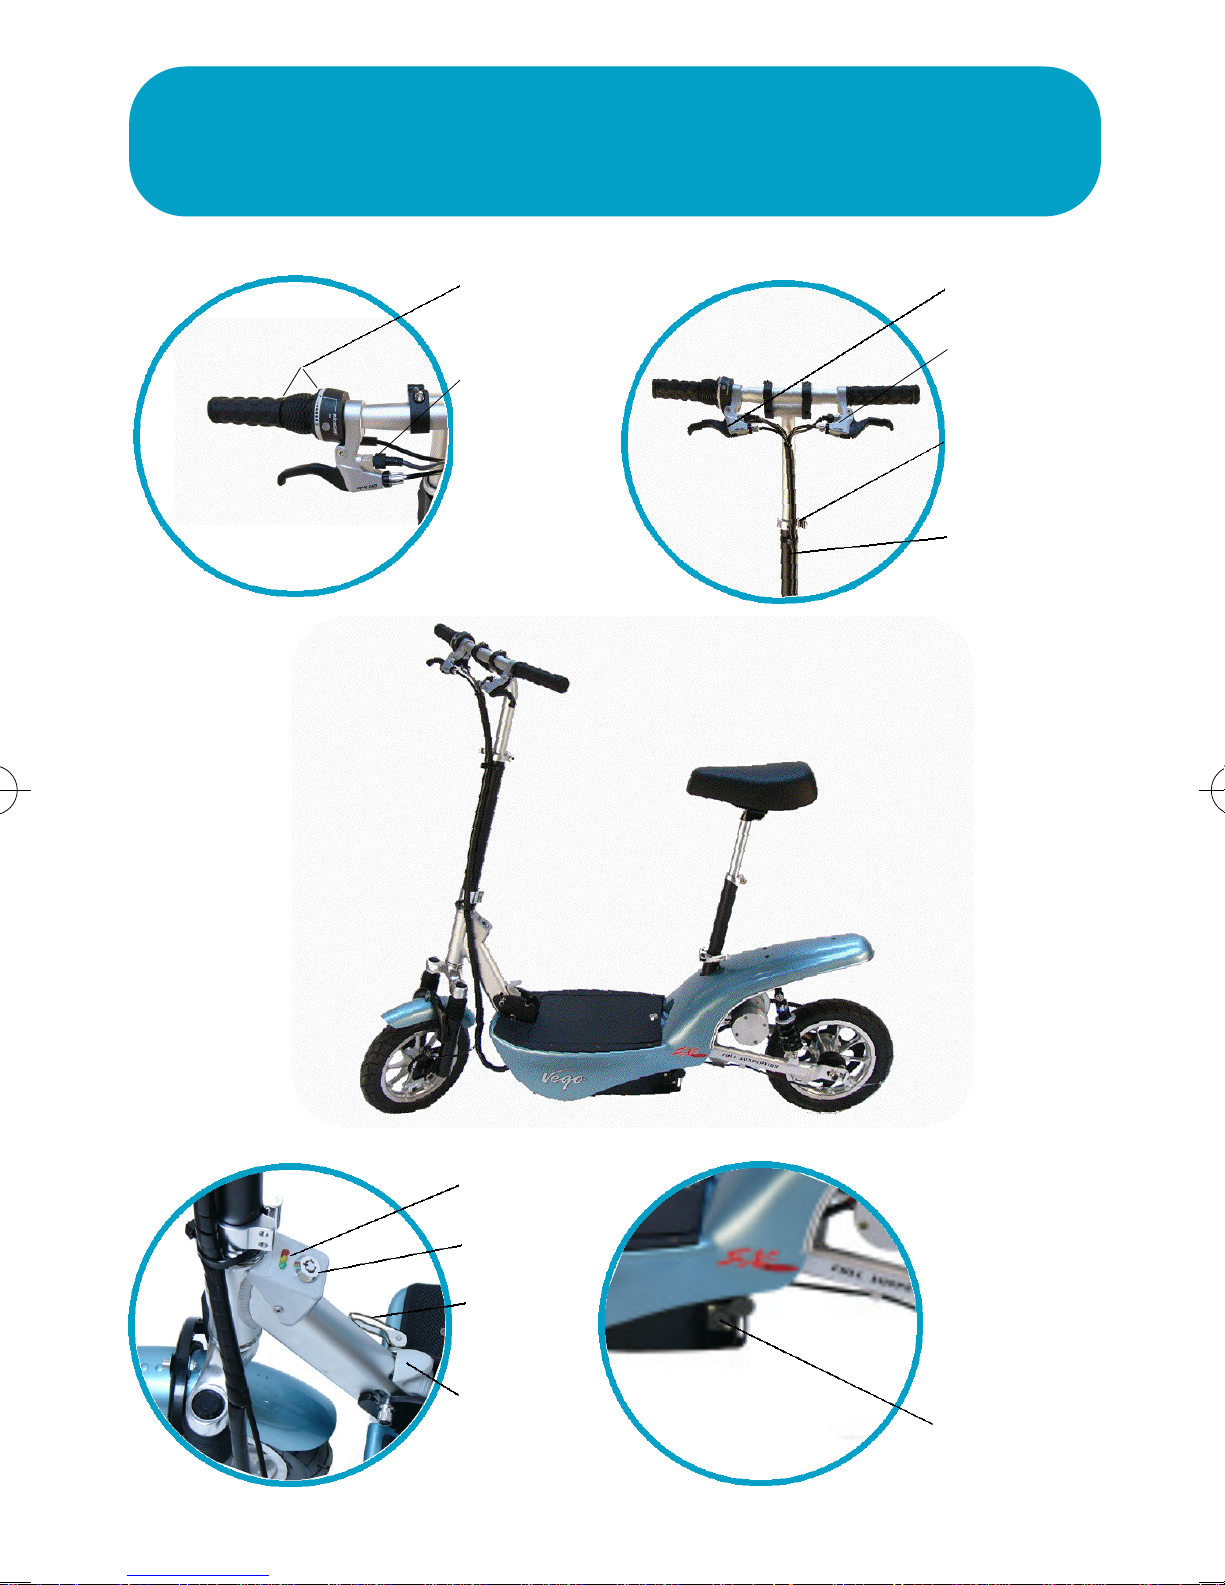
SCOOTER DIAGRAM
•Throttle
(rotates
clockwise)
•Brake cutoff sensor
(signals
motor to stop
when brake
is applied)
•Rear brake
•Front brake
•Handlebar
quick
release
• Handlebar
release button
• Battery
gauge
• On/Off
switch
•Quick
release
lever
• Gray
locking
lever
• Circuit
breaker on
opposite side
of scooter
• Charge port
Page 4
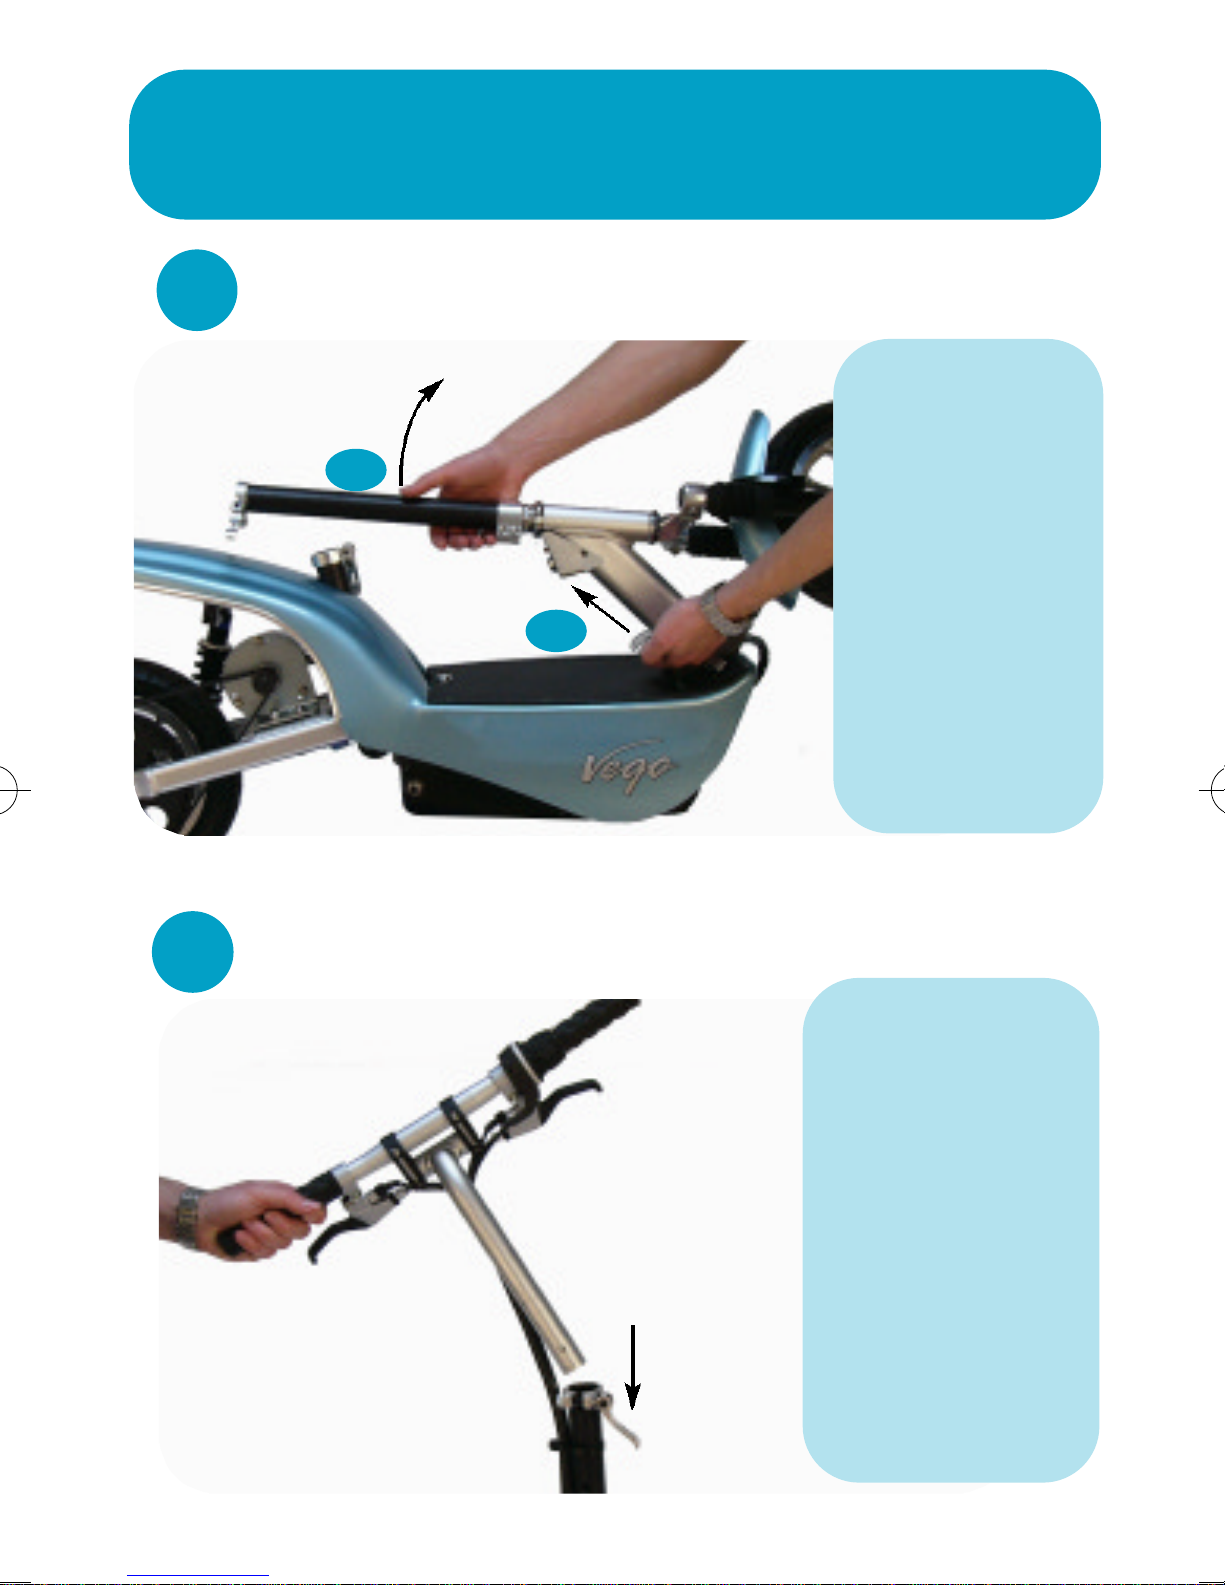
SETUP GUIDE
1
Unfold Scooter
b
a
(a) Loosen
quick release
lever and pull the
gray locking lever
upwards.
(b) Unfold scooter.
Note: The gray locking
lever will not move
freely if you are putting
presure on the steering
t u b e .
2
Install Handlebars
CAUTION:
If you are not familiar
with bicycle assembly
techniques please bring
your scooter to a qualified
mechanic for proper
assembly and tightening
of all components.
See next page for
further instructions
on how to properly
tighten the handle-
b a r s .
Page 5
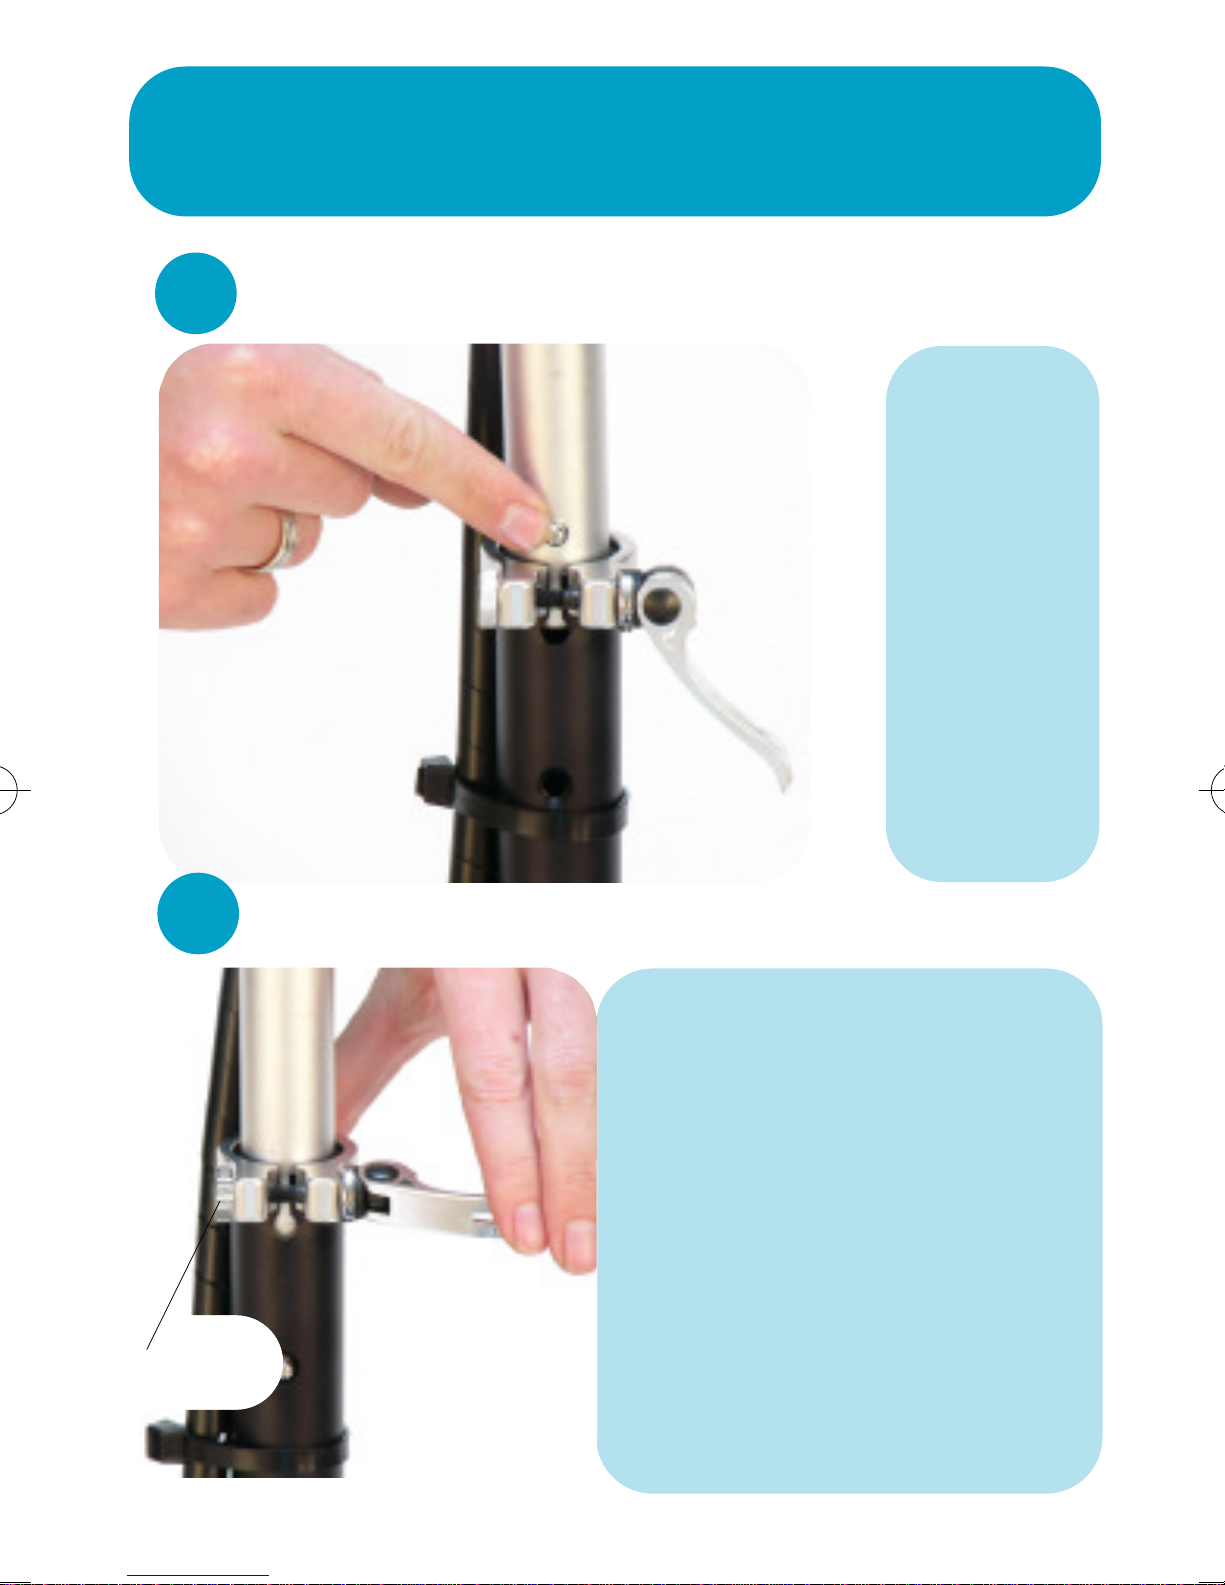
SETUP GUIDE
3
Adjust Handlebar Height
P r e s s
the small silver button
while inserting the handlebar into
the steer tube.
Make sure the
silver button
is locked into
one of the four
preset height
s e t t i n g s .
4
•Tensioner
Nut
Tighten Handlebars
Tighten the quick release lever
to lock the handlebars in place. Yo u
may need to adjust the tensioner nut
on the quick release lever to hold the
handlebar firmly in position. Check
for proper tightness by holding the
front wheel stationary in between
your feet while wiggling the handlebars. If the handlebars are loose,
open the quick release lever, tighten
the tensioner nut, close the quick
release lever and check again for
t i g h t n e s s .
Page 6
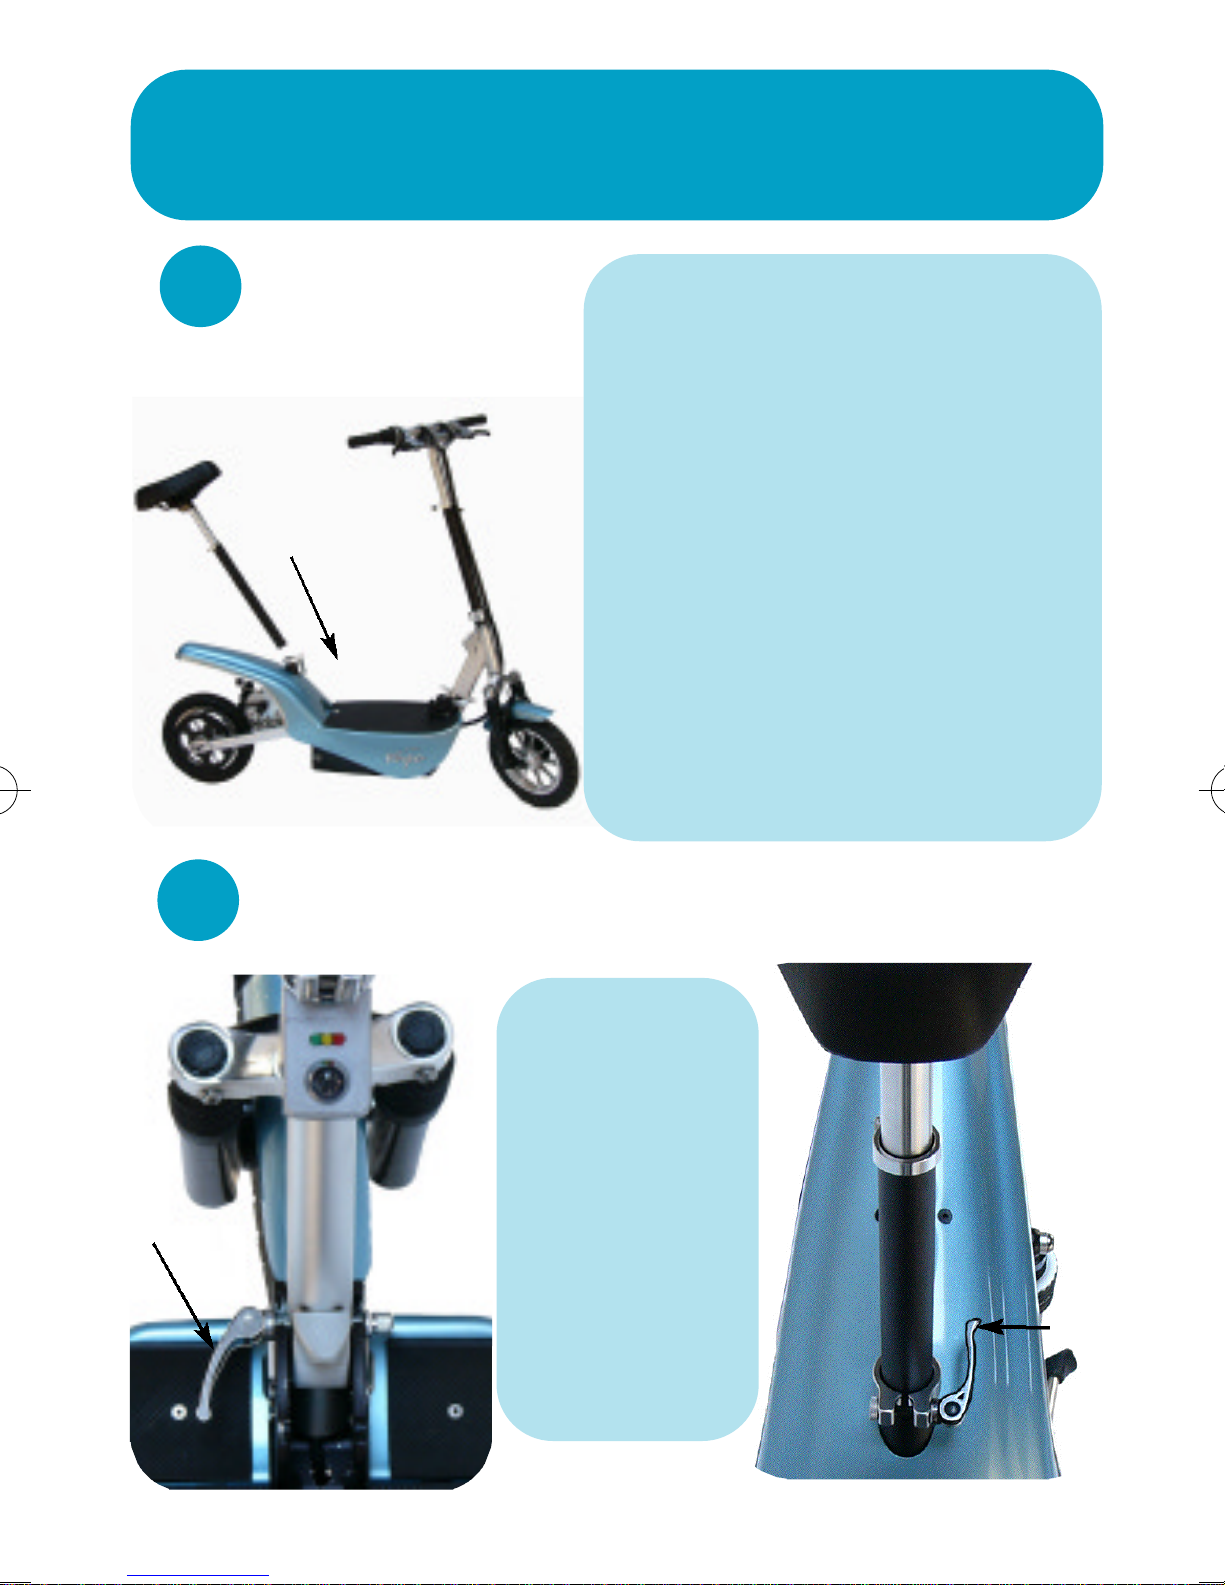
5
SETUP GUIDE
Install Seat
Fully insert the seat assem-
bly and tighten quick release lever
at the base of the seat tube. Adjust
seat height using the upper quick
release lever. Do not adjust seat
height at the base of the seat tube or
extend the seat post past warning
line.
Caution: The seat tube must be fully
inserted into the scooter frame.
Leaving the seat tube partially insert ed in the frame could cause the seat
6
tube to dislodge unexpectedly and
cause serious injury to the rider.
Tighten Quick Release Levers
Securely
tighten the folding mechanism
quick release
lever and the
seat tube quick
release lever.
Remember to
adjust the ten-
sioner nuts if
necessary.
Page 7
SETUP GUIDE
7
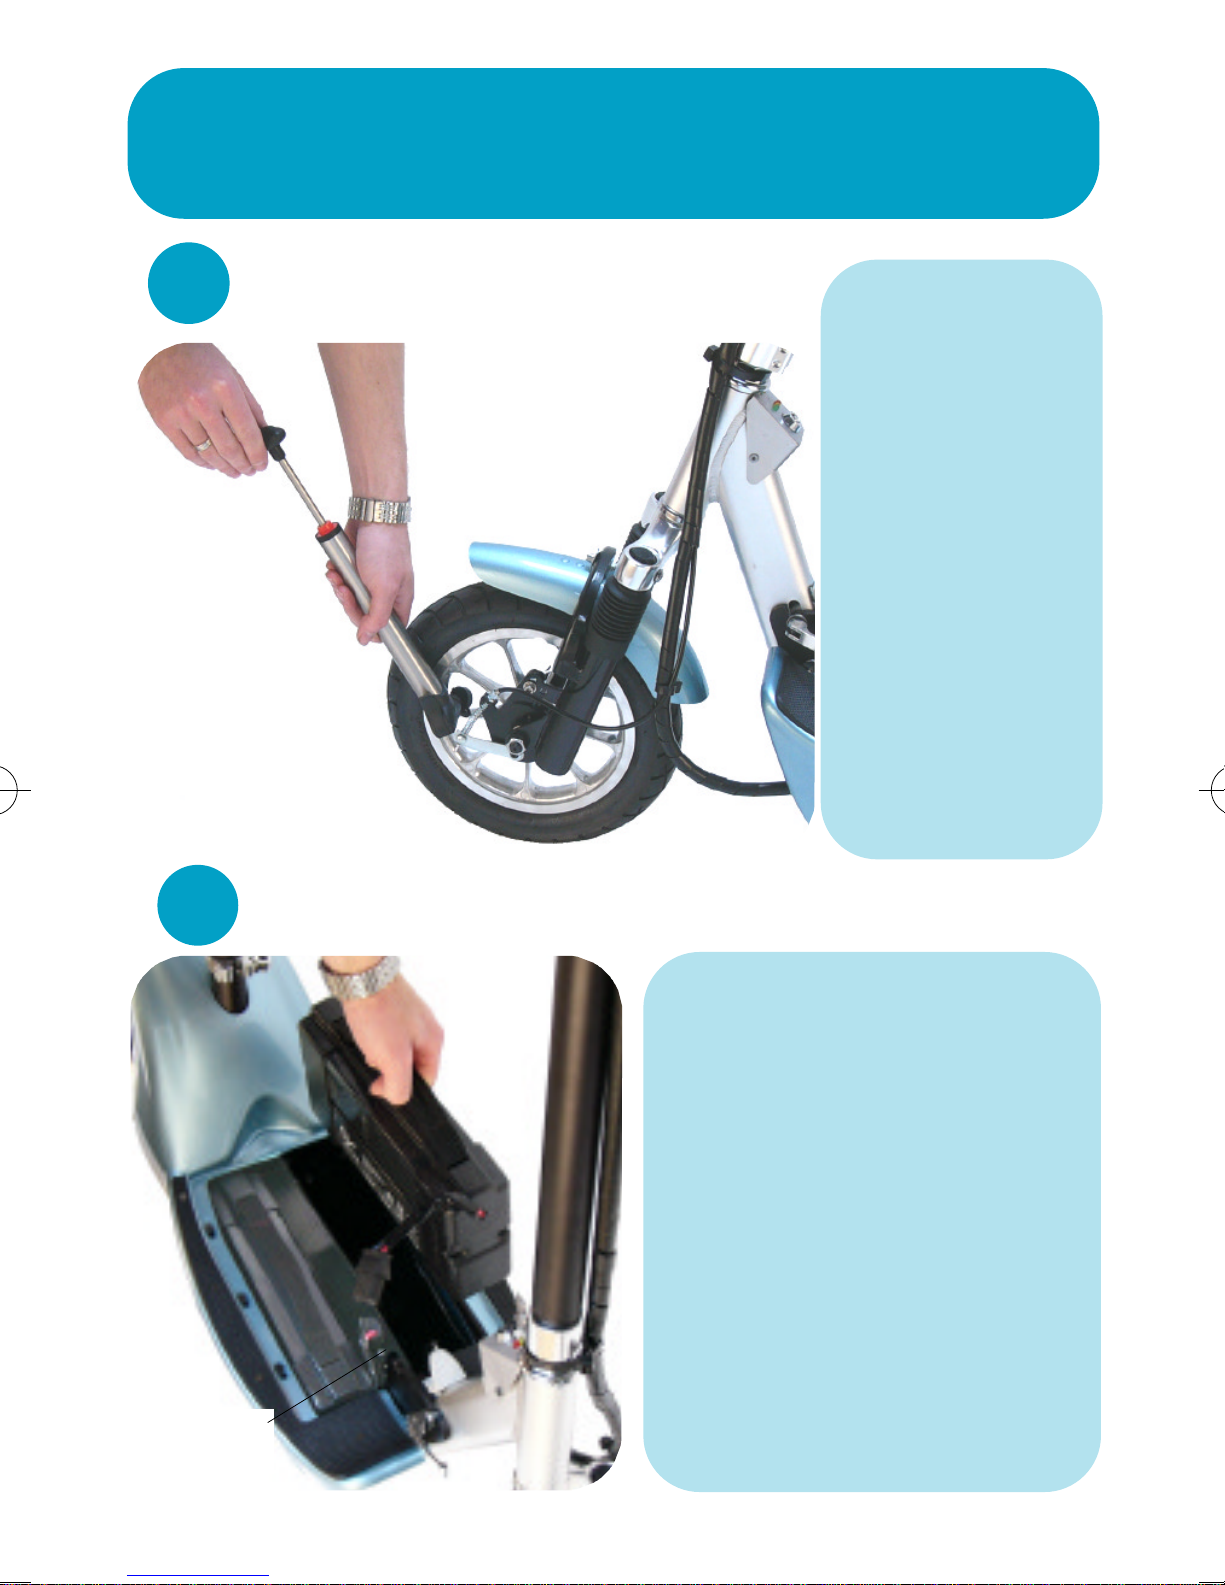
Inflate Tires
Make sure to
add air to the tires
before riding. Use
the pump included
with your Ve g o
s c o o t e r. Fasten the
pump head to the
air valve on the
wheels. Your scooter
rides best with 50
psi in the tires. Yo u
should use a tire
pressure gauge to
check the exact
pressure monthly.
8
Install Batteries
Power
Panel
Unpack the two battery
packs for your SX 600. Unlock
and remove the battery door
and place both batteries in the
battery compartment. Plug
both batteries into the power
panel.
Note: You may ride the scooter with a
single battery pack but the powerful SX
600 motor may drain the battery too
quickly and significantly reduce life span
of that battery pack. It is recommended
to always use both battery packs.
Page 8

SET UP GUIDE
9
Wear a Helmet
In order to
have a safe ride
and abide by
federal law you
must wear a helmet every time
you ride your
Vego scooter.
Please wear
your helmet
every time you
r i d e !
10
Turn Power On
•Power
Gauge
• Key
Switch
Turn the scooter power
on using the key. The power
gauge will illuminate, indicating the scooter power is on.
Be careful- the scooter will
start moving once you twist
the throttle. All three lights
will be on when the battery is
full. The green light will go
out at 70% charge and the
yellow light will go out at 30%
charge. Warning: completely
discharging the battery signif-
icantly reduces its usable life.
Page 9

CHARGING
You can recharge the batteries one of two ways.
• On board charging. With the batteries installed in the
scooter plug the charger into the charge port on the side of
the scooter. On board charging simultaneously charges
both batteries.
• Off board charging. Remove the batteries from the scooter and charge each battery pack individually using the
charge ports on the batteries.
Note: Both battery packs cannot be charged simultaneously when
charged off board.
Charging Instructions
1. Plug your smart charger into a household outlet. The
green power light will blink indicating the charger is ready.
2. Plug the charger into the charge port located on the side
of the scooter or into the charge port on a battery pack
which has been removed from the scooter. The charger fan
will come on and the red light will begin blinking.
3. Once the battery charge is complete the red light will
become solid and the charger fan will shut off . Your scooter will be fully charged in 5-6 hours. The smart charger
may be left plugged in for extended periods of time and will
never overcharge the battery.
• Scooter
Charge Port
• Battery
Charge Port
Page 10
PRE-RIDE CHECKLIST
d
a
c
b
Warning : If you do not perform these simple
saftey checks before each ride, you risk serious
injury due to improperly maintained equipment.
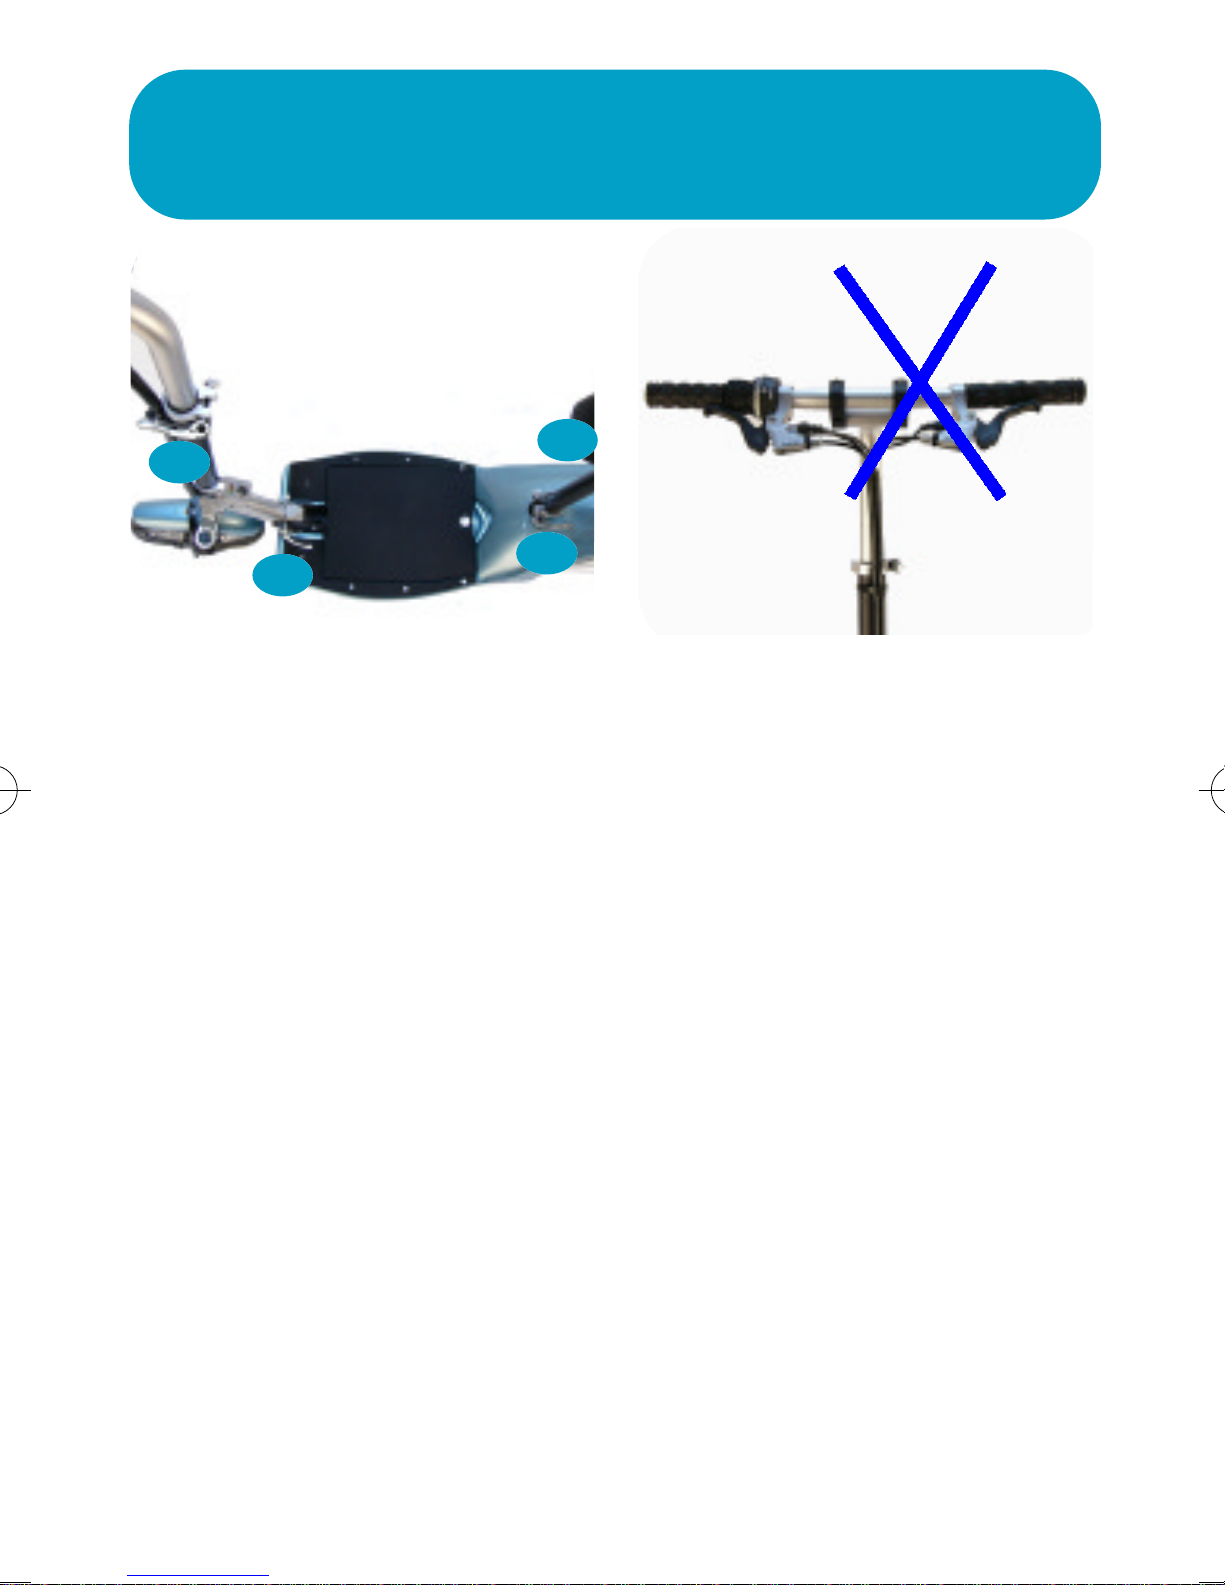
•Read and understand all safety instructions.
•Check all four quick release levers for tightness.
a. Handlebar quick release lever
b. Folding mechanism quick release lever
c. Seat tube quick release lever
d. Seat height adjustment release lever
•Check the brakes for proper function. If you can
pull the brake lever all the way down to the handle
grip you should have the brakes adjusted before riding.
•Make sure the tires are properly inflated.
Page 11

SPECIFICATIONS
Motor: 600 watt brushed DC motor with rare earth magnets.
Patent pending
Controller: PWM controller with advanced battery manage-
ment and motor temp sensor.
Batteries: Two quick release 24V, 11.5 AH packs with hard
mount plugs.
Charger: 3 amp fan cooled.
Frame: All aluminum TIG welded dual suspension frame..
Fork: Progressive dampening with large diameter legs and alu-
minum crown.
Swing arm: Reinforced tubular aluminum with ovalized stays
and bushing pivots.
Body: One-piece ABS dent resistant body.
Drive belt: 20mm German made toothed belt with dual billet
tensioners.
Throttle: Micro Shift quarter length hall sensor type twist
throttle.
B r a k e s : Exclusive single spring drum with light vehicle pad com-
pound and treated drums.
Wheels: Custom polished aluminum 12” wheels with oversized
15mm axles and cartridge bearings.
Tires: Motorcycle grade street slicks with exclusive thorn resist -
ant center layer.
Page 12

TROUBLE SHOOTING
Problem
•Charge light does not
come on, scooter will
not recharge.
Symptom
•Green Power light illuminates when charger is
plugged into household
outlet but red charge
light does not illuminate
when charger is plugged
into battery.
Solution
•Battery charge jack is
not properly connected
to the charger. See
Charging section of
this manual for
instructions on connecting charger to battery.
or
•Batteries have been
depleted beyond the
point when they can be
charged. Leave the
charger on for 24 hours
•Red charging light illuminates but green
charge complete light
does not come on.
and check status again.
If batteries will not
accept charge after 24
hours see
w w w.govego.com for
battery pack order info.
•Sometimes the batteries will take up to 24
hours to charge, especially during break-in
period (the first four
charges).
Page 13

TROUBLE SHOOTING
Problem
•Charge light does not
come on. Scooter will not
recharge.
•Scooter has become
slow.
Symptom
•No red power light
comes on when the
charger is plugged into a
working household
power outlet.
• Scooter is slightly
slower than when it was
new.
• Scooter has significant
speed loss after only a
Solution
•Try a different outlet. If there is still no
power light the
charger must be
replaced. Order a
new charger from
govego.com
•Tires are low and
need air added.
•Batteries have
become weak and
few blocks of riding and
battery is fully charged.
•Scooter has significant
speed loss and does not
roll freely.
need replacement.
Always charge batter-
ies after each use to
avoid premature bat-
tery failure.
•Brakes are drag-
ging and need
adjustment. See gov-
ego.com/service for
instructions on brake
adjustment.
If you were not able to solve your problem see
www.govego.com or call us at 1-888-8GOVEGO
Page 14

MAINTENANCE SCHEDULE
Below are tips to help keep your scooter running well.
This schedule is calculated based on a 1 mile daily
commute ride.
Item Inspection Instructions
•Tires
•Belt
• Every 30 days check the sidewalls and tread for damage. Tires
will need replacement about once a
year. If your tires are gouged or
threadbare replace them immediately.
•Before each ride, squeeze the
tires to make sure they are firm. If
you are not sure if there is enough
air pressure check with a pressure
gauge. The tires should be inflated
to 50 psi. Tires lose about 10 psi
per month.
•Every 30 days check the belt for
tears. Clean gravel and small peb-
bles out of the grooves in the rear
sprocket. Replace the belt if you
find any tears more than 1/3 the
width of the belt. It is not necessary to retension or lubricate the
belt because it will not stretch and
will break if over-tensioned or
oiled. If you ride every day expect
to change the belt once a year.
Page 15

MAINTENANCE SCHEDULE
Item
•Bearings
•Brakes
Inspection Instructions
• Vego scooters use all sealed
bearings. The only bearings that
require adjustment are the headset. Adjust the headset only if it
feels loose.
•Once a year check the brake
shoes for wear. The brake system
is similar to that of a car and
should be serviced when the shoes
are 90% worn out but before the
drum is damaged. The shoe life
depends on rider weight and other
•Brake cable
factors and varies widely from a
few months to a year or longer. If
your brakes start to make a grinding sound and you have ridden
your scooter very regularly replace
the shoes immediately.
•Before every ride, check the
brake cable for stretch by pulling
the brake lever back with moderate force. If the lever pulls back to
the handle grip easily adjust the
brake barrel on the brake lever. If
you can still easily pull the lever
back please see govego.com for
assistance in adjusting your
brakes.
Page 16

MAINTENANCE SCHEDULE
Item Inspection Instructions
•Batteries
•Wheels
• Immediately after every ride
charge your batteries. The batteries are rated at 750 charge cycles.
That means if you ride everyday
you will need a new battery pack
after about two years. The best
method to ensure good battery life
is to charge the batteries to full
after every ride.
•Check the wheels for cracks if
you jump curbs or ride aggressively. This type of hard riding causes
excessive wear and tear on your
scooter and voids your warranty. If
you regularly jump down curbs
•Folding
mechanism
check your wheels for cracks every
ride.
•Every 30 days check the folding
mechanism for looseness. If there
is over one inch of play at the handlebars, tighten the headset, steer
tube clamp and folding mechanism quick release. If the handlebars remain loose after tightening
(over one inch of play) you may
need to replace a worn part.
Contact us at www.govego.com or
1-888-8GOVEGO
Page 17

MAINTENANCE SCHEDULE
Item Inspection Instructions
•Front Fender
• Every 6 months check the front
fender for tightness and alignment. Often a loose fender will
make a buzz or rattle sound. If the
fender is misaligned, straighten it
using your hands while peering
straight down on the front tire
from above. If the fender is misaligned it may cause interference
with the tire and wear through. If
the front fender attatchment bolt
is loose tighten it immediately.
Page 18

LIMITED WARRANTY
eMOBILE LLC (“Vego”) warrants, to the original
purchaser only, this scooter (the “Product”)
against defects in materials and workmanship
as follows:
1. BATTERY:Vego warrants the Product’s battery to be free from
defects in material and workmanship for a period of ninety (90) days
from the date of purchase. If the battery is determined by Vego to have
been defective during the 90-day warranty period, as your sole remedy,
Vego will, at its option, either repair or replace it.
2. SCOOTER PAINT AND COMPONENTS: (EXCLUDING
BATTERY AND SCOOTER FRAME) Vego warrants the Product’s
paint and electronic components (except battery) , plastic body, and
mechanical components such as front forks, wheels (except tires and
tubes), drive train (except belt), brakes (except brake pads), seatpost, handlebars and folding mechanism to be free from defects in materials and
workmanship for a period of one (1) year from the date of original purchase. If any of the foregoing is determined by Vego to have been defective
during the one (1) year period, as your sole remedy, Vego will, at its option,
either repaint the product (if applicable) or repair or replace a component
using a new or remanufactured component.
3 . SCOOTER FRAME:Vego warrants the Product’s frame to be
free from defects in material and workmanship for a period of (3) years
from the date of original purchase. If the Products frame is determined by
Vego to have been defective during the three (3) year warranty period, as
your sole remedy, Vego will, at its option either repair or replace it using
a new or remanufactured frame.
Page 19

LIMITED WARRANTY
4. WARRANTY CONDITIONS AND EXCLUSIONS: This limit-
ed warranty is conditioned upon the Product being operated under normal conditions and being properly used and maintained. WARRANTY
CLAIMS MUST BE MADE DURING THE APPLICABLE WARRANTY PERIOD. This limited warranty does not cover:
• Tires, tubes, belts, brake linings or rubber grips
• Replacement of items as a result of normal wear and tear, use or exposure including but not limited to wheels, bearings, shock
absorbers, fuses, seat or deck plate.
• Product Damage due to failure to properly maintain the Product
(including but not limited to its battery) as prescribed in the owners
manual or failure to follow Product use requirement set forth in the
owners’ manual or on instruction labels.
• Damage due to acts of God, environmental conditions (including but
not limited to acid rain), accident, abuse, misuse, neglect, alteration,
or commercial use.
• Damage due to improper operation or use of the Product in a manner
other than for which it was designed or intended, including without
limitation use in racing, use of the Product in competitive
events, trick riding, ramp riding, jumping, agressive riding, off road
riding, riding with heavy loads (if used as part of a commercial or
rental fleet).
• Damage caused by use of un authorized, aftermarket or used accessories, attachments, parts or products.
• Damage to paint or surface treatments due to chemical treatments,
or aftermarket products.
• Damage caused by lack of care or improper or unauthorized repair
or maintenance.
Page 20

LIMITED WARRANTY
• Damage resulting from using the product after a warning light,
gauge reading or other indicator of a mechanical or operational
problem.
• Damage caused by use of a charger not supplied by Vego.
• Damage occuring during transportation of the product (such claims
are the sole resposibility of the shipper).
5. WARRANTY SERVICE: To obtain warranty service, you must
deliver the defective Product or component, or send the Product or component freight prepaid, in either its original packaging or packaging
affording an equal degree of protection, to any authorized Vego service
facility. Proof of purchase in the form of the original bill of sale or
receipted invoice, which confirms that the Product is within the warranty period, also must be presented to obtain warranty service. You are
responsible for paying costs to ship the defective product to and from the
authorized Vego service facility.
6. SOLE AND EXCLUSIVE REMEDY, YOUR SOLE AND
EXCLUSIVE REMEDY FOR A BREACH OF THIS LIMITED WARRANTY AND VEGO’S SOLE AND ENTIRE LIABILITY IS, AT
VEGO’S OPTION, THE REPAIR, REPLACEMENT, OR REFUND
OF THE PURCHASE PRICE OF THE DEFECTIVE PRODUCT.
Repair (including parts and labor) shall be made at Vego’s expense. All
warranty service claims will be handled at authorized service centers
designated by Vego.
Page 21

LIMITED WARRANTY
7. DISCLAIMER OF WARRANTIES. EXCEPT FOR THE
FOREGOING LIMITED WARRANTY, VEGO MAKES NO OTHER
EXPRESS OR IMPLIED WARRANTIES TO THE EXTENT PER-
MITTED BY LAW SPECIFICALLY DISCLAIMS AND EXCLUDES
ALL IMPLIED WARRANTIES, INCLUDING WITHOUT LIMITATION TO THE IMPLIED WARRANTIES OF NONINFRINGEMENT
OF THIRD PARTY RIGHTS, MERCHANTABILITY AND FITNESS
FOR A PARTICULAR PURPOSE. IF SUCH DISCLAIMER OF ANY
IMPLIED WARRANTY IS NOT PERMITTED BY LAW, THE DURA-
TION OF ANY SUCH IMPLIED WARRANTIES IS LIMITED TO
THE DURATION SET FORTH IN THIS WARRANTY. SOME
JURISTICTIONS DO NOT ALLOW THE EXCLUSION OF
IMPLIED WARRANTIES OR LIMITATIONS ON HOW LONG AN
IMPLIED WARRANTY MAY LAST, SO SUCH LIMITATIONS OR
EXCLUSIONS MAY NOT APPLY TO YOU. THIS WARRANTY
GIVES YOU SPECIFIC LEGAL RIGHTS AND YOU MAY ALSO
HAVE OTHER RIGHTS WHICH VARY FROM JURISTICTION TO
JURISTICTION.
 Loading...