

Page 1
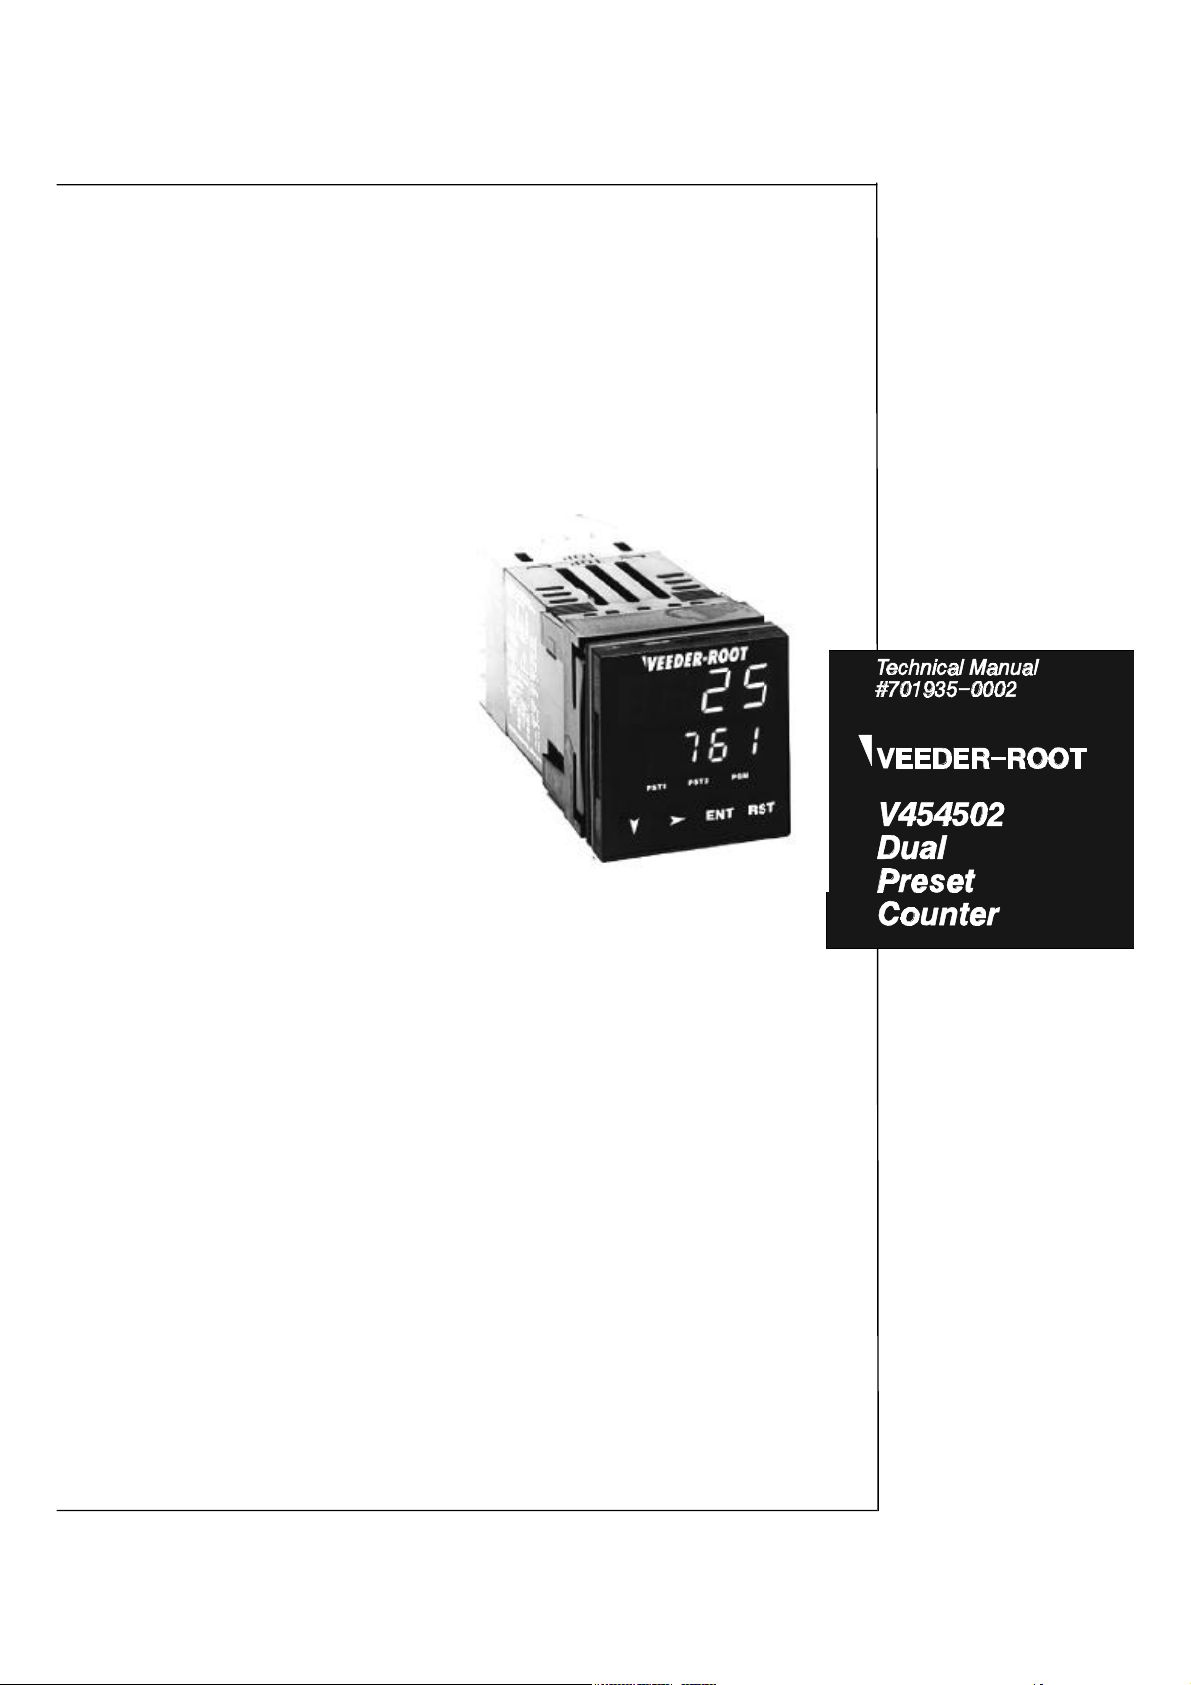
Introduction
A new standard of performance and functionality in a compact preset
counter. The V454502 Dual Preset Counter offers a pre-settable
counter with full calibration for a variety of applications.
The bright red LED display provides simultaneous count and preset
indication. The use of annunciators and simple key sequences makes
operator changes quick and easy. A variety of count sources are
accommodated, including relay and pushbutton contacts, photocells
and proximity switches and uni- or bi-directional incremental encoders.
The open collector output can interface to light duty devices and the
relay contacts offer heavy duty load switching.
Set-up and installation are simplified
through
front panel entry of configuration
parameters
and a unique “no tools required” panel
mounting bracket.
The V454500 family of preset counters
combines state-of-the-art circuitry and
electronic assembly techniques with an
ergonomic package design that results
in the most cost-effective ,
high-performance counter value
on the market.
Features
Dual four-digit displays for Count
*
and Preset values
10kHz count speed
*
Add/Subtract or bi-directional
*
count inputs
Digital calibrator and
*
programmable decimal point
Accepts current sinking or
*
sourcing devices
Key reset, remote reset and auto
*
reset modes
Reset to zero or preset number
*
Relay (SPDT) and open collector
*
outputs
Accessory sensor power supply
*
Universal 90 - 264V AC power
*
requirements
NEMA 4/IP65 sealed front panel
*
Designed to comply with
*
EN50081 and EN50082 EMC
specifications
Index
Overview
Construction Page 2
Installation
Wiring Page 3
Panel Mounting Page 4
Operation
Front Panel Page 5
Programming
Viewing Preset Value Page 6
Changing Preset Value Page 6
Program Mode Page 7
Configuration Mode Page 8
Appendix A - Specifications Page 9
Order Codes Page 12
Page 2
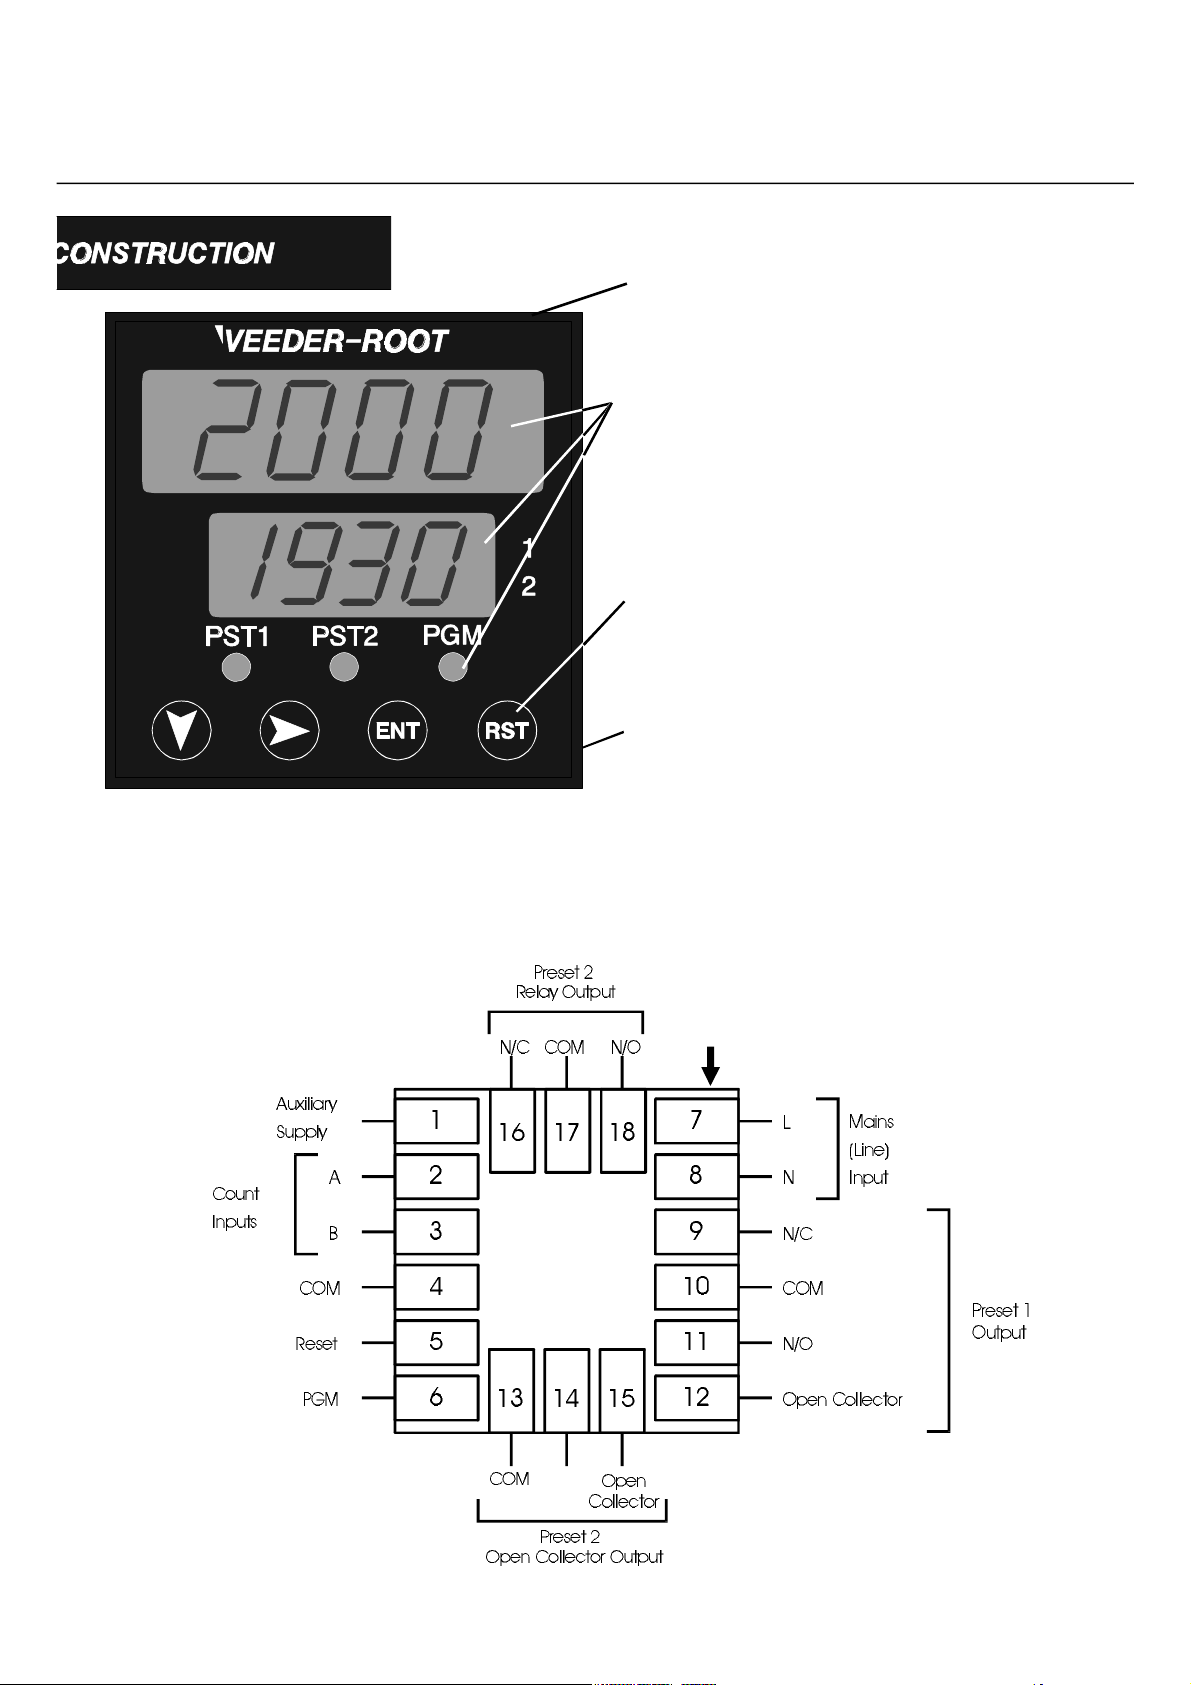
Compact Design
Uses only 48mm of panel space. 110mm behind-panel depth.
Dual Four-character Display
Simultaneous display of Count and Preset data. Red LED
display. Annunciators show input, display and output status.
Ergonomic Keypad
Simple key sequences to view and edit Presets.
Front Panel Reset key can be disabled.
Front Panel Seal
NEMA 4/IP65-rated when installed with panel mount gasket
supplied.
Rear Terminal Connections
Top of Counter
Page 3
I N S T A L L A T I O N
IMPORTANT: In severe electrical noise environments, shielded cable is
recommended for inputs and outputs. Connect the shield only to the
building earth (ground).
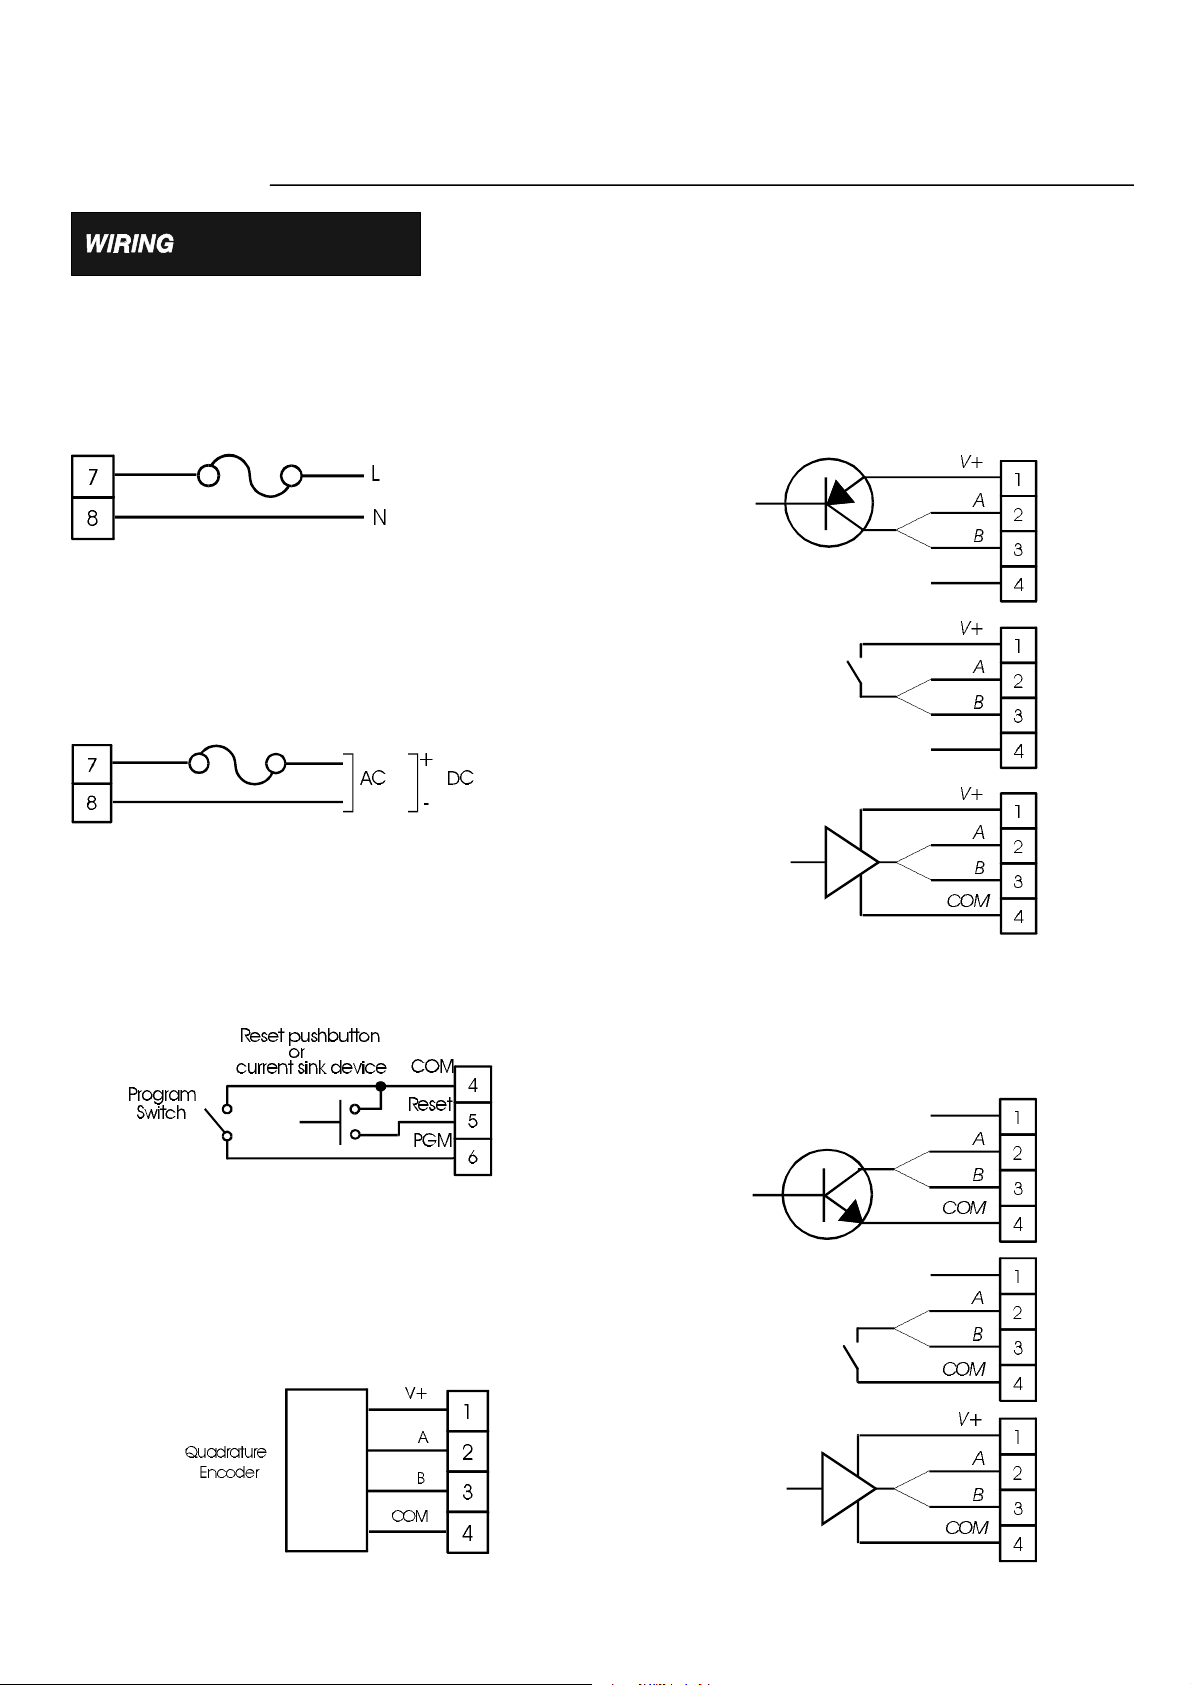
AC Power Input
Connect AC power to Terminal 7 (Line) via a 1A
slow-blow fuse and to Terminal 8 (Neutral) - see below.
AC power should be from a separate branch circuit
which is noise-free and does not feed heavy loads.
DC/Low Voltage AC Power Input
Connect DC/low voltage AC power to Terminal 7 (+)
via a 0.5A slow-blow fuse and to Terminal 8 (–) - see
below. DC power should have low ripple and be
noise-free.
Reset and Program Inputs
Current Sourcing (PNP) Count Inputs
Connect Add count input to Terminal 2 (A) and/or Subtract
count input to Terminal 3 (B) - see below. In Configuration
Mode, set PuLL parameter to no and, for Add/Subtract
operation, set InPu parameter to A-B .
PNP Open Collector
Contact Closure
Current Source or
Line Driver
Connect Reset pushbutton or current sink device to Reset
(Terminal 5) and COM (Terminal 4). Connect Program
switch or jumper to PGM (Terminal 6) and COM
(Terminal 4).
Bi-directional Quadrature Inputs
Connect Quadrature Encoder to V+ (Terminal 1), A input
(Terminal 2), B input (Terminal 3) and COM (Terminal 4) as
shown below. In Configuration Mode, set InPu parameter to
QuAd . For NPN open collector devices with no pullup
resistors, set PuLL parameter to YES .
Current Sinking (NPN) Count Inputs
Connect Add count input to Terminal 2 (A) and/or Subtract
count input to Terminal 3 (B) - see below. In Configuration
Mode, set PuLL parameter to YES and, for Add/Subtract
operation, set InPu parameter to A-B .
NPN Open Collector
Contact Closure
Current Sink or
Line Driver
Page 4
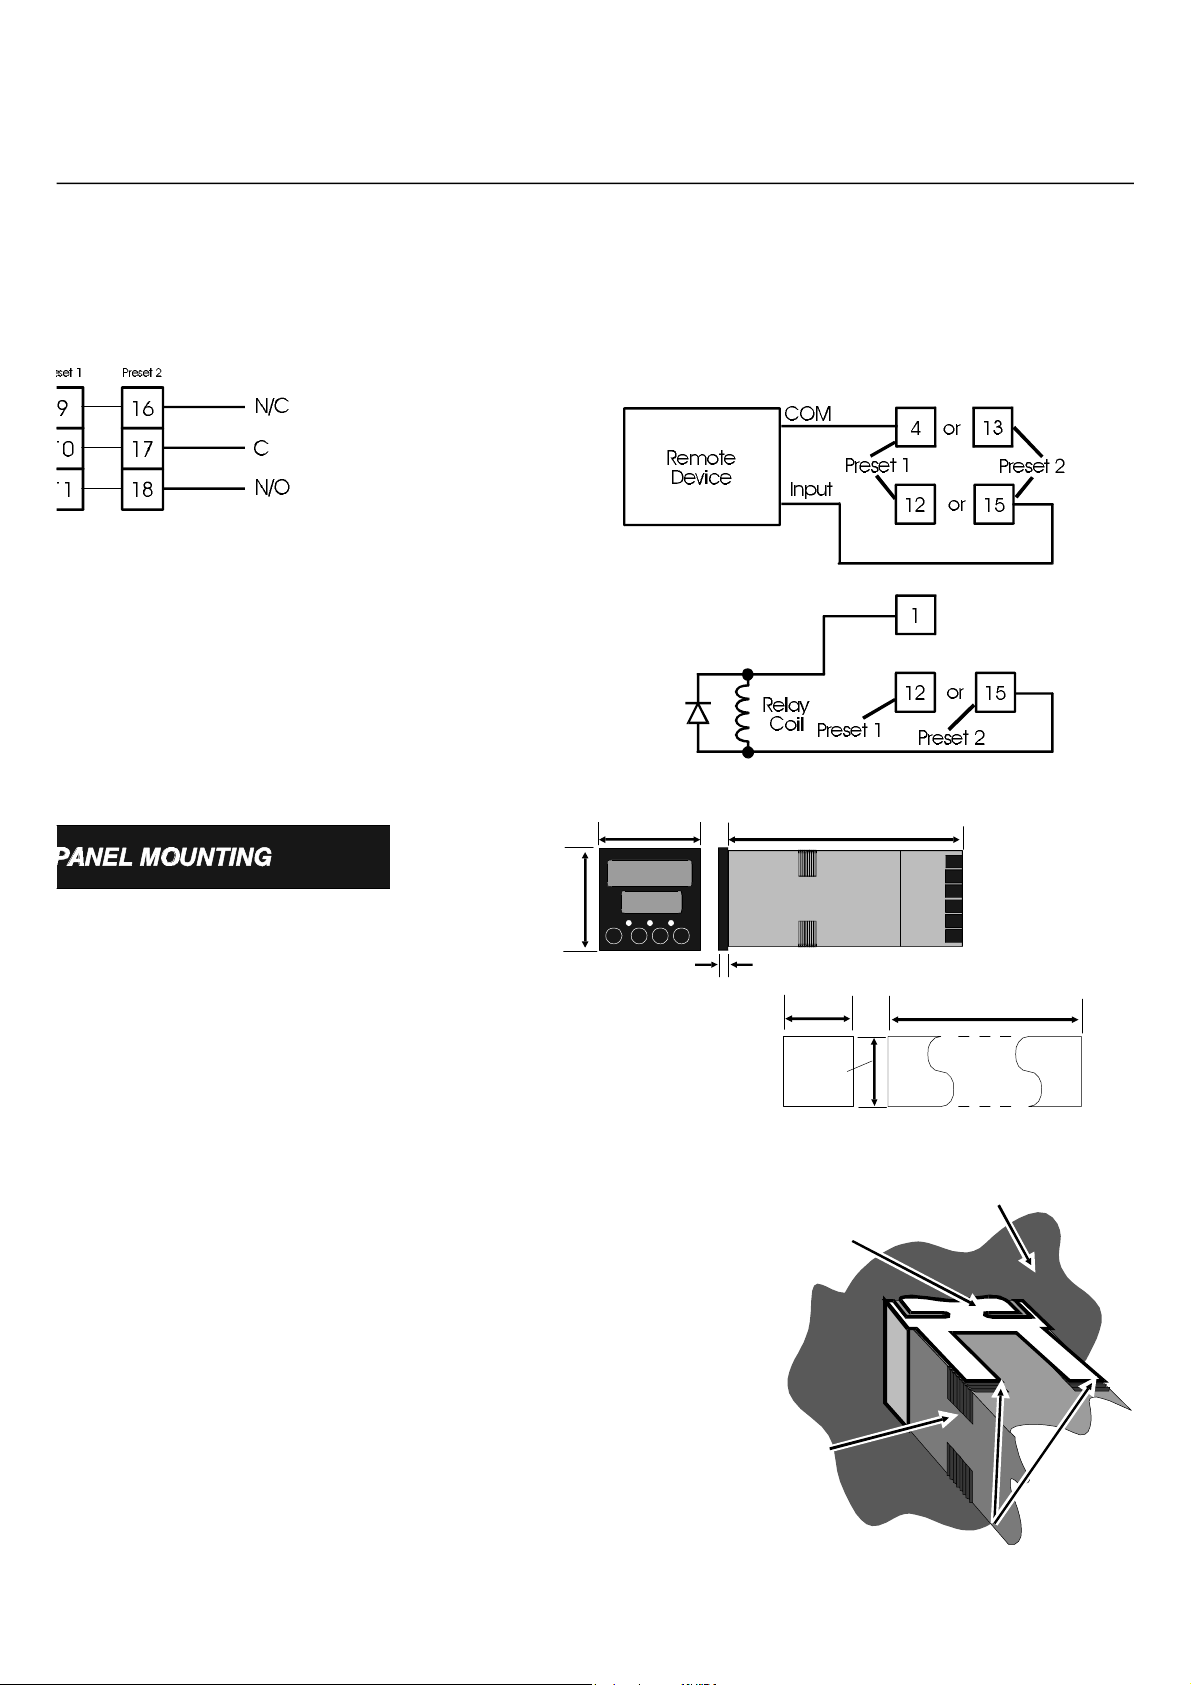
Open Collector Output
below (upper circuit). To drive DC relay coils, connect Terminal 12
switching transients with a suppression diode, connected as shown.
Connect Terminals 12 (Preset 1 open collector) and 4 (COM) or 15
(Preset 2 Open Collector) and 13 (COM) to solid state devices as
or 15 and V+ (Terminal 1) as below (lower circuit). Suppress
48m
48m
Panel Mounting
Make cut-out(s) according to the details in
the diagram on the right. The maximum
panel thickness is 6 mm.
Insert the rear of the Counter housing
through the cut-out (from the front of the
mounting panel) and hold the Counter
lightly in position against the panel. Ensure
that the panel gasket is not distorted and that
the Controller is positioned squarely against
the mounting panel. Apply pressure to the
front panel bezel only. Slide the mounting
bracket in place (see right) and push it
forward until it is firmly in contact with the
rear face of the mounting panel (tongues on
the bracket should engage in matching
rachet positions on the Counter housing and
the mounting bracket springs should push
firmly against the mounting panel rear face).
110
10mm (approx.)
45m
45m
Single
Installatio
Rear face of mounting panel
Mounting bracket
Counter
housing
Tongues on mounting bracket
engage in ratchet slots on Counter housing
(48n - 4)mm
Multiple Installation (n
Counters)
Page 5

O P E R A T I O N
10. Preset 1 Annunciator
(ON when Preset 1 shown
on lower display)
1. Upper Display
2. Lower Display
3. Preset Output Displays
(ON when active)
4. Program
5. Preset 2 Annunciator
(ON when Preset 2 shown
on lower display)
NOTE
ENT.
IMPORTANT
ENT key within
9. Down Key
8. Next Key
Down key
Operator Mode: Used to change the
currently-selected (flashing) digit.
Depressing this key will decrement the
value (wrap-around from 0 to 9). If the
key is held continuously, the value will
decrement at the rate of 2/sec.
Program Mode: Used to advance from
one parameter to the next. Once a
parameter value has been selected for
editing (through use of the Next key),
depressing this key will decrement the
value (wrap-around from 0 to 9). If the
key is held continuously, the value will
decrement at the rate of 2/sec.
Configuration Mode: Used to advance
from one parameter to the next.
ENT key
Operator Mode/Program Mode:
Confirms an edited value (display will
cease flashing after the ENT key is
depressed).
Configuration Mode: Confirms
setting/value selection (display will cease
flashing after the ENT key is depressed).
7. Enter
6. Reset Key
Next key
Operator Mode: Used to select a
parameter for editing (left-most digit will
start to flash) and to move between the
digits. Once the proper digit is selected
(flashing) with the Next key, its value can
be altered through use of the Down key.
Program Mode: Used to select a
parameter for editing (left-most digit will
start to flash) and to move between the
digits. Once the proper digit is selected
(flashing) with the Next key, its value can
be altered through use of the Down key.
For Decimal Point Position, this key
scrolls through the available choices.
Configuration Mode: Used to select a
parameter for editing and to scroll through
available choices.
RST key
Operator Mode/Program Mode: Resets
count value to either zero or Preset value
(based on the setting of the Count
Direction parameter in Configuration
Mode). Also releases latched outputs.
Configuration Mode: Exits
Configuration Mode when held down for 2
seconds.
NOTE: The RST key will not be active
unless enabled in Configuration Mode.
For information on Operator Mode, see Page 6.
For information on Program Mode, see Page 7.
For information on Configuration Mode, see Page 8.
Page 6

The Operator Mode is used for viewing the
Count value and viewing/changing the Preset
1/Preset 2 value.
Counter value
Preset 1 or Preset 2 value
NOTE
To abort an edit
operation (before the
new value is confirmed),
press the Down and Next
keys together.
WARNING!
Caution should be
observed if it is
necessary to change
the preset value while
the process is
operating. Do not set
values which are
already exceeded by
the count value without
resetting the counter.
Press the Next key to enter Edit Mode.
The most significant digit of the Preset
Data display will then flash. Press the
Next key repeatedly as required to select
the desired digit.
Press the Down key to change the value
of the selected digit (there is wrap-round
from 0 to 9).
When all digits are as required, press the
ENT key to confirm the changes; the
display will stop flashing.
IMPORTANT
You must press the ENT key within 15
seconds of the last keypress when entering a
new value, otherwise the new value will be
discarded and the old value will be retained.
Page 7

digit to be adjusted, and adjust digit value using Down key. When adjustment
WARNING!
Changing Program
Mode parameter values
while the process is
operating may be
hazardous to the
operator and/or the
controlled equipment.
Use extreme caution
and stop the process
before attempting to
change Program Mode
parameter values.
IMPORTANT
You must press the ENT
key to implement new
parameter values.
To enter Program Mode, set the PGM input active (low) e.g. by tying it to COM.
Whilst in Program Mode, the PGM indicator will be ON.
Function
Pre-scaler
Output 1 Time
Parameter
Description
(Upper Display)
Meaning
Pre-scales counter operation.
Value = Count units displayed
Count pulses input
Sets momentary ON time for
PRESET 1 output (0.01 -
99.99s; 0.00 for latched
operation)
NOTE
Possible Decimal Point
Position settings are:
Output 2 Time
Decimal Point
Operator Mode:
Preset 1
Preset 2
1. To adjust Pre-scaler, Out Time or either Preset value (as selected), press
Next key to enter Edit Mode (digits will flash), use Next key to select each
is complete, press ENT key to exit Edit Mode (digits will become static).
None
None
NOTES
Sets momentary ON time for
PRESET 2 output (0.01 -
99.99s; 0.00 for latched
operation)
Defines decimal point position
Shows Preset 1 value
Shows Preset 2 value
2. To adjust decimal point position, select that parameter, press Next key to
enter Edit Mode, then use Next key to position decimal point. Press ENT key
when finished.
To exit Program Mode, set the PGM input inactive (High).
Page 8

To enter Configuration Mode,
power-down the Counter and
remove it from its housing. Change
the position of the lnk jumper on
the CPU PCB (the actual position is
irrelevant, as long as the position is
changed). Replace the Counter in
its housing and power-up. The PGM
indicator will flash whilst the
Counter is in Configuration Mode.
Counter
(Top view)
To edit a parameter, use the Down key to step through the parameters; when the desired
parameter description is shown in the upper display, press the Next key to enter Edit Mode and
to scroll through the available settings. When the desired setting is shown, press the ENT key.
The Configuration Mode parameters, in order of appearance, are:
Parameter
Counter Speed
Input Operation
Panel Reset Key
Auto Reset
Input Pull-Ups
Count Direction
Parameter
Description
(Upper Display)
Available Settings
20Hz 200Hz 10kHz
A-B
(Add/Subtract)
Enable Disable
Enable Disable
Yes
(current-sinking
Up-countin Down-countin
Quadrature
(bi-directional)
No
(current-sourcing
Down key steps
through parameters
Lock Strategy
None
Preset
Lock
Partial
Program
Lock
Preset &
Program
Lock
LOCK STRATEGY:
None = No security; all parameters available through regular methods of access
Preset Lock = Preset 1 and Preset 2 become Read Only
Partial Lock = Output ON times are Read Only
Both = Operator Mode parameters and Output ON times are Read Only.
To exit Configuration Mode, either momentarily remove power from the Counter
or press and hold down the RST key for at least two seconds.
Page 9

A P P E N D I X A
Input Power
AC: Terminals 7 (Line) and 8 (Neutral)
90 - 264V 50/60Hz (standard)
20 - 50V AC 50/60Hz (option)
DC: Terminals 7 and 8; 22 - 65V (option)
Power consumption: 4W approx.
Output Power
DC: Terminals 1 (+) and 4 (COM)
9 - 15V DC (unregulated)
0 - 100mA. 0.5V ripple
Main Counter
Decades: 4, Bi-directional
Presets: 2 (4 decades each)
Operation: Add/Subtract (Input A counts up, Input B
counts down) or bi-directional
(quadrature;
counts up when Signal A leads Signal B).
Direction: Up (reset-to-zero) or Down
(set-to-a-number)
Count Rate
High: 10kHz max.
Medium: 200Hz max.
Low: 20Hz max.
Resets: Manual or automatic.
Selectable reset-to-zero
or reset-to-Preset
Calibrator
Range: 0.001 to 9.999
Common to Inputs A and B.
Count Inputs
Signal A: Terminal 2
Signal B: Terminal 3
Input Voltage
High: 3.0V (source)
3.0V or open (sink)
Low: 2.0V or open (source)
2.0V (sink)
Max.: 30V DC
Input Impedance
Source: 10kΩ to COM
Sink: 4.7kΩ to +V
Input Response: 0.05ms (high speed)
(Source or sink) 2.5ms (medium speed)
25.0ms (low speed)
Control Inputs
Remote Reset: Terminal 5 (edge-sensitive)
Program Mode: Terminal 6 (level-sensitive)
Input Voltage: High - 3.0V or open
Input Impedance: 4.7kΩ to +V
Input Response: 25.0ms
Max.: 30V DC
Low - 2.0V
Front Panel Keys
Type: Mechanical switches under sealed
membrane overlay.
Display
Type: LED (red) 4 digit
Height: Upper - 0.4" (10mm)
Lower - 0.3" (7mm)
Security
Preset data can be protected (selectable in Configuration Mode).
Program data is accessible only if the PGM input is active.
Output
Operation: Output 1 energised when
SOLID STATE (OPEN COLLECTOR)
Terminal Nos.: 12 (Preset 1) and 15 (Preset 2)
Type: Open collector, current sink to COM.
RELAY
Terminals: Preset 1: 9 (N/C), 10 (C), 11 (N/O)
Type: Form C (SPDT)
Rating: 5A resistive @ 110V AC
Count = Preset 1
Output 1 released when Hold time
elapses or reset occurs
Output 2 energised when
Count = Preset 2 (Up mode) or
Count = 0 (Down mode)
Output 2 released when Hold time
elapses or reset occurs
30V DC max. 100mA max.
Preset 2: 16 (N/C), 17 (C), 18 (N/O)
3A resistive @ 240V AC
Mechanical
Cut-Out: 45mm x 45mm (
Depth: 110mm
Weight: 0.2kg approx.
1
16
-DIN)
Environmental
Operating Temp.: 0 - 55oC (32 - 131oF)
Storage Temp.: –20 - 80oC (–4 - 176oF)
Relative Humidity: 20 - 95% non-condensing
Front Panel Seal: NEMA 4/IP65 when installed with
panel gasket (supplied)
Page 10

Page 11

11
Page 12

The order codes for the Veeder-Root 454502 Dual Preset Counter are shown below:
Dual Preset Counter (USA) V45450-2
Dual Preset Counter (UK/Europe) V45450E2
Dual Preset Counter (USA) - Low Voltage AC/DC supply V45450-22
Dual Preset Counter (UK/Europe) - Low Voltage AC/DC supply V45450E22
This instrument is warranted to be free from defects in workmanship and material for a period
of three years from the date of despatch. In the unlikely event of a fault, call the appropriate
number below for a Return Material Authorisation (RMA) number.
The obligation of the Company under this warranty is limited to the repair or replacement of
this instrument. Should the cause of the fault be due to misuse or abuse of the instrument or the
warranty period has expired, the customer shall be informed before any repair work is started.
In the UK:
Veeder-Root Division
West Instruments Limited
The Hyde
Brighton
E. Sussex BN2 4JU
Tel. +44 (0) 1273 606271
Fax: +44 (0) 1273 609990
1675 N. Delany Road
Gurnee, IL
60031-1282
Tel. 708.662.2666
In France:
Veeder-Root SARL
8 Place de la Loire
94583 Rungis Cedex
Tel. 33-146870981
Fax: 33-146868004
In Germany:
Veeder-Root GmbH
Morikestrasse 30
73761 Neuhausen ADF
Tel. 49-71589003-0
Fax: 49-71589003-32
In Brazil:
Veeder-Root do
Brasil
Rua Ado Benatti No-92
Caixa Postal, 8343
CEP 05037-010
São Paulo
Tel. 55-118612155
Fax: 55-118611982
 Loading...