

Veebeam TV Accessories User Manual

© 2012 Veebeam Corp. The information in this document is proprietary and confidential to Veebeam Corporation.
It is not to be partially or wholly reproduced or disclosed to any third party without prior permission
user guide

SC-200912-PS-A (v5.12 - 20120913)
©2010/2012 Veebeam Ltd. All rights reserved. Veebeam and the Veebeam logo are trademarks of Veebeam Ltd.
Other brands and product names are trademarks or registered trademarks of their respective holders.
2 of 53
Table of contents
Welcome........................................................................................................................................................... 4
In the box........................................................................................................................................................... 4
Veebeam back panel....................................................................................................................................... 5
Setting up your Veebeam................................................................................................................................ 7
Connecting your Veebeam box.......................................................................................................................... 7
Setting up your Laptop ...................................................................................................................................... 8
Veebeam software updates..............................................................................................................................13
Veebeam software updates..............................................................................................................................14
Starting your Veebeam...................................................................................................................................19
Turn on your TV and Veebeam box..................................................................................................................19
Connect the USB antenna to your Laptop....................................................................................................20
Screencasting and Veebeam Player.................................................................................................................22
Veebeam icon and menu..................................................................................................................................23
Veebeam Player...............................................................................................................................................26
Veebeam configuration (Settings/Preferences)...........................................................................................29
Windows settings..............................................................................................................................................29
OS X settings ...................................................................................................................................................30
Appendix A - Getting the most from your Veebeam....................................................................................31
Screencasting mode.........................................................................................................................................31
Appendix B – Veebeam message explanations...........................................................................................33
Appendix C – Veebeam box/USB antenna association/pairing ..................................................................39

SC-200912-PS-A (v5.12 - 20120913)
©2010/2012 Veebeam Ltd. All rights reserved. Veebeam and the Veebeam logo are trademarks of Veebeam Ltd.
Other brands and product names are trademarks or registered trademarks of their respective holders.
3 of 53
Appendix D – Do I have a firewall?................................................................................................................41
OS X.................................................................................................................................................................41
Windows...........................................................................................................................................................41
General firewall settings for Veebeam..............................................................................................................43
Appendix E - USB antenna status light indications.....................................................................................44
Appendix F – Veebeam box upgrade............................................................................................................45
Checking your Veebeam box firmware version.................................................................................................45
Appendix G – Troubleshooting .....................................................................................................................46
Installation and initial connection issues...........................................................................................................46
Screencasting performance issues...................................................................................................................47
Codecs and file compatibility for the Veebeam Player......................................................................................47
Appendix H - Important safety instructions..................................................................................................48
Appendix I – License and legal information.................................................................................................50
Note: throughout this document, wherever the term ‘Laptop’ is used, it refers to both a Windows
PC or an Apple Mac, unless explicitly stated otherwise.

SC-200912-PS-A (v5.12 - 20120913)
©2010/2012 Veebeam Ltd. All rights reserved. Veebeam and the Veebeam logo are trademarks of Veebeam Ltd.
Other brands and product names are trademarks or registered trademarks of their respective holders.
4 of 53
Welcome
Thank you for purchasing Veebeam. With this guide, you should be up and enjoying videos on your TV
in no time.
In the box
Your Veebeam should include all the items below

SC-200912-PS-A (v5.12 - 20120913)
©2010/2012 Veebeam Ltd. All rights reserved. Veebeam and the Veebeam logo are trademarks of Veebeam Ltd.
Other brands and product names are trademarks or registered trademarks of their respective holders.
5 of 53
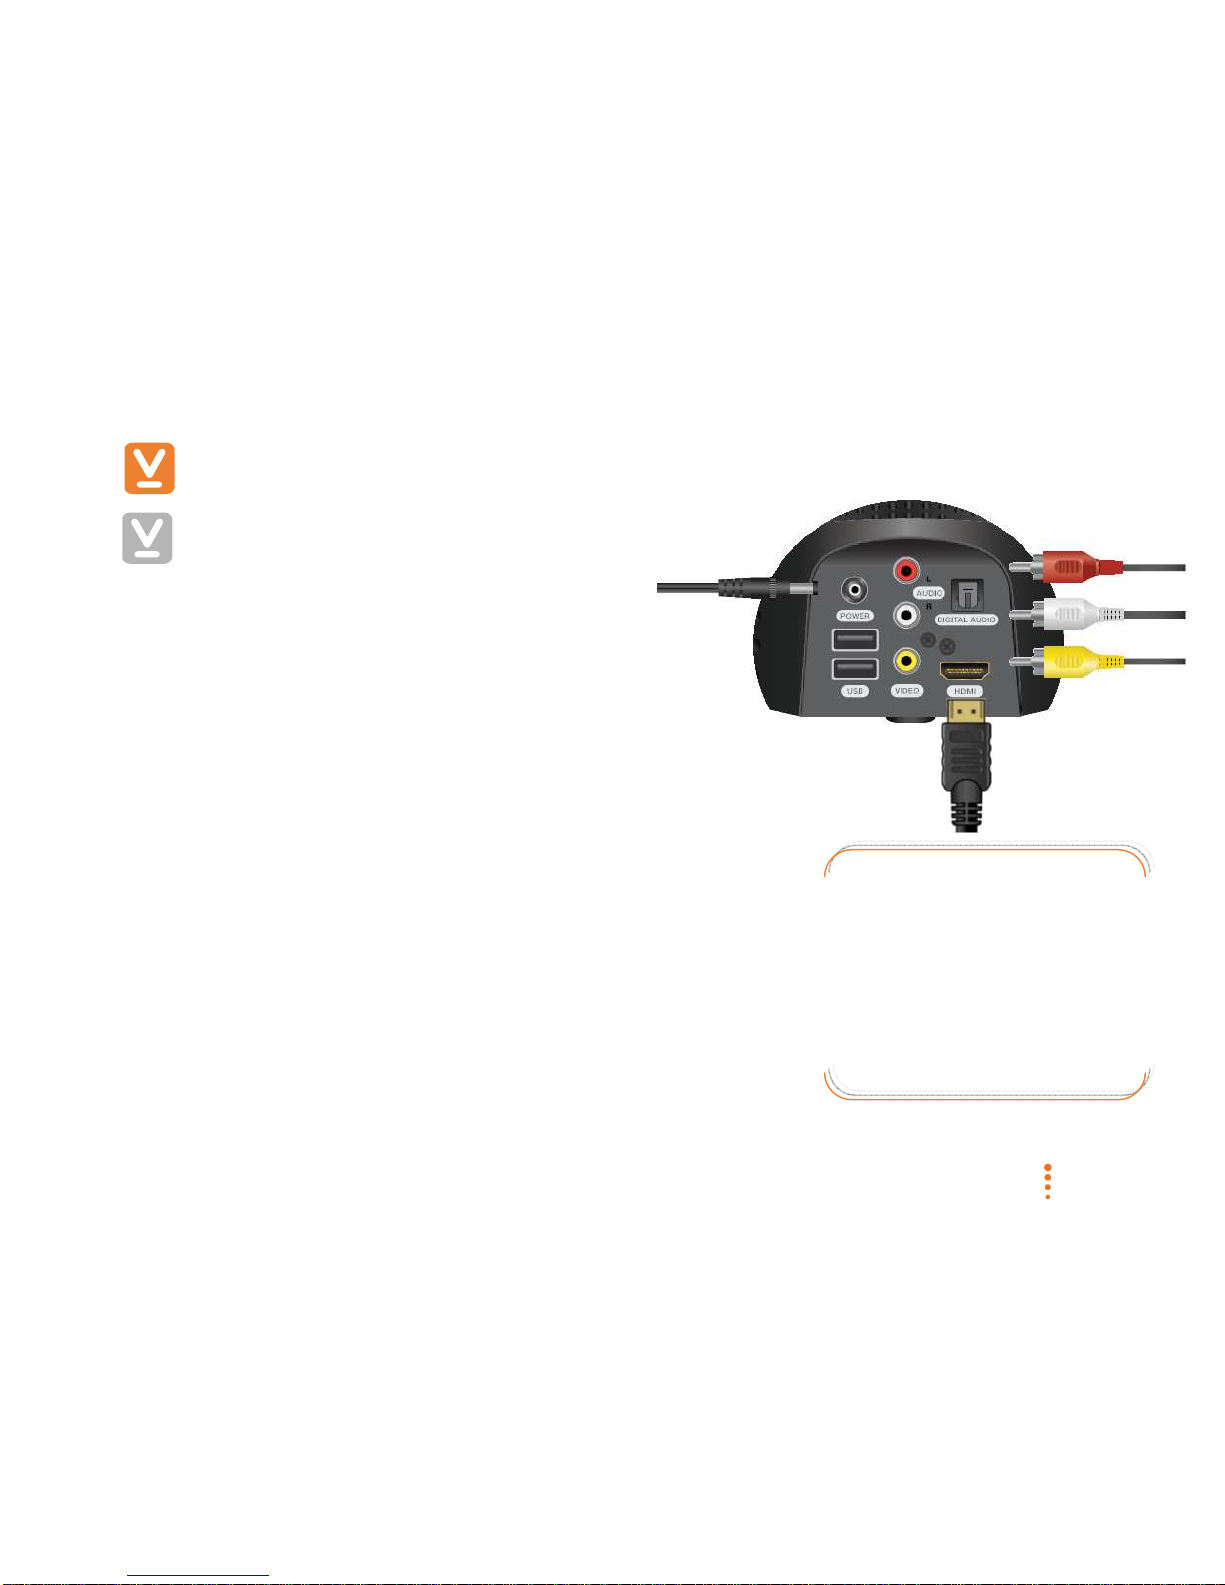
Veebeam back panel
Before starting, please take a few moments to familiarize yourself with the Veebeam unit.
Veebeam box connectors
Power
USB ports
(used for pairing and
upgrade)
Digital audio (TOSLINK)
Stereo (RCA)
audio
Composite A/V (RCA) video
HDMI (audio and video)
Veebeam SD back panel

SC-200912-PS-A (v5.12 - 20120913)
©2010/2012 Veebeam Ltd. All rights reserved. Veebeam and the Veebeam logo are trademarks of Veebeam Ltd.
Other brands and product names are trademarks or registered trademarks of their respective holders.
6 of 53
Veebeam status indication lights and On/Off
Veebeam box
USB antenna
Status light
Status light
USB connector
Cradle
To turn On,
remove USB
antenna from cradle.
To turn Off, place USB
antenna in cradle.
SC-200912-PS-A (v5.12 - 20120913)
©2010/2012 Veebeam Ltd. All rights reserved. Veebeam and the Veebeam logo are trademarks of Veebeam Ltd.
Other brands and product names are trademarks or registered trademarks of their respective holders.
7 of 53
Setting up your Veebeam
Connecting your Veebeam box
Your Veebeam box needs to be connected to your
TV. The connection you use is one of the major factors
that will determine the quality of the audio/video you will
get from Veebeam.
Video connections supported:
• HDMI – gives the best quality video
• Composite A/V (RCA) – typically associated with
Standard Definition (SD) quality video
In order to view content in High Definition (HD), an HDMI
connection must be used.
Audio connections supported:
• HDMI – if your video is connected via HDMI, your audio will also be
carried over the HDMI connection. If this is not the case, use either the
Digital Audio or Stereo Audio connection
• Digital Audio – provides high quality audio separate from HDMI
• Stereo (RCA) Audio – provides standard, two channel, stereo audio
Veebeam checks if an
HDMI cable is connected.
If it is, only HDMI video is
output.
Veebeam outputs on all
audio connections all the
time.

SC-200912-PS-A (v5.12 - 20120913)
©2010/2012 Veebeam Ltd. All rights reserved. Veebeam and the Veebeam logo are trademarks of Veebeam Ltd.
Other brands and product names are trademarks or registered trademarks of their respective holders.
8 of 53
Note: Ensure the USB antenna is not
connected to your Laptop during installation
For EU TVs with a SCART connection, converters from
composite A/V (RCA) or HDMI to SCART are available in
most electronics retail outlets.
Setting up your Laptop
Next, you need to get Veebeam running on your Laptop. To
ensure best performance, please check that your Laptop
meets the minimum system requirements listed (at right).
To set up your Laptop, ensure the USB antenna is not
plugged into your laptop. You will then need to:
1) download and install the latest Veebeam software
2) check there are no problems with your firewall
software
3) check if your Laptop needs any codecs
1) Installing the Veebeam software
You now need to install the Veebeam software on your Laptop.
Minimum System Requirements:
• Intel Core 2 Duo 2.2GHz or above (inc. i3,
i5 and i7) or AMD Turion II (dual core)
2.2GHz or above
• Windows 7 (32 or 64-bit), Vista (32-bit),
Windows XP (32-bit) or OS X 10.5/10.6
• 2GB or more of memory
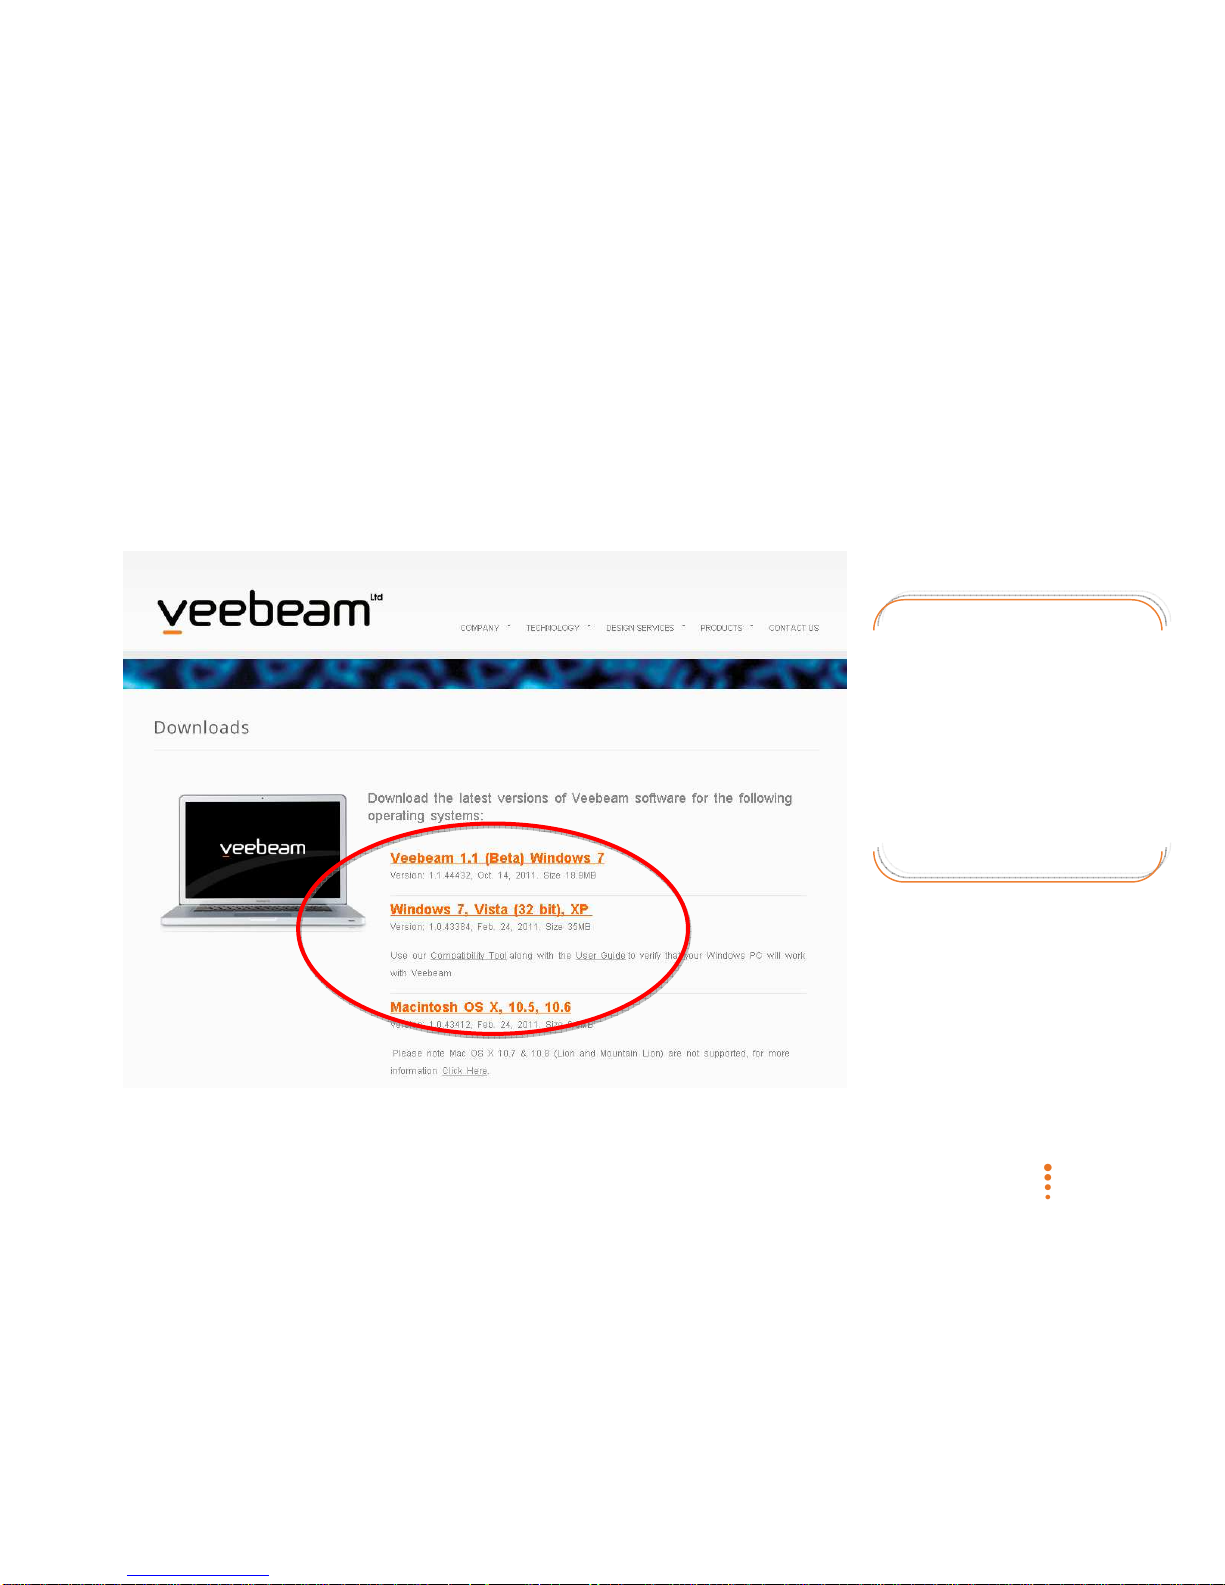
This can be downloaded by visiting
www.veebeam.com, selecting
Products, Support and then
Downloads.
SC-200912-PS-A (v5.12 - 20120913)
©2010/2012 Veebeam Ltd. All rights reserved. Veebeam and the Veebeam logo are trademarks of Veebeam Ltd.
Other brands and product names are trademarks or registered trademarks of their respective holders.
9 of 53
The Downloads page will then be displayed and you can select the Download link that you need (Windows or
OS X):
Some Virtual Private
Network (VPN)
connections can cause
problems with Veebeam
installation.
Please ensure no VPN
connections are active
during Veebeam

SC-200912-PS-A (v5.12 - 20120913)
©2010/2012 Veebeam Ltd. All rights reserved. Veebeam and the Veebeam logo are trademarks of Veebeam Ltd.
Other brands and product names are trademarks or registered trademarks of their respective holders.
10 of 53
When the software has downloaded, click on the downloaded file and follow the installation instructions shown
on your screen. In Windows, if prompted with a Security Warning, select ‘Run’. On OS X, if prompted to
authorize VeebeamHelper or that a new network interface has been detected, please see section OS X
additional installation info, below.
When the installation has finished you may see a message advising that the Laptop should be restarted. If this
appears please restart your Laptop.
The Veebeam application then starts automatically and the Veebeam ‘V’ icon will be visible on the System
Tray (Windows) or the Menu Bar (OS X) as shown below. On OS X, the icon will not appear until the USB
antenna is inserted in the Mac.
SC-200912-PS-A (v5.12 - 20120913)
©2010/2012 Veebeam Ltd. All rights reserved. Veebeam and the Veebeam logo are trademarks of Veebeam Ltd.
Other brands and product names are trademarks or registered trademarks of their respective holders.
11 of 53
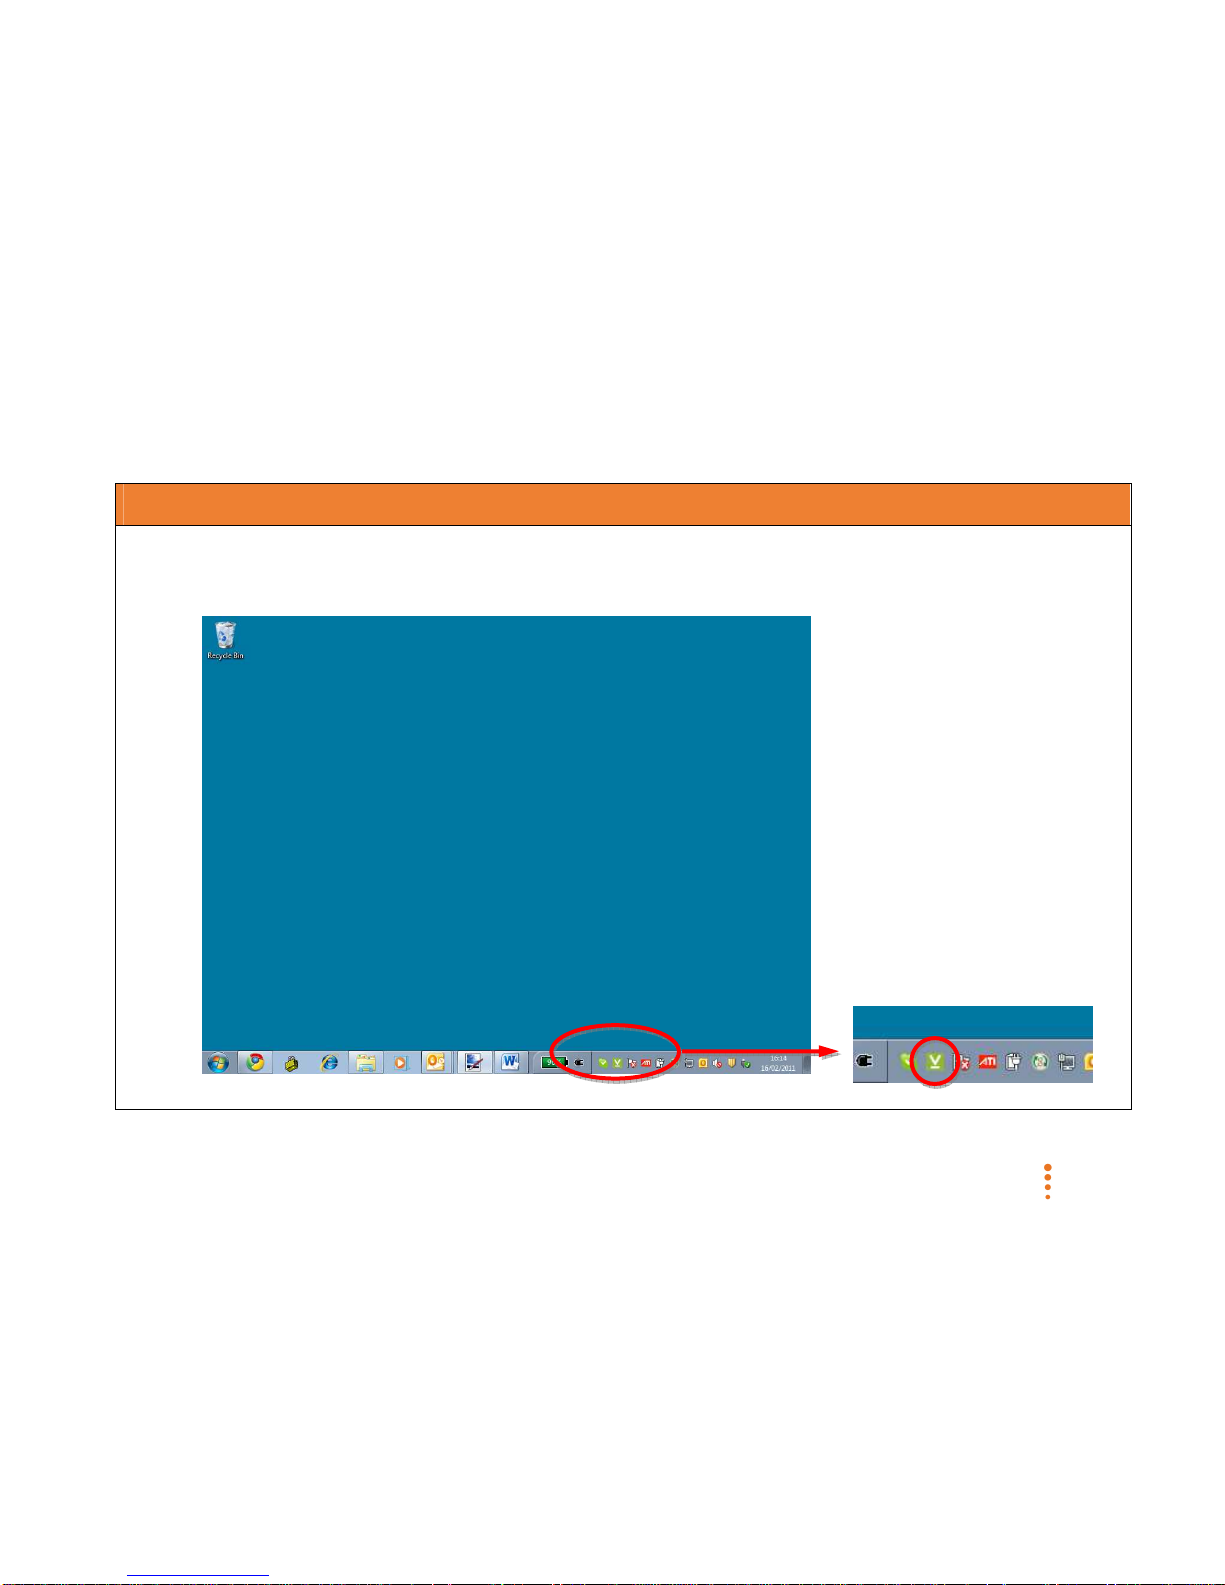
Windows 7, Vista and XP
The System Tray is typically displayed at the bottom of the PC screen at the right hand side. The
System Tray icon with a ‘V’ symbol is displayed at all times.
SC-200912-PS-A (v5.12 - 20120913)
©2010/2012 Veebeam Ltd. All rights reserved. Veebeam and the Veebeam logo are trademarks of Veebeam Ltd.
Other brands and product names are trademarks or registered trademarks of their respective holders.
12 of 53
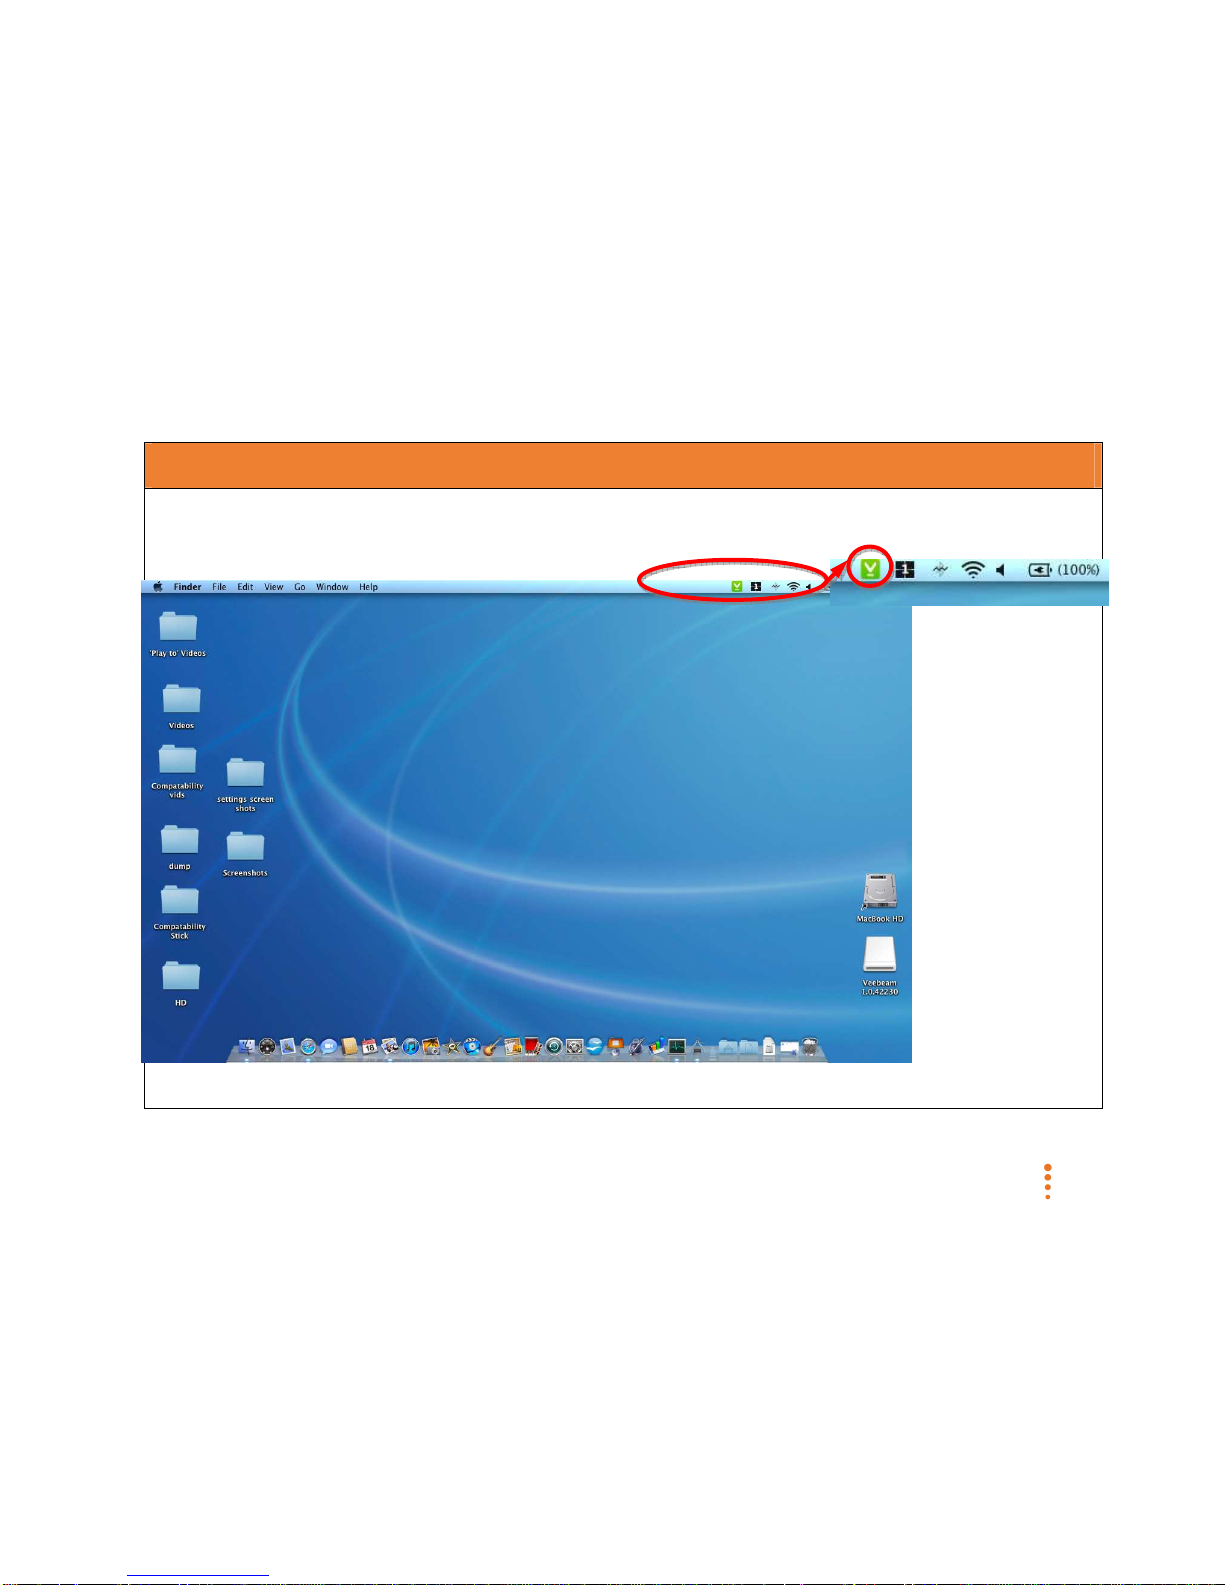
Macintosh OS X
The Menu Bar is displayed at the top of the Mac screen at the right hand side. The Menu Bar icon
with ‘V’ symbol is displayed ONLY when the USB antenna is inserted into the Mac.

SC-200912-PS-A (v5.12 - 20120913)
©2010/2012 Veebeam Ltd. All rights reserved. Veebeam and the Veebeam logo are trademarks of Veebeam Ltd.
Other brands and product names are trademarks or registered trademarks of their respective holders.
13 of 53
OS X additional installation info
Authorise VeebeamHelper window
Veebeam uses its own (private) network between the USB antenna and
Veebeam box. In order for Veebeam to configure this network correctly,
it may be necessary for you to authorise ‘VeebeamHelper’ to make
changes. If asked, please enter an administrator username and
password and click ‘OK’.
Network Preferences window
As part of installation or first time use of Veebeam, you may be asked to confirm acceptance of a new network.
If a ‘new network interface window’ is shown, select
Network Preferences. When the Network window
appears, simply accept all defaults by clicking ‘Apply’ and
then close the window.

SC-200912-PS-A (v5.12 - 20120913)
©2010/2012 Veebeam Ltd. All rights reserved. Veebeam and the Veebeam logo are trademarks of Veebeam Ltd.
Other brands and product names are trademarks or registered trademarks of their respective holders.
14 of 53
Veebeam software updates
Veebeam periodically releases updated software for your Laptop
which includes additional features and bug fixes. In order to take
advantage of the latest software, please periodically check
www.veebeam.com, under Products, Support and then Downloads,
to ensure you have the latest software.
Veebeam box firmware
Your Veebeam box will ship to you with the latest firmware. To
check if there is a newer version of the Veebeam box firmware available
(or if instructed to upgrade by Veebeam Customer Support), see Appendix F – Veebeam box upgrade.
2) Firewalls
Firewalls provide essential security for your Laptop when using the internet by monitoring traffic on all
‘networks’. Veebeam uses a secure, private network to communicate between the Veebeam box and the USB
antenna and, during Veebeam installation, will configure the standard Windows and OS X firewalls to allow this
network to operate. However, some third party firewalls may consider Veebeam’s network to be ‘unknown’
and stop Veebeam from working. In such cases, your firewall software will need to be told to allow the
Veebeam private network to operate.
Common third party firewall software includes McAfee Internet Security and Norton Internet Security.
If your firewall software produces a notification that it has identified Veebeam as a threat (if asked, you should
‘Allow’ Veebeam) or your Veebeam does not connect after installation (despite the USB antenna and Veebeam
box being close together) then you may need to add Veebeam to your firewall’s ‘exception list’.
In addition to the Laptop
software download, it is
suggested you take a few
moments to review the
Known Issues and
Limitations associated with
the software (found at the
same web location as the
software download).

SC-200912-PS-A (v5.12 - 20120913)
©2010/2012 Veebeam Ltd. All rights reserved. Veebeam and the Veebeam logo are trademarks of Veebeam Ltd.
Other brands and product names are trademarks or registered trademarks of their respective holders.
15 of 53
For more information on how to determine if you have a third party firewall, see Appendix D – . Detailed
information on configuring some common third party firewalls can be found at www.veebeam.com, under
Products, Support and then Downloads.
Veebeam uses a secure, closed, private network and enabling it in your firewall does not compromise your
Laptop’s security in any way.
3) What are codecs and why are they important?
When playing local video files directly from your Laptop to the TV using the Veebeam Player, Veebeam relies
on compression/decompression software (known as ‘codecs’) on the Laptop to understand the files. In order
to achieve the highest level of compatibility as well as highest quality of sound and video, it is recommended
that you install a ‘codec pack’ on your Laptop. Depending on the pack, you should only need to have one
codec pack installed on your Laptop to play most files.
If you already have a codec pack installed on your Laptop it will typically be shown in either All Programs on
the Start menu (Windows) or Other under System Preferences (Mac).
Following are some examples of codec packs which can help ensure a high level of compatibility.

SC-200912-PS-A (v5.12 - 20120913)
©2010/2012 Veebeam Ltd. All rights reserved. Veebeam and the Veebeam logo are trademarks of Veebeam Ltd.
Other brands and product names are trademarks or registered trademarks of their respective holders.
16 of 53
Note: K-Lite codec pack on Windows 7, Vista and XP
Windows 7, Vista and XP OS X
Examples of codec packs which have been checked with
Veebeam
• K-Lite codec pack -
http://www.codecguide.com/download_klite_codec_pack_full.htm
• CCCP codec pack - http://www.cccp-
project.net/download.php?type=cccp
Veebeam for Windows is a 32-bit application and will use only 32bit codecs. If given a choice between 32-bit and 64-bit, 32-bit
codecs should be installed.
Examples of codec packs which have been checked
with Veebeam
• Perian Quicktime add-on - http://perian.org/
• Flip4Mac WMV codec -
http://www.telestream.net/flip4macwmv/overview.htm
 Loading...