


© 2011 Veebeam Corp. The information in this document is proprietary and confidential to Veebeam Corporation.
It is not to be partially or wholly reproduced or disclosed to any third party without prior permission
user guide

SC-200912-PS-9 (v5.9 - 20110224)
©2010/2011 Veebeam Corp. All rights reserved. Veebeam and the Veebeam logo are trademarks of Veebeam Corp.
Other brands and product names are trademarks or registered trademarks of their respective holders. 2 of 59
Table of contents
Welcome............................................................................................................................................................4
In the box .......................................................................................................................................................................................... 4
Veebeam back panel ........................................................................................................................................5
Setting up your Veebeam .................................................................................................................................7
Connecting your Veebeam box ........................................................................................................................................................... 7
Setting up your Laptop ....................................................................................................................................................................... 8
Veebeam software updates .............................................................................................................................................................. 12
Veebeam box firmware .................................................................................................................................................................... 13
Starting your Veebeam................................................................................................................................... 18
Turn on your TV and Veebeam box ................................................................................................................................................... 18
Connect the USB antenna to your Laptop .................................................................................................... 19
Screencasting and Veebeam Player ................................................................................................................................................... 21
Veebeam icon and menu .................................................................................................................................................................. 22
Veebeam Player ............................................................................................................................................................................... 25
Veebeam configuration (Settings/Preferences) ........................................................................................... 28
Windows settings ............................................................................................................................................................................ 28
OS X settings ................................................................................................................................................................................... 29
Appendix A - Getting the most from your Veebeam .................................................................................... 30

SC-200912-PS-9 (v5.9 - 20110224)
©2010/2011 Veebeam Corp. All rights reserved. Veebeam and the Veebeam logo are trademarks of Veebeam Corp.
Other brands and product names are trademarks or registered trademarks of their respective holders. 3 of 59
Screencasting mode ......................................................................................................................................................................... 30
Appendix B – Veebeam message explanations ........................................................................................... 32
Appendix C – Veebeam box/USB antenna assoc iation/pairing .................................................................. 37
Appendix D – Firewall set up ......................................................................................................................... 38
OS X - Do I have a firewall? ............................................................................................................................................................. 38
Windows - Do I have a firewall? ....................................................................................................................................................... 38
General firewall settings for Veebeam .............................................................................................................................................. 40
Veebeam settings for Norton Internet Security and Norton 360 ......................................................................................................... 41
Veebeam settings for McAfee Total Protection / Security Center ........................................................................................................ 49
Appendix E - USB antenna status light indica ti ons ..................................................................................... 50
Appendix F – Veebeam box upgr a de ............................................................................................................ 51
Checking your Veebeam box firmware version .................................................................................................................................. 51
Installation and initial connection issues ........................................................................................................................................... 52
Screencasting performance issues ..................................................................................................................................................... 53
Codecs and file compatibility for the Veebeam Player ....................................................................................................................... 53
Appendix H - Important safety instructions .................................................................................................. 54
Appendix I – License and legal information ................................................................................................. 56
Note: throughout this document, wherever the term ‘Laptop’ is used, it refers to both a Windows PC or an Apple
Mac, unless explicitly stated otherwise.

SC-200912-PS-9 (v5.9 - 20110224)
©2010/2011 Veebeam Corp. All rights reserved. Veebeam and the Veebeam logo are trademarks of Veebeam Corp.
Other brands and product names are trademarks or registered trademarks of their respective holders. 4 of 59
Welcome
Thank you for purchasing Veebeam. With this guide, you should be up and enjoying videos on your TV in no time.
In the box
Your Veebeam should include all the items below

SC-200912-PS-9 (v5.9 - 20110224)
©2010/2011 Veebeam Corp. All rights reserved. Veebeam and the Veebeam logo are trademarks of Veebeam Corp.
Other brands and product names are trademarks or registered trademarks of their respective holders. 5 of 59
Veebeam back panel
Before starting, please take a few moments to familiarize yourself with the Veebeam unit.
Veebeam box connectors
Power
USB ports
(used for association and upgrade)
Digital audio (TOSLINK)
Stereo (RCA) audio
Composite A/V (RCA)
video
HDMI (audio and video)
Veebeam SD back panel

SC-200912-PS-9 (v5.9 - 20110224)
©2010/2011 Veebeam Corp. All rights reserved. Veebeam and the Veebeam logo are trademarks of Veebeam Corp.
Other brands and product names are trademarks or registered trademarks of their respective holders. 6 of 59
Veebeam status indication lights and On/Off
Veebeam box
USB antenna
Status light
Status light
USB connector
Cradle
To turn On, remove USB antenna from cradle.
To turn Off, place USB antenna in cradle.

SC-200912-PS-9 (v5.9 - 20110224)
©2010/2011 Veebeam Corp. All rights reserved. Veebeam and the Veebeam logo are trademarks of Veebeam Corp.
Other brands and product names are trademarks or registered trademarks of their respective holders. 7 of 59
Setting up your Veebeam
Connecting your Veebeam box
Your Veebeam box needs to be connected to your TV. The
connection you use is one of the major factors that will determine the
quality of the audio/video you will get from Veebeam.
Video connections supported:
• HDMI – gives the best quality video
• Composite A/V (RCA) – typically associated with Standard
Definition (SD) quality video
In order to view content in High Definition (HD), an HDMI connection
must be used.
Audio connections supported:
• HDMI – if your video is connected via HDMI, your audio will also be carried over the
HDMI connection. If this is not the case, use either the Digital Audio or Stereo Audio
connection
• Digital Audio – provides high quality audio separate from HDMI
• Stereo (RCA) Audio – provides standard, two channel, stereo audio
For EU TVs with a SCART connection, converters from composite A/V (RCA) or HDMI to
SCART are available in most electronics retail outlets.
Veebeam checks if an HDMI cable
is connected. If it is, only HDMI
video is output.
Veebeam outputs on all audio
connections all the time.

SC-200912-PS-9 (v5.9 - 20110224)
©2010/2011 Veebeam Corp. All rights reserved. Veebeam and the Veebeam logo are trademarks of Veebeam Corp.
Other brands and product names are trademarks or registered trademarks of their respective holders. 8 of 59
Note: Ensure the USB antenna is not connected to your
Laptop during installation
Setting up your Laptop
Next, you need to get Veebeam running on your Laptop. To
ensure best performance, please check that your Laptop meets the
minimum system requirements listed (at right).
To set up your Laptop, ensure the USB antenna is not plugged into your
laptop. You will then need to:
1) download and install the latest Veebeam software
2) check there are no problems with your firewall software
3) check if your Laptop needs any codecs
1) Installing the Veebeam software
You now need to install the Veebeam software on your Laptop. This
can be downloaded by visiting www.veebeam.com, selecting
Support and then Downloads.
The Downloads page will then be displayed and you can select the Download link that you need (Windows or OS X):
Minimum System Requirements:
• Intel Core 2 Duo 2.2GHz or above (inc. i3, i5 and
i7) or AMD Turion II (dual core) 2.2GHz or above
• Windows 7 (32 or 64-bit), Vista (32-bit),
Windows XP (32-bit) or OS X 10.5/10.6
• 2GB or more of memory
• 60MB or more of free disk space

SC-200912-PS-9 (v5.9 - 20110224)
©2010/2011 Veebeam Corp. All rights reserved. Veebeam and the Veebeam logo are trademarks of Veebeam Corp.
Other brands and product names are trademarks or registered trademarks of their respective holders. 9 of 59
When the software has downloaded, click on the downloaded file and follow the installation instructions shown on your screen. In
Windows, if prompted with a Security Warning, select ‘Run’. On OS X, if prompted to authorize VeebeamHelper or that a new
network interface has been detected, please see section OS X additional installation info, below.
When the installation has finished you may see a message advising that the Laptop should be restarted. If this appears please restart
your Laptop.
The Veebeam application then starts automatically and the Veebeam ‘V’ icon will be visible on the System Tray (Windows) or the Menu
Bar (OS X) as shown below. On OS X, the icon will not appear until the USB antenna is inserted in the Mac.
Some Virtual Private Network
(VPN) connections can cause
problems with Veebeam
installation.
Please ensure no VPN
connections are active during
Veebeam installation.

SC-200912-PS-9 (v5.9 - 20110224)
©2010/2011 Veebeam Corp. All rights reserved. Veebeam and the Veebeam logo are trademarks of Veebeam Corp.
Other brands and product names are trademarks or registered trademarks of their respective holders. 10 of 59
Windows 7, Vista and XP
The System Tray is typically displayed at the bottom of the PC screen at the right hand side. The System Tray icon
with a ‘V’ symbol is displayed at all times.

SC-200912-PS-9 (v5.9 - 20110224)
©2010/2011 Veebeam Corp. All rights reserved. Veebeam and the Veebeam logo are trademarks of Veebeam Corp.
Other brands and product names are trademarks or registered trademarks of their respective holders. 11 of 59
Macintosh OS X
The Menu Bar is displayed at the top of the Mac screen at the right hand side. The Menu Bar icon with ‘V’
symbol is displayed ONLY when the USB antenna is inserted into the Mac.

SC-200912-PS-9 (v5.9 - 20110224)
©2010/2011 Veebeam Corp. All rights reserved. Veebeam and the Veebeam logo are trademarks of Veebeam Corp.
Other brands and product names are trademarks or registered trademarks of their respective holders. 12 of 59
OS X additional installation info
Authorise VeebeamHelper window
Veebeam uses its own (private) network between the USB antenna and Veebeam box.
In order for Veebeam to configure this network correctly, it may be necessary for you to
authorise ‘VeebeamHelper’ to make changes. If asked, please enter an administrator
username and password and click ‘OK’.
Network Preferences window
As part of installation or first time use of Veebeam, you may be asked to confirm acceptance of a new network.
If a ‘new network interface window’ is shown, select Network
Preferences. When the Network window appears, simply accept all
defaults by clicking ‘Apply’ and then close the window.

SC-200912-PS-9 (v5.9 - 20110224)
©2010/2011 Veebeam Corp. All rights reserved. Veebeam and the Veebeam logo are trademarks of Veebeam Corp.
Other brands and product names are trademarks or registered trademarks of their respective holders. 13 of 59
Veebeam software updates
Veebeam periodically releases updated software for your Laptop which includes
additional features and bug fixes. In order to take advantage of the latest software,
please periodically check www.veebeam.com, under Software and then
Downloads, to ensure you have the latest software.
Veebeam box firmware
Your Veebeam box will ship to you with the latest firmware. To check if there
is a newer version of the Veebeam box firmware available (or if instructed to upgrade
by Veebeam Customer Support), see Appendix E – Veebeam box upgrade.
In addition to the Laptop software
download, it is suggested you
take a few moments to review the
Known Issues and Limitations
associated with the software
(found at the same web location
as the software download).

SC-200912-PS-9 (v5.9 - 20110224)
©2010/2011 Veebeam Corp. All rights reserved. Veebeam and the Veebeam logo are trademarks of Veebeam Corp.
Other brands and product names are trademarks or registered trademarks of their respective holders. 14 of 59
2) Firewalls
Firewalls provide essential security for your Laptop when using the internet by monitoring traffic on all ‘networks’ on your Laptop.
Common firewall software includes McAfee Internet Security and Norton Internet Security. Veebeam uses a secure, private network to
communicate between the Veebeam box and the USB antenna. Sometimes, firewall software can mistake Veebeam’s network for a
threat and stops Veebeam from working. In such cases, your firewall software needs to be told to allow the Veebeam private network
to operate.
If your firewall produces a notification that it has identified Veebeam as a threat, you need to add Veebeam to the firewall’s ‘exception
list’. For more information, see the Help documentation associated with your firewall. Details of setting up some common firewalls
can be found in the appendices of this document, see Appendix C – Firewall set up
.

SC-200912-PS-9 (v5.9 - 20110224)
©2010/2011 Veebeam Corp. All rights reserved. Veebeam and the Veebeam logo are trademarks of Veebeam Corp.
Other brands and product names are trademarks or registered trademarks of their respective holders. 15 of 59
3) What are codecs and why are they important?
When playing local video files directly from your Laptop to the TV using the Veebeam Player, Veebeam relies on
compression/decompression software (known as ‘codecs’) on the Laptop to understand the files. In order to achieve the highest level
of compatibility as well as highest quality of sound and video, it is recommended that you install a ‘codec pack’ on your Laptop.
Depending on the pack, you should only need to have one codec pack installed on your Laptop to play most files.
If you already have a codec pack installed on your Laptop it will typically be shown in either All Programs on the Start menu
(Windows) or Other under System Preferences (Mac).
Following are some examples of codec packs which can help ensure a high level of compatibility.
Windows 7, Vista and XP OS X
Examples of codec packs which have been checked with Veebeam
•
K-Lite codec pack - http://www.codecguide.com/download_k-
lite_codec_pack_full.htm
•
CCCP codec pack - http://www.cccp-
project.net/download.php?type=cccp
Veebeam for Windows is a 32-bit application and will use only
32-bit codecs. If given a choice between 32-bit and 64-bit, 32-bit
codecs should be installed.
Examples of codec packs which have been checked with Veebeam
•
Perian Quicktime add-on - http://perian.org/
• Flip4Mac WMV codec -
http://www.telestream.net/flip4mac-
wmv/overview.htm

SC-200912-PS-9 (v5.9 - 20110224)
©2010/2011 Veebeam Corp. All rights reserved. Veebeam and the Veebeam logo are trademarks of Veebeam Corp.
Other brands and product names are trademarks or registered trademarks of their respective holders. 16 of 59
Note: K-Lite codec pack on Windows 7, Vista and XP
If you have the K-Lite codec pack installed on your computer some of the settings may need adjusting to ensure all file types will play
on the Veebeam Player:
Click on the Start icon, then select All Programs then K-Lite Codec Pack and Configuration.
Under Configuration select
ffdshow video decoder and
the ffdshow video decoder
configuration screen is displayed.
Check the decoder settings for
MPEG1 and MPEG2.

SC-200912-PS-9 (v5.9 - 20110224)
©2010/2011 Veebeam Corp. All rights reserved. Veebeam and the Veebeam logo are trademarks of Veebeam Corp.
Other brands and product names are trademarks or registered trademarks of their respective holders. 17 of 59
If MPEG1 and MPEG2 are not set to “libavcodec” click
on the current setting (“disabled” in the example) and
select “libavcodec” from the drop down menu displayed
for both MPEG1 and MPEG2.
When MPEG1 and MPEG2 are both set to “libavcodec” click on OK.

SC-200912-PS-9 (v5.9 - 20110224)
©2010/2011 Veebeam Corp. All rights reserved. Veebeam and the Veebeam logo are trademarks of Veebeam Corp.
Other brands and product names are trademarks or registered trademarks of their respective holders. 18 of 59
Starting your Veebeam
Now that your TV and Laptop are all set up, we’re ready to start Veebeaming.
Turn on your TV and Veebeam box
Check that the TV is set up to receive input from the same TV connection where the
Veebeam box has been connected (e.g. HDMI1, HDMI2, AV1, AV2 etc.). Depending on which TV you
have, you may need to alter this from one of your TV menus using the TV remote control.
Also, make sure the Veebeam box is turned on by removing the USB antenna from the cradle. The
Status light at the front of the Veebeam box should turn on.
After a short period of time, the screen shown below should appear on your TV:
Remove the USB antenna to
turn Veebeam On

SC-200912-PS-9 (v5.9 - 20110224)
©2010/2011 Veebeam Corp. All rights reserved. Veebeam and the Veebeam logo are trademarks of Veebeam Corp.
Other brands and product names are trademarks or registered trademarks of their respective holders. 19 of 59
Connect the USB antenna to your Laptop
Now connect the USB antenna to your Laptop by first turning the antenna so that it is vertical and at a right angle to the USB
plug and pushing the USB plug firmly into any USB port on your Laptop.
USB antenna light
Once the USB antenna is connected, the status light on the USB antenna should start to flash. Initially it blinks relatively fast while the
USB antenna is turning on and then flashes more slowly while the USB antenna searches for a Veebeam box. Once the USB antenna
finds and connects to a Veebeam box, the light will stop flashing and will stay on. If the light continues flashing for more than25
seconds, try moving the Laptop closer to the Veebeam box until the light stops flashing and stays on.
The first time the USB antenna is connected to a PC using a
particular USB port, it will need to install the Veebeam USB
drivers for that USB port. This will happen automatically and
may take a minute or two. The status light on the USB antenna
flashes and a notification is displayed on the PC to inform you
that the USB drivers are being installed.

SC-200912-PS-9 (v5.9 - 20110224)
©2010/2011 Veebeam Corp. All rights reserved. Veebeam and the Veebeam logo are trademarks of Veebeam Corp.
Other brands and product names are trademarks or registered trademarks of their respective holders. 20 of 59
For best re
sults the USB antenna needs
to be as close as possible to your
Veebeam box and no more than 10
yards (or 10 meters) away, in the same
room and with a clear path in
between.
Veebeam icon
When the connection between the USB antenna and the Veebeam box has been
established, the ‘V’ icon on the System Tray (Windows) or Menu Bar (OS X) should be
visible and will change color:
Displayed Icon Description
Not connected – Veebeam is not available.
Your USB antenna is either searching for a Veebeam box or
Veebeam Player has been paused
Ready! – Veebeam is running
Once Veebeam is running on your Laptop and connected to a Veebeam box, Veebeam
will automatically enter ‘Screencasting’ mode and start displaying your Laptop screen on
the TV.
To remove the USB antenna from the Laptop, pull it firmly out of the USB port.
Your Veebeam comes pre-configured
and no wireless configuration is
required.

SC-200912-PS-9 (v5.9 - 20110224)
©2010/2011 Veebeam Corp. All rights reserved. Veebeam and the Veebeam logo are trademarks of Veebeam Corp.
Other brands and product names are trademarks or registered trademarks of their respective holders. 21 of 59
Using your Veebeam
Once your Veebeam is up and running, take a little time to familiarize yourself with the User Interface and features.
Screencasting and Veebeam Player
Veebeam provides two different ways of playing video files.
• Screencasting mode – Whatever is shown on your Laptop is shown on your TV. This is the mode Veebeam uses whenever it
first connects. This mode allows you to watch live internet video content (for example from your favourite news website or
from a TV catch up website) on your TV. It is recommended you set the internet service you want to watch to its highest
resolution and ‘full-screen’ to get the best experience.
• Veebeam Player – allows you to play video files stored locally (e.g. on your Laptop or HDD) directly from your Laptop to the
TV. This not only provides a high quality audio/video experience but also allows you to use the Laptop for other activities
(e.g. reading email). This is the mode Veebeam uses when you press the Play button in the Veebeam Player
.
The default mode for Veebeam is Screencasting mode and when the Veebeam Player is stopped (by pressing the Stop button
on the Veebeam Player), Screencasting mode resumes automatically. For more information on how to switch between
Screencasting Mode and the Veebeam Player please see the section on Veebeam Player (in this User Guide).

SC-200912-PS-9 (v5.9 - 20110224)
©2010/2011 Veebeam Corp. All rights reserved. Veebeam and the Veebeam logo are trademarks of Veebeam Corp.
Other brands and product names are trademarks or registered trademarks of their respective holders. 22 of 59
Veebeam icon and menu
The Veebeam menu is displayed by right clicking on the System Tray icon (Windows) or clicking on the Menu Bar icon (OS X).
Windows 7 and Vista OS X
System tray icon with ‘V’ symbol. The ‘V’ icon should be
displayed at all times.
Menu Bar icon with ‘V’ symbol. The ‘V’ icon ONLY shows when
the USB Antenna is inserted into the Mac.

SC-200912-PS-9 (v5.9 - 20110224)
©2010/2011 Veebeam Corp. All rights reserved. Veebeam and the Veebeam logo are trademarks of Veebeam Corp.
Other brands and product names are trademarks or registered trademarks of their respective holders. 23 of 59
Veebeam menu actions
The menu options are as follows:
Menu Option Description Action
About…
Gives information about your particular
version of Veebeam
Displays Veebeam version number and
license information
Play…
Allows you to play files you have stored on
your Laptop (HDD)
Displays the Veebeam Player Play screen
Stop Screencasting mode/Stop
Audiocasting mode
Start Screencasting mode/Start
Audiocasting mode
Allows you to control whether your Laptop
screen and audio are sent to the TV, only
audio is sent (e.g. music – this mode uses
less CPU then video) or nothing is sent.
The Laptop screen and/or audio is either
sent or not sent to your TV, as selected.

SC-200912-PS-9 (v5.9 - 20110224)
©2010/2011 Veebeam Corp. All rights reserved. Veebeam and the Veebeam logo are trademarks of Veebeam Corp.
Other brands and product names are trademarks or registered trademarks of their respective holders. 24 of 59
Settings / Open Veebeam Settings
Allows you to customize various settings
for your Veebeam
Please see later section for details
Screencasting Mode (Windows only)
Allows you to change the Screencasting
performance
Please see later section for details

SC-200912-PS-9 (v5.9 - 20110224)
©2010/2011 Veebeam Corp. All rights reserved. Veebeam and the Veebeam logo are trademarks of Veebeam Corp.
Other brands and product names are trademarks or registered trademarks of their respective holders. 25 of 59
Veebeam Player
The Veebeam Player allows you to play local video files (i.e. files stored on your hard drive or external mass storage device)
directly to the TV. This provides very high quality audio/video and also frees up your laptop for other activities.
The Veebeam Player is opened by selecting the Play… option from the Menu Bar icon (as shown in Veebeam icon and menu
section) or left clicking on the System Tray icon (Windows only).
Windows Veebeam Player
The following gives an overview of the Windows Veebeam Player:
Shows the status
Sh
ows the currently
selected title/file
Shows title duration
Shows current play time
Slider can be used to
change position in
current title/file
File
compatibility status
(see next page)
Standard media player
controls
Current playlist entries
and order
Drag and drop files or
press this to manually
locate files
Wireless connection
status

SC-200912-PS-9 (v5.9 - 20110224)
©2010/2011 Veebeam Corp. All rights reserved. Veebeam and the Veebeam logo are trademarks of Veebeam Corp.
Other brands and product names are trademarks or registered trademarks of their respective holders. 26 of 59
Windows file compatibility status
The following shows the indicators for file compatibility status:
Waiting to be checked (requires connection to a Veebeam box).
Currently being checked for compatibility.
Suitable for playing on a Veebeam box.
Checked and found not to be suitable. Please see Troubleshooting section.
Missing file. It may have been moved and is no longer where expected on your hard drive. Try removing the file from the
playlist and adding it again.
Adding/removing files from the Windows playlist
Files can be added to the playlist either by dragging and dropping
them onto the Veebeam Player window or by pressing the ‘Add files
to playlist’ and manually locating the file(s). Files may be removed by
selecting the target file(s) and pressing the Delete key.
Drag and drop – find the file you want to add to your
playlist in any application (e.g. Windows Explorer). Then
click the left button on the PC mouse (or single button on
Mac) and continue to hold the button while dragging the
item across the screen until it is over the Veebeam Player
window. Release the left mouse button (single button on
Mac) and drop the item into the Veebeam Player. It will
then appear in the playlist.

SC-200912-PS-9 (v5.9 - 20110224)
©2010/2011 Veebeam Corp. All rights reserved. Veebeam and the Veebeam logo are trademarks of Veebeam Corp.
Other brands and product names are trademarks or registered trademarks of their respective holders. 27 of 59
OS X Veebeam Player
The following gives an overview of the OS X Veebeam Player
Adding/Removing Files from the OS X Playlist
Files can be added to the playlist by dragging and dropping them into the Veebeam Player.
Files may be removed by first selecting the file to be removed and then pressing the Delete key.
Shows the status
Shows the currently
selected title/file
Elapsed time on Track
slider (only appears when
a file is playing)
Compatible files sho
w in
green. Incompatible files
show in red.
Drag and drop files into
the playlist
Shows time remaining
until end of video (only
appears when a file is
playing)
When .MKV or .WMV files are added,
there may be a delay of up to 1-2
minutes before Seek is functional.
This is to allow Veebeam to index the
file.

SC-200912-PS-9 (v5.9 - 20110224)
©2010/2011 Veebeam Corp. All rights reserved. Veebeam and the Veebeam logo are trademarks of Veebeam Corp.
Other brands and product names are trademarks or registered trademarks of their respective holders. 28 of 59
Veebeam configuration (Settings/Preferences)
You may wish to customize your Veebeam for your personal preferences. The options you can alter are shown below.
Windows settings
The Windows settings can be accessed from the Veebeam icon right click menu.
Note: The settings option is only available when a USB antenna is connected and it is
connected to a Veebeam box.
• Screen Size – Sets the amount the video from Veebeam is shrunk when sent to the TV.
Used on TVs where the video from Veebeam goes beyond the edges of the TV
screen.
• TV Aspect Ratio – Set this to the aspect ratio of your TV (see your TV’s user manual
for more details)
• Composite Output – Sets the format for the composite video output. In general,
North America uses NTSC while European countries typically use PAL
• HDMI Mode –Sets the output scan frequency, mode and resolution of the HDMI
connection between the Veebeam box and TV. Check your TV owner’s manual if you
are uncertain of the TV’s supported modes.
Windows Settings Dialogue

SC-200912-PS-9 (v5.9 - 20110224)
©2010/2011 Veebeam Corp. All rights reserved. Veebeam and the Veebeam logo are trademarks of Veebeam Corp.
Other brands and product names are trademarks or registered trademarks of their respective holders. 29 of 59
OS X settings
The OS X settings can be accessed by clicking the Veebeam menu bar icon.
The following diagrams show the same settings dialogue as above but for OS X.

SC-200912-PS-9 (v5.9 - 20110224)
©2010/2011 Veebeam Corp. All rights reserved. Veebeam and the Veebeam logo are trademarks of Veebeam Corp.
Other brands and product names are trademarks or registered trademarks of their respective holders. 30 of 59
Appendix A - Getting the most from your Veebeam
For more complete guidelines on achieving the best performance and/or diagnosing performance issues, please refer to the
Veebeam support FAQs at www.veebeam.com (click Support and an FAQs link should appear on the following page).
Screencasting mode
Screencasting mode is designed to be used with common internet video sites such as news websites and TV catch up sites,
with the Laptop web browser in ‘full screen’ mode. Your picture quality may be affected by several factors:
• Internet connection speed – affects the basic quality of the video coming into your Laptop.
Veebeam can not improve the quality of this original source material so it is important it is
as good as possible
• Resolution selected for the video on the internet site – many websites allow you to select
the size or resolution of the video being shown. In general, higher quality/resolution is
recommended when showing sites on a larger TV
• Wireless vs. wired – Wireless internet connection performance can vary. If uncertain of the
connection quality you are getting, try using a wired connection to connect to the internet
(note: Veebeam’s wireless is separate to and not affected by Wi-Fi)
• Composite/HDMI configuration – ensure your output connection from the Veebeam box is configured to the highest resolution
supported by both your TV and Veebeam
As Veebeam simply transmits your
Laptop’s screen to the TV,
Veebeam is not able to produce
higher quality video than the raw
material show on the Laptop’s
screen

SC-200912-PS-9 (v5.9 - 20110224)
©2010/2011 Veebeam Corp. All rights reserved. Veebeam and the Veebeam logo are trademarks of Veebeam Corp.
Other brands and product names are trademarks or registered trademarks of their respective holders. 31 of 59
• Laptop performance – for certain Laptops you may get better overall video performance by reducing the resolution that Veebeam
uses for capturing video. This can be changed from the Veebeam menu as shown below.
Windows 7, Vista and XP OS X
Right click on icon to display Veebeam menu, and change settings
for resolution and frame rate to tune to best performance for your
laptop/website.
Click on icon to display Veebeam menu, then select Open
Veebeam Preferences to change settings for Veebeam capture
resolution and frame rate.

SC-200912-PS-9 (v5.9 - 20110224)
©2010/2011 Veebeam Corp. All rights reserved. Veebeam and the Veebeam logo are trademarks of Veebeam Corp.
Other brands and product names are trademarks or registered trademarks of their respective holders. 32 of 59
Appendix B – Veebeam message explanations
The following table lists some of the messages Veebeam may show you on your Laptop, along with basic explanations of their
meaning.
Windows 7, Vista or XP Message Macintosh OS X Message Meaning
“Aero theme has been turned off to
improve performance. Click here to
stop this message appearing again.”
None
This occurs on Windows only. Windows Vista and 7
support ‘Aero themes’ which provide advanced graphics
features such as see-through window frames and
Windows key + tab key window scrolling.
This mode can reduce the performance of Veebeam’s
Screencasting mode significantly. As such, Veebeam turns
off this mode (and reverts to the normal Windows ‘basic’
theme) while Screencasting is in operation. Aero is
automatically turned back on when Veebeam is not active.

SC-200912-PS-9 (v5.9 - 20110224)
©2010/2011 Veebeam Corp. All rights reserved. Veebeam and the Veebeam logo are trademarks of Veebeam Corp.
Other brands and product names are trademarks or registered trademarks of their respective holders. 33 of 59
Windows 7, Vista or XP Message Macintosh OS X Message Meaning
“The settings in your USB antenna
have been found to be incorrect. A
change needs to be applied in order
for Veebeam to function correctly.”
Or
The settings in your USB antenna
need to be changed. Please accept
this change so that Veebeam can
connect quickly.
“Type your password to allow
VeebeamHelper to make
changes.”
Veebeam has found that the configuration settings for the
Veebeam network adaptor are not correct (they may have
been changed by either your – accidentally – or by
another program).
Veebeam will correct the setting automatically but requires
your permission to make the changes. Please allow this.
“Your Veebeam USB antenna has
found a Veebeam box it is not
associated (secure linked) with. To
associate, plug the USB antenna into
the back of the Veebeam box. See
the Veebeam User Guide for more
information on association.”
“The antenna and box are not
linked. Please refer to the user
manual”
Or
"Box has not allowed connection.
Please refer to the user manual"
The USB antenna in your Laptop can see a Veebeam box
but it has not been ‘associated’ with the box so it cannot
use it for receiving video. A secure association needs to
be made between them first. See section
Appendix B –
Veebeam box/USB antenna association/pairing for
more information on associating.
Audio will not be available when
Screencasting. This is due to
limitations in your audio hardware.
Click here to stop this message
appearing again."
None
It appears that the audio drivers used by Veebeam are
incompatible with your Laptop. Please contact Veebeam
customer support for further information/diagnosis.

SC-200912-PS-9 (v5.9 - 20110224)
©2010/2011 Veebeam Corp. All rights reserved. Veebeam and the Veebeam logo are trademarks of Veebeam Corp.
Other brands and product names are trademarks or registered trademarks of their respective holders. 34 of 59
Windows 7, Vista or XP Message Macintosh OS X Message Meaning
“The computer cannot be suspended
while Veebeam is Screencasting or
Playing a file.”
Or
“The computer cannot enter standby
while Veebeam is Screencasting or
Playing a file.”
None
When Veebeam is active on a Windows Laptop, it
overrides any automatic standby or suspend that may
normally happen when you close the lid on the Laptop.
This message appears when this happens.
The user can still manually put the Laptop into standby or
suspend.
"Your Veebeam receiver isn't turned
on or is out of range. Please plug it
in, turn it on and move closer. Ensure
the receiver's orange light is
illuminated and PC's USB antenna is
vertical."#
Or
"Veebeam Receiver Out of Range /
Powered Off"
"Could not find a Veebeam box
to connect to. Please make sure it
is switched on and in range”
The USB antenna is connected to your Laptop and the
Laptop is working fine and ready to connect to a Veebeam
box but no Veebeam box can be found on the wireless
connection.
To correct this issue, ensure the Veebeam box is turned on
and/or move the Laptop closer to the Veebeam box.
"The Veebeam software appears to
be running in Compatibility Mode.
For more information on changing
this setting see the Veebeam User
None
Windows 7 and Vista provide a facility for an application
to run in what is called ‘Compatibility Mode’. This mode
mimics the application running under an older version of
the operating system.

SC-200912-PS-9 (v5.9 - 20110224)
©2010/2011 Veebeam Corp. All rights reserved. Veebeam and the Veebeam logo are trademarks of Veebeam Corp.
Other brands and product names are trademarks or registered trademarks of their respective holders. 35 of 59
Windows 7, Vista or XP Message Macintosh OS X Message Meaning
Guide, the FAQs section of
veebeam.com or contact Veebeam
technical support for assistance.
Veebeam cannot be used in
Compatibility Mode."
This mode is incompatible with Veebeam and will cause
Veebeam to not work correctly. To correct this, find the
file “Veebeam.exe” on you Hard disk, select the
‘Properties’ for this file and ensure ‘Compatibility Mode’ is
disabled.
None
“Please close box settings
window before starting
Screencasting.”
Or
“Please close box settings
Veebeam settings on OS X can not be changed while
Veebeam is active (sending audio/video to the TV). Please
close the settings dialogue before trying to use either
Screencasting or Video Play-To modes.
Ensure this is
NOT checked

SC-200912-PS-9 (v5.9 - 20110224)
©2010/2011 Veebeam Corp. All rights reserved. Veebeam and the Veebeam logo are trademarks of Veebeam Corp.
Other brands and product names are trademarks or registered trademarks of their respective holders. 36 of 59
Windows 7, Vista or XP Message Macintosh OS X Message Meaning
window before playing media.”
“The Veebeam USB antenna is not
working properly. Please unplug it
and plug it in again.”
“The Veebeam USB antenna is
not working properly. Please
unplug it and plug it in again.”
Something has gone wrong with your USB antenna’s
connection to the Laptop. Try unplugging and replugging
the USB antenna. If this does not correct the problem,
contact customer support.
SC-200912-PS-9 (v5.9 - 20110224)
©2010/2011 Veebeam Corp. All rights reserved. Veebeam and the Veebeam logo are trademarks of Veebeam Corp.
Other brands and product names are trademarks or registered trademarks of their respective holders. 37 of 59
Appendix C – Veebeam box/USB antenna association/pairing
A Veebeam box and USB antenna use a highly secure link to communicate over Wireless USB. In order for this high security to
be achieved, the box and USB antenna need to be ‘associated’ with each other. When you purchase a Veebeam product the Veebeam
box and USB antenna which are supplied together are already associated with each other. However if you acquire or purchase any
additional USB antenna each one will need to be associated with your Veebeam box or they will not work together.
In order to associate a Veebeam box and USB antenna:
• Turn on the Veebeam box and WAIT for the
‘Waiting for PC/TV connection’ screen to appear
• Plug the USB antenna into one of the USB
connections in the back of the Veebeam box. The
status light on the USB antenna flashes while the
association is taking place.
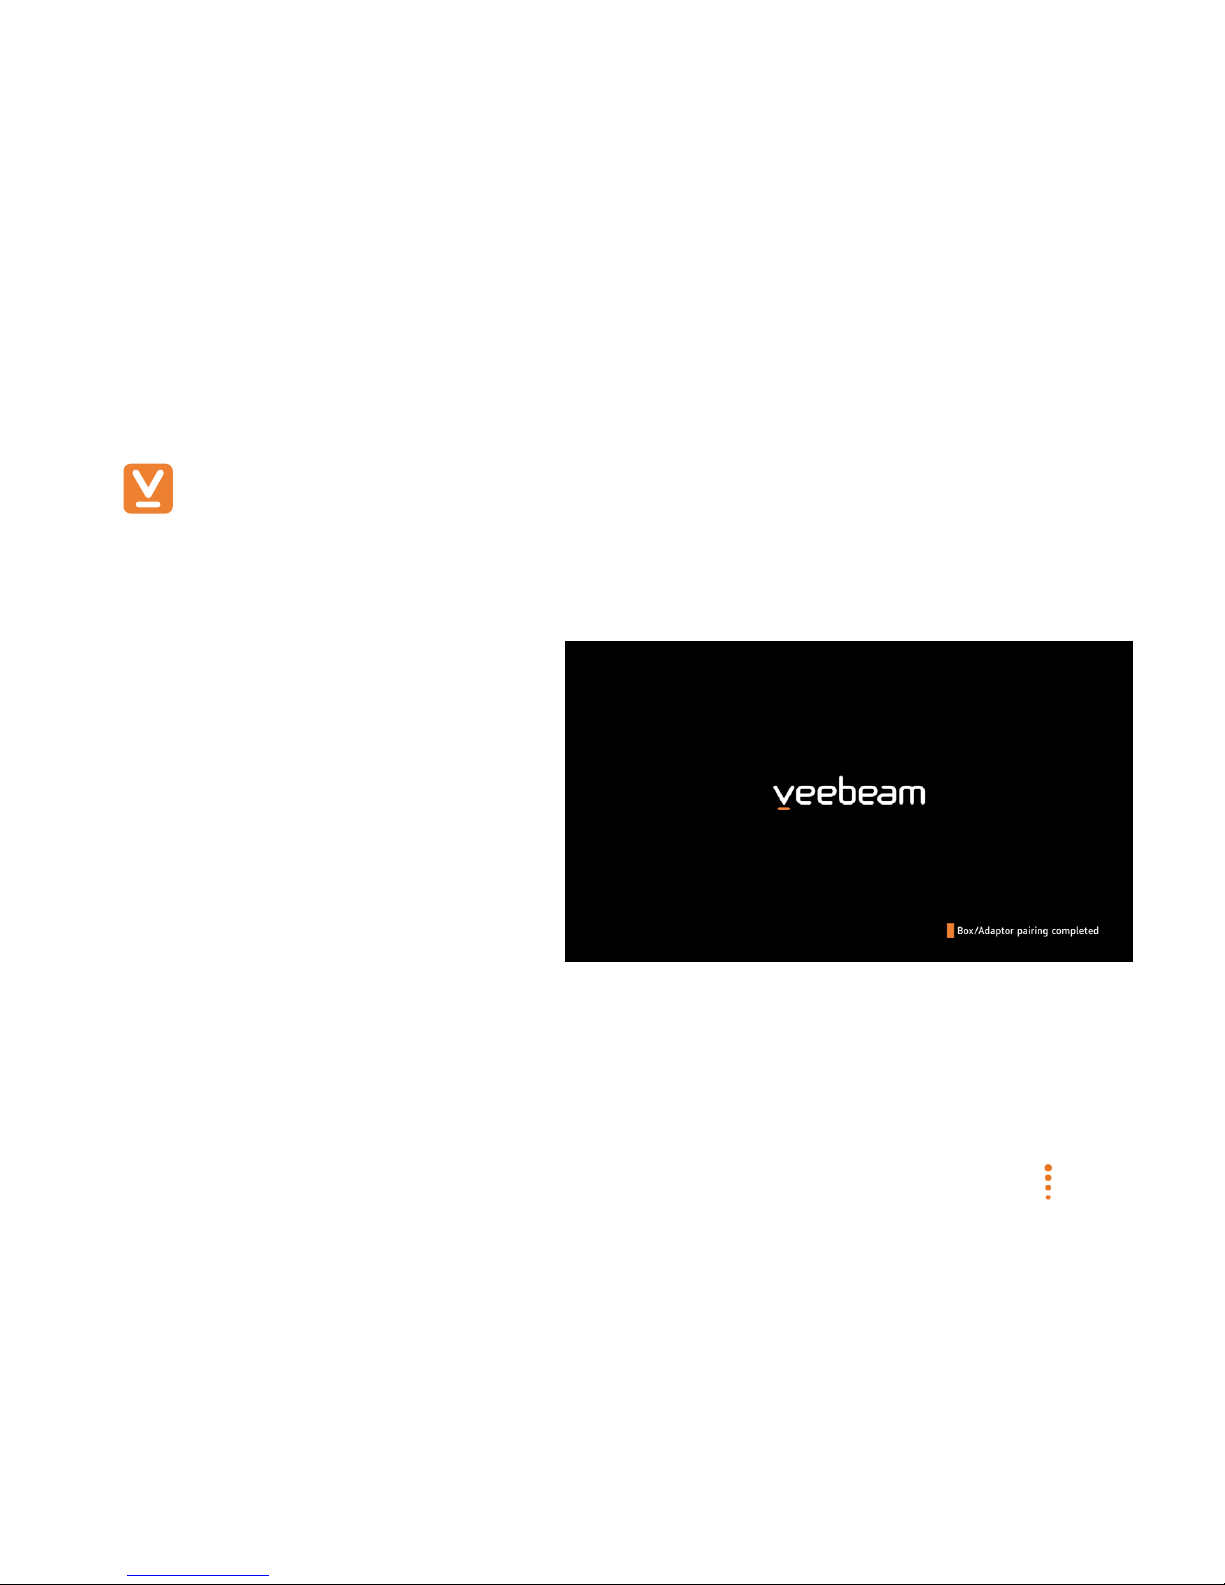
• Wait for the screen at right to appear on the TV.
The status light on the USB antenna will be on
and steady.
When the “…pairing completed” message is displayed on the TV you can remove the USB antenna. Turn your Veebeam box off and
then on and you can then begin using it as normal.
Veebeam boxes can be associated with up to 32 USB antenna. The Veebeam box will connect to the first USB antenna it finds.
Associating more than 32 USB antenna with a box will cause the ‘oldest’ associations to be overwritten. However, each USB antenna
stores only one (1) association and this is overwritten each time it is associated with a new box.

SC-200912-PS-9 (v5.9 - 20110224)
©2010/2011 Veebeam Corp. All rights reserved. Veebeam and the Veebeam logo are trademarks of Veebeam Corp.
Other brands and product names are trademarks or registered trademarks of their respective holders. 38 of 59
Appendix D – Firewall set up
The following provides detailed instructions for setting up some common firewall software to allow Veebeam to operate. In
general you will need to tell the firewall to allow the Veebeam network to function. Veebeam uses a secure, closed, private network
and enabling it does not in any way compromise your Laptop’s security.
OS X - Do I have a firewall?
Macs typically only use the standard OS X firewall and Veebeam automatically configures this for its use. However, if you have
a third party firewall on OS X, you will probably need to follow the basic instructions for Windows, shown below (see your firewall
manual on setting up ‘exceptions’ for more detailed information).
Windows - Do I have a firewall?
For Windows PCs with only the standard Windows firewall, Veebeam will automatically configure the firewall for its use and
no changes are needed to any of the settings.
If you have a non-Windows firewall the Veebeam application should be “Allowed” (if so prompted) or given Full access. For some
firewalls it may be necessary to do this by changing the settings in the firewall Program Control and/or to “add a rule.”
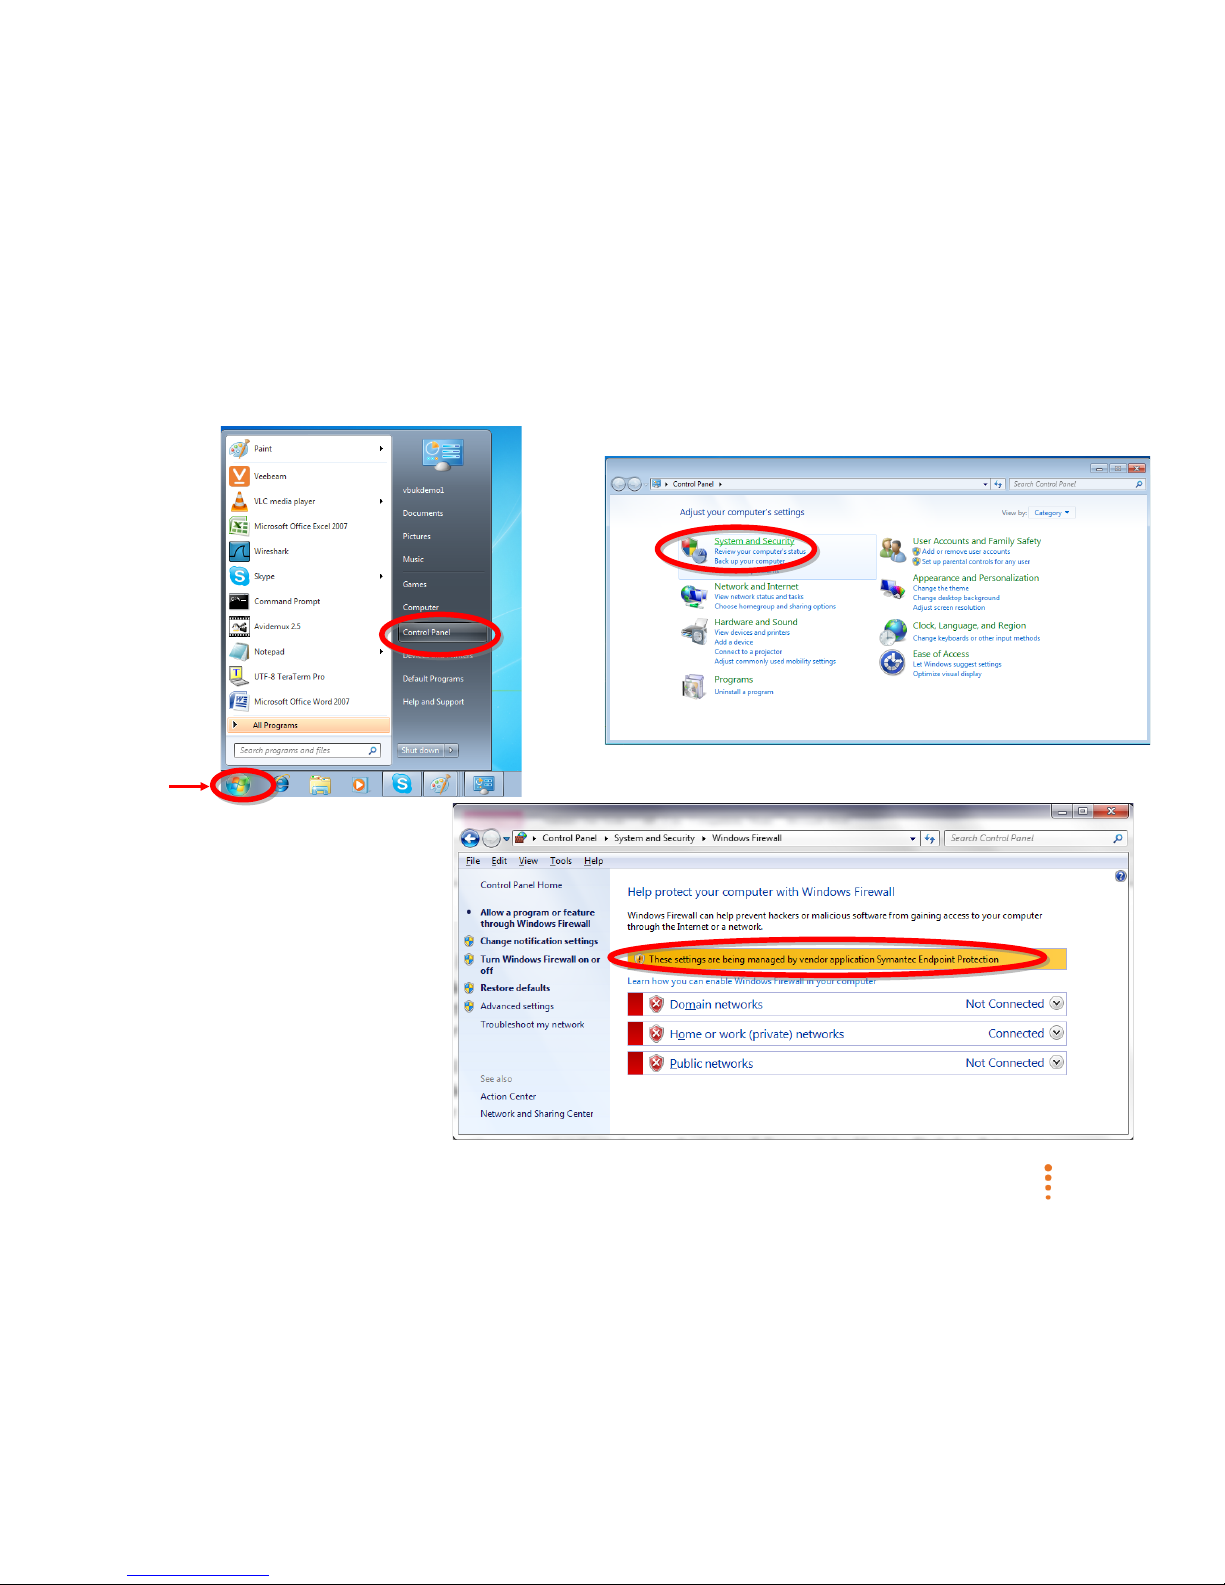
You can check which firewall you are using by selecting Start menu / Control Panel / System and Security / Windows Firewall.
SC-200912-PS-9 (v5.9 - 20110224)
©2010/2011 Veebeam Corp. All rights reserved. Veebeam and the Veebeam logo are trademarks of Veebeam Corp.
Other brands and product names are trademarks or registered trademarks of their respective holders. 39 of 59
Start
The picture shown is for a Windows PC
and indicates that a third party
application, Symantec Endpoint
Protection, is in control of the firewall.

SC-200912-PS-9 (v5.9 - 20110224)
©2010/2011 Veebeam Corp. All rights reserved. Veebeam and the Veebeam logo are trademarks of Veebeam Corp.
Other brands and product names are trademarks or registered trademarks of their respective holders. 40 of 59
General firewall settings for Veebeam
The following provides a generic, technical description of what is required to configure Veebeam for third party firewalls.
Some specific instructions for common firewall software (supplied by McAfee and Norton) are also provided.
• In the firewall control settings, ensure that the Veebeam application has
Full
access. It should not be
Blocked, Outgoing
or
Auto
• For the
Port Control
or
System Services
in third party firewall, ensure that traffic to and from UPnP/SSDP ports (TCP-2869, TCP-
5000 and UDP-1900) are set to
Allow
for “All PCs/Networks”

SC-200912-PS-9 (v5.9 - 20110224)
©2010/2011 Veebeam Corp. All rights reserved. Veebeam and the Veebeam logo are trademarks of Veebeam Corp.
Other brands and product names are trademarks or registered trademarks of their respective holders. 41 of 59
Veebeam settings for Norton Internet Security and Norton 360
The following shows how to set up Norton Internet Security and Norton 360 software to work with Veebeam. Please note that
if using Norton 360 the same screens are displayed except that “360” shows where “Internet Security” is displayed on the
example.
1. Click
Settings
located in
Network
section.
2. On the next page click on Configure for
Smart Firewall
->
Advanced
Settings
.

SC-200912-PS-9 (v5.9 - 20110224)
©2010/2011 Veebeam Corp. All rights reserved. Veebeam and the Veebeam logo are trademarks of Veebeam Corp.
Other brands and product names are trademarks or registered trademarks of their respective holders. 42 of 59
3. Click
General Rules
->
Configure
.
4. Click
Add
button.

SC-200912-PS-9 (v5.9 - 20110224)
©2010/2011 Veebeam Corp. All rights reserved. Veebeam and the Veebeam logo are trademarks of Veebeam Corp.
Other brands and product names are trademarks or registered trademarks of their respective holders. 43 of 59
5. Follow the prompts and respond as shown to successfully add
a Veebeam rule.

SC-200912-PS-9 (v5.9 - 20110224)
©2010/2011 Veebeam Corp. All rights reserved. Veebeam and the Veebeam logo are trademarks of Veebeam Corp.
Other brands and product names are trademarks or registered trademarks of their respective holders. 44 of 59

SC-200912-PS-9 (v5.9 - 20110224)
©2010/2011 Veebeam Corp. All rights reserved. Veebeam and the Veebeam logo are trademarks of Veebeam Corp.
Other brands and product names are trademarks or registered trademarks of their respective holders. 45 of 59

SC-200912-PS-9 (v5.9 - 20110224)
©2010/2011 Veebeam Corp. All rights reserved. Veebeam and the Veebeam logo are trademarks of Veebeam Corp.
Other brands and product names are trademarks or registered trademarks of their respective holders. 46 of 59

SC-200912-PS-9 (v5.9 - 20110224)
©2010/2011 Veebeam Corp. All rights reserved. Veebeam and the Veebeam logo are trademarks of Veebeam Corp.
Other brands and product names are trademarks or registered trademarks of their respective holders. 47 of 59
6. Veebeam rule appears as shown below. Click the
Move Up
until the Veebeam rule is at the top of the rule list.

SC-200912-PS-9 (v5.9 - 20110224)
©2010/2011 Veebeam Corp. All rights reserved. Veebeam and the Veebeam logo are trademarks of Veebeam Corp.
Other brands and product names are trademarks or registered trademarks of their respective holders. 48 of 59
7. Veebeam rule then appears at the top of the list as shown.

SC-200912-PS-9 (v5.9 - 20110224)
©2010/2011 Veebeam Corp. All rights reserved. Veebeam and the Veebeam logo are trademarks of Veebeam Corp.
Other brands and product names are trademarks or registered trademarks of their respective holders. 49 of 59
Veebeam settings for McAfee Total Protection / Security Center
The following shows how to set up McAfee Total Protection software to work with Veebeam.
1. Access the McAfee Total Protection control panel (from Start menu /
McAfee) and allow Veebeam network access
2.Add 'Home' type Connection for 169.254.XXX.XXX IP address range.

SC-200912-PS-9 (v5.9 - 20110224)
©2010/2011 Veebeam Corp. All rights reserved. Veebeam and the Veebeam logo are trademarks of Veebeam Corp.
Other brands and product names are trademarks or registered trademarks of their respective holders. 50 of 59
Appendix E - USB antenna status light indications
The USB antenna status light may take one of three states:
State Definition Indication
Fast flash (blink)
Flashes 2 times every 1 second (On for
0.25s, Off for 0.25s)
The USB antenna is switching on
Slow flash
Flashes 1 time every 2 seconds (On for
1.5s, Off for 0.5s)
The USB antenna is working and
searching for a Veebeam box
Continuous (steady) On
The USB antenna has connected to a
Veebeam box

SC-200912-PS-9 (v5.9 - 20110224)
©2010/2011 Veebeam Corp. All rights reserved. Veebeam and the Veebeam logo are trademarks of Veebeam Corp.
Other brands and product names are trademarks or registered trademarks of their respective holders. 51 of 59
Appendix F – Veebeam box upgrade
Veebeam should ship to you with the latest version of the box firmware pre-installed. If you want to upgrade the Veebeam
box to the latest firmware, please see www.veebeam.com (select Support and then Downloads at the top of the page).
Checking your Veebeam box firmware version
During start up, the Veebeam box will display its current firmware version (bottom left of initial TV screen, next to ‘SW’ label).
This version can be checked against the Veebeam website Downloads page (as above) to determine if newer firmware is available.
Current firmware
version shown here

SC-200912-PS-9 (v5.9 - 20110224)
©2010/2011 Veebeam Corp. All rights reserved. Veebeam and the Veebeam logo are trademarks of Veebeam Corp.
Other brands and product names are trademarks or registered trademarks of their respective holders. 52 of 59
Appendix G – Troubleshooting
For the latest (and more extensive) troubleshooting information please visit
http://www.veebeam.com/pages/Support.html and select FAQs.
Installation and initial connection issues
The following provides some basic information on common issues seen with installation.
Most installation issues can be resolved by one of the following:
• Firewalls (also known as Internet Security software) can sometimes stop Veebeam from
working. Check that your Laptop firewall in configured to allow Veebeam to operate (see
Appendix C – Firewall set up earlier in this document or visit www.veebeam.com
(select Support and then click on FAQs).
• Please allow sufficient time for Veebeam to start up. When the USB antenna is plugged
into your Laptop, it can sometimes take up to 30-45 seconds for the USB to be recognised
on the Laptop and start displaying on the TV. This can be even longer the first time the
USB antenna is plugged into a particular USB port.
• Remove the USB antenna from the Laptop and reboot your Laptop (allow sufficient time
after reboot for all applications to complete start-up).
• Turn off the Veebeam box and turn it back on (allow sufficient time for the Veebeam box
to fully start up).
• Ensure the distance between the USB antenna (while connected to a Laptop) and Veebeam box is within 10 yards (approx. 10
meters) – ideally less for best performance – and there are no obstructions between them.
Antenna positioning - the
wireless technology used in
Veebeam is designed to work
‘in-room’ and to distances of
around 10 yards (approx. 10m).
However, better performance is
achieved the shorter the
distance between the Veebeam
box and USB antenna. Long
distances and/or objects
obstructing the path between
the Veebeam box and USB
antenna can cause performance
issues.

SC-200912-PS-9 (v5.9 - 20110224)
©2010/2011 Veebeam Corp. All rights reserved. Veebeam and the Veebeam logo are trademarks of Veebeam Corp.
Other brands and product names are trademarks or registered trademarks of their respective holders. 53 of 59
Screencasting performance issues
The following provides some basic information for improving the performance of the product in Screencasting mode:
• Ensure the distance between the USB antenna (while connected to a Laptop) and Veebeam box is less than 10 yards
(approx. 10 meters) and there are no obstructions between them.
• Try reducing the Screencasting Mode / Resolution via the right click menu on the system tray (Mac Menu Bar / Veebeam
Settings…)
Codecs and file compatibility for the Veebeam Player
Media files (particularly those downloaded from the internet) can vary significantly in terms of the way they are ‘encoded’ from
video to computer ‘data’. As mentioned in the installation section of this manual, the Veebeam Player relies upon the encoding/deencoding (codec) facilities already installed on your Laptop in order to play these files.
In general, if it will play on your Laptop screen, it will also play in the Veebeam Player. The most common problem encountered when
using the Veebeam Player is that a file can not be played because it is not seen as ‘compatible’. This means Veebeam can not find a
suitable codec on your Laptop to decode the file. In order to try and remedy this situation, it is suggested that you look on the
internet for a suitable codec (or codec pack) for the file you are trying to play (this can often be determined from the Properties page in
Windows or by using a specialist tool like MediaInfo). Numerous sources of information on codecs and codec packs can be found on
the internet. See the FAQs section at www.veebeam.com (under Support) for more information.

SC-200912-PS-9 (v5.9 - 20110224)
©2010/2011 Veebeam Corp. All rights reserved. Veebeam and the Veebeam logo are trademarks of Veebeam Corp.
Other brands and product names are trademarks or registered trademarks of their respective holders. 54 of 59
Appendix H - Important safety instructions
Please read the following important safety information on the use of the Veebeam product
• Read these instructions. All the safety and operating instructions in the Quick Start Guide and User Guide should be read
before the product is operated.
• Keep these instructions. The safety and operating instructions for the product should be retained for future reference.
• Heed all warnings. All warnings on the product and in the operating instructions should be adhered to.
• Follow all instructions. All operating and use instructions should be followed.
• Do not use this apparatus near water. To reduce the risk of fire or electric shock, do not expose this appliance to rain or
moisture. Do not use this product near water (e.g. near a bathtub, wash bowl, kitchen sink or laundry tub; in a wet basement;
or near a swimming pool). Do not expose this product to dripping or splashing. Do not place objects filled with liquids, such as
vases, near the product.
• Object and Liquid Entry. Never push objects of any kind into this product through openings as they may touch dangerous
voltage points or short-out parts that could result in a fire or electric shock. Never spill liquid of any kind on the product.
• Clean only with dry cloth. Unplug this product from the wall outlet before cleaning. Do not use liquid cleaners or aerosol
cleaners. Use a dry cloth for cleaning.
• Do not block any ventilation openings. Ensure that the product vents are not obstructed and allow for sufficient
ventilation to keep the product from overheating.
• Do not install near any heat sources. Do not place the product near heart sources (radiators, heat registers, stoves, or
other apparatus (including amplifiers) that produce heat). This may defeat the intended cooling/ventilation and cause the
product to overheat.

SC-200912-PS-9 (v5.9 - 20110224)
©2010/2011 Veebeam Corp. All rights reserved. Veebeam and the Veebeam logo are trademarks of Veebeam Corp.
Other brands and product names are trademarks or registered trademarks of their respective holders. 55 of 59
• Do not defeat the safety purpose of the polarized or grounding-type plug. This product may be equipped with a
polarized alternating current line plug (e.g. a plug having one blade wider than the other in the US). This plug will fit into the
power outlet only one way. This is a safety feature. If you are unable to insert the plug fully into the outlet, try reversing the
plug. If the plug should still fail to fit, contact your electrician to replace your obsolete outlet. Do not defeat the safety purpose
of the polarized plug.
• Power Sources. This product should be operated only from the type of power source indicated on the marking label. If you are
not sure of the type of power supply to your home, consult your product dealer or local power company.
• Protect the power cord. Power supply cords should be routed so that they are not likely to be walked on or pinched by items
placed upon them or against them. Ensure the power cord is not walked on or pinched, particularly at plugs, convenience
receptacles, and the point where they exit from the apparatus.
• Overloading. Do not overload wall outlets, extension cords or integral convenience receptacles as this can result in a risk of
fire or electric shock.
• Accessories. Only use attachments/accessories specified by the manufacturer.
• Lightning and extended non-use. Unplug this apparatus during lightning storms or when unused for long periods of time.
• Servicing. Do not attempt to service this product yourself as opening or removing covers may expose you to dangerous voltage
or other hazards. Refer all servicing to qualified service personnel.
• Damage requiring servicing. Servicing is required when the apparatus has been damaged in any way, such as power-supply
cord or plug is damaged, liquid has been spilled or objects have fallen into the apparatus, the apparatus has been exposed to
rain or moisture, does not operate normally, or has been dropped.
• Dropping. Do not drop or shake the device.
• Moving. Do not move the device when it is powered on.

SC-200912-PS-9 (v5.9 - 20110224)
©2010/2011 Veebeam Corp. All rights reserved. Veebeam and the Veebeam logo are trademarks of Veebeam Corp.
Other brands and product names are trademarks or registered trademarks of their respective holders. 56 of 59
Appendix I – License and legal information
The following provide license information for the Veebeam product.
FCC Statement
This product has been tested and complies with the specifications for a Class B digital devices, pursuant to Part 15 of the FCC Rules.
These limits are designed to provide reasonable protection against interference in a residential installation. This device generates,
uses, and can radiate radio frequency energy and if not installed and used according to the instructions, may cause harmful
interference to radio communication. However, there is no guarantee that interference will not occur in a particular installation.
If this equipment does cause harmful interference to radio or television reception, which is found by turning the equipment off and on,
the user is encouraged to try to correct the interference by one or more of the following measures:
• Reorient or relocate the receiving USB antenna
• Increase the separation between the equipment or devices
• Connect the equipment to an outlet other than the receiver’s
• Consult a dealer or an experienced radio/TV technician for assistance.
FCC Caution: Any changes or modifications not expressly approved by the party responsible for compliance could void the user’s
authority to operate this equipment.
This device complies with Part 15 of the FCC Rules. Operation is subject to the following two conditions: (1) This device may not cause
harmful interference, and (2) this device must accept any interference received, including interference that may cause undesired
operation.
This equipment may only be operated indoors. Operation outdoors is in violation of 47 U.S.C. 301 and could subject the operator to
serious legal penalties.
This device and its USB antenna(s) must not be co-located or operating in conjunction with any other antenna or transmitter.

SC-200912-PS-9 (v5.9 - 20110224)
©2010/2011 Veebeam Corp. All rights reserved. Veebeam and the Veebeam logo are trademarks of Veebeam Corp.
Other brands and product names are trademarks or registered trademarks of their respective holders. 57 of 59
Industry Canada Compliance Statement l Avis de Conformité à la Réglementation d’Industrie Canada
This Class B digital apparatus complies with Canadian ICES-003.
Cet appareil numérique de la classe B est conforme à la norme NMB-003 du Canada.
H.264/AVC
This product is licensed under the AVC patent portfolio license for the personal and non-commercial use of a consumer to (i) encode
video in compliance with the AVC standard (“AVC video”) and/or (ii) decode AVC video that was encoded by a consumer engaged in a
personal and non-commercial activity and/or was obtained from a video provider licensed to provide AVC video. No license is granted
or shall be implied for any other use. Additional information may be obtained from MPEG LA, L.L.C. See http://www.mpegla.com.
Rovi ACP
This product incorporates copy protection technology that is protected by US patents and other intellectual property rights of Rovi
Corporation. The use of Rovi Corporation’s copy protection technology in the product must be authorized by Rovi Corporation. Reverse
engineering and disassembly are prohibited.

SC-200912-PS-9 (v5.9 - 20110224)
©2010/2011 Veebeam Corp. All rights reserved. Veebeam and the Veebeam logo are trademarks of Veebeam Corp.
Other brands and product names are trademarks or registered trademarks of their respective holders. 58 of 59
Third Party Licenses and Free/Open Source Software
The software included in this product contains copyrighted software that is licensed under the GPL, LGPL and AFL. A copy of these
licenses can be accessed in the product on the Laptop application ‘About…’ box. You may obtain the complete Corresponding Source
code from us for a period of three years after our last shipment of this product, by sending a money order or check for $5 to:
Veebeam Corp.
Open Source Compliance
1469 Rollins Rd
Burlingame, CA 94010
USA
Please write “source code for product Veebeam” in the memo line of your payment.
You may also find a free copy of the source at http://www.veebeam.com/ under Support and then Downloads. This offer is valid
to anyone in receipt of this information.
This software is based in part on the work of the FreeType Team.
This software is based in part on the work of the Independent JPEG Group.
This product includes software developed by the OpenSSL Project for use in the OpenSSL Toolkit (http://www.openssl.org/).

©2010 Veebeam Corp. All rights reserved. Veebeam and the Veebeam logo are trademarks of Veebeam Corp.
Other brands and product names are trademarks or registered trademarks of their respective holders.
play anything. share anything.
United Kingdom United States
Betjeman House 1469 Rollins Road
104 Hills Road Burlingame, CA
Cambridge 94010, USA
CB2 1LQ, UK
 Loading...