


VECTRON SYSTEMS
User manual
VECTRON SYSTEMS


3Vectron POS MobilePro
Date: 22.07.2008
© 2005 - 2008 by Vectron Systems AG
Subject to error and modifi cation
Manu facturer
Vectron Systems AG
Willy-Brandt-Weg 41
D-48155 Münster
www.vectron.de
Vectron
Leading in POS Technology
Your Vectron dealer
Stamp


5Vectron POS MobilePro
1 Introduction ..................................................................... 9
2 Notes on safety ..............................................................11
3 Instructions for use ..................................................... 12
4 Disposal ............................................................................ 13
5 Vectron POS MobilePro .............................................. 15
5.1 Shipment ................................................................................... 15
5.2 Mode of operation and starting .......................................16
5.2.1 Mode of operation ..................................................................16
5.2.2 Power supply ...........................................................................19
5.2.3 Switch on and -off ................................................................. 19
5.3 Components ............................................................................. 21
5.3.1 Display .......................................................................................21
5.3.2 Keyboard and Soft keys ......................................................23
5.3.3 Charge contacts ..................................................................... 25
5.3.4 Battery exchange ..................................................................26
5.3.5 LED -Signals .............................................................................36
5.3.6 Acoustic signal ....................................................................... 37
5.3.7 Vibration motor ......................................................................37
5.3.8 Wireless LAN ..........................................................................38
5.3.9 Bluetooth ...................................................................................39
5.3.10 Transponder ............................................................................ 39
5.3.11 SIM-card reader ...................................................................... 42
5.3.12 Brightness sensor ..................................................................44
5.3.13 Tilt sensor .................................................................................44
5.3.14 Power management .............................................................46
5.3.15 Failure of power supply .......................................................46
5.4 Technical data Vectron POS MobilePro ........................47
6 Charging station and batteries ................................ 51
6.1 Shipment ................................................................................... 51
6.2 Mode of operation ..................................................................51
6.3 Charging ...................................................................................55
6.4 Service life of batteries ........................................................56
6.5 Technical data ........................................................................57
Contents

6 Vectron POS MobilePro
7 Putting into operation ................................................ 59
8 Operating the POS system ........................................63
8.1 Sign in and -out at the POS system ................................63
8.1.1 Sign in by transponder card .............................................. 63
8.1.2 Sign in without transponder card ...................................64
8.1.3 Sign out ......................................................................................64
8.2 Guest checks and hold buffers .........................................64
8.2.1 Starting a new GC ................................................................. 64
8.2.2 Close and re-open a GC ....................................................... 65
8.2.3 Paying a guest check ........................................................... 65
8.2.4 Guest check split ...................................................................65
8.2.5 Guest check move ................................................................. 66
8.2.6 Shift change ............................................................................. 66
8.2.7 Hold buffers .............................................................................66
8.3 Reports .......................................................................................67
8.4 Input and output .................................................................... 69
8.4.1 Input of amounts ....................................................................69
8.4.2 Screen windows.....................................................................69
8.5 Making a sale ..........................................................................70
8.5.1 Input of PLUs ...........................................................................70
8.5.2 Free price input ......................................................................70
8.5.3 Payment..................................................................................... 71
8.6 Void and merchandise return ...........................................71
8.6.1 Correction ................................................................................. 71
8.6.2 Void .............................................................................................71
8.6.3 Merchandise return ..............................................................72
8.7 Change invoice format ........................................................72
8.8 Programming the POS system .........................................72
8.9 Final remark ............................................................................73
9 Service and maintenance .......................................... 75
9.1 Cleaning the display ............................................................75
9.2 Cleaning the keyboard ........................................................ 75
9.3 Cleaning the housing ...........................................................84
9.4 Cleaning the charge contacts ........................................... 84
9.5 Careful handling of the terminal ..................................... 85

7Vectron POS MobilePro
10 Accessories ..................................................................... 87
10.1 System accessories ...............................................................87
10.1.1 Charging station and batteries ........................................ 87
10.1.2 Transponder ............................................................................ 88
10.1.3 Touch pen .................................................................................88
10.1.4 Multi-function touch pen .................................................... 88
10.2 Additional accessories ........................................................89
10.2.1 Mobile thermal printer Vectron MP20 ..........................89
10.2.2 Leather holster ........................................................................ 90
10.2.3 Safety swirl ..............................................................................93
11 Special functions for Vectron POS MobilePro .... 94
11.1 Alphanumeric short cuts ....................................................94
11.2 Print data server..................................................................... 95
11.3 Offline Guest Checks ...........................................................96
12 Additional Vectron products ................................... 97
12.1 Stationary Vectron POS systems ..................................... 97
12.2 Vectron POS PC ...................................................................... 98
12.3 Vectron Commander ............................................................98
13 EC-declaration of conformity for CE-marking ... 99
14 FCC / IC Compliance Statements .......................... 101
14.1 Vectron POS MobilePro Terminal .................................101
14.2 Vectron POS MobilePro charging station...................101
15 SAR ..................................................................................102
16 Supplement .................................................................. 103
16.1 Piktographs ............................................................................103
16.2 Glossary...................................................................................105
16.3 Document revision ..............................................................10 9


9Vectron POS MobilePro
MobilePro
US
Introduction1
We very much appreciate your purchase of the Vectron POS MobilePro. You have decided in favor of a high quality product that will
support you in your daily work.
The Vectron POS MobilePro is a self-contained POS system which
uses the same software as the stationary Vectron POS systems.
In addition, the Vectron POS MobilePro is convincing by high-quality
features like wireless network communication (Wireless LAN), connection of modern mobile printers through Bluetooth, a high-resolution colour display and simplifi ed operating functions.
Since it is technically comparable to stationary Vectron POS 64-Bit
systems, you can easily integrate the Vectron POS MobilePro into an
existing ECR network or establish such a network.
The high-quality electronics of the Vectron POS MobilePro is protected by a very robust magnesium housing.
In chapter 5 you get an overview on the hardware features and their
handling.
This manual describes in chapter 7 how to start the Vectron POS
MobilePro.
Chapter 8 informs you on how to operate the Vectron POS MobilePro.
The following chapters contain additional information, e.g. on the
maintenance of the system and its components and on optional
accessories.
A glossary of terms completes the manual.

10 Vectron POS MobilePro
Please see the instructions for use and notes on safety on the following pages.
Note
This manual does not contain information on the very
extensive programming of the Vectron POS MobilePro.
This requires detailled knowledge and is therefore incumbent on your Vectron dealer.
For all detailed questions please contact your local Vectron dealer who will be glad to assist you.
Vectron Systems AG

11Vectron POS MobilePro
MobilePro
US
Notes on safety2
When operating your Vectron POS system please follow these instructions:
• Only by means of proper positioning and maintenance, as well
as operation according to the instructions for use, the safety and
health of individuals and of animals and property, will not be endangered.
• Improper installation, maintenance or operation may result in
injury to the user and damage to the devices.
• Maintenance and repair of the Vectron POS system is to be carried out only by trained personnel, certifi ed by the manufacturer.
• The Vectron POS system has been manufactured to the highest
possible standards. However, we cannot guarantee that the delivered components, their constituent parts and the documentation are, and will remain, free of faults.
• The manufacturer does not accept liability in case of improper
installation and maintenance and improper operation of the Vectron POS system.

12 Vectron POS MobilePro
Instructions for use3
Please follow these instructions.
• Only operate the POS system with the dealer installed periphe-
rals.
• Do not insert any foreign objects into any openings on the de-
vices.
• Operate the touch screen exclusively with a touch pen. Do not use
biros or sharp objects!
• Exchange the Vectron B30 battery only when the terminal is swit-
ched off.
• Charge the Vectron B30 battery exclusively in the „Vectron POS
MobilePro Charging Station“.
• Do not leave unused batteries in the charging station.
• If possible use the batteries to their full capacity and only charge
them if the terminal asks you to exchange them.
• The devices may not be exposed to strong heat. Ensure there is
adequate cooling.
• Do not operate the devices near strong electromagnetic fi elds
(TVs, loudspeakers).
• Protect the POS system from dust and humidity.
• Clean only with a damp cloth using a mild cleanser.
• Keep the packaging material for dispatch.
13Vectron POS MobilePro
MobilePro
US
• In case of service please contact your Vectron dealer. When sen-
ding the device for repair always use the original packing. For
damages due to improper packing the manufacturer does not
accept liability.
Disposal4
The manufacturer assumes a unilateral obligation to take back waste electric and electronic equipment that has been used for commercial purposes, consistent with Art. 9 of European Union Directive
2002/96/EC, last changed by European Union Directive 2003/108/
EC. It applies:
• The manufacturer takes back waste electric and electronic
equipment that was produced by or on behalf of the company
and guarantees a proper recycling of this equipment.
• The legal obligation applies for devices, that will be put on the
market after August 13, 2005. In addition, the manufacturer
extends this obligation to all devices that have been put on the
market as of January 1, 2004.
• Please hand over any waste electric or electronic equipment and
any accessories or peripherals that you do not require or that cannot be used anymore to your Vectron dealer. Or send it back to the
manufacturer directly, prepaid and marked “Waste electric and
electronic equipment”.
WEEE-Reg.-No. DE 91733199


15Vectron POS MobilePro
MobilePro
US
Vectron POS MobilePro5
The Vectron POS MobilePro is a mobile POS system with high performance and autonomous applications. The proven Vectron POS
software is also applied in the Vectron POS MobilePro. This makes
mobile and stationary Vectron POS systems compatible.
In this chapter we will introduce you the Vectron POS MobilePro and
explain its functions.
The charging station and its handling will be described in chapter 6.
Shipment5.1
Standard delivery of the Vectron POS MobilePro comprises:
• One terminal Vectron POS MobilePro, equipment as per order.
• One Vectron B30 battery.
• User manual.
• Dispatch box.
• Software license as per order.
Note
The Vectron POS MobilePro is available with different
equipment. Please check the correct delivery on receipt. In case of incorrect delivery please contact your
Vectron dealer.
Your dealer will supply the system and install it. You may then start
working immediately.

16 Vectron POS MobilePro
Mode of operation and starting5.2
The Vectron POS MobilePro is a self-contained POS system, which
supports the user in his work independent of the location.
Mode of operation5.2.1
The Vectron POS MobilePro has a very robust magnesium housing,
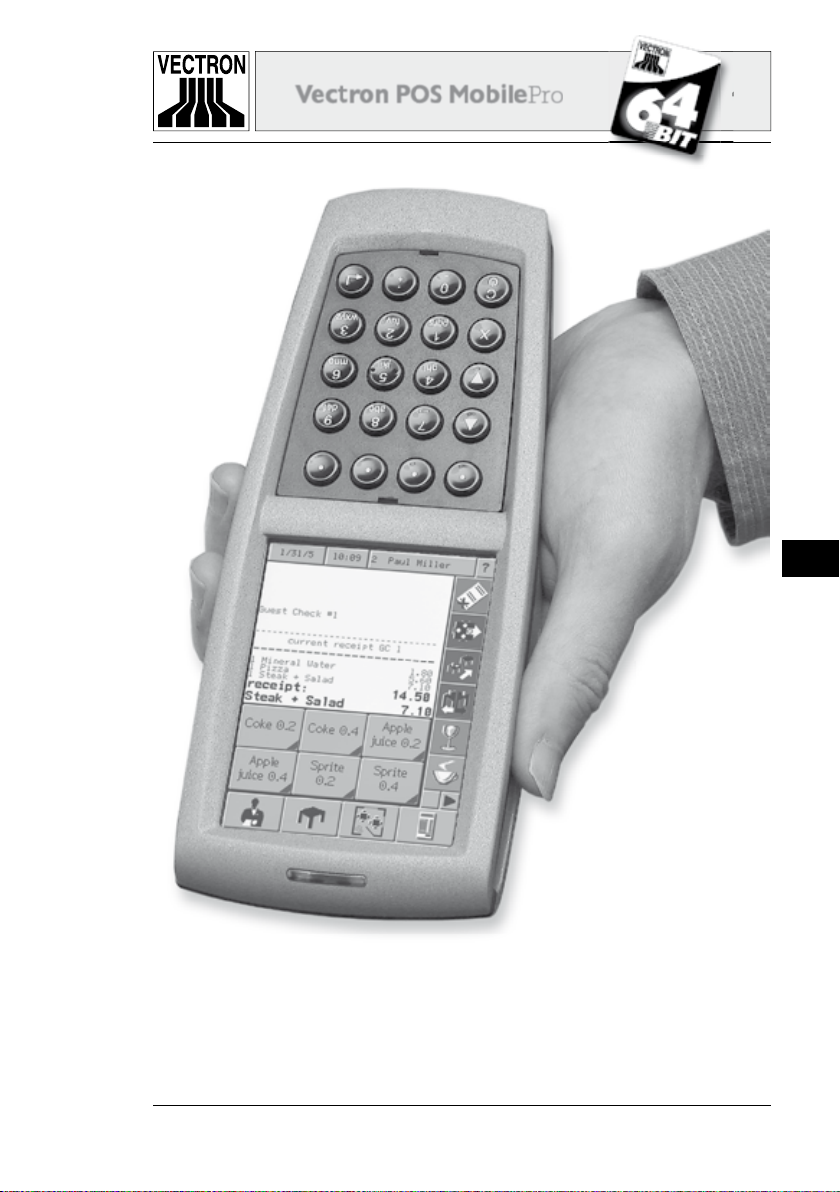
which is designed to be dust- and waterproof.
Below the high-resolution colour display there is the keyboard with
20 keys, four of which are soft keys. The latter can be assigned individual functions. A brightness sensor activates - if required - automatically the background lighting of keyboard and display. You can
take off the whole keyboard unit for cleaning without having to open
the housing.
The complete systems electronics and the Vectron POS software are
in the terminal, so that you can do without a base station.
The user can sign in to the POS system. This is either made per password or identifi cation number or via the optional built-in transponder
reader. This reader recognizes a user card and the Vectron POS software releases the authorization.
The user can now go to the customer and take orders or collect money. Data input and -display takes place on the high-resolution colour
display with touch sensor, the so-called touch screen. The booking
data is stored in the main memory. Powerful batteries and an effi cient energy management avoid data loss. In addition, an integrated
system battery powers the main memory with minimum current in
case the battery must be exchanged.
Order data is transferred to counter or kitchen via a wireless network
connection, so-called Wi-Fi. Thanks to the built-in Wi-Fi-module the
Vectron POS MobilePro can easily be integrated into an existing radio network.

17Vectron POS MobilePro
MobilePro
US
Fig. 1: Vectron POS MobilePro
Colour display w ith
touch screen
LED
Four soft keys
Keyboard

18 Vectron POS MobilePro
The radio range is approximately 50 metres for indoor applications
and up to 150 metres in open air. A permanent radio communication
is not required, all data to be transferred is stored. Via a Wi-Fi connection you can also update the Vectron POS software and read out
the data for further processing.
An additional integrated radio module serves for connection of mobile peripherals. Via so-called Bluetooth, e.g. mobile printers can
contact the Vectron POS MobilePro via short distances.
The already mentioned optional transponder reader allows to use
customer card systems. The presently used format is „Tag-it®“, other
formates like Mifare® and Legic® are being prepared.
The tilt sensor facilitates the display of information for the customer.
The sensor recognizes a tilt of the terminal and rotates the screen
information by 180°.
The integrated SIM-card reader prepares the ground for coded data
processing, which can be used e.g. for future payment systems.
The Vectron POS MobilePro has several possibilities for giving signals.
• Three LEDs in the housing serve for optical perception of battery
status or warnings.
• Loudspeakers can give acoustic signals.
• A built-in vibration motor serves for an unobtrusive transmission
of information.
All three signals can be confi gured and combined individually.

19Vectron POS MobilePro
MobilePro
US
Power supply5.2.2
The Vectron POS MobilePro is powered by the exchangeable lithium-ion-battery Vectron B30. The maximum service life is approx. ten
hours. This period of course depends on the level of utilization and
the confi guration of the power management. Discharged batteries
can be charged again in the charging station.
Switch on and -off5.2.3
By pressing the C key the POS MobilePro is switched on and off.
For switch on press the key briefl y. The three LEDs above the display
blink one after the other.
In case of a new start, e.g. after
battery exchange, you see the start
screen.

20 Vectron POS MobilePro
You then see the registration surface
and the POS MobilePro is ready for
operation.
Note
You registration surface may differ completely from
the fi gure above. This depends on the programming of
the POS MobilePro. Please contact your local Vectron
dealer.
For switch off press the
C
key for two seconds or longer. This does
not switch off the POS MobilePro as such but the display and an energy save mode is enabled. This saves the battery and prolongs the
service life of the POS system.
On next switch on you therefore do not see the start screen but the
registration surface.
For a complete switch off of the Vectron POS MobilePro you must
press the C and keys on top right simultaneously for fi ve seconds.
The blue and red LED light up for fi ve seconds.
Then the blue and green LED start to fl ash parallel with approx. 1 Hz.
You can now release the keys. The blue and green LED fi nally fl ash
up once and go out.
The POS MobilePro is completely switched off.

21
Vectron POS MobilePro
MobilePro
US
Components5.3
The Vectron POS MobilePro boasts high-quality components and a
large variety of functions. In this chapter we will describe the components and their functions.
Display5.3.1
The high-resolution colour display shows all required information.
Furthermore, it has a pressure-sensitive surface for touch operation.
The colour display has a transfl ective screen with active TFT-technology and a resolution of 240 x 320 pixels and 256 colours. A transfl ective display is advantegous because it uses the ambient light for
illumination. This saves battery supply and allows application in
direct sunlight. You thus get a high-contrast and sharp picture even
in case of strong light incidence. The display has a large viewing
angle. Its graphical attributes allow an excellent display of photos
and pictographs.
You can operate the Vectron POS MobilePro via the touch screen.
All display elements can be selected by touch. You can arrange the
buttons individually and assign them colours.
Attention!
Danger of damage!
Only touch the screen with the suitable touch pen!
Using biros or other sharp objects can damage the
device!

22 Vectron POS MobilePro
Fig. 2: Operating the POS MobilePro with touch pen
If you don‘t have the touch pen at hand you can exceptionally operate the touch screen with the fi nger tip. However, depending on the
button size this can lead to inaccurate input!

23
23
Vectron POS MobilePro
MobilePro
US
Keyboard and Soft keys5.3.2
Another operating element of the Vectron POS MobilePro is a keyboard with 20 keys. The keyboard has a numeric pad, four soft keys,
two scroll keys (line up or down) and keys for multiplication and input and Delete or On-/Off key.
Attention!
Danger of damage!
The keyboard may exclusively be operated with fi ngers or a suitable pen!
Using sharp objects can damage the device!
Keyboard
The keys of the POS MobilePro have the following functions:
C
...................................... ON-/OFF switch of device or Correction
(delete of last character).
...................................... Close data input.
+
...................................... Decimal input.

24 Vectron POS MobilePro
0
-
1
pqrs2tuv3wxyz
4
ghi
5
jkl6mno
7
[
8
abc9def
........... Keys for alphanumeric input
(see chapter 11.1).
...................................... Scrolling up or down.
X
...................................... Multiplication key.
The keys can also be assigned different functions.
Softkeys
The four soft keys below the display can be assigned individual functions, e.g. PLU booking or operator sign in. Please contact your local
Vectron dealer.
You can take out the keyboard unit for cleaning, see chapter 9.2. You
do not have to open the housing.

25
25
Vectron POS MobilePro
MobilePro
US
Charge contacts5.3.3
At the bottom of the Vectron POS MobilePro there are two charge
contacts for charging an inserted battery in the station.
In order to charge the battery that is in the POS MobilePro, insert
the device with the display to the top in the large medium slot of the
charge station.
The green LED above the display indicates the charging.
The charge contacts permanently supply the POS MobilePro with
operating voltage, if it is inserted in the charge station without battery. An operation without battery is therefore possible.
Fig. 3: Charge contacts of Vectron POS Mobi lePro
Charge contacts
Please heed the remarks on the cleaning of charging contacts in
chapter 9.4.

26 Vectron POS MobilePro
Battery exchange5.3.4
The Vectron POS MobilePro is supplied with power by the Vectron
B30 battery. The battery is in a compartment at the rear of the POS
MobilePro under a removable lid.
Proceed as follows to exchange the battery:
1. Press the C key for two seconds or longer until the display of the
POS system switches off.
2. Turn the locking button of the compartment lid by 90° to the left
until you feel a clear resistance. Take off the lid.
Fig. 4: Opening the locki ng button of the battery compartment

27
Vectron POS MobilePro
MobilePro
US
3. Take off the lid by pressing with the thumb on the lower edge of
the battery compartment lid. The upper edge of the lid is lifted.
Fig. 5: Lifting the lid

28 Vectron POS MobilePro
4. Put one or two fi ngers at the upper edge of the lid and take the lid
off from the battery compartment.
Fig. 6: Removing the l id

29
29
Vectron POS MobilePro
MobilePro
US
5. Depending on the design there is a notch at the bottom of the
right long side (see fi g. 7) or at the bottom of the battery housing
(see fi g. 8). Put a fi nger nail at the notch and press the battery to
the top.
Fig. 7: Lifting the battery

30 Vectron POS MobilePro
Fig. 8: Lifting the battery
6. Take out the battery.

31Vectron POS MobilePro
MobilePro
US
7. Slide the new battery with the charge contact surface to the front
in the battery compartment.
Fig. 9: Inserting the batter y
Current
collectors
At tention!
Danger of damage!
Do not remove the battery by turning round the POS
MobilePro when the compartment lid is removed and
letting drop the battery out of the compartment.
This may damage the collectors of POS MobilePro irreparably.

32 Vectron POS MobilePro
Fig. 10: Inserted battery
Current
collectors
8. The charge contact surfaces of the battery (see fi g. 21) must contact the current collectors of the POS MobilePro.
9. Put back the battery compartment lid as follows:
a. The battery compartment lid has at its bottom two holders.
they exactly fit into the recesses left and right of the charge
contacts (see fig. 3).
b. Put on the battery compartment lid and leave the lid half open
on the top (see fig. 11).

33
33
Vectron POS MobilePro
MobilePro
US
Fig. 12: Closing the battery compar tment l id
Fig. 11: Putting on the battery compartment lid
c. Press down the locking button with one finger and turn it by
90° to the right into a horizontal position.

34 Vectron POS MobilePro
10. Check that the battery compartment lid is fi xed and seated correctly (see fi g. 11). If this is not the case (see fi g. 13), the Vectron
POS MobilePro is not dust- and waterproof!
Furthermore there is the risk that the battery is not charged when
you put the terminal into the charging station!
Fig. 13: Batter y lid is not closed cor rectly
11. For switch on press the C key. The Vectron POS MobilePro is now
ready for operation.
Caution!
Caution!
Use exclusively batteries type Vectron B30!
Risk of explosion if battery is replaced by an incorrect
type!

35
35
Vectron POS MobilePro
MobilePro
US
Battery voltage display
The POS MobilePro has different possibilities to signal that the battery is low and should be exchanged. Normally a window is faded
in with the request „Charge battery“. Additional optical and acoustic
signals can be confi gured.
In running mode you can fade in a progress bar to display the voltage of the battery.
Battery protection circuit
The Vectron POS MobilePro has a battery protection circuit, which
checks the voltage of a newly inserted battery. In case the battery
does not have the required minimum voltage, the red LED fl ashes
twice when being switched on (see below).
If, however, the battery exchange takes place in less than three seconds, the battery protection circuit cannot always recognize the
battery exchange correctly. Here, too, the red LED would fl ash twice
when being switched on. You should therefore take at least three
seconds for the exchange of the battery. Should the POS MobilePro
erroneously reject a charged battery, you can either take the battery
out of the terminal for three seconds or put the terminal with the
battery into the charging station for a short time. The POS MobilePro
will then recognize the charged battery correctly.

36 Vectron POS MobilePro
LED-Signals5.3.5
Above the display there are three LEDs in blue, green and red. They
indicate a different operating state and can be programmed individu al ly.
Blue LED
Main function of the blue LED is to indicate new incoming messages
by a slow fl ashing. The Vectron POS MobilePro can be confi gured
so that messages in the ECR network can be sent and received. For
instance the kitchen could inform that a meal is ready, which the
waiter can now serve. Please contact your local dealer if you want
your POS MobilePro to be confi gured accordingly.
Green LED
Main function of the green LED is to indicate the status of the inserted battery during charge in the charging station. Signals:
• Green LED on: terminal in network mode (charge station).
• Green LED off: terminal in battery mode.
• Green LED fl ashes: battery is charged.
Red LED
Main function of the red LED is to indicate a critical situation. There
are two signals:
• Red LED fl ashes quickly: battery defect.
• Red LED fl ashes slowly for ca. 2 sec.
when switching on: battery to weak to switch on
the terminal.

37
37
Vectron POS MobilePro
MobilePro
US
Combinations of the three LEDs can indicate different situations:
• Complete switch off with key combination C & :
Red and blue LED light up for approx. fi ve seconds, then the blue
and green LED fl ash parallel with approx. 1 Hz.
• Switch on, voltage too low:
Alternate quick fl ashing of red and green LED for approx. two
seconds.
• Power supply in network mode too low:
Alternate slow fl ashing of red and green LED.
You can combine the LEDs with the other signals (loudspeaker, vibration motor).
Acoustic signal5.3.6
The Vectron POS MobilePro has a built-in loudspeaker, which can
produce polyphone tones. It is suitable for acoustic warnings.
You can confi gure the loudspeaker via the Vectron POS software and
combine it with other signals (LED, vibration motor).
Vibration motor5.3.7
The integrated vibration motor serves as noiseless signal. You can
combine it with other signals (LED, loudspeaker).

38 Vectron POS MobilePro
Wireless LAN5.3.8
The Vectron POS MobilePro has a built-in module for wireless network communication, so-called Wireless LAN. It allows to integrate
the POS MobilePro in an existing Vectron POS network without having to use network cables.
The integrated Wireless LAN-module uses the widespread standard
802.11b. This allows communication with nearly all commercial
Wireless LAN-peripherals, so-called Access Points.
The Vectron POS MobilePro can communicate with max. 16 different
access points but not simultaneously. This is not necessary since
data fl ow takes place from access point to access point. This guarantees that data is always sent to the correct location. Order data for
instance is sent to e. g. kitchen or counter.
The range of the Wireless LAN-module is approx. 50 metres indoor
and approx. 150 metres in open air. However, the range is reduced
by obstacles in the environment. This can be plants and trees, windowpanes, furniture and walls or human bodies. As a general rule a
Wireles LAN-connection is interference-free if there is visual contact
between the communicating devices.
We recommend to mount access points at a height of at least two
metres.
An interrupted Wireless LAN-connection is no restriction since you
can use the Vectron POS MobilePro as autonomous POS system. The
POS MobilePro stores all entries in the main memory. If data is to be
transferred per Wireless LAN to other POS systems, the POS MobilePro re-establishes communication as soon as it comes into the range
of the radio network. Data loss is excluded.
Finally, the Wireless LAN-module allows to update the Vectron POS
software and to transfer data for further processing to the Vectron
Comma nder.
Please contact your local dealer if you want to establish a Wireless
LAN-network.

39
39
Vectron POS MobilePro
MobilePro
US
Bluetooth5.3.9
Another integrated radio module, so-called Bluetooth, serves for communication with peripherals via short distances. This radio connection enables the Vectron POS MobilePro to contact mobile printers.
Further connections to e.g. bar code scanners, PC or mobile phones
are being prepared.
The range is approx. fi ve metres. The same provisions as for Wireless
LAN apply (see above): obstacles reduce the range or can interrupt
communication. For a trouble-free communication there should be
visual contact between the devices.
Note
The application of a Bluetooth-module requires an additional license. Please contact your local dealer if you
want to connect e.g. a mobile printer per Bluetooth.
Transponder5.3.10
The Vectron POS MobilePro can have an integrated module for a contactless card system, so-called Transponder, as an option (see chapter 10.1.2). With the transponder users can sign in to the POS system
and customer cards can be recognized.
The transponder reads and writes cards without the card having to
touch the transponder. The used format is „Tag-IT
®
“.
For reading or writing of the transponder card hold it to the rear of
the terminal. The transponder is behind the dark plastic plate with
the product logo.

40 Vectron POS MobilePro
Fig. 14: Using the optional tran sponder
This technology can be used for user sign in and -out. The user only
approaches his transponder card to the housing of the POS MobilePro. The transponder module reads the card data and releases the
authorization for this user.
This technology also serves to establish a simple customer card
system. The customer gets a transponder card, which he approaches
for each booking to the housing of the POS MobilePro. On his card
points are debited or credited.

41
Vectron POS MobilePro
MobilePro
US
Fig. 15: Using the optional transponder

42 Vectron POS MobilePro
SIM-card reader5.3.11
For future applications we equipped the Vectron POS MobilePro with
a SIM-card reader. It serves e.g. for a coding for cashless payment.
The card reader is under the battery compartment lid next to the
current collectors.
Proceed as follows to insert a SIM-card to the reader:
1. Press the C key for two seconds or longer until the display of the
POS system switches off.
2. Turn the locking button of the compartment lid by 90 degree to
the left and take off the lid (see above, fi g. 4).
3. Take out the battery.
4. Take the SIM-card so that the chip is at the bottom. The rounded
edge points to the rear.
SIM- card
Fig. 16: Adjusting the SIM-card

43
43
Vectron POS MobilePro
MobilePro
US
5. Insert the SIM-card to the card reader.
6. Insert the battery with the charge contacts to the front into the
battery compartment (see above, fi g. 5).
7. Put back the compartment lid and close it.
8. To start the device press the C key. The Vectron POS MobilePro
is now ready for operation.
To remove the SIM-card you require a pair of pincers. Take the SIMcard with the pincers and take it out of the reader.
Fig. 17: Removing the SIM- card

44 Vectron POS MobilePro
Brightness sensor5.3.12
An integrated brightness sensor adjusts the background lighting of
the display and switches on the keyboard lighting if necessary.
Here, a newly developed power management is applied, which offers various profi les for selection. Thus, you can adjust the Vectron
POS MobilePro before starting work to the light conditions and you
always have a clear and precise display.
Please ask your local Vectron dealer to present you the profi les under
different environmental conditions.
Tilt sensor5.3.13
A tilt sensor, which is built in the housing of the Vectron POS MobilePro recognizes changes of the horizontal position. You can thus turn
the screen of the POS MobilePro by 180° if for instance you want to
show the customer the invoice. A turn round the transverse axis and
the display points to the bottom. You can program the POS MobilePro so that a turn of the screen switches to another layout format.
Thus, you can present the customer e.g. a sorted invoice.
The tilt sensor also recognizes the vertical position of the POS MobilePro, for instance if it is stored in the leather holster. The tilt sensor
then switches off the display of the POS system and enables an energy save mode.
On the other hand the tilt sensor switches the display on again if you
take the POS MobilePro and bring it into a horizontal position.
45
45
Vectron POS MobilePro
MobilePro
US
Fig. 18: Vectron POS MobilePro with activated ti lt sensor

46 Vectron POS MobilePro
Power management5.3.14
Some of the previously presented functions and attributes of the
Vectron POS MobilePro can be confi gured so that it switches to an
energy save mode if it is not used.
Following components of the POS MobilePro can be switched on
and off depending on the requirements: screen, main processor,
background lighting for screen and keyboard as well as Wireless
LAN- and Bluetooth-module.
For further information see chapter 7.
Failure of power supply5.3.15
All data in the Vectron POS MobilePro is protected against a sudden
failure of the power supply (e.g. removal of battery). This is guaranteed by an integrated system battery, which supplies the data memory of the POS system with minimum current.
The service life of this battery is at least fi ve years. A data loss can
therefore be excluded.
In your own interest you should re-establish the power supply in
case of failure as soon as possible.

47
Vectron POS MobilePro
MobilePro
US
Technical data Vectron POS MobilePro5.4
Software
• 100,000 PLUs*
• 65,535 Departments*
• 1,000 Operators*
• 65,535 Guest checks or customers*
• 200 Cash registers per network*
• 100 Printers per network*
*) The indicated values are maximum values, which can only be reached
with special programming and optimum hardware equipment. Please contact your specialist dealer to assist you with your special requirements.
• Intelligent, partly sensor-controlled power management (bright-
ness- and tilt sensor).
• On- and Offl ine mode incl. synchronization of order- and print
data.
• Improved functions for direct PLU keys via alphanumeric codes.
• Support of Bluetooth peripherals (printers).
• USB backup via ECR network.
• Paging function combined with Vectron ServiceCall.
• Simplifi ed order input through additional touch functions.
• Power management with various profi les for energy saving.
Hardware
• 3.5‘‘ TFT-Display with 256 colours, background-lighted, transfl ec-
tive, resolution 240 x 320 pixels.
• Analogue-resistive 4-wire touch panel.
• Keyboard with 20 keys (4 soft keys); background--lighted.
• Magnesium diecast housing, dust- and waterproof.
• 64-Bit Processor with 131 MHz clock frequency.
• 4 MB SRAM (battery-buffered), optional 8 MB.
• 8 MB FlashROM for system software.
48 Vectron POS MobilePro
• Bluetooth interface for connection of printers. Bluetooth standard
1.1, range approx. 5 meters. Further connections e.g. to bar code
scanners, PC or mobile phones are being prepared.
• WLAN network interface, standard 802.11b, transfer rate up to 11
Mbit /s.
• Optional transponder module with 13,56 MHz for a contactless
card system (customer cards, operator sign-in etc.); Tag-it® stan-
dard.
• SIM-card reader.
• Exchangeable 3.6V Li-Ion battery with 1950 mAh, max. operating
time 10 hours.
• License memory module.
• Loudspeaker (digitized tones).
• 3 LEDs (red, green, blue) for indication of warnings, messages
etc.
• Vibration motor.
• Brightness sensor to control background- and keyboard lighting.
• Tilt sensor to control screen display and -switch off.
• Temperature range -10° ... +50°C.
Note
At the beginning of series production not all of the
functions and attributes are available. Please contact
your local dealer in case of questions.

49
49
Vectron POS MobilePro
MobilePro
US
Dimensions
• Depth approx.
1.06 in
• Dimensions
in inches
Weight
• approx. 300 g resp. 0.66 lb (incl. battery)
3,06
2,21
2,91
7,32


51Vectron POS MobilePro
MobilePro
US
Charging station and batteries6
The most important accessories of the Vectron POS MobilePro
are charge station and batteries. While a battery is comprised in
the shipment of the POS MobilePro, the charging station can be
purchased separately.
Shipment6.1
The charging station is delivered as follows:
• One Vectron POS MobilePro Charging Station for charging of two
batteries and one terminal.
• External power supply Vectron PS20 with country-specifi c plug.
• Dispatch box.
Mode of operation6.2
The batteries of the Vectron POS MobilePro are charged in the charging station. This station has two lateral slots for external batteries.
In the medium large slot you can charge the battery that is in the
Vectron POS MobilePro. You can operate the POS Mobile Pro during
charging.
LEDs indicate the operating and charge status.
Charging time is approx. 2,5 hours.
The housing of the charging station is made of plastic and has a metal ground plate.
Four rubber feet at the bottom ensure a fi xed, horizontal position.
Alternatively you can mount the charging station at the wall. For this
purpose you require a mounting angle.

52 Vectron POS MobilePro
Fig. 19: Charging station for Vectron POS MobilePro

53
53
Vectron POS MobilePro
MobilePro
US
Fig. 20: Term ina l and one battery in cha rging station
Fig. 21: Battery Vectron B30 - old and new housing shape
Charge contacts Charge contacts

54 Vectron POS MobilePro
Fig. 22: Power supply Vectron PS20
The shape of batteries and slots of the charging station match each
other; you cannot insert the batteries the wrong way round.
Attention!
Danger of damage!
For the power supply of the charging station please
use exclusively the Vectron PS20 power supply.
Using other devices may damage or destruct the
charging station.

55
55
Vectron POS MobilePro
MobilePro
US
Charging6.3
1. Connect the charging station with the Vectron PS20 power supply to the network. The green LED below the left battery slot desi-
gnated „Power“ indicates the readiness for operation.
2. Insert one or two batteries carefully into the lateral slots of the
charging station. Make sure that the charge contacts are at the
front of the bottom. You must see the product label at the right
side. The yellow LED (charge control, designated „Charge“ and
„End“) fl ashes slowly.
3. You can charge a third battery, if this is in the Vectron POS MobilePro. Insert the terminal with the charge contacts to the bottom
into the station. The green LED above the display fl ashes.
4. The charging takes approx. 2,5 hours. It is fi nished when the respective control lamp is permanently on.
Notes
1. The inserting of fully charged batteries to the lateral slots may cause different reactions of the yellow
LED: In one slot the battery is immediately recognized as fully charged, the LED is permanently on. In
the other slot this recognition may take up to one
minute; the LED fl ashes for the time being.
This is due to minimum manufacturing tolerances
at the charge contacts of the charging station and
does not indicate an error.
2. The charging procedure depends on the temperature. Outside a temperature range of approx. 0°...45°C
the charging station interrupts the charging. Please
make sure that charging station and batteries are
not used outside this temperature range. A thus interrupted charging will be continued automatically.

56 Vectron POS MobilePro
Service life of batteries6.4
The Vectron B30 battery is a high-quality, rechargeable Lithium-Ionbattery. To reach its maximum capacity they should be discharged
completely three to four times and then charged again.
Symptoms which indicate an exhaustion of the battery capacity:
• The battery must be charged in ever shorter intervals.
• The Vectron POS MobilePro suddenly switches off and can only
be used with a newly charged battery. The error message „Batte-
ry empty“ is no longer displayed.
• The Vectron POS MobilePro does not react to switch on.
At tention!
Important note:
Exhausted or damaged batteries cannot be repaired
but need to be exchanged and disposed of properly!
Tips for a long service life of the batteries:
• If possible use the batteries until the Vectron POS MobilePro fades in the message „Battery empty“ or - when having confi gured
the capacity progress bar - the bar turns red.
• Always charge the discharged batteries completely. This status
is indicated by permanently illuminated control lamps.
• Batteries that are not used for a longer period (approx. 2 - 3
months), should be charged to max. 30 %. For this purpose the
discharged Vectron B30 must be charged for approx. 40 minutes.
Afterwards do not store the battery in the charging station.

57
57
Vectron POS MobilePro
MobilePro
US
Technical data6.5
• Charging station for simultaneous charging of one terminal Vec-
tron POS MobilePro and and two Vectron B30 batteries.
• POS MobilePro can be operated during charging.
• Charging time approx. 2,5 h.
• PC-ABS-plastic housing with metal ground plate.
• Four rubber feet.
• Two charge control lamps (yellow LED).
• One green LED for readiness for operation.
• Power supply via external Vectron PS20.
• input voltage 90 - 240V.
• output voltage 24V, max. 1,25A.
• Permissible supply voltage: 12 - 30V.
• Max. power consumption depending on voltage.
• Max. wattage 30W.
• Temperature range (operating condition) 0° ... 40°C.

58 Vectron POS MobilePro
Weight
• approx. 600 g resp. 1.32 lb (without battery and terminal)
Dimensions
Front view - dimen sions i n inches
View from top - dimensions in inches
6.54
3.21
2. 91
0.64

59
59
Vectron POS MobilePro
MobilePro
US
Putting into operation7
In this chapter we will explain how to start the Vectron POS MobilePro.
Note
Your local Vectron dealer has already made the preparational work so that the Vectron POS MobilePro is
ready for operation. Please ask him to assist you with
the fi rst starting.
Please check in particular the following aspects with your local
dealer:
1. Make sure your POS system is equipped according to your order.
2. The Vectron POS MobilePro is basically designed to work in an
ECR network. In this network you require at least one access
point, which establishes a wireless network connection between
stationary Vectron POS systems or Vectron POS PC and Vectron
POS MobilePro. Please heed the following:
a. Configuration of the access point
Please ask your dealer to configure the access point so that a
wireless network connection between the participating Vectron POS systems can be established.
b. Installation of access point
Select a central set up site. The access point should be in-
stalled in min. 2 m height, measured from bottom.
c. Compatibility
Prerequisite for operating the Vectron POS MobilePro in an
ECR network is that all participating Vectron POS systems use
the same Vectron POS software version. For technical reasons,
version Vectron POS 4.0.1.0 or higher must be used.

60 Vectron POS MobilePro
3. The Vectron POS MobilePro has specifi c profi les. They serve to
adjust power save modes and signals to your requirements.
a. Power save profile
This profile determines whether and how the background ligh-
ting of the display shall be dimmed. You can select between
„high“, „medium“, „low“ and „none“. The power saving from
„high“ to „none“ decreases continuously because the back-
ground lighting is increased step by step.
b. Signal profile
This profile determines the signaling of error messages,
messages or keyboard- and button use. Decisive here are the
environmental noises. You can select between „Normal environment“, Loud environment“ and „Quiet environment“.
• Normal environment: Signal per loudspeaker
• Loud environment: Signal per loudspeaker and vibration
motor
• Quiet environment: Signal per vibration motor and blue
LED
Please ask your local dealer to adjust the profi les according to
your requirements.
4. Charge a Vectron B30 battery (see above, chapter 6.3).
The charging takes approx. 2,5 hours. It is fi nished when the re-
spective control lamp is permanently on.
5. Take the battery out of the lateral slot and insert it to the Vectron
POS MobilePro (see above, chapter 5.3.4, no. 2 - 4, 7 - 10).
6. Or you take the Vectron POS MobilePro with inserted battery out
of the medium slot.
7. Switch on the POS MobilePro by pressing the C key.

61Vectron POS MobilePro
MobilePro
US
8. During the start you see the start
screen. You may also hear a start
melody.
9. You then see the registration surface and the POS MobilePro is
ready for operation.
Note
Your registration surface may differ from that above.
This depends on the programming of the POS MobilePro. Please contact your Vectron dealer.
Your Vectron POS MobilePro is now ready for operation.


63
63
Vectron POS MobilePro
MobilePro
US
Operating the POS system8
In this chapter you get an overview on the functions of your Vectron
POS system and an introduction in the basic operational procedures.
Normally, your Vectron dealer has adjusted the POS system according to your requirements. Some operations at your POS system may
therefore be completely different to those described in this manual.
In this case ask your Vectron dealer who will explain the functions
particularly installed for you.
Note
The buttons on the touch screen display their functions mainly by small pictographs, so-called icons.
The icons contained in the Vectron POS software and
their meaning are explained in the supplement.
Sign in and -out at the POS system8.1
Before you can make any entries the clerk has to sign in at the POS
system. This allows you to trace at any moment which clerk is responsible for which entries. Different clerks can get different authorizations, e.g. void.
There are different ways to sign in and -out at the Vectron POS MobilePro.
Sign in by transponder card8.1.1
In case your Vectron POS MobilePro has a built-in transponder reader, you can sign in to the POS system with the transponder card.
Hold the card to the rear of the terminal. The transponder is behind
the dark plastic plate with the product logo.
If the POS system is programmed to require a secret clerk number
you now have to enter this secret number and confi rm with <Enter>
or .

64 Vectron POS MobilePro
Sign in without transponder card8.1.2
You can sign in at the POS system without transponder card if you
have been assigned a clerk number and a key is not compulsory.
Enter your clerk number and press the <Clerk> or key. You may
have to enter a secret number and confi rm it with <Enter> or .
Sign out8.1.3
Clerk sign out is made by:
• approaching the transponder card again,
• closing the receipt,
• pressing <Clerk> or key.
Guest checks and hold buffers8.2
Guest checks and hold buffers serve to store several invoices simultaneously. This function is often required in restaurants, to store the
goods consumed for each guest check.
In retail, it can also be useful to store several invoices simultaneously, if for instance in a bakery there is only one cash register for
several clerks. In a supermarket, if a customer forgot his wallet in
his car, the entire sale can be stored temporarily in a “hold-buffer”
so that other customers can be serviced until the customer returns
with his wallet.
Starting a new GC8.2.1
To open a new guest check, enter the number and depress the <GC>
key or .

65
65
Vectron POS MobilePro
MobilePro
US
Close and re-open a GC8.2.2
By pressing the <GC> key or the guest check is closed. Depending
on the programming, the order is now printed on different printers,
e.g. at the counter or in the kitchen. The POS system is now open for
other orders.
If you want to re-open a GC to make further entries, repeat the steps
(see above).
Paying a guest check8.2.3
To pay a GC, open it again (see above). If you open a GC again the balance is displayed. If you now press the <Cash> key or or any other
media key, the invoice is printed and all PLUs are deleted from the
GC. Before pressing the <Cash> key or you can enter the amount
the customer gives you and the change is displayed.
Depending on the programming of your POS system, there are several other possibilities. For instance you can fi rst print a subtotal
invoice and then print the total invoice after the guest decided on
the mode of payment.
Guest check split8.2.4
It may often be necessary to split the guest check, if for instance one
guest wants to leave earlier than the others. For these cases you have the function “G.C. Split”. This function is only available for clerks
who have been vested with the according authorization.
To split a GC it must be opened anew. If necessary, close the GC and
open it again. Press <GC split> or.. . Select the PLUs to be split via
the direct PLU ot the PLU numbers. After having selected all PLUs fi nalize the split with <Cash> or or any other media key. The invoice
is printed.
It may happen that a guest changes to a different table. You may
then split PLUs from one guest check to another. Proceed as described above, however enter the guest check number to which the

66 Vectron POS MobilePro
PLUs are to be transferred before pressing <G.C. Split> or . Store
the split with <GC> or .
Guest check move8.2.5
Rather than splitting single PLUs from one check to another, “Check
Move” allows the entire check to be moved to another guest check.
The clerks must be vested with the according authorization. Proceed
as follows:
1. Open the GC to be moved. If the GC has alredy been opened, close it with <GC> or and open it again via GC number and <GC>
key or . G.C. moves can only be carried out if the G.C. is opened
ane w.
2. Enter the target GC number and press <Check move> or . The
GC that has been moved is closed automatically.
Shift change8.2.6
Shift change means that a guest check is transferred to another clerk
(e.g. change of shift). Open the guest check that is to be transferred.
Enter the number of the clerk to whom the guest check is to be transferred and press <Shift change> or .
Hold buffers8.2.7
To open a hold buffer press the respective key. By means of the hold
buffer keys you can switch between the individual hold buffers. To
close a hold buffer press a media key.
Depending on the programming of the POS system a hold buffer is
automatically assigned to a certain clerk. In this case the hold buffer
change is automatically carried out if a new clerk signs in.

67
67
Vectron POS MobilePro
MobilePro
US
Reports8.3
The Vectron POS System offers various reports for a determined period or selected clerks. You can select reports via the <Mode> or <M>
key or via other special keys and print them. .
It is also possible to read reports by means of the PC program Ve ctron Commander and to process them on the computer.
Note
It depends on the programming and on the clerks’ authorization which reports can be called. Please contact
your Vectron dealer.
By pressing the <Mode> or <M> key you can select between „X-reports“ and „Z-reports“.
“X- reports” are interim reports, the memory is not deleted. All data
is kept for further reading and processing.
“ Z-reports” are fi nal reports, the memory is reset to zero and the
report cannot be restored!
After choosing either an X-report or a Z-report, you may decide
which report is to be printed. The following are short descriptions of
some of the most common reports:
Operators (Menu Operators etc.)
An overview of the fi nancial data for each operator.
Single operator (Menu Operators etc.)
An overview of the fi nancial data for only one operator.

68 Vectron POS MobilePro
Operator invoices (Menu GCs/invoices)
Shows the invoices that were created by each operator in the reporting period.
• An X-report creates a subtotal invoice with the guest check still
open for service.
• A Z-report creates a fi nal invoice and closes the guest check.
Open guest checks (Menu GCs/invoices)
Lists all guest checks that have not yet been paid.
Invoices (Menu GCs/invoices)
Shows all invoices that were created in the reporting period.
• An X-report creates a subtotal invoice with the guest check still
open for service.
• A Z-report creates a fi nal invoice and closes the guest check.
Hourly report
Indicates the turnover per hour.
Transactions
Gives an overview of the fi nancial data, including turnover, taxes
and cash in drawer totals.
Departments, PLUs, Main groups
Shows fi nancial data according to department, PLUs or Main
groups.
Journal
Records all actions carried out at the POS system (programming and
fi nancial data) since the last Z-report.
For Transaktions, Operators, Operators (single), Departments, PLUs,
Main groups and Hourly report you can select between different report levels. For instance there may be a level for daily reports and
another level for weekly reports. At the end of a day you can print
the Z-reports of level 1, at the end of a week those of level 2. For some
reports you may also select an evaluation range and print the report
only for selected PLUs.

69
69
Vectron POS MobilePro
MobilePro
US
Please note that due to the amount of data, the printing of invoices,
clerk reports and journals may take quite some time.
Input and output8.4
8.4.1 Input of amounts
Amounts are generally entered into the POS system with two decimals. The dot can also be omitted. For ten Dollars enter “1000” or
“10.00”, for 3.95 Dollars “395” or “3.95”.
Screen windows8.4.2
Depending on the programming different windows are available on
the screen. The most important will be explained here. By means
of the key <go to (window)> you can switch between the individual
windows or select new ones.
Overview on open GCs / open hold-buffers
Displays all those GCs and hold-buffers which have been opened by
the currently signed-in clerk. It also shows the total sales for each GC
or hold-buffer.
Receipt window
Displays the current receipt or invoice.
Info window
Displays the last entry or information on current actions such as
“ Void” or “GC split”.
Input window
Here you enter amounts or PLU numbers.
GC window
Displays all PLUs of the currently opened GC that have not yet been
paid.

70 Vectron POS MobilePro
Making a sale8.5
The usual procedure is as follows:
• PLUs or prices are entered,
• the sale is invoiced and passed to the customer,
• the customer pays.
The details of each of these steps are explained in the following. A
clerk must be signed-in (see above).
Input of PLUs8.5.1
There are different ways to enter PLUs:
• Enter the PLU number and press <PLU> key or .
• Use the direct PLU key (e.g. <Coke 0,2 l>).
• Select a PLU per alphanumeric short cut (see chapter 11.1).
• Scan the bar code of the PLU.
Free price input8.5.2
When you enter a PLU (see above), it will sell for its preset price. You
may also enter a different price, e.g. for goods with small faults that
you want to sell cheaper.
Free price input can be locked at your POS system or only be possible for selected clerks.
To carry out free price input, enter a price and select the corresponding PLU or department. Before selecting PLU or department you
may have to press the <Price> button.

71Vectron POS MobilePro
MobilePro
US
Payment8.5.3
The booking is closed if all PLUs have been entered and the customer wants to pay. The signed-in clerk can now display the subtotal
by pressing the <Subtotal> key or . The sum is told to the customer.
Enter the amount you got from the customer and press <Cash> or
. The change is displayed and the receipt is printed. If the customer pays the exact amount you can directly depress <Cash> or
without entering an amount.
If the customer does not pay cash, press the respective media key,
e.g. <EC> or <Visa> instead of <Cash> or .
Void and merchandise return8.6
Void and merchandise return are similar functions.
Void serves to cancel entries.
Merchandise return is a negative account where goods are taken
back and money is paid out or deducted from the open balance.
Void and merchandise return can only be carried out by clerks who
have been vested with the corresponding authorization.
Correction8.6.1
Pressing the <Correction> key or deletes the last entered PLU.
Void8.6.2
If you wish to delete another PLU press <Void> or . Select the PLU
to be deleted via direct PLU key or PLU number (see above). If you
want to delete additional PLUs, press the <Void> key or again.

72 Vectron POS MobilePro
Merchandise return8.6.3
For merchandise return it is decisive whether you book to a guest
check or not. When working in a guest check, it is only possible to return those PLUs that have previously been sold on this guest check.
When working in a cash sale, you may return any PLUs.
To carry out a merchandise return press the <Merchandise Return>
key. The further procedure is identical with “Void”.
Change invoice format8.7
Your dealer has adapted the invoice format according to your requests. It may sometimes be necessary to change the format, e.g.
to print a receipt for entertainment expenses. In this case press the
<Change invoice format> key before closing the invoice.
Programming the POS system8.8
Improper changes in the programming of the POS system can cause
unwanted erratic behaviour during operation.
In order to avoid this, only authorized service staff should have access to the programming area. Vectron POS systems are programmable in a way that safety keys, passwords and unambiguous access restrictions can be assigned individually for every user.
Please contact your local Vectron dealer to advise you with saftey
precautions that are useful for your company.

73
73
Vectron POS MobilePro
MobilePro
US
Final remark8.9
We hope that we were able to give you some helpful information
about your Vectron POS system. Due to the numerous programming
possibilities, the description had to be quite general and the information restricted to the main functions. Your Vectron dealer will gladly
answer any of your questions.
Please visit us on the web at www.vectron.de. Here you get additional information and you can send us your inquiries via E-Mail.


75
75
Vectron POS MobilePro
MobilePro
US
Service and maintenance9
The Vectron POS MobilePro does not contain any parts that can be
serviced by the user. Please leave all maintenance and service to
your Vectron dealer.
Attention!
Danger of damage!
Do not carry out any maintenance or service on your
own. Only authorized service staff may open the
housing.
Cleaning the display9.1
To clean the display of your Vectron POS system please use a clean,
soft cloth, soaked with isopropyl alcohol if necessary.
Attention!
Danger of damage!
Do not use chemical cleansers or cleansers containing solvents or benzine!
Cleaning the keyboard9.2
You can take off the keyboard for cleaning without having to open
the housing of the Vectron POS MobilePro. You require a thin tool like
e.g. a screw driver.
We recommend to store the POS MobilePro in the charging station so
you can use both hands for taking off the keyboard.
Proceed as follows:

76 Vectron POS MobilePro
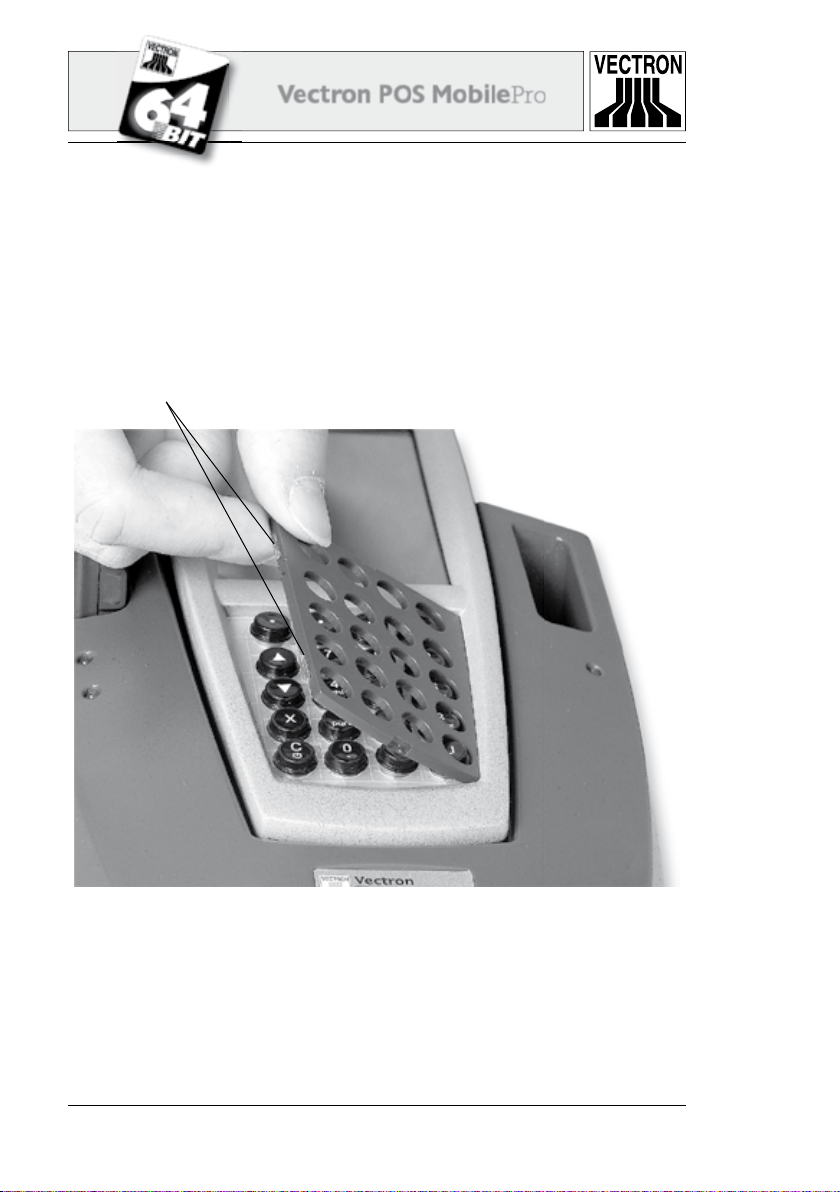
1. At the upper and lower edge of the keyboard grid you see a thin
notch. Put the tip of the screw driver into the upper notch. To protect grid and housing place a small rubber- or plastic strip under
the screw driver. Carefully lift the keyboard grid to the top by
pressing down the screw driver.
Fig. 23: Lifting the keyboard grid
notches

77
77
Vectron POS MobilePro
MobilePro
US
2. Put the tip of the screw driver into the lower notch and put the
strip under the screw driver. Carefully lift the keyboard grid to the
top.
Fig. 24: Li fting the keyboard grid

78 Vectron POS MobilePro
3. Take off the keyboard grid. You can see the keyboard pad with
the 20 keys of the Vectron POS MobilePro.
Fig. 25: Removed keyboard g rid
4. The further procedure depends on whether the POS MobilePro
has a removable keyboard pad or not. You can fi nd it out by trying
to remove it (see fi g. 26).
a) Removable keyboard pad
Take off the keyboard pad (see fig. 26). Clean the keyboard
compartment with a brush. If you want to clean the keyboard
pad you can take off the key caps. You can clean the keyboard
pad with a brush.

79
79
Vectron POS MobilePro
MobilePro
US
Fig. 26: Removing the keyboard pad
b) Unremovable keyboard pad
As of week 12/2006 the POS MobilePro is produced without
removable keyboard pad. The keyboard pad is glued fixed to
the keyboard compartment. In this case take the key caps off
the keyboard pad (see fig. 27). Clean the pad with a brush.

80 Vectron POS MobilePro
5. Use a (damp) cloth to clean the key caps.
The keyboard grid can also be cleaned with a cloth.
At tention!
Danger of damage!
Do not use chemical cleansers or cleansers containing solvents or benzine!
Fig. 27: Unremovable keyboard pad

81Vectron POS MobilePro
MobilePro
US
6. Put the caps back to the keyboard pad (see above, fi g. 1).
The exact seating of the caps is guaranteed by a small shape at
the inside which matches the notch of the button.
Fig. 28: Put ting on the key caps
7. Vectron POS MobilePro with removable keyboard pad:
Put back the keyboard pad. Two holes near the upper and lower
edge ensure it is seated exactly.
notch
shape
82 Vectron POS MobilePro
8. Inserting the keyboard grid is a bit diffi cult and must be done
with utmost precision.
The keyboard grid has at its lateral edges two tongues of approx.
8 mm length. These tongues must be inserted to the lateral
grooves of the keyboard compartment.
Start at one side.
Fig. 29: Inserting the keyboard grid
tongues

83
83
Vectron POS MobilePro
MobilePro
US
9. Press the keyboard grid at the other side into the compartment
until the tongues lock in the groove.
Fig. 30: Fi xing the keyboard gr id
10. Check that the individual keys are seated correctly in the keyboard grid. They may not jam, otherwise you cannot operate the
Vectron POS MobilePro correctly.
The Vectron POS MobilePro is now ready again for operation.

84 Vectron POS MobilePro
Cleaning the housing9.3
The magnesium housing of the Vectron POS MobilePro is equipped
with a display and has some plastic parts at front and rear. It is therefore well protected against dirt and must only be cleaned if it is
very fi lthy.
To clean the housing use a damp cloth which is soaked with a mild
cleanser. Wipe the dirty surface with the cloth.
Attention!
Danger of damage!
Do not use chemical cleansers or cleansers containing solvents or benzine!
Otherwise the plastic parts of the housing and the
display could be damaged.
Cleaning the charge contacts9.4
The cleaning of charging contacts can considerable prolong the service life of terminal and charging station. Dirty charging contacts
impede the charging and may cause a stronger heating and damage
of the charging station.
Please check the charging contacts of the terminal regularly and if
necessary clean them with a spirit-soaked cotton bud.
At tention!
Danger of damage!
Do not use benzine, solvents or chemical cleaning
agents!

85
85
Vectron POS MobilePro
MobilePro
US
Careful handling of the terminal9.5
In a restaurant, particularly in hectic times, a careless handling may
damage or even destroy the terminal. We would therefore like to give
you some hints how to protect the Vectron POS MobilePro and thus
prolong its service life.
• Do not put the device on a tray with drinks! When serving your
guests you may drop glasses and the moisture could damage the
device. The POS MobilePro is designed to be waterproof. Yet, it is
not designed to be permanently operated in a wet environment.
Always carry the POS MobilePro in the optionally available lea-
ther holster. This protects the device against humidity and other
damage.
• Although carried in the leather holster you cannot exclude that
the display is damaged as long as it is not turned to the body. In
narrow rooms or during hectic hours you may easily hit tables,
counter or other obstacles. The display can scratch until you cannot use it anymore.
Always carry the POS MobilePro with the display turned to the
body to protect it from scratches!


87
87
Vectron POS MobilePro
MobilePro
US
Accessories10
By using high-quality accessories you can perfectly adjust the Vectron POS MobilePro to various requirements.
On the following pages we will present you the accessories available
for the POS MobilePro.
You can purchase the accessories from your local Vectron dealer. He
will assist you with the confi guration of POS system and accessories.
System accessories10.1
Following items are available:
• Charging station incl. power supply.
• Battery.
• Transponder
• Touch pen.
• Multi-function touch pen.
Charging station and batteries10.1.1
We described the „Vectron POS MobilePro Charging Station“ incl.
power supply „Vectron PS20“ and batteries „Vectron B30“ in chap-
ter 6.

88 Vectron POS MobilePro
Transponder10.1.2
We already mentioned the transponder reader of the Vectron POS
MobilePro several times (see chapter 5.3.10). It serves for sign in of
clerks or for reading customer cards.
The transponder is not included in the standard delivery; however, it
can be built-in or retrofi tted ex-works.
Touch pen10.1.3
The touch pen is made of resistant plastic with a rounded tip. It is
particularly suitable for operating the touch screen of the Vectron
POS MobilePro.
Fig. 31: Touch pen
Fig. 32: Multi-fu nction touch pen
Multi-function touch pen10.1.4
The multi-function touch pen is touch pen and biro all in one. By turning the rear part of the cap you can select between cartridge and
touch.

89
89
Vectron POS MobilePro
MobilePro
US
Additional accessories10.2
Following additional accessories are available for the Vectron POS
MobilePro:
• Mobile thermal printer Vectron MP20.
• Leather holster (to be combined with belt).
• Safety swirl.
Mobile thermal printer Vectron MP2010.2.1
The mobile thermal printer Vectron MP20 is connected via Bluetooth
to the POS MobilePro and communicates directly with the terminal.
Fig. 33: Mobile Thermal pri nter Vectron MP20
A clip at the rear allows you to wear the printer at the belt. It requires
customary thermal paper and can store and print logos. Its housing
is light, yet robust and is splash-proof.

90 Vectron POS MobilePro
Leather holster10.2.2
To protect the Vectron POS MobilePro we can offer a special leather
hol ster.
This holster can be combined with a belt and allows to carry the POS
MobilePro comfortably at the hip.
Fig. 34: Leather hols ter

91Vectron POS MobilePro
MobilePro
US
Fig. 35: Leather holster with term ina l, touch pen and multi-f unction touch pen
The holster is made of robust cowhide to store the terminal as well
as touch pen and multi-function touch pen.
The metal lug at the side serves to mount a chain to hold the terminal
in case it falls down. The chain can be mounted to the Vectron POS
MobilePro by means of a fastening swirl (see below).

92 Vectron POS MobilePro
Fig. 36: Belt

93
93
Vectron POS MobilePro
MobilePro
US
Safety swirl10.2.3
For the Vectron POS MobilePro a safety swirl is available. The safety
swirl is mounted at the housing instead of one of the torx screws. By
means of a safety strap the POS MobilePro can be carried out around
the waist.
The swirl turns freely, adjusting to body motion without inhibiting
the work process.
At tention!
Danger of damage!
Do not use metal safety straps. When touching the
magnesium housing of the POS MobilePro they may
cause severe and irreparable damages.
Fig. 37: Safety swirl

94 Vectron POS MobilePro
Special functions for Vectron POS 11
MobilePro
In addition to the already mentioned profi les (see chapter 7) some
special functions for the Vectron POS MobilePro have been integrated in the Vectron POS software. These functions support the
problem-free operation of the POS system particularly in connection
with other Vectron POS systems. We will explain them in the following:
• Alphanumeric short cuts.
• Print data server.
• Offl ine GCs.
Alphanumeric short cuts11.1
Alphanumeric short cuts allow an easy and fast booking of PLUs via
a combination of numbers. Several letters and numbers are assigned
to each number of the numeric keyboard:
0 ......... -0
1 ......... pqrs1
2 ......... tuv2
3 ......... wxyz3
4 ......... ghi4
5 ......... jkl5
6 ......... mno6
7 ......... 7
8 ......... abc8
9 ......... def9
0
-
1
pqrs2tuv3wxyz
4
ghi5jkl6mno
7
[
8
abc9def
If e.g. you want to book a coke, press key 8. All PLUs starting with
A, B or C are displayed. Now press key 6. All PLUs starting with AM,
AN, AO, BM, BN, BO, CM, CN or CO are displayed. The PLU „Coke“
should appear on top of the selection list and you can use the touch
pen to select and book the PLU.

95
95
Vectron POS MobilePro
MobilePro
US
Prerequisite is that alphanumeric short cuts have been enabled in
the Vectron POS software. Please contact your Vectron dealer.
Note
Alphanumeric short cuts follow the letter-number-combination of mobile phones.
Print data server11.2
A print data server receives print data from a terminal, which cannot
process and print the data. Technical procedure:
1. Data is entered at the terminal (= Vectron POS MobilePro), the
processed data is to be printed.
2. The printer is connected to a stationary Vectron POS system,
which is connected to the terminal via Wireless LAN.
3. The stationary POS system receives the unprocessed print data,
processes it and prints it on the connected printer.
Advantage of this method is the reduction of data amount. The terminal is relieved and independent of a Wireless LAN-connection.
Otherwise the terminal itself would have to process the print data
and send it to the printer via stationary POS system. During this time
the Wireless LAN-connection could be interrupted and the print job
would not be transmitted in time.
Prerequisite is that the print data server function in the Vectron POS
software has been enabled. Please contact your Vectron dealer.

96 Vectron POS MobilePro
Offline Guest Checks11. 3
This function reserves GCs in an ECR network for some time for exclusive operation by one POS system.
For the Vectron POS MobilePro this means that it can be assigned defi ned GCs before leaving the Wireless LAN-radio range. This can be
made manually or automatically with operator sign in. The operator
always fi nds his GC range in the POS MobilePro and can serve these
GCs. This GC range is blocked for the other POS systems or users for
the time being.
If the user wants to release again his GC range, e.g. when returning
to the Wireless LAN-radio range, this can also be made manually or
automatically with operator sign out.
Prerequisite is that the Offl ine-GC-function has been enabled in the
Vectron POS software. Please contact your Vectron dealer.

97
97
Vectron POS MobilePro
MobilePro
US
Additional Vectron products12
Here we would like to inform you on additional Vectron products,
which are designed to perfectly complete the Vectron POS MobilePro.
Stationary Vectron POS systems12.1
Stationary Vectron POS systems with fast and reliable 64-Bit hardware are ideally applied as single stations. Being perfectly suitable
as server they allow data exchange with the Vectron POS MobilePro.
The chart below lists the most important performance data of stationary and mobile systems.
Vectron POS System
ColorTouch Mini Vario MobilePro
Colour display
Touch screen
Customer display
64-Bit Processor
SRA M, extendable 2 MB, 2 MB, 2 MB, 4 MB,
DRA M 64 MB 64 MB 64 MB 64 MB
FlashROM 8 MB 8 MB 8 MB 8 MB
Network Ethernet LA N Ethernet LAN Ethernet L AN WLAN
Ports
• serial
• parallel
• USB
• Cash drawers
• PS/2
• Bluetooth
6
1
2
2
1
6
1
2
2
1
6
1
2
2
1
Transponder
Int. card reader
Power management
Clerk lock
1)
= standard eq uipment, = optional, = not available.
1)
To be reali zed via transponder reader.

98 Vectron POS MobilePro
For further information on stationary Vectron POS systems please
refer to the Internet under www.vectron.de.
Vectron POS PC12.2
Vectron POS PC imports the Vectron POS software to your PC. You
only need a PC with Microsoft® Windows® operating system. The
advantage of Vectron POS PC is that you can use the Vectron POS
software simultaneously with E-Mail-, offi ce- and stock control programs. This allows data exchange within seconds.
For further information on Vectron POS PC please refer to the Internet under ww w.vectron.de.
Vectron Commander12.3
The Vectron Commander is a communication- and evaluation software for PCs with Microsoft® Windows® operating system. Via its
connection to the Vectron POS system the Vectron Commander can
call and evaluate the ECR data. At any time you can get an overview
on sales-, order- or working time data etc.
For further information on the Vectron Commander please refer to
the Internet under www.vectron.de.

99
99
Vectron POS MobilePro
MobilePro
US
EC-declaration of conformity 13
for CE-marking
For the device
Vectron POS MobilePro
We declare that the device complies with the essential requirements
as stipulated in the Council directives on electric and electronic products:
1. 89/336/EEC - EMC-Directive
2. 73/23/EEC or 93/68/EEC - Low Voltage Directive
3. 1999/5/EU - RTTE-Directive
Applied standards:
Ad 1 (Electromagnetic compatibility):
• EN 61000-3-2 (2000) and EN 61000-3-3 (1995 + App.) Only for pow-
er supply.
• EN 301489-03 V1.4.1 - EMC - SRD.
• EN 301489-17 V1.2.1 - EMC - Wireless LAN & Bluetooth.
Ad 2 (Electric safety):
• EN 60950-1 (2001).
Ad 3 (Radio- or transmitter test):
• EN 300 328-2 V1.2.1 - Wireless LAN & Bluetooth.
• EN 300 330-2 V1.1.1 - SRD.
• EN 50371 (2002) - Restrictions of human exposure to electromag-
netic fi elds.

100 Vectron POS MobilePro
Münster, 6 July 2005.
Jens Reckendorf Thomas Stümmler
This declaration is signed for the Manufacturer / Importer by:
Vectron Systems AG
 Loading...