


OPERATION MANUAL
GSM IC-Card
OF FUNCTION SETTING
PAYPHONE
MODEL: VT700CR

Vector Technology Co. – GSM IC-CARD Payphone Manual
Installation:
Getting Started::::Before initial installing the SIM Card to the payphone, please disable your SIM card PIN
code on your cell phone in advance.
If the SIM card requests a PIN CODE to activate, but you do not disable the PIN code in advance, when
the GSM payphone starts initially, LCD will display NO PIN CODE. Please enter Function Setting
Mode COMMAND 01: Function 01 to enter your PIN code.
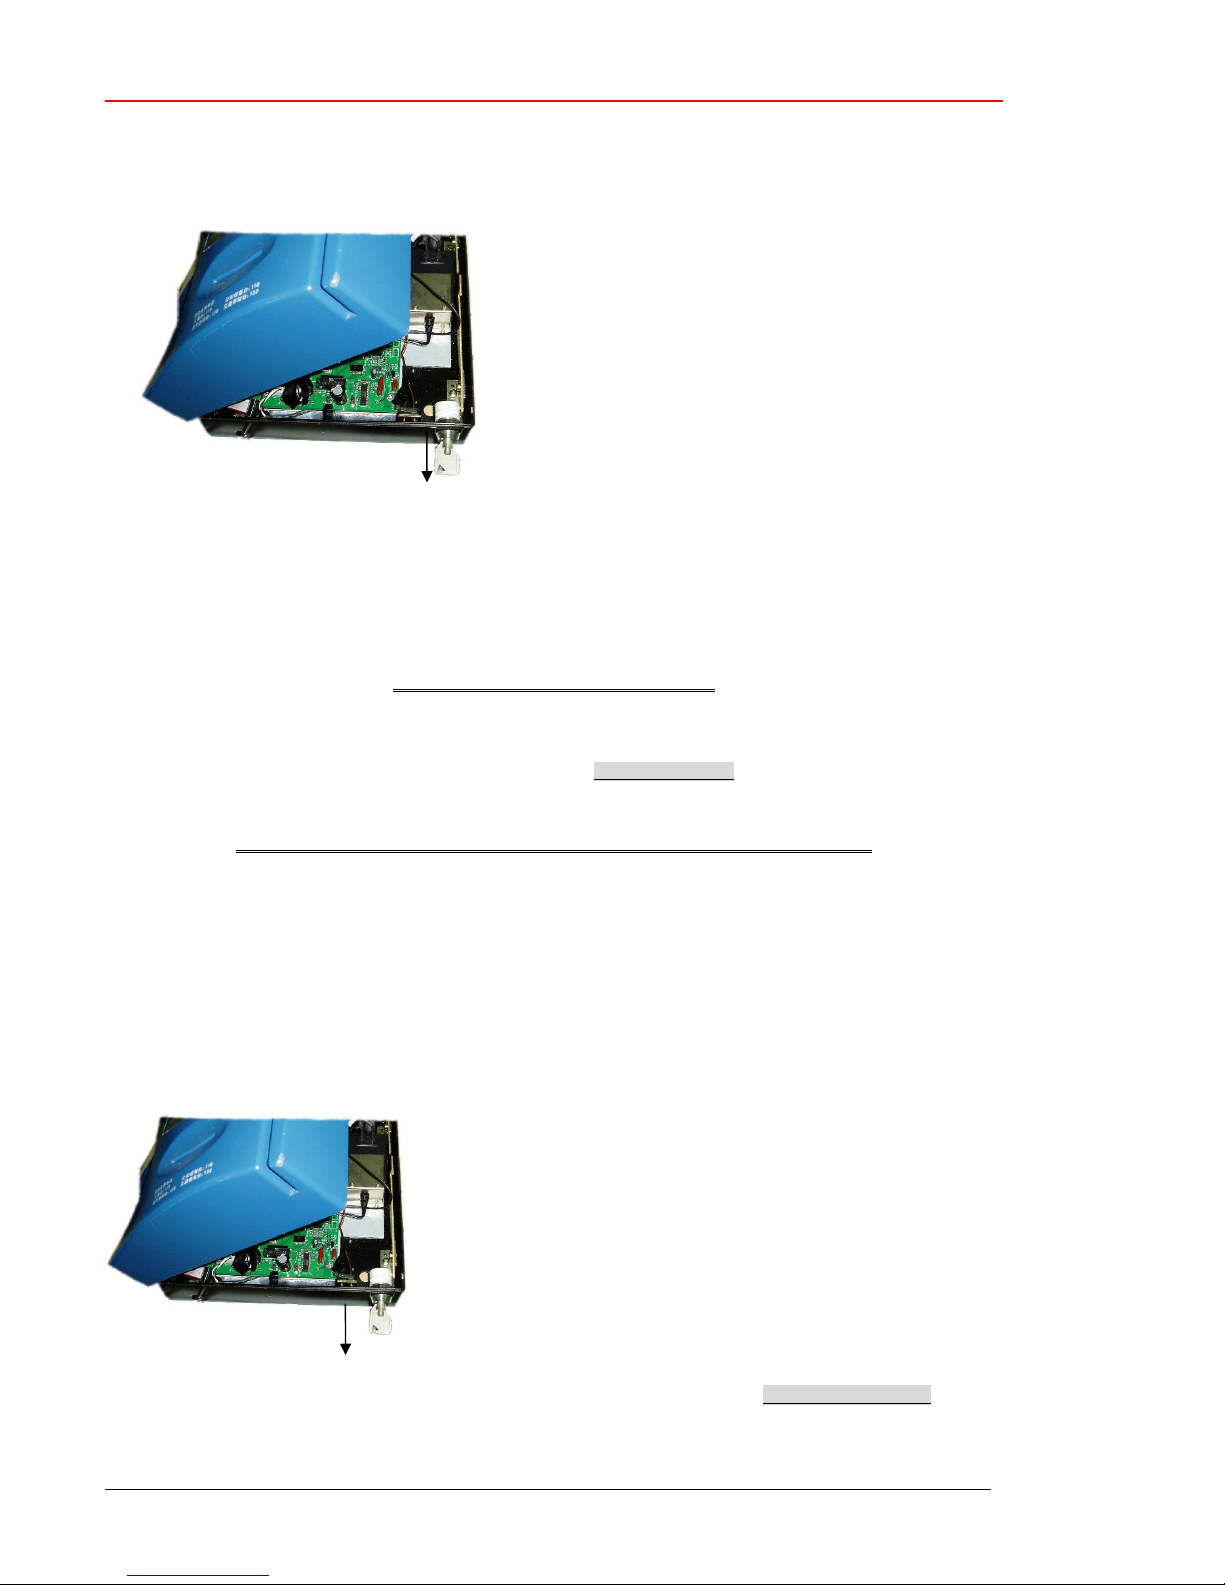
1 ) Insert SIM card :Open the front door to find the SIM card holder near the door hinge to insert your SIM
card. Clip down the SIM card securely.
2) Please plug in the AC power Adaptor.
yet, the main power supply is provided from AC power only.
3) Wait for about 30 seconds for network registration process and the LCD displays -- GSM POWER ON--
SIM TEST OK – Signal Quality xx –
4) The Payphone LCD screen displays ““WWEELLCCOOMM”” in idle mode (on-hook status). Lift up the handset to
display “Welcome” “Insert Card” to make calls.
A) Function Setting Item List of COMMAND (00-31):
The payphone provides 31 Function setting items (COMMAND) via keypad programming feature. Before setting the
parameters to your phone, please make sure what you want to do, prepare the operational manual by your side and
follow the instructions carefully. If you don’t understand what the function is, don’t change anything, but leave the default
When the Solar Power supply connection is not established ready
value for safety.
Function Setting Item List of COMMAND (00-31):
Function 00 : Self-Diagnosis 4
Function 01 : SIM card pin code setting 5
Function 02 :
Function 03 : RMS, SIM Card number programming 9
Function 04 : Incoming call time setting 9
Function 05 : RMS, SIM Card number programming 9
Function 06 : Warning Tone 10
Function 07 : SIM card designate setting 10
Function 08 : Total collected money display 10
Function 09 : (Reserved) 11
Function 10 : Meter signal selection 11
Function 11 : Owner password setting 12
Function 12 : (Reserved) 12
Function 13 : Language mode Selecting. 13
Function 14 :
Function 15 :
Function 17 : The gateway number setting 17
Function 18 : Speed dial programs (10 sets) 17
Function 19 : Real Time Clock Setting 17
Function 20 : Discount time setting 18
Function 24 : Simple discount program 19
Function 27 : Software checking number. 19
Function 30 : Parameter setting 20
How to set a rate completely 20
Q&A 22
FCT Specification 23
Page
Define Local/STD/IDD Area Prefix number (Tariff table prefix number setting) 6
The credit of indication of rate Program 15
Time group & Indication of Rate's time program 16
GSM IC-Card PAYPHONE - 1 -
Vector Technology Co. – GSM IC-CARD Payphone Manual
B) How to enter the Function Setting Mode of COMMAND ( 00-31):
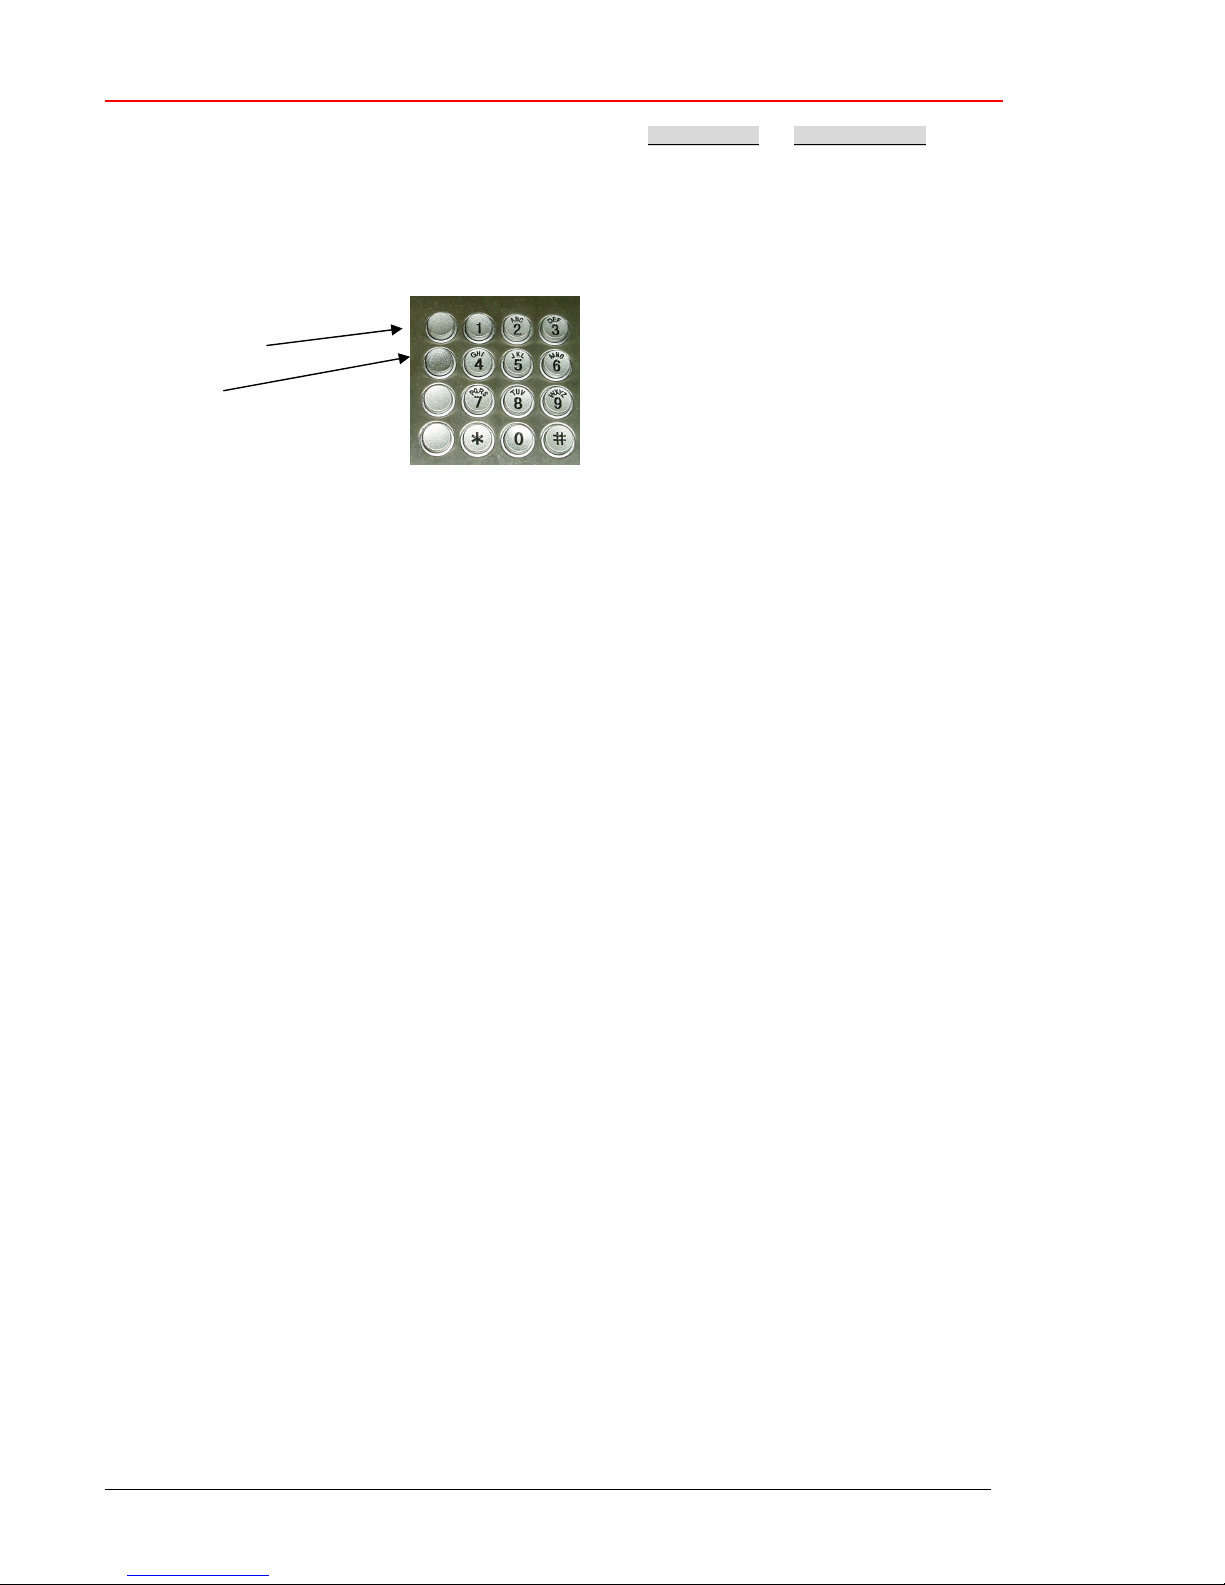
1) Please open the front door and pick up the handset. Slightly ouch the Function door switch (see the photo below).
Function/Door switch
LCD will display “COMMAND (00-31)”. If not, please hang up the handset to wait for 5 seconds, and try again.
2)
3) Enter the COMMAND number of the Function Items you want to program and follow the instructions page 4 -22 to
set the parameters.
4) After finishing the programming, LCD will return to command screen:
LCD Display
COMMAND(00-31)
5) Press REDAIL key to save the data entered, LCD will show SAVING while the data is saving.
LCD Display Operation
1.COMMAND(00-31) Press “REDAIL” to save
2. SAVING Wait for around 10 seconds
Important note:
When the LCD shows “ SAVING”, it means the data is saving into the memory chip. Please don’t close the front door or
put the handset back to cradle. Make sure the function switch is open and handset is off hook to avoid any in-completed
data saving process to lead the micro-chip losing memory and causing permanent damage to the phone.
Don’t close the front door. Make sure the function switch is open.
6) If there is no change of the setting, no update data will be saved. The LCD will show ENDING
GSM IC-Card PAYPHONE - 2 -
Vector Technology Co. – GSM IC-CARD Payphone Manual
7) If you touch the function switch carelessly or a power failure happens during the data saving, after the phone regaining
the power, it will be starting to activate. The LCD screen will turn from *****GSM****** to xxxxxGSMxxxxxx for 0.5
second. It means the data is not being saved correctly during the previous step. Please re-enter the COMMAND mode
again and complete the data-saving process correctly to save the data by following the correct steps.
C ) FOLLOW ON and REDAIL key definition for programming purpose:
“FOLLOW ON”
“REDIAL”
a. Press the "FOLLOW ON" key to exit without saving from programming &to return to Command mode.
b. Press the "REDIAL" key to save the programming data and return to Command mode.
GSM IC-Card PAYPHONE - 3 -

Vector Technology Co. – GSM IC-CARD Payphone Manual
Function 00 : Self-Diagnosis
When LCD displays COMMAND (00 –31), please enter 00 to start Function 00: "Self-Diagnosis"
Diagnostic items: KEYBOARD unit
Function and door SWITCH
HOOK SWTICH unit
HANDSET unit
LCD DISPLAY unit
Operation LCD Display
SELECT (0-1)
Select "0" to run step 1 KEYPAD TEST
(0) 0000000000000000
(1) 1111111111111111
(2) 2222222222222222
(3) 3333333333333333
(4) 4444444444444444
(5) 5555555555555555
(6) 6666666666666666
(7) 7777777777777777
(8) 8888888888888888
(9) 9999999999999999
(*) ****************
(#) ################
(FOLLOW ON) NNNNNNNNNNNNNNN
(REDIAL) RRRRRRRRRRRRRRRR
(LOUD) LLLLLLLLLLLLLLLLL
Door and function switch open CASHBOX OUT
Door and function switch close CASHBOX IN
GSM IC-Card PAYPHONE - 4 -

Vector Technology Co. – GSM IC-CARD Payphone Manual
Function 01: SIM card PIN code program
Note: this function is only necessary when you do not disable the PIN code on your cell phone in advance.
When LCD displays COMMAND (00 –31), please enter 01 to start Function 01:
code program
COMMAND(00-30)
Press "01" OWNER PASS:
Key the PIN code OWNER PASS: ****
Press" REDIAL" to save
Operation LCD Display
SIM card PIN
GSM IC-Card PAYPHONE - 5 -

Vector Technology Co. – GSM IC-CARD Payphone Manual
Function 02: Define Local/STD/IDD Area Prefix number
(Tariff table prefix number setting)
Note: This function 02 helps you define the Local/STD/IDD CALL AREA Telephone Prefix
Numbers. We define 3 Call Areas below:
0 : Local CALL AREA : The Prefix number is 1, 2,3,4,5,6,7,8 or 9. (1 digit)
1: STD CALL AREA : The Prefix number is 0. ( 1 digit)
2: IDD CALL AREA : The Prefix number is 00. ( 2 digits)
Example:
If you would like to program the prefix number 00886XXXX…. is 1 dollar for 60 seconds.
You need to program 00886 in the IDD Call Area. Because 00886 prefix with 00, the default of
IDD Call Area prefix number is 00.
Then, we need to program the rate. The rate is 1 dollar for 60 second will be program in Function
14 and Function 15.
In Function 02, we only program the indication of Rate. There are 47 sets indication of Rate.
Now, we choose the Rate 07 which is 1 dollar for 60 seconds. (Please check the Function 14 and
Function 15 later)
LCD Display Operation
1) COMMAND (00-31) press 02
2) FUN PASS: **** 8080( enter 8080 password)
3) CALL AREA (0/2): press 2 (0 for LOCAL,1 for STD,2 for IDD Call
Area)
4) IDD 000-399: press 000(The Serial No.000-399 total is 400sets
for IDD Call Area )
5) 000: enter 00886 and press REDAIL key (00886 is
the Prefix Code ; press REDAIL to save )
6) 000:00886 07 enter 07 and REDAIL key ( 07 is the indication
of Rate , press REDAIL to save)
7) CALL AREA (0/2):
Notes: 1) Function Password: It can be changed in function 23.
2) Indication of Rate :
GSM IC-Card PAYPHONE - 6 -

Vector Technology Co. – GSM IC-CARD Payphone Manual
399 total is 400sets for
There are 47 sets indication of Rate. After we call the indication 7 is Rate”07”.
When we program the 00886 prefix number will follow the Rate”07”. All the phone
number will follow the tariff with Rate”07”.
How do you define the Rate”07” to follow 1 dollar for 60 seconds? Please check the
function 14 and function 15 later.
3) The default for indication of rate :
Rate"00" is default rate of LOCAL Call Area.
( The prefix number 1, 2, 3, 4, 5, 6, 7, 8 or 9 which doesn’t program in the LOCAL Call
Area will follow the Rate”00”)
Rate"01" is default rate of STD Call Area.
( The prefix number 0 which doesn’t program in the STD Call Area will follow the
Rate”01”)
Rate"02" is default rate of IDD Call Area.
( The prefix number 00 which doesn’t program in the LOCAL Call Area will follow the
Rate”02”)
Rate"46" is default rate of FREE CALL.
Rate"47" is default rate of BARRED CALL.
4) Serial No. of Call Area :
Local Call Area: 000-199 , total 200 sets.
STD Call Area : 000-399, total 400 sets.
IDD Call Area : 000-399, total 400 sets.
5) Priority :
For the CALL AREA : The priority is IDD , STD, then LOCAL CALL AREA.
For the Serial no of Call Area :
High Serial no. will be prior than low serial no.
Example:
We program the 00886 prefix number in the IDD CALL AREA and in the Serial No.
000.
LCD Display Operation
8) COMMAND (00-31) 02
9) FUN PASS: **** 8080( Input password)
10) CALL AREA (0/2): 2 (0 for LOCAL,1 for STD,2 for IDD Call Area)
11) IDD 000-399: 000(The Serial No.000-
GSM IC-Card PAYPHONE - 7 -

Vector Technology Co. – GSM IC-CARD Payphone Manual
399 total is 400sets for
IDD Call Area )
12) 000: press 00886 and REDAIL key (00886 is the
Prefix Code ; REDAIL to save )
13) 000:00886 07 07 and REDAIL key( 07 is the indication of
Rate , REDAIL to save )
Next, we continue to program the 008867 prefix number in the IDD CALL AREA and
the Serial No. 001
14) CALL AREA (0/2): 2 (0 for LOCAL,1 for STD,2 for IDD Call Area)
15) IDD 000-399: 001(The Serial No. 000-
IDD Call Area )
16) 001: 008867 and REDAIL key (008867 is the Prefix
Code ; REDAIL key to save)
17) 001:008867 08 08 and REDAIL ( 08 is the indication of Rate ,
REDAIL to save)
18) CALL AREA (0/2):
After finishing the program, when we dial 008867XXX, the tariff will follow Rate”08”.
If you program the 00886 in Serial No. 001 and the 008867 in Serial No. 000.
When we dial 008867XXXX, the tariff will follow the Rate”07”.
Since the CHIP system program check is starting from Serial No. 399 to 000, the priority
001 prevails over 000.
GSM IC-Card PAYPHONE - 8 -

Vector Technology Co. – GSM IC-CARD Payphone Manual
Function 03: RMS, SMS caller ID
The Function is to save the RMS of SMS Caller ID to the payphone.
Please see the RMS manual for the operation.
Function 04: Incoming call
To program the time limited of the incoming call
Example: If you want to set the time of incoming call for 10 minutes.
Operation LCD Display
COMMAND(00-30)
Press "04" INCOMING: 0M
Press "1" to increase to 10 INCOMING: 10M
Note:
Press "1" one time will decrease 1 minute, "3" will increase 1 minute.
The Min is 0 M. The Max is 100 M.
Function 05: RMS, the SIM card number programming
To use the RMS function, please make sure that RMS function is available for your
payphone. CPU and Flash Memory chip should be upgraded.
Step 1 Exchange RMS cell phone's SIM card with payphone's SIM card
Step 2 Set RMS cell phone's numbers under function 05, then it'll return to
command mode
Step 3 Enter function 03, you'll see the screen showing" SAVE" and payphone will
send SMS to itself. When you hear "Di Di", it means SMS is successful. Payphone
will return to command mode again
Step 4 Be sure to press "REDIAL" key to save the data.
Step 5 Exchange SIM CARDS BACK.
GGGGSM
SM RMS
RMS Operation Manual
Please read the
SM SM
Operation Manual
RMS RMS
Operation Manual Operation Manual
for details.
GSM IC-Card PAYPHONE - 9 -

Vector Technology Co. – GSM IC-CARD Payphone Manual
Function 06: Warning Tone Setting
To program when the Warning Tone appears before disconnection.
Example: If you want to set the warning tone appear in 10 seconds before disconnection.
Operation LCD Display
COMMAND(00-30)
Press "06" WT: 0S
Press "4" to increase to 10 WT: 10S
Note:
1) Press "1" one time will decrease 0.1 sec., "3" will increase 0.1 sec.
2) Press "4" one time will decrease 1 sec., "6" will increase 1 sec.
Function 07: The SIM card lock setting
You can program a specific SIM card in this function. The payphone will be working with the SIM
card only you program.
Example: To enable this function. Please insert the SIM card you prefer to lock before plugging
the power.
Operation LCD Display
COMMAND(00-30)
Press "07" SIM.PRESET :0/1 0
Press "1" to Enable ENABLE
Press "Redial" to save
If you want to disable it, please Press "0'.
Function 08: Total Collected Money Display
Display only.
SUM is total collected money from this payphone installed. PURSE is the balance from crediting
air time values.
Note: if you want to clear the balance here, please refer to function 30.
GSM IC-Card PAYPHONE - 10 -

Vector Technology Co. – GSM IC-CARD Payphone Manual
Function 09: (Reserved)
Function 10: Metering Signal Selecting
There are two metering Signal Selections (0) Auto detection, (1) Auto + C. Normally, please set
(0) Autodetection as default. (1) Auto+ C is special function to cooperate with gateway terminal
and owner should also set gateway numbers under Function17
Set the phone to tariff on the GSM system via auto detection.
Operation LCD Display
COMMAND(00-30)
Press "10" METER(0-1)
Press "0" select auto detection AUTODETECTION
Note: If you select "1" for Gateway system, please program the function 17 also.
GSM IC-Card PAYPHONE - 11 -

Vector Technology Co. – GSM IC-CARD Payphone Manual
Function 11: Owner password setting
To set the password for the free call. 1 to 10 digits.
Operation LCD Display
COMMAND(00-30)
Press "11" OWNER PASS :
Please key in the password "1234567" 1234567
You can set for max 10 digital.
and press "redial" to save
How to use: Pick up the handset. Press the "louder" key, the LCD will ask the pass word.
Key in the owner password and press the "Redial" It can make a free call.
Function 12: (Reversed)
GSM IC-Card PAYPHONE - 12 -

Vector Technology Co. – GSM IC-CARD Payphone Manual
Function 13: Language Mode Selecting
There are two language modes you can choose. 0 is for English, 1 and 2 are for other languages.
Example: if you want to select the second mode.
Operation LCD Display
COMMAND(00-30)
Press "13" ENG / OTHER (0/2):
Press "1" to select local language
Press "Redial" to save
Note:
You can press the" follow on" button to change the language display before dialing the telephone
number.
GSM IC-Card PAYPHONE - 13 -

Vector Technology Co. – GSM IC-CARD Payphone Manual
r for the minimum credit the user should
Function 14: The credit of indication of rate Program
This function is to program the credit of the indication of rate.
If you choose the tariff by payphone ( In function 10 you choose tariff by payphone itself),
you need to program the credit of the indication of rate.
There are 47 sets indication of rate for programming. But the Rate”46” and Rate “47” is fix.
Rate”46” Free call
Rate “47” Barred call
Example:
In the function 02, we program the prefix number 00886 will follow the Rate”07”. Now, we
program the credit of the Rate “07” in function 14. The credit is 1 dollar for 60 seconds. We
program 1 dollar in function 14.
LCD Display Operation
1. COMMAND(00-31) 14
2. TAXE(1) press 1 and REDAIL key( This is for system tariff ,
please read below)
3. TAXE(2) press 1 and REDAIL key ( This is for system tariff ,
please read below)
4. RATE(00-47): 07 and REDAIL key (Program the Rate”07”
5. MIN.1 ST 1 ( 1 dolla
insert to make a call)
6. MIN 2 ND: 2 ( When the MIN.1 ST credit run out, User should
insert 2 dollar to keep this call continue.)
7. RATE(00-47): You can continue to program other indication of rate.
Note. 1) In function 10, you choose :
. (4) REVERSE+_SELF (5) 50Hz_+_SELF
(6) 16KHz_+_SELF (7) 12KHz_+_SELF
(8) AUTODECT
It will tariff by payphone.
2) The TAXE(1) , TAXE(2) , is for the system Tariff. Please program the minimum credit in
TAXE(1) , TAXE(2), when you choose the tariff by payphone itself.
If you choose the tariff by system ( In function 10 you choose tariff by system), you need to
program the credit of TAXE(1) and TAXE(2).
GSM IC-Card PAYPHONE - 14 -

Vector Technology Co. – GSM IC-CARD Payphone Manual
1 ( 1 dollar for the minimum credit the user should
Example : The tariff is by System. Each metering signal will take 1 dollar credit.
LCD Display Operation
1. COMMAND(00-31) 14
2. TAXE(1) 1 and REDAIL key(The first metering signal from
system, the payphone will take 1 dollar credit. )
3. TAXE(2) 1 and REDAIL key ( The second and after metering
signal from system, the payphone will take 1 dollar credit)
4. RATE(00-47): 07 and REDAL key ( If you would like to the prefix
number 00886 will be asked for 1 dollar minimum insert, you can program the indication of
rate or you may ignore it.)
5. MIN.1 ST
insert to make a call)
6. MIN 2 ND: 2 ( When the credit is less than Taxe(2), User should
insert 2 dollar to keep this call continue. Or the
payphone will disconnect this call when it receive
the next metering signal )
Note. 1) In function 10, you choose :
. (0) REVERSE (1) METERING_50Hz
(2) METERING_16KHz (3) METERING_12KHz
It will tariff by system.
2) In the example, if you program the prefix number 00886 in Function 02, and the MIN.1
ST and MIN 2 ND in function 14. When user dial the 00886XXX numbers, the payphone
will ask for the minimum credit 1 dollar to make a call and 2 dollar for keeping this call
continue.
GSM IC-Card PAYPHONE - 15 -

Vector Technology Co. – GSM IC-CARD Payphone Manual
Function 15: Time group & Indication of Rate's time program
This function is to program the time of the indication of rate.
If you choose the tariff by payphone itself (In function 10 you choose tariff by payphone
itself), you need to program the Time of the indication of rate.
There are 47 sets indication of rate for programming. But the Rate”46” and Rate “47” is
fixed.
Rate”46” Free call
Rate “47” Barred call
Thus, there are Rate 00-45 can be programmed.
TIME GROUP (FOR Discount time program, please check the function 20 later):
The Time Group has 18 sets, Group (00-17), for discount programming. Normal rate (no
discount) is group 00. In this function, You can set the communication time (seconds) for each
rate at different discount time. (Discount time is defined in function 20).
Example:
Follow function 02 and 14 example, we want to program the prefix number 00886 is 1 dollar for
60 seconds.
LCD Display Operation
1. COMMAND(00-31) 15
2. GROUP(00-17) 00 (Set for normal time first , please read the notes
below )
3. RATE(00-45) 07
4. RATE: 60 S 60 S
5. RATE(00-45) You may program other indication of Rate.
Notes:
1) There are 18 sets time groups. There is Rate”00-47” in each time groups. Thus, in
different time will follow the different tariff rate. How to program the time zone? Please
check the Function 20. Please check the Function 20.
GSM IC-Card PAYPHONE - 16 -

Vector Technology Co. – GSM IC-CARD Payphone Manual
.
Function 17: Gateway number setting
You can program the gateway numbers in this function.
Function 18: Speed dial programs
User can press “MEMO function key” +“0(1/2/3/4/5/6/7/8/9)” for a speed dial call. Due to
less choice in hot line function, this function can compensate owner to set many hot line phone
numbers.
Example:
If you want to set speed dial number “MEMO 0”=”22678080”. The rest can be done in the same
manner. “MEMO 1”=“12345678”, “MEMO 2”=“87654321”, etc.
Operation LCD Display
COMMAND(00-30)
Press “18” SPEEDDIAL(0-9)
Press “0” SPEEDDIAL(0-9)
“22678080” “Redial”
Function 19: Real Time clock Setting
Example: Set the 2003/3/28 09:50:45 Wednesday
Operation LCD Display
COMMAND(00-30)
Press "19" REAL TIME CLOCK INPUT
KEY IN YEAR YEAR :2003
KEY IN MONTH MONTH:03
KEY IN DAY DAY: 28
KEY IN HOUR HOUR: 09
KEY IN MIN MINUT: 50
KEY IN SEC SECOND: 45
KEY IN WEEK WEEKDAY:3
GSM IC-Card PAYPHONE - 17 -

Vector Technology Co. – GSM IC-CARD Payphone Manual
Function 20: Discount time Setting
You can define what time interval is for discount rate which set under function 15.
Example:
Follow function 15’s example. We should define the time interval for discount rate. The time we
set is period 00, everyday, AM00:00~06:00, group 01
Operation LCD Display
COMMAND(00-30)
Press "20" PERIOD(00-17)
Press "00" to select the first period CLOCK INPUT
The total periods are 18 sets (00-17)
Key "0230060000060001" 0230060000060001
Press "Redial" to save
Note:
1) Phone must have real time clock(RTC) hardware support.
2) Format:
30 0 6 00 00 06 00 01
02
month day week week hour min. hour min group
start end start start end end
3) Month: 2 digits, ranging form 01 to 12, if key in 00 means any month
Day: 2 digits, ranging from 01 to 31 & 00 means any day
Weekday: 1 digit, ranging from 0 (Sunday) to 6 (Saturday)
Hour: 2 digits, ranging from 00 to 23.
Minute: 2 digits, ranging from 00 to 59
Time group: 2 digits, ranging from 0 to 23
4) If hour setting across to another day must be divided into two time periods ex. 9:00pm to
6:00am You should set first period 9:00pm to 11:59pm, second period 00:00am to 6:00am.
Group 00 is normal rate, no discount.
Time group corresponds to Function 15
GSM IC-Card PAYPHONE - 18 -

Vector Technology Co. – GSM IC-CARD Payphone Manual
Function 24: Simple discount program
Our function 24 is to set all rates increase/decrease percentage no matter normal or discount time
Example: Adjust the rate to 200% (double)
Operation LCD Display
COMMAND(00-30)
Press "24" DISCOUNT: 100%
Press "3" to increase to 200% DISCOUNT: 200%
Press "Redial" to save
The Call Time Discount Discounted time
180S 50% 90S
180S 120% 216S
180S 200% 360S
Note1): Press “1” to decrease, “3” to increase
2): The discount range: from 0%~200%
Function 27: Software Version NB.
Show the software check sum.
Operation LCD Display
COMMAND(00-30)
Press "27" AA08
"AA08" is the software's check sum.
GSM IC-Card PAYPHONE - 19 -

Vector Technology Co. – GSM IC-CARD Payphone Manual
Function 30 Parameter setting
This function contains all memory data. Usually not open if not required by agents.
Here we provide one setting available for owner to zero the coin accumulation from F08
Operation LCD Display
COMMAND(00-30)
Press "30" ENTER ADDR:
Press “20720” “Redial” ENTER ADDR:20720
Press “001” “Redial” ENTER DATA: 001
Press “Redial” COMMAND(00-30)
SAVING
How to set a rate completely
This article describes the relationship of function 2,14,15,20
Ex: I will define a STD call 032XXXXXXX, and when user dials this number, min charge 40 cents
is request when connection (No matter LOCAL/STD/IDD, 20 cents is a must to dial a number).
After every 30 seconds, charged 20 cents in daytime. It charges 20cents for 45 seconds from
23:00~06:00, and Sunday all day long.
Step 1:
Define 032 is a STD number code in function 02. And it is related to rate 04.
Operation LCD Display
COMMAND(00-30)
Press "02" CALL AREA(0/2)
Press "1"to select STD STD 000-399
( 0 for Local, 1 for STD,2 for IDD)
Press "000" to select the first set 000:
(The STD set number: 000-399 total is 400 sets)
Press "032" and " Redial" to save 000:032
(032 is the Prefix code)
Press "04" to set rate 000:032 04
GSM IC-Card PAYPHONE - 20 -

Vector Technology Co. – GSM IC-CARD Payphone Manual
Step2: Define the 04 rate under function 14 and 15.
The minimum charges for Rate 04 is 40 cents for 30 seconds, 2nd charge is 20 cents every 30
seconds at normal time. 20 cents every 45 seconds at discount time.
The values we set is under function 14:
Operation LCD Display
COMMAND(00-30)
Press "14" TAXE (1) :
Press "3" to increase to 20 cents TAXE (1) : 20
Press "Redial" to save
Press "3" to increase to 20 cents TAXE (2) : 20
Press "Redial" to save
Press " 04" to set rate. RATE(00-47): 04
Press "Redial" to save
Press "3" to increase to 40 cents MIN.1st : 40
Press "Redial" to save
Press "3" to increase to 20 cents MIN.2st : 20
Press "Redial" to save
Continue to program other rate RATE(00-47):
Go to function 15 to set time.
Operation LCD Display
COMMAND(00-30)
Press "15" GROUP(00-17)
Press "00" into the 00 group RATE(00-47)
Press "Redial" to save
Press “04” RATE: 20S
Press "3" to increase time to 30 S RATE : 30S
Press "Redial" to save
Press "01" to into the 01 group GROUP(00-17)
Press "Redial" to save
Press "3" to increase second to 45 S RATE : 45S
Press "Redial" to save
GSM IC-Card PAYPHONE - 21 -

Vector Technology Co. – GSM IC-CARD Payphone Manual
Step 4: Define the time groups:
Because the discount time is from 23:00~ 06:00, and Sunday all day long, we define the time
group in function 20.
PERIOD 00 0230162300235901 (Monday to Saturday 23:00~23:59)
PERIOD 01 0230160000060001 (Monday to Saturday 00:00~06:00)
PERIOD 02 0230000000235901 (Sunday all day long)
Q&A
Q1.The LCD displays that the diagnostic test are not completed. It stops at
Step 3 -- Step 4 -- repeatedly
A: --Step 3—Step 4 means the phone can’t read the SIM card data.
Ensure that the SIM card is secured in the holder and it makes proper contact. Ensure that the
GSM phone cable is secure and that is makes proper contact at both ends.
Q2. If no “GSM Power On” message on the LCD when payphone boots?
A: It means phone can’t read GSM module. Ensure GSM Module work fine. Ensure a micro
switch near GSM module switched to GSM side( left side). If switch to PC side, it’s for PC
programming.
Q3. Signal Quality shows 00 or 99
A: Ensure the internal antenna cable and external antenna are plugged in well.
Q4. The LCD display shows “Service”?
A: It means the SIM card was locked. Payphone recognized the SIM card you insert now is not the
original one.
Please enter F30→ 11969→255 (enable F07) then go F07 press 0(disable SIM card lock)
→SAVING
Q5. The LCD display gets stuck on “Please Wait”
A: Ensure the function 10 on the programming must be set to (0) Autodetection.
GSM - GSM Power On --
GSM IC-Card PAYPHONE - 22 -

Vector Technology Co. – GSM IC-CARD Payphone Manual
FCT Specification:
1. Air Interface :
- GSM 900 MHz / 1800 MHz
2. Antenna
- SMA magnet Antenna.
3. AC Adaptor
- AC input 100-240VAC , 50/60Hz
4. Environment
- Operation temperature: -5℃ ~ 50℃
- Storage temperature : -20℃ ~ 60℃
- Humidity : 5% ~ 95%
The payphone can not work under the rain, should be install in a booth or the place which
won’t be contact the water directly.
5. For the lithium battery CR2032.
Risk of explosion if battery is replaced by an incorrect type dispose of used batteries
according to the instruction.
6. The electric shock protect.
In order to avoid the bad users take advantage of the electric shock ( suddenly high electricity)
to effect payphone metering functions ( Make the free call).
When payphone detect the electric shock, the payphone will stop all the work and reset to the
initial mode.
GSM IC-Card PAYPHONE - 23 -
 Loading...