

Page 1
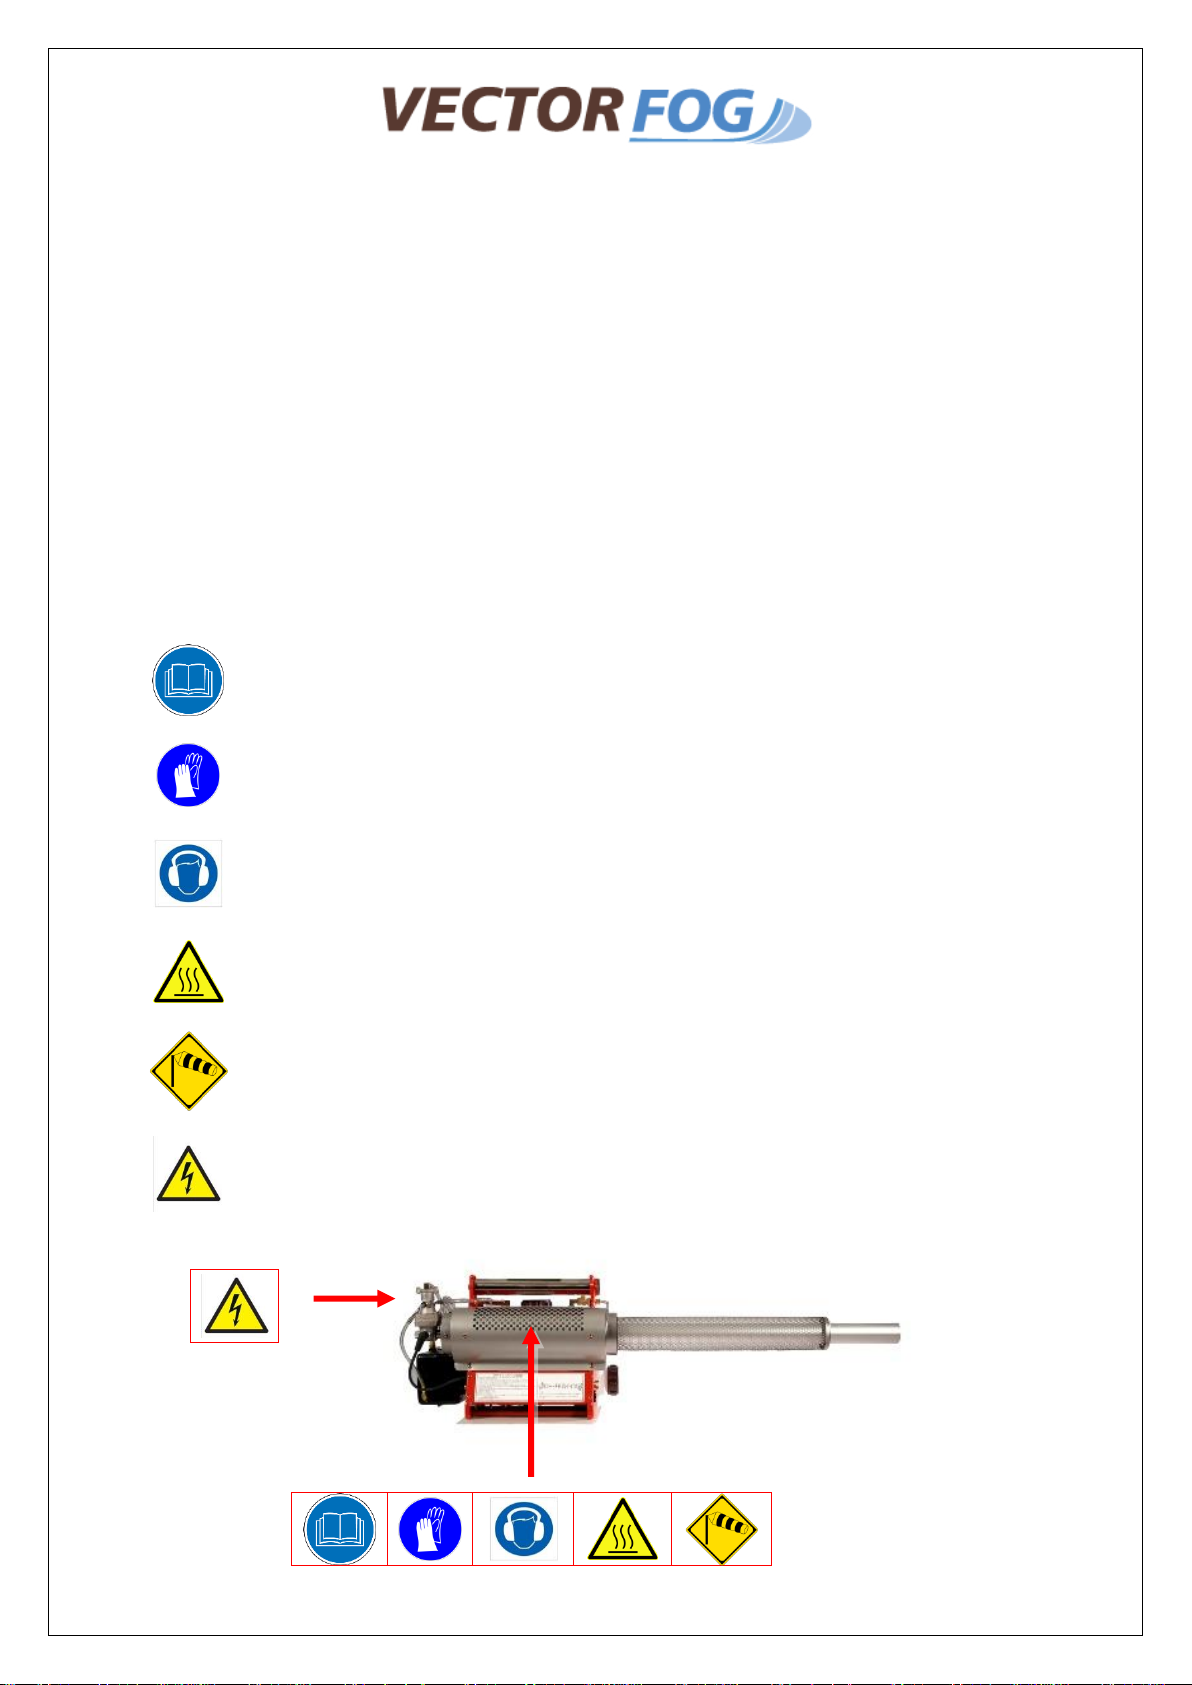
Please read this manual before using the equipment.
You must wear protective equipment (face/breathing mask, protective clothing, gloves,
etc.) when handling potentially hazardous chemicals.
It is advisable to wear ear plugs to protect the user from the high noise produced by the
machine
The interior of the machine heats up to extremely high temperatures. Do not add fuel or
chemicals during the operation of the machine or when it is hot after use.
Avoid fogging chemicals upwind.
High voltage can be dangerous. Do not turn on the machine when the spark plugs
electrode is exposed.
Experts in Fogging Technology™
INSTRUCTION MANUAL THERMAL FOGGER VECTORFOG H100, H100SF, H200 & H200SF
When fogging outdoors, you should only fog for short periods at a time and when there is not much wind. When
fogging indoors you should start at the furthest part of the building and work your way back until you get to the
entrance or exit.
It’s essential to read the chemical manufacturer’s instructions before you start applying, including diluting ratio and
safety precautions.
Only experienced personnel should operate this equipment.
You must exercise caution if fuel is spilt, in order to avoid the risk of fire.
CAUTION MARKS
1
Page 2
SPECIFICATIONS
Model
H100 / H100SF
H200 / H200SF
Motor
Pulse Jet
Pulse Jet
Chemical Tank
Polymer
Stainless steel
Tank Size
4.5L
6.5 L
Flow rate
10-50 LPH
10-50 LPH
Pressure in the chemical tank
0.224 bar
0.224 bar
Fuel
Petrol
Petrol
Performance
19 kW
19 kW
Fuel tank pressure
0.8 bar
0.8 bar
Start
Automatic (manual version available)
Automatic (manual version available)
Fuel tank capacity
1.2 L
1.2 L
Weight(net)
8.5 Kg
10.8 Kg
Dimension
112x30x35 (cm)
135x30x35 (cm)
Features
Short-circuit breaker (tank)
(Model SF : Dual Function – Fog water/oil based
Chemicals)
Short-circuit breaker (tank)
(Model SF : Dual Function – water based
chemicals as well as oil based)
Accessories
Belt, Spares Kit, Charger, Toolkit, Instruction
Manual
Belt, Spares Kit, Charger, Toolkit, Instruction
Manual
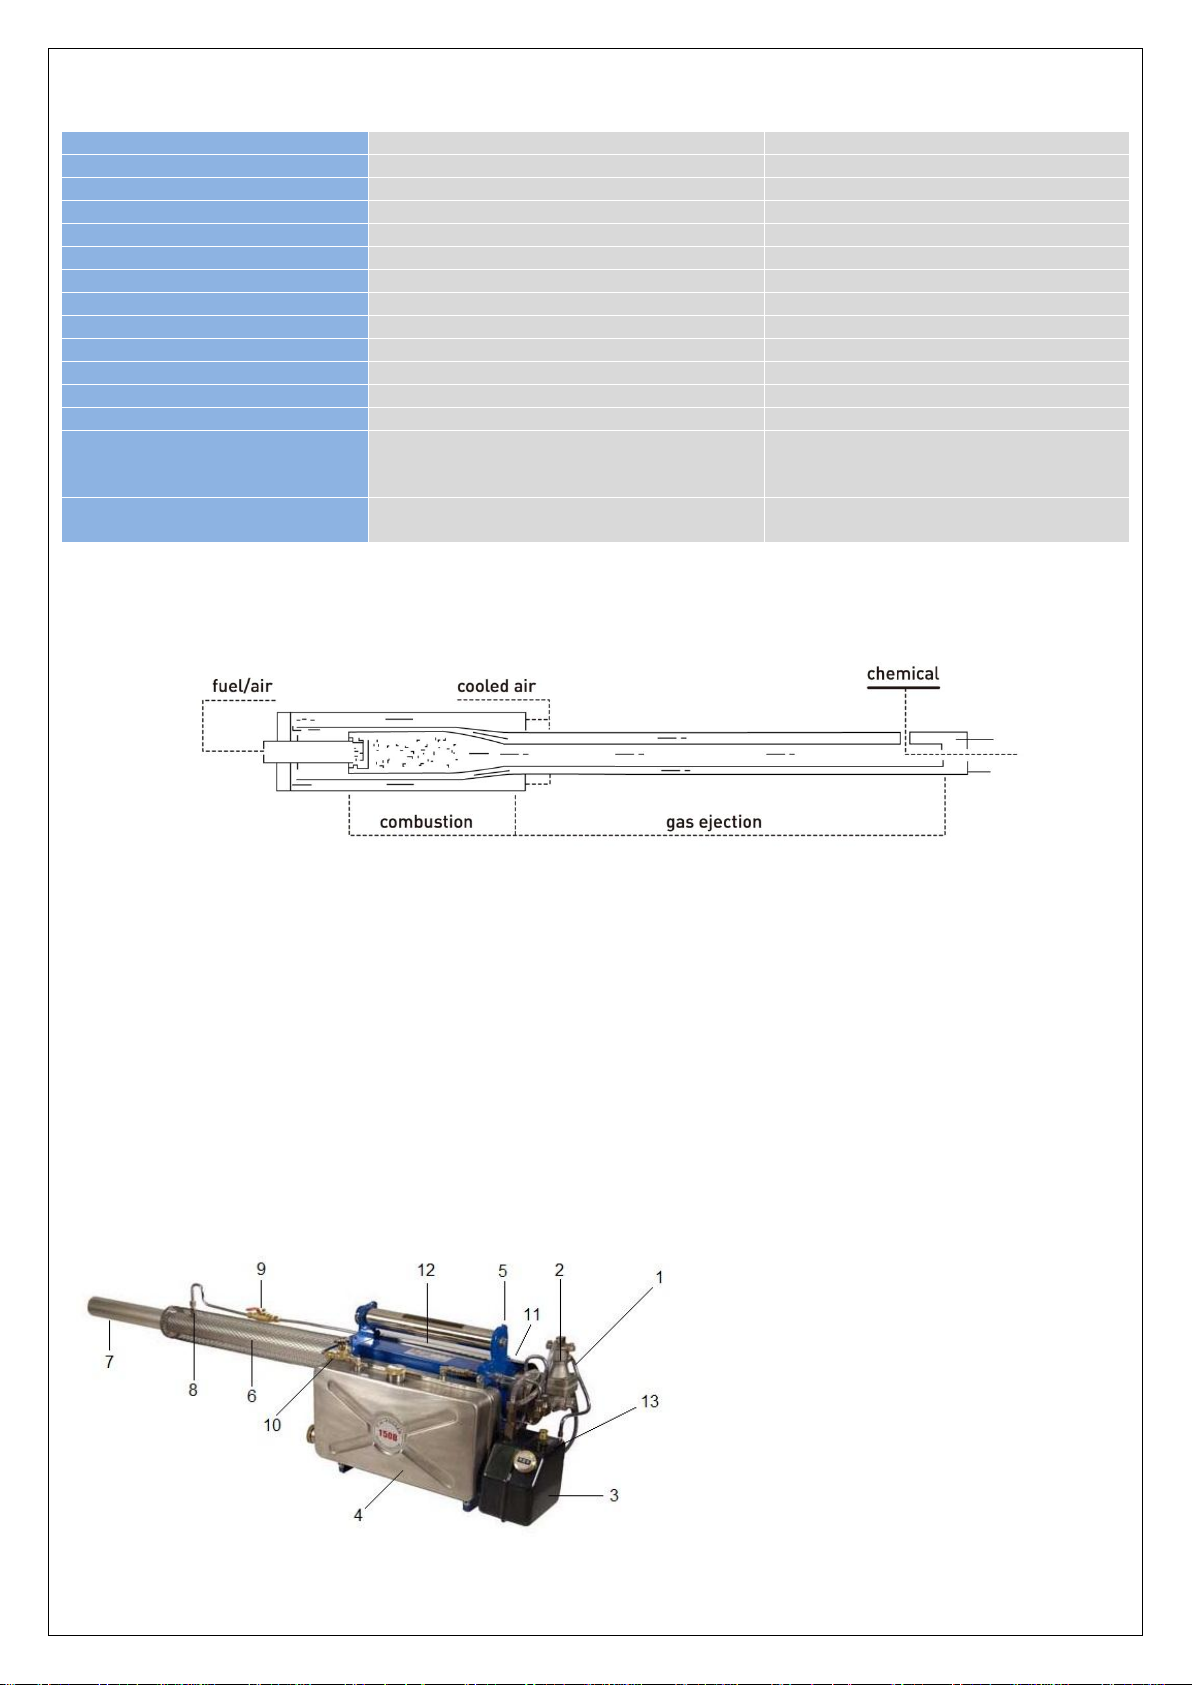
1. Fuel Injector
2. Carburettor
3. Fuel Tank
4. Chemical Tank
5. Main Body
6. Safety Mesh
7. Resonator
8. Chemical Inlet
9. Close valve/Directional valve (SF model)
10. Chemical Supply valve
11. Security Cover
12. Handle/Manual Start Pump (optional)
13. Off Button (choke)
BASIC CONCEPT OF THERMAL FOGGING
VectorFog™ Thermal Foggers are powered using the pulse jet principle. Pulse jet engines don’t have any moving
parts; instead they have a funnel shaped combustion chamber similar to a rocket engine which opens into a long
resonator or exhaust pipe. VectorFog thermal foggers have an auto start and operate through compressed air via a
compressor. When the auto start button is pressed, the compressed air pressurizes the fuel tank, causing fuel to flow
to the injector and then into the carburettor. Air/fuel mixture is then ignited by a spark plug in the carburettor. The
spark is created by an ignition coil which is powered by a rechargeable battery. The ignition coil, battery and
compressor are all housed in the base of the machine. Operating at its optimum performance, combustion and
injection is repeated with a frequency of around 200-250 cycles per second. Once the machine starts, the chemical
tank also becomes pressurized by means of a non-return valve. A close valve and supply valve are then opened to
allow the flow of the chemical/oil solution in to the resonator. At this stage the solution is heated up to around 500C
and dispersed into millions of tiny droplets (around 10 microns) creating a dense and visible smoke.
2
Page 3
CHECKLIST BEFORE STARTING THE UNIT
Unpacking the unit
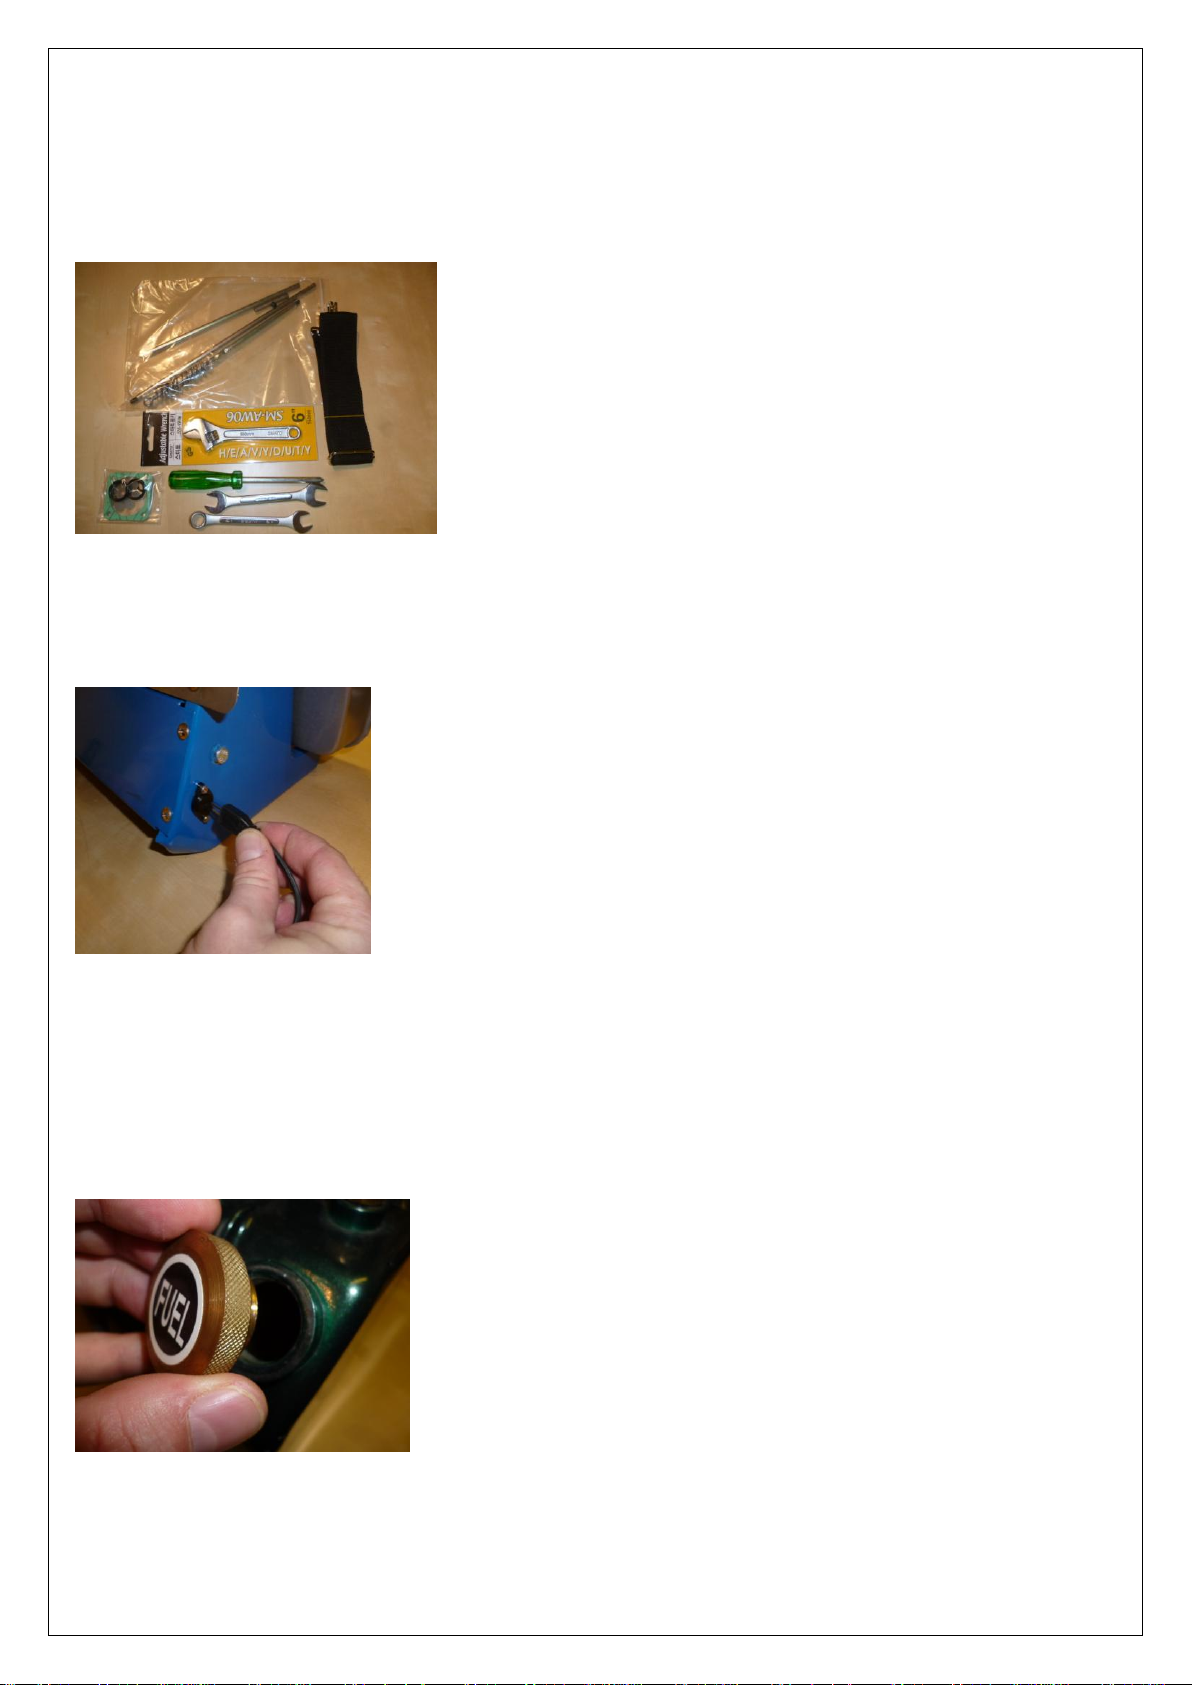
When unpacking the unit, please make sure that that the machine is not damaged and that all the accessories
mentioned in this manual are not missing.
Charge the battery
Make sure the right power supply is being used (110/220 volts). Connect the charger to the unit and then connect to
the mains. The machine requires around 8 to 10 hours to fully charge.
Inspect the ignition unit
Press the power button and listen to ensure that the spark plug is working to start the ignition process.
Fill the fuel tank
Fill the tank with undiluted petrol using a funnel. Do not overfill the tank. When you finish filling the tank, close the
tank cap tightly. The unit operates for approximately 40 minutes with a full tank.
3
Page 4
Fill the chemical tank
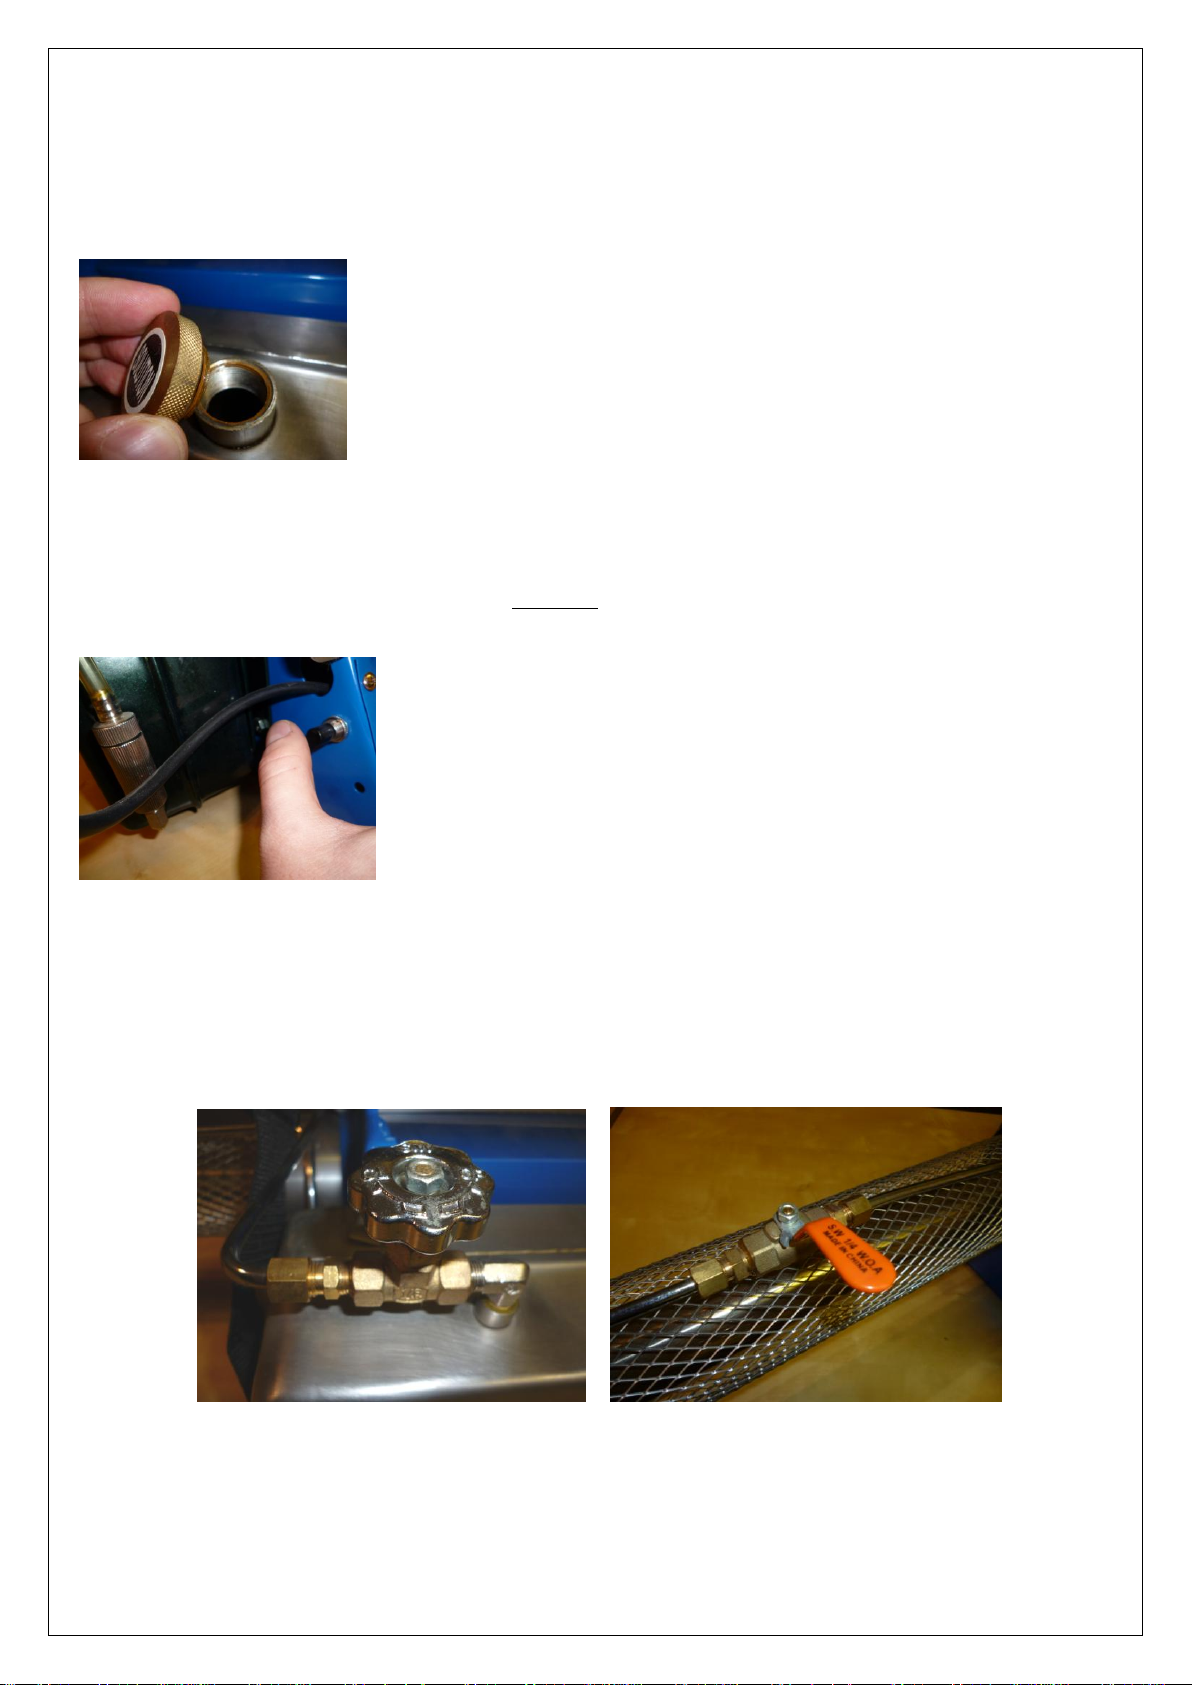
Pour the special fogging chemical mixture into the chemical tank. It is important not to add more chemical mixture
than it’s needed. Leaving remaining chemicals in the tank after use could affect the performance of the machine in
the following session as deposits may solidify. When you finish filling the tank, close the tank cap tightly.
To turn on the machine
Press the power button and keep it pressed for 5 seconds after you hear combustion starting (sounds like a small
explosion). It is necessary to keep the machine on for about 10 seconds to warm up before opening the chemical
valves. TIP: If the machine fails to start, press the choke/off button so pressure can be re-established. Press the start
button again and repeat the above procedure until it starts.
To start fogging
Once the machine has heated up for 10 seconds, first turn the chemical supply valve counter clockwise. When you
are ready to start fogging, open the directional/close valve. With this valve you can also adjust the amount of
chemical being used by turning it left to right.
4
Page 5
To turn off the machine
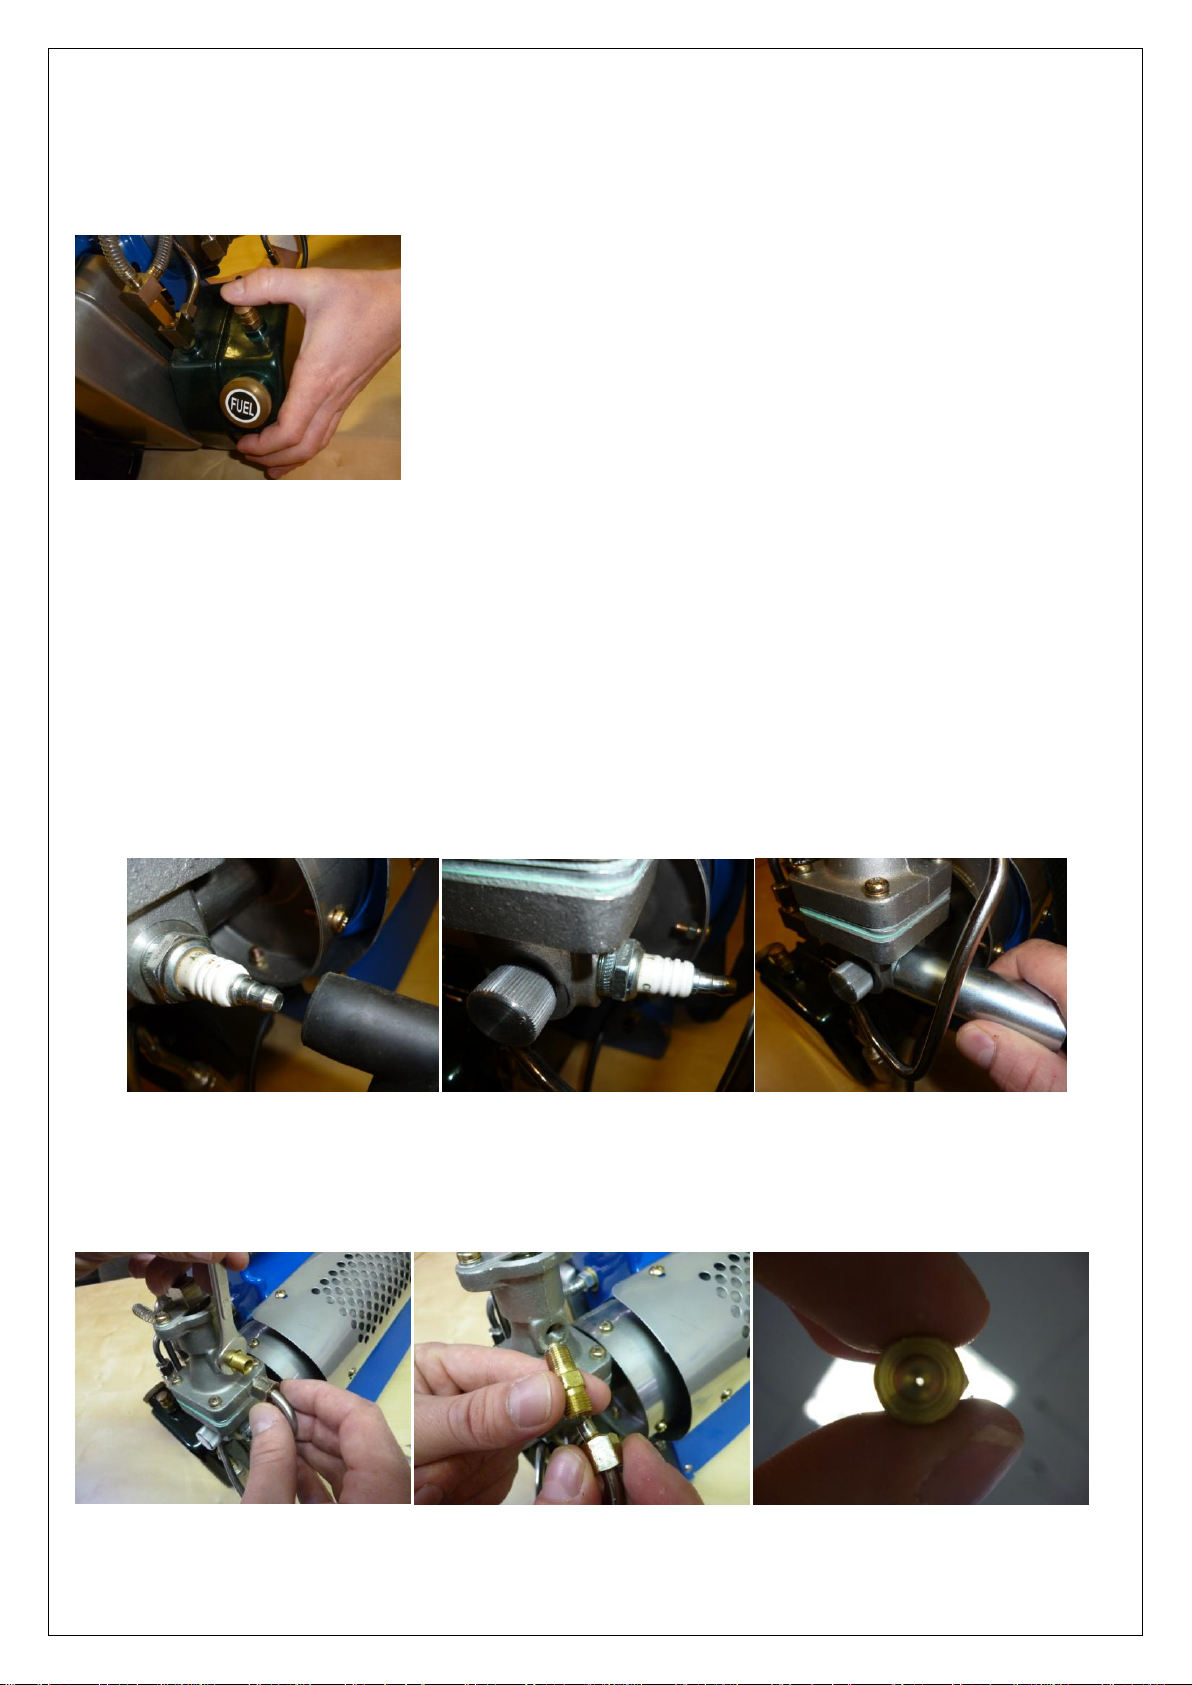
Turn the chemical supply valve clockwise to stop the supply of chemical. Keep the machine in operation for 5
seconds to help get rid-off any chemical mixture still in the system. Close the directional/close valve and press the
off/choke button located above the fuel tank to stop the machine.
MAINTENANCE
Cleaning the Chemical Tank and Pipes
Fill the chemical tank with 25% of clean water and turn on the unit. This will prevent corrosion and the accumulation
of chemical deposits in the tank and pipes.
Spark Plug Maintenance
Remove the spark plug using a spanner or spark plug remover. Remove any carbon deposits between the electrode
and the earth section with a wire brush. Make sure that there is a space of 3 to 5 mm between the electrode and the
earth.
Fuel injector Maintenance
Unscrew the fuel injector situated on the side of the carburettor. Clean the injector with compressed air to remove
any blockages.
5
Page 6
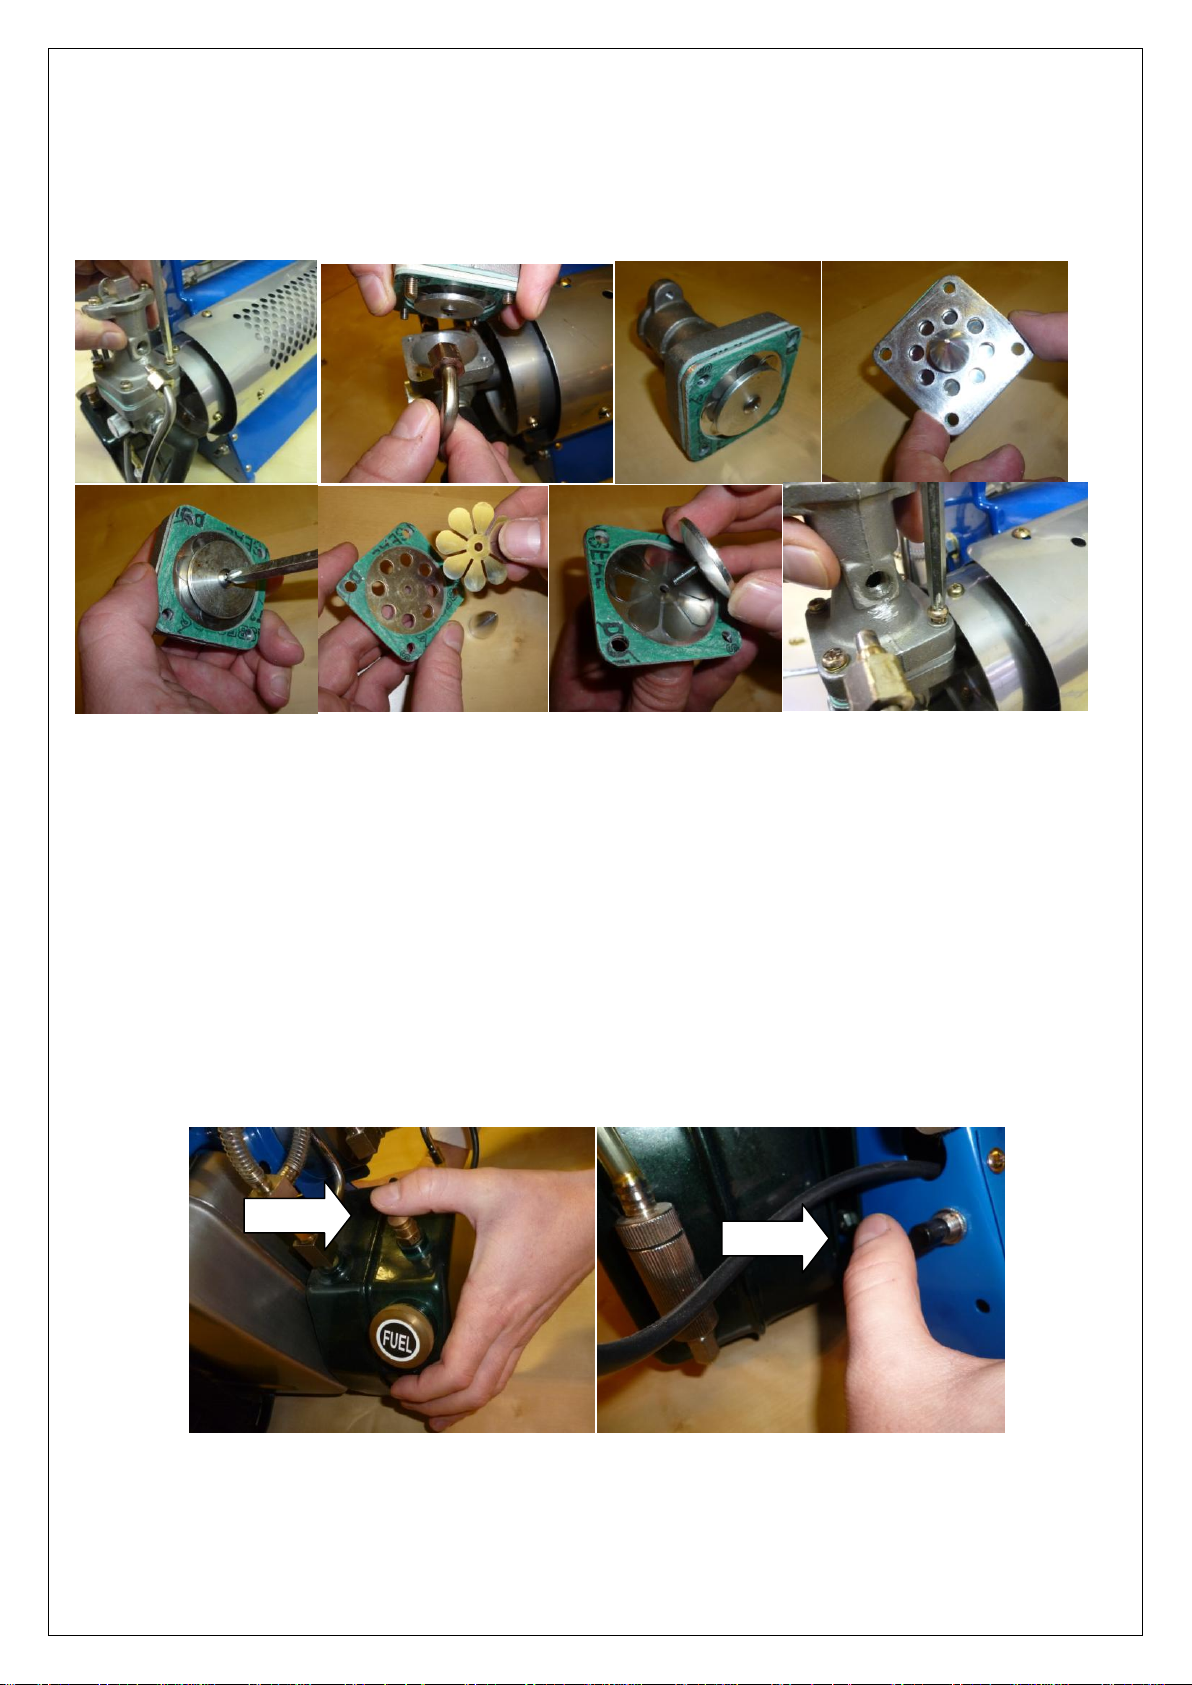
Maintaining the valve petal
STEP 1
STEP 2
Unscrew the fuel filter before removing the top of the carburettor. Check the valve for any distortions or cracks. If
it’s damaged, you will need to replace this part. TIP: It’s important to assemble the parts of the carburettor in the
order there where disassembled. The distance between the petal valve and the valve plate o should be approximately
1 mm.
COMMON TROUBLESHOOTING
If there is no ignition:
• Listen for any noises coming from the engine
If there is noise coming from the engine but there is no ignition, this could be because the engine has flooded (an
over-supply of fuel in the carburettor). Press the choke/off button above the fuel tank and then press the start
button until you hear the machine ignite. Repeat this procedure several times if it doesn’t start the first time.
6
Page 7
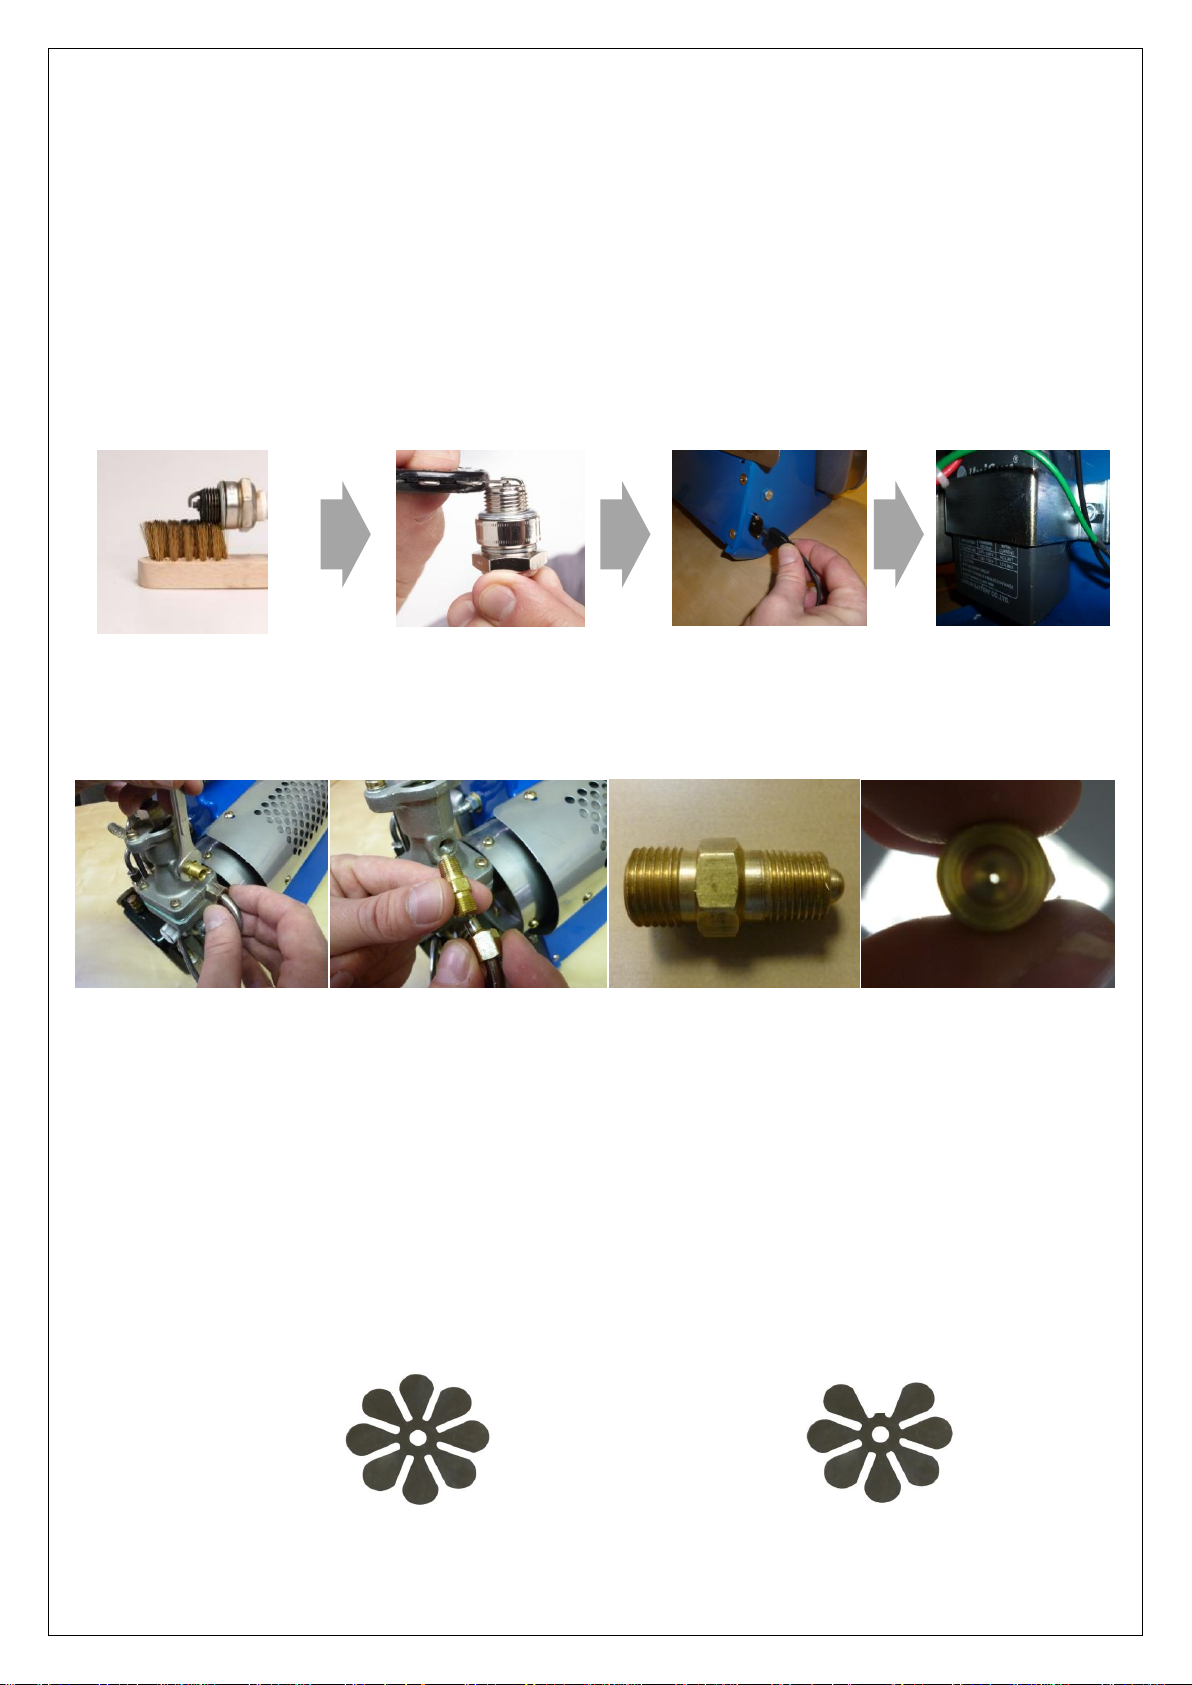
• Check the spark plug
Remove the spark plug using a spanner or spark plug remover. Hold the plug by its plastic cap and press the start
button to check if there is a spark between the electrode and the earth. Also you should hear if there buzzing sound
from the ignition coil.
If there is no spark:
Clean any carbon deposits in between the electrode and earth with a wire brush.
Check that there is a distance of 3 to 5 mm between the electrode and earth.
Check that the battery is fully charged.
Check that the battery and ignition coil are working. If necessary, replace the battery or coil
Clean the contacts and wires inside the battery case
Once these checks have been carried out, try starting the machine again.
• Check the fuel is being injected into the carburettor.
Examine the fuel hose located on the side of the fuel tank to make sure it’s not blocked. Make sure the fuel tank is
full before starting the machine. Make sure the seal in the petrol cap is not damaged. Make sure the cap is firmly
closed to prevent leakage. Unscrew the fuel injector from the side of the carburettor but keep it attached to the
metal fuel pipe. Pointing the injector away from the machine and any people, press the start button and on each
stroke of the compressor pump, fuel should be injected. If not, examine that the injector is not blocked. Do this by
unscrewing the filter from the metal pipe and clean the filter with compressed air.
• Check the Petal Valve.
Remove the spark plug cap, filter and unscrew the carburettor. Examine the petal valve to see if it’s damaged. If it’s
damaged, replace petal valve. TIP: It’s important to assemble the parts of the carburettor in the order there where
disassembled. The distance between the petal valve and the valve plate o should be approximately 1 mm.
7
Page 8
The machine is turned on, but the engine works intermittently or stops:
• Examine the fuel tank assembly to check for any leakages.
After pressing the start button, cover the tank and connections with soap to check for leaks. If bubbles are observed,
the gasket needs replacing on the fuel tank cap or the tank itself.
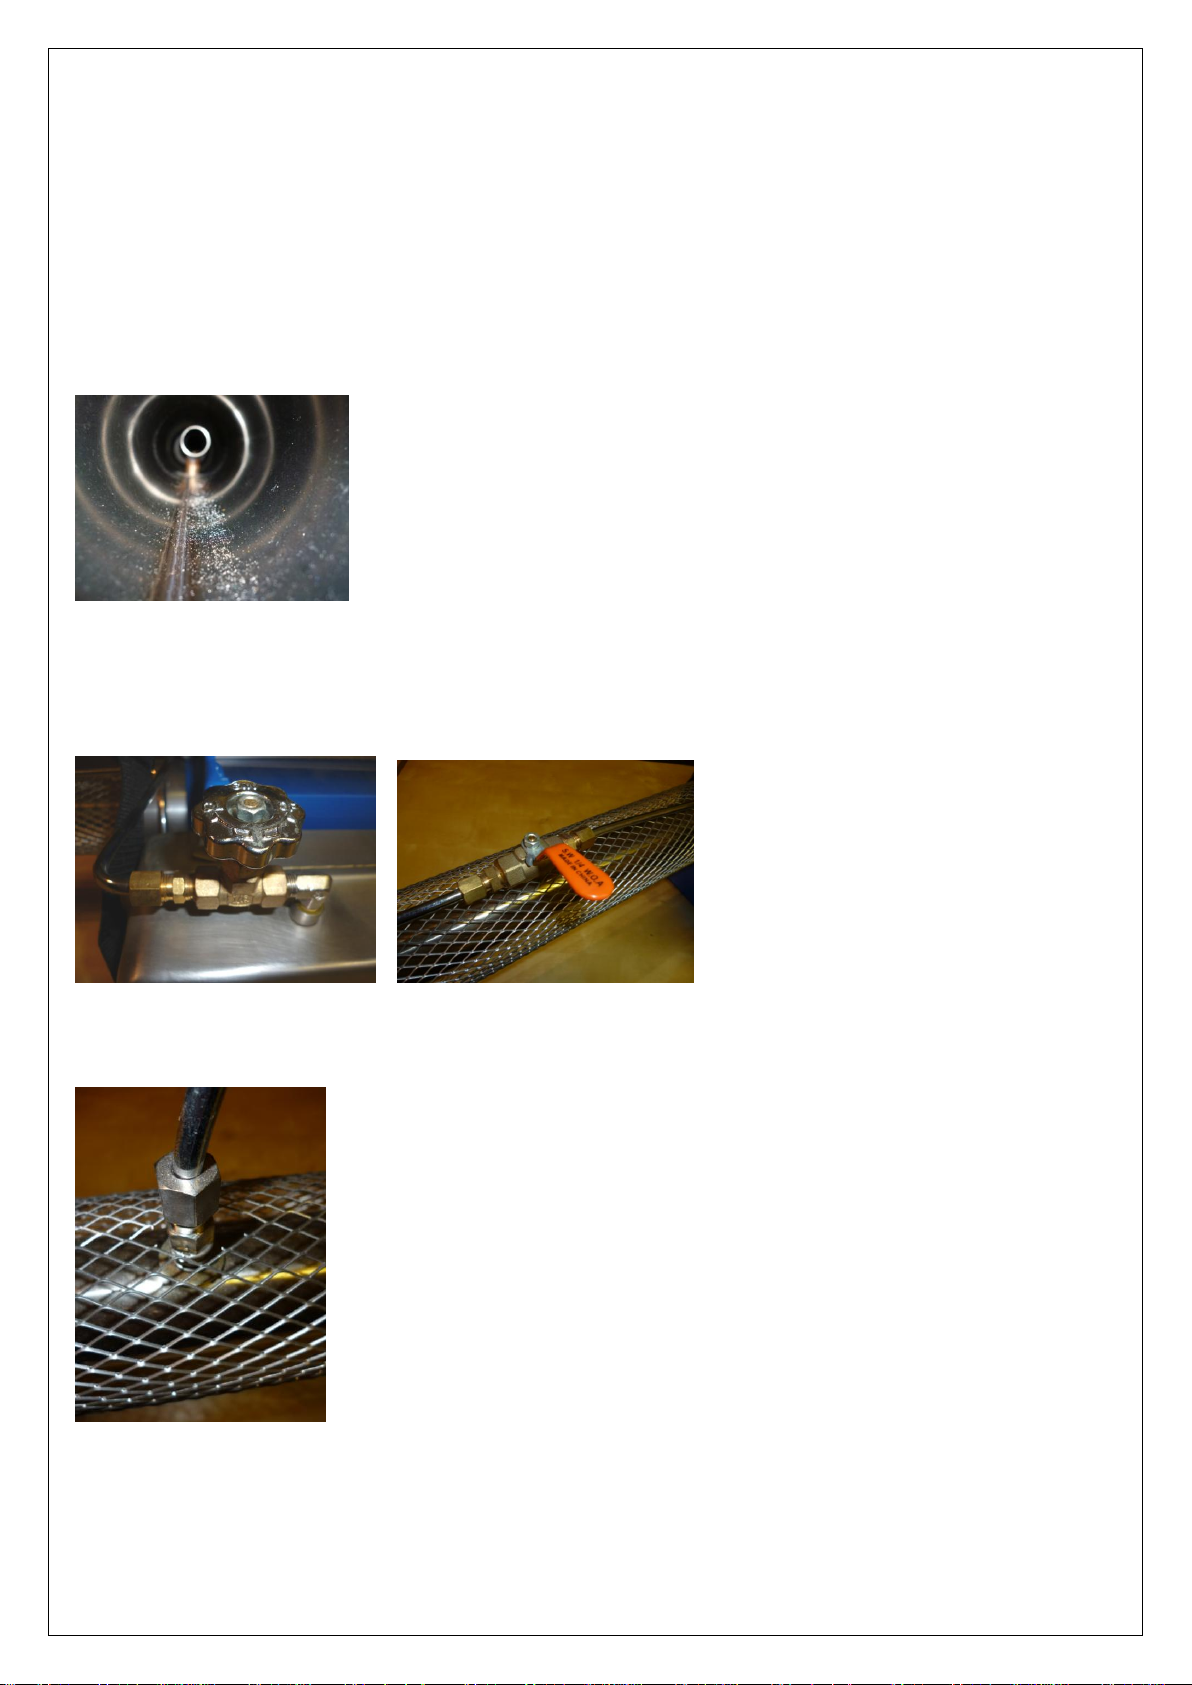
• Clean the resonator.
Remove carbon deposits in the resonator with the wire brush provided. Use and forward and backward motion.
The machine doesn’t fog or doesn’t fog enough:
• Check that the chemical supply valve is opened. This is done by turning it anticlockwise. Make sure that the
directional/close valve is set to the open position.
• Unscrew the main chemical inlet nozzle from the resonator and clean it using compressed air to remove any
blockages.
• Check there is no leaks in the chemical tank. Blow compressed air backwards though the chemical tube from the
inlet nozzle to see if any bubbles appear. Replace leaking parts if necessary.
8
Page 9
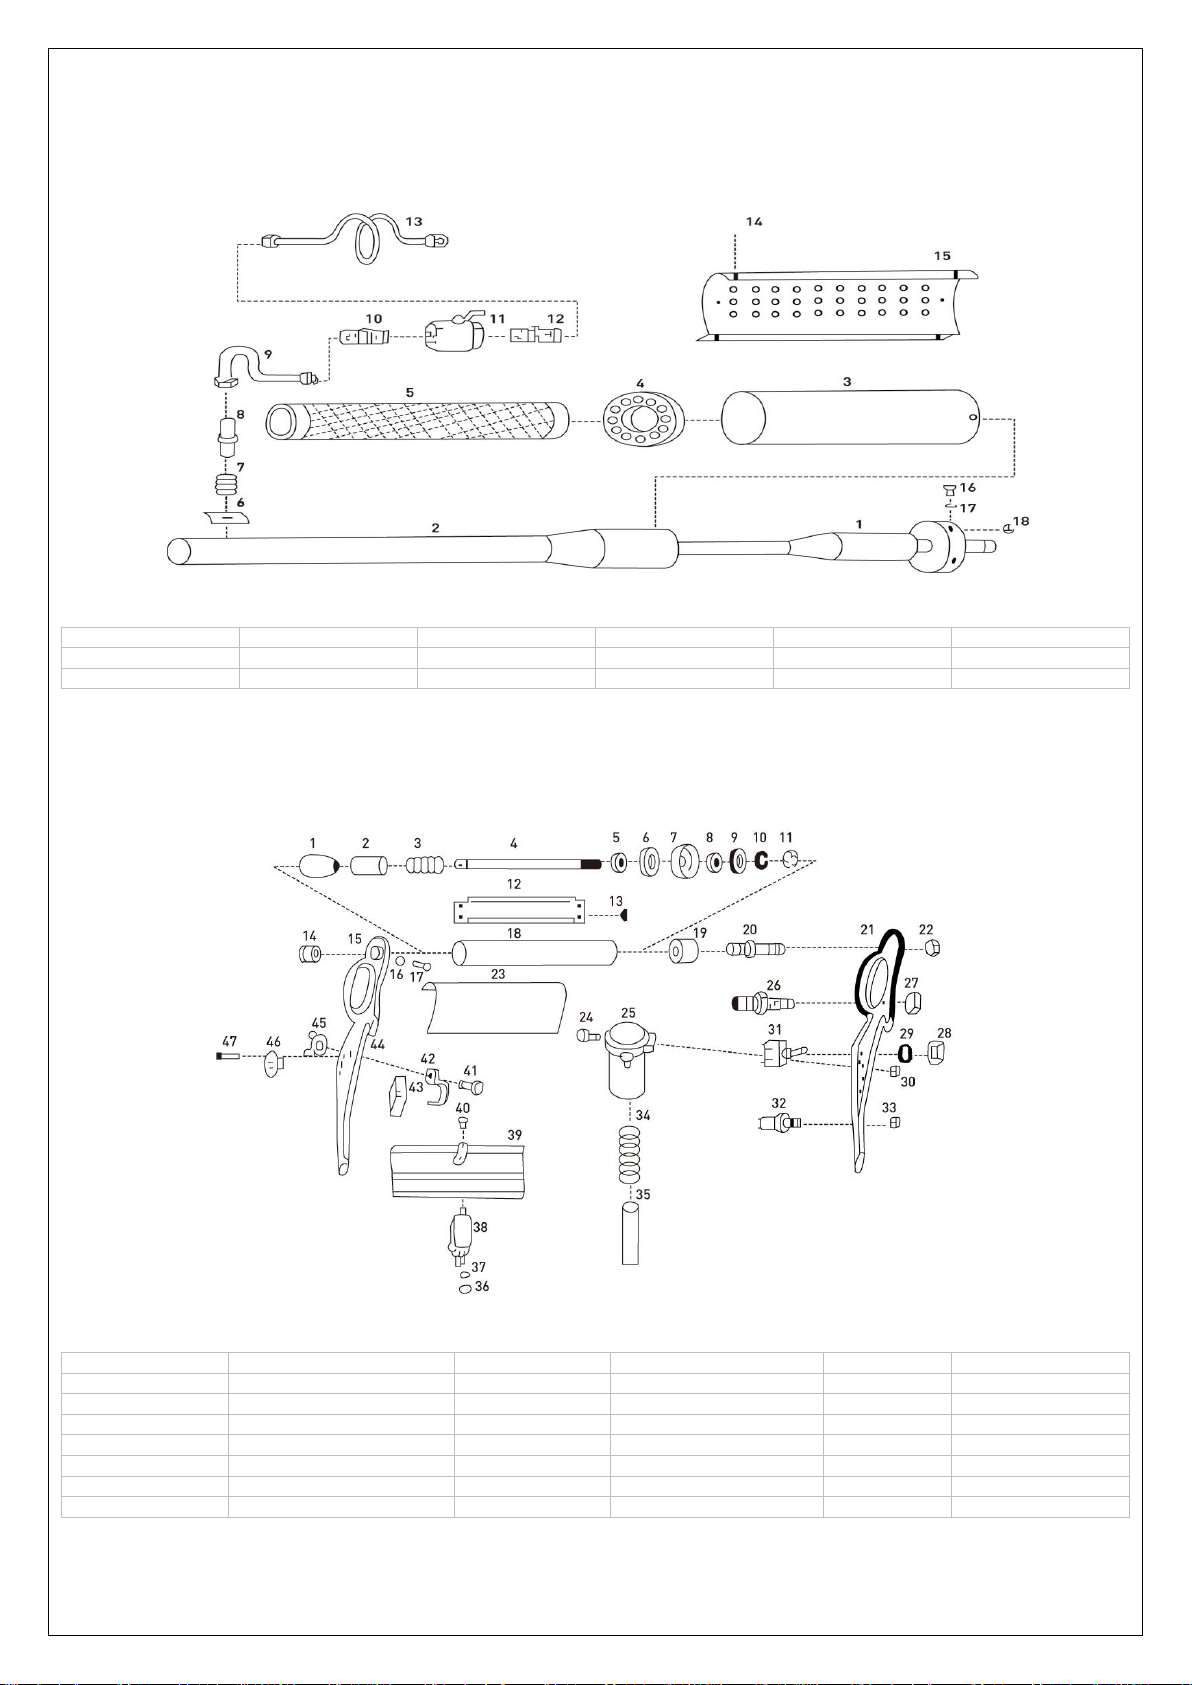
01. Resonator & chemical Inlet nozzle
1. Ejection pipe
2. Inner cooling pipe
3. Outer cooling pipe
4. Bracket
5. Safety net
6. Ejection nipple plate
7. Ejection buffer spring
8. Ejection nipple
9. Ejection nipple tube
10. Straight nipple
11. Ball valve
12. Straight nipple
13. Chemical pipe
14. Bolt
15. Protective cover
16. Bolt
17. Flat washer
18. Nut
1. Handle ball
2. Buffer hose
3. Buffer spring
4. Pump shaft
5. Pump nut
6. Washer(large)
7. Pump packing
8. Washer(small)
9. Washer(medium)
10. Spring washer
11. Nut
12. Under cover
13. Piercer
14. Pump peg
15. Body(left)
16. Spring washer
17. Bolt
18. Pump(cylinder)
19. Pump rear peg
20. Hand pump hose nipple
21. Body(right)
22. Nut
23. Middle plate
24. Bolt
25. Automatic pump
26. Automatic pump air nipple
27. Nut
28. Nut
29. Washer
30. Nut
31. Toggle switch
32. Ignition switch
33. Nut
34. Hose protection spring
35. Hose
36. Nut
37. Washer
38. Vibrator
39. Bottom plate
40. Bolt
41. Bolt
42. Battery grip
43. Battery
44. Nut
45. Butterfly nut
46. Charging consent
47. Bolt
PARTS ASSEMBLY
02 Pump, Frame, Ignition
9
Page 10
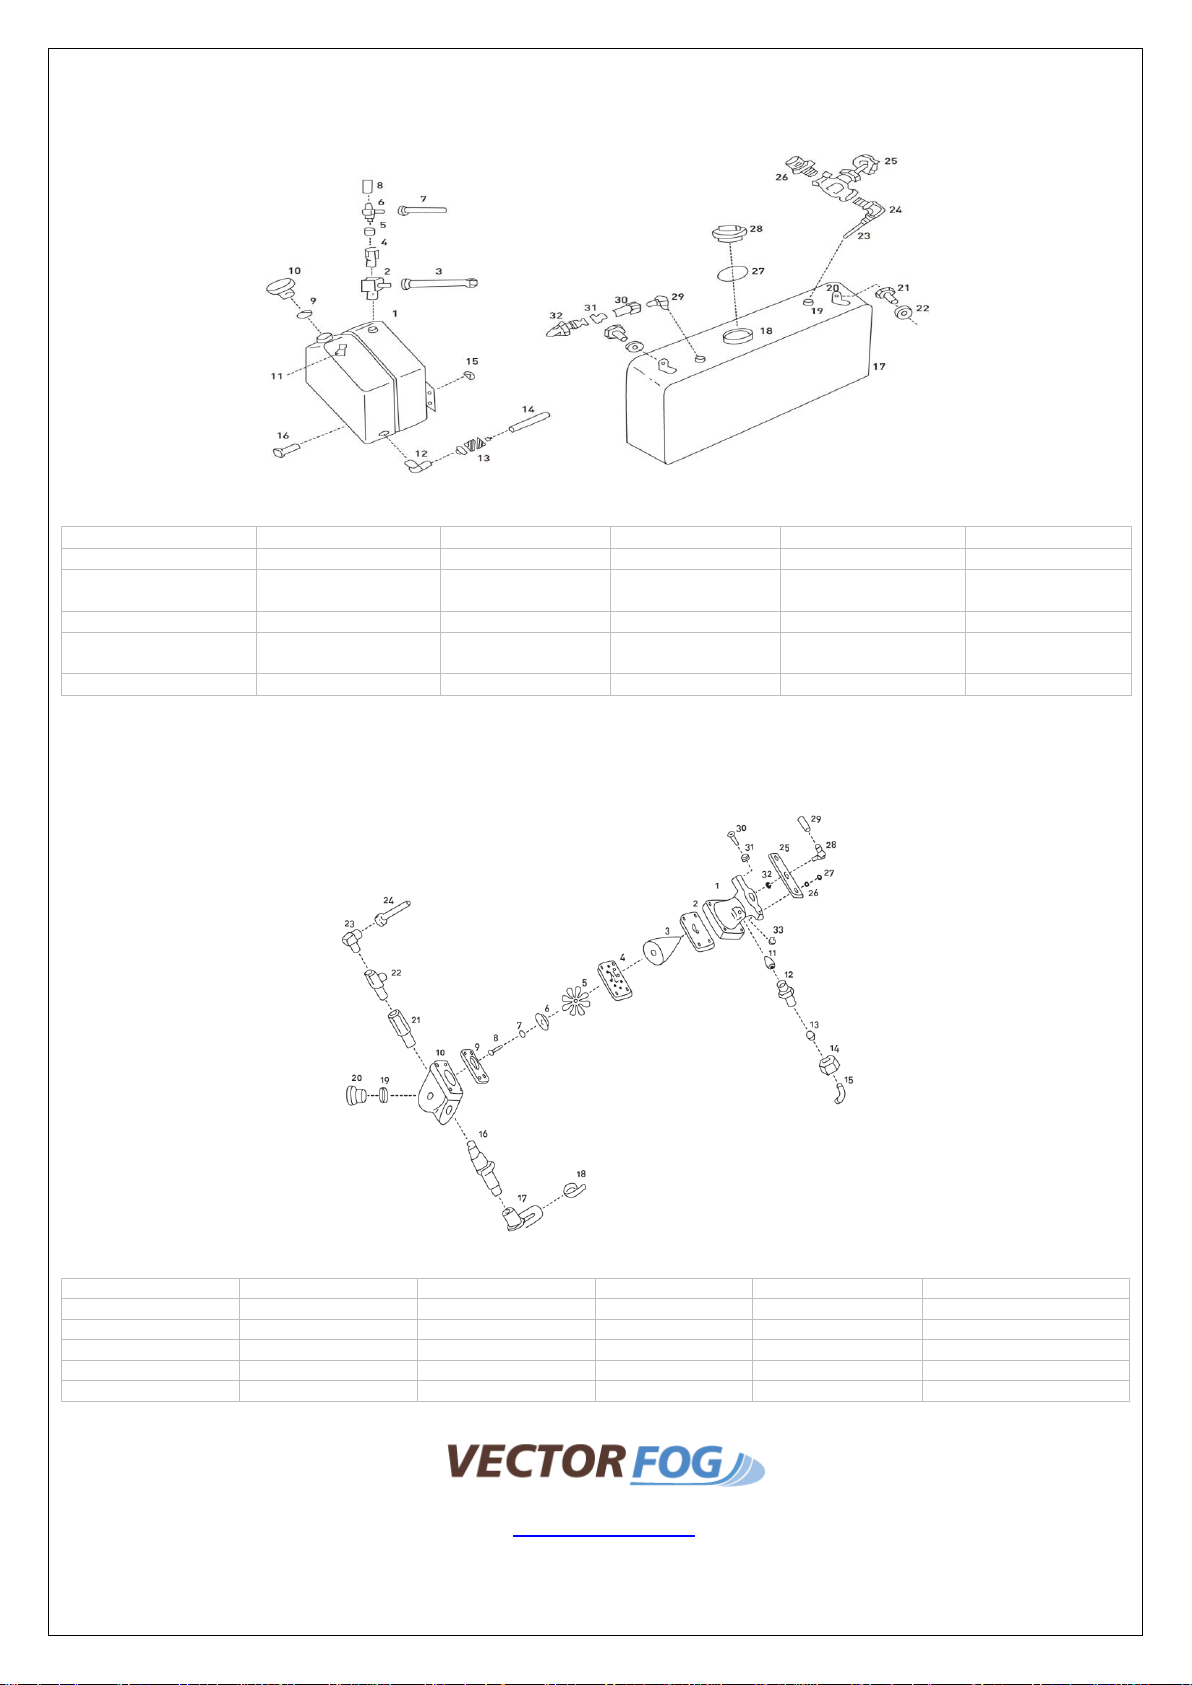
03. Chemical & Fuel Tank
1. Venturi
2. Upper Gasket
3. Cone sha
4. Petrol valve board
5. Petrol valve
6. Petrol valve support
19. O-ring
20. Engine rear peg
21. Reducer
22. Run tee
23. Elbow
24. Explosion pipe
25. Air gasket
26. Washer
27. Air Gasket Bolt
28. Air elbow
29. Extension hose
30. Air gasket bolt
1. Fuel tank
2. Run tee
3. Fuel tank pipe
4. Check valve
5. Rubber check valve
6. T-check valve
7. upper air pipe
8. Oil pressure hose (blk)
9. O-ring
10. Oil tank peg
11. Knocking release
12. Oil tank elbow
13. oil filter device
14. fuel hose
15. nut
16. nut
17. chemical tank
18. chemical tank
19. Chemical tank fing
20. Chemical tank grip
21. Chemical tank bolt
22. Chemical tank nut
23. Chemical outlet pipe
24. Elbow
25. Chemical amount
26. Straight nipple
27. Chemical tank
28. Chemical tank
29. Elbow
30. Check valve-1
31. Check valve packing
32. Check valve-2
mouth
control valve
04. Carbureor
mouth ring
mouth peg
7. Spring washer 8. Bolt 9. Lower Gasket 10. Engine 11. Ejecon nozzle 12. Nozzle
13. Ring 14. Nut 15. Engine upper pipe 16. Plug 17. Plug cap 18. Metal grip
31. Air gasket washer 32. Air gasket nut 33. Air gasket nut
Unit 13 Riverside Park, Dogflud Way, Farnham, GU9 7UG. United Kingdom. Tel: +44 (0)1252 757 222. Fax: +44 (0)1483 326 534
www.vectorfog.com
10
 Loading...