

Vector Power City VEC029ACY Owner's Manual


IMPORTANT SAFETY INSTRUCTIONS
Read and Understand all Warnings, Cautions and Notes before operating Power City. Warnings alert the user to
hazardous conditions that can be harmful to people. Cautions alert the user to conditions that can cause property
damage. Notes are important operational information.
KEEP THIS USER’S GUIDE FOR FUTURE USE.
JUMP-START WARNINGS AND CAUTIONS
! There is risk of explosive gas being released when batteries are improperly charged or discharged. Failure to
follow instructions may cause property damage, explosion hazard and/or personal injury
! Do not smoke while jump-starting
! Only attempt to jump-start a vehicle or boat in a well ventilated area
! This power system is to be used ONLY on vehicles or boats with 12 volt DC battery systems
! Do not wear vinyl clothing when jump-starting a vehicle - friction can cause dangerous static electricity sparks
! Remove all metal jewelry - this can cause short circuits. Always use protective eyewear when jump-starting:
contact with battery acid may cause blindness and/or severe burns.
! Never touch Power City red and black clamps together - this can cause dangerous sparks, power arcing and/or
explosion
! Do not attempt to jump-start a frozen battery
! After use as jump-starter, turn off safety switch
! Keep out of reach of children
! Vehicles that have on-board computerized systems may be damaged if vehicle battery is jump started. Before
jump-starting this type of vehicle, read the vehicle’s owners manual to confirm that external-starting assistance
is advised
! Excessive engine cranking can damage the vehicle’s starter motor. If the engine fails to start after the
recommended number of attempts, discontinue jumpstart procedure and look for other problems that ma y need
to be corrected
! When safety switch is off, Polarity Alarm is enabled. If cables are connected to another battery and the alarm
sounds, the cable connections must be switched. If alarm sounds, do not turn on safety switch
! If vehicle to be started has a positive grounded System (positive battery terminal is connected to chassis), replace
steps 9 and 10 of the jump-start procedure (below) with the following steps A and B, and then proceed to step 11
A. Connect negative (-) black clamp to vehicle battery ‘s negative terminal.
B. Connect positive (+) red clamp to vehicle chassis or a solid, non-moving, metal vehicle component or
body part. DO NOT clamp directly to positive battery terminal or moving part.
! Replace worn or defective parts immediately - contact Vector Technical Support Department at toll-free (866)
584-5504
! Skin: if battery acid comes in contact with skin, rinse immediately with water, then wash thoroughly with soap
and water. If redness, pain, or irritation occurs, seek immediate medical attention
! Eyes: if battery acid comes in contact with eyes, flush eyes immediately for a minimum of 15 minutes, seek
immediate medical attention

CONTENTS
1. INTRODUCTION 4
1.1 General description 4
1.2 Key features 5
1.3 Use Power City to 5
1 .4 Storage location 6
2. USE AS A JUMP-START SYSTEM 6
2.1 Jumpstart warnings 5
3. USE AS A 12 VOLT DC PORTABLE POWER SUPPLY 7
4. POWER INVERTER 7
4.1 Inverter operations 8
4.2 Principles of operations 8
4.3 Connecting Inverter to power source away from unit 8
4.3.1 Procedure for connecting inverter to remote DC source 9
4.3.2 Operating time 9
4.4 Powering an AC load 9
4.5 Placement of the power inverter 10
4.6 Operating tips 10
4.7 Inverter fuse replacement 11
5. COMPRESSOR/TIRE INFLATOR 11
5 1 Compressor use 11
5.2 Warnings 11
5.3 Tire Inflation or products with a valve stem 1 2
5.4 Inflate other articles (without valve stem) 1 2
5.5 Typical inflation times 12
6. LANTERN USE 12
6.1 Lantern operation on main unit 12
6.2 Lantern operation detached from main unit 13
6.2.1 Lantern operation from DC source 13
6.2.2 Lantern operation 110 volt with AC recharge adapter 13
6.3 Lamp replacement..
7. RECHARGING POWER CITY’S BATTERY 14
7.1 AC recharging 15
7.2 DC recharge 15,16
7.3 Alternate DC recharge 16
7.4 Simultaneous DC recharge and inverter operation 16
8. MAINTENANCE/REPLACEMENT PARTS 16
9. BATTERY DISPOSAL AND WARNINGS 16
1 0. SPECIFICATIONS 17
11 .WARRANTIES 18,19
1. INTRODUCTION
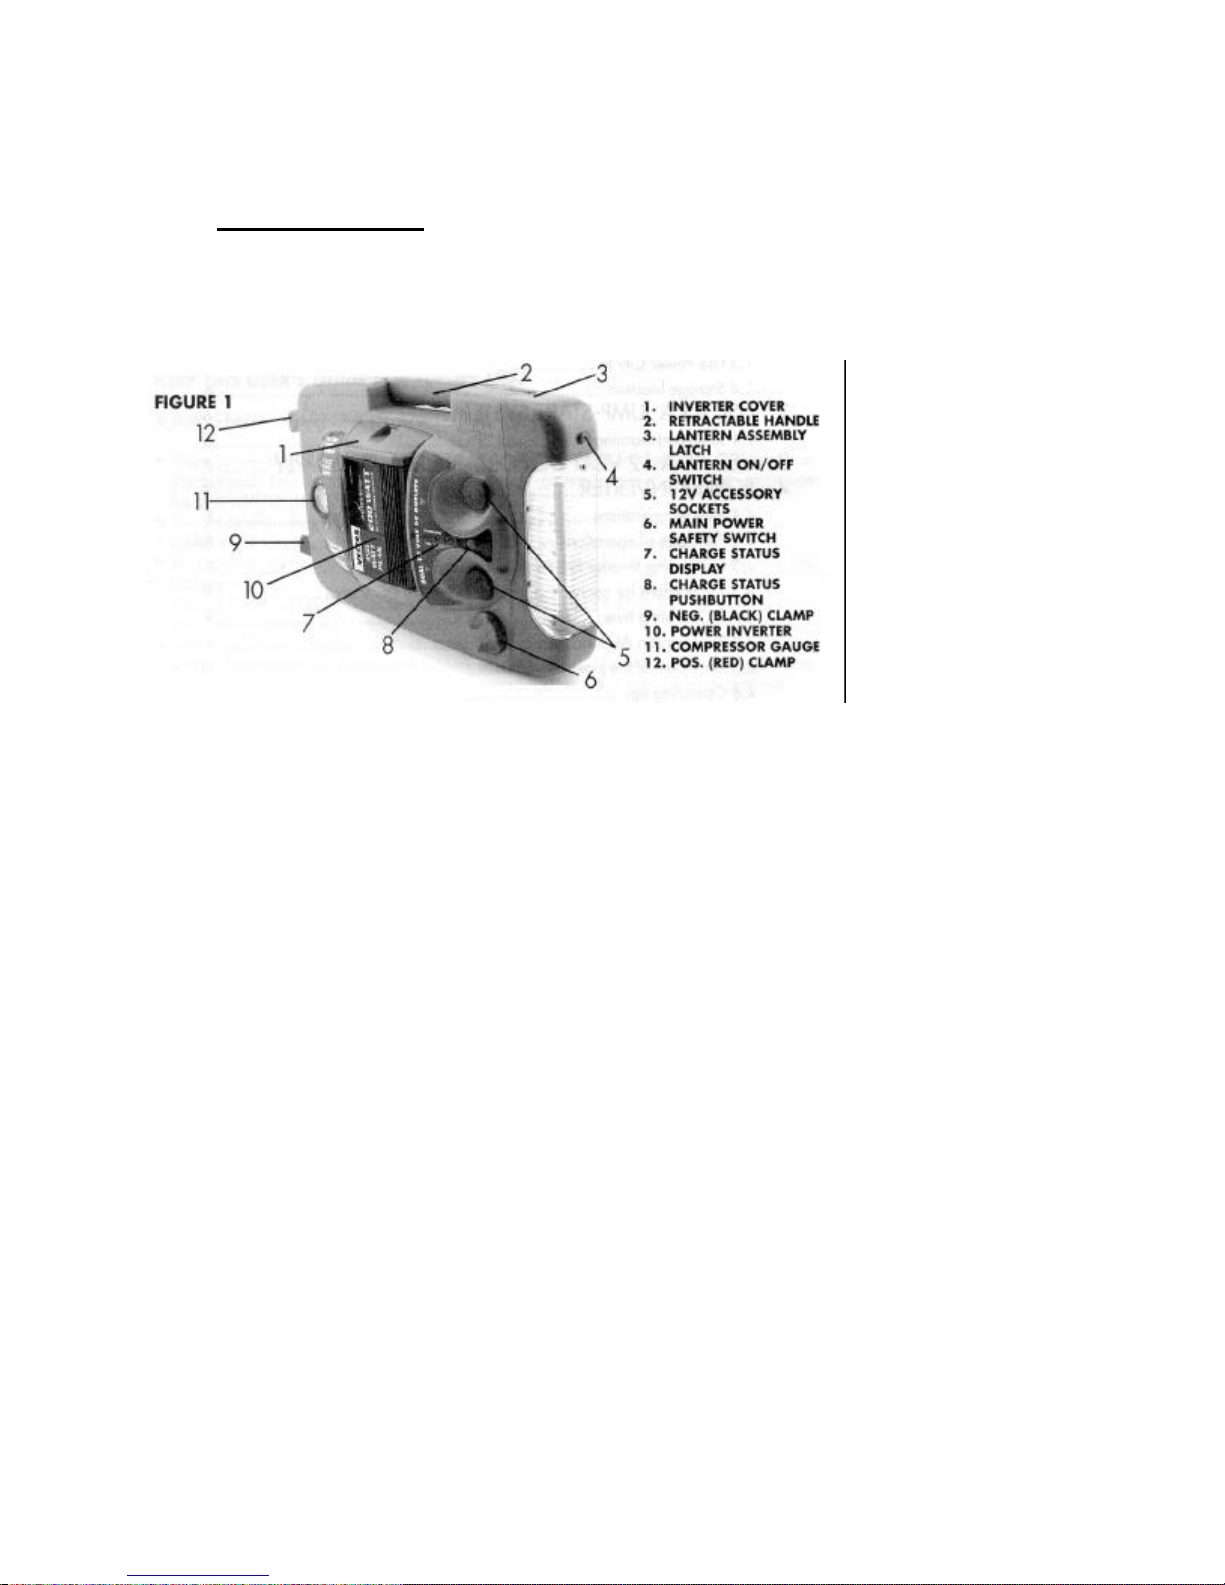
Congratulations on selecting the Vector Power City® Multi-Function AC/DC Power System. Power City is an
advanced power and lump-start system with unique features that set it far above the value and utility of ordinary
jump-starters. It supplies AC for 110/120 volt appliances to 200 watts, and DC for 12 volt appliances to 23 amps. It
can jumpstart any vehicle with a standard 12 volt DC electrical system: boat, truck, car, airplane, RV, personal
watercraft, snowmobile, tractor, etc. See Figure 1.
1 .1 GENERAL DESCRIPTION
This advanced design is ideal for emergencies and can also enhance your fun by powering
appliances on the road and at the campsite. Be sure to read and understand all WARNINGS an
CAUTIONS before using this product. Please read this guide carefully before use to ensure
optimum performance and avoid damage to the system or items that you are using it with.
Power City® has several exclusive features that set it apart from other similar devices. Primarily,
it includes a special, patented, built-in mounting for a supplied, removable 12 VDC to 110/120
volt AC power inverter. This allows you to operate 110 volt AC devices to 200 watts, while still
maintaining the jump-starter*s one-piece compact styling. When the inverter is removed from the
main unit it can be fully powered from any accessory socket that can provide up to 23 amperes at
12 VDC.
A removable Lantern operates from Power City*s self-contained battery. It can be operated
attached to the main unit or removed from the Main Unit. Away from the Main Unit, the Lantern
is powered using an extension cord attached to the Inverter power cable. This feature is invaluable
when it becomes necessary to locate battery terminals while preparing to jumpstart a dead battery
in the dark, changing a tire, etc.
Power City is also ideal to power 12 volt DC cordless, portable, rechargeable appliances with
ratings up to 23 amperes. For information about Vector appliances, contact Vector Customer
Support for the location of the nearest retailer.
The unit has an easy-to-read, series of LEDs (light emitting diodes) arranged as a charge status
display that shows when the unit is fully charged or the level of charge in the battery (from low to
full). The charge status display activates whenever the charge status pushbutton is pressed or
automatically during AC recharge operations. Two 12 volt DC outlets are provided for use with
appliances that can operate from the accessory outlet. NOTE: that all exposed electrical sockets
recharge ports have covers that help keep out dirt, dust and moisture.
Another feature is the high pressure, self-contained air compressor. This compressor allows quick
inflation of tires, sports balls and other small inflatables. An easy-to-read analog pressure gauge
allows accurate pressure readings, so there*s no guesswork about critical tire pressures. Now
there is no excuse for driving on under, or over-inflated tires. Three different types of adapter
nozzles allow for easy connection to all popular inflatables. A compressor on/off slide switch
located between the lump-start clamps controls operation of the compressor. The air compressor
hose and connector nozzle are stored on the back of the unit. (See Figure 3)
1.2 KEY FEATURES
! On/off safety power switch (no key required, no key to get lost!)
! Cordless/rechargeable-includes recharge adapters for standard 110 volt AC wall socket and vehicle*s 1 2 volt
DC accessory outlet using adapter cables
! Powerful 400 boost amps; 1200 peak amps
! Includes non-spillable, maintenance-free, heavy duty, 19 ampere hour, sealed, lead-acid battery
! Audible polarity alarm to warn of reverse polarity
! Requires no maintenance (other than recharging) for optimum operation
! Heavy duty, industrial grade copper clamps and #4 AWG jumper cables-with exclusive recessed cable holsters
! Built-in 260 PSI compressor with lighted gauge
! Built-in, removable fluorescent lantern
! Storage channels that keep jumper cables and the compressor hose out of the way until they are needed and
allow Power City to securely lay against flat surfaces
! 110 volt AC charger is Underwriter Laboratories safety tested and listed
! Easy-to-read LED battery charge status display - activated by pressing the charge status button and automatically
activated during AC recharge
1 .3 USE POWER CITY TO:
! Jump-start (using heavy duty battery cable and clamps) any vehicle with a standard 12 volt DC battery system:
boat, truck, car airplane, RV, personal watercraft, snowmobile, tractor etc.
! Power/recharge: AC laptop computers and printers, color TVs up to 13”, reading lamps, fans, small appliances
and power hand tools, cellular phones, camcorders, power tool rechargeable batteries that have an appropriate
recharging adapter with a 110 volt AC standard-type plug
! Operate (using 23 ampere rated 12 volt accessory sockets): 12 volt DC fans, fluorescent worklights, air
compressors, spotlights, TVs portable radios, cassette or CD players and more, Can operate and quick-charge a
cellular ph one by using the phone’s 12 volt DC
! Inflate truck, auto, motorcycle and trailer tires and small popular beach and camping accessories such as volley
balls, soccer beach balls, saving valuable time and effort
! Illuminate areas: under the hood, inside tents, work areas while changing tires, etc. Lantern is removed from
main unit and powered by an extension cord, for light where you need it
NOTE: Other appliances may also be used with the Power City as long as they do not exceed the 23 ampere limit
of the units 12 volt DC accessory outlet, or the 200 watt limit of the inverter.
READ INSTRUCTION MANUAL AND PRODUCT LABELING CAREFULLY, BEFORE USING THIS
PRODUCT. FOLLOW RECOMMENDED WARNINGS, CAUTIONS, AND SAFETY PROCEDURES
AND MANUFACTURER’S GUIDELINES FOR YOUR VEHICLE BATTERY.
IMPORTANT: This unit is delvered in a partially charged state - you must fully charge it before using it for the
first time. Initial AC Charge should be for 24 hours.
Refer to Section 7 for use of recharge cables, AC adapter and detailed charging instructions.
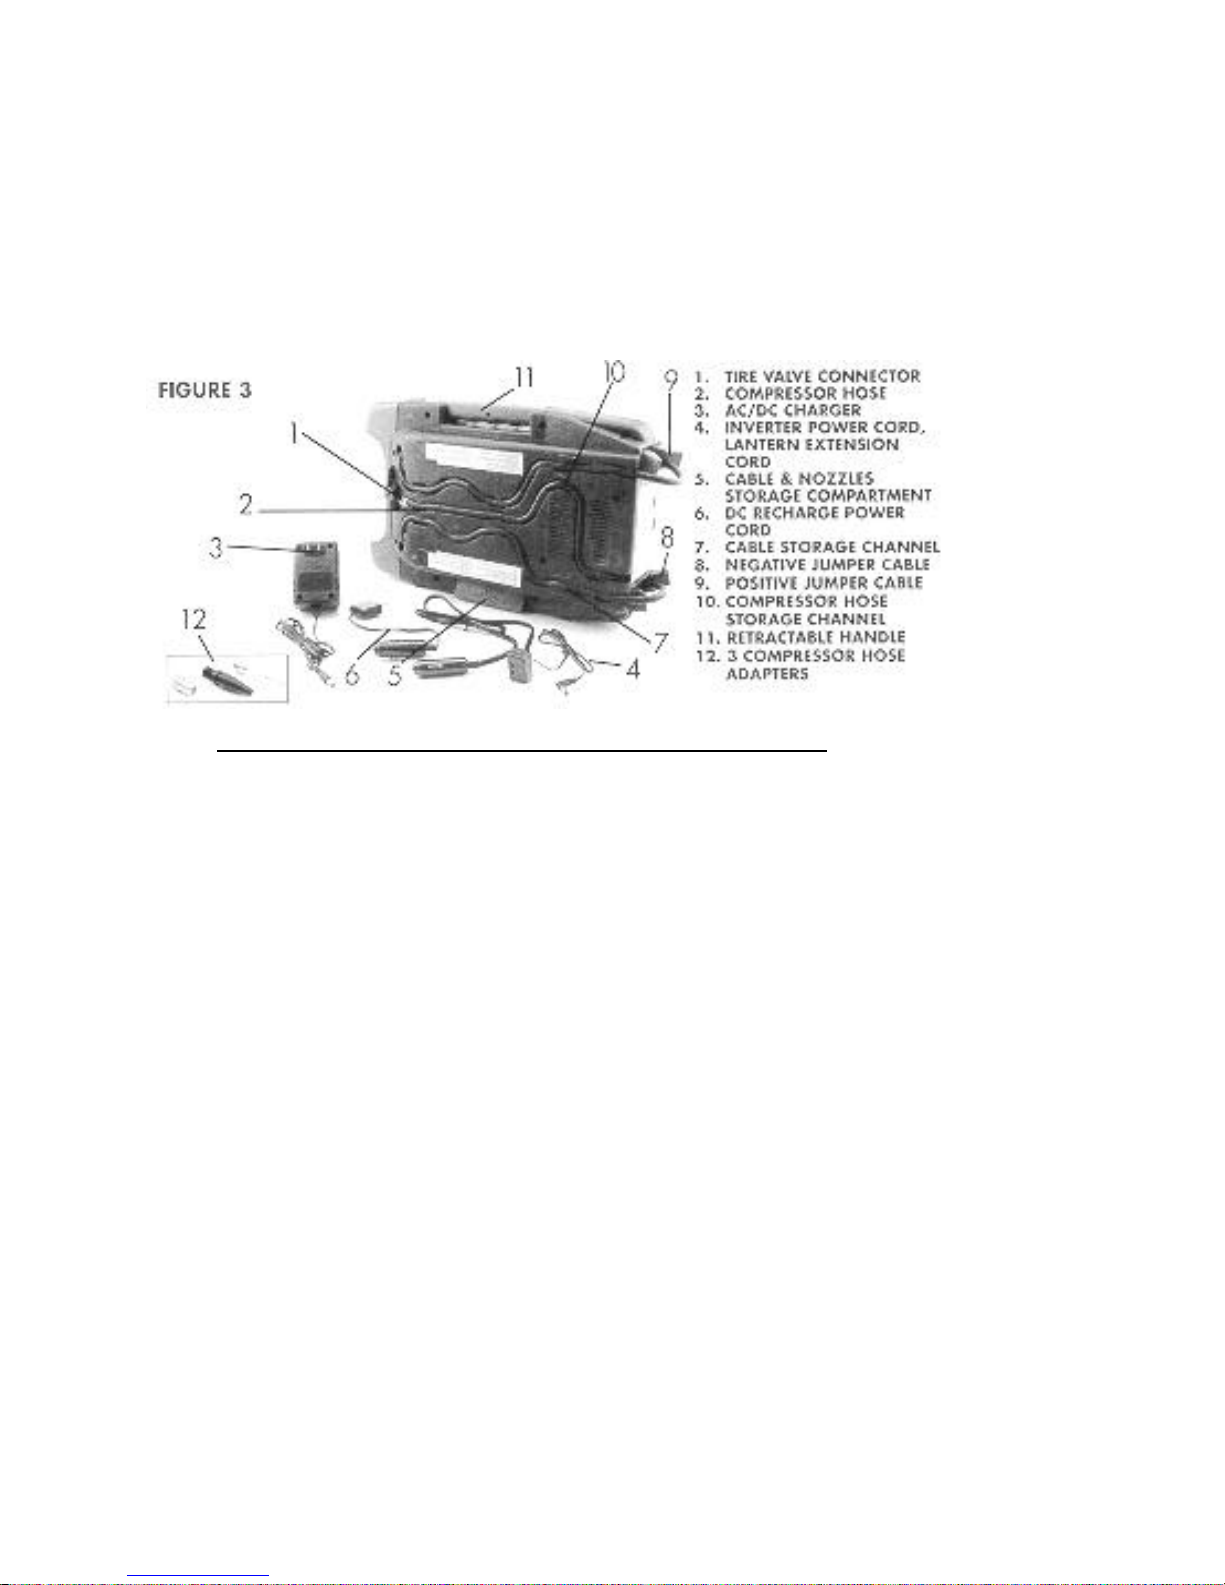
1.4 STORAGE LOCATIONS
Figure 3 shows all removable parts and their locations. NOTE: The location of the storage channels for the jumper
cables and compressor hose and nozzle. Two cables are supplied with Power City and they are the inverter owner
cable with attached lantern extension cord and the DC recharge cable. The fit inside the cable storage hatch. Three
compressor hose adapters (nozzles) are also stored in the cable storage hatch.
2. USING POWER CITY AS A JUMP-START SYSTEM
Read all Warnings, Cautions and Notes carefully before using these instructions. In particular read and understand
the WARNINGS printed on inside cover.
2.1 JUMP-START PROCEDURE
1. Turn off ignition and all accessories (radio, a/c, lights, cell phone, etc.). Place vehicle in “park” and set the
emergency brake.
2. Make sure Power City’s safety switch is turned off.
3. Observe jumpstarting negative or positive ground system, as follows: Negative ground (negative battery
Terminal connected to chassis) - most common.
4. Make sure Power City’s main unit safety switch is turned off.
5. Carefully lift negative (black) jumper cable wire from storage channel starting at clamp end of cable.
6. Squeeze negative (black) clamp handles and slide clamp from holster.
7. Carefully lift positive (red) lumper cable wire from storage channel starting at clamp end of cable.
8. Squeeze positive (red) clamp handles and slide clamp from holster.
9. Connect positive (+) red clamp to vehicle’s positive battery terminal.
10. Connect negative (-) black clamp to chassis or a so lid, non-moving, metal vehicle component or body part -
never clamp directly to negative battery terminal or moving part. If audible alarm sounds, DO NOT turn on
safety switch reverse polarity of cable connections.
11. Turn On Power City’s safety switch
12. Start vehicle (crank engine in 5 - 6 second bursts) If engine won*t start, seek help and go to step 15.
1 3. After vehicle starts turn Power City*s safety switch to off position.
14. Leave engine running.
15. Remove clamps (disconnect the negative (black) clamp first; followed by the positive (red) clamp and store
cables and clamps.
17. Carefully press negative (black) jumper cable wire into storage channel starting at lantern end of cable.
18. Squeeze positive (red) clam p handles and slide clamp into holster.
16. Squeeze negative (black) clamp handles and slide clamp into holster.
19. Carefully press positive (red) jumper cable wire into storage channel starting at lantern end of cable.
20. Recharge Power City as soon as possible.
 Loading...