

Page 1

Page 2
iiiii
not available, do not use this appliance until the proper outlet has been
installed by a qualified electrician.
1. Determine voltage of battery to be charged by referring to the owner's manual.
2. If it is necessary to remove battery from vehicle to charge, or to clean terminals, always remove
grounded terminal from battery first. Make sure all accessories in the vehicle are off, so as not to
cause an arc.
3. Clean battery terminals. Do not allow corrosion to come in contact with eyes.
4. Add distilled water in each cell until battery acid reaches level specified by battery manufacturer.
This helps purge excessive gas from cells. Do not overfill. For a battery without cell caps
(maintenance free), carefully follow manufacturer's charging instructions.
5. Study all battery manufacturer’s specific precautions, such as removing or not removing cell caps
while charging, and recommended rates of charge.
6. Area around battery should be well ventilated while battery is being charged. Gas can be forcefully
blown away by using a piece of cardboard or other nonmetallic material as a fan.
7. Make sure the initial charging rate does not exceed battery manufacturer’s requirement.
1. Locate charger as far away from battery as cables permit.
2. NEVER place charger directly above battery being charged; gases from battery will corrode and
damage charger.
3. NEVER allow battery acid to drip on charger when reading gravity or filling battery.
4. NEVER operate charger in a closed-in area or restrict ventilation in any way.
5. Marine batteries must be removed and charged on shore.
6. Do not set a battery on top of charger.
1. Connect and disconnect DC output clamps only after removing AC cord from electric outlet.
2. Never allow clamps to touch each other.
3. Attach clamps to battery chassis as indicated in “Battery Installed in Vehicle” steps 5 and 6, and
in “Battery Outside of Vehicle” steps 2, 4 and 5.
1. Position AC and DC cords to reduce risk of damage by hood, door, or moving engine part.
2. Stay clear of fan blades, belts, pulleys, and other parts that can cause injury to persons.
3. Check polarity of battery posts. POSITIVE (POS, P, +) battery post usually has larger diameter than
NEGATIVE (NEG, N, –) post.
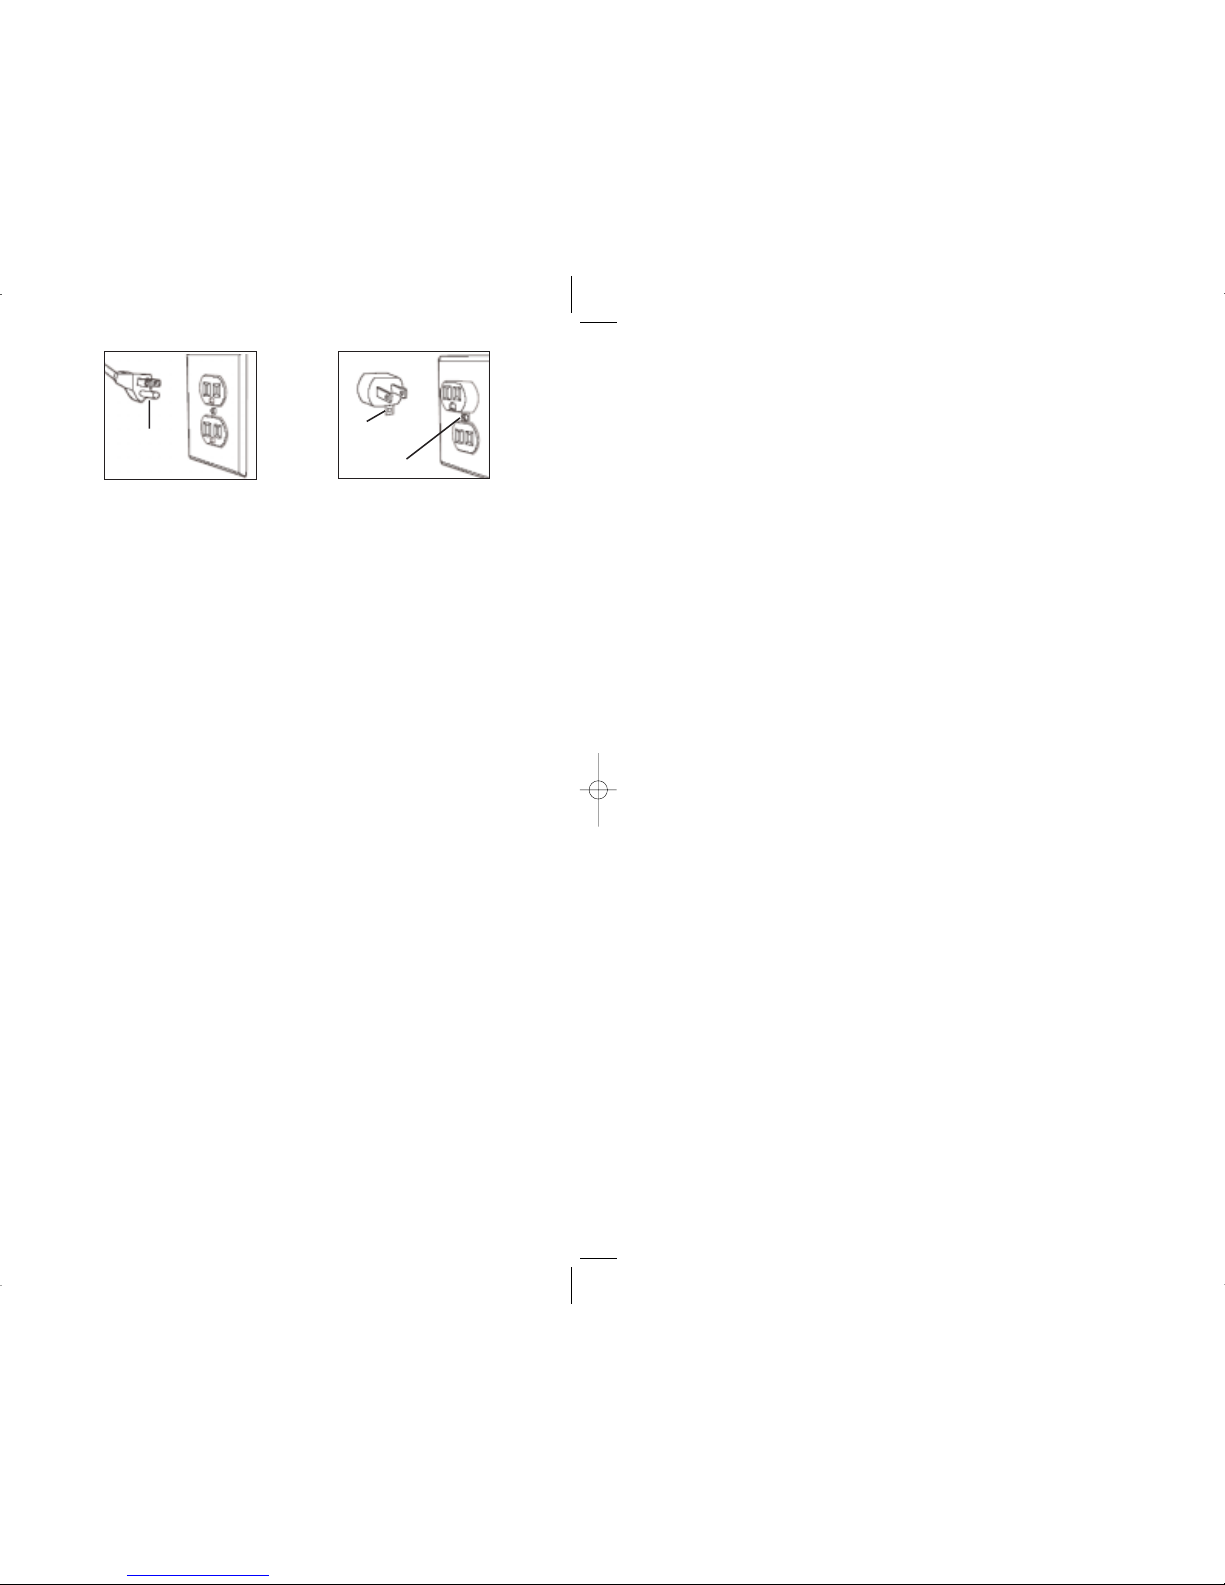
GROUNDING
PIN (A)
GROUNDING
MEANS
METAL SCREW
ADAPTER (B)
Figure
1A
Figure
1B
Page 3
1
TABLE OF CONTENTS
Introduction . . . . . . . . . . . . . . . . . . . . . . . . . . . . . . . . . . . . . . . . . . . . . . . . . . 1
Features . . . . . . . . . . . . . . . . . . . . . . . . . . . . . . . . . . . . . . . . . . . . . . . . . . . . 2
Controls and Indicators . . . . . . . . . . . . . . . . . . . . . . . . . . . . . . . . . . . . . . . . 3
Operating Instructions . . . . . . . . . . . . . . . . . . . . . . . . . . . . . . . . . . . . . . . . . . . 4
Charge Rate Selection . . . . . . . . . . . . . . . . . . . . . . . . . . . . . . . . . . . . . . . . 4
Charging the Battery . . . . . . . . . . . . . . . . . . . . . . . . . . . . . . . . . . . . . . . . . 5
Automatic Float Charging . . . . . . . . . . . . . . . . . . . . . . . . . . . . . . . . . . . . . . 6
Equalizing . . . . . . . . . . . . . . . . . . . . . . . . . . . . . . . . . . . . . . . . . . . . . . . . . 6
Engine Start . . . . . . . . . . . . . . . . . . . . . . . . . . . . . . . . . . . . . . . . . . . . . . . . 7
Recondition Mode . . . . . . . . . . . . . . . . . . . . . . . . . . . . . . . . . . . . . . . . . . . 7
Alternator Check . . . . . . . . . . . . . . . . . . . . . . . . . . . . . . . . . . . . . . . . . . . . 8
Approximate Charging Times . . . . . . . . . . . . . . . . . . . . . . . . . . . . . . . . . . . . . 8
Care and Maintenance . . . . . . . . . . . . . . . . . . . . . . . . . . . . . . . . . . . . . . . . . . 9
Troubleshooting . . . . . . . . . . . . . . . . . . . . . . . . . . . . . . . . . . . . . . . . . . . . . . . 9
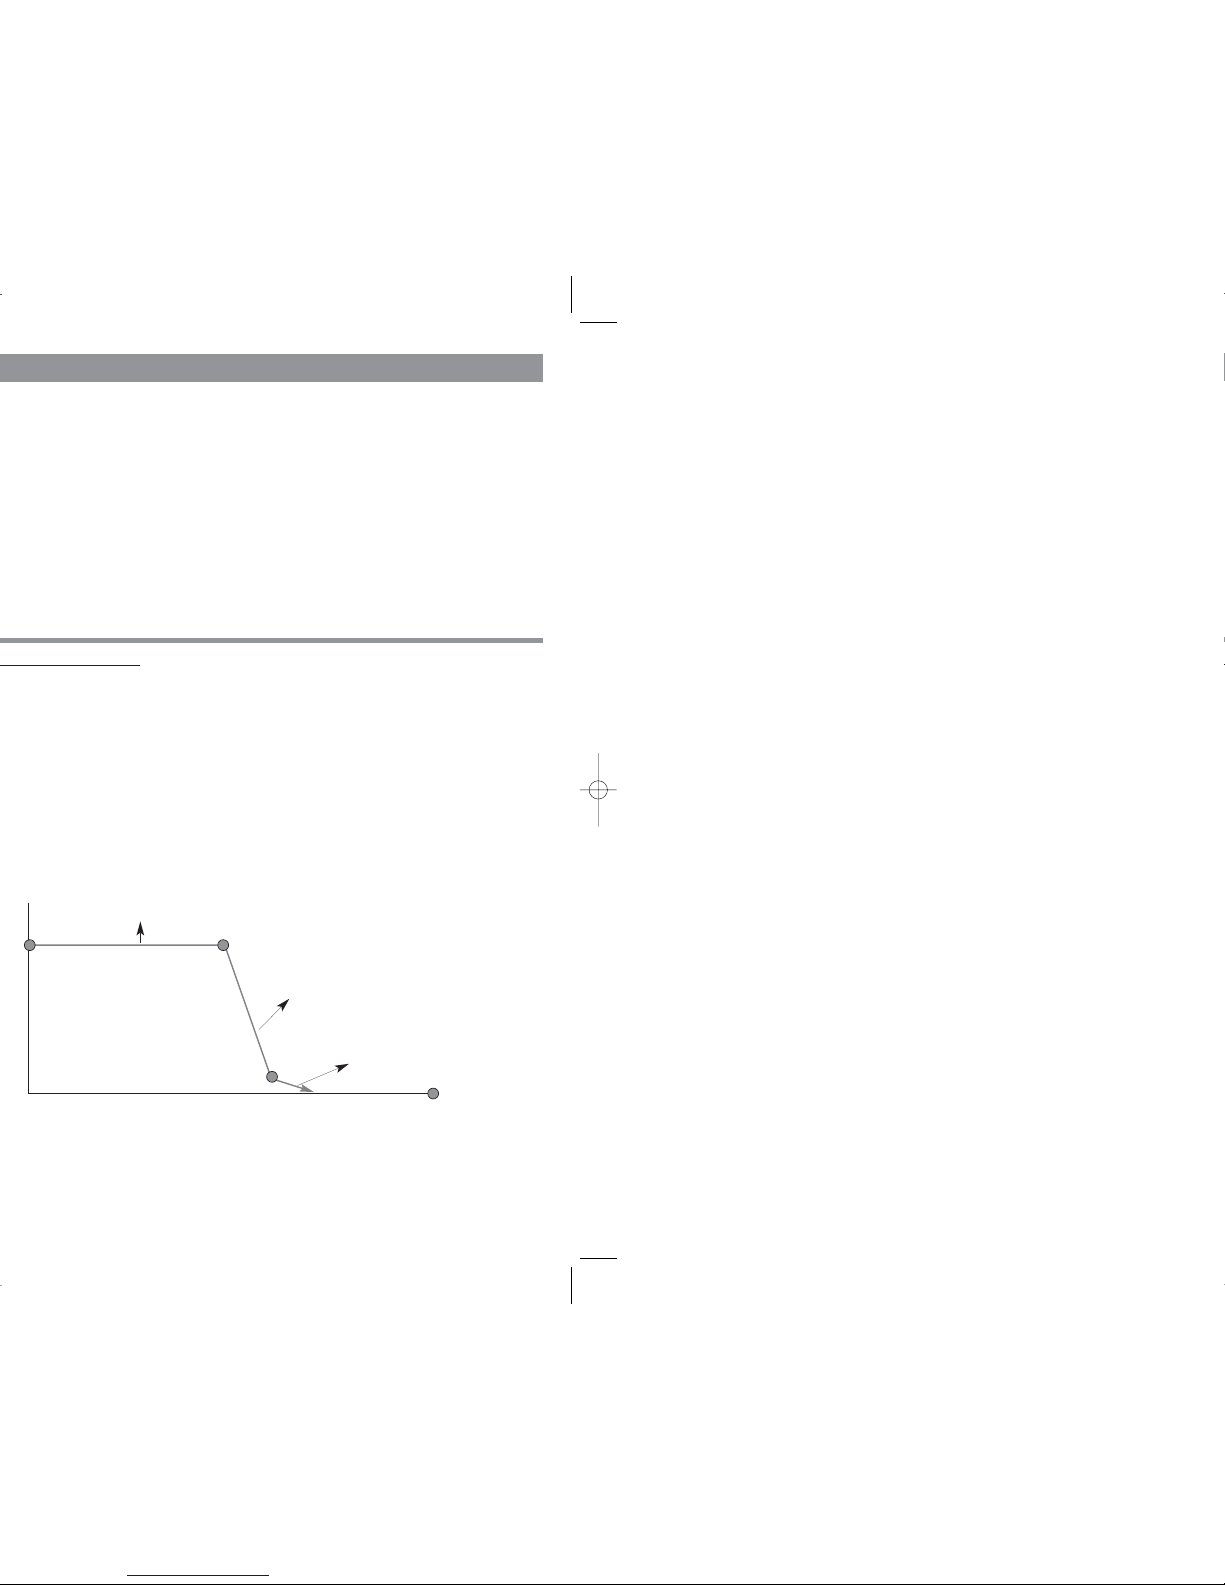
Charge Curve
STAGE ONE
BEEP
BEEP
OFF BEEP
STAGE TWO
STAGE THREE
CHARGING
COMPLETE
LED LIT
Page 4

3
DIGITAL READOUT
CIRCULATING PATTERN
Page 5

5
is when the battery is nearly full and charging at either step two or three. The
display will be showing a reduced charge rate. To return to 2A, press the
2/20/50 AMP button. When the battery is fully charged, the charging complete
and “FUL” is displayed on the Digital Display.
WARNING
1. Press Battery Type selector until desired battery type LED lights.
Note: The default selection is “GEL” type battery.
2. Press 4/10/20/50 AMP button to begin charging at the 4 amp rate; the unit
sounds a beep and the charging current LED lights. The charger starts charging
at 4 amp rate automatically if 4/10/20/50 AMP button is not pressed within
3 minutes after applying AC power.
If the Display on the charger varies between “F03” and the amp rate, the battery
is sulfated and the charger is trying to give it some charge. If after approximately
2 hours the display just shows “F03”, then the battery will not charge.
Charger occasionally sounds a beep and displays “0.0” during self-test or
charging stage changes.
3. Pressing the 4/10/20/50 AMP button again advances charging rate to 10
amps, pressing once more advances charging rate to 20 amps, and again to 50
amps. (Pressing the button again will turn OFF the charger output and the Display
will show “000”.) This selection and actual battery charge rate are monitored by
the microprocessor, and the unit will stop charging if the selected rate is too fast
or too slow for battery size or condition.
As the battery nears full charge capacity, the unit’s output will automatically drop
to a lower charge rate.
Pressing the 4/10/20/50 AMP button repeatedly advances to standby mode;
the unit sounds a beep, displays “000” and stops charging.
4. The battery charger displays the charge current. To view the battery voltage,
press BATTERY VOLTAGE button. The charger will sound a beep and display the
battery voltage for 3 seconds, then returns to displaying the charge current.
5. The display shows “FUL” when the battery is fully charged.
6. Follow the steps outlined in “Important Safety Instructions” at the front of this
manual to disconnect.
Page 6

7
equalize in 4 amp limited current. Note that in order to push the recessed button
you will need a small pin or ballpoint pen.
battery is hot to the touch, stop the charging and allow the battery to cool.
depending on ambient temperature, it will automatically adjust.
1. Set the 4/10/20/50 AMP button to 50 amp mode and immediately press the
110A button switch to activate the Engine Start mode.
2. The digital display will countdown from “999” to “000.”
3. When the “000” count is reached and begins flashing on the Display, the
charger is ready to start.
4. Crank the engine using manufacturer’s guidelines, typically in 3 to 5 second
bursts. The high current engine starting function requires a resting/cooling period
between tries. The charger will switch back to regular charge mode after
5 seconds and will not allow operation in this mode for 4 minutes. Wait 4 to 5
minutes before a second attempt at starting the engine, if needed.
5. During the rest period, the battery is charging at 50 amps. After engine starts,
follow the steps outlined in “Important Safety Instructions” at the front of this
manual to disconnect.
1. Make sure the charger is in initiation state with a circulating pattern on the
display or in charge OFF mode with “000” on the display. If not, press
4/10/20/50 AMP button repeatedly until “000” shows on the display.
2. Press the Battery Recondition button to start the process.
Page 7

9
fluid that will cause corrosion of the copper clamps.
solution.
cords.
WARNINGS
way — call Technical Support toll-free at (866) 584-5504.
to manufacturer for professional testing and repair. OPENING THE
UNIT WILL VOID THE MANUFACTURER’S WARRANTY.
to disconnect AC cord and clamps, clean battery terminal and reconnect.
service center for evaluation.
Page 8

1110
 Loading...