

Vecta Personal Safe Operating And Installation Instructions
Personal Safe
™
Operating and installation instructions
Vecta Personal Safe™
IMPORTANT
Please read the following instructions carefully before installing your Vecta Personal Safe™.
The Vecta Personal Safe™ comes pre-programmed with two codes preset into the safe - an
Administrator Code (preset “0000”) and the User Code (preset “1234”).
As both these codes can be used to open the safe, for security reasons BOTH CODES SHOULD BE
CHANGED IMMEDIATELY UPON INSTALLING THE SAFE.
Instructions for changing the codes are described in section 3.1 (setting Administrator Code) and
section 3.2 (setting User Code)
Box Contents
1 x Vecta Personal Safe
1 x Key rack
1 x Valuables tray
2 x Manual override keys
1 x Instruction sticker
4 x AA batteries
6 x Fixing/anchoring bolts
1 x Code card (for recording
Administrator Code and Override
Key Number)
1. PRIOR TO INSTALLATION
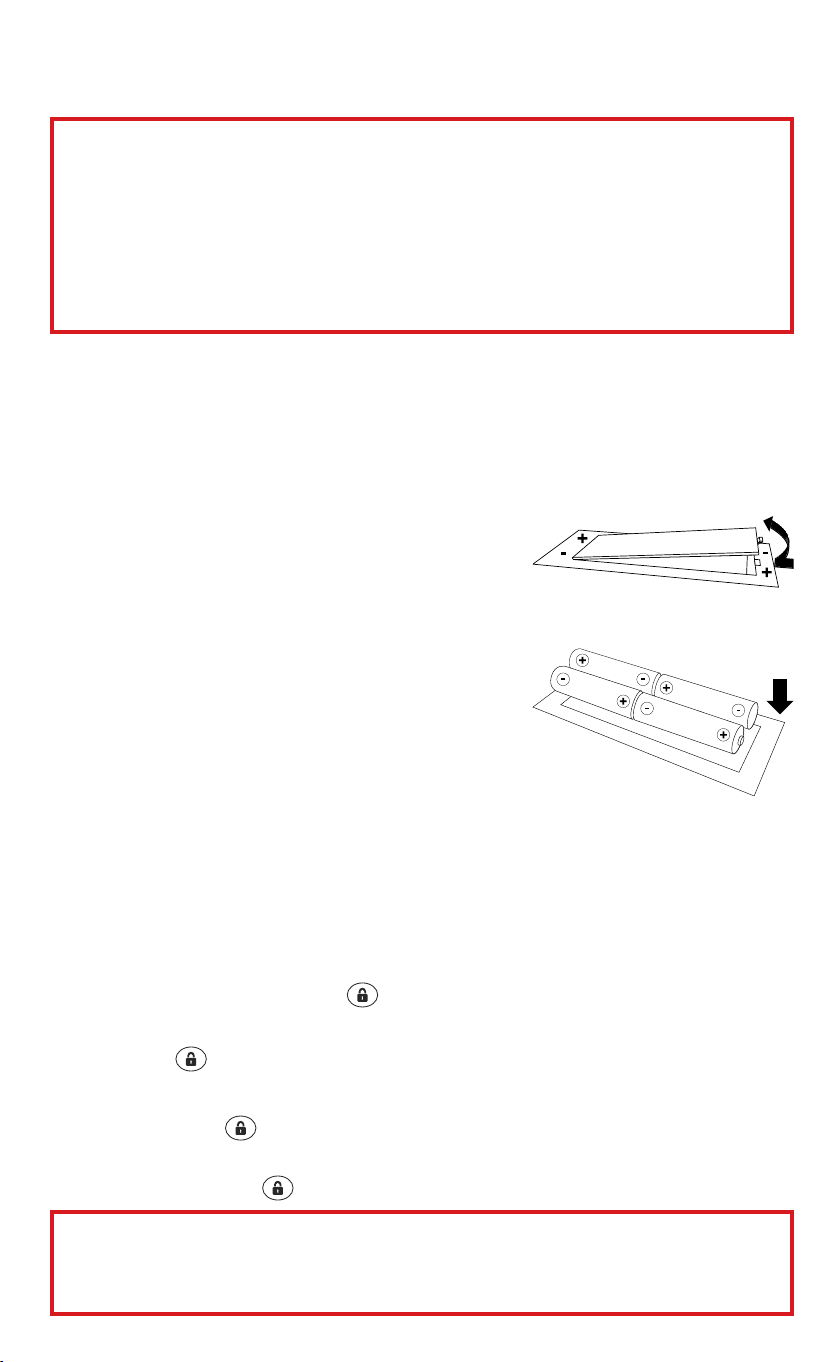
1.1 Install the batteries
1) If the safe is locked, open the safe using one of the entry codes
or the manual override key (Follow instructions in section 4.1
“Opening the Safe” or 4.4 “Using the manual override key”).
2) If the tray is in place, remove it from the bottom of the safe
and remove the battery compartment cover located inside and
at the base of the safe [Fig. 1].
3) Place the 4 x AA batteries (supplied) as shown in [Fig.2].
Once the batteries are installed, close the battery
compartment lid.
4) When batteries need changing the display will show “Lo batt”
together with a warning sound when the safe is opened.
5) When new batteries are installed the sound function is reset
to the default setting (beep On) but the User Code and
Administrator Code are not reset.
1.2 Testing the Vecta Personal Safe™
Before installing the Personal Safe, please ensure you have all the box contents as detailed above, and
test the Personal Safe will operate correctly by following these instructions:
Fig. 1
Fig. 2
• Always test with the batteries installed and the safe door held open to ensure you do not get
locked out of the Personal Safe.
• With the door held open press the key and the bolts should slide into the locked position.
Test the User Code by entering the preset User Code (“1234”) on the keypad, and the bolts
should retract.
• Press the key again to slide the bolts into the locked position. This time test the
Administration Code by entering the preset Administrator Code (“0000”) and, again, the bolts
should retract.
• Finally, press the key again to slide the bolts into the locked position but this time remove
the magnetic Vecta logo on the front of the Personal Safe and use the manual override keys
(turned clockwise) to retract the bolts. After opening the safe using the Override Key it must be
closed by pressing the key again and unlocked using the preset User or Administrator Code.
NB With the safe tested, it is recommended that the Administrator Code is changed as detailed in 3.1
and a note of the new Administrator Code is recorded on the Code Protector Card provided.
The number on the barrel of the Override Key should also be recorded in case a replacement key is
required in the future.
2. INSTALLATION
Always wear goggles or other suitable protective eye protection before starting to drill.
The safe is heavy so incorrect installation may result in injury.
Before installing the safe please read and follow these Operating and Installation instructions
and test the safe as described in Section 1.2.
The performance of the safe is dependent on the quality of the installation and the quality of the
wall to which the safe is fixed. To ensure it is correctly fitted it is recommended that the safe is
installed by a competent DIYer, tradesman or professional locksmith.
2.1 Tools required
• Power drill & extension lead
• Marker pencil
• 10mm masonry drill bit
• Tape measure
• Goggles or suitable protective eyewear
• Spirit level
• Large phillips screwdriver
2.2 Positioning the Vecta Personal Safe™
Determine the location of the Personal Safe, which should be:
• Located on a solid internal wall constructed of brick, blockwork or concrete.
• Positioned out of sight of visitors or non-authorised persons but easily accessible. The keypad
should be easy to read and the safe easy to open and view contents.
• Positioned close to an adjacent wall to make it difficult for a potential intruder to prise the safe
off the wall.
NOTE: Ensure the wall area where the safe is to be fixed is clear of pipes and electrical cables
before drilling holes for the fixing bolts
2.3 Fixing to a wall
IMPORTANT: To reduce the risk of theft and ensure your safe is
securely installed, use the 6 x anchoring bolts supplied and secure to
a solid brick, blockwork or concrete wall.
• The wall safe should always be attached to a flat, vertical surface.
using the fixing/anchoring bolts provided for the installation.
• The safe is heavy and should be handled with care, whilst installing,
in order to avoid injury.
• The safe should be kept in a dry environment to prevent corrosion
of the safe and the locking mechanism.
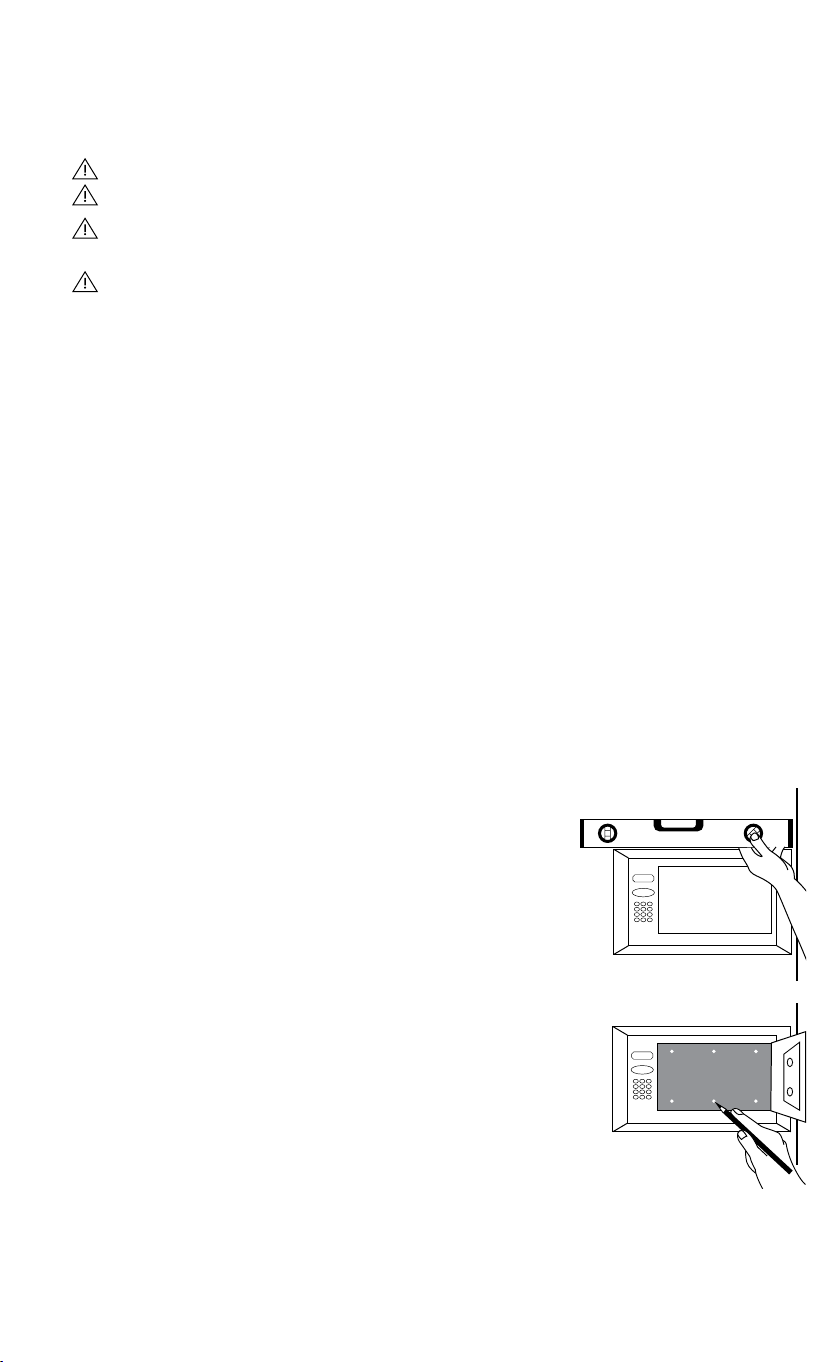
• Firstly, determine the position of the safe against the wall using a
spirit level to ensure it is level. Ideally the safe should be close to an
adjacent wall to make it difficult for an intruder to prise off. [Fig. 3]
• Holding the safe in position against the wall, with the safe door
open, use a pencil to mark the position of the 6 holes used by the
anchoring bolts to secure the safe to the wall [Fig. 4].
NOTE: The safe is heavy so it may be necessary for two people to
be involved in fixing it to the wall - one to hold the safe against
the wall whilst the other marks the position of the holes for the
anchoring bolts.
Fig. 3
Fig. 4
 Loading...