

Page 1
User Manual
Of Digital Set Top Box
Please read this User Manual carefully to ensure proper use of this
product and keep this manual for future reference.
Size:120X170mm
VEA T100
Page 2

Disclaimer
Information in this document is subject to change without notice.
The manufacturer does not make any representations or warranties
(implied or otherwise) regarding the accuracy and completeness of this
document and shall in no event be liable for any loss of profit or any
commercial damage, including but not limited to special, incidental,
consequential, or other damage.
Safety Instructions
Always read the safety instructions carefully
Keep this User's Manual for future reference
Keep this equipment away from humidity
Lay this equipment on a reliable flat surface before setting it up.
Do not stand it on soft furnishings.
If any of the following situation arises, get the equipment checked by
a service technician:
The equipment has been exposed to moisture.
The equipment has been dropped and damaged.
The equipment has obvious sign of breakage.
The equipment has not been working well or you cannot get it work
according to User's Manual.
Warning
To prevent the risk of electric shock, do not open the cover or the
back of the receiver.
Do not block the ventilation holes of the device. Leave appropriate
gap above and around it to allow for adequate ventilation.
Do not place the device in an unventilated cabinet or on top of a unit
which emits heat.
Copyright Statement
No part of this publication may be reproduced in any form by any means
without the prior written permission. Other trademarks or brand names
mentioned herein are trademarks or registered trademarks of their
respective companies.
Page 3

Table of Contents
Introduction .......................................................................... 1
Front and Rear Panel............................................................. 2
Remote Controller ................................................................. 3
Connections...........................................................................5
First Time Installation............................................................. 7
Basic Operations ...................................................................9
Using the On-Screen Setup Menu...........................................13
Troubleshooting ...................................................................25
Specifications...................................................................... 26
Page 4

11
Introduction
This DVB-T TV Receiver is a Free-To-Air digital terrestrial receiver,
allowing you to access free-to-air digital terrestrial TV channels
and radio broadcasts on your TV set. Its digital reception covers
VHF & UHF band. Compared with the analog TV programs, digital
TV programs eliminate the noise and interference but offer high
quality video and audio. An on-screen initial installation guide is
provided so that you can easily start to enjoy watching the
programs. In addition, a fully featured remote controller is
included that offers you access to every feature with a simple
press of a button.
Main Features
Full comply with European DVB-T standard
Full MPEG2 ISO/IEC 13818 transport stream compliant audio/
video decoding
Bandwidth of 6/7/8MHz supported
COFDM demodulator
Automatic/manual channel search
Channel edit, moving and deletion
Parental lock control
NTSC/PAL converting automatically and manually
EPG (Electronic Program Guide) and Teletext function
Multiple-language OSD (English, French, German,
Spanish and Czech)
Supports multi-subtitle
RS-232 serial port for software upgrade
Dual SCART(TV SCART output/VCR SCART input)
Tuner RF in/loop through
SDTV only
Full function remote control
Package Contents
Before installation, please check the items of the package.
The package should contain the following items:
~ DVB-T TV Receiver x1
~ Remote Controller x1
~ AAA Battery for the remote controller x2
~ User's Manual x1
Page 5
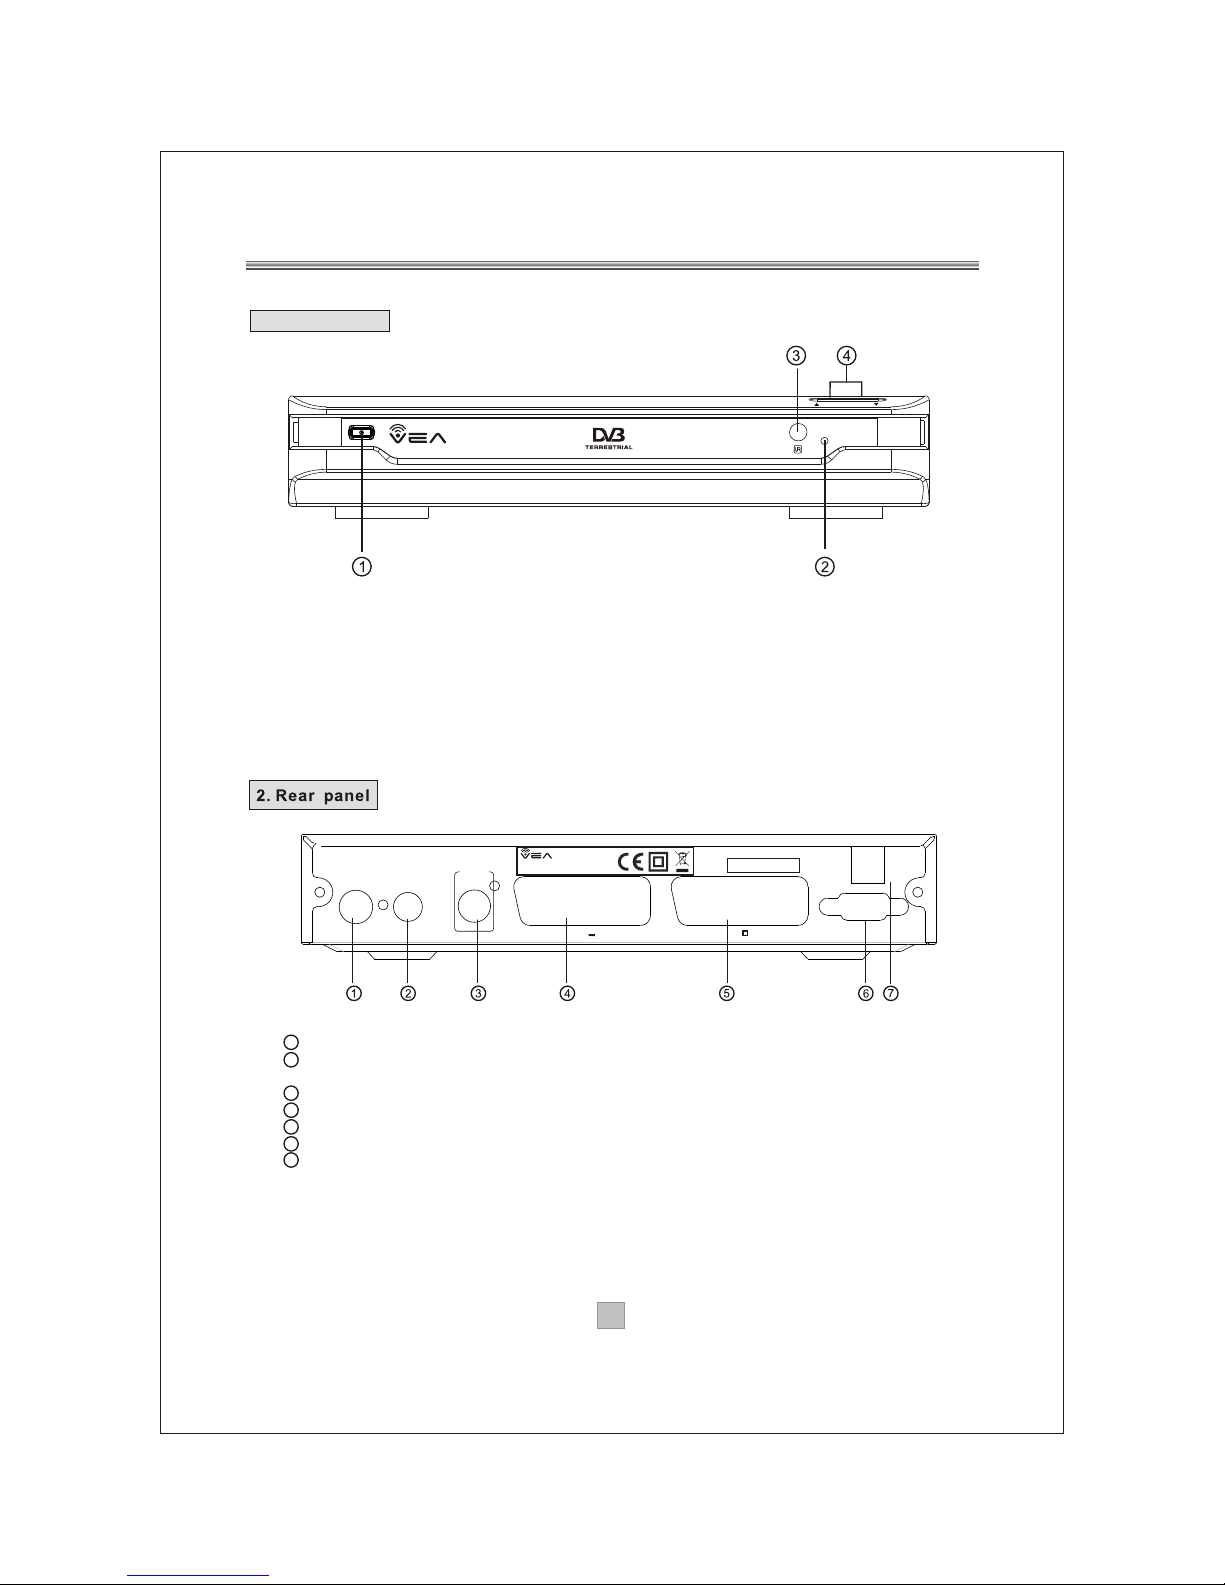
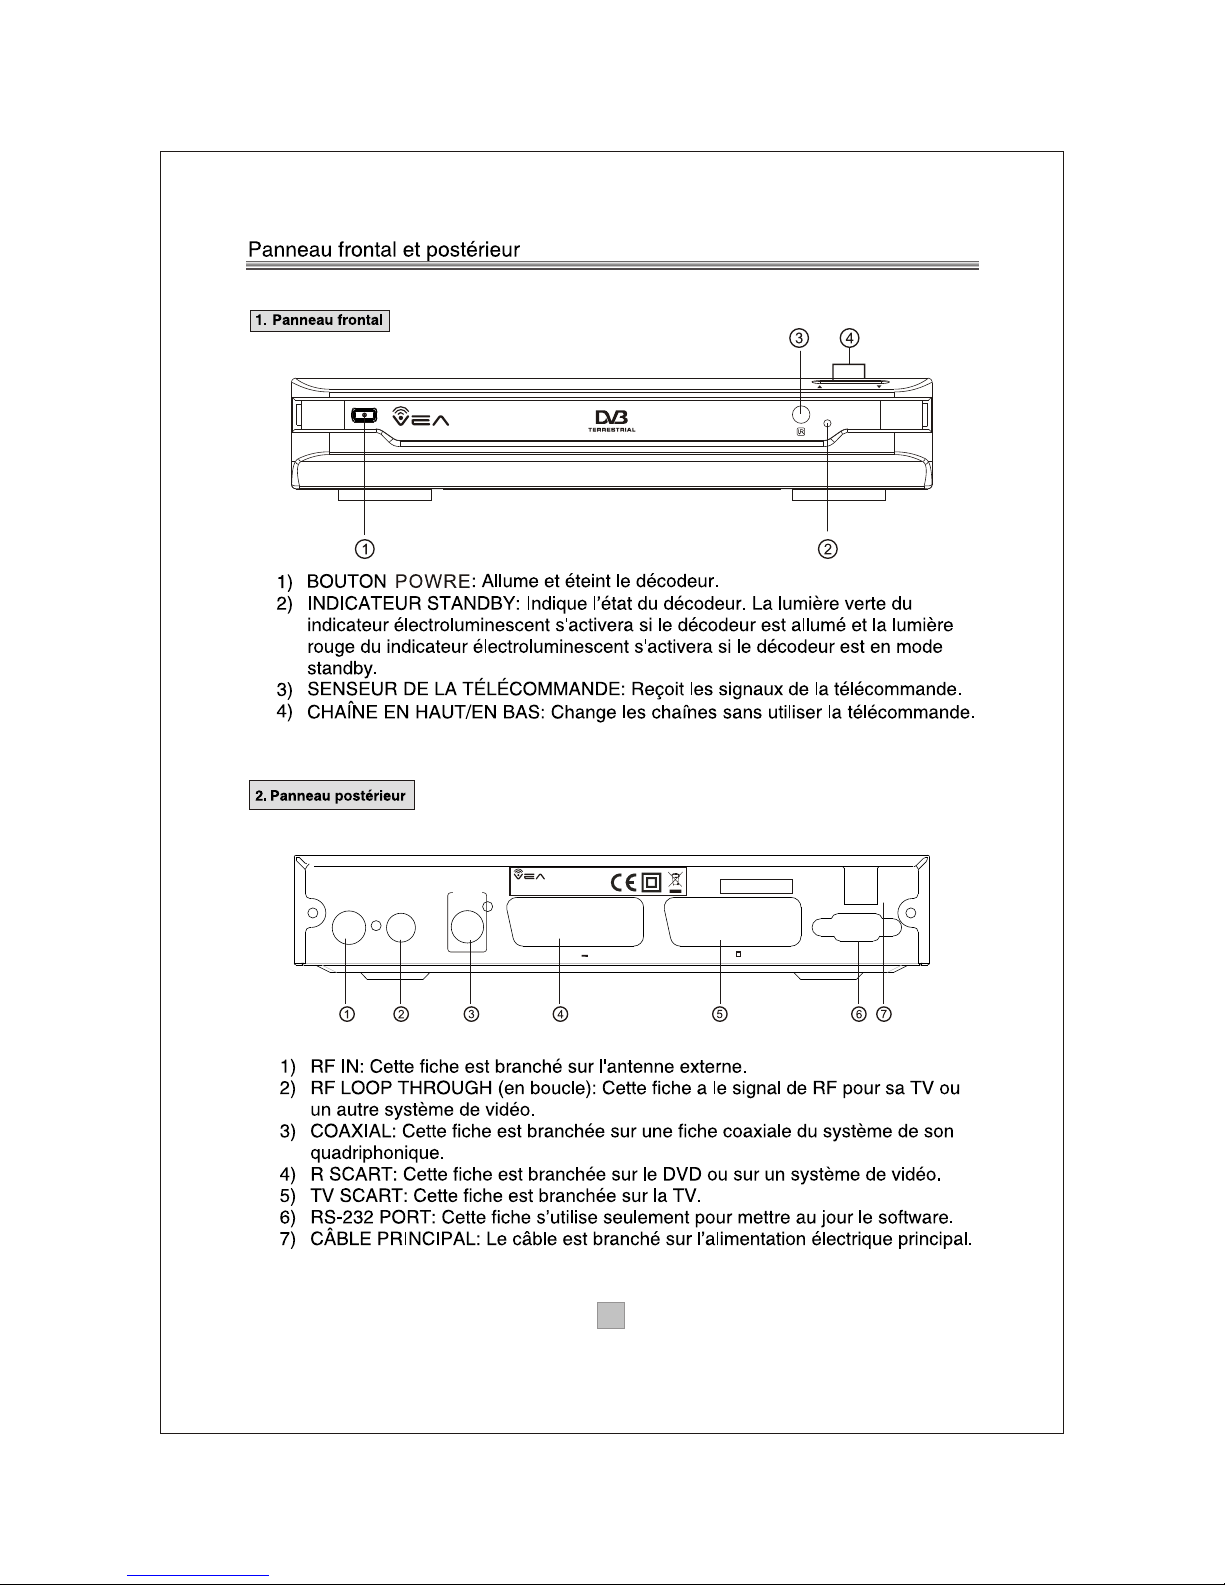
Front Panel and Rear Panel
1. Front panel
1 RF IN : This socket connects to your external aerial.
2 RF LOOP THROUGH: This socket will bypass the RF signal to either your TV or another
video system.
3 COAXIAL: This socket connects to a coaxial socket on your surround sound system.
4 VCR SCART: This socket connects to either a DVD or other video system.
5 TV SCART: This socket connects to your TV.
6 RS-232 PORT: This socket is only used for software upgrade.
7 MAINS CABLE: This is used to connect to your main power supply.
22
1 POWER: Used to turn on/off the main power supply.
2 STANDBY INDICATOR: Used to visually show power state of the set top box, the green
LED will be light if turned on the set top box and the red LED will be light if the set top box
entered standby mode.
3 REMOTE CONTROL SENSOR: Used to receive the signal from the remote control.
4 CHANNEL UP/DOWN: Used to change channels without using the remote control.
Serial No.:
100-240V~
50/60Hz
CoaxialCoaxial
Digital
Audio
Digital
Audio
VCR O OVCR O O
TVTV
SERVICE
ININRR FF
LOOPLOOPR RF F
THROUGHTHROUGH
DIGITAL TERRESTRIAL RECEIVER
POWER SUPPLY: 100-240V~ 50/60Hz
MAX POWER CONSUMPTION: 10WATTS
MODEL: VEA T100
CHANNEL
VEA T100
Page 6
OK
DTV/VCR
EXIT
PAUSE
1 2 3
4 5 6
7 8 9 0
INFO
AUDIO
EPG
VOL
+
VOL
-
CH+
CH-
MENU
MUTE
RECALL
TV/RADIO
STANDBY
GAME
SUBTITLE TEXT
FAVORITE
3 3
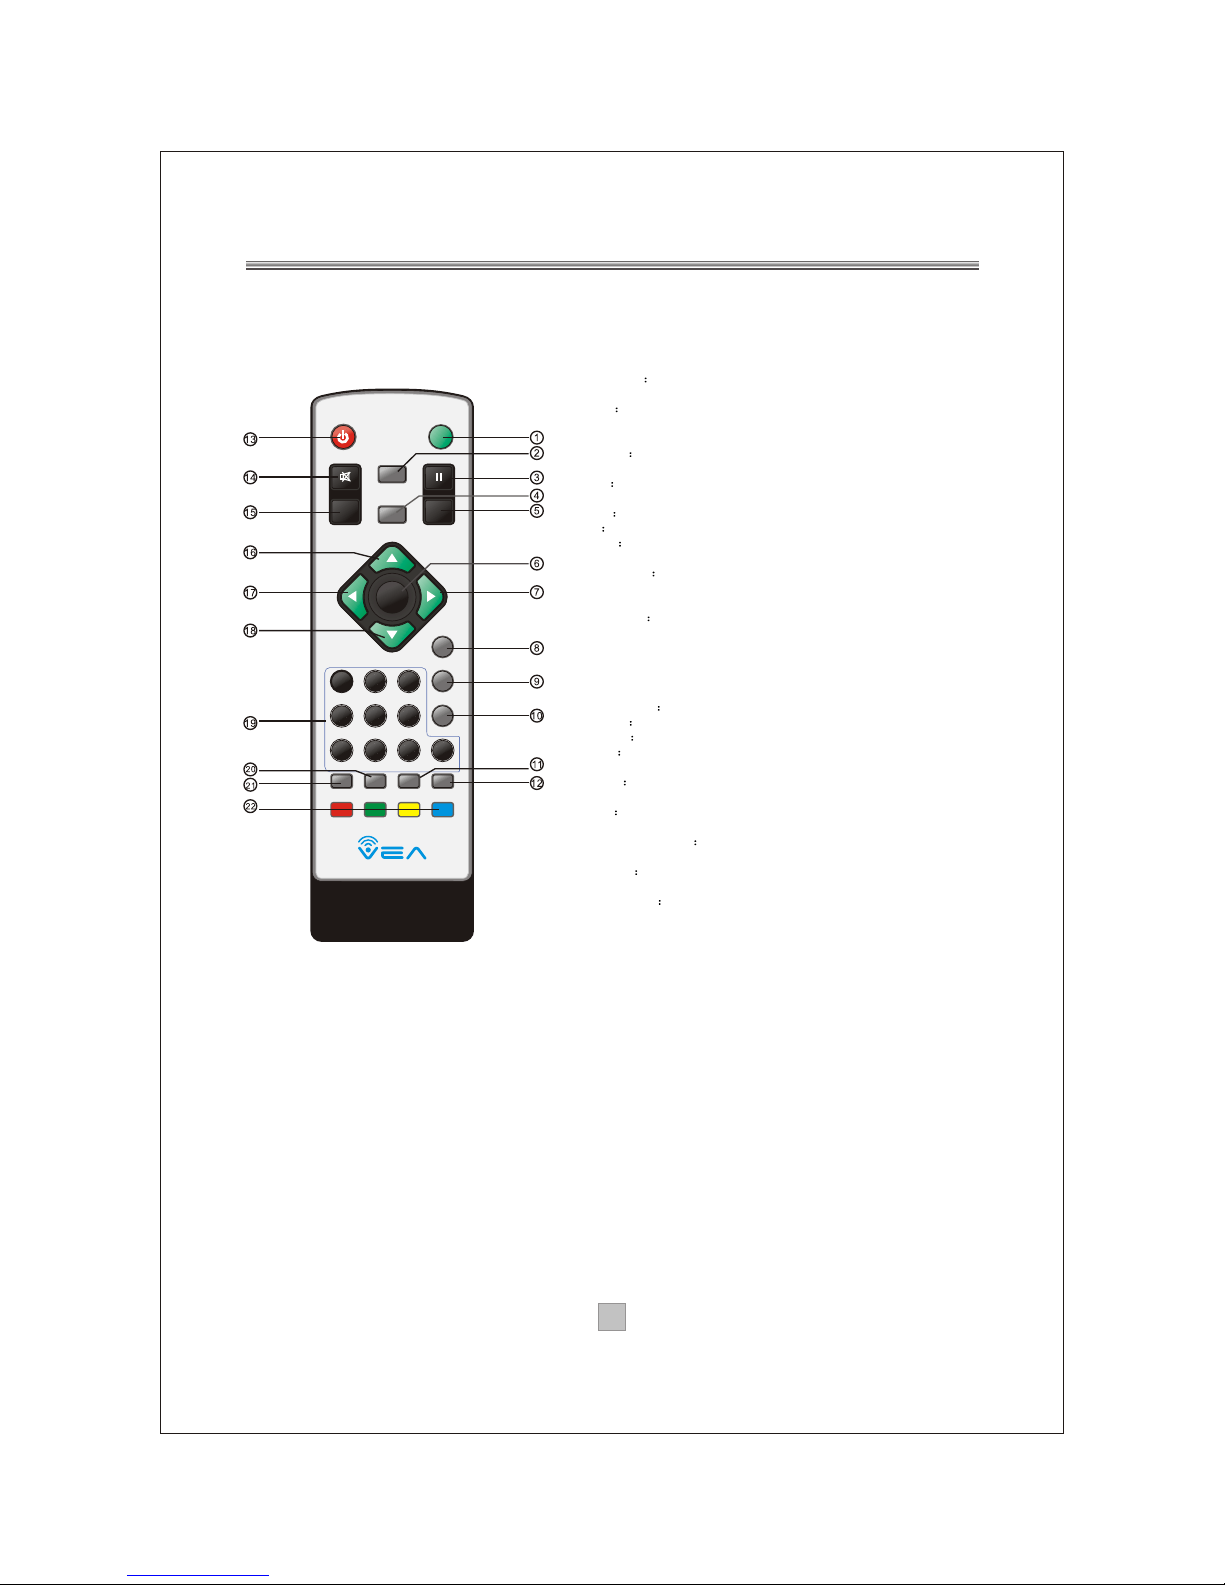
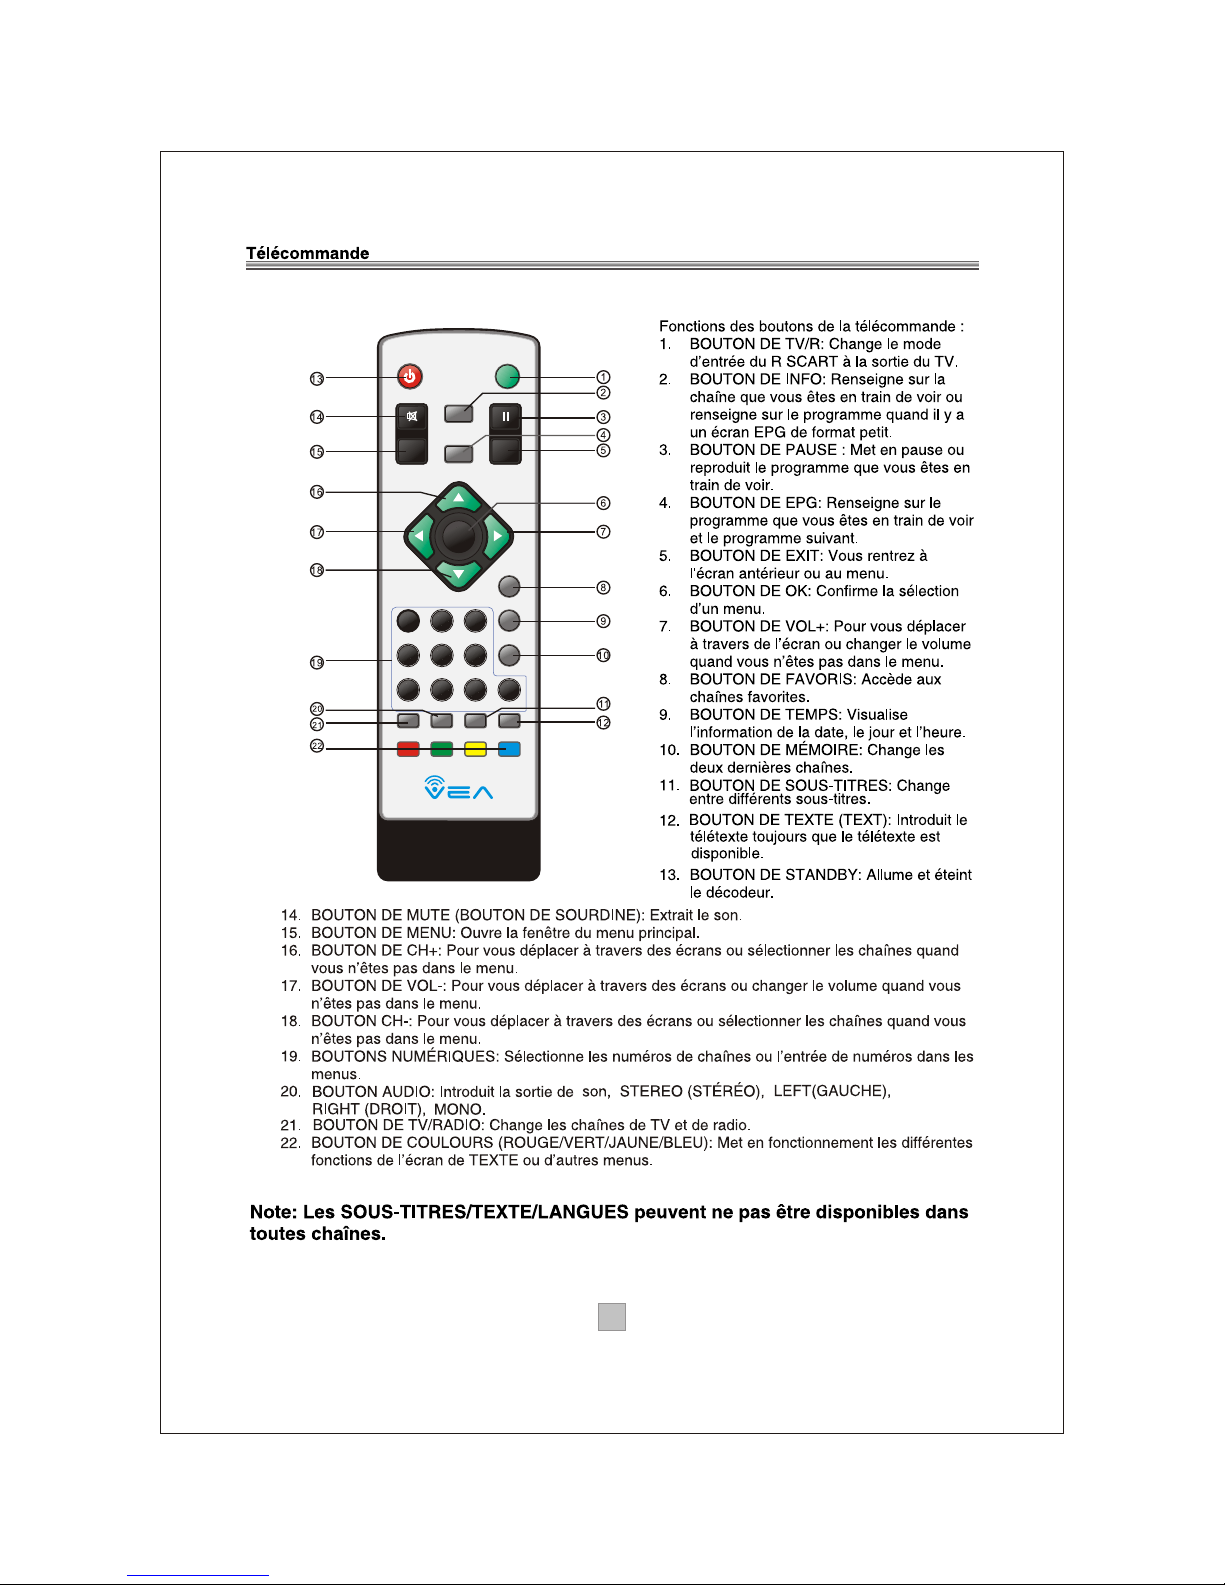
Remote Key Function:
1. DTV/VCR Used to switch between the VCR SCART input
and the DTV output mode.
2. INFO Used to display information about the channel being
viewed or further information about the program when in
small EPG screen.
3. PAUSE Used to pause or playback the program being
viewed .
4. EPG Used to display information about the program being
viewed and what's on next.
5. EXIT Used to return to the previous screen or menu.
6. OK Used to confirm a selection within a menu.
7. VOL+ Used to move around the menu screens or changing
the volume in non-menu state.
8. FAVORITE Used to access your favourite channels.
9. GAME: Used to select 4 built-in mini games: Mine, Tetris,
Gomoku, Calendar.
10. RECALL Used to switch between the last two viewed
channels.
11. SUBTITLE: Used to switch between different subtitles that
are broadcasted
12. TEXT: Used to open teletext OSD display if teletext available
in the broadcasted stream.
13. STANDBY Used to switch the set top box to on and off.
14. MUTE Used to turn the sound on or off.
15. MENU Used to open the main menu window.
16. CH+ Used to move around the menu screens or selecting
the channels in non-menu state.
17. VOL- Used to move around the menu screens or changing
the volume in non-menu state.
18. CH- Used to move around the menu screens or selecting
the channels in non-menu state.
19. NUMBER KEYS Used to select channel numbers or input
numbers in menus.
20. AUDIO Used to set the sound output, the available
settings are STEREO, LEFT, RIGHT, MONO.
21. TV/RADIO Used to switch between TV channels and
Radio stations.
22. COLOR KEYS(RED/GREEN/YELLOW/BLUE): Used to
operate different functions in TEXT screen or other menus.
Note: SUBTITLE/TEXT/LANGUAGE may not be available
for all channels
Remote Controller
Page 7
CHANNEL
VEA T100
44
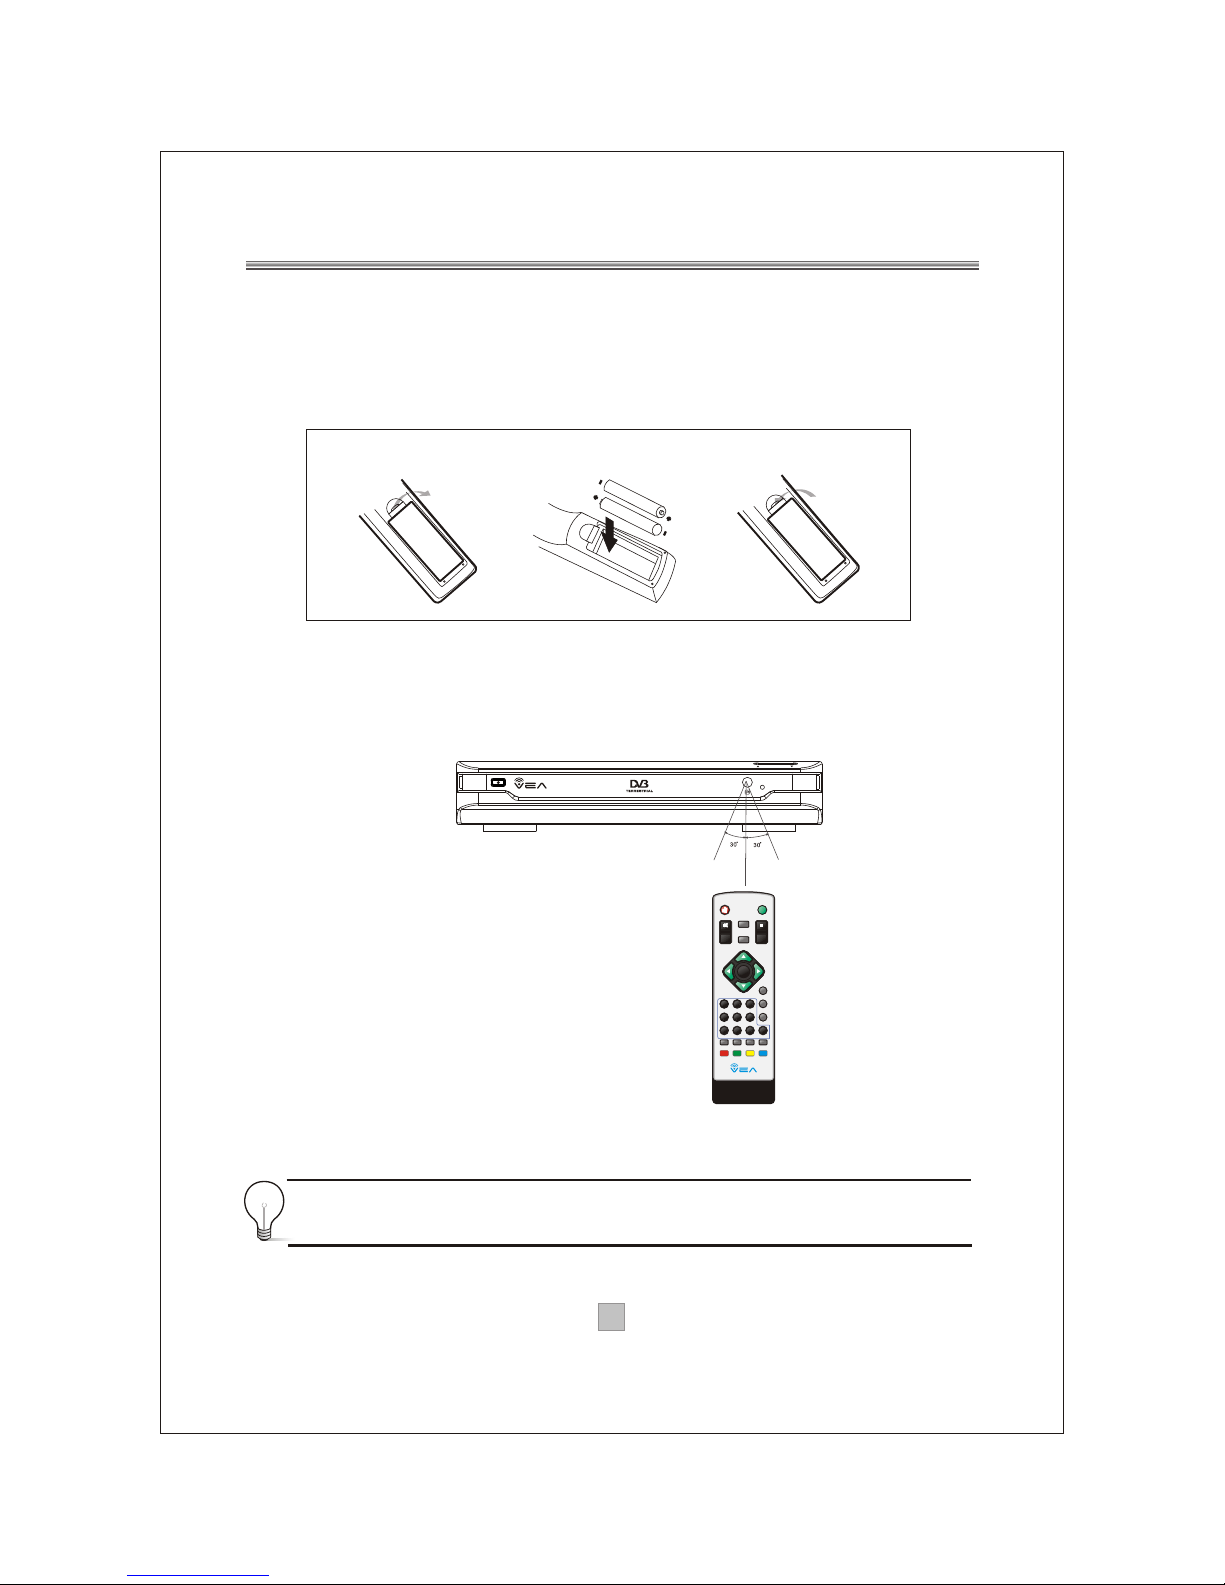
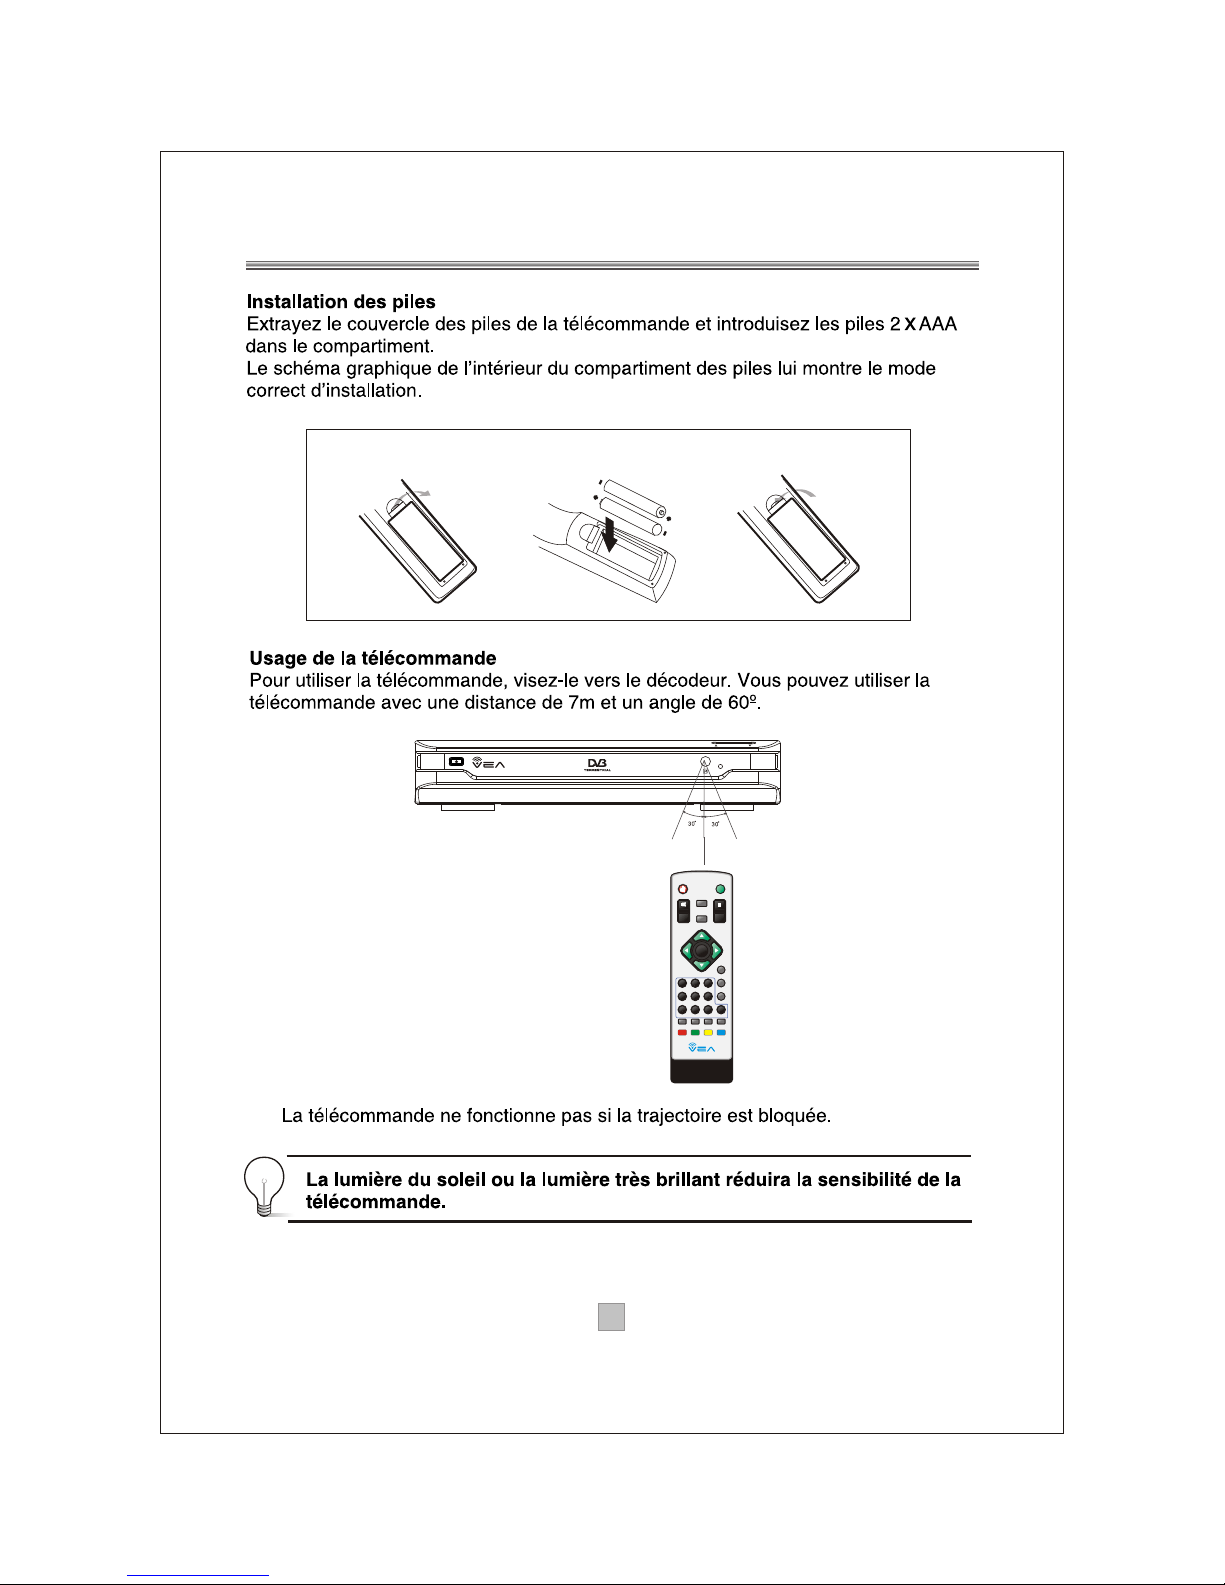
Installing the Batteries
Remove the battery cover from the remote control and put 2XAAA size batteries
inside the compartment.
The diagram inside the battery compartment shows the correct way to install the
batteries.
O
P
E
N
O
P
E
N
1.Open the cover
2.Install batteries
3.Close the cover
Using the Remote Control
To use the remote control, point it towards the front of the digital set top box
The remote control has a range of up to 7 metres from the set top box at an angle
of up to 60 degrees.
The remote control will not operate if its path is blocked.
Sunlight or very bright light will decrease the sensitivity of the remote
control.
OK
DTV/VCR
EXIT
PAUSE
1 2 3
4 5 6
7 8 9 0
INFO
AUDIO
EPG
VOL
+
VOL
-
CH+
CH-
MENU
MUTE
RECALL
TV/RADIO
STANDBY
GAME
SUBTITLE TEXT
FAVORITE
Page 8
55
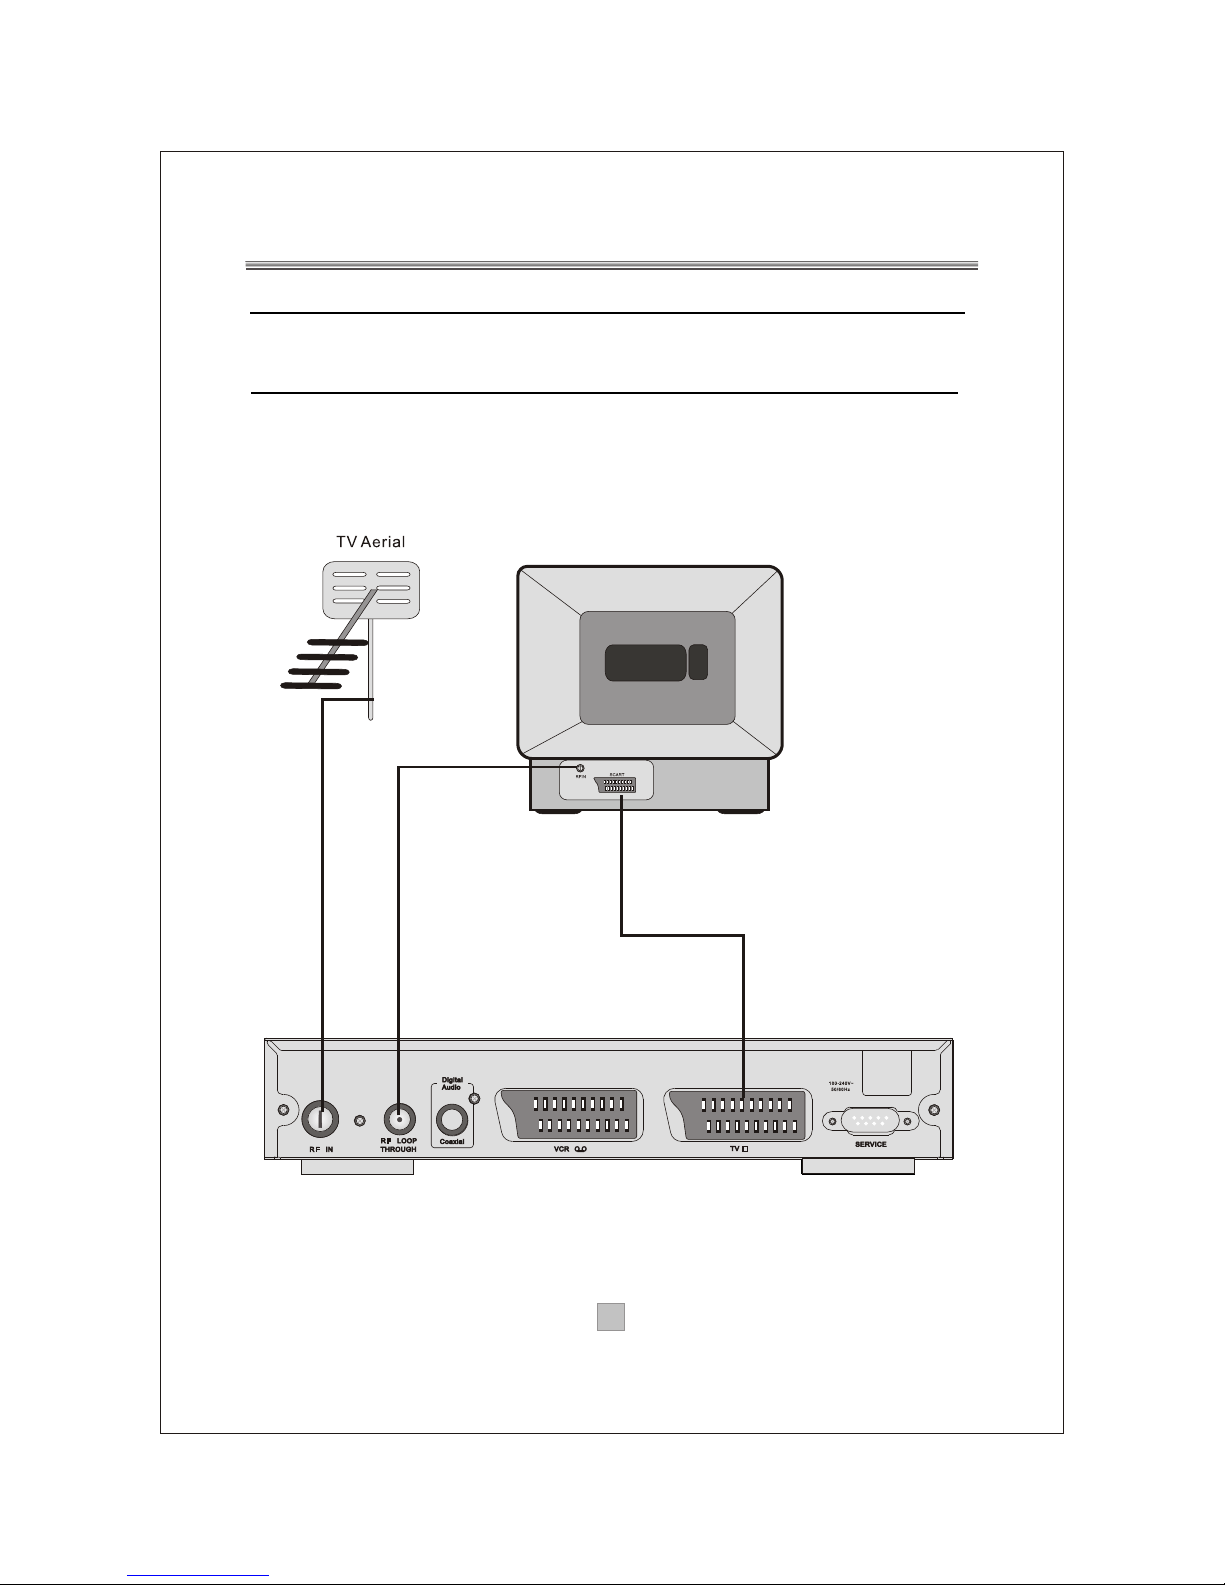
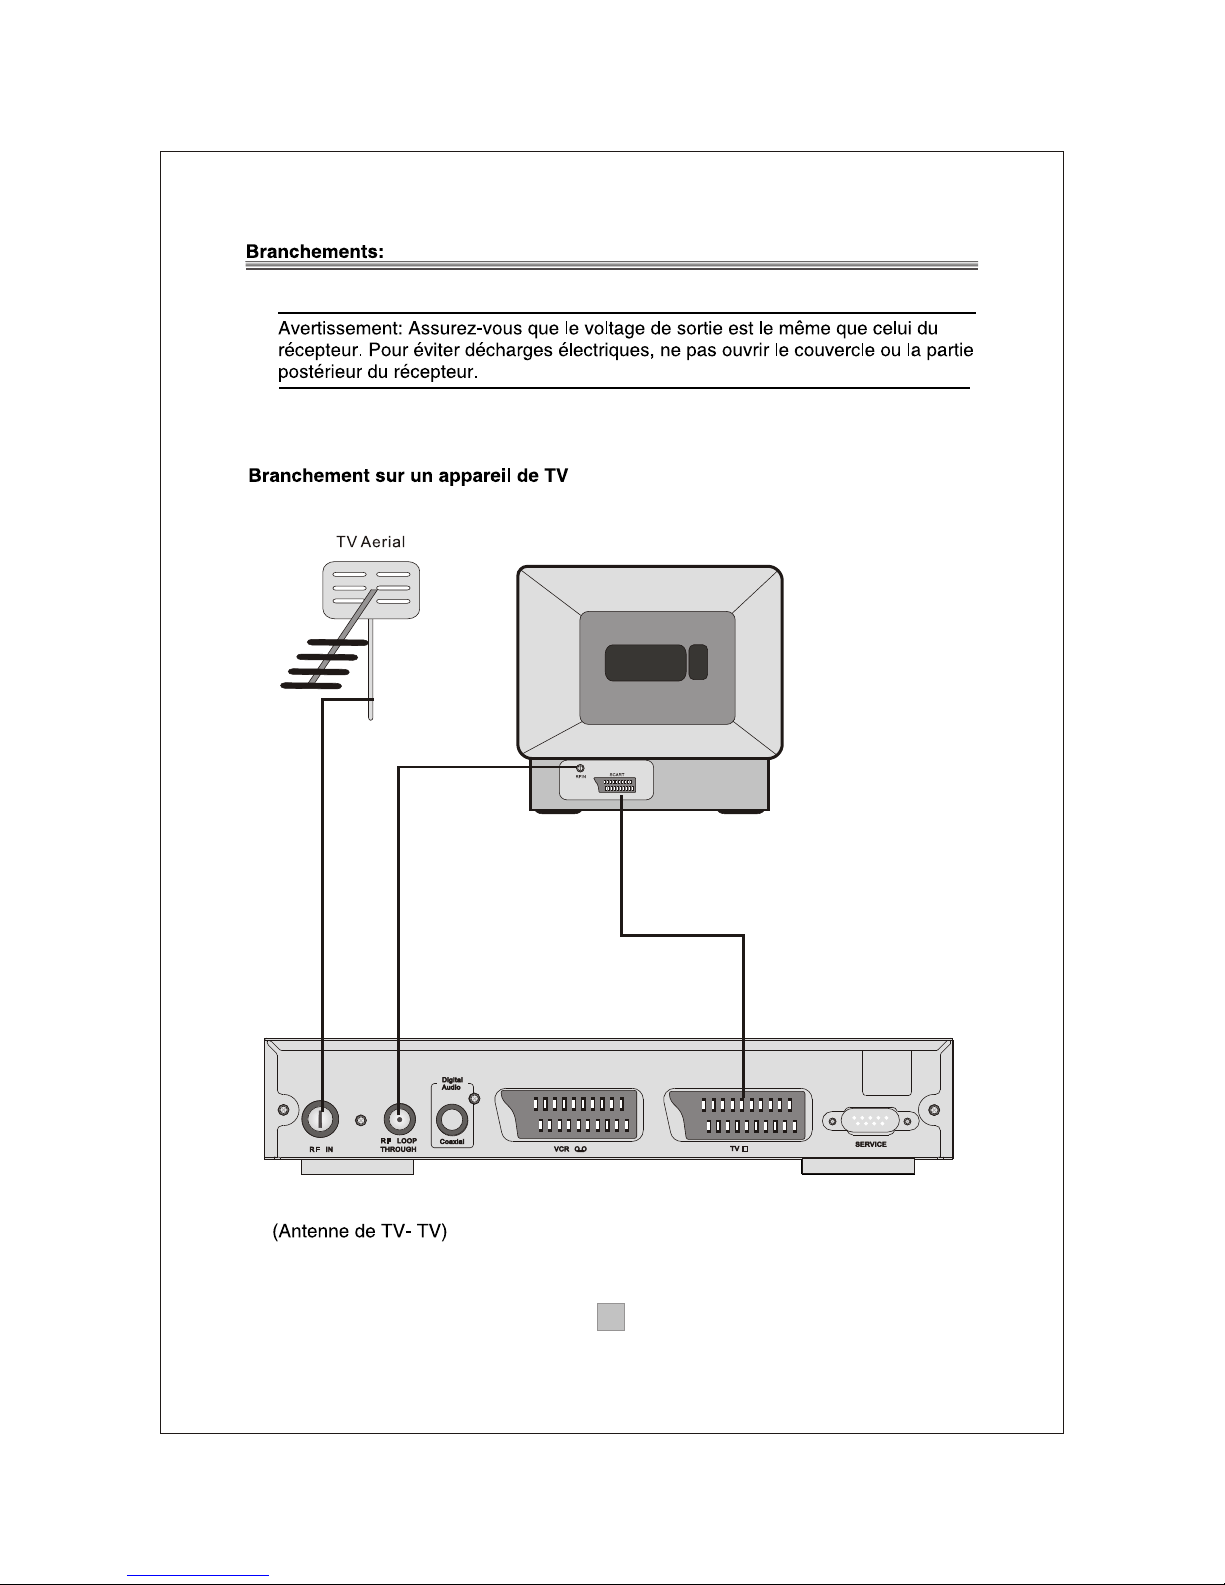
Caution: Make sure to check the voltage specification of the wall outlet
is the same rating with the receiver. To prevent the risk of electric shock,
do not open the cover or the back of the receiver.
Connections
Connecting to a TV Set
TV
Page 9
66
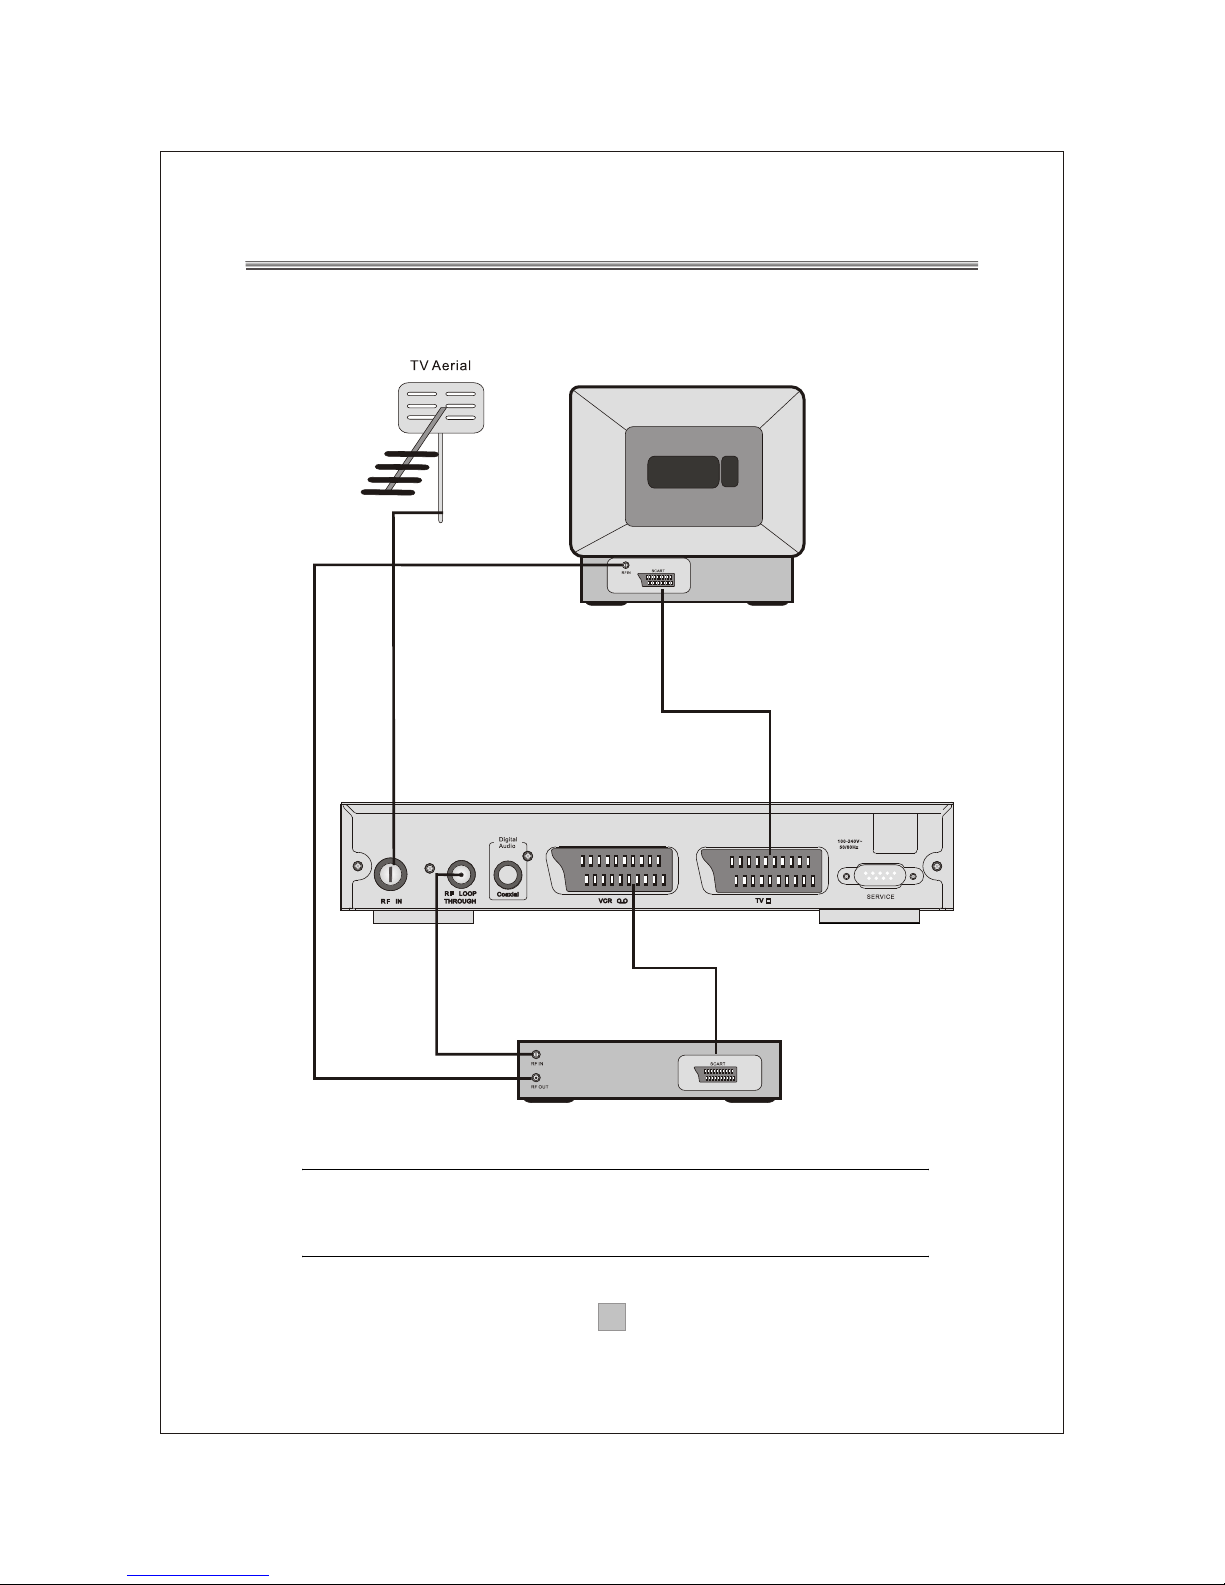
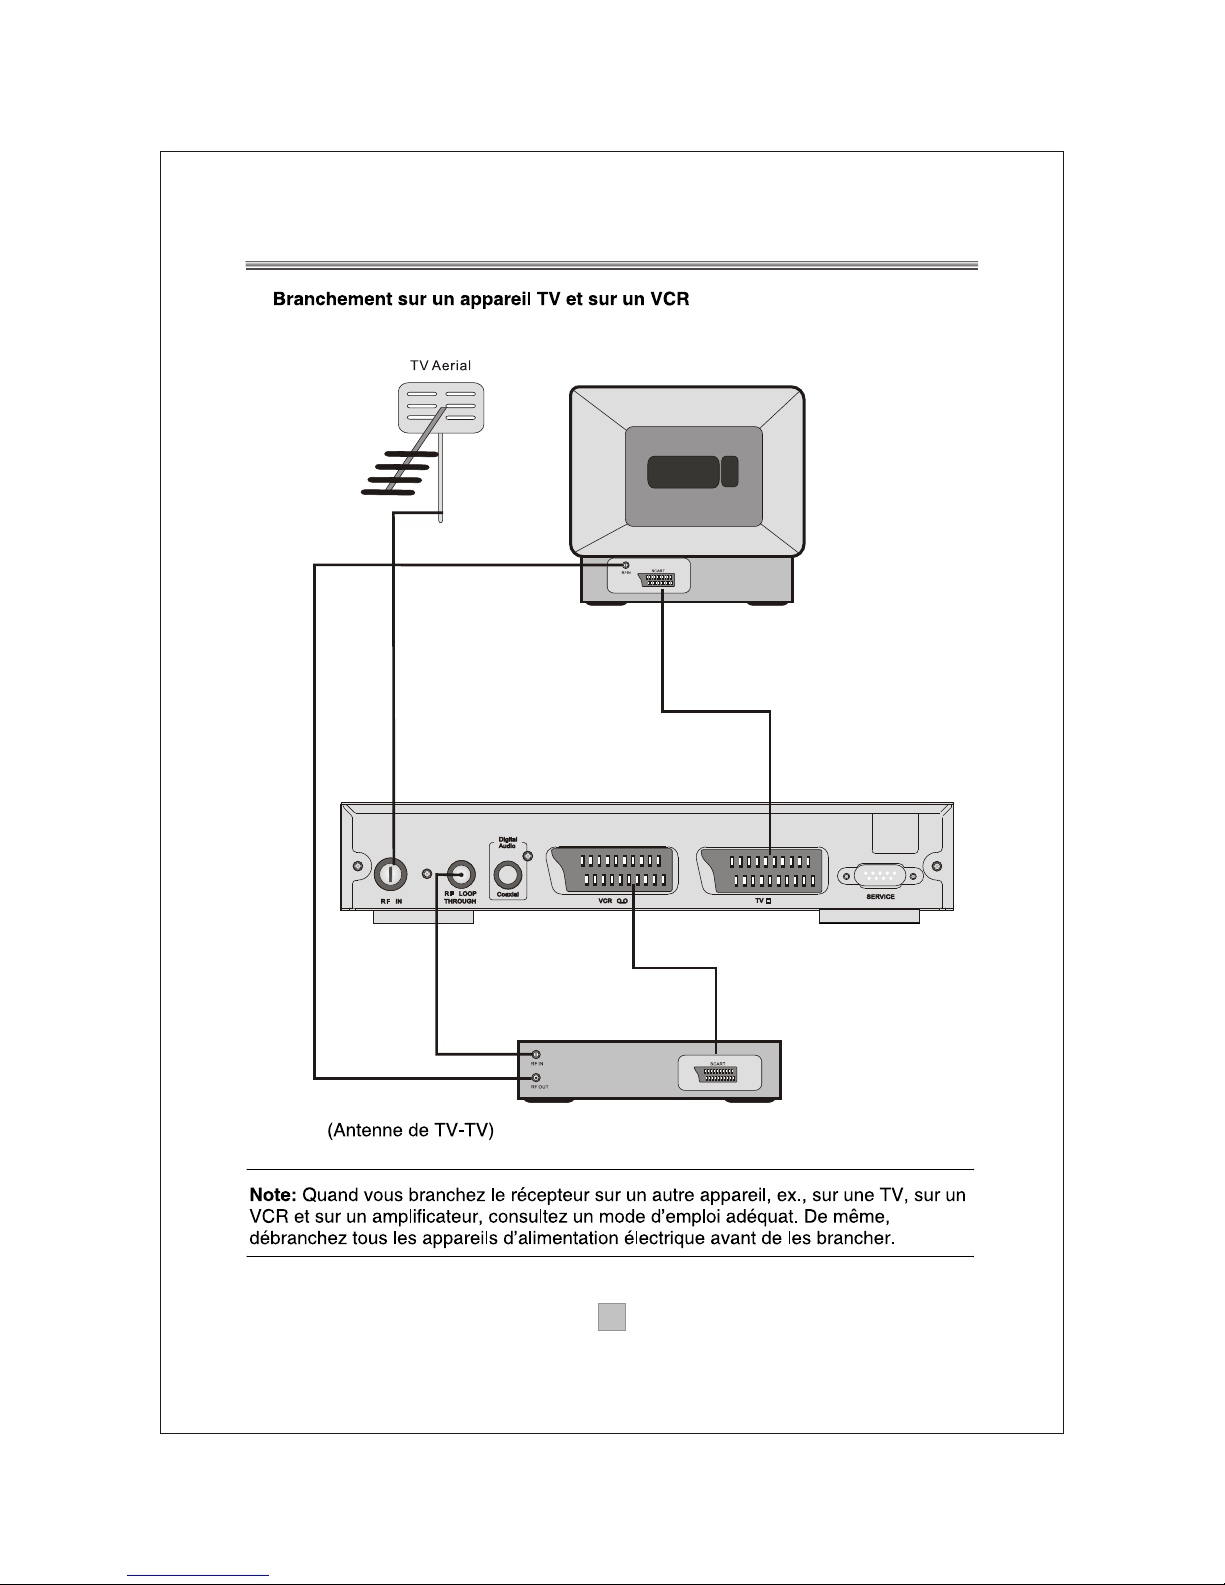
Connecting to TV and VCR
Note: When connecting the receiver to other equipment, e.g., TV,
VCR and amplifier, make sure to refer to relevant user manual for
instruction. Also, make sure you disconnect all the equipments from
the mains supply before the connection.
VCR
TV
Page 10
77
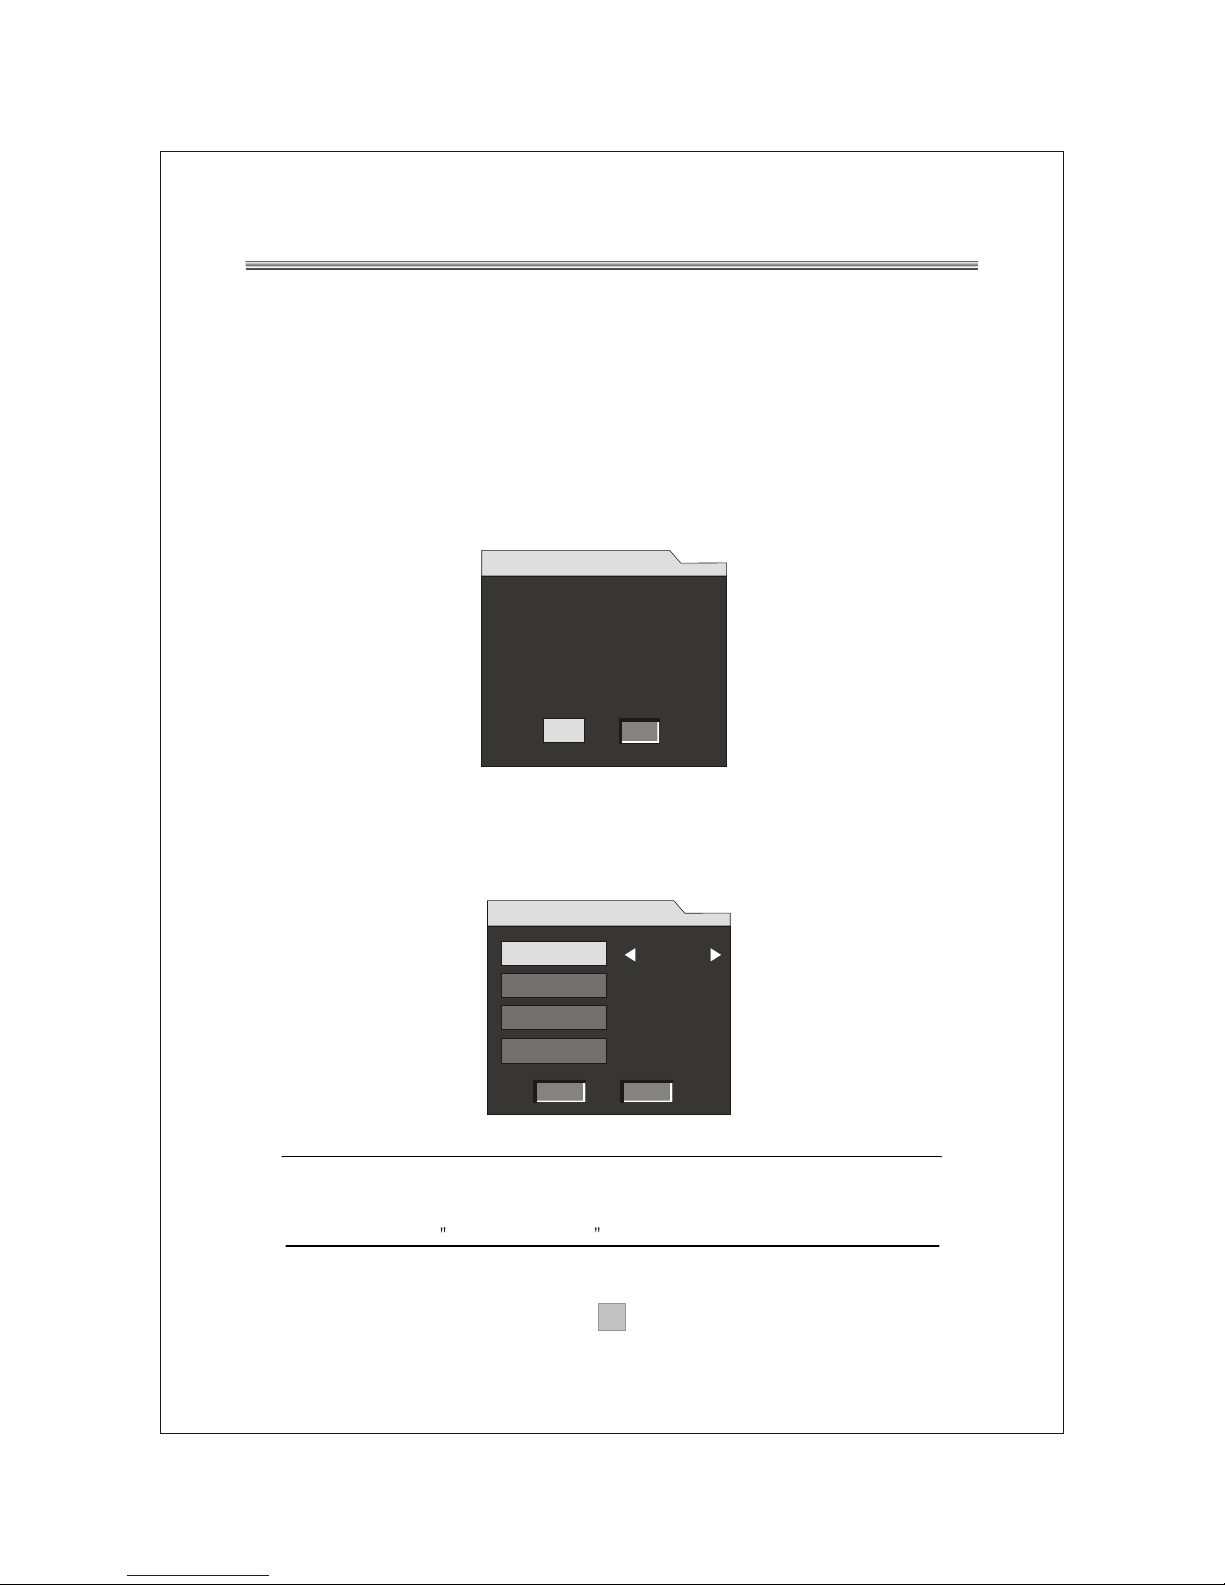
After all the connections have been made properly, switch on your
TV. Make sure the receiver is connected to the mains and press
Power to switch the receiver on. If you are using the receiver for
the first time, a First Time Installation menu will be displayed to
guide you through the initial setup. Use the remote controller to
finish the setup.
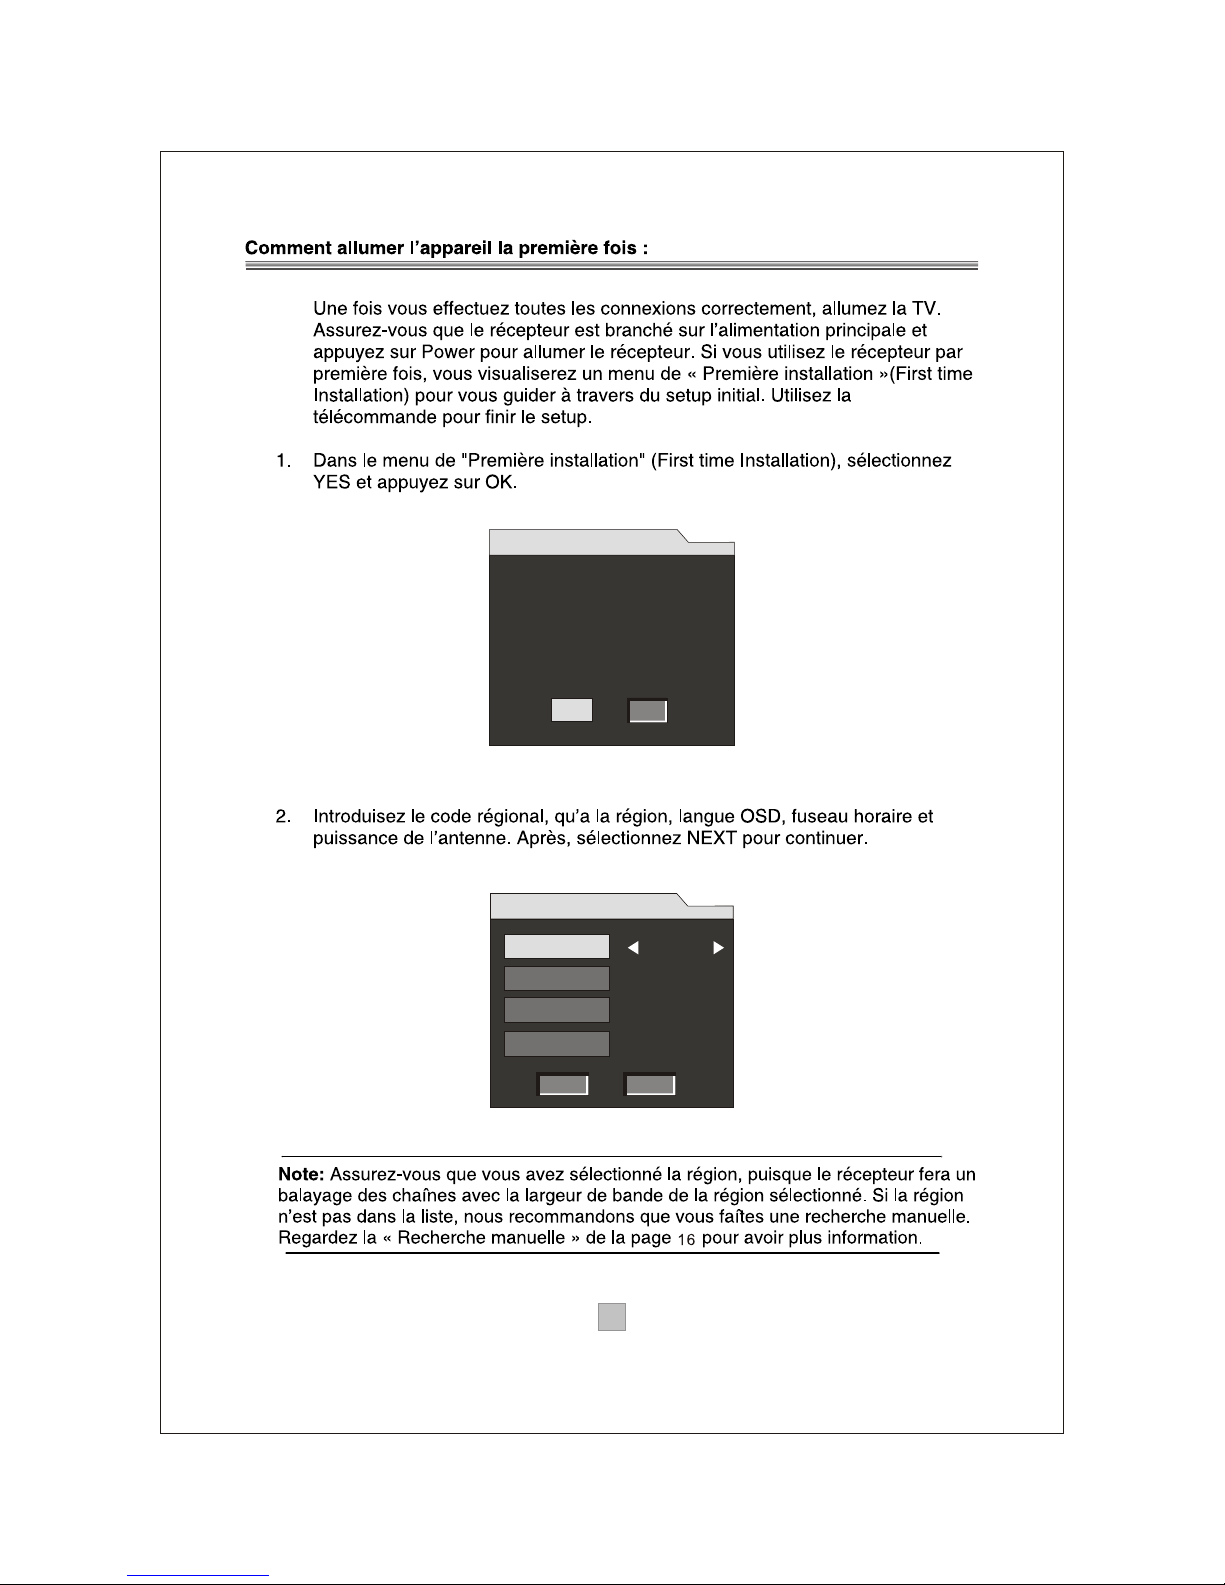
1. At the First time installation menu, select YES and press OK
on the remote controller to proceed.
2. Enter your regional settings, include your Region, OSD
Language, Time Zone and Antenna Power. Then select
NEXT to proceed.
Note: Make sure to select the region you are located since the receiver
will scan the channels based on the bandwidth of the region you selected.
If your region is not on the list, you are recommended to conduct a manual
search. Refer to Manual Search on page 16 for details.
First Time Installation
First Time Installation
Do you want to start first time
Installation Wizard?
YES
NO
England
English
GMT + 00:00
OFF
First Time Installation (1)
BACK NEXT
Region
Language
Time Zone
Antenna Power
Page 11
88
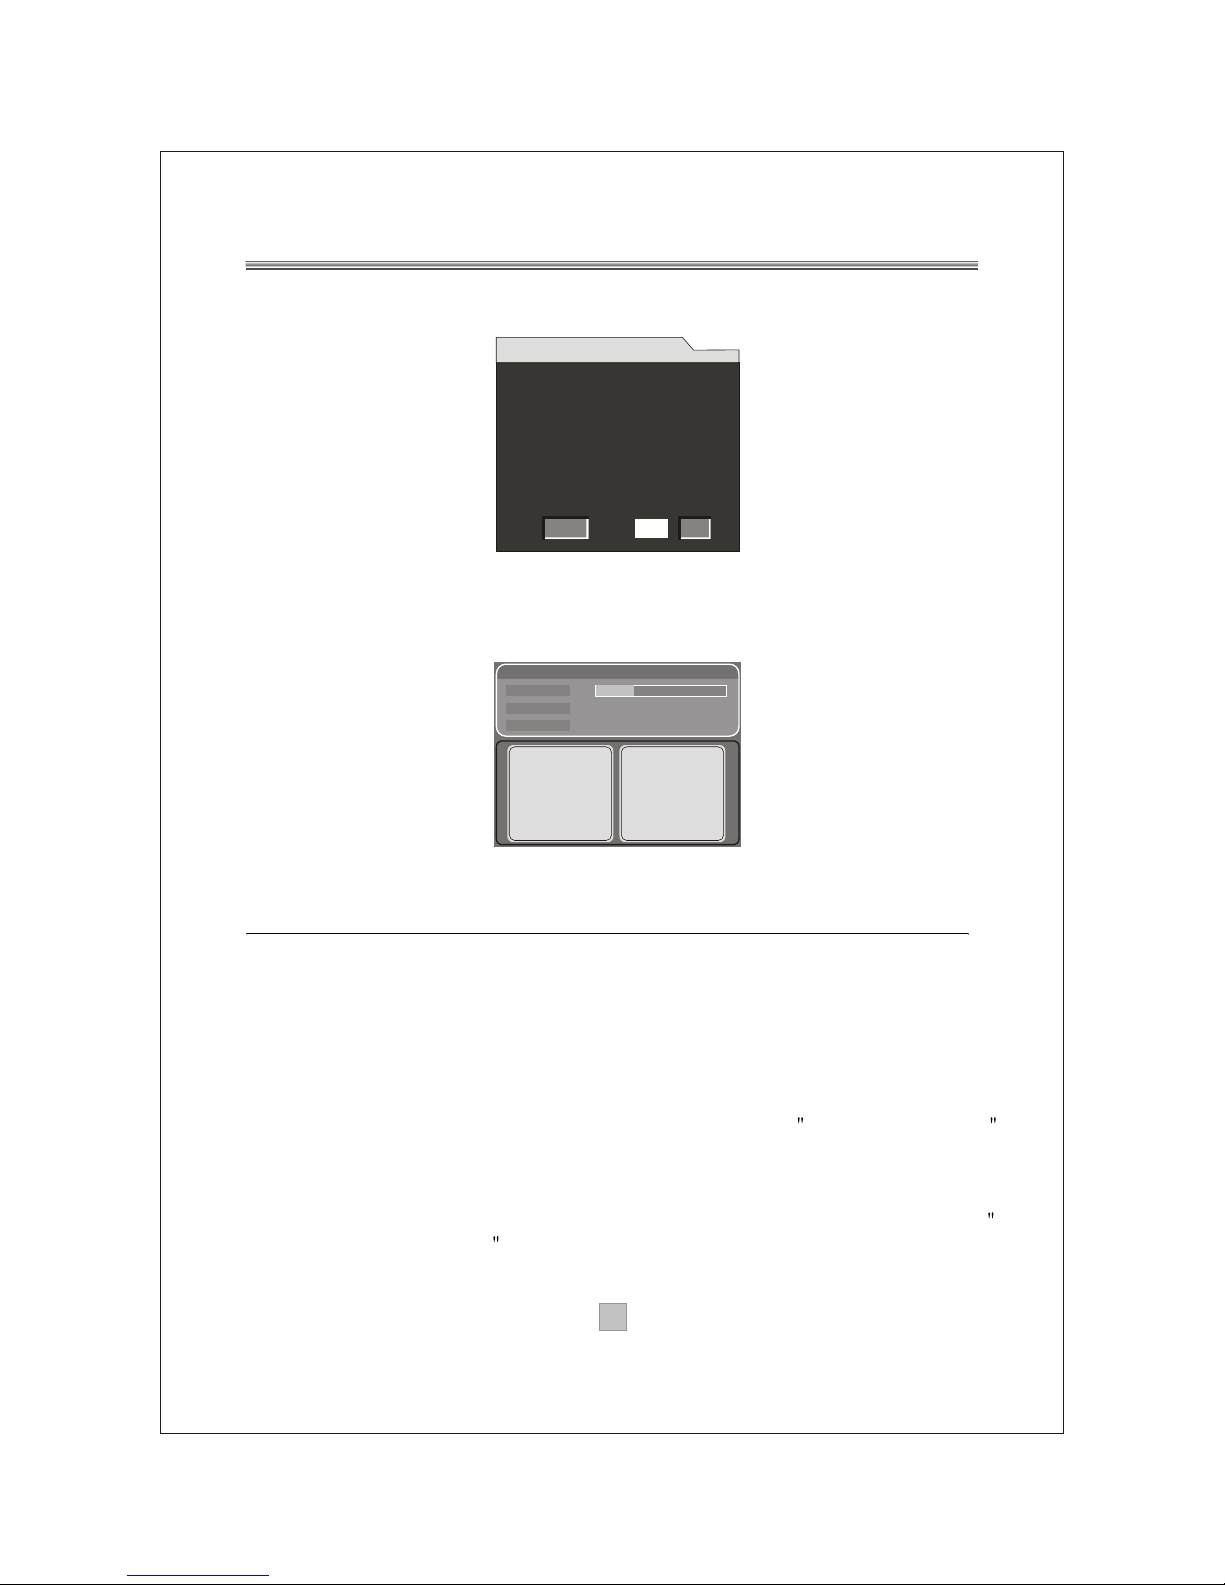
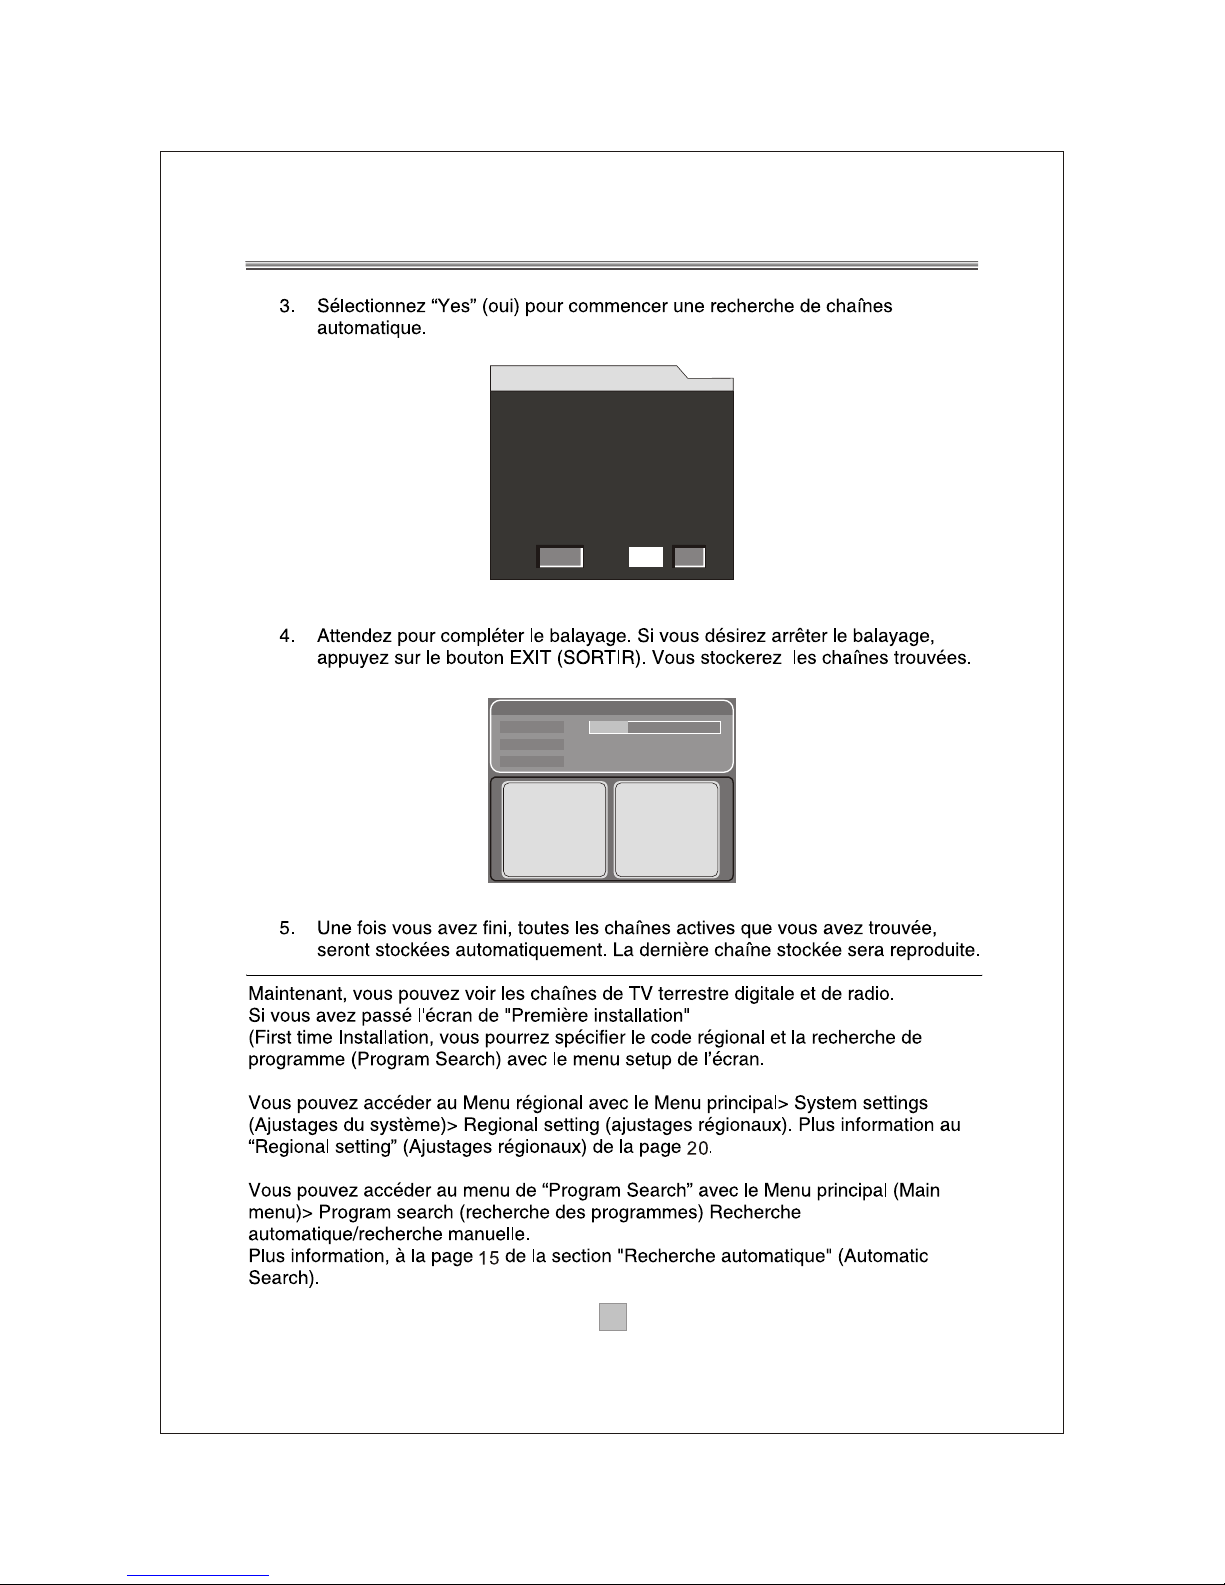
4. Wait to complete the scanning.
In case you want to stop the scanning, press the EXIT key.
The channels already found will still be stored.
5. When finished, all active channels found will be stored
automatically. The last found channel will be played.
Now you are ready to watch digital terrestrial TV channels and radio
broadcasts.
In case you skip the First Time Installation screen, you can still
specify your Regional Setting and Program Search via the on-
screen setup menu.
The Regional Setting menu can be accessed via Main Menu >
System Settings > Regional Setting. Refer to Regional Setting
on page 20 for details.
The Program Search menu can be accessed via Main Menu >
Program Search > Automatic Search / Manual Search. Refer to
Automatic Search on page 15 for details.
3. Select Yes to start the automatic channel search.
Do you want to start Auto Search?
Previous channel list will be replaced.
First Time Installation (2)
BACK
NOYES
Automatic Search
Progress
Channel No
Frequency
30%
33
587.0 MHz
TV List : 013
TTV-1
TTV-2
HAKKA
Music List : 002
G-Guide
RAIL WAY
Page 12
9 9
Basic Operations
Once program search is completed, you can start to watch digital
terrestrial TV channels and radio broadcasts. Some typical
operations are given in this chapter.
Switching On and Off
Whenever you are not using the receiver, press the Standby key on
remote control or button on the receiver to put it into standby mode.
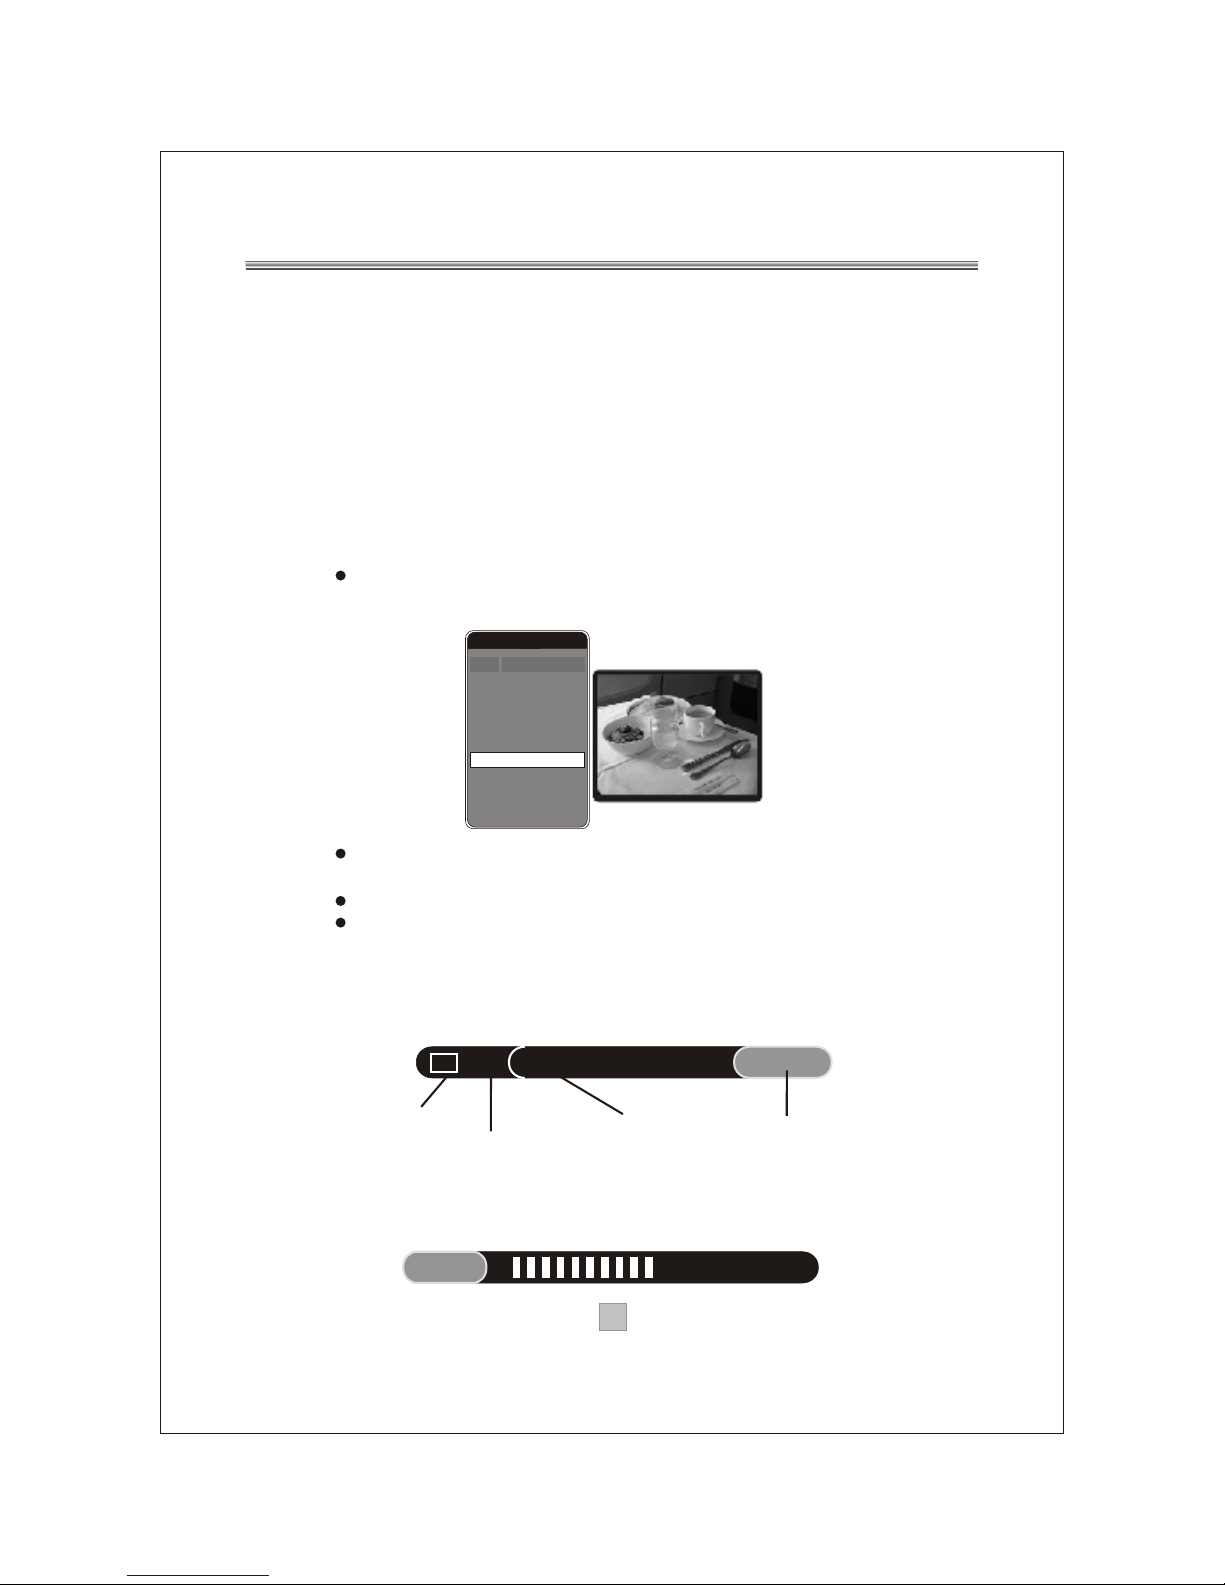
Changing Channels
To switch between different channels, you can:
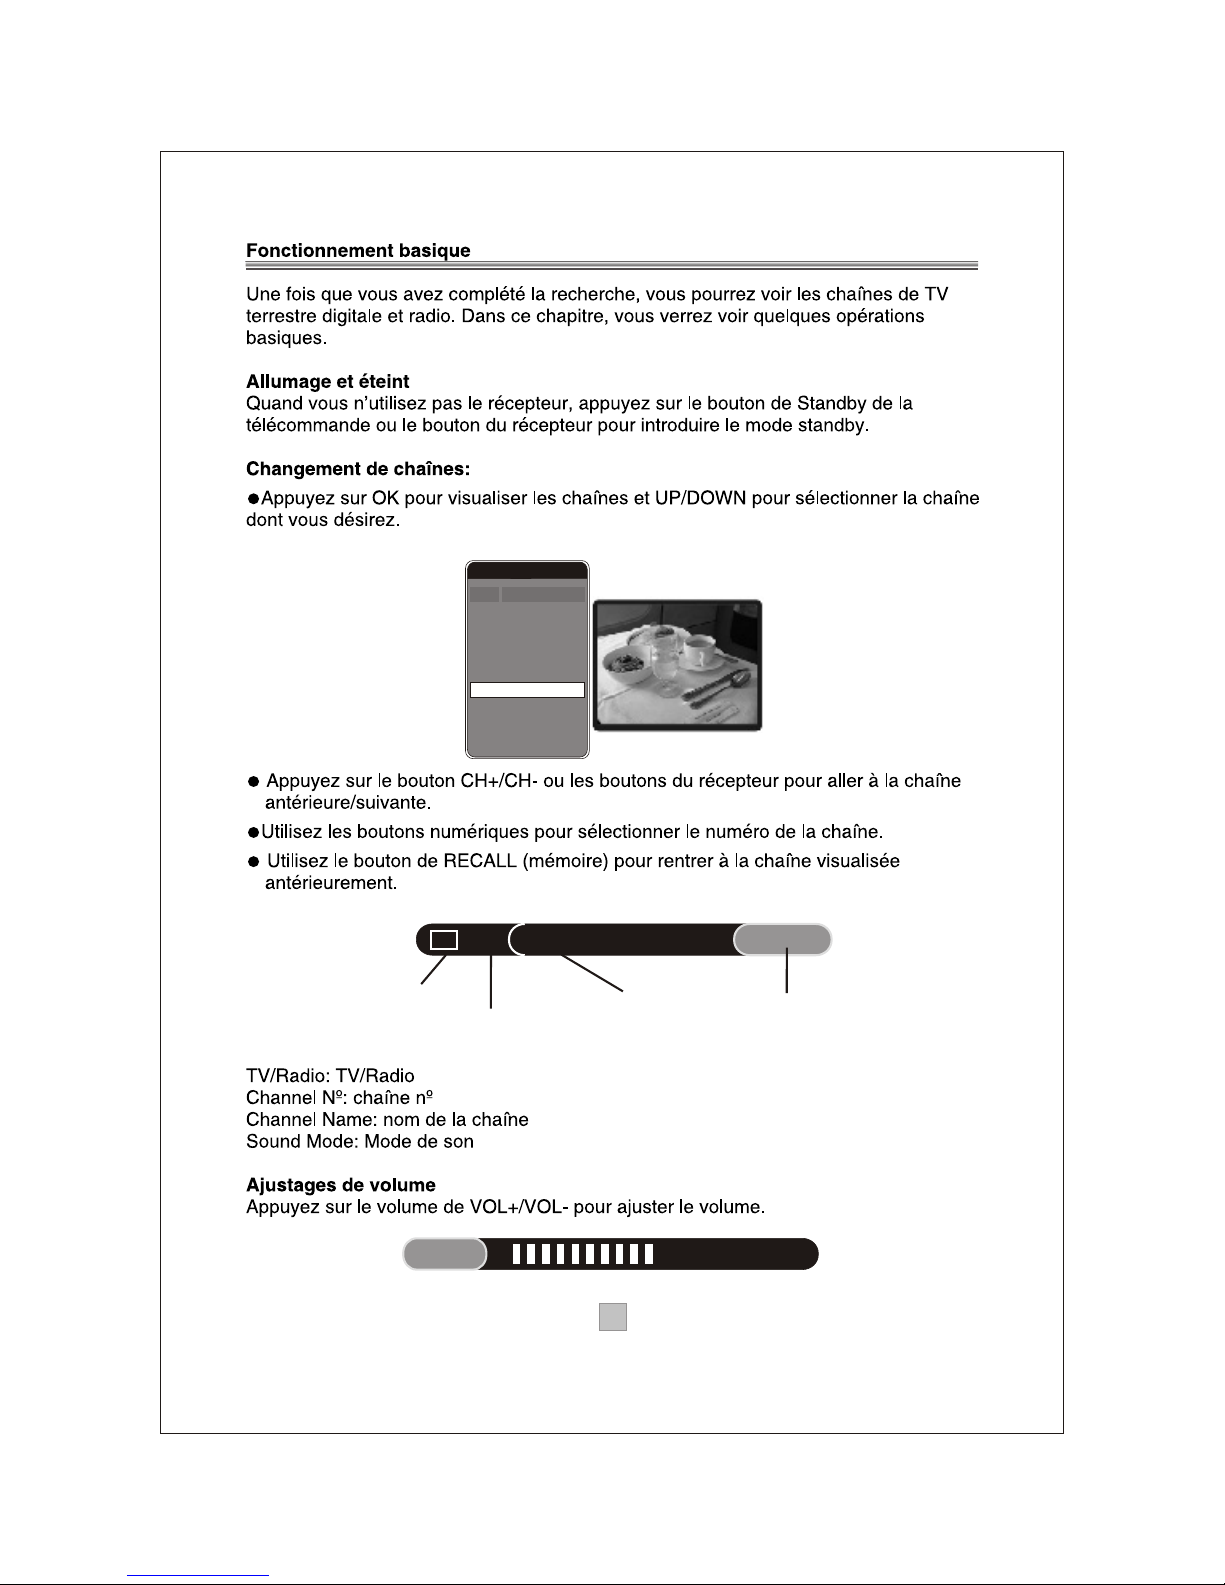
Press OK to display the channel list and UP/DOWN to select
a desired channel.
Press the CH+ / CH- key or buttons on the receiver to go to the
previous/next channel.
Use the numeric keys to select a channel number.
Use the RECALL key to return to the previous viewed channel.
Whenever you change a channel, a banner appears at the bottom
of the screen displaying the basic information on the current
channel.
Adjusting the Volume
Press the VOL+ / VOL- key to adjust the volume.
1
2
3
4
5
7
8
Program Name
DIMO
FTV
FMTV
FTVN
TTV-1
HAKKA
CTS
No.
TTV-2
6
TV Program List
TV
13
HAKKA
LR
TV/Radio
Channel No.
Channel Name
Sound Mode
V olume
Page 13
1010
Watching Favorite List
You can press FA VORITE to watch your preset favorite channels.
To create your favorite list, go to Main Menu > Program List.
Refer to Creating Favorite Channel Groups on page 13 for
detailed information.
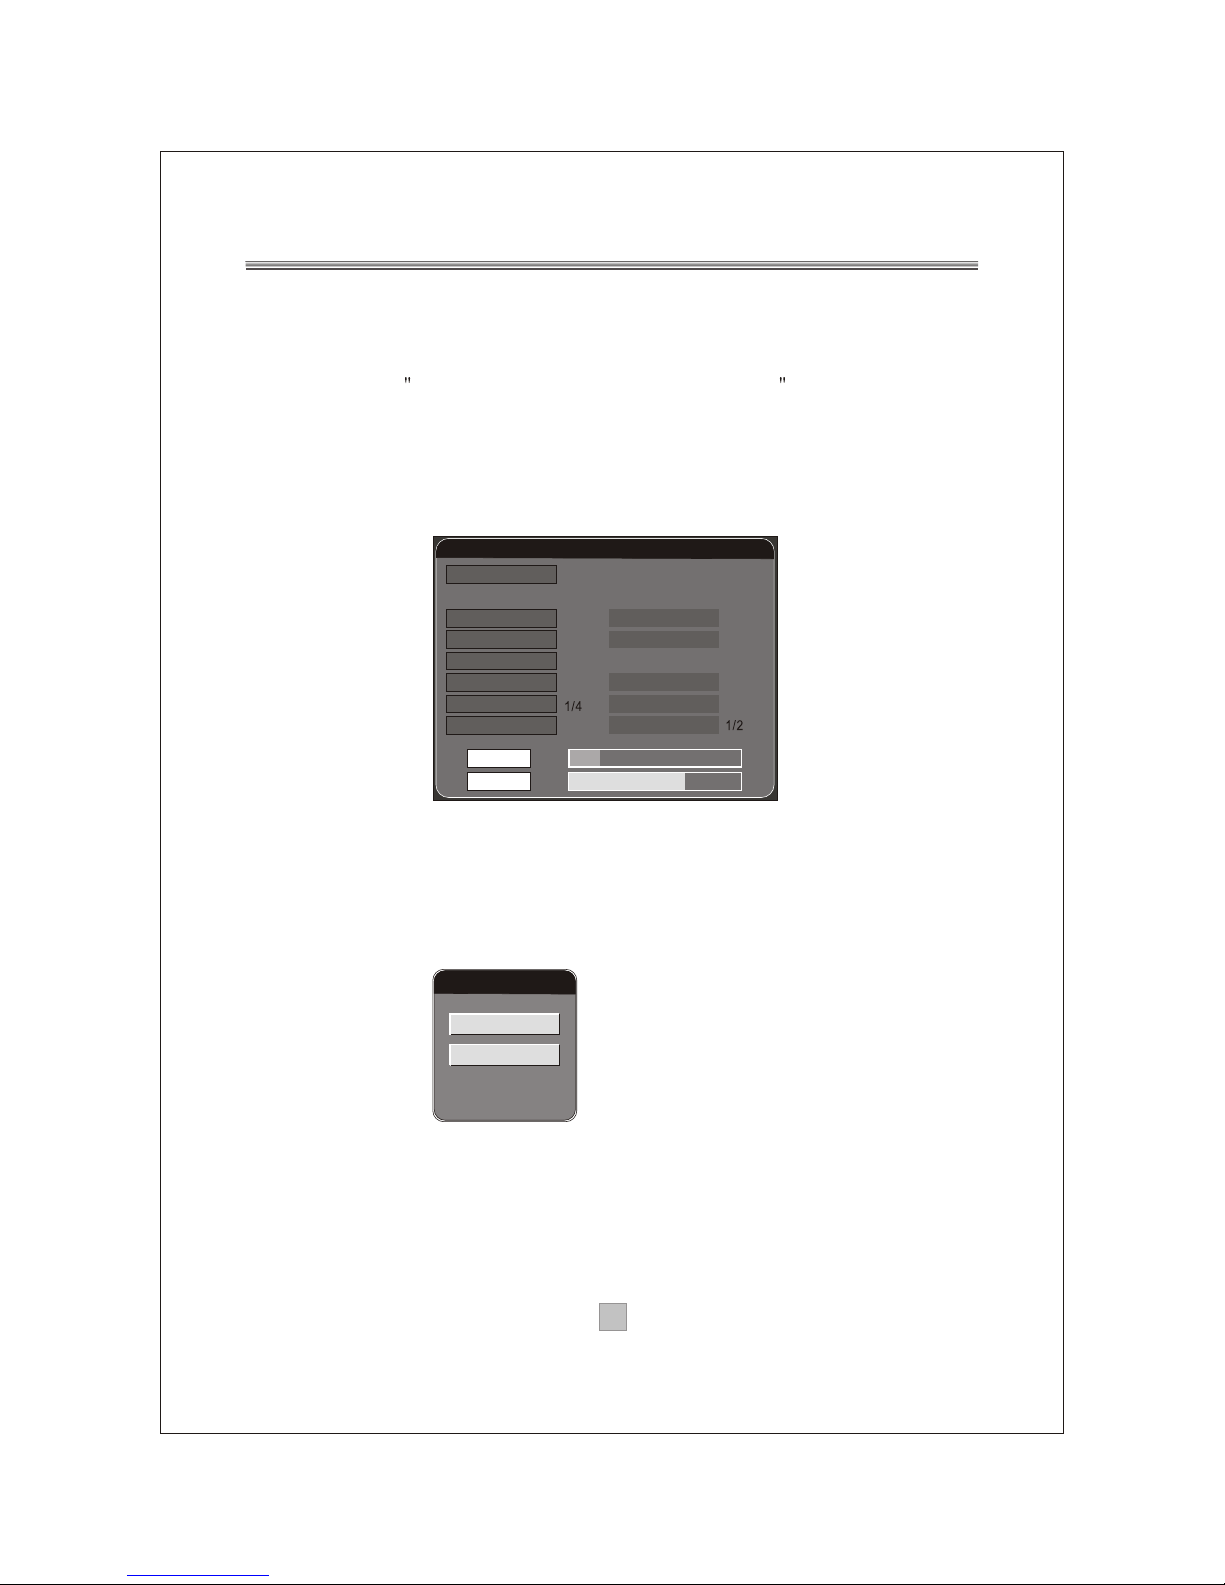
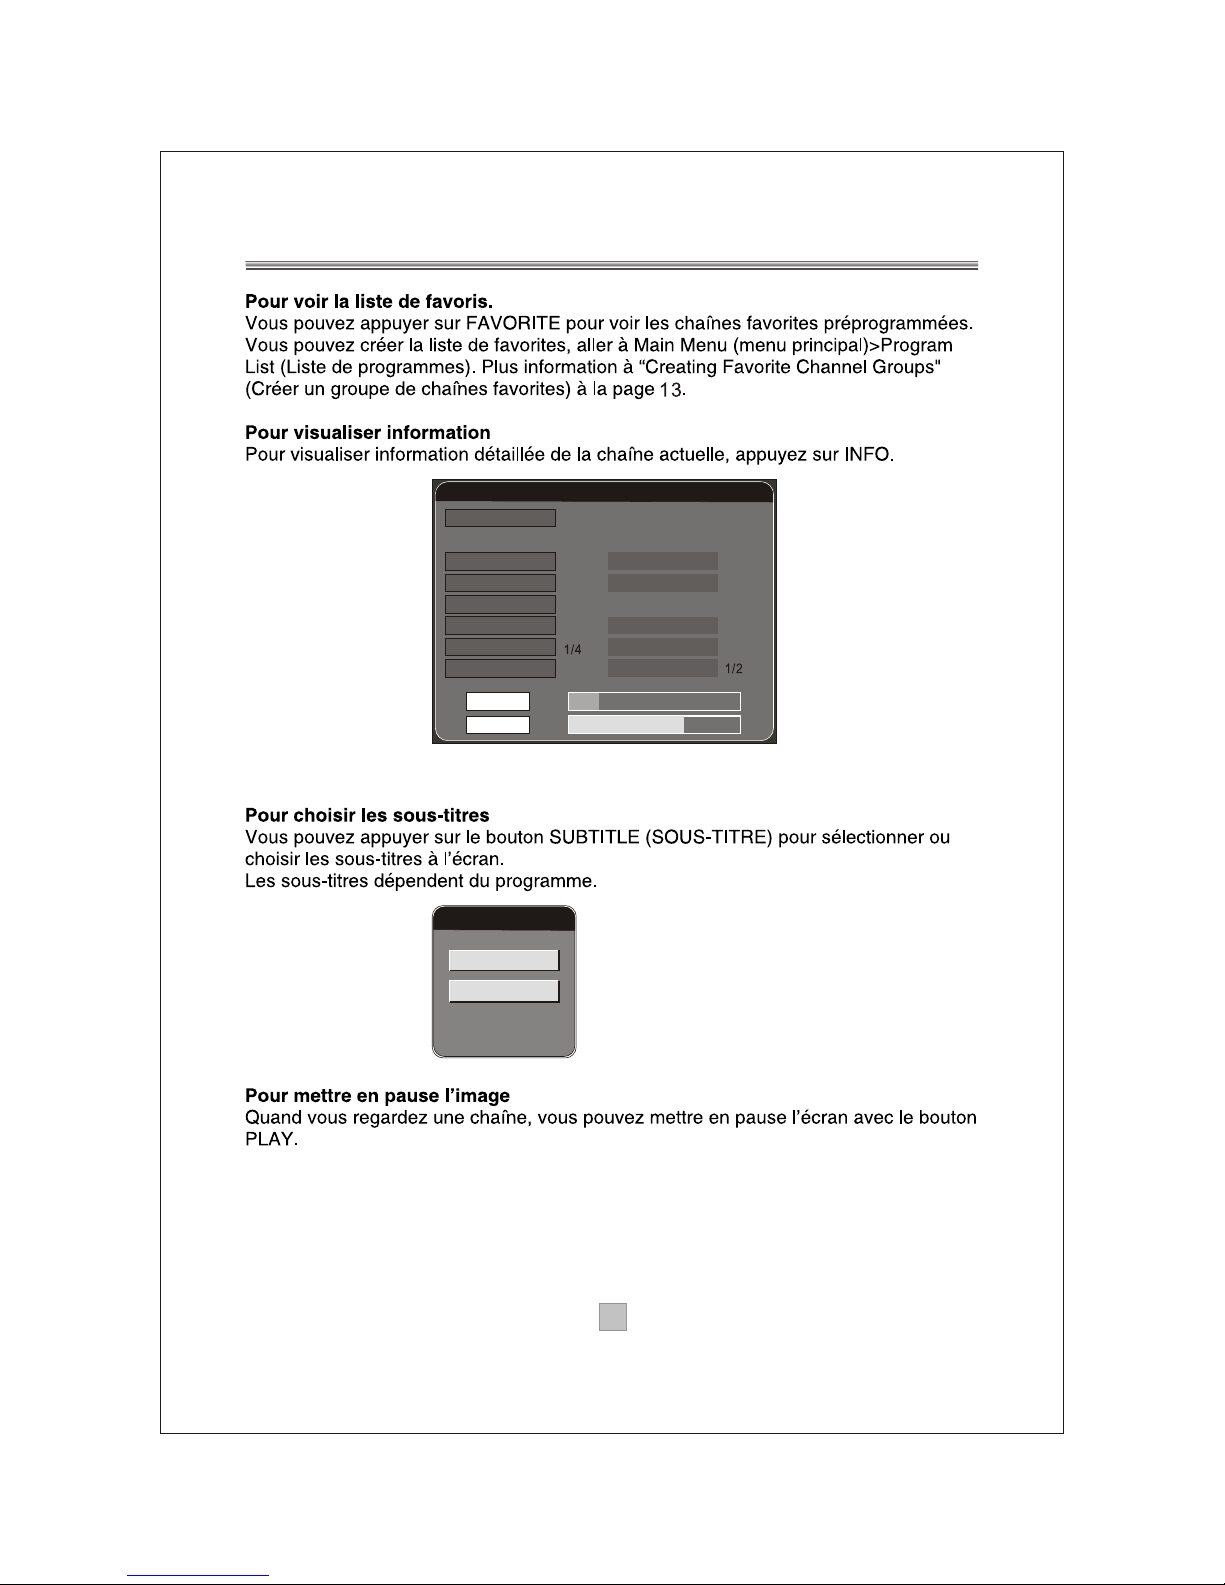
Displaying information
To display the detailed information of the current channel, press
the INFO key.
Choosing Subtitle
You can press the SUBTITLE key to select or close subtitles on
the screen. The available subtitles depend on the broadcaster.
Freezing
When watching a channel, you can freeze the current screen by
pressing the PAUSE key. Pressing it again disables the freeze
function.
Subtitle Language
ENG
OFF
Program Info
Program Name
Program No
Channel No
Frequency
Modulation
Guard Interval
Transmit Mode
4021
4022
0
32
581
QAM16
8k
HAKKA
Video PID
Audio PID
Hierarchy Mode
HP Code Rate
LP Code Rate
2/3
11
Strength
Quality
67%
17%
Page 14
1111
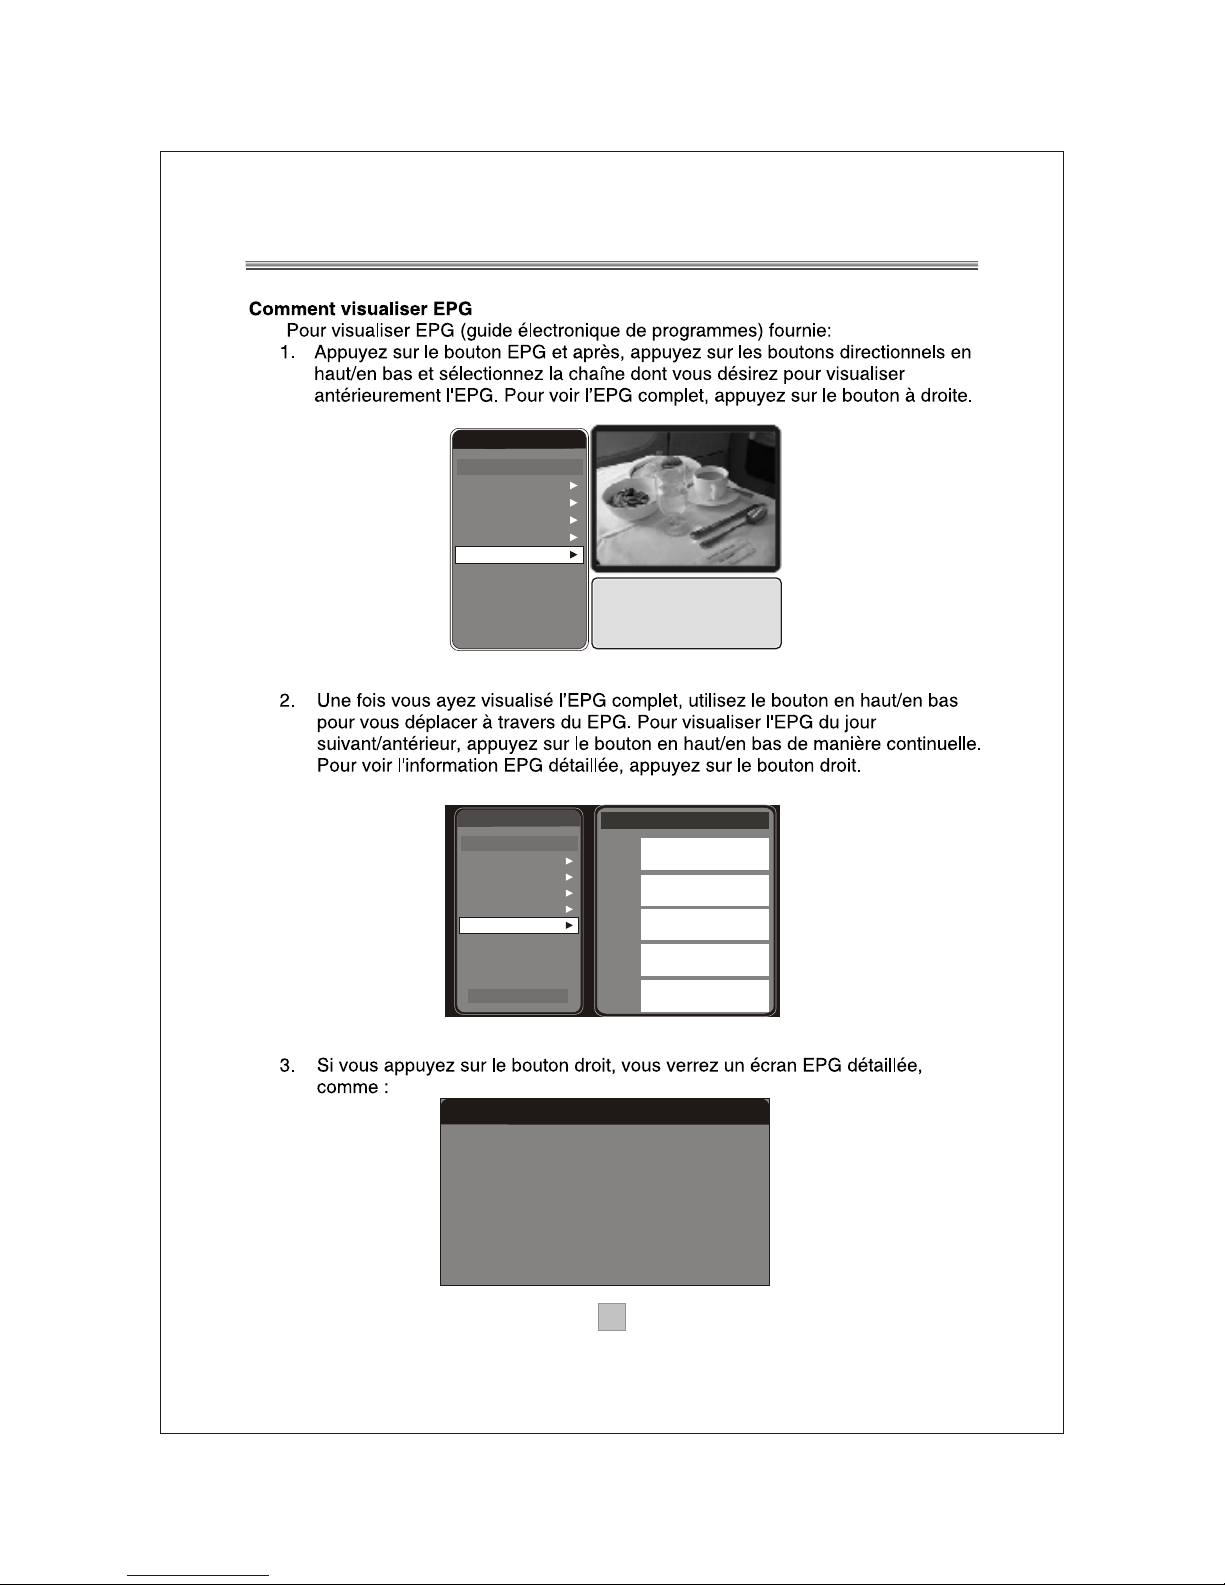
Displaying EPG
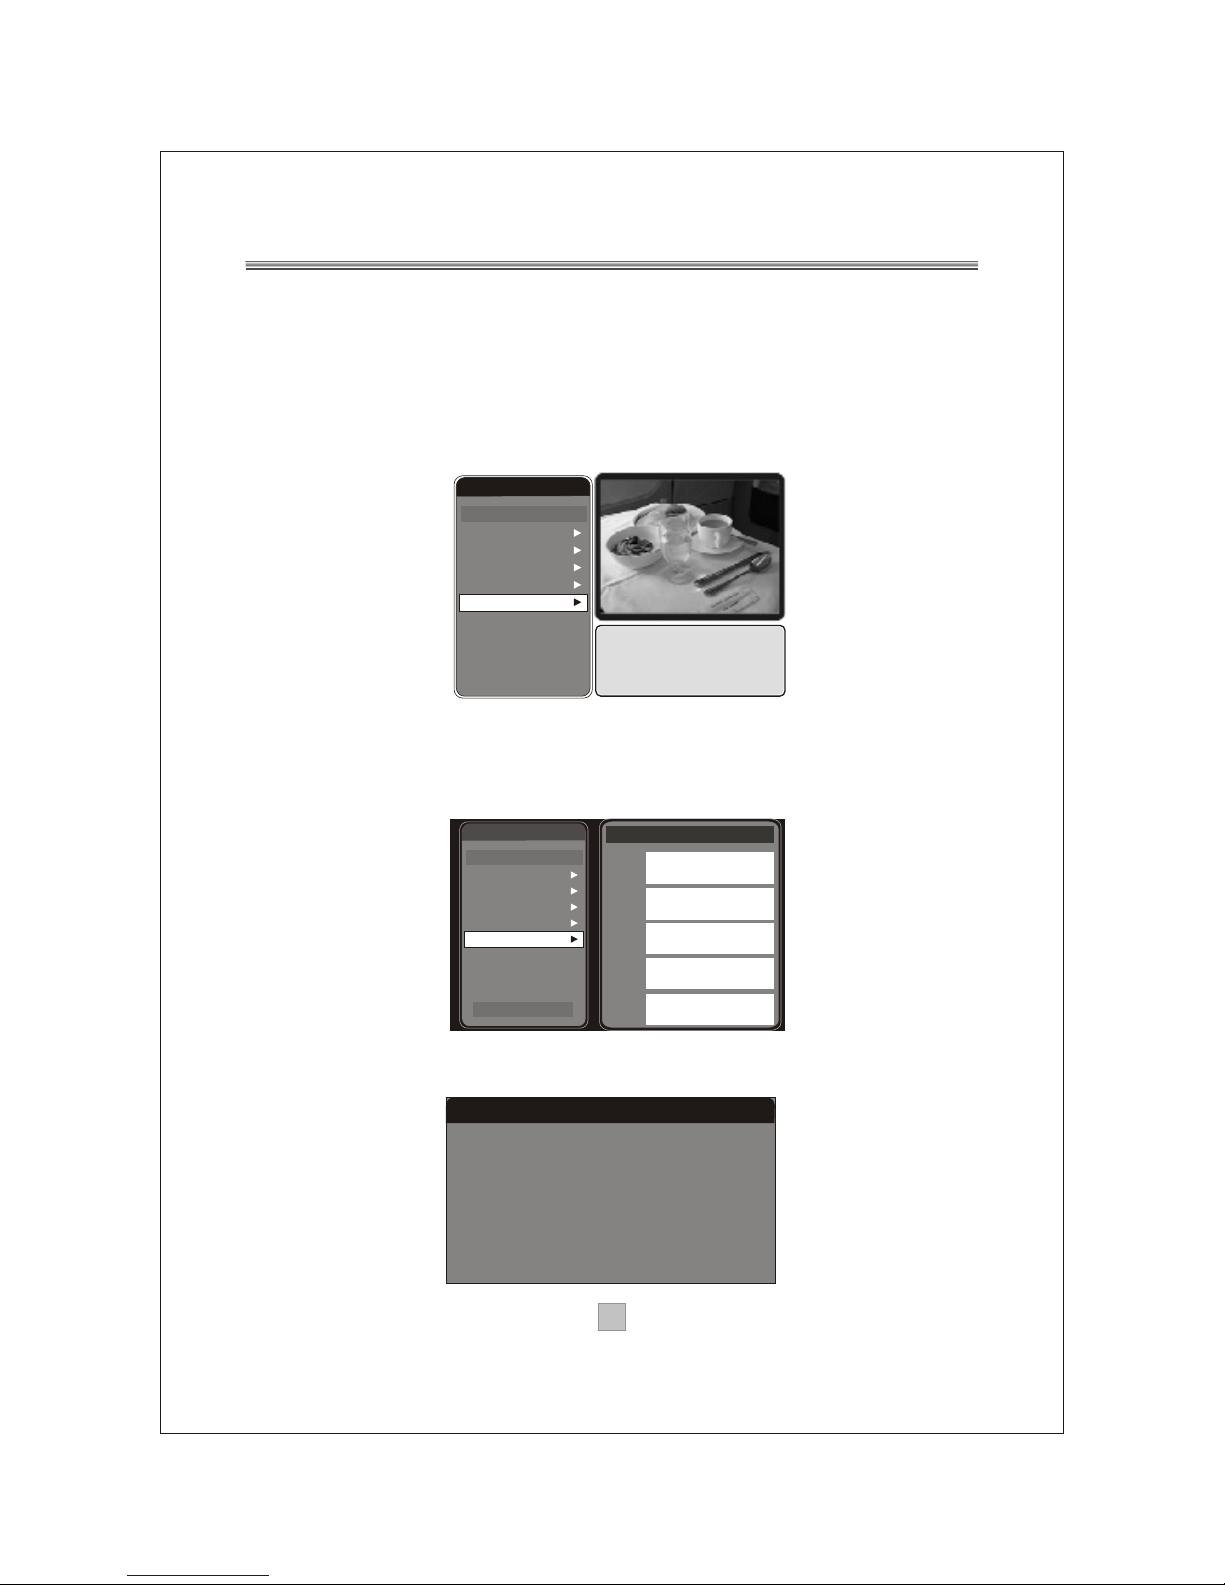
To view the EPG (electronic program guide) provided by the
content provider:
1. Press the EPG key and then use the Up / Down key highlight a
desired channel to preview the EPG. To view today's complete
EPG, press the Right key.
2. When today's complete EPG is displayed, use the Up / Down
key to scroll along the EPG. To view the EPG of next/previous
day, press the UP / Down key continuously.
To see the highlighted EPG details, press the Right key.
3. The detailed EPG screen will show as below if pressed the Right
key.
2006/06/23 Ideal World
16:00
18:00
18:00
19:00
20:00
21:00
12:00
13:00
2006/06/23 05:00-07:00
Description:
Fashion on Friday at 4 and 5
A fantastic selection of this seasons fashion
brought to you in the comfort of your own home.
18
19
20
21
Program Name
The HITS
UKTV Br tIdea
f tn
TMF
No.
TV Program List
2006/06/23 15:36
Fashion on Friday at 4 and 5
16:00-18:00
The Quattro Gem Collection
18:00-19:00
22
Ideal World
,
18
19
20
21
Program Name
The HITS
UKTV Br tIdea
f tn
TMF
No.
TV Program List
22
Ideal World
,
Fashion on Friday at 4
The Quattro Gem Coll
Pick of the Day
Prai Luxury Skincare
Pick of the Day
19:00
20:00
2006/06/23 15:36
Page 15
1212
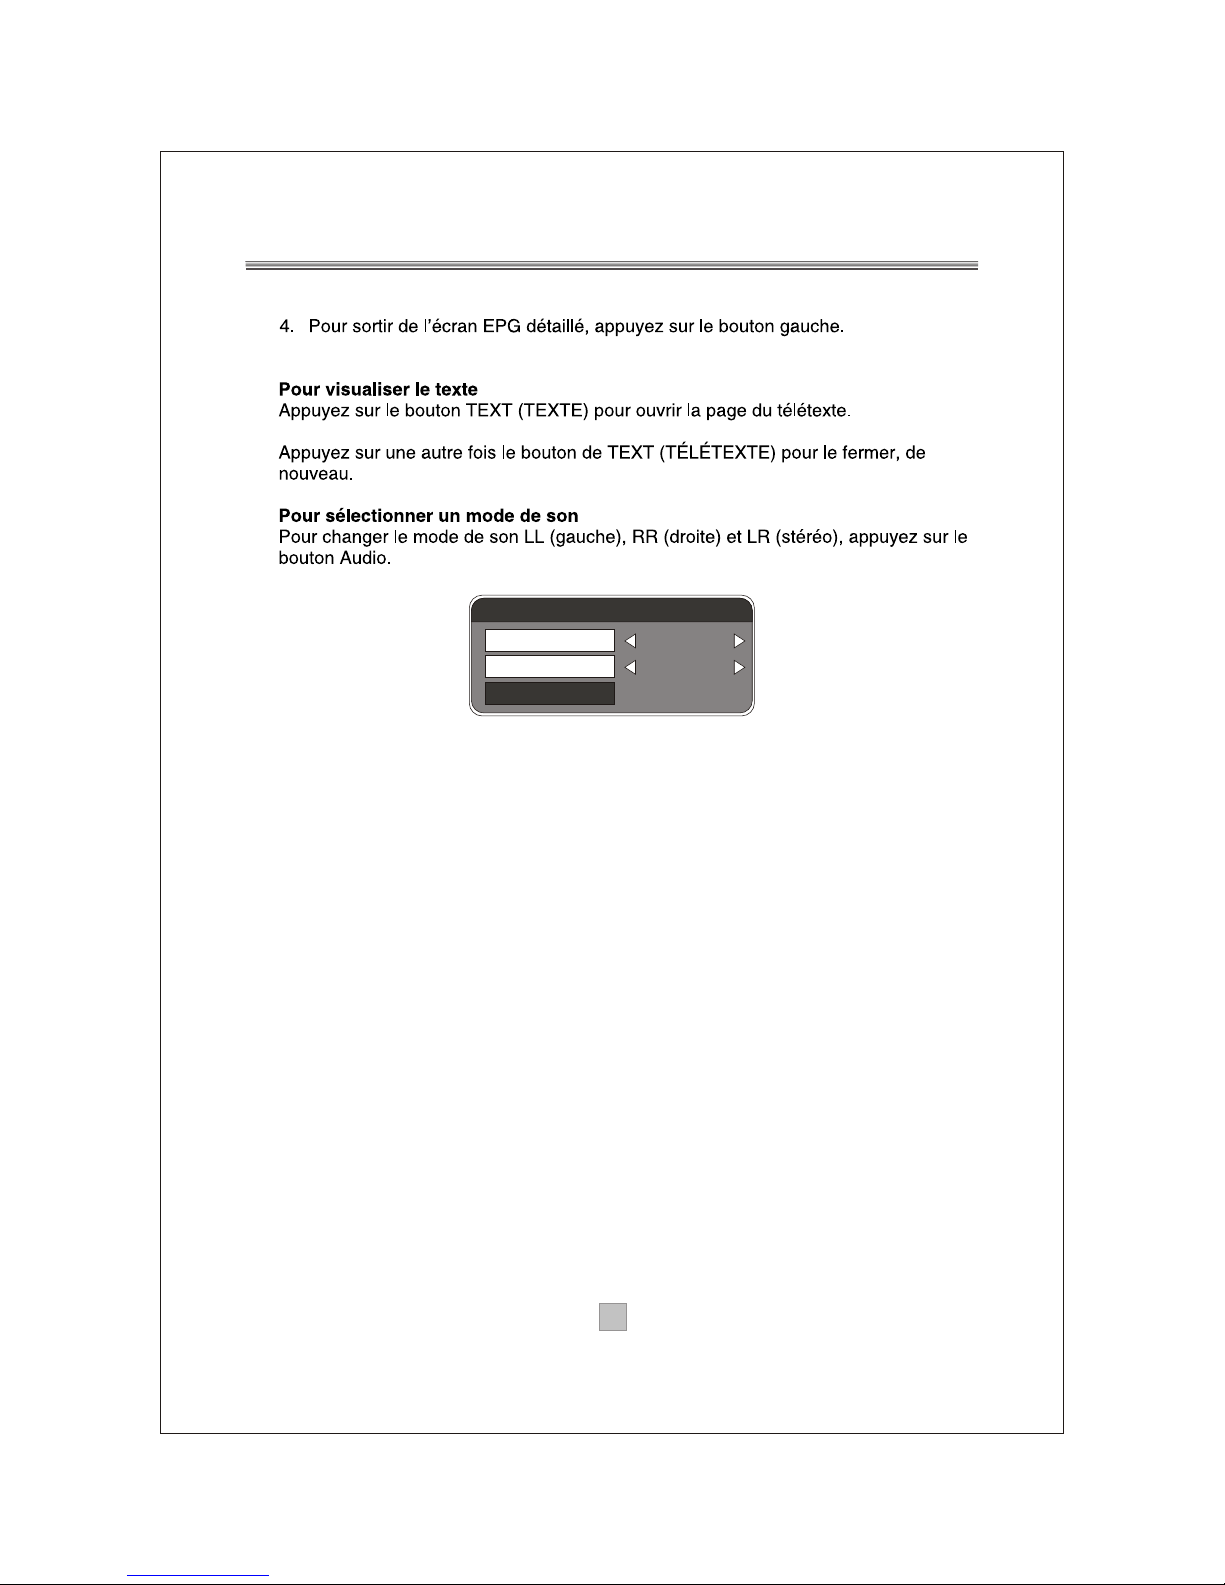
Displaying Text
Press the TEXT key to open a teletext page (if teletext is
transmitted).
Press TEXT key again to close it.
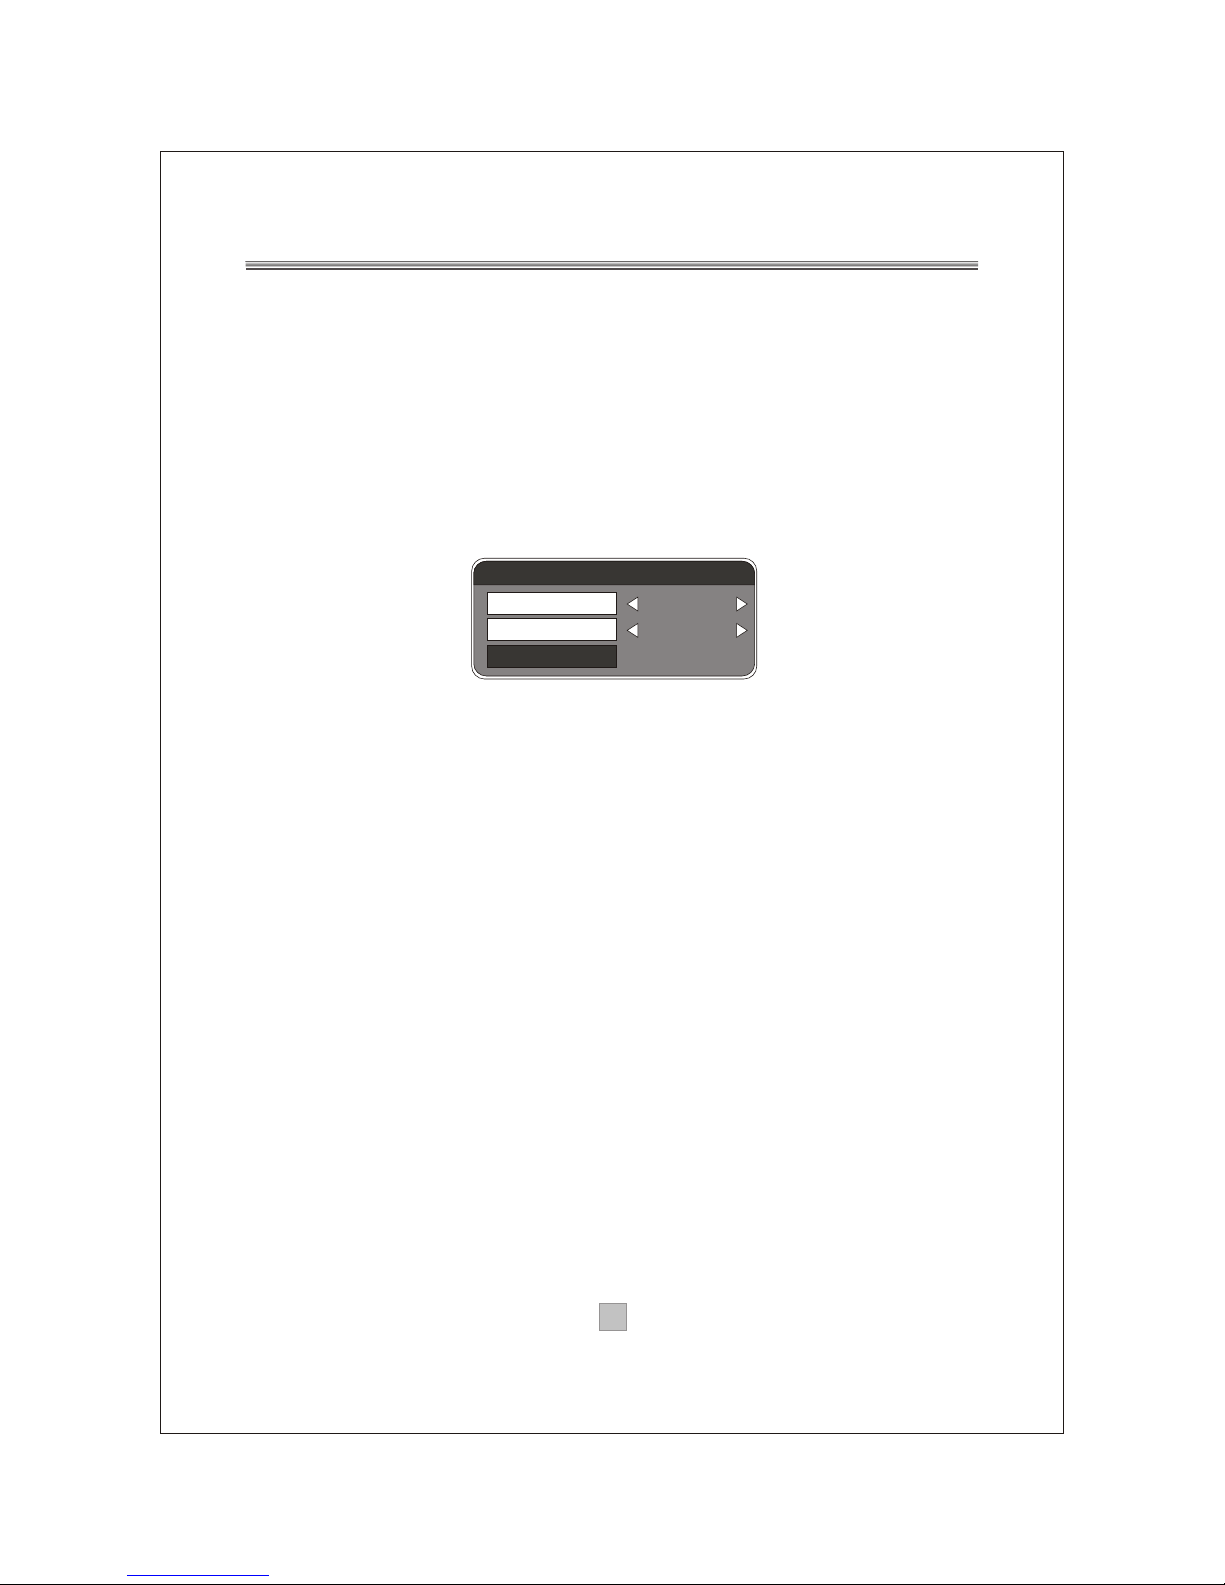
Selecting Sound Mode
To switch the sound mode between LL (left),
RR (right) and LR (stereo), press the Audio key.
4. To exit the detailed EPG screen, press the Left key.
Audio channel
Channel
Audio PID
Sound Mode
Audio 1
4012
LR
Page 16
1313
The receiver features an on-screen menu providing access to a
variety of setup and management controls.
Use the remote controller to navigate through the menu and
activate required settings.
Managing Program List
Main Menu > Program List > TV / Radio Program List
All active channels are listed in the Program List, allowing you to
make your own favorite channel group, move, delete or sort
channels.
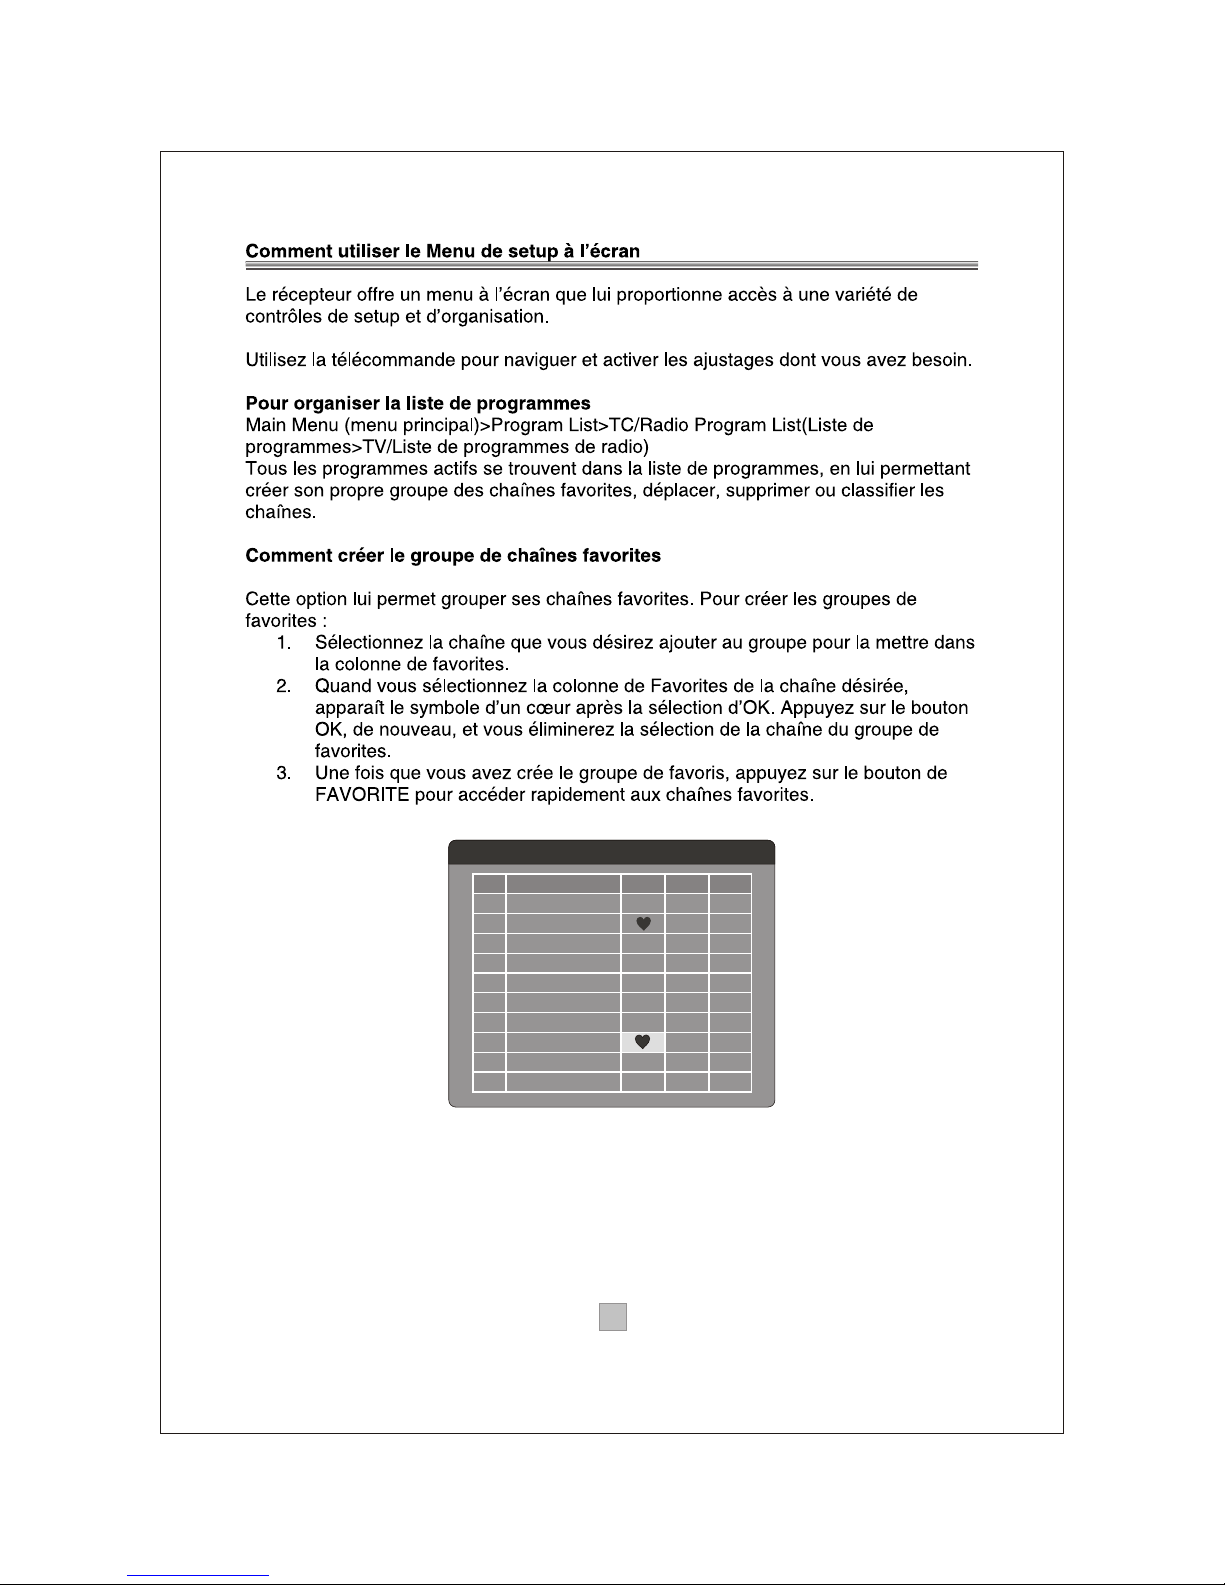
Creating Favorite Channel Groups
This feature allows you to group your favorite channels. To create
your favorite groups:
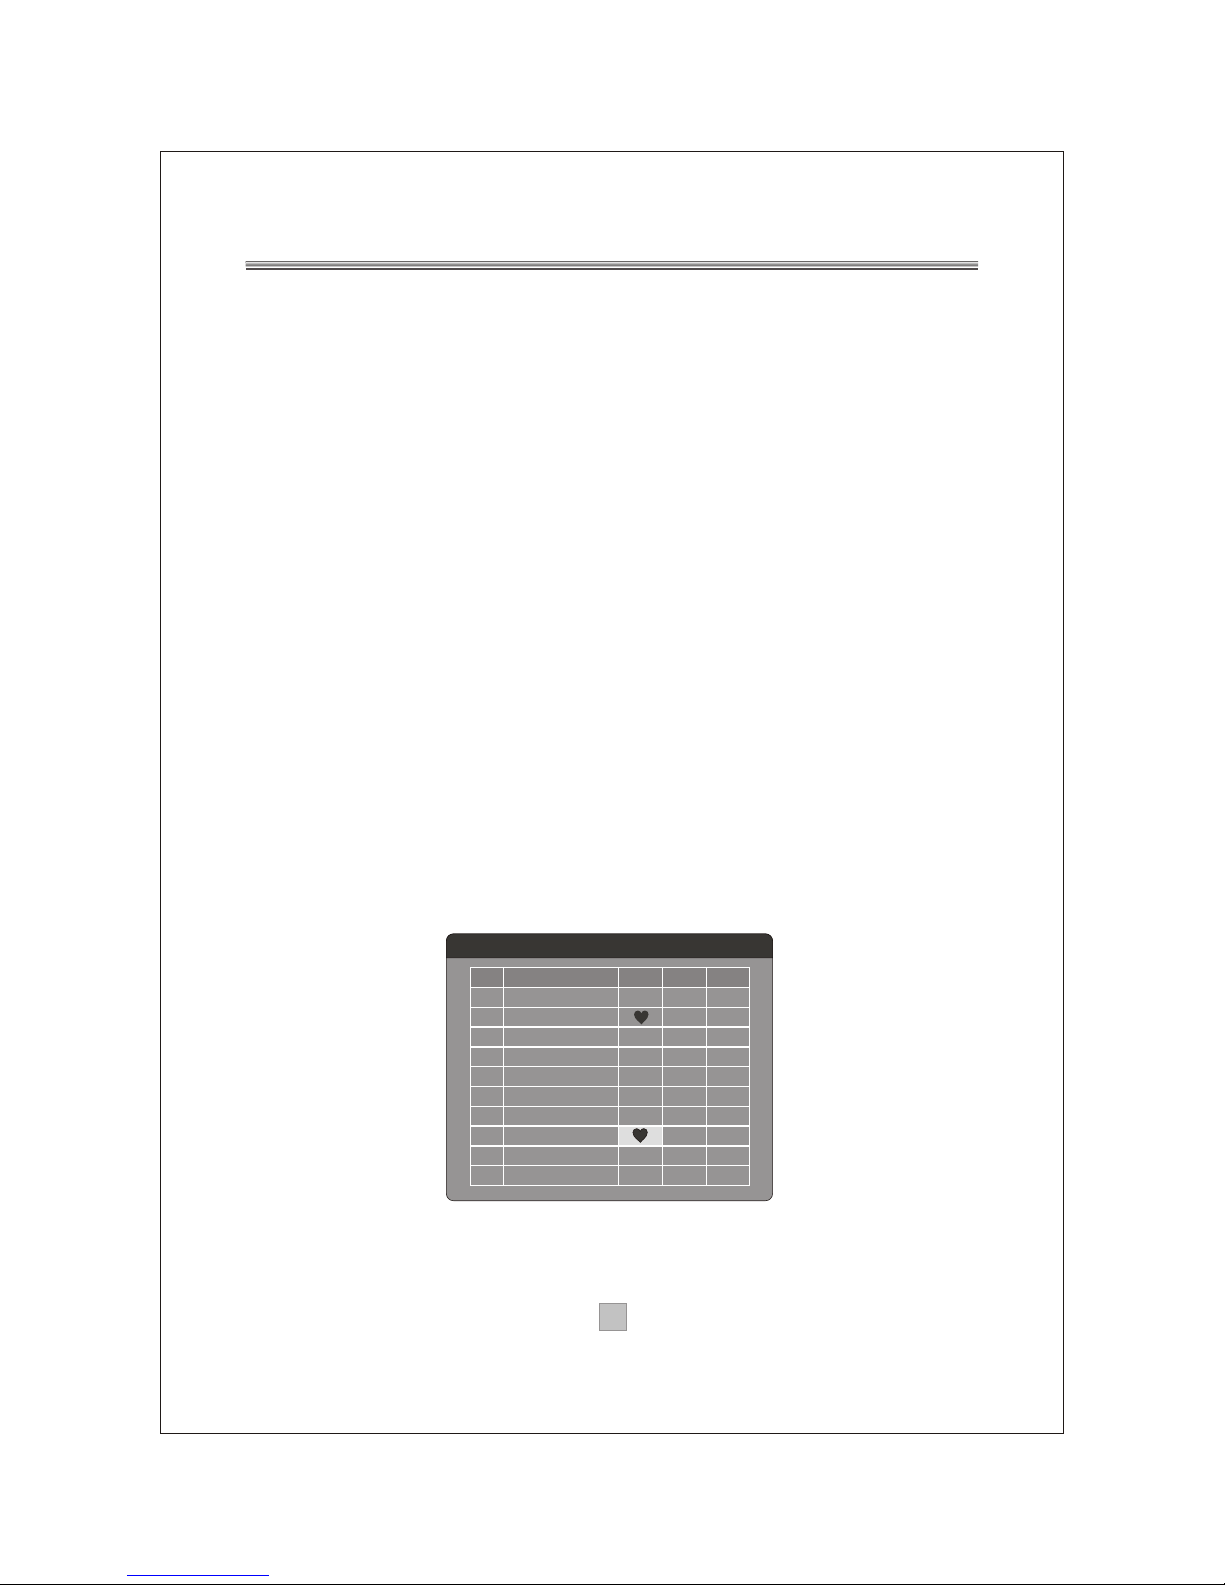
1. Select the channel which you would like to add to the group and
go to the Favor column.
2. When the Favor column of the desired channel is highlighted,
one red heart symbol would appear after pressed the OK key.
Pressing the OK key again will un-select the channel from the
favorite group.
3. Once your favorite group is created, you can press the
FAVORITE keys to quickly access your favorite channels.
Using the On-Screen Setup Menu
Program edit table
Program Name
Favor
Move
Del
No.
1
2
3
4
5
6
7
8
9
10
DIMO
FTV
FMTV
FTVN
TTV-1
TTV-2
HAKKA
CTS
CTS-IQ
CTS-EQ
Page 17
1414
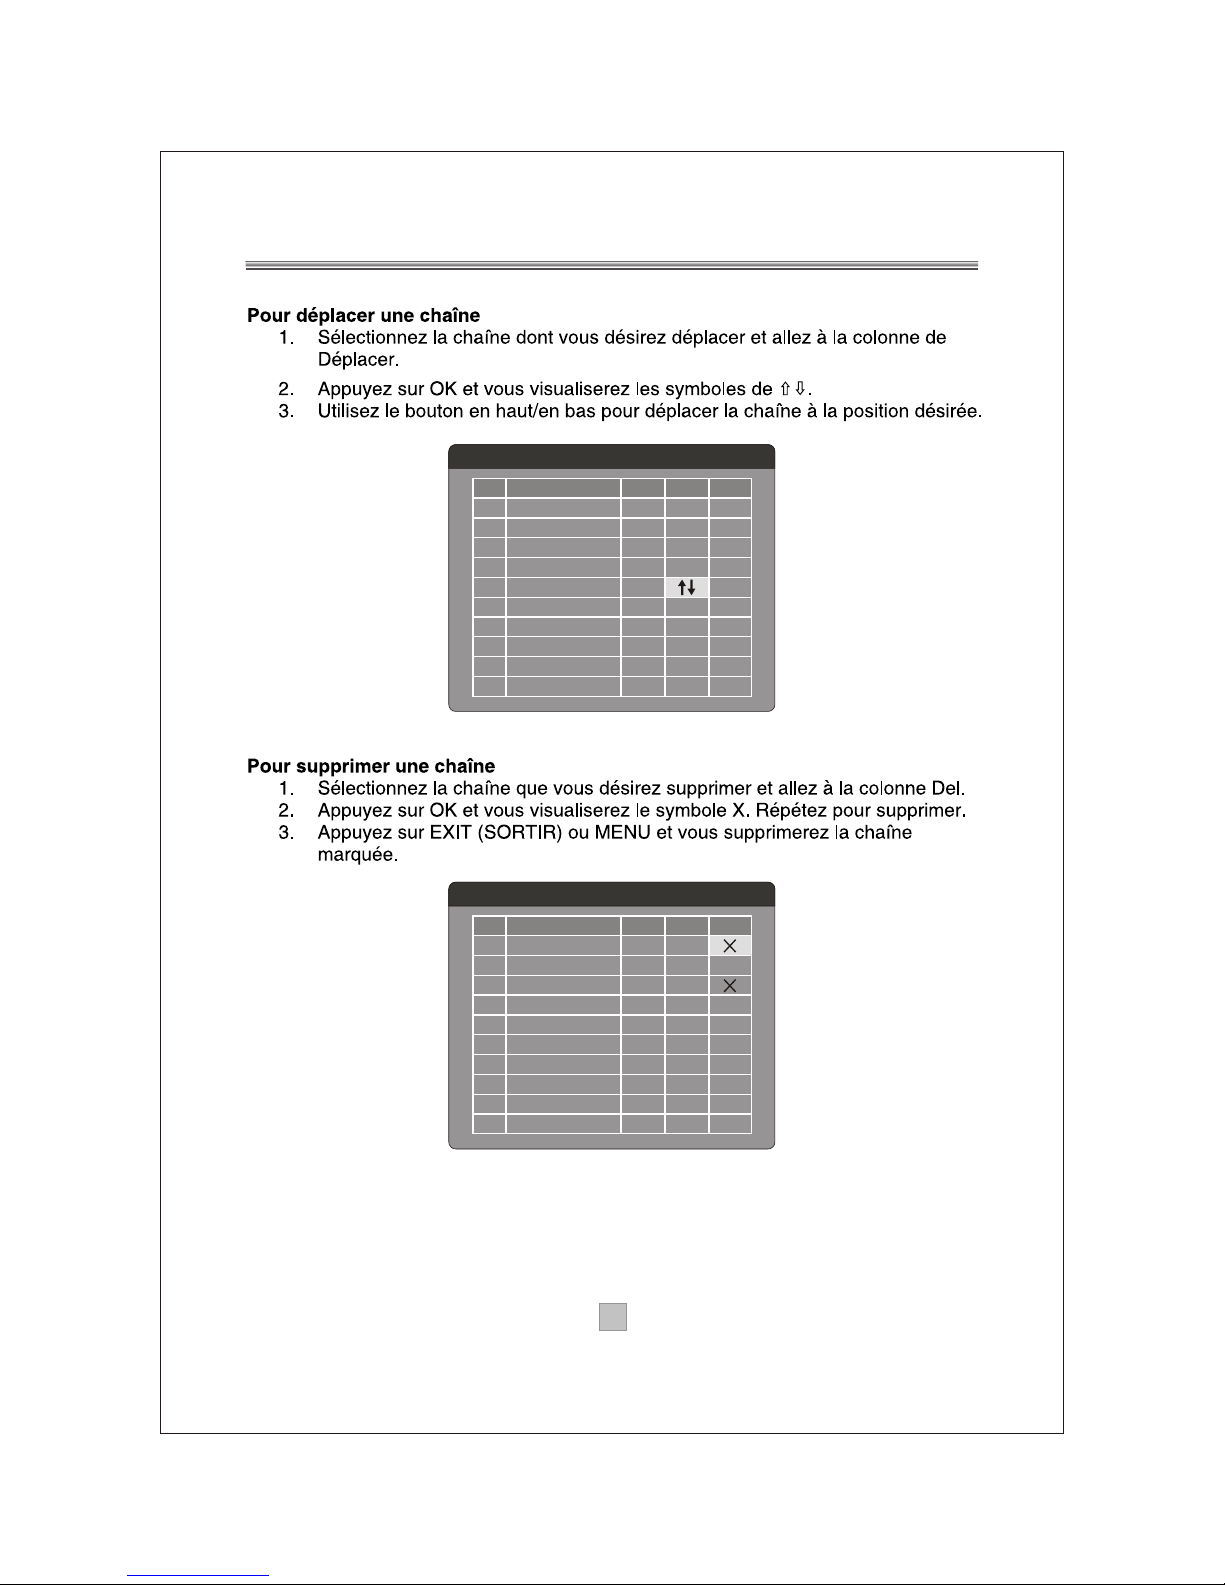
Moving a Channel
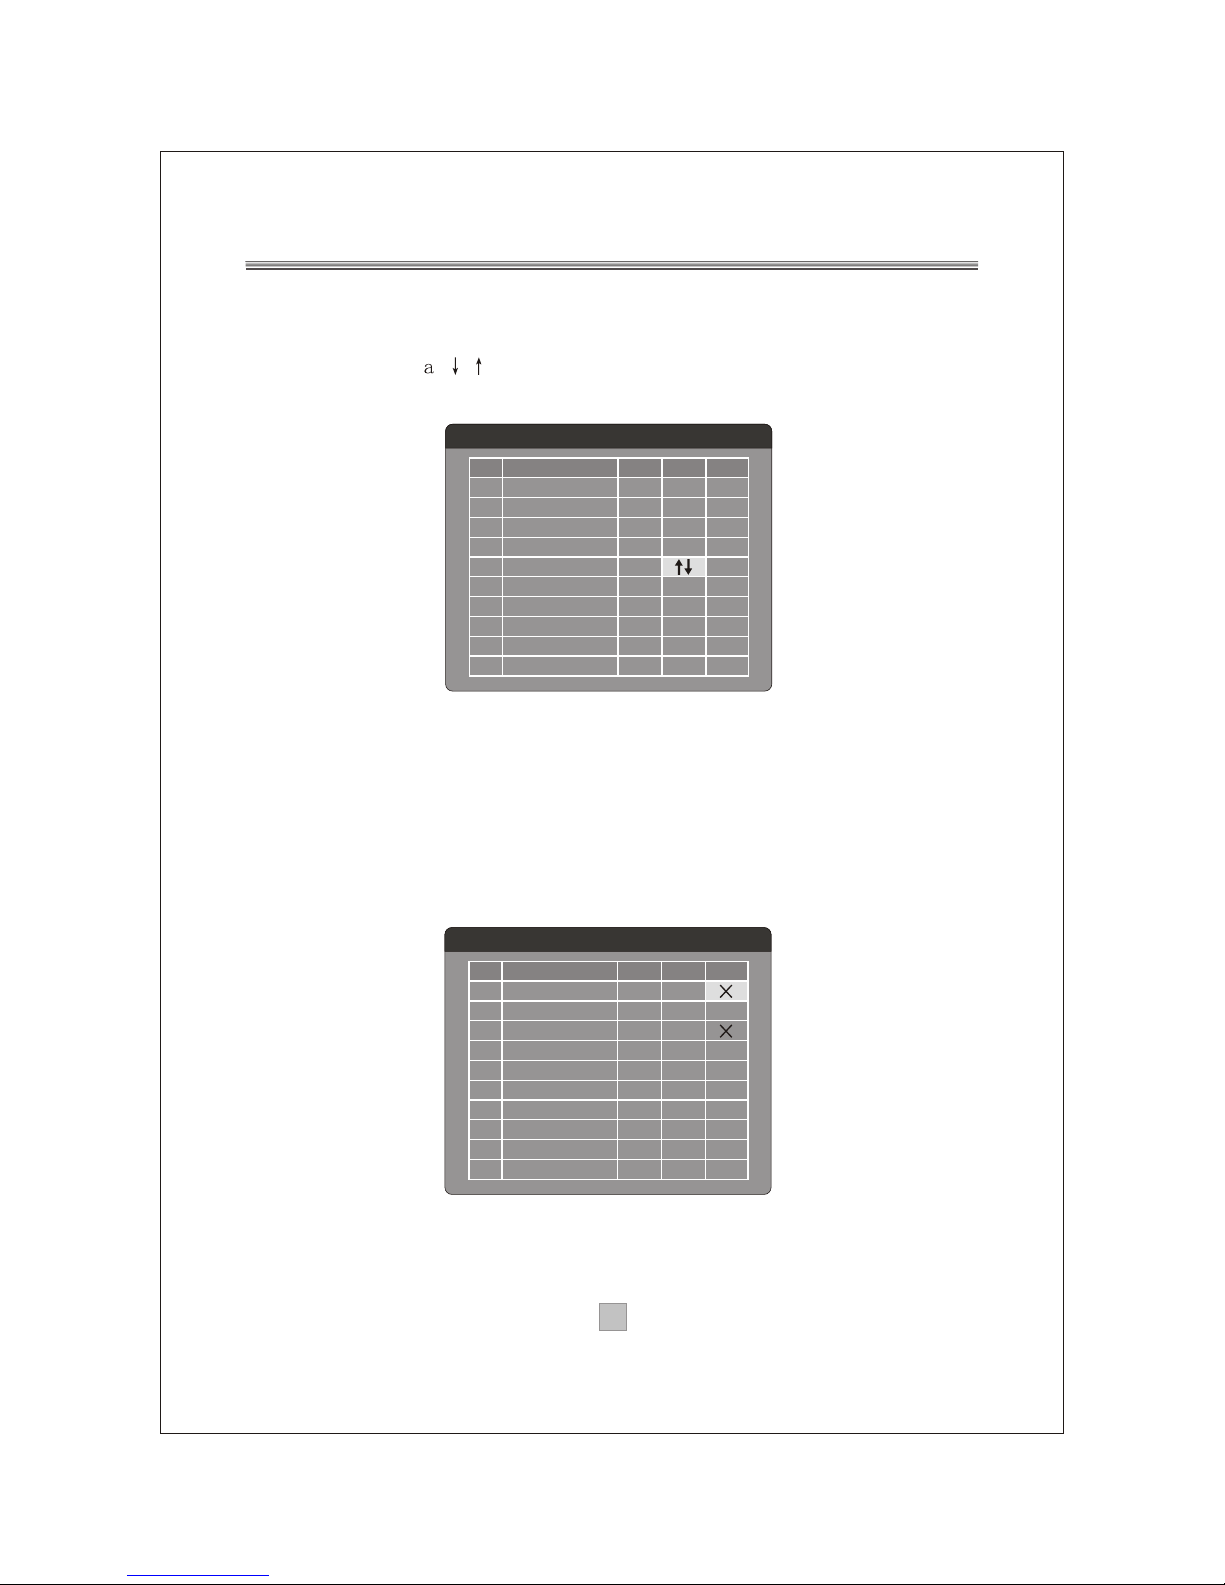
1. Select the channel which you like to move and go to the Move column.
2. Press OK and symbol will be displayed.
3. Use the Up / Down key to move the channel to a desired position.
Deleting a Channel
1. Select the channel which you like to delete and go to the Del column.
2. Press OK and an X symbol will be displayed. Repeat this step in the
channel to be deleted.
3. Press EXIT or MENU and the marked channel will be deleted.
Program edit table
Program Name
Favor
Move
Del
No.
1
2
3
4
5
6
7
8
9
10
DIMO
FTV
FMTV
FTVN
TTV-1
TTV-2
HAKKA
CTS
CTS-IQ
CTS-EQ
Program edit table
Program Name
Favor
Move
Del
No.
1
2
3
4
5
6
7
8
9
10
DIMO
FTV
FMTV
FTVN
TTV-1
TTV-2
HAKKA
CTS
CTS-IQ
CTS-EQ
Page 18
1515
Sorting Channels
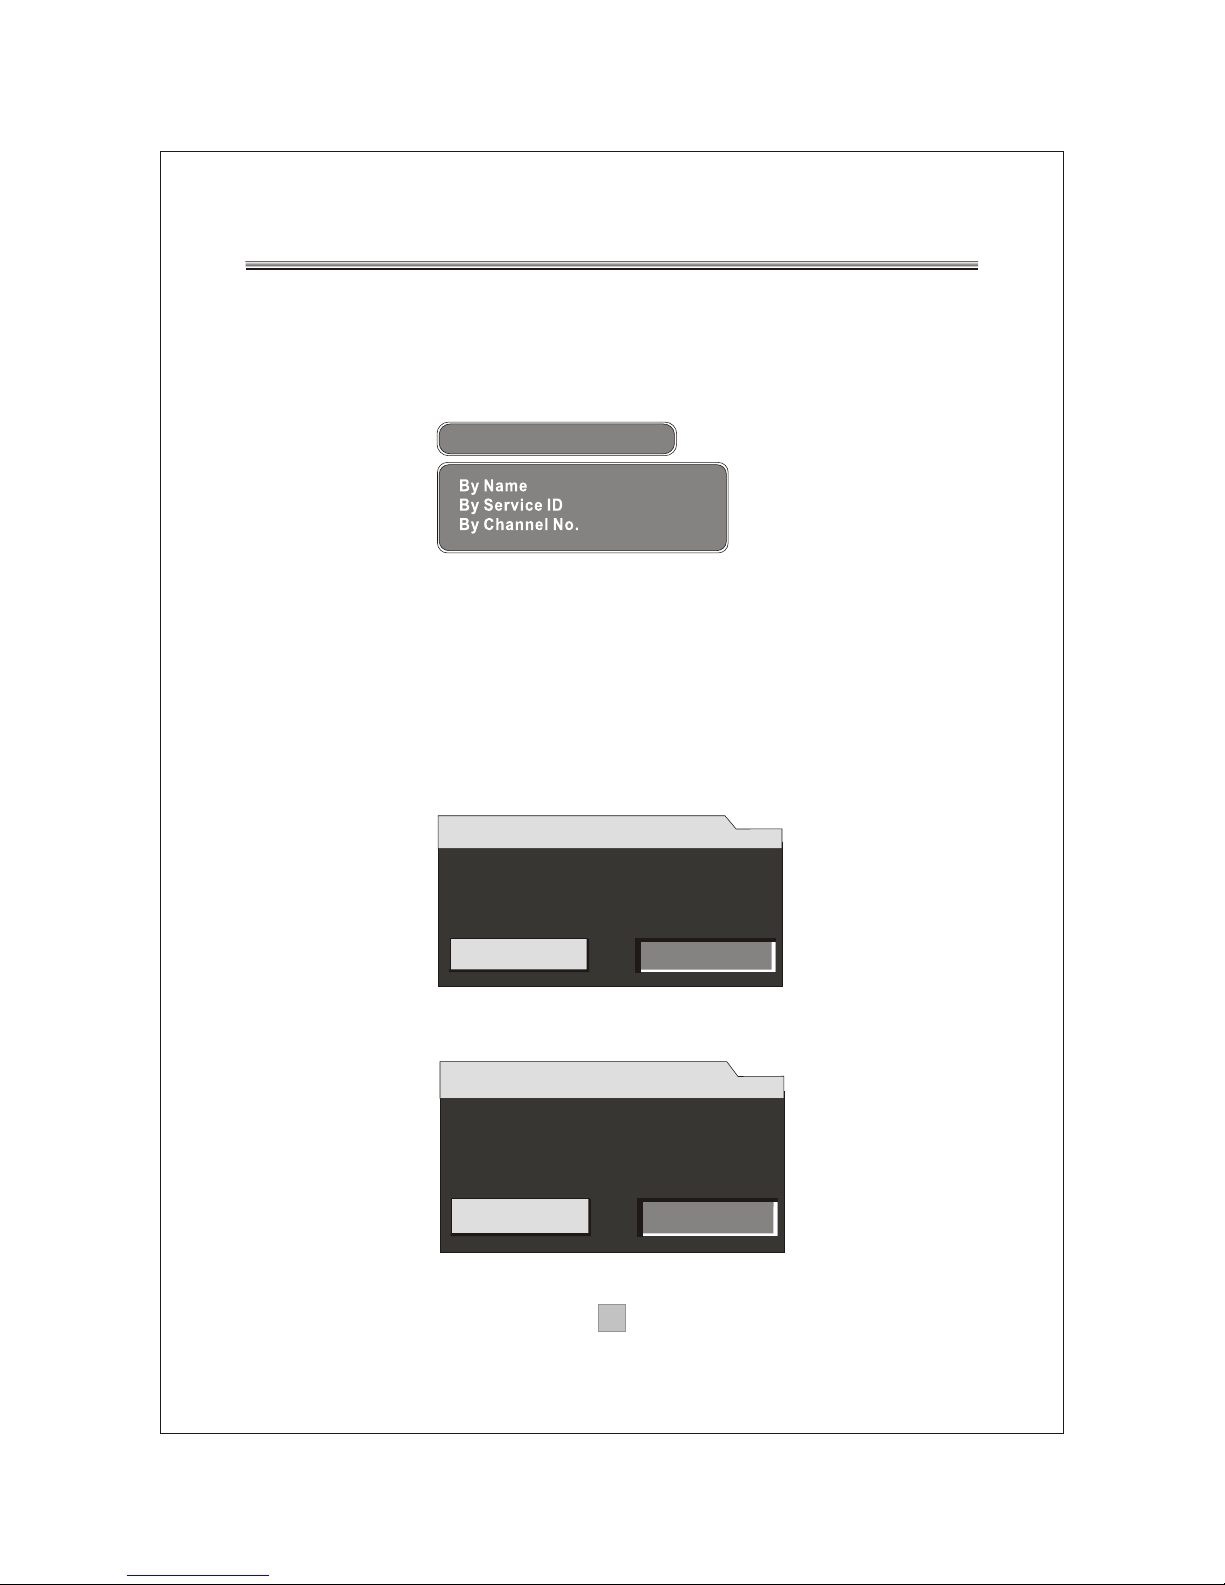
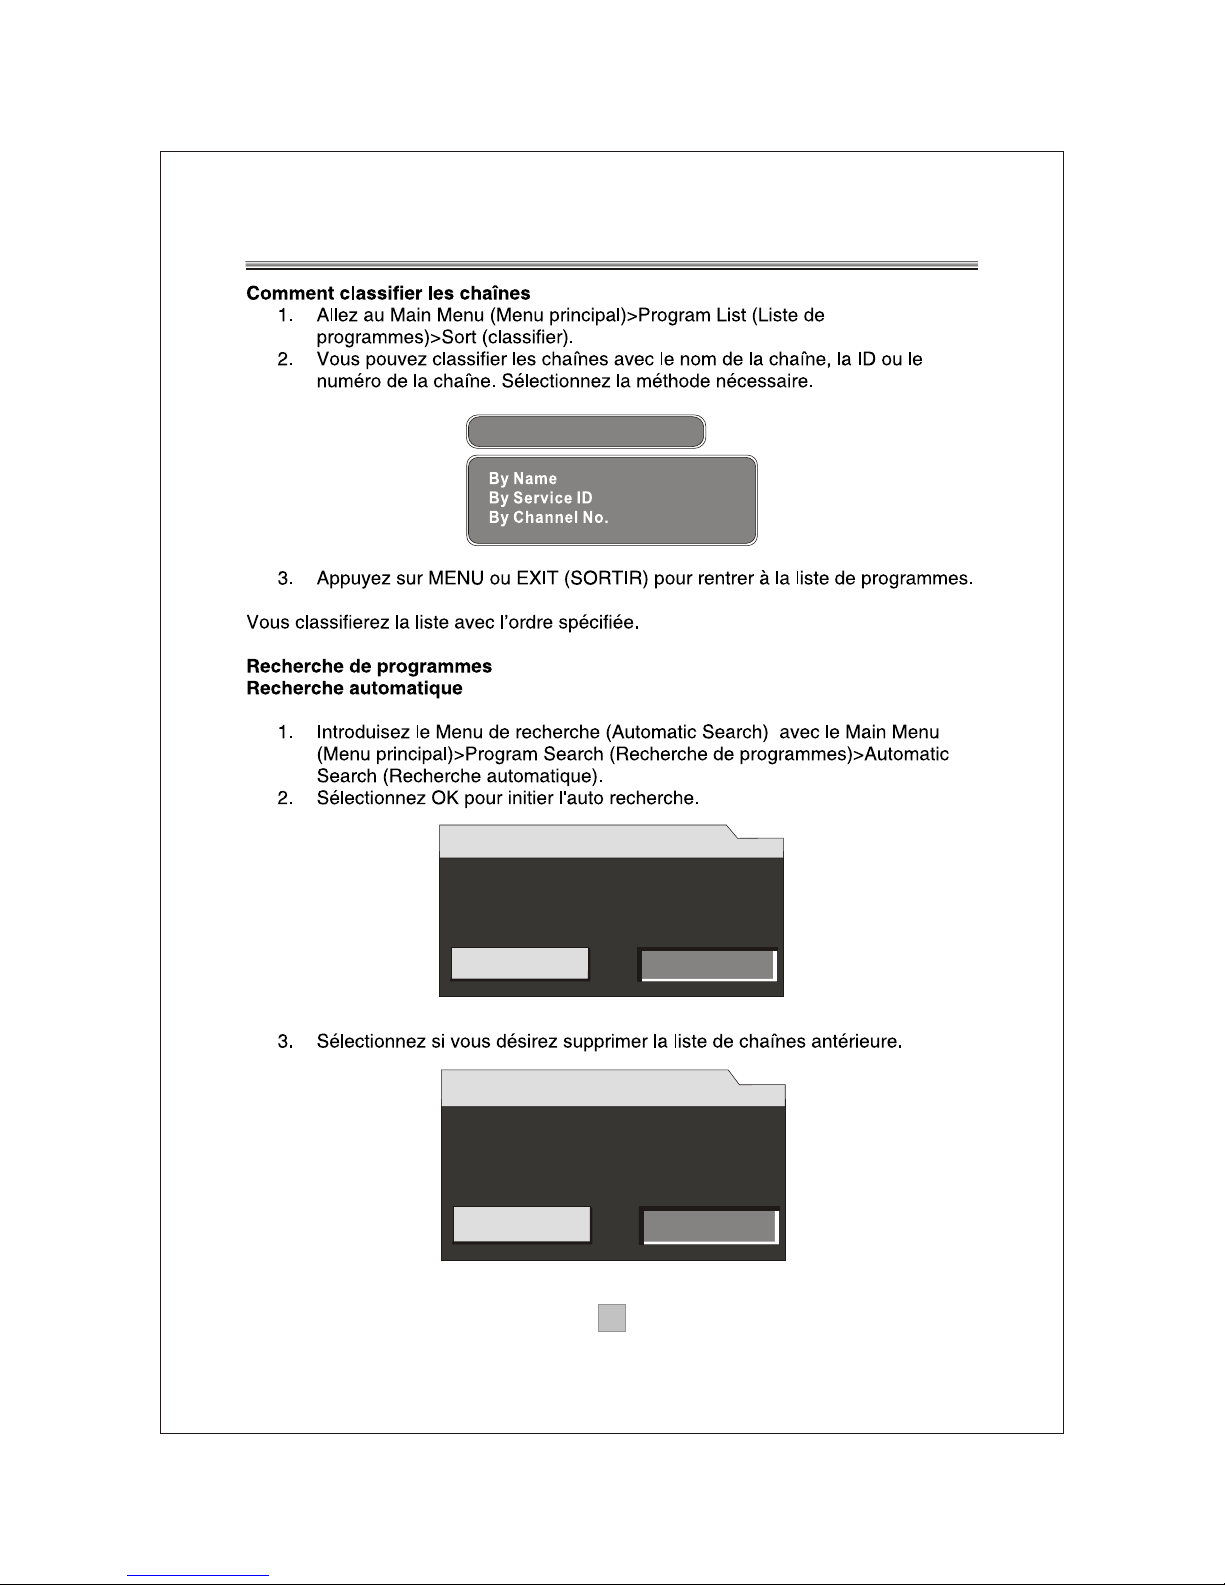
1. Go to Main Menu > Program List > Sort.
2. You can sort the channels by the channel name, service ID or
channel number. Select one method as required.
3. Press MENU or EXIT to return the program list.
The list is now sorted by the specified order.
Program Search
Automatic Search
1. Enter the Automatic Search menu via Main Menu > Program
Search > Automatic Search.
2. Select OK to start auto search.
3. Select whether to erase your previous channel list as required.
Sort
Warning
Do you want to start Auto Search?
OK
Cancel
Warning
Do you want to erase
your previous channel list?
YES NO
Page 19
1616
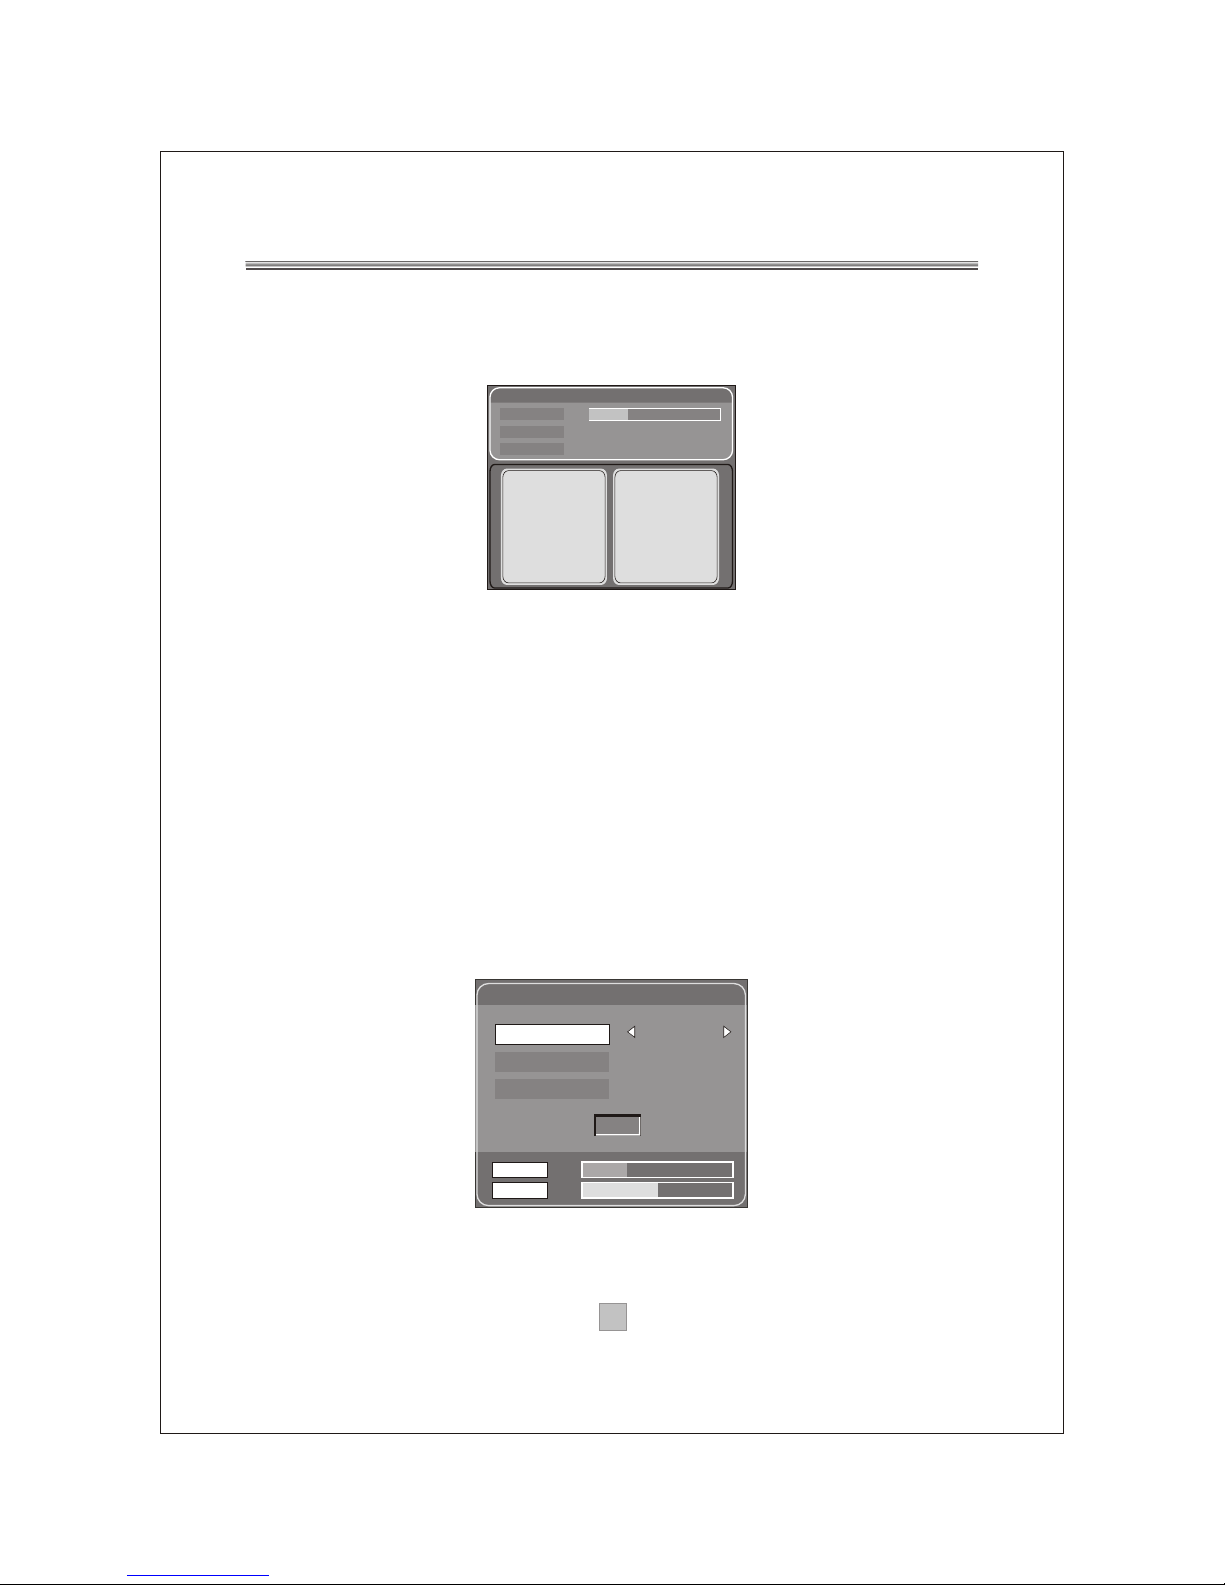
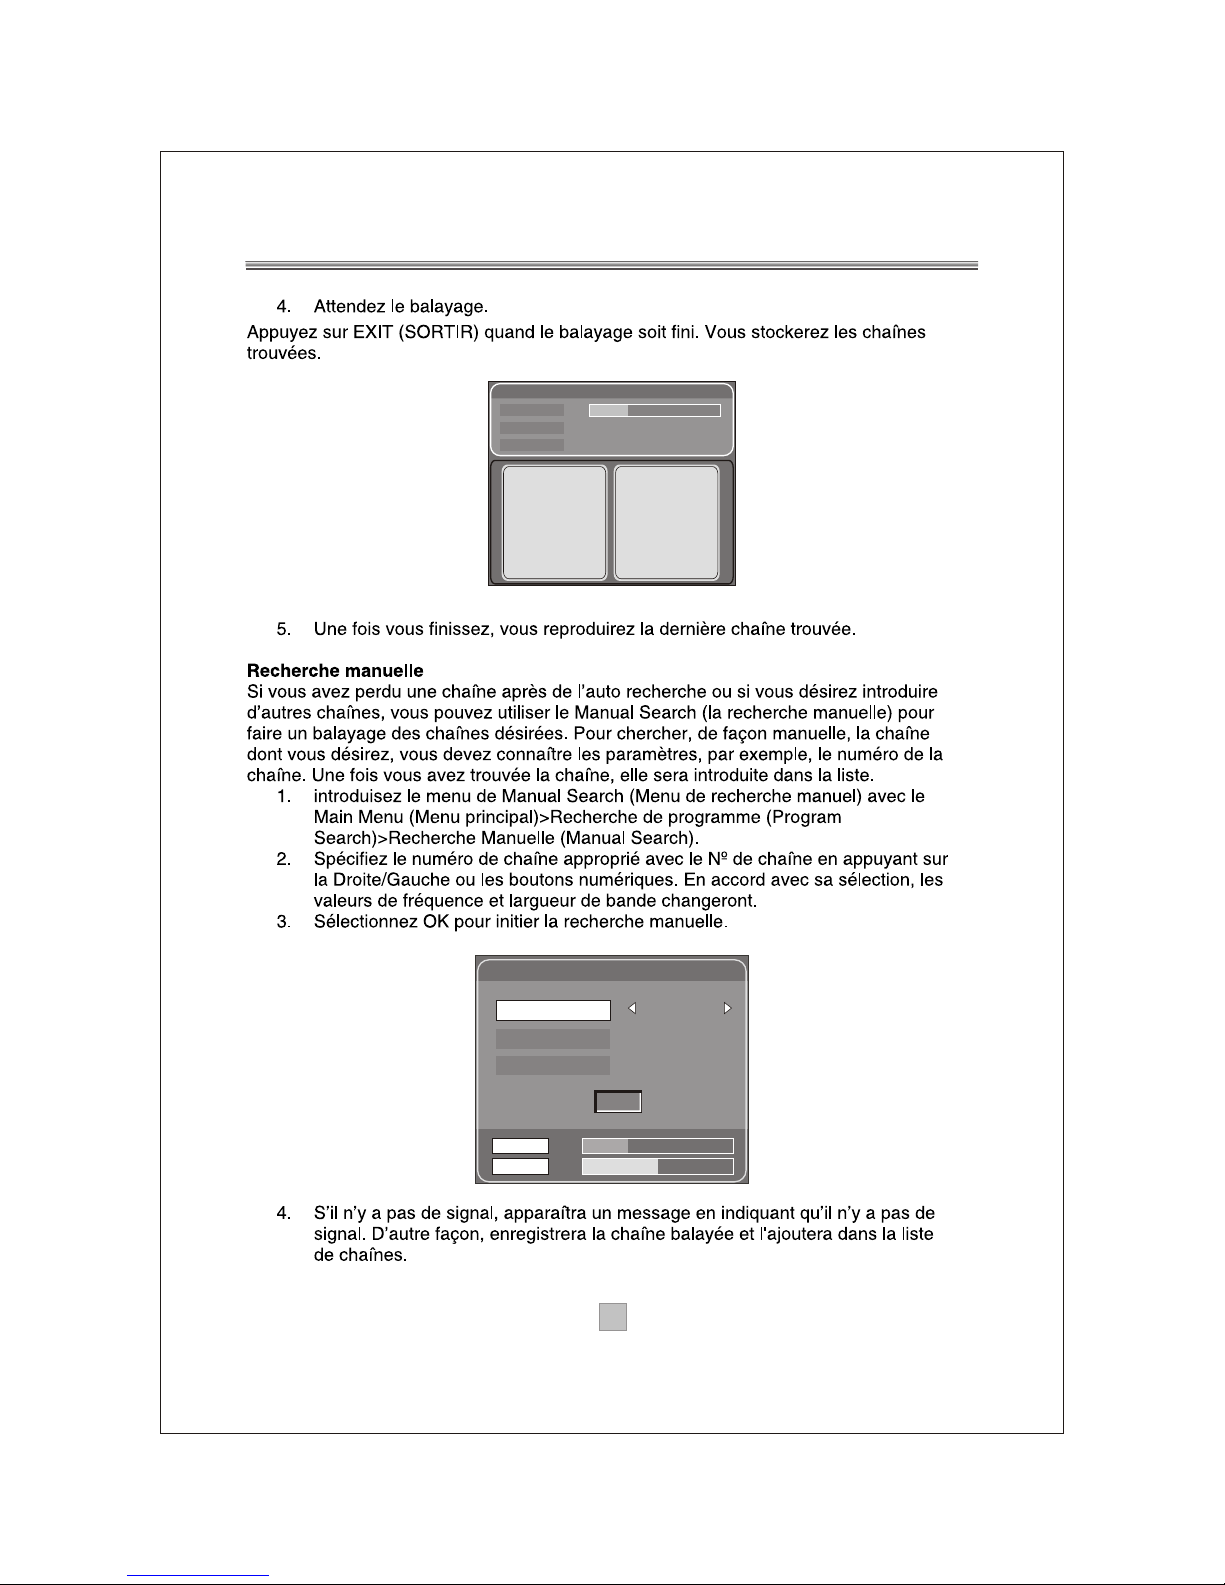
4. Wait to complete the scanning.
In case you want to stop the scanning, press the EXIT key.
The channels already found will still be stored.
5. When finished, the last found channel will be played.
Manual Search
If any channel is missing after auto search, or you want to add
newly launched channels, you can use Manual Search to scan
the desired channels. To manually search the target channel,
you must know its parameters, e.g., the channel number. After the
channel is found, it is appended to the current channel list.
1. Enter the Manual Search menu via Main Menu > Program
Search > Manual Search.
2. Specify the appropriate channel number in the Channel No
field by pressing Right/Left or the numeric keys. Upon your
selection, the frequency and bandwidth values are changed
accordingly.
3. Select OK to start manual search.
4. If no signal is found, a message indicating no signal will appear.
Otherwise scanned channel will be saved and appended to the
current channel list.
Automatic Search
Progress
Channel No
Frequency
30%
33
587.0 MHz
TV List : 013
TTV-1
TTV-2
HAKKA
Music List : 002
G-Guide
RAIL WAY
Manual Search
28
557.0 MHz
6 MHz
OK
Strength
Quality
55%
35%
Channel No.
Frequency
Bandwidth
Page 20
1717
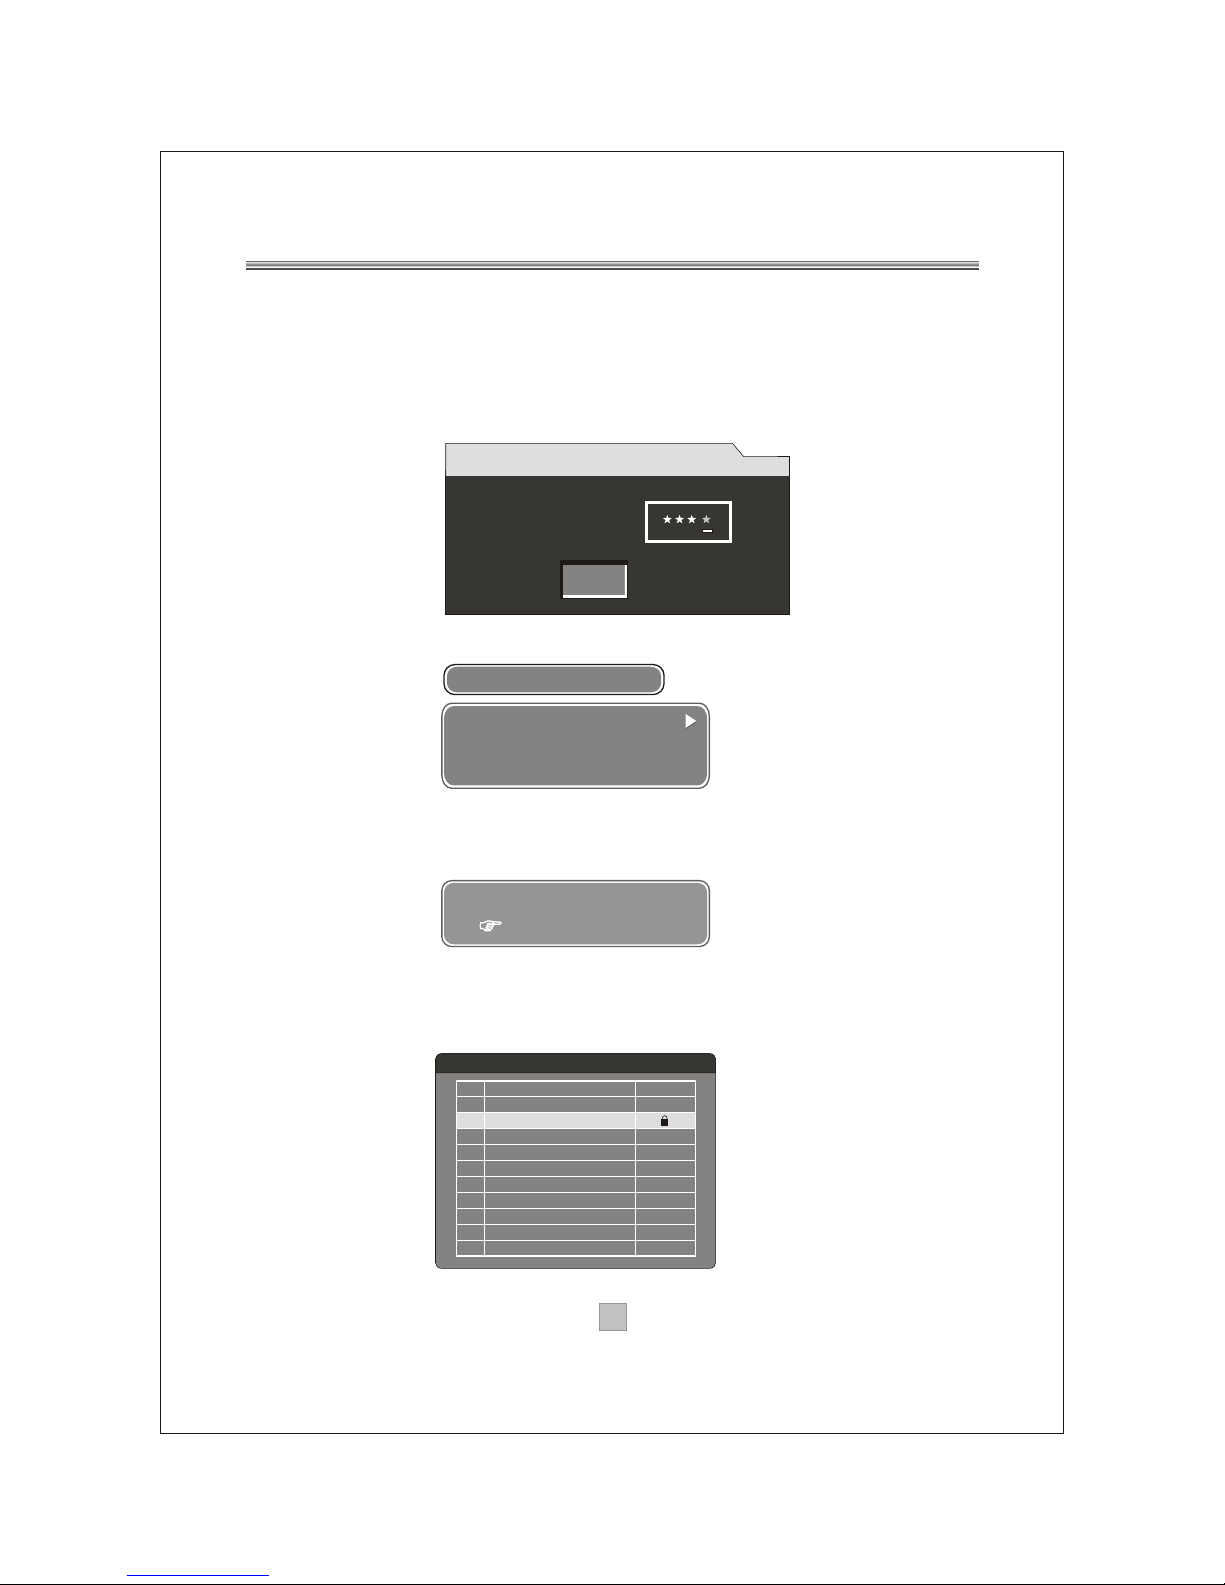
Parental Control
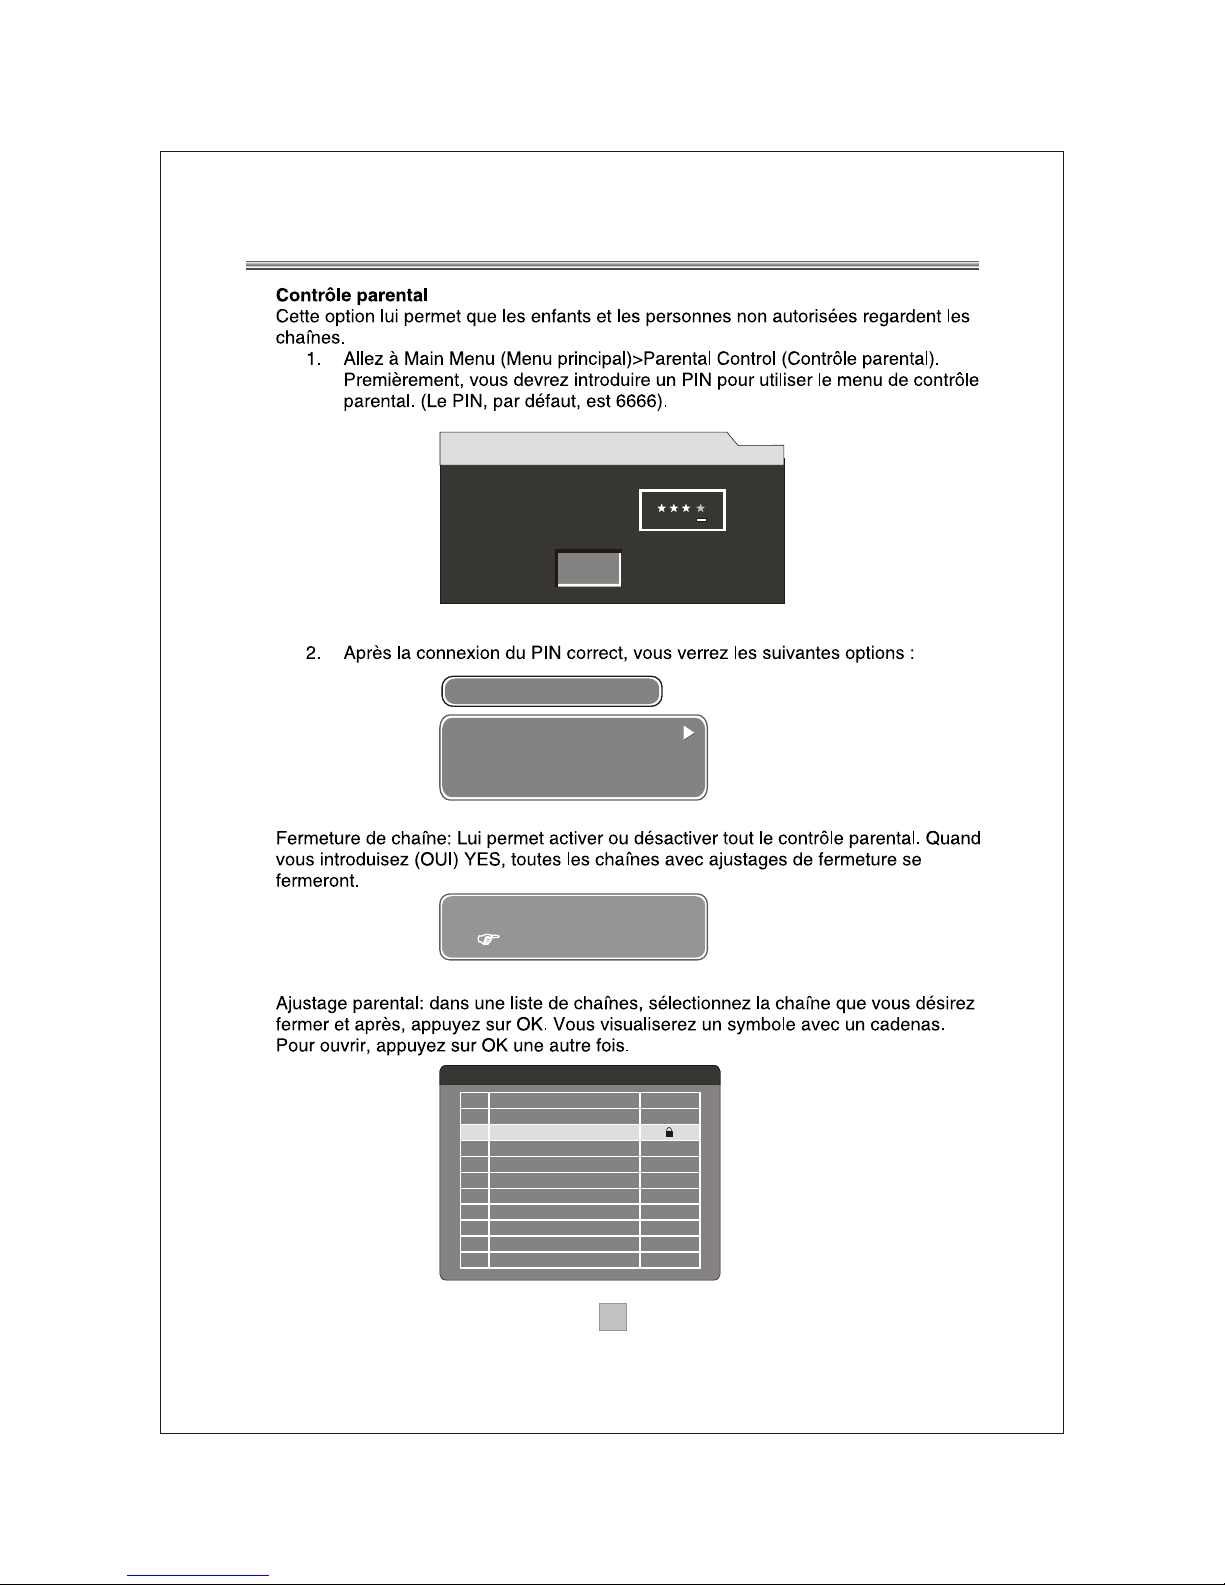
This feature allows you to prevent children or unauthorized people
from watching channels.
1. Go to Main Menu > Parental Control. First, you will need to
enter PIN as prompted to use the parental control menu. (The
default PIN is 6666.)
2. After correct PIN input, the following options are provided:
Channel Lock: Allows you to activate or de-activate the overall
parental control. When set to YES, all the channels with locking
settings will be locked.
Parental Setting: In the channel list, select the channel you
want to lock and then press OK. A padlock symbol will be
displayed. To remove the lock, press OK again.
YES
NO
NO
Parental Setting
Change PIN
Channel Lock
Channel Lock
Parental Control
Enter Parental PIN
Enter PIN
OK
Parental Setting
Program Name
Lock
No.
1
2
3
4
5
6
7
8
9
10
DIMO
FTV
FMTV
FTVN
TTV-1
TTV-2
HAKKA
CTS
CTS-IQ
CTS-EQ
Page 21
1818
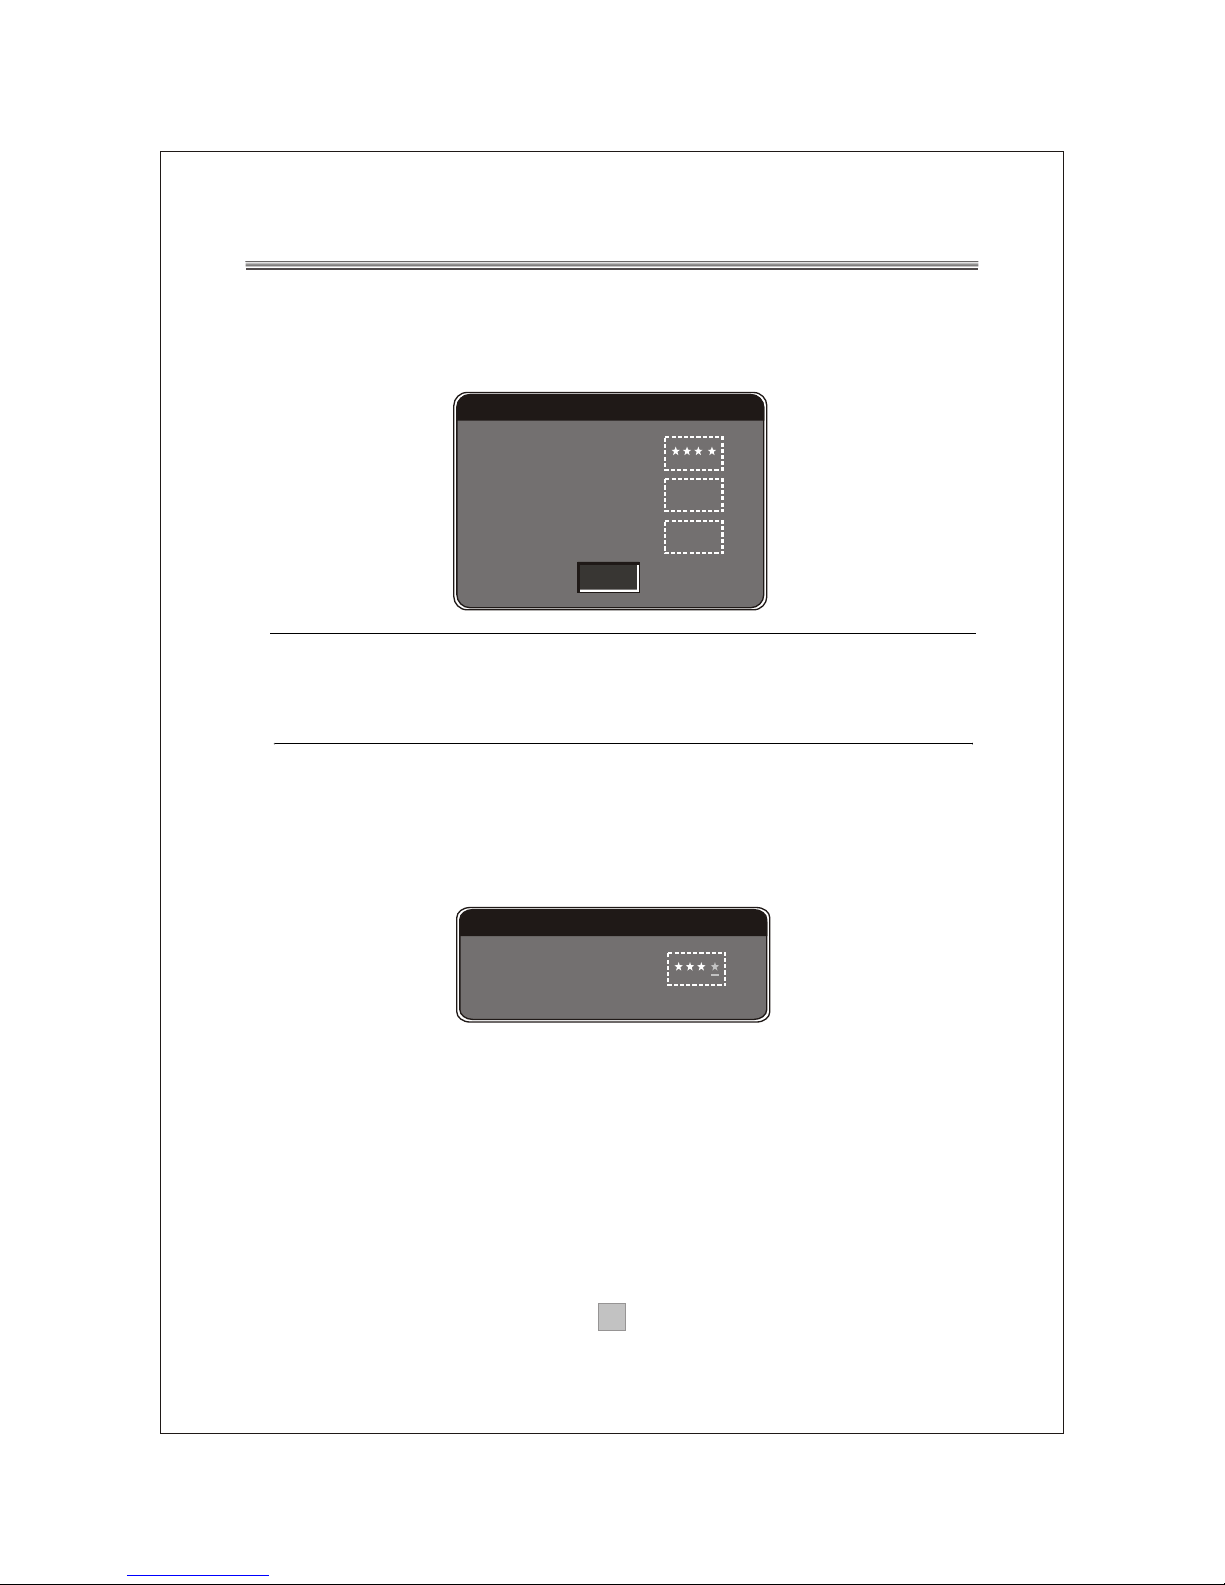
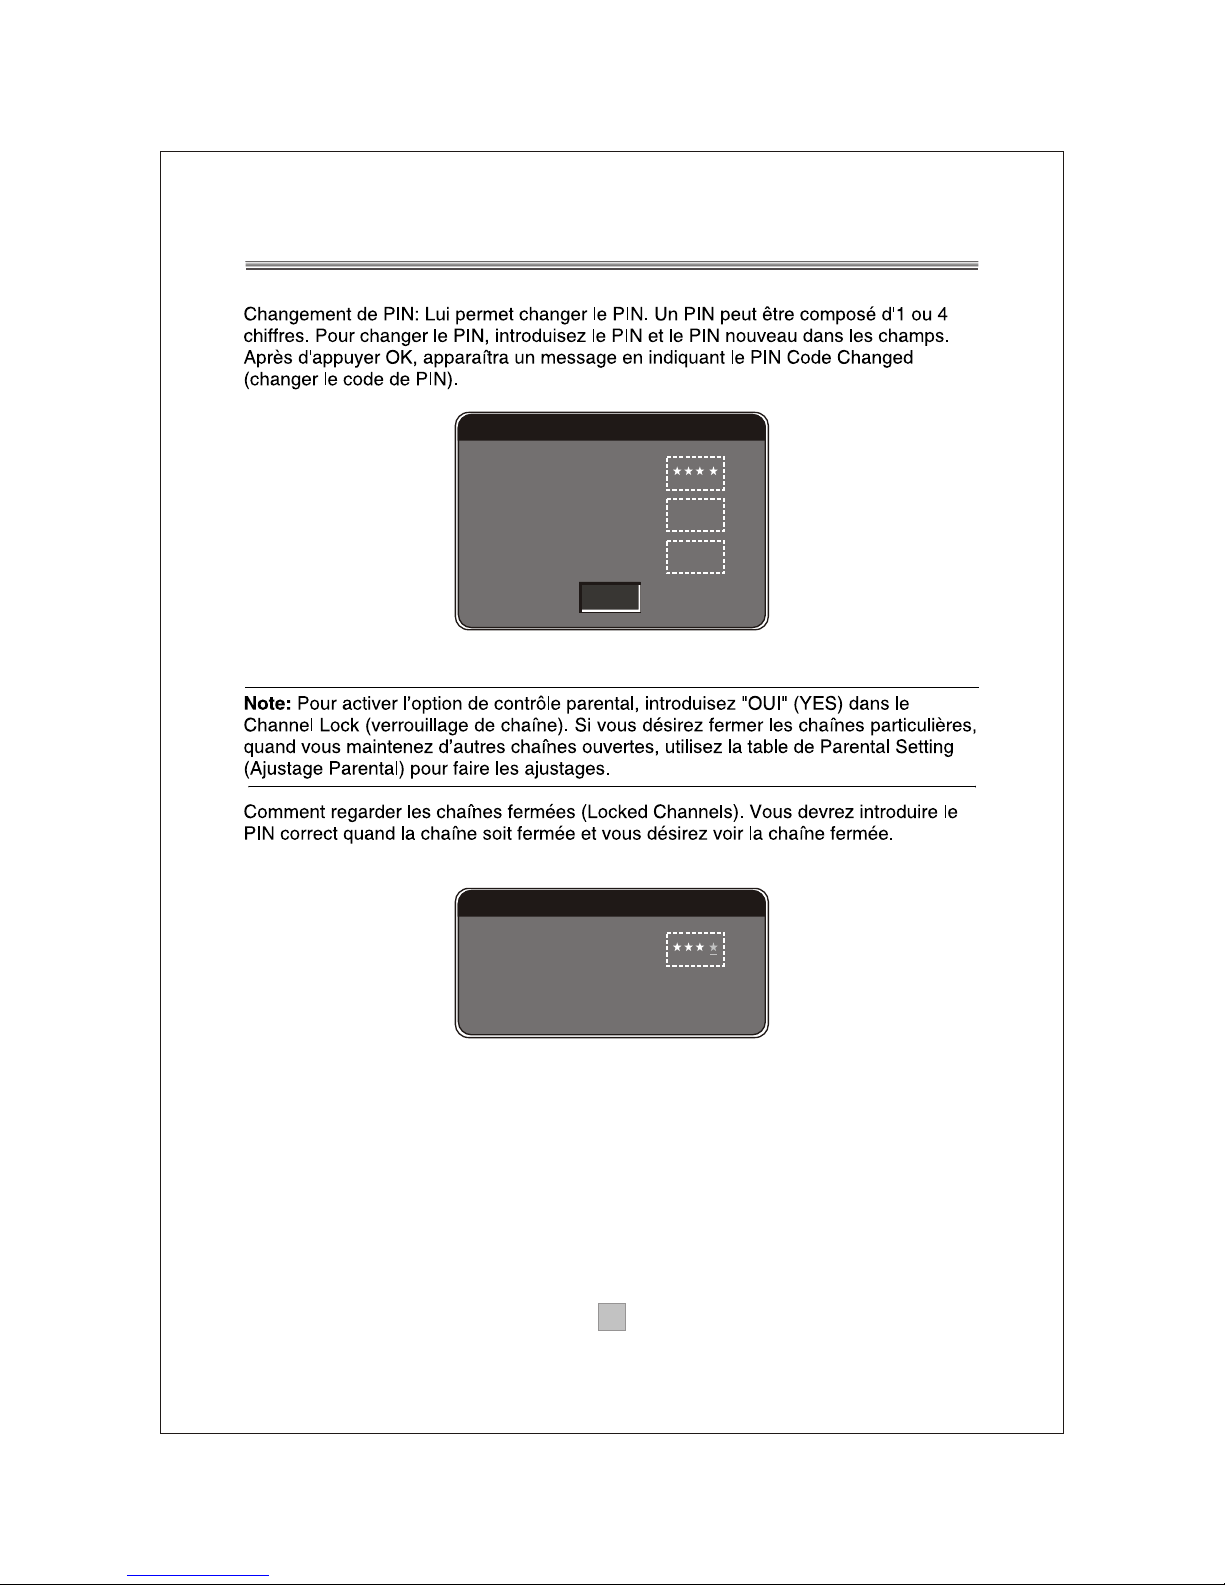
Change PIN: Allows you to change the PIN. A PIN can be
composed of 1 to 4 digits. To change the PIN, enter the old, new
PIN in the provided fields. After pressing OK, a message indicating
PIN Code Changed will appear.
Note: To activate the parental control feature, Channel Lock must
be set to YES. If you want to lock particular channels while keeping
other channels unlocked, use Parental Setting table to make the
settings.
Watching Locked Channels
Once a channel is locked, whenever one want to watch the locked
channel, correct PIN must be entered.
Change Parental PIN
Old PIN
New PIN
Confirm New PIN
OK
Enter Parental PIN
Enter PIN
Page 22
1919
System Settings
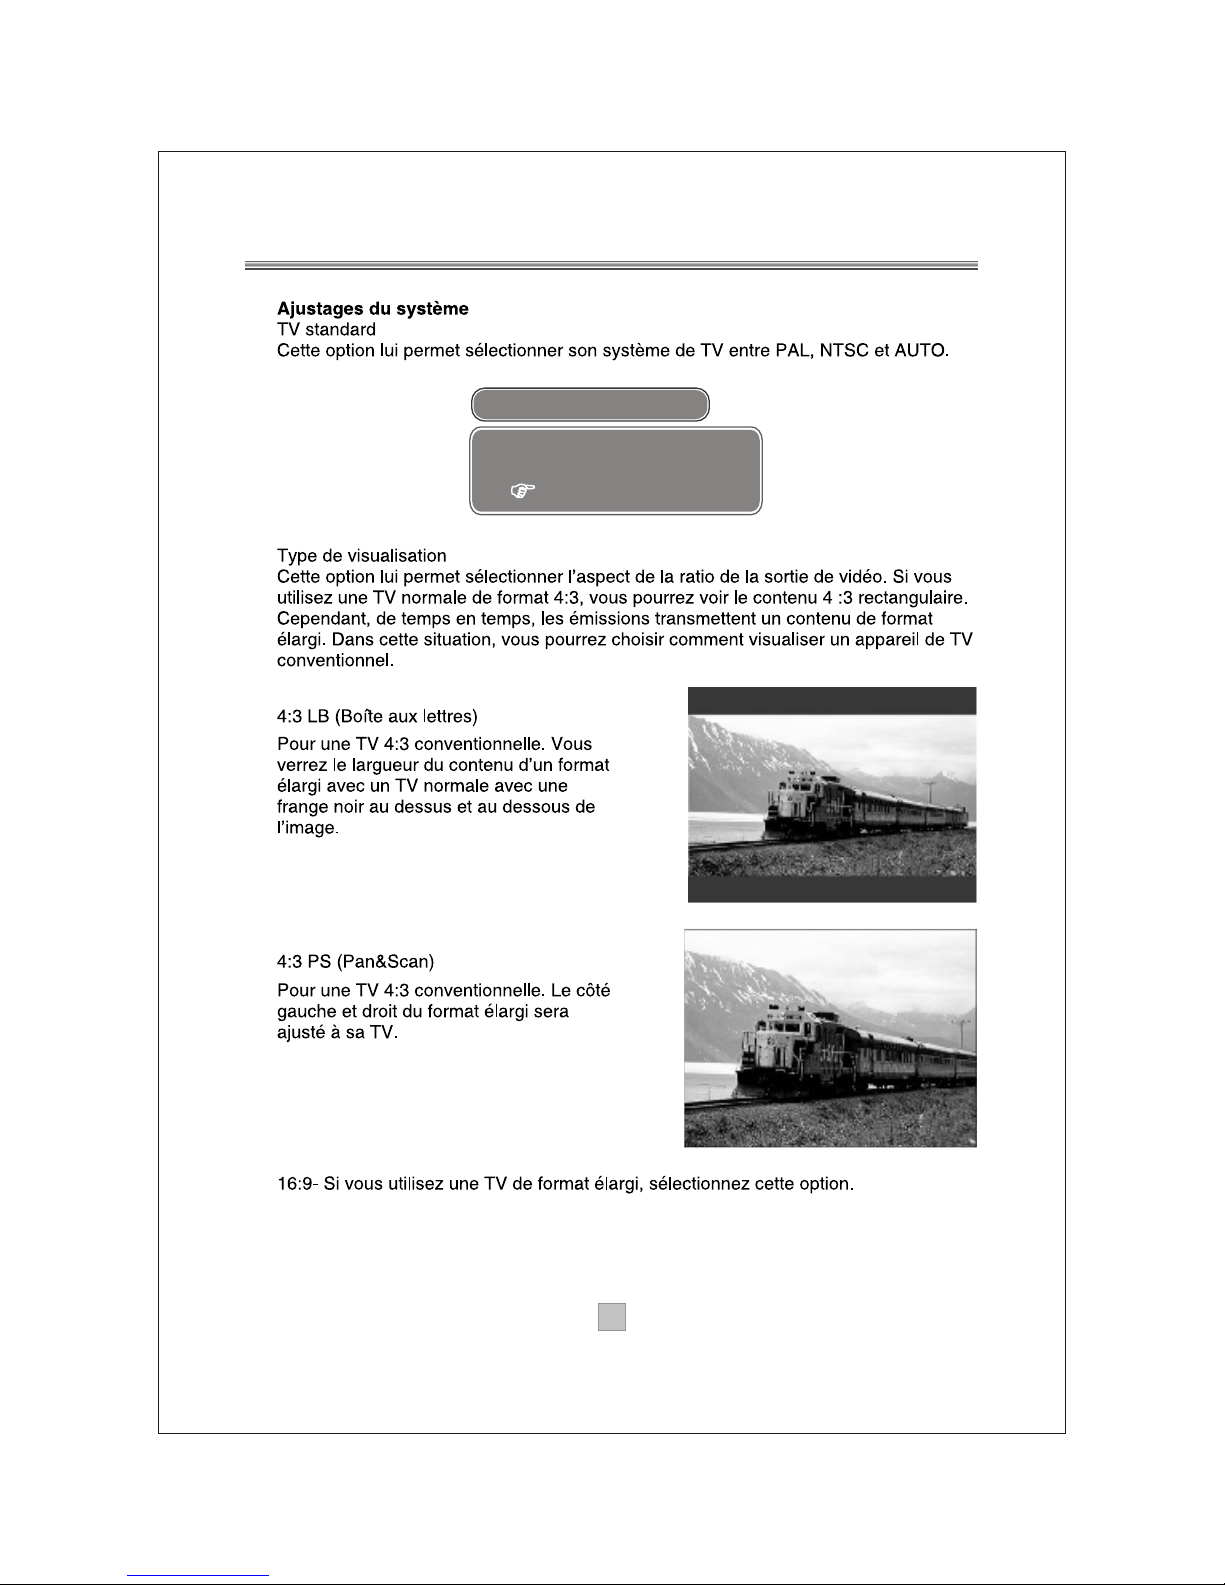
TV Standard
This option allows you to select your TV system among PAL, NTSC
and Auto.
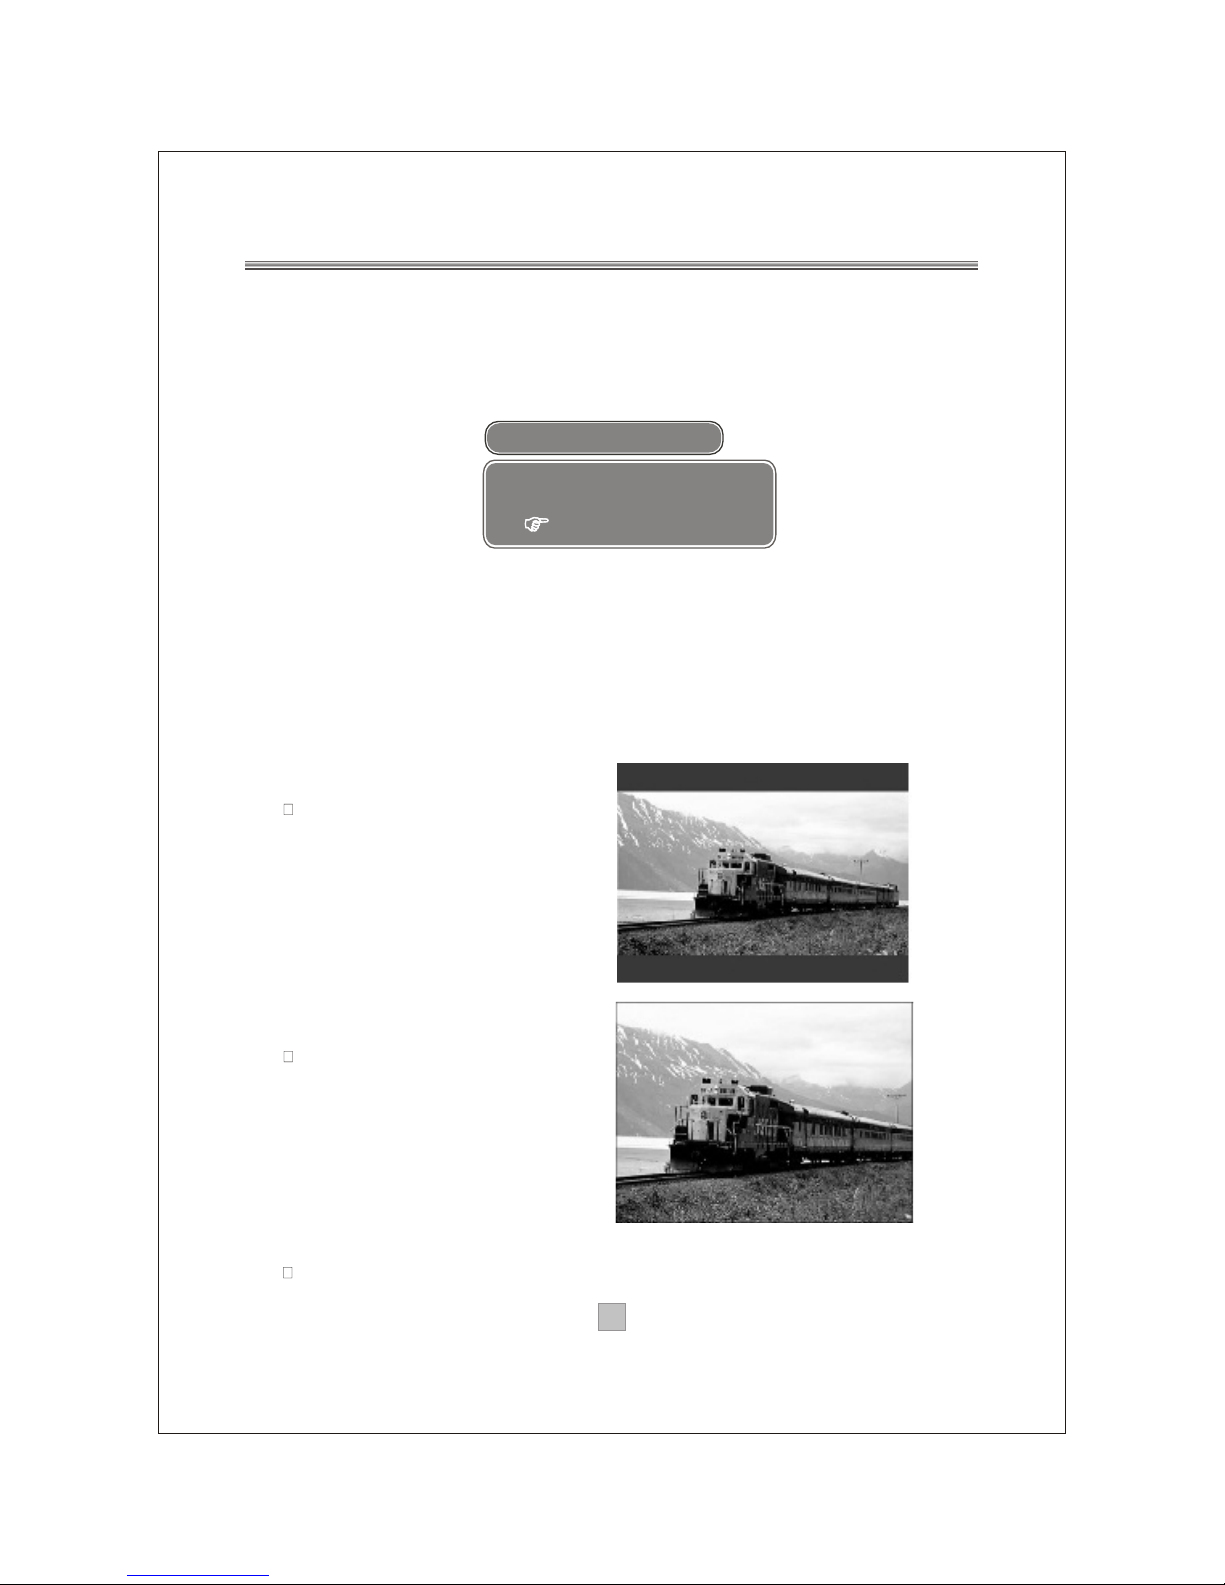
Display Type
This option allows you to select the aspect ratio of the video output.
If you are using normal 4:3 TV, it is OK to view the regular 4:3
content being broadcasted. But occasionally broadcasters
transmit widescreen content; in this situation, you can choose how
to display it in a conventional TV set.
4:3 LB (Letterbox)
For conventional 4:3 TV.
The full width of a widescreen
content is displayed on a
normal TV with black bars
above and below the picture.
4:3 PS (Pan & Scan) For
conventional 4:3 TV. It crops
the left and right edges of a
widescreen content to fit a
normal TV.
16:9 - If you are using a wide screen TV, select this option.
PAL
NTSC
AUTO
AUTO
TV Standard
Page 23
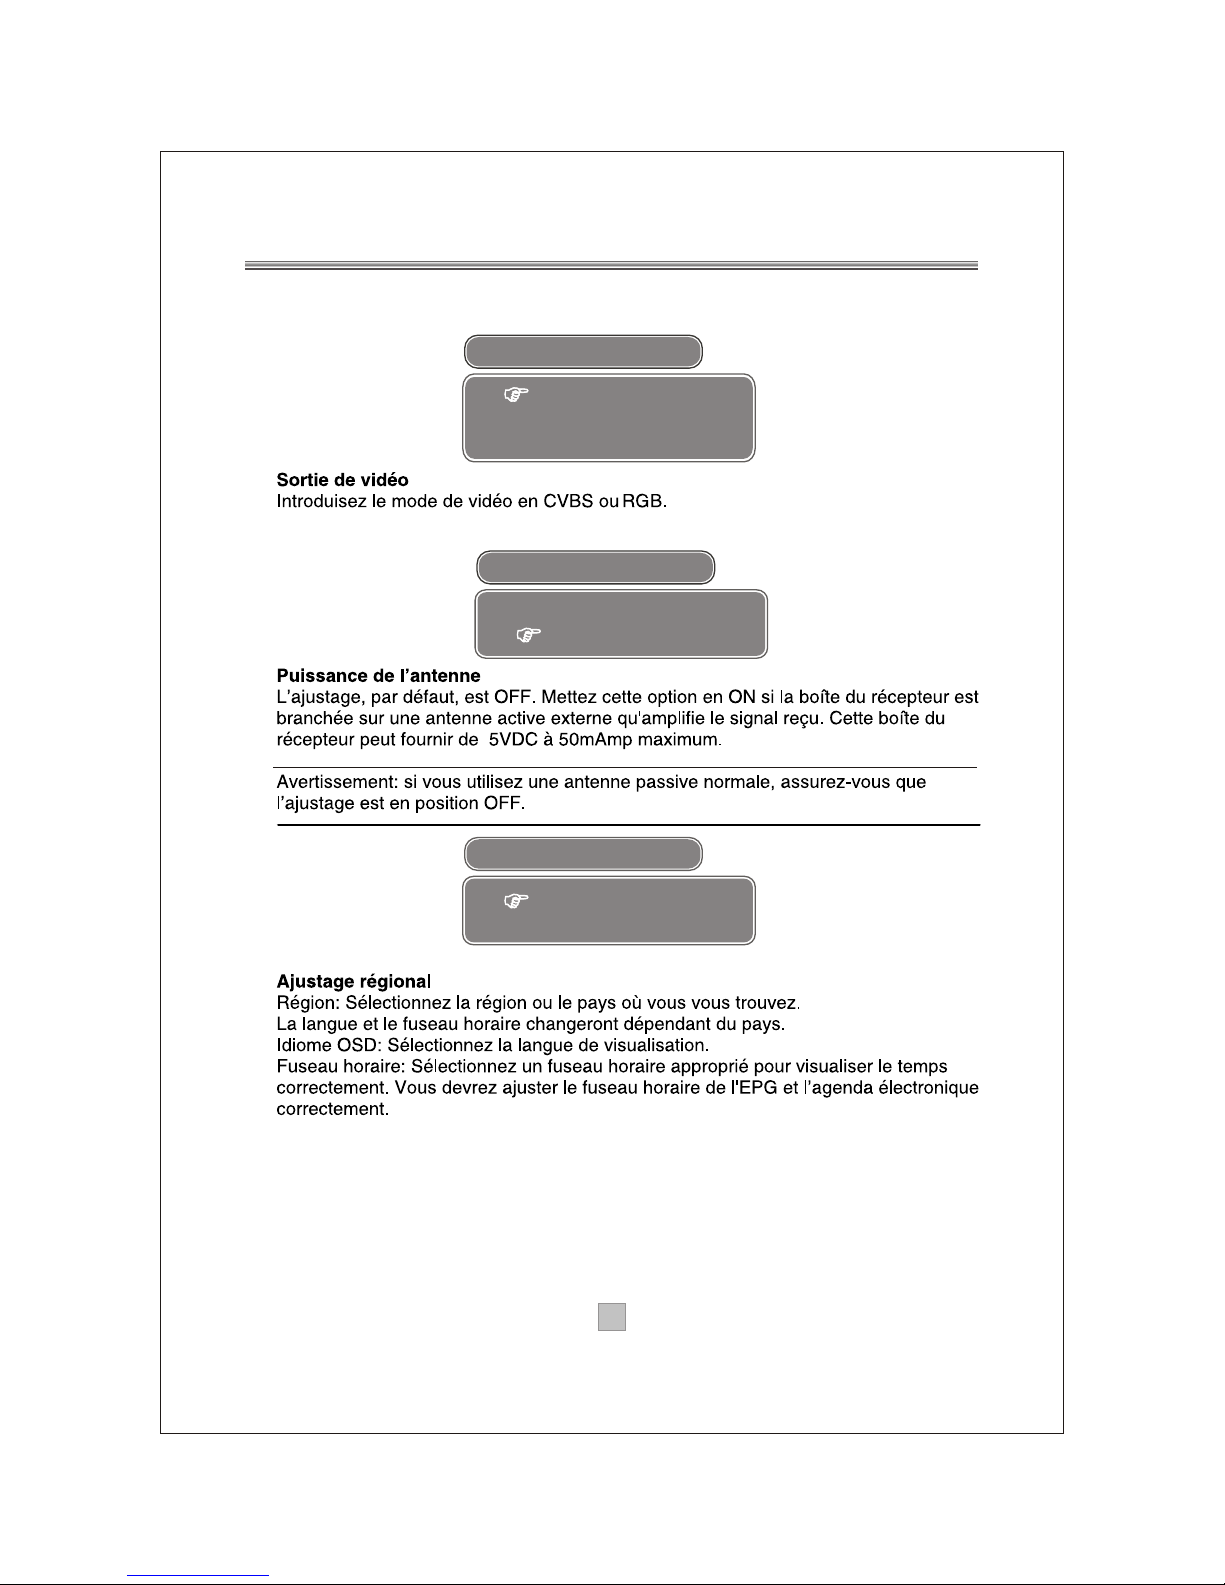
Video Output
CVBS
RGB
RGB
2020
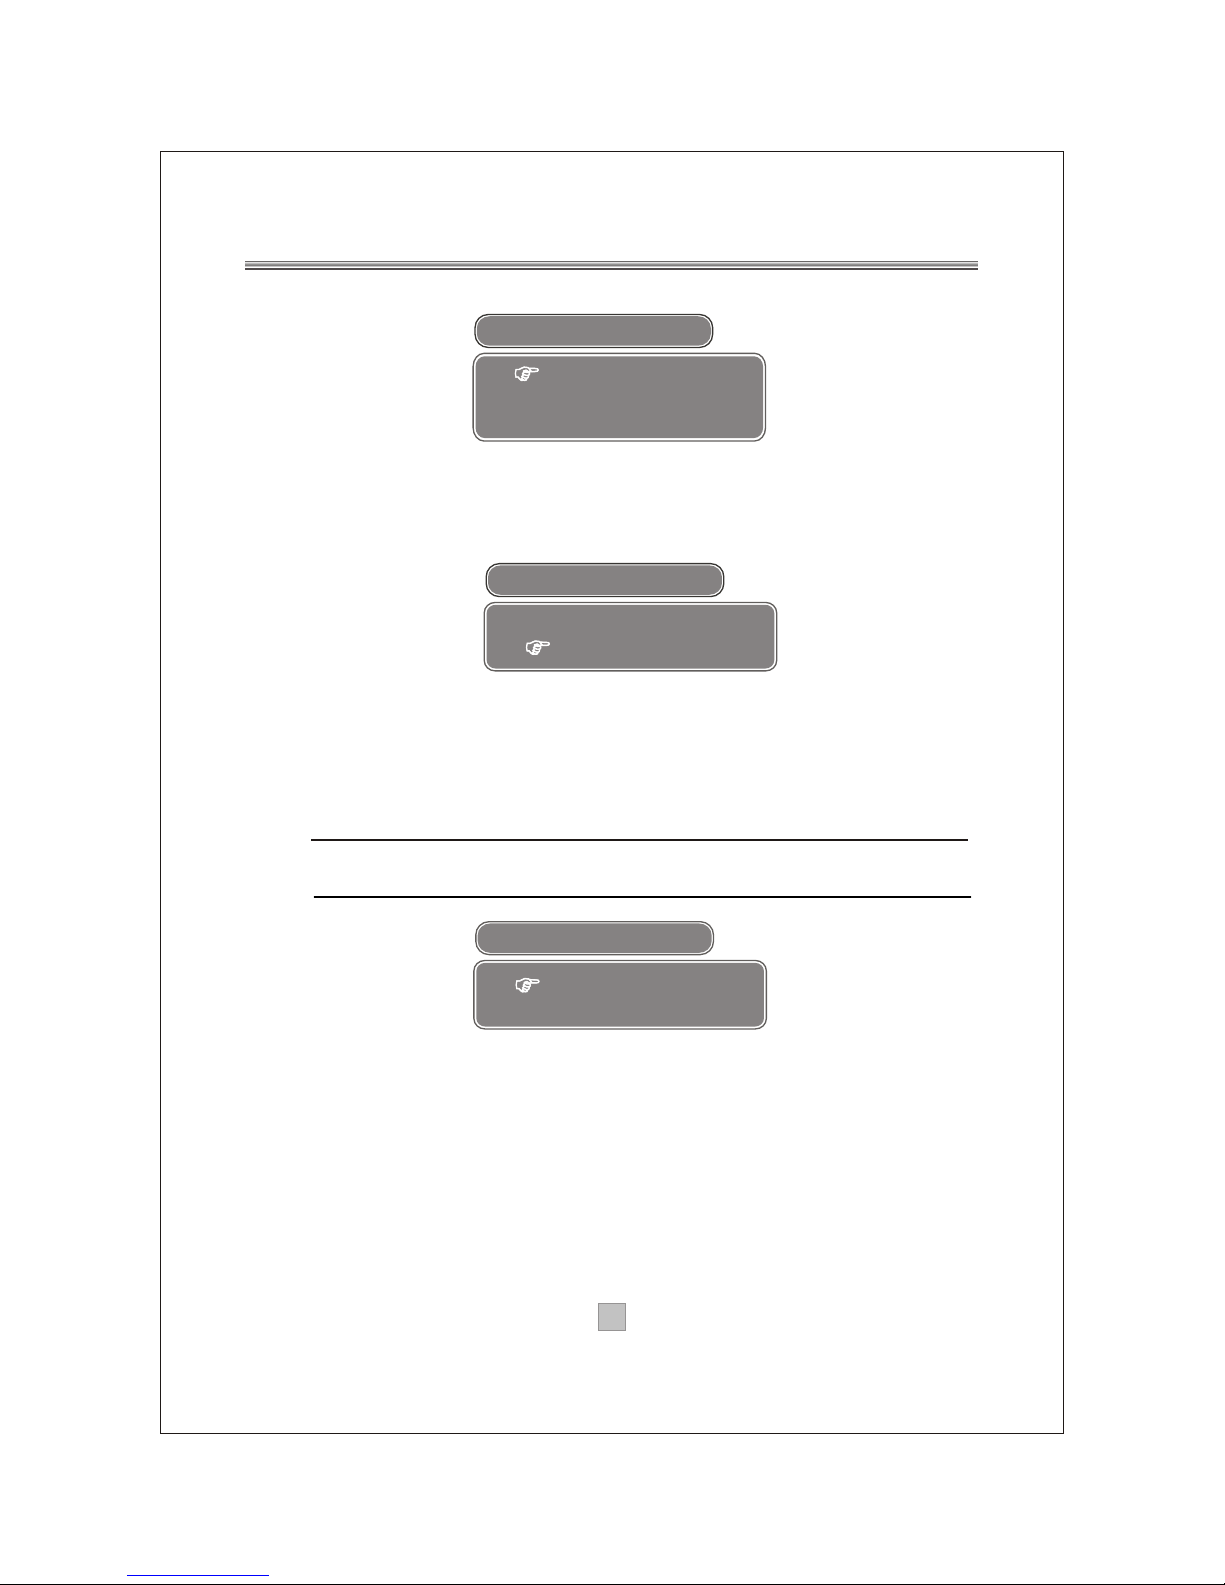
Video Output
Set the video mode as CVBS or RGB.
Antenna Power
The default setting is OFF. Set this option to ON if this receiver
box is connected to an external active antenna that amplifies the
received signal. This receiver box can supply 5V DC at 50mA
maximum.
Caution: If you are using a normal passive antenna,
make sure to set this setting to OFF .
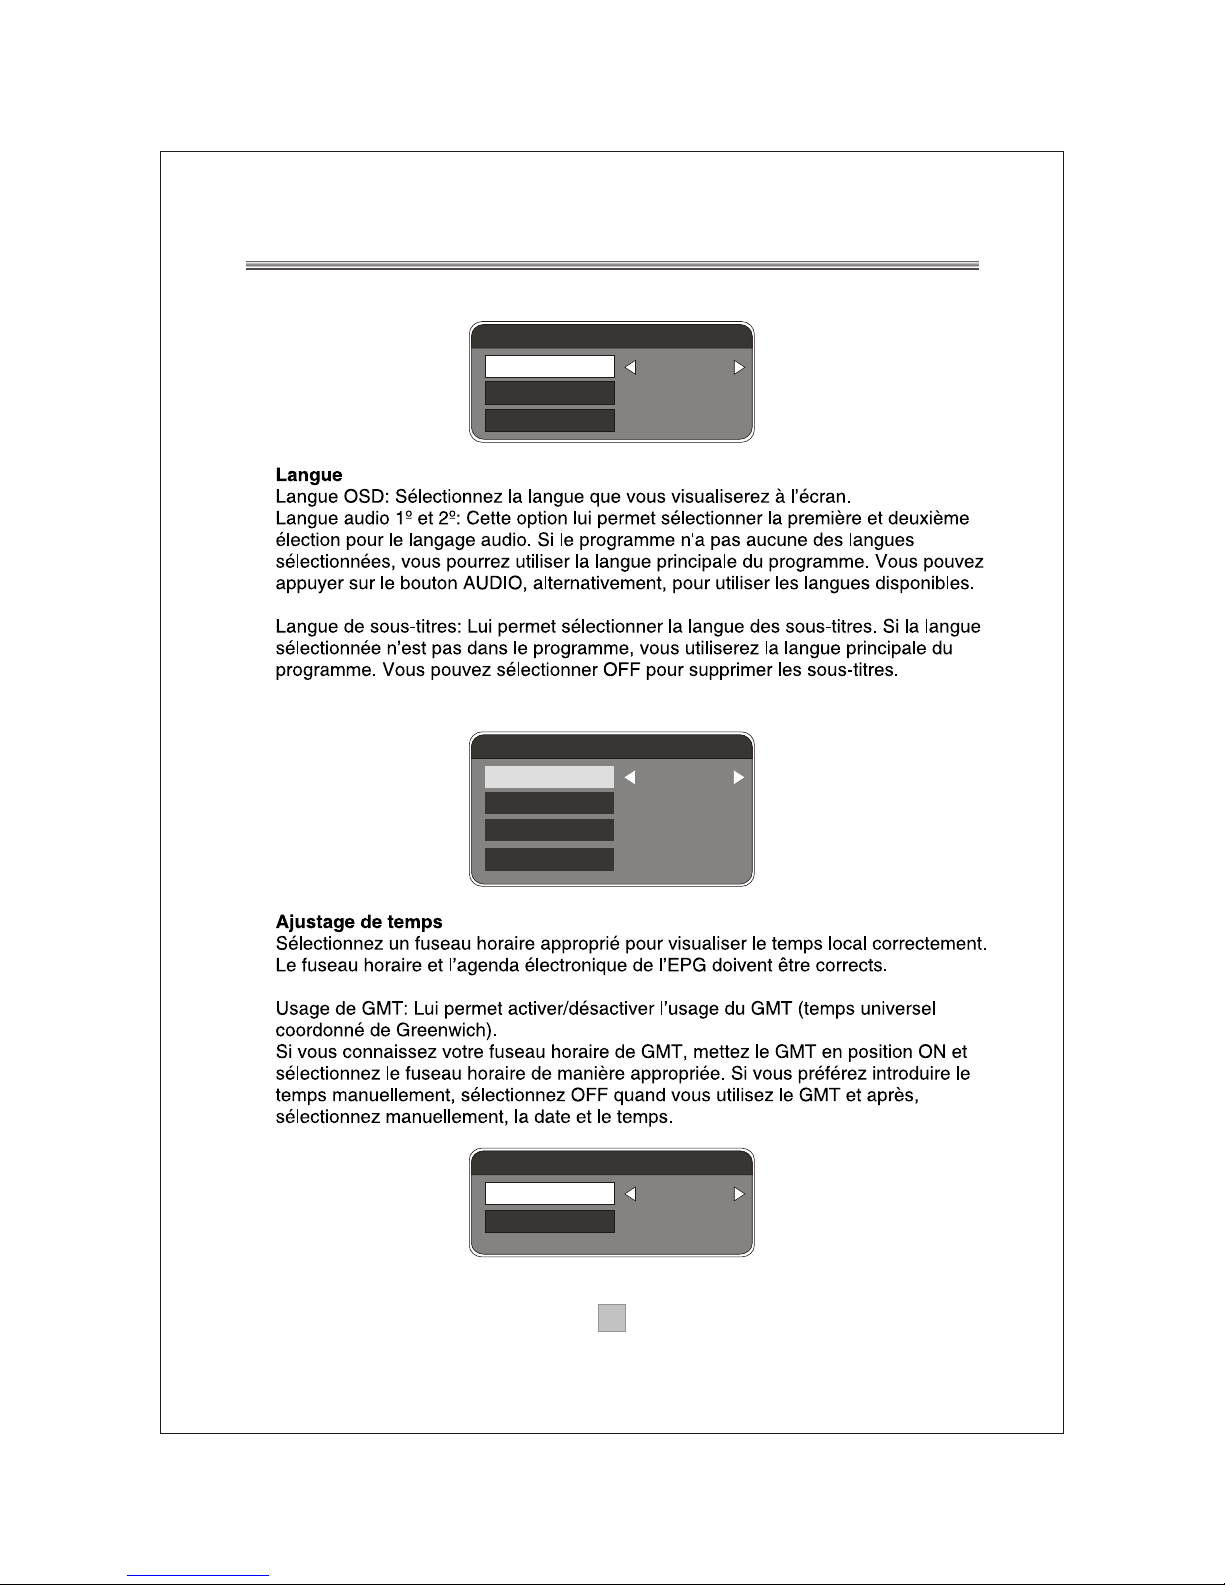
Regional Setting
Region: Select the region or country you are located. Depending
on the country you select, the on-screen-display language and
time zone settings change accordingly.
OSD Language: Select the on-screen-display language as
required.
Time Zone: Select an appropriate time zone to display the local
time correctly. Both EPG and system schedule need a correct time
zone setting.
4:3 PS
4:3 LB
16:9
Display Type
4:3 PS
Antenna Power
OFF
ON
OFF
Page 24
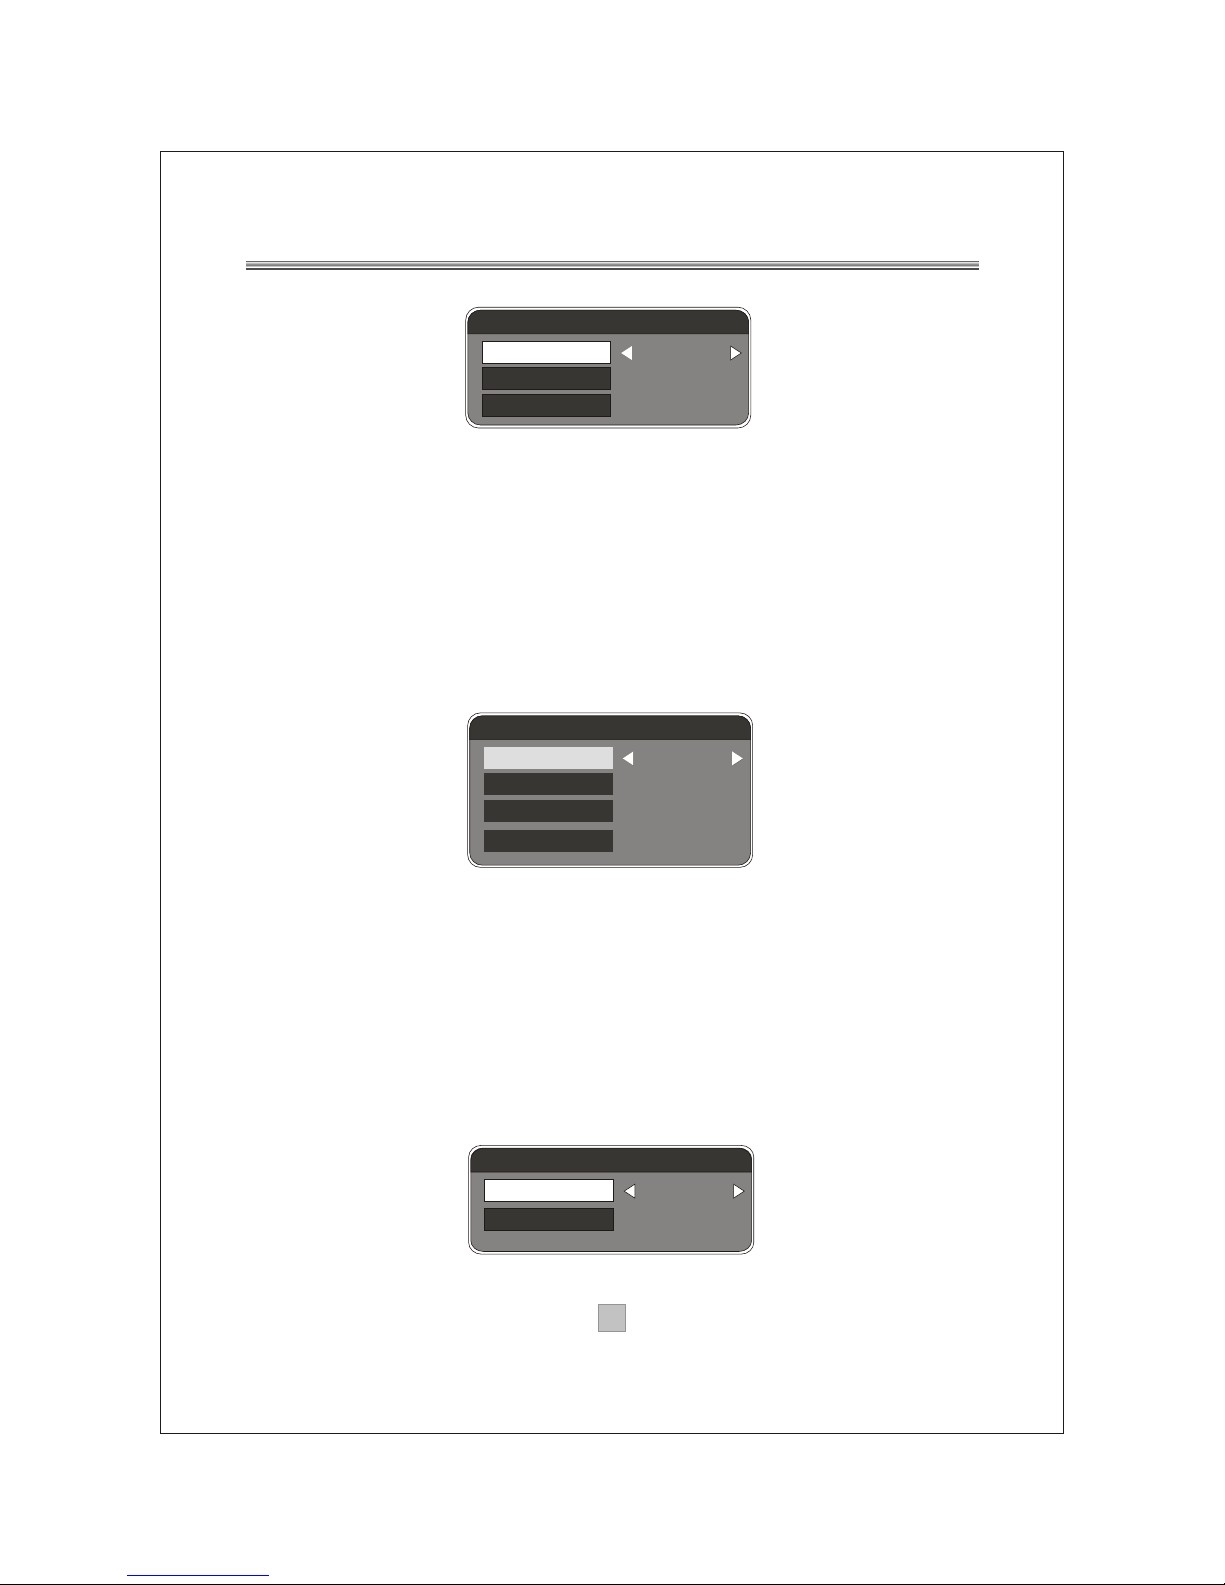
Language
OSD Language: Select the on-screen-display language as required.
1 st /2nd Audio Language: This option allows you to select your
first and second choice for the audio language. If neither of your
selected language is available on the program transmitted, the main
language of the program will be used. You can alternatively press the
AUDIO key to use another available language.
Subtitle Language: Allows you to select the subtitle language.
If your selected language is not available on the program transmitted,
the main language of the program will be used. You can also
select OFF to close the subtitle on the screen.
Time Setting
Select an appropriate time zone to display the local time
correctly. Both EPG and system schedule need a correct time
zone setting.
GMT usage: Allows you to enable/disable Greenwich Mean
Time (GMT) usage.
If you know the GMT time zone of your location, set GMT usage
to ON and select an appropriate time zone. If you prefer to set
the time manually, select OFF in GMT usage item and then
manually select the date and time.
2121
Regional Setting
Region
OSD Language
Time Zone
England
English
CMT+00:00
Language
OSD Language
English
English
English
OFF
1st Audio Language
2nd Audio Language
Subtitle Language
English
Time Setting
GMT usage
Time Zone
ON
CMT+00:00
Page 25
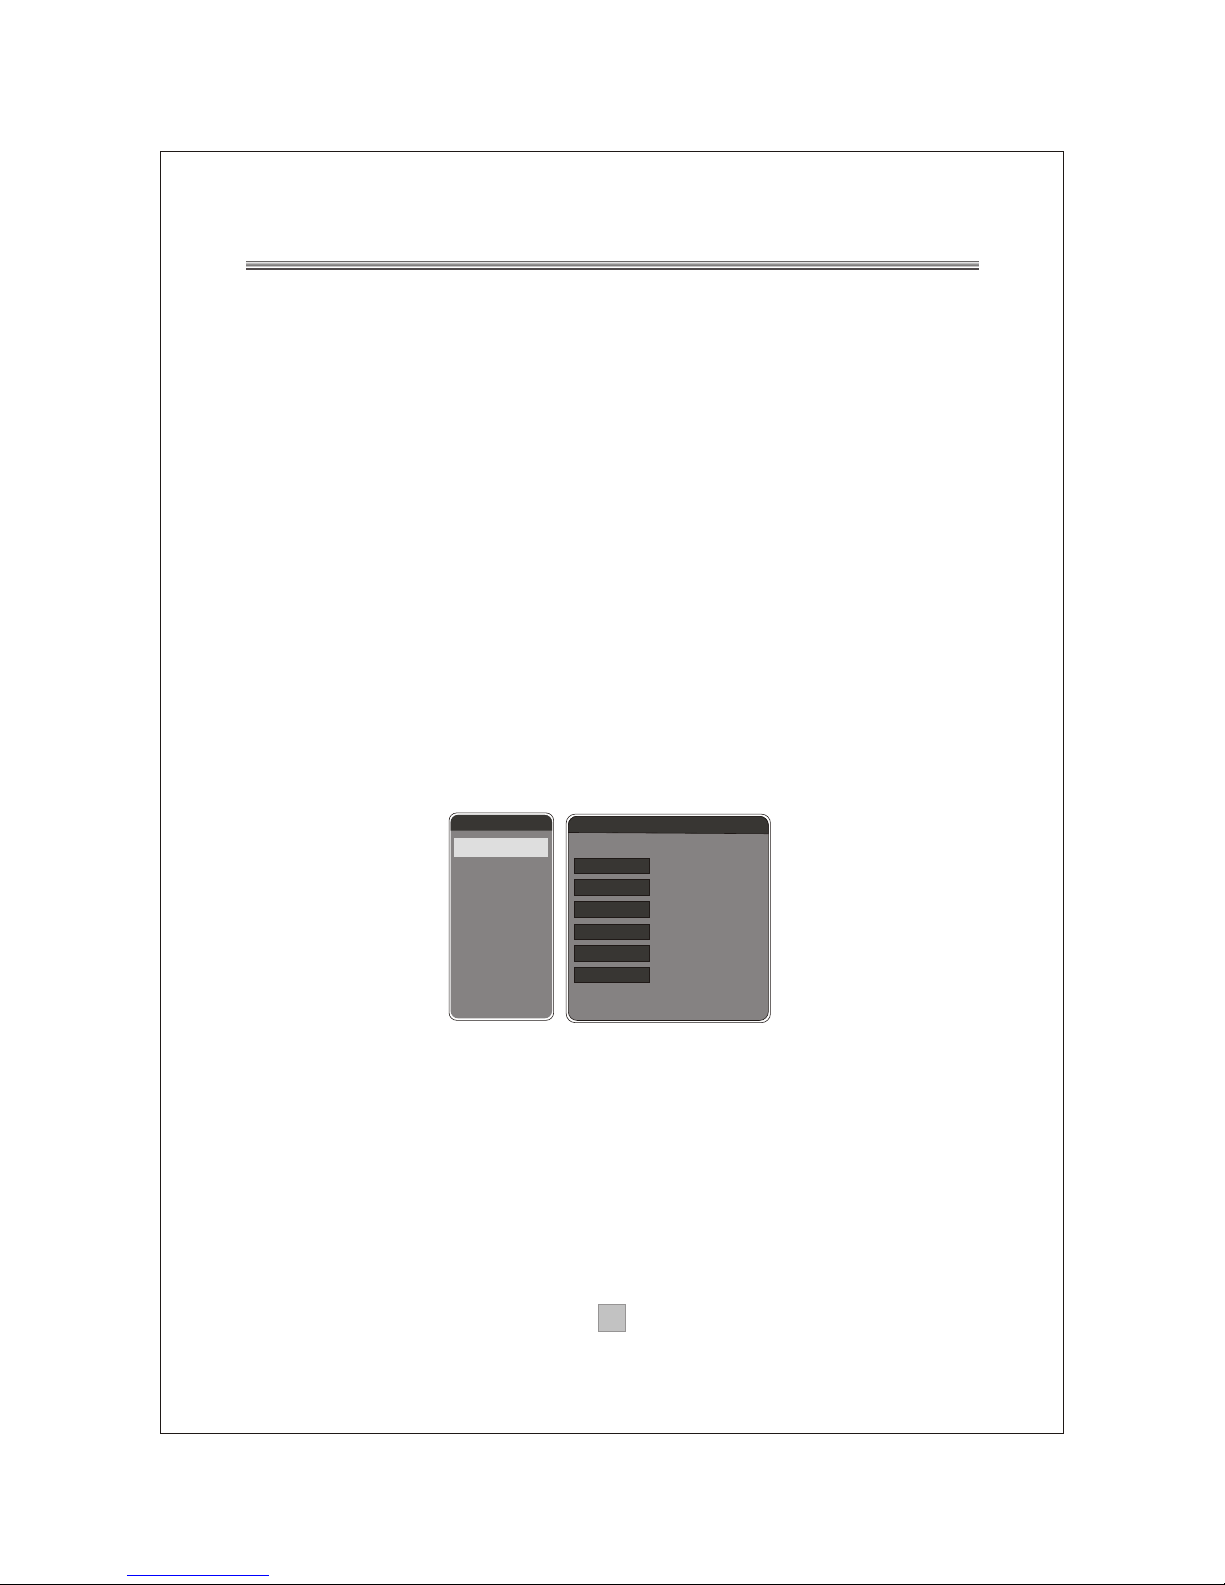
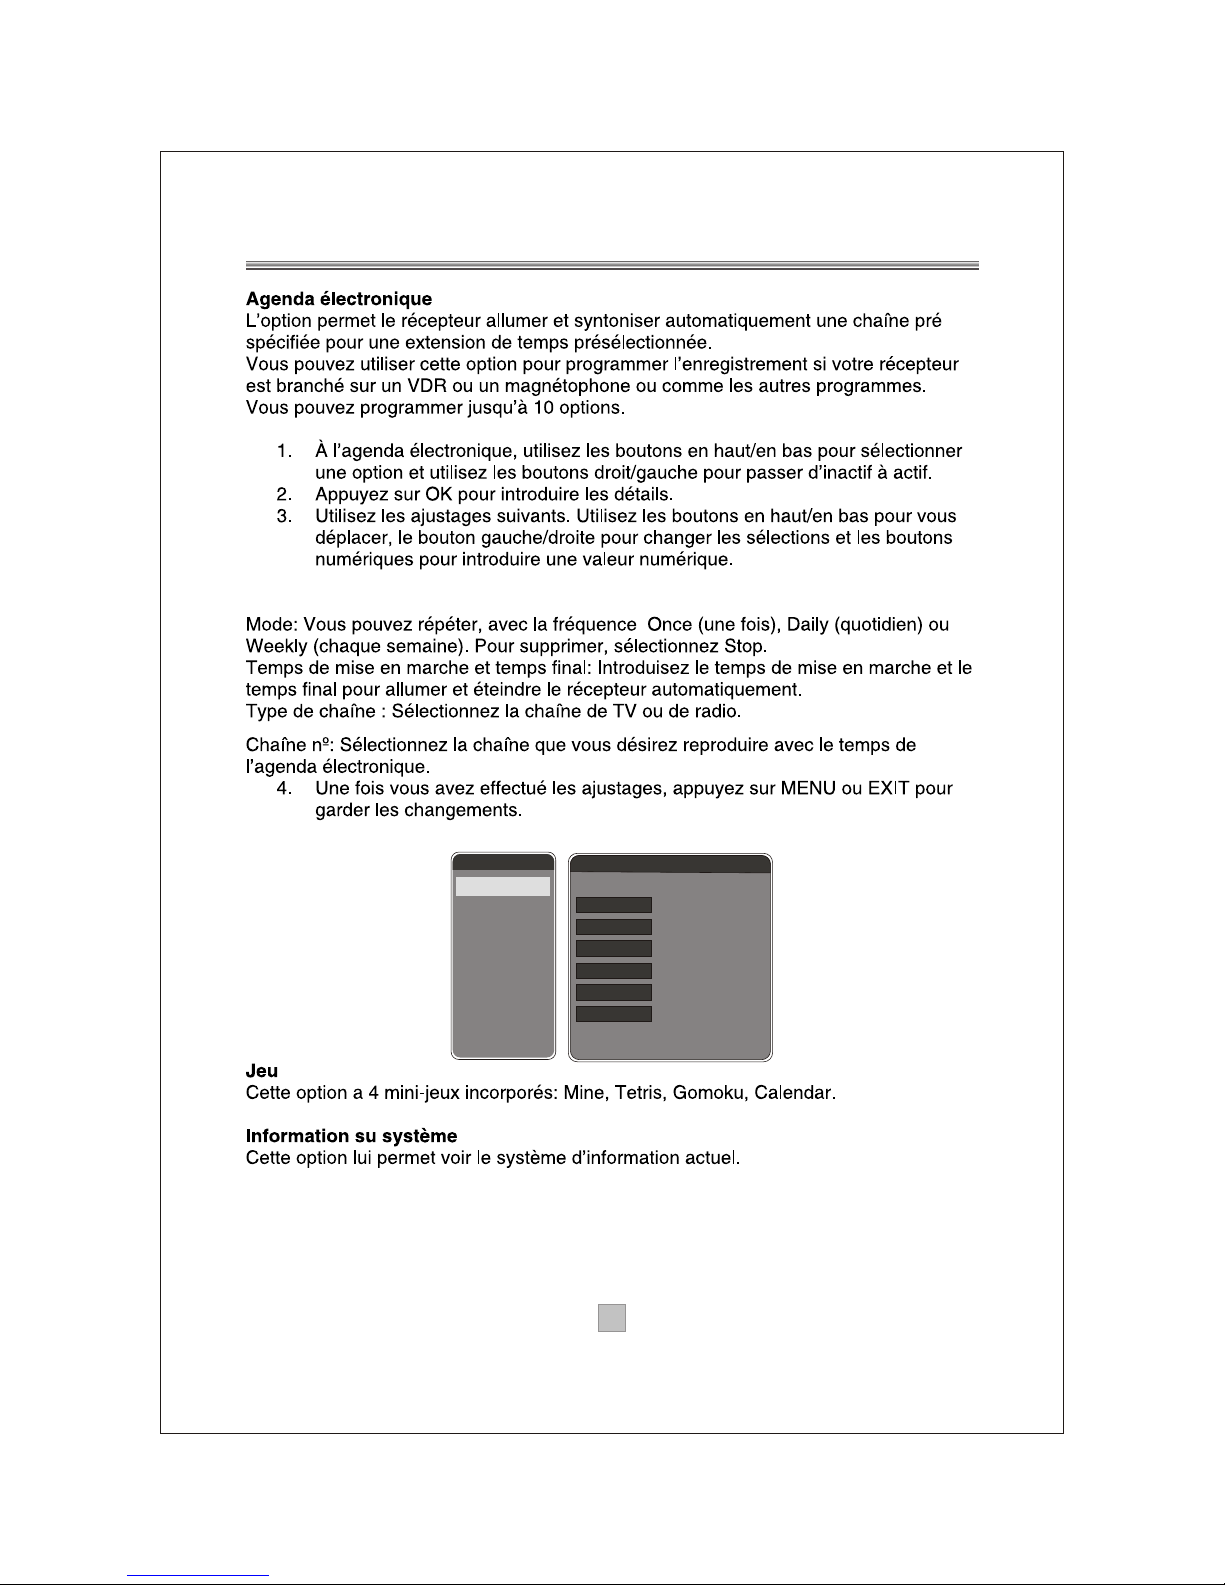
System Schedule
This feature allows the receiver to automatically switch on and tune
to a pre-specified channel for a pre-set length of time. You can use
this feature to schedule recording if your receiver is connected to a
VCR or recorder or as reminders of certain programs. Up to 10
tasks can be scheduled.
1. In the Schedule pane, use the Up / Down key to select a task and
use Right / Left key to switch between Inactive and Active.
2. Press OK to enter the Detail pane.
3. Enter the following settings as required. Use the Up / Down key
to move between setting items, the Right / Left key to switch
between available selections and numeric keys to enter numeric
value.
Mode: You can repeat the task by setting the frequency as Once,
Daily or Weekly. Or you can select Stop to disable the task.
Start and End Time: Enter the start and end time that
automatically turns on and off the receiver.
Channel Type: Select TV or radio channel as required.
Channel No: Select the channel to be played at scheduled time.
4. When the setting is done, press MENU or EXIT to save the changes.
Game
This option includes 4 built-in mini games: Mine, Tetris, Gomoku,
Calendar.
Accessory
System Information
This option allows you to view the current system information.
2222
Schedule
Task1
Task2
Task3
Task4
Task5
Task6
Task7
Task8
Task9
Task10
Active
Inactive
Inactive
Inactive
Inactive
Inactive
Inactive
Inactive
Inactive
Inactive
Mode
Start Date
Start Time
Eng Time
Channel T ype
Channel No
Daily
2005/06/06
00:00
00:00
TV
0001
Detail
Page 26
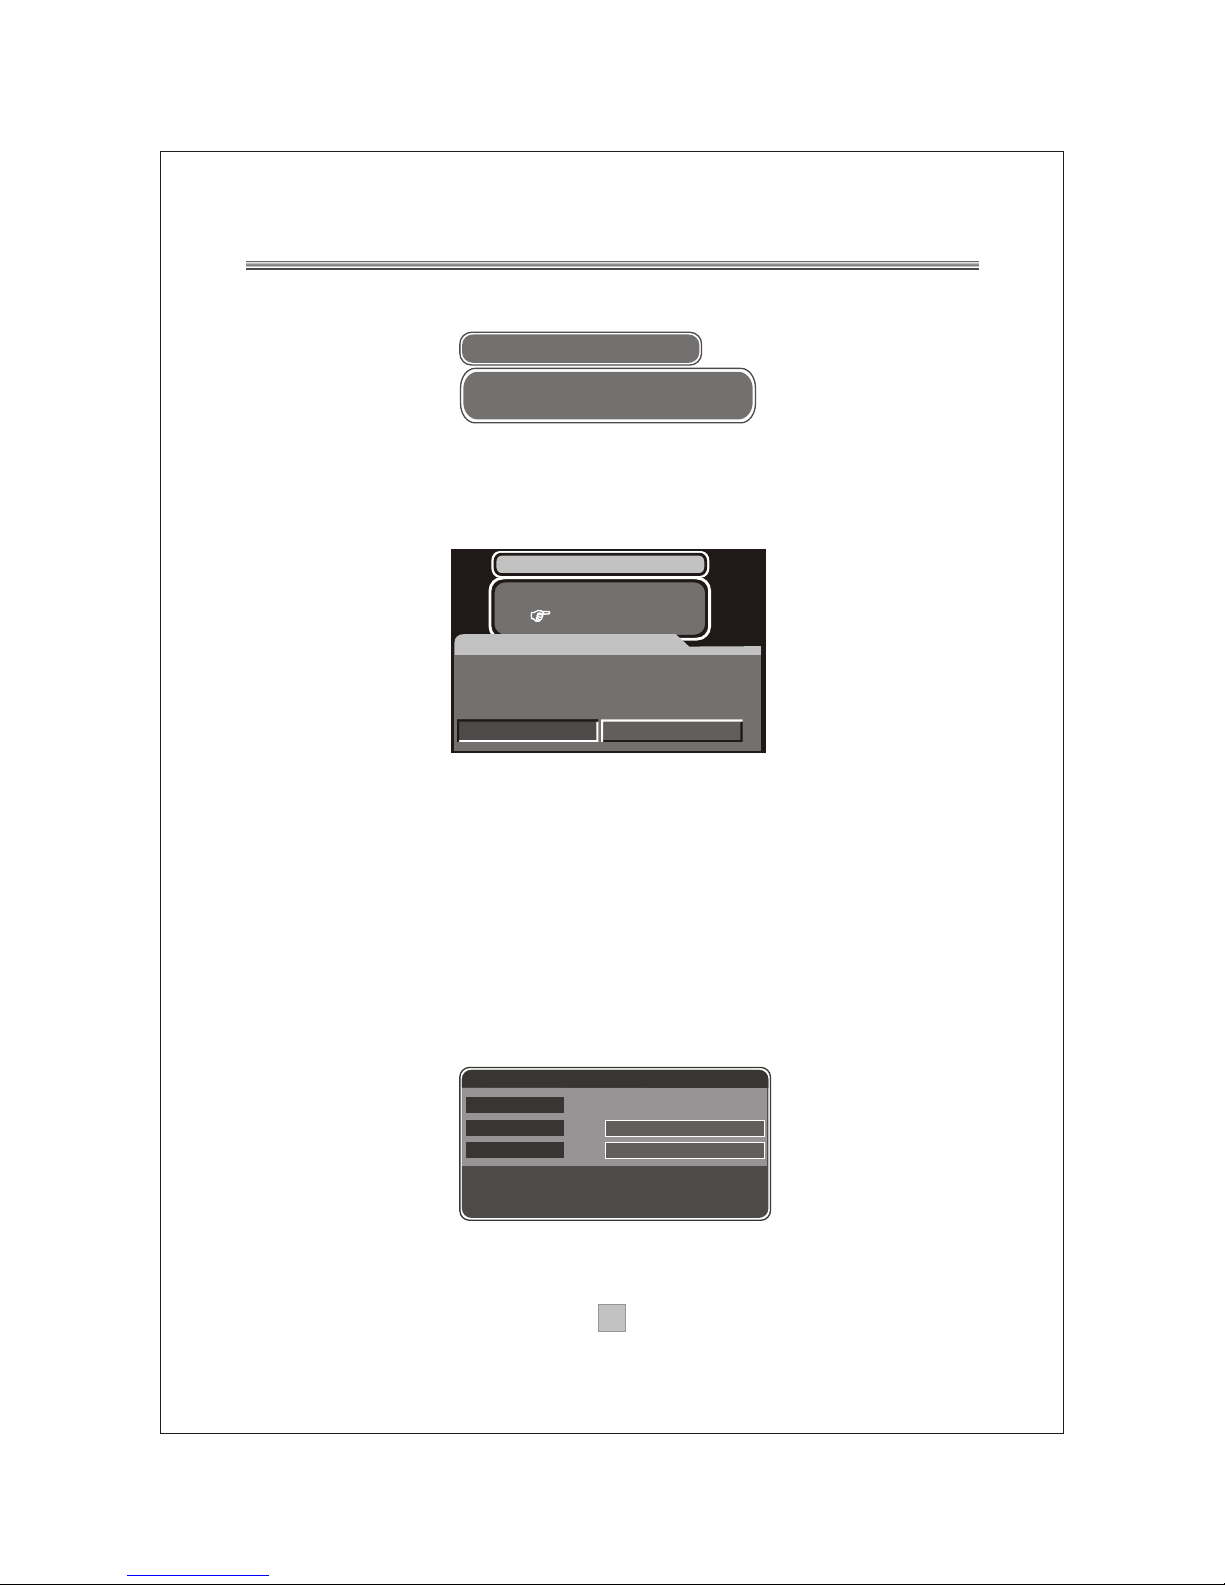
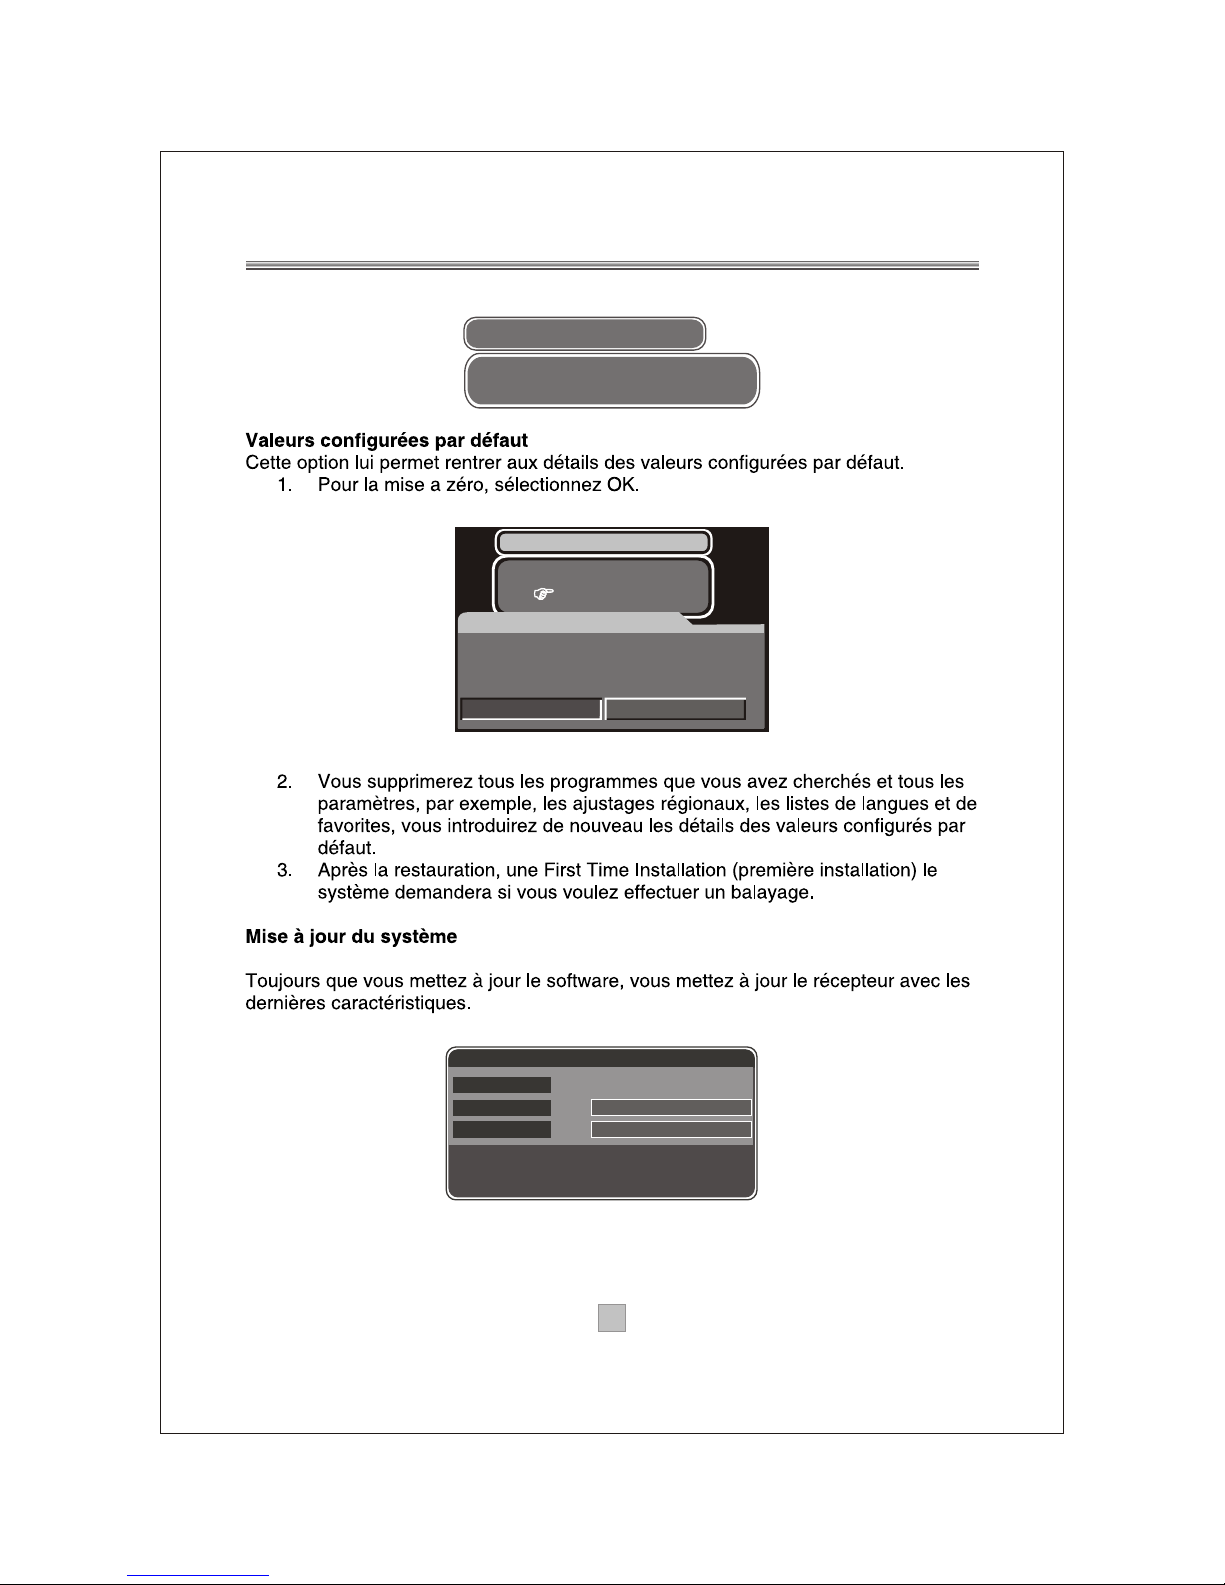
Factory Default
This option allows you to resume factory defaults.
1. To reset defaults, select OK.
2. All programs you have searched will be erased and all
parameters, e.g., the regional settings, languages and favorite
lists, will return to the factory default.
3. After restoring defaults, a First Time Installation screen
appears asking if you would like to conduct an automatic scan
search.
System Update
Whenever a software update is available, the receiver can be
upgraded for new features.
2323
System Information
Version: v1.08 212u_IO_LG_9013_0.1.7.1
Date:MM/DD/YYYY
System Update
Press Any Key to Exit.
Status
T ansmission
Burn
Initializing
000%
000%
Factory Default
NO
YES
OK
Cancel
Warning
Do you want to set factory default?
Page 27
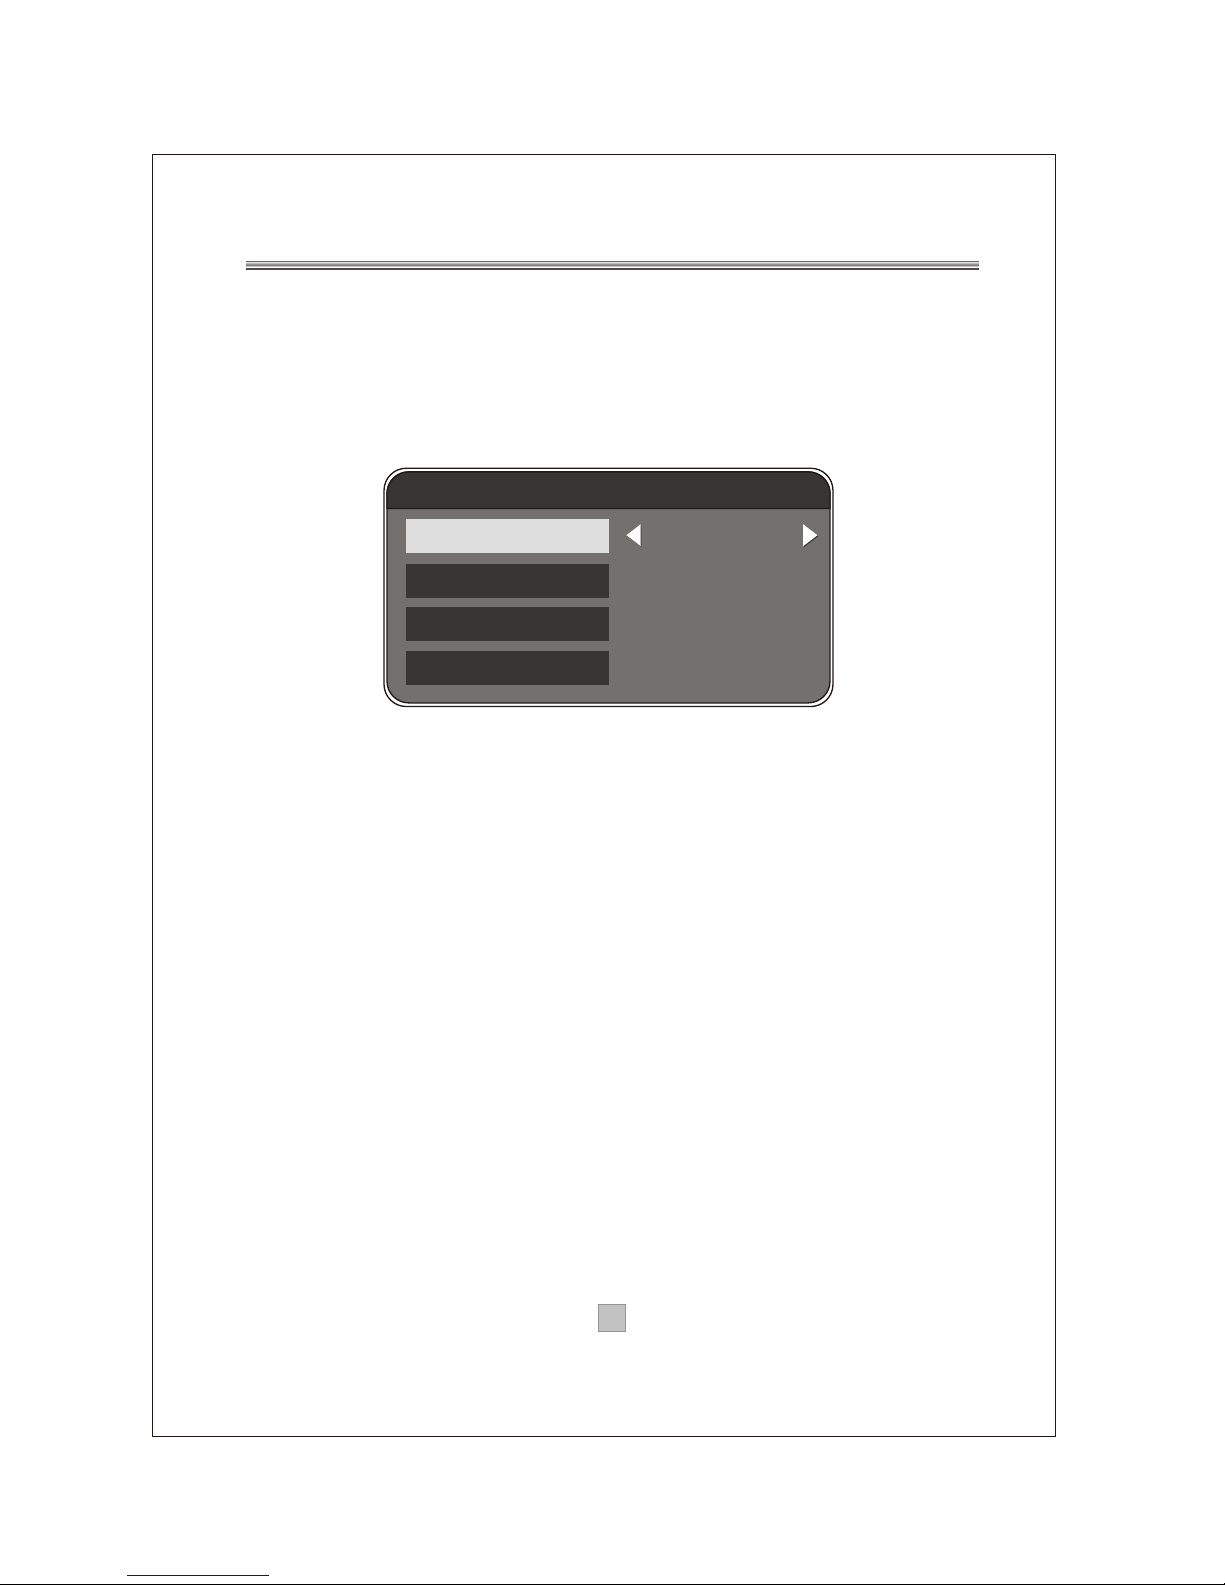
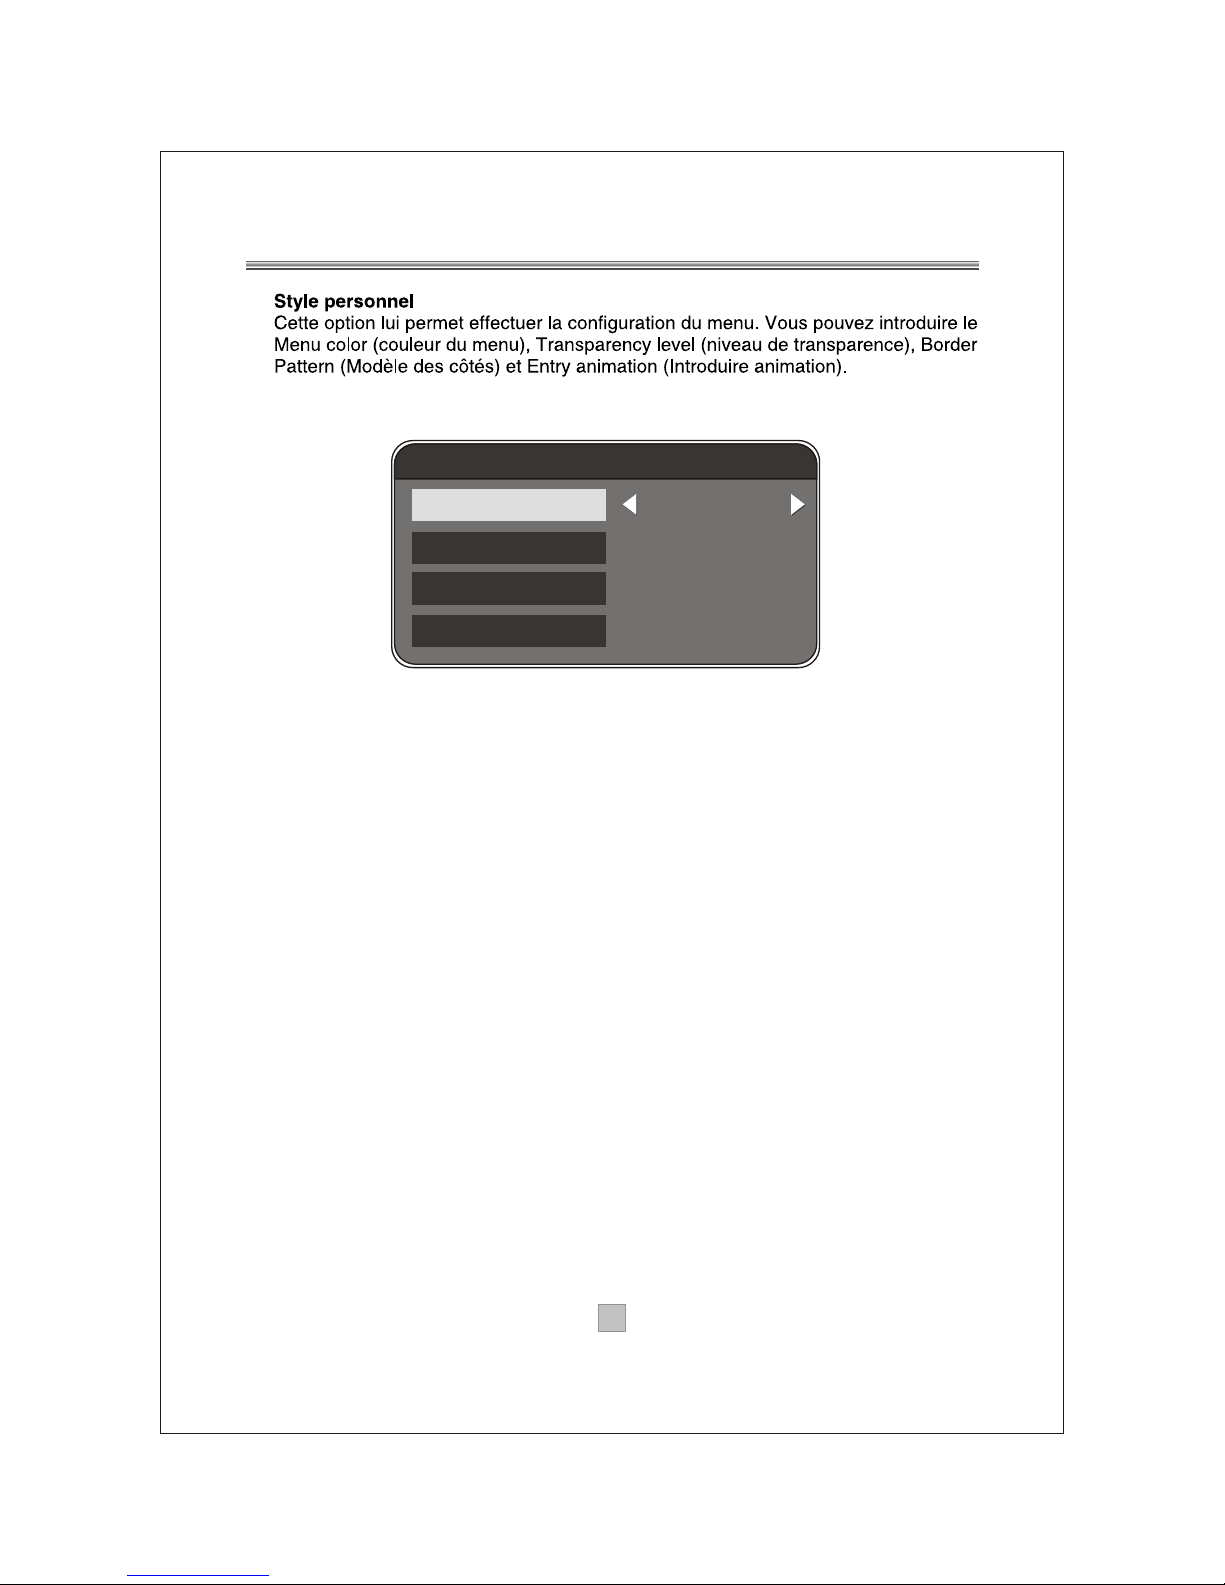
Personal Style
This option allows you to customize the menu settings.
You can set the Menu Color, Transparency level, Border Pattern
and Entry Animation as preferred.
2424
Menu Color
Transparency Level
Border Pattern
Entry Animation
Personal Style
8
Round
Right
Blue
Blue
Page 28
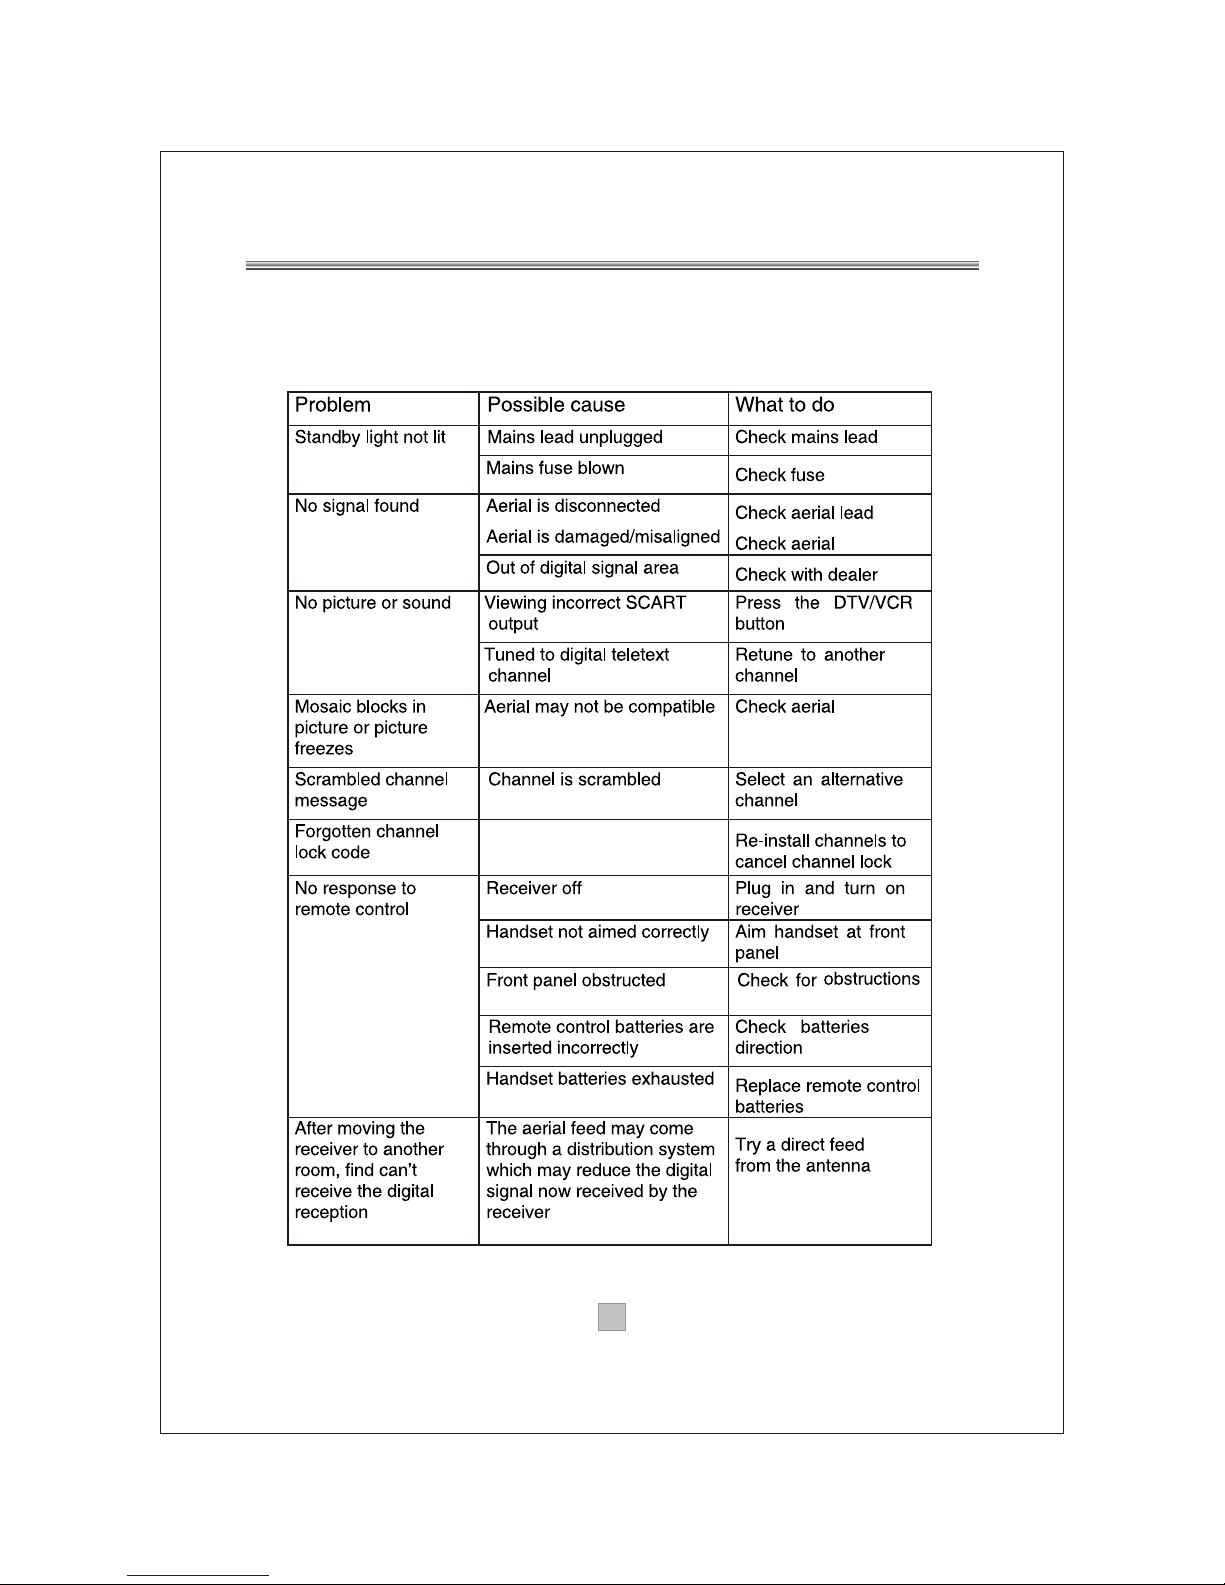
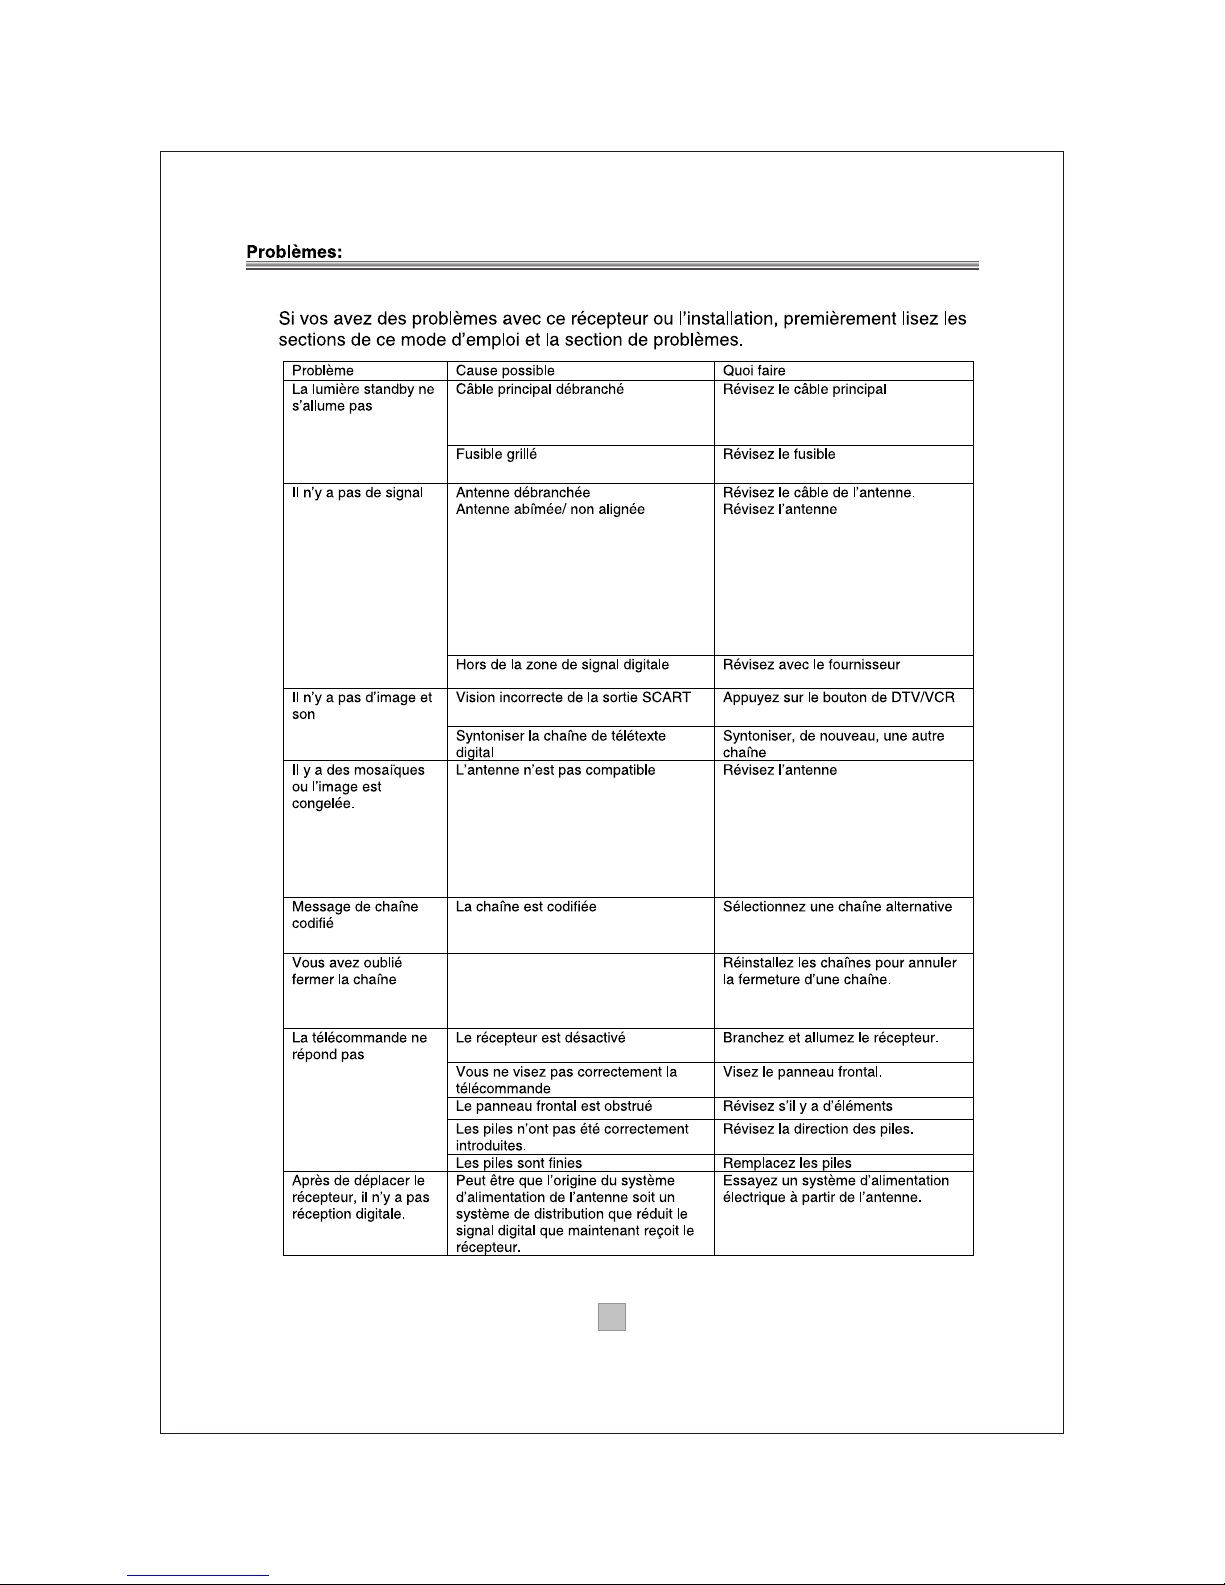
If you experience problems with this receiver or its installation, in the
first instance please read carefully the relevant sections of this User
Manual and this Troubleshooting section.
2525
Troubleshooting
Page 29
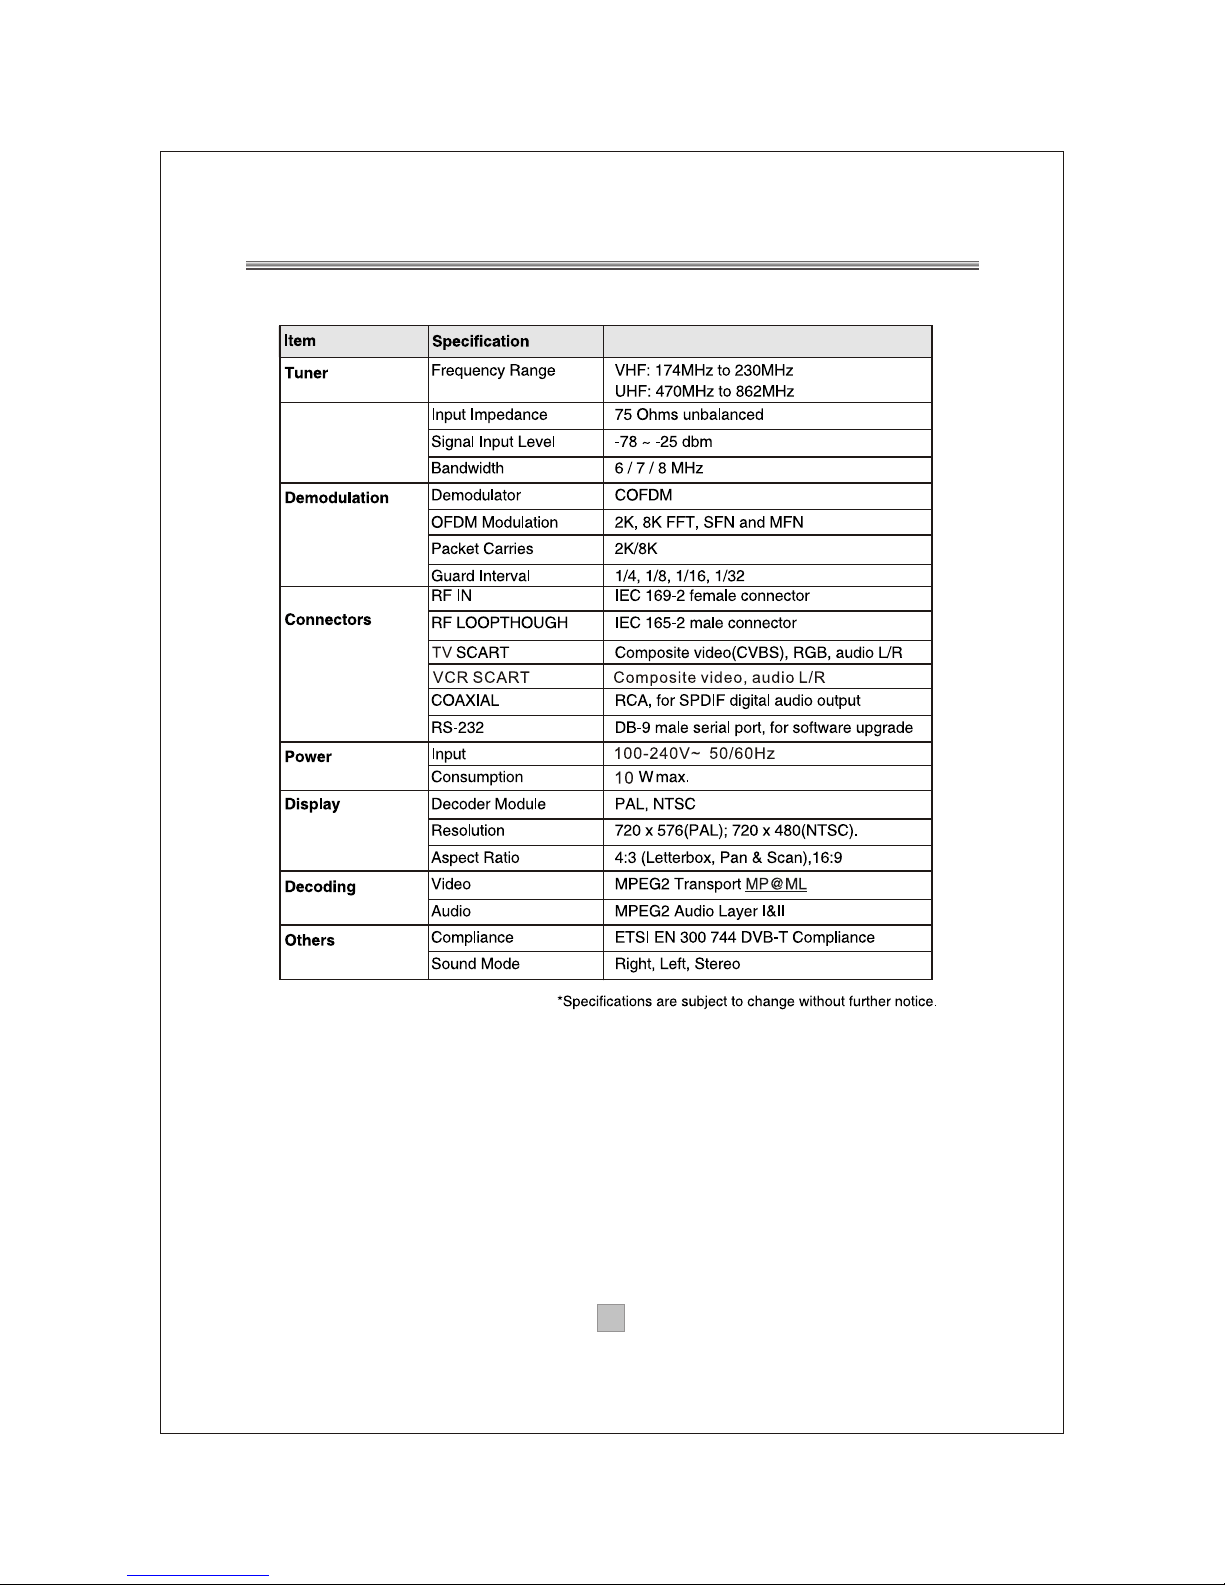
Specifications
2626
Page 30
Page 31
VEA T100
Page 32
Page 33
Page 34
11
Page 35
22
Serial No.:
100-240V~
50/60Hz
CoaxialCoaxial
Digital
Audio
Digital
Audio
VCR O OVCR O O
TVTV
SERVICE
ININRR FF
LOOPLOOPR RF F
THROUGHTHROUGH
DIGITAL TERRESTRIAL RECEIVER
POWER SUPPLY: 100-240V~ 50/60Hz
MAX POWER CONSUMPTION: 10WATTS
MODEL: VEA T100
CHANNEL
VEA T100
Page 36
OK
DTV/VCR
EXIT
PAUSE
1 2 3
4 5 6
7 8 9 0
INFO
AUDIO
EPG
VOL
+
VOL
-
CH+
CH-
MENU
MUTE
RECALL
TV/RADIO
STANDBY
GAME
SUBTITLE TEXT
FAVORITE
3 3
Page 37
44
O
P
E
N
O
P
E
N
1.Open the cover
2.Install batteries
3.Close the cover
CHANNEL
VEA T100
OK
DTV/VCR
EXIT
PAUSE
1 2 3
4 5 6
7 8 9 0
INFO
AUDIO
EPG
VOL
+
VOL
-
CH+
CH-
MENU
MUTE
RECALL
TV/RADIO
STANDBY
GAME
SUBTITLE TEXT
FAVORITE
Page 38
55
TV
100-240V~
50/60Hz
Page 39
66
VCR
TV
100-240V~
50/60Hz
Page 40
77
England
English
GMT + 00:00
OFF
First Time Installation (1)
BACK NEXT
Region
Language
Time Zone
Antenna Power
First Time Installation
Do you want to start first time
Installation Wizard?
YES
NO
Page 41
88
Do you want to start Auto Search?
Previous channel list will be replaced.
First Time Installation (2)
BACK
NOYES
Automatic Search
Progress
Channel No
Frequency
30%
33
587.0 MHz
TV List : 013
TTV-1
TTV-2
HAKKA
Music List : 002
G-Guide
RAIL WAY
Page 42
9 9
1
2
3
4
5
7
8
Program Name
DIMO
FTV
FMTV
FTVN
TTV-1
HAKKA
CTS
No.
TTV-2
6
TV Program List
TV
13
HAKKA
LR
TV/Radio
Channel No.
Channel Name
Sound Mode
V olume
Page 43
1010
Subtitle Language
ENG
OFF
Program Info
Program Name
Program No
Channel No
Frequency
Modulation
Guard Interval
Transmit Mode
4021
4022
0
32
581
QAM16
8k
HAKKA
Video PID
Audio PID
Hierarchy Mode
HP Code Rate
LP Code Rate
2/3
11
Strength
Quality
67%
17%
Page 44
1111
2006/06/23 05:00-07:00
Description:
Fashion on Friday at 4 and 5
A fantastic selection of this seasons fashion
brought to you in the comfort of your own home.
18
19
20
21
Program Name
The HITS
UKTV Br tIdea
f tn
TMF
No.
TV Program List
2006/06/23 15:36
Fashion on Friday at 4 and 5
16:00-18:00
The Quattro Gem Collection
18:00-19:00
22
Ideal World
,
2006/06/23 Ideal World
16:00
18:00
18:00
19:00
20:00
21:00
12:00
13:00
18
19
20
21
Program Name
The HITS
UKTV Br tIdea
f tn
TMF
No.
TV Program List
22
Ideal World
,
Fashion on Friday at 4
The Quattro Gem Coll
Pick of the Day
Prai Luxury Skincare
Pick of the Day
19:00
20:00
2006/06/23 15:36
Page 45
1212
Audio channel
Channel
Audio PID
Sound Mode
Audio 1
4012
LR
Page 46
1313
Program edit table
Program Name
Favor
Move
Del
No.
1
2
3
4
5
6
7
8
9
10
DIMO
FTV
FMTV
FTVN
TTV-1
TTV-2
HAKKA
CTS
CTS-IQ
CTS-EQ
Page 47
1414
Program edit table
Program Name
Favor
Move
Del
No.
1
2
3
4
5
6
7
8
9
10
DIMO
FTV
FMTV
FTVN
TTV-1
TTV-2
HAKKA
CTS
CTS-IQ
CTS-EQ
Program edit table
Program Name
Favor
Move
Del
No.
1
2
3
4
5
6
7
8
9
10
DIMO
FTV
FMTV
FTVN
TTV-1
TTV-2
HAKKA
CTS
CTS-IQ
CTS-EQ
Page 48
1515
Warning
Do you want to erase
your previous channel list?
YES NO
Warning
Do you want to start Auto Search?
OK
Cancel
Sort
Page 49
1616
Automatic Search
Progress
Channel No
Frequency
30%
33
587.0 MHz
TV List : 013
TTV-1
TTV-2
HAKKA
Music List : 002
G-Guide
RAIL WAY
Manual Search
28
557.0 MHz
6 MHz
OK
Strength
Quality
55%
35%
Channel No.
Frequency
Bandwidth
Page 50
1717
Enter Parental PIN
Enter PIN
OK
Parental Setting
Change PIN
Channel Lock
Channel Lock
Parental Control
YES
NO
NO
Parental Setting
Program Name
Lock
No.
1
2
3
4
5
6
7
8
9
10
DIMO
FTV
FMTV
FTVN
TTV-1
TTV-2
HAKKA
CTS
CTS-IQ
CTS-EQ
Page 51
1818
Change Parental PIN
Old PIN
New PIN
Confirm New PIN
OK
Enter Parental PIN
Enter PIN
Page 52
1919
PAL
NTSC
AUTO
AUTO
TV Standard
Page 53
2020
Antenna Power
OFF
ON
OFF
4:3 PS
4:3 LB
16:9
Display Type
4:3 PS
Video Output
CVBS
RGB
RGB
Page 54
2121
Regional Setting
Region
OSD Language
Time Zone
England
English
CMT+00:00
Time Setting
GMT usage
Time Zone
ON
CMT+00:00
Language
OSD Language
English
English
English
OFF
1st Audio Language
2nd Audio Language
Subtitle Language
English
Page 55
2222
Schedule
T ask1
Task2
Task3
Task4
Task5
Task6
Task7
Task8
Task9
Task10
Active
Inactive
Inactive
Inactive
Inactive
Inactive
Inactive
Inactive
Inactive
Inactive
Mode
Start Date
Start Time
Eng Time
Channel T ype
Channel No
Daily
2005/06/06
00:00
00:00
TV
0001
Detail
Page 56
2323
System Update
Press Any Key to Exit.
Status
T ansmission
Burn
Initializing
000%
000%
Factory Default
NO
YES
OK
Cancel
Warning
Do you want to set factory default?
System Information
Version: v1.08 212u_IO_LG_9013_0.1.7.1
Date:MM/DD/YYYY
Page 57
2424
Menu Color
Transparency Level
Border Pattern
Entry Animation
Personal Style
8
Round
Right
Blue
Blue
Page 58
2525
Page 59
2626
Page 60
 Loading...