

VDW ROTATE 35.04, ROTATE 20.05, ROTATE 30.04, ROTATE 15.04, ROTATE 50.04 Directions For Use Manual
...Page 1

VDW.ROTATE™
Gebrauchsanweisung
vdw-dental.com
Page 2

2
NUR FÜR DEN ZAHNÄRZTLICHEN GEBRAUCH
de
GEBRAUCHSANWEISUNG
VDW.ROTATE™ INSTRUMENTE FÜR ENDODONTISCHE BEHANDLUNGEN
VDW.ROTATE™ : 15.04, 20.05, 25.04, 25.06, 30.06, 35.06, 40.06, 30.04, 35.04, 40.04, 50.04, 60.04
VDW.ROTATE™ INSTRUMENTE FÜR DIE ENDODONTISCHE
REVISION
VDW.ROTATE™ Revision: 25.05
1. ZUSAMMENSETZUNG
Die VDW.ROTATE™ Instrumente bestehen aus drei Hauptkomponenten: dem Arbeitsteil aus einer wärmebehandelten Nickel-Titan-Legierung und mit lackierten Tiefenmarkierungen, einem farbigen Silikonstopper und einem
vernickelten Messingschaft.
2. LIEFERUMFANG
VDW.ROTATE™ Blisterverpackung mit 3, 4 oder 6 sterilen Instrumenten.
3. VERWENDUNGSZWECK, VORGESEHENER BENUTZER
Die VDW.ROTATE™ Feilen sind sterile, motorgetriebene Instrumente mit kontinuierlicher Bewegung für die
Aufbereitung und Reinigung des Wurzelkanalsystems bei endodontischen Behandlungen.
Diese Instrumente dürfen nur von Zahnärzten und Endodontologie-Spezialisten in Zahnarztpraxen und Krankenhäusern verwendet werden.
4. KONTRAINDIKATIONEN
Wie alle mechanisch angetriebenen Wurzelkanalinstrumente sollten VDW.ROTATE™ Feilen aufgrund des
erhöhten Bruchrisikos nicht bei ausgeprägten und plötzlichen apikalen Krümmungen verwendet werden.
Die Sicherheit und Wirksamkeit der Verwendung wurden bei schwangeren oder stillenden Frauen und Kindern
noch nicht nachgewiesen.
Page 3

3
5. WARNHINWEISE
Dieses Produkt enthält Nickel und sollte nicht bei Personen mit bekannter allergischer Überempfindlichkeit auf
dieses Material angewandt werden.
VDW.ROTATE™ Feilen werden steril geliefert. Bei Wiederverwendung besteht ein erhöhtes Risiko einer Kreuzkontamination oder eines Bruchs.
6. VORSICHTSMASSNAHMEN
• Instrumente im Falle von Korrosion/Farbverlust entsorgen.
• Mehrfache Verwendung und Desinfektion sowie erneute Sterilisation können zu einem erhöhten Bruchrisiko
führen.
• Diese Instrumente dürfen nicht in eine Natriumhypochlorit-Lösung eingetaucht werden.
• Instrumentenaufbereitung: Befolgen Sie die Anweisungen zur Aufbereitung in Teil 9.
• Reinigen Sie die Schneiderillen während der Instrumentierung häufig, mit gleichzeitiger Sichtprüfung auf
Anzeichen von Verformung oder Abnutzung wie etwa ungleichmäßige Rillen oder stumpfe Stellen.
• Spülen Sie den Kanal während des gesamten Verfahrens immer wieder gründlich, mindestens bei jedem
Feilenwechsel.
• VDW.ROTATE™ Feilen sollten nur in Regionen des Kanals mit bestätigtem und reproduzierbarem Gleitpfad
verwendet werden. Stellen Sie einen reproduzierbaren Gleitpfad mit Handfeilen wie C-Pilot
bis Größe ISO010.
• Verwenden Sie die passende Finierfeilengröße, um dem Kanal passiv bis auf Arbeitslänge zu folgen, und
ziehen Sie sie dann sofort zurück.
• Arbeiten Sie stets mit minimalem Druck nach apikal. Drücken Sie die Feilen niemals gewaltsam den Kanal
hinunter.
• Zur optimalen Nutzung werden Geräte mit Drehmomentkontrolle empfohlen.
• Verwenden Sie in engen und/oder stark gekrümmten Kanälen die spezielle VDW.ROTATE™ Sequenz (siehe
Abschnitt „ANWENDUNG SCHRITT FÜR SCHRITT“).
• Die rotierenden VDW.ROTATE™ Feilen können mit Endodontiemotoren von VDW mit einer Drehzahl zwischen
300 und 400U/min verwendet werden. In der nachstehenden Tabelle sind die empfohlenen Motoreinstellungen für die jeweilige Instrumentengröße aufgeführt:
®
her, mindestens
de
Page 4
4
Feilengröße Drehmoment [Ncm] Drehzahl [U/min]
VDW.ROTATE™ 15.04 1,3
de
VDW.ROTATE™ 20.05 2,1
VDW.ROTATE™ 25.04 2,3
VDW.ROTATE™ 25.06 2,3
VDW.ROTATE™ 30.04 2,0
VDW.ROTATE™ 35.04 2,3
VDW.ROTATE™ 40.04 2,3
VDW.ROTATE™ 50.04 2,3
VDW.ROTATE™ 60.04 2,3
VDW.ROTATE™ 30.06 2,0
VDW.ROTATE™ 35.06 2,3
VDW.ROTATE™ 40.06 2,3
VDW.ROTATE™ Revision 25.05 3,5 400
7. UNERWÜNSCHTE WIRKUNGEN
Keine bekannt.
300 - 400
8. ANWENDUNG SCHRITT FÜR SCHRITT
8.1. Anweisungen für VDW.ROTATE™ Behandlungsfeilen
Das Arbeitsteil der VDW.ROTATE™ Instrumente besteht aus einer Nickel-Titan-Legierung. VDW.ROTATE™ Feilen werden wärmebehandelt und weisen dadurch eine bessere Biegsamkeit und größere Widerstandsfähigkeit
gegen zyklische Ermüdung im Vergleich zu herkömmlichem Nickel-Titan auf. Aufgrund dieses Verfahrens können VDW.ROTATE™ Instrumente leicht gebogen erscheinen. Dabei handelt es sich nicht um einen Herstellungsfehler, und die Leistungsfähigkeit des Instruments wird nicht beeinträchtigt. Es ist nicht erforderlich, das
Instrument vor dem Einsatz im Wurzelkanal zu begradigen.
8.1.1. Röntgenologische Evaluierung
Konsultieren Sie zur diagnostischen Bestimmung von Weite, Länge und Krümmung von Wurzel und Kanal ein
Röntgenbild oder einen 3D-Scan.
Page 5

8.1.2. VDW.ROTATE™ Aufbereitungstechnik
5
Die VDW.ROTATE™ Instrumente sind vielseitig verwendbar; es werden jedoch die beiden folgenden Grundtechniken empfohlen:
• Auf- und Abbewegung: Führen Sie das Instrument in 2-3 sanften Auf- und Abbewegungen etwa 1-3mm in
den Kanal hinein und wieder hinaus.
• Bürstbewegung mit folgender Technik:
a) Führen Sie das rotierende Instrument in den Wurzelkanal ein, ohne dabei die Kanalwände zu berühren.
b) Führen Sie das Instrument mit leichtem Druck an die Kanalwände.
c) Führen Sie kleine Streich-/Bürstbewegungen (über 1-3 Millimeter) in koronaler Richtung aus; lassen Sie
das Instrument dabei im Kanal.
d) Bewegen Sie das Instrument 1-3Millimeter nach apikal und wiederholen Sie dann die unter c beschrie-
bene Bewegung. Arbeiten Sie sich Schritt für Schritt mit Auf- und Abbewegungen weiter in Richtung
Apex vor.
1) Schätzen Sie die Arbeitslänge mit präoperativen Röntgenaufnahmen aus einem geeigneten Winkel.
2) Präparieren Sie eine ausreichend große Zugangskavität, so dass alle Wurzelkanaleingänge freigelegt sind.
3) Sondieren Sie die koronalen 2/3 der Kanäle mit einer 010C-Pilot
4) Sondieren Sie den gesamten Wurzelkanal mit einer 010C-Pilot
®
Feile.
®
, bestimmen Sie die Arbeitslänge (AL)
mit einem elektronischen Apex-Lokalisator (EAL) in Verbindung mit Röntgenaufnahmen, spülen Sie und
bestätigen Sie die Gängigkeit.
5) Stellen Sie den Silikonstopper entsprechend ein.
6) Wählen Sie entsprechend der Größe des VDW.ROTATE™ Instruments die geeignete Elektromotoreinstellung mit voreingestellter Drehmomentkontrolle.
7) Schaffen Sie mit Spülflüssigkeit im Kanal mit der VDW.ROTATE™ 15.04 einen reproduzierbaren Gleitpfad
bis zur Arbeitslänge und bestätigen Sie diesen.
8) Spülen Sie den Kanal regelmäßig und reinigen Sie die Schneiderillen der Feilen beim Herausnehmen mit
einem mit Alkohol befeuchteten Gazestreifen von Verschmutzungen.
9) Inspizieren Sie die Schneiderillen routinemäßig beim Herausnehmen auf Entwindung und Begradigung
(oder Ausdehnung). Wenn Sie Verformungen feststellen, entsorgen Sie die Feile und verwenden Sie eine
neue VDW.ROTATE™ Feile.
10) Verwenden Sie das nächste Instrument der Sequenz, VDW.ROTATE™ 20.05, bis zum Erreichen der
Arbeitslänge.
11) Spülen Sie den Kanal regelmäßig und reinigen Sie die Schneiderillen der Feilen beim Herausnehmen mit
einem mit Alkohol befeuchteten Gazestreifen von Verschmutzungen.
12) Inspizieren Sie die Schneiderillen routinemäßig beim Herausnehmen auf Entwindung und Begradigung
(oder Ausdehnung). Wenn Sie Verformungen feststellen, entsorgen Sie die Feile und verwenden Sie eine
neue VDW.ROTATE™ Feile.
13) Bestimmen Sie die finale Arbeitslänge mit einem elektronischen Apex-Lokalisator.
14) Wählen Sie je nach Krümmung und Größe des Kanals wie folgt zwischen VDW.ROTATE™ Größe 25.04
oder 25.06:
a) Wenn der Kanal eng und stark gekrümmt ist, verwenden Sie bis zum Erreichen der Arbeitslänge
VDW.ROTATE™ 25.04.
b) Verwenden Sie für die anderen Kanäle VDW.ROTATE™ 25.06 bis zur Arbeitslänge.
15) Spülen Sie den Kanal regelmäßig und reinigen Sie die Schneiderillen der Feilen beim Herausnehmen mit
einem mit Alkohol befeuchteten Gazestreifen von Verschmutzungen.
de
Page 6

6
16) Inspizieren Sie die Schneiderillen routinemäßig beim Herausnehmen auf Entwindung und Begradigung
(oder Ausdehnung). Wenn Sie Verformungen feststellen, entsorgen Sie die Feile und verwenden Sie eine
de
neue VDW.ROTATE™ Feile.
17) Sondieren Sie das Foramen mit einer Handfeile Nr. 25 (NiTi oder Edelstahl):
a) Wenn das Instrument auf Arbeitslänge gut passt, ist der Kanal aufbereitet und bereit für die Obturation.
b) Wenn die Handfeile Nr. 25 (NiTi oder Edelstahl) auf Arbeitslänge locker sitzt, fahren Sie mit der nächsten
Größe 030 und bei Bedarf mit 035, 040, 050 oder 060 fort, unter Sondierung nach jedem Instrument
mit den jeweiligen Handfeilen 030, 035, 040, 050 oder 060. Verwenden Sie die gleiche Aufbereitungstechnik bis zur Arbeitslänge.
18) Spülen Sie während der Behandlung reichlich und überprüfen Sie wiederholt die Gängigkeit des Kanals.
19) Verwenden Sie zum Spülen Desinfektionslösungen wie etwa Natriumhypochlorit mit einer Konzentration
von maximal 5% .
20) Trocknen und füllen Sie den Kanal mit einer geeigneten Technik für eine dreidimensionale Füllung mit
passenden VDW.ROTATE™ Guttapercha-Stiften oder GUTTAFUSION
®
.
8.2. Anweisungen für VDW.ROTATE™ Revisionsfeile
1) Öffnen Sie den Kanaleingang mit einem Gates-Glidden-Bohrer oder einem Ultraschallinstrument und entfernen Sie die Guttapercha aus dem koronalen Drittel.
2) Bei Bedarf die Guttapercha mit einem Lösungsmittel (z. B. Eukalyptusöl, Orangenöl) erweichen.
3) Wählen Sie entsprechend der Größe des VDW.ROTATE™ Instruments die geeignete vorprogrammierte
Elektromotoreinstellung mit Drehmomentkontrolle (siehe Kapitel 6).
4) Setzen Sie die Spitze des VDW.ROTATE™ Revisionsinstruments 25.05 auf die Guttapercha auf und lassen
Sie es rotieren. Die VDW.ROTATE™ Revisionsfeile 25.05 hat eine schneidende Spitze, so dass das Instrument ohne Druck leicht in die Guttapercha vordringen sollte.
5) Verwenden Sie das VDW.ROTATE™ Revisionsinstrument 25.05, ohne Druck nach unten auszuüben.
6) Entfernen Sie die Wurzelkanalfüllung sukzessive mit umlaufenden Feilenbewegungen.
7) Inspizieren Sie die Schneiderillen routinemäßig beim Herausnehmen auf Entwindung und Begradigung
(oder Ausdehnung). Wenn Sie Verformungen feststellen, entsorgen Sie die Feile und verwenden Sie eine
neue VDW.ROTATE™ Feile.
8) Verwenden Sie ein Handinstrument (z.B. C-Pilot Feile) der Größe ISO08, um den Wurzelkanal auf volle
Arbeitslänge aufzubereiten.
9) Wenn die volle Arbeitslänge bis zum Apex mit dem Handinstrument der ISO08 erreicht ist, bereiten Sie den
Wurzelkanal bis zur vollen Arbeitslänge mit Handfeilen bis Größe ISO10 auf.
10) Setzen Sie die Vorbereitung mit VDW.ROTATE™ Behandlungsinstrumenten mit der in Abschnitt
8.1 beschriebenen Vorgehensweise fort, bis die erforderliche Größe erreicht ist.
9. DESINFEKTION, REINIGUNG UND STERILISATION
Aufbereitungsverfahren in Übereinstimmung mit DINENISO17664/AAMI ST81.
9.1. Allgemeine Grundsätze
Alle Instrumente müssen vor jeder Verwendung gereinigt, desinfiziert und sterilisiert werden; dies gilt für in sterilem Zustand gelieferte Instrumente, die für den wiederholten Gebrauch bestimmt sind, sowie für beschädigte
oder geöffnete sterile Verpackungen. Gründliche Reinigung und Desinfektion sind unabdingbare Voraussetzungen für eine effektive Sterilisation.
Page 7
7
9.2. Vorbehandlung am Einsatzort
Verunreinigungen (insbesondere Pulpa- und Dentinreste) müssen sofort entfernt werden, nachdem das Instrument an einem Patienten verwendet wurde (innerhalb von maximal 2 Stunden).
Um sicherzustellen, dass keine Verunreinigung am Instrument antrocknet, und für eine bessere Wirksamkeit der
nachfolgenden Vorbereitung muss folgendes Verfahren angewandt werden:
Schritt-für-Schritt-Verfahren:
1) Legen Sie das verwendete Instrument nach der Behandlung vor der Vordesinfektion/Reinigung und zum
Transport in den Zwischenhalter (Mindestaufbewahrungszeit entsprechend der Gebrauchsanweisung des
Herstellers des Desinfektionsmittels: max. 2 Stunden).
2) Für jeden Patienten muss ein mit einer neuen Schaumstoffplatte vorbereiteter Zwischenhalter verwendet
werden. Der Zwischenhalter muss zu mindestens zwei Dritteln mit Desinfektionsmittel gefüllt sein.
Bei der Wahl eines Desinfektionsmittels ist Folgendes zu beachten:
• Es muss für die Desinfektion von Instrumenten aus Metall und Kunststoff geeignet sein.
• Es muss aldehydfrei sein (Cidex OPA ist aufgrund seiner speziellen Rezeptur zulässig).
• Seine Wirksamkeit muss bestätigt sein (VAH/DGHM-Zulassung, FDA-Zulassung oder CE-Kennzeichnung).
• Es muss mit den Instrumenten kompatibel sein (siehe Abschnitt „9.11. Wichtige Informationen zur Material-
beständigkeit“).
• Die vom Hersteller des Desinfektionsmittels angegebene Konzentration und Mindesteinwirkzeit müssen strikt
eingehalten werden. Verwenden Sie nur frisch zubereitete Lösungen und keimarmes (<10CFU/ml) Wasser.
• Bitte beachten Sie, dass das bei der Vorbehandlung verwendete Desinfektionsmittel nur dem persönlichen
Schutz dient und nicht den nach der Reinigung erforderlichen Desinfektionsschritt ersetzt.
de
WARNHINWEISE
• Unter keinen Umständen dürfen Instrumente, die bereits mit Desinfektionsmittel in Kontakt gekommen sind, erneut für die Behandlung eines Patienten verwendet werden.
• Der blaue Schaumstoffeinsatz für den Zwischenhalter darf nur ein Mal verwendet und weder gereinigt/desinfiziert noch sterilisiert werden.
Alle weiteren Schritte des Vorbereitungsverfahrens müssen am gleichen Tag ausgeführt werden.
Page 8
8
9.3. Vorbereitung vor der Reinigung
Schritt-für-Schritt-Verfahren:
de
1) Entfernen Sie den Stopper vom Instrument und entsorgen Sie ihn.
2) Reinigen Sie es dann zur Entfernung von Verunreinigungen mindestens 3 Mal 1 Minute lang unter fließendem Wasser; verwenden Sie zur manuellen Entfernung von Verunreinigungen eine saubere, weiche Bürste
oder ein sauberes, weiches Tuch, die nur diesem Zweck dienen; verwenden Sie niemals Metallbürsten
oder Stahlwolle.
3) Kontrollieren Sie, dass keine sichtbaren Verschmutzungen oder Rückstände mehr vorhanden sind und
wiederholen Sie bei Bedarf die Vorreinigung.
WARNHINWEIS
Es wird empfohlen, nur keimarmes (<10CFU/ml) Wasser zu verwenden; bei diesem Schritt kann
jedoch Leitungswasser geeignet sein.
9.4. Reinigung/Desinfektion
Wir empfehlen ein automatisiertes Verfahren für die Reinigung und Desinfektion der Instrumente (siehe
9.4.1 nachstehend). Eine manuelle Methode, einschließlich der Verwendung eines Ultraschallbades (siehe
9.4.2 nachstehend), sollte nur angewandt werden, wenn eine automatisierte Methode nicht möglich ist, da dies
weniger effektiv ist und eine geringere Reproduzierbarkeit aufweist.
Bei der Wahl eines Reinigungs- und Desinfektionsmittels ist Folgendes zu beachten:
• Es muss für die Reinigung und Desinfektion der Instrumente geeignet sein.
• Das Reinigungsmittel muss gegebenenfalls für die Ultraschallreinigung geeignet sein (kein Schäumen).
• Wird kein thermisches Desinfektionsverfahren angewendet, muss außerdem ein geeignetes Desinfektions-
mittel mit bestätigter Wirksamkeit verwendet werden, das mit dem verwendeten Reinigungsmittel kompatibel
ist.
• Die verwendeten Chemikalien müssen mit den Instrumenten kompatibel sein (siehe Abschnitt „9.11. Wichtige
Informationen zur Materialbeständigkeit“).
• Es darf keine Neutralisation erforderlich sein.
• Kombinierte Reinigungs-/Desinfektionsmittel dürfen nicht verwendet werden.
• Die vom Hersteller des Reinigungs- und Desinfektionsmittels angegebenen Konzentrationen, Temperaturen
und Einwirkzeiten sowie die Mindestanforderungen für das anschließende Spülen müssen strikt eingehalten
werden. Verwenden Sie nur frisch zubereitete Lösungen, steriles oder keimarmes (<10CFU/ml) und gering
endotoxinbelastetes (<0,25EU/ml) Wasser (z. B. hochreines Wasser HPW).
9.4.1. Automatische Reinigung/Desinfektion (Thermodesinfektor)
Für die Aufbereitung empfehlen wir die Verwendung der LavEndo Box (Artikelnummer: V04479).
Page 9
9
Schritt-für-Schritt-Verfahren:
1) Bringen Sie an den vorgereinigten Instrumenten neue Stopper an.
2) Sortieren Sie die Instrumente in die Endo-Module ein; Mini-Stufenmodule (Artikelnummer: V040403).
3) Setzen Sie das Endo-Modul in den unteren blauen Bereich der LavEndo Box ein und schließen Sie sie
(einrasten lassen).
HINWEIS
Eine Vorbereitung im Sockelmodul ist nicht zulässig.
4) Stellen Sie die LavEndo Box waagerecht in den Thermodesinfektor.
5) Starten Sie das Programm.
6) Wenn das Programm beendet ist, nehmen Sie die LavEndo Box aus dem Thermodesinfektor.
7) Kontrollieren und verpacken Sie die Instrumente so bald wie möglich nach dem Herausnehmen (siehe
„9.5. Inspektion“; „9.7. Wartung“ und „9.8. Verpackung“), nachdem Sie sie gegebenenfalls an einem
sauberen Ort weiter haben trocknen lassen.
WARNHINWEISE
• Die Wirksamkeit des Thermodesinfektors muss bestätigt sein (DGHM-Zulassung, FDA-Zulassung
oder CE-Kennzeichnung gemäß ENISO15883).
• Der Thermodesinfektor muss regelmäßig entsprechend den Angaben des Herstellers gewartet und
kontrolliert sowie gemäß ENISO15883 validiert werden.
• Nach Möglichkeit ist ein geprüftes Programm zur thermischen Desinfektion zu verwenden (A0-Wert
≥ 3000 oder mindestens fünf Minuten bei 90°C, oder bei älteren Geräten mindestens 10Min. bei
93°C).
• Das verwendete Programm muss für die Instrumente geeignet sein und die vorgeschriebenen Spülzyklen beinhalten.
• Zum abschließenden Spülen darf nur steriles oder keimarmes (<10CFU/ml) und gering endotoxinbelastetes (<0,25EU/ml) Wasser verwendet werden.
• Im Falle einer chemischen Desinfektion muss die Entfernung der Rückstände durch die Validierung
des Verfahrens des Thermodesinfektors bestätigt sein.
• Stellen Sie sicher, dass die neuen Stopper in ihrer Originalverpackung an einem sauberen Ort aufbewahrt werden.
de
9.4.2. Manuelle Reinigung und Desinfektion
Für die manuelle Aufbereitung empfehlen wir die Verwendung der LavEndo Box (Artikelnummer: V04479).
Schritt-für-Schritt-Verfahren für die manuelle Reinigung:
1) Sortieren Sie die Instrumente ohne Stopper in die Endo-Module; Mini-Stufenmodule (Artikelnummer:
V040403).
2) Setzen Sie das Endo-Modul in den unteren blauen Bereich der LavEndo Box ein und schließen Sie sie
(einrasten lassen).
Page 10

10
HINWEIS
Eine Vorbereitung im Sockelmodul ist nicht zulässig.
de
3) Legen Sie neue Stopper in einen Kleinteilekorb mit ausreichend kleiner Maschenweite.
4) Stellen Sie die LavEndo Box waagrecht und den Kleinteilekorb mit den neuen Stoppern für die vorgeschriebene Einwirkzeit in das Reinigungsbad; stellen Sie dabei sicher, dass die Instrumente ausreichend bedeckt
sind (ggf. mit Ultraschall-Unterstützung).
5) Nehmen Sie dann die LavEndo Box und den Kleinteilekorb mit den neuen Stoppern aus dem Reinigungsbad
und spülen Sie sie mindestens 3 Mal 1 Minute lang gründlich mit Wasser.
Schritt-für-Schritt-Verfahren für die manuelle Desinfektion:
1) Stellen Sie die LavEndo Box waagrecht und den Kleinteilekorb mit den neuen Stoppern für die vorgeschriebene Einwirkzeit in das Desinfektionsbad; stellen Sie dabei sicher, dass die Instrumente ausreichend
bedeckt sind.
2) Nehmen Sie dann die LavEndo Box und den Kleinteilekorb mit den neuen Stoppern aus dem Desinfektionsbad und spülen Sie sie mindestens 5 Mal 1 Minute lang gründlich mit Wasser.
3) Trocknen Sie die LavEndo Box und den Kleinteilekorb mit den neuen Stoppern durch vollständiges Abblasen mit ölfreier, gefilterter Druckluft (oder medizinischer Druckluft aus einer Dose) und lassen Sie sie an
einem sauberen Ort weiter trocknen.
4) Kontrollieren und verpacken Sie die Instrumente so bald wie möglich und versehen Sie sie mit neuen
Stoppern.
9.5. Inspektion
Öffnen Sie die LavEndo Boxen und entnehmen Sie die Module. Kontrollieren Sie alle Instrumente, Module und
LavEndo Boxen nach der Reinigung/Desinfektion. Beschädigte Instrumente, Boxen und Module sollten sofort
entsorgt werden.
Diese Defekte umfassen: plastische Verformungen (z. B. durch zu hohe Temperatur bei der Sterilisation); verbogene Instrumente; beschädigte Gewinde; beschädigte Schneideflächen; stumpfe Schneideklingen; Korrosion;
Verfärbung.
9.6. Entsorgung
Beachten Sie für eine ordnungsgemäße Entsorgung stets die nationalen Gesetzte und Empfehlungen der Behörden.
9.7. Wartung
WARNHINWEIS
Es darf kein Instrumentenöl verwendet werden.
Page 11

9.8. Verpackung
11
Schritt-für-Schritt-Verfahren:
1) Stellen Sie das Modul in den unteren Bereich des schwarzen Sterilisationstrays und schließen Sie es mit
der passenden Abdeckung.
2) Verpacken Sie dann die Sterilisationstrays in Einweg-Sterilisationsbeutel (Einweg-Verpackung).
WARNHINWEISE
• Eine Sterilisation in den Sterilisationstrays ohne zusätzliche Verpackung ist nicht zulässig. Das Autoklav-Papier in den Boxen dient nur zur zusätzlichen Sicherheit.
• Verwenden Sie nur Sterilisationsbeutel gemäß DIN EN 11607/ANSI AAMI ISO 11607 und die für
Dampfsterilisation geeignet sind (temperaturbeständig bis 142°C (288°F) oder höher, ausreichende
Dampfdurchlässigkeit).
9.9. Sterilisation
Verwenden Sie nur die unten angegebenen Sterilisationsmethoden; andere Sterilisationsmethoden sind nicht
zulässig.
• Fraktioniertes Vakuum-/Vorvakuumverfahren (mindestens drei Vakuumzyklen) oder Gravitationsverfahren
ausreichender Produkttrocknung
2
:
Minimale Sterilisationszeit
Sterilisationsverfahren Sterilisationstemperatur
Einwirkzeit bei Sterilisationstem-
peratur
Fraktioniertes Vakuum-/
Vorvakuumverfahren
Fraktioniertes Vakuum-/
Vorvakuumverfahren
Gravitationsverfahren 134°C (273°F) 15 Minuten
Gravitationsverfahren 121°C (250°F) 60 Minuten
134°C (273°F) 3 Minuten
121°C (250°F) 20 Minuten
3
1
mit
de
1
Das weniger effektive Gravitationsverfahren sollte nur verwendet werden, wenn das fraktionierte Vakuumver-
fahren nicht verfügbar ist.
2
Die tatsächlich erforderliche Trocknungszeit hängt direkt von Parametern ab, für die ausschließlich der Anwender verantwortlich ist (Bestückungskonfiguration, wie viele Gegenstände und wie eng beieinander diese geladen werden, Zustand des Sterilisators usw.) und muss deshalb vom Anwender festgelegt werden. Die Trocknungszeit muss jedoch immer mindestens 20 Minuten betragen.
3
Oder 18Min. (Prionen-Inaktivierung).
Page 12
12
WARNHINWEISE
de
• Der Dampfsterilisator muss DINEN13060 oder DINEN285, ANSIAAMIST79 entsprechen.
• Der Dampfsterilisator muss gemäß DINENISO17665 validiert sein (gültige IQ und OQ sowie produktspezifische Leistungsqualifikation (PQ)).
• Die maximale Sterilisationstemperatur von 138°C (280°F, einschließlich Toleranzen) darf nicht überschritten werden; gemäß DINENISO17665.
9.10. Aufbewahrung
Nach der Sterilisation müssen die Instrumente in der Sterilisationsverpackung sowie trocken und staubfrei
aufbewahrt werden.
WARNHINWEISE
• Bewahren Sie die Rückverfolgbarkeitsaufzeichnungen auf und bestimmen Sie die Haltbarkeit gemäß
den Richtlinien des Verpackungsherstellers.
• Nach der Sterilisation sollte das Produkt vorsichtig gehandhabt werden, um die Unversehrtheit der
Verpackung aufrechtzuerhalten (Sterilbarriere).
• Überprüfen Sie die Verpackung und die Medizinprodukte vor Gebrauch (Unversehrtheit der Verpackung, keine Feuchtigkeit und Haltbarkeitsdatum). Im Falle einer Beschädigung der Verpackung sollte
das gesamte Verfahren einschließlich Sterilisation wiederholt werden.
9.11. Wichtige Informationen zur Materialbeständigkeit
Stellen Sie bei der Auswahl der Reinigungs- und Desinfektionsmittel sicher, dass diese keine der folgenden
Substanzen enthalten:
Phenol / starke Säuren (ph< 6) oder starke Alkalien (ph > 8) / neutrales enzymatisches Reinigungsmittel
empfohlen / Aldehyde / Korrosionsschutzmittel (insbesondere Di- oder Triethanolamin) / Oxidationsmittel (Wasserstoffperoxid, Natriumhypochlorit über 5% Stärke) / NiTi-Instrumente dürfen nur für maximal 5Minuten in
Oxidationsmittel (Natriumhypochlorit <5% Stärke) gegeben werden / Lösungsmittel / Öle.
WARNHINWEISE
• Reinigen Sie die Instrumente, Boxen, Module oder den Zwischenhalter niemals mit Metallbürsten
oder Stahlwolle. Setzen Sie die Instrumente, Boxen, Module oder den Zwischenhalter niemals Temperaturen über 142°C (288°F) aus. Es ist besonders wichtig sicherzustellen, dass sich die zu sterilisierenden Produkte nicht zu nahe an den Wänden oder dem Boden des Dampfsterilisators befinden
(Übertemperatur- und Verformungsgefahr).
• Der blaue Schaumstoffeinsatz für den Zwischenhalter darf nur ein Mal verwendet und weder gereinigt/desinfiziert noch sterilisiert werden.
Page 13

13
9.12. Maximale Anzahl von Verwendungen
Wir empfehlen, die nachstehende maximale Anzahl von Verwendungen unserer Instrumente für die Wurzelkanalaufbereitung nicht zu überschreiten:
Typ des Kanals
Extrem gekrümmte
(>30°) oder S-förmige
Kanäle
Mäßig gekrümmte Kanäle
(10° bis 30°)
Leicht gekrümmte
(<10°) oder gerade Kanäle
Edelstahlinstrumente
mit einem Durchmesser
≤ISO015
max. 1 Kanal max. 2 Kanäle max. 2 Kanäle
max. 1 Kanal max. 4 Kanäle max. 4 Kanäle
max. 1 Kanal max. 8 Kanäle max. 8 Kanäle
Edelstahlinstrumente
mit einem Durchmesser
>ISO015
NiTi-Instrumente
de
Page 14

300-400 rpm
0123
14
Symbole DE
de
Artikelnummer
Handgriff im rechten Winkel RW
Haltbarkeitsdatum
Hersteller
Gebrauchsanweisung beachten
Sterilisiert durch Bestrahlung
Chargenbezeichnung
Sortiment
Nickel-Titan
Bei beschädigter Verpackung nicht verwenden
Verpackungseinheit
䢵
䢶
In einem Dampfsterilisator (Autoklav) bei der angegebenen Temperatur sterilisierbar
Rotation im Uhrzeigersinn (empfohlene Drehzahl: min.: 300U/min, max.: 400U/min)
CE-Kennzeichnung
Page 15

Hinweise:
15
de
Page 16
Hersteller
0123
VDW GmbH
Bayerwaldstr. 15
81737 Munich
Deutschland
Telefon +49 (0) 89 62734-0
Fax +49 (0) 89 62734-304
info@vdw-dental.com
www.vdw-dental.com
MDEVROTDFUWEB Rev.2 / 13.05.2019
Page 17

VDW.ROTATE™
Directions
For Use
vdw-dental.com
Page 18

2
FOR DENTAL USE ONLY
en
DIRECTIONS FOR USE
VDW.ROTATE™ INSTRUMENTS FOR ENDODONTIC TREATMENT
VDW.ROTATE™ : 15.04, 20.05, 25.04, 25.06, 30.06, 35.06, 40.06, 30.04, 35.04, 40.04, 50.04, 60.04
VDW.ROTATE™ INSTRUMENTS FOR ENDODONTIC
RETREATMENT
VDW.ROTATE™ Retreatment: 25.05
1. COMPOSITION
The VDW.ROTATE™ instruments are made by three main components: the working part made of a nickeltitanium alloy with a heat treatment and with painted depth marks, a colored silicone stopper and a shank
made of brass with nickel plated.
2. CONTENTS
VDW.ROTATE™ blister package, 3, 4 or 6sterile instruments each.
3. INTENDED USE, INTENDED USER
The VDW.ROTATE™ files are engine driven sterile instruments with continuous motion, used in endodontic
treatment for shaping and cleaning the root canal system.
These instruments are to be used only in a clinical or hospital environment, by professional dentists,
general practitioners as well as endo specialists.
4. CONTRAINDICATIONS
As with all mechanically driven root canal instruments, VDW.ROTATE™ files should not be used in cases
of sudden apical curvatures due to heightened risk of breakage.
Safety and effectiveness of use have not been established in pregnant or breastfeeding women or in
children.
Page 19

3
5. WARNINGS
This product contains nickel and should not be used for individuals with known allergic sensitivity to this
material.
VDW.ROTATE™ files are provided sterile and reuse can increase the risk of cross contamination or
breakage.
6. PRECAUTIONS
• Discard instruments in case of appearance of corrosion/ loss of color.
• Multiple use disinfection and re-sterilisation cycles may lead to increased risk of file separation.
• These instruments should not be immersed in a sodium hypochlorite solution.
• Instrument reprocessing: follow the reprocessing instructions in part 9.
• Clean the flutes frequently during instrumentation, inspecting for signs of distortion or wear, such as
uneven flutes, dull spots.
• Frequently irrigate, recapitulate and irrigate the canal throughout the procedure, after using each file
at least.
• VDW.ROTATE™ files should only be used in regions of the canal that have a confirmed and reproducible
glide path. Establish a reproducible glide path using hand files such as C-Pilot
• Use the appropriate finishing file size to passively follow the canal to the working length, and then
withdraw immediately.
• Always use minimal apical pressure. Never force the files down the canal.
• For optimal usage, torque control devices are recommended.
• In narrow and/or highly curved canals, use the dedicated VDW.ROTATE™ sequence (see STEP BY STEP
INSTRUCTIONS section).
• The VDW.ROTATE™ rotary files can be used with endodontic motors from VDW at speed between 300
and 400 rpm. The table below shows the recommended motor settings adapted for each instrument
size:
®
, at least to ISO010 size.
en
Page 20

4
File Size Torque [cNm] Speed [rpm]
VDW.ROTATE™ 15.04 1.3
en
VDW.ROTATE™ 20.05 2.1
VDW.ROTATE™ 25.04 2.3
VDW.ROTATE™ 25.06 2.3
VDW.ROTATE™ 30.04 2.0
VDW.ROTATE™ 35.04 2.3
VDW.ROTATE™ 40.04 2.3
VDW.ROTATE™ 50.04 2.3
VDW.ROTATE™ 60.04 2.3
VDW.ROTATE™ 30.06 2.0
VDW.ROTATE™ 35.06 2.3
VDW.ROTATE™ 40.06 2.3
VDW.ROTATE™ Retreatment 25.05 3.5 400
7. ADVERSE REACTIONS
None known.
300 - 400
8. STEP BY STEP INSTRUCTIONS
8.1. Instructions for VDW.ROTATE™ Treatment files
The working part of the VDW.ROTATE™ instruments is made of nickel-titanium alloy. VDW.ROTATE™ files
undergo a thermal treatment process for more flexibility and a greater cyclic fatigue resistance compared
to traditional nickel-titanium. Due to this processing, VDW.ROTATE™ instruments may appear slightly
curved. This is not a manufacturing defect and dœs not weaken the instrument performance. It is not
necessary to straighten the instrument prior to use in the root canal.
8.1.1. Radiographic Evaluation
Review radiograph or 3D scan to diagnostically determine the width, length, and curvature of any given
root and canal.
Page 21

8.1.2. VDW.ROTATE™ Shaping technique
5
Although the VDW.ROTATE™ instruments are versatile, the 2following basic techniques are recommended:
• Pecking motion: advance of the instrument in 2-3gentle amplitudes approximately 1-3mm in-and-out
of the canal.
• Brushing motion using the following technique:
a) Insert the rotating instrument into the root canal without touching the walls of the canal.
b) Exerting gentle pressure, allow the instrument to touch the canal wall.
c) Make small, stroking/brushing movements (over 1-3millimeters) in a coronal direction, without
taking the instrument out of the canal.
d) Allow the instrument to move apically for 1-3millimeters and then repeat the movement described
under c. Gradually advance step-by-step towards the apex with up and down movements.
1) Estimate the working length using well-angulated preoperative radiographs.
2) Prepare an access cavity sufficient enough to reveal all root canal orifices.
3) Scout coronal 2/3 of canals with a 010 C-Pilot
4) Scout the whole root canal with a 010 C-Pilot
®
file.
®
, determine Working Length (WL) using an electronic
apex locator in combination with radiographs, irrigate and confirm patency.
5) Set the silicone stopper accordingly.
6) Choose the appropriate preprogrammed torque-controlled electric motor setting according to the
VDW.ROTATE™ instrument size.
7) With irrigation solution in the canal, create and confirm a reproducible glide path to WL using the
VDW.ROTATE™15.04 until reaching working length.
8) Routinely irrigate the canal and clean the file’s cutting flutes of debris upon removal with an alcohol-
moistened gauze.
9) Inspect cutting flutes routinely upon removal for presence of unwinding and straightening (or
elongation). If deformation is noted, discard and use a new VDW.ROTATE™ file.
10) Use the next instrument in the sequence, VDW.ROTATE™20.05 until reaching working length.
11) Routinely irrigate the canal and clean the file’s cutting flutes of debris upon removal with an alcohol
moistened gauze.
12) Inspect cutting flutes routinely upon removal for presence of unwinding and straightening (or
elongation). If deformation is noted, discard and use a new VDW.ROTATE™ file.
13) Determine the final working length using an electronic apex locator.
14) Depending on the canal curvature and size, choose between the VDW.ROTATE™ 25.04 or 25.06
size as following:
a) If the canal is narrow and highly curved, use the VDW.ROTATE™25.04 until reaching working
length.
b) For the other canals, use the VDW.ROTATE™ 25.06 until reaching working length.
15) Routinely irrigate the canal and clean the file’s cutting flutes of debris upon removal with an alcohol
moistened gauze.
en
Page 22

6
16) Inspect cutting flutes routinely upon removal for presence of unwinding and straightening (or
elongation). If deformation is noted, discard and use a new VDW.ROTATE™ file.
17) Gauge the foramen with a 25 hand file (NiTi or stainless steel):
en
a) If the instrument is snug at length, the canal is shaped and ready to be obturated.
b) If the 25 hand file (NiTi or stainless steel) is loose at length, proceed to the next size #030, and,
when necessary, the #035 or #040 or #050 or #/060, gauging after each instrument with the 030,
035, 040, 050 or 060 hand files, respectively. Use the same shaping technique up to working
length.
18) Use copious irrigation; re-verify canal patency throughout the procedure.
19) Irrigate using disinfecting solutions such as Sodium Hypochlorite at a concentration no more than
5%.
20) Dry and fill the canal with a proper technique that promotes a three-dimensional fill using matching
VDW.ROTATE™ Gutta Percha points or GUTTAFUSION
®
.
8.2. Instructions for VDW.ROTATE™ Retreatment file
1) Open the canal orifice with a gates glidden drill or an ultrasound instrument and remove guttapercha
from the coronal third.
2) If needed, soften the gutta-percha with a solvent (e. g. eucalyptus oil,orange oil).
3) Choose the appropriate preprogrammed torque-controlled electric motor setting according to the
VDW.ROTATE™ instrument size (see table chapter 6).
4) Place the tip of the VDW.ROTATE™ Retreatment 25.05 instrument on the guttapercha and allow
it to rotate. VDW.ROTATE™ Retreatment 25.05 file has a cutting tip so that the instrument should
progress easily in the guttapercha without pressure.
5) Use VDW.ROTATE™ Retreatment 25.05 instrument without downward pressure.
6) Gradually remove the root canal filling with circumferential filing movements.
7) Inspect cutting flutes routinely upon removal for presence of unwinding and straightening (or
elongation). If deformation is noted, discard and use a new VDW.ROTATE™ file.
8) Use a hand instrument (e.g. C-Pilot file) size ISO08 to negotiate the root canal to full working length.
9) Once full working length to the apex has been negotiated with the previous ISO08 hand instrument,
prepare the root canal with hand files up to size ISO10 to full working length.
10) Continue the preparation with VDW.ROTATE™ instruments for treatment using the same procedure
as described in section 8.1, until the required size has been reached.
9. DISINFECTION, CLEANING AND STERILISATION
Reprocessing procedure in line with DIN EN ISO17664/AAMI ST81.
9.1. General basics
All instruments must be cleaned, disinfected and sterilised prior to each use; this applies to instruments
delivered in a sterile condition that are intended for repeated use, and to damaged or opened sterile
packaging. Thorough cleaning and disinfection are essential prerequisites for effective sterilisation.
Page 23
7
9.2. Pre-Treatment at the place of use
Cross contamination (particularly pulp and dentine remnants) must be removed immediately after the
instrument has been used on a patient (within maximum 2hours).
The following procedures must be used to ensure that any contamination on the instruments cannot dry
on and to make subsequent preparation more effective:
Step by step procedure:
1) After treatment, place the used instrument in the interim stand prior to pre-disinfection/cleaning and
for transport (minimum storage time according to the disinfecting agent manufacturer’s directions
for use: max. 2hours).
2) A prepared interim stand with a new foam disc must be used for each patient. The interim stand must
be filled at least 2thirds of the way with disinfecting agent.
The following must be taken into account when selecting a disinfecting agent:
• It must be suitable for disinfecting instruments made from metal and plastic.
• It must be aldehyde-free (Cidex OPA is permitted due to its special recipe).
• Its effectiveness must have been verified (VAH/DGHM approval, FDA clearance or CE mark).
• It must be compatible with the instruments (see section “9.11. Important Information on material
resistance”).
• The concentration and minimum contact time specified by the disinfecting agent manufacturer must be
strictly adhered to. Only use freshly prepared solutions and low-germ (<10CFU/ml) water.
• Please note that the disinfecting agent used during pre-treatment is for personal protection only and is
not a substitute for the disinfection stage required after cleaning.
en
WARNINGS
• Under no circumstances may instruments that have already come into contact with disinfecting
agent be used to treat a patient again.
• The blue foam insert for the interim stand must only be used once and must neither be cleaned/
disinfected nor sterilised.
All further steps in the preparation process must be performed on the same day.
Page 24
8
9.3. Preparation prior to cleaning
Step by step procedure:
en
1) Remove the stopper from the instrument and dispose of it.
2) Then clean to remove contamination under flowing water at least 3 x 1 minute; to remove
contamination manually, use a soft, clean brush or soft, clean cloth that is only used for this purpose;
never use metal brushes or wire wool.
3) Check that no visible contamination or remnants remain and repeat the pre-cleaning process if
necessary.
WARNING
It is recommended to use only low-germ (<10CFU/ml) water; nevertheless, at this step, tap
water could be suitable.
9.4. Cleaning/disinfection
We recommend an automated procedure to clean and disinfect the instruments (see 9.4.1 below). A
manual method-including the use of an ultrasonic bath (see 9.4.2 below), should only be used if it is not
possible to use an automated method, as it is less effective and demonstrates a lower reproducibility.
The following must be taken into account when selecting a cleaning and disinfecting agent:
• It must be suitable for cleaning and disinfecting instruments.
• The cleaning agent, if applicable, must be suitable for ultrasonic cleaning (no foaming).
• If a thermal disinfection process is not used, a suitable disinfecting agent with verified effectiveness
must also be used and this must be compatible with the cleaning agent used.
• The chemicals used must be compatible with the instruments (see section “9.11. Important Information
on material resistance”).
• Neutralization must not be necessary.
• Combined cleaning agents/disinfecting agents must not be used.
• The concentrations, temperatures and contact times specified by the manufacturer of the cleaning
and disinfecting agent as well as the minimum specifications for subsequent rinsing must be strictly
adhered to. Only use freshly prepared solutions, sterile or low-germ (<10CFU/ml) and low-endotoxin
(<0.25EU/ml) water (e.g. highly purified water HPW).
9.4.1. Automated cleaning/disinfection (washer-disinfector)
For reprocessing, we do recommend the use of the LavEndo box (Reference: V04479).
Page 25
9
Step by step procedure:
1) Fit new stoppers to the pre-cleaned instruments.
2) Sort the instruments into the endo modules; Mini step modules (Reference: V040403).
3) Place the endo module in the blue lower section of the LavEndo box and close it (click into place).
NOTE
Preparation in the socket module is not permitted.
4) Insert the LavEndo box horizontally into the washer disinfector.
5) Start the program.
6) After the program has finished, remove the LavEndo box from the washer-disinfector.
7) Check and package the instruments as soon as possible after removing them (see “9.5. Inspection”;
“9.7. Maintenance” and “9.8. Packaging”), after leaving them to dry further in a clean place if
necessary.
WARNINGS
• The effectiveness of the washer-disinfector must have been verified (DGHM approval, FDA
clearance or CE mark according to EN ISO15883).
• The washer-disinfector must be regularly maintained and inspected according to the
manufacturers information and validated according to EN ISO15883.
• Where possible, a tested thermal disinfection program must be used (A0 value≥ 3000 or at
least five minutes at 90°C, or for older equipment at least 10 min. at 93°C).
• The program used must be suitable for the instruments and include the prescribed rinsing cycles.
• Only sterile or low-germ (<10CFU/ml) and low-endotoxin (<0.25EU/ml) water must be used
for final rinsing.
• In the case of chemical disinfection, the removing of the residues has to be approved by the
process validation of the washer disinfector process.
• Make sure to store the new stoppers in a clean place using the original packaging.
en
9.4.2. Manual cleaning and disinfection
For manual reprocessing we do recommend the use of the LavEndo box (Reference: V04 479).
Step by step procedure for Manual Cleaning:
1) Sort the instruments, without stoppers, into the endo modules; Mini step modules (Reference:
V040403).
2) Place the endo module in the blue lower section of the LavEndo box and close it (click into place).
Page 26
10
NOTE
Preparation in the socket module is not permitted.
en
3) Place new stoppers in a small parts basket with a sufficiently small mesh size.
4) Insert the LavEndo box horizontally and the small parts basket with the new stoppers into the
cleaning bath for the prescribed contact time, ensuring that the instruments are sufficiently covered
(with ultrasound assistance if necessary).
5) Then remove the LavEndo box and the small parts basket with the stoppers from the cleaning bath
and rinse thoroughly with water at least 3 x 1 min.
Step by step procedure for Manual disinfection:
1) Insert the LavEndo box horizontally and the small parts basket with the new stoppers into the
disinfection bath for the prescribed contact time, ensuring that the instruments are sufficiently
covered.
2) Then remove the LavEndo box and the small parts basket with the stoppers from the disinfection bath
and rinse thoroughly with water at least 5 x 1 min.
3) Dry the LavEndo box and the small parts basket with the stoppers by blowing them down fully with
oil-free, filtered compressed air (or medical compressed air from a can) and then leaving them to dry
further in a clean place.
4) Check and package the instruments as soon as possible and fit new stoppers to the instruments.
9.5. Inspection
Open the LavEndo boxes and remove the modules. Check all instruments, modules and LavEndo boxes
after cleaning/disinfection. Defective instruments, boxes and modules should be immediately discarded.
These defects include: plastic deformation (e.g. caused by an excessively high temperature during
sterilisation); bent instrument; untwisted threads; damaged cutting surfaces; dull cutting blades;
corrosion; discolouration.
9.6. Disposal
For proper disposal, always observe national laws and recommendations of the authorities.
9.7. Maintenance
WARNING
Instrument lubricants must not be used.
Page 27

9.8. Packaging
11
Step by step procedure:
1) Place the module in the lower section of the black sterilisation tray and close it with the matching
cover.
2) Then package the sterilisation trays into disposable sterilisation pouches (disposable packaging).
WARNINGS
• Sterilisation in the sterilisation trays without additional packaging is not permitted. The autoclave
paper in the boxes is for added safety only.
• Use only sterilization pouches compliant with DIN EN 11607/ANSI AAMI ISO11607; and suitable
for steam sterilisation (withstands temperatures of up to 142°C (288 °F) or more, sufficient
vapour permeability).
9.9. Sterilisation
Use only the sterilisation methods listed below; other sterilisation methods are not permitted.
• Fractional vacuum/pre-vacuum method (at least three vacuum cycles) or gravity displacement method
with sufficient product drying
Sterilisation procedure Sterilisation temperature
Fractionated vacuum/
pre-vacuum method
Fractionated vacuum/
pre-vacuum method
Gravity method 134°C (273°F) 15 minutes
Gravity method 121°C (250°F) 60 minutes
2
:
Minimum sterilisation time
Exposure time at sterilisation
temperature
134°C (273°F) 3 minutes
121°C (250°F) 20 minutes
3
en
1
1
The less effective gravity method should only be used if the fractionated vacuum method is not available.
2
The drying time that is actually required depends directly on parameters that are the sole responsibility
of the user (loading configuration, how many items are loaded and how closely together they are loaded,
condition of the steriliser, etc.) and must therefore be established by the user. However, the drying time
must never be less than 20 minutes.
3
Or 18 min. (prion inactivation).
Page 28
12
WARNINGS
en
• Steam steriliser must comply with DIN EN 13060 or DIN EN 285, ANSI AAMI ST79.
• Steam steriliser must be validated in accordance with DIN EN ISO17665 (valid IQ and OQ plus
product-specific performance qualification (PQ)).
• Maximum sterilisation temperature of 138 °C (280 °F, including tolerances) must not be
exceeded; according to DIN EN ISO17665.
9.10. Storage
After sterilisation, instruments must be stored in the sterilisation packaging and kept dry and dust-free.
WARNINGS
• Store traceability records and define shelf-life according to packaging manufacturer guidelines.
• After sterilization, the product should be manipulated with care in order to keep the integrity of
the packaging (sterile barrier).
• Check the packaging and the medical devices before using them (packaging integrity, no
humidity and use by date). In case of damage, a complete rework should be performed.
9.11. Important Information on material resistance
When selecting cleaning and disinfecting agents, make sure that they do not contain any of the following
substances:
Phenol / Strong acids (ph<6) or strong alkalis (ph>8) / neutral enzymatic cleaning agent recommended
/ Aldehydes / Anti-corrosive substances (especially di- or triethanolamine) / Oxidants (hydrogen peroxide,
sodium hypochlorite over 5% strength) / NiTi instruments may only be placed in oxidants (<5% strength
sodium hypochlorite) for a maximum of 5 minutes / Solvents / Oils.
WARNINGS
• Never clean the instruments, boxes, modules or the interim stand with metal brushes or wire
wool. Never subject any instruments, boxes, modules or the interim stand to temperatures above
142°C (288°F). It is particularly important to ensure that the products to be sterilised are not
stored too close to the walls or floor of the steam steriliser (risk of excessive temperature and
deformation).
• The blue foam insert for the interim stand must only be used once and must neither be cleaned/
disinfected nor sterilised.
Page 29

13
9.12. Maximum number of uses
For our root canal shaping instruments we recommend not to exceed the following maximum number
of uses:
Type of canal
Extremely curved
(>30°) or S-shaped
canals
Moderately curved canals
(10° to 30°)
Slightly curved
(<10°) or straight canals
Stainless Steel
instruments with a
diameter ≤ISO015
1 canal max. 2 canals max. 2 canals max.
1 canal max. 4 canals max. 4 canals max.
1 canal max. 8 canals max. 8 canals max.
Stainless Steel
instruments with a
diameter >ISO015
NiTi instruments
en
Page 30

300-400 rpm
0123
14
Symbols EN
en
Reference number
Handle Right angle RA
Use by date
Manufacturer
Consult Instructions for use
Sterilized using irradiation
Batch number
Assortment
Nickel titanium
Do not use if package is damaged
Packaging unit
䢵
䢶
Sterilizable in a steam sterilizer (autoclave) at temperature specified
Clockwise rotation (recommended rotation speed: min: 300rpm, max: 400rpm)
CE marking
Page 31

Notes:
15
en
Page 32

Manufacturer
0123
VDW GmbH
Bayerwaldstr. 15
81737 Munich
Germany
Phone +49 (0) 89 62734-0
Fax +49 (0) 89 62734-304
info@vdw-dental.com
www.vdw-dental.com
MENVROTDFUWEB Rev.2 / 13.05.2019
Page 33

VDW.ROTATE™
Protocole
d’utilisation
vdw-dental.com
Page 34

2
RÉSERVÉ À UN USAGE DENTAIRE
fr
PROTOCOLE D’UTILISATION
INSTRUMENTS VDW.ROTATE™ POUR TRAITEMENT ENDODONTIQUE
VDW.ROTATE™ : 15.04, 20.05, 25.04, 25.06, 30.06, 35.06, 40.06, 30.04, 35.04, 40.04, 50.04, 60.04
INSTRUMENTS VDW.ROTATE™ POUR RETRAITEMENT
ENDODONTIQUE
Instrument de retraitement VDW.ROTATE™: 25.05
1. COMPOSITION
Les instruments VDW.ROTATE™ sont constitués de trois composants majeurs: la partie travaillante en alliage
nickel-titane qui est soumise à un traitement thermique et présente des repères de profondeur peints, une
butée en silicone de couleur et une tige en laiton nickelé.
2. CONTENU
Emballage blister VDW.ROTATE™ contenant 3, 4 ou 6instruments stérileschacun.
3. USAGE PRÉVU, UTILISATEUR CONCERNÉ
Les limes VDW.ROTATE™ sont des instruments stériles soumis à un mouvement continu par un moteur
qui servent à mettre en forme et nettoyer le système de canaux radiculaires dans le cadre d’un traitement
endodontique.
Ces instruments doivent être utilisés uniquement en milieu médical, par des dentistes, des généralistes ainsi
que des endodontistes.
4. CONTRE-INDICATIONS
À l’instar de tous les instruments de traitement canalaire mécanisés, les limes VDW.ROTATE™ ne doivent pas
être utilisées en cas de courbure apicale franche en raison du risque élevé de rupture.
L’innocuité et l’efficacité de l’utilisation n’ont pas été établies chez les femmes enceintes ou allaitantes ainsi
que chez les enfants.
Page 35

3
5. MISES EN GARDE
Ce produit contient du nickel et ne doit pas être utilisé sur des patients présentant une sensibilité allergique
connue à ce matériau.
Les limes VDW.ROTATE™ sont livrées stériles et leur réutilisation peut accroître le risque de contamination
croisée ou de rupture.
6. PRÉCAUTIONS
• Éliminez les instruments en cas d’apparition de corrosion/décoloration.
• La multiplication des cycles de désinfection et de re-stérilisation peut augmenter le risque de séparation de
la lime.
• Ces instruments ne doivent pas être immergés dans une solution d’hypochlorite de sodium.
• Retraitement des instruments: suivez les instructions de retraitement détaillées à la section 9.
• Nettoyez souvent les spires pendant l’instrumentation et inspectez-les pour rechercher d’éventuels signes de
déformation ou d’usure, par exemple des spires ébréchées ou des zones émoussées.
• Irriguez fréquemment: irriguez, reprenez et irriguez de nouveau le canal durant toute la procédure –à chaque
changement de lime au minimum.
• Utilisez les limes VDW.ROTATE™ uniquement dans les zones canalaires présentant un couloir d’irrigation
confirmé et reproductible. Réalisez un couloir d’irrigation reproductible à l’aide de limes manuelles telles que
®
C-Pilot
, de taille minimale ISO010.
• Utilisez la taille de lime de finition appropriée pour permettre une pénétration passive dans le canal jusqu’à la
longueur de travail. Lorsque cette dernière est atteinte, retirez immédiatement la lime.
• Exercez toujours une pression apicale minimale. Ne forcez jamais le passage des limes dans le canal.
• Des appareils de contrôle du couple sont recommandés pour une utilisation optimale.
• Dans les canaux étroits et/ou à forte courbure, utilisez la séquence VDW.ROTATE™ dédiée (cf. la section
INSTRUCTIONS D’UTILISATION (ÉTAPE PAR ÉTAPE)).
• Les limes rotatives VDW.ROTATE™ peuvent être utilisées avec les moteurs pour applications endodontiques
VDW à une vitesse comprise entre 300 et 400tr/min. Le tableau ci-après présente les paramètres de moteur
recommandés selon chaque taille d’instrument:
fr
Page 36

4
Taille de la lime Couple [cNm] Vitesse [tr/min]
VDW.ROTATE™ 15.04 1.3
fr
VDW.ROTATE™ 20.05 2.1
VDW.ROTATE™ 25.04 2.3
VDW.ROTATE™ 25.06 2.3
VDW.ROTATE™ 30.04 2.0
VDW.ROTATE™ 35.04 2.3
VDW.ROTATE™ 40.04 2.3
VDW.ROTATE™ 50.04 2.3
VDW.ROTATE™ 60.04 2.3
VDW.ROTATE™ 30.06 2.0
VDW.ROTATE™ 35.06 2.3
VDW.ROTATE™ 40.06 2.3
Lime de retraitement VDW.ROTATE™ 25.05 3.5 400
7. EFFETS SECONDAIRES
Aucun connu.
300 - 400
8. INSTRUCTIONS D’UTILISATION (ÉTAPE PAR ÉTAPE)
8.1. Instructions pour les limes de traitement VDW.ROTATE™
La partie travaillante des instruments VDW.ROTATE™ est en alliage nickel-titane. Les limes VDW.ROTATE™
font l’objet d’un traitement thermique afin d’obtenir une flexibilité et une résistance à la fatigue cyclique supérieures à celle de l’alliage nickel-titane classique. En raison de ce traitement, les instruments VDW.ROTATE™
peuvent présenter une légère courbure. Il ne s’agit pas d’un défaut de fabrication et cela n’amoindrit pas les
performances de l’instrument. Il n’est pas nécessaire de redresser l’instrument avant son utilisation dans le
canal radiculaire.
8.1.1. Examen radiographique
Étudiez la radiographie ou l’examen en 3D pour déterminer la largeur, la longueur et la courbure de la racine
et du canal.
Page 37

5
8.1.2. Technique de mise en forme VDW.ROTATE™
En dépit de la polyvalence des instruments VDW.ROTATE™, les 2techniques de base suivantes sont recommandées:
• Mouvement de va-et-vient: introduisez et ressortez l’instrument au niveau du canal par 2 à 3gestes circulaires de faible amplitude sur env. 1 à 3mm.
• Mouvement de pinceau au moyen de la technique suivante:
a) Introduisez l’instrument rotatif dans le canal radiculaire sans toucher les parois.
b) Mettez l’instrument au contact de la paroi en exerçant une faible pression.
c) Effectuez de petits mouvements de va-et-vient/pinceau (sur 1 à 3millimètres) dans le sens coronaire,
sans sortir l’instrument du canal.
d) Déplacez l’instrument dans le sens apical de 1 à 3millimètres, puis répétez le mouvement décrit en c.
Avancez progressivement vers l’apex par des mouvements vers le haut et vers le bas.
1) Estimez la longueur de travail à l’aide de radiographies préopératoires offrant des angulations pertinentes.
2) Préparez une cavité d’accès suffisante pour la mise en évidence de tous les orifices canalaires.
3) Explorez les deux tiers coronaires des canaux avec une lime 010C-Pilot
4) Explorez l’intégralité du canal radiculaire avec une lime 010 C-Pilot
®
.
®
, déterminez la longueur de travail
(LT) au moyen d’un localisateur d’apex électronique combiné à des radiographies, irriguez et confirmez la
perméabilité.
5) Réglez la butée en silicone en conséquence.
6) Sélectionnez le paramètre préprogrammé approprié du moteur électrique avec contrôle du couple conformément à la taille de l’instrument VDW.ROTATE™.
7) En présence de solution d’irrigation dans le canal, réalisez et confirmez un couloir d’irrigation reproductible
au moyen de l’instrument VDW.ROTATE™ 15.04 jusqu’à atteindre la longueur de travail.
8) Irriguez régulièrement le canal et, lors du retrait de la lime, éliminez les débris sur les spires coupantes
avec une compresse imbibée d’alcool.
9) Inspectez régulièrement les spires coupantes lors du retrait afin de déceler tout signe d’irrégularité des
spires ou un allongement (élongation). En cas de déformation, mettez au rebut la lime VDW.ROTATE™ et
utilisez une neuve.
10) Utilisez l’instrument suivant dans la séquence, à savoir la lime VDW.ROTATE™ 20.05 jusqu’à atteindre la
longueur de travail.
11) Irriguez régulièrement le canal et, lors du retrait de la lime, éliminez les débris sur les spires coupantes
avec une compresse imbibée d’alcool.
12) Inspectez régulièrement les spires coupantes lors du retrait afin de déceler tout signe d’irrégularité des
spires ou un allongement (élongation). En cas de déformation, mettez au rebut la lime VDW.ROTATE™ et
utilisez une neuve.
13) Déterminez la longueur de travail finale au moyen d’un localisateur d’apex électronique.
14) Selon la courbure et la taille du canal, choisissez la taille de lime VDW.ROTATE™ 25.04 ou 25.06 comme
suit:
a) Si le canal est étroit et fortement courbé, utilisez la lime VDW.ROTATE™ 25.04 jusqu’à atteindre la
longueur de travail.
b) Pour les autres canaux, employez la lime VDW.ROTATE™ 25.06 jusqu’à atteindre la longueur de travail.
15) Irriguez régulièrement le canal et, lors du retrait de la lime, éliminez les débris sur les spires coupantes
avec une compresse imbibée d’alcool.
fr
Page 38

6
16) Inspectez régulièrement les spires coupantes lors du retrait afin de déceler tout signe d’irrégularité des
spires ou un allongement (élongation). En cas de déformation, mettez au rebut la lime VDW.ROTATE™ et
fr
utilisez une neuve.
17) Mesurez le foramen à l’aide d’une lime manuelle 25 (NiTi ou acier inoxydable):
a) si l’instrument est bien ajusté apicalement, le canal est mis en forme et prêt pour l’obturation.
b) Si la lime manuelle 25 (NiTi ou acier inoxydable) n’est pas bien ajustée apicalement, passez à la
taille030 et, le cas échéant, aux tailles 035, 040, 050 ou 060, en mesurant après chaque instrument
à l’aide de la lime manuelle correspondante 030, 035, 040, 050 ou 060. Utilisez la même technique de
mise en forme pour atteindre la longueur de travail.
18) Irriguez abondamment; vérifiez de nouveau la perméabilité canalaire tout au long de la procédure.
19) Irriguez au moyen de solutions désinfectantes telles que de l’hypochlorite de sodium à une concentration
maximale de5%.
20) Séchez et remplissez le canal en appliquant une technique appropriée qui favorise un remplissage tridimensionnel au moyen de pointes gutta-percha VDW.ROTATE™ adaptées ou d’obturateurs GUTTAFUSION
8.2. Instructions pour la lime de retraitement VDW.ROTATE™
1) Ouvrez l’orifice canalaire à l’aide d’un foret Gates-Glidden ou d’un instrument à ultrasons et évacuez la
gutta-percha du tiers coronaire.
2) Si nécessaire, ramollissez la gutta-percha avec un solvant (huile d’eucalyptus ou huile d’orange par ex.).
3) Sélectionnez le paramètre préprogrammé approprié du moteur électrique avec contrôle du couple en fonction de la taille de l’instrument VDW.ROTATE™ (cf. tableau de la section 6).
4) Placez l’extrémité de l’instrument de retraitement VDW.ROTATE™ 25.05 sur la gutta-percha et faites-le
tourner. La lime de retraitement VDW.ROTATE™ 25.05 possédant une extrémité coupante, l’instrument
doit progresser facilement et sans pression dans la gutta-percha.
5) Utilisez l’instrument de retraitement VDW.ROTATE™ 25.05 sans exercer de pression vers le bas.
6) Évacuez progressivement le matériel d’obturation canalaire en effectuant des mouvements de limage circonférentiel.
7) Inspectez régulièrement les spires coupantes lors du retrait afin de déceler tout signe d’irrégularité des
spires ou un allongement (élongation). En cas de déformation, mettez au rebut la lime VDW.ROTATE™ et
utilisez une neuve.
8) Utilisez un instrument manuel (lime C-Pilot par ex.) de taille ISO08 pour traiter le canal radiculaire jusqu’à
la longueur de travail totale.
9) Une fois la longueur de travail totale et donc l’apex atteints avec le précédent instrument manuel ISO08,
préparez le canal radiculaire sur toute la longueur de travail à l’aide de limes manuelles allant jusqu’à la
taille ISO10.
10) Continuez la préparation avec des instruments de traitement VDW.ROTATE™ en appliquant la procédure
décrite à la section 8.1 jusqu’à ce que la taille requise soit atteinte.
®
.
9. DÉSINFECTION, NETTOYAGE ET STÉRILISATION
Procédure de retraitement conforme à la norme DINENISO17664/AAMI ST81.
9.1. Généralités
Tous les instruments doivent être nettoyés, désinfectés et stérilisés avant chaque utilisation; ce principe s’applique aux instruments fournis dans un emballage stérile destinés à une utilisation répétée et aux instruments
fournis dans un emballage stérile endommagé ou ouvert. Une procédure rigoureuse de nettoyage et de désinfection est indispensable pour garantir l’efficacité de la stérilisation.
Page 39
7
9.2. Prétraitement sur le lieu d’utilisation
La contamination croisée (en particulier les résidus de pulpe et de dentine) doit être éliminée immédiatement
après l’utilisation de l’instrument sur un patient (dans un délai maximum de 2heures).
Les procédures suivantes doivent être appliquées pour éviter qu’une éventuelle contamination ne puisse sécher
sur les instruments et pour accroître l’efficacité de la préparation suivante:
Procédure étape par étape:
1) Après le traitement, placez l’instrument utilisé dans le support Interim-Stand avant la pré-désinfection/ le
nettoyage et pour le transport (durée de stockage minimale selon les instructions du fabricant de l’agent
de désinfection: max. 2heures).
2) Un support Interim-Stand avec un nouveau disque de mousse doit être préparé pour chaque patient. Le
support doit être rempli au moins aux deux tiers de l’agent de désinfection.
Les points suivants doivent être pris en compte lors du choix de l’agent de désinfection:
• Il doit être adapté à la désinfection des instruments en métal et en plastique.
• Il ne doit pas contenir d’aldéhydes (Cidex OPA est autorisé en raison de sa composition particulière).
• Son efficacité doit avoir été démontrée (par ex. certification VAH/DGHM ou FDA ou marquage CE).
• Il doit être compatible avec les instruments (cf. section «9.11. Remarques importantes sur la résistance des
matériaux»).
• Il est impératif de strictement respecter la concentration et la durée minimale d’exposition indiquées par le
fabricant de l’agent de désinfection. Utilisez uniquement des solutions fraîchement préparées et de l’eau
pauvre en germes (<10UFC/ml).
• Veuillez noter que l’agent de désinfection du prétraitement est utilisé uniquement pour garantir votre protec-
tion personnelle et ne peut se substituer à l’étape de désinfection requise après le nettoyage.
fr
MISES EN GARDE
• Les instruments qui ont déjà été mis en contact avec l’agent de désinfection ne doivent en aucun cas
être utilisés pour traiter à nouveau un patient.
• Le disque en mousse bleu du support Interim-Stand ne doit être utilisé qu’une seule fois et ne doit
donc être ni nettoyé/désinfecté ni stérilisé.
Toutes les autres étapes du processus de préparation doivent être réalisées le même jour.
Page 40

8
9.3. Préparatifs avant le nettoyage
Procédure étape par étape:
fr
1) Retirez la butée de l’instrument et mettez-la au rebut.
2) Nettoyez ensuite les instruments sous l’eau courante pendant au moins 3 x 1minute pour éliminer la
contamination; pour éliminer la contamination manuellement, utilisez une brosse douce et propre ou bien
un chiffon doux et propre employé exclusivement à cette fin; n’utilisez jamais de brosse métallique ou de
paille de fer.
3) Contrôlez l’absence de traces visibles de contamination ou de résidus et renouvelez la procédure de prénettoyage si nécessaire.
MISE EN GARDE
Il est recommandé d’utiliser uniquement une eau pauvre en germes (<10UFC/ml); néanmoins, à
cette étape, de l’eau du robinet pourrait convenir.
9.4. Nettoyage et désinfection
Nous recommandons une procédure automatisée de nettoyage et de désinfection des instruments (cf. la
section 9.4.1 ci-après). Une méthode manuelle, y compris l’utilisation d’un bain à ultrasons (cf. la section
9.4.2 ci-après), devra être utilisée seulement s’il n’est pas possible d’utiliser une procédure automatisée, car
elle est moins efficace et présente une reproductibilité moindre.
Les points suivants doivent être pris en compte lors du choix de l’agent de nettoyage et de désinfection:
• Il doit être adapté au nettoyage et à la désinfection des instruments.
• L’agent de nettoyage, le cas échéant, doit être adapté au nettoyage à ultrasons (pas de formation de mousse).
• En l’absence de processus de désinfection thermique, un agent de désinfection adapté présentant une effica-
cité démontrée et compatible avec l’agent de nettoyage retenu doit être également utilisé.
• Les produits chimiques utilisés doivent être compatibles avec les instruments (cf. section «9.11. Remarques
importantes sur la résistance des matériaux»).
• La neutralisation n’est pas impérative.
• Les agents de nettoyage et de désinfection combinés ne doivent pas être utilisés.
• Les concentrations, températures et durées de contact indiquées par le fabricant de l’agent de nettoyage
et de désinfection, ainsi que les indications minimales concernant le rinçage subséquent, doivent être strictement respectées. Utilisez uniquement des solutions fraîchement préparées, une eau stérile ou pauvre en
germes (<10UFC/ml) et faiblement concentrée en endotoxines (<0,25EU/ml) –une eau hautement purifiée
(EHP) par exemple.
9.4.1. Procédure automatisée de nettoyage et désinfection (laveur-désinfecteur)
Pour le retraitement, nous recommandons l’utilisation de la boîte LavEndo (référence: V04479).
Page 41

9
Procédure étape par étape:
1) Placez de nouvelles butées sur les instruments prénettoyés.
2) Répartissez les instruments dans les modules Endo; modules mini-étagés (référence: V040403).
3) Insérez le module Endo dans la partie inférieure bleue de la boîte LavEndo et fermez-la (vous devez
entendre un déclic).
REMARQUE
La préparation ne doit pas être effectuée directement dans le module de base.
4) Insérez la boîte LavEndo horizontalement dans le laveur-désinfecteur.
5) Lancez le programme.
6) Une fois le programme terminé, retirez la boîte LavEndo du laveur-désinfecteur.
7) Une fois les instruments sortis, contrôlez et emballez-les dès que possible (cf. « 9.5. Inspection »;
«9.7. Entretien» et «9.8. Emballage») –si nécessaire, laissez-les finir de sécher dans un endroit propre.
MISES EN GARDE
• L’efficacité du laveur-désinfecteur doit avoir été démontrée (certification DGHM ou FDA ou marquage
CE conformément à la norme ENISO15883).
• Le laveur-désinfecteur doit être régulièrement entretenu et contrôlé conformément aux informations
du fabricant et être homologué selon la norme ENISO15883.
• Dans la mesure du possible, un programme de désinfection thermique éprouvé doit être utilisé (valeur
A0≥ 3000 ou au moins cinq minutes à 90 °C, ou, pour les équipements plus anciens, au moins
10min à 93°C).
• Le programme doit être adapté aux instruments et comporter les cycles de rinçage prescrits.
• Seule une eau stérile ou pauvre en germes (<10UFC/ml) et faiblement concentrée en endotoxines
(<0,25EU/ml) doit être utilisée pour le rinçage final.
• En cas de désinfection chimique, l’élimination des résidus doit être approuvée par la validation du
procédé du laveur-désinfecteur.
• Veillez à entreposer les nouvelles butées dans un endroit propre en utilisant l’emballage d’origine.
fr
9.4.2. Procédure manuelle de nettoyage et de désinfection
Pour le retraitement manuel, nous recommandons l’utilisation de la boîte LavEndo (référence: V04479).
Procédure étape par étape pour le nettoyage manuel:
1) Répartissez les instruments, sans leur butée, dans les modules Endo; modules mini-étagés (référence:
V040403).
2) Insérez le module Endo dans la partie inférieure bleue de la boîte LavEndo et fermez-la (vous devez
entendre un déclic).
Page 42

10
REMARQUE
La préparation ne doit pas être effectuée directement dans le module de base.
fr
3) Placez les nouvelles butées dans un panier «petites pièces» à mailles suffisamment petites.
4) Insérez la boîte LavEndo horizontalement et le panier «petites pièces» avec les nouvelles butées dans le
bain nettoyant pendant la durée de contact prescrite, en veillant à ce que les instruments soient suffisamment immergés (avec des ultrasons en complément si besoin).
5) Sortez la boîte LavEndo et le panier «petites pièces» avec les butées du bain nettoyant et rincez soigneusement les différents éléments à l’eau pendant au moins 3x 1min.
Procédure étape par étape pour la désinfection manuelle:
1) Insérez la boîte LavEndo horizontalement et le panier « petites pièces» avec les nouvelles butées dans
le bain désinfectant pendant la durée de contact prescrite, en veillant à ce que les instruments soient
suffisamment immergés.
2) Sortez la boîte LavEndo et le panier «petites pièces» avec les butées du bain désinfectant et rincez soigneusement les différents éléments à l’eau pendant au moins 5x 1min.
3) Séchez la boîte LavEndo et le panier «petites pièces» contenant les butées avec de l’air comprimé filtré
sans huile (ou de l’air comprimé médical en bouteille), puis laissez-les finir de sécher dans un endroit
propre.
4) Contrôlez et emballez les instruments dès que possible et installez de nouvelles butées sur les instruments.
9.5. Inspection
Ouvrez les boîtes LavEndo et sortez les modules. Contrôlez tous les instruments, les modules et les boîtes
LavEndo après le nettoyage et la désinfection. Les instruments, boîtes et modules présentant un défaut doivent
être immédiatement éliminés.
Ces défauts peuvent être: une déformation du plastique (causée par ex. par une température trop élevée lors de
la stérilisation); un instrument tordu; un filetage déformé; des surfaces de coupe endommagées; des lames
de coupe émoussées; des traces de corrosion; une décoloration.
9.6. Élimination
Respectez toujours les réglementations nationales et les recommandations des autorités concernant l’élimination.
9.7. Entretien
MISE EN GARDE
N’appliquez pas de lubrifiants sur les instruments.
Page 43

9.8. Emballage
11
Procédure étape par étape:
1) Placez le module dans la partie inférieure du plateau de stérilisation noir et fermez-le avec le couvercle
adapté.
2) Emballez ensuite les plateaux de stérilisation dans des sachets de stérilisation jetables (emballages
jetables).
MISES EN GARDE
• La stérilisation dans des plateaux de stérilisation sans emballage complémentaire n’est pas autorisée.
Le papier autoclave dans les boîtes apporte uniquement une sécurité supplémentaire.
• Utilisez uniquement des sachets de stérilisation conformes à la norme DINEN11607/ ANSIAAMIISO11607
et adaptés à la stérilisation à la vapeur (résistant à des températures allant jusqu’à 142°C (288°F)
voire plus, avec une perméabilité suffisante à la vapeur).
9.9. Stérilisation
Utilisez uniquement les méthodes de stérilisation répertoriées ci-après. Les autres méthodes ne sont pas autorisées.
• Procédé de vide/ pré-vide fractionné (au moins trois cycles) ou procédé de gravitation
suffisant du produit
2
:
Durée minimale de stérilisation
Procédure de stérilisation Température de stérilisation
Procédé de vide/
pré-vide fractionné
Procédé de vide/
pré-vide fractionné
Procédé de gravitation 134°C (273°F) 15minutes
Procédé de gravitation 121°C (250°F) 60minutes
134°C (273°F) 3minutes
121°C (250°F) 20minutes
Durée d’exposition à la tempéra-
1
avec un séchage
ture de stérilisation
3
fr
1
Le procédé de gravitation, moins efficace, doit être utilisé seulement si le procédé de vide fractionné n’est
pas possible.
2
La durée de séchage requise dépend directement de paramètres qui relèvent de la seule responsabilité de
l’utilisateur (configuration du chargement, nombre d’articles chargés et proximité des articles, état du stérilisateur, etc.) et elle doit donc être déterminée par ce dernier. Cette durée ne doit toutefois jamais être inférieure
à 20minutes.
3
Ou 18minutes (élimination des prions).
Page 44

12
MISES EN GARDE
fr
• Le stérilisateur à la vapeur d’eau doit être conforme à la norme DINEN 13060 ou DINEN 285,
ANSIAAMIST79.
• Le stérilisateur à la vapeur d’eau doit être validé conformément à la norme DINENISO17665 (QI et
QO valides ainsi que qualification de performance (QP) spécifique au produit).
• La température de stérilisation ne doit pas excéder 138°C (280°F, tolérances incluses) conformément à la norme DINENISO17665.
9.10. Stockage
Après la stérilisation, les instruments doivent être conservés dans leur emballage de stérilisation, au sec et à
l’abri de la poussière.
MISES EN GARDE
• Rangez les documents de traçabilité et déterminez la durée de conservation en fonction des instructions du fabricant de l’emballage.
• Une fois stérilisé, le produit doit être manipulé avec précaution afin de préserver l’intégrité de l’emballage (barrière stérile).
• Contrôlez l’emballage et les dispositifs médicaux avant leur utilisation (intégrité de l’emballage,
absence d’humidité et date de validité). En cas d’emballage endommagé, il convient de répéter l’ensemble de la procédure de traitement.
9.11. Remarques importantes sur la résistance des matériaux
Lorsque vous choisissez les agents de nettoyage et de désinfection, assurez-vous qu’ils ne contiennent pas les
substances suivantes:
phénol/ acides forts (pH <6) ou alcalins forts (pH >8)/ agent de nettoyage enzymatique neutre recommandé/
aldéhydes/ substances anticorrosion (en particulier di- ou triéthanolamine)/ oxydants (peroxyde d’hydrogène,
hypochlorite de sodium à plus de 5%)/ les instruments NiTi peuvent être mis en contact avec des oxydants
(hypochlorite de sodium <5%) pendant 5minutes au maximum/ solvants/ huiles.
MISES EN GARDE
• Ne nettoyez jamais les instruments, boîtes, modules ou le support Interim-Stand à l’aide d’une brosse
métallique ou de paille de fer. Ne soumettez jamais les instruments, boîtes, modules ou le support
Interim-Stand à des températures supérieures à 142°C (288°F). Il est particulièrement important de
veiller à ce que les produits à stériliser ne soient pas stockés à proximité des parois ou du fond du
stérilisateur à la vapeur d’eau (risque de température excessive et de déformation).
• Le disque en mousse bleu du support Interim-Stand ne doit être utilisé qu’une seule fois et ne doit
donc être ni nettoyé/désinfecté ni stérilisé.
Page 45

13
9.12. Nombre maximum d’utilisations
Concernant nos instruments de mise en forme canalaire, nous recommandons de ne pas dépasser le nombre
maximum d’utilisations détaillé ci-après:
Type de canal
Canaux à courbure sévère
(>30°) ou en forme de S
Canaux à courbure modérée
(10 à 30°)
Canaux à faible courbure
(<10°) ou droits
Instruments en acier
inoxydable d’un dia-
mètre ≤ISO015
1canal max. 2canaux max. 2canaux max.
1canal max. 4canaux max. 4canaux max.
1canal max. 8canaux max. 8canaux max.
Instruments en acier
inoxydable d’un dia-
mètre >ISO015
Instruments NiTi
fr
Page 46

300-400 rpm
0123
14
Symboles FR
fr
Référence
Manche angle droit AD
Utilisation par date
Fabricant
Se reporter aux instructions d’utilisation
Stérilisé par irradiation
Numéro de lot
Assortiment
Nickel-titane
Ne pas utiliser si l’emballage est endommagé
Unité d’emballage
䢵
䢶
Stérilisable dans un stérilisateur à vapeur (autoclave) à la température spécifiée
Sens de rotation horaire (vitesse de rotation recommandée: min. 300tr/min,
max.400tr/min)
Marquage CE
Page 47

Remarques:
15
fr
Page 48

Fabricant
0123
VDW GmbH
Bayerwaldstr. 15
81737 Munich
Allemagne
Téléphone +49 (0) 89 62734-0
Fax +49 (0) 89 62734-304
info@vdw-dental.com
www.vdw-dental.com
MFRVROTDFUWEB Rev.2/ 13.05.2019
Page 49

VDW.ROTATE™
Istruzioni per
l’uso
vdw-dental.com
Page 50

2
SOLO PER USO ODONTOIATRICO
it
ISTRUZIONI PER L’USO
VDW.ROTATE™ STRUMENTI PER IL TRATTAMENTO ENDODONTICO
VDW.ROTATE™ : 15.04, 20.05, 25.04, 25.06, 30.06, 35.06, 40.06, 30.04, 35.04, 40.04, 50.04, 60.04
VDW.ROTATE™ STRUMENTI PER IL RITRATTAMENTO
ENDODONTICO
VDW.ROTATE™ Ritrattamento: 25.05
1. COMPOSIZIONE
Gli strumenti VDW.ROTATE™ sono formati da tre componenti principali: la parte tagliente, realizzata in una
lega di nichel-titanio con trattamento termico e con marcature di profondità verniciate, uno stop in silicone
colorato e un codolo in ottone con nichelato.
2. CONTENUTO
VDW.ROTATE™ confezione blister, 3, 4 o 6 strumenti sterili ciascuna.
3. USO PREVISTO, UTILIZZATORE DESTINATO
Le lime VDW.ROTATE™ sono strumenti sterili motorizzati con movimento continuo, utilizzate nel trattamento
endodontico per modellare e pulire il sistema canalare radicolare.
Questi strumenti devono essere utilizzati solo in ambiente clinico ed ospedaliero, da dentisti professionisti,
medici generici ed endospecialisti.
4. CONTROINDICAZIONI
Come per tutti gli strumenti canalari azionati meccanicamente, le lime VDW.ROTATE™ non devono essere
utilizzate in caso di curvature apicali accentuate a causa del maggiore rischio di rottura.
La sicurezza e l’efficacia d’uso non sono state determinate nelle donne in gravidanza o in allattamento e
nei bambini.
Page 51

3
5. AVVERTENZE
Questo prodotto contiene nichel e non deve quindi essere utilizzato per pazienti con sensibilità allergica
nota a questo materiale.
Le lime VDW.ROTATE™ sono fornite sterili e il loro riutilizzo può aumentare il rischio di contaminazione
crociata o rottura.
6. PRECAUZIONI
• Eliminare gli strumenti in caso di comparsa di corrosione / perdita di colore.
• Ripetuti cicli di disinfezione e sterilizzazione possono aumentare il rischio di rottura della lima.
• Questi strumenti non devono essere immersi in soluzioni di ipoclorito di sodio.
• Riutilizzo degli strumenti: seguire le istruzioni di riutilizzo nella parte 9.
• Pulire frequentemente le scanalature durante l’utilizzo, cercando eventuali segni di distorsione o usura,
come scanalature irregolari o zone opache.
• Irrigare spesso, ricapitolare e irrigare il canale durante tutta la procedura, almeno dopo aver utilizzato
ciascuna lima.
• Le lime VDW.ROTATE™ devono essere utilizzate solo nelle regioni canalari che hanno un glide path
confermato e riproducibile. Stabilire un glide path riproducibile utilizzando lime manuali come C-Pilot
almeno alla dimensione ISO010.
• Utilizzare la dimensione appropriata della lima di finitura per seguire in modo passivo il canale fino al
raggiungimento della lunghezza di lavoro, quindi ritirare immediatamente.
• Utilizzare sempre una pressione apicale minima. Non forzare mai la lima nel canale.
• Per un uso ottimale si raccomandano dispositivi con controllo di coppia.
• In canali stretti e/o molto curvi, utilizzare la sequenza VDW.ROTATE™ dedicata (vedere la sezione
SEQUENZA OPERATIVA).
• Gli strumenti rotanti VDW.ROTATE™ possono essere utilizzati con motori per endodonzia da VDW a velocità
compresa tra 300 e 400 giri/min. La tabella seguente mostra le impostazioni del motore consigliate per
ciascuna dimensione dello strumento:
®
it
,
Page 52

4
Dimensioni della lima Coppia [Ncm] Velocità [giri/min]
VDW.ROTATE™ 15.04 1,3
it
VDW.ROTATE™ 20.05 2,1
VDW.ROTATE™ 25.04 2,3
VDW.ROTATE™ 25.06 2,3
VDW.ROTATE™ 30.04 2,0
VDW.ROTATE™ 35.04 2,3
VDW.ROTATE™ 40.04 2,3
VDW.ROTATE™ 50.04 2,3
VDW.ROTATE™ 60.04 2,3
VDW.ROTATE™ 30.06 2,0
VDW.ROTATE™ 35.06 2,3
VDW.ROTATE™ 40.06 2,3
VDW.ROTATE™ Ritrattamento 25.05 3,5 400
7. REAZIONI INDESIDERATE
Nessuna nota.
300 - 400
8. SEQUENZA OPERATIVA
8.1. Istruzioni per lime di trattamento VDW.ROTATE™
La parte tagliente degli strumenti VDW.ROTATE™ è realizzata in lega di nichel-titanio. Le lime VDW.ROTATE™
vengono sottoposte a un processo di trattamento termico per una maggiore flessibilità e una maggiore
resistenza alla fatica ciclica rispetto al nichel-titanio tradizionale. A seguito di tale trattamento, gli strumenti
VDW.ROTATE™ possono apparire leggermente curvi. Questo non è un difetto di fabbricazione e non riduce
le prestazioni dello strumento. Non è necessario raddrizzare la lima prima dell’uso nel canale radicolare.
8.1.1. Valutazione radiografica
Rivedere la radiografia o la scansione 3D per determinare in modo diagnostico la larghezza, la lunghezza e
la curvatura di una data radice e di un dato canale.
Page 53

5
8.1.2. Tecnica di sagomatura VDW.ROTATE™
Sebbene gli strumenti VDW.ROTATE™ siano versatili, sono consigliate le due seguenti tecniche di base:
• Controllo del movimento: avanzamento dello strumento in 2-3 ampiezze di circa 1-3 mm in entrata e in
uscita del canale.
• Movimento di pennellatura mediante la seguente tecnica:
a) Inserire lo strumento rotante nel canale radicolare senza toccare le pareti del canale.
b) Esercitando una leggera pressione, fare in modo che lo strumento tocchi la parete del canale.
c) Effettuare piccoli movimenti (oltre 1-3 millimetri) di tocco/pennellatura in direzione coronale, senza
togliere lo strumento dal canale.
d) Consentire allo strumento di muoversi apicalmente per 1-3 millimetri e quindi ripetere il movimento
descritto in c. Avanzare gradualmente passo dopo passo verso l’apice con movimenti in su e in giù.
1) Stimare la lunghezza di lavoro utilizzando radiografie preoperatorie ben angolate.
2) Preparare una cavità d’accesso sufficiente a rivelare tutti gli orifizi canalari.
3) Esplorare i 2/3 coronali dei canali con una lima 010C-Pilot
®
.
4) Esplorare l’intero canale radicolare con una 010 C-Pilot®, determinare la lunghezza di lavoro (WL)
utilizzando un localizzatore apicale elettronico in combinazione con radiografie, irrigare e confermare
la pervietà.
5) Fissare quindi lo stop in silicone.
6) Scegliere l’impostazione appropriata del motore elettrico a controllo di coppia in base alle dimensioni
dello strumento VDW.ROTATE™.
7) Con la soluzione di irrigazione nel canale, creare e confermare un glide path riproducibile alla lunghezza
di lavoro (WL) utilizzando VDW.ROTATE™ 15.04 fino a raggiungere la lunghezza di lavoro.
8) Irrigare sistematicamente il canale e pulire le scanalature della lima dai detriti dopo averla rimossa con
una garza imbevuta di alcol.
9) Ispezionare regolarmente le scanalature al momento della rimozione per verificare che non vi siano
rotture o stirature (o allungamenti). In caso si noti una deformazione, scartare e utilizzare una nuova
lima VDW.ROTATE™.
10) Utilizzare lo strumento successivo nella sequenza, VDW.ROTATE™ 20.05 fino a raggiungere la
lunghezza di lavoro.
11) Irrigare sistematicamente il canale e pulire le scanalature della lima dai detriti dopo averla rimossa con
una garza imbevuta di alcol.
12) Ispezionare regolarmente le scanalature al momento della rimozione per verificare che non vi siano
rotture o stirature (o allungamenti). In caso si noti una deformazione, scartare e utilizzare una nuova
lima VDW.ROTATE™.
13) Determinare la lunghezza di lavoro finale utilizzando un localizzatore apicale elettronico.
14) A seconda della curvatura e della dimensione del canale, scegliere tra VDW.ROTATE™ di dimensione
25.04 o 25.06 come segue:
a) Se il canale è stretto e molto curvo, utilizzare il VDW.ROTATE™ 25.04 fino a raggiungere la lunghezza
di lavoro.
b) Per gli altri canali, utilizzare VDW.ROTATE™ 25.06 fino a raggiungere la lunghezza di lavoro.
15) Irrigare sistematicamente il canale e pulire le scanalature della lima dai detriti dopo averla rimossa con
una garza imbevuta di alcol.
it
Page 54

6
16) Ispezionare regolarmente le scanalature al momento della rimozione per verificare che non vi siano
rotture o stirature (o allungamenti). In caso si noti una deformazione, scartare e utilizzare una nuova
it
lima VDW.ROTATE™.
17) Misurare il forame con una lima manuale da 25 (NiTi o acciaio inossidabile):
a) Se lo strumento è aderente, il canale è sagomato e pronto per essere otturato.
b) Se la lima manuale da 25 (NiTi o acciaio inossidabile) non è aderente, passare alla misura successiva
030 e, se necessario, 035, 040, 050 o 060, misurando il forame dopo ogni strumento con lime
manuali da 030, 035, 040, 050 o 060 rispettivamente. Utilizzare la stessa tecnica di sagomatura fino
alla lunghezza di lavoro.
18) Utilizzare un’abbondante irrigazione; ricontrollare la pervietà del canale durante tutta la procedura.
19) Irrigare con soluzioni disinfettanti come l’ipoclorito di sodio ad una concentrazione non superiore al 5%.
20) Asciugare e riempire il canale con una tecnica adeguata che favorisca un riempimento tridimensionale
mediante l’abbinamento con punte in guttaperca VDW.ROTATE™ o GUTTAFUSION®.
8.2. Istruzioni per lime di ritrattamento VDW.ROTATE™
1) Aprire l’orifizio del canale con una fresa di Gates-Glidden o uno strumento ad ultrasuoni e rimuovere la
guttaperca dal terzo coronale.
2) Se necessario, ammorbidire la guttaperca con un solvente (ad es. olio di eucalipto, olio di arancia).
3) Scegliere l’impostazione appropriata del motore elettrico a controllo di coppia in base alle dimensioni
dello strumento VDW.ROTATE™ (ved. tabella cap. 6).
4) Posizionare la punta dello strumento per il ritrattamento 25.05 VDW.ROTATE™ sulla guttaperca e
lasciarlo ruotare. La lima per il ritrattamento 25.05 VDW.ROTATE™ ha una punta da taglio in modo che
lo strumento possa progredire facilmente nella guttaperca senza pressione.
5) Utilizzare lo strumento per il ritrattamento 25.05 VDW.ROTATE™ senza esercitare pressione verso il
basso.
6) Rimuovere gradualmente l’otturazione del canale radicolare con movimenti circonferenziali.
7) Ispezionare regolarmente le scanalature al momento della rimozione per verificare che non vi siano
rotture o stirature (o allungamenti). In caso si noti una deformazione, scartare e utilizzare una nuova
lima VDW.ROTATE™.
8) Utilizzare uno strumento manuale (ad es. la lima C-Pilot) di dimensione ISO08 per trattare il canale
radicolare fino alla lunghezza di lavoro completa.
9) Una volta che la lunghezza di lavoro completa all’apice è stata trattata con il precedente strumento
manuale ISO08, preparare il canale radicolare alla lunghezza di lavoro completa con lime manuali fino
alla dimensione ISO10.
10) Continuare la preparazione con gli strumenti per il trattamento VDW.ROTATE™ usando la stessa
procedura descritta nella sezione 8.1, fino a raggiungere la dimensione richiesta.
9. DISINFEZIONE, PULIZIA E STERILIZZAZIONE
Procedura di ritrattamento in linea con DINENISO17664/AAMI ST81.
9.1. Principi generali
Tutti gli strumenti devono essere puliti, disinfettati e sterilizzati prima di ogni utilizzo; ciò vale sia per
strumenti forniti in condizioni sterili e concepiti per l’utilizzo ripetuto, sia per strumenti in confezioni
sterili, ma danneggiate o aperte. Una pulizia e una disinfezione profonde sono requisiti essenziali per una
sterilizzazione efficace.
Page 55

7
9.2. Pretrattamento nel luogo di utilizzo
La contaminazione crociata (in particolare residui di polpa e dentina) deve essere rimossa immediatamente
dopo l’uso degli strumenti su un paziente (al massimo entro 2 ore).
È necessario attuare le procedure seguenti per garantire che gli agenti contaminanti sugli strumenti non si
secchino e per aumentare quindi l’efficacia della preparazione successiva.
Procedura passo-passo:
1) Dopo il trattamento, posizionare lo strumento nel supporto provvisorio prima della predisinfezione/
pulizia e per il trasporto (durata minima di conservazione in base alle istruzioni per l’uso del produttore
del disinfettante: max. 2 ore).
2) Per ciascun paziente è necessario impiegare un supporto provvisorio preparato con un disco in espanso
nuovo. Il supporto provvisorio deve essere riempito almeno per due terzi con prodotto disinfettante.
Per la selezione di un prodotto disinfettante considerare quanto segue:
• Deve essere adatto alla disinfezione di strumenti in metallo e in plastica.
• Deve essere privo di aldeidi (Cidex OPA ammesso data la sua formulazione speciale).
• Deve essere di efficacia verificata (approvazione VAH/DGHM, autorizzazione FDA o marchio CE).
• Deve essere compatibile con gli strumenti (vedere sezione “9.11. Informazioni importanti sulla resistenza
dei materiali”).
• La concentrazione e il tempo minimo di azione specificati dal produttore del disinfettante devono essere
rigorosamente rispettati. Usare solo preparazioni appena preparate e acqua a bassa carica batterica
(<10CFU/ml), ad es. acqua purificata.
• Ricordare che il prodotto disinfettante usato durante il pretrattamento serve solo per la protezione
personale e non sostituisce la fase di disinfezione necessaria dopo la pulizia.
it
AVVERTENZE
• Gli strumenti già entrati in contatto con un prodotto disinfettante non possono in alcun caso essere
usati per trattare di nuovo un paziente.
• L’inserto in espanso blu per il supporto provvisorio deve essere usato solo una volta e non deve
essere pulito/disinfettato, né sterilizzato.
Tutti gli ulteriori passaggi nel processo di preparazione devono essere eseguiti nello stesso giorno.
Page 56

8
9.3. Preparazione prima della pulizia
Procedura passo-passo:
it
1) Rimuovere lo stop dallo strumento e smaltirlo.
2) Pulire quindi sotto acqua corrente per rimuovere la contaminazione (per un minuto e per almeno tre
volte). Eliminare manualmente le tracce di contaminazione con una spazzola morbida e pulita oppure
un panno morbido e pulito usato esclusivamente per questo scopo; non utilizzare spazzole metalliche
o lana di acciaio.
3) Controllare che non rimangano contaminazione o residui visibili e, all’occorrenza, ripetere la procedura
di pre-pulizia.
AVVERTENZA
Si raccomanda di utilizzare solo acqua a bassa carica batterica (<10Cfu/ml), ad es. acqua
purificata; in questa fase, tuttavia, è possibile utilizzare acqua del rubinetto.
9.4. Pulizia e disinfezione
Per pulire e disinfettare gli strumenti si consiglia una procedura automatica (vedi 9.4.1 sotto). Un metodo
manuale, compreso l’impiego di bagno a ultrasuoni (vedi 9.4.2 sotto), deve essere utilizzato solo se non è
possibile ricorrere a un metodo automatico, in quanto è meno efficace e mostra una minore riproducibilità.
Per la selezione di un prodotto detergente e disinfettante considerare quanto segue:
• Deve essere adatto alla pulizia e disinfezione degli strumenti.
• Il prodotto detergente, laddove applicabile, deve essere idoneo alla pulizia a ultrasuoni (nessuna
formazione di schiuma).
• Se non si utilizza un processo di disinfezione termica, è necessario utilizzare anche un disinfettante idoneo
con efficacia verificata che deve essere compatibile con il detergente utilizzato.
• I prodotti chimici utilizzati devono essere compatibili con gli strumenti (vedere sezione “9.11. Informazioni
importanti sulla resistenza dei materiali”).
• La neutralizzazione non deve essere necessaria.
• Non utilizzare combinazioni di prodotti detergenti/disinfettanti.
• Le concentrazioni, le temperature e i tempi di azione specificati dal produttore del detergente e del
disinfettante, nonché le specifiche minime per il risciacquo successivo devono essere rigorosamente
rispettati. Utilizzare solo soluzioni appena preparate, acqua sterile o a bassa carica batterica (<10Cfu/ml)
e basso contenuto di endotossine (<0,25 EU/ml), ad es. acqua altamente purificata (HPW).
9.4.1. Pulizia/disinfezione automatica (lavatrice disinfettante)
Per il ritrattamento, raccomandiamo l’uso del contenitore LavEndo (Riferimento: V04479).
Page 57

9
Procedura passo-passo:
1) Inserire i nuovi stop negli strumenti sottoposti a pre-pulizia.
2) Suddividere gli strumenti fra i moduli Endo; Moduli mini step (Riferimento: V040403).
3) Posizionare il modulo endo nella sezione inferiore blu del contenitore LavEndo e chiuderlo (far scattare
in posizione).
NOTA
La preparazione nel modulo presa non è consentita.
4) Inserire il contenitore LavEndo orizzontalmente nella lavatrice disinfettante.
5) Avviare il programma.
6) Al termine del programma, rimuovere il contenitore LavEndo dalla lavatrice disinfettante.
7) Controllare gli strumenti e, dopo la rimozione, confezionarli il prima possibile (vedere “9.5. Controllo”;
“9.7. Manutenzione” e “9.8. Inserimento nelle buste”), ma solo dopo averli lasciati asciugare in un
luogo pulito, se necessario.
AVVERTENZE
• L’efficacia della lavatrice disinfettante deve essere stata verificata (approvazione DGHM,
autorizzazione FDA o marchio CE in base a ENISO15883).
• La lavatrice disinfettante deve sottostare a manutenzioni regolari e ispezioni come da informazioni
del produttore e deve essere convalidata secondo la norma ENISO15883.
• Se possibile, usare un programma di disinfezione termica testato (valore A0 ≥ 3000 o almeno
cinque minuti a 90°C oppure per equipaggiamento più vecchio almeno 10 min. a 93°C).
• Il programma usato deve essere adatto agli strumenti e includere i cicli di risciacquo previsti.
• Per il risciacquo finale è necessario utilizzare solo acqua sterile o a basso contenuto di germi
(<10CFU/ml) nonché a basso contenuto di endotossine (<0,25 EU/ml).
• In caso di disinfezione chimica, la rimozione dei residui deve essere approvata tramite convalida
del processo del sistema di disinfezione.
• Assicurarsi di conservare i nuovi stop in un luogo pulito utilizzando la confezione originale.
it
9.4.2. Pulizia e disinfezione manuali
Per il ritrattamento manuale, raccomandiamo l’uso del contenitore LavEndo (Riferimento: V04479).
Procedura passo-passo per pulizia manuale:
1) Suddividere gli strumenti, senza stop, fra i moduli endo; Moduli mini step (Riferimento: V040403).
2) Posizionare il modulo endo nella sezione inferiore blu del contenitore LavEndo e chiuderlo (far scattare
in posizione).
Page 58
10
NOTA
La preparazione nel modulo presa non è consentita.
it
3) Posizionare nuovi stop in un cestello per componenti piccoli, con maglia sufficientemente piccola.
4) Inserire il contenitore LavEndo in orizzontale e il cestello per componenti piccoli con i nuovi stop nel
bagno detergente per il tempo d’azione prescritto, assicurandosi che gli strumenti siano sufficientemente
coperti (con il supporto degli ultrasuoni, se necessario).
5) Togliere dal bagno detergente il contenitore LavEndo e il cestello per componenti piccoli con gli stop,
quindi risciacquare a fondo con acqua (per un minuto e per almeno tre volte).
Procedura passo-passo per disinfezione manuale:
1) Inserire nel bagno disinfettante, per il tempo di azione previsto, il contenitore LavEndo in orizzontale e il
cestello per componenti piccoli con i nuovi stop, assicurandosi che gli strumenti siano sufficientemente
coperti.
2) Togliere dal bagno disinfettante il contenitore LavEndo e il cestello per componenti piccoli con gli stop,
quindi risciacquare a fondo con acqua (per un minuto e per almeno cinque volte).
3) Asciugare il contenitore LavEndo e il cestello per componenti piccoli con gli stop soffiando aria
compressa filtrata e priva di oli (o aria compressa a uso medico da una bombola), quindi lasciare
asciugare ulteriormente in un luogo pulito.
4) Controllare e confezionare gli strumenti il più presto possibile e inserire nuovi stop sugli strumenti.
9.5. Controllo
Aprire i contenitori LavEndo e rimuovere i moduli. Controllare tutti gli strumenti, i moduli e i contenitori
LavEndo dopo la pulizia/disinfezione. Gli strumenti, i contenitori e i moduli con difetti devono essere scartati
immediatamente.
Tali difetti comprendono: deformazione della plastica (causata ad es. da temperatura eccessivamente alta
durante la sterilizzazione); strumento piegato; fili non ritorti; superfici di taglio danneggiate; lame di taglio
smussate; corrosione; scolorimento.
9.6. Smaltimento
Per lo smaltimento corretto attenersi sempre alle leggi e normative nazionali delle autorità.
9.7. Manutenzione
AVVERTENZA
Non occorre utilizzare olio per strumenti.
Page 59
9.8. Inserimento nelle buste
11
Procedura passo-passo:
1) Collocare il modulo nella sezione inferiore del vassoio di sterilizzazione nero e chiuderlo con il coperchio
corrispondente.
2) Quindi confezionare i vassoi di sterilizzazione in sacchetti monouso per sterilizzazione (confezione
monouso).
AVVERTENZE
• La sterilizzazione in supporti senza confezione aggiuntiva non è consentita. La carta per autoclave
nei contenitori è aggiunta solo per una sicurezza supplementare.
• Utilizzare solo sacchetti di sterilizzazione conformi con DIN EN11607/ANSI AAMI ISO11607; e
idoneità alla sterilizzazione a vapore (resistenza a temperature fino a 142°C (288°F) o superiori,
sufficiente permeabilità al vapore).
9.9. Sterilizzazione
Utilizzare esclusivamente i metodi di sterilizzazione indicati di seguito; non sono ammessi altri metodi di
sterilizzazione.
• Metodo di vuoto frazionato/prevuoto (almeno tre cicli sotto vuoto) oppure metodo gravitazionale
prodotto sufficientemente asciutto2:
Durata max. della sterilizzazione
Procedura di sterilizzazione Temperatura di sterilizzazione
Tempo di esposizione alla
temperatura di sterilizzazione
Metodo di vuoto frazionato/
prevuoto
Metodo di vuoto frazionato/
prevuoto
Metodo gravitazionale 134°C (273°F) 15 minuti
Metodo gravitazionale 121°C (250°F) 60 minuti
134°C (273°F) 3 minuti
121°C (250°F) 20 minuti
1
con
3
it
1
L’utilizzo di un metodo gravitazionale meno efficace è consentito se non è disponibile il metodo a vuoto
frazionato.
2
Il tempo di asciugatura effettivamente necessario dipende direttamente dai parametri impostabili sotto
la sola responsabilità dell’utilizzatore (configurazione carico, quantità di elementi caricati e distanza fra gli
elementi caricati, condizione dello sterilizzatore, ecc.) e deve quindi essere stabilito dall’utilizzatore stesso.
Il tempo di asciugatura non deve tuttavia mai essere inferiore a 20 minuti.
3
Oppure 18minuti (inattivazione del prione).
Page 60

12
AVVERTENZE
it
• Sterilizzatore a vapore conforme alla norma DINEN13060 o DINEN285, ANSIAAMIST79.
• Convalida della sterilizzazione a vapore in conformità con la norma DINENISO17665 (qualifica
valida di installazione e funzionamento (IQ e OQ) e qualifica di performance specifica del prodotto
(PQ)).
• Non superare la temperatura massima di sterilizzazione 138°C (280°F), comprese le tolleranze, in
conformità con la norma DINENISO17665.
9.10. Conservazione
Dopo la sterilizzazione, gli strumenti devono essere conservati nella confezione di sterilizzazione in un luogo
asciutto e privo di polvere.
AVVERTENZE
• Conservare le registrazioni di tracciabilità e definire la data di scadenza in base alle linee guida del
produttore delle confezioni.
• Dopo la sterilizzazione, il prodotto deve essere maneggiato con cura al fine di preservare l’integrità
dell’imballaggio (barriera sterile).
• Controllare la confezione e i dispositivi medici prima dell’uso (integrità della busta, nessuna traccia
di umidità e uso entro la data prevista). In caso di danni, occorre eseguire una nuova procedura
completa.
9.11. Informazioni importanti sulla resistenza dei materiali
Quando si scelgono prodotti detergenti o disinfettanti, assicurarsi che non contengano le sostanze seguenti:
Fenolo / Acidi forti (ph<6) o alcali forti (ph>8) / detergente enzimatico neutro raccomandato / Aldeidi /
Sostanze anticorrosive (in particolare di- o trietanolamina) / Ossidanti (perossido di idrogeno, ipoclorito di
sodio superiore al 5%) / Gli strumenti NiTi possono essere collocati solo in ossidanti (<5% di ipoclorito di
sodio) per un massimo di 5minuti / Solventi / Oli.
AVVERTENZE
• Non pulire strumenti, contenitori, moduli o il supporto provvisorio con spazzole metalliche o lana
d’acciaio. Non sottoporre strumenti, contenitori, moduli o il supporto provvisorio a temperature
superiori a 142°C (288°F). È particolarmente importante garantire che i prodotti da sterilizzare
non vengano conservati troppo vicini alle pareti o al fondo dello sterilizzatore a vapore (rischio di
temperatura eccessiva e deformazione).
• L’inserto in espanso blu per il supporto provvisorio deve essere usato solo una volta e non deve
essere pulito/disinfettato, né sterilizzato.
Page 61

13
9.12. Numero massimo di utilizzi
Per i nostri strumenti di sagomatura del canale radicolare si raccomanda comunque di non superare il
seguente numero massimo di utilizzi:
Tipo di canale
Canali estremamente curvi
(>30°) o a S
Canali moderatamente
curvi (da 10° a 30°)
Canali leggermente curvi
(<10°) o dritti
Strumenti in acciaio
inossidabile con
diametro ≤ISO015
1 canale max. 2 canali max. 2 canali max.
1 canale max. 4 canali max. 4 canali max.
1 canale max. 8 canali max. 8 canali max.
Strumenti in acciaio
inossidabile con
diametro >ISO015
Strumenti NiTi
it
Page 62

300-400 rpm
0123
14
Simboli IT
it
Numero di riferimento
Impugnatura contrangolo CA
Data di scadenza
Produttore
Consultare le Istruzioni d’uso
Sterilizzato mediante irradiazione
Numero di lotto
Assortimento
Nichel titanio
Non utilizzare se la confezione è danneggiata
Unità di confezionamento
䢵
䢶
Sterilizzabile in uno sterilizzatore a vapore (autoclave) alla temperatura specificata
Rotazione in senso orario (velocità di rotazione raccomandata: min: 300giri/min,
max: 400giri/min)
Marcatura CE
Page 63

Note:
15
it
Page 64

Produttore
0123
VDW GmbH
Bayerwaldstr. 15
81737 Munich
Germania
Telefono +49 (0) 89 62734-0
Fax +49 (0) 89 62734-304
info@vdw-dental.com
www.vdw-dental.com
MITVROTDFUWEB Rev.2 / 13.05.2019
Page 65

VDW.ROTATE™
Instrucciones
de uso
vdw-dental.com
Page 66

2
ÚNICAMENTE PARA USO DENTAL
es
INSTRUCCIONES DE USO
INSTRUMENTOS VDW.ROTATE™ PARA TRATAMIENTO ENDODÓNTICO
VDW.ROTATE™ : 15.04, 20.05, 25.04, 25.06, 30.06, 35.06, 40.06, 30.04, 35.04, 40.04, 50.04, 60.04
INSTRUMENTOS VDW.ROTATE™ PARA RETRATAMIENTO
ENDODÓNTICO
VDW.ROTATE™ Retratamiento: 25.05
1. COMPOSICIÓN
Los instrumentos VDW.ROTATE™ constan de tres componentes principales: la pieza operante, fabricada
en una aleación de níquel-titanio con tratamiento térmico y marcas de profundidad pintadas, un tope de
silicona coloreada y un vástago de latón chapado en níquel.
2. CONTENIDO
Envase blíster VDW.ROTATE™ de 3, 4 o 6 instrumentos estériles cada uno.
3. USO PREVISTO, USUARIO PREVISTO
Las limas VDW.ROTATE™ son instrumentos estériles accionados por motor con movimiento continuo
empleados en tratamientos endodónticos para conformar y limpiar el sistema del conducto radicular.
Estos instrumentos están destinados a ser empleados únicamente en entornos clínicos u hospitalarios por
parte de dentistas profesionales, médicos generalistas y especialistas en endodoncia.
4. CONTRAINDICACIONES
Al igual que con los demás sistemas rotatorios para la preparación de conductos radiculares, las limas
VDW.ROTATE™ no deben utilizarse en aquellos casos que presenten curvaturas apicales bruscas debido
al elevado riesgo de rotura.
No se han determinado la seguridad y efectividad de uso en mujeres embarazadas o en periodo de lactancia
ni en niños.
Page 67

3
5. ADVERTENCIAS
Este producto contiene níquel y no debe ser usado en personas con alergia conocida a este material.
Las limas VDW.ROTATE™ se suministran estériles y su reutilización puede aumentar el riesgo de
contaminación cruzada y rotura.
6. PRECAUCIONES
• Deseche los instrumentos en caso de que presenten corrosión o pérdida de color.
• Los múltiples ciclos de esterilización y desinfección tras el uso pueden aumentar el riesgo de rotura de
la lima.
• Estos instrumentos no deben sumergirse en soluciones de hipoclorito de sodio.
• Reprocesamiento del instrumento: siga las instrucciones de reprocesamiento del apartado 9.
• Limpie las espiras con frecuencia durante la instrumentación y compruebe si hay signos de distorsión o
desgaste, como irregularidades en las espiras o zonas mate.
• Realice irrigaciones con frecuencia, recapitule e irrigue el conducto durante toda la operación y como
mínimo después de usar cada lima.
• Las limas VDW.ROTATE™ solo deben utilizarse en regiones del conducto que tengan una vía de
deslizamiento confirmada y reproducible. Establezca una vía de deslizamiento reproducible con limas
manuales, como C-Pilot
• Introduzca una lima de acabado de tamaño adecuado de forma pasiva hasta la longitud de trabajo del
conducto y, a continuación, retire la lima inmediatamente.
• Utilice siempre la mínima presión apical. Nunca fuerce las limas para introducirlas en el conducto.
• Para optimizar el uso de las limas se recomienda utilizar dispositivos de control del par.
• En conductos estrechos o con curvatura pronunciada, use la secuencia específica VDW.ROTATE™
(consulte la sección INSTRUCCIONES PASO A PASO).
• Las limas giratorias VDW.ROTATE™ se pueden usar con motores endodónticos de VDW a velocidades de
300 a 400rpm. La tabla siguiente muestra la configuración de motor recomendada para cada tamaño
de instrumento:
®
, al menos hasta el tamaño ISO010.
es
Page 68

4
Tamaño de la lima Par [cNm] Velocidad [rpm]
VDW.ROTATE™ 15.04 1,3
es
VDW.ROTATE™ 20.05 2,1
VDW.ROTATE™ 25.04 2,3
VDW.ROTATE™ 25.06 2,3
VDW.ROTATE™ 30.04 2,0
VDW.ROTATE™ 35.04 2,3
VDW.ROTATE™ 40.04 2,3
VDW.ROTATE™ 50.04 2,3
VDW.ROTATE™ 60.04 2,3
VDW.ROTATE™ 30.06 2,0
VDW.ROTATE™ 35.06 2,3
VDW.ROTATE™ 40.06 2,3
VDW.ROTATE™ Retratamiento 25.05 3,5 400
7. REACCIONES ADVERSAS
Ninguna conocida.
300 - 400
8. INSTRUCCIONES PASO A PASO
8.1. Instrucciones de las limas de tratamiento VDW.ROTATE™
La pieza operante de los instrumentos VDW.ROTATE™ está fabricada en aleación de níquel-titanio. Las
limas VDW.ROTATE™ son sometidas a un proceso térmico para darles más flexibilidad y mayor resistencia
a la fatiga cíclica en comparación con el níquel-titanio tradicional. Debido a ese proceso, los instrumentos
VDW.ROTATE™ pueden parecer ligeramente curvados. No se trata de un defecto de fabricación y no reduce
el rendimiento del instrumento. No es necesario enderezar el instrumento antes de usarlo en el conducto
radicular.
8.1.1. Evaluación radiográfica
Revise radiografías o imágenes de escáner 3D para determinar la anchura, la longitud y la curvatura del
conducto o raíz en cuestión.
Page 69

5
8.1.2. Técnica de conformación VDW.ROTATE™
Aunque los instrumentos VDW.ROTATE™ son versátiles, se recomiendan las 2 técnicas básicas siguientes:
• Movimiento de picoteo: avance del instrumento en 2 o 3 movimientos suaves de entre 1 y 3mm dentro
y fuera del conducto.
• Movimiento de cepillado con la técnica siguiente:
a) Inserte el instrumento rotatorio en el conducto radicular sin tocar las paredes de este.
b) A continuación ejerza una ligera presión para permitir que el instrumento toque la pared del conducto.
c) Efectúe pequeños movimientos de contacto/cepillado (entre 1 y 3 milímetros) en dirección coronal
sin sacar el instrumento del conducto.
d) Deje que el instrumento se desplace apicalmente a lo largo de 1-3milímetros y repita el movimiento
descrito en el punto c. Avance gradualmente paso a paso hacia el ápice con movimientos de arriba
abajo.
1) Calcule la longitud de trabajo mediante radiografías preoperatorias bien anguladas.
2) Prepare una cavidad de acceso suficientemente grande para revelar todos los orificios del conducto
radicular.
3) Explore los 2/3 coronales de los conductos con una lima C-Pilot
®
010.
4) Explore todo el conducto radicular con una lima C-Pilot® 010, determine la longitud de trabajo (LT) con
un localizador de ápice electrónico y radiografías, irrigue y confirme la permeabilidad.
5) Coloque el tope de silicona según corresponda.
6) Elija el ajuste de motor eléctrico controlado por par preprogramado adecuado en función del tamaño
del instrumento VDW.ROTATE™.
7) Con solución de irrigación en el conducto cree y confirme una vía de deslizamiento reproducible hasta
la LT mediante la VDW.ROTATE™15.04 hasta alcanzar la longitud de trabajo.
8) Irrigue frecuentemente el conducto y limpie los restos acumulados en las espiras cortantes de la lima
al retirarla con una gasa humedecida con alcohol.
9) Inspeccione las espiras cortantes frecuentemente al retirar el instrumento para detectar partes
estiradas o deformadas (o elongación). Si observa alguna deformación, deseche la lima y use una
nueva lima VDW.ROTATE™.
10) Use el siguiente instrumento de la secuencia, VDW.ROTATE™20.05, hasta alcanzar la longitud de
trabajo.
11) Irrigue frecuentemente el conducto y limpie los restos acumulados en las espiras cortantes de la lima
cuando la saque con una gasa humedecida con alcohol.
12) Inspeccione las espiras cortantes frecuentemente al retirar el instrumento para detectar partes
estiradas o deformadas (o elongación). Si observa alguna deformación, deseche la lima y use una
nueva lima VDW.ROTATE™.
13) Determine la longitud de trabajo final mediante un localizador de ápice electrónico.
14) En función de la curvatura del conducto y el tamaño, elija entre la VDW.ROTATE™25.04 o la 25.06,
según lo siguiente:
a) Si el conducto es estrecho y muy curvo, use la VDW.ROTATE™25.04 hasta alcanzar la longitud de
trabajo.
b) Para el resto de conductos, use la VDW.ROTATE™25.06 hasta alcanzar la longitud de trabajo.
15) Irrigue frecuentemente el conducto y limpie los restos acumulados en las espiras cortantes de la lima
cuando la saque con una gasa humedecida con alcohol.
es
Page 70

6
16) Inspeccione las espiras cortantes frecuentemente al retirar el instrumento para detectar partes
estiradas o deformadas (o elongación). Si observa alguna deformación, deseche la lima y use una
es
nueva lima VDW.ROTATE™.
17) Calibre el foramen con una lima manual del 25 (NiTi o acero inoxidable):
a) Si el instrumento queda ajustado al alcanzar la longitud, el conducto está conformado y listo para
ser obturado.
b) Si la lima manual del 25 (NiTi o acero inoxidable) queda suelta al alcanzar la longitud, siga con el
siguiente tamaño, #030, y, si es necesario, el #035, #040, #050 o #/060; calibrando tras el uso de
cada instrumento con las limas manuales 030, 035, 040, 050 o 060, respectivamente. Utilice la
misma técnica de conformación hasta alcanzar la longitud de trabajo.
18) Irrigue abundantemente; vuelva a comprobar la permeabilidad del conducto durante todo el
procedimiento.
19) Irrigue con soluciones desinfectantes, como hipoclorito de sodio a una concentración no superior al
5%.
20) Seque y rellene el conducto con una técnica adecuada que promueva un rellenado tridimensional con
puntas de gutapercha VDW.ROTATE™ o GUTTAFUSION
®
.
8.2. Instrucciones para la lima de retratamiento VDW.ROTATE™
1) Abra el orificio del conducto con una broca Gates-Glidden o un instrumento de ultrasonidos y retire la
gutapercha del tercio coronal.
2) Si es necesario, ablande la gutapercha con un disolvente (p.ej. aceite de eucalipto o de naranja).
3) Elija el ajuste de motor eléctrico controlado por par preprogramado adecuado en función del tamaño
del instrumento VDW.ROTATE™ (consulte la tabla del capítulo 6).
4) Coloque la punta del instrumento VDW.ROTATE™ Retratamiento 25.05 sobre la gutapercha y deje
que gire. La lima VDW.ROTATE™ Retratamiento 25.05 tiene la punta afilada para que el instrumento
avance con facilidad en la gutapercha sin tener que hacer presión.
5) Utilice el instrumento VDW.ROTATE™ Retratamiento 25.05 sin hacer presión hacia abajo.
6) Retire de forma gradual la obturación del conducto radicular con movimientos de limado circulares.
7) Inspeccione las espiras cortantes frecuentemente al retirar el instrumento para detectar partes
estiradas o deformadas (o elongación). Si observa alguna deformación, deseche la lima y use una
nueva lima VDW.ROTATE™.
8) Utilice un instrumento manual (p.ej. una lima C-Pilot) de calibre ISO08 para continuar por el conducto
radicular hasta su longitud de trabajo completa.
9) Una vez completada la longitud de trabajo hasta el ápice con el anterior instrumento manual ISO08,
prepare el conducto radicular con limas manuales de hasta el calibre ISO10 hasta su longitud de
trabajo completa.
10) Continúe la preparación con instrumentos VDW.ROTATE™ para tratamiento utilizando el procedimiento
descrito en la sección 8.1 hasta alcanzar el tamaño necesario.
9. DESINFECCIÓN, LIMPIEZA Y ESTERILIZACIÓN
Procedimiento de reprocesamiento en línea con DINENISO17664/AAMI ST81.
9.1. Fundamentos generales
Es necesario limpiar, desinfectar y esterilizar todos los instrumentos antes de cada uso. Esto se aplica a los
instrumentos que se suministran esterilizados y que se quiere reutilizar, así como a los embalajes estériles
que están dañados o han sido abiertos. La limpieza y la desinfección son requisitos indispensables para
una esterilización eficaz.
Page 71

7
9.2. Tratamiento previo en el lugar de uso
La contaminación cruzada (especialmente los restos de pulpa y dentina) deberá eliminarse inmediatamente
después de usar el instrumento con un paciente (en un plazo máximo de 2horas).
Deberán utilizarse los siguientes procedimientos para evitar que se reseque la contaminación en los
instrumentos y para que la preparación posterior sea más eficaz:
Procedimiento paso a paso:
1) Una vez terminado el tratamiento, coloque el instrumento usado en el soporte provisional antes de
la desinfección previa/limpieza y para el transporte (tiempo de almacenamiento mínimo según las
instrucciones de uso del fabricante del desinfectante: máx. 2 horas).
2) Para cada paciente deberá utilizarse un soporte provisional preparado con un disco de espuma nuevo.
El soporte provisional deberá llenarse con desinfectante al menos a dos tercios de su capacidad.
Tenga en cuenta lo siguiente a la hora de elegir un desinfectante:
• Debe ser adecuado para desinfectar instrumentos de metal y plástico.
• Debe estar libre de aldehídos (Cidex OPA está permitido debido a su fórmula especial).
• Su eficacia debe estar comprobada (aprobación VAH/DGHM, autorización FDA o marcado CE).
• Debe ser compatible con los instrumentos (consulte la sección «9.11. Información importante sobre la
resistencia del material»).
• Observe estrictamente la concentración y el tiempo mínimo de contacto especificados por el fabricante
del desinfectante. Utilice únicamente soluciones recién preparadas y agua con bajo contenido en
microorganismos (<10UFC/ml).
• Tenga en cuenta que el desinfectante empleado para el tratamiento previo es solo para protección
personal y no sustituye la fase de desinfección posterior a la limpieza.
es
ADVERTENCIAS
• Los instrumentos que hayan entrado en contacto con el desinfectante bajo ninguna circunstancia
pueden utilizarse para volver a tratar a un paciente.
• La esponja azul del soporte provisional es de un solo uso y no debe limpiarse, desinfectarse ni
esterilizarse.
Todos los demás pasos del proceso de preparación deben realizarse el mismo día.
Page 72

8
9.3. Preparación previa a la limpieza
Procedimiento paso a paso:
es
1) Retire el tapón del instrumento y deséchelo.
2) A continuación, limpie el instrumento para eliminar la contaminación colocándolo bajo agua corriente
al menos 3veces durante 1minuto cada vez. Para eliminar la contaminación manualmente, utilice
un cepillo o paño limpio y suave que solo se utilice para este fin. Nunca use cepillos ni estropajos
metálicos.
3) Compruebe que no quedan restos ni contaminación visibles y repita el proceso de limpieza previa si
es necesario.
ADVERTENCIA
Se recomienda usar únicamente agua con bajo contenido en microorganismos (<10UFC/ml);
no obstante, en este paso se podría usar agua del grifo.
9.4. Limpieza/desinfección
Recomendamos utilizar un procedimiento automático para limpiar y desinfectar los instrumentos (véase
9.4.1 a continuación). Los métodos manuales —incluido el uso del baño de ultrasonidos — (véase
9.4.2 a continuación) únicamente deberán utilizarse cuando no sea posible utilizar un método automático,
ya que son menos efectivos y presentan una menor reproducibilidad.
Tenga en cuenta lo siguiente a la hora de elegir un limpiador o desinfectante:
• Debe ser adecuado para limpiar y desinfectar instrumentos.
• El agente de limpieza debe ser adecuado para la limpieza por ultrasonidos (no espumante).
• Si no se usa un proceso de desinfección térmica, se deberá usar también un desinfectante de eficacia
probada que sea compatible con el agente de limpieza empleado.
• Los productos químicos que se utilicen deben ser compatibles con los instrumentos (consulte la sección
«9.11. Información importante sobre la resistencia del material»).
• La neutralización no debe ser necesaria.
• No deben emplearse agentes de limpieza/desinfectantes combinados.
• Observe estrictamente las concentraciones, temperaturas y tiempos de contacto especificados
por el fabricante del agente de limpieza y del desinfectante, así como las especificaciones mínimas
para el aclarado posterior. Utilice únicamente soluciones recién preparadas y agua esterilizada o con
bajo contenido en microorganismos (< 10 UFC/ml) y agua con baja concentración de endotoxinas
(<0,25 UE/ml) (p.ej. agua altamente purificada HPW).
9.4.1. Limpieza y desinfección automáticas (lavador-desinfectador)
Para el reprocesamiento recomendamos usar la caja LavEndo (referencia: V04479).
Page 73
9
Procedimiento paso a paso:
1) Coloque tapones nuevos en los instrumentos previamente limpiados.
2) Clasifique los instrumentos en los módulos endodónticos. Minimódulos de etapa (referencia: V040403).
3) Coloque el módulo endodóntico en la sección inferior azul de la caja LavEndo y ciérrelo (insértelo en su
sitio hasta que haga clic).
NOTA
No se permite la preparación en el módulo de soporte.
4) Inserte la caja LavEndo horizontalmente en el lavador-desinfectador.
5) Inicie el programa.
6) Cuando finalice el programa, retire la caja LavEndo del lavador-desinfectador.
7) Una vez retirados, compruebe y embale los instrumentos lo antes posible (consulte «9.5. Inspección»,
«9.7. Mantenimiento» y «9.8. Embalaje»); antes déjelos secar del todo en un lugar limpio en caso
necesario.
ADVERTENCIAS
• La efectividad del lavador-desinfectador tiene que estar verificada (aprobación DGHM, autorización
FDA o marcado CE según ENISO15883).
• El lavador-desinfectador tiene que mantenerse e inspeccionarse regularmente de conformidad
con la información del fabricante y ha de ser validado de conformidad con la norma ENISO15883.
• Cuando sea posible, deberá utilizarse un programa de desinfección térmica comprobado (valor
A0 ≥3000 o como mínimo cinco minutos a 90 °C o, para equipos antiguos, como mínimo
10minutos a 93°C).
• El programa empleado debe ser adecuado para los instrumentos e incluir los ciclos de aclarado
prescritos.
• En el aclarado final, únicamente se puede utilizar agua esterilizada o con bajo contenido en
microorganismos (<10UFC/ml) y baja concentración de endotoxinas (<0,25UE/ml).
• En caso de desinfección química, la eliminación de los residuos tiene que ser aprobada por la
validación del proceso del lavador-desinfectador.
• Asegúrese de almacenar los tapones nuevos en un lugar limpio en su embalaje original.
es
9.4.2. Limpieza y desinfección manuales
Para el reprocesamiento manual recomendamos usar la caja LavEndo (referencia: V04479).
Procedimiento paso a paso para limpieza manual:
1) Clasifique los instrumentos, sin los tapones, en los módulos endodónticos. Minimódulos de etapa
(referencia: V040403).
2) Coloque el módulo endodóntico en la sección inferior azul de la caja LavEndo y ciérrelo (insértelo en su
sitio hasta que haga clic).
Page 74
10
NOTA
No se permite la preparación en el módulo de soporte.
es
3) Coloque los tapones nuevos en una cesta para piezas pequeñas cuya malla sea suficientemente
pequeña.
4) Coloque la caja LavEndo horizontalmente y la cesta para piezas pequeñas con los tapones nuevos en
la solución de limpieza durante el tiempo de contacto indicado, asegurándose de que los instrumentos
quedan totalmente cubiertos (con ayuda de ultrasonidos si es necesario).
5) A continuación, retire de la solución de limpieza la caja LavEndo y la cesta para piezas pequeñas con
los tapones y aclare con abundante agua al menos 3veces durante 1minuto cada vez.
Procedimiento paso a paso para desinfección manual:
1) Coloque la caja LavEndo horizontalmente y la cesta para piezas pequeñas con los tapones nuevos en la
solución desinfectante durante el tiempo de contacto indicado, asegurándose de que los instrumentos
quedan totalmente cubiertos.
2) A continuación, retire de la solución desinfectante la caja LavEndo y la cesta para piezas pequeñas con
los tapones y aclare con abundante agua al menos 5veces durante 1minuto cada vez.
3) Seque la caja LavEndo y la cesta para piezas pequeñas con los tapones utilizando aire comprimido
filtrado y sin aceite (o aire medicinal comprimido en bote) y déjelas secar del todo a continuación en
un lugar limpio.
4) Compruebe y embale los instrumentos lo antes posible y ponga tapones nuevos en ellos.
9.5. Inspección
Abra las cajas LavEndo y extraiga los módulos. Compruebe todos los instrumentos, módulos y cajas
LavEndo después de la limpieza y desinfección. Los instrumentos, cajas o módulos que presenten defectos
deberán ser desechados inmediatamente.
Los defectos pueden ser: deformación plástica (p.ej. causada por una temperatura excesivamente alta
durante la esterilización); instrumentos doblados; hilos deshilachados; superficies de corte dañadas; hojas
de corte no afiladas; corrosión; decoloración.
9.6. Eliminación
Observe siempre las leyes nacionales y las recomendaciones oficiales para una eliminación adecuada.
9.7. Mantenimiento
ADVERTENCIA
No deben utilizarse lubricantes para instrumentos.
Page 75

9.8. Embalaje
11
Procedimiento paso a paso:
1) Coloque el módulo en la sección inferior de la bandeja de esterilización negra y ciérrela con la tapa
correspondiente.
2) A continuación, embale las bandejas de esterilización en bolsitas para esterilización desechables
(embalaje desechable).
ADVERTENCIAS
• No está permitida la esterilización en las bandejas de esterilización sin un embalaje adicional. El
papel para autoclave de las cajas es solamente un refuerzo de seguridad.
• Use únicamente bolsitas para esterilización que cumplan con las normas DIN EN 11607/
ANSIAAMIISO11607 y sean aptas para esterilización por vapor (resistentes a temperaturas de
hasta 142°C o más, con suficiente permeabilidad al vapor).
9.9. Esterilización
Use solo los métodos de esterilización indicados a continuación; no está permitido utilizar otros métodos
de esterilización.
• Método de vacío/prevacío fraccionado (al menos tres ciclos de vacío) o método de desplazamiento por
gravedad
Método de vacío/
prevacío fraccionado
Método de vacío/
prevacío fraccionado
Método de gravedad 134°C 15minutos
Método de gravedad 121°C 60minutos
1
con suficiente secado de producto2:
Procedimiento de esterilización Temperatura de esterilización
134°C 3 minutos
121°C 20minutos
Tiempo mínimo de esterilización
Tiempo de exposición a la
temperatura de esterilización
3
es
1
El método de gravedad, menos efectivo, solo debe utilizarse si el método de vacío fraccionado no está
disponible.
2
El tiempo de secado necesario depende directamente de parámetros que son responsabilidad exclusiva
del usuario (configuración de carga, cuántos elementos se cargan y a qué distancia entre ellos se sitúan,
estado del esterilizador, etc.) y, por tanto, debe ser establecido por el usuario. No obstante, el tiempo de
secado nunca puede ser inferior a 20minutos.
3
O 18min (inactivación de priones).
Page 76

12
ADVERTENCIAS
es
• El esterilizador de vapor deberá cumplir con las normas DIN EN 13060 o DIN EN 285,
ANSIAAMIST79.
• El esterilizador de vapor deberá estar validado de conformidad con la norma DINENISO17665
(cualificación de instalación y cualificación del funcionamiento (IQ y OQ) válidas y cualificación de
rendimiento específica de producto (PQ)).
• No debe superarse la temperatura máxima de esterilización de 138°C (tolerancias incluidas), de
conformidad con la norma DINENISO17665.
9.10. Almacenamiento
Después de la esterilización, los instrumentos deben guardarse en el embalaje de esterilización y
conservarse secos y libres de polvo.
ADVERTENCIAS
• Guarde registros de trazabilidad y defina la vida útil del producto estéril teniendo en cuenta las
instrucciones del fabricante del embalaje.
• Tras la esterilización hay que manipular el producto con cuidado para mantener la integridad del
embalaje (embalaje de barrera estéril).
• Compruebe el embalaje y los aparatos de uso médico antes de utilizarlos (integridad del embalaje,
ausencia de humedad y fecha de caducidad). En caso de advertirse algún daño se debe repetir
todo el proceso.
9.11. Información importante sobre la resistencia del material
Cuando elija agentes de limpieza y desinfectantes, asegúrese de que no contienen ninguna de las sustancias
siguientes:
Fenol / Ácidos fuertes (pH<6) o álcalis fuertes (pH>8) (se recomiendan agentes de limpieza enzimáticos
neutros) / Aldehídos / Sustancias anticorrosivas (especialmente di- o trietanolamina) / Oxidantes (peróxido
de hidrógeno, hipoclorito de sodio de fuerza superior al 5%) / Los instrumentos de NiTi solo pueden
colocarse en oxidantes (hipoclorito de sodio de fuerza <5%) durante un máximo de 5minutos / Disolventes
/ Aceites.
ADVERTENCIAS
• Nunca limpie los instrumentos, las cajas, los módulos o el soporte provisional con cepillos
metálicos o lana de acero. Nunca exponga los instrumentos, las cajas, los módulos o el soporte
provisional a temperaturas superiores a 142°C. Es especialmente importante asegurarse de que
los productos que se van a esterilizar no se guardan demasiado cerca de las paredes o de la base
del esterilizador de vapor (riesgo de temperatura excesiva y deformación).
• La esponja azul del soporte provisional es de un solo uso y no debe limpiarse, desinfectarse ni
esterilizarse.
Page 77

13
9.12. Número máximo de usos
Recomendamos no superar el número de usos máximo que aparece a continuación para nuestros
instrumentos de conformación del conducto radicular:
Tipo de conducto
Conductos
extremadamente curvados
(>30°) o con forma de S
Conductos
moderadamente curvados
(de 10° a 30°)
Conductos ligeramente
curvados
(<10°) o rectos
Instrumentos de acero
inoxidable con diámetro
≤ISO015
1conducto máx. 2conductos máx. 2conductos máx.
1conducto máx. 4conductos máx. 4conductos máx.
1conducto máx. 8conductos máx. 8conductos máx.
Instrumentos de acero
inoxidable con diámetro
>ISO015
Instrumentos de NiTi
es
Page 78

300-400 rpm
0123
14
Símbolos ES
es
Número de referencia
Mango en ángulo recto
Fecha de caducidad
Fabricante
Consultar instrucciones de uso
Esterilizado por radiación
Número de lote
Surtido
Níquel-titanio
No utilizar si el embalaje está dañado
Unidad de embalaje
䢵
䢶
Esterilizable en un esterilizador a vapor (autoclave) a la temperatura especificada
Rotación en sentido horario (velocidad de rotación recomendada: mín.: 300rpm,
máx.: 400rpm)
Marcado CE
Page 79

Notas:
15
es
Page 80

Fabricante
0123
VDW GmbH
Bayerwaldstr. 15
81737 Munich
Alemania
Tel. +49 (0) 89 62734-0
Fax +49 (0) 89 62734-304
info@vdw-dental.com
www.vdw-dental.com
MESVROTDFUWEB Rev.2 / 13.05.2019
Page 81

VDW.ROTATE™
Instruções
de Utilização
vdw-dental.com
Page 82

2
APENAS PARA UTILIZAÇÃO EM MEDICINA DENTÁRIA
pt
INSTRUÇÕES DE UTILIZAÇÃO
VDW.ROTATE™ INSTRUMENTOS PARA TRATAMENTO ENDODÔNTICO
VDW.ROTATE™ : 15.04, 20.05, 25.04, 25.06, 30.06, 35.06, 40.06, 30.04, 35.04, 40.04, 50.04, 60.04
VDW.ROTATE™ INSTRUMENTOS PARA RETRATAMENTO
ENDODÔNTICO
Lima de retratamento VDW.ROTATE™: 25.05
1. COMPOSIÇÃO
Os instrumentos VDW.ROTATE™ são constituídos por três componentes principais: a parte ativa, em liga de
níquel-titânio com tratamento térmico e com marcas de profundidade pintadas, um stop de silicone colorido
e uma haste em latão revestido a níquel.
2. CONTEÚDO
Embalagem blister VDW.ROTATE™, com 3, 4 ou 6 instrumentos esterilizados cada.
3. UTILIZAÇÃO PREVISTA, UTILIZADOR PREVISTO
As limas VDW.ROTATE™ são instrumentos esterilizados motorizados com movimento contínuo, utilizados
em tratamentos endodônticos, para instrumentação e limpeza do sistema de canal radicular.
Estes instrumentos destinam-se a ser utilizados unicamente em ambientes clínicos ou hospitalares, por
dentistas profissionais, médicos generalistas e especialistas de endodontia.
4. CONTRAINDICAÇÕES
Tal como todos os instrumentos de ação mecânica para intervenção nos canais radiculares, as limas
VDW.ROTATE™ não devem ser utilizadas em casos em que a curvatura apical é abrupta, devido ao maior
risco de rutura.
A segurança e a eficácia de utilização não foram determinadas para grávidas ou lactantes ou para crianças.
Page 83

3
5. AVISOS
Este produto contém níquel e não deve ser utilizado em pessoas com sensibilidade alérgica conhecida a
este material.
As limas VDW.ROTATE™ são fornecidas esterilizadas e a reutilização pode aumentar o risco de contaminação
cruzada ou rutura.
6. PRECAUÇÕES
• Rejeite os instrumentos, se detetar corrosão/perda de cor.
• Múltiplos ciclos de utilização, desinfeção e esterilização podem provocar um risco acrescido de fratura
da lima.
• Estes instrumentos não devem ser mergulhados numa solução de hipoclorito de sódio.
• Reprocessamento do instrumento: siga as instruções de reprocessamento na parte 9.
• Durante a instrumentação, limpe frequentemente as estrias e verifique se existem sinais de distorção ou
desgaste, como estrias desiguais ou manchas baças.
• Irrigue frequentemente, recapitule e irrigue o canal ao longo do procedimento, no mínimo, depois de
utilizar cada lima.
• As limas VDW.ROTATE™ só devem ser utilizadas em zonas do canal com via de permeabilidade (glide
path) confirmada e reproduzível. Estabeleça uma via de permeabilidade (glide path) reproduzível,
utilizando limas manuais como a C-Pilot
• Utilize o tamanho adequado de lima de acabamento para seguir passivamente o canal até ao comprimento
de trabalho e, em seguida, retire imediatamente.
• Aplique sempre uma pressão apical mínima. Nunca force as limas ao inseri-las no canal.
• Para uma utilização otimizada, recomenda-se o recurso a dispositivos de controlo do binário.
• Em canais estreitos e/ou extremamente curvos, aplique a sequência específica VDW.ROTATE™ (consulte
a secção INSTRUÇÕES DETALHADAS).
• As limas rotativas VDW.ROTATE™ podem ser utilizadas com motores endodônticos da VDW a velocidades
entre 300 e 400rpm. A tabela abaixo apresenta as definições de motor recomendadas, adaptadas a cada
tamanho de instrumento:
®
, no mínimo até ao tamanho ISO010.
pt
Page 84

Tamanho da lima Binário [cNm] Velocidade [rpm]
VDW.ROTATE™ 15.04
pt
VDW.ROTATE™ 20.05 2.1
VDW.ROTATE™ 25.04 2.3
VDW.ROTATE™ 25.06 2.3
VDW.ROTATE™ 30.04 2.0
VDW.ROTATE™ 35.04 2.3
VDW.ROTATE™ 40.04 2.3
VDW.ROTATE™ 50.04 2.3
VDW.ROTATE™ 60.04 2.3
VDW.ROTATE™ 30.06 2.0
VDW.ROTATE™ 35.06 2.3
VDW.ROTATE™ 40.06 2.3
Lima de retratamento
VDW.ROTATE™ 25.05
7. REAÇÕES ADVERSAS
Nenhuma conhecida.
4
1.3
300 - 400
3.5 400
8. INSTRUÇÕES DETALHADAS
8.1. Instruções para limas de tratamento VDW.ROTATE™
A parte ativa dos instrumentos VDW.ROTATE™ é produzida em liga de níquel-titânio. As limas VDW.ROTATE™
são submetidas a um processo de tratamento térmico, para maior flexibilidade e superior resistência à
fadiga cíclica, em comparação com o níquel-titânio convencional. Devido a este processamento, os
instrumentos VDW.ROTATE™ podem parecer ligeiramente curvos. Não se trata de um defeito de fabrico e
não prejudica o desempenho do instrumento. Não é necessário endireitar o instrumento antes da utilização
no canal radicular.
8.1.1. Avaliação radiográfica
Analise radiografias ou tomografias 3D, para determinar a largura, o comprimento e a curvatura de qualquer
raiz e canal.
Page 85

5
8.1.2. Técnica de instrumentação VDW.ROTATE™
Apesar de os instrumentos VDW.ROTATE™ serem versáteis, recomendam-se as 2 técnicas básicas
seguintes:
• Movimento de vaivém (pecking motion): faça avançar o instrumento em 2-3 amplitudes suaves de,
aproximadamente, 1-3mm no sentido do interior e do exterior do canal.
• Movimento de escovagem, com a seguinte técnica:
a) Insira o instrumento rotativo no canal radicular, sem tocar nas paredes do canal.
b) Exercendo uma pressão suave, deixe que o instrumento toque na parede do canal.
c) Efetue curtos movimentos de toque/escovagem (em 1-3 milímetros) no sentido coronário, sem
retirar o instrumento do canal.
d) Deixe que o instrumento se desloque apicalmente 1-3milímetros e repita o movimento descrito na
alínea c). Avance gradualmente, passo a passo, na direção do ápice, com movimentos cima/baixo.
1) Determine o comprimento de trabalho recorrendo a radiografias pré-operatórias com ângulos
adequados.
2) Prepare uma cavidade de acesso suficiente para revelar todos os orifícios do canal radicular.
3) Explore os 2/3 coronários dos canais com uma lima 010C-Pilot
®
.
4) Explore todo o canal radicular com uma 010C-Pilot®, determine o comprimento de trabalho (CT) com
um localizador apical eletrónico em conjunto com radiografias, irrigue e confirme a patência.
5) Posicione o stop de silicone em conformidade.
6) Escolha a definição apropriada para o motor elétrico controlado por binário pré-programado, de acordo
com o tamanho do instrumento VDW.ROTATE™.
7) Com solução de irrigação no canal, crie e confirme uma via de permeabilidade (glide path) reproduzível
para o CT, utilizando a VDW.ROTATE™ 15.04 até atingir o comprimento de trabalho.
8) Irrigue o canal periodicamente e limpe, com gaze humedecida em álcool, as estrias de corte da lima,
quando a remover.
9) Inspecione sistematicamente as estrias de corte, aquando da remoção, para verificar se existe
desenrolamento e endireitamento (ou alongamento). Se for detetada deformação, rejeite e utilize uma
nova lima VDW.ROTATE™.
10) Utilize o instrumento seguinte na sequência, VDW.ROTATE™ 20.05 até atingir o comprimento de
trabalho.
11) Irrigue o canal periodicamente e limpe, com gaze humedecida em álcool, as estrias de corte da lima,
quando a remover.
12) Inspecione sistematicamente as estrias de corte, aquando da remoção, para verificar se existe
desenrolamento e endireitamento (ou alongamento). Se for detetada deformação, rejeite e utilize uma
nova lima VDW.ROTATE™.
13) Determine o comprimento de trabalho final, utilizando um localizador apical eletrónico.
14) Dependendo da curvatura e do tamanho do canal, escolha entre a VDW.ROTATE™ tamanho 25.04 ou
25.06, consoante o seguinte:
a) Se o canal for estreito e extremamente curvo, utilize a VDW.ROTATE™ 25.04 até atingir o
comprimento de trabalho.
b) Para os outros canais, utilize a VDW.ROTATE™ 25.06 até atingir o comprimento de trabalho.
15) Irrigue o canal periodicamente e limpe, com gaze humedecida em álcool, as estrias de corte da lima,
quando a remover.
pt
Page 86

6
16) Inspecione sistematicamente as estrias de corte, aquando da remoção, para verificar se existe
desenrolamento e endireitamento (ou alongamento). Se for detetada deformação, rejeite e utilize uma
pt
nova lima VDW.ROTATE™.
17) Meça o forame com uma lima manual de tamanho 25 (NiTi ou aço inoxidável):
a) Se o instrumento estiver justo em comprimento, o canal está modelado e pronto a ser obturado.
b) Se a lima manual de tamanho 25 (NiTi ou aço inoxidável) apresentar folga em comprimento, passe
ao tamanho seguinte #030 e, se necessário, o #035 ou #040 ou #050 ou #/060, medindo após cada
instrumento com as limas manuais 030, 035, 040, 050 ou 060, respetivamente. Aplique a mesma
técnica de instrumentação até ao comprimento de trabalho.
18) Irrigue abundantemente; reconfirme a patência do canal ao longo do procedimento.
19) Irrigue com soluções desinfetantes, como hipoclorito de sódio a uma concentração não superior a 5%.
20) Seque e preencha o canal com uma técnica adequada, que promova o preenchimento tridimensional,
utilizando pontas de guta-percha VDW.ROTATE™ correspondentes ou GUTTAFUSION®.
8.2. Instruções para a lima de retratamento VDW.ROTATE™
1) Abra o orifício do canal com uma broca Gates-Glidden ou um instrumento de ultrassons e remova a
guta-percha do terço coronário.
2) Se necessário, amoleça a guta-percha com um solvente (por exemplo, óleo de eucalipto, óleo de
laranja).
3) Escolha a definição apropriada para o motor elétrico controlado por binário pré-programado, de acordo
com o tamanho do instrumento VDW.ROTATE™ (ver tabela no capítulo 6).
4) Coloque a extremidade do instrumento 25.05 de retratamento VDW.ROTATE™ na guta-percha e
deixe-a rodar. A lima 25.05 de retratamento VDW.ROTATE™ dispõe de uma extremidade de corte;
portanto, o instrumento deve avançar facilmente na guta-percha, sem pressão.
5) Utilize o instrumento 25.05 de retratamento VDW.ROTATE™ sem aplicar pressão descendente.
6) Remova gradualmente a obturação do canal radicular com movimentos de limagem circulares.
7) Inspecione sistematicamente as estrias de corte, aquando da remoção, para verificar se existe
desenrolamento e endireitamento (ou alongamento). Se for detetada deformação, rejeite e utilize uma
nova lima VDW.ROTATE™.
8) Utilize um instrumento manual (por exemplo, uma lima C-Pilot) tamanho ISO08 para avançar no canal
radicular até atingir todo o comprimento de trabalho.
9) Depois de avançar até ao ápice do comprimento de trabalho com o instrumento manual ISO08 referido
acima, prepare o canal radicular a todo o comprimento de trabalho com limas manuais de tamanho
até ISO10.
10) Continue a preparação com instrumentos VDW.ROTATE™ para tratamento, aplicando o procedimento
descrito na secção 8.1, até atingir o tamanho necessário.
9. DESINFEÇÃO, LIMPEZA E ESTERILIZAÇÃO
Processo de reprocessamento em conformidade com a DINENISO17664/AAMI ST81.
9.1. Princípios básicos gerais
Todos os instrumentos têm de ser limpos, desinfetados e esterilizados antes de cada utilização; isto aplicase a instrumentos fornecidos esterilizados, que se destinem a ser reutilizados, e a embalagens esterilizadas
que estejam danificadas ou abertas. Uma limpeza e uma desinfeção rigorosas são pré-requisitos essenciais
para uma esterilização eficaz.
Page 87

7
9.2. Pré-tratamento no local de utilização
A contaminação cruzada (particularmente resíduos de polpa e dentina) tem de ser removida imediatamente
após o instrumento ter sido utilizado num paciente (no prazo máximo de 2 horas).
Têm de ser aplicados os seguintes procedimentos, para assegurar que nenhuma contaminação dos
instrumentos seca e tornar mais eficiente a subsequente preparação:
Procedimento detalhado:
1) Após o tratamento, coloque o instrumento utilizado no Interim Stand antes da pré-desinfeção/limpeza
e para transporte (tempo de armazenamento mínimo de acordo com as instruções de utilização do
fabricante do agente desinfetante: máx. 2 horas).
2) Tem de ser utilizado um Interim Stand com um novo disco de esponja para cada paciente. O Interim
Stand tem de ser cheio até 2 terços da capacidade, no mínimo, com agente desinfetante.
Deve ter-se em conta o seguinte ao selecionar um agente desinfetante:
• Tem de ser adequado à desinfeção de instrumentos em metal e plástico.
• Tem de ser isento de aldeídos (o Cidex OPA é permitido, devido à sua fórmula especial).
• A sua eficácia tem de ter sido comprovada (homologação VAH/DGHM, aprovação FDA ou marca CE).
• Tem de ser compatível com os instrumentos (consulte a secção "9.11. Informações importantes sobre a
resistência do material").
• A concentração e o tempo de contacto mínimo especificados pelo fabricante do agente desinfetante
têm de ser rigorosamente cumpridos. Utilize unicamente soluções recém-preparadas e água com baixos
valores de germes (<10CFU/ml).
• Tenha em atenção que o agente desinfetante utilizado durante o pré-tratamento se destina apenas a
proteção pessoal e não substitui a fase de desinfeção necessária após a limpeza.
pt
AVISOS
• Instrumentos que já tenham entrado em contacto com agente desinfetante nunca poderão, sob
circunstância alguma, ser utilizados para tratar novamente um paciente.
• As esponjas azuis para o Interim Stand só podem ser utilizadas uma vez e não podem ser limpas/
desinfetadas ou esterilizadas.
Todas as fases seguintes do processo de preparação têm de ser efetuadas no mesmo dia.
Page 88

8
9.3. Preparação anterior à limpeza
Procedimento detalhado:
pt
1) Retire o stop do instrumento e elimine-o.
2) Em seguida, limpe sob água corrente, para remover a contaminação, no mínimo 3 x 1 minuto; para
remover a contaminação manualmente, utilize uma escova macia e limpa ou um pano suave e limpo
que seja utilizado unicamente para esta finalidade; nunca utilize escovas metálicas ou lã de aço.
3) Assegure-se de que não ficam resíduos ou contaminação visíveis e repita o processo de pré-limpeza,
se necessário.
AVISO
Recomenda-se que só seja utilizada água com baixos valores de germes (<10 CFU/ml);
contudo, nesta fase, água da torneira pode ser adequada.
9.4. Limpeza/desinfeção
Recomendamos um procedimento automático para limpar e desinfetar os instrumentos (consulte
9.4.1 abaixo). Só deve recorrer-se a um método manual, incluindo o banho ultrassónico (consulte
9.4.2 abaixo), se não for possível aplicar um método automatizado, uma vez que é menos eficaz e demonstra
uma menor reprodutibilidade.
Deve ter-se em conta o seguinte ao selecionar um agente de limpeza e um agente desinfetante:
• Tem de ser adequado à limpeza e à desinfeção dos instrumentos.
• O agente de limpeza, se aplicável, tem de ser adequado à limpeza ultrassónica (sem formação de espuma).
• Se não for aplicado um processo de desinfeção térmica, também é necessário utilizar um agente
desinfetante adequado e de eficácia comprovada, que terá de ser compatível com o agente de limpeza
utilizado.
• Os químicos utilizados têm de ser compatíveis com os instrumentos (consulte a secção "9.11. Informações
importantes sobre a resistência do material").
• Não pode ser necessária a neutralização.
• Não utilize agentes de limpeza/agentes desinfetantes combinados.
• As concentrações, as temperaturas e os tempos de contacto especificados pelo fabricante do agente
de limpeza e do agente desinfetante, bem como as especificações mínimas para o enxaguamento
subsequente, têm de ser rigorosamente cumpridos. Utilize unicamente soluções recém-preparadas e
água esterilizada ou com baixos valores de germes (<10CFU/ml) e de endotoxinas (<0,25EU/ml) (por
exemplo, água altamente purificada (HPW)).
9.4.1. Limpeza/desinfeção automatizada (aparelho de lavagem/desinfeção)
Para o reprocessamento, recomendamos a utilização da caixa LavEndo (referência: V04479).
Page 89

9
Procedimento detalhado:
1) Instale novos stops nos instrumentos pré-limpos.
2) Disponha os instrumentos nos módulos de endodontia; Minimódulos escalonados (referência:
V040403).
3) Coloque o módulo de endodontia na secção inferior azul da caixa LavEndo e feche-a (encaixando na
devida posição).
NOTA
Não é autorizada a preparação no módulo compartimentado.
4) Introduza a caixa LavEndo horizontalmente no aparelho de lavagem/desinfeção.
5) Inicie o programa.
6) Depois de finalizado o programa, retire a caixa LavEndo do aparelho de lavagem/desinfeção.
7) Verifique e acondicione os instrumentos tão rapidamente quanto possível depois de os retirar
(consulte "9.5. Inspeção"; "9.7. Manutenção" e "9.8. Acondicionamento"), depois de os deixar secar
adicionalmente num local limpo, se necessário.
AVISOS
• É imperativo que a eficácia do aparelho de lavagem/desinfeção tenha sido comprovada
(homologação DGHM, aprovação FDA ou marca CE, de acordo com a ENISO15883).
• O aparelho de lavagem/desinfeção tem de ser sujeito a manutenção e inspeção regular, de acordo
com as informações do fabricante, e validado de acordo com a ENISO15883.
• Quando possível, tem de ser utilizado um programa de desinfeção térmica testado (valor
A0≥3000 ou cinco minutos a 90°C, no mínimo, ou, para equipamentos mais antigos, 10 min a
93°C, no mínimo).
• O programa utilizado tem de ser adequado aos instrumentos e incluir os ciclos de enxaguamento
preconizados.
• Utilize unicamente água esterilizada ou com baixos valores de germes (< 10 CFU/ml) e de
endotoxinas (<0,25EU/ml) para o enxaguamento final.
• Em caso de desinfeção química, a remoção de resíduos tem de ser aprovada pela validação do
processo do aparelho de lavagem/desinfeção.
• Assegure-se de que armazena os stops novos num local limpo, na embalagem original.
pt
9.4.2. Limpeza e desinfeção manuais
Para o reprocessamento manual, recomendamos a utilização da caixa LavEndo (referência: V04479).
Procedimento detalhado para a limpeza manual:
1) Disponha os instrumentos, sem stops, nos módulos de endodontia; Minimódulos escalonados
(referência: V040403).
2) Coloque o módulo de endodontia na secção inferior azul da caixa LavEndo e feche-a (encaixando na
devida posição).
Page 90

10
NOTA
Não é autorizada a preparação no módulo compartimentado.
pt
3) Coloque stops novos num cesto para peças pequenas, cuja malha tenha um tamanho suficientemente
pequeno.
4) Introduza a caixa LavEndo horizontalmente e o cesto para peças pequenas com os stops novos no
banho de limpeza durante o tempo de contacto preconizado, assegurando que os instrumentos
dispõem de cobertura suficiente (com recurso a ultrassons, se necessário).
5) Em seguida, retire a caixa LavEndo e o cesto para peças pequenas com os stops do banho de limpeza
e enxague abundantemente com água durante 3 x 1 min, no mínimo.
Procedimento detalhado para a desinfeção manual:
1) Introduza a caixa LavEndo horizontalmente e o cesto para peças pequenas com os stops novos no
banho de desinfeção durante o tempo de contacto preconizado, assegurando que os instrumentos
dispõem de cobertura suficiente.
2) Em seguida, retire a caixa LavEndo e o cesto para peças pequenas com os stops do banho de desinfeção
e enxague abundantemente com água durante 5 x 1 min, no mínimo.
3) Seque a caixa LavEndo e o cesto para peças pequenas com os stops recorrendo a sopragem com ar
comprimido filtrado e sem óleo (ou ar comprimido médico proveniente de uma botija) e deixando secar
adicionalmente em local limpo.
4) Verifique e acondicione os instrumentos tão rapidamente quanto possível e coloque novos stops nos
instrumentos.
9.5. Inspeção
Abra as caixas LavEndo e retire os módulos. Verifique todos os instrumentos, módulos e caixas LavEndo
após a limpeza/desinfeção. Instrumentos, caixas e módulos defeituosos devem ser rejeitados de imediato.
Estes defeitos incluem: deformação plástica (por exemplo, causada por uma temperatura excessivamente
alta durante a esterilização); instrumento arqueado; fios danificados; superfícies de corte danificadas;
lâminas de corte rombas; corrosão; descoloração.
9.6. Eliminação
Para uma eliminação correta, respeite sempre a legislação nacional e as recomendações das autoridades.
9.7. Manutenção
AVISO
Não utilize lubrificantes de instrumentos.
Page 91

9.8. Acondicionamento
11
Procedimento detalhado:
1) Coloque o módulo na secção inferior da bandeja de esterilização preta e feche com a respetiva tampa.
2) Em seguida, acondicione as bandejas de esterilização em bolsas de esterilização descartáveis
(embalagem descartável).
AVISOS
• Não é autorizada a esterilização em bandejas de esterilização sem acondicionamento adicional. O
papel de autoclave nas caixas é apenas para maior segurança.
• Utilize apenas bolsas de esterilização em conformidade com DINEN11607/ANSI AAMIISO11607;
compatíveis com esterilização a vapor (resistentes a temperaturas até 142°C (288°F) ou mais,
suficiente permeabilidade ao vapor).
9.9. Esterilização
Utilize unicamente os métodos de esterilização indicados abaixo; não são autorizados outros métodos de
esterilização.
• Método de vácuo fracionado/pré-vácuo (no mínimo, três ciclos de vácuo) ou método de deslocamento de
gravidade
Método de vácuo fracionado/
pré-vácuo
Método de vácuo fracionado/
pré-vácuo
Método da gravidade 134°C (273°F) 15 minutos
Método da gravidade 121°C (250°F) 60 minutos
1
com secagem suficiente do produto2:
Procedimento de esterilização Temperatura de esterilização
134°C (273°F) 3 minutos
121°C (250°F) 20 minutos
Tempo de esterilização mínimo
Tempo de exposição à
temperatura de esterilização
3
pt
1
O menos eficaz método da gravidade só deve ser utilizado se o método de vácuo fracionado não estiver
disponível.
2
O tempo de secagem efetivamente necessário depende diretamente de parâmetros que são da exclusiva
responsabilidade do utilizador (configuração da carga, quantidade de artigos colocados e proximidade entre
os mesmos, estado do esterilizador, etc.) tendo, consequentemente, de ser determinado pelo utilizador. No
entanto, o tempo de secagem nunca deve ser inferior a 20 minutos.
3
Ou 18min (inativação de priões).
Page 92

12
AVISOS
pt
• O esterilizador a vapor tem de estar em conformidade com a DIN EN 13060 ou DIN EN 285,
ANSIAAMI ST79.
• O esterilizador a vapor tem de estar validado de acordo com a DINENISO17665 (qualificações IQ,
OQ e PQ (desempenho específico do produto) válidas).
• A temperatura de esterilização máxima de 138°C (280°F, incluindo tolerâncias) não pode ser
excedida; de acordo com a DINENISO17665.
9.10. Armazenamento
Após a esterilização, os instrumentos têm de ser armazenados na embalagem de esterilização e mantidos
secos e sem pó.
AVISOS
• Guarde registos de rastreabilidade e defina o prazo de validade de acordo com as linhas de
orientação do fabricante da embalagem.
• Após a esterilização, o produto deve ser manuseado com cuidado, para preservar a integridade
da embalagem (barreira estéril).
• Verifique a embalagem e os dispositivos médicos antes de utilizá-los (integridade da embalagem,
sem humidade e data de validade). No caso de danos, repita todo o processo descrito nas
presentes instruções.
9.11. Informações importantes sobre a resistência do material
Ao selecionar agentes de limpeza e agentes desinfetantes, assegure-se de que os mesmos não contêm
qualquer das seguintes substâncias:
Fenol / ácidos fortes (ph<6) ou alcalinos fortes (ph>8) / agente de limpeza neutro enzimático recomendado
/ aldeídos / substâncias anticorrosivas (especialmente di- ou trietanolamina) / oxidantes (peróxido de
hidrogénio, hipoclorito de sódio com força superior a 5%) / os instrumentos em NiTi só podem ser colocados
em oxidantes (hipoclorito de sódio com força <5%) durante 5 minutos, no máximo / solventes / óleos.
AVISOS
• Nunca limpe instrumentos, caixas, módulos ou o Interim Stand com escovas metálicas ou lã de
aço. Nunca submeta instrumentos, caixas, módulos ou o Interim Stand a temperaturas superiores
a 142°C (288 °F). É particularmente importante assegurar que os produtos a esterilizar não
são armazenados demasiado perto das paredes ou da base do esterilizador a vapor (risco de
temperatura excessiva e deformação).
• As esponjas azuis para o Interim Stand só podem ser utilizadas uma vez e não podem ser limpas/
desinfetadas ou esterilizadas.
Page 93

13
9.12. Número máximo de utilizações
Em relação aos nossos instrumentos de instrumentação de canais radiculares, recomendamos que não
exceda o seguinte número máximo de utilizações:
Tipo de canal
Canais extremamente
curvos (>30°) ou em
forma de S
Canais moderadamente
curvos (10° a 30°)
Canais ligeiramente curvos
(<10°) ou retos
Instrumentos em aço
inoxidável com um
diâmetro ≤ISO015
1 canal máx. 2 canais máx. 2 canais máx.
1 canal máx. 4 canais máx. 4 canais máx.
1 canal máx. 8 canais máx. 8 canais máx.
Instrumentos em aço
inoxidável com um
diâmetro >ISO015
Instrumentos NiTi
pt
Page 94
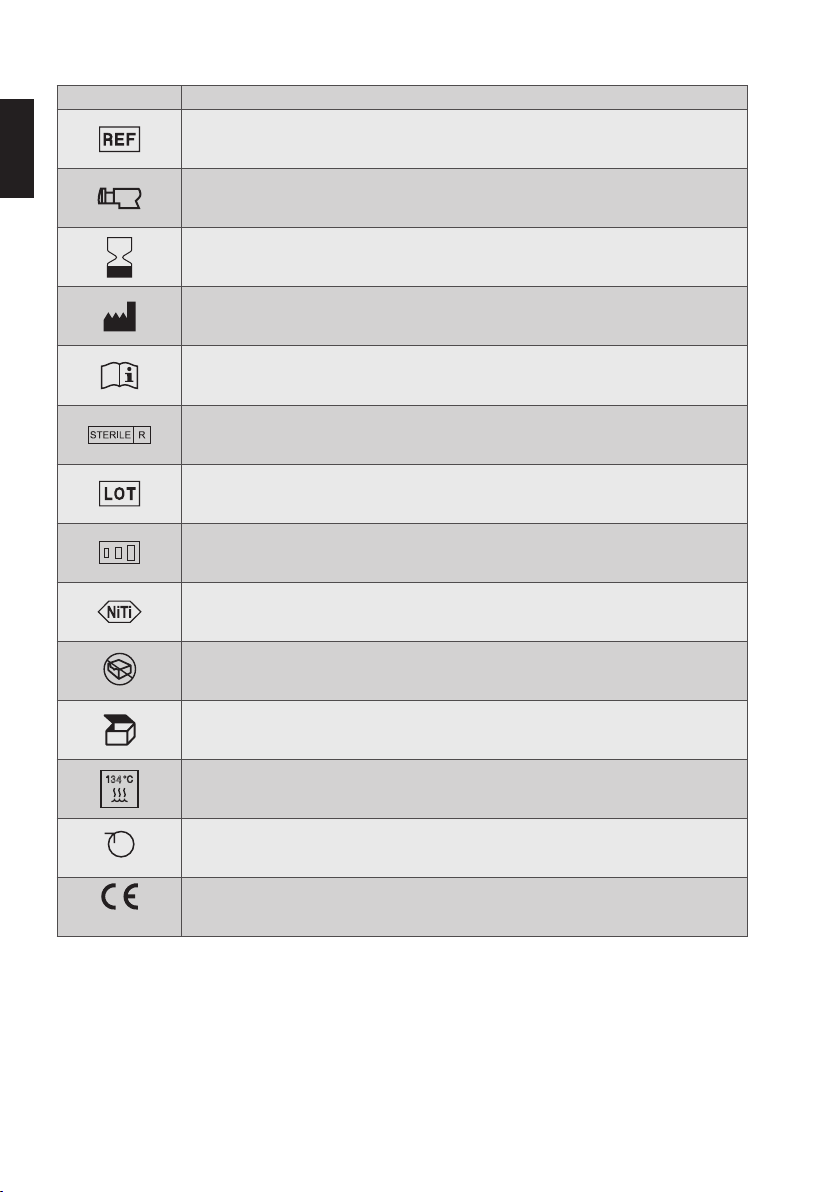
300-400 rpm
0123
14
Símbolos PT
pt
Número de referência
Punho ângulo reto AR
Prazo de validade
Fabricante
Consulte as Instruções de utilização
Esterilização com irradiação
Número de lote
Sortimento
Níquel titânio
Não utilizar se a embalagem estiver danificada
Unidade de acondicionamento
䢵
䢶
Esterilizável num esterilizador a vapor (autoclave) à temperatura especificada
Rotação no sentido dos ponteiros do relógio (velocidade de rotação recomendada:
mín.: 300rpm, máx.: 400rpm)
Marcação CE
Page 95

Notas:
15
pt
Page 96

Fabricante
0123
VDW GmbH
Bayerwaldstr. 15
81737 Munich
Alemanha
Telefone +49 (0) 89 62734-0
Fax +49 (0) 89 62734-304
info@vdw-dental.com
www.vdw-dental.com
MPTVROTDFUWEB Rev.2 / 13.05.2019
Page 97

VDW.ROTATE™
Gebruiksaanwijzing
vdw-dental.com
Page 98

2
UITSLUITEND VOOR TANDHEELKUNDIG GEBRUIK
nl
GEBRUIKSAANWIJZING
VDW.ROTATE™-INSTRUMENTEN VOOR ENDODONTISCHE
BEHANDELING
VDW.ROTATE™ : 15.04, 20.05, 25.04, 25.06, 30.06, 35.06, 40.06, 30.04, 35.04, 40.04, 50.04, 60.04
VDW.ROTATE™-INSTRUMENTEN VOOR HERHAALDE
ENDODONTISCHE BEHANDELING
VDW.ROTATE™ herhaalde behandeling: 25.05
1. SAMENSTELLING
VDW.ROTATE™-instrumenten bestaan uit drie hoofdcomponenten: een werkgedeelte, dat gemaakt is van een
nikkel-titaanlegering, een hittebehandeling heeft ondergaan en voorzien is van geverfde dieptemarkeringen,
een gekleurde silicone stopper en een koperen schacht, die vernikkeld is.
2. INHOUD
VDW.ROTATE™-blisterverpakking met elk 3, 4 of 6 steriele instrumenten.
3. BEOOGD GEBRUIK, BEOOGDE GEBRUIKER
VDW.ROTATE™-vijlen zijn steriele, motoraangedreven, continu roterende instrumenten die bedœld zijn om te
worden gebruikt bij een endodontische behandeling voor het vormgeven en reinigen van het wortelkanaalsysteem.
Deze instrumenten mogen uitsluitend worden gebruikt in een klinische of ziekenhuisomgeving en alleen door
tandartsen, huisartsen en endospecialisten.
4. CONTRA-INDICATIES
Zoals alle mechanisch aangedreven wortelkanaalinstrumenten mogen VDW.ROTATE™-vijlen niet worden
gebruikt bij abrupte apicale krommingen vanwege het verhoogde risico op breuk.
De veiligheid en werkzaamheid zijn niet vastgesteld bij zwangere vrouwen, vrouwen die borstvœding geven
en kinderen.
Page 99

3
5. WAARSCHUWINGEN
Dit product bevat nikkel en mag niet worden gebruikt bij personen met een bekende allergische gevœligheid
voor dit materiaal.
VDW.ROTATE™-vijlen worden steriel geleverd en mogen niet opnieuw worden gebruikt. Hergebruik vergroot
het risico op kruisbesmetting of breuk.
6. VOORZORGSMAATREGELEN
• Dœ instrumenten weg die corrosie vertonen of waarvan de kleur is vervaagd.
• Het meermaals desinfecteren en hersteriliseren kan het risico op vijlbreuk verhogen.
• Deze instrumenten mogen niet worden ondergedompeld in een natriumhypochlorietoplossing.
• Reiniging, desinfectie en sterilisatie van instrumenten: volg de instructies voor reiniging, desinfectie en sterilisatie uit hoofdstuk 9 op.
• Reinig de windingen regelmatig tijdens gebruik. Let hierbij op tekenen van vervorming of slijtage, zoals ongelijkmatige windingen en doffe plekken.
• Spœl het wortelkanaal regelmatig, recapituleer het en spœl het opnieuw gedurende de behandeling, ten
minste na gebruik van elke vijl.
• VDW.ROTATE™-vijlen mogen uitsluitend worden gebruikt in de delen van het wortelkanaal die een voltooide
en reproduceerbare geleide baan hebben. Creëer een reproduceerbare geleide baan met behulp van handvijlen, zoals de C-Pilot
• Gebruik de juiste afwerkingsvijlen om het wortelkanaal passief te volgen tot de werklengte en trek hem dan
onmiddellijk terug.
• Oefen te allen tijde minimale apicale druk uit. De vijlen mogen nooit met kracht in het wortelkanaal worden
ingebracht.
• Voor een optimaal gebruik worden instrumenten met regeling van de torsiekracht aanbevolen.
• Gebruik in nauwe kanalen en/of in kanalen die sterke krommingen vertonen de aanbevolen
VDW.ROTATE™-reeks (zie STAP-VOOR-STAP-INSTRUCTIES).
• De VDW.ROTATE™ roterende vijlen kunnen worden gebruikt in combinatie met endodontische motoren van
VDW met een snelheid tussen 300 en 400tpm. In onderstaande tabel staan de aanbevolen motorinstellingen
voor elke instrumentmaat:
®
, tot ten minste eENISO-vijlmaat 010.
nl
Page 100

Vijlmaat Torsiekracht [cNm] Snelheid [tpm]
VDW.ROTATE™ 15.04
nl
VDW.ROTATE™ 20.05 2.1
VDW.ROTATE™ 25.04 2.3
VDW.ROTATE™ 25.06 2.3
VDW.ROTATE™ 30.04 2.0
VDW.ROTATE™ 35.04 2.3
VDW.ROTATE™ 40.04 2.3
VDW.ROTATE™ 50.04 2.3
VDW.ROTATE™ 60.04 2.3
VDW.ROTATE™ 30.06 2.0
VDW.ROTATE™ 35.06 2.3
VDW.ROTATE™ 40.06 2.3
VDW.ROTATE™ 25.05 voor herhaalde
behandeling
7. ONGEWENSTE REACTIES
Er zijn geen ongewenste reacties bekend.
4
1.3
300 - 400
3.5 400
8. STAP-VOOR-STAP-INSTRUCTIES
8.1. Instructies voor VDW.ROTATE™-vijlen voor behandeling
Het werkgedeelte van de VDW.ROTATE™-instrumenten is gemaakt van een nikkel-titaanlegering.
VDW.ROTATE™-vijlen ondergaan een thermische behandeling voor meer flexibiliteit en een betere weerstand
tegen cyclische vermœidheid vergeleken met vijlen van gewoon nikkel-titaan. Door deze behandeling zijn
VDW.ROTATE™-instrumenten iets gebogen. Dit is geen fabricagefout en heeft geen invlœd op de prestaties van
het instrument. Het is niet nodig om het instrument vóór gebruik in het wortelkanaal recht te buigen.
8.1.1. Radiografische evaluatie
Bestudeer de röntgenfoto of de 3D-scan om diagnostisch de breedte, lengte en kromming van de wortel en het
kanaal te bepalen.
 Loading...