

Page 1
®
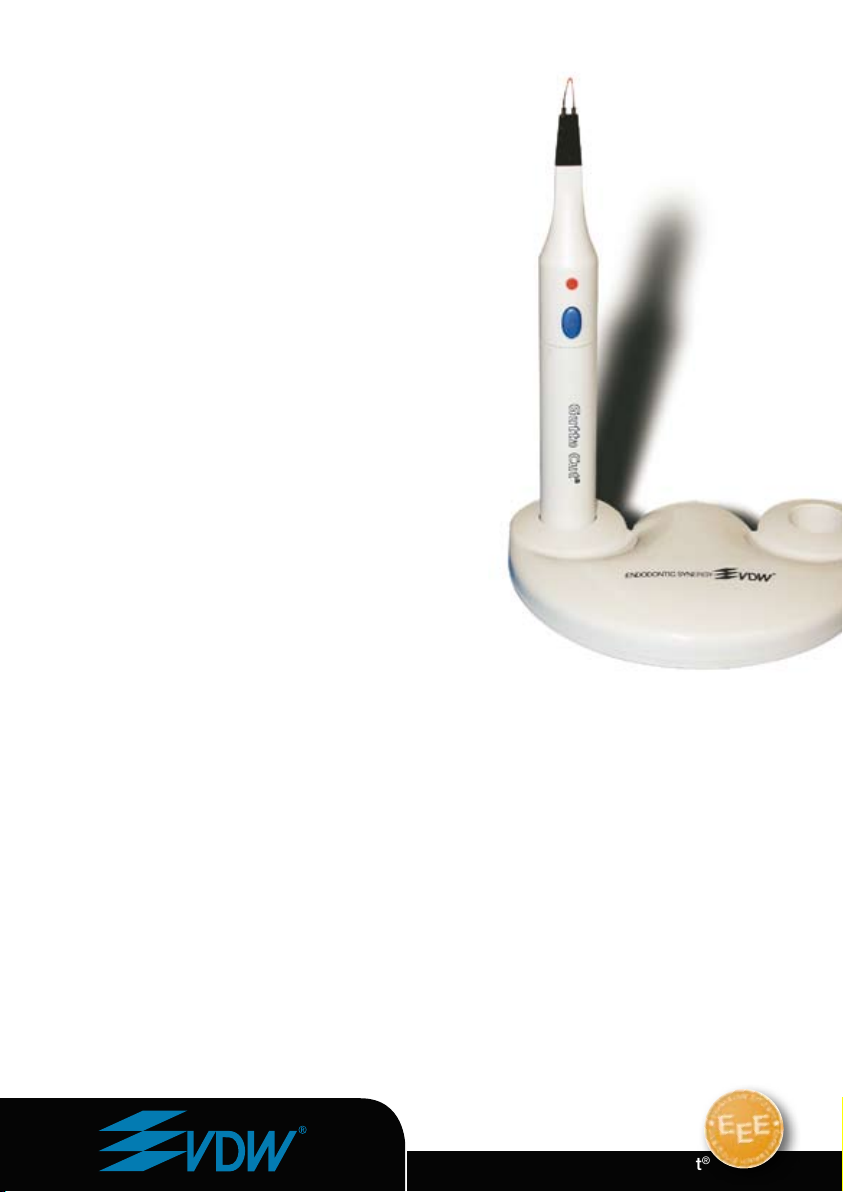
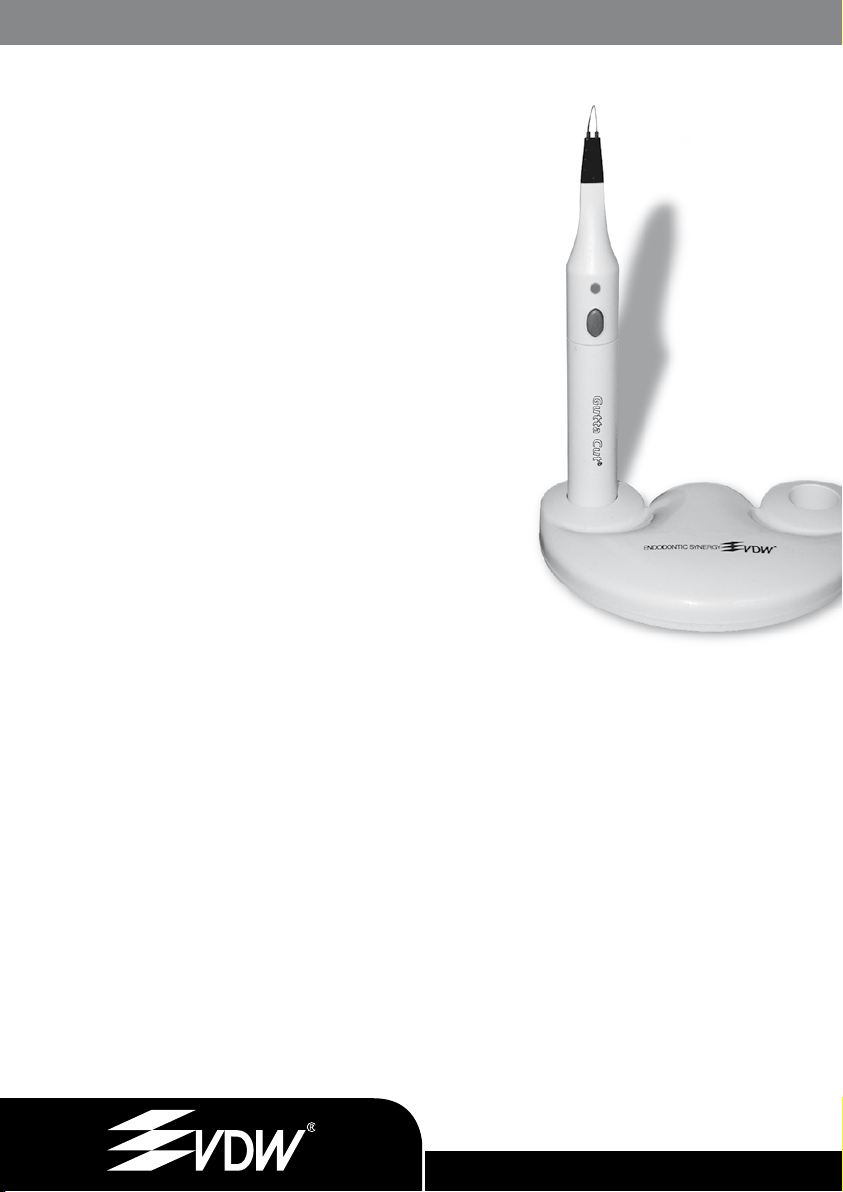
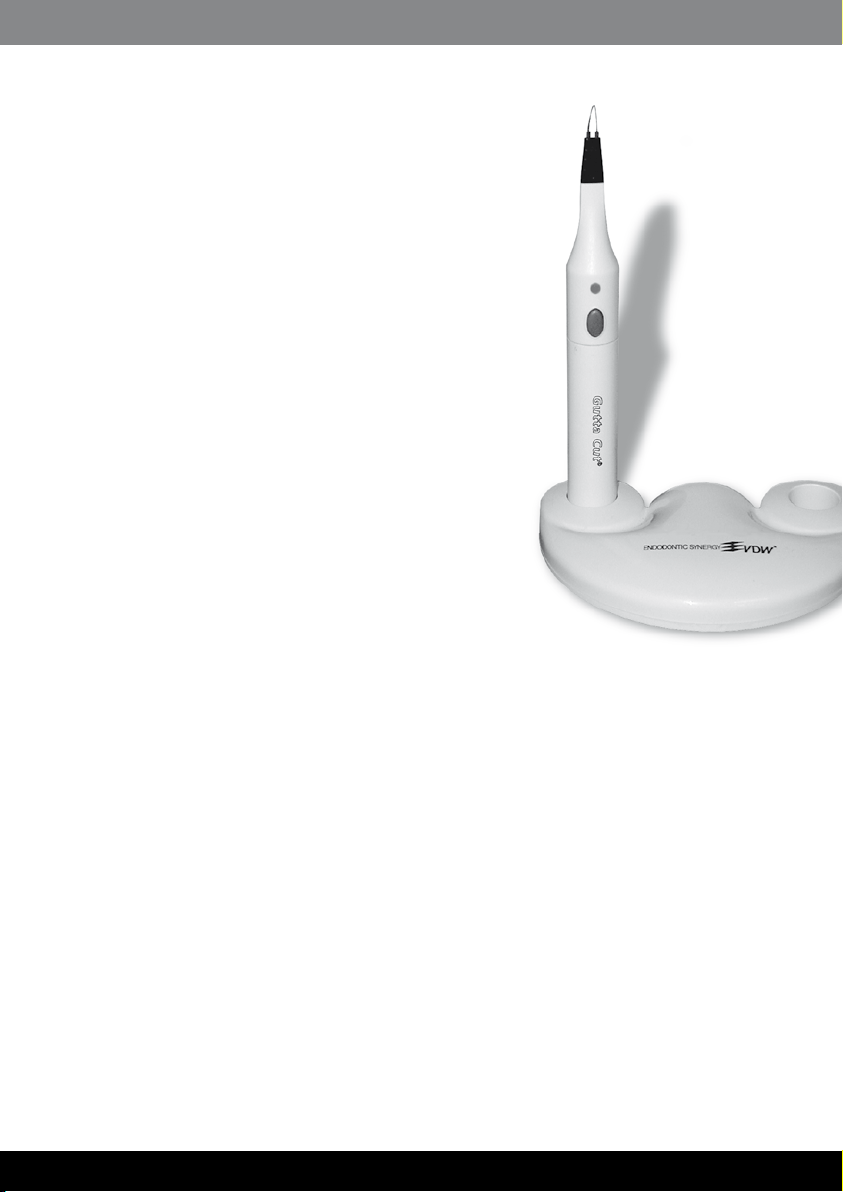
Gutta Cut
Heißes Abtrennen von Guttapercha Stiften
Hot removal of gutta-percha point
Coupe thermique des pointes de Guttapercha
Taglio a caldo di punte di guttaperca
Separación en caliente de puntas de gutapercha
Corte a quente de cones de guta-percha
Varmbehandling av guttaperkastift
Varmseparering af guttaperchaspidser
Avkutting av guttaperkaspisser med varme
Endo Easy Efficient
®
Page 2
Endo Easy Efficient
®
1
Page 3

Endo Easy Efficient
®
1
de • Gebrauchsanweisung 2
en • User instructions 5
fr • Mode d‘emploi 8
it • Istruzioni per l‘uso 11
es • Manual de usuario 14
pt • Manual de instruções 17
sv • Bruksanvisning 20
da • Brugsanvisning 23
no • Bruksanvisning 26
Page 4
2
Endo Easy Efficient
®
3
Gebrauchsanweisung Deutsch
Gutta Cut
®
Heißes Abtrennen
von Guttapercha Stiften
Wir gratulieren Ihnen
zum Erwerb Ihres Gutta Cut
Dieses kabellose Gerät mit auswechselbaren
Einsätzen ist zum schnellen, sauberen und sicheren Abtrennen überstehender Guttapercha
Stifte bestimmt. Mit der schlaufenförmigen
Spitze wird die Kavität gut erreicht und die
überstehenden Stifte direkt am Kanaleingang
präzise abgetrennt, so dass ein Lockern der
Füllung verhindert wird. Verschiedene Instrumentenspitzen stehen zur Auswahl und sind
für mehrfachen Einsatz autoklavierbar. Das
kabellose Handstück kann ohne Ladestation
am Behandlungsplatz für bis zu ca. 80 Anwendungen eingesetzt werden und ist somit
immer einsatzbereit.
®
!
Lieferumfang
1 Ladestation (lieferbar in 110 oder 220 V)
mit 2 Mulden für je 1 Handstück
1 Handstück
(mit aufladbarem Nickel-Metallhydrid Akku)
4 Trennspitzen
1 Gebrauchsanweisung
Ersatztrennspitzen sowie ein separates Handstück sind bei Ihrem Händler erhältlich.
Technische Spezifikationen
Abmessungen des Handstücks:
Länge: 14,2 cm (ohne Trennspitze), Ø: 1,8 cm
Gewicht des Handstücks: 42 g
(ohne Trennspitze)
Netzspannung: 230V/50Hz; 110V/60Hz
Indikationen
Dieses Gerät ist für das heiße Abtrennen von
Guttapercha-Spitzen bestimmt.
Gegenanzeigen
Es sind keine Gegenanzeigen bekannt.
Page 5

Endo Easy Efficient
®
3
Warnhinweise
Berühren Sie die Lippen, das Zahnfleisch •
oder Mundschleimhaut des Patienten nicht
mit der erhitzten Trennspitze – Verletzungsgefahr! Benutzen Sie immer Kofferdam!
Feuergefahr: Die erhitzte Spitze oder das •
Handstück nicht mit brennbaren Gasen oder
Flüssigkeiten in Berührung bringen.
Das Gerät nicht mit einer entflammbaren •
Reinigungslösung reinigen.
Der Gebrauch des Gerätes ist in einer Um-•
gebung mit entflammbaren Gasen nicht geeignet.
Das Handstück und die Ladestation nicht in •
Flüssigkeit eintauchen.
Bitte beachten Sie, dass die während einer •
Behandlung auszuwechselnden Trennspitzen
evtl. noch heiß sein können.
Sollte aus der Einheit irgendeine Flüssigkeit •
austreten, die auf ein Leck in der Batterie
hindeutet, unterbrechen Sie sofort die Arbeit
und senden Sie das Gerät an ein autorisiertes
Servicezentrum zum Batteriewechsel ein. Es
ist gefährlich das Gerät zu verwenden, wenn
die Batterie ausläuft.
Es ist gefährlich das Gerät zu öffnen, um •
einen Batteriewechsel vorzunehmen. Durch
Öffnen des Geräts erlischt die Garantie.
Vorsichtsmaßnahmen
Biegen Sie niemals die Spitze, solange sie •
sich im Handstück befindet.
Die Nutzungsdauer der Trennspitzen wird •
durch zu große Kraftanwendung bei der Behandlung negativ beeinflusst.
Um eine optimale Nutzung des Nickel- •
Metallhydrid Akkus zu gewährleisten sollte
keinesfalls länger als 12 Stunden ununterbrochen aufgeladen werden.
Nebenwirkungen
Es sind keine Nebenwirkungen bekannt.
Anwendungsanleitung
Vorbereitung
1. Bitte überprüfen Sie vor Inbetriebnahme,
dass die Netzspannung mit der auf dem Gerät angegebenen übereinstimmt.
Ladevorgang
1. Laden Sie zunächst das Gerät auf, indem Sie
die Ladestation mit einer Netz-Steckdose
verbinden.
2. Stecken Sie das Handstück in eine der beiden Mulden der Ladestation. Während das
Gerät auflädt, leuchtet die Diode am Handstück.
Hinweise zur Handhabung mit dem NickelMetallhydrid Akku
Bevor Sie das Gerät erstmalig benutzen, •
muss es vollständig aufgeladen werden.
Dieser Vorgang dauert 12 Stunden.
Der im Gutta Cut•
hydrid Akku sollte immer vollständig entladen sein, bevor er wieder komplett aufgeladen wird. Dadurch sichern Sie eine optimale
Lebensdauer ihres Gutta Cut
nach Anwendungshäufigkeit bei ca. 2 Jahren.
Verhindern Sie, dass die Batterie länger als •
erforderlich aufgeladen wird, um den vollen
Ladestand zu erreichen. Keinesfalls länger
als 12 Stunden ununterbrochen aufladen.
Anwendung
1. Eine Trennspitze auf das Handstück setzen.
Beachten Sie, dass der Winkel der Spitze
in die entgegengesetzte Richtung des Bedienungsknopfes zeigt. Dies erleichtert die
Arbeit. Falls erforderlich, kann der auf 30°
vorgebogene Winkel der Trennspitzen ein
wenig verändert werden. Dies sollte jedoch
mit größter Sorgfalt erfolgen.
Achtung: Biegen Sie niemals die Spitze, so-
lange sie sich im Handstück befindet.
®
befindliche Nickel-Metall-
®
. Diese liegt je
Page 6
Endo Easy Efficient
®
5
4
2. Die Trennspitze im kalten Zustand (ohne den
Bedienungsknopf zu drücken) in die Kavität
einführen. Die abzutrennenden Guttapercha
Stifte müssen von der Schlaufe der Trennspitze umschlossen sein.
3. Sobald sich die Trennspitze direkt am Kanaleingang befindet, den Bedienungsknopf
drücken.
4. Sekundenschnell ist die Spitze erhitzt und
die Guttapercha Stifte können schnell und
sauber abgetrennt werden.
5. Nach dem Abtrennen den Bedienungsknopf
loslassen. Die Trennspitze kühlt sofort ab und
kann aus dem Mund des Patienten entfernt werden.
Bei dem Bedienungsknopf handelt es sich
um einen „Kontaktknopf“, der das Gerät nur
einschaltet, wenn er gedrückt ist. Wird er
losgelassen, schaltet das Gerät aus.
6. Die Trennspitze nach der Anwendung vom
Handstück abnehmen.
Reinigung und Sterilisation
Die Trennspitzen müssen vor jeder Anwen-•
dung am Patienten gereinigt und sterilisiert
werden (Auch vor der ersten Anwendung –
Trennspitzen werden nicht steril ausgeliefert).
Eventuell noch an der Instrumentenspitze •
befindliche Reste von Guttapercha können
vorsichtig durch Abstreifen an einem Wattepellet entfernt werden.
Die Trennspitzen können bei bestimmungs-•
gemäßem Gebrauch maximal 25-mal autoklaviert werden. Die Sterilisationszeit richtet
sich nach der Sterilisationstemperatur (bei
121°C mind. 20 min. und bei 132°C/134°C
mind. 5 min. bzw. 18 min. zur Prioneninaktivierung).
Das Handstück und die Ladestation mit einem •
milden, chlorfreien Desinfektionsmittel abwischen. Das Desinfektionsmittel sollte von
der DGHM oder FDA zugelassen sein oder
ein CE-Zeichen tragen.
Verwenden Sie außerdem keine phenolhaltigen Desinfektionslösungen, Korrosionsschutzmittel oder stark saure oder stark
alkalische Lösungen. Bei der Benutzung von
Desinfektionslösungen beachten Sie bitte
die Hinweise des Herstellers.
Wartung
Gutta Cut® benötigt keine Wartung und ist einfach in der Anwendung.
Störungsbehebung
Findet keine augenblickliche Erhitzung der
Trennspitze bei Betätigung des Bedienungsknopfes statt, dann überprüfen Sie die elektronischen Kontakte der Trennspitze. Sind diese
defekt, tauschen Sie die Trennspitze gegen eine
neue aus.
Leuchtet die Diode am Handstück während
des Ladevorgangs nicht, dann überprüfen Sie,
ob die Ladestation an eine Stromquelle angeschlossen ist bzw. überprüfen Sie die Stromquelle selbst.
Dieses Medizinprodukt wurde nach dem
13.08.2005 in Verkehr gebracht. Das Produkt darf nicht über den normalen Hausmüll
entsorgt werden. Die Entsorgungsvorschriften
für Elektro- und Elektronik-Altgeräte müssen
beachtet werden.
Für Rückfragen stehen wir Ihnen gerne zur
Verfügung:
Hersteller: VDW GmbH
Bayerwaldstraße15•81737München•Deutschland
Tel.+498962734-0•Fax+498962734-304
www.vdw-dental.com•info@vdw-dental.com
Page 7
Endo Easy Efficient
®
5
User instructions English
5
Gutta Cut
®
Hot removal of
gutta-percha points
Congratulations on purchasing
your Gutta Cut
This cordless device with interchangeable
inserts is intended for fast, precise and safe
cutting of excess gutta-percha points. The
loop on the cutting tip provides easy access
to the cavity and catches the excess guttapercha exactly at the canal orifice and precisely
cuts it off so that an unintentional loosening
of the filling material is avoided. Various
instrument tips are available and autoclavable
for repeated use. The cordless handpiece
can be used for up to about 80 applications
without re-inserting it into the charging station
and thus is always readily available for use.
®
!
Scope of supply
1 Charging station
(110 or 220 V versions available)
with 2 sockets for 1 handpiece each
1 Handpiece (with re-chargeable nickel-metal
hydride battery)
4 Cutting tips
1 User instruction
Spare tips as well as a separate handpiece are
also available from your supplier.
Technical specification
Dimensions of handpiece:
Length: 14.2 cm (without cutting tip), Ø: 1.8 cm
Weight of handpiece: 42 g (without cutting tips)
Mains voltage: 230V/50Hz; 110V/60Hz
Indication for use
This instrument is intended for hot removal of
gutta-percha points.
Counter indications
No counter indications are known.
Page 8

Endo Easy Efficient
®
7
6
Warning instructions
In order to avoid risk of injury, do not let the •
tip come into contact with the lips, gums or
mucous of the mouth of the patient. Always
use rubber dam!
Risk of fire: do not allow the heated tip or •
the handpiece to come into contact with
combustible gases or liquids.
Do not clean the instrument with a flammable •
cleaning solution.
The instrument is not suitable for use in an •
environment containing flammable gases.
Do not immerse the handpiece and the •
charging station in liquid.
Please note that the cutting tips to be •
changed during a treatment may still be hot.
If any liquid leaks out of the unit (possibly •
from the battery), stop work immediately
and send the device to an authorised
service centre for a change of battery. It
is dangerous to use the device when the
battery is leaking.
It is dangerous to open the device for a •
change of battery. If you open the device,
the guarantee will be voided.
Precautions
Never bend the tip while it is still in the •
handpiece.
Using excessive force during treatment will •
have an adverse effect on the service life of
the cutting tips.
To safeguard optimal use of the nickel-metal •
hydride battery, never charge longer than
12 hours on end.
Adverse reactions
No adverse reactions are known.
Instructions for use
Preparations
1. Please check before use that the mains
voltage is the same as the voltage
specified for the instrument.
Charging
1. First, charge the instrument by connecting
the charging station to a mains power
socket.
2. Plug the handpiece into one of the two
sockets in the charging station. While the
instrument is charging, the diode lights up
on the handpiece.
Instructions for use with nickel-metal
hydride battery
Before using the instrument for the first •
time, make sure that it is fully charged. This
process takes 12 hours.
Always fully discharge the nickel-metal •
hydride battery in the Gutta Cut
completely recharging it. This ensures an
optimal life-span of your Gutta Cut
Depending on the frequency of use, the
product’s life-span amounts to about
2 years.
Avoid charging the battery longer than •
necessary for reaching full charging status.
Never charge longer than 12 hours on end.
Use
1. Fit a cutting tip onto the handpiece. Make
sure that the angle of the tip is pointing
in the opposite direction to the operating
button. This makes work easier. If necessary,
the 30° angle of the cutting tips can be
slightly altered. However, this must be
carried out with great care.
Important: Never bend the tip while it is still
in the handpiece.
®
before
®
.
Page 9
Endo Easy Efficient
®
7
2. Insert the cutting tip into the cavity while it is
cold (without pressing the operating button).
The gutta-percha point to be cut off must be
encircled by the loop of the cutting tip.
3. As soon as the cutting tip is located directly
on the canal access, press the operating
button.
4. The tip heats up in seconds and the guttapercha point can be quickly and cleanly
removed.
5. After the point has been cut off, release
the operating button. The cutting tip
immediately cools down and can be
removed from the patient‘s mouth. The
operating button is a „contact button“ which
only switches the instrument on while it is
pressed. When the button is released, the
instrument switches off.
6. Remove the cutting tip from the handpiece
after use.
Cleaning and sterilisation
Before each patient, the cutting tips must •
be cleaned and sterilised (even before using
the instrument for the first time – the cutting
tips are not supplied sterile).
Any residues of gutta-percha which still •
remain on the instrument tip can be removed
by carefully wiping it on a pellet of cotton
wool.
When used properly, the cutting tips can be •
autoclaved no more than 25 times. The sterilisation time depends on the sterilisation
temperature (at 121°C, at least 20 minutes
and at 132°C/134°C at least 5 minutes or 18
minutes for prion deactivation).
Wipe the handpiece and the charging sta-•
tion with a mild, chlorine-free disinfectant.
The disinfectant must be approved by the
DGHM or FDA or bear the CE symbol. Apart
from this, do not use disinfectant solutions
which contain phenol, corrosion protection
agents or strong acid or strong alkaline solutions. When using disinfectant solutions,
make sure that you follow the manufacturer‘s
instructions.
Maintenance
Gutta Cut® is maintenance free and simple to
use.
Troubleshooting
If the cutting tip does not heat up immediately
after the operating button is pressed, check the
electrical contacts on the cutting tip. If these are
defective, change the cutting tip for a new one.
If the diode on the handpiece fails to light up
during charging, check whether the charging
station is connected to the mains or check
the mains supply itself.
This medical product was put in
circulation after 13 August 2005. The
product may not be disposed of with normal
household garbage. The disposal regulations
for old electrical and electronic equipment
must be followed.
If you have further questions, please do not
hesitate to contact us.
Manufacturer: VDW GmbH
Bayerwaldstraße15•81737München•Germany
Phone+498962734-0•Fax+498962734-304
www.vdw-dental.com•info@vdw-dental.com
Page 10

8
Endo Easy Efficient
®
9
Mode d‘emploi Français
Gutta Cut
®
Coupe thermique des
pointes de Guttapercha
Félicitation pour l‘achat de votre Gutta Cut®!
Cet appareil sans fil avec kits remplaçables a
été conçu pour la coupe thermique teinte, ce
qui permet de séparer directement et de façon
précise les pointes de Guttapercha. Grâce à
leur forme tranchante, la cavité est bien atteinte
et permet d‘éviter ainsi tout détachement
de l‘obturation. Vous pouvez choisir parmi
différentes pointes d‘instrument autoclavables
pour plusieurs usages. La pièce à main sans fil
peut être utilisée sans station de chargement
pour effectuer jusqu‘à 80 applications, ce qui
signifie qu‘elle est toujours prête à l‘emploi.
Définition de la Livraison
1 Station de chargement
(disponible en 110 ou 220 volts) avec
2 inserts pour 1 pièce à main par insert
1 Pièce à main
(avec pile nickel-cadmium rechargeable)
4 Pointes
1 Mode d’emploi
Les pointes ainsi que la pièce à main de
rechange sont disponibles auprès de votre
revendeur.
Spécifications techniques
Dimensions de la pièce à main :
Longueur : 14,2 cm (sans pointe), Ø : 1,8 cm
Poids de la pièce à main : 42 g (sans pointe)
Tension de réseau : 230V/50Hz ; 110V/60Hz
Indication
Cet appareil permet la coupe à chaud des
pointes de Guttapercha.
Contre-indications
Aucune contre-indication connue jusqu’à
présent.
Page 11

Endo Easy Efficient
®
9
Mesures de sécurité et
avertissements
Ne pas toucher les lèvres, les gencives ou la
muqueuse buccale du patient avec la pointe
de coupe chaude - risque de lésion ! Utilisez
toujours une digue en caoutchouc !
Risque d‘incendie : Ne pas mettre la pointe •
chauffée ou la pièce à main en contact avec
des gaz ou des liquides inflammables.
Ne pas nettoyer l’appareil avec un nettoyant •
inflammable.
Ne pas utiliser l’appareil dans un •
environnement contenant des gaz
inflammables.
Ne pas plonger la pièce à main ou la station •
de chargement dans un liquide.
Veuillez tenir compte du fait que les pointes •
qui doivent être changées pendant un
traitement peuvent éventuellement être e
ncore chaudes.
En cas de fuite de liquide de l‘unité, ce qui •
signifie une fuite dans la batterie, cesser
immédiatement toute utilisation et retournez
l‘appareil à un centre de réparation agrée
pour le remplacement de la batterie.
Il est très dangereux d‘utiliser l‘appareil si •
la batterie coule. L‘ouverture de l‘appareil,
rend la garantie caduque.
Mesures de précaution
Ne jamais tordre la pointe, lorsqu‘elle se •
trouve dans la pièce à main.
La durée d‘utilisation des pointes de coupe •
est influencée négativement par une
application électrique trop intense lors du
traitement.
Pour garantir l‘utilisation optimale de la •
pile Nickel-MiMH, elle ne doit être chargée
en aucun cas pendant plus de 12 heures
continuellement.
Effets collatéraux
Aucun effet collatéral connu jusqu‘à présent.
Guide d‘application
Préparation
1. Veuillez vérifier avant la mise en service que
la tension de réseau est bien la même que
celle indiquée sur l‘appareil.
Procédure de chargement
1. Commencez par charger l‘appareil en
branchant la station de chargement sur une
prise de réseau.
2. Placez la pièce à main dans un des deux
inserts se trouvant sur la station de
chargement. La diode de la pièce à main est
allumée pendant l’opération de chargement
de l’appareil.
Conseils de manipulation de la batterie Ni-Mh
Avant d‘utiliser pour la première fois •
l‘appareil, chargez-le complètement. Ce
processus dure 12 heures.
La batterie Ni-Mh qui se trouve dans •
Gutta Cut
complètement, avant de la recharger.
Cela permet d‘assurer la durée de vie
optimale de votre Gutta Cut
de deux ans environ selon la fréquence
d‘application.
Évitez de charger batterie plus longtemps •
que nécessaire pour atteindre la pleine
charge. Ne chargez en aucun cas pendant
plus 12 heures continuellement.
Application
1. Mettre une pointe sur la pièce à main.
Veillez à ce que l’angle de la pointe soit
dirigé dans le sens opposé à celui du bouton,
ce qui facilite le travail. Vous pouvez modifier
si besoin est, l‘angle préformé de la pointe de
coupe qui est de 30°. Effectuez néanmoins
®
doit toujours être déchargée
®
qui est
Page 12

10
Endo Easy Efficient
®
11
cette opération avec le plus grand soin.
Attention: ne jamais tordre la pointe
lorsqu‘elle se trouve dans la pièce à main.
2. Introduire la pointe dans la cavité lorsqu’elle
EST FROIDE (sans appuyer sur le bouton).
Il faut que les pointes Guttapercha que vous
désirez couper soient prises dans la boucle
de la pointe.
3. Appuyez sur le bouton dès que la pointe se
trouve directement à l’entrée du canal.
4. La pointe chauffe en quelques secondes
et il est possible de couper rapidement et
proprement les pointes de Guttapercha.
5. Relâchez le bouton une fois l’opération
terminée. La pointe refroidit immédiatement
et vous pouvez la retirer de la bouche du
patient.
Le bouton de commande est un bouton dit
de contact qui ne met l’appareil en service
que si on appuie dessus. Si le bouton est
relâché, l’appareil se met hors service.
6. Remettre la pièce à main dans la station de
chargement après utilisation.
Nettoyage et stérilisation
Il faut absolument, avant chaque utilisation •
dans la bouche d’un patient, nettoyer et
stériliser les pointes (y compris avant la
première utilisation – les pointes ne sont
pas livrées stérilisées).
Il est possible de retirer avec précaution les •
restes de Guttapercha se trouvant éventuellement encore sur la pointe de l’instrument en
essuyant avec un pellet de coton.
En cas d’utilisation conforme, les pointes •
peuvent être autoclavées 25 fois maximum.
Le temps de stérilisation varie en fonction
de la température de stérilisation (au moins
20 minutes à 121°C et au moins 5 minutes
à 132°C/134°C et 18 minutes pour la
désactivation des prions)
Nettoyer la pièce à main et la station de •
chargement avec un désinfectant doux sans
chlore. Le désinfectant devra être agréé par
la DGHM ou FDA ou porter le sigle CE.
Par ailleurs, n’utilisez jamais de solutions
désinfectantes contenant des phénols, de
produits anti-corrosifs ou de solutions
fortement acides ou fortement alcalines.
Veuillez tenir compte des consignes du
fabricant lors de l’utilisation de solutions
désinfectantes.
Entretien
Gutta Cut® ne nécessite aucun entretien et est
facile à appliquer.
Depannage
Si la pointe ne chauffe pas immédiatement
lorsque vous appuyez sur le bouton de
commande, vérifiez les contacts électroniques
de la pointe. Si ces contacts sont défectueux,
veuillez prendre une pointe neuve.
Si la diode se trouvant sur la pièce à main
ne s’allume pas pendant l’opération de
chargement, veuillez vérifier que la station de
chargement est bien branchée sur une source
d’électricité ou vérifiez lasource d’électricité
elle-même.
Ce produit médical a été mis en circulation
après le 13.08.2005. Ce produit ne peut
être éliminé avec les déchets ménagers
normaux. Veuillez tenir compte des dispositions
enrigueur pour l’élimination des appareils
électriques et électroniques usagés.
Nous vous à votre disposition pour plus de
renseignements :
Fabricant : VDW GmbH
Bayerwaldstraße15•81737München•Germany
Phone+498962734-0•Fax+498962734-304
www.vdw-dental.com•info@vdw-dental.com
Page 13

Endo Easy Efficient
®
11
Istruzioni per l‘uso Italiano
Gutta Cut
®
Taglio a caldo di punte
di guttaperca
Congratulazioni per l‘acquisto di Gutta Cut®!
Questo apparecchio senza fili con elementi
sostituibili è concepito per tagliare punte
sporgenti di guttaperca in modo rapido,
igienico e sicuro. La punta a forma di occhiello
permette il corretto raggiungimento della
cavità e il taglio preciso della punta sporgente
direttamente all‘ingresso del canale, in modo
da evitare che il riempimento si allenti. È
possibile scegliere tra diverse punte per gli
strumenti, tutte sterilizzabili mediante ciclo in
autoclave per un molteplice utilizzo. Il manipolo
senza fili può essere impiegato senza stazione
di carica sul posto di trattamento fino a circa
80 utilizzi, in questo modo è sempre pronto
all‘uso.
Elementi forniti
1 Stazione di carica (disponibile a 110 o a 220 V)
con 2 vani per 1 manipolo ciascuno
1 Manipolo (con accumulatore ricaricabile al
nichel metal-idrato)
4 Punte di taglio
1 Istruzioni per l‘uso
Punte di taglio di ricambio, così come un
manipolo aggiuntivo, sono disponibili presso il
vostro rivenditore.
Specifiche tecniche
Dimensioni del manipolo: lunghezza: 14,2 cm
(senza punta di taglio), Ø: 1,8 cm
Peso del manipolo: 42 gr (senza punta di taglio)
Tensione di rete: 230V/50Hz; 110V/60Hz
Indicazioni
Questo apparecchio è concepito per il taglio a
caldo di punte di guttaperca.
Controindicazioni
Fino ad oggi non sono note controindicazioni
di sorta.
Page 14

12
Endo Easy Efficient
®
13
Avvertenze di pericolo
Evitate il contatto della punta di taglio •
riscaldata con le labbra, le gengive o la
mucosa orale del paziente - pericolo di lesioni!
Utilizzate sempre una diga dentale!
Pericolo di incendio: non mettete la punta •
riscaldata o il manipolo a contatto con gas o
liquidi infiammabili.
Non pulite l‘apparecchio con una soluzione •
detergente infiammabile.
L‘apparecchio non è adatto ad essere usato •
in un ambiente contenente gas infiammabili.
Non immergete il manipolo e la stazione di •
carica in liquidi.
Ricordate che le punte di taglio che devono •
essere sostituite durante un trattamento
potrebbero eventualmente essere ancora
calde.
Se dall‘unità dovesse fuoriuscire un liquido •
di qualsiasi tipo, riconducibile a una perdita
nella batteria, interrompete immediatamente
l‘attività e inviate l‘apparecchio a un centro
assistenza autorizzato per la sostituzione della
batteria. È pericoloso utilizzare l‘apparecchio
in caso di perdite dalla batteria.
È pericoloso aprire l‘apparecchio per cambiare •
la batteria. L‘apertura dell‘apparecchio
comporta il decadimento della garanzia.
Misure precauzionali
Non piegate mai la punta quando questa si •
trova nel manipolo.
La durata utile delle punte di taglio viene •
influenzata negativamente da un uso
eccessivo della forza durante il trattamento.
Per garantire un funzionamento ottimale •
dell‘accumulatore al nichel metal-idrato
l‘operazione di carica, in nessun caso, deve
durare più di 12 ore consecutive.
Effetti collaterali
Fino ad oggi non sono noti effetti collaterali di
sorta.
Istruzioni d‘uso
Preparazione
1. Prima della messa in funzione verificate che
la tensione di rete corrisponda a quella
indicata sull‘apparecchio.
Messa in carica
1. Per prima cosa caricate l‘apparecchio
collegando la stazione di carica con la presa
di corrente di rete.
2. Inserite il manipolo in uno dei due vani della
stazione di carica. Durante il periodo di
carica dell‘apparecchio il diodo sul manipolo
è illuminato.
Avvertenze per l‘uso con accumulatore al
nichel metal-idrato
Prima di utilizzare l‘apparecchio per la prima •
volta è necessario che questo venga
completamente caricato. Questo processo
dura 12 ore.
L‘accumulatore al nichel metal-idrato presente •
in Gutta Cut
completamente scarico prima di essere
nuovamente sottoposto a una carica completa.
In questo modo garantirete al vostro Gutta
®
una vita utile ottimale di circa 2 anni,
Cut
variabile a seconda della frequenza d‘impiego.
Per raggiungere lo stato di carica completa, •
evitate di sottoporre la batteria a processi di
carica più lunghi del necessario. La messa
in carica, in nessun caso, deve durare più di
12 ore consecutive.
Modalità d‘impiego
1. Applicate una punta di taglio sul manipolo.
Accertatevi che l‘angolo della punta sia
rivolto in direzione opposta rispetto al
pulsante di comando. Ciò facilita il lavoro.
®
dovrebbe essere sempre
Page 15

Endo Easy Efficient
®
13
Se necessario, è possibile modificare
leggermente l‘angolazione predeterminata
di 30° della punta di taglio. Ciò dovrebbe
però avvenire con la massima cura.
Attenzione: non piegate mai la punta
quando questa si trova nel manipolo.
2. Inserite la punta di taglio ancora fredda
(senza premere il pulsante di comando) nella
cavità. I bastoncini di guttaperca da tagliare
devono essere circondati completamente
dall‘occhiello della punta di taglio.
3. Non appena la punta di taglio si trova
direttamente all‘ingresso del canale premete
il pulsante di comando.
4. La punta si riscalda in pochi secondi e le
punte di guttaperca possono essere tagliate
in modo rapido e pulito.
5. Una volta ultimato il taglio lasciate andare il
pulsante di comando. La punta di taglio si
raffredda subito e può essere rimossa dalla
bocca del paziente.
Il pulsante di comando è un „pulsante di
contatto“ che attiva l‘apparecchio solo
quando viene premuto. Quando viene
lasciato andare l‘apparecchio si disattiva.
6. Le punte di taglio vanno rimosse dal
manipolo dopo l‘utilizzo.
Pulizia e sterilizzazione
Le punte di taglio devono essere pulite e •
sterilizzate prima di ogni utilizzo su di un
paziente (anche prima del primo impiego - le
punte di taglio non vengono fornite sterili).
I resti di guttaperca che si trovino •
eventualmente ancora sulla punta degli
strumenti possono essere rimossi
sfregando questi ultimi delicatamente con
una compressa di cotone.
Se utilizzate in modo conforme, le punte di •
taglio possono essere trattate in autoclave
per un massimo di 25 volte. La durata del
processo di sterilizzazione dipende dalla
temperatura di sterilizzazione (a 121 °C
almeno 20 min. e a 132 °C/134 °C almeno
5 min. o 18 min. per l‘inattivazione dei prioni).
Pulite il manipolo e la stazione di carica •
passando un panno con disinfettante
delicato privo di cloro. Il disinfettante deve
essere autorizzato dalla DGHM o dalla FDA
(Food and Drug Administration) oppure
portare un marchio CE. Non utilizzate inoltre
soluzioni disinfettanti a base di fenoli,
anticorrosivi o soluzioni fortemente acide
o molto alcaline. Nell‘usare soluzioni
disinfettanti osservate le avvertenze del
produttore.
Manutenzione
Gutta Cut® non necessita di alcuna
manutenzione ed è facile da usare.
Eliminazione delle anomalie
Se, una volta azionato il pulsante di comando,
non si verifica un riscaldamento immediato
della punta di taglio, controllate i contatti
elettronici della punta stessa. Se questi sono
difettosi, sostituite lapunta di taglio con una
nuova. Se il diodo sul manipolo non si illumina
durante il processo di carica, verificate che la
stazione di carica sia collegata ad una fonte di
energia e controllate la fonte di energia stessa.
Questo dispositivo medicale è stato
messo in commercio dopo il 13/08/2005.
Il prodotto non deve essere smaltito con i
normali rifiuti domestici. Devono essere
rispettate le disposizioni di smaltimento per
gli apparecchi elettrici ed elettronici usati.
Per qualsiasi informazione siamo a Vostra
disposizione:
Produttore: VDW GmbH
Bayerwaldstraße15•81737München•Germany
Phone+498962734-0•Fax+498962734-304
www.vdw-dental.com•info@vdw-dental.com
Page 16

14
Endo Easy Efficient
®
15
Manual de usuario Español
Gutta Cut
®
Separación en caliente de
puntas de gutapercha
¡Le felicitamos por la compra del Gutta Cut®!
Este aparato inalámbrico con insertos
intercambiables ha sido concebido para una
rápida, limpia y segura separación de puntas
de gutapercha salientes. La punta en forma
de bucle permite alcanzar adecuadamente la
cavidad y separar las puntas salientes de
forma precisa, directamente en la entrada
del canal, de modo tal que se evita un
aflojamiento del relleno. Se encuentran
disponibles diferentes puntas de instrumento,
que son autoclavables y aptas para múltiples
usos. La pieza de mano inalámbrica puede
utilizarse sin estación de carga en el lugar
de tratamiento para hasta 80 aplicaciones
aproximadamente, por lo que está siempre
lista para el uso.
Alcance del suministro
1 Estación de carga (suministrable en 110 ó
220 voltios) con 2 cavidades, cada una para
1 pieza de mano
1 Pieza de mano (con batería recargable de
níquel-hidruro metálico)
4 Puntas separadoras
1 Manual de usuario
Puede solicitar a su vendedor puntas
separadoras de recambio y una pieza de mano
independiente.
Especificaciones técnicas
Dimensiones de la pieza de mano:
Longitud: 14,2 cm (sin punta separadora),
Ø: 1,8 cm
Peso de la pieza de mano: 42 g
(sin punta separadora)
Tensión de red: 230V/50Hz; 110V/60Hz
Uso previsto
Este aparato ha sido concebido para la
separación en caliente de puntas de
gutapercha.
Contraindicaciones
No se conocen contraindicaciones.
Page 17

Endo Easy Efficient
®
15
Advertencias
No toque los labios, las encías o la mucosa •
bucal del paciente con la punta separadora
caliente - ¡peligro de lesión! ¡Utilice siempre
un dique de goma!
Peligro de incendio: La punta calentada y la •
pieza de mano no deben entrar en contacto
con gases o líquidos inflamables.
El aparato no debe limpiarse con una •
solución de limpieza inflamable.
No debe emplearse el aparato en un •
ambiente con gases inflamables.
La pieza de mano y la estación de carga no •
deben sumergirse nunca en un líquido.
Tenga en cuenta que las puntas separadoras •
que deben cambiarse durante un tratamiento
aún pueden estar calientes.
Si de la unidad sale algún líquido que indica •
la presencia de una fuga en la batería,
interrumpa inmediatamente el trabajo y envíe
el aparato a un centro de servicio técnico
autorizado para reemplazar la batería. Es
peligroso utilizar el aparato si la batería
sufre una fuga.
Es peligroso abrir el aparato para realizar •
el reemplazo de la batería. La apertura del
aparato significará la anulación de la
garantía.
Medidas de precaución
No doble nunca la punta mientras ésta se •
encuentra en la pieza de mano.
La vida útil de las puntas separadoras es •
afectada negativamente si se aplica una
fuerza excesiva durante el tratamiento.
Para garantizar un óptimo aprovechamiento •
de la batería de níquel-hidruro metálico,
nunca debe realizarse una carga durante
más de 12 horas de forma ininterrumpida.
Efectos adversos
No se conocen efectos adversos.
Instrucciones de uso
Preparación
1. ¡Antes de la puesta en funcionamiento,
compruebe que la tensión de red coincida
con la tensión indicada en el aparato!
Procedimiento de carga
1. Cargue primero el aparato, conectando la
estación de carga a una toma de corriente.
2. Inserte la pieza de mano en una de las dos
cavidades de la estación de carga. Durante
la carga del aparato, se enciende el diodo en
la pieza de mano.
Indicaciones relativas a la batería de níquelhidruro metálico
Antes de emplear por primera vez el aparato, •
debe cargarlo completamente. Este proceso
dura 12 horas.
Antes de volver a cargarse por completo, la •
batería de níquel-hidruro metálico incluida
en el Gutta Cut
descargada. De este modo se garantiza una
óptima vida útil del Gutta Cut
frecuencia de uso, la vida útil es de
aproximadamente 2 años.
Evite que la batería se cargue durante un •
tiempo superior al necesario para alcanzar
el estado de carga total. Nunca debe
realizarse una carga durante más de 12 horas
de forma ininterrumpida.
Aplicación
1. Inserte una punta separadora en la pieza de
mano. Compruebe que el ángulo de la punta
esté orientado en dirección opuesta al botón
de mando. Esto facilitará el trabajo.
2. En caso necesario, el ángulo predoblado
a 30° de las puntas separadoras puede
modificarse ligeramente. Sin embargo, esto
debe realizarse con el mayor cuidado.
Atención: No doble nunca la punta mientras
ésta se encuentra en la pieza de mano.
®
debe estar totalmente
®
. Según la
Page 18

16
Endo Easy Efficient
®
17
2. Introduzca la punta separadora en estado
frío (sin apretar el botón de mando) en la
cavidad. Las puntas de gutapercha a
separar deben ser envueltas por el bucle de
la punta separadora.
3. En cuanto la punta separadora se encuentre
directamente en la entrada del canal, presione
el botón de mando.
4. En pocos segundos se calienta la punta, y
las puntas de gutapercha pueden separarse
de forma rápida y limpia.
5. Después de la separación, suelte el botón
de mando. La punta separadora se enfría
inmediatamente y puede ser retirada de la
boca del paciente.
El botón de mando es un „botón de contacto“,
que sólo enciende el aparato cuando está
apretado. Cuando se suelta, el aparato se
apaga.
6. Después de la aplicación, extraiga la punta
separadora de la pieza de mano.
Limpieza y esterilización
Antes de cada aplicación en el paciente, •
las puntas de separación deben limpiarse y
esterilizarse (también antes de la primera
aplicación, ya que las puntas de separación
se suministran en estado no estéril).
Los restos de gutapercha que aún se •
encuentran en la punta del instrumento
pueden retirarse cuidadosamente con una
torunda de algodón.
Si se utilizan correctamente, las puntas •
separadoras pueden esterilizarse en autoclave hasta 25 veces. El tiempo de
esterilización depende de la temperatura de
esterilización (a 121°C mín. 20 minutos y a
132°C/134°C mín. 5 minutos o 18 minutos
para la inactivación de priones).
Limpie la pieza de mano y la estación de •
carga con un desinfectante suave sin cloro.
El desinfectante debe contar con la
aprobación de la DGHM o la FDA o debe
llevar el marcado CE. Evite el uso de
soluciones desinfectantes con fenol, agentes
anticorrosivos o soluciones muy ácidas o
muy alcalinas. Al utilizar soluciones
desinfectantes, tenga en cuenta las
instrucciones del fabricante.
Mantenimiento
Gutta Cut® no requiere mantenimiento y es
fácil de usar.
Eliminación de fallos
Si al accionar el botón de mando no se
produce el calentamiento instantáneo de la
punta separadora, controle los contactos
electrónicos de dicha punta. Ante la presencia
de contactos defectuosos, reemplace la punta
separadora por una nueva.
Si no se enciende el diodo en la pieza de mano
durante el proceso de carga, verifique si la
estación de carga está conectada a una fuente de electricidad o controle dicha fuente.
Este producto médico fue comercializado
después del 13/08/2005. El producto no
debe ser eliminado con la basura doméstica
normal. Tenga en cuenta las normas para la
eliminación de aparatos eléctricos y electrónicos
usados.
Si desea realizar alguna consulta, puede
ponerse en contacto con nosotros:
Fabricante: VDW GmbH
Bayerwaldstraße15•81737München•Germany
Phone+498962734-0•Fax+498962734-304
www.vdw-dental.com•info@vdw-dental.com
Page 19

Endo Easy Efficient
®
17
Manual de instruções Português
Gutta Cut
®
Corte a quente de
cones de guta-percha
Parabéns pela aquisição do Gutta Cut®!
Este aparelho sem fios com acessórios
opcionais destina-se ao corte rápido, limpo
e seguro de cones de guta-percha salientes.
Com a ponta em forma de laço, a cavidade
é facilmente alcançada e o cone saliente
é cortado directamente e com precisão
à entrada do canal, impedindo assim um
afrouxamento do enchimento. Estão disponíveis
diversas pontas de instrumentos autoclavadas
para uma aplicação diversificada. A peça de
mão sem fios pode ser utilizada sem estação
de carregamento no local de aplicação até
cerca de 80 aplicações, estando assim
sempre pronta a utilizar.
Volume de Fornecimento
1 Estação de carregamento
(fornecida em 110 ou 220 V) com 2 bases
para cada peça de mão
1 Peça de mão (com bateria de níquel-hidreto
metálico recarregável)
4 Pontas de separação
1 Manual de instruções
Junto do seu vendedor pode adquirir pontas
sobressalentes, bem como uma peça de mão
separada.
Especificações técnicas
Dimensões da peça de mão:
Comprimento: 14,2 cm
(sem ponta de separação), Ø: 1,8 cm
Peso da peça de mão: 42 g
(sem ponta de separação)
Tensão de rede: 230V/50Hz; 110V/60Hz
Indicação
Este aparelho destina-se ao corte a quente
de cones de guta-percha.
Contra-indicações
Não são conhecidas quaisquer
contra-indicações.
Page 20

18
Endo Easy Efficient
®
19
Indicações desegurança
Não toque nos lábios, gengivas ou mucosa •
oral do paciente com a ponta de separação
quente – perigo de ferimentos! Utilize sempre
uma barreira dental!
Perigo de incêndio: a ponta aquecida ou a •
peça de mão não podem entrar em contacto
com gases ou líquidos inflamáveis.
Não limpar o aparelho com uma solução de •
limpeza inflamável.
O aparelho não pode ser utilizado em •
ambientes com gases inflamáveis.
Não imergir a peça de mão e a estação de •
carregamento em líquidos.
Tenha em atenção que as pontas de •
separação que pretende substituir durante
um tratamento podem ainda estar quentes.
Se a unidade derramar qualquer líquido •
que indique uma eventual fuga da bateria,
interrompa imediatamente o trabalho e envie
o aparelho para um centro de assistência
autorizado, para substituir a bateria. É
perigoso utilizar o aparelho quando a bateria
se encontra a derramar líquido.
É perigoso abrir o aparelho para proceder à •
substituição da bateria. Abrindo o aparelho
expira a garantia.
Medidas de precaução
Nunca dobre a ponta enquanto esta se •
encontrar na peça de mão.
A vida útil das pontas de separação é •
negativamente influenciada pela aplicação
de força excessiva durante o manuseamento.
Para garantir um aproveitamento ideal da •
bateria de níquel-hidreto metálico, esta
nunca deve ser carregada ininterruptamente
por mais de 12 horas.
Efeitos secundários
Não são conhecidos quaisquer efeitos secundários.
Manual de utilização
Preparação
1. Antes da colocação em funcionamento,
certifique-se de que a tensão de rede está
em conformidade com a tensão indicada no
aparelho.
Processo de carregamento
1. Em primeiro lugar carregue o aparelho,
ligando a estação de carregamento a uma
tomada de rede.
2. Encaixe a peça de mão numa das duas
bases da estação de carregamento. Enquanto
o aparelho carrega acende-se o díodo na
peça de mão.
Indicações sobre o manuseamento da
bateria de níquel-hidreto metálico
Antes de utilizar o aparelho pela primeira •
vez esta deve ser totalmente carregada.
Este processo demora 12 horas.
A bateria de níquel-hidreto metálico incluída •
no Gutta Cut
antes de voltar a ser carregada na totalidade.
Desta forma garante uma vida útil ideal do
seu Gutta Cut
de utilização, esta situa-se aprox. nos 2 anos.
Evite que a bateria carregue durante mais •
tempo do que o necessário para atingir o
nível de carga completo. Em caso algum
a bateria deve carregar mais de 12 horas
ininterruptamente.
Aplicação
1. Colocar uma ponta de separação na peça
de mão. Tenha em atenção que o ângulo da
ponta deve apontar na direcção oposta do
botão de operação. Isto facilita o trabalho.
Se necessário, no ângulo das pontas de
separação dobrado a 30° pode ser
ligeiramente alterado. No entanto, tal deve
ser efectuado com cuidado redobrado.
Atenção: Nunca dobre a ponta enquanto
esta se encontra na peça de mão.
®
deve ficar totalmente vazia
®
. Dependendo da frequência
Page 21

Endo Easy Efficient
®
19
2. Inserir a ponta de separação fria (sem
pressionar o botão de operação) na cavidade.
Os cones de guta-percha a separar devem
estar envolvidos pelo laço da ponta de
separação.
3. Premir o botão de operação assim que a
ponta de separação se situar directamente
na entrada do canal.
4. A ponta aquece em alguns segundos e os
cones de guta-percha podem ser rápida e
correctamente separados.
5. Soltar o botão de operação após a
separação. A ponta de separação arrefece
imediatamente e pode ser retirada da boca
do paciente.
O botão de operação é um „botão de
contacto“ que liga o aparelho apenas quando
se encontra premido. Assim que é solto o
aparelho desliga imediatamente.
6. Após a utilização retirar a ponta de
separação da peça de mão.
Limpeza e esterilização
Antes de cada utilização nos pacientes, •
as pontas de separação devem ser limpas
e esterilizadas (mesmo antes da primeira
utilização – as pontas de separação não são
fornecidas esterilizadas).
Eventuais restos de guta-percha na ponta do •
instrumento podem ser cuidadosamente
removidos com pellets de algodão.
Para uma utilização adequada, as pontas •
de separação podem ser submetidas a um
máximo de 25 processos de autoclave. O
tempo de esterilização orienta-se pela
temperatura de esterilização (a 121°C pelo
menos 20 minutos e a 132°C/134°C pelo
menos 5 minutos ou 18 minutos para a
inactivação de priões).
Lavar a peça de mão e a estação de •
carregamento com um desinfectante suave
e sem cloro. O desinfectante deve estar
homologado pela DGHM ou FDA ou possuir
um símbolo CE. Não utilize também
soluções de desinfecção com fenol, agentes
corrosivos ou soluções muito ácidas ou
alcalinas. Durante a utilização de soluções
de desinfecção tenha em atenção as
indicações do fabricante.
Manutenção
O Gutta Cut® não necessita de manutenção e
é de fácil utilização.
Reparação de avarias
Se a ponta de separação não aquecer
imediatamente ao premir o botão de operação,
verifique o contacto electrónico da mesma. Se
estes estiverem avariados deve substituir a
ponta de separação por uma nova.
Se o díodo na peça de mão não acender
durante o processo de carregamento, deve
verificar se a estação de carregamento está ligada a uma fonte de electricidade ou verificar
a própria fonte de alimentação.
Este produto médico foi colocado
no mercado após 13.08.2005. O produto
não pode ser eliminado com o lixo doméstico.
Devem ser tidas em consideração as
prescrições de eliminação para aparelhos
eléctricos e electrónicos.
Em caso de dúvidas estamos à sua disposição:
Fabricante: VDW GmbH
Bayerwaldstraße15•81737München•Germany
Phone+498962734-0•Fax+498962734-304
www.vdw-dental.com•info@vdw-dental.com
Page 22

20
Endo Easy Efficient
®
21
Bruksanvisning Svenska
Gutta Cut
®
Varmbehandling av
guttaperkastift
Vi gratulerar dig till köpet av en Gutta Cut®!
Denna kabellösa apparat med utbytbara
insatser är avsedd för snabb, ren och säker
borttagning av utskjutande guttaperkastift.
Dess spets i form av en slinga gör att man lätt
kommer in i hålrummet och de utskjutande
stiften tas bort direkt vid kanalingången. På det
sättet förhindras att fyllningen kan lossna. Man
kan välja bland olika instrumentspetsar som är
autoklaverbara för flergångsanvändning. Det
kabellösa handstycket kan vid behandlingsplatsen användas utan laddningsstation ca 80
gånger och är således alltid funktionsberett.
Leveransomfattning
1 Laddningsstation (finns med 110 eller 220
volt) med 2 fack för 1 handstycke vardera
1 Handstycke (med laddningsbart
nickel-metallhydrid-batteri)
4 Skiljespetsar
1 Bruksanvisning
Reservspetsar samt ett separat handstycke
finns hos din återförsäljare.
Tekniska specifikationer
Handstyckets mått: Längd: 14,2 cm
(utan skiljespets), Ø: 1,8 cm
Handstyckets vikt: 42 g (utan skiljespets)
Nätspänning: 230 V/50 Hz; 110 V/60 Hz
Indikation
Denna utrustning är avsedd för
varmbehandling av guttaperkaspetsar.
Kontraindikationer
Inga kontraindikationer är ännu kända.
Page 23

Endo Easy Efficient
®
21
Varningsanvisningar
Vidrör aldrig patientens läppar, tandkött •
eller slemhinnor med skiljespetsen när den
är varm – risk för skada föreligger! Använd
alltid kofferdam!
Brandfara: Den uppvärmda spetsen eller •
handstycket får inte komma i kontakt med
brännbara gaser eller vätskor.
Apparaten får inte rengöras med antändlig •
rengöringsvätska.
Apparaten är inte avsedd för användning i •
en miljö där antändliga gaser finns.
Handstycket och laddningsstationen får inte •
sänkas ned i vatten.
Tänk på att skiljespetsarna vid byte under •
behandling fortfarande kan vara varma.
Om någon vätska skulle tränga fram ur •
enheten som tyder på läckage i batteriet
måste arbetet avbrytas omedelbart och
utrustningen skickas till ett auktoriserat
servicecenter för byte av batteriet. Det är
farligt att använda utrustningen när batteriet
läcker.
Det är farligt att öppna utrustningen för att •
byta batteriet. När utrustningen öppnas
upphör garantin att gälla.
Försiktighetsåtgärder
Böj aldrig spetsarna när de sitter i •
handstycket.
Skiljespetsarnas livslängd påverkas negativt •
om för stor kraft används vid behandling.
För att säkerställa optimal användning •
av nickel-metallhydrid-batteriet bör det under
inga omständigheter laddaslängre än 12
timmar i streck.
Biverkningar
Inga kända biverkningar.
Användningsinformation
Föreberedelser
1. Kontrollera före idrifttagning att
nätspänningen överensstämmer med den
spänning som anges på apparaten.
Laddning
1. Ladda först upp apparaten genom att
ansluta laddningsstationen till ett eluttag.
2. Stick in handstycket i ett av de båda facken
på laddningsstationen. När apparaten laddas
lyser dioden på handstycket.
Anvisningar till användning med nickelmetallhydrid-batteri
Innan du använder apparaten för första •
gången måste det laddas fullständigt.
Detta tar 12 timmar.
Nickel-metallhydrid-batteriet som sitter i •
Gutta Cut
det återladdas helt. Därigenom säkerställs
en optimal livslängd för din Gutta Cut
Beroende på hur ofta den används är
livslängden ca. 2 år.
Förhindra att batteriet laddas längre än vad •
som krävs för att det ska bli fulladdat. Det
får under inga omständigheter laddas längre
än 12 timmar.
Användning
1. Sätt på en skiljespets på handstycket. Tänk
på att spetsens vinkel ska peka i motsatt
riktning mot manöverknappen. Detta
underlättar arbetet.
Vinkeln på skiljespetsarna (som i förväg
böjts till 30°) kan vid behov ändras en aning.
Detta bör dock göras med stor försiktighet.
Viktigt: Böj aldrig spetsarna när de sitter i
handstycket.
2. För in skiljespetsen när den är kall (utan att
trycka på manöverknappen) i hålrummet.
Guttaperkaspetsarna som ska tas bort måste
omslutas av skiljespetsens slinga.
®
skall alltid vara helt urladdat innan
®
.
Page 24

22
Endo Easy Efficient
®
23
3. Så snart som skiljespetsen är direkt vid
kanalingången, tryck på manöverknappen.
4. Spetsen värms upp på några sekunder och
guttaperkaspetsarna kan tas bort snabbt
och rent.
5. Släpp manöverknappen när dessa avlägsnats.
Skiljespetsarna kyls av omedelbart och kan
tas ut ur patientens mun.
Manöverknappen är en kontaktknapp, som
gör att maskinen endast drivs när knappen
hålls in. Om knappen släpps stängs
apparaten av.
6. Ta loss skiljespetsen från handstycket efter
användning.
Rengöring och sterilisering
Skiljespetsarna måste rengöras och •
steriliseras före varje användning på en
patient (även före första användningen –
skiljespetsarna är inte sterila när de
levereras).
Eventuella rester av guttaperka som finns •
på instrumentets spets kan försiktigt tas
bort genom att man stryker den mot en
bomullstuss.
Skiljespetsarna kan vid avsedd användning •
autoklaveras upp till max. 25 gånger.
Steriliseringstiden utgår ifrån steriliseringstemperaturen (vid 121 °C minst 20 min och
vid 132 °C/134 °C minst 5 min resp. 18 min
tills prionerna inaktiveras).
Torka av handstycket och laddningsstationen •
med milt, klorfritt desinfektionsmedel.
Desinfektionsmedlet ska vara godkänt av
DGHM eller FDA eller ha en CE-märkning.
Använd inte heller några fenolhaltiga
desinfektionslösningar, korosionsskyddsmedel eller starkt sura eller starkt alkaliska
lösningar. När du använder desinfektionslösningar, observera alla tillverkarens
anvisningar.
Underhåll
Gutta Cut® kräver inget underhåll och är enkel
att använda.
Felsökning
Om inte skiljespetsen värms upp omedelbart när
man trycker på manöverknappen, kontrollera
skiljespetsens elektroniska kontakter. Om
dessa är defekta, byt ut skiljespetsen mot en ny.
Om dioden på handstycket inte lyser under
laddningen, kontrollera om laddningsstationen
är ansluten till en strömkälla eller kontrollera
själva strömkällan.
Denna medicinska produkt började
serietillverkas efter 13 augusti 2005.
Produkten får inte slängas i det vanliga
hushållsavfallet. Föreskrifterna för avfallshantering av uttjänta elektriska och elektroniska
apparater måste följas.
Kontakta oss för ytterligare frågor:
Tillverkare: VDW GmbH
Bayerwaldstraße15•81737München•Germany
Phone+498962734-0•Fax+498962734-304
www.vdw-dental.com•info@vdw-dental.com
Page 25

Endo Easy Efficient
®
23
Brugsanvisning Dansk
Gutta Cut
®
Varmseparering af
guttaperchaspidser
Hjertelig tillykke med erhvervelsen
af Gutta Cut
Dette ledningsfri apparat med udskiftelige
indsatser er beregnet til hurtig, præcis og
sikker fjernelse af fremstående guttaperchaspidser. Med den sløjfeformede spids opnås
der god adgang til kaviteten og de fremstående
spidser fjernes præcist direkte ved kanalindgangen, så det forhindres, at fyldningen går
løs. Der kan vælges mellem flere instrumentspidser og spidserne kan autoklaveres til ny
brug. Det ledningsfri håndstykke kan anvendes
ved behandlingspladsen op til 80 gange uden
ladestationen og er således altid klar til brug.
®
!
Leveringsomfang
1 ladestation (leveres til 110 eller 220 V)
med 2 fordybninger til hver 1 håndstykke
1 håndstykke
(med opladeligt nikkel-cadmium-batteri)
4 skillespidser
1 brugsanvisning
Reserveskillespidser samt et separat
håndstykke kan fås ved din forhandler.
Tekniske specifikationer
Håndstykkets mål:
Længde: 14,2 cm (uden skillespids), Ø: 1,8 cm
Håndstykkets vægt: 42 g (uden skillespids)
Netspænding: 230V/50Hz; 110V/60Hz
Indikation
Dette apparat er beregnet til varmseparering
af guttaperchaspidser.
Kontraindikationer
Ingen kendte kontraindikationer.
Page 26

24
Endo Easy Efficient
®
25
Advarselshenvisninger
Undgå at berøre patientens læber, tandkød •
eller mundslimhinder ved den varme
skillespids – risiko for læsioner! Brug altid
kofferdam!
Brandrisiko: Bring ikke den ophedede spids •
eller håndstykket i berøring med brændbare
gasser eller væsker.
Rengør ikke apparatet med en antændelig •
rengøringsopløsning.
Apparatet er ikke egnet til brug i omgivelser •
med antændelige gasser.
Dyp ikke håndstykket og ladestationen ned •
i væske.
Vær opmærksom på, at skillespidser, der skal •
skiftes ud under en behandling, evt. stadig
kan være varme.
Skulle der lække væske ud af enheden, •
som kunne tyde på en lækage i batteriet,
skal arbejdet straks afbrydes og apparatet
indsendes til et autoriseret servicecenter for
at få skiftet batteri. Det er farligt at benytte
apparatet, hvis batteriet lækker.
Det er farligt at åbne apparatet for at skifte •
batteri. Garantien bortfalder, hvis apparatet
åbnes.
Brugsvejledning
Forberedelse
1. Kontroller, at netspændingen stemmer
overens med den netspænding, der er angivet
på apparatet, før apparatet tages i brug.
Opladning
1. Oplad først apparatet, idet du forbinder
ladestationen med en net-stikkontakt.
2. Sæt håndstykket ned i en af ladestationens
to fordybninger. Mens apparatet oplades,
lyser dioden på håndstykket.
Henvisninger vedr. håndtering af nikkelcadmium-batteriet
1. Før du benytter apparatet første gang, skal
det oplades fuldstændigt. Denne proces
varer 12 timer.
2. Nikkel-cadmium-batteriet i Gutta Cut
altid være helt afladet, før det oplades fuldt
igen. Derved sikres Gutta Cut
levetid. Levetiden er afhængigt af
brugshyppigheden ca. 2 år.
3. Undgå at batteriet oplades i længere
tid end nødvendigt for at opnå fuld
opladningstilstand. Det må aldrig oplades i
mere end 12 timer i træk.
®
bør
®
en optimal
Forsigtighedsregler
Bøj aldrig spidsen, så længe den befinder •
sig i håndstykket.
Skillespidsernes levetid påvirkes negativt •
ved for høj kraftanvendelse ved behandlingen.
For at opnå optimal udnyttelse af nikkel-•
cadmium-batteriet bør det aldrig oplades
uafbrudt i mere end 12 timer.
Bivirkninger
Ingen kendte bivirkninger.
Anvendelse
1. Sæt en skillespids på håndstykket. Sørg
for, at spidsens vinkel peger i den modsatte
retning af betjeningsknappen. Dette letter
arbejdet.
Hvis det er nødvendigt, kan skillespidsernes
på forhånd bøjede vinkel på 30° ændres lidt.
Dette bør dog foretages med største omhu.
Vigtigt: Bøj aldrig spidsen, så længe den
befinder sig i håndstykket.
2. Før skillespidsen ned i kaviteten i kold tilstand
(uden at trykke på betjeningsknappen). De
guttaperchastifter, der skal adskilles, skal
være omsluttet at skillespidsens løkke.
Page 27

Endo Easy Efficient
®
25
3. Tryk på betjeningsknappen, så snart
skillespidsen befinder sig direkte ved
kanalindgangen.
4. Spidsen er opvarmet i løbet af sekunder, og
guttaperchastifterne kan fjernes hurtigt og
rent.
5. Slip betjeningsknappen efter fjernelsen.
Skillespidsen køler straks af og kan fjernes
fra patientens mund.
Betjeningsknappen er en ”kontaktknap“,
som kun tilslutter apparatet, når der trykkes
på den. Hvis den slippes, frakobles apparatet.
6. Tag altid skillespidsen ud af håndstykket
efter brugen.
Rengøring og sterilisation
Skillespidserne skal rengøres og steriliseres •
før hver anvendelse på patienten (også før
den første anvendelse - skillespidser leveres
ikke sterile).
Rester af guttapercha, der evt. stadig befinder •
sig på instrumentspidsen, kan forsigtigt
fjernes ved at stryge instrumentet let hen
over en vattampon.
Skillespidserne kan ved korrekt brug •
maksimalt autoklaveres 25 gange.
Sterilisationstiden retter sig efter
sterilisationstemperaturen (ved 121 °C i
mindst 20 min. og ved 132 °C/134 °C mindst
5 min. hhv. 18 min. til inaktivering af prioner).
Afvask håndstykket og ladestationen •
med et mildt, chlorfrit desinfektionsmiddel.
Desinfektionsmidlet bør være godkendt af
DGHM eller FDA eller bære et CE-mærke.
Anvend derudover ikke phenolholdige
desinfektionsopløsninger, korrosionsbeskyttelsesmidler, stærk syre eller stærkt
alkaliske opløsninger. Overhold producentens
henvisninger ved anvendelse af desinfektionsopløsninger.
Vedligeholdelse
Gutta Cut® kræver ingen vedligeholdelse og er
let at anvende.
Afhjælpning af fejl
Hvis der ikke sker en øjeblikkelig opvarmning
af skillespidsen ved aktivering af betjeningsknappen, bør du kontrollere skillespidsens
elektroniske kontakter. Hvis disse er defekte,
skal skillespidsen udskiftes.
Hvis dioden på håndstykket ikke lyser under
ladeprocessen, bør du kontrollere, om
ladestationen er tilsluttet en strømkilde hhv.
kontrollere strømkilden selv.
Dette medicinalprodukt er bragt i omløb
efter den 13.08.2005. Produktet må ikke
bortskaffes via det normale husholdningsaffald.
Reglerne for bortskaffelse af elektriske og
elektroniske apparater skal overholdes.
De er velkommen til at kontakte os for
yderligere oplysninger:
Producent: VDW GmbH
Bayerwaldstraße15•81737München•Germany
Phone+498962734-0•Fax+498962734-304
www.vdw-dental.com•info@vdw-dental.com
Page 28

26
Endo Easy Efficient
®
27
Bruksanvisning Norsk
Gutta Cut
®
Avkutting av guttaperkaspisser
med varme
Hjertelig til lykke med anskaffelsen av
Gutta Cut
Dette kabelløse apparatet med utskiftbare
innsatser er beregnet for hurtig, ren og sikker
avkutting av guttaperkaspisser med varme.
Med den sløyfeformede spissen oppnås
kaviteten godt, og stiftene som stikker ut
direkte på kanalinngangen er nøyaktig atskilt,
slik at at man forhindrer låsing av fyllingen blir
forhindret. Man kan velge mellom forskjellige
instrumentspisser, og kan autoklaveres for
flergangsbruk. Det kabelløse håndenhet kan
brukes uten ladestasjon på behandlingssteder
for inntil ca. 80 gangers bruk, og er dermed
alltid klart til bruk.
®
!
Leveringsomfang
1 Ladestasjon (kan leveres for 110 eller 220 V)
med to plasser for hver en håndenhet.
1 Håndenhet
(med oppladbart nikkel-medtallhydridbatteri)
4 Kuttespisser
1 Bruksanvisning
Du kan få flere kuttespisser og en separat
håndenhet hos leverandøren din.
Tekniske spesifikasjoner
Mål for håndenheten:
Lengde: 14,2 cm (uten kuttespiss), Ø: 1,8 cm
Vekt for håndenheten: 42 g (uten kuttespiss)
Nettspenning: 230 V/50 Hz; 110 V/ 60Hz
Indikasjoner
Dette apparatet er beregnet for avkutting av
guttaperkaspisser med varme.
Kontraindikasjoner
Det finnes ingen kjente kontraindikasjoner.
Page 29

Endo Easy Efficient
®
27
Advarsler
Ikke berør leppene, tannkjøttet eller •
slimhinnen i munnen med den varme
kuttespissen - fare for skader! Benytt alltid
en kofferdam (gummibeskytter)!
Brannfare: Den oppvarmete spissen må ikke •
bringes i berøring med brennbare gasser
eller væsker.
Apparatet må ikke rengjøres med brennbare •
rengjøringsmidler.
Apparatet er ikke egnet for bruk i omgivelser •
med brennbare gasser.
Håndenheten og ladestasjonen må ikke •
senkes ned i væske.
Vær oppmerksom på at kuttespisser som •
blir skiftet ut under behandlingen, fremdeles
kan være varme.
Hvis det kommer en eller annen væske ut •
av enheten som tyder på at batteriet lekker,
må du avbryte arbeidet umiddelbart og
sende det til et autorisert serviceverksted for
å bytte batteri. Det er farlig å bruke apparatet
når batteriet er oppbrukt.
Det er farlig å åpne apparatet for å bytte •
batteri. Hvis apparatet åpnes, opphører
garantien.
Forholdsregler
Bøy aldri spissen hvis den befinner seg i •
håndenheten.
Levetiden til kuttespissene påvirkes negativt •
hvis det brukes for mye kraft ved behandlingen.
For å sikre optimal levetid for nikkel-metall-•
hydrid-batteriet, må det aldri lades opp lenger enn 12 timer uten avbrudd.
Bivirkninger
Det finnes ingen kjente bivirkninger.
Brukerveiledning
Forberedelse
1. Før igangsettning må man passe på at
nettspenningen passer med den som er
angitt på apparatet.
Lading
1. Apparatet må først lades helt opp ved
at ladestasjonen forbindes med en
nettstikkontakt.
2. Sett håndenheten i en av de to plassene i
ladestasjonen. Dioden på håndenheten lyser
under ladingen.
Henvisninger for bruk med nikkel-medtallhydridbatteri
Før du bruker apparatet første gang, må det •
være fullstendig oppladet. Denne prosessen
varer 12 timer.
Nikkel-metallhydridbatteriet som befinner •
seg i Gutta Cut
utladet før det lades helt opp igjen. På
denne måten sikrer du optimal levetid for
Gutta Cut
av brukshyppigheten.
Ikke lad batteriet lenger enn nødvendig •
for å nå fullading. Det må under ingen
omstendighet lades opp uavbrutt lenger enn
12 timer.
Bruk
1. Sett en kuttespiss på håndenheten. Pass
på at vinkelen på spissen peker i motsatt
retning av betjeningsknappen. Dette letter
arbeidet.
Dersom det er nødvendig, kan kuttespissens
forinnstilte vinkel på 30° endres en smule.
Dette bør gjøres med stor forsiktighet.
Forsiktig: Bøy aldri spissen hvis den
befinner seg i håndenheten.
2. Før kuttespissen i kald tilstand (uten å trykke
på betjeningsknappen) inn i kaviteten. Guttaperkastiftene som skal kuttes, må være
omsluttet av sløyfen på kuttespissen.
®
skal alltid være fullstendig
®
. Levetiden er ca. 2 år, avhengig
Page 30

28
Endo Easy Efficient
®
3. Så snart kuttespissen befinner seg i
kanalinngangen, kan du trykke på
betjeningsknappen.
4. Spissen varmes opp på sekunder, og guttaperkastiftene kan kuttes raskt og rent.
5. Etter avkuttingen må du slippe betjeningsknappen. Kuttespissen kjøler seg av med
en gang, og kan bli fjernet fra pasientens
munn.
Betjeningsknappen er en „kontaktknapp“
som bare kobler til apparatet når den er
trykket inn. Når den slippes kobler apparatet
seg av.
6. Ta kuttespissen av håndenheten etter bruk.
Rengjøring og sterilisering
Kuttespissene må før hver bruk på pasienter •
rengjøres og steriliseres (også før første
gangs bruk - kuttespissene blir ikke levert
sterile).
Eventuelle guttaperkarester som måtte •
bli igjen på instrumentspissen kan fjernes
forsiktig ved å stryke over den med en
bomullstupfer.
Kuttespissene kan ved bruk for formålet •
autoklaveres maksimalt 25 ganger.
Steriliseringstiden retter seg etter steriliseringstemperaturen (ved 121°C min. 20 min og
ved 132 °C/134 °C min. 5 min hhv. 18 min
ved inaktivering av prioner).
Tørk av håndenheten og ladestasjonen •
med et mildt, klorfritt desinfeksjonsmiddel.
Desinfeksjonsmidlet bør være godkjent av
DHGM eller FDA eller bære et CE-merke.
Du bør dessuten ikke bruke en fenolholdig
desinfeksjonsløsning, korrosjonsbeskyttelsesmiddel eller sterk syre, eller sterke alkaliske
løsninger. Når du bruker desinfeksjonsløsninger må du ta hensyn til produsentens
anvisninger.
Vedlikehold
Gutta Cut® trenger ikke noe vedlikehold og er
enkel å bruke.
Feilretting
Dersom det ikke kommer til noen umiddelbar
oppvarming av kuttespissen ved bruk av
betjeningsknappen, må du undersøke om
det er elektrisk kontakt til kuttespissen. Er
denne defekt, må du skifte den ut med en ny
kuttespiss.
Hvis dioden på håndenheten ikke lyser under
lading, må du undersøke om ladestasjonen er
knyttet til strømnettet, eventuelt må strømnettet
selv kontrolleres.
Dette medisinproduktet ble sendt ut på
markedet etter 13.08.2005. Produktet
må ikke deponeres i vanlig husholdningsavfall.
Forskrifter for avfallsbehandling av gammelt
elektrisk og elektronisk utstyr må overholdes.
Hvis du har spørsmål, står vi gjerne til
disposisjon:
Produsent: VDW GmbH
Bayerwaldstraße15•81737München•Germany
Phone+498962734-0•Fax+498962734-304
www.vdw-dental.com•info@vdw-dental.com
Page 31

Endo Easy Efficient
®
Page 32

0123
Hersteller: VDW GmbH
•
Bayerwaldstraße 15
Tel. +49 89 62734-0
www.vdw-dental.com
81737 München • Deutschland
•
Fax +49 89 62734-304
•
info@vdw-dental.com
Endo Easy Efficient
Rev. 4/30.10.2009
®
 Loading...