

Page 1
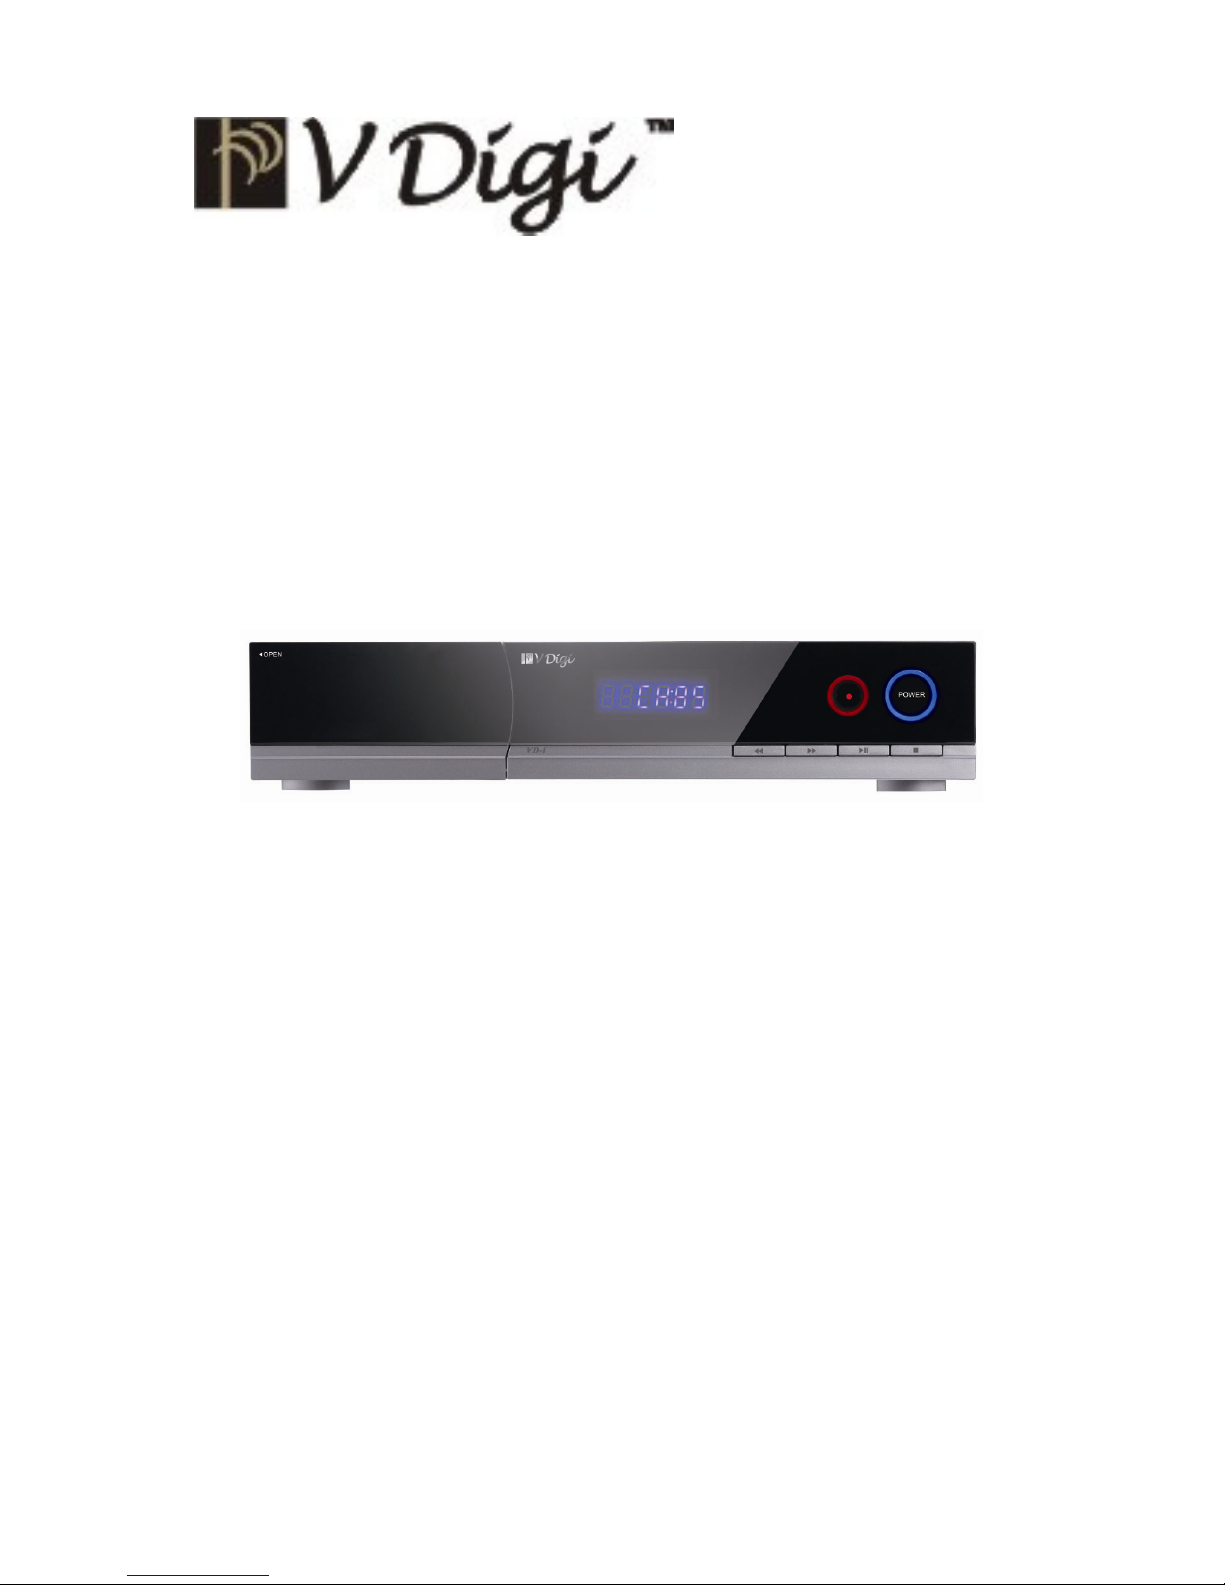
VD-i
使
使使
使
使
使使
使
用
用用
用
用
用用
用
手
手手
手
手
手手
手
冊
冊冊
冊
冊
冊冊
冊
UUsseerr M
Maannuuaall
Winning Perfect Limited
Page 2
安 全 須 知
在操作高清電視錄影機前,請細心閱讀本使用手冊,並請注意以下事
項:
清潔外殼時,請先拔出電源插頭。請不要用濕手接觸電源線。請
用不起毛的布混合少許暖水清洗。請不要使用含有苯、酒精、汽
油溶劑等化學物。
如果有不正常現象出現(冒煙、聲音異常、有異味等),請立即
停止使用,並切斷電源,拔出電源插頭。
在有雷電的情況下,請拔出電源插頭。
請不要把重物放在高清電視錄影機上,並避免劇烈碰撞。
請水平擺放高清電視錄影機,並安放在通風環境中,不要拿桌布
等物體覆蓋接收器上面的所有通風口。
請安放在遠離熱源、無直接光線的環境中,不要讓高清電視錄影
機接近火源
請安放在遠離強磁場和強電場設備的環境中。
Manufactured under license from Dolby Laboratories. Dolby and
the double-D symbol are trademarks of Dolby Laboratories.
Page 3
目目目目
錄錄錄錄
1111 產品介紹
產品介紹產品介紹
產品介紹 ................................
................................................................
................................................
................................
................ 1111
1.1 產品規格
....................................................... 1
1.2 包裝內容
....................................................... 2
2222 設置介紹
設置介紹設置介紹
設置介紹 ................................
................................................................
................................................
................................
................ 3333
2.1 前面板
......................................................... 3
2.2 後面板
......................................................... 5
2.3 遙控器
......................................................... 6
3333
接收器的安裝
接收器的安裝接收器的安裝
接收器的安裝
................................
................................................................
............................................
........................
............ 9999
3.1 電源連接
....................................................... 9
3.2 天線連接
....................................................... 9
3.3 天線環路輸出連接
.............................................. 10
3.4 連接高清電視機
-HDMI(
視頻及音頻
) ............................... 10
3.5 連接電視機-複合視頻連接(視頻及音頻
) ........................... 11
3.6 連接高清電視機-分量視頻連接(視頻
) ............................. 11
3.7 S
端子連接(視頻
) .............................................. 12
3.8 連接音頻
...................................................... 12
3.9 連接擴音機-同軸(音頻
) ......................................... 12
3.10 連接擴音機-光纖(音頻
) ......................................... 13
3.11 網路連接
...................................................... 13
3.12 硬碟安裝
...................................................... 14
3.13 安裝注意事項
.................................................. 15
Page 4
3.14 開/關接收器及
LED
顯示
......................................... 15
4444 使用簡介
使用簡介使用簡介
使用簡介 ................................
................................................................
...............................................
..............................
............... 16
1616
16
4.1 本機設定
...................................................... 16
4.2 EPG
電子節目指南
.............................................. 28
4.3 錄影功能
...................................................... 29
4.4 其他功能
...................................................... 32
5555 故障排除
故障排除故障排除
故障排除 ................................
................................................................
...............................................
..............................
............... 35
3535
35
6666
Product Overview
Product OverviewProduct Overview
Product Overview ................................
................................................................
.......................................
..............
....... 37
3737
37
6.1 Product Specification ......................................... 37
6.2 Package Information ........................................... 38
7777
Configuration Introduction
Configuration IntroductionConfiguration Introduction
Configuration Introduction .............................
..........................................................
............................. 39
3939
39
7.1 Front Panel ................................................... 39
7.2 Rear Panel .................................................... 41
7.3 Remote Control ................................................ 42
8888
Receiver Installation
Receiver InstallationReceiver Installation
Receiver Installation ................................
................................................................
..................................
....
.. 45
4545
45
8.1 Power Connection .............................................. 45
8.2 Antenna Connection ............................................ 45
8.3 Antenna Bypass Output Connection .............................. 46
8.4 Connection with HD TV -- HDMI(video & audio) .................. 46
8.5 Connection with HD TV -- Component Video ...................... 47
8.6 Composite Video & Stereo Audio Connection with SD TV .......... 47
8.7 S-Video Connection with Standard Definition TV ................ 48
Page 5
8.8 Audio Connection .............................................. 48
8.9 Connect with amplifiers - Coaxial (audio) ..................... 48
8.10 Connect with amplifiers - Optical (audio) ..................... 49
8.11 Network Connection ............................................ 49
8.12 Hard drive installation ....................................... 50
8.13 Important Notice .............................................. 51
8.14 Turning On/Off VD-i and LED Display Status .................... 51
9999
Operation Intr
Operation IntrOperation Intr
Operation Introduction
oductionoduction
oduction ................................
................................................................
.................................... 52
5252
52
9.1 Receiver Configuration ........................................ 52
9.2 EPG Digital Program Guide ..................................... 66
9.3 Video Recording Function ...................................... 67
9.4 Other Features ................................................ 71
10
1010
10 Troubleshooting
TroubleshootingTroubleshooting
Troubleshooting ................................
................................................................
........................................
................
........ 74
7474
74
Page 6

Page 7
1
1111 產品介紹
產品介紹產品介紹
產品介紹
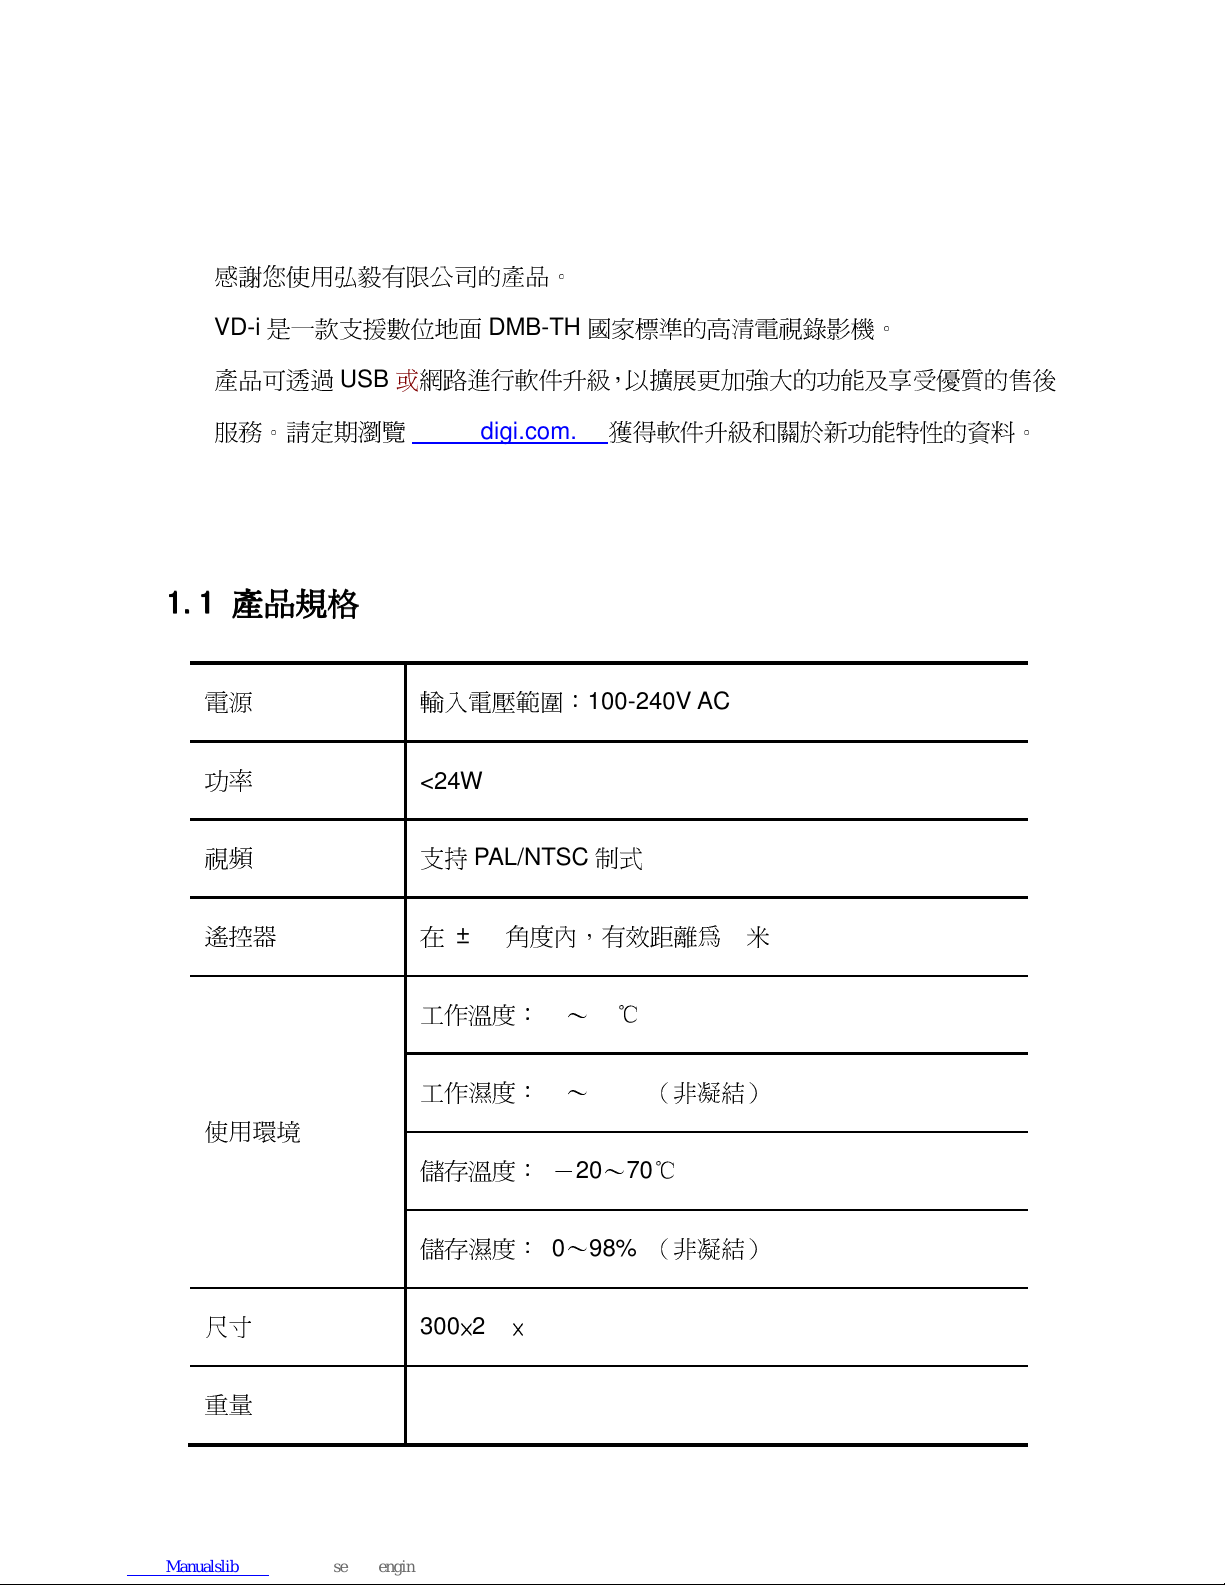
感謝您使用弘毅有限公司的產品。
VD-i
是一款支援數位地面
DMB-TH
國家標準的高清電視錄影機。
產品可透過
USB
或網路進行軟件升級,以擴展更加強大的功能及享受優質的售後
服務。請定期瀏覽
www.vdigi.com.hk
獲得軟件升級和關於新功能特性的資料。
1.1
1.11.1
1.1 產品規格
產品規格產品規格
產品規格
電源
輸入電壓範圍:
100-240V AC
功率
<24W
視頻
支持
PAL/NTSC
制式
遙控器
在
±30°
角度內,有效距離為7米
使用環境
工作溫度:
0~40℃
工作濕度:
5~90%
(非凝結)
儲存溫度: -20~70℃
儲存濕度:
0~98%
(非凝結)
尺寸
300×220×58 mm
重量
1900g
Page 8
2
1.2
1.21.2
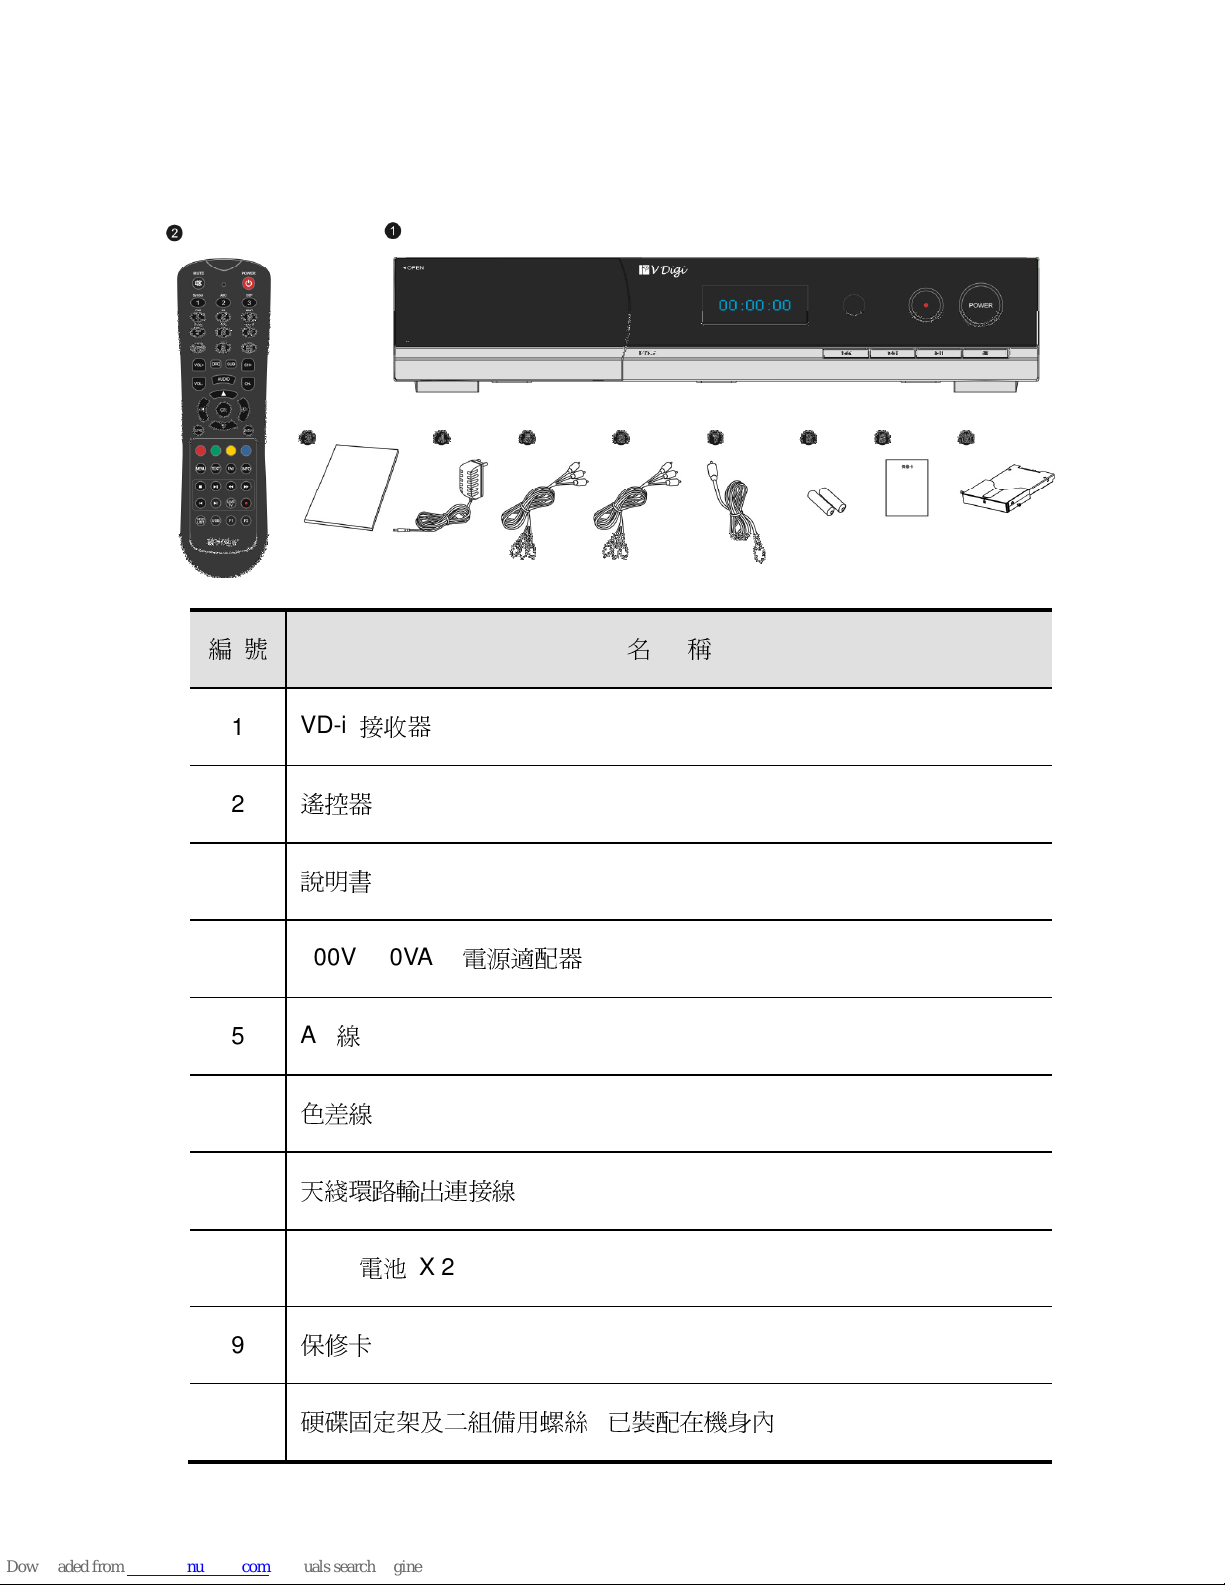
1.2 包裝內容
包裝內容包裝內容
包裝內容
編 號
名
稱
1
VD-i
接收器
2
遙控器
3
說明書
4
100V-240VAC
電源適配器
5
AV線
6
色差線
7
天綫環路輸出連接線
8
AAA
電池
X 2
9
保修卡
10
硬碟固定架及二組備用螺絲
(
已裝配在機身內
)
Page 9
37
2222 設置介紹
設置介紹設置介紹
設置介紹
2.1
2.12.1
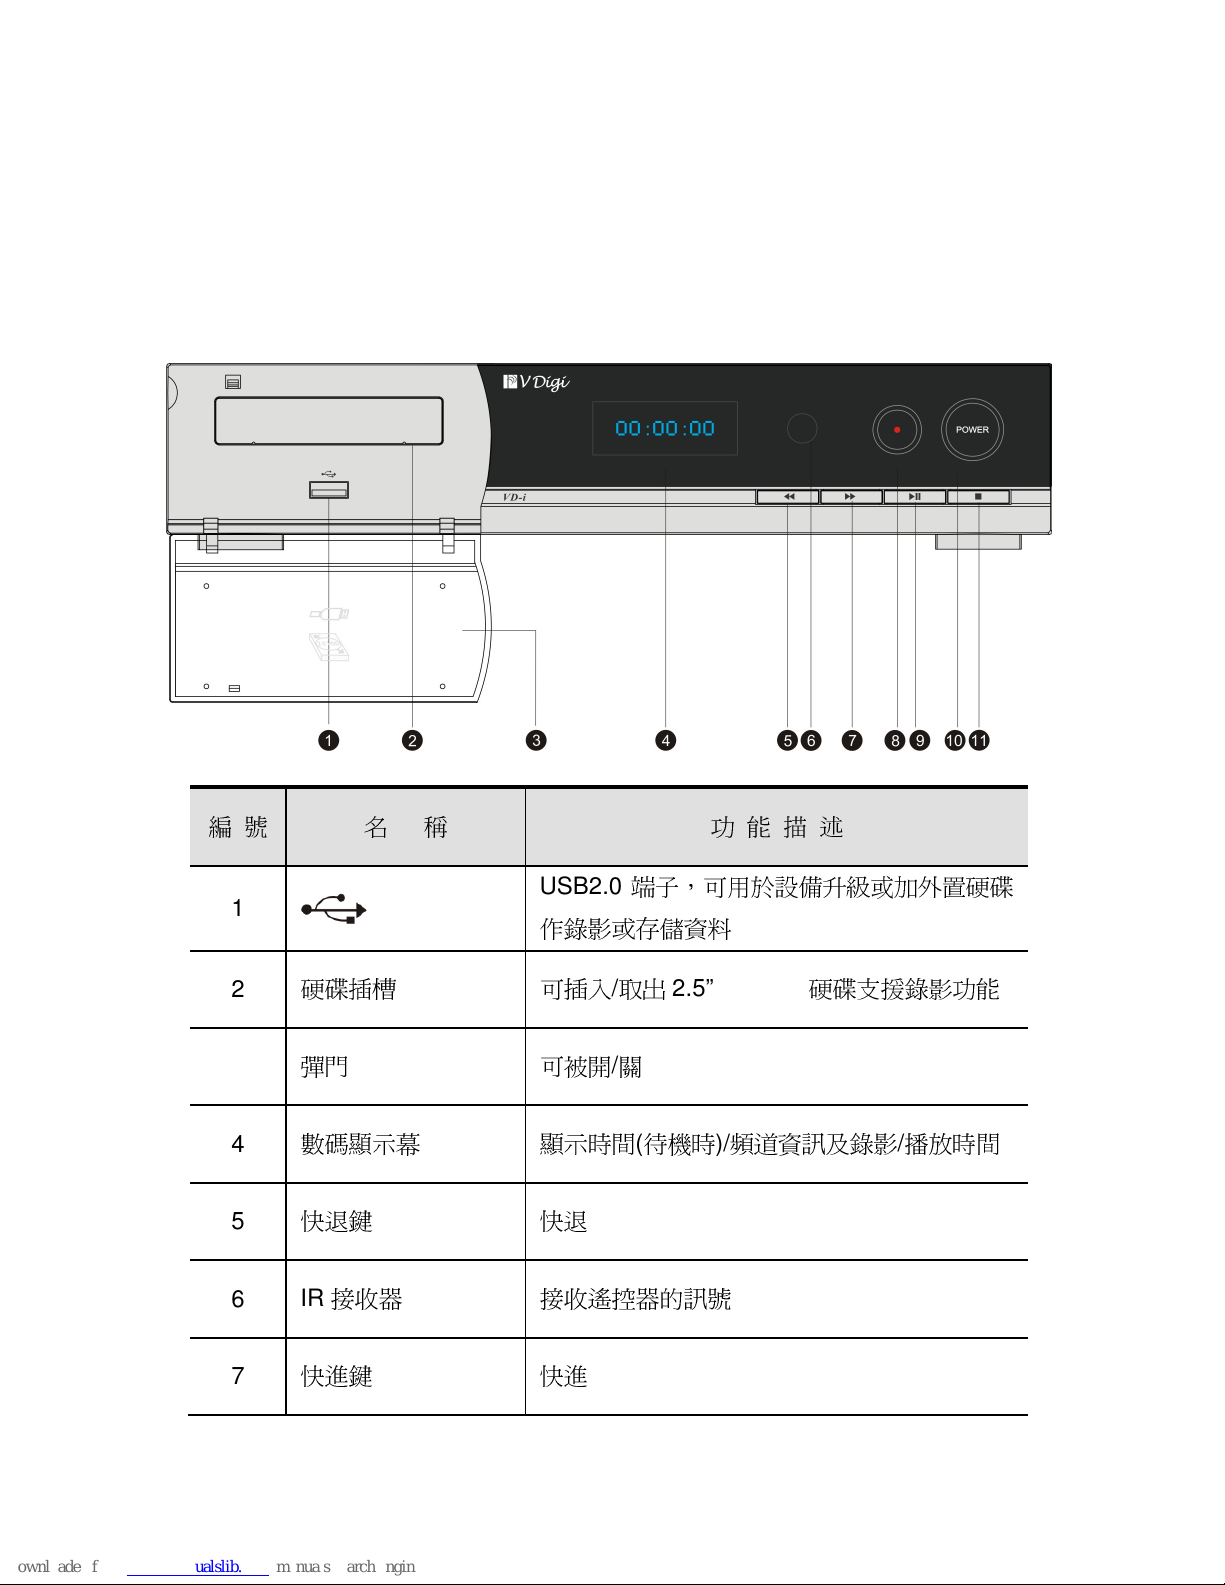
2.1 前面板
前面板前面板
前面板
編 號
名
稱
功 能 描 述
1
USB2.0
端子,可用於設備升級或加外置硬碟
作錄影或存儲資料
2
硬碟插槽
可插入/取出
2.5” SATA 1
硬碟支援錄影功能
3
彈門
可被開/關
4
數碼顯示幕
顯示時間(待機時)/頻道資訊及錄影/播放時間
5
快退鍵
快退
6
IR
接收器
接收遙控器的訊號
7
快進鍵
快進
Page 10
4
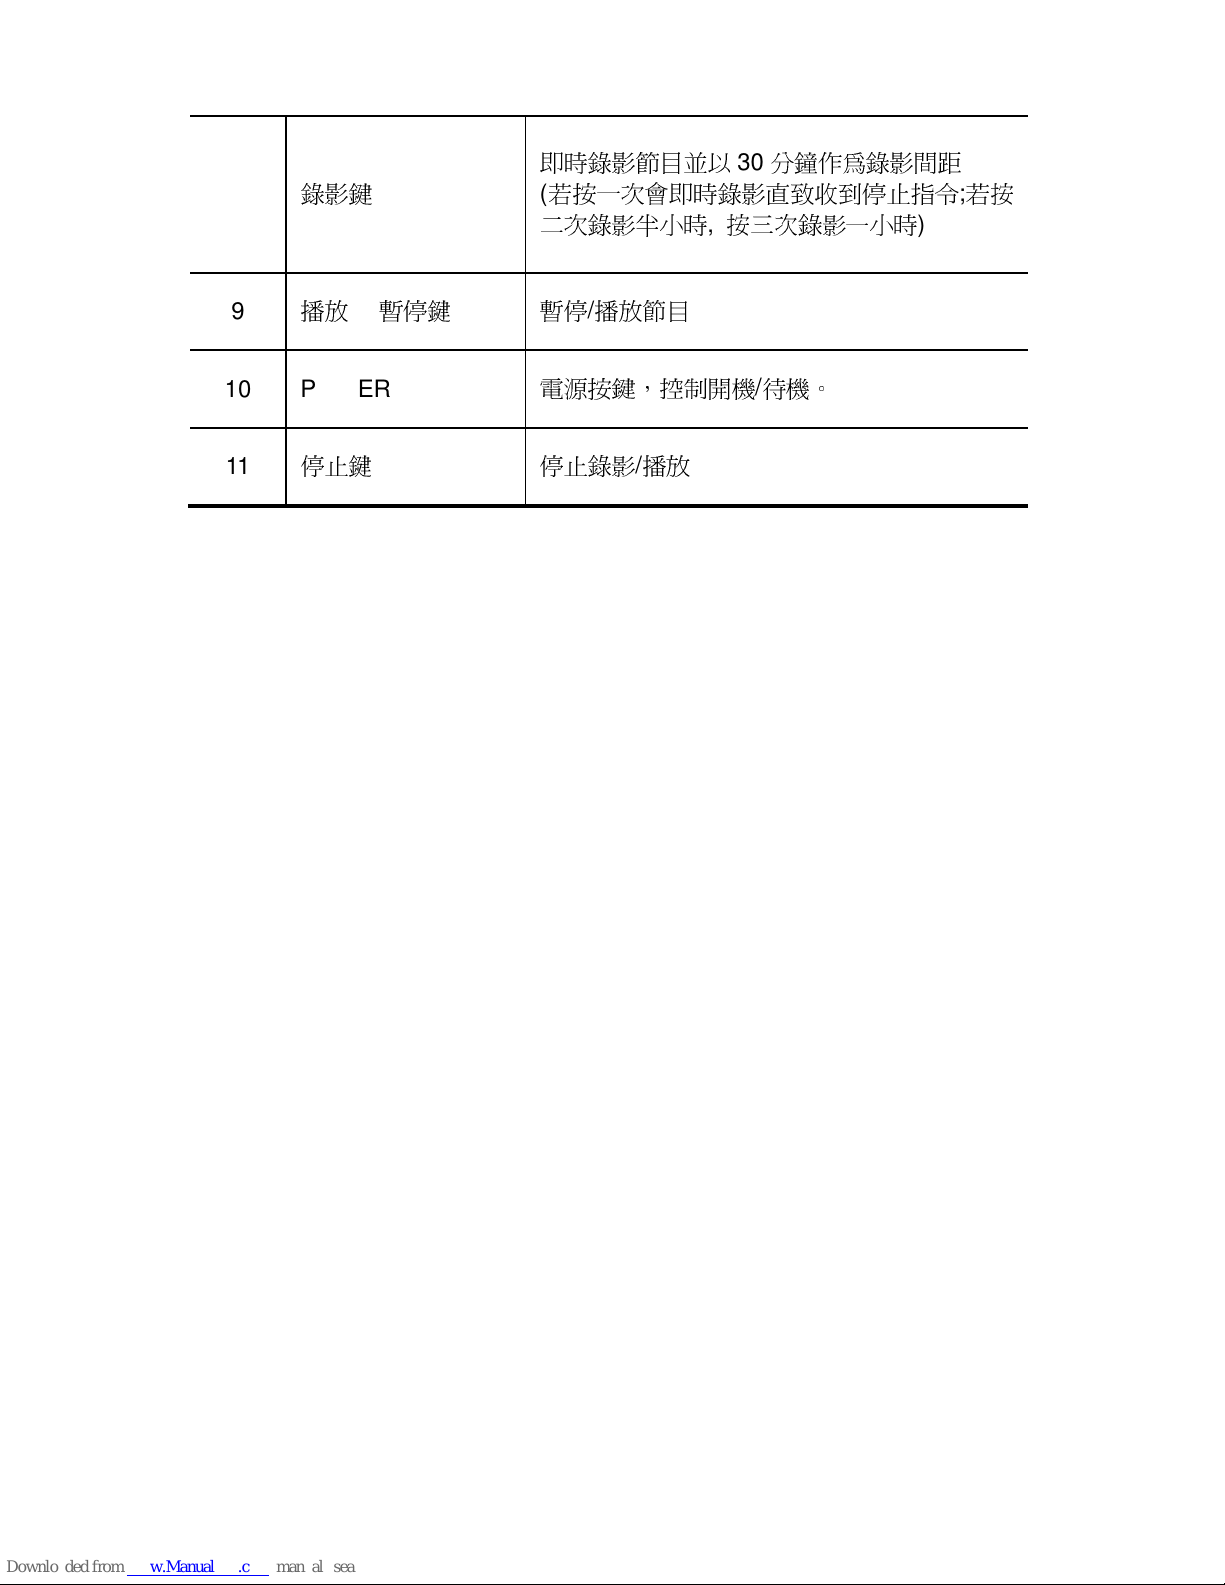
8
錄影鍵
即時錄影節目並以30分鐘作為錄影間距
(
若按一次會即時錄影直致收到停止指令;若按
二次錄影半小時, 按三次錄影一小時
)
9
播放
/
暫停鍵
暫停/播放節目
10 POWER
電源按鍵,控制開機/待機。
11
停止鍵
停止錄影/播放
Page 11
5
2.2
2.22.2
2.2 後面板
後面板後面板
後面板
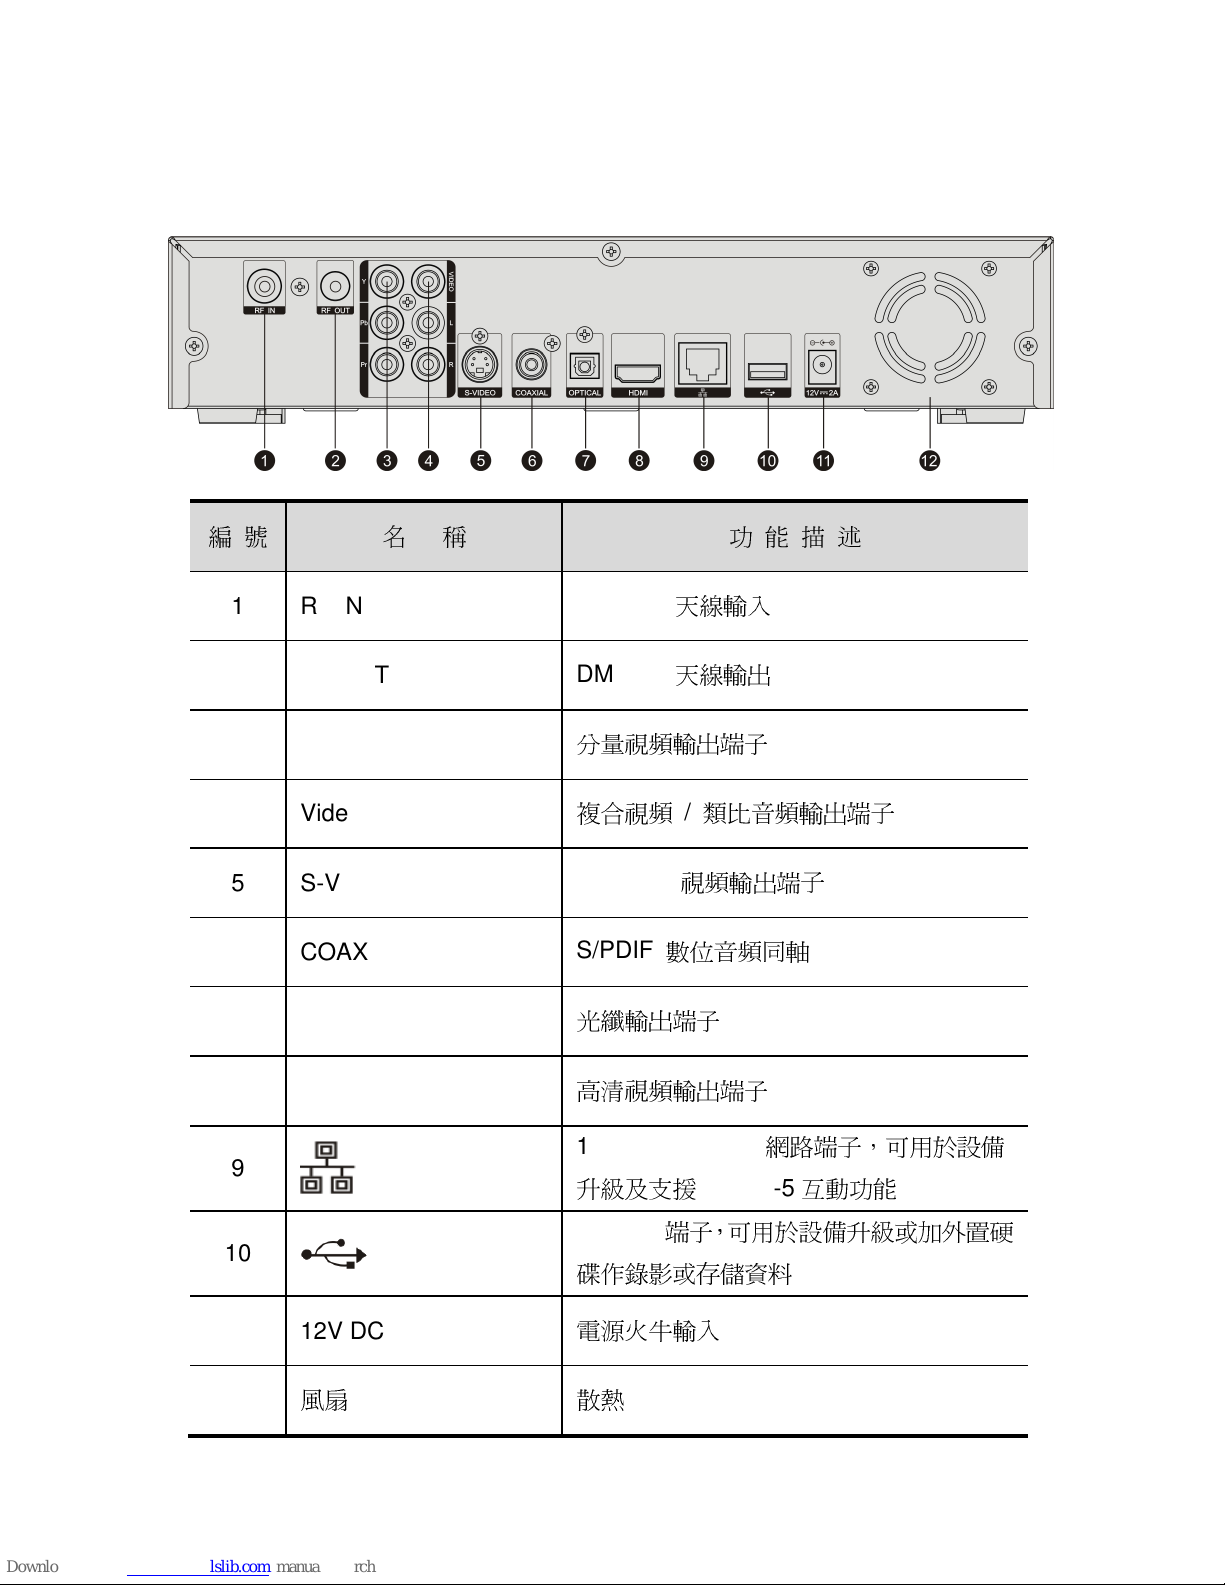
編 號
名
稱
功 能 描 述
1 RF IN
DMB-TH
天線輸入
2 RF OUT
DMB-TH
天線輸出
3 YPbPr
分量視頻輸出端子
4 Video/ L/ R
複合視頻
/
類比音頻輸出端子
5 S-VIDEO
S-VIDEO
視頻輸出端子
6 COAXIAL
S/PDIF
數位音頻同軸
7 OPTICAL
光纖輸出端子
8 HDMI
高清視頻輸出端子
9
10/100M Base-T
網路端子,可用於設備
升級及支援
MHEG-5
互動功能
10
USB2.0
端子,可用於設備升級或加外置硬
碟作錄影或存儲資料
11 12V DC IN
電源火牛輸入
12
風扇
散熱
Page 12
6
2.3
2.32.3
2.3 遙控器
遙控器遙控器
遙控器
Page 13
7
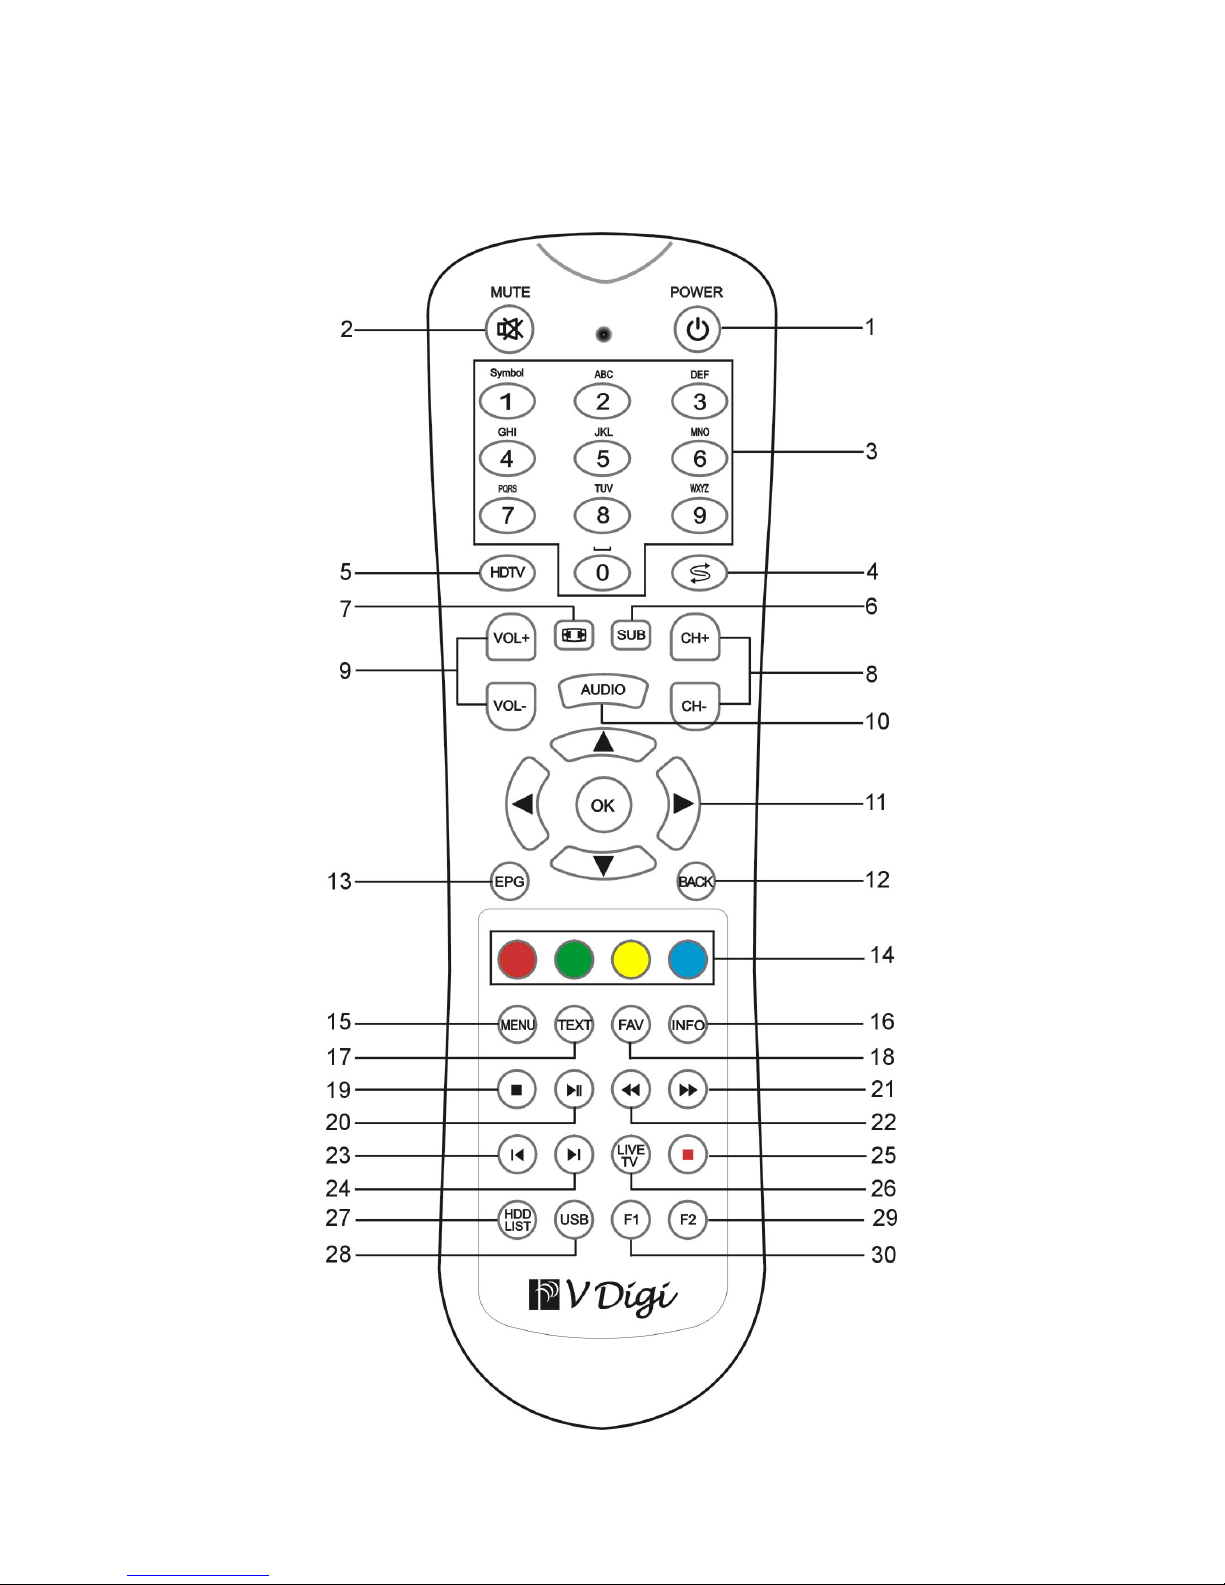
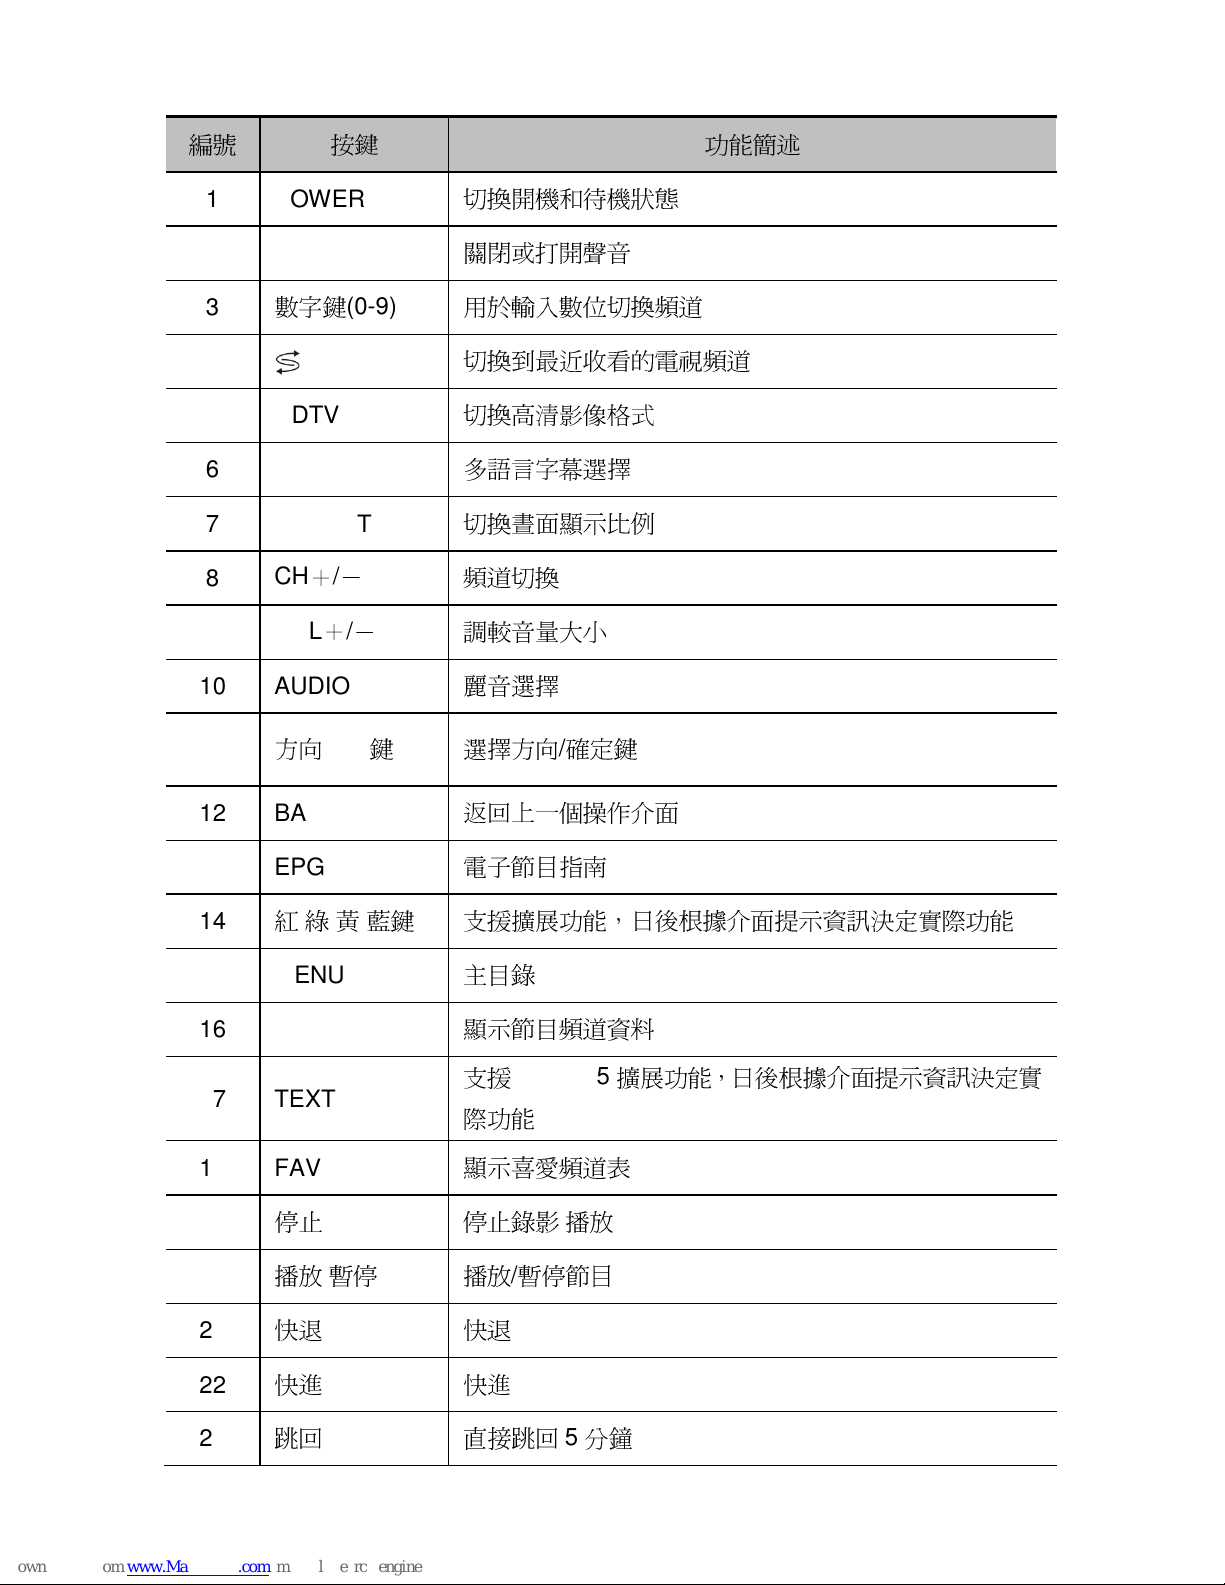
編號
按鍵
功能簡述
1 POWER
切換開機和待機狀態
2 MUTE
關閉或打開聲音
3
數字鍵
(0-9)
用於輸入數位切換頻道
4
切換到最近收看的電視頻道
5 HDTV
切換高清影像格式
6 SUB
多
語言
字幕
選擇
7 ASPECT
切換晝面顯示比例
8
CH+/-
頻道切換
9
VOL+/-
調較
音量大小
10 AUDIO
麗音選擇
11
方向
/OK鍵
選擇方向/確
定鍵
12 BACK
返回上一個操作介面
13 EPG
電子節目指南
14
紅/綠/黃/藍鍵
支援擴展功能,日後
根據介面提
示資訊決定
實際
功能
15 MENU
主
目錄
16 INFO
顯示節目頻道資料
17 TEXT
支援
MHEG-5
擴展功能,日後
根據介面提
示資訊決定
實
際
功能
18 FAV
顯示
喜愛
頻道表
19
停止
停止錄影/播放
20
播放/暫停
播放/暫停節目
21
快退
快退
22
快進
快進
23
跳回
直接
跳回5分鐘
Page 14
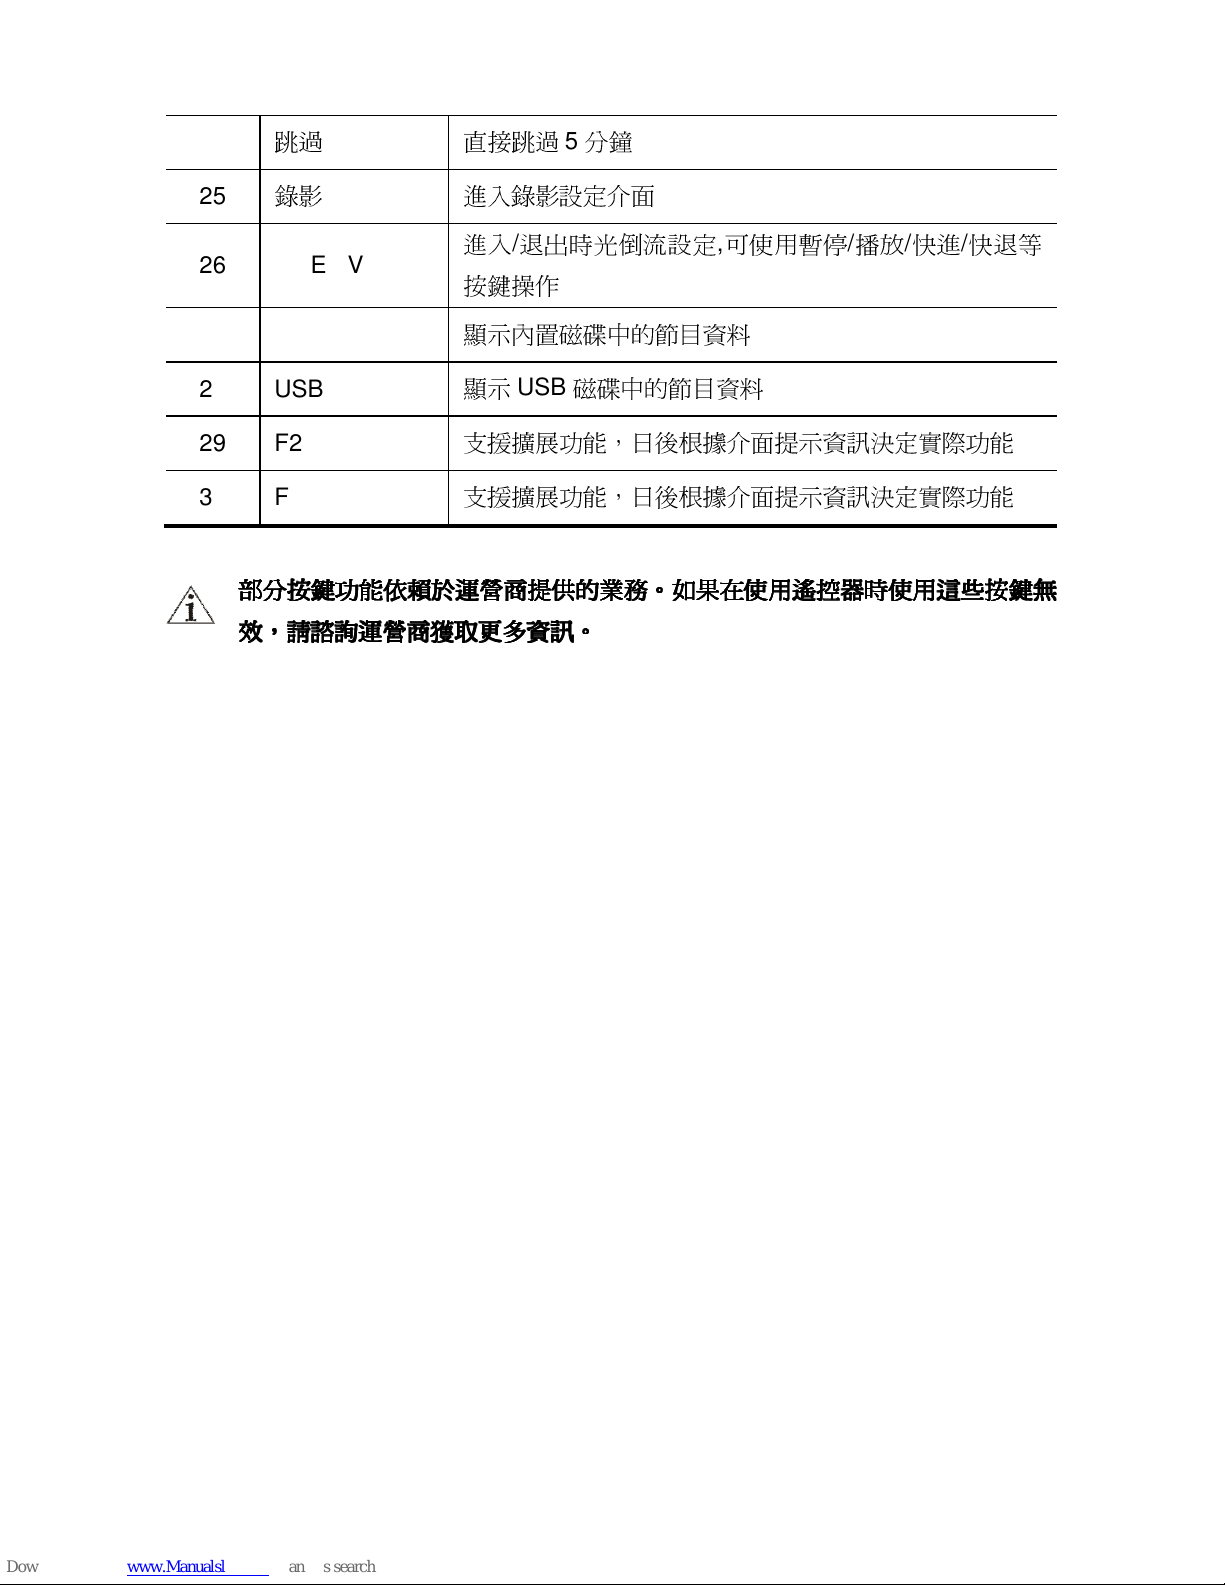
8
24
跳過
直接跳過5分鐘
25
錄影
進入錄影設定介面
26 LIVE TV
進入/退出時光
倒流
設定,可使用暫停/播放/快進/快退
等
按鍵操作
27 HDD LIST
顯示內置磁碟中的節目資料
28 USB
顯示
USB磁碟中的節目資料
29 F2
支援擴展功能,日後
根據介面提
示資訊決定
實際
功能
30 F1
支援擴展功能,日後
根據介面提
示資訊決定
實際
功能
部分按鍵功能依賴於
部分按鍵功能依賴於部分按鍵功能依賴於
部分按鍵功能依賴於運營商提供的業務
運營商提供的業務運營商提供的業務
運營商提供的業務。。。。如果在使用遙控器時使用這些按鍵無
如果在使用遙控器時使用這些按鍵無如果在使用遙控器時使用這些按鍵無
如果在使用遙控器時使用這些按鍵無
效效效效,,,,請諮詢運營商獲取更多資訊
請諮詢運營商獲取更多資訊請諮詢運營商獲取更多資訊
請諮詢運營商獲取更多資訊。。。。
Page 15
9
3333 接收器的安裝
接收器的安裝接收器的安裝
接收器的安裝
3.1
3.13.1
3.1 電源連接
電源連接電源連接
電源連接
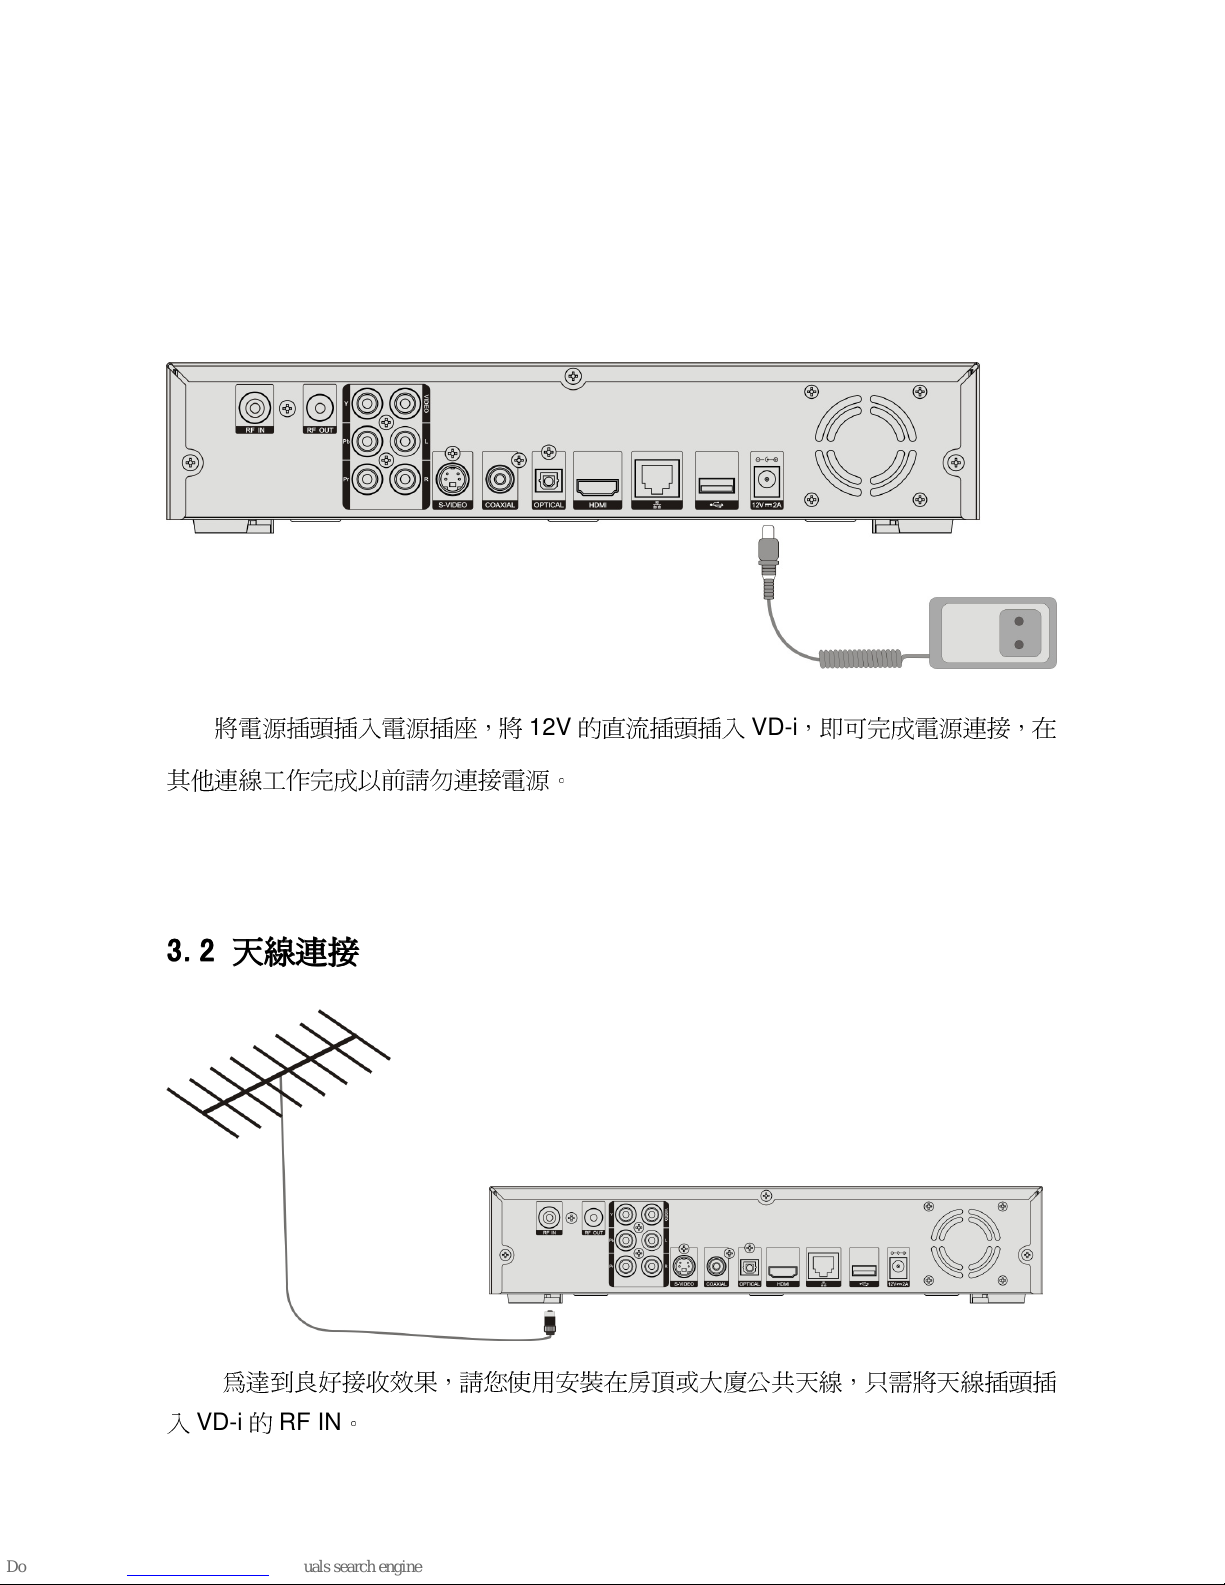
將
電源插頭插入電源插座,將12V
的直流插頭插入
VD-i
,即可
完成
電源連接,在
其他連線工作
完成
以前請勿連接電源。
3.2
3.23.2
3.2 天線連接
天線連接天線連接
天線連接
為達到
良好
接收效果,請您使用安裝在
房頂
或大廈公共天線,
只需將
天線插頭插
入
VD-i的RF IN。
Page 16
10
3.3
3.33.3
3.3 天線環路輸出連接
天線環路輸出連接天線環路輸出連接
天線環路輸出連接
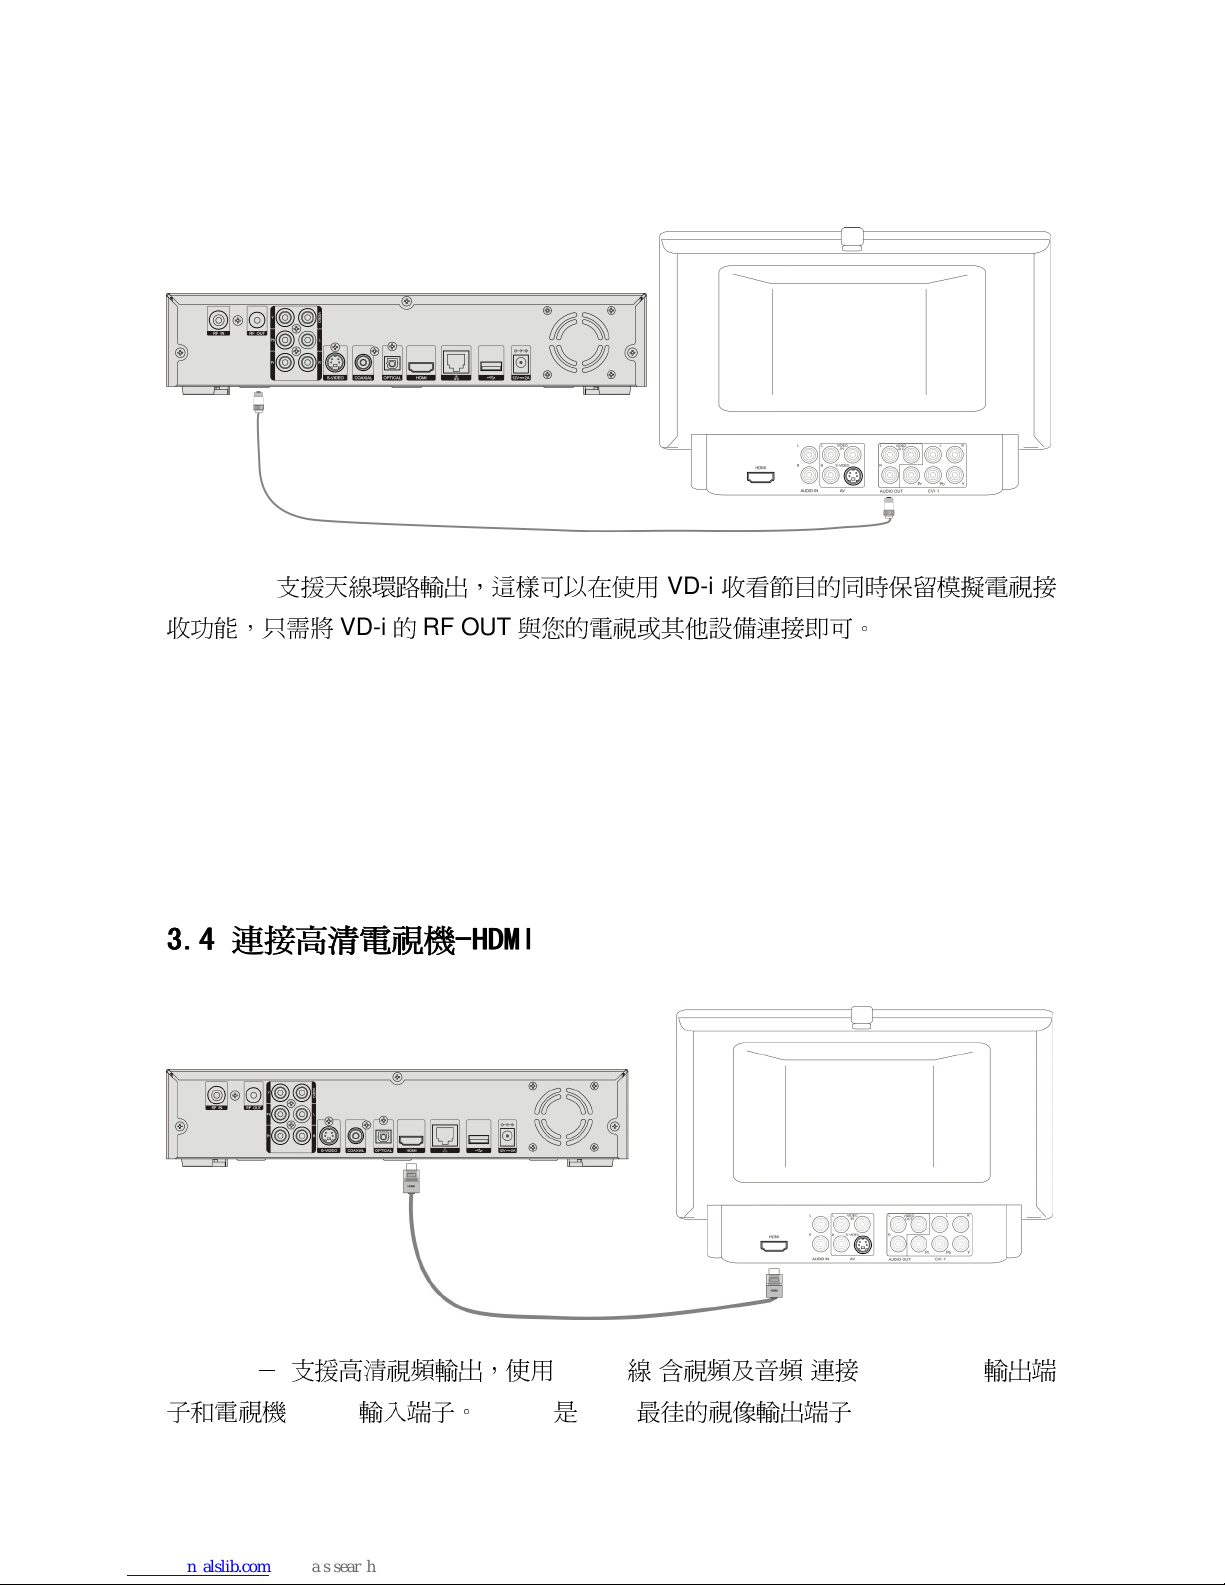
VD-i
支援天線環路輸出,
這樣
可以在使用
VD-i
收看節目的同時保
留模擬
電視接
收功能,
只需將
VD-i的RF OUT與您的電視或其他設備連接即可。
3.4
3.43.4
3.4 連接高清電視機
連接高清電視機連接高清電視機
連接高清電視機----HDMI
HDMIHDMI
HDMI((((視頻及音頻
視頻及音頻視頻及音頻
視頻及音頻))))
VD-i
支援高清視頻輸出,使用
HDMI線(含視頻及音頻)連接
VD-i HDMI
輸出端
子和電視機
HDMI
輸入端子。
(HDMI是VD-i最徍
的視像輸出端子
)
Page 17
11
3.5
3.53.5
3.5 連接電視機
連接電視機連接電視機
連接電視機----複合視頻連接
複合視頻連接複合視頻連接
複合視頻連接((((視頻及音頻
視頻及音頻視頻及音頻
視頻及音頻))))
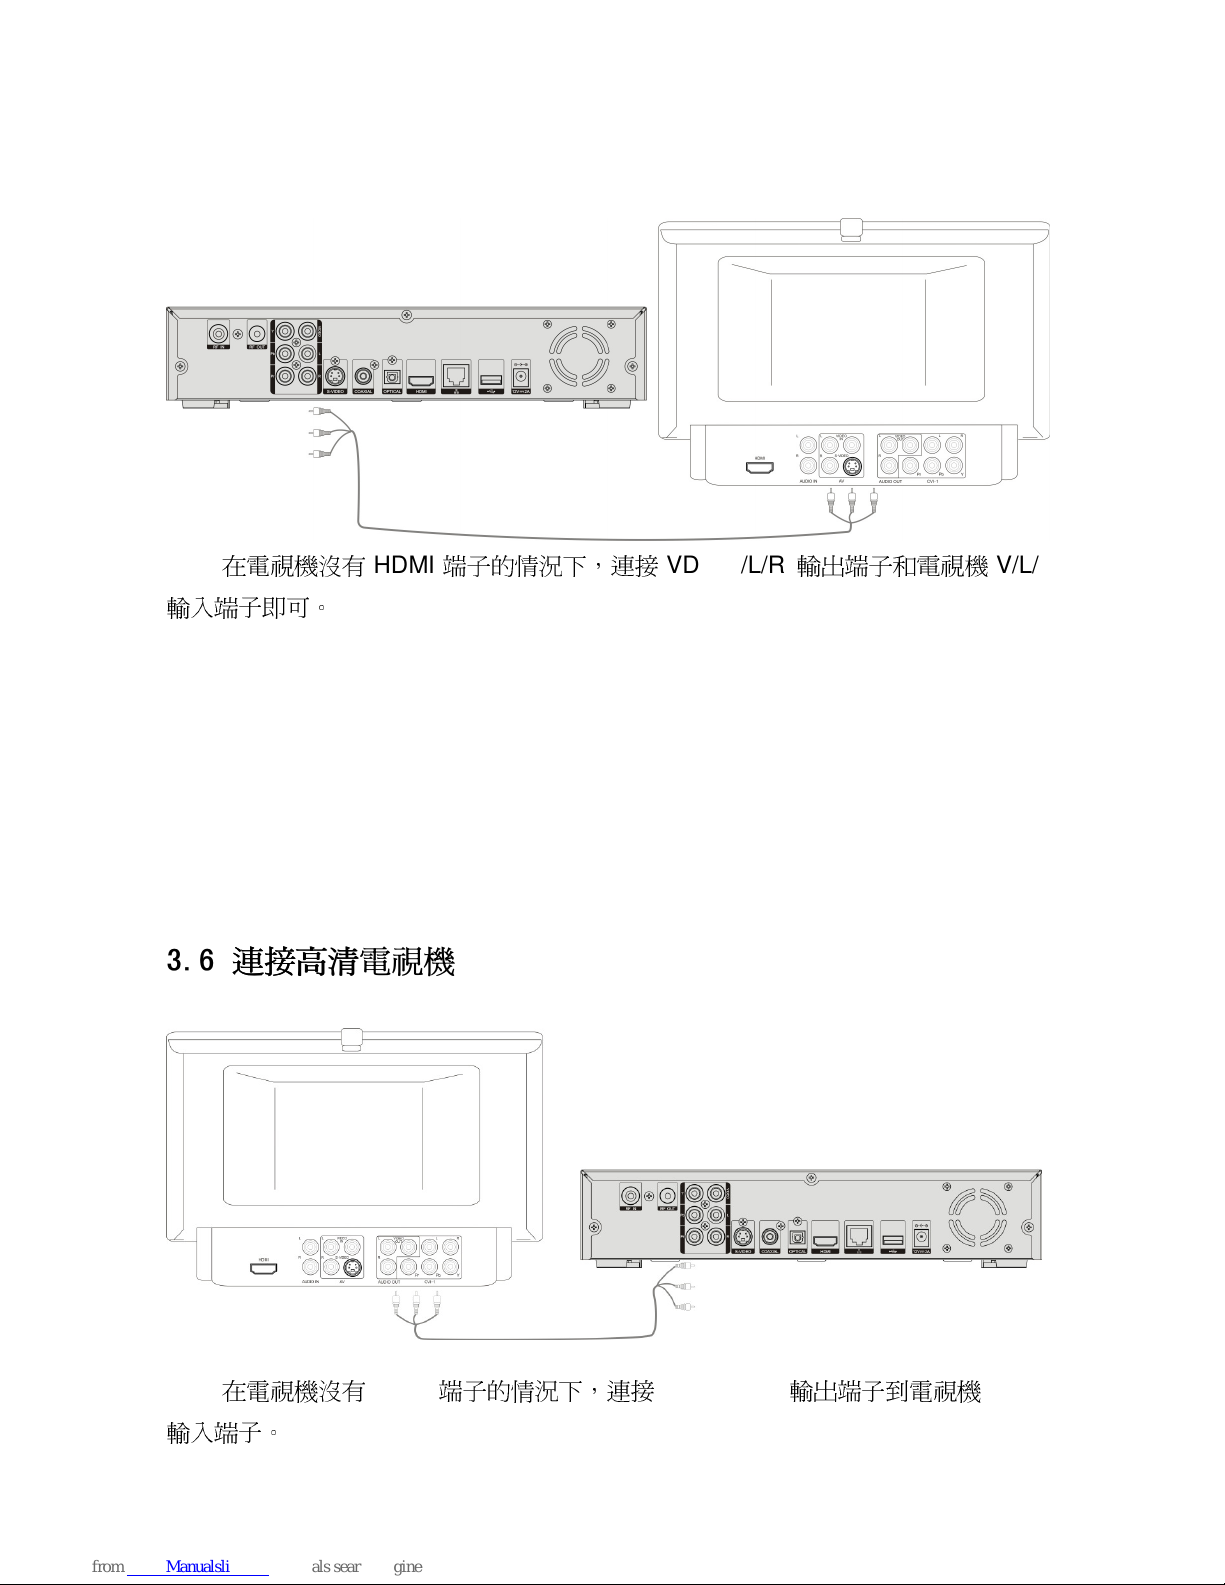
在電視機沒有
HDMI
端子的
情況下
,連接
VD-i V/L/R
輸出端子和電視機
V/L/R
輸入端子即可。
3.6
3.63.6
3.6 連接高清電視機
連接高清電視機連接高清電視機
連接高清電視機----分量視頻連接
分量視頻連接分量視頻連接
分量視頻連接((((視頻
視頻視頻
視頻))))
在電視機沒有
HDMI
端子的
情況下
,連接
VD-i YPbPr
輸出端子到電視機
YPbPr
輸入端子。
Page 18
12
3.7
3.73.7
3.7 SSSS 端子連接
端子連接端子連接
端子連接((((視頻
視頻視頻
視頻))))
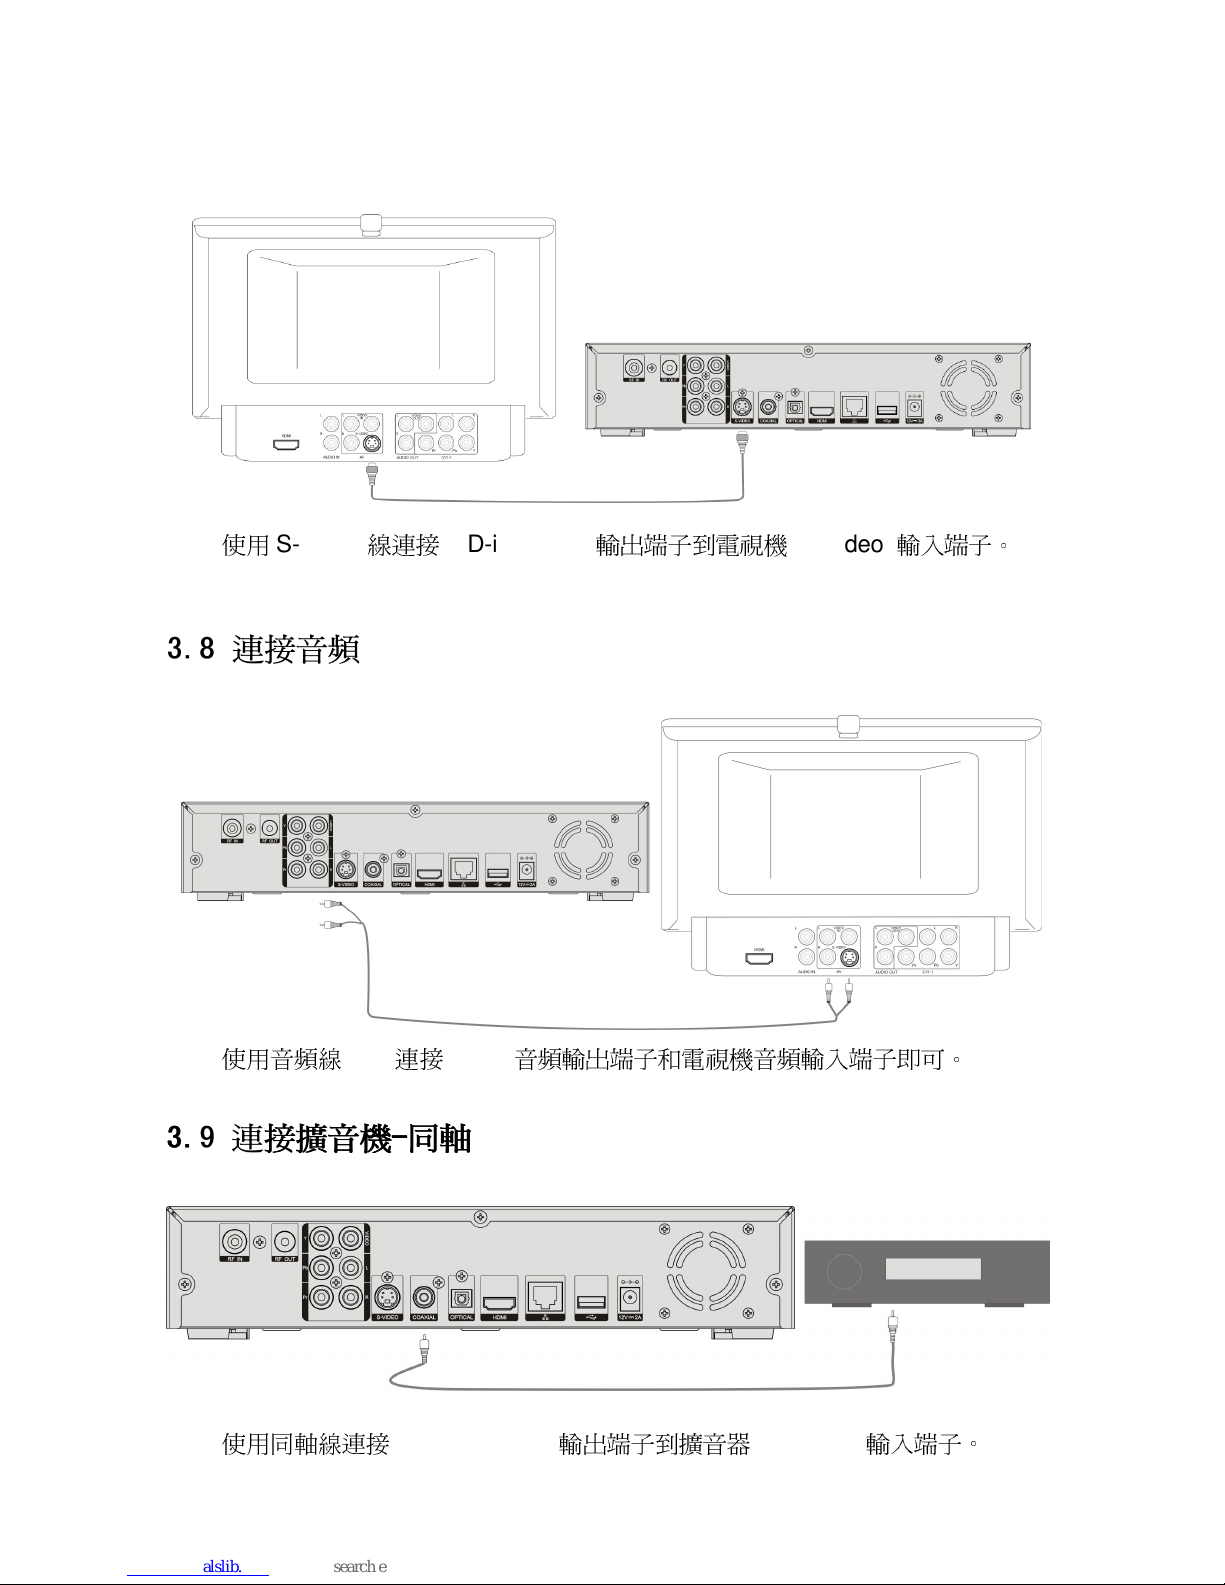
使用
S-Video
線連接
VD-i S-Video
輸出端子到電視機
S-Video
輸入端子。
3.8
3.83.8
3.8 連接音頻
連接音頻連接音頻
連接音頻
使用音頻線
(L/R)
連接
VD-i
音頻輸出端子和電視機音頻輸入端子即可。
3.9
3.93.9
3.9 連接擴音機
連接擴音機連接擴音機
連接擴音機----同軸
同軸同軸
同軸((((音頻
音頻音頻
音頻))))
使用同軸線連接
VD-i COAXIAL
輸出端子到擴音器
COAXIAL
輸入端子。
Page 19
13
3.10
3.103.10
3.10 連接擴音機
連接擴音機連接擴音機
連接擴音機----光纖
光纖光纖
光纖((((音頻
音頻音頻
音頻))))
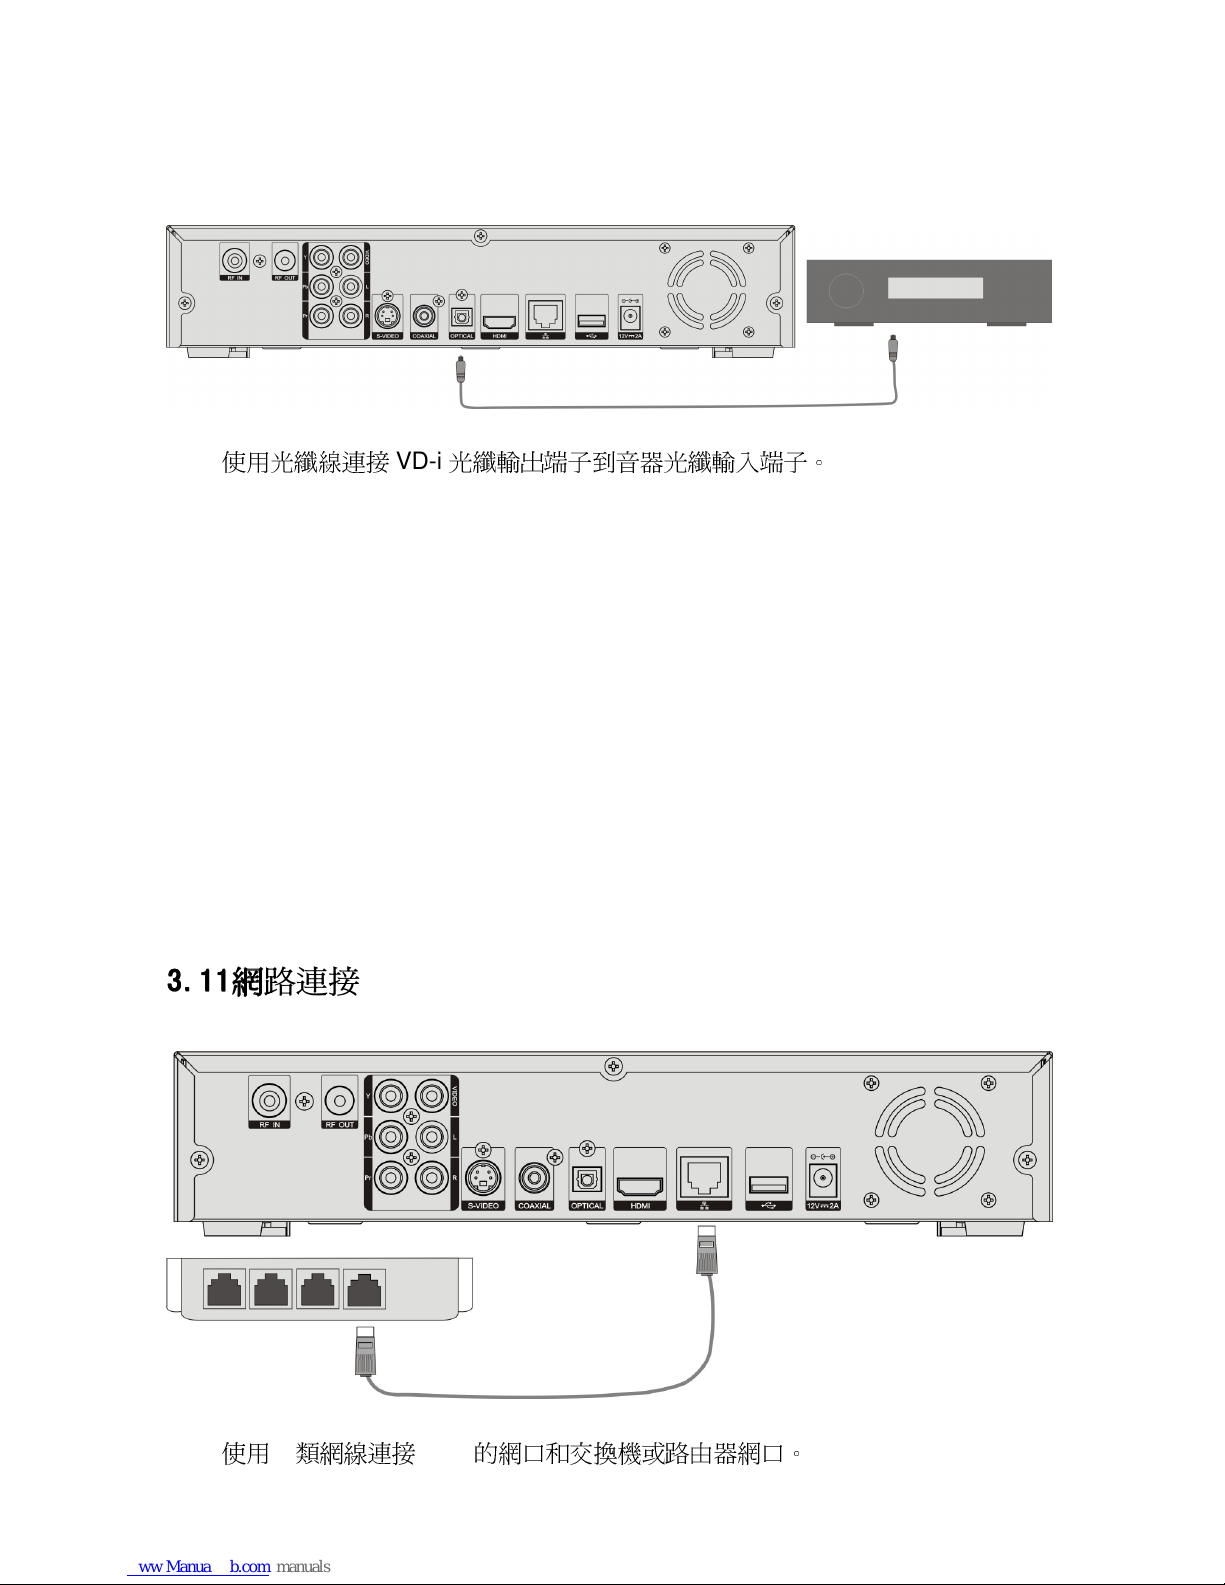
使用光纖線連接
VD-i
光纖輸出端子到音器光纖輸入端子。
3.11
3.113.11
3.11 網路連接
網路連接網路連接
網路連接
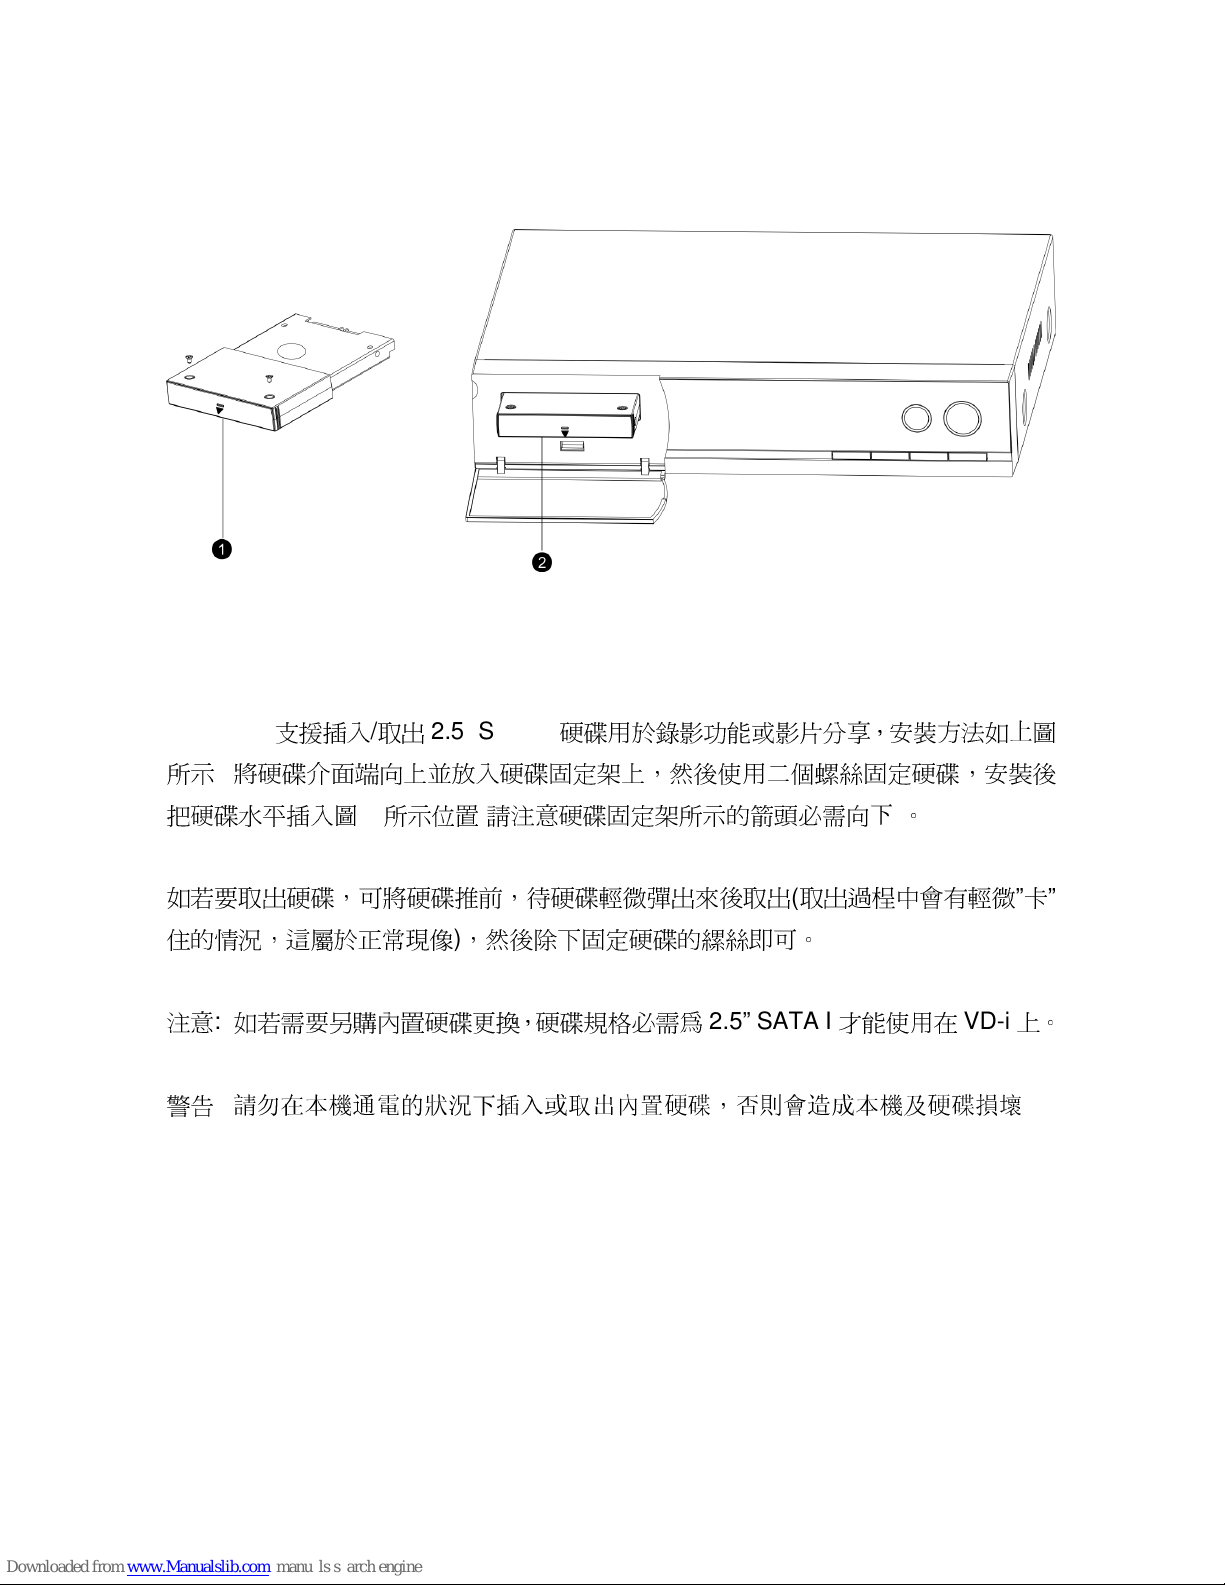
使用5類網線連接
VD-i
的網口和交換機或路由器網口。
Page 20
14
3.12
3.123.12
3.12 硬碟安裝
硬碟安裝硬碟安裝
硬碟安裝
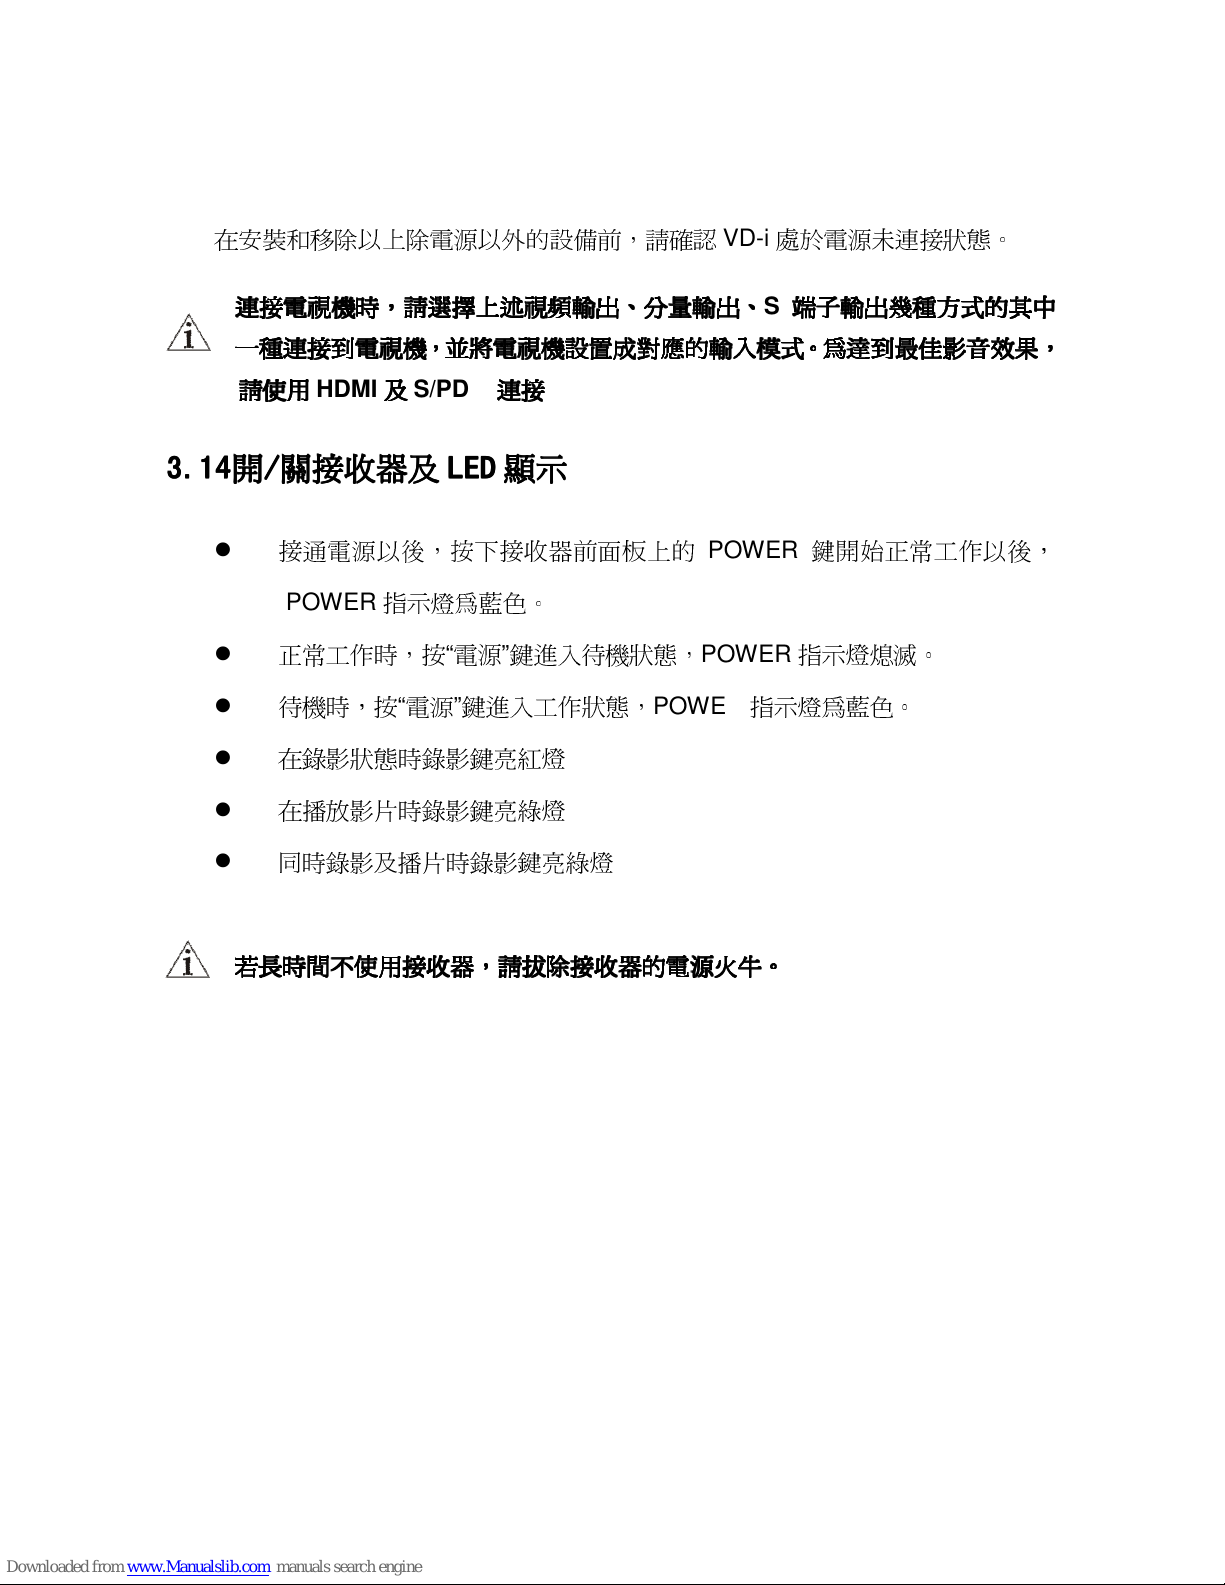
VD-i
支援插入/取出
2.5” SATA I
硬碟用於錄影功能或影片分享,安裝
方法如上圖
所示: 將硬碟介面端
向上
並放入硬碟固定架上,然後使用二個螺絲固定硬碟,安裝後
把
硬碟
水平
插入圖2所示位置(請注意硬碟固定架所示的
箭頭必需向下)。
如若要
取出硬碟,可將硬碟推前,待硬碟
輕微
彈出來後取出(取出過
桯中
會有
輕微”卡
”
住的情況,這屬於正常現像),然後除下
固定硬碟的縲絲即可。
注意: 如若需要另購
內置硬碟更換,硬碟規格
必需為2.5” SATA I才能使用在
VD-i上。
警告: 請勿在本機通電的狀況下插入或取出內置硬碟,否則會造成本機及硬碟損壞
Page 21
15
3.13
3.133.13
3.13 安裝注意事項
安裝注意事項安裝注意事項
安裝注意事項
在安裝和
移除以上除
電源以外的設備前,請
確認
VD-i處於電源未連接狀態。
連接電視
連接電視連接電視
連接電視機時
機時機時
機時,,,,請選擇上述視頻輸出
請選擇上述視頻輸出請選擇上述視頻輸出
請選擇上述視頻輸出、、、、分量輸出
分量輸出分量輸出
分量輸出、、、、S端子輸出幾種方式的其中
端子輸出幾種方式的其中端子輸出幾種方式的其中
端子輸出幾種方式的其中
一種連接到電視機
一種連接到電視機一種連接到電視機
一種連接到電視機,,,,並將電視機設置成對應的輸入模式
並將電視機設置成對應的輸入模式並將電視機設置成對應的輸入模式
並將電視機設置成對應的輸入模式。。。。為達到最佳影音效果
為達到最佳影音效果為達到最佳影音效果
為達到最佳影音效果,,,,
請使用
請使用請使用
請使用
HDMI
及及及及
S/PDIF
連接
連接連接
連接
3.14
3.143.14
3.14 開開開開////關接收器
關接收器關接收器
關接收器及及及及 LED
LEDLED
LED 顯示
顯示顯示
顯示
接通電源以後,按下接收器前面板上的
POWER
鍵開
始正常
工作以後,
POWER
指示燈為藍色。
正常
工作時,按“電源”鍵進入待機狀態,
POWER
指示
燈熄滅。
待機時,按“電源”鍵進入工作狀態,
POWER
指示燈為藍色。
在錄影狀態時錄影鍵
亮紅燈
在播放影片時錄影鍵
亮綠燈
同時錄影及播片時錄影鍵
亮綠燈
若長時間不
若長時間不若長時間不
若長時間不使用接收器
使用接收器使用接收器
使用接收器,,,,請拔除接收器的電源火牛
請拔除接收器的電源火牛請拔除接收器的電源火牛
請拔除接收器的電源火牛。。。。
Page 22
16
4444 使用簡介
使用簡介使用簡介
使用簡介
透過遙控器和前面板上的按鍵可以對VD-i
進行操作,請注意以下事項:
部
分按鍵在不同的功能
下具有不
同的作用。
電視機螢幕會
提供類似
遙控器按鍵一樣的“按鈕”提示,可以通過遙控器上的
功能
表導航和選擇
鍵進行操作。
某些應
用功能
僅提供螢幕上的“按鈕”用於操作,此時遙控器
上對應
的按鍵可
能
不起
作用,
甚至不提供對應
的按鍵。
4.1
4.14.1
4.1 本機設定
本機設定本機設定
本機設定
通
過使用
方向
鍵和
MENU、OK、CH+、CH-
可以
完成所
有的操作動作。
按
MENU
進入主目錄以後,按
選擇您想
進入的子目錄,按 進入子目錄,按
回
到
前一個目錄。進入最後的子目錄以後,按
修改。有多頁內容時,按
CH+、CH-
可
以
翻頁
。在
任何
目錄下,按
MENU
退出,
繼續
收看節目。請您操作時注意目錄介面的
提
示。
4.1.1. 設定介面
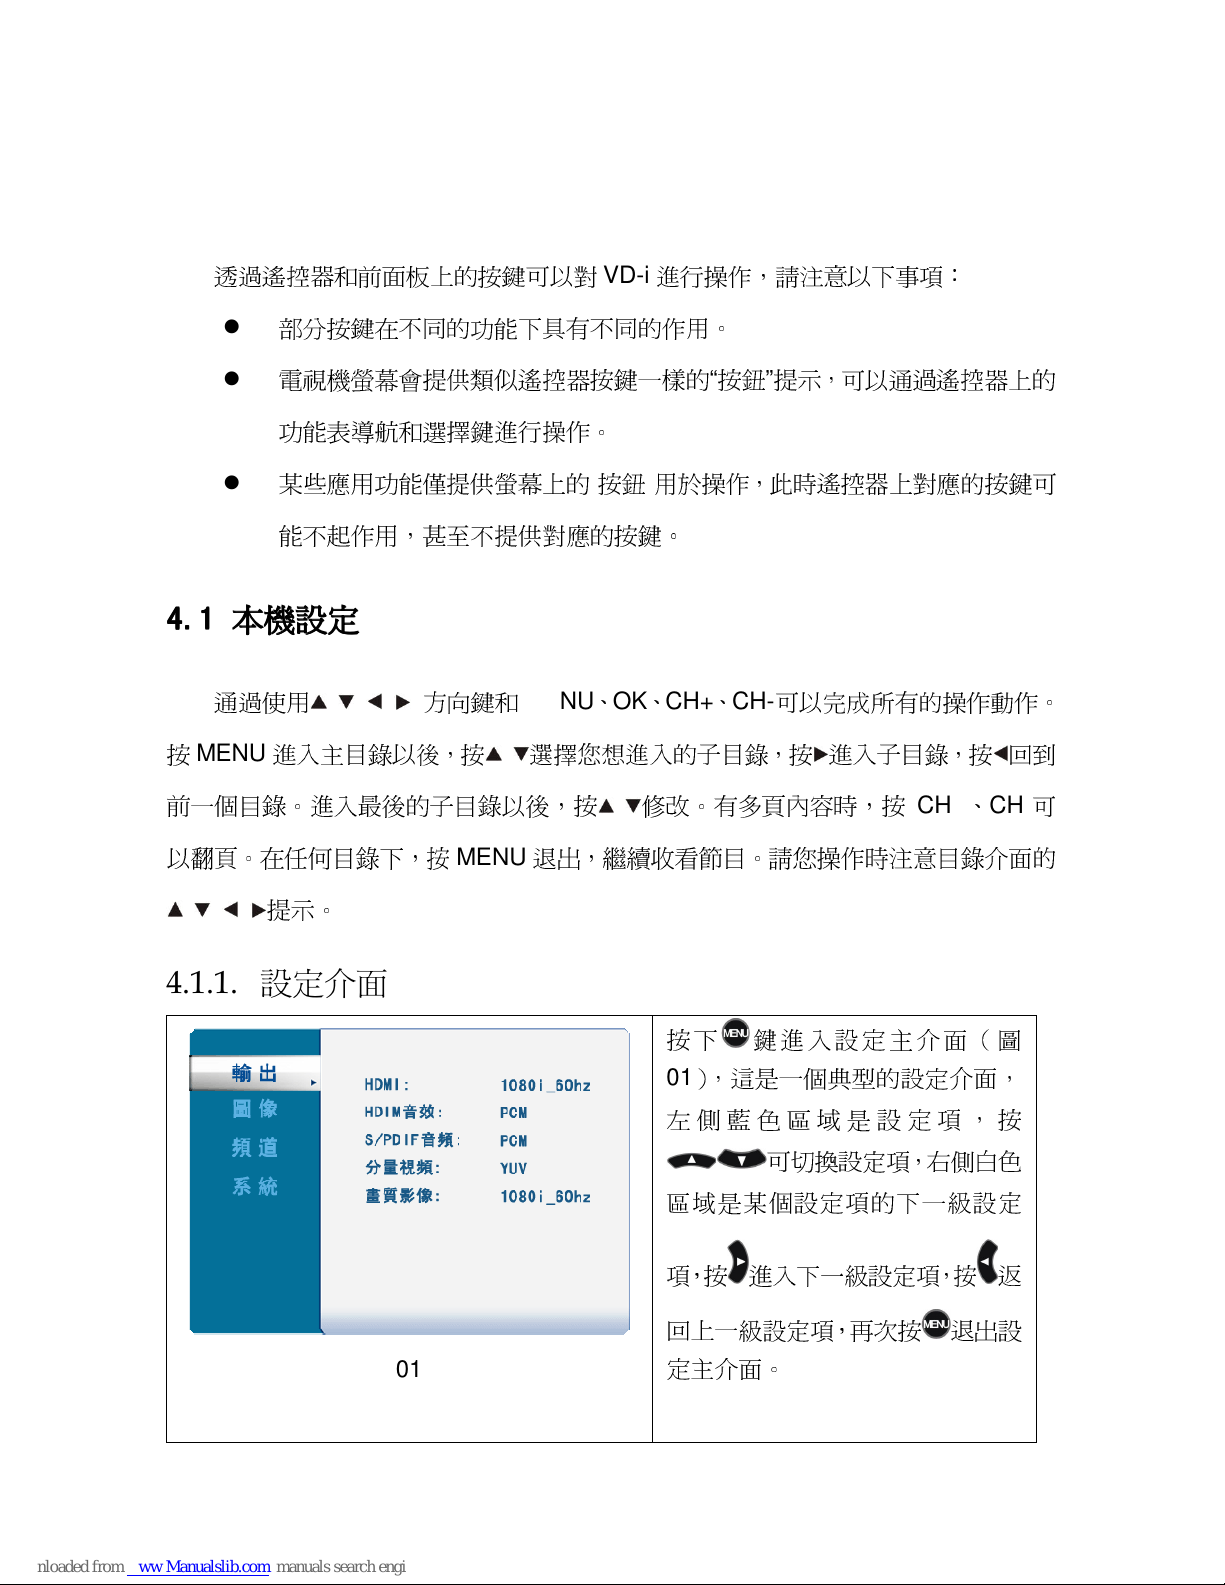
01
按
下
鍵進入設定
主介
面(
圖
01),這
是一
個典型
的設定介面,
左 側 藍色區 域
是 設 定 項 , 按
可切換設定項,
右側白
色
區域是某個
設定項的下一級設定
項,按 進入下一級設定項,按
返
回上
一級設定項,再次按
退出設
定
主介
面。
Page 23
17
4.1.2. 輸出設定
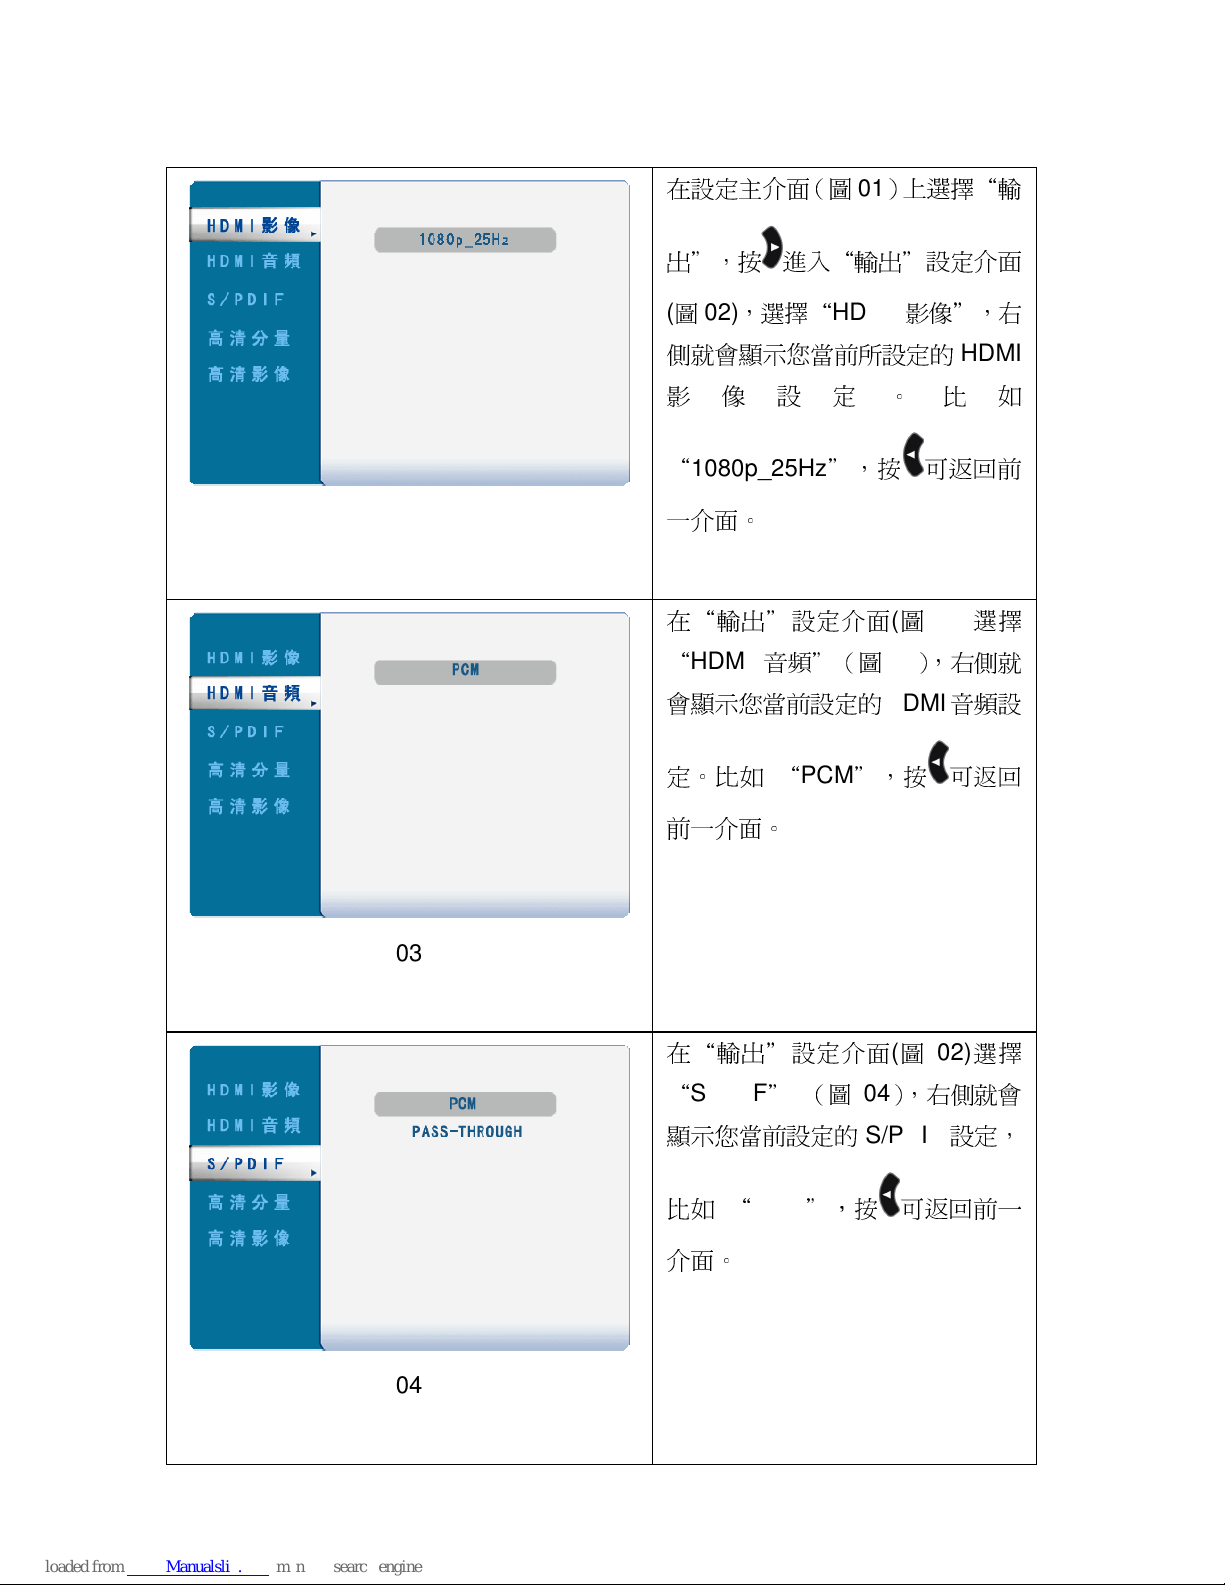
02
在設定
主介
面(圖01)上選擇“
輸
出”,按 進入“輸出”設定介面
(圖02),選擇“
HDMI
影像”,
右
側就
會顯示您當前所設定的
HDMI
影 像 設 定 。 比
如
“
1080p_25Hz”,按 可
返回
前
一介面。
03
在“輸出”設定介面(圖
02)
選擇
“
HDMI
音頻”(圖03),右側就
會顯示您當前設定的
HDMI
音頻設
定。比如 “PCM”,按 可
返回
前一介面。
04
在“輸出”設定介面(圖
02)
選擇
“
S/PDIF” (圖04),
右側就
會
顯示您當前設定的
S/PDIF
設定,
比如 “PCM”,按 可
返回
前一
介
面。
Page 24
18
05
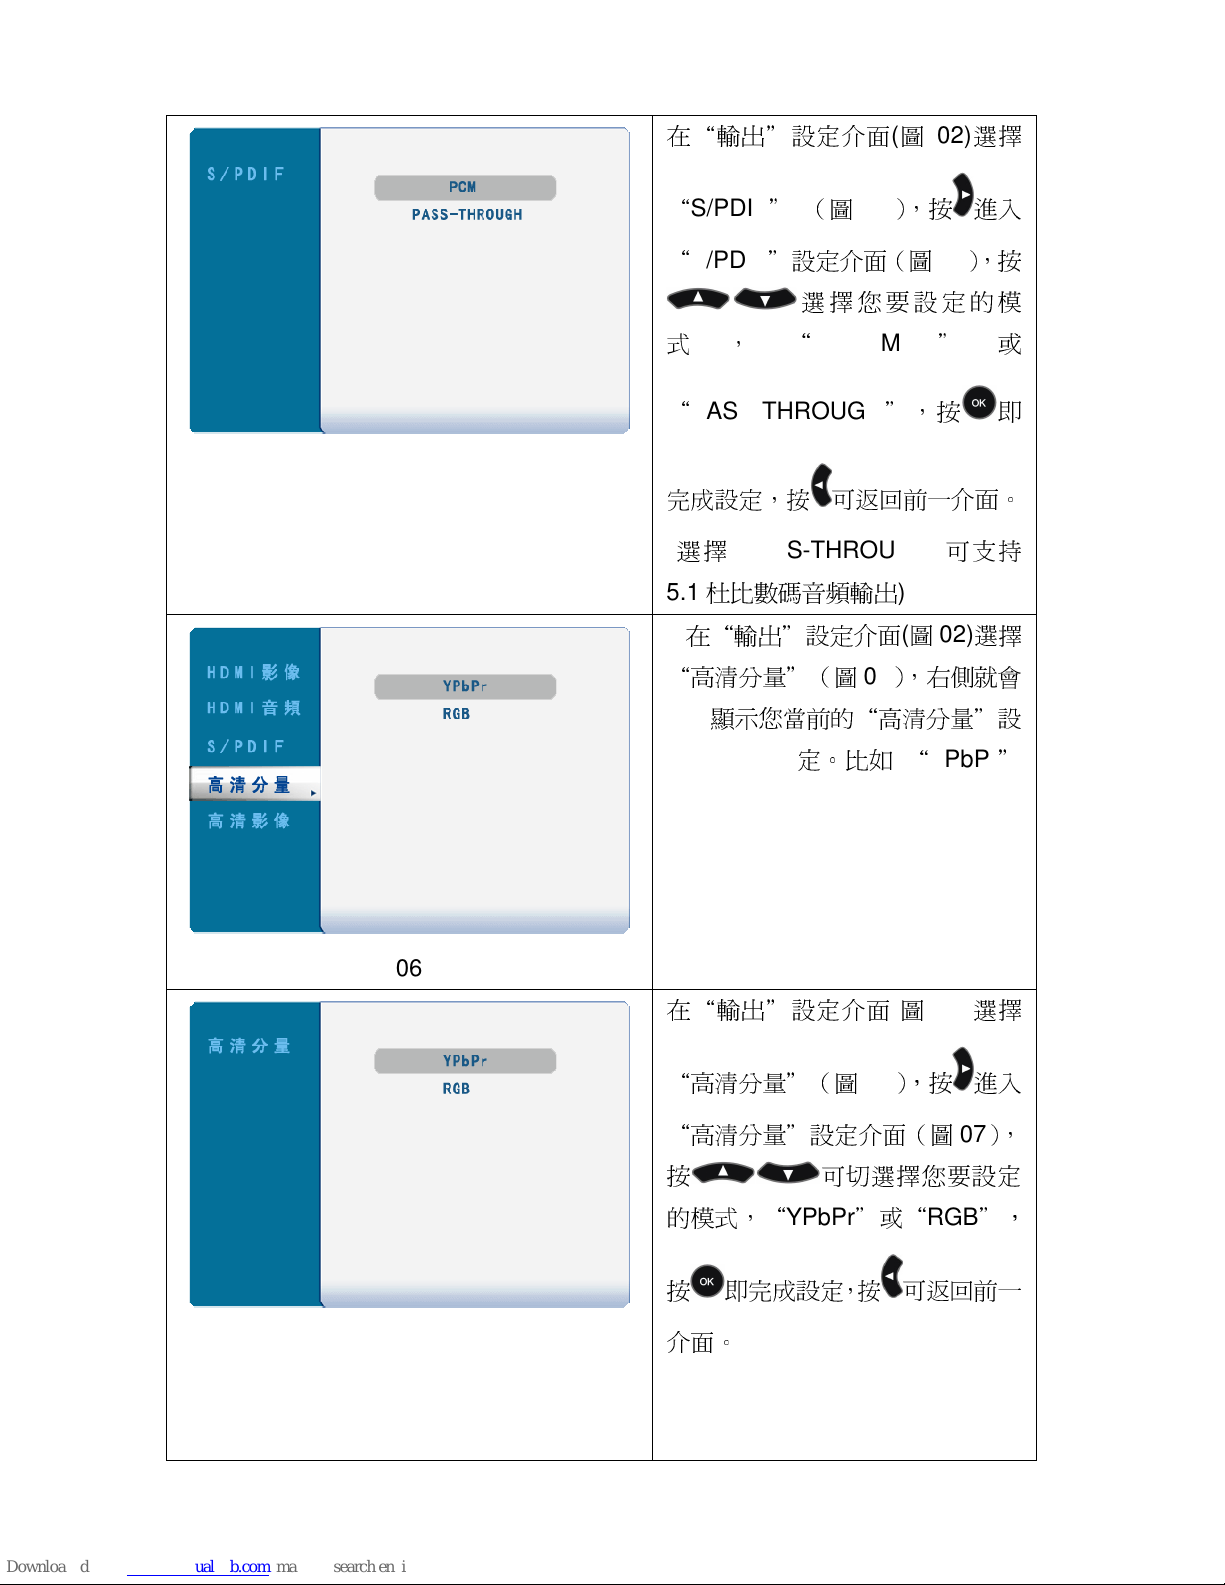
在“輸出”設定介面(圖
02)
選擇
“
S/PDIF” (圖04),按 進入
“
S/PDIF”設定介面(圖05
),按
選 擇您要
設 定 的
模
式 ,
“
PCM
”
或
“
PASS-THROUGH”,按 即
完成
設定,按 可
返回
前一介面。
(
選擇
PASS-THROUGH
可支持
5.1杜比數碼音頻輸出
)
06
在“輸出”設定介面(圖
02)
選擇
“
高清分量”(圖06),右側就
會
顯示您當前的“高清分量”設
定。比如 “YPbPr
”
07
在“輸出”設定介面(圖
02)
選擇
“
高清分量”(圖06
),按 進入
“
高清分量”設定介面(圖07
),
按 可切
選擇您要
設定
的模式,“YPbPr”或“RGB”,
按 即
完成
設定,按 可
返回
前一
介
面。
Page 25
19
08
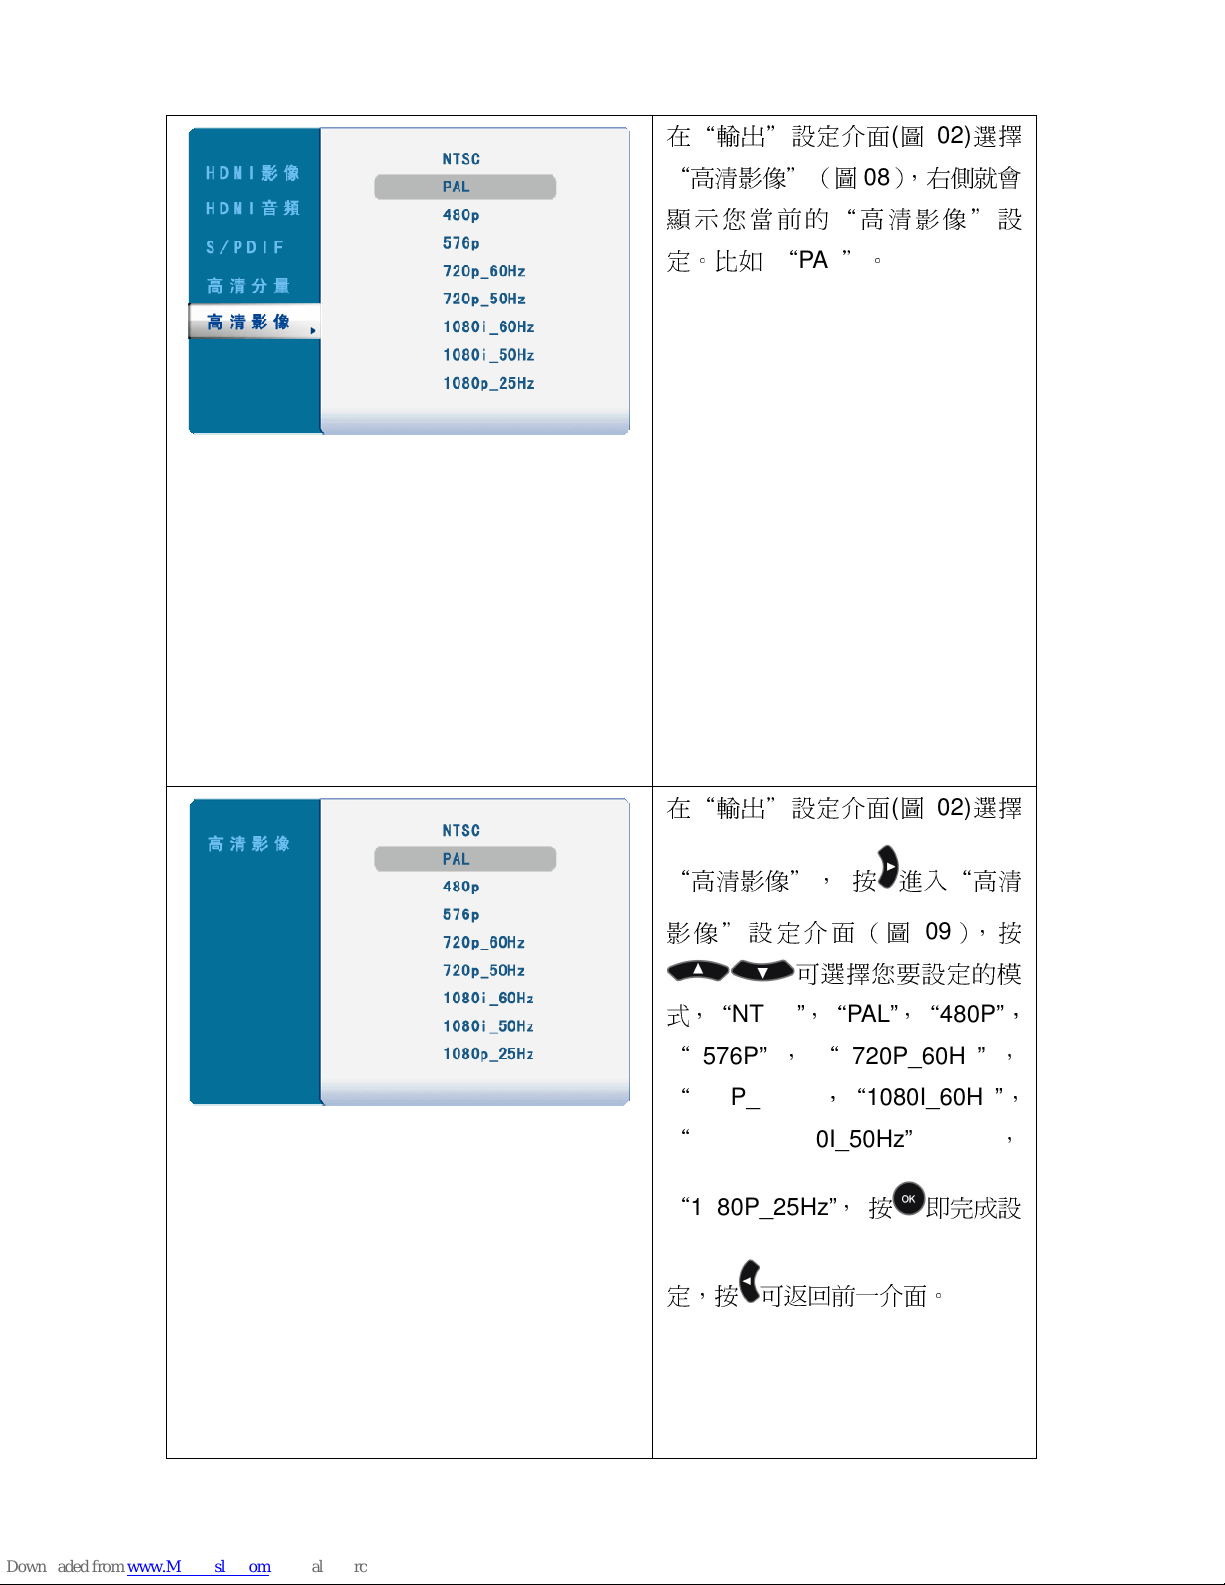
在“輸出”設定介面(圖
02)
選擇
“
高清影像”(圖08),右側就
會
顯示您當前的“高清影像”設
定。比如 “PAL”。
09
在“輸出”設定介面(圖
02)
選擇
“
高清影像”, 按 進入“高清
影像”設定介面(
圖
09
),按
可
選擇您要
設定的
模
式,“NTSC”,“
PAL”,“
480P”
,
“
576P”
,
“
720P_60Hz”
,
“
720P_50Hz”,“
1080I_60Hz”
,
“
1080I_50Hz”
,
“
1080P_25Hz”,
按 即
完成
設
定,按 可
返回
前一介面。
Page 26
20
4.1.3. 圖像設定
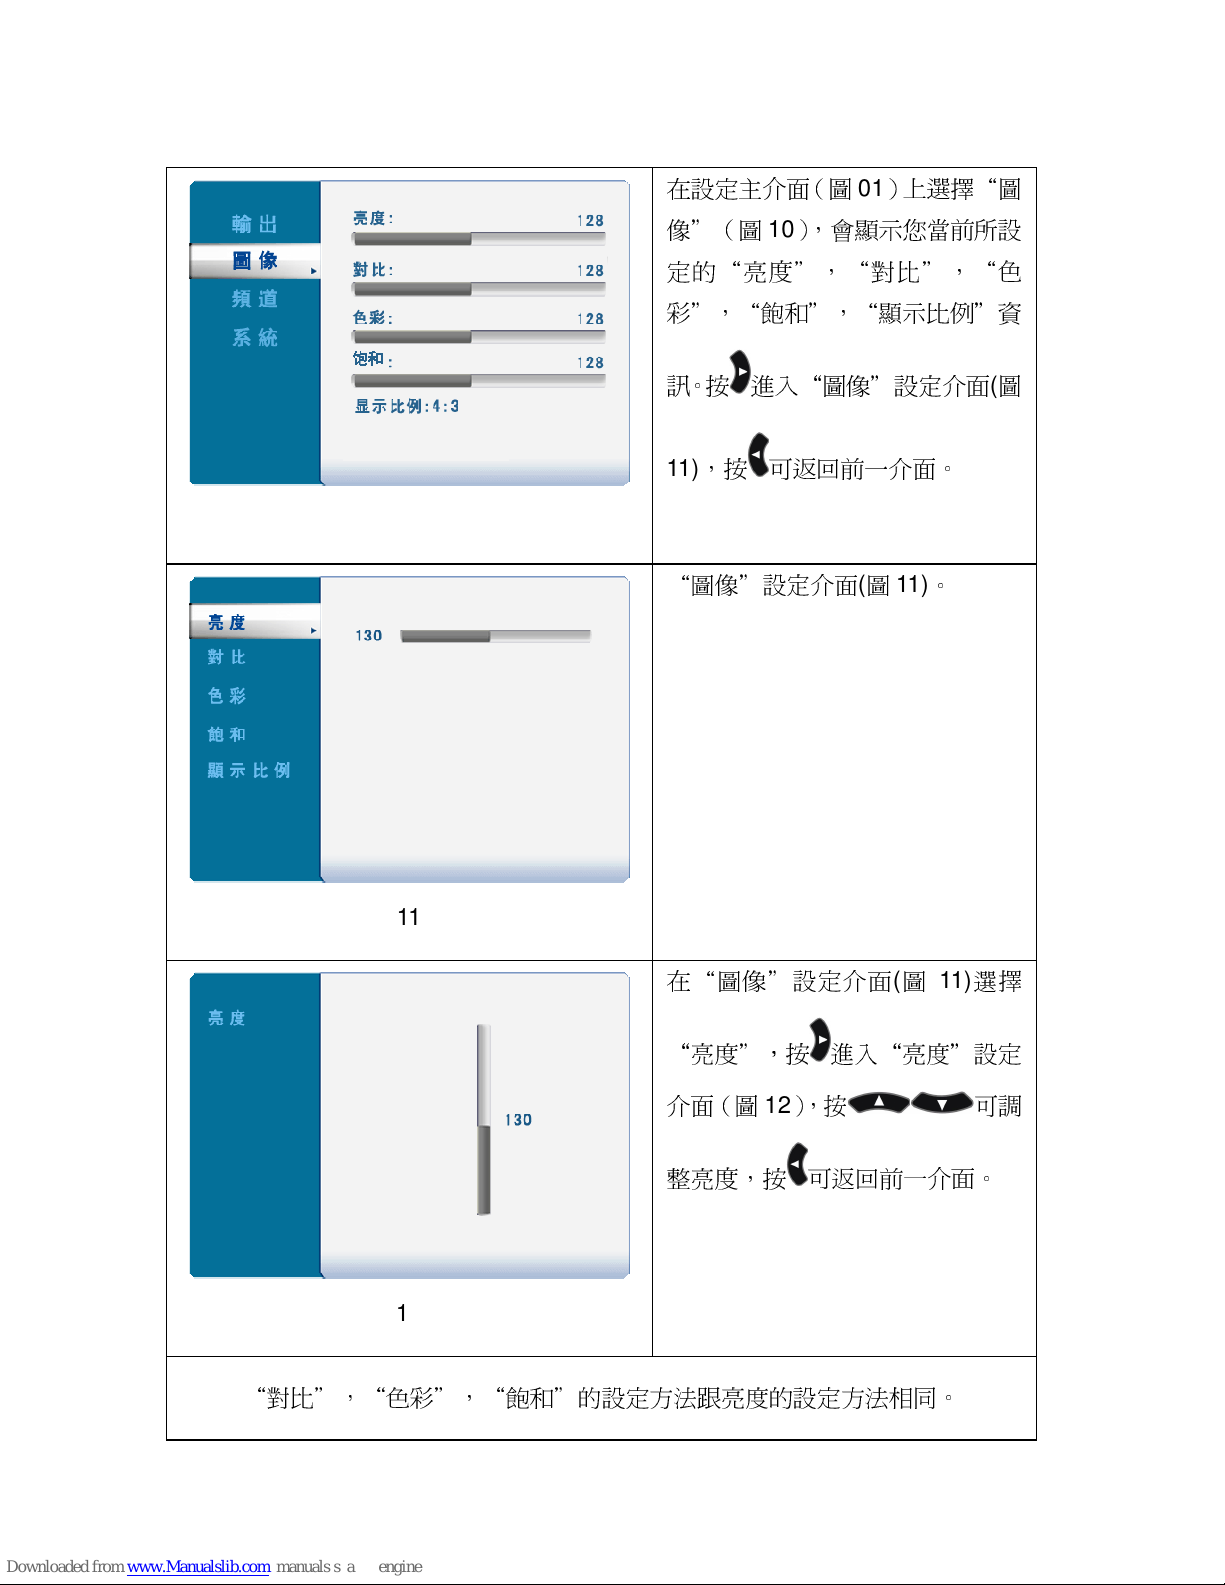
10
在設定
主介
面(圖01)上選擇“圖
像”(圖10
),會顯示您當前所設
定的
“亮度”,“對比”,“
色
彩”,“飽和”,“
顯示比
例”
資
訊。按 進入
“圖像”
設定介面(圖
11)
,按 可
返回
前一介面。
11
“圖像”
設定介面(圖
11)。
12
在
“圖像”
設定介面(圖
11)
選擇
“亮度”
,按 進入
“亮度”
設定
介
面(圖12
),按 可
調
整亮
度,按 可
返回
前一介面。
“對比”,“色彩”,“飽和”
的設定
方法跟亮
度的設定
方法相
同。
Page 27
21
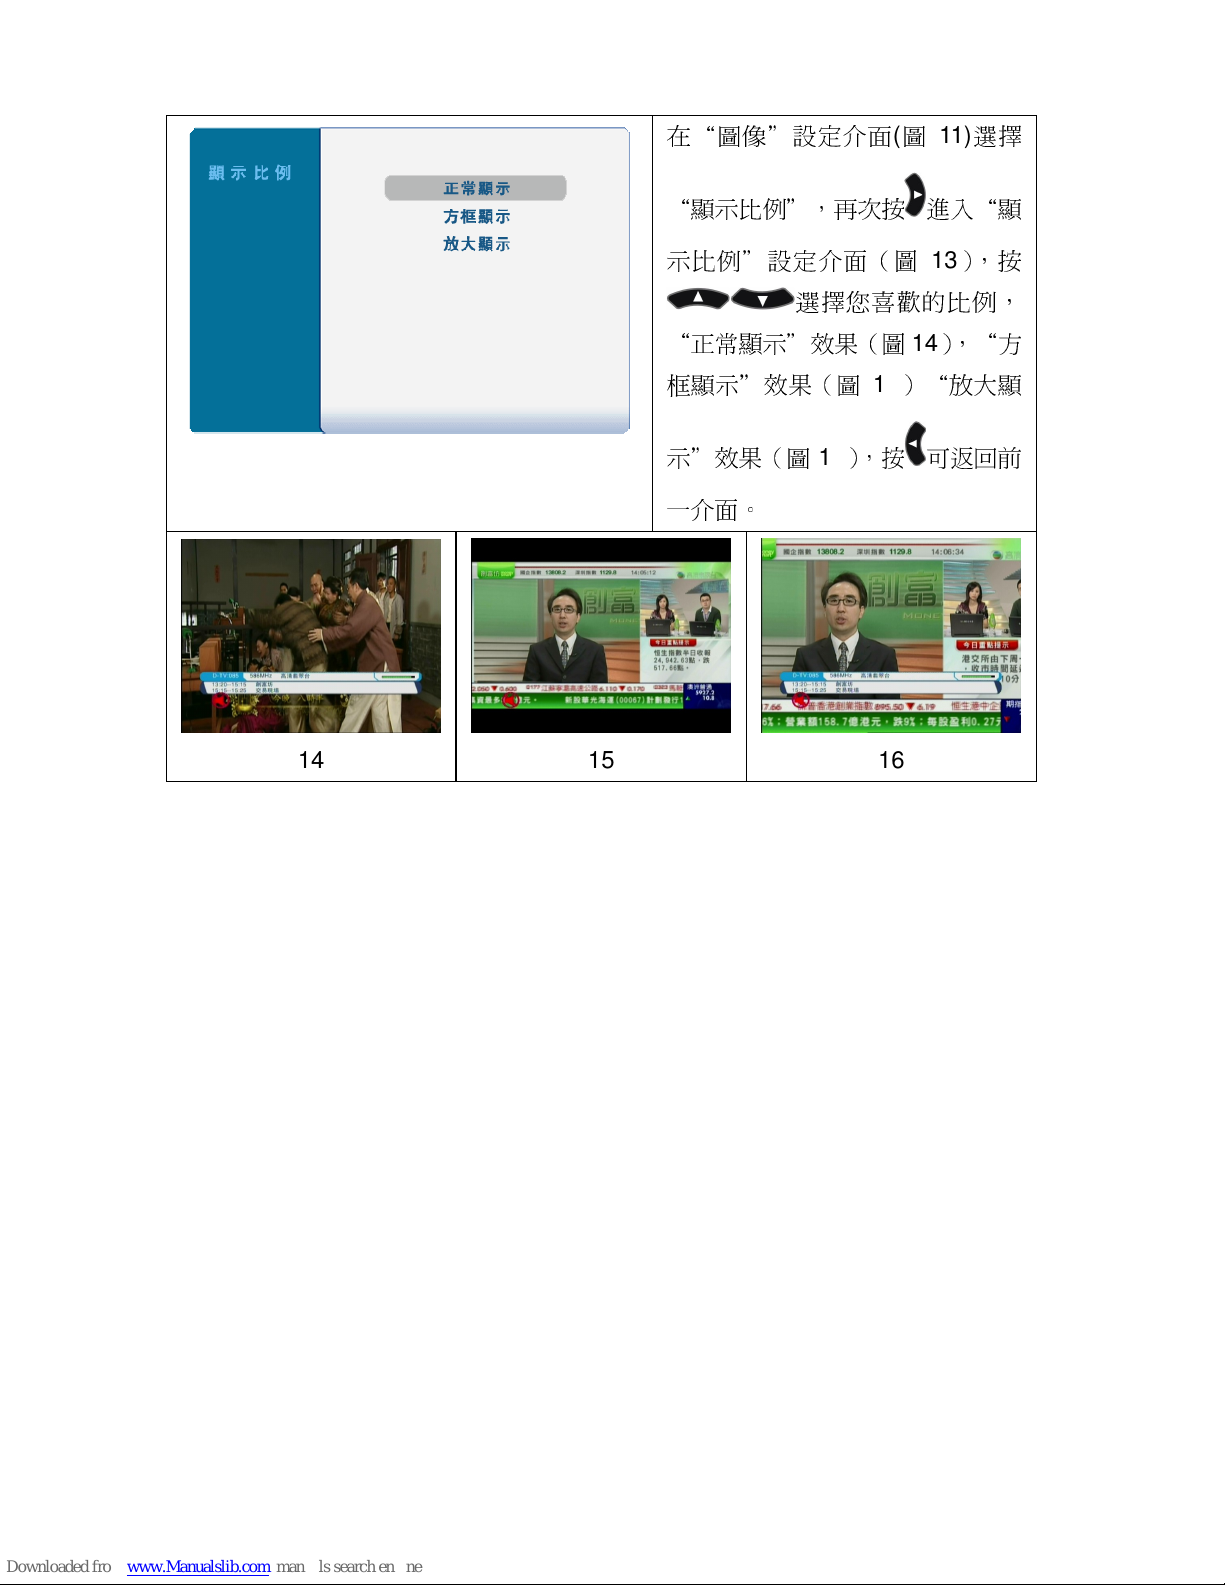
13
在
“圖像”
設定介面(圖
11)
選擇
“
顯示比
例”,再
次按 進入“顯
示比
例”
設定介面(圖13
),按
選擇您喜歡
的比例,
“正常
顯示”效果(圖14),“方
框
顯示”效果(圖15)“
放大顯
示”效果(圖16
),按 可
返回
前
一介面。
14
15
16
Page 28
22
4.1.4. 頻道設定
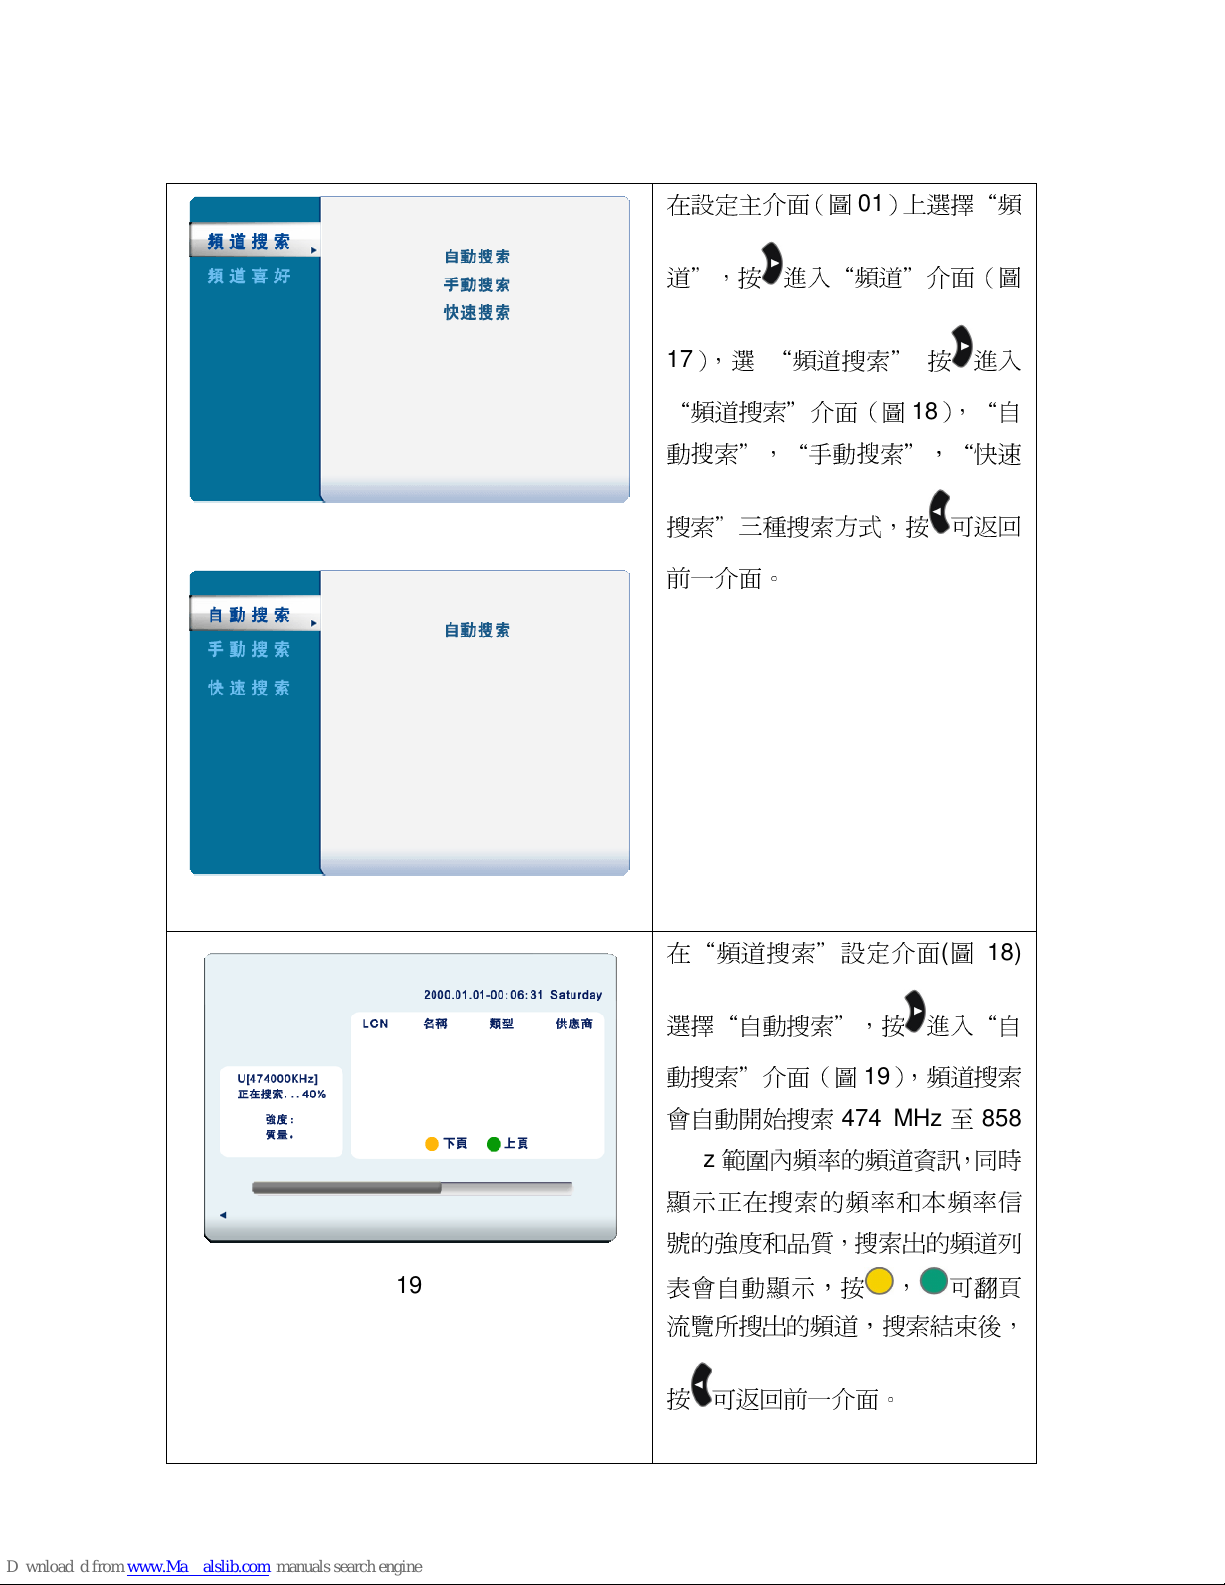
17
18
在設定
主介
面(圖01)上選擇“
頻
道”,按 進入“頻道
”介
面(
圖
17),選 “
頻道
搜索” 按 進入
“
頻道
搜索”介
面(圖18),“自
動搜索”,“手動搜
索”,“快速
搜索”三種搜索方
式,按 可
返回
前一介面。
19
在“頻道
搜索”
設定介面(圖
18)
選擇“自動搜索”
,按 進入
“自
動
搜索”介
面(圖19
),頻道
搜索
會自動開
始搜索
474 MHz
至
858
MHz
範圍內頻率的頻道資訊,同時
顯示正在
搜索
的頻率和本頻率
信
號的強度和品質,
搜索
出的頻道
列
表會自
動顯示,按 , 可
翻頁
流覽所搜
出的頻道,
搜索結束
後,
按
可
返回
前一介面。
Page 29
23
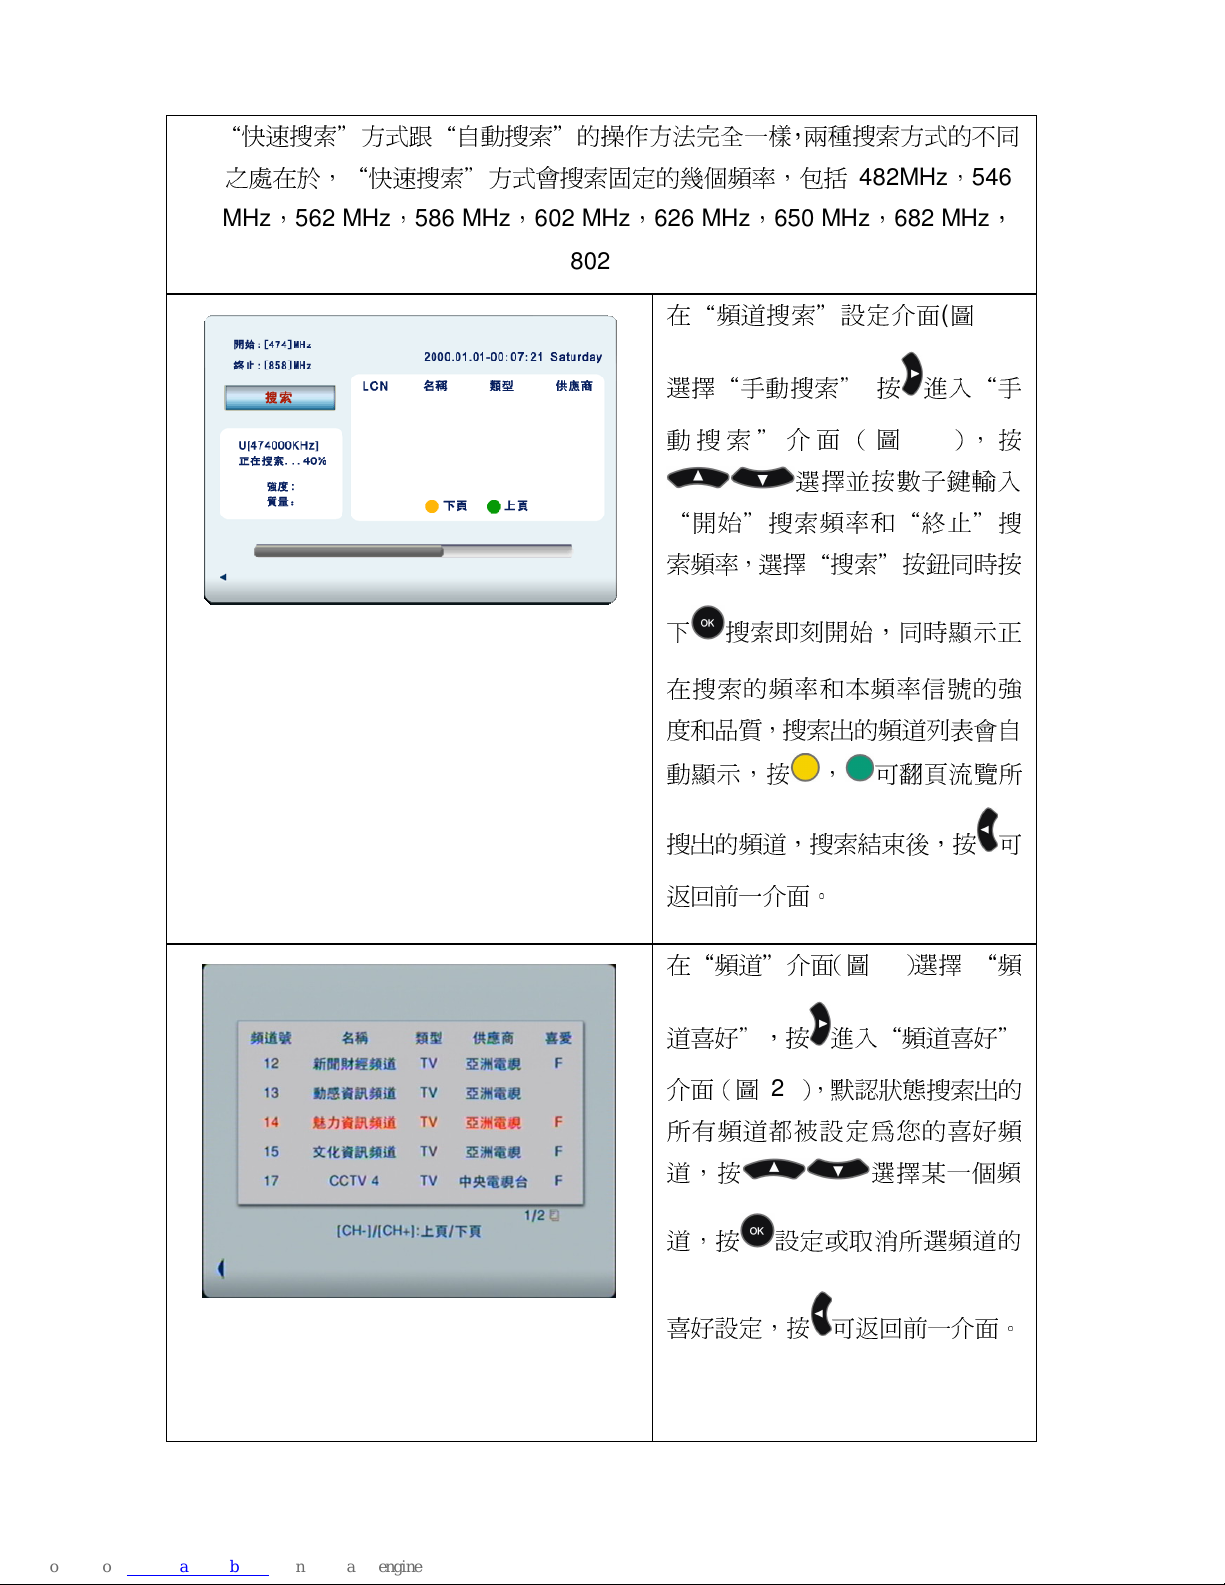
“快速搜索”方式跟“自動搜索”的操作方法完全一樣,兩種搜索方
式的不同
之處
在於,“快
速搜索”方
式會
搜索
固定的
幾個
頻率,包括 482MHz,546
MHz,562 MHz,586 MHz,602 MHz,626 MHz,650 MHz,682 MHz
,
802 MHz
20
在“頻道
搜索”
設定介面(圖
18)
選擇“手動搜索” 按 進入
“手
動
搜 索 ” 介
面 (
圖
20
), 按
選擇
並按數子鍵輸入
“開始”搜索
頻率和
“終止”搜
索
頻率,
選擇“搜索”按鈕
同時按
下 搜索即刻開始
,同時顯示
正
在
搜索
的頻率和本頻率信號的強
度和品質,
搜索
出的頻道
列表會自
動顯示,按 , 可
翻頁流覽所
搜
出的頻道,
搜索結束
後,按 可
返回
前一介面。
21
在“頻道
”介面(圖17)
選擇 “
頻
道
喜好”
,按 進入“頻道
喜好”
介
面(圖 21),默認
狀態
搜索
出的
所
有頻道都被設定為您的
喜好
頻
道,按
選擇某一個
頻
道,按 設定或取
消所選
頻道的
喜好
設定,按
可
返回
前一介面。
Page 30
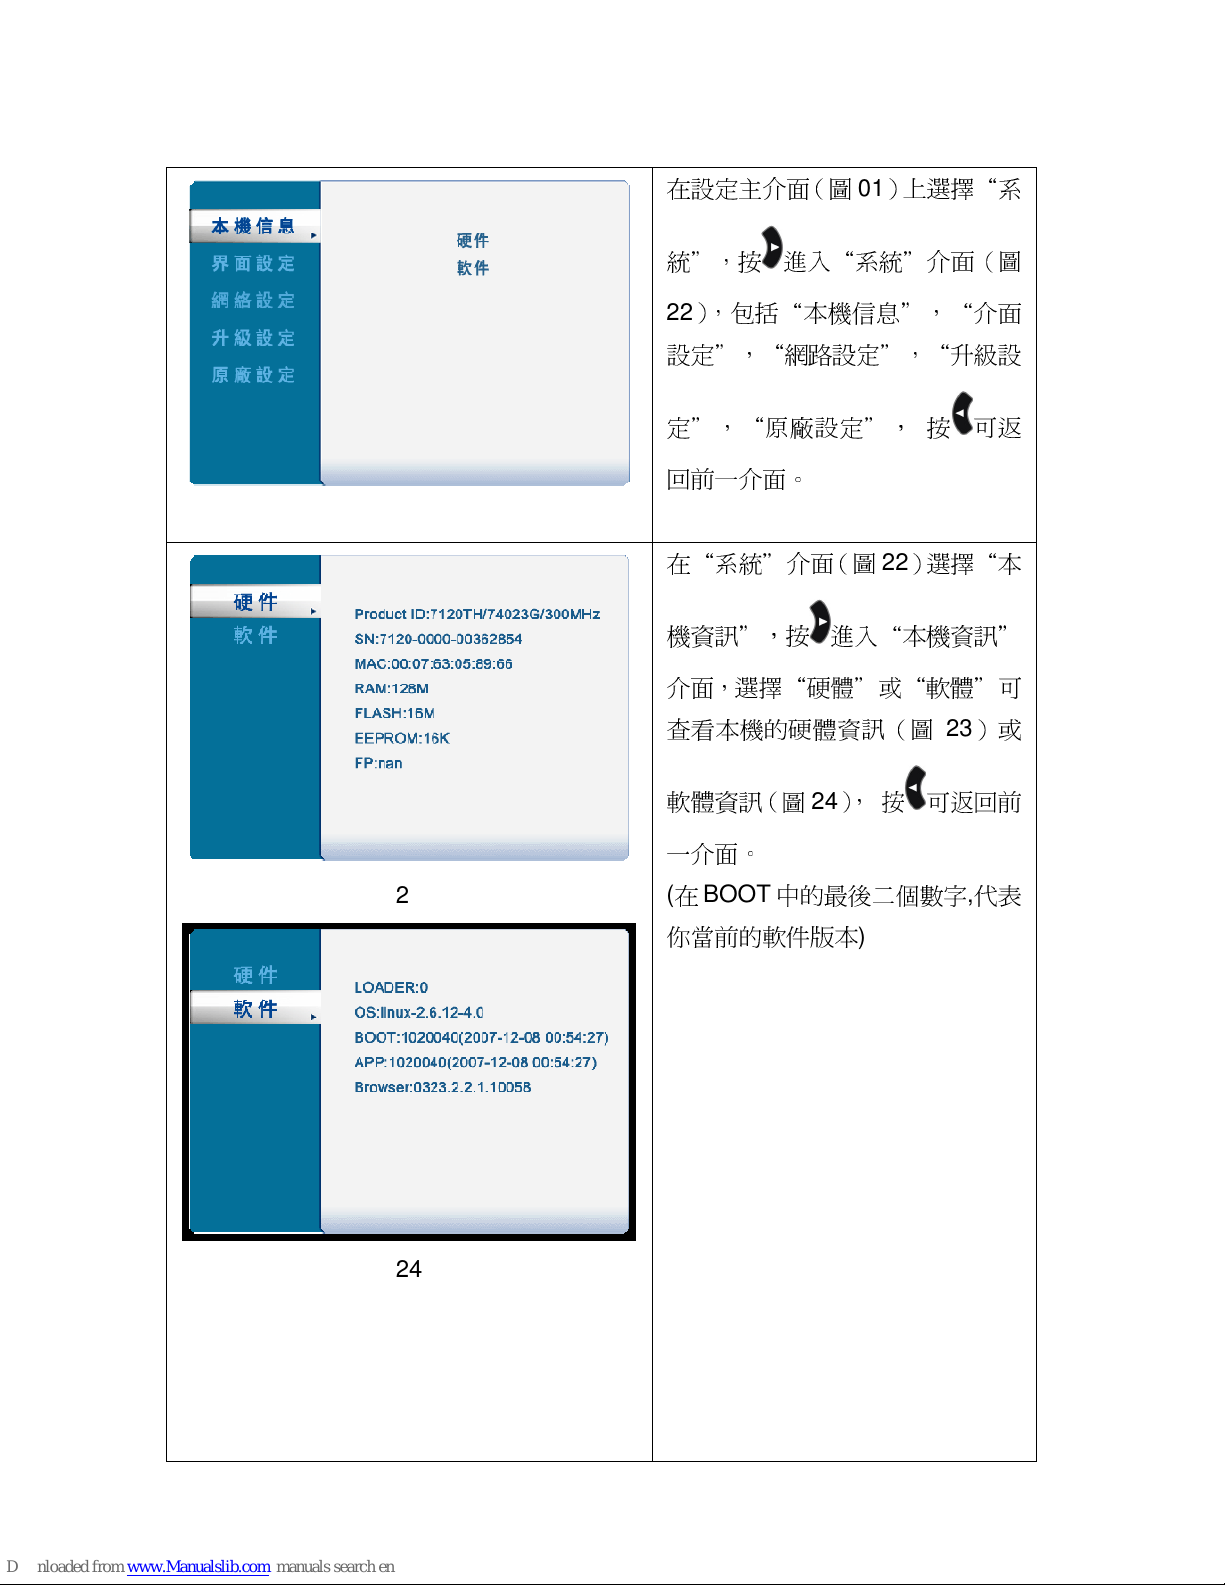
24
4.1.5. 系統設定
22
在設定
主介
面(圖01)上選擇“系
統”
,按 進入
“系統”介
面(
圖
22
),包
括“
本機
信息”,“介
面
設定”,“網路設定”,“升級設
定”,
“原廠
設定”, 按 可
返
回
前一介面。
23
24
在
“系統”介
面(圖22)選擇“
本
機資訊”,按 進入“本機資訊
”
介
面,
選擇“硬體”或“軟體”
可
查
看本機的硬體資訊(圖23
)或
軟體資訊(圖24),
按 可
返回
前
一介面。
(在BOOT中的最後二個數字,代表
你當
前的軟件版本
)
Page 31
25
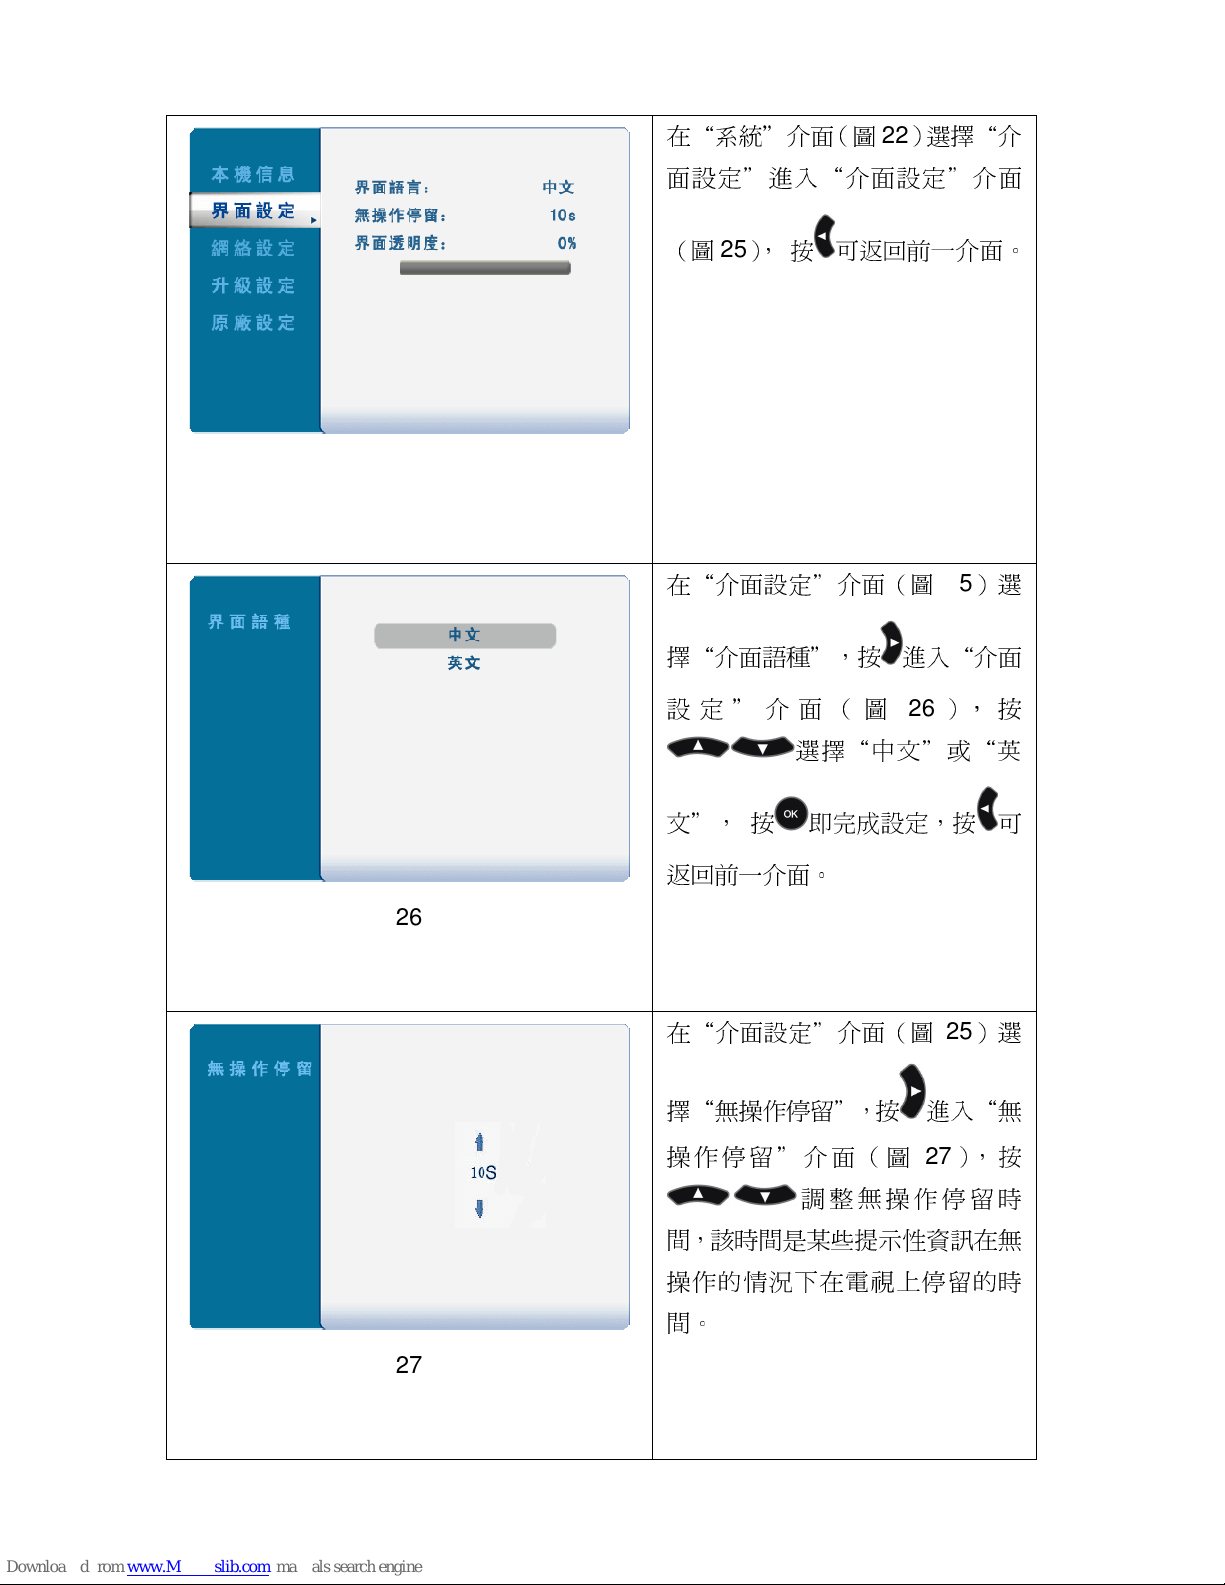
25
在
“系統”介
面(圖22)選擇“介
面設定”進入
“介
面設定
”介
面
(圖25),
按 可
返回
前一介面。
26
在
“介
面設定
”介
面(圖25)選
擇“介面語種”
,按 進入
“介
面
設 定
” 介
面 (
圖
26
), 按
選擇“中文”或“英
文”,
按 即
完成
設定,按 可
返回
前一介面。
27
在
“介
面設定
”介
面(圖25)選
擇“無操
作停
留”
,按 進入
“無
操
作停
留”介
面(
圖
27
),按
調 整 無操
作 停留時
間,該時間是
某些提
示性資訊在
無
操
作的
情況下
在電視上停留的時
間。
Page 32
26
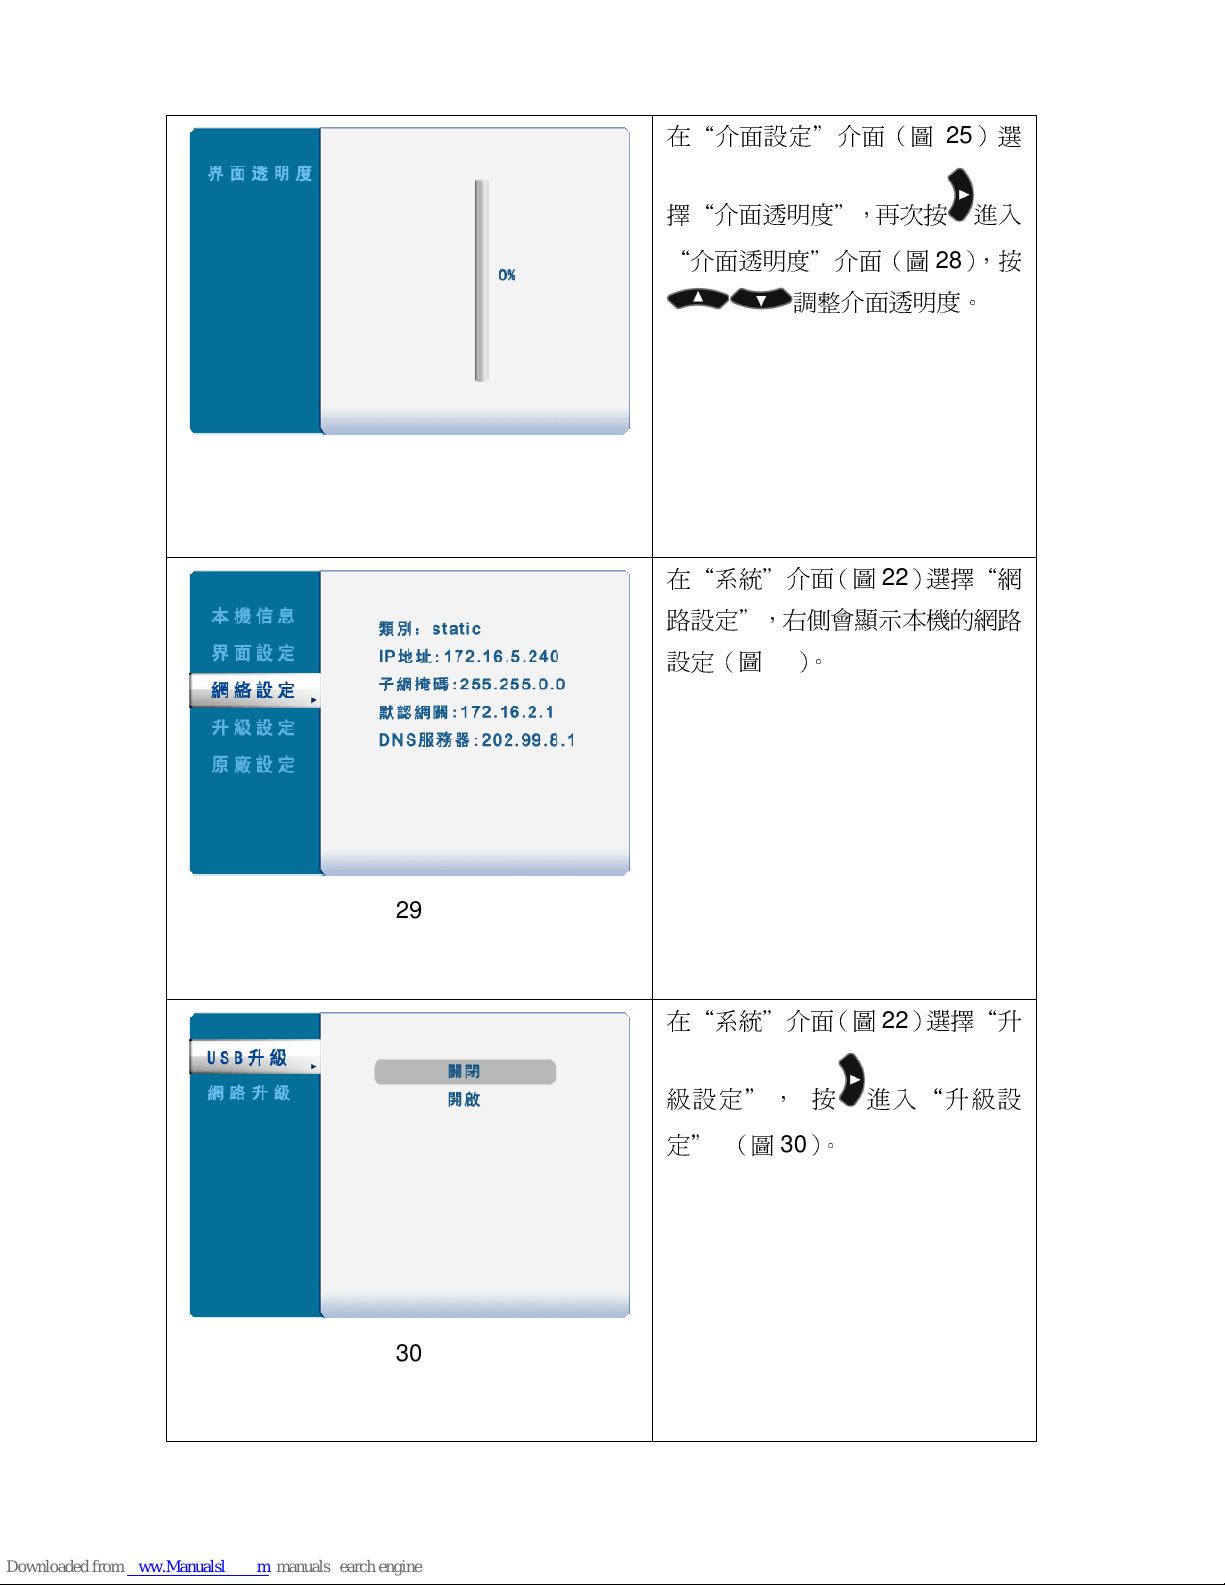
28
在
“介
面設定
”介
面(圖25)選
擇“介
面透明度”,再次按 進入
“介
面透明度
”介
面(圖28
),按
調整介
面透明度。
29
在
“系統”介
面(圖22)選擇“
網
路設定”,
右側
會顯示本機的網路
設定(圖29)。
30
在
“系統”介
面(圖22)選擇“
升
級設定”, 按 進入“升級設
定” (圖30)。
Page 33
27
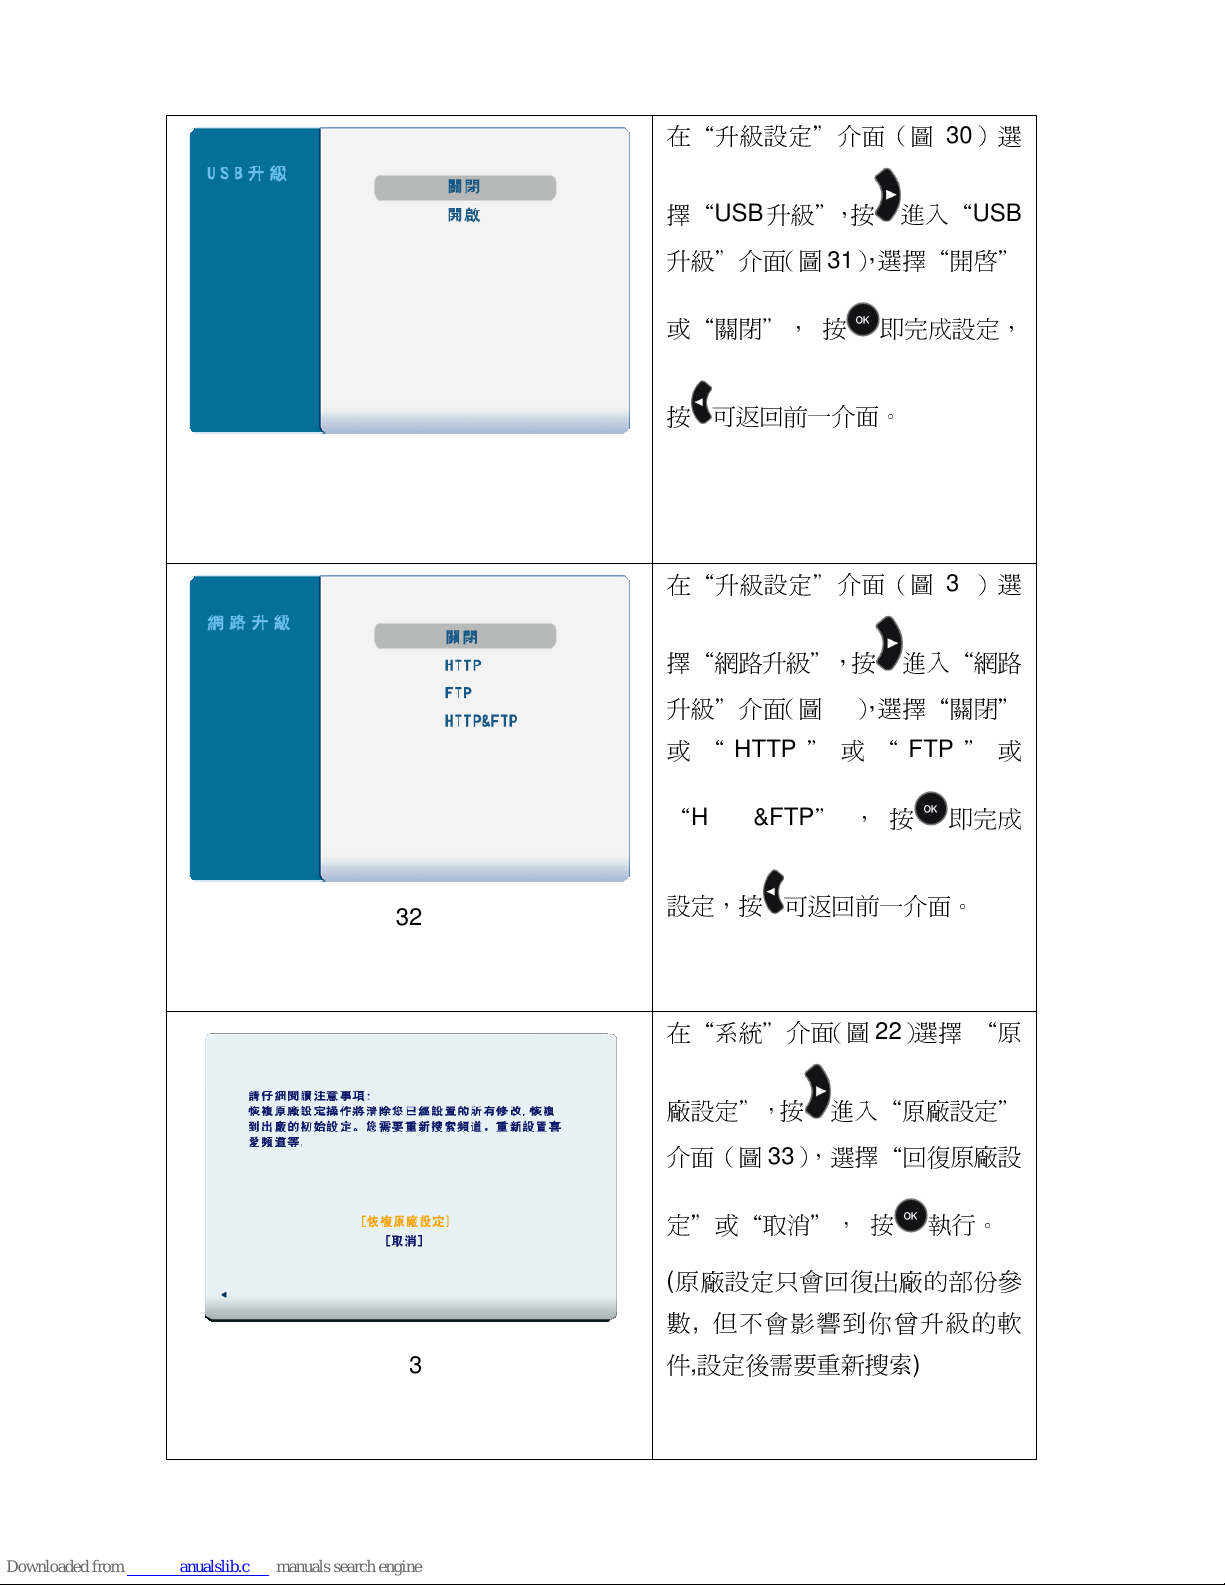
31
在“升級設定
”介
面(圖30)選
擇“
USB
升級”,按 進入“USB
升級
”介面(圖31),
選擇“開啟”
或“關閉”, 按 即
完成
設定,
按 可
返回
前一介面。
32
在“升級設定
”介
面(圖30)選
擇“
網路升級”,按 進入“網路
升級
”介面(圖32),
選擇“
關閉
”
或
“
HTTP
”
或
“
FTP
”
或
“
HTTP&FTP” ,
按 即
完成
設定,按 可
返回
前一介面。
33
在
“系統”介面(圖22)
選擇 “原
廠
設定”,按 進入
“原廠
設定
”
介
面(圖33),選擇“回復原廠
設
定”或“取
消”,
按
執
行。
(
原廠
設定只會
回復出廠的部份參
數
,
但不
會影響到
你曾
升級的軟
件,設定後
需要
重新搜索
)
Page 34
28
4.2
4.24.2
4.2 EPG
EPG EPG
EPG 電子節目指南
電子節目指南電子節目指南
電子節目指南
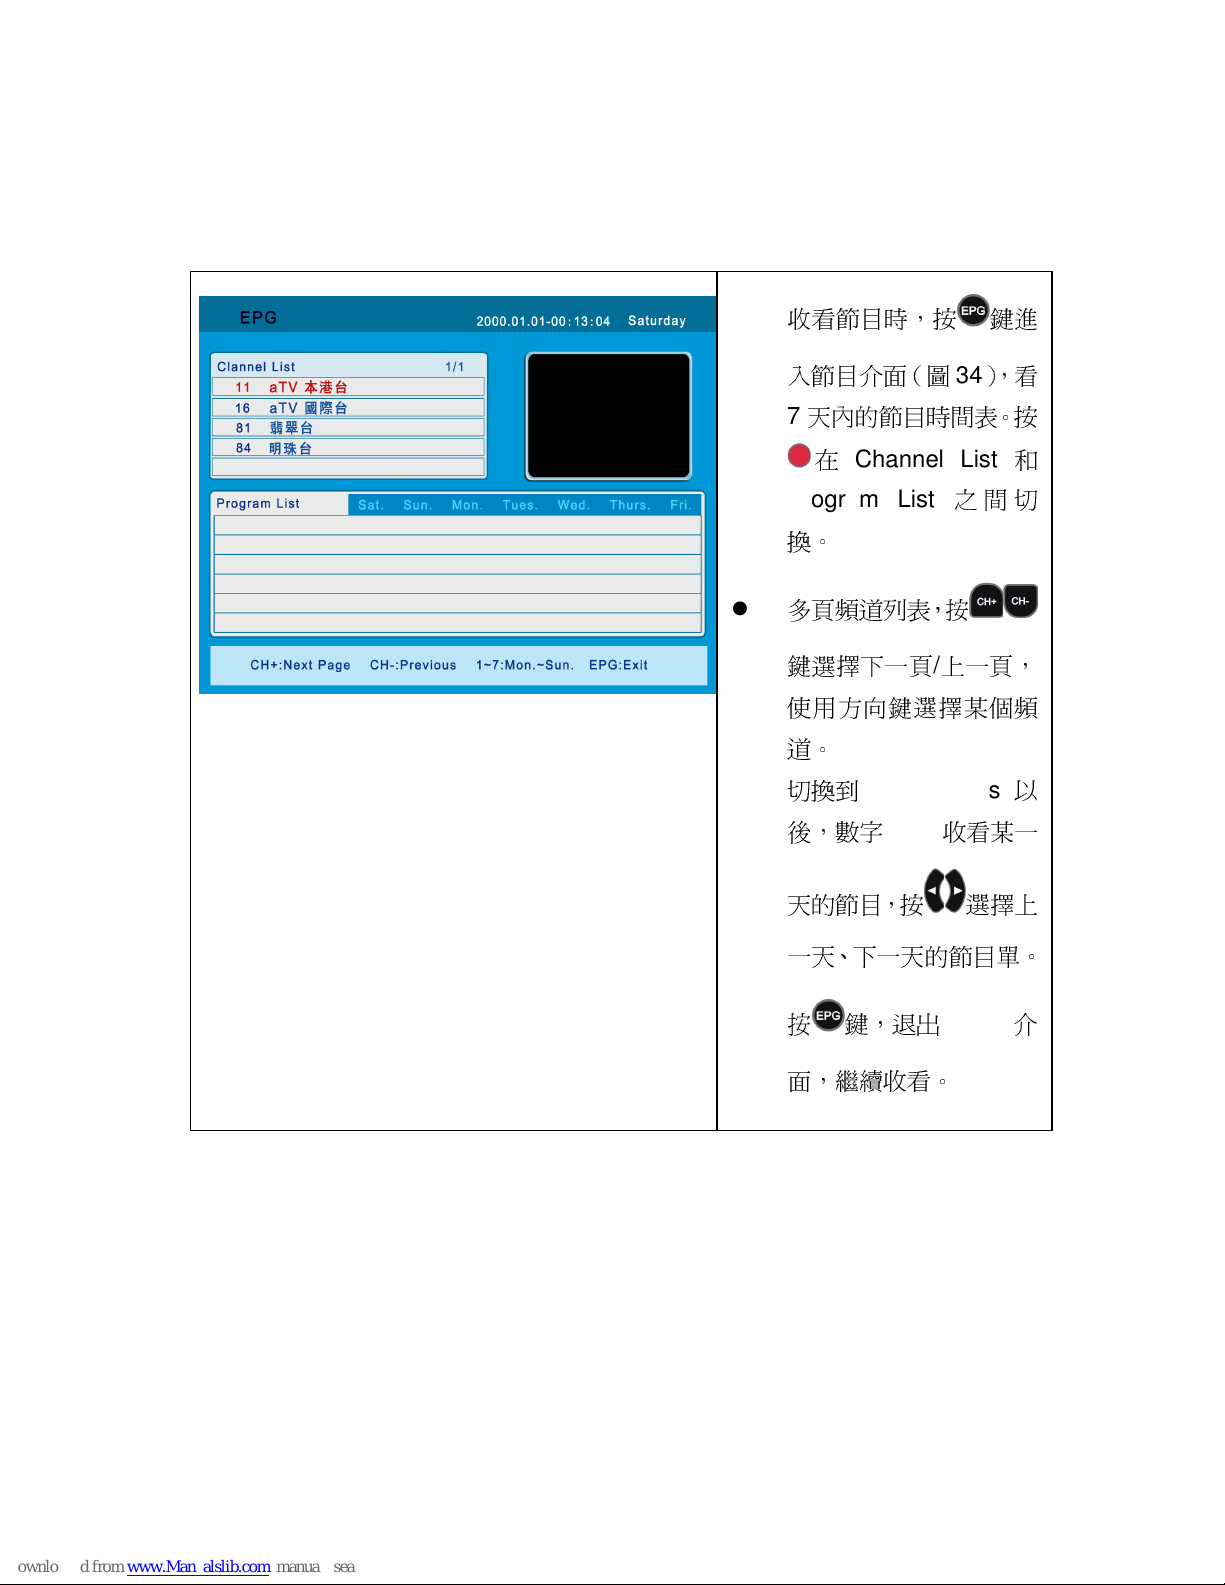
34
收看節目時,按 鍵進
入節目介面(圖34
),看
7
天內的節目時間表。按
在
Channel List
和
Program List
之
間 切
換。
多頁頻道
列表
,按
鍵
選擇下一頁/上一頁
,
使用
方向鍵選擇某個
頻
道。
切換到
Program List
以
後,數字
1~7
收看某一
天的節目,按
選擇上
一天
、下
一天的節目單。
按 鍵,退出
EPG
介
面,
繼續
收看。
Page 35
29
4.3
4.34.3
4.3 錄影功能
錄影功能錄影功能
錄影功能
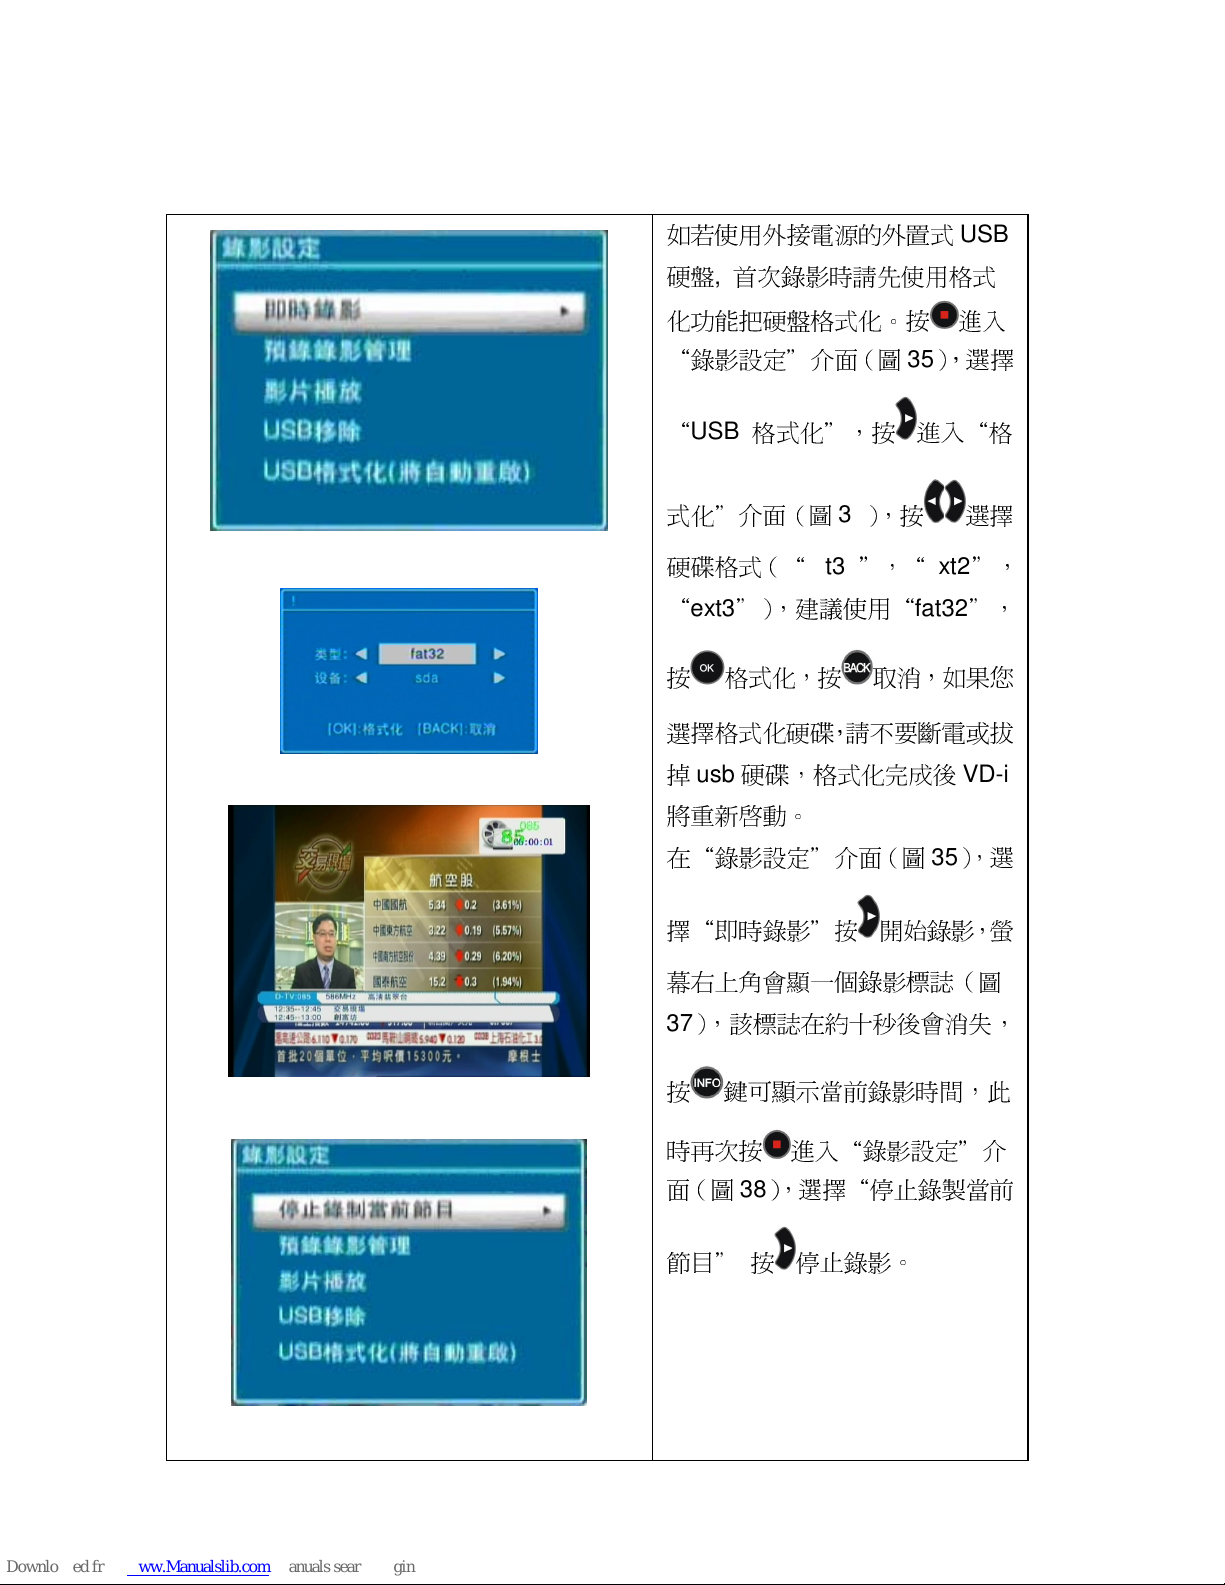
35
36
37
38
如
若使用外接電源的外置式
USB
硬盤, 首次錄影時請先使用格式
化
功能把硬盤格式化。按 進入
“
錄影設定
”介
面(圖35),選擇
“
USB
格式
化”
,按 進入“格
式
化”介
面(圖36
),按
選擇
硬碟格式(“fat32”,“ext2”,
“
ext3”),
建議
使用“fat32”,
按 格式化,按 取消,
如果
您
選擇
格式化硬碟,請
不要斷
電或
拔
掉
usb
硬碟,格式
化完成後VD-i
將
重新啟動。
在“錄影設定
”介
面(圖35),選
擇“
即時錄影”按 開始錄影,
螢
幕
右上
角會顯一個錄影標誌(
圖
37),該標誌在約十秒
後會
消失
,
按 鍵可顯示當前錄影時間,
此
時再次按 進入“錄影設定
”介
面(圖38),選擇“
停止錄
製當
前
節目”
按 停止錄影。
Page 36
30
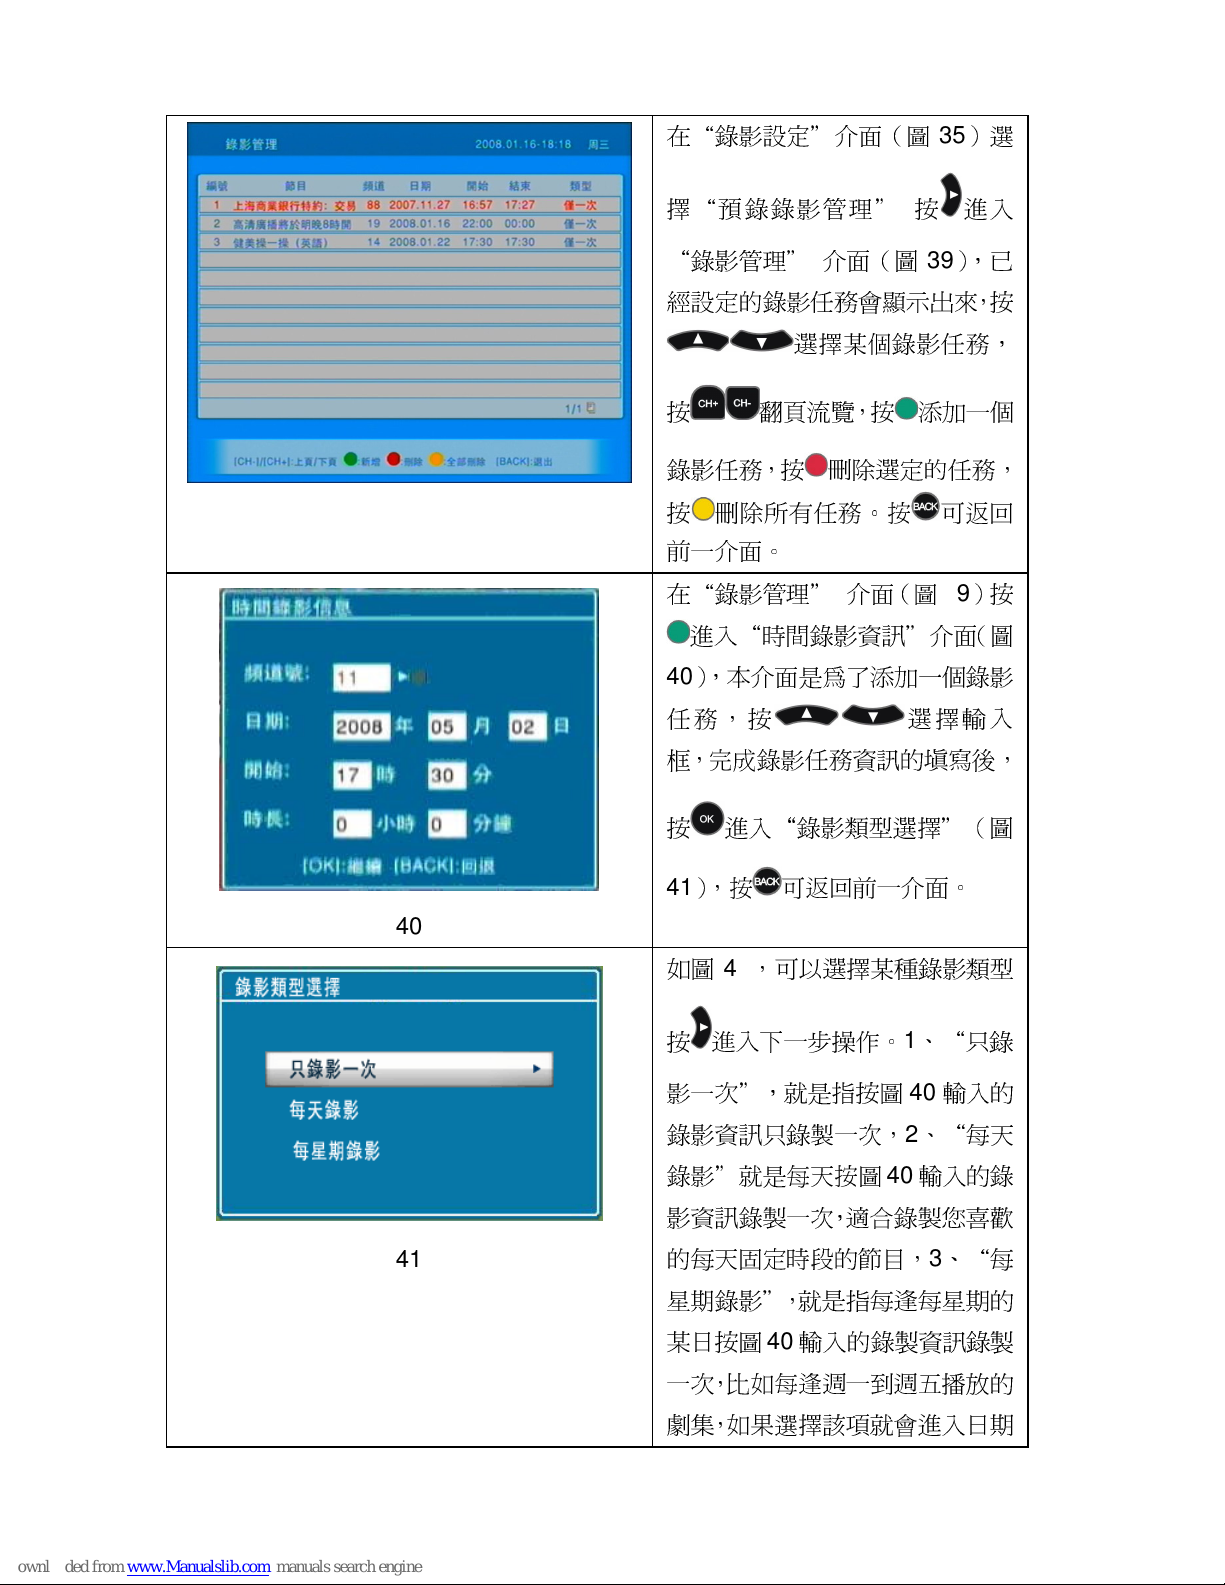
39
在“錄影設定
”介
面(圖35)選
擇“預
錄錄影
管理” 按 進入
“
錄影
管理” 介
面(圖39
),已
經
設定的錄影任務會顯示出來,按
選擇某個
錄影任務,
按
翻頁流
覽,按
添
加一
個
錄影任務,按
刪除選
定的任務,
按
刪除所有任
務。按 可
返回
前一介面。
40
在“錄影
管理” 介
面(圖39
)按
進入“時間錄影資訊
”介面(圖
40
),本介面是為
了添
加一個錄影
任
務,按
選擇
輸入
框,完成
錄影任務資訊的
填寫
後,
按 進入“錄影類
型選擇”(圖
41
),按 可
返回
前一介面。
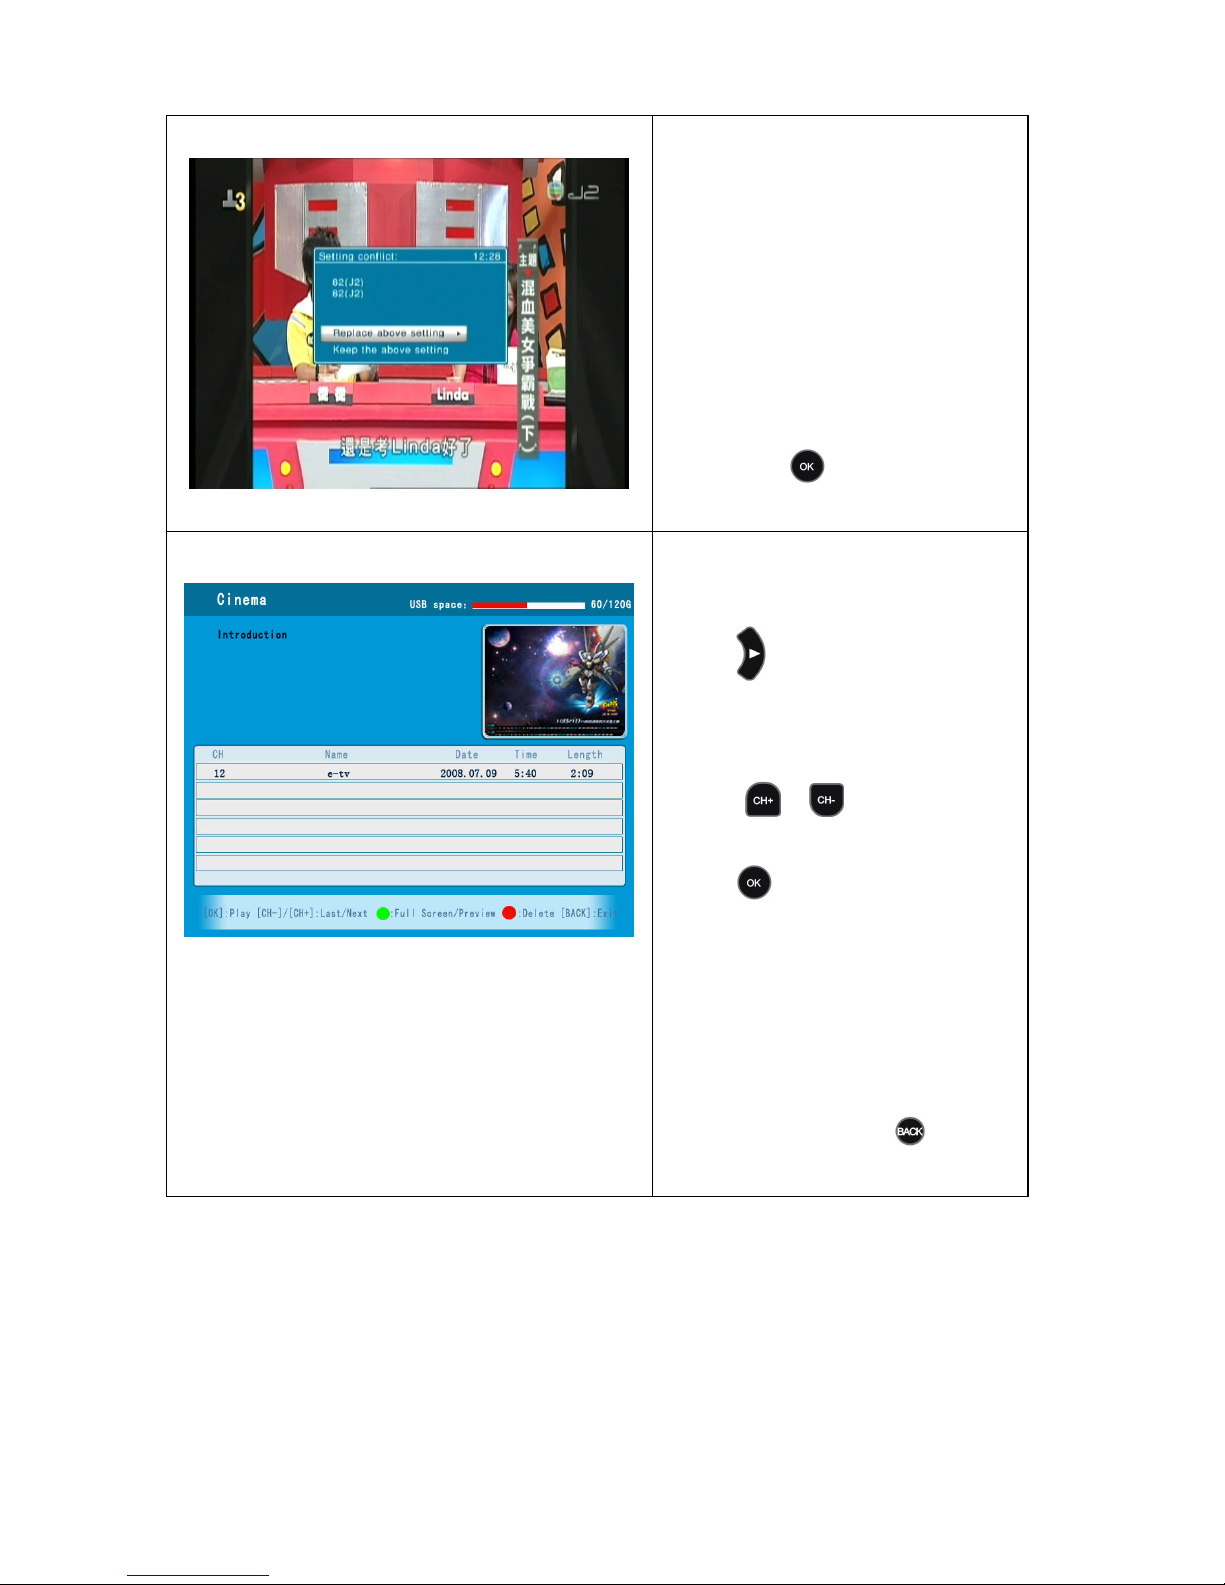
41
如圖41,可以
選擇某種
錄影類
型
按 進入下一
步操
作。1、“只
錄
影一次”,就是指按圖40
輸入的
錄影資訊只錄製一次,2、“每
天
錄影
”就是每
天按圖40
輸入的錄
影資訊錄製一次,適合錄製您
喜歡
的每天固定時段的節目,3、“每
星
期錄影”,就是指
每逢每星
期的
某日按圖
40
輸入的錄製資訊錄
製
一次,比
如每逢週
一到
週五
播放的
劇集,如果選擇該項就
會進入日期
Page 37
31
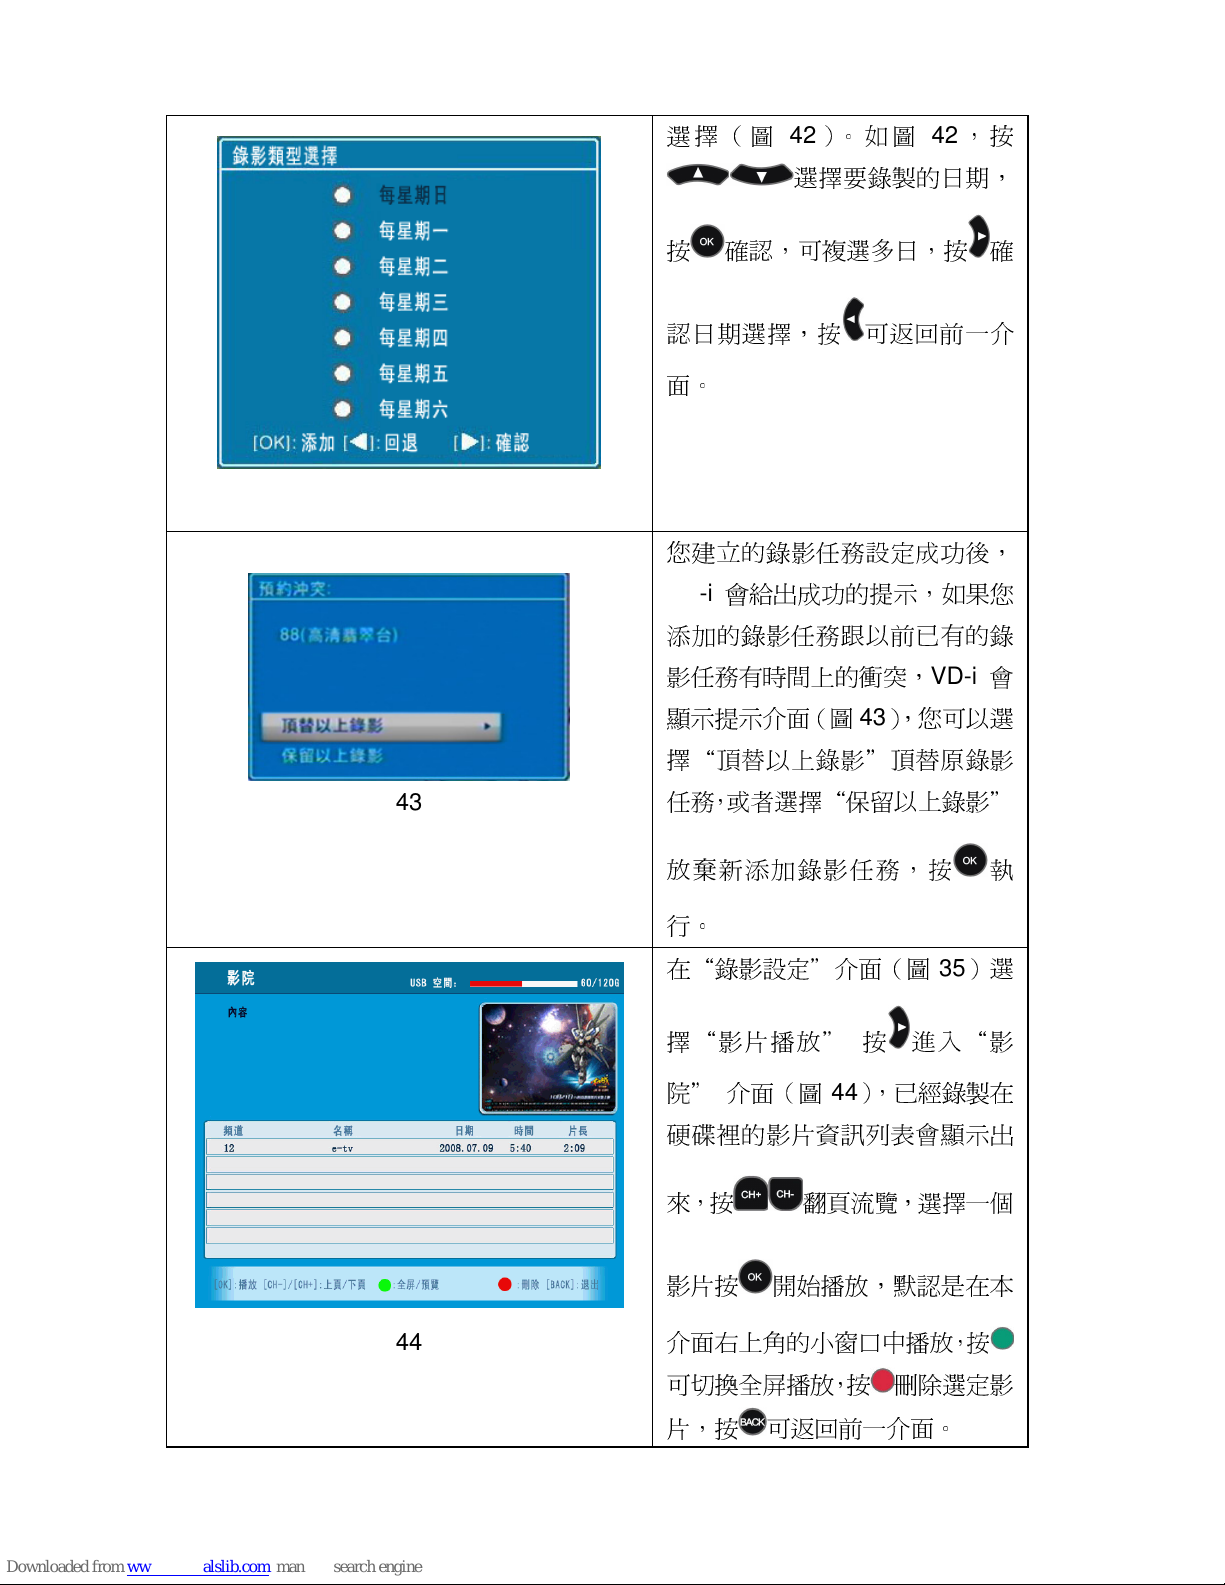
42
選擇(圖
42
)。
如圖
42
,按
選擇要錄製的日
期,
按
確認
,可複選多日,按
確
認日期選擇
,按 可
返回
前一
介
面。
43
您
建立
的錄影任務設定成功後,
VD-i會給出成
功的提示,
如果
您
添
加的錄影任務跟以前已有的錄
影任務有時間上的
衝突,VD-i
會
顯示提示介面(圖43
),您可以
選
擇“頂替以上
錄影
”頂替原
錄影
任
務,或
者選擇“保留以上
錄影
”
放棄新添加錄影任務,按
執
行。
44
在“錄影設定
”介
面(圖35)選
擇“影片
播放”
按 進入“影
院” 介
面(圖44
),已經錄製在
硬碟裡的影片資訊
列表
會顯示出
來
,按
翻頁流
覽,
選擇一個
影片按 開始播放,
默認
是在本
介面右上
角的小
窗口中
播放,按
可切換
全屏
播放,按
刪除選
定影
片
,按 可
返回
前一介面。
Page 38
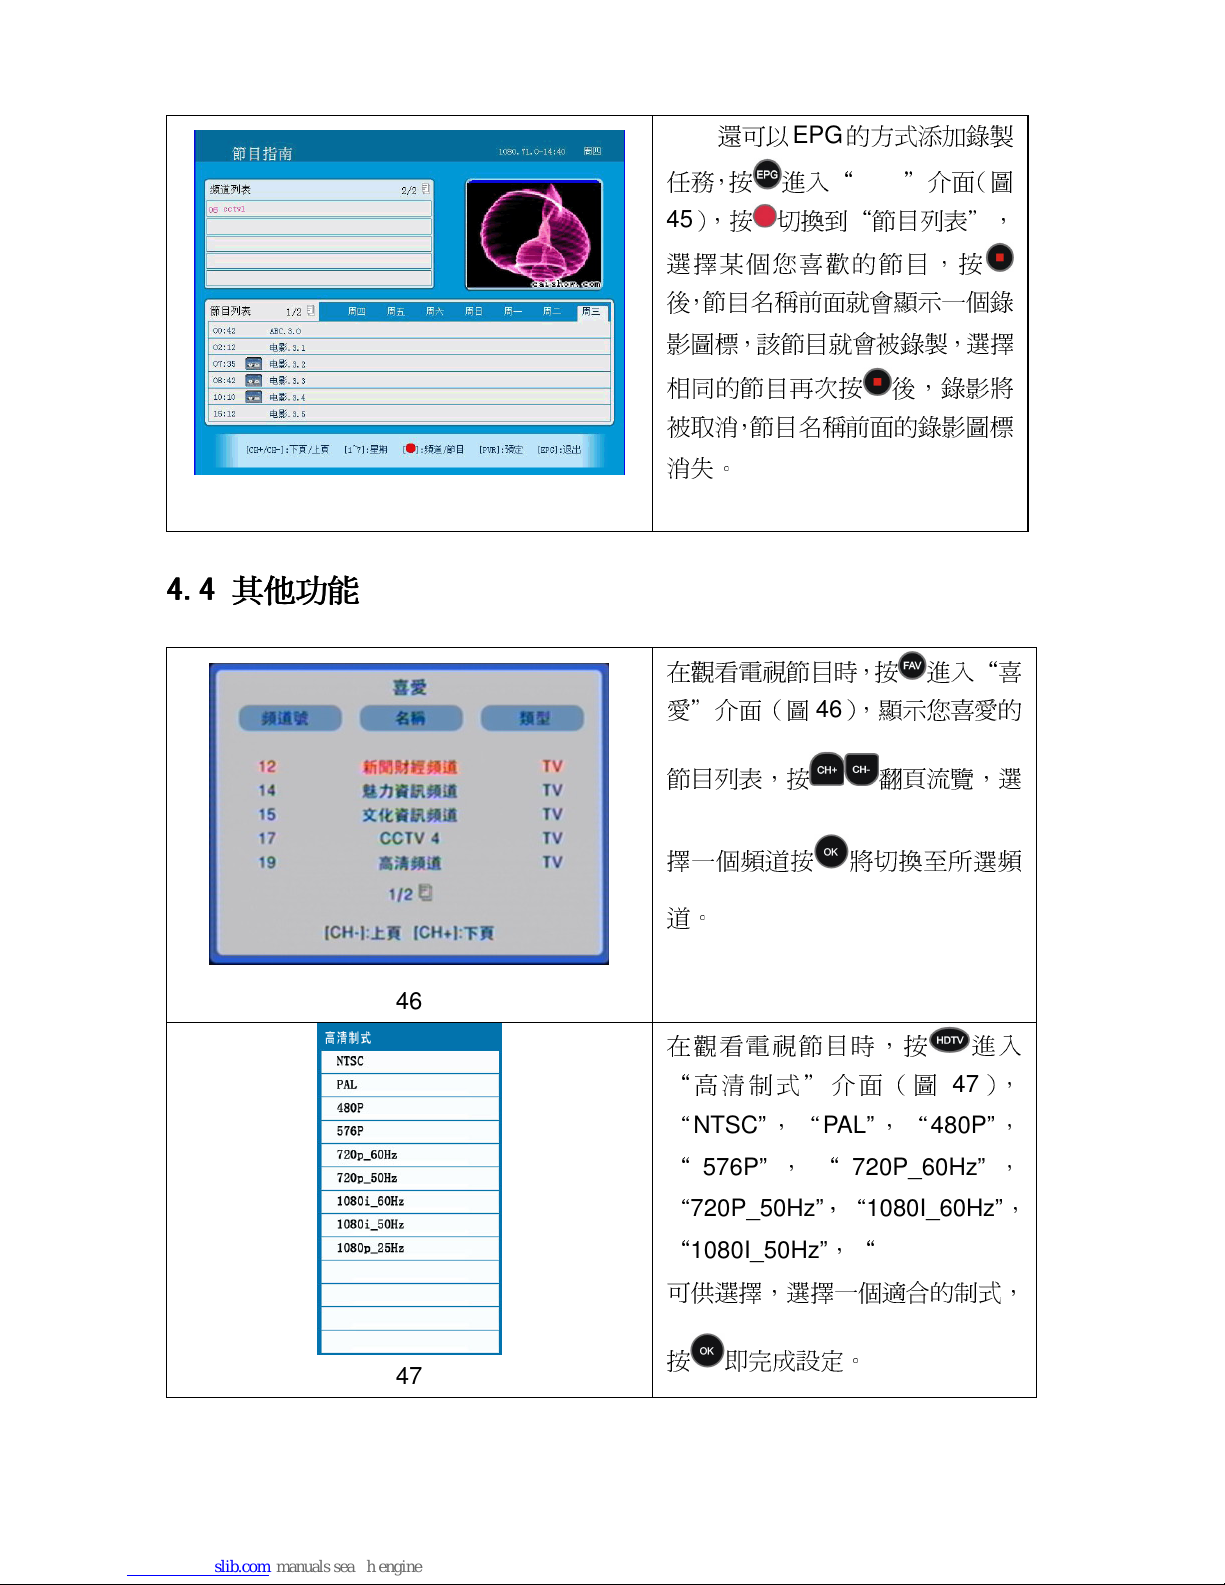
32
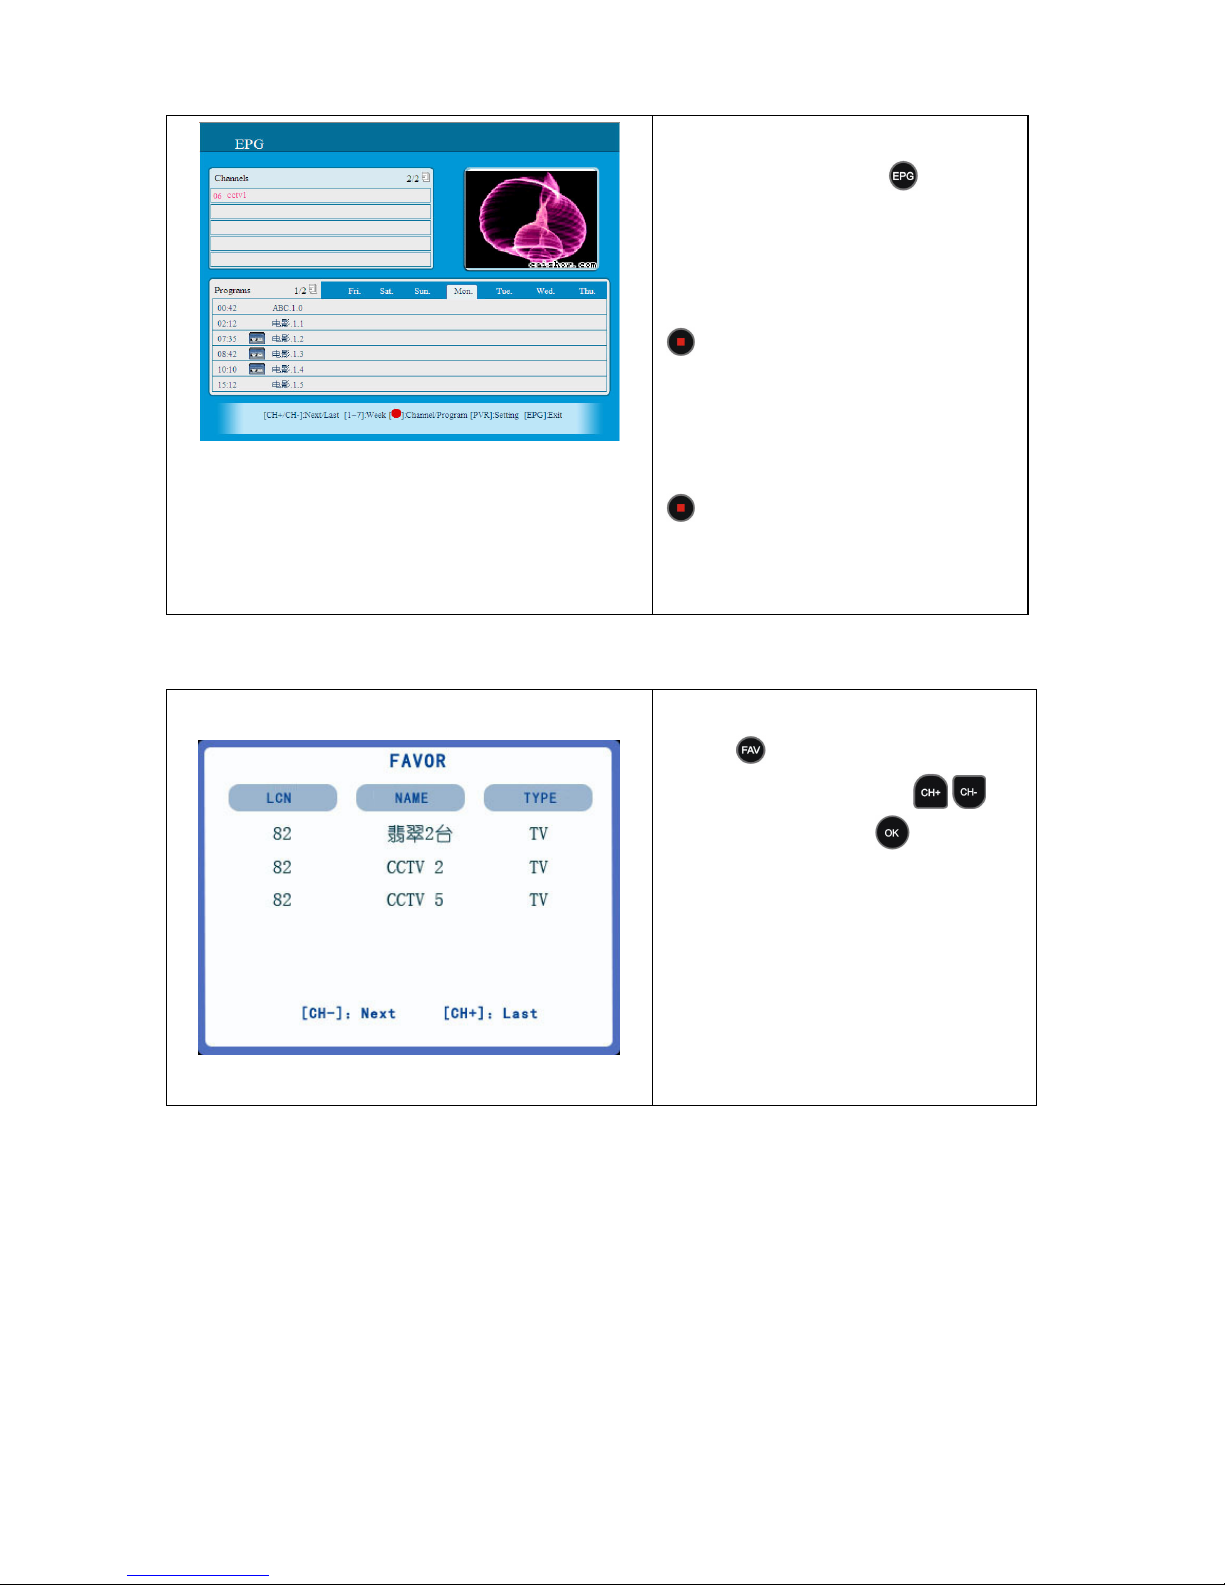
45
VD-I還可以
EPG的方式添
加錄
製
任
務,按 進入“EPG
”介面(圖
45
),按 切換到“節目
列表”
,
選擇某個您喜歡
的節目,按
後,節目名稱前面就會顯示一個錄
影圖標,該節目就會被錄製,
選擇
相
同的節目再次按 後,錄影
將
被取消,節目名稱前面的錄影圖標
消失。
4.4
4.44.4
4.4 其他功能
其他功能其他功能
其他功能
46
在觀看電視節目時,按 進入
“喜
愛”介
面(圖46
),顯示您
喜愛
的
節目
列表
,按
翻頁流
覽,
選
擇一個
頻道按
將
切換
至所選
頻
道。
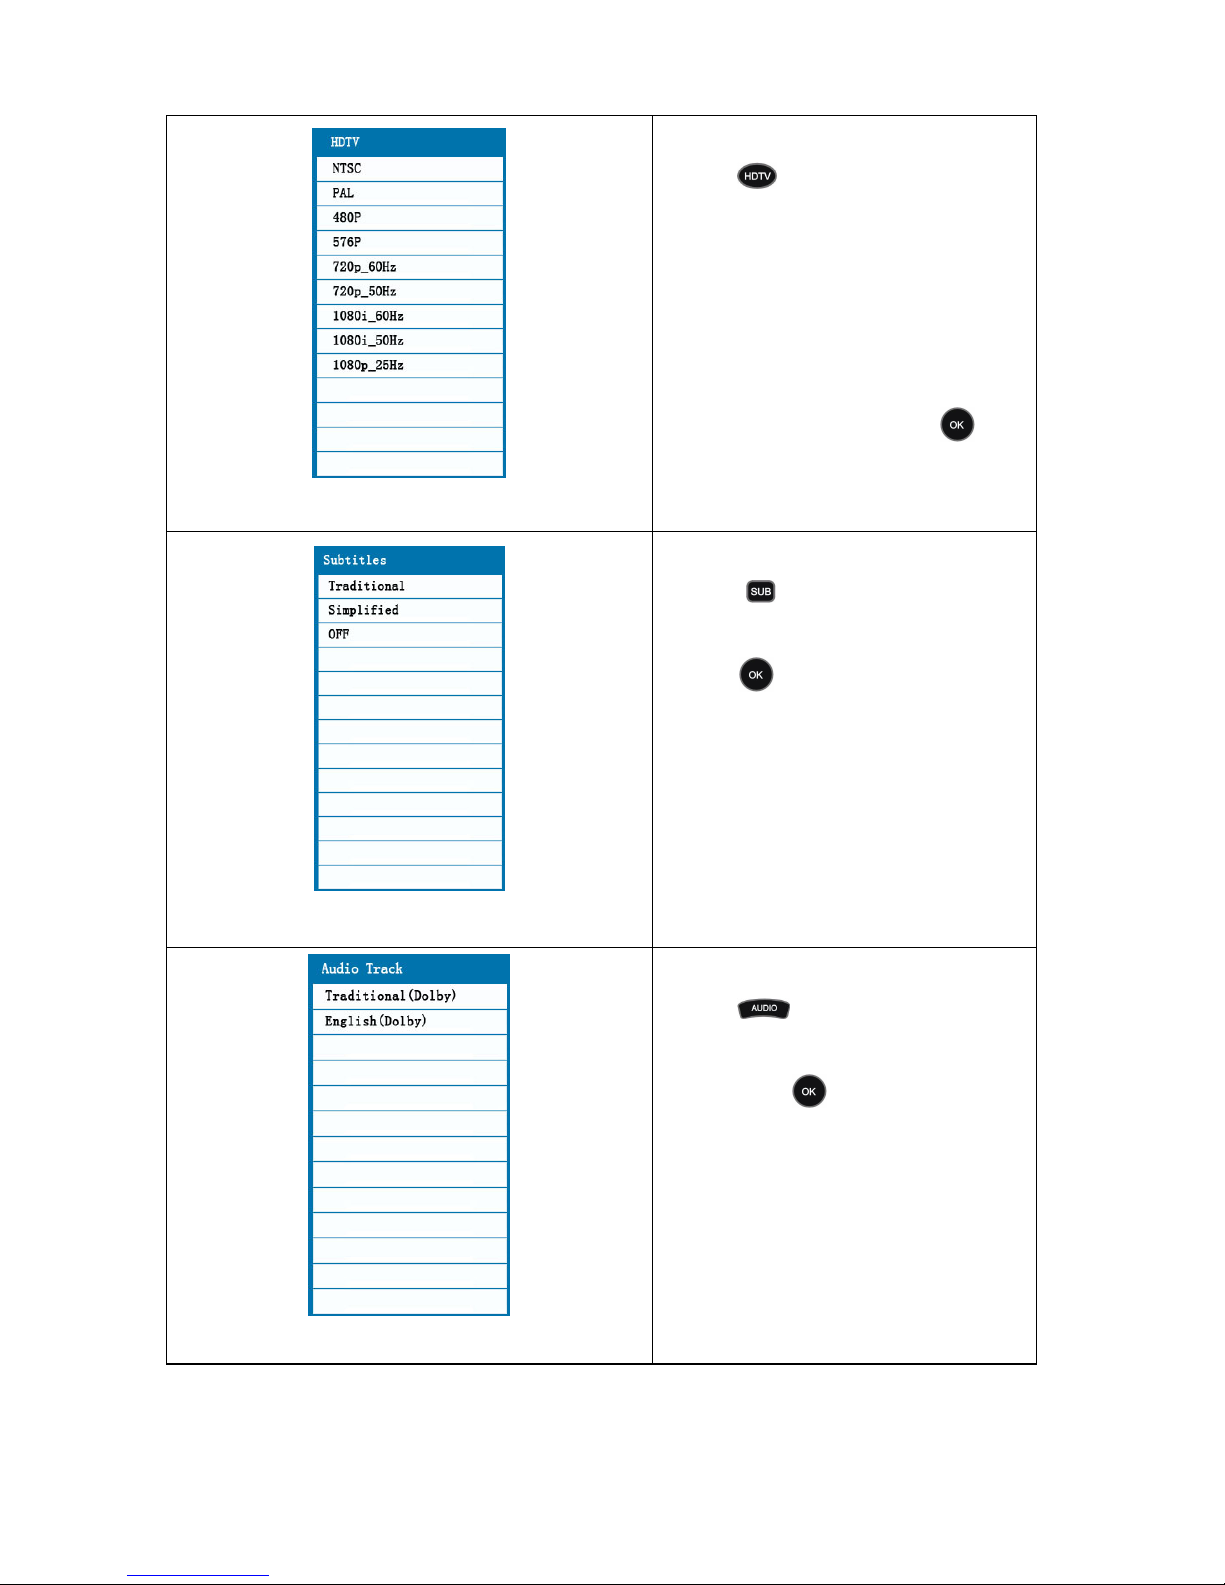
47
在觀看電視節目時,按 進入
“
高清制 式
”介
面(
圖
47
),
“
NTSC”,“
PAL”,“
480P”
,
“
576P”
,
“
720P_60Hz”
,
“
720P_50Hz”,“
1080I_60Hz”
,
“
1080I_50Hz”,“
1080P_25Hz”
可
供選擇,選擇一個
適合的制式,
按
即
完成
設定。
Page 39
33
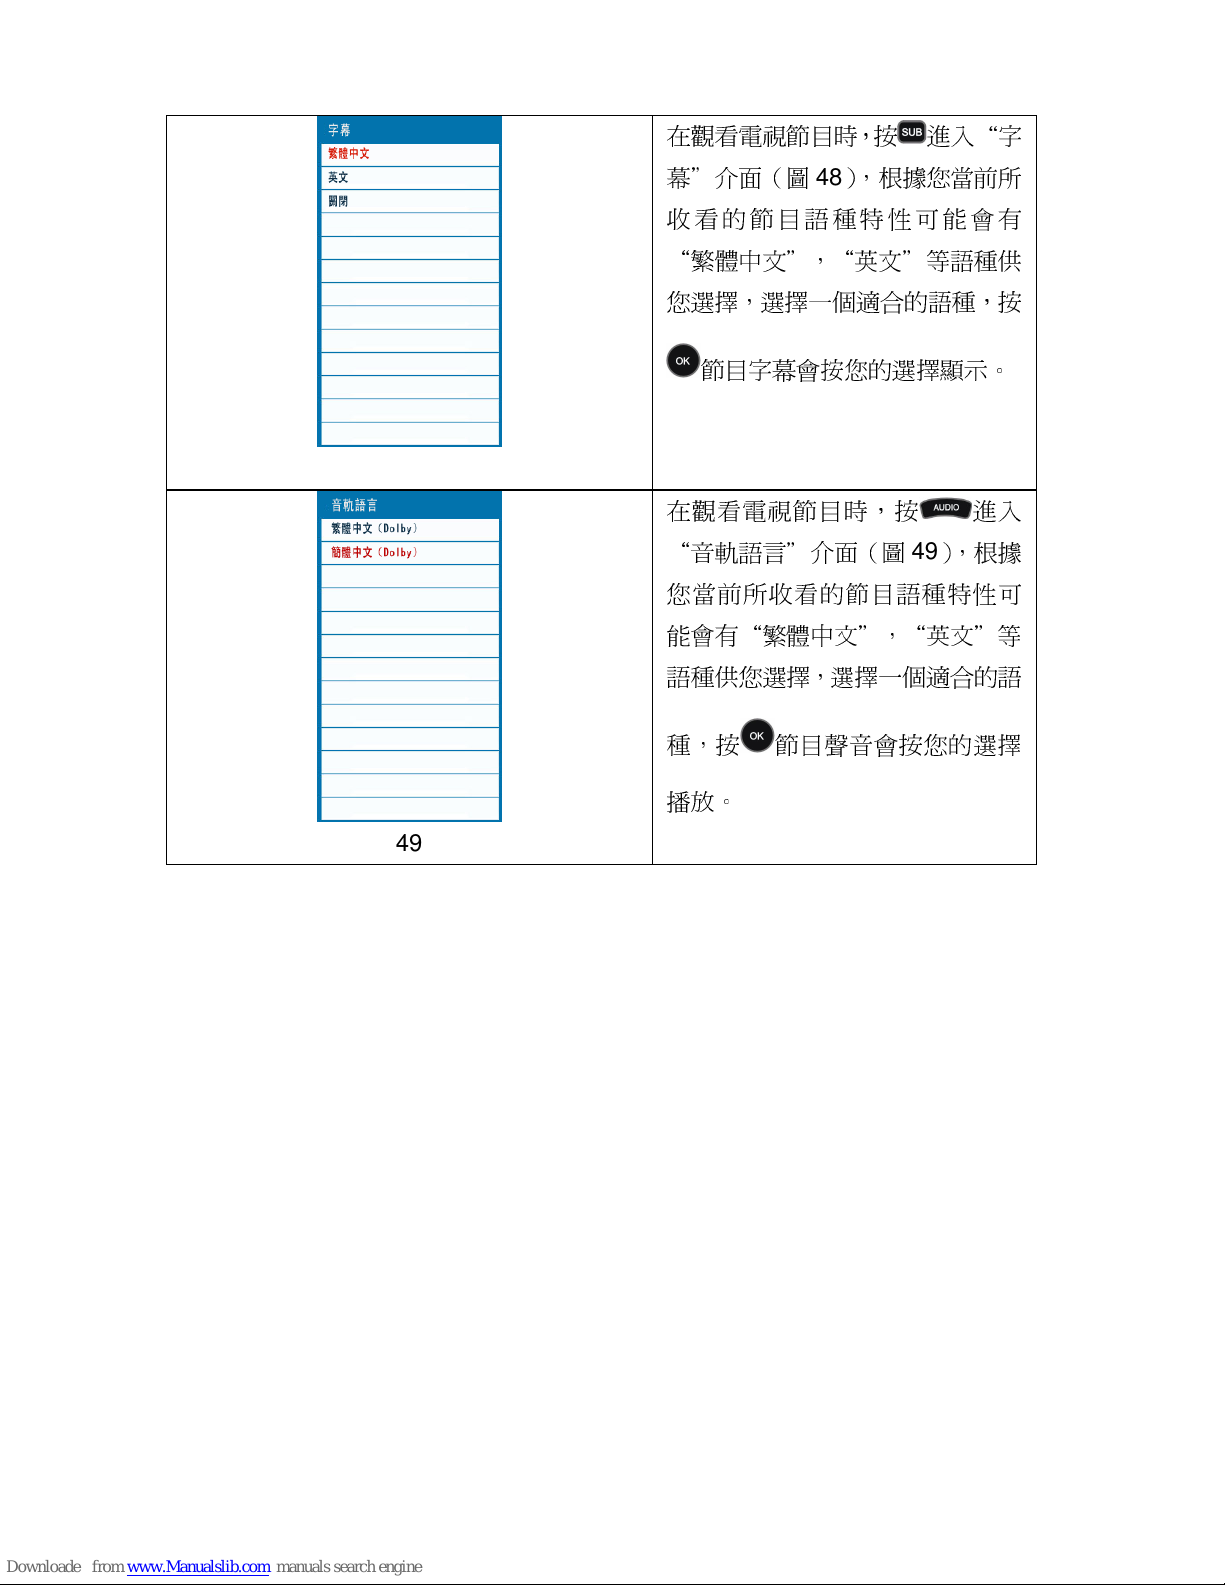
48
在觀看電視節目時,按 進入“字
幕
”介
面(圖48),根據您當前所
收看的節 目
語種
特性可能 會 有
“繁體中文”,“英文”等語種供
您
選擇,選擇一個
適合的
語種
,按
節目字幕會按您的
選擇
顯示。
49
在觀看電視節目時,按 進入
“音軌語言”介
面(圖49),根據
您當前所收看的節目
語種
特性可
能會有
“繁體中文”,“英文”等
語種供您選擇,選擇一個
適合的
語
種
,按 節目聲音會按您的
選擇
播放。
Page 40
34
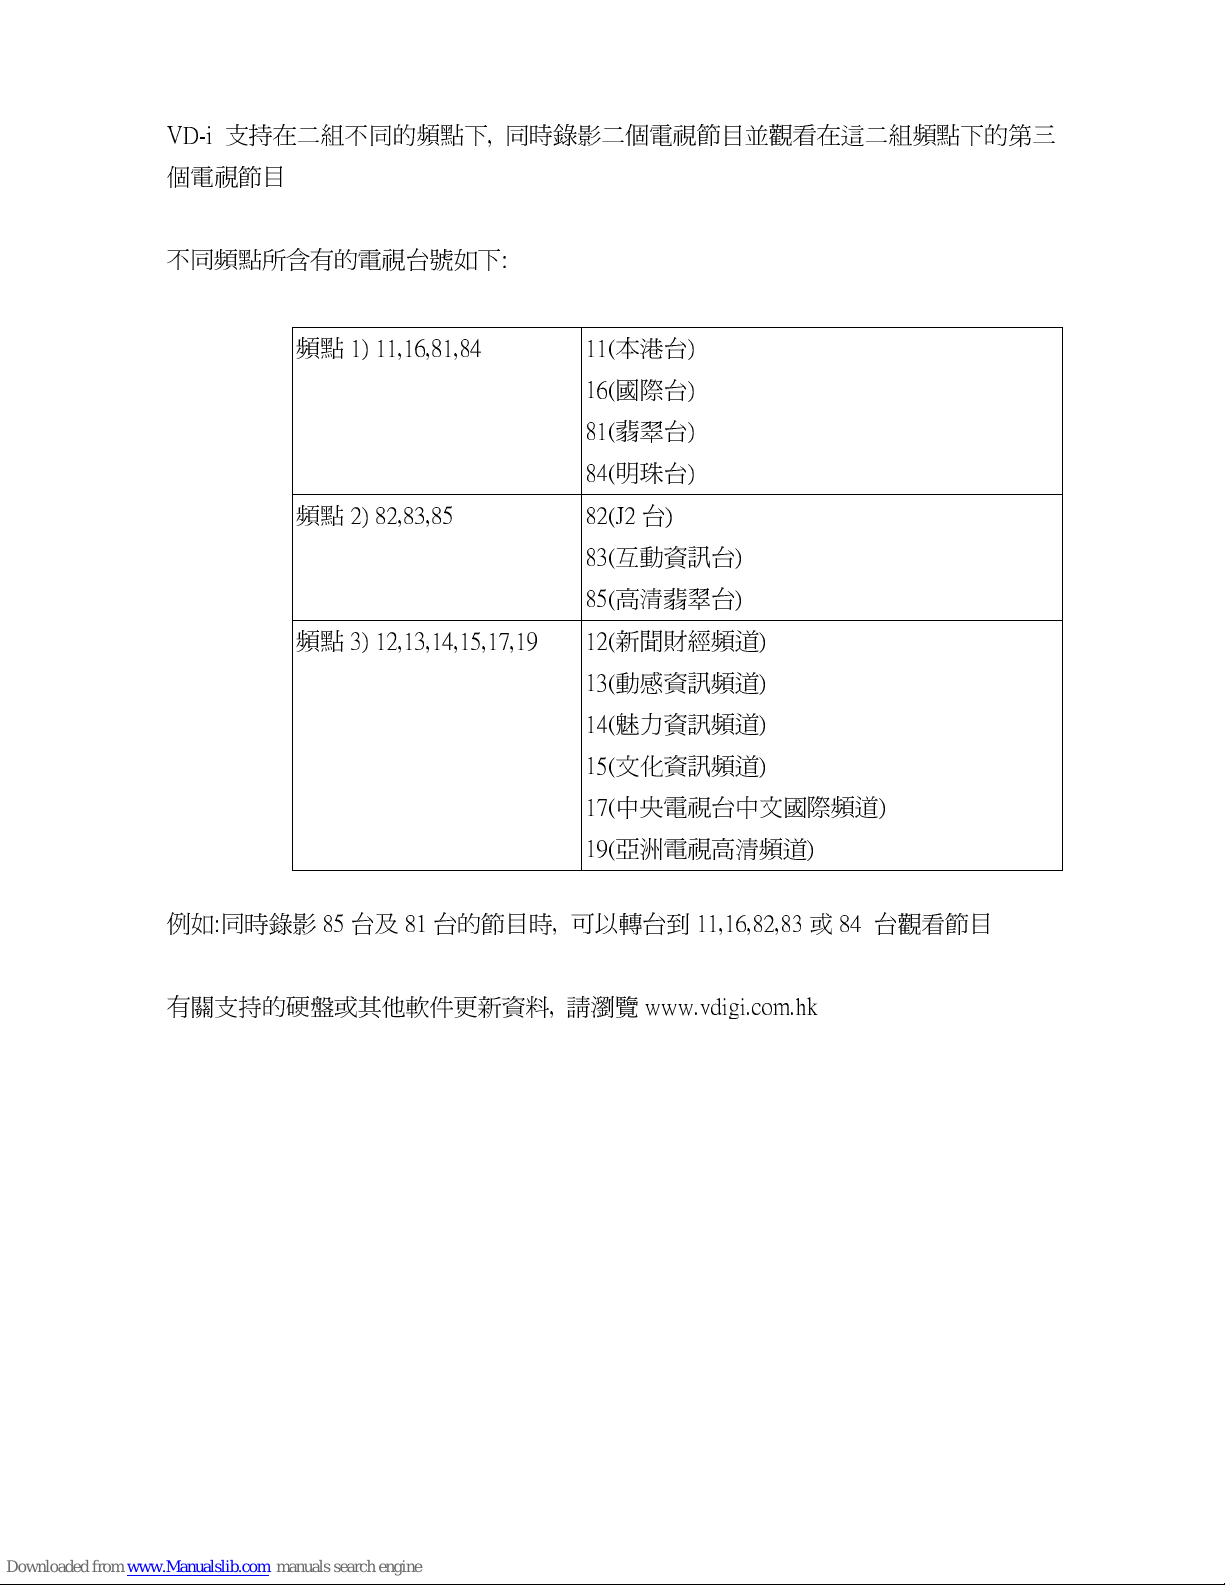
VD-i
支持在二組不同的頻
點下, 同時錄影二個電視節目並觀看在這二組頻
點下的第
三
個
電視節目
不
同頻
點所含
有的電視台號
如下
:
例如:同時錄影
85 台及81 台
的節目時,
可以
轉台到11,16,82,83或84 台觀看節目
有關支持的硬盤或其他軟件更新資料,
請瀏覽
www.vdigi.com.hk
頻點1) 11,16,81,84 11(本港台)
16(國際
台)
81(翡翠台)
84(明珠台)
頻點2) 82,83,85 82(J2 台)
83(
互動資訊
台)
85(
高清
翡翠台)
頻點3) 12,13,14,15,17,19 12(新聞財經頻道
)
13(
動感資訊頻道
)
14(魅力
資訊頻道
)
15(
文化
資訊頻道
)
17(中央
電視台中文國際
頻道
)
19(亞洲
電視高清頻道
)
Page 41
35
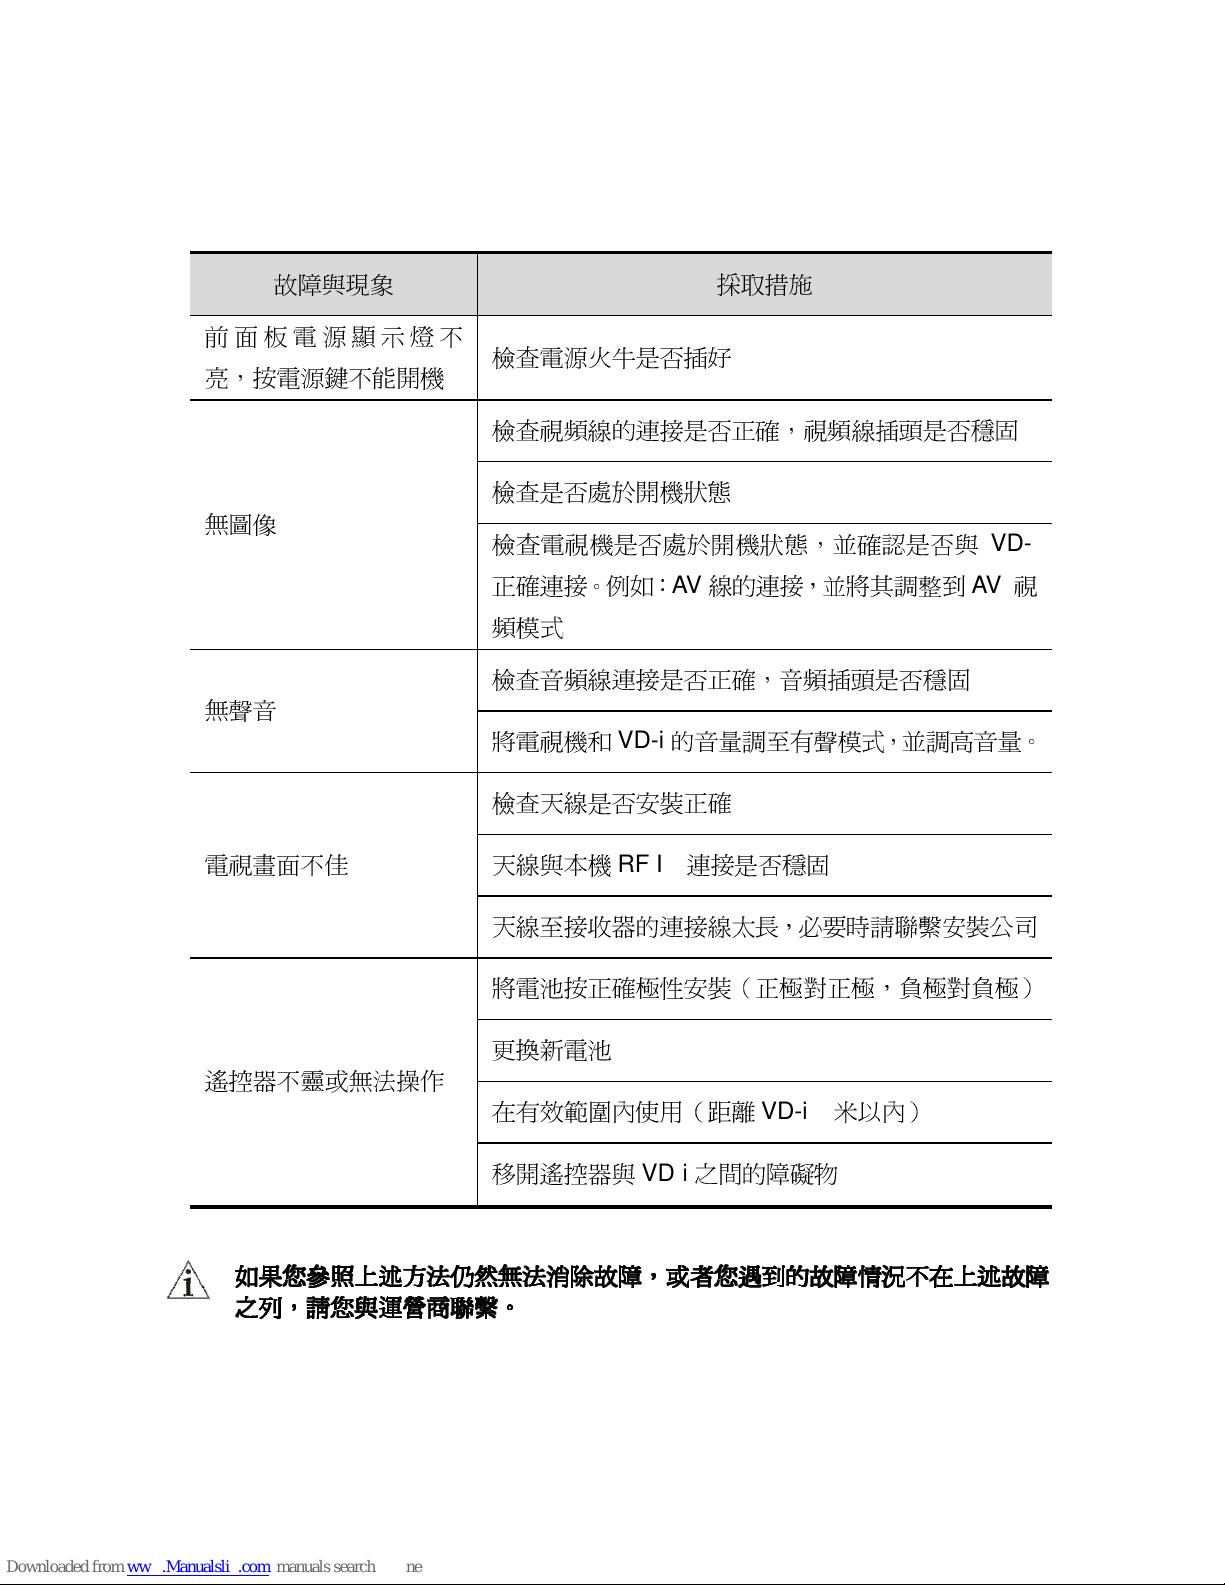
5555 故障排除
故障排除故障排除
故障排除
故障
與現象
採取措施
前 面 板 電 源 顯 示
燈 不
亮
,按電源鍵不能開機
檢查電源火牛是否插好
無圖像
檢查視頻線的連接是否正確
,視頻線插頭是
否穩固
檢查是否處
於開機狀態
檢查電視機是否處
於開機狀態,並
確認是否與VD-i
正確
連接。
例如:AV
線的連接,並將其
調整到AV
視
頻模式
無
聲音
檢查音頻線連接是否正確
,音頻插頭是
否穩固
將
電視機和
VD-i
的音量
調至
有聲模式,並調高音量。
電視畫面不佳
檢查天線是否安裝
正確
天線與本機
RF IN
連接是
否穩固
天線至接收器的連接線
太長,必要
時請
聯繫
安裝公司
遙控器不靈或無法操作
將
電池按
正確極性安裝(正極
對正極,
負極對負極
)
更換新電池
在有效範圍內使用(距離
VD-i 7
米以內)
移
開遙控器與VD-i之間的
障礙物
如果您參照上述方法仍然無法消除故障
如果您參照上述方法仍然無法消除故障如果您參照上述方法仍然無法消除故障
如果您參照上述方法仍然無法消除故障,,,,或者您遇到的故障情況不在上述故障
或者您遇到的故障情況不在上述故障或者您遇到的故障情況不在上述故障
或者您遇到的故障情況不在上述故障
之列
之列之列
之列,,,,請您與運營商聯繫
請您與運營商聯繫請您與運營商聯繫
請您與運營商聯繫。。。。
Page 42
36
Safety Warning
Safety WarningSafety Warning
Safety Warning
Please read the user manual before operation and pay attention to the following
items:
Make sure the Power adapter has been disconnected before cleaning
the receiver. Do not touch the power cord with wet hand. Use featherless
cloth mixed with less warm water to do the cleaning, no chemicals
containing, like benzene, alcohol, gasoline, etc.
When abnormal phenomenon occurs (smoking, abnormal sound, smell,
etc.), please stop using, cut off the power supply and pull out the Power
adapter immediately.
When thundering or lighting, please pull out the Power adapter
immediately.
Do not put heavy objects on the receiver and also avoid heavy collisions.
Placed the receiver horizontally in good ventilation environment. Avoid
objects like tablecloth covering all the vents.
Keep away from heat sources, e.g. fire, direct sunshine.
Keep away from strong magnetic field and electric field environment.
Manufactured under license from Dolby Laboratories. Dolby and the
double-D symbol are trademarks of Dolby Laboratories.
Page 43
37
6666 Product Overview
Product OverviewProduct Overview
Product Overview
Thank you for choosing products of Winning Perfect Ltd.
VD-i is an upgraded version of receiver/recorder which can support national
standard of territorial digital DMB-TH.
Software of VD-i can be upgraded via USB or Network to add more powerful
functions and enjoy high-quality after-sales service. For more information of
software upgrade and new features, please visit www.vdigi.com.hk.
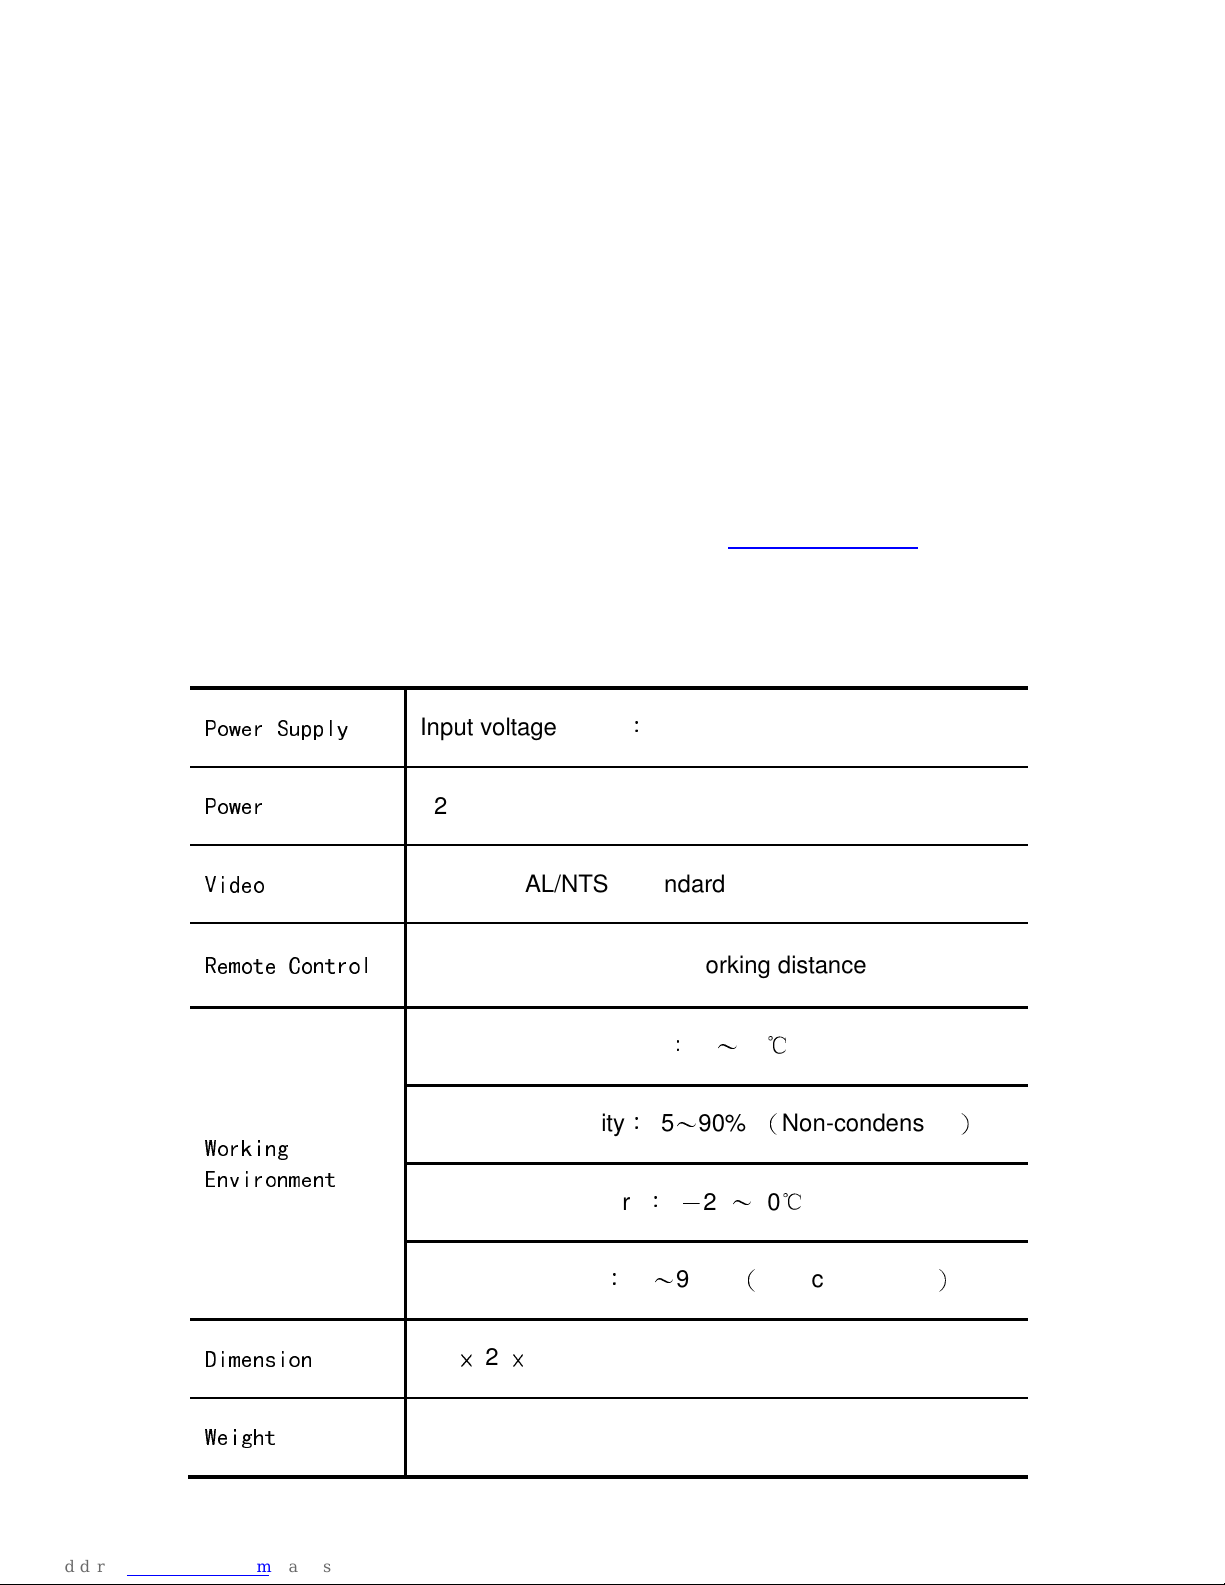
6.1
6.16.1
6.1 Product
Product Product
Product Specification
SpecificationSpecification
Specification
Power Supply
Input voltage range:100-240V AC
Power
<24W
Video
Support PAL/NTSC standard
Remote Control
Working range: ± 30 ° , working distance: 7 meters.
Working
Environment
Operation Temperature: 0~40℃
Operation Humidity: 5~90% (Non-condensing)
Storage Temperature: -20~70℃
Storage Humidity: 0~98% (Non-condensing)
Dimension
300×220×58 mm
Weight
1900g
Page 44
38
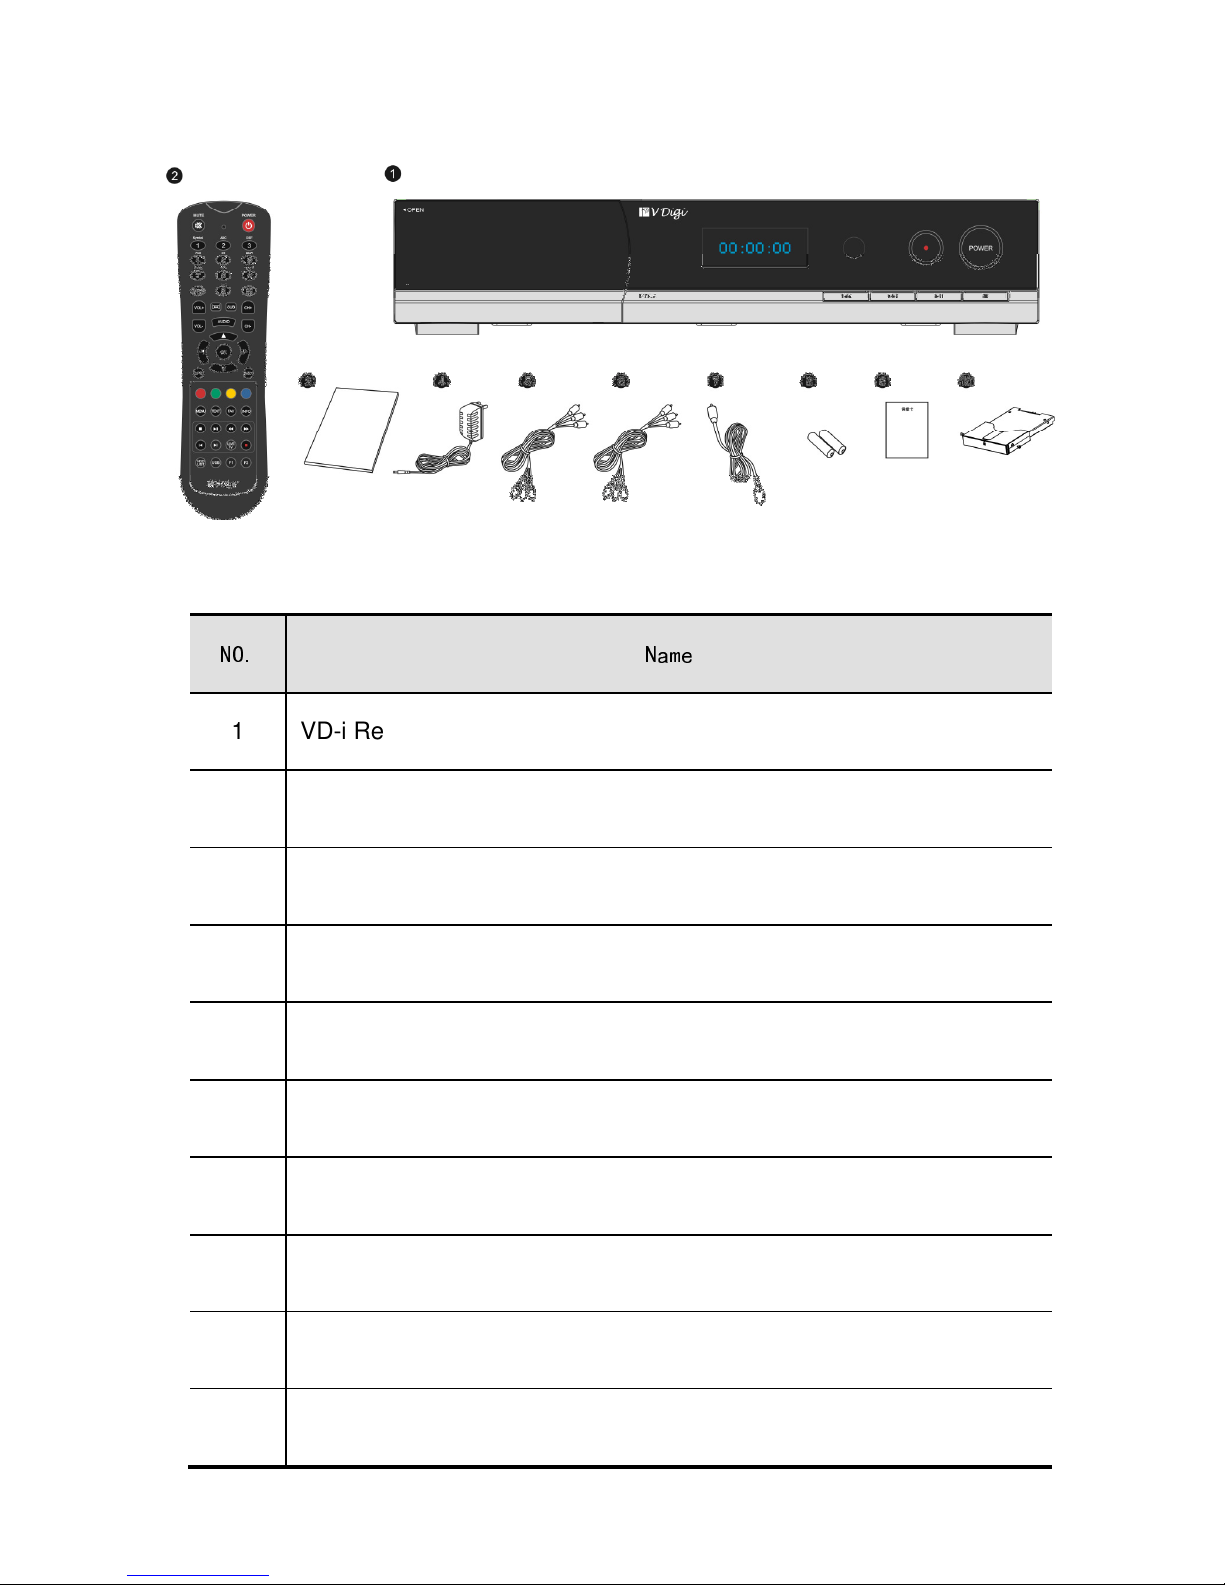
6.2
6.26.2
6.2 Package Information
Package InformationPackage Information
Package Information
NO.
Name
1 VD-i Receiver
2 Remote Control
3 User Manual
4 100V-240VAC Power Adapter
5 AV Cable
6 Component video Cable
7 RF antenna extension cable
8 AAA Battery X 2
9 Warranty Card
10 Hard disk plastic case and two backup screws (installed in receiver)
Page 45
39
7777 Configuration Introduction
Configuration IntroductionConfiguration Introduction
Configuration Introduction
7.1
7.17.1
7.1 Front Panel
Front PanelFront Panel
Front Panel
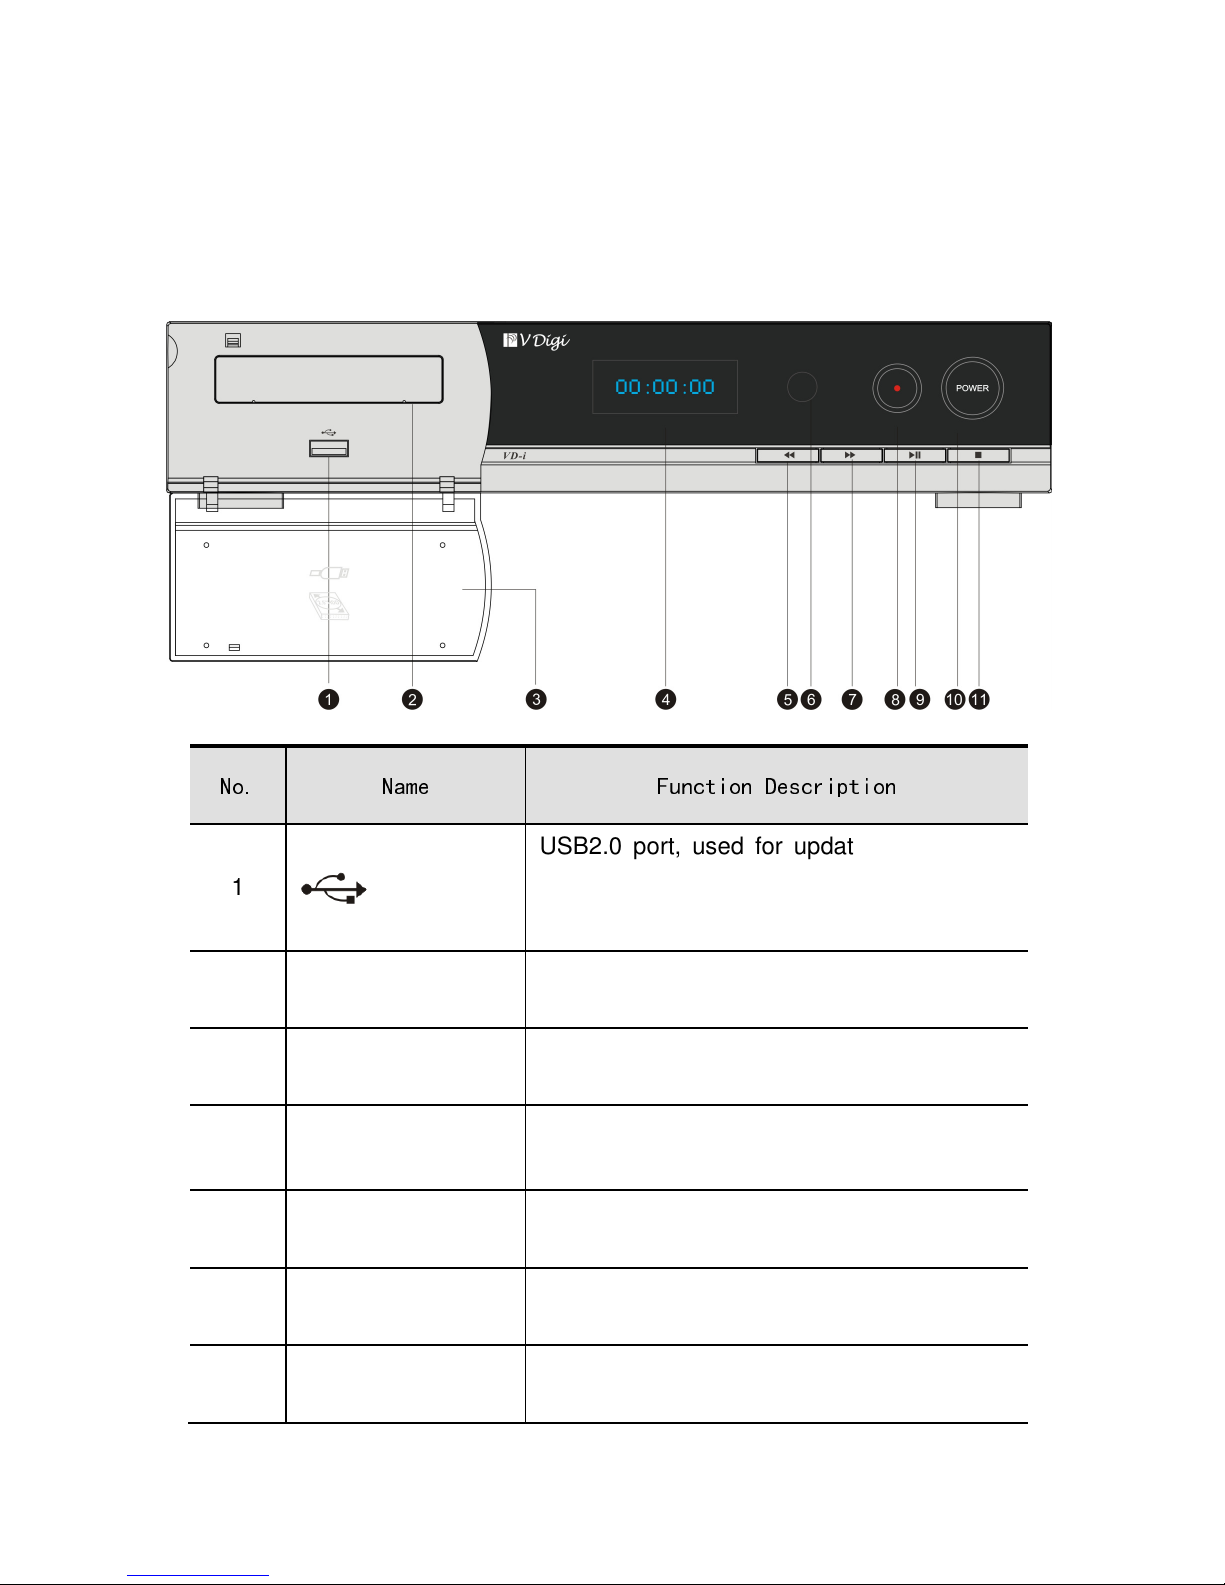
No. Name Function Description
1
USB2.0 port, used for updating receiver or
adding external USB hard disk or other USB
memory
2 Hard Disk slot Insert/remove 2.5” SATA 1 hard disk
3
Cover Open/Close to mount hard disk or USB
4
LED screen
Show time (in standby)/ channel information
/ recording or playing time
5 REW
Fast backwards
6 IR Remote control signal receiver
7 FF Fast forwards
Page 46
40
8 Record
When “Record” key is pressed once,
receiver will record program until “stop”
key is press. If “Record” key is pressed
twice, recording will stop after 30 minutes. If
the key is press three times, recording will
stop after 60 minutes, and so on. The
maximal recording time is 180 minutes.
9 Play / Pause Play/Pause recorded program
10 POWER Power key, turn on/off (standby) the receiver
11 Stop Stop recording program
Page 47
41
7.2
7.27.2
7.2 Rear Panel
Rear PanelRear Panel
Rear Panel
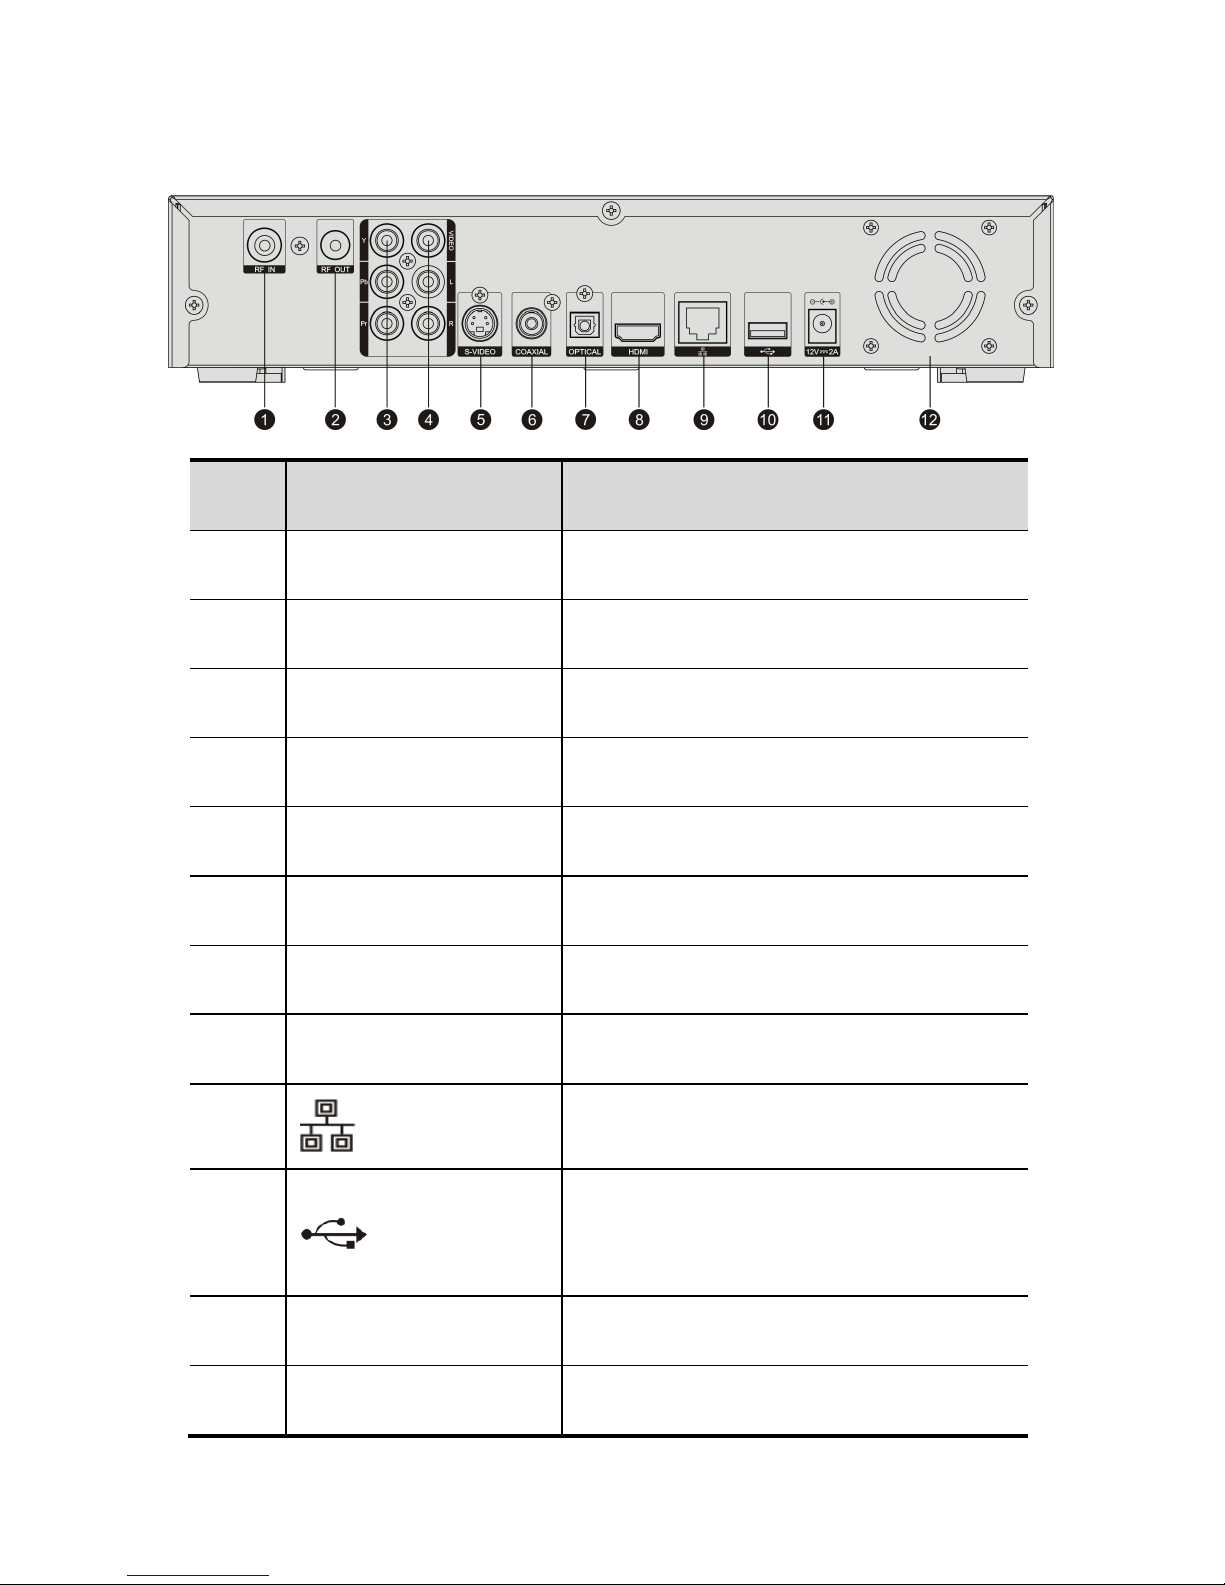
NO. Name Description
1 RF IN DMB-TH Antenna input
2 RF OUT DMB-TH Antenna bypass output
3 YPbPr Component video output
4 Video/ L/ R Composite video and stereo audio output
5 S-VIDEO S-VIDEO output
6 COAXIAL Coaxial digital audio output,
7 OPTICAL Optical digital audio output
8 HDMI HDMI video output
9
10/100M Base-T network port, may be
used for upgrading receiver via network
10
USB2.0 port, used for updating receiver
or adding external USB hard disk or other
USB memory
11 12V DC IN Power supply input
12 Fan Ventilation
Page 48
42
7.3
7.37.3
7.3 Remote Control
Remote ControlRemote Control
Remote Control
Page 49
43
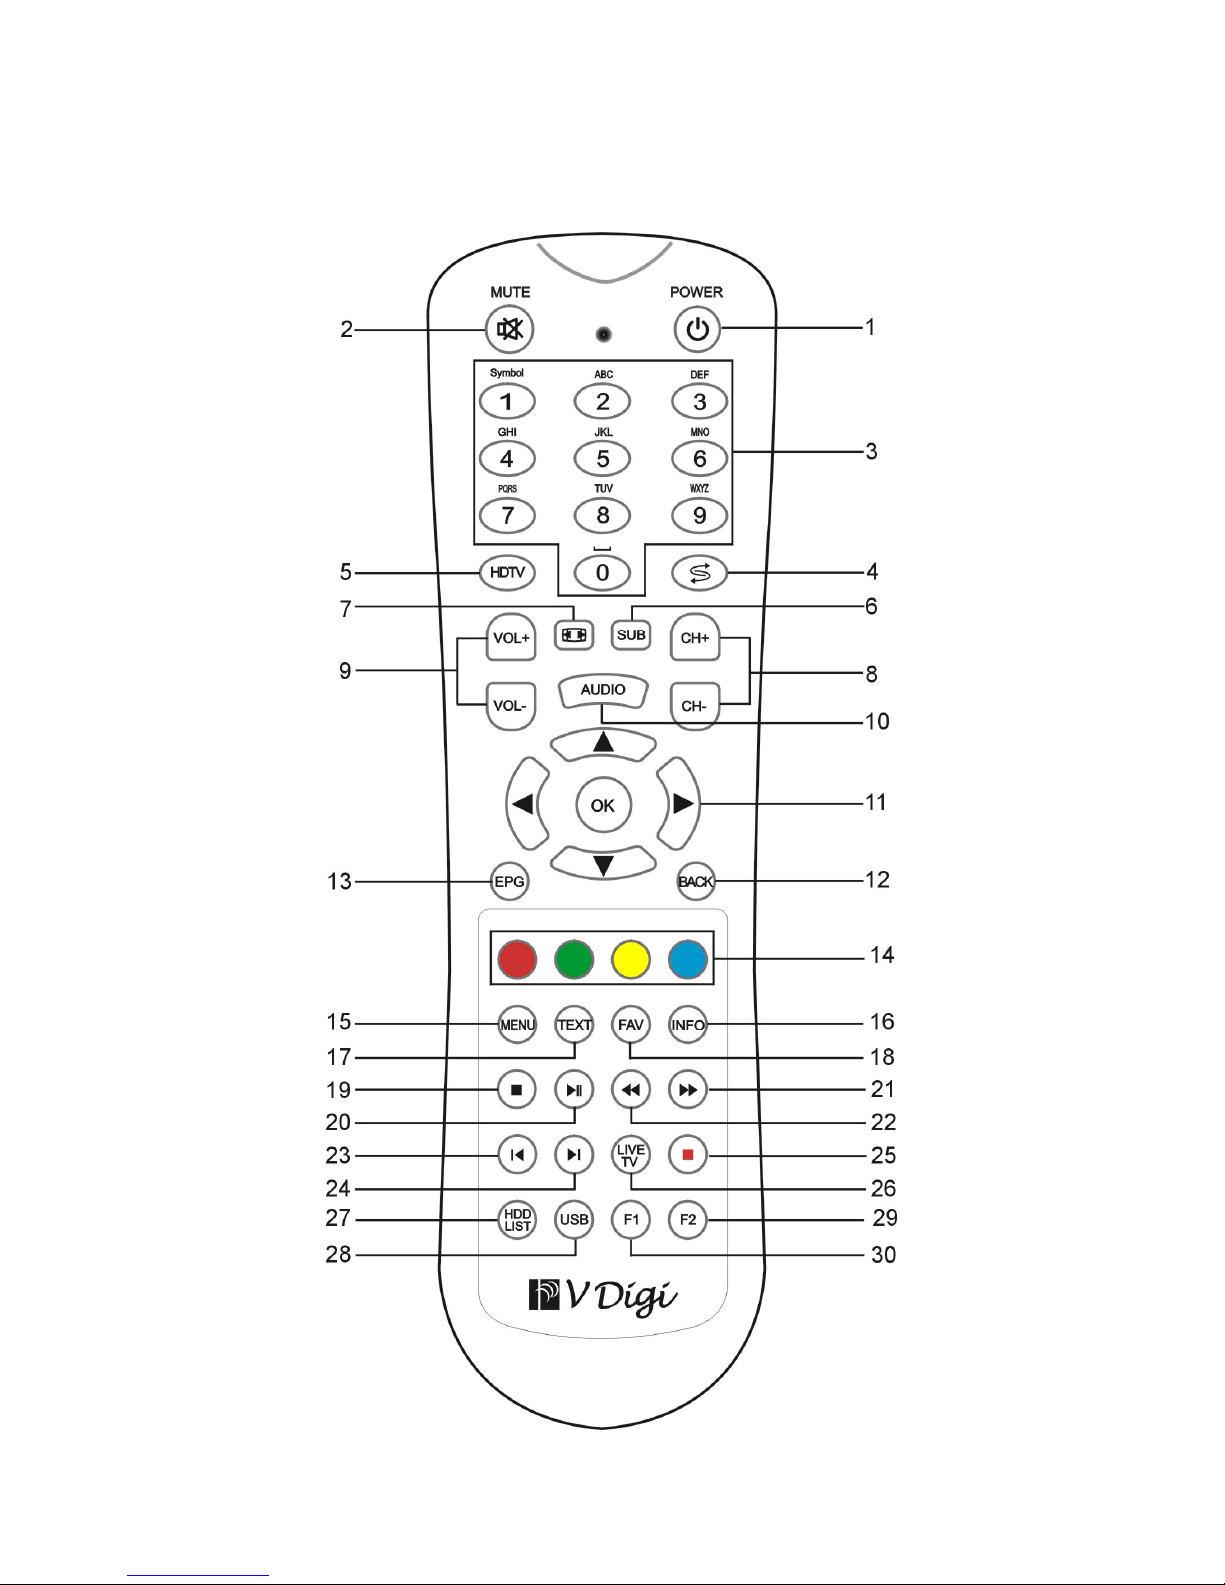
No. Key Function Description
1 POWER Switch between working and standby status
2 MUTE Turn on/off audio
3 Digit Key (0-9) Press to select channel
4
Switch to the last channel
5 HDTV Select HDTV standard
6 SUB Select language of subtitle
7 ASPECT Adjust image display proportion
8
CH+/-
Change channel
9
VOL+/-
Change sound volume
10 AUDIO Select audio output
11 Direction/OK Key Navigate on menu/confirm selection
12 BACK Back to the previous page
13 EPG Show electronic program guide
14 Color Keys
Please use these keys according to indication in
menu displaying on TV screen.
15 MENU Show main Menu
16 INFO Show channel program information
17 TEXT
Key for MHEG-5 features, please use the key
according to indication in menu displaying on TV
screen.
18 FAV Select favorite channel
19 Stop Stop program
20 Play/Pause Play/pause program
21 FF Fast forward
Page 50
44
22 REW Fast backward
23 Skip backwards Skip program backwards 5 minutes
24 Skip forwards Skip program forwards 5 minutes
25 Video recording Enter program recording set menu
26 LIVE TV
Enter/exit from Time Shifting mode, operate with
play/pause/REW/FF keys
27 HDD LIST
Show information of program saved on internal hard
disk
28 USB
Show information of program saved on USB
memory
29 F2
Reserved for future features, please use the key
according to indication in menu displaying on TV
screen.
30 F1
Reserved for future features, please use the key
according to indication in menu displaying on TV
screen.
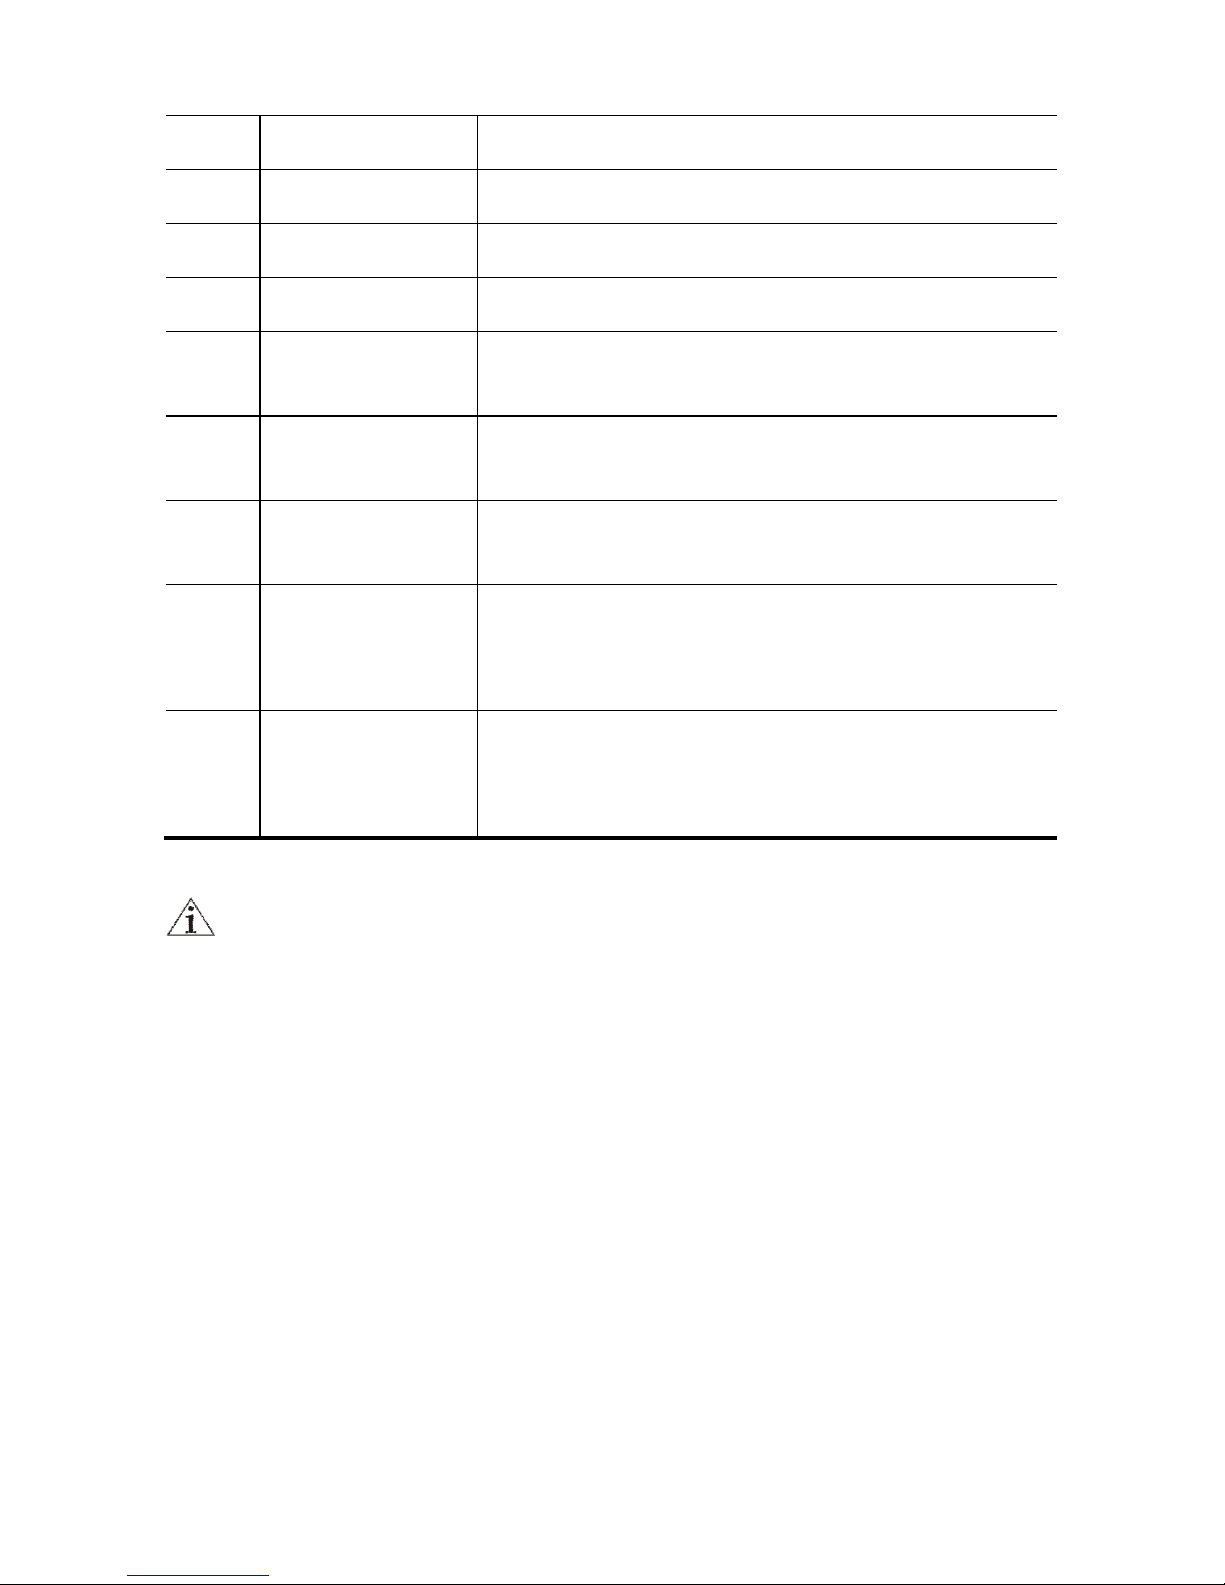
Functions of some key(s) depend on the services provide by the
operators. If there is no response when you press the key(s), please
contact the service provider for more information.
Page 51
45
8888 Receiver I
Receiver IReceiver I
Receiver Installation
nstallationnstallation
nstallation
8.1
8.18.1
8.1 Power
Power Power
Power CCCConnection
onnectiononnection
onnection
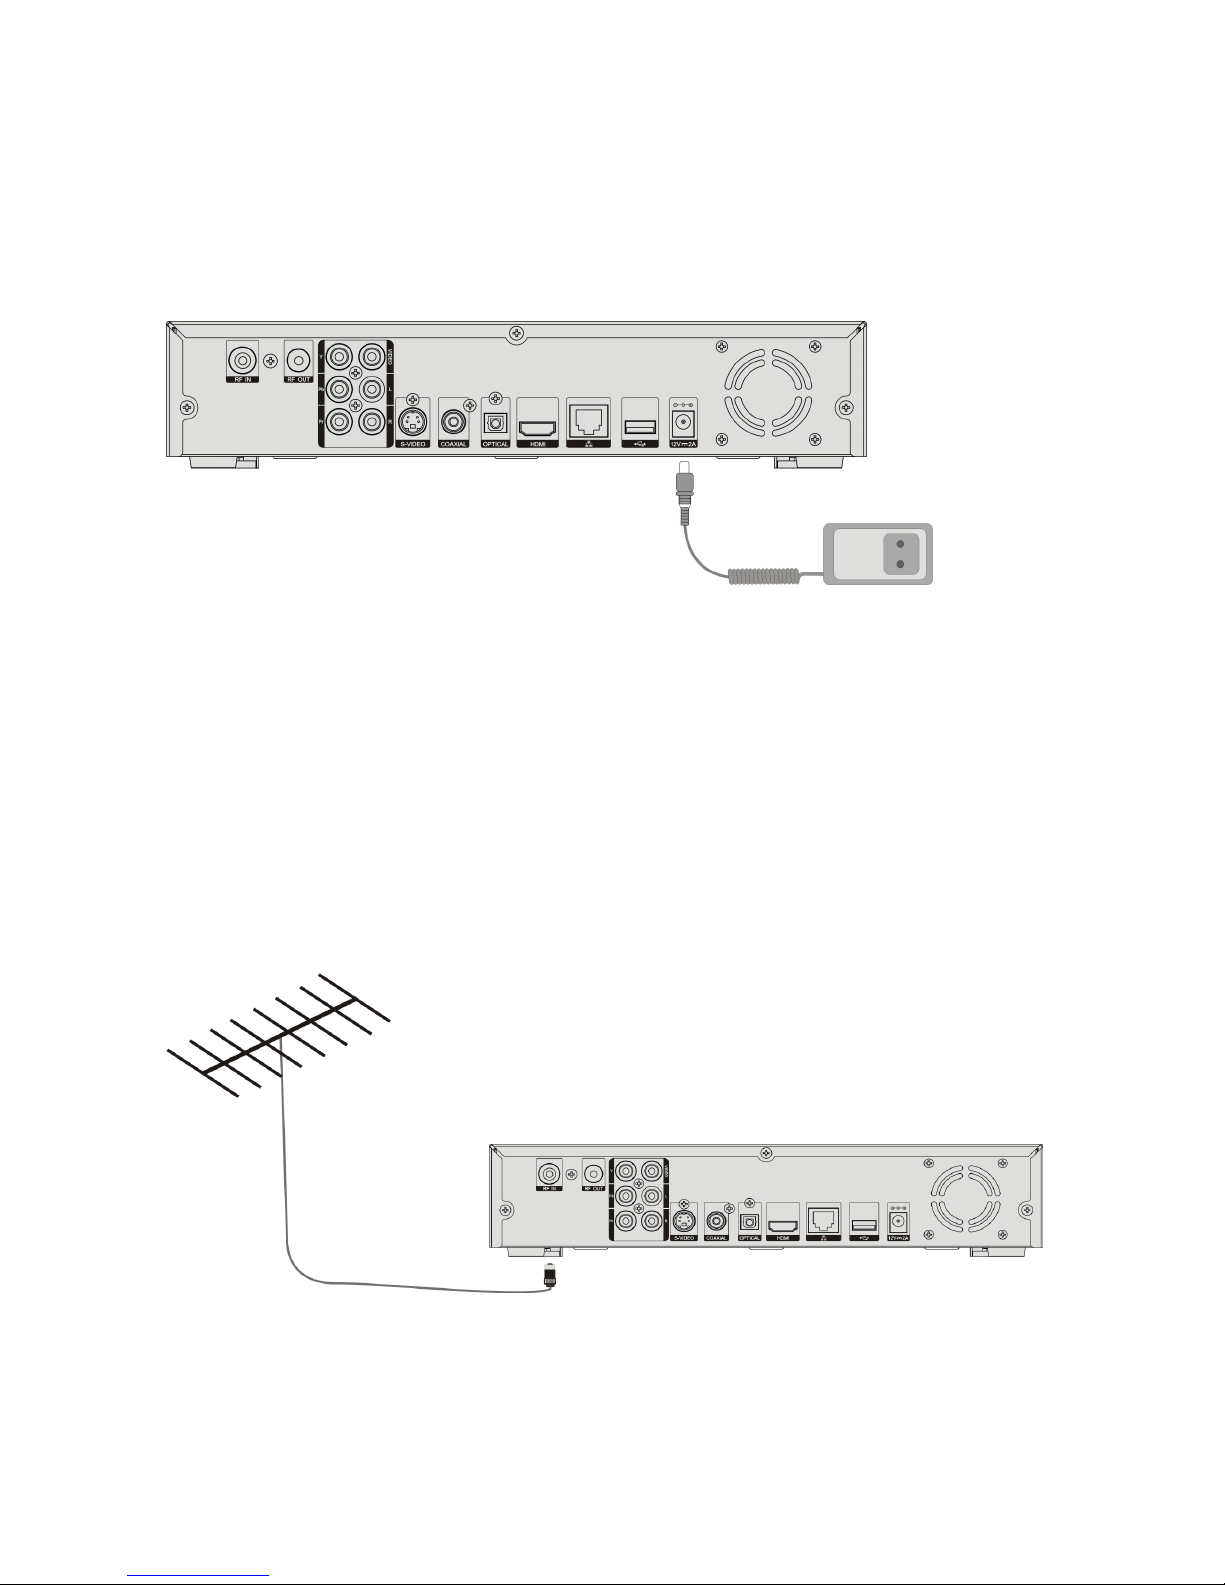
Plug the pin head of the Power adapter into power supply socket, then the other
end the receiver, do not connect power before other connections are completed.
8.2
8.28.2
8.2 AAAAntenna
ntennantenna
ntenna Connection
ConnectionConnection
Connection
For good video/audio quality, please use the public antenna installed of your
building if available, simply insert the plug to receiver’s PF IN port.
Page 52
46
8.3
8.38.3
8.3 AAAAntenna
ntennantenna
ntenna Bypass Out
Bypass OutBypass Out
Bypass Output Connectio
put Connectioput Connectio
put Connectionnnn
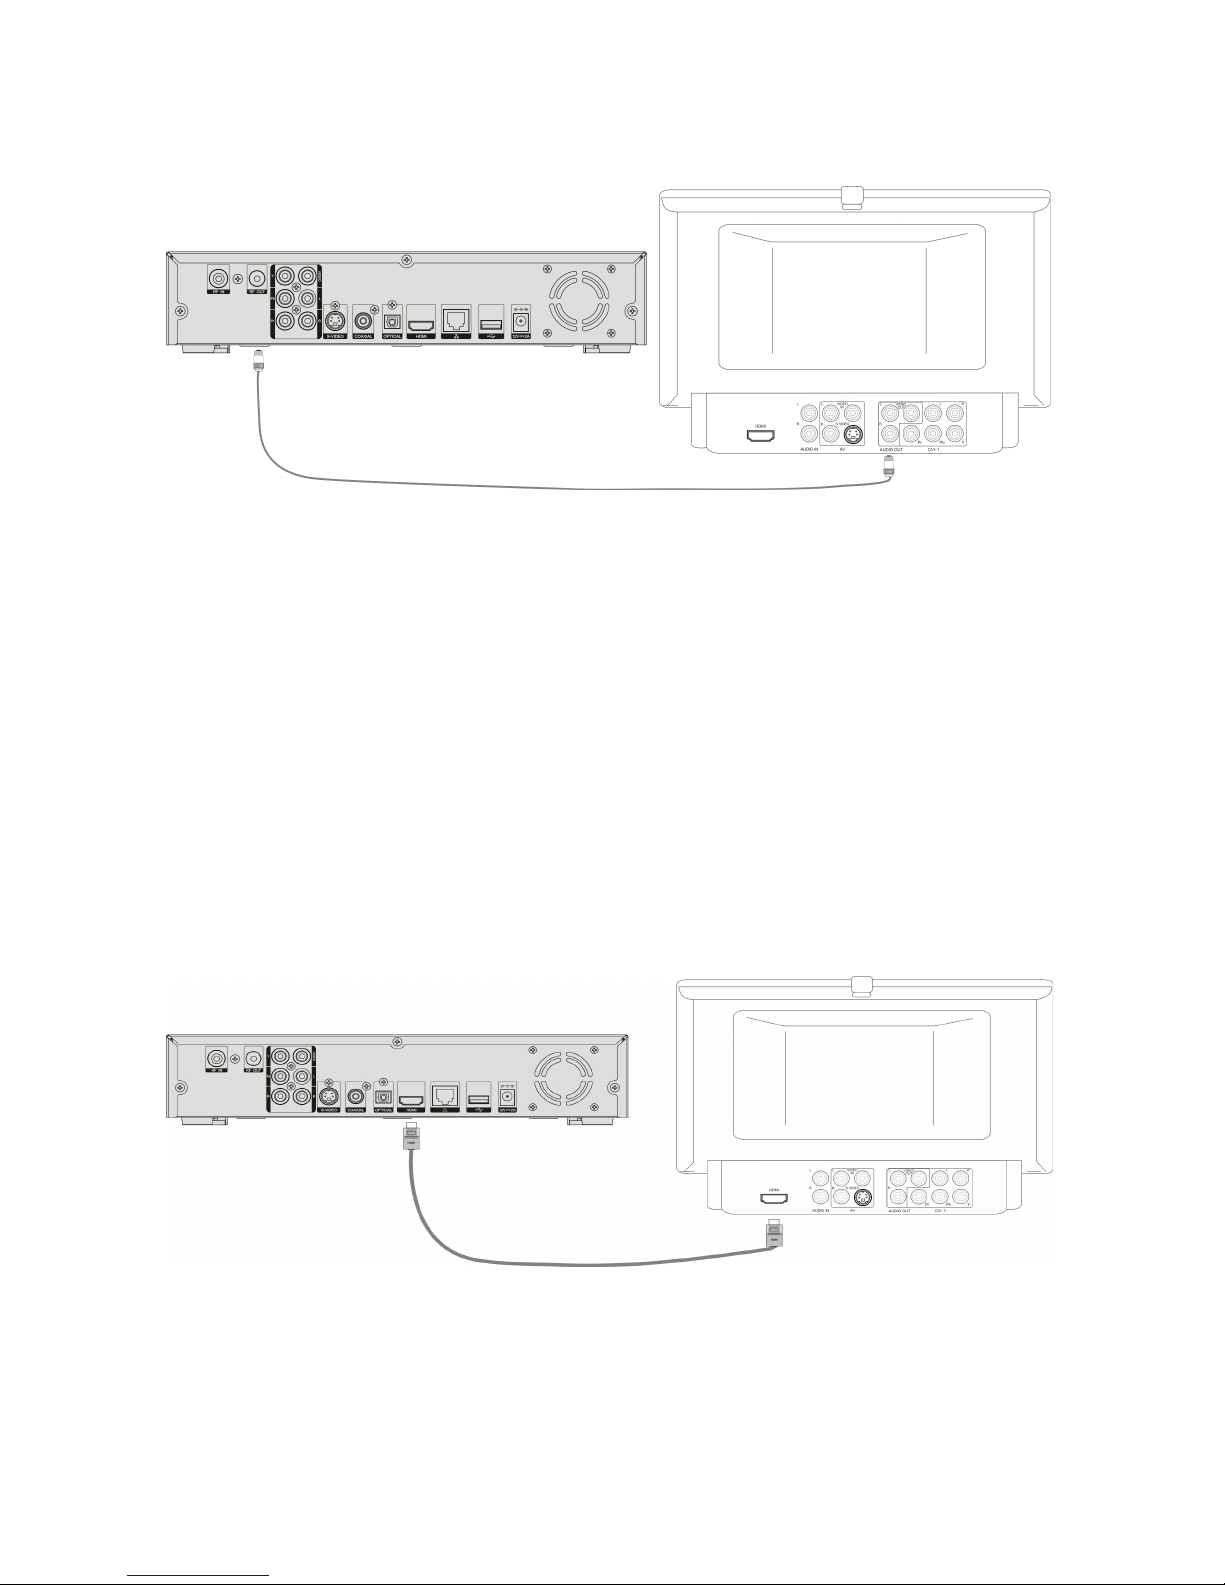
Support antenna bypass output. Connected VD-i PF OUT with RF IN port of
your own TV or other equipment, you can watch program while reserve the function
of an analog TV.
8.4
8.48.4
8.4 Connect
ConnectConnect
Connection
ionion
ion with H
with Hwith H
with HDDDD TV
TVTV
TV -------- HDMI
HDMIHDMI
HDMI(video
(video(video
(video &&&& audio)
audio)audio)
audio)
VD-i supports high definition output, use HDMI cable (including video & audio)
connect VD-i HDMI output port and TV HDMI input port.
Page 53
47
8.5
8.58.5
8.5 Connection
Connection Connection
Connection with
withwith
with HD TV
HD TV HD TV
HD TV --
----
-- Component Video
Component Video Component Video
Component Video
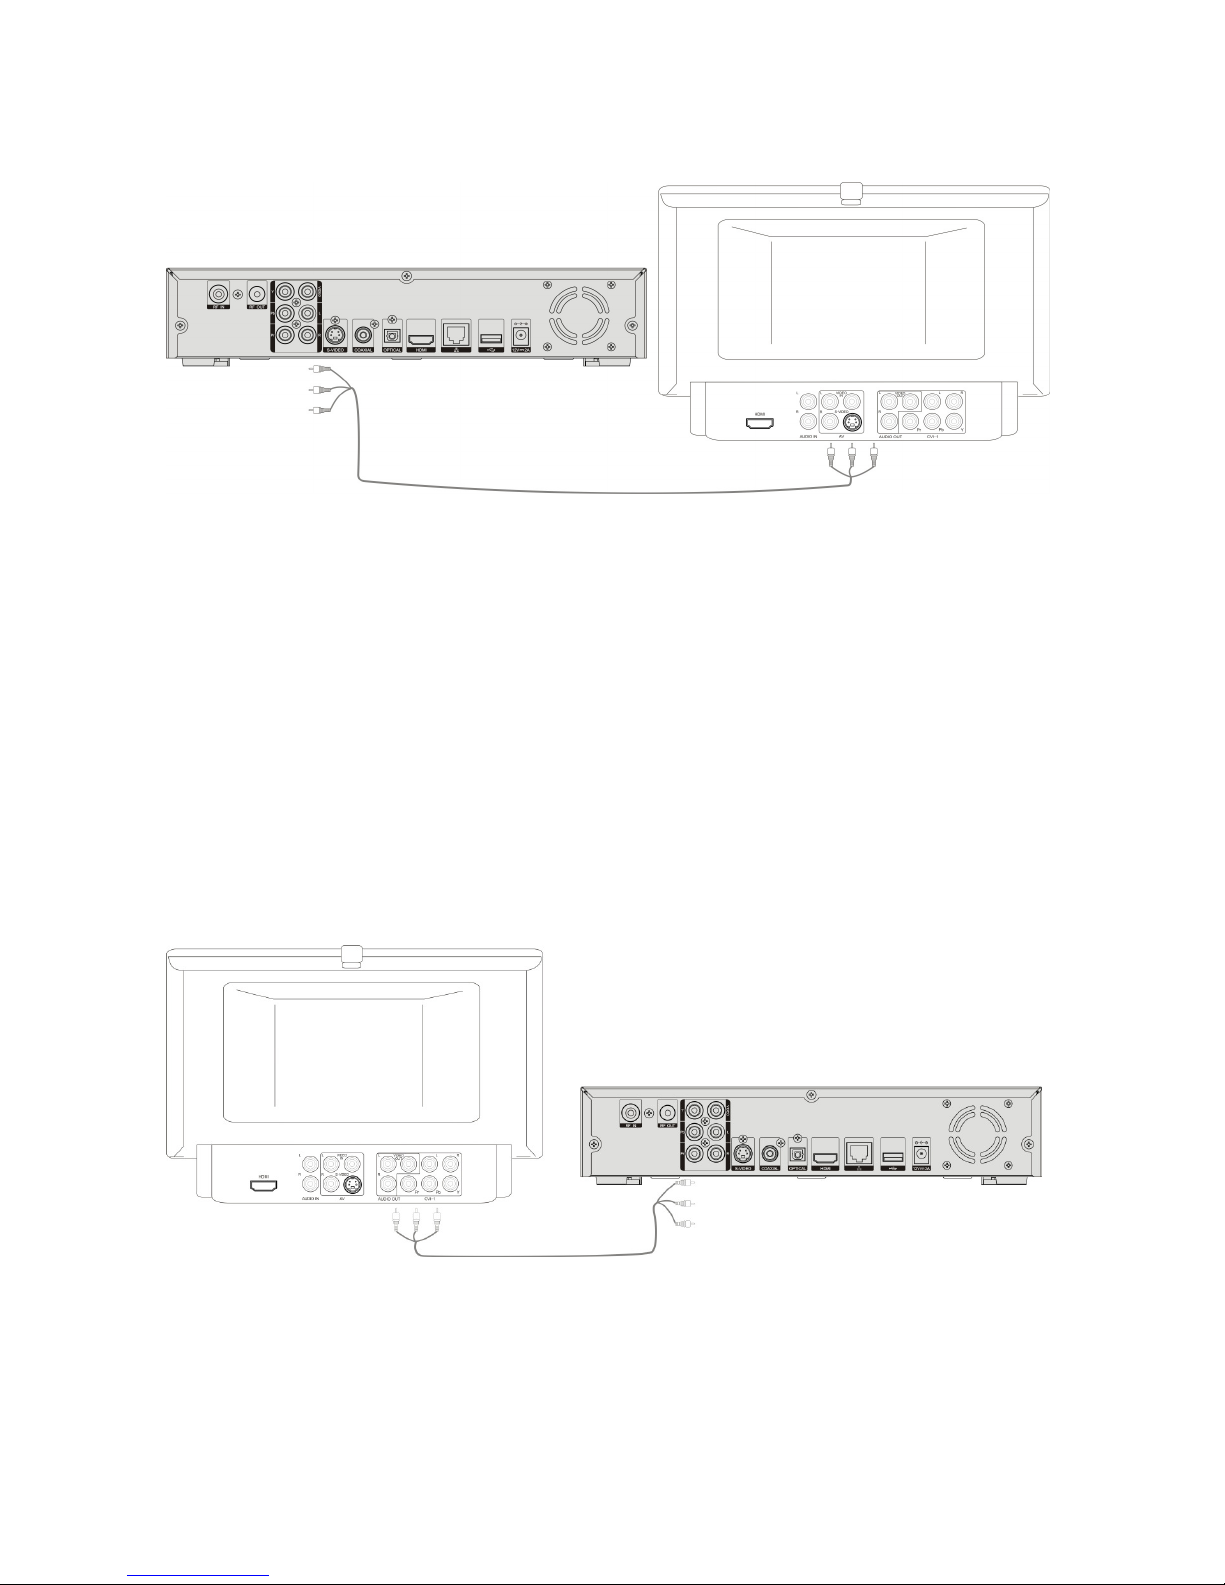
Connect VD-i YPbPr output ports with TV YPbPr input ports if there is no HDMI
ports on your high definition TV. You also need to connect audio cable with your TV,
please refer 3.8 or 3.9 or 3.10 Audio Connection.
8.6
8.68.6
8.6 Composite Video & Stereo Audio Connection with SD TV
Composite Video & Stereo Audio Connection with SD TVComposite Video & Stereo Audio Connection with SD TV
Composite Video & Stereo Audio Connection with SD TV
Connect VD-i V/L/R output ports with TV V/L/R input ports if high definition
ports (HDMI or Component) are not available on your TV.
Page 54
48
8.7
8.78.7
8.7 SSSS----Video
Video Video
Video Connection with Standard D
Connection with Standard DConnection with Standard D
Connection with Standard Definition
efinitionefinition
efinition TV
TVTV
TV
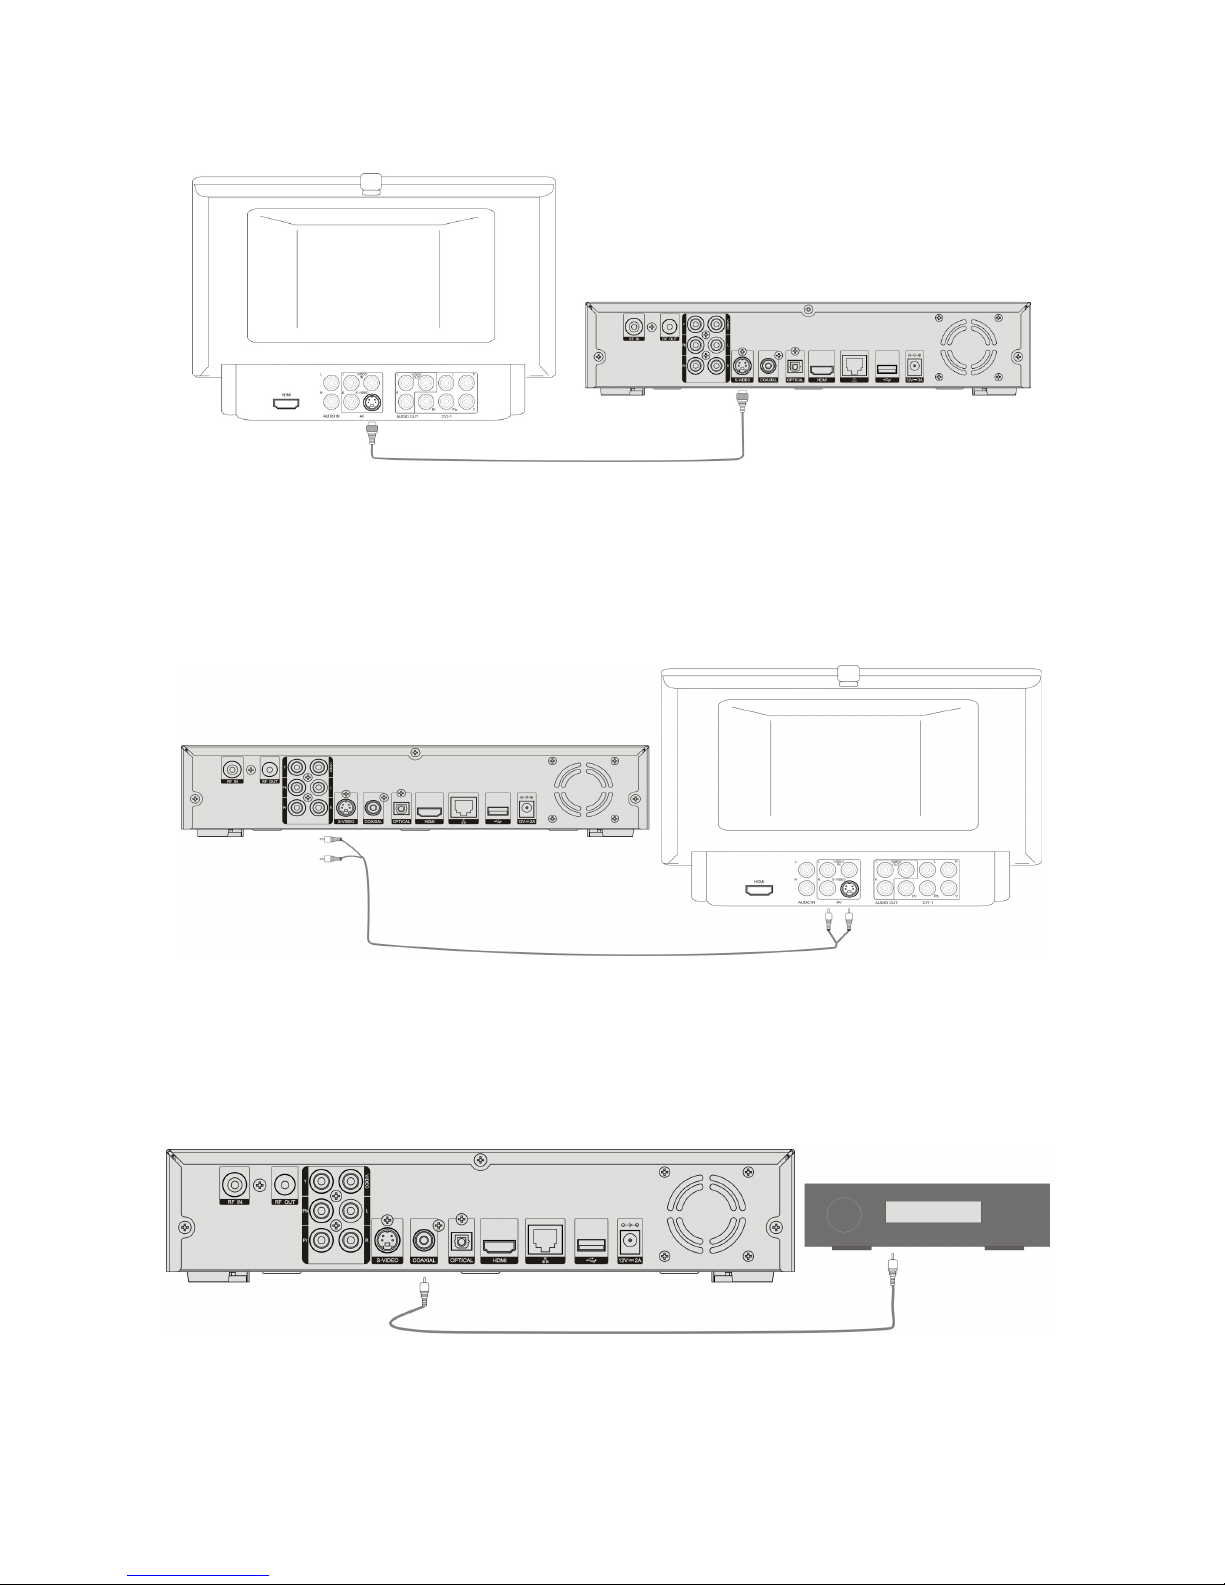
Use S-Video cable connect VD-i S-Video output port with S-Video input port on
your TV.
8.8
8.88.8
8.8 Audio Connection
Audio ConnectionAudio Connection
Audio Connection
Use audio cable to connect VD-i audio output ports (L/R) with audio input ports
(L/R) of your TV.
8.9
8.98.9
8.9 Connect
ConnectConnect
Connect with
withwith
with amplifiers
amplifiers amplifiers
amplifiers ---- Coaxial (audio)
Coaxial (audio)Coaxial (audio)
Coaxial (audio)
Use coaxial cable to connect VD-i COAXIAL output port with the amplifier’s
Coaxial input port.
Page 55
49
8.10
8.108.10
8.10 Connect
ConnectConnect
Connect with
withwith
with amplifiers
amplifiers amplifiers
amplifiers ---- Optical
OpticalOptical
Optical (audio)
(audio)(audio)
(audio)
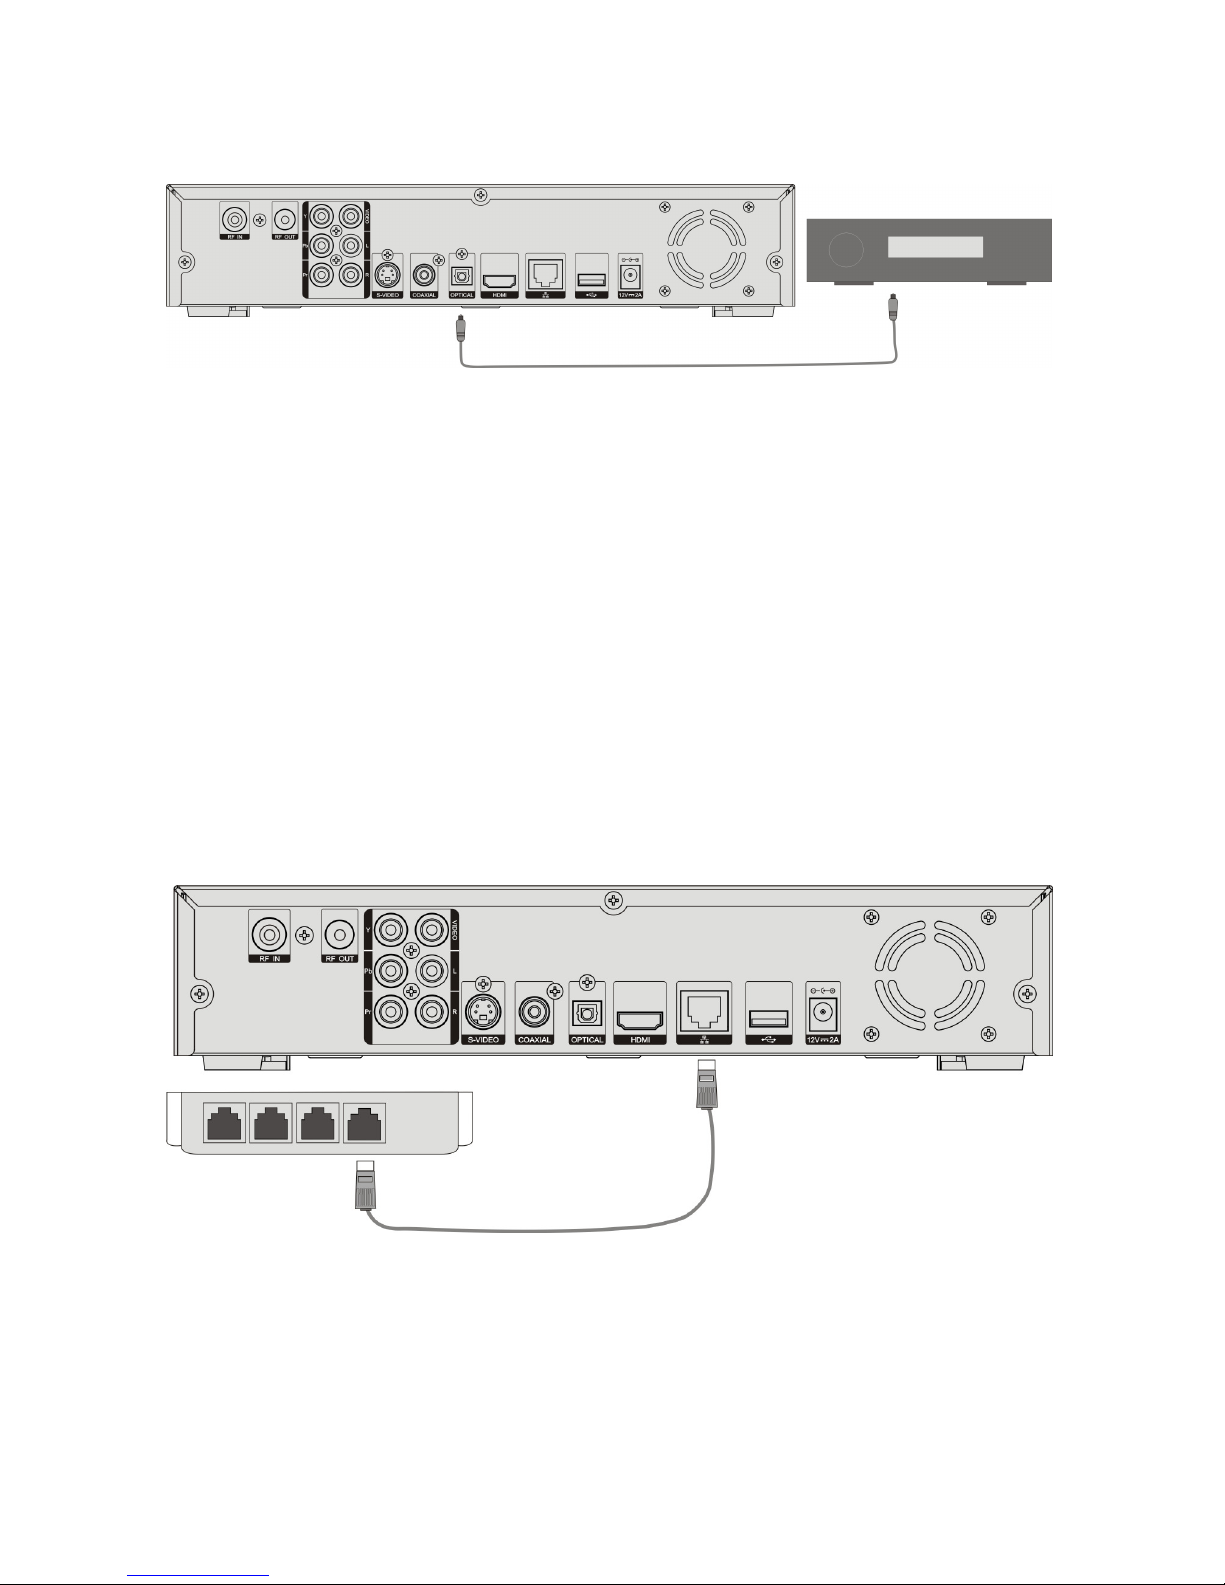
Use optical fiber cable to connect VD-i optical output port with amplifier’s fiber
input port.
8.11
8.118.11
8.11 Network Connection
Network ConnectionNetwork Connection
Network Connection
Use Ethernet cable to connect Ethernet port of VD-i to the Ethernet port of device of
your internet service provider.
Page 56
50
8.12
8.128.12
8.12 Hard drive install
Hard drive installHard drive install
Hard drive installation
ationation
ation
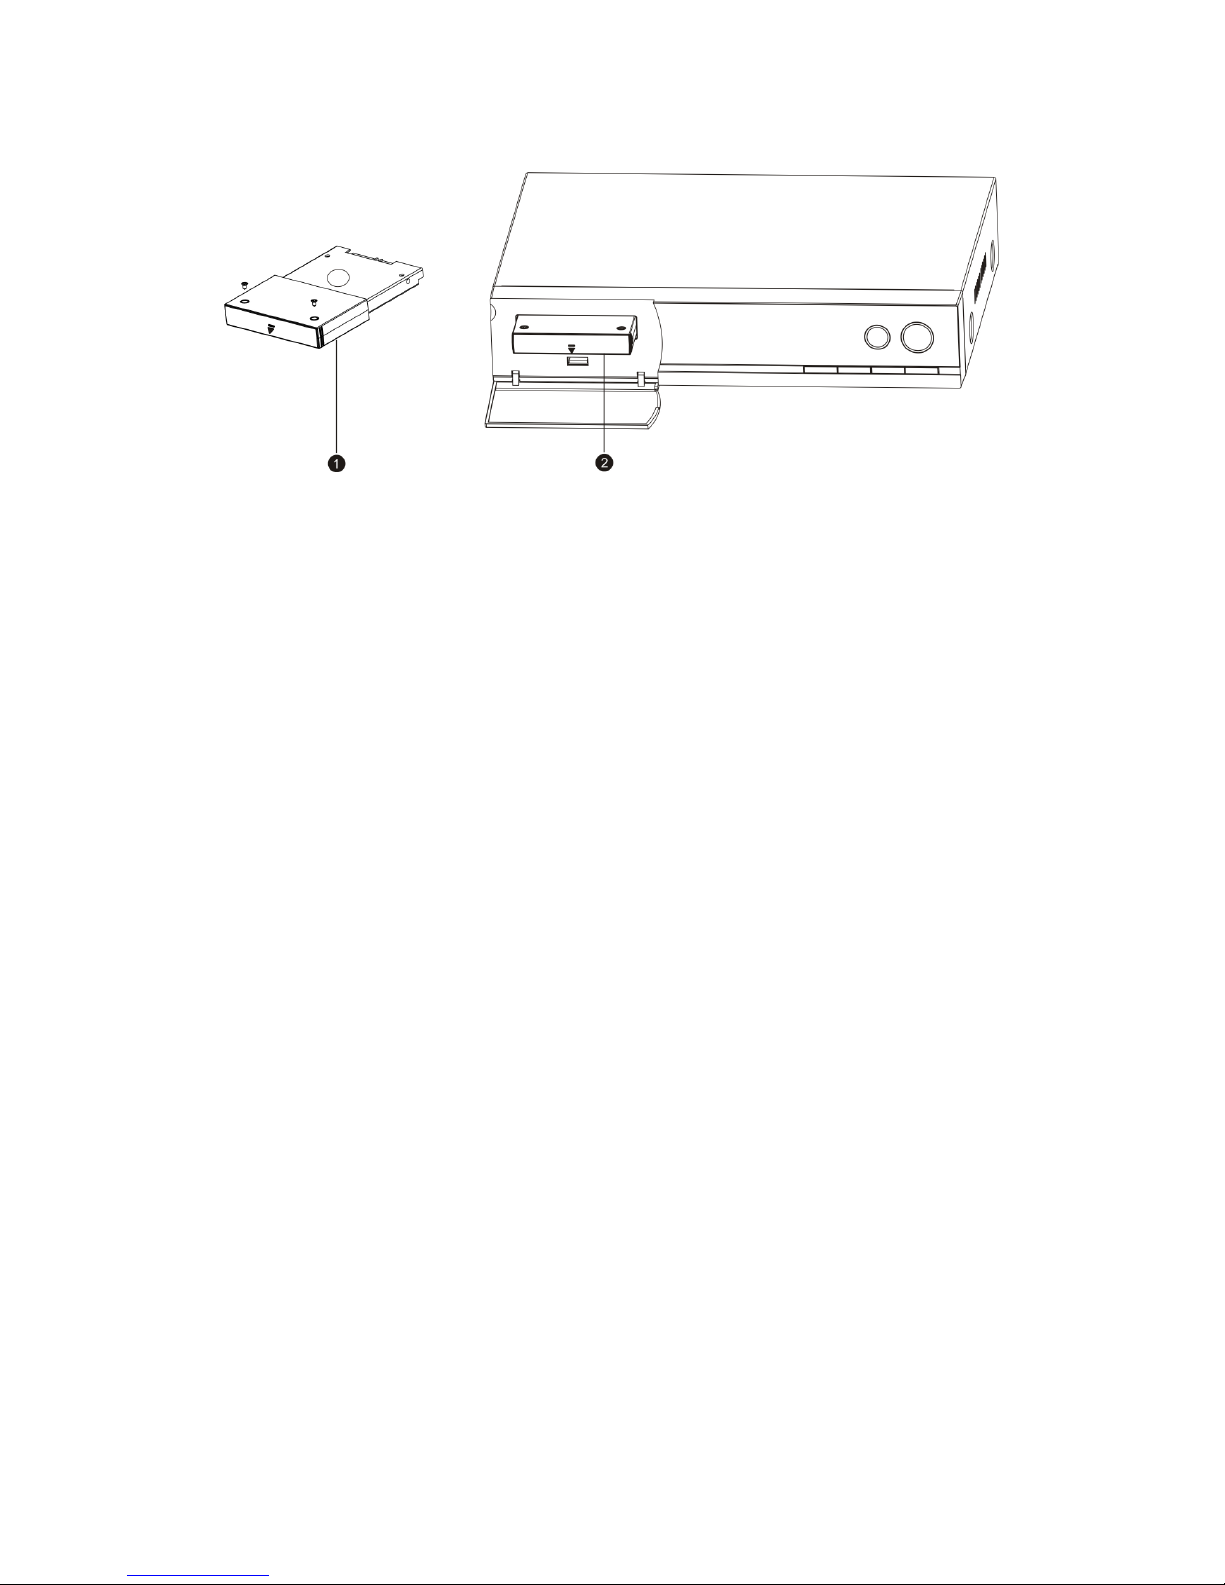
VD-i supports insert/remove 2.5” SATA I hard disk to record/share program,
please refer above picture to insert/remove hard disk: make sure the disk interface
side up and slot it into the framework, then use two screw to fix the disk, last slot in
the disk into port as shown in above picture (step 2, make sure disk framework arrow
down)
To remove the hard disk, push the framework first, the framework will slip out.
Remove the framework out from the port, (you may feel the framework in slightly
jammed, which is normal), then you can un-screw the disk from the framework.
Note: If you want to use your won disk, it must be a 2.5” SATA I standard disk.
(For the details of supportable HDD, please visit www.vdigi.com.hk)
Warning: Don’t insert or remove disk when the receiver is being powered on.
Page 57

51
8.13
8.138.13
8.13 IIIImportant Notice
mportant Noticemportant Notice
mportant Notice
Please only use the Power adapter provided in the VD-i package, and finish
other cable connection before connect VD-i to power supply, and disconnect power
supply first before remove any other cable connection.
Pleas select one of above mentioned method to connect video/audio
output of the receiver to correspondent input of your TV, e.g. Composite
video, Component video, S-video, etc, and set the TV to correspondent video
input mode. For enjoying better video/audio quality, please select HDMI
and/or S/PDIF connection.
8.14
8.148.14
8.14 Turning
Turning Turning
Turning On/
On/On/
On/OOOOff
ff ff
ff VD
VDVD
VD----i
i i
i and LED Display
and LED Displayand LED Display
and LED Display Status
StatusStatus
Status
After power supply has being connected, press “Power” key on front panel
of the receiver, the receiver will start to work and power indicator will turn
into blue.
In working status, when press “Power” key, the receiver will turn into the
standby status, Power indicator will turn off.
In standby status, when press “Power” key, the receiver will turn to the
working status, Power indicator will turn to blue.
Record key indicator turns red when receiver is recording program.
Record key indicator turns green when receiver is playing recorded
program.
Record key indicator turns green when the receiver is recording one
program and playing a recorded program.
Please disconnect power supply when you do not use the receiver for a
long period of time.
Page 58

52
9999 Operation Introduction
Operation Introduction Operation Introduction
Operation Introduction
You can control the receiver by remote control or the keys on front panel of the
receiver. Please note the followings:
Each key may have different function under different mode.
The TV screen will offer a similar “key” indication menu e.g. that of
remote control, through RC navigation key & OK key to operate.
Some of the features can only be used referencing indication displayed
on TV screen, at this time, the relevant key on the remote control may not
work, or you can not find such key on remote control.
9.1
9.19.1
9.1 Receiver Configuration
Receiver Configuration Receiver Configuration
Receiver Configuration
Through navigation key & MENU、OK、CH+、CH- to achieve all the
operation action. Presses MENU enter into the main menu interface, and then press
to select subdirectory, press enter into one subdirectory. Press back to
the previous interface. After enter into the final subdirectory, press to amend,
press CH+、CH- to turn pages if needed when there are pages of contents. Press
MENU to exit, then you can watch program again. Please pay attention to
indication info on the main menu interface during the operation.
Page 59
53
4.1.6.
4.1.6.4.1.6.
4.1.6. Configuration Menu
Configuration MenuConfiguration Menu
Configuration Menu
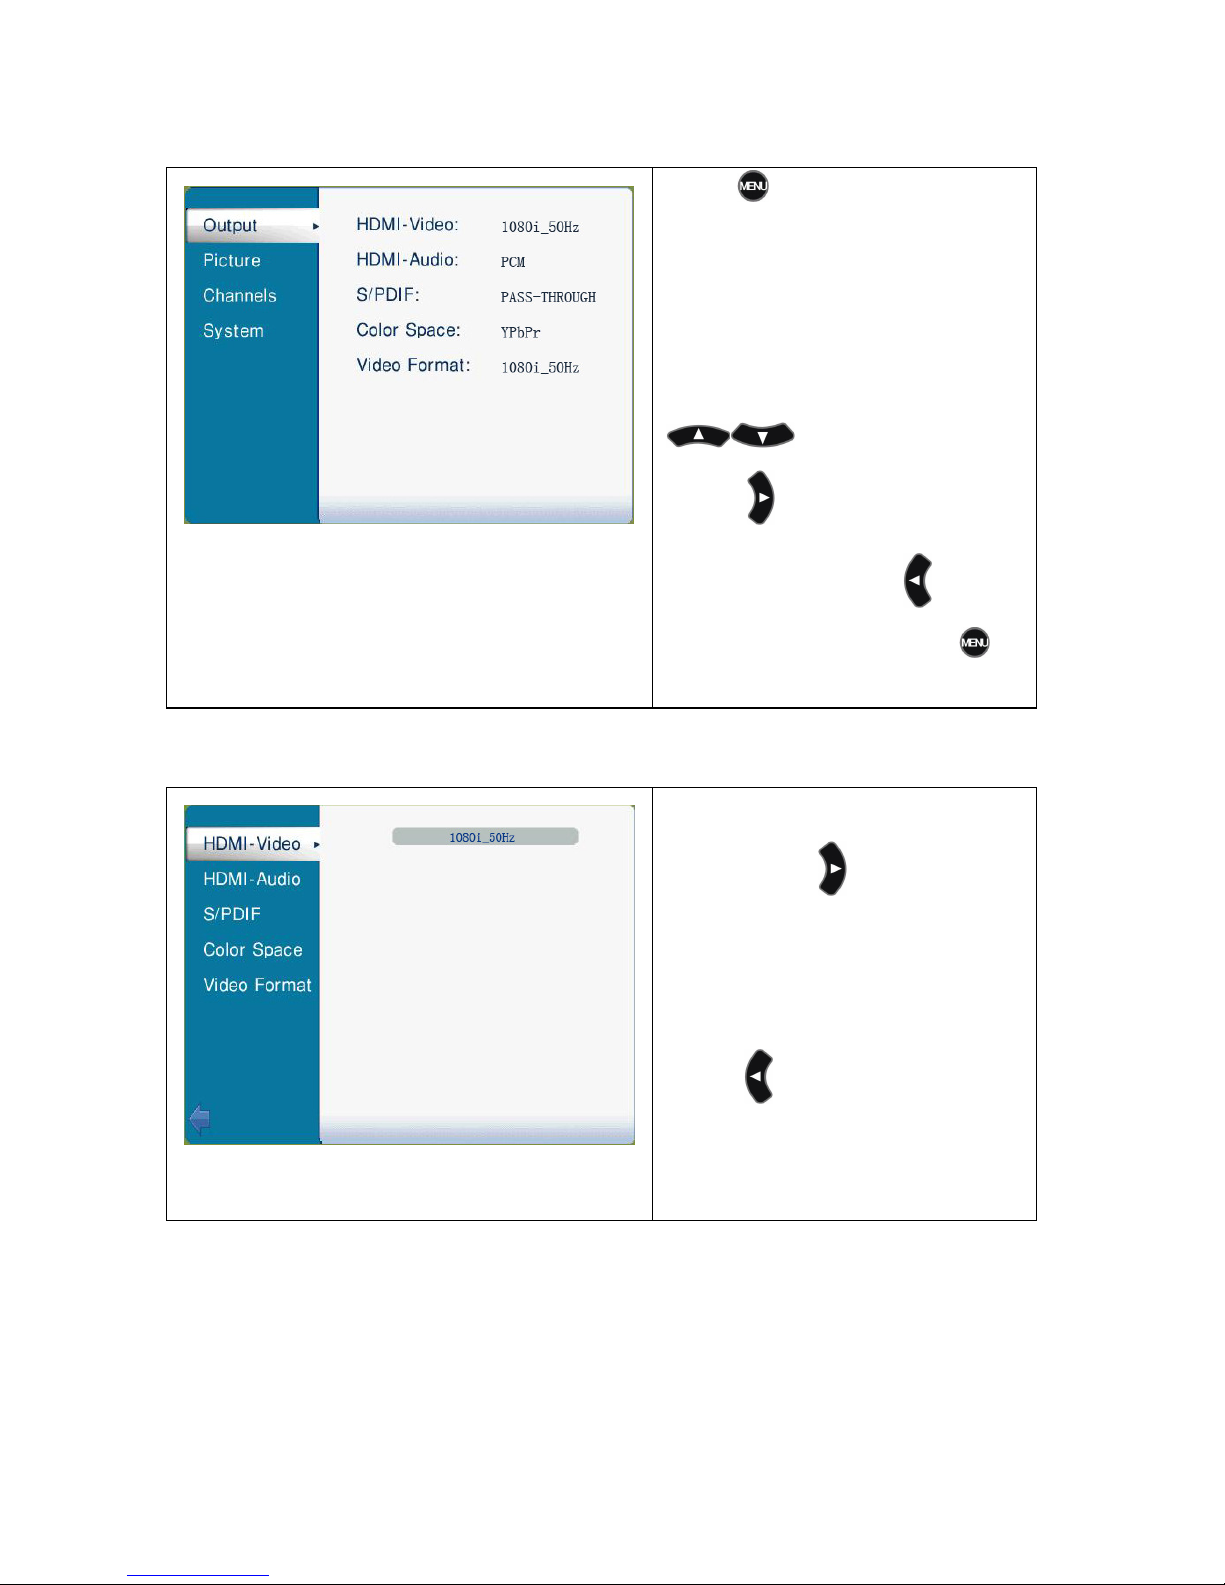
01
Press to enter into Main
Menu’s setting menu (pic1),
which is a typical menu. The Blue
area on the left shows all options.
The white area on the right shows
details of each option. Press
to select one option.
Press to enter next level
setting page, press back to
the previous page, press to
exit the main setting menu.
4.1.7.
4.1.7.4.1.7.
4.1.7. Output Setting
Output SettingOutput Setting
Output Setting
02
Select Output in the Main Menu
(pic1), press to enter Output
setting menu (pic2), select “HDMI
image”, the current set display on
the right, e.g. “1080i_50Hz”.
Press back to the previous
menu.
Page 60
54
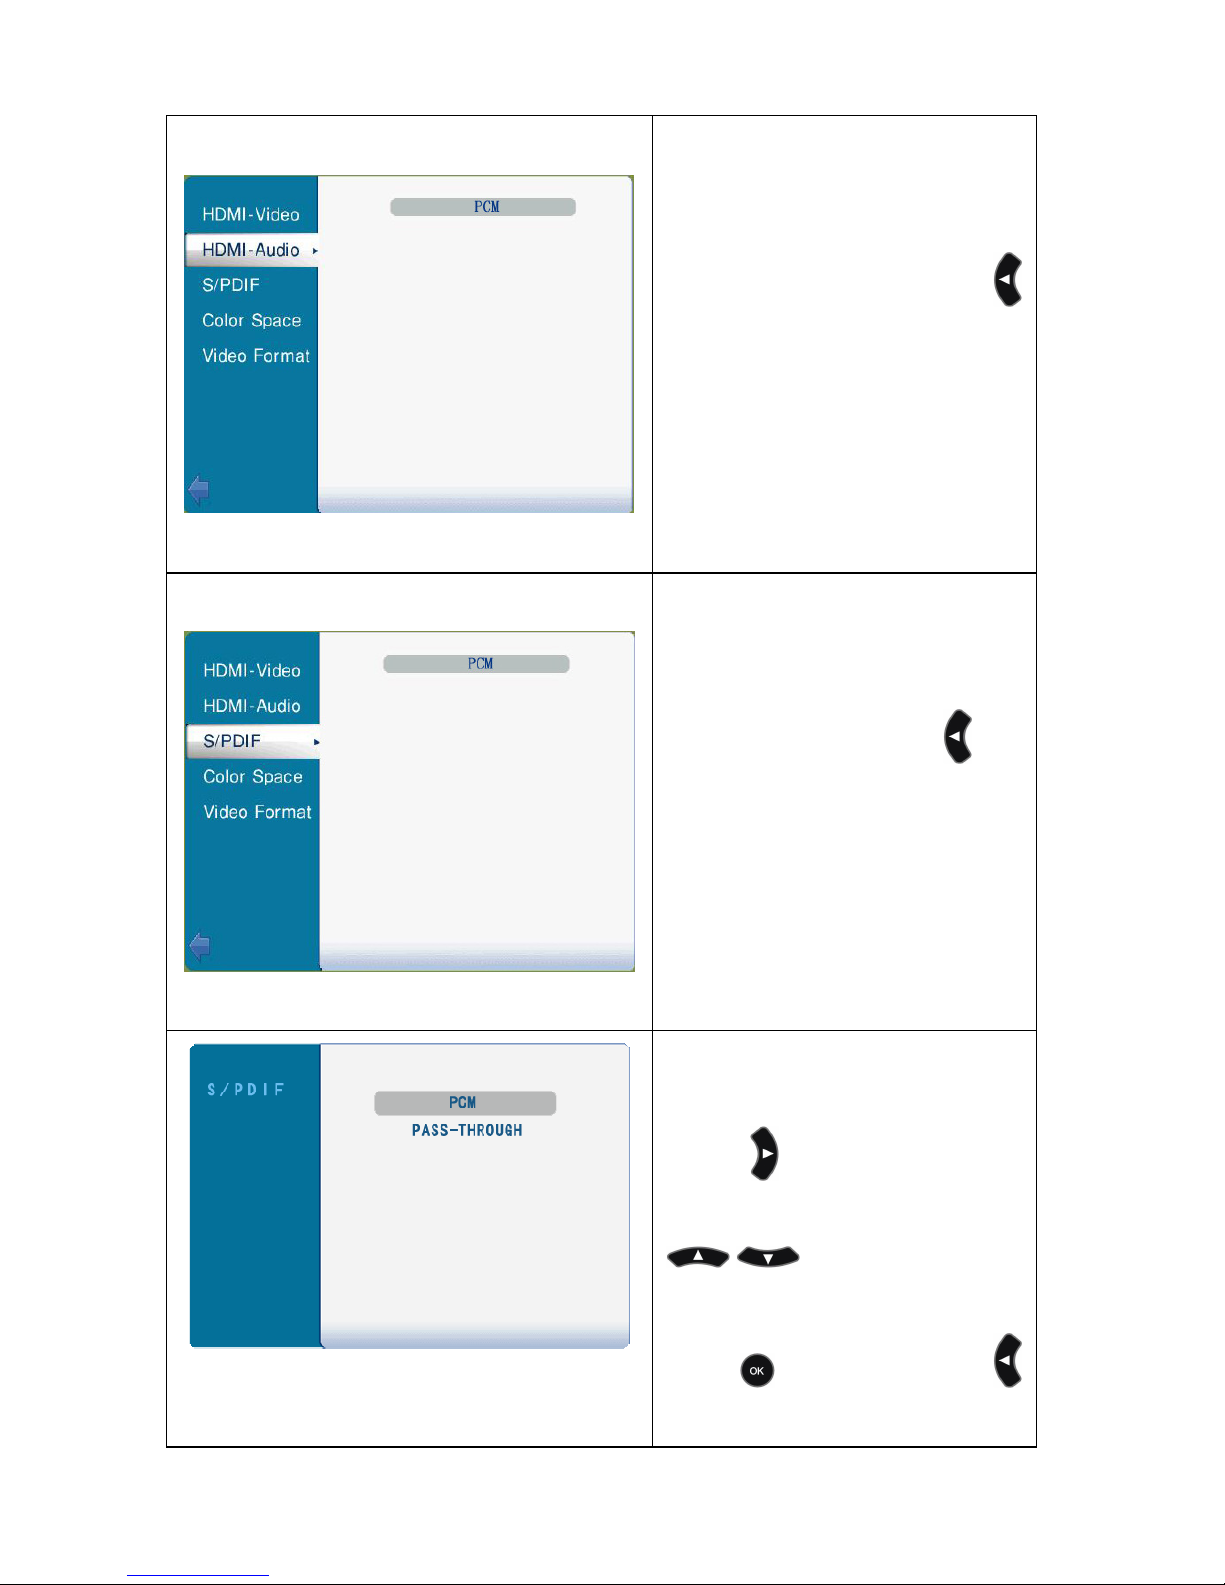
03
Select “HDMI-Audio” (pic3) in the
“Output” in menu (pic2), then the
current HDMI set will display on
the right, e.g. “PCM”. Press
back to the previous menu.
04
Select “S/PDIF”
(pic4) in
“Output” menu (pic2), the current
S/PDIF set will display on the
right, e.g. “PCM”. Press back
to the previous menu.
05
Select “S/PDIF” (pic4) in the
“Output”
setting menu (pic2),
press to enter “S/PDIF”
setting menu, press
to set mode, e.g.
“PCM” or “&PASS-THROUGH”.
Press
to confirm. Press
back to the previous menu.
Page 61
55
(PASS-THROUGH supports 5.1
Dolby Digital audio output).
06
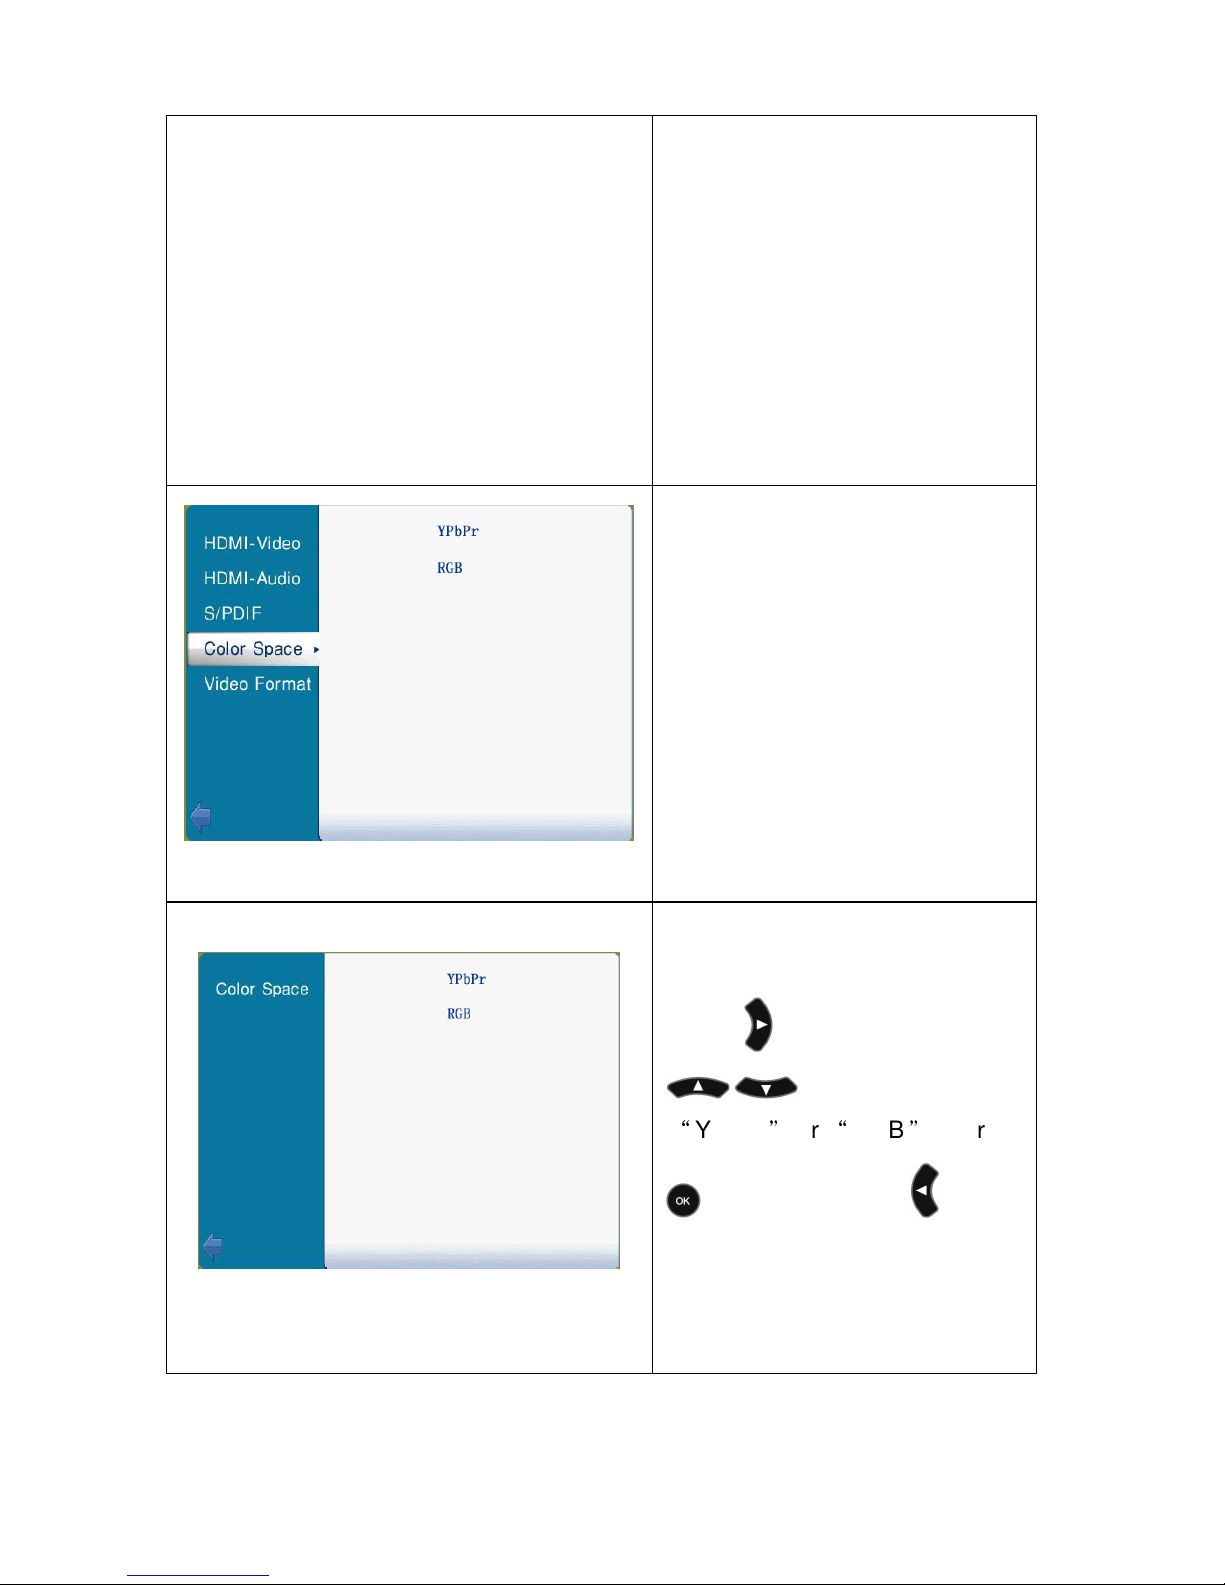
Select “Color Space” (pic6) in the
“Output” menu (pic2), current
component video output set will
display on the right.
07
Select “Color Space” (pic6) in the
“Output” setting menu (pic6),
press enter into it, press
to select one, e.g.
“
YPbPr”or“RGB”. Press
to comfirm. Press back to
the previous menu.
Page 62
56
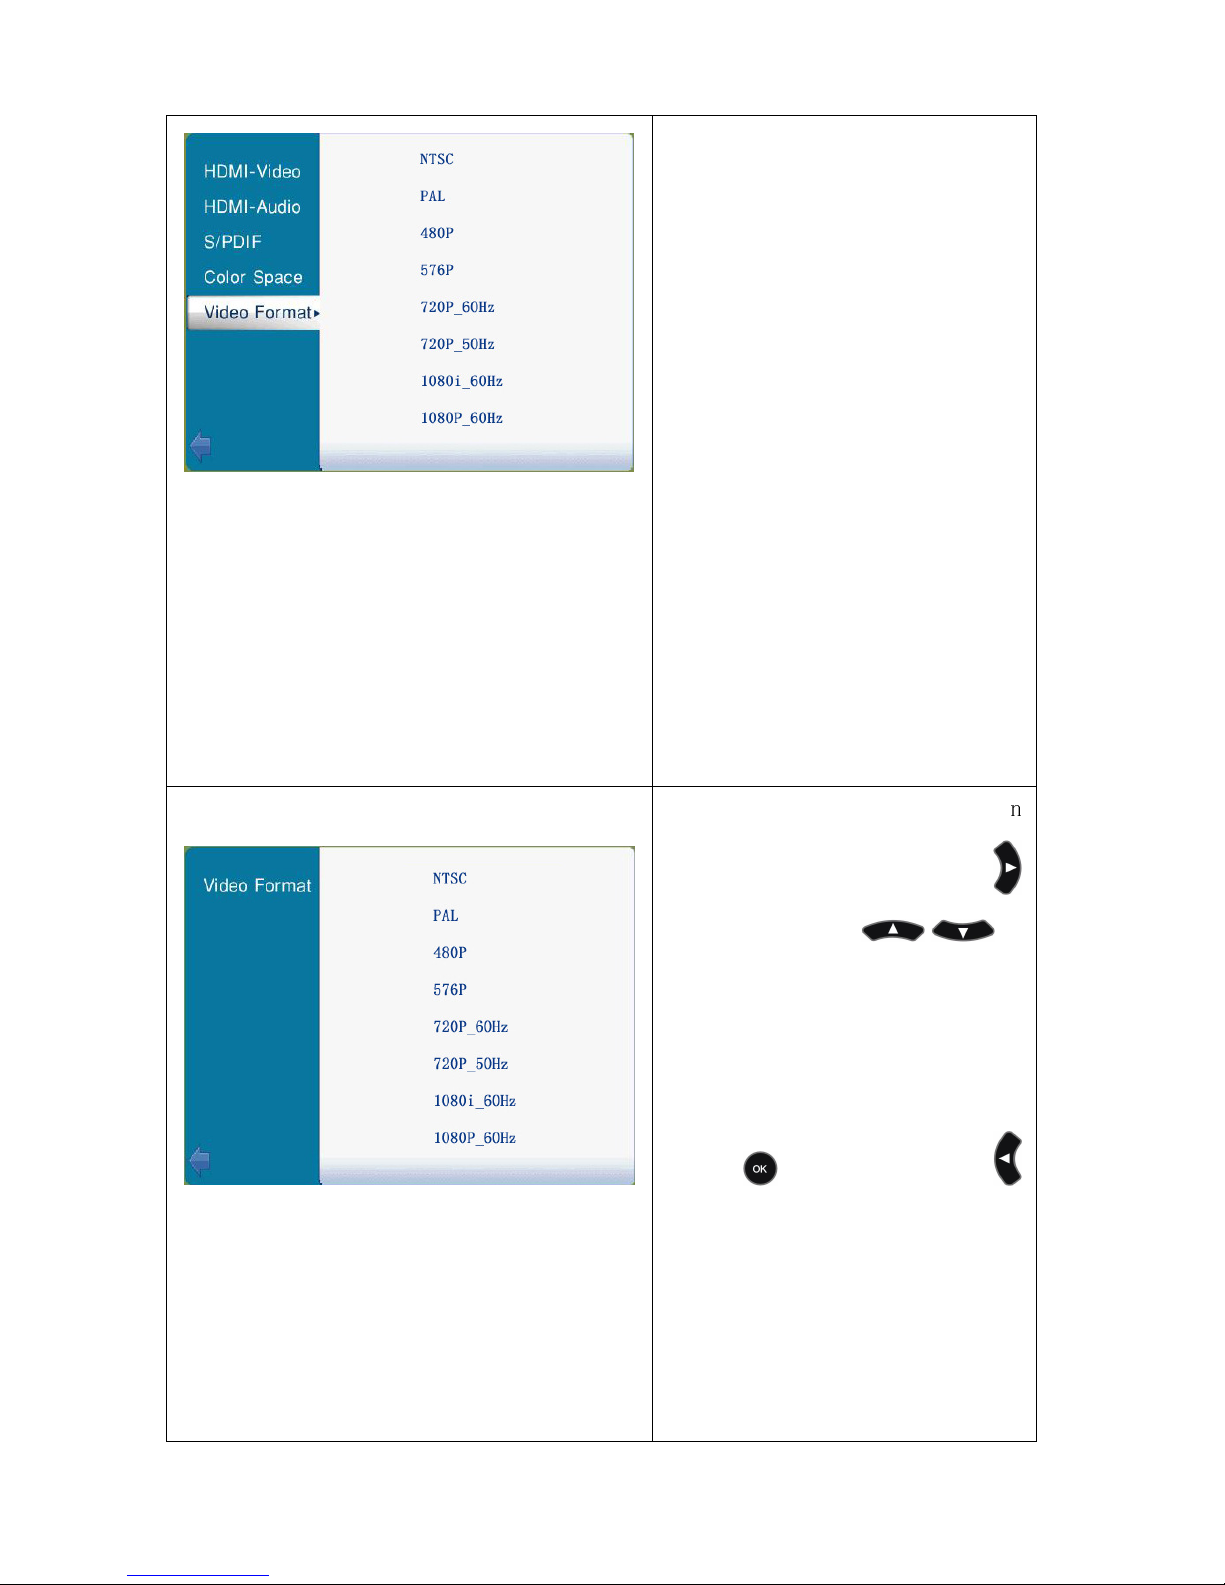
08
Select “Video Format” (pic8) on
the “output” setting menu (pic2),
then the current Video Format set
display on the right, e.g. “PAL”.
09
Select “Video Format ” (pic9) on
“Output” menu (pic2), press
to enter, press to
select one, e.g. “NTSC”, “PAL”,
“480P”, “576P”, “720P_60Hz”,
“720P_50Hz”, “1080I_60Hz”,
“1080I_50Hz”, “1080P_25Hz”.
Press to confirm. Press
back to the previous menu.
Page 63
57
4.1.8.
4.1.8.4.1.8.
4.1.8. Pi
PiPi
Picture
cturecture
cture Setting
SettingSetting
Setting
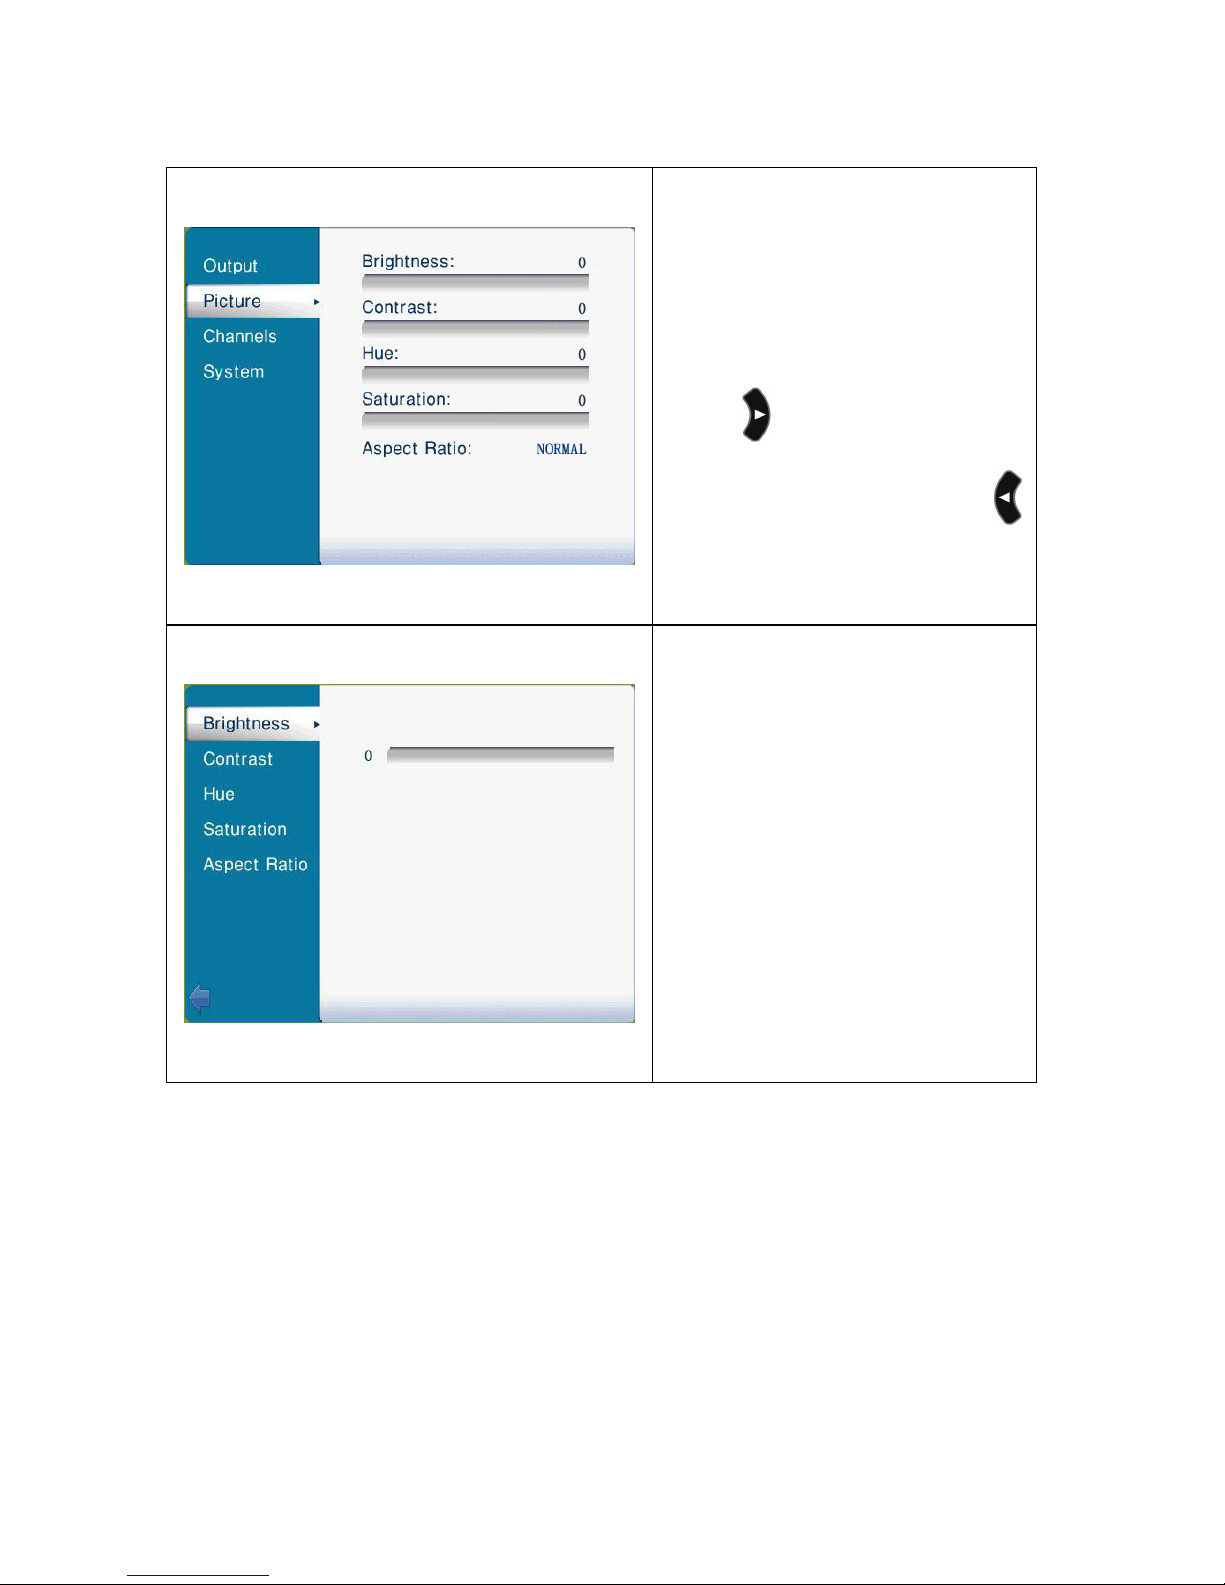
10
Select “Picture” (pic10) in main
menu (pic1), the current
“Brightness”, “Contrast”, “Hue” ,
“Saturation” & “Aspect Ratio” will
display on the right.
Press to enter into “Picture”
setting menu (pic11). Press
back to the previous menu.
11
“Picture” setting menu (pic11).
Page 64
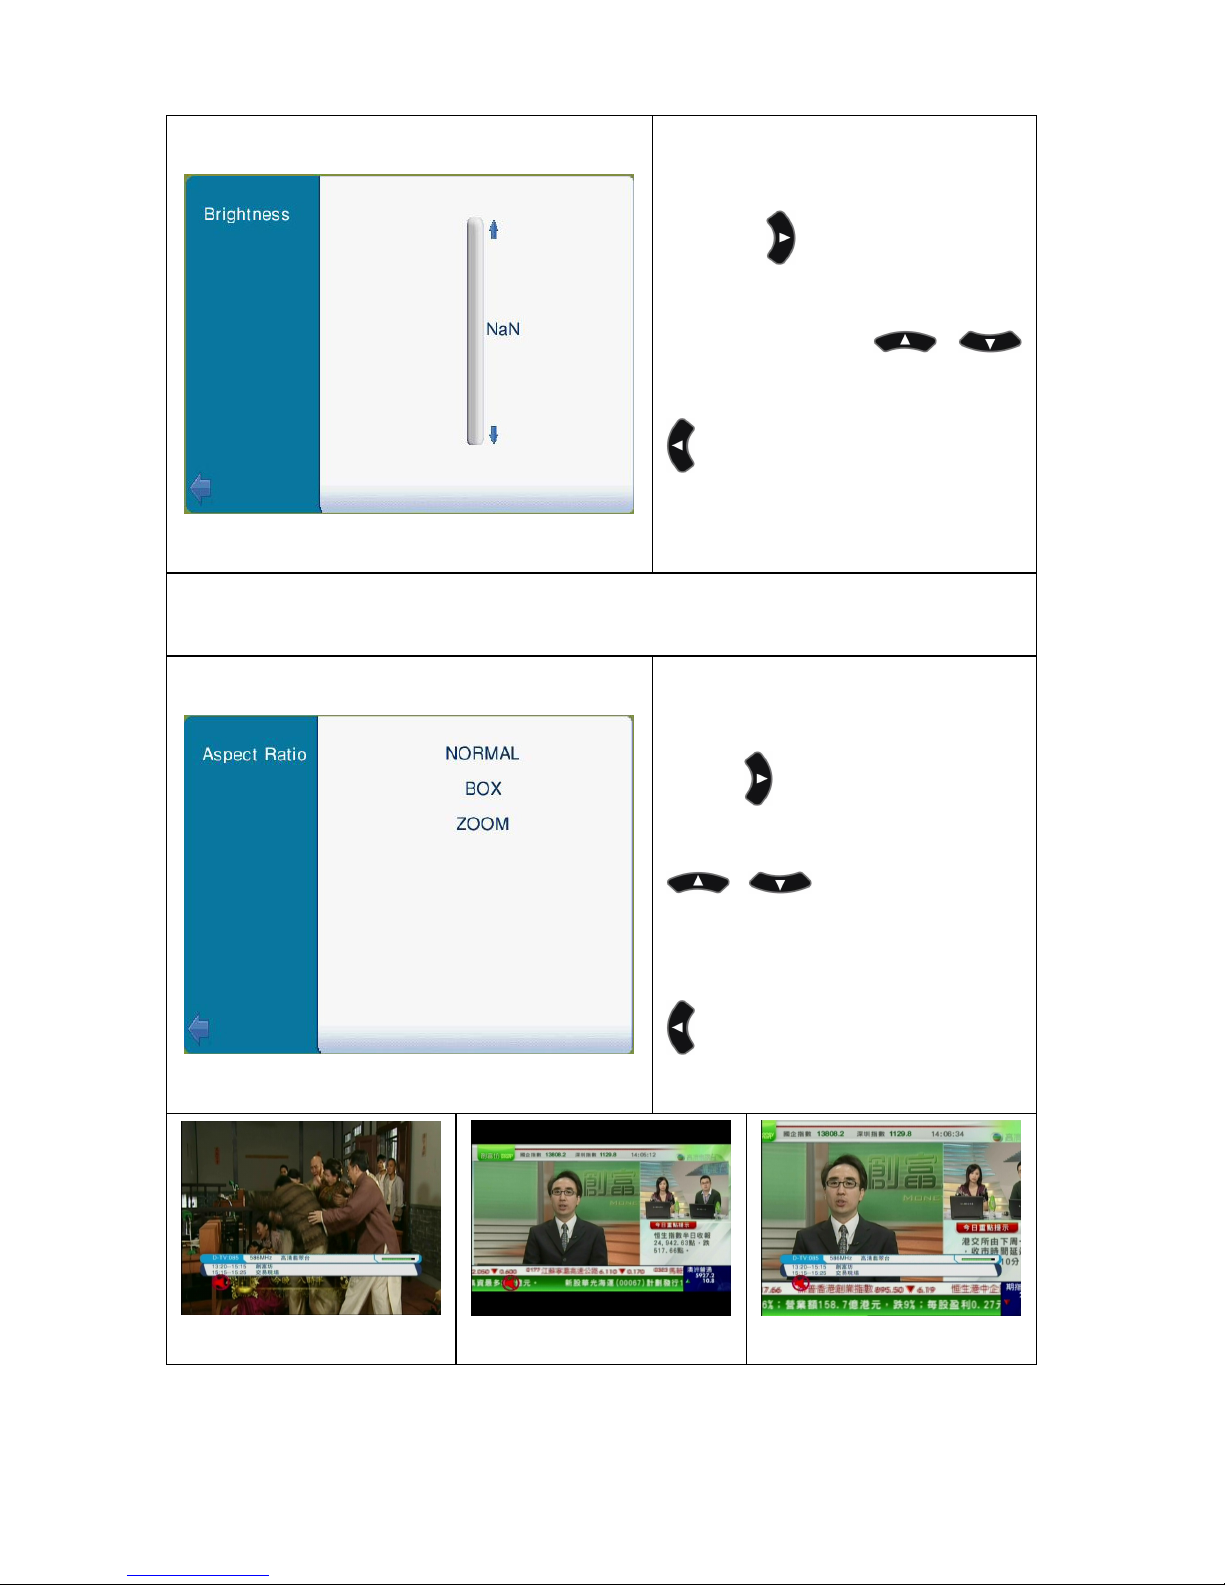
58
12
Select “Brightness” in the
“Picture” setting menu (pic11),
press to enter into
“Brightness” setting menu
(pic12), press
adjusting the brightness, press
back to the previous menu.
“Contrast”, “Hue”, “Saturation” setting method is the same to the “Brightness”.
13
Select “Aspect Ratio” on the
Picture setting menu (pic11),
press to enter into Aspect
Ratio setting menu (pic13), press
to adjust the
proportion e.g.: Normal (pid14),
Box (15), or ZOOM (16). Press
back to the previous menu.
14
15
16
Page 65
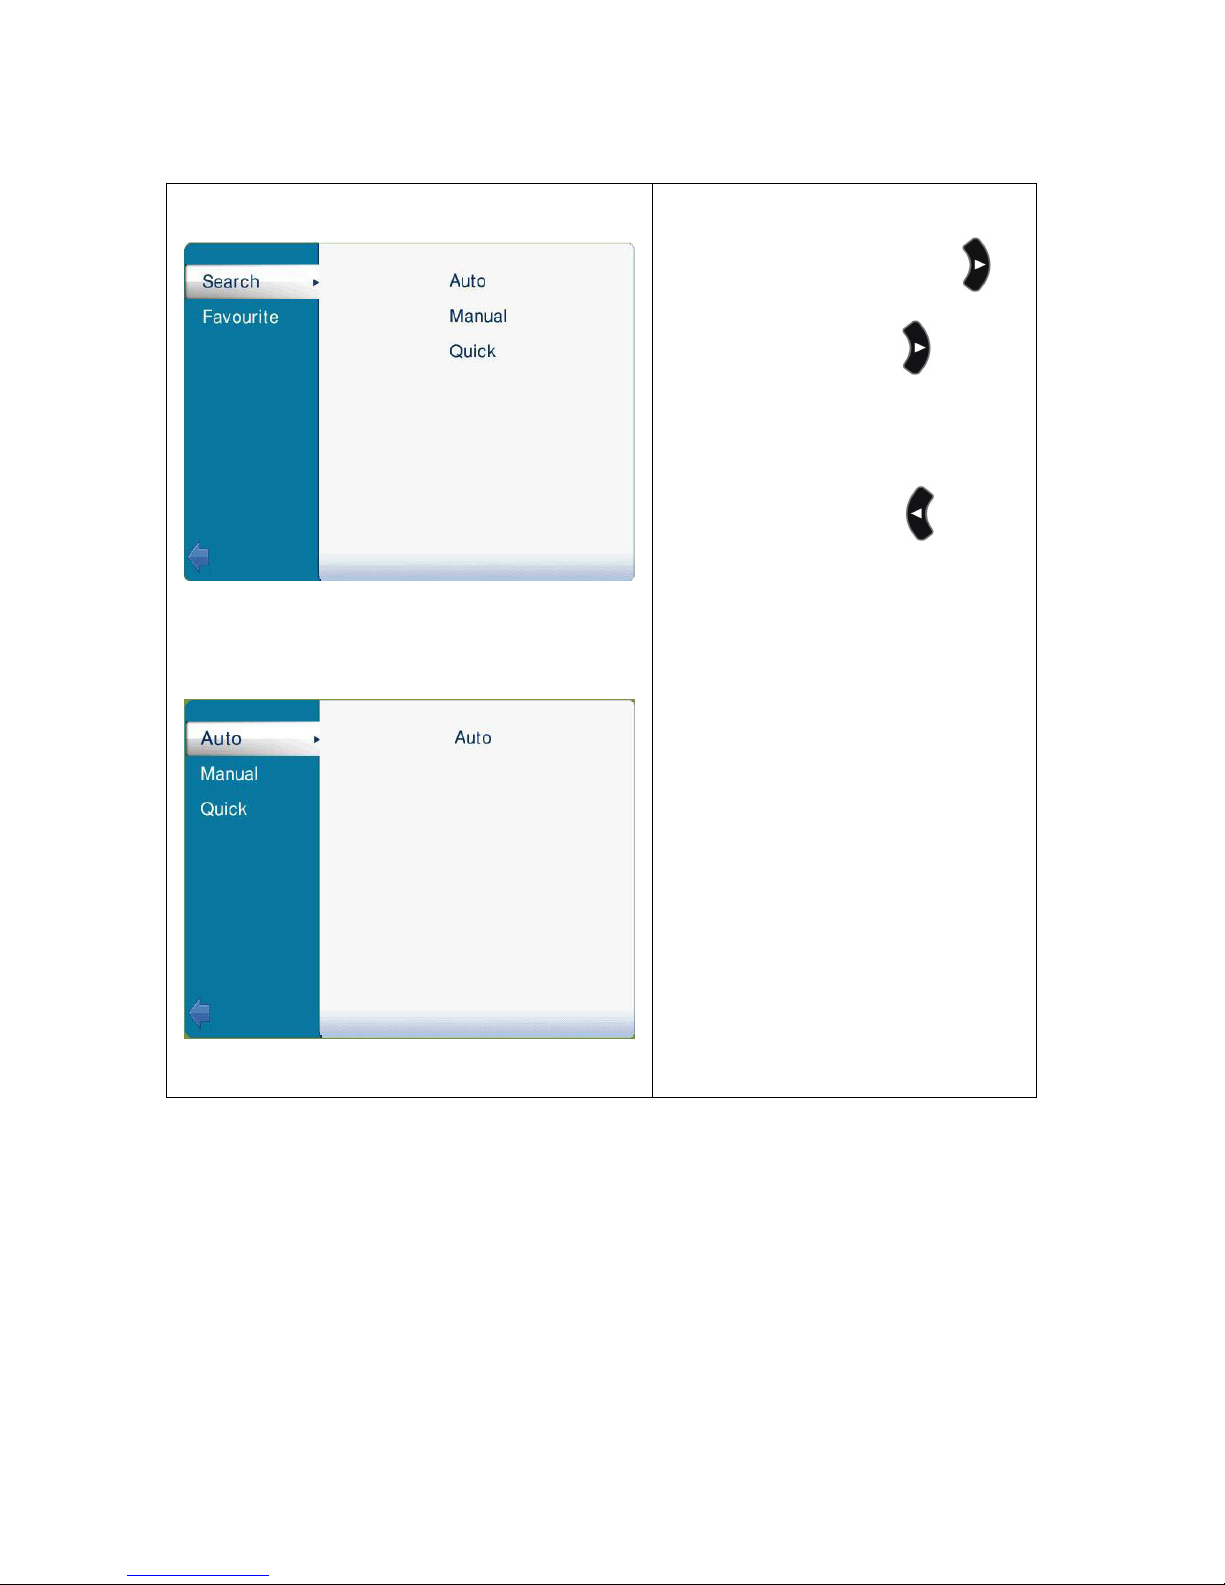
59
4.1.9.
4.1.9.4.1.9.
4.1.9. Search
Search Search
Search Channel
ChannelChannel
Channel
17
18
Select “Search” on the main
setting menu (pic1), press to
enter (pic17), press
to enter
“Search” menu (pic18). There are
3 searching methods: Auto,
Manual, Quick. Press back to
the previous menu.
Page 66
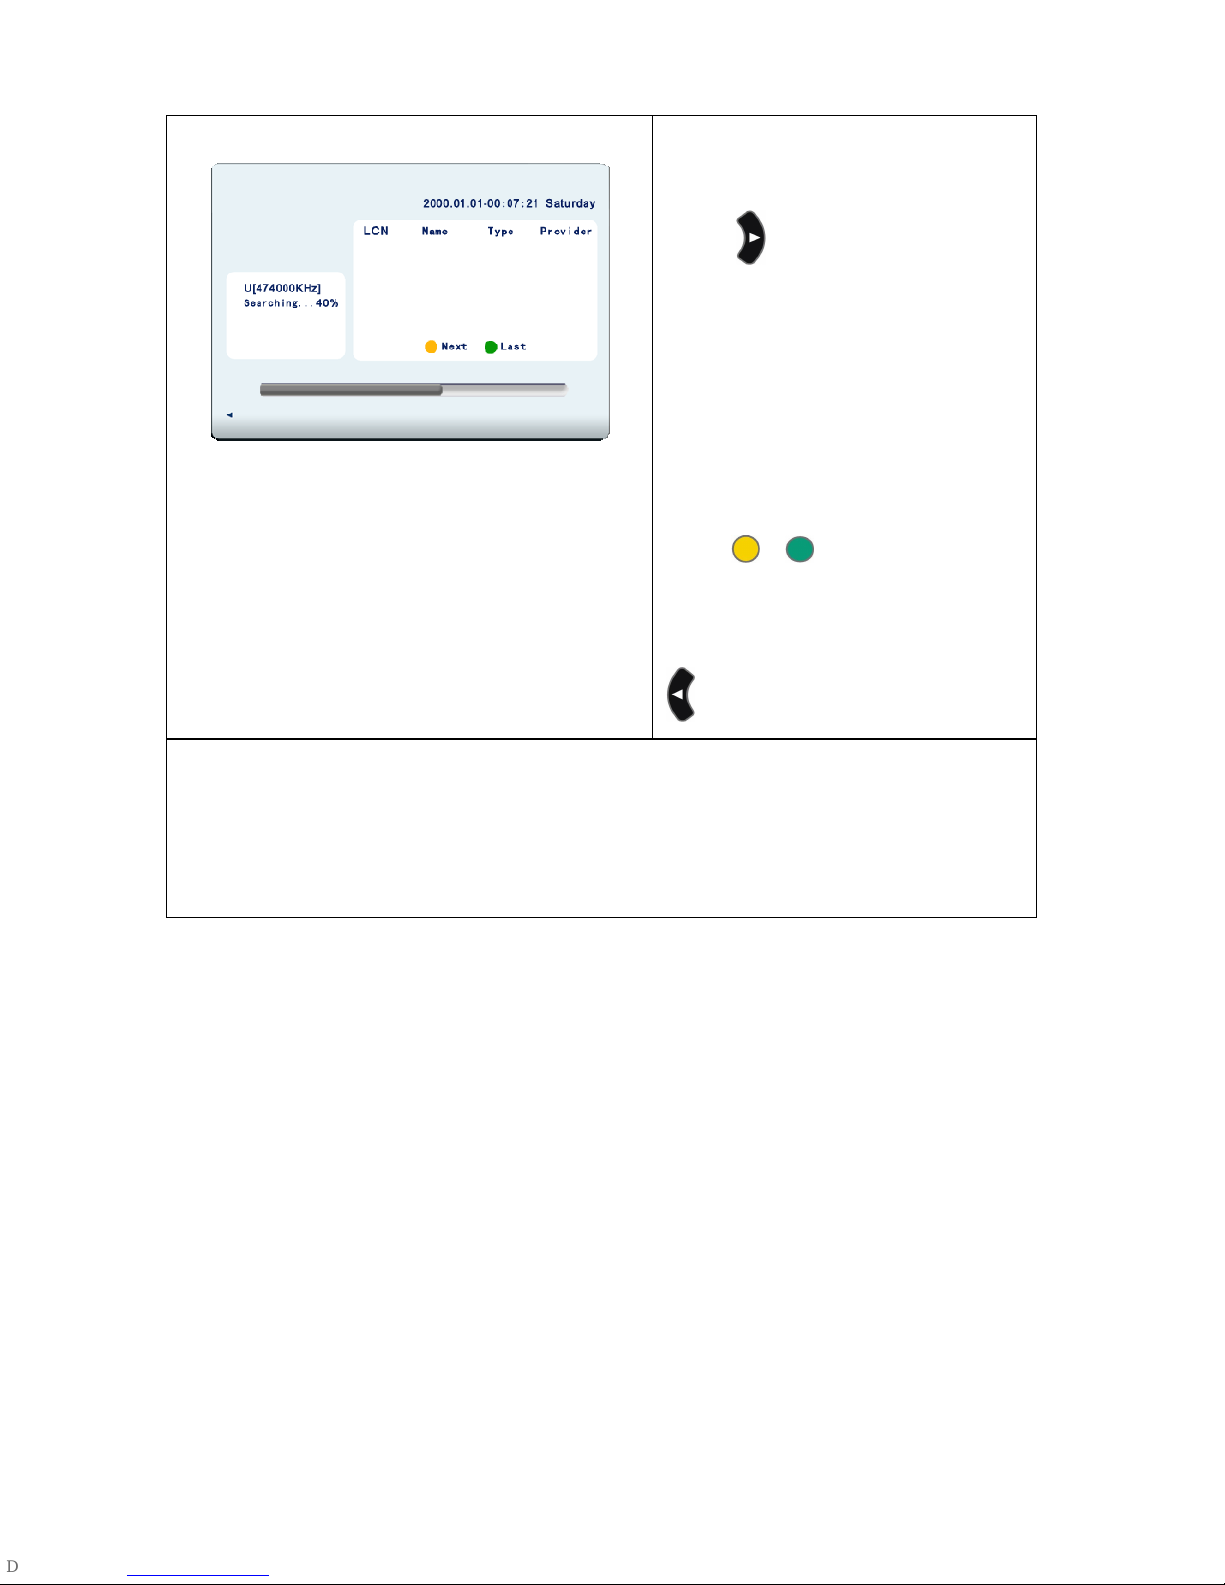
60
19
Select “Auto” on the channel
“Searching” menu (pic19), then
press to enter, the receiver will
automatically search channel
from 474MHz to 858MHz
frequency point, and show signal
strength and quality of the current
frequency point. Channel list
will automatically display.
Press , to turn pages to
show the entire channel list. After
channel search complete, press
back to the previous menu.
The method of Manual and Quick searching is the same to the Auto, except
the Quick searching method’s frequency including: 482MHz, 546 MHz, 562
MHz, 586 MHz, 602 MHz, 626 MHz, 650 MHz, 682 MHz, 802 MHz.
Page 67
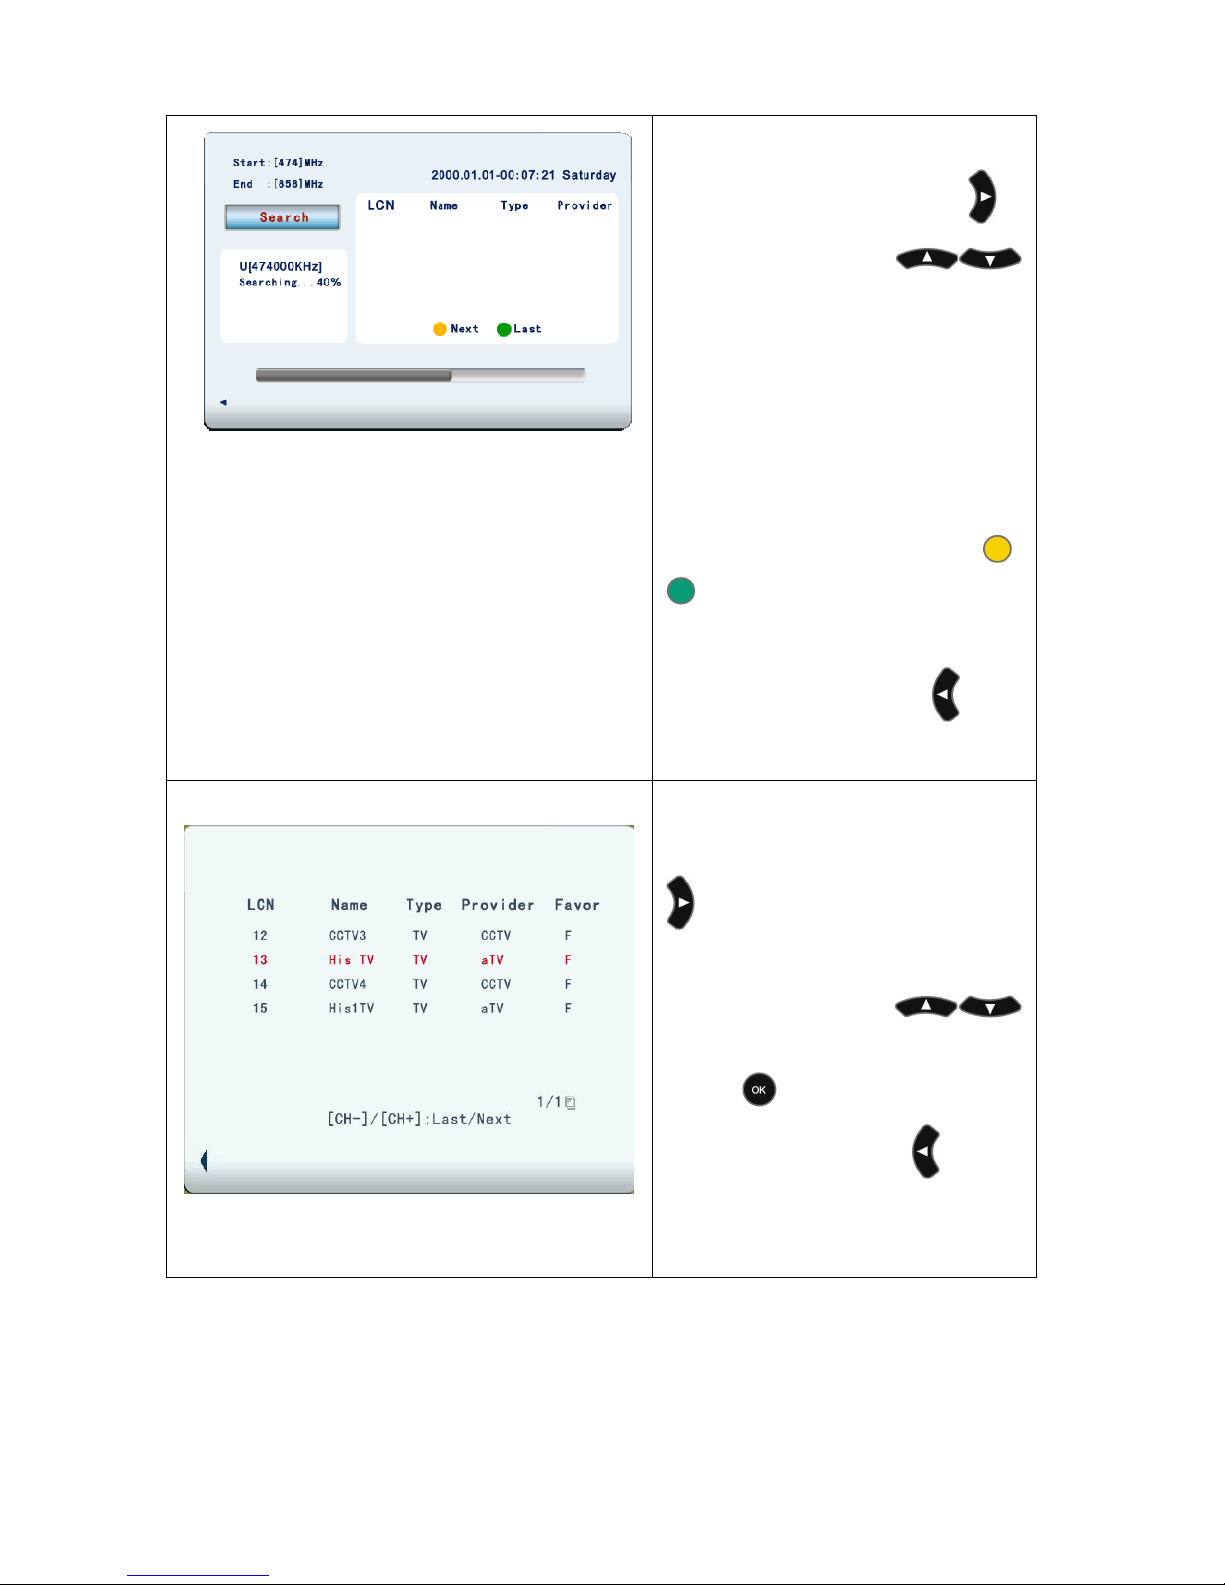
61
20
Select “Manual” on the channel
“Searching” menu, press to
enter (pic19), press
to set the start or stop frequency
point, the receiver will
automatically search channel and
display signal strength and
quality of the current frequency
point. Channel list will
automatically display. Press ,
to turn pages to show the
entire channel list. After channel
search complete, press back
to the previous menu
21
Select “Favorite” on the
searching “Channel” menu, press
to enter (pic21). All the
automatically searched channel
will list here, press
to select your favorite one(s).
Press to confirm or delete
your selection. Press back to
the previous menu
Page 68
62
4.1.10.
4.1.10.4.1.10.
4.1.10. System Setting
System SettingSystem Setting
System Setting
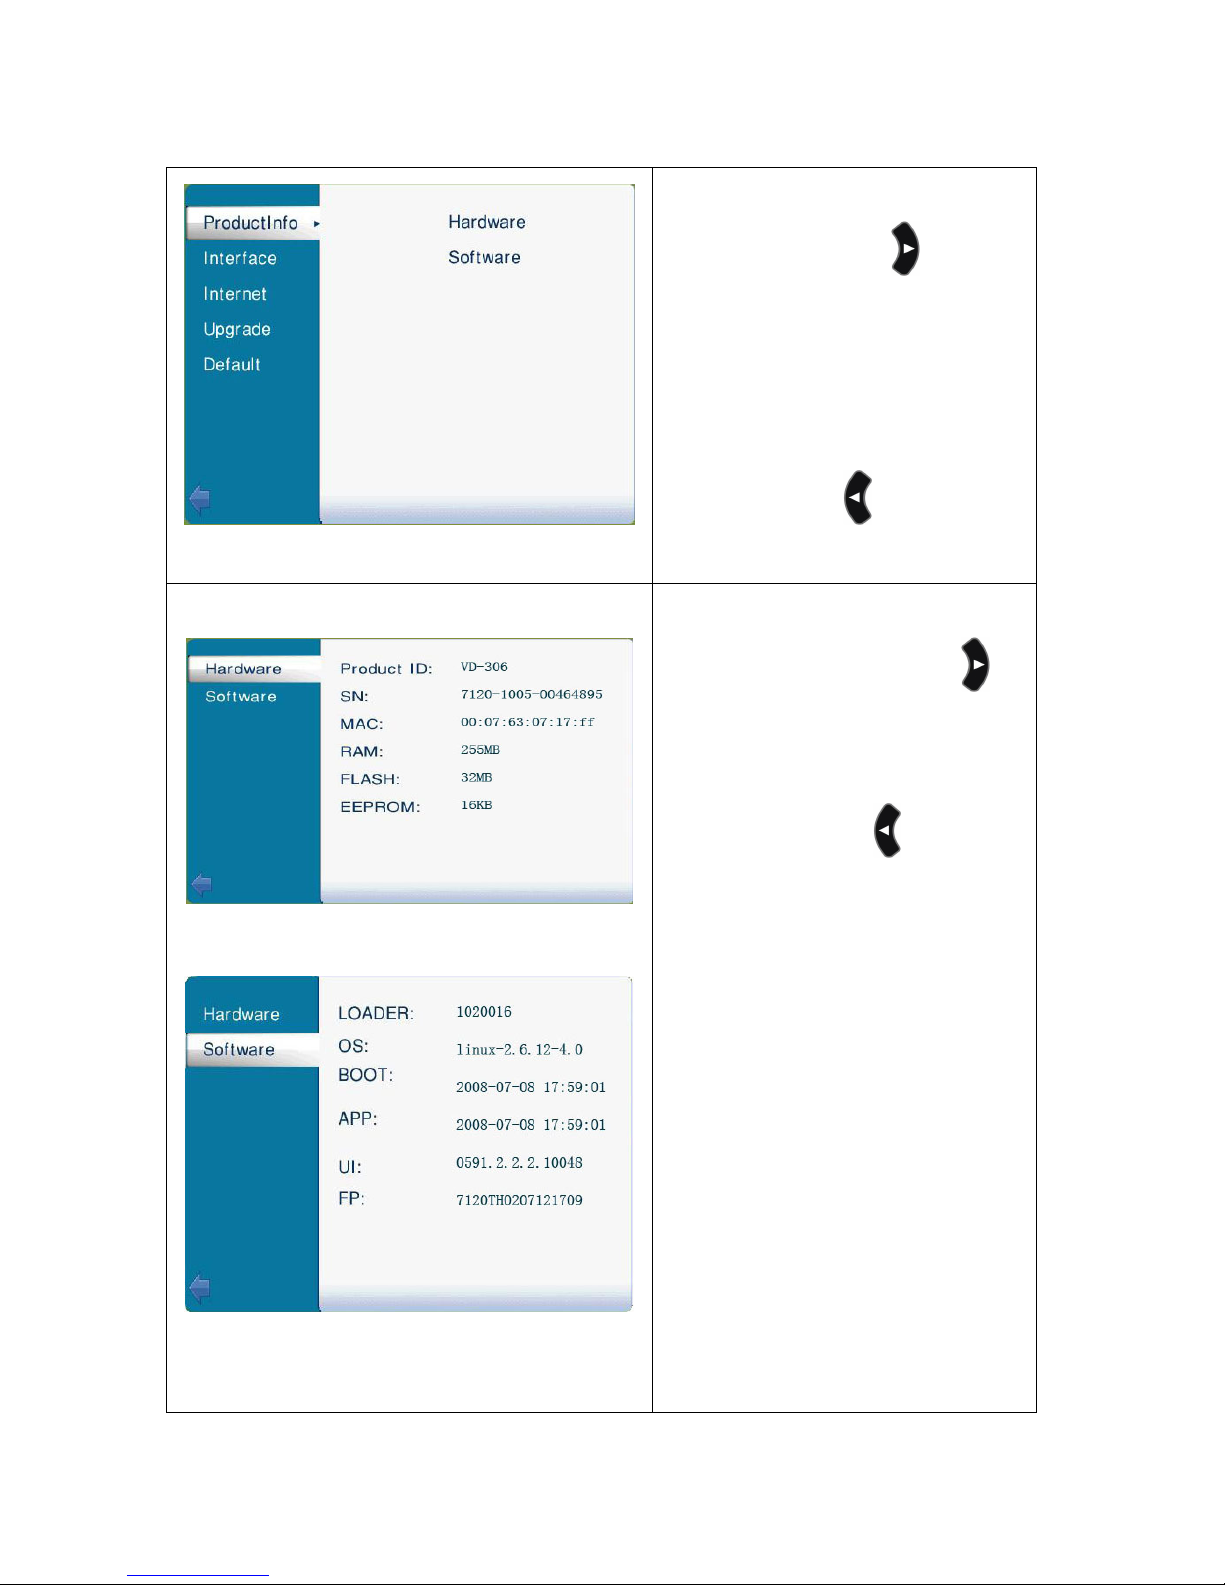
22
Select “System” on the main
setting menu; press enter into
“System” menu (pic22), it
including: ProductInfo Setting,
Interface Setting, Internet Setting,
Upgrade Setting and Default
setting. Press back to the
previous menu
23
24
Select “ProductInfo” on the
“System” menu, press
to
enter, choose “Hardware” (pic23)
or “Software” (pic24) for more
information. Press back to the
previous menu. (The last two
number of “Boot” is the current
firmware of VD-i)
Page 69
63
25
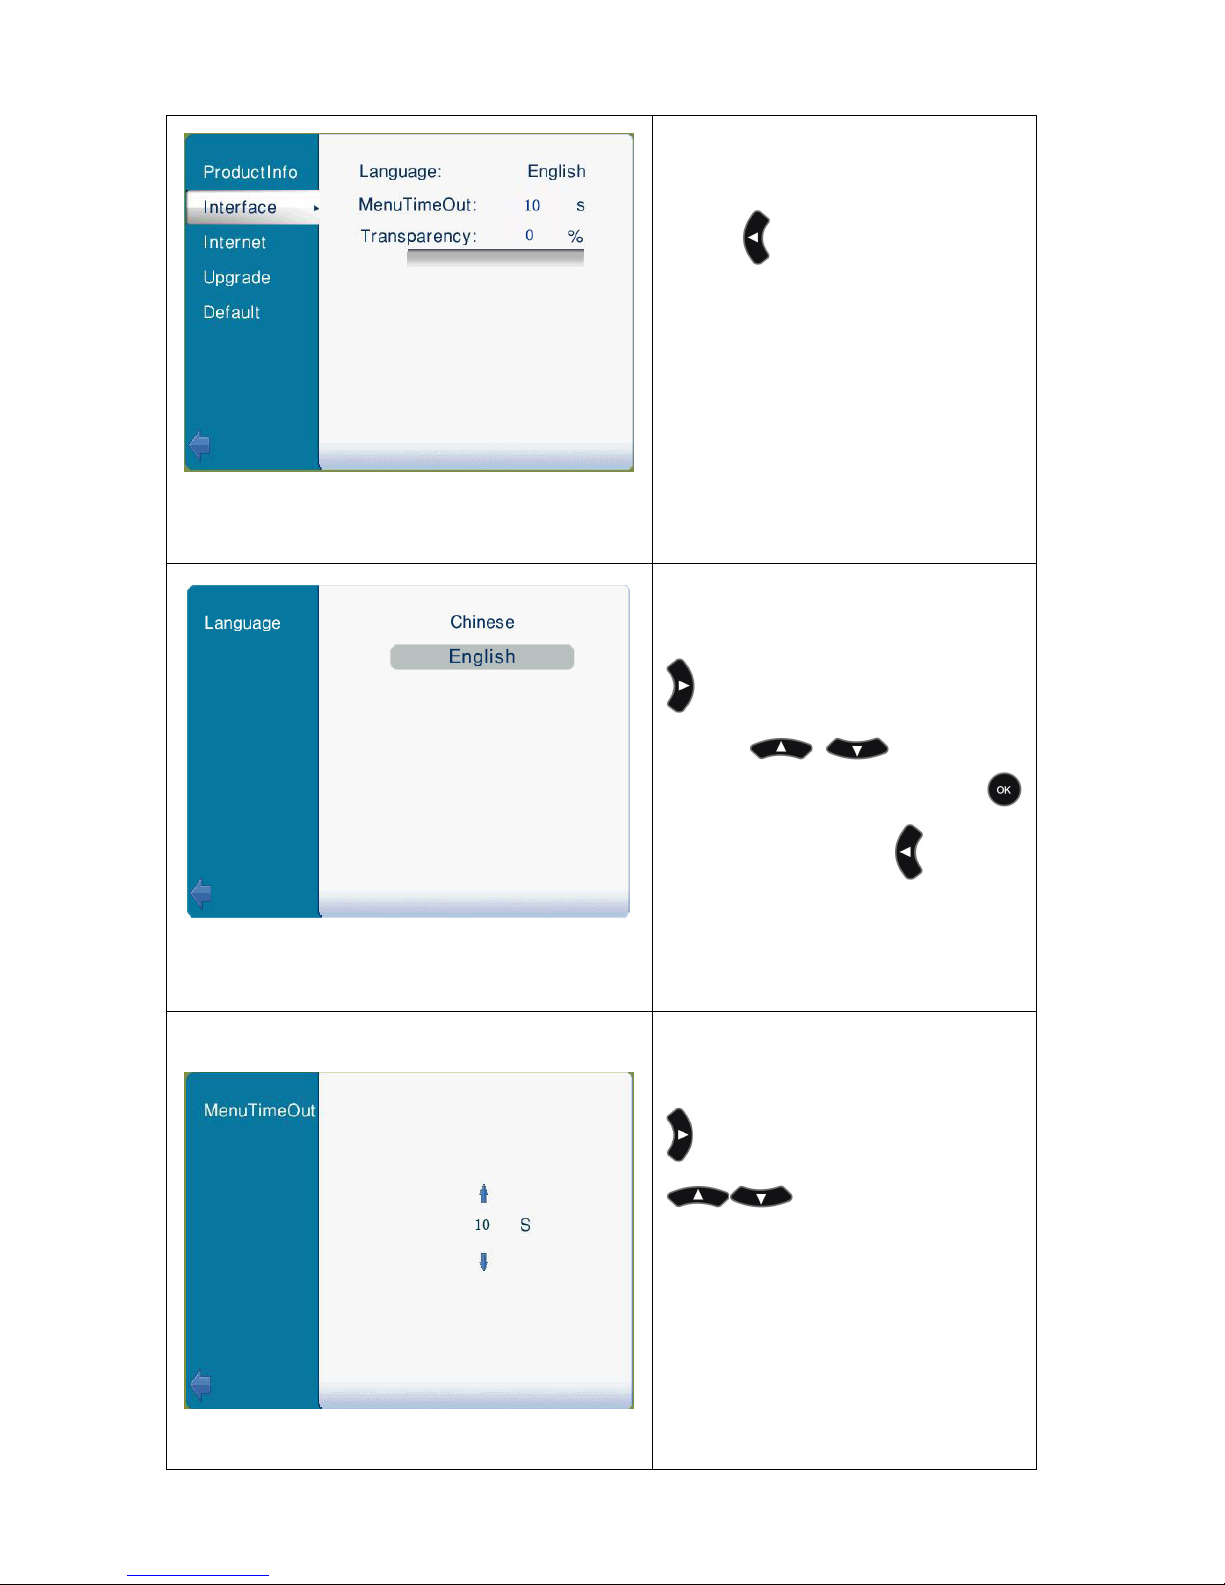
Select “Interface” setting (pic22)
on the “System” menu (pic25).
Press back to the previous
menu.
26
Select “Language” on the
“Interface” menu (pic25), press
to enter to it (pic26), and
press to select
“Chinese” or “English”. Press
to complete. Press back to
the previous menu.
27
Select “Menu Time Out” on the
“Interface” menu (pic25), press
enter (pic27), press
to adjust the display
time which is the time length of
some information displaying on
TV screen when no action is
undertaken.
Page 70
64
28
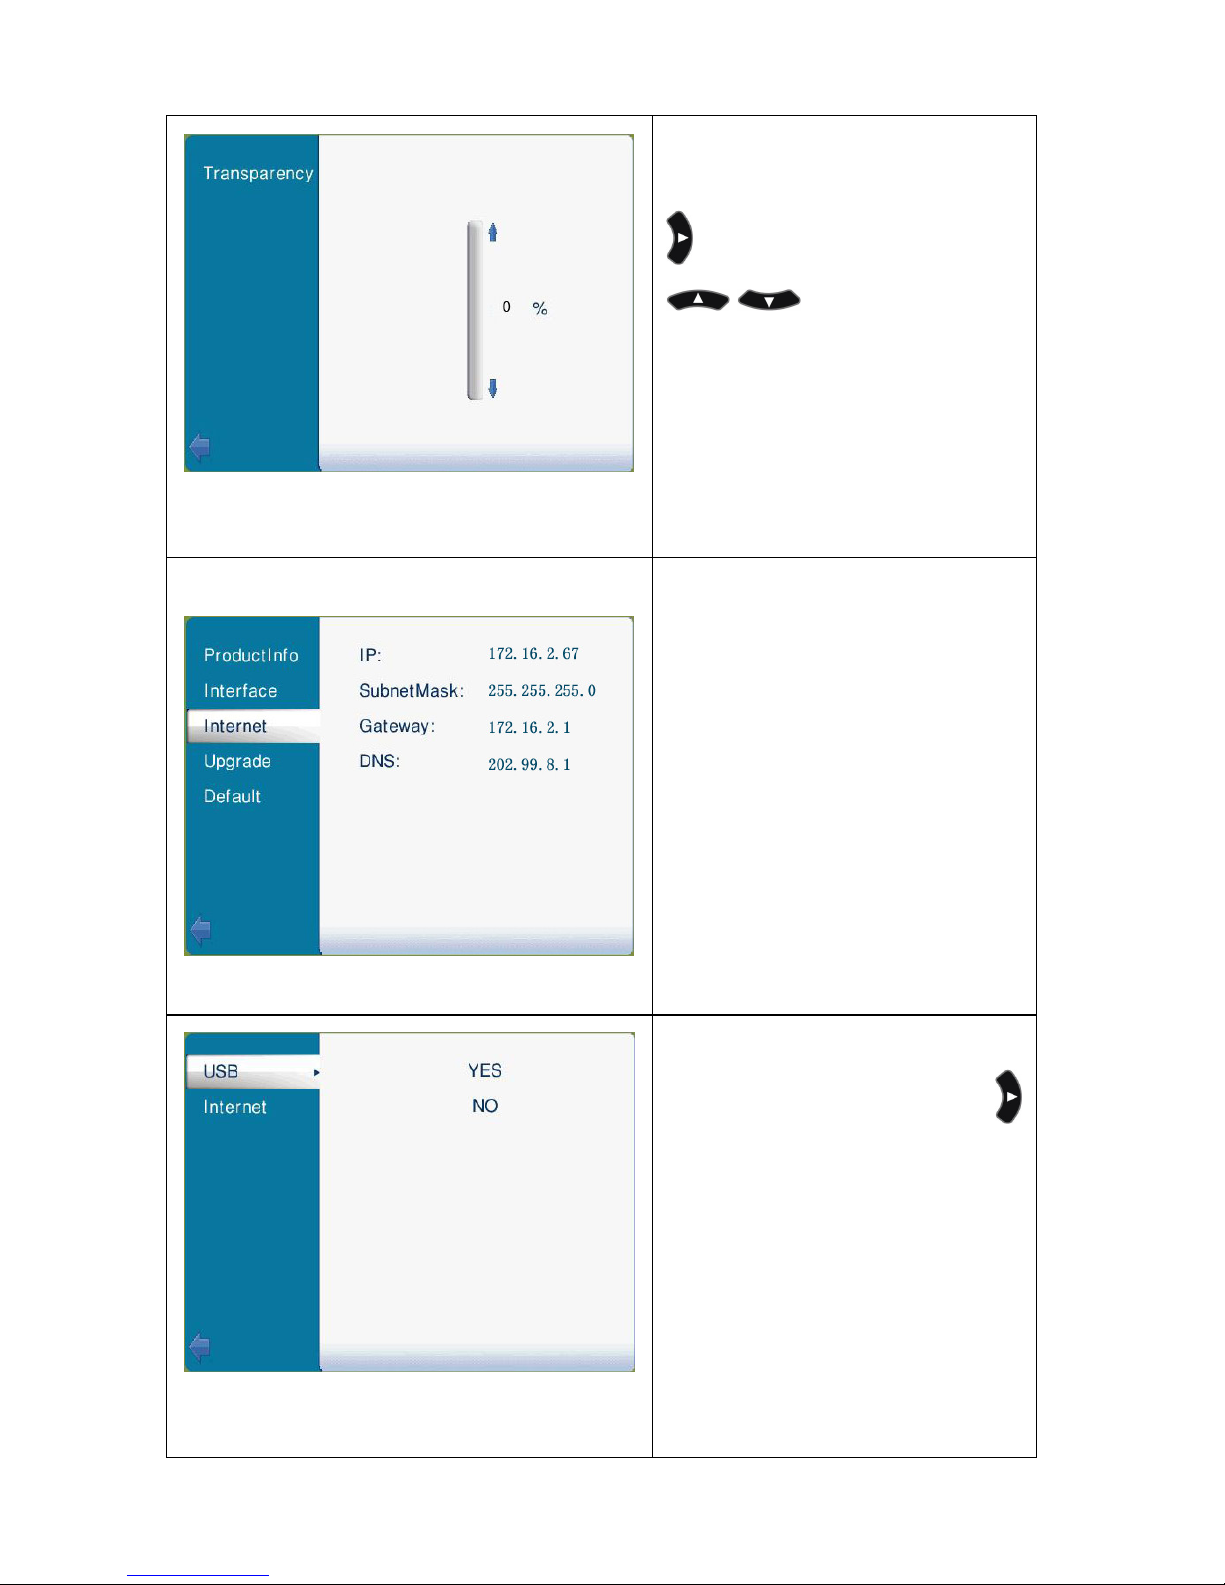
Select “Transparency” on the
“Interface” menu (pic25), press
to enter into it (
pic28), press
key to adjust the
transparency of the menu.
29
Select “Network” setting on the
“System” menu (pic22), the
current network setting will
display on the right area (pic29).
30
Select “Upgrade” setting on the”
System” menu (pic22), press
to enter (pic30).
Page 71
65
31
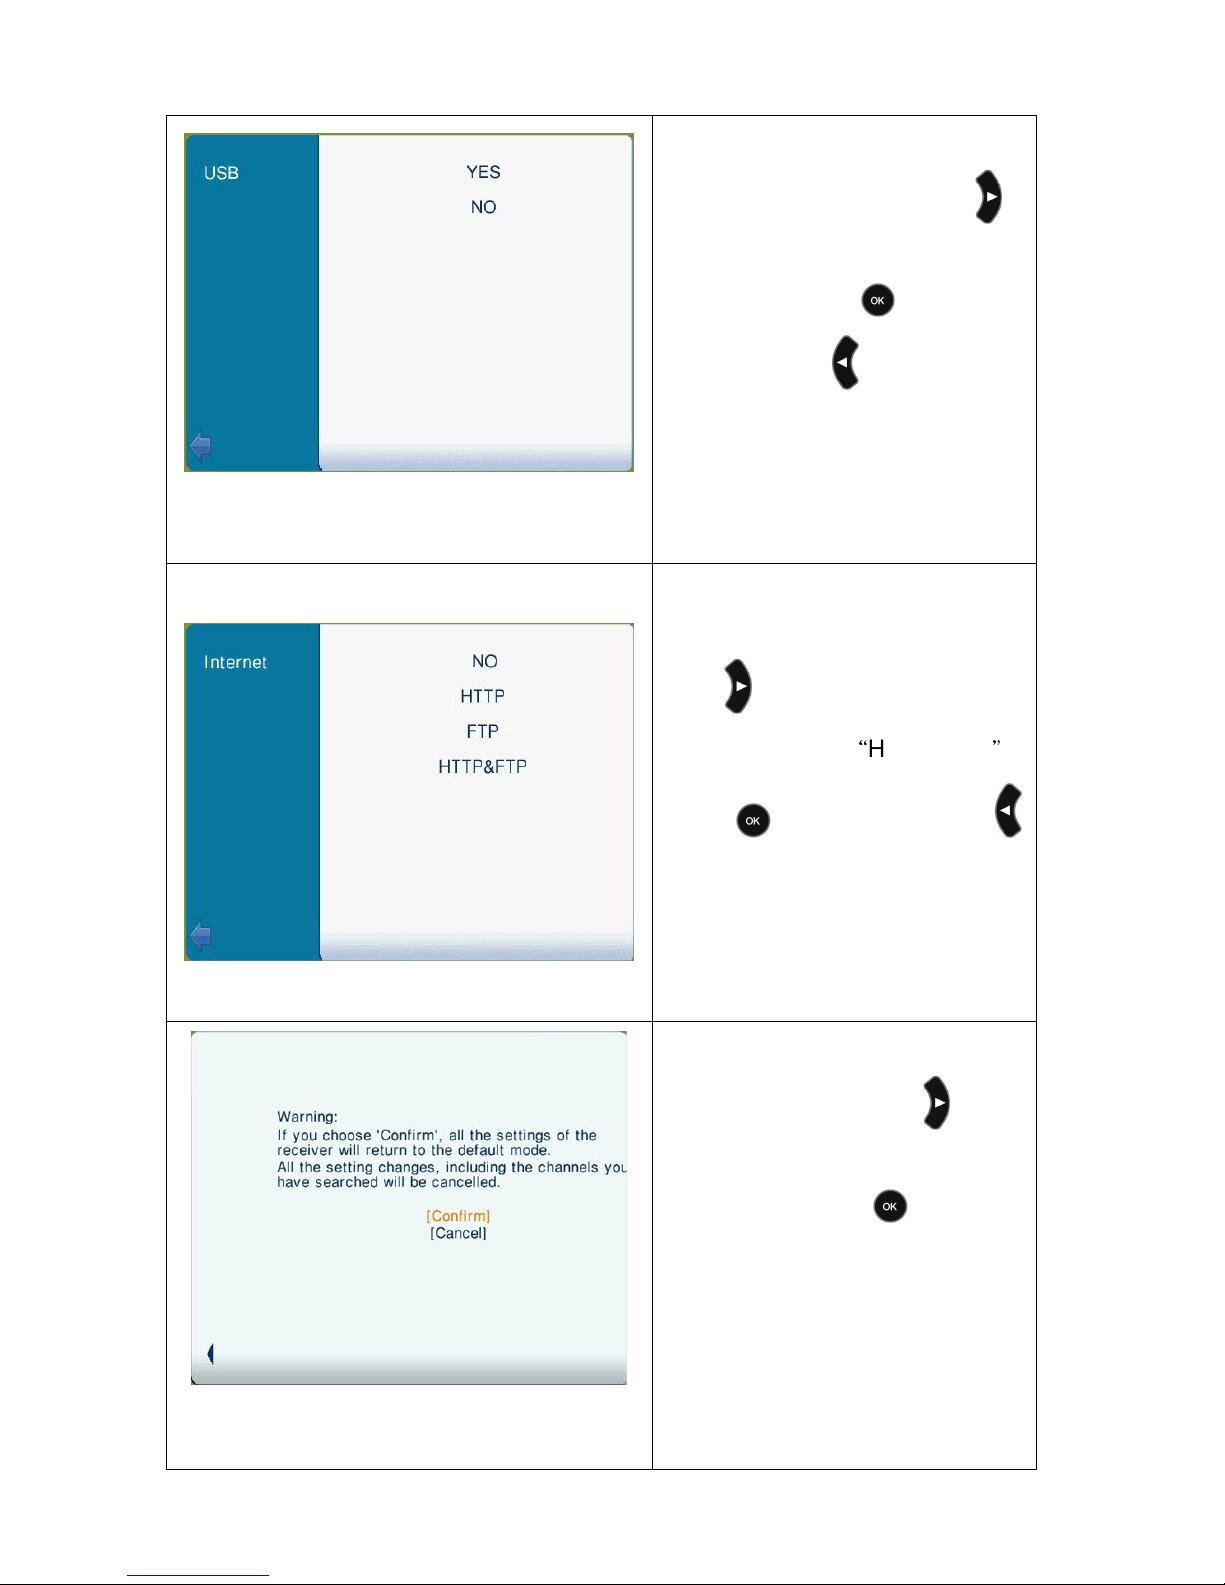
Select “USB” on the “Upgrade”
setting menu (pic30), press to
enter into it(pic31), select “YES”
or “NO” , press to confirm
setting. Press back into the
previous menu.
32
Select “Network” on the
“Upgrade” menu (pic30),
press to enter (pic32), choose ”
NO”, “HTTP” or “HTTP&FTP”,
press to complete. Press
back to the previous menu.
33
Select “Default ” on the “System”
menu(pic22), press enter
(pic33), select “Confirm” or
“Cancel”. Press to start
(Please read the notification
displayed on TV screen before
doing so.)
Page 72
66
9.2
9.29.2
9.2 EPG
EPGEPG
EPG Digital Program Guide
Digital Program GuideDigital Program Guide
Digital Program Guide
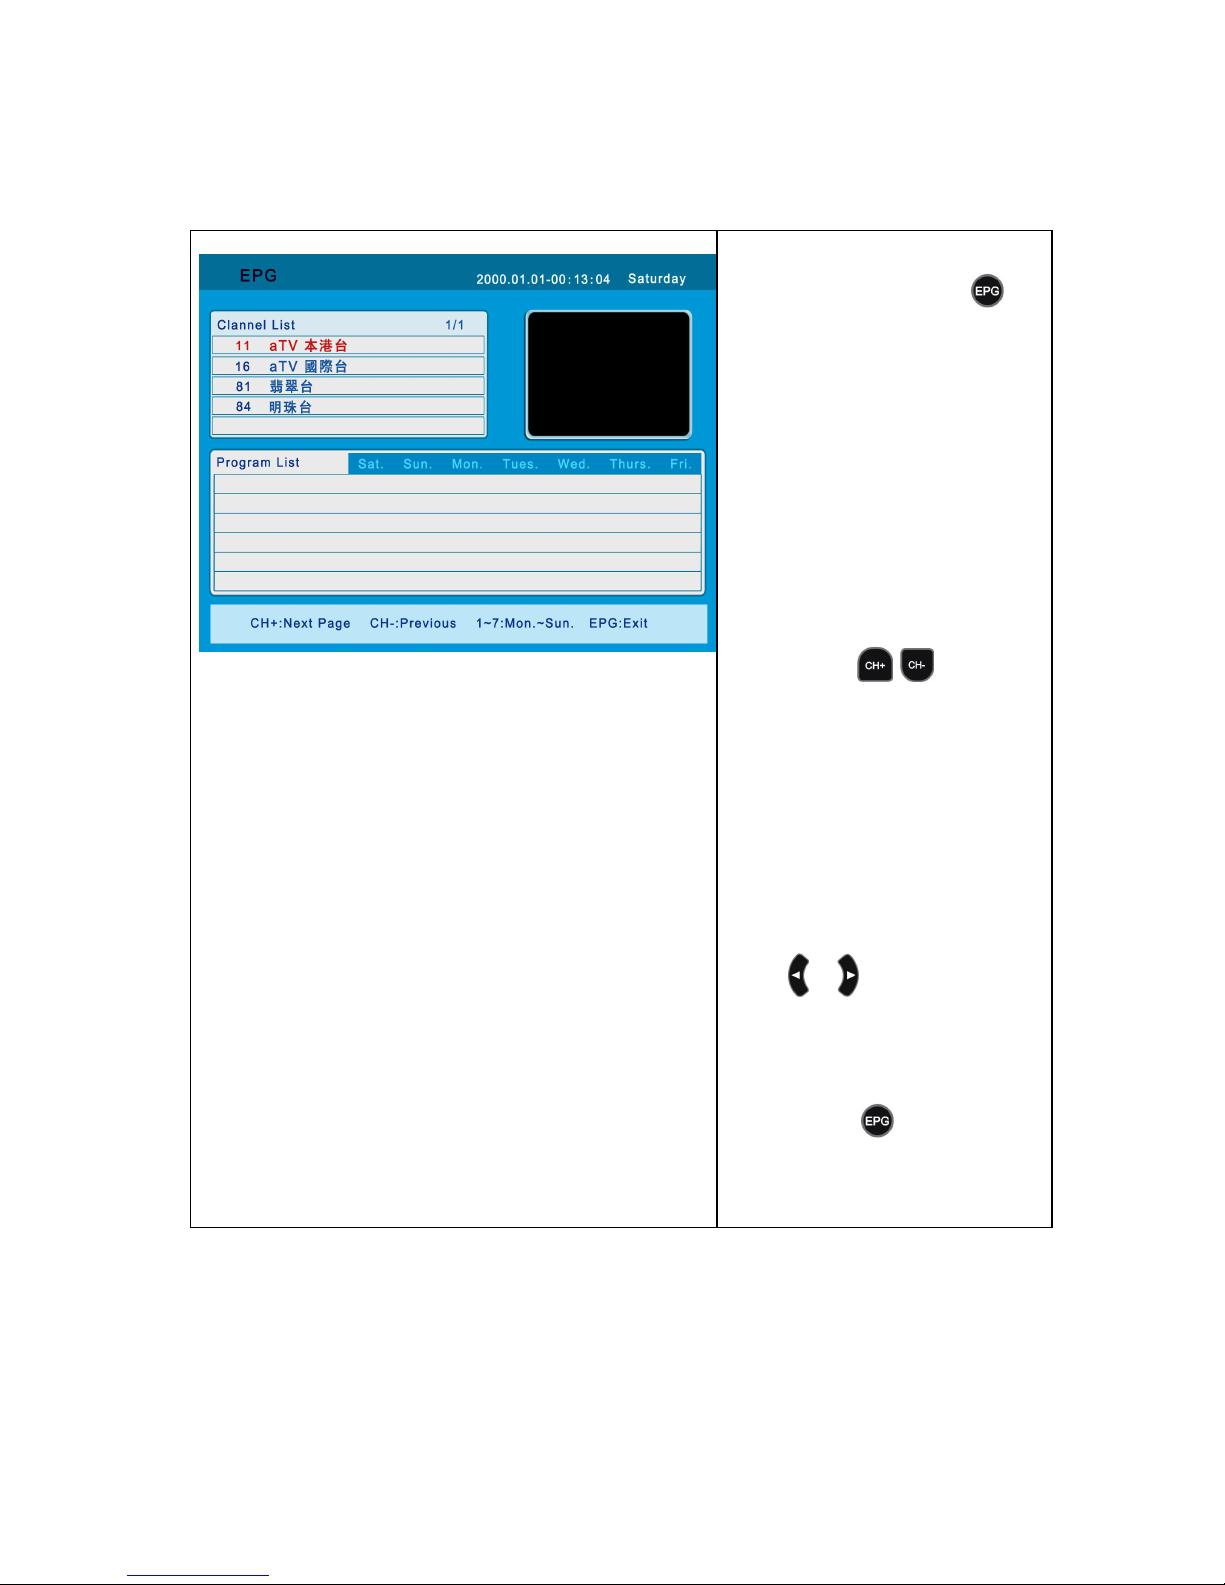
34
When watching TV
program, press
to
enter EPG Menu
(pic34), check program
schedule of next 7
days. Press the red key
to shift between
Channel List and
Program List
Multi-page channel list:
press / to go to
Next page / Last page.
Use the Navigation key
to select a channel.
Switch to Program List
menu, press 1~7 to
choose the day, press
to choose
program of Next day /
Last day.
Press to exit from
EPG menu to TV
program.
Page 73
67
9.3
9.39.3
9.3 Video Recording Function
Video Recording FunctionVideo Recording Function
Video Recording Function
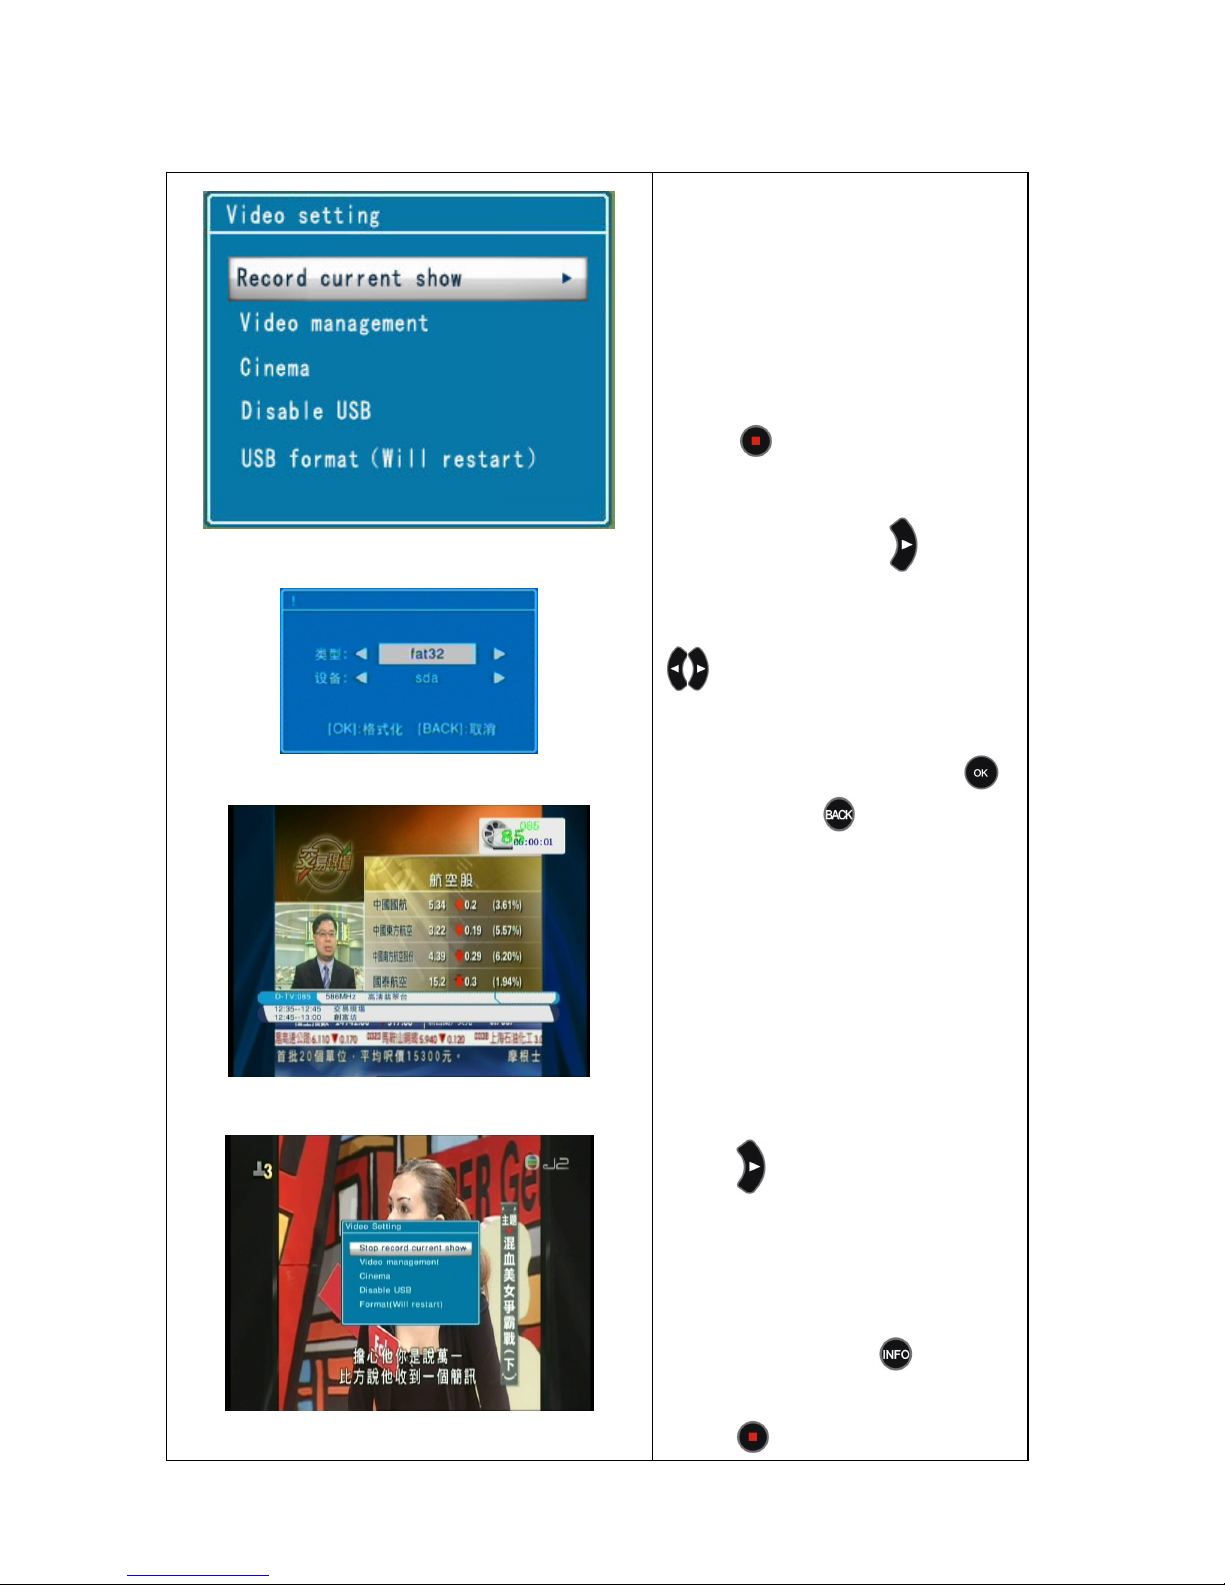
35
36
37
38
If you are going to use a new
USB Hard Disk (with self-power
supply) to record TV program,
the hard disk must be formatted
by the USB format function.
Press
to enter into “Video
setting” menu (pic35), choose
“USB format”, press to enter
into format menu (pic36), press
to choose HD
format(“fat32”, “ext2”, “ext3”).
Recommend “fat32”. Press
to start, press to cancel.
During disk formatting, DO NOT
cut off the power supply or
disconnect the disk from USB
port. The receiver will restart
after disk format is completed.
Select “Instant Video” in the
“Video setting” menu (pic35),
press to Start video
recording, then a recording icon
will show up for within 10
seconds on the right corner of
TV screen. Press
to
display current time, and then
press to enter into “video
Page 74
68
record setting” menu (pic38),
select “stop the current video
recording”, press to stop.
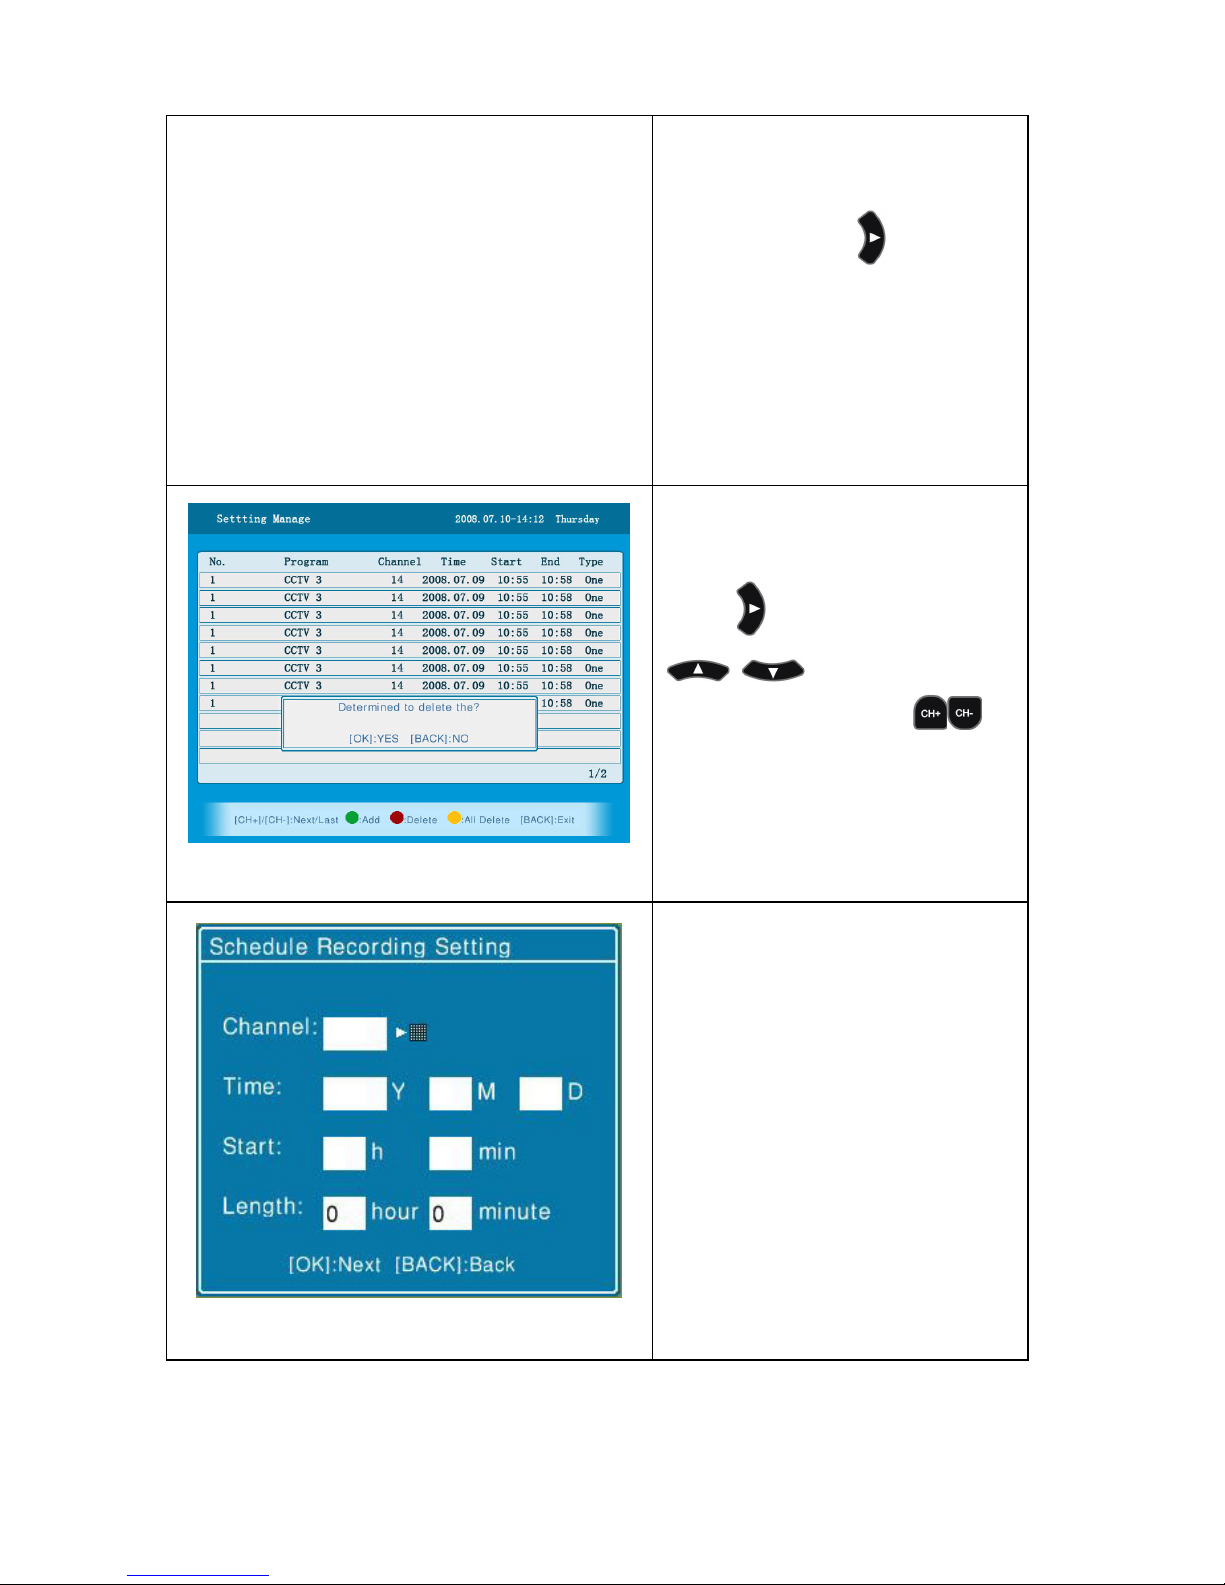
39
Select “Video management” on
the “video setting” menu (pic35),
press to enter (pic39), press
to choose one
recorded video. Press to
turn over pages, press green key
to add a record task, press red
key to delete a task, or press
yellow key to delete all tasks.
40
Page 75
69
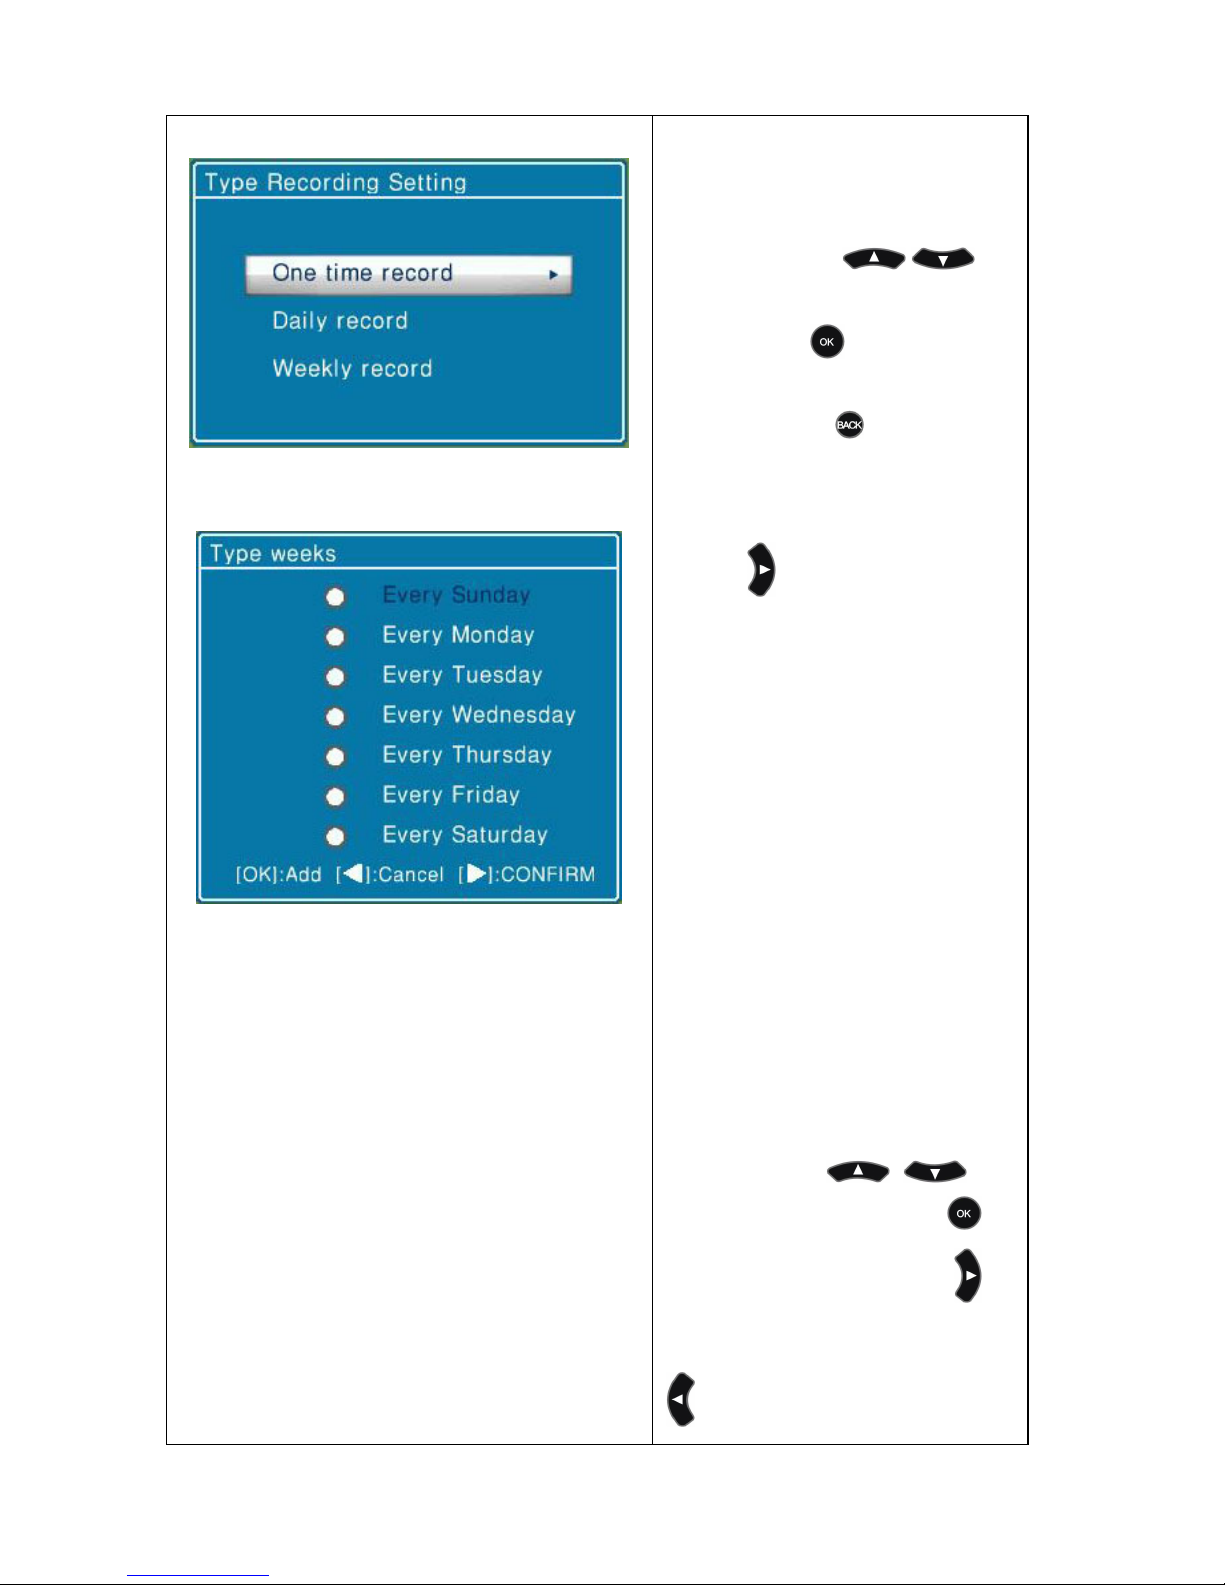
41
42
In the “Setting Manage” menu,
press the green key to enter into
“Schedule Recording setting”
(pic40), press to
choose input box, input your
info. Press to enter into
“Type Recording Setting”
(pic41), press back to the
previous menu.
Press to enter into next
step: 1. “One time record”,
means video record one time
according to the input info of
pic40.
2.”Daily record”, means the
program will be recorded one
time everyday according to the
input info of pic 40.
3.”Weekly record”, means one
day in each week, the program
will be recorded. Please refer
pic42. Use to
select date(s) and press to
confirm the date(s), press to
confirm the weekly setting, press
back to the previous menu.
Page 76
70
43
After the video recording setting
is completed, the receiver will
show successful. If the new
record task setting is contradict
with existed one, the screen will
display a notice page, you can
either choose renew the record
task or resume the existed task
then press to confirm.
“
44
In the “Video setting” menu
(pic35), select “Cinema” and
press to enter into it(pic44),
the information of all recorded
program on disk is displayed,
press to turn over
page, select one program then
press , the program will be
played in the small video window
on up-right corner of TV screen.
Press green key can switch
to/from full screen. If you want
delete the recorded program,
press red key. Press back to
the previous menu.
Page 77
71
45
You can also add record task in
EPG page. Press to enter
into “EPG” menu (pic45), press
the red key to display channel
list, select one program, press
to add record task, there will
be an icon displaying next to the
time of the program. If you want
to delete the record task, press
again, record task of this
program will be deleted and the
icon will disappear.
9.4
9.49.4
9.4 Other Features
Other FeaturesOther Features
Other Features
46
When watching TV program,
press to enter into “Favorite”
menu (pic46), press to
turn pages, press to switch
to the selected channel.
Page 78
72
47
When watching TV program,
press to enter into “HD TV”
menu (pic47), choose an
appropriate standard of: “NTSC”,
“PAL”, “480P”, “576P”,
“720P_60Hz”, “720P_50Hz”,
“1080I_60Hz”, “1080I_50Hz”,
“1080P_25Hz”, press to
confirm.
48
When watching TV program,
press to enter “Subtitles”
menu, choose appropriate one.
Press to confirm.
49
When watching TV program,
press to enter into “Audio
Track” menu, choose appropriate
one. Press to confirm.
Page 79
73
VD-i supports dual program recording within any two frequencies and watch another
program under these two frequencies.
There are three frequencies of DTV:
There are three frequencies of DTV:There are three frequencies of DTV:
There are three frequencies of DTV:
For example, when you record channel 85 and channel 81, you are able to watch
channel 11,16,82,83,84 at the same time.
For more information about supportable HDD, please visit www.vdigi.com.hk
Frequency 1) 11,16,81,84 11(Home)
16(World)
81(Jade)
84(Pearl)
Frequency 2) 82,83,85 82(J2)
83(Interactive Information Channel)
85(High Definition Jade)
Frequency3)12,13,14,15,17,19 12(News & Business)
13(His TV)
14(Her TV)
15(Plus TV)
17(CCTV 4)
19(HDTV)
Page 80
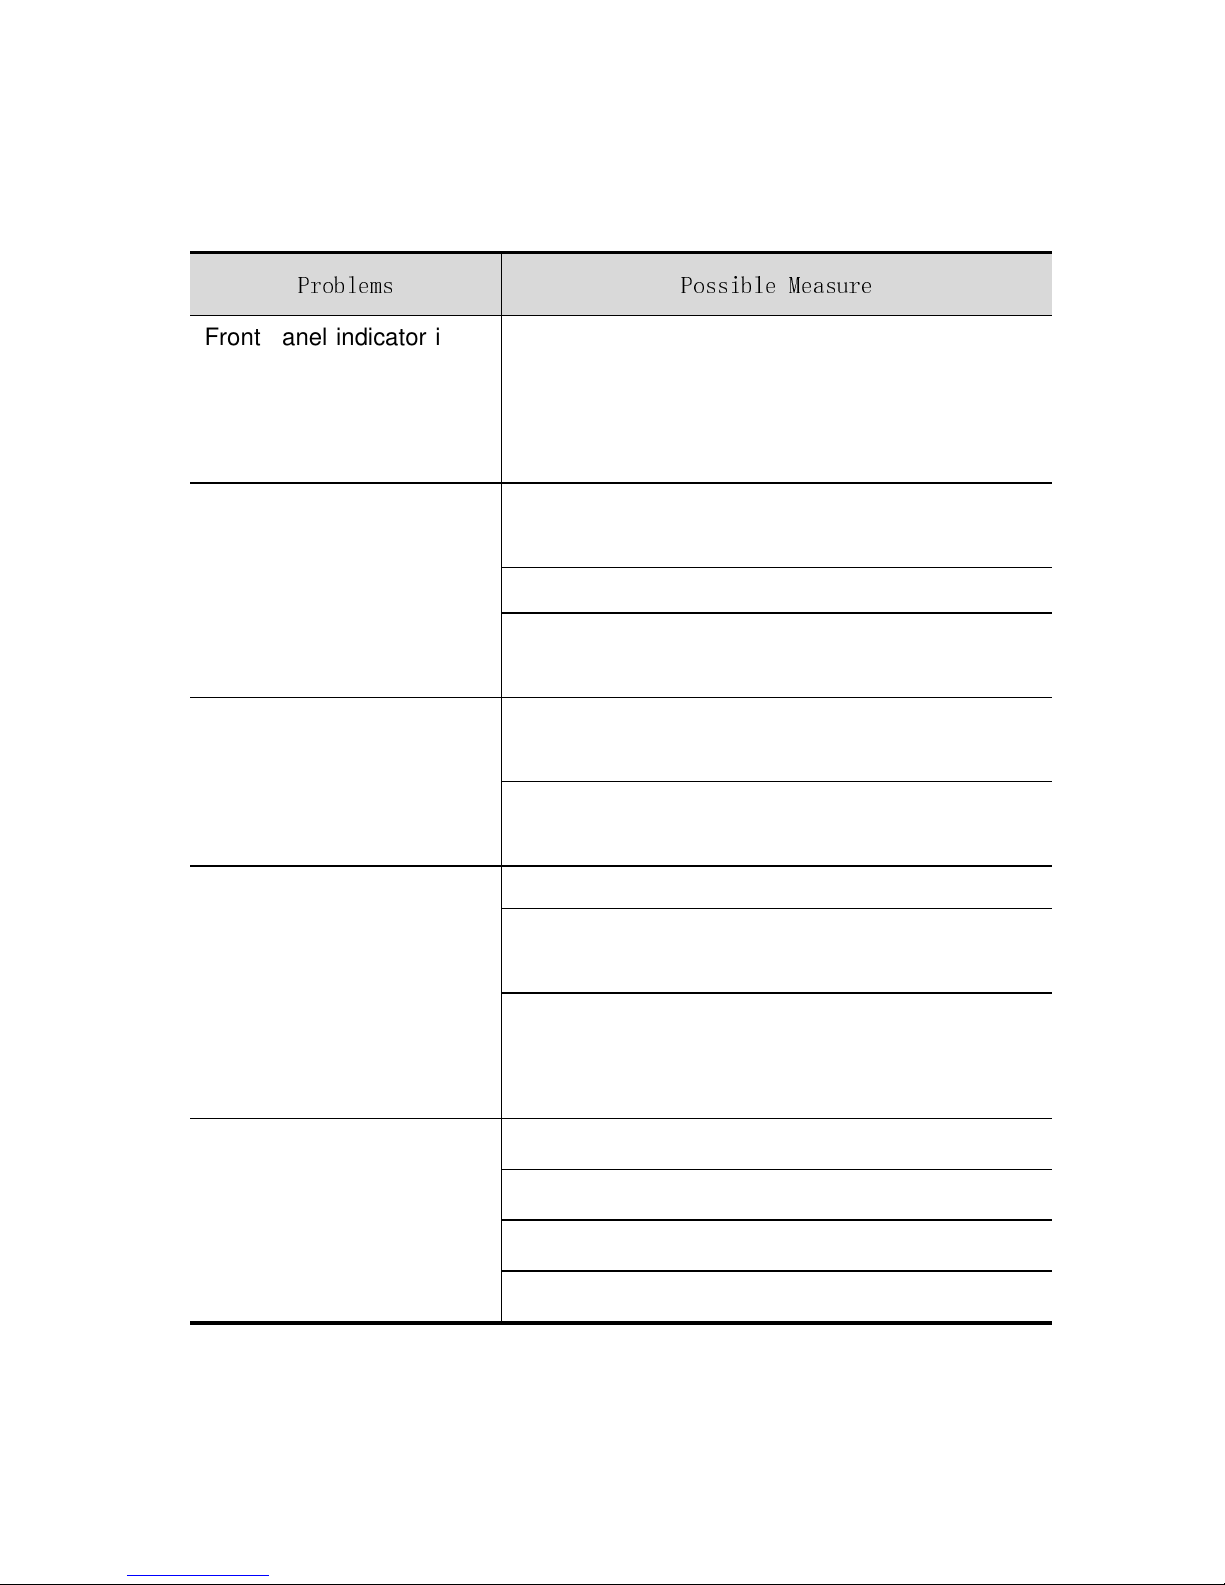
74
10
1010
10 TTTTroubleshooting
roubleshootingroubleshooting
roubleshooting
Problems
Possible Measure
Front panel indicator is off
and receiver does not
power on by pressing the
POWER key
Check if the power supply is connected properly.
No video
Check whether the video cable is connected
correctly and firmly.
Check whether the S-box is powered on.
Check whether TV is turned on, and TV input
mode is correct.
No audio
Check whether the audio cable is connected
correctly and firmly.
Adjust the sound volume of TV and receiver to
appropriate level.
Video picture is not good
Check whether the antenna installed properly
Check whether the antenna is connected
correctly and firmly to RI IN port of the receiver.
Check whether the antenna cable to receive is
too long.
Check with installation agent if needed.
RC does not work
Check whether batteries are mounted correctly.
Change the exhausted battery.
Use RC is within workable distance (7 meters)
Remove the hinder between RC and the receiver.
Note: If the problem remains or if you have problem not listed above, please
contact us or your sell agent for help.
Page 81
75
弘毅有限公司
弘毅有限公司弘毅有限公司
弘毅有限公司
Winning Perfect Ltd.
香港九龍長沙灣道
833
號長沙灣廣場二期
506室
Room 506, Tower 2, Cheung Sha Wan Plaza,
833 Cheung Sha Wan Road, Kowloon, Hong Kong
Tel: 852-28611109
Fax: 852-83437386
Email: [email protected]
Web site: www.vdigi.com.hk
 Loading...