

Page 1
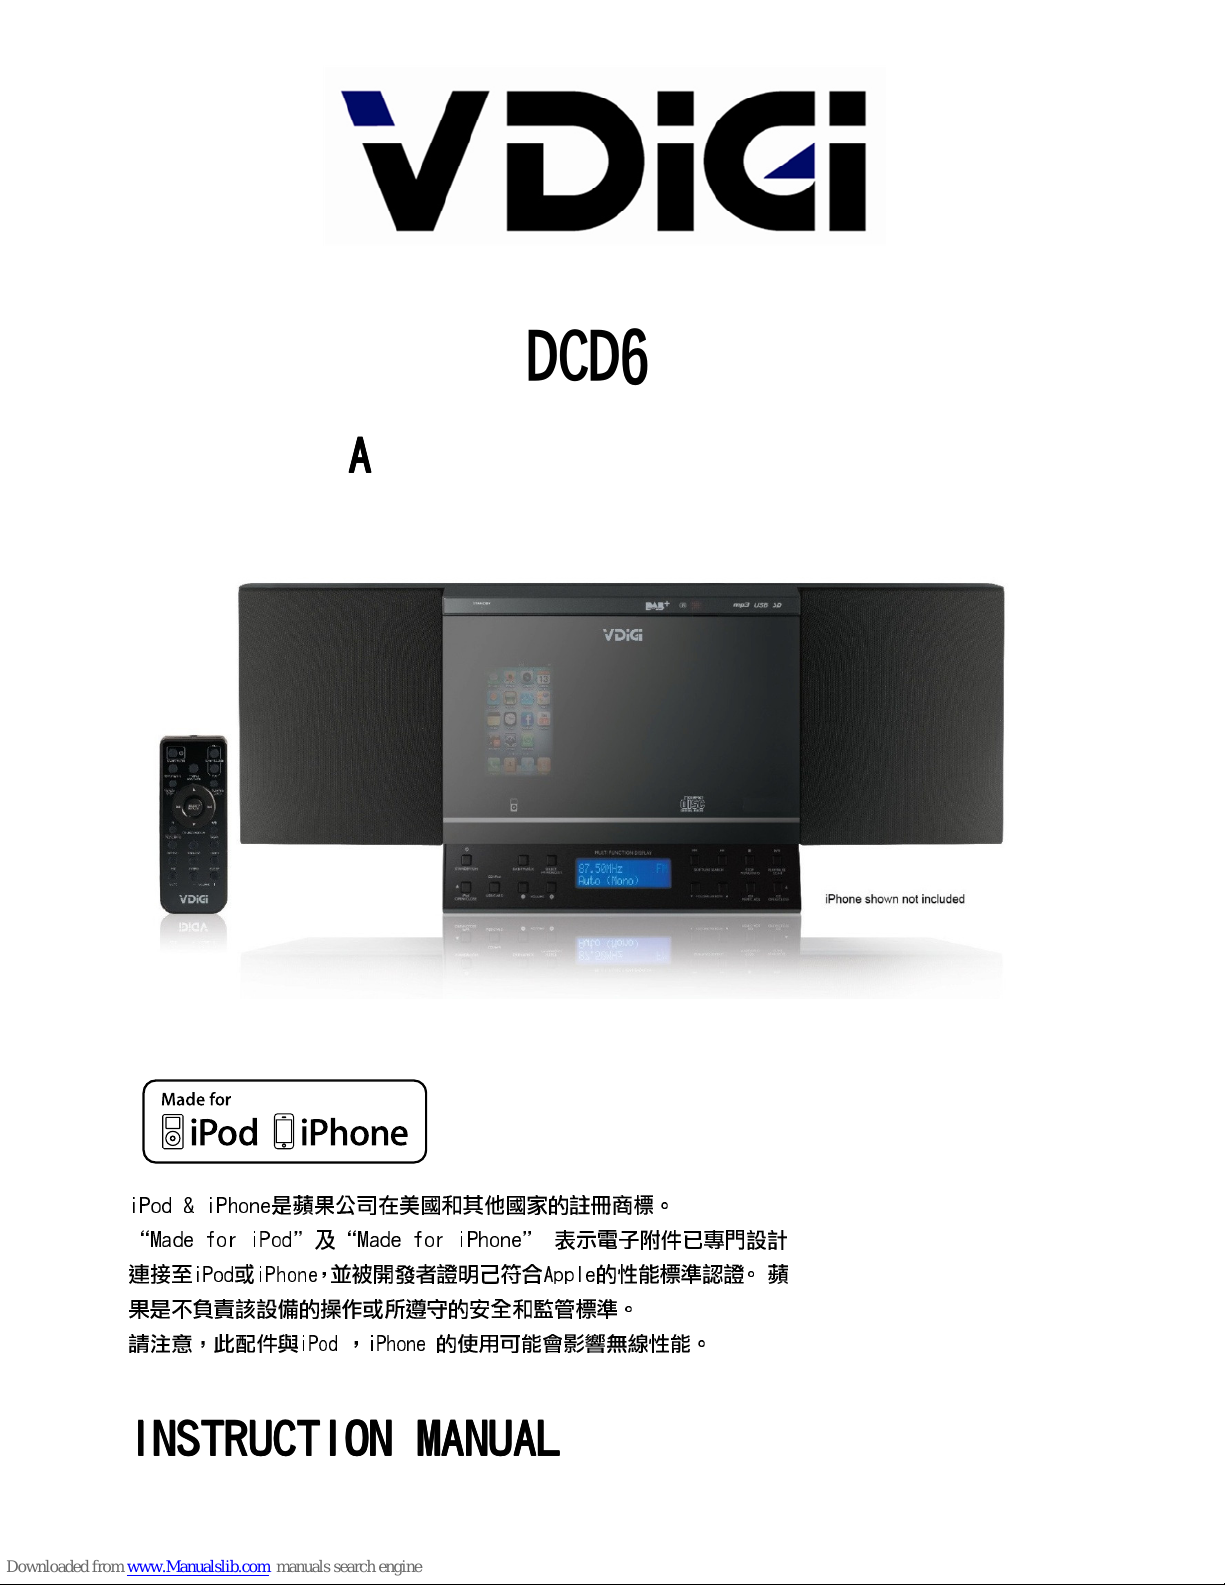
DCD6.0
DCD6.0DCD6.0
DCD6.0
DDDD
AAAA
BBBB
++++
微型音響組合用戶手冊
iPod & iPhone
是蘋果公司在美國和其他國家的註冊商標。
“Made for iPod”及
“Made for iPhone”
表示電子附件已專門設計
連接至
iPod或iPhone
,並被開發者證明己符合
Apple
的性能標準認證。 蘋
果是不負責該設備的操作或所遵守的安全和監管標準。
請注意,此配件與
iPod ,iPhone
的使用可能會影響無線性能。
INSTRUCTION MANUAL
INSTRUCTION MANUALINSTRUCTION MANUAL
INSTRUCTION MANUAL
Page 2
目錄
安全注意事項 P.2
重要事項 P.2
產品的裝配圖 P.3
功能及操作說明
P.4
遙控器 P.4
電池安裝 P.5
CD P.5
操作
開關/待機 P.6
時鐘設置 P.6
定時器設置 (遙控器) P.6
睡眠時間設置 (遙控器) P.6
收聽收音機 P.6-7
存儲和調用存儲的預設電台 P.7
顯示模式 P.7-8
CD/MP3/WMA的操作 P.8-9
USB/SD卡的操作 P.9
ID3的操作 P.9
重複播放功能(遙控器) P.9
程式功能(遙控器上) P.10
隨機播放(遙控器) P.10
前奏播放(遙控器) P.10
iPod / iPhone的操作 P.11
AUX輸入播放 P.11
EQ控制(遙控器) P.11
靜音設置(遙控器) P.11
使用耳機聽音樂 P.12
規格
P.12
----1111----
Page 3
安全注意事項
請先仔細閱讀本手冊以熟悉本產品功能,然後再嘗試操作本產品,以得到最佳及最可靠的聽覺享受和體驗。
重要事項
1.
請妥善保管本手冊以備將來參考。
2.
切勿將本產品靠近水源使用。產品上也不應放置如花瓶等可能會導致液體滲入的物件。切勿將本產品
安裝在以下地方
:
* - 直接暴露於陽光或靠近熱源安裝如暖爐、加熱器、爐灶或其他產生熱力的產品(包括擴音機)。
* - 會阻塞本產品任何通風出口或積滿灰塵的地方。
* - 經常震盪或潮濕的環境。
3.
切勿將明火源頭如燃點的蠟燭靠近本產品。
4.
棄置電池時要留意環保條例和對環境的影響。
5.
請確保留有足夠空間散熱。請與其他物件保留約10cm的散熱空間。
6.
切勿將報紙、布、窗簾等雜物阻塞通風出口。並在適中環境下使用本產品。
7.
請依據本手冊操作本產品。
8.
在首次操作本產品時,請確保電插頭已正確插入電源插座。
9.
電源插頭是一個中斷電源設備,須隨時可以操作。如須完全中斷電源,請將電插頭從電源插座拔出。
10.
本產品在強靜電幹擾的情況下可能無法正常操作,請依據本手冊自行關閉及重開本產品。如情況依然
存在,請將本產品 放在其他地方使用。
11.
請勿自行拆開螺絲釘或外殼。所有維修程式須由合格的技術人員進行,請轉交給弘毅有限公司檢查。
小心︰為減少觸電危險,請勿自行拆開外殼。所有維修程式須由合格技術人員進行,請轉交
弘毅有限公司檢查。
本圖標說明產品內有構成觸電危險的電壓。
本圖標說明隨機
附送
的操作和維修
指示具
有重要的意義。
警告
︰減少火警或觸電的危險,切勿將本產品暴露於雨水或濕
氣之
中。
注
意︰本產品經長時間操作會發熱,
此乃
正常
現象且
並不
表示
本產品
故障
。外來的電力幹擾/雜訊或靜電放
電均有可能使內置的
微處理器失去
功能。
如本產品無法正常操作,請關閉及將電插頭完全地從電源插座拔出,然後將電插頭插回並 重開本產
品。
過大
的音量可使聽力受損。
本機所附的遙控器有可能操控到其他電器產品, 敬請留意.
----2222----
Page 4
產品的裝配圖
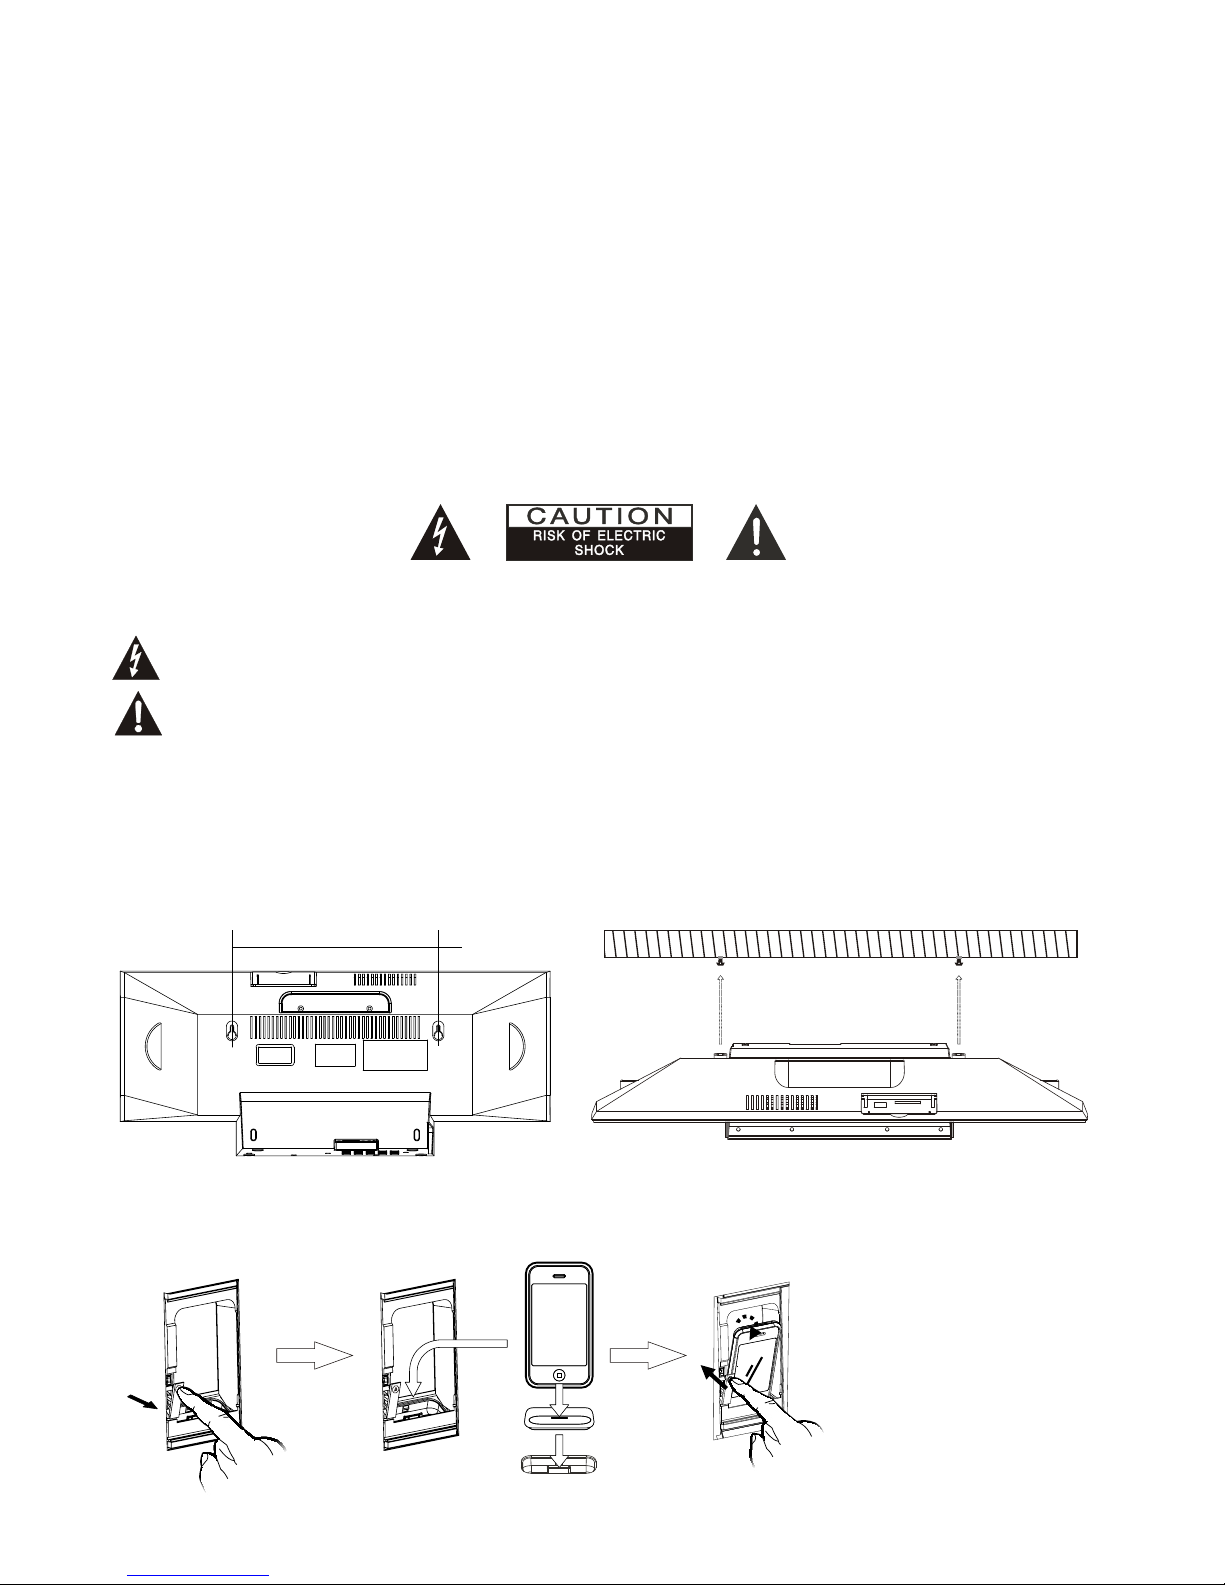
1.
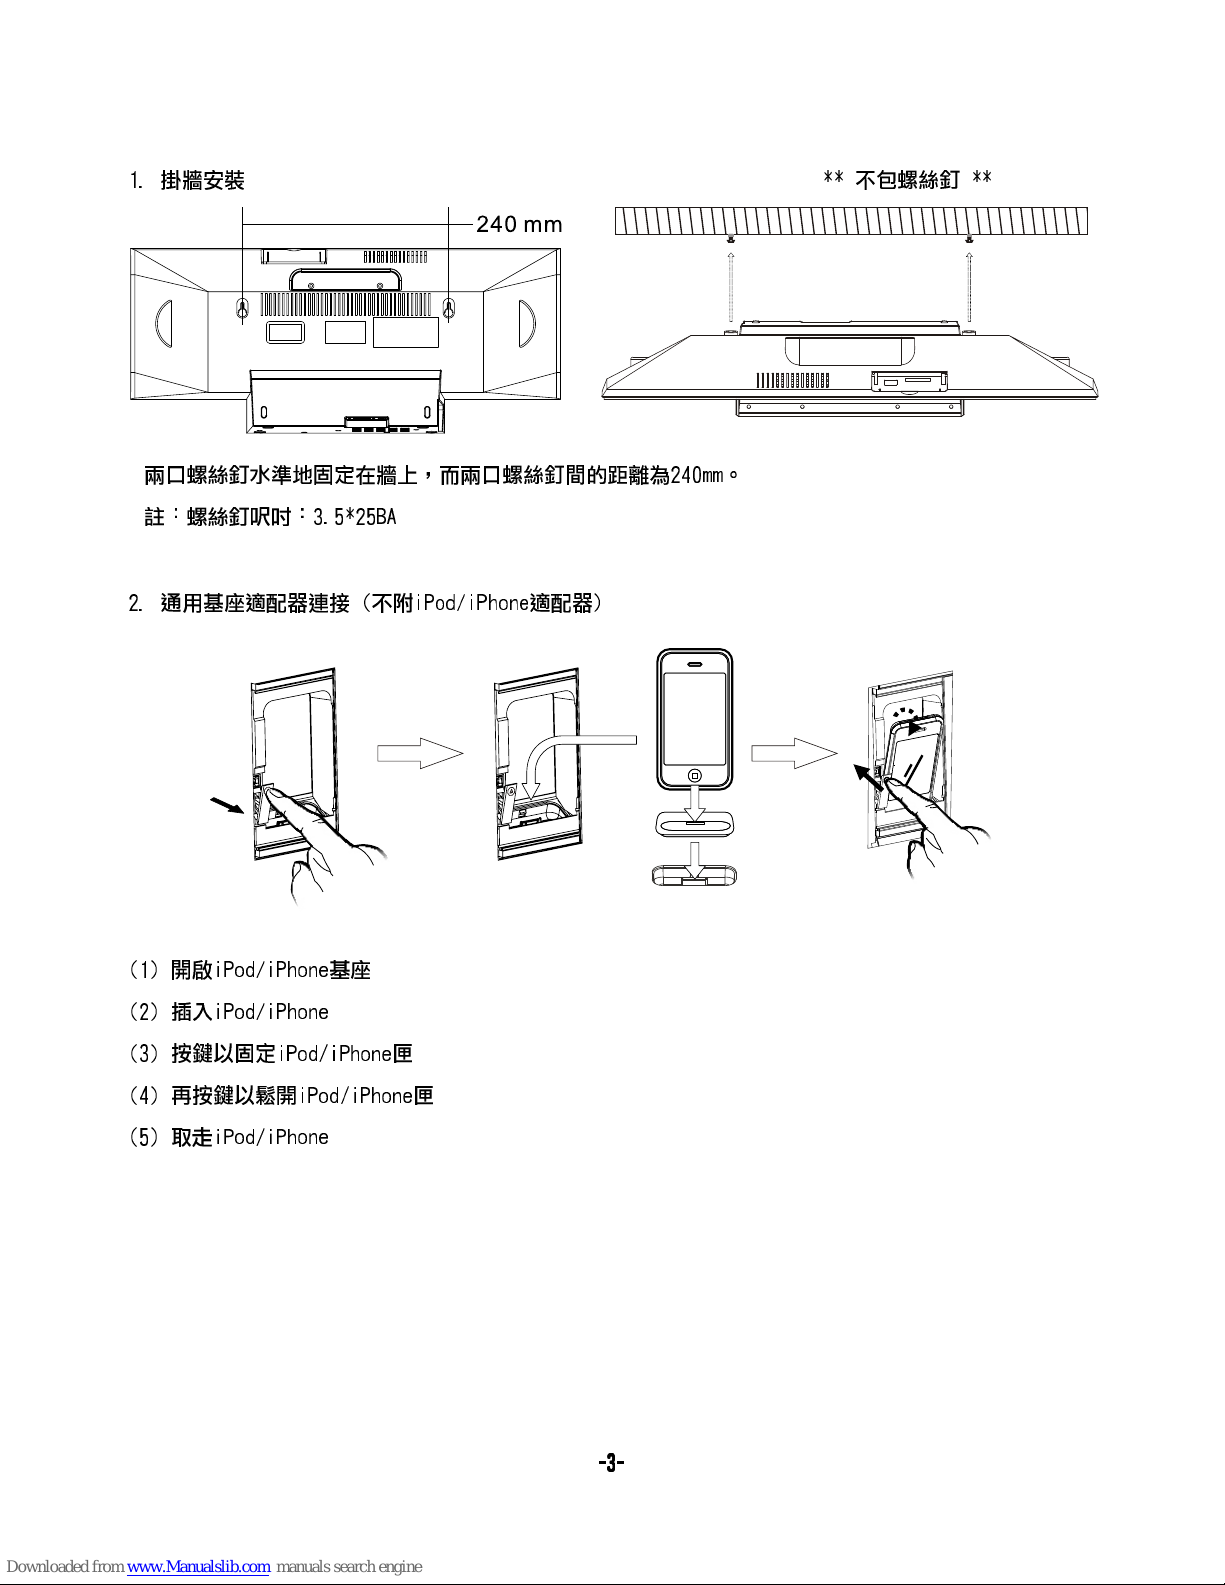
掛牆
安裝 ** 不包螺絲釘 **
兩
口螺絲釘水準地
固定在牆
上,
而兩
口螺絲釘間的
距離
為240mm。
註
︰螺絲釘
呎吋︰3.
5*25BA
2.
通用基座適配器連接 (不附iPod/iPhone適配器)
(1) 開啟i
Pod/iPhone基座
(2) 插入iPod/iPhon
e
(3) 按鍵以固定iPod/iPhone匣
(4) 再
按鍵以鬆開i
Pod/iPhone匣
(5) 取走iPod/iPhon
e
----3333----
Page 5
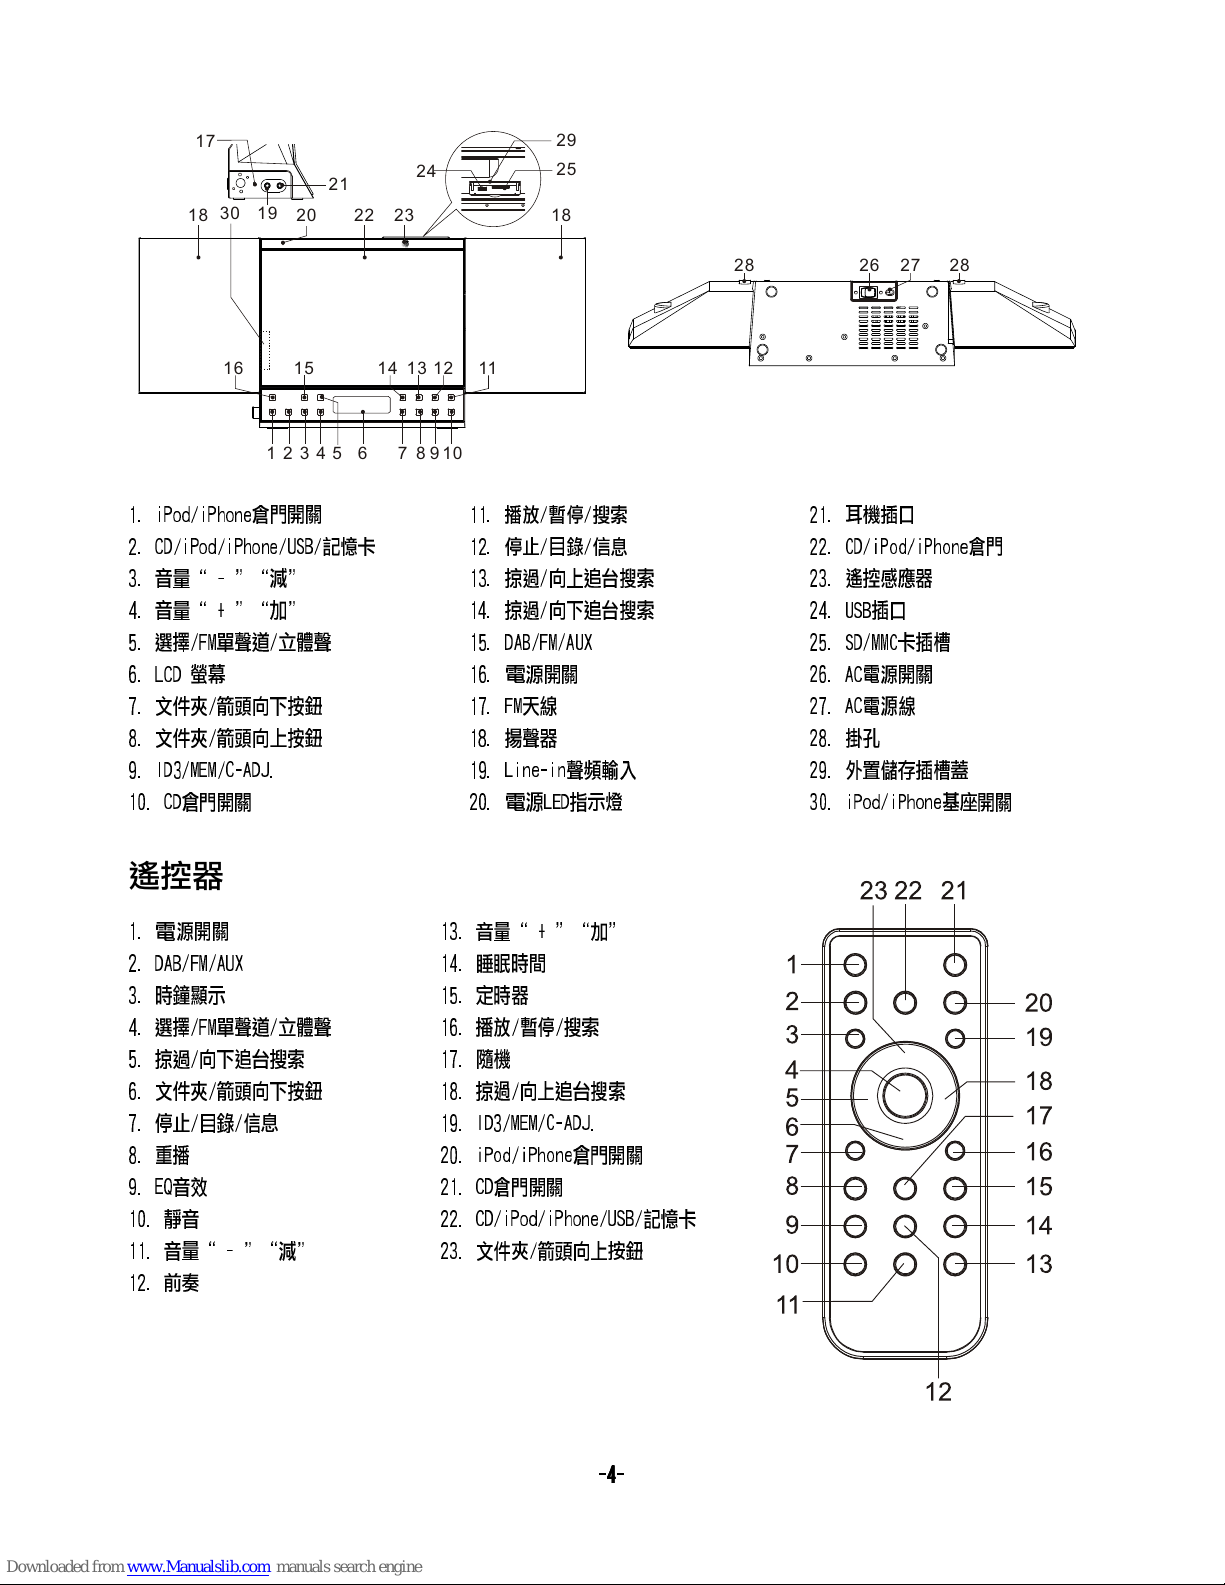
功能及操作說明
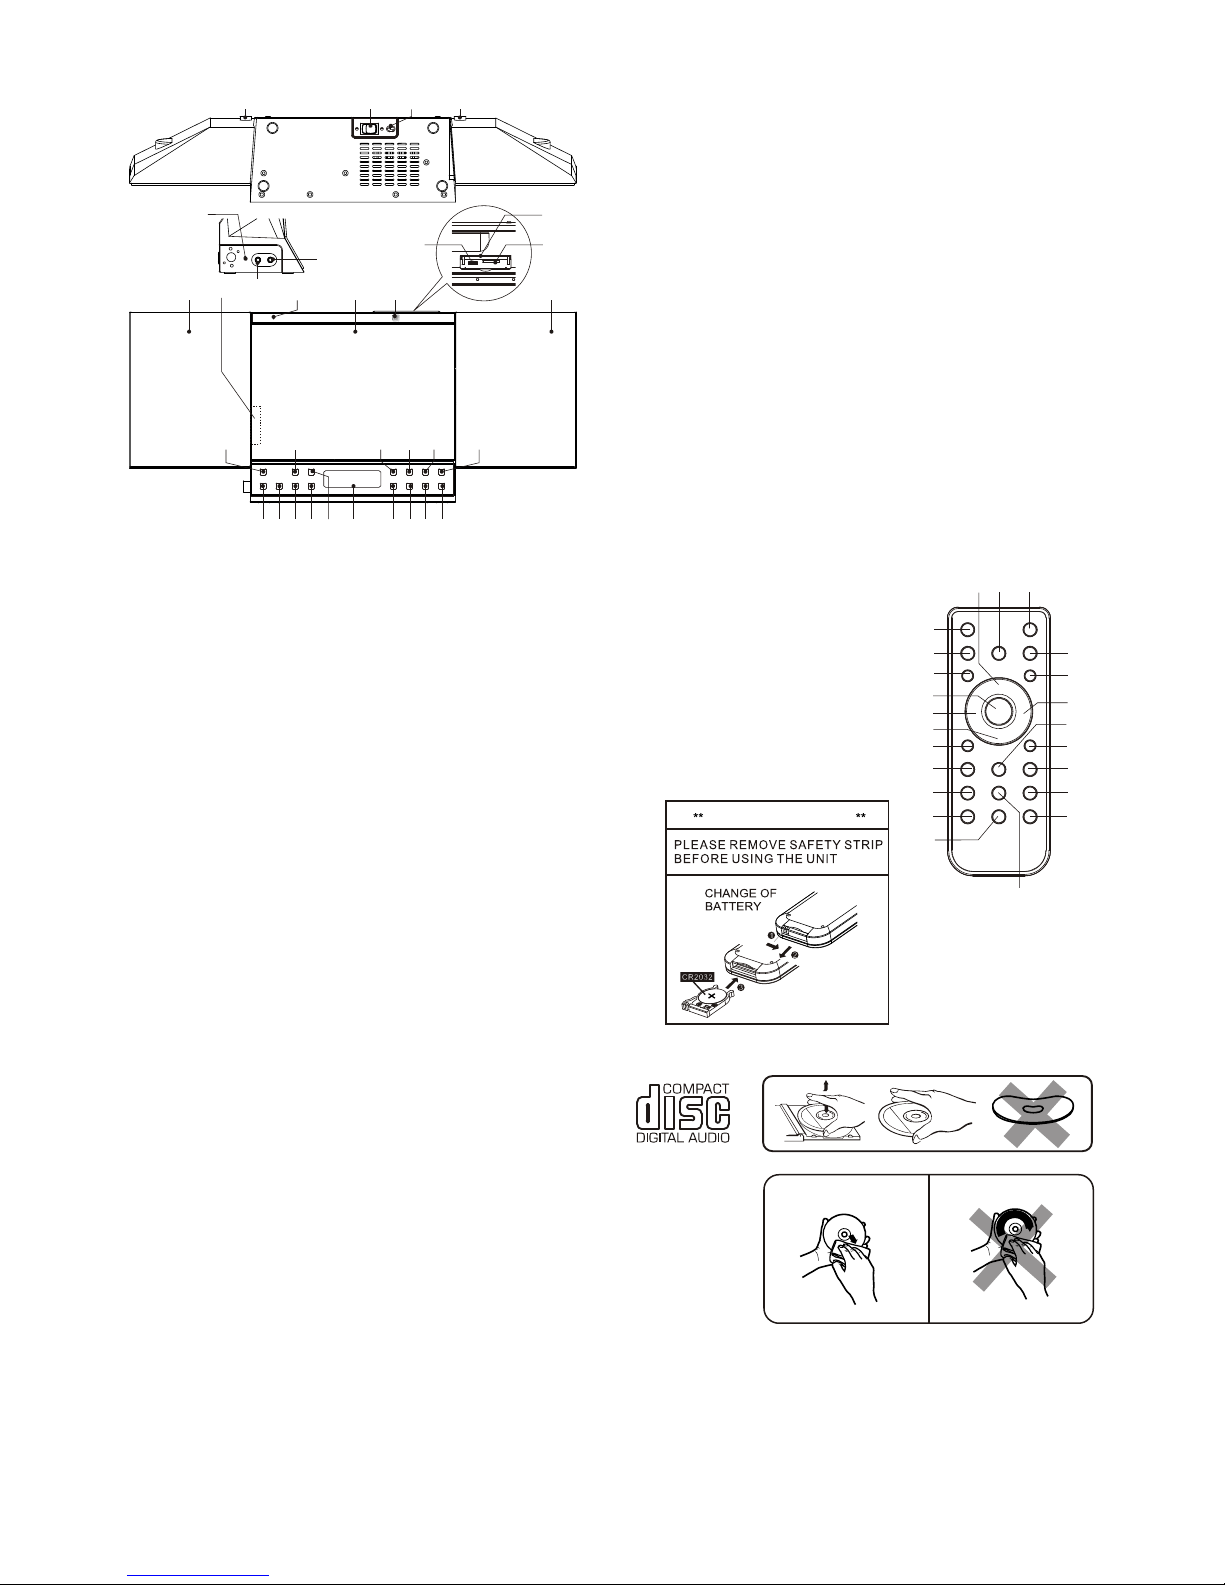
1. iPod/iPhone倉門開關
2. CD/iPod/iPhone/USB/記憶卡
3. 音量“ - ”“減”
4. 音量“ + ”“加”
5. 選擇/FM單聲道/立體聲
6. LCD 螢幕
7. 文件夾/箭頭向下按鈕
8. 文件夾/箭頭向上按鈕
9. ID3/MEM/C-ADJ.
10. CD倉門開關
11. 播放/暫停/搜索
12. 停止/目錄/信息
13. 掠過/向上追台搜索
14. 掠過/向下追台搜索
15. DAB/FM/AUX
16. 電源開關
17. FM天線
18. 揚聲器
19. Line-in聲頻輸入
20. 電源LED指示燈
21. 耳機插口
22. CD/iPod/iPhone倉門
23. 遙控感應器
24. USB插口
25. SD/MMC卡插槽
26. AC電源開關
27. AC電源線
28. 掛孔
29. 外置儲存插槽蓋
30. iPod/iPhone基座開關
遙控器
1. 電源開關
2. DAB/FM/AUX
3. 時鐘顯示
4. 選擇/FM單聲道/立體聲
5. 掠過/向下追台搜索
6. 文件夾/箭頭向下按鈕
7. 停止/目錄/信息
8. 重播
9. EQ音效
10. 靜音
11. 音量“ - ”“減”
12. 前奏
13. 音量“ + ”“加”
14. 睡眠時間
15. 定時器
16. 播放/暫停/搜索
17. 隨機
18. 掠過/向上追台搜索
19. ID3/MEM/C-ADJ.
20. iPod/iPhone倉門開關
21. CD倉門開關
22. CD/iPod/iPhone/USB/記憶卡
23. 文件夾/箭頭向上按鈕
----4444----
26
27 2828
19
21
24
25
18 20 22 23 18
1 2 3 4 5 6 7 8 9 1 0
111213141516
17
29
30
Page 6
電池安裝
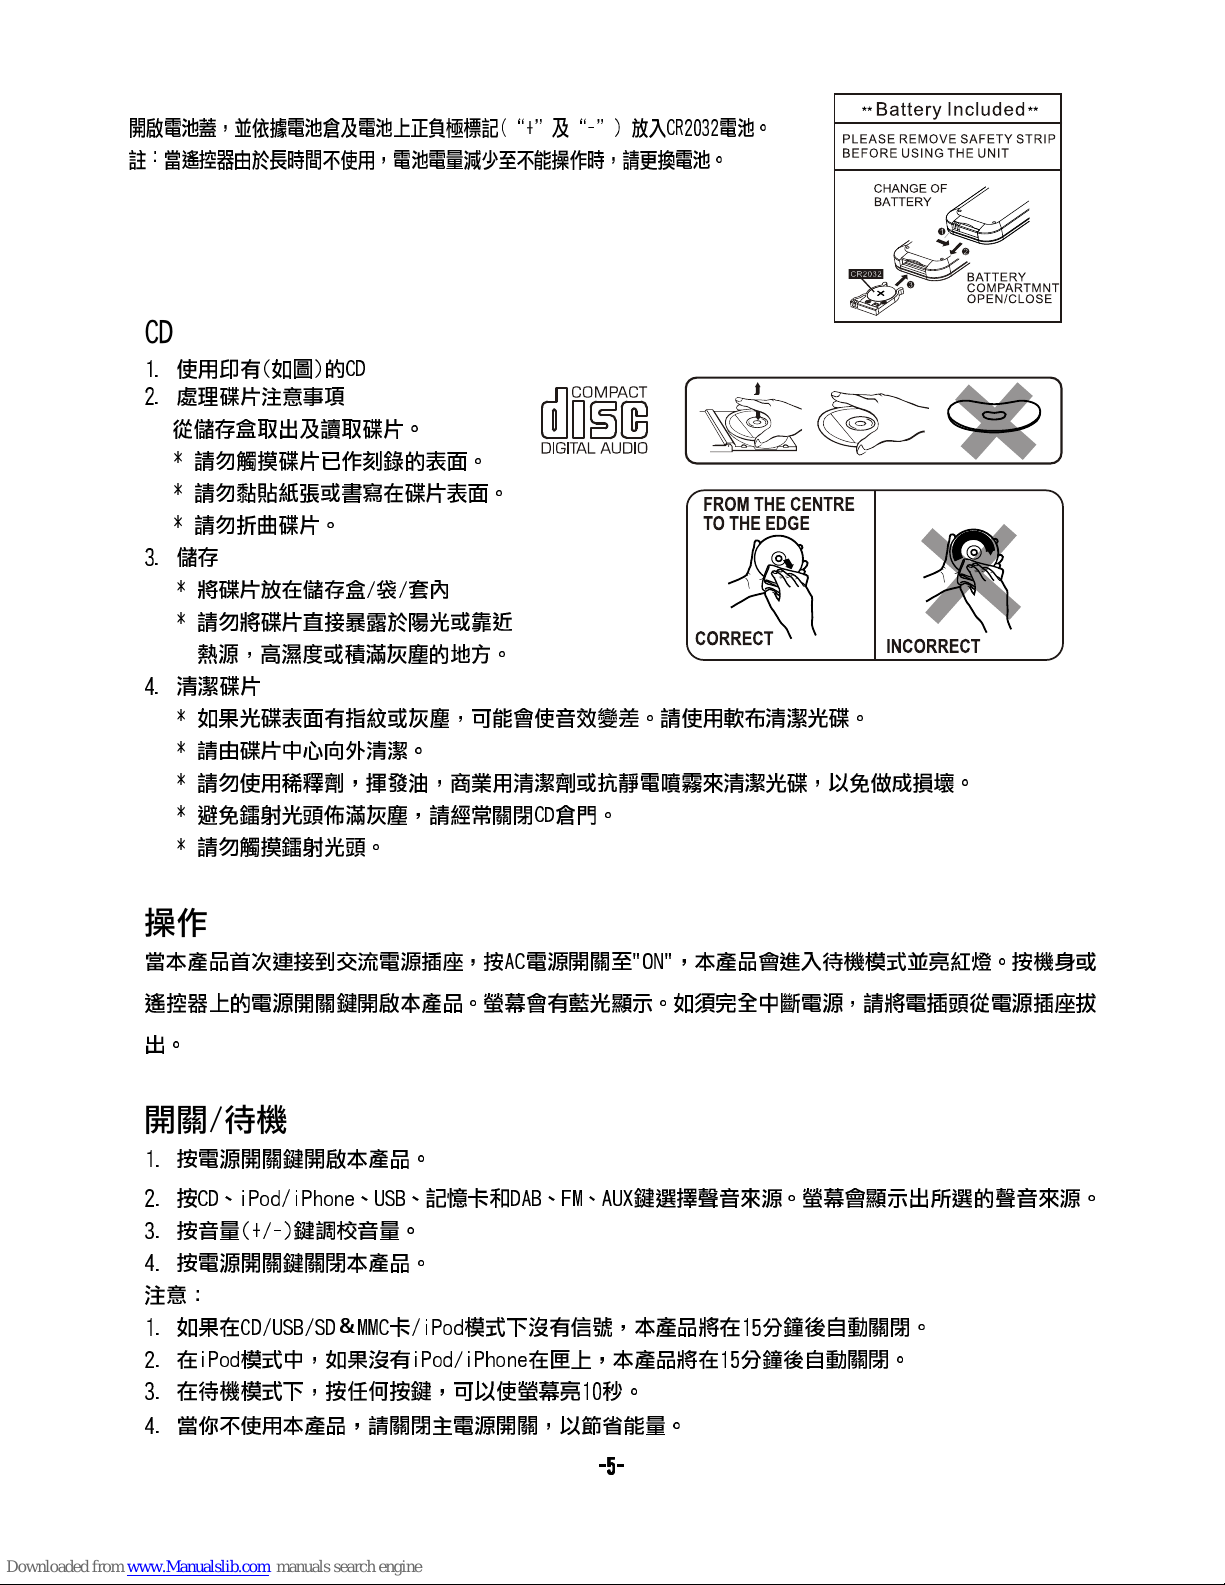
開啟電池蓋,並依據電池倉及電池上正負極標記(“+”及“-”) 放入CR2032電池。
註︰當遙控器由於長時間不使用,電池電量減少至不能操作時,請更換電池。
CD
1.
使用印有(如圖)的CD
2.
處理碟片注意事項
從儲存盒取出及讀取碟片。
* 請勿觸摸碟片已作刻錄的表面。
* 請勿黏貼紙張或書寫在碟片表面。
* 請勿折曲碟片。
3.
儲存
* 將碟片放在儲存盒/袋/套內
* 請勿將碟片直接暴露於陽光或靠近
熱源,高濕度或積滿灰塵的地方。
4.
清潔碟片
* 如果光碟表面有指紋或灰塵,可能會使音效變差。請使用軟布清潔光碟。
* 請由碟片中心向外清潔。
* 請勿使用稀釋劑,揮發油,商業用清潔劑或抗靜電噴霧來清潔光碟,以免做成損壞。
* 避免鐳射光頭佈滿灰塵,請經常關閉CD倉門。
* 請勿觸摸鐳射光頭。
操作
當本產品首次連接到交流電源插座,按AC電源開關至"ON",本產品會進入待機模式並亮紅燈。按機身或
遙控器上的電源開關鍵開啟本產品。螢幕會有藍光顯示。如須完全中斷電源,請將電插頭從電源插座拔
出。
開關/待機
1. 按電源開關鍵開啟本產品。
2. 按CD、iPod/iPhone、USB、記憶卡和DAB、FM、AUX鍵選擇聲音來源。螢幕會顯示出所選的聲音來源。
3. 按音量(+/-)鍵調校音量。
4. 按電源開關鍵關閉本產品。
注意:
1. 如果在CD/USB/SD&MMC卡/iPod模式下沒有信號,本產品將在15分鐘後自動關閉。
2. 在iPod模式中,如果沒有iPod/iPhone在匣上,本產品將在15分鐘後自動關閉。
3. 在待機模式下,按任何按鍵,可以使螢幕亮10秒。
4. 當你不使用本產品,請關閉主電源開關,以節省能量。
----5555----
Page 7
時鐘設置
如果你的位置能接收DAB信號,時鐘將自動同步調整到DAB的時鐘。如果只能接收FM,那麼你必須手動設置時鐘。手動時鐘設置
必須在待機狀態下進行。
手動時鐘設置
1. 本產品首次連接到交流電源插座時會在待機模式下,螢幕將顯示" - : - "並閃動。
2. 在待機狀態下,按住ID3/MEM/C-ADJ鍵至螢幕上小時數字顯示在閃動,按掠過/向上(下)追台搜索鍵設置正確的小時,然後
再按ID3/MEM/C-ADJ鍵確認。
3. 在小時設置後,分鐘數字會閃動,按掠過/向上(下)追台搜索鍵設置正確的分鐘。
4. 如螢幕上顯示正確的時間,按ID3/MEM/C-ADJ鍵確認,完成手動時鐘設置。 註︰開啟本機,在任何模式下按CLOCK鍵時,螢
幕將顯示時間並維持5秒,然後返回原來的顯示。
同步調整到本地DAB的時鐘
1. 按電源開關鍵開啟本產品。
2. 按DAB、FM、AUX鍵選擇DAB模式。
3. 調至一個DAB電台,時鐘將被自動同步調整到DAB的本地時間。
定時器設置 (遙控器)
此功能允許以您設定的時間和模式打開和關閉本產品:
1. 按遙控器上定時器鍵切換定時器開關,螢幕將顯示"Timer on"或"Timer Off"。並在"Timer on"時顯示" "圖示。
2. 要設置定時器開啟時間, 按住遙控器上的定時器鍵至螢幕上顯示"On Timer"及小時數字顯示在閃動。
3. 按掠過/向上(下)追台搜索鍵設置正確的小時,然後再按遙控器上定時器鍵確認。再依此步驟設置正確的分鐘。
4. 然後將進入定時器關閉時間設置,螢幕將顯示"Off Timer"及小時數字顯示在閃動。按掠過/向上(下)追台搜索鍵設置正確
的小時,然後再按遙控器上定時器鍵確認。再依此步驟設置正確的分鐘。
5. 按掠過/向上(下)追台搜索鍵設置定時器開啟模式 - FM,CD,iPod,USB,記憶卡及DAB,再按定時器鍵確認。
6. 再次按定時器鍵,螢幕上會顯示"VOL 20"並閃動,按掠過/向上(下)追台搜索鍵設置定時器開啟時的音量。
7. 按ID3/MEM/C-ADJ鍵檢查定時器設置。
睡眠時間設置 (遙控器)
此功能允許在本產品開啟時以您設定的時間關閉本產品:
1. 要開啟睡眠時間功能,按遙控器上的睡眠時間鍵,螢幕上將顯示"Sleep-90"並閃動,再按睡眠時間鍵,螢幕上將依次顯示
"80,70,60,50,40,30,20,10,Off"並閃動。
2. 當螢幕上顯示
所需之
睡眠時間,停止按鍵,睡眠時間功能即開啟,螢幕上會顯示"Sleep-##",並開始倒數 (
##代表餘
下的
關機時間)。當螢幕上會顯示"Sleep-00",本產品會自動關閉。
3. 要取消睡眠時間功能,再按睡眠時間鍵至螢幕顯示"Sleep-Off","Sleep-##"亦會在螢幕上消失。
收聽收音機
獲得較佳
接收的提示
本產品載有單一導線DAB/ FM天線,如要
獲得最佳
的接收效果,請將天線盡量伸展並調整至最佳位置以及方向。 如
欲獲得理想
的DAB接收效果,
強烈建議將導
線天線保持在垂直位置(在機背保持著向上或向下擺放)。
DAB/DAB+模式
1. 本產品首次連接到交流電源插座時會在待機模式,按電源開關鍵開啟收音機,螢幕上會顯示"Welcome to Digi
tal Ra
dio",
並動進入DAB/DAB+模式及進行全頻段搜台。
2. 搜台時螢幕上會顯示"Searching..."及提示搜台的進度及已搜的台數。
----6666----
Page 8
3. 搜台完成後,收音機會根據電台字母排列較前的電台播放。找尋已搜的電台,按掠過/向上(下)追台搜索鍵,選擇您想收聽
的
電台。
DAB/DAB+全頻段搜台模式
全頻段搜台將搜索所有在DAB / DAB+頻帶III的電台。頻道搜台完成後,收音機會根據電台字母排列較前的電台來播放。
1. 開啟全頻段搜台,按播放/暫停/搜索鍵進入"全掃描"模式,再按選擇/FM單聲道/立體聲鍵確認,螢幕上會顯示
"Searching..."及提示搜台的進度及已搜的台數。
2. 所有搜尋到的電台均會自動地儲存起來。找尋已搜的電台,按掠過/向上(下)追台搜索鍵,選擇您想收聽的電台。
DAB/DAB+手動搜台
1. 按選擇/FM單聲道/立體聲鍵進入"手動搜台"模式。
2. 按掠過/向上(下)追台搜索鍵找尋DAB / DAB+的電台。螢幕上會顯示"5A至13F"及其相關頻率。
3. 當螢幕上顯示欲收聽的頻道,按選擇/FM單聲道/立體聲鍵確認,電台名稱(ensemble/multiplex)將顯示在螢幕上。
4. 按停止/目錄/信息鍵查看在已搜尋到的(ensemble/multiplex)內的電台。
輔助服務
在某些情況下會看到一個">"符號出現在電台的名稱後,這表明該電台有提供輔助服務。這些輔助服務包含涉及到主電台的額
外服務。例如在體育頻道可能需要增加額外的評論。輔助服務會直接插入主電台後。如要選擇輔助電台,請在">"符號 出現在
螢幕上時按選擇/FM單聲道/立體聲鍵。
FM模式
1. 按DAB/FM/AUX鍵進入FM模式。螢幕上會顯示FM及頻率。
2. 如要進行自動頻率搜尋,按播放/暫停/搜索鍵至自動向上或向下搜尋開始;當搜尋到電台,搜尋會自動停止。
3. 亦可按掠過/向上(下)追台搜索鍵去搜尋電台。
4. 按選擇/FM單聲道/立體聲鍵挑選單聲道/立體聲接收。
存儲和調用存儲的預設電台
在DAB或FM模式,可以預設多達30個最喜愛的電台,這使你可直接收聽您喜歡的電台。
1. 先調至欲存儲的電台,然後按住ID3/MEM/C-ADJ鍵至螢幕顯示"Preset Empty #"及"#"在閃動。
2. 按掠過/向上(下)追台搜索鍵為喜愛的電台選擇預設號碼,再按ID3/MEM/C-ADJ鍵確認,螢幕會顯示"Preset # Stored"。
3. 按ID3/MEM/C-ADJ鍵,再按掠過/向上(下)追台搜索鍵調用已預設的電台,按ID3/MEM/C-ADJ鍵確認。
註︰1. 預設的電台會儲存在本產品的內存中,電源關閉也不會刪除。存儲一個新的電台到已預設了的號碼,會將之前存儲在
此預設號碼的電台存儲刪除。
2. 在待機模式下按住Stop/Menu/Info鍵可刪除所有預設記憶。
顯示模式
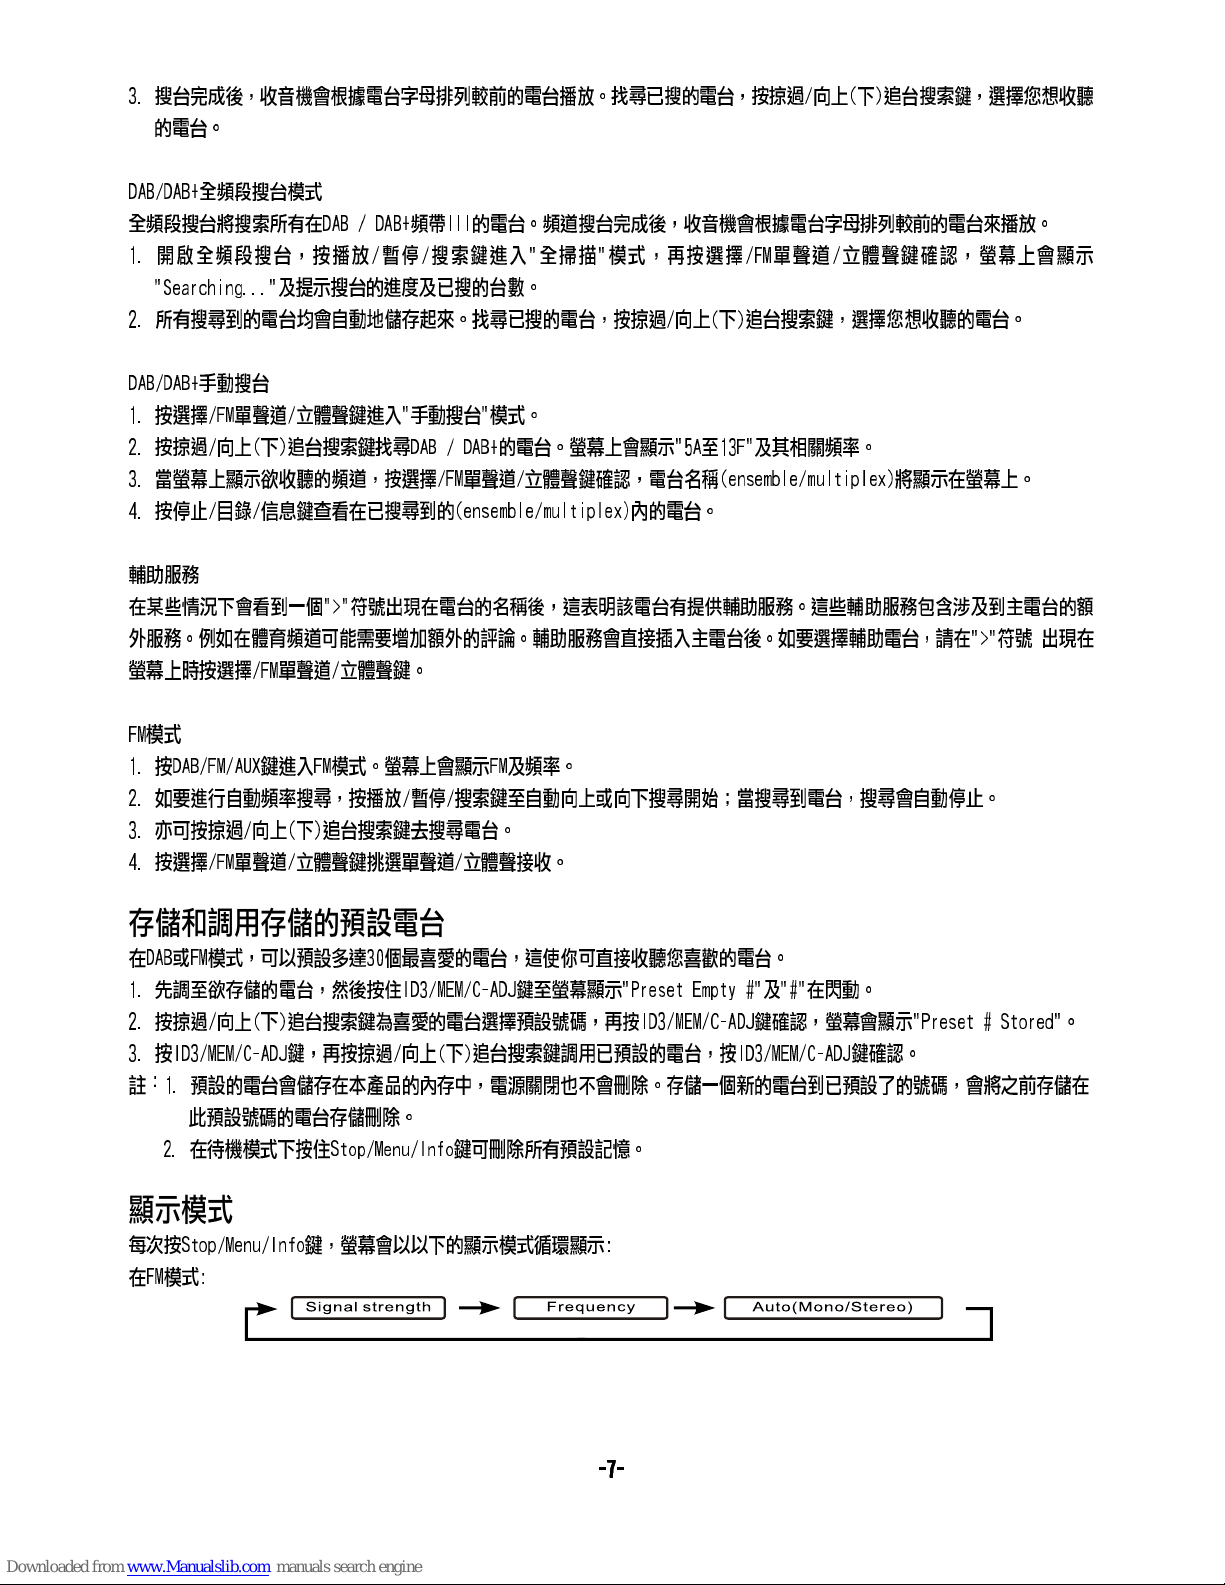
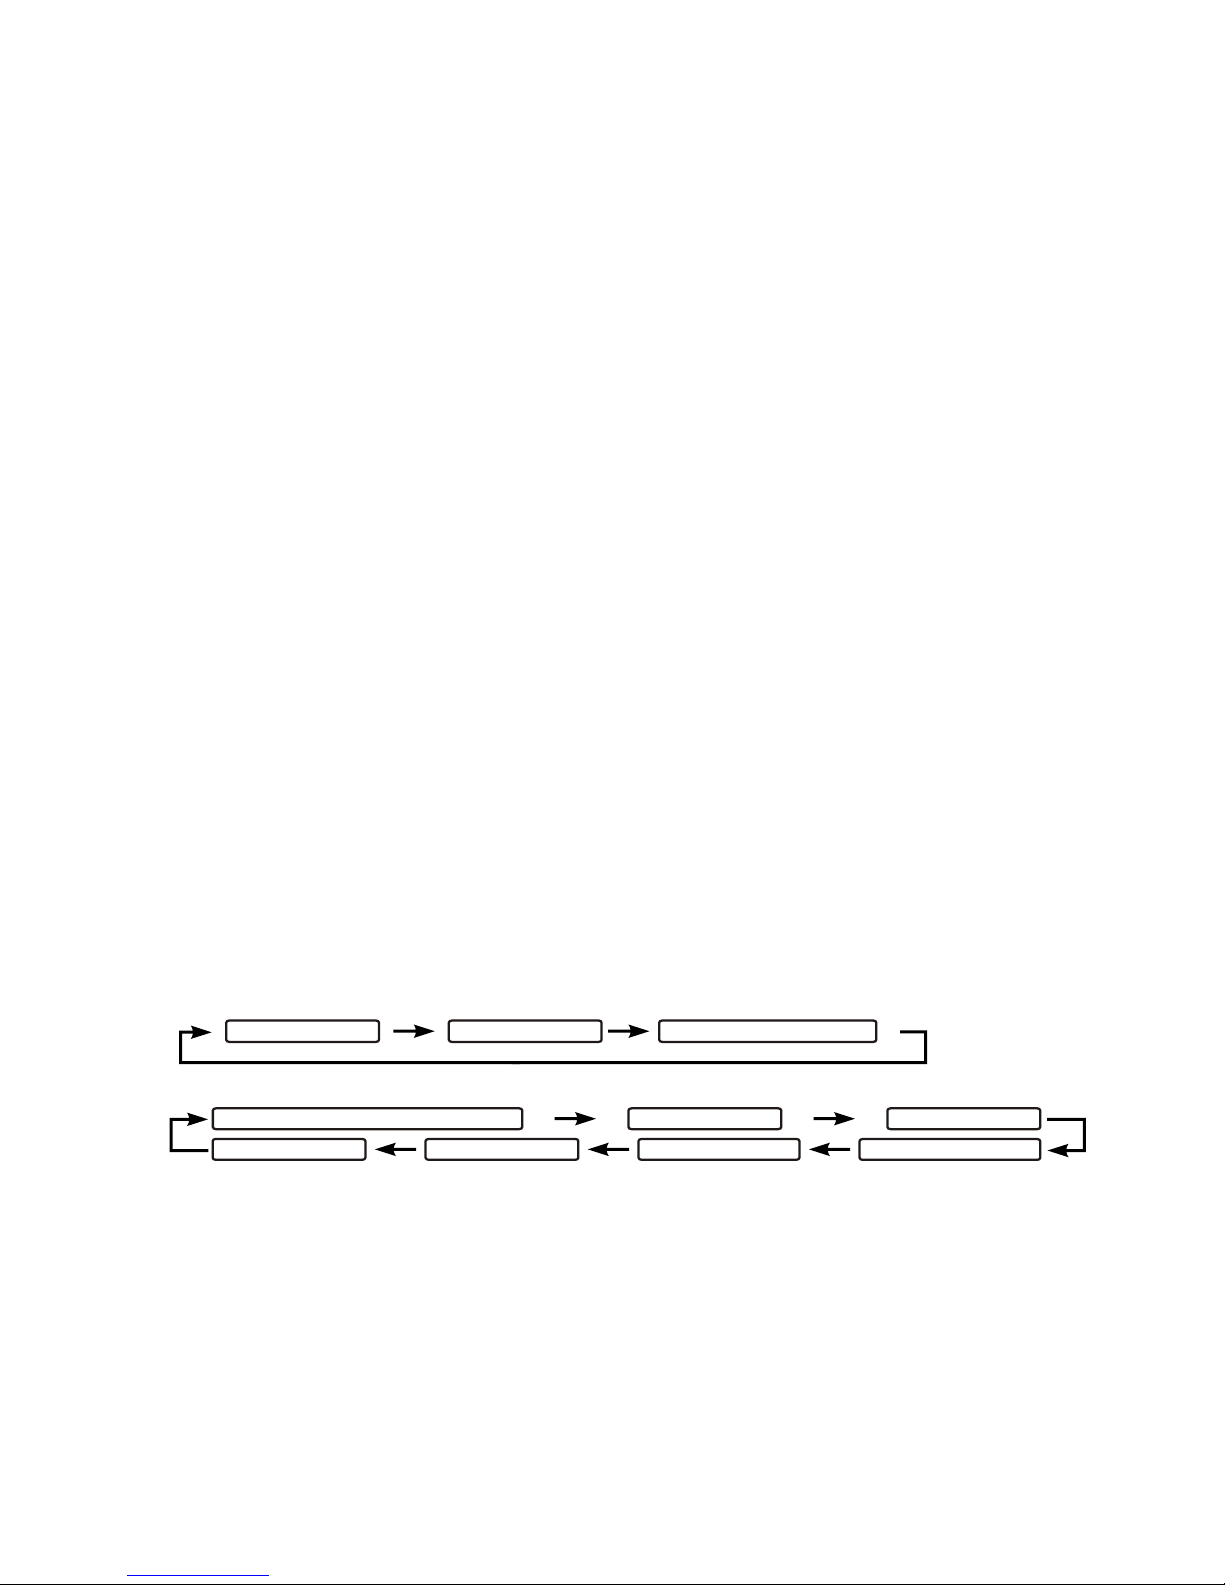
每次按Stop/Menu/Info鍵,螢幕會以以下的顯示模式循環顯示:
在FM模式:
----7777----
Page 9
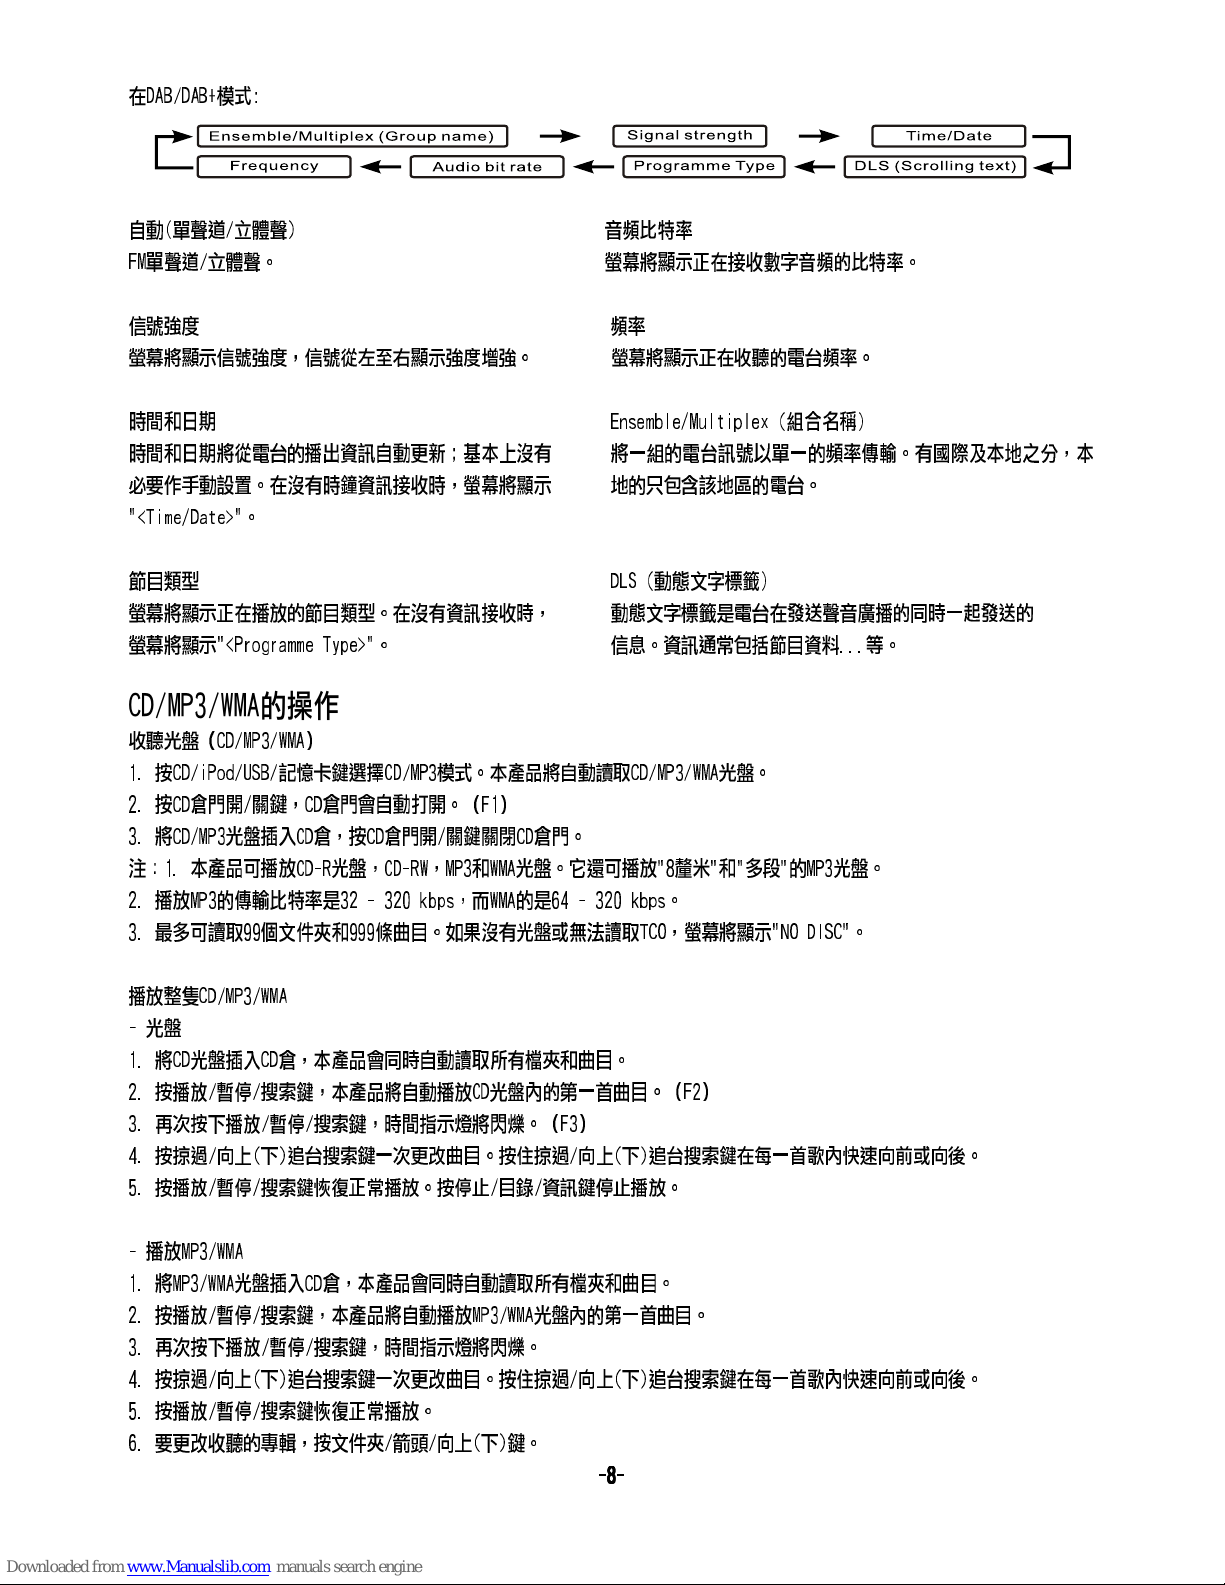
在DAB/DAB+模式:
自動(單聲道/立體聲) 音頻
比特率
FM單聲道/立體聲。 螢幕將顯示正在接收數字音頻的
比特率
。
信號強度 頻率
螢幕將顯示信號強度,信號從左至右顯示
強度增強
。 螢幕將顯示正在收聽的電台頻率。
時間和日期 Ensemble/M
ultiplex (組合名稱
)
時間和日期將從電台的播
出資訊
自動更新;基本上沒有 將一組的電台訊號以單一的頻率傳輸。
有國際
及本地之分,本
必要作手動設置。在沒有時鐘資訊接收時,螢幕將顯示 地的只
包含該地區
的電台。
"<Time/Date>"。
節目類型
DLS (動態文字標籤)
螢幕將顯示正在播放的節目類型。在
沒有資訊
接收時, 動態文字標籤是電台在發送聲音廣播的同時一
起發送
的
螢幕將顯示"<Programme Type>"。 信息。
資訊通常包括節目資料
...等。
CD/MP3/WMA的操作
收
聽光盤(
CD/MP3/WMA)
1. 按CD/iPod/USB/記憶卡鍵選擇CD/MP3模式。本產品將自動讀取CD/MP3/WMA光盤。
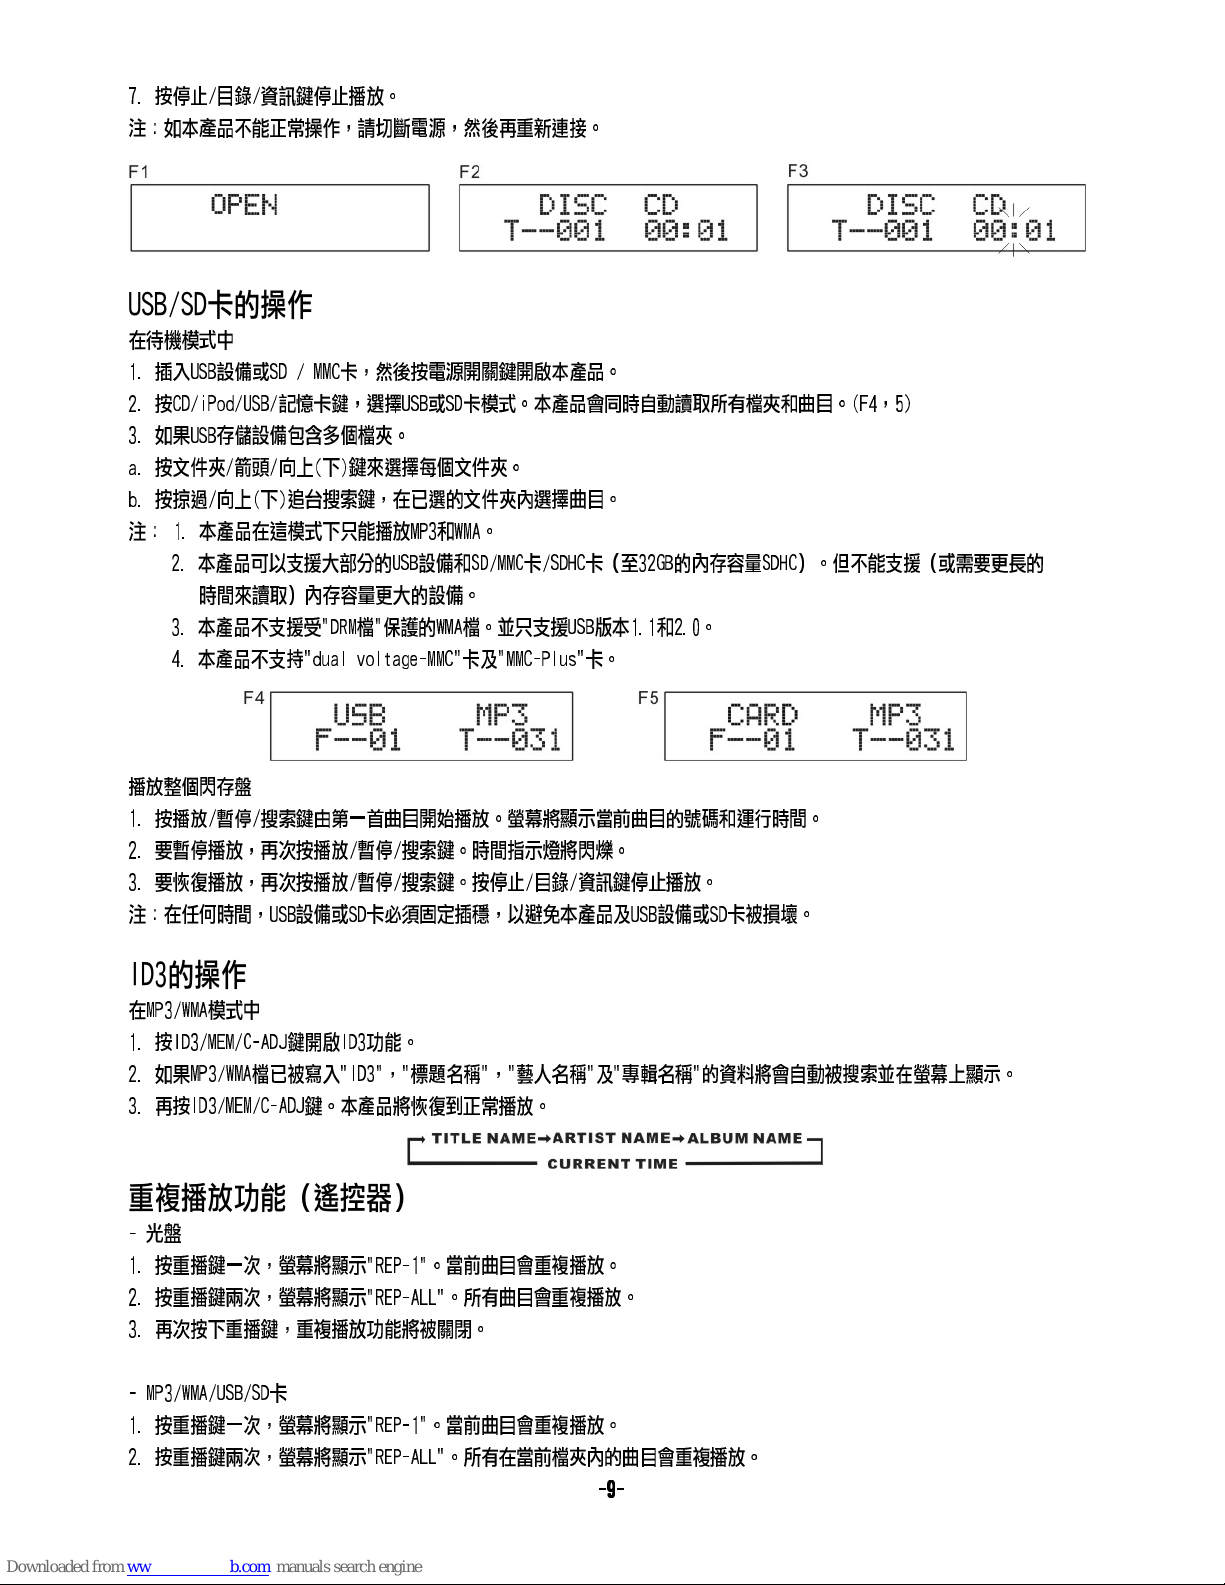
2. 按CD倉門開/關鍵,CD倉門會自動打開。(F1)
3. 將CD/MP3光盤插入CD倉,按CD倉門開/關鍵關閉CD倉門。
注
:1. 本產品可播放CD-R光盤,CD-RW,MP3和WMA光盤。
它還可
播放"8釐米"和"多段"的MP3光盤。
2. 播放MP3的傳輸
比特率是
32 - 320
kbps,而W
MA的是64 - 320
kbps
。
3.
最多可讀取
99個文件夾和999條曲目。如果
沒有光盤或無法讀取
TCO,螢幕將顯示"NO DISC"。
播放整隻CD/MP3/WMA
- 光盤
1. 將CD光盤插入CD倉,本產品會同時自動
讀取所有
檔夾和曲目。
2. 按播放/暫停/搜索鍵,本產品將自動播放CD
光盤內的第一首曲目。(F2)
3. 再次按下播放/暫停/搜索鍵,時間指示燈將閃爍。(F3)
4. 按掠過/向上(下)追台搜索鍵一次更改曲目。按住掠過/向上(下)追台搜索鍵在每一首
歌內快速
向前或向後。
5. 按播放/暫停/搜索鍵恢復正常播放。按停止/目錄/資訊鍵停止播放。
- 播放MP3/WMA
1. 將MP3/WMA光盤插入CD倉,本產品會同時自動
讀取所有
檔夾和曲目。
2. 按播放/暫停/搜索鍵,本產品將自動播放MP3/WMA
光盤內的第一首曲
目。
3. 再次按下播放/暫停/搜索鍵,時間指示燈將閃爍。
4. 按掠過/向上(下)追台搜索鍵一次更改曲目。按住掠過/向上(下)追台搜索鍵在每一首
歌內快速
向前或向後。
5. 按播放/暫停/搜索鍵恢復正常播放。
6. 要更改收聽的專輯,按文件夾/箭頭/向上(下)鍵。
----8888----
Page 10
7. 按停止/目錄/資訊鍵停止播放。
注
:如本產品不能正常操作,請切斷電源,然後再重新連接。
USB/SD卡的操作
在待機模式中
1. 插入USB設備或SD / MMC卡,然後按電源開關鍵開啟本產品。
2. 按CD/iPod/USB/記憶卡鍵,選擇USB或SD卡模式。本產品會同時自動
讀取所有
檔夾和曲目。(F4,5)
3. 如果USB存儲設
備包含多
個檔夾。
a
. 按文件夾/箭頭/向上(下)鍵來選擇每個文件夾。
b
. 按掠過/向上(下)追台搜索鍵,在已選的文件夾內選擇曲目。
注
: 1. 本產品在這模式下只能播放MP3和WMA。
2. 本產品可以
支援大部
分的USB設備和SD/MMC卡/SDHC卡(至32GB的內存容量SDHC)。但不能
支援(或需
要更長的
時間來
讀取)內存容量更大的設備
。
3. 本產品不
支援受
"DRM檔"保護的WMA檔。並只支援USB版本1.1和2.0。
4. 本產品不支持"d
ual voltag
e-MMC"卡及"MMC-P
lus
"卡。
播放整個閃存盤
1. 按播放/暫停/搜索鍵由第一首曲目開始播放。螢幕將顯示當前曲目的號碼和運行時間。
2. 要暫停播放,再次按播放/暫停/搜索鍵。時間指示燈將閃爍。
3. 要恢復播放,再次按播放/暫停/搜索鍵。按停止/目錄/資訊鍵停止播放。
注
:在任何時間,USB設備或SD卡必須固定插穩,以避免本產品及USB設備或SD卡被損壞。
ID3的操作
在MP3/WMA模式中
1. 按ID3/MEM/C-ADJ鍵開啟ID3功能。
2. 如果MP3/WMA檔已被寫入"ID3","標
題名稱
","
藝人名稱
"及"
專輯名稱"的資料
將會自動被搜索並在螢幕上顯示。
3. 再按ID3/MEM/C-ADJ鍵。本產品將恢復到正常播放。
重複播放功能(遙控器)
- 光盤
1. 按重播鍵一次,螢幕將顯示"REP-1"。當前曲目會重複播放。
2. 按重播鍵兩次,螢幕將顯示"REP-ALL"。
所有曲
目會重複播放。
3. 再次按下重播鍵,重複播放功能將被關閉。
- MP3/WMA/USB/SD卡
1. 按重播鍵一次,螢幕將顯示"REP-1"。當前曲目會重複播放。
2. 按重播鍵兩次,螢幕將顯示"REP-ALL"。所有在當前檔夾內的曲目會重複播放。
----9999----
Page 11
3. 按重播鍵三次,螢幕將顯示"REP-ALBUM"。
所有曲
目會重複播放。
4. 再次按下重播鍵,重複播放功能將被關閉。
程式功能(遙控器上)
用戶可以自
己喜愛的序列
,在CD模式
中編程式最多
32個曲目,或在MP3/WMA/USB/SD卡模式
中編程式最多64曲目。而編程 序
須
在本產品停止播放時進行。
1. 如何
編程序曲
目
- 光盤
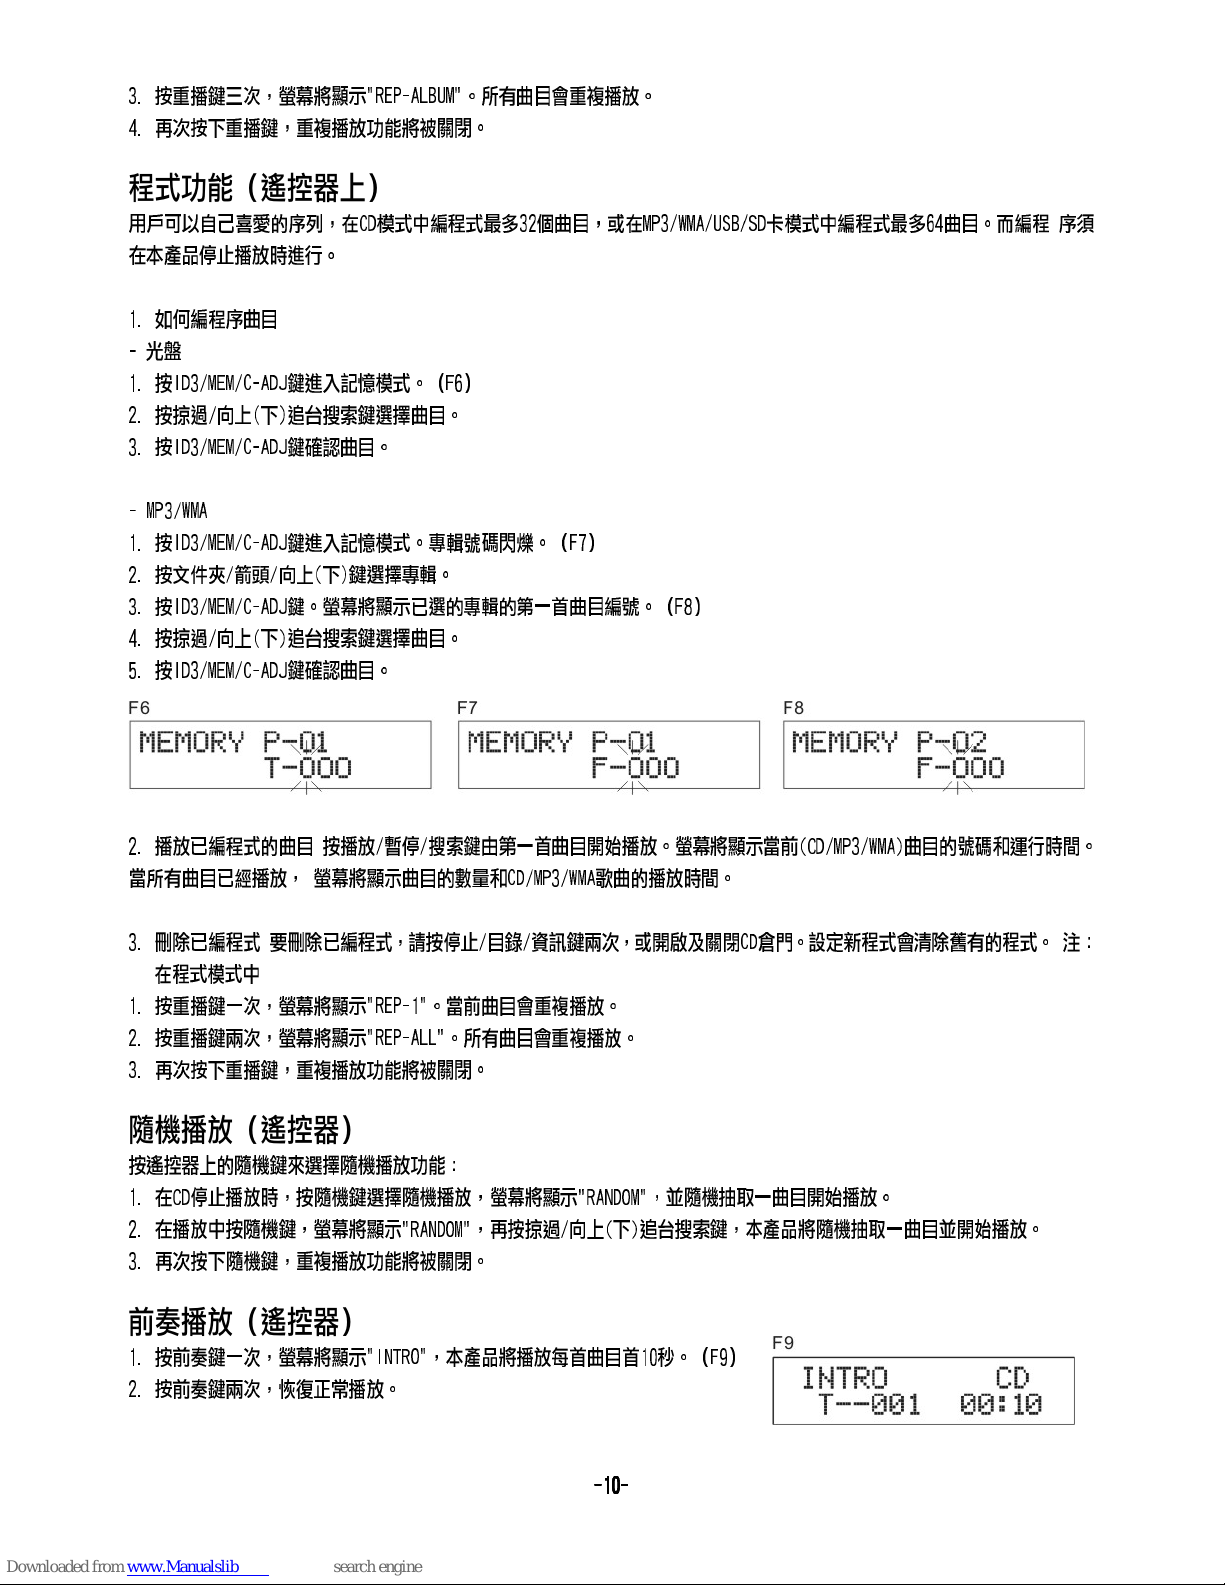
1. 按ID3/MEM/C-ADJ鍵進入記憶模式。(F6)
2. 按掠過/向上(下)追台搜索鍵選擇曲目。
3. 按ID3/MEM/C-ADJ鍵確認曲目。
- MP3/WMA
1. 按ID3/MEM/C-ADJ鍵進入記憶模式。專輯號碼閃爍。(F7)
2. 按文件夾/箭頭/向上(下)鍵選擇專輯。
3. 按ID3/MEM/C-ADJ鍵。螢幕將顯示已選的專輯的第一首曲目編號。(F8)
4. 按掠過/向上(下)追台搜索鍵選擇曲目。
5. 按ID3/MEM/C-ADJ鍵確認曲目。
2. 播放
已編程式的曲
目 按播放/暫停/搜索鍵由第一首曲目開始播放。螢幕將顯示當前(CD/MP3/WMA)曲目的號碼和運行時間。
當
所有曲目已經
播放, 螢幕將顯示曲目的數量和CD/MP3/WMA歌曲的播放時間。
3.
刪除已編程
式 要
刪除已編程
式,請按停止/目錄/資訊鍵兩次,或開啟及關閉CD倉門。設定新程式會
清除舊有的程
式。 注:
在程式模式中
1. 按重播鍵一次,螢幕將顯示"REP-1"。當前曲目會重複播放。
2. 按重播鍵兩次,螢幕將顯示"REP-ALL"。
所有曲
目會重複播放。
3. 再次按下重播鍵,重複播放功能將被關閉。
隨機播放(遙控器)
按遙控器上的隨機鍵來選擇隨機播放功能:
1. 在CD停止播放時,按隨機鍵選擇隨機播放,螢幕將顯示"RANDOM",並隨機抽取一曲目開始播放。
2. 在播放中按隨機鍵,螢幕將顯示"RANDOM",再按掠過/向上(下)追台搜索鍵,本產品將隨機抽取一曲目並開始播放。
3. 再次按下隨機鍵,重複播放功能將被關閉。
前奏播放(遙控器)
1. 按前奏鍵一次,螢幕將顯示"INTRO",本產品將播放每首曲目首10秒。(F9)
2. 按前奏鍵兩次,恢復正常播放。
----10
1010
10----
Page 12
iPod/iPhone的操作
本產品在待機模式:
1. 按電源開關鍵開啟本產品。
2. 按CD/iPod/USB/記憶卡鍵,選擇iPod模式。
3. 按iPod/iPhone倉門開關鍵打開iPod/iPhone的倉門,然後按iPod/iPhone基座開關鍵打開iPod/iPhone基座(見產品的
裝配
圖 2)。將iPod / iPhone插入基座支架,"iPod / iPhone"的指示燈會在螢幕上顯示。(F10)
注
:iPod/iPhone基座開關開啟時,CD/ iPod的倉門將不能關閉。
4. 按播放/暫停/搜索鍵播放當前曲目。
5. 按音量(+/-)鍵調整音量控制。
6. 按播放/暫停/搜索鍵暫停播放當前曲目。
7. 按掠過/向上(下)追台搜索鍵選擇所需的曲目。
注
:當iPod/iPhone螢幕
已經鎖
定,以上的操作仍然可用。
在iPod / iPhone的菜單模式:
注:需要先
手動進入iPod和iPhone系列音樂菜單,然後才可進行下一個操作。
1. 在iPod模式中,按停止/目錄/資訊鍵進入iPod/iPhone菜單模式。選擇當前菜單如下:
Music > Extras > Photo Import(iPod Mini
沒有這
個功能)> Settings > Shuffle Songs > B
acklight > Now Playing
會
顯示在iPod/iPhone的螢幕上。
2. 按文件夾/箭頭/向上(下)鍵來搜索當前菜單。
3. 按選擇/FM單聲道/立體聲鍵進入所需的菜單文件夾。
4. 按文件夾/箭頭/向上(下)鍵來搜索所需的菜單文件夾內的內容。
5. 按停止/菜單/ INFO鍵返回iPod/iPhone菜單。
通
過本產品代替iPod / iPhone電池充電:
在待機或開啟模式下自動地通過本產品替iPod/iPhone的電池充電。
注
:1. 替iPod/iPhone電池充電至80
%約需
一個小時,完全充電
約需幾
個小時。如果同時播放音樂,可能需要更長的時間。
2. 不建議在TUNER模式下替iPod/iPhone的電池充電。它可能會
幹擾了
接收能力。
3. 在"iPod"模式任何時
候均可透
過本產品、遙控器或iPod/iPhone本身控制iPod/iPhone。
4. 在任何時間,iPod/iPhone必須固定插穩,以避免本產品及iPod/iPhone被損壞。
AUX輸入播放
AUX位於本產品的左側。使用3.5mm立體聲插孔連接線連接音頻設備及LINE IN插孔。
1. 要選擇AUX輸入功能,按DAB/FM/AUX鍵,直到"AUX"顯示在螢幕上。
2. 按音量(+/-)鍵調整音量控制。
注:不包
Line in線。
EQ控制(遙控器)
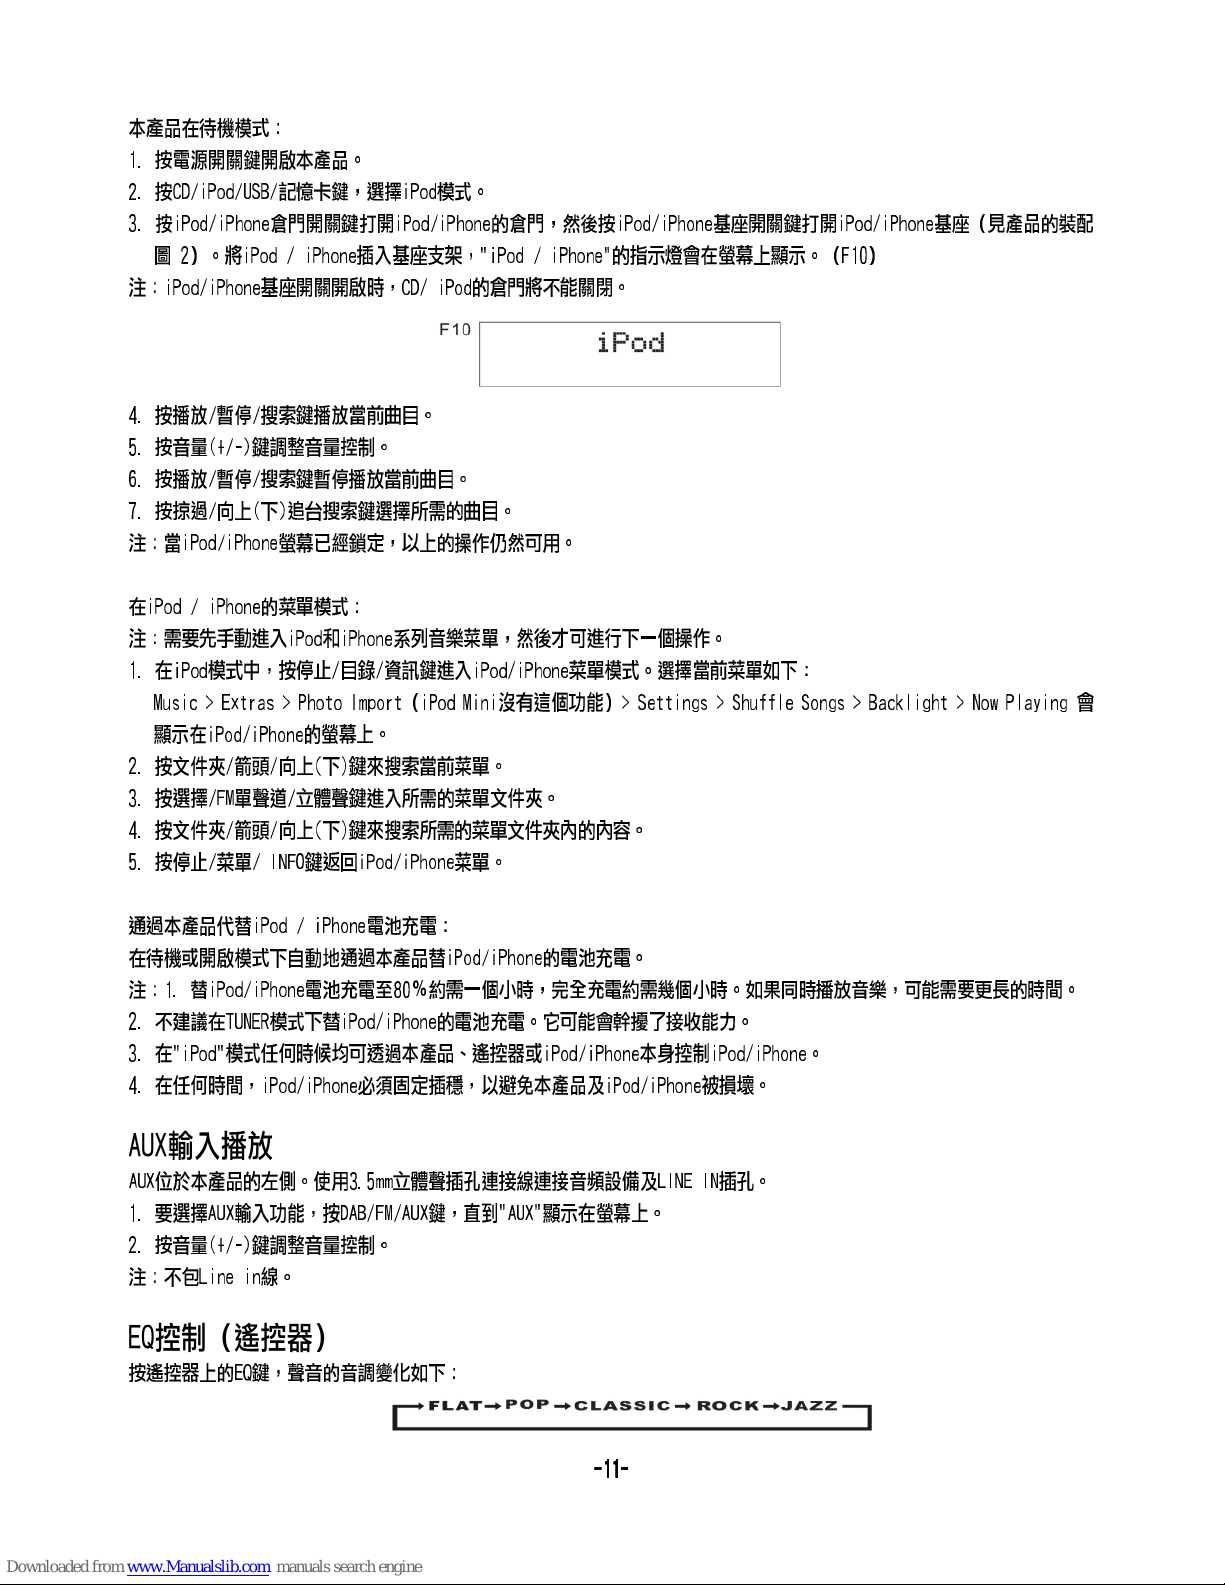
按遙控器上的EQ鍵,聲音的音調變化如下:
----11
1111
11----
Page 13
靜音設置(遙控器)
按遙控器上的靜音鍵,暫時停止從揚聲器輸出聲音,聲音停止及在螢幕上顯示"MUTE"。要取消靜音,再次按靜音鍵或按音量(+/
-)鍵,"MUTE"在螢幕上消失,並恢復揚聲器聲音輸出。
使用耳機聽音樂
在本產品左側的耳機插孔插入耳機(3.5mm迷你立體聲插頭)。聲音將通過耳機播放,而揚聲器則停止輸出聲音。
規格
電源供應: AC 230V~50Hz
輸出 : 5
Watts x
2
尺寸 :
500 (W) x 104 (D) x 214.5 (H) mm
淨重:
2.4 kg
收音機
頻
率範圍 :
FM 87.5 - 108 MHz
DAB/DAB+ 174 - 240 MHz
CD
CDCD
CD
光學讀取 :
3 - BEAM LASER
頻率響應 :
100Hz - 16
kHz
規格如有更改恕不另行通知。 通風的警告:“切
勿阻塞任何通風出口處
”
地址: 香港九龍長沙灣
道833號長沙灣廣場二期
506室
電話:
2861 1109
傳真:
2411 6625
電郵:
enquiry@vdigi.c
om.hk
Website: www.vdigi.c
om.hk
----12
1212
12----
Page 14
UK-1
SA FETY P REC AUT ION S
To achie ve the utmos t in enjo yment a nd perf ormance, p lease r ead thi s manua l carefull y befor e attem pting t o operate
the un it in order to b ecome f amili ar with i ts feature s, and as sure yo u years o f faithful, troub le free p erfor mance a nd
list ening plea sure.
Important Notes
This safety and operating instruction should be retained for future reference.
The apparatus shall not be exposed to dripping or splashing and no objects filled with liquids, such as vases, shall be placed on
apparatus. Avoid installing the unit in locations described below:
* - Places exposed to direct sunlight or close to heat radiating appliances such as electric heaters,
on top of other stereo equipment that radiate too much heat.
* - Places blocking ventilation or dusty places.
* - Places subject to constant vibration, humid or moist places.
No naked flame sources such as lighted candles should be placed on the unit.
Attention should be drawn to the environmental aspects of battery disposal.
Make sure not to obstruct the ventilation openings, a minimum of 10cm should be kept around the apparatus for ventilation.
The ventilation should not be impeded by covering the ventilation openings with items such as newspaper, table-cloths, curtains,
etc.Use apparatus in moderate climates only.
Operate tuning controls and switches as instructed in the manual.
Before turning on the power for the first time, make sure the power cord is properly installed.
The mains plug is used as the disconnect device and it must remain readily operable. To completely disconnect the power input,
the mains plug of the apparatus must be disconnected from the mains.
The normal function of the product may be disturbed by Strong Electro Magnetic Interference. If so, simply reset the product to
resume normal operation by following the instruction manual. In case the function could not resume, please use the product in
other location.
Do not attempt to remove any screws, or open the casing of the unit; there are no user serviceable parts inside, refer all servicing
to qualified service personnel.
CAUTION : TO REDUCE THE RISK OF ELECTRIC SHOCK DO NOT REMOVE COVER(OR BACK), NO USER SERVICEABLE
PARTS INSIDE, REFER SERVICING TO QUALIFIED SERVICE PERSONNEL.
DANGEROUS VOLTAGE
Conductor dangerous voltage, that may be of sufficient magnitude to constitute a risk of electric shock to persons is resent
within this product's enclosure.
ATTENTION
The owner's manual contains important operating and maintenance instructions, for your safety, it is necessary to refer
to the manual.
WARNING :TO PREVENT FIRE OR SHOCK HAZARD, DO NOT EXPOSE THIS APPLIANCE TO DRIPPING OR SPLASHING.
Note: This unit will become warm when used for a long period of time. This is normal and does not indicate a problem with the
unit. This unit includes micro-processors which may malfunction as a result of external electrical interference/ noise or
electrostatic discharge. If the unit is not working properly, disconnect the power source and then reconnect it. Excessive sound
pressure from earphones and headphones can cause hearing loss.
ASSEMBLY DRAWING OF UNIT
1. fix ing the board for wal l mount ing
Para llel the two n ails th at fix in to the wa ll, the dist ance of t hem sho uld kee p in 240mm.
Note : The s ize of the nai l : 3.5*2 5BA.
2. Uni versal Doc k adapt er conn ectio n(iPo d adaptors a re not in clude d)
240 mm
** Scr ew Not Inclu ded **
(1) Open the iPod dock
(2) Insert iPod
(3) Push 1st time to fix the iPod tray
(4) Push 2nd time to release the
iPod tray
(5) Takeout iPod
Page 15
UK-2
FEATURES AND CONTROLS
1. iPo d DOOR OPEN/ CLOSE B UTTON
2. CD/ iPod/USB /CARD B UTTON
3. VOL UME “-” BUTTON
4. VOL UME “+” BUTTON
5. SEL ECT/FM MON O/ST. BUT TO N
6. LCD D ISPLAY WINDOW
7. FOL DER/ARRO W DOWN BU TTON
8. FOL DER/ARRO W UP BUTTON
9. ID3 /MEM/C-A DJ. BUT TO N
10.C D DOOR OPEN/ CLOSE B UTTON
11.PLAY/PAUSE/SC AN BUTTON
12.S TO P/MENU/I NFO BUT TO N
13.S KIP/TUNE S EARCH U P BU TTON
14.S KIP/TUNE S EARCH D OWN BUT TO N
15.D AB/FM/AU X BUTTON
16.S TAN DBY/ON BUT TO N
17.F M ANTENNA
18.S PEAKER
19.L INE IN JACK
20.S TAN DBY LED INDICATOR
21.H EADPHONE S JACK
22.C D/iPod DOO R
23.I R SENSOR
24.U SB DEVICE IN P ORT
25.S D/MMC CARD I N SLOT
26.A C POWER SWIT CH
27.A C POWER CORD
28.H ITCHING HO LE
29.A UDIO DEVIC E IN COVE R
30.i Pod DOCK OPE N/CLO SE BUTTON
RE MOT E CON TRO L
1. STANDB Y BUTTON
2. DAB /FM/AUX BU TTON
3. CLO CK DISP BUTTON
4. SEL ECT/MONO/ST. BUTTON
5. SKI P/TUNE SEA RCH DOW N BUTTON
6. FOL DER/ARRO W DOWN BU TTON
7. STOP/ MENU/INF O BUTTON
8. REP EAT BUTTON
9. EQ BU TTON
10. MU TE BUTTON
11. VOLUM E “-” BUTTON
12. IN TRO BUTTON
13. VO LUME “+” BUT TO N
14. SL EEP BUTTO N
15. TIME R BUTTON
16. PL AY/ PAUSE/SCAN BU TTON
17. RA NDOM BUTTON
18. SK IP/TUNE SE ARCH UP BUT TO N
19. ID 3/MEM/C- ADJ. BU TTON
20. iP od OPEN/CL OSE BUT TO N
21. CD O PEN/CLOS E BUTTON
22. CD /iPod/US B/CAR D BUTTON
23. FO LDER/ARR OW UP BUTTON
CO MPACT DIS C
1. Alwa ys use a compa ct disc s beari ng the ma rk as shown.
2. Not es on handli ng disc s
Remo ving the dis c from it s stora ge case a nd loading i t.
* Do not t ouch the reflecti ve reco rded su rface.
* Do not s tick paper o r write a nythi ng on the s urface.
* Do not b end the disc .
3. Sto rage
* Stor e the disc in its case.
* Do not e xpose disc s to dire ct sunl ight or h igh temperature s, high
humi dity or dusty place s.
4. Cle aning a disc
* Shou ld the disc be come so iled, w ipe off dus t, dirt and fi ngerp rints
with a s oft cloth.
* The disc s hould be cle aned fr om the ce nter to t he edge.
* Neve r use benzen e, thin ners, r ecord c leaner flu id or ant i stati c spray.
* Be sur e to close the C D door so t he lens i s not con taminated by dust .
* Do not t ouch the len s.
OP ERATI NG TH E UNIT
When y ou first plu g the uni t into th e AC outle t, then pres s the pow er swit ch on the b ottom of the unit, th e unit wi ll be in
stan dby mode, th e black l ight of s tandb y is red. You can no w press t he STANDBY /ON but ton on the uni t or on the
remo te control t o switc h the uni t ON. The bla ck light of th e multi f uncti on disp lay will lig ht on blu e.
Pull t he AC plug out of t he wall s ocket i f you wan t to switch off co mplet ely.
CORRECT
INCORRECT
FROM THE CENTRE
TO THE EDGE
26
27
19
21
24
25
18 20 22 23 18
1 2 3 4 5 6 7 8 9 10
111213141516
17
282 8
1
4
5
6
7
8
9
10
11
12
13
14
15
16
18
20
212223
2
3
17
19
PU TTIN G THE B ATTE RIES I NTO THE RE MOT E
CO NTROL UNI T
Pres s down on the co mpart ment co ver, and s lide the cov er off
to ope n the compar tment . Place t he one CR 2032 batte ry in the
remo te control a ccord ing to th e polar ity markin gs ("+" a nd "-”)
insi de the compa rtmen t and on th e batte ry.
Plac e the cover in to the co mpart ment, p ress down li ghtly, and
push i t inside unt il it sna ps on.
Note : If the remot e contr ol is not i n use for l ong period s, the
batt ery will bec ome wea k and the r emote c ontrol wil l not
func tion, plea se repl ace wit h a new one i f the above ha ppens .
Battery Incl ude d
BATT ERY
COM PARTMN T
OPE N/ CL OSE
29
30
Page 16

UK-3
POWER /STAN DBY
2. Sel ect the soun d sourc e (CD, iP od, USB , CARD) and (D AB, TUNER , AUX) by pr essin g the (CD/iP od/US B/CAR D)
and( DAB/FM/A UX) but ton on th e unit (o r remote control) . Th e corre spond ing displa y will li ght up.
3. Adju st the volum e with th e VOLUM E (+ or -) bu tton on the un it (or re mote co ntrol ).
4. Pre ss the STANDBY/ ON butt on on the u nit (or r emote cont rol) ag ain to tu rn off the un it.
iPod
CLOCK S ETTI NG
Manu al clock set ting
TI MER SE TTI N G(o n the re m ote c ontr o l)
6. Pre ss the TIMER but ton aga in, the t imer "V OL 20” indi cator a ppear s on the di splay and fl ashes , adjus t the tim er
volu me high or low b y press ing the S KIP/T UNE SEARCH ( UP or DOWN) b utton .
LI STEN ING TO YOUR R ADIO
Pres s
1. Pre ss the STANDBY/ ON butt on on the u nit or on t he remote co ntrol t o switc h the uni t on.
Note :
1. If th ere is no sign al unde r the CD/ USB DEV ICES/ SD & MMC C ARD/ mode, th e main un it will be swi tched o ff
with in 15 minute s autom atica lly.
2. Dur ing in the iPo d mode, i f there i s no iPod P layer on the i Pod dec k brack et; the m ain unit wil l also tu rn off with in
15 min utes autom atica lly.
3. Dur ing in stand by mode , press a ny butt on/key can m ake the d ispla y light f or 10 second s.
4. Ple ase turn the m ain swi tch off to sa ve ener gy, when you do not u se the un it.
The cl ock will be au tomat icall y synch ronized to t he DAB cl ock if yo u can rec eive DAB sig nals in y our loc ation . If you
can on ly receive F M, then y ou have t o set the c lock manua lly. Th e manua l clock s etting mus t be done i n stand by mode .
1. Whe n the unit is fi rst con necte d to the AC ma ins outlet , it will b e in stan dby mod e, and the dis play wi ll show “ --:-- ”
and fl ash.
2. Dur ing standb y, pr ess and h old the I D3/ME M/C-ADJ. b utton , the hou r digit s flash in the d ispla y, pr ess the
SKIP /TUNE SEARCH (UP or DOW N) butt on on the u nit or the rem ote con trol to s et the co rrect hour, then
pres s the ID3/ME M/C-A DJ. but ton aga in to confirm.
3. Afte r the hour is se t, the mi nute di gits wi ll then flas h, pres s the SKI P/TUN E SEARCH (UP or DO WN) but ton
(or re mote contr ol) to se t the cor rect mi nute.
4. Whe n the displa y shows t he corr ect tim e, press the I D3/ME M/C-A DJ. but ton on th e remote con trol ag ain to
conf irm, the man ual clo ck sett ing is no w complete d.
Note : Turn on the unit and p ress th e CLOCK b utton in any mode, th e displ ay will s how the time and disa ppear a bout
5 seco nds, then return to t he orig inal co ndition.
Sync hronise th e clock t o DAB loc al time
1. Pre ss the STANDBY/ ON butt on on the u nit(o r remote con trol) o nce to sw itch th e unit on.
2. Pre ss the DAB/F M/AUX b utton o n the uni t(or remote contr ol) to se lect DA B mode.
3. Tune t o a DAB statio n and the c lock wi ll be aut omatical ly sync hroni zed to th e DAB local ti me.
This f unction al lows yo u to swit ch on and o ff t he system at y our des ired ti me and mo de:
1. Pre ss the TIMER but ton on th e remot e contr ol to toggle t he time r funct ion bet ween on and off, t he disp lay wil l
show “ Timer on” or “Tim er Off”. The di splay w ill show “ ” to indicat e timer f uncti on on.
2. To s et the On Timer c lock, p ress an d hold th e TIMER button o n the rem ote con trol un til the disp lay sho ws “On Tim er”
and th e “hour” dig it of the t imer cl ock wil l flash.
3. Pre ss the SKIP/ TUNE SE ARCH (U P or D OWN) bu tton to set to the desi red hou r, then pr ess the TIMER bu tton on
the re mote contr ol to con firm, f irst se t the hou r and finall y the min ute, th e On Timer c lock is set.
4. T he n yo u will enter into the Off Tim er cloc k setti ng, the display wil l show “O ff Ti mer” an d the “hour” d igit wi ll flas h.
Pres s the SKIP/TUNE SEA RCH (UP or DO WN) but ton to set to the desir ed hour, t hen pre ss the TIMER but ton on
the re mote contr ol to con firm, f irst se t the hou r and finall y the min ute, th e Off Timer clock i s set.
5. Fin ally press t he SKIP /TUNE S EARCH ( UP or DOWN) butt on to sel ect the t imer on m ode - FM, CD, iP od, USB ,
CARD o r DAB then pre ss the TIME R butto n to conf irm. The timer s ettin g is now co mplet ed.
7. To c heck the tim er sett ing, re peate dly press th e ID3/M EM/C- ADJ. bu tton, unti l the dis play sh ows the o n timer and
the off ti mer settin g.
TO SET S LEEP F UNCT ION ( o n the r e mot e c ont r ol)
This f unction al lows yo u to prog ram the s ystem to swi tch off its elf aft er a set pe riod of time . You can set y our sle ep
time i n power on mod e:
1. T o a ctiva te the sle ep func tion, p ress th e SLEEP button o n the rem ote, th e displ ay will show “ SLEEP -90,8 0,70, 60,
50, 40 ,30,20,1 0,OFF ” and fla sh.
2. Whe n the displa y shows y our des ired sl eep time, re lease t he butt on, the s leep timer i s now act ivate d.
The disp lay will sho w “S#” in w hich “S 1” is to in dicate “10 m inute s” slee p time and so on. When th e sleep t ime
coun ts to zero, th e unit wi ll go off.
3. To cance l sleep , press t he SLEEP butto n once ag ain, th e displ ay will show “ SLEEP -OFF” a nd the“ S#” will dis appea r.
Hint s for better r ecept ion
This u nit carrie s a singl e lead wi re DAB/ FM antenna , to obta in the be st perf ormance, y ou shou ld full y exten d the wire
ante nna and adju st the po sitio n as well a s the direct ion unt il you fi nd the be st recepti on.
For id eal DAB rece ption , alway s maint ain the lead w ire ant enna in a v ertic al positio n (hold ing it up ward or downward
behi nd the unit) i s highl y recom mende d.
DAB/ DAB+ mode
When t he unit is pow ered up f or the fi rst tim e, it will be in s tandb y mode. P ress th e STANDBY/ON bu tton on t he unit ( or
remo te control ) to turn t he radi o on, the d isplay wil l show “Wel come to D igital Radio”, th en it wil l autom atically e nter
into t he DAB/DAB + mode an d perfo rm full s can functi on.
Duri ng scan, the d ispla y will sh ow “Sea rching …” to gethe r with a sl ide bar t hat indica tes the p rogre ss of the s can and
the am ount of stat ions th at have b een fou nd so far.
Once t he scan has fi nishe d, the ra dio wil l select the f irst al phanu meric ally found s tatio n. To explo re the fo und sta tions ,
the SK IP/TUNE SE ARCH (U P or D OWN) bu tton to y our desire d stati on.
DAB/ DAB+ Full sc an mode s
Full s can will sea rch for a ll DAB/ DAB+ Ba nd III chann els. Aft er the sc an has fi nished, th e first a lphan umeri cally foun d
stat ion will be au tomat icall y selec ted.
Page 17
UK-4
1. To acti vate fu ll scan , press the PL AY/ PAU SE/SC AN button on the unit ( or remo te cont rol) once to e nter in to the
“Ful l scan” mode , press t he SELE CT/FM MONO/ST. butt on on the r emote c ontro l to confirm , the dis play
will s how “Searc hing. ..” and a s lower prog ressi ng slide bar.
2. All th e stations t hat hav e been fo und will be st ored au tomat ically, to expl ore the s tatio ns that have b een fou nd,
the SK IP/TUNE SE ARCH ( UP or DO WN) but ton for sele ction .
DAB/ DAB+ manua l tune
1. To sel ect manual t une, pr ess the S ELECT/FM M ONO/S T. button o n the uni t (or remote c ontro l) to ent er into t he
“Man ual tune” mo de.
2. Pre ss the SKIP/ TUNE SE ARCH (U P or D OWN) butto n to scro ll thro ugh the DAB/ DAB+ ch annel s, the displ ay will
show “ 5A to 13F” and th eir ass ociat ed frequen cies.
3. W h en yo ur de sired f reque ncy appear s in the di splay, pre ss the SELEC T/FM MO NO/ST. bu tton to c onfirm. The
name o f the statio n group ( ensem ble/mult iplex ) will be d isplayed .
4. T t he STOP/M ENU/I NFO t o see wh at station s are pre sent on t he found ens emble /mult iplex.
Seco ndary Serv ices
On som e occasion s you wil l see a “>” symb ol appe ared af ter the n ame of the sta tion, t his ind icates tha t there a re
seco nda ry serv ices av ailable to t hat sta tion. The se seconda ry serv ices co ntain extr a servi ces tha t relate to the
prim ary statio n. E.g. a s ports s tatio n may want to ad d extra c ommen taries. The se conda ry service s are ins erted
dire ctly after t he prim ary sta tion. To se lect th e secondar y stati on, pre ss the SELEC T/FM MO NO/ST. bu tton on t he
remo te control w hen the “ >” appe ars i n the dis play.
FM mod e
1. To select FM, pr ess the D AB/FM /AUX bu tton on the un it (or re mote co ntrol), th e displ ay will s how FM and the
freq uency.
2. To activate frequen cy auto s earch, pre ss the PL AY/ PAU SE/SC AN button on t he unit ( or remo te cont rol) until i t
star ts to scan dow n or up the f reque ncy band; it w ill sto p autom atica lly o nce a sta tion ha s been fo und .
3. You can also p ress th e SKIP/ TUNE SE ARCH(UP or DOW N) butt on on the u nit (or remo te cont rol) to s elect your
desi red freque ncy.
4. Pre ss the SELEC T/FM MO NO/ST. bu tton on t he unit (or re mote co ntrol ) to togg le select be tween t he FM “ST EREO”
and “M ONO” recep tion.
STOR I NG AN D RECA LLIN G STORED P RES ET STATI ONS
In eit her DAB or FM mo de, you c an stor e up to 30 stations to th e favou rite pr esets; thi s will en able yo u to get direc t
acce ss to your fav ourit e stati ons.
1. To store a prese t, firs t tune to y our des ire d stati on, the n press a nd ho ld the ID 3/MEM /C-AD J. button on t he remo te
cont rol until th e displ ay will s how “ Preset E mpty # ” an d the “#” f lash.
2. Pre ss the SKIP/ TUNE SE ARCH ( UP or DO WN) button o n the rem ote con trol to s ele ct your d esire d stati on pr eset
numb er, then pres s the ID3 /MEM/ C-ADJ. but ton on th e remot e contr ol to confir m your se lecti on; the disp lay wil l
show “ Preset # sto red” in D AB/FM m ode.
3. To recall a pres et stat ion, pr ess the I D3/MEM/C -ADJ. b utton o nce and then p ress th e SKIP/ TUNE SE ARC H
(UP or DOWN) button to s elect t he stat ions that yo u have st ored, t hen press th e ID3/M EM/C- ADJ. bu tton on
the re mote contr ol to con firm yo ur selecti on.
Note : 1. The store d stati ons wil l be save d into it s memory and p ower of f will no t erase i t. Stor ing a new
stat ion int o a preset loc ation w ill era se the pr eviou sly stored s tatio n in that l ocati on.
2
pres s
. Duri ng the un it in STANDBY mode, p ress an d hold th e STOP/ME NU/INFO button to e rase al l prese t
memo ry.
ouch ouch p late t
In FM mode:
DI SPLAY MODE S
Ever y time you pre ss the STOP /MENU /INFO butt on, the d ispla y will cycle t hroug h the fol lowing dis play mo des:
Audio b it r at e
Progr am me Ty pe
Time/D at e
Signa l st re ng th
Ensem bl e/ Mu ltiplex ( Gr ou p na me)
DLS (Sc ro ll in g text)
Frequ en cy
In D AB/ DAB + mode:
Auto (Mono) Freq uency
The fr equency of t he pres ent sta tion wi ll be displa yed.
FM FM
Sign al strength
The di splay will s how a sli de bar to i ndicate th e signa l
stre ngth, the st ronge r the sig nal, th e longer the b ar will
be fro m left to righ t.
Prog ramme type
Time and d ate
This d escribes t he styl e of the pr ogramme th at is bei ng
The ti me and date wi ll be aut omati cally updated by th e
broa dca st. If th e infor matio n is not avail able, t he disp lay
broa dca sted in forma tion; t here is no need to set th e
will s how “ <Prog ramme Type >”.
cloc k manually. In th e unlik ely eve nt that no clo ck
info rmation is r eceiv ed, the d isplay will show
“<Time/Date >”.
Audi o bit rat e
The di splay will s how the d igita l audio bit ra te bein g
rece ived.
Ster eo and Mono.
Ense mble/Multiple x (Grou p name)
The En semble/M ultip lex is a co llection o f radio s tatio ns
that a re bundled a nd tran smitt ed together in a sing le
freq uency. The re are na tiona l and local mu ltipl exes,
loca l ones conta in stat ions th at are sp ecific to th at area .
DLS
DLS st ands for Dyn amic La bel Seg ment which i s a
scro lling mess age tha t the bro adcaster may incl ude in
thei r transmis sions . Th e messa ge usua lly includ es
info rmation su ch as pro gramm e details …etc.
Frequen cy
Signal st re ng th
Auto(Mo no /S te re o)
Page 18
UK-5
US B/SD C ARD O PERAT ION
Duri ng in the STANDBY mod e
1. Ins ert the USB DE VICE or S D/MMC C ARD, an d then press the STANDBY /ON but ton on th e unit (o r remote
cont rol) to powe r"ON" t he unit .
2. Pre ss the CD/iP od/US B/CAR D butto n on the unit (o r remot e contr ol) to se lect th e USB or SD CARD m ode. The
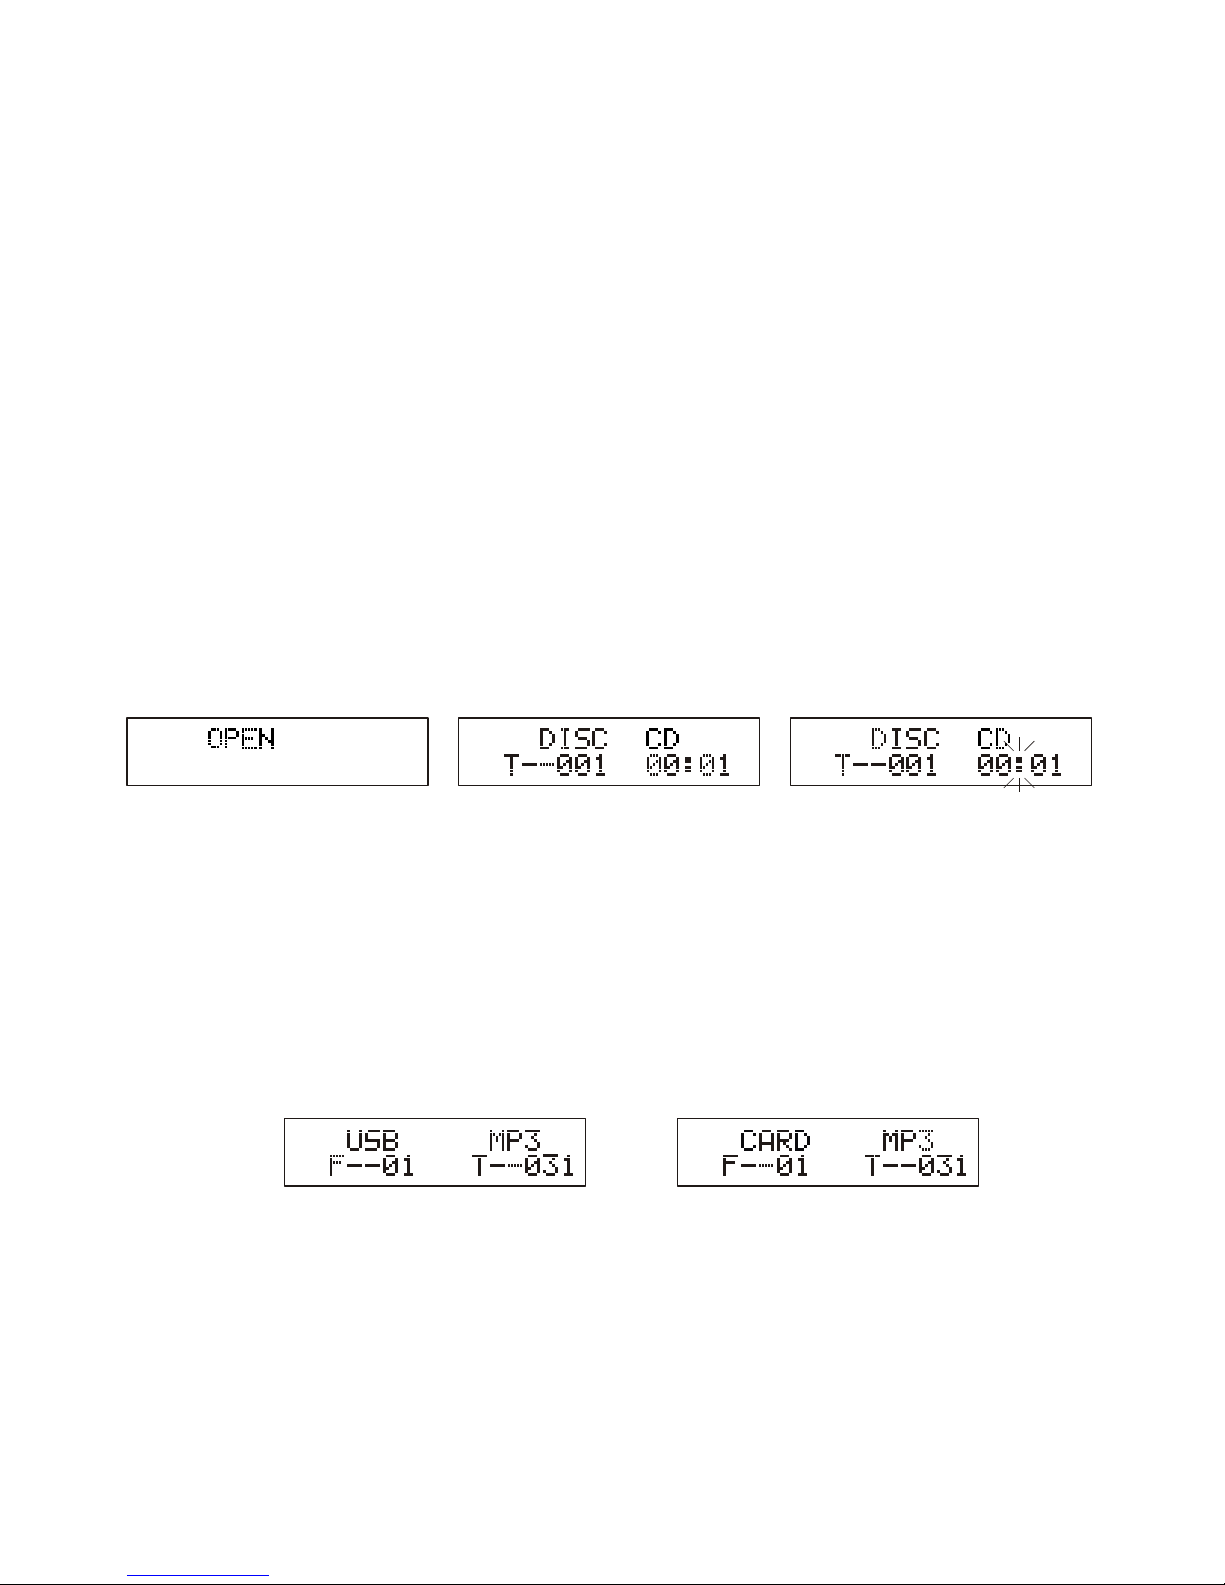
main u nit will aut omati cally r ead the t otal numbe r of the fo lders a nd trac ks at the s ame time. (F 4,F5)
3. If th e USB memory d evice m ore tha n one fol der.
a. Pre ss the FOLDE R/ARR OW (UP or DOW N) butt on on the remo te cont rol to se lect ea ch folder.
b. Pre ss the SKIP/ TUNE SE ARCH (U P or D OWN) bu tton on the un it (or re mote co ntrol ) to select current t rack in
desi red folder.
No te : 1. The main u nit can p lay MP3 and WM A only in th is mode .
3. The mai n unit does no t suppo rt the WM A file whi ch is protec ted by "D RM FILE ". It jus t suppo rt USB versi on
1.1 an d 2.0.
2. This un it can suppo rt most o f USB dev ices an d SD/MMC/S DHC car ds (up- to 32GB m emory capa city fo r
SDHC ). It can not access ( or, need l onger t ime to ac cess) thos e devic es with b ig memo ry capacit y.
4. Not s upport all k inds of “ d ual vol tage- MMC” card no r “MMC- Plus” c ard.
Play ing The Entire flas h disc
1. Pla yback will s tart by p ressi ng the PL AY/ PAU SE/SCAN bu tton on t he unit ( or remo te control ) once. P layba ck
star ts with the first tra ck. The dis play sh ows the curr ent tra ck numb er and it s elapsed time.
2. To interr upt playba ck, pre ss the PL AY/ PAU SE/SCAN bu tton ag ain. The ti me elap sed indica tor wil l flash .
3. Pre ss the PLAY/PAUSE/ SCAN bu tton on ce more t o resume the p layba ck. To stop by pr essing the STO P/MEN U/
INFO b utton.
In any t ime, the USB D EVICE o r SD CARD m ust be fi xed well und er in the S TAN DBY mode to a void th e main
unit a nd USB DEVICE or SD CAR D were da maged .
Note :
F1 F2
F3
F4
F5
CD /MP3 /WM A OPER ATION
List ening To Compac t Disc (C D/MP3 /WMA)
1. Pre ss the CD/iP od/US B/CAR D butto n on the unit (o r remot e contr ol) is se lect to C D/MP3 mode . Th e unit wi ll read
the CD /MP3/WMA di sc auto matic ally.
2. P (F1)
3. Ins ert the CD/M P3 disc i nto the C D compa rtment, press the C D to clo se the CD door.
Note : 1. This unit can p lay CD, C D-R, CD -RW, MP3 and WMA dis cs. It al so play t he "8 cm" a nd "Multi Section " of MP3
DISC .
2. The "Pl ayback Tran sfer Bi t Rate in M P3 is 32 - 32 0 kbps and WAM is 64 - 320 k bps.
3. The "Ma x Readable 9 9 folde rs and 99 9 track s. If no disc or c an not re ad the TCO, " NO DISC " will be
disp layed.
Play ing The Entire CD/M P3/WM A
- CD
1. Ins ert the CD dis c into th e CD comp artme nt, the main unit wil l autom atica lly read the total nu mber of t he fold ers
and tr acks at the sa me time.
2. Pre ss the PLAY/PAUSE/ SCAN bu tton on t he unit ( or remote co ntrol ), the un it will p lay the firs t track o f the CD di sc
auto maticall y.( F2)
3. Pre ss the PLAY/PAUSE/ SCAN bu tton on ce agai n, the time el apsed i ndica tor wil l flash.(F 3)
4. Pre ss the SKIP/ TUNE SE ARCH( UP or DOWN) b utton once t o chang e Track NO ., pres s and hold the SKIP/T UNE
SEAR CH (UP or DOWN) bu tton to s kip fas t forwa rd or backwa rd of eac h song.
5. Pre ss the PLAY/PAUSE/ SCAN bu tton on ce more t o resume the p layba ck. To stop by pr essing the
STOP/M ENU/INFO b utton .
- MP3/ WMA
1. Ins ert the MP3/ WMA disc i nto the C D compa rtment, the main un it will a utoma tically read the to tal num ber of th e
fold ers and trac ks at the s ame tim e.
2. Pre ss the PLAY/PAUSE/ SCAN bu tton on t he unit ( or remote co ntrol ), the un it will p lay the firs t track o f the MP3 /
WMA dis c automati cally.
3. Pre ss the PLAY/PAUSE/ SCAN bu tton on ce agai n, the time el apsed i ndica tor wil l flash.
4. Pre ss the SKIP/ TUNE SE ARCH( UP or DOWN) b utton once t o chang e Track NO ., pres s and hold the SKIP/T UNE
SEAR CH(UP or DOWN) b utton o n the uni t once (o r remote con trol) t o skip fa st forw ard or backw ard of ea ch song .
5. To resume p layback, p ress th e PLAY/PAUSE/ SCAN butto n once mo re agai n.
6. To change the ALBUM NO., p ress th e FOLDE R/ARR OW (UP or DOWN) bu tton on t he remo te cont rol once.
7. To stop pla yback, pre ss the STOP /MENU / button o nce on the uni t (or rem ote con trol) .
ress t he CD DOOR OPE N/CLO SE butt on on the m ain unit only, an d then th e CD door w ill ope n automati cally.
OPEN /CLOSE but ton
Note : If the main un it is not w orkin g prope rly, disconne ct the po wer sou rce and t hen reconn ect it ag ain.
INFO
ID 3 OPER ATIO N
Duri ng in the MP3/WMA mo de
1. Pre ss the ID3/M EM/C- ADJ. Bu tton on t he unit ( or remote co ntrol ) once to o pen the I D3 functio n.
2. If th e MP3/WMA fil e is writ ten “ID 3”, it wi ll auto maticall y searc h the inf ormat ion of “TITL E NAME” , “A RT IST NAME”
and “A LBUM NAME” ind icate d on the di splay .
3. Pre ss the ID3/M EM/C- ADJ. bu tton on t he unit (or remote co ntrol ) again . Th en the unit wi ll resu me to pla y norma lly.
Page 19
UK-6
F6 F7 F8
F9
RE PEAT PL AY FUN CTI ON
- CD
1. Pre ss the REPEAT butto n once, R EP-1 is d ispla yed. CD will p lay the c urren t track r epeatedl y.
2. Pre ss the REPEAT butto n twice , REP- ALL is dis played. CD w ill pla y all tra cks rep eatedly.
3. Pre ss the REPEAT butto n once mo re agai n, REPE AT functio n will be o ff .
- MP3/ WMA/USB/ SD CARD
1. Pre ss the REPEAT butto n once, t hen REP -1 is dis played. It w ill pla y the cur rent tr ack repeat edly.
2. Pre ss the REPEAT butto n twice , REP- ALL is dis played. It w ill pla y all tra cks in th e current folder re peate dly.
3. Pre ss the REPEAT butto n thric e, REP- ALBUM i s displaye d. It wil l play al l track s repeated ly.
4. Pre ss the REPEAT butto n once mo re agai n, then R EPEAT func tion wi ll be off.
PROGR AM FUN CTI O N
1. How t o play the program
- CD
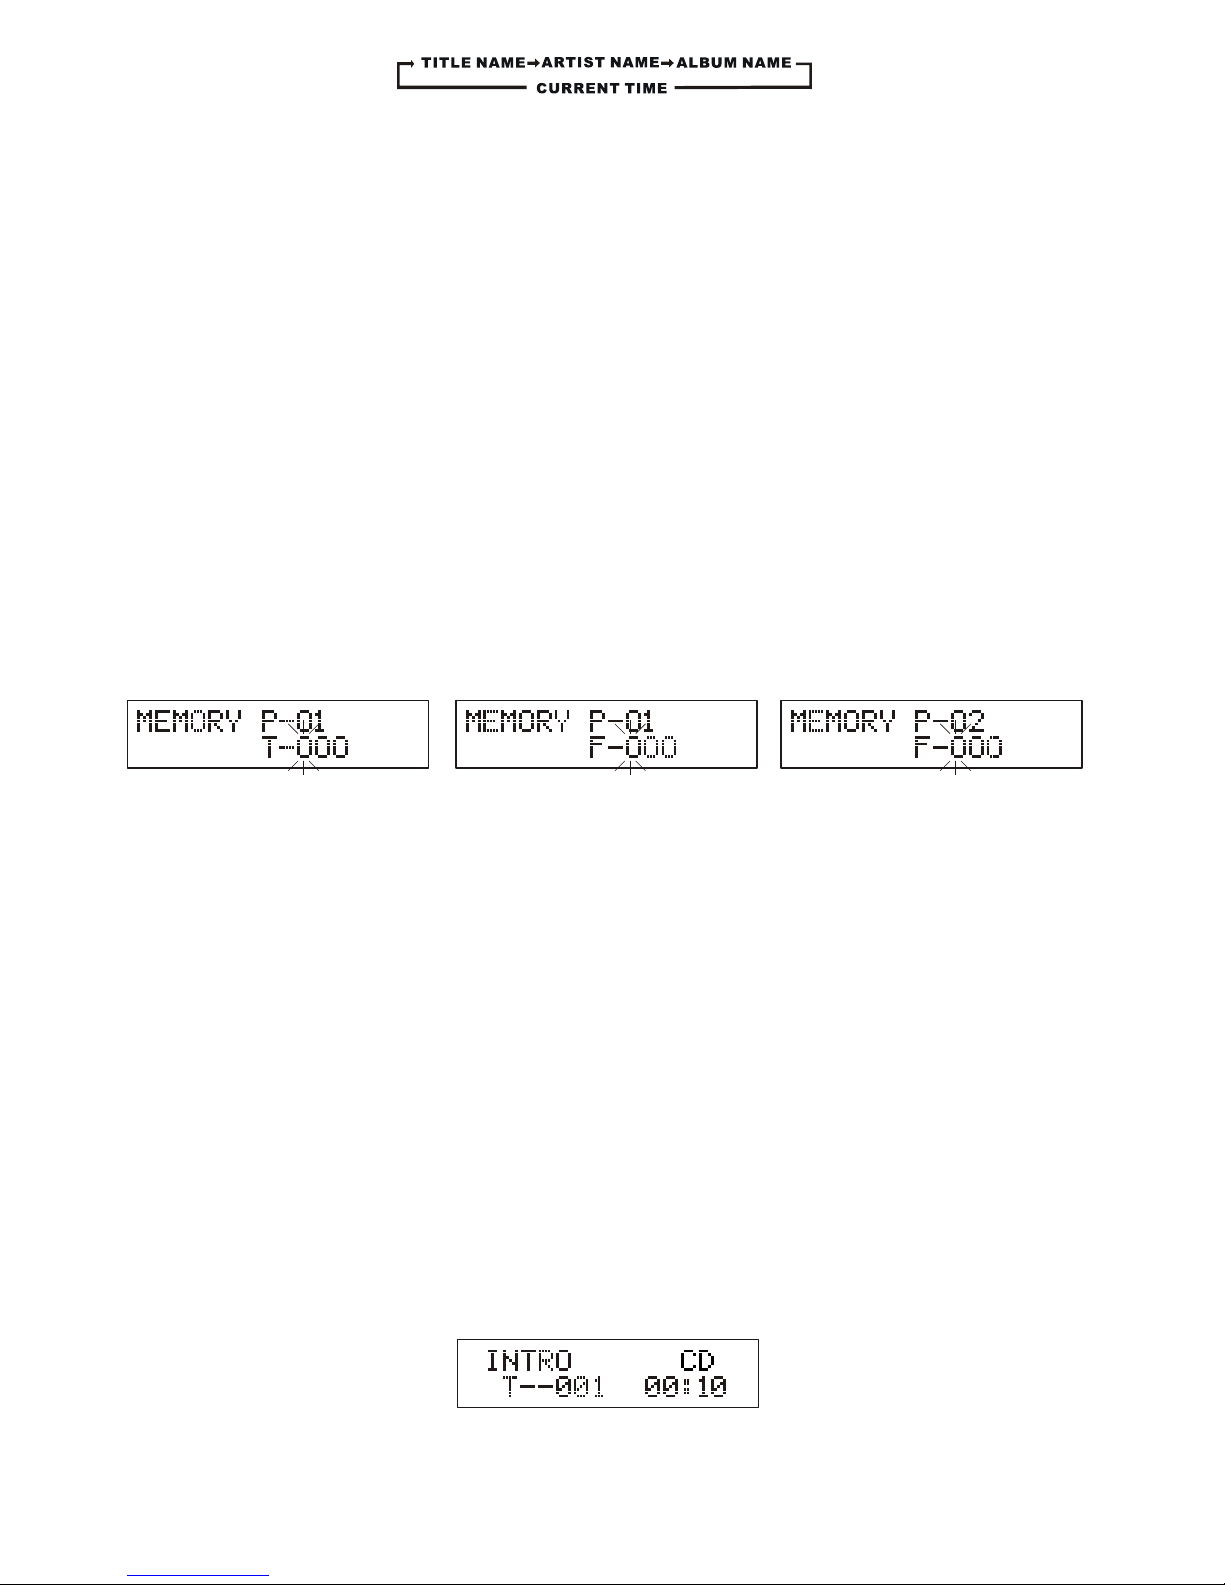
1. Pre ss the ID3/M EM/C- ADJ. bu tton on t he remo te control , shift t o MEMORY mode .(F6)
2. Pre ss the SKIP/ TUNE SE ARCH( UP or DOWN) b utton on the u nit (or r emote c ontro l), the track numbe r will be
chan ged.
3. Pre ss the ID3/M EM/C- ADJ. bu tton on t he remo te control t o confi rm the tr ack num ber.
- MP3/ WMA
1. Pre ss the ID3/M EM/C- ADJ. bu tton on t he remo te control , shift t o MEMORY mode . Th e album numb er is
flas hing. (F7)
2. Pre ss the FOLDE R/ARR OW(UP or DO WN) but ton on the rem ote con trol, t he albu m number wil l be chan ged.
3. Pre ss the ID3/M EM/C- ADJ. bu tton on t he remo te control , the fir st trac k numbe r will be disp layed .(F8)
4. Pre ss the SKIP/ TUNE SE ARCH( UP or DOWN) b utton on the u nit (or r emote c ontro l), the track numbe r will be
chan ged.
5. Pre ss the ID3/M EM/C- ADJ. bu tton on t he remo te control t o confi rm the fa vorit e track numb er.
REP- 1
REP- ALL
(o n the re mote c ontr ol)
(o n the re mote c ontr ol)
INFO
REPE AT
REPE AT
REPE AT
RA NDOM P LAY( on th e r emot e con trol)
You ca n press the RA NDOM bu tton on t he remo te control to selec t the ran dom pla y function:
1. D uring CD stop, p ress th e RANDO M butto n once to sele ct rand om play, the d ispla y will show “R ANDOM ”, one
trac k will be rand omly se lecte d and sta rted playi ng.
2. D uring p layba ck, fir st press the R ANDOM b utton o nce, th e display wi ll show “ RANDO M”, the n press the
SKIP/T UNE SEA RCH(UP or DOWN ) butto n on the un it (or re mote contr ol), on e track w ill be ra ndomly sel ected a nd
star ted to play.
3. To resu me norm al play back, pres s the RAN DOM but ton aga in.
User c an make the pr ogram u p to 32 tra cks in CD m ode or 64 trac ks in MP3 /WMA/ USB/S D CARD mode in a ny
desi red order. Pr ogram m ode is ac tivat ed while in st op mode .
2. PRO GRAM PLAY
Pres s the PLAY/PAUSE/S CAN but ton on th e unit (o r remote con trol) . Th e unit wi ll play the first tra ck of the p rogra m.
When a ll tracks ha ve been p layed , the uni t display wi ll show t he numb er of tra cks and the pl aying t ime of th e
CD/M P3/WMA song s.
3. CAN CEL PROGRAM
Pres s the STOP/MEN U/ b utton o n the uni t (or rem ote contro l) twic e, or ope n the CD tr ay door and cl ose it
agai n that the mem ory wil l be eras ed. Set a n ew program , the exi sting o ne will b e cleared
Note : D uring in the progra m mode.
1. Pre ss the butt on on the remo te cont rol onc e, the indi cator will l ight on t he disp lay. Th en the unit wi ll
repe at the curre nt trac k.
2. Pre ss the butt on twice, th e will l ight on the di splay. Then th e unit wi ll repeat al l the tot al
numb er of tracks .
3. Pre ss the butt on once more a gain. The u nit wil l retur n to play the pr ogram i n norma lly.
IN TRO P LAY( on the r emot e cont rol)
1. Pre ss the INTRO b utton o nce, an d then IN TRO is di splayed. The m ain uni t will pl ay the first 1 0 secon ds of eac h
trac k.(F9)
2. Pre ss the INTRO b utton t wice, a nd then r esume to normal pla y.
iPod
Pres s the STANDBY/O N butto n on the un it or on re mote contr ol to swi tch the u nit on.
ress t he CD/iPod /USB/ CARD bu tton on t he unit (or re mote co ntrol )
/i Phon e OPE R ATIO N
Duri ng the unit in STAN DBY mode:
1.
2. P to the i Pod mode.
Page 20
UK-7
3. P
Inse rt the iPod/ iPhon e playe rs in
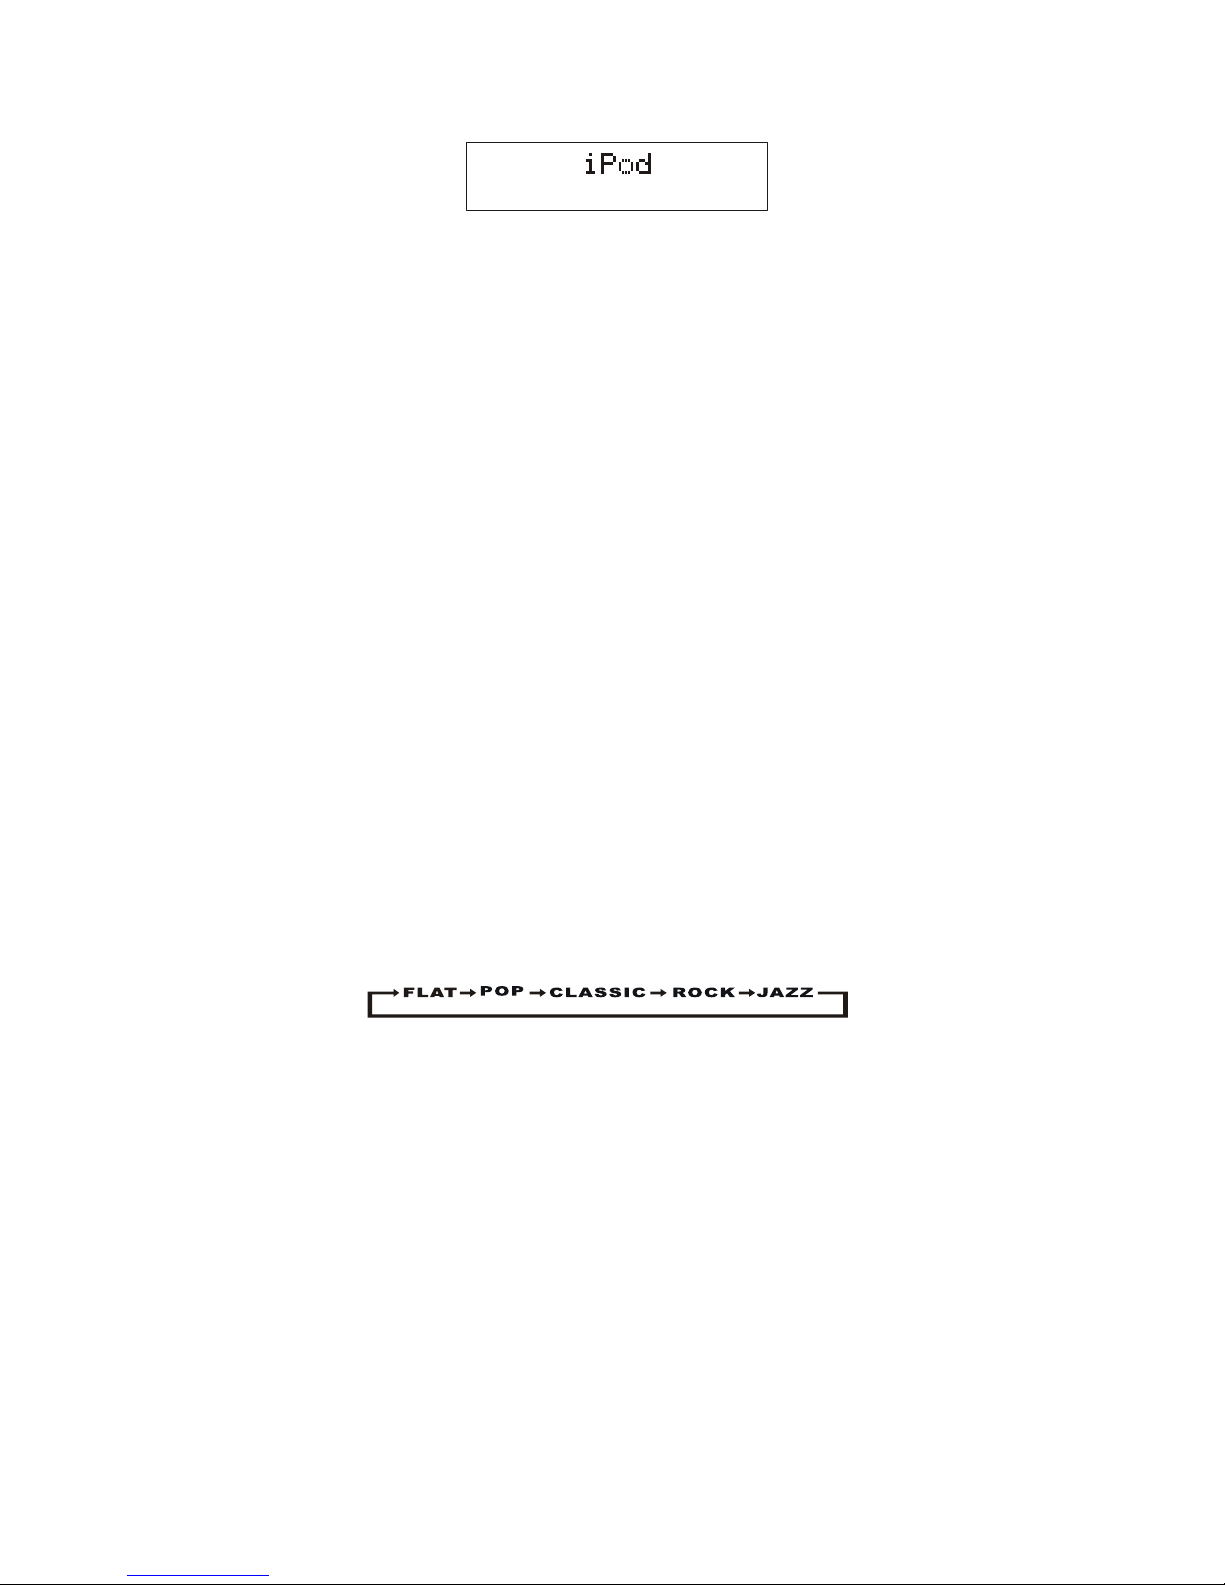
the iP od docking b racke t ixedl y, th e iPod in dicator wi ll appe ar on the m ain uni t display. (F10 ) Note: The C D/iPo d
door c an’t close d under t he dock ing ope n.
4. P PL AY/ PAU SE/SC AN on ce to pla y the cur rent track .
5. Adju st the volum e contr ol by
6. P PL AY/ PAU SE/SC AN on ce to pau se the cu rrent trac k.
7. To skip for wards or bac kward s, pres s the (UP or DOW N) button
to sel ect the desi red tra ck.
Note : When the iPo d touch i Phone s creen h as been lock ed, abo ve oper ation a re still ava ilabl e.
Duri ng the unit in iPod/i Phone M ENU mod e:
Note : iPod touch &iPho ne seri es need s to manual in to the mu sic men u first , then proce eding t he next o perat ion.
1. Dur ing the unit i n iPod mo de, res s the STOP/MEN U/INF O butto n once , the unit
will e nter to the iP od/iP hone ME NU mode . To sel ect the curr ent men u as belo ws :
Musi c > Extras > Pho to Impo rt (wit hout th is func tion displ ay on the i Pod Min i) > Sett ings > Shuffle S ongs >
Back light > Now Pl aying w ill sho ws on the i Pod/iPho ne Play er disp lay.
2. Pre ss the FOLDE R/ARR OW (UP or DOW N) butt on on the remo te cont rol to se arch th e current menu.
3. Pre ss the SELEC T/MON O/ST. but ton ente r to the desir ed menu f older.
4. Pre ss the FOLDE R/ARR OW (UP or DOW N) butt on on the unit ( or remo te cont rol) to s earch the current
cont ent in the eac h desir ed menu f older.
5. If yo u want retur n to the iP od menu , press t he STOP/MENU /INFO b utton ag ain.
Char ging the iPod/iPh one Pla yer bat tery th rough the ma in unit :
1. iPo d/iPhone P layer h as a inte rnal no nremovab le batt ery, the bat tery ma y need to be cha rged th at is not u sed for
a whil e.
2. You can c harge the iP od/iP hone Pl ayer th rough the ma in unit a utoma tical ly under the S TAN DBY or POWE R ON
mode .
Note s:1. The iPod/ iPhon e Playe r batte ry is 80-per cent ch arged i n about a n hour, and ful ly char ged in ab out a few
hour s. If you c harge it whi le play ing mus ic, it ma y take longe r.
2. It is n ot bett er to charge u nder th e TU NER mod e. It may i nterfere t he rece ption .
3. In an y time, y ou can contr ol the iP od/iP hone pl ayer on the ma in unit , remot e contr ol or iPod/i Phone p layer
itse lf whil e the unit in th e "iPod " mode.
4. In an y time, t he iPod/iP hone pl ayer mu st be fix ed well unde r in the STAND BY mode to av oid the unit a nd
iPod /iPho ne player we re dama ged.
ress t he iPod DOOR O PEN/C LOSE bu tton on ce on the unit first to o pen the i Pod doo r, then pr ess the iPod D OCK
OPEN b utton to ope n the iPo d docki ng (see p oint 2 on Assem bly Dra wing of u nit).
ress t he butt on on the unit ( or remo te cont rol)
pres sing the VOL UME (+ or - ) butto n on the un it (or remote contr ol).
ress t he butt on on the unit ( or remo te cont rol)
SKIP /TUNE SEAR CH on the u nit (or remo te
cont rol)
p on the u nit (or remo te cont rol)
on the u nit (or remo te cont rol)
on the u nit (or remo te cont rol)
MU TE SET TIN G ( on th e r emo t e con trol )
Pres s the MUTE but ton on th e remot e contr ol to stop the sound fr om the sp eaker s tempo rarily, the sou nd stop s and
the di splay will s how “MU TE”. To cance l mute, press the MUT E butto n again o r press t he VOLUME +/ -, “MUT E”
disa ppears in th e displ ay and th e sound i s restored .
LI STEN TO TH E MUSI C BY US I NG HE ADPH ONE
pena l
SP ECIF ICAT ION
POWE R SUPPLY : A C 230V~50H z
OUTP UT POWER : 5 Watts x 2
UNIT DIM ENSION : 500 (W) x 1 04 (D) x 214.5 ( H) mm
N. W. : 2.4 k g
RADI O SECTION
FREQ UENCY RANGE : FM 87.5 - 108 MHz
DAB/ DAB+ 17 4 - 240 MHz
COMPACT D ISC SECTIO N
OPTI CAL PICKUP : 3 - BEAM L ASER
FREQ UENCY RESPON SE : 100H z - 16kHz
Plug y our headph ones (3 .5mm mi ni-st ereo plug) i nto the h eadph ones ja ck on the left of the u nit. The sound
will b e heard thro ugh the h eadph ones, n ot the speak er.
SPEC IFICATION SUB JECT TO CHA NGE WIT HOUT FU RTHER NOTI CE.
Venti lation war ning : " The no rmal ve ntilation of the pr oduct s hall no t be impeded for inte nded us e."
Pres s button
(o n the re mote c ontr ol)
AUX IN P LAY
pres s butt on
EQ C ONTROL
When y ou press the E Q butto n, the so und ton e changes as b elow:
The AUX i nput is loca ted at th e left of t he unit . Use a 3.5mm stereo ja ck cabl e to conn ect audio eq uipme nt thro ugh
the LI NE IN jack.
1. To select the AUX input fu nctio n, repe atedl y the DAB/FM /AUX on the uni t (or rem ote con trol) u ntil the
AUX is in dicated on t he disp lay.
2. the VO LUME (+ or -) on th e unit (or remote con trol) t o adjus t the sou nd output le vel.
Note : LINE in cabl e not inc luded .
F10
 Loading...