

Page 1
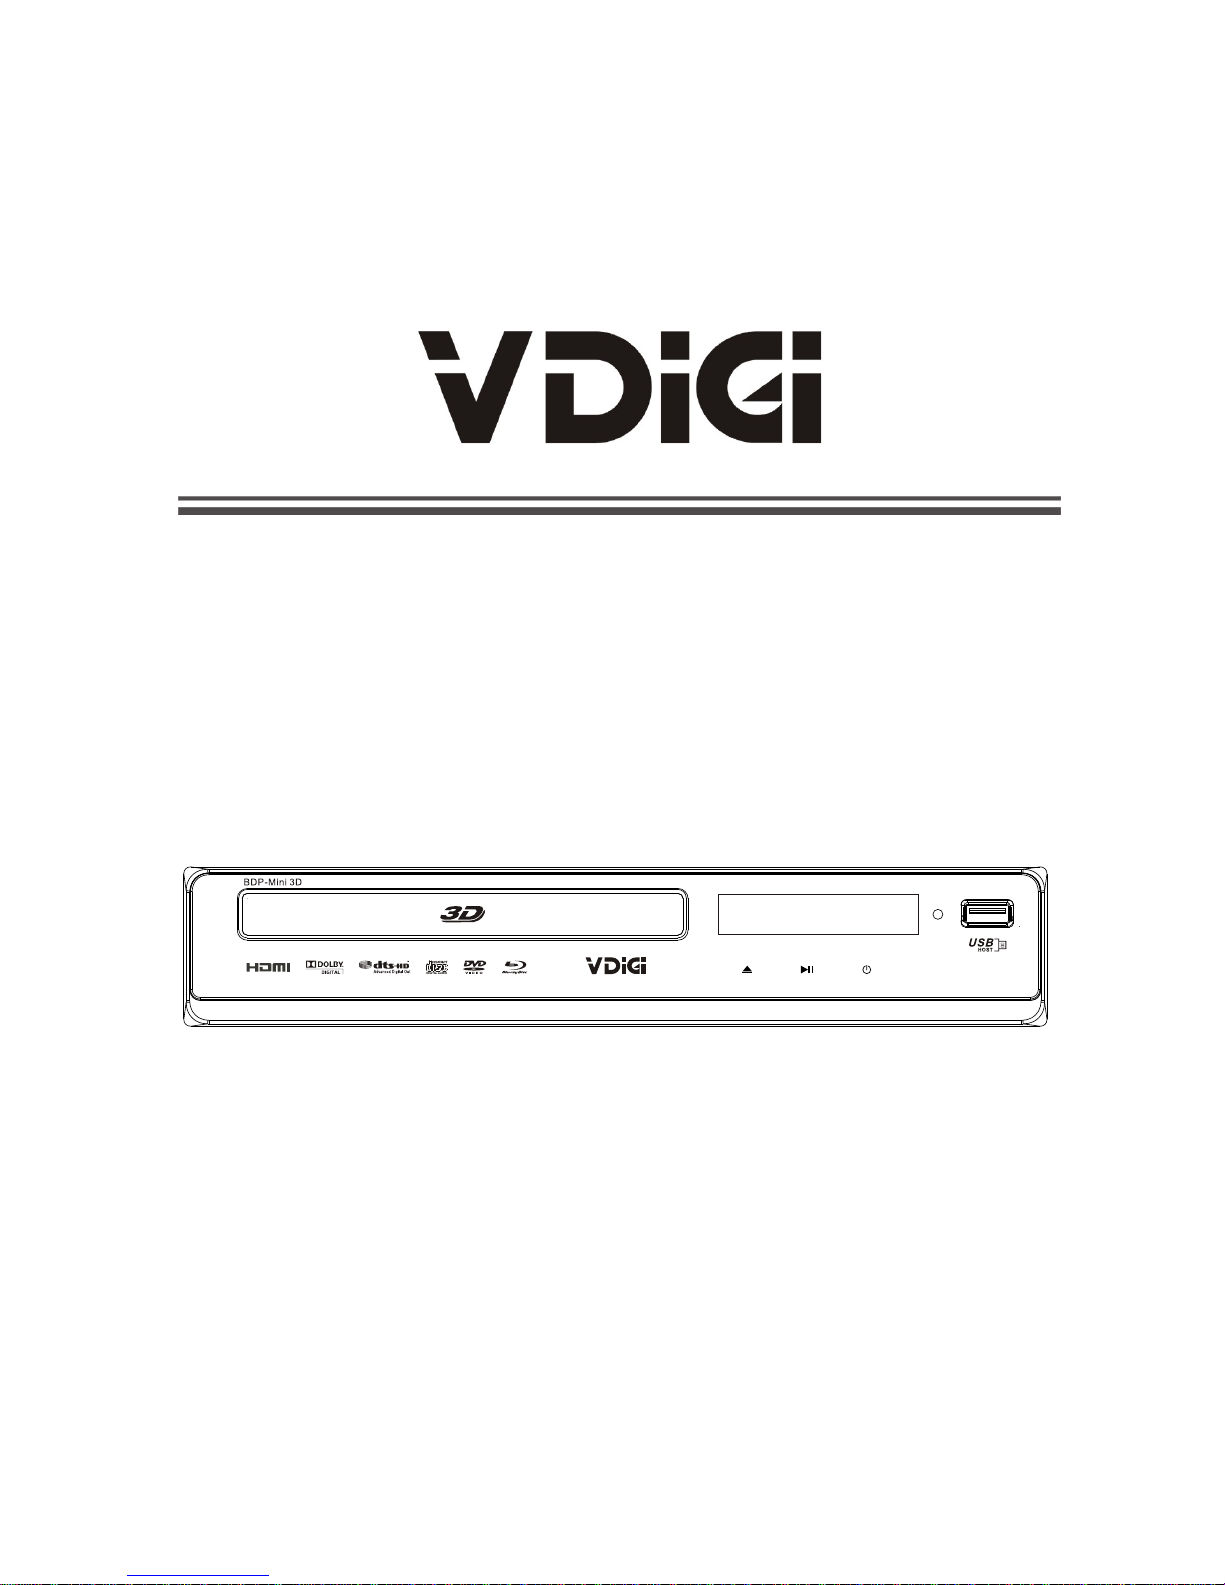
BDP-Mini 3D
藍光影碟播放機
用戶手冊
請仔細閱讀用戶手冊以確保適當使用本產品,並妥善保管本手冊以備將來參考。
Page 2

目錄
重要安全指示…………………………………………………………………………… 2
1. 產品介紹……………………………………………………………………………… 3
2. 前面板和後面板說明………………………………………………………………… 4
3. 輸出顯示……………………………………………………………………………… 7
4. 遙控器………………………………………………………………………………… 9
5. 系統設定……………………………………………………………………………… 11
6. 播放影碟或USB裝置的音頻、視頻及影像檔案…………………………………… 16
7. 操作BD-Live功能 …………………………………………………………………… 21
8. 故障排除……………………………………………………………………………… 23
9. 規格…………………………………………………………………………………… 24
- 1 -
Page 3

重要安全指示介紹
1)請仔細閱讀本說明書。
2)請妥善保管本說明書。
3)要留意所有警告字眼。
4)跟從所有指示。
5)切勿將本產品靠近水源使用。
6)只可使用乾布清潔本產品。
7)切勿阻塞任何通風出口處,請根據指示安裝本產品。
8)切勿將本產品靠近熱源安裝如暖爐、加熱器、爐灶或其產生熱力的產品(包括擴音機)。
9)切勿破壞極化插頭的安全目的,若隨機供應的插頭不能與家中的電源插座匹配,請諮詢
電器技師更換舊的電源插座。
10)要妥善保護電源線,切勿在其上行過或將它擠壓,特別是插頭和插座以及電源線從產品
伸延的接駁位置。
11)只可使用由生產商指定的附件/配件。
12)當遇上颱風和雷電時,又或長時間沒有使用本產品,請從電源插座拔出插頭。
13)所有維修程序須由合格的技術人員進行,若產品的電源線或插頭損毀、或有液體、物件
意外掉入產品內,又或本產品曾暴露於雨水或濕氣之中,又或產品不能正常操作或曾經跌
下,請轉交給弘毅有限公司檢查。
14)電源插頭是一個中斷電源的設備,這個斷電設備須要隨時可以操作。
15)切勿將報紙、枱布、窗簾等雜物阻塞通風出口。
16)切勿將明火源頭如燃點的香煙靠近本產品。
17)棄置電池時要留意環保條例和對環境的影響。
18)在適中的天氣使用本產品。
19)請勿將本產品放置在潮濕的環境中,產品上也不應放置如花瓶等可能會導致液體滲入的
物件。
警告︰要減少火警或觸電的危險,切勿將本產品暴露於雨水或濕氣之中。
警告︰切勿將電池暴露於過渡熱源之中如陽光、明火或類似物體。
本圖標說明產品內有構成觸電危險的電壓。
本圖標說明隨機附送的操作和維修指示具有重要的意義。
本圖標說明本產品在危險電壓和用戶可接觸到的零件上,具有雙重絕緣裝置,如須要
維修,只可使用原廠的相同零件。
- 2 -
Page 4
1. 產品介紹
本藍光影碟機可提供高清晰度、具有影院質素的影像及多聲道音頻播放功能。影碟大多會提供多於一種語言的
聲軌及更多不同語言的字幕以供選擇。
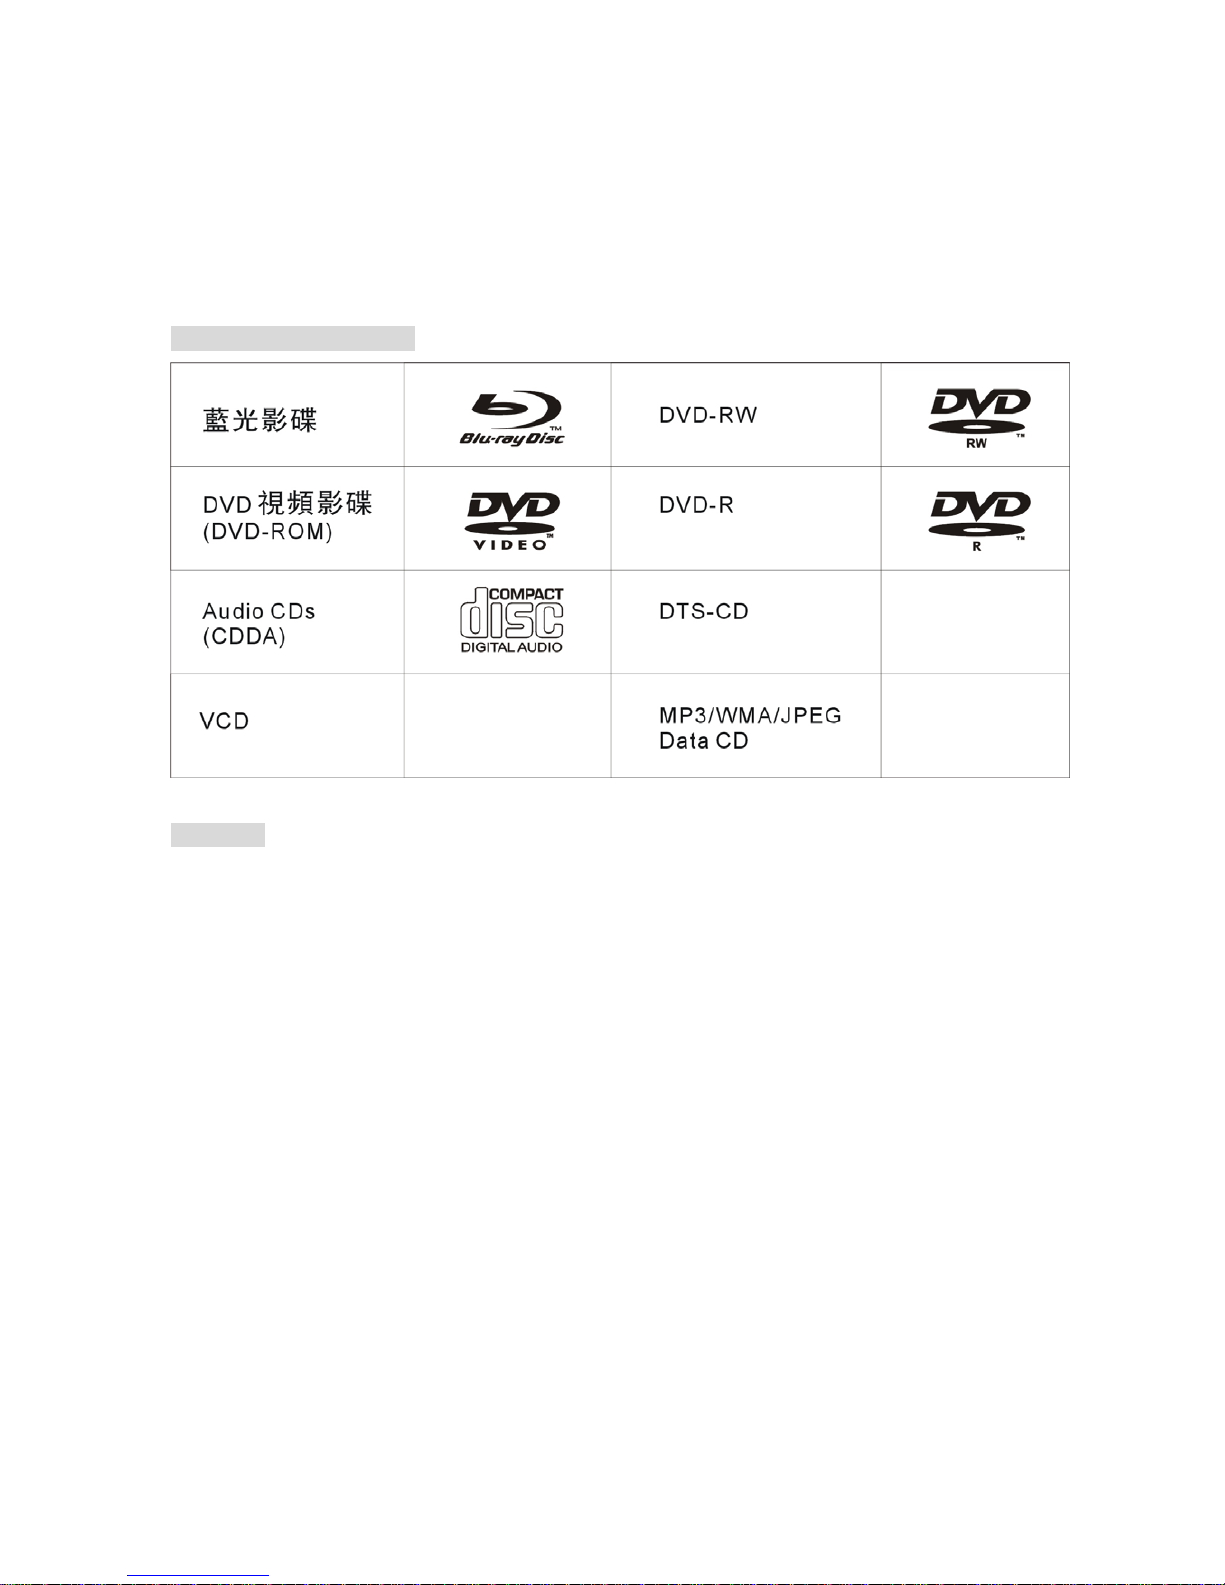
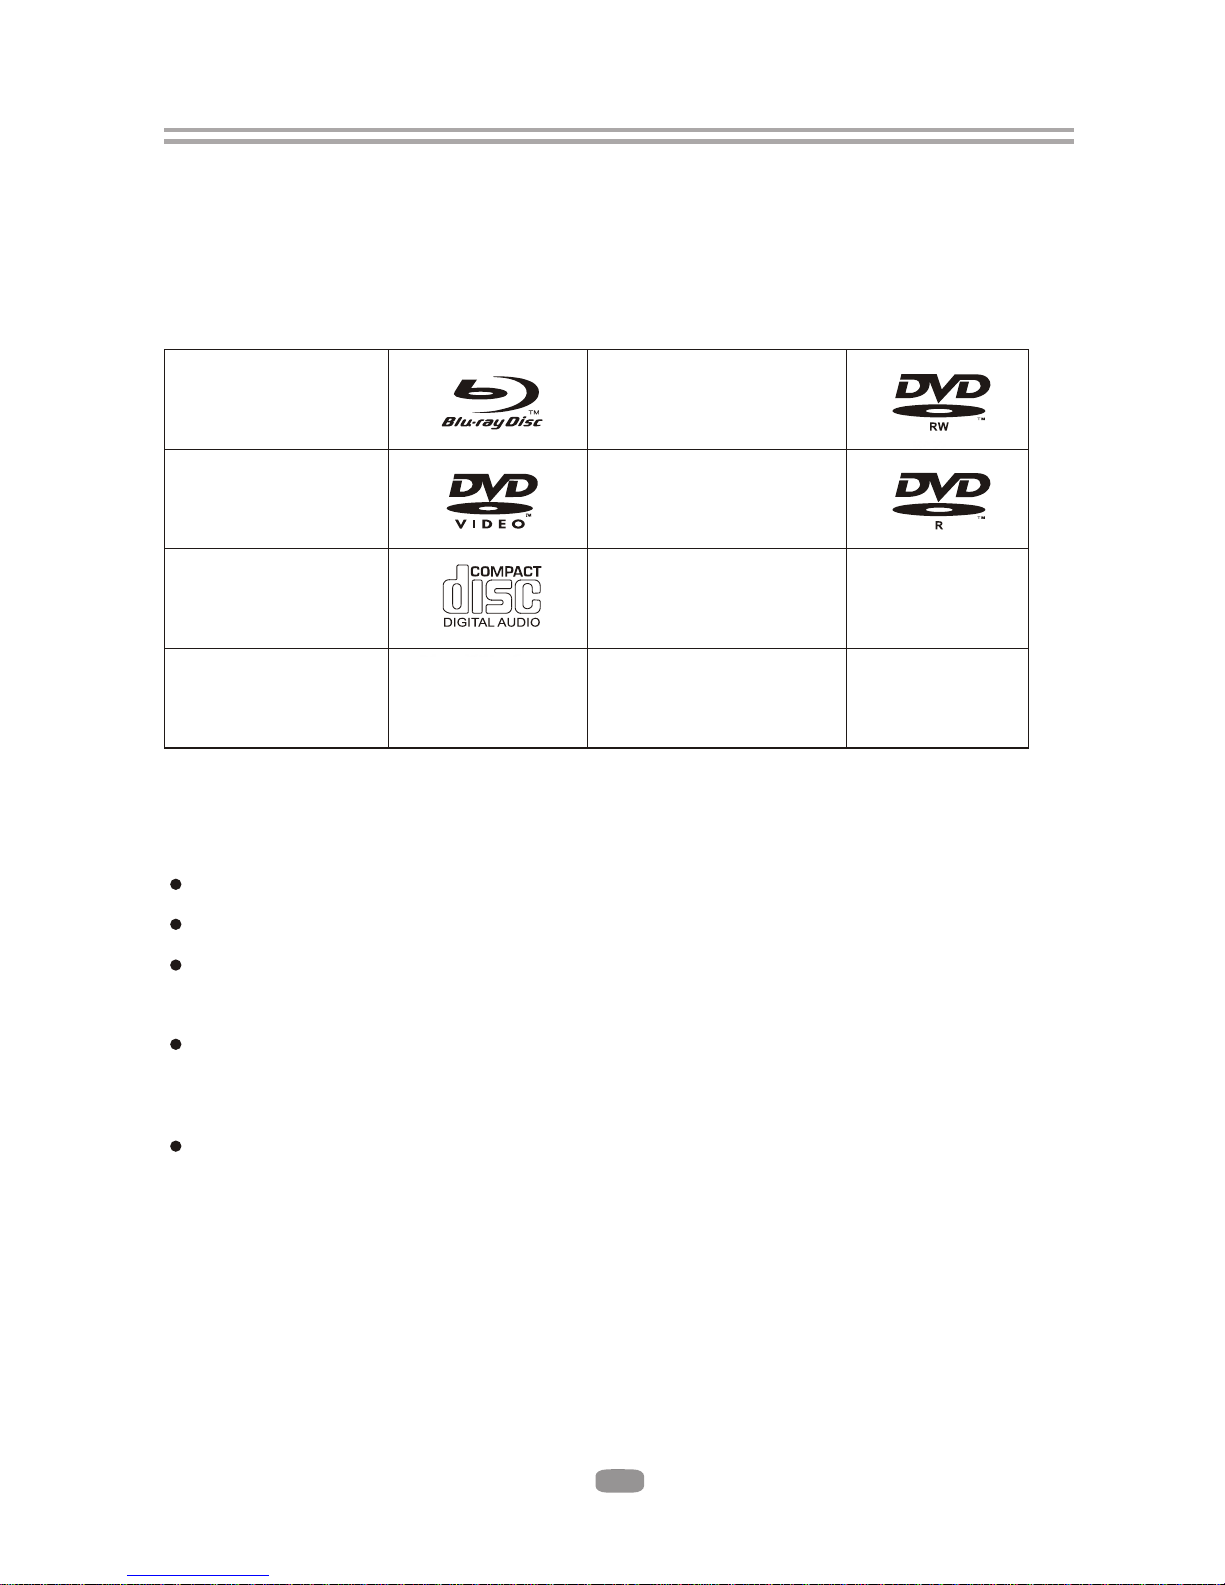
1.1 可播放的影碟格式
REF 播放機能播放以下格式的影碟:
下表為本機支援的碟片種類:
注意事項:
本機只支援完整的 VR mode 格式的可寫入式 DVD 碟片(DVD-RW, DVD-R) 。
註:VR Mode 是採用 DVD-RW Ver1.0&Ver1.1 規格的錄影方式,使用了 Video Recording Format 技術。這個規格
使用了 MPEG 壓縮技術,能夠 Real Time 的錄製高畫質影像且同時具備編輯修改的功能。
z 本機有可能不支援某些種類的碟片,或是某些碟片的特殊功能無法正常表現,例如:有些有播放角度、
畫面比例調整等的功能,有關支援碟片相關訊息,已詳細地說明在包裝盒上,必要時請參考。
z 請勿在本機使用髒污或有刮痕的碟片,這些指印、髒污、灰塵、刮痕、沉積的煙垢等附著在碟片的表面,
可能會導致碟片無法播放。
z 可支援播放使用 UDF 技術錄製的 CD-R/-RW, DVD-RW/-R ,或是使用 ISO9660 格式碟片。
z 為了讓本機能讀取及正確播放 MP3 格式檔案, 請選用使用 MP3 格式寫入檔案的光碟。
z 為了讓本機能讀取及正確播放 WMA 格式檔案, 敬請選用使用 WMA 格式寫入檔案的光碟。
z 高比特率或可變比特率 MP3 和 WMA 格式檔案的碟片,本機有可能無法正確讀取。
z 為了讓本機能讀取及正確播放 JPEG 格式圖片檔案,敬請選用使用.jpeg、.jpg 格式寫入檔案的光碟。
1.2 區碼
如BD或DVD區域代碼未能與藍光影碟播放機的區域代碼配對,本產品將不能播放該影碟。藍光影碟播放機的
區碼印於產品的背板上。
- 3 -
Page 5
2. 前面板和後面板說明
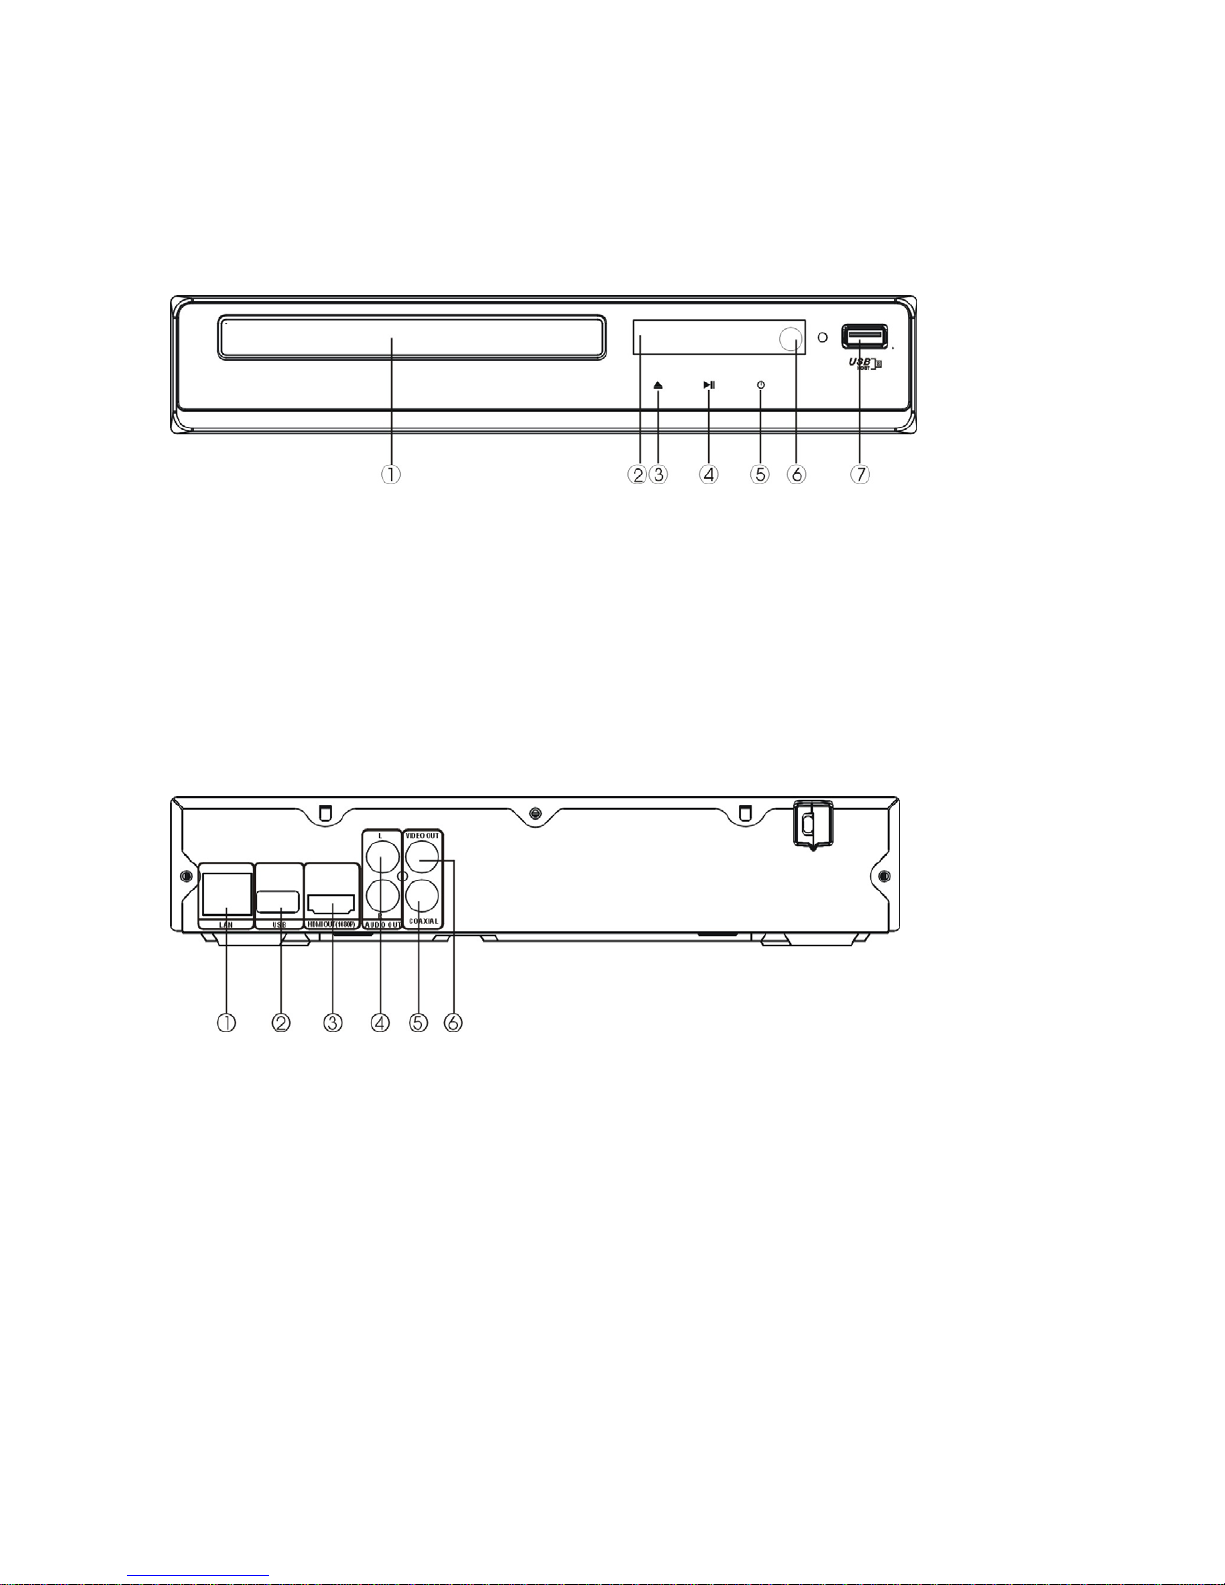
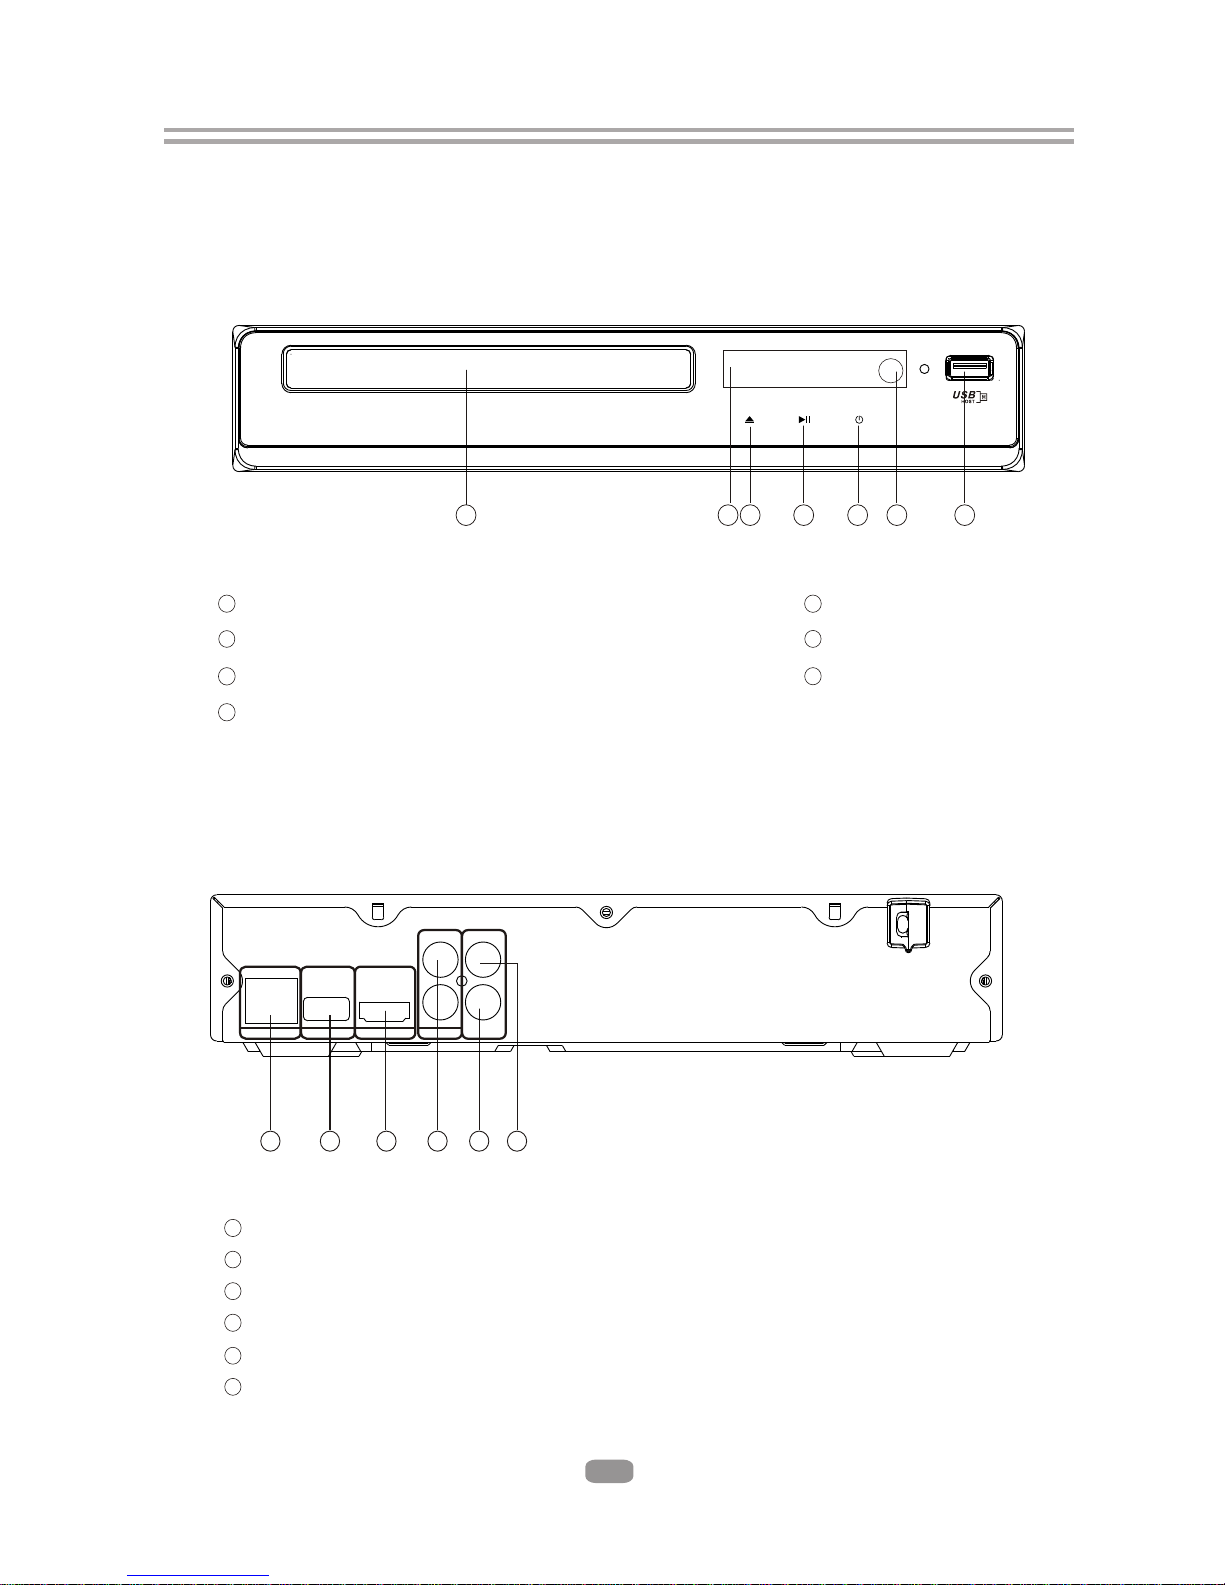
2.1 前面板
1、影碟門 5、電源按鈕
2、LED 屏幕 6、感應器
3、開啟/關閉按鈕 7、USB
4、播放/暫停按鈕
2.2 後面板
1、LAN
2、USB 2.0
3、HDMI輸出
4、2聲道音頻輸出(左, 右)
5、數碼音頻同軸輸出
6、複合視頻輸出
- 4 -
Page 6
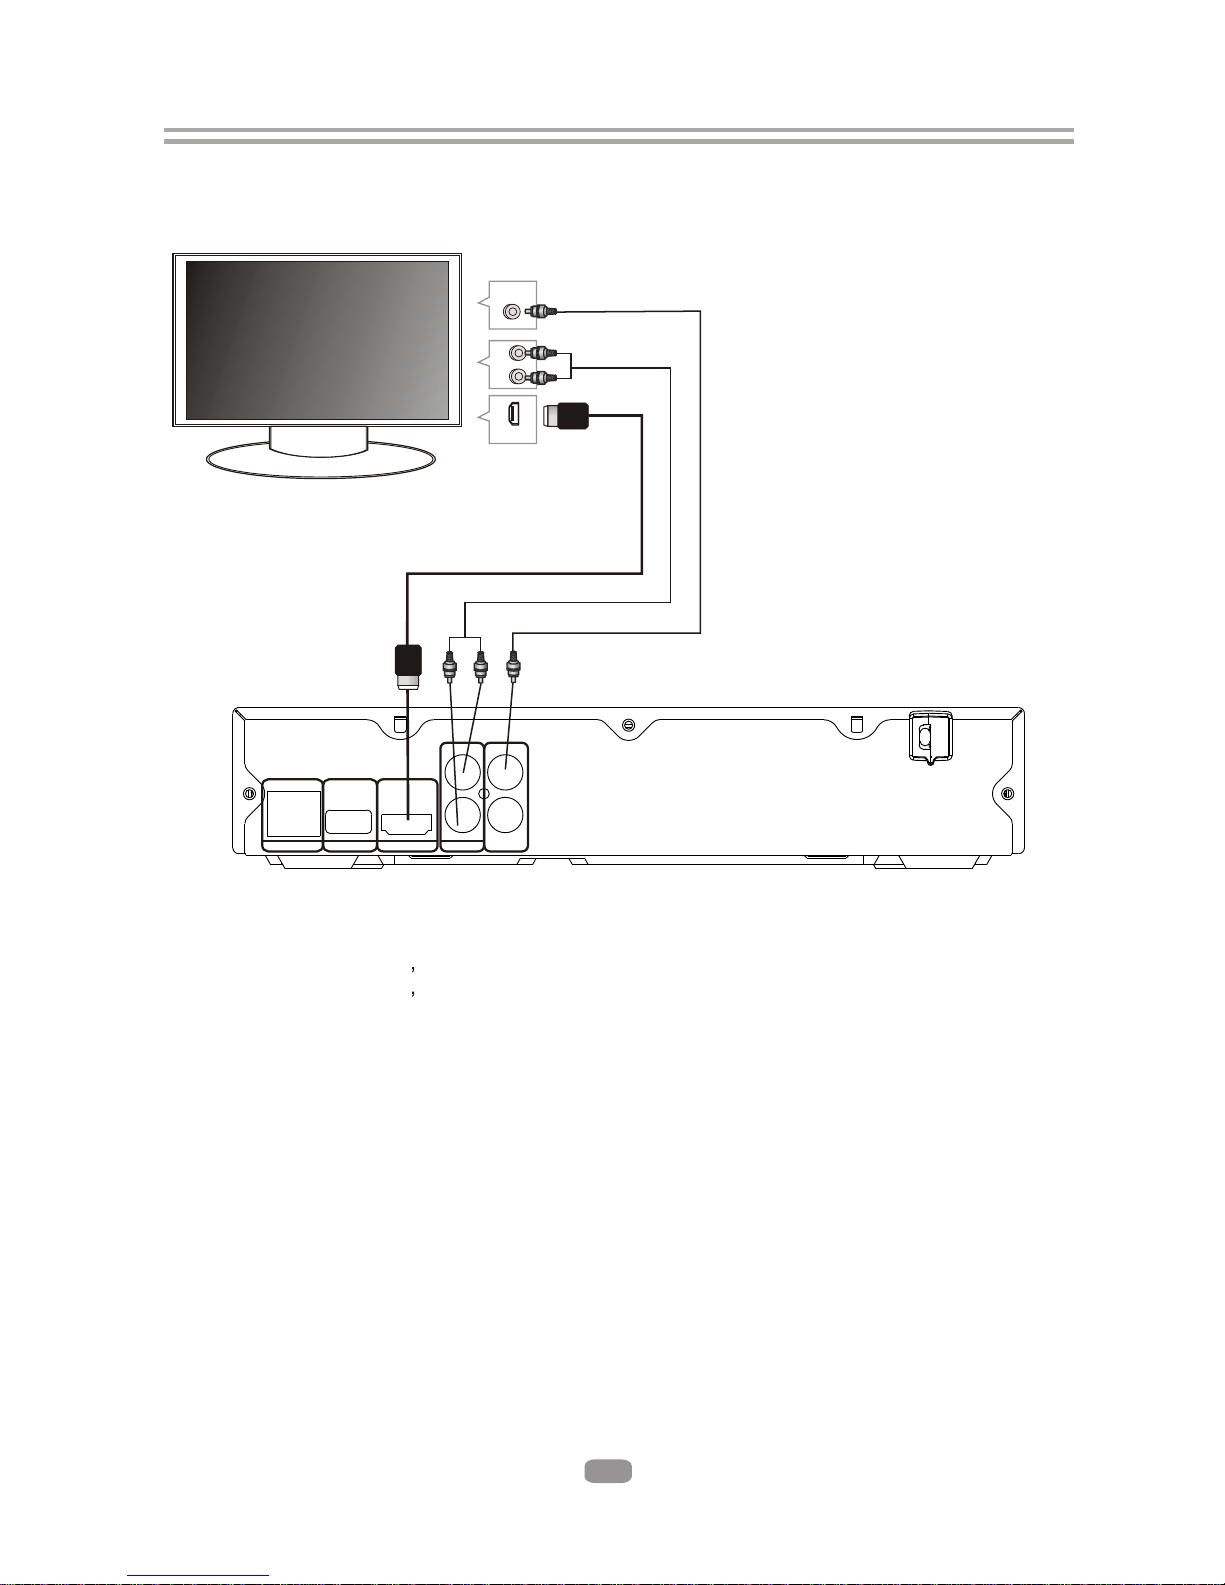
2.3 連接電視
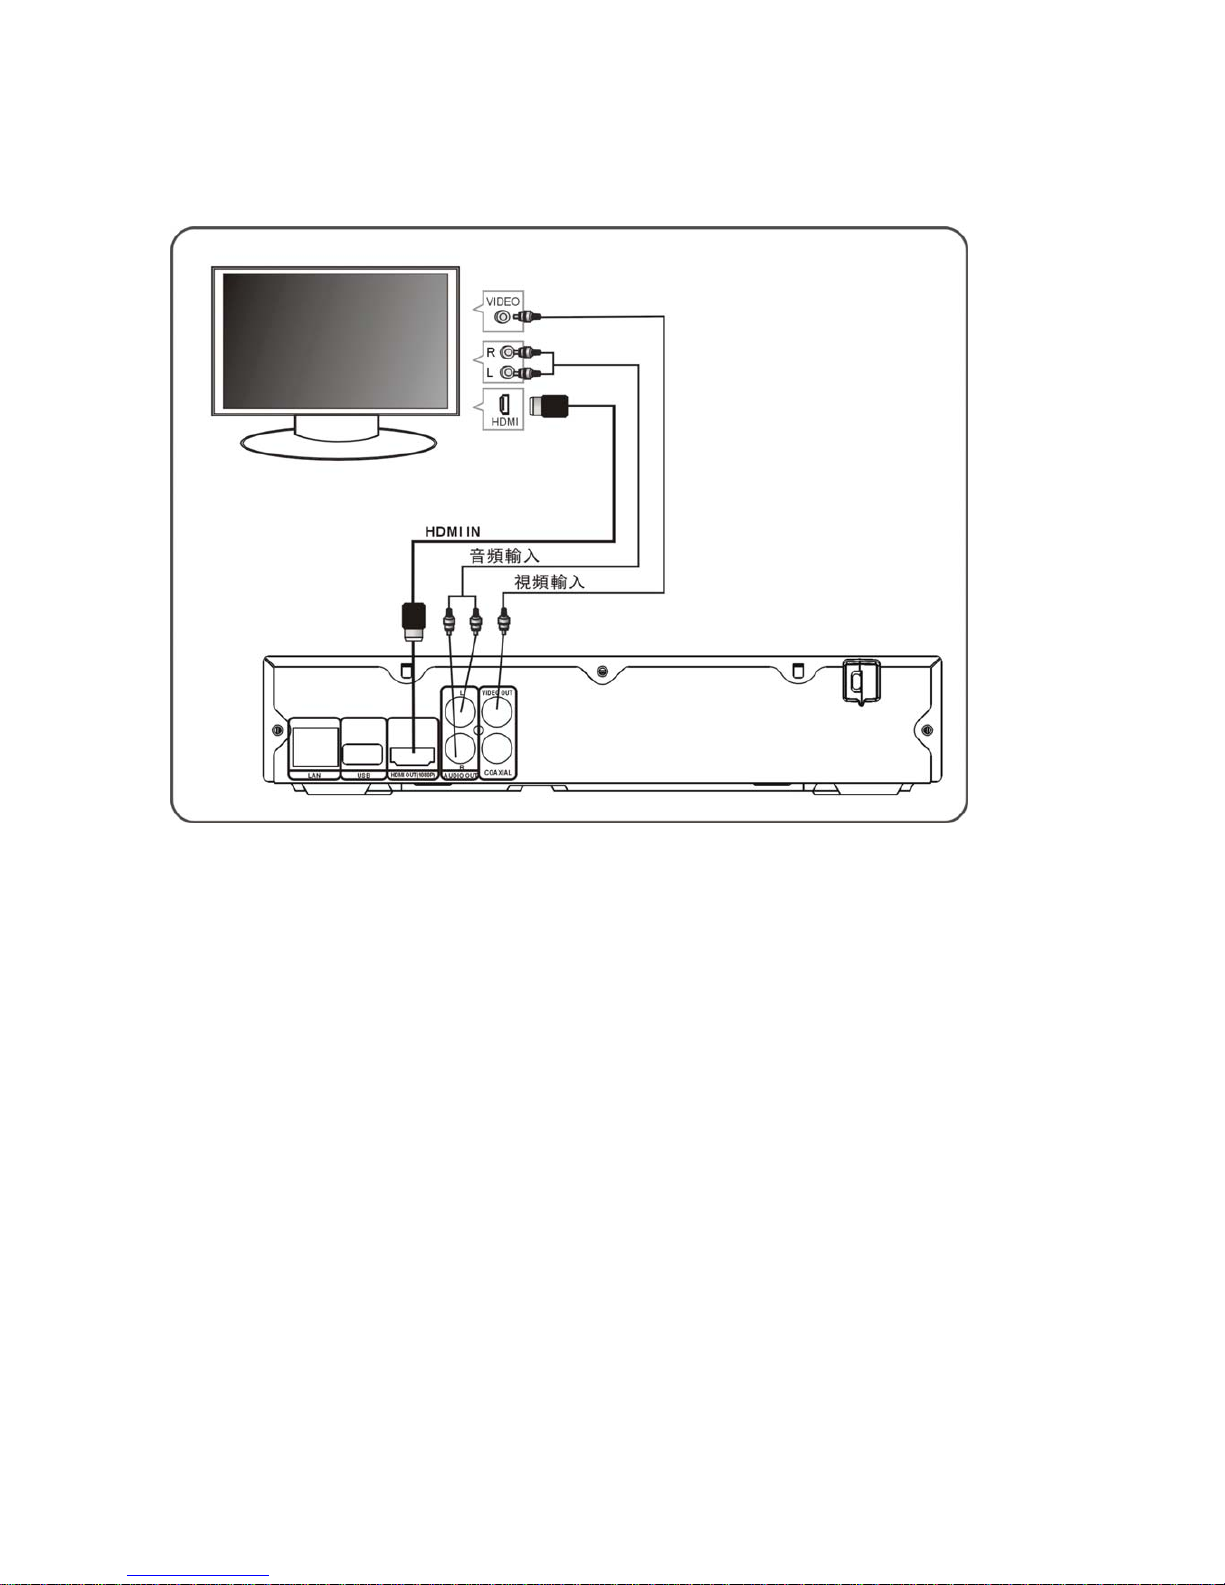
2.3.1使用AV纜線將BD播放機連接至電視
將BD播放機的L和R插孔連接至電視的音頻輸入插孔。
將BD播放機的視頻輸出插孔連接至電視的視頻輸入插孔。
2.3.2 使用HDMI輸出將BD播放機與電視連接
使用HDMI纜線(不供應),將BD播放機與電視連接。
注意︰本播放機可支援在HDMI輸出的視頻解像度達1080p 60Hz 。如果選擇了電視機不支援
的解像度,電視機將無法正常顯示影像。
- 5 -
Page 7
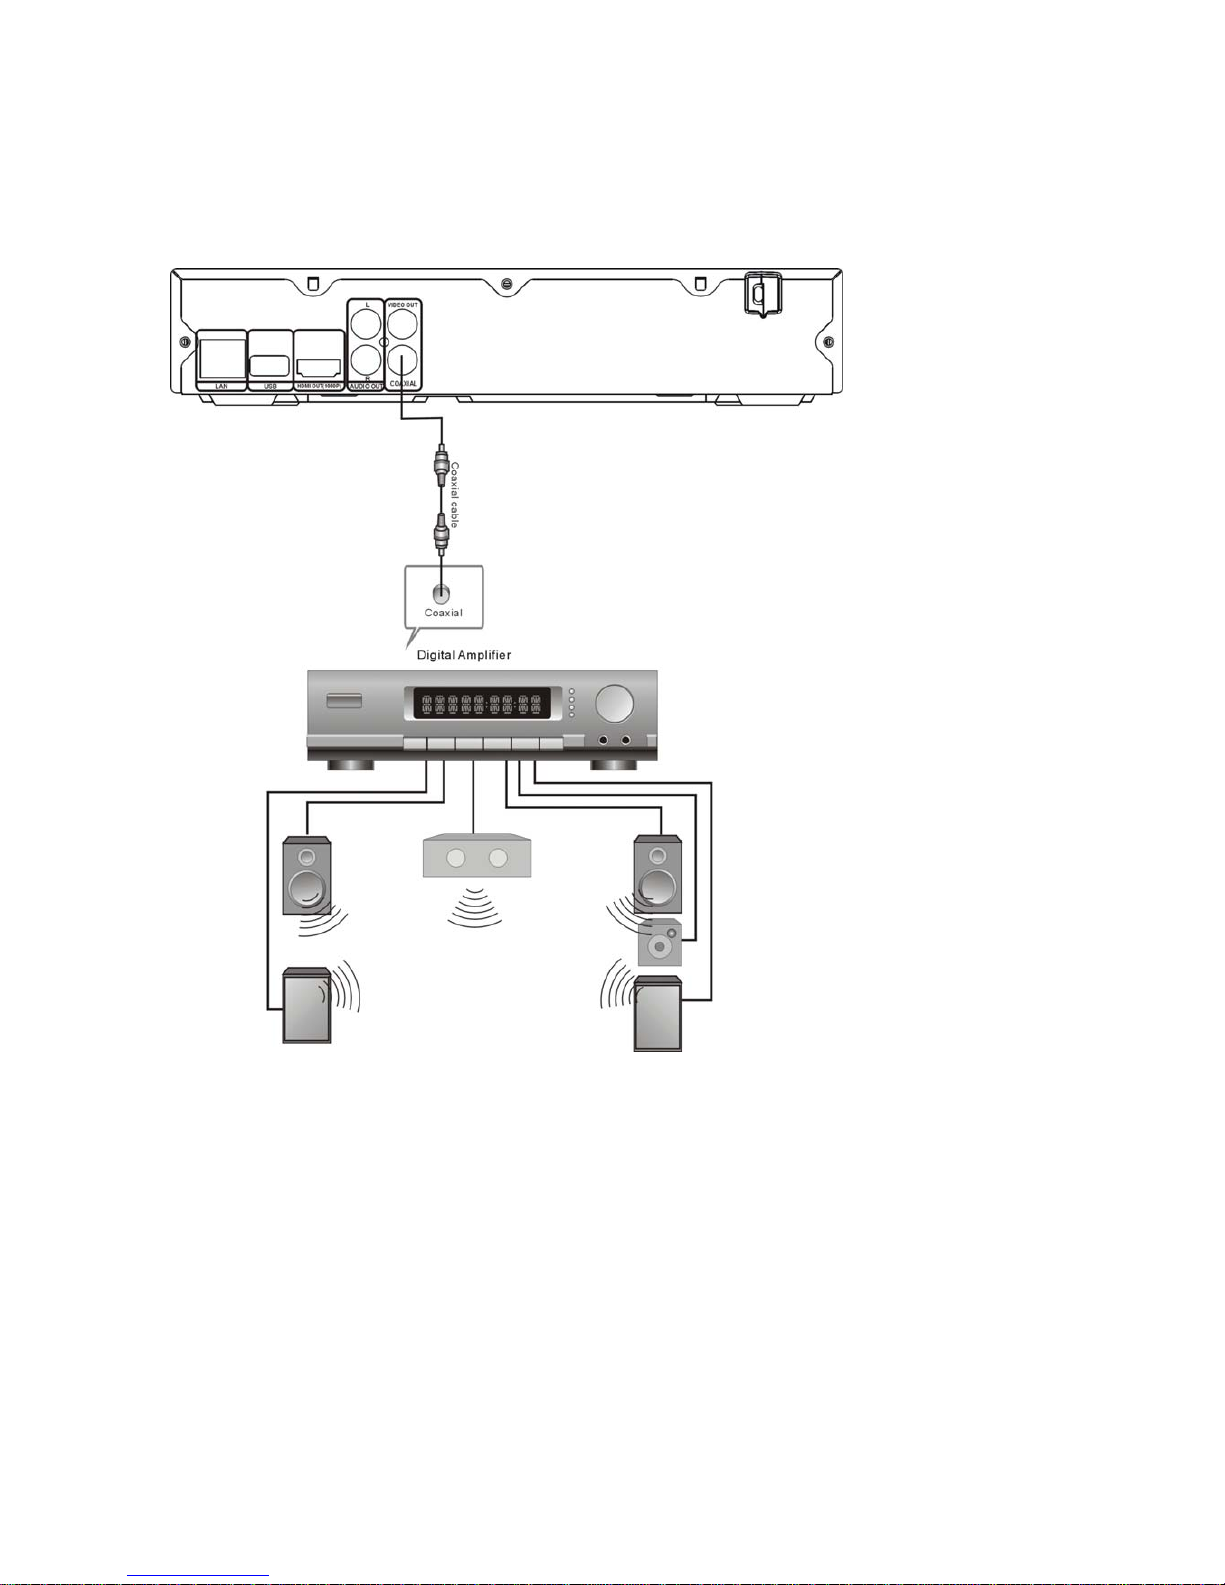
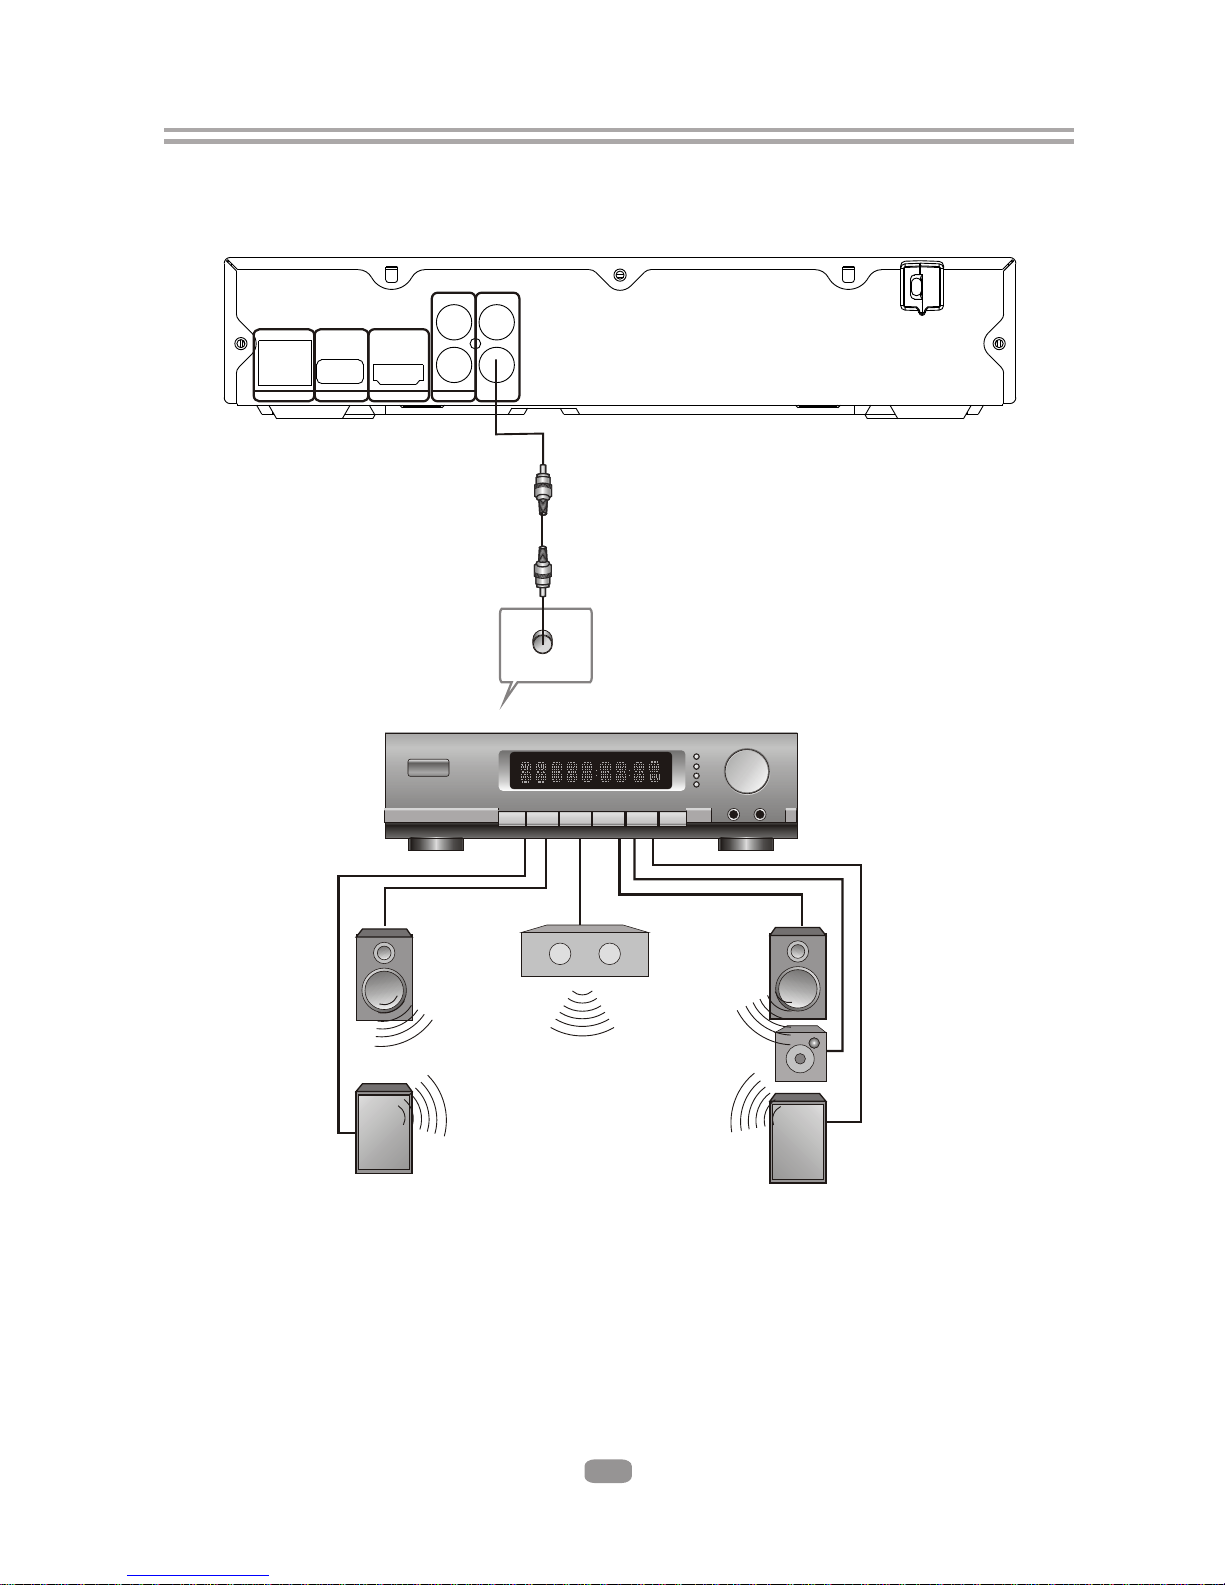
2.3.3 數碼音頻連接
- 使用數碼音頻輸入,將播放機與 AV 擴音器連接
注意:
1. 選擇同軸數碼音頻輸出。
2. 將數碼擴音機設定為 AV 輸入以連接 BD 播放機。
- 6 -
Page 8

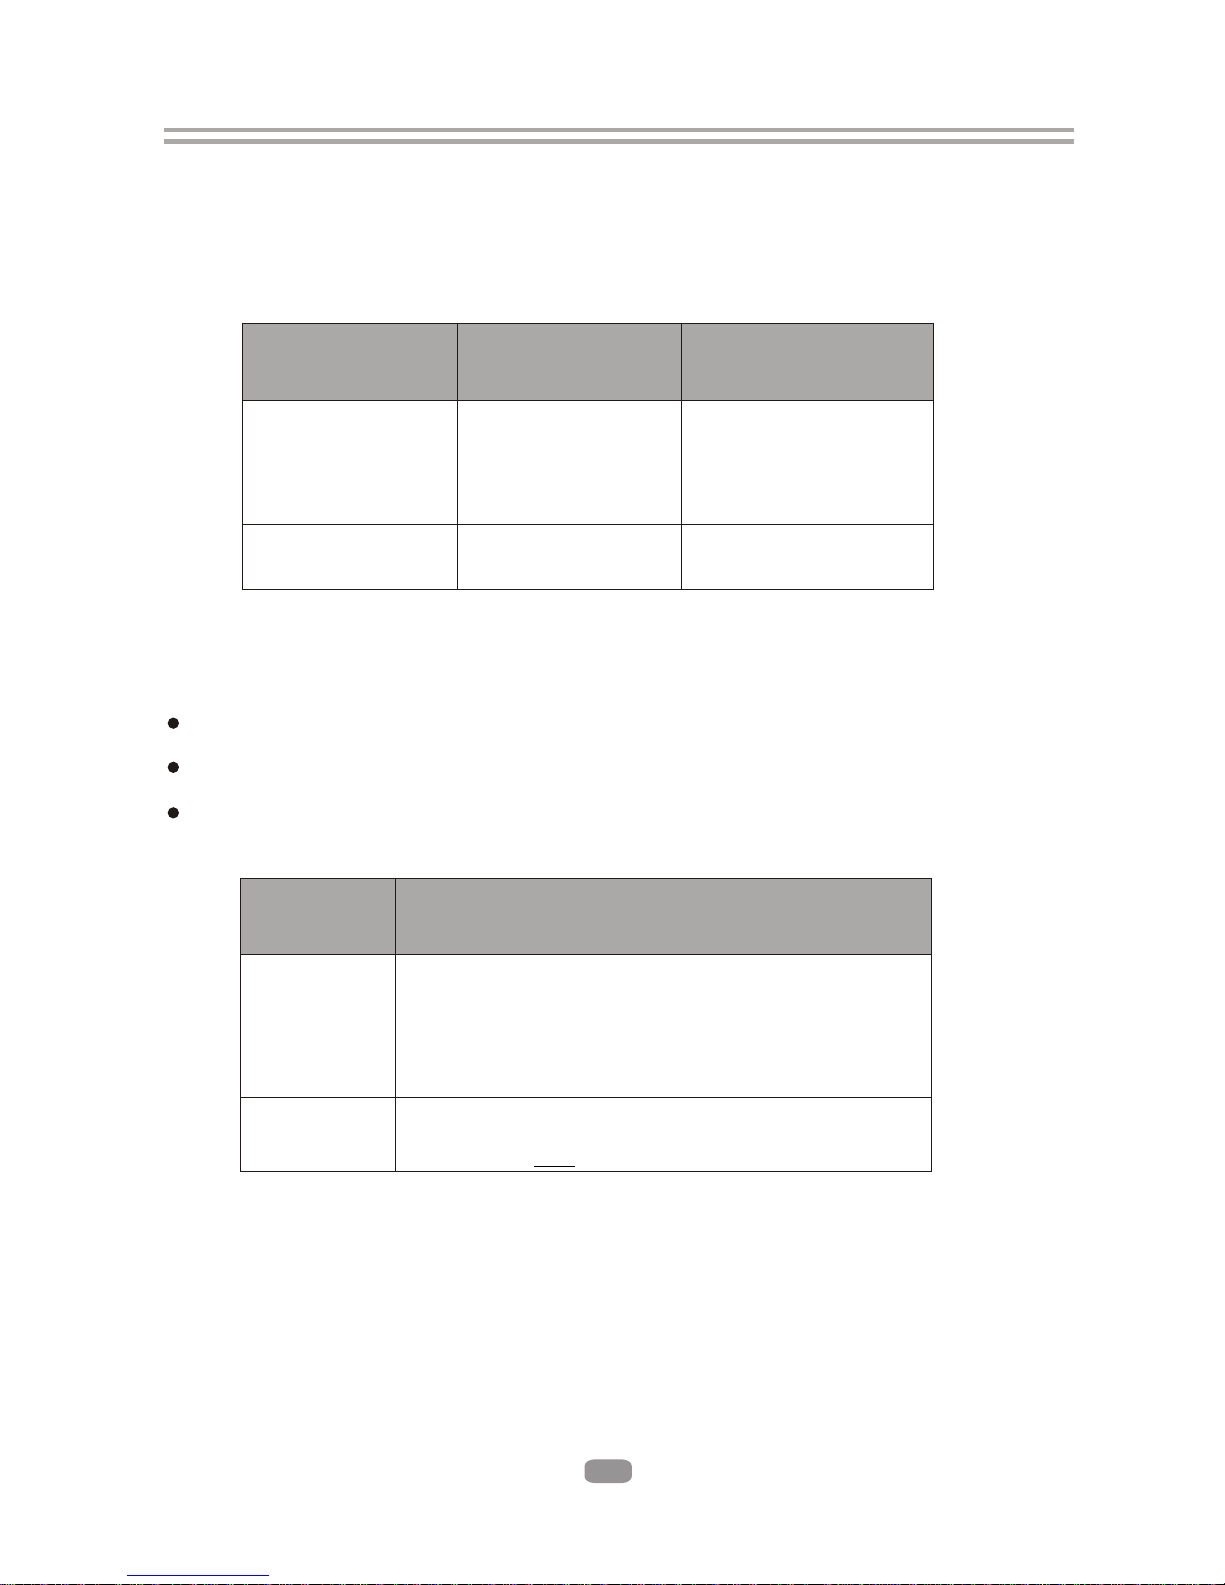
3. 輸出說明
3.1 視頻輸出能力
正如下表所述,每一個視頻輸出都有不同等級的功能。實際輸出要視乎功能表的設定和具備 HDMI 功能的電視
性能而定。
BD 播放機
視頻輸出
支援解析度
(NTSC 型號)
支援解析度
(PAL 型號)
HDMI 1080p 60/30/24 Hz
1080i
720p
480p
480i
1080p 50/25/24 Hz
1080i
720p
576p
576i
色差視頻 1080i
720p
576p
480p
NTSC SD (480i)
1080i
720p
576p
480p
PAL SD (576i)
複合視頻 NTSC SD (480i) PALSD (576i)
3.2 音頻輸出能力
正如下表所述,每一個音頻輸出都有不同等級的功能。實際輸出要視乎:
z BD 播放機的功能表設定
z 影碟上編碼的音頻聲軌種類,以及
z 環繞立體聲接收器的性能 (適用於將 BD播放機通過 HDMI 或 SPDIF 連接至環繞立體聲系統)
BD 播放機
音頻輸出
音頻聲軌可直接送到輸出
HDMI Dolby TrueHD
Dolby Digital Plus
DTS-HD High-Resolution Audio
Dolby Digital
DTS
PCM (由單聲道至 7.1 聲道@96Khz)
SPDIF Dolby Digital
DTS
PCM (只限於立體聲,達至 96Khz)
- 7 -
Page 9

3.3 連接說明
3.3.1 SPDIF 數碼音頻輸出
SPDIF 輸出是一種數碼音頻輸出。若您擁有連 SPDIF(同軸)輸入的環迴立體聲接收器,將此
輸出連接至環迴立體聲接收器的同軸輸入。
3.3.2 立體聲音頻輸出
這些是模擬的「舊式」立體聲(左/右)輸出。若您的電視沒有 HDMI 輸入,您可以將這些輸出
連接至電視的立體聲視頻輸入。
3.3.3. 複合視頻
若電視沒有色差或 HDMI 視頻輸入,請將此輸出連接至電視機的複合視頻輸入。
3.3.4. HDMI 1.3 音頻/視頻輸出
若您使用具有 HDMI 輸入的環迴立體聲音頻接收器,將 BD 播放機的 HDMI 輸出,連接至音
頻接收器的 HDMI 輸入(您須要從音頻接收器的 HDMI 輸出,連接第 2 條 HDMI 纜線至電
視的 HDMI 輸入)。
若您的環迴立體聲音頻接收器沒有 HDMI 輸入(或您沒有使用環迴立體聲接收器),請將此
輸出直接連接至電視的 HDMI 輸入。其中一個音頻輸出,可以連接至音頻接收器。
3.3.5. 以太網連接器
只限於 BD-Live,當播放 BD-Live 影碟時,使用以太網纜線將此連接器連接至以太網。
3.3.6. USB 2.0 連接器
作為外置 USB 記憶體的連接,可播放在 USB 記憶體的音頻/視頻檔案,或儲存下載內容至
USB 記憶體作 BD-Live 播放。
警告: USB 記憶碟必須是直接連接本機。 若是使用連接線連接 USB,有可能導致資料傳輸
失敗或干擾的情形。
- 8 -
Page 10
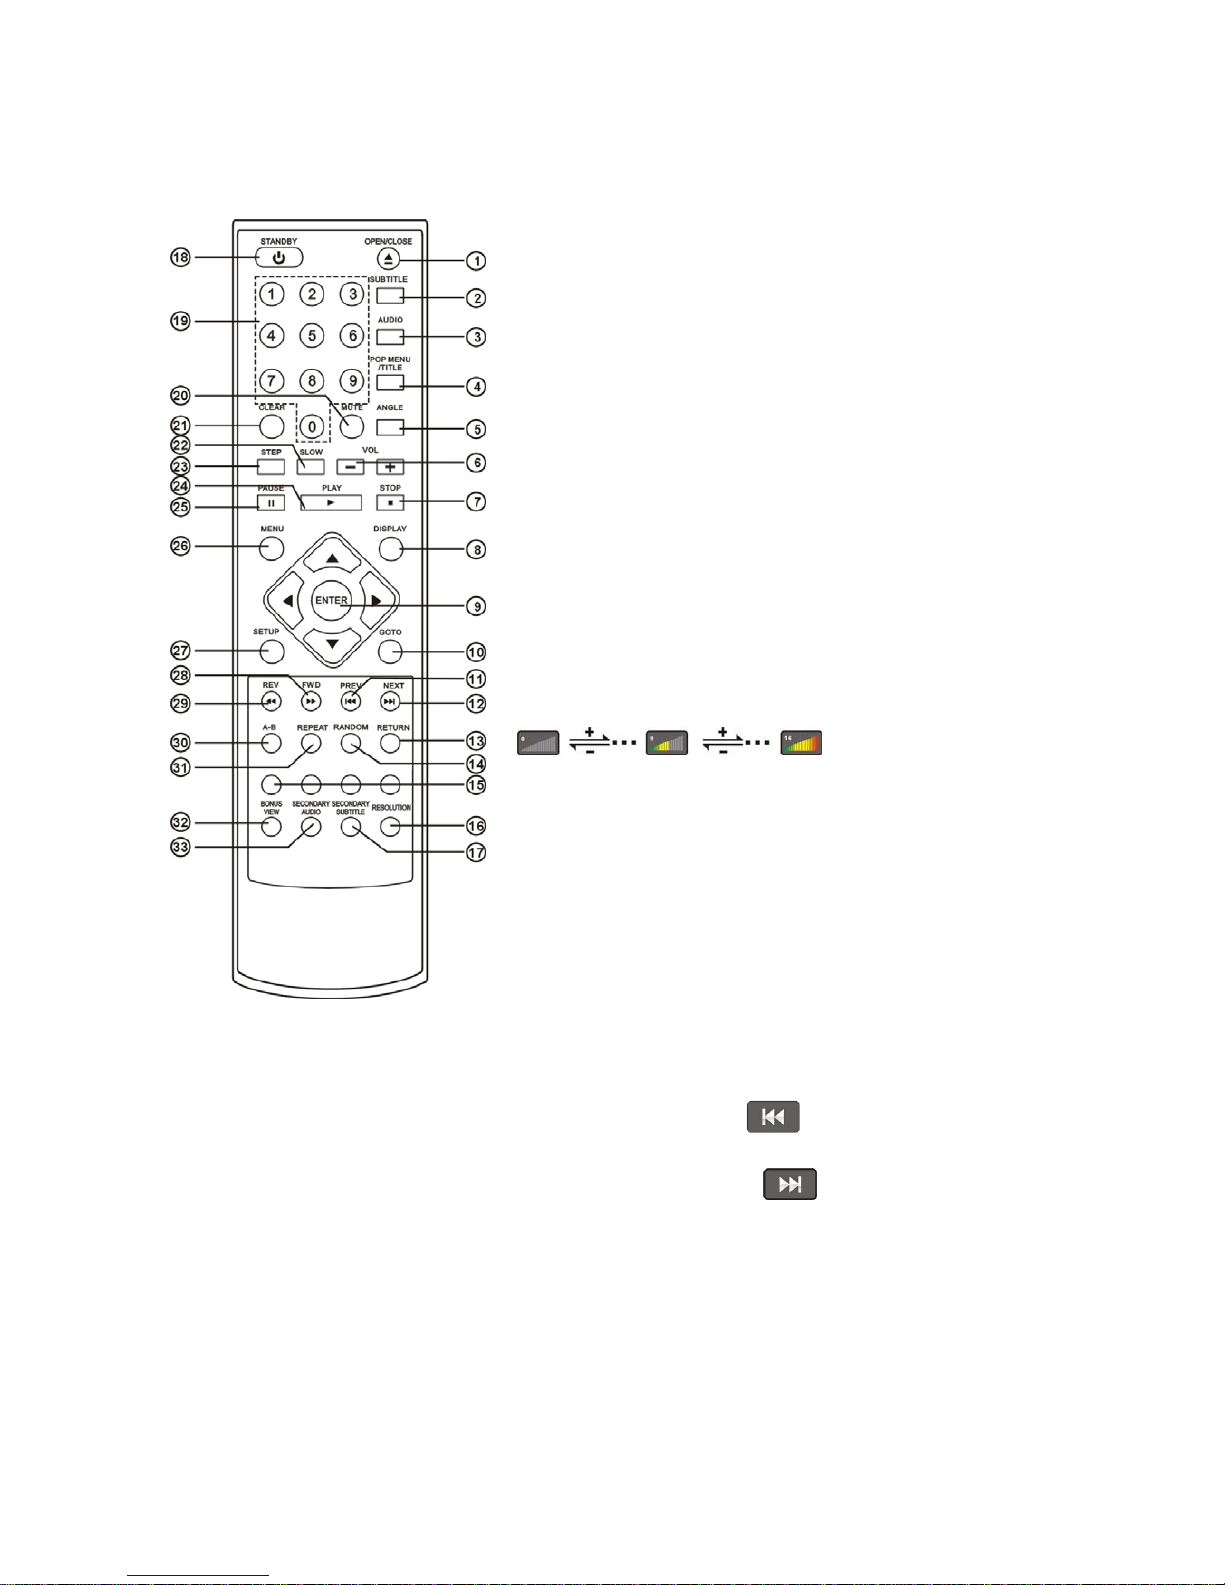
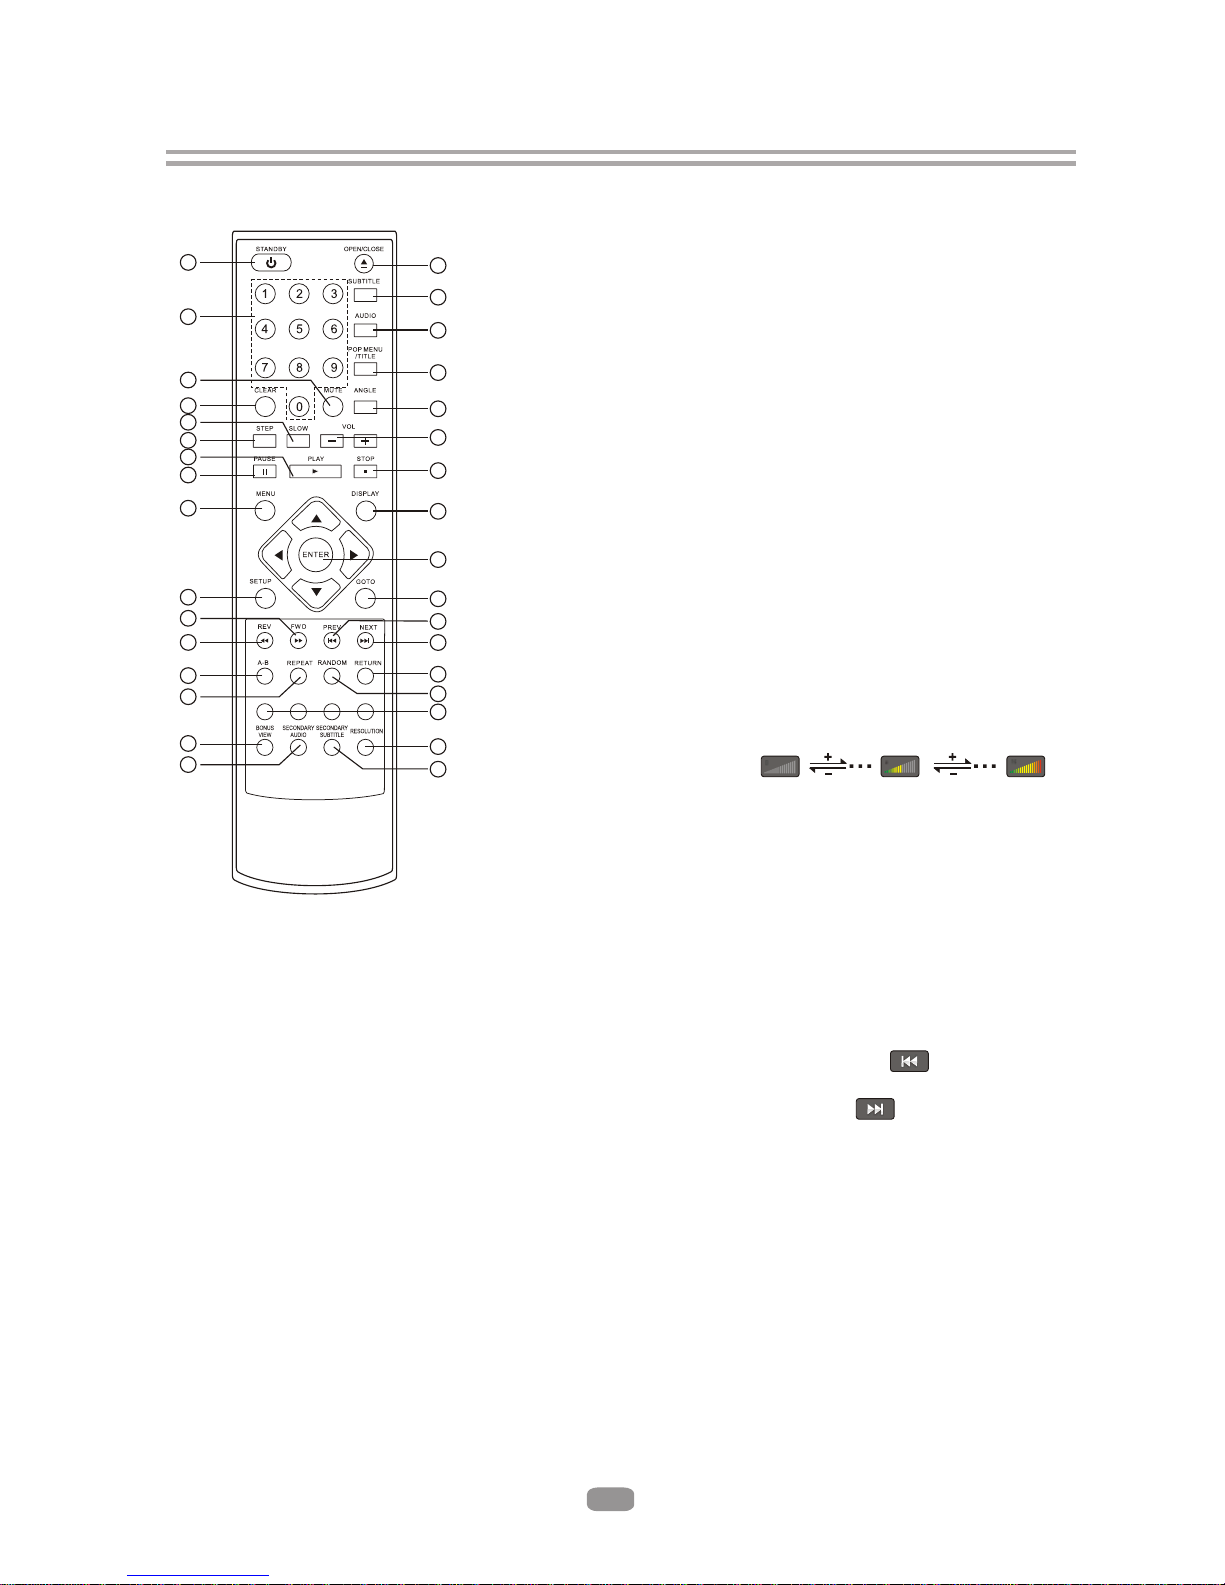
4. 遙控器
1. 開啟/關閉
按此鍵開啟/關閉光碟托盤。
2. 字幕
此按鍵可在 BD/DVD 播放時用作啟動/關閉字幕。若影碟提供多於一種
字幕語言,此按鍵也可用作循環切換字幕語言。
3. 語言
此按鍵用作循環切換影碟提供的影片語言。 (非所有影碟適用)
4. 標题/選單
只限於 BD 影碟,按此按鍵可用作開啟影片的主功能表。(非所有影碟
適用)
5. 角度
有些 BD 和 DVD 是以多於一個攝影角度來拍攝。在播放此類影碟時,
按此按鍵可讓您轉換攝影角度。(非所有影碟適用)
6. 音量(+/-)
按音量
+ 鍵來增加音量,按音量 - 鍵來減低音量。
7. 停止
此按鍵可停止播放在影碟的 BD/DVD 影片或檔案。
8. 顯示
按此按鍵便會顯示目前的播放狀態和時間資料。
9. 導覽功能表按鈕
在導覽 BD 和 DVD 的功能表時,便會使用這些按鈕,亦會用作導覽
BD 播放機的設定功能表。
10. 選時
此按鍵與小型數字鍵盤同時使用,以跳到 CD 的某一歌曲上。
11. 上一曲
按此按鍵播放上一個提供的標題、章節、聲軌或檔案。
12. 下一曲
按此按鈕播放下一個提供的標題、章節、聲軌或檔案。
13. 返回
當在數據 CD 或 USB 記憶卡導覽檔案時,按此按鍵可返回上一個文件夾或功能表。
14. 隨機播放
用作隨機播放影碟中的音頻檔案。(非所有影碟適用)
15. 顏色按鈕
紅、綠、黃及藍色按鍵,是用作執行一些 BD 影碟中的特定功能。(非所有影碟適用)
- 9 -
Page 11
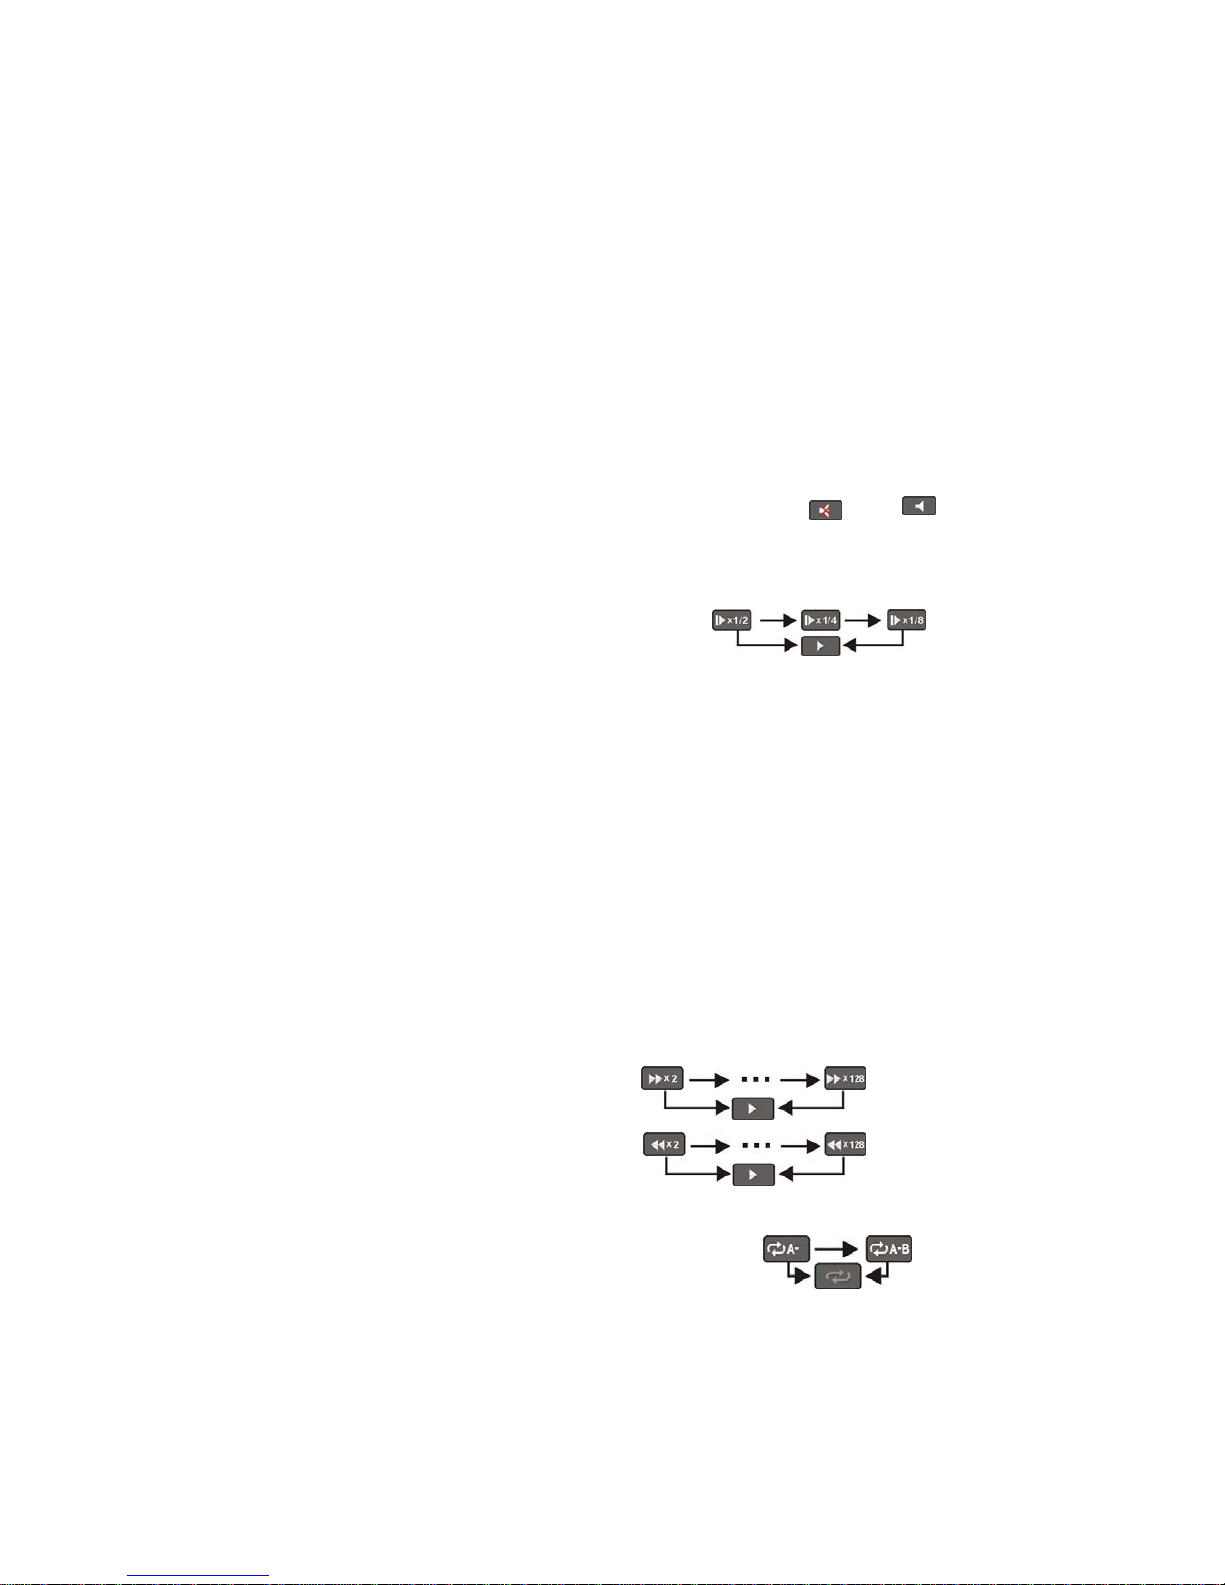
16. 分辨率
在停止狀態下, 按此鍵可以直接改變解析度的設定。
17. 子字幕
在 BD 標題的畫中畫(導演評述等)開啟字幕(如適用)。如果影碟提供多於一種導演評述的字幕語言,可用作
循環切換字幕語言。(非所有影碟適用)
18. 電源
按此鍵開啟或關閉 BD 播放機。
注意: 在開機後系統需要約 20 秒時間啟動,在啟動過程中本機將不會對其他操作作出響應。
19. 小型數字鍵盤
此按鍵與“選時"鍵一起使用,可跳到指定的標題/章節 (聲軌)或時間。
20. 靜音
按此按鍵刪除音頻輸出,再次按下靜音按鍵會恢復音頻輸出。 靜音 靜音關閉
21. 清除
當使用小型數字鍵盤輸入數值時,此按鍵用作清除錯誤輸入的數字。
22. 慢放
按此按鍵會使影片以 1/2、1/4 及 1/8 速度播放。
23. 格放
按此按鍵會逐格播放影片。
24. 播放
按此鍵會開始或重新開始播放影片。
25. 暫停
按此鍵會暫停本機播放影片。
26. 目錄
按下此按鍵會立刻停止播放,並會彈出 BD 或 DVD影碟的主頁或 “首頁"功能表。(非所有影碟適用)在
主功能表上,您可以選擇字幕語言、音頻聲軌、不同畫面等。
27. 設定
開啟 BD 播放機的設定功能表。此按鍵不能在影碟播放時操作。
28. 快進
在播放影片內容時,進行“快速向前播片"。
29. 快退
在播放影片內容時,進行“快速退片"。
30. A-B
在播放影碟時,按此按鍵一次會儲存一個“開始點" 作重覆播放。再次按此按鍵選擇一個“結束點",
這樣便會由開始點到結束點重覆播放。
- 10 -
Page 12
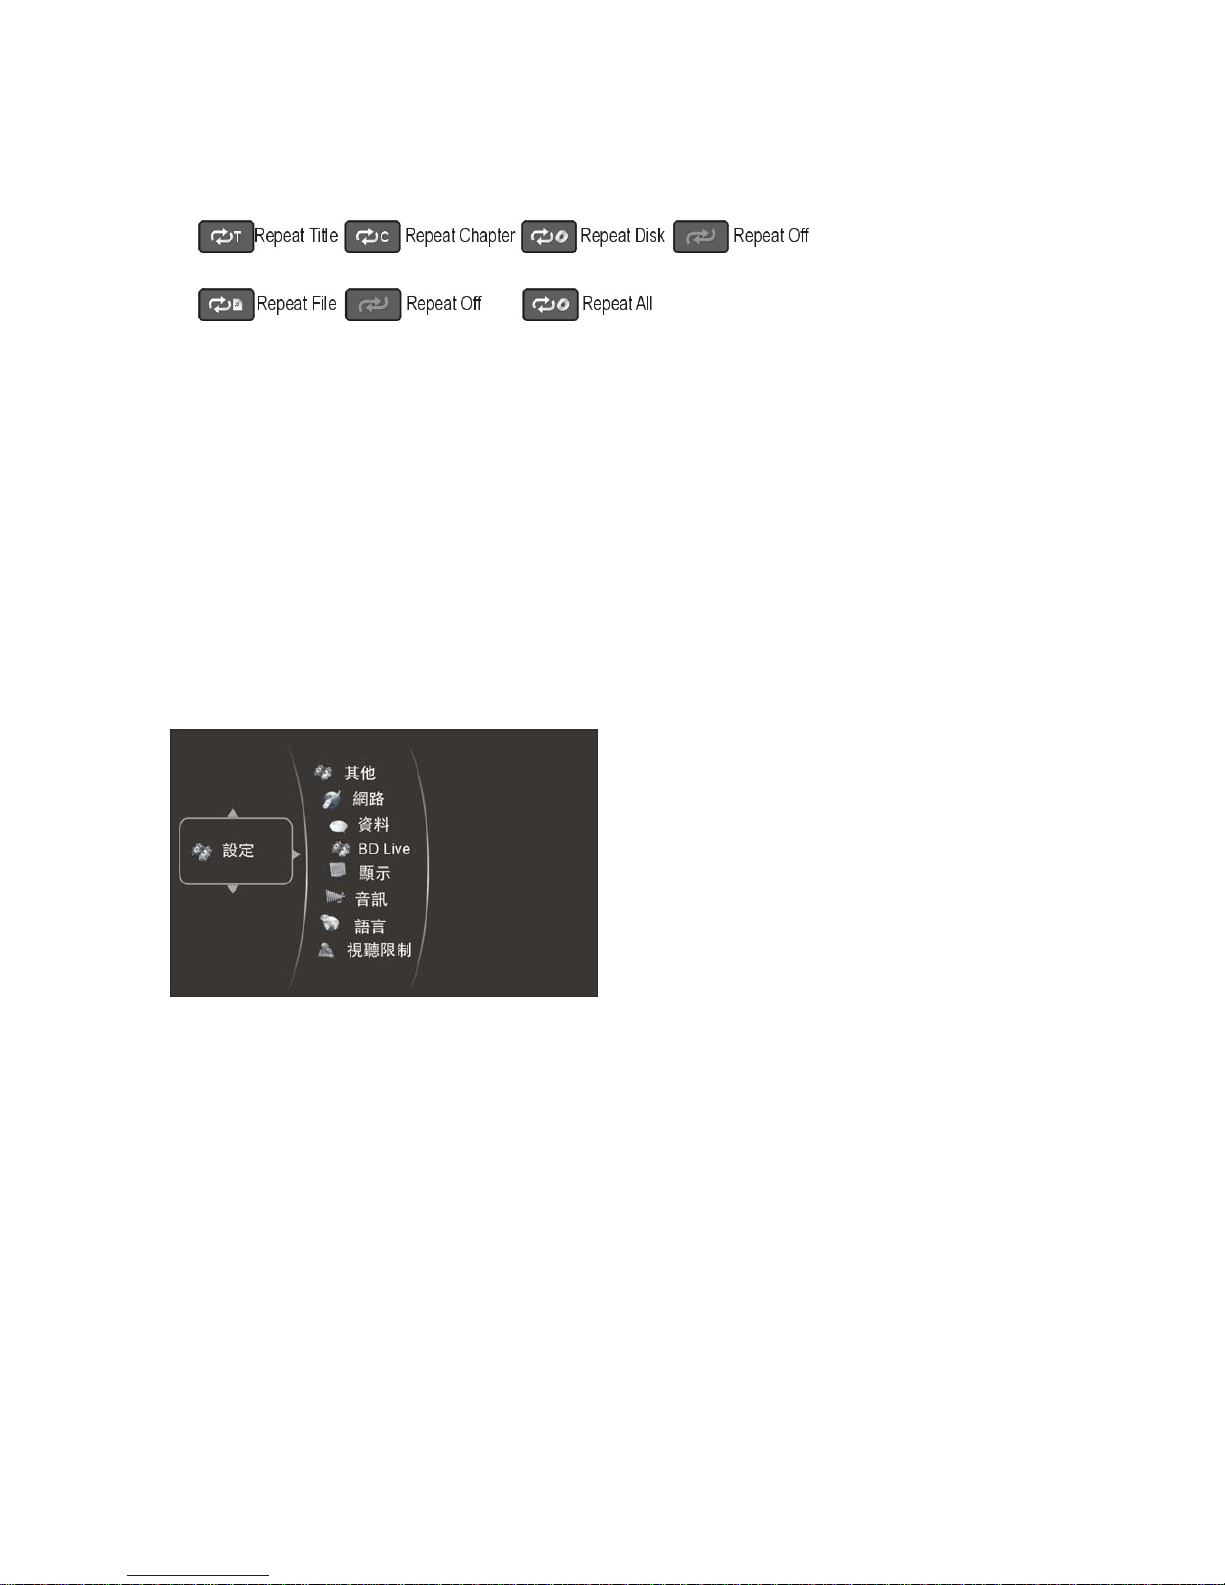
31. 重覆
此按鍵可根據播放的影片內容,循環切換有可能出現的“重覆"模式。
影碟中的 BD/DVD 或視頻檔案:
影碟中的 CDDA 或音頻檔案:
32. 子畫面
在 BD 影碟中,此按鈕用作開啟或關閉前述(畫中畫)的影片部分。(非所有影碟適用)
注意:需要在 BD 主功能表中開啟前述,此按鈕才可操作。
33. 子語言
在備有多個音軌前述的 BD 影碟,按此按鍵導演評述會以不同音軌循環切換播放。(非所有影碟適用)
5. 系統設定
在停止模式下按下設定鍵,或按下主功能表中的向右箭頭。系統會顯示如下圖的設定功能表︰
主功能表 設定功能表
5.1 選單
5.1.1 設定螢幕顯示語言︰為用戶的界面顯示選擇語言。
5.1.2 設定選單語言︰為BD/DVD的功能表選擇語言(並非所有影碟均設有此功能) 。
5.1.3 設定音訊語言︰為BD/DVD選擇預設的語言(並非所有影碟均設有此功能) 。
5.1.4 設定字幕語言︰為BD/DVD選擇字幕語言(並非所有影碟均設有此功能) 。
5.2 顯示
5.2.1 電視模式:選擇 NTSC或 PAL 格式。
5.2.2 解析度:設定您的電視的最高解析度,以獲得最佳視頻質素。
如您不肯定適合的解析度,請使用 HDMI Auto,系統會透過 EDID讀取電視支援的解析度。
5.2.3 顯示比例:選擇適合您的電視的顯示比例 (請參考下表的資料)
注意:只影響 HDMI 及色差輸出;當解析度設定為 720p、1080i 或 1080p 時,4:3 設定將不能操作。
- 11 -
Page 13

顯示比例功能表選項
如您的電視螢幕較修長
(16:9),請選擇:
如您的電視螢幕較接近方形
(4:3),請選擇:
16:9 Full 16:9 Pillarboxed 4:3 Letterboxed 4:3 Pan Scan
影碟內容
寬螢幕格式的影片 影片畫面佔據
整個屏幕
沒有改變 –
影片畫面佔據整
個螢幕
影片畫面以長方
形的“寬闊"比
例顯示在螢幕上
(螢幕上/下出現
兩個水平方塊)
螢幕只顯示影片畫面的中
間部份,左面及右面的畫面
不會出現在螢幕上
寬螢幕格式的高
清電視節目
節目畫面佔據
整個螢幕
沒有改變 –
節目畫面佔據整
個螢幕
節目畫面以長方
形的“寬闊"比
例顯示在螢幕上
(螢幕上/下出現
兩個水平方塊)
螢幕只顯示節目畫面的中
間部份,左面及右面的畫面
不會出現在螢幕上
標準清晰度(4:3)
電視節目
節目畫面向水平
伸延,配合整個
螢幕
節目畫面顯示在
螢幕的正中位
置;螢幕兩旁出
現兩個垂直方塊
沒有改變 –
節目畫面佔據整
個螢幕
沒有改變 –
節目畫面佔據整個螢幕
剪輯影片(4:3 比
例儲存在光碟的
影片)
影片畫面向水平
伸延,配合整個
螢幕
影片畫面顯示在
螢幕的正中位
置;螢幕兩旁出
現兩個垂直方塊
沒有改變 –
剪輯影片畫面佔
據整個螢幕
沒有改變 –
剪輯影片畫面佔據整個螢
幕
注意: 4:3PS 和 4:3LB 只有在 SD 模式中有效(解像度是 480p/576p or 480i/576i)
5.2.4 電影模式: 當此選項啟動後,而且播放的影片是以每秒24 格錄製,系統會輸出 1080p 24Hz。
注意 : 此選項只會在解像度設定為 1080p 時才會操作, 請確保您的電視可支援 1080p 24Hz 的模式。
5.2.5 Color Depth: 設定影像或影片可顯示的顏色數量。
注意: 請確保您的電視可支援 30bit/36bit 色深,再選擇相關設定。
5.2.6 Blu-ray 3D 模式: 自動或強制 2D 顯示。
5.3 音訊
5.3.1 PCM 向下取樣:根據 PCM 訊號選擇適合的比特率,確保您的SPDIF 接收器可正確地處理。這並不影響
HDMI 數位視頻輸出。
5.3.2 數位輸出:
如只有兩個揚聲器,請設定為 PCM 立體聲模式。
如您把兩個以上揚聲器連接至擴大器,請參考下表:
擴大器性能
- 12 -
Page 14

可對 DTS 作出解碼 可對杜比數位(Dolby
Digital)作出解碼
可對 DD+(Dolby Digital
Plus)作出解碼
我想播放的影片達到最
高清晰度的效果
播放 DTS(數位影院系
統)聲軌的影碟時,設定
為“Bitstream Mixed"
播放杜比數位(Dolby
Digital)音軌的影碟時,設
定為“Bitstream
Legacy"
播放不設杜比數位
(Dolby Digital)的音軌(視
乎立體聲接收器連接的
揚聲器數目)的影碟時,
設定為 PCM5.1 或
PCM7.1
播放 DD+(Dolby Digital
Plus)音軌的影碟時,設定
為“Bitstream Legacy"
播放不設 DD+(Dolby
Digital Plus)的音軌(視乎
立體聲接收器連接的揚
聲器數目)的影碟時,設
定為 PCM5.1 或 PCM7.1
我想聆聽 BD 影碟中的
前述
--或—
我想只設定此選項一
次,然後不再重新進行
設定
把輸出設定為
“Bitstream Mixed"
如您的接收器可支援 DTS,請設定為“Bitstream
Mixed"
或者,請設定輸出為 PCM5.1 或 PCM7.1(視乎立體
聲擴大連接的揚聲器數目)
擴大器性能
可對 DTS-MA Essential 作
出解碼
可對 Dolby True HD 作
出解碼
不可對 DTS-HD 或
Dolby True HD 作出解碼
我想播放的影片達到最
高清晰度的效果
播放 DTS- HD 聲軌的影碟
時,設定為“Bitstream
HD"
否則,請設定為“Bitstream
Mixed".
播放 Dolby True HD 音
軌的影碟時,設定為
“Bitstream HD"
否則,請設定為
“Bitstream Mixed"
請參照上面表格的內容
後,再作決定
我想聆聽 BD 影碟中的
前述
--或—
我想只設定此選項一
次,然後不再重新進行
設定
把輸出設定為“Bitstream Mixed"
5.3.3 動態控制範圍 : 您可藉此讓播放機把影片音軌聲量響亮的部份,比在影院播放時,顯得較為柔和,而同時
並不會使影片的對話聲量減弱。 (影響類比音頻輸出,而數位輸出應設定為 PCM 或 Bitsteam Mixed)
- 13 -
Page 15

5.3.4 立體聲向下混音: 選擇自動, 立體聲(LoRo) 或 環迴阻隔(LtRt).
注意: 為了在聲音輸出 FL和 FR 取得正確的初始及第二混音,請在設定介面設定 HDMI 到 2ch-PCM (設定>聲音>
數位輸出>PCM 立體聲) 或 使用 HDMI 線連接電視機。
5.4 BD-Live
5.4.1 BD-Live 互聯網連接功能: 操作 BD播放機連接互聯網的功能。
有限允許: 只允許放入的藍光影碟從 BD-Live 網站下載已獲有效認網上認證的資訊,以減少下載惡意資訊至播
放機的危險。
總是允許:允許放入的藍光影碟,從所有已編碼至影碟的 BD-Live 網址上存取資訊。使用具備有效商業認證的
藍光影碟,並不會發生下載惡意編碼的危險;但如在此功能下使用非法錄製的藍光影碟或來歷不明的藍光影碟
下載 BD-Live 資訊,將可能導致意外下載惡意編碼至藍光播放機的危險。
總是禁止:禁止放入的藍光影碟透過互聯網從 BD-Live 網址存取資訊。
5.4.2 BD-Live 儲存容量:
顯示 BD-Live 儲存容量的資料。
5.4.3 Erase Blu-Ray Storage: 清除藍光存儲。
5.5 系統
5.5.1 光學自動影碟播放:此功能指示 BD播放機是否在光碟托盤關閉後,立刻載入影碟的主標題功能表。
5.5.2 屏幕保護裝置時限:當系統正播放音樂檔案或處於停止/完全停止模式時,在經過此功能預設的時間後,
藍光影碟播放機將 啟動屏幕保護模式,終止視頻輸出(電視將顯示 “空白"畫面 )。
5.5.3 自動關機: 在設定時間內沒有對本機作出任何操作,系統將會自動進入待機狀態。
5.5.4 CEC 支持:
設定此功能以啟動/終止 CEC :
CEC 功能允許符合 CEC 規格的設備在沒有受到用戶指令的情況下自行操作。例子 : 若您的電視機也支持
及開啟 CEC 功能,當您關閉電視機時, 本機也經過 HDMI 取得電視機發送的 CEC 訊號,並自動關機。
或者, 如開啟本機後,您的電視機也會自行開始並轉到相應的HDMI 輸出源。
注意: 不是所有支持 CEC 規格的設備都能與本機的 CEC 相容
5.5.5 原廠設定:
把所有設定重新設置至原廠預設模式,但兒童安全設定將不受影響。
5.6 網絡
5.6.1 連接狀態
顯示以網路纜線與藍光影碟機是否已連接。
5.6.2 MAC 地址
顯示此藍光影碟機的 MAC 地址(Media Access Control)地址,或稱為 MAC 位址、硬體位址,用來定義網路
設備的位置)
5.6.3 IP 模式
選擇連接互聯網的 IP 模式。如選擇“Manual"IP 模式,5.6.4 至 5.6.8 將被啟動為用戶的輸入設定,否則
不會啟動。
5.6.4 IP 地址
在“Manual"IP模式下,顯示此時的 IP 位址或進入用戶輸入的資料。
- 14 -
Page 16

5.6.5 Subnet Mask (子網路遮罩)
在“Manual"IP 模式下,顯示現時的 Subnet Mask (子網路遮罩)或進入用戶輸入的資料。
子網路遮罩(subnet mask),它是一種用來指明一個
IP位址的哪些位標識的是主機所在的
子網以及哪些位標識的是主機的
位掩碼。
5.6.6 Gateway (閘道)
在“Manual"IP 模式下,顯示此時的 Gateway (網間連接器)或進入用戶輸入的資料。
5.6.7 慣用DNS 伺服器(Primary DNS)
在 “Manual"IP 模式下,顯示此時的慣用 DNS 伺服器(Primary DNR)或進入用戶輸入
的資料。
5.6.8 備用 DNS 伺服器(Secondary DNS)
在“Manual"IP 模式下,顯示此時的備用 DNS 伺服器(Secondary DNS)或進入用戶輸入的資料。
當 Apply 按鈕顯亮時,按下 ENTER (輸入)按鈕以啟動您選擇的設定,或在 Cancel 按鈕顯亮時,按下 ENTER
按鈕,取消您對網絡設定的變更。
5.7 資訊
此項目顯示載入器及主面板的軟體及硬體的資訊,其內容不能更改。
5.8 視聽控制功能
5.8.1 視聽控制的所在國家:
使用此功能選項,把您身處的國家名稱輸入播放機。(此功能選項並未啟動)
5.8.2 視聽控制
啟動或關閉視聽控制功能。
5.8.3 視聽控制等級
限制播放由您設定相等或較高等級的影碟。如需使用此功能,必須先啟動此功能選項。
5.8.4 視聽控制密碼:
更改視聽控制功能表的新操作密碼。(密碼預設為 6666)
- 15 -
Page 17

6. 播放影碟或 USB 上的音頻、視頻及影像檔案
6.1 介紹
本節解釋如何播放儲存在影碟或 USB 記憶體上的 PC type 音頻、影像及視頻檔案。
6.2 支援的音頻、視頻及影像檔案類型
視頻
- MPEG4 (.mp4)檔案
- .m4v 檔案
- .mkv 檔案
注意: 影像檔案副檔名必須是上述格式, 並且必須是 UTF8 or UTF16 編碼。(例如:影像檔案 : file001.mkv、副
檔名: file001_01.srt,file001_eng.srt 或 file001_ger.sub 等等)
音樂
- .mp3 檔案
- .wma 檔案
影像
- .jpeg 檔案
- .Png 檔案
6.3 準備播放影碟或 USB 設備
6.3.1 本藍光影碟機可播放以 UDF 或 ISO06660 格式錄製於 CD-R/RW、DVD+/-R、DVD+/-RW、BD-R或BD-RE
的檔案。
6.3.2 本機可識別 USB 設備上以 FAT/FAT32 分區支援的檔案
注意:USB 連接埠只提供低於 500mA 的電流。如需較高電流,請使用外置電源。
- 16 -
Page 18
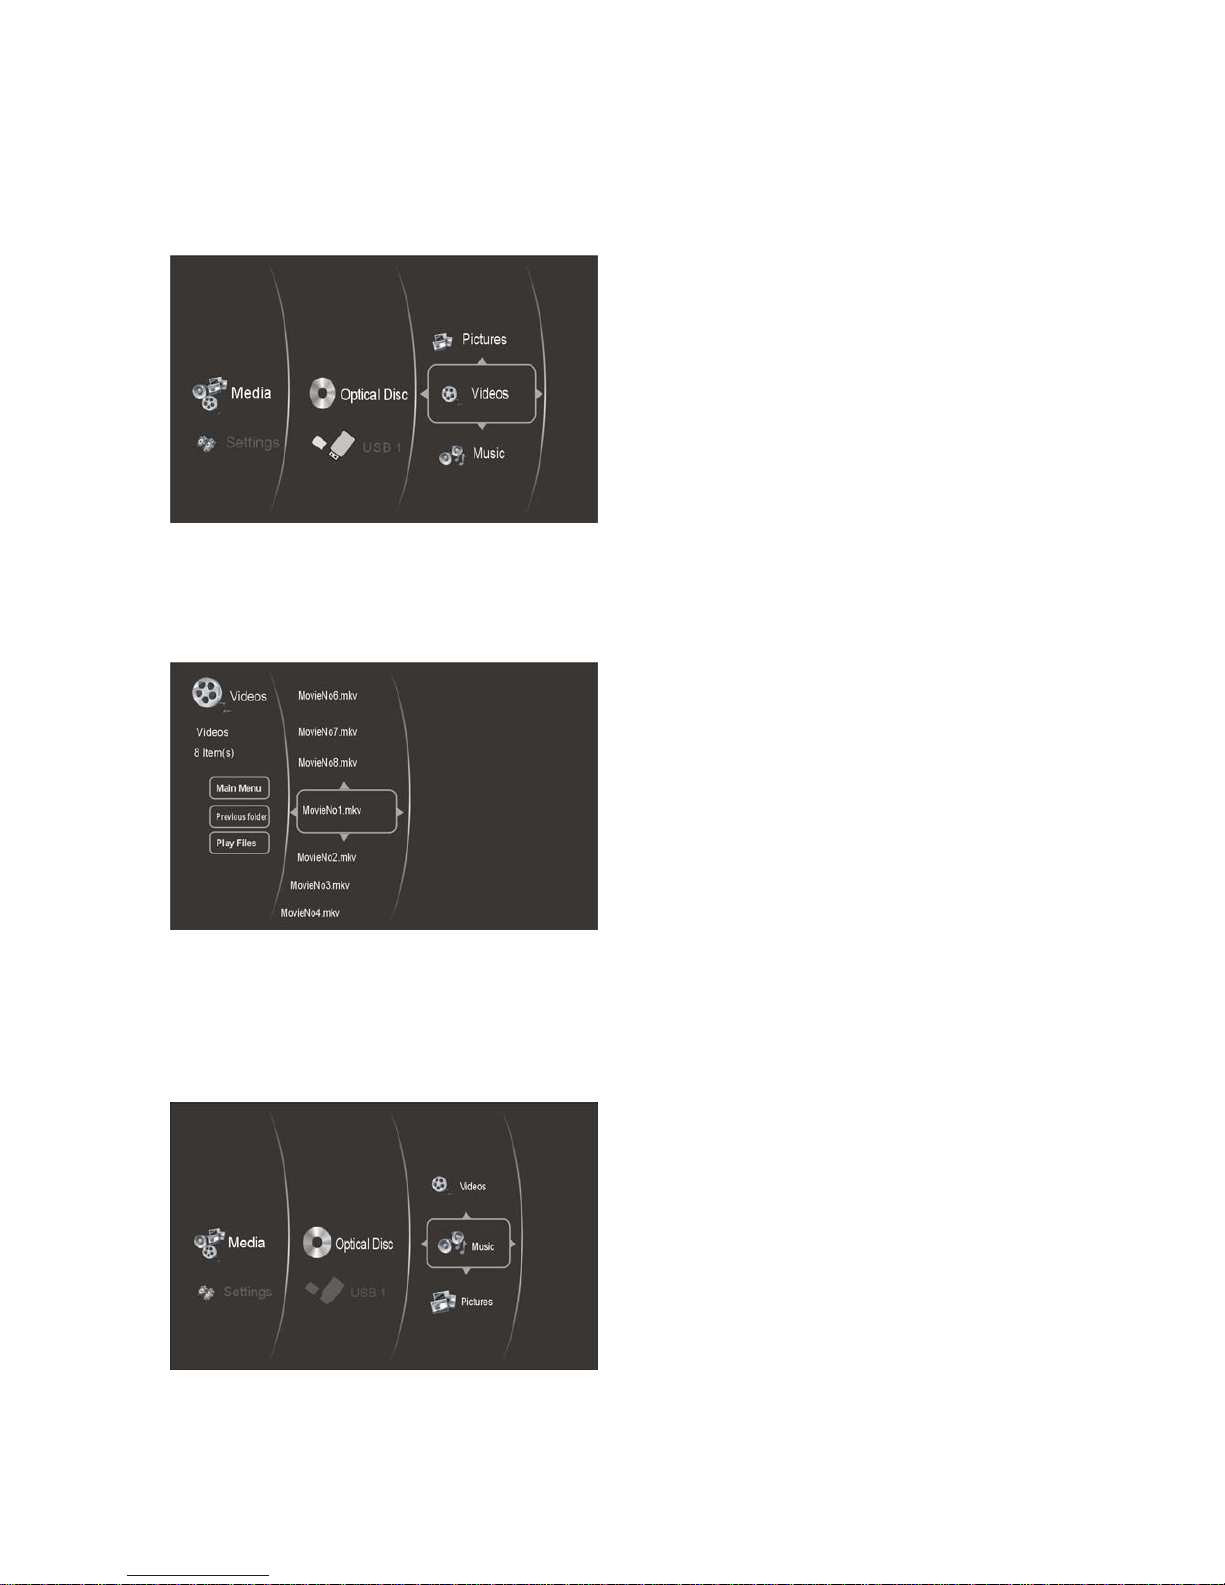
6.4 瀏覽視頻檔案
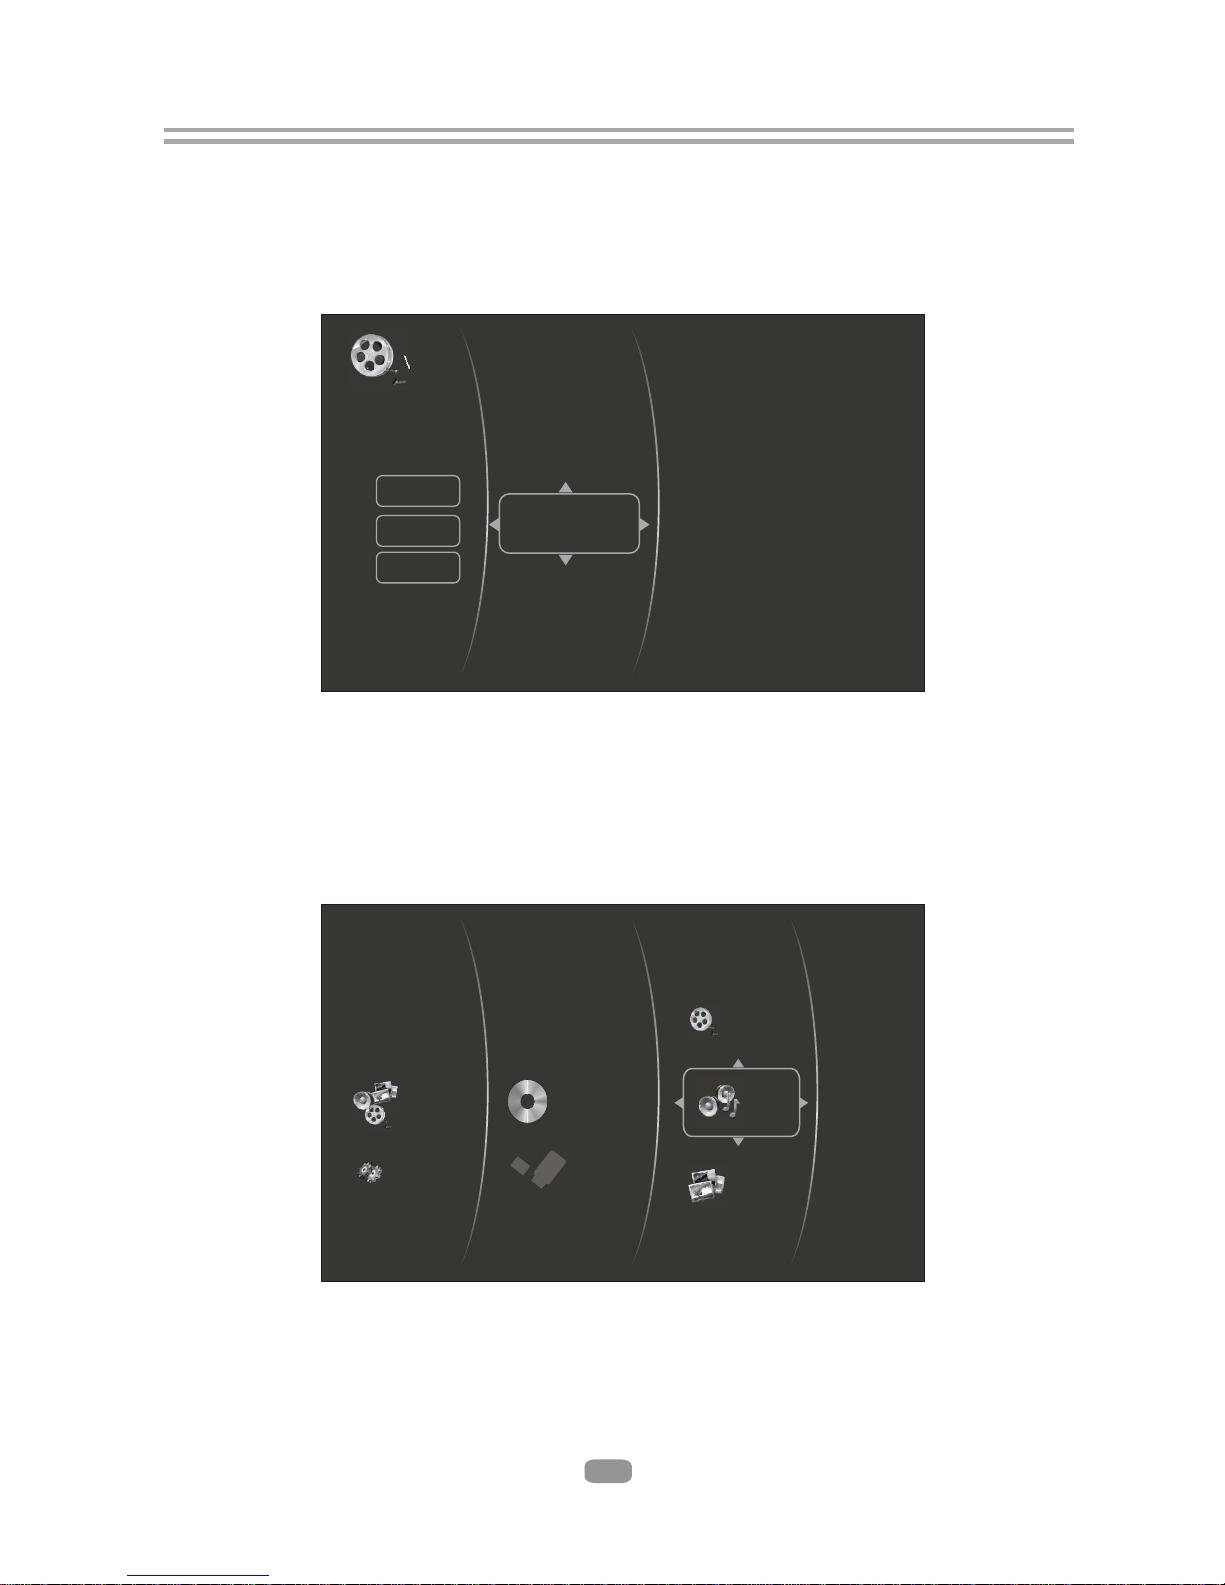
6.4.1 當藍光播放機讀取影碟或/及 USB 檔案後,螢幕將會顯示主功能表,請選擇 Video (視頻)圖示。當螢幕顯
亮 Video (視頻)圖示後,按下確認鍵,系統會出現次功能表,提供檔案來源的選項。(圖5-1)
圖 5-1 視頻媒體選單
6.4.2 選擇影碟或 USB 開啟瀏覽器,讓您瀏覽此時正操作的影碟/USB 檔案,便可選擇播放任何一個想播放的檔
案。(圖 5-2)
圖 5-2 視頻瀏覽器選單
6.5 瀏覽音訊檔案
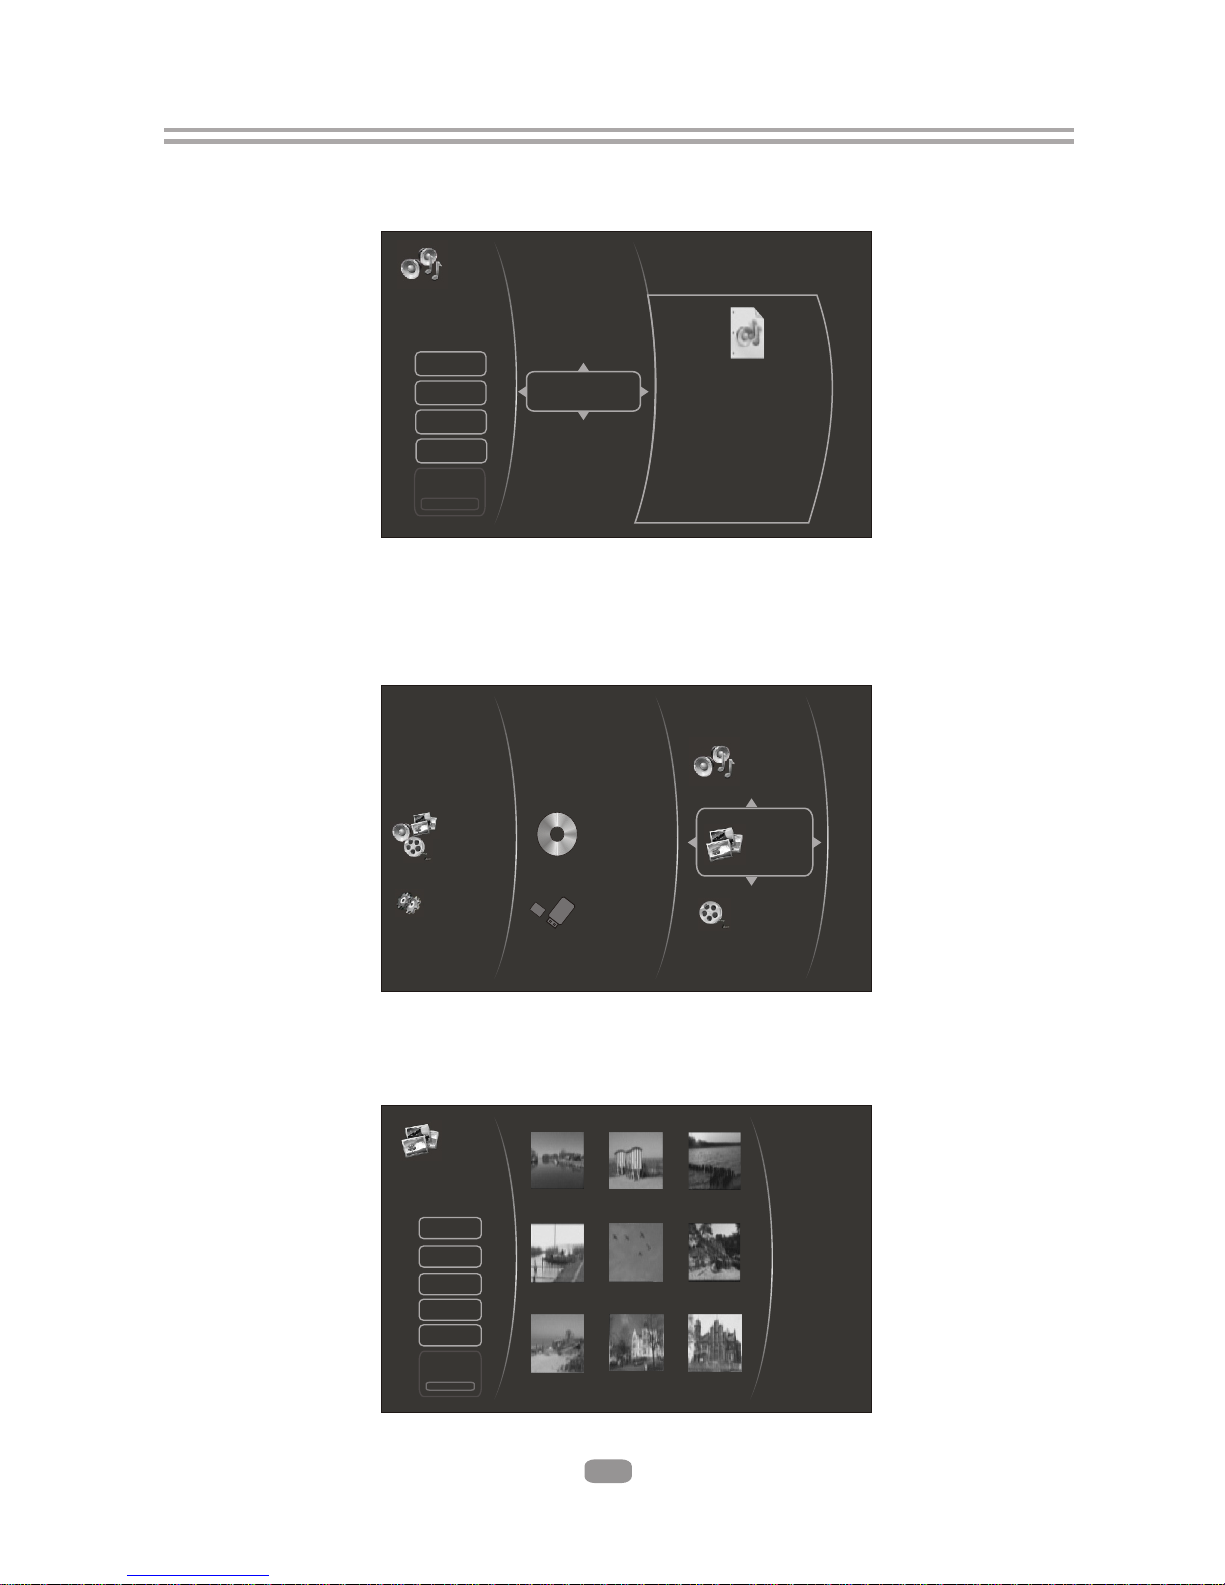
6.5.1 當藍光播放機讀取影碟或/及 USB 檔案後,螢幕將會顯示主功能表,請選擇 Music (音樂)圖示。當螢幕顯
亮選擇 Music (音樂)圖示後,按下確認鍵,系統會出現次功能表,提供檔案來源選項。(圖 5-3)
圖 5-3 音樂媒體選單
- 17 -
Page 19
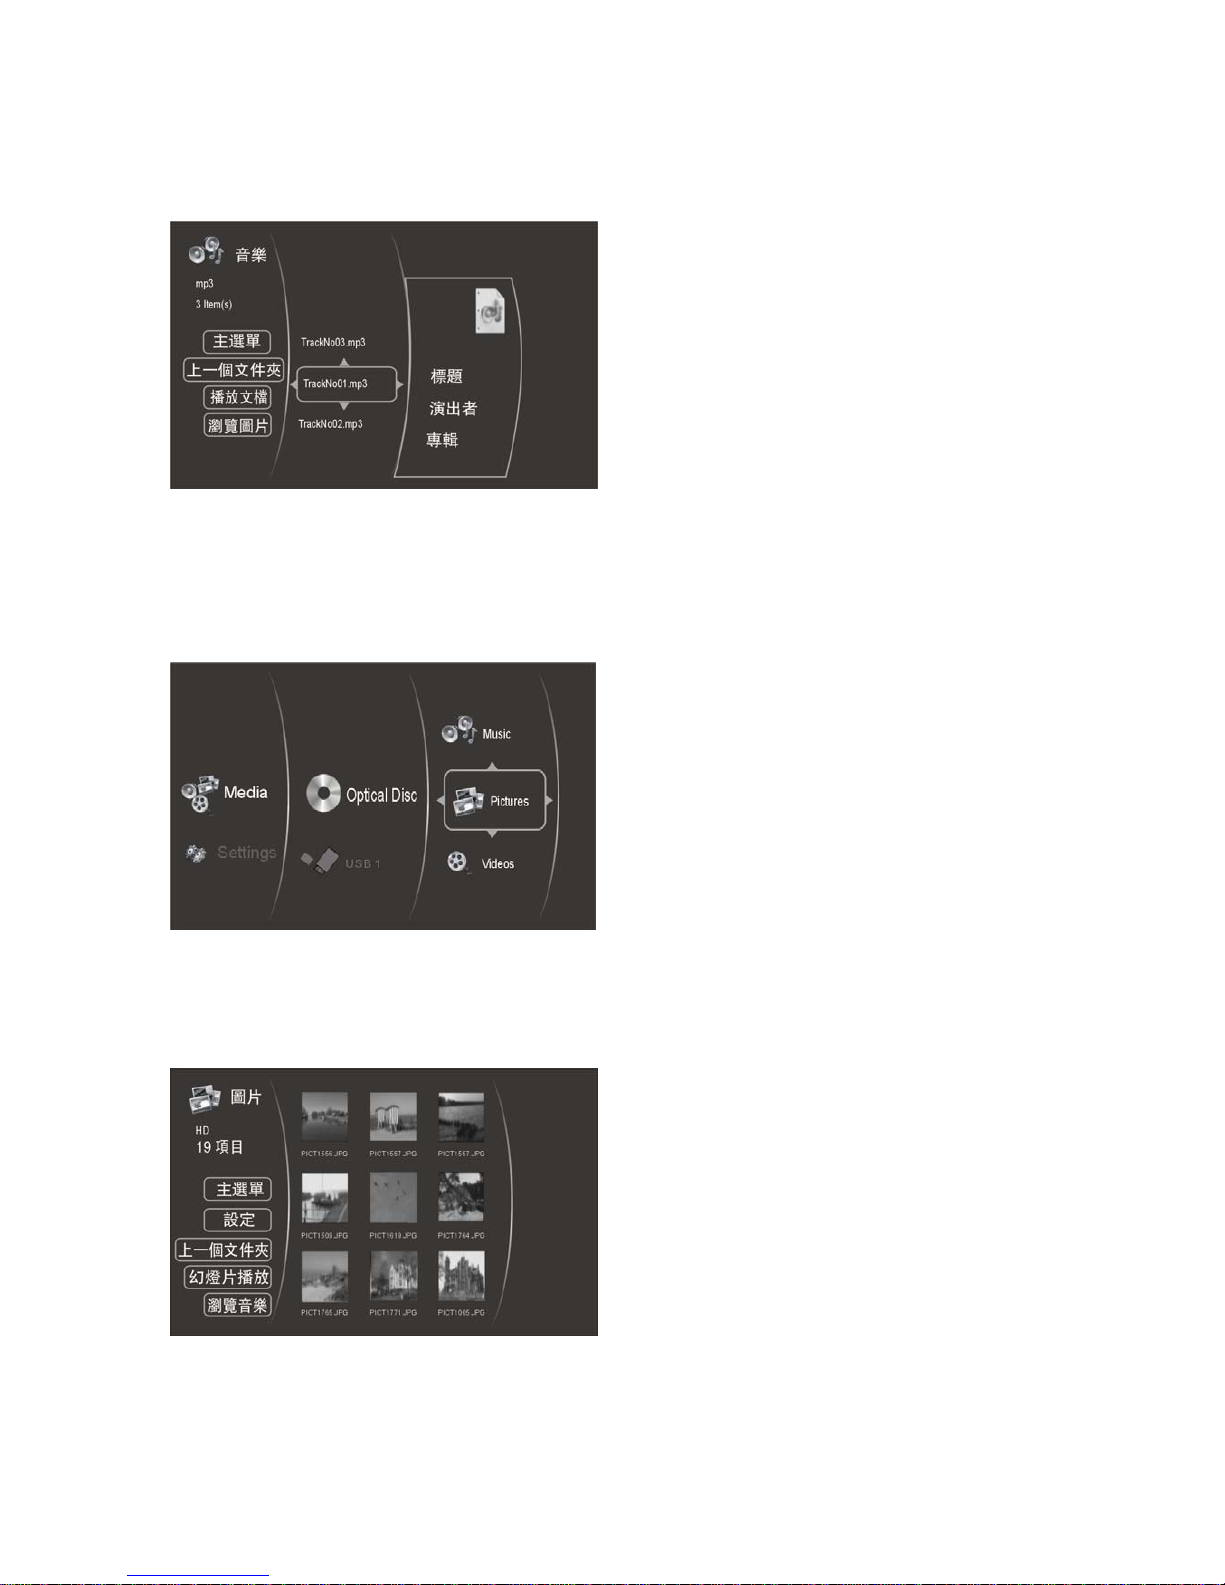
6.5.2 選擇影碟或 USB 開啟瀏覽器,讓您瀏覽現時正操作的影碟/USB 檔案,便可選擇播放任何一個想播放的檔
案。(圖 5-4)
圖 5-4 音樂瀏覽器選單
6.6 瀏覽圖像檔案
6.6.1 當藍光播放機讀取影碟或/及 USB 檔案後,螢幕將會顯示主功能表,請選擇 Picture (圖像)圖示。當螢幕顯
亮 Picture (圖像)圖示後,按下確認鍵,系統會出現次功能表,提供檔案來源選項。(圖5-5)
圖 5-5 圖像媒體選單
6.6.2 選擇影碟或 USB 開啟瀏覽器,讓您瀏覽現時正操作的影碟/USB 檔案,便可選擇播放任何一個想播放的檔
案。(圖 5-6)
圖 5-6 圖像瀏覽器選單
- 18 -
Page 20
7. BD-Live 操作
7.1 功能介紹
某些(並不是所有)藍光影碟提供一些特別功能,當播放機連接至互聯網時,便可操作這些功
能,並提供附加記憶容量。這些特別功能包括:
- 下載最新電影預告片,
- 演員及導演的“評論"
- 多人遊戲模式及聊天服務
播放機必須完成 BD-Live 互聯網的正確配置及安裝附加記憶體,才能操作 BD-Live 功能。
7.2 為播放機安裝外置記憶體
7.2.1 獲取經格式化的 FAT32 USB 記憶體。
7.2.2 把 USB 記憶棒插進播放機的 USB 插槽。
7.3 設定 BD-Live 互聯網連接模式
7.3.1 在藍光影碟播放機的主功能表中,進入“Other"功能表選項;然後選擇“BD-Live
Internet Access"。請確保已選擇“Limit Access"或“Always Allow Access"。
7.3.2 如播放機沒有 100Mbyte 可用記憶容量,請在插入 USB 記憶棒後,在“Other"設定功能
表中選擇“Clear BD Storage"選項。
7.3.3 在藍光影碟播放機的主設功能表中,進入“Network"功能表選項;然後選擇“IP
Mode"。根據您的路由器或互聯網服務供應商的建議,設定網絡 IP 位址。
注意: 必須通過“連接性測試",才可連接至互聯網及從互聯網存取 BD-Live 資訊。
7.4 進入 BD-Live 互聯網例子
7.4.1 獲取BD-Live影片如 “
The 6th Day
"
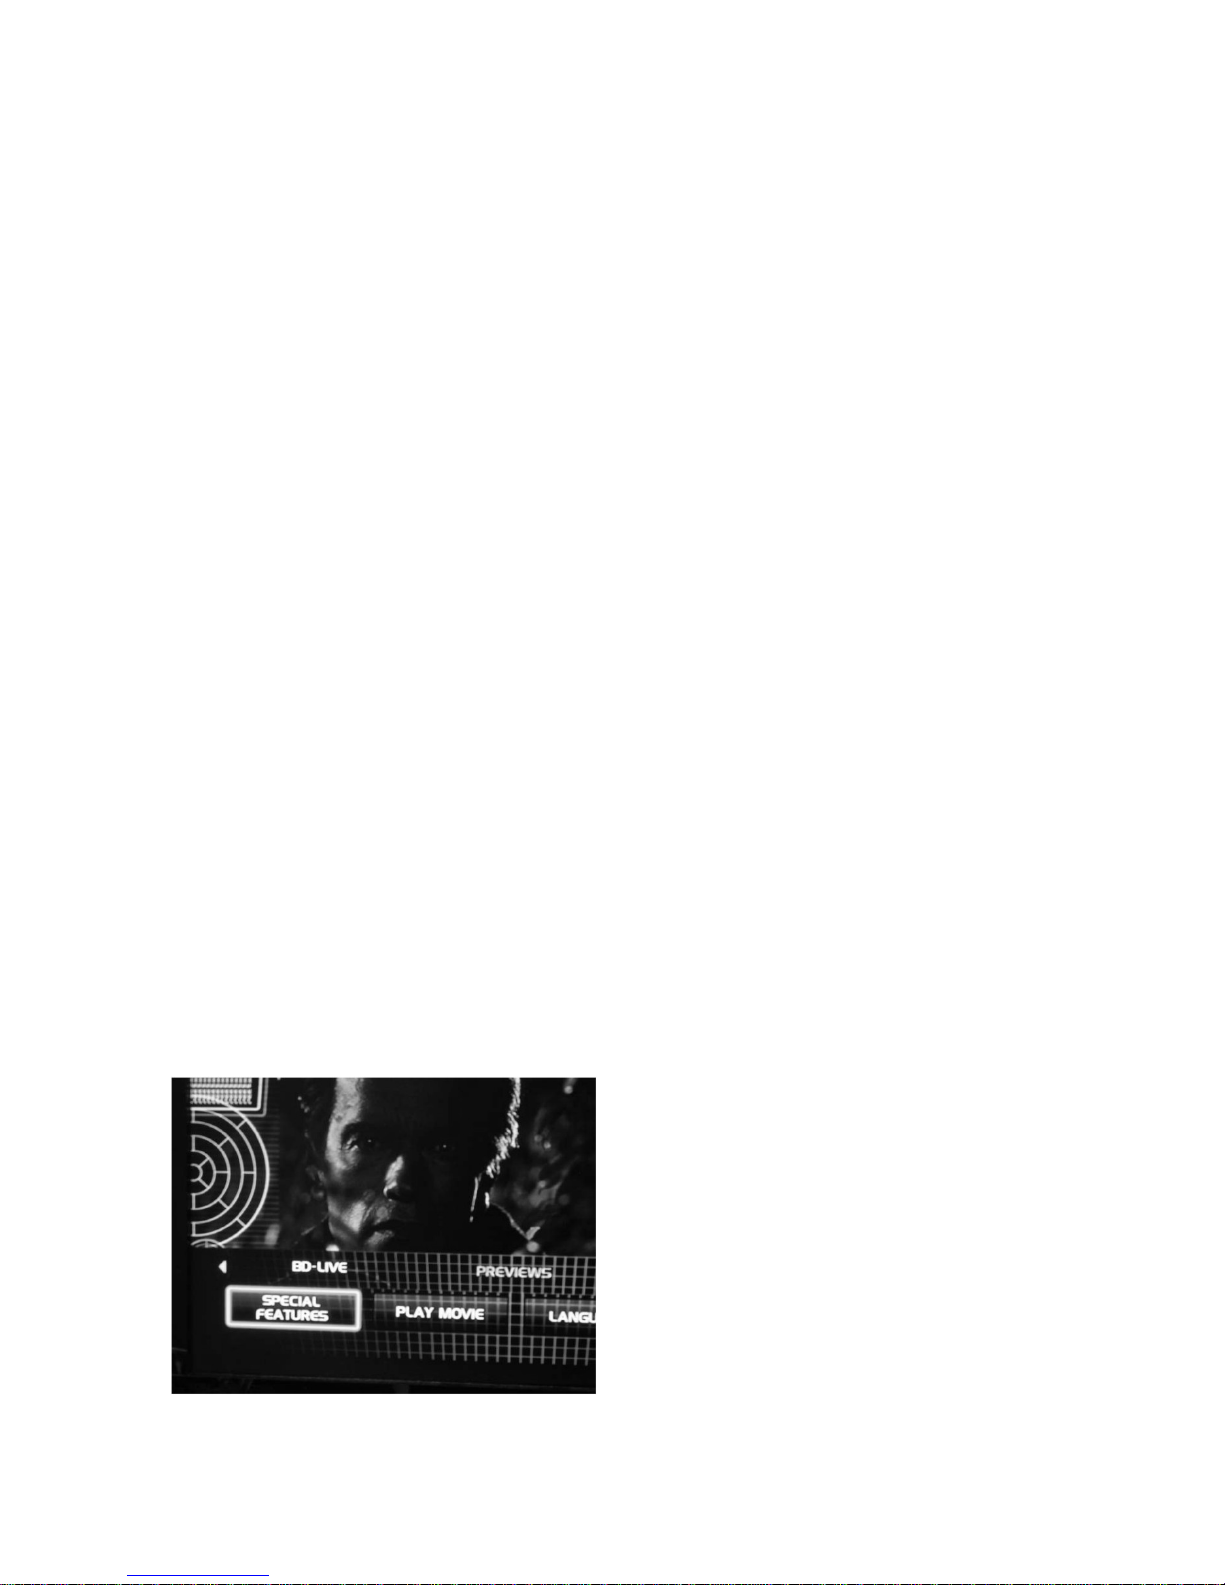
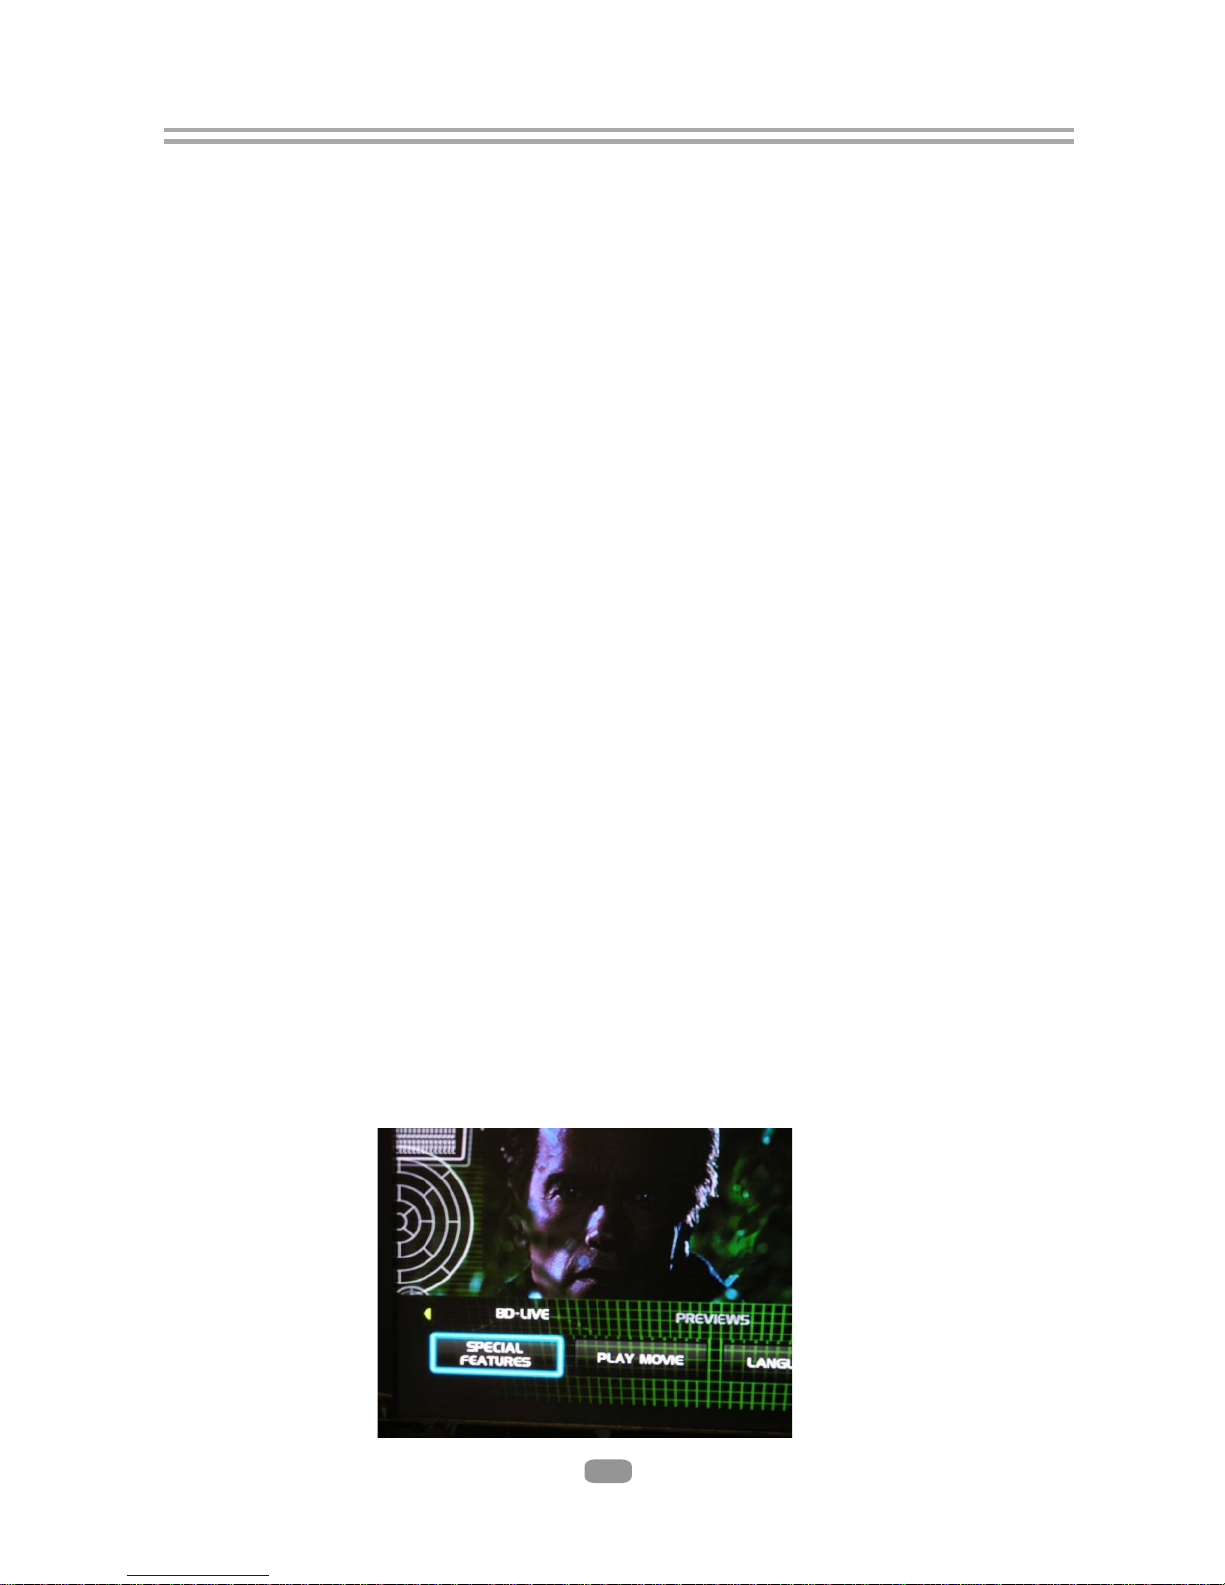
7.4.2 從“Special Features"功能表選擇 BD-Live 選項。(在某些影碟中,你亦可在主功能表中
看見 BD-Live 選項)
- 19 -
Page 21
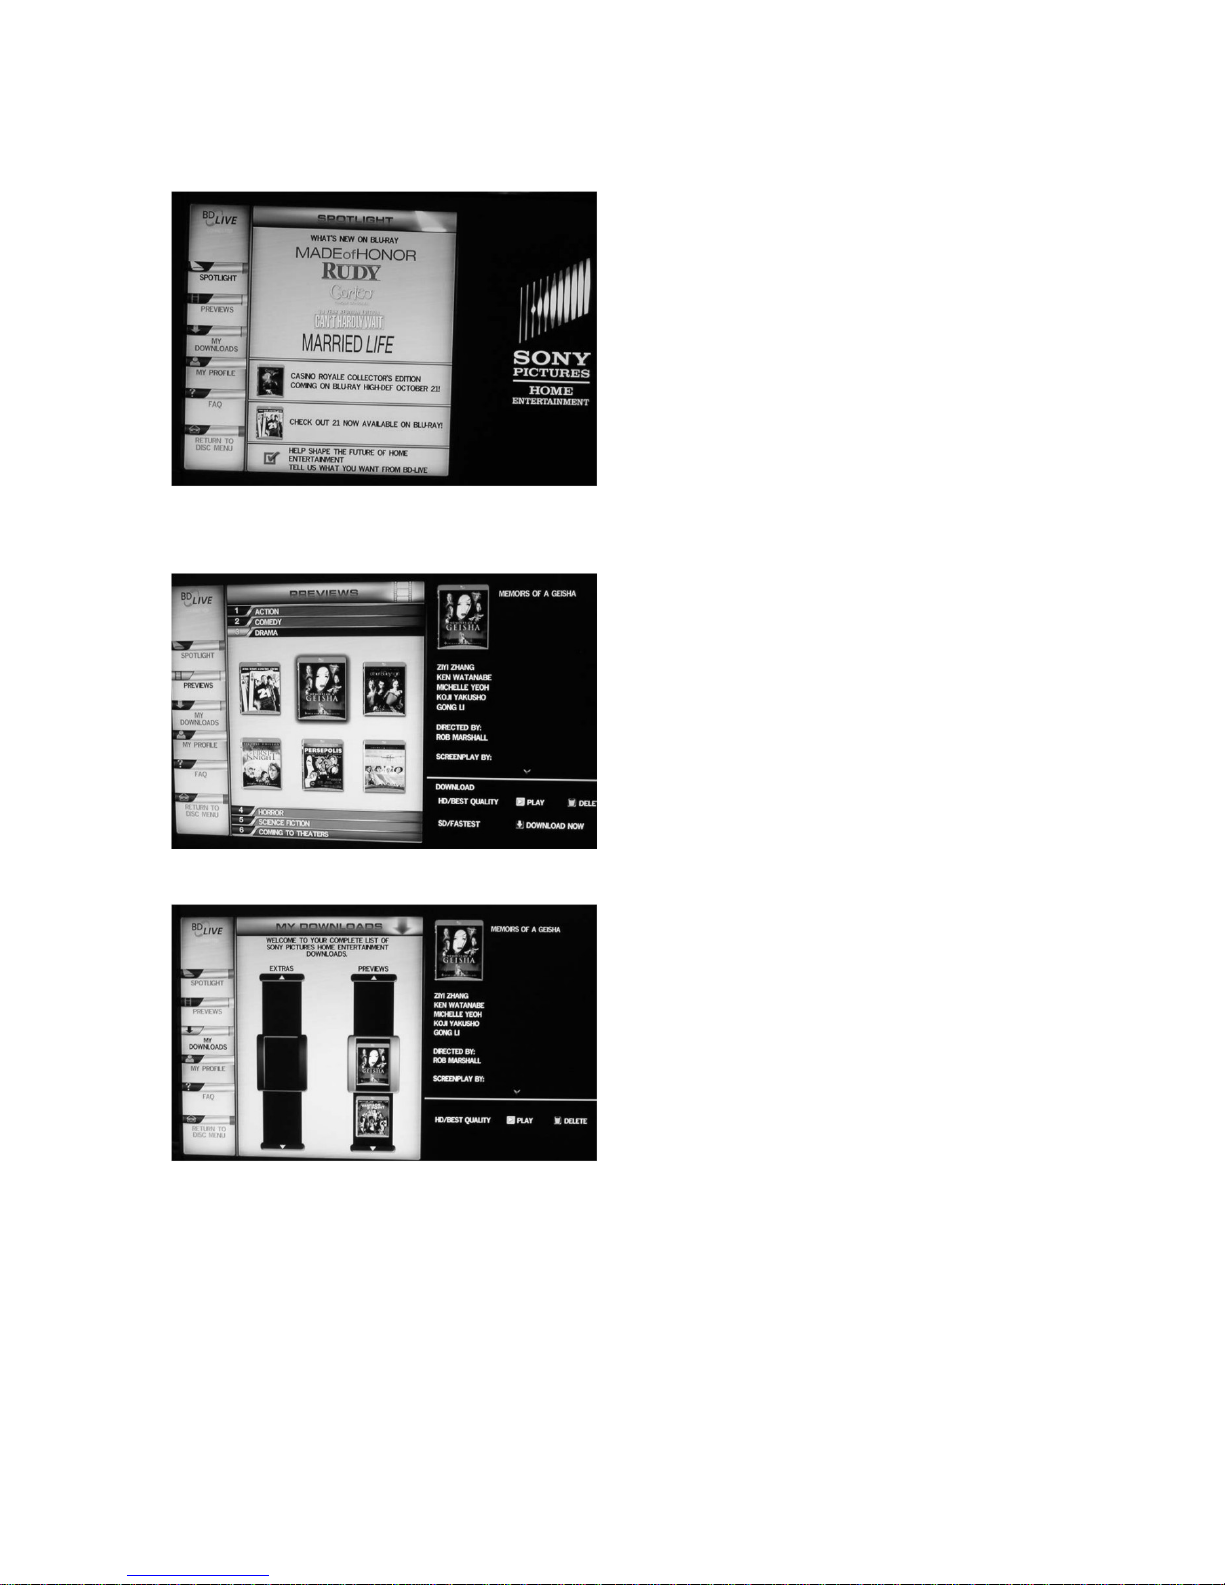
7.4.3 數分鐘之後,播放機將會連接至互聯網,並顯示下載功能表(如下圖所示):
7.4.4 您可從預覽次功能表中(Preview sub menu) ,選擇需要下載的資訊。下載可長達 10 分鐘,
視乎資訊內容大小及網絡速度而定。
7.4.5 下載的資訊儲存在 “我的下載檔案" (My Downloads)。你可選擇播放或刪除資訊內容。
7.5 BD-Live 注意事項
7.5.1 本播放機只支援 USB 記憶連接,保存 BD2.0 下載的內容。
7.5.2 任何連接的外置設備將設定儲存在 BD-Live 記憶體,內置儲存將不適用。
7.5.3 某些 BD-Live 資訊可能因過期而不能播放,用戶須人手刪除 BD 記憶的內容以騰出更多
的記憶空間。
- 20 -
Page 22

8. 故障排除
如發現產品出現任何問題,請參考以下的故障排除指南。
沒有畫面或聲音
確保已啟動電源開關。
確保電源插座可正常操作。
確保電源線沒有損毀
確保電源插頭已穩固地插進插座。
有畫面但沒有聲音
確保音頻連接插孔已穩固連接。
確保音頻連接器沒有損毀。
確保已正確設定播放機的音頻設定。
確保已為電視正確輸入 AV 輸入。
確保沒有把音量設為靜音模式。
有聲音但沒有畫面
確保視頻連接插孔已穩固連接。
確保已為電視正確輸入 AV 輸入。
確保視頻連接器沒有損毀。
確保已正確設定播放機的音頻設定。
畫面或聲音質素十分差
確保已正確設定播放機的音頻設定。
確保光碟沒有刮花或污漬。
確保AV連接器或輸出端子沒有損毀。
遙控器無法操作
確保主機的電源開關已啟動。
把遙控器直接指向播放機的
紅外線感應器。
移走任何在遙控器及紅外線感應器之間的
障礙物。
產品無法操作
關閉電源後重新啟動播放機。
顯示屏出現“NO DISC"字樣
確保已把影碟放在光碟托盤上。
確保影碟沒有反轉。
確保光碟沒有變形,附有污漬或刮花。
- 21 -
Page 23

規格
一般資料
功率要求︰交流電 100-240V,50/60Hz
耗電量︰<20W
影碟兼容
BD,DVD,DVD+/-R/RW,VCD,CD-DA,CD-R/RW.
視頻輸出
1.0V(p-p)/75Ω, 同步,負極RCA針插×1
音頻輸出
2.0聲道輸出︰RCA針插×2
同軸輸出︰0.5V(p-p)75 ,頻率響應20Hz 20kHz
訊噪比>90dB
總失真<-65dB
[配件]
遙控器(包括 2 個 AAA 電池)
複合視頻及類比音頻連接線
用戶手冊
規格可隨時改變而無須另行通知。
- 1 -
Page 24
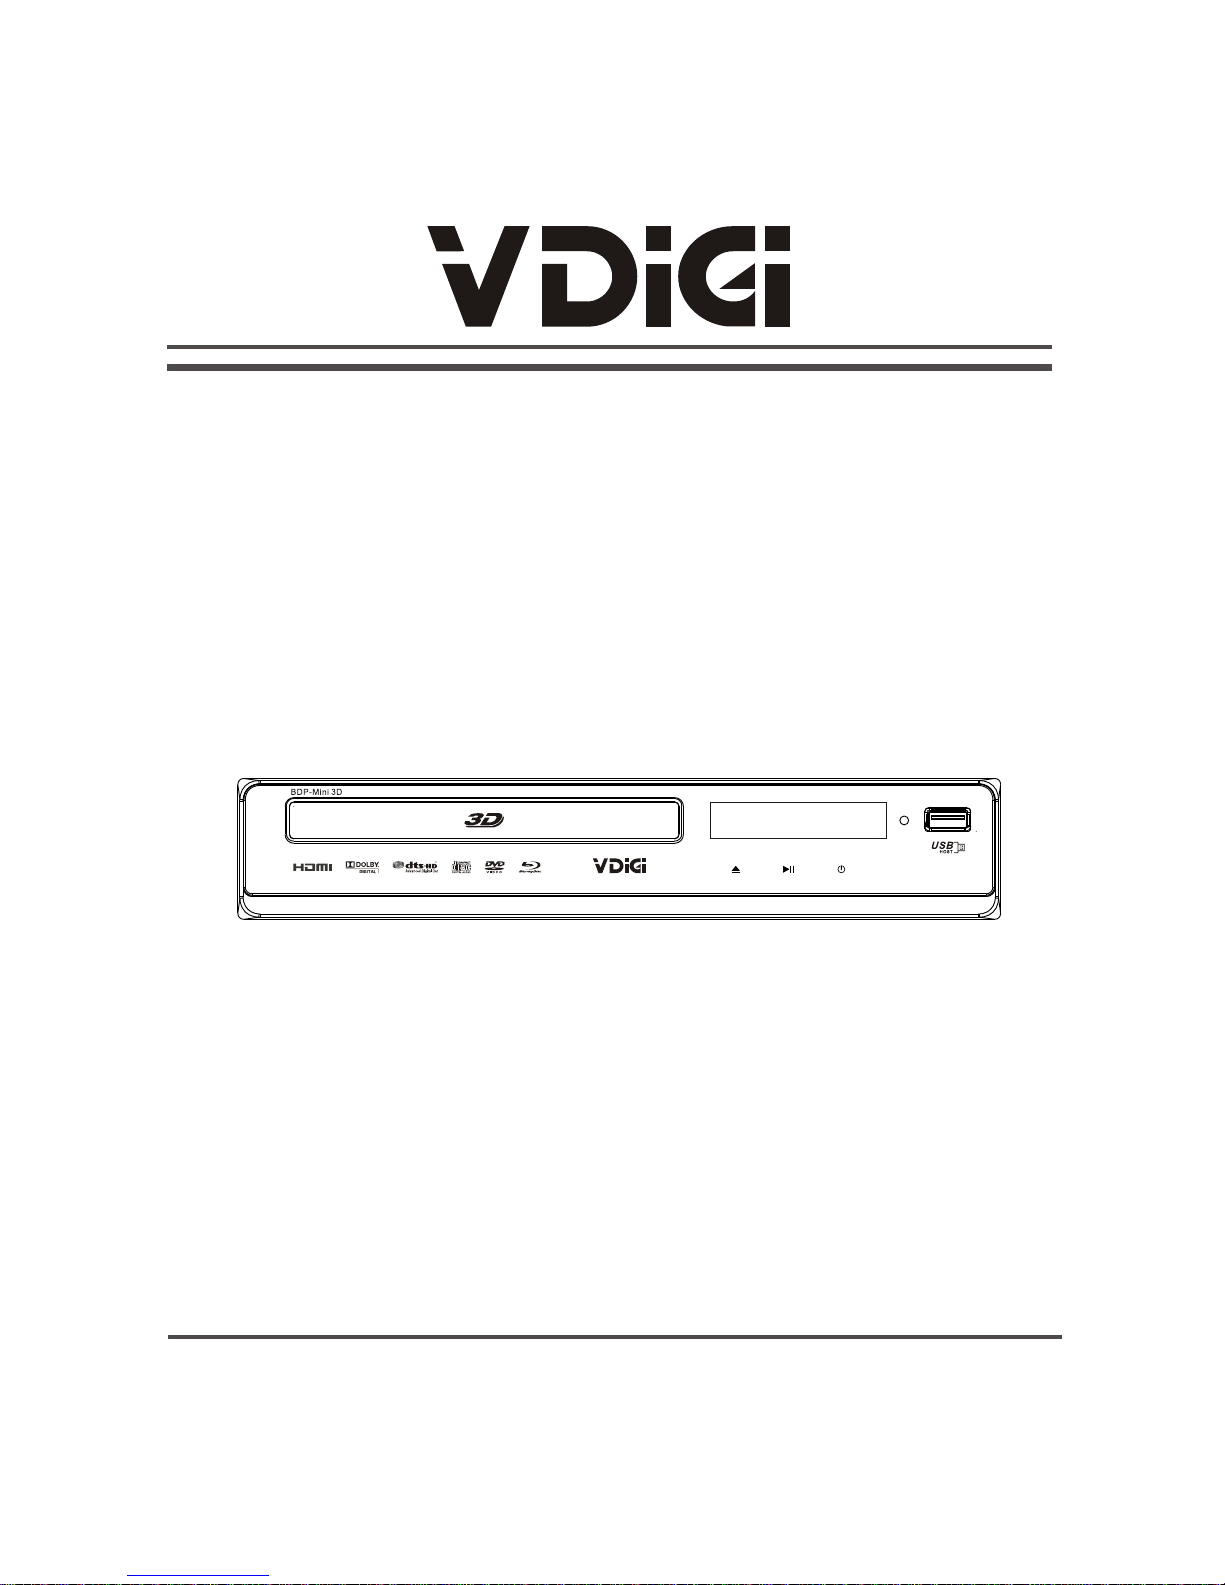
Please read this User Manual carefully to ensure proper use of this
product and keep this manual for future reference.
BLU-RAY DISC PLAYER
BDP-Mini 3D
Page 25

Important Safety Instructions
9. Specifications
10. Gnu public license
1. Overview
. Output Illustration
4
5.System Setting
6. Audio, Video, Picture files on disk or USB devices
7. BD-Live Operation
2. Front Panel and Rear Panel Illustration
3
. Remote Control
8. Trouble shooting
2
3
4
7
9
23
11
15
19
21
22
Content
1
Page 26

2
Important Safety Instructions
The symbol indicates that dangerous voltages constituting a risk of electric shock
are present within this unit.
The symbol indicates that there are important operating and maintenance
instructions in the literature accompanying this unit.
This symbol indicates that this product incorporates double insulation between
hazardous main voltage and user accessible parts. When servicing use only
identical replacement parts.
1) Read these instructions.
2) Keep these instructions.
3) Heed all warnings.
4) Follow all instructions.
5) Do not use this apparatus near water.
6) Clean only with dry cloth.
7) Do not block any ventilation openings, install in accordance with the instructions.
8) Do not install near any heat sources such as radiations, heat registers, stoves, or
other apparatus (including amplifiers) that produce heat.
9) Do not defeat the safety purpose of the polarized plug. If the provided plug does
not fit into your outlet, consult an electrician for replacement of the obsolete outlet.
10)Protected the power cord from being walked on or pinched particularly at plugs,
convenience receptacles, and the point where they exit from the apparatus.
11)Only use attachments/accessories specified by the manufacturer.
12)Unplug this apparatus during lighting storms or when unused for long periods of
time.
13)Refer all servicing to qualified service personnel. Servicing is required when the
apparatus has been damaged in any way, such as power-supply cord or plug is
damaged, liquid has been spilled or objects have fallen into the apparatus, the
apparatus has been exposed to rain or moisture, does not operate normally, or has
been dropped.
14) Mains plug is used as the disconnect device, the disconnect device shall remain
readily operable.
15) The ventilation should not be impeded by covering the ventilation openings with
items, such as newspapers, table-cloth, curtains, etc.
16) No naked flame sources, such as lighted candles, should be placed on the
apparatus.
17) Attention should be drawn to the environmental aspects of battery disposal.
18) The use of apparatus in moderate climate.
19) The apparatus shall not be exposed to dripping or splashing and that no objects
filled with liquids, such as vases, shall be placed on the apparatus.
WARNING: To reduce the risk of fire or electric shock, do not expose this apparatus to
rain or moisture.
WARNING: The batteries shall not be exposed to excessive heat such as sunshine,
fire or the like.
Page 27
5
3
TM
Blu-Ray Disks
DVD Video Disks
(DVD-ROM)
DVD-RW
1.1 PLAYABLE DISK TYPES
The following types of disks can play in the Blu-Ray Disc player:
1. OVERVIEW
This BD player has the capability of providing high-definition, cinema-like pictures and
multi-channel audio. Soundtracks in more than one language are usually included on
the disk, and subtitles in more languages are often included as well.
DVD-R
Audio CDs
(CDDA)
VCD
MP3/WMA/JPEG
Data CD
DTS-CD
NOTES:
For writeabl DVD-RW, DVD-R)
Only DVD-RW/-R recorded with UDF or ISO9660 format can be played back.
The disks must be finalized, VR-mode.
Playback may not work for some types of disks, or when specific operations, such as
angle change and aspect ratio adjustment, are being performed. Information about
the disks is written in detail on the box. Please refer to this if necessary.
Some DVD-VR disks will be playable but not all features are available.
For writeab
Only CD-R/-RW media recorded with UDF or ISO9660 format can be played, and they
must be finalized.
e DVD disks (
le CD disks
1.2 REGION CODE
If the Region number of a BD or DVD disk does not correspond to the region number of
this Blu-ray disk player, the BD player cannot play the disk. The region code is printed
on the rear panel of the BD Player.
Page 28
4
2. Front Panel and Rear Panel Illustration
2.1 Front panel
2.2 Rear panel
1
2
3
POWER
4
DISPLAY
DISC TRAY
7
PLAY/PAUSE BUTTON
1
2
3 4
765
5
6
SENSOR
USB
OPEN/CLOSE BUTTON
1
2
4
5 6
3
1
4
Digital Audio COAXIAL output
2
3
Audio output(FR,FL)
5
HDMI output
COMPOSITE VIDEO output
6
LAN
USB
HDMI OUT(1080P)
LAN USB
AUDIO OUT
L
R
COAXIAL
VIDEO OUT
Page 29
5
2.3 TV Set Connections
AUDIO IN
HDMI IN
VIDEO IN
VIDEO
R
L
HDMI
2.3.1 CONNECT BD PLAYER TO TV SET BY AV CABLE
Connect the BD player s L and R jack to the audio input jack on the TV.
Connect the BD player s video out jack to the video input jack of TV.
2.3.2 CONNECT THE BD PLAYER TO TV SET USING THE HDMI OUTPUT
Use the HDMI cable (not supplied) to connect BD player to your TV.
Notes: The player supports video resolution up to 1080p 60Hz on HDMI output.
HDMI OUT(1080P)
LAN USB
AUDIO OUT
L
R
COAXIAL
VIDEO OUT
Page 30
HDMI OUT(1080P)
LAN USB
AUDIO OUT
L
R
COAXIAL
VIDEO OUT
6
2.3.3 Connecting to an AV Amplifier with Digital Audio Input
Coaxial
Coaxial cable
Notes:
1. Select the Coaxial digital audio output.
2. Set the digital Amplifier to the AV input connected to the BD player.
Digital Amplifier
Page 31
7
3.1 Video Output Capabilities
Each of the video outputs are capable of different levels of functionality, as described
in the table below. Actual output will depend on setup menu settings and TV capabilities
for HDMI televisions.
3.2 Audio Output Capabilities
Each of the audio outputs are capable of different levels of functionality, as described
in the table below. Actual output will depend on
BD player setup menu settings,
What types of audio tracks are encoded on the disk, and,
Surround sound receiver capabilities (for BD players connected to a surround sound system through HDMI or SPDIF)
BD Player
Audio Output
Audio tracks that can be sent directly to output
Dolby TrueHD
Dolby Digital Plus
DTS-HD High-Resolution Audio
Dolby Digital
DTS
PCM (From mono up to 7.1 channels @96 Khz)
Dolby Digital
DTS
PCM (stereo only, up to 96 Khz)
HDMI
SPDIF
3. Output Illustration
BD Player
Video Output
Resolutions Supported
(NTSC Models)
Resolutions Supported
(PAL Models)
HDMI
Composite Video
1080p 60/30/24Hz
1080i
720p
480p
480i
NTSC SD (480i)
1080p 50/25/24Hz
1080i
720p
576p
576i
PAL SD (576i)
Page 32

8
3.3.2. Stereo Audio Outputs
These are analog, “old fashioned” stereo (left/right) outputs. If your TV does not have
an HDMI input, you can connect these outputs to the stereo audio inputs of a TV.
3.3.3. Composite Video
If your TV does not have component or HDMI video inputs, connect this output to the
composite video input of the television.
3.3.4. HDMI 1.3 Audio/Video Output
If you are using a surround-sound audio receiver with an HDMI input, connect
the HDMI output of the BD player to the HDMI input of the audio receiver. (You will need
to connect a second HDMI cable from the HDMI output of the audio receiver to the HDMI
input of the television)
If your surround-sound audio receiver does not have an HDMI input (or if you are not
using a surround- sound receiver), connect this output directly to the HDMI input of the
TV. One of the other audio outputs can be connected to the audio receiver.
3.3.5. Ethernet Connector
For BD-Live only, use an Ethernet cable to connect this connector to access Ethernet
while playing BD-Live disk.
3.3.6. USB 2.0 Connector
Used for external USB memory access, play supported audio/video files on USB
memory or store download content into USB memory for BD-Live
Warning: The USB memory stick should be plug in the unit directly. USB extension
cable should not be used to avoid failing of data transferring and interference caused.
3.3 Connectors Description
3.3.1 SPDIF Digital Audio Output
The SPDIF output is a digital audio output. If you have a surround-sound receiver with
a SPDIF (coaxial)input, connect this output to the coaxial input of the surround sound
receiver.
Page 33
1
2
3
4
5
6
7
8
9
10
12
11
13
14
15
16
17
18
19
21
20
23
25
26
27
29
30
32
28
31
33
22
24
4. Remote Control
1.Open/Close
Press this button to open/close the disk tray.
2.Subtitle
This key can be used to enable/disable subtitles during
BD/DVD playback. If the disk has more than one
subtitle language, it can also be used to cycle through
the subtitle languages.
3.Audio
This key is used to cycle through the movie audio
soundtracks available on the disk. (Not available on all
disks).
4.Pop Menu/Title
On BD disks only, this button can be used to bring up
the main movie menu. (Not available on all disks).
5.Angle
Some BD and DVDs are filmed with more than one
camera angle. During playback of such a disk,
pressing this button will allow you to switch camera
angles. (Not available on all disks)
6.VOL (+/-)
Pressing the VOL + button will increase the volume of
the BD player's audio output. Pressing the VOL -
button will decrease the volume of the BD player's
audio output.
7.STOP
This button stops playback of a BD/DVD movie or files
on disk.
8.DISPLAY
Press this button to show current play status and time
information.
9.Menu Navigation Keys
These keys are used when navigating the menus on BD and DVDs. They are also used
for navigating the setup menus for the BD player.
10.GOTO
This button is used with the numeric keypad to jump to a specific track on an audio CD.
11.PREV
Press this button to play previous title, chapter, track or file if valid.
12.NEXT
Press this button to play next title, chapter, track or file if valid.
13.Return
When navigating files on a data CD or USB stick, pressing this button will return you
to the previous folder or menu.
14.Random
Used for random playback of audio files on disk. (Not available on all disks).
15.Colour Keys
The red, green, yellow, and blue keys are used to implement disk-specific features on
some BD disks. (Not available on all disks).
16. Resolution
Under STOP status, press this button can change resolution settings directly.
17.Secondary Subtitle
Used to bring up the subtitle (if available) for the picture- in-picture (director's
commentary, etc) on a BD title. If the disk has more than one director's commentary
subtitle language, it can also be used to cycle through the subtitle languages.
(Not available on all disks).
9
16
0
9
Page 34
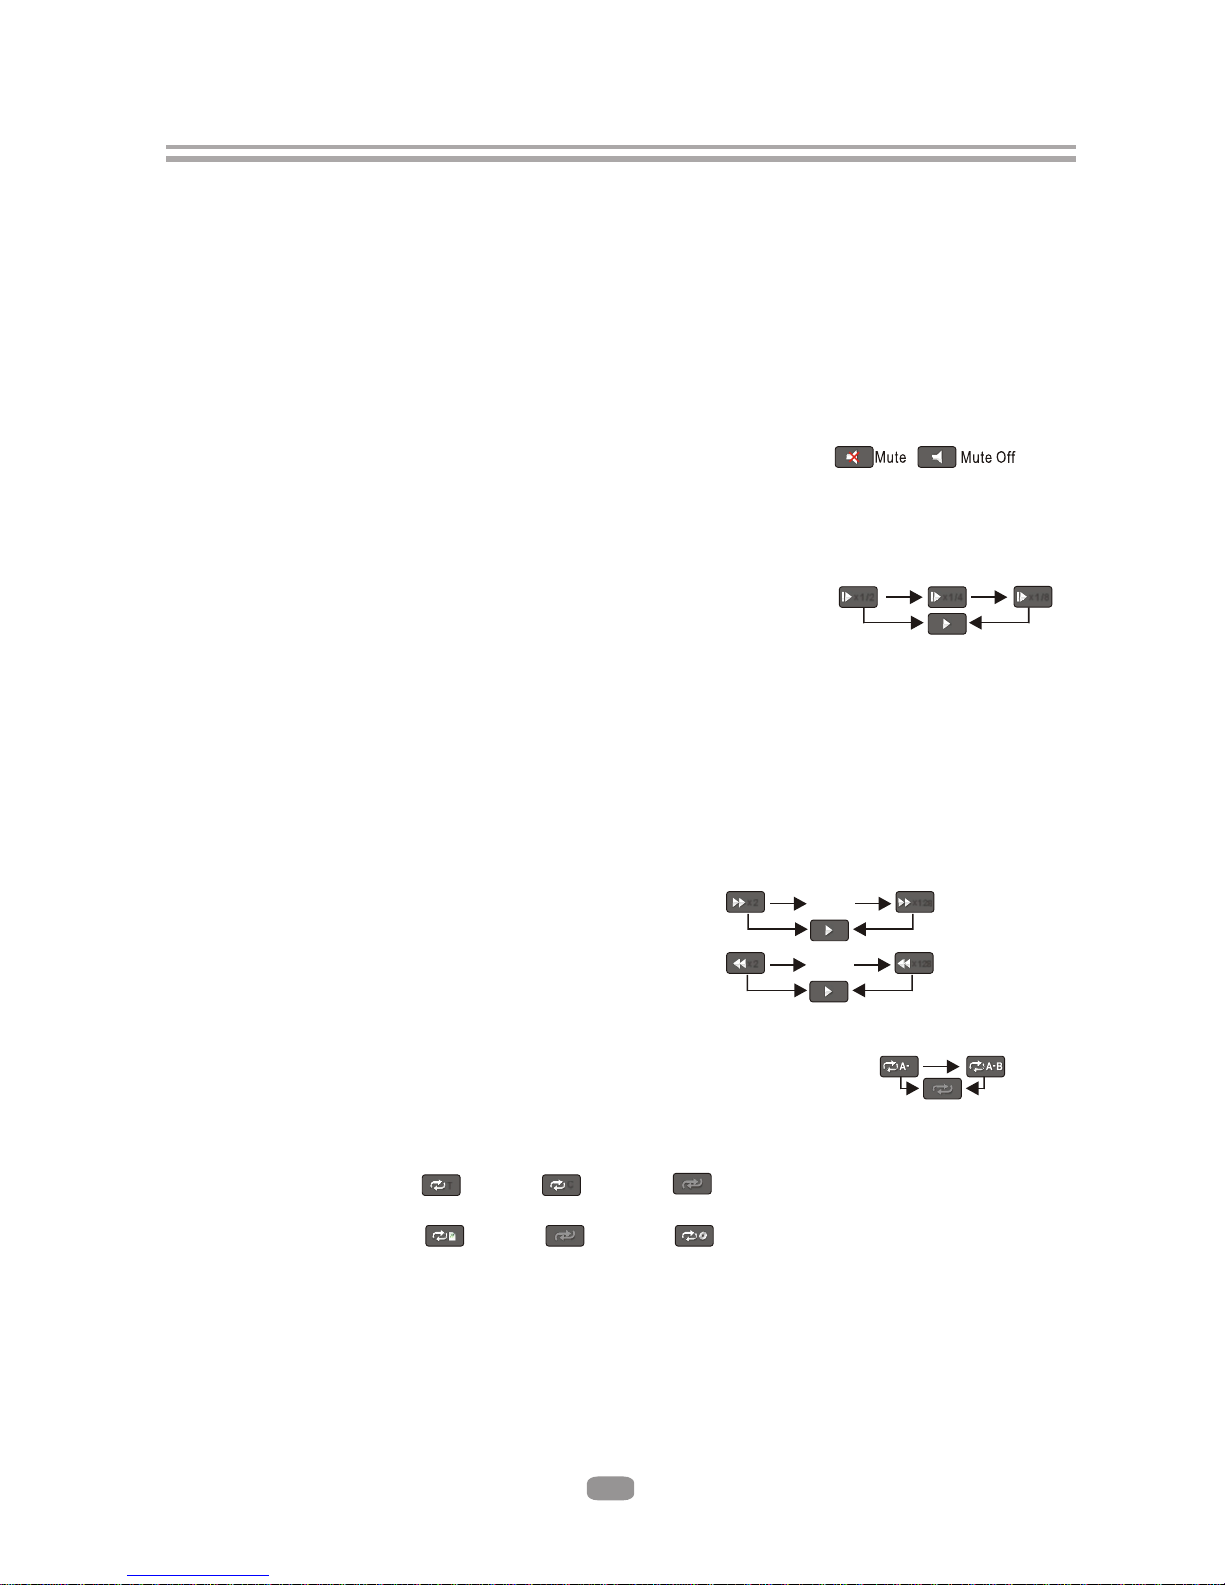
18. STANDBY
Press the STANDBY button to turn the BD player on or off.
Note: After AC power being turned on, system will take about 16s to run linux and
initialize hardware, please be patient, system will not respond any key input
during this period.
19. Numeric Keypad
These buttons are used with the GOTO button to jump to specific title/chapter (track)
or time.
20. MUTE
Pressing this button to avoid audio output, pressing the MUTE button again will
resume audio output.
21. CLEAR
When entering numeric values via the numeric keypad , this button is used to clear a
number entered incorrectly.
22.SLOW
Pressing this button will cause the video to be played at ½, 1/4, 1/8 speed.
23. Step
Pressing this button will play movie by one frame.
24.Play
Pressing this button will start or resume playback.
25. Pause
Pressing this button will pause audio and video playback.
26.Menu
Pressing this key will immediately stop playback, and bring up the main or 'top' menu
of the BD or DVD disk. (Not available on all disks)In the main menu, you can typically
choose subtitle language, audio track, or different scene etc.
27.Setup
Bring out the settings menu of the BD player. This key will not work during disk play-
back
28.Fast Forward
Used to “Fast Forward” during content playback.
29.Fast Reverse
Used to “Fast Reverse” during content playback .
30.A-B
When a disk is playing, pressing this button once will save a “start point” for repeating
playback. Pressing this button again to select a “end point” then playback will repeat
from the start point to the end point. (Not available on all disks)
31.REPEAT
This button is used to cycle through the possible“repeat” modes based on content
played.
BD/DVD or video files on disk: (Not available on all disks)
CDDA or audio Files on disk:
32.Bonus View
On BD disks, this button is used to turn the video portion of the director's commentary
(picture-in-a-picture) on and off. (Not available on all disks).
Note: Director's commentary must have been turned on in the BD's main menu in
order for this key to work.
33.Secondary Audio
On BD disks equipped with multiple director's commentaries in several languages,
pressing this key will cycle through all of the languages available for the director's
commentaries. (Not available on all disks).
10
Repeat File
Repeat Off
Repeat All
C
T
Repeat Title
Repeat Chapter
Repeat Off
x
128
…
x
2
x
2
x
128
…
x
1/8
x
1/4
x
1/2
Page 35
5.System Setting
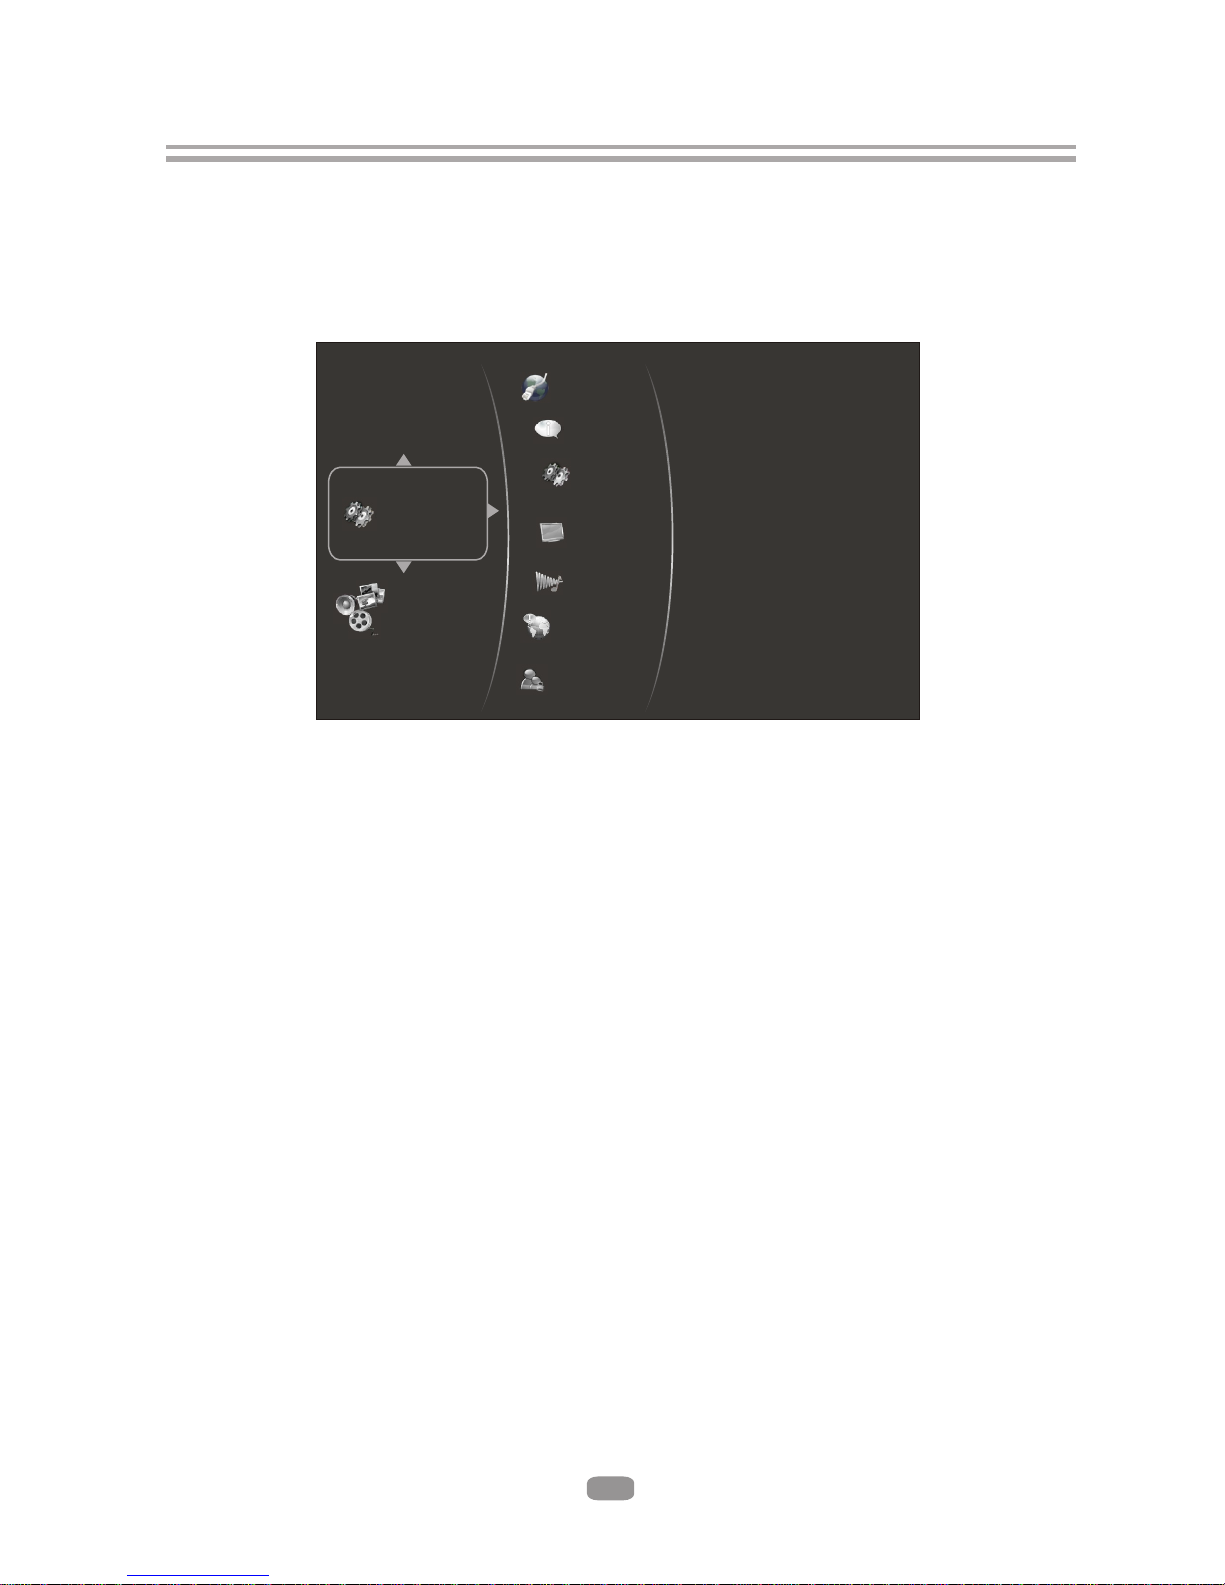
Press SETUP button under stop status or press RIGHT button in main menu. System
will bring out setting menu as below picture:
Main Menu Setting Menu
11
5.1Language
5.1.1 OSD: set language used for user interface displayed .
5.1.2 Menu: set language used for BD/DVD menu (not available on all disks).
5.1.3 Audio: select audio language for BD/DVD disk (not available on all disks) .
5.1.4 Subtitle: select subtitle language used for BD/DVD disk (not available on all disks).
Settings
Audio
Display
Info
Network
Language
Parental
BD Live
Media
Page 36
5.2Display
5.2.1 TV Type: Select to output NTSC or PAL video format .
5.2.2 Resolution: Set maximum resolution of your TV here to get best video quality,
if you are not sure, please use HDMI Auto, system will read the preferred
resolution your TV supported via EDID.
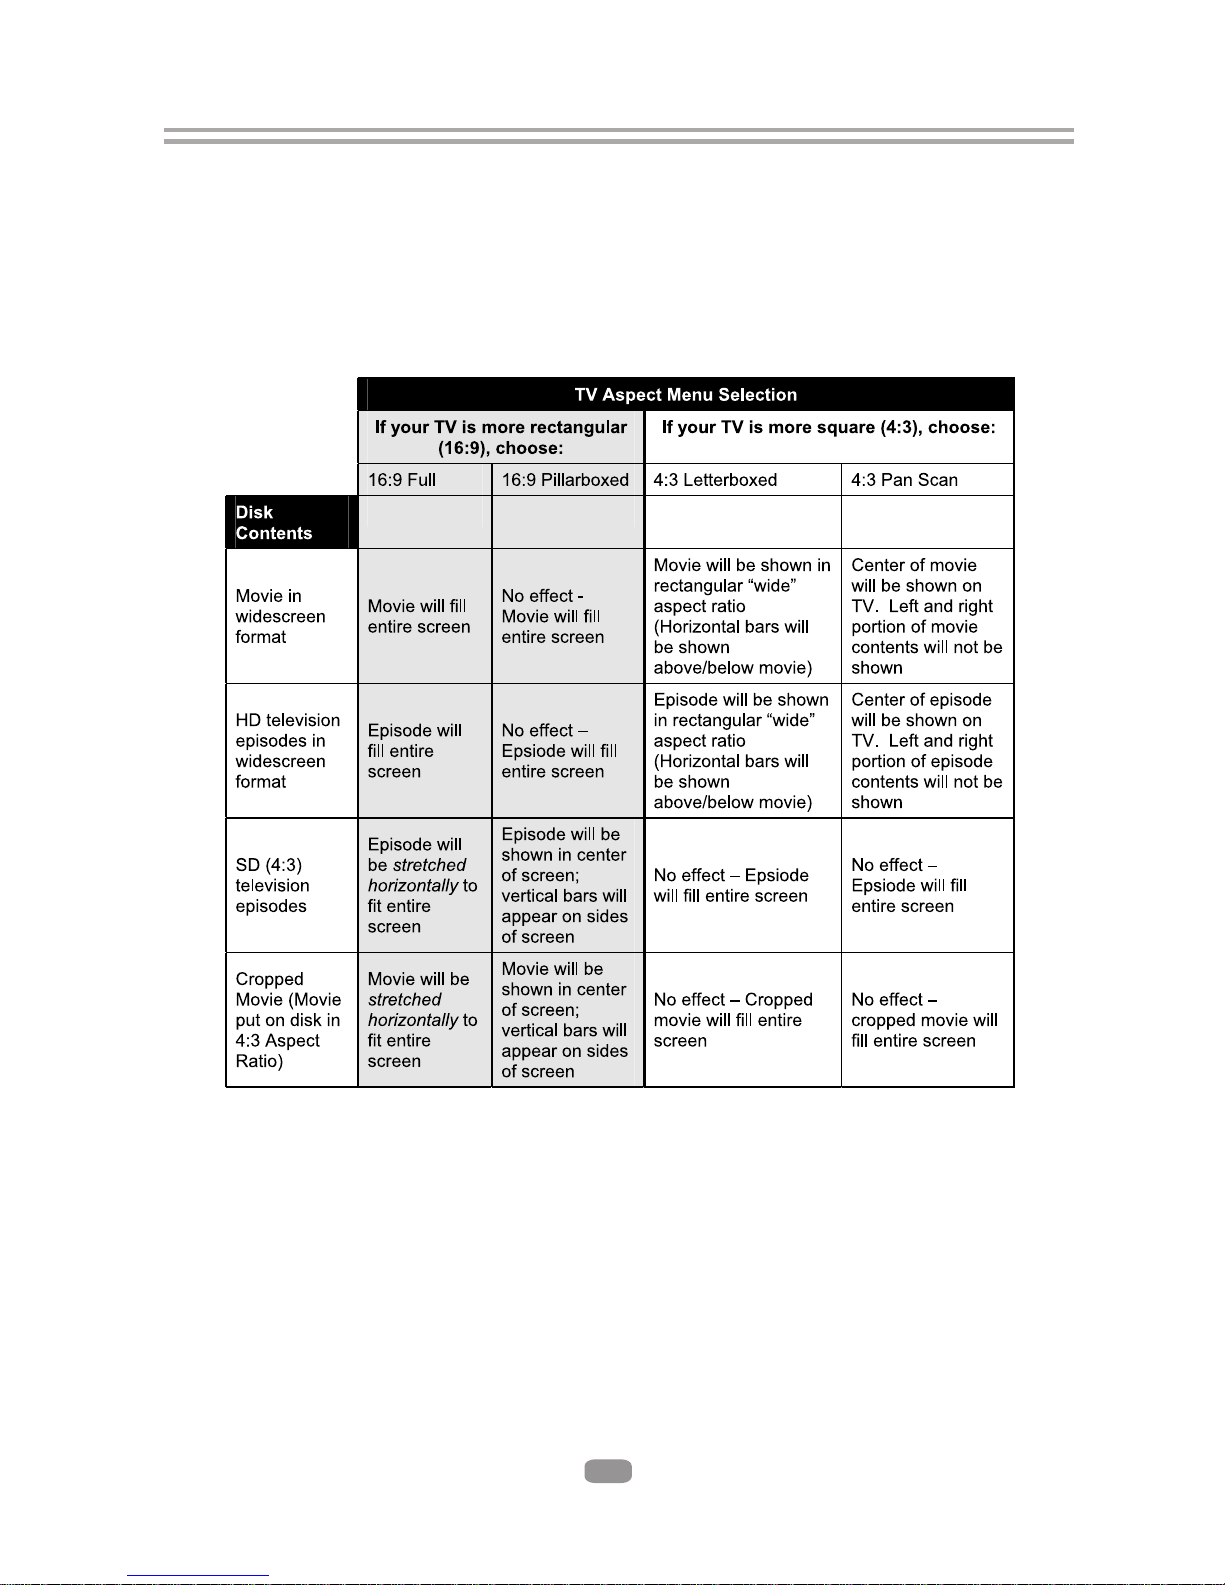
5.2.3 TV Aspect: Select right video ratio based on your TV. ( Refer to below table)
Note: Aspect setting only effect HDMI and component output, and 4:3 setting has
no effect if resolution has been set to 720p or 1080i or1080p).
Note:4:3PS and 4:3LB only valid under SD mode (resolution is 480p/576p or 480i/576i).
5.2.4 Film Mode: system will output 1080p 24Hz if this item is set to ON and disk
movies are recorded on film at rate of 24 frames per second.
Note: This item only effect when Resolution is set to 1080p, and make sure your TV can
support 1080P24Hz mode.
5.2.5 Color Depth:ON/OFF
Note: Please ensure your TV can support deep color properly if you want to select ON.
5.2.6 Bluray 3D mode: Automatic or Forced 2D.
12
Page 37
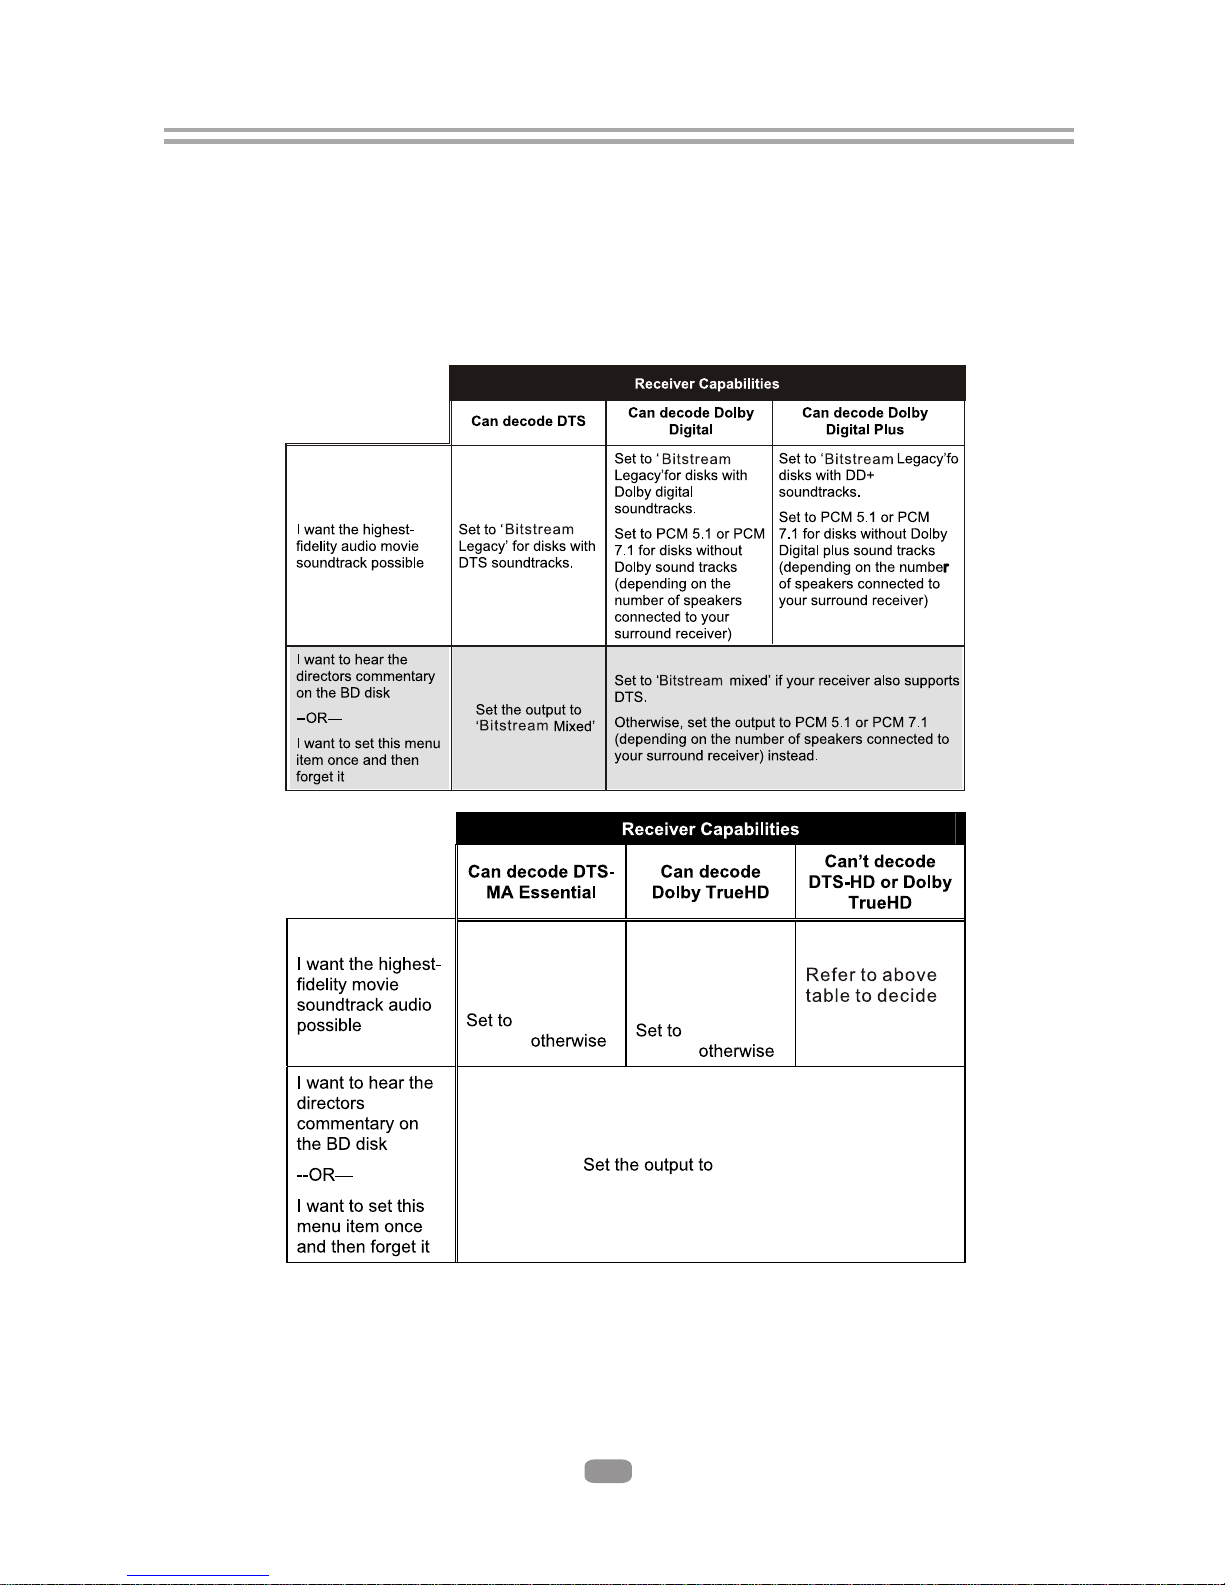
5.3.2 Digital Output:
If you only have two speakers, set PCM stereo.
If you connect receiver with more than two speakers, please refer to below tables:
5.3 Audio
5.3.1 PCM Downsampling: select right bitrate for PCM signal to ensure your SPDIF
receiver can handle it correctly. It's no effect for HDMI digital audio output.
13
Bitstream
mixed
Bitstream
mixed
Bitstream mixed
Set to Bitstream
HD for disks with
DTS-HD
soundtracks.
Set to Bitstream
HD for disks with
Dolby TrueHD
soundtracks.
5.3.3 Dynamic Range Control: means that you can allow the BD player to make the loud
parts of amovie's audio track quieter than they would be in the theatre, without
making the dialog of theactors any quieter. (It effects on analog audio output and
digital output should be set to PCM or Bitstream Mixed).
5.3.4 Stereo Downmix: Select Auto. Stereo(LoRo) or Surround Enclosed(LtRt).
Note: In order to get correct primary and secondary mixed audio at the Audio Out FL and
FR, please set HDMI to 2ch-PCM on SETUP menu (Settings>Audio>Digital Output>PCM
Stereo) or connect the HDMI to a TV.
Page 38

5.4 BD-Live
5.4.1 BD-Live Internet Access: Control BD player accessing internet
Limit access : Only allow the inserted Blu-Ray disk to download content from a
BD-Live website which has a valid online certificate. This will reduce the chances
of downloading malicious content onto the player.
Always allow access : Allow the BD the inserted Blu-Ray disk to access content
from all BD-Live internet sites whose internet address is encoded onto the disk.
There is no danger of malicious code download from valid commercial BD disks,
but choosing this option and downloading BD-live content via illegally authored
BD disks, or disks obtained from questionable sources, could result in malicious
code being downloaded onto the player.
Prohibit access : Blocks the inserted Blu-Ray disk from accessing BD-Live content
over the internet.
5.4.2 BD-Live Storage:
Show BD-Live storage information, select storage device to clear Blu-ray storage.
5.4.3 Erase Blu-Ray Storage: Clear Blu-Ray storage.
5.5 System
5.5.1 Optical Disc Auto Play: This option is used to tell the BD player whether or not to
start loading the main title menu of a disk as soon as the disk tray is closed.
5.5.2 Screen Saver Duration:
This BD player will activate screen saver mode after certain period of time set by
this item when system is playing music file or in stop/fullstop mode.
5.5.3 Auto Power Down: System will enter standby after certain period of time
automatically if no user operation.
5.5.4 CEC support:
Set this item to enable/disable CEC:
The CEC feature is designed to allow CEC-enabled devices to command and
control each other without user intervention. For example: If your TV is also CEC
-enabled and you will turn off your TV, the Blu-Ray player will get a CEC signal
and turn off automatically. Or if you turn on your Blu-Ray player, your TV will
automatically turn on and switch to HDMI input.
Note: Not every CEC-Enabled unit is compatible with this unit.
5.5.5 Reset Settings:
Reset all settings to factory default (Parental Control level will not be reset).
5.6 Network
Press “ENTER” button when the item is highlighted, then select “ WIRED” to config
network:
5.6.1 Link Status: Show if ethernet cable is connected to BD player.
5.6.2 MAC Address: Show MAC address of this BD player.
5.6.3 IP Mode: Choose IP mode here for internet access. Choosing “Manual” mode,
5.6.4 ~ 5.6.8 will be activated for user input, otherwise they are inactivated.
5.6.4 IP Address: Show current IP address or access user input while in “Manual” IP
mode.
5.6.5 Subnet Mask: Show current Subnet Mask or access user input while in “Manual”
IP mode.
5.6.6 Gateway: Show current Gateway or access user input while in “Manual” IP mode.
5.6.7 Primary DNS: Show current Primary DNS or access user input while in “Manual”
IP mode.
14
Page 39

5.8 Parental
5.8.1 Parental Country:
Use this menu item to tell the BD player what country you are in.(Currently this
menu item has no effect)
5.8.2 Parental Control:
To turn parental control ON or OFF,
5.8.3 Parental Level:
To restrict playback of disks encoded with a rating level equal to or higher than the
level you set. Parental Control must be turned on for this menu item to have an
affect
5.8.4 Parental Password:
Change new password for Parental Control menu operation. (Default value is: 6666)
6. Audio, Video, Picture files on disk or USB devices
6.1 Introduction
This section explains how to play back PC-type audio, pictures, and video files
that have been placed onto a disk or USB memory stick.
6.2 Supported Audio, Video, Picture files types
Video
.MPEG4 (.mp4) files
.m4v files
.mpg files
Note: External subtitle file must have name begin with the video file name, and it must
be UTF8 or UTF16 encoded. (e.g. For video file: file001.avi, external subtitle file
can be: file001_01.srt,file001_eng.srt or file001_ger.sub etc)
Music:
.mp3 files
.wma files
Picture:
.jpeg files
.Png files
15
5.6.8 Secondary DNS:
Show current Secondary DNS or access user input while in “Manual” IP mode.
Press ENTER key while Apply button is highlighted to activate setting you made,
or press ENTER key while Cancel button is highlighted to cancel changes you
made for network settings.
5.7 Info
This item shows software and hardware information for loader and main board, no
changes are allowed.
Page 40
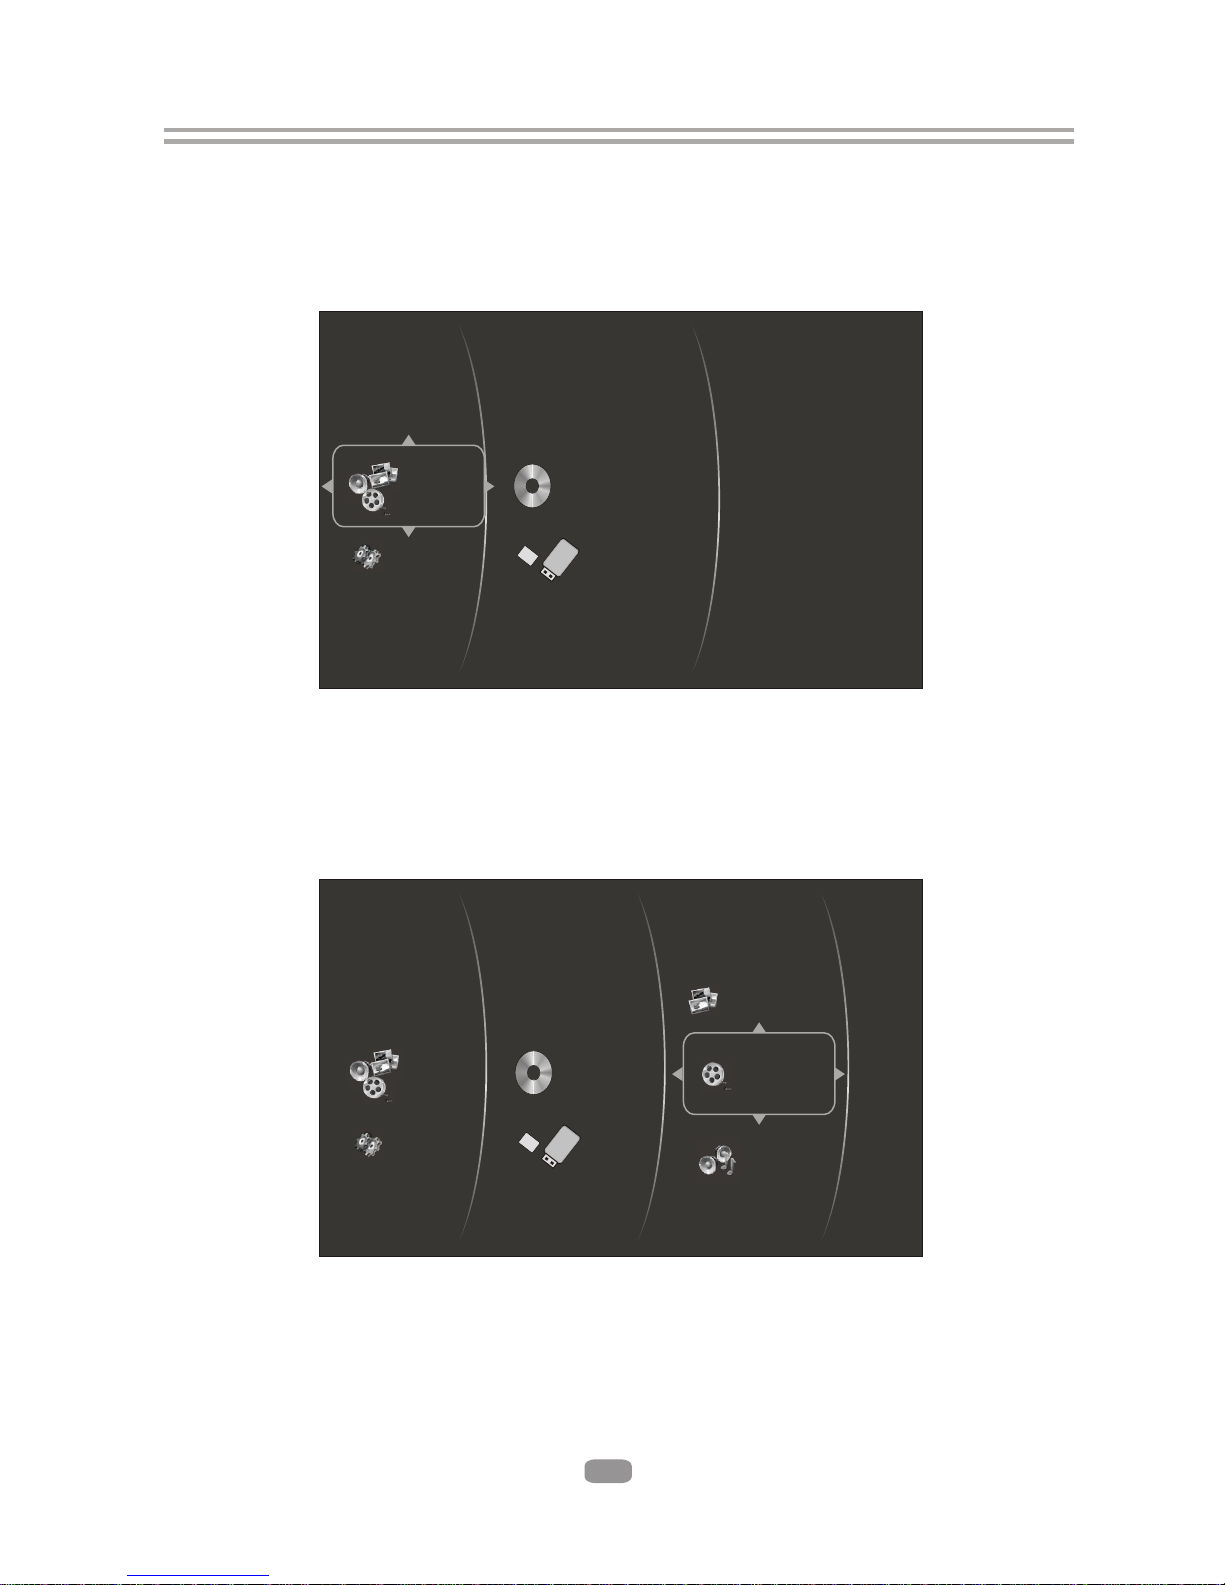
Figure 5-1 Video Media Selector
6.4.1 Select Videos icon in main menu which will appear after BD player read out disk
or/and USB device. Press ENTER key while Video icon is highlighted, system will
bring out a sub menu for file source selection.(Figure 5-1)
6.4 Browsing video files
16
6.3 Disk or USB devices preparation
6.3.1 CD-R/RW, DVD+/-R, DVD+/-RW, BD-R or BD-RE with supported files recorded in
UDF or ISO9660 format (must be finalized) can be playback on this BD player.
6.3.2 USB device with supported files on its FAT/FAT32 partition will be recognized.
Settings
Optical Disc
USB 1
Media
Settings
Optical Disc
USB 1
Media
Pictures
Music
Videos
Page 41
6.5 Browsing Audio files
6.5.1 Select Music icon in main menu which will appear after BD player read out disk or
/and USB device. Press ENTER key while Music icon is highlighted, system will
bring out a sub menu for file source selection.( Figure 5-3 )
17
6.4.2 Select disk or USB to open a browser which allow files on current disk/
USB device, so you can choose any files you want to play.(
you to view
Figure 5-2 )
Figure 5-3 Audio Media Selector
Figure 5-2 Video Browser Screen
Optical Disc
USB 1
Videos
8 Item(s)
Main Menu
Previous folder
Play Files
MovieNo6.mkv
Videos
Pictures
Music
Videos
Settings
Media
MovieNo7.mkv
MovieNo8.mkv
MovieNo1.mkv
MovieNo2.mkv
MovieNo3.mkv
MovieNo4.mkv
Page 42
6.6 Browsing picture files
6.6.1 Select Pictures icon in main menu which will appear after BD player read out disk
or/and USB device . Press ENTER key while Pictures icon is highlighted, system
will bring out a sub menu for file source selection.( Figure 5-5)
6.6.2 Select disk or USB to open a browser which files on current
disk/USB device, so you can choose any files you want to play.(
allows you to view
Figure 5-6 )
18
6.5.2 Select disk or USB to open a browser which allow files on current disk /
USB device, so you can choose any files you want to play .(
you to view
Figure 5-4 )
Figure 5-5 Picture Media Selector
Figure 5-6 Picture Browser Screen
Figure 5-4 Audio Browser Screen
Pictures
Optical Disc
USB 1
Music
19 Item(s)
MP3 kbps test filer
Browse Pictures
Main Menu
Previous folder
Play Files
8 kbps.mp3
Title:
112 kbps
Artist:
112 kbps
Album:
Hell freezer Over (Rock/Pop)
57 Item(s)
JPG
Browse Music
Main Menu
Previous folder
Start Silde Show
Pictures
Settings
PICT1556.JPG PICT1557.JPG PICT1557.JPG
PICT1509.JPG PICT1619.JPG PICT1764.JPG
PICT1765.JPG PICT1771.JPG PICT1005.JPG
Now Playing
Music
Videos
Settings
Media
Now Playing
80 kbps.mp3
96 kbps.mp3
112 kbps.mp3
120 kbps.mp3
16 kbps.mp3
160 kbps.mp3
Page 43
7. BD-Live Operation
7.1 D
Some (but certainly not all) BD disks contain additional features that are made
available to players that are connected to the internet, and have additional memory
added. These additional features may include things like
-the ability to download new movie trailers,
-additional 'commentary' by actors and directors,
- game play and chat
In order to access BD-Live functions, the player must be properly configured for
BD-Live internet access, and it must be equipped with additional memory.
7.2 Adding external BD-live Memory to player
7.2.1 Obtain USB memory which has been formatted as FAT32.
7.2.2 Insert the USB memory stick into the USB slot on the player.
7.3 Setting BD-Live Internet Access Mode
7.3.1 In the BD Player's main setup menu, go to the 'Other” menu choice;
Then, choose “BD-Live Internet Access”. Be sure that “Limit Access” or “Always
Allow Access” is checked.
7.3.2 Once the USB memory stick has been inserted, if there is not at least 100Mbyte
of free space on the device, you should choose “Clear BD Storage” from the
“Other” setup menu item
7.3.3 In the BD Player's main setup menu, go to the 'Network' menu choice; Then,
choose “IP mode”. Set up the Network IP addresses per your router's or ISPs
recommendations
NOTE: The 'Connectivity Test' must pass, or you are not connected to the internet, and
cannot access BD-Live Content on the web.
7.4 BD-Live Internet Access Example
th
7.4.1 Obtain a BD-Live disk like <The 6 Day>
7.4.2 Select BD-Live option from Special Features Menu (or in some disk, you can see
BD-Live option in main menu)
escription
multiperson
19
Page 44
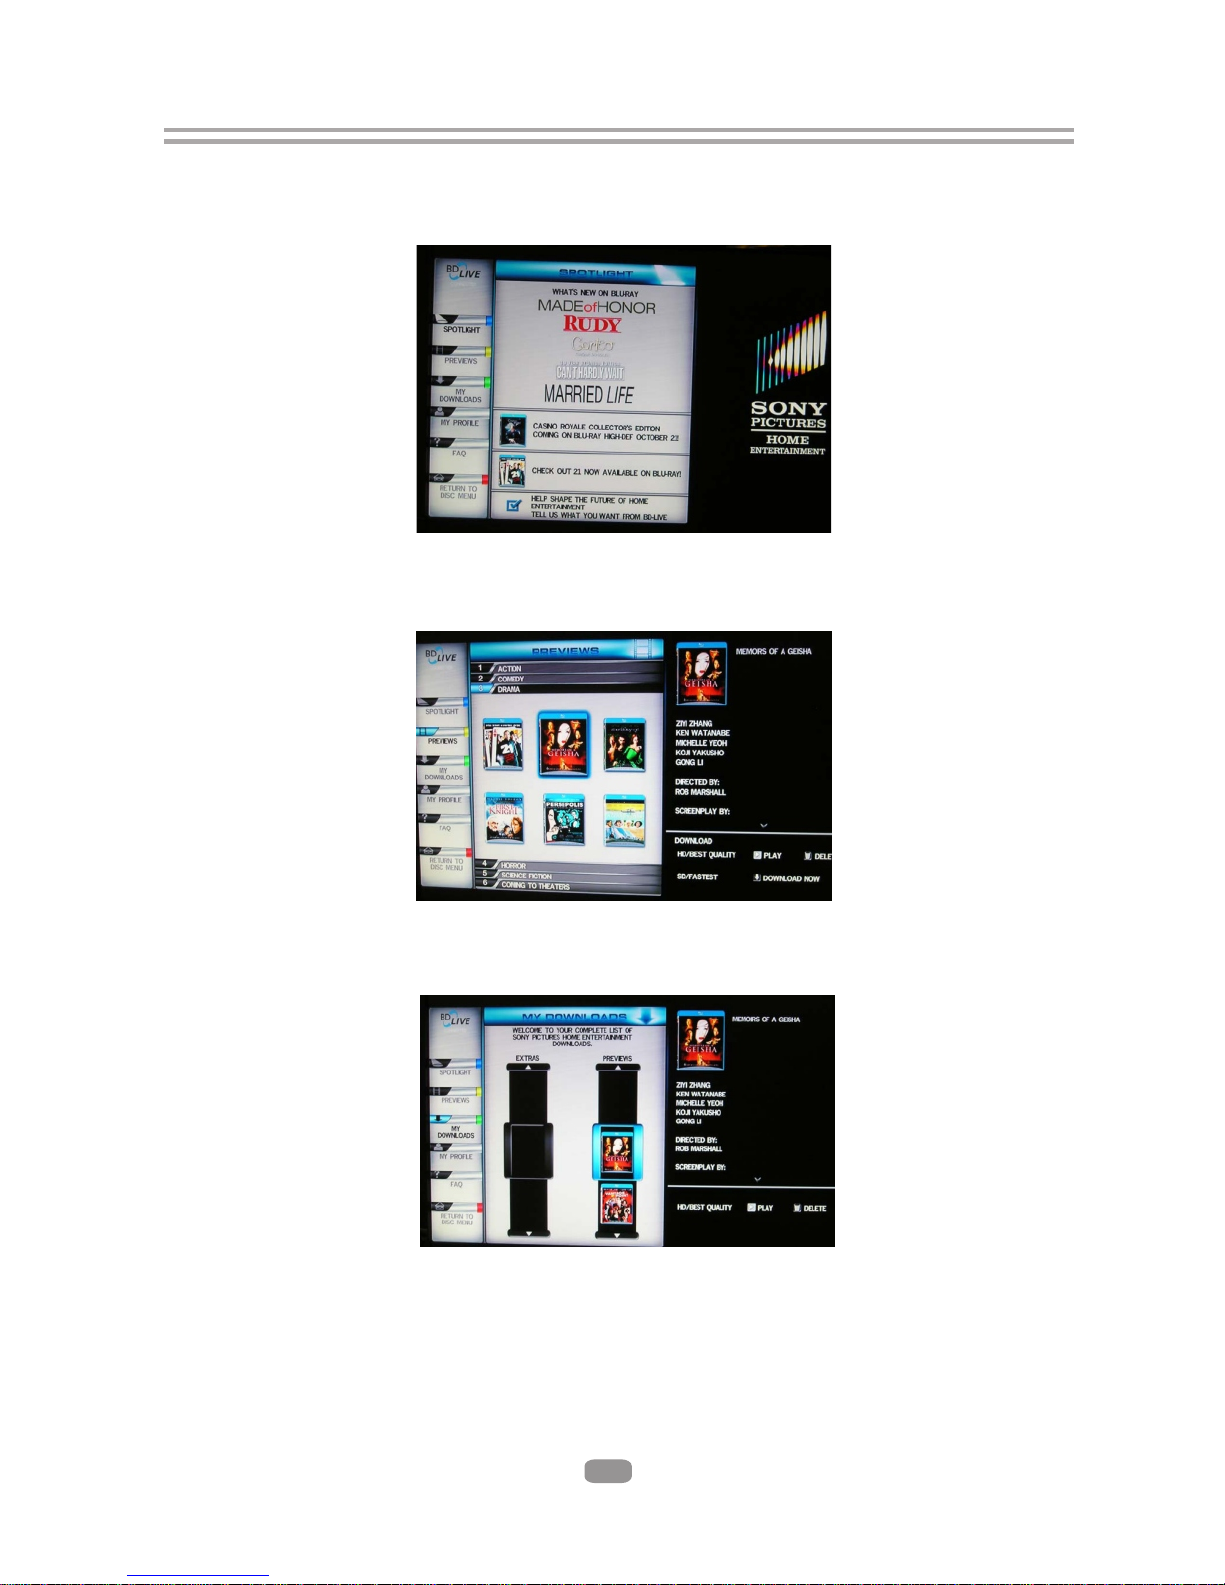
7.4.5 The downloaded content is stored under My Downloads. You can choose to either
play back or delete the downloaded content
7.5 BD-Live Notes
7.5.1 This player only supports the connection of USB memory in order to store BD 2.0
downloaded content
7.5.2 Any externally connected device will be set as BD-Live storage and internal
storage will be ignored in same time.
7.5.3 Some BD-Live content will be expired and not playable, user need to manually
delete the contents in BD storage in order to free space.
20
7.4.3 The player will connect to internet and show download menu as below picture.
Note: This can take several minutes.
7.4.4 You can select the content to download from the Previews sub menu.
Note: This can take several minutes.
Page 45
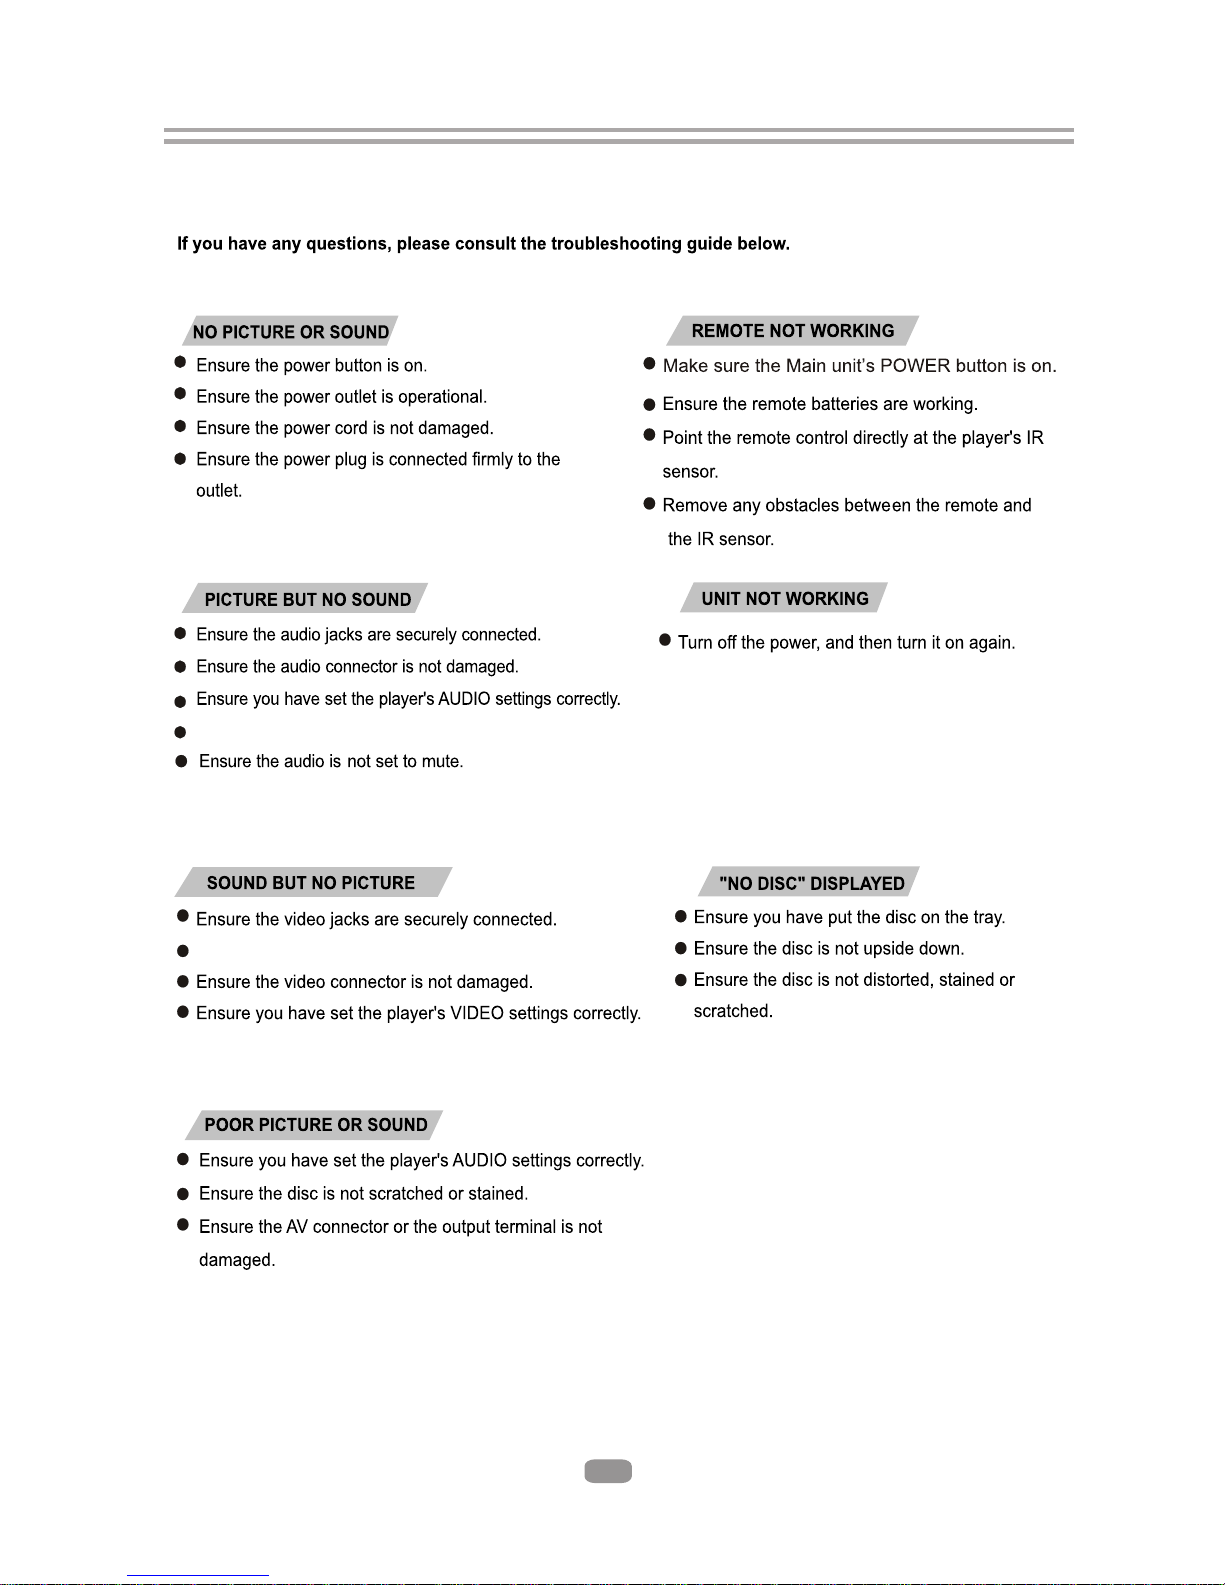
Ensure you have entered the correct AV input for your TV.
Ensure you have entered the correct AV input for your TV.
8. Trouble shooting
21
Page 46
9. Specifications
General
Power requirements: AC 100-240 Volt, 50/60Hz
Power consumption: 20W
Discs Compatibility:
BD,DVD,DVD+/-R/RW,VCD,CD-DA,CD-R/RW.
Video out
HDMI
CVBS: 1.0V(p-p)/75 , sync, negative polarity, RCA pin jack x 1
Audio out
2 channel out: RCA pin jackx2
Coaxial out: 0.5V(p-p)75 , RCA pin Jack x l
Frequency response: 20Hz to 20kHz
S/N ratio:>90dB
Total harmonic distortion: <-65dB
[Accessories]
Remote control (including AAA batteries X 2)
Composite video and stereo audio cable
User Manual
Specifications are subject to change without notice.
Weight and dimensions are approximate.
22
This device complies with Part 15 of the FCC Rules. Operation is subject to the following two conditions:(1)
this device may not cause harmful interference, and(2) this device must accept any interference received,
including interference that may cause undesired operation.
Manufactured under license under U.S. Patent # s: 5,451,942; 5,956,674; 5,974,380; 5,978,762;
6,487,535 & other U.S. and worldwide patents issued & pending. DTS is a registered trademark
and the DTS logos, Symbol, DTS-HD and DTS-HD Advanced Digital Out are trademarks of DTS,
Inc. 1996-2008 DTS, Inc. All Rights Reserved.
This product incorporates copyright protection technology that is protected by U.S. patents and
other intellectual property rights. Use of this copyright protection technology must be authorized
by Rovi Corporation, and is intended for home and other limited viewing uses only unless
otherwise authorized by Rovi Corporation. Reverse engineering or disassembly is prohibited.
Manufactured under license from Dolby Laboratories. Dolby and the double-D symbol are
trademarks of Dolby Laboratories.
Page 47
23
Page 48
24
Page 49
25
Page 50
26
Page 51
27
 Loading...