

Page 1
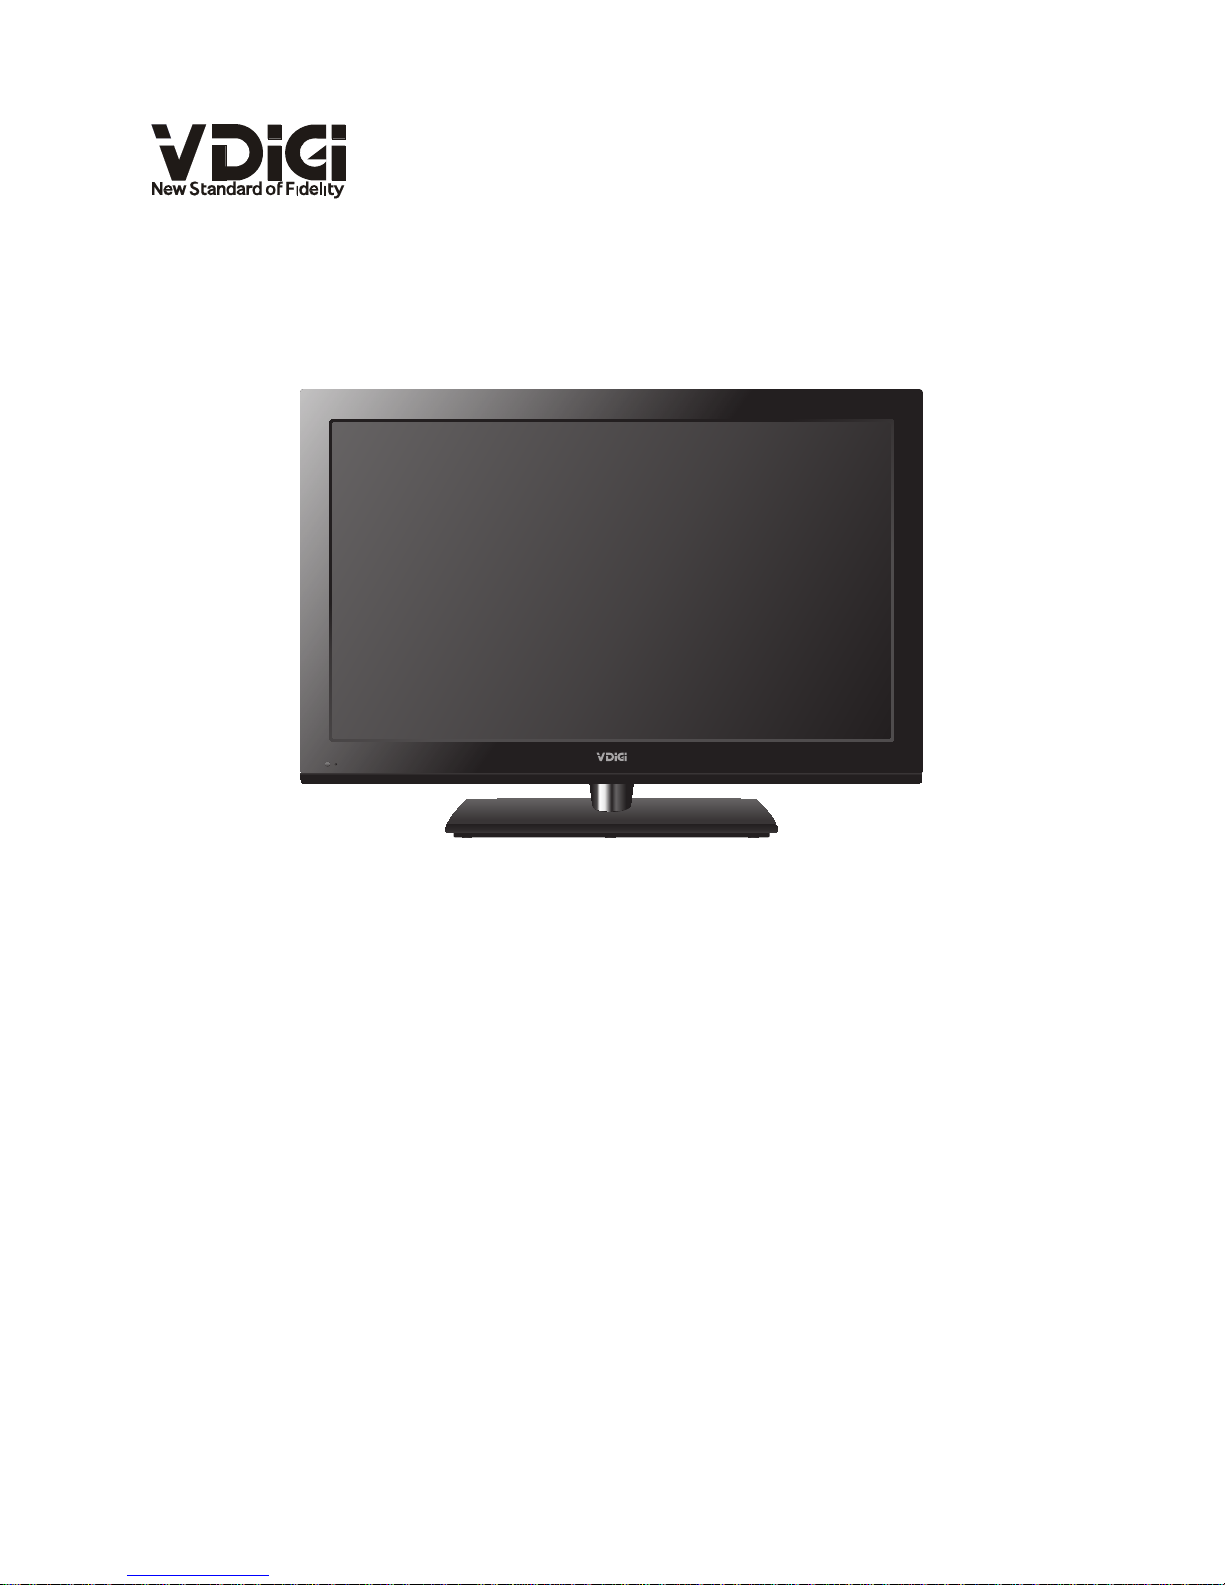
32E200SQB
使用手冊
User Manual
Page 2

目錄
目錄……………………………………………………………………
1
安全資訊………………………………………………………………
2
預先注意事項…………………………………………………………
4
底座安裝 ………………………………………………………………
5
遙控器 …………………………………………………………………
6
面板功能描述…………………………………………………………
7
後置端子及功能描述………………………………………………….
8
基本操作及菜單操作………………………………………………….
9
頻道……………………………………………………………………. .
10
影像……………………………………………………………………..
12
聲音及時間……………………………………………………………..
13
選項……………………………………………………………………..
14
多媒體……………………………………………………………….....
15
圖片……………………………………………………………………..
16
音樂……………………………………………………………………..
17
電影……………………………………………………………………..
18
文本……………………………………………………………………..
19
錄影功能………………………………………………………………..
20
操作電視機前, 請閱讀”安全資訊”,並保留本說明書以便將來參考。
技術規格………………………………………………………………..
22
解決問題……………………………………………………………..…
23
1
Page 3

安全資訊
安裝/設定
為了避免火災,觸電,損壞及受傷等危險, 請遵照下列指示來安裝和使用電視機。
安裝
應將電視機安裝在易於插拔的AC電源插座附近。
將電視機擺放在平穩的水平表面上, 以防止傾倒而造成人員的傷害或者損及電視機。
僅可由合格的維修人員執行掛壁安裝。
為了安全起見, 強烈建議您使用V DIGI壁掛式支架。
搬動
搬動電視機之前, 請斷開所有訊號線的連接。
大尺寸電視機需要二人或二人以上搬動。
用手搬動電視機時, 請勿對液晶面板施加壓力。
抬起或移動電視機時, 請從底部牢牢抓握住。
搬動電視機時, 請勿使其受到搖晃或過度震動。
搬動電視機以進行維修或移動時, 請使用原有的紙箱和包裝材料進行包裝。
通風
切勿遮擋通風孔或將任何物體插入機殼內。
在電視機周圍保留一定通風空間。
為了確保正確通風及防止髒物或灰塵堆積:
請勿將電視機平放, 上面朝下安裝, 向後安裝或側面安裝。
請勿將電視機放置於架子, 地毯, 床或壁櫥中。
請勿用布 (如窗簾) 或物件 (如報紙等) 覆蓋電視機。
2
AC 電源線
為了避免火災,觸電,損壞及受傷等危險,請遵照下列指示來處理AC電源線和插座:
請僅使用V DIGI隨附的AC電源線,不要使用其他品牌的電源線。
將插頭完全插入AC電源插座。
僅可在110-240V AC電源上使用電視機。
連接訊號線時,為了安全起見請務必拔下AC電源線,以免被訊號線絆到腳。
在進行作業或移動電視機之前,請從AC電源插座上斷開AC電源線的連接。
保持AC電源線遠離熱源。
拔下AC電源插頭,定期進行清潔。如果插頭上有積灰並帶有濕氣,則其絕緣品質可能
己經劣化, 並可能會造成火災。
Page 4

註:
請勿在任何其他設備上使用所隨附的AC電源線。
請勿過度擰捏,彎曲或扭轉AC電源線。否則線芯可能會曝露在外或折斷。
請勿改裝AC電源線。
請勿將任何重物放在AC電源線上。
斷開AC電源線連接時, 請勿拉扯AC電源線。
請勿在相同的AC電源插座上連接太多設備。
請勿使用不適當的AC電源插座。
使用限制
請勿在下列地點, 環境或情況條件下安裝 / 使用電視機, 否則電視機可能會發生故障
並造成火災, 觸電, 損壞或受傷等危險。
地點:
室外 (在直射的陽光下), 海邊, 船上或其他船艦上, 車內, 醫療機構中, 不穩定的場
所,靠近水, 雨, 濕氣或煙霧的地方。
環境:
炎熱, 潮濕或太多灰塵的地方: 昆蟲可能進入的地方, 可能受到機械或震動的地方: 靠
近易燃物體(蠟燭等)的地方。不應該讓液體滴濕或噴濕電視, 而且裝滿液體的物體 (例
如花瓶) 不應該擺在電視上。
情況條件:
手濕, 機殼拆除或採用非製造商所建議的配件時切勿使用本電視機。出現雷電時請將電
視機電源線從AC電源插座和天線拔下。
打破電視機螢幕
請勿將任何物品丟向電視機。否則螢幕可能會因為受到撞擊而破裂並造成嚴重傷害。
如果電視機的表層破裂, 在拔下AC電源線以前請勿觸摸它,否則可能導致觸電。
不使用時
如果您不使用電視機數天, 為了環保和安全原因, 應將電視機電源線從AC電源插座上
拔下。
關閉電視機電源時, 電視機並未與AC電源斷開連接, 請將插頭從AC電源插座上拔下完
全斷開電視機的電源連接。
但是,某些電視機可能具有需要將電視機保持在待命模式下才能正常工作的特點。
3
Page 5
對於兒童
請勿讓兒童爬上電視機。
將體積小的配件放在兒童拿不到的地方, 以便不會被兒童誤吞。
如果出現下列問題
如果出現以下任何問題, 請立刻關閉電視機並拔除 AC 電源線。
請咨詢您的經銷商或 V DIGI 服務中心以交由合格的服務人員進行檢查。
當:
AC 電源線損壞。
AC 電源插座不適當。
電視機由於跌落, 敲擊或撞擊而損壞。
任何液體或固體物件通過開口處掉入機殼內。
預先注意事項
觀賞電視
請在適當光線條件下觀賞電視, 因為在光線不足條件下或長時間觀賞電視會損傷您的眼
睛。
使用耳機時, 請調整音量以免音量過高損傷聽力。
螢幕
雖然
LED
螢幕採用最精密技術製造且 99.99%以上的圖元有效, 但還是可能會出現黑點
或 LED 螢幕上可能會經常出現亮點 (紅,藍或綠色) 。這是 LED 螢幕的結構特性, 並不
是故障。
請勿按壓或刮傷前濾光面板或在電視機頂部放置物件。畫面可能會不均, 或者 LED 螢幕
可能會損壞。
如果在寒冷地點使用本電視機, 畫面上可能會出現模糊或變暗。這並不是故障。溫度上
升後這些現象就會消失。
畫面靜止不動將會產生重影。片刻後該現象將消失。
電視機使用過程中, 螢幕和機殼會變熱。這不是故障。
LED 螢幕包含少量液晶。視螢光管類而定, 有時候會含有水銀。 請按照您當地的法規
進行廢棄物處理。
使用和清潔電視機的螢幕表層 /
機殼
清潔前, 務必將電視機的 AC 電源線從 AC 電源插座上斷開連接。
4
Page 6
底座安裝
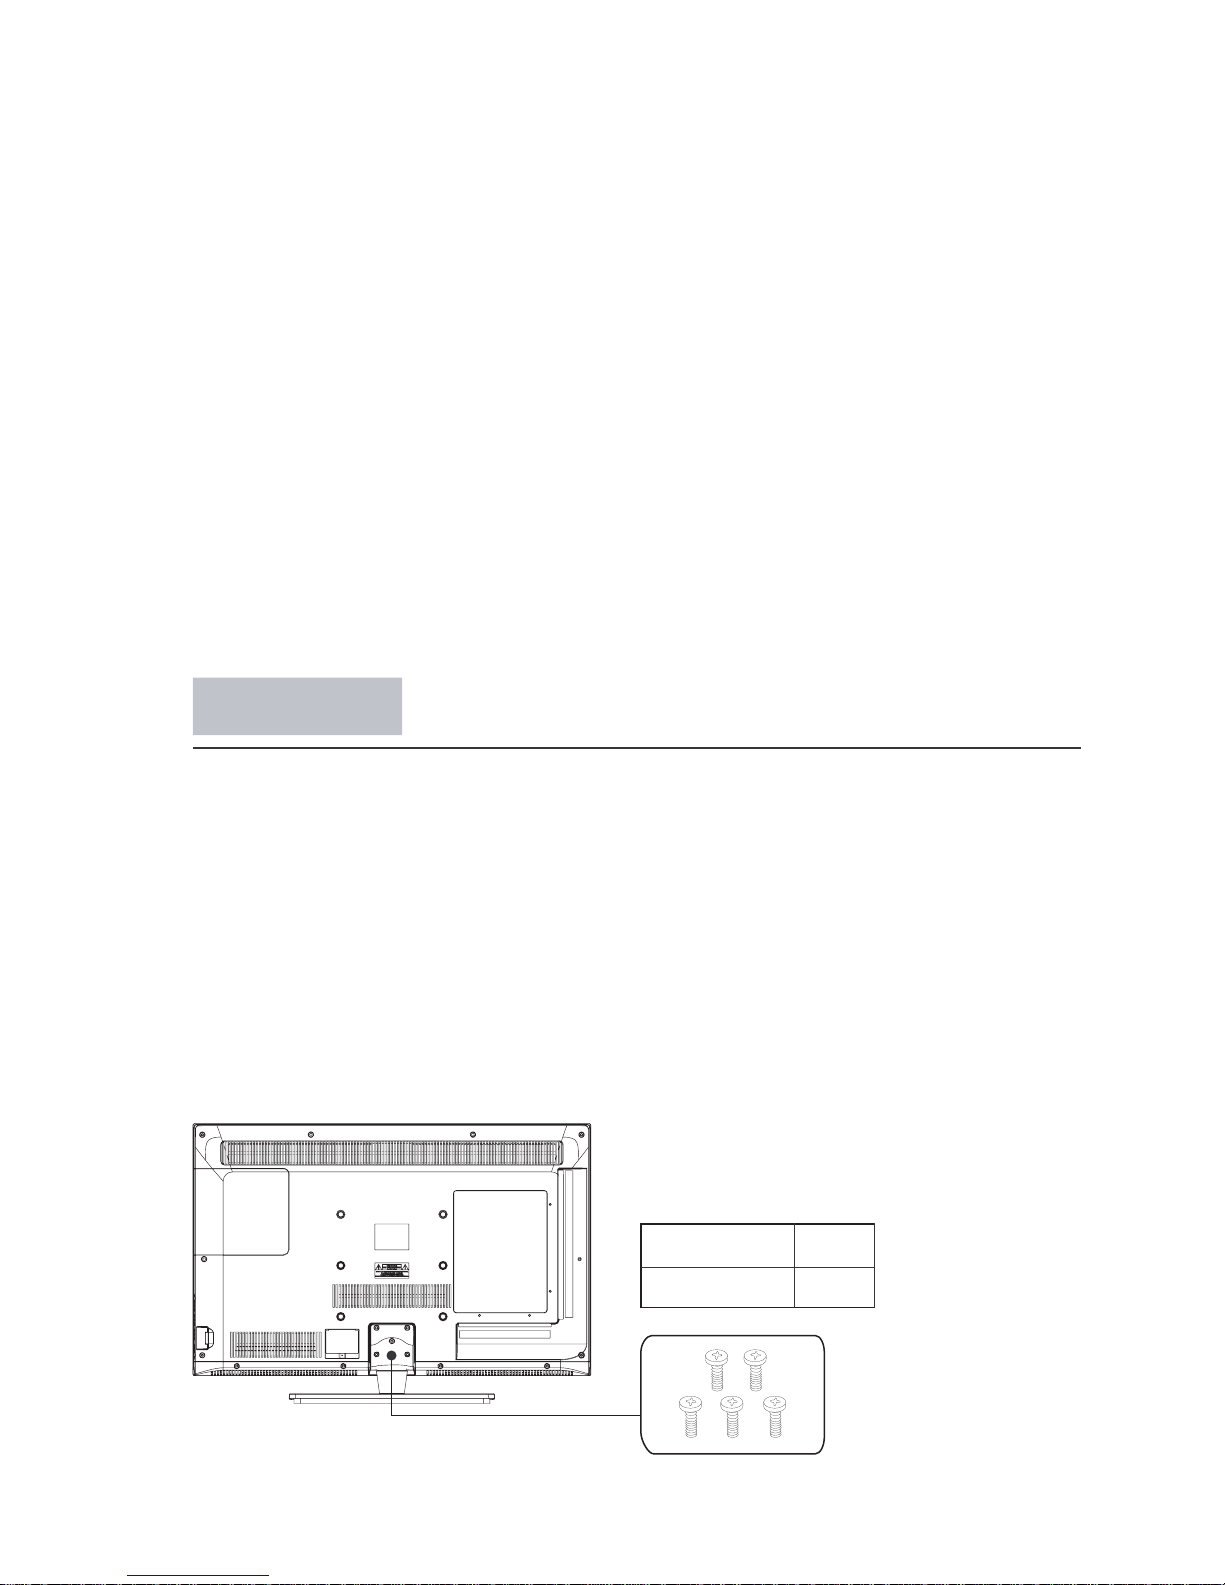
產品為拆底座包裝,底座安裝步驟如下:
步骤1
取一塊護墊或柔軟的桌布放於工作臺上,將電視機屏幕朝下平放於上面。
注:1)避免損壞屏幕,請勿將電視機直接平放於桌面。
2)請將電視機電源線從AC電源插座拔下。
步驟2
將底座放於電視機後殼上。請對齊底座立柱和電視機後殼上的5個螺絲孔。
步驟3
插入產品附隨的5顆底座螺絲並安裝好。
規格 數量
5pcsM4 x 12mm
選購設備
將產生電磁輻射的選購元件或任何其他設備遠離電視機。 否則可能會造成畫面失真或噪
音。
5
若要擦去螢幕表層 / 機殼上的灰塵, 請用軟布輕輕擦拭。 如果灰塵較難除去, 請用稍稍蘸有
稀釋中性清潔溶劑的軟布進行擦拭。
切勿使用任何類型的磨砂墊,鹼性/酸性清潔劑, 擦洗粉或揮發溶劑,如酒精, 汽油, 稀釋劑或殺
蟲劑。 使用上述材料或與橡膠或乙烯材料長時間接觸可能會造成螢幕表層和機殼材料的損
壞。
建議您定期使用真空吸塵清理通風口以確保通風順暢。
當調整電視機的角度時, 請慢慢地調動以防電視機從其桌面型底座移動或滑落。
為了避免物質或螢幕塗層剝離, 請遵照下列預先注意項:
Page 7
18
9
13
14
15
16
17
19
20
21
22
23
24
25
26
27
28
29
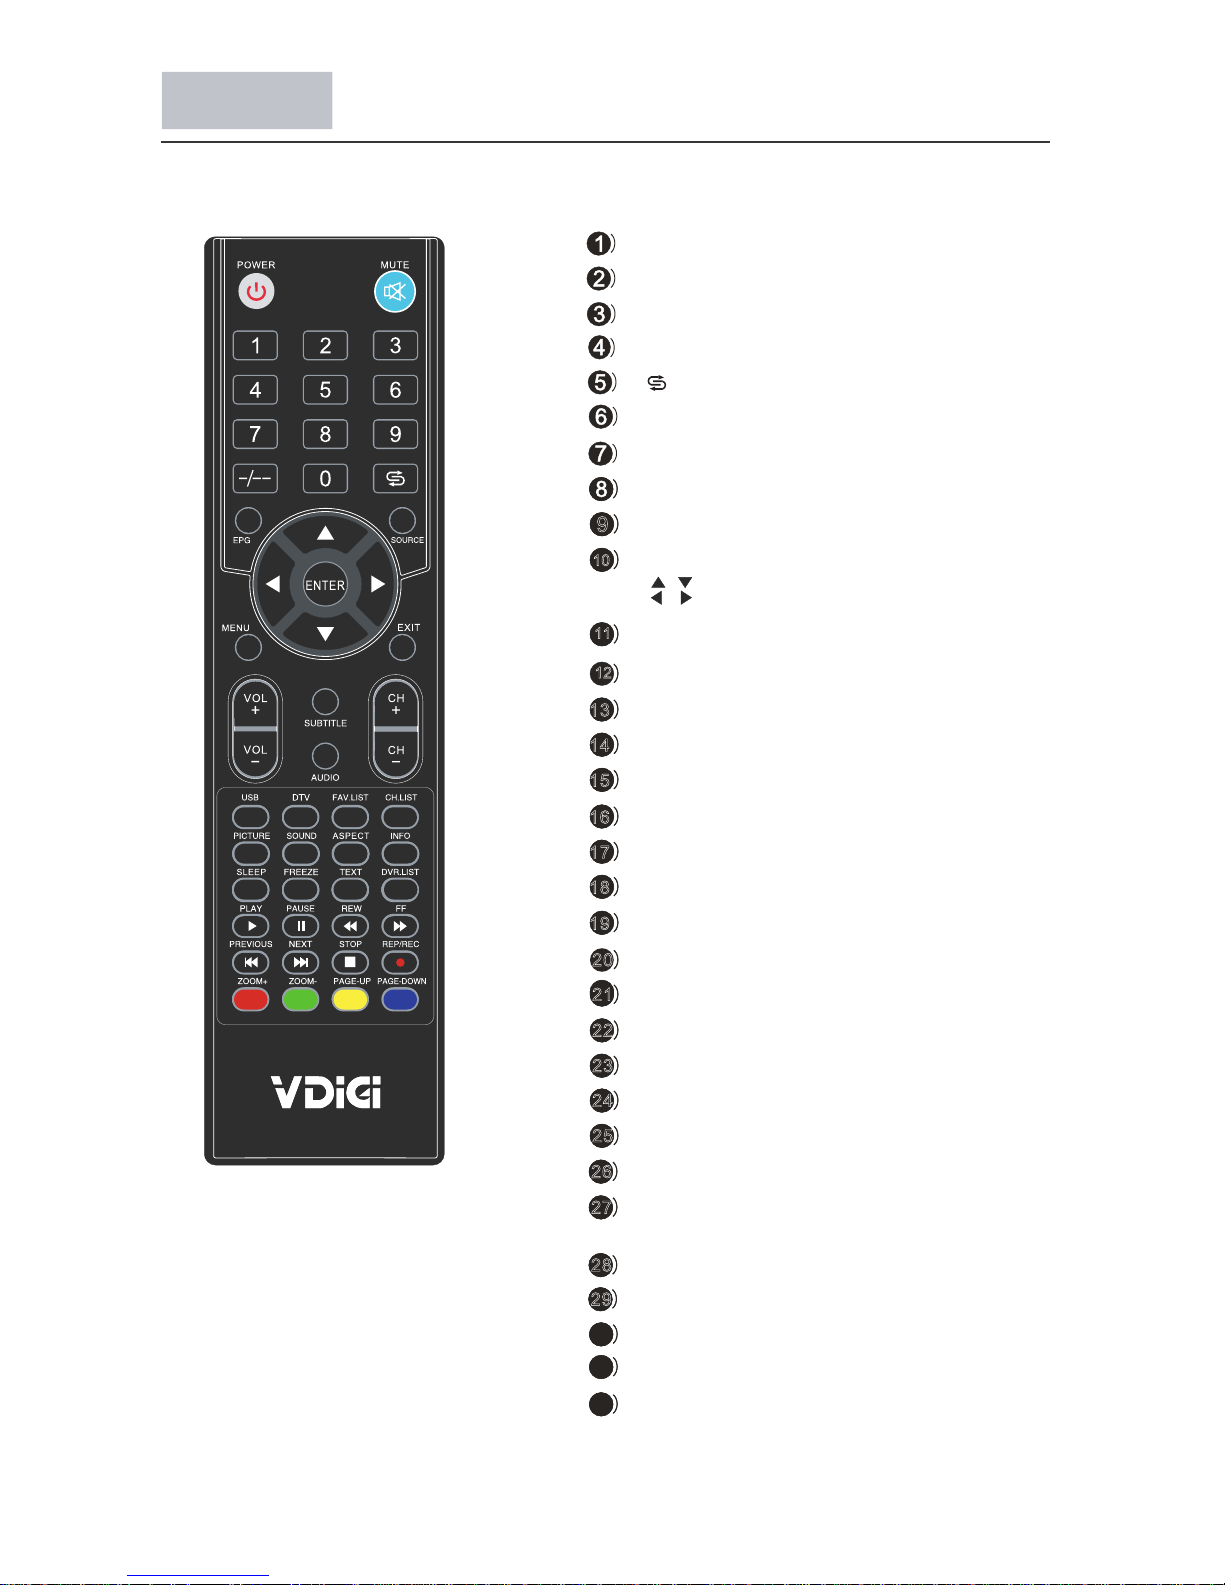
POWER:切換開機和待機狀態
MUTE:關閉或打開聲音
0-9:用於輸入數位切換頻道
-/--:切換多位數頻道輸入
:切換到最近收看的電視頻道
INFO:顯示當前狀態信息
SOURCE:選擇或顯示信號輸入源
MENU:顯示主目錄
EXIT:退出菜單
VOL+/-:調校音量大小
CH+/-:頻道切換
PICTURE:調校影像模式
SOUND:調校聲音模式
CH.LIST:顯示頻道表
ASPECT:切換畫面顯示比例
SLEEP:設置自動關機時間
FREEZE:畫面靜止
FAV.LIST:顯示喜愛頻道表
USB:選擇多媒體信號輸入源
DTV:選擇數碼電視信號輸入源
DVR.LIST:顯示DVR菜單
TEXT:圖文按鍵
SUBTITLE:多語言字幕切換
AUDIO: 麗音選擇
ZOOM+/-:調校屏幕比例(多媒體下使用)
REP/REC: 錄影按鍵
PAGE-UP:翻上一頁
PAGE-DOWN:翻下一頁
彩鍵:具體功能見屏幕提示
PLAY/PAUSE/REW/FF/STOP/PREVIOUS/
NEXT:多媒體功能按鍵
10
11
12
/
/
ENTER:確定鍵
:選擇方向
遙控器
遙控器功能描述:
6
EPG:電子節目指南
30
31
32
Page 8
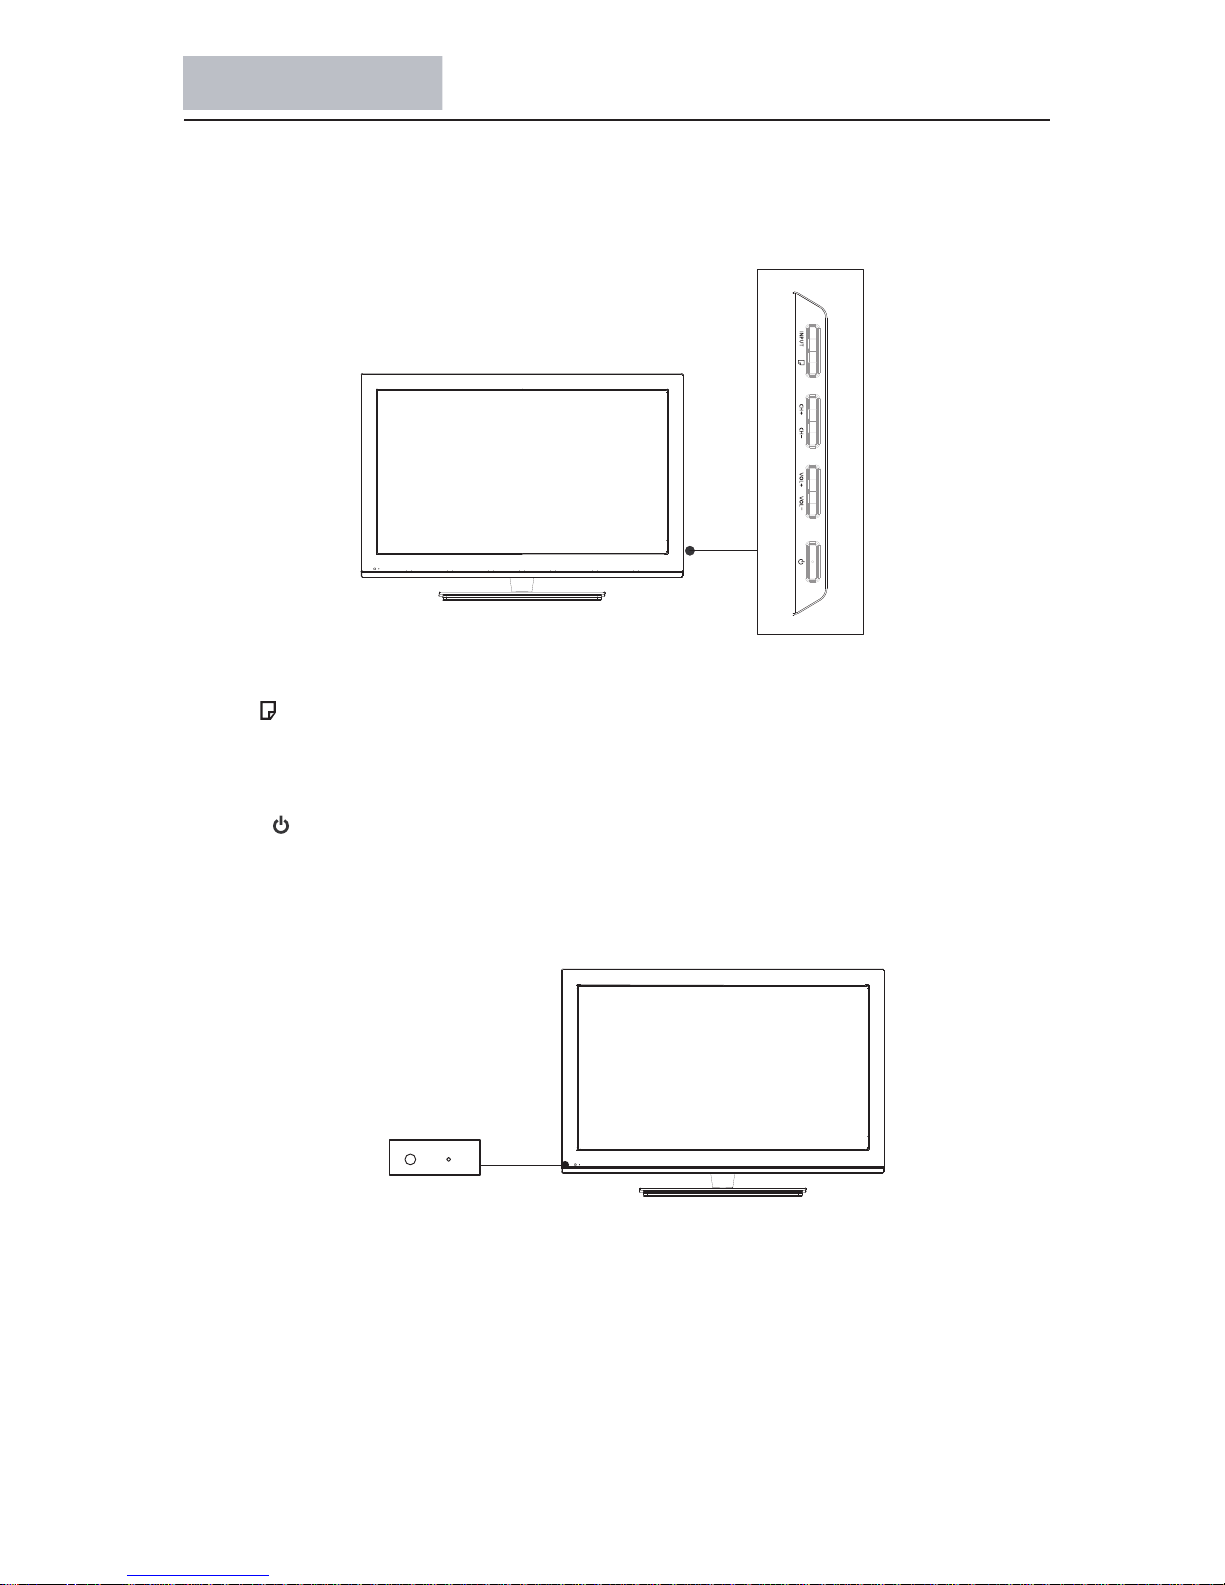
電源指示燈
遙控感應器
按鍵功能描述
圖片僅供參考,請以實物爲準
INPUT: 顯示輸入信源菜單。
VOL + / - : 按此按鍵增加或減小音量。
電源指示燈:電視處於待機模式時亮紅色;電視開啟時點亮藍色。
遙控感應器:接收來自遙控器的紅外線訊號(請不要將任何東西放在感應器上否則感應器可能
會無法正常操作)
CH + / - : 按此按鍵增加或減少頻道號。
POWER ( ): 打開或關閉電視機。
MENU ( ): 按此按鍵顯示主菜單。
面板功能描述
7
Page 9
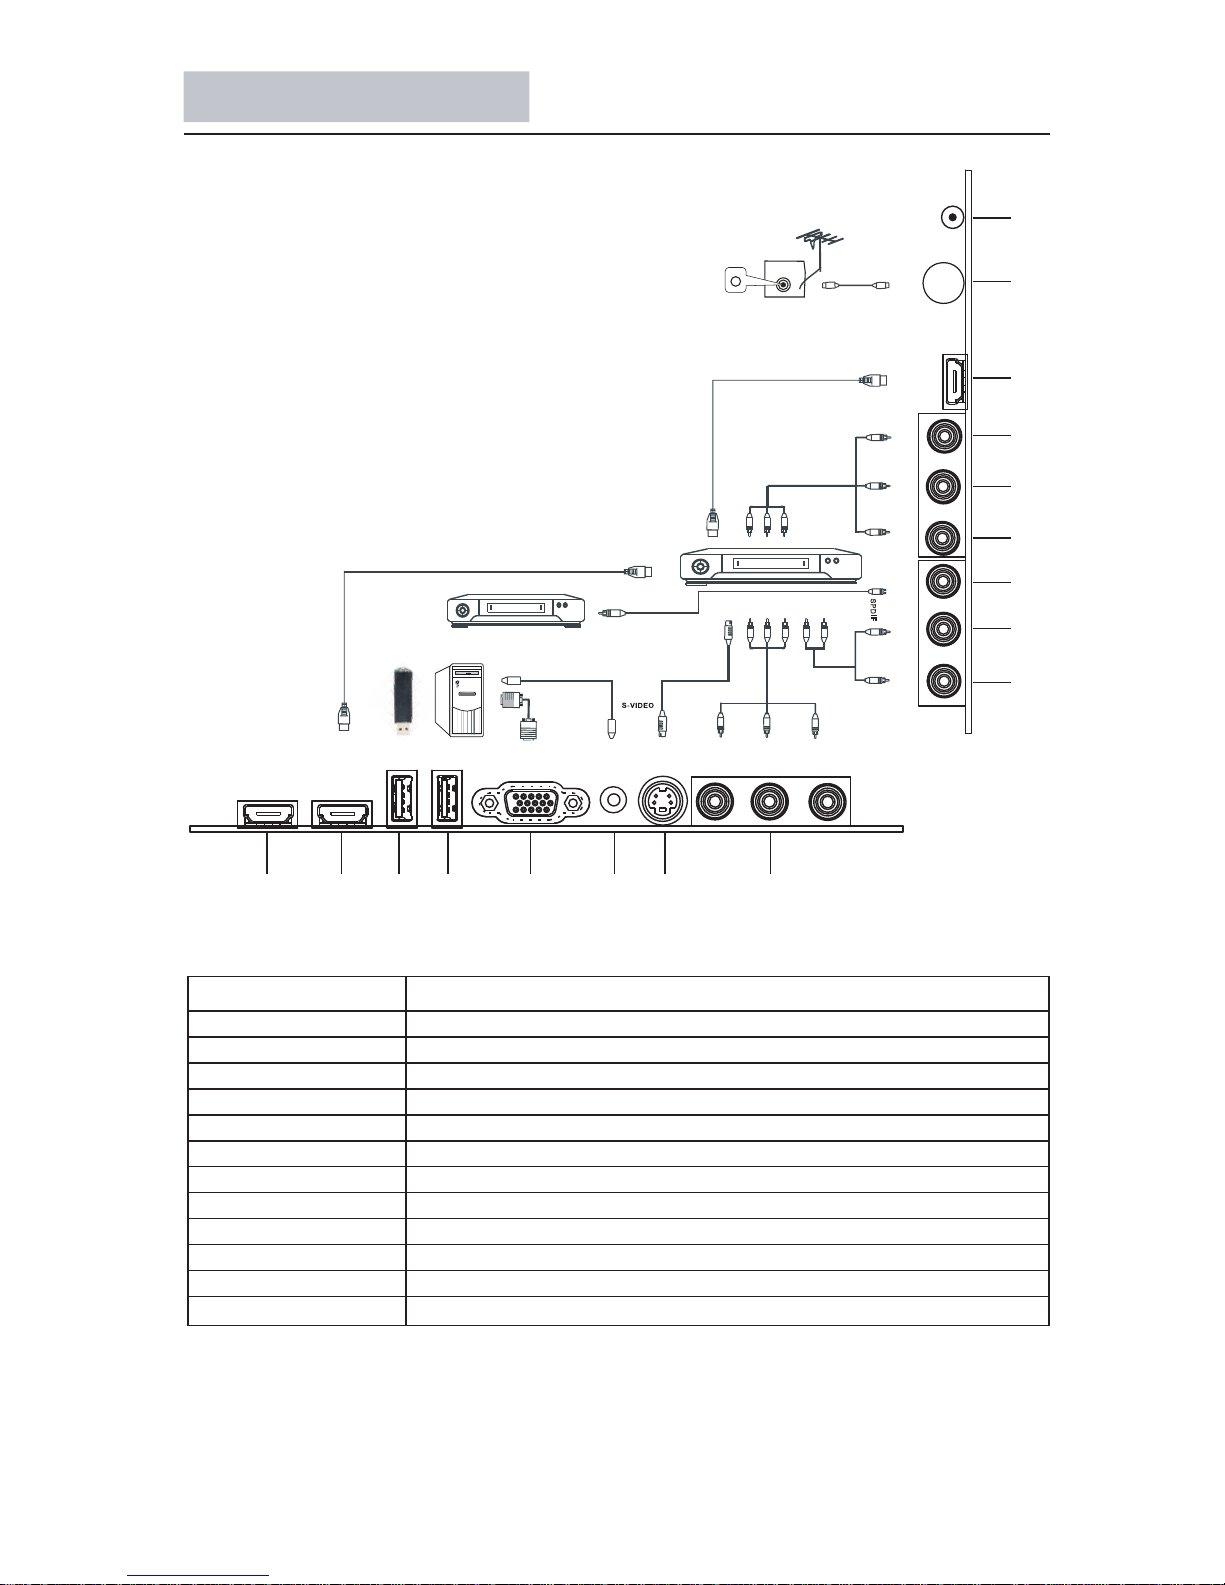
端子名稱 功 能 描 述
YPbPr音频
YPbPr
VGA
RF
保留供外置USB裝置之用
HDMI輸入端子
連接電腦的VGA輸入端子
連接電腦的VGA音頻輸入端子
分量視頻輸入端子
分量音频輸入端子
S-VIDEO視頻輸入端子
同軸音頻輸出
複合視頻輸入
複合視頻音頻輸入
天線輸入端子
Earphone
耳機輸出端子
VGA
音頻
HDMI1, 2, 3
S-VIDEO
SPDIF
AV
AV音頻
USB1,USB2
YPbPr/L YPbPr/R SPDIF AV AV/L AV/R HDMI1 RF
SPDI F
TV
DV D
AM P.
HDMI2 USB2HDMI3 USB1 VGA S-VIDEO YPbPrVGA-AUDIO
Earphone
後置端子及功能描述
8
Page 10
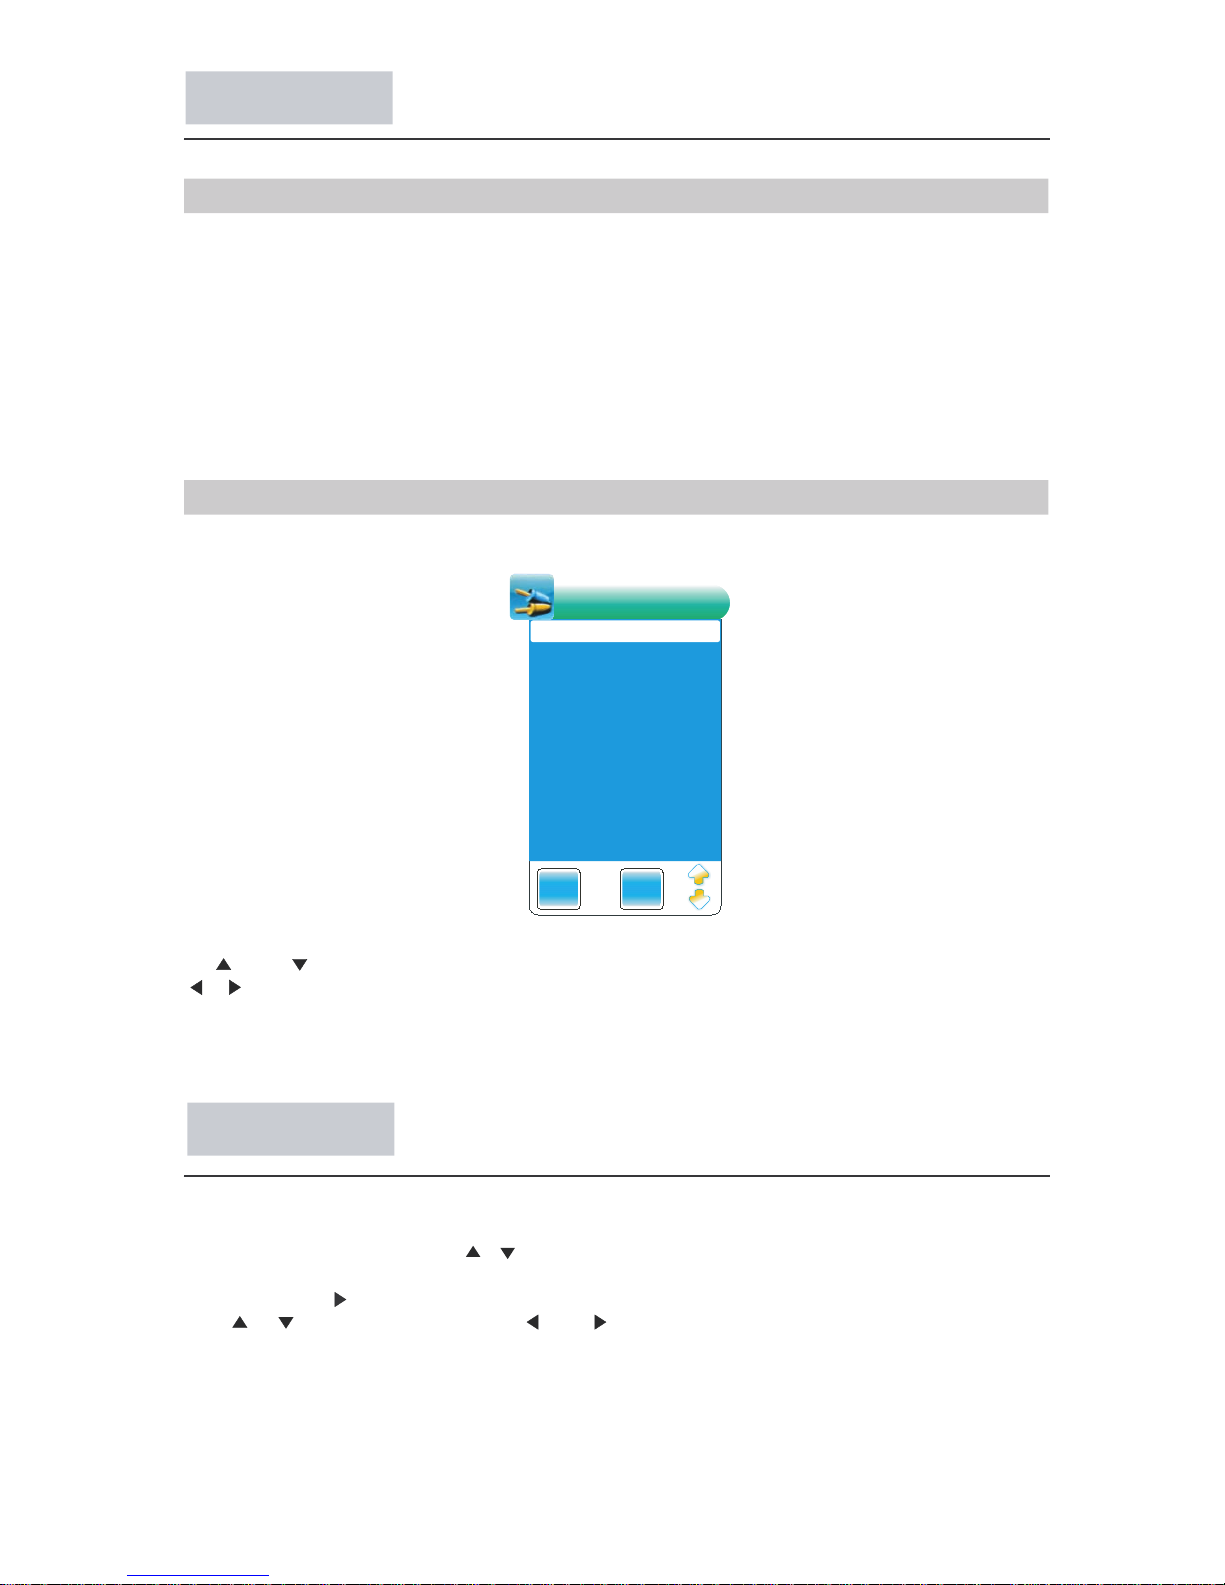
EX IT ENT ER
輸入信 源
數碼電 視
電視
色差
電腦
HDM I1
HDM I2
HDM I3
影音
S-端子
多媒體
電源打開或 關 閉
1.把電源線插到電視機電源插孔上。
2.當電源指示燈顯示紅色時,則電視機處於待機狀態。此時, 你可以通過遙控器上的“POWER”
按鍵或電視機面板“POWER” 鍵來打開電視機。電視機處於正常工作狀態時,電視指示燈顯示為藍色。
3.要把電視機切換到待機狀態,請按遙控器“POWER”鍵或電視機面板“POWER”鍵,此時電源指示
燈顯示為紅色,則表示電視機已處於待機狀態。
4.請不要長時間使用待機,最好拔掉電源線關機。
注意:如果沒有信號輸入時,15分鐘後電視機會自動關機。
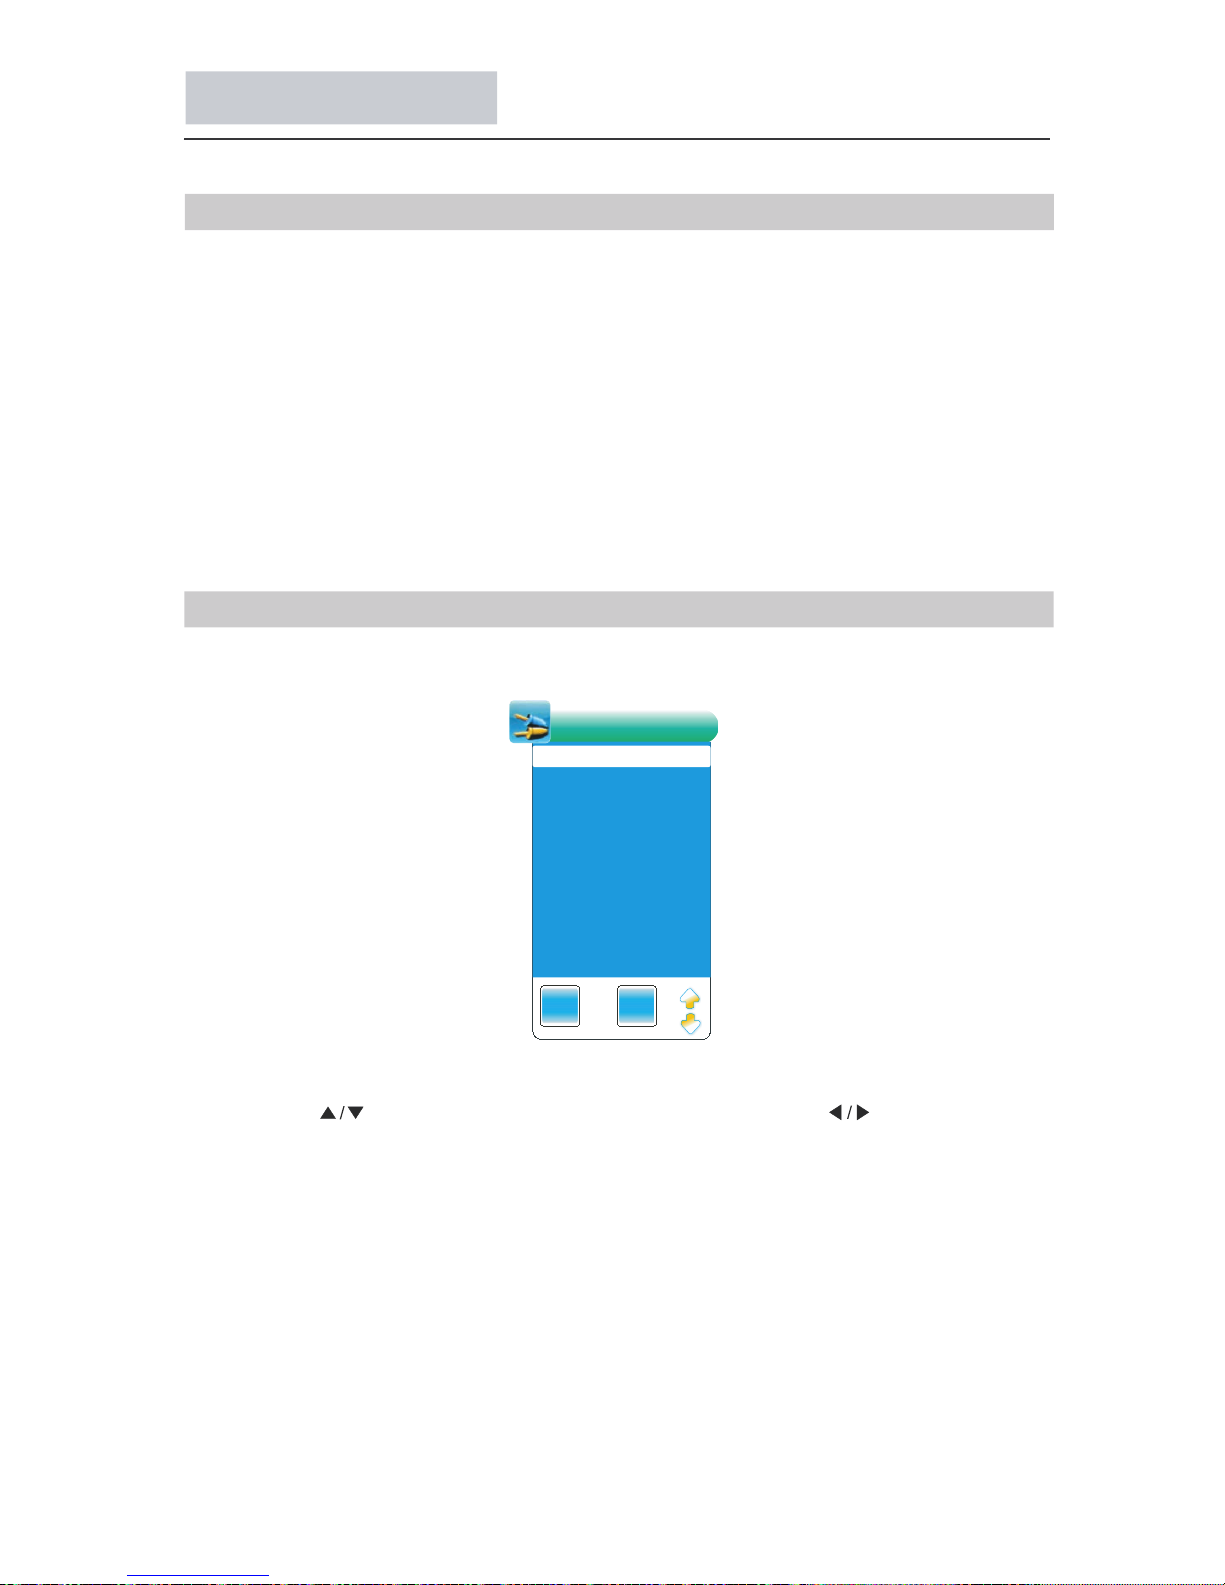
選擇或查看 信 號 源
按“SOURCE”鍵來顯示信號源菜單。
按 鍵或 鍵來選擇所 需 輸 入 信 號 源,然後按“ENTER”鍵或
、 鍵來確定。
注意:請確保 你 所 選 擇 的 連接是可用的。
如果你想調整 顯 示 設 置 , 請按照下面的說明 來 操 作 。
選擇菜單和多媒體菜單。
4.按“
MENU”
鍵可退出或返 回 到 上 一 層 菜單。
5.按“
EXIT”鍵來 退 出 菜 單 狀態。
注意:當菜單 選 項 顯 示 為 灰色時,則表示該 選 項 沒 作 用 或 不能調整。
2.按
ENTER鍵或 鍵來 進 入 子 菜 單 。
1.按“MENU”鍵彈出菜單,再按 或 鍵來選擇頻道菜單、影像菜單、聲音菜單、時間菜單、
3.按 或 鍵選擇菜單 選 項 , 然 後 按 鍵或 鍵進行調整。
基本操作
菜單操作
9
Page 11
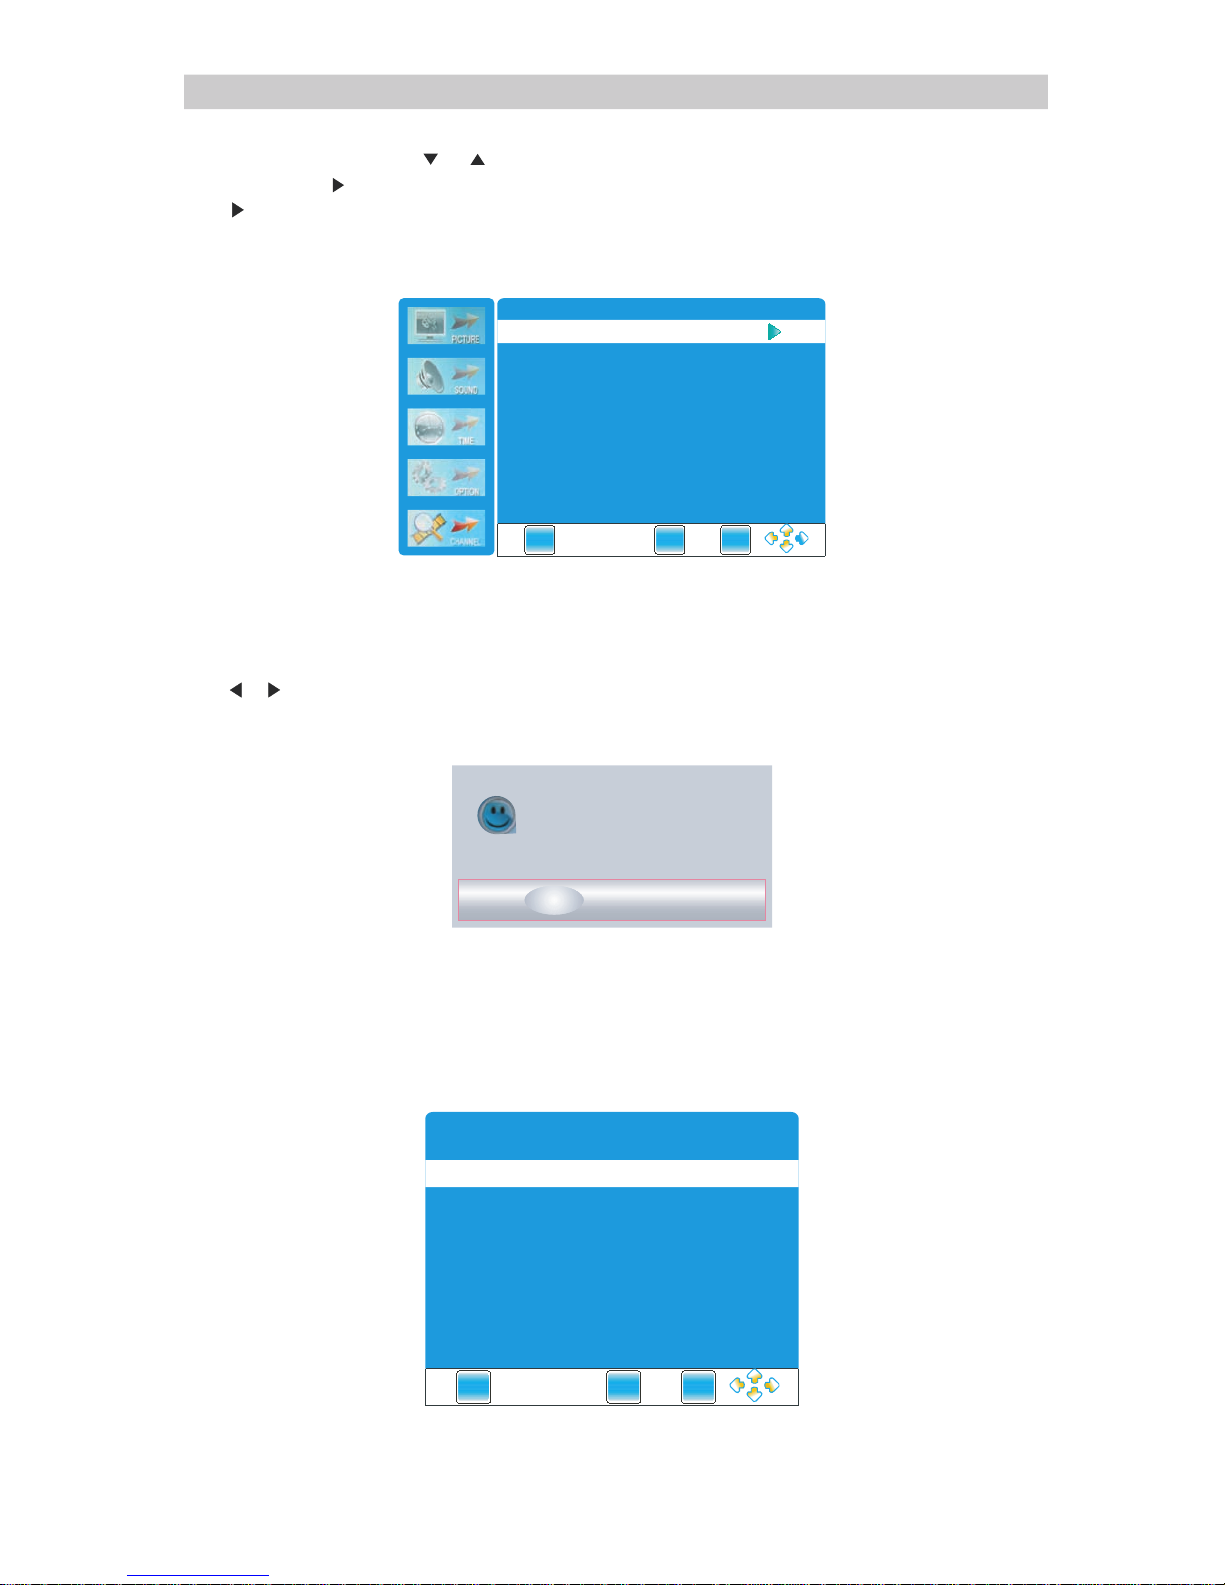
3.按 鍵或ENTER鍵進入子菜單。
自動搜 台
1.按 、 鍵來選擇“ 開 始 ” 或 “ 取消”。
2.按
鍵來確認開始 進 行 自 動 搜 台或取消自動搜台 , 進 行 自 動 搜 台將自動搜索電 視
頻道。
3
.自
動搜台結束後 , 所 有 搜 到 的節目頻道,將會 自 動 保 存 起 來 。
4
.在
自動搜台過程 中 , 你 還 可 以按“EXIT” 鍵 來 選 擇 退出搜台菜單。
2.按
鍵或 鍵選擇“頻 道 ” 菜 單 的 選項。
1.按“MENU” 鍵 後 ,再按 或 鍵選擇“頻道 ” 菜 單 選 項 。
頻 道
注意:如果是 首 次 設 置 時 ,將自動彈出設定 指 導 菜 單 。
10
ENTER
ENTER
自動 搜臺
數碼 電視 手 動搜 臺
電視 手動 微 調
節目 設置
EX IT
MENU
ENTE R
然後選 擇開始 搜索?
開始 取消
EX IT
MENU
ENTE R
設定 向 導
目錄 語 言 繁體 中 文
自動 搜 臺
MENU
EX IT
ENTE R
Page 12
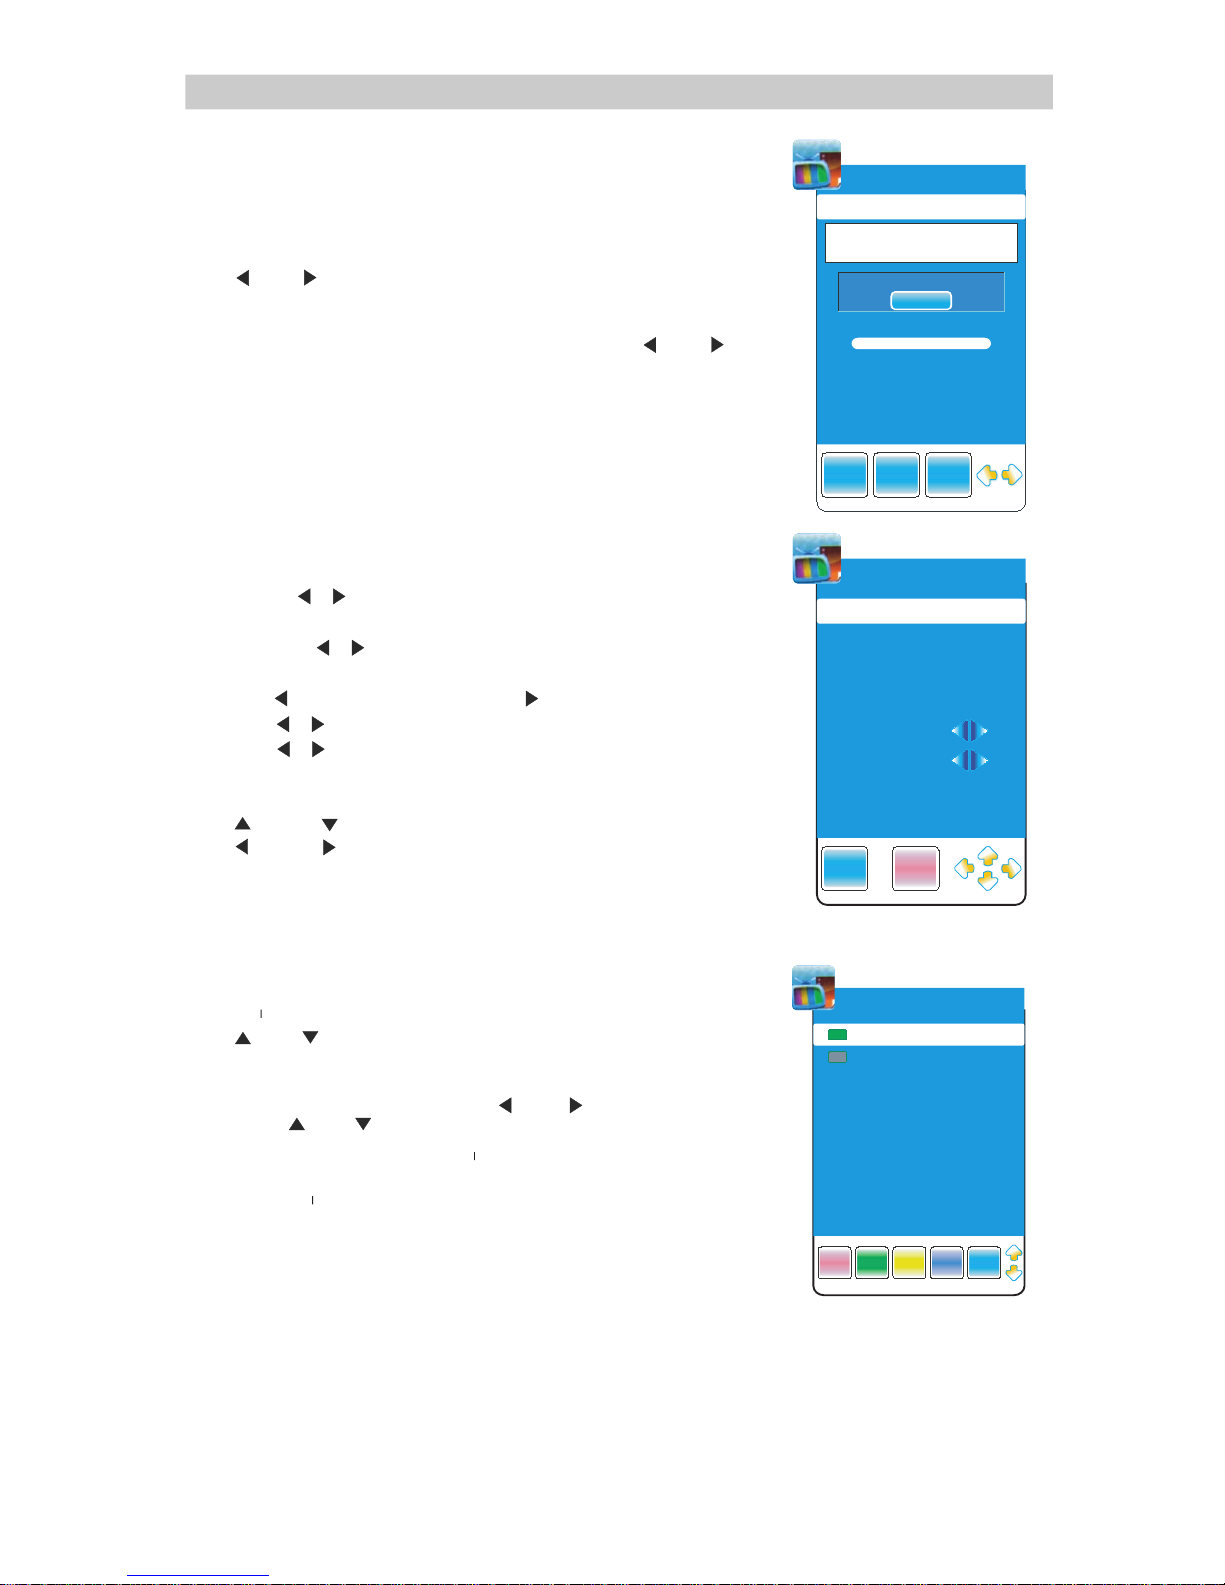
數字電視手 動 搜 台 ( 僅 在 數 碼電視信號源 輸 入 時 才 有 效 )
在手動搜台下 , 可 以 一 個 接 一個地搜索節目頻 道 。
1.按 鍵或 鍵選擇頻 道 。
2.按 ENTER 鍵開始搜台。
3.當搜到一個 頻 道 節 目 , 則 停止搜台,該頻道 將 被 保 存 為 當 前
頻道號,如果 你 不 喜 歡 該 頻 道節目,那麼你可以按 鍵 或 鍵
繼續搜 。台
4.按“EXIT” 鍵 退 出搜台。
電視手動微 調 ( 僅 在 電 視 模 式下有效)
如果發現某頻 道 比 較 差 , 你 可以調整該頻道頻 率 , 可 能 會 改 善
畫面質量和音 質 。
保存到:按 / 鍵選 擇 把 當 前 頻 道 保存在1-100之間 的 頻 道 。
彩色系統:不 能 被 選 擇 。
音頻系統:按 / 鍵 選 擇 伴 音 制 式 :
I→DK→BG
收視頻道:當 前 收 視 頻 道 號 。
搜台:按 鍵從高 頻 到 低 頻 搜 台 ,按 鍵從低頻到高頻 搜 台 。
微調:按 / 鍵進行 頻 率 微 調 。
跳 :按 / 鍵確認或返 回 跳 。台 台功能
頻率:顯示當 前 頻 道 頻 率 。
1.按 鍵或者 鍵選擇 菜 單 選 項 。
2.按 鍵或者 鍵去調 整 該 選 項 中 的 參數。
3.按紅色鍵保 存 該 參 數 。
4.按“EXIT” 鍵 退 出菜單。
1.按 鍵或 鍵選擇該 菜 單 選 項 。
2.按紅色鍵刪 除 頻 道 。
3.按綠色鍵對 頻 道 重 新 命 名 。
注意:只有TV頻 道才能重命名,按 鍵 或 鍵 選 擇 字 符 ,
再按 鍵或 鍵來改變 字 符 。
注意:電視節 目 清 單 裡 的 選 項只能在此清單中 移 動 。
6.按“FAV”鍵 來 設 定 常 看 的 頻道。
頻 道
節目設置
4.按黃色鍵去 移 動 頻 道 選 項 的位置。
5.按藍色鍵設 置 跳 過 頻 道(即 用CH+或CH-選 台 時不會被選中,
只有直接輸入 數 字 才 會 被 選 中)。
11
EXIT E NTER
數碼 電 視手 動 搜臺
UHF CH 2 1 47 4 MHz
請選 擇 頻道 然 後
按<E N TE R >鍵搜 臺
差 標準 好
NO SIGNAL
MENUEXIT E NTE R ME NU
EXITEXIT SAVE
電視手 動 微 調
存儲 到
1
彩色 制 式
PA L
伴音 制 式
I
當前 頻 道
1
搜索
微調
跳臺
頻率
確認
44 . 00
MHz
節目設 置
TV
TV
1 C- 01
2 C- 02
DELE TE
RE NAME
MOVE S KIP FAV
Page 13
→→ →
。
。
。
。
NTSC
→ → →
1→ → →→ → 2
→ → →→
A B
EXI T
MENU
ENTE R
影像 模式
對比 度
亮度
彩色
畫質
色相
標準
50
50
50
50
0
EXI T
MENU
ENTE R
屏幕設置
。
EXIT
EXI T
MENU
ENTE R
50
50
50
自動 調整
垂直 位置
大小
相位
50水平 位置
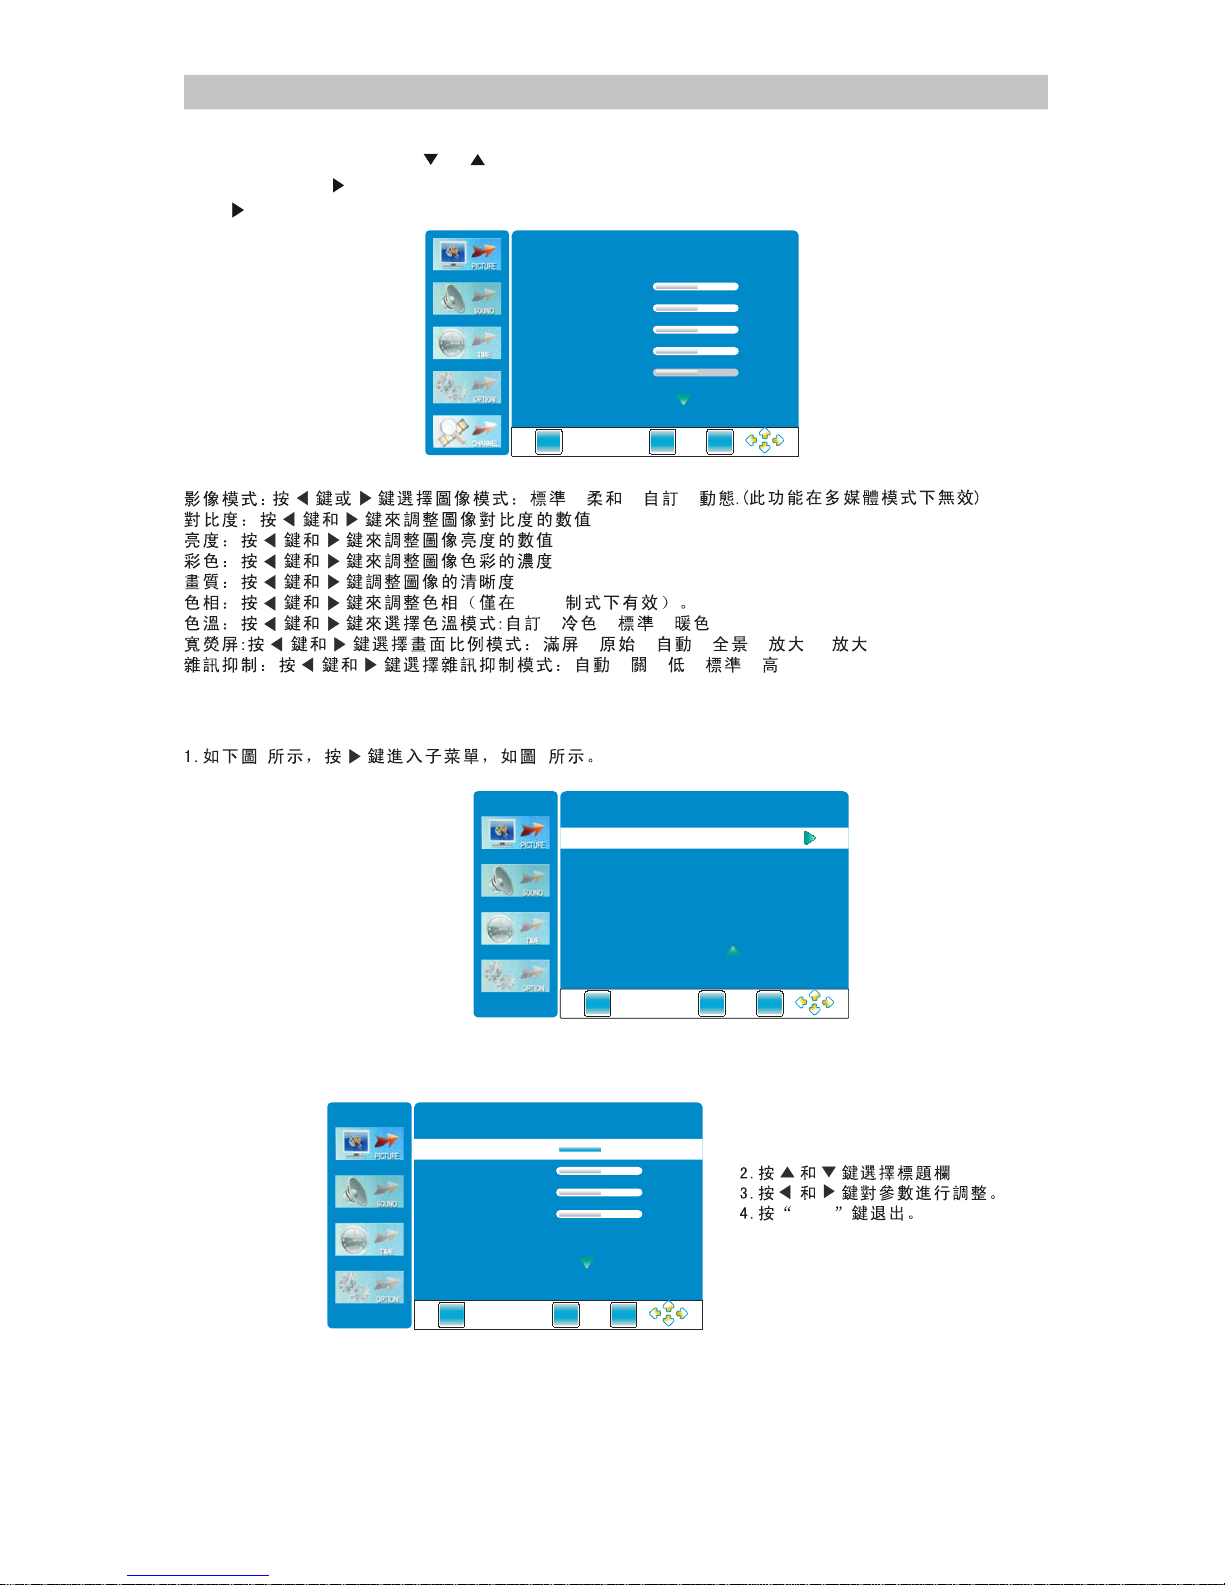
3.按 鍵或ENTER鍵進入子菜單。
2.按
鍵或 鍵選擇“影像 ” 菜 單 的 選 項 。
1.按“MENU” 鍵 後 ,再按 或 鍵選擇“影像 ” 菜 單 選 項 。
影 像
12
ENTER
屏幕設置(只在電腦模式下出現)
Page 14
→ → → →
Q
(EQ
EX IT
MENU
ENTE R
標準
聲音 模式
EQ
平衡
0
自動 音量 調整 關
環繞 聲 關
SPD IF輸出
PC M
EX IT
MENU
ENTE R
EQ 500HZ
EQ 1.2kHZ
EQ 3kHZ
EQ 7.5kHZ
40
40
40
40
EQ 120HZ
40
13
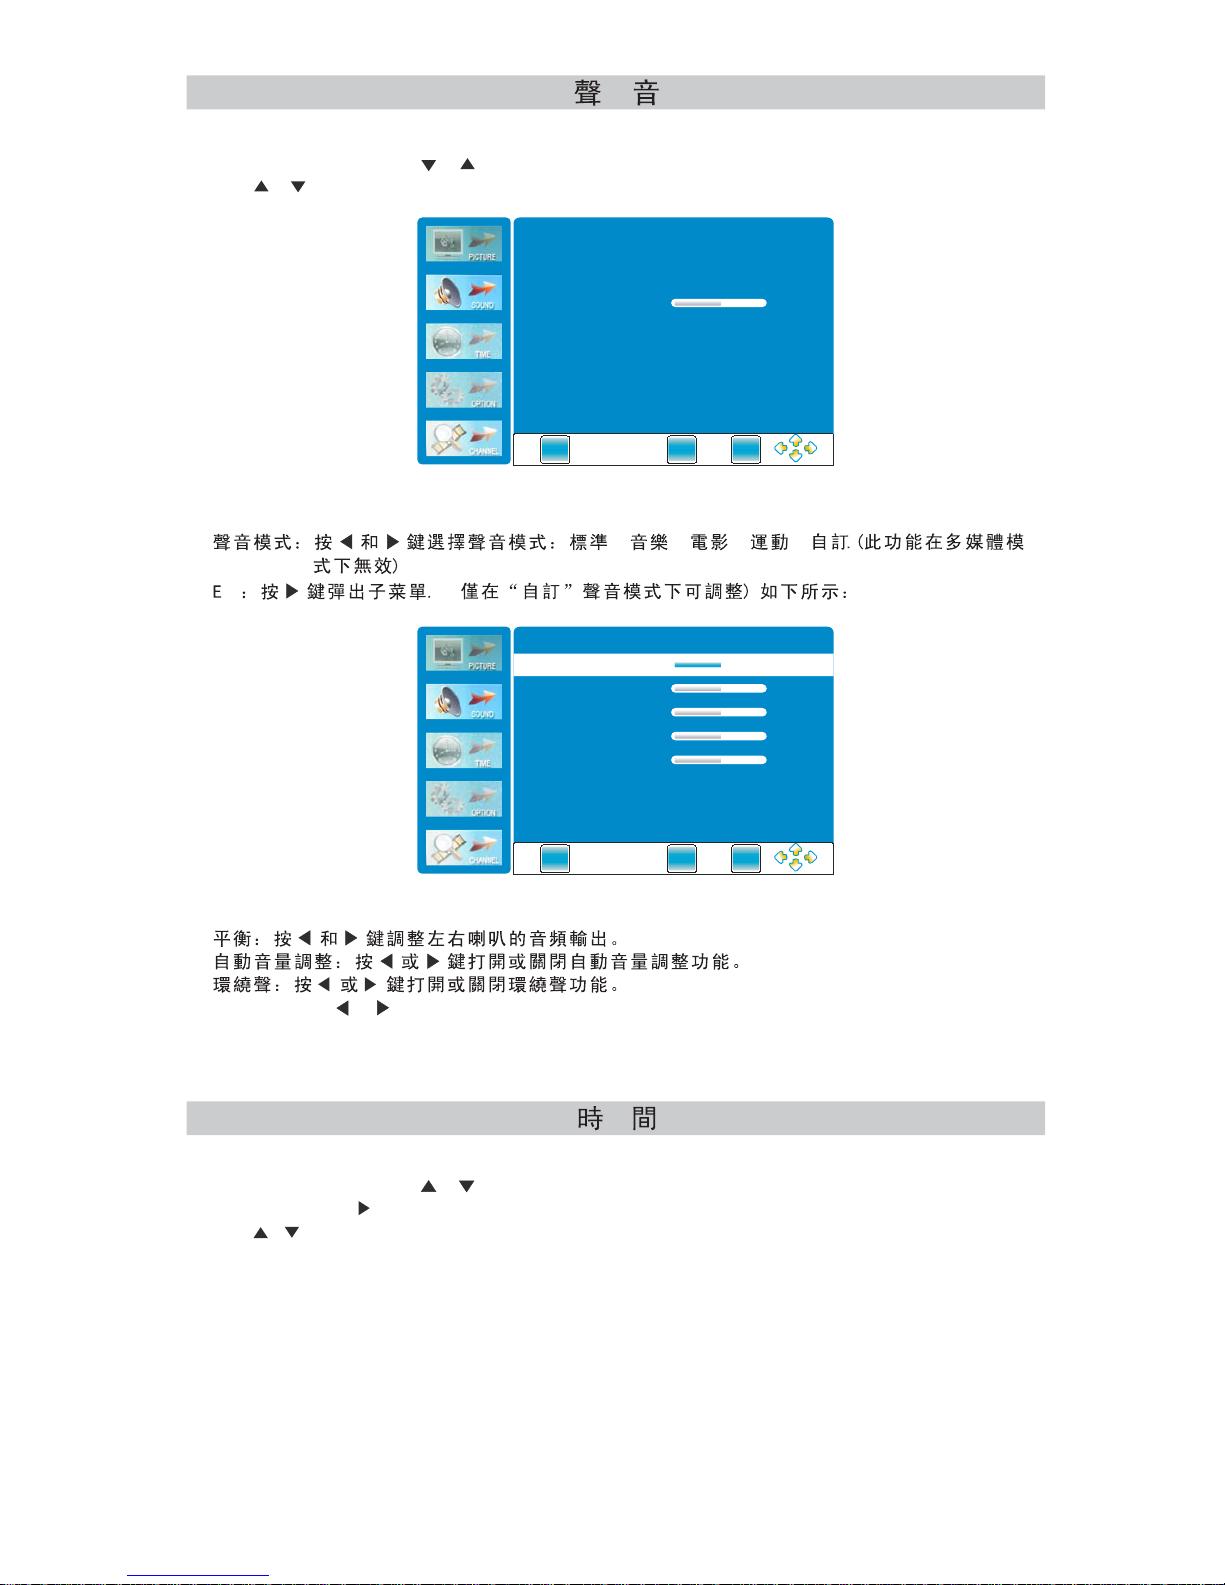
1.按“MENU”鍵後,再按 或 鍵選擇時間菜單。
2.按ENTER鍵或者 鍵進入時間子菜單。
3.按 、 鍵選擇菜單標題欄。
SPDIF輸出:按 或 鍵選擇PCM, 關,AC3。(此功能僅可在數碼電視模式下使用)
1.按“MENU”鍵後,再按 或 鍵選擇時間菜單。
2.按 或 鍵選擇菜單選項。
Page 15
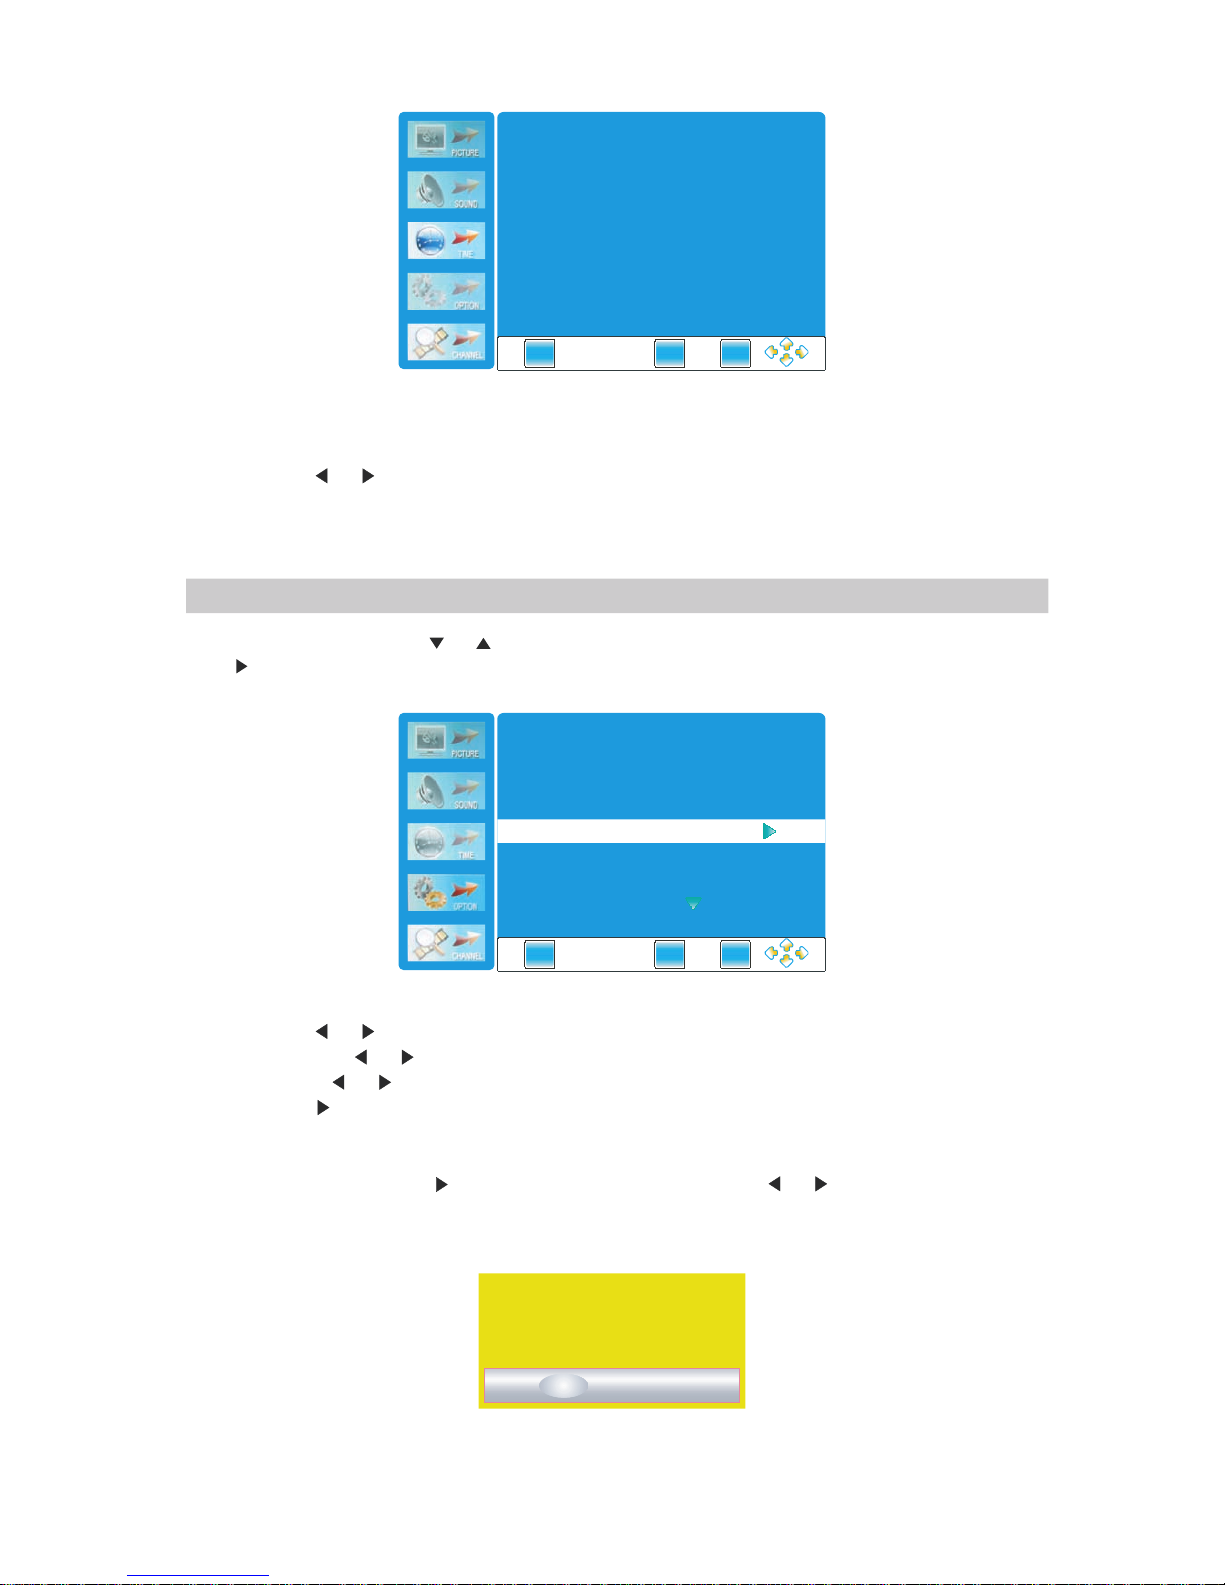
1.按“MENU” 鍵 後 , 再按 或 鍵選擇“選項”菜單。
2.按 鍵或者
ENTER鍵進入“選項”子菜單。
目錄語言:按 或 鍵 選 擇 目 錄 語 言:繁體中文→英 文
目錄消失時間 : 按 或 鍵 選 擇 目 錄停留時間:關
→5 秒→10秒→15秒→20秒→30秒→45秒→60秒
目錄透明度: 按 或 鍵 调 整 目 錄 透明度:關→25
%→50%→75%→10 0 %
軟體升級:按 鍵 或 者 ENTER 鍵 彈 出 確 認 軟件升級的對話框 , 選 擇 確 認 圖 標,並單擊ENTER
進 行 軟件升級,但能升 級 的 前 提 條 件是必須要有生產 廠 家 給 相 同 格式相同命名的軟鍵
(注意: 不 推 薦 使 用 本功能,如需使用 , 請 聯 繫 銷 售商或廠家。)件。
工廠設定:按 ENTER 鍵或者 鍵彈出確 認 工 廠 復 位 的對話框,按 和 鍵進行 選 擇 確 認 圖 標,
單擊ENTER 鍵確 認 進 行 工 廠 復 位。工廠復位成 功 後 , 必 須 重 新搜台。按 ME NU然後
按 EXIT 鍵退出。鍵返回,
選 項
時鐘:
睡眠關機:按 或 鍵 設 定 睡 眠 關 機時間:
關→10分鐘→20分 鐘 →3 0分 鐘 →6 0分鐘→90分鐘→120分 鐘 →1 8 0分 鐘 →240分鐘
14
EX IT
MENU
ENTE R
時鐘
睡眠 時間 關
__ _ _ __ __
EX IT
MENU
ENTE R
目錄 語言
繁體 中文
目錄 消失 時 間 10秒
目錄 透明 度
25 %
工廠 設定
軟體 升級
確認 ?
確認 返回
自動讀取數碼電視時鐘顯示
Page 16
主要 按鍵
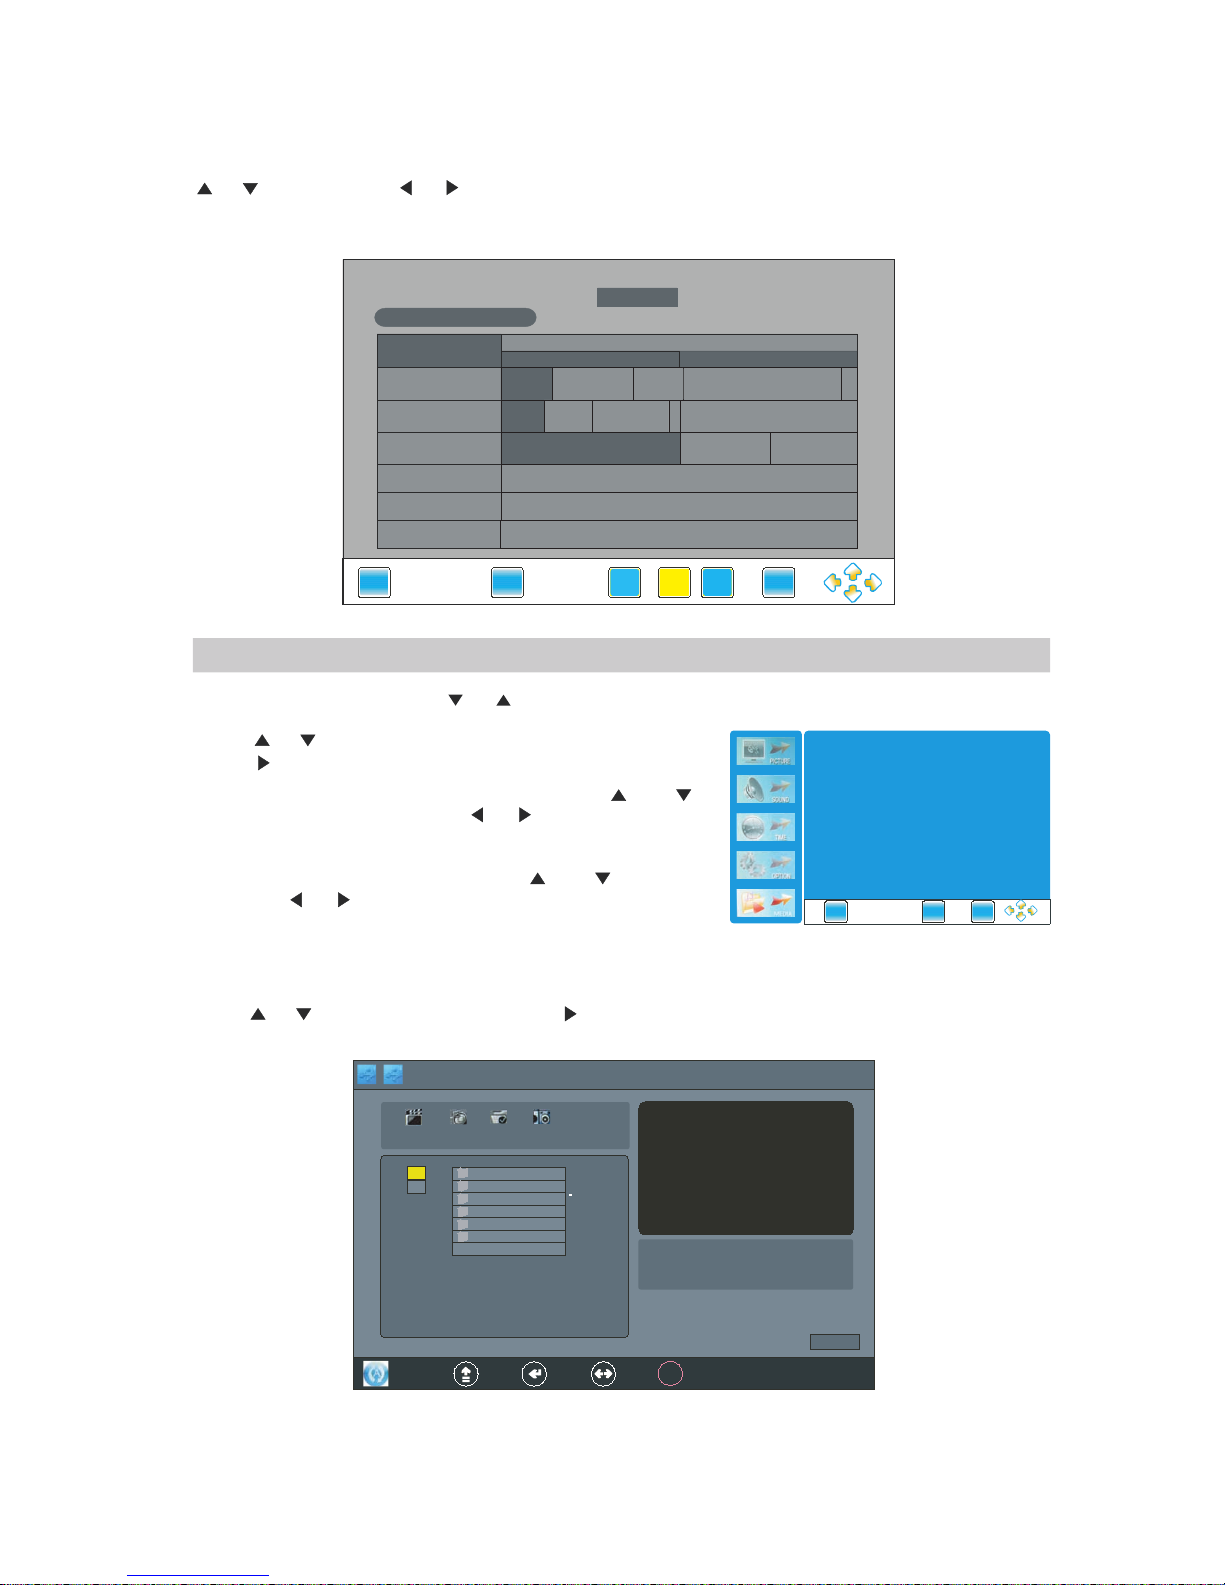
電子節目指 南(僅 在 數 碼 電 視模式下有效)
按“EPG”鍵顯示電 子 節 目 指 南。
你可以查到 後7天 內 的 節 目 信息。
(相關信息來 源 於 廣 播)
按 或 鍵選擇頻道 。
按 和 鍵或黃色鍵選 擇 時 間 。
按“INFO” 鍵 查 看 節目情況。
按 或 鍵選擇重複 模 式 : 全 部 →選擇→ 無
重複:按“M ENU” 鍵彈出菜單,按 鍵 或 鍵 選 擇 選 項 。
慢→中 → 快速度:
圖片播放速 度 : 按 “MENU”鍵彈出 菜 單 , 按 鍵 或 鍵
選擇選項。按 或 鍵 選 擇 圖 片 播放
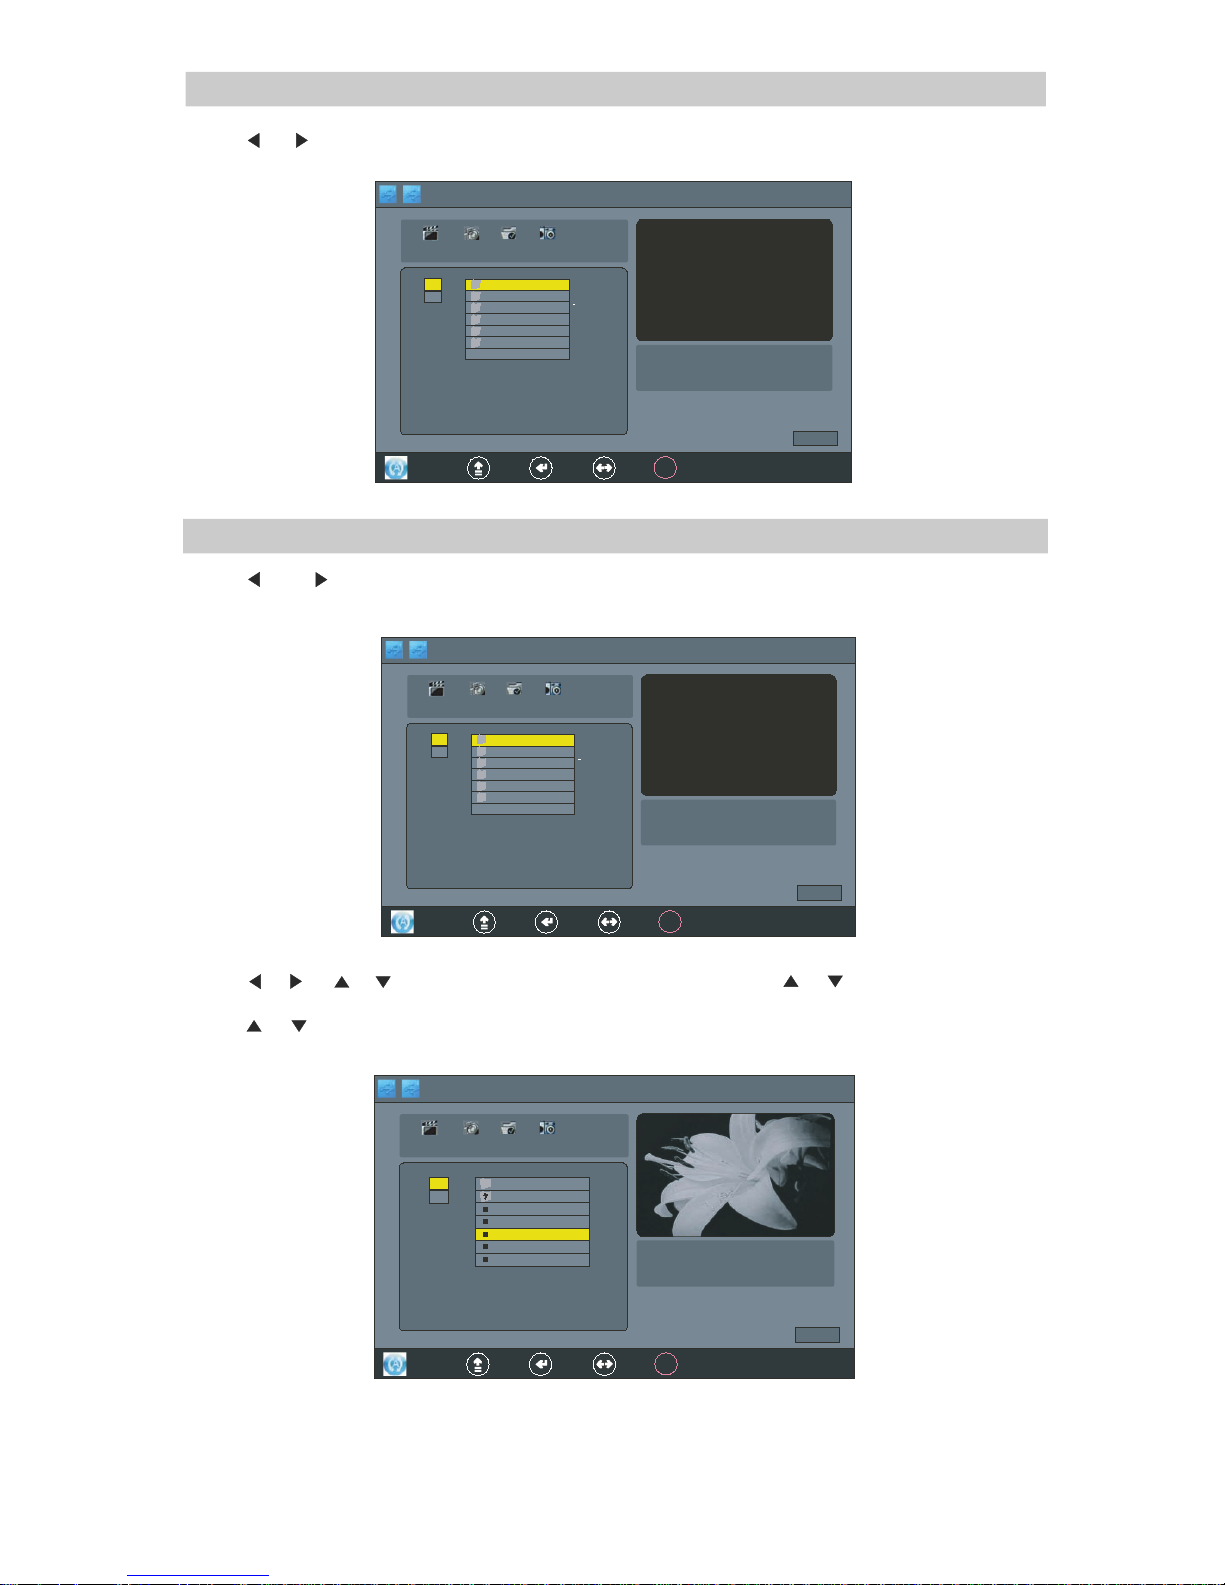
3.按 或ENTER鍵確認或進入 子 菜 單 。
2.按 或 鍵選擇菜 單 各 選 項 。
標)。
1.按“MENU” 鍵 後 ,再按 或 鍵選擇“多 媒 體 ” ( 僅 在多媒體信號源 下 才 能 選 擇 到多媒體圖
多 媒 體
2.按 或 鍵選擇“ 多 媒 體 ” , 然後按 鍵或者ENTER 鍵進入 多 媒 體 界 面 。
1.按 SOURCE 鍵 彈 出 信 號 源 輸入選擇菜單。“ ”
多媒體 界 面操作 :
11 十一月 2008 01 07
:
DTV 85
高清翡翠台
18:00-19:00 高清劇場:茶煲阿四
數數碼碼電電視視
8822 JJ22臺臺
8833 互互動動新新聞聞臺臺
8855 高高清清翡翡翠翠臺臺
1111 十十一一月月
18 00
:
19 00
:
無無資資訊訊
衝衝鋒鋒2211
搞搞邊邊科科??
寵寵物物大大本本營營
新新聞聞報報道道
新新聞聞報報道道
....
六六點點半半新新聞聞報報道道
高高清清劇劇場場::茶茶煲煲阿阿四四
流流行行速速聽聽 東東張張西西望望
:
15
EXI T
MENU
ENTER
EX IT
INFO
ENTER
DATE ReminderRecord
圖片 播放速 度 中
重複
全部
Mar
2008 01 08
.
:
21 A BC1 Once
USB 2.0
圖片
音樂 電影
C:
\
PVR
MUSIC
PHOTOS2
PHOTOS1
新建文件 夹
D:
文本
OOKK
離開 進入 移動
Path
寬×高:
大小:
1/1
play
全屏播放
Page 17
多 媒 體
3.按 或 鍵選擇圖片 、 音 樂 、 電 影和文本文件的 圖 標 , 然 後 按ENTER鍵進入。
1.按 或者 鍵選擇“ 圖 片 ” 圖 標 。
2.按ENTER 鍵進入子 菜 單 。
3.按 、 、 、 鍵選擇圖片 文 件 , 按ENTER 鍵 打 開 文件;按 和 鍵選擇圖片,按 ENTER 鍵
選擇,再 按 一 次ENTER 鍵 取 消 選 擇。確認
4.按 或 鍵瀏覽圖片 , 入 下 圖 所 示:
圖 片
16
Mar
2008 01 08
.
:
21
ABC
1
Once
USB 2.0
圖片
音樂 電影
C:
\
PVR
MUSIC
PHOTOS2
PHOTOS1
新建文件夹
D:
文本
OOKK
離開 進入 移動
Path
寬×高:
大小:
1/1
play
全屏播放
Mar
2008 01 08
.
:
21
ABC
1
Once
USB 2.0
圖片
音樂 電影
C:
\
PVR
MUSIC
PHOTOS2
PHOTOS1
新建文件夹
D:
文本
OOKK
離開 進入 移 動
Path
寬×高:
大小:
1/1
play
全屏播放
.
21 ABC1 Once
C: \PHOTOS 2\
上級
0002. jpg
0006.jp g
001.jp g
009.jpg
003.jp g
D:
v
v
v
Path
USB 2.0
圖片
音樂 電影 文本
OOKK
離開 進入 移動
高寬比: 1024×768
大小: 5966 2 Byt es
:
1/1
play
全屏播放
Page 18
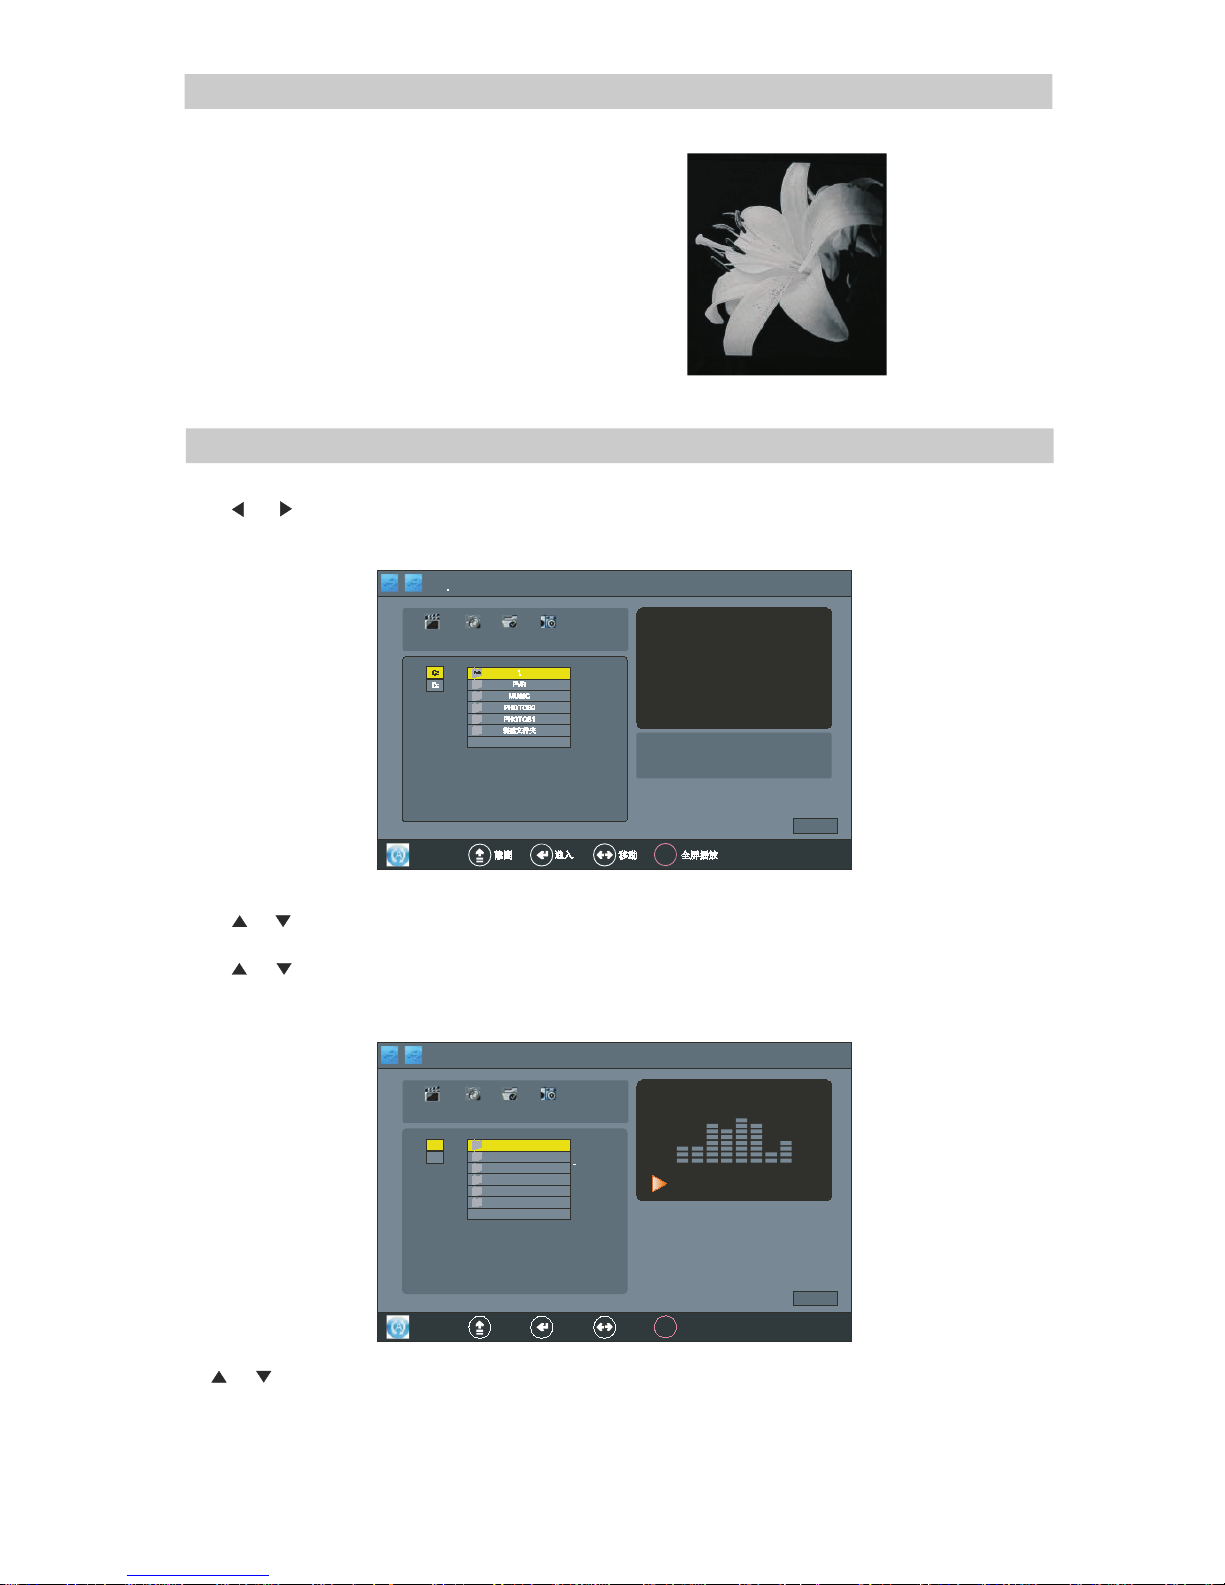
圖 片
5.按ENTER 鍵 選定好要播放的圖 片 , 再 按ENTER
鍵一次取消選 擇 。
6.按“PLAY”鍵 播 放 圖 片,如 右 下 圖所示:
“PAUSE” 鍵 : 按“PAUSE” 鍵 暫 停 播放圖片。
“STOP”鍵:按“STOP”鍵停止播放。
“NEXT” 、 “PREV”:按“PREV” 鍵 或 者 “N-
EXT”鍵播放上一張 或 下 一 張 圖 片。
“EXIT”鍵:按“EXIT” 鍵 退 出。
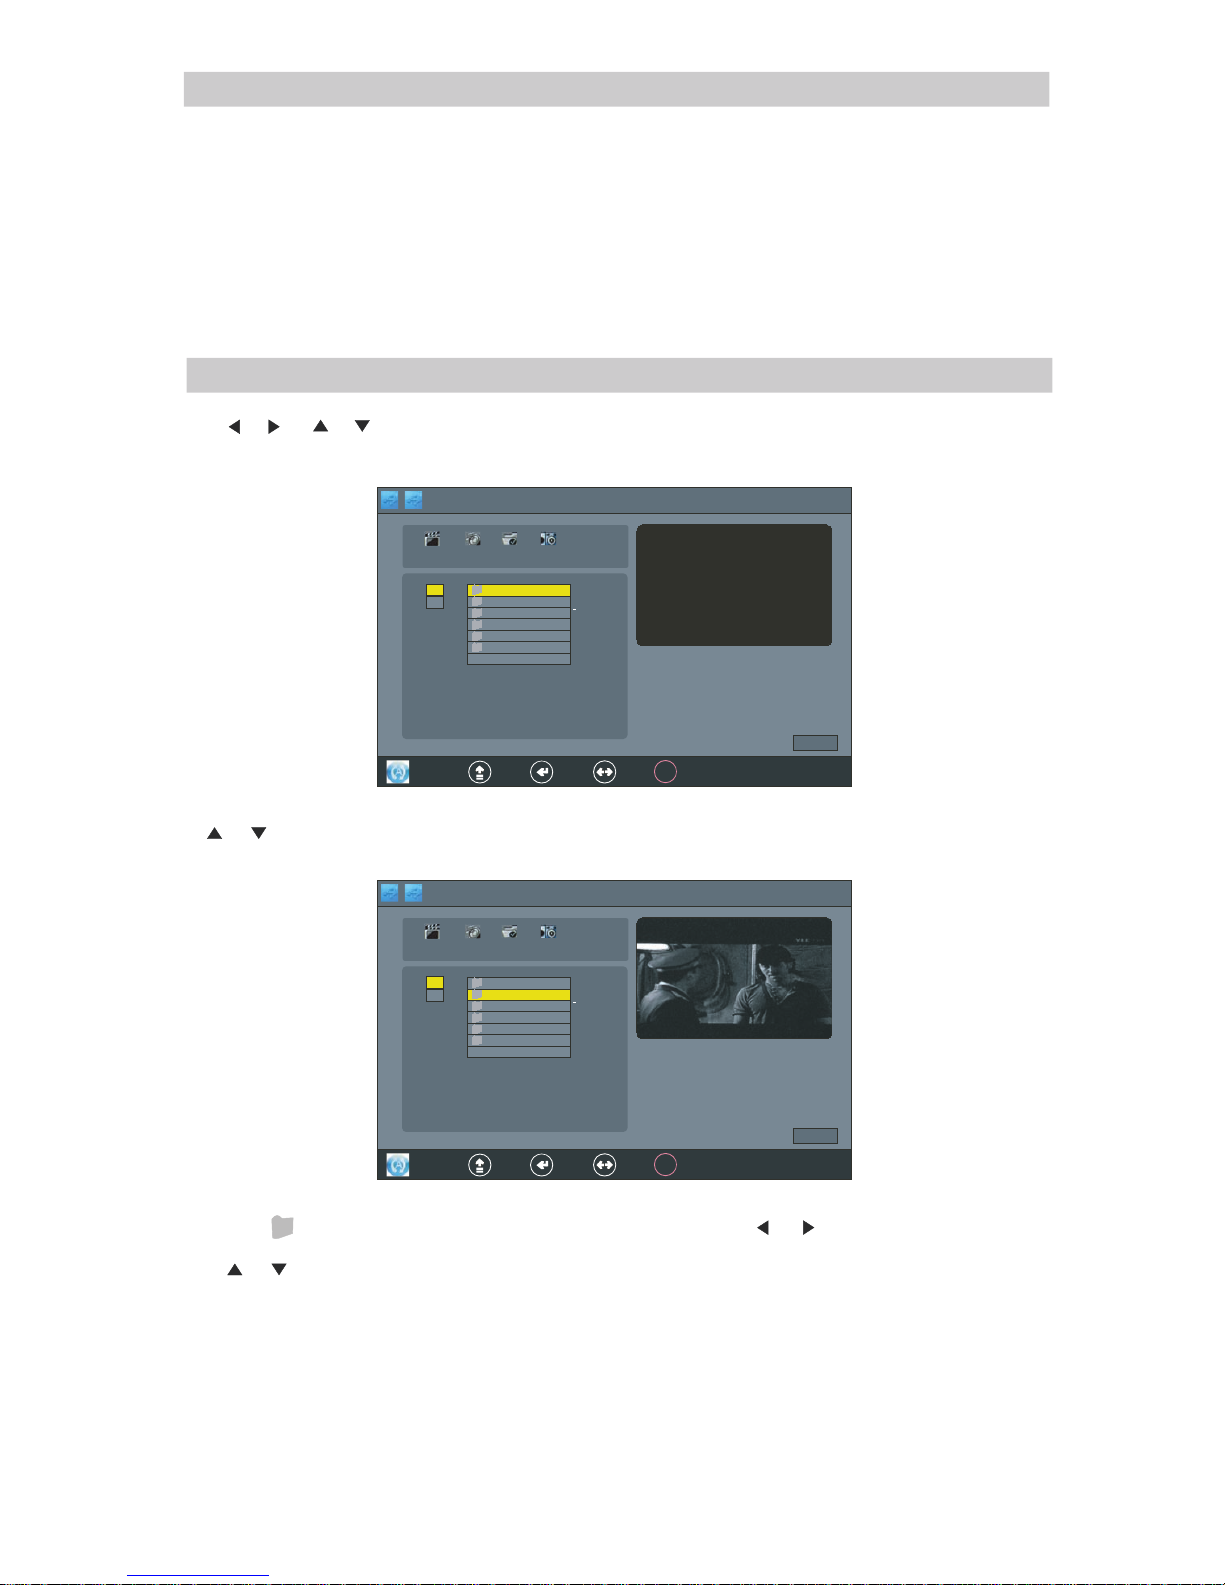
1.按 和 鍵選擇“MUSIC”圖標 。
2.按ENTER 鍵 進入音樂界面圖片 , 如 下 圖 所 示 :
3.按 和 鍵選擇 文件。音樂
4.按ENTER 鍵 打開 文 件夾。音 樂
5.按 或 鍵選擇試聽 音 樂 , 然 後 按ENTER 鍵選 定 音 樂 (作為選擇音樂上 下 曲 用 ) , 再 按
ENTER
鍵可取消選定。
6.按“PLAY”鍵 進 入 音 樂 播 放 器并播放已選定好 的 音 樂 , 如 下 圖所示:
音 樂
按 和 鍵選擇要播放 的 曲 目 , 然 後 按ENTER 鍵播 放 。
17
Mar
2008 01 08
.
:
21
ABC
1
Once
USB 2.0
圖片
音樂 電影
C
:
\
PVR
MUSIC
PHOTOS2
PHOTOS1
新建文件夹
D:
文本
Path
1/1
play
專輯:
標題:
波特率: 採樣 率:
藝術家: 時間:
Mar
2008 01 08
.
:
21 ABC1 O nce
USB 2.0
圖片
音樂 電影
C:
\
PVR
MUSIC
PHOTOS2
PHOTOS1
新建文件夹
D:
文本
OOKK
離開 進入 移 動
Path
1/1
play
全屏播放
專輯:大海
標題:大海
波特率:246
K
採樣率:44
K
藝術家:张 雨生 時間:
00 :00 :0 8/0 0:0 1: 01
Page 19
“PAUSE” 鍵 : 按“PAUSE” 鍵 暫 停 播放音樂。
“PLAY” 鍵: 按 “PL AY”鍵播放音樂 。
“STOP”鍵:按“S TOP”鍵停止播放 , 並 返 回 上 一 層菜單。
“PREV” 鍵:按 “PREV”鍵播放上一曲 歌 曲 。
“NEXT” 鍵:按 “NEXT” 鍵 播 放 下一曲歌曲。
“FWD” 鍵: 按 “FWD” 鍵 選 擇快進模式:X2→X4→X8→X16
“REV” 鍵: 按 “REV” 鍵 選 擇快退模式:X2→X4→X8→X16
“EXIT”:按 “EXIT”鍵直接退出 , 但 是 可 以 通 過按“EXIT” 鍵 退 出 後 ,再去選擇播放圖 片 , 就 可
以實現音樂和 圖 片 同 時 播 放 。
音 樂
按 和 鍵選擇文件, 然 後 按ENTER 鍵進 入 , 如 下 圖 所 示:
1.選擇“ ”圖標 , 然 後 按ENTER 鍵彈 出 來 選 擇 對 話框,再按 和 鍵選擇“ 選 擇 ” 或 “ 取
消選擇”圖標 , 再 按ENTER 鍵確 認 選 擇 全 部 電 影或取消全部選擇 。
2.按 或 鍵選擇視頻 文 件 , 然 後 按ENTER 鍵確 認 選 定 ,再按ENTER 鍵一次取消選定 。
3.按“PLAY”鍵 播 放 電 影;按 “PAU SE ”暫停播放;按“PREV” 鍵 和“NE XT” 鍵 播 放 上 下 部電
影;按“REV”鍵和“FWD 鍵快退快進;按“STO P”鍵和“EXIT” 鍵 停 止 播放並返回。”
2.按ENTER 鍵 進入電影圖片界面 , 如 下 圖 所 示 :
1.按 、 、 、 鍵選擇電影 節 目 。
電 影
PPaatt hh
4.選擇“up Folder”圖標,然後 按 ENTER 鍵返回上一 層 菜 單 。
5.按“EXIT” 鍵 退 出。
18
Mar
2008 01 08
.
:
21
ABC
1
Once
USB 2.0
圖片
音樂 電影
C:
\
PVR
MUSIC
PHOTOS2
PHOTOS1
新建文件夹
D:
文本
OOKK
離開 進入 移 動
Path
1/1
play
全屏播放
大小:
Mar
2008 01 08
.
:
21 ABC 1 Once
USB 2.0
圖片
音樂 電影
C:
\
MUSIC
PHOTOS2
PHOTOS1
新建文件夹
D:
文本
OOKK
離開 進入 移 動
Path
1/1
play
全屏播放
大小:
YLE FST 5(070502 1941~
Page 20
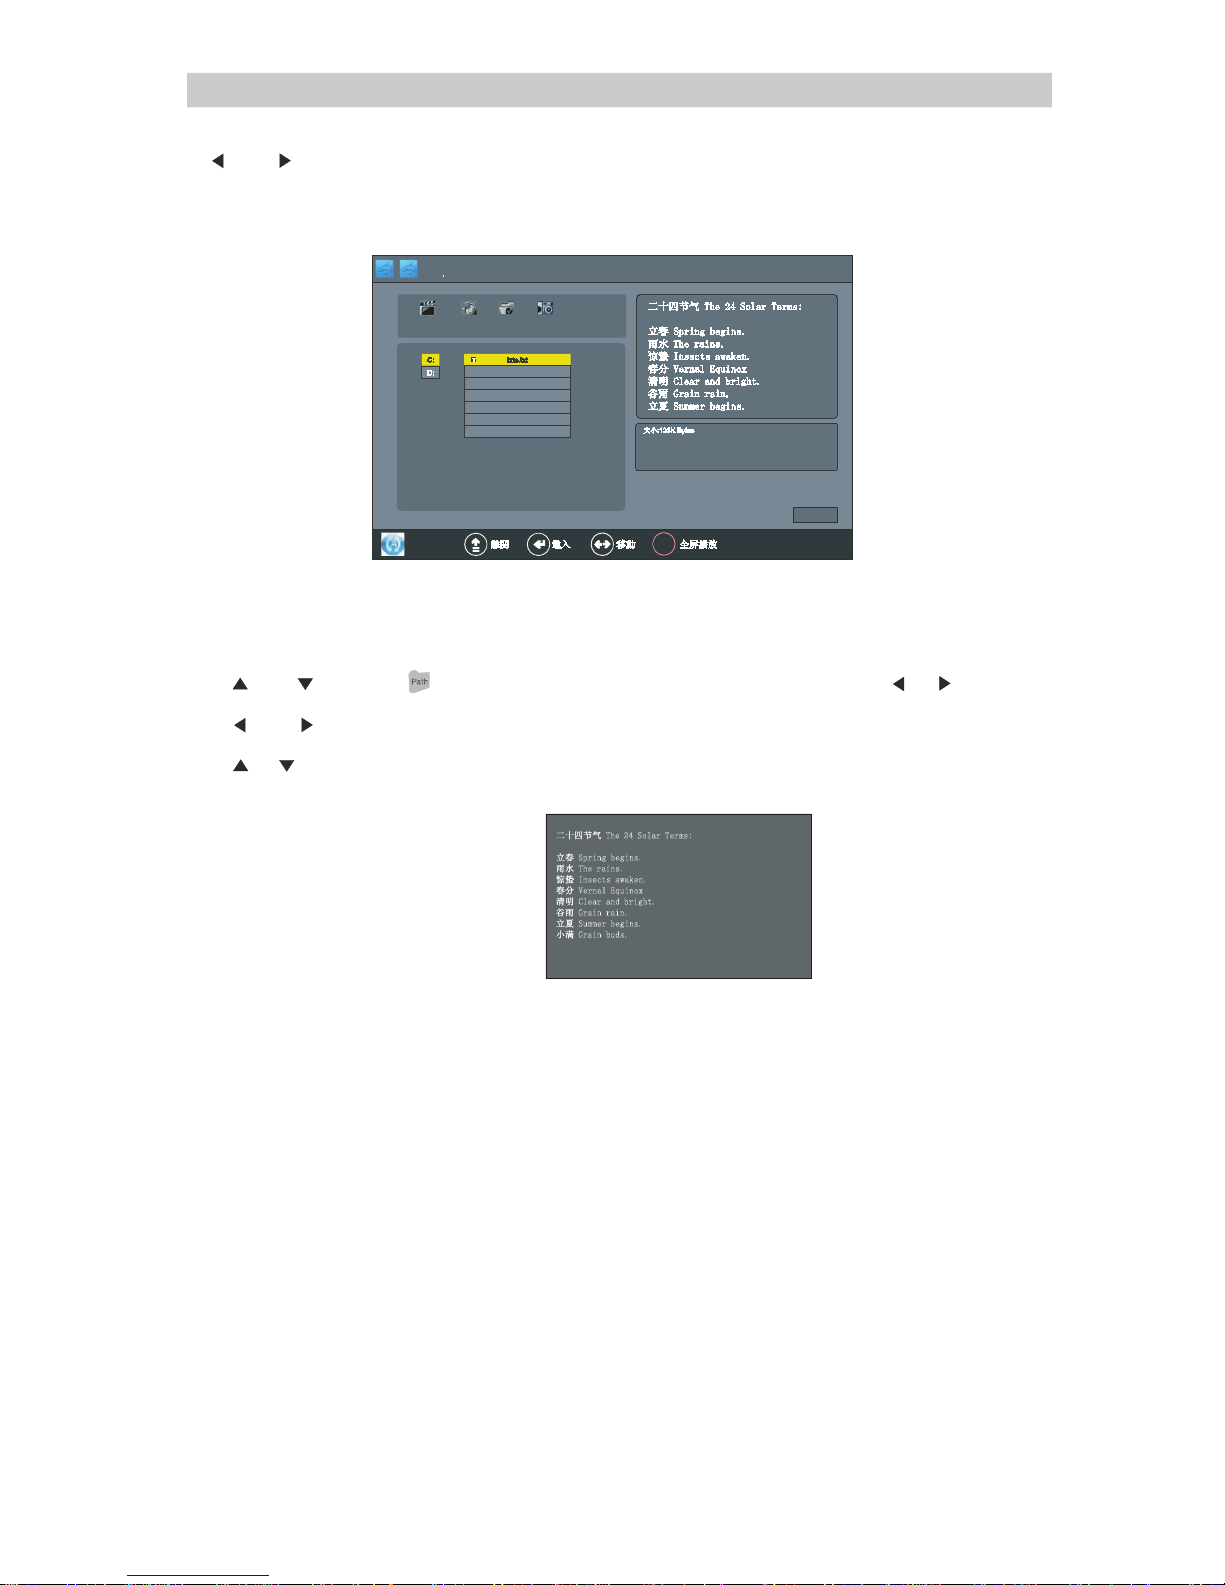
文 本
按 鍵和 鍵選擇“文本”圖標,然後按ENTER鍵進入文本菜單介面,如下圖所示:
1.按 或者 鍵選擇 圖標,然後按 ENTER 鍵彈 出 來 選 擇 對話框,再按 和 鍵選定
“選擇 和 取消選 擇 圖 標 , 然 後 再 按ENTER 鍵 確認選擇全部的文 件 或 取 消 選 定全部的文件。
2.按 或者 鍵選擇文 本 文 件 , 然 後按ENTER 鍵 打开文件。或者 選 擇 Up Fo ld er 圖 標,再 按
ENTER鍵 確 認 返 回 上 一 層菜單。
3.按 和 鍵選擇文件 , 然 後 按ENTER 鍵 確 認 。
4.按 PLAY 鍵 打 開 文 本 文件,如圖所示
按 FWD 鍵查看 下 一 頁。
按 REV 鍵查看 上 一 頁。
按 STOP 鍵 或者 EXIT 鍵 返回。
5.按 EXIT 鍵退出。
Path
19
The 2 4 Sola r Terms :
Spring begins.
The r
ains.
Insects a
waken.
Vernal Eq
uinox
Clear and bri ght.
G
rain r
ain.
Summer begins.
G
rain b
uds.
USB 2.0
圖片
音樂 電影 文本
1/1
play
大小:
C: txte .txt
D:
v
:123KByt es
The 24 Sol ar Te rms:
Spring begins.
The rains.
Insects awaken .
Vernal Equinox
Clear and bright.
Grain rain.
Summer begins.
Page 21
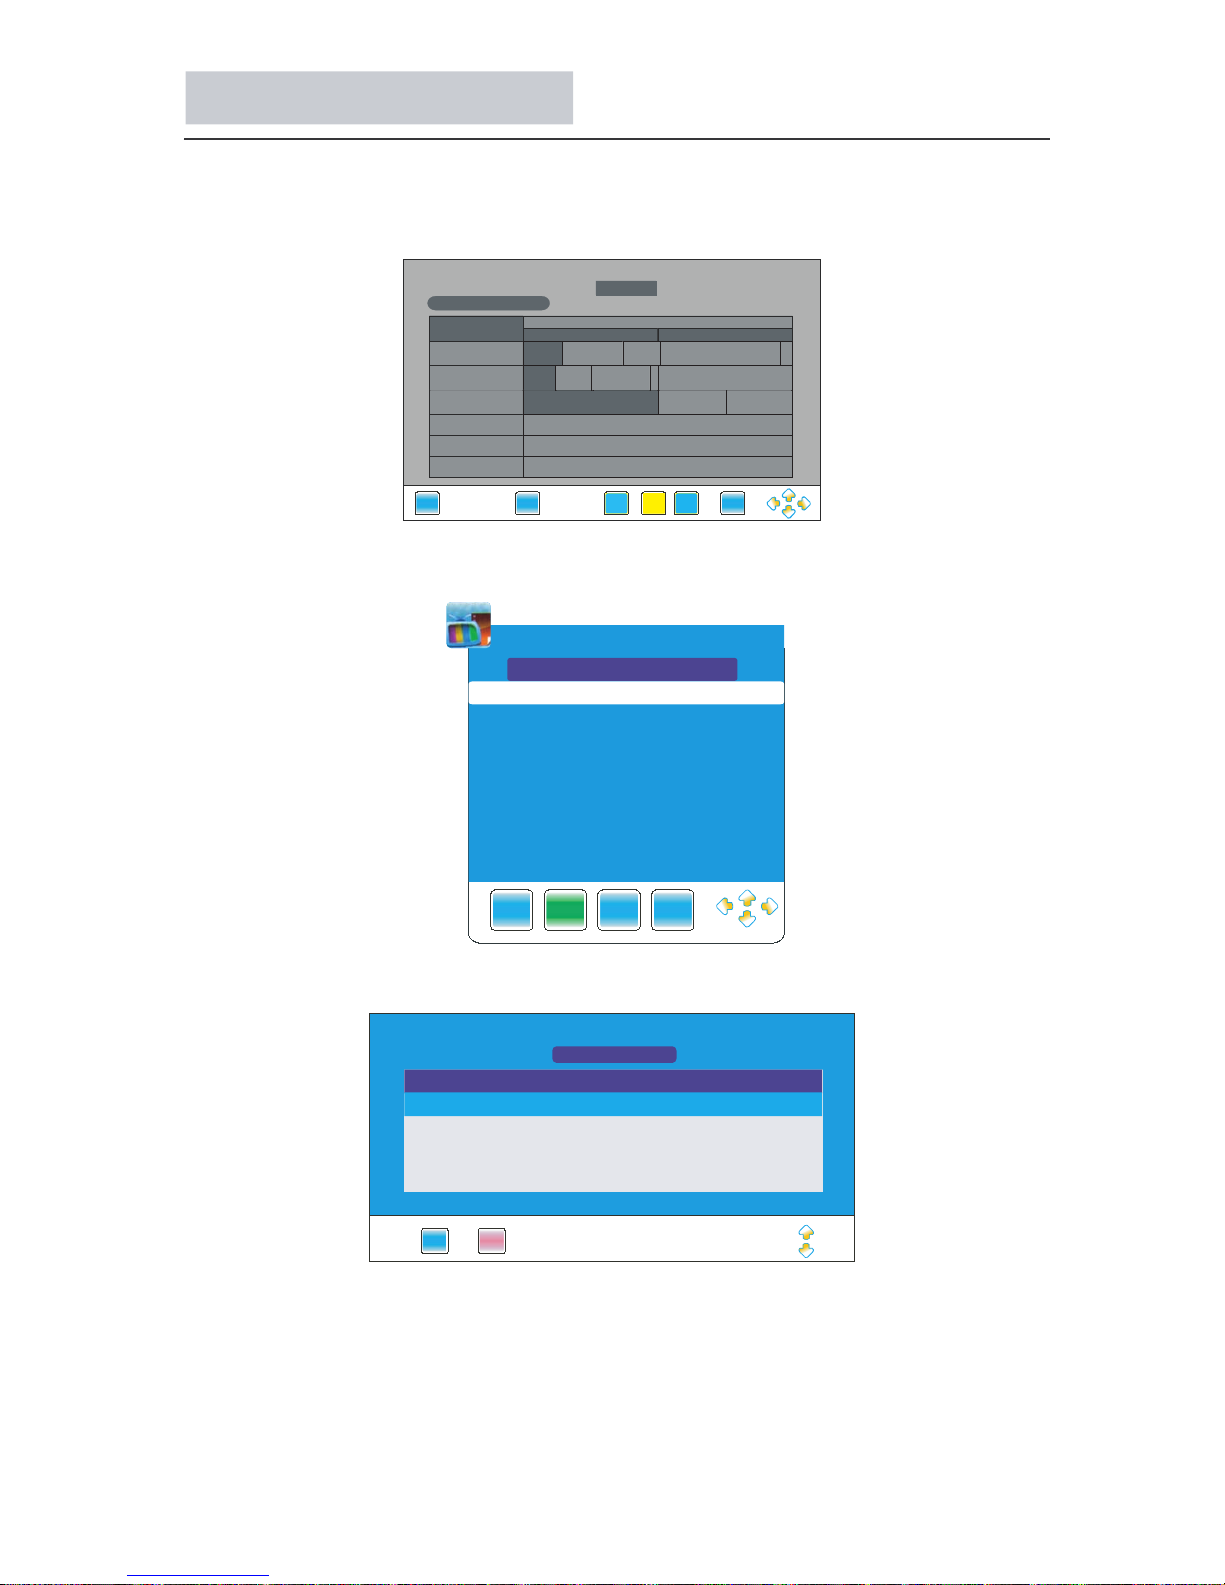
一、設置錄影任務:
1、在數碼電視通道下,按下EPG按鍵將顯示各個頻道的節目列表。
2、按◄►▲▼按鈕選擇想要錄影的節目,按下REC按鍵,將進入錄影菜單:
3、在錄影菜單下,按綠色鍵可以查看已經設置的任務列表:
4、在錄影菜單下,按ENTER鍵將添加新的任務到任務列表中。
待機錄影功能的操作說明 (僅在數碼電視節目中可用)
20
11 十一月 2008 01 07
:
DTV 85
高清翡翠台
18:00-19:00 高清劇場:茶煲阿四
數數碼碼電電視視
8822 JJ22臺臺
8833 互互動動新新聞聞臺臺
8855 高高清清翡翡翠翠臺臺
1111 十十一一月月
18 00
:
19 00
:
無無資資訊訊
衝衝鋒鋒2211
搞搞邊邊科科??
寵寵物物大大本本營營
新新聞聞報報道道
新新聞聞報報道道
....
六六點點半半新新聞聞報報道道
高高清清劇劇場場::茶茶煲煲阿阿四四
流流行行速速聽聽 東東張張西西望望
:
EXI T
INFO
ENTER
DATE ReminderRecord
錄製
EXIT
Sch edul e
MEN U EN TER
11月 十 一月 2 008 1 8:03
節目
開始日期
開始時間
結束日期
結束時間
模式
85 高清 翡 翠 台
200 8 /1 1 /11
18:00
200 8 /1 1 /11
19:00
單次
11 十 一月 20 08 18:0 4
REC ORD ER SCH EDUL E L IST
11 十 一月 20 08 18:0 4
EXI T SAVE
標題 開 始日 期 結束日 期
節目
模式
流行 速遞 20 08/ 11 /1 1
19 :0 0
20 08 /11 /1 1
19 :3 0 8 5
高清 翡翠 台
單次
Page 22
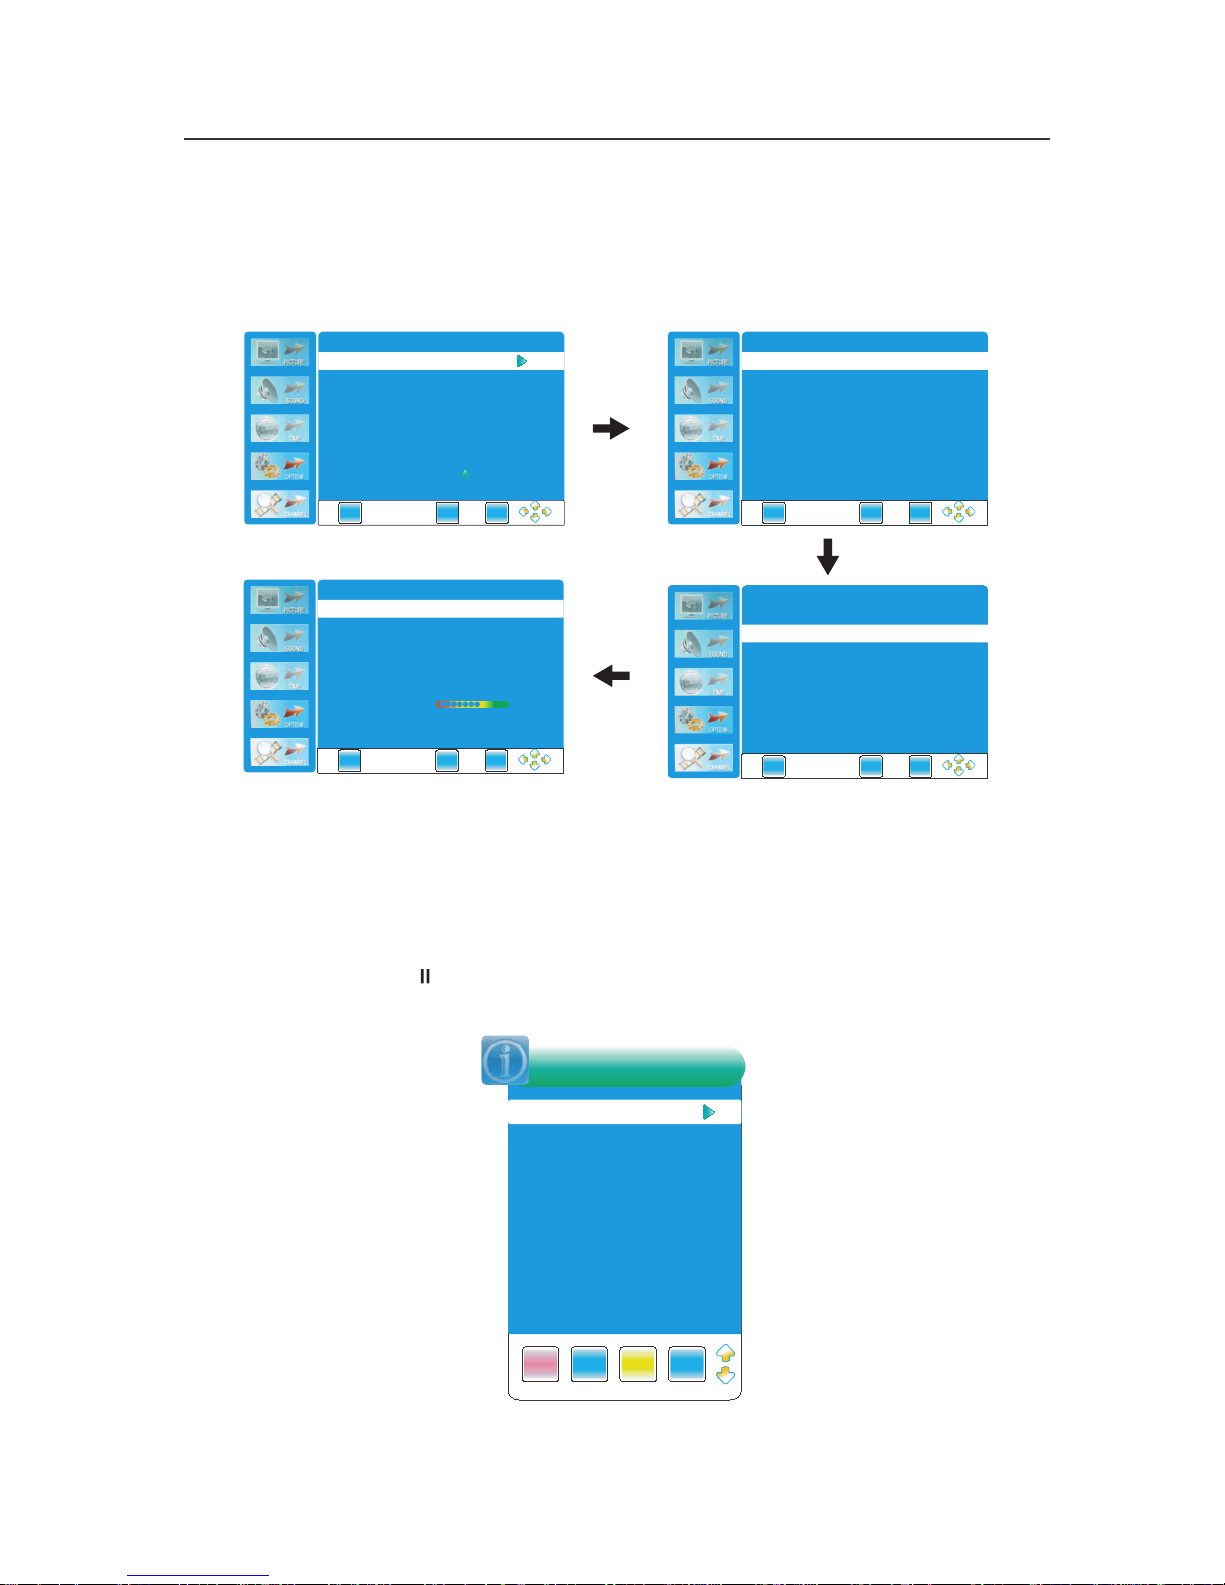
二、在整機待機的狀態下,系統將自動進行錄影。
注意:外部USB設備必須處於連接狀態。
如果外部USB設備為首次連接到電視機,須進行格式化建立DVR系統,進入OPTION菜單選擇DVR
文件系統選項,按ENTER或
►進入:
三、如何播放已錄節目(僅在數字電視節目中可用)
播放所錄製的文件:
按下遙控器的DVR.LIST按鈕,可進入錄製文件清單。如圖所示:
按黃色按鍵,可以根據文件名稱、頻道號或者時間進行排序。
按
▲▼鍵可選擇所需的文件,按右鍵►或INFO按鈕可顯示文件的信息。
按▲▼鍵選擇所需的文件,并按ENTER鍵開始播放。
在文件播放的過程中,按 暫停鍵可以暫停播放,再次按下PLAY可以恢復播放。
文件播放結束后,系統將自動回到之前觀看的DTV節目。
聲明:OSD菜單僅供參考,請以實物爲準。
由於不同品牌及型號的外置硬碟表現有差異或不被兼容, 建議使用Buffalo Drive Station (USB2.0)
3.5"1TB或以下的外置硬碟錄影。
21
EXI T
MENU
ENTER
DV R文件系 統
EXI T
MENU
ENTER
檢測 刻錄文 件系 統 開始
US B磁盤
時移 空間設 置
格式 化
U盤速 度
選擇 磁盤
C:
EXI T
MENU
ENTER
US B磁盤
時移 空間設 置
格式 化
U盤速 度
檢測 刻錄文 件系 統 開始
選擇 磁盤
C:
EXI T
MENU
ENTER
檢測 刻錄文 件系 統 完成
US B磁盤
時移 空間設 置
格式 化
U盤速 度
選擇 磁盤
C:
通過
通過
51 2MB
32 64K BS
磁盤 速度大 於1. 5MB /S,可 以錄 製標清 信號
DELE TE
IN FO
IND EX
ENT ER
DVRLIST
Pro gra mm e
沒有 信息
沒有 信息
皇家 雙妹 嘜
皇家 雙妹 嘜
皇家 雙妹 嘜
皇家 雙妹 嘜
Page 23
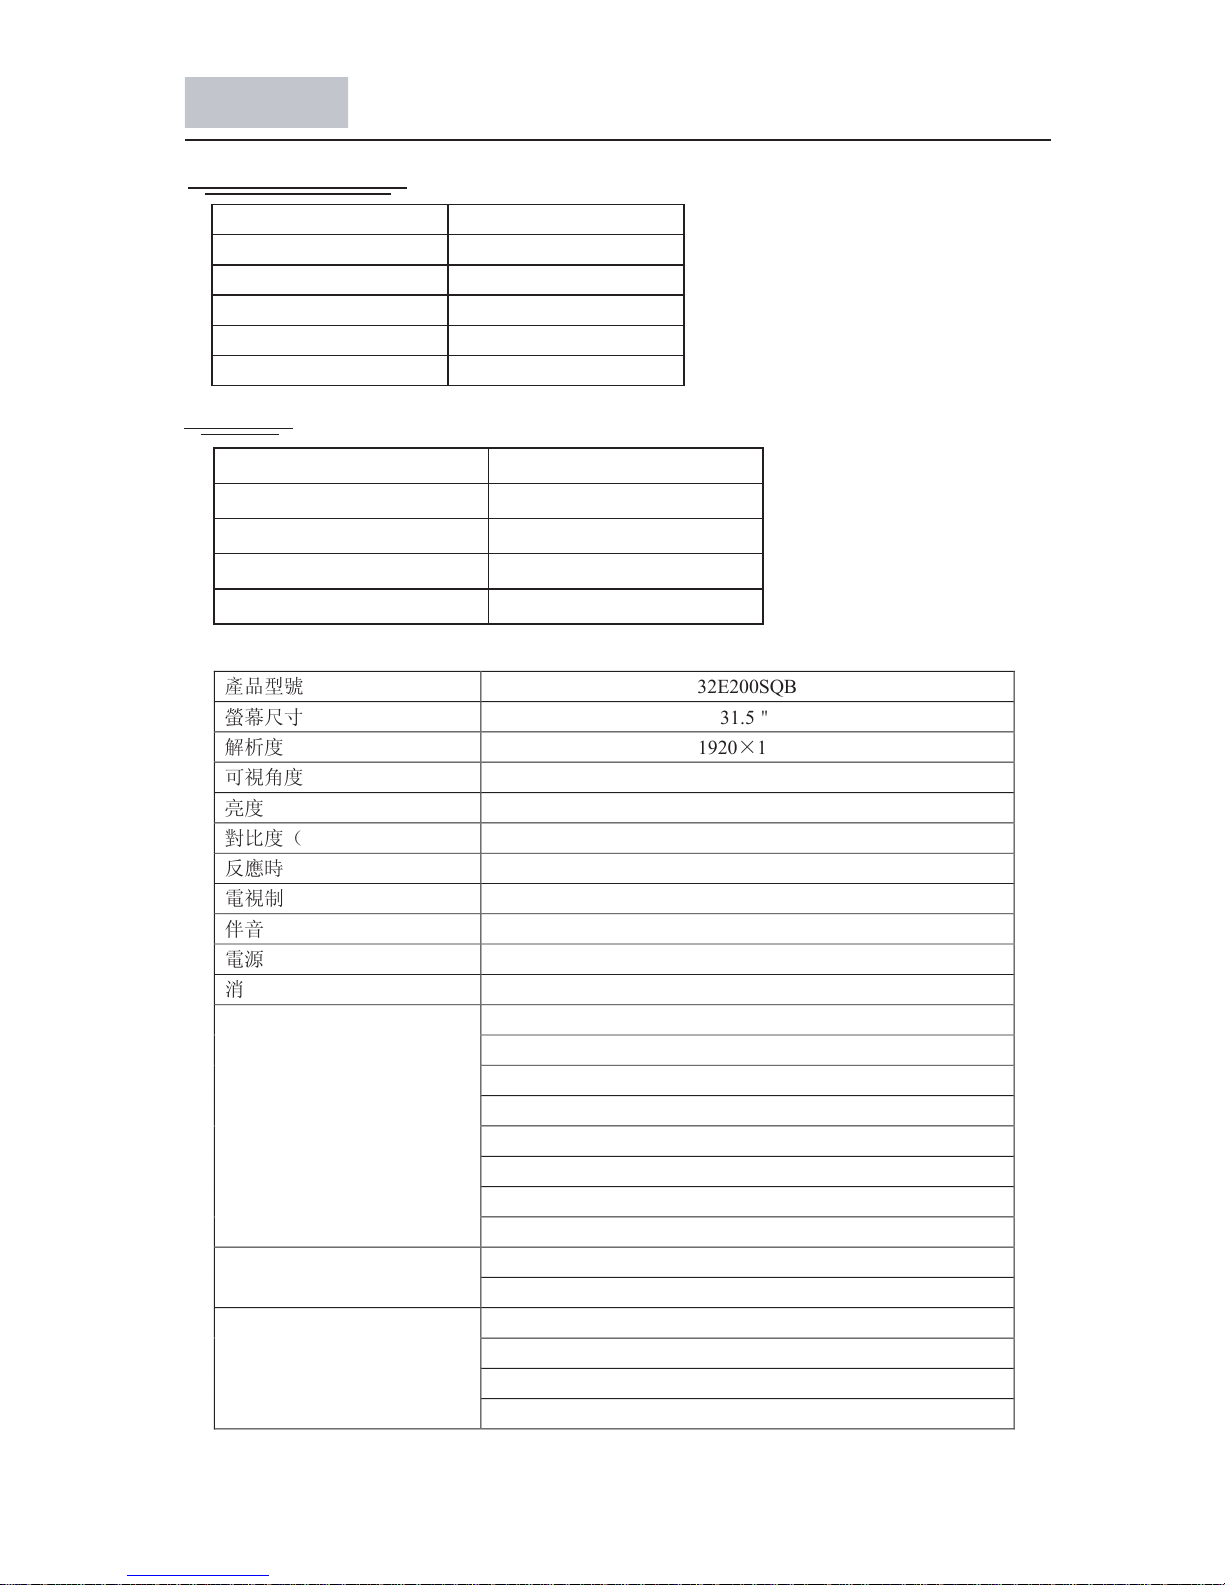
2.VGA
1024*768
1440*900
800*600
640*480
60
60
60
60
分辨率
場頻(Hz)
技術規格
1.YPbPr/HDMI
480i
480p
720p
1080i
1080P
60
60
60
60
60
分辨率
場頻(Hz)
22
產品型號
32E200SQB
螢幕尺寸
31.5"
解析度
1920×1080
可視角度
176°
亮度
300 cd/m2
對比度(標準)
4000:1
反應時間
6.5ms
電視制式
DMB-TH;PAL
伴音制式
BG;DK;I
電源輸入範圍
交流 110~240V/頻率 50/60Hz
消耗功率
≤78W
天線輸入端×1
HDMI 輸入端×3
S 端子輸入×1
YPbPr 輸入端×1 L/R×1
VGA×1
VGA 音頻輸入端×1
USB 輸入端×2
輸入端子
AV 輸入端×1 L/R×1
同軸音頻輸出端×1
輸出端子
耳機輸出端×1
說明書×1
遙控器×1
電池×2
附件
保修卡×1
Page 24
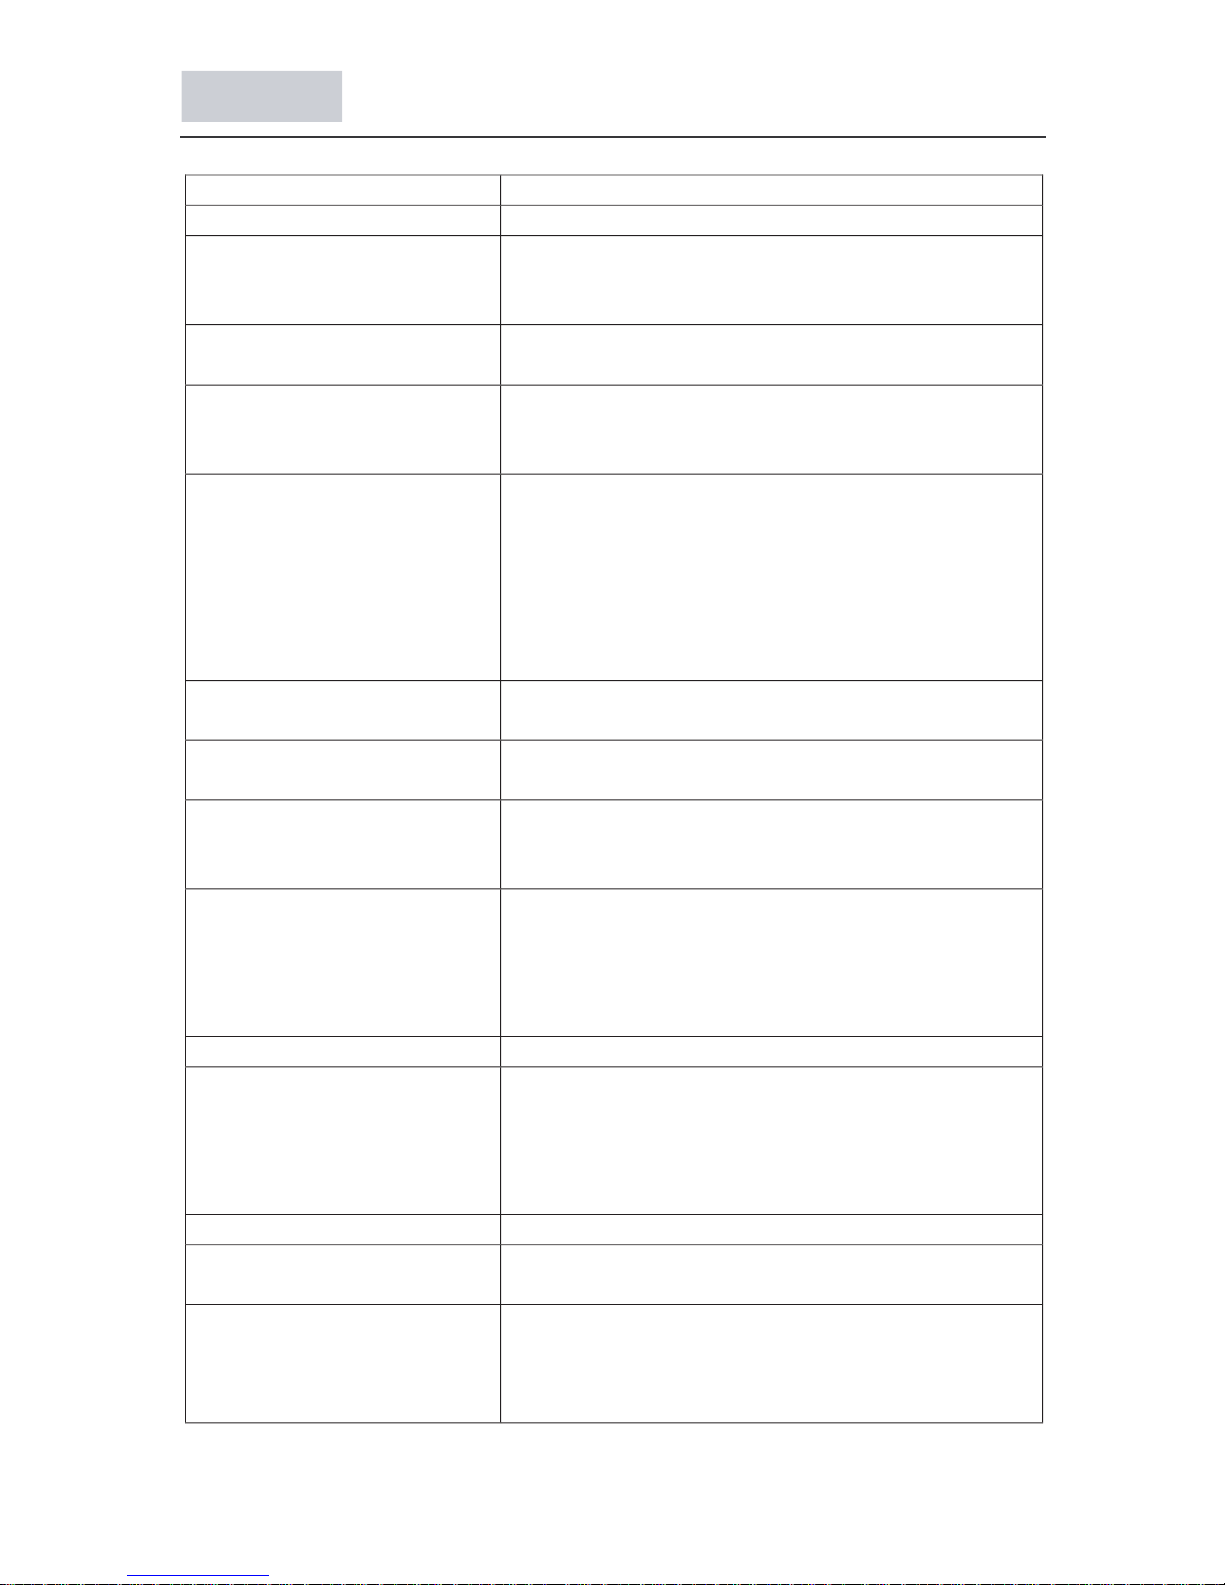
發生殘影, 或者出現雙重影像。 檢查天線 / 訊號線的連接情形。
檢查天線 / 纜線的位置和方向。
只有雪花和噪訊出現在螢幕上。 檢查天線 / 纜線是否破損或彎折。
檢查天線 / 纜線的使用壽命是否已經達到限度。 (正常
使用情況為 3 至 5 年, 在海邊使用時為1 至 2 年) 。
影像扭曲 (出現虛線或條紋)
。
電視要遠離電子噪訊來源, 例如, 汽車、摩托車、吹風機
或光學設備。
安裝選用設備時, 要在選用設備與電視之間保留一些空
間。
檢查天線 / 訊號線的連接情形。
天線 / 有線電視的訊號線要與其他連接訊號線保持距
離。
觀賞電視頻道時畫面或聲音有噪
訊。
檢查天線 / 訊號線的連接情形。
螢幕上出現微小的黑點 或亮
點。
畫面由圖元構成。 螢幕上的若干微小黑點 或亮點
(畫素)
並不代表是故障的表示。
來自連接到各輸入端子的設備影
像未以彩色顯示, 或者是以不規則
的彩色顯示。
檢查各輸入端子插孔的連接情形, 並檢查各個插孔是否
牢牢地插在各自的插孔中。
來自連接設備的影像沒有出現在
螢幕上。
開啟連接的設備。
檢查訊號線的連接情形。
按 Source 鍵顯示輸入清單, 然後選擇您要的輸入。
不保證所有 USB 裝置都能夠操作。而且操作可能因為
USB 裝置的功能和播放的視訊而有所不同。
聲音
影像很好, 但是沒有聲音。 按 Vol +/- 或 Mute 鍵。
檢查聲音訊號線 L/R 連接情況
以 Super Audio CD 或 DVD-Audio 使用 HDMI 輸入時,
DIGITAL AUDIO OUT (COAXIAL) 可能不會輸出音頻
訊號。
頻道
您無法選擇您要的頻道。 在數位 類比模式之間切換, 然後選擇要觀賞的數
位 // 類
比電視頻道。
有些頻道空白。 這些頻道僅供鎖碼 / 付費服務觀賞。 請向付費電視服
務公司訂購。
只用於資料的頻道 (沒有畫面或聲音)。
關於傳送內容的詳細資訊, 請聯絡頻道業者。
解決問題
情況 解釋/解決方法
畫面
沒有影像( 螢幕是黑的)也沒有聲
音。
檢查天線 / 訊號線的連接情形。
將電視連接到交流電源插座, 然後開啟電源開關。
如果指示燈點亮紅色, 按 Power 鍵。
23
Page 25
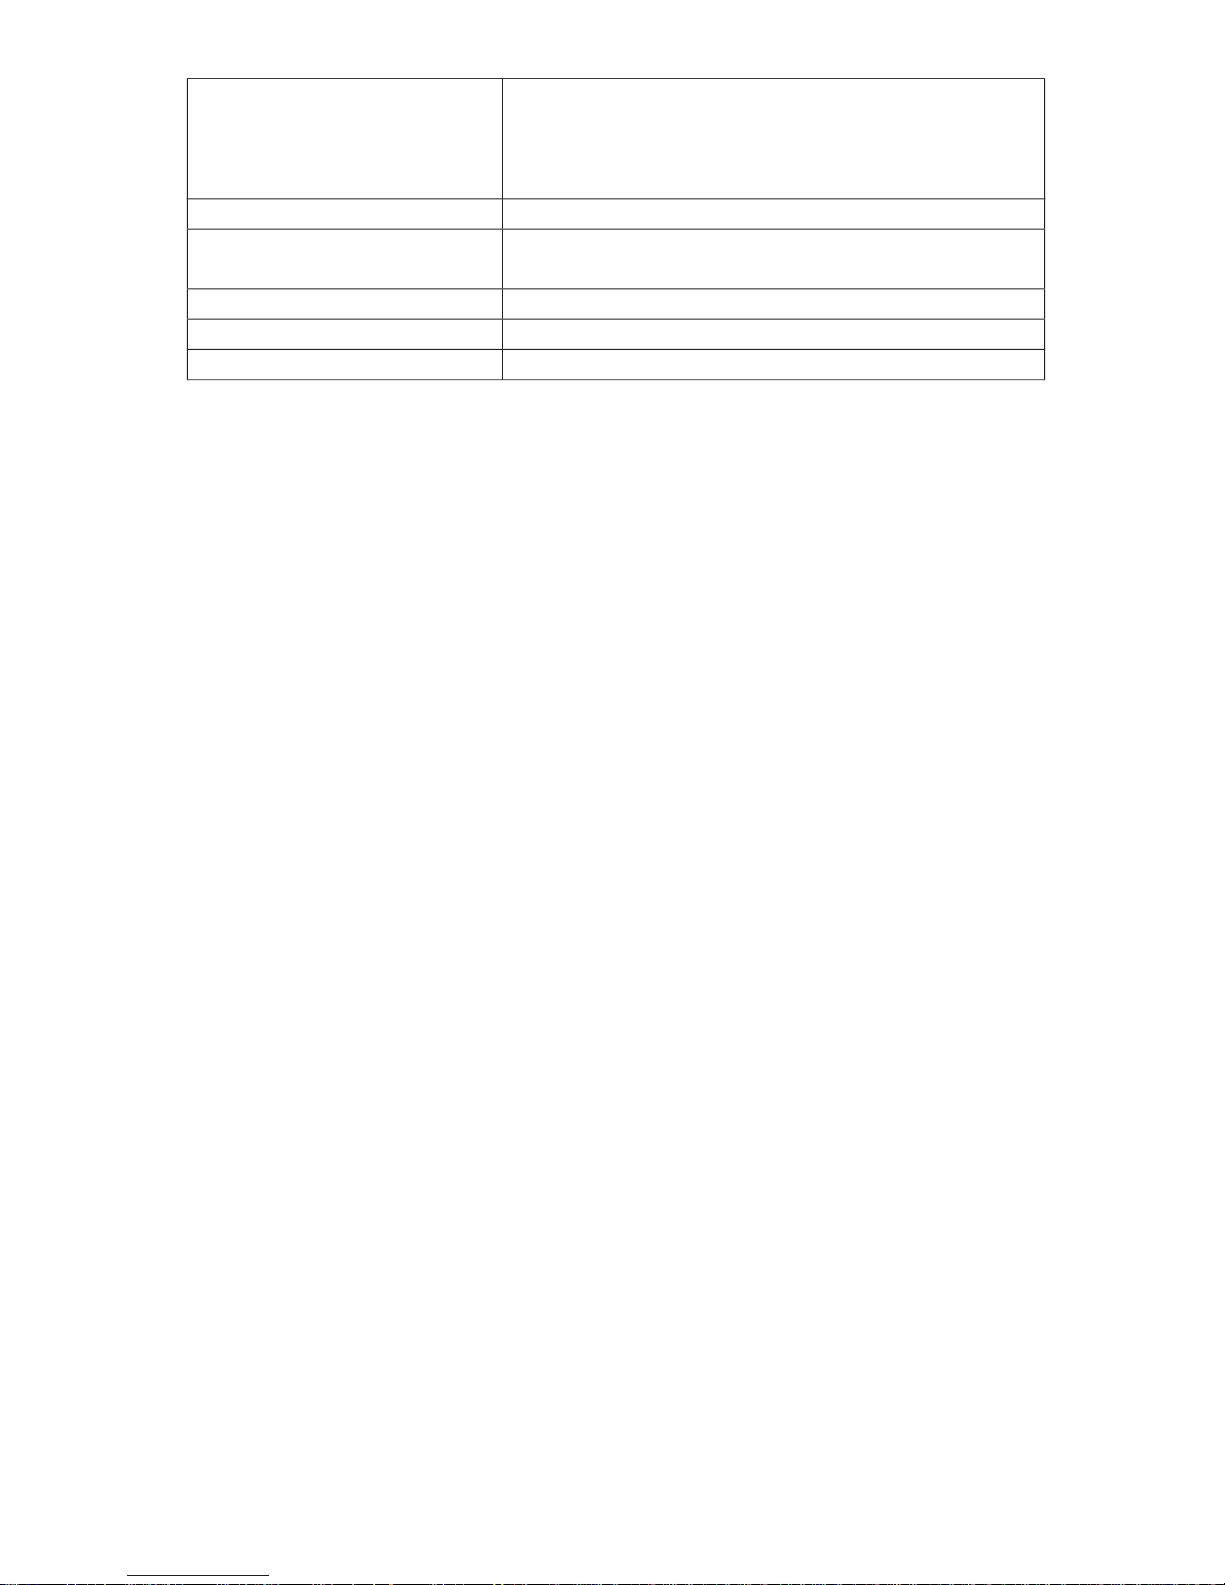
您無法觀賞數位頻道。
請聯絡當地的安裝業者, 看看您的地區是否提供數位傳
輸。
一般
電視自動關閉( 電視進入待機模
式) 。
檢查 “睡眠關機” 是否啟用。
遙控器沒有作用。 更換電池。
HDMI 設備不能被識別.。 確認您的設備興 HDMI 控制相容。
不是所有有線電視頻道都能收到。 請聯絡相關有線頻道業者
升級至有更高增益的天線。
檢查天線 / 纜線是否太舊破損或彎折。
24
Page 26

Table of Contents
Safety Information……………………………………………………..
Table of Contents………………………………………………………
Precautions………………………………………………….…….……
25
26
28
Stand Installation..………………………………………….…….……
Remote Control ………………………………………………………..
Functions of the panel…………………………………………………..
Rear Panel and Descriptions…………………………………………...
Basic Operation ……………………………………………………….
Menu Operation ………………………………………………………
Channel Menu…………………………………………………………
Picture Menu…………………………………………………………..
Sound Menu……………………………………………………………
Time Menu…………………………………………………………….
Option Menu…………………………………………………………...
Media Menu……………………………….…………………………..
Photo…………………………………………………………………...
Music…………………………………………………………………..
Movie…………………………………………………………………..
Text…………………………………………………………………….
Record……................………………………………………………….
29
30
31
32
33
34
34
36
37
38
39
40
41
43
44
45
47
Specifications………………………………………………………….
Troubleshooting………………………………………………………..
Before operating the TV, please read “Safety Information” and retain
this manual for the future reference.
49
50
25
Page 27

Installation/Set-up
Install and use the TV set in accordance with the instructions below in order to
avoid any risk of fire, electrical shock or damage and/or injuries.
Safety information
Installation
Transporting
Ventilation
AC power cord
The TV set should be installed near an easily accessible AC power outlet.
Place the TV set on stable, level surface to avoid it form falling down and cause personal
injury or damage to the TV.
Only qualified service personnel should carry out wall installations.
For safety reasons, it is strongly recommended that you use V DIGI Accessories.
Before transporting the TV set, disconnect all cables.
Two or more people are needed to transport a large TV set
When transport the TV set hand, hold it as shown on the right. Do not put stress on the
panel.
When lifting or moving the TV set, hold it firm
ly from the bottom.
When transporting the TV set, do not subject it to jolts or excessive vibration.
When transporting the TV set for repairs or when moving, pack it using the original carton
and packing material.
Never cover the ventilation holes or insert anything in the cabinet.
Leave space around the TV set
To ensure proper ventilation and prevent the collection of dirt or dust.
Do not lay the TV set flat, install upside down, backwards, or sideways.
Do not pace the TV set on a shelf, rug, bed or in a closet.
Do not cover the TV set with a cloth, such as curtains, or item such as newspaper, etc.
Handle the AC power cord and outlet as follows in order to avoid any risk of fire, electrical
shock or damage and/or injuries:
Use only V DIGI supplied AC power cords, not those of other brands.
Insert the plug fully into the AC power outlet
Operate the TV set on a 110-240V AC supply only.
When wiring cables, be sure to unplug the AC power cord for your safety and take care not
to catch your feet on the cables.
Disconnect the AC power cord form the AC power outlet before working on or moving
the TV set.
Keep the AC power cord away form heat sources.
Unplug the AC power plug and clean it regularly. If the plug is covered with dust and it
picks up moisture, its insulation may deteriorate, which could result in a fire.
26
Page 28

Do not use the supplied AC power cord on any other equipment.
Do not pinch, bend, or twist the AC power cord excessively. The core conductors may be
exposed or broken.
Do not modify the AC power cord.
Do not put anything heavy on the AC power cord.
Do not pull on the AC power cord itself when disconnecting the AC power cord.
Do not connect too many appliances to the same AC power outlet.
Do not use a poor fitting AC power outlet.
Do not install/use the TV set in locations, environments or situations such as those listed
below, or the TV set may malfunction and cause a fire, electrical shock, damage and/or
injuries.
Outdoors (in direct sunlight), at the seashore, on a ship or other vessel, inside a vehicle, in
medical institutions, unstable locations, near water, rain, moisture or smoke.
Do not use when your hands are wet, with the cabinet removed, or with attachments not
recommended by the manufacturer. Disconnect the TV set from AC power outlet and
antenna during lightning storms.
Do not throw anything at the TV set. The screen glass may break by the impact and cause
serious injury.
If the surface of the TV set cracks, do not touch it until you have unplugged the AC power
cord. Otherwise electric shock may result.
Places that are hot, humid, or excessively dusty; where insects may enter; where it might
be exposed to mechanical vibration, near flammable objects (candles, etc). The TV shall
not be exposed to dripping or splashing and no objects filled with liquids, such as vases,
shall be placed on the TV.
If you will not be using the TV set for several days, the TV set should be disconnected
from the AC power for environmental and safety reasons.
As the TV set is not disconnected from the AC power when the TV set is just turned off,
pull the plug from the AC power outlet to disconnect the TV set completely.
However, some TV set may have features that require the TV set to be left in standby to
work correctly.
Prohibited Usage
Location
Environment
Situation
Broken pieces
When not in use
Notes:
27
Page 29

Precautions
For children
Do not allow children to climb on the TV set.
Keep small accessories out of the reach of children, so that they are not mistakenly swallowed.
If the following problems occur
Turn off the TV set and unplug the AC power cord immediately if any of the following
problems occur. Ask your dealer or V DIGI service centre to have it checked by qualified
service personnel.
Viewing the TV
View the TV in moderate light, as viewing the TV in poor light or during long period of
time, strains your eyes.
When using headphones, adjust the volume so as to avoid excessive levels, as hearing
damage may result.
Screen
Although the screen is made with high-precision technology and 99.99%or more of
the pixels are effective, black dots may appear or bight points of light (red, blue, or green)
may appear constantly on the screen. This is a structural property of the screen
and is not a malfunction.
Do not push or scratch the front filter, or place o
bject on top of this TV set. The image
may be uneven or the screen may be damaged.
If this TV set is used in a cold place, smear may occur in the picture or the picture may
become dark. This does not indicate a failure. These phenomena disappear as the temperature rises.
Ghosting may occur when still pictures are displayed continuously. It may disappear after
a few moments.
The screen and cabinet get warm when this TV set is in use. This is not a malfunction.
The screen contains a small amount of liquid crystal. Mercury is sometimes
contained depending on the kind of fluorescent tubes. Follow your local ordinances and
regulations for disposal.
When:
AC power cord is damaged.
Poor fitting of AC power outlet.
TV set is damaged by being dropped, hit or having something thrown at it.
Any liquid or solid object falls through opening in the cabinet.
28
Page 30
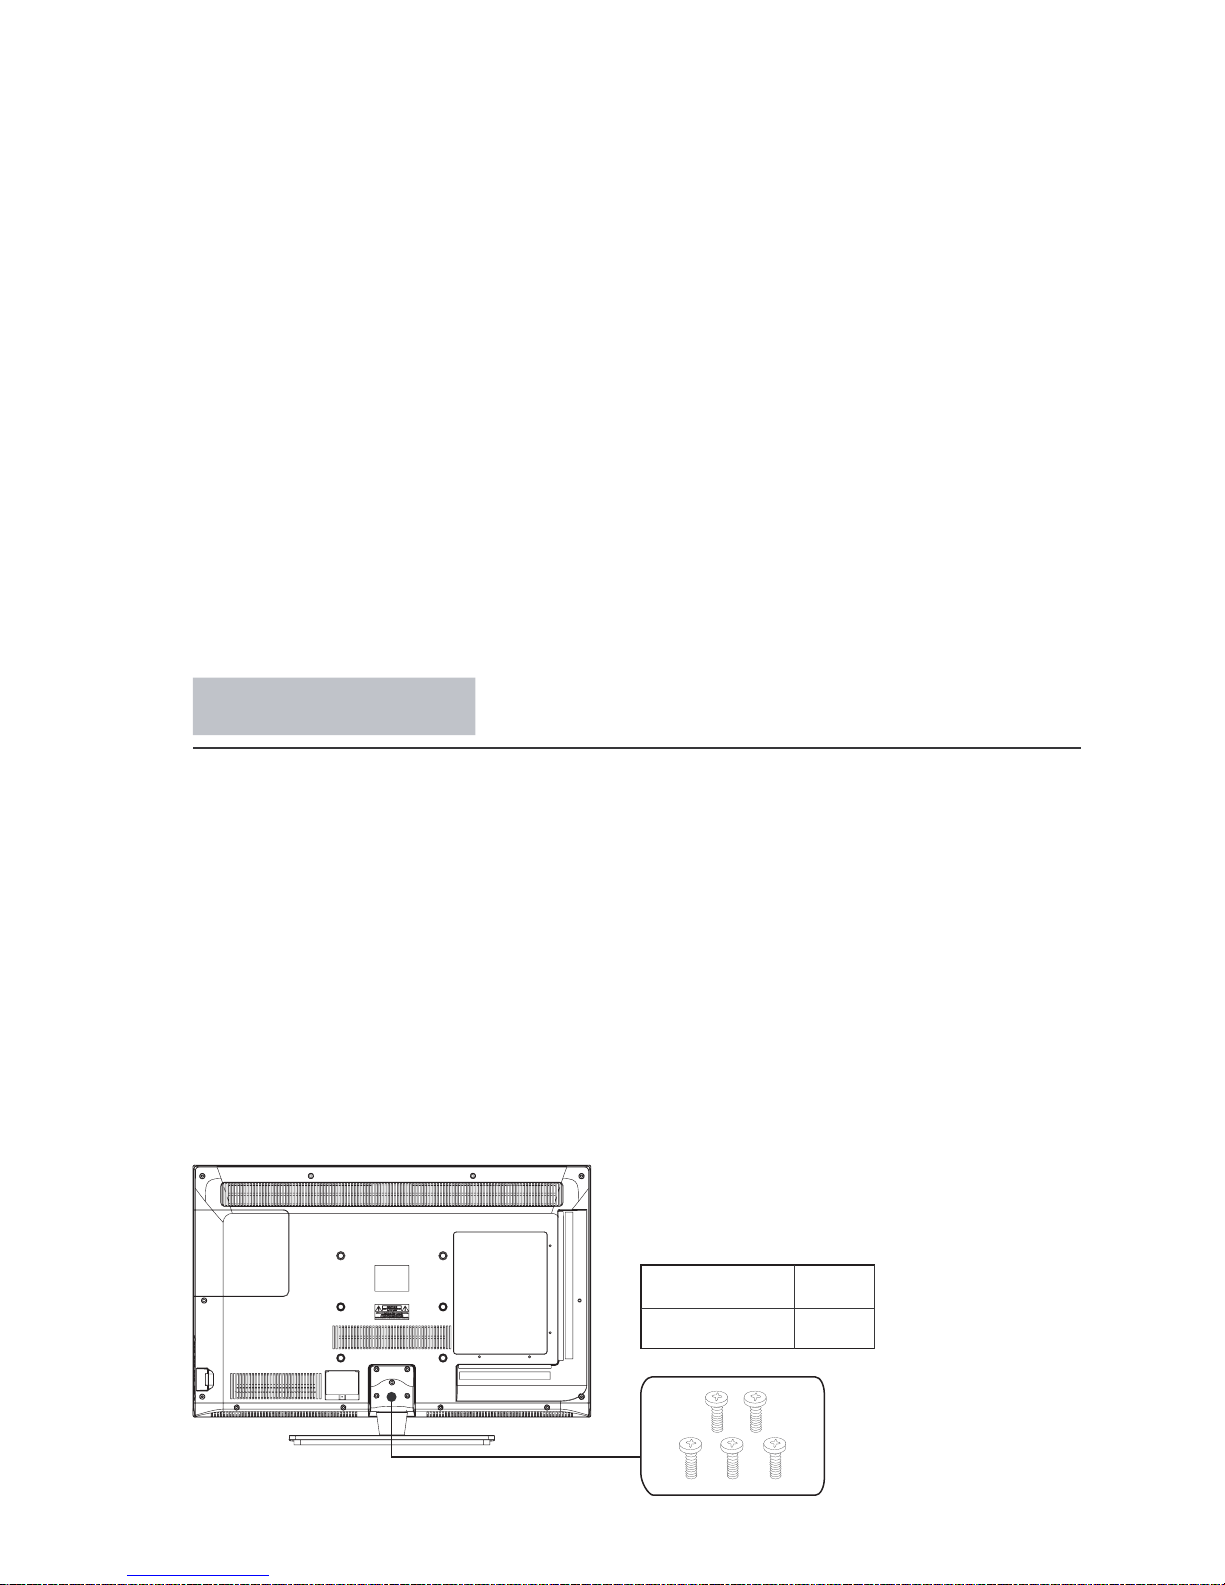
5pcsM4 x 12mm
Your TV is packaged with the TV stand separated from the cabinet. To setup the TV table stand,
please carry out the installation according to the instructions below.
Step One
Place the TV faced down on a soft cloth or cushion to prev
ent the panel from being damaged.
Note:
1. The panel is easy to scratch, so please choose an absolu
tely flat surface to place the
TV, and use soft cloth or cushion to protect the TV panel. Do not put TV on table directly.
2. Always unplug the AC cord first when installing or removing the stand.
Step Three
Insert the fiv
e M4 screws (which are totally the same) and tighten them.
Step Two
Take the sta
nd. Please align the screw holes of the stand and TV.
Stand Installation
Pedestal Screws Quantity
Handing and cleaning the screen surface/cabinet of the TV set
Optional Equipment
Be sure to unplug the AC power cord connected to the TV set form AC power outlet
before cleaning.
To avoid material degradation or screen coating degradation, observe the following
precautions.
To remove dust form the screen surface/cabinet, wipe gently with a soft cloth of dust is
persistent, wipe with a soft cloth slightly moistened with a diluted mild detergent solution.
Never use any type of abrasive pad, alkaline/ acid cleaner, scouring powder, or volatile
solvent, such as alcohol, benzene, thinner or insecticide. Using such materials or maintaining prolonged contact with rubber or vinyl materials may result in damage to the
screen surface and cabinet material .
When adjusting the angle of the TV set, move it slowly so as to prevent the TV set form
moving or slipping off from its table stand.
Keep optional components or any equipment emitting electromagnetic radiation away
from the TV set. Otherwise picture distortion and/or noisy sound may occur.
29
Periodic vacuuming of the ventilation openings is recommended to ensure to proper ventilation.
Page 31
Remote Control
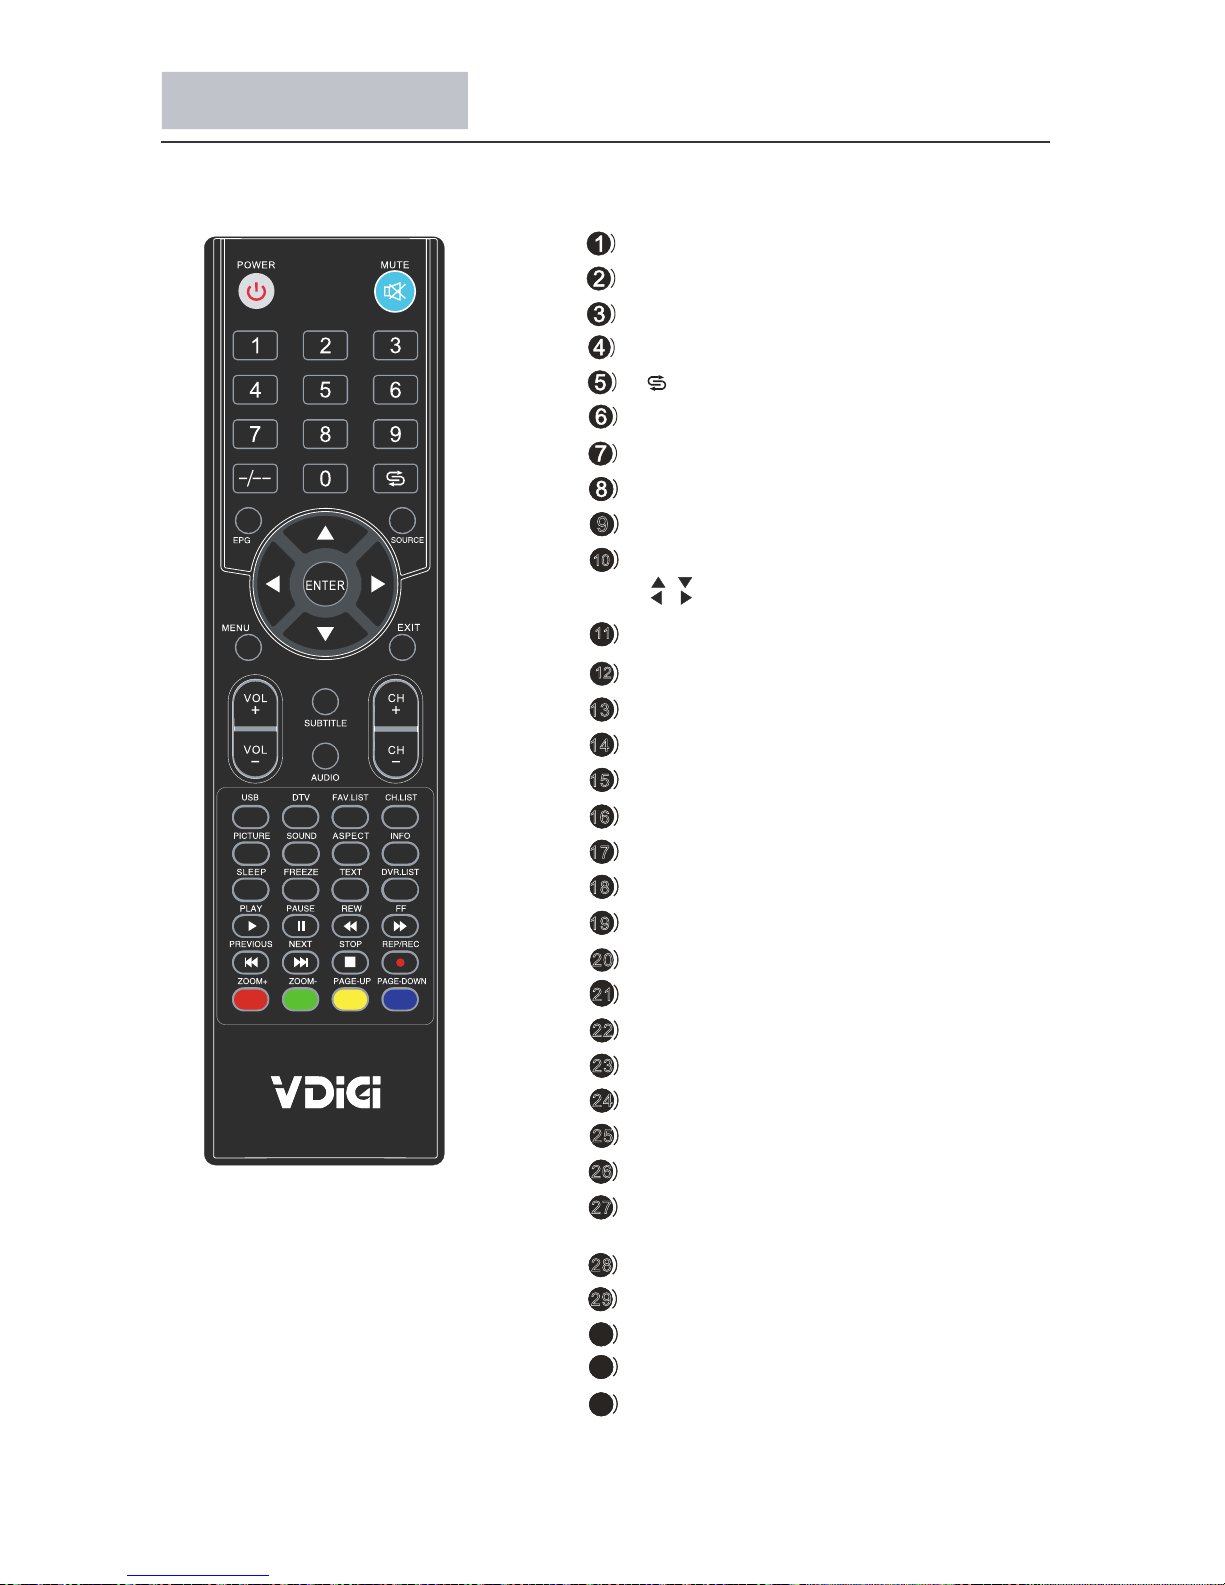
Description of television of remote control
30
18
9
13
14
15
16
17
19
20
21
22
23
24
25
26
27
28
29
POWER:Switch between working status and standby status
MUTE: Turn on/off audio
0-9: Press to select channel
-/--:Channel digit setup button
:Switch to the last channel
INFO: Show channel program information
SOURCE:Input source conversion button
MENU:Show the main menu
EXIT: Exit the OSD menu
VOL+/-: Change sound volume
CH+/-: Change channel
PICTURE: Select the picture mode
SOUND: Select the sound mode
CH.LIST:Show channel list
ASPECT: Adjust image display proportion
SLEEP: Set the timer turn off TV automatically
FREEZE: Freeze the picture
FAV.LIST: Display/Define favorite channel
USB: Select USB source input
DTV: Select DTV source input
DVR.LIST: Show the DVR list
TEXT: Teletext switching.
SUBTITLE: Select language of subtitle
AUDIO: Select audio output
ZOOM+/-: Zoom the size of screen(multimedia)
REP/REC: Personal video record button
PAGE-UP: Page up
PAGE-DOWN: Page dowm
COLOR BUTTONS: Follow the on-screen instruction
PLAY/PAUSE/REW/FF/STOP/PREVIOUS/
10
11
12
/
/
ENTER: Confirm selection
: Navigate on menu
EPG:Show electronic program guide
30
31
32
NEXT: Available in multimedia
Page 32
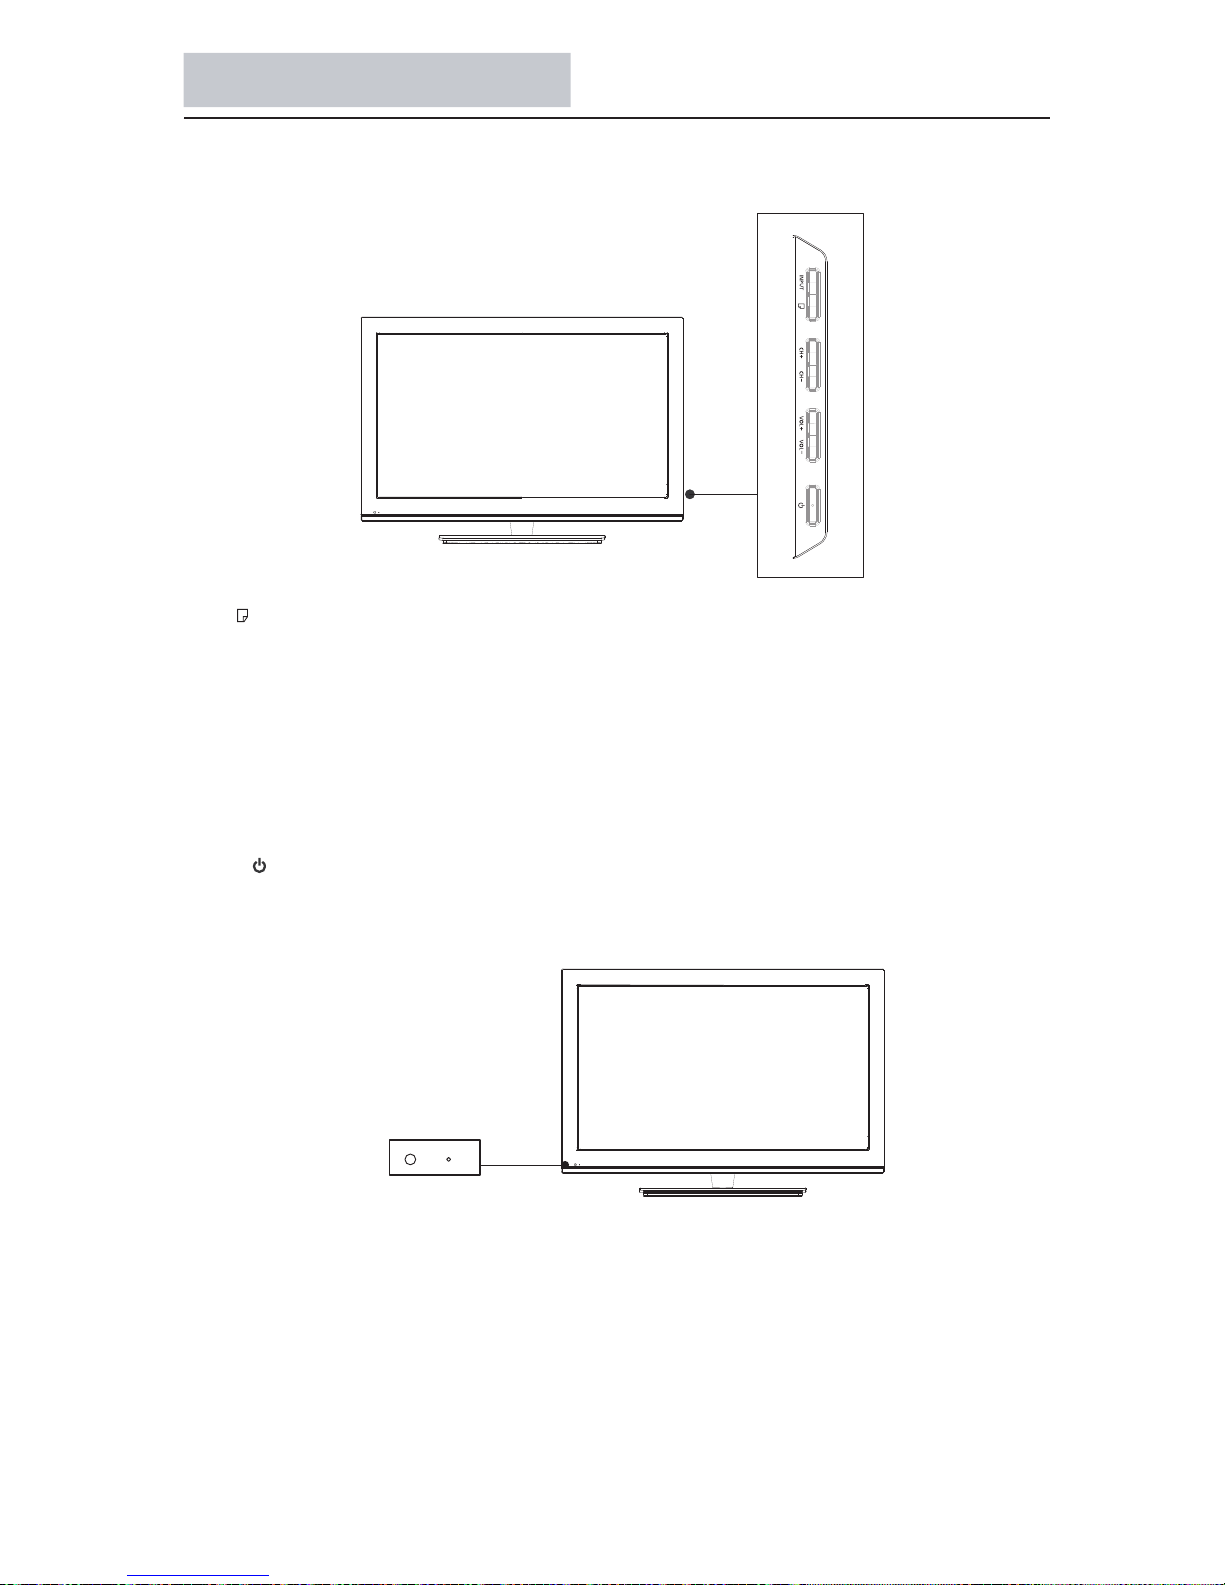
Functions of the panel
31
Panel Buttons
MENU( ): Displays the TV Main Menu.
INPUT:
Displays the Source Select List.
VOL-: Decreases the volume. In the TV m
enu system, it acts like the left arrow on the remote control and can be used to
select menu options.
VOL+: Increases the volume. In the TV menu system, it acts like the right arrow on the remote control and can be used to
select menu options.
CH-: Scans down through the channel list. In the TV menu system, it acts like the down arrow on the remote control
and can be used to select menu options.
CH+: Scans up through the channel list. In
the TV menu system, it acts like the up arrow on
the remote control and can be used to select menu options.
POWER ( ): Turns the TV on and off.
Power Indicator: Light up in red when the TV is in standby mode. Light up in blue when the TV is on.
Remote control sensor: Receives IR signals from the remote.(Do not put anything over the sensor, otherwise, the sensor may
not operate property.)
Power Indicator
Remote Control Sensor
Page 33
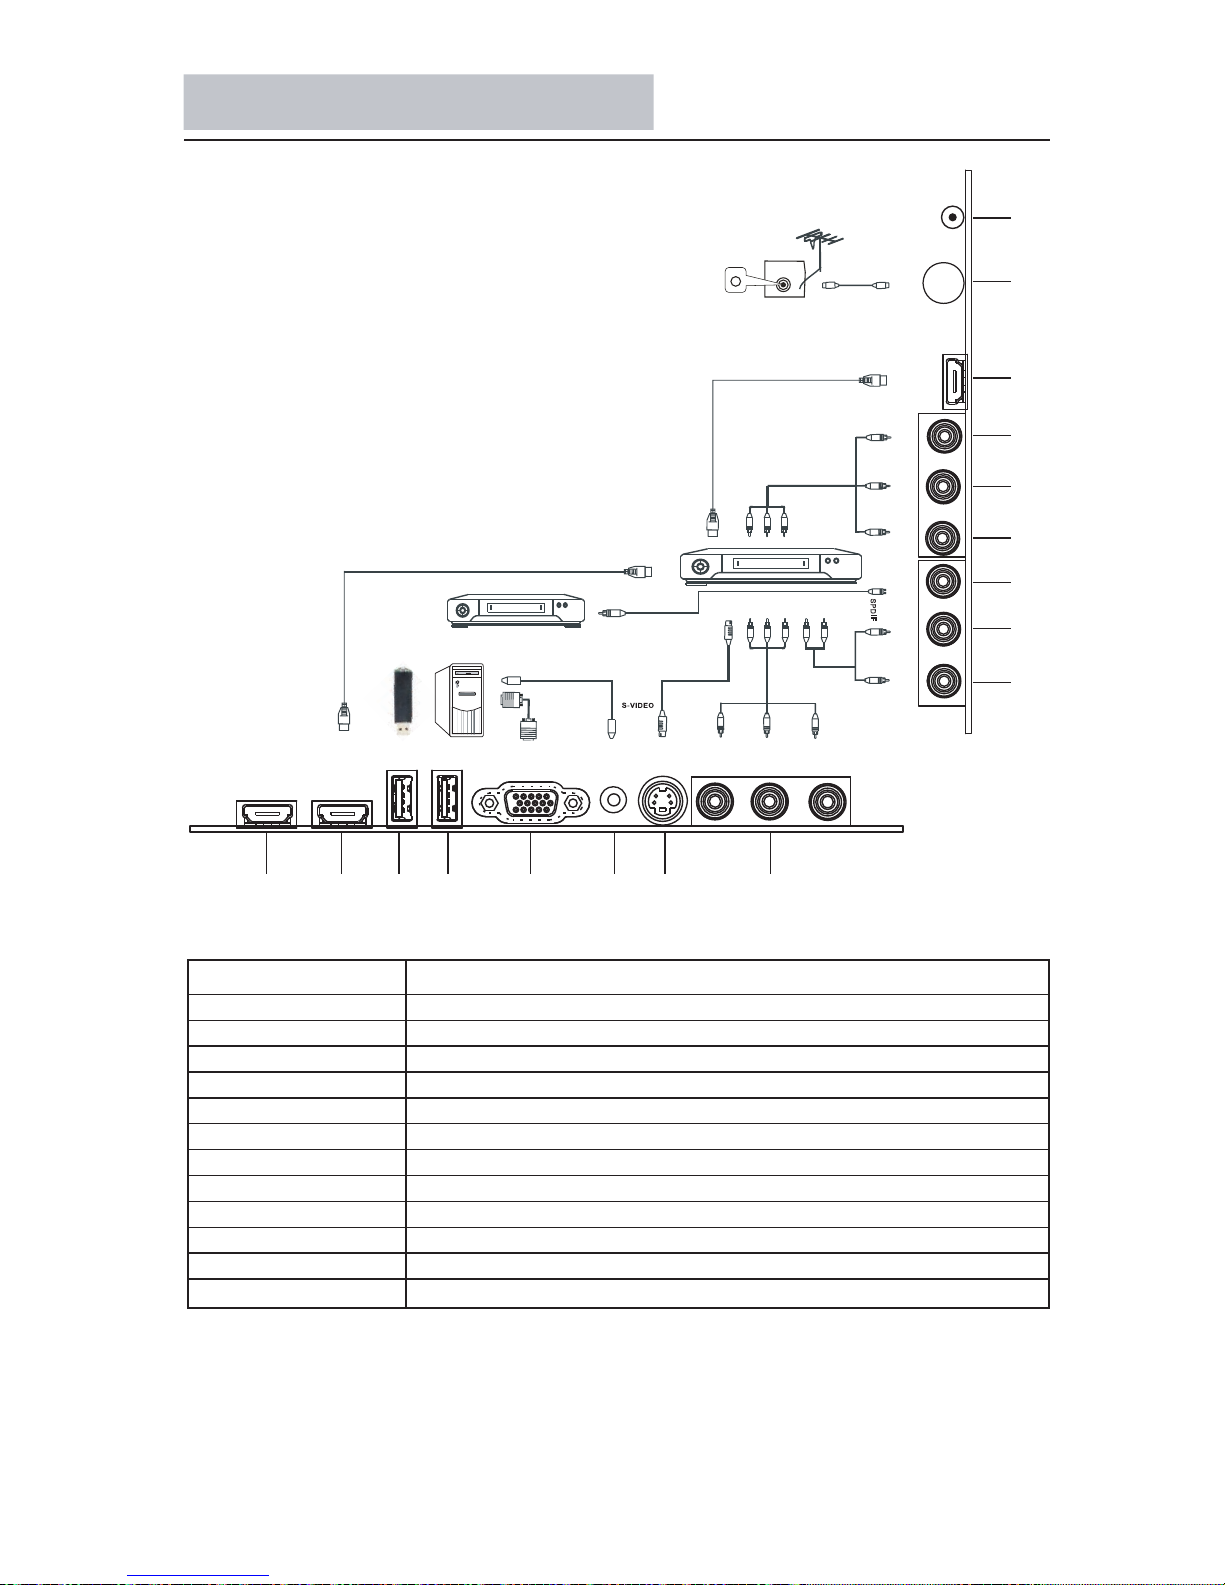
Name Function Description
Reserve for external USB device
HDMI input
VGA input
VGA audio input
Component input
Component audio input
S-VIDEO input
Coaxial output
Composite video input
Composite audio input
Antenna input
Earphone output
YPbPr audio L/R
YPbPr
VGA
RF IN
Earphone
VGA audio
HDMI1, 2, 3
S-VIDEO
SPDIF
AV
AV audio L/R
USB1, USB2
YPbPr/L YPbPr/R SPDIF AV AV/L AV/R HDMI1 RF
SPDI F
TV
DV D
AM P.
HDMI2 USB2HDMI3 USB1 VGA S-VIDEO YPbPrVGA-AUDIO
Earphone
Rear Panel and Descriptions
32
Page 34
EX IT E NTER
Input S ource
DTV
TV
Compo nent
PC R GB-
HDMI1
HDMI2
HDMI3
AV
S Video-
Stora ge
Basic Operation
Power On / Off
Select Viewing Source
Press the "SOURCE" bu tt on to di sp la y th e sources list.
Please use the b ut to ns t o se le ct desired signal, and press ENTER or " " b ut to n to c on fi rm .
Please make sure t he c on nection for your choice is available .
33
1. Connect the TV unit to power source using power cord.
2. When the power indicator is in red, the TV is in standby mode. Now press the “POWER” button on
remote control or “POWER” button on top panel to turn on the TV. The TV work normally when
the power indicator is in blue.
button on top panel. Now the indicator will be in red
.
3. Switch the TV to standby mode, just press “POWER” button on the remote control or the “POWER”
4. If unused for a long time in standby mode, please disconnect the power cord from the wall outlet.
Note: The TV set can turn off automatically afer 15 minutes while there is no signal input.
Note:
Page 35
cctt
r
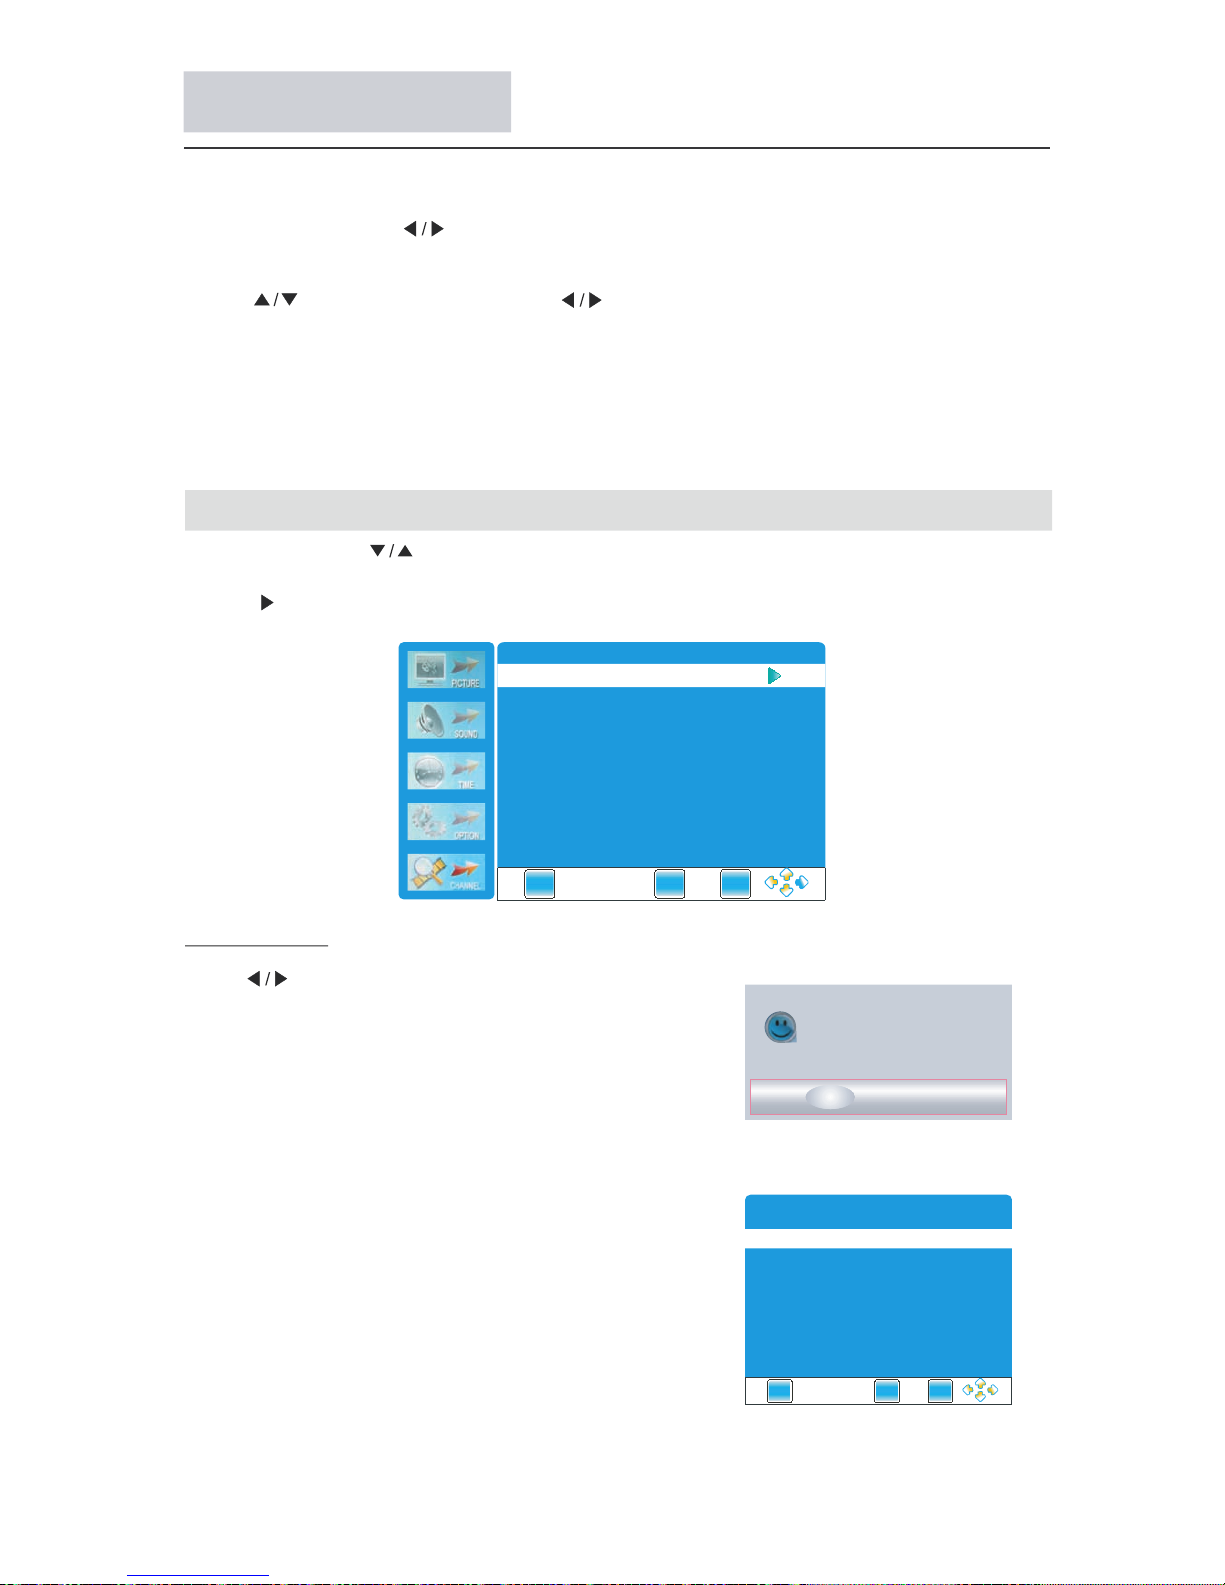
Channel Menu
search channel s au to ma ti ca ll y.
All channels will be s av ed o nc e se ar ching finished.
In the course of a ut o se ar ch in g, y ou c an pre ss "E XI T" to
stop the searching p ro ce ss .
Press to s el ec t th e items
" "
ENTER or button .
Press
.
" "
or ENTER button to enter the shubmeu
Press " .to Start b uttons se le ct
▼
Auto Tun ing
Note If it i s the first time installation i t will start
with Installation Guide Menu
: ,
.
Press ENTER button to enter Auto Tuning, the TV will
Press "MENU"
" "
and buttons to select the CHANNEL.
"
Menu Operation
34
Press the "MENU" and to browse the Picture Menu, Sound Menu,
Menu, Menu i n tu rn .
" "
Press "EXIT" to exit "MENU" mode.
.
.
: ,
.
" " buttons CHANNEL Menu,
Time Option Menu and Me di a
Press ENTER or button to enter the submenu.
Press button to s el ect items and button to a dj us t it
Press M EN U bu tt on to return to the previous menu
button
Note When an item in M EN U is displayed as gray it means that t he item is not avai la bl e
or can not be adjusted
▼
Press "EXIT" to exit "MENU" mode.
" "
" "
If you want to adjust the display settings, please follow the instruction below.
Aut o Tunin g
DTV Ma nual Tun ing
ATV Man ual Tun ing
Pro gra mme Edi t
EX IT
MENU
ENTE R
Sta rt to updat e in fo
?
Sta rt
Cancel
EXI T
MENU
ENTE R
Ins tall ation Gu ide
Lan guage
Engl ish
Aut o Tu ning
MENU
EXI T
ENTE R
Page 36
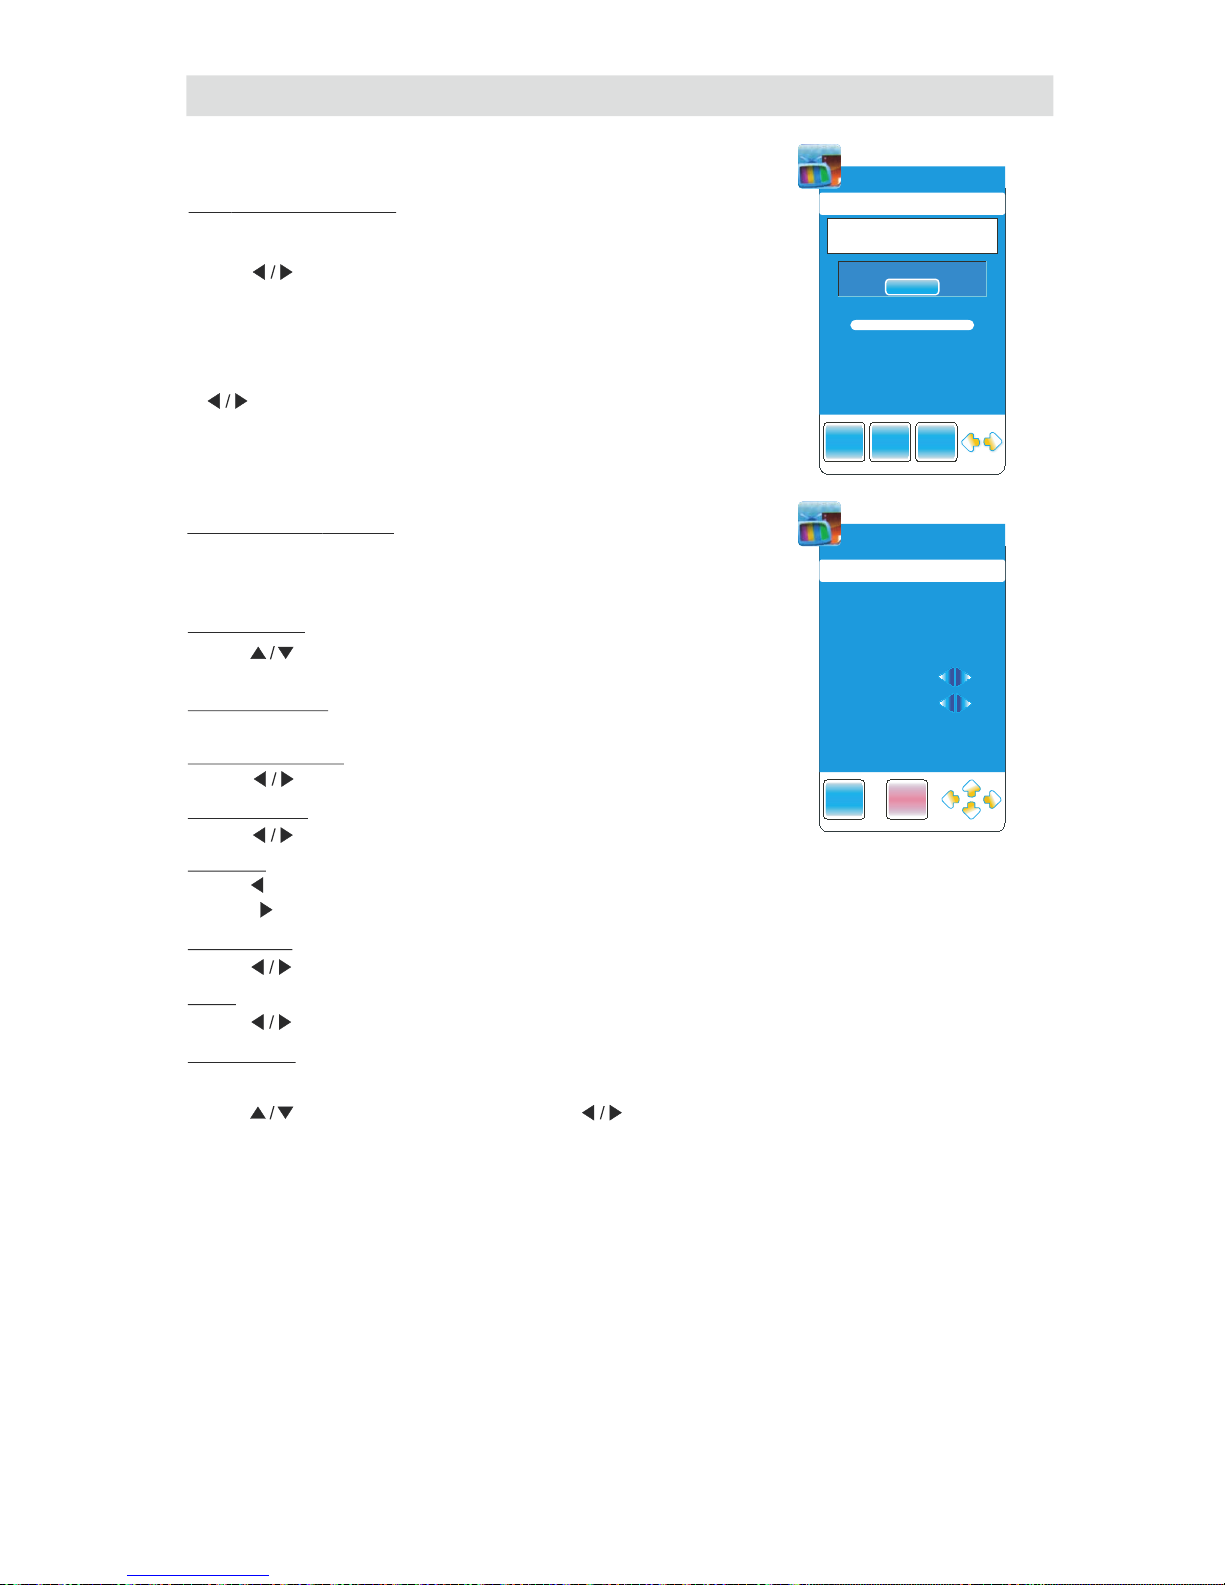
Press ENTER button to search
DT V Ma nual Tunin g ( )only available in DTV mode
Press to
." " button select c hannel
Whe n a ch annel is found, the se arch ing pro cess will stop ,
the ch an ne l will be sa ve d wi th cu rr en t ch annel numbe r
If the prog ram is not your ex pe cted on e, plea se pre ss
button to co nti nue the se arch ing.
" "
Press EXIT to ex it .
" " button
If y o u f i n d o n e c h an n el i s a l i t t l e w eak,
you c an adj u s t t he freq uen c y o f t h e c han n el .
It m i ght i m p r o ve the q u alit y o f p i c t u r e an d s ound .
ATV M anu al Tuni ng
S t o r a g e T O
C o l o r S y s t e m
A u d i o Sy s t e m
C u r r e n t C H
F i n e -T u n e
S k i p
Fr e q u e n c y
S e a r c h
( )only available in TV mo de
Press to
.
"
" bu tt on select it em s
Press to
Can’t be adjus te d.
Press bu tt on t o se le ct Audion System:I—BG —DK." "
Press bu tt on t o se le ct c urrent channel." "
Press bu tt on t o ad ju st f requency." "
Press bu tt on t o tu rn o n/ off " " "SKIP ".
Display the cu rr en t ch an ne l fr eq uency.
Press bu tt on t o se ac h channel from high to low,until find the cha nn el ." "
Press bu tt on t o se ar ch channel from ,until find the channel." " low to high
" " button select to storage to channal
NO. from 1 to 100.
Press to adjust it
.
" " butto n
Press the red button to save it
.
Press "EXIT" to exi t.
button
Channel Menu
35
You can also set program list again one by one by “DTV Manual Tuning” function.
EX IT E NTER
DT V Manu al T uni ng
UHF CH 21 4 7 4M Hz
Plea se s elect cha nnel t hen
pre ss ENTER t o searc h
Bad N ormal Go od
NO SIGNAL
MENUE XIT ENT ER MENU
EX ITEX IT SAV E
ATV Ma nua l Tuni ng
Sto rage To
1
Col or Syst em
PA L
Aud io S ystem
I
Cur rent CH
1
Sea rch
Fin e T une-
Ski p
Fre quenc y
No
44 . 00 MHz
Page 37
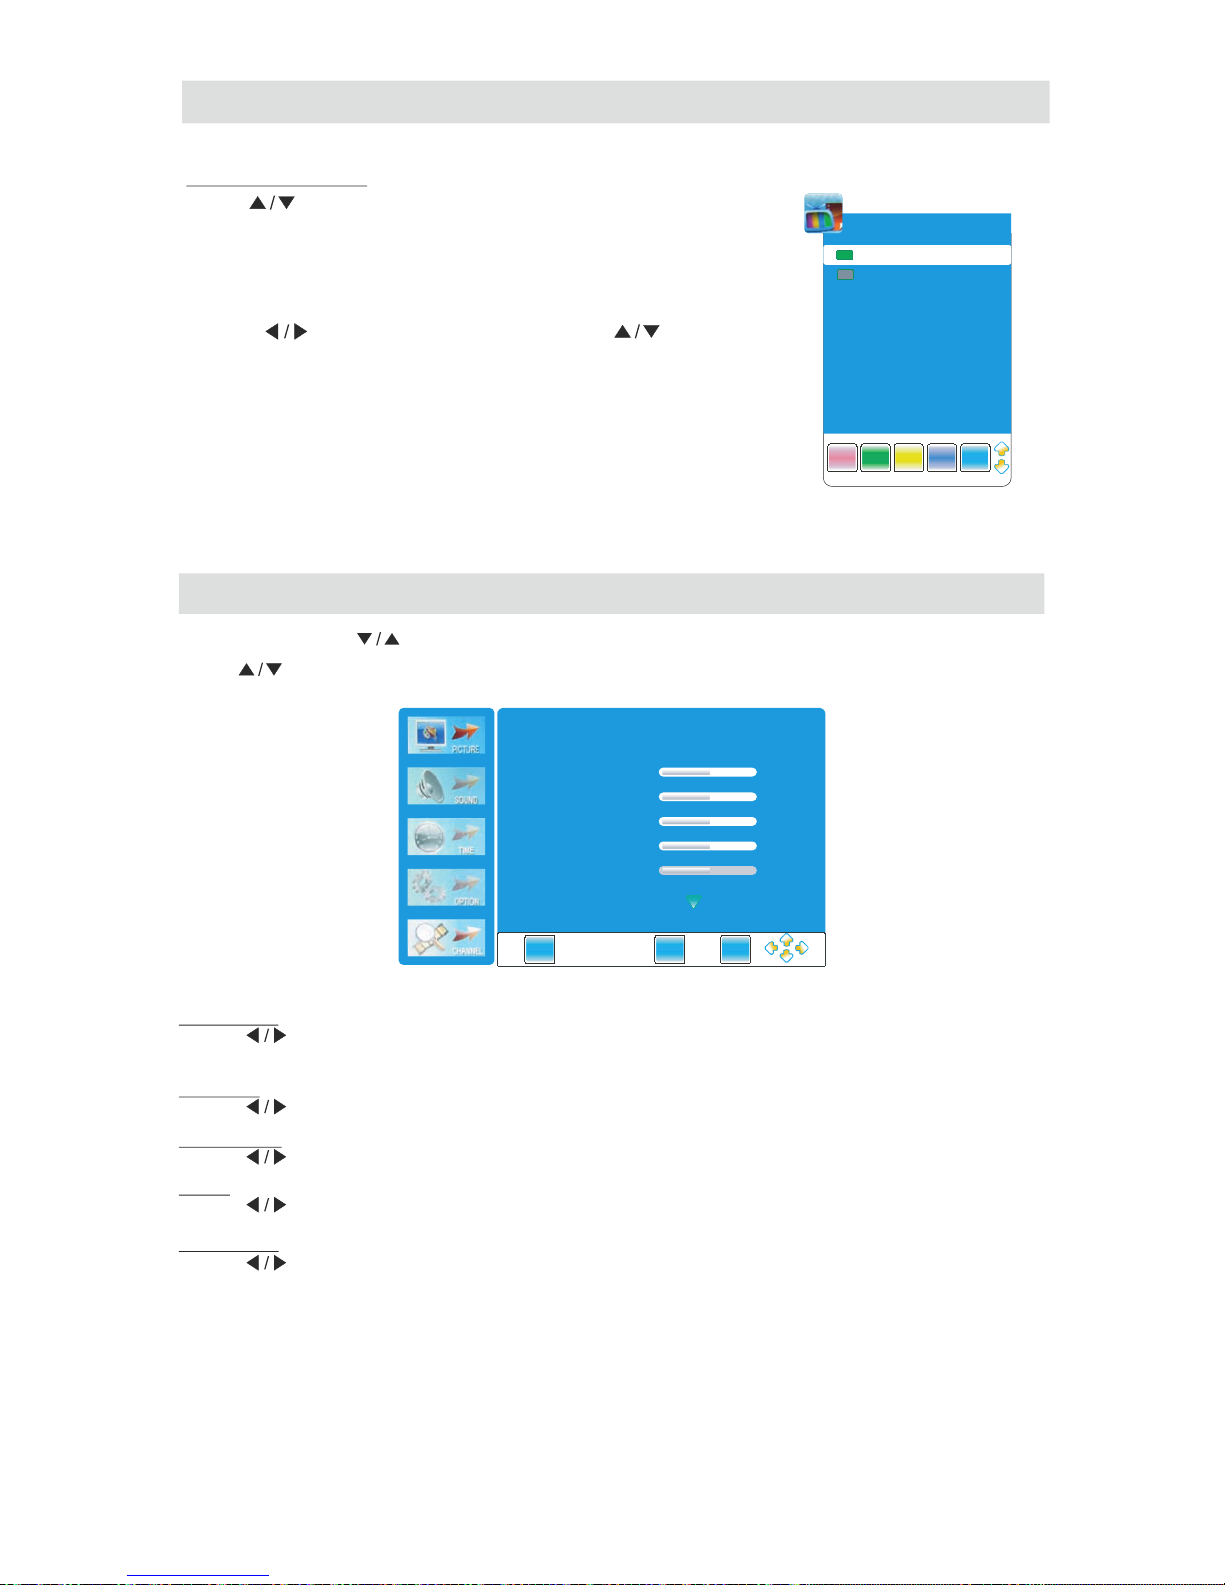
Pr o g ramme Ed it
Pres s to .
" " button selec t items
Press red to
.
butt on delete th e channel
Pres s gr een to .butt on renam e the channel
: .Note Only th e TV channel can be renamed
.ch ange the letter
Pres s ye llow to .button move the channel
Pres s " BL UE" button to skip the chan nel.
Pres s" FAV
." to
.
button set t he f avorite chann el
Pres s " " to select the le tt er and press" " to
Note The list of programs include TV and DTV.
:
The programs can be moved only among the same kind
.
Channel Menu
Picture Menu
Press "MENU" .and " " buttons to select the P IC TU RE MENU
Picture Mode
Press button to sel ec t among,Standard, mild,user and dynamic mo de s.
" "
Co n t r ast
Press button to adjust the contrast of the picture
.
" "
Brightnes s
Press button to adjust the brightness of the picture
.
" "
Co l o r
Press button to adjust the color saturation
.
" "
Sh arpnes s
Press button to adjust the sharpness level of the picture
.
" "
Press .to
" " button s el ec t items
(The fun ct ion is not available fo r"S TORA GE "mo de. )
36
Pro gramm e Edit
TV
TV
1 C-0 1
2 C-0 2
DELE TE
RE NAME
MOVE SK IP FAV
EX IT
MENU
ENTE R
Pic tur e Mode
Con trast
Bri ght ness
Col or
Sha rpn ess
Tin t
Sta nda rd
50
50
50
50
0
Page 38
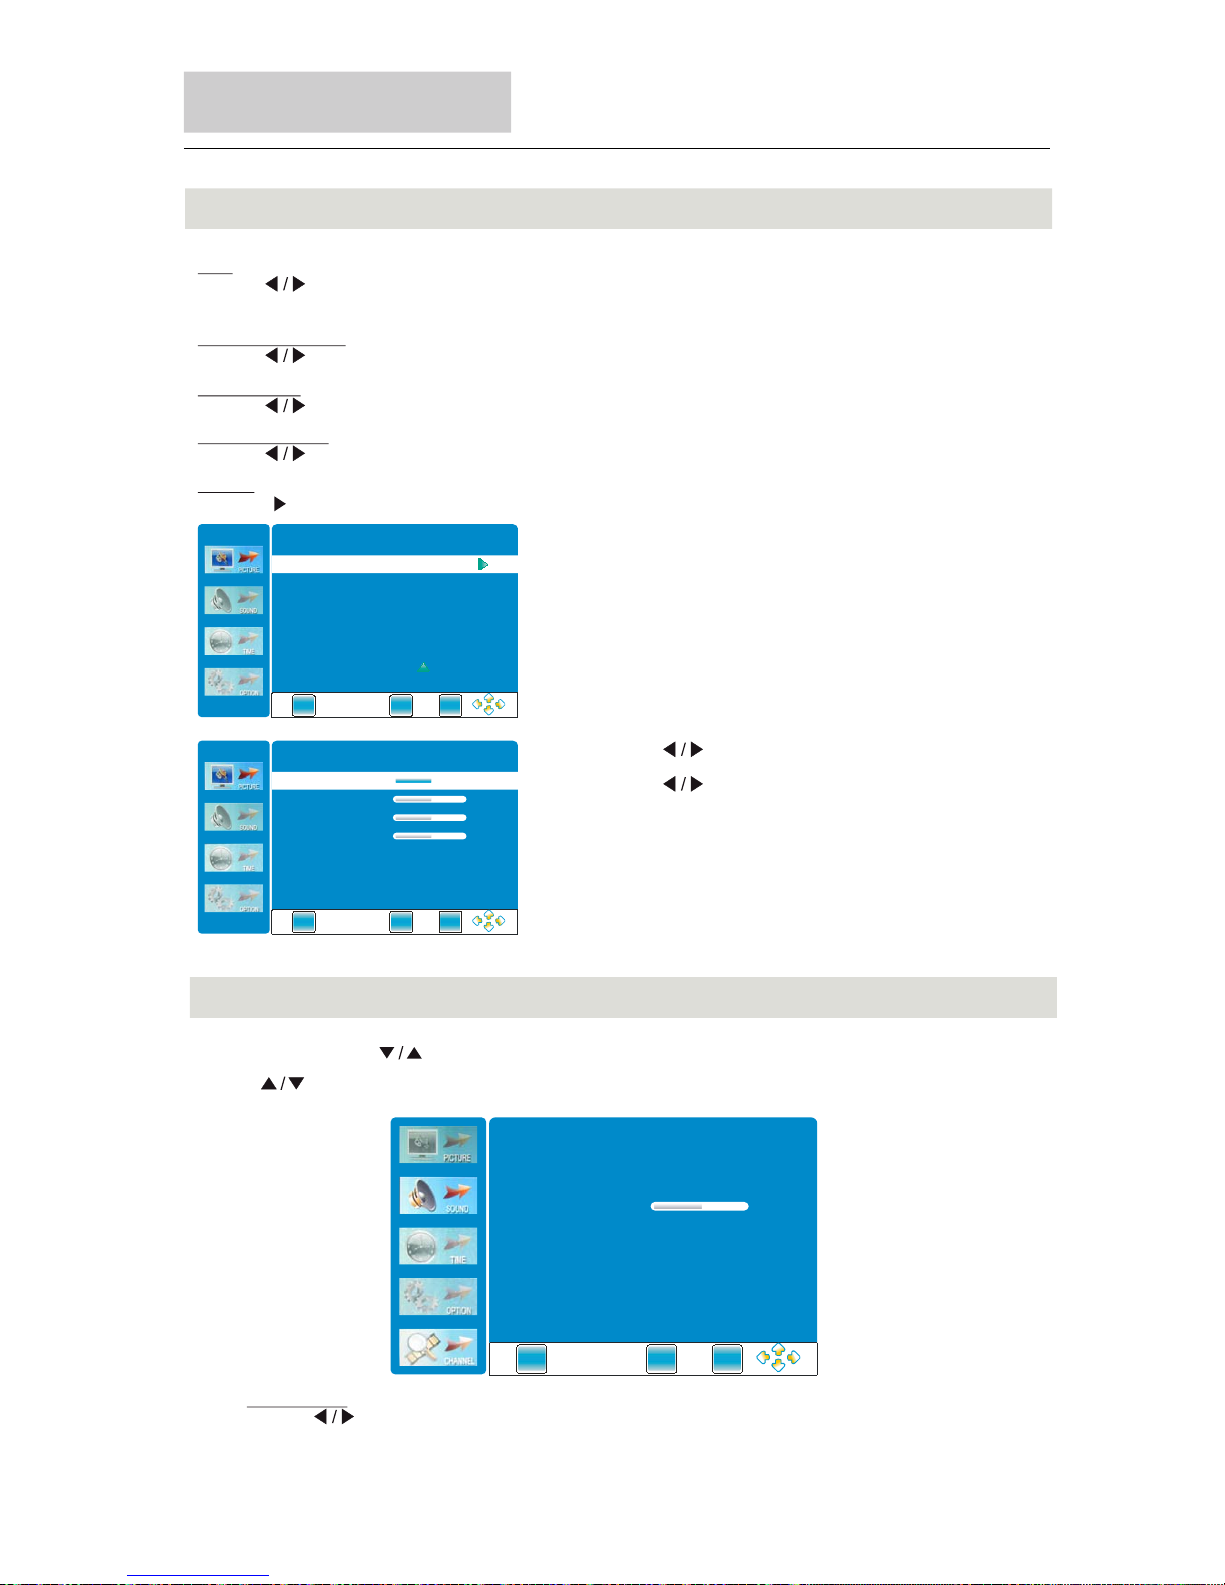
Picture Menu
Menu Operation
37
Color Temperature
Press button to select among user, normal, warm, and cold mode.
" "
Aspect Ratio
Press button to select the ratio of the screen: FULL-NORMAL-AUTO-panorama-ZOOM1-ZOOM2.
" "
Noise Reduction
Press button to select among Auto, off, weak, middle and strong.
" "
Press button to select items.
" "
Press button to adjust it.
" "
Press “EXIT” button to adjust it.
Screen (only available in PC RGB mode)
Press button to enter the submenu.
" "
Tint
Press button to adjust the tint of the picture.
" "
(NTSC mode only)
EXI T
MENU
ENTER
Scre en.
EXI T
MENU
ENTER
50
50
50
Auto Adjus t
Vert ical pos .
Size
Phas e
50Hor izont al pos.
Sound Menu
Sound Mode
Press button to select among Standard, Music, Movie, Sports, and User.
(The function is not available for “STORAGE” mode.)
" "
Press "MENU"and " "buttons to select th e Sound Menu.
Press .to
" " button s el ec t items
EX IT
MENU
ENTE R
Sta nda rd
Sou nd Mod e
EQ
Bal anc e
0
Aut o Volum e Off
Sur rou nd Sou nd Off
SPD IF Out put
PC M
Page 39
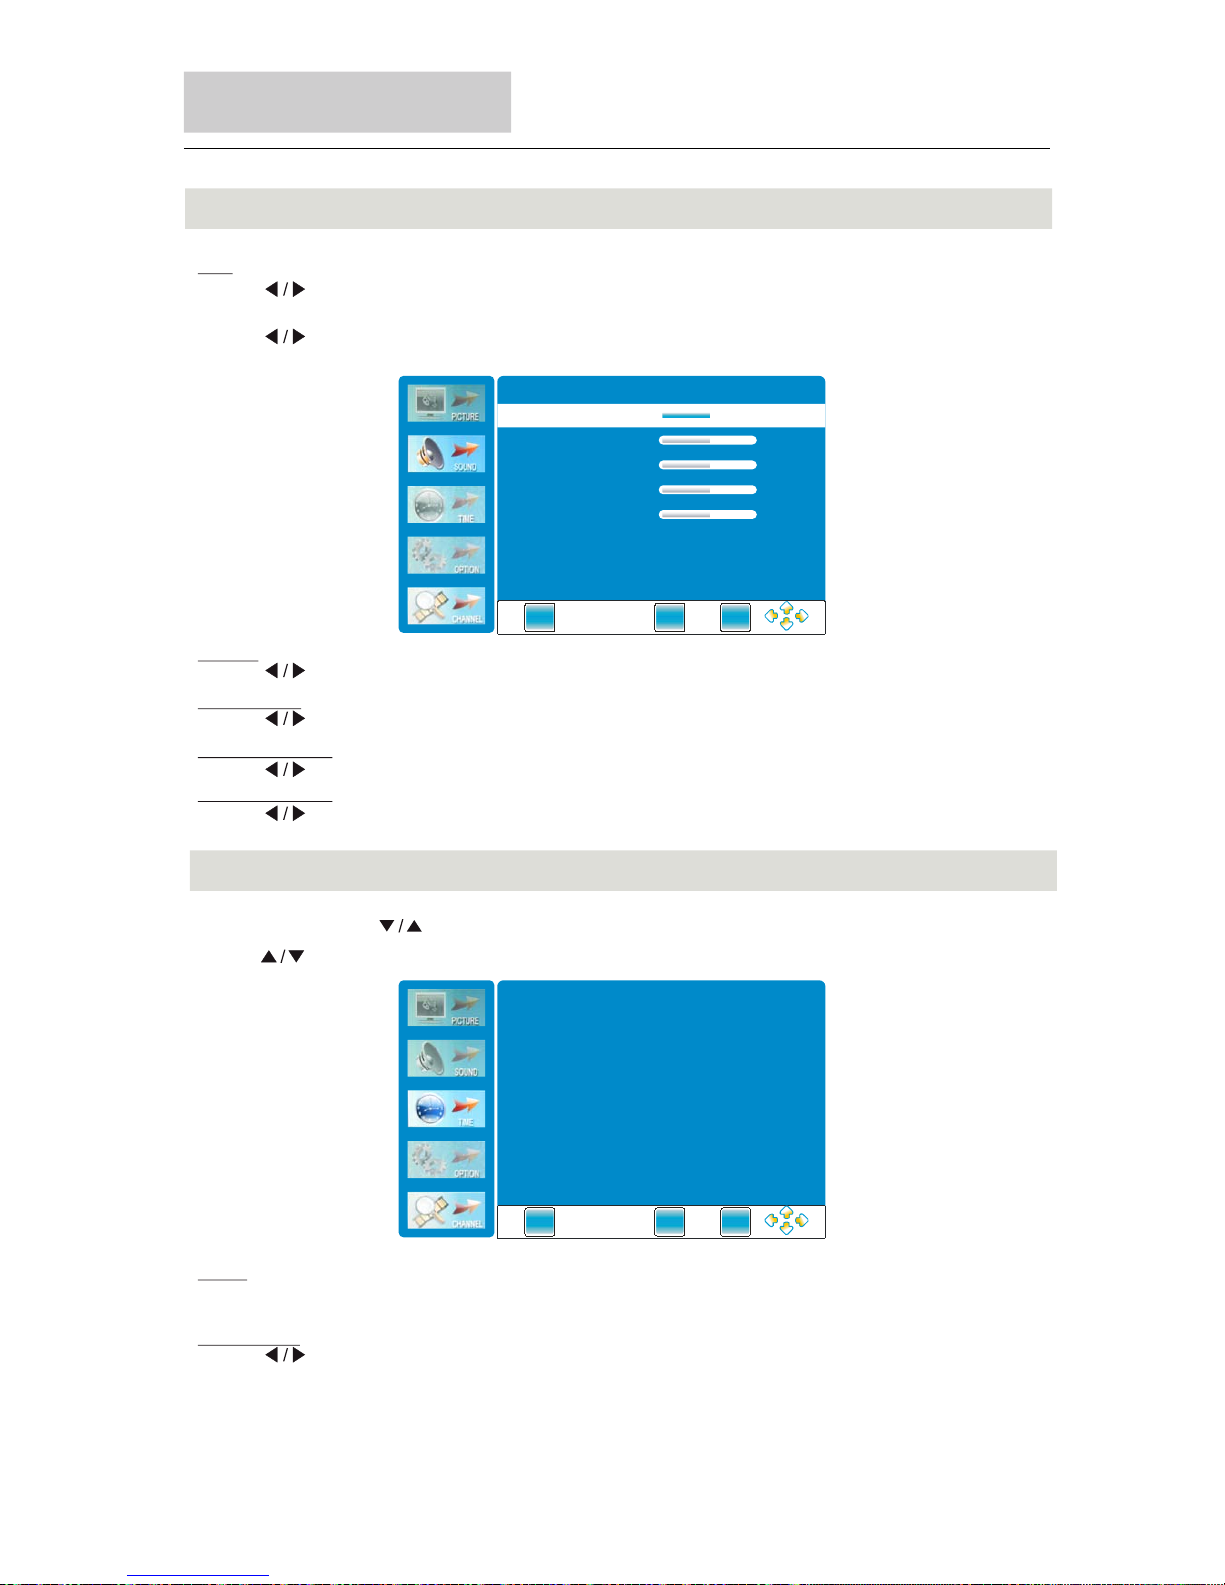
Sound Menu
Menu Operation
38
Press button to change the value.
" "
Balance
Press button to adjust the audio output between left and right speakers.
" "
Auto Volume
Press button to turn on/off the function of auto volume.
" "
Press button to turn on/off the function of surround sound.
" "
Surround Sound
" "
Press button to select PCM, Off, AC3.(Only available in DTV )
" "
SPDIF Output
" "
Press button to POP-UP the submenu, as follow picture to display:
" "
EQ
(Only available in the “USER” sound mode).
Time Menu
Clock
Automatic reads digital television the clock display.
Sleep Timer
Press button to set the sleep timer.
" "
Press "MENU"and " "buttons to select th e TIME MENU.
Press .to
" " button s el ec t items
EX IT
MENU
ENTE R
EQ 500HZ
EQ 1.2kHZ
EQ 3kHZ
EQ 7.5kHZ
40
40
40
40
EQ 120HZ
40
EX IT
MENU
ENTE R
Clo ck
Sle ep Time r Off
__ _ _ __ __
Page 40
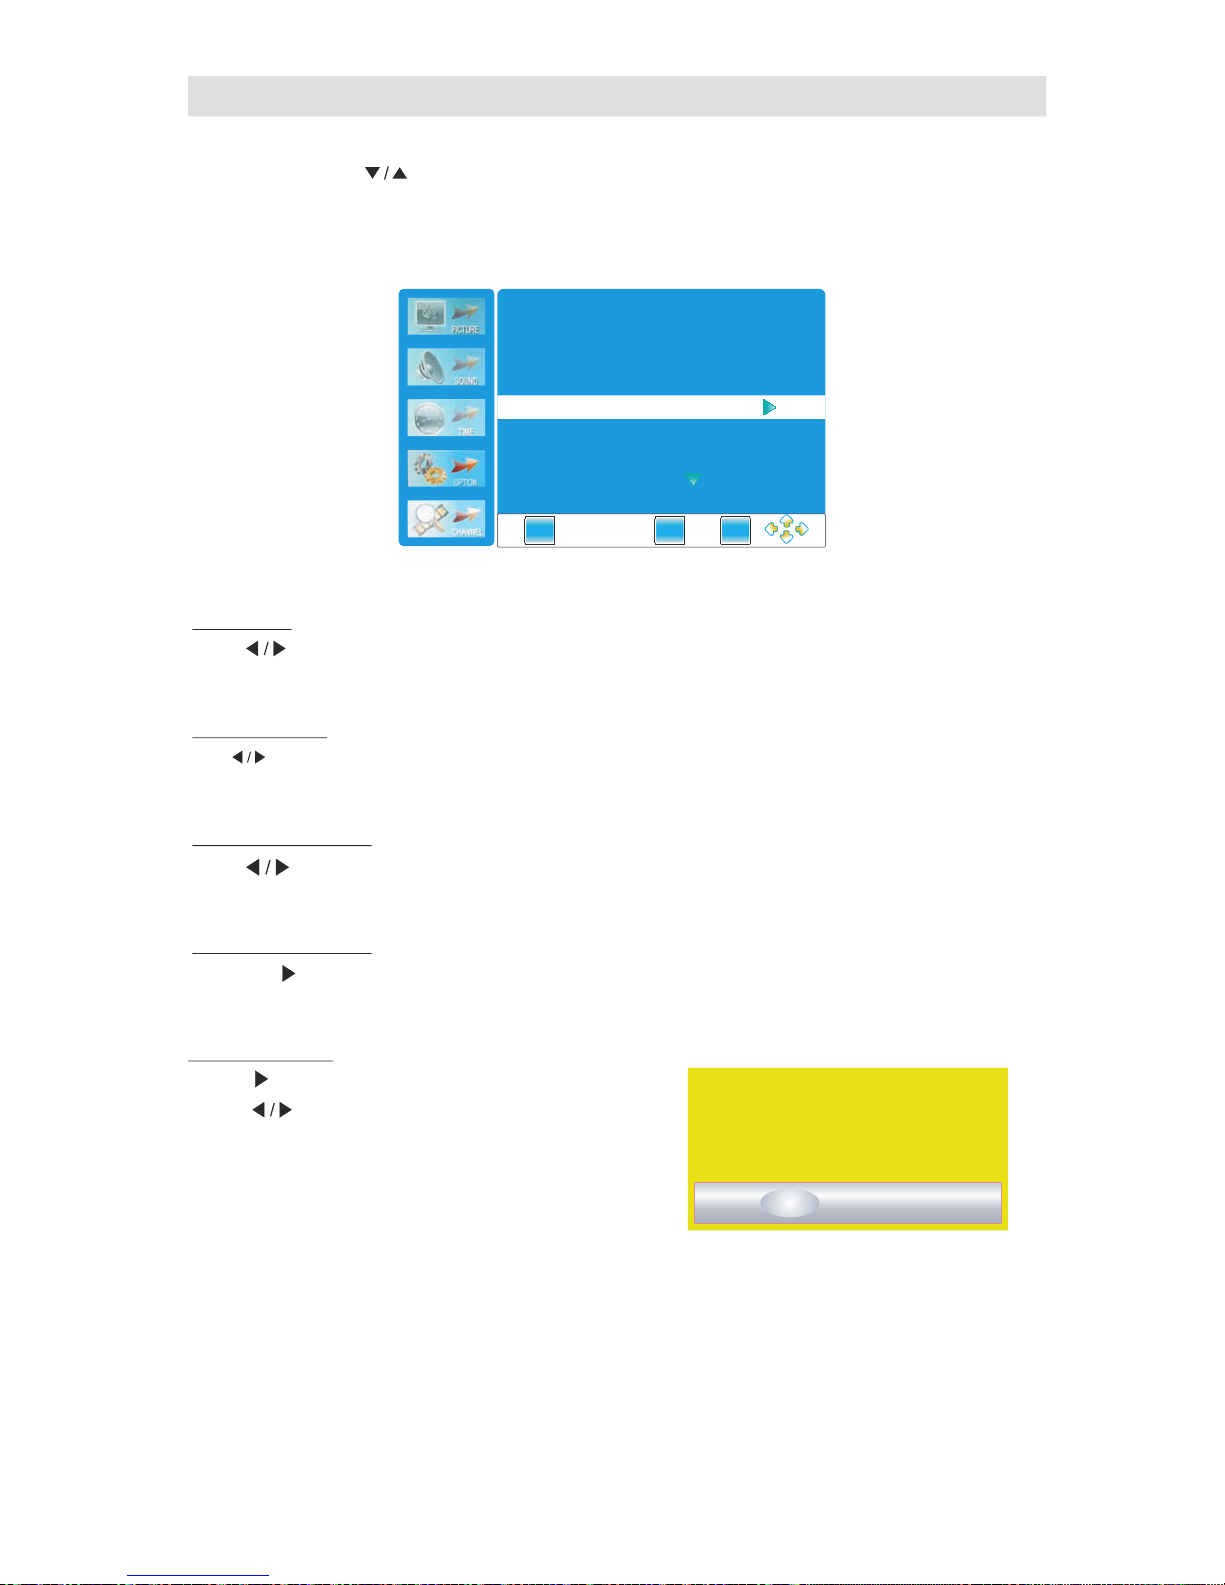
Option Menu
Press "MENU"
and but to ns to s el ec t the Option Menu.
" "
Press
" "
or ENTER button to enter the submenu.
▼
Lan g u age
Press button to select between English and Traditional Chinese.
" "
OSD Tran s p aren c y
Press button
to select among the OFF , 25% , 50% , 75% and 100% paramenters." " " " " " " " " "
" "
So f t w are Up d ate
Press the button or ENTER button for software update." "
(Note:No professionals,please do not easily use this function.)
Factory Def ault
Press button to select yes/no, and press ENTER
Press MENU button to return.Press EXIT button to exit." " " "
button to confirm.
" "
Press" " button t o POP-UP dialogue menu.
39
OSD
Ti m e Ou t
Press button to select among the" ","5 ""10 ",OFF SEC SEC
" "
"15 ","20 ","30 ","45 " "60 " .SEC SEC SEC SEC and SEC Paramenters
EX IT
MENU
ENTE R
Lan guage
Eng lish
OSD Ti me Out 1 0秒
OSD Tr ans pare ncy
25 %
Res tore Fa cto ry Def ault
Sof twa re Upd ate
Are you s ure?
Yes
No
Page 41
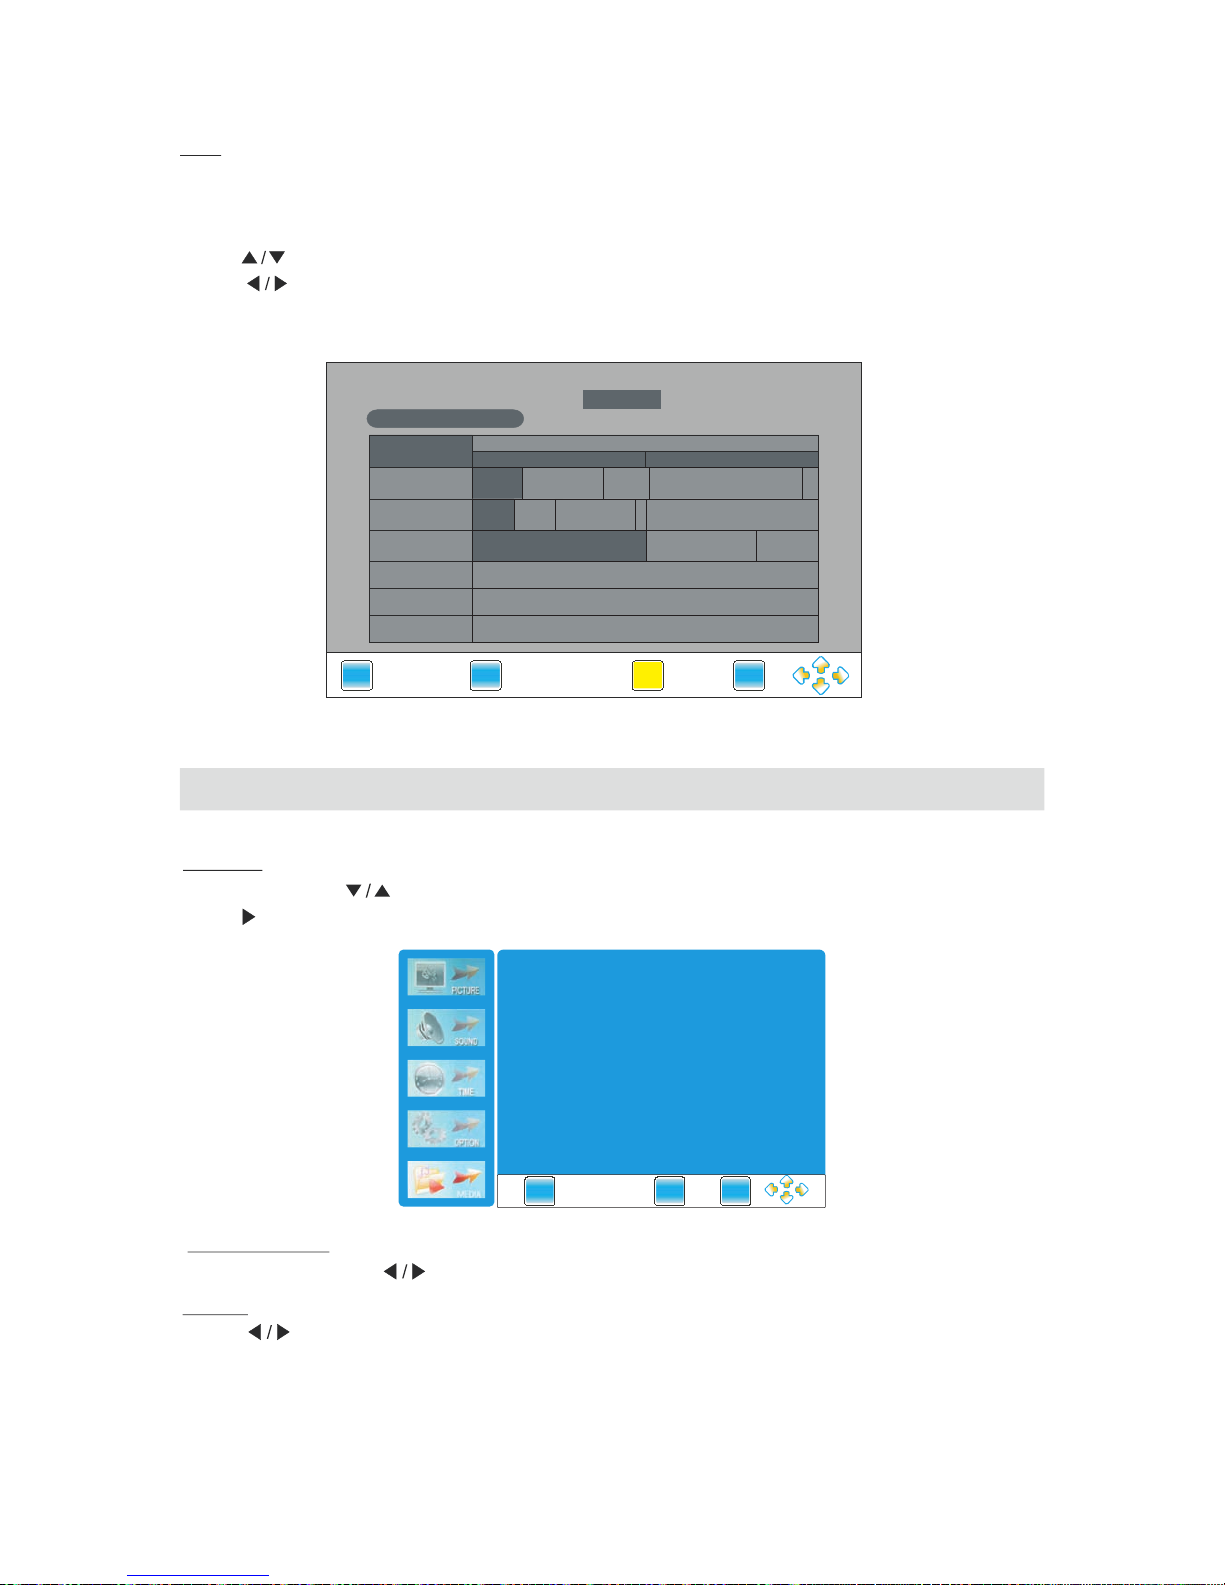
EPG( )only available in DTV mode
PPRROOGGRRAAMMMMEE GGUUIIDDEE
05 Nov 2008 01 07
::
DTV 23
J2
17:45-18:15 You
\'re Under Arrest 2
::
DDTTVV
82 J2
83 iNews
8855 HHiigghh DDeeffiinniittiioo....
1111 NNoovv
18 00:: 19 00::
You can check the program information for the next 7days.
(If the information is available from broadcast)
Press to
Press EPG button to display the Ele ct ro ni c Pr og ra mm e Gu id e.
" "
.
" " button select the c ha nn el
Press and yellow button to select the time
.
" "
NN
..
Press I NF O bu tt on to show th e info rm at io n of the pr og ra m.
" "
Important Unique Button
Rem i nd e r
Media Menu
MEDIA
Press and button to sel ect the .
Press or ENTER button to enter the submenu
" "
Slide show speed
Slide show sp eed:P ress button to selec t among slow,Med ium and fas t.
Repeat
"MENU"
"MEDIA"
" "
" "
" "
Press button to select among the"all" ,"select" and " none" modes.
YYoouu\\''rree EEyyeesshhiieelldd
2211
IInnvveenntt PPeett WWoonnddeerrllaanndd
NNeewwssNNeewwssFFiinnaann
....
NNeewwss AAtt
66::3300
CCoouuppllee OOrr TTrroouubbllee VViiddeeooffaasshhiioonn NNeewwss SSccoooopp
HH
..
40
EX IT
INFO
ENTER
DATE
EX IT
MENU
ENTE R
Sli de Sho w Spee d Med ium
Rep eat
All
Page 42
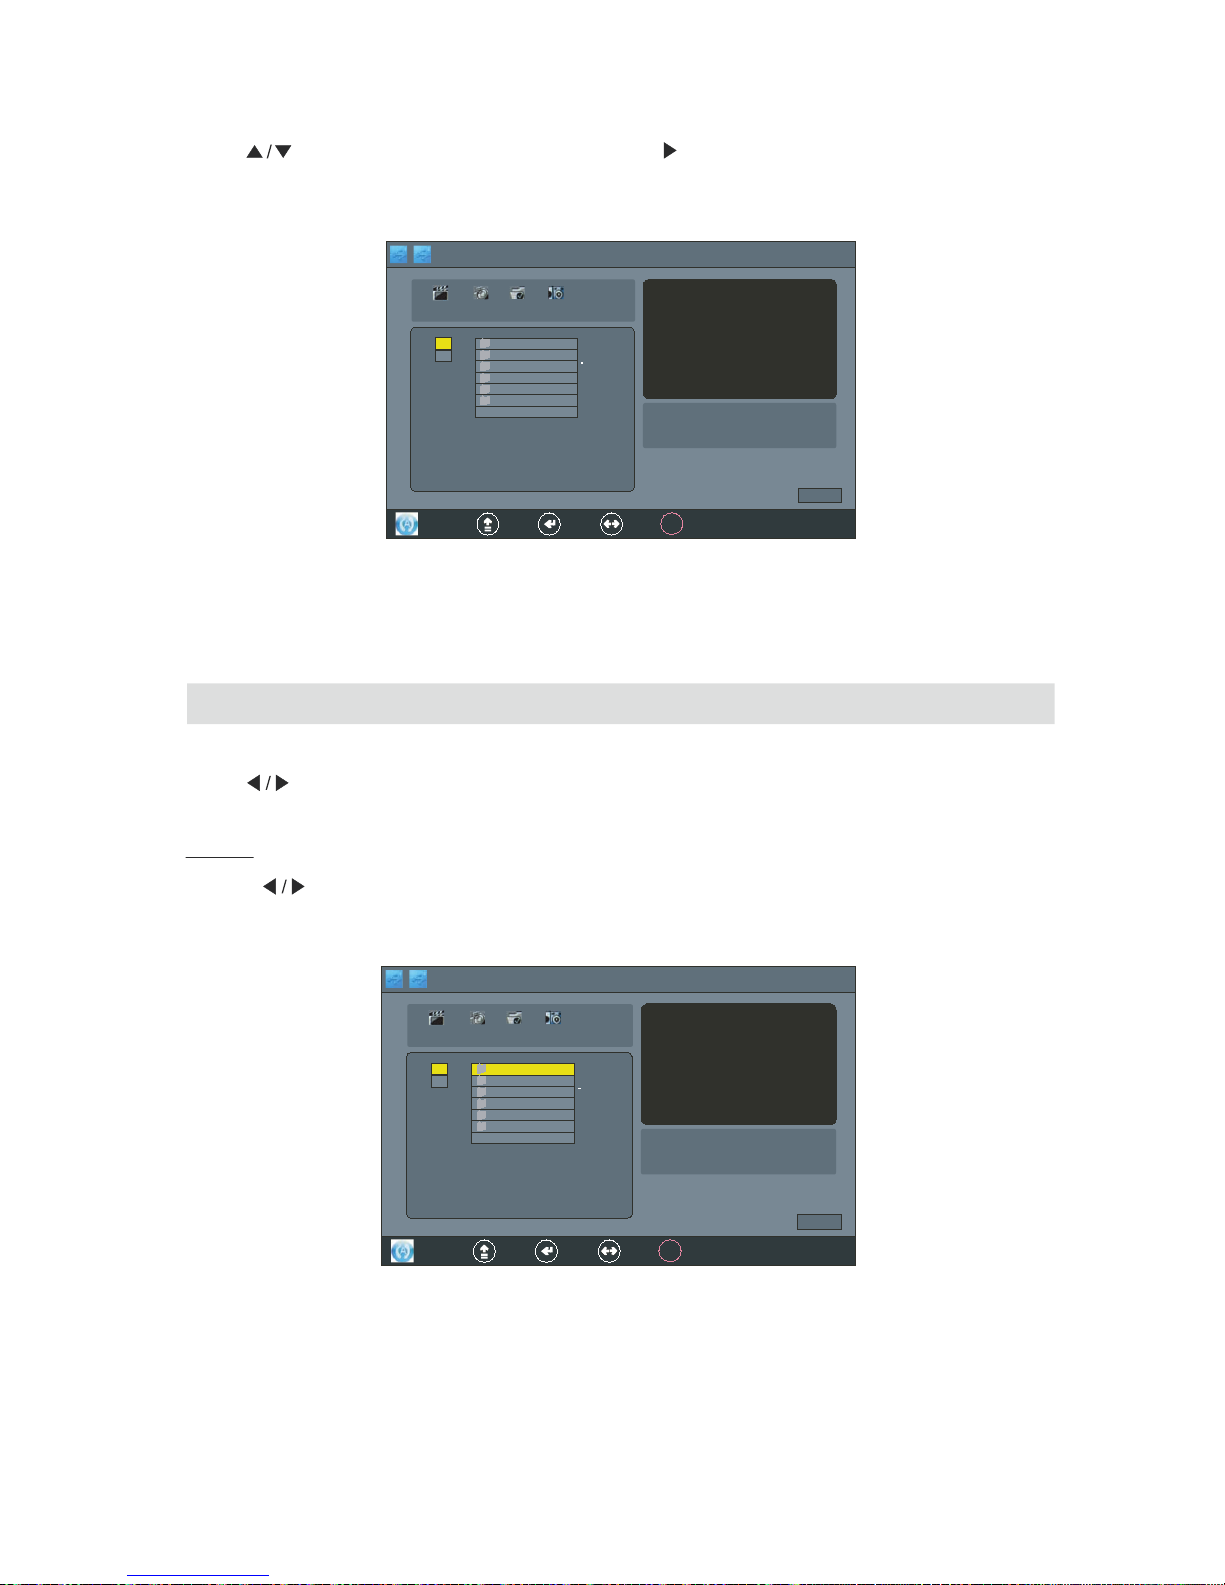
Press " SO UR CE"but ton to PO P-UP t he input sour ce menu.
Press button to sel ect the ST ORAGE ,and pr ess or ENTER to enter the interface, as follow display:" " " "
" "
Press but ton to sel ect among the PH OTO , MU SIC , MOVIE and TE XT ." " " " " " " "icons
" "
Photo
PHOTO
1.P ress bu tton to se lec t the"
PHOTO
"
2.
Press ENTER button to enter the submenu
Press ENTER button to confirm.
" "
41
05
Mar
2008 0 1 08
.
:
21 ABC1 Once
USB 2.0
PHOTO
MUSIC MOVIE
C:
\
PVR
MUSIC
PHOTOS2
PHOTOS1
MOVIE
D:
TEXT
OOKK
EXIT ENTER MOVE
Path
W H
× :
SIZE
:
1/1
play
FULL SCREEN PLAY
5
Mar
2008 01 08
.
:
21
ABC
1
Once
USB 2.0
PHOTO
MUSIC MO VIE
C:
\
PVR
MUSIC
PHOTOS2
PHOTOS1
D:
TEXT
OOKK
EXIT ENTER MOVE
Path
W H
× :
SIZE
:
1/1
play
FULL SCREEN PLAY
MOVIE
Page 43
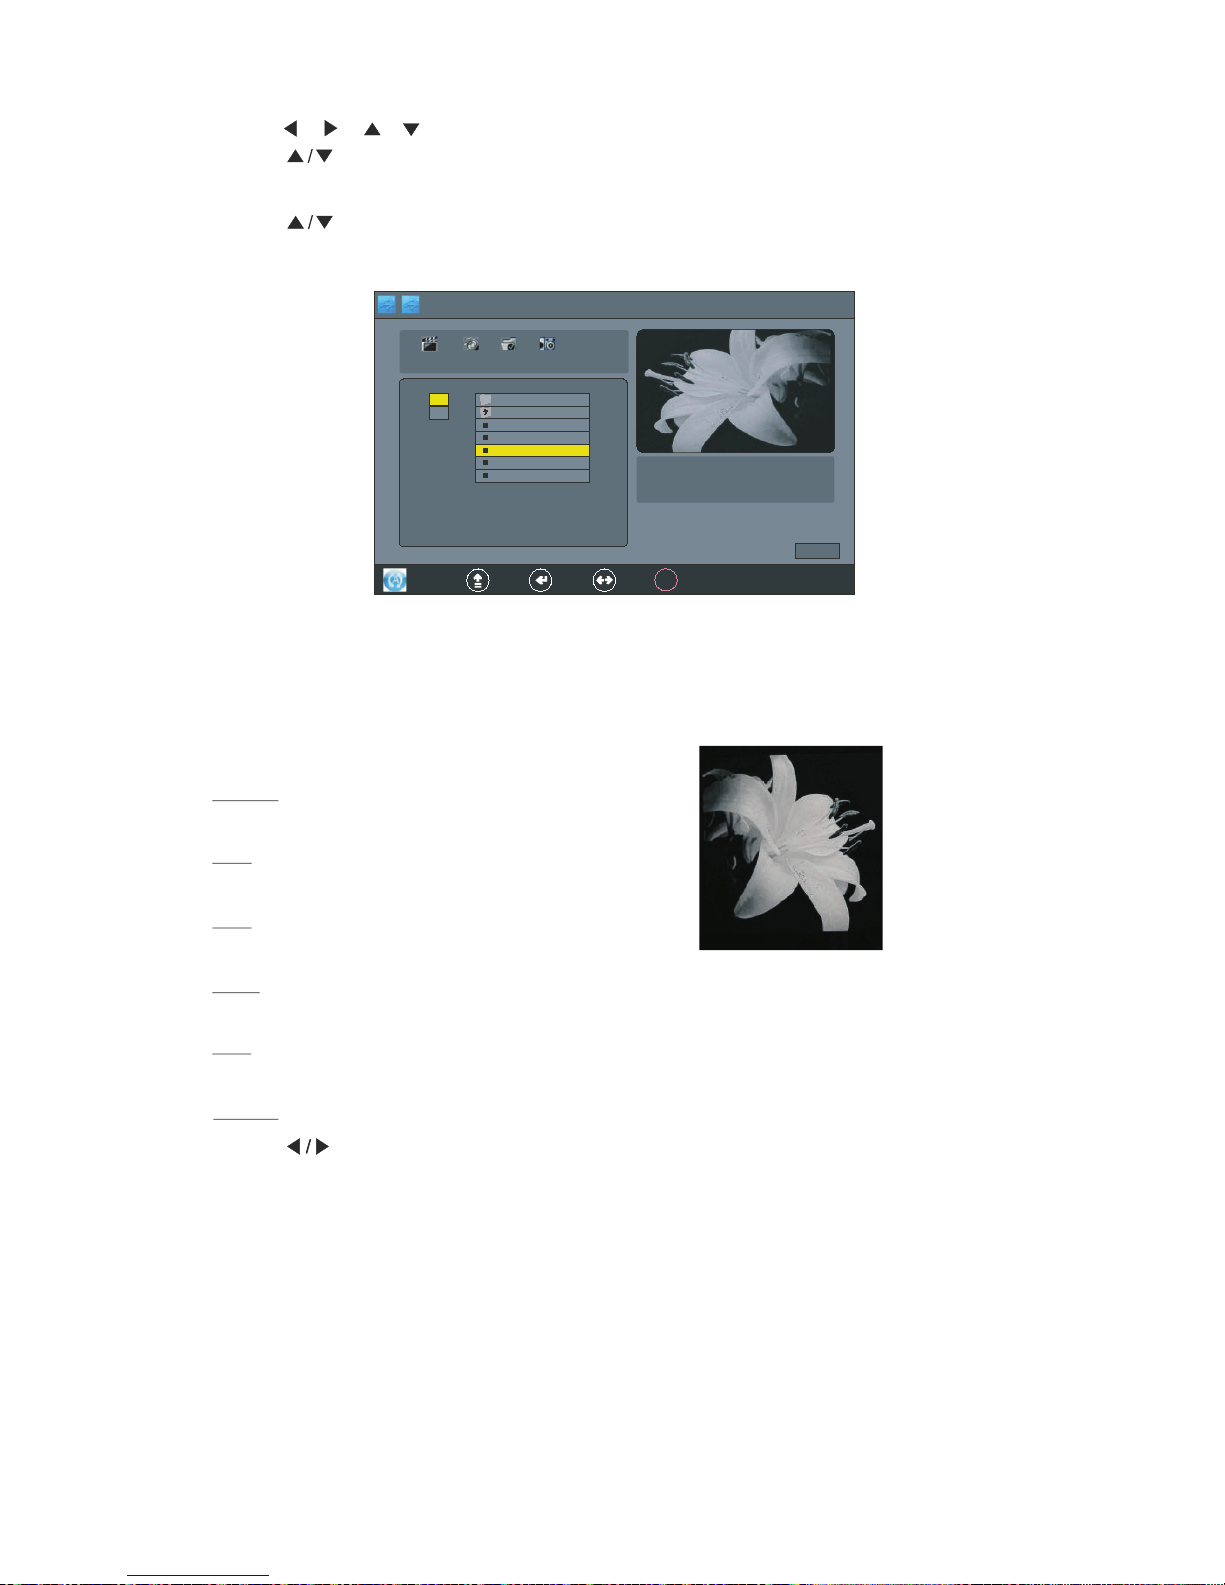
4.P ress button to pre view the ph oto,as foll ow display:
5.P ress ENTER button to select the photo, Press it again to unselect.
" "
3.
Press
, , ,
button to selec t the files,and
Press ENTER button to oper the file, and
Press button to select the photo ,Press ENTER button to confirm, Press it again to
unselect the photo.
" "
Pause
Play
Stop
Next
Exit
Press" PAUSE" button to pause playing the photo.
Press" PL AY" bu tton to play the select ed photo.
Press" STOP"but ton to stop and return.
Press" NE XT"or"P REV. " bu tton to skip to view the ph oto which are selecte d the photo.
Press" EX IT"button to e xit.
6.P ress PLAY button to the ph oto,as foll ow display:
" "
play
" "" "
1.P ress button to sel ect the
"MUSIC",as foll ow display :
Music
42
.
21 ABC1 Once
C: \PHOTOS 2\
Up folder
0002. jpg
0006.jp g
001.jp g
009.jpg
003.jp g
D:
v
v
v
Path
USB 2.0
PHOTO
MUSIC MO VIE TEXT
OOKK
EXIT ENTER MOVE
W H× : 1024×76 8
SIZE: 5966 2 Bytes
1/1
play
FULL SCREEN PLAY
Page 44
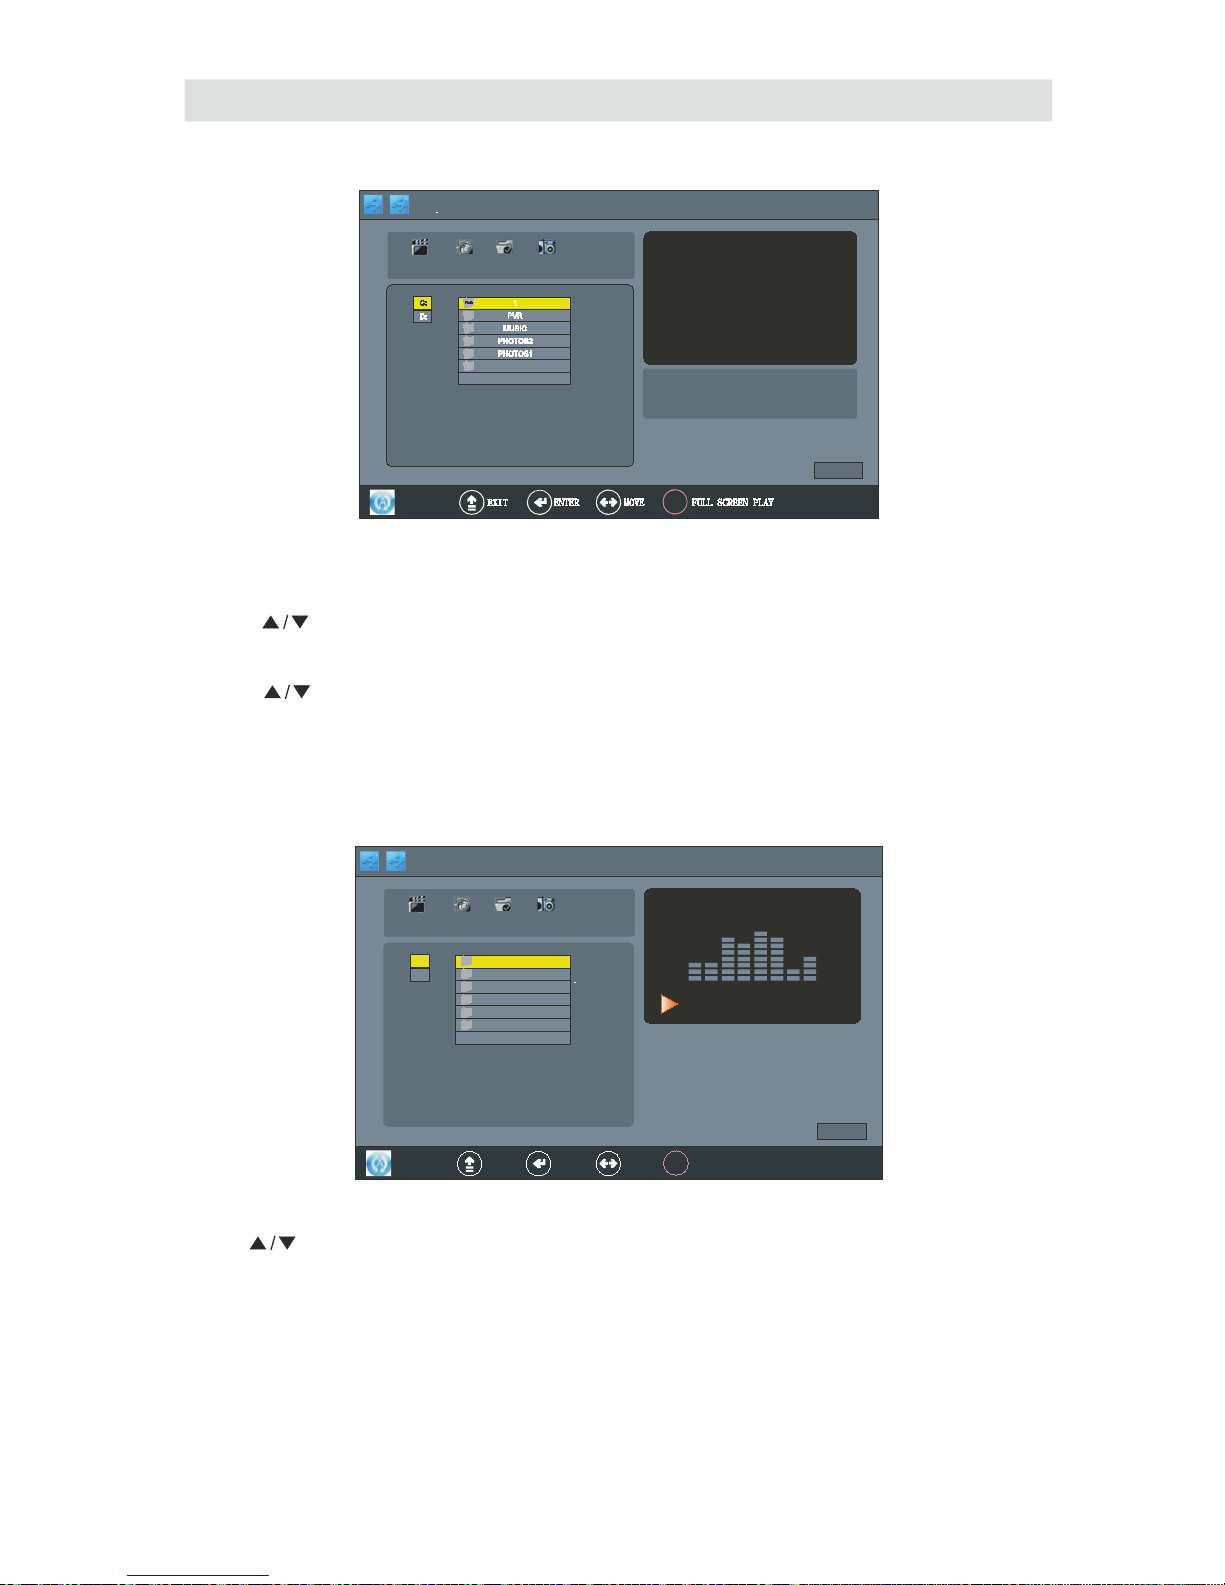
Music
(be used for skip in music player), and press ENTER button to unselect.
button to confirm to select the misic.
5. Press bu tton to preview the music, and press ENTER
" "
4. Press ENTER button to open the file
3. Press bu tton to selec t the files .
" "
2. Press ENTER button into MUSIC interface.
6. Press “PLAY” button into music player and playing the selected music, as follow display:
Press button to selec t the mus ics which were sel ected , an d press ENTER button to confirm playing.
" "
43
5
Mar
2008 01 08
.
:
21 A BC1 Once
USB 2.0
PHOTO
MUSIC MOVIE
C
:
\
PVR
MUSIC
PHOTOS2
PHOTOS1
D:
TEXT
Path
1/1
play
Album:
Title:
Bit Rate
:
Sampling:
Artist: Year
:
MOVI E
5
Mar
2008 01 08
.
:
21
ABC
1
Once
USB 2.0
PHOTO
MUSIC MOVIE
C:
\
PVR
MUSIC
PHOTOS2
PHOTOS1
D:
TEXT
OOKK
EXIT ENTER MOVE
Path
1/1
p l a y
FULL SCREEN PLAY
Album
:大海
Title
: 大海
Bit Rate K: 128 Sampling K
:44
Artist
:张雨生
Year:
00 :0 0:0 8/ 00: 01 :0 1
MOV IE
Page 45
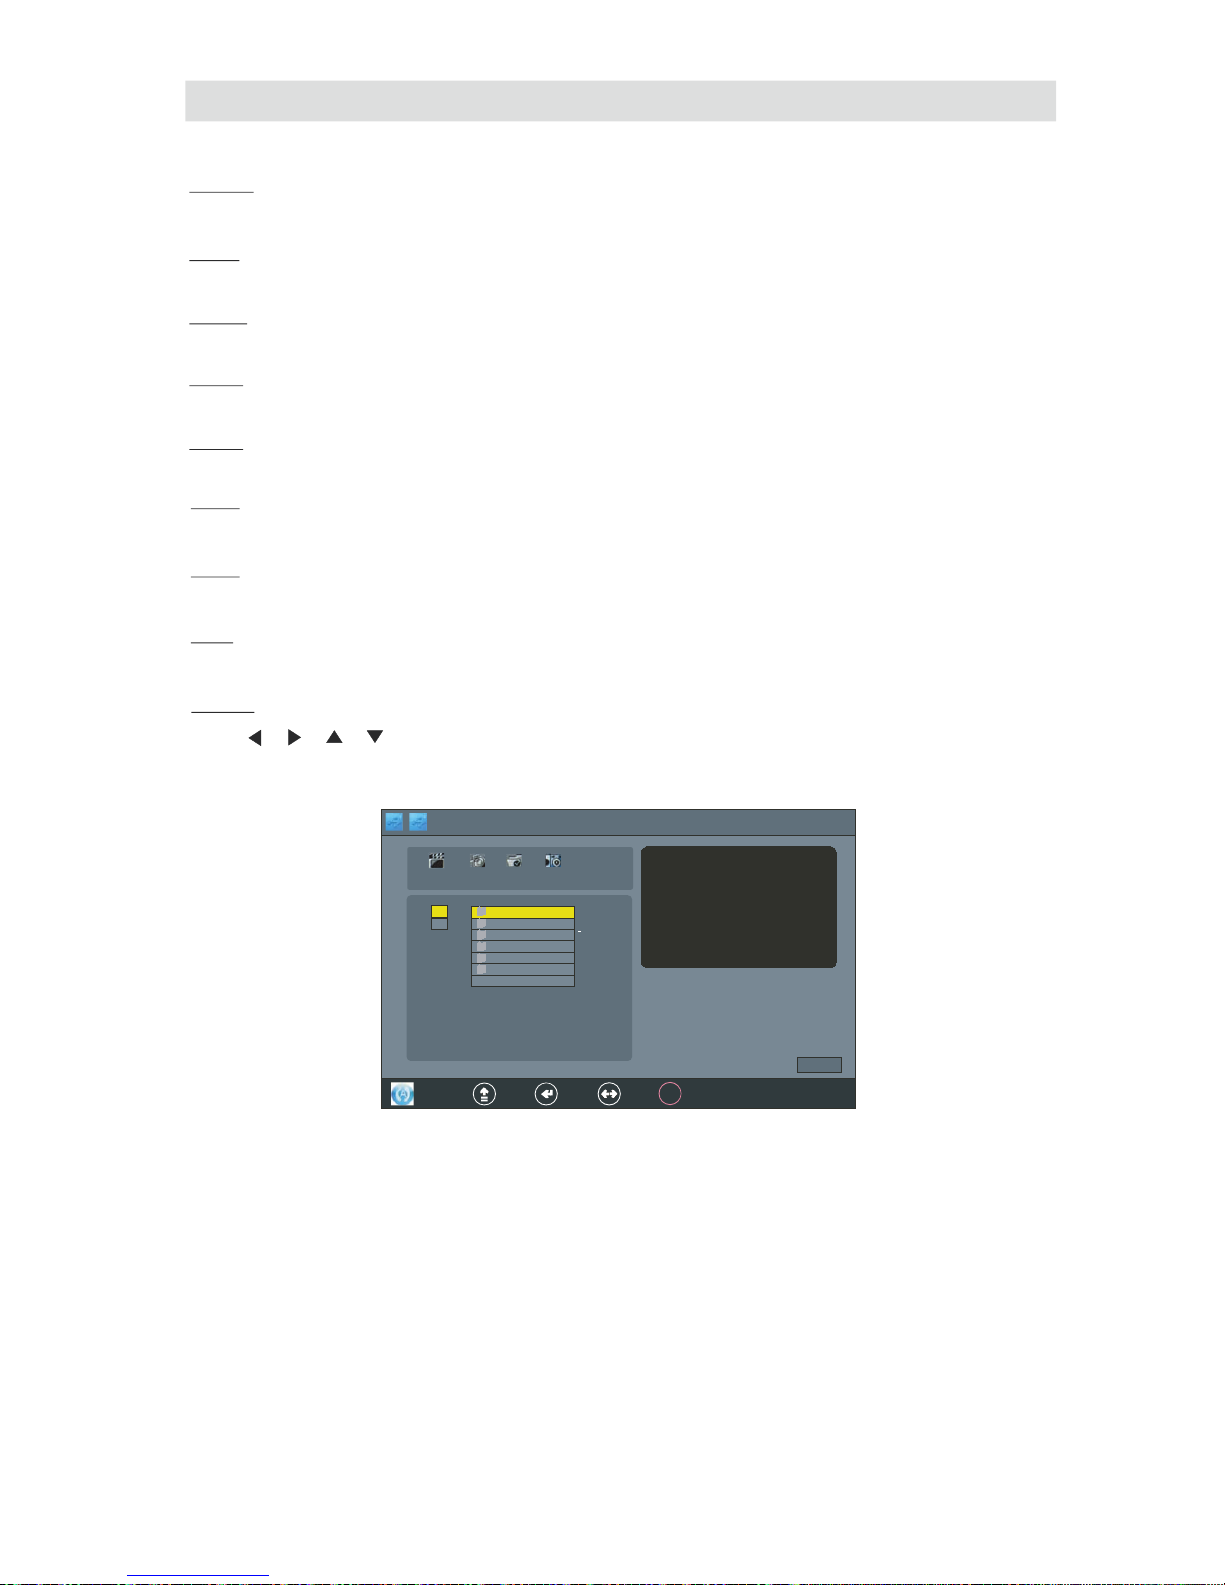
Movie
NEXT
REV.
Press "NEXT" bu tton to skip the forw ard mus ic.
Press "REV."bu tton to fast reve rse am on gx 2,x4 ,x8 , andx16 mod es.
FWD.
STOP
EXIT
Press
"FWD."button to fas t forw ard am on gx 2,x4 ,x8 an dx 16 mod es.
Press
"STOP" bu tton to stop an d ret urn.
Press
"EXIT"bu tton to ex it,and the n ca n se lect to vi ew t he ph oto at the same time.
PAUSE
PLAY
PREV.
Press "PAUSE"button to pause the playing music.
Press "PLAY"bu tton to play the mus ic .
Press "PREV. "button to skip the backward music.
MOVIE
Press , , , button to sel ect the
"MOVIE",Press "OK" bu tt on into the " MOVI E" interface.
as foll ow display :
44
5
Mar
2008 01 08
.
:
21 ABC1 O nce
USB 2.0
PHOTO
MUSIC MOVI E
C:
\
PVR
MUSIC
PHOTOS2
PHOTOS1
D:
TEXT
OOKK
EXIT ENTER MOVE
Path
1/1
play
FULL SCREEN PLAY
SIZE
:
MOV IE
Page 46
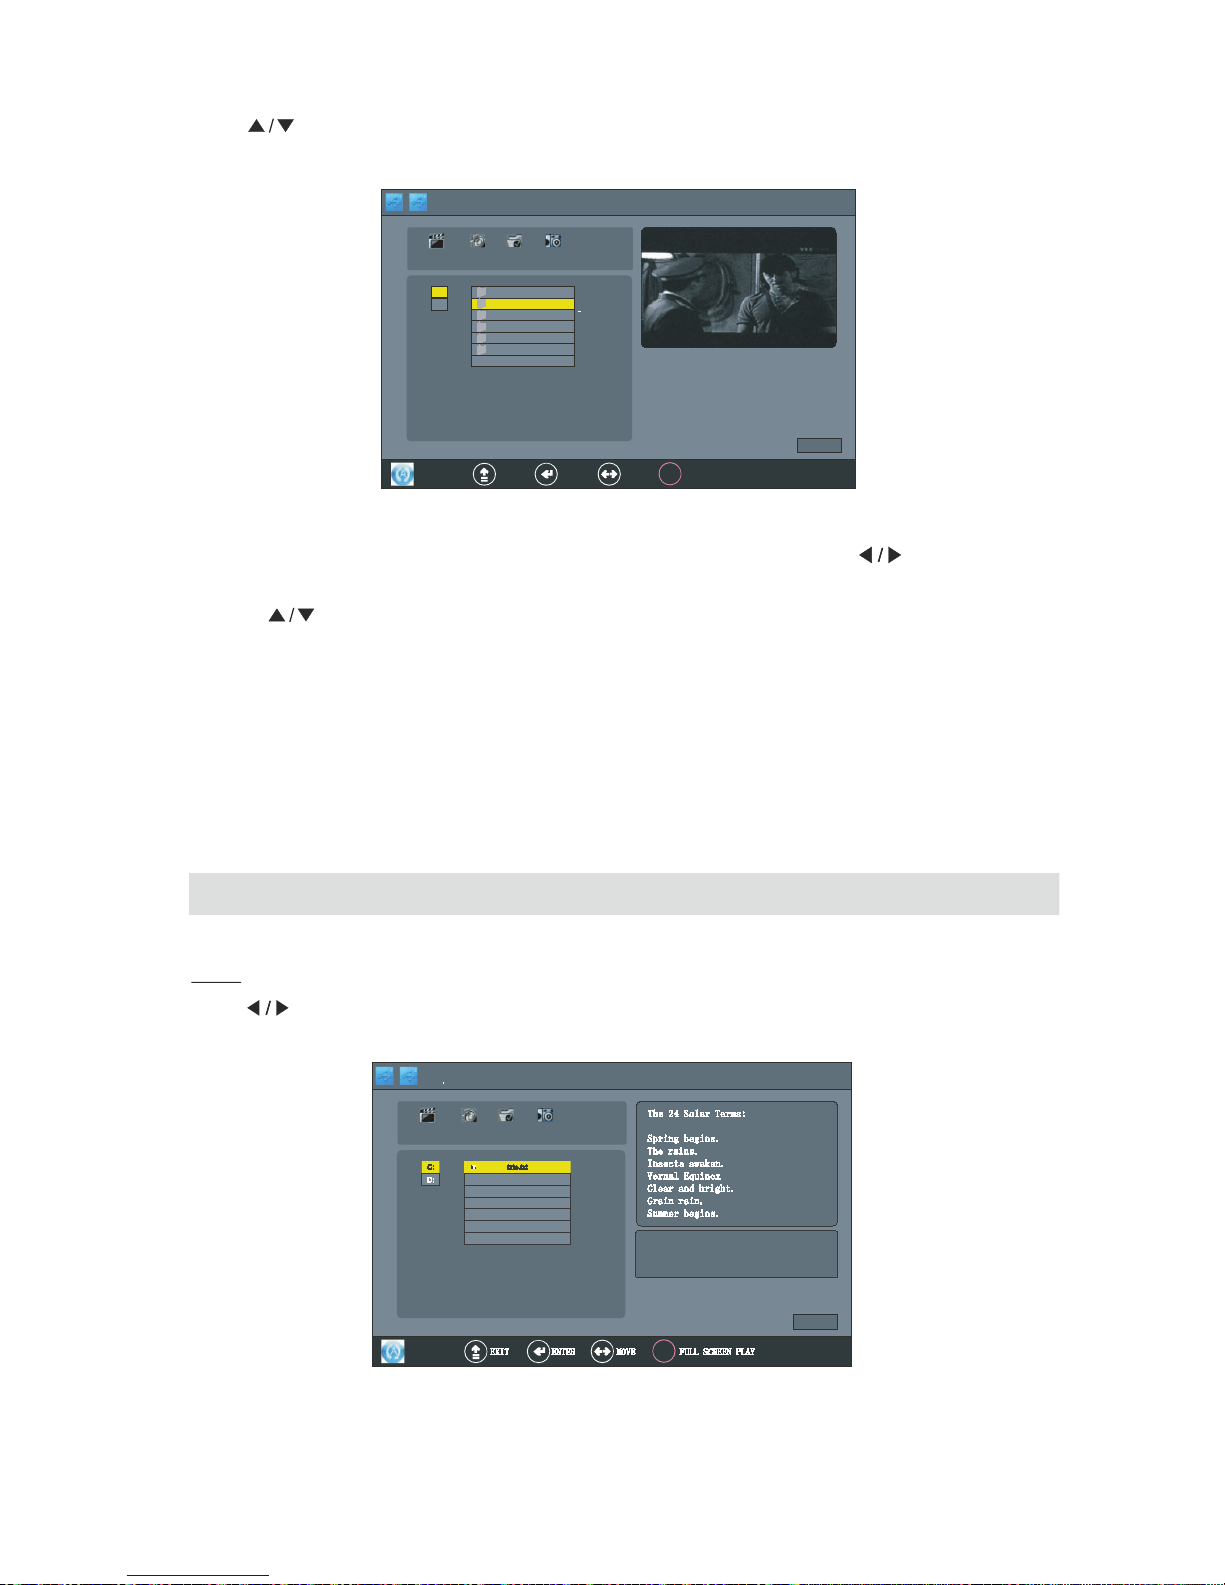
Text
Press
" "
button to select the files, and press ENTER button to confirm, as follow display:
Press ENTER button again to unselect the movie.
select between "SELECT" and "UNSELECT" all files,andpress ENTER button to confirm.
2.Press " " button to select the movie, and press ENTER button to confirm the selected movie, and
1. Select the "PATH" icon, and press ENTER button to POP-UP the sub-menu, and press " " button to
4. Select the "UP FOLDER" icon, and press ENTER button to return one level the menu.
5.Press "EXIT" button to exit.
TEXT
Press " " button to select the "TEXT" icon, and press ENTER button to the TEXT interface, as follow display:
3.Press the "PLAY" button to play the movie. Press the "PAUSE" button to pause the playing movie.
Press "PREV." or "NEXT" button to skip the backward or forward.Press "REV." or "FWD." button to
fast reverse or fast forward, press "STOP" or "EXIT" button to return.
45
5
Mar
2008 01 08
.
:
21 ABC1 O nce
USB 2.0
PHOTO
MUSIC
MOVIE
C:
\
MUSIC
PHOTOS2
PHOTOS1
D:
TEXT
OOKK
EXIT ENTER MOVE
Path
1/1
play
FULOL SCREEN PLAY
SIZE
:
YLE FST 5(070502 1941~
MOV IE
USB 2.0
PHOTO
MUSIC MO VIE TEXT
1/1
play
C: txte .txt
D:
v
Spring begi ns.
The rains.
Insects awa ken.
Vernal Equi nox
Clear and bri ght.
Grain rain.
Summer begi ns.
The 24 Solar Te rms:
SIZE
:
Page 47
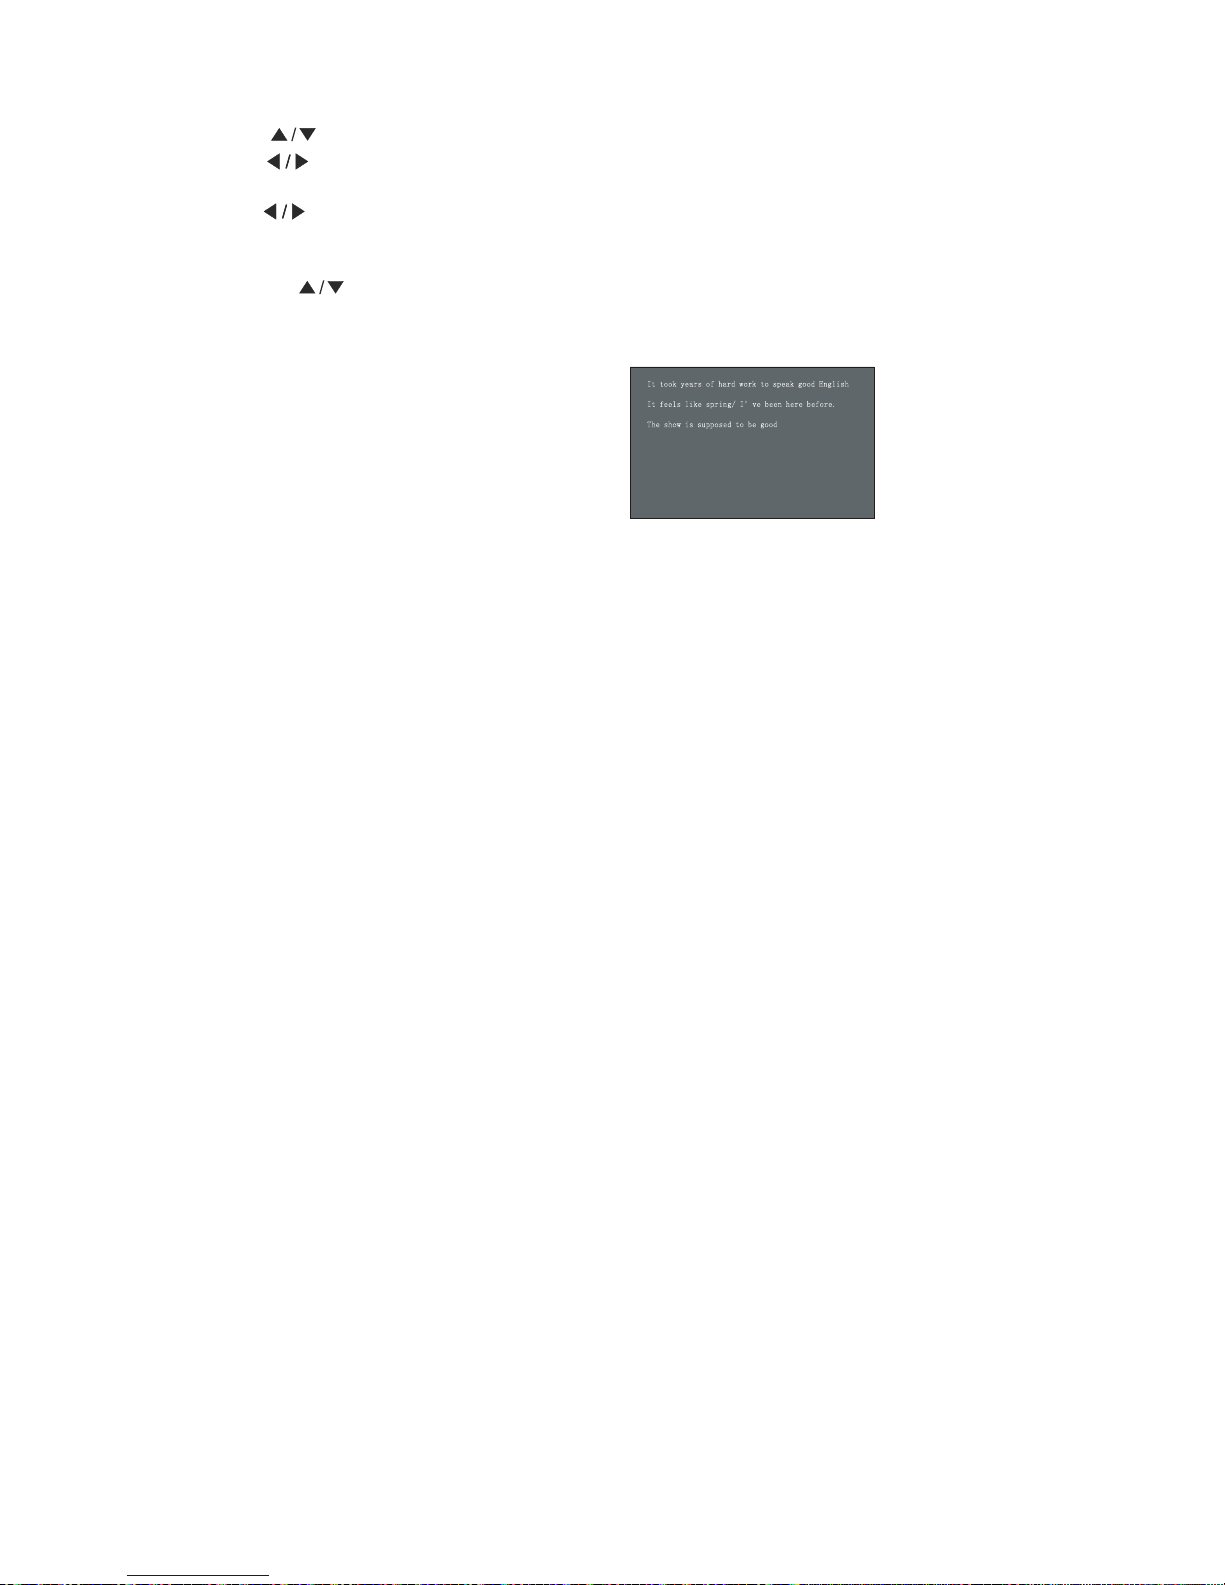
1.P ress bu tton to select the
"PATH" ico n,and pre ss ENTER button to POP-UP the submenu, and
2.P ress button to se lect the fi le,and pre ss ENTER button open the file or select the UP FOLDER
3.P ress the button to se lect the file,and pre ss ENTER button to confirm.
4.P ress
"PLAY"button to op en and play the fi le,as foll ow display :
5.P ress the
"EXIT"bu tton to ex it.
Press
"FWD."button to vi ew a next pa ge .
Press
"REV."button to vi ew a pre vi ou s pa ge.
Press
"STOP" or " EXIT"button to ret urn.
ico n,an d pre ss ENTER button to return one level the menu.
Press button to se lect be twee n the
"SELECT" an d"UNS ELE CT" all fi les .
" "
" "
" "" "
" "" "
46
It too k years o f hard wo rk to sp eak good English
It fee ls like s pring/ I’ ve been h ere befor e.
The sh ow is sup posed to be good
Page 48
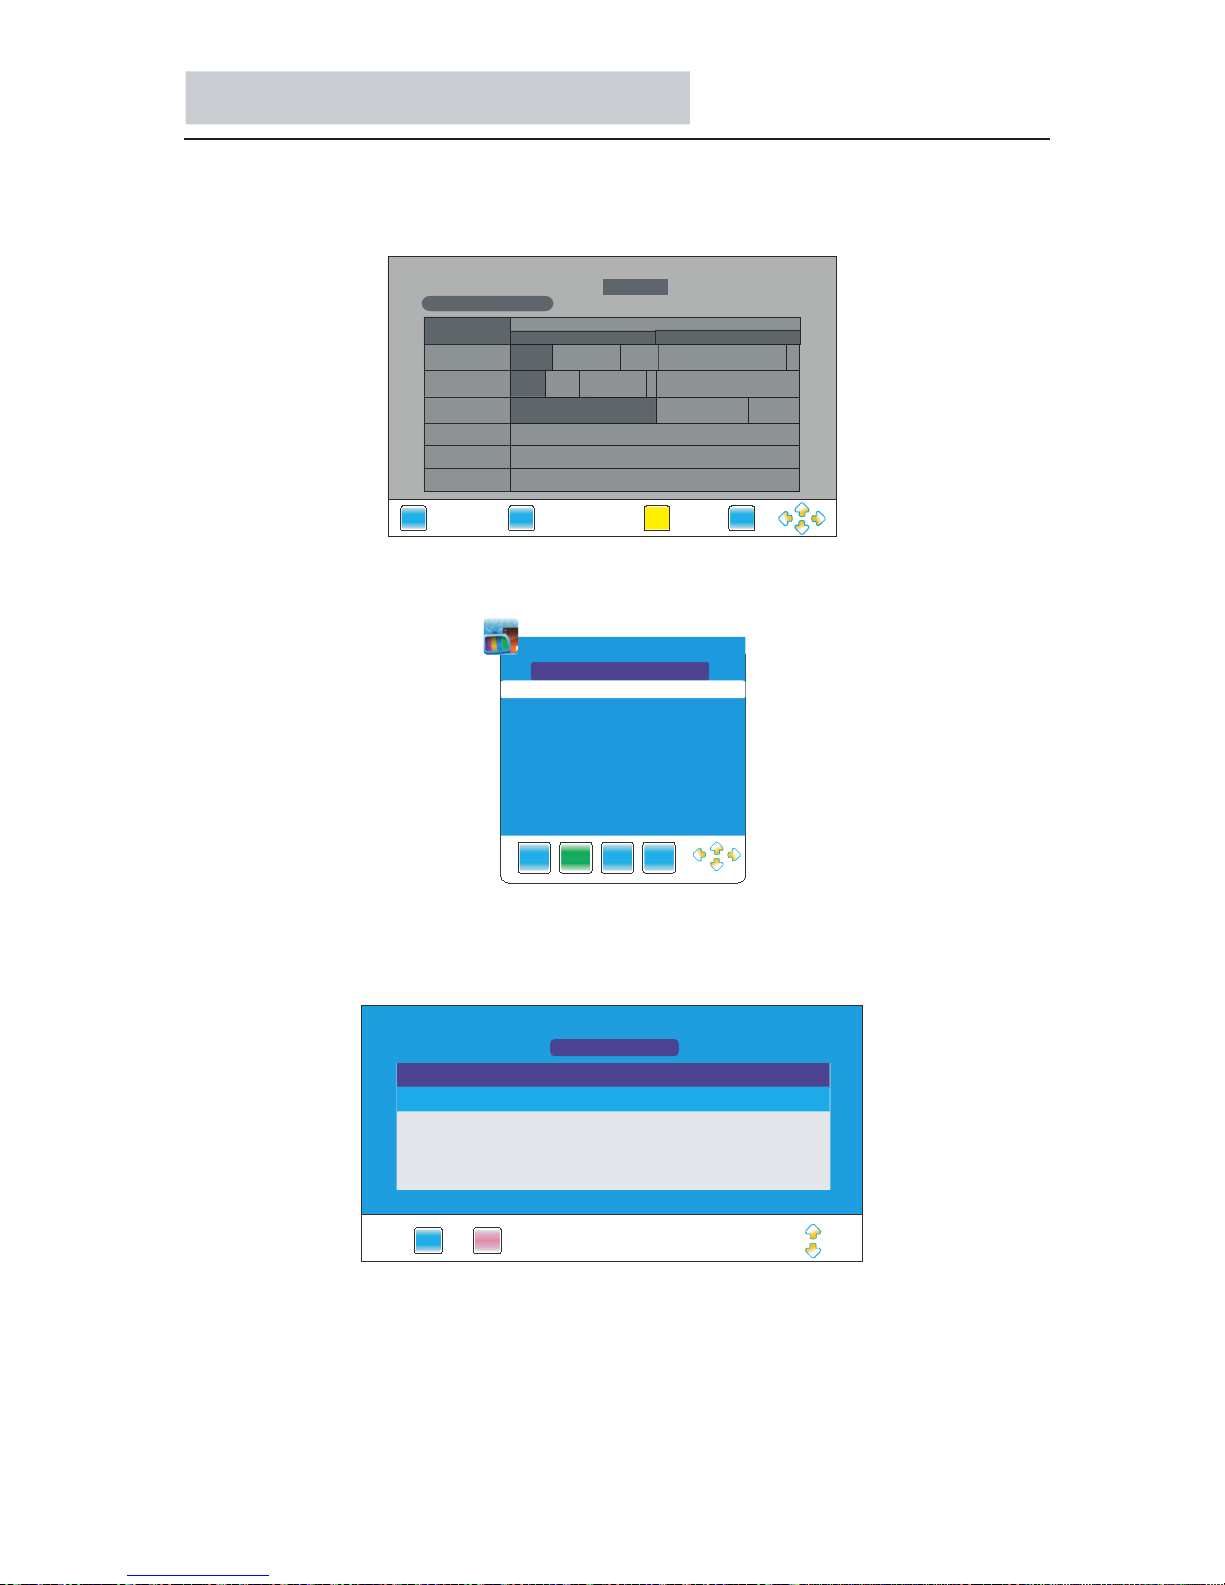
一、Set EPG record task
1.In DTV mode, press EPG button to show programme list within 7 days.
2.Press
◄►▲▼ buttons to select programme, press REC button to enter recording
page:
3.When in recording page, press green button to enter recording task list:
4.When in recording page, press ENTER button will add a new task to recording
task list.
Standby Record (Only in DTV mode)
47
PPRROOGGRRAAMMMMEE GGUUIIDDEE
05 Nov 2008 01 07
::
DTV 23
J2
17:45-18:15 You
\'re Under Arrest 2
::
DDTTVV
82 J2
83 iNews
8855 HHiigghh DDeeffiinniittiioo....
1111 NNoovv
18 00
:: 19 00::
YYoouu\\''rree EEyyeesshhiieelldd
2211
IInnvveenntt PPeett WWoonnddeerrllaanndd
NNeewwssNNeewwssFFiinnaann
....
NNeewwss AAtt
66::3300
CCoouuppllee OOrr TTrroouubbllee VViiddeeooffaasshhiioonn NNeewwss SSccoooopp
HH
..
EXI T
INFO
ENTER
DATE
Rec order
EXI T
Sche dule
MEN U ENT ER
11 20 08 1 8: 0 1
Nov
Pro gramm e
Sta rt D ate
Sta rt Ti me
End Da te
End Tim e
Mod e
85
Hig h D efini tion Jad
20 0 8/ 11 /1 1
18:0 0
20 0 8/ 11 /1 1
19:0 0
Onc e
11 十 一月 20 08 18:0 4
REC ORDE R S CHED ULE LIST
11 十 一月 20 08 18:0 4
EXI T S AVE
Tit le S tart Dat e End Da te
Pro gramm e
Mod e
20 08 /11 /1 1
19 :0 0
20 08 /11 /1 1
19 :3 0 85
Hig h D efin ition
On ce
Page 49
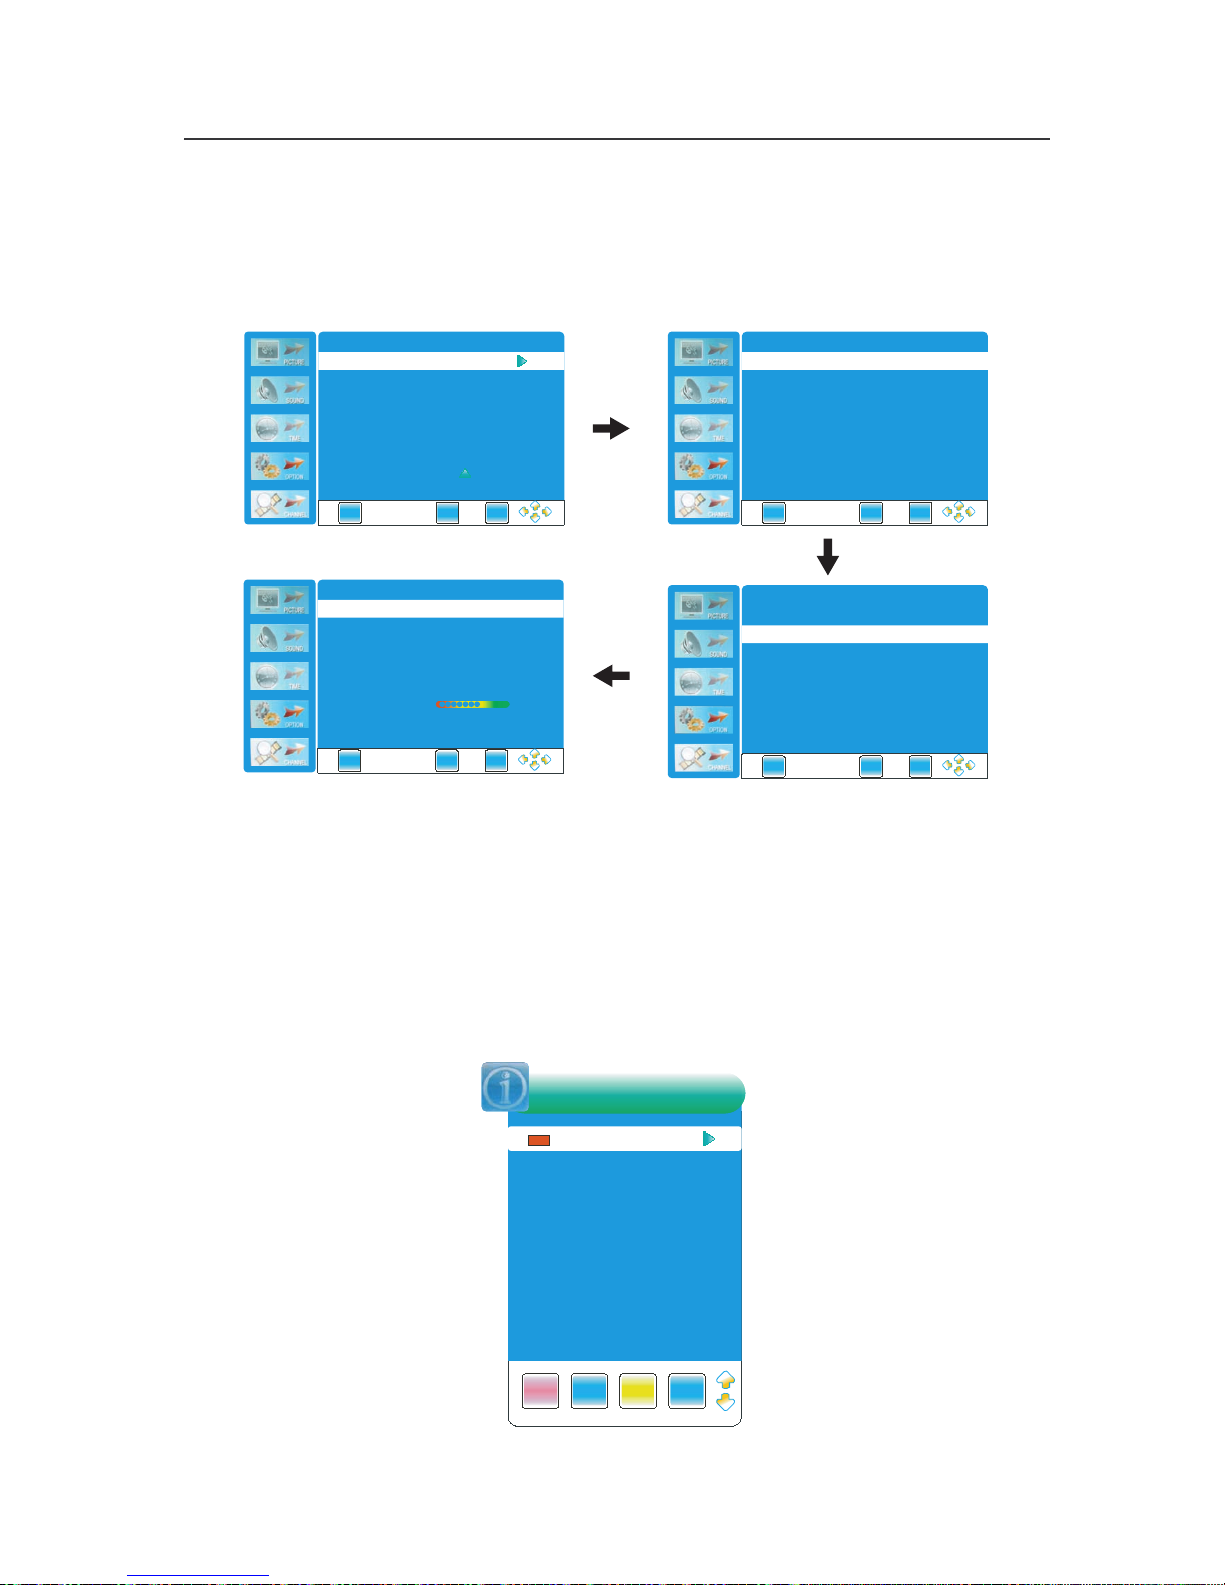
二、When in standby mode, the system will finish recording programme according
to the recording task list. Make sure that external USB device is connecting.
When the storage device is detected for the first time as a record, you need to format
to achieve the following functions: Enter the OPTION menu,press ENTER or
► to
DVR File System
:
三、Play a recorded file
Press the DVR.LIST button on the remote control to enter the Record List as shown:
Press the YELLOW button repeatedly to list the files named Program, Channel or Time.
Press the ▲▼ button to select desired file and press the ► or the DISPLAY button to
display the information of the program.
Press the ▲▼ button to select desired file and press the ENTER button to start to play.
During playing a recorded file, press the PAUSE button to pause and press the ►PLAY
button to resume.
It will go to DTV program playback after the recorded file is played.
Note: The OSD menu pictures are only for reference, the products are subject to material object.
As some kind of external hard disk may not be compatible with the TV. We suggest to use Buffalo Drive Station (USB2.0) 3.5"
1TB or below external hard disk for recording.
48
E X I T
M E N U
E N T E R
DVR File Sy stem
EXI T
MENU
ENTER
Che ck DVR File Sy stem
Star t
USB D isk
Time Shift Size
Form at
USB D isk Sp eed
Sele ct Dis k
C:
EXI T
MENU
ENTER
USB D isk
Time Shift Size
Form at
USB D isk Sp eed
Che ck DVR File Sy stem
Star t
Sele ct Dis k
C:
EXI T
MENU
ENTER
Che ck DVR File Sy stem SUCC ESS
USB D isk
Time Shift Size
Form at
USB D isk Sp eed
Sele ct Dis k
C:
Pass
Pass
51 2MB
52 48K BS
Dis k b it r ate MB s PVR is safe a t H D s tream - > 4.5 /
DELE TE
IN FO
IND EX
ENT ER
DVRLIST
Pro gra mme
Ne ws
Ne ws
Recor d
Page 50
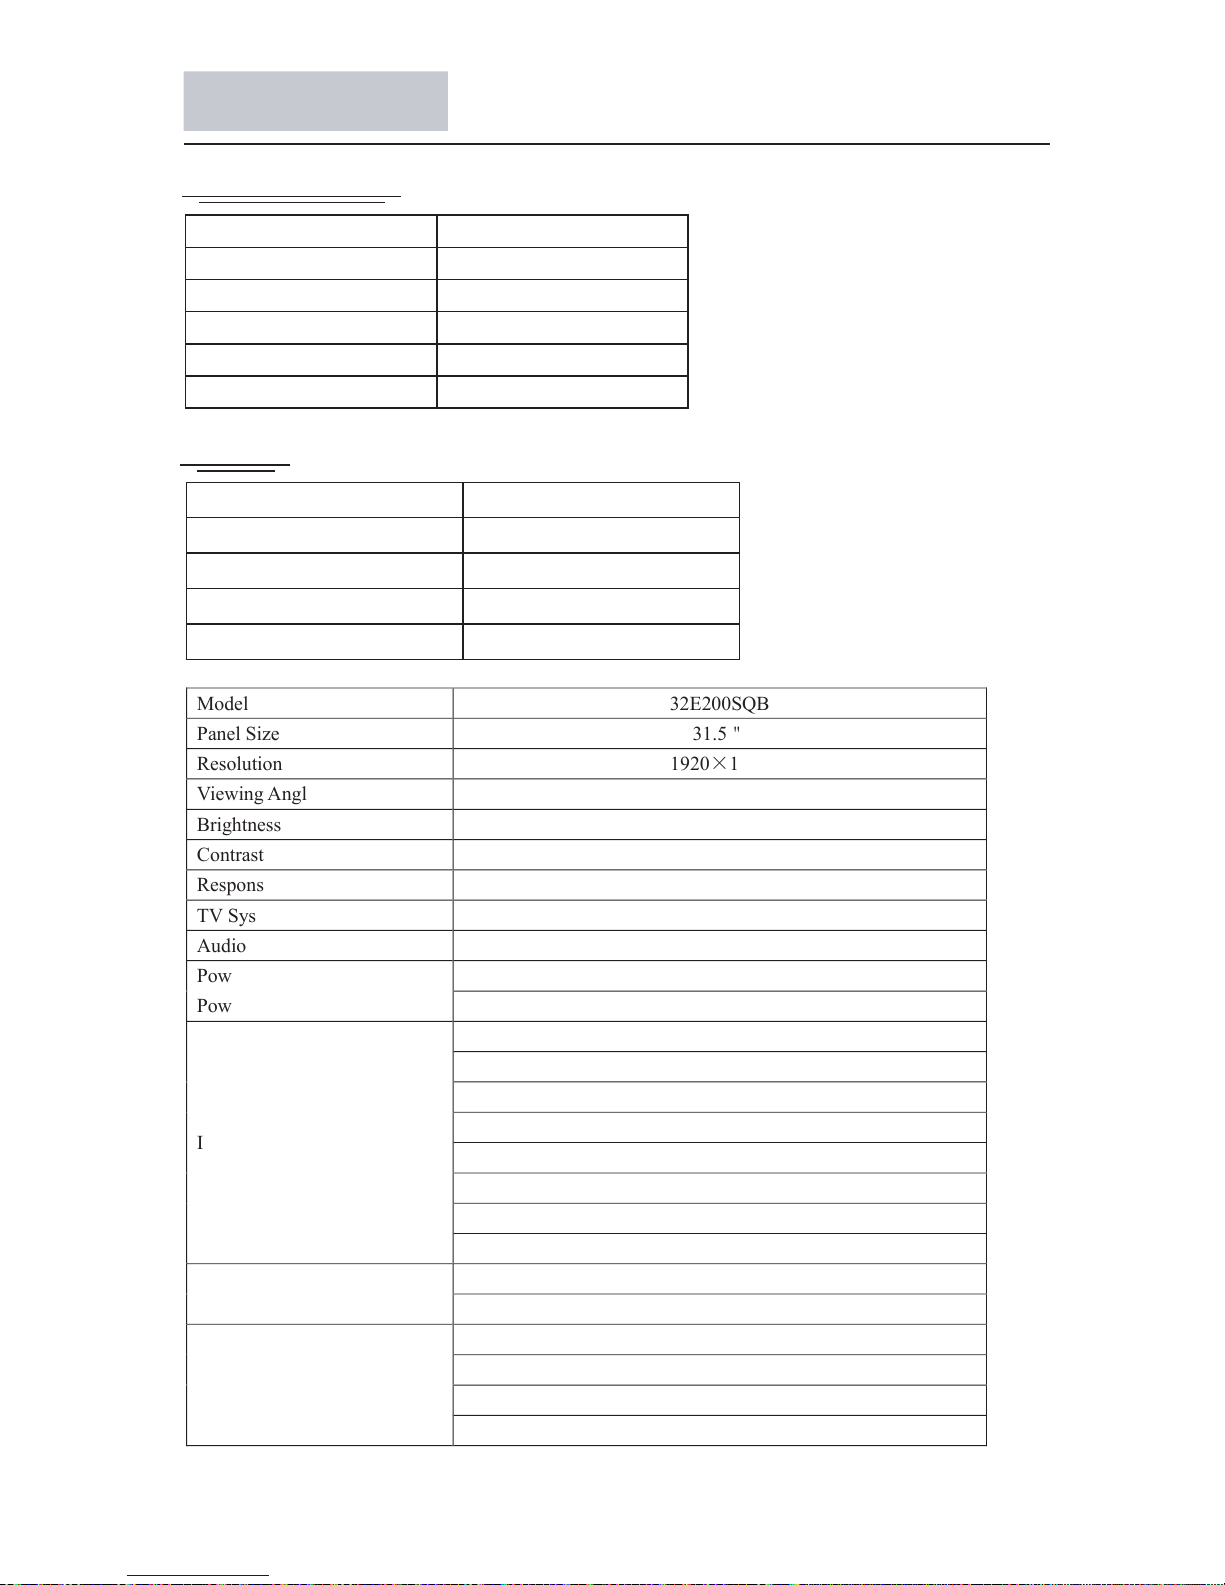
2.VGA
10 2 4 *76 8
14 4 0 *90 0
80 0 *60 0
64 0 *48 0
60
60
60
60
Resolution Vert.Freq.(Hz)
Specifications
1.YPbPr/HDMI
480i
480p
720p
1080i
1080P
60
60
60
60
60
Resolution
Vert.Freq.(Hz)
49
Model
32E200SQB
Panel Size
31.5"
Resolution
1920×1080
Viewing Angle
176°
Brightness
300 cd/m2
Contrast Ratio(Typ.)
4000:1
Response Time
6.5ms
TV System
DMB-TH;PAL
Audio System
BG;DK;I
AC110~240V/Frequency 50/60Hz
Power Input
Power Consumption
≤78W
Tuner In×1
HDMI×3
S-Video×1
YPbPr In×1 L/R×1
VGA×1
VGA Audio×1
USB×2
Input Terminal
AV In×1 L/R×1
SPDIF×1
Output Termianl
Earphone×1
User Manual×1
Remote Controller×1
Battery×2
Accessories
Warranty Card×1
Page 51
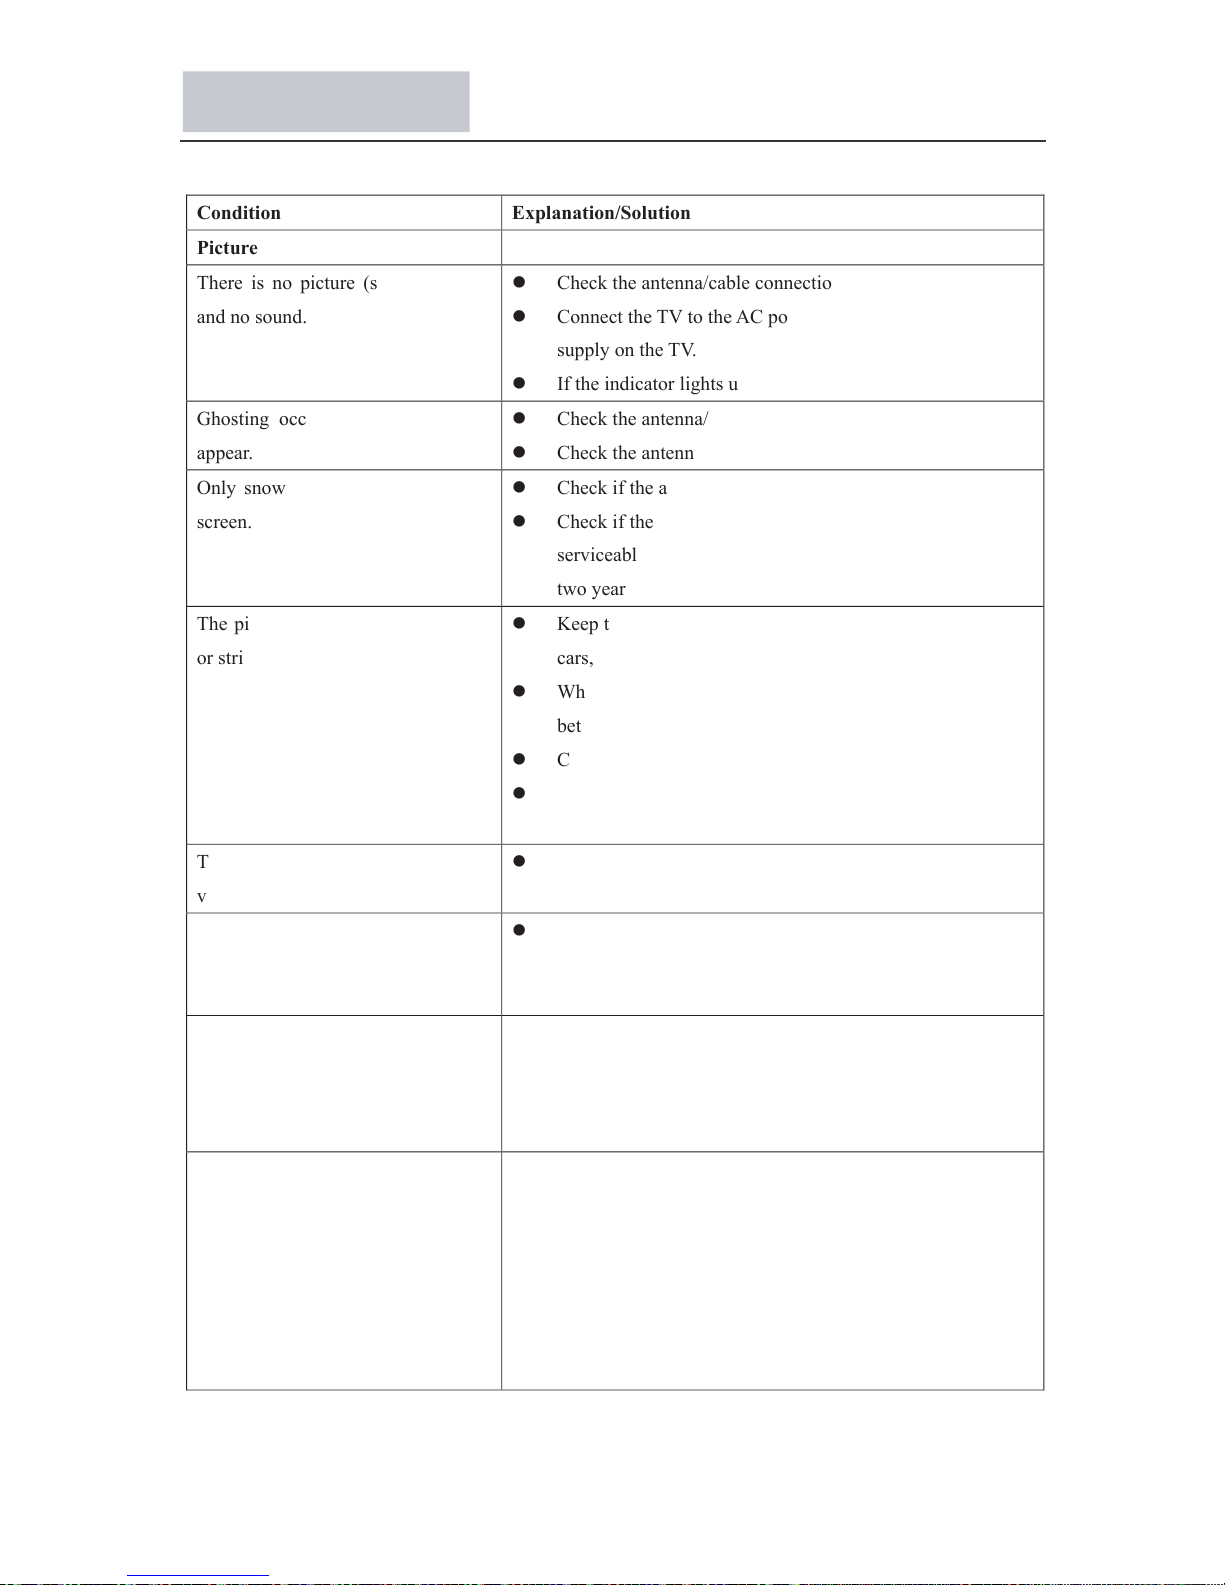
Troubleshooting
Condition
Explanation/Solution
Picture
There is no picture (screen is dark)
and no sound.
Check the antenna/cable connection.
Connect the TV to the AC power, and open the power
supply on the TV.
If the indicator lights up in red, press Power button.
Ghosting occurs, or double images
appear.
Check the antenna/cable connection.
Check the antenna/cable location and direction.
Only snow and noise appear on the
screen.
Check if the antenna/cable is broken or bent.
Check if the antenna/cable has reached the end of its
serviceable life (three to five years for normal use, one to
two years when used at the seaside).
The picture is distorted (dotted lines
or stripes appear).
Keep the TV away from electrical noise sources such as
cars, motorcycles, hair-dryers, or optical equipment.
When installing optional equipment, leave some space
between the optional equipment and the TV.
Check the antenna/cable connections.
Keep the antenna/cable TV cable away from other
connecting cables.
There is picture or sound noise when
viewing a TV channel.
Check the antenna/cable connection.
Tiny back points and/or bright points
appear on the screen.
The screen is composed of pixels. Tiny black points and/or
bright points (pixels) on the screen do not indicate a
malfunction.
The picture from equipment
connected to different input ports is
not displayed in colour, or is
displayed in irregular colours.
Check the connection of different input ports and check if
the ports are firmly seated in their respective ports.
No picture from the connected
equipment appears on the screen.
Turn the connected equipment on.
Check the cable connection.
Press Source to display the list inputs, and then select the
desired input.
Operations are not guaranteed for all USB devices. Also,
operations differ depending on the features of the USB
device and the video being played.
50
Page 52
Sound
The picture is good, but there is no
sound.
Press Vol +/- or Mute key.
Check the audio cable L/R connection
When using HDMI input with Super Audio CD or
DVD-Audio, DIGITAL AUDIO OUT (COAXIAL) may not
be able to output audio signal
Channels
You cannot select your desired
channel.
Switch between digital and analogue mode, and select the
desired digital/analogue channel.
Some channels are blank.
The channel is for scrambled/subscription service only.
Subscribe to a pay TV service.
The channel is used only for data (no picture or sound).
Contact the broadcaster for transmission details.
You cannot view digital channels.
Contact a local installer to find out if digital transmissions
are provided in your area.
Check if the antenna/cable is broken or bent
Upgrade to a higher gain antenna.
General
The TV turns off automatically (the
TV enters standby mode).
Check if the “Sleep off” is activated.
The remote does not function.
Replace the batteries.
HDMI equipment cannot be
recognized.
Check that your equipment is compatible with control for
HDMI.
Not all channels are tuned for cable.
Contact the related cable broadcaster
51
Page 53

弘毅有限公司
香港九龍長沙灣道 833 號長沙灣廣場二期 506 室
Tel: 852-28611109
Fax: 852-83437386
Email: [email protected]
Web site: www.vdigi.com.hk
Winning Perfect Limited
Room 506, Tower 2, Cheung Sha Wan Plaza, 833 Cheung Sha Wan Roa
d,
Kowloon, Hong Kong
 Loading...