

Page 1
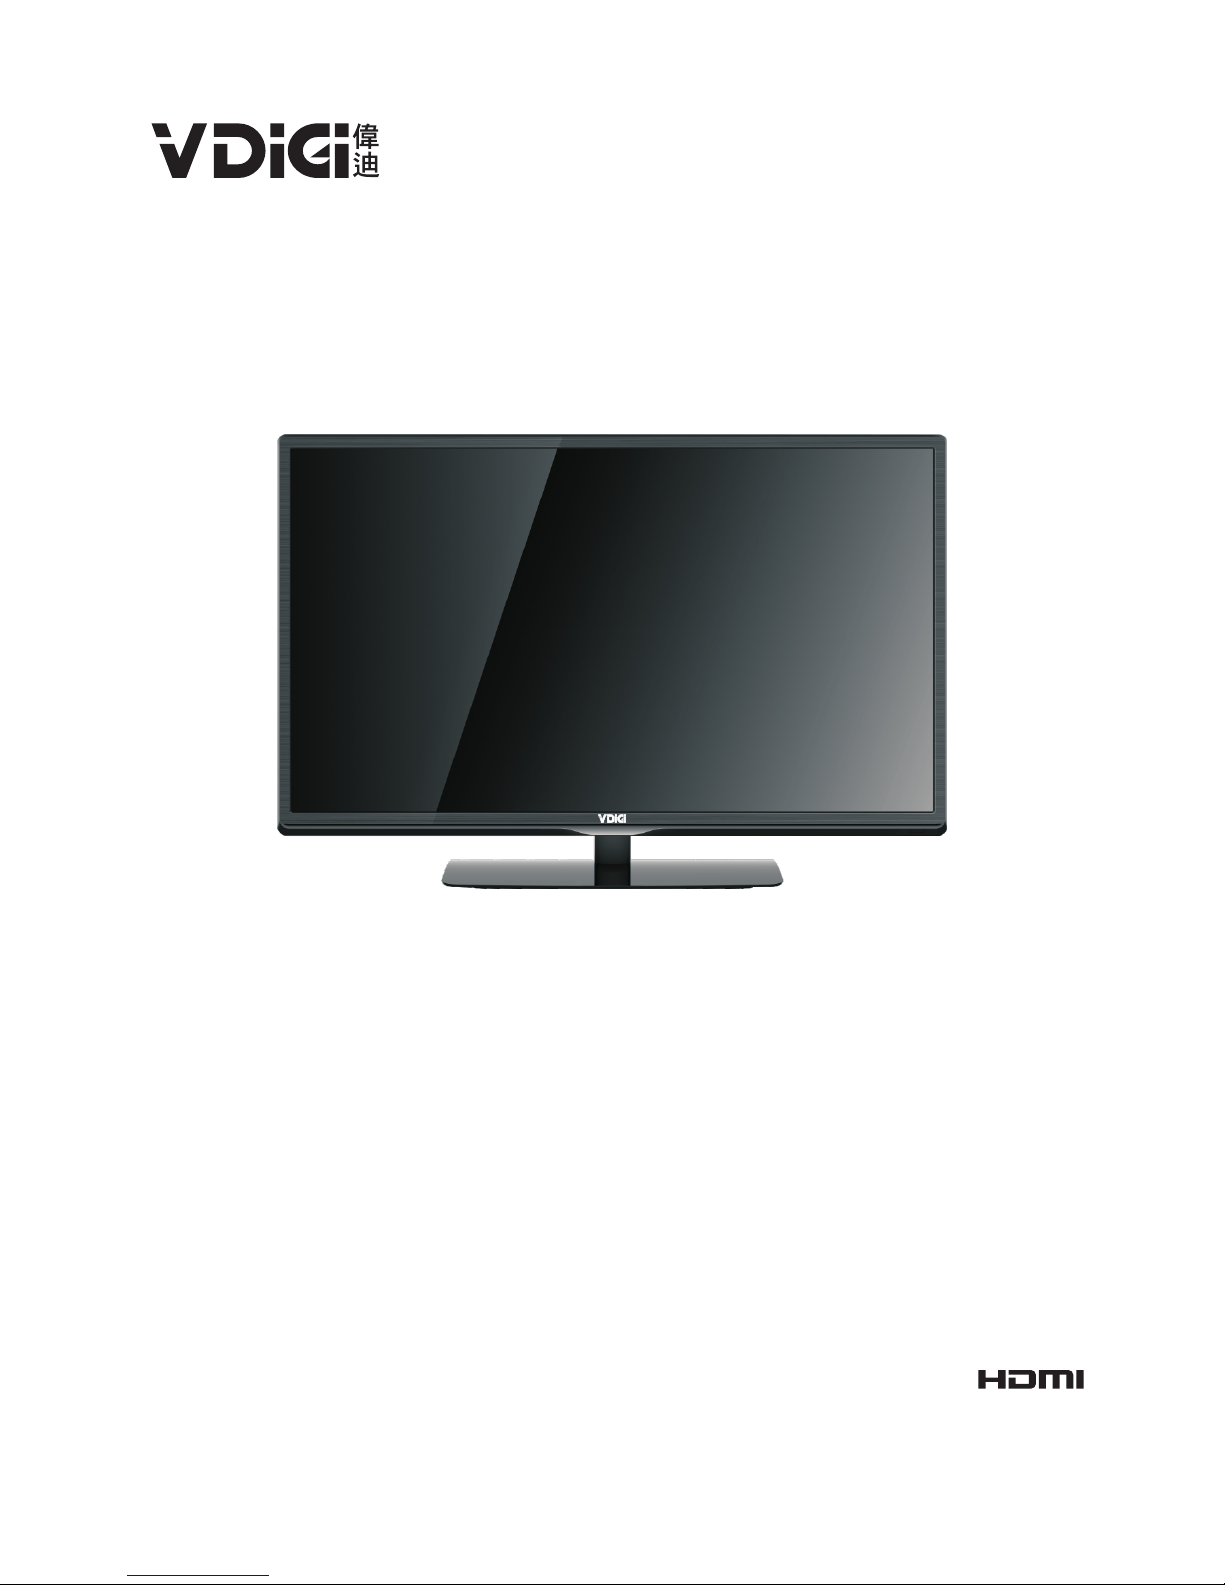
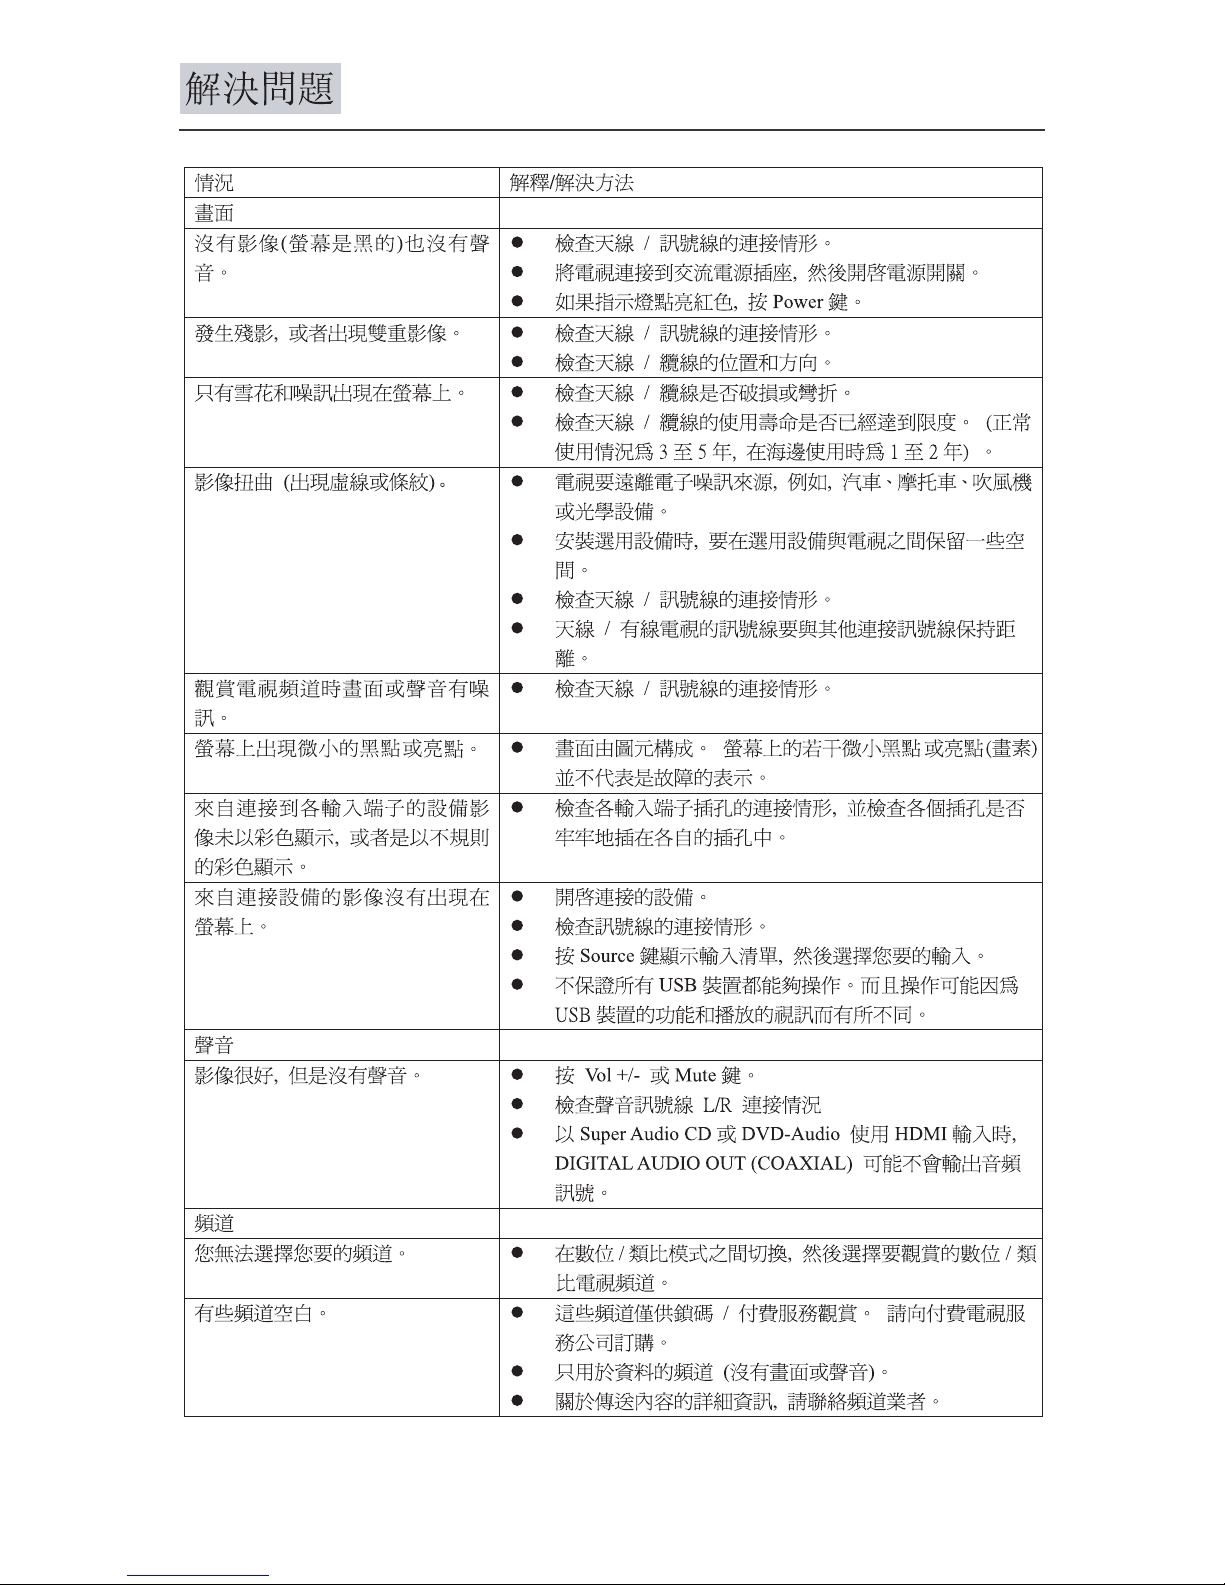
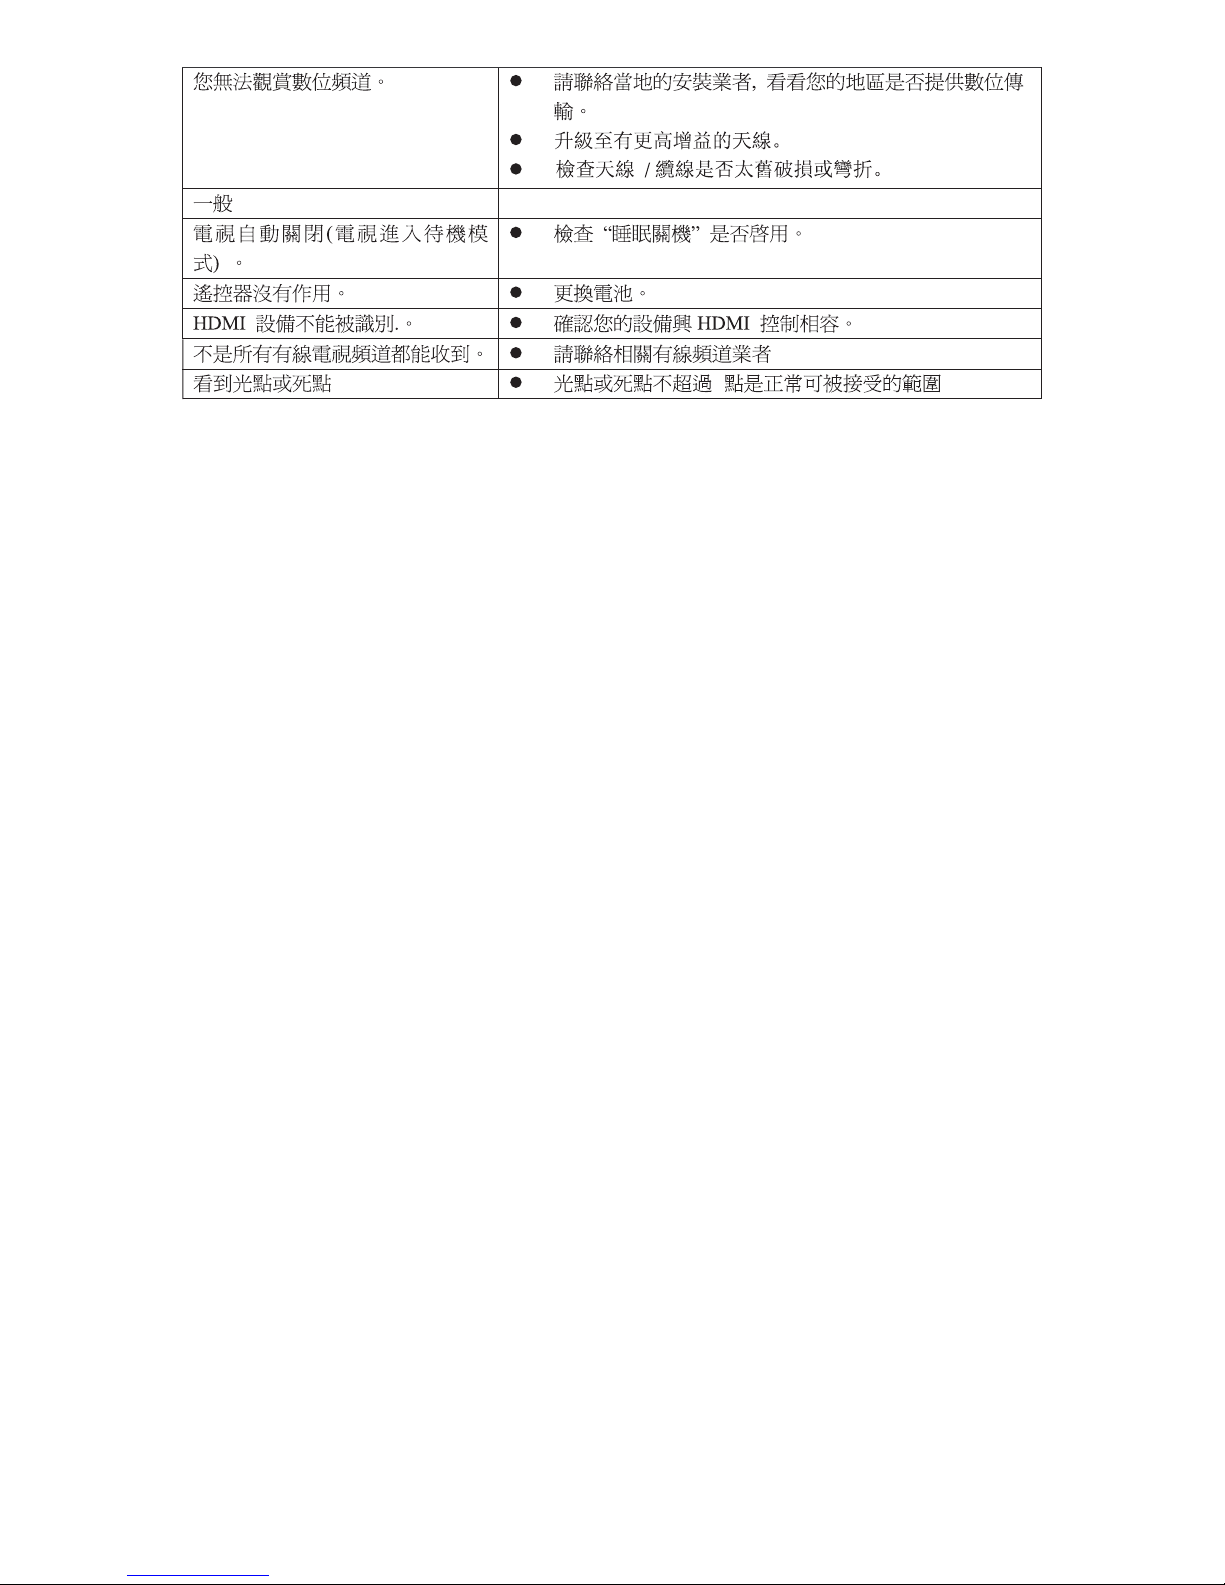
使用手冊
User Manual
19E600CT
Page 2

目錄
操作電視機前, 請閱讀”安全資訊”,並保留本說明書以便將來參考。
1
目錄……………………………………………………………………
1
安全資訊………………………………………………………………
2
…………………………………………………… 4
底座安裝………………………………………………………………
5
遙控器………………………………………………………………… 7
面板功能描述…………………………………………………………
8
後置端子及功能描述………………………………………………….
9
基本操作及菜單操作……………………………………………….
10-13
技術規格…………………………………………………………….. 18..
解決問題………………………………………………………… 19-20...
…………………………………………. ….. 14-17
使用上注意事項
預錄/錄影/時移操 作
壁挂安裝………………………………………………………………
6
Page 3
2
Page 4
3
Page 5
4
使用上注意事項
清潔電視機的螢幕和機身
Page 6
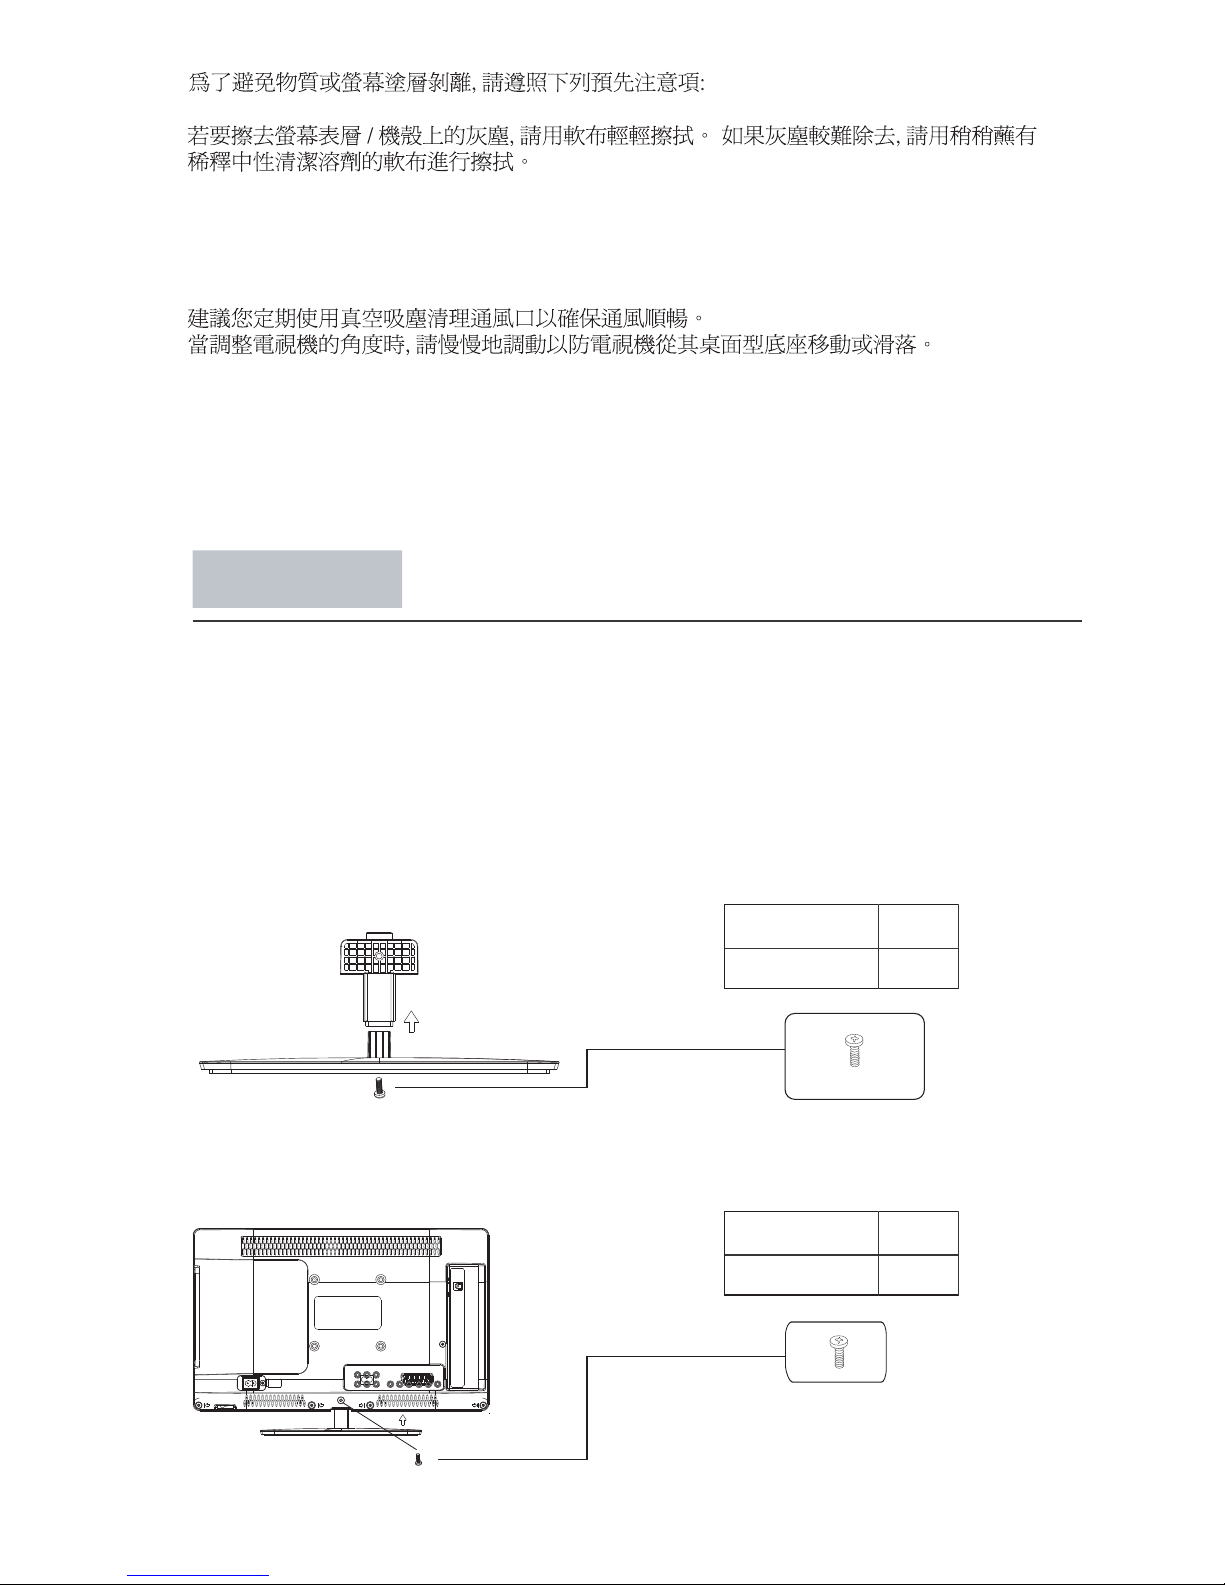
底座安裝
產品為拆底座包裝,底座安裝步驟如下:
步骤1
取一塊護墊或柔軟的桌布放於工作臺上,將電視機屏幕朝下平放於上面。
注:1)避免損壞屏幕,請勿將電視機直接平放於桌面。
2)請將電視機電源線從AC電源插座拔下。
5
切勿使用任何磨砂紙,鹼性/酸性清潔劑,含砂狀擦洗劑或揮發性有機溶液清潔(如酒精/電油
/潔而亮/稀釋劑等等)。使用上述清潔用品與橡膠或乙烯材質長時間接觸可能會造成螢幕
和機身表面損壞。
設備安放位置
任何產生電磁輻射或無線干擾的設備都必須遠離電視機(如無線路由器/揚聲器/電磁爐
/電風扇等等)。否則可能會造成畫面失真或噪音。
步驟2
步驟3
按照下圖指示方向用一顆螺絲將底座支撐架與底座連接起來,請確保这顆螺絲被牢牢擰緊。
插入產品附隨的 顆底座螺絲並安裝好。1
將底座放於電視機後殼上。請對齊底座立柱和電視機後殼上的1個螺絲孔。
規格 數量
1pcs
M4 x 20 mm
規格 數量
1pcs
M4 x 10 mm
Page 7
6
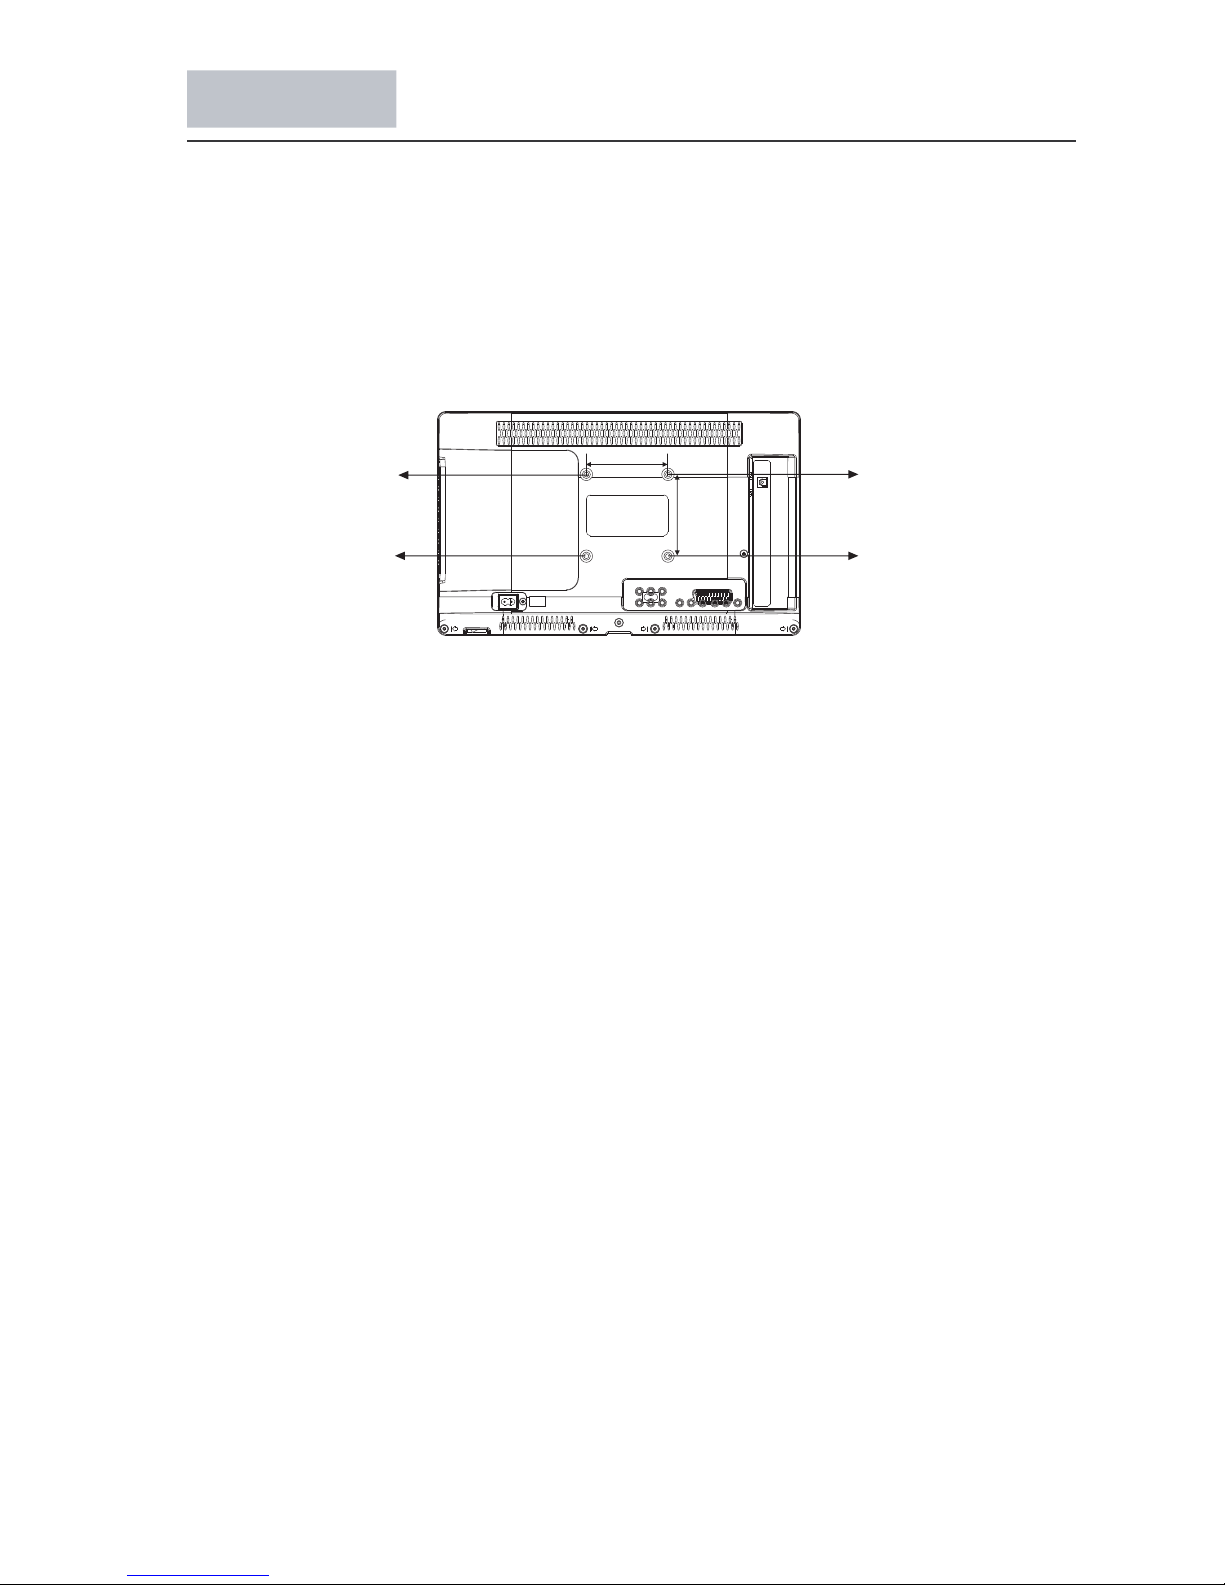
2.将壁挂螺丝锁在背部的四个螺丝孔上(此螺丝孔为Vesa标准的) 然后将此四颗壁挂螺丝
对应固定在墙上的壁挂固定架上的孔位内即可 《以上提到的壁挂螺丝和壁挂固定架需
另行购买》
,
。
1.将电视屏幕朝下平置在柔软的平面上以避免损坏或擦伤屏幕。
壁挂组件安装说明:
壁挂安裝
M4X5mm
M4X5mm
100mm
100mm
M4X5mm
M4X5mm
Page 8
1OK2 3
4 5 6
7 8 9 0
+
CH
_
+
_
VOL
POW ER
MUT E
AUD IO
REC ALL
TV ME NU SOU RCE
CH. LIST
SOU ND
EXI T
PIC
SLE EP ASP ECT
TEX TUSBFRE EZE
INF OFAVEPG
DTV
HOL D
LIS T
IND EX
SUB PAGE PVR .LIST MIX SUB TITLE
REC /REP
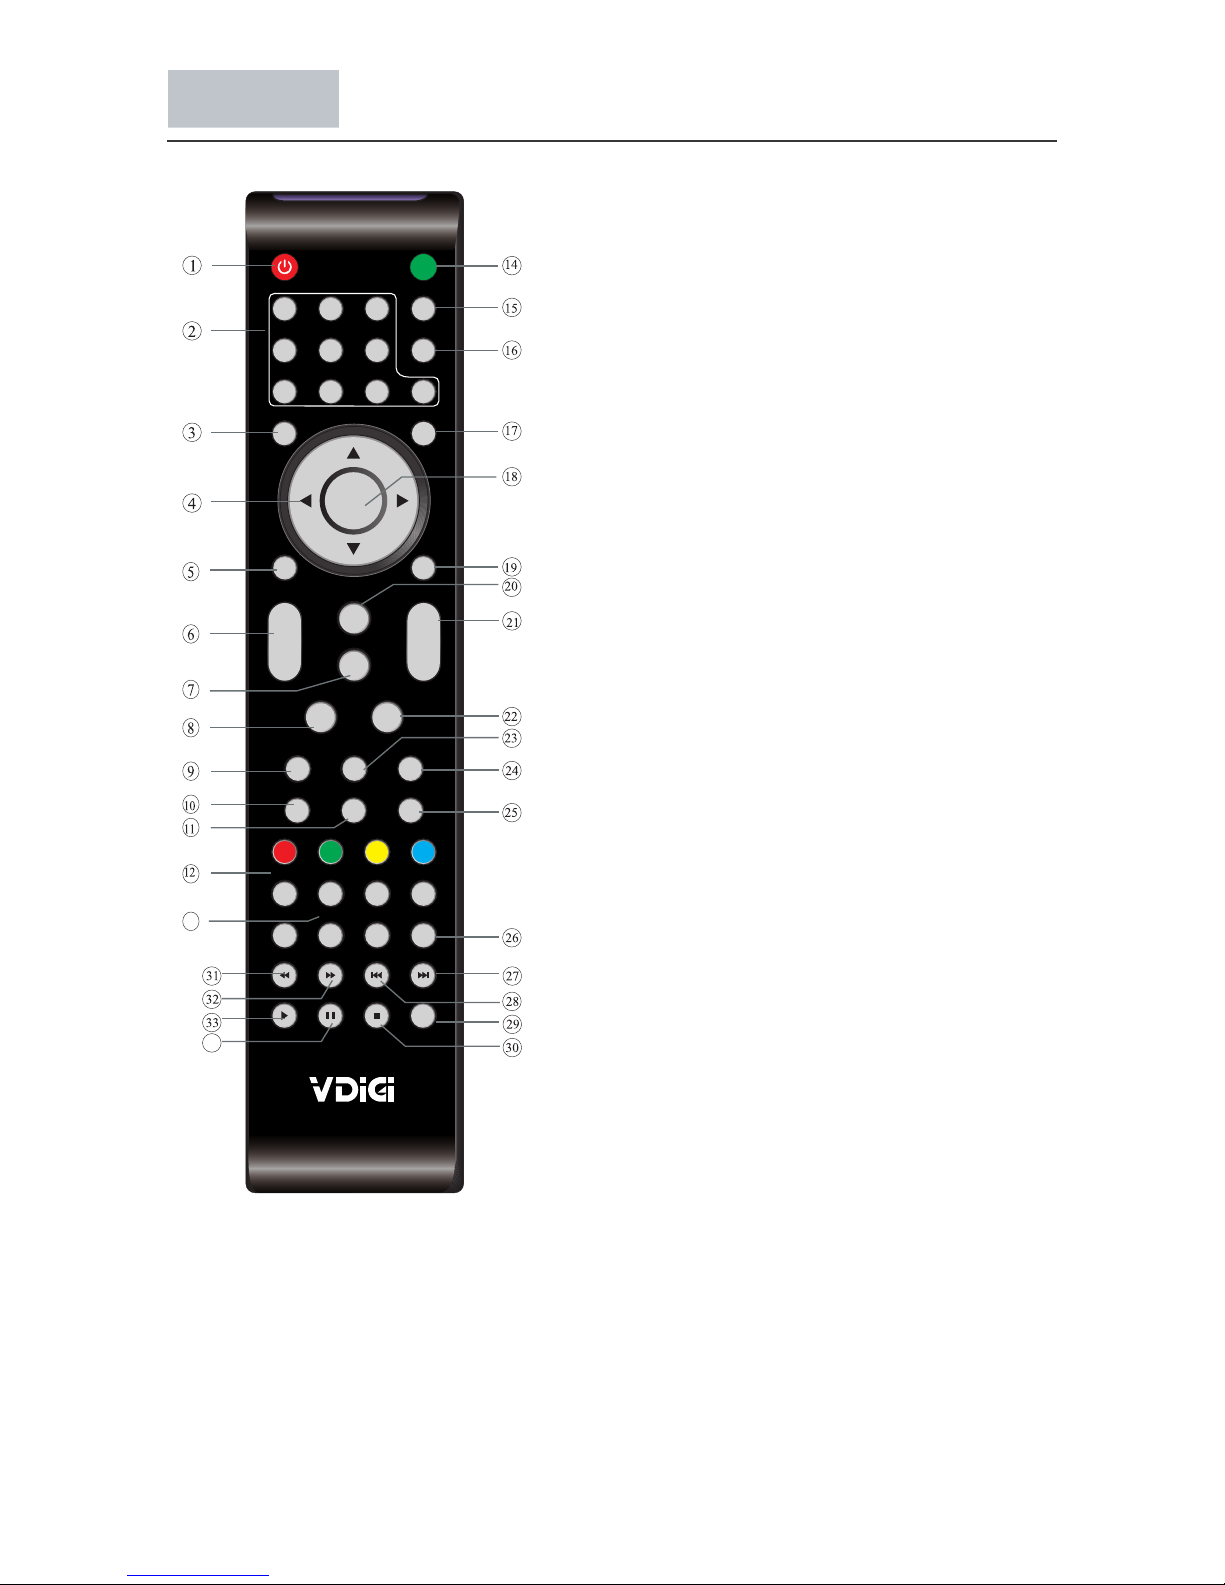
遙控器
1: POWER
开启电视或切换至待机模式
2: NUMERIC KEY
选择频道
3: MENU
显示设置选项表
4: CURSOR
在选项表内移动
5: CH.LIST
显示频道列表
6: VOL+/-
调节音量
7: PIC
改变图像模式
8: SLEEP
定时关机
9: FREEZE
使活动影像静止
10: EPG
11: FAV
在ATV模拟电视或DTV数码电视模式下,直接切换
至用户喜欢的频道列表
12: DTV
选择DTV数码电视信号输入源
13: PVR.LIST
14: MUTE
15: AUDIO
16: RECALL
退回之前观看的频道
17: SOURCE
选择输入源
18: OK
确认选择
19: EXIT
退出键
20: SOUND
切换声音模式
21: CH+ /CH-
选择频道
22: ASPECT
切换画面显示比例
显示数码电视频道电子节目指南
静音或恢復音量
显示录影文件列表
多声道选择
13
34
23: USB
选择多媒体信号输入源
24: TEXT,HOLD,LIST,INDEX,SUBPAGE,MIX
图文按键,如果当地无图文功能,这些按键无效
25: INFO
26: SUBTITLE.
29: REC/REP
录影按键DTV数码电视模式下,切换字幕
27,28,30,31,32,33,34:
多媒体功能按键
输入源或数码电视节目的信息内容
数码电视字幕切换
7
Page 9
INP UT
MEN U
CH+
CH-
VOL -
POW ER
VOL +
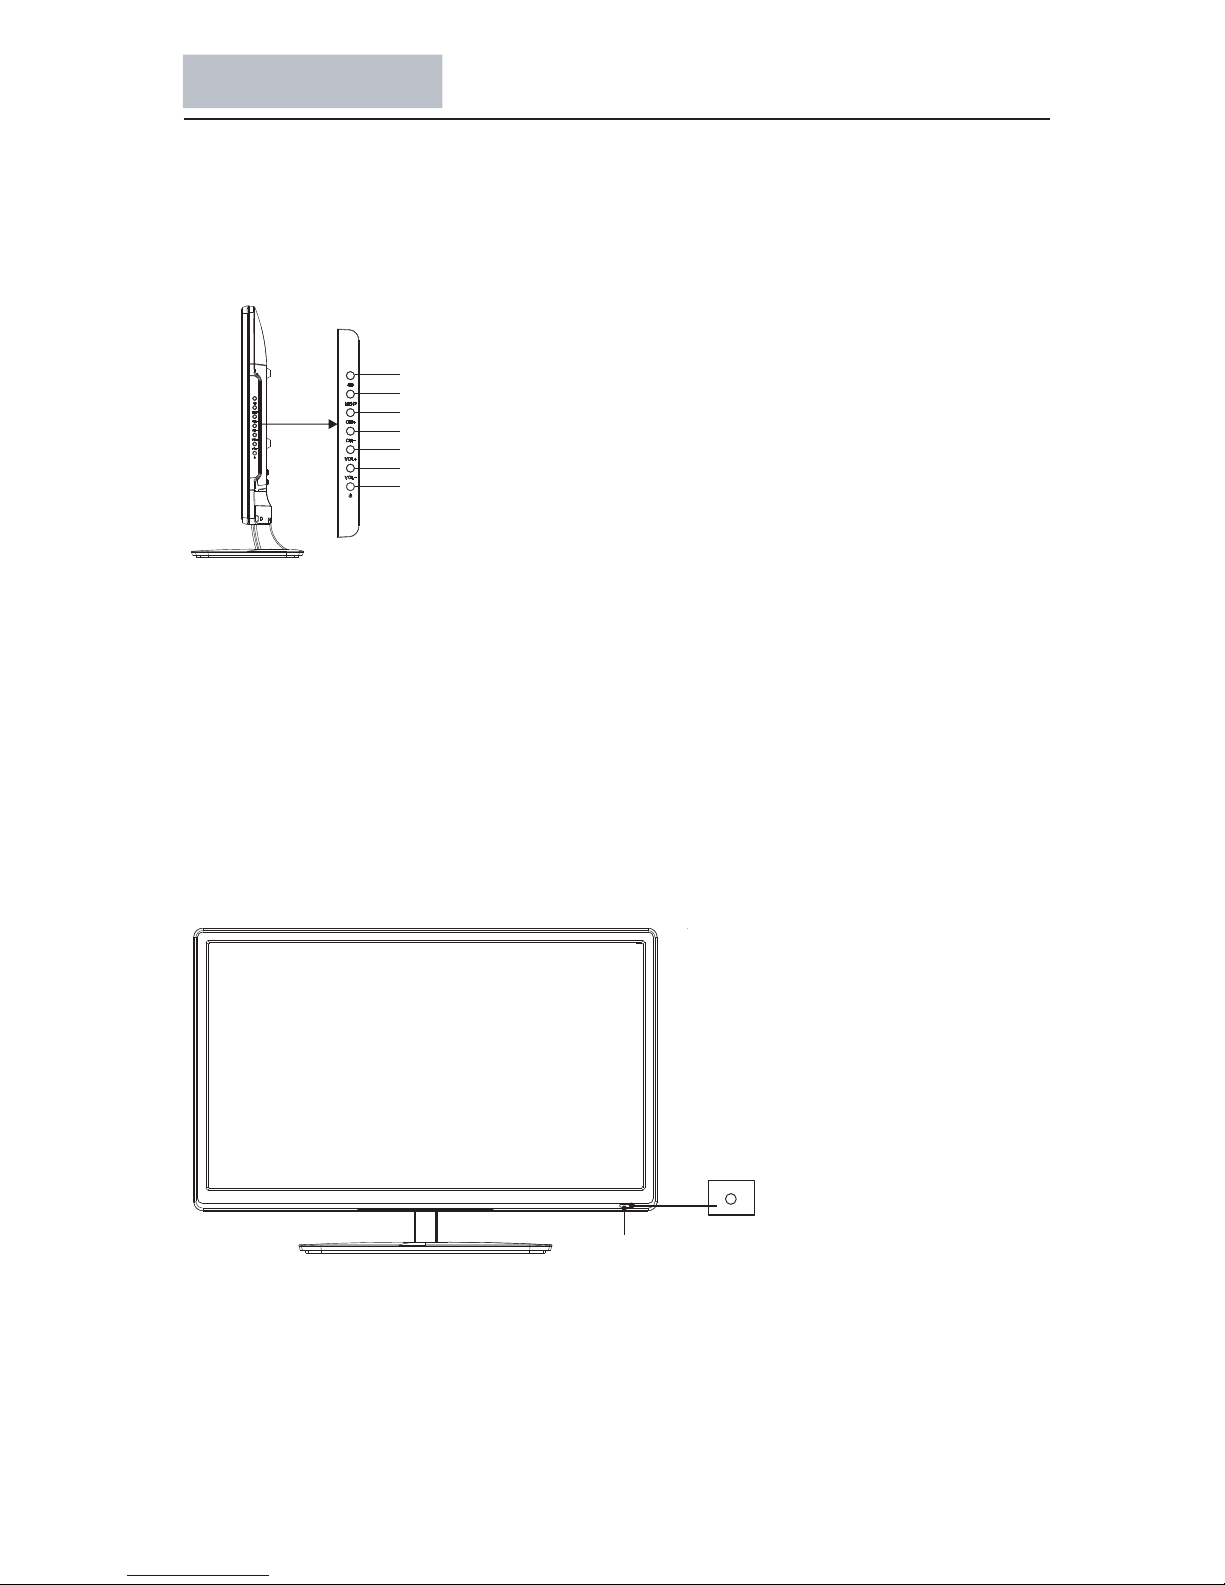
面板功能描述
8
側面按鍵功能描述
圖片僅供參考,請以實物爲準
VOL + / - : 按此按鍵增加或減小音量。
電源指示燈:電視處於待機模式時亮紅色;電視開啟時無燈。
遙控感應器:接收來自遙控器的紅外線訊號(請不要將任何東西放在感應器前
否則感應器可能會無法正常操作)
CH + / - : 按此按鍵增加或減少頻道號。
POWER: 打開或關閉電視機。
MENU: 按此按鍵顯示主菜單。
INPUT: 顯示輸入信源菜單。
電源指示燈
遙控感應器
Page 10
连接音频
输出端子
连接视频
输出端子
视频
视频设备
音频(左/右)
HDMI
连接音频
输入端子
连接视频
输入端子
视频
视频设备
音频(左/右)
R
L
视频
音频
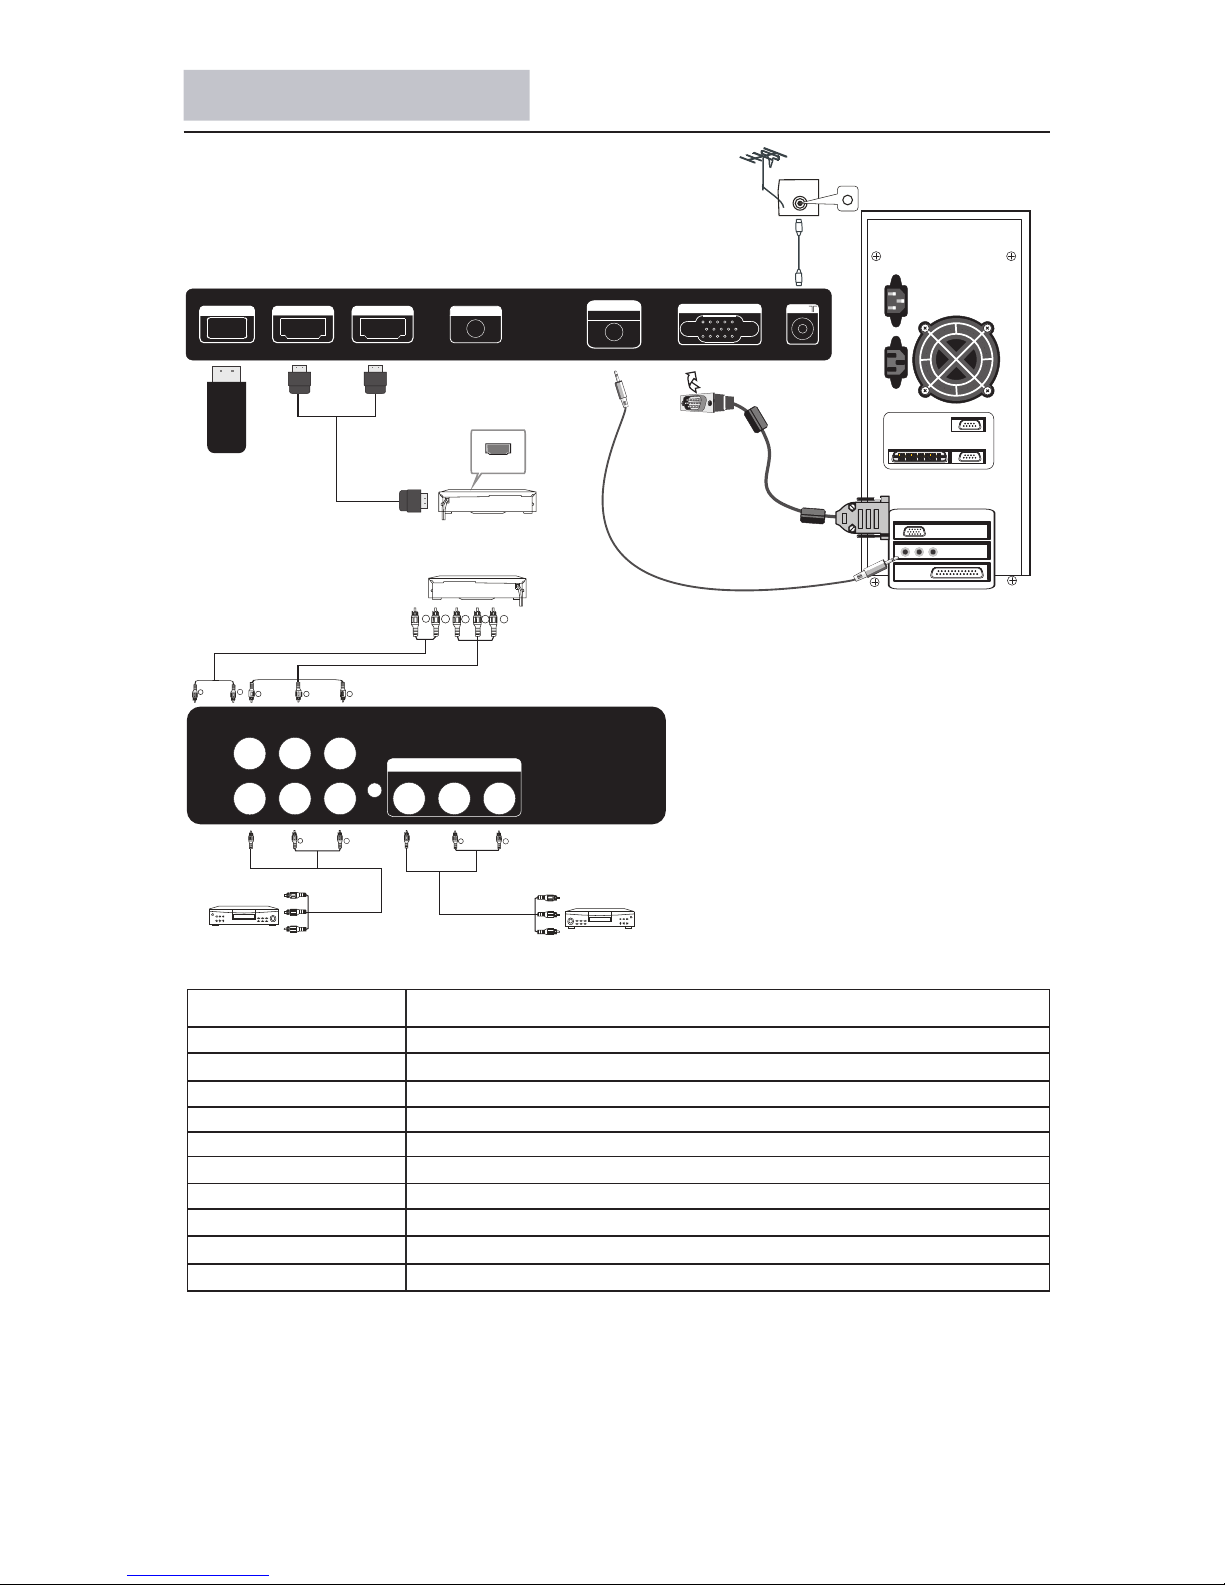
後置端子及功能描述
功能描述
保留供外置USB裝置之用
HDMI輸入端子
連接電腦的VGA輸入端子
複合視頻輸入端子
色差/複合音频輸入端子(共用)
天線輸入端子
9
TV
端子名稱
VGA
RF
HDMI1,HDMI2
VIDEO
L/R
USB
PC
電腦 端子音頻輸入
監聽輸出
MONITOR OUT
R
L
视频
音频
耳机輸出
HEADPHONE
备有色差输出的视频设备
Y
R
L
Pb Pr
Y
P
B
P
R
R
L
音频
Y P b P r
RL
VIDE O
R
L
VID EO
MON ITOR OUT
USB HDMI2 INPUT HDMI1 INPUT
PC
AUDIO INPUT
HEADPHONE
VGA INPUT
ANT
YPbPr
色差視頻輸入端子
Page 11
基本操作
10
< >
频道
自动 搜台
数码 电视 手动 搜台
模拟 电视 手动 搜台
频道 编辑
信号 资讯
软件 升级( USB)
安装 指导
搜台 种类 数 码+模拟 电视
中国 (香 港)
突尼 斯
奥尔 尼利 亚
埃及
南非
以色 列
伊朗
阿拉伯联合酋长国.
斯洛 伐克
MEN U
瑞典
英国
荷兰
挪威
波兰
塞尔 维 亚
斯洛 文 尼亚
西班 牙
OK
葡萄 牙
罗马 尼 亚
俄罗 斯
阿拉 伯 合酋
新西 兰
中国 香 港
瑞士
存储 至1
系统 伴 音制 式 I
当前 频 道1
搜索
微调
频率 4 24.25 M Hz
_
+
数码电 视 手动搜 台
UHF CH 35
_
+
差 一般
好
按 OK 执 行 搜台
频道 搜 索
模拟 电 视 : 0 节目 数
96% U HF CH 68 DT V
数码 电 视 : 0 节目 数
广 播 : 0 节目 数
保存
MENU
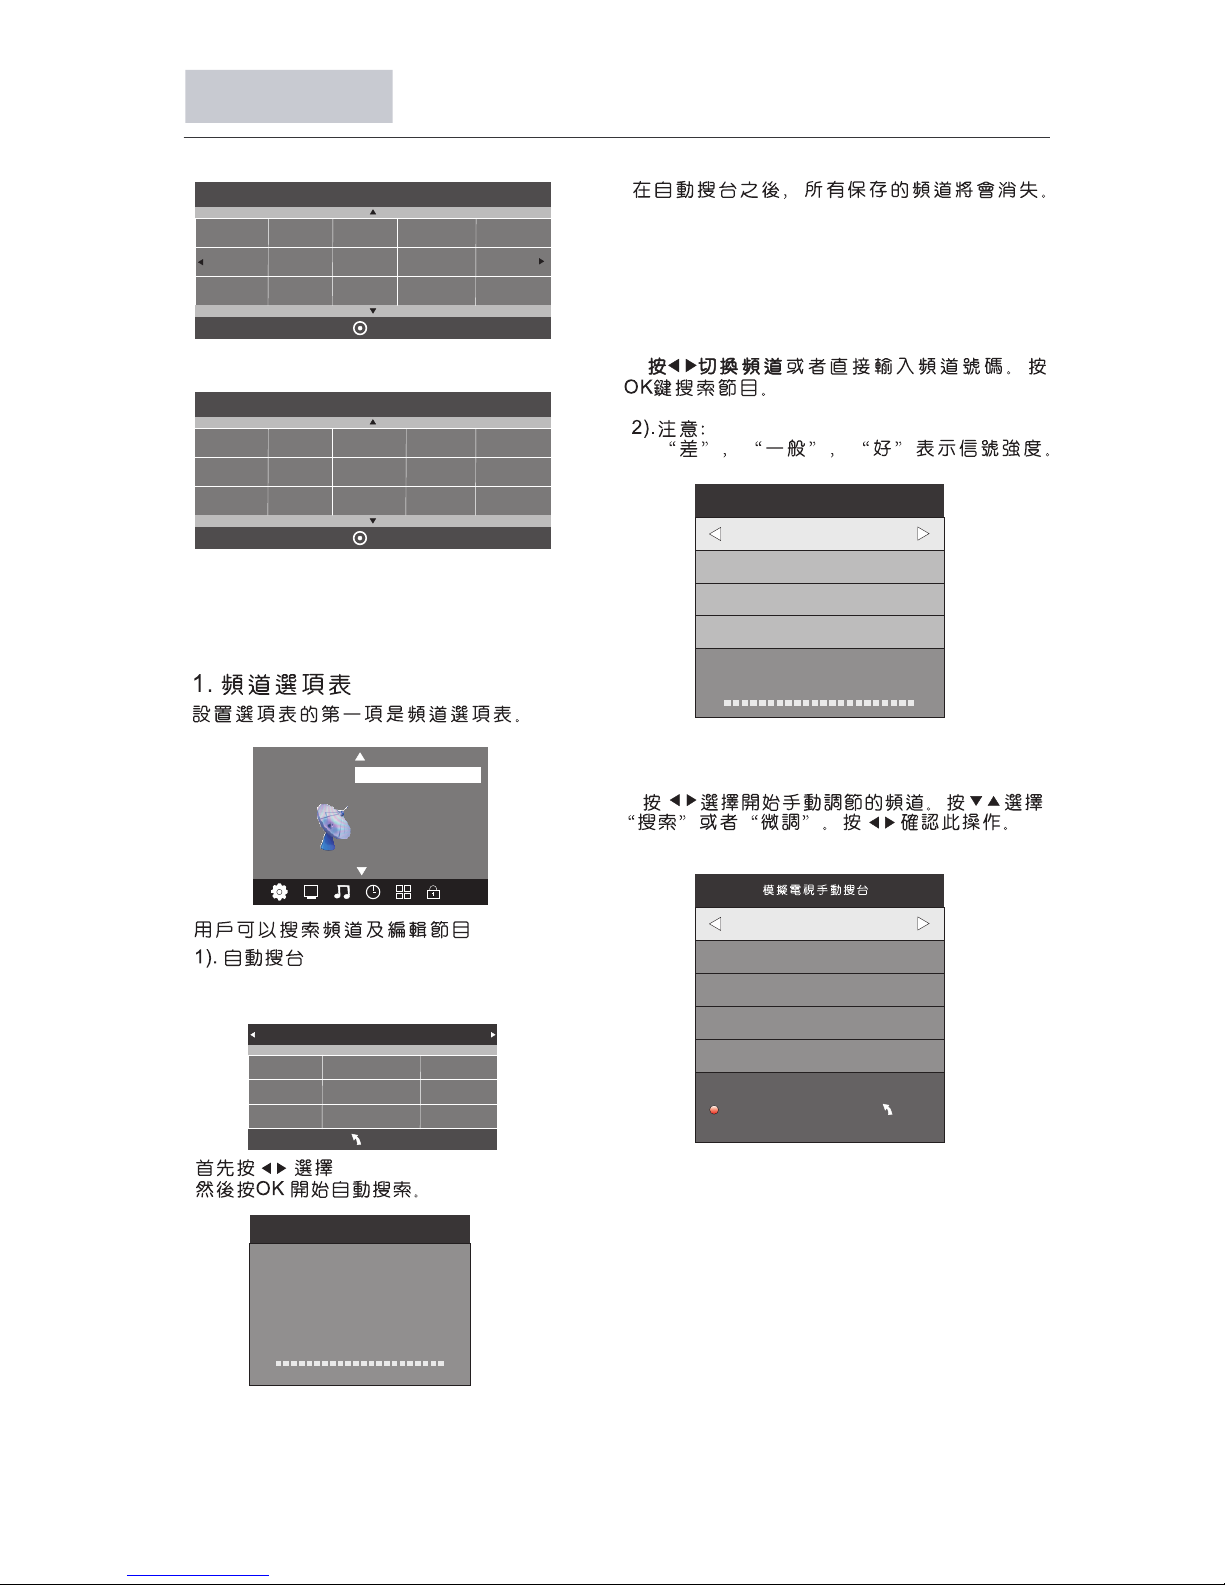
3).模 拟 电 视手动搜 台
搜索完毕,屏幕将显示第一个数码电视
节目。
(模拟电视或数码电视模式)
自动搜索所有频道(用户可以选择模拟
电视,数码电视或者数码+模拟电视)
注意:
如果搜台模式是数码+模拟电视,所有频道包
括数码电视和模拟电视可以一次性搜索。
自动搜台完成之后,电视会显示第一个数码
电视频道的内容。
数码电视手动搜台
用户可以选择一个数码电视频道,然后观看
此频道的节目。
数码电视和模拟电视,
OK
请选 择 菜单 语言
英语
中文 (繁体 )
请选择语言按OK 确认
以上屏幕显示只有在机器第一次开启或者
恢复到出厂设置时才会出现。按“OK” 键
开始自动频道搜索。
国家
Page 12
11
基本操作
FAV最喜爱的频道
跳过
色温
缩放 模 式
降嗓
萤幕
图像 模 式 标准
< >
影像
MEN U
图像 模 式 用户
对比 度 50
亮度 5 0
色彩 5 0
锐度 5 0
色调 5 0
色温 用 户
红 40
绿 31
蓝 50
MEN U
开机 时 间
定时 关 机
自动 休 眠
时区
时间
< >
< >
平衡 0
自动 音 量 关
声音 模 式 用户
声音
环绕 声 关
2) 在数码电视频道搜索完毕后系统会自动
按照数码电视的信号设置时钟上的时间。
移动功能
按 键选择频 道 , 按 黄 色按钮
来选中要 移 动 的 频 道,再按 选择 要 移 动
到的位置 , 最 后 按 黄色键确认 。
五
Page 13
12
基本操作
退回 C
1/1
退回
1/1
01 By My s ide.m p3 02 By My s ide.m p3
04 I Won 't Lase A. .. 05 Just Wh en I... 06 By M y side. mp3
专辑: By M y side
歌曲 名: By My sid e
比特 率: 128K
艺术 家: Chet La m
采标 率: 44K
年份: 20 07
大小: 19 81KBy tes
图片 音 乐 电影 文 档
设置 密 码
系统 锁 定
管理
< >
频道 锁
儿童 安 全锁 关
< >
恢复 原 厂设 定
设定
声道 选 择
字幕 选 择
语言/ Lan gu age 中 文(繁 体)
刻录 档 系统
注意: 如 果 选择<恢复原 厂 设 定>将会
清除所 有 存 储的节目 。
6.管 理选 项 表
设置选项表的第六项是管理选项表。可以使
6666
按“Sour ce”键,选中数码媒体接口, 按“OK”
键进入数码媒体接口.
7.设 定数码 媒 体 接 口
数码电 视
输入源
模拟电 视
色差
电脑
HDMI1
HDMI2
视频
数码媒 体 接口
OK
Page 14
13
基本操作
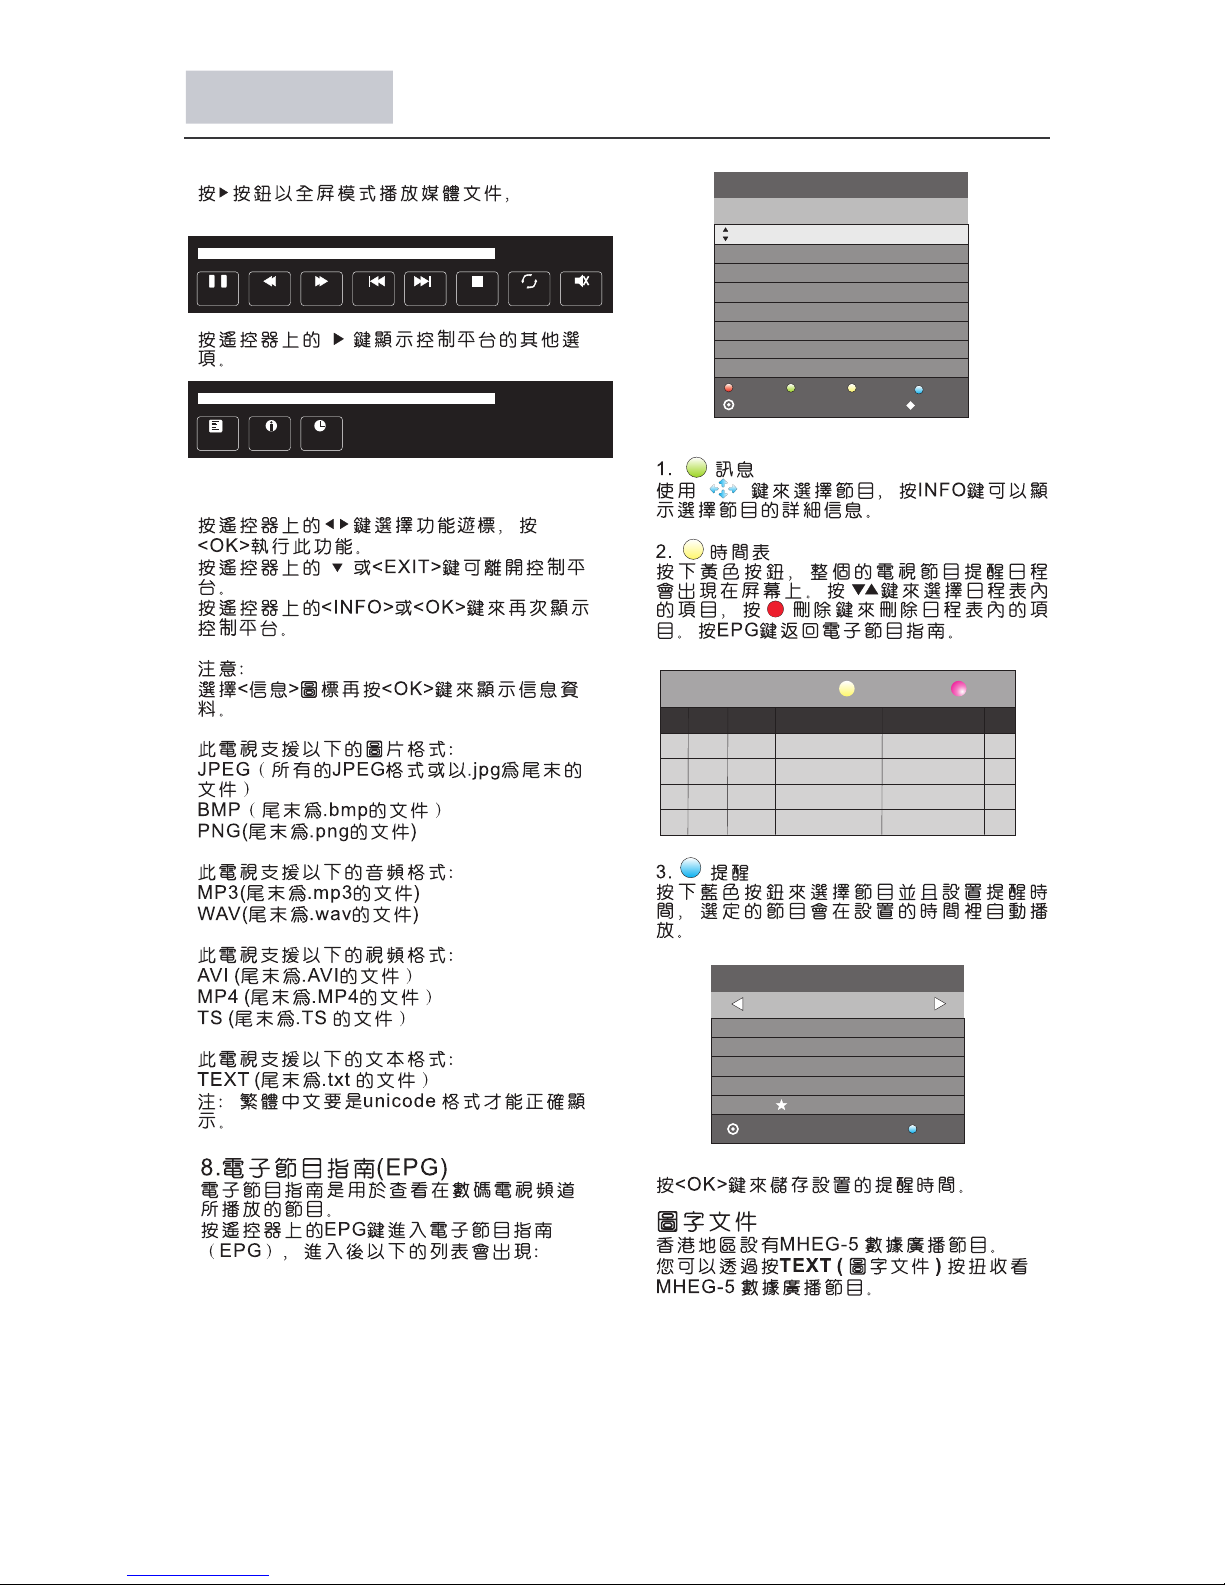
时间 表 04:5 5 28th 4月 退回删除
时间 日 期
节目 表
频道 名
11 台
15 分
16 时
8 月
16 日
仅一 次 模式
提醒
返回
OK
_
+
暂停 快进 上一 个 下 一个快退 停止
Rep eat ALL
00: 00:33 /00:0 4:22
静音
播放 列表
00: 00:48 /00:0 4:22
讯息
08/ 11月 15 :14
11 本港 台 理财 博 客之 投资 多面 睇(粤)
电子 节 目指 南 时间
时间 表
讯息
提醒
OK
IND EX
12亚 洲高 清台 理 财 博客 之投 资多 面睇( HD)
13 南 方卫 视 醒目 生 活至 轻松
14 中 天亚 洲台 新 台 湾星 光大 道
15 中 央4台 电视 剧:郑和 下 西洋
16 国 际台 教 育电 视
81 翡 翠台 今 日VIP
82 J2 东 京o靓模 大作 战(韩)
跳至 时间点
预录
当从外接存储装置选择 选项时,
控制平台的选项会和上述不同。
其他媒体文件
按“OK”
键或“Info”键,以下的控制平台会显示出来。
Page 15
14
预录/录影/时移操作
01/1月 00 :07
800 无信 息
电子节 目 指南 时 间
时间 表
讯息
提醒
OK
IND EX
预录
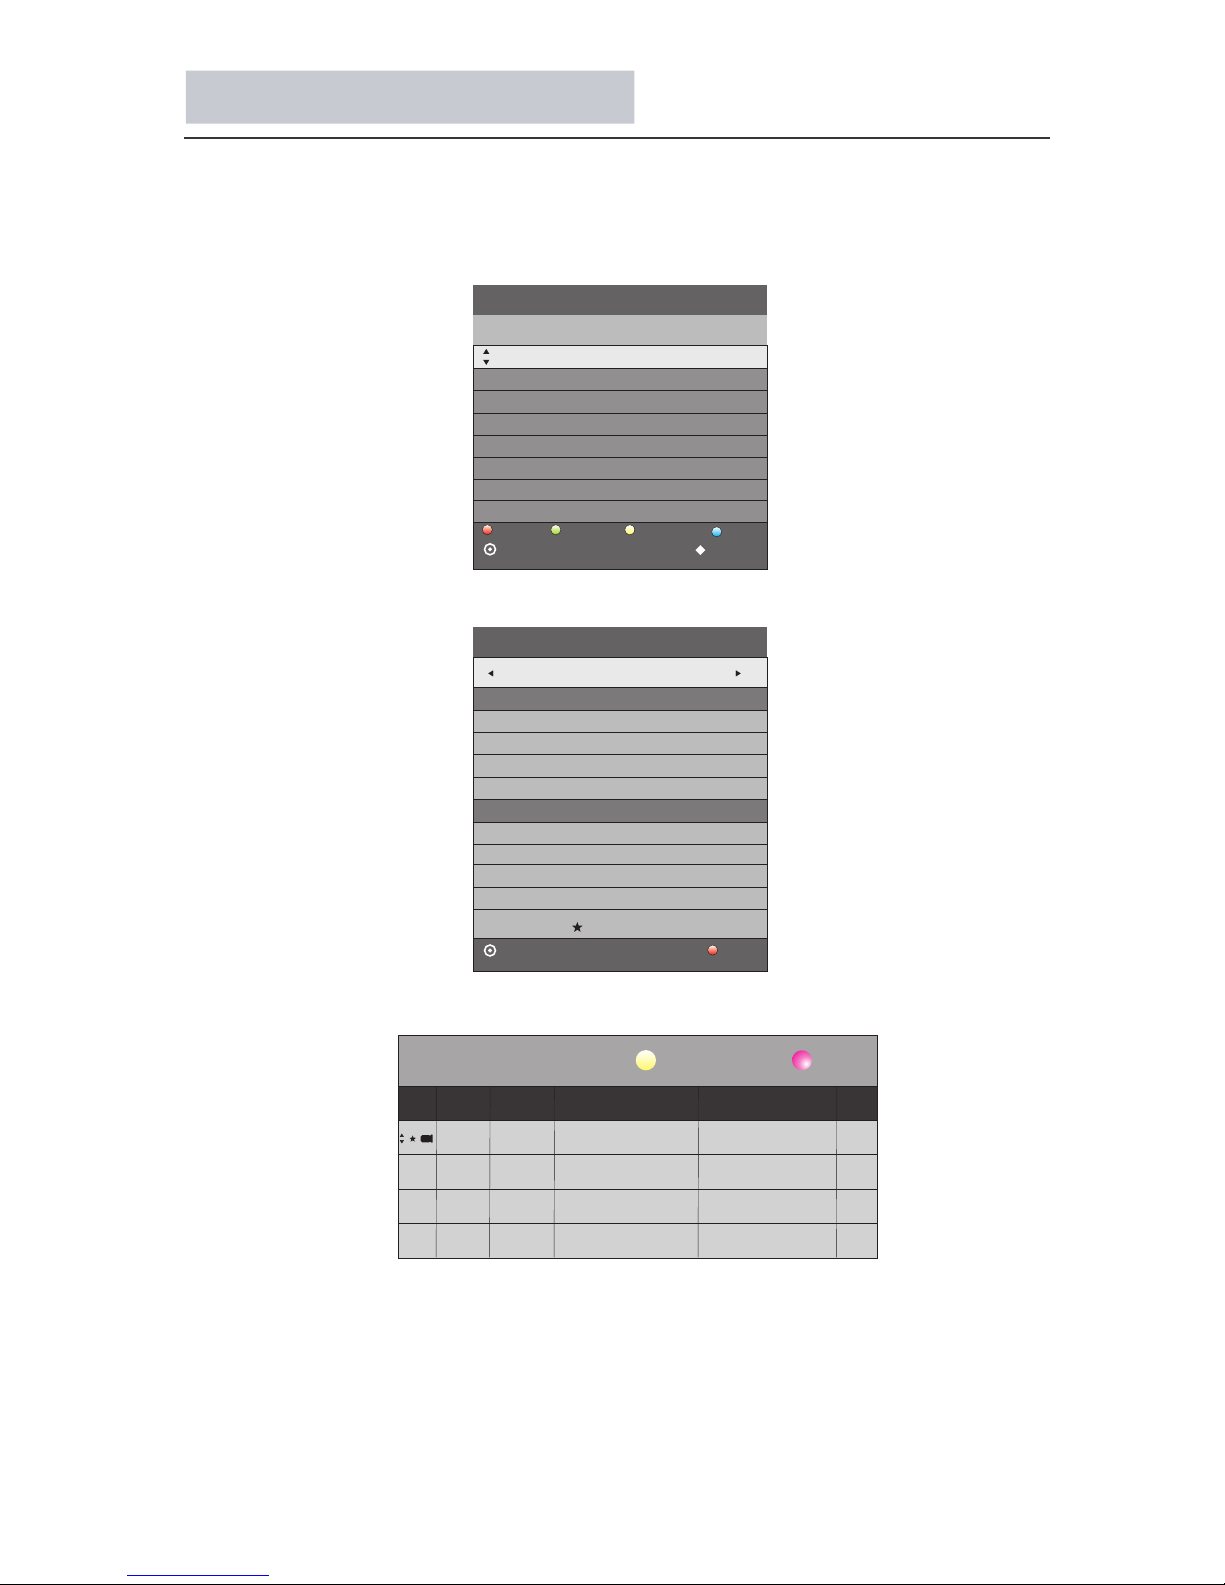
一.设置录影任务
1、在数码电视 道下,按下 按键将显示各个频道的节目列表。频 EPG
2、按▲▼按鈕選擇想要錄影的節目,按下红色键或REC/REP鍵,將進入预录设定:
單 次 十一月 2 008 18:04
11
01/1月 00 :07
开始 时 间
预录设 定
OK
BAC K
- 800 +
10分
00时
01月
01日
40分
00时
01月
01日
结束 时 间
模式 自 动
时间表 00:09 01th 1月 删 除 退回
时间 日期
节目表
频道名
00: 10-00 :40 星期 二01/0 1月 无 标题 800
3、在EPG菜单下, 按 色键可以查看已经置的任务列表:黄
4、在录影菜单下, 按“ ”键添加新的任务到任务列表中。OK
Page 16
15
预录/录影/时移操作
Format:
选择磁碟
USB 0
磁碟 C :
MENU
OK
检查档案系统 开始
6 Hr.r.
选择磁碟 :
SD 104 Mins
HD 29 Mins
文件系统容量
MENU
PVR 功能
< >
恢 原厂 设 定
设定
声道 选 择
字幕 选 择
语言/ Lan gu age 中 文(繁 体)
录影 格 式化
USB磁碟
格式化
速度
录影时间限制
OK
Pv文件系统类型 HiSpeedFS
文件系统容量 All
SD 104 Mins
HD 29 Mins
文件系统容量
MENU
OK
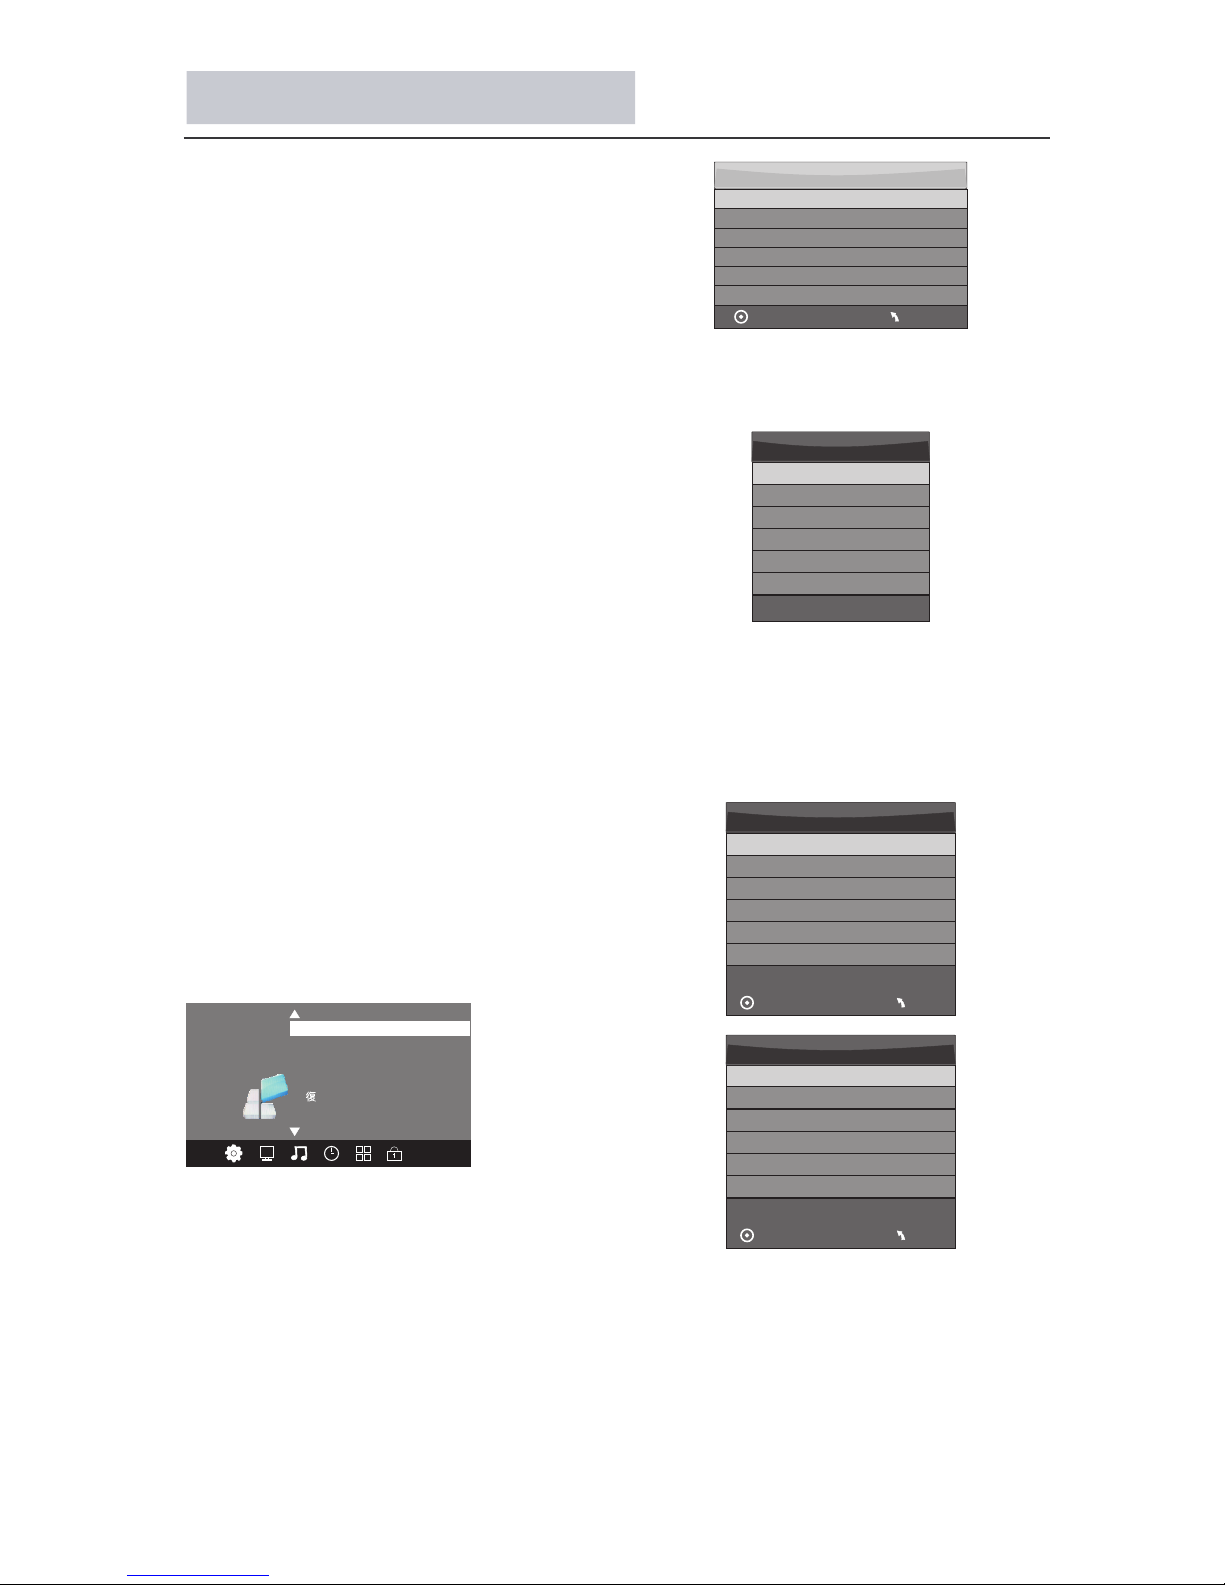
选择磁 碟 :选择 存 储 刻录文 件 。
检查PV R档 案 系 统:检 查U SB设备是
否成功安 装P V R档 案 系统。
如图:
1.录影程式预设
从选择功 能 表 进 入 “录影格式 化 ” 的 选
择功能表 内 , 选 择 “ ”,点
击“OK”,直 到检查跳转 为 “ 成 功 ”。
提示:查 询 “ 速 度 ”一项,如 果 显 示
“支援HD” , 那 USB设备 支 援 时 移 和录
音。如果 不 是 , 请 格式化设备 以 确 保 该 功
能可用。 如 果 磁 碟 空间够大, 那 么 默 认 设
置“ 时间限制 ” 为6小 时 ; 如果磁碟空
间不够, 时间 将 会 缩 短 , 时间长
短由磁碟 空 间 决 定 。在“检查P V R档 案 系
统”时间 , 请 勿 进 行任何操作 直 至 检 测 完
成。
电视机需 带 有P V R档 案系统才能 使 用
功能。而 且 只 能 使 用同一种电 视 机 进
行播放, 不 能 使 用 其他与.TS .不 相 容 的 设
备(电脑 ,D V D等 ) 。
警告:当 格 式 化 时 ,所有您存 储 在 外
部设备的 资 料 和 资 讯将会丢失 。
从选择功 能 表 进 入P VR档案系统 如 下
图:
检查档案 系 统
麼
录影
录影 录影
录影
PVR Hi Sp eed F S
PVR All
Pv文件系统类型 HiSpeedFS
文件系统容量 All
PVR FAT32
PVR All
C:
Page 17
16
预录/录影/时移操作
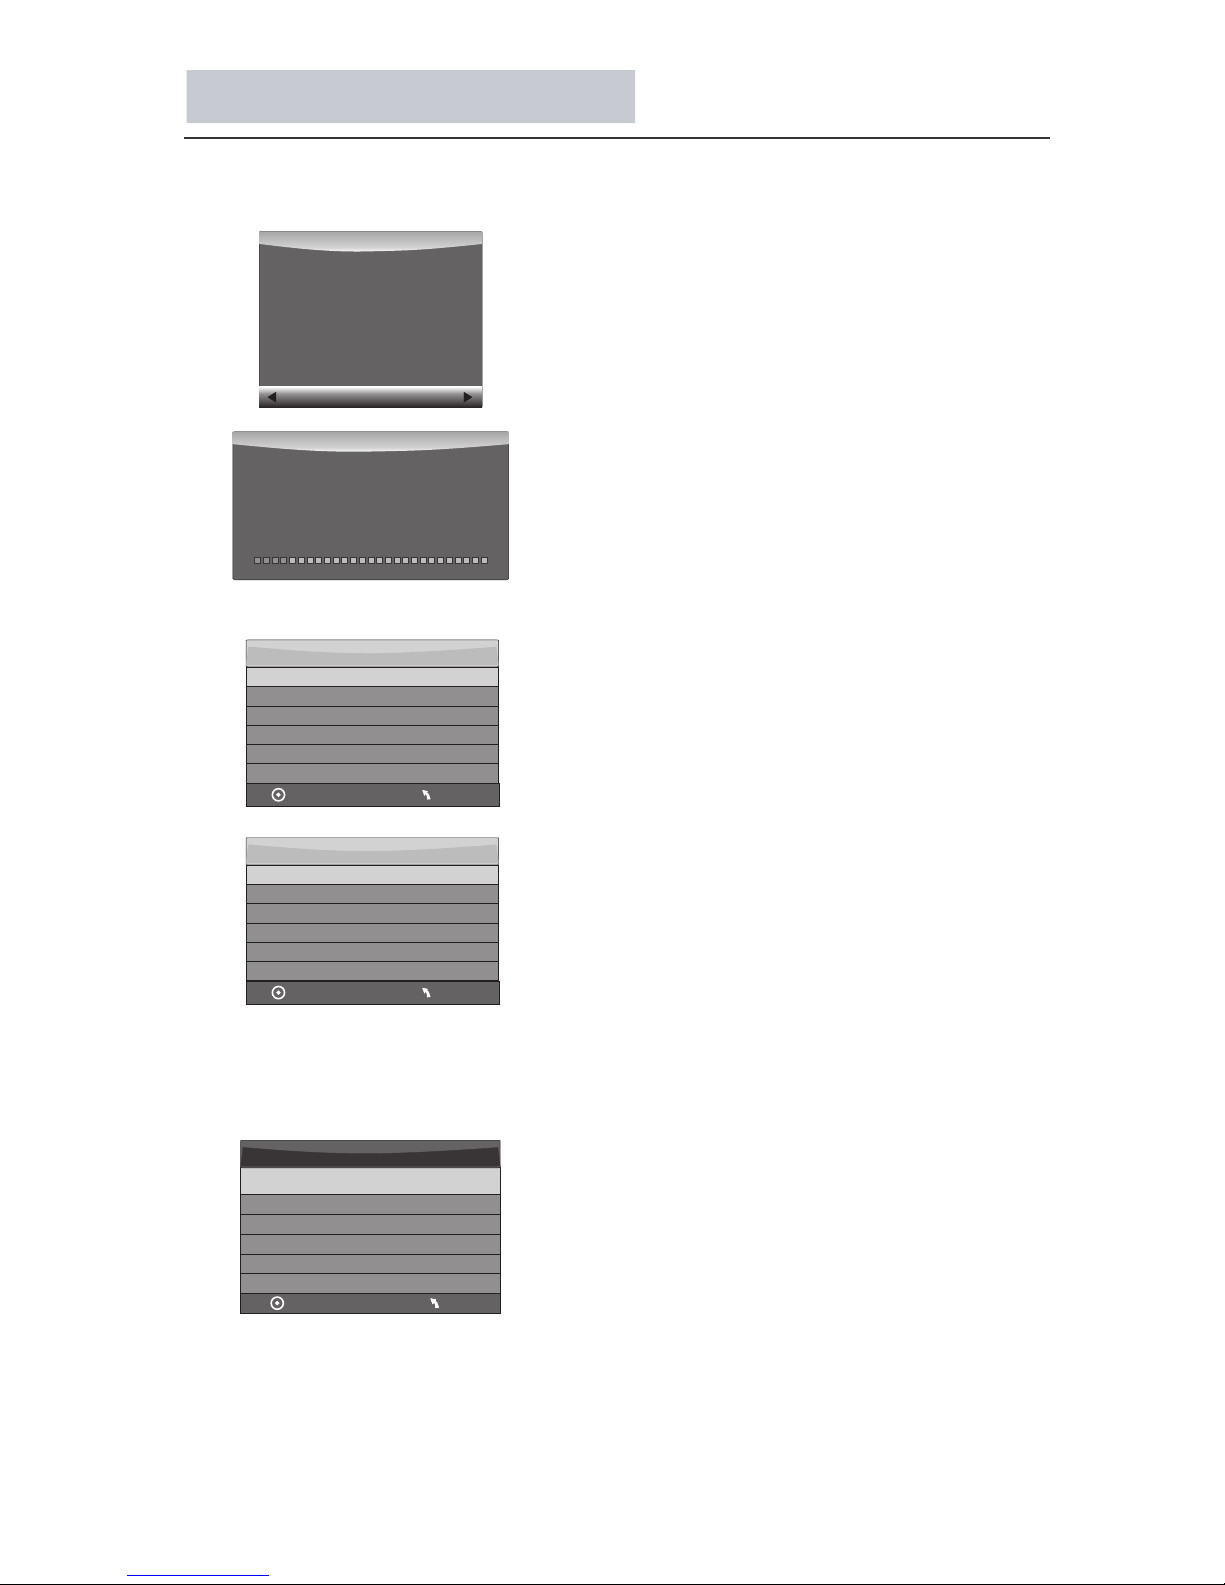
警告!将丢失所有资料。
开始 退出
格式化磁片
格式化磁片
勿拔出USB设备
正在格式化!请等待
格式化磁片
时移磁碟容量
时移磁碟容量 512 MB
SD 14 Mins
HD 4 Mins
MENU
OK
检查刻录档系统 检查中
6 Hr.
选择碟片 C :
USB磁碟
格式化
速度
刻录时间限制
成功
成功
检查中
All
OK
2. 录 影节目
在观看 数 码电视 时 , 只要已 连 接 磁碟
而磁碟 的 容量未 满 , 按遥控 上 的
“REC / REP” 会 进 行 的“录
影”,录影 视 窗将会 弹 出 。另外,用 户
也可按 遥 控上的 “E P G”透过 电 子节
目表进 行 预录。
即时
3. 播 放 内容
在“USB”里, 录 影的节 目 将 会被保
存到设 备 的“_M S T PVR” 资 料夹
里。
1.U S B记忆体 容 量 必须达 到4 GB到
500 G B。
2.视频 位 元速率 太 低 时,视 频 播 放
。
录影
会
出现起 格 的情况
建议通 过 Hi Speed FS
化设备 加 速 进度。
“ ”格 式
录影
格式化 结 束后弹 出 以 下菜单:
如果您 选 择“ ”格 式
化模式 则 可改变 时 移 大小。
Hi Speed FS
MENU
OK
检查刻录档系统 检查中
6 Hr.
选择碟片 C :
USB磁碟
格式化
速度
刻录时间限制
成功
成功
检查中
All
MENUMENU
Page 18
17
预录/录影/时移操作
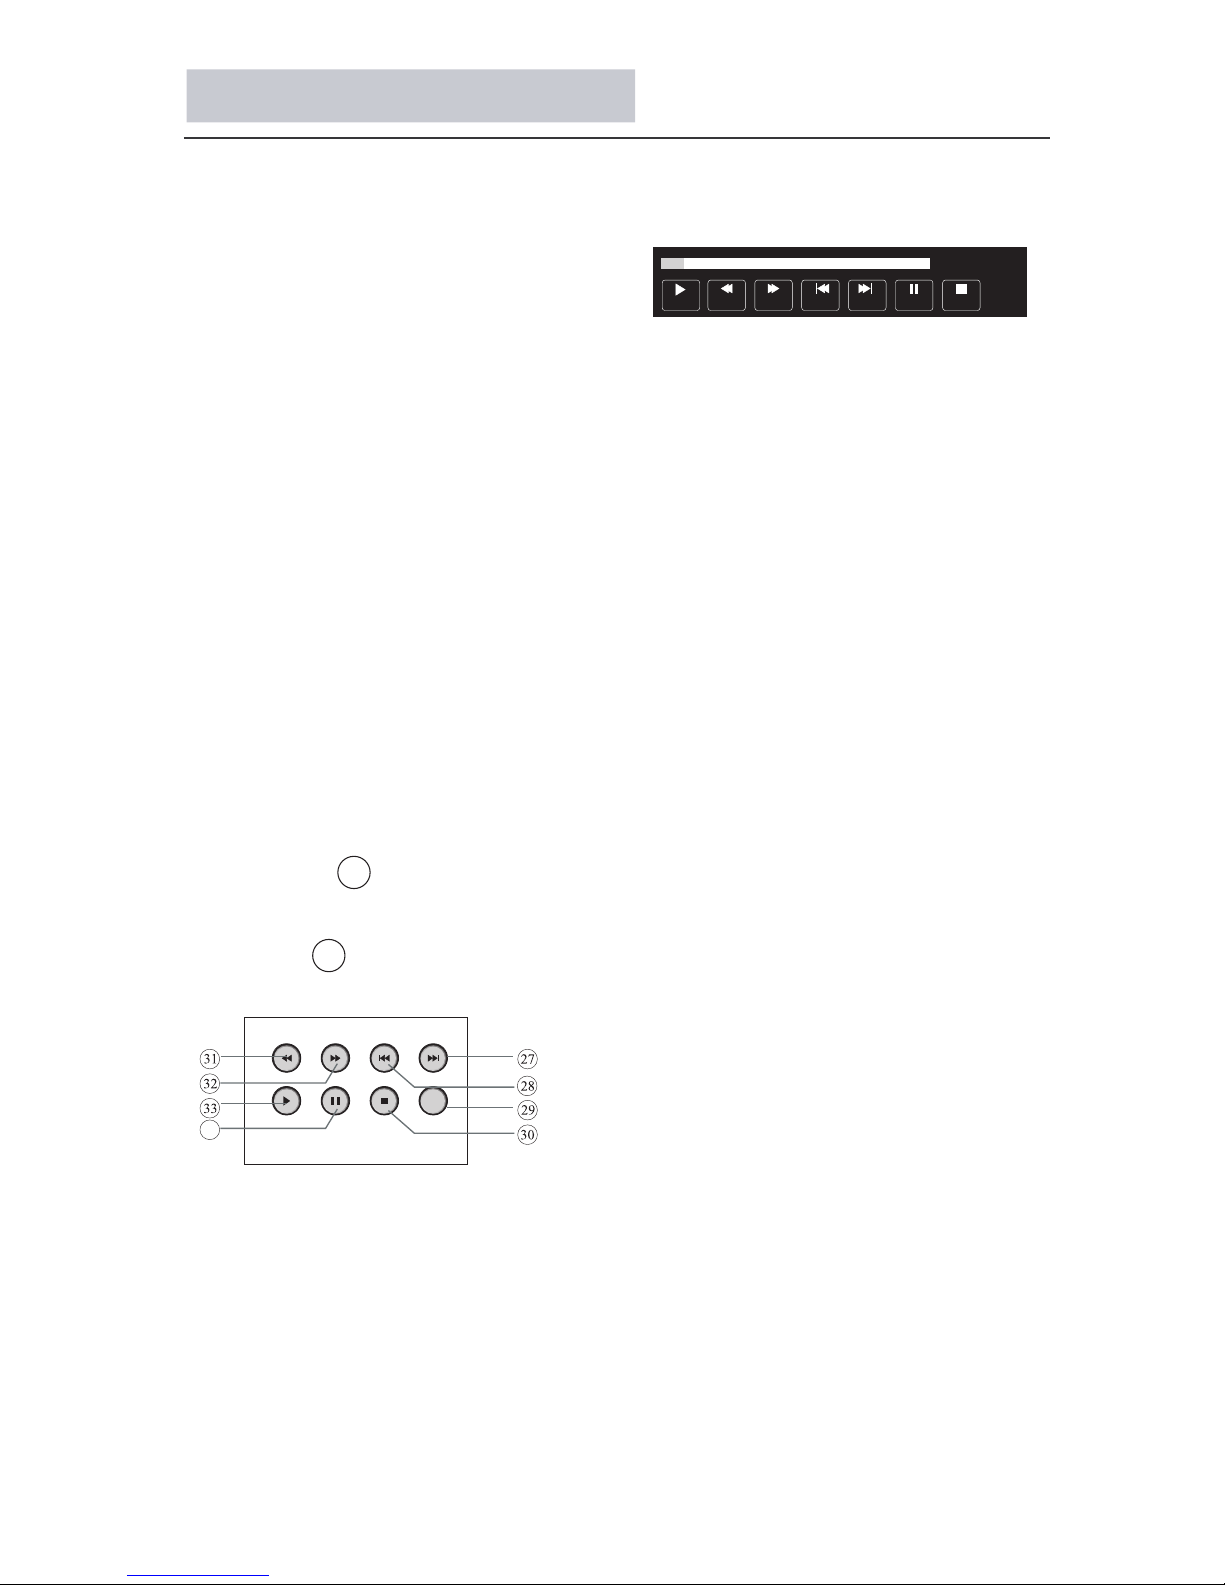
时移功能
REC /REP
34
1. 时移 功 能
电视机 支 援暂停 以 及 将正在 观 看 的
到USB存 放 装置, 以 便
从暂停 处 重新观 看 。
提示:
· 需要格 式 化USB 2 . 0记忆体 设 备.格
式化前 请 保存您 的 资 料。格 式 化 後所
有存储 在U SB设备 里 的 资料将 被 清除。
·时移 功 能启动 後 , 睡眠计 时 器 将会
被中止 。
USB存 储 驱动格 式 化
· 格式化 时 长至少2分 钟 , 请不要 在 格
式化过 程 中切断 电 源 或将US B设 备拔
出。
· 格式化 过 程中, U S B设 备将会 启 动
速度检 测 。如果 检 测 失败, 则U S B设备
可能不 支 援时移 功 能 。
将暂停 的D TV节目 到U S B存放装置
中
1. 数码 电 视模式 下 , 在后置 端 子 插入
USB存 储 装置。
2. 按PA U SE 34 启 动 时 移功能 。 电视
节目暂 停 。时移 介 面 弹出, 开 始
。
3. 按ST O P30 停 止 时 移功能 , 中止节
目 。
数
码电视 节 目录影
录影
录
影
录影
提示:
· 请勿在 时 移功能 启 动 时拔出U S B存
放装置
· 4GB緩衝
提供40分钟 内容录影
快进 上一个 下一个快退
暂停
[-00:00:08/00:09:00]
播放 停止
00:06
s
Page 19
2.VGA
1024*768
1440*900
800*600
640*480
60
60
60
場頻(Hz)
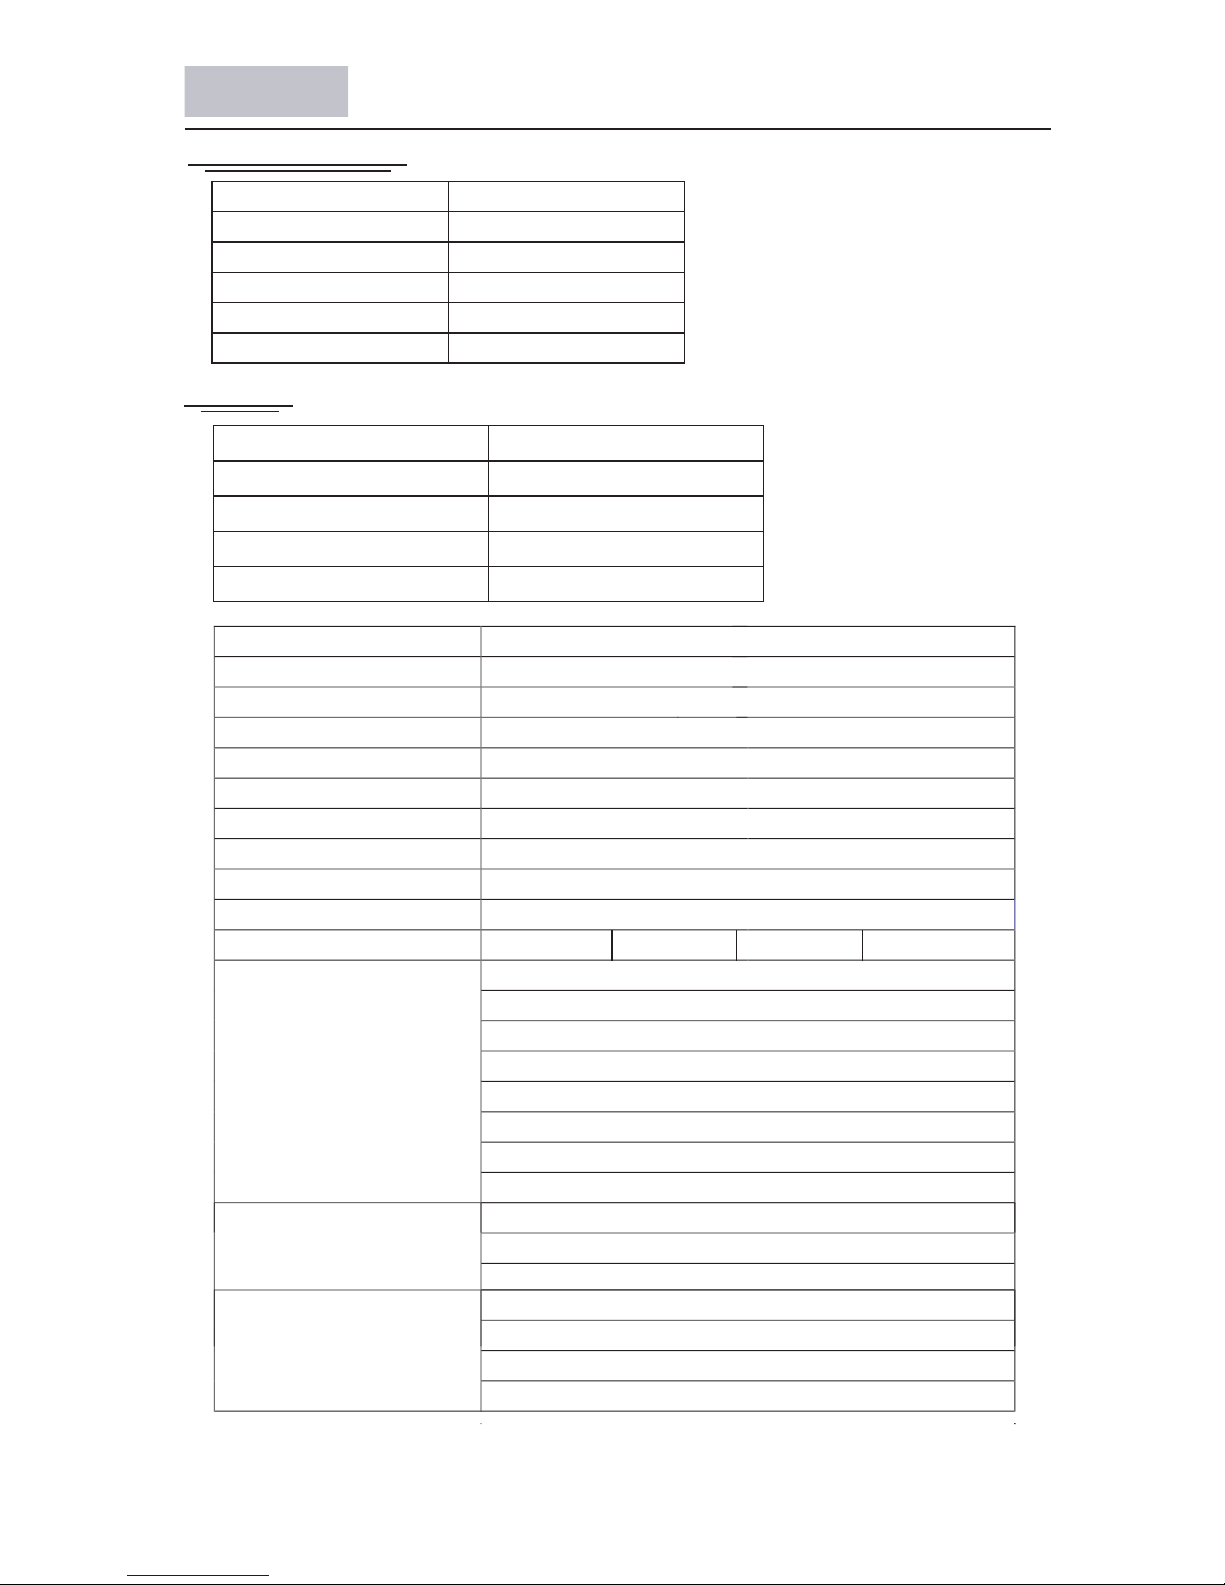
技术规格
1.YPbPr/HDMI
480i
480p
720p
1080i
1080P
60
60
60
60
分辨率
場頻(Hz)
產品型號
19E600CT
螢幕尺寸
解析度
可視角度
亮度
對比度(標準)
800:1
反應時間
6.5 ms
電視制式
DMB-TH;PAL
伴音制式
BG;DK;I
電源輸入範圍
交流 100~240V/頻率 50/60Hz
消耗功率 ≤35W
天線輸入端×1
HDMI 輸入端×2
輸入端子
YPbPr 輸入端×1
VGA输入端 ×1
USB 輸入端×1
AC交流電源輸入端×1
VIDEO輸入端×1 L/R×1
MONITOR 音頻輸出端×1
輸出端子
說明書×1
遙控器×1
電池×2
附件
保修卡×1
18
60
分辨率
60
200 cd/m
2
MONITOR 视頻輸出端×1
×1
PC AUDIO輸入端
H:170° V:160°
HEADPHONE 耳机輸出端×1
注意:規格細節最終可能與實物不同,恕不另行通知,請以實物爲準。
1366X768
18.5"
≤28W ≤34W
≤35W
Page 20
19
Page 21
20
7
Page 22

Table of Contents
Before operating the TV, please read “Safety Information” and retain
this manual for the future reference.
21
Safety Information……………………………………………………..
Table of Contents………………………………………………………
Precautions………………………………………………….…….……
22-24
24-25
Stand Installation..………………………………………….…….……
Remote Control ………………………………………………………..
Functions of the panel…………………………………………………
Rear Panel and Descriptions………………………………………...
Menu Operation ………………………………………………………
Record……................……………………………………………….
27
28
29
30-33
34-37
Specifications………………………………………………………….
Trouble shooting………………………………………………………..
39-40
38
25
21
Wall Mounting Installation..………………………………………….…
26
Page 23
22
Page 24
23
Page 25
24
Page 26
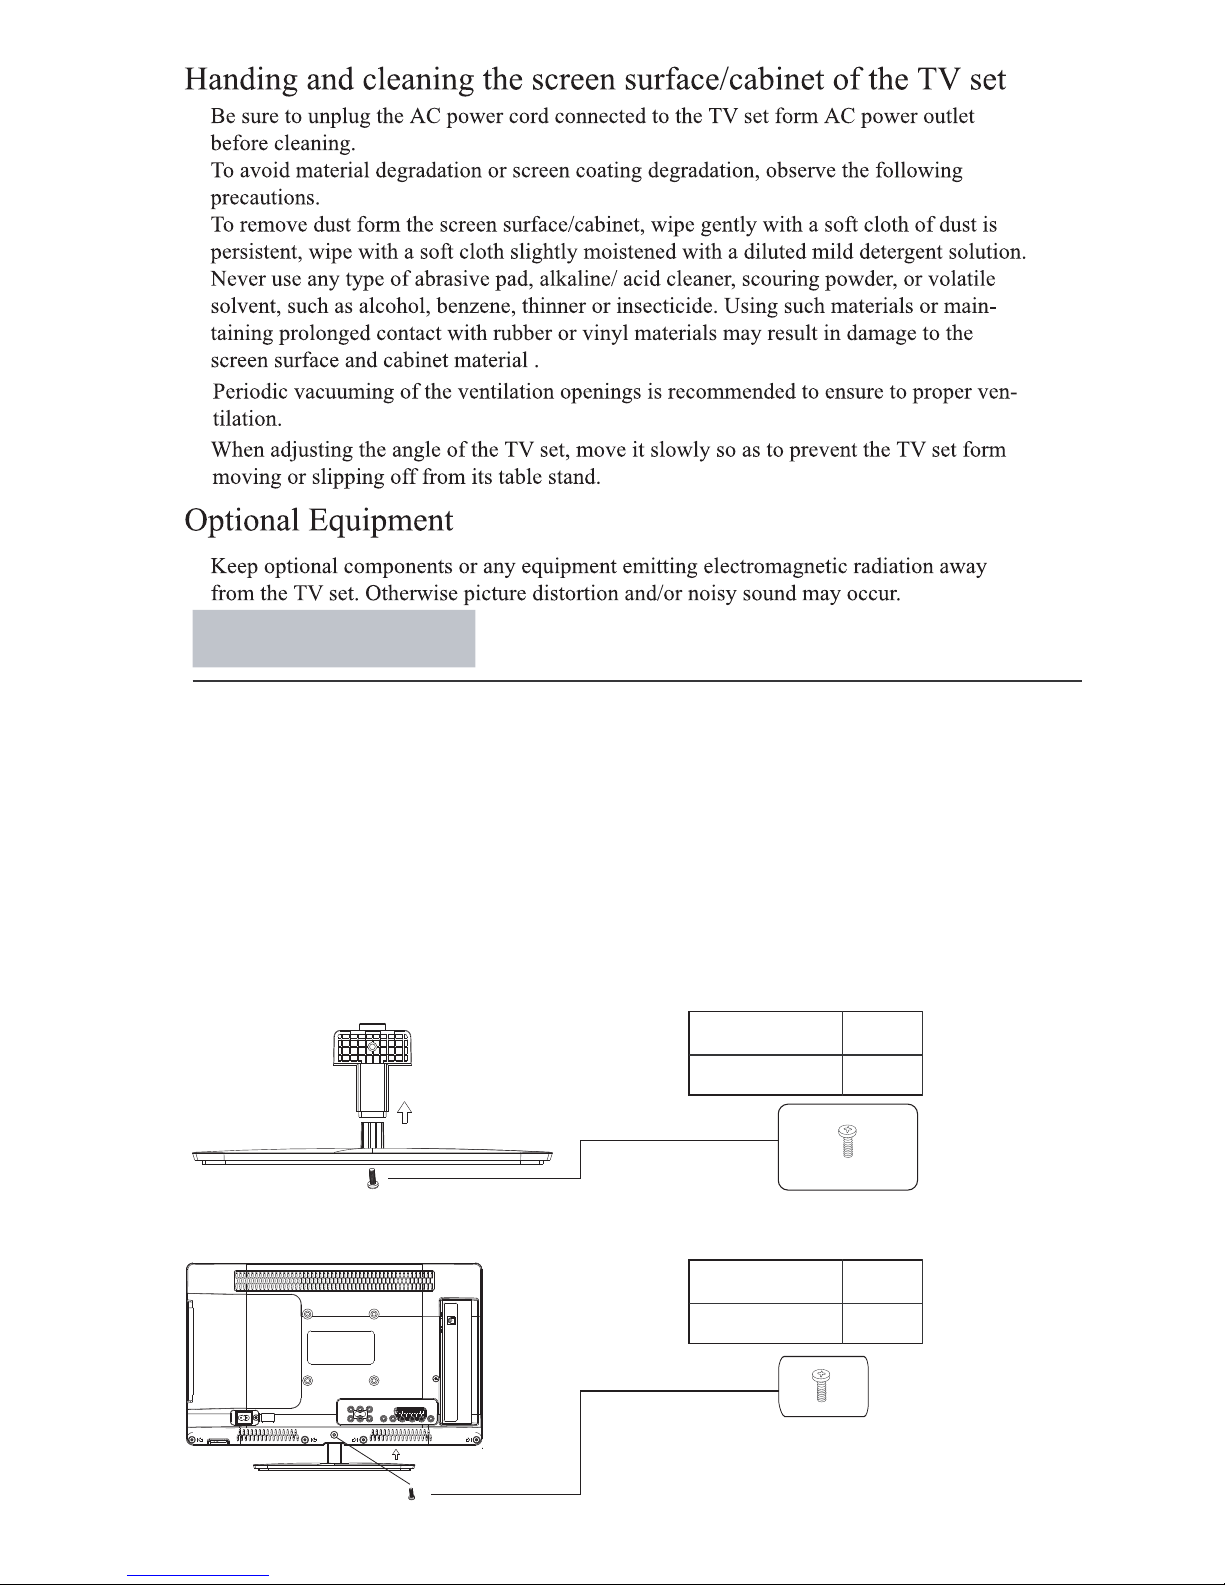
Your TV is packaged with the TV stand separated from the cabinet. To setup the TV table stand,
please carry out the installation according to the instructions below.
Step One
Place the TV faced down on a soft cloth or cushion to prev
ent the panel from being damaged.
Note:
1. The panel is easy to scratch, so please choose an absolu
tely flat surface to place the
TV, and use soft cloth or cushion to protect the TV panel. Do not put TV on table directly.
2. Always unplug the AC cord first when installing or removing the stand.
Stand Installation
25
Step Three
Step Two
Pedestal Screws Quantity
1pcs
M4 x 20mm
Pedestal Screws Quantity
1pcs
M4 x 10mm
Insert the sc
rews (which are totally the same) and tighten them.
Take the sta
nd. Please align the screw holes of the stand and TV.
fastened with the screw.
Insert the stand support pillar into the stand as the arrow indicated direction, and then
Page 27
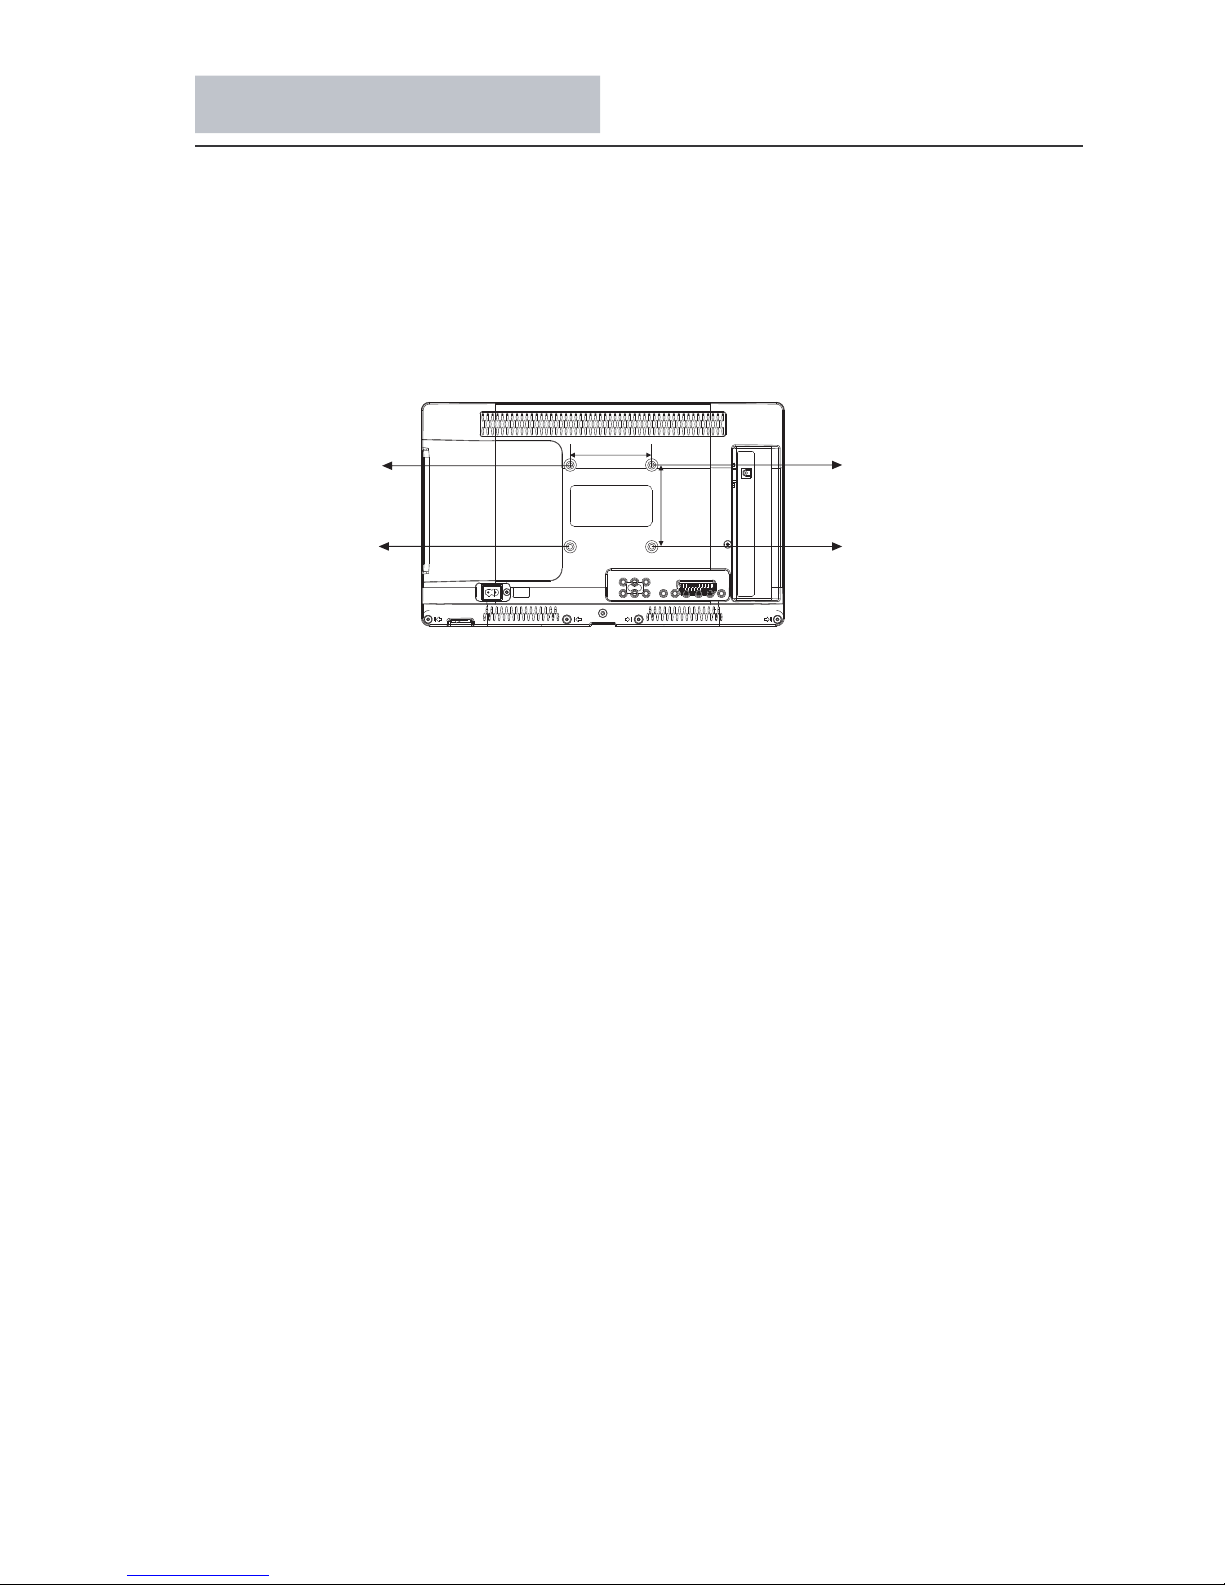
26
2.Use the four screws provided to fix the TV onto a wall mounting bracket (not included)
via the four VESA standard holes on the back of the television.
1.Place the LED LCD Television onto a solid surface. Please place some soft material over the
front of the screen to protect it from any damage.
This television can be wall mounted as follows:
Wall Mounting Installation
M4X5mm
M4X5mm
100mm
100mm
M4X5mm
M4X5mm
Page 28
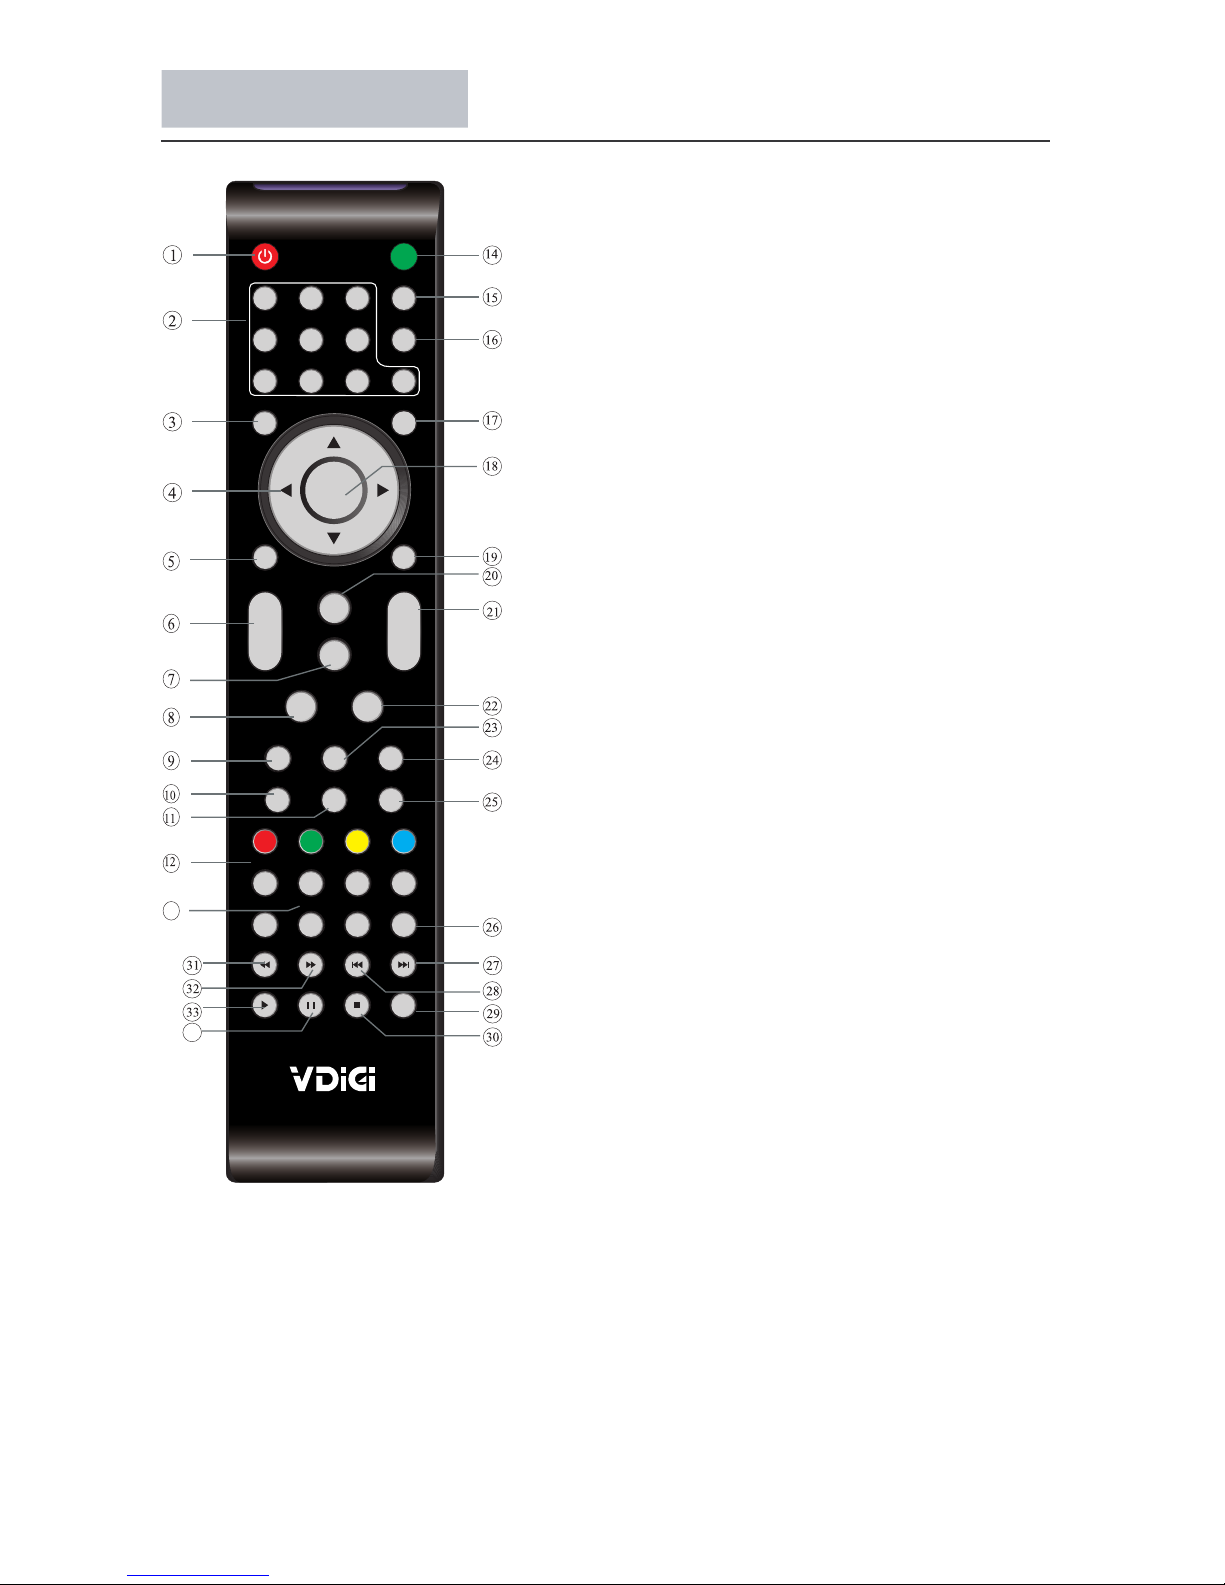
Remote Control
27
1OK2 3
4 5 6
7 8 9 0
+
CH
_
+
_
VOL
POW ER
MUT E
AUD IO
REC ALL
TV ME NU SOU RCE
CH. LIST
SOU ND
EXI T
PIC
SLE EP ASP ECT
TEX TUSBFRE EZE
INF OFAVEPG
DTV
HOL D
LIS T
IND EX
SUB PAGE PVR .LIST MIX SUB TITLE
REC /REP
13
34
1: POWER
To set the TV to standby or power on.
2: NUMERIC KEY
For direct access to channels.
3: TV MENU
To display TV menu.
4: CURSOR
To move within the menu.
5: CH.LIST
To display the channel list.
6: VOL+/-
To adjust sound level.
7: PIC
To switch picture mode.
8: SLEEP
Set timer to turn off the TV.
9: FREEZE
To freeze the picture.
10: EPG
11: FAV
To access your favourite channels list in ATV or
DTV mode.
12: DTV
Select DTV source input.
13: PVR.LIST
Show the PVR list.
14: MUTE
To disable or enable the sound output.
15: AUDIO
Select audio output.
16: RECALL
To access the previously viewed channel.
17: SOURCE
To select input source.
18: OK
To confirm selection.
19: EXIT
To return to the previous menu or exit menu.
20: SOUND
To switch sound mode.
21: CH+ /CH-
To access the next or previous channels.
22: ASPECT
Adjust image display proportion.
23: USB
Select USB source input.
24: TEXT,HOLD,LIST,INDEX,SUBPAGE,MIX
25: INFO
To display information of current and next program
in DTV mode.
26: SUBTITLE
To switch between different subtitles in DTV mode.
29: REC/REP
Personal video record button.
27,28,30,31,32,33,34: Available in multimedia.
To display the DTV Electronic Program Guide Screen.
Teletext switching,if the local don’t have teletext swithing,
these keys is not valid.
Page 29
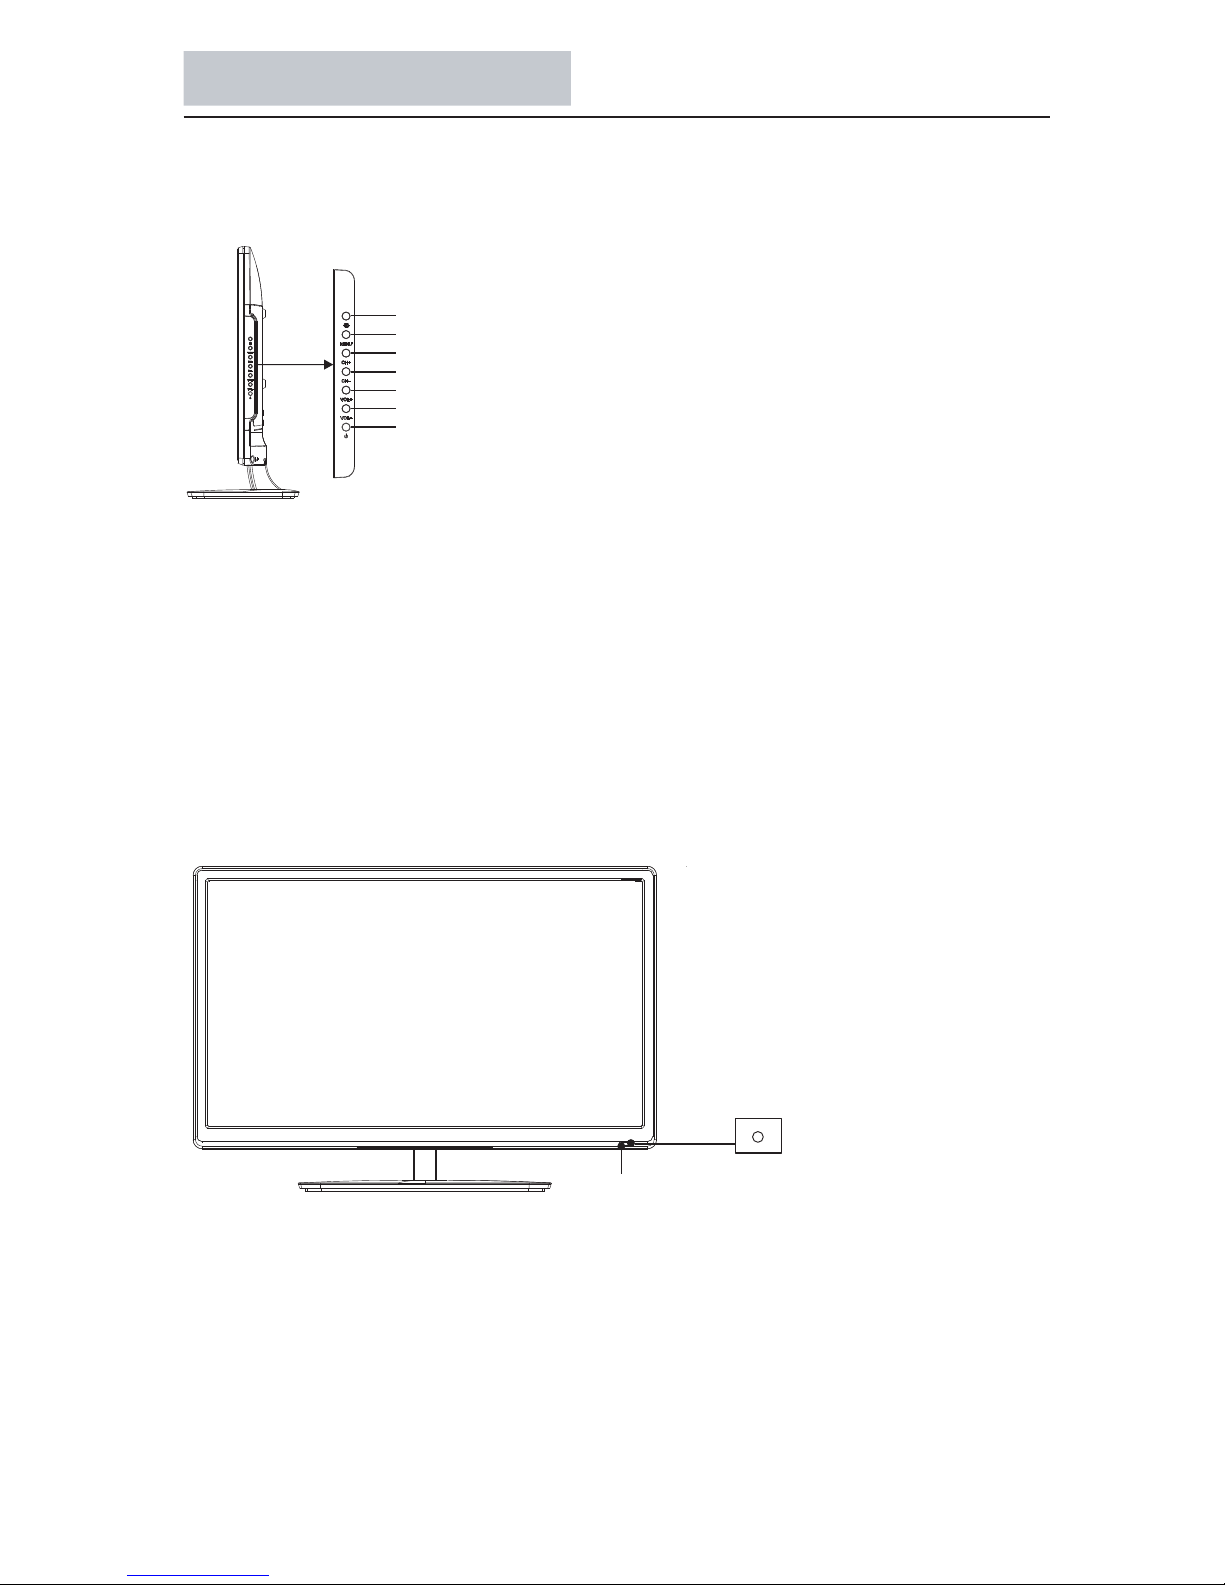
Functions of the panel
Top Panel Buttons
MENU: Displays the TV Main Menu.
INPUT:
Displays the Source Select List.
VOL-: Decreases the volume. In the TV m
enu system, it acts like the left arrow on the remote control and can be used to
select menu options.
VOL+: Increases the volume. In the TV menu system, it acts like the right arrow on the remote control and can be used to
select menu options.
CH-: Scans down through the channel list. In the TV menu system, it acts like the down arrow on the remote control and can
be used to select menu options.
CH+: Scans up through the channel list. In
the TV menu system, it acts like the up arrow on the remote control and can be
used to select menu options.
POWER: Turns the TV on and off.
Power Indicator: Light up in red when the TV is in standby mode. No indicator when TV is on.
Remote control sensor: Receives IR signals from the remote.(Do not put anything over the sensor,
otherwise, the sensor may not operate property.)
28
Remote control sensor
Power indicator
INP UT
MEN U
CH+
CH-
VOL -
POW ER
VOL +
Page 30
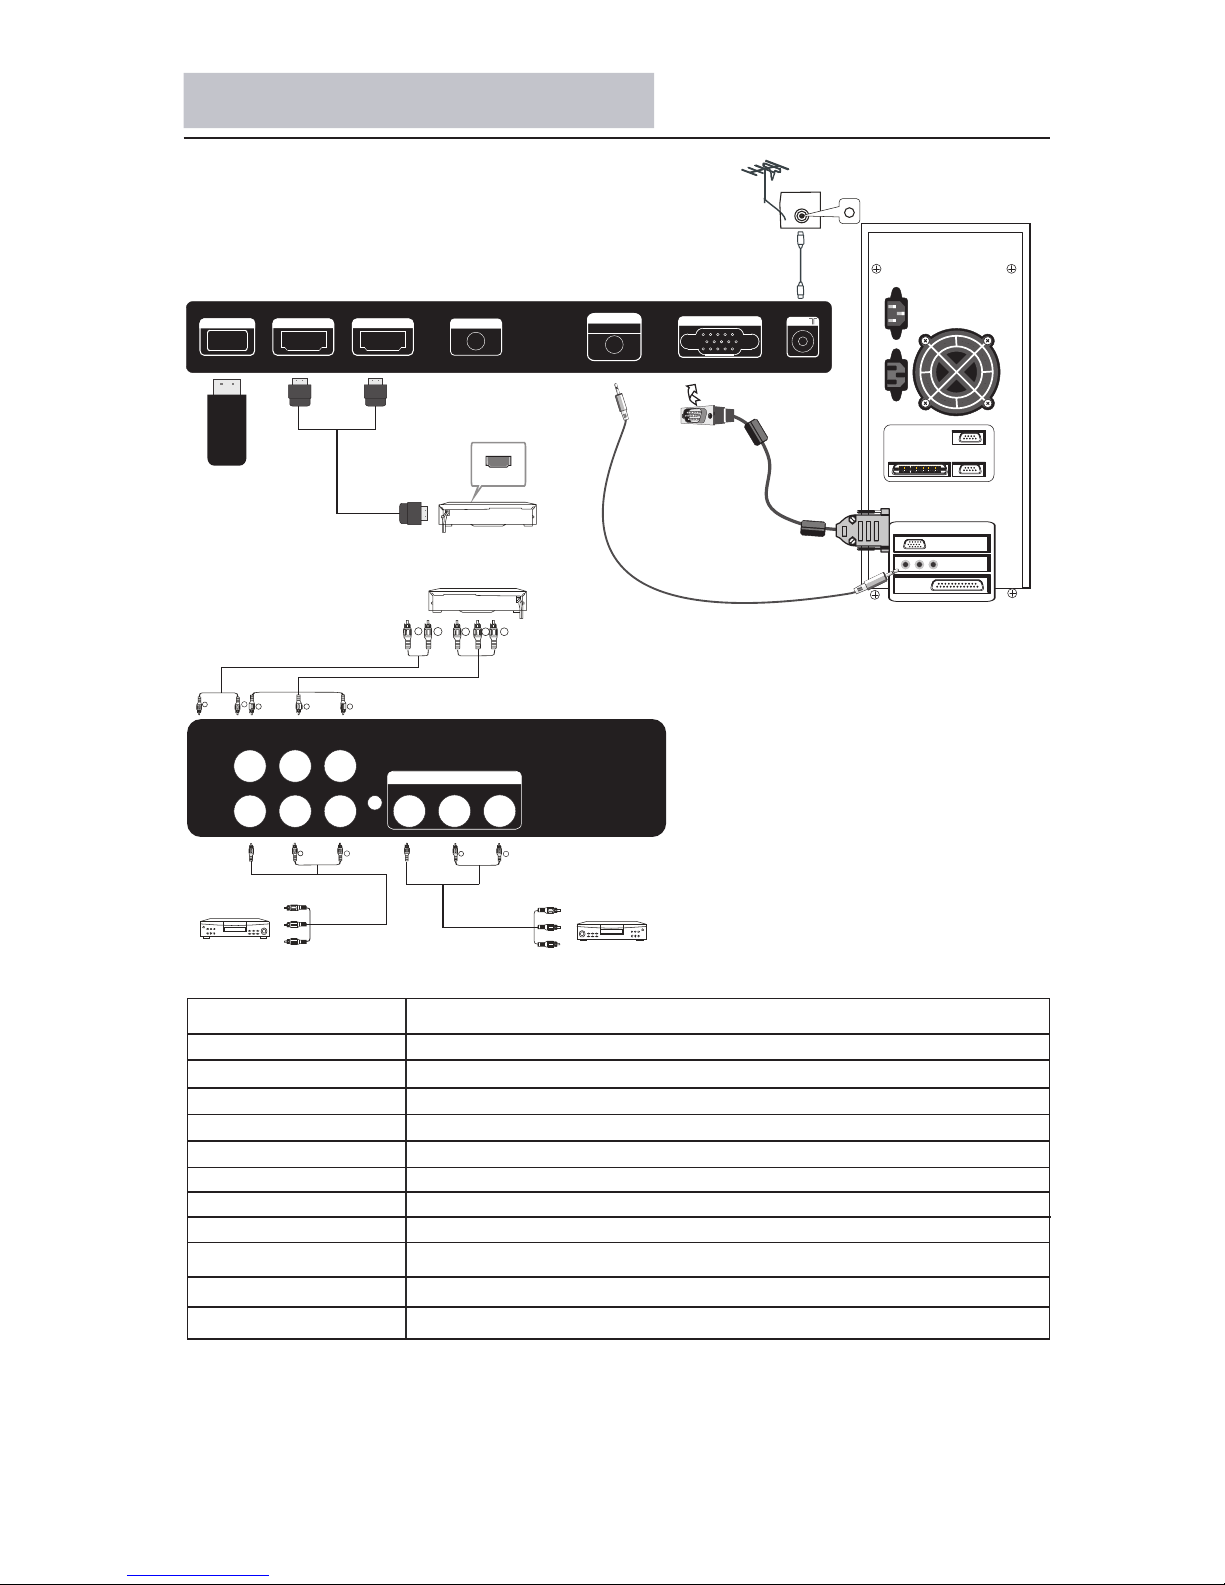
Rear Panel and Descriptions
Name Function Description
Reserve for external USB device
HDMI input
VGA video input
VGA audio input
Composite video input
Composite/Component audio input
Antenna input
VGA video
RF IN
VGA audio
HDMI1,HDMI2
VIDEO
L/R
USB
29
PC
MONITOR OUTPUT
PC audio input
MONITOR output
Headphone Headphone output
Video e qu ipment wi th
compone nt o utput ter mi nal
To audio output
equipment
Audio L/R
Video
Video equipment
To video output
equipment
Vid eo Audi o
R
L
TV
R
L
Y
R
L
Pb Pr
Y
P
B
P
R
Aud io
R
L
Y P b P r
RL
VIDE O
R
L
VID EO
MON ITOR OUT
USB HDMI2 INPUT HDMI1 INPUT
PC
AUDIO INPUT
HEADPHONE
VGA INPUT
ANT
HDMI
To audio input
equipment
Audio L/R
Video
Video equipment
To video input
equipment
Vid eo A udio
Component video input
YPbPr
Page 31
30
Menu Operation
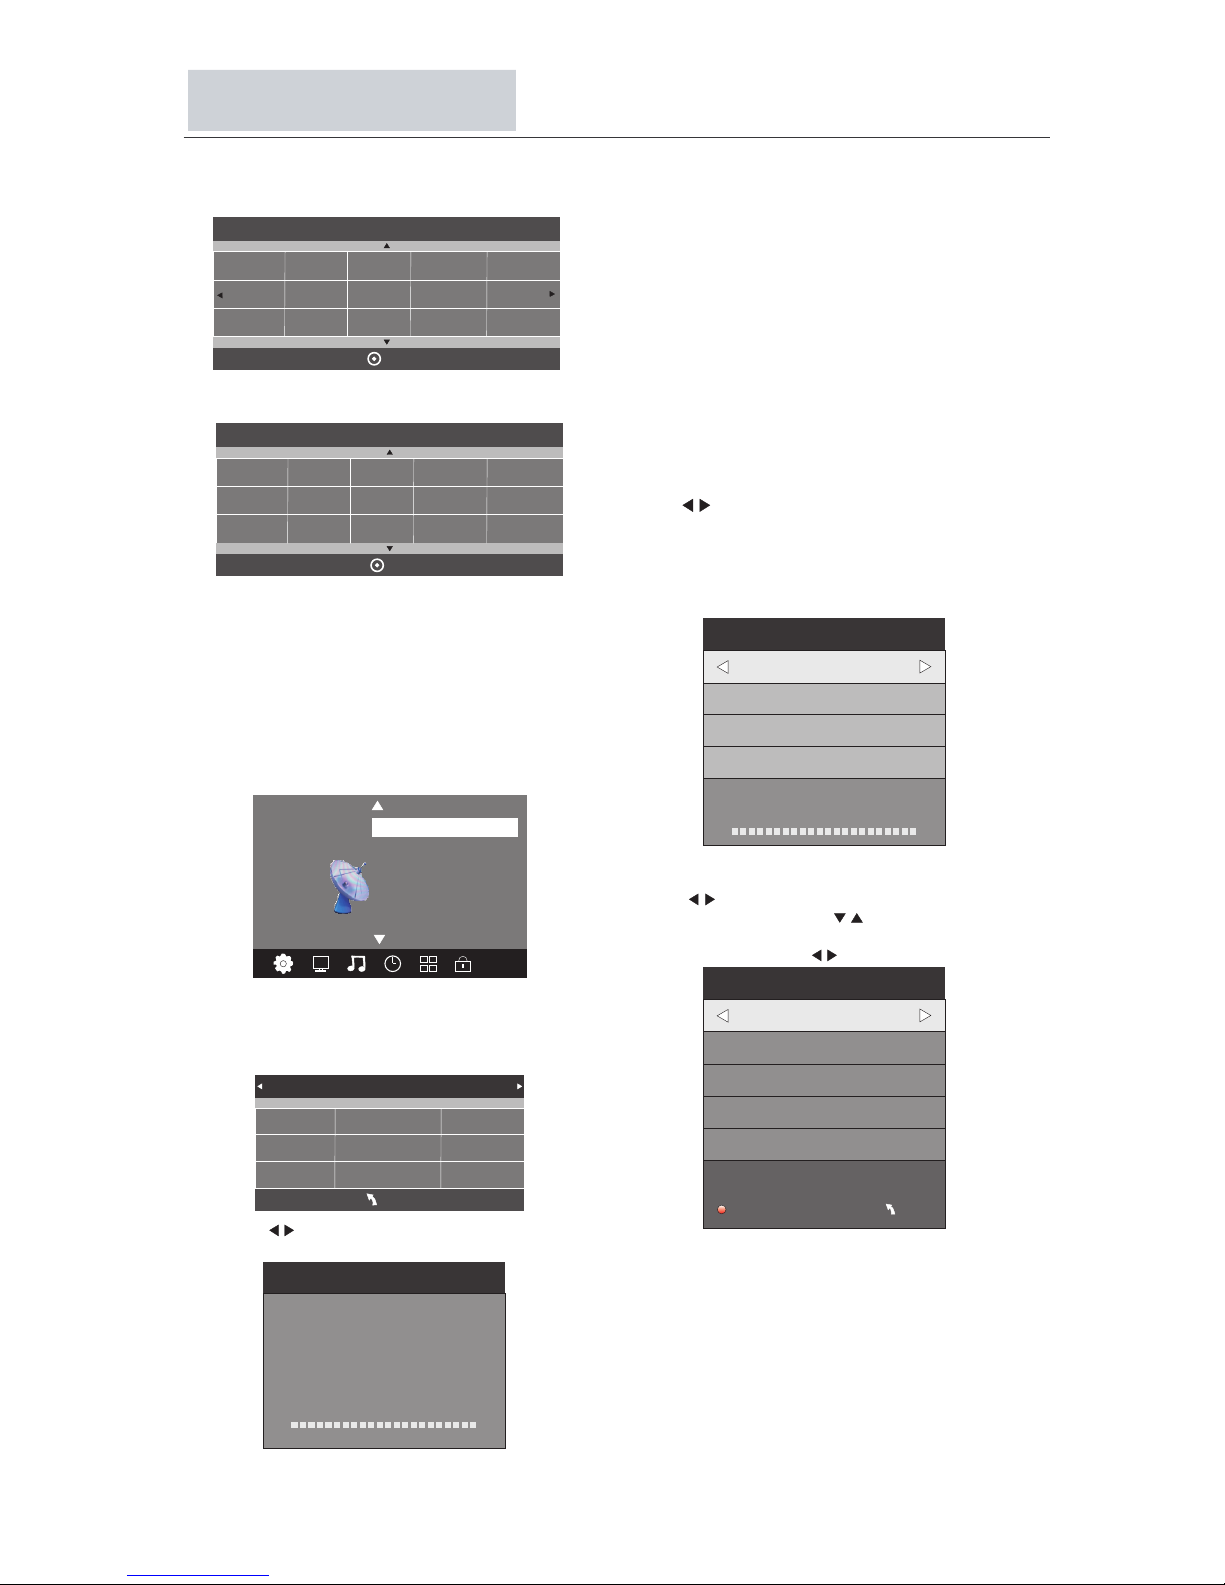
Inst allation Gu ide
All the channels including ATV and DTV
can be tuned at one time,if the Tune Type is
DTV+ATV .
All the stored channels will be disappeared aft er
auto tuning .
After auto tuning , the TV wi ll s ho w th e co nt en ts
of the first DTV channel.
2).DTV Manual tuning
You can select a DTV channel, then find the program
in this channel.
Press to change the channel number or input the
channel number. Press OK to search the programs .
NOTE:
Bad, Normal and Good means signal intensity.
3). ATV Manual tuning
Press to select the channel number
for manual tuning. Press to select
"Search" or "Fine tune" ,confirm the
execution by pressing .
ATV Ma nua l Tuni ng
Sto rage To 1
Sys tem I
Cur rent CH 1
Sea rch
Fin e-Tun e
Fre quenc y 424.2 5 MHz
Sav e MENU
_
+
DTV Man ua l Tuning
UHF C H 35
_
+
Bad Norm al
Goo d
Pre ss OK to se ar ch
Press to select ATV and DTV at first ,
then press OK to start auto tuning .
Above screen only appear when the TV is
turn on for first time or reset to factory setting.
Press OK key to start auto tuning .
And after tuning, the screen will show the first
DTV program.
1.CH ANNEL MENU
The first item of the MENU is channel menu (for
ATV or DTV only).
You can search channels and edit programs here.
1).Auto tuning
Search all the channels automatically(you can
select ATV, DTV or DTV+ATV)
Tun e Type DT V+ATV
Chi na(HK )
Tun is
Alg eria
Egy pt
Sou th Afric a
Isr ael
Ira n
United Arab Emirat..
Slo vak
MEN U
Chann el Tu ning
ATV : 0 Pr ogr amm e(s)
DTV : 0 P rogra mme(s )
96% U HF CH 68 DT V
ATV Ma nua l Tuni ng
Pro gramm e Edit
Sig nal Inf ormat ion
< >
CHA NNEL
Aut o Tun ing
DTV M anual Tu ning
Sof tware U pdate (USB)
Swe den
UK
Net herla nds
Nor way
Pol and
Ser bia
Slo venla
Spa in
Count ry
OK
Por tugal
Rum anla
Rus sian
United Arab Emir...
New Z ealan d
Chi na
Swi tzerl and
Eng lish
Ple ase sel ect an OS D Langu age
OK
Chi nese
Select your language and press OK to confirm.
Rad io: 0 Pro gramm e(s)
Page 32
Menu Operation
31
NOTE:
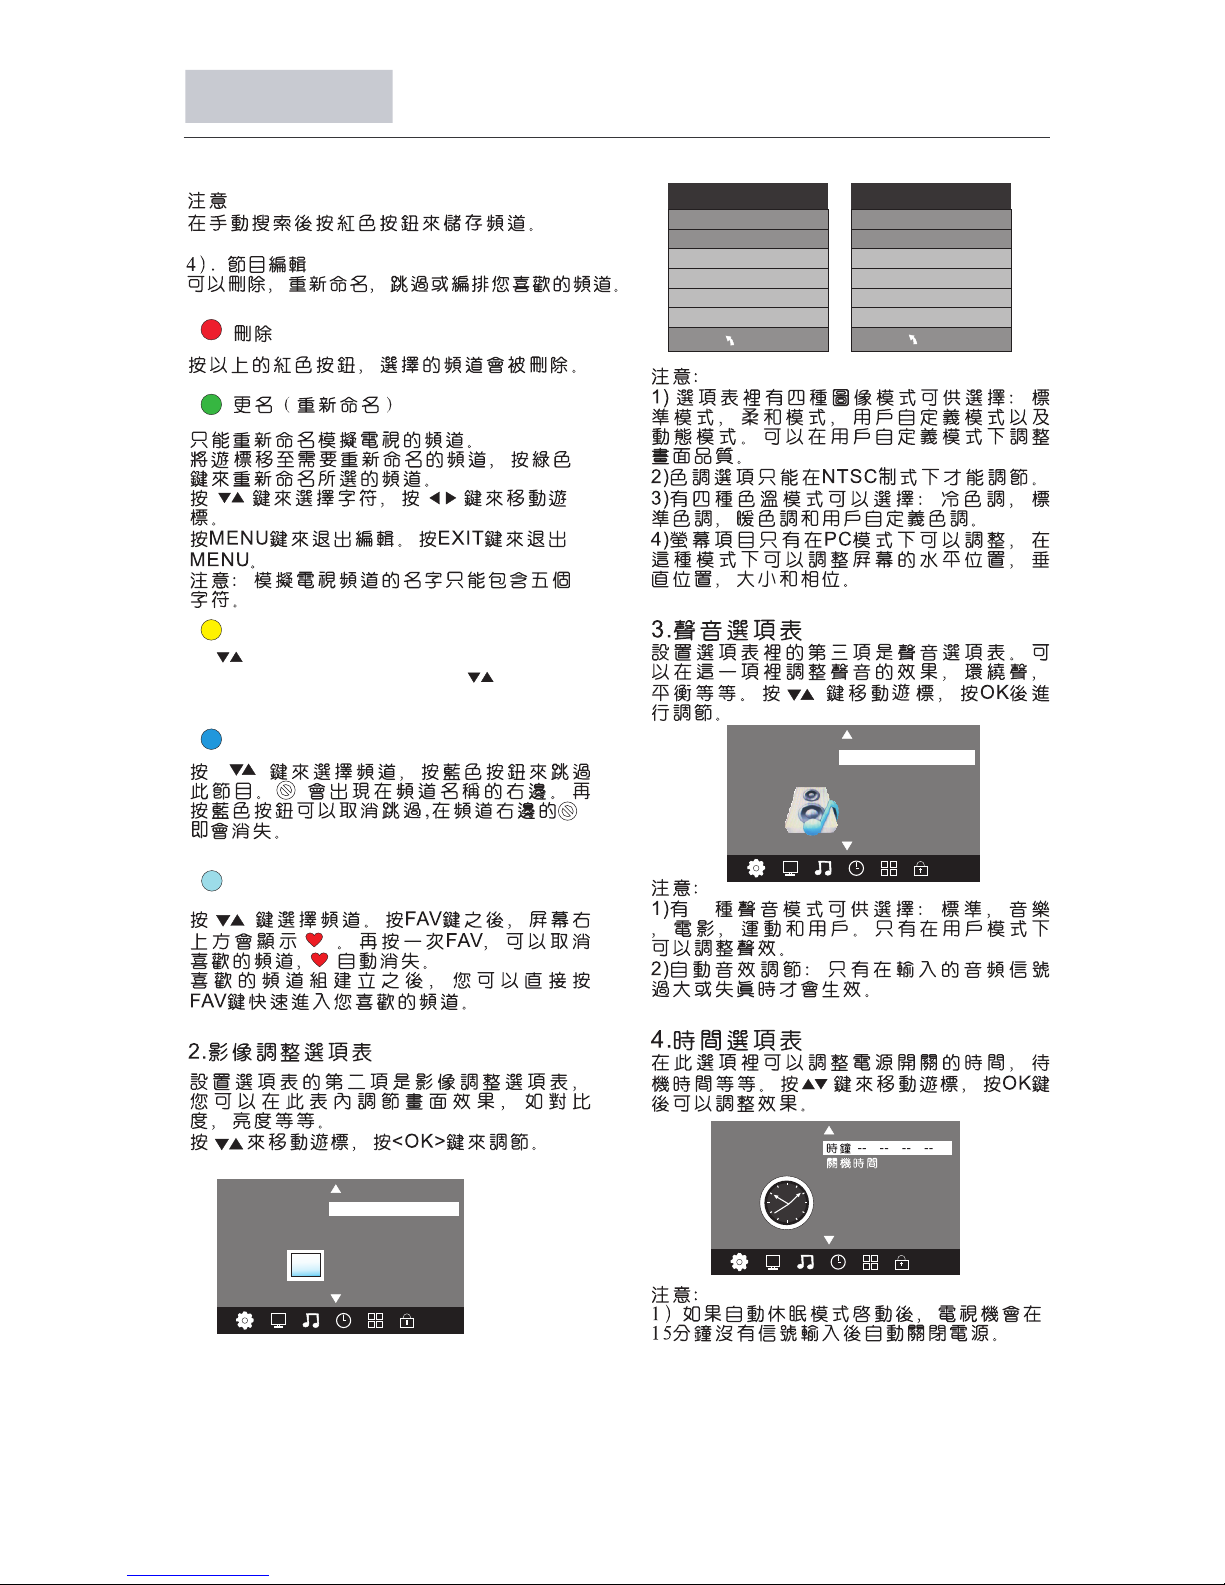
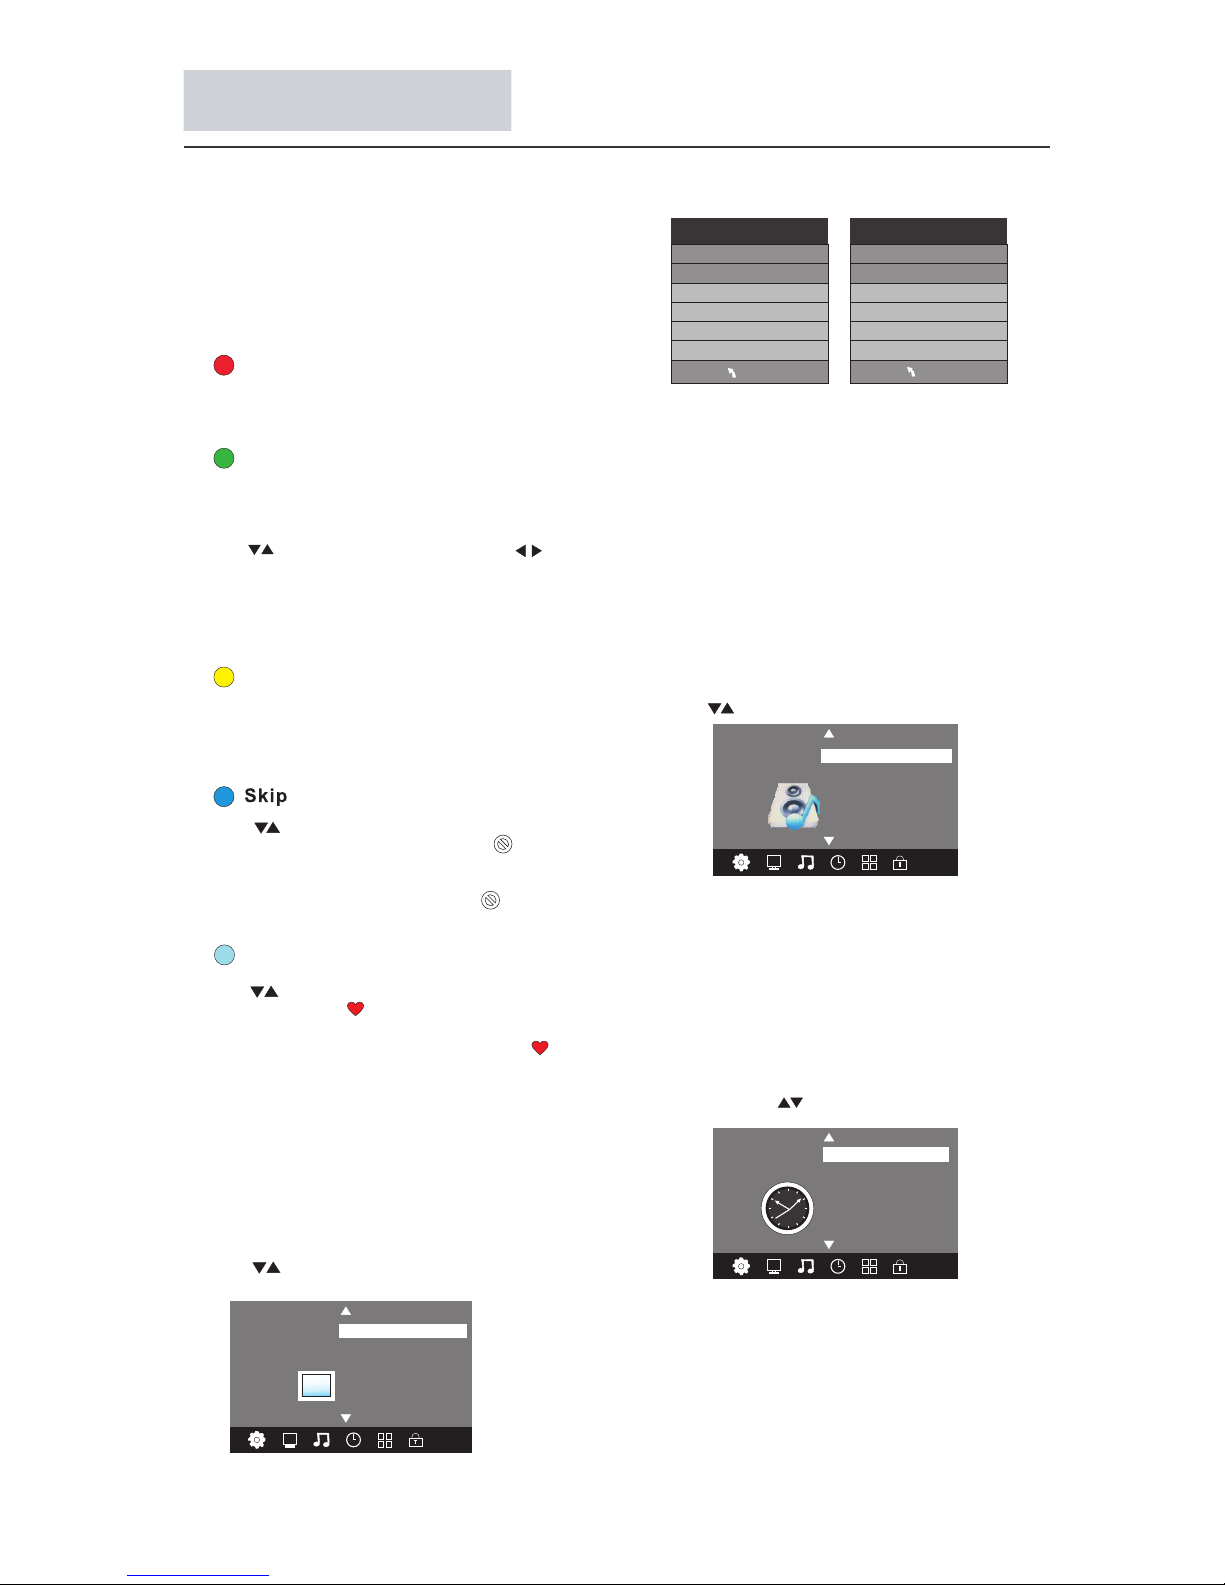
1).There are 4 picture modes: Standard, Mild, User
and Dynamic.You can only adjust the picture effect
when "User" mode is selected.
2).Tint is available in NTSC system only.
3).There are 4 colors temperature modes:
Cool,Medium, Warm and User.
4).Screen is available in PC mode only which,
you can adjust horizontal position, vertical
position, size and phase.
3.SOUND MENU
The third item of the MENU is the SOUND
MENU.
You can adjust the sound effect here such as
treble, bass, balance etc.
Press to move, press OK to adjust.
Note:
1).There are 5 sound modes:
Standard, Music, Movie, Sports and User.You
can only adjust the sound effect when "User"
mode is selected.
2).Auto volume: only available when the input
signal volume is too large or with distortion.
Col or Tem per atur e
Asp ect Rat io
Noi se Redu ction
Scr een
Pic ture Mo de Stan dard
< >
PIC TURE
Favo urite
Press to choose the program, press FAV
button, it will show on the right side of the
program.Choose the FAV program, press
FAV button again, you can cancel the FAV,
will disappear.
Once your favorite group is created, you can
press the FAV key to quickly access your favorite
channel.
The second item of the MENU is PICTURE MENU.
You can adjust picture effect here, such as
contrast, brightness, etc.
Press to move, press OK to adjust.
2. PIC TURE MENU
MEN U
Pic ture Mo de User
Con trast 5 0
Bri ghtne ss 50
Col or 50
Sha rpnes s 50
Tin t 50
Col or Temper ature U ser
Red 4 0
Gre en 31
Blu e 50
MEN U
Rena me
Only ATV programs can be renamed.
Move the cursor to the program, press green
button to rename the program.
Press to choose the character. Press to
move the cursor.
Press MENU button to exit edit. Press EXIT to
exit the menu.
Note: ATV programs name can only contain 5
characters.
Press to choose the program, press
blue button to skip this program, The will
show on the right side of the program.
Choose the skipped program, press blue button
again, you can cancel the skip,The will
disappear.
NOTE :
Press red button to store the channels after manual
tuning .
4). Program edit
You can Delete, Rename, Skip, or assign any
programs as your favourite programs.
Dele te
Press red button, the highlighted program will be
deleted.
4.TIME MENU
The forth item of the menu is the TIME MENU.
You can adjust the power on/off time, sleep
time etc. Press to move, press OK to adjust.
NOTE:
1.If "Auto Sleep" is set to on, the TV will be
automatically powered off if there is no signal
within 15 minutes.
2.The clock time will be set automatically after the
DTV channels are tuned.
Off Ti me
On Tim e
Sle ep Timer
Aut o Sleep
Tim e Zon e
Clo ck -- -- -- - -
TIM E
< >
< >
Bal ance
Aut o Volume
Sou nd Mode u ser
SOU ND
Sur round S ound
Use the Arrow Buttons to select the channel yo u
wish to move. Then pr es s th e Yell ow B ut to n to
select Move function. Once active use t he Ar ro w
Buttons to move and then press Yellow to confir m.
Move
0
off
off
Page 33
32
Menu Operation
DTV
Input S ource
ATV
YPbPr
PC
HDMI1
HDMI2
AV
USB
OK
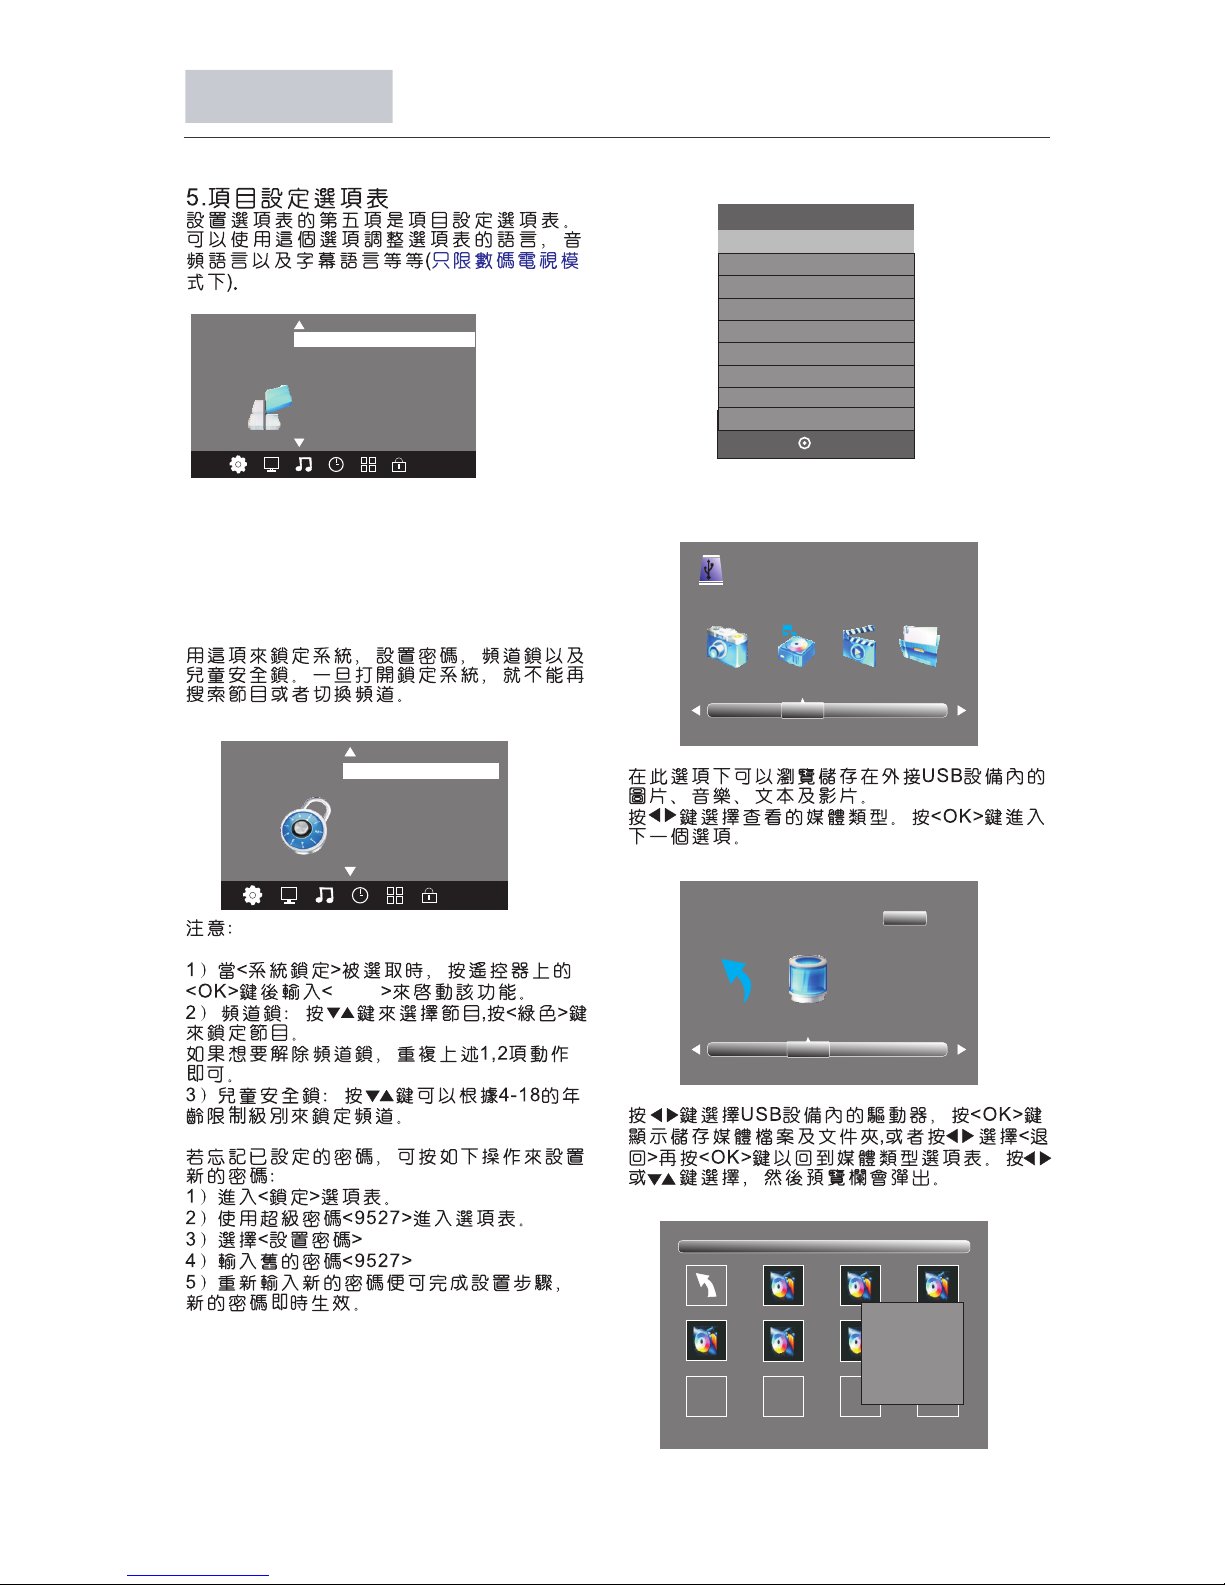
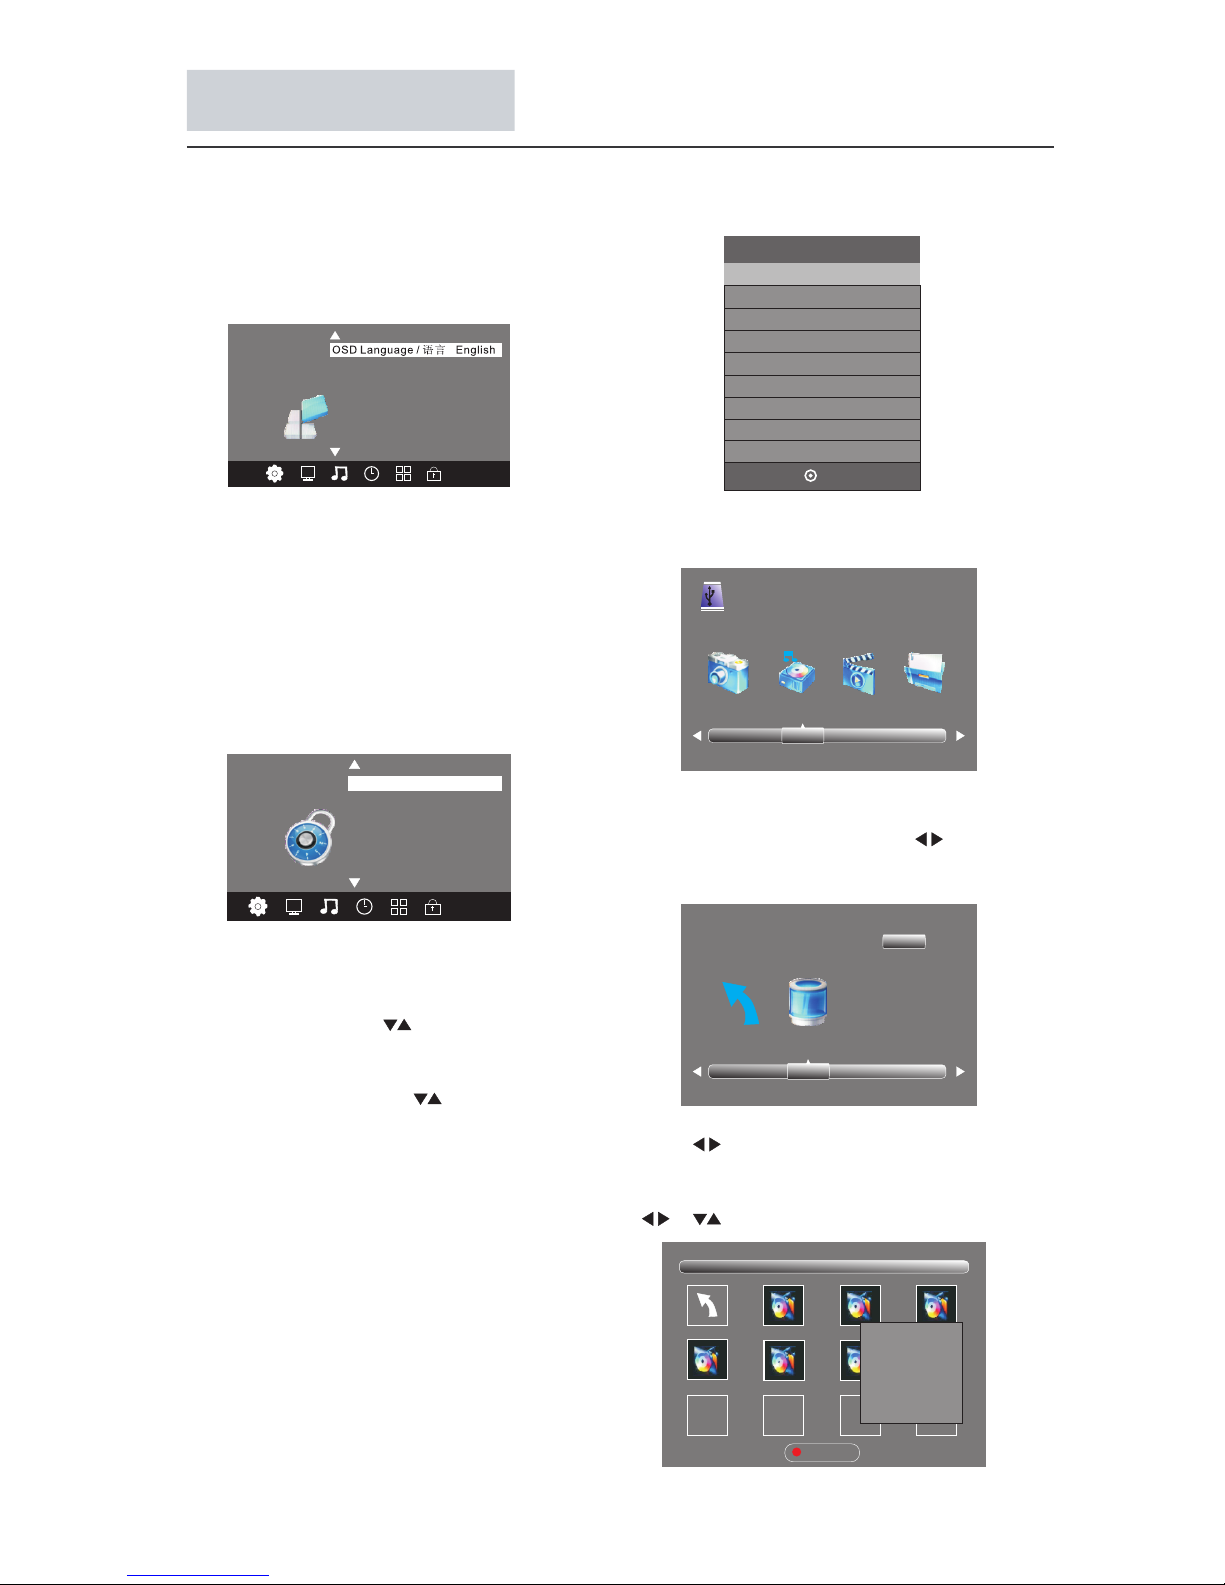
6.LOCK MENU
NOTE:
1) When "Lock system" is highlighted, press
OK and enter the default password " " to
activate it.
2) Block program: Press to choose the
program, press green button to block the
program. If you want to unblock the program,
simply repeat steps mentioned in 1 and 2.
3) Parental guidance: Press to choose
4~18 years.
If you forget your password, you can clear it
with the following steps:
1) Enter into the "Lock" menu.
2) Enter the super code: 9527.
3) Select "Set Password".
4) Input "9527" as old password.
5) Enter the new password, then the setting
process is finished and the new password
will be enabled.
6666
The sixth item of the MENU is the LOCK MENU.
You can lock system, set password, block program
and set parental guidance. Once you set the lock
system on, you cannot search the channels or
change any programs.
5.OPTION MENU
The fifth item of the MENU is the OPTION
MENU. You can adjust the Menu language,
Audio language,Subtitle language etc (only
for DTV).
NOTE:
Restore factory default will clear all the pr og ra ms .
< >
PVR F ile Sys tem
OPT ION
Aud io Lang uages
Sub title L angua ges
7. USB
Press the "Source" button, select the USB
Interface, press OK to enter the USB menu.
You ca n en jo y vi ew in g ph otos, listening music and
watching video and text from external USB devic e.
Select the media type by pressing , press OK
to enter the next selection menu.
Ret urn C
1/1
Press to select the right drive and press
OK to display media files and folder list or
choose "Return" to back to the media type
selection menu. Select the media file by pressi ng
or , then the preview frame will pop up.
Retu rn
1/1
Set Pas swo rd
Lock Sy ste m
LOC K
< >
Block P rog ra m
Paren tal G ui dan ce Off
01 By My s ide.m p3 02 By My si de.mp 3
04 I Won 't Lase A. .. 0 5 Just Wh en I... 06 By M y side. mp3
Sub M enu
Albu m: By My si de
Titl e: By My si de
Bit Ra te: 128 K
Arti st: Che t Lam
Samp ling: 4 4K
Year:
Size : 1981K Bytes
PHO TO MUSI C MOVIE TE XT
Res tore Fa ctory D efaul t
Page 34
33
Menu Operation
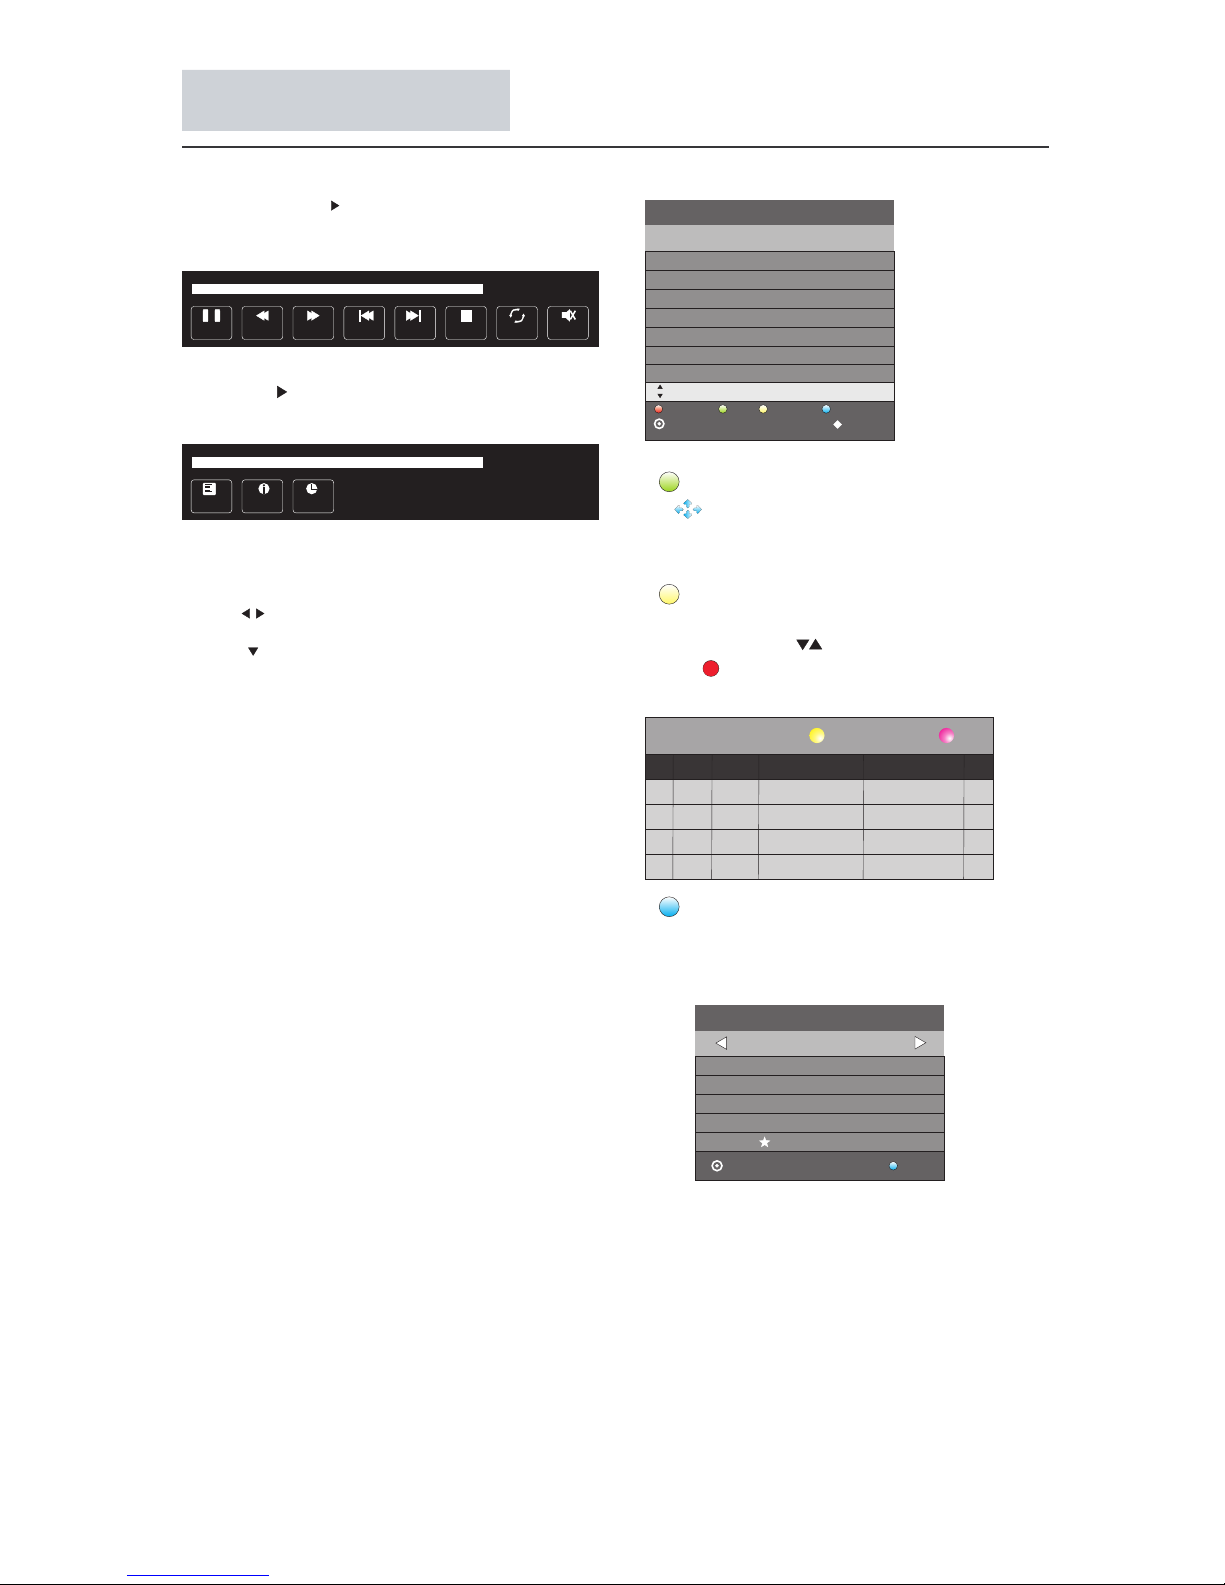
Press to select the funct io n ic on , pr ess OK
to confirm the function .
Press or EXIT to ex it t he c on trol bar.
Press "INFO" or "OK" to dis pl ay t he c on trol bar again.
NOTE:
Choose the Info icon and pres s OK
to display the Info MENU.
8.EPG Menu( Electronic Pro gram
Guide)
The EPG menu is used to look at what is being
broadcasted on DTV channel.
To access the EPG menu, press EPG button,
the following menu will be displayed:
1.
Use to choose the programs , Press
INFO key, you can display the highlighted program's
information.
INFO
2.
Press yellow key, the entire reminder schedule
will be listed. Press to choose the list, press
red key to delete the schedule list.
Press EPG to return to EPG menu.
Schedule
DELETE
3.
Press the blue key to choose one program
and set up one reminder time, the TV screen will
show the selected program in the reminder time
automatically.
Reminder
Schedule List 04:55 28th Apr Delete Retum
Tim e Dat e
Pro gramm e Tit le
Cha nnel Na me
11 Hom e
15 Mi nute
16 Ho ur
Aug M onth
16 Da te
Onc e Mode
Remin der
BAC K
OK
_
+
Below photo formats are sup po rt ed :
—JPEG(JPEG format, fil es w it h th e ex tension ".jpg" )
—BMP (files wi th t he e xt en sion ".bmp")
—PNG (files with the exten si on " .p ng ")
Below music formats are sup po rt ed :
—MP3 (files with the extensi on " .m p3 ")
—WAV (files with the extensi on " .w av ")
Below video formats are sup po rt ed :
—AVI (files wit h th e ex te ns ion ".AVI")
—MP4 (files with the extensi on " .M P4 ")
—TS (files with the extens io n ". TS ")
Below text formats are su pp or te d:
—TEXT (files w it h th e ex te nsion ".txt")
Note:Only supported the t ra di ti onal
Chinese with Unicode form at .
Press OK to save the reminder.
Pau se FF Pre v. N extFB Sto p
Rep eat ALL
00: 00:33 /00:0 4:22
MUT E
Press the button to play th e me di a fi le i n full
screen, , the following control ba r
will be displayed on the scre en .
press ok or info key
Press the cursor on the rem ot e co nt ro l to display
the other options on the cont ro l ba r.
The options available in th e co nt ro l ba r will be
different w he n is selected from the
external USB device.
else file type
Pla ylist
00: 00:48 /00:0 4:22
Inf o.
Goto Ti me
24 / Se p 15:12
11 Hom e Weal th Blog (C)
PRO GRAMM E GUIDE T IME
Sch edule
Inf o
Rem inder
OK
IND EX
12 HD a T V Weal th Blog (HD)( C)
13 TV S Afte rnoo ntea ti me show
14 CT I-Asi a New Talwa n Sta r Avenu e
15 CC TV 4 TV Dra ma
16 Wo rld E TV
81 Ja de The Gr een R oom
82 J2 L ovey Do vey My Fi ji
TEXT
MHEG-5 data broadcast is scheduled in Hong Kong.
You can watch a MHEG-5 data broadcast after
pressing the TEXT button.
Rec ord
Page 35
34
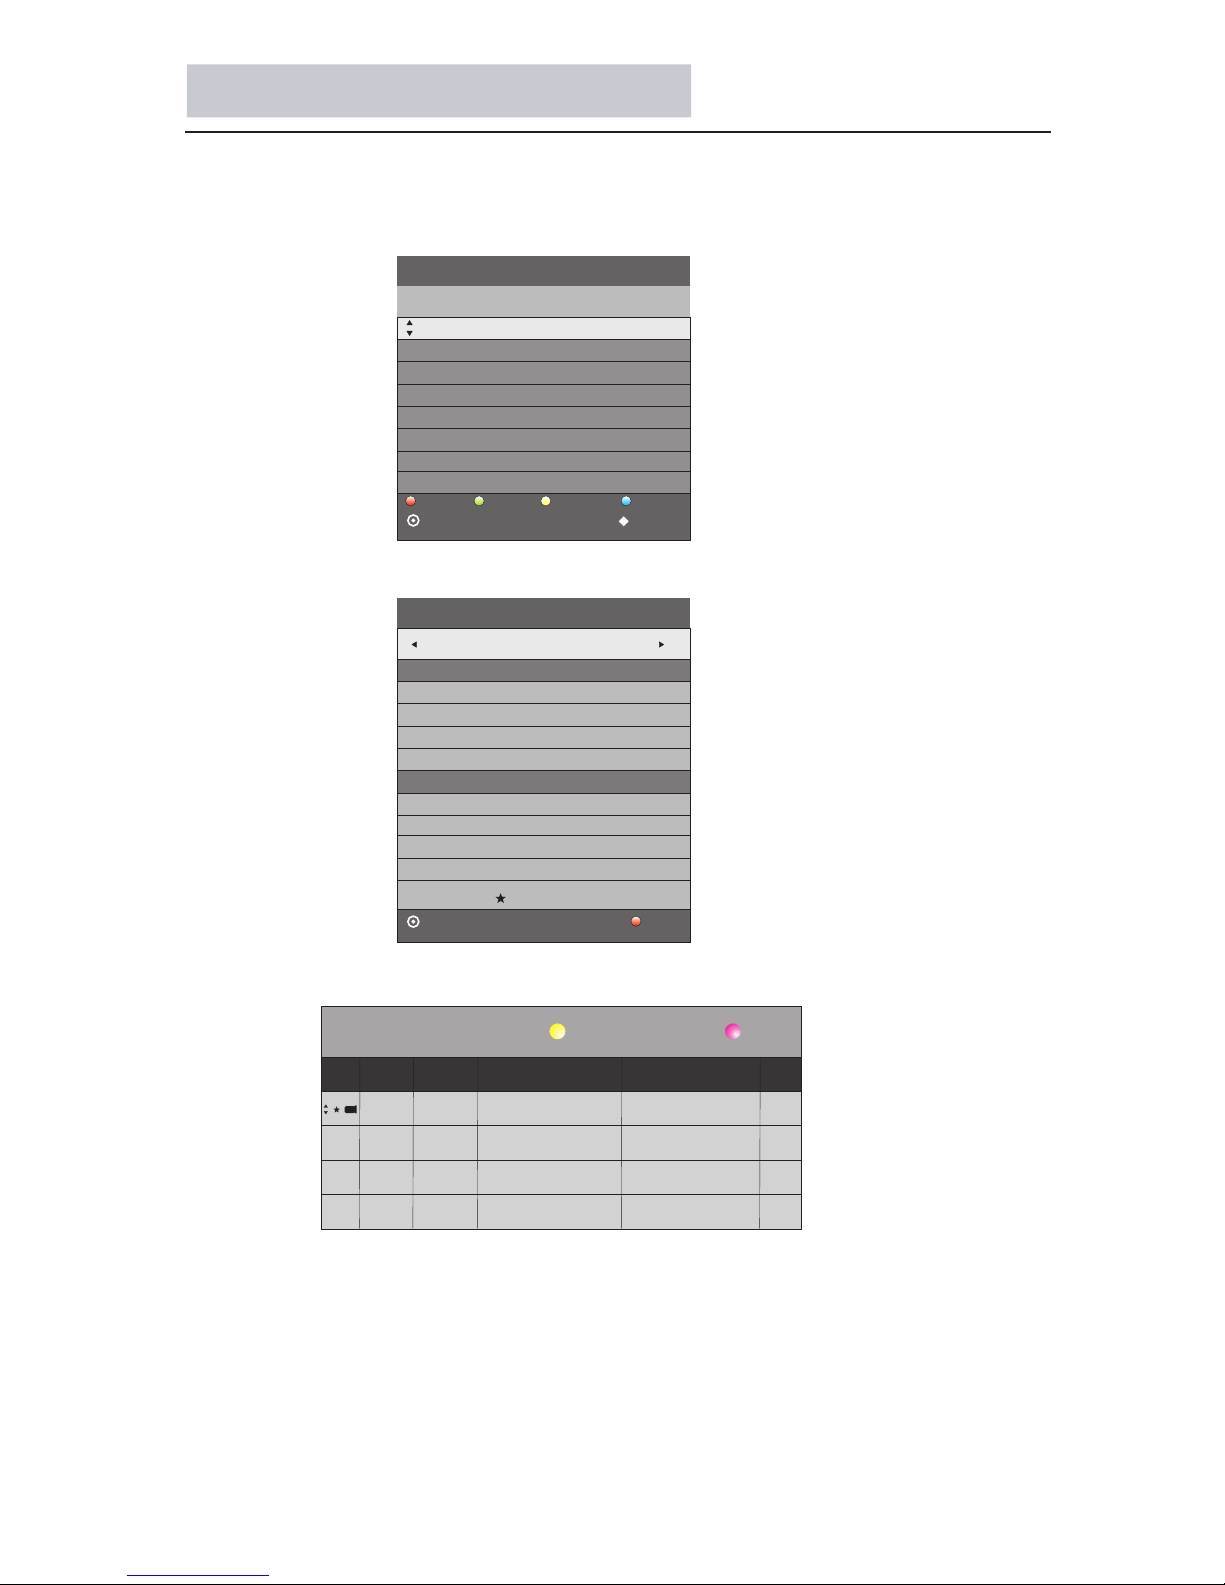
Standby Record (Only in DTV mode)
Set EPG record task
1.In DTV mode, press EPG button to show programme list within 7 days.
2.Press
▲▼ buttons to select programme, press REC button to enter recording
page:
3.When in EPG page, press button to enter recording task list:yellow
4.When in recording page, press button will add a new task to recordingOK
task list.
19:00 ce 十 一月 2008 18: 04
On
11
01/JA N 00:32
800 NO In for mat ion
PROGR AMME GU ID E TIM E
sch edule
inf o.
rem inder
OK
IND EX
Rec ord
01/1月 00 :07
Start Ti me
RECOR DER
OK
BAC K
- 800 +
30 Minu te
00 Hour
Jan Mon th
01 Date
40 Minu te
00 Hour
End Time
Mode AU TO
Schedule List 00:03 01th Jan Delete Retum
Tim e D at e
Programme Title
Channel Name
00: 34-01 :04 Tu e.01/ Jan N o Infor matio n 800
Jan Mon th
01 Date
Page 36
35
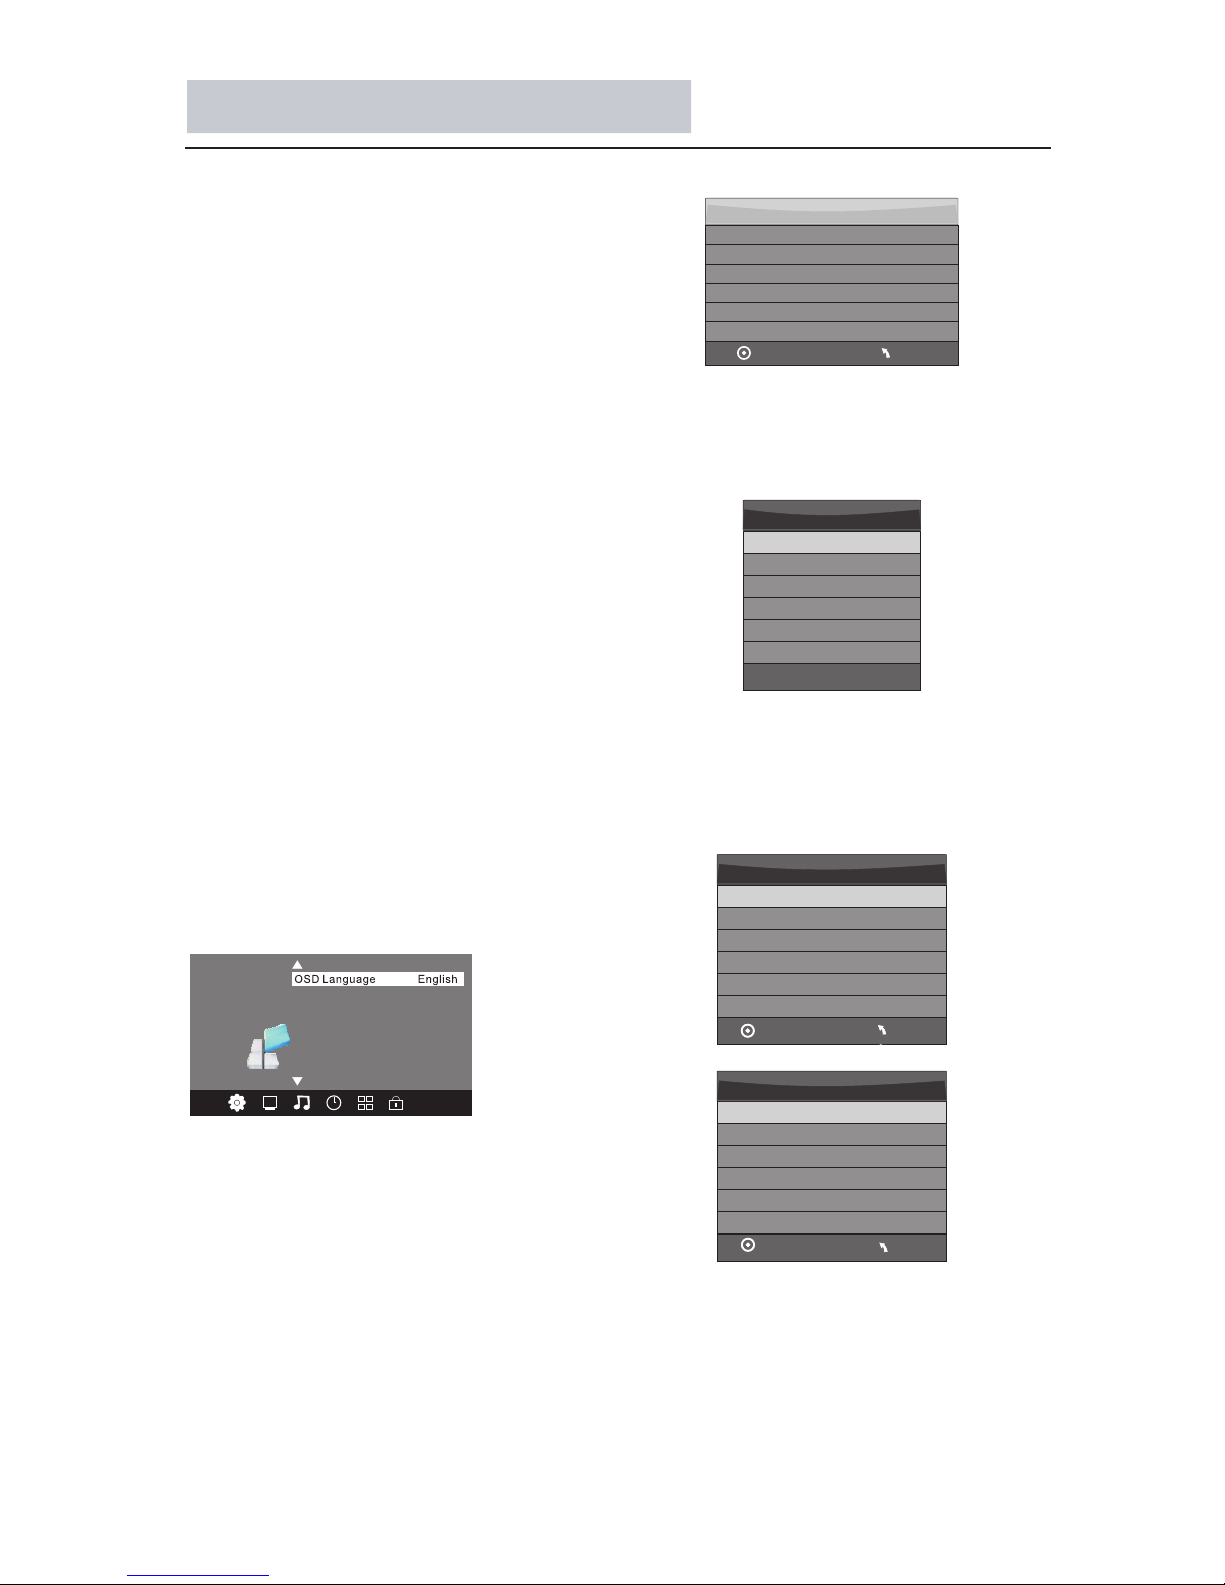
Standby Record (Only in DTV mode)
< >
PVR F ile Sys tem
OPT ION
Aud io Lang uages
Sub title L angua ges
Res tore Fa ctory D efaul t
Select Disk:select which disc to save the
record file.
Check PVR File System: check if the PVR File
System set up in the USB device or not.
Format:
Select Disk
USB 0
Disk C :
PVR File System Type Hi Speed FS
PVR File System Size All
SD 104 Mins
HD 29 Mins
File System Size
MENU
OK
Check PVR File System Start
USB Disk
Format
Time Shift Size
Speed
Free Record Limit 6 H r.
Select Disk C :
PVR File System Type FAT32
PVR File System Size All
SD 104 Mins
HD 29 Mins
OK
File System Size
MENU
1.Prepare to record the program
PVR function
From OPTION MENU enter into PVR File
System In “OPTION MENU”, please
choose “check PVR File System”. Click
“OK”, until “checking”change into
“Success”.
Note: please check the term “speed”. If it
is “HD support”, that means the speed of
USB device is available for time shift and
record. If not, please format the device, to
make sure the device available. The default
“Free Record Limit” is 6 hour, if the space
on the disk is big enough. If the space is not
big enough, the record time should be
shorter, depends on the room on the
device. During the “check PVR File
System” checking, please do not take any
other operation until it finished.
The recordings have to be done with TV PVR
system. It can only be played in the same TV,
not in other kind of devices (computer, DVD,
etc...) which doesn't be compatible with .TS.
Format.
See that in order to carry out any kind of
recording, the TV will oblige you to format the
connected device to store the recording.
WARNING. WHEN YOU FORMAT, THE
EXTERNAL DEVICE WILL LOSE ALL THE
FILES AND INFORMATION YOU STORAGE
IN THE DEVICE.
From OPTION MENU enter into PVR File
System as below:
MENU
MENU
MENU
OK
OK
OK
Page 37
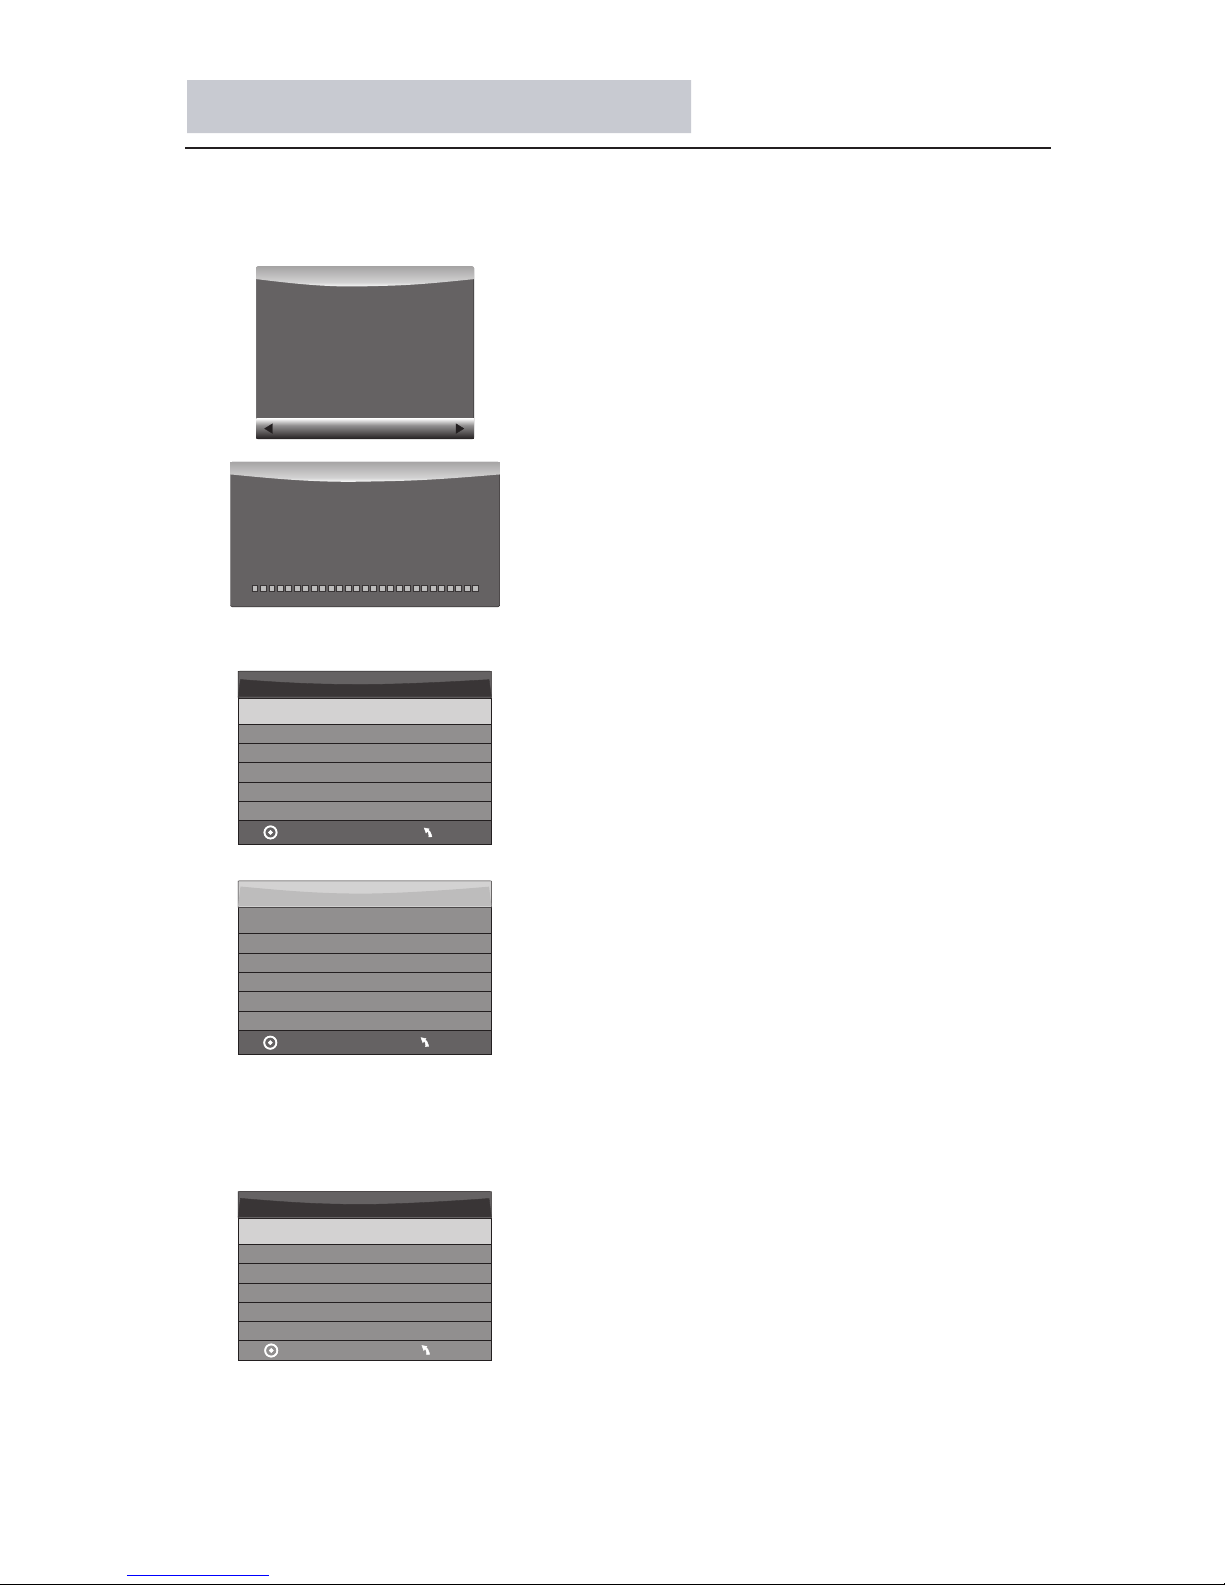
Standby Record (Only in DTV mode)
36
2.Record the program
3.Play the record
As playing the DTV source, choose the
channel and click “record”, the record
frame will pop up. Click “record” again,
the record frame will disappear and the
“REC” icon still on the left top. It will
disappear until you click “stop”.
In “USB”, the record program will be
saved in the folder “_MSTPVR” on the
device.
1. The USB storage size needs to be the
size between 4GB to 500GB.
2. Video may become pixelated when Video
bit rate is too low.
3. Not all USB devices are compatible.
Below is a list of recommended USB
drvies.Models that are not listed may be
compatible, but it is not guaranteed to work.
below menu appear after Format finish:
(Suggest to format the format the device by
“High Speed Fs...”, which can speed up
the record.)
Warning! All data will be lost.
Start Exit
Format disk
Format disk
MENU
Check PVR File System Checking
Free Record Limit 6 H r.
Select Disk C :
USB Disk P ass
Format P ass
Time Shift Size All
Speed C hecking
MENU
Check PVR File System SUCCESS
Free Record Limit 6 H r.
Select Disk C :
USB Disk P ass
Format P ass
Time Shift Size All
Speed HD support 2048 KB/s
Do not unplug USB device.
Formatting,please wait
Format disk
If you select the “Hi Speed FS ”format mode,
then you can change the time shift size:
Time Shift Size
Time Shift Disk Size 512 MB
SD 14 Mins
HD 4 Mins
User is highly recommended to consulting
us before purchasing USB Device.
OK
OK
OK
OK
MENU
OK
OK
Page 38

Standby Record (Only in DTV mode)
37
The format process will take at least 2
minutes. Please do not turn off the power
or remove the USB device during
formatting.
During formatting, a speed test will be
done on the USB device. If it fails, it
means the USB device may not support
the Time Shift function.
NOTE:
NOTE:
Please do not unplug the USB storage
device when the Time Shift function is
activated.
Approximately 4GB of memory buffers
about offer 140 minutes.
FF Prev. NextFB
Pause
00:00:33/00:04:22
Play Stop
1.Prepare to record the program
Timeshift function
This TV allows you to pause and record the
currently watched digital program to a USB
storage device, and to resume to the point
where it was paused.
NOTE:
Formatting a USB 2.0 storage device will
be needed. Save your original data
before formatting. All the data stored in
the USB device will be erased after
formatting.
Sleep timer will be suspended if it had
been set before activating the Time Shift
function.
USB Drive Storage Format
Select to format the USB device and
allocate the amount of space for the Time
Shift function.
Record a paused DTV program to
USB storage device
1. While in the DTV input source, insert
USB storage device to the USB port on the
side of your TV.
2. Press PAUSE 34 to start Time Shift
function. The TV program paused. The Time
Shift OSD appears, and starts recording.
3. Press STOP 30 to stop Time Shift
function and stop recording program.
REC /REP
34
Page 39
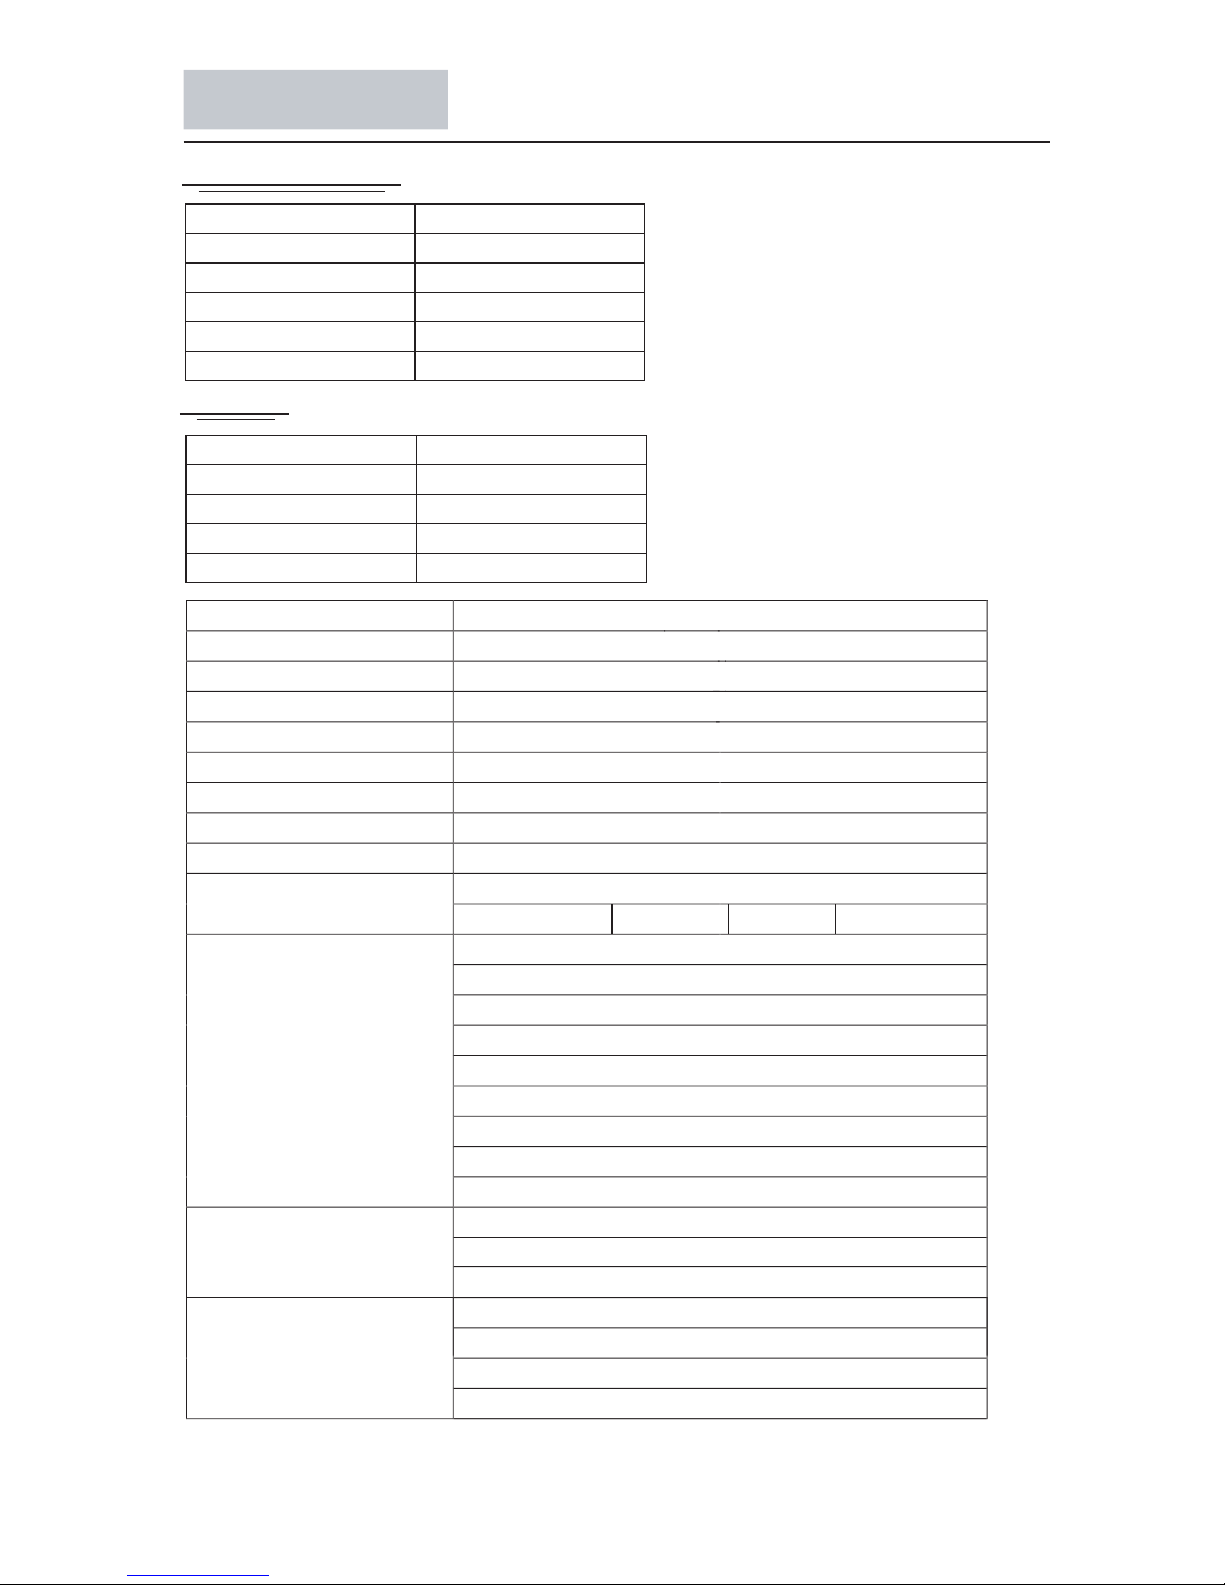
2.VGA
1024* 7 68
1440* 9 00
800* 6 00
640* 4 80
60
60
60
60
Resolution Vert.Freq.(Hz)
Specifications
1.YPbPr/HDMI
480i
480p
720p
1080i
1080P
60
60
60
60
60
Resolution
Model
Panel Size
Resolution
Viewing Angle
Brightness
Contrast Ratio(Typ.)
Response Time 6.5ms
200 cd/m2
800:1
TV System DMB-TH;PAL
Audio System BG;DK;I
AC 100~240V/Frequency 50/60Hz Power Input
Power Consumption
≤34W
Tuner In×1
HDMI×2
YPbPr In×
1
VGA Video×1
VGA Audio×1
USB×1
AC×1
Input Terminal
VIDEO In ×1 L / R×1
Output Termianl
User Manual×1
Remote Controller×1
Battery×2
Accessories
Warranty Card×1
Vert.Freq.(Hz)
1366(H)×768(V)
PC AUDIO×
1
MONITOR 1VIDEO×
MONITOR 1AUDIO×
38
H:170° V:160°
Headphone Output 1×
Note:Particular specifications are subjected to change without prior notice.
19E600CT
18.5inch
≤28W ≤35W
≤35W
Page 40
39
Page 41
40
Page 42

弘毅有限公司
Tel: 852-28611109
Fax: 852-24116625
Email: [email protected]
Web site: www.vdigi.com.hk
Winning Perfect Limited
香港新界葵涌葵榮路1-11號金城工業大廈一樓C室
Unit C, 1 / F, Kam Shing Industrial Building,
Nos. 1-11 Kwai Wing Road,
Kwai Chung, N.T. Hong Kong
 Loading...