

Page 1

PX-150HDBG
PX-150BG
BENCH GRINDER
VDH Machines & Gereedschappen BV
Texasdreef 8, 3565 CL UTRECHT
Tel.:+31 30 296 32 70, Fax: +31 30 293 66 00
www.vdhbv.nl
1
Page 2
Operator’s Manual
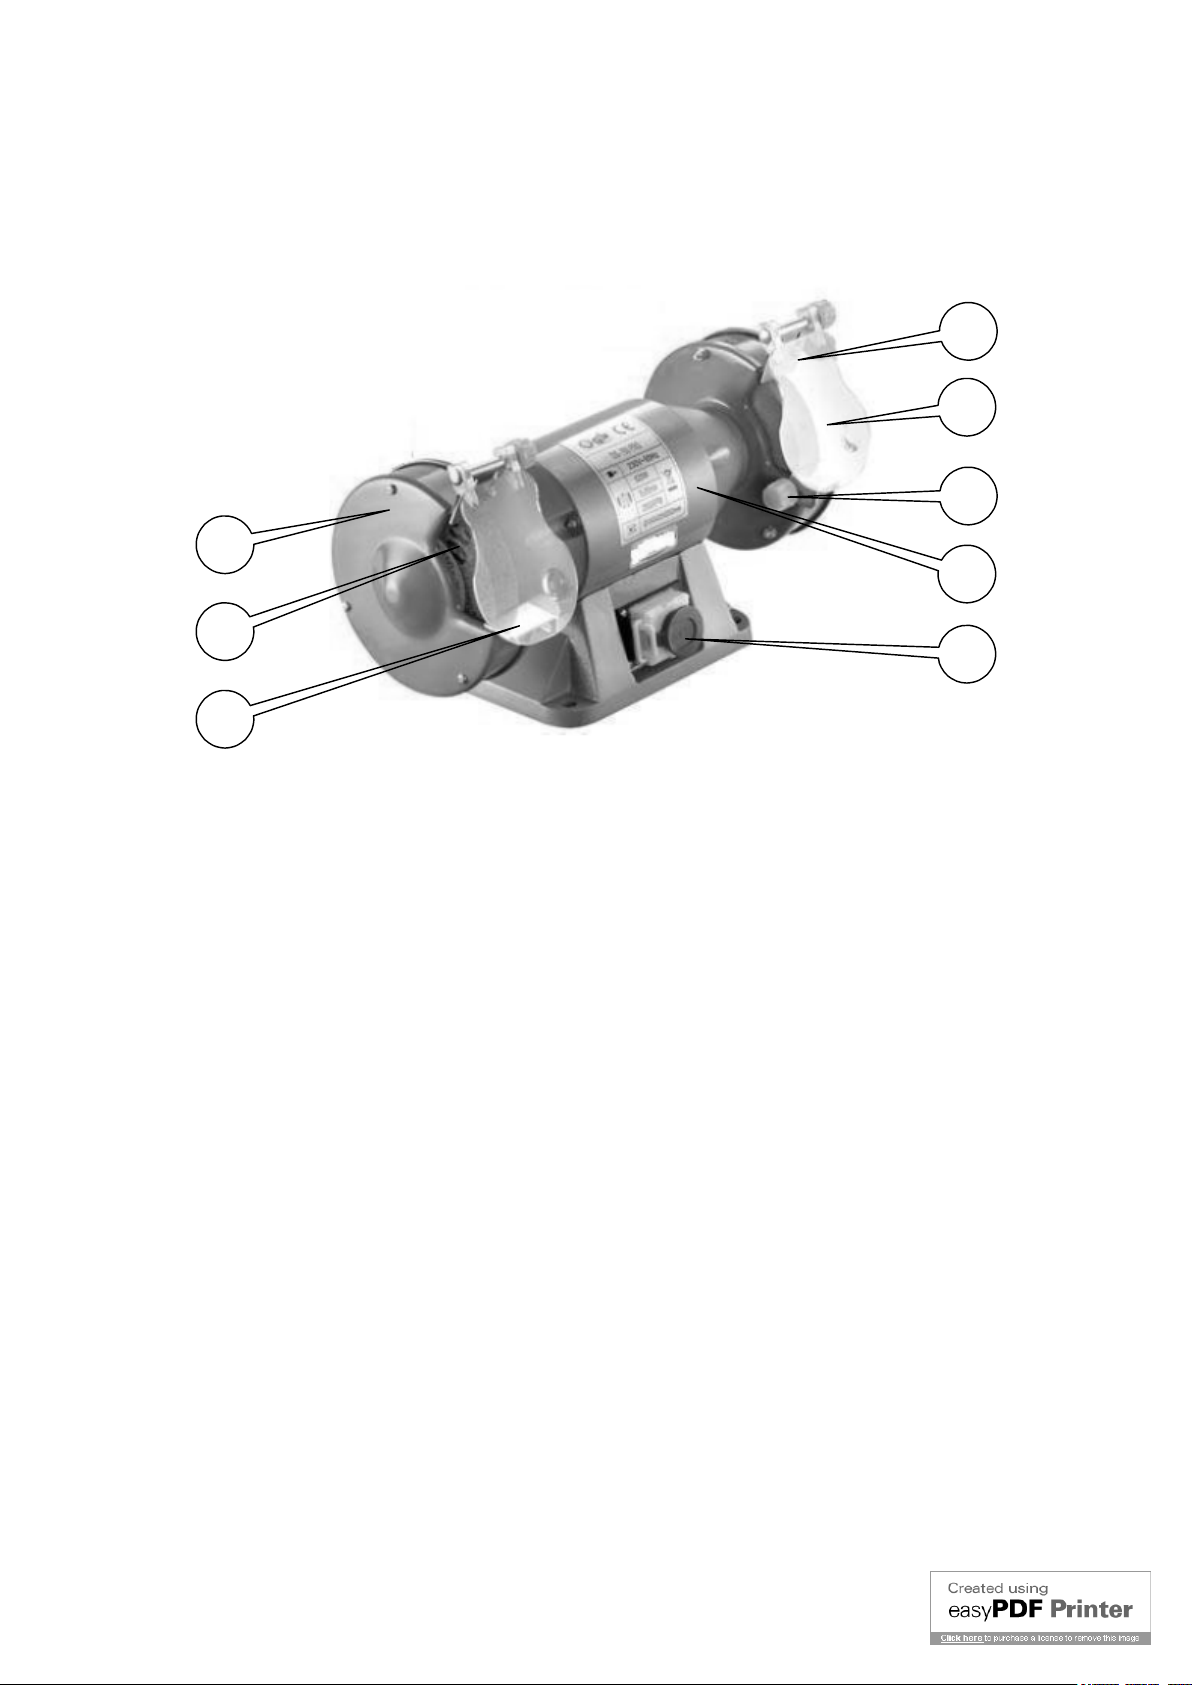
1
2
3
6
4
7
5
8
1. Spark protection guard 2. Eye protection shield
3. Tool rest knob 4. Motor
5. Emergency switch 6. Grinding wheel housing
7. Grinding wheel 8. Tool rest
Content of delivery
Bench grinder
Abrasive wheels grit 36 and 60
2 Tool rests
2 Spark protection guards
2 Eye protection shields
Operator’s manual
Spare parts list
2
Page 3

TABLE OF CONTENTS
Specifications 3
Safety Rules 4-5
Assembly 6
Main connection 7
Starting- Machine operation 7
Startup and adjustments 8-9
Maintenance and inspection 10
Trouble shooting 10
SPECIFICATIONS
Model No. PX-150HDBG / PX-150BG
Motor 230V~50Hz – 0,52kW / 0,25kW
-
No load speed
2950 min
ø 150 x 25 x 32,0 mm /
Grinding wheel dimension
ø 150 x 20 x 12,7 mm
Grinding wheel grit 36 / 60
Package dimension (LxWxH) 471x261x254 mm / 405x210x265 mm
Weight (Gross – Net) 11,5kg – 10,5kg / 18kg – 16kg
1
3
Page 4

CAUTION: Read and follow all Safety Rules and Operating Instructions before First Use of
this Product.
This manual provides important information on proper operation and maintenance. Every effort has
been made to ensure the accuracy of this manual. We reserve the right to change this product at any
time without prior notice.
SAFETY RULES
WHEN USING ELECTRIC TOOLS. ALL THE SAFETY INSTRUCTIONS SHOULD ALWAYS BE
OBSERVED TO REDUCE THE RISK OF FIRE, ELECTRIC SHOCK AND PERSONAL INJURY.
BEFORE ATTEMPTING TO OPERATE THE TOOL PLEASE READ ALL THE INSTRUCTIONS AND
SAVE IT FOR FURTHER REFERENCE
BASIC SAFETY PRECAUTIONS FOR ALL ELECTRIC TOOLS
(1) Keep work area clear
- Cluttered area and benches invite injuries.
(2)
Consider work area environment
- Don’t expose electric tools to rain.
- Do not use electric tools in damp or wet locations.
- Keep work area well lit.
- In particular, no inflammable liquids or gases must be present.
Avoid electric shock
(3)
- When you are operating tool, do not touch metal being grounded such as pipe, radiator, freezer etc.
(4)
Keep children and visitors away
- Don’t let children contact tool or extension cord. All visitors should be kept away from work place.
(5)
Store idle tools
- When not in use, tools should be stored in try, high, or locked-up place.
(6)
Don’t force the tool
- It will do the job better and safer at the rate it is intended. Avoid unnecessary overload, which may
put the operator at risk and impair function of the tool.
Use the right tool
(7)
- Don’t force small tools and attachment to do the job of a heavy-duty tool.
(8)
Dress properly
- Don’t wear loose clothes or jewelry; they can be caught in moving parts.
- Rubber gloves and non-skid footwear are recommended when working outdoors.
- Wear protective hair covering to contain long hair.
Use safety goggles
(9)
- Always wear safety goggles. If dust is produced, use the special masks.
(10)
Don’t abuse cables
- Never carry tool by cable or rank it to disconnect it from socket. Keep cable from heat, oil and sharp
edges.
Don’t overreach
(11)
- Keep proper footing and balance at all times.
(12)
Maintain tools with care
- Keep tools sharp and clean for better and safer performance. Follow instruction for lubricating
accessories inspect tool cords periodically and replace if damaged.
- Keep handles dry, clean and free from oil grease.
4
Page 5

(13) Disconnect tools
- When not in use, before servicing and when changing accessories such as wheels, bits and cutters,
disconnect tools from the power supply.
Remove adjusting keys and wrenches
(14)
- Form the habit of checking to see that keys and adjusting wrenches are removed from the tool
before turning it on.
Avoid unintentional starting
(15)
- Don’t carry plugged-in tool with finger on switch. Make sure the switch is “off” when connecting the
plug to the socket.
Use extension cord
(16)
- If an extension cord is required, always check that its cross-section measurement is equal to or
greater than that of the tool capability and so marked.
Stay alert
(17)
- Watch what you are doing, use common sense and do not operate the tool when you are tired.
(18)
Check damaged parts
- Before further use of tool, a guard or other part that is damaged should be carefully checked to
determine that it will operate properly and perform it’s intended function.
- Check for alignment of moving parts, binding of moving parts, mounting and any other conditions
that may affect its operation.
- A guard or other part that is damaged should be properly repaired or replaced by an authorized
service center unless otherwise indicated elsewhere in this instruction manual.
- Have defective switches replaced by a qualified service center.
- Do not use the tool if the switch does not turn it on and off.
Check the voltage
(19)
- Don’t plug the electric tool into the mains until you have checked that the voltage shown on the data
plate corresponds to the voltage available.
Replace parts
(20)
- The use of improper accessory or attachment other than recommended present a risk of personal
injuries.
Have your tool repaired by an expert
(21)
- This electric tool complies with the relevant safety rules. Repairs should only be carried out by
qualified persons using original spare parts; otherwise this may result in considerable danger to the
.
user
SPECIFIC SAFETY INSTRUCTIONS FOR BENCHGRINDERS
This tool should not be used by people under the age of 16 years.
Do not use damaged, deformed or vibrating grinding wheels.
Use only grinding wheels with an allowable speed matching at least the highest no-load speed of
the tool.
Before use, check that the grinding wheels are free of damage, properly mounted, and able to
rotate freely.
Always mount spark protection guard and tool rest ; never use the tool without them.
Do not work materials containing asbestos (asbestos is considered carcinogenic).
Secure the work piece (a work piece clamped with clamping devices or in a vice is held more
securely than by hand).
Only use the flanges which are supplied with this tool.
When grinding metal, sparks are generated; keep other persons and combustible material from
work area.
5
Page 6

Keep hands away from the rotating grinding wheels
Wear protective gloves and use safety glasses.
The noise level when working can exceed 85 dB(A); wear ear protection
Anyone entering the work area must wear personal protective equipment (fragments of the work
piece or of a broken accessory may fl y away and cause injury beyond the immediate area of
operation).
• Never grind side wards against the rotating grinding wheel; only grind at the front.
• Do not brake the grinding wheels with side pressure.
• Allow the tool to cool down after a continuous use of 30 minutes.
• If the cord is damaged or cut through while working, do not touch the cord, but immediately
disconnect the plug.
• Never use the tool when cord is damaged; have it replaced by a qualified person.
• Inspect the extension cord periodically and replace it, if damaged.
• Always disconnect plug from power source before making any adjustment or changing any
accessory.
Never cut magnesium high danger to fire!
- Do not use the power tool if the ON/OFF switch does not turn the power tool ON and OFF.
Make all machine adjustments or maintenance with the machine unplugged from the power
source.
ASSEMBLY
If you notice any transport damage while unpacking, notify your supplier immediately. Do not operate
the machine!
Dispose of the packing in an environmentally friendly manner.
Clean all rust protected surfaces with a mild solvent.
Mount the tool rests:
There is a left and a right tool rest, ensure that you install them correctly.
Use the bolt, washer, spring washer (B) and mount the tool rest (C) to the wheel housing (D).
Adjust the tool rest to within < 2mm of the grinding wheel.
As the wheel wears down, the tool rest must be re-adjusted.
Mounting the spark protection guards and eye protection shields:
Use a bolt and washer to mount the eye protection shield and spark protection guard.
6
Page 7

Adjust the spark protection guard to within < 2mm of the grinding wheel.
As the wheel wears down, the spark guard must be re-adjusted.
Mount the bench grinder:
To prevent the grinder from moving during operation, it must be securely mounted to a work bench or
stand.
MAIN CONNECTION
Do not connect bench grinder to the power source until all assembly steps have been
completed. The motor is designed for operation on the voltage and frequency specified. The mains
voltage must comply with the information on the machine licence plate. Normal loads will be handled
safely on voltages not more than 10% above or below specified voltage. Running on voltages, which
are not within range, may cause overheating and motor burnout. Heavy loads require that voltage at
motor terminals be not less than the voltage specified on nameplate.
Mains connection and any extension cords used must comply with applicable regulations.
Connections and repairs to the electrical equipment may only be carried out by qualified electricians.
Properly Ground Outlet
2-Prong Plug
Improper connection of equipment grounding conductor can result in the risk of electrical shock.
Equipment should be grounded while in use to protect operator from electrical shock.
- Check with a qualified electrician if you do not understand grounding instructions or if you are in doubt
as to whether the tool is properly grounded.
- This tool is equipped with an approved cord rated at 230V and a 2- prong grounding type plug for you
protection against shock hazards.
7
Page 8

- Grounding plug should be plugged directly into a properly installed and grounded 2- prong groundingtype receptacle, as shown.
- Do not remove or alter grounding prong in any manner. In the event of a malfunction or breakdown,
grounding provides a path of least resistance for electrical shock.
STARTING OPERATION
You can start the machine with the green ON-button.
The red OFF-button on the main switch (5) stops the machine.
Machine operation
The bench grinder is designed for grinding metal materials only without use of water.
The medium
must be removed.
The fine
finish.
Hold and guide the work piece safely during machining.
Do not perform any operation freehand; always have the work piece supported by the tool rest.
Apply a moderate pressure on the work piece and keep it moving for smooth grinding.
Pressing too hard overheats the motor and prematurely wears down the grinding wheels.
Note the original bevel angle on the item to be sharpened and try to maintain the same shape.
The grinding wheel should rotate into the object being sharpened.
Keep a tray filled with water and dip your work piece regularly to prevent overheating. Overheating can
weaken metals.
When the wheel becomes loaded of debris, use an approved grinding wheel dresser and dress the
wheel.
grain abrasive wheel is suitable for rough grinding where a considerable amount of metal
grain abrasive wheel is suitable for sharpening tools and grinding to close size and smooth
Warning:
The condition of the abrasive wheels should be checked before each machining process. Work only
with flawless abrasive wheels.
Do not allow anyone to stand behind the unit or close to the work piece where debris can be thrown.
Flying sparks will occur when cutting. They can cause injury and ignite flammable materials.
Use safety goggles at all times.
Use ear protection at all times.
Wear a face and dust mask when working in a dusty environment.
Ensure that the wheel guards are in the correct position before you start machining.
Keep the tool rest and spark guard to within 2mm of the grinding wheel.
Before starting the grinder, turn the wheels by hand making sure they turn freely.
Allow the abrasive wheels to reach full speed before machining.
Do not use the side of the grinding wheel; this puts dangerous stress on the wheel.
Do not stop the wheel by side pressure.
Do not touch the machined work piece until it cools or you may be burned!
Never place your hand near the cutting area while machine is in operation.
Never machine pieces that are too small to hold safely.
Support long work pieces with helping roller stands.
8
Page 9

SETUP AND ADJUSTMENTS
Changing the abrasive wheel
The abrasive wheel may only be changed when the mains plug is pulled!
The abrasive wheel has to meet the technical specification.
1
-
Use only abrasive wheels rated at 3000 min
Check abrasive wheel for flaws (cracks) before installation. Make the ring test.
Ring test:
An internal defect may not be apparent by visual inspection alone.
The ring test may uncover an internal crack or void.
Loop a piece of string through the grinding wheel hole and suspend the wheel.
Tap the wheel with a piece of scrap wood.
A good wheel will "ring"; a defective wheel will "thud".
Do not use a wheel that does not “ring”.
To change a grinding wheel:
Disconnect grinder from the power source.
Move the tool rest (C) and the spark protection guard away from the wheel.
or higher.
D
Remove the wheel housing cover.
Remove the nut clamping flange and abrasive wheel (D).
Note:
Turn the nut on the right-hand wheel counter-clockwise to loosen.
Turn the nut on the left-hand wheel clockwise to loosen (left hand thread).
Clean flanges.
To install the new abrasive wheel reverse the process.
Do not over tighten the nut; this may cause the wheel to crack.
Replace the wheel cover.
Adjust the spark guards and tool rests to a 2 mm clearance from the wheel and plug in.
Before starting the grinder, turn the wheels by hand making sure they turn freely.
Run the unit and check to make sure the abrasive wheel is in good condition.
When testing a new abrasive wheel, run the unit for 3 minutes.
Note: Always stand on one side when turning on the unit.
Adjusting the spark protection guard
As the wheel wears down, the spark guard must be re-adjusted to maintain a maximum 2mm
clearance.
Loosen star knob (K) to adjust.
9
Page 10

Adjusting the tool rest
As the wheel wears down, the tool rest must be re-adjusted to maintain a maximum 2mm clearance.
Loosen screws (A) to adjust.
MAINTENANCE AND INSPECTION
Make all machine adjustments or maintenance with the machine unplugged from the power
source.
Maintenance, cleaning and repair work may only be carried out after the machine is protected
against accidental starting by pulling the mains plug.
Repair and maintenance work on the electrical system may only be carried out by a qualified
electrician.
Clean the machine regularly.
All protective and safety devices must be re-attached immediately after completed cleaning, repair and
maintenance work.
Defective safety devices must be replaced immediately.
Cleaning:
Regularly clean the machine housing with a soft cloth preferably after each use.
If the dirt does not come off use a soft cloth moistened with soapy water.
Never use solvents such as petrol, alcohol, ammoniac water, etc. These solvents may damage the
plastic parts.
10
Page 11

TROUBLE SHOOTING
Motor doesn’t start
*No electricity – check mains and fuse.
*Defective switch, motor or cord – consult an electrician.
Machine vibrates excessively
Stand on uneven surface – adjust base for even support.
*
*abrasive wheel damaged – replace abrasive wheel immediately
Grinding surfaces is bad
*Worn abrasive wheel
*Work piece not suitable for machining
*Feed pressure too high – Do not force the machine.
ENVIRONMENT
INFORMATION FOR USERS
In accordance with the implementation of Directives 2002/95/EEC, 2002/96/EEC and 2003/108/EEC,
relative to reducing the use of hazardous substances in electric and electronic appliances and the
disposal of waste, please take note of the following:
The crossed out wheelie bin symbol found on the appliance or the packaging indicates that the
product must be disposed separately from ordinary household waste when it reaches the end of
its working life.
The user must consign the unwanted appliance to an authorized waste disposal centre for
electric and electronic goods, or alternatively, hand it over to the relative dealer at the moment
of purchasing a new appliance of the same type on a basis of a one to one ratio.
Differentiated disposal to enable possible recycling or environmentally compatible elimination of
the appliance helps to limit undesirable effects on health and environment and promotes the
reuse and/or recycling of the materials that compose the appliance.
This symbol will remind you of this when the need for disposing occurs.
11
Page 12

Exploded Drawing
Part List: PX-150HDBG
ITEM DESCRIPTION QTY ITEM DESCRIPTION QTY
1 Left Outer Cover 1 38 Wheel Lock Nut 1
2 Wheel Lock Nut 1 39 Right Tool Rest 1
3 Outer Wheel flange 2 40 Washer 2
4 Nameplate of wheel 4 41 Knob Nut 2
5 Wheel 2 42 Cable protector 1
6 Inner Wheel flange 2 43 Bolt 3
7 Ash Tube 2 44 Base 1
8 Bolt 6 45 Bolt 2
9 Washer 6 46 Switch 1
10 Flat washer 6 47 Base plate 1
11 Left Inner Cover 1 48 Washer 4
12 Screw 6 49 Rubber feet 4
13 Washer 6 50 Bolt 4
14 Flat washer 6 51 Bolt 1
15 End cover 1 52 Washer 1
12
Page 13

16 Stator 1 53 Tooth washer 1
17 Bearing 2 54 Bolt 2
18 Rotor 1 55 Flat washer 2
19 Bolt 3 56 Bolt 2
20 Label 1 57 Cord bushing plate 1
21 Waved spring 1 58 Bolt 1
22 End cover 1 59 Flat washer 1
23 Screw 6 60 Capacitor clip 1
24 Washer 6 61 Capacitor 1
25 Flat washer 6 62 Washer 2
26 Eye shield 2 63 Flat washer 2
27 Square Neck Screw 2 64 Plug & Cord 1
28 Square Neck Screw 2 65 Cable Adaptor 1
29 Eye shield Bracket 2 66 Left Tool Rest 1
30 Washer 2 67 Flat washer 2
31 Flat washer 2 68 Washer 2
32 Wing nut 2 69 Bolt 2
Exploded Drawing
13
Page 14

Part List: PX-150BG
ITEM DESCRIPTION QTY ITEM DESCRIPTION QTY
1 Bolt 6 29 Ground terminal 1
2 Washer 6 30 Washer 1
3 Nut 1 31 Bolt 1
4 Wheel flange 4 32 Washer 4
5 Wheel A36 1 33 Washer 4
6 Bolt 2 34 Bolt 4
7 Eye shield Bracket 2 35 Rubber feet 4
8 Eye shield 2 36 Base plate 1
9 Bolt 2 37 Screw 2
10 Washer 4 38 Capacitor 1
11 Nut 4 39 Capacitor clip 1
12 Washer 10 40 Bolt 1
13 Washer 16 41 Cable & plug 1
14 Nut 10 42 Nameplate of wheel 4
15 Stator 1 43 Bolt 2
16 Nameplate 1 44 Left Inner guard 1
17 Motor house 1 45 Bolt 2
18 Rotor 1 46 Left Tool Rest 1
19 Bolt 4 47 Washer 2
20 Bearing 2 48 Washer 2
21 Cover 2 49 Knob Nut 2
22 Right Inner guard 1 50 Cable Adaptor 1
23 Middle ring 2 51 Bolt 4
24 Wheel A60 1 52 Cable protector 1
25 Nut 1 53 Cable Block 1
26 Right Outer guard 1 54 Cable clip 1
27 Right Tool Rest 1 55 Base 1
28 Switch 1
14
 Loading...