

Page 1

Top
Videoconferencing
Systems
Media Xchange
Manager
Administrator’s Guide
DOC01094 Rev. 12.0 07.06
®
Version 4. 5
Page 2

© 2006 Emblaze-VCON Ltd. All Rights Reserved.
Information in this document is subject to change without notice. No part of this
document can be reproduced or transmitted in any form or by any means electronic or mechanical - for any purpose without written permission from
Emblaze-VCON Ltd.
VCON and Media Xchange Manager are registered trademarks of
Emblaze-VCON Ltd.
ViGO is a registered trademark of Emblaze-VCON Ltd in the United States and
China.
MeetingPoint is a registered trademark of Emblaze-VCON Inc. in the United States.
Microsoft and Outlook are registered trademarks or trademarks of Microsoft
Corporation in the United States and/or other countries.
Windows and NetMeeting are trademarks of Microsoft Corporation.
Novell and NDS are registered trademarks of Novell, Inc.
Accord is a registered trademark o f Polycom, Inc. MGC-100 and MGC-50 are
trademarks of Polycom, Inc.
All other product names are tr ademark s o r registered trademarks of their respective
companies or organizations.
Limited Warranty
Emblaze-VCON Ltd. warrants that SOFTWARE will perform according to
accompanying user documentation for a period of 90 (ninety) days from the date of
receipt; replacement SOFTWARE will be warranted for 90 (ninety) days from the
date of receipt. This Limited Warranty shall not apply to any product that in the
opinion of Emblaze-VCON Ltd. has not been installed or upgraded according to
accompanying documentation from Emblaze-VCON Ltd. or been subject to misuse,
misapplication, negligence or accident while in the hands of the purchaser.
GRANT OF LICENSE
and non-transferable license to use the SOFTWARE product and to make one copy
solely for backup or archival purposes, which may include user documentation
provided via online or other electronic form. Additional copies may not be made nor
may anyone else be allowed to copy or otherwise reproduce any part of the licensed
software without prior written consent of Emblaze-VCON Ltd.
Emblaze-VCON Ltd. grants the Purchaser a non-exclusive
ii Emblaze-VCON MXM Administrator’s Guide
Page 3

COPYRIGHT
other supporting materials relating to the Product are trademarked, copyrighted or
owned by Emblaze-VCON Ltd. as proprietary information protected by United
States copyright laws and international and applicable national treaty provisions
and laws. Software protection extends beyond its literal code to structure, sequence
and organization; any unauthorized use or modification would constitute a
misappropriation of Emblaze- VCON’s proprietary rights and a violation of the
License agreement.
LIABILITIES
shall be at Emblaze-VCON’s option, either return of the price paid or repair/
replacement of the Product not meeting Emblaze-VCON’s declared Limited
warranty. Emblaze-VCON or its suppliers s hall not be liable in any event to anyone
for any indirect, incidental, consequential, special or exemplary damages including
without limitation damages for loss of business profits, business interruptions,
business information or other pecuniary loss arising out of the use of or inability to
use the said Product even if advised of the possibility of such damages. In any case,
Emblaze-VCON’s entire liability under any provision of this agreement shall be
limited to the amount actually paid by the Purchase for the Product.
All trademarks(s), logo(s), name(s), software, documentation and
Emblaze-VCON’s entire liability and the Purchaser’s exclusive remedy
About this Administrator’s Guide
This Administrator Guide explains how to work with the Emblaze-VCON Media
Xchange Manager (MXM) system. The following chapter summary briefly describes
this guide’s contents:
Chapter 1 Welcome to Media Xchange Manager®
Introduction to the MXM and to this Administrator’s
Guide
Chapter 2 Getting Started
Instruct ions for installing the MXM.
Chapter 3 A Quick Tour of the MXM Administrator
Brief description of the main MXM applications’ screens.
Chapter 4 Managing the MXM
Procedures for configuring administrators and MXMs,
monitoring status within the video network, and setting
up hunting and administrative groups.
Chapter 5 Setting MXM System Properties
Descriptions of the various properties that comprise the
MXM’s system configuration.
Chapter 6 Defining End Point Nodes
Procedures for defining registered end points which run
Emblaze-VCON or third-party videoconferencing
applications.
Emblaze-VCON MXM Administrator’s Guide iii
Page 4

Chapter 7 Initiating Videoconferences From the MXM
Administrator
Instruct io ns f or s et ting up an d st art ing vid eo con fe renc es
from the Administrator application.
Chapter 8 Remote Upgrade of Videoconferencing
Devices Software
Instructions for upgrading the videoconferencing
software of registered end points through the Remote
Software Upgrade utility.
Chapter 9 Registering Gateways
Procedures for registering, setting up a gateway’s MXM
configuration and setting up available gateway services.
Chapter 10 Least Cost Routing of Gateway Calls
Description and instructions for determining the most
cost-efficient gateway services for IP-to-ISDN calls
originating from the MXM’s zone.
Chapter 11 Registering an MCU
Procedures for registering, setting up an MCU’s MXM
configuration, defining MCU service properties, and
setting up MCU service permission groups.
Chapter 12 Setting Up Multipoint Conferences Managed
by a VCB
Instructions for setting up Emblaze-Emblaze-VCON
VCB for initiating ad-hoc multipoint videoconferences.
Chapter 13 Using Polycom® MGC™ with the MXM
Instructions for setting up the Accord MGC’s
configuration for management within the MXM’s
network.
Chapter 14 Neighboring Zones
Procedures for setting up an MXM-managed network
that includes more than one zone of videoconferencing
users.
Chapter 15 Registering with LDAP Directories
Procedures and required information for setting up the
MXM’s configuration in online directory servers such as
ILS and NDS.
Chapter 16 Managing SIP Networks
Instructions for registering SIP User Agents, setting up
SIP Proxy Server, and initiating calls involving SIP User
Agents.
iv Emblaze-VCON MXM Administrator’s Guide
Page 5

Chapter 17 Emblaze-VCON Cluster Module
Description of the Emblaze-VCON Cluster and
instructions for setting up a Cluster configuration in your
organization.
Chapter 18 Customizing the MXM Administrator
Procedures for customizing the Administrator
application according to yo ur personal preferences.
Appendix A vPoint HD End Point Properties
Definiti ons of configuratio n properties for vPoint HD
end points.
Appendix B vPoint™ End Point Properties
Definiti ons of configuratio n properties for vPoint end
points.
Appendix C HD3000 End Point Properties
Definitions of configuration properties for HD3000 end
points.
Appendix D HD5000 End Point Properties
Definitions of configuration properties for HD5000 end
points.
Appendix E Upgrading HD3000/2000 Software Upgrade
Procedures for updating your Emblaze-VCON HD3000/
2000 devices to their latest software versions.
Appendix F QoS Priority Values
List of available QoS priority level settings for IP
Precedence and DiffServ.
Emblaze-VCON MXM Administrator’s Guide v
Page 6

Emblaze-VCON Technical Support
This Administrator’s Guide was designed to help you set up and work with your
MXM easily so that you can enjoy its many features.
If a situation occurs that is not covered by the supplied documentation, contact yo ur
local Emblaze-VCON distributor, and request a ssistance fro m their Emblaze-VCO Ntrained technical support department. Please describe the problem, device, and PC
operating system (if applicab le), and any other relevant details.
Also, you may access the Technical Support section of the Emblaze-VCON website
(http://www.emblaze-vcon.com/support/index.shtml) in order to check its
knowledge base or initiate other customer support processes:
Page Type of support
Support Notes Troubleshoot or receive technical information about
specific Emblaze-VCON products.
Downloads Download a new software release or a free product
evaluation.
Demo
Numbers
License Key
Requests
Test your videoconferencing system.
Request a permanent license key for your organ i zation’s
MXM(s).
vi Emblaze-VCON MXM Administrator’s Guide
Page 7

Table of Contents
TABLE OF CONTENTS
Limited Warranty................................................................................................. ii
About this Administrator’s Guide ....................................................................... iii
Emblaze-VCON Technical Support..................................................................... vi
1 Welcome to Media Xchange Manager® ................................. 1
1.1 About the MXM Server.................................................................................1
1.2 About the MXM Administrator................................................................... 2
1.3 Glossary of MXM Terms ............................................................................. 3
2 Getting Started ...................................................................... 5
2.1 Minimum System Requirements ................................................................ 5
MXM Server ................................................................................................ 5
MXM Administrator Application................................................................6
Conference Moderator ................................................................................ 6
2.2 Installing the MXM Server.......................................................................... 7
2.3 Installing the MXM Administrator ............................................................. 8
2.4 Installing Conference Moderator ............................................................... 9
Setup Parameters ........................................................................................ 9
Running the Conference Moderator Installation Program ........................ 9
Additional Configuration Issues ............................................................... 10
2.5 Replacing the MXM License Key ...............................................................11
2.6 Running the MXM......................................................................................12
2.7 Basic MXM Operations ..............................................................................14
3 A Quick Tour of the MXM Administrator.............................. 17
3.1 The Main View............................................................................................17
Connected MXMs.......................................................................................18
Registered Nodes........................................................................................19
Neighboring MXMs and Gatekeeper Zones..............................................20
Software Upgrade Indication .................................................................... 20
Filtering the Main View..............................................................................21
3.2 The Node Status View ............................................................................... 22
3.3 The Login Status View............................................................................... 22
3.4 The Event Log............................................................................................ 23
3.5 LDAP Servers............................................................................................. 23
3.6 The Frontier Server View ..........................................................................24
4 Managing the MXM ............................................................ 25
4.1 Setting Up Administrators ........................................................................ 25
Adding an Administrator .......................................................................... 25
Changing Administrator Properties.......................................................... 27
Emblaze-VCON MXM Administrator’s Guide vii
Page 8

Table of Contents
4.2 Editing Nodes............................................................................................ 28
Adding Nodes............................................................................................ 28
Deleting a Login Request .......................................................................... 30
Setting a Node’s Properties....................................................................... 30
Finding Nodes and Objects in the Administrator .....................................31
Editing Multiple Nodes............................................................................. 34
Changing Directory Numbers ....................................................................35
Deleting a Node......................................................................................... 36
4.3 Status Monitoring ..................................................................................... 36
Monitoring Nodes in the Main View......................................................... 36
Viewing the Login Status ...........................................................................37
Viewing the Node Status........................................................................... 38
Event Log Monitoring ................................................................................41
4.4 Setting Up Templates.................................................................................47
Editing a Template.....................................................................................47
4.5 Bandwidth Groups .................................................................................... 49
General Properties .................................................................................... 50
Network Settings Properties ...................................................................... 51
Bandwidth Settings ....................................................................................52
Pinning a Node to a Bandwidth Group......................................................53
4.6 Adding Hunting Groups.............................................................................53
General Properties .....................................................................................54
Call Forwarding Properties........................................................................55
Hunting Group Properties .........................................................................56
Hunting Group LDAP Properties.............................................................. 58
Additional ID Properties........................................................................... 58
4.7 Adding an Administrative Group...............................................................59
Changing Group Member Properties........................................................ 60
4.8 Adding a Short Dial Number ..................................................................... 61
General Properties .....................................................................................61
Call Forwarding Properties....................................................................... 62
LDAP Properties........................................................................................ 62
Additional ID Properties........................................................................... 62
5 Setting MXM System Properties .......................................... 63
5.1 MXM Properties........................................................................................ 64
Connection ................................................................................................ 64
System Info................................................................................................ 66
Dial Plan .....................................................................................................67
LDAP Settings ........................................................................................... 70
5.2 Call Control Properties...............................................................................72
Bandwidth Control.....................................................................................72
Call Settings................................................................................................73
Ad-hoc Resources.......................................................................................74
Number Manipulation ...............................................................................75
viii Emblaze-VCON MXM Administrator’s Guide
Page 9

Table of Contents
5.3 ISDN Call Routing Properties ....................................................................77
System Location .........................................................................................77
Dialing Prefixes ..........................................................................................77
5.4 Security Properties .................................................................................... 79
Security Mode............................................................................................ 79
License........................................................................................................81
Non-Registered Devices ............................................................................ 83
5.5 H.323 & SIP Properties.............................................................................84
Zone Settings .............................................................................................84
Advanced Settings .....................................................................................86
5.6 Reporting Properties .................................................................................87
Billing......................................................................................................... 87
Event Log...................................................................................................88
6 Defining End Point Nodes .................................................... 89
6.1 Setting Up an End Point............................................................................89
Login Attempt by Duplicate Users............................................................90
6.2 Setting End Point MXM Properties ...........................................................91
General........................................................................................................91
Status ......................................................................................................... 93
Call Forwarding....... ..... .... ..... .... ..... .... ..... ............................................. .....94
Bandwidth Control Properties ..................................................................95
Pickup Permissions ................................................................................... 97
MCU Services............................................................................................. 98
Gateway Services .......................................................................................99
ISDN Call Routing................................................................................... 100
Product Info............................................................................................. 102
H.323 Parameters.................................................................................... 103
LDAP........................................................................................................ 104
Additional IDs ......................................................................................... 106
7 Initiating Videoconferences From the MXM Administrator . 107
7.1 Administrator-Initiated LAN Dialing ......................................................107
Setting Point-to-Point Videoconference Properties ............................ ... 108
7.2 Administrator-Initiated ISDN Dialing.................................................... 109
Setting ISDN Videoconference Properties...............................................110
7.3 Administrator-Initiated Hang Up.............................................................111
8 Remote Upgrade of Videoconferencing Devices Software .. 113
8.1 Defining a Software Upgrade...................................................................114
8.2 Setting Software Upgrade Properties.......................................................114
Selecting a Software Version.................................................................... 115
Setting a Target Location for the Upgrade...............................................116
Setting Up User Login ..............................................................................118
Setting the Upgrade Schedule ..................................................................119
Confirm Upgrade Definition ..................................... ............................... 121
Emblaze-VCON MXM Administrator’s Guide ix
Page 10

Table of Contents
8.3 Selecting Nodes to Upgrade.....................................................................122
Node Software Upgrade Properties .........................................................122
8.4 Monitoring Software Upgrade Status......................................................128
9 Registering Gateways ........................................................ 129
9.1 Logging in a Gateway ...............................................................................129
9.2 Setting Gateway Properties......................................................................132
General .....................................................................................................132
Product Info ............................................................................................. 133
ISDN Dialing ............................................................................................134
Call Routing..............................................................................................136
9.3 Setting Gateway Service Properties .........................................................139
General .....................................................................................................139
Bandwidth Control...................................................................................140
9.4 Gateway Service Hunting Groups............................................................ 141
10 Least Cost Routing of Gateway Calls ................................. 143
10.1 Setting ISDN Call Routing Properties .....................................................144
10.2 Setting Gateway Call Routing Properties ................................................ 145
10.3 Setting Preference of Using Least Cost Routing or Bandwidth Rules ....145
10.4 Testing for the Optimal Gateway Service ................................................ 147
11 Registering an MCU........................................................... 149
11.1 Logging in a New MCU ............................................................................149
11.2 Setting MCU Properties........................................................................... 151
General ..................................................................................................... 151
Bandwidth Control...................................................................................152
Product Info ............................................................................................. 153
H.323 Parameters ....................................................................................154
11.3 MCU Services ...........................................................................................155
General .....................................................................................................156
Bandwidth Control................................................................................... 157
Session......................................................................................................158
LDAP ........................................................................................................159
Additional ID............................................................................................159
11.4 MCU Service Permission Groups.............................................................160
General ..................................................................................................... 161
Permission Group ....................................................................................162
11.5 Dedicated MCU Services..........................................................................163
11.6 Ad-hoc Permission Groups......................................................................164
General .....................................................................................................165
Permission Group ....................................................................................166
x Emblaze-VCON MXM Administrator’s Guide
Page 11

Table of Contents
12 Setting Up Multipoint Conferences Managed by a VCB .... 167
12.1 Overview of the Emblaze-VCON VCB......................................................167
12.2 Logging in a New VCB..............................................................................170
12.3 Setting VCB Properties.............................................................................173
General......................................................................................................173
License ..................................................................................................... 174
Network Settings ......................................................................................176
Product Info..............................................................................................177
H.323 Parameters.....................................................................................178
12.4 Setting VCB Services Properties...............................................................179
General.....................................................................................................180
Session ......................................................................................................181
Mixing Parameters .................................................................................. 182
Dual Video ...................................... .... ..... .... ..... .... ..... .............................. 184
Multicast.................................................................................................. 186
Parameters............................................................................................... 188
Advanced ................................................................................................. 190
H.263 Annexes .........................................................................................193
Enabled Audio Codecs..............................................................................195
QoS............................................................................................................196
Network Settings ......................................................................................197
LDAP........................................................................................................ 198
Additional ID........................................................................................... 198
12.5 Setting the Ad-hoc Resources Table ........................................................199
12.6 Dedicated VCB Service for End Points....................................................200
12.7 Dedicated VCB Service for a Zone........................................................... 201
12.8 Adding VCB Services to an Ad-hoc Permission Group...........................202
12.9 Expanding to an Ad-hoc Videoconference..............................................203
13 Using Polycom® MGC™ with the MXM ............................. 205
13.1 MGC Configuration................................................................................. 205
Network Services Configuration .............................................................205
H.323 Card Configuration....................................................................... 210
13.2 Adding an Accord Meeting Room............................................................ 211
13.3 Setting Meeting Room Properties............................................................212
General......................................................................................................212
Session ......................................................................................................213
Hunting Group .........................................................................................214
LDAP.........................................................................................................215
Additional ID............................................................................................215
13.4 Adding an Accord Gateway......................................................................215
Network Services Configuration ..............................................................216
13.5 Adding the Accord Gateway to the Main View ....................................... 227
Emblaze-VCON MXM Administrator’s Guide xi
Page 12

Table of Contents
13.6 Setting Accord Gateway Properties ........................................................ 228
General .................................................................................................... 228
Dialing ..................................................................................................... 229
Resources ................................................................................................ 230
Call Routing............................................................................................. 232
13.7 Adding Accord Gateway Services............................................................ 232
14 Neighboring Zones ............................................................ 233
14.1 The MXM’s Relationship with Neighboring Zones ................................ 233
14.2 Logging in New Zones............................................................................. 234
Adding Zones Automatically................................................................... 234
Adding Zones Manually ...........................................................................235
14.3 Setting Zone Properties........................................................................... 236
General .................................................................................................... 236
Zone Settings............................................................................................237
Bandwidth Control.................................................................................. 239
MCU Services .......................................................................................... 240
Gateway Services......................................................................................241
ISDN Call Routing................................................................................... 243
H.323 Parameters ................................................................................... 245
Additional IDs ......................................................................................... 246
Redundancy..............................................................................................247
Advanced.................................................................................................248
14.4 Permanent Non-Registered Devices....................................................... 250
Adding a Permanent Non-Registered Device......................................... 250
14.5 Inter-Zone Videoconferencing Management ..........................................251
Setting Up Inter-Zone Dialing ................................................................. 251
Directory Gatekeepers............................................................................. 254
Restricting Bandwidth Allotment ........................................................... 258
Restricting H.450 Exchange Functions.................................................. 260
Sharing Gateway and MCU Services with Other Zones ......................... 262
15 Registering with LDAP Directories ..................................... 267
15.1 Overview of LDAP ....................................................................................267
15.2 Registering the MXM with an ILS .......................................................... 269
Setting Up the ILS Configuration in the MXM Administrator ............... 271
15.3 Registering the MXM with Microsoft Exchange Server..........................273
Setting Up the Exchange Server Configuration
in the MXM Administrator ......................................................................276
15.4 Registering the MXM with Windows 2000 Active Directory ................ 278
Adding an Administrator with Full Configuration Rights ..................... 278
Adding the MXM Attributes ....................................................................279
Adding the MXMNode Class....................................................................281
Granting Full Control for the MXMNode Class
to an Active Directory User..................................................................... 285
xii Emblaze-VCON MXM Administrator’s Guide
Page 13

Table of Contents
Setting the Properties of the MXM Attributes........................................286
Creating an Organizational Unit for Your MXM .................................... 287
Setting Up the LDAP Configuration in the MXM Administrator........... 287
15.5 Registering the MXM with Novell Directory Services (NDS).................289
Creating MXM Attributes........................................................................290
Creating the MXMNode Class................................................................. 293
Creating an MXM Container...................................................................296
Setting Up the LDAP Group Object Configuration................................. 297
Adding a Trustee for the MXMNode Container .....................................299
Setting Up the LDAP Configuration in the MXM Administrator...........300
15.6 Registering the MXM with Site Server ILS on Windows 2000.............. 301
Setting Up the LDAP Configuration in the MXM Administrator........... 301
15.7 Registering the MXM with Netscape Directory Server .......................... 303
Setting Up the LDAP Configuration in the MXM Administrator........... 305
15.8 Registering the MXM with Sun ONE Directory Server.......................... 306
Generating a Database of MXM Users in the Directory Server..............306
Setting Up the LDAP Configuration in the MXM Administrator........... 307
15.9 Registering the MXM with OpenLDAP Directory Server.......................309
Setting Up the LDAP Configuration in the MXM Administrator...........309
15.10Registering the MXM with ADAM Server................................................311
Generating a Database of MXM Users in the Directory Server...............312
Setting Up the LDAP Configuration in the MXM Administrator............313
16 Managing SIP Networks .................................................... 315
16.1 SIP User Agents ........................................................................................315
16.2 SIP Servers................................................................................................316
SIP Proxy ..................................................................................................316
SIP Redirect Server ..................................................................................317
SIP Registrar.............................................................................................317
16.3 Logging in New SIP User Agents .............................................................318
16.4 Setting the MXM SIP Advanced Settings.................................................319
16.5 Registering a Windows XP Messenger SIP User Agent to the MXM .....320
16.6 Dialing Unlisted Users in Windows XP Messenger................................ 322
17 Emblaze-VCON Cluster Module ........................................ 323
17.1 Installing SQL Server on an External Server..........................................324
17.2 Installing the MXM Servers ....................................................................326
Before Installing the MXMs .................................................................... 326
Installing the Primary MXM ................................................................... 326
Installing the Secondary MXM ...............................................................328
17.3 Verifying Correct Installation..................................................................329
17.4 Installing the Cluster Application ........................................................... 329
17.5 Customizing Cluster Operation................................................................331
Operational Registry Entries ............................................. .... ..................331
Setting Up E-mail Notification.................... ............................................ 332
Emblaze-VCON MXM Administrator’s Guide xiii
Page 14

Table of Contents
17.6 Takeover Events...................................................................................... 332
17.7 Shutting Down the Cluster Service......................................................... 333
17.8 Switching the Active MXM ..................................................................... 334
17.9 Licensing the Cluster MXMs................................................................... 334
18 Customizing the MXM Administrator .................................335
18.1 Defining the Main View Options .............................................................335
Tree Styles ................................................................................................335
Item Attributes.........................................................................................337
18.2 Setting Up the Workspace....................................................................... 339
Defining Workspace Options .................................................................. 339
Managing Workspaces ...................................... ..... .... ..... .... ..... ................341
18.3 Customizing the Toolbar......................................................................... 346
Defining the Toolbar Display.................................................................. 346
Adding and Removing Toolbar Buttons ................................................. 348
Creating a Custom Toolbar ..................................................................... 349
18.4 Customizing the Status Views................................................................. 349
Setting Table On-Screen Display Properties .......................................... 350
Style Formats for Table Elements or Types of Information....................352
Showing and Hiding Columns .................................................................356
A vPoint HD End Point Properties.......................................... 359
A.1 Calls Properties ........................................................................................359
General .....................................................................................................359
Outgoing Calls ......................................................................................... 362
Ringing .................................................................................................... 363
Broadcast................................................................................................. 364
A.2 User Data Properties............................................................................... 366
A.3 Network Properties..................................................................................367
LAN...........................................................................................................367
Firewall.................................................................................................... 370
Login......................................................................................................... 371
SecureConnect..........................................................................................372
A.4 Hardware Properties................................................................................373
Audio ........................................................................................................373
Camera .....................................................................................................374
A.5 Advanced Properties ..................................... ...........................................375
System Info...............................................................................................375
General Options .......................................................................................376
QoS ...........................................................................................................377
Advanced Video................................................. ..... .... ..............................37 9
Advanced Audio .......................... .... ............................................. ..... ......380
H.264........................................................................................................381
xiv Emblaze-VCON MXM Administrator’s Guide
Page 15

Table of Contents
B vPoint™ End Point Properties ............................................. 383
B.1 Conversation Properties.......................................................................... 383
Video........................................................................................................ 383
Data..........................................................................................................385
B.2 Calls Properties........................................................................................386
Incoming Calls.........................................................................................386
Outgoing Calls ......................................................................................... 387
Ringing ....................................................................................................388
3rd Party Viewer......................................................................................389
Interactive Multicast ................................................................................391
B.3 User Data Properties ...............................................................................394
B.4 Communication Properties..................................................................... 395
LAN.......................................................................................................... 395
Firewall.................................................................................................... 397
Login........................................................................................................398
B.5 Hardware Properties ...............................................................................399
Audio........................................................................................................399
Camera.....................................................................................................402
B.6 Advanced Properties ...............................................................................403
System Info..............................................................................................403
QoS...........................................................................................................404
Intras........................................................................................................405
Advanced Video.......................................................................................406
Advanced Audio....................................................................................... 407
C HD3000 End Point Properties ............................................ 409
C.1 Network Configuration............................................................................ 410
LAN Connection and Registration .......................................................... 410
Streaming .................................................................................................411
Firewall.....................................................................................................413
H.323 Management..................................................................................414
QoS............................................................................................................415
C.2 Camera Properties....................................................................................417
C.3 Audio Properties...................................................................................... 418
C.4 Options .....................................................................................................419
General Options........................................................................................419
Calls ..........................................................................................................421
MCU Calls................................................................................................ 423
Monitor.................................................................................................... 424
Security....................................................................................................426
Version.....................................................................................................428
Upgrade ................................................................................................... 429
Emblaze-VCON MXM Administrator’s Guide xv
Page 16

Table of Contents
D HD5000 End Point Properties ............................................ 431
D.1 Calls Properties ........................................................................................431
Incoming Calls..........................................................................................431
Outgoing Calls ......................................................................................... 433
Ringing .................................................................................................... 434
Broadcast..................................................................................................435
D.2 User Data Properties................................................................................437
D.3 Network Properties .................................................................................438
LAN.......................................................................................................... 438
Firewall.................................................................................................... 440
Login.........................................................................................................441
SecureConnect......................................................................................... 442
D.4 Telephony Properties.............................................................................. 443
Phone Numbers....................................................................................... 443
Switch Type ............................................................................................. 444
SPID Numbers ........................................................................................ 445
MSN......................................................................................................... 446
Subaddressing ..........................................................................................447
Dialing ..................................................................................................... 448
D.5 Hardware Properties............................................................................... 449
Audio ....................................................................................................... 449
Camera .................................................................................................... 450
D.6 Advance d Properties .............. ..... .... ..... .... ..... .... ..... .... ..............................451
System Info...............................................................................................451
General Options ...................................................................................... 452
QoS ...........................................................................................................453
Advanced Video................................................. ..... .... ..............................455
Advanced Audio .......................... .... ............................................. ..... ...... 456
H.264........................................................................................................457
E Upgrading HD3000/2000 Software Upgrade ..................... 459
E.1 Upgrading From a Remote PC................................................................ 459
Before Downloading................................................................................ 459
Enable Remote Upgrade ......................................................................... 460
Downloading the HD Upgrade Utility .....................................................461
Downloading the New HD Software Version ..........................................461
Installing the New Upgrade in the HD Device ........................................461
E.2 Confirming Successful Upgrade.............................................................. 463
E.3 Installer Mode ......................................................................................... 464
F QoS Priority Values ............................................................ 465
F.1 IP Precedence Values.............................................................................. 465
F.2 DiffServ Values........................................................................................ 466
Index ................................................................................. 467
xvi Emblaze-VCON MXM Administrator’s Guide
Page 17

1WELCOME TO MEDIA XCHANGE
M
ANAGER
Congratulations on your entry into the revolutionary world of Emblaze-VCON’s
Media Xchange Manager
over IP communication within an enterprise-wide network.
1.1 About the MXM Server
The MXM provides centralized videoconferencing management services for
corporate networks running on IP. It transfers many adminstration and
configuration tasks from the individual computers, called end points, to the
network, where they belong.
The MXM provides the following services:
T H.323 Revision 4-compliant Gatekeeper functions, including login and security:
— Auto-discovery and registration of nodes, such as videoconferencing end
points, gateways, MCUs and their respective services.
— Addres s translation of I P addresses, H.323 aliases, E.164 numbers, e-mail
addresses and URLs.
T Call Forwarding, Pickup, Transfer, Ad-hoc Conferencing and Hunting Groups
T Search capabilities for nodes in zones managed by other MXMs and
gatekeepers
T Simplified gateway and MCU dialing for registered end points
T Control of the usage of gateway and MCU services by registered users
T Bandwidth management for allocating available bandwidth to registered nodes
T Compatibility with external online directory services (LDAP)
T IP-Nexus messaging and chat
T Network usage reports (Call Details Records and Asset Management Reports) -
optional
T Integrated Videoconferencing Bridge (VCB5/VCB 2500) - optional.
T Integration with Emblaze VCON secure conferencing solutions (Frontier,
ALG Proxy)
®
®
(MXM). The MXM centralizes the management of Video
Emblaze-VCON MXM Administrator’s Guide 1
Page 18

1 Welcome to Media Xchange Manager®
1.2 About the MXM Administrator
The Administrator application provides an interface for performing the
management and monitoring of the MXM network. It may be installed on the same
computer as the MXM Server as well as on additional computers, therefore
providing remote management capability.
The Administrator application enables:
T Remote configuration and management of Emblaze-VCON HD, vPoint,
MeetingPoint, Falcon, and VCB nodes
T Registration, configuration and management of H.323 end points, such as
Emblaze-VCON’s and other vendors’ H.323 videoconferencing systems
T Registration, configuration and management of SIP User Agents, such as SIP
phones and Windows XP Messenger applications.
T Registration, configuration and management of Gateways, MCUs and their
respective services
T Configuration of videoconferencing policies between the local MXM and zones
of nodes managed by other MXMs and gatekeepers
T Monitoring of connection states, login status, and events logging
T Creation of hunting groups (groups of end points that may be called through
one common number)
T Creation of administrative groups that reflect the organization’s corporate
structure and enables efficient configuration of these groups’ stations
T Setting limits on the permitted bandwidth usage
T Initiation and hangup of point-to-po int calls between two end points
T Utility for upgrading the videoconferencing software of registered end points
T Testing for Least Cost Routing of gateway calls.
2 Emblaze-VCON MXM Administrator’s Guide
Page 19

1 Welcome to Media Xchange Manager®
1.3 Glossary of MXM Terms
This section lists special MXM terms that are commonly used in this guide.
Ad-hoc
conference
Administrator
Bandwidth
Group
End point
Firewall
Gatekeeper
Gateway
Hunting group
LDAP
Login
MCU
MXM Node
NAT
A videoconference that expands from a point-to-point
session to a multipoint session while it remains open.
Additional end points are "invited" by one of the parties.
User whose responsibilities may include monitoring and
managing the MXM network. Three levels of
Administrator provide vario us rights for managing,
controlling, monitoring, and viewing information.
A group of nodes who belong within a specified IP
address range, or who have been added manually, who
have the same administrator-defined bandwidth usage
policies.
An H.323 terminal, Gateway, or MCU. An end point can
call and be called. It generates and/or terminates
information streams.
A means of providing a network security from intruders.
Firewall s may emp lo y a si ngl e ro ute r or a c omb inat ion of
routers and servers that perform firewall processing of
incoming and outgoing traffic.
Application that controls registration (login) into a
computer or network, translates addresses, and manages
bandwidth within a network.
A network device that enables communication between
two different types of networks, such as IP and ISDN
telephony.
A group of users within an organization that may be
reached through one common number.
Lightweight Directory Access Protocol - used to access
online directory servers, for registering and searching for
other online users.
The process of gaining entry, or registering, into a
computer or a network.
Multipoint Control Unit - a device used to connect three
or more end points in a single video meeting.
A node that is registered in the local MXM.
Network Address Translation - An IETF standard that
allows an organization to present itself to the Internet
with one address.
Emblaze-VCON MXM Administrator’s Guide 3
Page 20

1 Welcome to Media Xchange Manager®
Neighbor Node
Neighboring
Zone
Node
Service
Temp lat e
Zone
A node that is registered in a neighboring zone.
A zone that is known and listed in the local MXM.
A device on a LAN. For example, end points, gateways
and MCUs are nodes.
A configuration for the allocatio n of avail able bandw idth
during videoconferences through gateways or MCUs.
A complete set of default properties for new nodes.
A collection of nodes that MXMs and gatekeepers
register and manage.
4 Emblaze-VCON MXM Administrator’s Guide
Page 21

2GETTING STARTED
2.1 Minimum System Requirements
The components of the MXM may be installed and operated on any computer that
meets the following minimum requirements:
MXM Server
For optimum performance, install the MXM Server on a workstation or server that
contains only the Windows 2003 or Windows 2000 operating system with Service
Pack 4 or higher. We recommend that no other applications except MXM
Administrator, Emblaze-VCON VCB, Conference Moderator or IP-Nexus be
installed on it at any time. The presence of other applications (even if they are not
open) may cause unpredictable operating results.
1 No other application may use the computer’s default H.323 TCP/IP
ports.
2 MXM installation program installs MDAC 2.8, which upgrades the
ODBC driver, and MSDE 2000 with Service Pack 3a.
Basic Version
Operating System Microsoft Windows 2003 or 2000 Server with
Minimum CPU Speed 1 GHz
Recommended Memory at least 512 MB
Minimum Free Disk Space 200 MB
Service Pack 4 or higher
With 2 VCB Session Support
Operating System Microsoft Windows 2003 or 2000 Server with
Minimum CPU Speed 2.4 GHz
Recommended Memory at least 512 MB
Minimum Free Disk Space 300 MB
Emblaze-VCON MXM Administrator’s Guide 5
Service Pack 4 or higher
Page 22

2 Getting Started
MXM Administrator Application
The MXM Administrator application may be installed on any workstation(s) on the
network that meet the following specifications:
Operating System Microsoft Windows 2003/98/XP/2000/NT4.0
Minimum CPU Speed 166 MHz
Minimum Memory 64 MB
Minimum Free Disk Space 10 MB
with Service Pack 5 or higher.
Conference Moderator
The Conference Moderator must be installed on the same computer as the MXM
Server.
Operating System Microsoft Windows 2003 or 2000 Server with
Service Pack 4 or higher.
Minimum CPU Speed 2.4 GHz
Minimum Memory 512 MB
Minimum Free Disk Space 300 MB
Already installed on same
computer
MXM 4.2 or higher.
Microsoft IIS 5.0 or higher.
Internet Explorer 6.0 or higher.
6 Emblaze-VCON MXM Administrator’s Guide
Page 23

2 Getting Started
2.2 Installing the MXM Server
The MXM server must be installed on a Windows 2003 or 2000 Server dedicated to
the management of your organization’s videoconferencing network.
³ To install the MXM Server
1 Insert the MXM Setup CD-ROM in your computer’s CD-ROM drive.
2 If Autorun is enabled, the Installation program appears automatically.
Otherwise, click Start in the Windows taskbar and then click Run. Browse
to the CD-ROM drive and double-click the Setup.exe file. The Installation
program appears.
3 Select MXM Server.
4 Follow the instructions in the Setup Wizard, clicking Next to continue. The
installation program installs the Server components.
If upgrading from a previous MXM version, the Installation program detects
it. Click OK to continue. The Installation program saves the previous
version’s database settings, except for Call Details Records (CDRs) and the
Event Log.
5 The Wizard asks where to install and use Microsoft SQL database. To
install it on the same computer as the MXM (default setting), click Next.
To install it on a different computer, click Choose Location and then
enter the appropriate computer name or IP address.
The installation program builds a system database, which requires a few
minutes.
6 At another stage, the Enter Serial Number dialog box appears. Type the
serial number that’s on the supplied key code agreement and click OK.
If you received a version for evaluation, click Cancel. To continue
installing the evaluation version (limited no. of users for a short period),
click Yes to confirm.
Whether this is a first-time installation or an upgrade, your initial key code is
valid for 30 days. For instructions on making it permanent or increasing the
permitted number of registered end points, see “Replacing the MXM License
Key” on page 11.
7 When the Wizard informs that the installation is complete, click Finish.
8 To install the MX M Ad m inistrator application on the same computer, keep
the Installation program open (see the next section).
To exit the Installation program, click Exit.
Emblaze-VCON MXM Administrator’s Guide 7
Page 24

2 Getting Started
2.3 Installing the MXM Administrator
The Administrator application may be installed on the same computer as the MXM
Server and/or other workstations from which you may perform remote
administration.
The new version of the MXM Administrator may be installed over a previous
version of the application. You do not need to uninstall the previous version.
³ To install the MXM Administrator
1 Insert the MXM Setup CD-ROM in your computer’s CD-ROM drive.
2 If Autorun is enabled, the Setup wizard will appear automatically.
Otherwise, click Start in the Windows taskbar an d then click Run. Browse
to the CD-ROM drive and double-click the Setup.exe file. The Setup wizard
appears.
3 Select MXM Administrator.
4 Follow the instructions in the wizard, clicking Next to continue.
5 The wizard provides a checkbox for installing the HD Upgrade Utility,
which provides you with the ability to upgrade the software version of
Emblaze-VCON HD3000/2000/1000/600 connected to your
organization’s network. If your organization has any of the above systems,
we recommend that you install this application.
Click Next to continue.
6 If you selected to install the HD Upgrade Utility, the wizard proceeds to its
installation process. Follow the instructions in the wizard, clicking Next to
continue to the next page.
7 When the Wizard informs that the installation is complete, click Finish.
8 To exit the Installation program, click Exit.
8 Emblaze-VCON MXM Administrator’s Guide
Page 25

2 Getting Started
2.4 Installing Conference Moderator
The following procedure applies to Conference Moderator installations on
computers that do not have a VCB5 set up on them (VCB5 includes a
Conference Moderator application).
®
Microsoft
use the Web Sharing, the IIS must include its FTP Server.
Setup Parameters
Before installing Conference Moderator, set up the following (if not applicable to
your organization, skip these instructions):
T If Microsoft Outlook
Custom Installation of Outlook and include the following elements:
— Collaboration Data Objects
— Electronic Forms Designer Runtime
T If the server’s operating system is Windows Server 2003, start ASP.NET
manually.
1 Right-click My Computer and choose Manage. Browse to Services and
Applications\Internet Information Services (IIS) Manager\Web Service
Extensions.
2 In the right pane, select ASP.NET [version number] and choose Allow
from the popup menu.
IIS 5.0 or higher must be already installed on the Server. To
®
is your organization’s e-mail application, install a
Running the Conference Moderator Installation Program
Conference Moderator must be installed on the same computer as the MXM Server.
³ To install the Conference Moderator
1 Insert the MXM Setup CD-ROM in your computer’s CD-ROM drive.
2 Click Start in the Windows taskbar and then click Run. Browse to the
[CD-ROM drive]>Moderator>Setup.exe file. The Setup wizard appears.
3 Follow the instructions in the wizard, clicking Next to continue.
4 The Wizard asks for the location of the MXM SQL database. You may use a
database installed on the same computer or click Choose Location and
enter a different computer name or IP address. Click Next to continue.
5 When the Wizard informs that the installation is complete, click Finish.
Emblaze-VCON MXM Administrator’s Guide 9
Page 26

2 Getting Started
Additional Configuration Issues
T In all Conference Moderator clients, enable the use of Active X controls and
plug-ins. In Internet Explorer, enter the Security tab of the Internet
Options, click Custom Level, and set all Active X settings to Enable.
T If Emblaze-VCON’s Reporting Option is already installed, run its Restore
program to restore its default configuration (the installation of Conference
Moderator causes complications to the Reporting Option). The Restore
program is located at
Program Files\VCON\Moderator\Setup\RestoreCtrlClient.exe.
T To work with WebEx Data Sharing, enter the Conference Moderator’s
System>Data Sharing page and enter the following login details:
— URL of your organization’s WebEx account
—User name
—Password
10 Emblaze-VCON MXM Administrator’s Guide
Page 27

2 Getting Started
2.5 Replacing the MXM License Key
The following circumstances require replacement of your MXM license key:
T Replacing a temporary demo version with a permanent, purchased version.
Your initial key code is valid for 30 days.
T Changing the number of permitted registered end points.
T Adding optional features to your MXM.
This process requires that an initial MXM is already set up. For instructions
on setting up an MXM, see Chapters 4 and 5.
³ To replace your MXM’s license key
1 In the Administrator window, click the MXM entry or any of its managed
objects.
2 In the MXM menu, choose Show License Page.
3 In the Properties dialog box’s License tab, click Export Key to create a
license file for the MXM on the host computer.
MXM System License Properties
4 Send the license file to your local Emblaze-VCON distributor. You will then
receive a new key code from the distributor.
5 Save the new license code file to a location on your network.
Emblaze-VCON MXM Administrator’s Guide 11
Page 28

2 Getting Started
6 After receiving a new license file from your Emblaze-VCON distributor, run
the MXM Administrator application. Enter the MXM Properties License
tab again.
7 Click New Key. The Open dialog box appears.
8 Browse to the location where you saved the license code file. Click Open.
9 When prompted to apply the license code, click OK.
10 To implement the license change and close the dialog box, click OK again.
2.6 Running the MXM
The MXM server opens automatically during the host computer’s startup, and runs
unseen as a service application.
³ To run the MXM Administrator
T In the Windows desktop, click Start, point to Programs and click MXM
Administrator.
Starting the MXM Administrator
When you open the MXM Administrator application fo r the first time, you must
open a new MXM object in the Main View.
12 Emblaze-VCON MXM Administrator’s Guide
Page 29
2 Getting Started
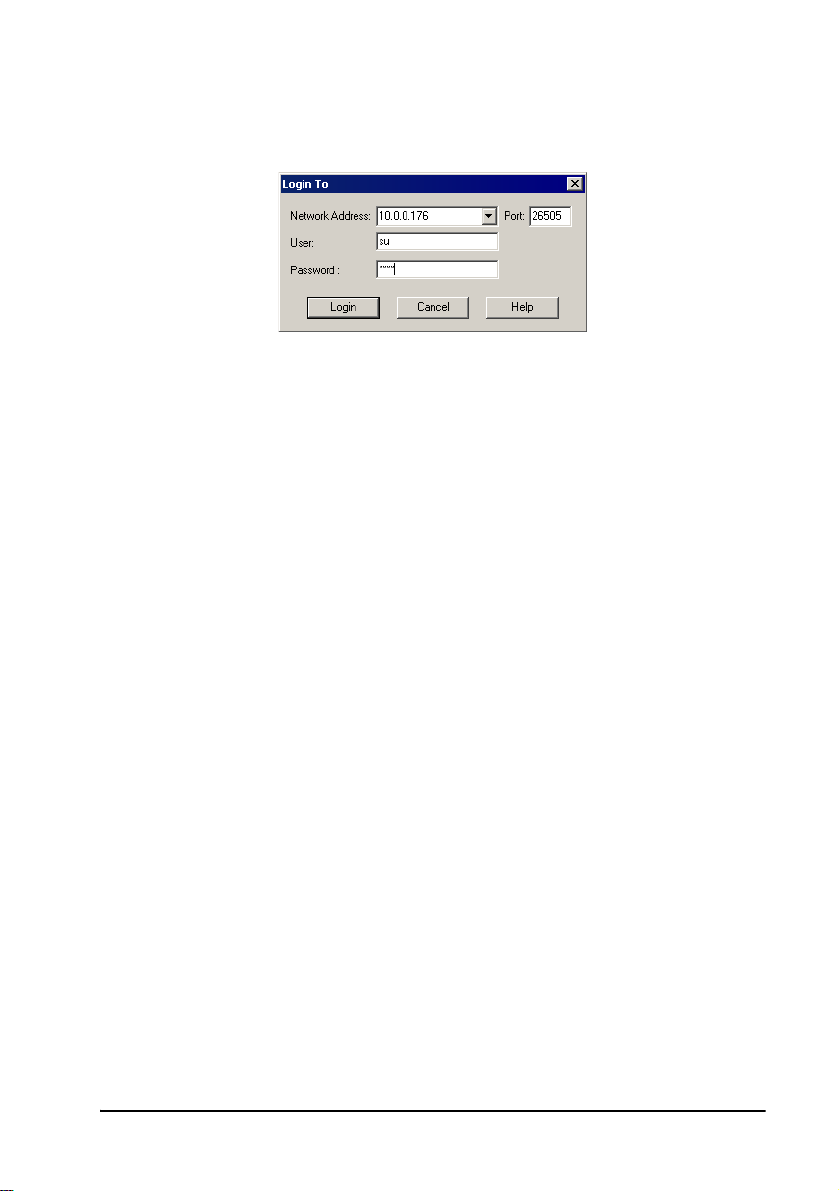
³ To op e n a ne w M XM
1 In the MXM menu, click Log in to New MXM.
Opening a New MXM
2 Enter the IP network address of the computer that it’s installed on. Then,
enter the default User name and default password during the startup.
Afterwards, you may change these values to meet your own operating
needs (see “Adding an Administrator” on page 25).
Default user su
Default
password
3 Click Login. The new MXM is displayed in the Main View of the
Administrator application. You can expand the MXM to see an initial
system tree (see Chapter 3, “A Quick Tour of the MXM Administrator,” for
more details).
4 To save the administrator application configuration, open the File menu
and click Save As. Save the configuration as a .vca file.
1234
Emblaze-VCON MXM Administrator’s Guide 13
Page 30

2 Getting Started
2.7 Basic MXM Operations
This section will list the various tasks required to set up the MXM for a typical video
network. At the end of each description, the location of detailed explanations are
provided.
1 Set up administrators.
Enter the administrators and their various privileges into the system. The
available privilege levels are Super User, Monitor System and View System
Properties. See “Setting Up Administrators” on page 25.
2 Set up the MXM’s configuration.
Define the various properties of the system’s configuration, such as
connection details, open or closed mode for registering end points, and so
on. See Chapter 5, “Setting MXM System Properties.”
3 Define default settings for end points and other nodes in templates.
A template includes the characteristic properties for a type of node or
service. Any new created item in the system will initially have the default
properties defined in the template. See “Setting Up Templates” on page 47.
4 Set up end point configurations.
End points may be registered with the default properies defined in a
template or be set following their login requests. See Chapter 6, “Defining
End Point Nodes.”
5 Create and set up bandwidth groups.
Bandwidth groups enable administrators to control usage of bandwidth
among a select group of nodes who belong within a specified IP address
range. This feature makes it easier for administrators to organize the
allocation of bandwidth limits throughout a whole organization. See
“Bandwidth Groups” on page 49.
6 Create and set up hunting groups.
A hunting group includes a series of nodes that may be grouped together
within an organization f or a var iety of reasons , but may be r eached thro ugh
one common address. See “Adding Hunting Groups” on page 53.
7 Create and set up administrative groups.
Administrative Groups of nodes in the Main View can help maintain a
visual structure for nodes and the teams and departments to which they
belong. This also makes it easier to control end point properties that need
to be common within a team or department, such as limiting the available
bandwidth for the group. See “Adding an Administrative Group” on page
59.
14 Emblaze-VCON MXM Administrator’s Guide
Page 31

2 Getting Started
8 Set up a videoconferencing software upgrade process that includes all or most
of the end points registered to the MXM (available for Emblaze-VCON vPoint,
VCB and the MXM Administrator application).
The software upgrade process enables you to place a new software version
on a server location and then either schedule an upgrade time or run the
upgrade program immediately for all the relevant end points. In this way,
you can make sure that all end points (of specific models) in the
organization are using the same and/or latest software. See Chapter 8,
“Remote Upgrade of Videoconferencing Devices Software.”
9 Prepare the MXM to provide gateway dialing services to ISDN connections for
the registered end points.
If gateways register with the MXM, you must set their MXM co nfigurations
and their services’ configurations in the Administrator application. Then,
you may define least-cost-gateway-dialing ru les in order to reduce your
organization’s call costs. See Chapter 9, “Registering Gateways” and
Chapter 10, “Least Cost Routing of Gateway Calls.”
10 Set up the MXM configurations for Multipoint Control Units (MCU) that
register with the MXM.
MCUs are used for connecting registered end points with a number of other
end points in a multipoint videoconference. MCU services are available
after the particular MCU is granted login permission to the MXM. See
Chapter 11, “Registering an MCU.”
Emblaze-VCON VCB provides multipoint conferencing and the expansion
of point-to-point IP videoconferences into ad-hoc multipoint
videoconferences. Set up the VCB services configurations, define VCB/
MCU services for use in ad-hoc sessions, and control the use of ad-hoc
session resources by creating ad-hoc service permission groups and
associating end points to them. See Chapter 12, “Setting Up Multipoint
Conferences Managed by a VCB.”
11 If your network includes an Accord
®
MGC™, set up its configurations to
provide gateway and MCU services to your MXM’s end points.
The MGC operates under a different configuration model than most other
MCUs being used in the videoconferencing sector. For detailed instructions
on setting up your MGC/MXM configurations, see Chapter 13, “Using
Polycom® MGC™ with the MXM.”
Emblaze-VCON MXM Administrator’s Guide 15
Page 32

2 Getting Started
12 If your organization has more than one network of videoconferencing users, set
up the MXM configurations for additional zones managed by other MXMs or
gatekeepers on your MXM Administrator application.
The configuration of additional zones enables end points registered in the
local MXM to engage in videoconferences with end points in these other
zones. You can set bandwidth allocation, enable inter-zone Call Details
Records (CDR) generation, and other inter-zone videoconferencing
management policies. See Chapter 14, “Neighboring Zones.”
13 Set up the MXM’s configuration in an Lightweight Directory Access Protocol
(LDAP) onl ine directory server.
By listing MXM registered users in an LDAP server, they will be able to
locate and call all other users listed in the same directory. The MXM
supports several LDAP server applications. See Chapter 15, “Registering
with LDAP Directories.”
14 If your organization includes Session Initiation Protocol (SIP) User Agents, set
up their configurations and manage communications among them and between
registered H.323 end points.
The MXM provides similar services to SIP and H.323 systems.
Administrators can initiate calls between two SIP user agents and between
a SIP user agent and an H.323 end point. The MXM provides gateway-like
services when connecting calls between H.323 and SIP networks. See
Chapter 16, “Managing SIP Networks.”
15 Set up a Cluster configuration to avoid interruptions of conferencing services
resulting from temporary server problems.
A Cluster configuration provides continuity of conferencing services in case
an MXM server goes down. The Emblaze-VCON Cluster application
eliminates the downtime that occurs during server hardware and software
interruptions. See Chapter 17, “Emblaze-VCON Cluster Module.”
16 Emblaze-VCON MXM Administrator’s Guide
Page 33

3A QUICK TOUR OF THE MXM
A
DMINISTRATOR
Your work with the MXM takes place inside the Administrator application, which
provides several elements and tools for performing the system management tasks.
In addition, the Administrator application provides various views and tables:
Main View
Node Status
Login Status
Event Log
LDAP Servers
Frontier Server Co ntains data about associated Frontier Servers. To
Displays a connected MXM and its registered nodes,
hunting groups, and templates. From this window, you
can view status, monitor activity, and configure
properties of these registered users.
Displays connection information about specific nodes
that you want to monitor.
Displays nodes that tried to register but were denied
login - you can monitor registration and login
procedures for nodes.
Displays information about system events and operating
conditions.
Displays information about the various online
directories in which this MXM lists its registered nodes.
enable registered end points to register and connect to a
Frontier Server, you must first list the Server's details in
the Frontier Server View
3.1 The Main View
Information about MXMs and their managed objects appears in the Main View.
These include:
• Connected MXMs
• Administrators and their privileges
• Registered nodes and services, including user numbers and addresses,
connection and call status
• Neighboring MXMs and Gatekeeper zones
• Software version indication for Emblaze-VCON vPoint end points and VCB
nodes.
In addition to displaying an MXM’s entire local and neighboring zones, viewing
filters are available for showing smaller subsets of the registered nodes.
Emblaze-VCON MXM Administrator’s Guide 17
Page 34

3 A Quick Tour of the MXM Administrator
The Administrator Application Main View
Connected MXMs
An Administrator may log in multiple MXMs. Each logged-in MXM is represented
in the Main View by an entry that has an expandable system tree. When this tree is
expanded, you can view nodes (such as Emblaze-VCON users, gateways, MCUs, and
other administrators) that have logged in to that particular MXM. In addition,
associated hunting groups, templates, and neighboring zones are shown in the
system tree.
The system tree also shows units that tried to register but were not accepted
automatically. In these cases, you have to grant login permission and set up the
units’ MXM properties.
For each MXM, the Administrator application stores property information such as
name/address, login settings, and various network settings (connection, timeouts,
bandwidth management, etc.). For more information, see Chapter 5, “Setting MXM
System Properties”.
18 Emblaze-VCON MXM Administrator’s Guide
Page 35

3 A Quick Tour of the MXM Administrator
Registered Nodes
The MXM supports the registration of Emblaze-VCON and other H.323 end points,
administrators, gatekeepers, gateways, MCUs, gateway services and MCU services.
In this Administrator’s Guide, registered nodes are also referred to as MXM nodes.
These nodes are visible when the system tree is expanded. For each of these items,
the Administrator application stores property information such as name/address,
bandwidth limits, online directory (LDAP) registration, and more.
Emblaze-VCON Group Systems with ISDN support
These are represented in the Main View by icons ( for HD5000,
for Falcon, for MediaConnect 9000) that display the status of the
ISDN connections. Green indicates that the ISDN line is connected. Red
indicates that the line is not connected.
Registered Administrators
Registered EmblazeVCON Users
VCB and its services
Registered Gateway
Neighboring Zones
Typical Main View
Displaying Call Status in the Main View
Emblaze-VCON MXM Administrator’s Guide 19
Page 36

3 A Quick Tour of the MXM Administrator
Neighboring MXMs and Gatekeeper Zones
If the local MXM is set to Open Mode for listing other MXMs and gatekeepers from
the connected network, the MXM lists them in the Main View after it detects them.
You can then set up the configurations for handling calls between each zone and the
local MXM.
Nodes from a known neighboring zone may also be listed under their associated
zone objects. In this way, neighboring nodes will be available for tasks such as call
initiation and bandwidth management.
For more information about se tting up and working with zones, see Chapter 14,
“Neighboring Zones.”
Software Upgrade Indication
The MXM Administrator application provides the ability to update software for
registered vPoint end points, Video Conference Bridge (VCB) end points, or the
MXM Administrator itself.
After an upgrade operation has been set up, an icon next to the relevant nodes
indicates if they require upgrade to the latest available version. After
successful installation of the latest version, the icon disappears.
20 Emblaze-VCON MXM Administrator’s Guide
Page 37

3 A Quick Tour of the MXM Administrator
Filtering the Main View
You can control the amount of information that appears in the Main View by
selecting filters according to the details that are important to you. You can set
filtering according to the following criteria:
• Entire System
• Systems Not Logged In
• Systems Logged In
• Systems In Call
• Systems with an outdated (software) version
³ To filter the main view
T In the Main View toolbar, open the Filter list and choose one of the options.
Main View Display Filters
Emblaze-VCON MXM Administrator’s Guide 21
Page 38

3 A Quick Tour of the MXM Administrator
3.2 The Node Status View
The Node Status View makes it easier to see the connection information only about
specific nodes instead of viewing the entire system tree. You can monitor the
following:
• End points
• Administrator nodes
• Gateways and services
• MCUs and services
• Neighboring zones
• Gatekeeper
• LDAP proxy
• SIP proxy.
Right-click the Node Name of the entry to open a shortcut menu that contain s
commands that relate to the selected item.
Node Status Table
3.3 The Login Status View
The Login Status View lists nodes that tried to register, but were not given login and
registration permission. This table makes it easier to monitor registration and login
procedures for specific nodes instead of viewing the entire system tree.
Login Status View
22 Emblaze-VCON MXM Administrator’s Guide
Page 39

3 A Quick Tour of the MXM Administrator
3.4 The Event Log
The Event Log displays information about system events and operating conditions.
You can refer to it for troubleshooting and isolating a problem.
The following illustration shows all the types of information (according to column)
that the Event Log provides. If you want to display only a few important details, you
can define filters that reduce the amount of displayed records according to various
criteria.
Event Log
3.5 LDAP Servers
The LDAP Servers View provides information about the MXM’s connection and
registration in an LDAP (Lightweight Directory Access Protocol) online directory.
The administrator may list the MXM and its registered nodes in any one of these
online directories.
LDAP Servers View
Emblaze-VCON MXM Administrator’s Guide 23
Page 40

3 A Quick Tour of the MXM Administrator
3.6 The Frontier Server View
Emblaze-VCON's Frontier Server allows your organization's personnel to engage in
videoconferences, yet still maintain your required level of security. The Frontier
Server applies secure firewall traversal, network address translation and encryption.
To enable registered end points to register and connect to a Frontier Server, you
must first list the Server's details in the Frontier Server View.
³ To add Frontier Server details
1 In the
2 In the table, enter the following information:
Description Name for the Frontier Server - it may be its alias or any
Server Address IP address of the Frontier Server.
Host Port Port used for communicating with the Frontier Server
Server URL The web page of the Frontier Server's User List, where
View
menu, point to
Servers View opens.
other arbitrary name.
unit configuration management.
the addition and deletion of nodes to the Server's
database takes place.
After being added to this table, this Server is available for selection in the
vPoint HD and HD5000
Views
and click
Frontier Servers View
Network>LAN
Properties.
Frontier Servers
. The Frontier
24 Emblaze-VCON MXM Administrator’s Guide
Page 41

4MANAGING THE MXM
This chapter provides instructions for organizing your MXM Administrator system
so that you can manage your organization’s videoconferencing network. The tasks
include:
T Setting Up Administrators
T Editing Nodes
T Status Monitoring
T Setting Up Templates
T Bandwidth Groups
T Adding Hunting Groups
T Adding an Administrative Group
T Adding a Short Dial Number
4.1 Setting Up Administrators
Adding an Administrator
At any time, you can register additional administrators to the MXM. Each
administrator must have an administration level (privileges) and a password.
In addition, you can change the privileges and other properties of the registered
administrators at any time.
³ To add an Administrator
1 Click the New Administrator button. The New Administrator
Properties dialog box appears.
2 Type the Administrator’s Name. Click Next.
Emblaze-VCON MXM Administrator’s Guide 25
Page 42

4 Managing the MXM
New Administrator - General
3 Enter the following privileges and security information:
Administration
Level
Defines the level of activity allowed for the selected
Administrator. The available options are:
T Monitor System - The Administrator may only
observe the Main View and the Node Status View,
and initiate videoconferences between known end
points.
T View System Properties - The Administrator
may only observe the Main View, the Node Status
View, view other nodes’ properties, and initiate
videoconferences between known end points.
T Super User - The Super User may change node
and system configurations, in addition to the
activities allowed for the other options.
Change
Password
In the New box, type a new password for the new
Administrator. In the Confirm box, type the new
password again.
26 Emblaze-VCON MXM Administrator’s Guide
Page 43

4 Managing the MXM
New Administrator - Administrator Properties
4 Click Finish to complete the setup. A new administrator appears in the
Main View under the Administrator icon.
Changing Administrator Properties
If necessary, you may change the properties of existing administrators.
³ To change an administrator node’s properties
1 In the Main View, expand the Administrator group to view a list of
Administrators.
2 Double-click an Administrator to open the Properties dialog box.
3 Change the appropriate properties. For a description of them, see “Adding
an Administrator” on page 25.
4 Click OK to complete the change. If you want to discard the change, click
Cancel.
Emblaze-VCON MXM Administrator’s Guide 27
Page 44

4 Managing the MXM
4.2 Editing Nodes
Adding Nodes
After a node connects to the MXM, it is added to the MXM’s databas e. The MXM
may automatically accept the registration attempt, require manual registration by
the administrator, or reject the attempt.
Granting Login Permission
To receive login requests, the MXM may be in Open Mode for certain types of nodes,
and/or in Closed Mode for all other nodes.
Open Mode Emblaze-VCON end points allows automatic login to
all Emblaze-VCON end points that register with the
MXM (Escort, Cruiser 150/384, ViGO,
MediaConnect 6000/8000, Falcon, VCON Conference
Bridge).
Non-Emblaze-VCON end points allows automatic
login to any non-Emblaze-VCON H.323
videoconferencing end point that registers.
MCUs allows automatic login to any MCU that registers.
Neighboring Gatekeepers (Zones) allows the MXM
to list any neighboring zones management device (MXM
or gatekeeper) that contacts it (see Chapter 14,
“Neighboring Zones.”).
SIP User Agents allo ws automatic lo gin to a ny SIP end
point that registers.
Closed Mode
The administrator can manually grant login permission
to nodes or reject them by ignoring their requests.
For nodes registering in Closed Mode (or nodes that cannot be registered
automatically, such as gateways), a Login Request entry appears on the system tree
in the Main View.
Login Request Indication
28 Emblaze-VCON MXM Administrator’s Guide
Page 45

4 Managing the MXM
³ To grant login permission
1 Expand the Login Request item.
2 Right-click the item name and then click Grant Login Permission.
A message appears, asking if you want to register the node now.
Node Registration Request
3 Click OK if you want to manually set the node’s properties, such as
directory number or call forwarding. The Add Wizard appears (for
definitions of the node properties, see “Setting End Point MXM Properties”
on page 91). The original property values are the default values defined in
the node type template (see “Setting Up Templates” on page 47).
If you click Cancel, the node will not log in, but remains under the Login
Requests object until you delete it (and the node stops trying to log in). See
the next section, “Deleting a Login Request”.
4 Change properties according to your specifications, or keep the default
settings. When you finish each page of the wizard, click Next.
5 When you finish the last page, click Finish.
The node is registered. It appears as an entry in an appropriately labelled
location of the system tree.
If the registering node is an Emblaze-VCON Personal system (MeetingPoint
4.5 or higher) or vPoint system, the login process does not continue
automatically after you click Finish. Instruct the node to log in again (user
must click Connect) in order to complete the registration.
Emblaze-VCON MXM Administrator’s Guide 29
Page 46

4 Managing the MXM
Deleting a Login Request
You may choose to reject any login requests that require you to grant permission
manually.
³ To delete a login request
T Right-click the Login Request i tem and then click Delete Login Request.
Click Yes to confirm.
If the node continues trying to register, ask the user to try logging in to
another gatekeeper or to operate stand-alone.
Setting a Node’s Properties
The MXM and all of its registered nodes have definable properties, or
characteristics, which define their functionality and operation. Setting up and
maintaining these properties is the key to efficient videoconferencing network
management. At any time, an Administrator with Super User privileges can change
propert ies of a registered node.
In addition, the videoconferencing configurations of vPoint HD, vPoint, HD2000/
3000/4000/5000, MeetingPoint 4.5 (and higher), and Falcon end points may also
be edited. See the appropriate appendix for the product you need to configure. For
®
MeetingPoint and Falcon end point properties configuration, see MeetingPoint
End Point Properties or Falcon™ End Point Properties from the MXM CD-ROM or
the Documentation>Manuals page of the Emblaze-VCON website.
³ To set a node’s properties
1 In the Main View, browse the system tree until you find the node that you
want to edit. If necessary, click a category’s plus sign to expand the tree and
display additional items.
2 Right-click the node, point to Property, and then click the specific
property type. The node’s Properties dialog box opens to the property type
that you clicked.
-orDouble-click the node. The node’s Properties dialog box opens to the
General tab.
30 Emblaze-VCON MXM Administrator’s Guide
Page 47

4 Managing the MXM
3 Change any appropriate properties.
If you want to continue to another property group, click that group’s tab. In
dialog boxes with many tabs, you may have to click the right or left arrow
on the tab row to access all of them.
4 Click OK to implement all the changes and close the dialog box.
Finding Nodes and Objects in the Administrator
The Find and Find Next utilities help you search for specific items in the MXM
Administrator. This feature is very useful if your enterprise’s network is large and
not all nodes are visible in the Administrator application window.
Find in Main View
In the Main View, you can search for any words, phrases or numbers in all of the
columns.
³ To find nodes and objects in the Main View
1 To search the whole system tree, click at the top of the Main View.
2 Click the Find button. The Find dialog box appears.
Find Dialog Box
3 In the Find What box, type a name and/or number.
4 If necessary, define additional search parameters:
Match whole
word only
Select this option to match only complete words or
phrases. For example, if you enter Gate, the search
ignores the word, “Gateway”.
If you want to find characters that may be part of a
longer word or part of a phrase, deselect this option.
Match exact
phrase
Select this option to match only complete phrases. For
example, if you enter Gateway Hunting Group, the
search ignores any items including only the word,
“Gateway”.
Emblaze-VCON MXM Administrator’s Guide 31
Page 48

4 Managing the MXM
Match case Select this option to match items whose capital ization is
identical to the item in the Find What box. For
example, if you enter GW, the search ignores any items
that include “gw” or “Gw”.
To find all matching items, regardless of capitalization,
deselect this option.
Find
backwards
5 Click Find Next. The first matching item in the Main View is selected. To
Select this option to search up the tree from the selected
location. To select down the tree, deselect this option.
search for more matching items, click Find Next again.
Finding an Item in the Main View
32 Emblaze-VCON MXM Administrator’s Guide
Page 49

4 Managing the MXM
Find in Other Views
In the MXM Administrator application’s other Views, you can search for the names
of entries. The search covers the first column of the table.
³ To find entries in other Views
1 Open the View in which you want to work.
2 Click the Find button. The Find dialog box appears.
Find Dialog Box
3 In the Find What box, type the name of the entry.
4 If necessary, define additional search parameters:
Match case Select this option to match items whose capitalization is
identical to the item in the Find What box. For
example, if you enter GW, the search ignores any items
that include “gw” or “Gw”.
To find all matching items, regardless of capitalization,
deselect this option.
Direction Select the direction from the selected entry to search in
the View, Up or Down.
5 Click Find Next. The first matching entry in the View is selected. To
search for more matching entries, click Find Next again.
Emblaze-VCON MXM Administrator’s Guide 33
Page 50

4 Managing the MXM
Editing Multiple Nodes
You can select more than one node at the same time and define certain properties
with identical values. If the selection of nodes contains more than one node type,
only the common properties among them may be changed. Other properties will be
unavailable.
³ To edit multiple nodes
1 Select the nodes that you want to change, using the standard Windows
object selection techniques:
— To select consecutive nodes, click the first node, press <Shift> and
click the last node in the series that you want.
— To select non-consecutive nodes, click the first node, hold down
<Ctrl> and click all the other nodes that you want.
2 Right-click one of the selected nodes, and then click Properties.
The Properties dialog box appears. Only common properties among the
selected nodes are available for change.
3 Change the appropriate properties. Remember that this change affects all
the selected nodes.
4 Click OK to complete the change.
Sample Properties Dialog Box - Multiple Nodes
34 Emblaze-VCON MXM Administrator’s Guide
Page 51

4 Managing the MXM
Changing Directory Numbers
All end points, services, hunting groups, and other registered items are assigned an
internal directory number (also called E.164 number). Any registered node can call
another registered item simply by dialing the destination’s directory number. This
number is usually only a few digits, and can be adopted from the node’s IP address,
telephone extension number, or randomly.
The administrator may change the directory numbers of one or a range of several
registered nodes.
³ To change the directory number of a single node
1 Double-click the node. The General tab of the node’s Properties dialog
box appears.
2 In the Directory Number box, type the new number. Press OK.
³ To change a range of directory numbers
1 In the Administrator window, find the nodes whose numbers you want to
change. If necessary, click a category’s plus sign to expand the tree and
display additional items.
Select the relevant nodes.
2 In the toolbar, click the Change Numbers button. The Change Number
Range dialog box appears. The title bar shows the number of nodes in the
selected range.
Changing Node Numbering
3 In the Start Numbering At box, type the new number for the start of th e
range.
Emblaze-VCON MXM Administrator’s Guide 35
Page 52

4 Managing the MXM
4 Select Ascending for the numbering range to go up from the number that
you typed (for example, 60, 61, 62, 63, ...). This new assignment affects the
numbers for all other selected nodes.
Select Descending for the numbering range to go down from the number
that you typed (for example, 63, 62, 61, 60, ...).
5 Click Update to implement the number change. On the Administrator
tree, the new numbers for the selected nodes appear. From this point, a
registered node must dial the new number to complete a call to the
respective node.
Deleting a Node
If a node is not relevant to the network anymore, you can delete it from the MXM.
³ To delete a node
T Click the node and then click the Delete button.
Click Ye s to confirm.
4.3 Status Monitoring
The Administrator application provides a number of views for monitoring the
operations of the MXM and its registered nodes:
• Main View
• Login Status View
• Node Status View
• Event Log.
Monitoring Nodes in the Main View
The Main View’s Connection State column (right side of table) provides status
information about the current activity of registered nodes. This column may display
nodes’ login status, or if nodes are currently in a videoconference and the amount of
bandwidth being used.
Indication of Nodes in a Videoconference
36 Emblaze-VCON MXM Administrator’s Guide
Page 53

4 Managing the MXM
Viewing the Login Status
Use the Login Status View to monitor registration and login procedures for nodes.
The table lists nodes that tried to register, but were not given login and registration
permission. This table makes it easier to see the login information only about
specific nodes instead of viewing the entire system tree.
³ To open the Login Status table
T Click the Login Status View butt on.
Login Status View
The Login Status table provides the following information:
Login Category The type of node that tried to register.
Network
Address
Alias Name of this node.
Login Name The node’s user name, as entered during the login
Login Status Describes what happened when the node last tried to log
Address of this node.
procedure. If the node cannot provide a user name to the
MXM, this space remains blank.
in to the MXM.
In the Login Status table, you can grant login permission by clicking the
node’s Login Status column and then selecting Login Permission Granted
(see the preceding figure). The node login process continues (see “Adding
Nodes” on page 28).
Emblaze-VCON MXM Administrator’s Guide 37
Page 54

4 Managing the MXM
Viewing the Node Status
The Node Status View makes it easier to see the connection information only about
specific nodes instead of the entire system tree. You can monitor the following:
• End points
• Gateways
• MCUs
• VCBs
• Neighboring Zones
³ To monitor nodes in the Node Status View
1 Click the Node Status View button. The Node Status View appears.
2 In the main Administrator window, select any number of nodes.
3 Drag the nodes into the Node Status View window. The information about
the selected nodes appears in the table.
Node Status Table
MXMs Displayed in Node Status Table
4 To go back to the Main Administrator View, click the Administrator tab
at the bottom of the window.
38 Emblaze-VCON MXM Administrator’s Guide
Page 55

4 Managing the MXM
Multiple Node Status Tables
You can make more than one Node Status Table to view different groups of nodes.
³ To create a new Node Status table
1 At the bottom of the Node Status View, click the Add New Tab button.
2 Double-click the tab name.
3 Press the <Delete> key as many times as required until the default name is
deleted.
4 Type a new tab name and press <Enter>.
³ To delete a Node Status table
1 Click the tab of the table.
2 At the bottom of the Node Status View, click the Remove Tab button.
The tab is deleted.
Node Status Table Information
The Node Status View provides the following information:
Server Name Name of the MXM in which the node is registered.
Applicable if more than one MXM is connected.
Server Address IP address of the MXM in which the node is registered.
Applicable if more than one MXM is connected.
Node Name Name for the node - it may be the node’s alias or any
other arbitrary name.
Node Number MXM directory number of the node.
Status Connection status as indicated by icon.
Direction Applicable to ISDN calls. Indicates if the node initiated
(Outgoing) or received the call (Incoming).
Connection
State
Bandwidth Amount of bandwidth that is consumed by the node
Describes the current connection or activity status of the
node. For example, this column may indicate that a node
is currently in a videoconference.
during the current call. If the node (such as an MCU) is
engaged in more than one session, both total and persession bandwidths appear.
Emblaze-VCON MXM Administrator’s Guide 39
Page 56

4 Managing the MXM
Audio Codec If the node is in a call, this column indicates the audio
transmission standard being used.
Video Codec If the node is in a call, this column indicates the video
transmission standard being used.
T.120 Data sharing specification that lets users share
documents and applicants during an H.323
videoconference.
MLP Multilayer Protocol. T.120 must use the MLP or HMLP
channel for transmitting data. MLP data and audio can
only be placed in the first 64 kbps channel of a
connection.
HMLP High-speed Multilayer Protocol. T.120 systems use this
standard for high-speed data transmission. HMLP
channels a re multiples of 64 kbps.
LSD Low Speed Data. During ISDN calls, this describes the
transmission of video, audio and data in a single 64 Kbps
channel.
40 Emblaze-VCON MXM Administrator’s Guide
Page 57

4 Managing the MXM
Event Log Monitoring
The Event Log displays information about system events and operating conditions.
You can view all network events during a time period, events involving a specific
node, specific types of events, events of a certain severity level, and more. Refer to it
if you need to troubleshoot and to isolate a problem.
³ To view the Event Log for the MXM
1 Click the Event Log button.
Event Log View
2 To see events that occurred before those in the table, click the Prior
Events button.
To see events that occurred after those in the table, click the Next
Events button.
To update the table and display new events, click the Refresh button.
³ To view the Event Log for a specific node
1 Right-click the node and then click View Events.
2 The Event Log opens for the specific node only.
Emblaze-VCON MXM Administrator’s Guide 41
Page 58

4 Managing the MXM
Changing Record-Keeping Periods
From the Event Log View, you can change the periods of time that the MXM keeps
records of specific types of events.
³ To change the record-keeping period
1 In the Event Log View, click the Event Log Settings button. The MXM’s
Event Log properties tab appears.
2 Change the appropriate record-keeping periods (see “Event Log” on page
88).
Event Log Information
The Event Log provides the following information:
Handled Indication if the event no longer needs administrator
attention.
Name Name of the node associated with the event.
Severity Classification of the type of event that occurred. This can
determine the level of attention that’s required from the
administrator.
Date/Time Date and time that the event occurred.
Application
Type
Network
Address
Error Code Indication of the type of error or event.
Details Description of the event.
Type of node or group in which the event occurred.
IP address of the node or group shown in the Application
Type column.
42 Emblaze-VCON MXM Administrator’s Guide
Page 59

4 Managing the MXM
Filtering the Event Log
You can control the level of information that appears in the Event Log by defining
filters according to the details that are important to you. You can set filtering
according to all or any combination of the following criteria:
• Severity level
• Application (node type)
• Handled/unhandled events
• Number of displayed records
• Date and time
• IP Address range
• Error code
• Event description.
Filtering the Event Log
Emblaze-VCON MXM Administrator’s Guide 43
Page 60

4 Managing the MXM
³ To set Event Log view filters
1 In the Event Log, click the Filter button. The Filter Records dialog box
appears.
2 Define the particular filters according to the specific criteria that you
require for reducing the possible accounts that you want to check (for
definitions of the categories, see “Filtering Criteria” on page 45).
3 Click OK.
³ To save a filter for future use
1 In the Event Log, click Create New.
2 In the Create New Filter dialog box, type a name for the new filter scheme.
3 Click OK.
Saving a Filter Scheme
The scheme name now appears in the Scheme list.
To delete a scheme, select it from the Scheme list and click Delete.
44 Emblaze-VCON MXM Administrator’s Guide
Page 61

4 Managing the MXM
Filtering Criteria
This section provides explanations for the various Event Log filtering categories (for
definitions of the categories, see “Event Log Information” on page 42):
Severity Set the log to display only certain types of events which
affect the network’s functioning.
Application
Type
Show Handled
Events
Query Size
Time Set the log to display only records within a specific time
Set the log to display only events that occur in specific
types of nodes.
Select Show All Types to include all node types in the
Event Log.
Show events that are defined as handled (or fixed) or
unhandled or both. This category helps you indicate if
events no longer need administrator attention.
Set the log to display a maximum number of records on
the screen. If the log contains more than this number of
records, you can click Prior Events and/or Next
Events to display them.
range. Select one of the following options:
T Any time
T Up to 60 days before the current day
T A time range according to the following criteria:
After, Before, Between, On or after, On or
before a specific date and time.
If you select Between, you have to set an earliest and latest time limit.
Setting a Time Range Filter
Emblaze-VCON MXM Administrator’s Guide 45
Page 62

4 Managing the MXM
Time (cont.) To specify the time limit, click the large down arrow
to open a calendar in which you can browse and
choose an exact date and year.
In addition, you can select one-by-one the date,
month, year, hour, minute, and/or AM/PM. Then,
click the small up or down arrows until the value
that you want appears.
Application
Network
Address
Error Code
Description Set the log to display only records whose Details
Filters the event log to display events only from nodes
whose IP addresses meet the criterion defined here.
In the adjacent box, type the address range that fits the
phrase selected from the list.
For example, clicking Begins with and then typing
100.100.100. will display records for accounts whose
IP address is in the range greater than 100.100.100.0.
Indicates the type of error or event that occurred.
contains, does not contain, ends or begins with (and
other criteria) a specific text string.
46 Emblaze-VCON MXM Administrator’s Guide
Page 63

4 Managing the MXM
4.4 Setting Up Templates
When you manually grant permission to a new node to register, or if you add a new
service, you have to confirm or change the item’s properties before the item is added
to the MXM’s tree and database. The original default properties were set at
Emblaze-VCON’s production facility.
An administrator with Super User privileges may change various default proper ties
by setting up a template. A template includes the characteristic properties for a type
of node or service. Any newly created item in the system will initially have the
default properties defined in the template.
Any changes to a template only affect new nodes that you create afterwards - they do
not affect existing nodes.
Editing a Template
Templates are provided for the following items. For explanations about a template’s
properties, see the referred section. Other referred guides may be found on the
MXM CD and the Documentation>Manuals page of the Emblaze-VCON website.
T Accord Gateway — See pages 228 to 232.
T Accord Meeting Room — See pages 212 to 215.
T Ad-hoc Permission Group — See pages 164 to 166.
T ALG Proxy Server — See the SecureConnect Getting Started Guide.
T Desktop systems — See pages 91 to 106 and the MeetingPoint
Properties Guide.
T Emblaze-VCON VCB — See pages 173 to 178.
T Falcon — See pages 91 to 106 and the Falcon End Point Properties Guide.
T Gateway — See pages 132 to 138.
T Gateway Service — See pages 139 to 140.
T Gateway Service Hunting Group — See page 141 to 142.
T H.323 (non-Emblaze-VCON) End Point — See pages 91 to 106.
T HD3000 — See pages 91 to 106 and App. C.
T HD5000 — See pages 91 to 106 and App. D.
T Hunting Group — See pages 53 to 58.
T MCU — See pages 151 to 155.
T MCU Permission Group — See pages 160 to 162.
T MCU Service — See pages 155 to 159.
®
End Point
Emblaze-VCON MXM Administrator’s Guide 47
Page 64

4 Managing the MXM
T MediaConnect 6000 — See pages 91 to 106.
T Permanent Non-registered Device — See pages 91 to 106.
T Short Dial — See pages 61 to 62.
T SIP User Agent — See pages 91 to 106.
T VCB Service — See pages 179 to 198.
T vPoint systems — See pages 91 to 106 and App. B
T vPoint HD systems — See pages 91 to 106 and App. A
T Zones (neighboring) — See pages 236 to 248.
³ To edit a template
1 In the Main view, expand the Templates group to display all available
templates.
List of Templates
48 Emblaze-VCON MXM Administrator’s Guide
Page 65

4 Managing the MXM
2 Right-click a template, and then click Properties.
The Properties dialog box appears.
3 Change the appropriate properties (see the list on the previous page for the
locations of the relevant properties explanations). If applicable, click on
other tabs in the dialog box to change more properties.
4 Click OK to complete the change. If you want to discard the change, click
Cancel.
4.5 Bandwidth Groups
Bandwidth groups enable administrators to control usage of bandwidth among a
select group of nodes who belong within a specified IP address range. An aggregate
amount of bandwidth is made available to all nodes within a group at a single time.
If enough bandwidth is available (within the aggregate), the MXM allows any node
in the group to make a call. If there is not enough bandwidth remaining, the MXM
does not allow any group member's calls to connect, unless enough bandwidth
becomes available again.
Every registered node, except neighboring zones, automatically belongs to the
bandwidth group which matches its IP address. A system-generated group,
"Endpoints Without BW Group," is intended for nodes which do not meet the
address specifications of the bandwidth groups that you create.
After you create a bandwidth group, it appears under the "Bandwidth Groups"
object in the Main View. Nodes whose IP address falls within the defined range are
placed in the appropriate group.
1 A node may belong to only one bandwidth group.
2 A bandwidth group may be a child of another bandwidth group.
3 You may force a node into a bandwidth group other than its "natural,"
address-determined group by using the Pin to Bandwidth Group
command.
4 Multicast calls are not included in the bandwidth group summations.
5 Running the Delete command on a node under a bandwidth group object
deletes the node and all its details from the MXM's database.
The illustration below shows an example of bandwidth groups.
Emblaze-VCON MXM Administrator’s Guide 49
Page 66

4 Managing the MXM
Bandwidth Groups in Main View
³ To cre a t e a Ba n d widt h G rou p
1 In the Main View, right-click the Bandwidth Group object and then click
New Group
2 Define the properties (IP address range for nodes, bandwidth limits)
according to your requirements (see ). Click
the wizard.
3 Click
General Properties
In the General page, give an identity to the bandwidth group. This name appears in
the Main View under the Bandwidth Groups object.
. The New Bandwidth Group wizard opens.
Finish
to add the entry to the Main View.
Next
to go to the next page in
Bandwidth Group - General Properties
50 Emblaze-VCON MXM Administrator’s Guide
Page 67

4 Managing the MXM
Network Settings Properties
In the Network Settings page, define the permitted IP address ranges for the nodes
belonging to this specific bandwidth group.
Bandwidth Group - Network Settings Properties
³ To define the IP address range
1 Click
2 Add the following:
Network
Address
Subnet Mask The subnet mask, helping to identify the available IP
3 Add as many rows as your network requires.
4 To test whether a specific node is within a defined range, enter its IP
Start Address The minimum IP address of the defined range.
End Address The maximum IP address of the defined range.
In Range If the tested address is within the defined range, a
Emblaze-VCON MXM Administrator’s Guide 51
Add Network
address in the Test Address range. Click
following information appears:
. A new row in the Network Settings table appears.
Define the host ID range for nodes in this group.
address range.
checkmark appears next to
Test
. In the Test Settings area, the
In Range
.
Page 68

4 Managing the MXM
Bandwidth Settings
In the Bandwidth Settings page, define the total bandwidth available to this
bandwidth group at a single time.
Bandwidth Group - Bandwidth Settings Properties
In the Bandwidth Settings, define the following information:
Maximum
Internal
Maximum
External
Per Call Maximum bandwidth allowed during a single call.
Used Internal/
External Rx/Tx
The total bandwidth available, at a single time, for calls
among nodes of this group.
The total bandwidth available, at a single time, for calls
between nodes of this group and nodes outside of this
group.
Shows the amount of bandwidth being used at the
current time by all the nodes of this group.
52 Emblaze-VCON MXM Administrator’s Guide
Page 69

4 Managing the MXM
Pinning a Node to a Bandwidth Group
Every node registered to the MXM automatically belongs to a bandwidth group
which is associated with the node's IP address. If you want to force a node to belong
to a different bandwidth, you can use the Pin To Bandwidth Group command to
accomplish this.
³ To create a bandwidth group
T In the Main View, right-click the node, point to
Group
, and then choose the target group. The node then appears under the
target group under the Bandwi dth Group object.
If you choose
node into the bandwidth group matching its IP address.
Return To Default Group
, the MXM automatically places the
Pin into Bandwidth
4.6 Adding Hunting Groups
A hunting group includes a series of nodes that may be grouped together within an
organization for a variety of reasons, but may be reached through one common
number. When the common number is dialed, the MXM searches for a free node.
For example, if the first node is busy, the system tries to contact the next node, and
so on. If all nodes are engaged, the MXM rejects the call.
The most important characteristic of a hunting group is the order in which calls are
routed to members of the group. When you create a hunting group, you can
determine the “hunting” order and method (see “Hunting Group Properties” on
page 56).
Gateway Service hunting groups operate under a similar principle. You can set the
order in which gateway services are requested when the hunting group’s access
number is dialed (see “Gateway Service Hunting Groups” on page 141).
³ To create a hunting group
1 Click the New Hunting Group button. The New Hunting Group
Properties wizard opens.
2 Change properties according to your hunting group requirements. To move
to the next properties page, click Next. For explanations about the various
properties, see pages 54 to 58.
3 Click Finish. In the Main View, the new hunting group appears under the
Hunting Group object.
Emblaze-VCON MXM Administrator’s Guide 53
Page 70

4 Managing the MXM
General Properties
The General page appears when you open the Hunting Group wizard. It contains
identity information about the hunting group.
Hunting Group - General Properties
Set the following General Properties:
Directory
Number
Description Description or name for the group. This name appears in
The number to be dialed in order to call this hunting
group.
the Main View under the Hunting Groups object.
54 Emblaze-VCON MXM Administrator’s Guide
Page 71

4 Managing the MXM
Call Forwarding Properties
In the Hunting Group Properties Call Forwarding page, set an alternate
destination for the MXM to route calls.
Hunting Group - Call Forwarding Properties
No Response
When this
group is not
responding,
dial this
number
Set an alternate destination for a call if none of th e group
members answers after a specified time. From the list,
select the alternate destination.
Emblaze-VCON MXM Administrator’s Guide 55
Page 72

4 Managing the MXM
Hunting Group Properties
In the Hunting Group Properties page, you can set the default hunting method,
place specific nodes in the hunting group, and set the preferred order of hunting.
Hunting Group Properties
Set hunting group properties as follows:
Calling Rule Default “hunting” method
Least Recently Called - Calls are routed first to the
node which has not received a call in the longest time.
Circular - Calls are routed first to the node in the
hunting group list that follows the last node that was
called.
Fixed Order - The search starts at the first node in the
hunting group list, then the second node, third node, and
so on, until a free node is found.
Simultaneous - Simultaneous calls go to every
member of the hunting group. Upon the first acceptance
of a call, all the other calls disconnect.
Description/
Number
Select the nodes that will belong to this hunting group.
— To place all nodes in the hunting group, click
Select All.
— To clear all the selections, click Clear All.
56 Emblaze-VCON MXM Administrator’s Guide
Page 73

4 Managing the MXM
Setting the Hunting Order
In the New Hunting Group Properties dialog box, selected nodes are automatically
placed in the top part of the list. You can then move them to different places in the
hunting order. Their locations in the list, together with the Calling Rules setting,
determines the hunting order.
³ To set the hunting order of the selected nodes
1 Click the name (not the checkbox) of a selected node. To move the node up
and down the list to its designated place, click Move Up or Move Down
as many times as necessary.
Repeat this step for as many nodes as necessary.
2 Click OK to implement the settings and close the dialog box.
Emblaze-VCON MXM Administrator’s Guide 57
Page 74

4 Managing the MXM
Hunting Group LDAP Properties
In the LDAP page, you can define the hunting group’s registration, if applicable, in
an LDAP (Lightweight Directory Access Protocol) server.
Hunting Group - LDAP Properties
List node in the
following LDAP
servers
Select LDAP servers that can contain the subdirectory in
which the hunting group should be listed. Hunting
groups may be registered in all LDAP servers in which
the MXM is registered.
If the hunting group has been previously registered in an
LDAP server, its entry name or number (node entry)
appears in the list.
— To be listed in all LDAP servers (depending on
MXM registration in them), click Select All.
— To clear all the selections, click Clear All.
Additional ID Properties
In addition to its directory (E.164) number, a hunting group may have other
addresses that may be used to dial it, such as additional E.164 addresses and/or
H.323 ID. In the Additional ID page, you may enter these, if applicable. For
example, the Description entered in the General page will appear as an
Additional ID as an H.323 ID.
For more information about adding Additional IDs, see “Additional IDs” on page
106.
58 Emblaze-VCON MXM Administrator’s Guide
Page 75

4 Managing the MXM
4.7 Adding an Administrative Group
You can create Administrative Groups of nodes that reflect the needs of the
enterprise’s organization. Administrative groups in the Main View can help
maintain a visual structure for nodes and the teams and departments to which they
belong. This also makes it easier to set common end point properties within a team
or department, such as limiting the available bandwidth for the group.
For example, you can create groups for Management, Sales, Finance, R&D, or others
and place end points accordingly.
³ To cr e a te an a dmin i s tra t i ve gr o up
1 Click the New Administrative Group button. The New Group wizard
appears.
New Administrative Group Properties
2 In the Description box, type a name for the group and click Finish. This
name will appear on the system tree.
3 To create more groups, repeat steps 1 and 2.
4 To see the created groups in the Main View, expand the Groups object.
You can also add administrative subgroups as branches under other created
groups. To do this, select an existing administrative group before clicking the
Add Administrative Group button.
Emblaze-VCON MXM Administrator’s Guide 59
Page 76

4 Managing the MXM
³ To place nodes into an administrative group
1 In the Main View, select one or more nodes.
2 Drag the nodes to the administrative group.
Sample Administrative Group
Changing Group Member Properties
Administrative groups make it easier to control end point properties that need to be
common within a team or department, such as limiting the available bandwidth for
the members of a group.
³ To change common properties for all group members
1 Right-click the group name, point to Member Property, and click the
specific property type.
A Properties dialog box for all group members opens to the property type
that you clicked. Common properties among the group members are
available for change.
2 Change the appropriate properties. Remember that this change affects all
the group members.
3 Click OK to complete the change. If you want to discard the change, click
Cancel.
60 Emblaze-VCON MXM Administrator’s Guide
Page 77

4 Managing the MXM
4.8 Adding a Short Dial Number
A Short Dial Number is a number, that when dialed, is routed to another specific
registered user. It ideally is used as an easy-to-remember number intended to dial
an ISDN number through a gateway, o r reach a depa rtment or a l ocation instead o f a
specific user.
For example, you can set up a Short D i al Number, “490”, that automatically dials
“90017185557890” through a gateway.
³ To add a Short Dial number
1 In the Main View’s toolbar, click the New Short Dial button. The New
Short Dial Wizard appears.
2 Change properties according to your short dial requirements. To move to
the next properties page, click Next. For explanations about the various
properties, see the following subsections.
3 Click Finish. In the Main View, the new Short Dial entry appears under
the Short Dial Numbers object.
General Properties
The General page appears when you open the New Short Dial wizard. It contains
identity information about the entry.
Short Dial - General Properties
Emblaze-VCON MXM Administrator’s Guide 61
Page 78

4 Managing the MXM
Set the following General Properties:
Directory
Number
Description Description or name for the entry. This name appears in
The number to be dialed in order to call the user that this
entry represents.
the Main View under the Short Dial Numbers object.
Call Forwarding Properties
In the Call Forwarding tab, select the user who will receive any videoconference
calls dialed to the Short Dial number.
Short Dial - Call Forwarding Properties
LDAP Properties
The LDAP tab provides information about the Short Dial number’s registration, if
applicable, in an LDAP (Lightweight Directory Access Protocol) server. For
information about nodes’ LDAP Properties, see “LDAP” on page 104.
Additional ID Properties
In addition to its directory (E.164) number, a Short Dial number may have other
addresses that may be used to dial it, such as additional E.164 addresses and/or
H.323 Alias. In the Additional ID page, you may enter these, if applicable. For
more information about adding Additional IDs, see “Additional IDs” on page 106.
62 Emblaze-VCON MXM Administrator’s Guide
Page 79

5SETTING MXM SYSTEM
P
ROPERTIES
MXM servers have system properties that define their operation. In the MXM
Properties dialog box, the properties are divided into various categories:
MXM Connection, System Information, Dial Plan, LDAP
Settings
See page 64.
Call Control System Bandwidth Control, Call Settings, Ad-hoc
Resources
See page 72.
ISDN Call
Routing
Security Security Mode, License, Non-registered Devices
H.323 & SIP Zone Settings, Advanced Settings
Reporting Billing, Event Log
³ To define MXM Server system properties
1 In the Administrator window, right-click the MXM no de at the to p, point to
Property (opening another menu), and click the specific property type.
-or-
System Location, Dialing Prefixes
See page 77.
See page 79.
See page 84.
See page 87.
Click the MXM node and then click the Display Properties button.
2 In the Properties dialog box, change properties according to the system’s
specifications. To set different types of system properties, click the
appropriate category icon on the left side of the dialog box, and then click
the tab at the top of the dialog box. For explanations about the various
properties, see the above list for their locations.
3 To implement the change and proceed to another set of MXM properties,
click Apply and then the appropriate category icon and tab.
4 To implement all the changes and close the dialog box, click OK.
Emblaze-VCON MXM Administrator’s Guide 63
Page 80

5 Setting MXM System Properties
5.1 MXM Properties
In the MXM system Properties dialog box, click the MXM icon to access the
following property pages:
T Connection
T System Info
T Dial Plan
T LDAP Settings
Connection
The Connection tab contains information about the MXM Administrator
application’s connection to the MXM.
MXM Connection Properties
64 Emblaze-VCON MXM Administrator’s Guide
Page 81

5 Setting MXM System Properties
Set the connection properties as follows:
Automatically
Connect at
Administrator
Startup
MXM Address IP address or DNS name of the MXM.
Port TCP/IP port number. Automatically provided by the
Connection
State
Login
User The administrator name.
Level Level of administration privileges permitted to the User.
Status Current state of the login attempt.
Clicking Advanced displays the following properties:
Select t his option if you want to connect to this MXM
automatically whenever you start the Administrator
application.
system.
Informs you if the MXM Administrator application is
connected and available for management, trying to
connect, or not trying to connect to the MXM.
Provides information about the current login state:
Network Connection
Check if MXM
is online
Message
Acknowledge
Timeout
Select if you want the Administrator application to
periodically check that the MXM is still connected, when
there is no traffic over the connection.
Next to that property, select the number of seconds
between checks if there is no activity over the
connection.
Select the number of seconds that the Administrator
application waits to receive an update response from the
MXM. After this interval, a message s tates th at the MXM
did not respond.
Emblaze-VCON MXM Administrator’s Guide 65
Page 82

5 Setting MXM System Properties
System Info
The System Info tab provides information about the current MXM version.
Provide this information if you contact Emblaze-VCON’s Technical Support.
MXM System Information
System Name The identifying name for the MXM. This name does not
affect the operation of the system.
Build Number The number and date of the MXM software version.
MXM Running
Since
Operating
System
Memory Shows the MXM server’s host computer’s memory usage
Date and time when the MXM started operating.
Operating system and version of the MXM server’s host.
at the time of the program’s startup, written in the
following syntax:
a/b - c
where:
a = amount of memory in use (MB).
b = total memory in the computer (MB).
c = percentage of memory which is free.
CPU
Information
66 Emblaze-VCON MXM Administrator’s Guide
Decscription of the MXM server’s host computer’s
processor.
Page 83

5 Setting MXM System Properties
Dial Plan
In the Dial Plan tab, define how the MXM assigns directory numbers (E.164-type)
to registered end points and other nodes. Entering directory numbers are a
convenient way for registered users to dial other nodes.
This tab also includes the names of the supplemental exchange functions and the
default Telephony User Interface (TUI) numbers that the end point may dial to
activate each of them. You may change the number for any of the functions.
For more information about how end points use exchange functions, see the MXM’s
Online Help’s Telephony Exchange Functions topics.
Dial Plan Properties
Set directory numbering as following:
Node
numbering
(E.164) starts
at
Emblaze-VCON MXM Administrator’s Guide 67
This number is the starting point for assigning directory
numbers to registering nodes. You can provide for two,
three, four, etc. digits for numbering nodes.
For example, if this number is “700”, new nodes will
receive the first 3-digit number available between 700
and 999. To increase the numbering capacity (according
to the license key code’s specification), you can specify a
larger 3-digit range or add a fourth digit.
Page 84

5 Setting MXM System Properties
End Points’ E.164 Numbering Request
If not used,
accept
requested
number
Select to grant any E.164 number requests, if available,
by registering end points.
If deselected, the MXM assigns directory numbers only
according to the Node numbering definition above, and
rejects all user E.164 numbering requests.
If already used
Assign new
number
Reject login
request
The Exchange Functions table lists the available functions and their corresponding
TUI numbers.
Select to accept the login request, but to assign a
directory number according to the Node numbering
definition above.
Select to reject the login request if the specified E.164
number is already assigned to another node.
³ To change the TUI number of an exchange function
T Click in the Number column of the entry that you want to change.
Delete the previous number and type a new number.
To replace other numbers, repeat this step as many times as necessary.
vPoint HD, vPoint, HD5000/4000, HD3000/2000, Falcon, and
MeetingPoint 4.6 provide access to the various exchange functions (call
pickup, forwarding, invite and transfer) from their interfaces.
The available functions are:
Video Gateway
Service
Audio Gateway
Service
Pickup
68 Emblaze-VCON MXM Administrator’s Guide
For starting an ISDN videoconference over a gateway.
The end point must enter this number, followed by the
ISDN channel numbers, and then click Dial.
The default value is 9.
For starting an ISDN audio conference over a gateway.
The end point must enter this number, followed by the
ISDN channel numbers, and then click Dial.
The default value is *9.
For picking up a call that’s intended for any destination
for which the end point has pickup permission. The end
point enters this number and then clicks Dial.
The default value is *17.
Page 85

5 Setting MXM System Properties
Specific Pickup
TUI Busy
Forward
TUI No Answer
Forward
TUI
Unconditional
Forward
Ad-hoc
Conference
Transfer
For picking up a call that's intended for a specific
destination (for which the end point has pickup
permission). The end point enters this number, followed
by the directory number of the destination end point,
and then clicks Dial.
The default value is *19.
If the end point is busy in a videoconference, the MXM
forwards all incoming calls for it to an alternate
destination. To activate, the end point enters this
number, followed by the directory number of the
alternate destination, and then clicks Dial.
The default value is *71.
If the end point does not answer, the MXM forwards a
call to an alternate destination. To activate, the end
point enters this number, followed by the directory
number of the alternate destination, and then clicks
Dial.
The default value is *70.
The MXM forwards ALL calls intended for the end point
to an alternate destination. To activa te, the end point
enters this number, followed by the directory number of
the alternate destination, and then clicks Dial.
The default value is *72.
For inviting additional users to an open point-to-point
videoconference. The end point enters this number,
followed by the directory number of the target end point,
and then clicks Dial.
The default value is *77.
For transferring an open videoconference to another end
point (and disconnecting from the transferring end
point). The transferring end point enters this number,
followed by the directory number of the target end point,
and then clicks Dial.
The default value is *45.
Emblaze-VCON MXM Administrator’s Guide 69
Page 86

5 Setting MXM System Properties
LDAP Settings
In the LDAP Settings tab, enable the MXM to periodically update its registered
users in connected LDAP (Lightweight Directory Access Protocol) online directories.
For more information about L DAP, see Chapter 15, “Registering with LDAP
Directories.”
LDAP Settings Properties
Set LDAP Settings as follows:
Enable Update
of LDAP
Servers
Prefix E.164
numbers with
local zone
number
Select to enable the MXM to update its registered users
information in the LDAP directories.
If neighboring zones are included in your online
directories, select this option to append zone numbers to
the directory numbers of all listed nodes.
70 Emblaze-VCON MXM Administrator’s Guide
Page 87

5 Setting MXM System Properties
Proxy Pending Messages
If no communication was received from the LDAP directory after a certain
interval, the MXM asks the LDAP Proxy server if its directory list (for the
MXM registered users) requires updating.
Trigger Time Enter the interval between update request messages sent
by the MXM to the LDAP Proxy server.
Time to Live Enter the interval for discarding an update request
message that is not received by the LDAP Proxy server.
LDAP Servers
View
If you update the MXM’s LDAP settings, you must also update the same
configuration settings in the LDAP server (see Chapter 15, “Registering with
LDAP Directories”).
For information about the available L DAP servers, click
this link. The LDAP Servers table appears, displaying
location and access information about the available
servers.
Emblaze-VCON MXM Administrator’s Guide 71
Page 88

5 Setting MXM System Properties
5.2 Call Control Properties
In the MXM system Properties dialog box, click the Call Control icon to access the
following property pages:
T Bandwidth Control T Call Settings
T Ad-hoc Resources T Number Manipulation
Bandwidth Control
In the Bandwidth Control tab, define how the MXM manages the available
bandwidth within its zone.
Local MXM’s Bandwidth Control Properties
Set bandwidth control properties as follows
Network
Bandwidth
Limit total
bandwidth of
MXM calls
Limit
maximum
number of calls
to
72 Emblaze-VCON MXM Administrator’s Guide
Total amount of bandwidth available to the LAN.
Select to define the percentage of total network
bandwidth to be allocated for calls managed by the
MXM.
Select to define the maximum number of conferences
managed by this MXM, that can carry on at the same
time. The amount of open conferences cannot exceed the
bandwidth limit defined above.
Page 89

5 Setting MXM System Properties
Call Settings
The Call Settings tab includes properties defining call connection throughout the
videoconferencing network.
Call Settings Properties
Set Call Settings properties as follows:
Ad-hoc Conference
Revert to pointto-point call
when 2 parties
remain
Wait __
seconds before
reverting to
point-to-point
Select to return to a point-to-point call when only two
parties remain in an ad-hoc videoconference.
After a third party disconnects, the videoconference will
revert to a point-to-point session after this interval.
Maximum Call Redirections
___ redirections Select the maximum number of times that a call can be
forwarded sequentially to other nodes before the call is
cancelled.
Unlimited Select to allow calls to be forwarded to as many
destinations as necessary until they are answered.
Emblaze-VCON MXM Administrator’s Guide 73
Page 90

5 Setting MXM System Properties
Ad-hoc Resources
The Ad-hoc Resources table contains a list of MCU and VCB services registered with
the MXM, together with the MCU or VCB with which they are associated. Select the
services that the MXM may use to initiate an ad-hoc videoconference.
Available Ad-hoc Resources
74 Emblaze-VCON MXM Administrator’s Guide
Page 91

5 Setting MXM System Properties
Number Manipulation
Number manipulation is a set of rules for t ranslating blocks of dialed digits and/or
characters into other formats, such as a gateway prefix or an area code, which
enables the MXM to send the call towards its destination.
When a user dials a string covered by any of the rules, the program identifies the
dialed digits/characters, and uses regular expressions to convert them into a target
string which complies with standard dialing convention.
For more information about w orking with regul ar expr essions, please go to
the following sites:
• www.snapfiles.com/get/regexcoach.html
• www.weitz.de/regex-coach/
Rules for Number Manipulation
Emblaze-VCON MXM Administrator’s Guide 75
Page 92

5 Setting MXM System Properties
³ To enter number manipulation rules
1 In the Main View, click the MXM node at the top and then click the
Display Properties button.
2 In the Properties dialog box, click the Call Control icon and scroll to the
Number Manipulation tab.
3 In the Rule Name box, enter a name for the set of rules.
4 In the table's Regex column, type the expressions which need a translation
rule.
5 In the Replace column, type the resulting target string for the translation.
³ To test the application of the rules on a dialing number
string
1 In the Test Number box, type the string you want to dial.
2 Click Test.
In the table, the Test Number appears in the Input column and the
resulting dialed number appears in the Output column for all the rules.
Examples
Convert Regex Replace Dialing
International calls
starting with a "+" sign
to standard dialing
convention ("0001")
Calls for a specific
country into local calls
Converting internal
calls into 5-digit PBX
calls
Blocking calls to a
particular prefix
\+ 0001 +44660994103 converts to
000144660994103.
\+44 00044 +44660994103 converts to
00044660994103.
001410 00141041050 converts to
41050.
\0089.* 00899876543 fails to
connect.
76 Emblaze-VCON MXM Administrator’s Guide
Page 93

5 Setting MXM System Properties
5.3 ISDN Call Routing Properties
In the MXM system Properties dialog box, click the ISDN Call Routing icon to
access the following property pages:
T System Location
T Dialing Prefixes
System Location
In the System Location tab, enter the country and area code in which the local
MXM is located. This information is used when the MXM computes ISDN and
gateway c all rates.
Local MXM Location
Dialing Prefixes
In the Dialing Prefixes tab, enter the prefixes which are required for dialing
international and long-distance videoconferencing calls. If the call requires routing
through a gateway, the MXM uses this information when it determines the optimum
gateway and service (see “Testing for the Optimal Gateway Service” on page 147.
For example, international calls may require that you add a prefix such as 00 or 1
before dialing a country code. This number is provided by the local telephone
company or other ISDN provider.
Long distance calls within a country also may require a prefix such as 0 or 1 before
the remainder of the ISDN number.
Emblaze-VCON MXM Administrator’s Guide 77
Page 94

5 Setting MXM System Properties
Gateway Dialing Prefixes for Local MXM Network
³ To add prefixes
1 Click the New Prefix button.
2 Type the prefix and press <Enter>.
3 To add more prefixes, repeat steps 1 and 2 as many times as required.
4 Click Apply to implement the settings while remaining in the dialog box.
-orClick OK to implement the settings and close the dialog box.
³ To delete prefixes
1 Select the prefix that you want to delete.
2 Click the Delete button.
3 Click Apply to implement the settings while remaining in the dialog box.
-orClick OK to implement the settings and close the dialog box.
78 Emblaze-VCON MXM Administrator’s Guide
Page 95

5 Setting MXM System Properties
5.4 Security Properties
In the MXM system Properties dialog box, click the Security icon to access the
following property pages:
T Security Mode
T License
T Non-Registered Devices
Security Mode
In the Security Mode tab, set the properties for restricting login to specific users.
You can set up the MXM in any or all of the available Open Modes, or in Closed
Mode to all nodes.
MXM’s Security Mode
Emblaze-VCON MXM Administrator’s Guide 79
Page 96

5 Setting MXM System Properties
Set the security mode as follows:
System Security Mode
Open Mode
Emblaze-VCON
end points
Non-EmblazeVCON end
points
MCUs Select to automatically log in any MCU that registers.
Neighboring
Gatekeepers
(Zones)
SIP User
Agents
Closed Mode
Login Status
View
Allow versions
that are not
registered via
the software
upgrade to log
in
Select to allow automatic login privileges to various
types of nodes, which are listed below this option. A
deselected type must be manually granted or refused
login permission by the administrator
Select to automatically accept Emblaze-VCON systems
that register (Escort, Cruiser 150/384, ViGO,
MediaConnect 6000/8000, Falcon, VCON Conference
Bridge).
Select to automatically log in any non-Emblaze-VCON
H.323 videoconferencing node that registers.
Select to automatically list other MXMs an d Gatekeepers
that the local MXM calls or that contact it. In addition,
this selection enables registered MXM nodes to receive
calls from other zones. These zones appear automatically
in the Main View.
Select to automatically log in any SIP user agent that
registers.
Select to restrict login privileges. All nodes that attempt
to register must be granted login permission manually or
rejected by the administrator.
Click this link to display the Login Status Table. The far
right column of the table shows the login status for
specified nodes. For more details about the Login Status
Table, see “Viewing the Login Status” on page 37.
Select this option to grant registration a nd login to nodes
that are using a videoconferencing application version
not defined in a Software Upgrade task (see “Selecting a
Software Version” on pag e 115).
If this option is deselected, the MXM refuses to grant
login to these nodes until their software matches a
Software Upgrade tas k.
80 Emblaze-VCON MXM Administrator’s Guide
Page 97

5 Setting MXM System Properties
License
The License tab shows the number of registered users that the MXM is licensed to
service. If you need to change these numbers, contact your local Emblaze-VCON
distributor.
License Properties
Serial Number The license number of your MXM system.
Capacity
Number of
Users
Number of
Logged On
Users
Number of
Concurrent
Calls
Number of
vPoint Seats
Expiration Date Depending on your license, this will be either Never or
Actual and maximum numbers, respectively, of nonvPoint Software-only end points that this MXM is
permitted to register, according to its current license.
Actual and maximum numbers, respectively, of nonvPoint software-only end points that ar e logged in at the
current time.
Actual and maximum numbers, respectively, of
registered nodes that can be engaged in calls at one time.
Actual and maximum numbers, respectively, of vPoint
software-only end points that this MXM is permitted to
register, according to its current license.
the date that your MXM license expires. If your license is
temporary, see “Replacing the MXM License Key” on
page 11 for information about updating your license.
Emblaze-VCON MXM Administrator’s Guide 81
Page 98

5 Setting MXM System Properties
Emblaze-VCON VCB
Max. Number
of VCB
Conferences
Expiration Date Depending on your license, this will be either Never or
The number of simultaneous ad-hoc videoconferences
managed by the VCB allowed.
the date that this license expires.
Moderator Option
Option
Installed
Data Share
Enabled
Expiration Date Depending on your license, this will be either Never or
Indicates if Conference Moderator has been installed on
the same server as the MXM.
Indicates if data sharing is allowed in conferences
managed through the Conference Moderator.
the date that this license expires.
IP-Nexus Server
Option
Installed
Expiration Date Depending on your license, this will be either Never or
Max. Number
of Concurrent
Users
Indicates if your MXM includes the IP-Nexus Server
option, which provides instant messaging, application
sharing, file transfer, and other services to users who
register with the IP-Nexus Server.
the date that this license expires.
The maximum number of users that can be logged in at
one time.
License Key
Export Key Your initial key code is valid for 30 days. To purchase a
license for a different number of ports, click Export Key
to create a license file for the MXM o n its ho st computer.
Send the file to your local Emblaze-VCON distributor.
You will then receive the appropriate key without time
restrictions.
Show Key Click to view the key code for the current MXM Server
installation.
New Key After receiving a new license file from your Emblaze-
VCON distributor, click this button, browse to select the
file and click Open.
When prompted to apply the license code, click OK.
To implement the license change and close the dialog
box, click OK again.
82 Emblaze-VCON MXM Administrator’s Guide
Page 99

5 Setting MXM System Properties
Non-Registered Devices
In the Non-Registered Devices tab, define how the MXM allows registered end
points to engage in videoconferences with nodes that are unable to register with the
MXM.
Non-Registered End Point Settings
Set the properties as follows:
Maximum Number of
Concurrent Calls with
Non-registered Devices
Total Network Bandwidth
Allowed for Calls with
Non-registered Devices
Maximum number of simultaneous calls
involving non-registered end points that the
MXM may handle.
Select the limit on the amount of bandwidth
(in Kbps) that may be allocated to these
videoconferences. The value must be a
multiple of 100 (such as 200, 5000,
999000).
Emblaze-VCON MXM Administrator’s Guide 83
Page 100

5 Setting MXM System Properties
5.5 H.323 & SIP Properties
In the MXM system Properties dialog box, click the H.323 & SIP icon to access the
following property pages:
T Zone Settings
T Advanced Settings
Zone Settings
In the Zone Settings tab, define the method of search that the MXM uses when a
registered end point dials a party in a different zone (neighbor node).
MXM Gatekeeper Zone Settings
Search Policy
If a dialed address is not found, the MXM will continue (or not) to search
for that address according to one of the following policies:
Don’t search in
other zones
84 Emblaze-VCON MXM Administrator’s Guide
The MXM will reject the call without searching in other
zones.
 Loading...