

Page 1

Mitel PBX Interface with Conferencing Server
Configuration Notes
Note: This document is maintained by Mitel
Page 2

Mitel PBX interface with Conferencing Server Configuration Notes 09/08/04
TABLE OF CONTENTS
MITEL PBX INTERFACE WITH CONFERENCING SERVER ...................................................................I
TDM CONNECTION...................................................................................................................................................1
I NTRODUCTION............................................................................................................................................................1
3300ICP WITH ISDN OR SX2000 WITH ISDN .......................................................................................................1
EXAMPLE OF T1 PRI PROGRAMMING ON 3300 OR SX2000..................................................................................2
Class Of Service – changes from default values..............................................................................................2
Link Descriptor Assignment................................................................................................................................2
Digital Link Assignment .......................................................................................................................................3
MSDN-DPNSS- DASSII Trunk Circuit Descriptor..........................................................................................3
Trunk Service Assignment ....................................................................................................................................3
Digital Trunk Assignment....................................................................................................................................4
3300 ICP WITH T1/D4 OR SX2000 WITH T1/D4....................................................................................................5
EXAMPLE OF T1/D4 (CAS) PROGRAMMING ON 3300 OR SX2000 ...................................................................... 6
Class Of Service – changes from default values..............................................................................................6
Link Descriptor Assignment................................................................................................................................6
Digital Link Assignment .......................................................................................................................................9
Digital E and M Trunk Circuit Descriptor Assignment ..................................................................................9
Trunk Service Assignment ..................................................................................................................................12
Digital Trunk Assignment..................................................................................................................................13
EXAMPLE OF ARS PROGRAMMING ON 3300 ICP/SX2000.................................................................................14
Create Trunk Group...........................................................................................................................................14
Add individual trunks to trunk group ...............................................................................................................14
Create Digit Modification Assignment............................................................................................................16
Create Route Assignment ...................................................................................................................................16
Create ARS Digits Dialed Assignment............................................................................................................16
SX200 WITH ISDN................................ ....................................................................................................................17
SX200 WITH T1/D4..................................................................................................................................................25
T1 CROSSOVER CABLE WIRIN G SPECIFICATIONS [RJ45 CONNECTOR].............................................................26
IP CONNECTION INSTUCTIONS AND OUTLINE......................................................................................27
IP CONNECTION INTRODUCTION.............................................................................................................................27
R EQUIREMENTS FOR IP CONNECTION....................................................................................................................27
C ONFIGURING THE MITEL NETWORKS 3300ICP ..................................................................................................28
1. Create the IP Phones....................................................................................................................................28
2. Set the Class of Service..................................................................................................................................30
3. Assign the New Class of Service to the IP IGC Ports ..............................................................................31
4. Create the Hunt Group..................................................................................................................................32
Page i of 35
Page 3

Mitel PBX interface with Conferencing Server Configuration Notes 09/08/04
TDM CONNECTION
Introduction
This document describes the configuration of Mitel Networks PBX’s to correctly
interface to the Interactive Group Communication System (IGC) by VCon. For
more information on the configuration of the IGC, please refer to Mitel 3300 -
RemoteAbility IGC Integration Specifications V1. Note that a qualified
Technician should undertake all PBX configurations.
3300ICP with ISDN or SX2000 with ISDN
• Attach VCon IGC server T1 link to NSU, DSU or Embedded PRI card
o Configure hardware for Line Termination through jumpers or DIP
switch – please refer to the Technician’s Handbook of the correct
product (3300 or SX2000)
• connect to server with a straight through cable
• Program trunks
o for example, please see Example of T1 PRI programming on 3300
• Program PRI link characteristics though IMAT (for NSU or DSU) or
through ESM (embedded PRI card in 3300ICP)
o Protocol us ed is DMS-250, user side
• Reset NSU or PRI card to allow new configuration to load
• Test link to server by dialing <feature access code for individual trunk
access> <trunk number><any 4 digit number>< # > e.g.
<**2><6101><1000><#>
o You should hear “Welcome to RemoteAbility”
• Program ARS so that a single four digit number accesses the IGC system
o Program trunk group
o Add trunks to trunk group
o Create Digit Modification Assignment
o Create Route Assignment
o Create ARS Digits Dialed Assignment
o Please see Example of ARS Programming on 3300 or SX2000
Page 1 of 35
Page 4

Mitel PBX interface with Conferencing Server Configuration Notes 09/08/04
ISDN NODE
Service Limit (millisec.):
Example of T1 PRI programming on 3300 or SX2000
Class Of Service – changes from default values
Public Network Access via DPNSS Yes
ANI/DNIS/ISDN Number Delivery Yes
Link Descriptor Assignment
Number: 4
Address for Message Control: A
BER - Maintenance Limit, 10**-n: 4
BER - Service Limit, 10**-n: 3
Data Call Alternate Digit Inversion: Yes
Framing Losses in 24 hrs - Maintenance Limit: 255
Framing Losses in 24 hrs - Service Limit: 9000
Integrated Digital Access:
Satellite Link Delay: No
Slip Rate - Maintenance Limit (slips/24hr.): 5000
Slip Rate - Service Limit (slips/24hr.): 7000
Alarm Debounce Timer -
Voice Encoding: Invert
Data Encoding:
500
Nil
QSIG Private Network Access: No
Digital Link Fault Delay Timer (sec.): 240
Termination Mode: LT
T1 Only:
B8ZS Zero Code Suppression: Yes
Operation Mode: DSX-1
CSU Tx Line Build-Out (dB.):
DSX-1 Line Length (Ft.): 0-133
Extended Super Frame: Yes
Inverted D channel ( DPNSS only ): No
E1 Only:
CRC-4 Enabled: Yes
E1 Line Length (Ft.): 0-133
E1 Impedance (Ohms): 120
Page 2 of 35
Page 5

Mitel PBX interface with Conferencing Server Configuration Notes 09/08/04
Local Office
Digital Link Assignment
Controlle
r Module
1 1 6 1 1 1 UNIVERSAL T1
1 1 6 1 1 2 UNIVERSAL T1
Port Unit
Shel
f
Slot
Link Interface Type
MSDN-DPNSS-DASSII Trunk Circuit Descriptor
Dual
Number Card Type
4 UNIVERSAL T1 Incoming
Seizure
Priority
Trunk Service Assignment
Trunk Service Number :
4
Release Link Trunk:
No
Class of Service:
4
Class of Restriction:
1
Baud Rate:
Far End
Connection
MSDN- DPNSS
Signalling
Protocol
Page 3 of 35
Page 6

Mitel PBX interface with Conferencing Server Configuration Notes 09/08/04
300
Intercept Number:
1
Non-dial In Trunks Answer Point - Day:
Non-dial In Trunks Answer Point - Night 1:
Non-dial In Trunks Answer Point - Night 2:
Dial In Trunks Incoming Digit Modification - Absorb:
0
Dial In Trunks Incoming Digit Modification - Insert:
Trunk Label:
ISDN Trunk
Digital Trunk Assignment
Cabinet:
6
Shelf:
Page 4 of 35
Page 7

Mitel PBX interface with Conferencing Server Configuration Notes 09/08/04
1
Slot:
1
Circuit:
1
Card Type:
UNIVERSAL T1
Trunk Number:
6101
Trunk Service Number:
4
DTS Service Number:
Circuit Descriptor Number:
4
Interconnect Number:
1
3300 ICP with T1/D4 or SX2000 with T1/D4
• Attach VCon IGC server T1 link to NSU, DSU or Embedded PRI card
o Configure hardware for Line Termination through jumpers or DIP
switch – please refer to the Technician’s Handbook of the correct
product (3300 or SX2000)
• connect to server with a straight through cable
Page 5 of 35
Page 8

Mitel PBX interface with Conferencing Server Configuration Notes 09/08/04
• Program trunks
o for example, please see Example of T1/D4 Programming on 3300
or SX2000
• Test link to server by dialing <feature access code for individual trunk
access> <trunk number><any 4 digit number>< # > e.g.
<**2><6101><1000><#>
o You should hear “Welcome to Remoteability”
• Program ARS so a single four digit number accesses the IGC system
o Program trunk group
o Add trunks to trunk group
o Create Digit Modification Assignment ** see following note
o Create Route Assignment
o Create ARS Digits Dialed Assignment
o Please see Example of ARS Programming on 3300 or SX2000
**Note: The Dialogic card in the IGC server is expecting ANI on the T1D4
trunk, but the 3300 or SX2000 does not deliver ANI over T1D4. This will
result in a 10 to 15 second delay in accessing the IGC after the trunk
access number is dialed. To correct this, send an ANI digit string to the
trunk through the Digit Modification Form. See below.
Digit Modificat ion Assignment
Digit
Modification
Number
Number of
Digits to
Absorb
Digits to be
Inserted
Final Tone
Plan/Information
Marker
1 3
2 0
3 1 <T01>
4 0 **6135922122**
Example of T1/D4 (CAS) Programming on 3300 or SX2000
Class Of Service – changes from default values
Public Network Access via DPNSS Yes
ANI/DNIS/ISDN Number Delivery Yes
Link Descriptor Assignment
Number:
Page 6 of 35
Page 9

Mitel PBX interface with Conferencing Server Configuration Notes 09/08/04
4
Address for Message Control:
BER - Maintenance Limit, 10**-n:
4
BER - Service Limit, 10**-n:
3
Data Call Alternate Digit Inversion:
Yes
Framing Losses in 24 hrs - Maintenance Limit:
255
Framing Losses in 24 hrs - Service Limit:
9000
Integrated Digital Access:
T1D4
Satellite Link Delay:
No
Slip Rate - Maintenance Limit (slips/24hr.):
5000
Slip Rate - Service Limit (slips/24hr.):
7000
Alarm Debounce Timer - Service Limit (millisec.):
500
Voice Encoding:
Page 7 of 35
Page 10

Mitel PBX interface with Conferencing Server Configuration Notes 09/08/04
Invert
Data Encoding:
Nil
QSIG Private Network Access:
No
Digital Link Fault Delay Timer (sec.):
240
Termination Mode:
NT
T1 Only:
B8ZS Zero Code Suppress ion:
Yes
Operation Mode:
DSX-1
CSU Tx Line Build-Out (dB.):
DSX-1 Line Length (Ft.):
0-133
Extended Super Frame:
No
Inverted D channel ( DPNSS only ):
Page 8 of 35
Page 11

Mitel PBX interface with Conferencing Server Configuration Notes 09/08/04
Controller
Shelf
Descriptor
No
E1 Only:
CRC-4 Enabled:
No
E1 Line Length (Ft.):
0-133
E1 Impedance (Ohms):
120
Digital Link Assignment
Digital
Module
Port Unit
Slot
Link Interface Type
Link
Comment
1 1 6 1 1 1 UNIVERSAL T1 4 Remoteability
1 1 6 1 1 2 UNIVERSAL T1 4 T1D4
Digital E and M Trunk Circuit Descriptor Assignment
Number:
4
Call Collision Handling:
Page 9 of 35
Page 12

Mitel PBX interface with Conferencing Server Configuration Notes 09/08/04
AT&T
AT&T Call Collision Handling:
Backoff
Ignore Far End Disconnect:
No
Release Acknowledge Timer:
80
Address Signalling:
DTMF
Disconnect Timer:
300
Incoming Start Type:
Wink
Dial Tone on Incoming Seize:
No
Outpulse Delay Timer:
800
Outgoing Start Type:
W ink
Supervision Timer:
200
Maximum Wink Timer:
400
Minimum Wink Timer:
Page 10 of 35
Page 13

Mitel PBX interface with Conferencing Server Configuration Notes 09/08/04
100
Guard Timer:
500
Fake Answer Supervision After Outpulsing:
No
Ignore Answer Supervision:
No
Release Supervision Expected:
Yes
Audio Inhibit Until Answer Supervision:
Yes
Far End Connection:
Main PBX
Facility Type:
Combination
Minimum Flash Timer:
250
Maximum Flash Timer:
200
Drop Digit Rcvr for Outgoing Audio Before Ans Sup:
No
Flash Timer:
300
Page 11 of 35
Page 14

Mitel PBX interface with Conferencing Server Configuration Notes 09/08/04
Trunk Service Assignment
Trunk Service Number:
4
Release Link Trunk:
No
Class of Service:
4
Class of Restriction:
1
Baud Rate:
300
Intercept Number:
1
Non-dial In Trunks Answer Point - Day:
Non-dial In Trunks Answer Point - Night 1:
Non-dial In Trunks Answer Point - Night 2:
Dial In Trunks Incoming Digit Modification - Absorb:
0
Page 12 of 35
Page 15

Mitel PBX interface with Conferencing Server Configuration Notes 09/08/04
Dial In Trunks Incoming Digit Modification - Insert:
Trunk Label:
T1 Trunk
Digital Trunk Assignment
Cabinet:
6
Shelf:
1
Slot:
1
Circuit:
1
Card Type:
UNIVERSAL T1
Trunk Number:
6101
Trunk Service Number:
4
DTS Service Number:
Circuit Descriptor Number:
4
Interconnect Number:
Page 13 of 35
Page 16

Mitel PBX interface with Conferencing Server Configuration Notes 09/08/04
1
Example of ARS Programming on 3300 ICP/SX2000
Create Trunk Group
Trunk Group Assignment
Trunk
Group
Number
Hunt
Mode
3 Terminal Analog TG
Trunk
Group
Busy RAD
Maximum
Network Hop
Comments
4 Circular Remoteabilty
5 Terminal To Sx2000
Add individual trunks to trunk group
- all 23 ISDN trunks or 24 T1/D4 trunks should be added to the trunk group
Trunk Group Members
Member Trunk Number
1 6101
2 6102
3 6103
4 6104
5 6105
6 6106
7 6107
8 6108
9 6109
Page 14 of 35
Page 17

Mitel PBX interface with Conferencing Server Configuration Notes 09/08/04
10 6110
Page 15 of 35
Page 18

Mitel PBX interface with Conferencing Server Configuration Notes 09/08/04
Digits to be
Number
Modification
Route
Compression
Number of Digits to
Create Digit Modification Assignment
- in this example, we are using Digit Modification number 4, and there are
no digits to absorb or to insert
Digit Modification Assignment
Digit
Modification
Number
1 3
2 0
3 1 <T01>
4 0
Number of
Digits to
Absorb
Inserted
Final Tone
Plan/Information
Marker
5 0
Create Route Assignment
- in this example, we are using Route 4
Route Assignment
XNET
Trunk
Group
Number
Type
Route
Number
Trunk
Group
COR
Group
Number
Digit
Number
Digits
Before
Outpulsing
1 1 1 1 Off
2 1 1 Off
3 3 1 3 Off
4 4 1 4 Off
5 5 1 1 Off
Create ARS Digits Dialed Assignment
- in this example, the digits dialed t o access the Vcon IGC are 1100
ARS Digits Dialed Assignment
Digits
Dialed
Follow
1100 0 Route 4
Termination
Type
Termination
Number
201 4 Route 1
Page 16 of 35
Page 19

Mitel PBX interface with Conferencing Server Configuration Notes 09/08/04
SX200 with ISDN
• Attach VCon IGC server to PRI card with straight through cable
o Configure hardware for Line Termination. Please refer to SX200
Technician’s Handbook for more information.
• Program trunks
o Please see Example of T1 PRI Programming on SX200
• Use IMAT to configure PRI card for DMS250, user side
• Reset PRI card to allow new configuration to load
• Program ARS
o See SX200 Technician’s Handbook for more information
Page 17 of 35
Page 20
Mitel PBX interface with Conferencing Server Configuration Notes 09/08/04
Example of T1 PRI Programming on SX200
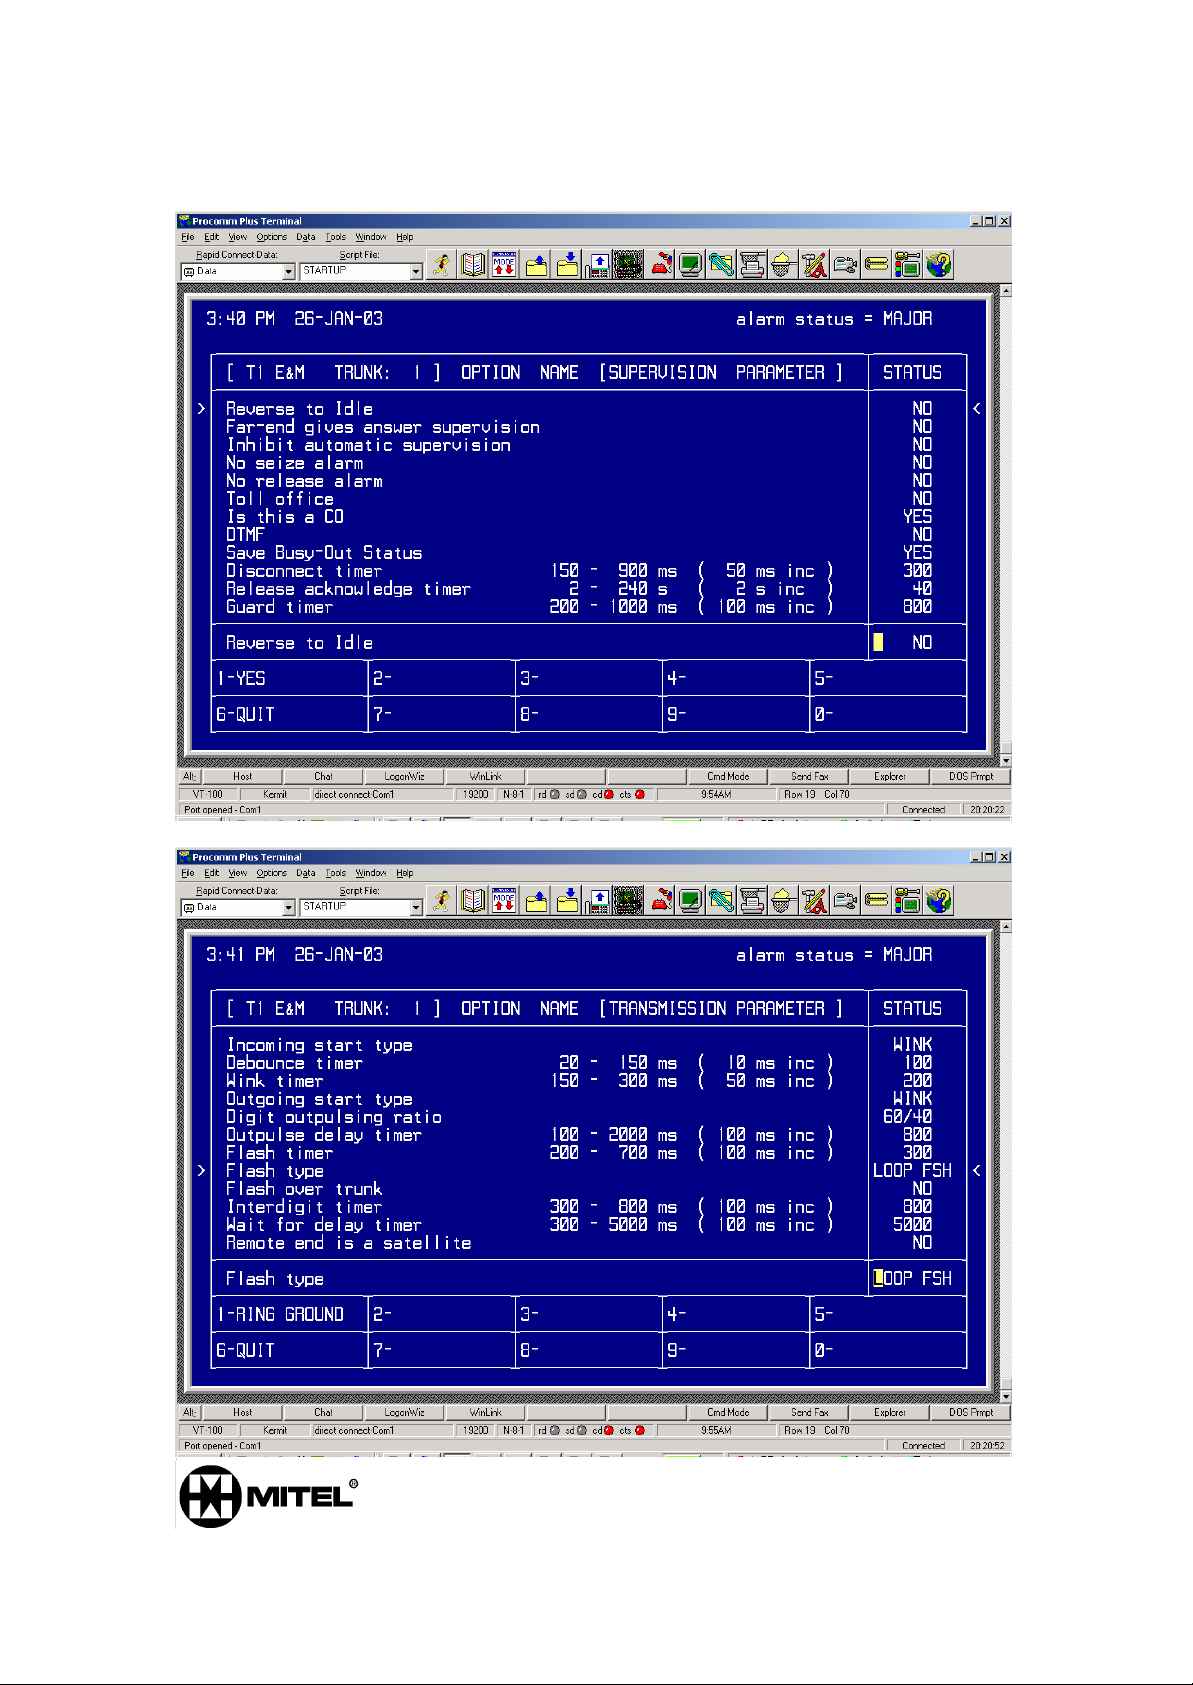
Refer to SX200 EL/ML Technicians Handbook , Programming a PRI, for System
Configuration, Class of Service Options and System Options/System Timers.
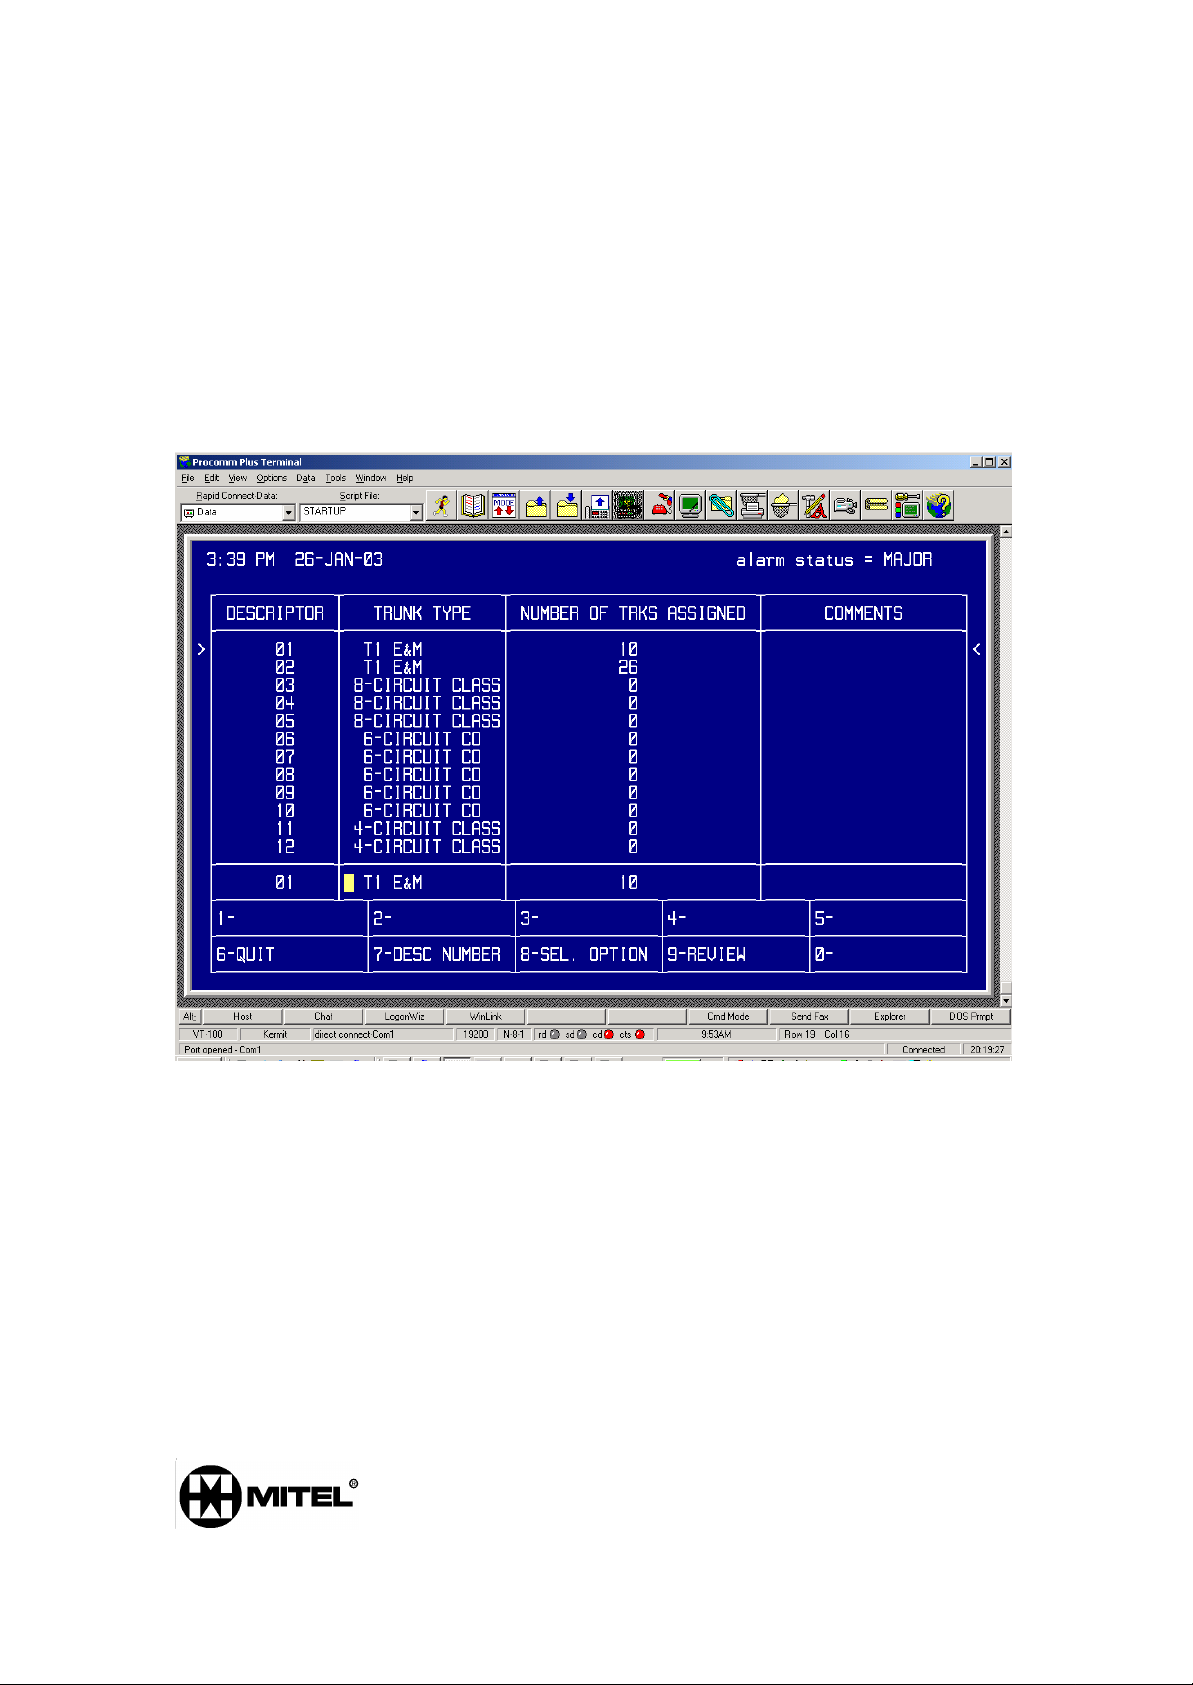
Form 13
Assign T1 E&M circuit descriptor to the ISDN trunk.
Page 18 of 35
Page 21
Mitel PBX interface with Conferencing Server Configuration Notes 09/08/04
Page 19 of 35
Page 22

Mitel PBX interface with Conferencing Server Configuration Notes 09/08/04
Page 20 of 35
Page 23

Mitel PBX interface with Conferencing Server Configuration Notes 09/08/04
Define the incoming ISDN trunk as a Dial In trunk in form 15
Page 21 of 35
Page 24

Mitel PBX interface with Conferencing Server Configuration Notes 09/08/04
Assign the ISDN trunks to a trunk group in Form 16
Page 22 of 35
Page 25

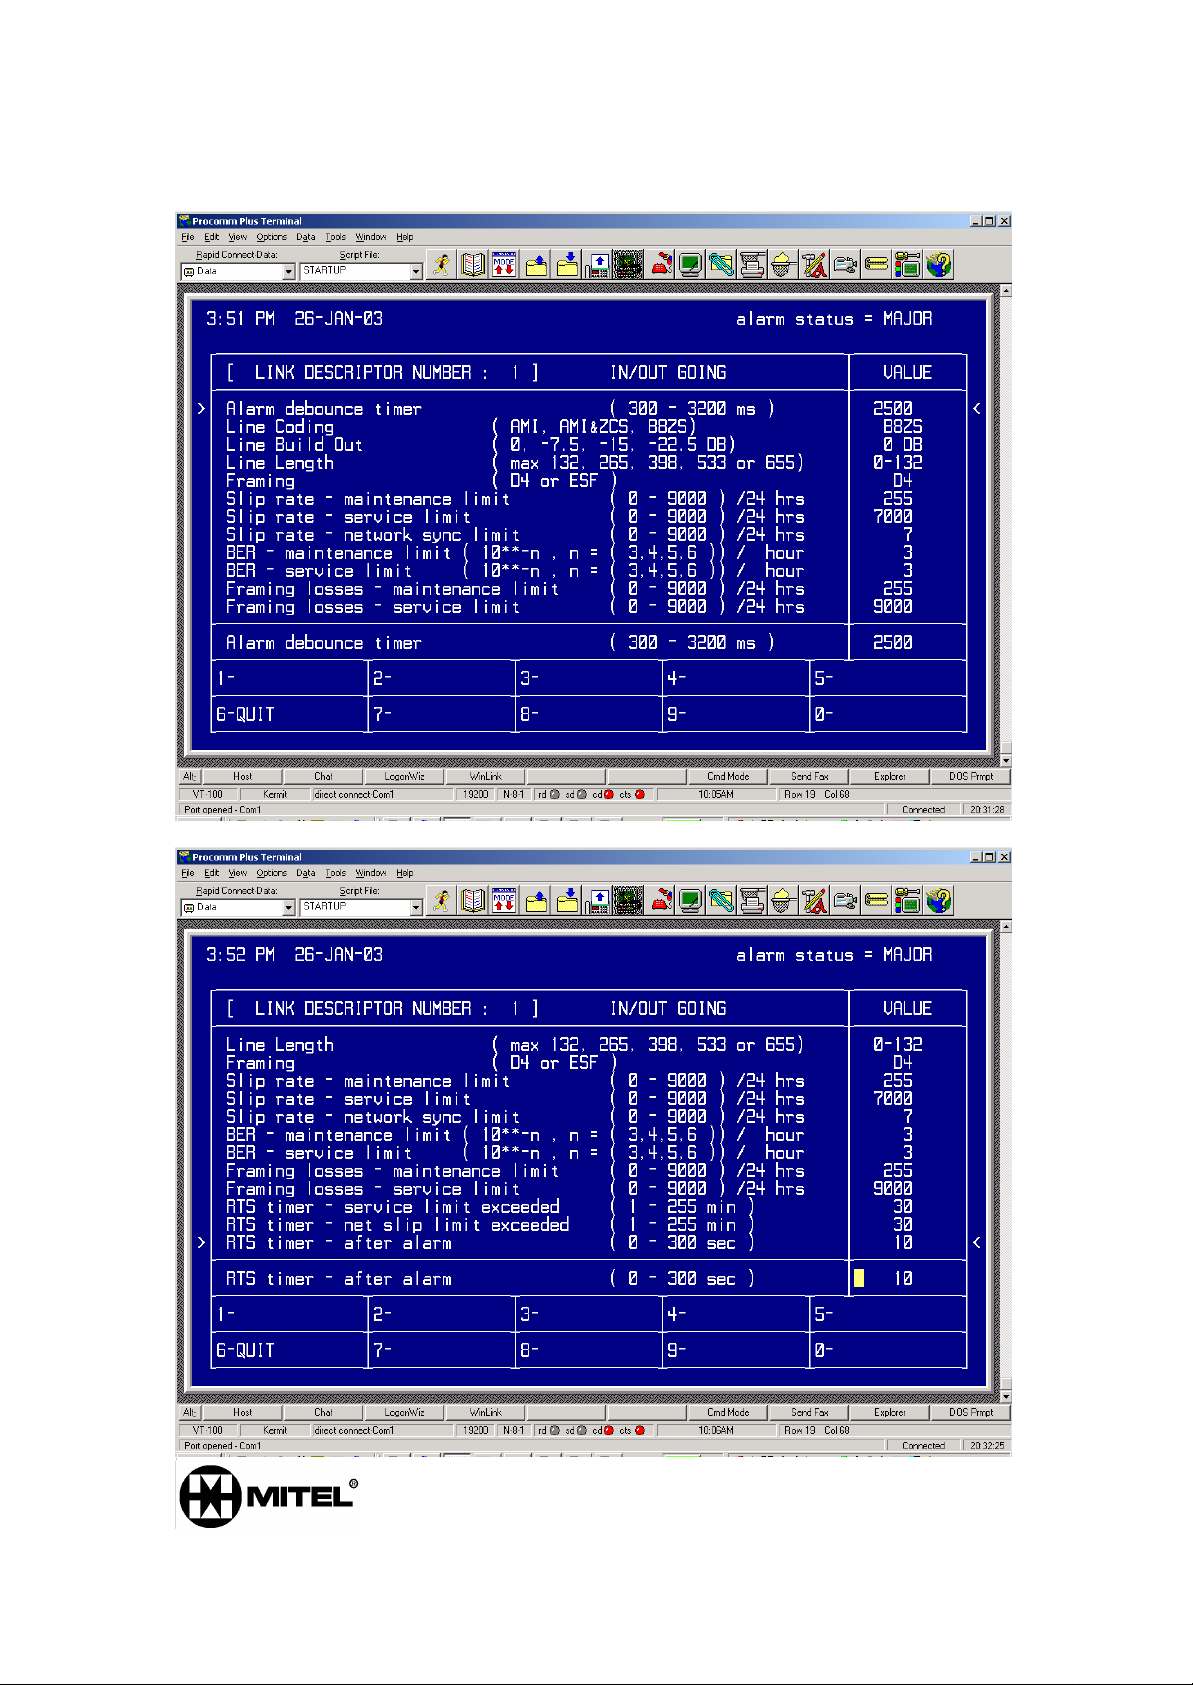
Mitel PBX interface with Conferencing Server Configuration Notes 09/08/04
Select a T1 Link Descriptor for the ISDN trunks in form 42
Page 23 of 35
Page 26
Mitel PBX interface with Conferencing Server Configuration Notes 09/08/04
Page 24 of 35
Page 27
Mitel PBX interface with Conferencing Server Configuration Notes 09/08/04
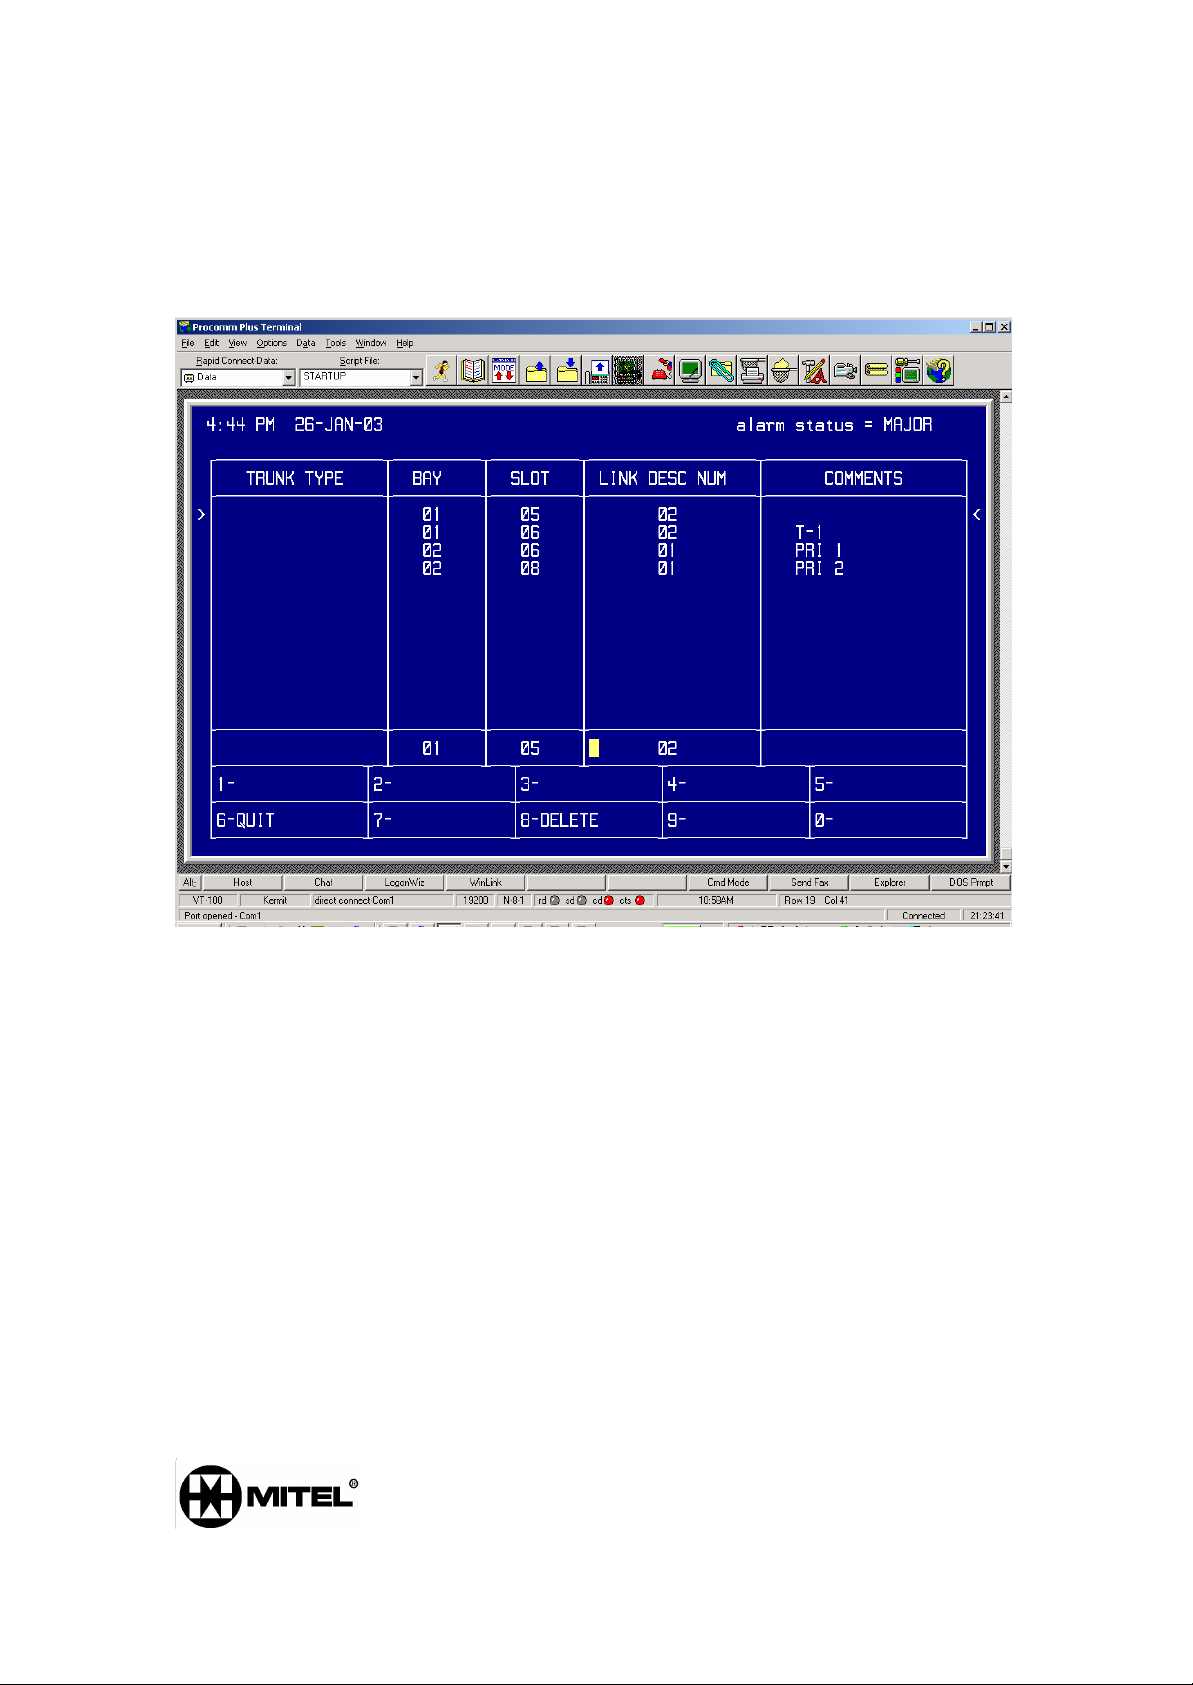
Assign the ISDN link descriptor to slot 6 and/or slot 8 on the PRI card bay, Form
43
Form 44, Net work Sync - To be determined by qualified Technician
SX200 with T1/D4
• Attach VCon IGC server to SX200 with cross over cable.
• Program trunks for T1/D4. All values are default.
• Program ARS so that a single four digit number accesses the IGC system
o See SX200 Technician’s Handbook for more information
o Send simulated ANI down trunk using Digit Modification Table, form
22 as shown below with digit mod number 3. The Dialogic card in
the IGC expects ANI, and there will be a 10 – 15s delay accessing
the server unless such a string is sent down the trunk.
Page 25 of 35
Page 28

Mitel PBX interface with Conferencing Server Configuration Notes 09/08/04
T1 Crossover cable wiring Specifications [RJ45 Connector]
Supplied with RemoteAbility system.
Connector
A Pin
1 4
2 5
4 1
5 2
Connector
B Pin
Page 26 of 35
Page 29

Mitel PBX interface with Conferencing Server Configuration Notes 09/08/04
IP CONNECTION INSTUCTIONS AND OUTLINE
IP Connection Introduction
This document describes how to configure the 3300ICP for IP IGC Release 6.6.
This document will only talk about the minimum configuration required on the
3300ICP for the VCON IP IGC to function. For further feature programming of
the 3300ICP refer to the 3300ICP Guides provided by Mitel Networks.
Requirements for IP Connection
To configure the 330ICP for IP IGC you should have:
• The basic knowledge and certificates from Mitel Networks on the 3300ICP
and the IP IGC 6.6 Server.
• A Mitel Networks 3300ICP properly licensed for Users and Mitai/Tapi
Computer Integration. Verify these in the License and Option Selection from
the ESM in: “System Configuration” à “System Capacity” à “License and
Option Selection”
• A IP IGC Server 6.6 properly licensed and configured
Page 27 of 35
Page 30

Mitel PBX interface with Conferencing Server Configuration Notes 09/08/04
Configuring the Mitel Networks 3300ICP
There is 4 different tasks that have to be completed on the Mitel Networks
3300ICP for the VCON IP IGC to function properly.
You Must:
• Create the IP Phones to act as IGC Ports
• Set the Class of Service
• Assign the New Class of Service to the IP Phones
• CREATE THE HUNT GROUP WITH THE IP PHONES INCLUDED
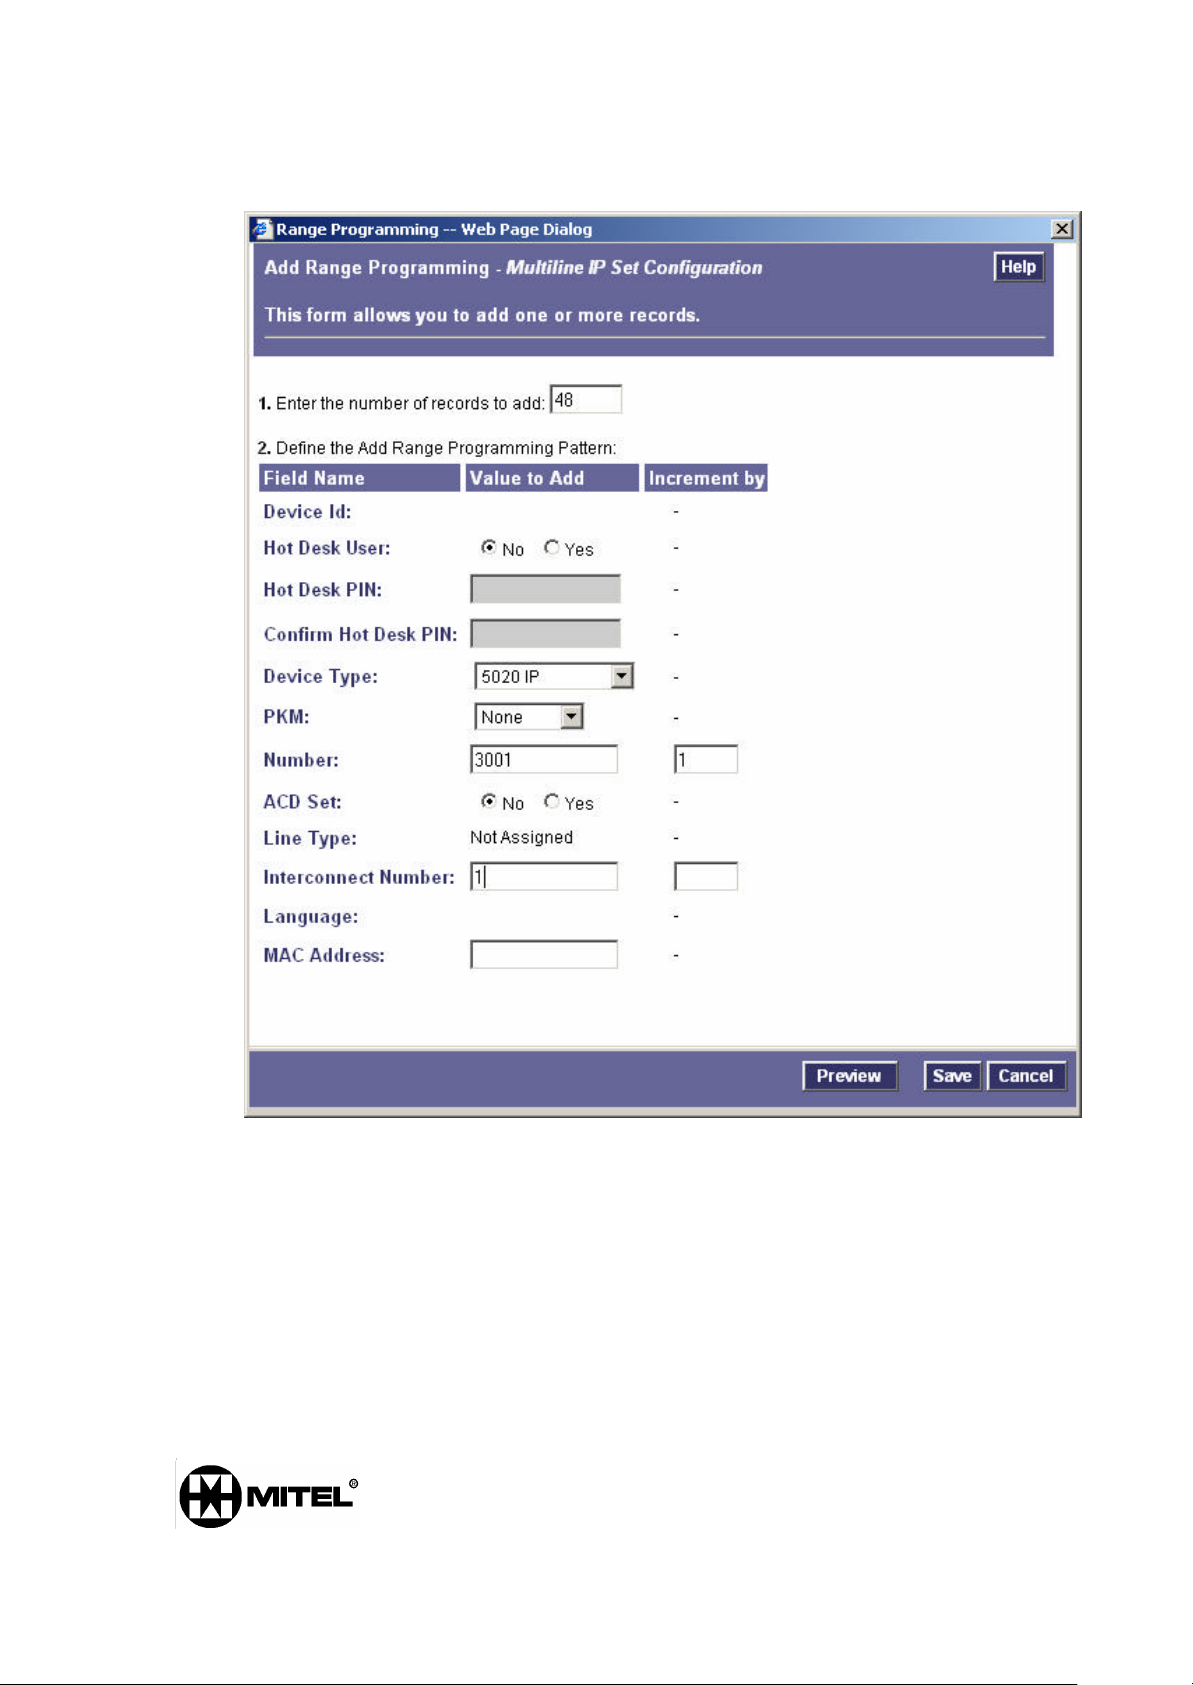
1. Create the IP Phones
1. Open the 3300ICP ESM in Internet Explorer 5.5 or later
2. Login (use defaults unless you have changed your password)
• Login: system
• Password: password
3. Select the System Administration Tool
4. Select “System Configuration” à “Devices” à “IP Telephones” à
“Multiline IP Sets” à “Multiline IP Set Configuration”
5. Click “Add”
6. Select the following:
• Number of Records to Add à (Amount of ports on the IGC)
• Device Type à 5020IP
• Number à The first port # of the IGC (note this must be one
higher then the Hunt Group # example HG = 3000 Number =
3001)
• Increment By à 1 (MUST Be 1 or The IGC Will Not Work)
• Interconnect Number à 1 (unless programming with another
Interconnect)
7. Click “Save”
8. Click “OK”
Page 28 of 35
Page 31
Mitel PBX interface with Conferencing Server Configuration Notes 09/08/04
All the required Ports of the IP IGC are now created
Page 29 of 35
Page 32
Mitel PBX interface with Conferencing Server Configuration Notes 09/08/04
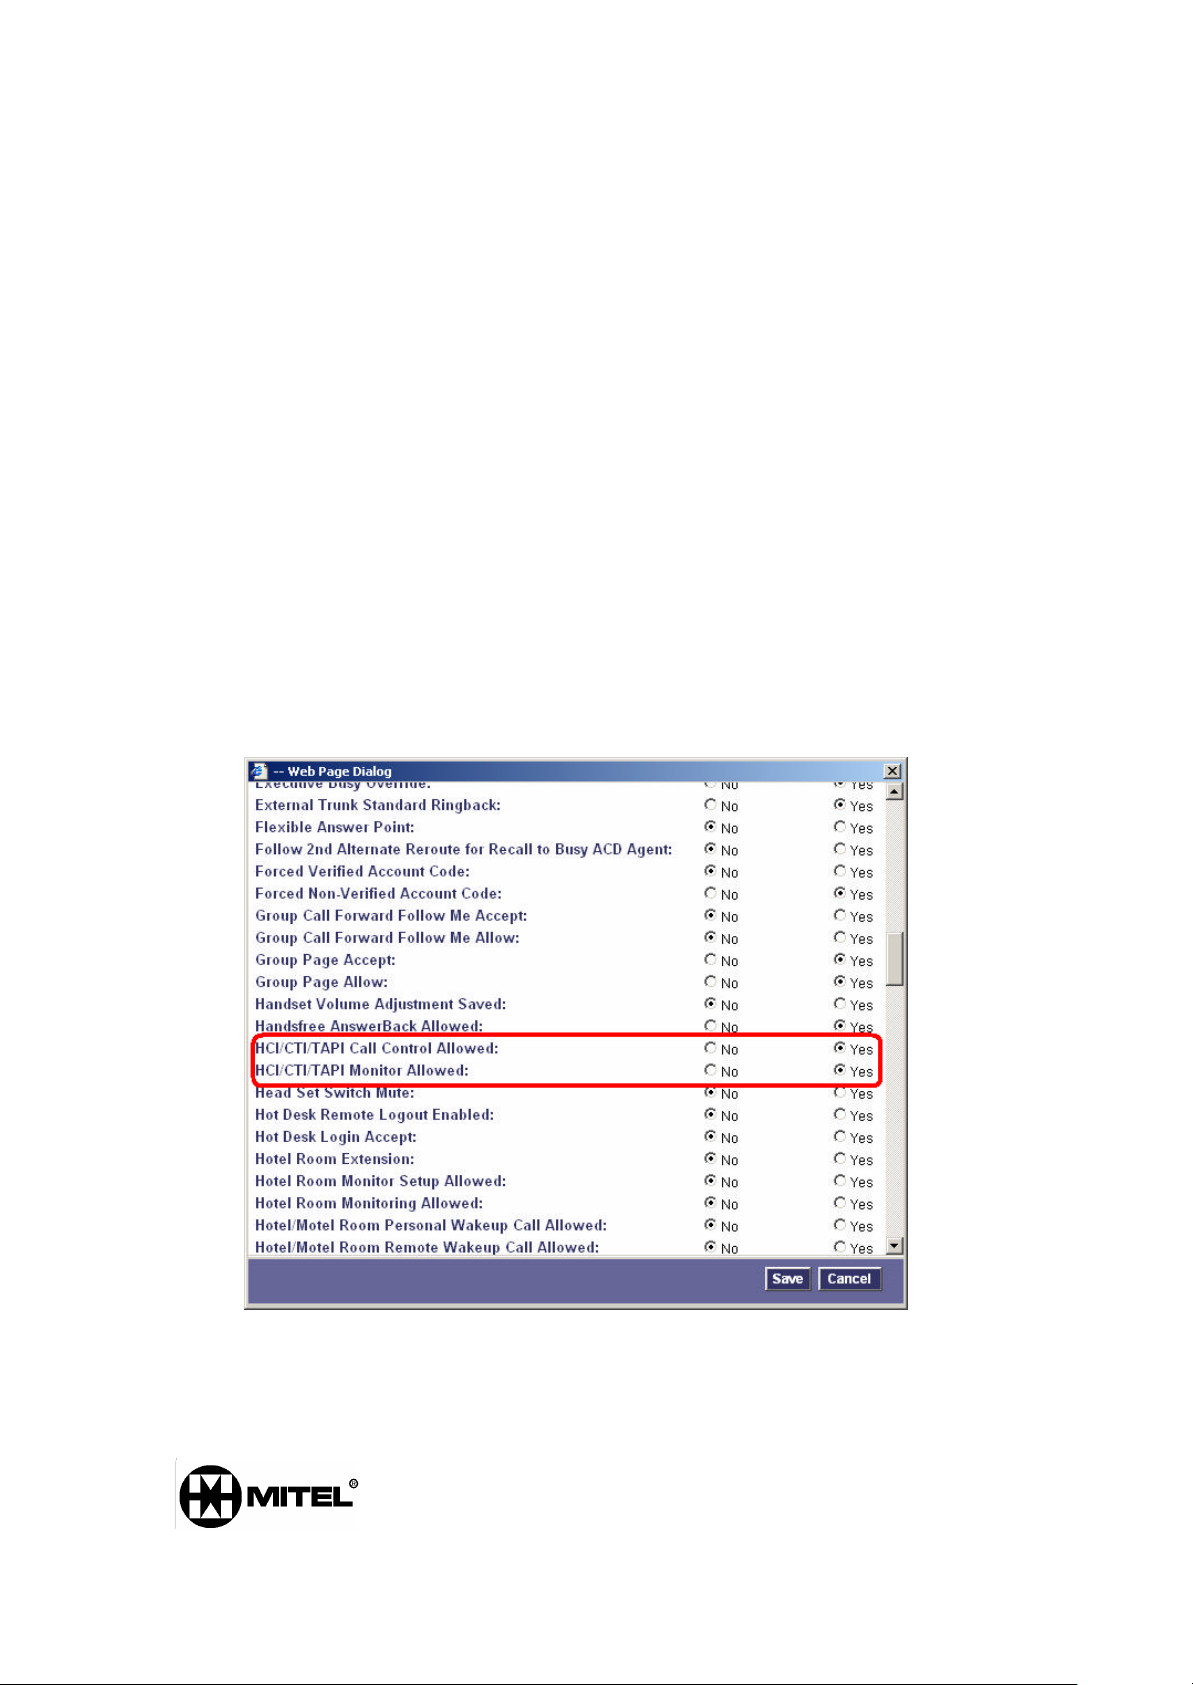
2. Set the Class of Service
Note: Steps 1, 2 & 3 are NOT required if already logged into the ESM
1. Open the 3300ICP ESM in Internet Explorer 5.5 or later
2. Login (use defaults unless you have changed your password)
• Login: system
• Password: password
3. Select the System Administration Tool
4. Select “System Configuration” à “Devices” à “Class of Service Option
Assignment”
5. Select an Unused Class of Service (Example Class of Service # 5)
6. Click “Change”
7. Change the Following:
• Comment à IP IGC Ports (or any other distinguishing comment)
• HCI/CTI/TAPI Call Control Allowed à Yes
• HCI/CTI/TAPI Monitor Allowed à Yes
8. Click “Save”
9. Click “OK”
The Class of Service for the IGC IP Ports is now created
Page 30 of 35
Page 33
Mitel PBX interface with Conferencing Server Configuration Notes 09/08/04
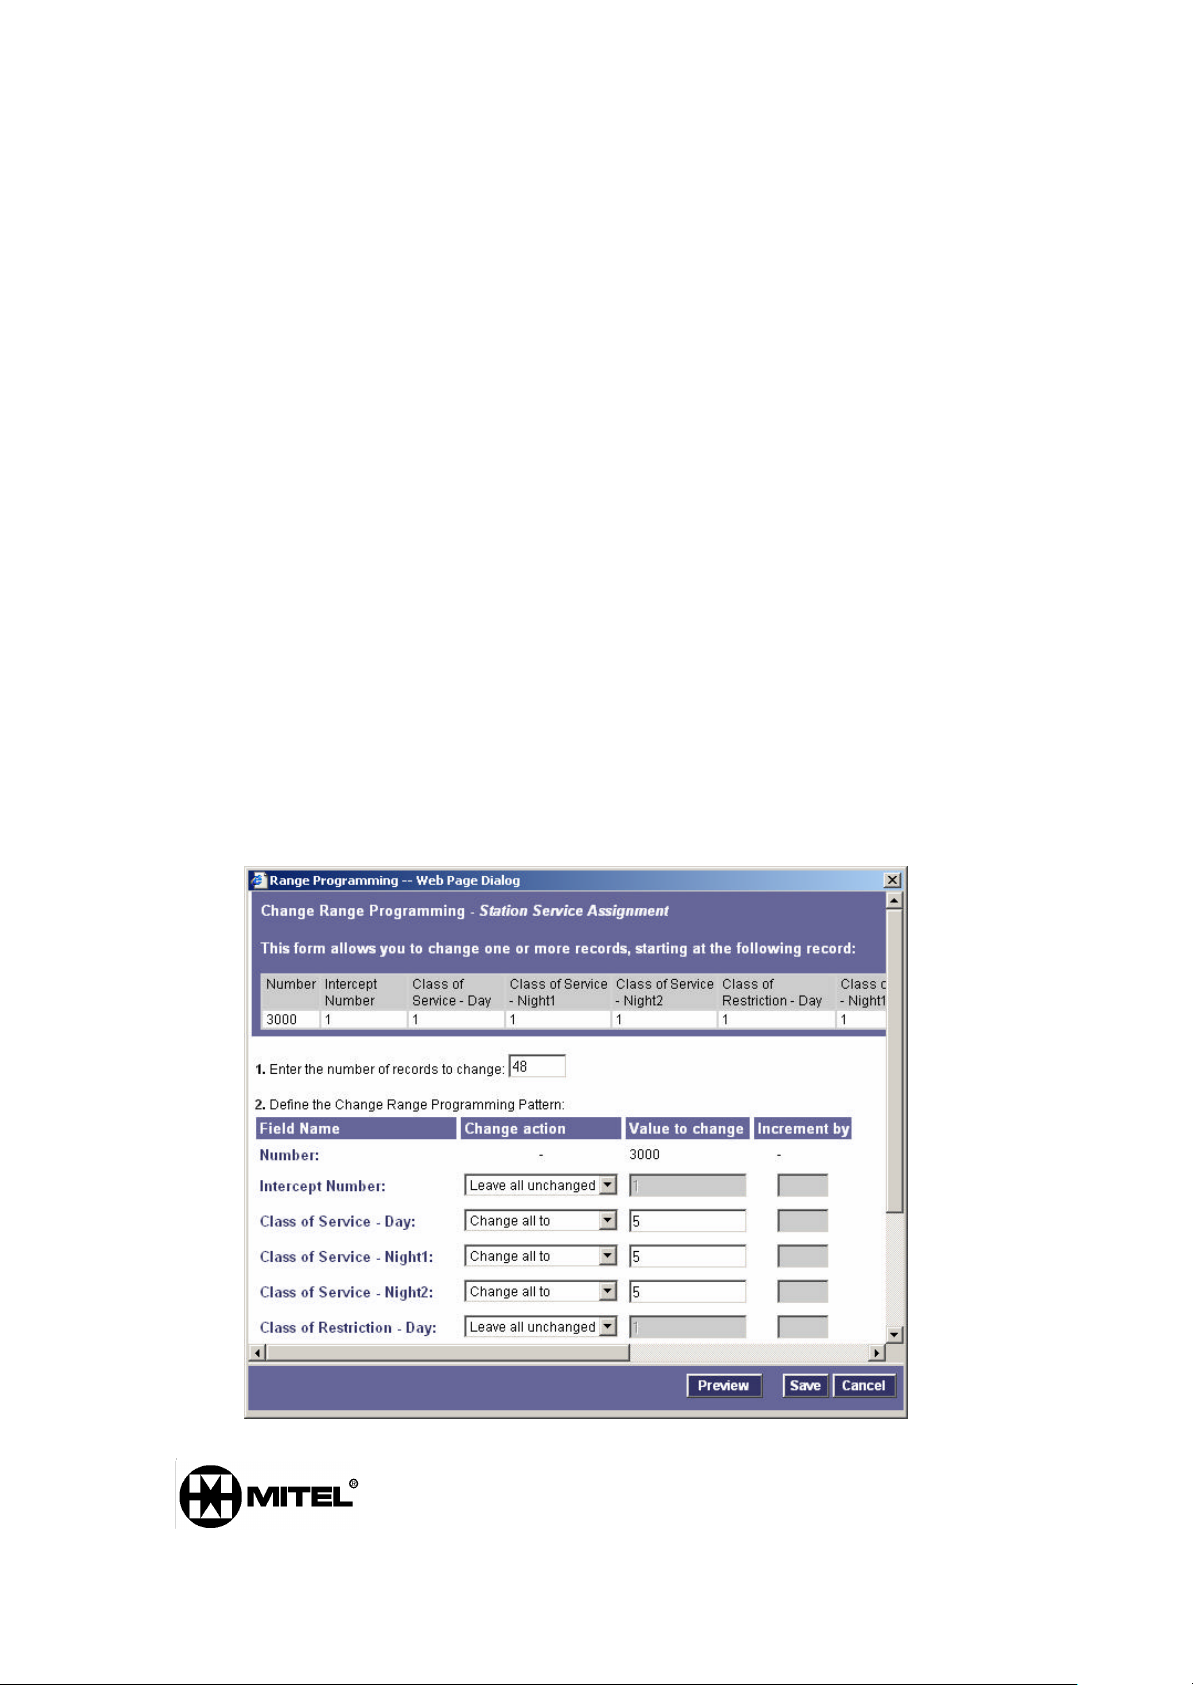
3. Assign the New Class of Service to the IP IGC Ports
Note: Steps 1, 2 & 3 are NOT required if already logged into the ESM
1. Open the 3300ICP ESM in Internet Explore 5.5 or later
2. Login (use defaults unless you have changed your password)
• Login: system
• Password: password
3. Select the System Administration Tool
4. Select “System Configuration” à “Devices” à “Station Service
Assignment”
5. Select the First IP Phone (IGC IP Port – Ex. 3001)
6. Click “Change”
7. Change the Following:
• Number of Records to Change à (Amount of ports on the IGC)
• Class of Service – Day à Change all to à 5 (New Class of
Service #)
• Class of Service–Night1àChange all to à 5 (New Class of
Service #)
• Class of Service–Night2àChange all to à 5 (New Class of
Service #)
8. Click “Save”
The IGC Ports now have the correct Class of Service assigned to them.
Page 31 of 35
Page 34
Mitel PBX interface with Conferencing Server Configuration Notes 09/08/04
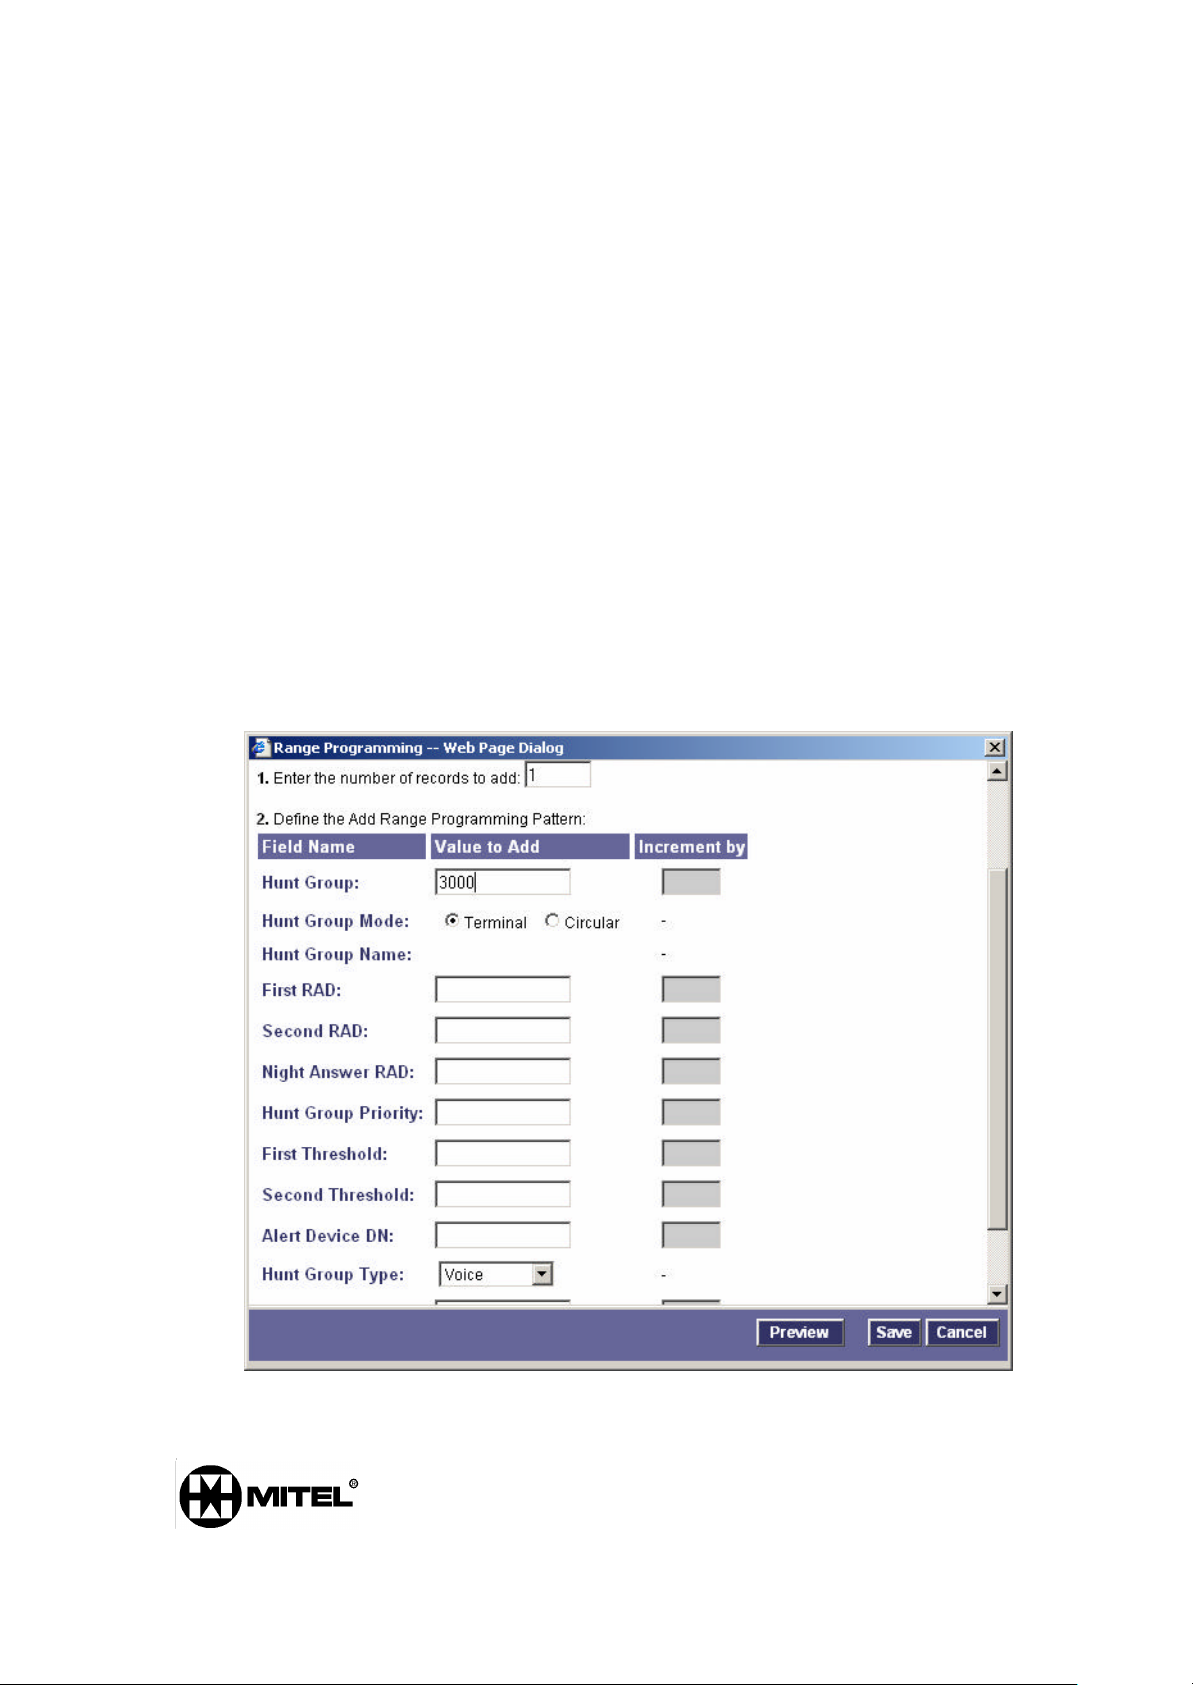
4. Create the Hunt Group
Note: Steps 1, 2 & 3 are NOT required if already logged into the ESM
1. Open the 3300ICP ESM in Internet Explorer 5.5 or later
2. Login (use defaults unless you have changed your password)
• Login: system
• Password: pa ssword
3. Select the System Administration Tool
4. Select “System Administration” à “Call Handling” à “Hunt Groups” à
“Hunt Group Assignment”
5. Click “Add”
6. Select the following
• Hunt Group à The Hunt Group Number (Should be 3000 if the
ports start at 3001 always one below the first port number)
• Hunt Group Mode à Either Terminal or Circular
• Hunt Group Type à Voice
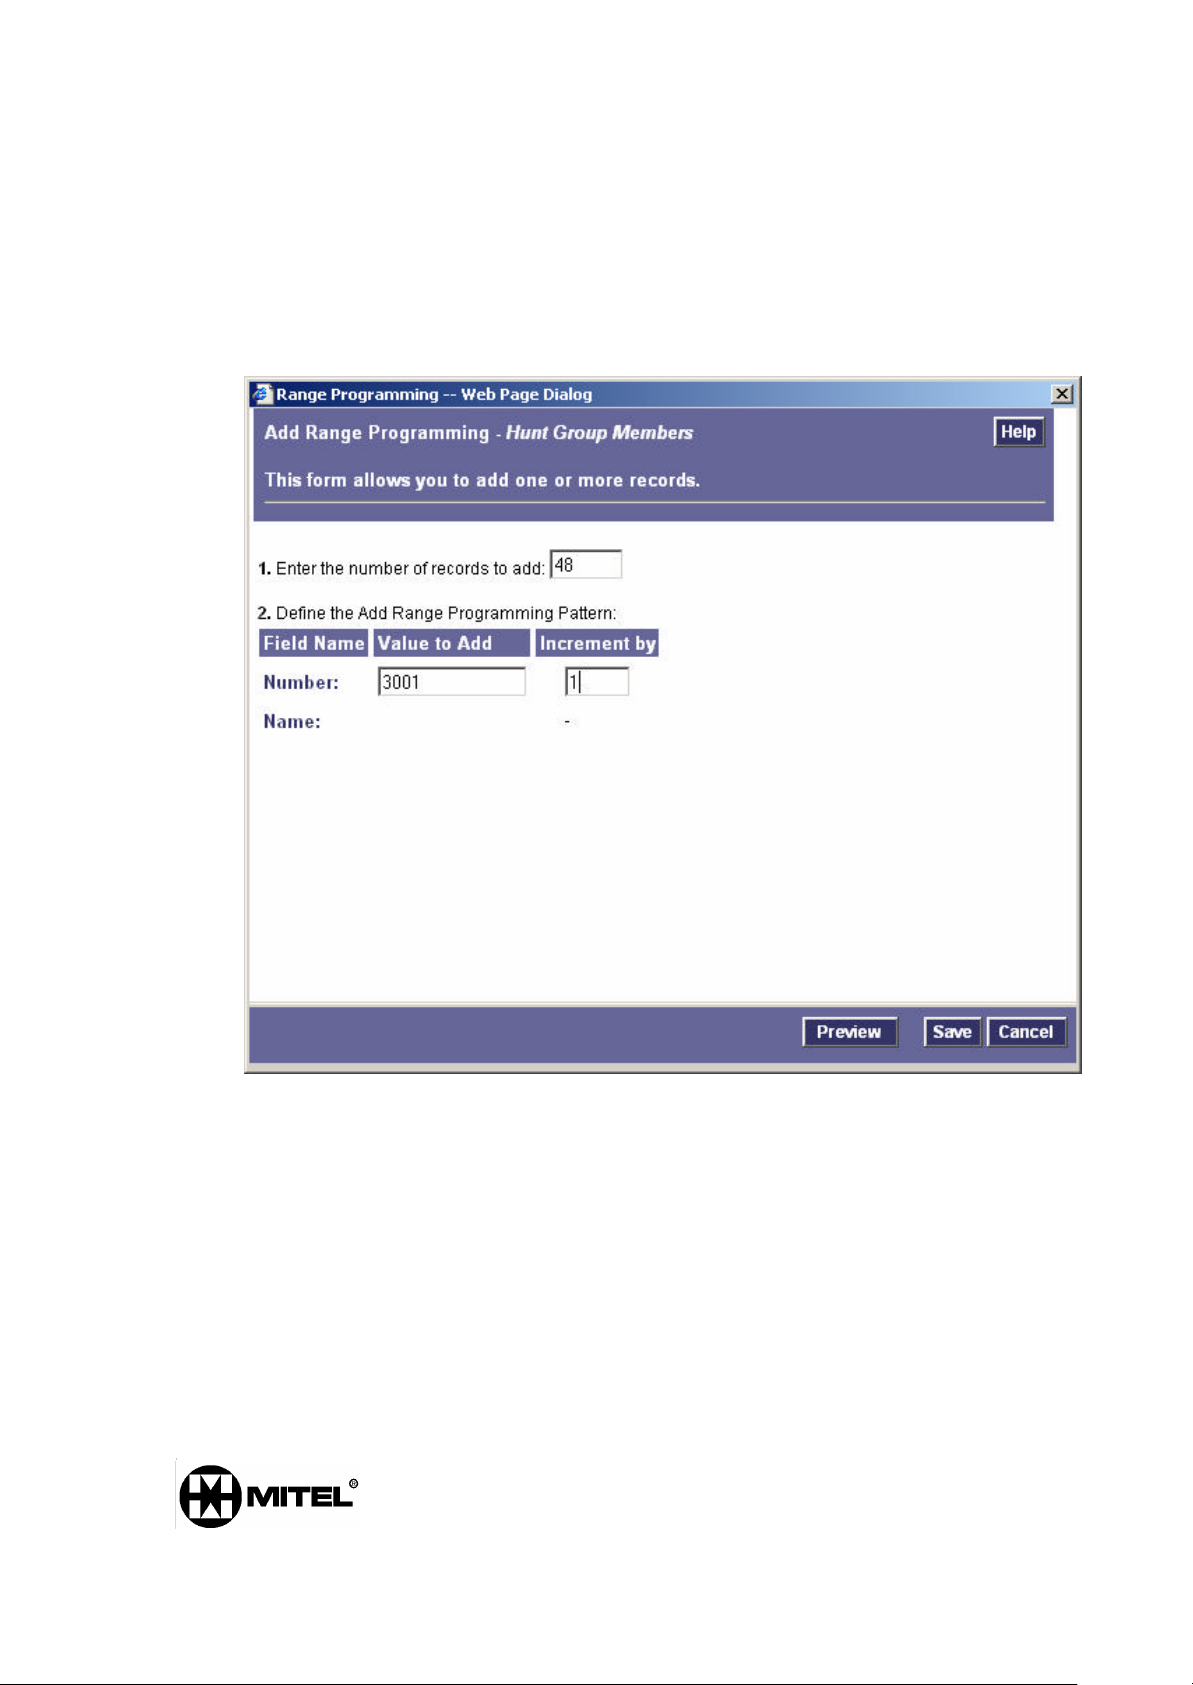
7. Click “Add Member”
8. Select the following
Page 32 of 35
Page 35
Mitel PBX interface with Conferencing Server Configuration Notes 09/08/04
• Number of Records to Add à Enter the number of ports
• Number à The 1st Port Number (3001 if the Hunt Group is
3000)
• Increment By à 1 (MUST Be 1 or The IGC Will Not Work)
9. Click “Save”
The IGC Hunt Group is now created and populated with the IGC IP ports
Page 33 of 35
 Loading...