

Page 1

H
D77000000
H
D
Geettttii
G
www.emblaze-vcon.com
ngg
n
G
uii
G
u
Sttaarrttee
S
dee
d
d
d
Page 2

© 2004 - 2008 Emblaze-VCON Ltd. All Rights Reserved.
Information in this document is subject to change without notice. No part of this
document can be reproduced or transmitted in any form or by any means electronic or mechanical - for any purpose without written permission from
Emblaze-VCON Ltd.
VCON and Media Exchange Manager are registered trademarks of EmblazeVCON Ltd.
Microsoft is a registered trademark of Microsoft Corporation.
All other trademarks are the trademarks of their respective companies.
Caution! To comply with the limits for a Class A digital device, pursuant to Part
15 of the FCC Rules, all cables used to connect the system and
peripherals must be shielded and grounded. Operation with nonshielded cables may result in interference to radio or television
reception.
HD7000 Getting Started Guide © 2008
Page 3

SAFETY INFORMATION
Caution! Do not open the HD7000 unit. There are no user-serviceable parts
inside. Opening the unit voids the warranty and can also cause injury.
Please refer servicing to Emblaze VCON-trained service personnel.
When you use an HD7000 system, observe the following safety guidelines:
Danger! The internal areas of the unit and auxiliary equipment are sources of
voltage that, if not handled properly, constitute danger of bodily harm.
DO NOT operate the unit with any of its covers (including main cover,
bezels, filler brackets, front-panel inserts, and so on) removed.
INCORRECT replacement of the Remote Control battery can cause an
explosion. Replace only with the same or equivalent-type of battery
recommended by the manufacturer. Dispose of used batteries according
to the manufacturer’s instructions.
1. Make sure that the power is turned off and all equipment is disconnected
from the power supply before making any equipment connections.
2. Make sure the monitor and attached accessories (PTZ camera, VCR,
document camera, and so on) are electrically rated to operate with the AC
power available in your location.
3. To help avoid possible damage to the system cards, wait 5 seconds after
turning off the system before disconnecting a device from the computer.
4. To help prevent electric shock, plug the unit and accessories’ power cables
into properly grounded power sources. These cables are equipped with threeprong plugs to help ensure proper grounding. Do not use adapter plugs or
remove the grounding prong from a cable. If you must use an extension
cable, use a three-wire cable with properly grounded plugs.
5. Make sure that nothing rests on the unit system’s cables and that the cables
are not located where they can be stepped on or tripped over.
6. Do not install this equipment near water, or in an otherwise wet or damp
environment.
7. Do not run the equipment in an environment with ambient temperature
higher than 35°C or lower than 10°C.
Page 4

8. Keep food and liquids away from the system or accessories.
9. Keep the unit away from radiators and heat sources. Also, do not block
cooling vents. Avoid placing loose papers underneath the unit, and do not
place the computer in a closed-in wall unit or on a bed, sofa, or rug.
10. Do not install or operate this equipment if chemical gas leakage is expected
in the area.
FCC Warning
Modifications not expressly approved by the manufacturer could void the user
authority to operate the equipment under FCC rules.
The FCC Wants You to Know
This equipment has been tested and found to comply with the limits for a Class A
digital device, pursuant to Part 15 of the FCC rules. These limits are designed to
provide reasonable protection against harmful interference when the equipment is
operated in a commercial environment.
This equipment can radiate radio frequency energy and, if not installed and used
in accordance with the instructions, may cause harmful interference to radio
communications.
Operation of this equipment in a residential area is likely to cause harmful
interference, in which case the user will be required to correct the interference at
his own expense.
HD7000 Getting Started Guide © 2008
Page 5

TABLE OF CONTENTS
...................................................... 6CONNECTING THE HARDWARE1
........................................................ 7MAKING AND ENDING A CALL2
M
AKING A CALL ......................................................................................... 7
ENDING A CALL .......................................................................................... 8
...................................................................... 8MXM CONFIGURATION3
............................ 9CAMERA ADJUSTMENTS FOR NA AND JAPAN4
C
HANGING THE REFRESH RATE .................................................................. 9
..................................................... 11
....................... 12RECEIVING AND INSTALLING A PERMANENT LICENSE KEY
.......... 11CREATING A PERMANENT SOFTWARE LICENSE KEY5
......................................................................... 12TROUBLESHOOTING6
............................................................................. 13
.................................................................................. 14CAMERA PROBLEMS
..................................................................................... 15VIDEO PROBLEMS
..................................................................................... 16AUDIO PROBLEMS
........................................................................ 18CONNECTIVITY PROBLEMS
TABLE OF FIGURES
Figure 1: Making a Call ............................................................................... 7
...................................................... 8Figure 2: Selecting MXM Configuration
Figure 3: Configuring MXM ......................................................................... 9
Figure 4: Changing the Refresh Rate ....................................................... 10
.............................. 11Figure 5: Changing the Refresh Rate on the Camera
Figure 6: License Activation Page ............................................................ 12
GETTING A TEMPORARY LICENSE KEY
KEYBOARD PROBLEMS
HD7000 Getting Started Guide © 2008
Page 6
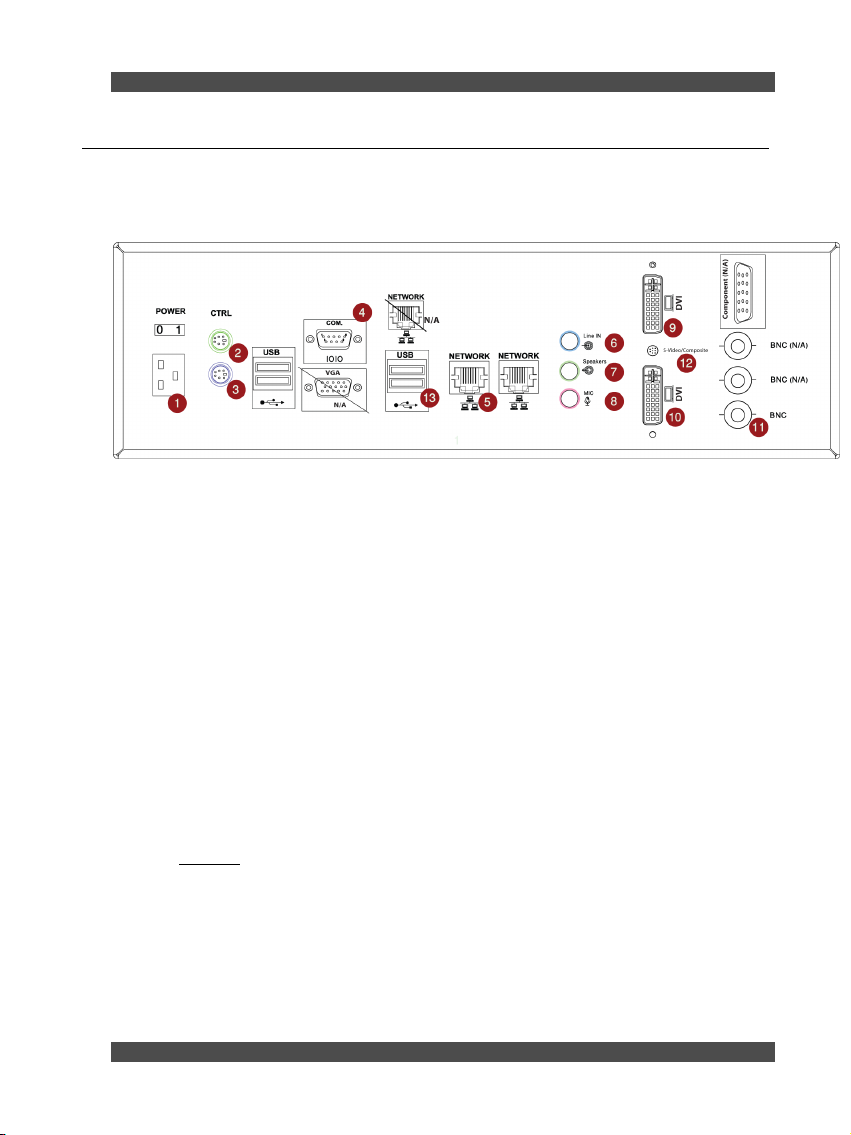
1 CONNECTING THE HARDWARE
Following is a drawing of the back panel with numbers for each step. Follow the
numbers to connect the appropriate device.
1. Connect the electrical cable.
2. Connect the remote control IR receiver Y cable mouse
3. Connect the remote control IR receiver Y cable keyboard
4. Connect the RS232 camera control cable
5. Connect the network Ethernet cable
6. Connect the line in (optional)
7. Connect the speakers
8. Connect the microphone
9. Connect the DVI cable connecting to your display
10. Connect the second DVI cable connecting to your second display (optional)
11. Connect the camera BNC cable from the camera into the HD-SDI socket at
the bottom
for Video input
12. Connect the S-Video or Composite connector to your display (optional)
13. For systems equipped with a USB license key, plug the supplied HD7000
USB license key into a USB port
of the Video input. Note: Use only the marked HD-SDI socket
HD7000 Getting Started Guide © 2008
Page 7

2 MAKING AND ENDING A CALL
Making a Call
After you turn on the HD7000 system:
1. Click the Call button.
2. Select the type of call you want to make (H.232 or ISDN).
3. Set the bandwidth and destination (IP address or ISDN telephone number).
4. Click the Call button. The status will appear at the bottom of the screen until
the connection is made.
Figure 1: Making a Call
HD7000 Getting Started Guide © 2008
Page 8

Ending a Call
Click the Hang up button (same as the Call button) to end the call.
3 MXM CONFIGURATION
If your HD7000 system connects to an MXM server, please follow
the steps below.
1. Select Settings > Network > LAN> MXM .
Figure 2: Selecting MXM Configuration
2. Enter your username, password and IP address then click Ok.
HD7000 Getting Started Guide © 2008
Page 9

Camera
A
Figure 3: Configuring MXM
4 CAMERA ADJUSTMENTS FOR NA AND JAPAN
In North America and Japan it is recommended that you change the
Refresh Rate of the camera and in the HD7000 configuration. This
is because the electrical network affects the fluorescent flicker rate
and the default frame rate for the HD7000 and its camera is
optimized for electrical network used in Europe (this is similar to
using NTSC or PAL on standard definition systems).
Changing the Refresh Rate
1. Select Settings > Hardware > Camera.
2. Change the setting to NTSC and click the Ok button.
HD7000 Getting Started Guide © 2008
Page 10

Camera
A
Figure 4: Changing the Refresh Rate
3. Use a small screwdriver to change setting on the camera itself from A to 2.
Note: Turn off the camera before applying any changes by
disconnecting the electricity cable (labeled “DC IN”)
Note: All other settings are NOT compatible with the HD7000. The camera
must be set to either A (in Europe and Middle East) or 2 (North
America and Japan).
HD7000 Getting Started Guide © 2008
Page 11

Creating a Per33B
m
Figure 5: Changing the Refresh Rate on the Camera
5 CREATING A PERMANENT SOFTWARE LICENSE KEY
This is only applicable to system integrators who purchased a Software Only
license. Installation of the HD7000 software is straight forward and simple. From
the installation media, execute the”setup.exe” file and follow the instructions.
Creating a permanent software license key for the HD7000 is a two step
procedure.
1. Get a temporary license key from your system and send it to Emblaze-VCON.
2. Receive your permanent key and install it via the web interface.
Getting a Temporary License Key
1. Open your web browser and navigate to your machine IP address
(e.g. HTTP://127.0.0.1/
2. Select Configuration
license key and the features that are enabled.
3. Copy the license key and paste it into an email. Add your purchase order
number and send to your contact person at Emblaze-VCON. In the meantime
your temporary license will remain active for 30 days.
).
> Options > License. In this page you can find the
HD7000 Getting Started Guide © 2008
Page 12

Receiving and Installing a Permanent License Key
1. Once you receive your permanent key from Emblaze-VCON, open your web
browser and navigate to your machine IP address (e.g. HTTP://127.0.0.1/
).
2. Select Configuration
3. Go to the “license key” field and delete the existing key.
4. Copy the permanent license key from the email and paste it into “license
key” field.
5. Click the Apply button.
> Options > License.
Figure 6: License Activation Page
6 TROUBLESHOOTING
If you are unable to find a solution to your problem, please access the Technical
Support section of the EMBLAZE-VCON website at http://www.emblaze-
vcon.com/support/index.shtml, where you can check its knowledge base or
initiate other customer support processes.
HD7000 Getting Started Guide © 2008
Page 13

Keyboard Problems
Problem Solution(s)
When you work
with the keyboard
the system does not
respond.
1. Make sure that you are directing the keyboard
directly at the receiver unit with no obstructions
between them.
2. Check that the receiver is connected correctly and
the receiver LEDs are ON.
3. Bring the keyboard closer to the HD7000. If this
solves the problem and the keyboard was within 6
meters (19.5 feet) then you should also replace the
batteries.
4. Check that the batteries are inserted correctly in the
keyboard. If necessary, replace the batteries.
5. If the problem continues, contact your local
EMBLAZE-VCON distributor for further
instructions.
HD7000 Getting Started Guide © 2008
Page 14

Camera Problems
Problem Solution(s)
The camera does
not respond to
movement
requests.
The camera at the
remote site does
not respond.
1. Open the Settings>Hardware>Camera dialog box
and make sure that the correct camera model, port,
video device and video type are defined.
2. Make sure that you are directing the keyboard directly
at the receiver unit with no obstructions between
them.
3. Verify that the Camera unit is connected correctly to
the video card.
4. Verify that the camera control cable is connected
between the camera’s serial IN connector and the
serial communication port on the rear panel of the
computer.
5. Make sure that the camera is the Sony EVI-HD1
camera.
1. Verify that a controllable PTZ camera is connected to
the remote user’s computer.
2. Verify that the remote user allows you to establish
control the remote camera.
3. Open the Settings>Hardware>Camera dialog box
and make sure that Allow Far End Camera Control
(FECC) is selected.
HD7000 Getting Started Guide © 2008
Page 15

Video Problems
Problem Solution(s)
The system is
switched ON but
the local Video
Image is blank.
1. Verify that the Camera is switched ON.
2. Verify that the HD-SDI cable is connected to bottom
connector of the Video In card.
3. Open the Settings>Hardware>Camera dialog box and
make sure that the correct video device is selected.
4. Make sure the System Select setting at the back of the
camera is either A or 2. All other settings will not
work.
5. Make sure that the System Select setting at the back of
the camera matches the setting in the HD7000
Settings>Hardware>Camera dialog box (PAL if set to
A or NTSC if set to 2).
6. If the problem continues, contact your local
EMBLAZE-VCON distributor for further instructions.
The local Video
Image is the
EMBLAZEVCON logo.
1. If you have only the HD monitor, open the
Settings>Hardware>Display dialog box and make sure
that Single Mode is selected.
2. If you have a TV and the HD monitor, open the
Settings>Hardware>Display dialog box and make sure
that Dual Mode is selected, and that the TV is tuned to
the correct channel.
HD7000 Getting Started Guide © 2008
Page 16

The image
flickers.
1. Make sure that the System Select setting at the back of
the camera and the setting in the HD7000
Settings>Hardware>Camera dialog box are
appropriate for your country. (PAL and A in Europe
and the Middle East; NTSC and 2 in North America
and Japan).
Audio Problems
Problem Solution(s)
When connected in
a videoconferencing
session, you cannot
hear any sounds
from the remote
user.
1. Check the volume on the HD7000 system and make
sure that it is not turned down or muted.
2. Check the volume on the monitor volume and make
sure that it is not turned down or muted
3. Check the audio connections from the HD7000 and
the HD monitor to make sure that they are plugged
into the correct sockets.
4. Have the remote participant make sure that the audio
transmissions are not muted on the remote side.
5. If you started the videoconference, then disconnect
and redial to verify whether the problem remains.
If the remote user started the videoconference,
advise the remote user to disconnect and redial to
verify whether the problem remains.
6. If the problem continues, contact your local
EMBLAZE-VCON distributor for further
instructions.
HD7000 Getting Started Guide © 2008
Page 17

Problem Solution(s)
Audio from your
system is not being
received by the
remote user.
1. Make sure that you have not turned off the audio
transmissions from your microphone, thus muting
audio being transmitted from your system to the
remote user.
2. Open the Settings>Hardware>Audio dialog box and
make sure that the correct audio device is selected.
3. Make sure that the microphone is connected to the
pink socket on the HD7000.
4. Instruct the remote participant to examine the remote
system as indicated in the previous section for
received audio.
5. If the problem continues, contact your local
EMBLAZE-VCON distributor for further
instructions.
HD7000 Getting Started Guide © 2008
Page 18

Connectivity Problems
Problem Solution(s)
The connection fails
when trying to start
or receive a call.
The connection fails
when trying to start
or receive a call
through the
Gatekeeper.
1. Make sure that LAN cable is connected and is not
loose.
2. Make sure that the TCP/IP settings (Windows
Control Panel > Network > Configuration tab) are
correct.
3. Open the Settings > Options > Security dialog box
and check your Encryption Mode settings.
1. Open the Settings > Network > Configuration
dialog box and make sure that the Gatekeeper IP
Address is entered correctly.
2. Make sure that your system's E.164 name or alias
name is entered correctly in the User Name box of
the LAN dialog box.
DOC000107 Rev.1
==END==
HD7000 Getting Started Guide © 2008
 Loading...