

Page 1
S100 Zero Client with vMatrix Server Manager
User Manual
Rev. Aug-26th-2016
This guide applies to Windows Server 2012 and earlier versions. All screen shots shown
were captured from a Windows Server 2012 installation. The installation, configuration
and login screens are based on vMatrix Server Manager 2.1.0 and device firmware 2.0.2.5.
Actual use may vary depending on the specific software used. Unless specifically noted,
the installation screens are generally identical for all systems.
Page 2

S100 Zero Client & vMatrix User Manual
www.vcloudpoint.com
Table of Contents
Important Notices
..................................................................................................
- 5 -
Safety Information
.................................................................................................
- 6 -
Regulatory Compliance
.........................................................................................
- 6 -
Chapter 1. Product Overview
..............................................................................
- 8 -
1.1 Brief Introduction
....................................................................................
- 8 -
1.2 Package Contents
....................................................................................
- 8 -
1.3 Device Connections
.................................................................................
- 8 -
Chapter 2. Panning for Deployment
..................................................................
- 9 -
2.1 Host Configurations & Networking
.....................................................
- 9 -
2.1.1 Configurations by number of users and workloads
............
- 9 -
2.1.2 Networking
..................................................................................
- 10 -
2.2 Software Requirements
.......................................................................
- 11 -
2.2.1 vMatrix Server Manager
...........................................................
- 11 -
2.2.2 Windows Operating System
....................................................
- 11 -
2.2.3 Multi-User Application
..............................................................
- 11 -
2.2.4 VLC Media Player
........................................................................
- 13 -
Chapter 3. Installation & Connection
..............................................................
- 15 -
3.1 vMatrix Installation
...............................................................................
- 15 -
3.2 User Creation
.........................................................................................
- 20 -
3.3 Device Connection
................................................................................
- 22 -
Page 3

S100 Zero Client & vMatrix User Manual
www.vcloudpoint.com
3.4 Device Login
............................................................................................
- 23 -
Chapter 4. Using The Zero Client
......................................................................
- 28 -
4.1 Settings Menu
........................................................................................
- 28 -
4.1.1 Login
.............................................................................................
- 28 -
4.1.2 Display
..........................................................................................
- 30 -
4.1.3 Network
........................................................................................
- 31 -
4.1.4 Ping
................................................................................................
- 34 -
4.1.5 Device Lock
..................................................................................
- 34 -
4.1.6 Shutdown Button
.......................................................................
- 35 -
4.2 Settings Lock
...........................................................................................
- 36 -
4.3 Keyboard Layout Settings
....................................................................
- 37 -
4.4 Notification Log
......................................................................................
- 38 -
4.5 Device Information
...............................................................................
- 39 -
4.6 Firmware Update
...................................................................................
- 40 -
4.7 Reset
.........................................................................................................
- 42 -
4.8 Disconnect & Sign off
...........................................................................
- 43 -
4.9 Use USB Devices
....................................................................................
- 43 -
4.10 More Tools & Settings
........................................................................
- 44 -
4.10.1 Chat Tool
....................................................................................
- 44 -
4.10.2 Set Password
............................................................................
- 44 -
4.10.3 Set Language
............................................................................
- 45 -
Page 4

S100 Zero Client & vMatrix User Manual
www.vcloudpoint.com
4.10.4 Set Hotkeys ...
...........................................................................
- 45 -
Chapter 5. Using vMatrix Server Manager
.....................................................
- 46 -
5.1 User Management
................................................................................
- 46 -
5.1.1 New User Creation
.....................................................................
- 46 -
5.1.2 User Status View
.........................................................................
- 48 -
5.1.3 User Information View
..............................................................
- 48 -
5.1.4 User Desktop View
.....................................................................
- 49 -
5.1.5 Right Click Menu
.........................................................................
- 50 -
5.1.6 Personal Monitoring & Controlling
........................................
- 53 -
5.1.7 Personal User Settings
..............................................................
- 54 -
5.2 Device Management
.............................................................................
- 65 -
5.2.1 Device Information View
..........................................................
- 65 -
5.2.2 Right Click Menu
.........................................................................
- 66 -
5.3 Configuration
.........................................................................................
- 73 -
5.3.1 Default User Settings
................................................................
- 73 -
5.3.2 TCP/IP Ports
.................................................................................
- 74 -
5.3.3 Storage Visibility
.........................................................................
- 75 -
5.3.4 Monitor Authorization
..............................................................
- 79 -
5.4 Tools
.........................................................................................................
- 82 -
5.4.1 Broadcast Mode
.........................................................................
- 82 -
5.4.2 Maintenance Mode
....................................................................
- 83 -
Page 5

S100 Zero Client & vMatrix User Manual
www.vcloudpoint.com
5.4.3 Diagnostic Tools
.........................................................................
- 84 -
5.5 Add-ons
...................................................................................................
- 85 -
5.6 Host Information
...................................................................................
- 86 -
5.7 Log
............................................................................................................
- 86 -
5.7.1 User Action Log
..........................................................................
- 86 -
5.7.2 Management Action Log
..........................................................
- 87 -
5.7.3 Event Log
......................................................................................
- 88 -
5.8 About vMatrix
.........................................................................................
- 88 -
5.9 Offline Usage
..........................................................................................
- 89 -
5.10 More Tools & Settings
........................................................................
- 92 -
5.10.1 Chat Tool
....................................................................................
- 92 -
5.10.2 Set Password
............................................................................
- 92 -
5.10.3 Set Language
............................................................................
- 93 -
5.10.4 Set Hotkeys ...
...........................................................................
- 93 -
5.11 vMatrix Update
....................................................................................
- 94 -
5.12 vMatrix Uninstall
.................................................................................
- 95 -
Chapter 6. FAQs & Trouble-shootings
.............................................................
- 97 -
6.1 Trouble-shootings
.................................................................................
- 97 -
6.2 Frequent Asked Questions
..................................................................
- 99 -
Page 6

S100 Zero Client & vMatrix User Manual
www.vcloudpoint.com
Important Notices
Please note that reproduction of this User Guide in whole or in part, without express
written permission from vCloudPoint, is not permitted.
vCloudPoint reserves the right to make improvements and/or changes to this User Guide
and to the products, programs and/or specifications described herein at anytime without
notice. Information contained in this document may have been obtained from internal
testing or from a third party. vCloudPoint shall not be liable for any direct, indirect, special,
incidental or consequential damages in connection with the use of this material. The
latest version of this User Guide is obtainable at the “Download center” under the
Support menu of the vCloudPoint website at: www.vcloudpoint.com.
Refer to the Limited Hardware Warranty applicable to your region for information on
what is and what is not covered by the warranty, your responsibilities, exclusions, and
how to obtain service.
Please refer to the End User License Agreement (EULA) and Terms of Use (TOU) that are
presented for your review during the software installation process. The information
contained in these documents is very important. The EULA and TOU constitute
agreements between you and vCloudPoint and are accepted by you by installing and
using the product. It is your responsibility to print a copy of the EULA and TOU directly
from the installer in order to keep for your records.
This product gives users shared access to computer resources. It is not a computer, and
may not support all software applications, especially 3D applications that are designed to
be supported by computers with stand-alone graphic card. Similarly, it may not support
all hardware peripherals that are designed to be supported by stand-alone computers.
Refer to your computer operating system and application software vendors license
agreements for information on using these products with the vCloudPoint system.
Additional software licenses may be required.
The vCloudPoint hardware and software products described in this user manual are
protected by numerous granted and pending P.R.C and international patents.
© 2015 by Shenzhen Cloudpoint Technology Co., Ltd. All rights reserved. vCloudPoint and
vMatrix are registered Trademark of Shenzhen Cloudpoint Technology Co., Ltd. – P.R.C.
Microsoft and Windows are registered trademarks of Microsoft Corporation. All
trademarks are the property of their respective owners.
Page 7

S100 Zero Client & vMatrix User Manual
www.vcloudpoint.com
Safety Information
Refer to the following information to prevent any physical injury or loss of assets caused
by damage to the product. A user must read this User Guide carefully before use and
properly follow the instructions.
Make sure that the place of installation is not too hot (above 35°C), too cold (below
0°C), or too wet (above 85% relative humidity).
Avoid any severe impacts to the product
Make sure that the product is not exposed to direct sunlight or any hot machinery.
Please keep the product away from any items which have strong magnetic
properties.
Do not disassemble, repair or rebuild the product.
Please properly route all cables and power cords to avoid a tripping hazard. An
electric shock, fire, damage to the product or physical injury may occur as a result of
tripping over the cable.
Regulatory Compliance
FCC Information
This equipment has been tested and found to comply with the limits for a class B digital
device, pursuant to part 15 of the FCC Rules.
These limits are designed to provide reasonable protection against harmful interference
in a residential installation. This equipment generates, uses, and can radiate radio
frequency energy, and if not installed and used in accordance with the instructions, may
cause harmful interference to radio communications. However, there is no guarantee
that interference will not occur in a particular installation. If this equipment does cause
harmful interference to radio or television reception, which can be determined by turning
the equipment off and on, the user is encouraged to try and correct the interference by
one or the following measures:
Reorient or relocate the receiving antenna
Increase the separation between the equipment and the receiver
Connect the equipment to a power outlet on a circuit different from which the
receiver is connected
Consult your dealer or an experienced radio TV technician for help
Changes or modifications not expressly approved by the party responsible for
compliance could void the user’s authority to operate the equipment.
Page 8
S100 Zero Client & vMatrix User Manual
www.vcloudpoint.com
European Community (CE):
The Bureau of Indian Standards (BIS):
Disposal Information:
This device complies with part 15 of the FCC Rules. Operation is
subject to the following two conditions:
(1) This device may not cause harmful interference, and
(2) This device must accept any interference received, including
interference that may cause undesired operation.
This symbol means that according to local laws and
regulations your product should be disposed of separately
from household waste. The separate recycling of your
product will help ensure that it is recycled in a manner that
protects human health and the environment.
Page 9
S100 Zero Client & vMatrix User Manual
www.vcloudpoint.com
Chapter 1. Product Overview
1.1 Brief Introduction
vCloudPoint zero clients with vMatrix Server Manager software provide an alternative
solution to the traditional one PC per seat solution by powering multiple users with just
one PC. vCloudPoint zero client is compact, network access device that contains no
moving parts but allows each of its users to share the untapped resources of a single
host PC. vMatrix Server Manager performs as the management role on the host side with
a number of tools to assist IT administration, such as desktop broadcasting, monitoring
and controlling, storage visibility configuration, and user policy setup, etc. vCloudPoint
zero clients, combined with vMatrix Server Manager software, provide computing
experience that is practically indistinguishable from running on a PC, but offer great
advantages over traditional PCs, such as saved costs, enhanced security, reduced
maintenance, and simplified deployment and management.
1.2 Package Contents
When you unpack your vCloudPoint box, you will find the following items:
A zero client terminal device
A base/mounting bracket
Two screws
A 5V power adapter
A quick installation guide
If you find any damage or shortage of any accessories, please contact your local dealer.
Note: Your vCloudPoint zero client purchase was bundled with an entitlement to vMatrix Server
Manager software and Premium Support.
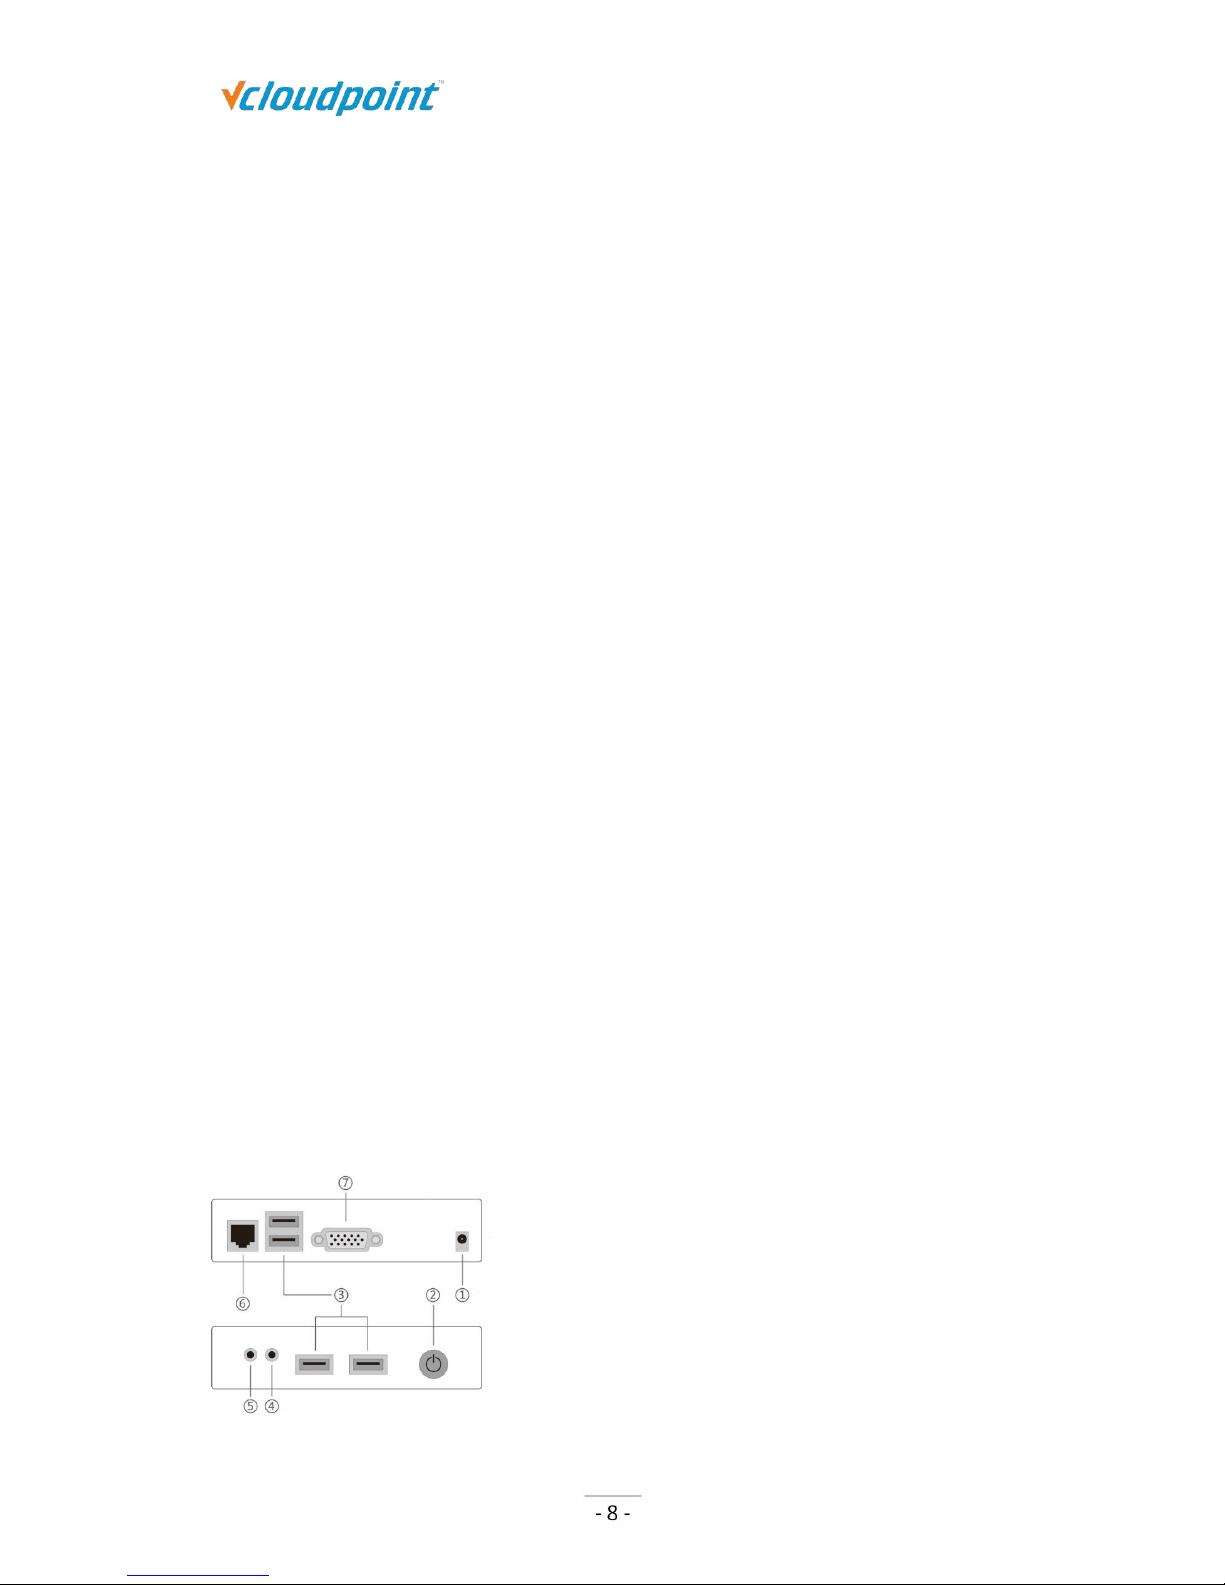
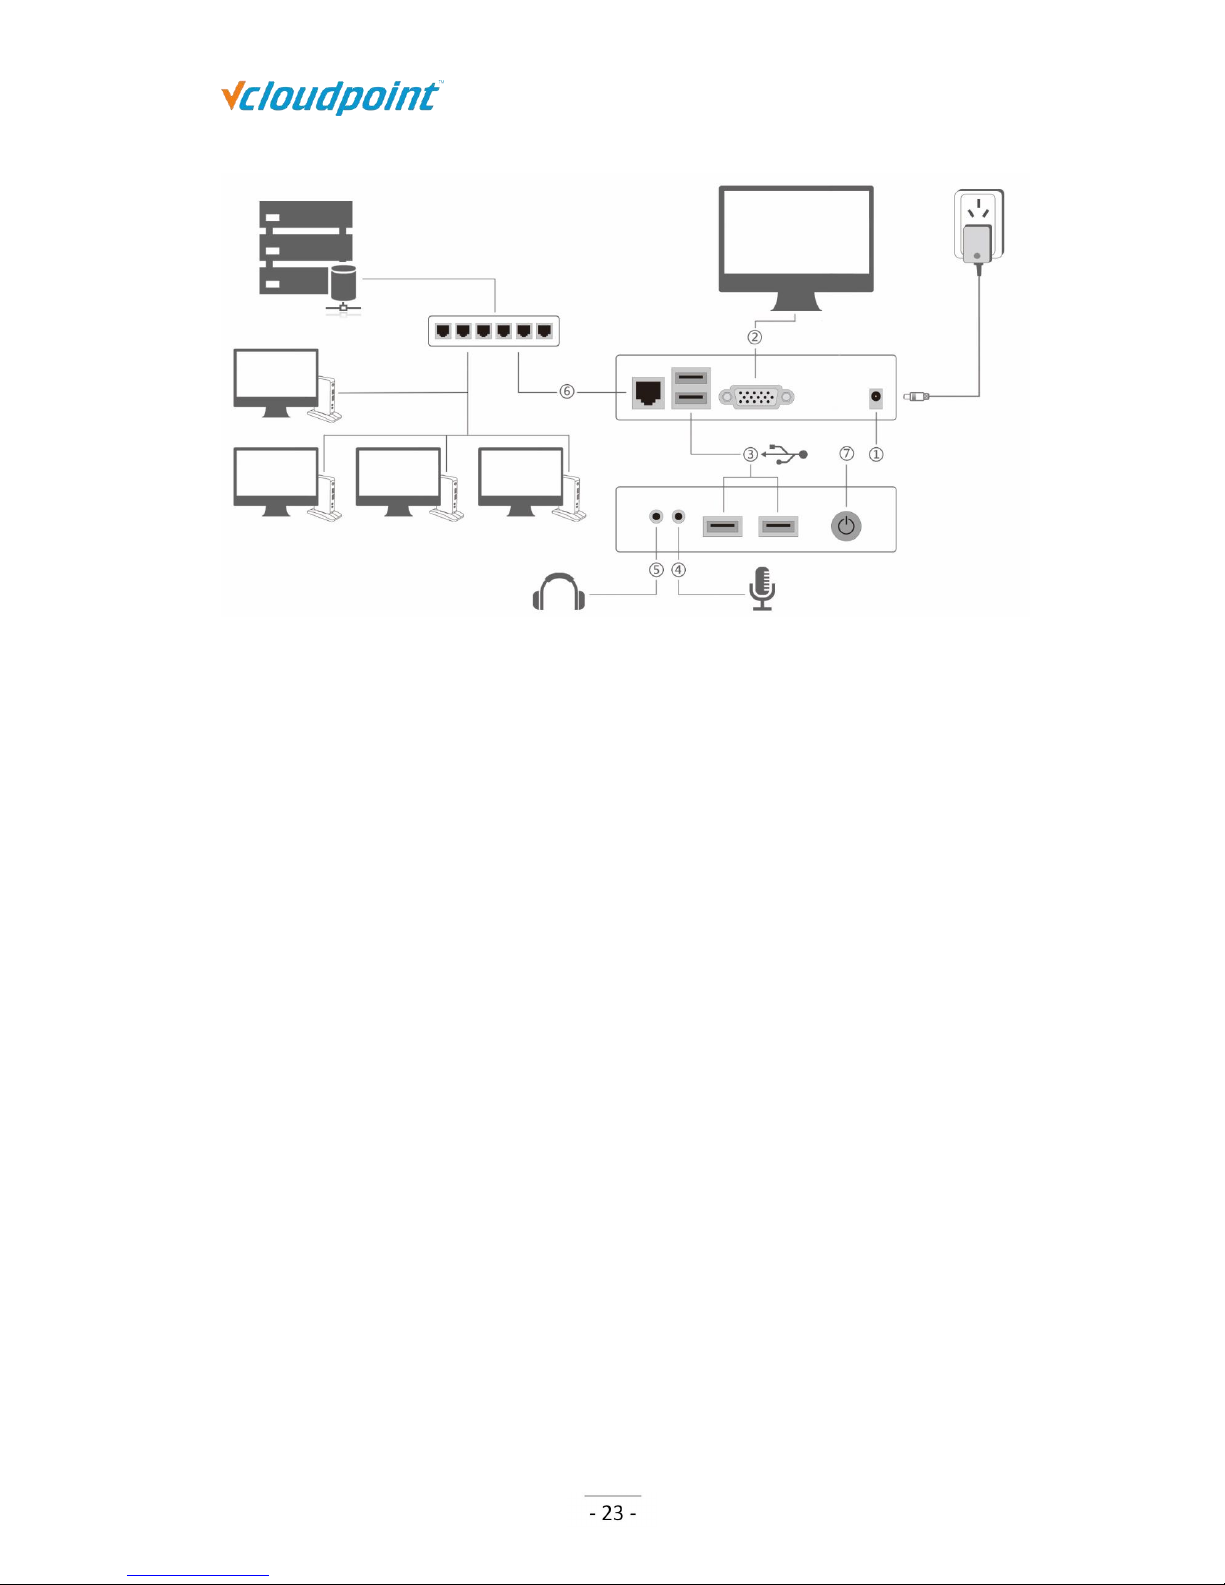
1.3 Device Connections
① 5V DC Power Input
②
Power/ Reset Button
③
USB2.0 Ports
④ 3.5mm Mic Jack
⑤ 3.5mm Speaker Jack
⑥ RJ45 Ethernet Input
⑦ VGA Display Port
Page 10
S100 Zero Client & vMatrix User Manual
www.vcloudpoint.com
Chapter 2. Panning for Deployment
2.1 Host Configurations & Networking
The preliminary guideline below provides an estimated starting point from which
administrators can test and, if needed, adjust the hardware specifications of their chosen
host systems. vCloudPoint recommends that you always test your environment in
advance of deployment to ensure it meets your expectations.
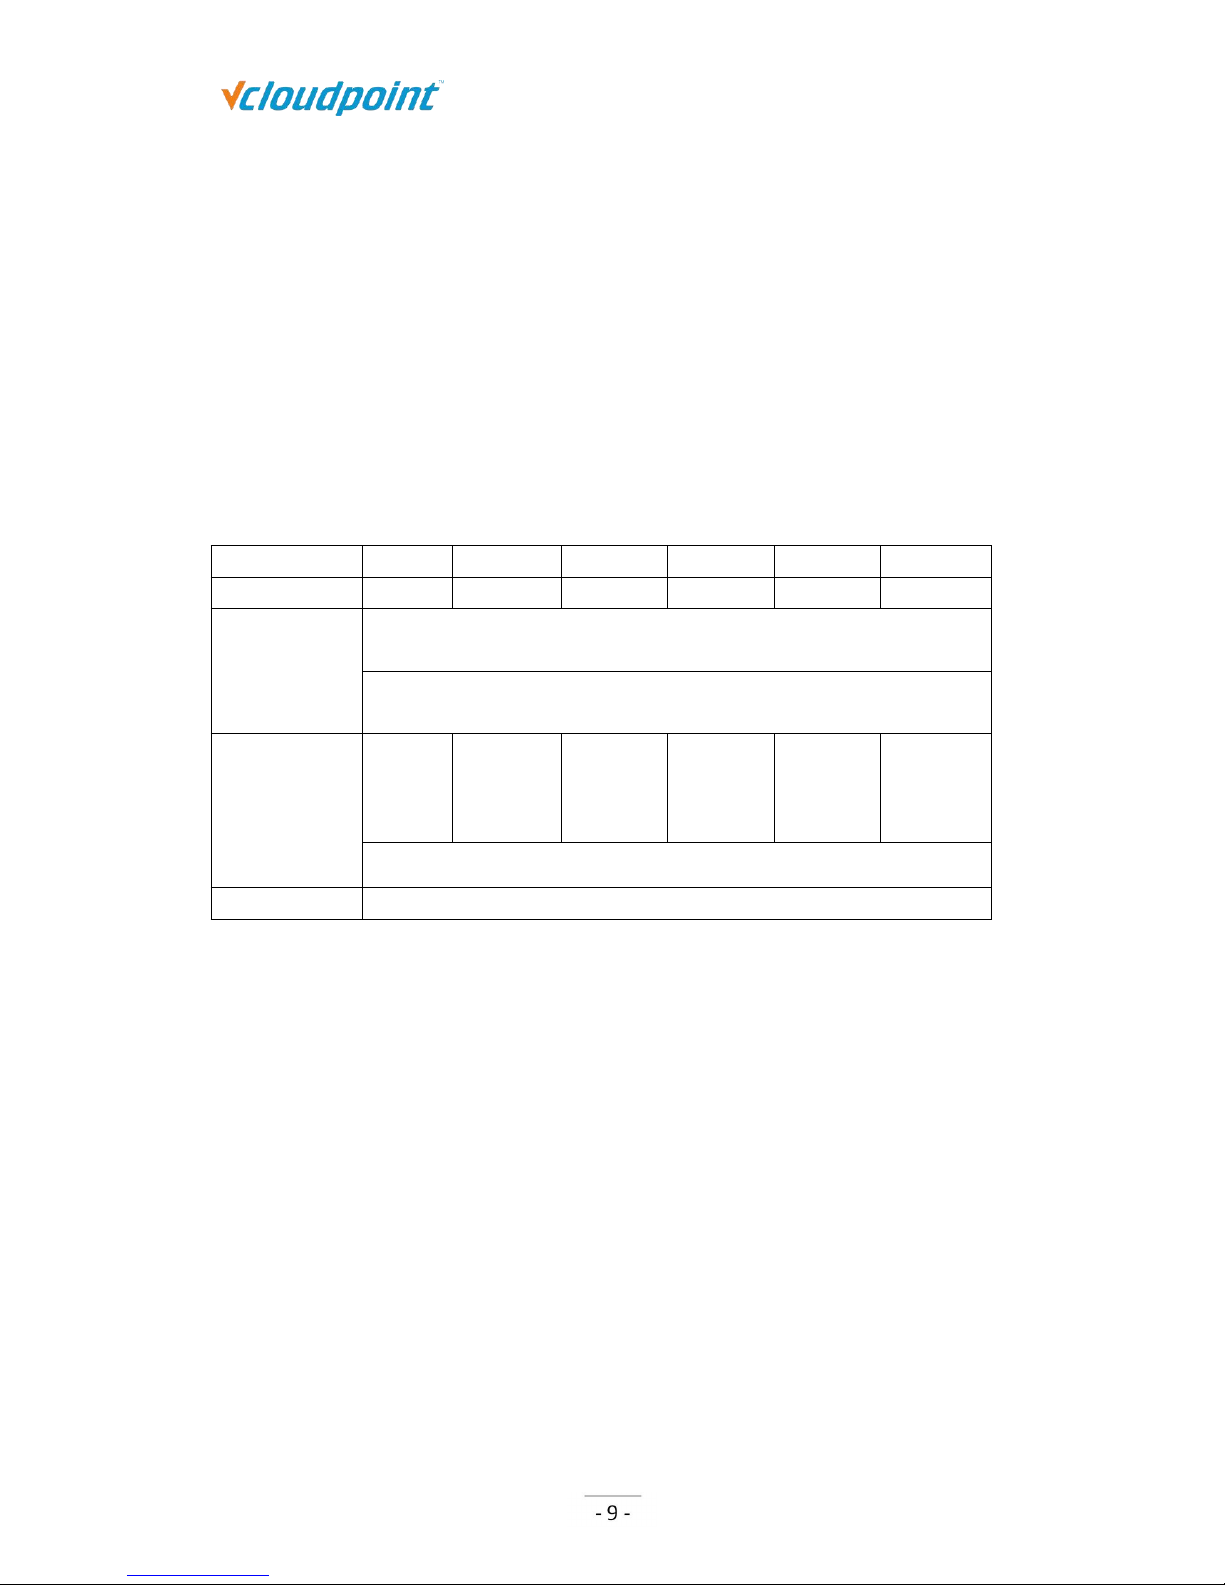
2.1.1 Configurations by number of users and workloads
Users
1~5
6~10
11~15
16~20
21~25
26~30
CPU
i5-4460
i5-4690k
i5-6600k
i7-6700
i7-6700k
i7-5820k
Memory
1.5G per Task Users running office, browser, messenger, video on VLC
player, etc., additional 2G for the host itself.
2G per Power Users running Photoshop, Illustrator, Auto-CAD, etc.,
additional 2G for the host itself.
Disk (SSD for
System and
Programs and
HDD for User
Data)
HDD
SSD 120G
SSD 120G
SSD 240G
SSD 240G
SSD 240G
HDD; Storage size to be determined by actual needs.
Bandwidth
Average 15Mbps per user within LAN
Note:
1) This recommended configuration is for supporting multiple users simultaneously running the
same applications, for environments of running mix applications, please thoroughly evaluate
expected workloads of every user and make some adjustments and fine tuning as your
deployment progresses.
2) vMatrix Server Manager permits up to 99 users per host. The number of users a customer's
installation will support depends upon the host's configuration and performance expectations of
the customer.
Page 11
S100 Zero Client & vMatrix User Manual
www.vcloudpoint.com
2.1.2 Networking
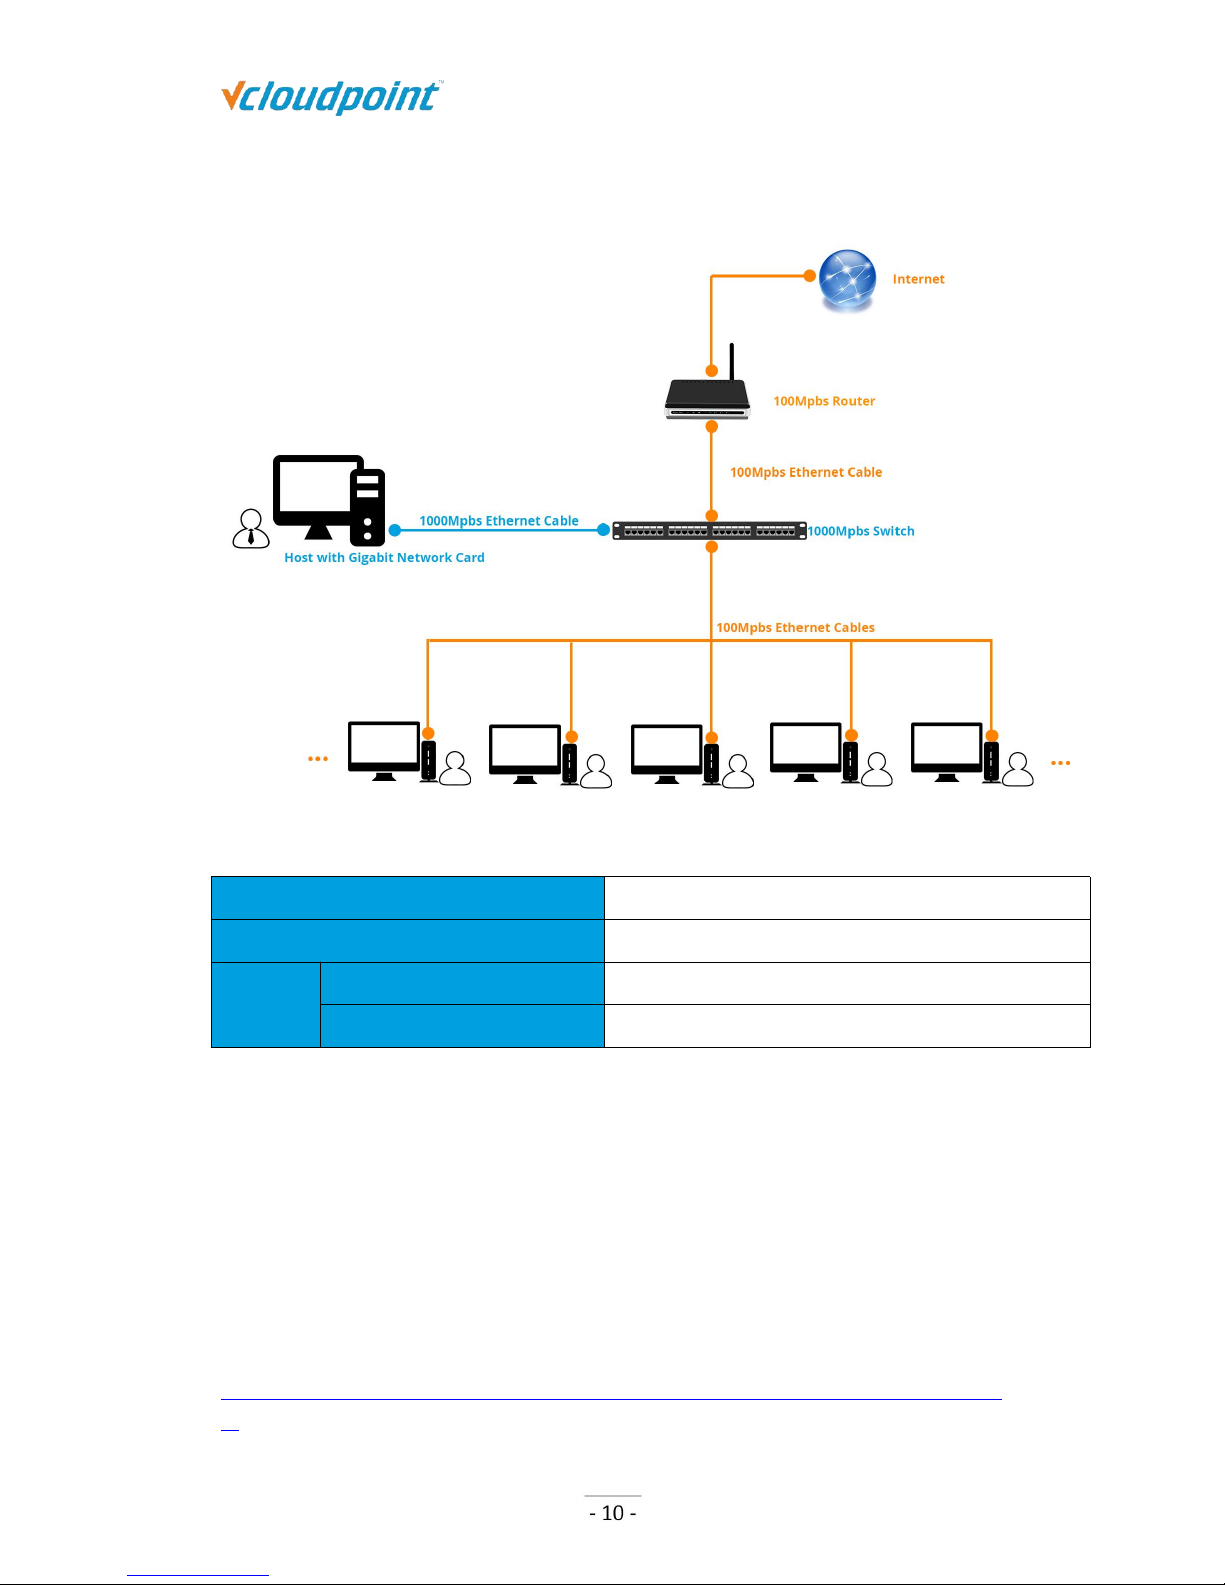
Host Network Controller
10/100/1000Mbps Base-T
Switch
10/100/1000Mbps Base-T
Cable
Connecting zero clients
10/100Mbps or 10/100/1000Mbps Base-T
Connecting host to switches
10/100/1000Mbps Base-T
Note:
1) You are recommended to use reliable gigabyte networking devices and CAT-6 Ethernet cables for
desirable multi-user experience.
2) Although vCloudPoint zero clients have a WIFI option, you are recommended to use standard
Ethernet network as unreliable WIFI network may cause disconnection or experience
compromised.
Download and view detailed deployment planning guide at:
www.vcloudpoint.com/wp-content/uploads/vCloudPointZeroClientDeploymentPlanning.p
df
Page 12

S100 Zero Client & vMatrix User Manual
www.vcloudpoint.com
2.2 Software Requirements
2.2.1 vMatrix Server Manager per shared host
The latest version of vMatrix Server Manager is obtainable at
www.vcloudpoint.com/support/downloads/.
2.2.2 Windows Operating System mounted on each shared host
Supported Operation Systems by vMatrix Server Manager:
Microsoft Windows XP SP3 Pro 32-bit (excluding Home Basic)
Microsoft Windows 7 32-bit & 64-bit (excluding Home Basic)
Microsoft Windows 8 32-bit & 64-bit (excluding Starter)
Microsoft Windows 8.1 32-bit & 64-bit (excluding Starter)
Microsoft Windows 10 32-bit & 64-bit (excluding Starter & Insider)
Microsoft Windows Server 2003 32 bits
Microsoft Windows Server 2008R2
Microsoft Windows Server 2012
Microsoft Windows Server 2012R2
Microsoft Windows Multipoint Server 2011
Microsoft Windows Multipoint Server 2012
Note: do not use a 32-bit Windows operating system in your real deployment, as it supports only
3.25 GB maximum memory.
2.2.3 Multi-User Application
vMatrix doesn’t contain a component or application to allow multiple users to access the
host simultaneously. To allow a simultaneous multi-user login, you need to install RDP
Wrapper (download and learn more at www.vcloudpoint.com/support/add-ons) or obtain
Microsoft RDS CALs. To properly license vCloudPoint zero clients in a Microsoft
Page 13
S100 Zero Client & vMatrix User Manual
www.vcloudpoint.com
environment, you are recommended to obtain Microsoft RDS CALs for each vCloudPoint
seat. For more information on licensing with Microsoft operating systems see: Article 02
at www.vCloudPoint.com/support/faq-how-tos/.
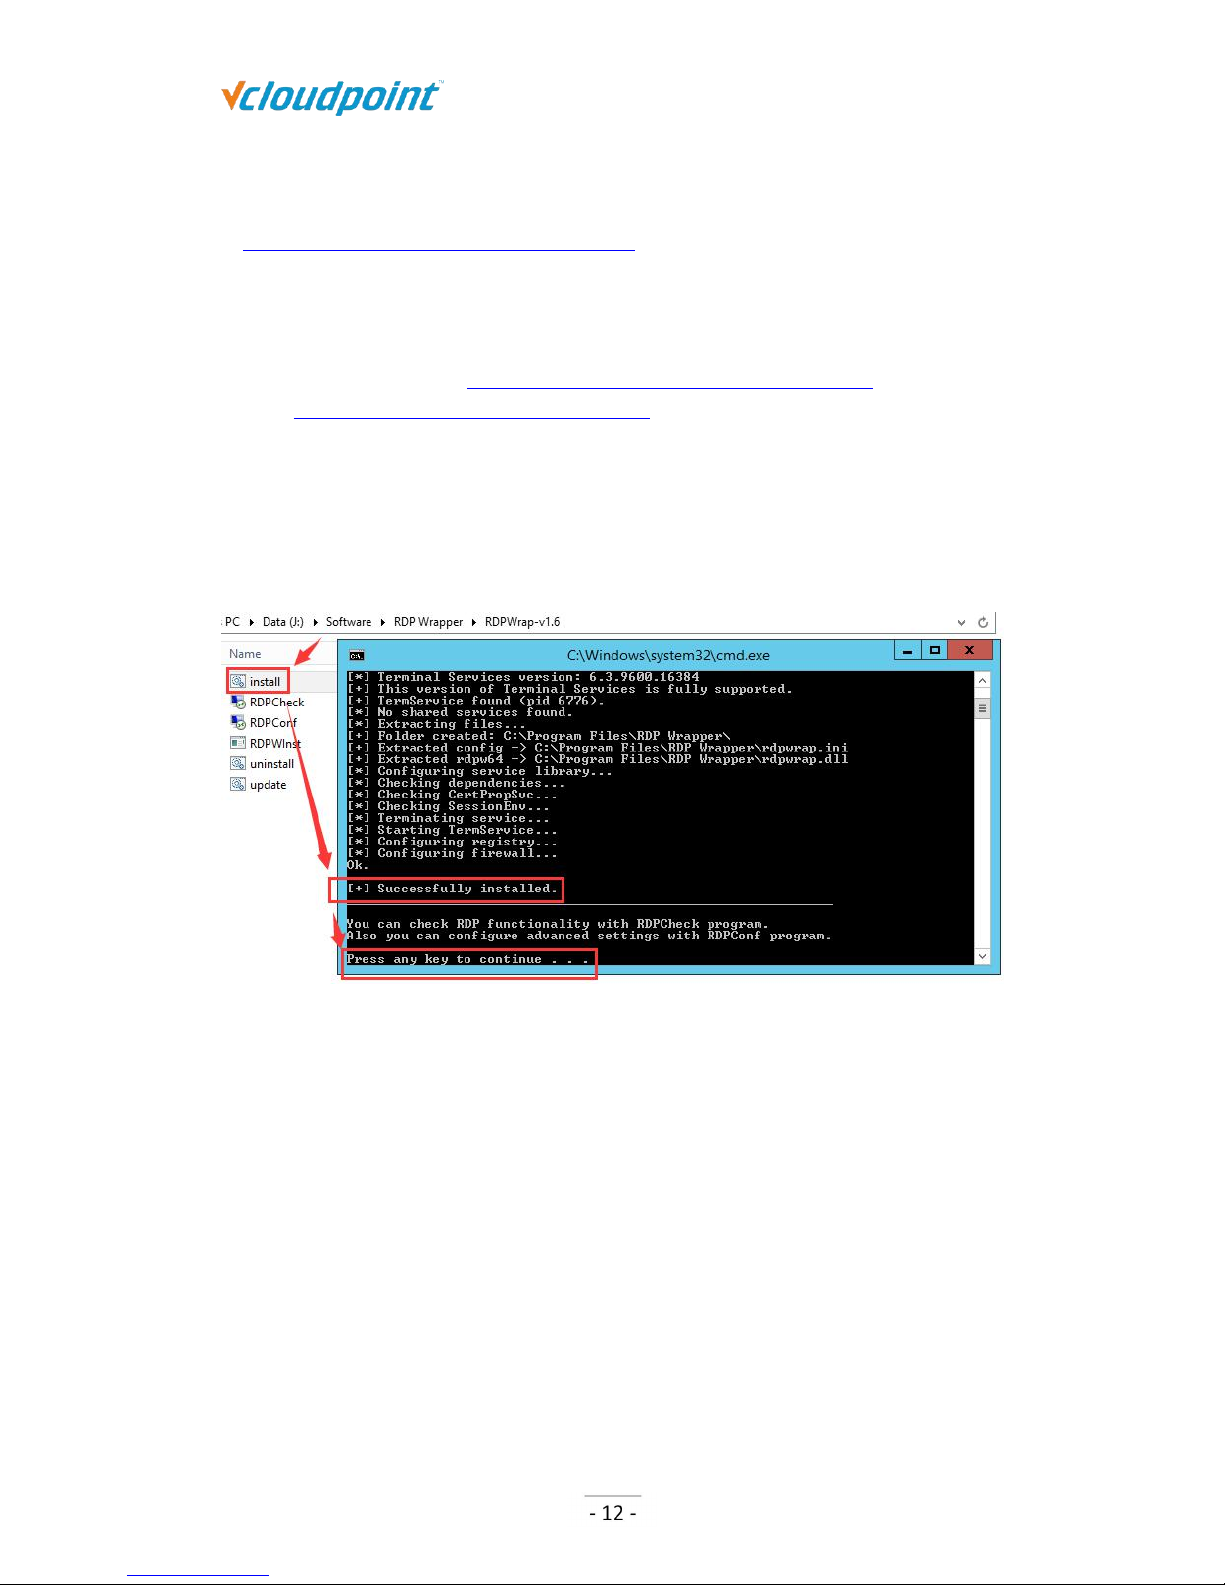
RDP wrapper
RDP Wrapper is a free open source project to enable Remote Desktop Host support. RDP
Wrapper is obtainable at https://github.com/stascorp/rdpwrap/releases or on official
website www.vcloudpoint.com/support/add-ons/.
Instructions:
1) Download the RDPWrap.zip file and then unzip it. Simply run the insall.bat file and
press any key when finished but make sure to disabled anti-virus software during
installation.
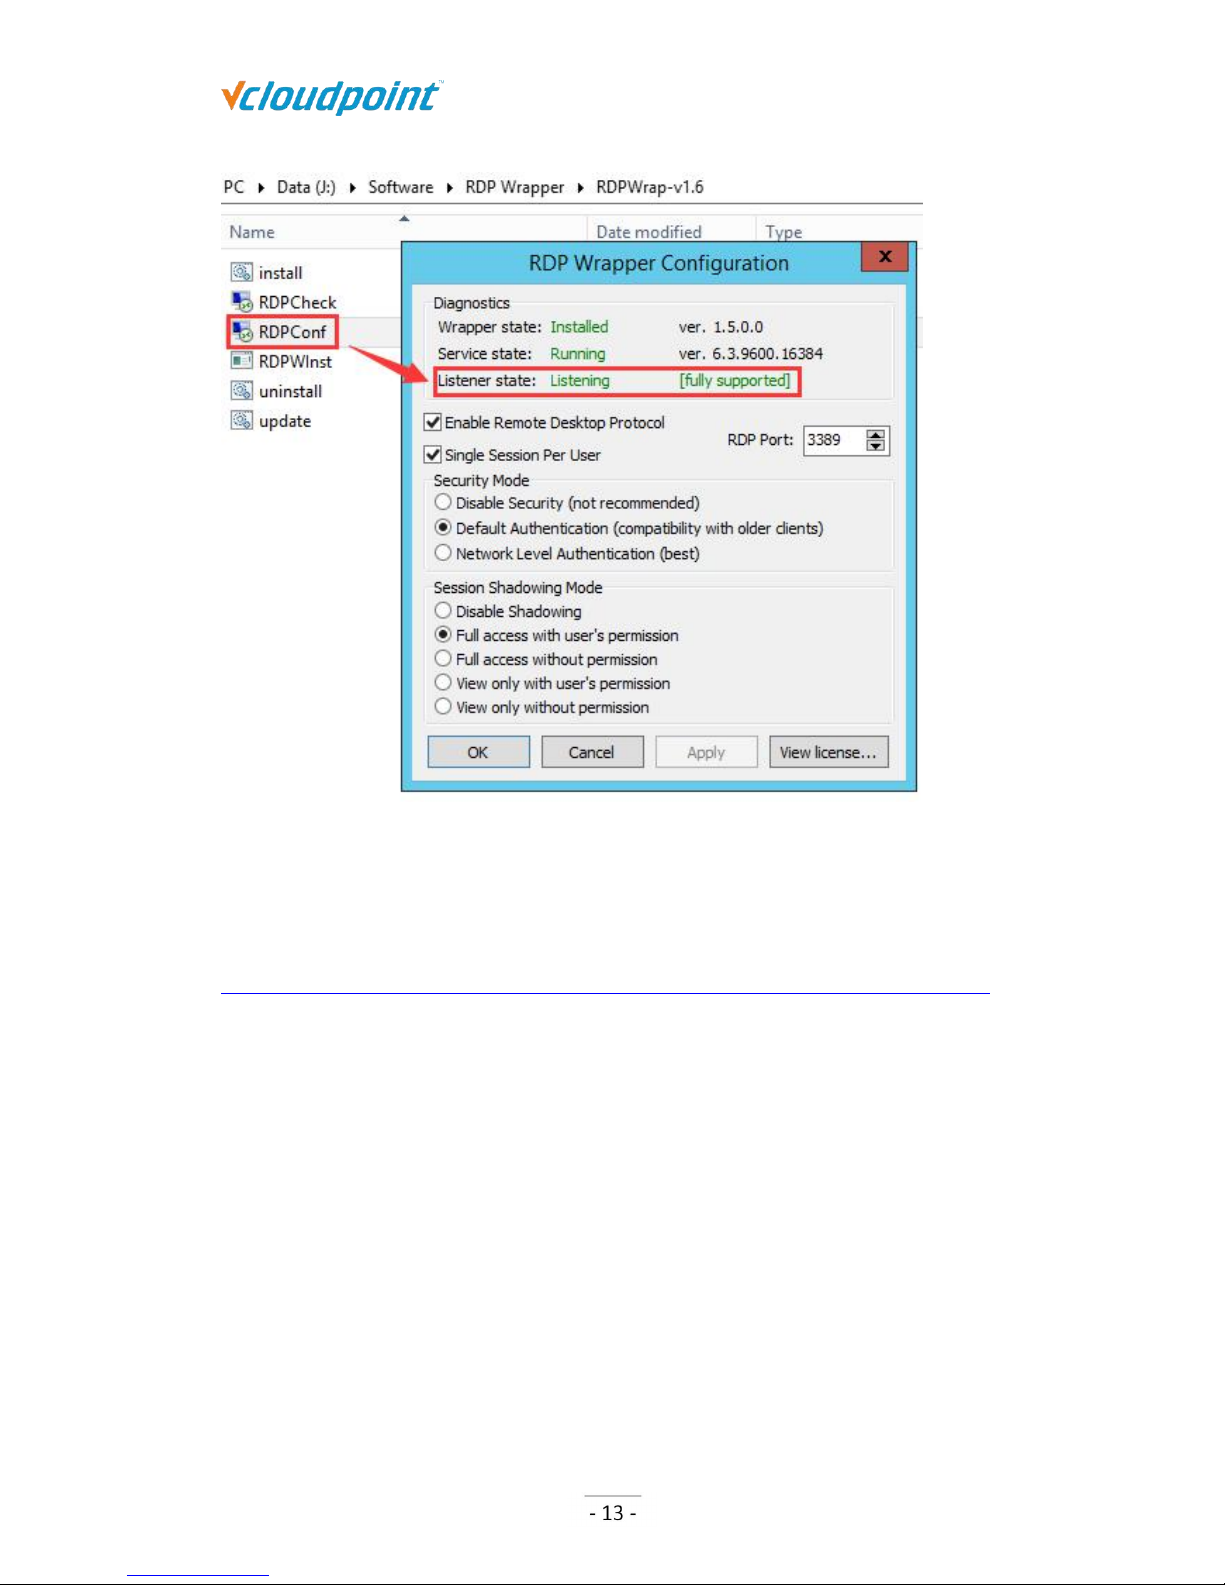
2) Check if the installation is successful by running “conf.exe”
Page 14
S100 Zero Client & vMatrix User Manual
www.vcloudpoint.com
Microsoft RDS CALs
Refer to the following link to install the Microsoft RDS CALs
https://www.microsoft.com/en-us/Licensing/product-licensing/client-access-license.aspx
Note: You are licensed by vCloudPoint to use the vMatrix Server Manager software under the
terms of the EULA. You cannot use the vMatrix Server Manager software with Windows Client
software (i.e., Windows XP, Windows 7, Windows 8/8.1, Windows 10) unless a single user and no
other user accesses the same Windows Client software at any one time, or you are authorized to do
so under an applicable license from Microsoft. In all cases, your rights and obligations with respect
to the use of vMatrix Server Manager software with Windows Server software and Windows Client
software are defined by both the vCloudPoint vMatrix Server Manager software EULA and the
applicable Microsoft Software License Agreement or EULA.
2.2.4 VLC Media Player
VLC is a free and open source cross-platform multimedia player and framework that
plays most multimedia files as well as DVDs, Audio CDs, VCDs, and various streaming
protocols. Beginning from vMatrix 2.0, vCloudPoint introduced a new feature that allows
Page 15

S100 Zero Client & vMatrix User Manual
www.vcloudpoint.com
local videos played on the zero client with VLC player to be rendered locally by the client
processor instead of the host cpu. This feature offloads 90% host-side CPU consumption
on video playing and can help support more video users per host especially for cases
where simultaneous video play is often required. This feature is supported by VLC player
of 2.1.5 or newer versions and works automatically after the installation of vMatrix 2.x.
Just make sure you are using the correct versions of vMatrix and VLC player and VLC
player is selected to play the video, then you are ready to “save”.
VLC player is obtainable at http://www.videolan.org/vlc/ or the official website of
vCloudPoint: www.vcloudpoint.com/support/add-ons/.
Note: As the media content is not rendered at the host side, there is a drawback of using this
feature: media content within the VLC player cannot be viewed by the administrator through
monitoring at the host side.
Page 16
S100 Zero Client & vMatrix User Manual
www.vcloudpoint.com
Chapter 3. Installation & Connection
3.1 vMatrix Installation
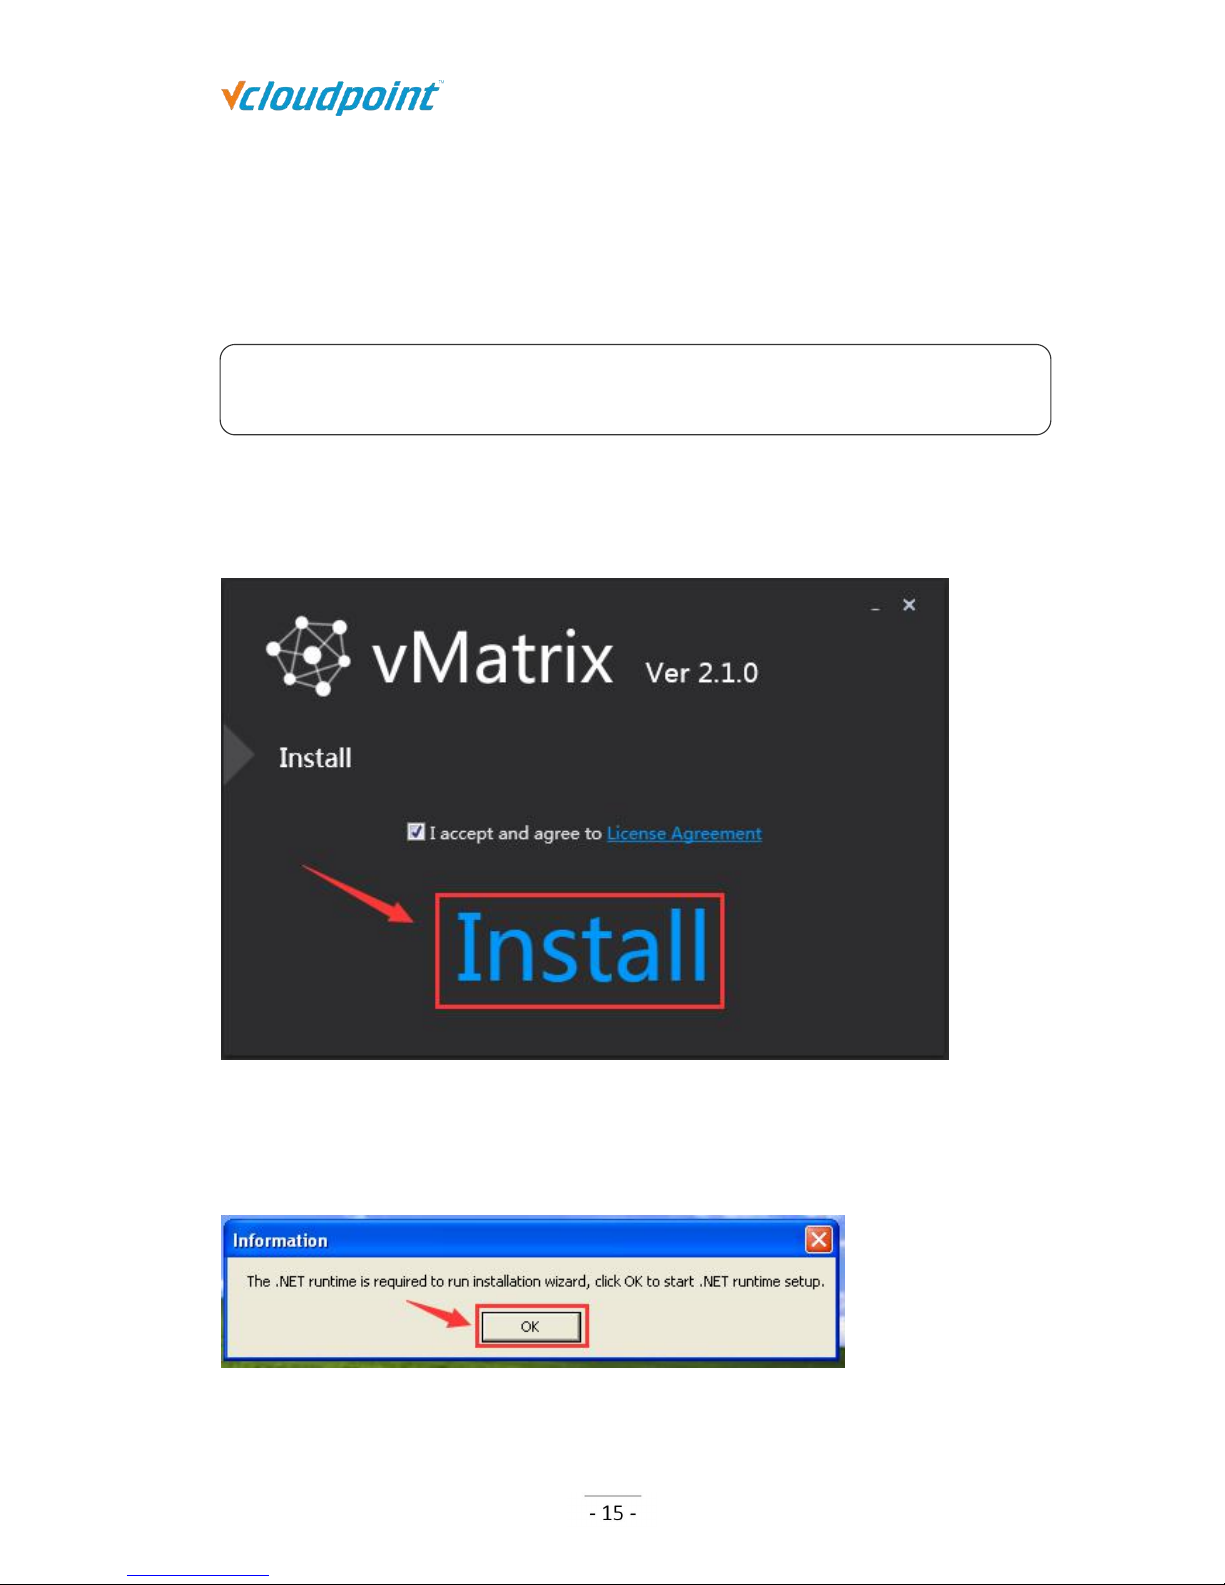
1) Run vMatrix installer.
2) Click “Install” to start installation.
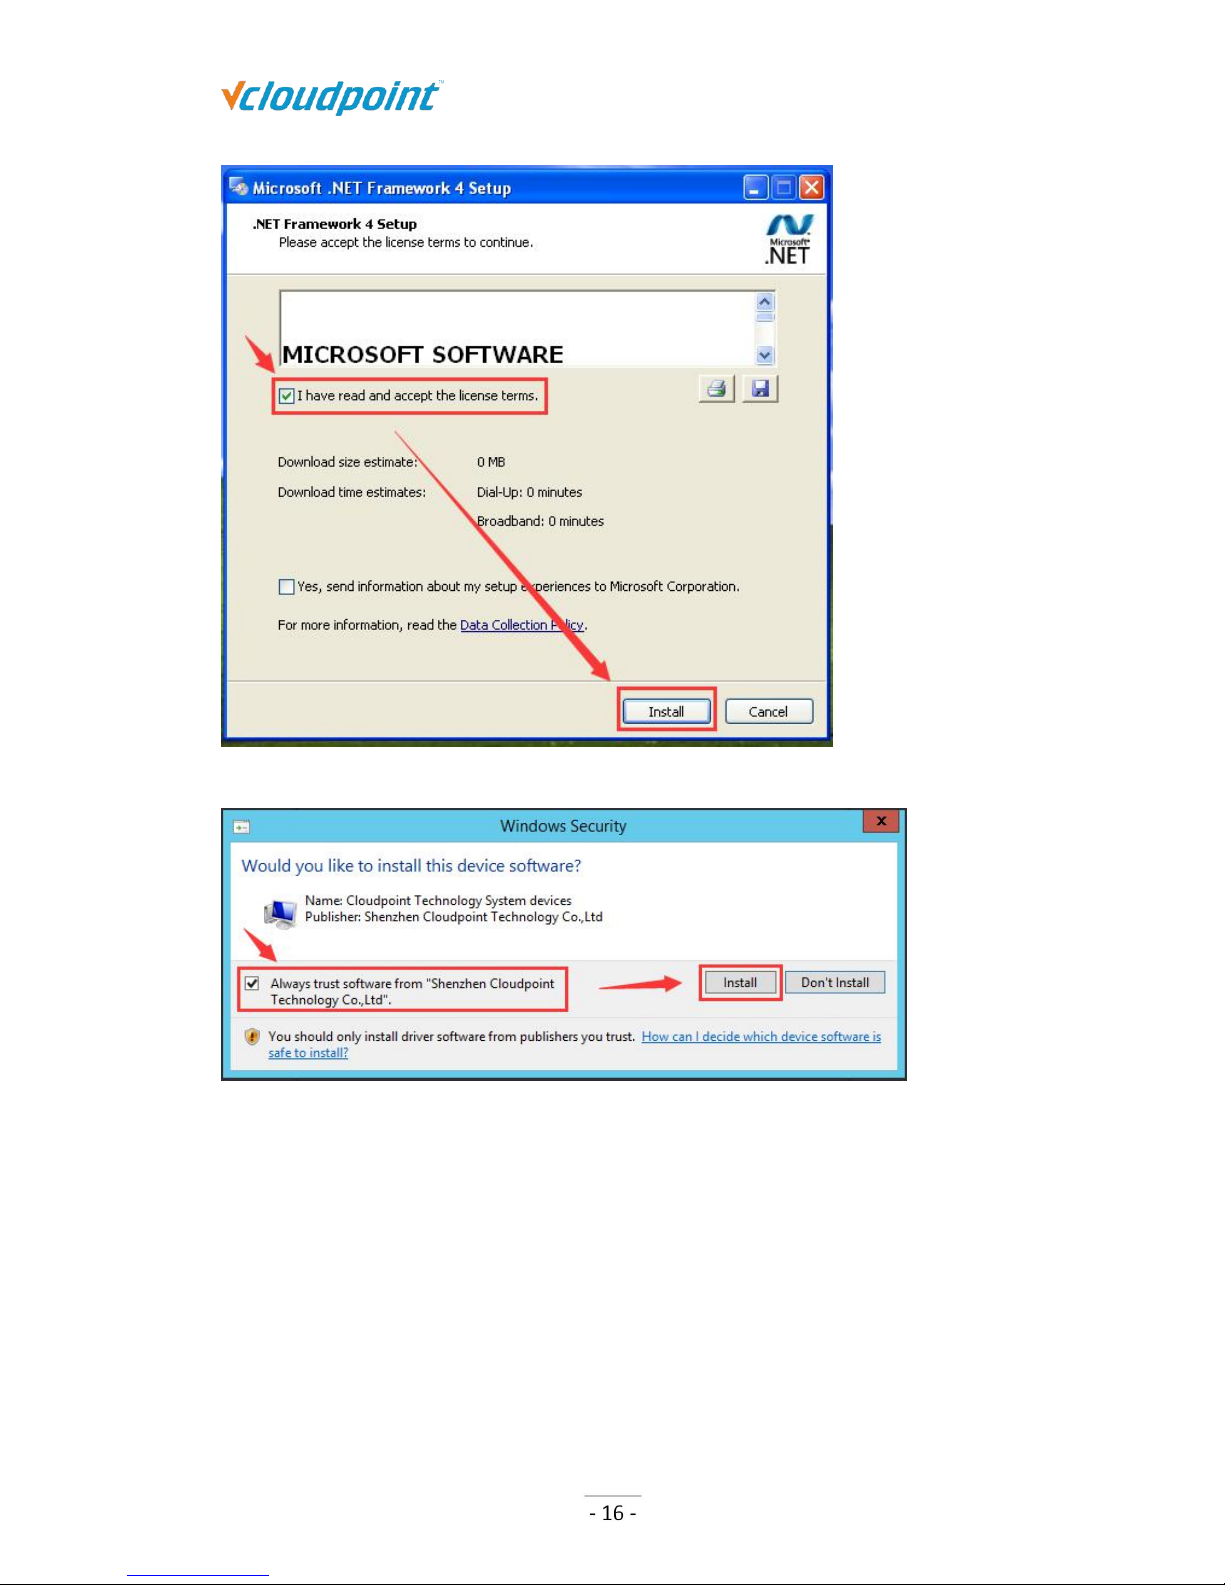
3) On initial installation, vMatrix Installer will detect if some required components are
installed on the host. Allow installing required components if it prompts. For the
Windows XP operating system, you have to manually install the components as
shown below:
Please make sure to DISABLE any Anti-Virus or Firewall software during the installation of vMatrix
Server Manager. After installation has completed, you may re-enable Anti-Virus and Firewall
Page 17
S100 Zero Client & vMatrix User Manual
www.vcloudpoint.com
4) During installation, your will be prompted to install drivers, click “Install”.
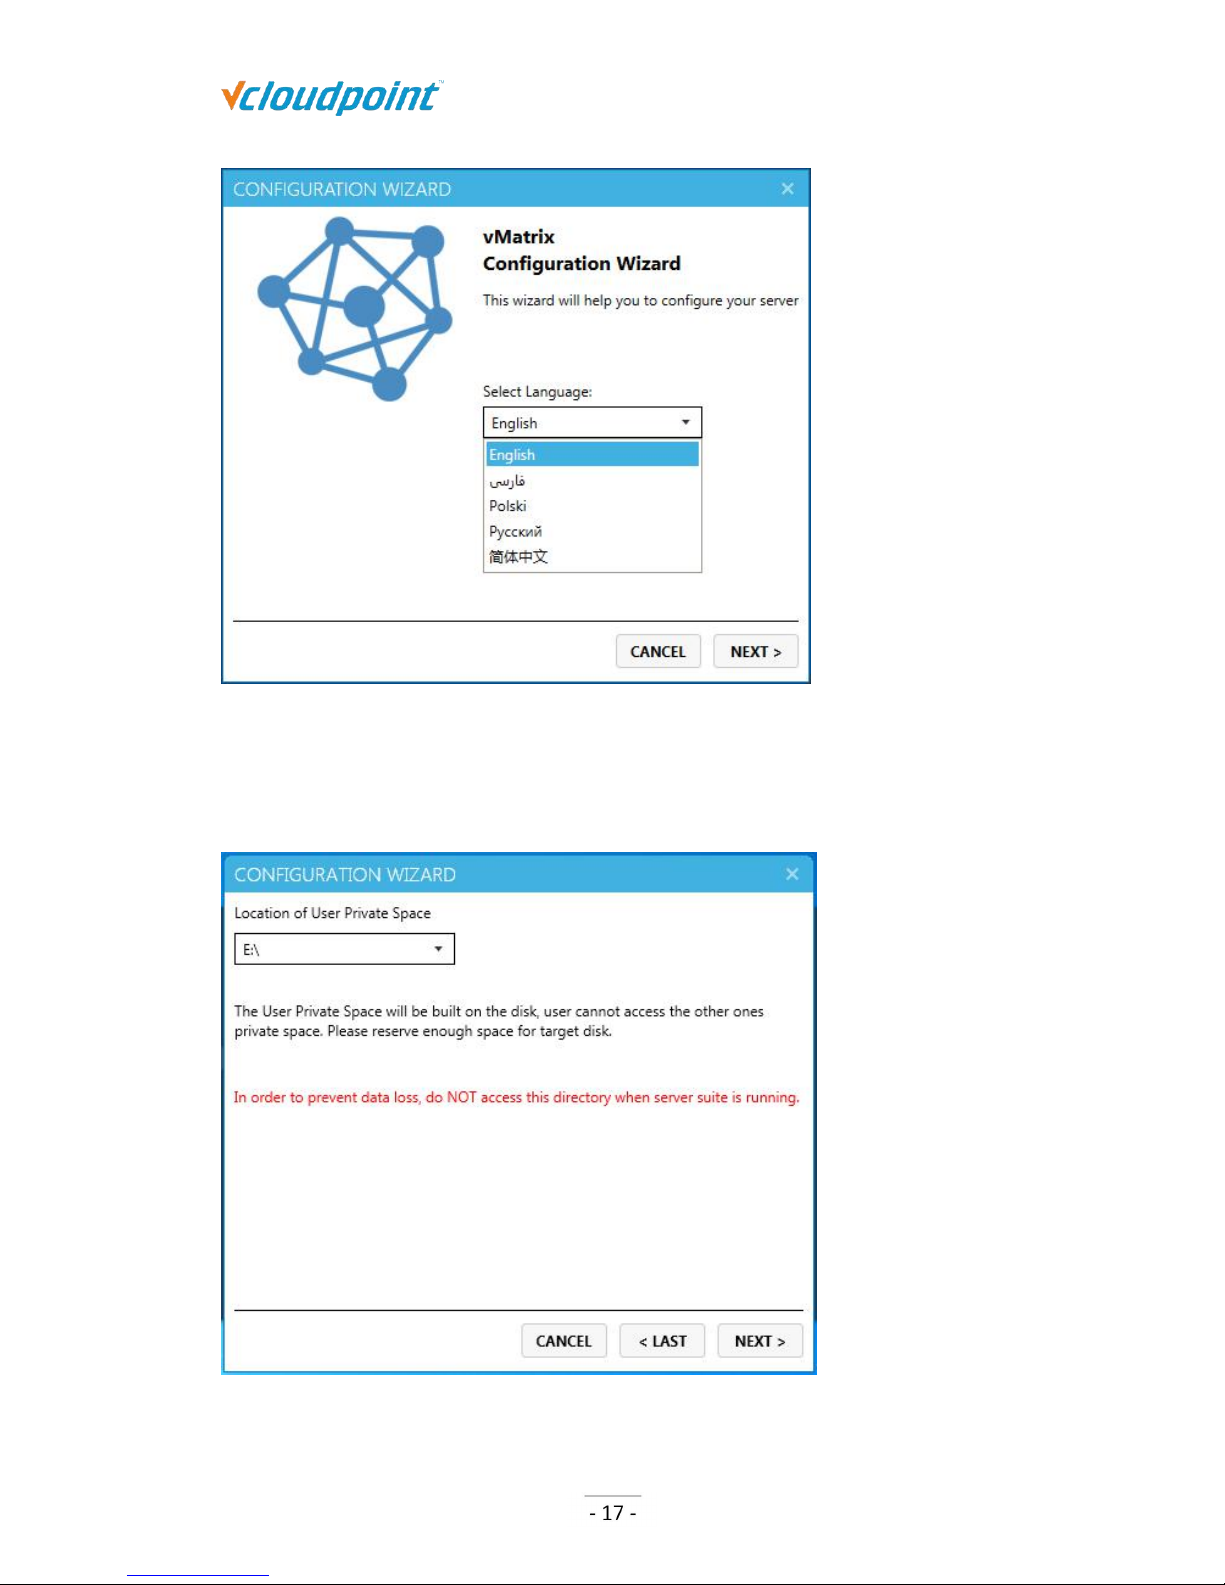
5) When the progress bar completes, you will be asked to select language of vMatrix
Server Manager. Select your language and click “next”. (This language selection
window won’t appear on later installations or updates, but you still can change at
vMatrix Server Manager.)
Page 18
S100 Zero Client & vMatrix User Manual
www.vcloudpoint.com
6) Select the disk partition which user files are stored. DO NOT select the partition that
system or programs are installed. And then click “Next”. (This configuration window
won’t appear on later installations or updates, but you still can change at vMatrix
Server Manager after installation.)
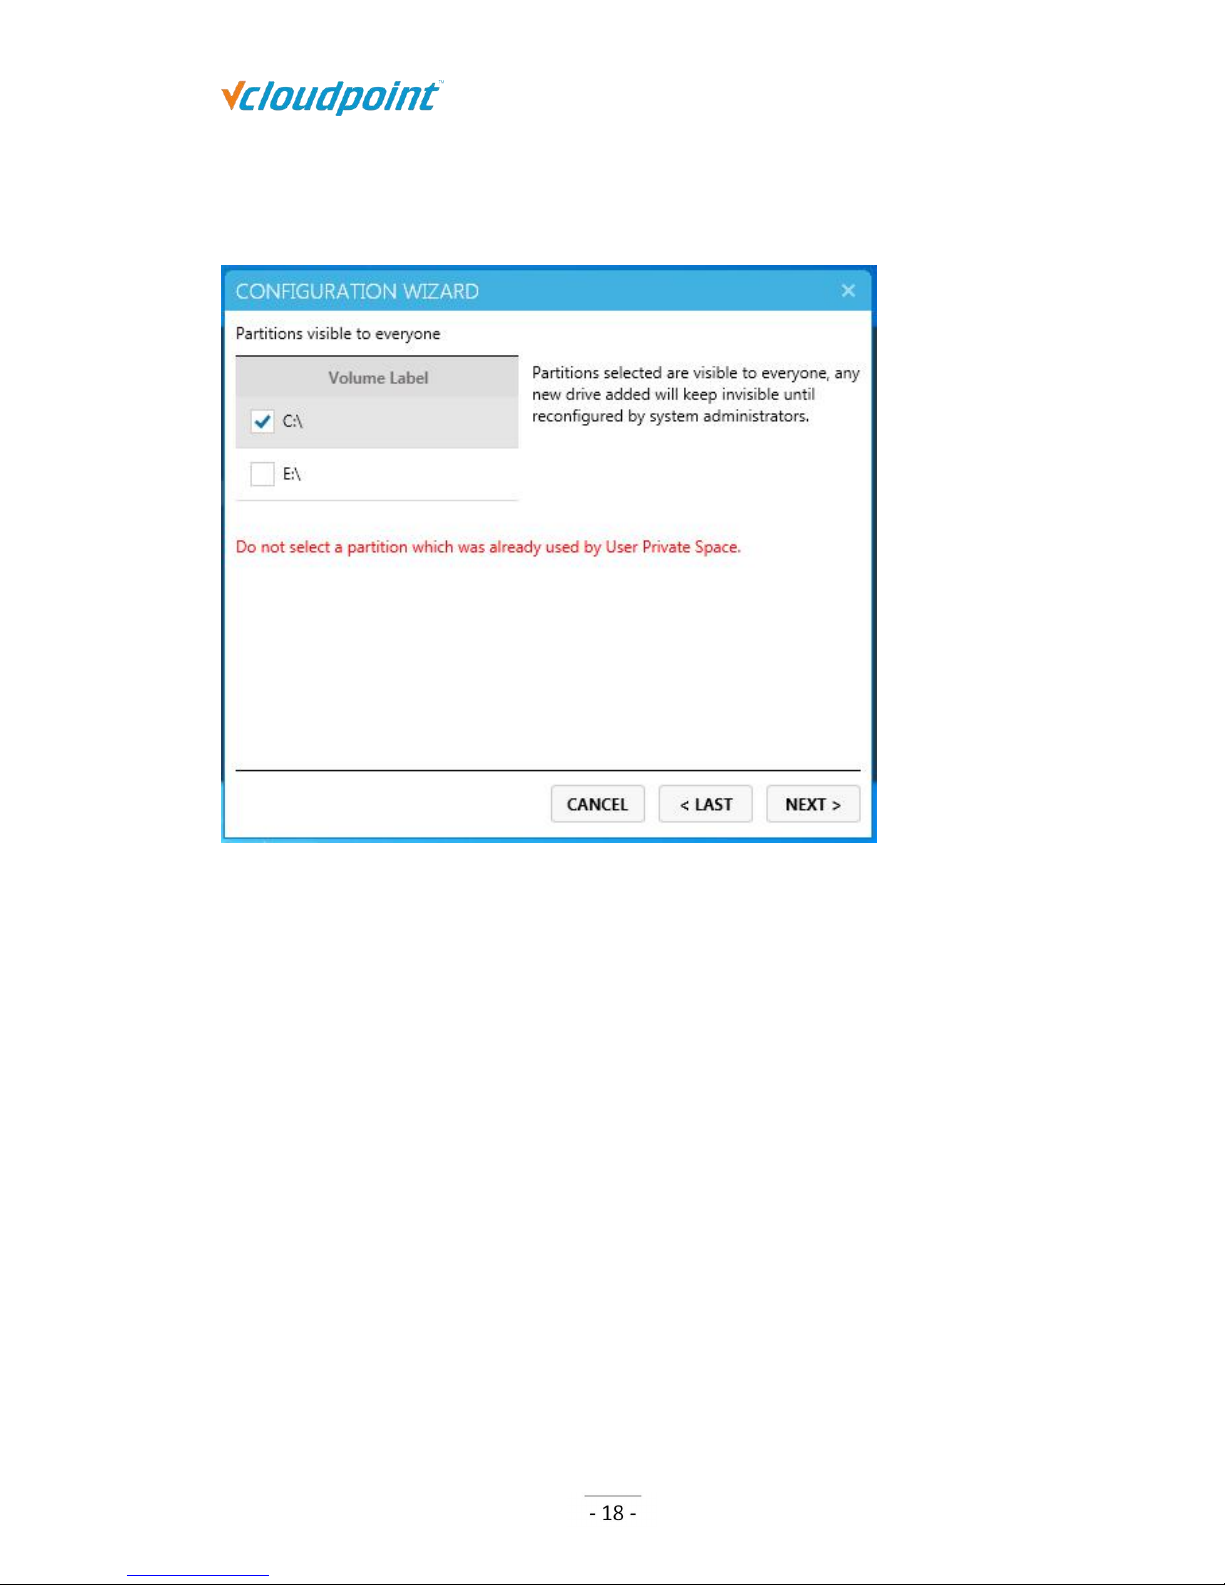
7) Select the partitions which are visible to users. DO NOT select the one which has
Page 19
S100 Zero Client & vMatrix User Manual
www.vcloudpoint.com
already been chosen for storing user files. And then click “Next”. (This configuration
window won’t appear on later installations or updates, but you still can change at
vMatrix Server Manager after installation.)
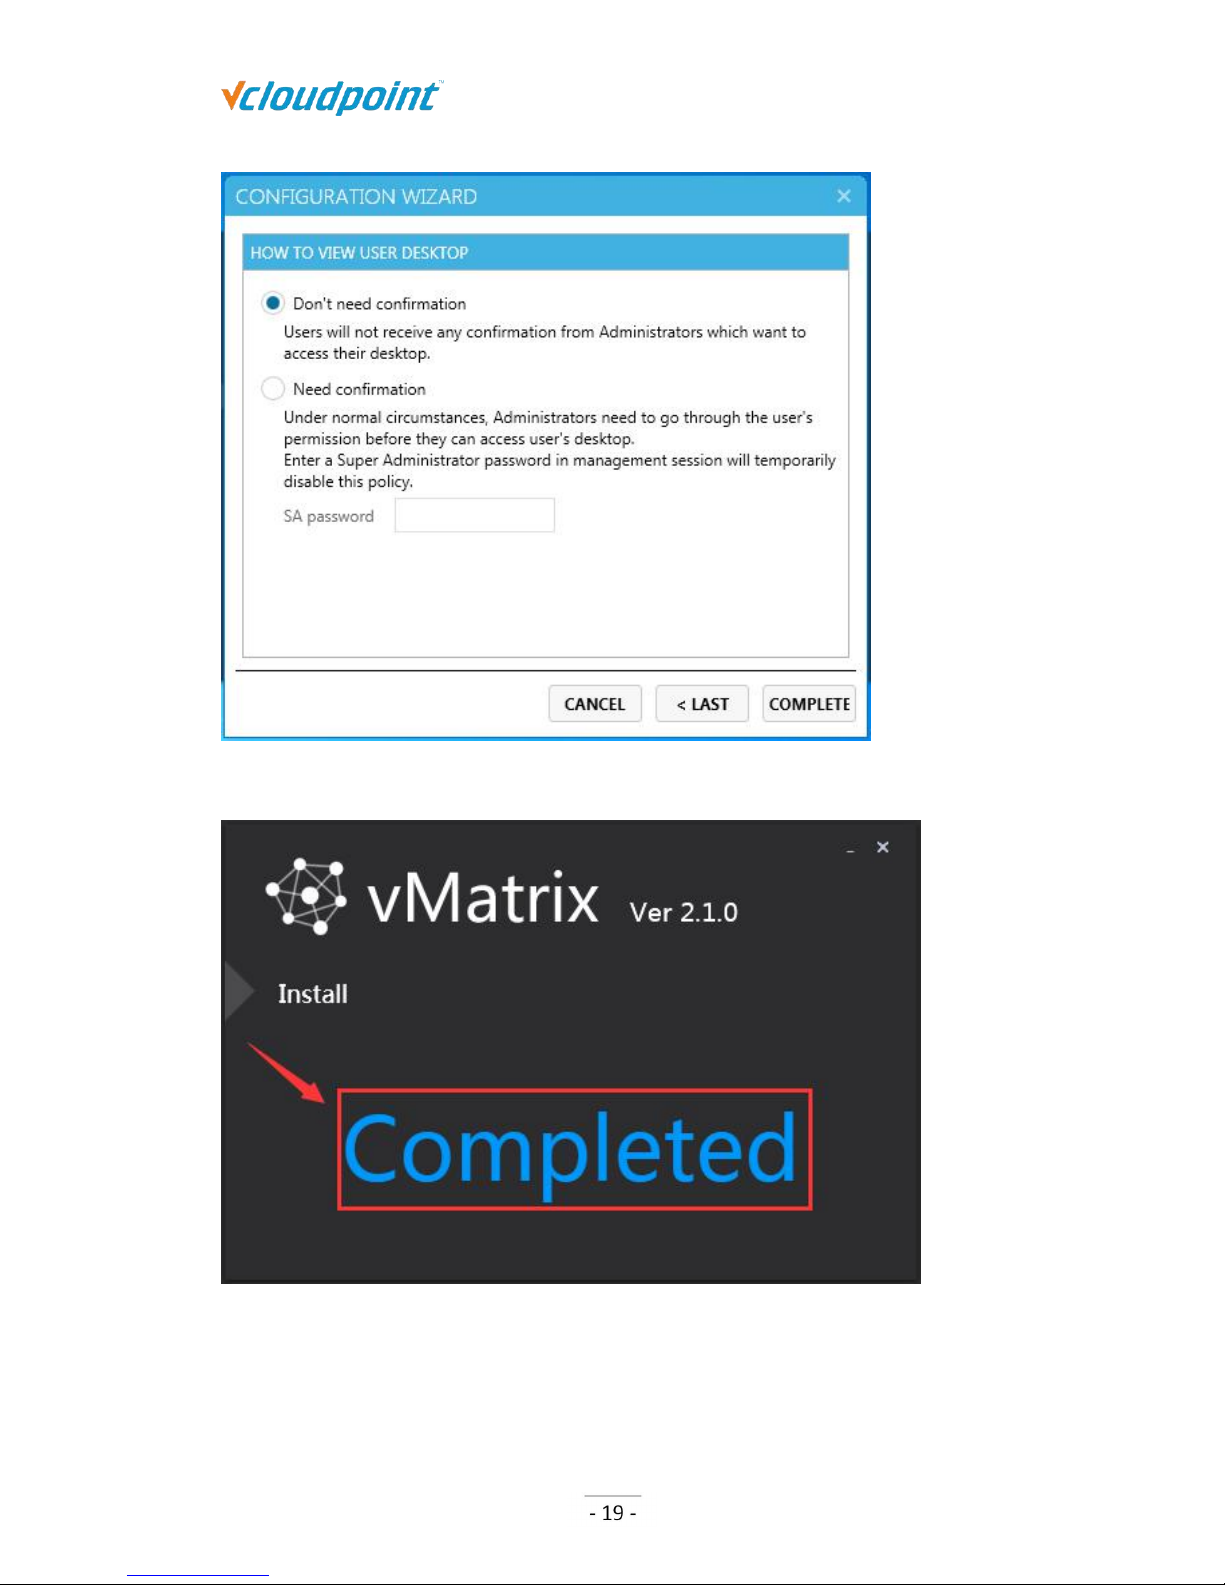
8) Select if the administrator on the host can view user desktops directly or will need to
send request or enter password. And then click “Next”. (This configuration window
won’t appear on later installations or updates, but you still can change at vMatrix
Server Manager.)
Page 20
S100 Zero Client & vMatrix User Manual
www.vcloudpoint.com
9) Click “Completed” and finish installation.
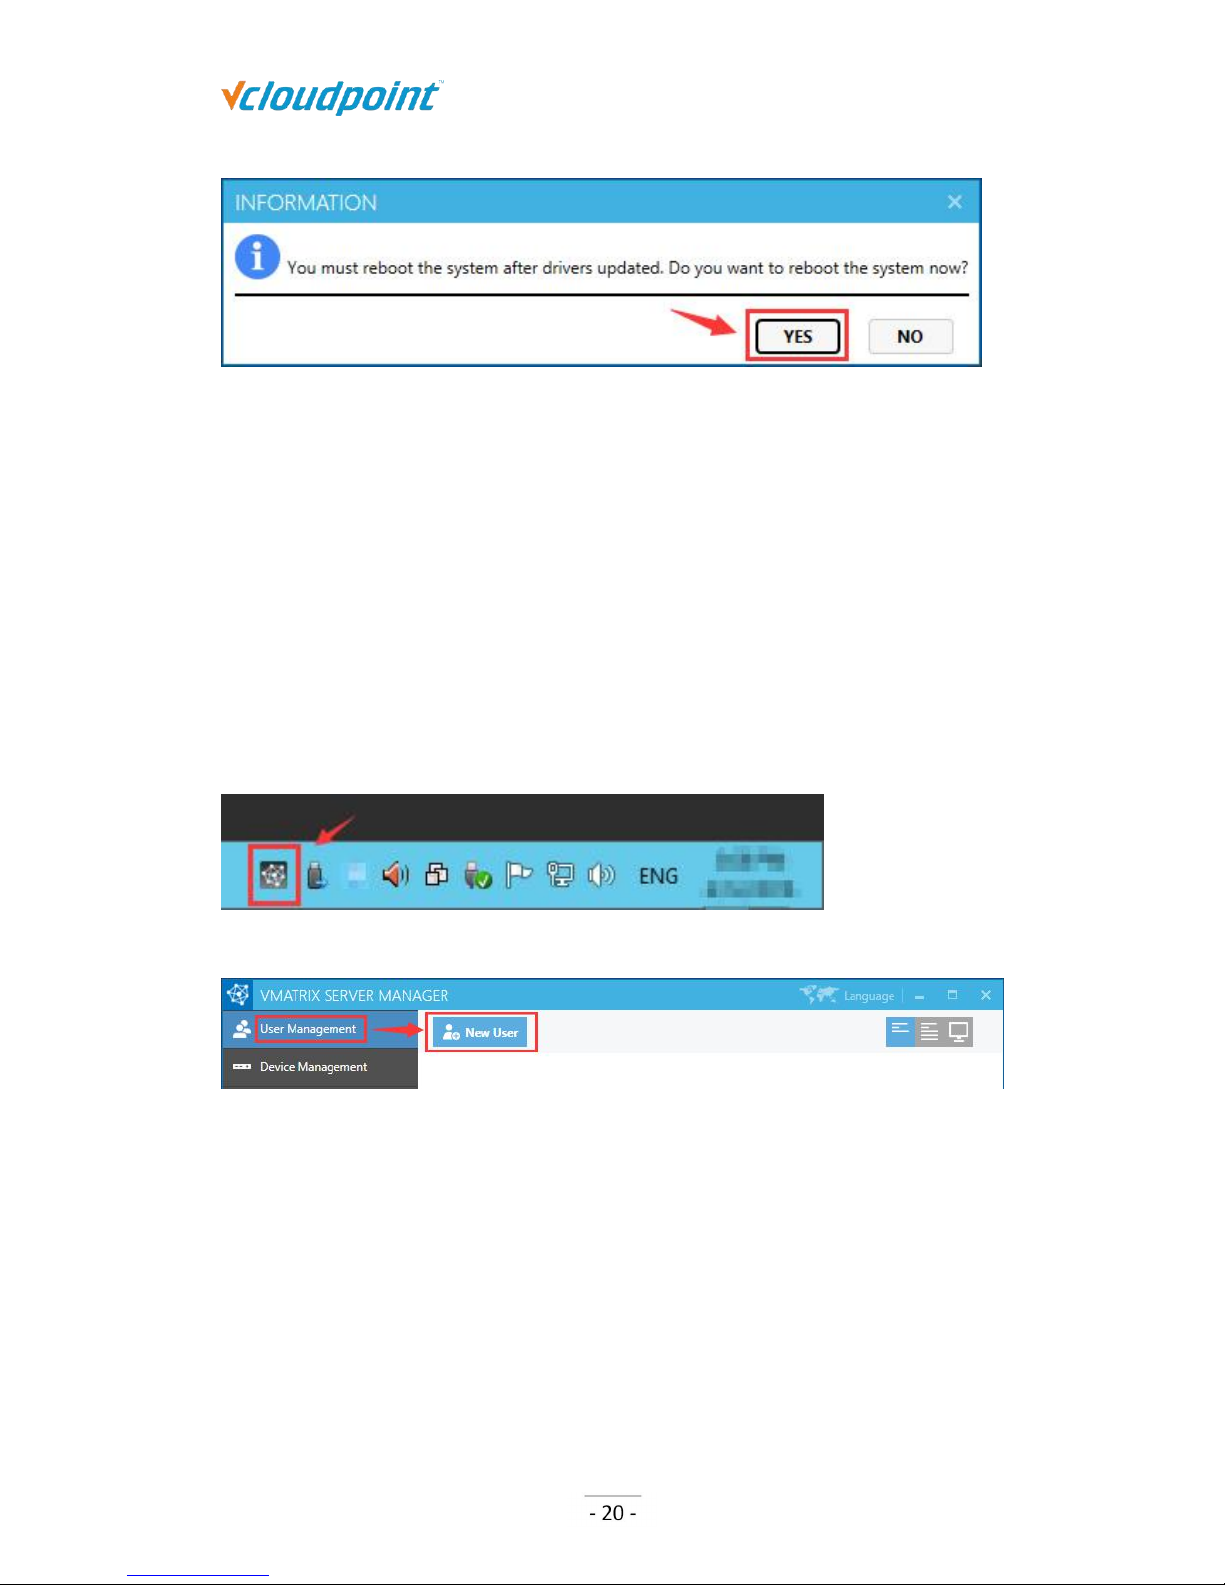
10) You will be asked to reboot the system. Click “yes”.
Page 21
S100 Zero Client & vMatrix User Manual
www.vcloudpoint.com
Note: If system instability occurs after installing vMatrix Server Manager, please try removing
vMatrix Server Manager and any anti-virus or security software present, and then re-installing
vMatrix Server Manager. If the system is stable in this configuration, re-install the anti-virus
software. In some cases, this change in install order can improve the interaction between vMatrix
Server Manager and anti-virus software. If issues persist, please try configuring your security
software to ignore/allow/trust the following ports and executables (refer to chapter 7, Q6 to
configure firewall and anti-virus software).
3.2 User Creation
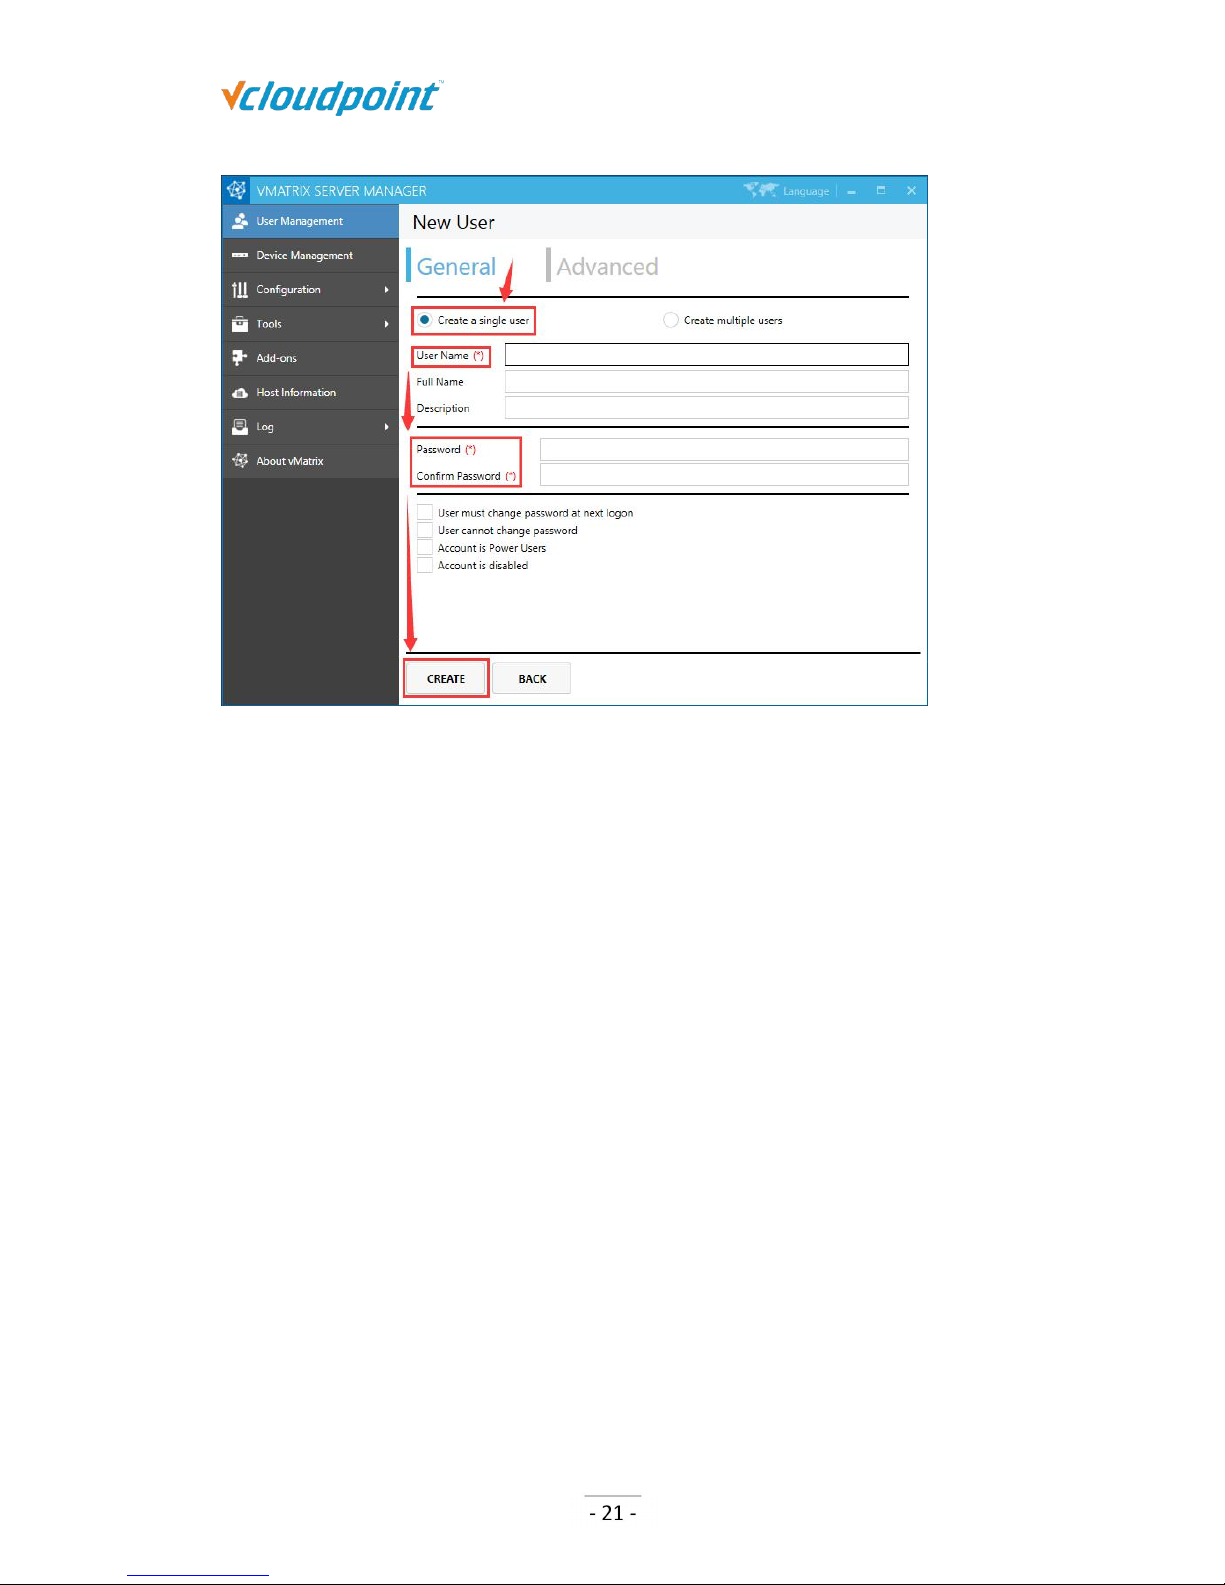
1) After rebooting the system, open vMatrix Server Manager by double clicking the
“vMatrix” icon at the right bottom of task bar.
2) Go to “User Management” page, click “New User” to create user accounts.
Enter “User Name” and “Password” and click “Create” at the bottom.
Page 22
S100 Zero Client & vMatrix User Manual
www.vcloudpoint.com
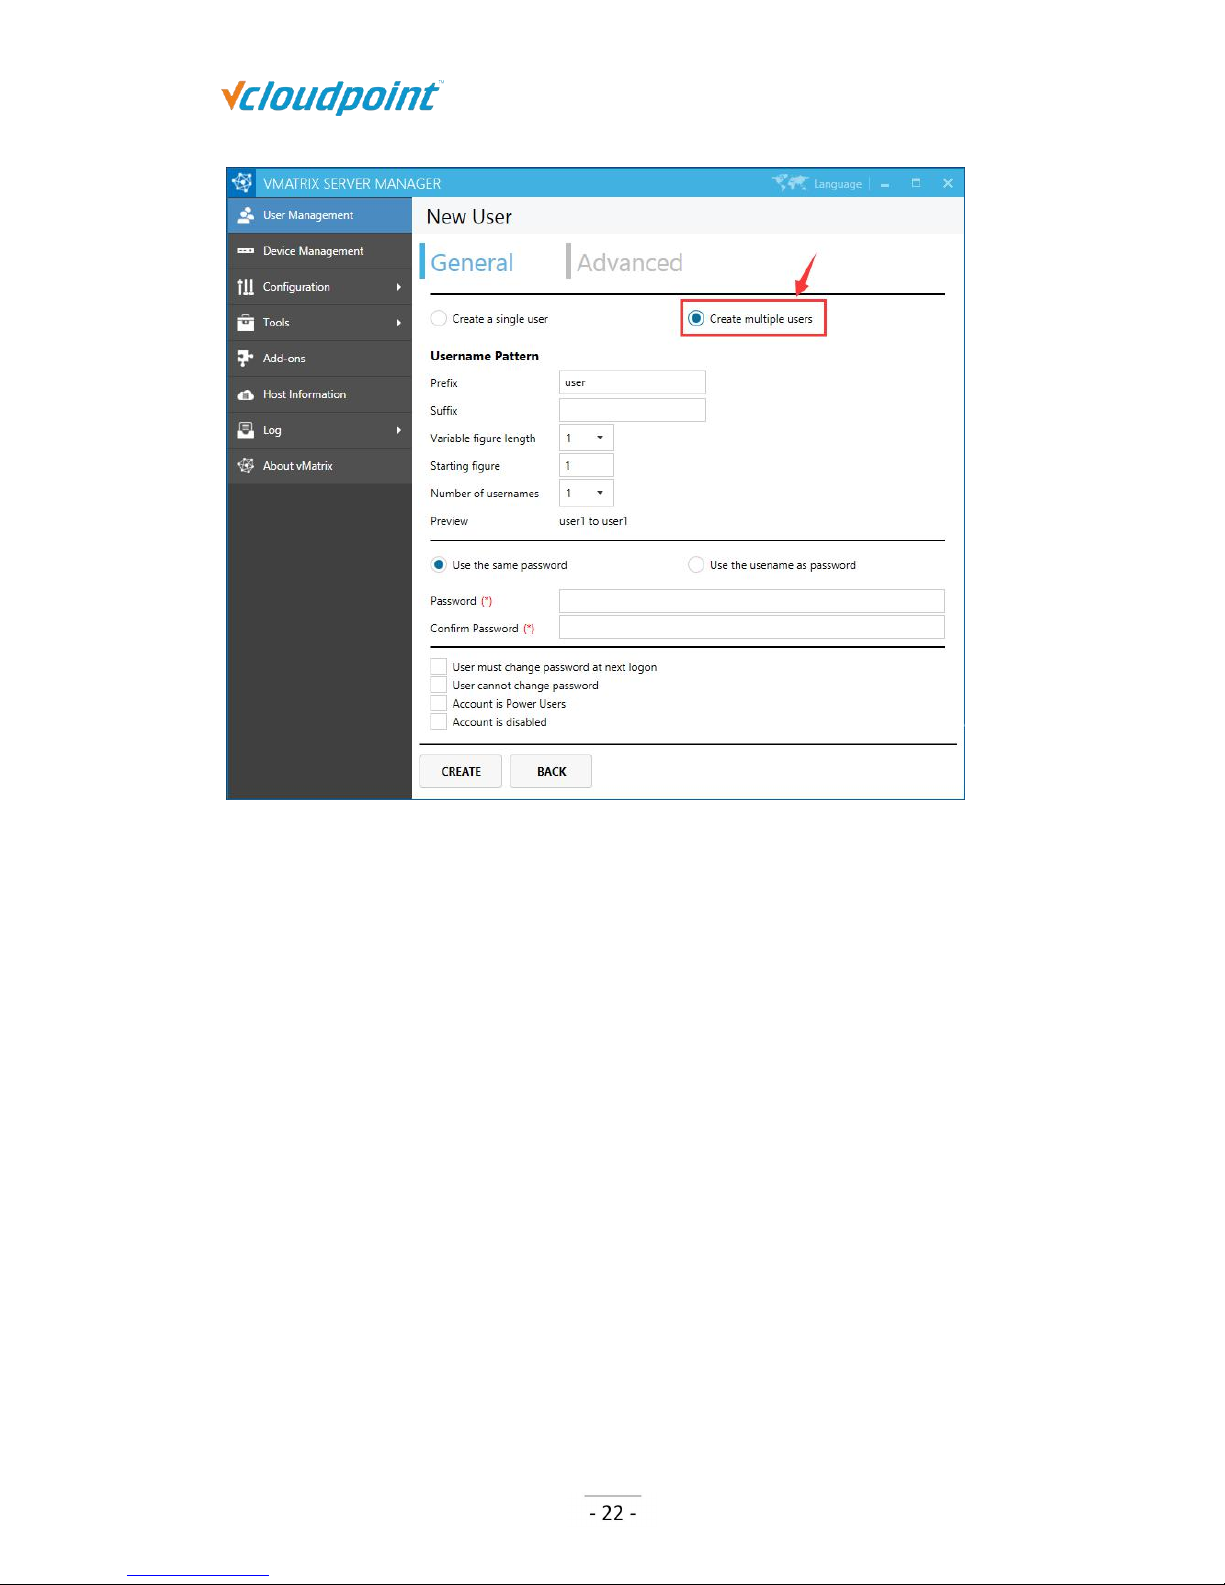
To create multiple users at a time, select “Create multiple users”, and then select the
number of users and enter passwords or select to use user name as password for all
users.
Page 23
S100 Zero Client & vMatrix User Manual
www.vcloudpoint.com
I
3.3 Device Connection
Connect the S100 device to other peripherals as show below.
Connect the S100 zero client to the power adapter of 5V, 2A. Do not use power
adapter of other specifications to avoid damage to the zero client.
Connect the S100 zero client connects to monitor with VGA port.
Connect the S100 zero client to USB keyboard and mouse and other USB devices if
necessary.
Connect the S100 zero client to Mic and speaker through 3.5mm jacks if necessary
(Audio devices through USB ports are also supported).
Connect the S100 zero client to the network through RJ45 type Ethernet cable to the
switch or USB wireless antenna built with RT8188 chipset.
Page 24
S100 Zero Client & vMatrix User Manual
www.vcloudpoint.com
3.4 Device Login
1) After connecting to the peripherals, press the device power button.
2) After system boot, go the display page, select your correct language and desktop
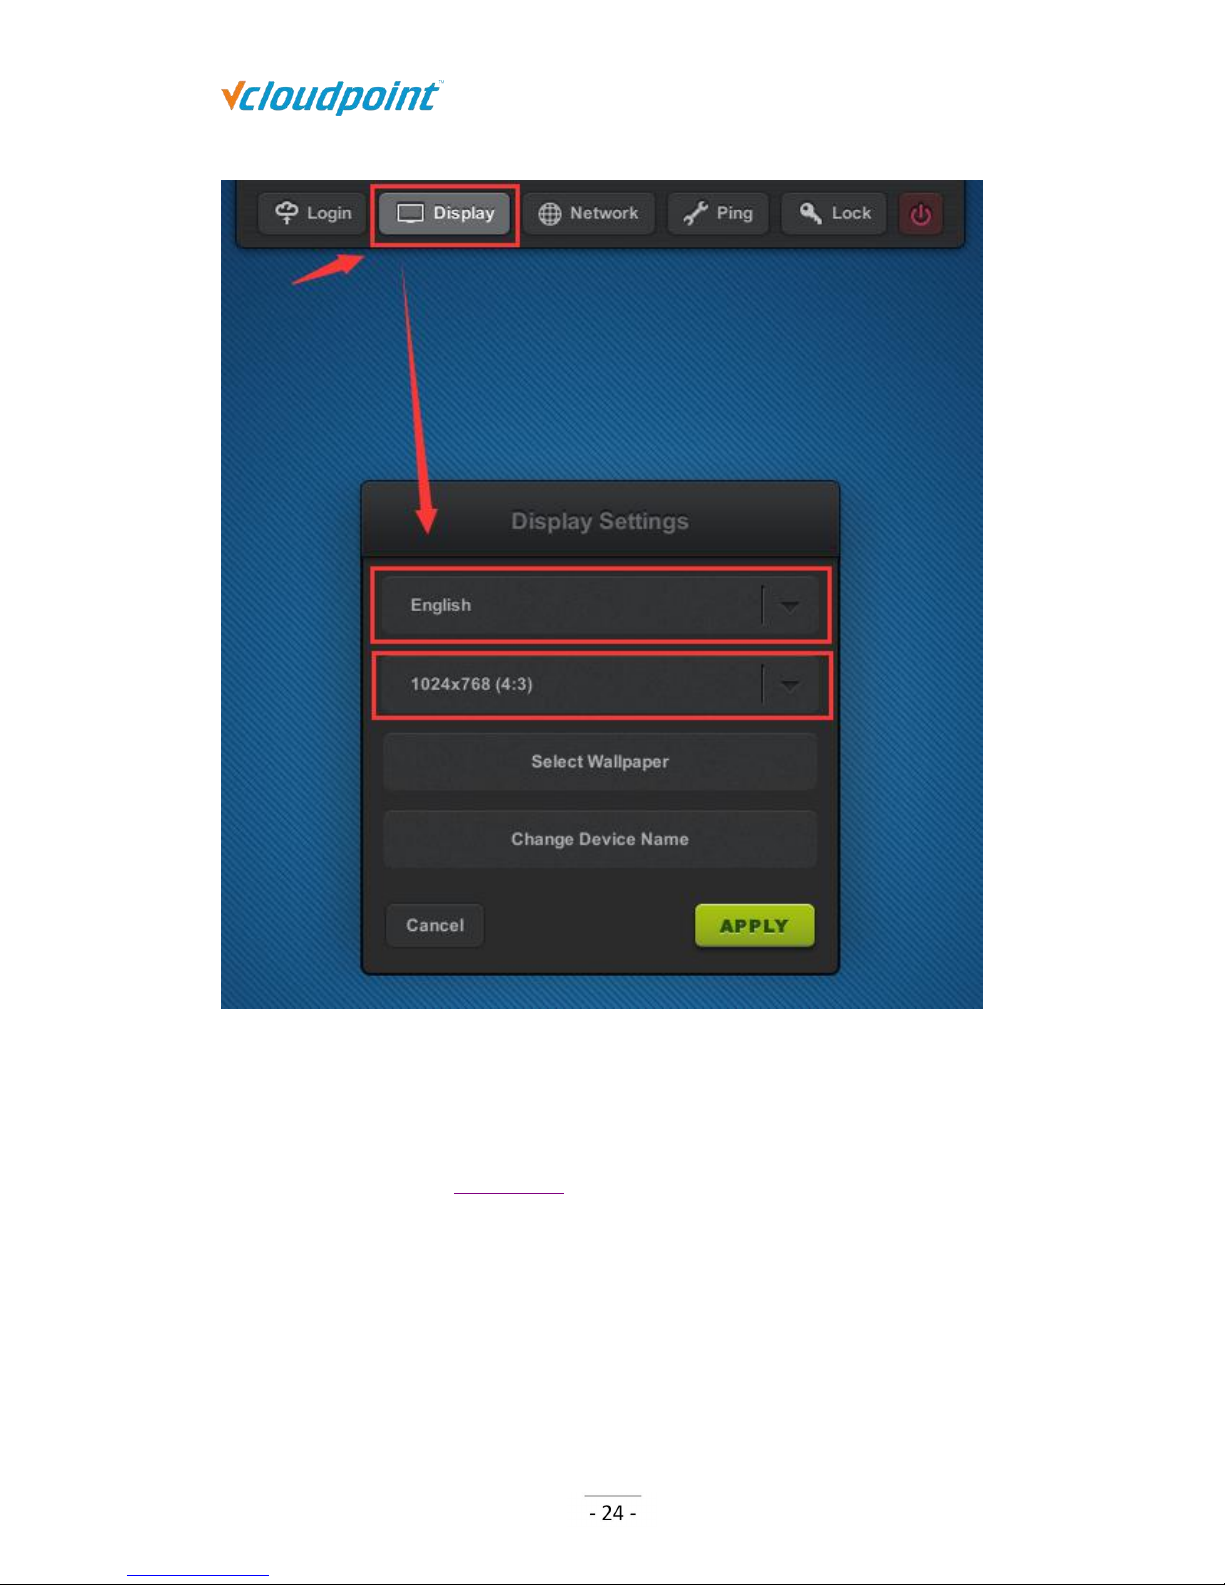
resolution; factory default language is “English” and desktop resolution is
“1024x768”.
Page 25
S100 Zero Client & vMatrix User Manual
www.vcloudpoint.com
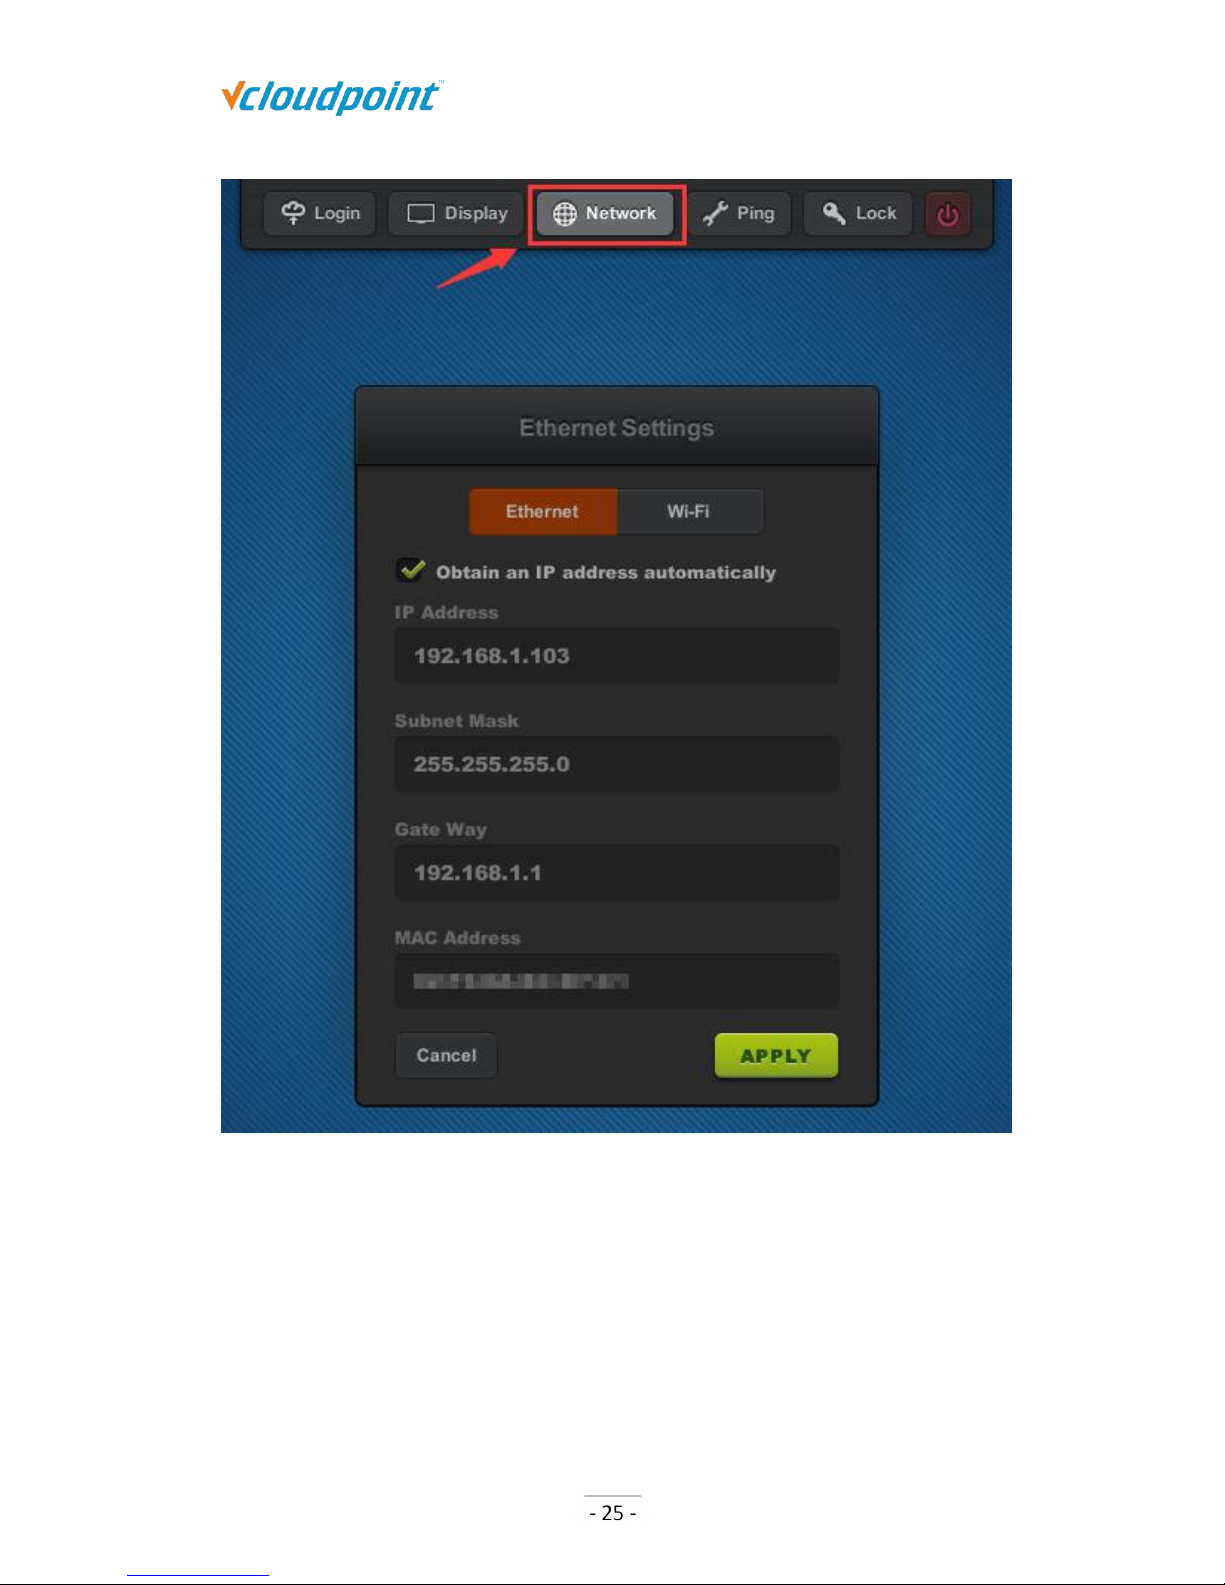
3) Go to “Network” page. If DHCP network service in available in your network, you can
just use the default setting to obtain an IP address for this device automatically.
Otherwise if you want to allocate an IP address manually, cancel the option and
enter an IP address instead. (If you are connecting the zero client to the network
through WIFI, refer to section 4.1.3.)
Page 26
S100 Zero Client & vMatrix User Manual
www.vcloudpoint.com
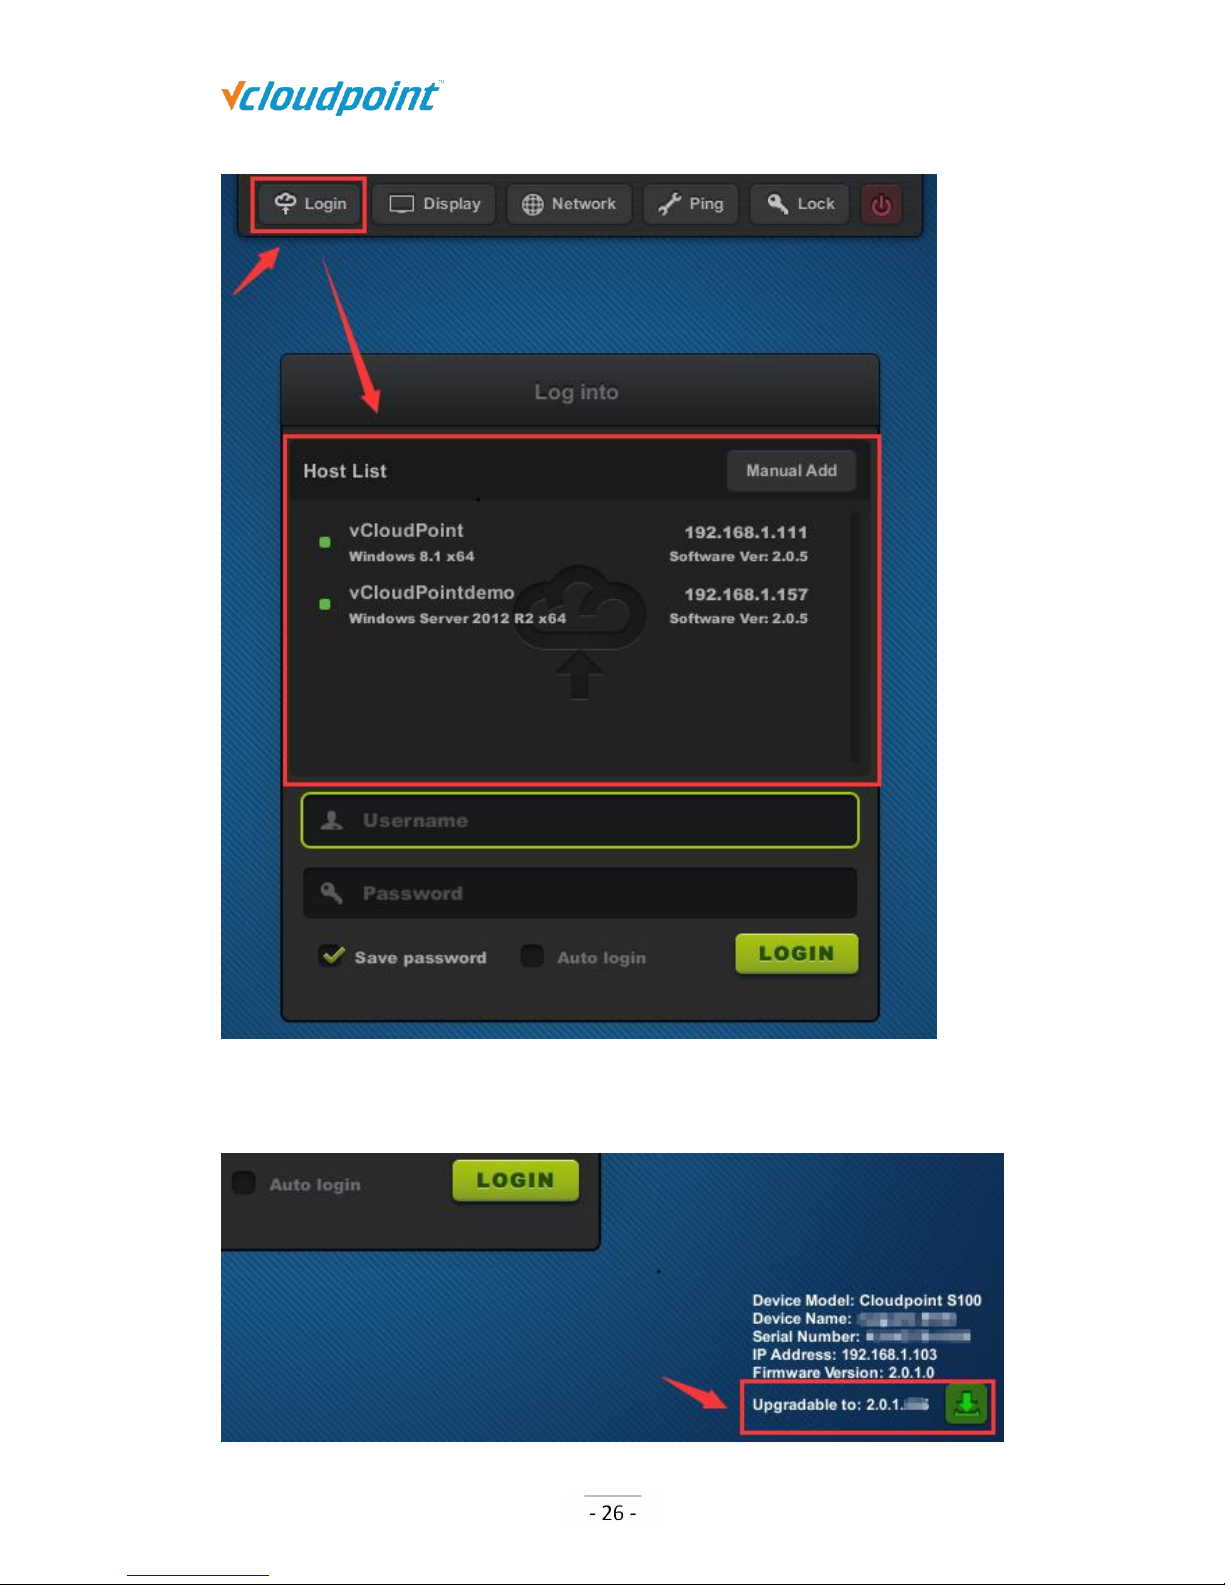
4) Go back to the “Login” page, select the host available in your network for connection.
Page 27
S100 Zero Client & vMatrix User Manual
www.vcloudpoint.com
z
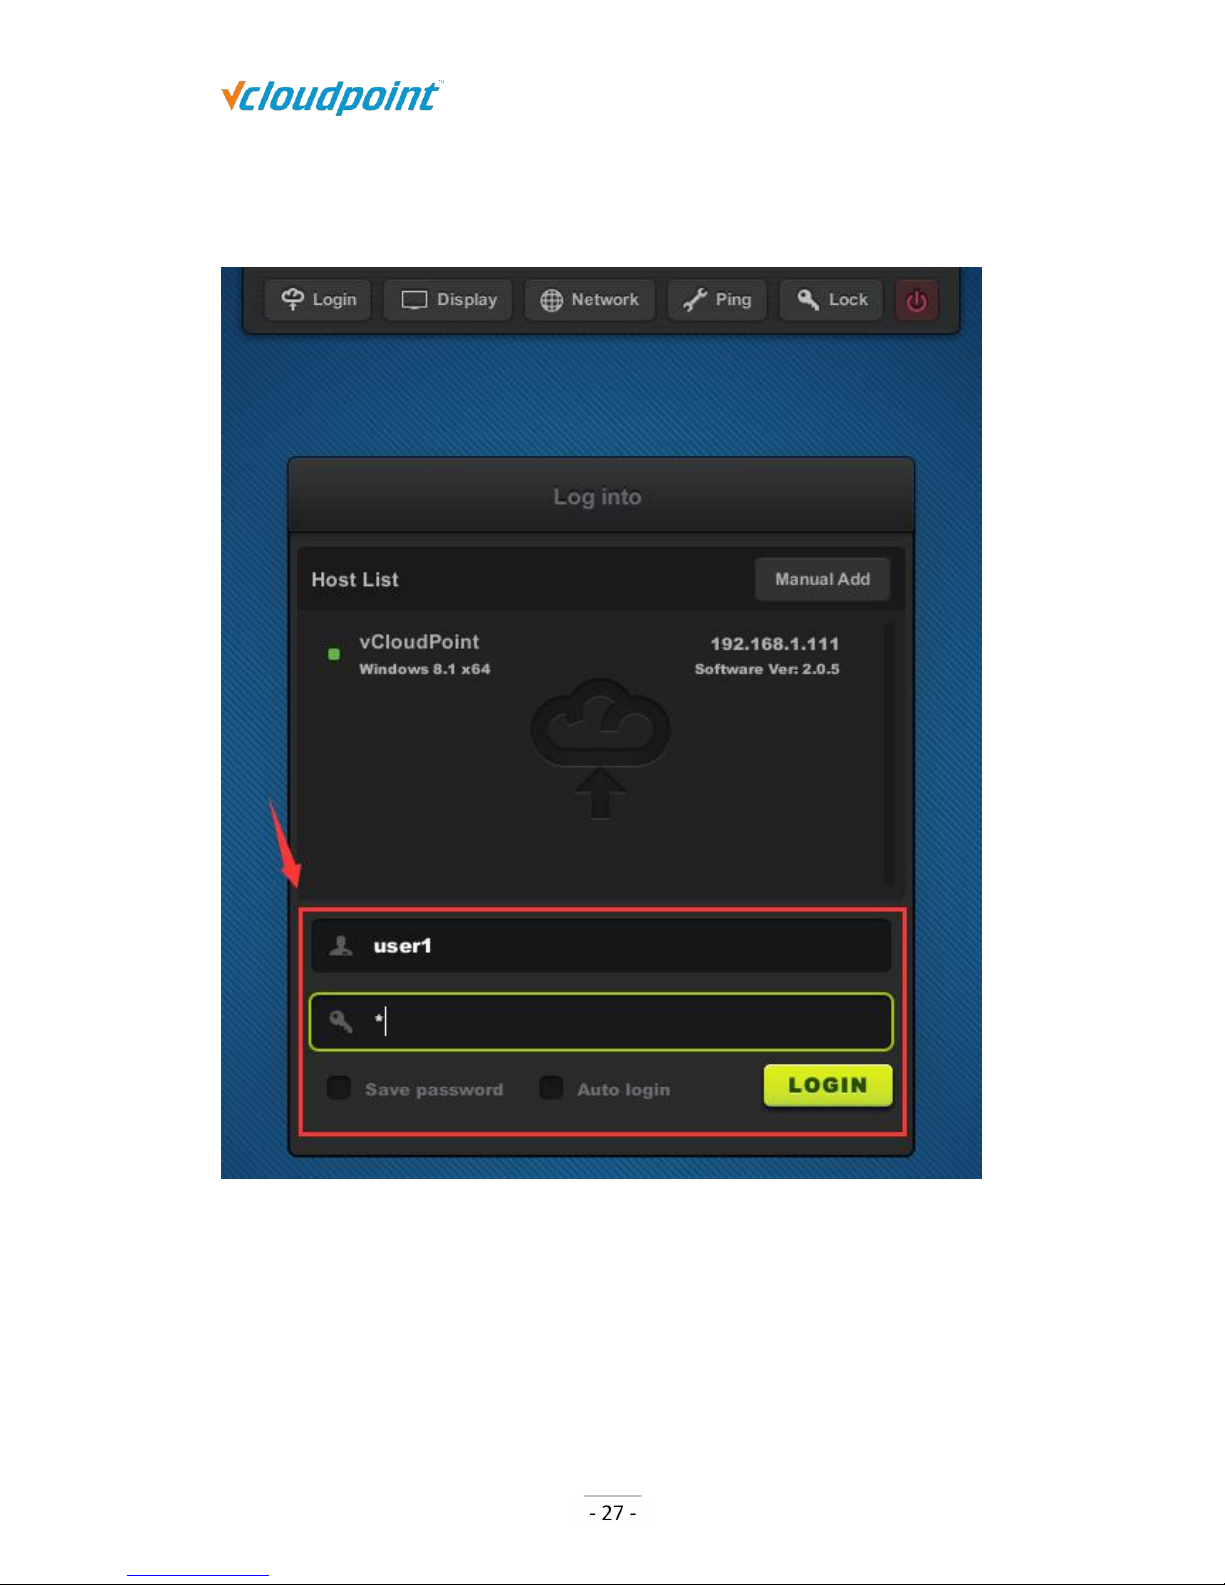
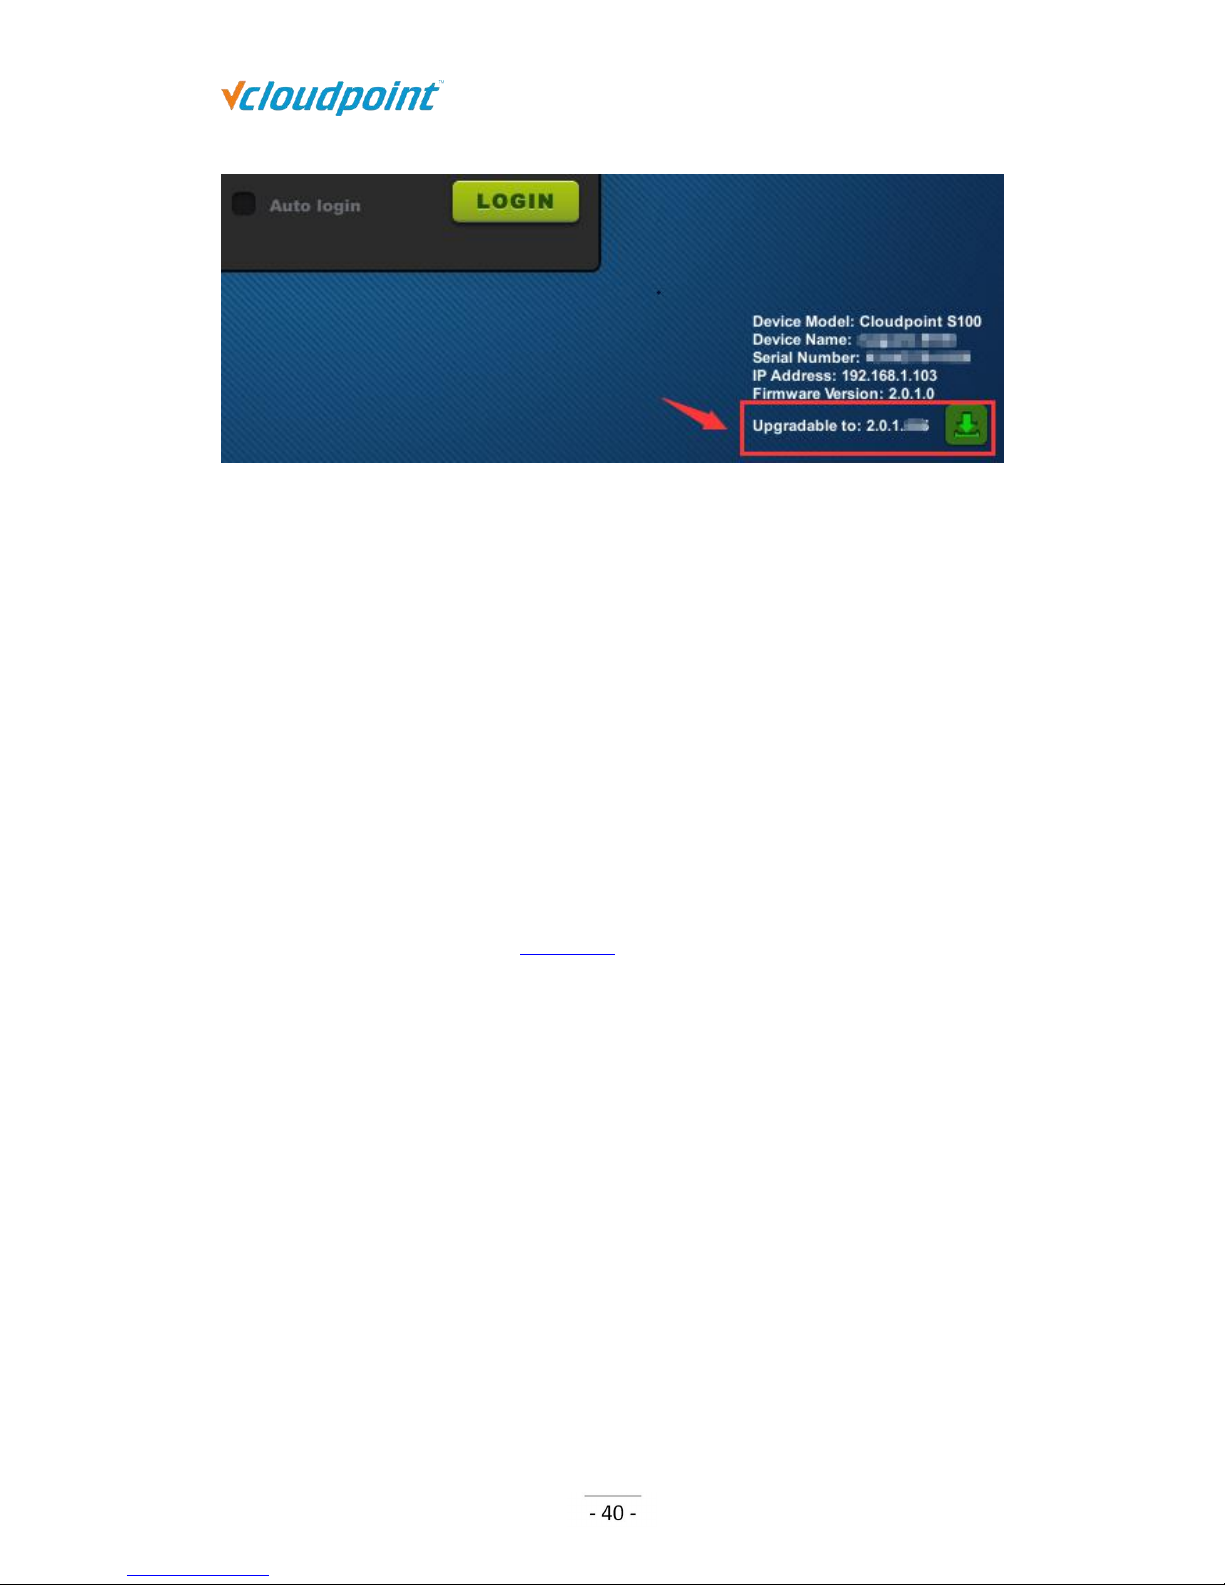
5) Check for any new firmware to upgrade at the right bottom of the screen. If yes, click
to upgrade.
Page 28
S100 Zero Client & vMatrix User Manual
www.vcloudpoint.com
6) Enter your user name and password, then click “Login”. If you use a new created user
for initial log-in to the host, you may need to wait a few seconds to minutes for
preparing a desktop.
Page 29
S100 Zero Client & vMatrix User Manual
www.vcloudpoint.com
Chapter 4. Using The Zero Client
4.1 Settings Menu
4.1.1 Login
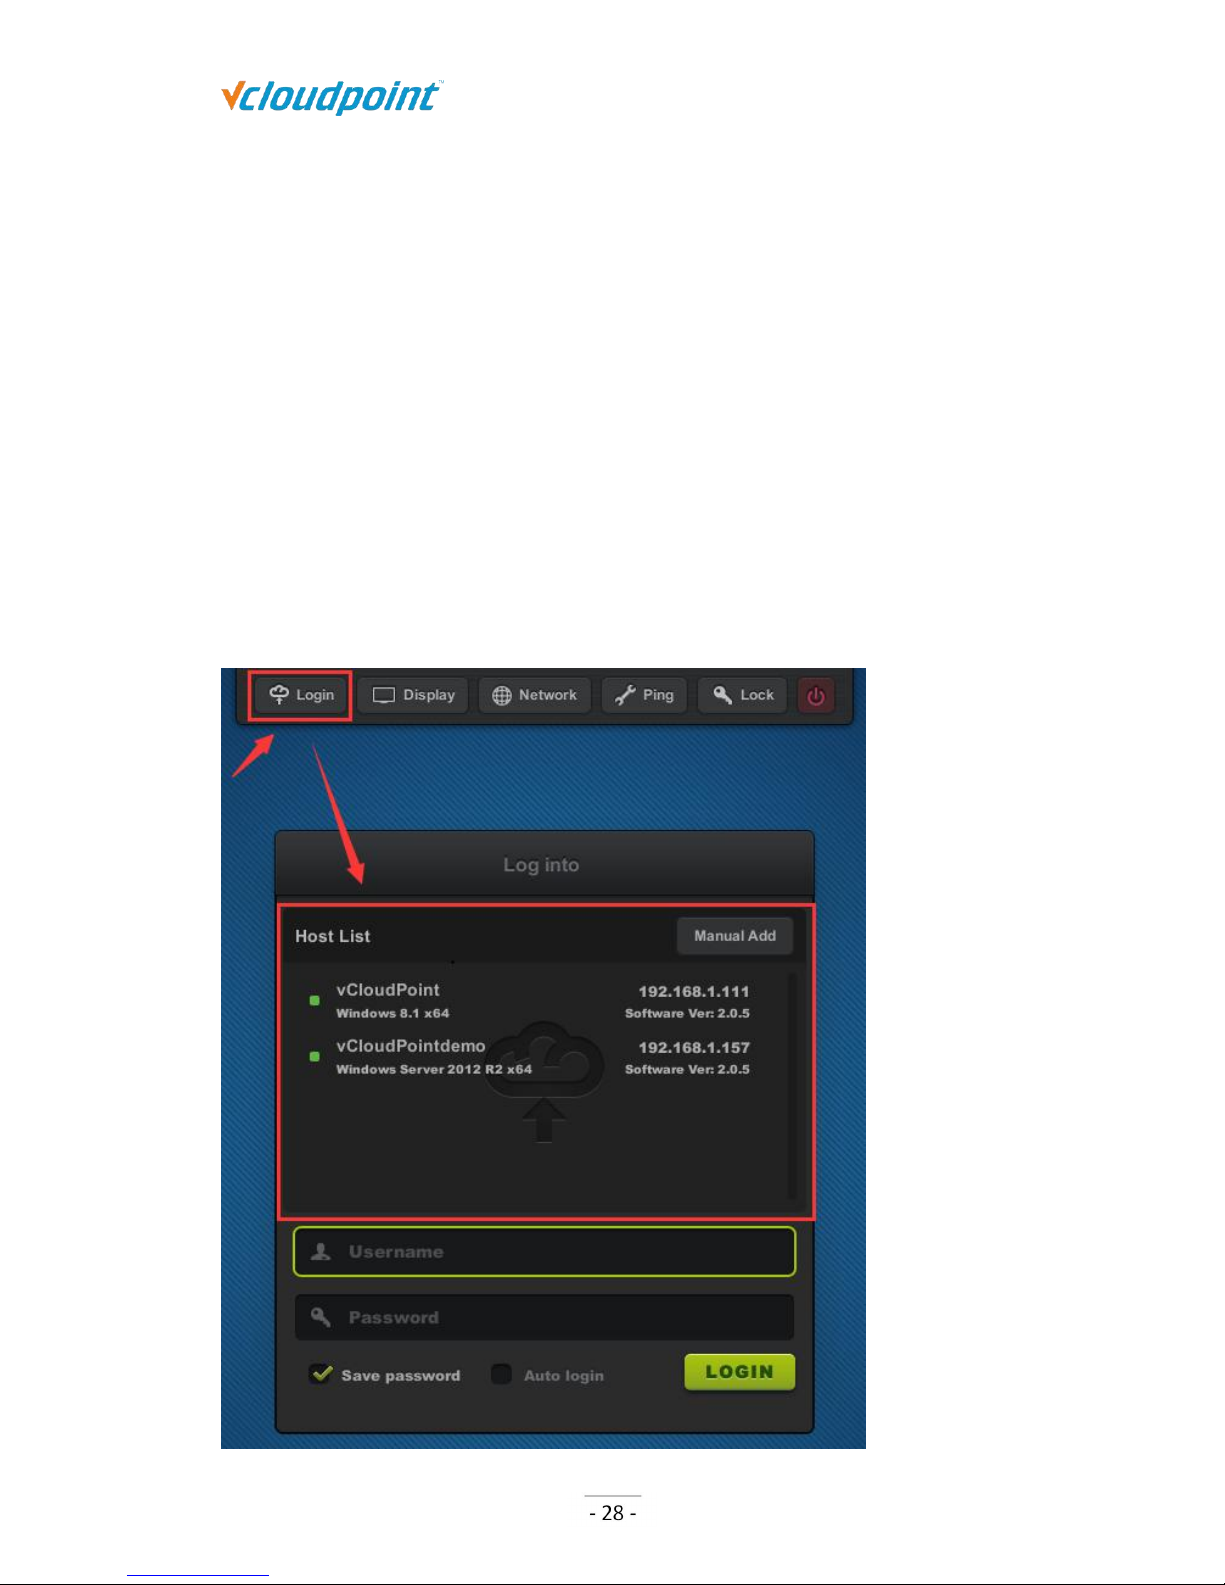
Host List window shows all available hosts in the network. Host to be shown in the
list are:
1) hosts with vMatrix Server Manager properly installed and running,
2) hosts in the same network segment as the device,
3) hosts that the device ever connected to even it is not in the same network segment.
Page 30
S100 Zero Client & vMatrix User Manual
www.vcloudpoint.com
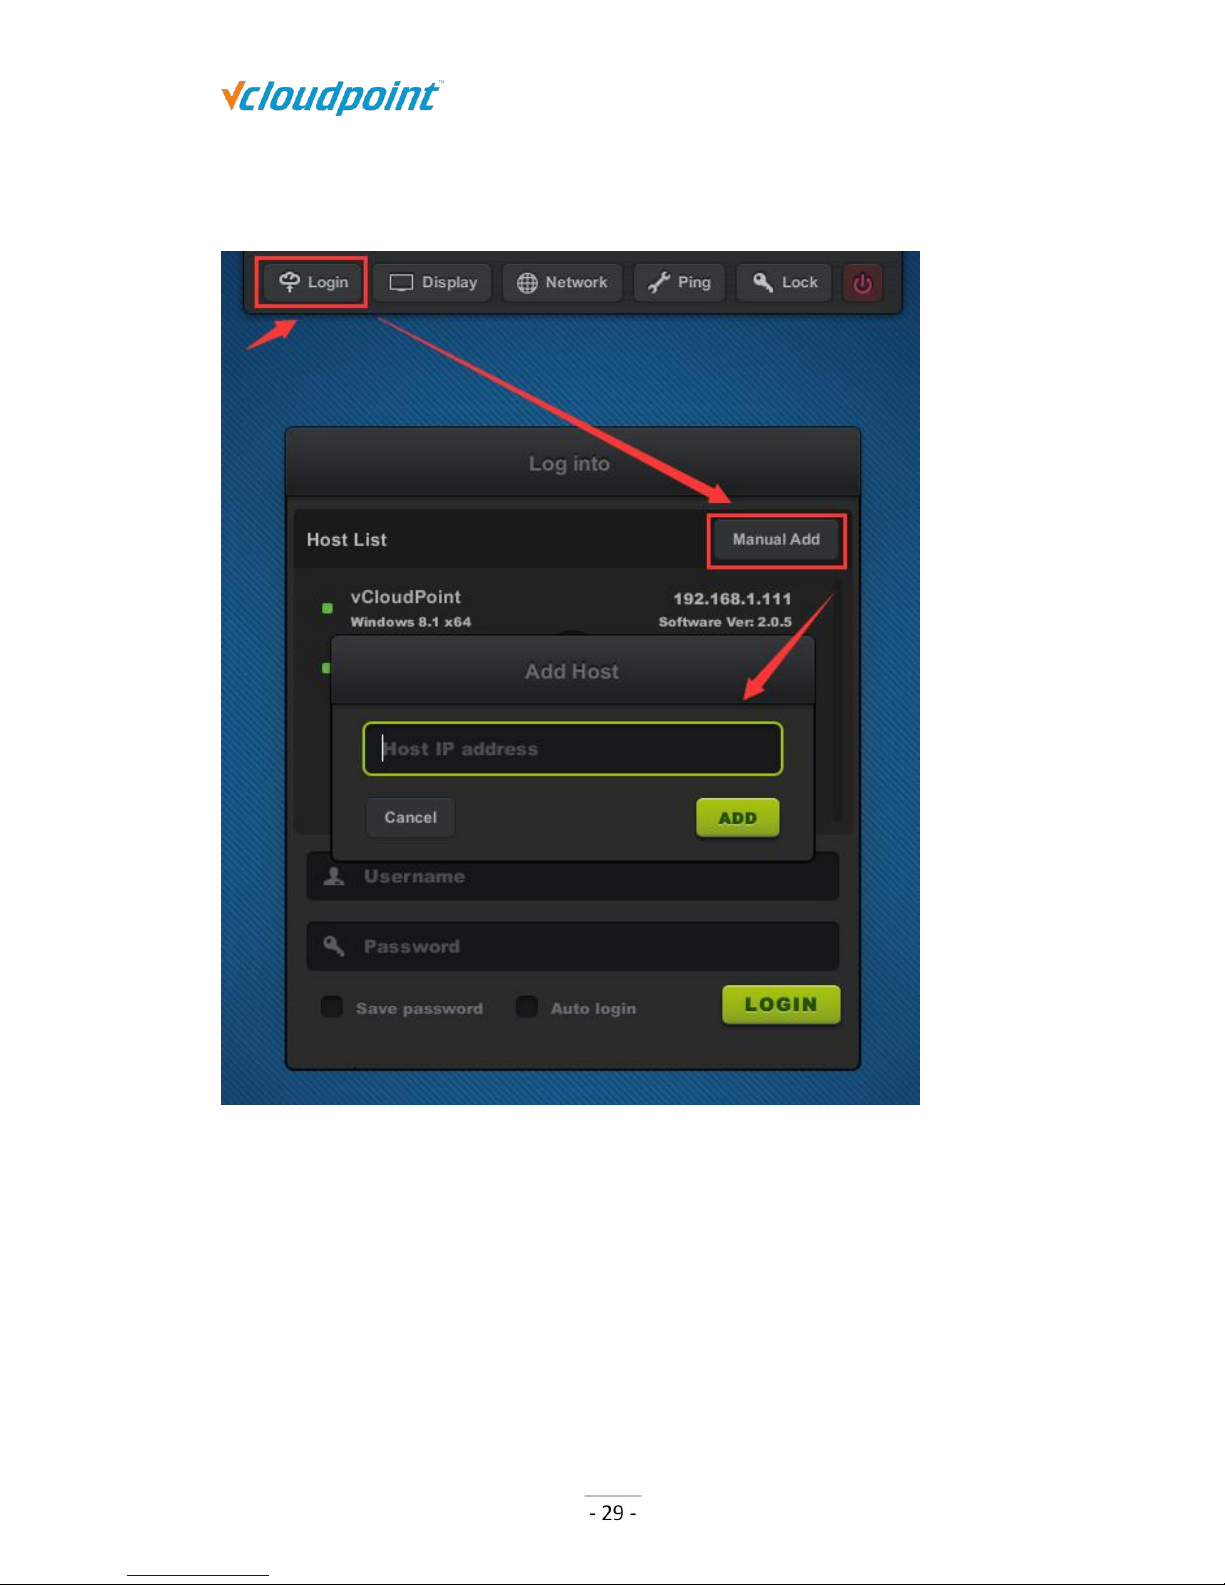
To connect to an available host not shown in the list, you can manually add the host
IP through the “Manual Add” button.
Password field is case-sensitive while user name field is not.
Save password: to remember the user name and password of this login so you won’t
have to enter user name and password again on next login. Changes will take effect
on next login.
Auto login: enabling auto login will skip the device login page and directly enter the
system of the last login host with saved user name and password on device boot.
Auto login will automatically enable “Save password”. Changes will take effect on
next login. To cancel Auto login (go back to the device login page) after entering the
host system, disconnect or sign out user session.
Page 31
S100 Zero Client & vMatrix User Manual
www.vcloudpoint.com
4.1.2 Display
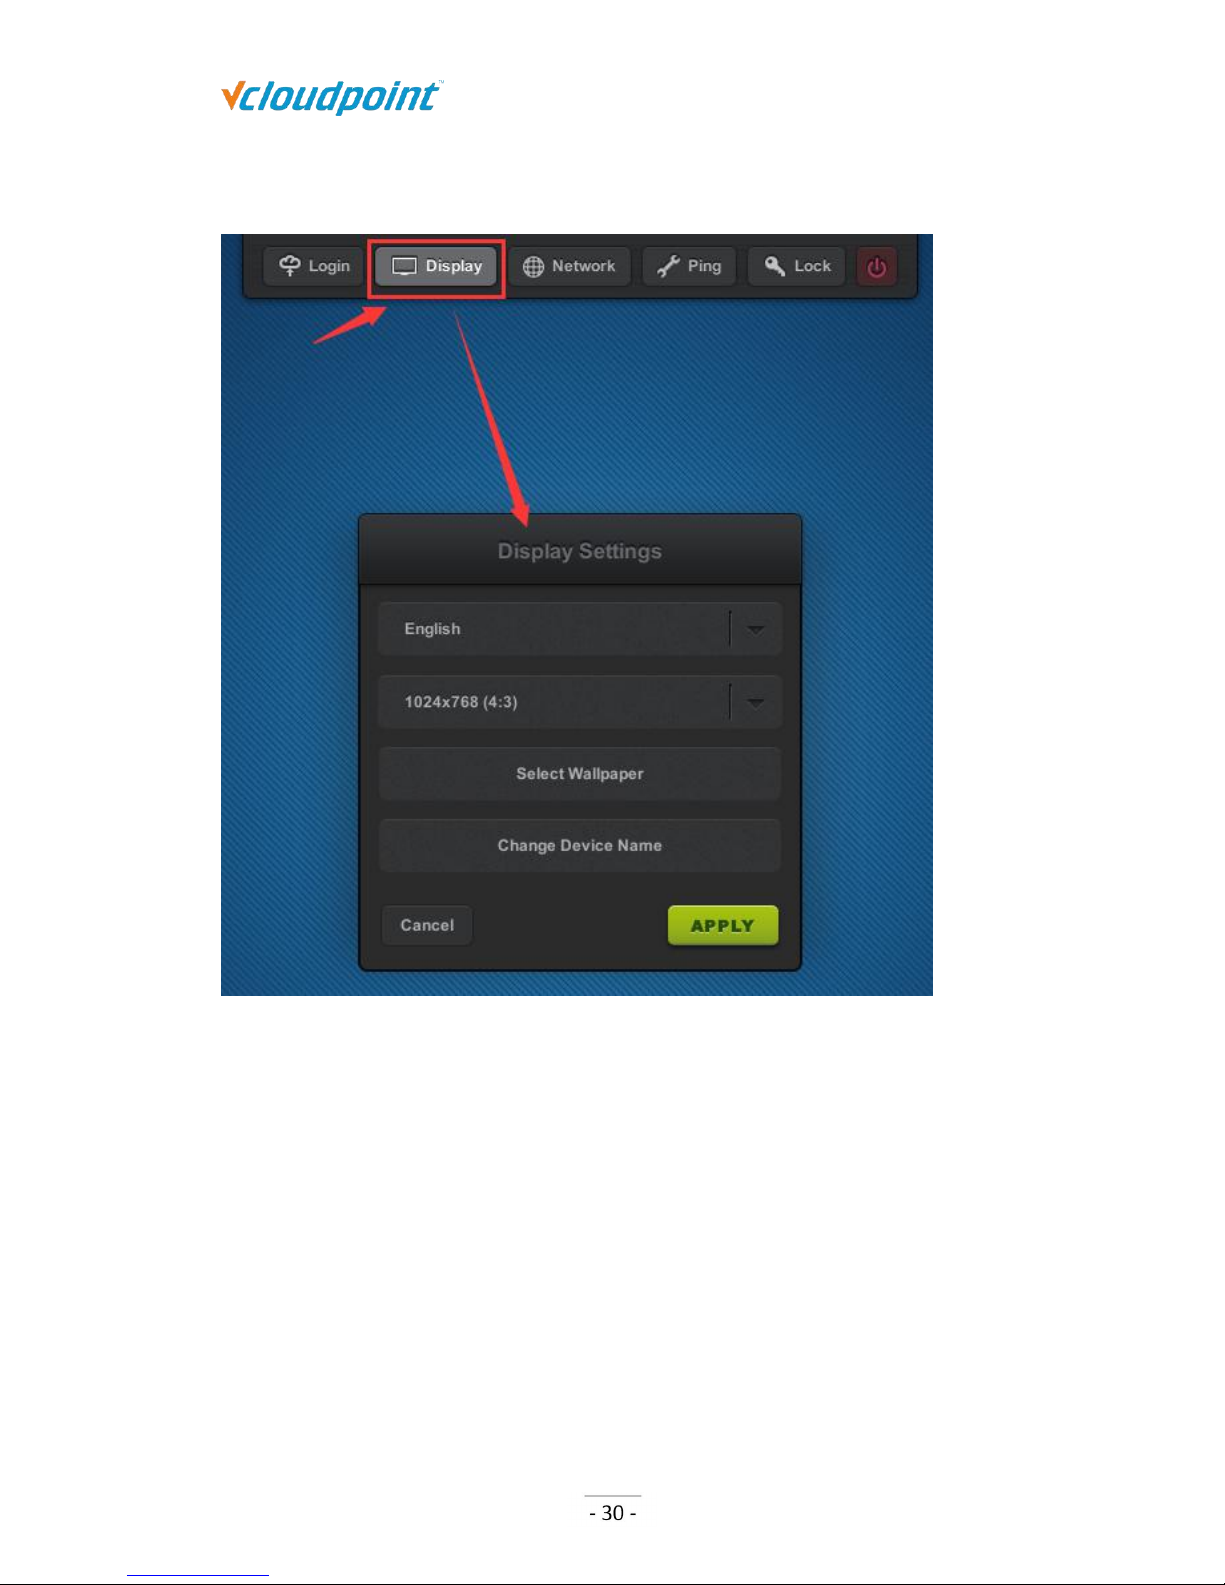
Language: to change the device language; available languages: English Chinese,
Russian, default: English.
Resolution: to change the resolution for the device interface and user desktop;
default: 1024x768 (4:3), maximum: 1920x1080.
Wallpaper: to change wallpaper for the device interface.
Device Name: to change device name; default: S100- (last 8 serial numbers). Device
name is shown at the right bottom of device interface and User Management page
on vMatrix Server Manager.
Page 32
S100 Zero Client & vMatrix User Manual
www.vcloudpoint.com
4.1.3 Network
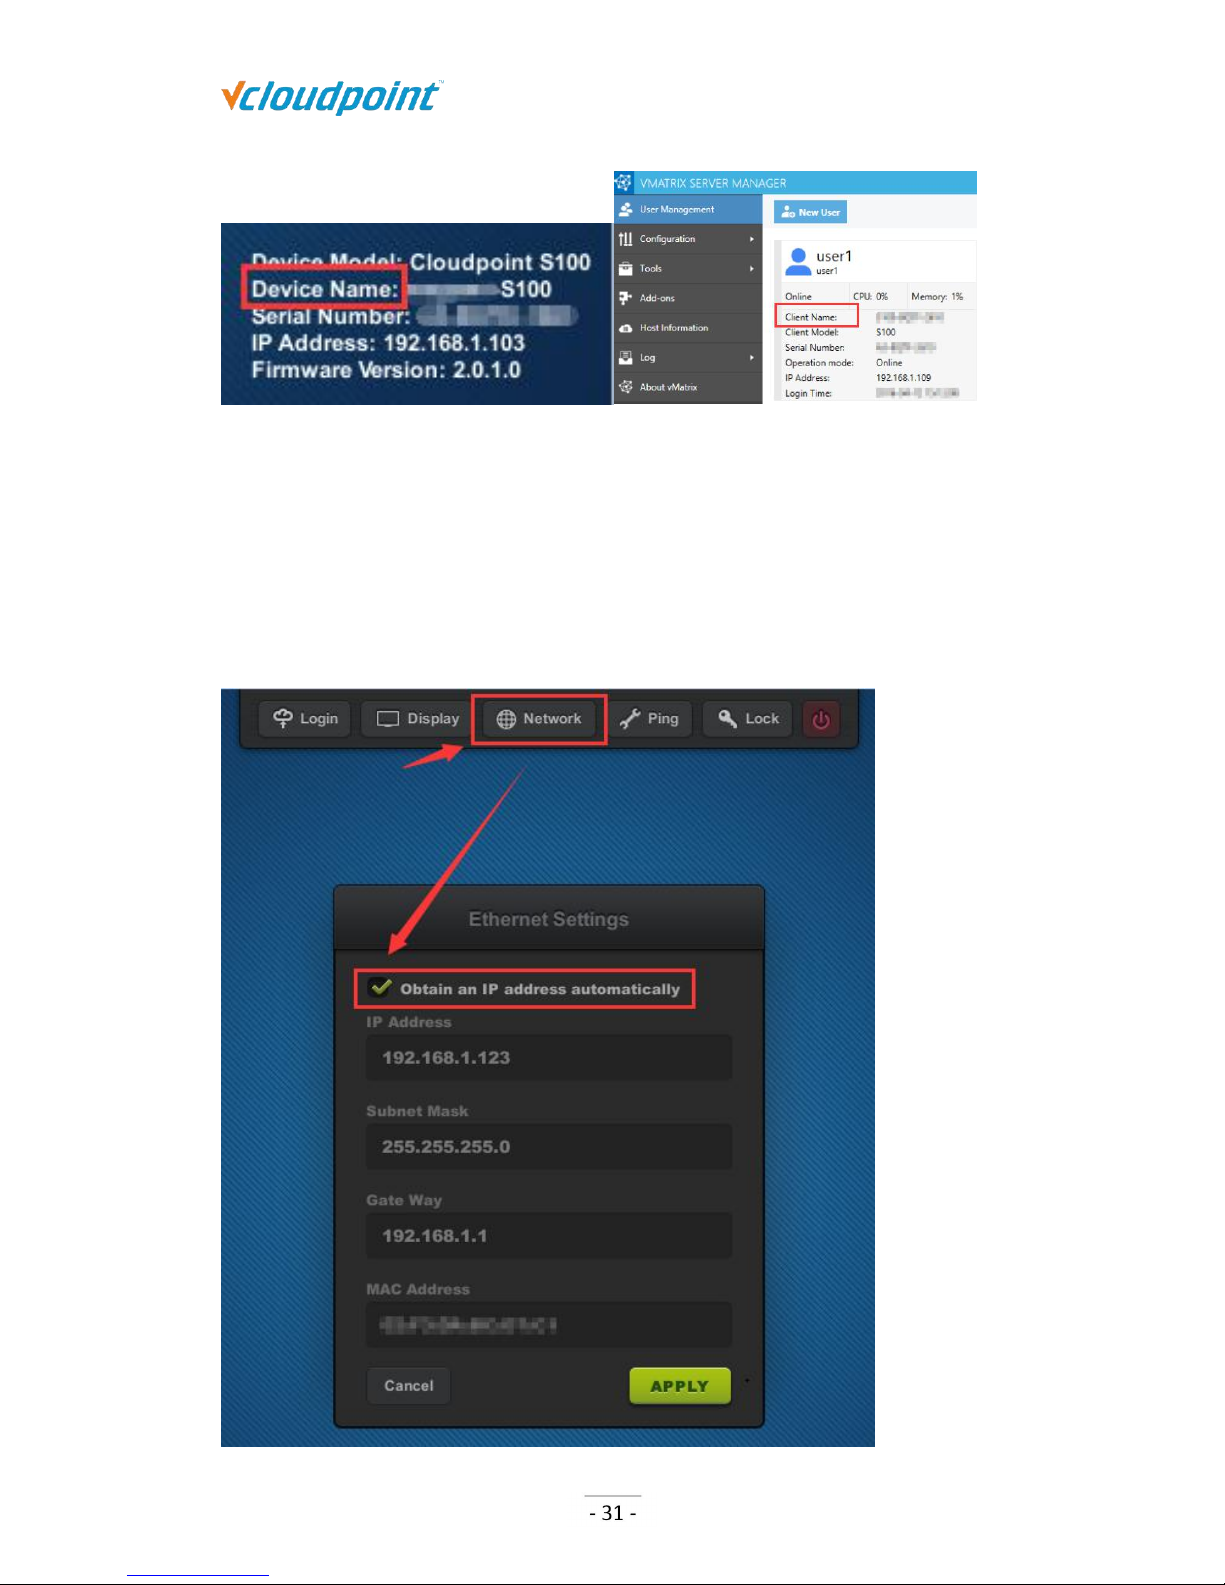
Ethernet Settings
If DHCP network service in available in your network, you can just use the default setting
to obtain an IP address for this device automatically. Otherwise if you want to allocate an
IP address manually, cancel the option and enter an IP address instead.
Page 33
S100 Zero Client & vMatrix User Manual
www.vcloudpoint.com
Note: IP address of the device is for communication in LAN with vMatrix Server Manager only,
cannot be recognized by other internet software.
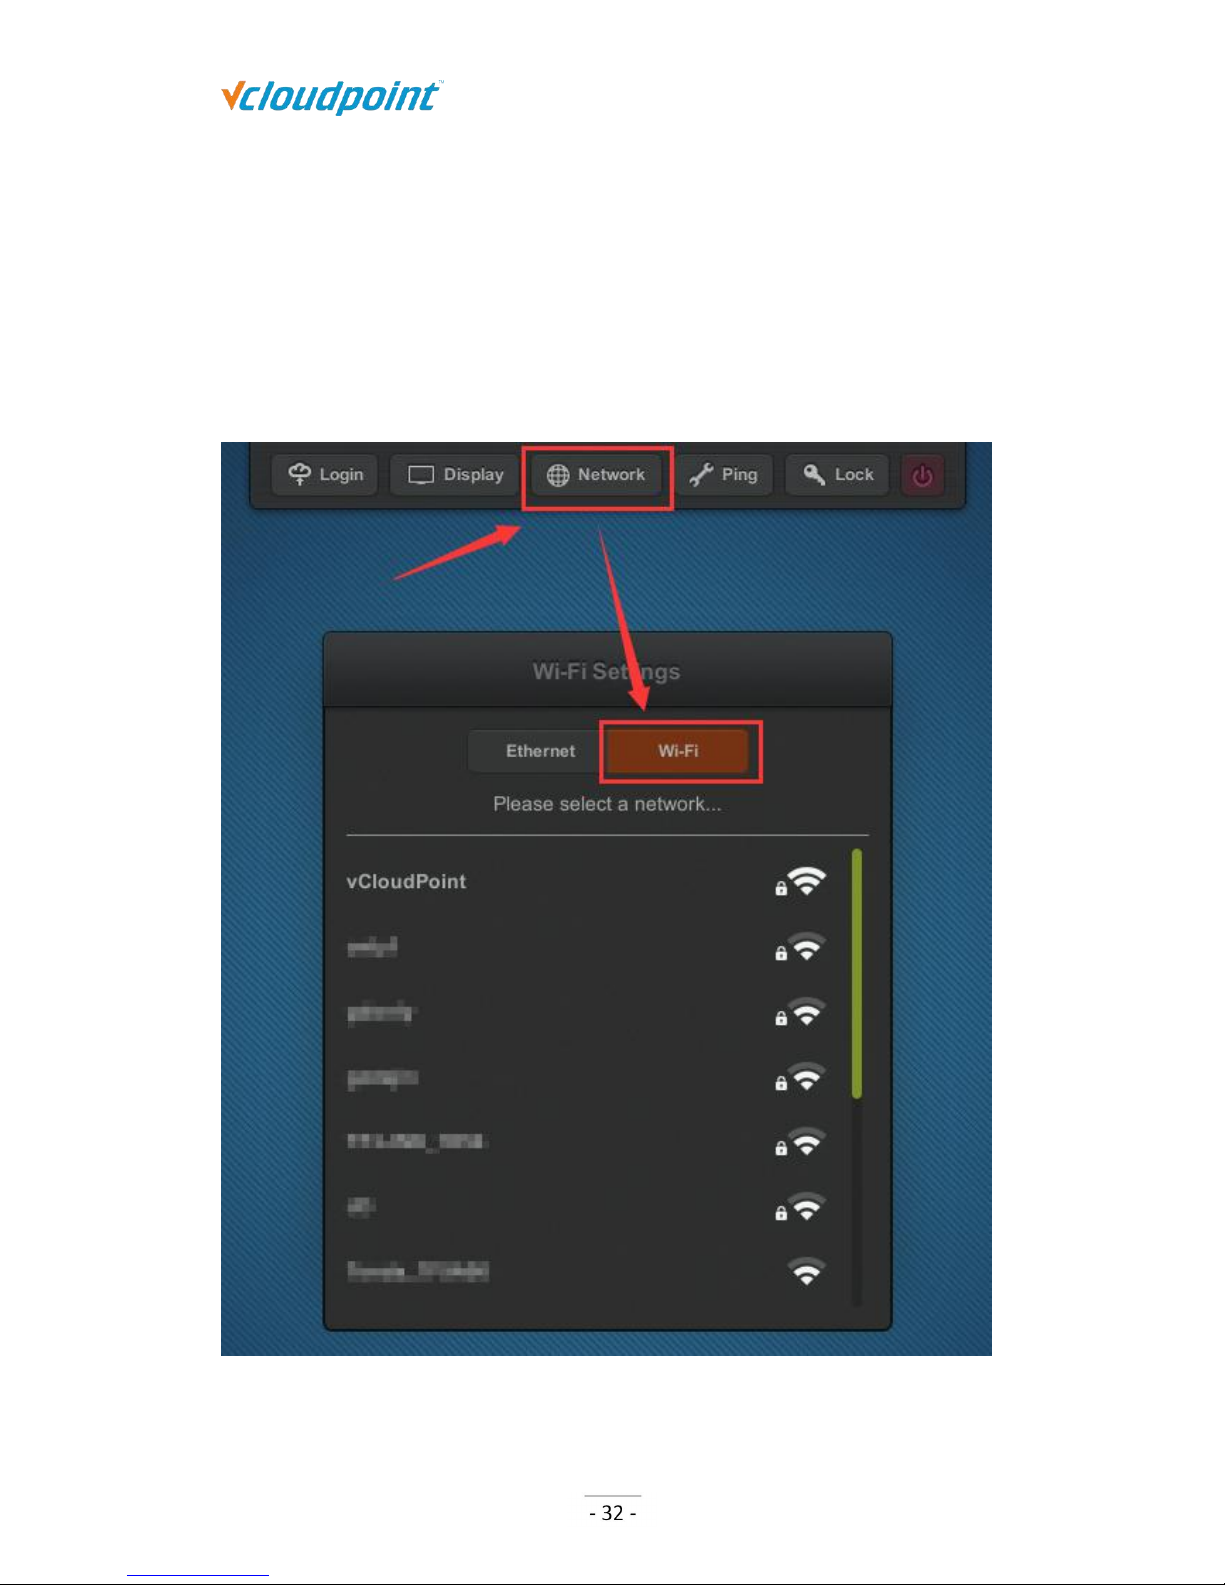
WIFI Settings
You will see the WIFI Settings sub-page only when the device is a WIFI model or
connected to a supported USB WIFI antenna on device boot.
1) Click the “WIFI” button to enter WIFI Settings page.
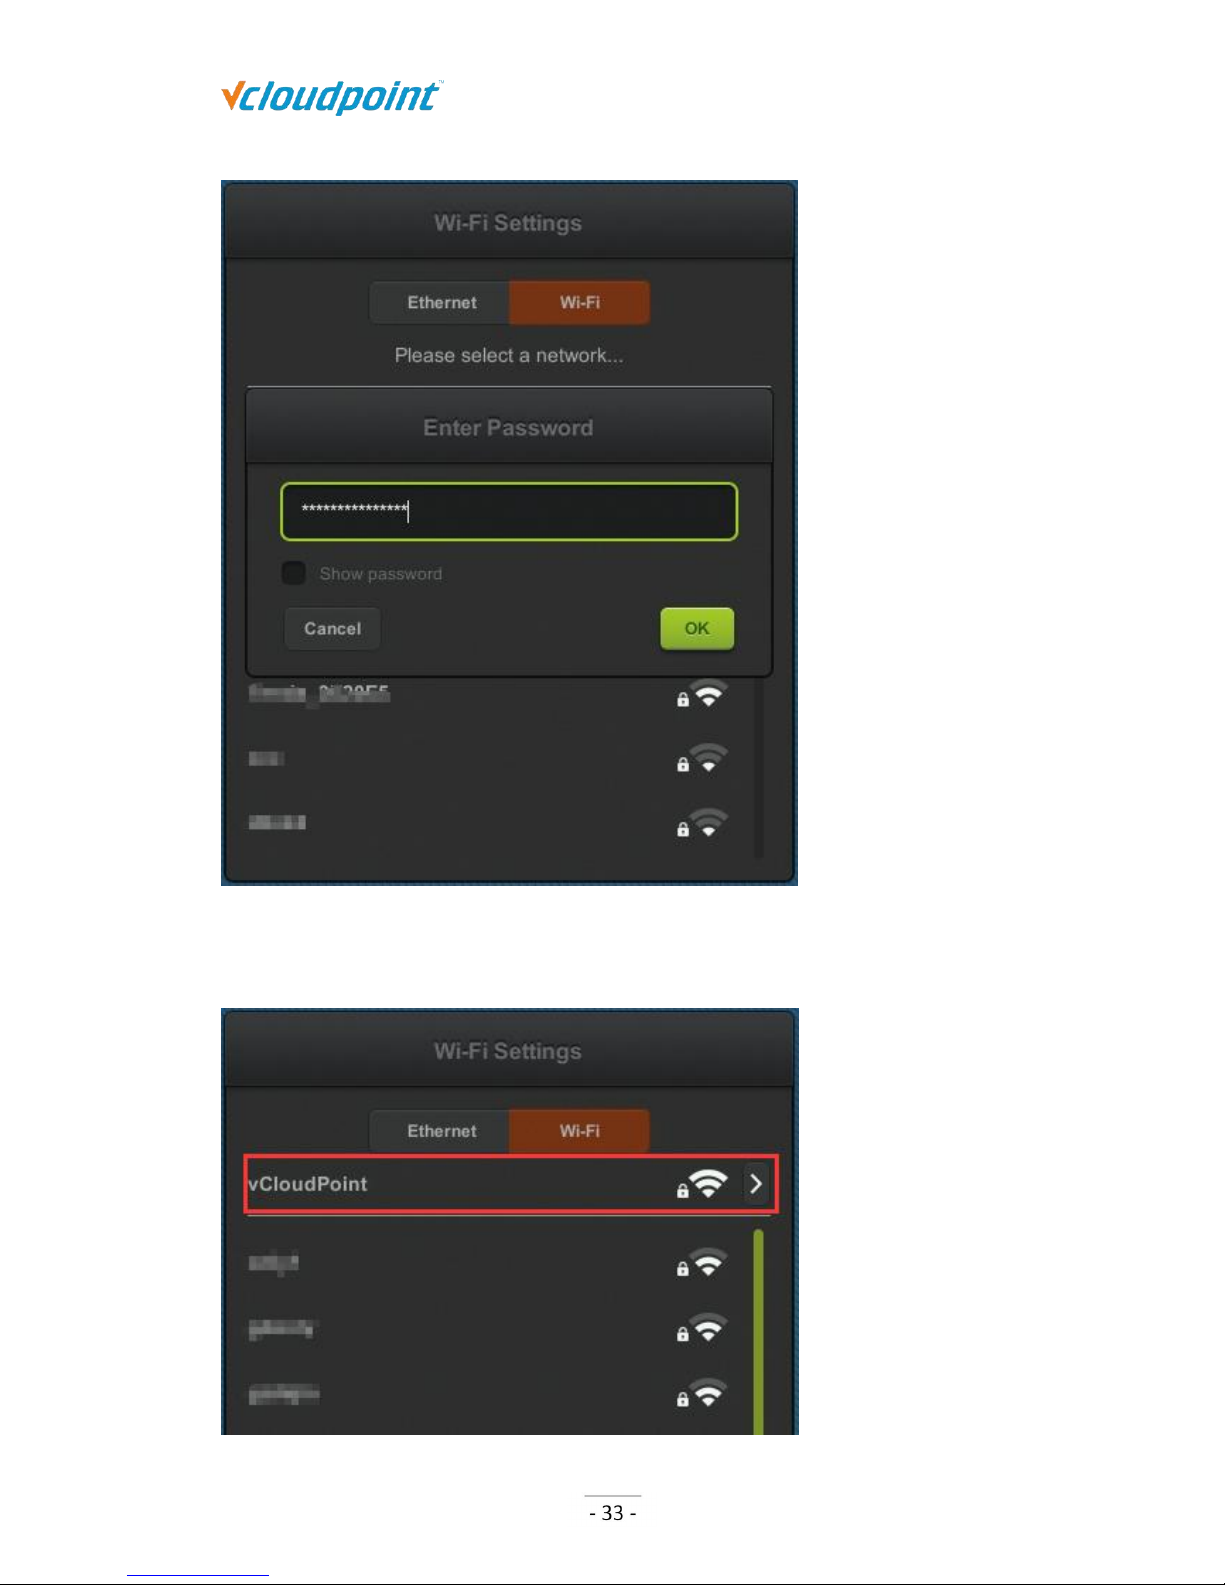
2) Double alick the WIFI network you are connecting to, and then enter password.
Page 34
S100 Zero Client & vMatrix User Manual
www.vcloudpoint.com
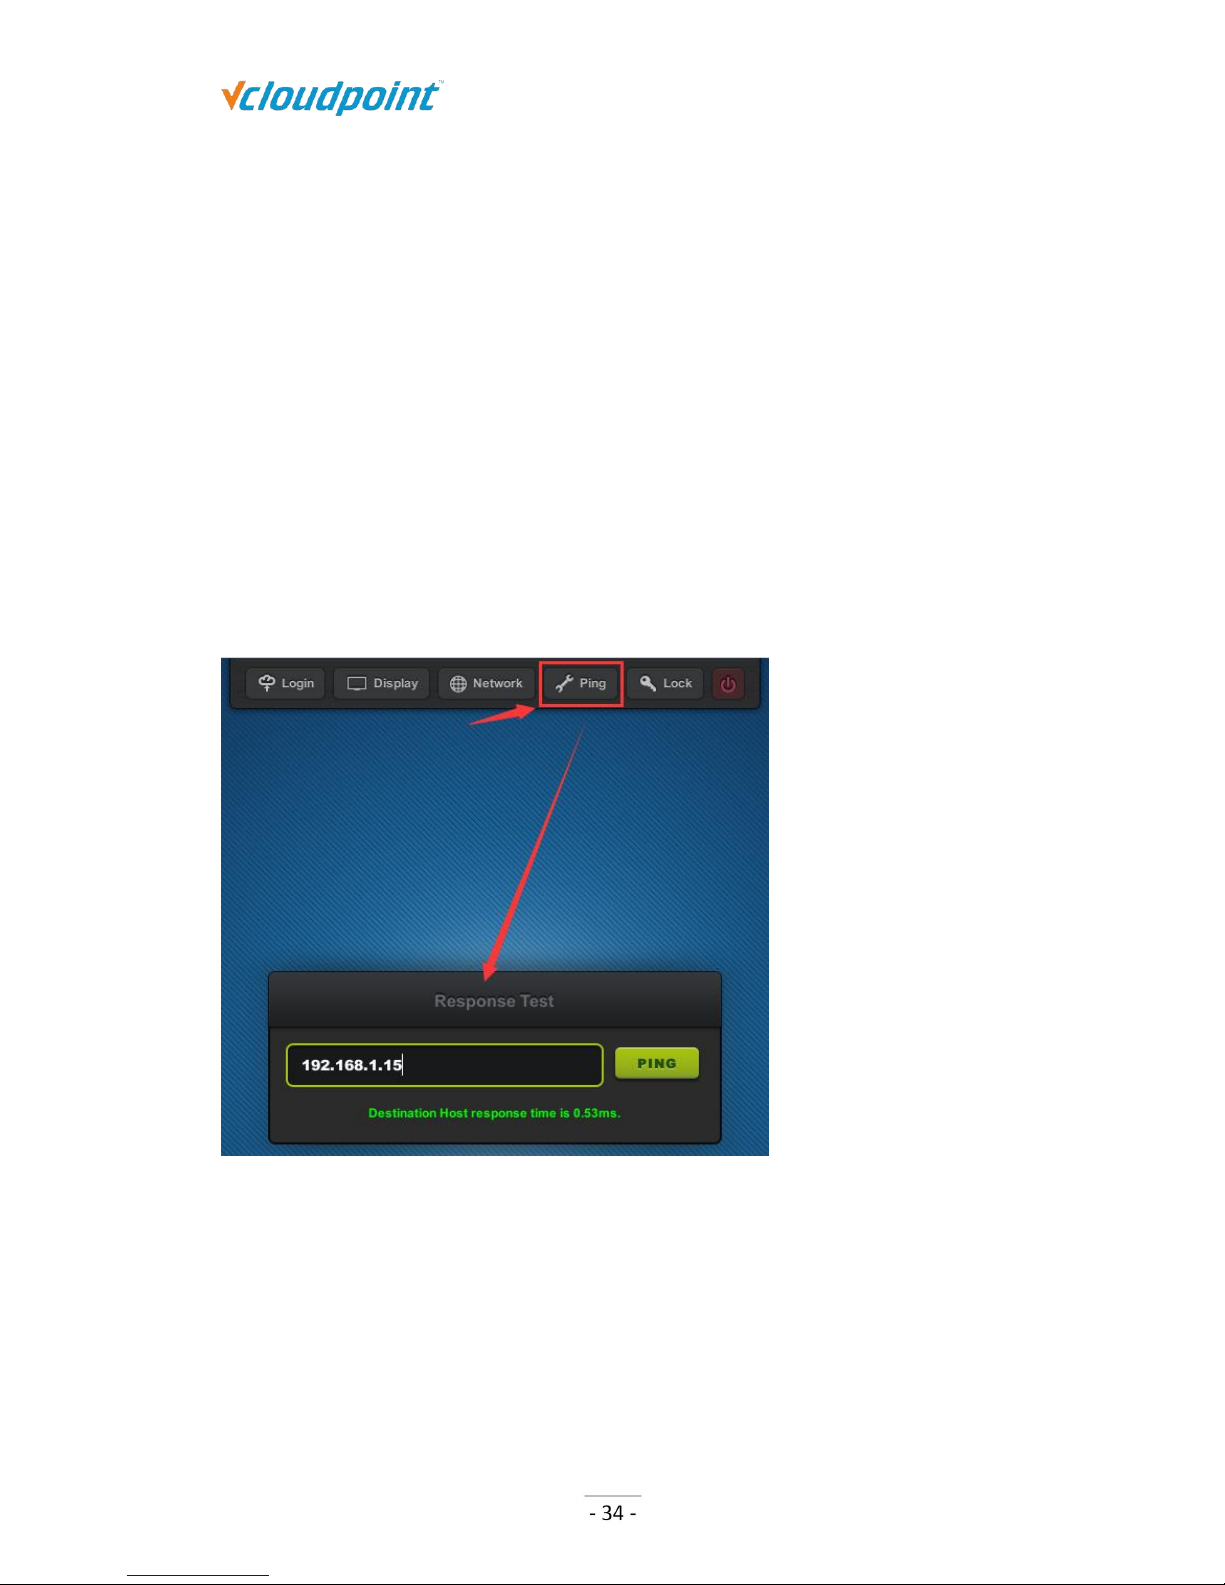
3) When the WIFI network you selected is displayed above the line divider, the WIFI
connection is established.
Page 35
S100 Zero Client & vMatrix User Manual
www.vcloudpoint.com
Note:
1) Any antenna that is built with 8TL8188EUS chip and connects with USB 2.0 standard is supported
by vCloudPoint devices.
2) Although the vCloudPoint devices are with an WIFI option, for a reliable user experience, you are
recommended to connect them through Ethernet cable, as WIFI network may fluctuates and causes
unexpected lags and disconnections during operation.
4.1.4 Ping
Ping test is to check the network connectivity between the current device and other
device, usually the destination host in the network. Simply enter the IP address of the
destination device and click the PING button. If you see a green message saying the
response time, the network between these two device is connected fine.
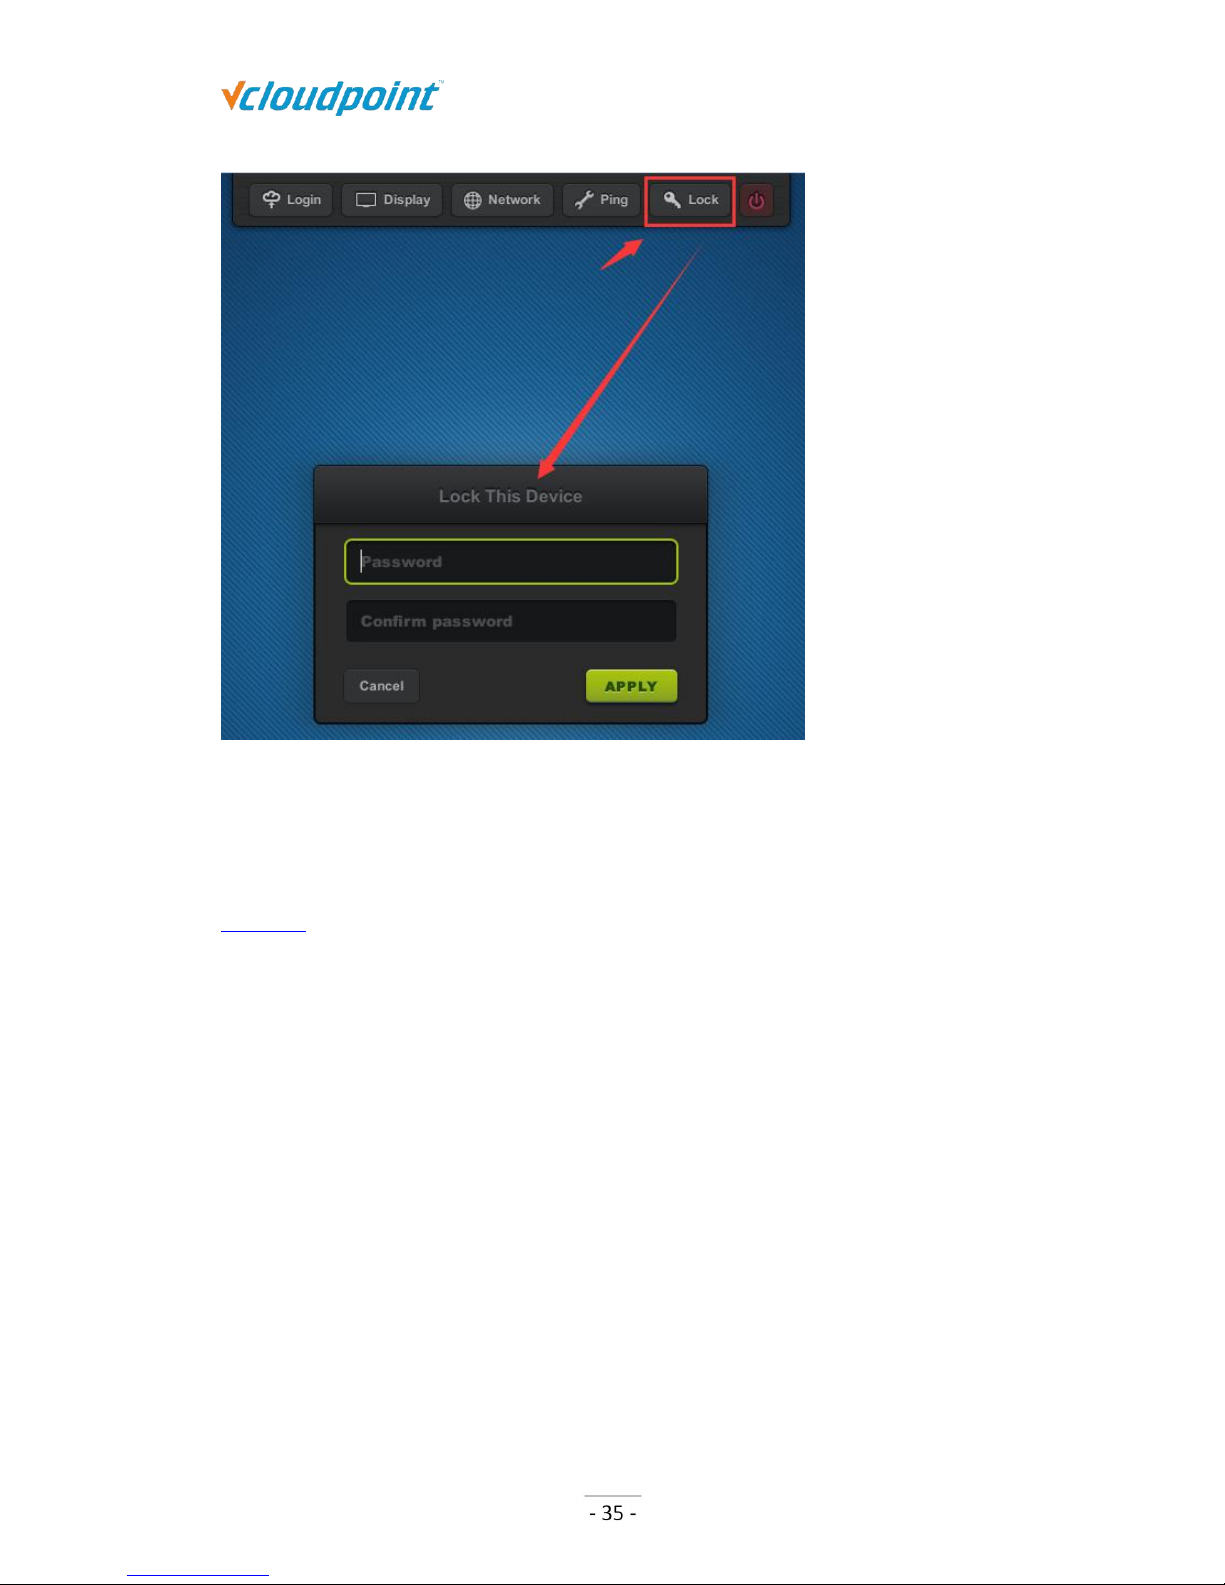
4.1.5 Device Lock
To lock the device is to set up a password on device boot so that the user is required to
enter password to use the device.
Page 36
S100 Zero Client & vMatrix User Manual
www.vcloudpoint.com
Note:
1) To unlock the device, just clear the password and apply.
2) If you forget the password, you have to reset the firmware to the factory default one. (Refer to
section 4.7)
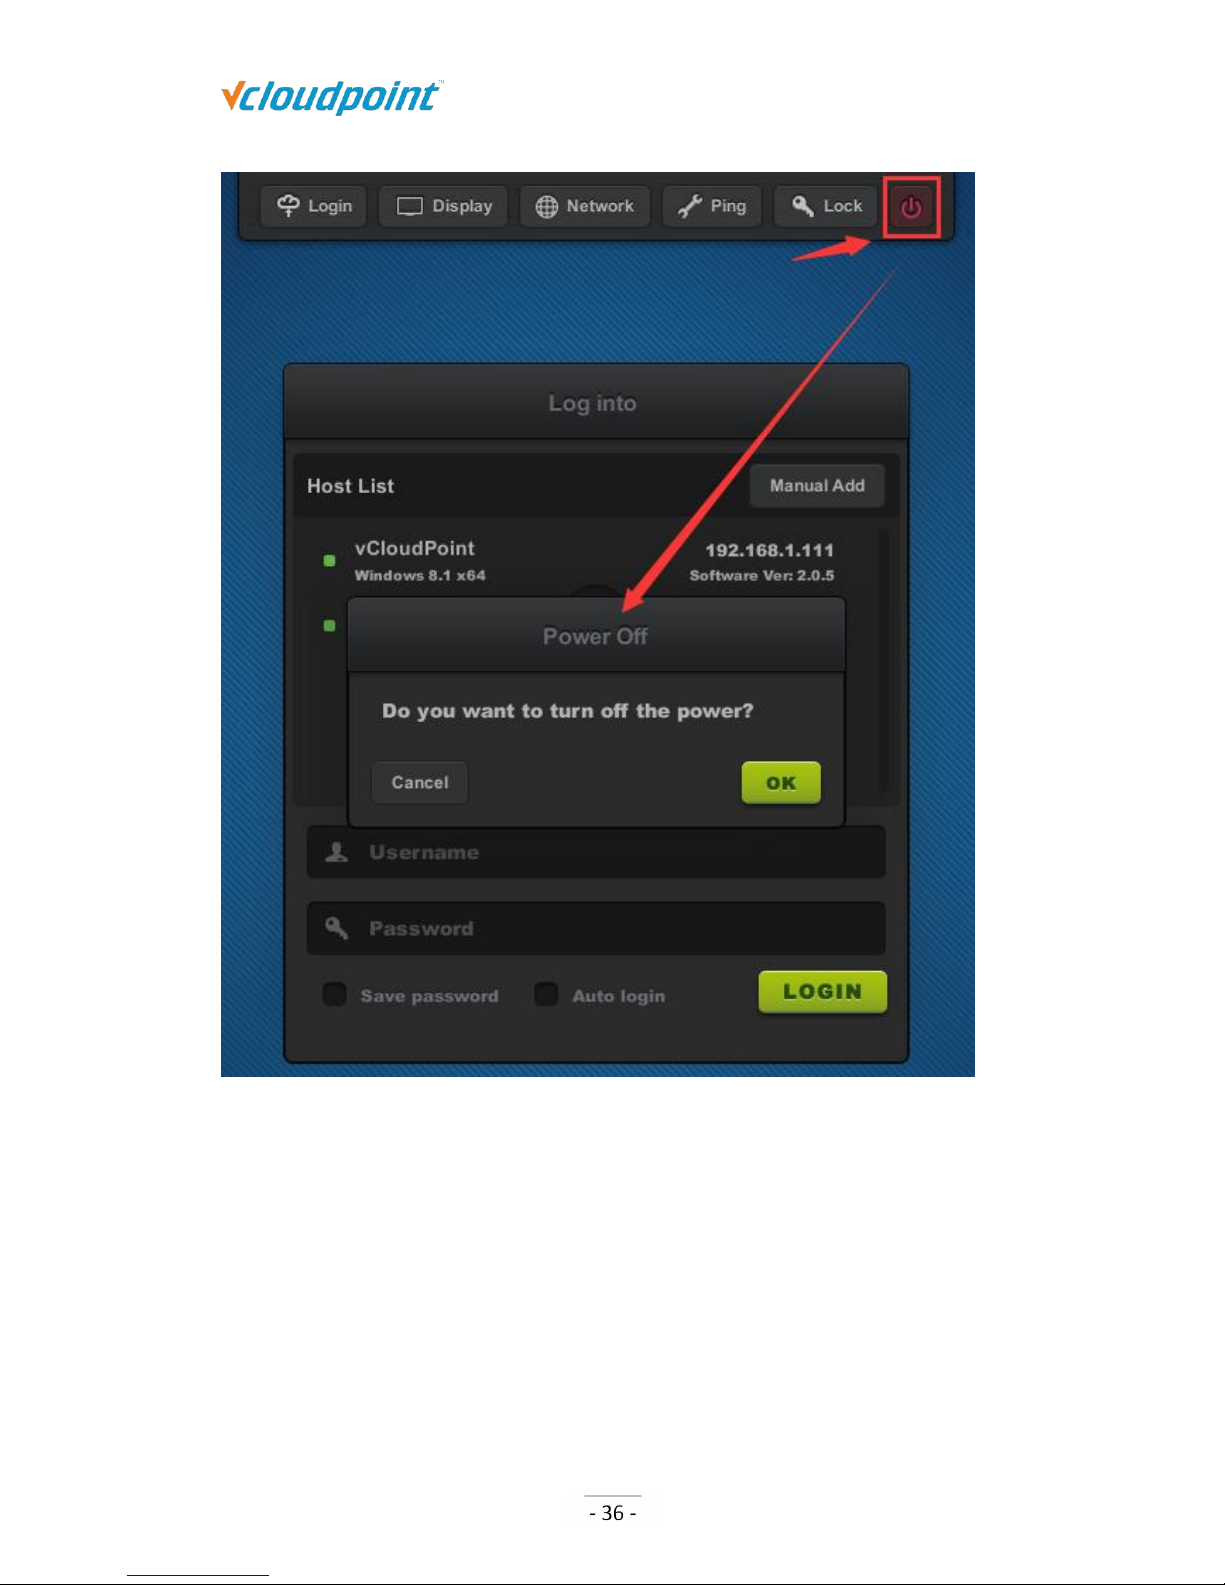
4.1.6 Shutdown Button
This button allows you to turn off the device without pressing the physical button on the
device. This is helpful when the device is mounted at the back of the monitor.
Page 37
S100 Zero Client & vMatrix User Manual
www.vcloudpoint.com
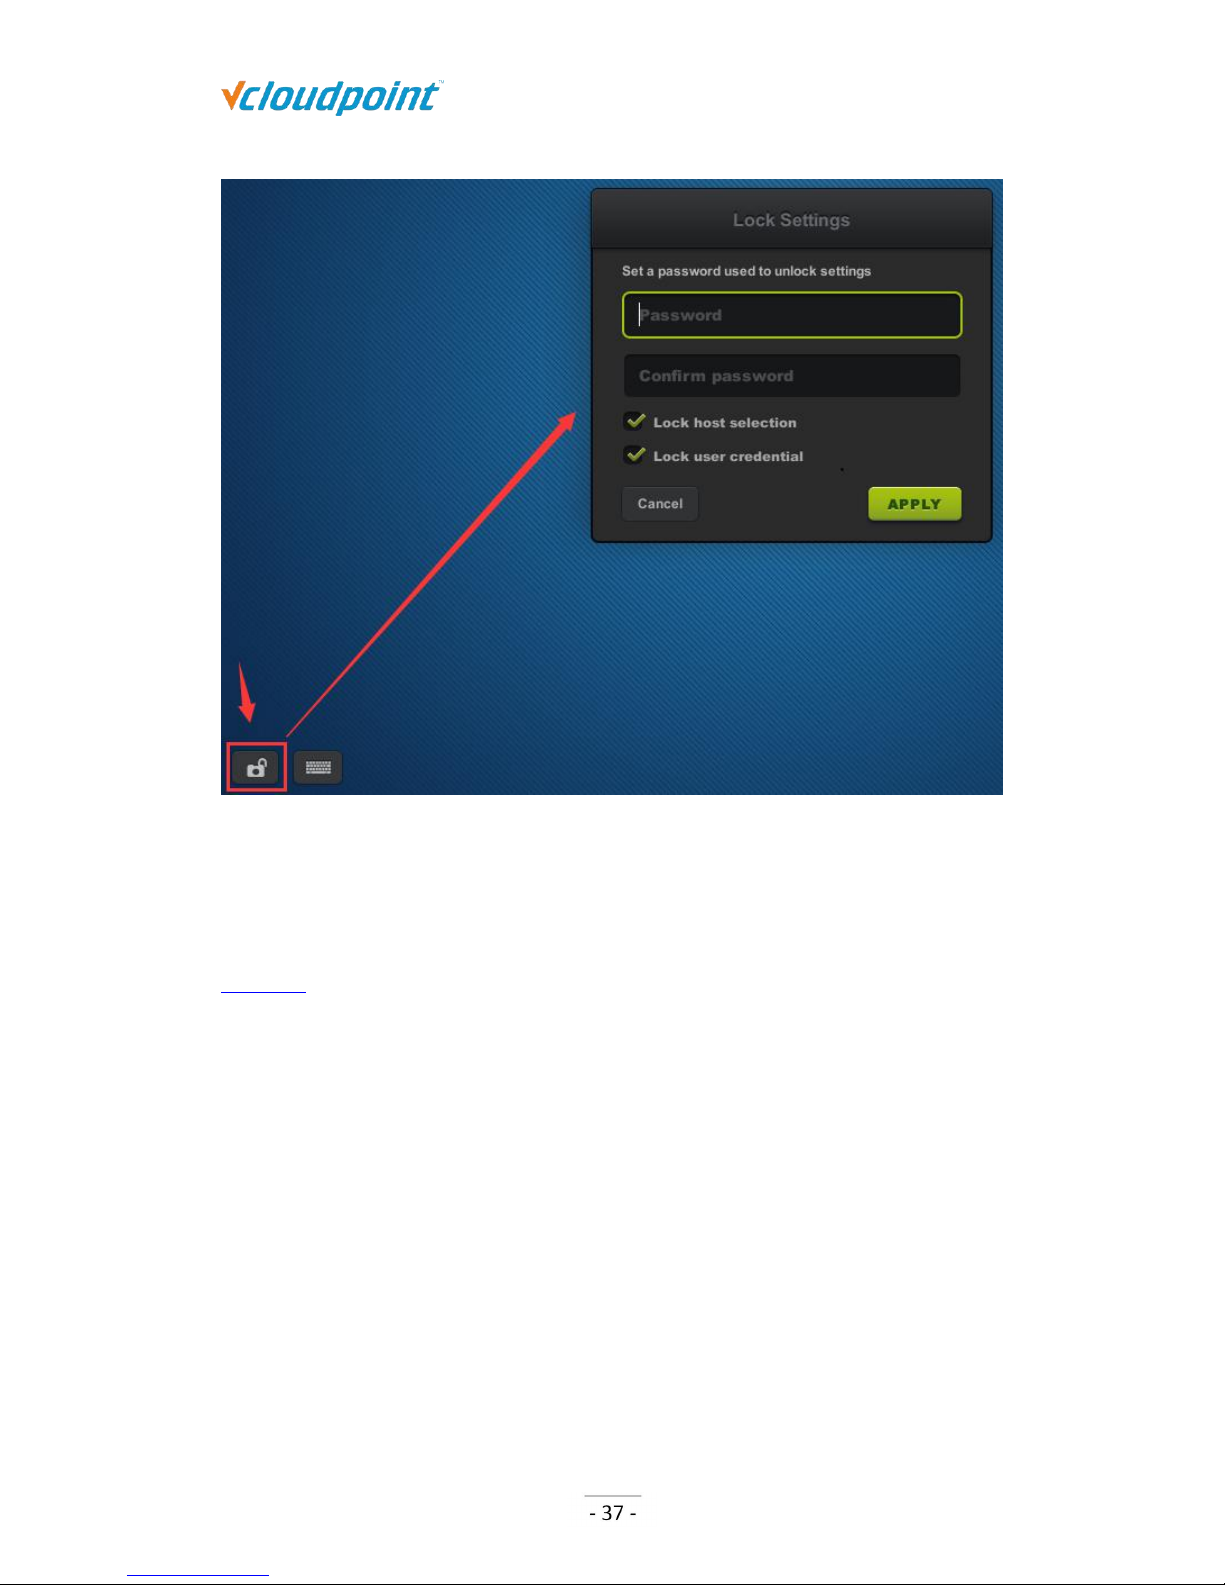
4.2 Settings Lock
To lock settings is to lock down the settings on the Login, Display, Network and Lock
menu in order to prevent other users from changing these settings.
Lock host selection: to disable the host selection and force the user to login to the
selected host. A host must be selected before this option is selected.
Lock user credential: to disable the user to change user name and password and
force the user to login with the saved user name and password. A correct user name
and its related password must be saved before this option is selected.
Page 38
S100 Zero Client & vMatrix User Manual
www.vcloudpoint.com
Note:
1) To unlock the device, just clear the password and apply.
2) If you forget the password, you have to reset the firmware to the factory default one. (Refer to
section 4.7)
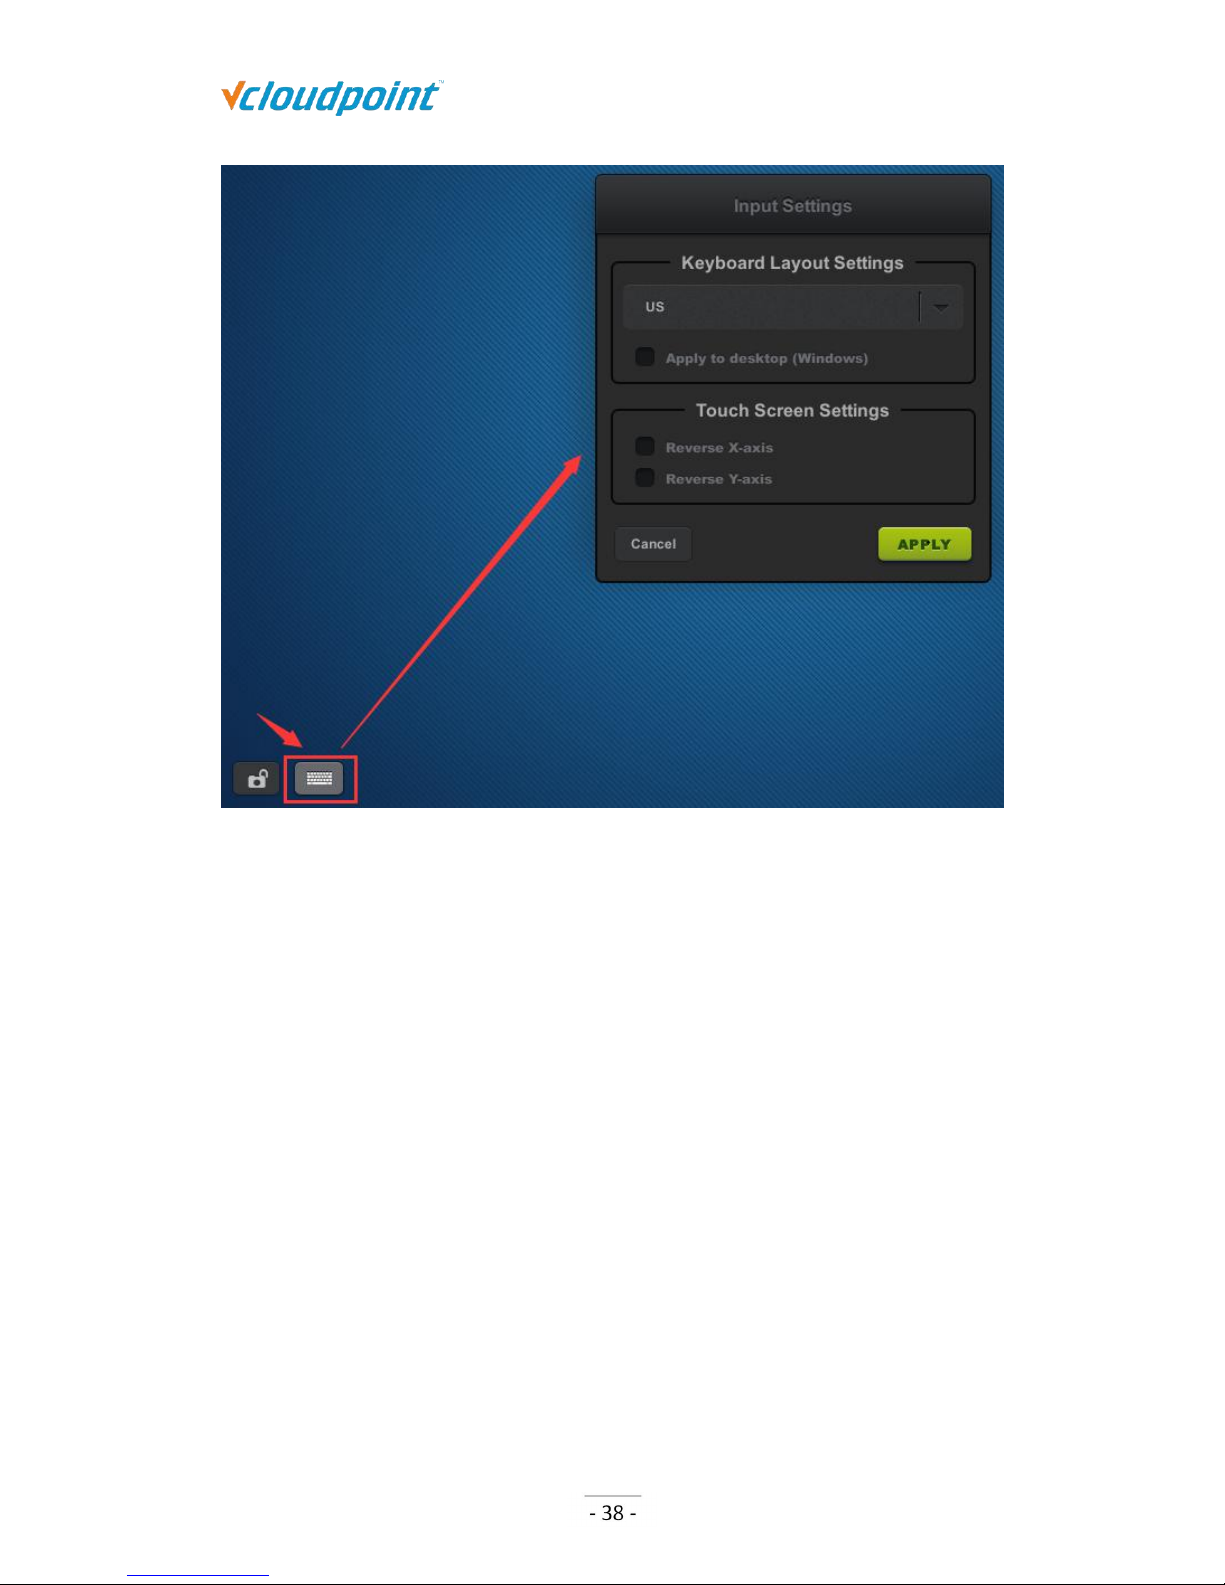
4.3 Keyboard Layout Settings
Keyboard Layout Settings: to set up the language of the keyboard input; 111
languages are available, defaulted US; if the option “Apply to desktop (Windows)” is
not selected, the setting applies to input on the device interface only.
Touch Screen Settings: to set up the display direction when using touch screen for
the device display. “Reverse X-axis” is to change the display direction from
left-to-right to right-to-left. “Reverse Y-axis” is to change the display direction from
up-to-down to down-to-up.
Page 39
S100 Zero Client & vMatrix User Manual
www.vcloudpoint.com
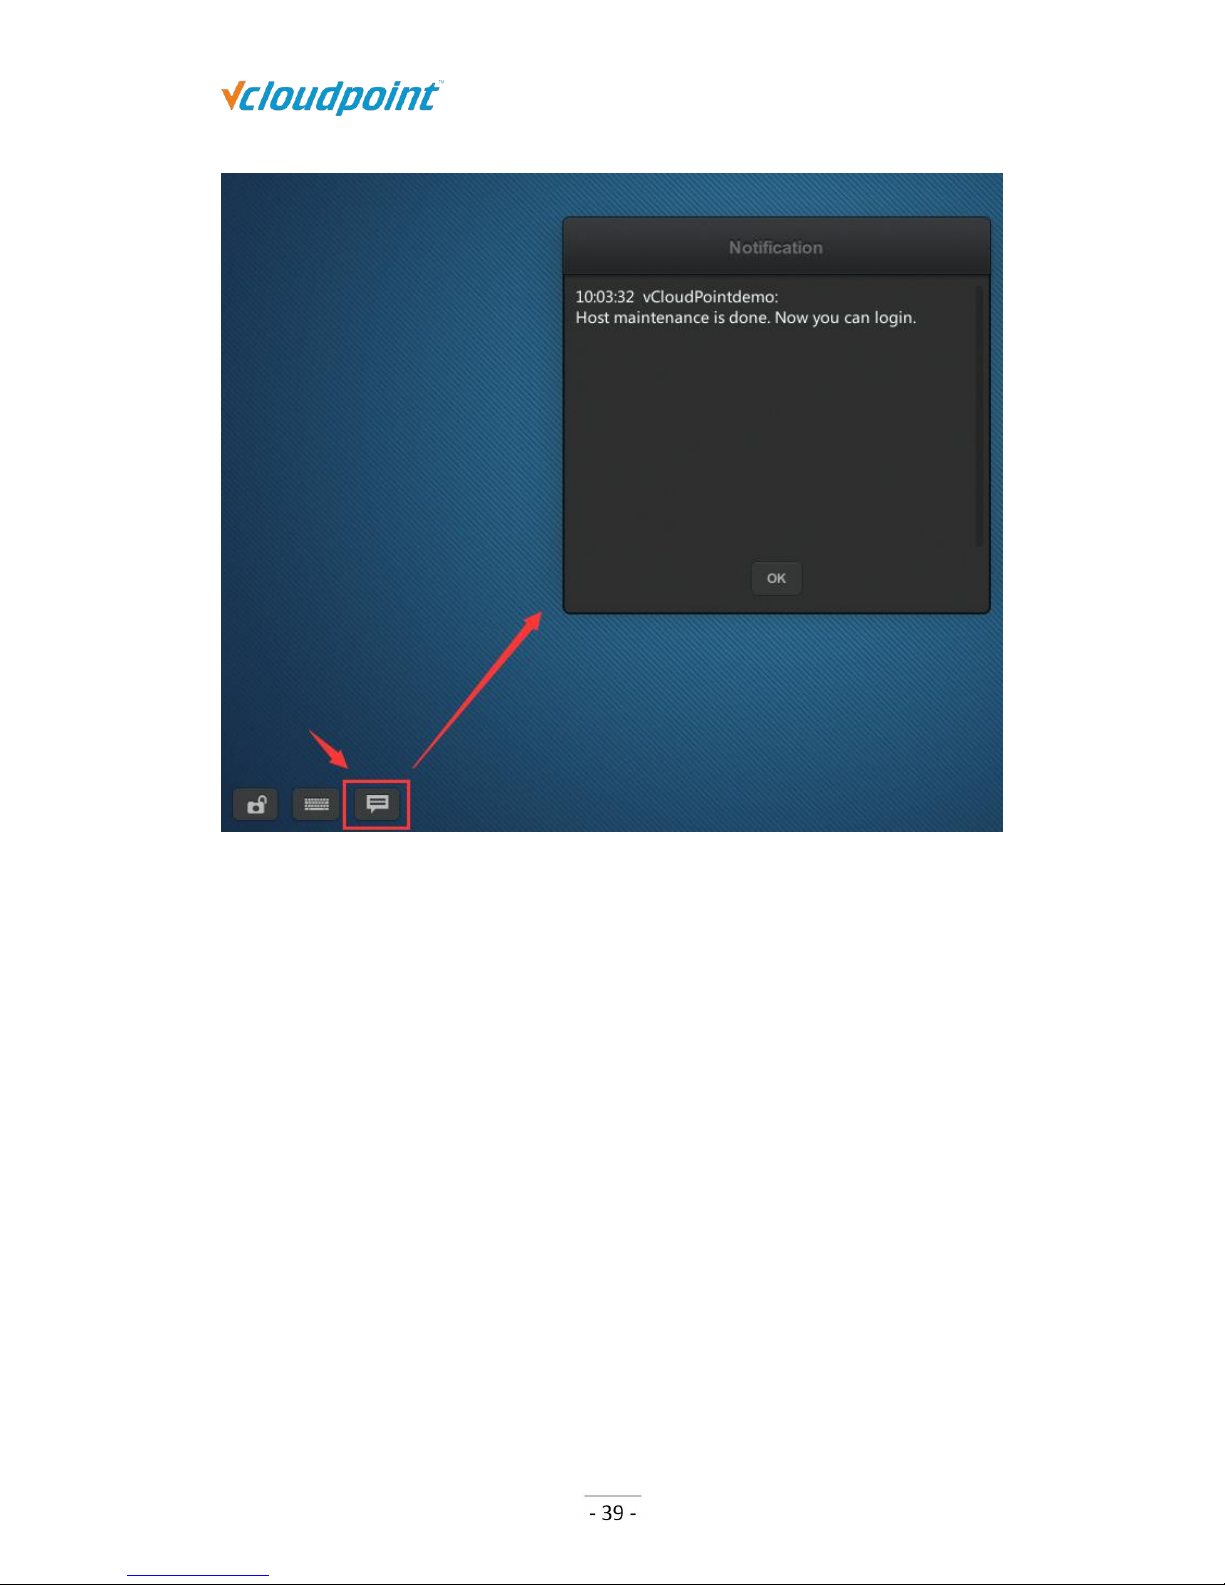
4.4 Notification Log
To view notifications send to this device from vMatrix Server Manager on the host side.
The notification icon displays only when there is notification sent to this device.
Notifications will be cleared on each reboot or shutdown of the device.
Page 40
S100 Zero Client & vMatrix User Manual
www.vcloudpoint.com
4.5 Device Information
At the right bottom screen of the device interface, you can view the device information
including:
Device Model: the model of the device, e.g.: vCloudPoint S100;
Device Name: the name of the device; default name is S100 - (last 8 serials number);
can be changed at the Display page;
Serial Number: the unique 12 digit numbers for each device;
IP Address: the IP address of the device in the LAN.
Firmware Version: the current device firmware version.
Upgradable to: the latest version of device firmware that is available in the network.
Click the download button to update.
Page 41
S100 Zero Client & vMatrix User Manual
www.vcloudpoint.com
4.6 Firmware Update
It is always recommended to use the latest available version of firmware on your
vCloudPoint zero client. Each installation of vMatrix Server Manager includes the latest
firmware, so no additional downloads are necessary to complete this process. When
powered on, the zero client establishes connection with vMatrix Server Manager and
checks for update, if there is a new version available. Firmware update is not always
required when a new version of vMatrix Server Manager is used. However, some
firmware of the device may be incompatible with the vMatrix Server Manager. In this case,
firmware update is required for logging to the host.
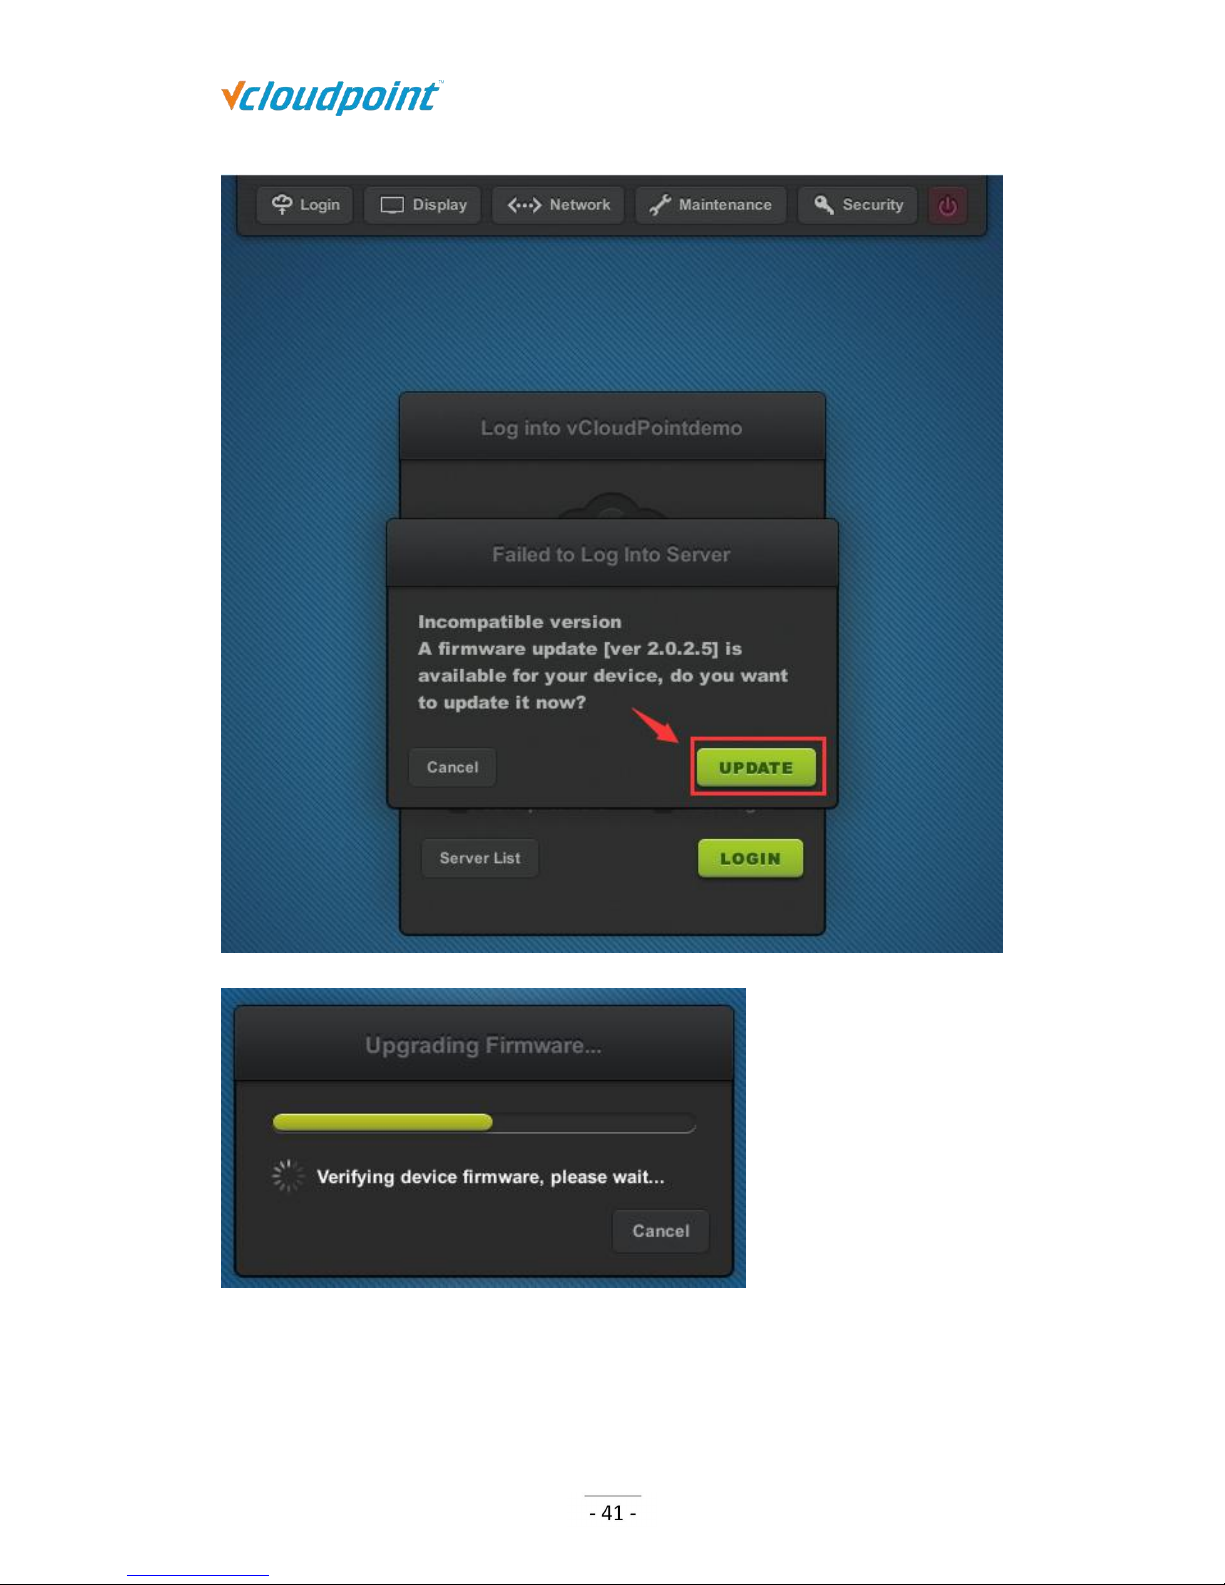
There are two ways for you to update the firmware:
1) Click the download icon at the right bottom screen to update to the latest version
available in the network. (Refer to section 4.6)
2) Select a host and enter user name and password. Simply click the “UPDATE” button on
the pop-up update window to update to the version included in the vMatrix Server
Manager on the host.
Page 42
S100 Zero Client & vMatrix User Manual
www.vcloudpoint.com
Page 43
S100 Zero Client & vMatrix User Manual
www.vcloudpoint.com
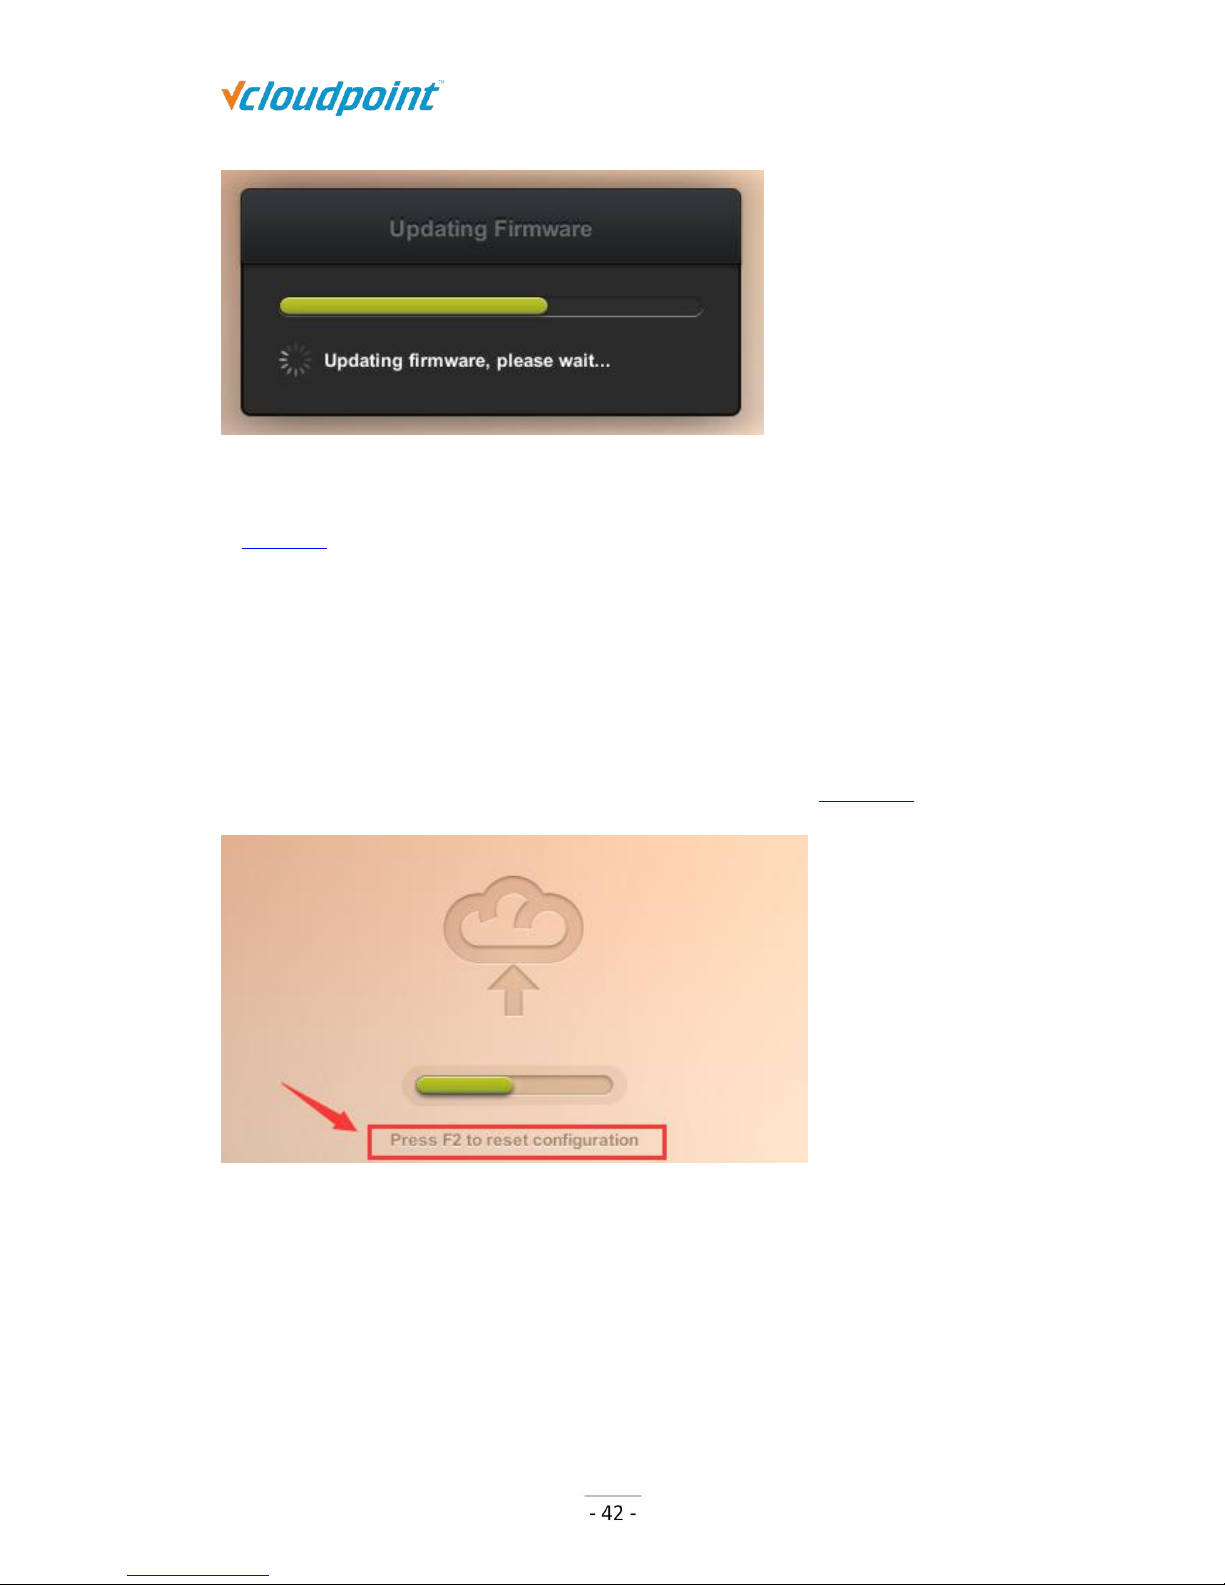
Note: please DO NOT pause update and make sure the connection between host and device is
reliable during firmware update. If the firmware is damaged, please reset and update again. (Refer
to section 4.7 for resetting firmware.)
4.7 Reset
Reset Configuration - press F2 key on device boot.
This is to restore all custom configurations to factory default. This is often used for
restoring desktop resolution which is out of range of the monitor to 1027x768. If the
Setting Lock is enable, you are required to enter password. (Refer to section 4.2.)
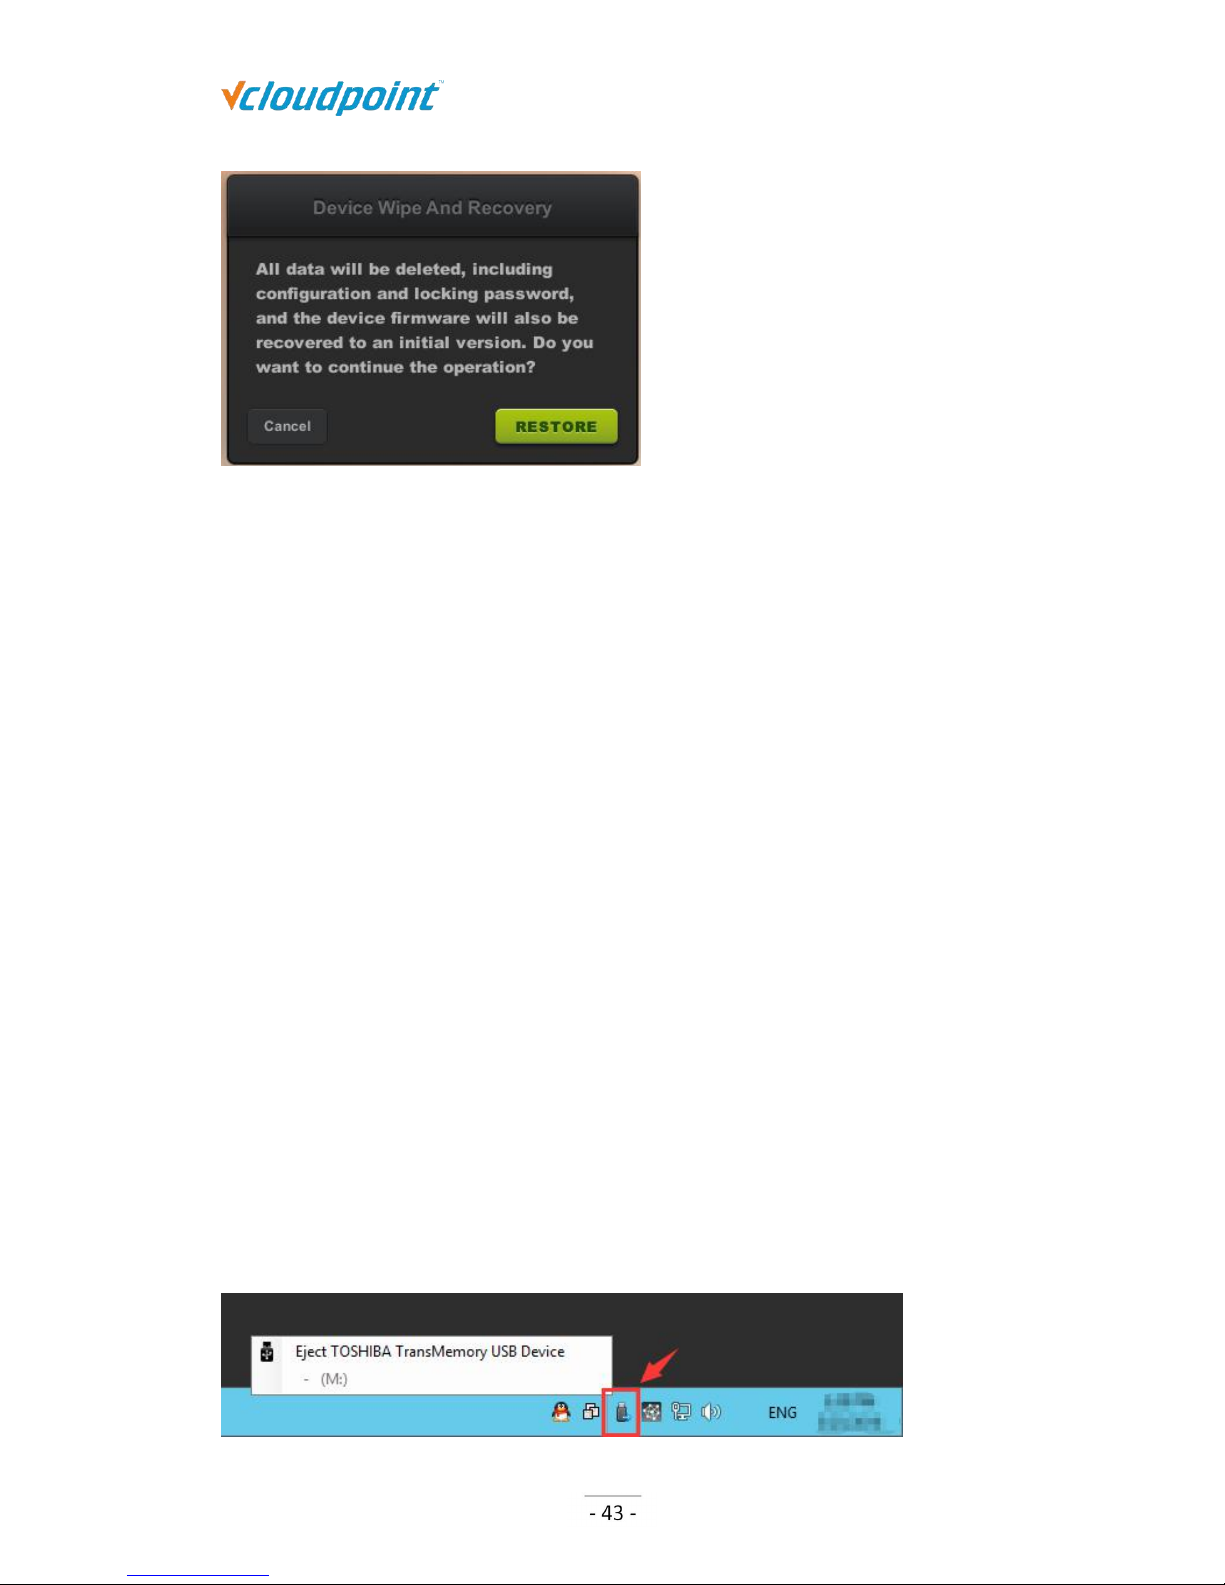
Reset Firmware - long press the switch button until you see the resetting window.
This is to reset the device firmware to the factory installed one. All configurations will be
recovered to the factory defaults. This is often used when device system turns faulty or is
damaged by improper firmware upgrade.
Page 44
S100 Zero Client & vMatrix User Manual
www.vcloudpoint.com
4.8 Disconnect & Sign off
Disconnect: to disconnect the user session; user session is still running, files and
applications are still opened and in place when user connects again. There are two
methods for a user to disconnect his session on host:
right click on the system’s window button, choose “Shutdown or sign out”, and
then “Disconnect”.
press the power button of the device.
Sign out: to sign out the user; the user’s session is ended; files applications are
closed. Right click on the system’s window button, choose “Shutdown or sign out”,
and then “Sign off”.
Note: there are only options of “disconnect” and “sign off” for users, but no “power off” option to
shut down the host system.
4.9 Use USB Devices
To use supported USB devices of , simply connect them to the USB ports on the device.
Some USB devices may require a driver to install on the host by an administrator. There is
no client driver needed for the device. To avoid data loss or damage to a memory device
plugged into the device, right click on the USB icon at the right task bar to eject the device
before unplugging it.
Page 45
S100 Zero Client & vMatrix User Manual
www.vcloudpoint.com
4.10 More Tools & Settings
4.10.1 Chat Tool
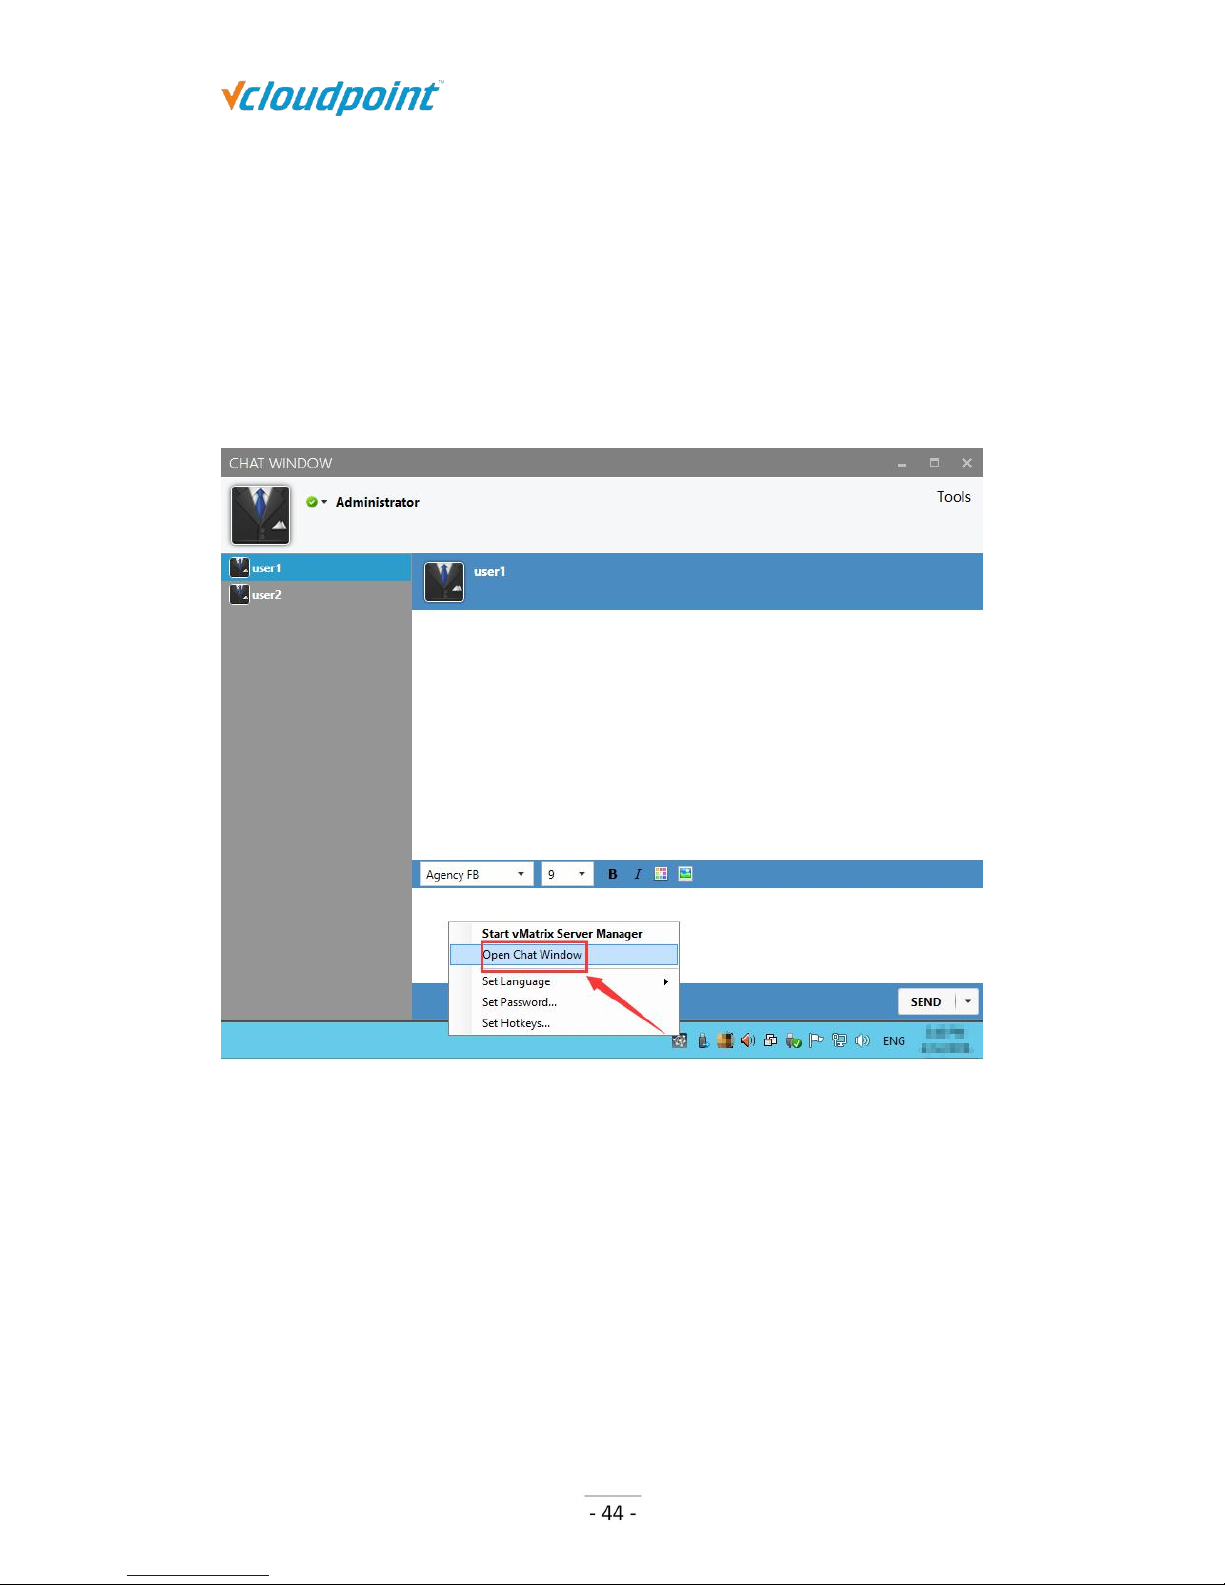
The Chat Tool allows users to talk with other users connecting to the same host. To run
the Chat Tool, right click on the vMatrx icon at the task bar and then click “Open Chat
Window”.
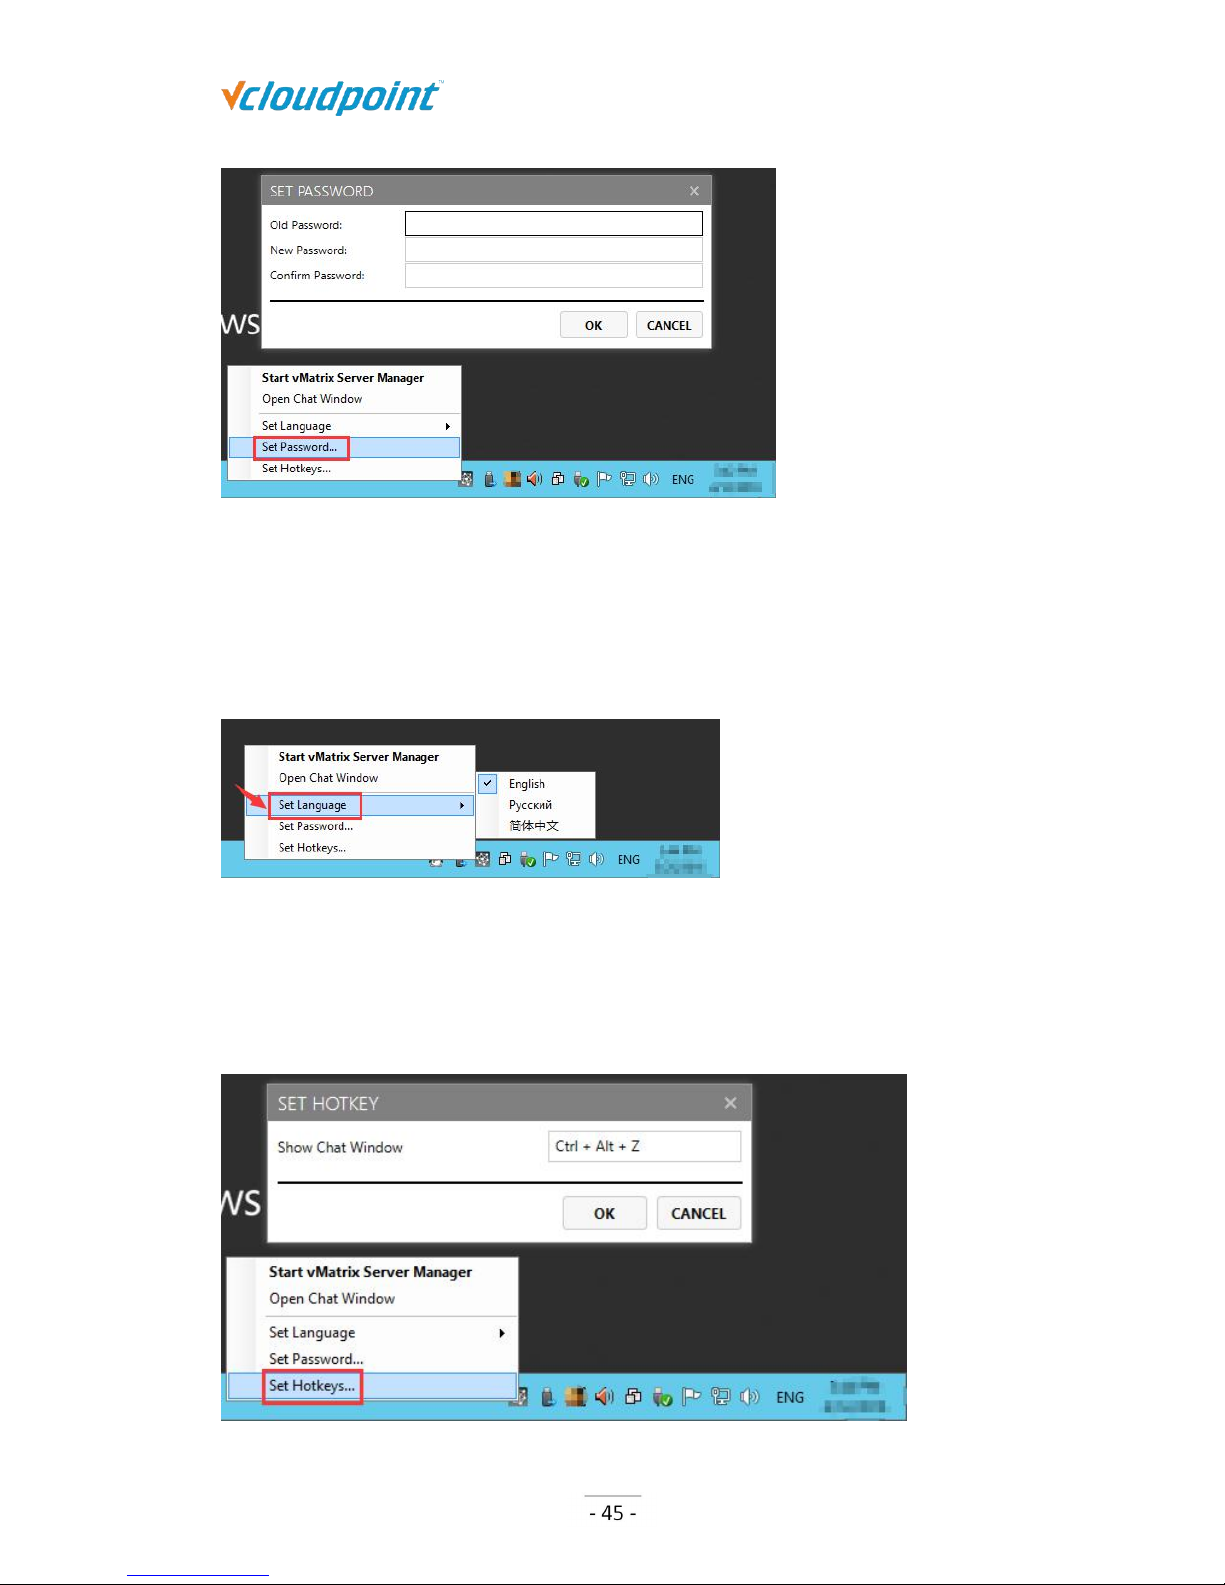
4.10.2 Set Password
This allows the current user to reset his login password without doing at the system
control panel. To reset password, right click on the vMatrx icon at the task bar, click on
“Set Password ...” and then enter passwords on the required fields.
Page 46
S100 Zero Client & vMatrix User Manual
www.vcloudpoint.com
4.10.3 Set Language
This is to set language for displaying messages of the vCloudPoint system. Right click on
the vMatrx icon at the task bar, click on “Set Language” and then available languages will
be shown on the right.
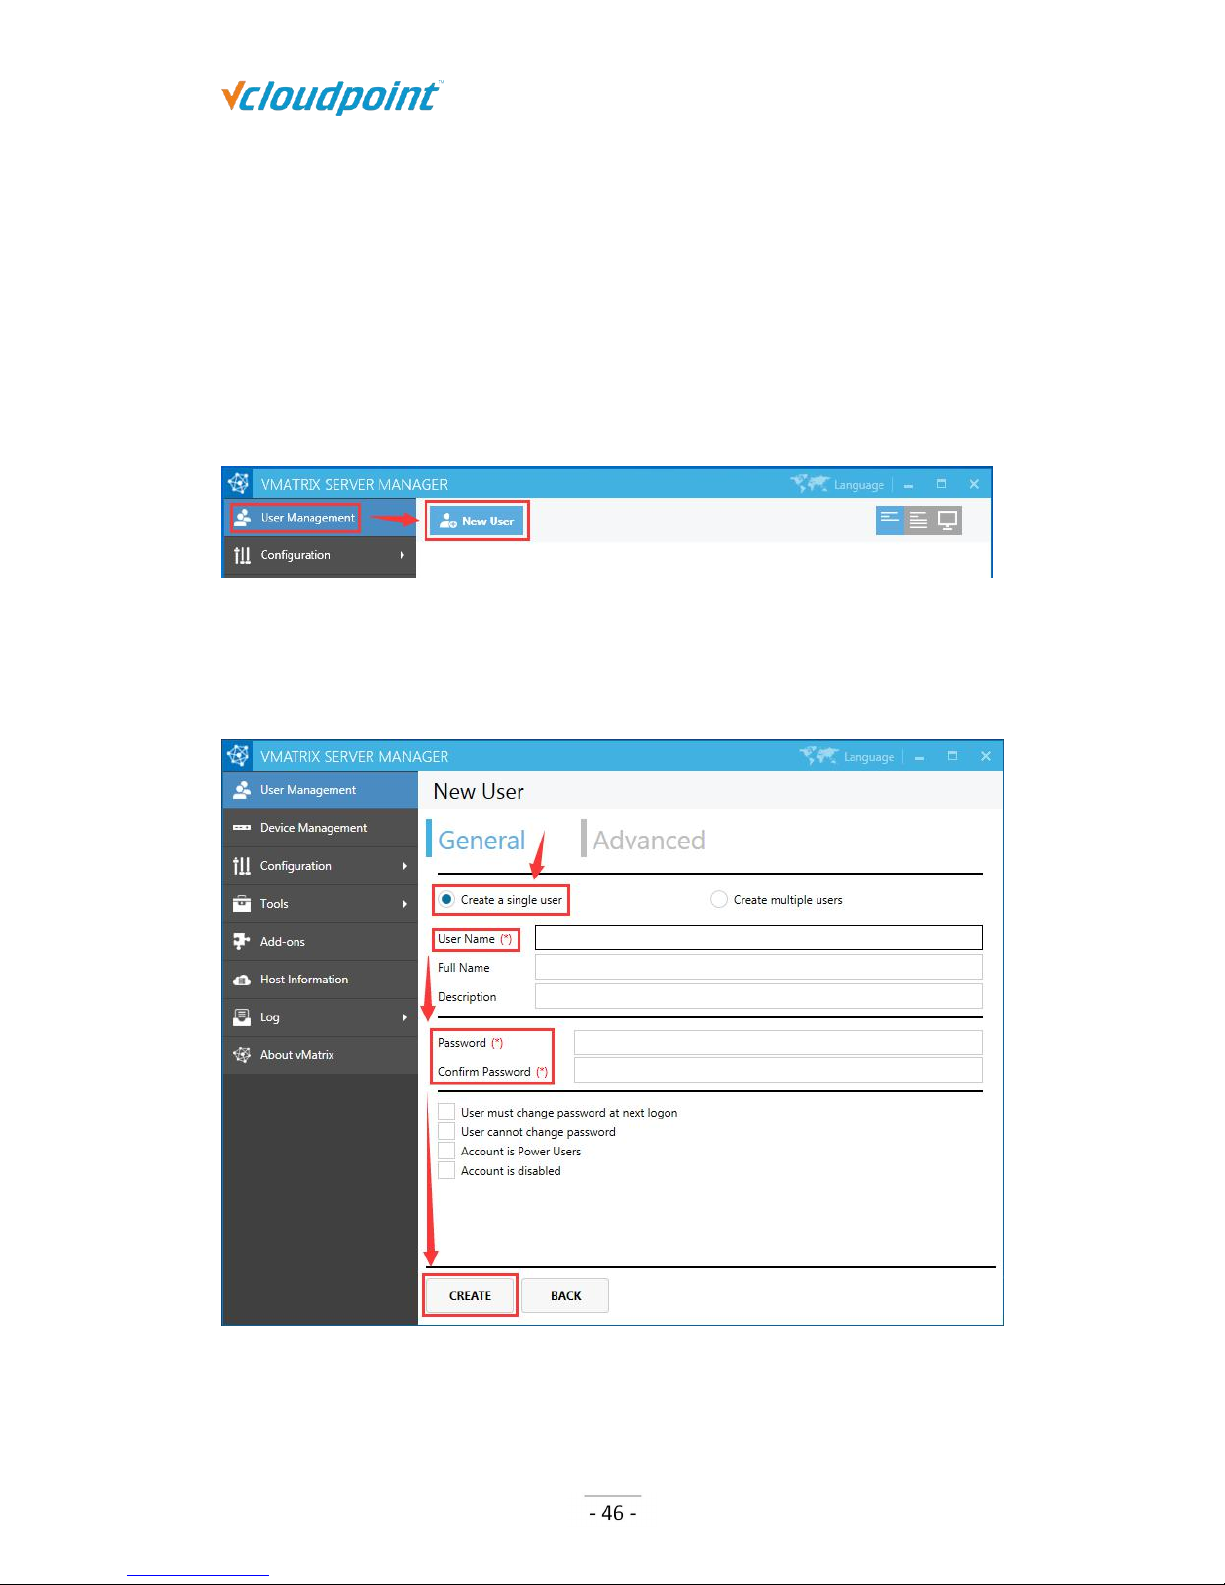
4.10.4 Set Hotkeys ...
This is to set hotkey to open chat window. To ensure the hotkey works, do not use the
same combination of keys for other applications.
Page 47
S100 Zero Client & vMatrix User Manual
www.vcloudpoint.com
Chapter 5. Using vMatrix Server Manager
5.1 User Management
5.1.1 New User Creation
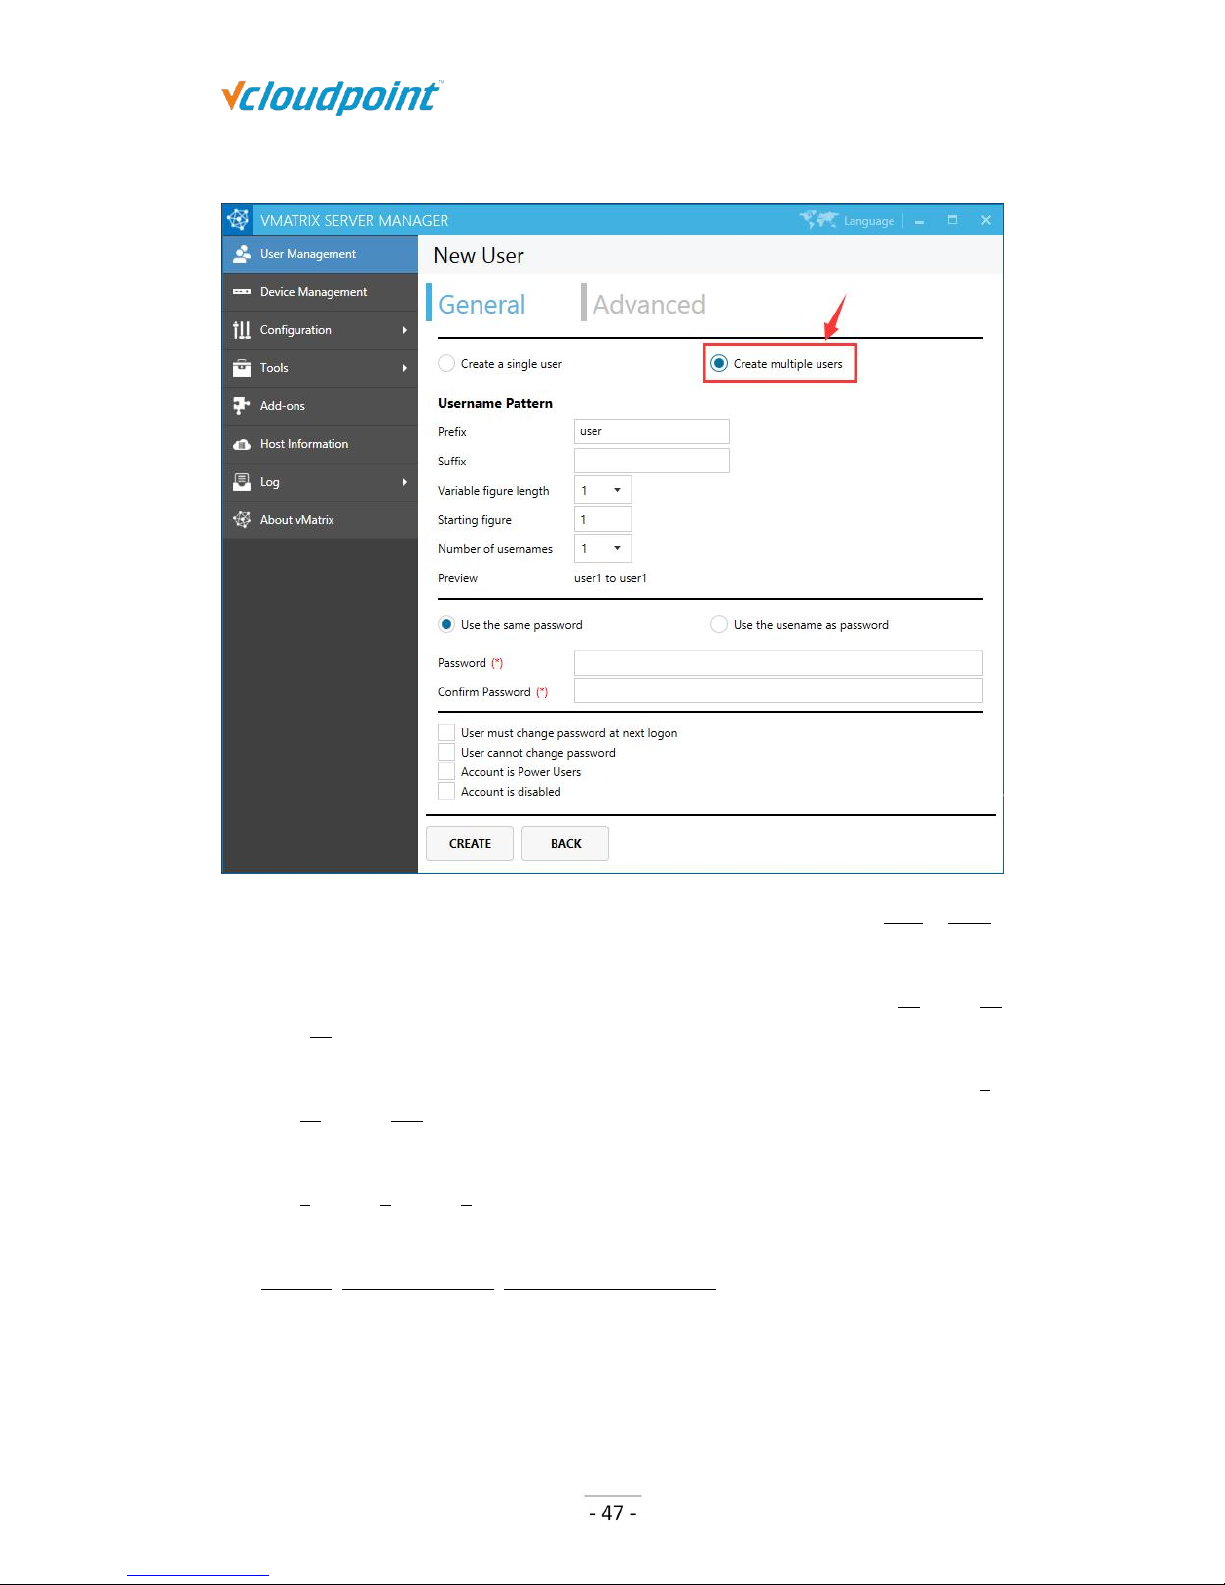
To Create users, open vMatrix Server Manager, on the initial page, click “New User”.
Single user creation (defaulted)
To create a single user each time, you simply enter required user name and password
and click “Create” at the bottom.
Multiple user creation
To create multiple users at a time, select “Create multiple users” and then you will be
Page 48
S100 Zero Client & vMatrix User Manual
www.vcloudpoint.com
given a few more fields.
Prefix: prefix that all user names start with; defaulted “user”; e.g.: user1, sales1,
student1, teacher1...
Suffix: suffix that all user names end with; defaulted empty; e.g.: user1fl1, user1fl2,
user1fl3...
Variable figure length: the number of the variable figure; defaulted “1”; e.g.: user1fl,
user01fl1, user001fl1...
Starting figure: the number that the variable figure start with; defaulted “1”; e.g.:
user4fl1, user5fl1, user6fl1...
Number of usernames: the number of users to be created; defaulted “1”; e.g.:
user1fl1; user1fl1, user2fl1; user1, user2fl1, user3fl1...
Use the same password: all users use the same password; defaulted; e.g.: user1,
user1, user1.
Use usename as password: all users use their use name as the password; e.g.:
user1, user2, user3.
Page 49
S100 Zero Client & vMatrix User Manual
www.vcloudpoint.com
Note: for more user settings, refer to section 5.1.7.
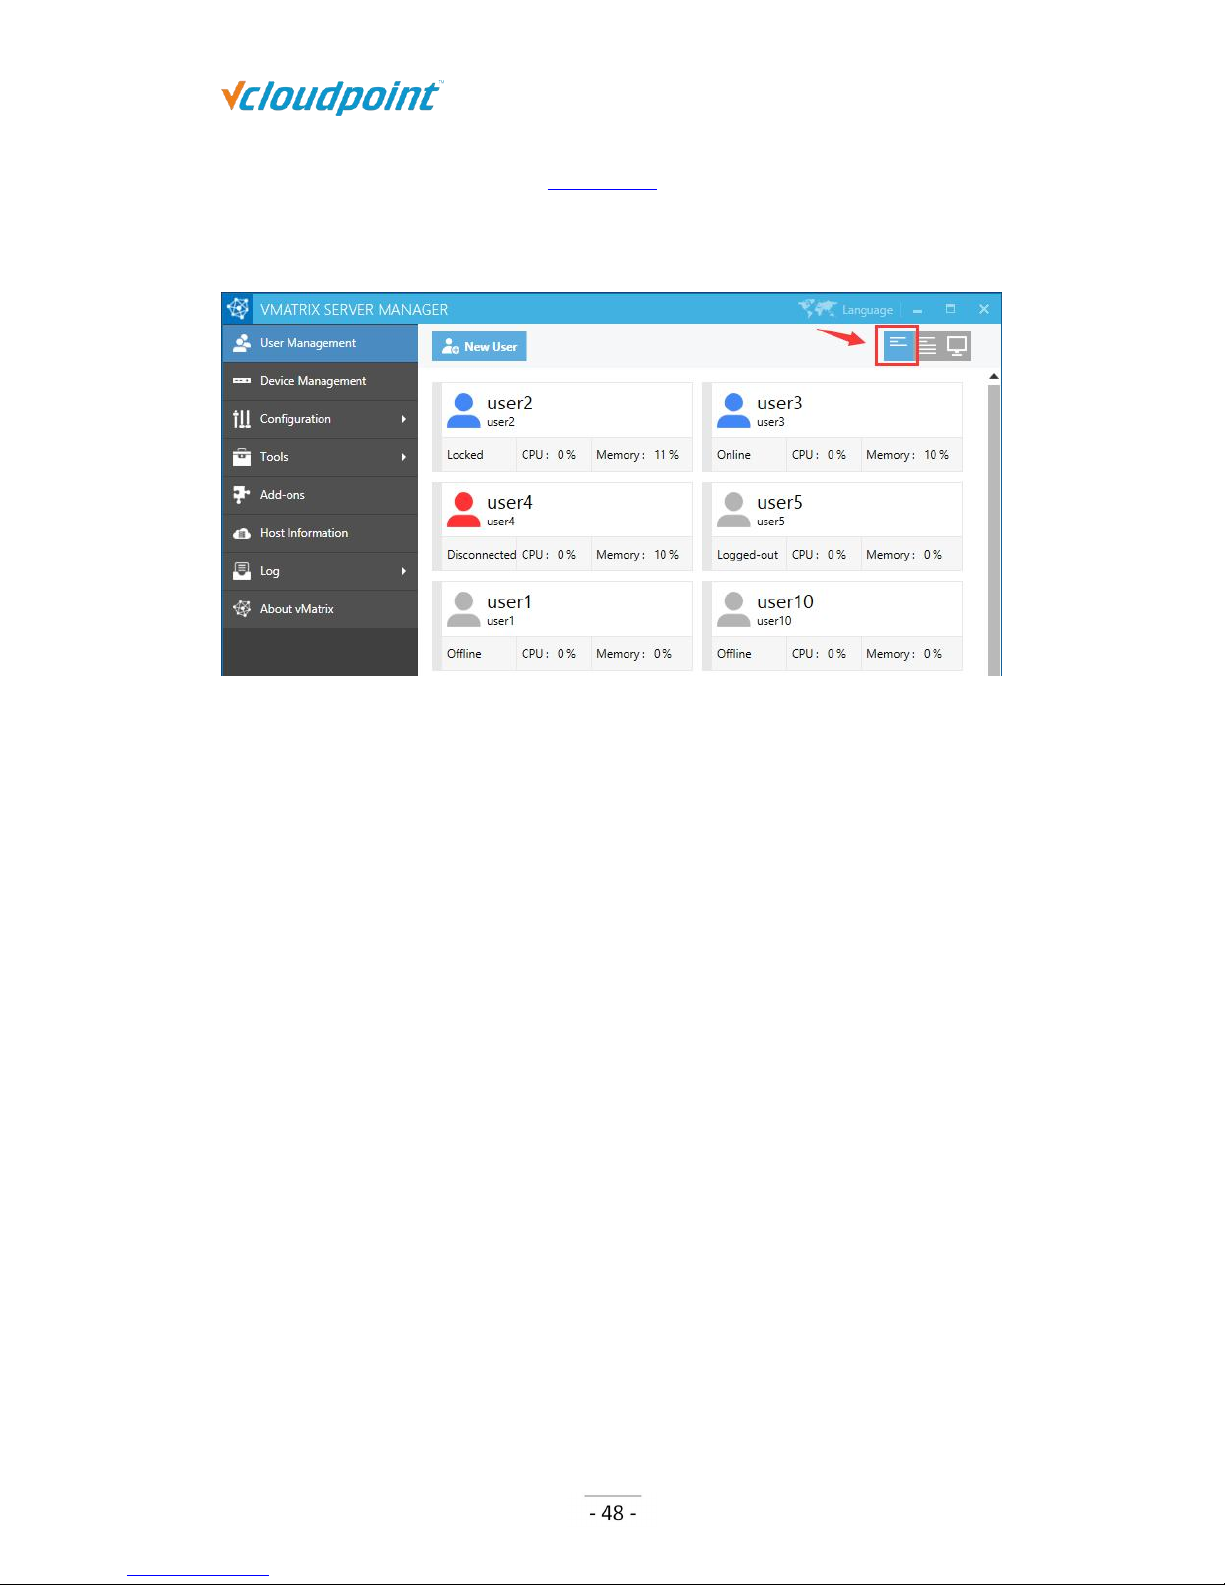
5.1.2 User Status View
On this selection, you can view CPU and Memory consumption for each user and their
status including:
Offline: the user has not logged into this host since host boot.
Online: the user has logged in and is connecting to this host.
Disconnected: the user has logged in but is not connecting to this host. User session
is till running but screen goes back to device login page.
Logged-out: the user logged into this host but has or has been logged out. User
session has been ended and screen goes back to device login page.
Locked: the user has logged into this host but user session has or has been locked.
Screen goes to system login page where password is required for re-login.
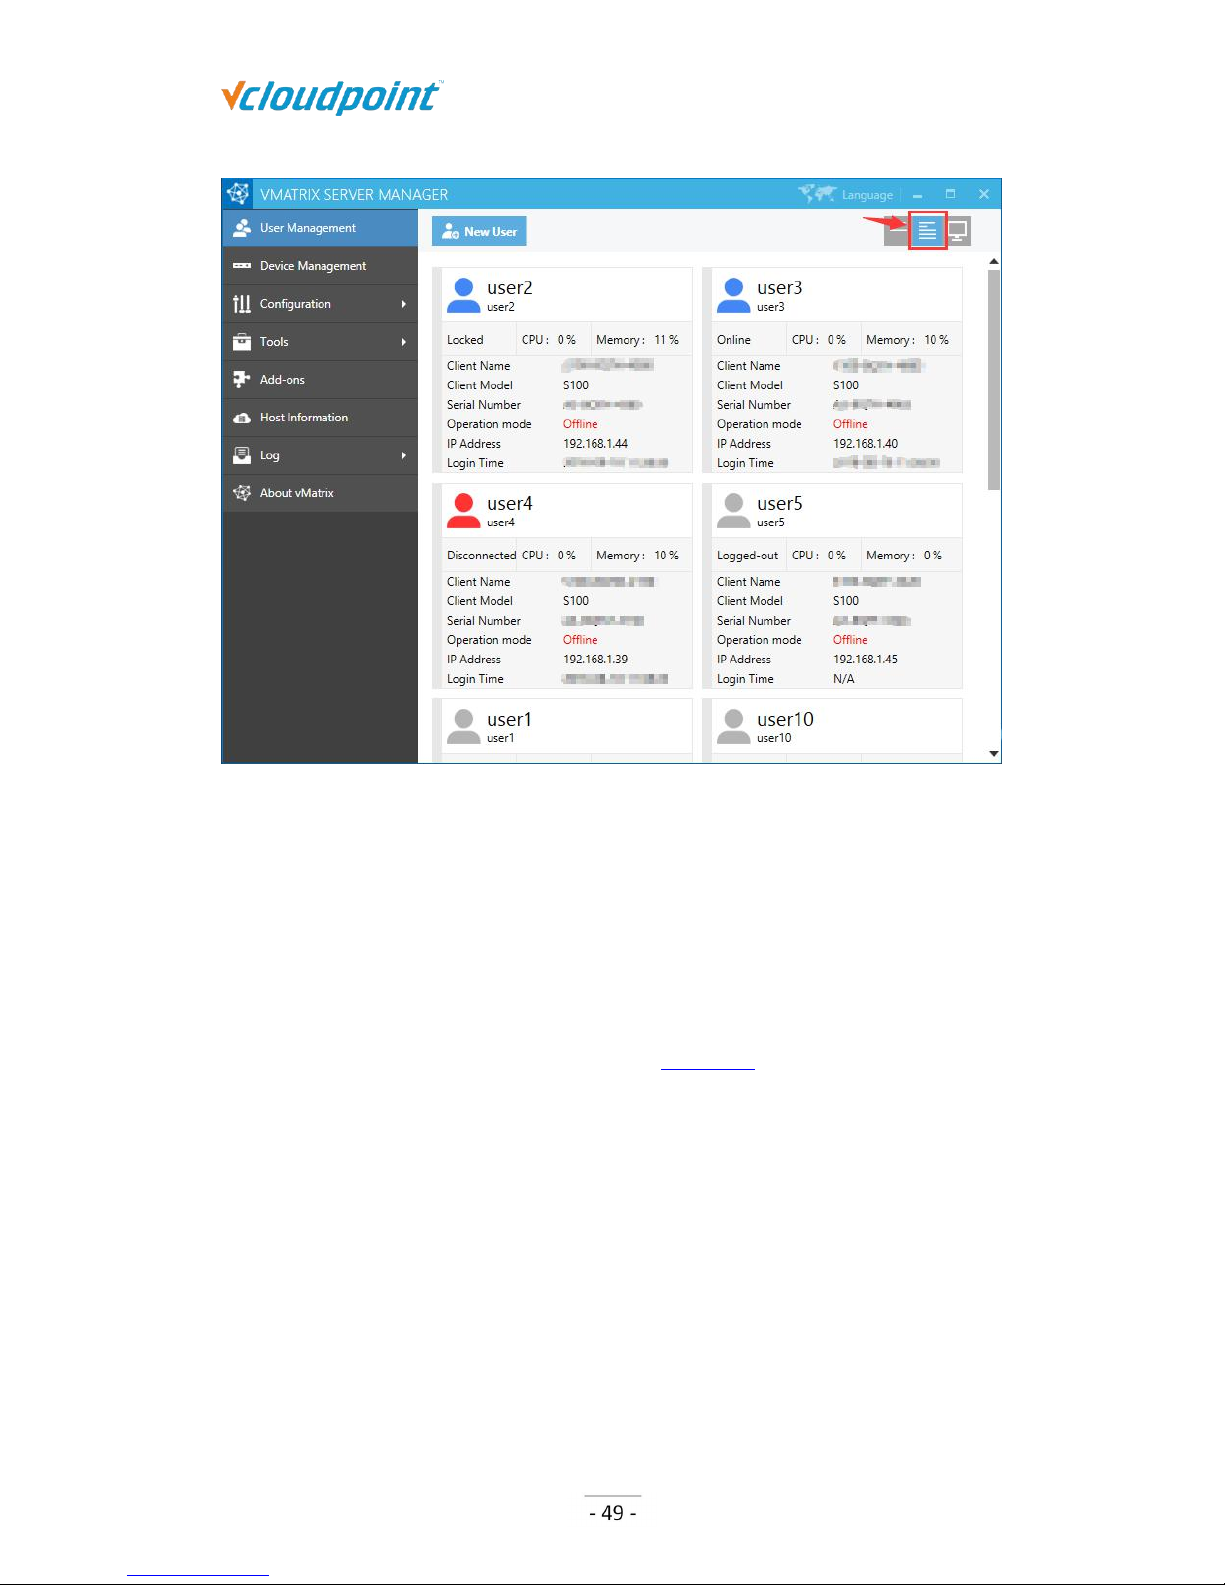
5.1.3 User Information View
Page 50
S100 Zero Client & vMatrix User Manual
www.vcloudpoint.com
On this selection, you can view CPU & Memory consumption and status for each user and
their device information including:
Client Name: name of the device.
Client Model: model of the device.
Serial Number: serial number of the device.
Operation Mode: “Online”, “Offline” (Refer to section 5.9).
IP Address: the physical IP address of the device.
Login Time: the time when the user logged into this host.
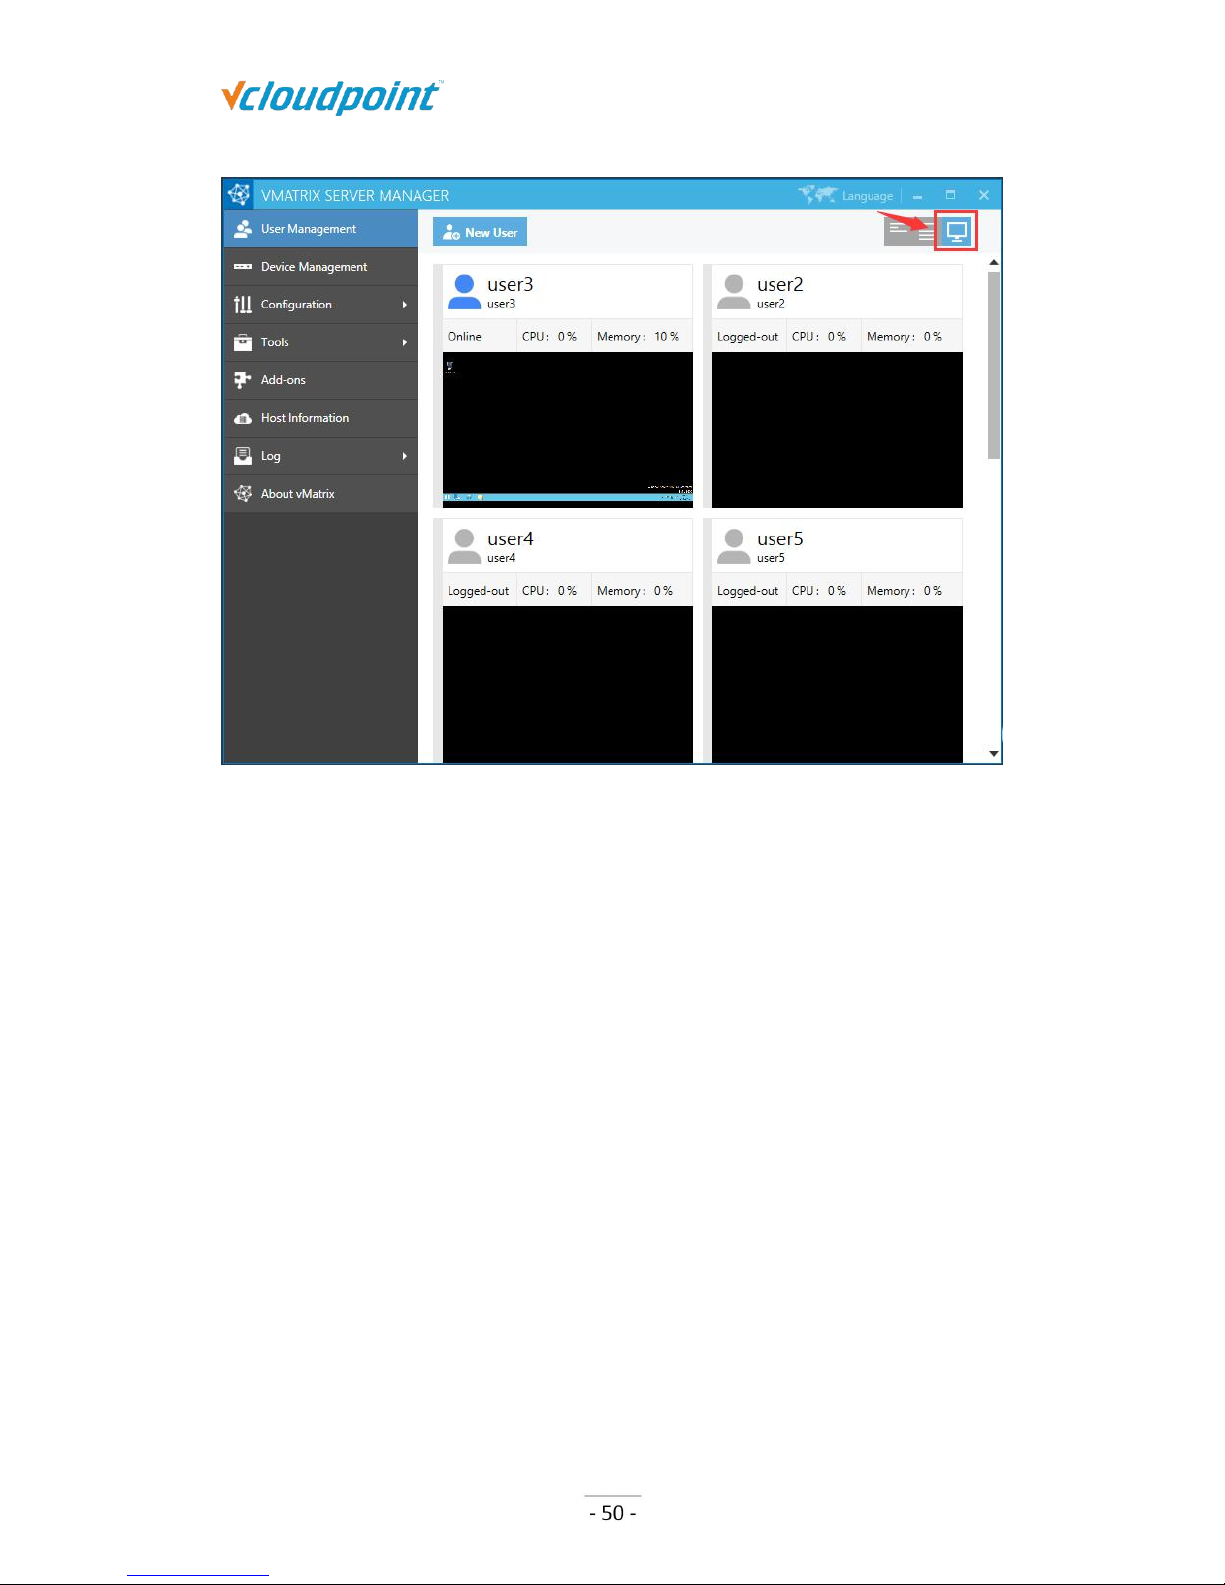
5.1.4 User Desktop View
Page 51
S100 Zero Client & vMatrix User Manual
www.vcloudpoint.com
On this selection, you can view user’s real time desktops in tiles.
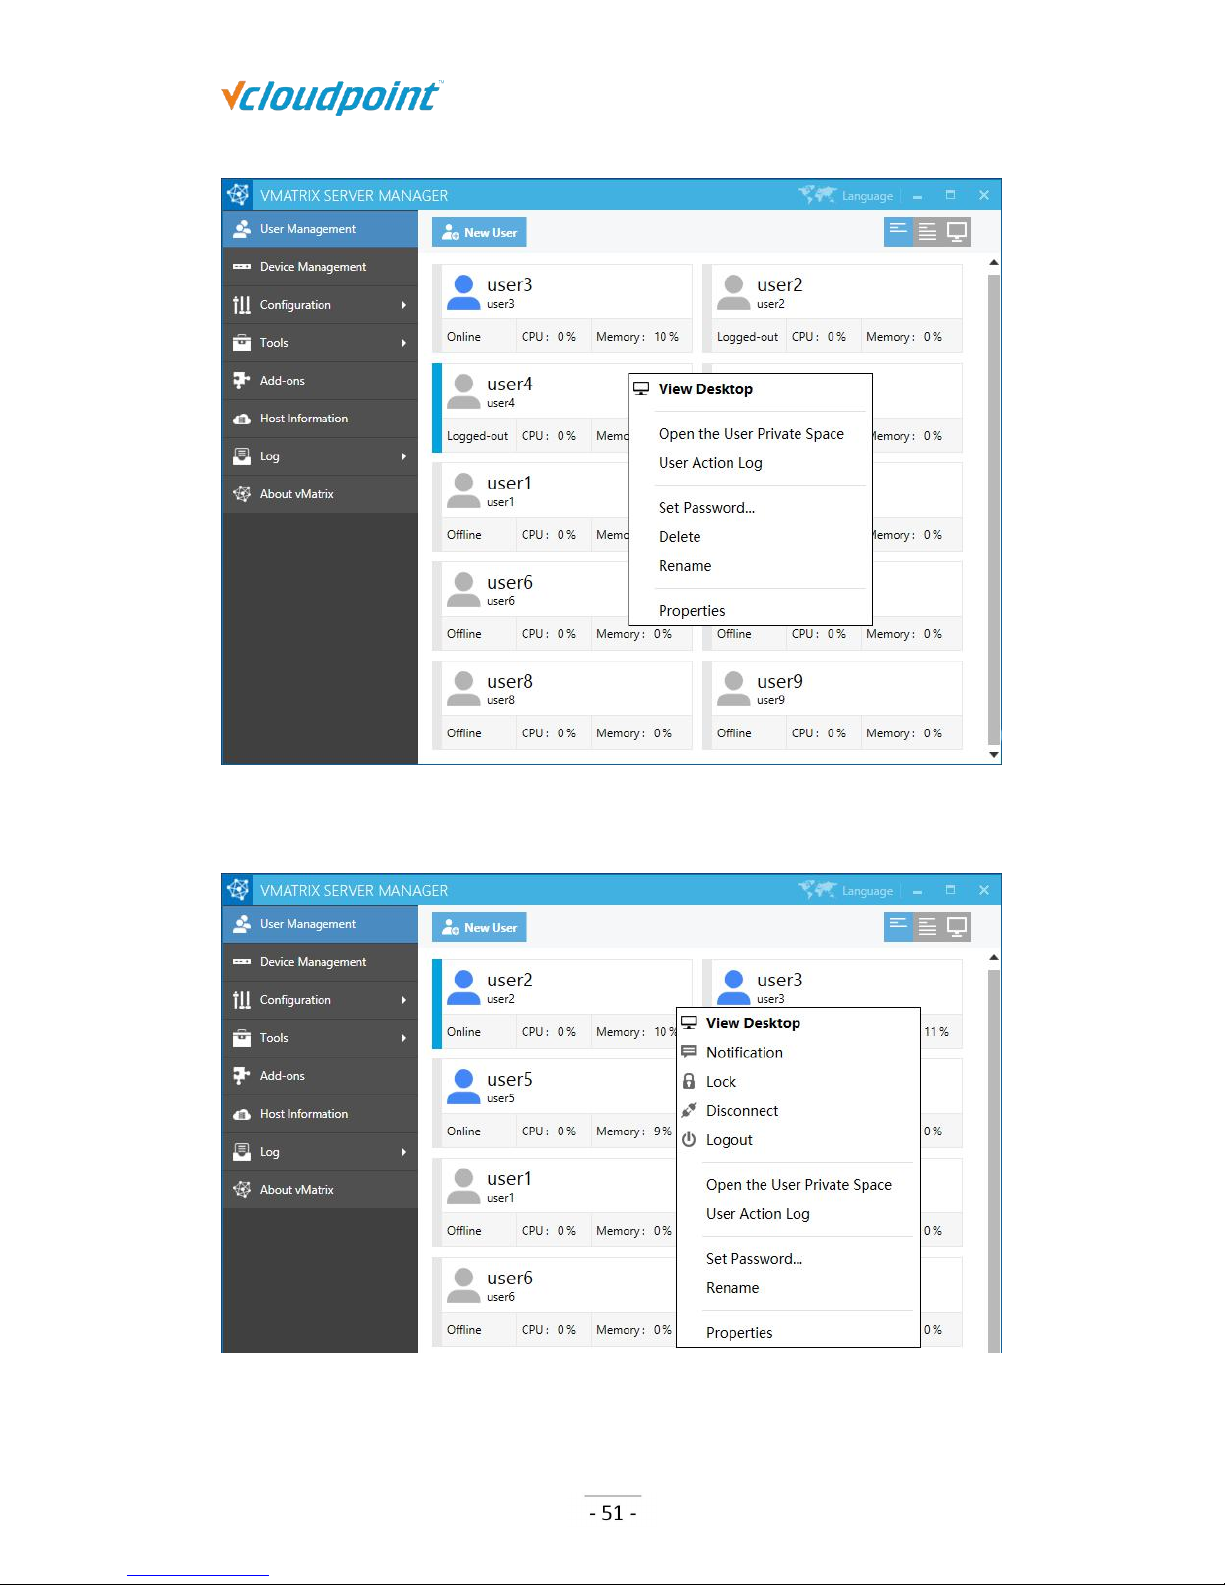
5.1.5 Right Click Menu
Right click on a single/group of offline/online user/users modules to open the user
management menu. You can drag the mouse, or use shortcut keys like “shift” or “CTRL” +
“A” to select multiple modules at a time.
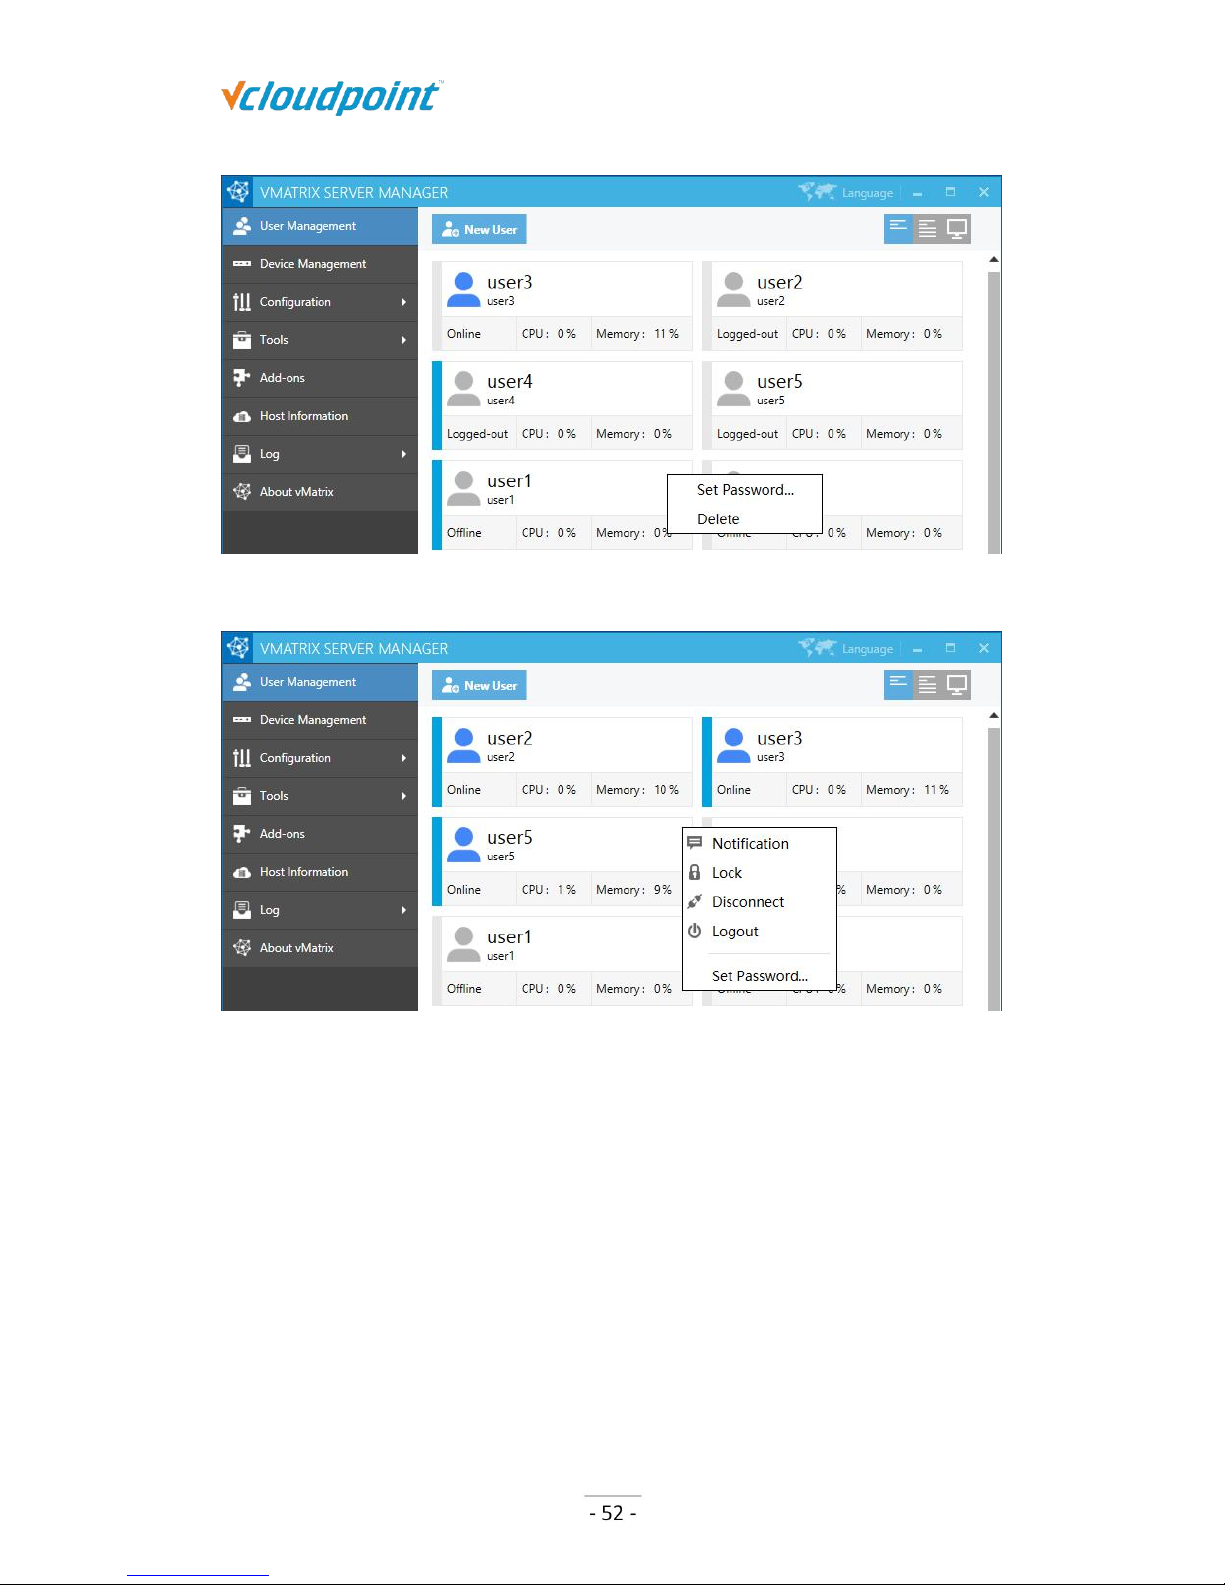
On a single offline user: Open the User Private Space, User Action Log, Set
Password..., Delete, Rename, Properties.
Page 52
S100 Zero Client & vMatrix User Manual
www.vcloudpoint.com
On a single online user: Notification, Lock, Disconnect, Logout, Open the User
Private Space, User Action Log, Set Password..., Rename, Properties.
On a group of offline users: Set Password, Delete.
Page 53
S100 Zero Client & vMatrix User Manual
www.vcloudpoint.com
On a group of online users: Notification, Lock, Disconnect, Logout, Set Password...
Notification: to send a notification to the selected user in a small pop-up windows.
Lock: to lock the selected user’s desktop; the user’s screen goes to system login page
where password is required for re-login.
Disconnect: to disconnect the selected user’s session; the user session is till running
but screen goes back to device login page.
Logout: to log selected user’s session out; the user’s session is ended and screen
goes back to device login page.
Open the User Private Space: to open the folder where the selected user’ personal
files are stored.
User Action Log: to view all action log of the selected users on this host.
Page 54
S100 Zero Client & vMatrix User Manual
www.vcloudpoint.com
Set Password...: to reset password for this user. This will take effect on next login.
Rename: to rename the selected user. This will take effect immediately.
Delete: to delete the selected user. This will take effect immediately.
Properties: to change the selected user’s personal settings. (Refer to section 4.1.7)
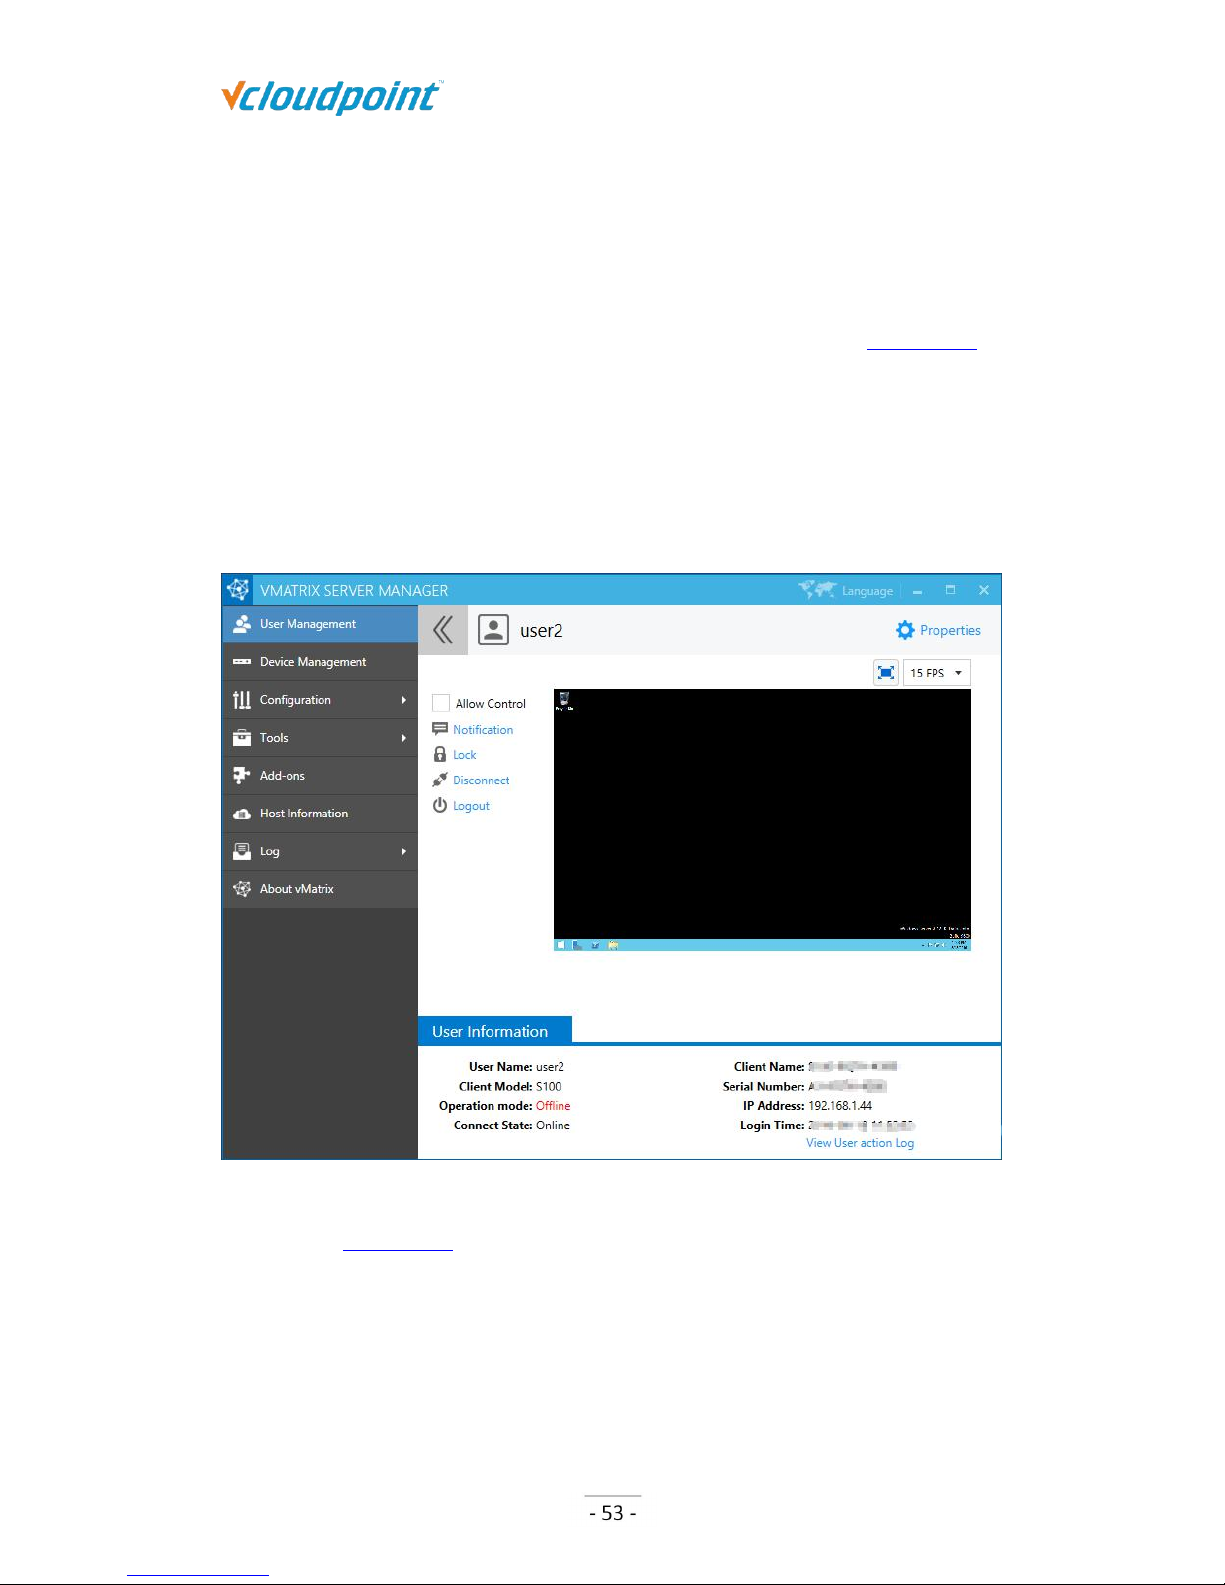
5.1.6 Personal Monitoring & Controlling
Double click or right click on on a single user module and then select “View Desktop”,to
enter the user’s personal page. This page allows you to monitor and take control over a
user desktop.
User Information and commands of “Notification”, “Lock”, “Disconnect”, “Logout” are
mentioned in section 5.1.5.
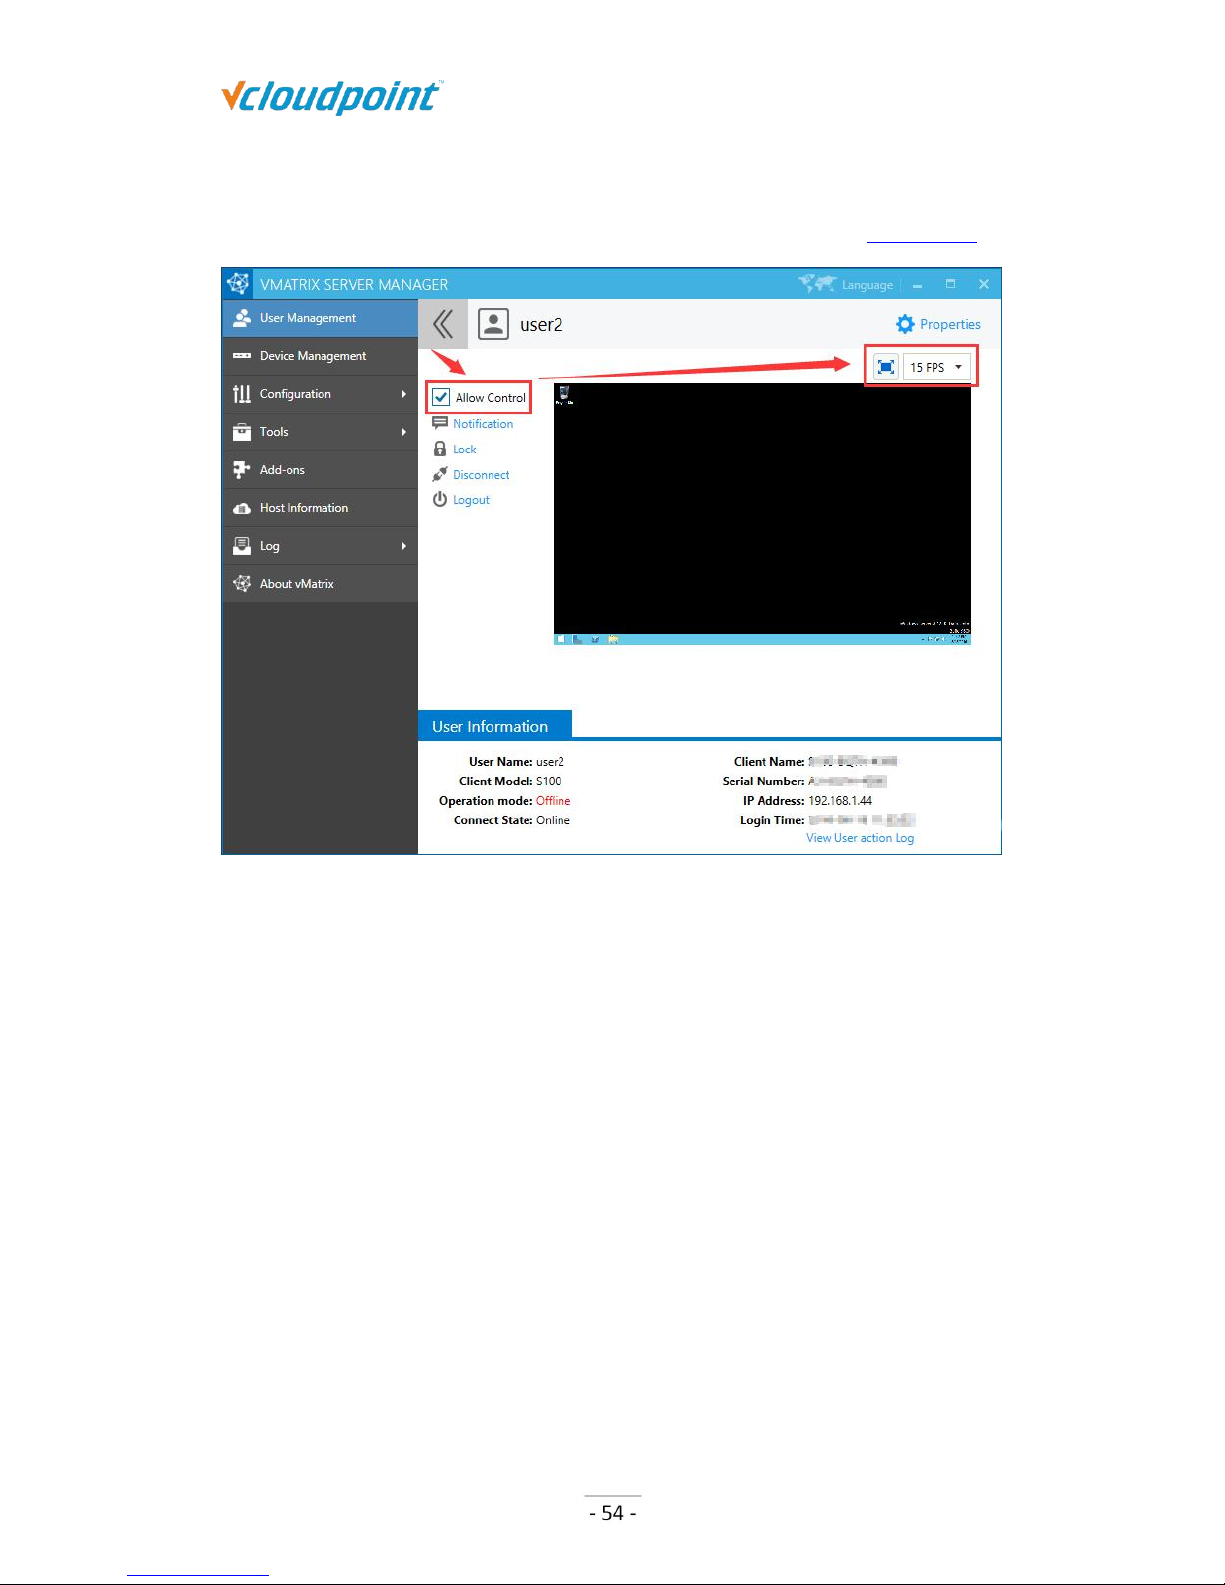
Allow Control: if this option is selected, you can take control over the user’s desktop.
Extend Icon: click on this icon to extend the view the user’s desktop in full screen.
When entering full screen view, you can move the cursor to the right top corner to
exit full screen view.
Page 55
S100 Zero Client & vMatrix User Manual
www.vcloudpoint.com
15FPS: select the refresh rate from 5- 30FPS when you are viewing the desktop.
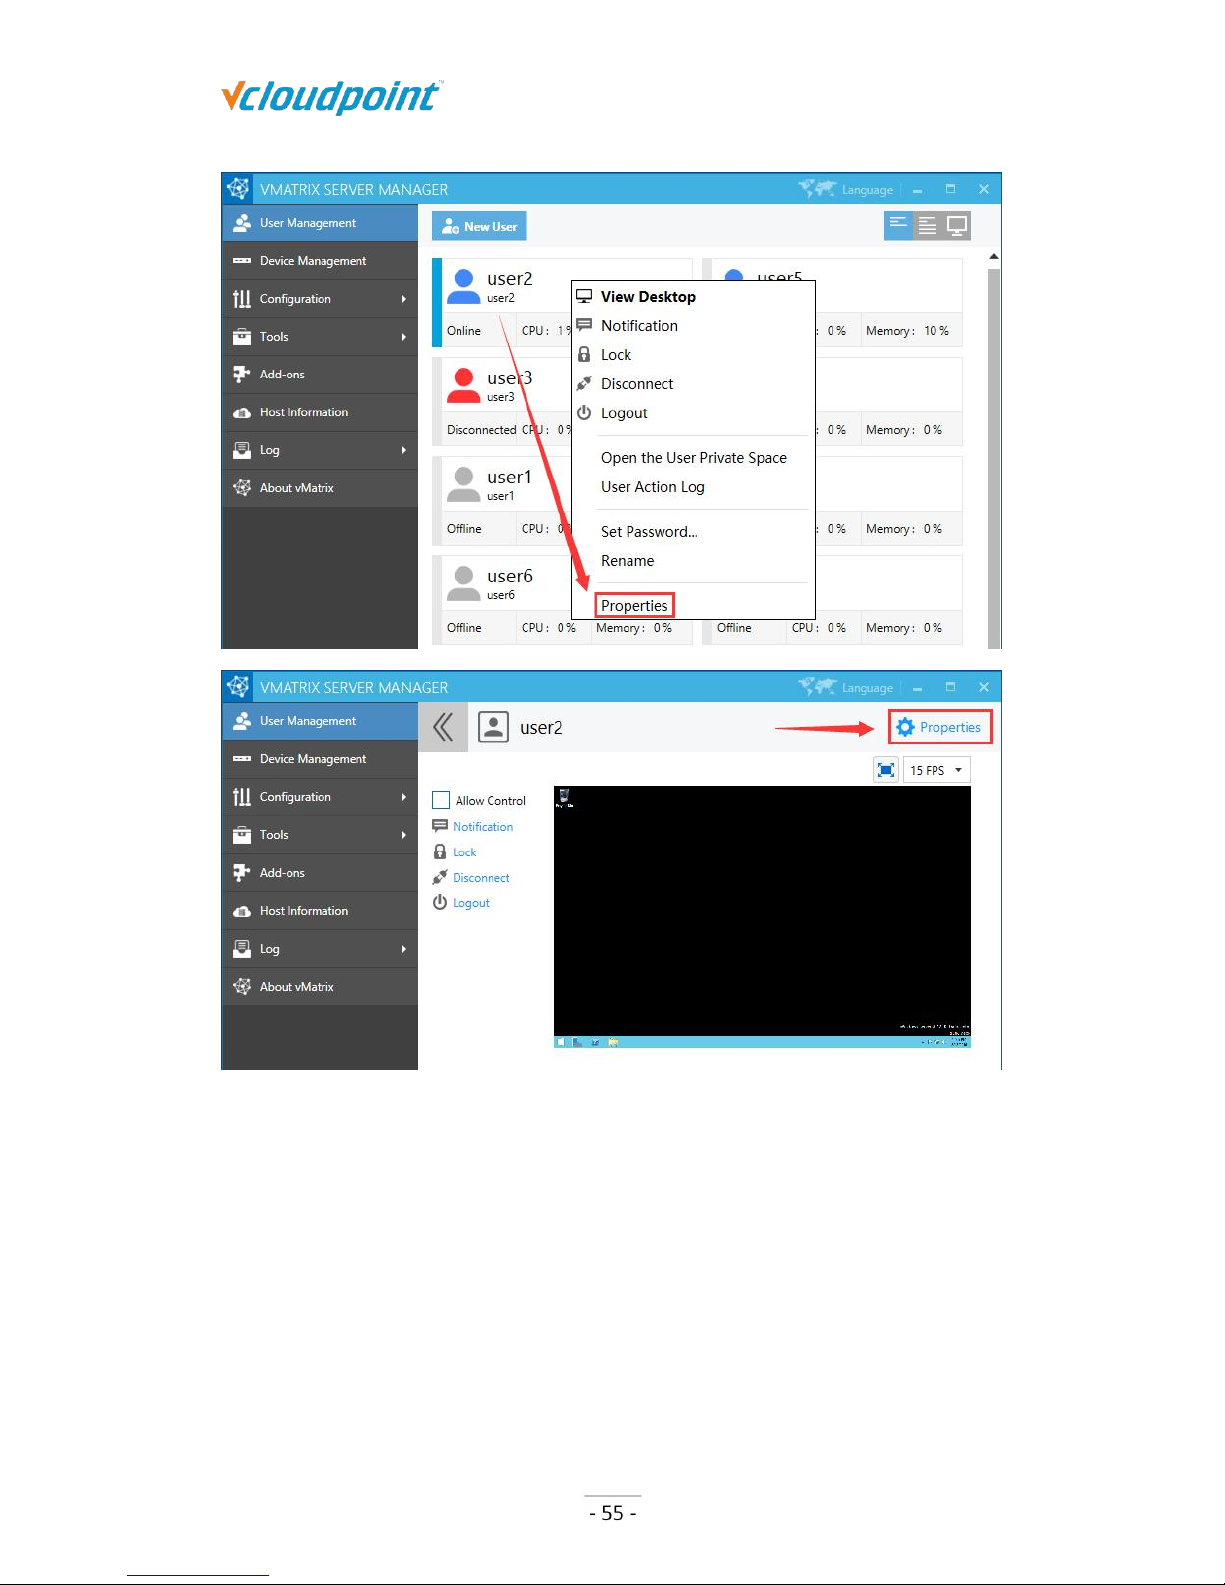
Properties: to change the selected user’s personal settings. (Refer to section 5.1.7)
5.1.7 Personal User Settings
To enter the setting page for a selected user, you can right click on the user module on
the initial User Management page, or click on the “Properties” option after entering
Personal Monitoring & Controlling page.
Page 56
S100 Zero Client & vMatrix User Manual
www.vcloudpoint.com
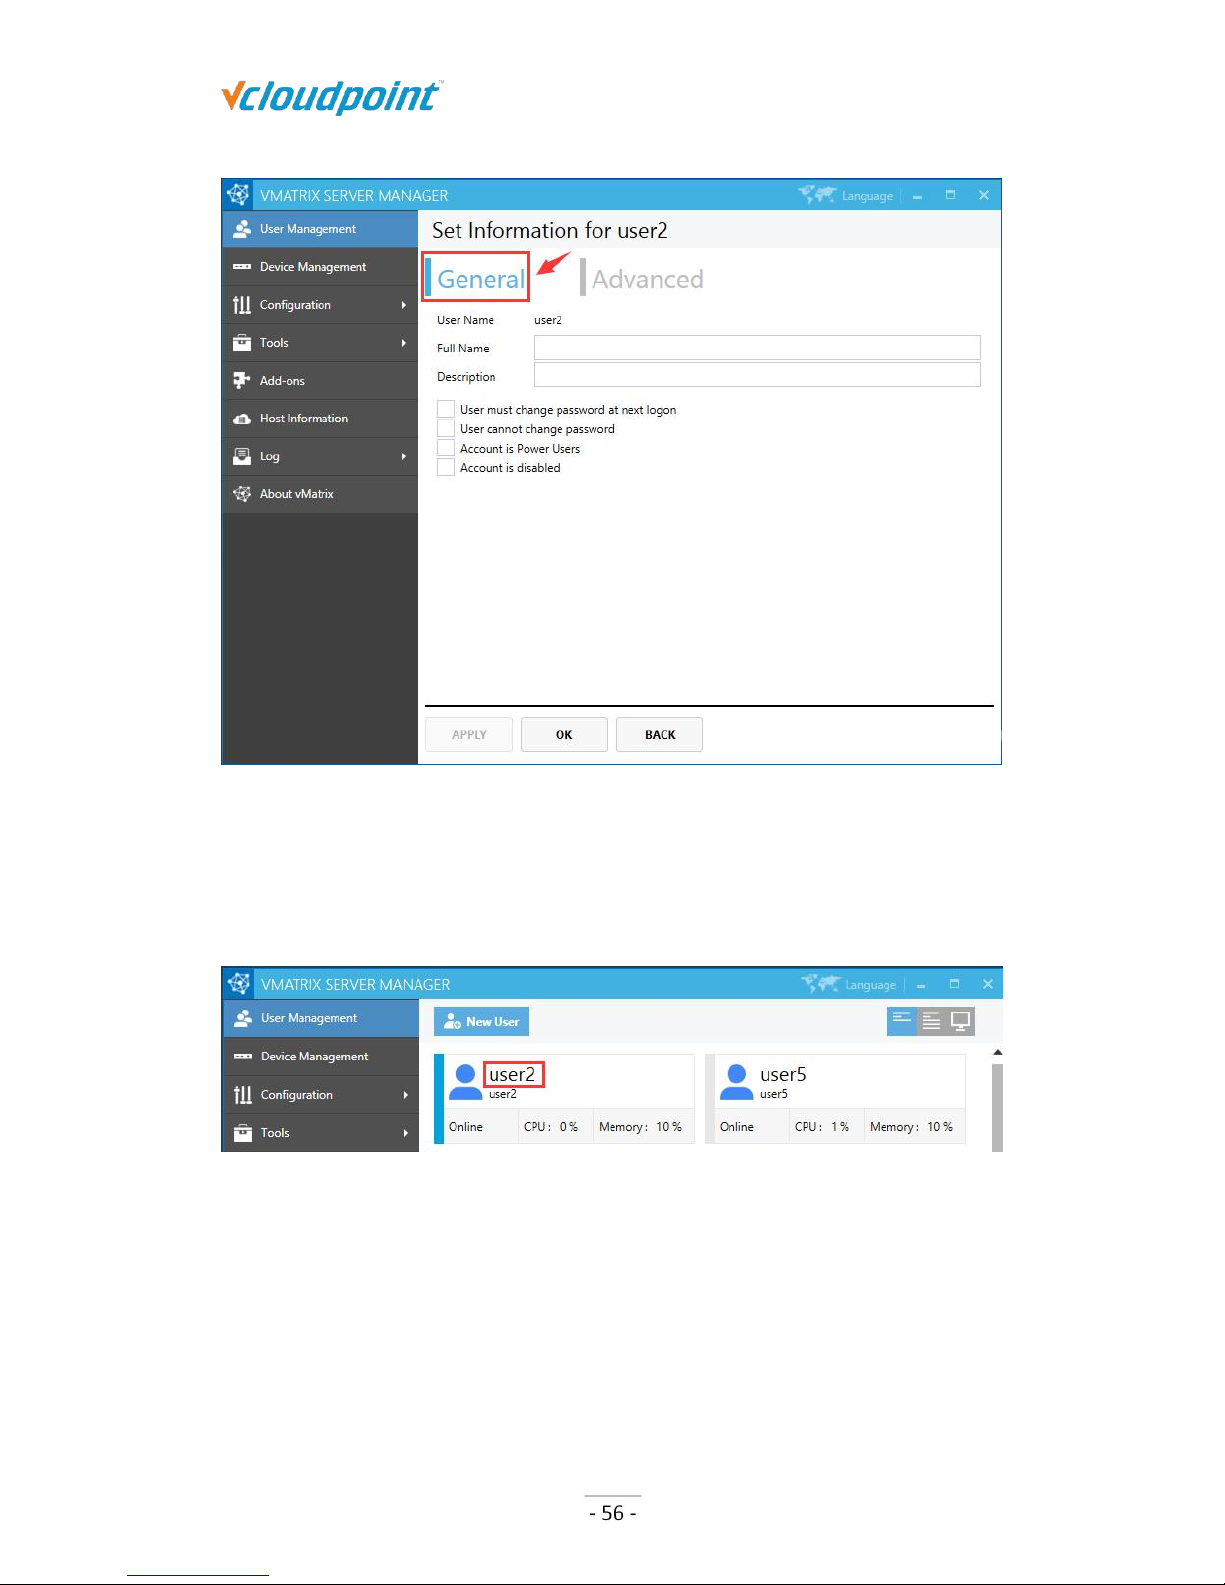
General Settings:
Page 57
S100 Zero Client & vMatrix User Manual
www.vcloudpoint.com
User Name: user name cannot be changed on this page but only by right clicking the
user module on initial User Management page.
Full Name: the user’s full name is the top one beside the user icon on initial User
Management page.
Description: description of the user does not show at any other place.
User must change password at next logon: selecting this option will force the user
to change password at next logon.
User cannot change password: selecting this option will disable the user to change
password.
Account is Power User: Power User is given more rights to change system settings
Page 58
S100 Zero Client & vMatrix User Manual
www.vcloudpoint.com
than a common user, but less than an Administrator.
Account is disabled: selecting this option will disable the user account. This is often
used when you want to disable the user temporarily, saving you trouble to delete
and re-create.
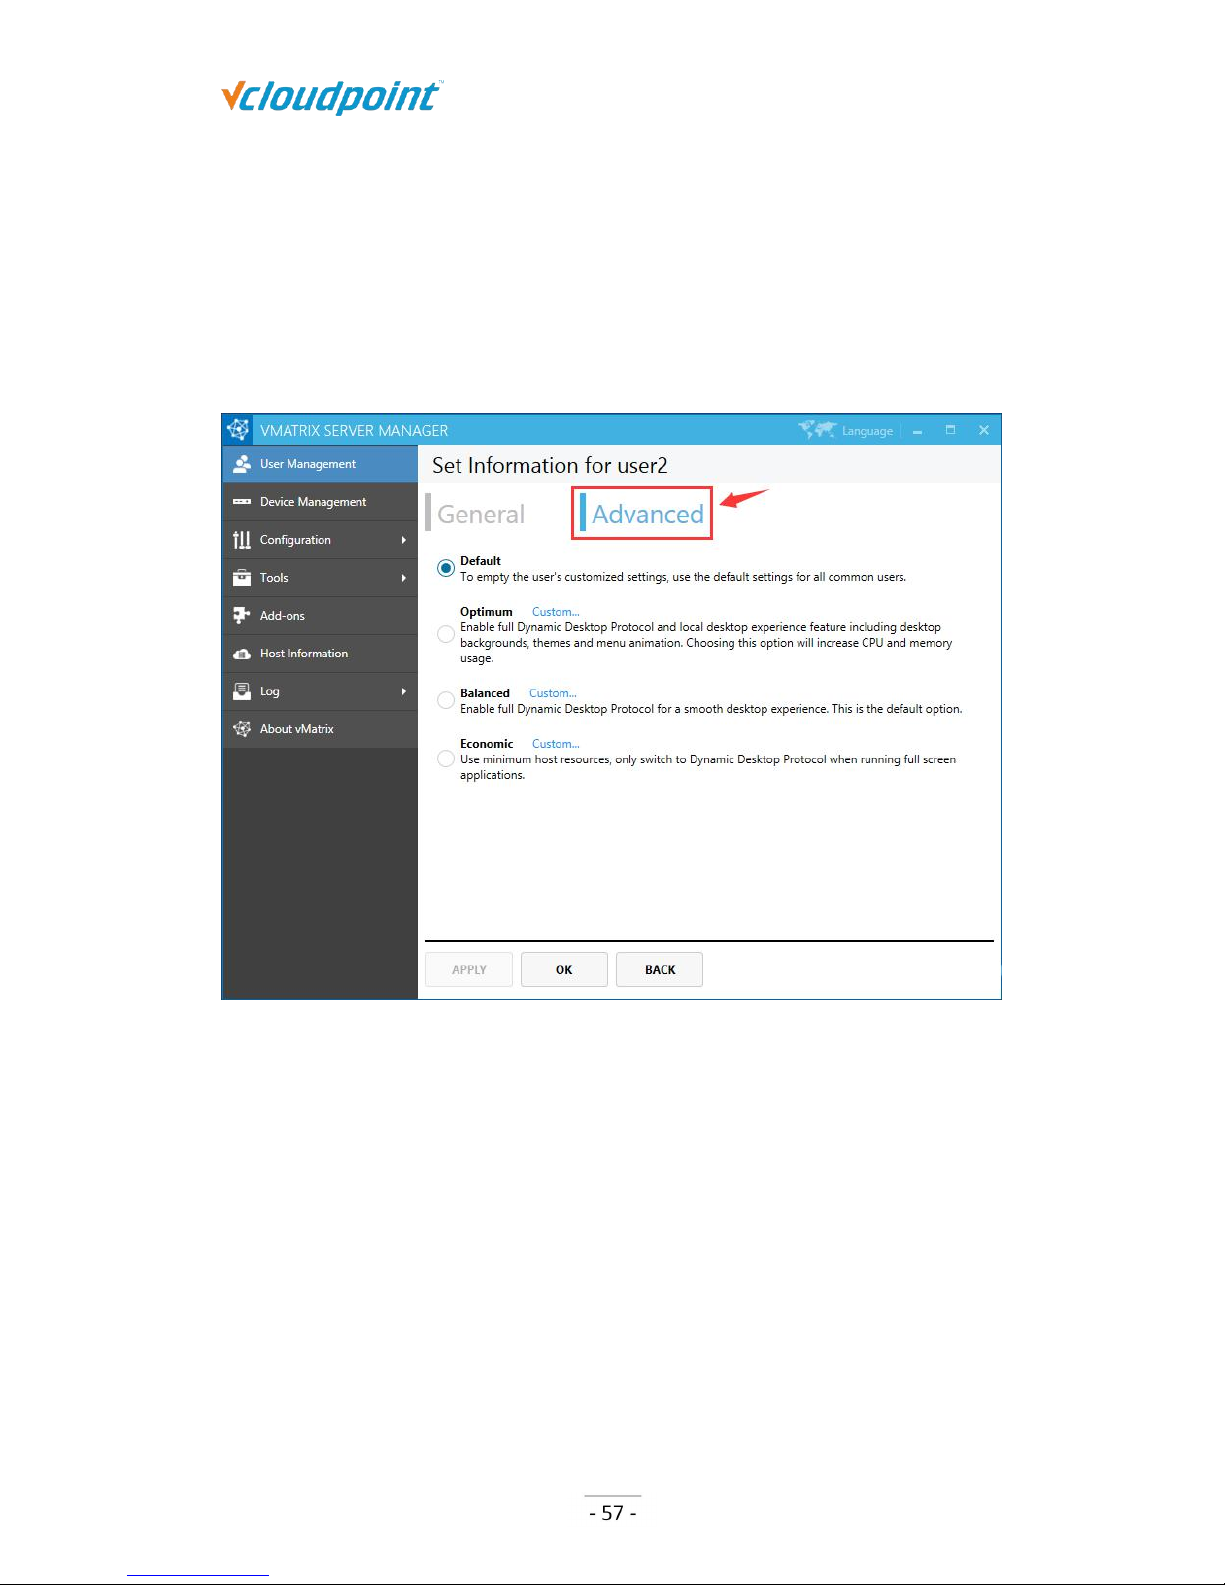
Advanced Settings:
Advanced settings allows you customize user settings. Changes will take effect at user’s
next login. Advance settings include:
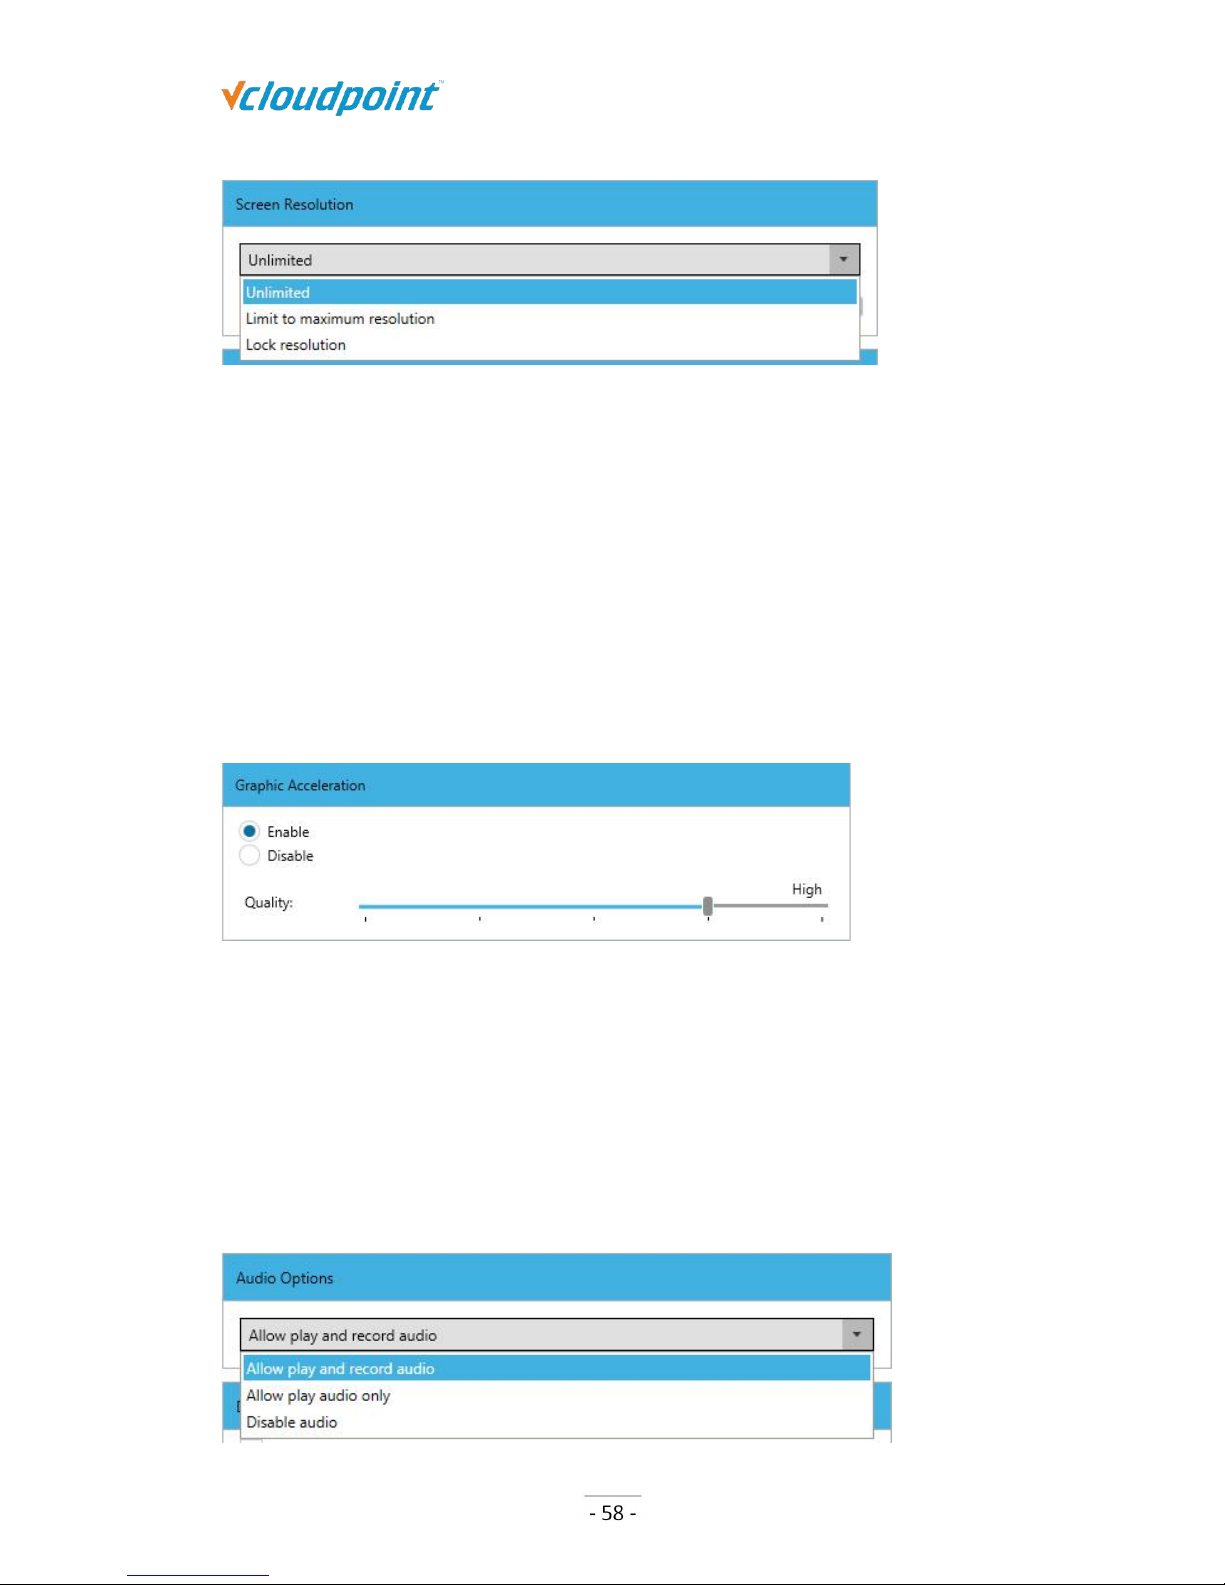
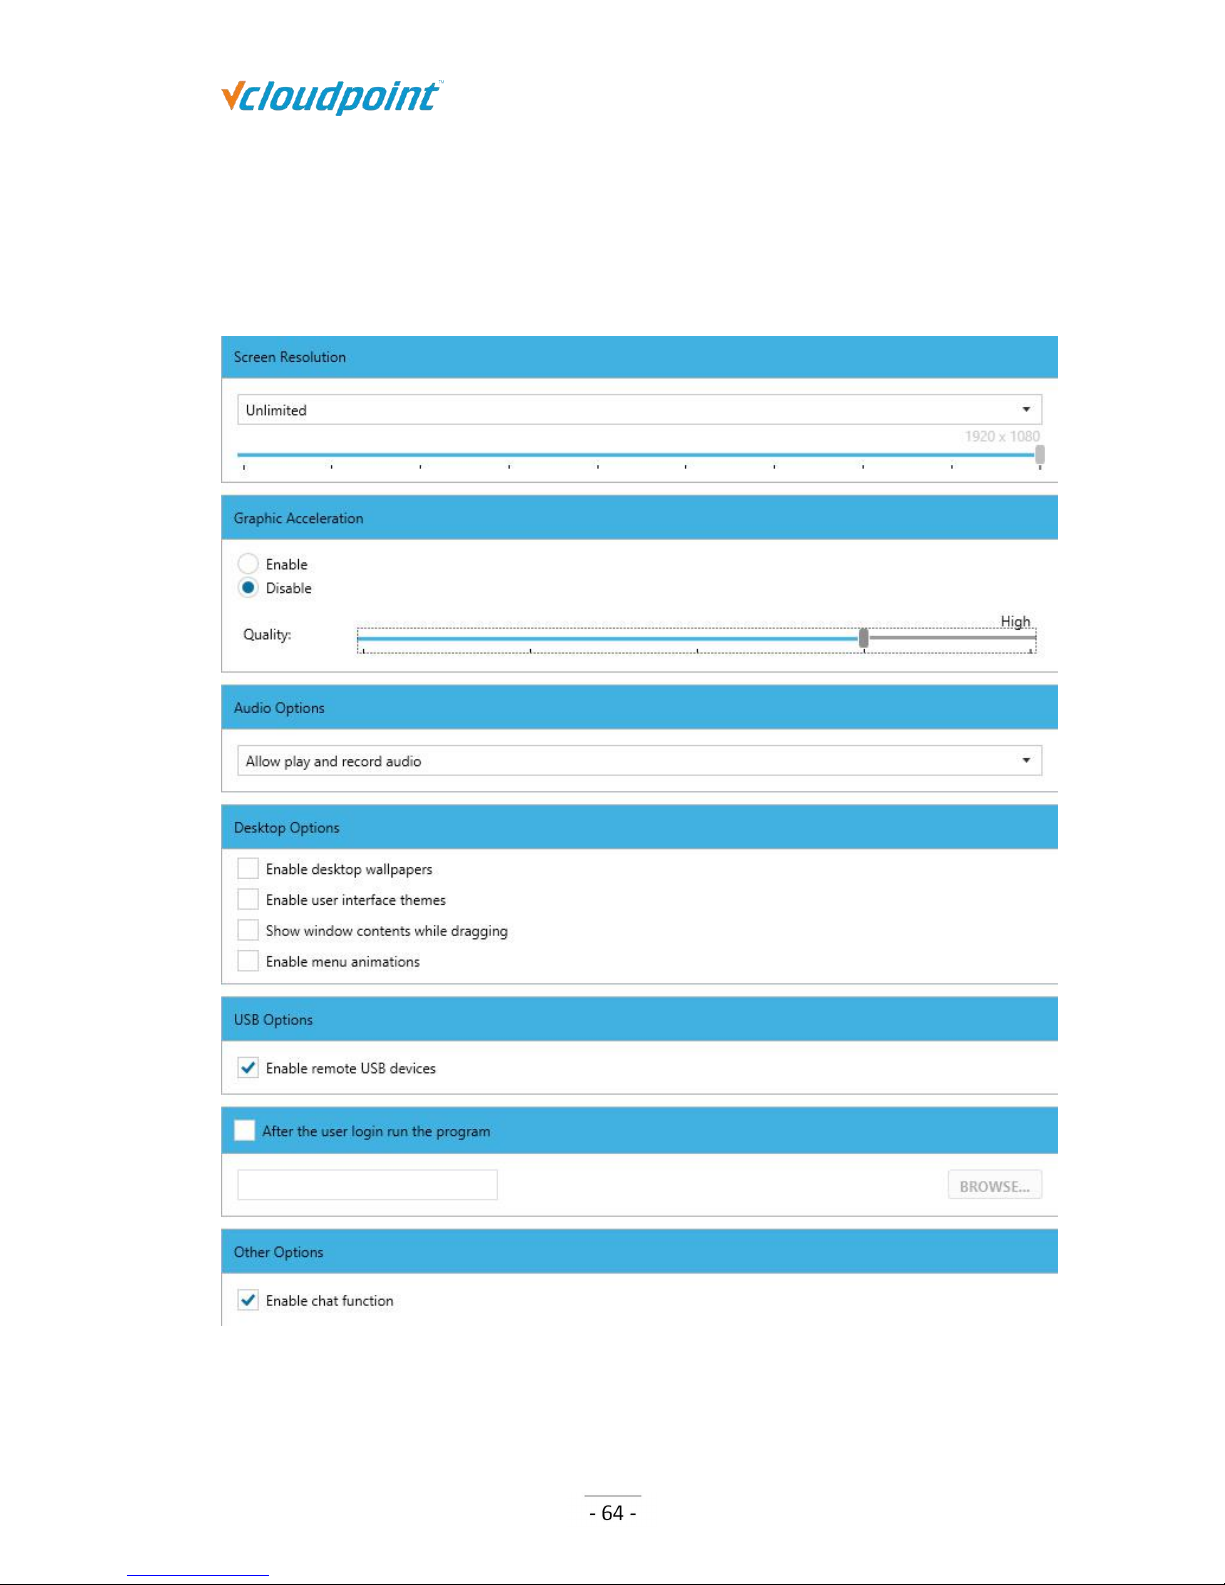
Desktop Resolution:
Unlimited: the user can use all device supported resolution.
Limit to maximum resolution: limit user to use a selected resolution or resolutions
below.
Lock resolution: lock resolution to the only selected resolution.
Page 59
S100 Zero Client & vMatrix User Manual
www.vcloudpoint.com
Graphic Acceleration:
Enable: (defaulted and recommended) to enable the use of vCloudPoint Dynamic
Desktop Protocol (DDP) for a smoother desktop experience. Enabling this option will
also allow you to select display quality from lowest, low, medium, high, to highest.
Default display quality is high. The higher display quality is selected, the higher CPU
and network bandwidth will be consumed.
Disable: to disable the use of DDP and use the system built-in Remote Desktop
Protocol (RDP) for image transmission. If this option is selected, the user will be given
a less desktop responsive experience and video play in full screen or large window is
not watchable.
Audio:
Allow play and record audio: to enable the user to play and record audio on the
device. (default)
Allow play audio only: to enable the user to play but not record audio on the
device.
Disable audio: to disable the user to play or record audio on the device.
Page 60
S100 Zero Client & vMatrix User Manual
www.vcloudpoint.com
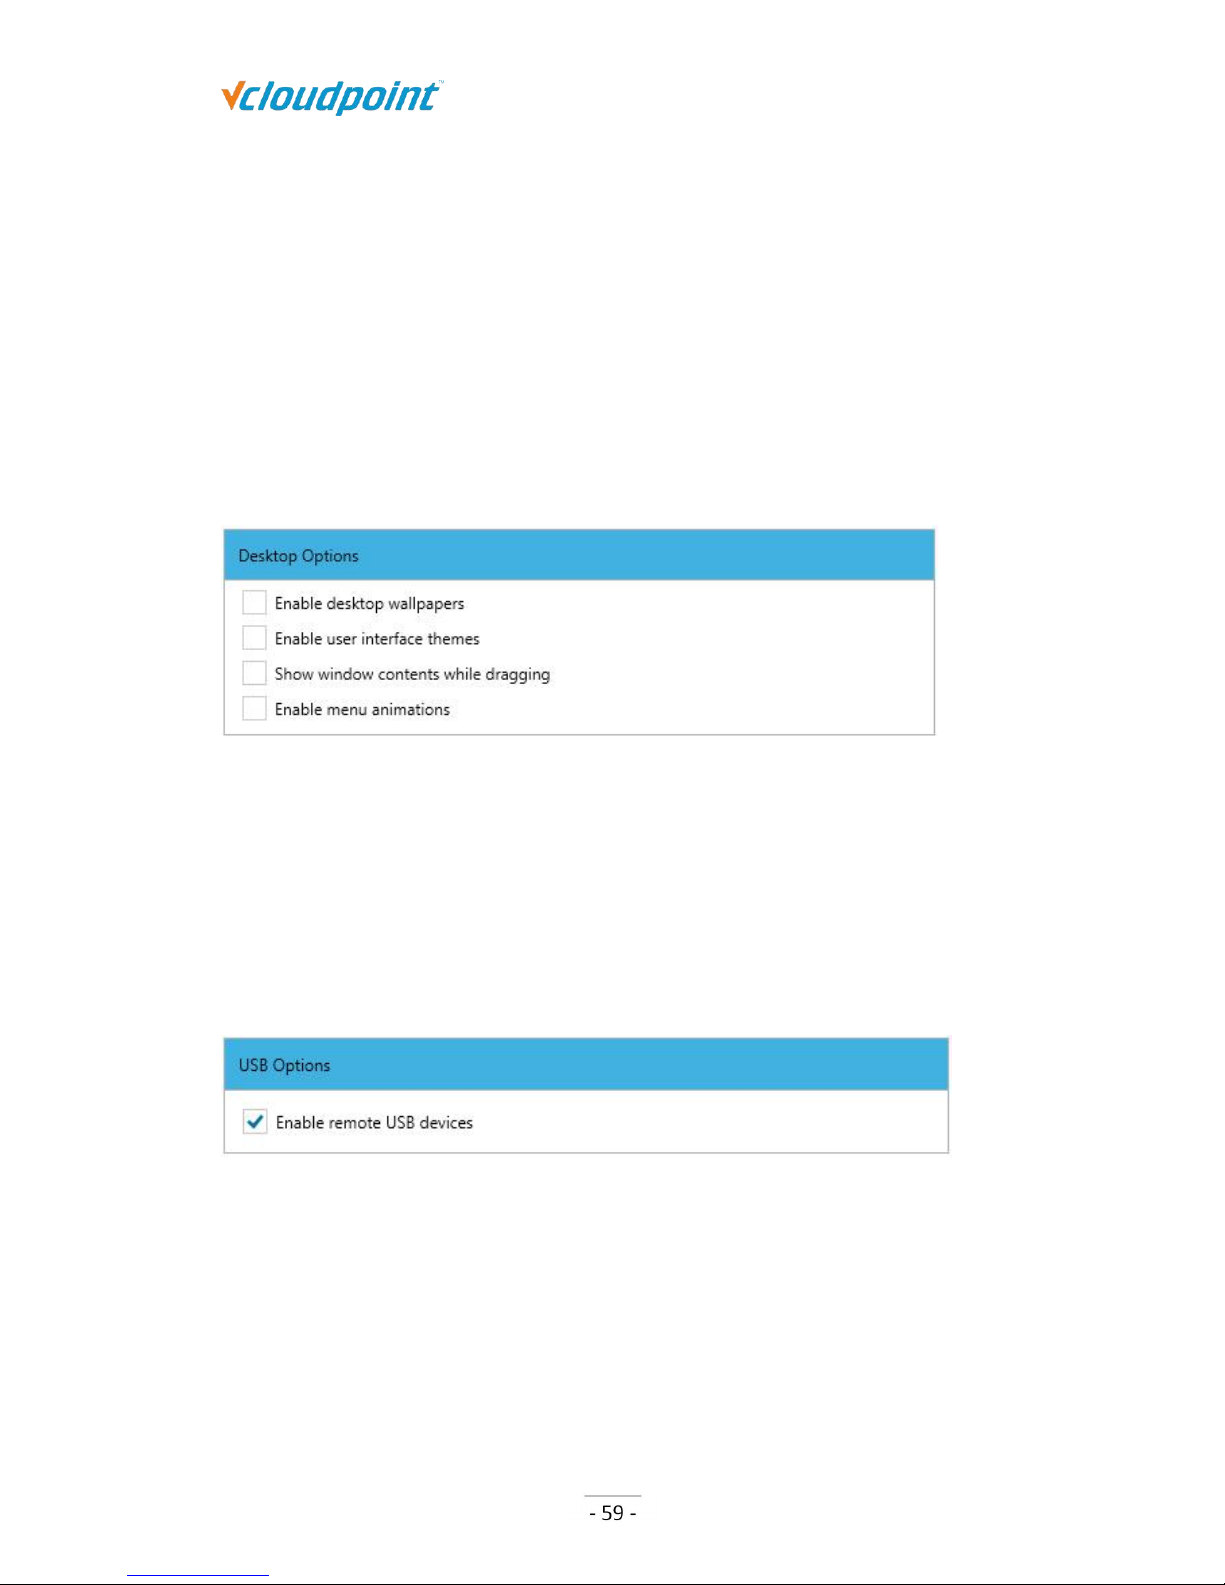
Desktop Options:
Enable desktop wallpapers: to enable the user to change background desktop
wallpapers.
Enable user interface themes: to enable the user to switch interface themes.
Show window contents while dragging: to enable the user to see contents within
window while dragging.
Enable menu animations: to enable the user to see menu animation while opening
a menu.
Note: Desktop Options are defaulted disabled. Enabling these options will cause higher CPU and
and network bandwidth consumption.
USB Options:
Selected: (defaulted) to allow the user to use all supported pluggable USB devices
including printer, scanner, memory device, and touch screen, etc.
Unselected: to allow the user to use USB keyboard, mouse and barcode scanner.
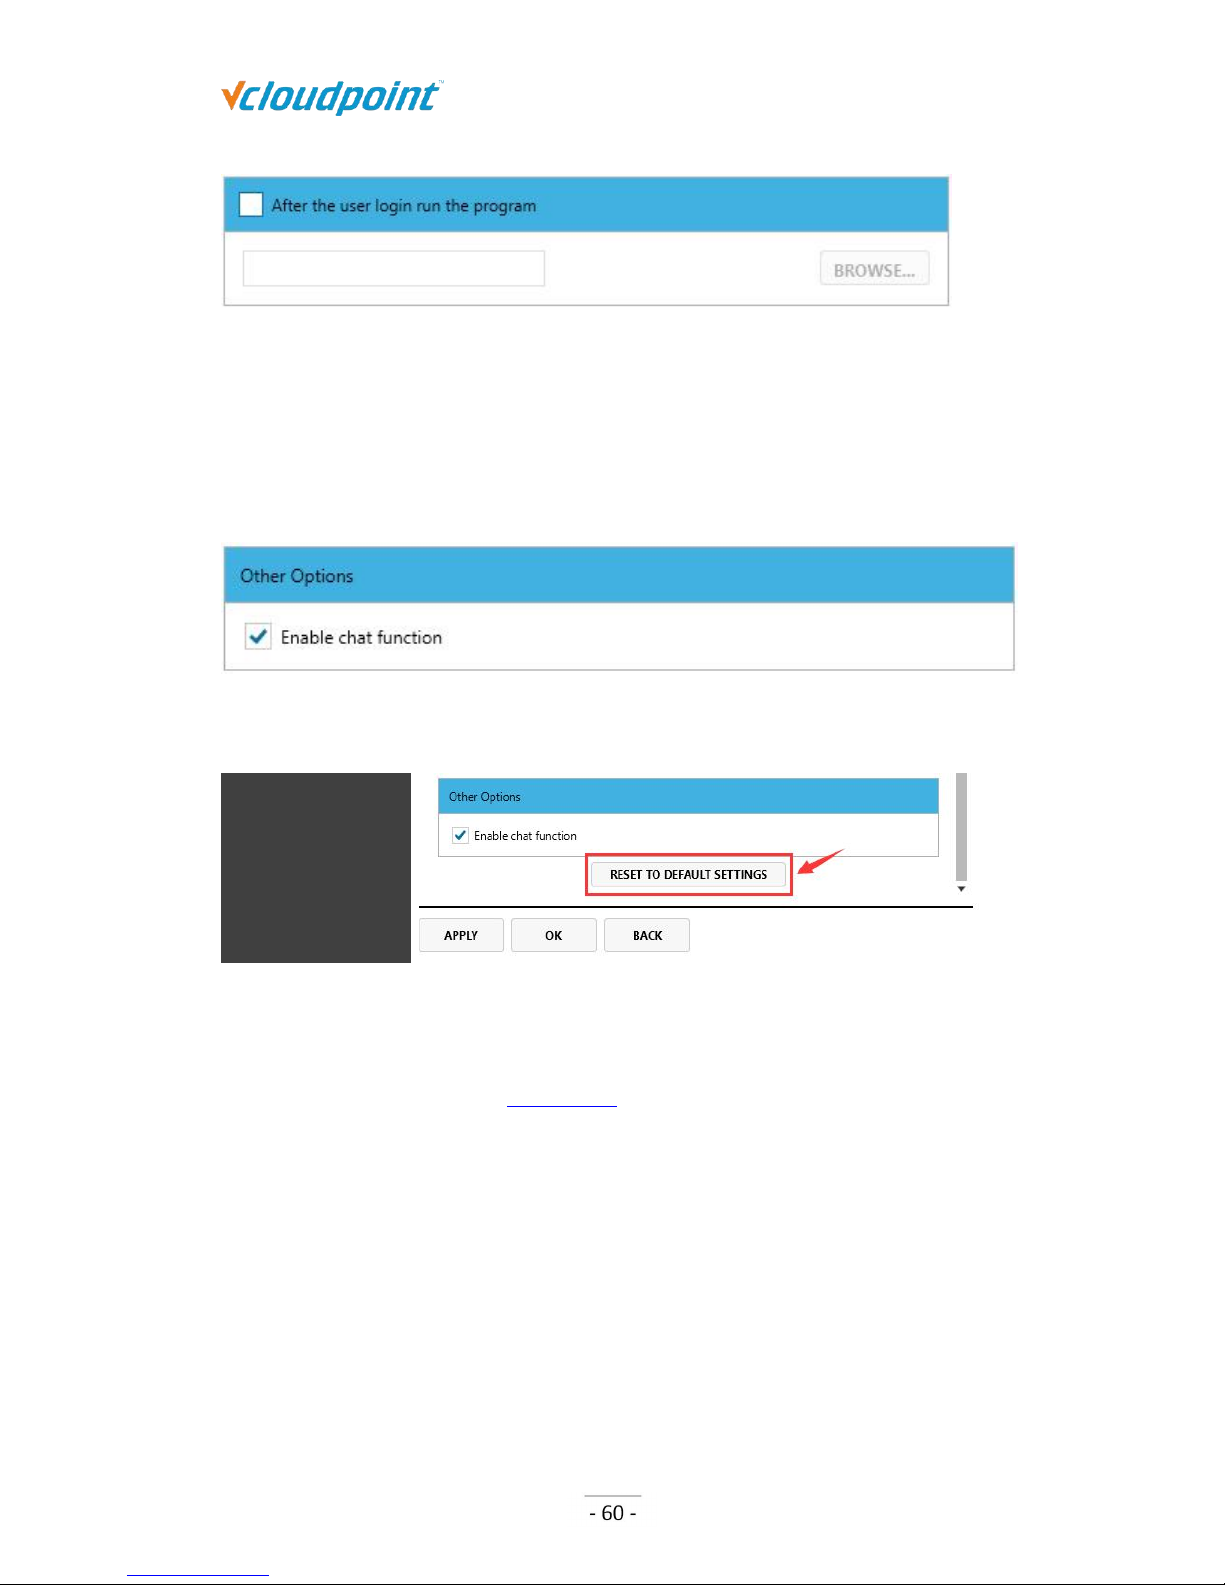
After the user login run the program:
Selected: to enable this user session to auto run a specific installed program after
user login without manual operation. This function is often used when the terminal
device by this user is configured to be auto login after powered on. To enable this
function, tick the option and then enter the directory or click “BROWSE...” to specify
an installed program.
Unselected: (defaulted) to go to the default desktop after user login.
Page 61
S100 Zero Client & vMatrix User Manual
www.vcloudpoint.com
Other Options (Chat Function):
Selected: (defaulted) to enable the user to use the Chat Tool for communication with
other login users.
Unselected: to disable the user to use the Chat Tool.
RESET TO DEFAULT SETTINGS: click to reset the current settings to default.
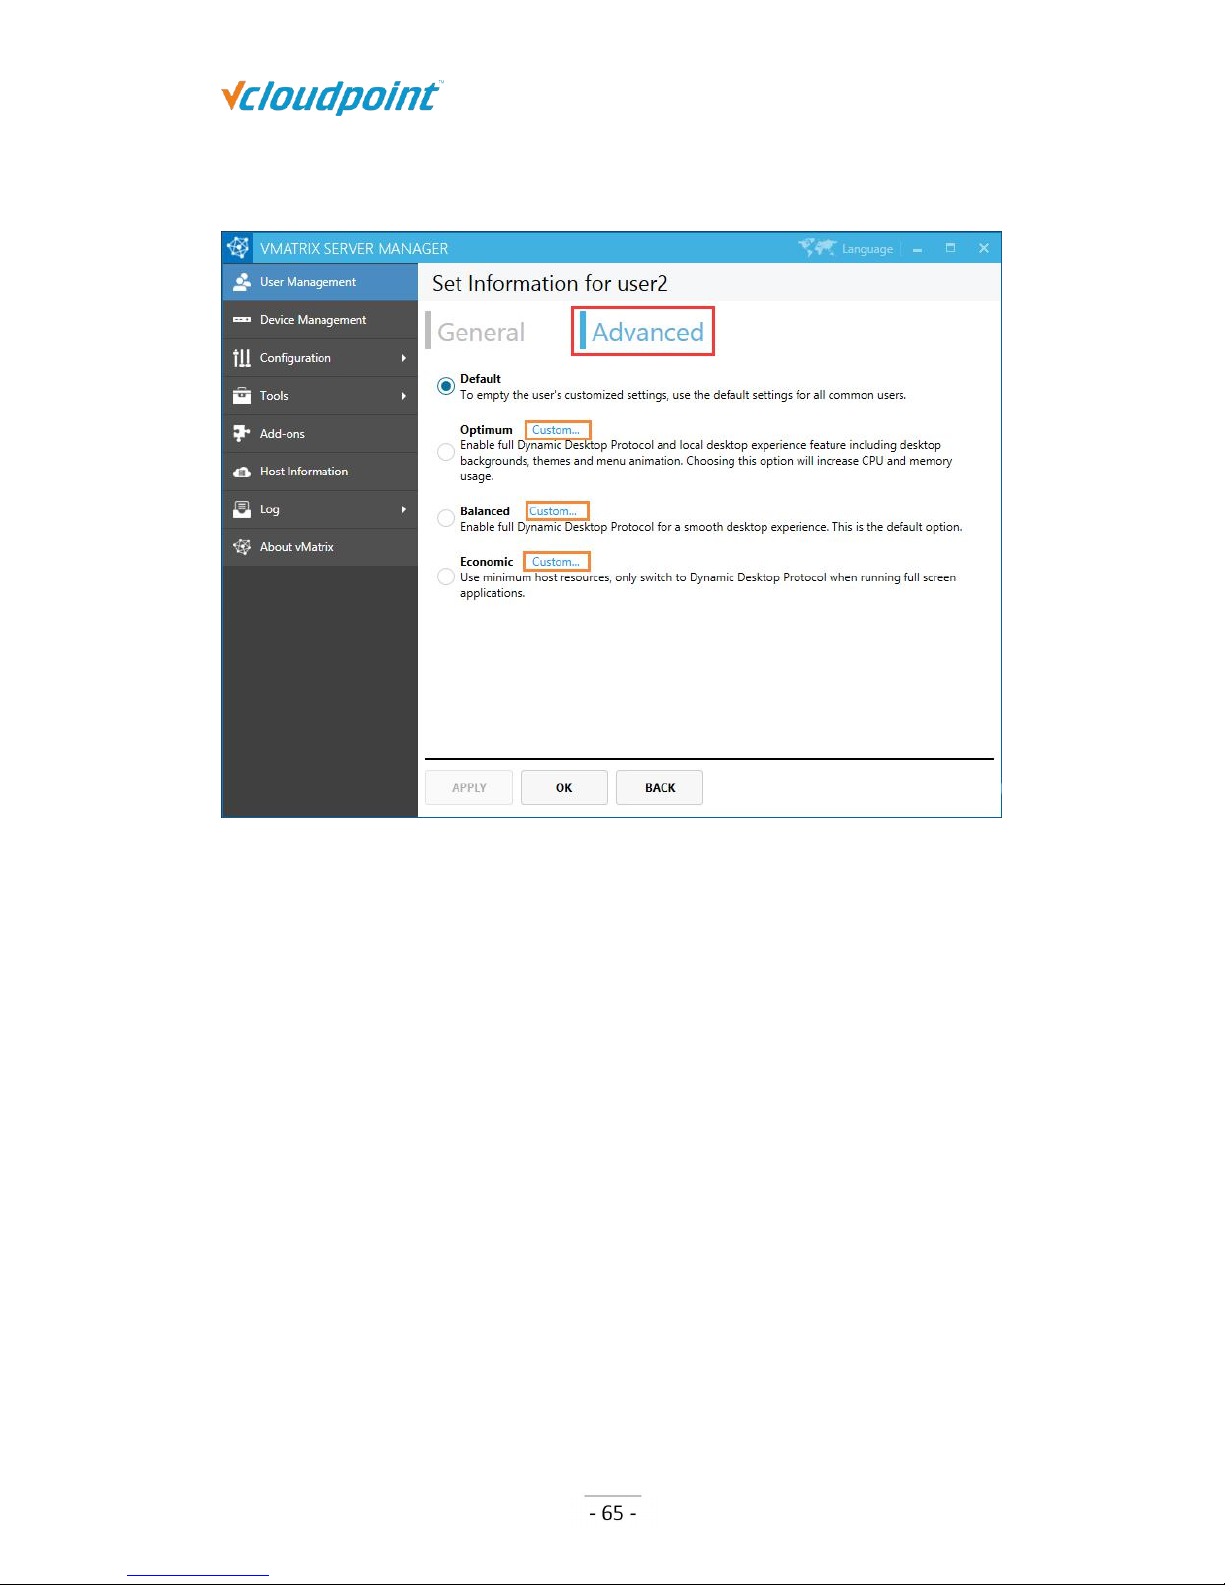
Default:
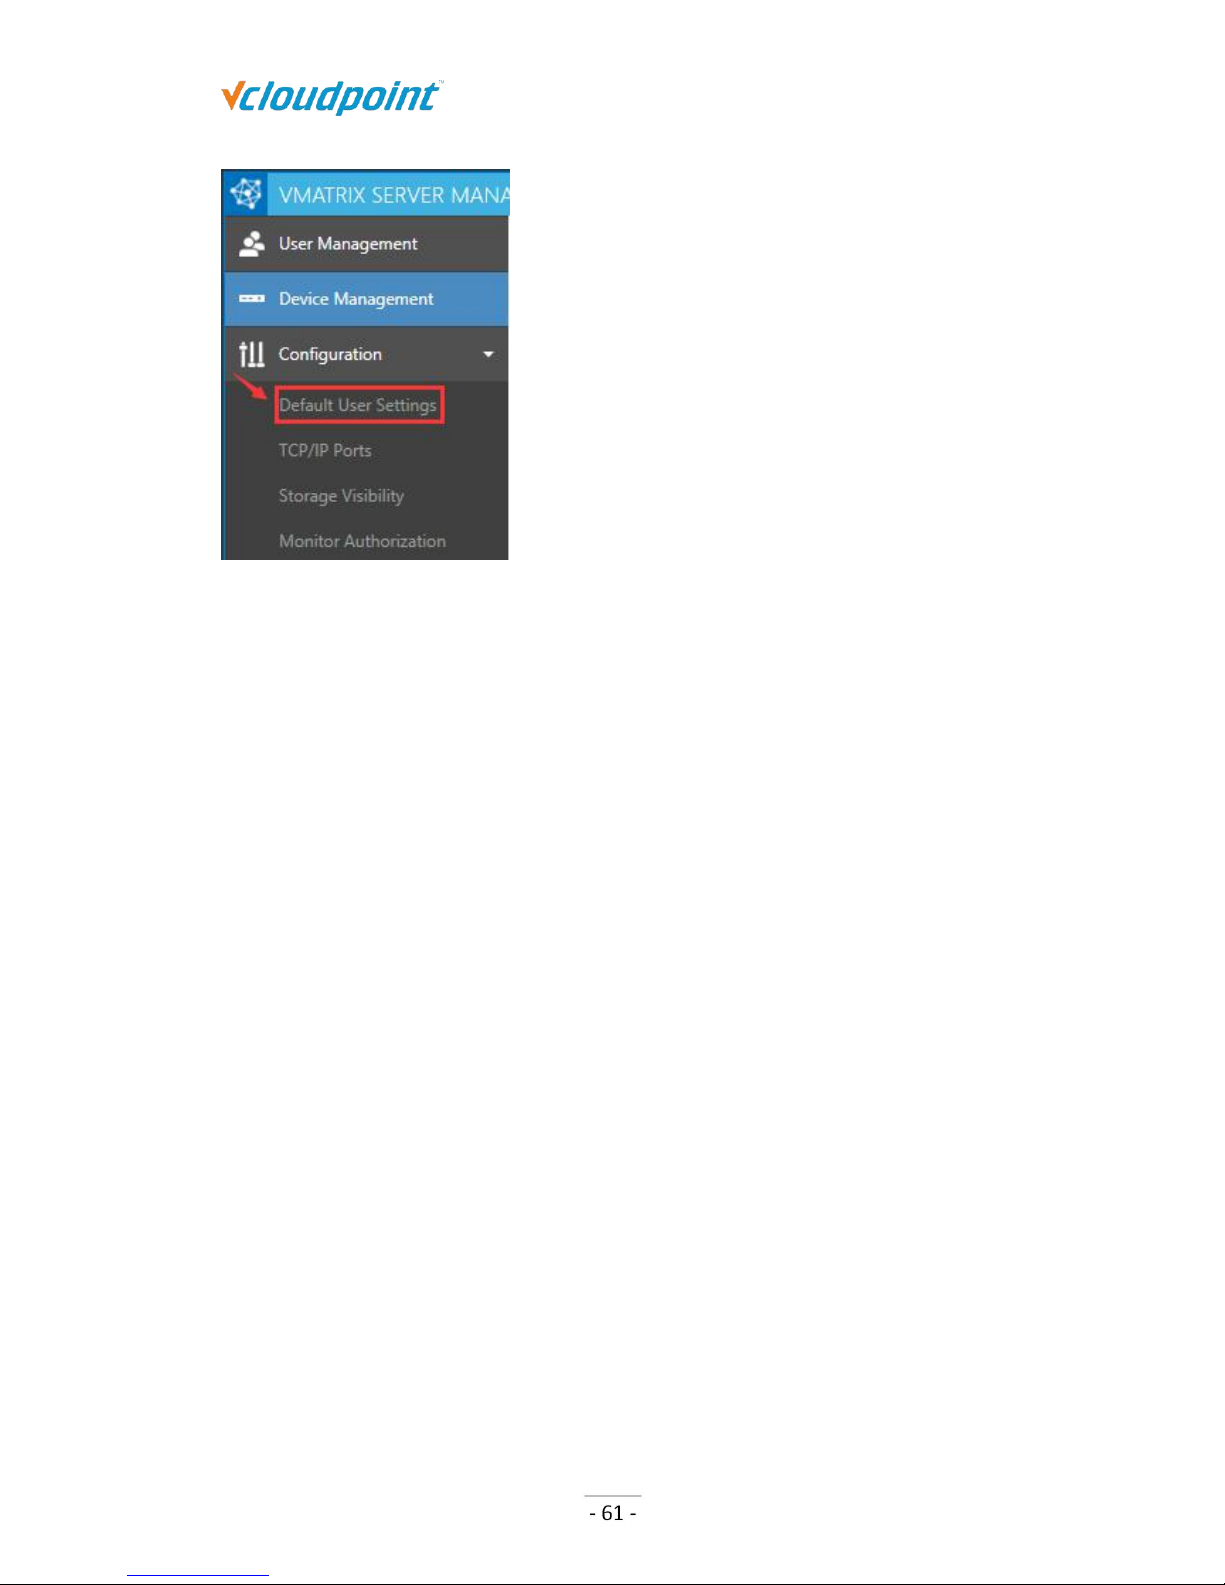
This option uses the global settings for all users which can be configured at Configuration
-> Default User Settings, refer to section 5.3.1)
Page 62
S100 Zero Client & vMatrix User Manual
www.vcloudpoint.com
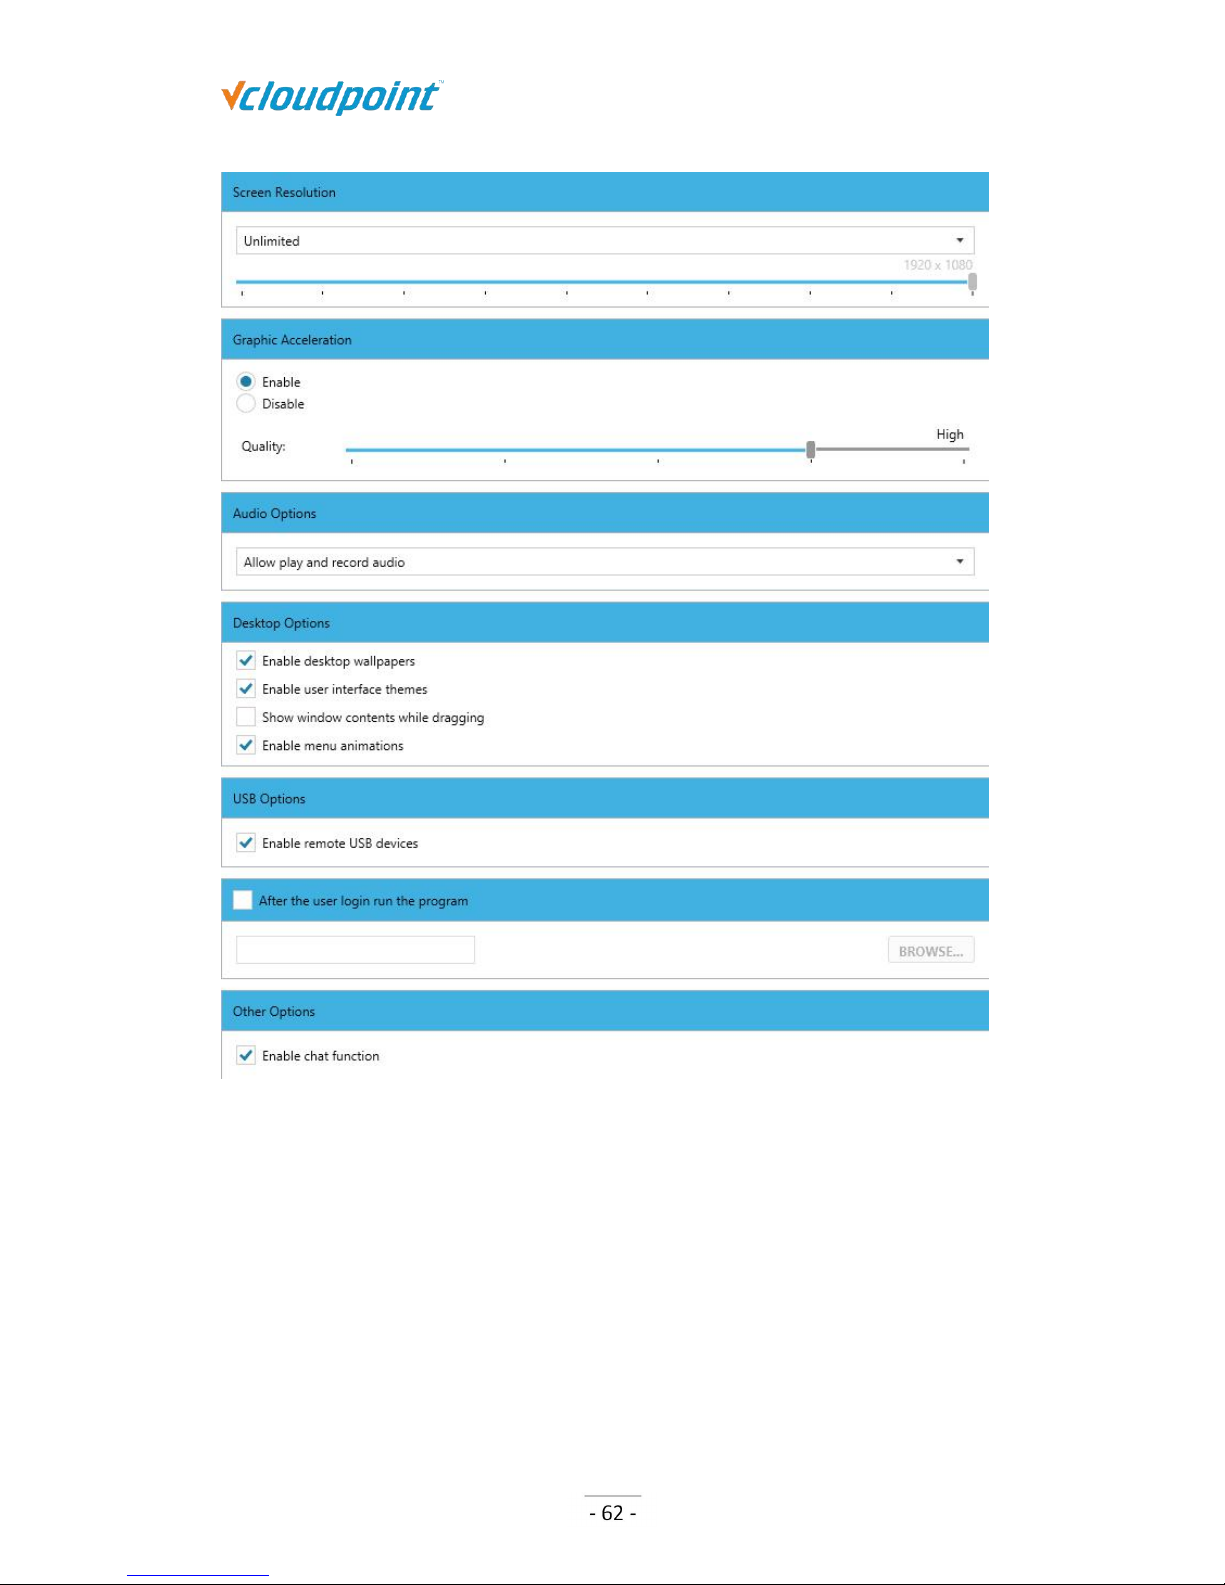
Optimum:
Desktop Resolution: Unlimited
Graphic Acceleration: Enable, High
Audio: Allow play and record audio
Desktop Options: 1st, 2ndand 4thoptions selected
USB Options: selected
After the user login run the program: unselected
Other Options (Chat Function): selected
Page 63
S100 Zero Client & vMatrix User Manual
www.vcloudpoint.com
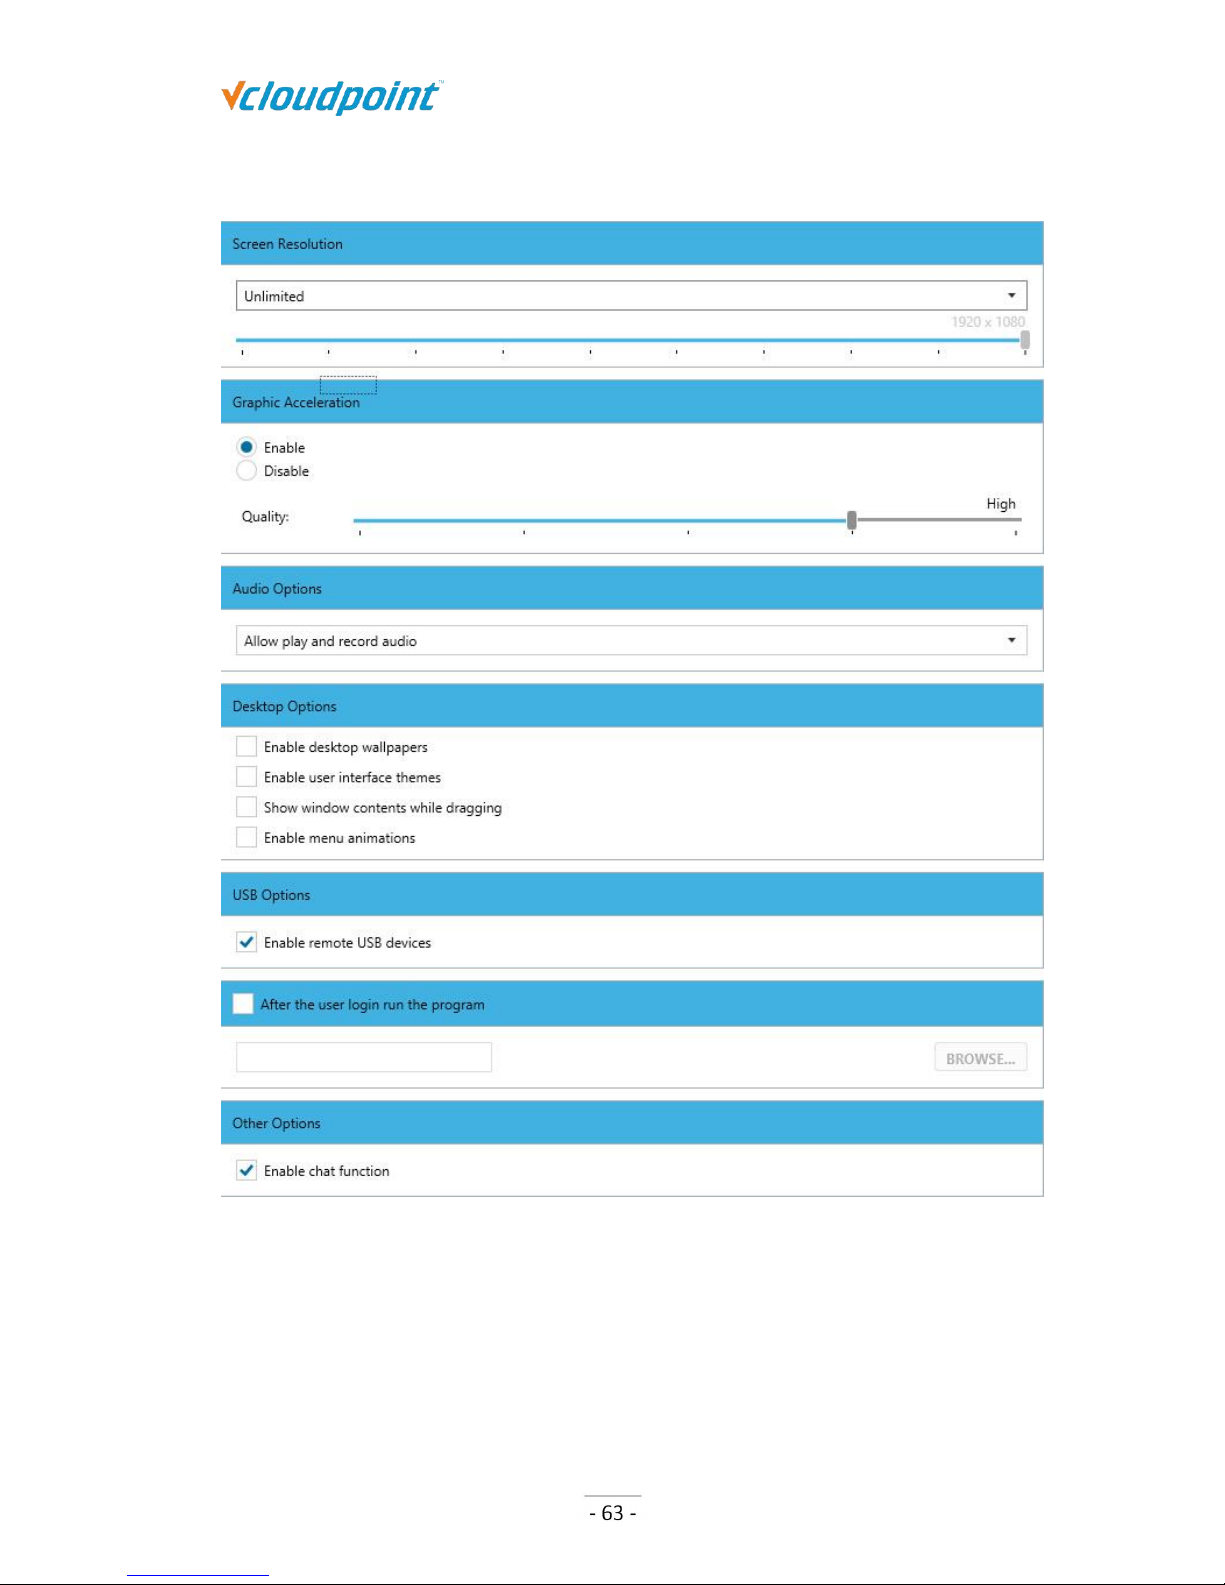
Balanced:
Desktop Resolution: Unlimited
Graphic Acceleration: Enable, High
Audio: Allow play and record audio
Desktop Options: all options unselected
USB Options: selected
After the user login run the program: unselected
Page 64
S100 Zero Client & vMatrix User Manual
www.vcloudpoint.com
Other Options (Chat Function): selected
Economic:
Desktop Resolution: Unlimited
Graphic Acceleration: Disable
Audio: Allow play and record audio
Desktop Options: all options unselected
Page 65
S100 Zero Client & vMatrix User Manual
www.vcloudpoint.com
USB Options: selected
After the user login run the program: unselected
Other Options (Chat Function): selected
Custom...:
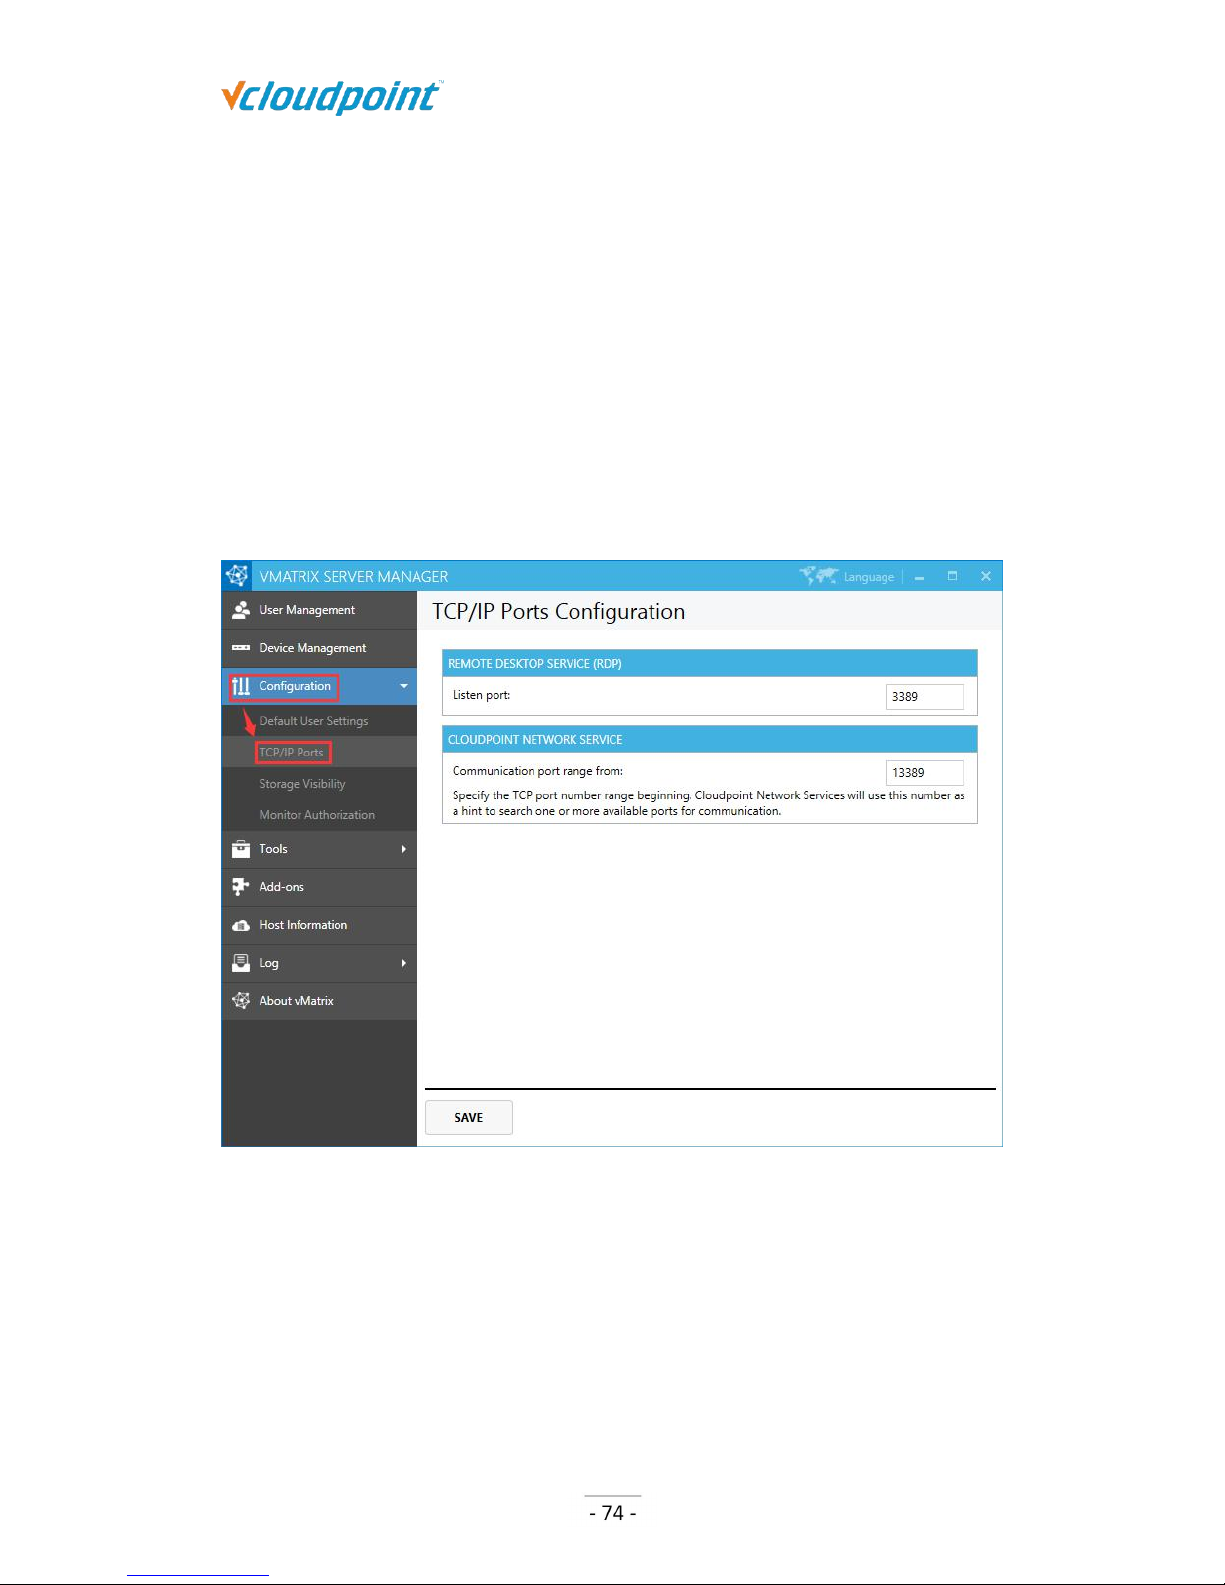
This option allows you to customize user settings based on the 3 most used types of
Page 66
S100 Zero Client & vMatrix User Manual
www.vcloudpoint.com
Optimum, Balanced, and Economic.
5.2 Device Management
5.2.1 Device Information View
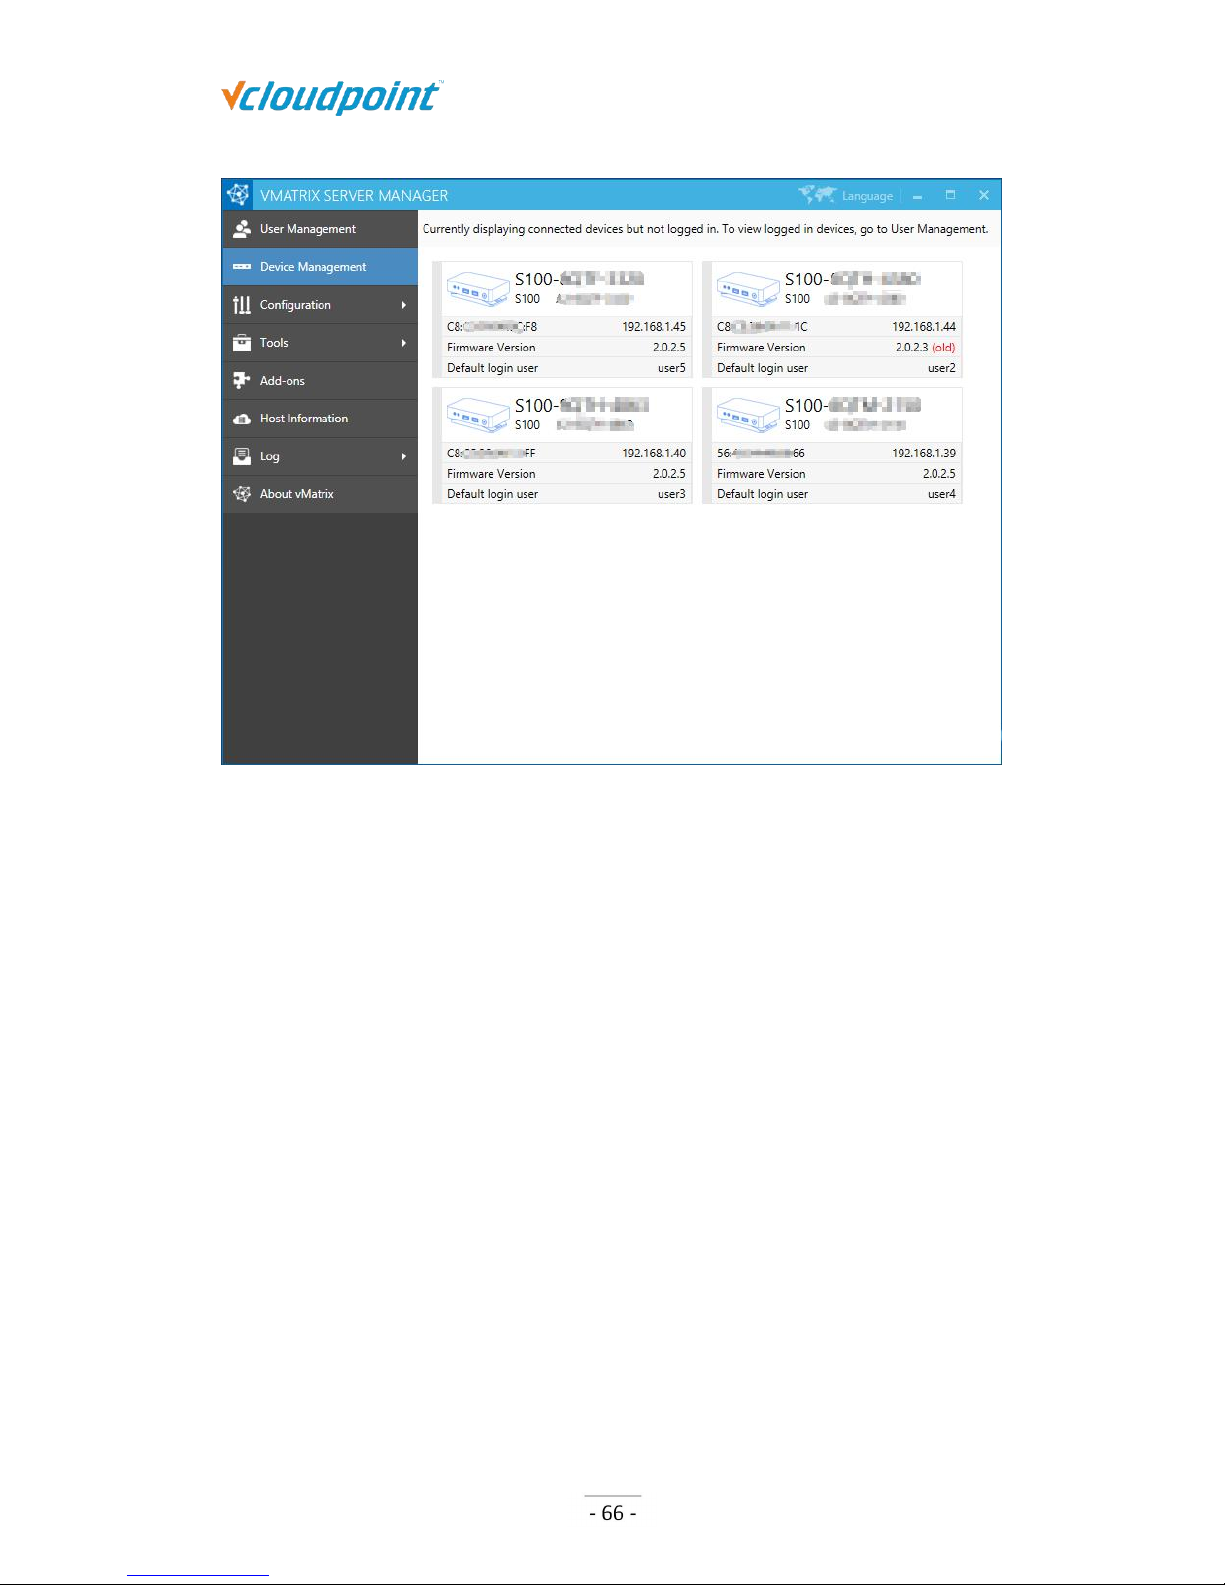
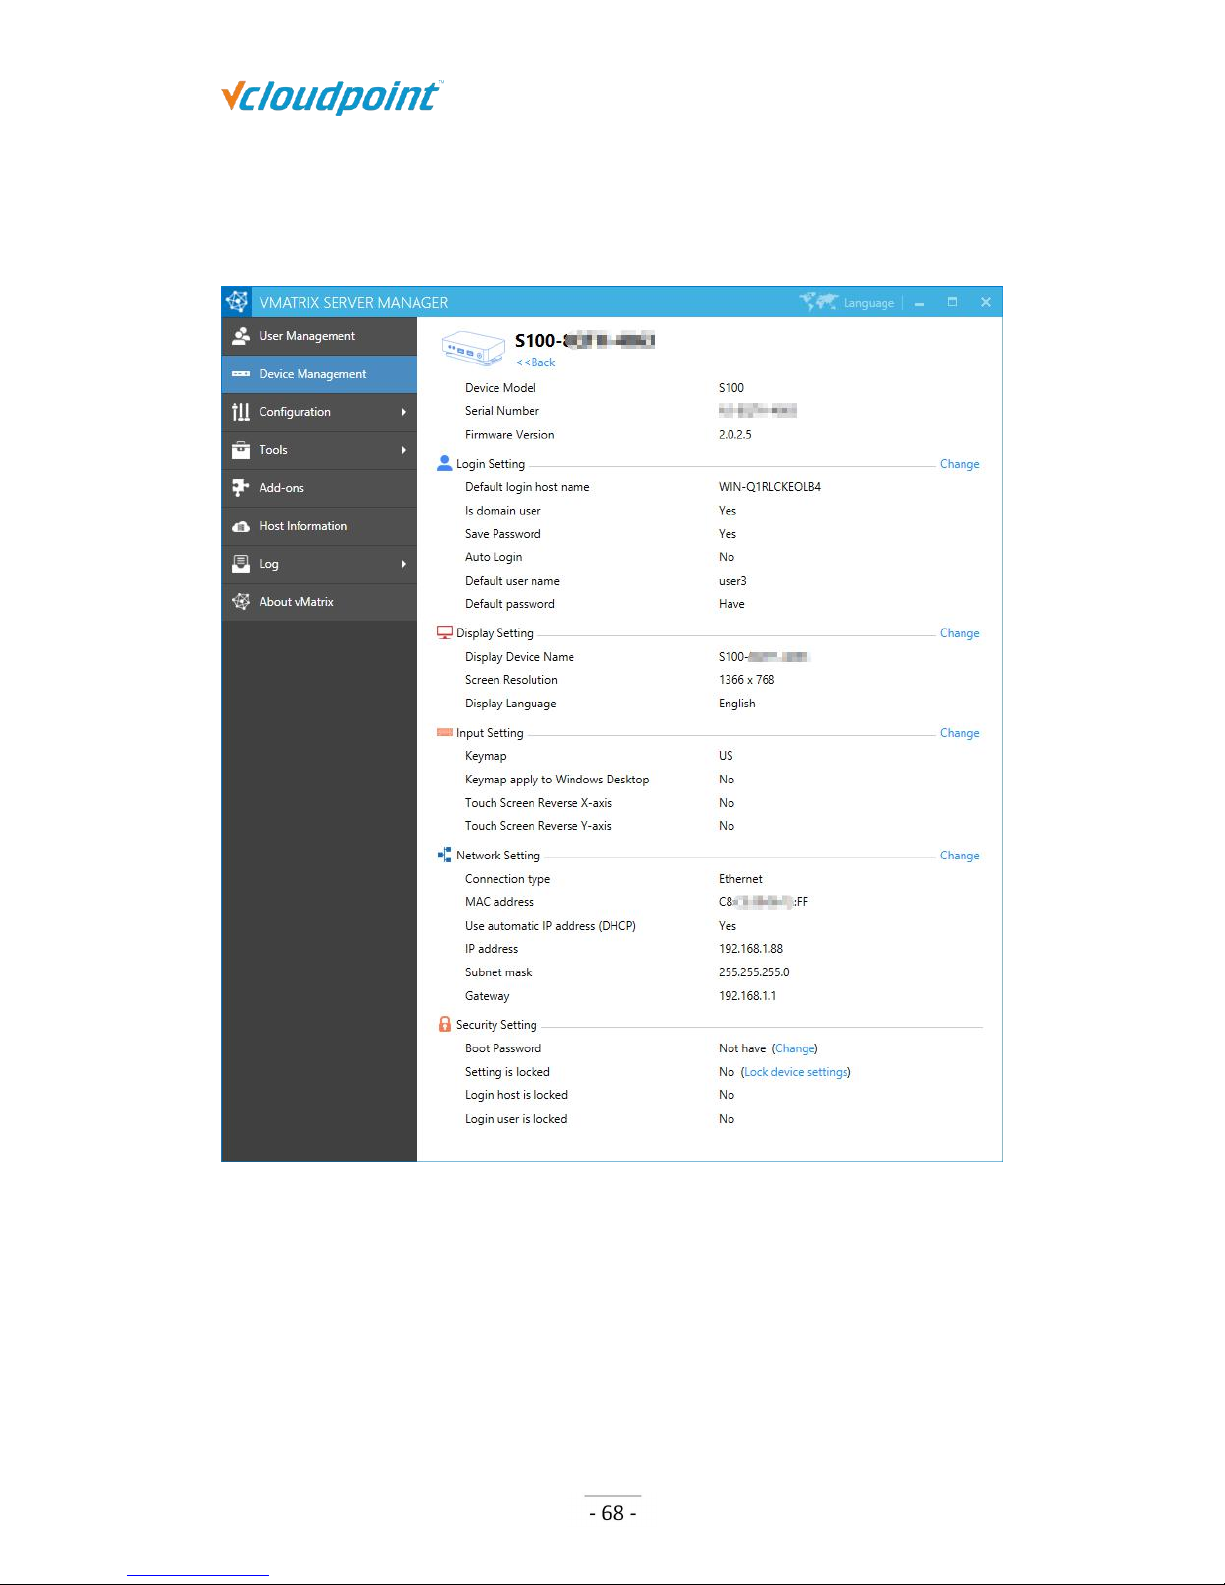
On this page, you can view device information including:
Device name: name of the device; defaulted model name + last 8 serial numbers.
Device model: model of the device.
Serial number:serial number of the device.
Mac address: physical Mac address of the device.
IP address: the IP address of the device in the LAN.
Firmware version: firmware version that the device is using.
Default login user: the saved user name for next login; it is the last login user name
or the one customized at the Login Settings.
Page 67
S100 Zero Client & vMatrix User Manual
www.vcloudpoint.com
Note: This page displays connected devices (powered on devices in the same LAN as the
host or powered on devices that has ever logged into the host) but not logged in. To view
logged in devices, go to User Manager.
5.2.2 Right Click Menu
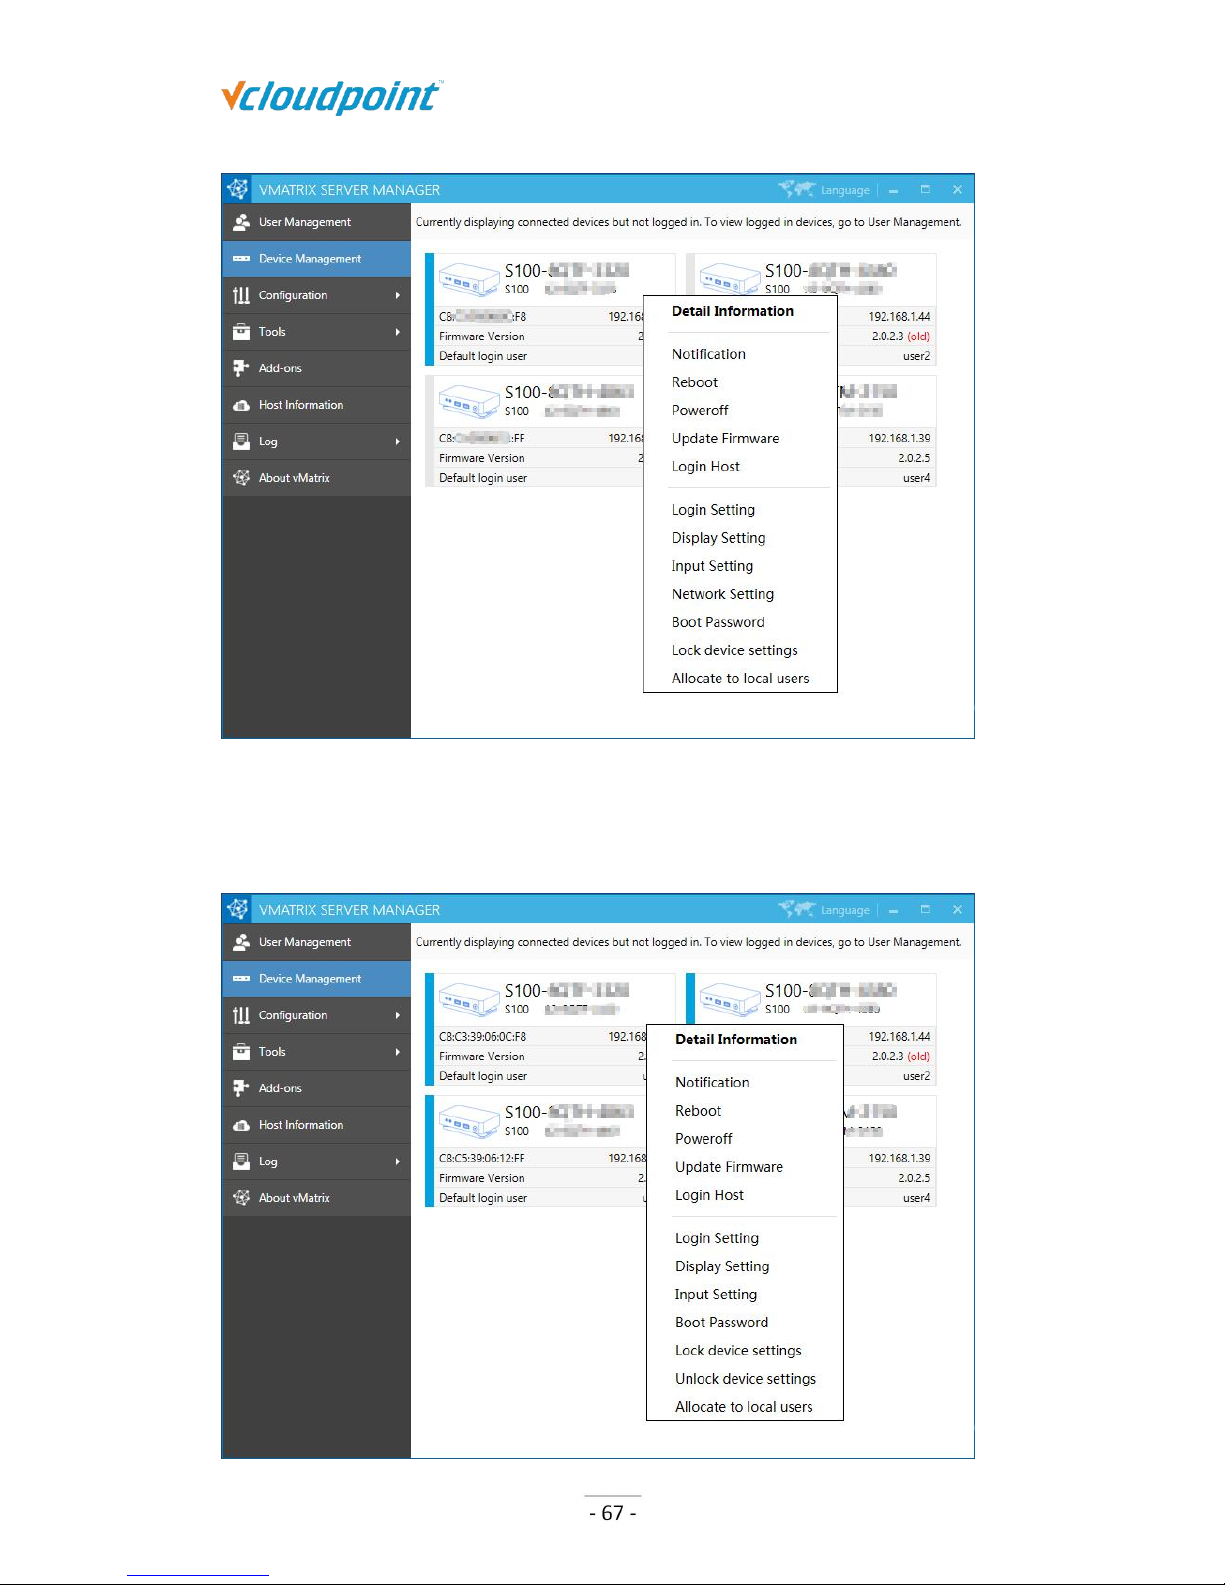
Right click on a single or multiple device modules to open the device management menu.
Each of displayed options (except Notification) performs a function which can be found
on the device interface, allowing administrators to set up or manage the devices centrally
and remotely from the host side. You can drag the mouse, or use shortcut keys like “shift”
or “CTRL” + “A” to select multiple modules at a time.
On a single device: Detail Information, Notification, Reboot, Poweroff, Update
Firmware, Login Host, Login Setting, Display Setting, Input Setting, Network Setting,
Boot Password, Lock Device Settings, Allocate to local users.
Page 68
S100 Zero Client & vMatrix User Manual
www.vcloudpoint.com
On multiple devices: Detail Information, Notification, Reboot, Poweroff, Update
Firmware, Login Host, Login Setting, Display Setting, Input Setting, Network Setting,
Boot Password, Lock (Unlock) Device Settings, Allocate to local users.
Page 69
S100 Zero Client & vMatrix User Manual
www.vcloudpoint.com
Detail Information: to view the detail information of the selected device. To enter
this page, you can either double click the device module or right click to select the
option. To change any setting on this page, click “Change”.
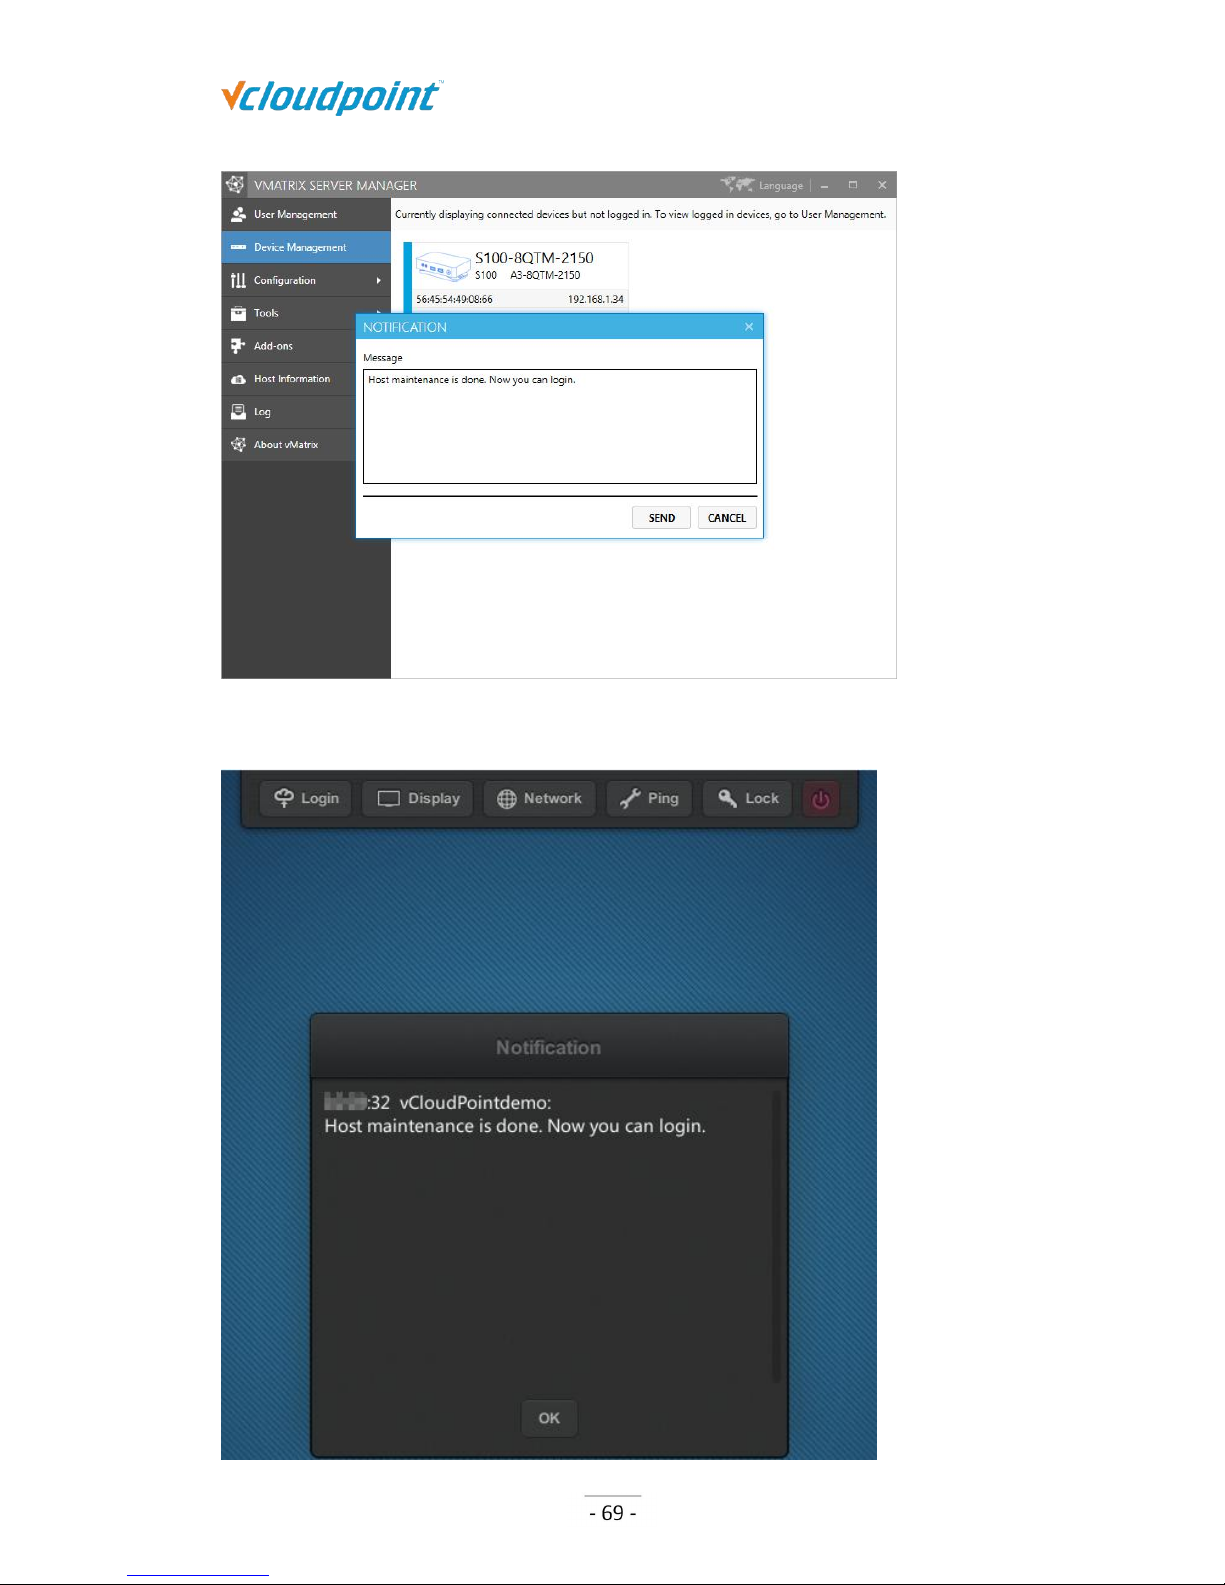
Notification: to send a notification to the selected user.
Notification sent from host:
Page 70
S100 Zero Client & vMatrix User Manual
www.vcloudpoint.com
Notification to the device:
Page 71
S100 Zero Client & vMatrix User Manual
www.vcloudpoint.com
Reboot: to reboot the selected devices.
Poweroff:to shut down the selected devices.
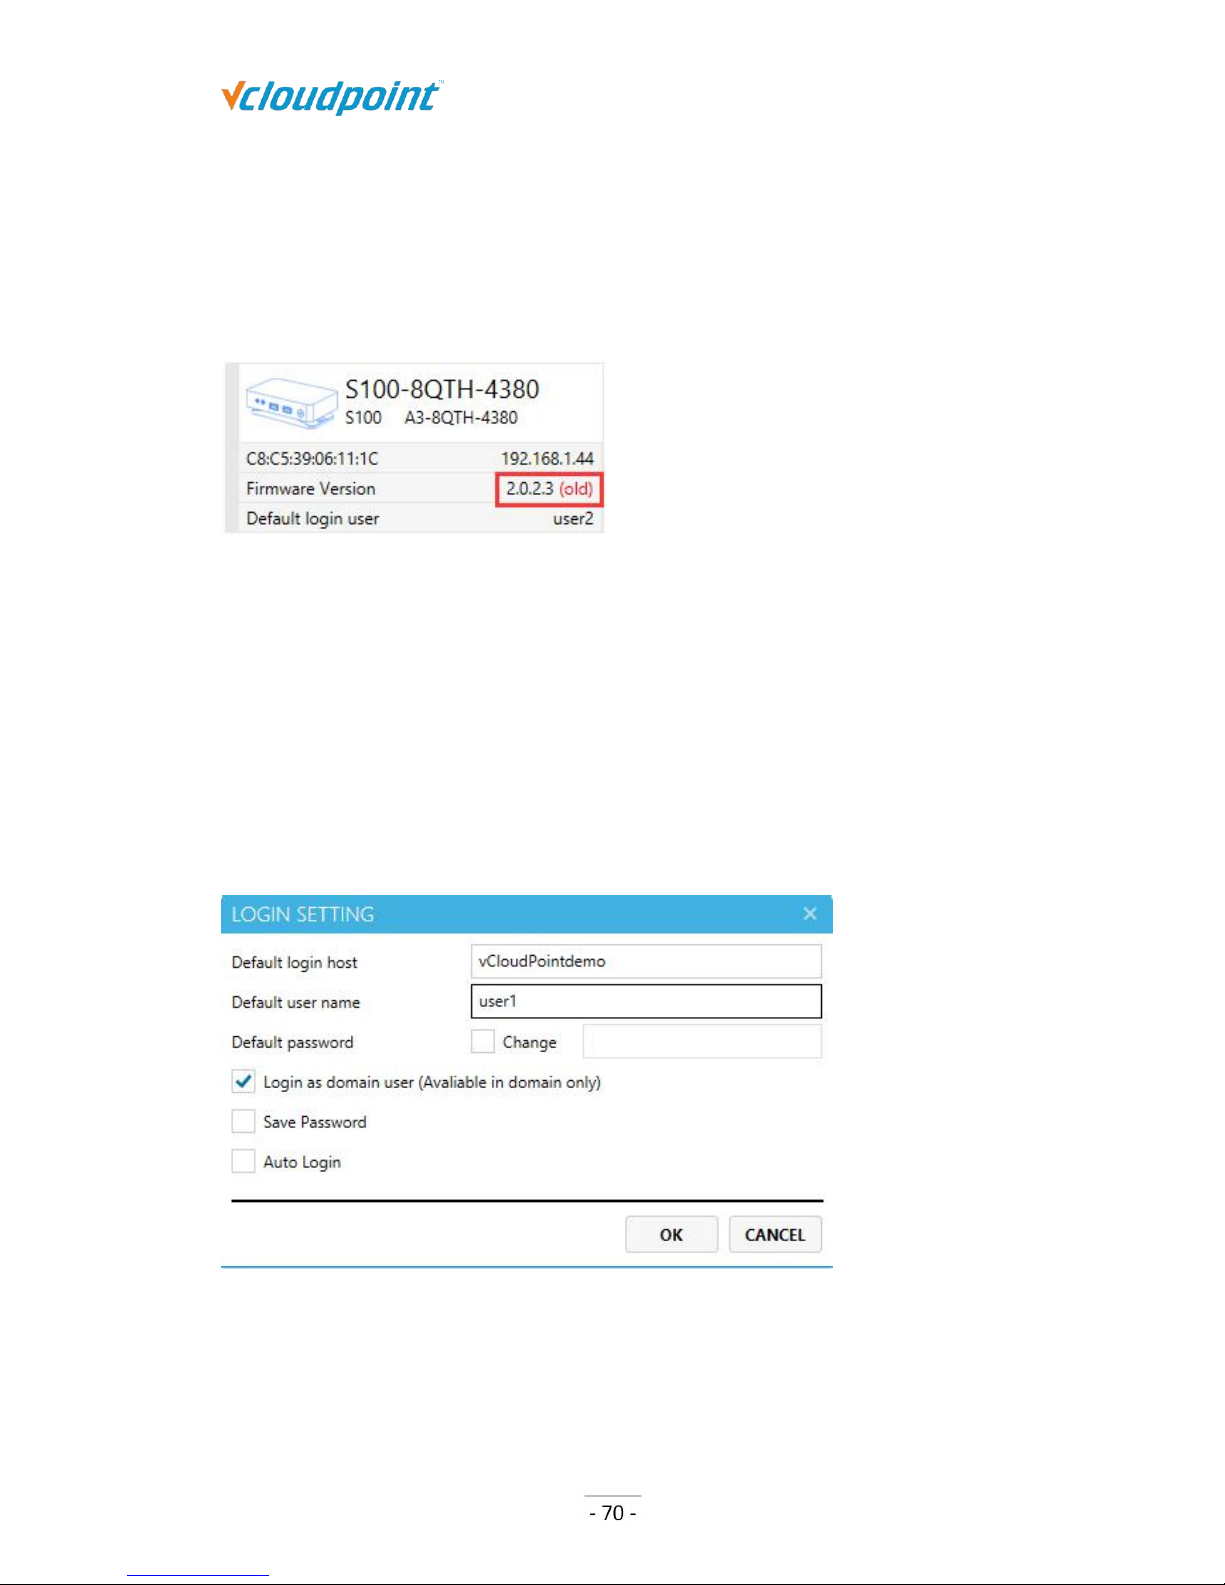
Update Firmware: to update the firmware of the selected devices; only works on
devices marked “(old)” in red.
Login Host: to log the selected devices into the designated host; only works on
devices with default login settings.
Login Setting: to change the selected devices login settings including default login
host, default user name, default password, domain selection, password saving
selection and auto login selection which will be used for the devices next login. When
multiple devices are selected, the Default User Name field is disabled and password
change only works when the same password is used by all users. If the host is in the
domain while users are logging into the host as local users (rather than domain),
cancel the selection of Login as domain users (Available in domain only).
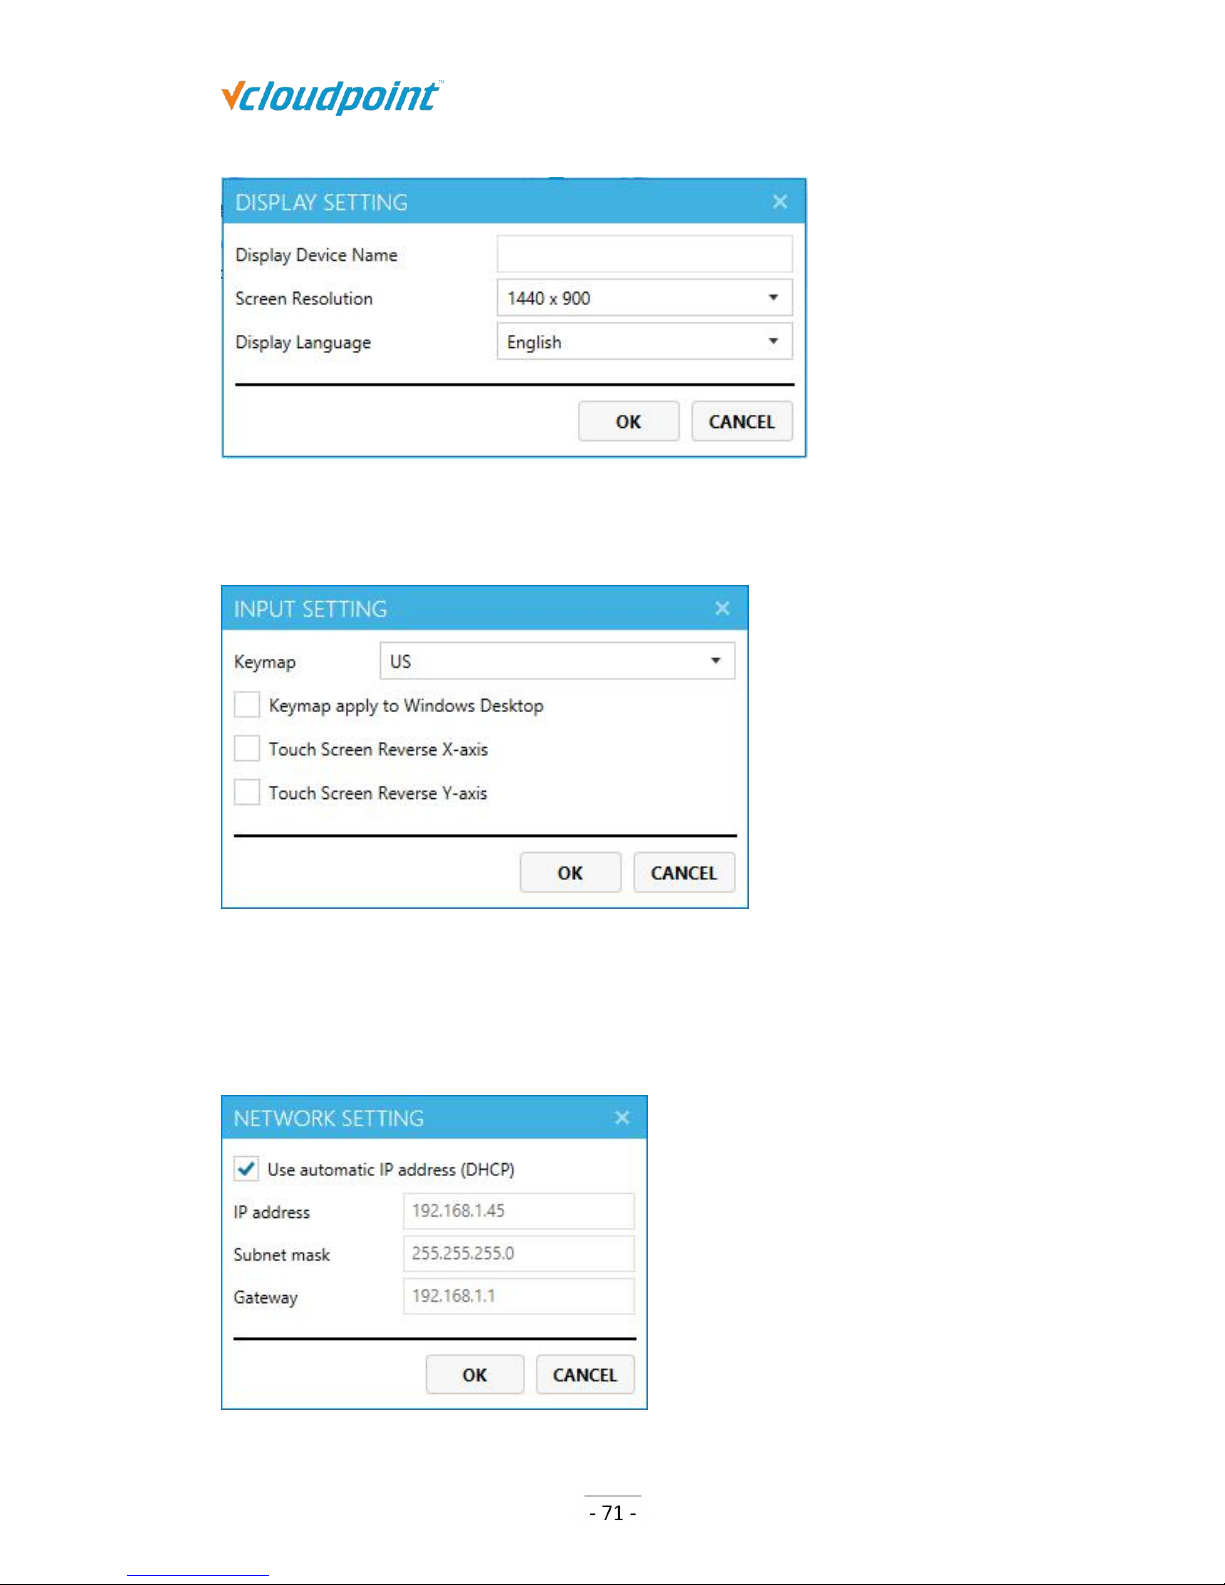
Display Setting: to change the display settings of the selected devices including
device name, screen resolution and language; when multiple devices are selected,
the Display Device Name field is disabled.
Page 72
S100 Zero Client & vMatrix User Manual
www.vcloudpoint.com
Input Setting: to change the input settings of the selected devices including keymap
and touch screen X & Y axis.
Network Setting: to change the network settings of the selected device to using
DHCP automatic or customized IP address; this option is available only when a single
device is selected and WIFI setting is not available on remote control through
network.
Page 73
S100 Zero Client & vMatrix User Manual
www.vcloudpoint.com
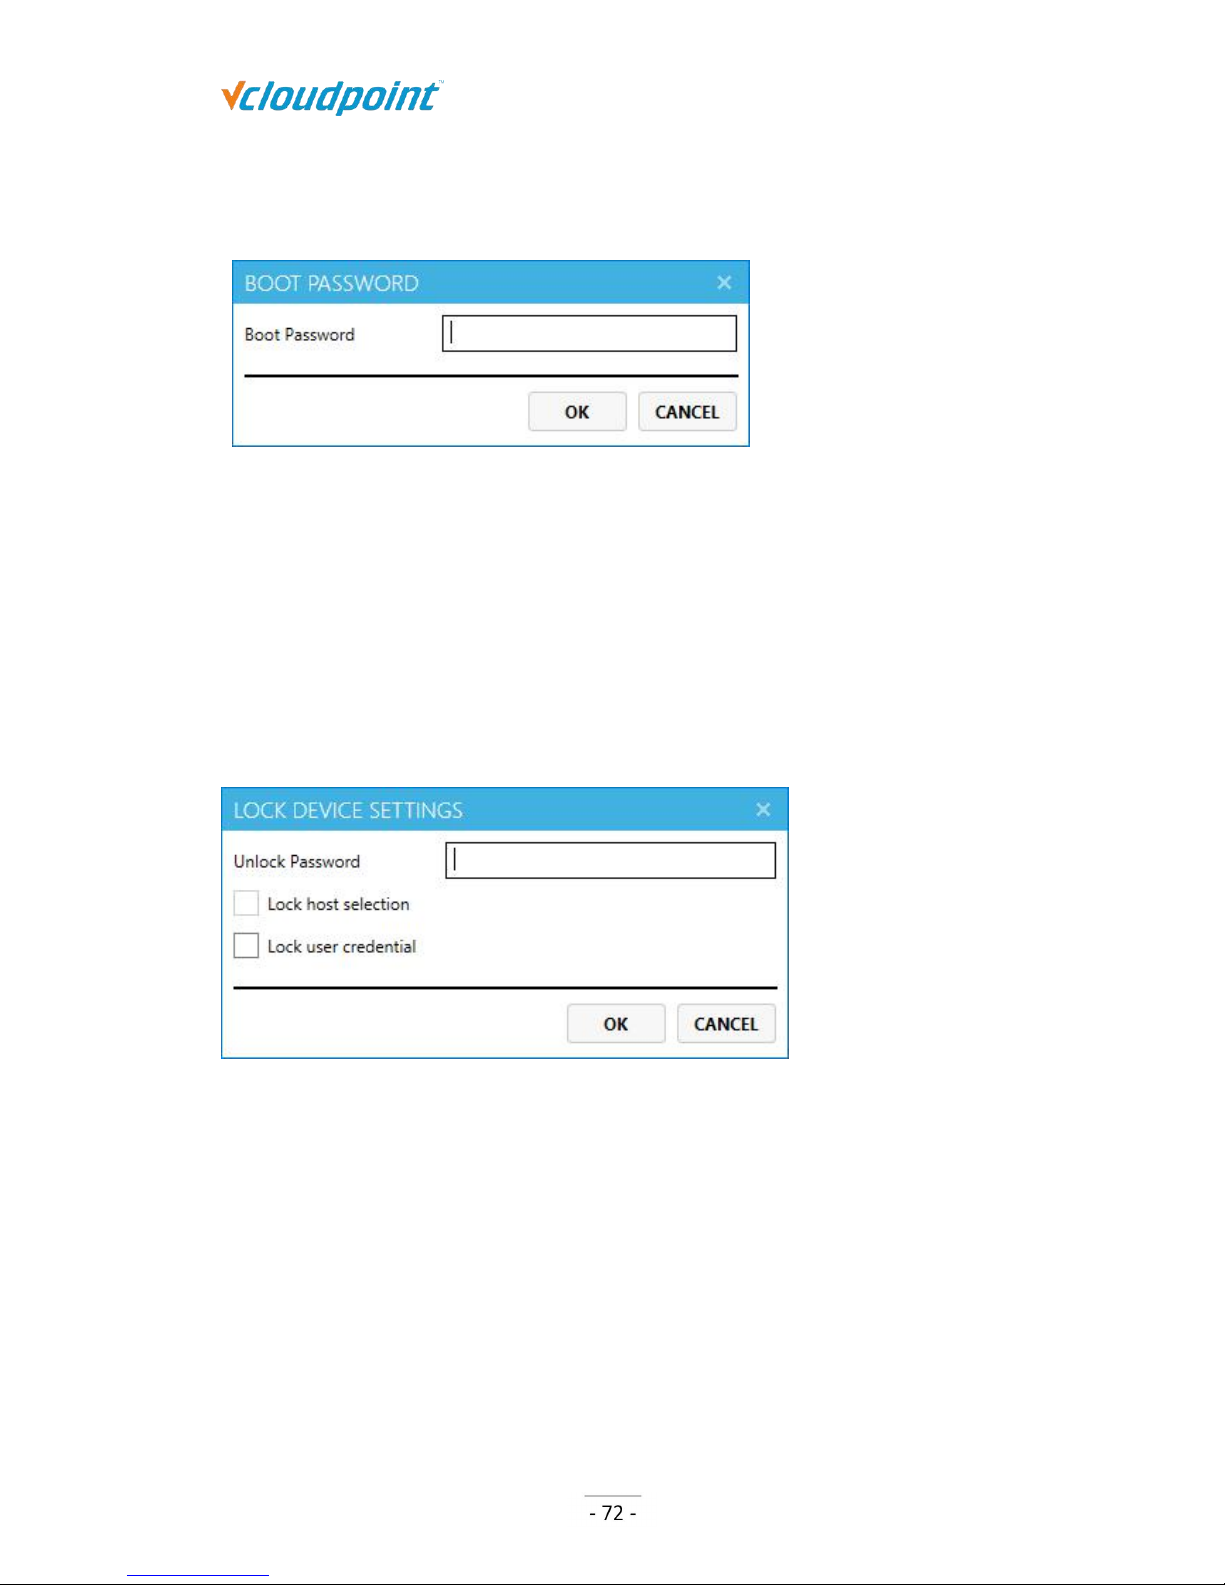
Boot Password: to set up a password on device boot so that the user is required to
enter password to use the device.
=
Lock Device Settings: to lock down the settings on the Login, Display, Network and
Lock menu in order to prevent other users from changing these settings. Lock host
selection is to disable the host selection and restrict the user to login to the selected
host. A host must be selected before this option is selected. Lock user credential is to
disable the user to change user name and password and restrict the user to login
with the saved user name and password. A correct user name and its related
password must be saved before this option is selected. After you set up a password
for the device, this option will be replaced by “Unlock Device Settings” on its right
click menu.
Unlock Device Settings:To unlock the device settings. The lock-down password will
be clear on clicking this option will immediately clear the earlier lock password
without the need to enter the password. After you unlock the settings for the device,
this option will be replaced by “Lock Device Settings” on its right click menu.
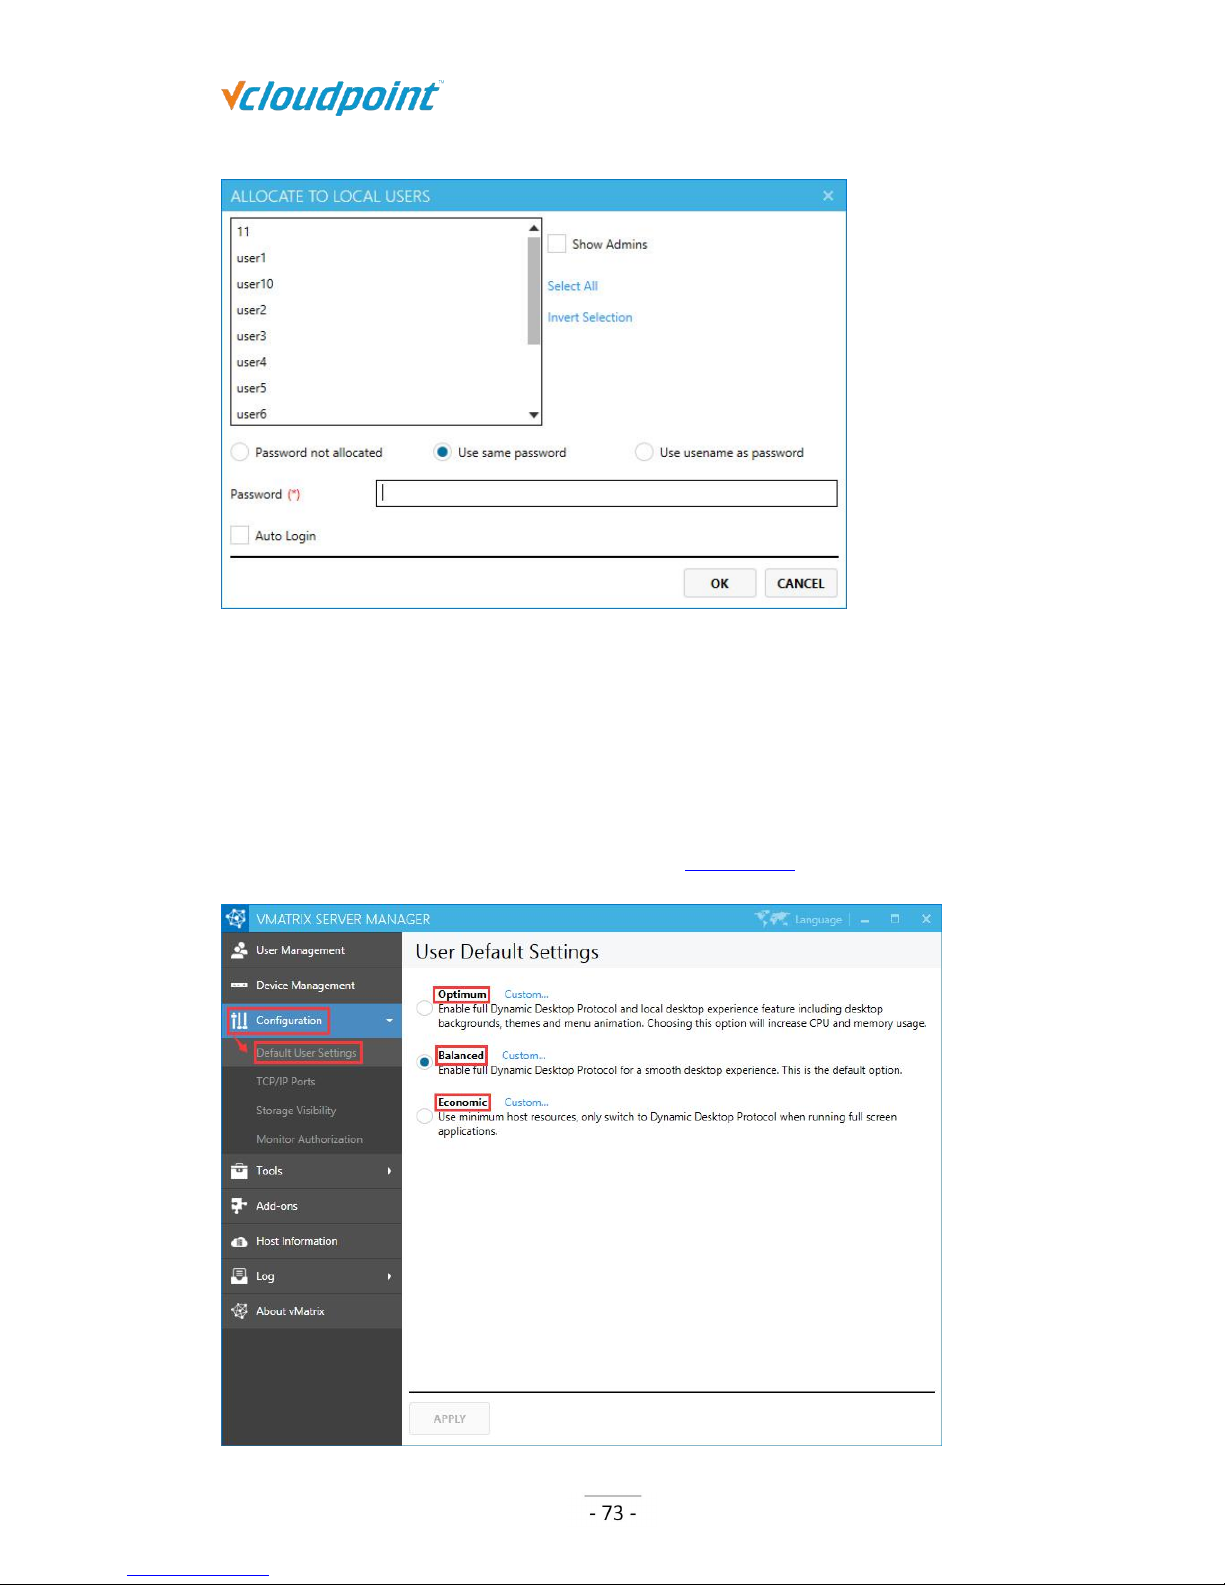
Allocate to local users: randomly allocate the selected devices to local users. Note:
if the number of devices exceeds the number of existing user, some devices will not
be collocated. If password is not allocated, auto login cannot be selected.
Page 74
S100 Zero Client & vMatrix User Manual
www.vcloudpoint.com
5.3 Configuration
5.3.1 Default User Settings
Default settings will apply for those users using “Default” as their advance settings.
Changes will take effect at user’s next login. (Refer to section 5.1.7)
Page 75
S100 Zero Client & vMatrix User Manual
www.vcloudpoint.com
5.3.2 TCP/IP Ports
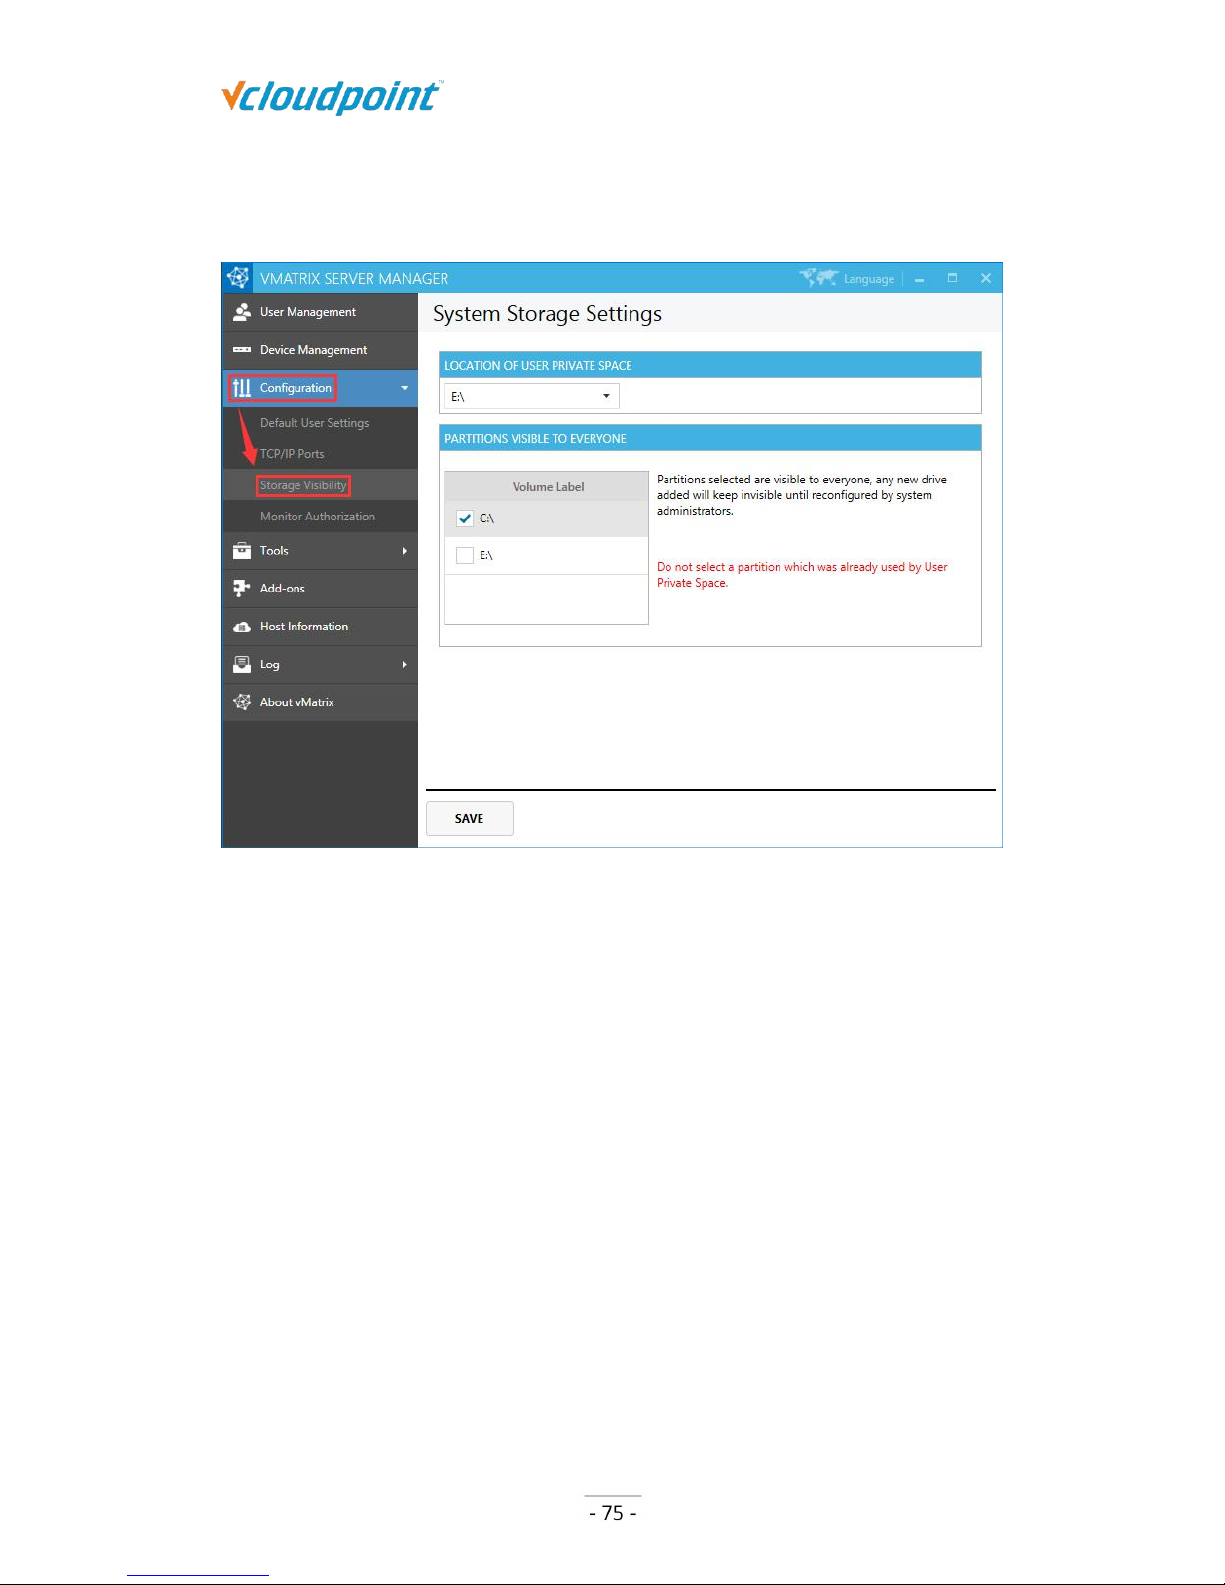
During the operation of your vCloudPoint system, some of your network ports are
utilized by vMatrix Server Manager and the zero clients. The vMatrix Network Service
uses both TCP and UDP ports. The broadcast port is fixed using UDP 13389, and the listen
port begins with TCP 13389 and extends to at least 3 extra plus 3 for each user. For
example, if there are 10 users needing to connect remotely, you need to at least add
ports of UDP 13389-13389, TCP 13389-13422 (13422 is the minimum and reserve more if
possible). The listen port for Remote Desktop Service itself also should be open. It uses
TCP 3389. The default settings are recommended to be used but you can still customize
the ports if needed. When customizing these ports, your zero clients will be disconnected.
Page 76
S100 Zero Client & vMatrix User Manual
www.vcloudpoint.com
5.3.3 Storage Visibility
LOCATION OF USER PRIVATE SPACE:
The disk partition which user files are stored. DO NOT select the partition that system or
programs are installed.
PATRTITIONS VISIBLE TO EVERYONE:
The partitions which are visible to all users. DO NOT select the one which has already
been chosen for storing user files.
Note: disk partitions viewed by common users will be different from those by
administrators.
Administrator’s view:
Page 77
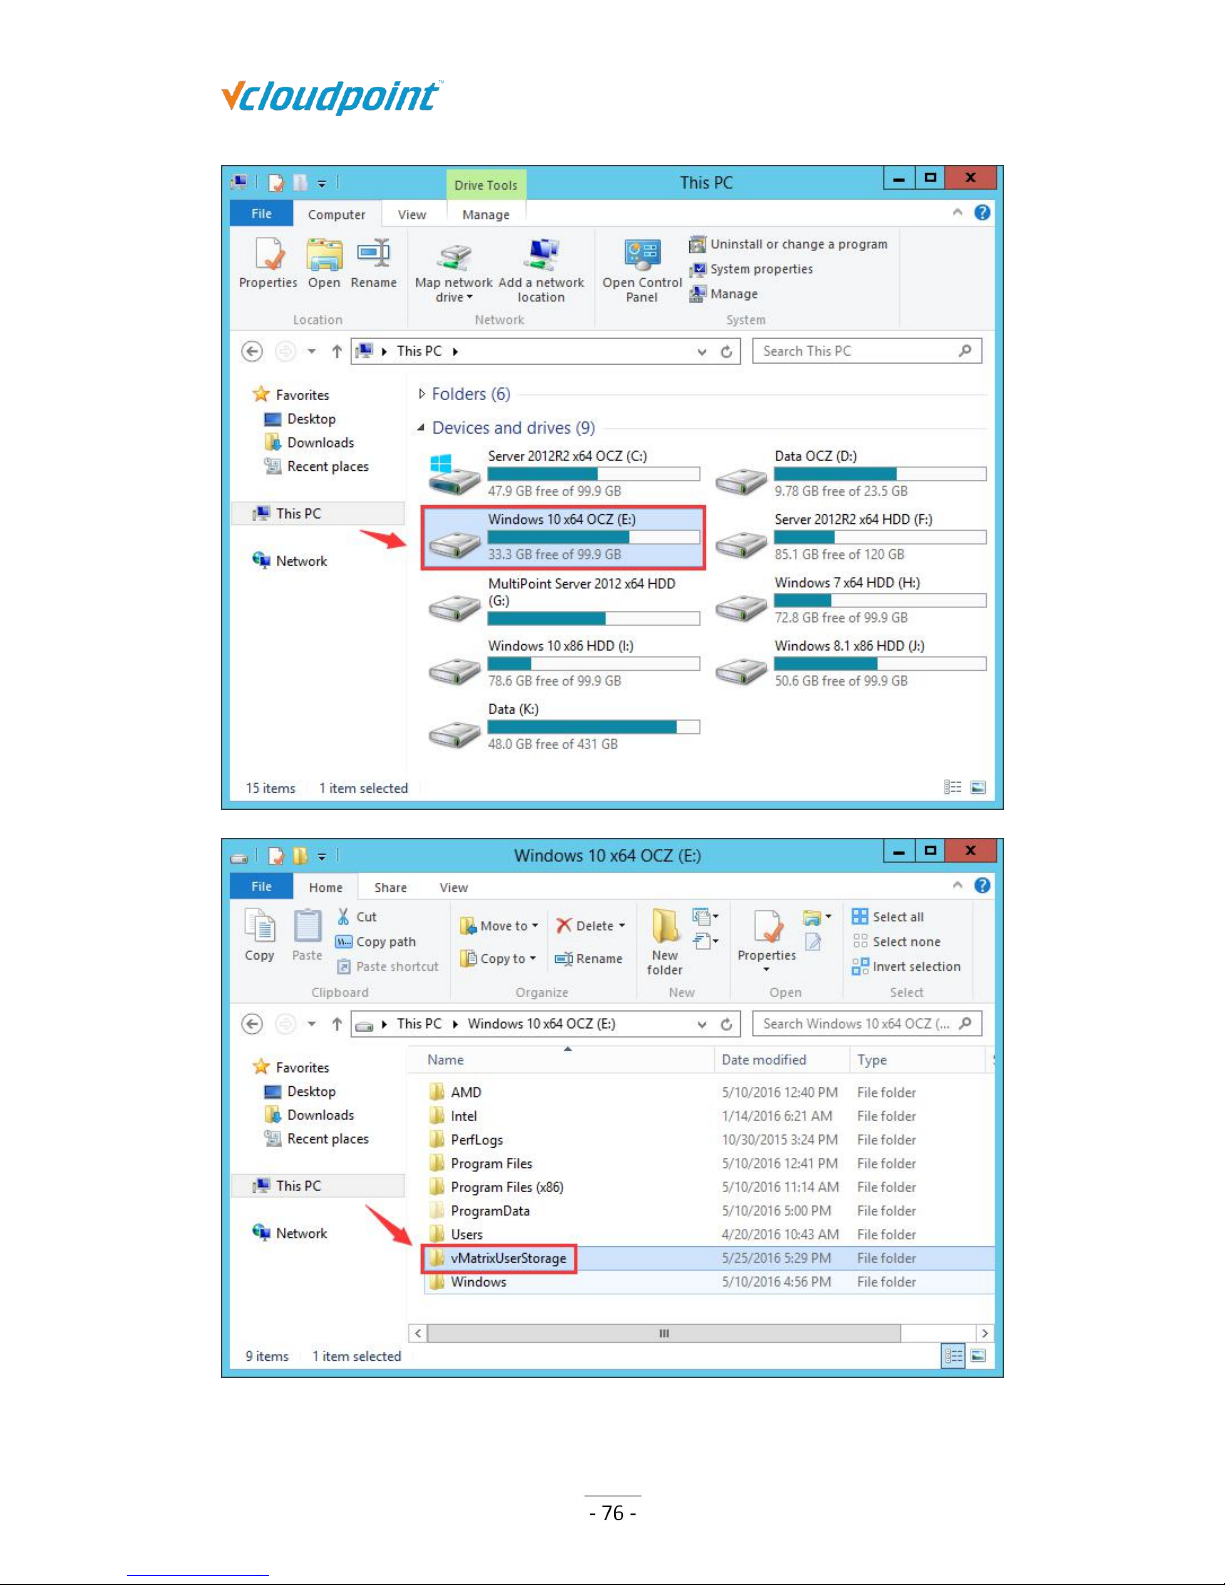
S100 Zero Client & vMatrix User Manual
www.vcloudpoint.com
Page 78
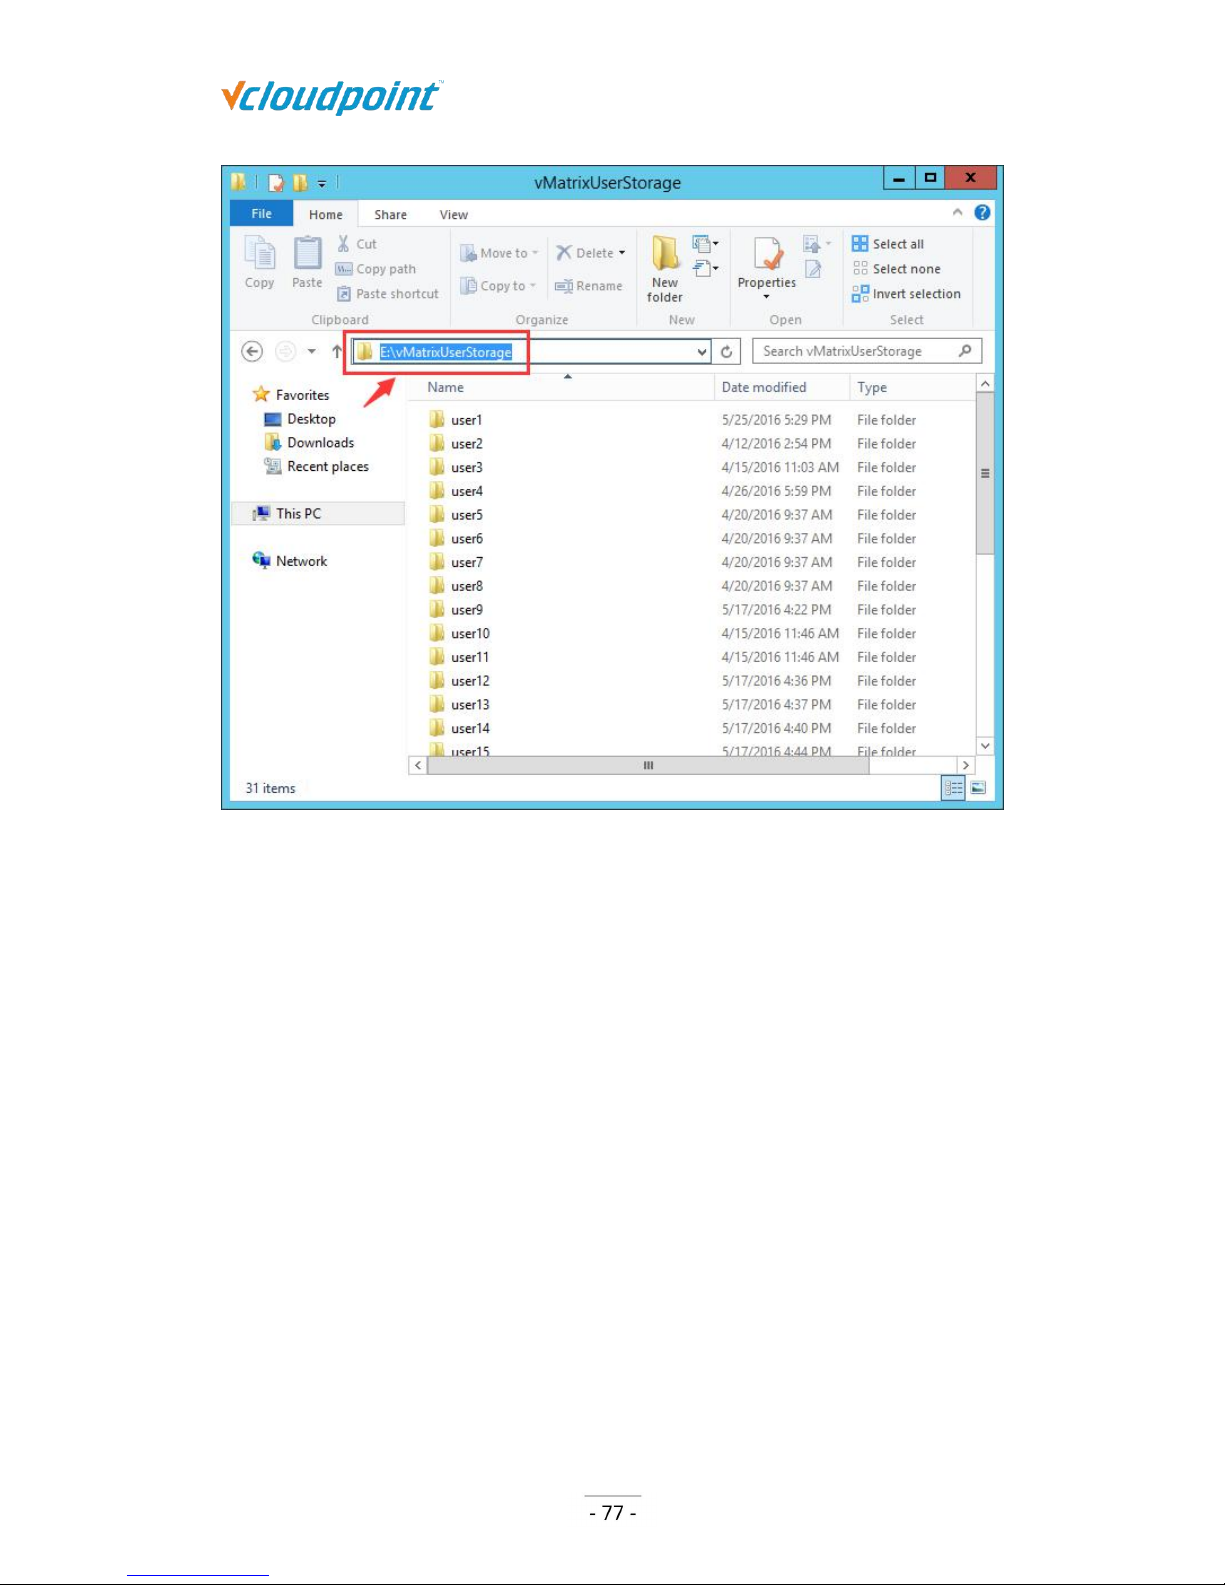
S100 Zero Client & vMatrix User Manual
www.vcloudpoint.com
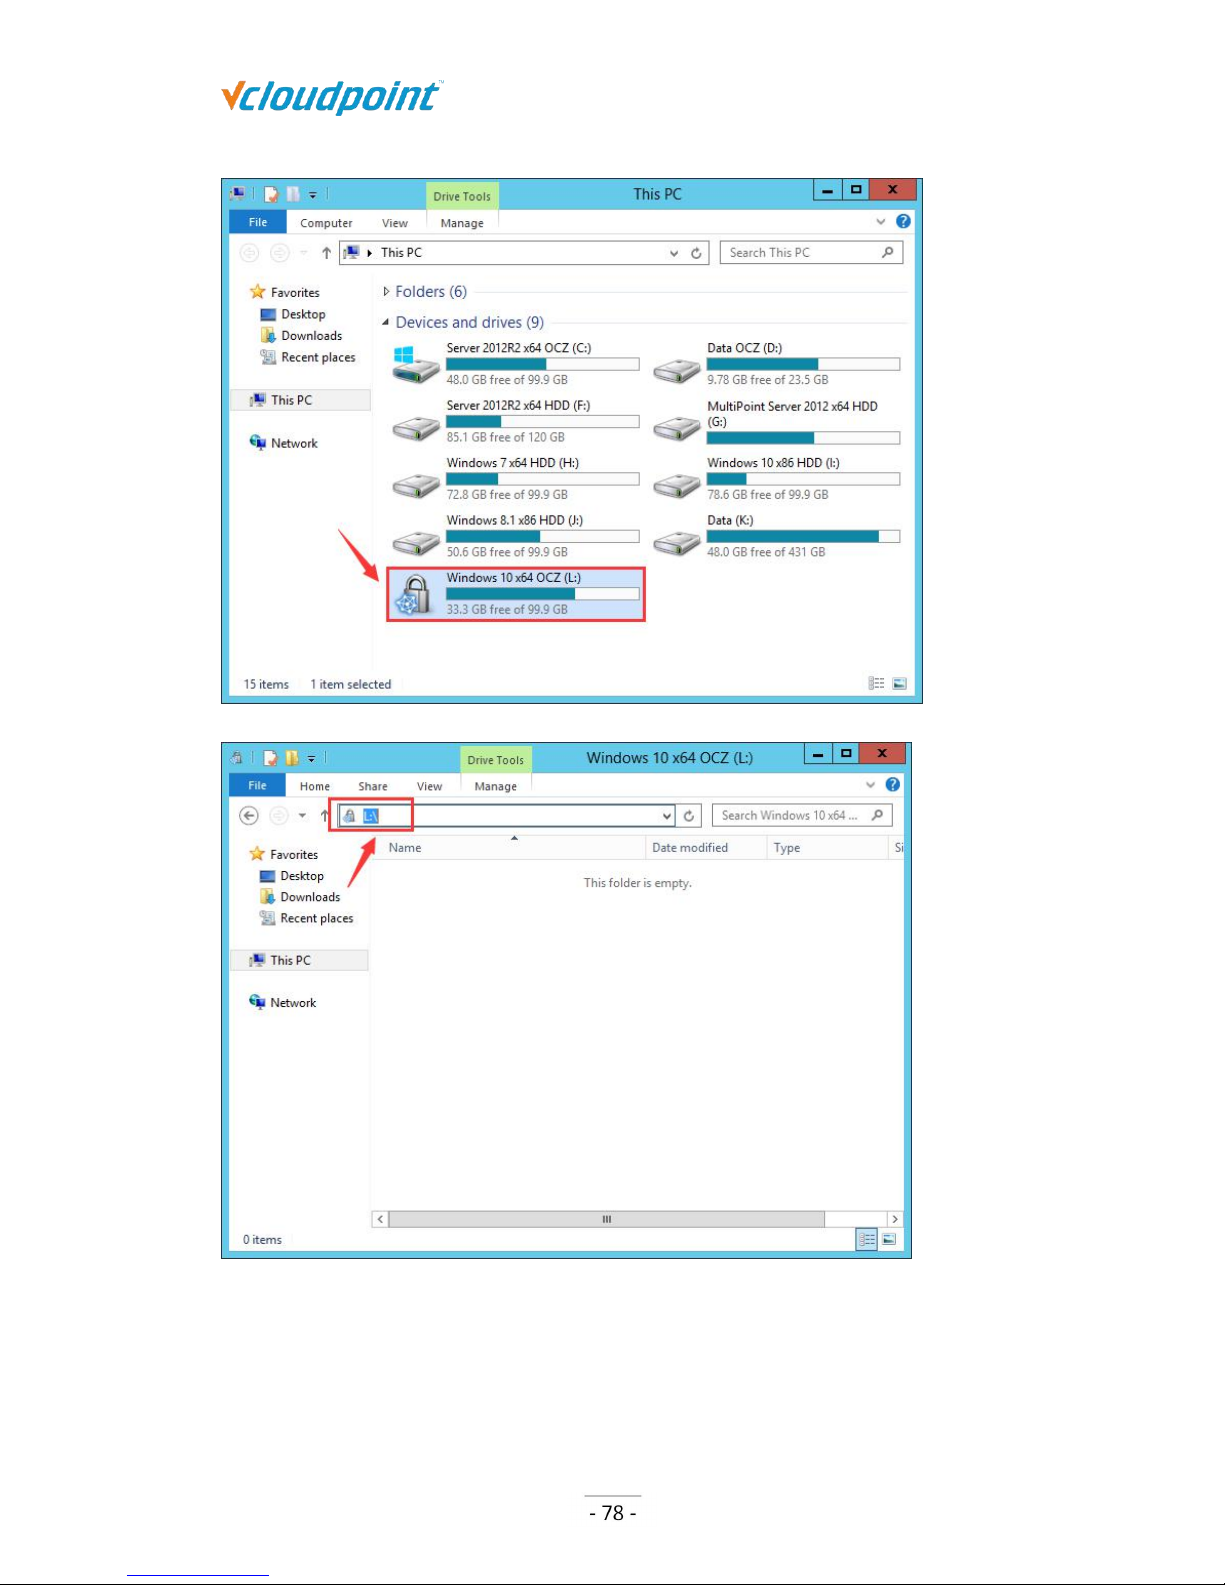
User’s view:
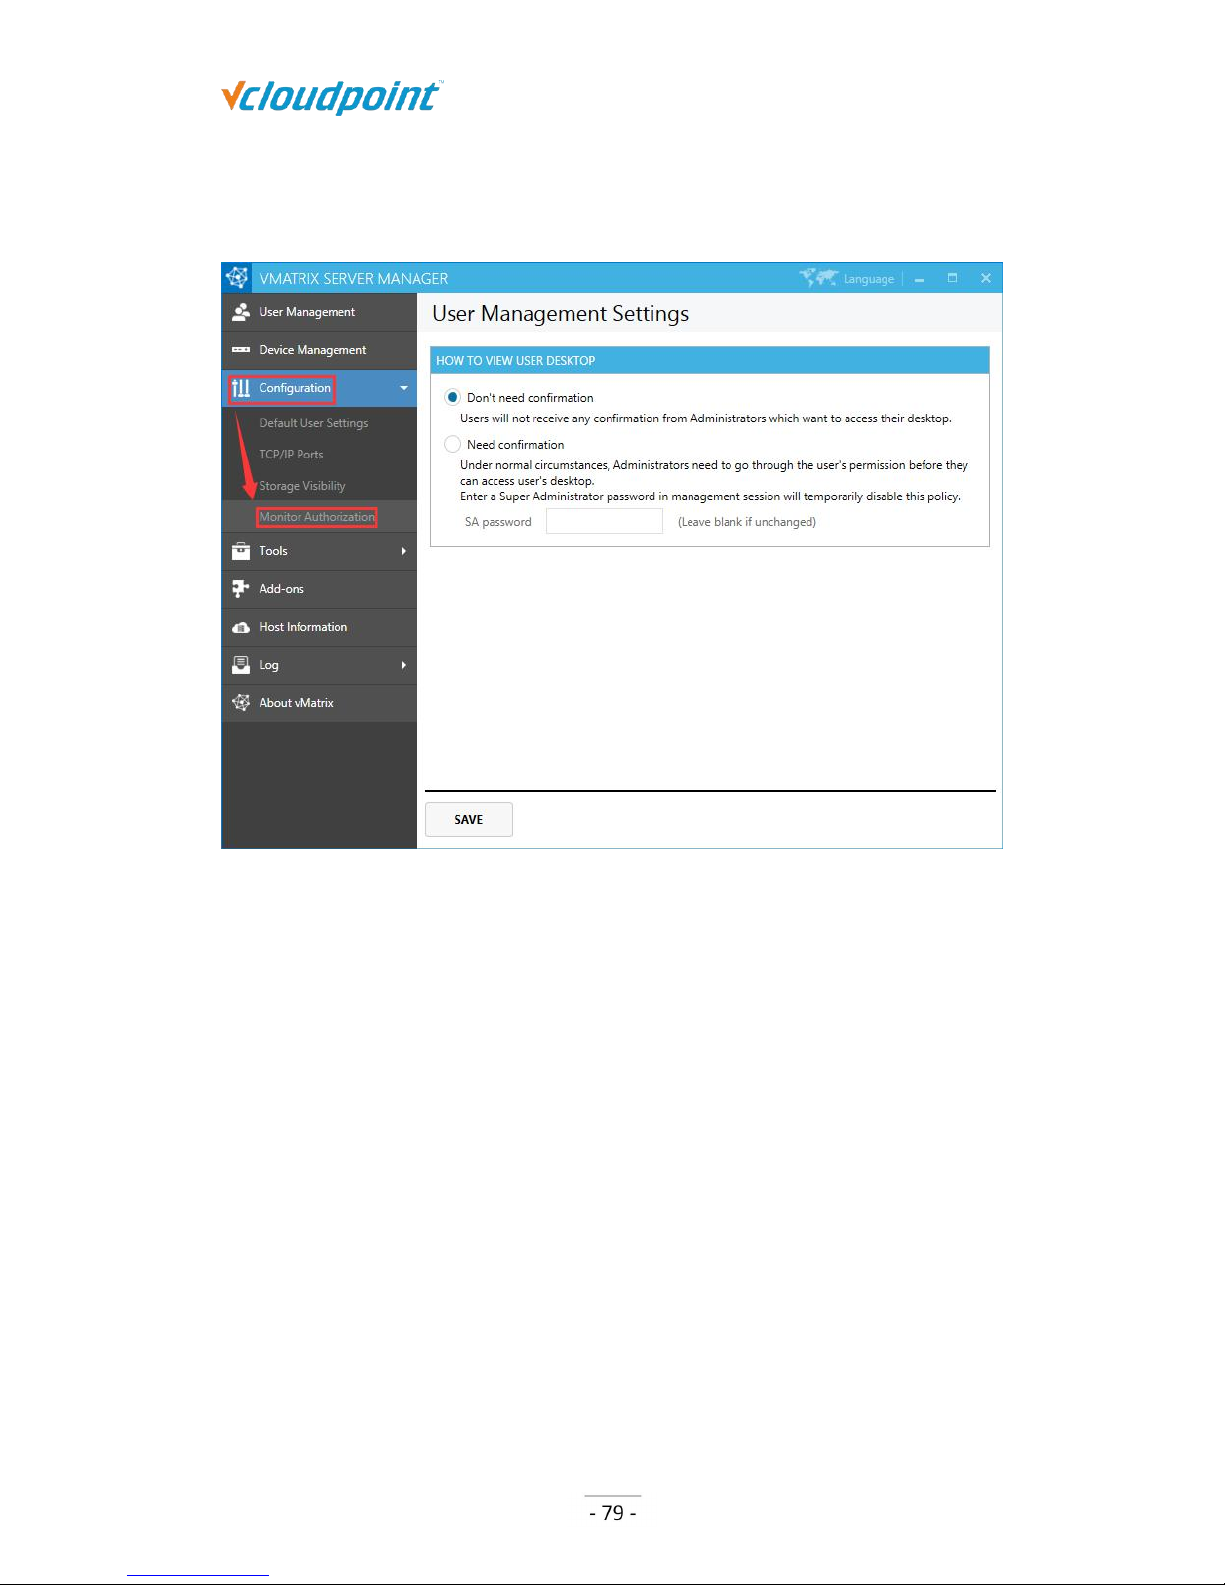
The root folder of the User Private Space viewed by common users is the third-level
subfolder beneath the root folder viewed by administrators (Root-> Folder:
vMatrixUserStroage -> Folder: %name of the user%). The partition letter of the User
Private Space falls to a latter letter of that viewed by administrators.
Page 79
S100 Zero Client & vMatrix User Manual
www.vcloudpoint.com
Page 80
S100 Zero Client & vMatrix User Manual
www.vcloudpoint.com
5.3.4 Monitor Authorization
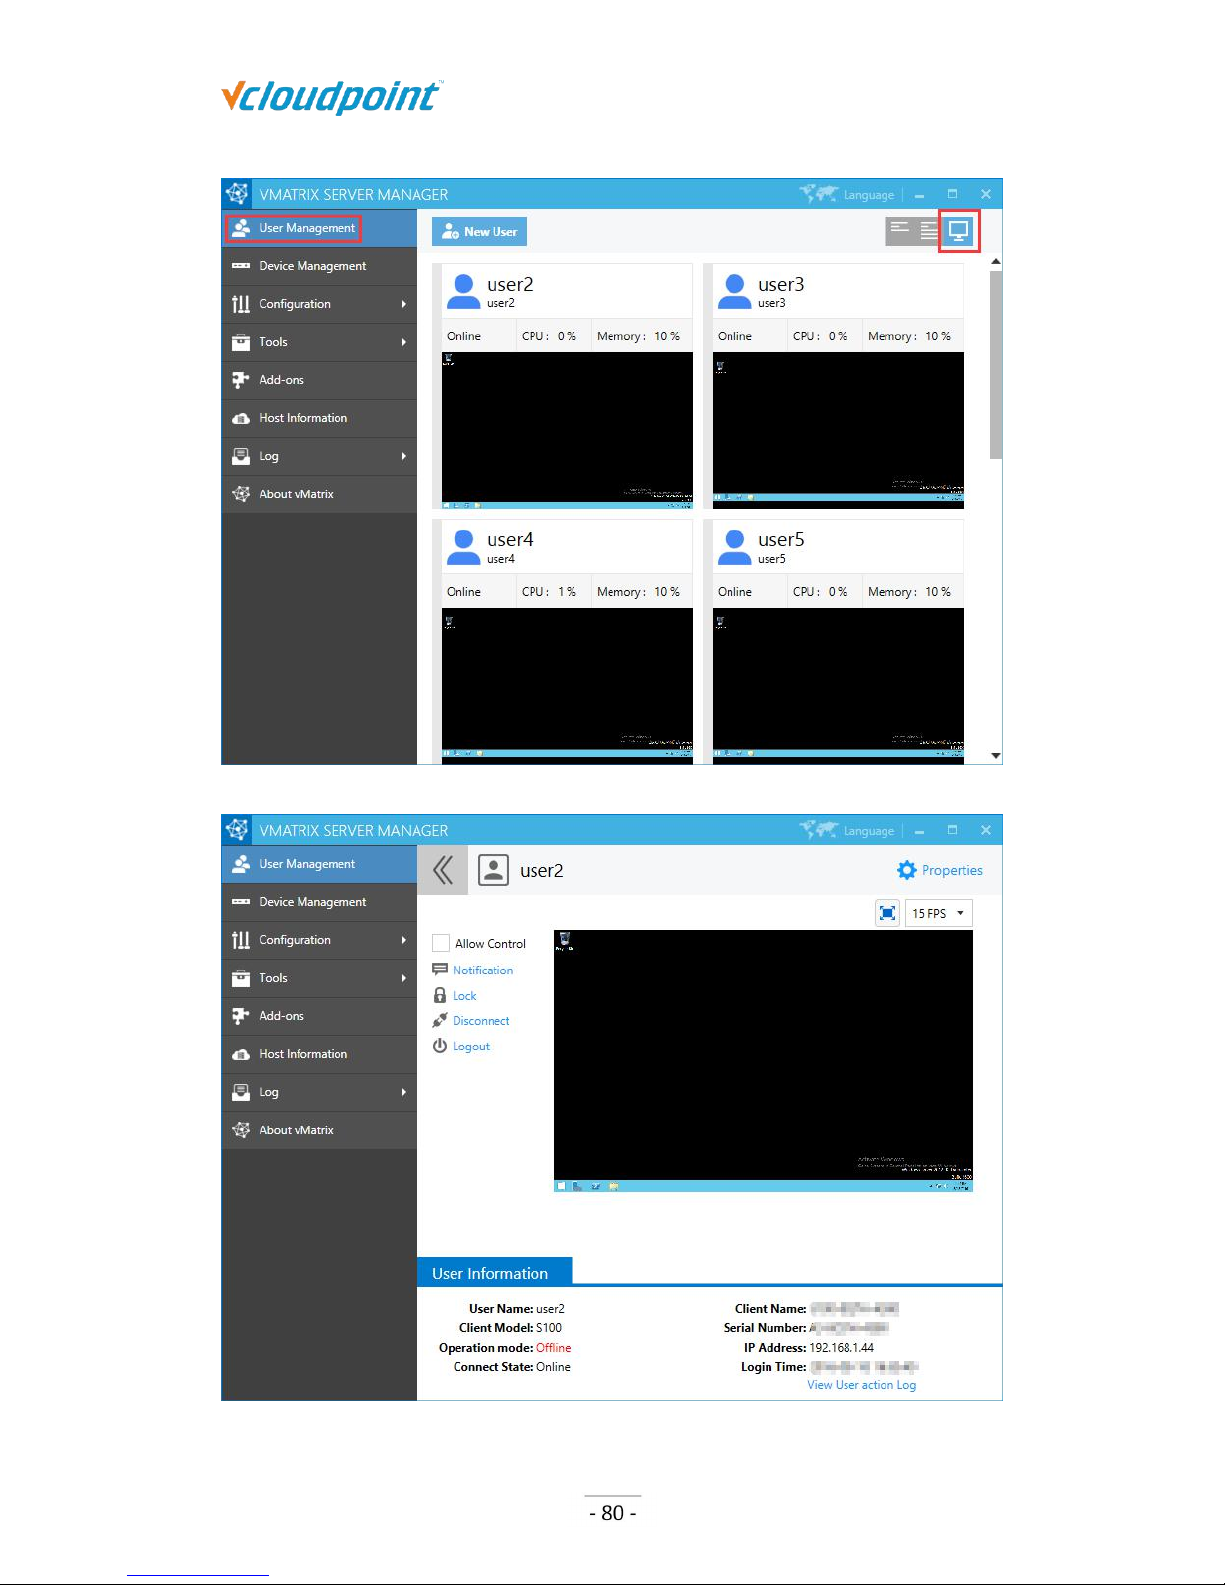
Don’t need confirmation:
administrators can monitor user desktops without requiring confirmation from the
monitored users.
Page 81
S100 Zero Client & vMatrix User Manual
www.vcloudpoint.com
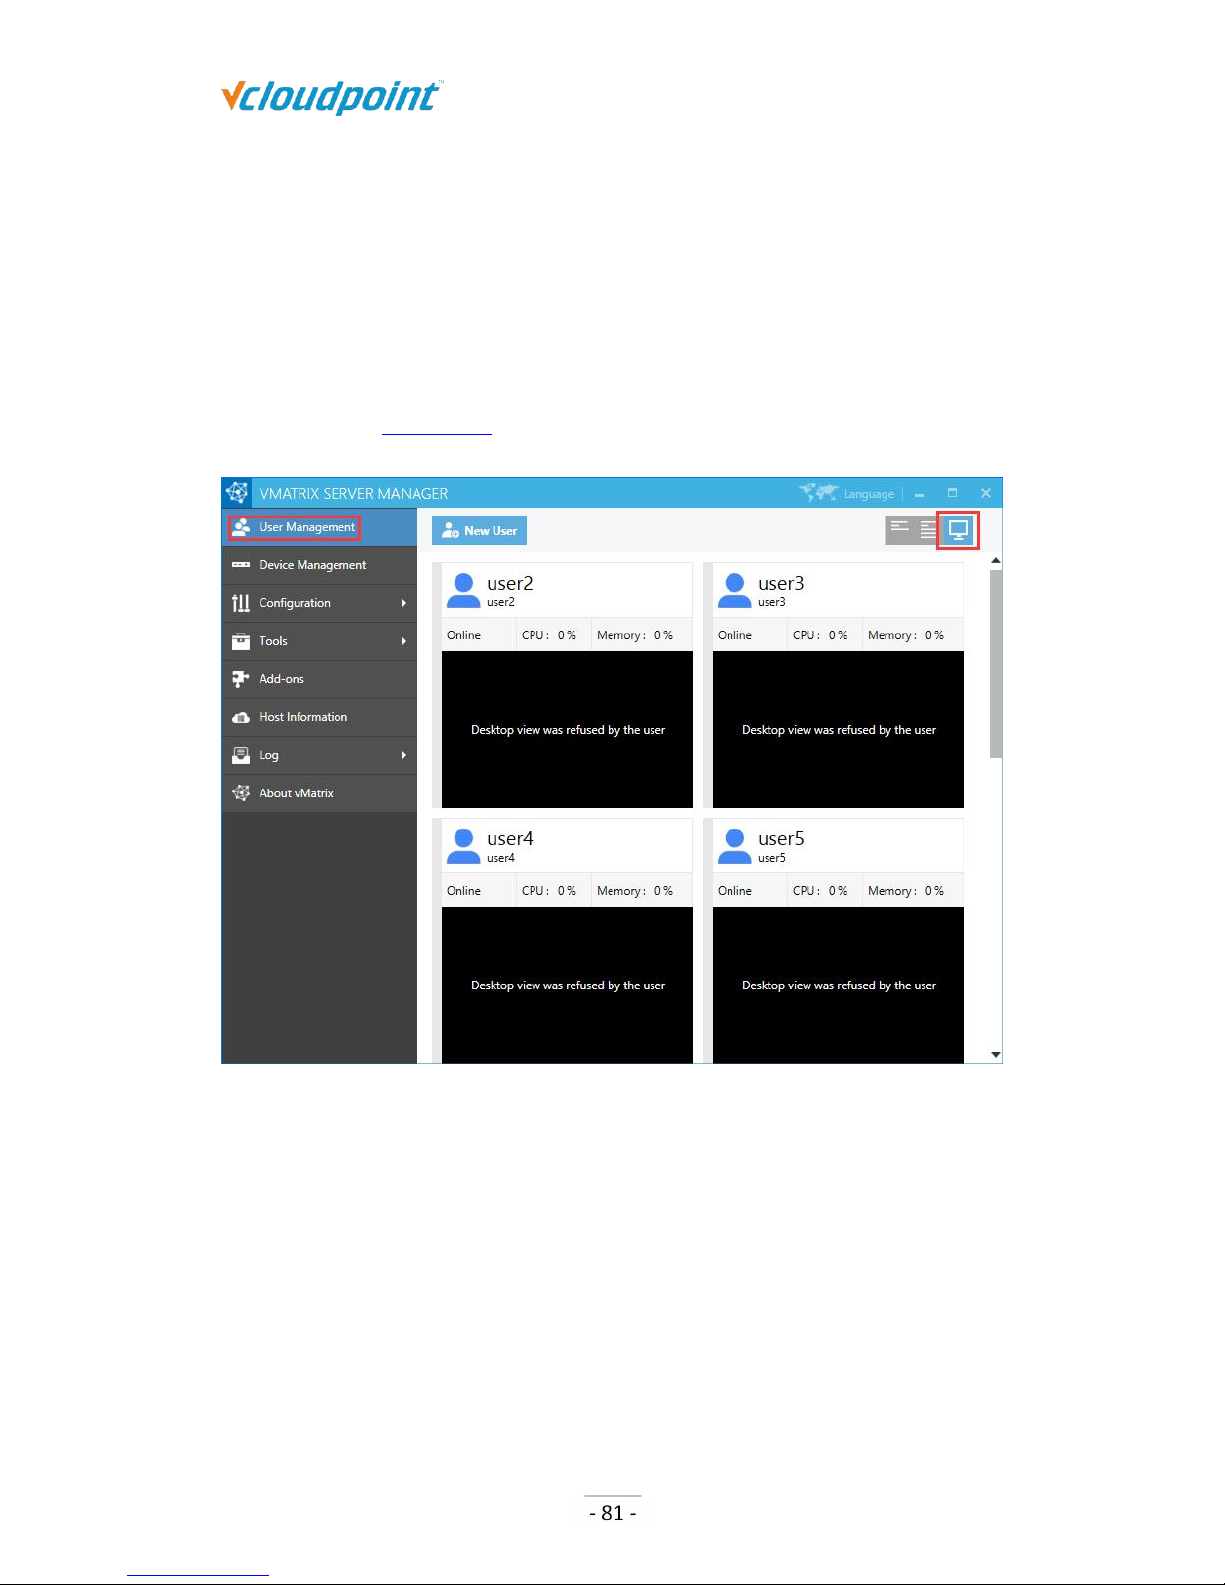
Need confirmation:
Page 82
S100 Zero Client & vMatrix User Manual
www.vcloudpoint.com
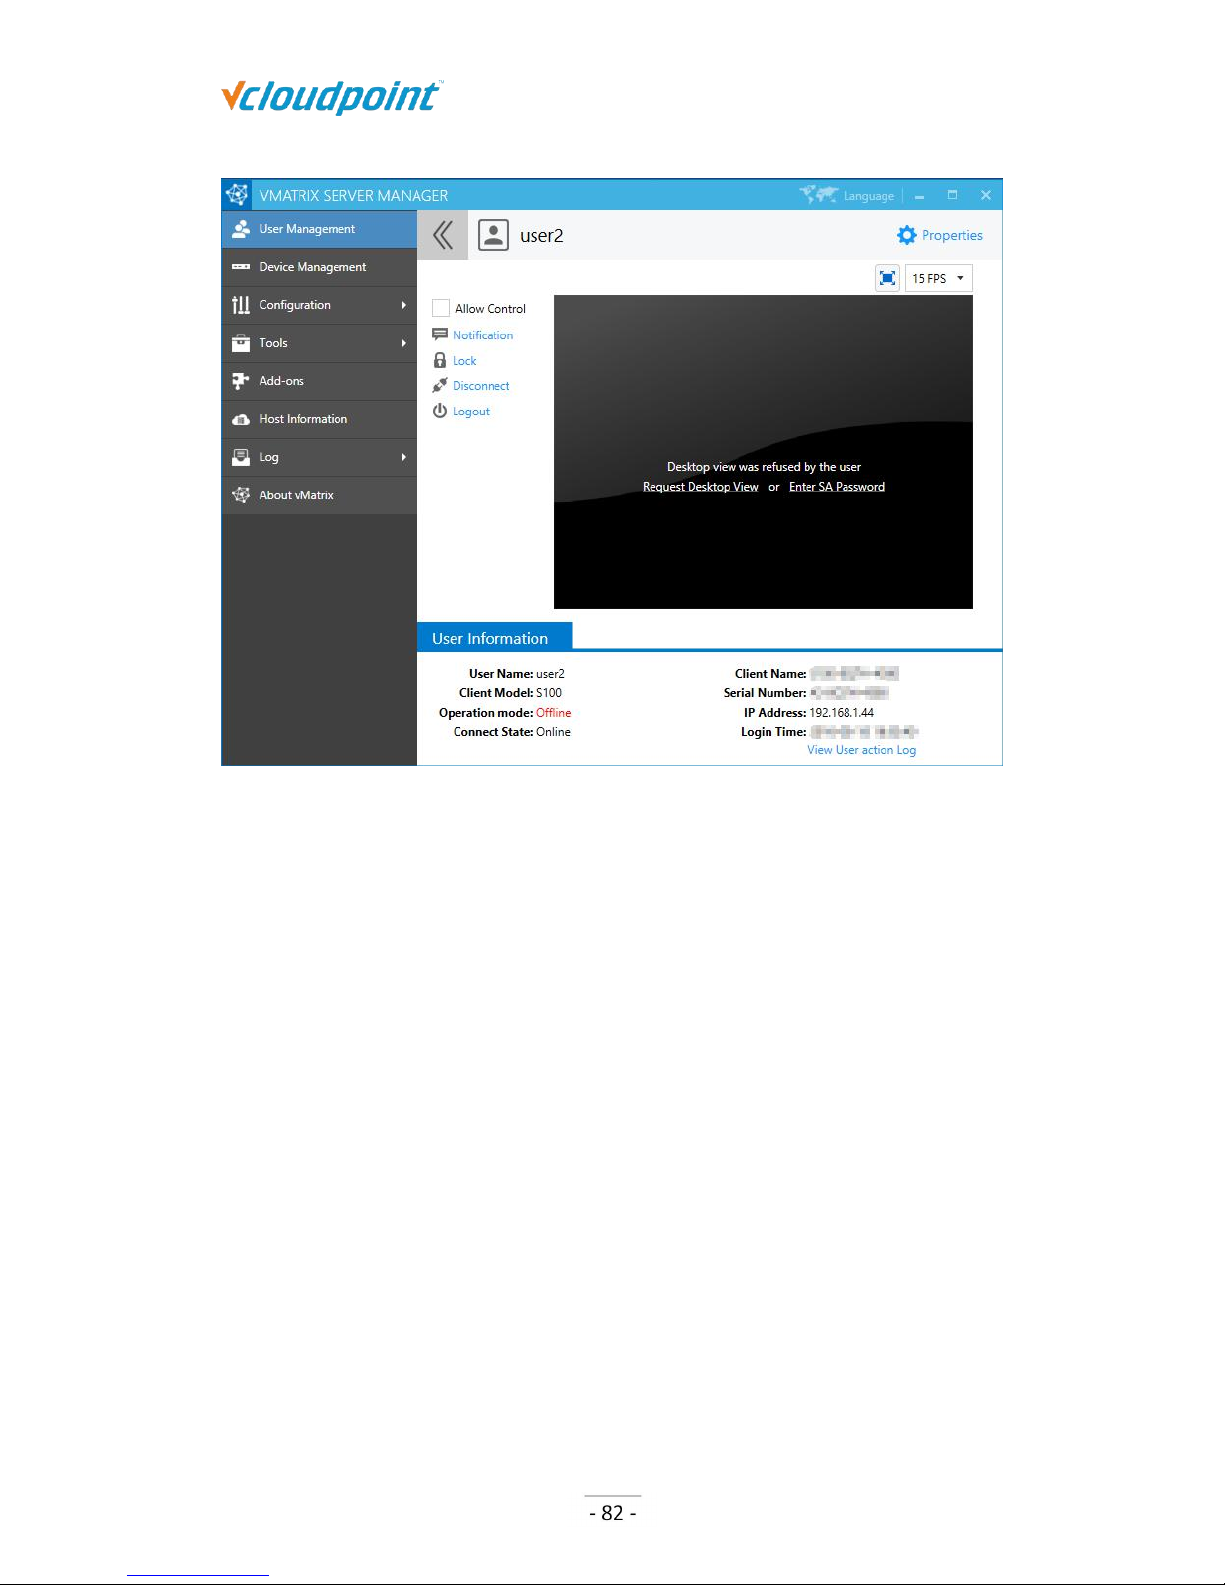
you are required to setup a Super Administrator (SA) password when this option is
selected. By selecting this option, administrators need to send request to the user or
enter SA password in order to get approval to monitor the user desktop. (Note: as local
system administrators have the highest privileges, there is no effective way to prevent
local system administrators from changing the settings, administrators can simply cancel
monitor authorization by simply changing the setting to “Don’t need confirmation” or
changing the SA password, however, this option allows organization owners to track
management logs which is available to view through “Log” -> “Management Log” of this
software. Refer to section 5.7.2.)
Page 83
S100 Zero Client & vMatrix User Manual
www.vcloudpoint.com
5.4 Tools
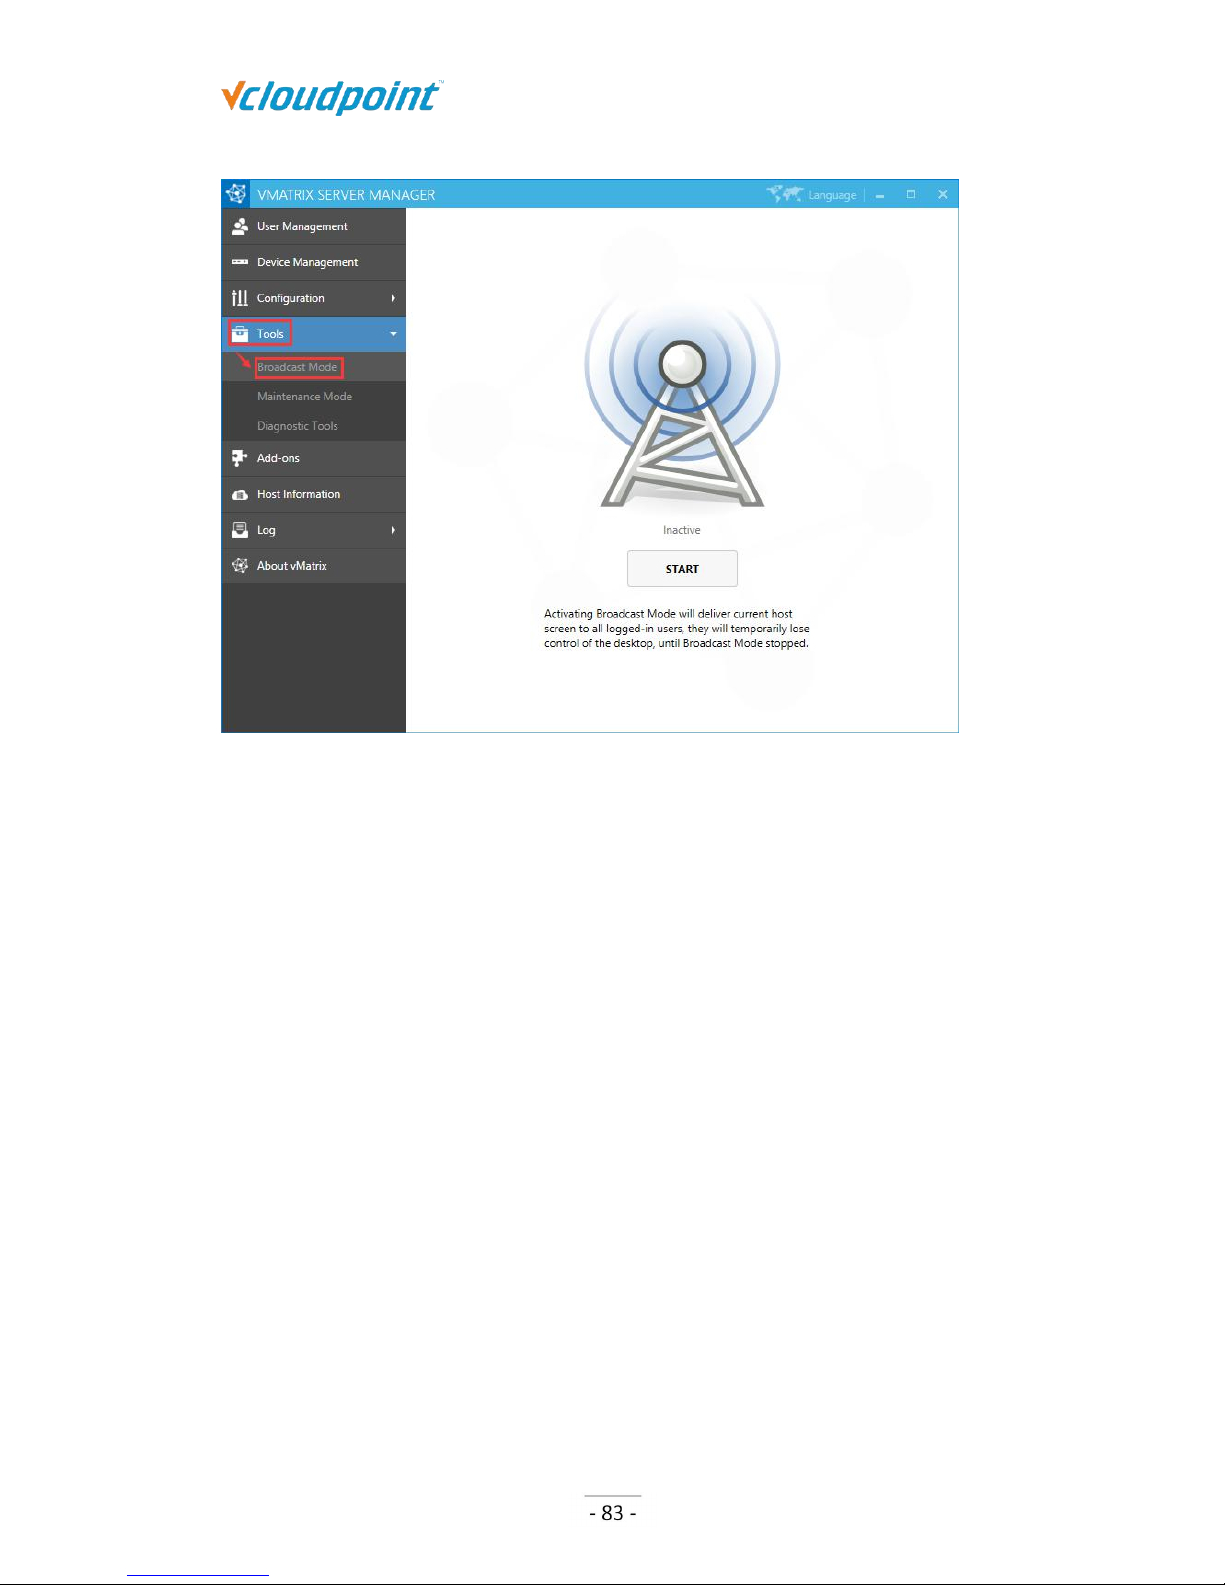
5.4.1 Broadcast Mode
Activating this mode will display the entire host screen to the users who are currently
connecting to the host. All users will lose control of their desktops when Broadcast Mode
is on.
Page 84
S100 Zero Client & vMatrix User Manual
www.vcloudpoint.com
Note:
1) Users who latter connect to the host after Broadcast Mode activation will also lose control of
their desktops and be given the host screen at the moment they enter their sessions.
2) Broadcast Mode is not effective on users who have logged in but are disconnected (back to
the device Login page).
3) When Broadcast Mode is on, desktop resolution of the effected users will be changed to that
of the host. Therefore, make sure the host desktop resolution is supported by the effected
users’ monitor, otherwise, the user monitor will go blank due to desktop resolution out of
range.
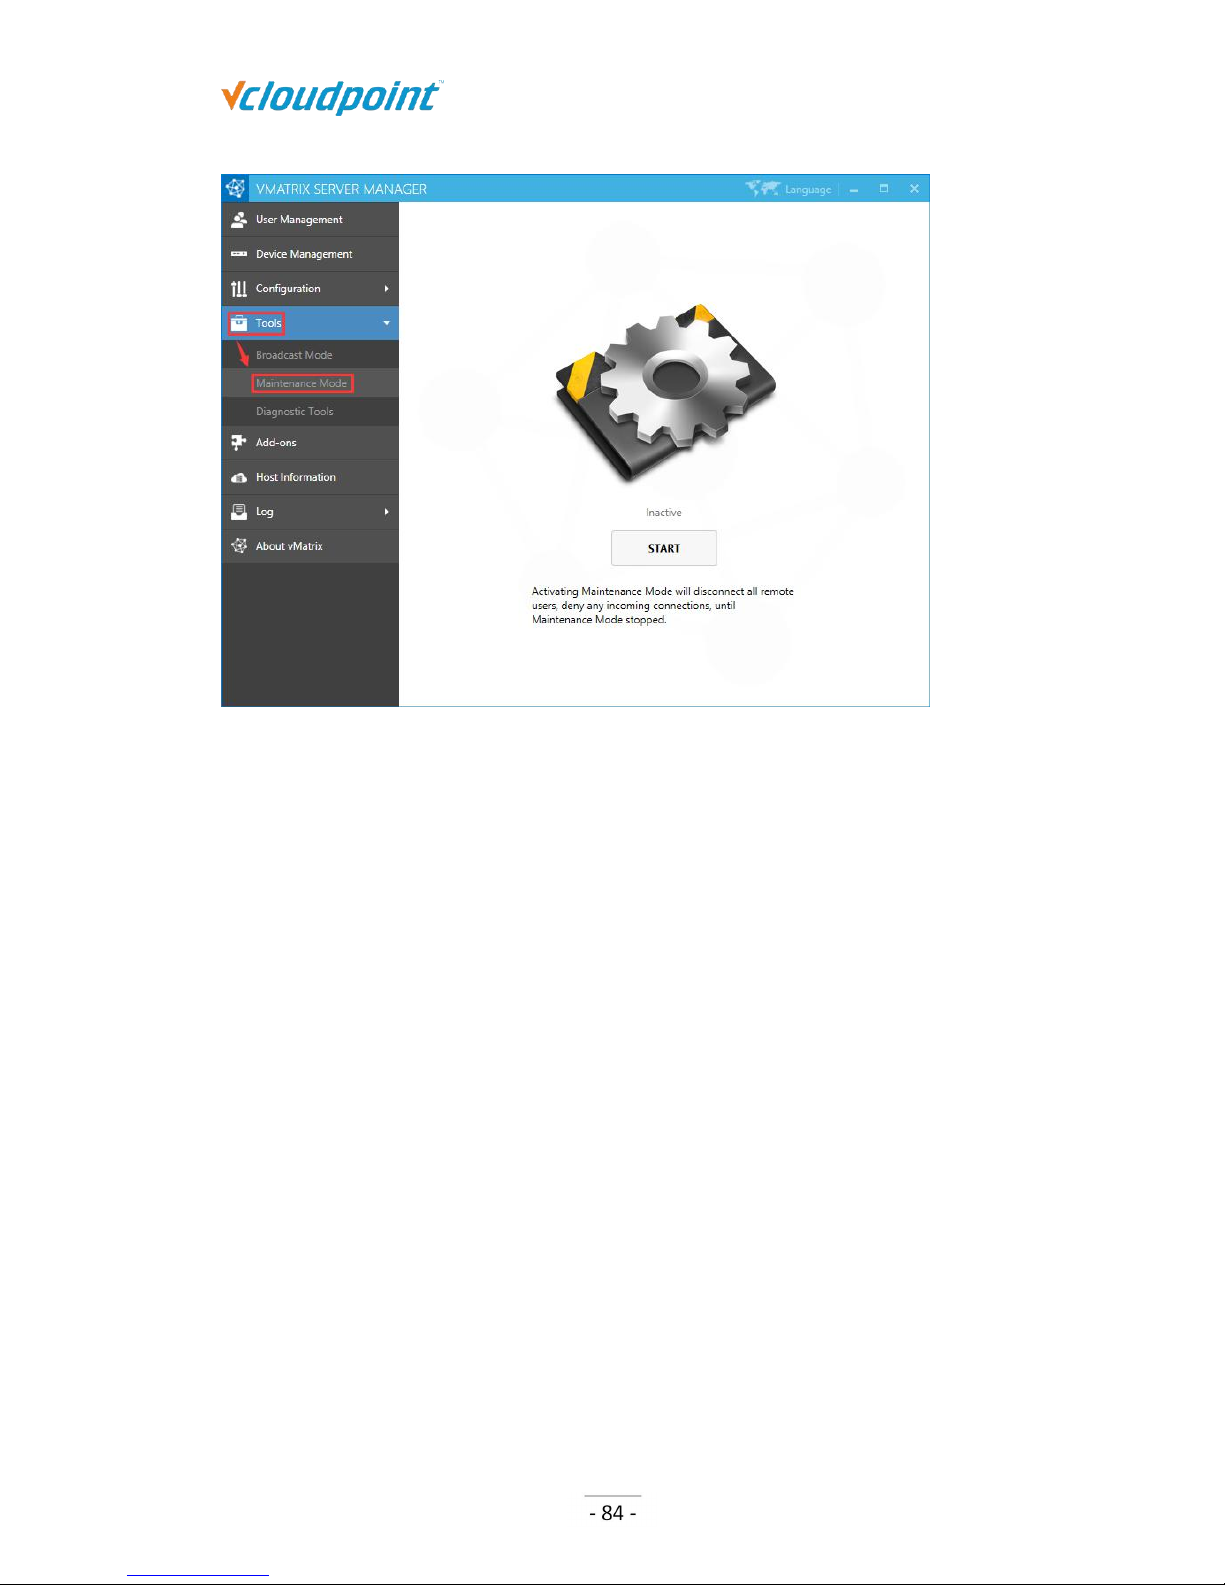
5.4.2 Maintenance Mode
Activating Maintenance Mode will disconnect all connecting users and also deny any
incoming connection request from users. This is often used when the host is under
maintenance.
Page 85
S100 Zero Client & vMatrix User Manual
www.vcloudpoint.com
Note: Activating Broadcast Mode just disconnects user sessions, but not logged them out. Users
will find their files & applications still in place when Maintenance Mode is off.
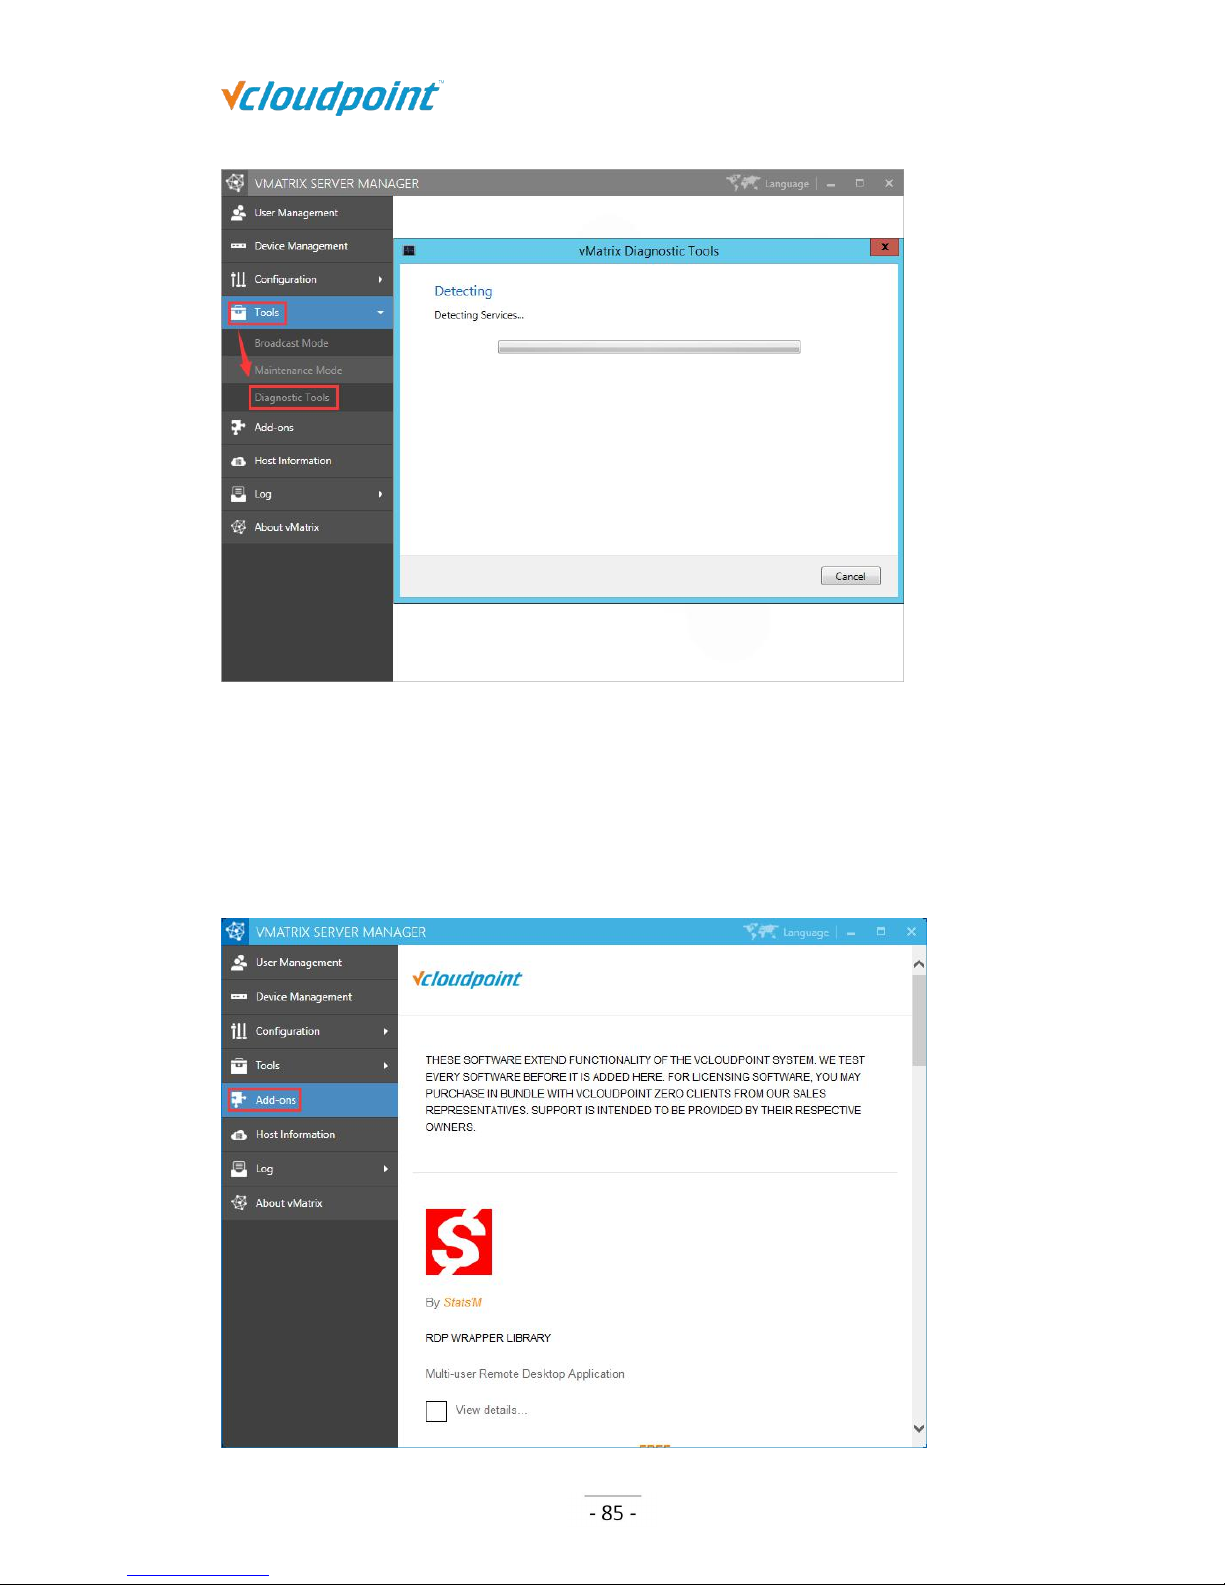
5.4.3 Diagnostic Tools
Running Diagnostic Tools will initiate a check on vMatrix Server Manager and prompts
you to fix accordingly if any problem is detected. You can also launch the Diagnostic Tools
at Programs and Features if vMatrix Server Manager cannot be opened.
Page 86
S100 Zero Client & vMatrix User Manual
www.vcloudpoint.com
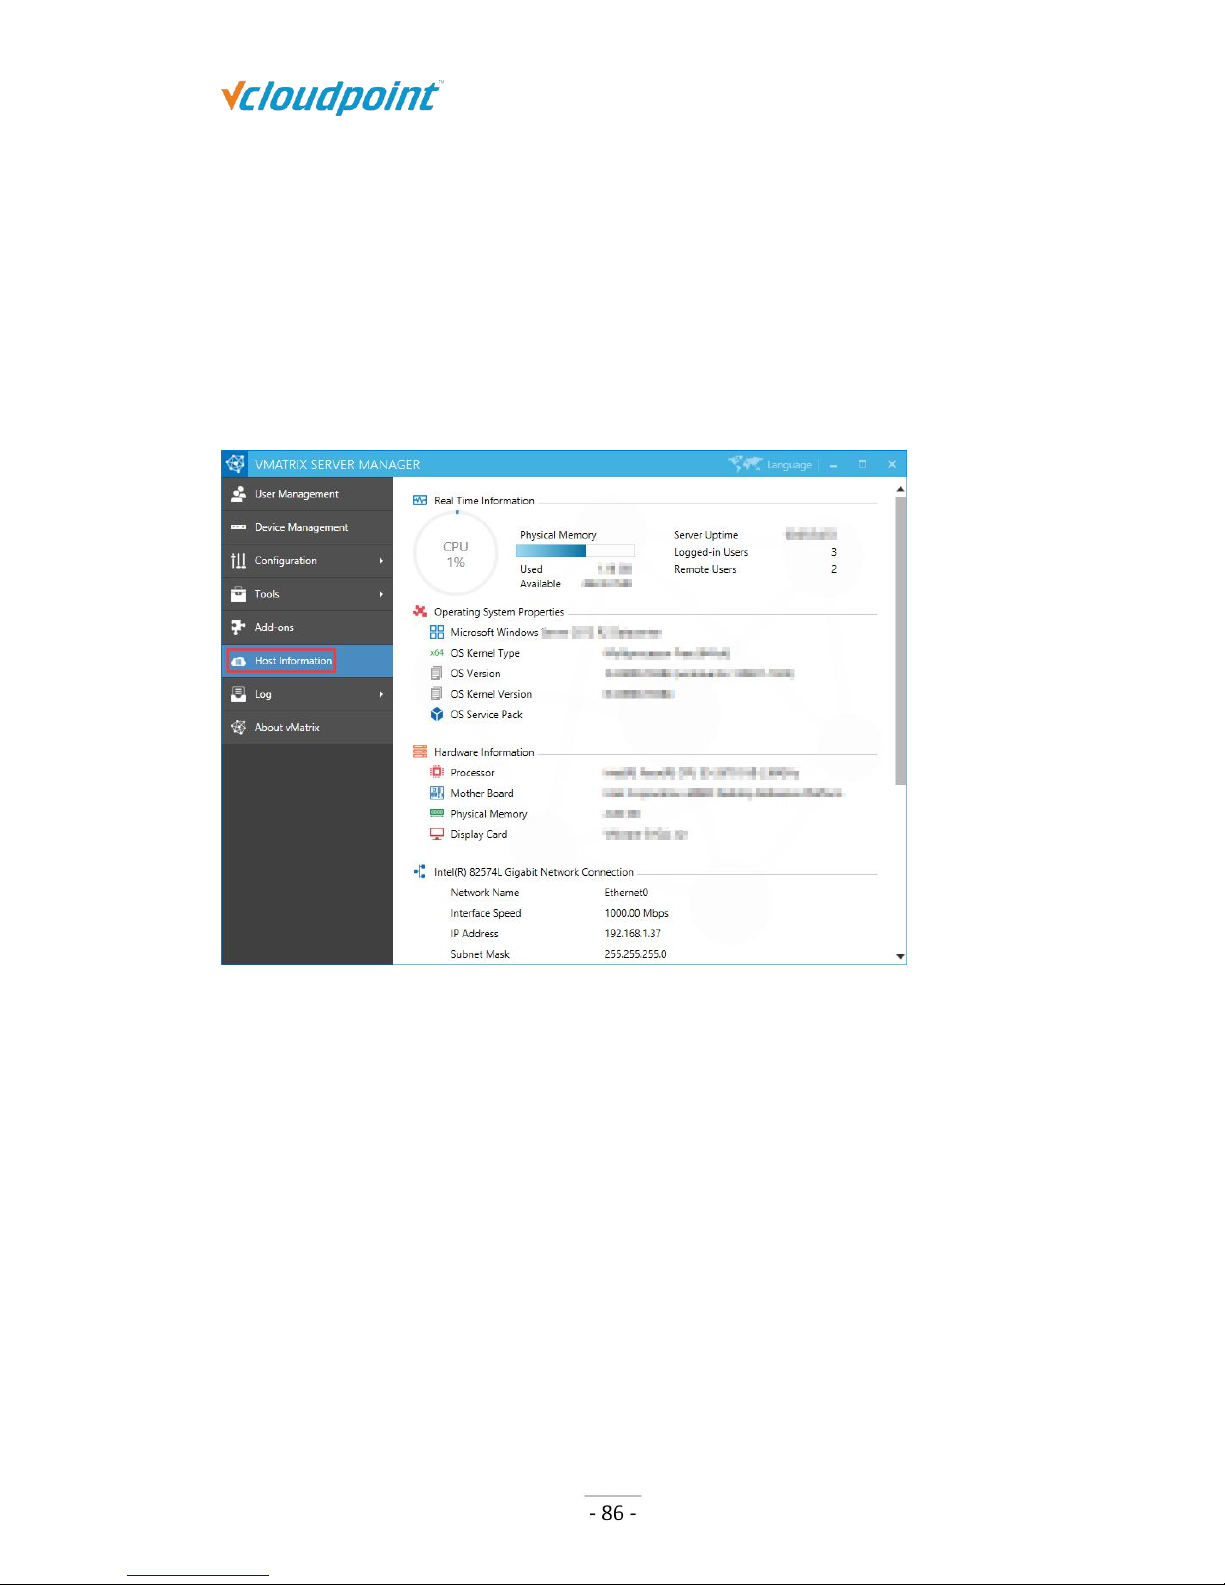
5.5 Add-ons
This page contains recommended software that may extend functionality of the
vCloudPoint System or are frequently used with vCloudPoint products. The software has
been tested compatible with the vCloudPoint system.
Page 87
S100 Zero Client & vMatrix User Manual
www.vcloudpoint.com
Note: this page connects to web page on vCloudPoint website through a web viewer window, thus
it requires time when loading contents. If you do not provide internet connection to the host, the
page contents will not show.
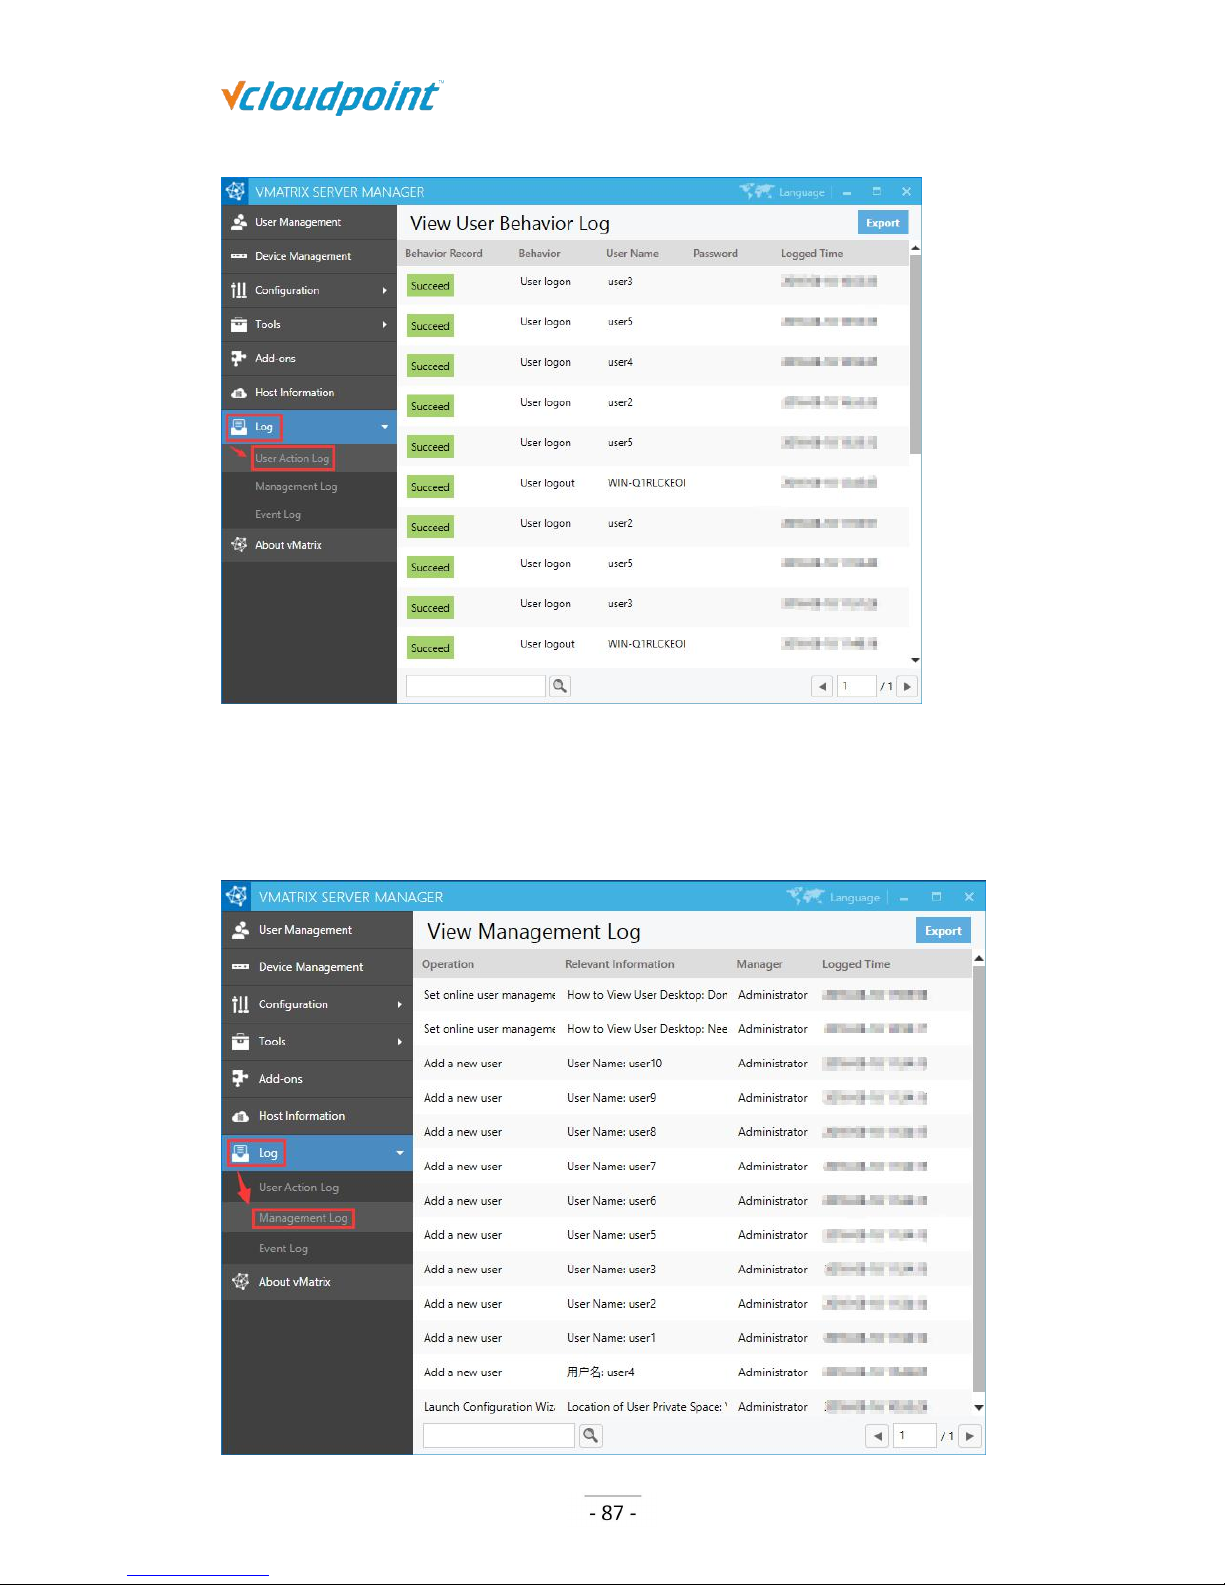
5.6 Host Information
This page provides an overview of the host information including real time resources
consumption, operating system, hardware and network.
5.7 Log
5.7.1 User Action Log
You can view all user actions since the installation of vMatrix Server Manager.
Page 88
S100 Zero Client & vMatrix User Manual
www.vcloudpoint.com
5.7.2 Management Action Log
You can view all management actions since the installation of vMatrix Server Manager.
Page 89
S100 Zero Client & vMatrix User Manual
www.vcloudpoint.com
Note: This is where you can view the setting history of Monitor Authorization to avoid
administrators overuse of monitoring over user desktops.
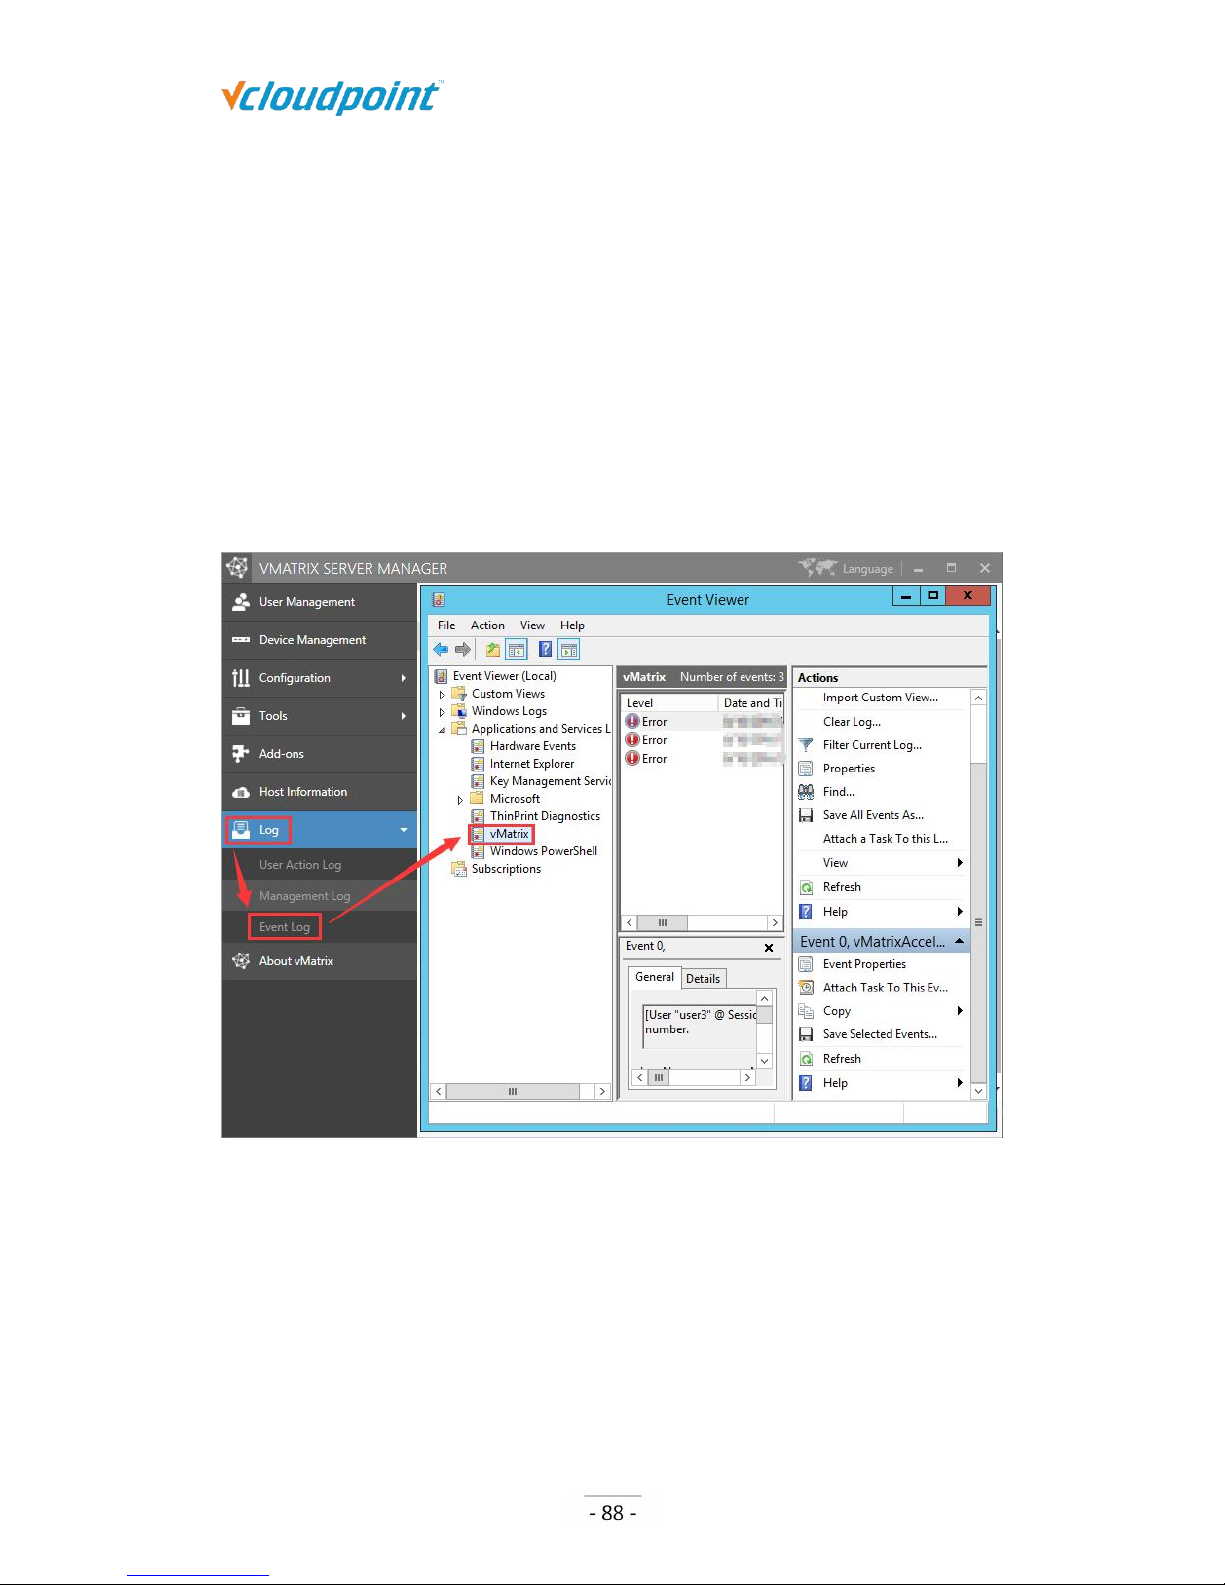
5.7.3 Event Log
Clicking on this menu will open the Windows Event Viewer and locate to the log of vMatrix.
When vMatrix Server Manager encounters a problem, the vMatrix error log is helpful for
our technical team to analyze and fix problems. As a result, please export and send the
vMatrix error log to vCloudPoint technical team when you are reporting a problem. (It
requires a few seconds to open the Event Viewer. Besides vMatrix Server Manager, Event
Viewer also can be opened through Windows Start Menu.)
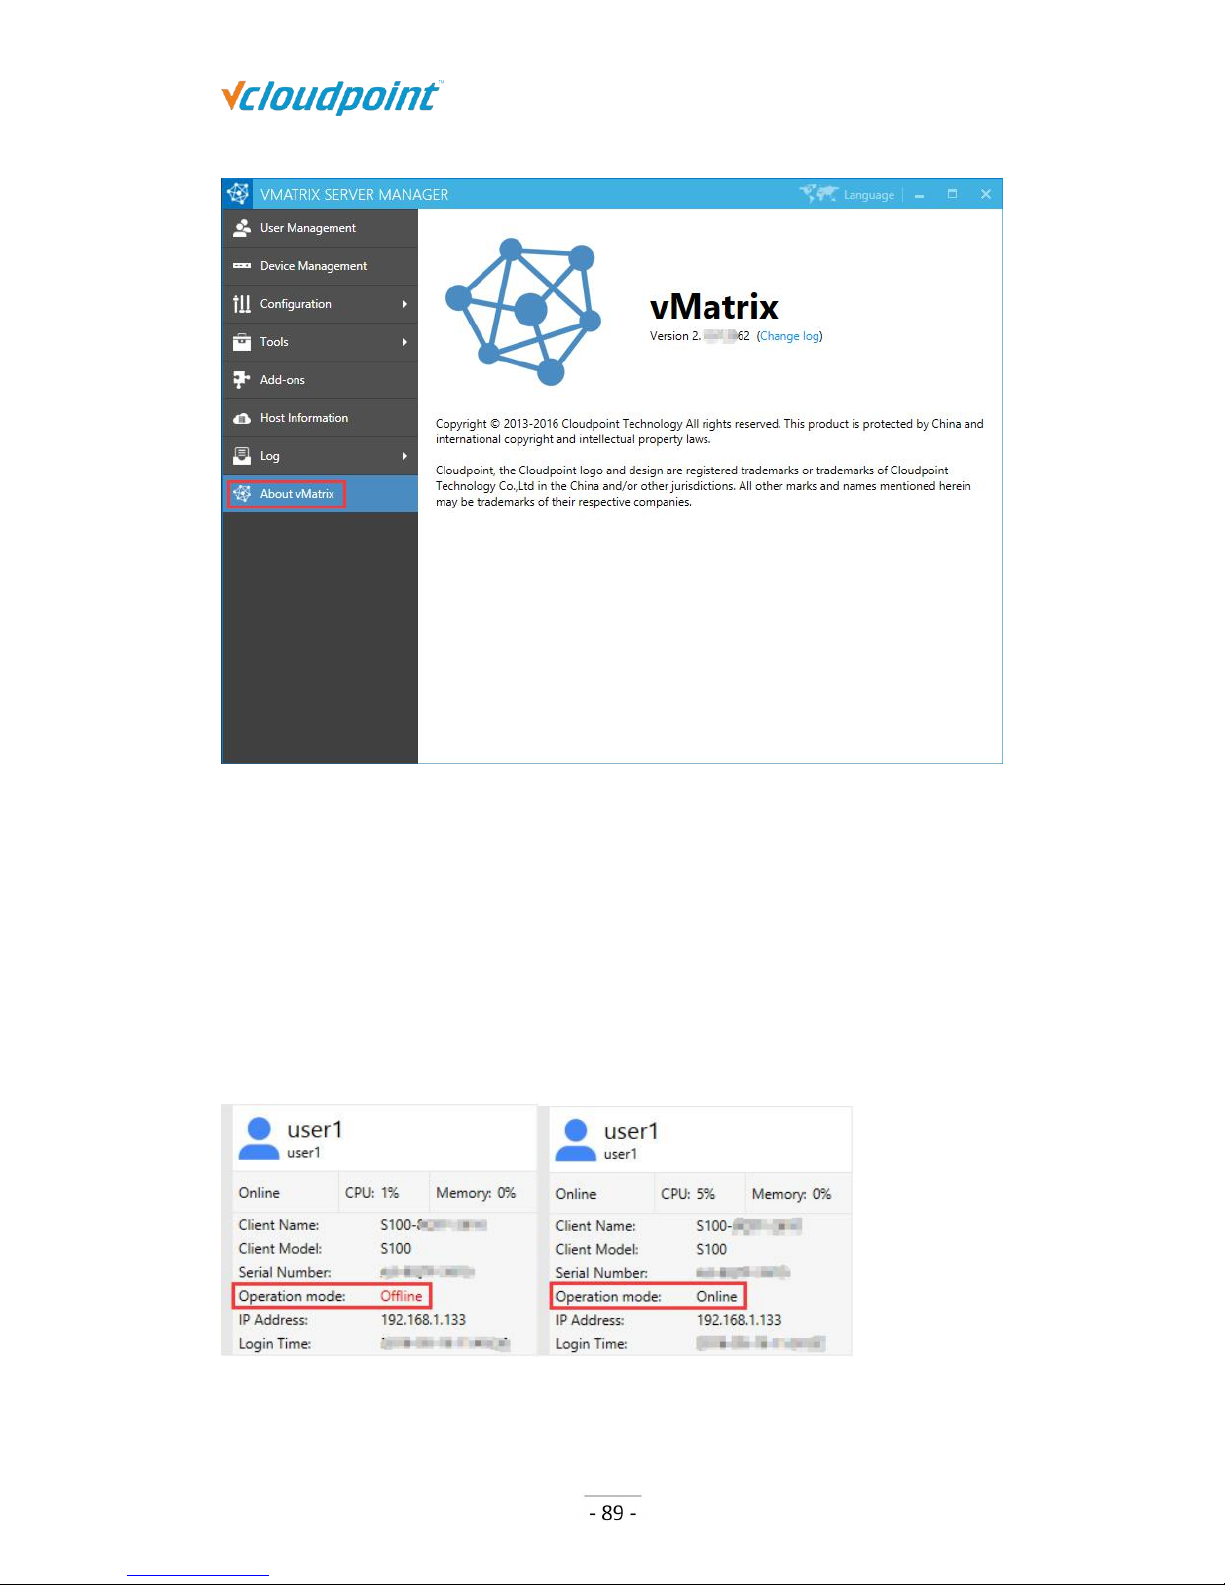
5.8 About vMatrix
This page displays the current version of vMatrix Server Manger and contains a change
log describing main changes over the past versions. It also describes the ownership of the
software.
Page 90
S100 Zero Client & vMatrix User Manual
www.vcloudpoint.com
5.9 Offline Usage
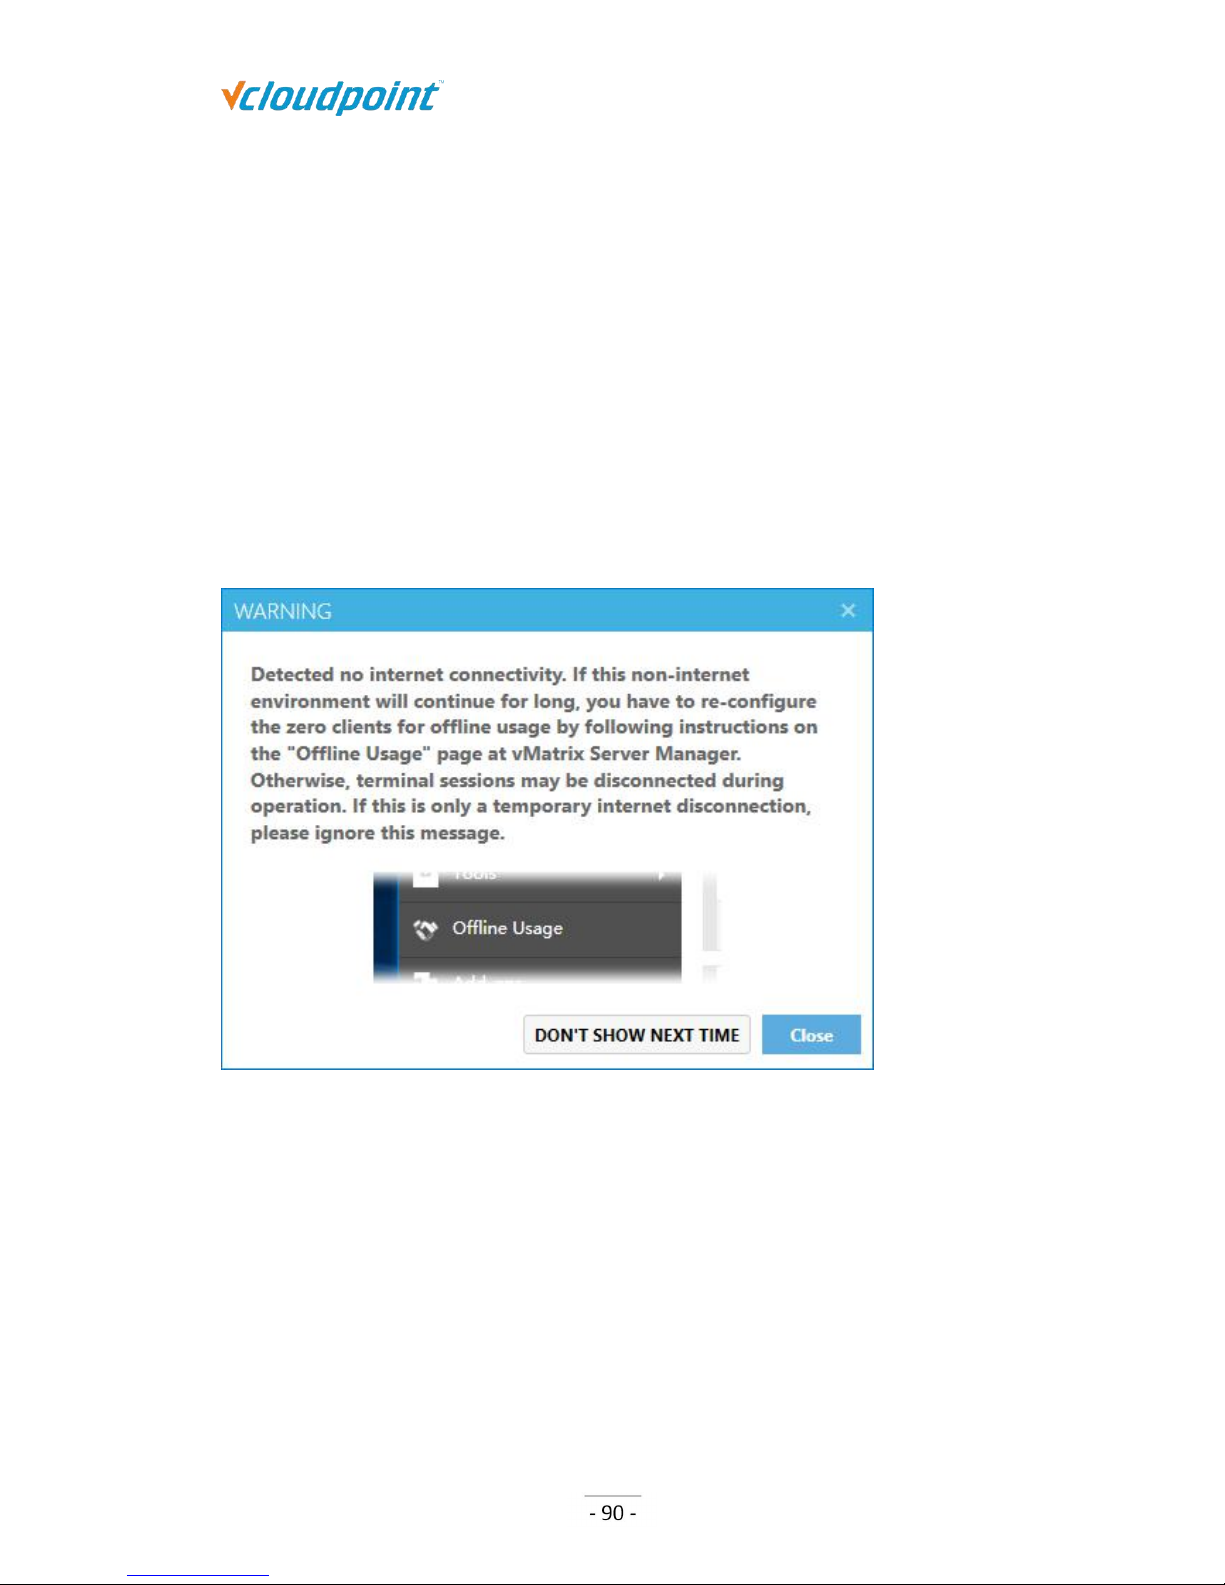
By factory default, vCloudPoint zero clients and vMatrix Server Manager software are
configured to be used in an internet connected environment (WAN). If your host is
provided with internet, no additional configuration is required to be done. The Operation
Mode displayed on the User Management page of any device connecting to the host will
automatically change from “Offline” in red to “Online” in black, meaning the device is
properly working in an internet provided environment.
However, if the Operation Mode of the devices connecting to the host stays “Offline” in
red all the time, you have to re-configure the devices for offline usage, otherwise the
Page 91
S100 Zero Client & vMatrix User Manual
www.vcloudpoint.com
devices may be disconnected in every few minutes during operation. Use cases where
you may encounter this problem and need to apply for “Offline Usage” normally includes
the followings:
you do not provide internet connection (WAN) to the host or the internet connection
is extremely unreliable;
you use proxy or VPN or internet control software that the host cannot access our
configuration server: api.cpterm.com.
How to re-configure the devices for offline usage:
1) In a non-internet connection environment, vMatrix Server Manager will prompt a
message window for offline usage configuration within 5 minutes after host boot.
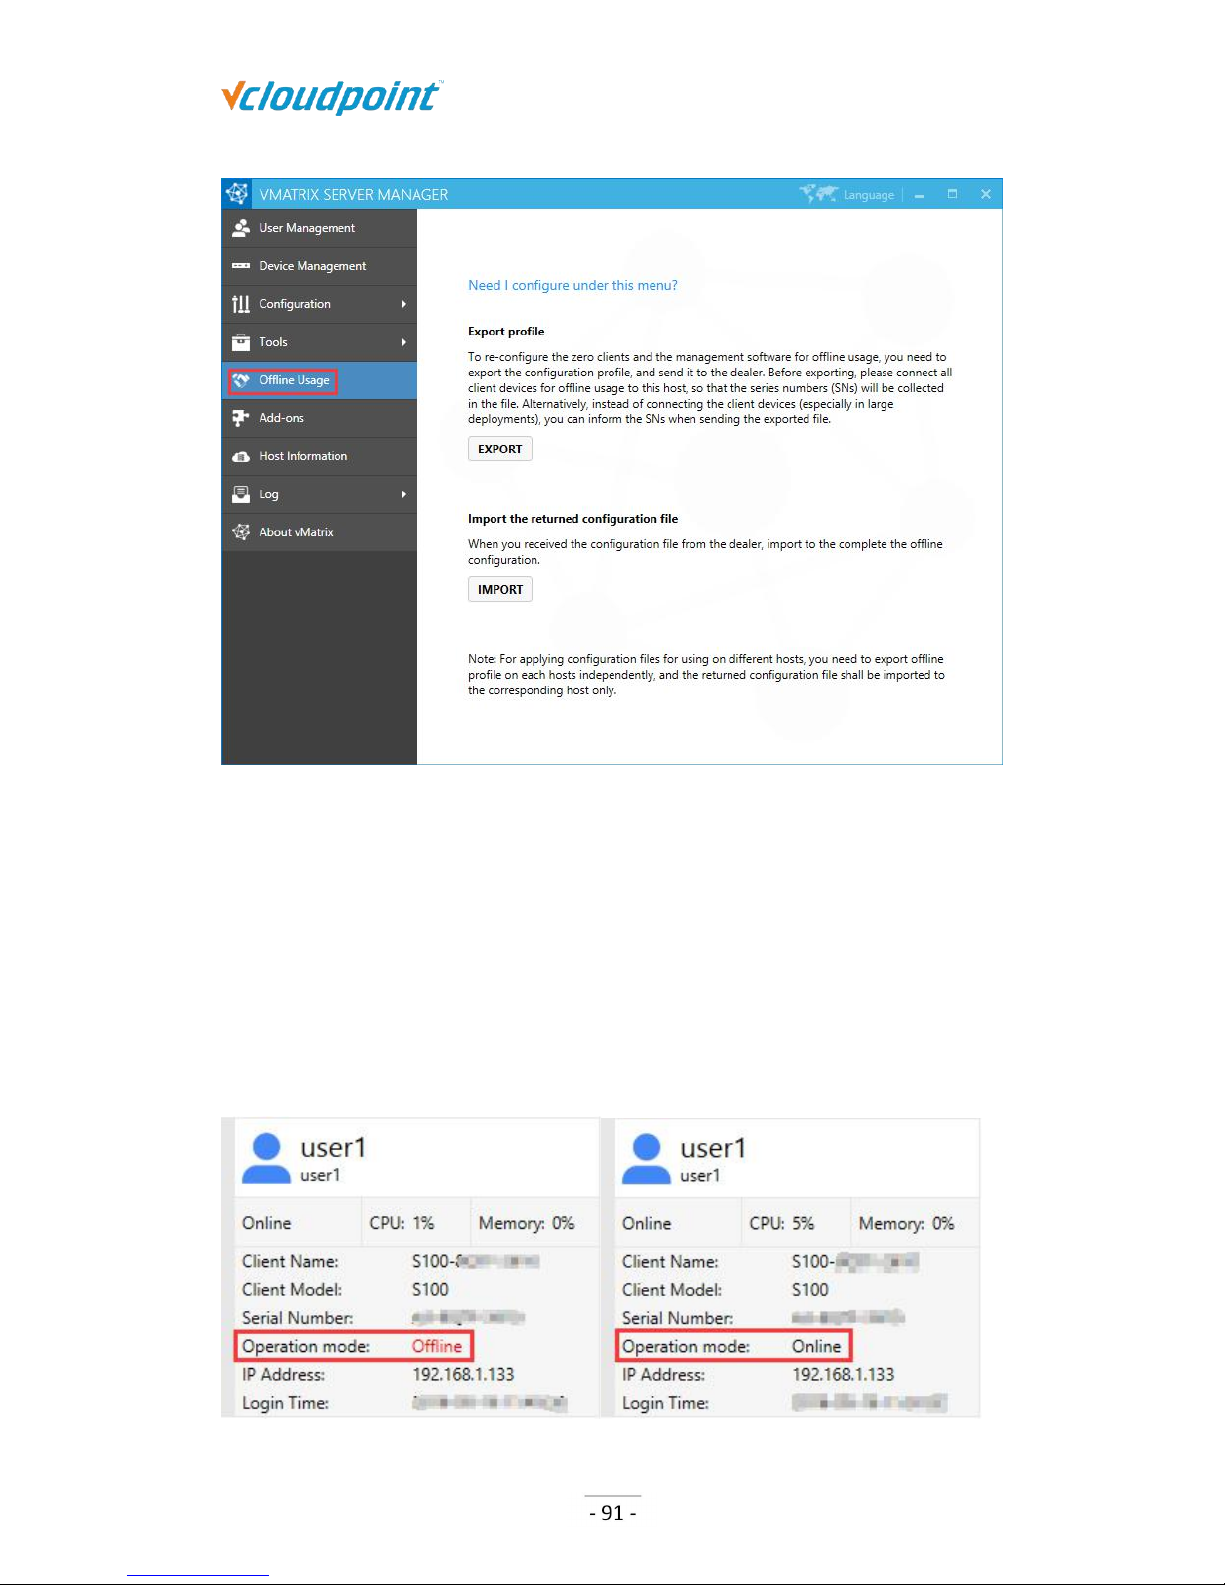
2) Open vMatrix Server Manager, go to Offline Usage page (this page only appears when
the host is not provided with internet connection on system boot).
Page 92
S100 Zero Client & vMatrix User Manual
www.vcloudpoint.com
3) Export the configuration profile, and send it to the dealer. Before exporting,
please connect all client devices for offline usage to the host, so that the serials numbers
(SNs) will be collected in the file. Alternatively, instead of connecting the client devices (es
pecially in large deployments), you can inform the SNs when sending the exported file.
4) The dealer will return you with a configuration file based on your last exported profile.
Import the returned file to complete.
5) If your configuration for offline usage is successfully accomplished, the Operation
Mode changes from “Offline” in red to “Online” in black.
Page 93
S100 Zero Client & vMatrix User Manual
www.vcloudpoint.com
Note: Offline usage configuration on vMatrix Server Manager was introduced in the release of
vMatirx Server Manager 2.0.2 version, if you are planning to use the vCloudPoint zero clients in a
non-internet or unstable internet environment, please use 2.0.2 or a later version of vMatrix Server
Manager, and follow the instructions on “Offline Usage” page to process.
5.10 More Tools & Settings
5.10.1 Chat Tool
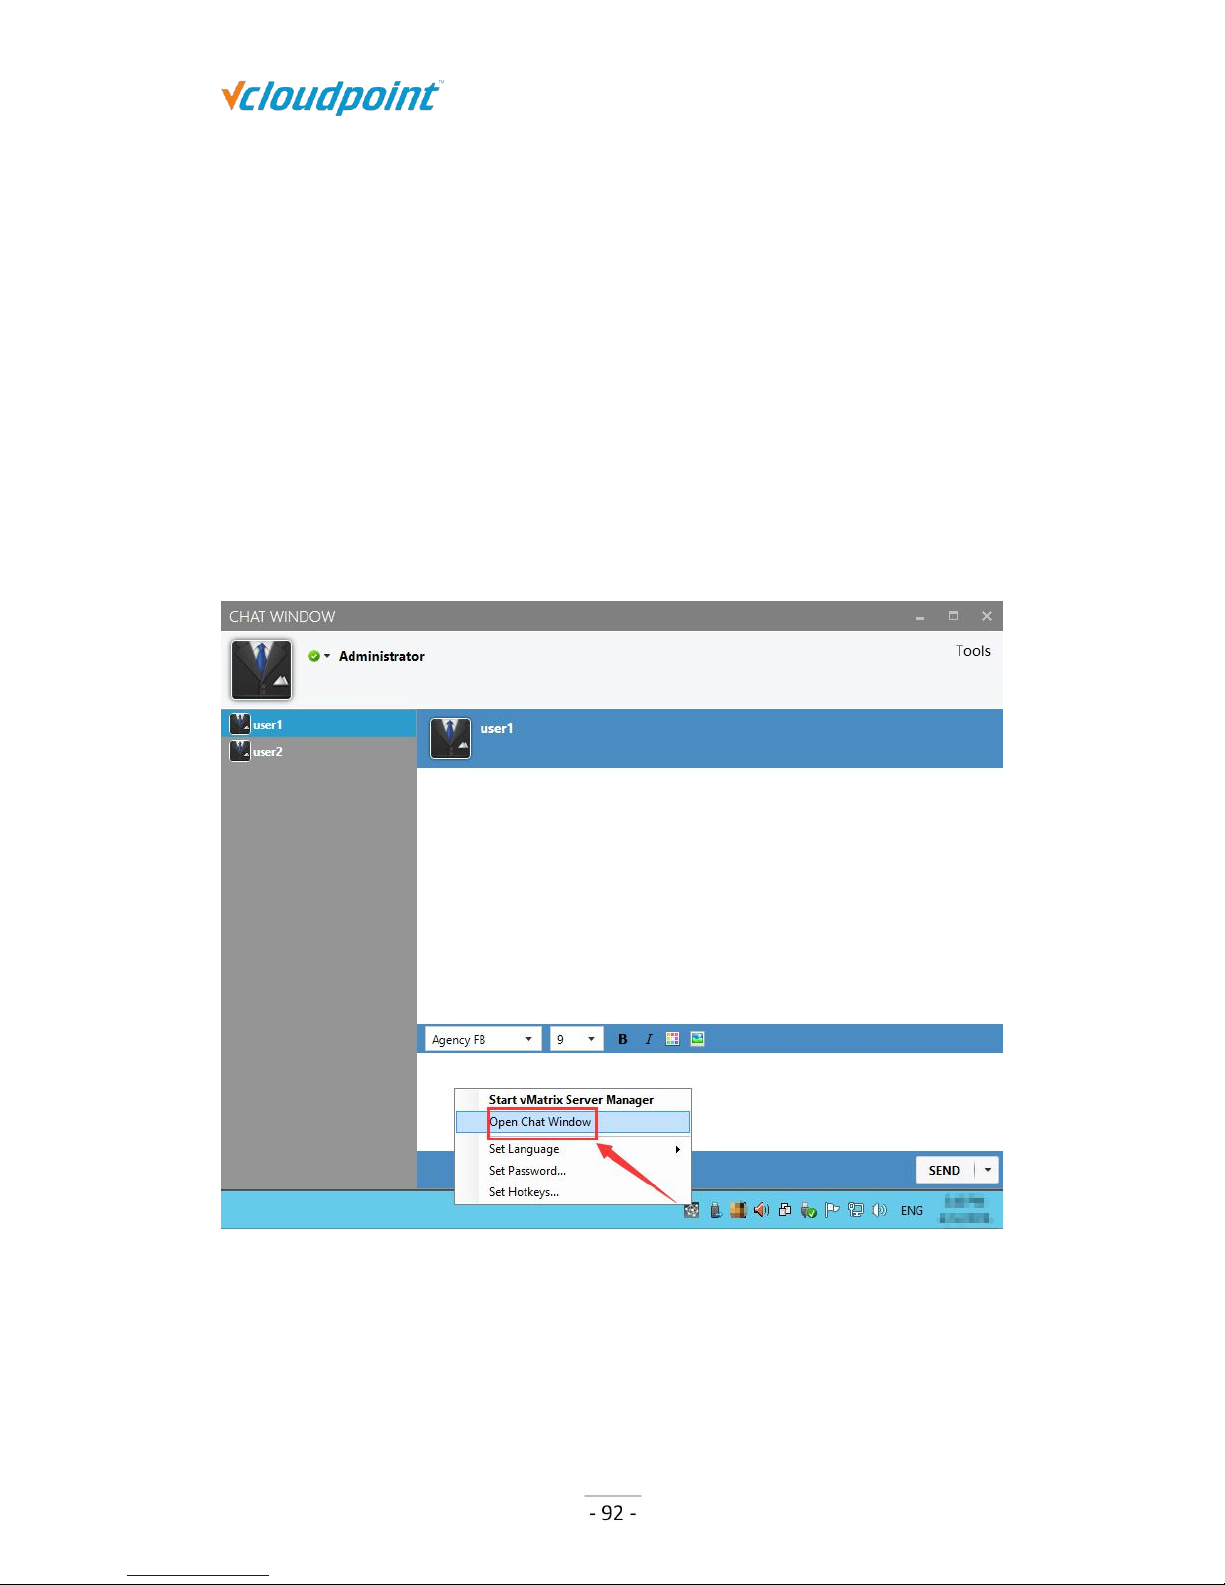
The Chat Tool allows users to talk with other users connecting to the same host. To run
the Chat Tool, right click on the vMatrx icon at the task bar and then click “Open Chat
Window”.
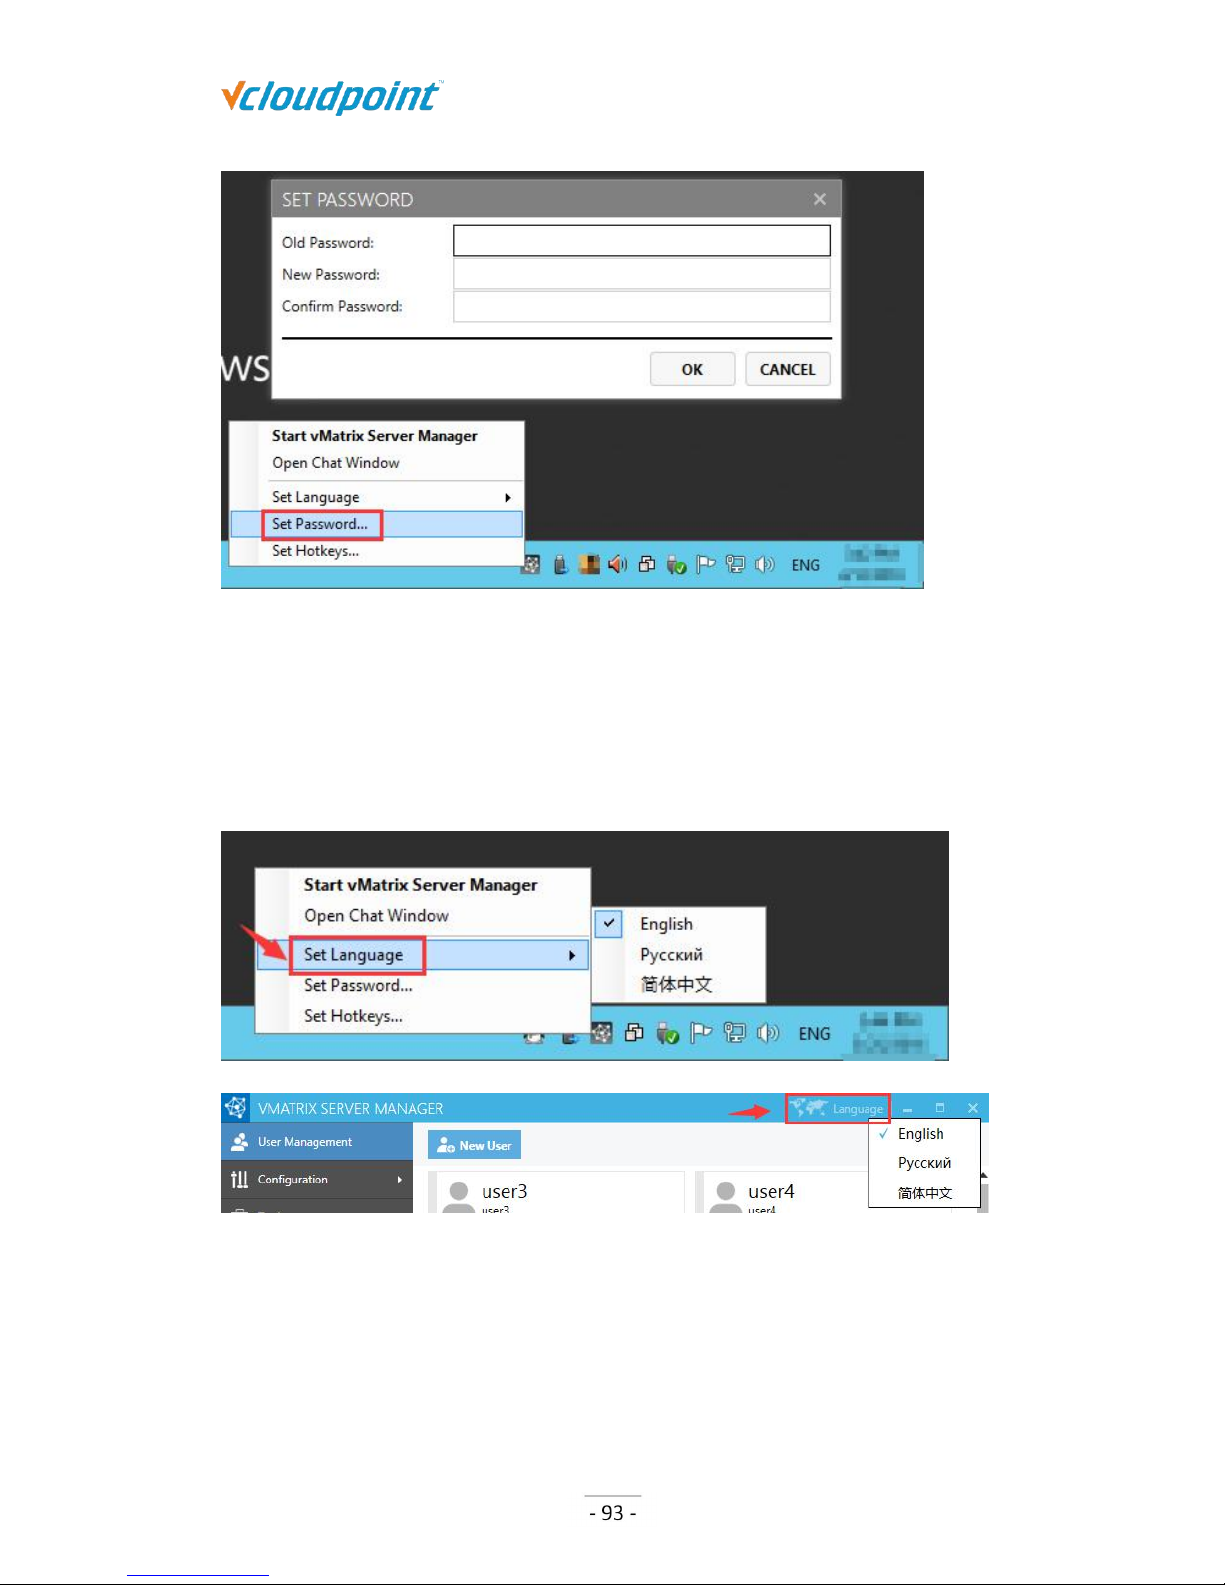
5.10.2 Set Password
This allows the current user to reset their login password without doing it at the system
control panel. To reset password, right click on the vMatrx icon at the task bar, click on
“Set Password ...” and then enter passwords in the required fields.
Page 94
S100 Zero Client & vMatrix User Manual
www.vcloudpoint.com
5.10.3 Set Language
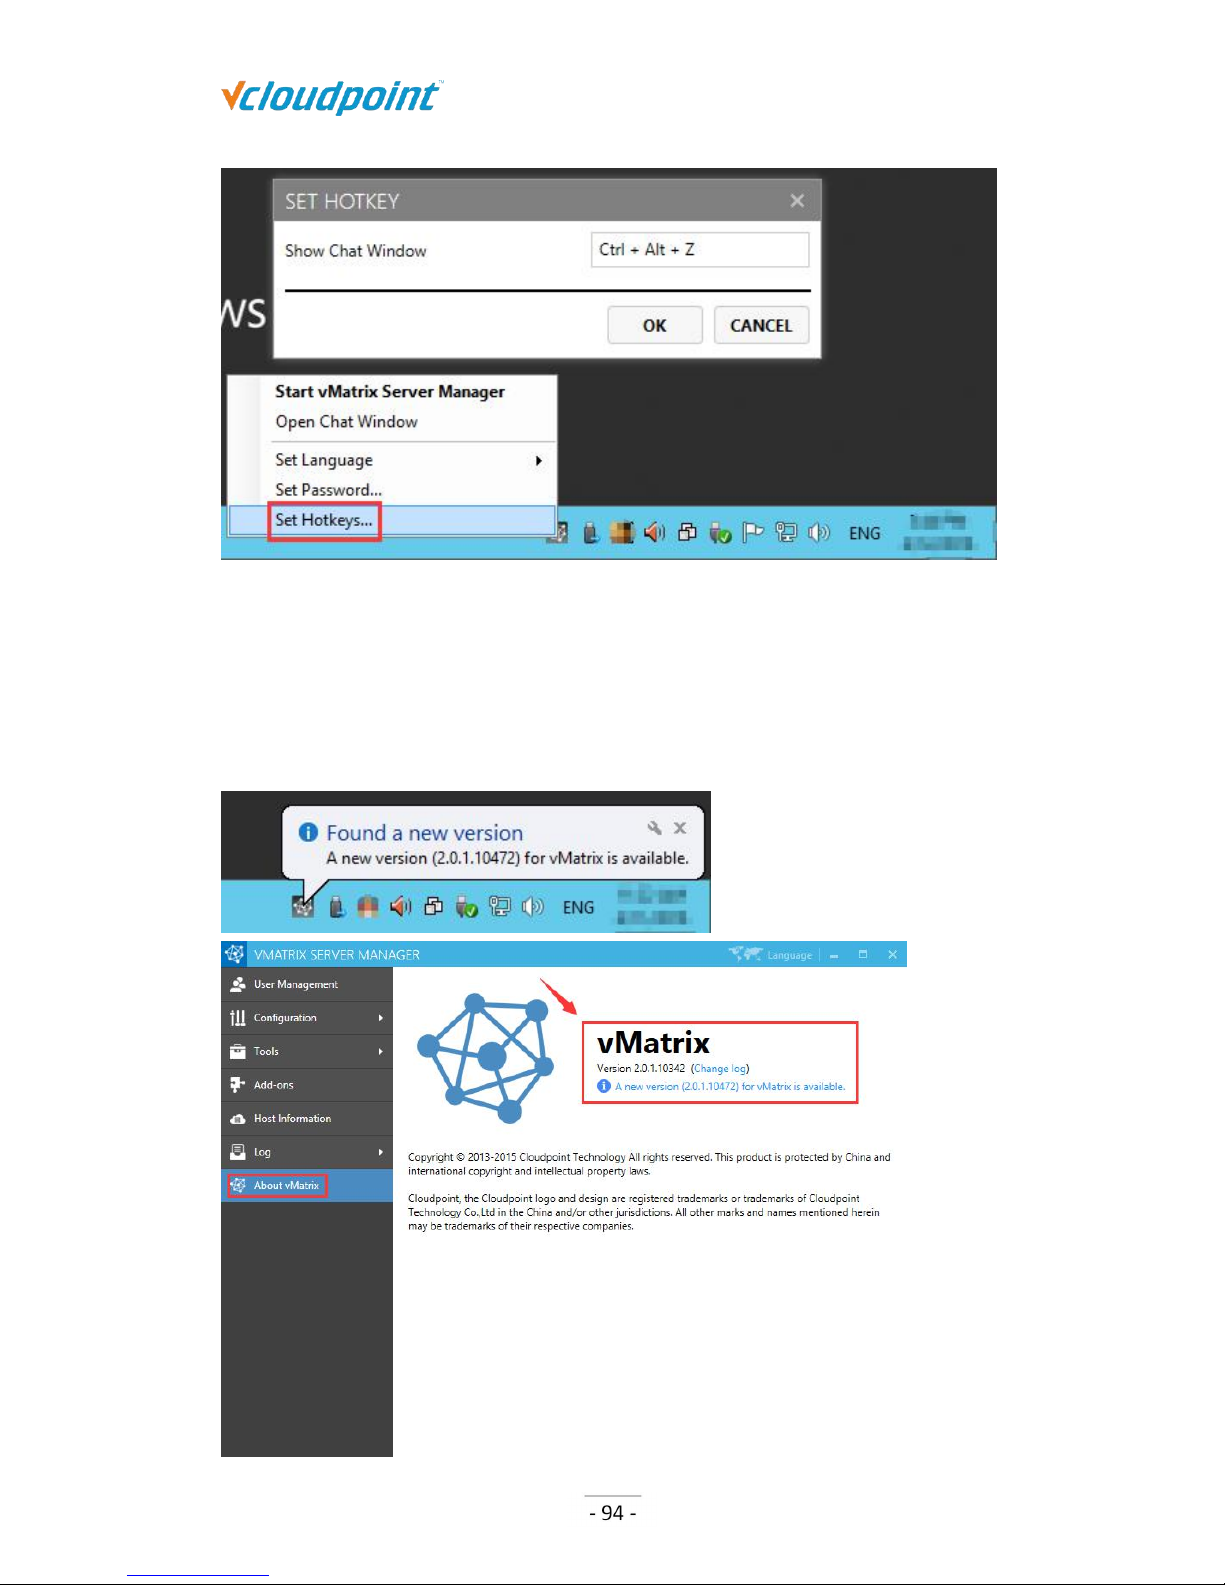
This is to set language used by vMatrix Server Manager. Right click on the vMatrx icon at
the task bar, click on “Set Language” and then available languages will be shown on the
right. You can also change language at the right top bar on vMatrix Server
Manager.
5.10.4 Set Hotkeys ...
This is to set hotkey to open chat window. To ensure the hotkey works, do not use the
same combination of keys for other applications.
Page 95
S100 Zero Client & vMatrix User Manual
www.vcloudpoint.com
5.11 vMatrix Update
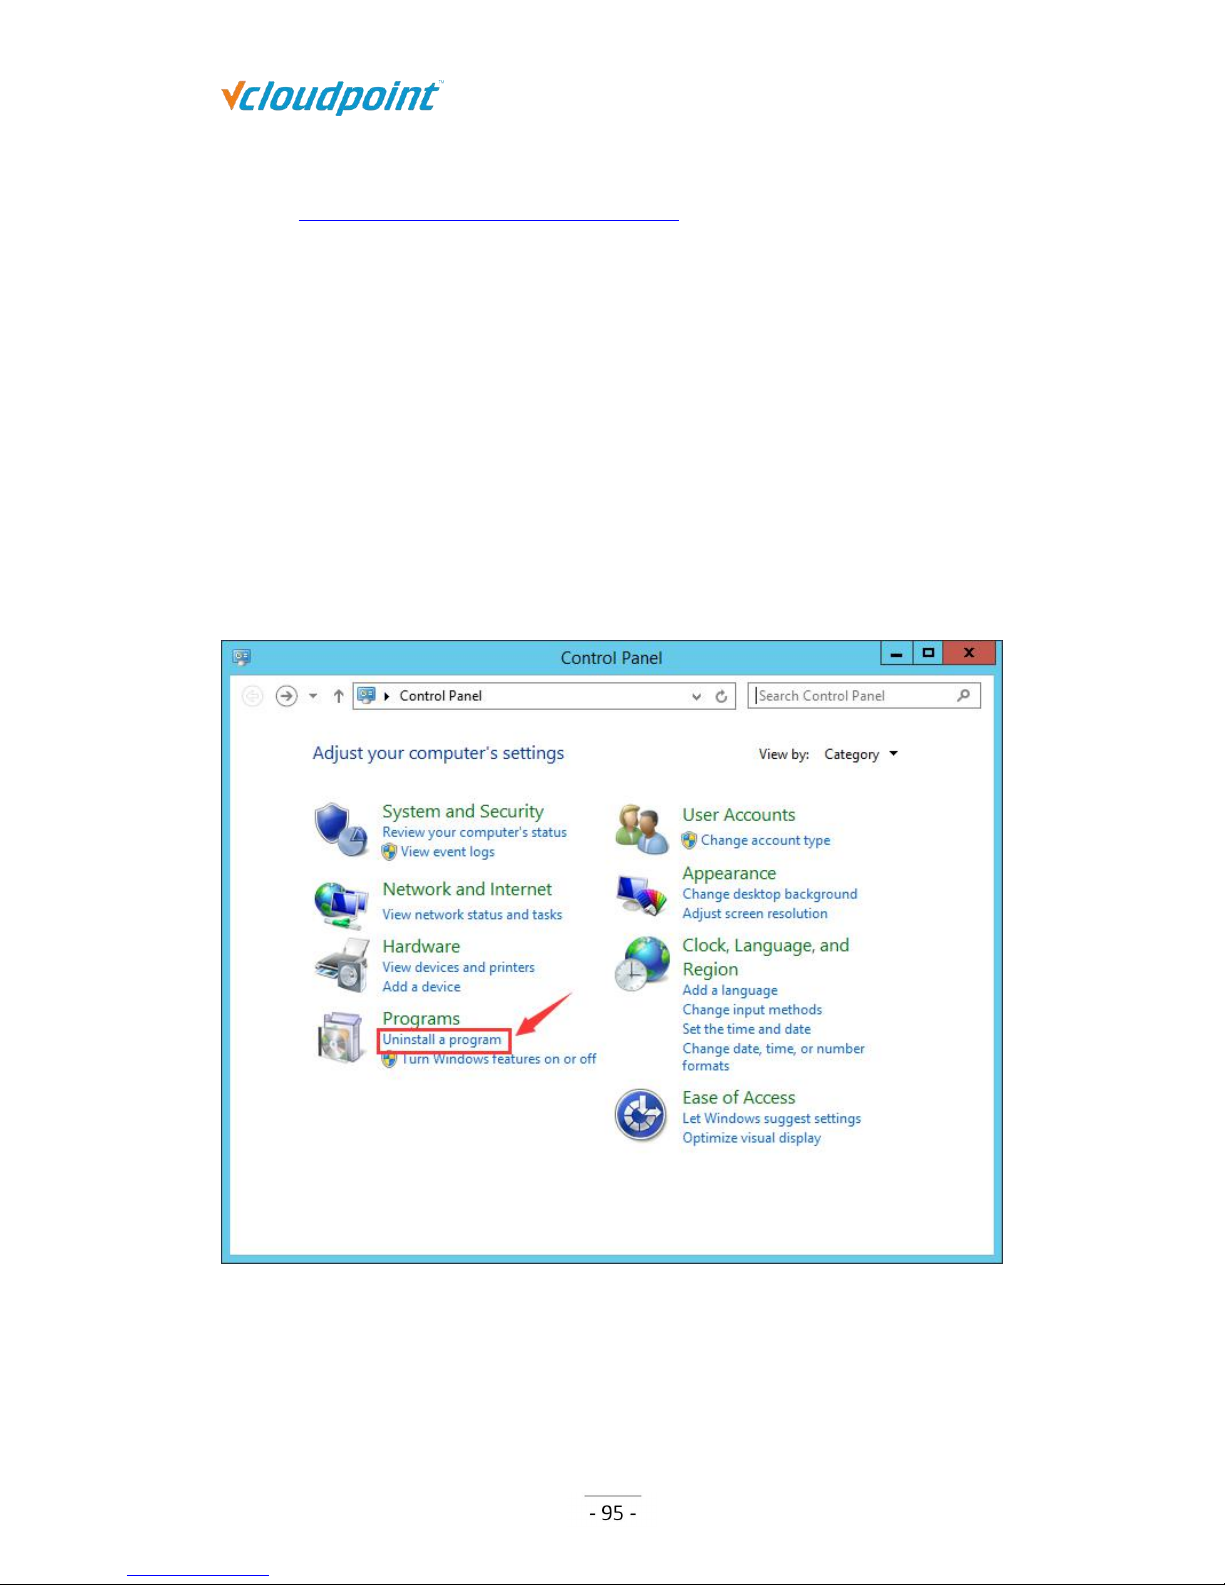
When a new version of vMatrix Server Manager is available, an update message will pop
up from the vMatrix icon at the task bar. You will also see the same message with link to
download on the About vMatrix page on vMatrix Server Manager.
Page 96
S100 Zero Client & vMatrix User Manual
www.vcloudpoint.com
Download the new version by opening the link or visit download center at vCloudPoint
website: www.vcloudpoint.com/support/downloads/.
After downloading, follow the steps below to update:
1) Log out all users and disable security software to avoid mistaken report on vMatrix
Installation files.
2) Run the installer and process as it is done on initial installation.
3) Reboot system after installation completes.
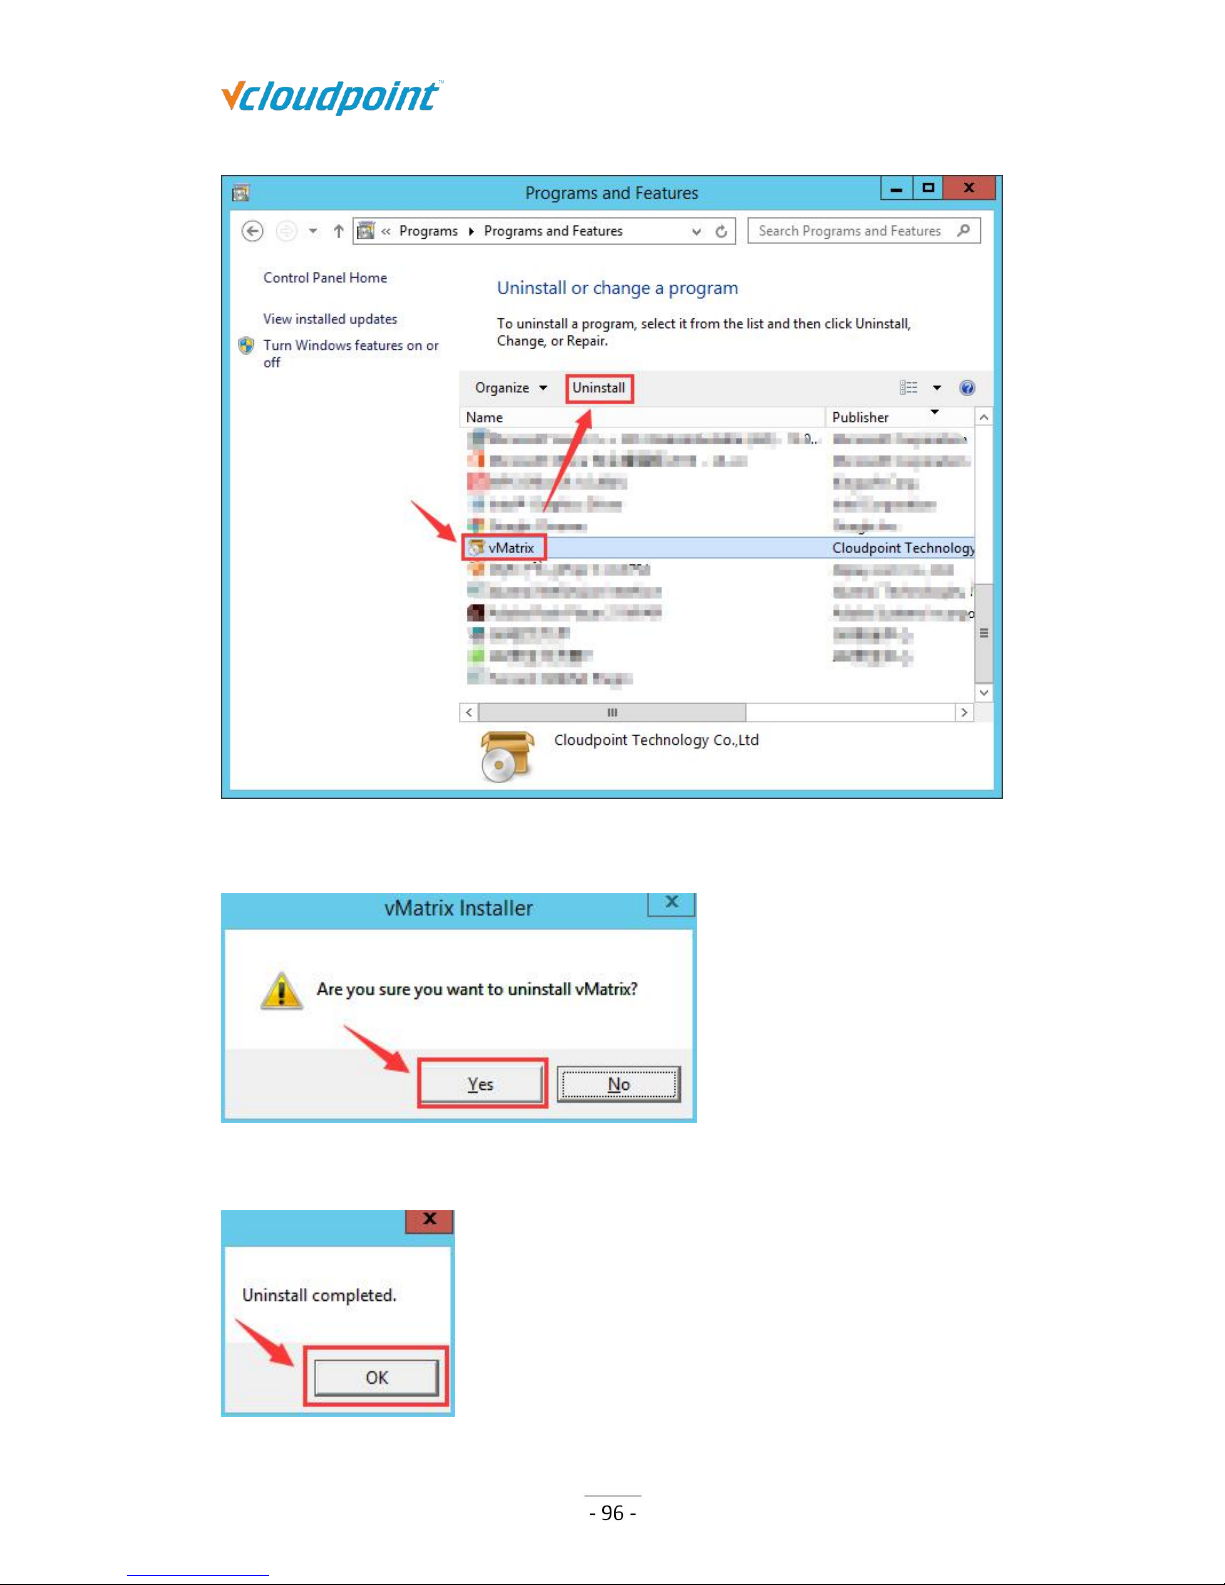
5.12 vMatrix Uninstall
1) Open system control panel, click uninstall a program,
2) Select “vMatrix”, and then click to uninstall.
Page 97
S100 Zero Client & vMatrix User Manual
www.vcloudpoint.com
3) Click “Yes” when it prompts if you want to uninstall.
4) Click “OK” when uninstall completes.
Page 98

S100 Zero Client & vMatrix User Manual
www.vcloudpoint.com
Chapter 6. FAQs & Trouble-shootings
6.1 Trouble-shootings
P1, My zero clients get disconnected every a few minutes.
By factory default, the vCloudPoint zero clients and the management software are
configured to be used in an internet connected environment (WAN). If you are using them
in a non-internet environment, you have to re-configure the zero clients and
management software by simply following the guides at the Offline Usage menu on
vMatrix Server Manager, otherwise, sessions will time out (disconnected) during
operation. (Refer to section 5.9)
Offline configuration is required if your actual use case meets any of the following
conditions:
you do not provide internet connection (WAN) to the host or the internet connection
is extremely unreliable;
you use proxy or VPN or internet control software that the host cannot access our
configuration server: api.cpterm.com.
P2, The host is not shown in host list.
1) The vMatrix Server Manager software is not installed on the host or not working
properly.
Solution: Install or re-install vMatrix Server Manager.
2) There is network problem between the host and the zero client.
Solution: Ping the host to see if the host responds to the zero client. If not, check the
network connection of the zero client and the host.
3) The zero client is with a new firmware version while the vMatrix Server Manager
version on the host is out of date.
Solution: Upgrade the vMatrix Server Manager.
4) IP Addresses in the DHCP pool have been used up so that new connected zero clients
cannot find hosts in the LAN while the old connected zero clients do not have the
problem.
Page 99

S100 Zero Client & vMatrix User Manual
www.vcloudpoint.com
Solution: Go to the DHCP setting page and enable more IP addresses or shorten the time
of IP address tenancy.
P3, Cannot log into the selected host.
1) A pop-up window says that the device’s serial number is invalid.
Solution: Contact our technical support team with the device’s serial number.
2) Unstable Local Area Network (LAN).
Solution: Examine cable and switch and make sure the zero clients are connected to the
host in the same LAN.
3) IP address pool is full that new devices cannot login.
Solution: Lease more IP addresses, and recommend shorten IP address tenancy time in
case there is a plenty of mobile devices connecting to the same network.
4) IP address conflict that the sign-in of one user may log the other out.
Solution: Make sure all devices use different IP address from the others in the same LAN.
Recommend using default DHCP instead static IP addresses.
P4, USB devices do not work, there is no sound or there are lags on
scrolling or playing a video.
If you have one or all of the above problems, you may probably see “cpaccel.exe”
(Cloudpoint Multimedia Accelerator) error message from Windows or by running vMatrix
Diagnostic Tool. This is due to some file missing of vMatrix Server Manager, mainly
caused by mistaken removal or block of fire-wall or anti-virus software. The best and
quickest way to fix this problem is to re-install vMatrix Server Manager (make sure you
have disabled security software before installation). If you still have this problem in use,
you may have to add vMatrix files or ports to exception list of security software. Also refer
to How to Configure Firewall and Antivirus software for vCloudPoint Products on this
page.
P5, Forget the password for device lock.
Press F2 on device boot to clear device configurations. Refer to section 4.7.
Page 100

S100 Zero Client & vMatrix User Manual
www.vcloudpoint.com
P6, Forget the password for settings lock.
Long press the switch button until you see the resetting window. Refer to section 4.7.
P7, Monitor displays “out of range” message or turns blank when
connecting to a zero client or the user session entering Broadcast
Mode.
1) the zero client is preset a desktop resolution (e.g.: 1920x1080) that is not supported by
the monitor (e.g.: maximum resolution support of the monitor is 1440x900).
Solution: press F2 on device boot to restore desktop resolution to default 1027x768.
Refer to section 4.7.
2) the desktop resolution on the host is not supported by the monitor connecting to the
zero client. (When entering Broadcast Mode, the user session will switch the desktop
resolution to that used by the host.)
Solution: lower desktop resolution used by the host to the one supported by the monitor
connecting to the zero client.
6.2 Frequent Asked Questions
Q1, How to use vCloudPoint system in a domain environment?
1) Your domain system should include at least one Domain Controller and one sharing
host that has joined the domain system.
2) Install the vMatrix Server Manager on the sharing host(s).
3) Create users on the Domain Controller.
(Note: as the users are not created through vMatrix Server Manager, you have to
manually add the created non-administrator users to the Remote Desktop Users group.)
4) Log into the host with vCloudPoint zero clients. Hosts will automatically be recognized
if they have joined the domain. The picture below shows two login options: the first
domain name “CLOUDPOINT” is chosen for domain login; the second one “Local Account”
is for local account login. If users choose local account login, they are logging on the host
rather than the domain.
 Loading...