

Page 1

VBrick v4.2.1 WM IP Receiver
VBrick
WM IP Receiver
Admin Guide
August 12, 2008
4410-0213-0002
Page 2

Copyright
© 2008 VBrick Systems, Inc. All rights reserved.
12 Beaumont Road
Wallingford, Connecticut 06492, USA
www.VBrick.com
This publication contains confidential, proprietary, and trade secret information. No part of this document may be
copied, photocopied, reproduced, translated, or reduced to any machine-readable or electronic format without
prior written permission from VBrick. Information in this document is subject to change without notice and
VBrick Systems assumes no responsibility or liability for any errors or inaccuracies. VBrick, VBrick Systems, the
VBrick logo, StreamPlayer, and StreamPlayer Plus are trademarks or registered trademarks in the United States and
other countries. Windows Media is a trademarked name of Microsoft Corporation in the United States and other
countries. All other products or services mentioned in this document are identified by the trademarks, service
marks, or product names as designated by the companies who market those products. Inquiries should be made
directly to those companies. This document may also have links to third-party web pages that are beyond the
control of VBrick. The presence of such links does not imply that VBrick endorses or recommends the content of
any third-party web pages. VBrick acknowledges the use of third-party open source software and licenses
VBrick products. This freely available source code is posted at http://www.vbrick.com/opensource
in some
.
FCC Notice
This equipment carries the CE mark and is UL listed in the U.S. and Canada. This equipment also complies with
the limits for Class B digital devices pursuant to FCC Part 15 testing standards for most electronic equipment.
These limits are designed to provide reasonable protection against harmful interference when the equipment is
operated in a commercial environment. This equipment generates, uses, and can radiate radio frequency energy
and, if not installed and used in accordance with the instruction manual, may cause harmful interference to radio
communications. Operation of this equipment in a residential area is likely to cause harmful interference in which
case the user will be required to correct the interference at their own expense. This Class B digital apparatus meets
all requirements of the Canadian Interference-Causing Equipment Regulations. Cet appareil numerique de la
Classe B respecte toutes les exigences do reglement dur le materiel brouilleur du Canada.
About VBrick Systems
Founded in 1997, VBrick Systems, an ISO 9001 certified vendor, is a privately held company that has enjoyed rapid
growth by helping our customers successfully introduce mission critical video applications across their enterprise
networks. Since our founding, VBrick has been setting the standard for quality, performance and innovation in the
delivery of live and stored video over IP networks—LANs, WANs and the Internet. With thousands of video
appliances installed world-wide, VBrick is the recognized leader in reliable, high-performance, easy-to-use
networked video solutions.
VBrick is an active participant in the development of industry standards and continues to play an influential role in
the Internet Streaming Media Alliance (ISMA), the MPEG Industry Forum, and Internet2. In 1998 VBrick
invented and shipped the world's first MPEG Video Network Appliance designed to provide affordable DVDquality video across the network. Since then, VBrick's video solutions have grown to include Video on Demand,
Management, Security and Access Control, Scheduling, and Rich Media Integration. VBrick solutions are
successfully supporting a broad variety of applications including distance learning and training, conferencing and
remote office communications, security, process monitoring, traffic monitoring, business and news feeds to the
desktop, webcasting, corporate communications, collaboration, command and control, and telemedicine. VBrick
serves customers in education, government, healthcare, and financial services markets among others.
Page 3

WM IP Receiver v4.2.1 Admin Guide
Organization . . . . . . . . . . . . . . . . . . . . . . . . . . . . . . . . . . . . . . . . . . . . . . . . . . . . . . . . . . .v
Model Numbers . . . . . . . . . . . . . . . . . . . . . . . . . . . . . . . . . . . . . . . . . . . . . . . . . . . . . . . .v
Getting Help . . . . . . . . . . . . . . . . . . . . . . . . . . . . . . . . . . . . . . . . . . . . . . . . . . . . . . . . . . .v
Font Conventions . . . . . . . . . . . . . . . . . . . . . . . . . . . . . . . . . . . . . . . . . . . . . . . . . . . . . . vi
Related Documents . . . . . . . . . . . . . . . . . . . . . . . . . . . . . . . . . . . . . . . . . . . . . . . . . . . . . vi
Printer-Friendly . . . . . . . . . . . . . . . . . . . . . . . . . . . . . . . . . . . . . . . . . . . . . . . . . . . . . . . . vi
1. Getting Started
Overview . . . . . . . . . . . . . . . . . . . . . . . . . . . . . . . . . . . . . . . . . . . . . . . . . . . . . . . . . . . . . . . . . 1
Hardware Specifications . . . . . . . . . . . . . . . . . . . . . . . . . . . . . . . . . . . . . . . . . . . . . . . . . . 2
Functional Specifications . . . . . . . . . . . . . . . . . . . . . . . . . . . . . . . . . . . . . . . . . . . . . . . . . 2
IPR Power States . . . . . . . . . . . . . . . . . . . . . . . . . . . . . . . . . . . . . . . . . . . . . . . . . . . . . . . . 3
1. Connect the IPR . . . . . . . . . . . . . . . . . . . . . . . . . . . . . . . . . . . . . . . . . . . . . . . . . . . . . . . . .4
Setting Date and Time . . . . . . . . . . . . . . . . . . . . . . . . . . . . . . . . . . . . . . . . . . . . . . . . . . . 5
2. Configure Network Parameters . . . . . . . . . . . . . . . . . . . . . . . . . . . . . . . . . . . . . . . . . . . . . . 6
Assigning an IP Address . . . . . . . . . . . . . . . . . . . . . . . . . . . . . . . . . . . . . . . . . . . . . . . . . .6
Changing the TV/Monitor Format. . . . . . . . . . . . . . . . . . . . . . . . . . . . . . . . . . . . . . . . . . 6
3. Login to IWS . . . . . . . . . . . . . . . . . . . . . . . . . . . . . . . . . . . . . . . . . . . . . . . . . . . . . . . . . . . . 7
4. Select a Start Mode . . . . . . . . . . . . . . . . . . . . . . . . . . . . . . . . . . . . . . . . . . . . . . . . . . . . . . . 8
Contents
2. Configuration
Using IWS . . . . . . . . . . . . . . . . . . . . . . . . . . . . . . . . . . . . . . . . . . . . . . . . . . . . . . . . . . . . . . . .9
Logging In. . . . . . . . . . . . . . . . . . . . . . . . . . . . . . . . . . . . . . . . . . . . . . . . . . . . . . . . . . . .10
Saving Changes . . . . . . . . . . . . . . . . . . . . . . . . . . . . . . . . . . . . . . . . . . . . . . . . . . . . . . . . 10
General Configuration . . . . . . . . . . . . . . . . . . . . . . . . . . . . . . . . . . . . . . . . . . . . . . . . . . . . . .11
Start Mode. . . . . . . . . . . . . . . . . . . . . . . . . . . . . . . . . . . . . . . . . . . . . . . . . . . . . . . . . . . .11
Local-Mode URLs . . . . . . . . . . . . . . . . . . . . . . . . . . . . . . . . . . . . . . . . . . . . . . . . . . . . . . 11
Network Configuration . . . . . . . . . . . . . . . . . . . . . . . . . . . . . . . . . . . . . . . . . . . . . . . . . . . . . 12
General . . . . . . . . . . . . . . . . . . . . . . . . . . . . . . . . . . . . . . . . . . . . . . . . . . . . . . . . . . . . . . 12
Domain Name Servers . . . . . . . . . . . . . . . . . . . . . . . . . . . . . . . . . . . . . . . . . . . . . . . . . . 13
SAP Configuration. . . . . . . . . . . . . . . . . . . . . . . . . . . . . . . . . . . . . . . . . . . . . . . . . . . . . . . . . 13
Management SAP Settings . . . . . . . . . . . . . . . . . . . . . . . . . . . . . . . . . . . . . . . . . . . . . . . 13
Decoder Configuration . . . . . . . . . . . . . . . . . . . . . . . . . . . . . . . . . . . . . . . . . . . . . . . . . . . . . 14
Player Settings . . . . . . . . . . . . . . . . . . . . . . . . . . . . . . . . . . . . . . . . . . . . . . . . . . . . . . . . .14
Video Output Settings. . . . . . . . . . . . . . . . . . . . . . . . . . . . . . . . . . . . . . . . . . . . . . . . . . . 15
Security Configuration . . . . . . . . . . . . . . . . . . . . . . . . . . . . . . . . . . . . . . . . . . . . . . . . . . . . . .15
Admin Interfaces. . . . . . . . . . . . . . . . . . . . . . . . . . . . . . . . . . . . . . . . . . . . . . . . . . . . . . . 16
Passwords . . . . . . . . . . . . . . . . . . . . . . . . . . . . . . . . . . . . . . . . . . . . . . . . . . . . . . . . . . . .16
Upgrade Configuration . . . . . . . . . . . . . . . . . . . . . . . . . . . . . . . . . . . . . . . . . . . . . . . . . . . . . 16
Pull-Upgrade Settings . . . . . . . . . . . . . . . . . . . . . . . . . . . . . . . . . . . . . . . . . . . . . . . . . . . 17
Miscellaneous Configuration . . . . . . . . . . . . . . . . . . . . . . . . . . . . . . . . . . . . . . . . . . . . . . . . . 17
VBrick WM IP Receiver Admin Guide iii
Page 4

Splash Screen Image . . . . . . . . . . . . . . . . . . . . . . . . . . . . . . . . . . . . . . . . . . . . . . . . . . . . 17
Reboot Parameters . . . . . . . . . . . . . . . . . . . . . . . . . . . . . . . . . . . . . . . . . . . . . . . . . . . . .17
3. Status, Maintenance & Help
Status . . . . . . . . . . . . . . . . . . . . . . . . . . . . . . . . . . . . . . . . . . . . . . . . . . . . . . . . . . . . . . . . . . . 19
System Status. . . . . . . . . . . . . . . . . . . . . . . . . . . . . . . . . . . . . . . . . . . . . . . . . . . . . . . . . .19
Maintenance . . . . . . . . . . . . . . . . . . . . . . . . . . . . . . . . . . . . . . . . . . . . . . . . . . . . . . . . . . . . . . 20
Power Management . . . . . . . . . . . . . . . . . . . . . . . . . . . . . . . . . . . . . . . . . . . . . . . . . . . . . 20
Upgrade . . . . . . . . . . . . . . . . . . . . . . . . . . . . . . . . . . . . . . . . . . . . . . . . . . . . . . . . . . . . . . 20
Default Device Configuration. . . . . . . . . . . . . . . . . . . . . . . . . . . . . . . . . . . . . . . . . . . . . 20
Help . . . . . . . . . . . . . . . . . . . . . . . . . . . . . . . . . . . . . . . . . . . . . . . . . . . . . . . . . . . . . . . . . . . . 20
4. Local Mode Configuration
Overview . . . . . . . . . . . . . . . . . . . . . . . . . . . . . . . . . . . . . . . . . . . . . . . . . . . . . . . . . . . . . . . . 23
Configuring Streams . . . . . . . . . . . . . . . . . . . . . . . . . . . . . . . . . . . . . . . . . . . . . . . . . . . . . . .23
Customizing the Interface . . . . . . . . . . . . . . . . . . . . . . . . . . . . . . . . . . . . . . . . . . . . . . . . . . . 24
5. Software Upgrade
Upgrading an IPR . . . . . . . . . . . . . . . . . . . . . . . . . . . . . . . . . . . . . . . . . . . . . . . . . . . . . . . . . 27
Uninstalling the IPRDownload Application . . . . . . . . . . . . . . . . . . . . . . . . . . . . . . . . . . 27
Installing the Download Application . . . . . . . . . . . . . . . . . . . . . . . . . . . . . . . . . . . . . . . 27
Before You Begin . . . . . . . . . . . . . . . . . . . . . . . . . . . . . . . . . . . . . . . . . . . . . . . . . . . . . . 29
Using ETV-IPRDownload . . . . . . . . . . . . . . . . . . . . . . . . . . . . . . . . . . . . . . . . . . . . . . . . . . . 29
Logging Upgrade Activities. . . . . . . . . . . . . . . . . . . . . . . . . . . . . . . . . . . . . . . . . . . . . . . 32
6. Using the IPR
Overview . . . . . . . . . . . . . . . . . . . . . . . . . . . . . . . . . . . . . . . . . . . . . . . . . . . . . . . . . . . . . . . . 33
Local-Fullscreen Mode. . . . . . . . . . . . . . . . . . . . . . . . . . . . . . . . . . . . . . . . . . . . . . . . . . . . . .33
Portal Server Mode . . . . . . . . . . . . . . . . . . . . . . . . . . . . . . . . . . . . . . . . . . . . . . . . . . . . . . . . 34
Portal Server Menu . . . . . . . . . . . . . . . . . . . . . . . . . . . . . . . . . . . . . . . . . . . . . . . . . . . . . 35
Local Mode . . . . . . . . . . . . . . . . . . . . . . . . . . . . . . . . . . . . . . . . . . . . . . . . . . . . . . . . . . . . . . 35
Using the WM IPR Remote . . . . . . . . . . . . . . . . . . . . . . . . . . . . . . . . . . . . . . . . . . . . . . . . . . 36
7. Legacy Models
Model 8000-0113-0000 Power States . . . . . . . . . . . . . . . . . . . . . . . . . . . . . . . . . . . . . . . . . . . 39
Model 8000-0113-0000 Remote Control . . . . . . . . . . . . . . . . . . . . . . . . . . . . . . . . . . . . . . . . 39
iv Contents
Page 5
WM IP Receiver v4.2.1 Admin Guide
VBrick's WM IP Receiver is similar to a conventional set top box but is significantly more
stable, rugged, and reliable. It is designed for 24x7 operation, and built for enterprise
networks that require a high degree of stability, security, and scalability. The WM IP Receiver
meets the demanding requirements of VBrick's EtherneTV Media Distribution System. The
WM IPR plays Windows Media streams from VBrick WM appliances and Windows Media
servers. The WM IPR is also a fully-featured VBrick EtherneTV client. This means that in
addition to the ability to deliver video, the WM IPR will eventually provide scheduling, access
logging, and device control from the Portal Server.
Organization
Getting Started provides an overview of the IP Receiver and explains how to
connect, configure, and login to the device.
Configuration
Status, Maintenance & Help
Local Mode Configuration
Software Upgrade
Using the IPR
explains all IPR configuration options including Start mode,
network configuration, and security options.
explains how to check system information, reboot or
shutdown the IPR, and launch a software upgrade.
explains how to configure the IPR for Local mode and how to
create and upload customized pages.
explains how to use the ETV-IPRDownload application to
upgrade the IPR software.
explains how to use the IPR to view Local, Fullscreen, or
Portal Server streams.
Model Numbers
This manual documents two slightly different WM IP Receivers that have different model
numbers. To determine the IPR model number, reboot the IPR and note the Model number
when the splash screen with the VBrick logo is displayed.
Model Number Description
8000-0113-0000
8000-0113-0001
Initial IPR release with non RoHS-compliant remote control.
Current IPR model with all RoHS-compliant components.
Getting Help
If you need help, or more information about any topic, use the online help system. The
online help is cross-referenced and searchable and can usually find the information in a few
seconds. Use the tree controls in the left pane to open documents and the up and down
arrows to page through them. Use the
VBrick WM IP Receiver Admin Guide v
Search box to find specific information. Simply enter
Page 6

one or more words in the box and press Enter. The search results will return pages that have
all of the words you entered—highlighted in yellow (Internet Explorer only). The Search box
is not case-sensitive and does not recognize articles (a, an, the), operators (+ and – ), or
quotation marks. You can narrow the search by adding words.
If you can't find the information you need from the online help, or from your certified
VBrick reseller, you can contact VBrick Support Services
on the web. Support Services can
usually answer your technical questions in 24 business hours or less. Also note that our
publications team is committed to accurate and reliable documentation and we appreciate
your feedback. If you find errors or omissions in any of our documents, please send e-mail to
[email protected]
and let us know. For more information about any VBrick
products, all of our product documentation is available on the web. Go to www.vbrick.com/
documentation to search or download VBrick product documentation.
Font Conventions
Arial bold is used to describe dialog boxes and menu choices, for example: Start > All
Programs > VBrick
Courier fixed-width font
Courier bold fixed-width font is used for user input in scripts, code examples, or keyboard
is used for scripts, code examples, or keyboard commands.
commands.
This bold black font is used to strongly emphasise important words or phrases.
Folder names and user examples in text are displayed in this sans serif font.
User input in text is displayed in this bold sans serif font.
Italics are used in text to emphasize specific words or phrases.
Related Documents
For more information about using and configuring the WM IPR with the Portal Server, see
the EtherneTV Portal Admin Guide. This document is available on the
at
www.VBrick.com/documentation
VBrick EtherneTV page
Printer-Friendly
WM IP Receiver Admin Guide
WM IP Receiver Release Notes
T To save or print a PDF document
1. Click once to open the PDF document in Acrobat Reader.
2. To save or print a PDF document, right-click and select
Save Target As or Print Target.
vi Preface
Page 7

Getting Started
Topics in this section
Overview . . . . . . . . . . . . . . . . . . . . . . . . . . . . . . . . . . . . . . . . . . . . . . . . . . . . . . . . . . . . . . . . . 1
1. Connect the IPR . . . . . . . . . . . . . . . . . . . . . . . . . . . . . . . . . . . . . . . . . . . . . . . . . . . . . . . . .4
2. Configure Network Parameters . . . . . . . . . . . . . . . . . . . . . . . . . . . . . . . . . . . . . . . . . . . . . . 6
3. Login to IWS . . . . . . . . . . . . . . . . . . . . . . . . . . . . . . . . . . . . . . . . . . . . . . . . . . . . . . . . . . . . 7
4. Select a Start Mode . . . . . . . . . . . . . . . . . . . . . . . . . . . . . . . . . . . . . . . . . . . . . . . . . . . . . . . 8
Overview
VBrick's EtherneTV Media Distribution System provides the ability to view live and stored
WM (Windows Media) streams directly on a television or monitor by using the ETV IP
Receiver. The IP Receiver is integrated with the EtherneTV Portal Server and the ETV
video-on-demand (VOD) servers to enable viewing of stored and live WM streams. The IP
Receiver can also be deployed as a standalone decoder without the need for a Portal Server.
Chapter 1
As explained on the following pages, the IPR can be configured to operate in one of three
modes:
includes a Portal Server, the IPR is directed to the Portal Server for user control—the
graphics and user interface reside on the ETV Portal Server. When the IPR is deployed
independently of the Portal Server, it comes equipped (in
and internal graphics. The IP Receiver can be configured using a standard web browser.
Portal Server, Local (standalone), Local-Fullscreen (standalone). When the installation
Local mode) with a user interface
Figure 1. Ethernet-TV Media Distribution System
VBrick WM IP Receiver Admin Guide 1
Page 8

The WM IP Receiver is a state-of-the-art decoder for WM streams originating from a VBrick
WM appliance or a Windows Media streaming server, or for streams hosted by a VBrick
EtherneTV Portal Server.
Figure 1. WM IPR – Top View
Hardware Specifications
Model WM IPR
Processor Intel® Pentium-M ® Processor 1.4 GHz
Chipset Intel 854 chipset with 3D graphics
Memory Standard: On Board DDR333 128 MB
Mass Storage 64 MB DOM
Input Device IR Remote Control
Front Panel LEDs: (left to right) Power, Standby, Activity, Link
Rear Panel • 10/100 Ethernet port
• One RCA jack for composite video output
• Two RCA jacks for stereo audio output (right/left)
• S-Video output connector
• Coaxial and Optical S/PDIF out (not used)
• Two USB 2.0 connectors
•VGA
Weight Less than 4.3 kg (9.4 lbs)
Dimension 308 (L) x 223 (D) x 60 (H) mm
Power AC 100~240V/47-63 Hz, 80W
Operating System Windows CE 5.0
Functional Specifications
Resolutions Composite/S-Video: NTSC (720x480), PAL (720x576)
VGA: 800x600, 1024x768, 1280x720, 1920x1080.
2 © 2007 VBrick Systems, Inc.
Page 9

Protocols Multicast, HTTP, MMS
Video Sources VBrick WM Appliance, Windows Media Server.
Decode Rate 56Kbps–4 Mbps.
Video System Type NTSC or PAL.
Getting Started
EthernetTV
Compatible with VBrick's ETV Portal Server (v4.1 or higher).
Support
IR Remote All standard functions.
Configurable
Modes
• Local (Static Program Guide).
• Local-Fullscreen (play configured program).
•Portal Server.
Outputs Composite, VGA, RCA audio.
Network Ethernet, DHCP, Manual IP configuration, IGMP v3.
Management • Remote Management via web browser.
•Web Service.
• Telnet (future release).
Security Login required for user interface change or system changes.
IPR Power States
The IPR has two "standby" modes as explained below. In hard standby, the Standby LED is
on; in soft standby, the
is on, reboot the IPR by pressing the (upper) triangular Power button on the front panel or
the red (unlabeled) button on the IR remote control. Note that in addition to the two standby
states there are also two independent IR remote buttons that transition into or out of these
states.
Standby LED is off. If you are having problems and the Standby LED
Note This section explains power state behavior for IPR Model
8000-0113-0001. You may
have an IPR model with slightly different functionality. To determine the IPR model
type, reboot the IPR and note the
logo. If the number is
8000-0113-0000, see Legacy Models on page 39.
Model number on the splash screen with the VBrick
Tab le 1. Triangular Power and Reset Buttons
Button Description
Upper button Power – Press once to power-on unit; press and hold for five seconds
to power-off. See Table 2 IPR Power States
for more information.
Lower button Reset –. Press once to reset the unit.
Table 2. IPR Power States
Power State Description
Off No AC power applied. The unit is completely off.
VBrick WM IP Receiver Admin Guide 3
Page 10

Power State Description
Hard Standby AC power applied but IPR turned off. The IPR is in this state after AC
power is initially applied or after holding the front panel power button
down for a few seconds until the
Standby LED comes on.
Soft Standby AC power applied but there is no video or network connectivity. You
get into this state by clicking the
Standby button on the IR remote. You can transition to On by
the
pressing the
Standby button on the IR remote.
Shutdown button in IWS or pressing
On The unit is operational. You get into this state by:
• Plugging in AC power. The unit boots up.
• Briefly pressing the front panel when in hard standby (i.e. when
Standby LED is lit). The unit boots.
the
• Pressing the power button on the IR remote when in hard standby.
The unit boots.
• Pressing the
Standby button on the IR remote when in soft
standby. The unit comes back immediately.
Table 3. IPR Transition States
Press this button To transition to
Front panel power
button
Red "power" button
on IR remote
Standby button on
IR remote
Shutdown button in
IWS
1. Connect the IPR
The WM IP Receiver is shipped with all the cables and connectors you need to install the
device. No software installation is required. The WM IPR is also shipped with the latest IPR
software already installed. In the unlikely event you need to reinstall (or upgrade) the
software, see Software Upgrade
shown in the following drawing. The WM IPR includes the following components:
•WM IP Receiver
• Remote Control with 2 AA Batteries
•Power cable
• RCA connector
When in hard standby, boots up. When in soft standby or On, hold for
several seconds to go into hard standby.
When in hard standby, this boots the IPR. In all other cases it has no
effect.
When the IPR is
On, this puts box in soft standby. When the IPR is in
soft standby, it comes on immediately. When the IPR is in hard
standby, there is no effect.
When the IPR is
On, this puts the box in soft standby.
on page 27. Connect the audio, video, and Ethernet cables as
T To connect the IPR
1. Using the provided RCA cable, connect the IPR video out to a TV monitor using the
yellow video connector.
4 © 2007 VBrick Systems, Inc.
Page 11

Getting Started
2. Using the provided RCA cable, connect the IPR audio out to a TV monitor using the
corresponding red and white audio connectors.
3. Using customer-provided cables, connect the IP Receiver to your Ethernet network, using
LAN port.
the
4. Connect a USB keyboard and mouse to the USB ports and install two AA batteries in the
remote control.
5. Connect the IPR power cord to a powerstrip and power on the IPR using the triangular
Power button on the front panel. (Press F2 during power up to set the date/time on the
BIOS menu. See Setting Date and Time below.)
Figure 2. WM IPR – Rear Panel Connectors
Composite Composite video out.
S-Video Connect to standard TV.
Audio Out Audio out left and right.
LAN Connect to local area network.
USB Ports (2) Connect USB mouse and/or keyboard.
VGA Connect to a standard TV or a projector with a VGA port.
Power Plug Connects to power cord.
Figure 3. WM IPR – Front Panel LEDs
Power Solid red when unit is powered on.
Standby Solid red when unit is in hard standby (see Table 2).
Activity Blinks red when there is network traffic.
Link Solid red (dim) when there is an Ethernet connection.
Setting Date and Time
Some IPR features (for example automatic reboot and log file timestamps) must have the
date and time set in order to work properly. The date and time can only be set from the BIOS
menu at startup.
VBrick WM IP Receiver Admin Guide 5
Page 12

T To set date and time
1. Attach a USB keyboard to the IPR and power up the device.
2. When the black and white startup screen appears, press and hold
appears.
3. Set the appropriate Date/Time for your region. Use the +/- keys to change the values,
the Tab key to change fields, and Up/Down arrows to change parameters.
4. When done, press
F10 to save changes, then confirm and exit.
2. Configure Network Parameters
The IP Receiver is configured with DHCP (Dynamic Host Configuration Protocol) enabled
and will automatically retrieve an IP address from a DHCP server if present. If a DHCP
server is not available, you can configure the IP Receiver with a static IP address. The
following steps explain how to login to the IPR the first time only. After this initial
configuration, you can login to the IPR using IWS.
Note By default, DHCP is used to retrieve a dynamic IP address for the IPR. If you are not
using a DHCP server, you must configure the IPR to use a static IP address as
explained below.
T To configure network parameters
1. Connect the TV, cables, keyboard, and mouse as explained above and power on the IPR.
Wait for the box to completely power up before continuing.
2. When the Login page is displayed, log in to the Integrated Web Server (IWS) using the
default username (admin) and password (admin).
3. Navigate to the Network Configuration
other network configuration parameters. Use this page to record the DHCP IP address
for future use or to set a different IP address (see Assigning an IP Address below). If
leaving the IPR in DHCP mode, be sure to record the IP address provided by the DHCP
server for future access to IWS from a PC.
4. When done, click
Apply and then Logout.
5. Remove the USB keyboard and mouse. The next time you will login using the IPR's
Integrated Web Server (IWS).
page which shows the IP Address, Hostname, and
F2 until the BIOS menu
Note VBrick recommends using the initial management pages only to record (or set) the IP
address using a keyboard and a mouse. Do not change other IPR parameters until you
logout, remove the keyboard and mouse, and login to the IWS management pages over
a network connection.
Assigning an IP Address
T To assign a static IP address (optional)
1. Go to the
2. Change
3. Set other network parameters (
necessary. Contact a system administrator for the parameters to use on your network.
6 © 2007 VBrick Systems, Inc.
Network configuration page.
DHCP Enable to Static and enter a valid IP Address.
Subnet Mask, Gateway, Domain Name Server etc.) as
Page 13
Getting Started
4. When done, click Apply and then Logout. If you do not logout, you will be unable to
configure the IPR from a PC. Either logout from the console or wait (15 minutes) for the
session to expire in order to manage the IPR over the network.
Changing the TV/Monitor Format
IP receivers are shipped with the monitor format set to NTSC. To change this setting to PAL
(or to set other parameters), you may need to login to the device using the IP address
configured by DHCP. The easiest way to get (or set) the IP address is to install the
VBDirectory management program from the Product CD that was included with the IPR.
VBDirectory discovers and displays all VBrick devices on the network and their
corresponding IP addresses.
T To change the TV/Monitor format
1. Find the IPR MAC address on the label (marked
2. Install and run VBDirectory from the Product CD.
3. Find and select the MAC address of the WM IPR and click
login with the default username (admin) and password (admin)
4. After logging in, you can change the
Decoder
page.
TV/Monitor Format setting on the Configuration >
MAC) attached to the bottom of the unit.
Connect to VBrick. Then
3. Login to IWS
You access the IP Receiver by typing its IP address in the Address field of a web browser
such as Internet Explorer or Firefox. You login to the IPR's Integrated Web Server (IWS)
using the default username and password (you can change these on the Security
Configuration page). IWS is a web management application used to set or change
configuration settings (see Using IWS on page 9 for more about IWS).
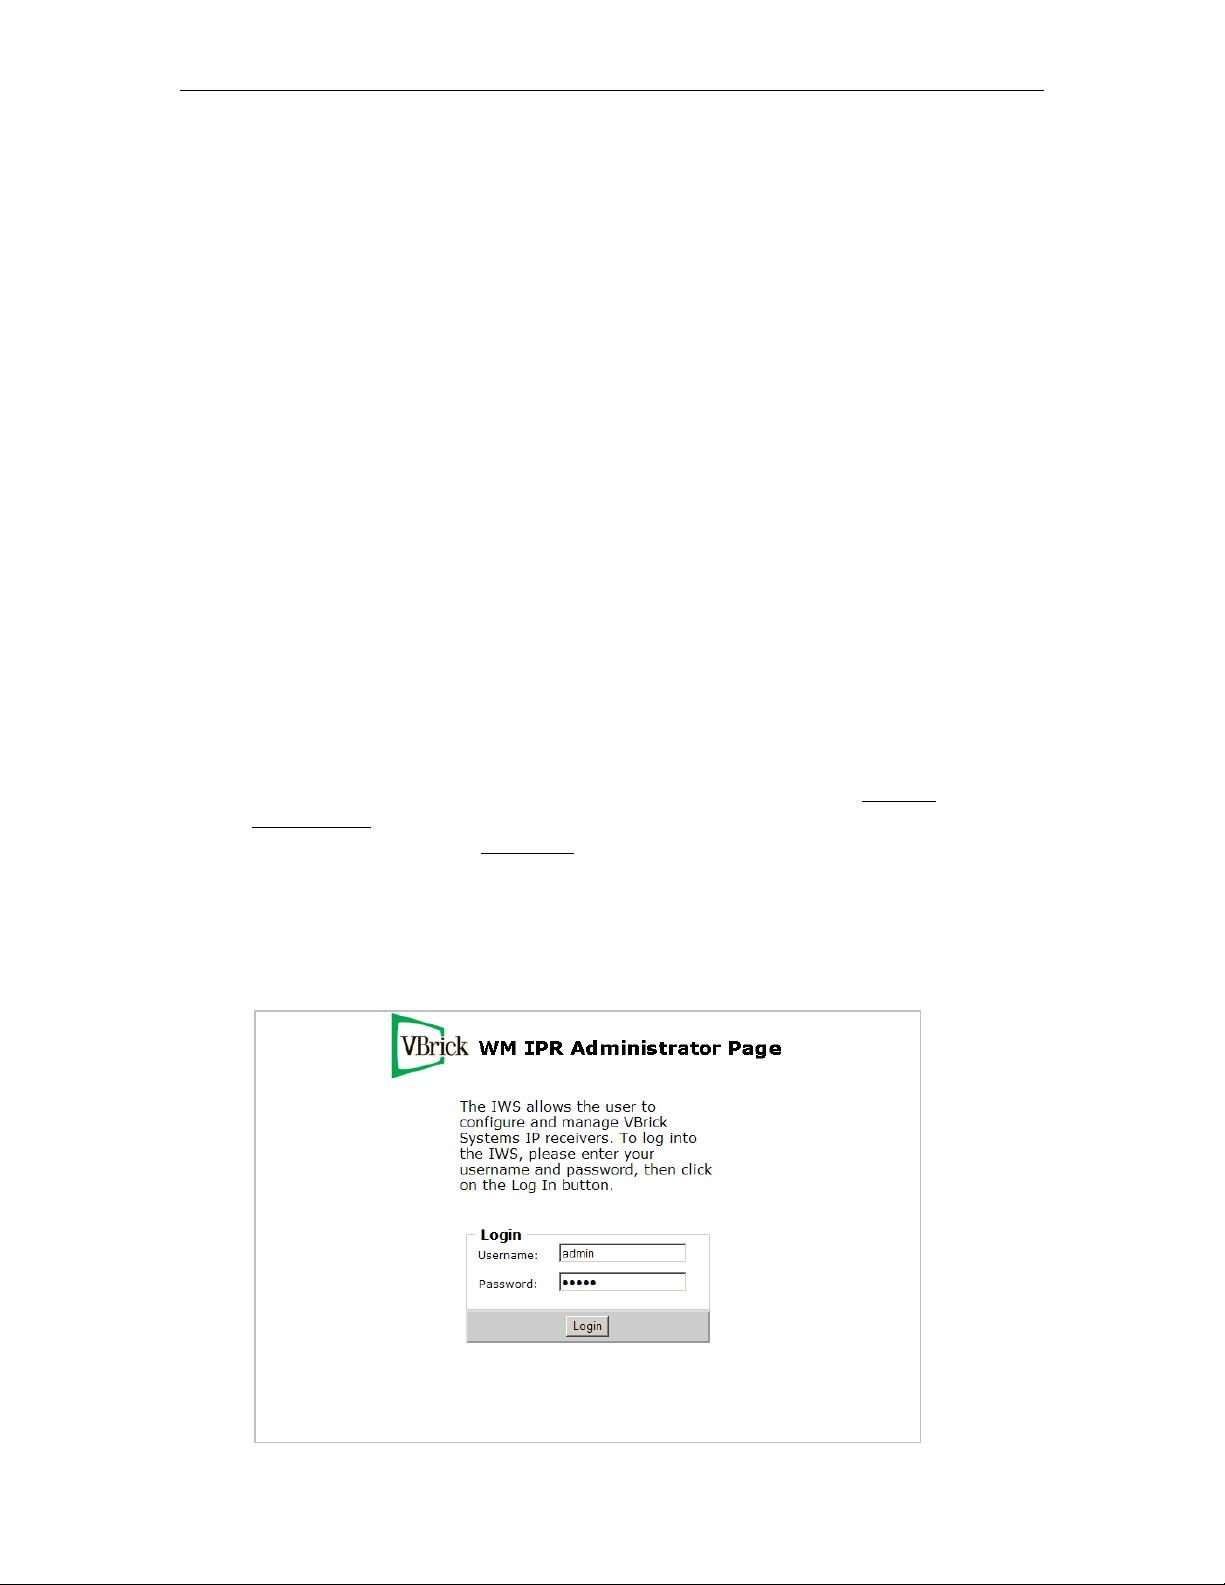
T To login to the IP Receiver
1. Type the IP address of the IPR in a browser, for example
2. Enter the Username and Password and click Login. This displays the Administrator Page.
Use this page to access all system configuration parameters.
http://<IPR_IPAddress>
VBrick WM IP Receiver Admin Guide 7
Page 14

Figure 4. Login Page
User name Case-sensitive username. Default =
(read-only).
Password Case-sensitive password. Default =
(read-only).
Note If you have problems logging in because of a misconfigured IPR or lost IP address,
you can still launch IWS by pressing
to the IPR. See Logging In
4. Select a Start Mode
The next step is to choose a Start mode from among the options explained below. The Start
mode determines how the IPR will behave in your network environment when it's powered
on. A network administrator will generally determine the
requirements at your site. Note that if you are using a TV monitor to configure IWS, as soon
as you select a Start mode and press Apply, IWS closes and the TV switches to the selected
mode.
T To set the Start mode
1. After logging in as explained above, the
2. Select a
Configuration on page 11 for more information about these options.
Start Mode from among the three choices listed below. See General
admin (all privileges) or public
admin (all privileges) or public
Ctrl-Alt-F1 from a USB keyboard directly attached
on page 10 for more information.
Start mode based on the functional
General Configuration page (Figure 5) opens.
Local-Fullscreen
The WM IPR can operate in a fullscreen mode. One channel is
displayed and this stream uses the entire screen of the attached
monitor. Table 4 below shows the URL syntax for Local-Fullscreen.
Portal Server
When installed with an ETV Portal Server, the features and options of
the VBrick WM IPR are controlled through the VBrick Portal Server.
See the Portal Server Admin Guide for more information.
Local
In Local mode, the IPR will retrieve and render the user interface web
page from the configured local path. This is typically located on the
IPR's file system. The program guide on the viewer web page will
Local mode on the IWS configuration
on page 23 for more information.
3. Press
include the streams defined for
page. See Local Mode Configuration
Apply to exit IWS and open the IPR interface in the selected mode.
Table 4. Local-Fullscreen URL Syntax
Stream Type URL Syntax
Multicast WM Multicast IP address of VBrick WM Appliance. On the WM
Appliance, go to Configuration: Encoder > Multicast and use the
Multicast URL, for example:
http://<ip_address>/vbs1multi.nsc
8 © 2007 VBrick Systems, Inc.
Page 15

Stream Type URL Syntax
Getting Started
Unicast WM HTTP
(Live)
Unicast or HTTP
(VOD)
HTTP URL of VBrick WM Appliance. On the WM Appliance, go to
Configuration: Encoder > Server and use the
http://<ip_address>:8080/vbrickvideo1/group1
HTTP URL, for example:
If your WM Appliance is configured to serve multiple bit rates (MBR)
you must configure the WM IPR with a group-specific URL, for
example:
http://<ip_address>:8080/vbrickvideo1/group1
Depends on VOD server. The complete path including HTTP URL
and publishing point, for example:
http://<ip_address>/VBP/MYWMVideos/myVideo.wmv
VBrick WM IP Receiver Admin Guide 9
Page 16

10 © 2007 VBrick Systems, Inc.
Page 17
Configuration
Topics in this section
Using IWS . . . . . . . . . . . . . . . . . . . . . . . . . . . . . . . . . . . . . . . . . . . . . . . . . . . . . . . . . . . . . . . .9
General Configuration . . . . . . . . . . . . . . . . . . . . . . . . . . . . . . . . . . . . . . . . . . . . . . . . . . . . . .11
Network Configuration . . . . . . . . . . . . . . . . . . . . . . . . . . . . . . . . . . . . . . . . . . . . . . . . . . . . . 12
SAP Configuration. . . . . . . . . . . . . . . . . . . . . . . . . . . . . . . . . . . . . . . . . . . . . . . . . . . . . . . . . 13
Decoder Configuration . . . . . . . . . . . . . . . . . . . . . . . . . . . . . . . . . . . . . . . . . . . . . . . . . . . . . 14
Security Configuration . . . . . . . . . . . . . . . . . . . . . . . . . . . . . . . . . . . . . . . . . . . . . . . . . . . . . .15
Upgrade Configuration . . . . . . . . . . . . . . . . . . . . . . . . . . . . . . . . . . . . . . . . . . . . . . . . . . . . . 16
Miscellaneous Configuration . . . . . . . . . . . . . . . . . . . . . . . . . . . . . . . . . . . . . . . . . . . . . . . . . 17
Using IWS
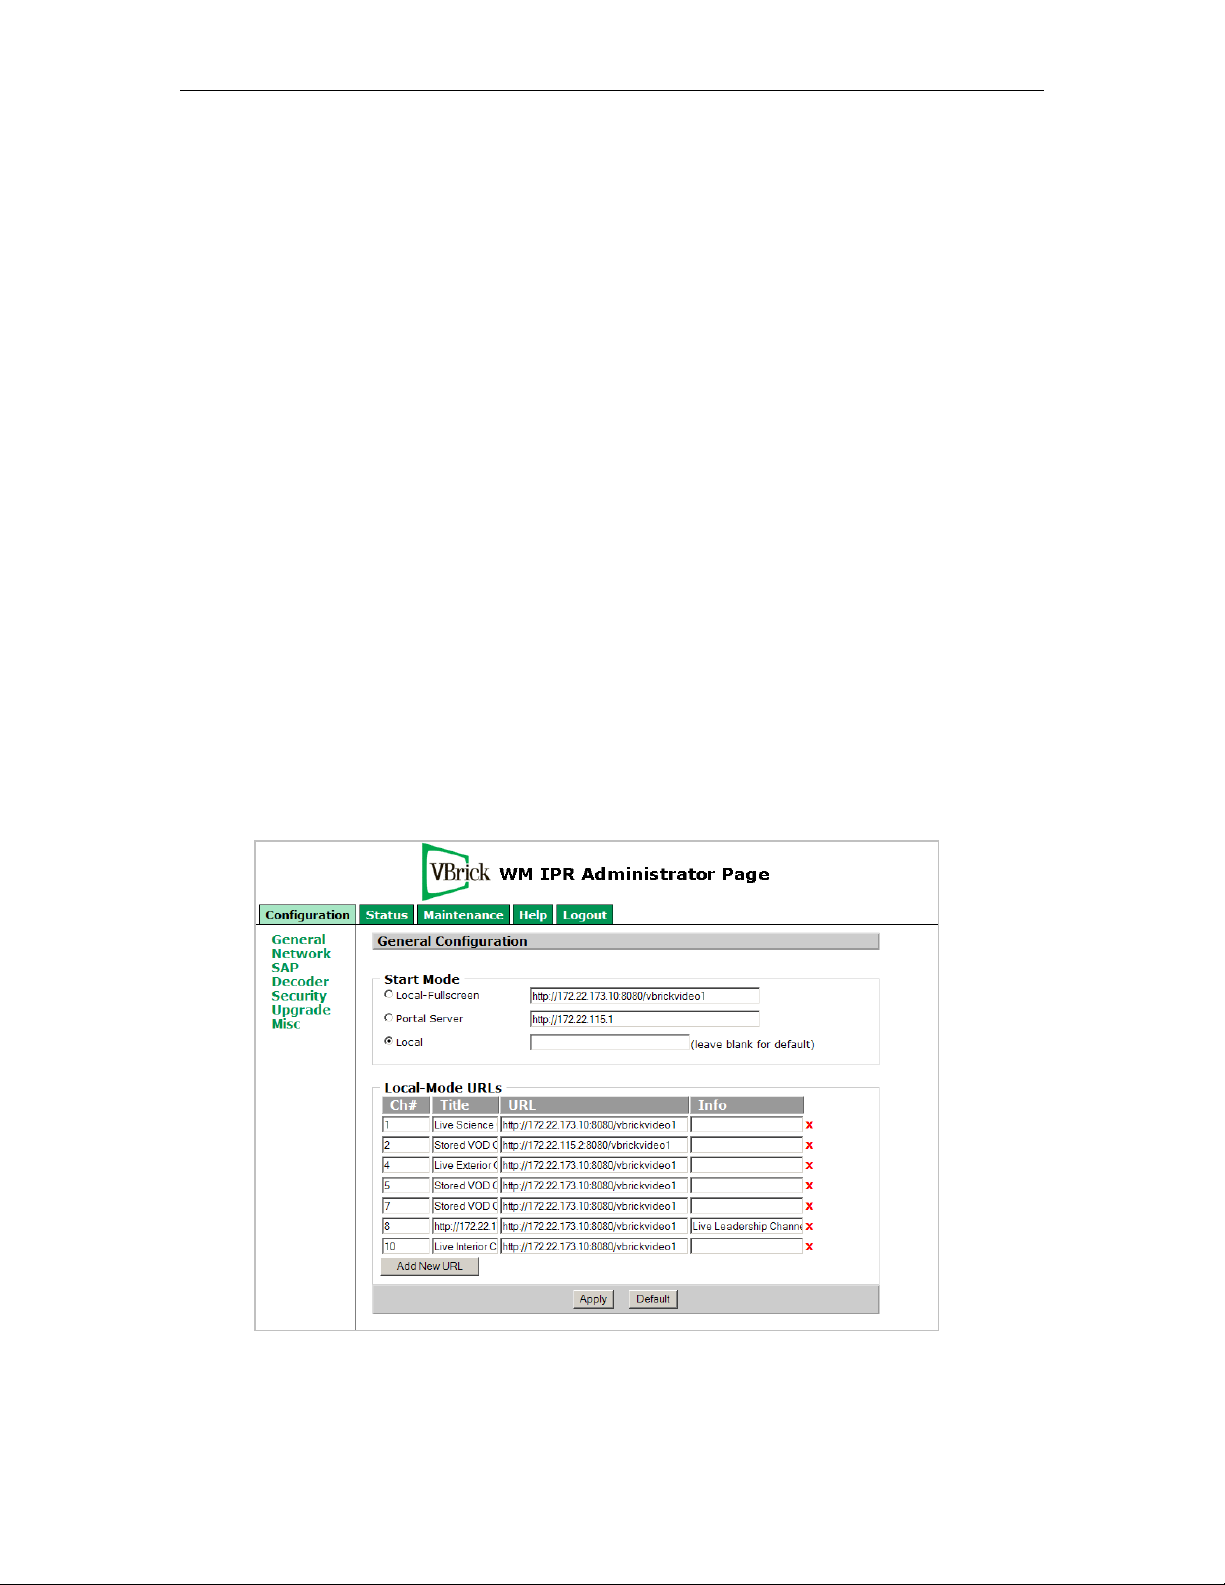
The following page is displayed when you power on the IPR and login to IWS. Use this page
to configure all IPR parameters. Use the navigation panel in the upper left part of the page,
and if necessary, select from the configuration options on the left. Note that only one admin
user can be logged in at any time. A second admin user attempting to login will receive an error
message.
Chapter 2
Figure 5. General Configuration Page
VBrick WM IP Receiver Admin Guide 9
Page 18

Configuration
displays all IPR configuration options including general options,
network configuration, and security options.
Status
Maintenance
displays system data including MAC address, serial number, etc.
displays options to reboot or shutdown the IPR, or launch a software
upgrade.
Help
Logout
displays the IPR online help pages.
automatically logs out the current user and displays the IWS login page.
Logging In
You login to the IWS management application for the IPR by typing its IP address in a web
browser and entering the default username and password (admin and admin) or by typing the
current username and password if they have been changed on the Security Configuration
page. If you have problems logging in because of a misconfigured IPR or a lost IP address, you can
still launch IWS by connecting a USB keyboard directly to the IPR:
T To manage the IPR via a USB keyboard
1. Attach a USB keyboard (and optionally a mouse) to the IPR and press
launch IWS on the attached TV monitor.
2. After logging in, check the IP address and/or configure the IPR as necessary. If you
don't have a mouse, use
3. When done, logout, press
interface in the configured
Tab and Shift-Tab to navigate.
Crtl-Alt-F2, and remove the keyboard. This restores the user
Start mode.
Ctrl-Alt-F1 to
Note You can use the IP address or the hostname to log into the IPR. Depending on your
network, you may need to enter a fully qualified domain name. For example, you may
need to enter
http://<hostname>.
http://<hostname>.<domain_name>.loc as the url rather than simply
Saving Changes
You must be logged in as an admin user to save changes; if logged in as a public user, no
configuration changes or maintenance operations will take effect. Once logged in you can
navigate and change configuration parameters as necessary. Each page has it's own
button that saves the changes you made on that page. Click
you've made on a page—do not click
Apply after each individual change. Note that file
Apply to save all of the changes
system writes, such as those resulting from a change to the configuration or modifying the
local user interface, may take several seconds. Do not reboot the IPR immediately after such
writes to avoid corrupting the file system and possibly losing data.
Note When making configuration changes, always press
selecting the
Default, an Apply is not necessary. A Default automatically applies your
Apply to save your changes. When
changes and may reboot the IPR depending on the parameters you changed.
Apply
10 © 2007 VBrick Systems, Inc.
Page 19
General Configuration
Configuration
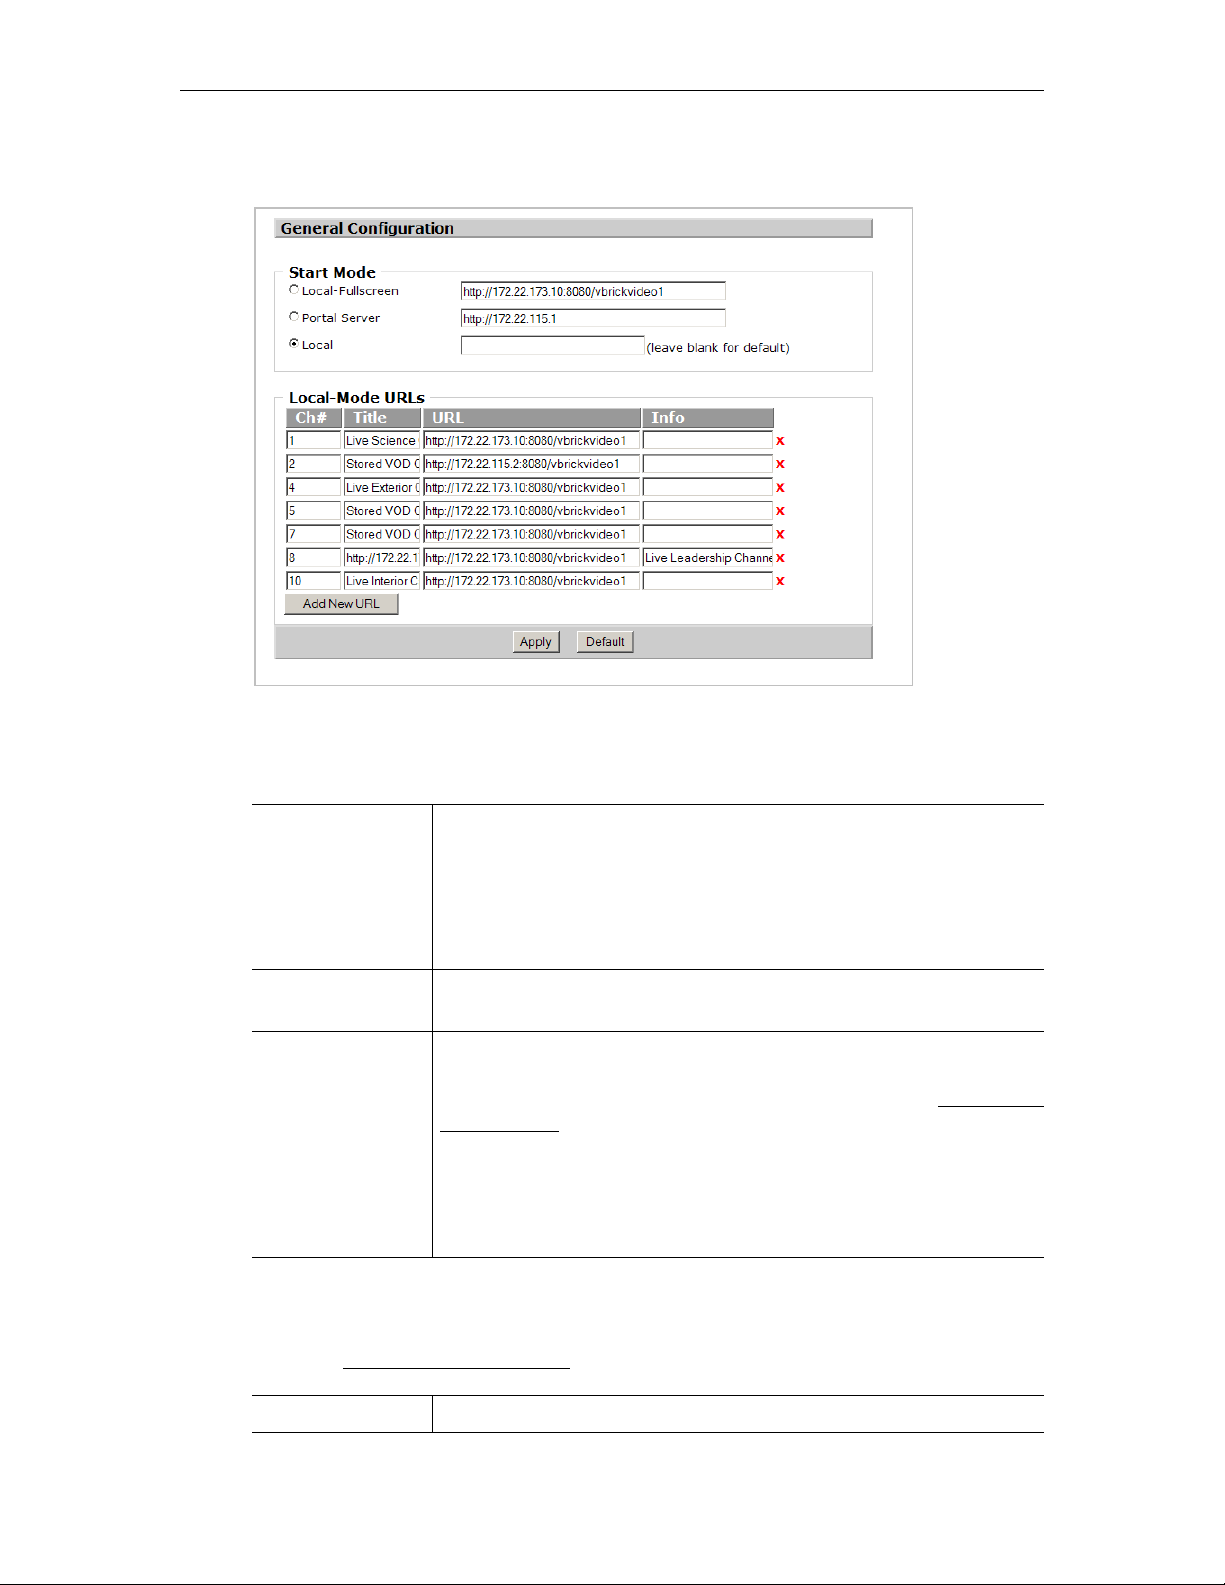
Start Mode
Controls the type of user interface and location of content that the IPR will display at startup.
Local-Fullscreen Use this option to set the unit to decode one channel and operate in
full screen mode at start up. You also need to enter a fully-qualified
URL for the channel as in the following example. If you use a public
URL, be sure it is accurate and has not changed. See Table 3 on page 8
for detailed Local-Fullscreen URL syntax.
http://<ip_address>:<port_number>/<channel_name>
Portal Server Use this option if the installation includes an EtherneTV Portal Server
and enter the Portal Server URL.
Local Use this option if the installation does not include an EtherneTV
Portal Server. Check
Default to use the default pages. Uncheck Default
and enter a Custom Local Path to use your own pages. See Local Mode
Configuration on page 23 for more about Local Mode. Note that the
Custom Local Path is relative to FTP root rather than absolute. For
example, the following relative path is valid:
Valid path:
sample\local.asp
Invalid path: c:\sample\local.asp
Local-Mode URLs
These fields are used to populate the program list on the IPR when Start mode is set to
Local. See Local Mode Configuration on page 23 for a discussion of how to add channels.
Ch# Channel number that will display on the IPR.
VBrick WM IP Receiver Admin Guide 11
Page 20
Title Channel title that will display on the IPR. Any number of alphanumeric
characters. Use any combination alphanumeric, special characters, and
spaces not exceeding 22 characters.
URL Channel URL with port number in the following format:
http://172.22.115.2:8080/vbrickvideo1/group1
Info Enter descriptive information. This information is displayed beneath
the preview window. Note: the
is used to view Portal Server data—not IPR data.
Network Configuration
Info button on the IPR remote control
General
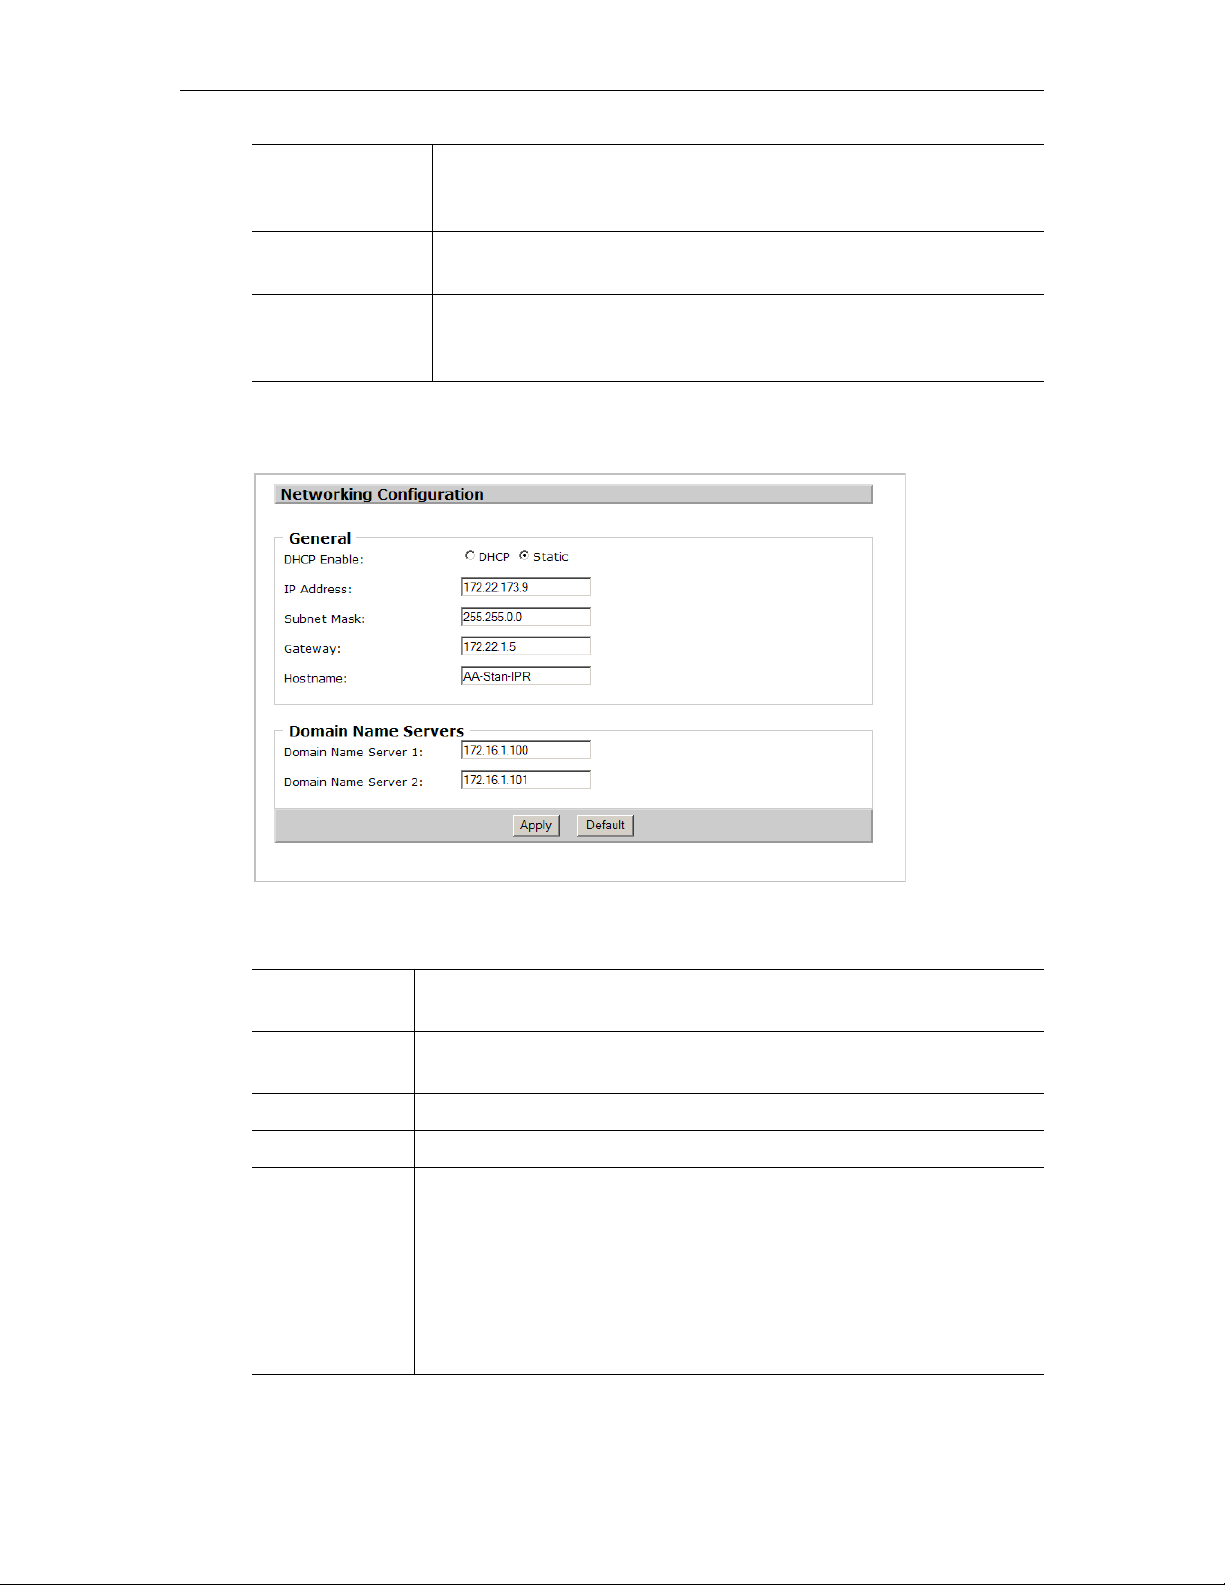
DHCP Enable Set to DHCP if a DHCP server is present. Otherwise set to Static and
configure an IP address in next field. Default = DHCP enabled.
IP Address Enter a static IP address from a network administrator if a DHCP server
is not present.
Subnet Mask Set when using a static IP address.
Gateway Set when using a static IP address.
Hostname You can use the IP address or hostname to log into the IPR. The
following rules apply to hostname:
• must less than 19 characters.
• first character must be a letter.
• last character must be a letter or digit.
• interior characters must be letters, digits, or hyphen.
• no embedded spaces or special characters allowed.
12 © 2007 VBrick Systems, Inc.
Page 21
Domain Name Servers
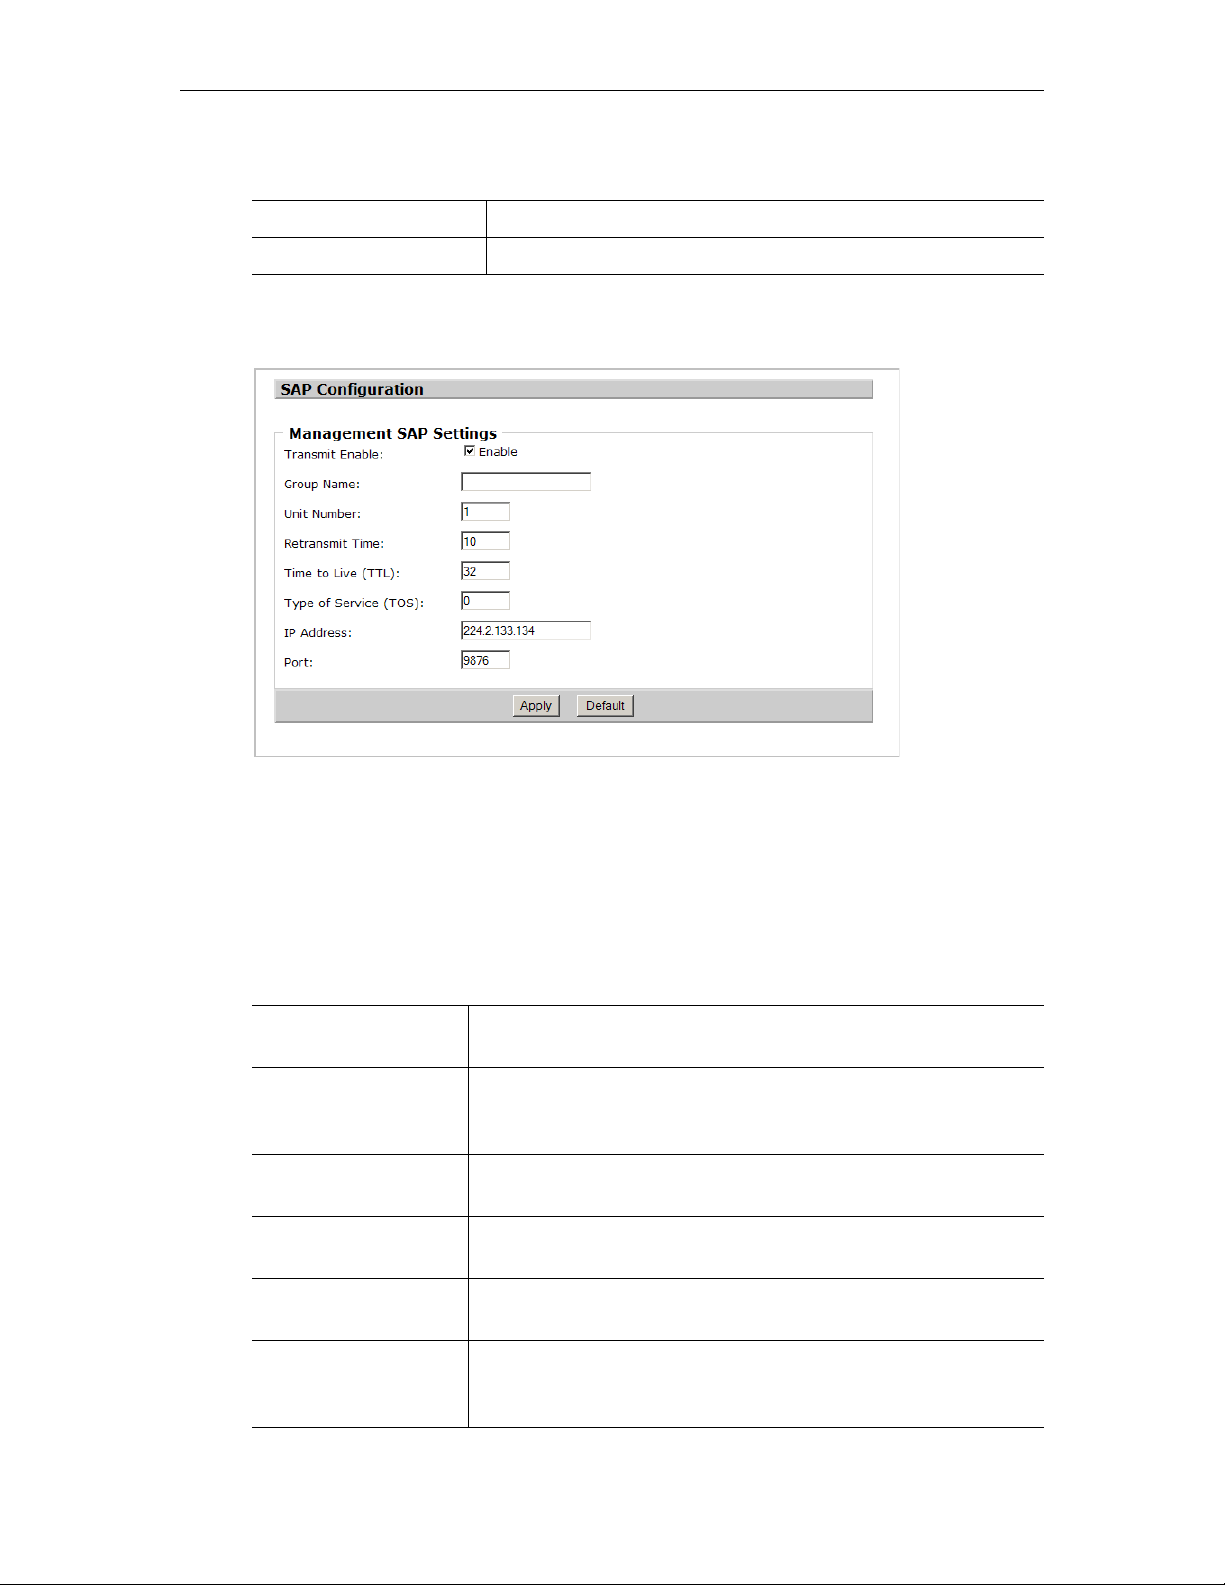
Domain Name Server 1 Enter IP address of the first DNS server if present.
Domain Name Server 2 Enter IP address of the second DNS server if present.
SAP Configuration
Configuration
Management SAP Settings
These options are used to enable or change the management SAP settings on the IPR. The
IPR transmits management SAPs for use by other VBrick devices and/or applications on the
network such as VBDirectory or the ETV Portal Server. SAPs (Session Announcement
Protocol) announce the presence of a device on the network. If configured, each VBrick
device periodically multicasts a SAP announcement to the network which can be detected by
listeners like VBDirectory.
Transmit Enable Enables transmission of the management SAP. Check to enable.
Leave blank to disable.
Group Name IPR can be assigned to groups for more organized management.
This is the group name that the IPR is associated with (for
example Finance).
Unit Number This value represents the specific IPR ID when it is part of a
group (for example Finance, unit 33).
Retransmit Time Specifies the interval (in seconds) between each transmission of
the management SAP.
Time to Live (TTL) Specifies the number of hops a SAP will travel before being
discarded.
Type of Service (TOS) Sets the value of the TOS bits in the IP header of the management
SAP packets. This parameter can be used to implement quality of
service within a network.
VBrick WM IP Receiver Admin Guide 13
Page 22
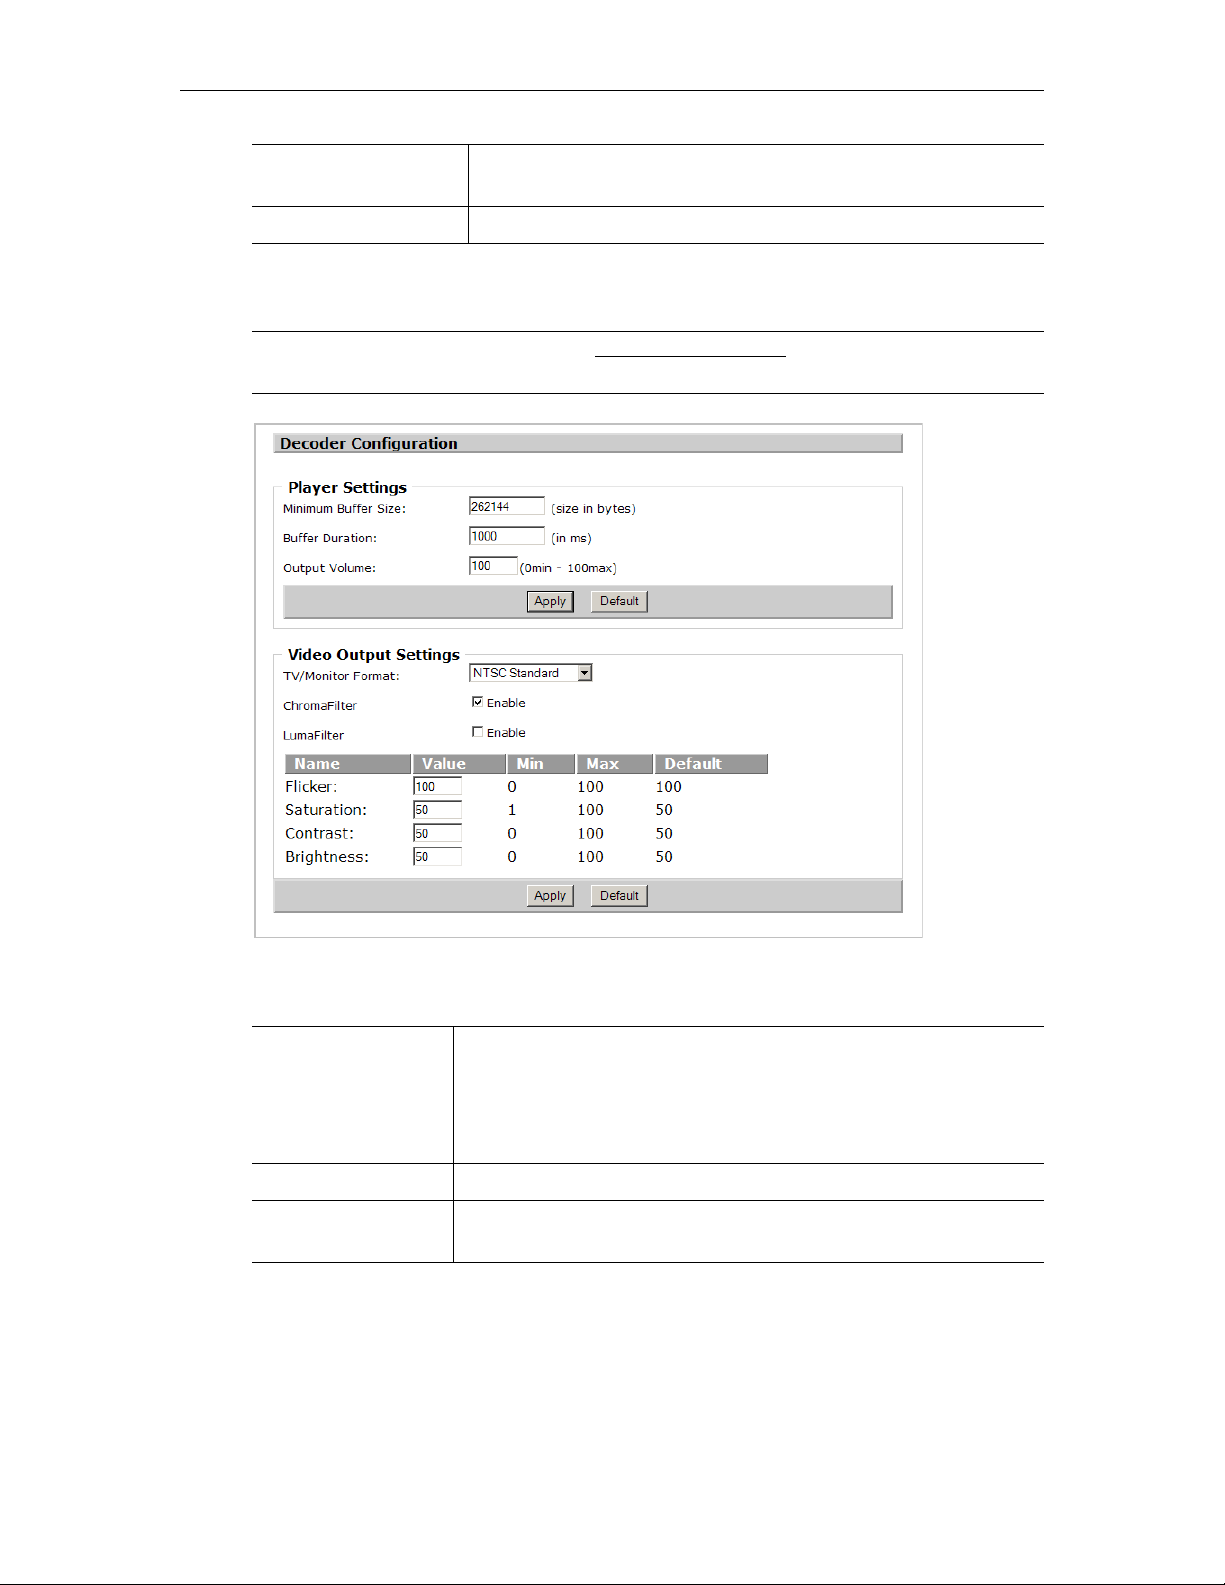
IP Address Specifies the unicast or multicast IP address that the SAP will be
sent to.
Port Specifies the IP port that the SAP will be sent to.
Decoder Configuration
Note Be aware that any changes to the Video Output Settings
configuration page will reboot the IPR resulting in a brief loss of connectivity.
(see below) on the decoder
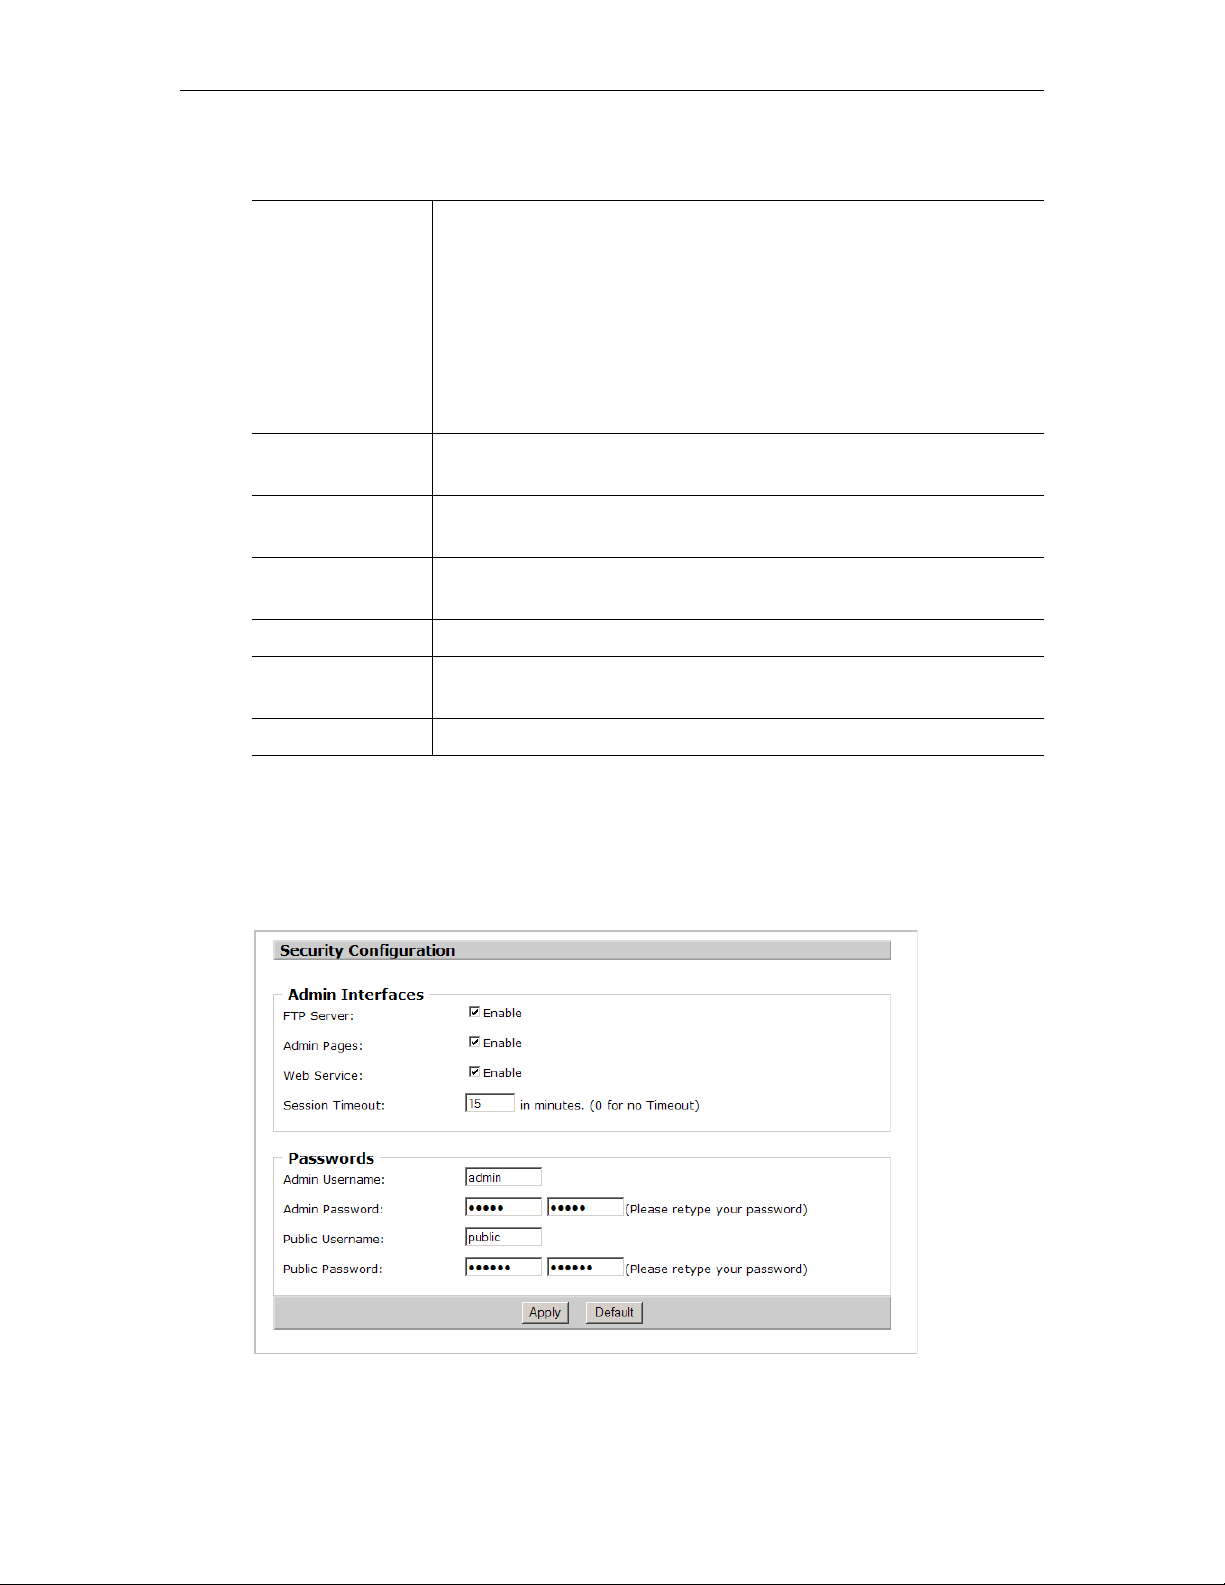
Player Settings
Minimum Buffer Size Default = 262144 bytes. This setting will allow more data to be
saved before it is displayed. This can be used in networks where
there is a high delay or congestion in the backbone. This parameter
should generally be left at the default value. However, if a stream will
not open, try setting at a higher value.
Buffer Duration Default = 1000 ms.
Output Volume Use to set default output volume. This can be overridden, adjusted,
or muted using the IR Remote Control.
14 © 2007 VBrick Systems, Inc.
Page 23
Configuration
Video Output Settings
Resolution • NTSC Standard
•PAL Standard
•NTSC Widescreen
•PAL Widescreen
• 800x600 (VGA)
• 1024x768 (VGA)
• 1280x720 (VGA)
• 1920x1080 (VGA)
ChromaFilter Chroma represents the color information in an image. Chroma is
typically paired with luma.
LumaFilter Luma represents the brightness in an image. Luma is typically paired
with chroma. Luma represents the image without any color.
Flicker Condition caused by the mismatch of vertical and horizontal refresh
rates.
Saturation The spectral purity or intensity of a color.
Contrast The control used to set the peak white level of the picture. A high
contrast picture will appear to have more detail.
Brightness Adjusts the light intensity of an image.
Security Configuration
This page lets you select the interfaces that can be used to access the IPR. It also manages
usernames and passwords. As a standard best practice, VBrick recommends that you change
(and carefully record) the admin and public passwords during initial configuration of the IPR.
VBrick WM IP Receiver Admin Guide 15
Page 24
Admin Interfaces
The Admin Interfaces are enabled by default. Be aware that if you disable the Admin Pages
you will not be able to configure the IPR; if you disable the Web Service you will not be able
to upgrade the IPR. If you disable both these interfaces, it will be difficult to regain control.
Contact VBrick Support Services for more information.
FTP Server Enables access to the FTP server for Local mode. Default = enabled.
Admin Pages Enables access to the Admin pages. Default = enabled.
Web Service Enables access to the IPR web service. Use to control the IPR via an
application other than IWS. Default = enabled.
Session Timeouts Defines the time period in minutes before an admin session times out.
Default = 15.
Passwords
The WM IPR has two privilege levels: admin and public. Admin users can set or change any
parameter. Only one admin user can be logged in at a time; additional admin users will not be
allow to log in. Public users have read-only access.
Admin Username Default = admin.
Admin Password Default =
Public Username Default = public.
Public Password Default = public.
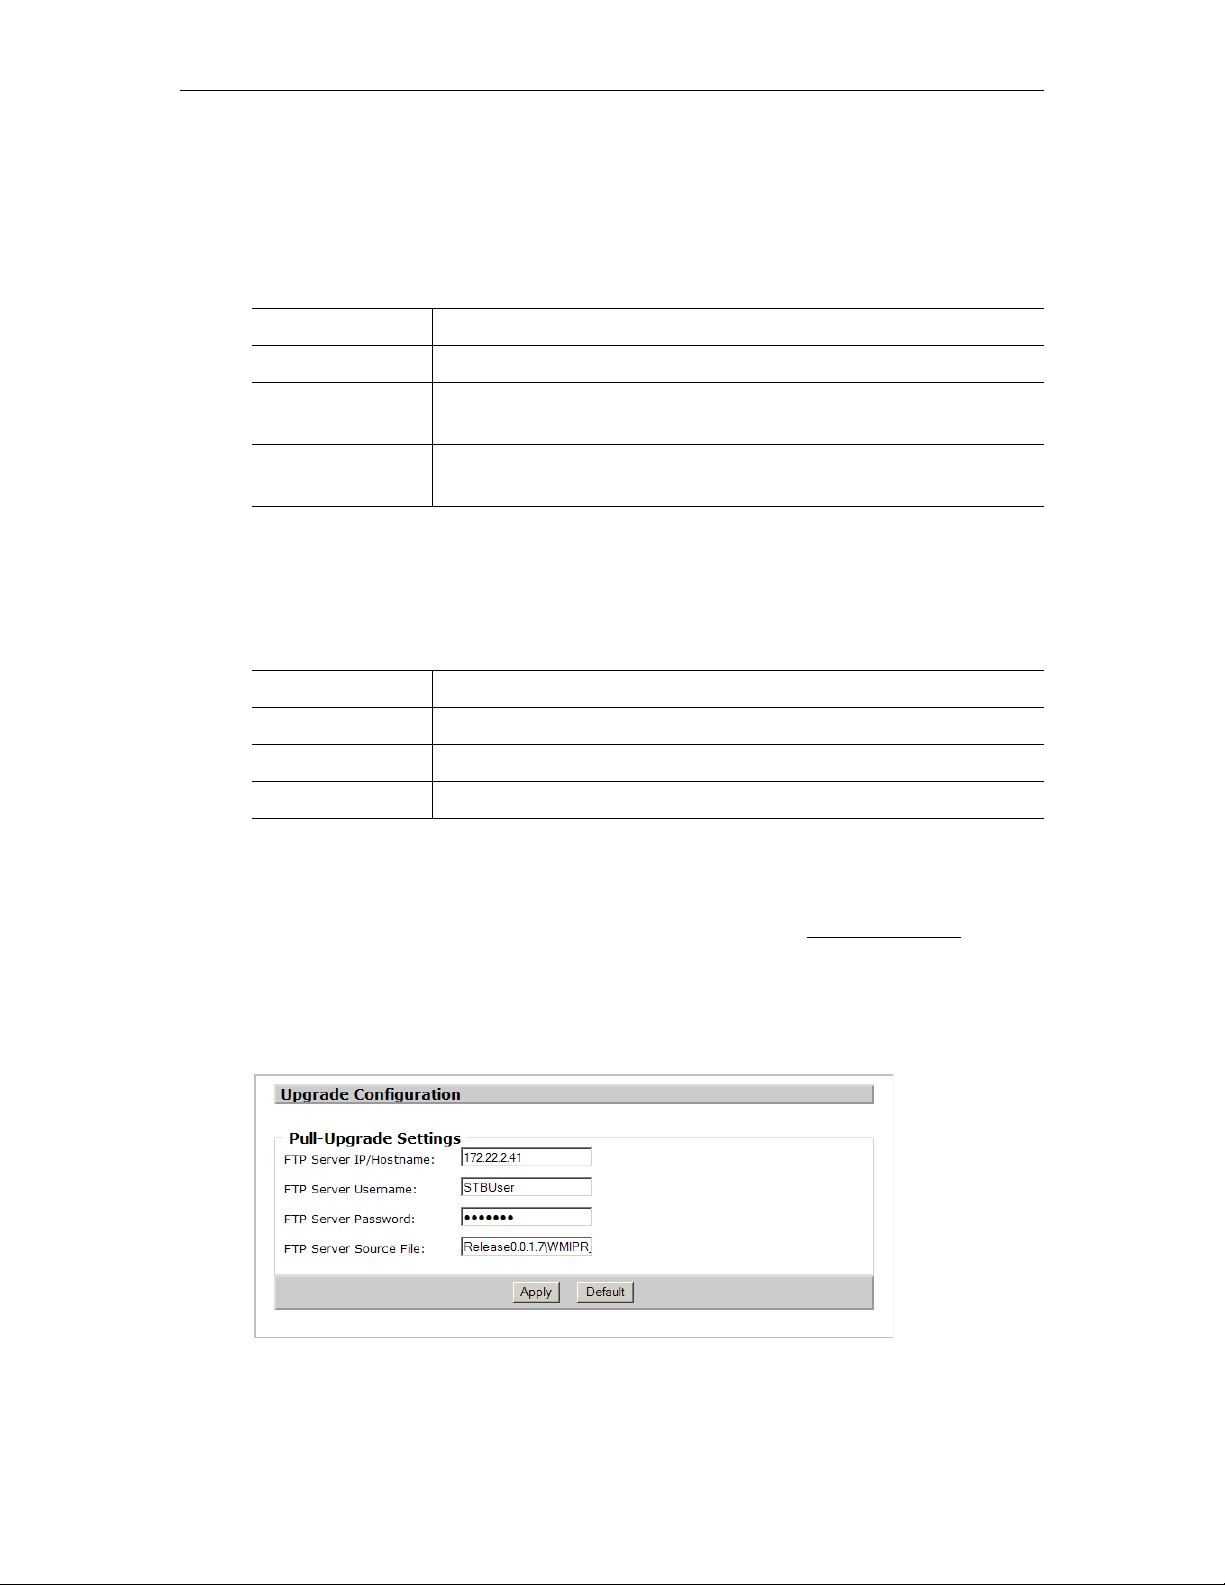
Upgrade Configuration
These settings are used to identify the FTP server that will be used for a manual IPR upgrade.
In most cases you will use the ETV-IPRDownload application (see Software Upgrade on
page 27) to upgrade IPR software. This application lets you automatically upgrade one or
more IPRs and provides detailed information and feedback. However you can also use the
Pull-Upgrade Settings explained below to run a manual upgrade on a single device. After
setting these parameters, go to the
admin.
Maintenance page and click Upgrade.
16 © 2007 VBrick Systems, Inc.
Page 25
Pull-Upgrade Settings
FTP Server IP Address/Hostname Hostname or IP address of the external FTP server
from which the IPR can access upgrade files.
FTP Server Username Username used to login to external FTP server.
FTP Server Password Password used to login to external FTP server.
FTP Server Source File Upgrade file name on external FTP server or path to
the file relative to FTP root.
Miscellaneous Configuration
Configuration
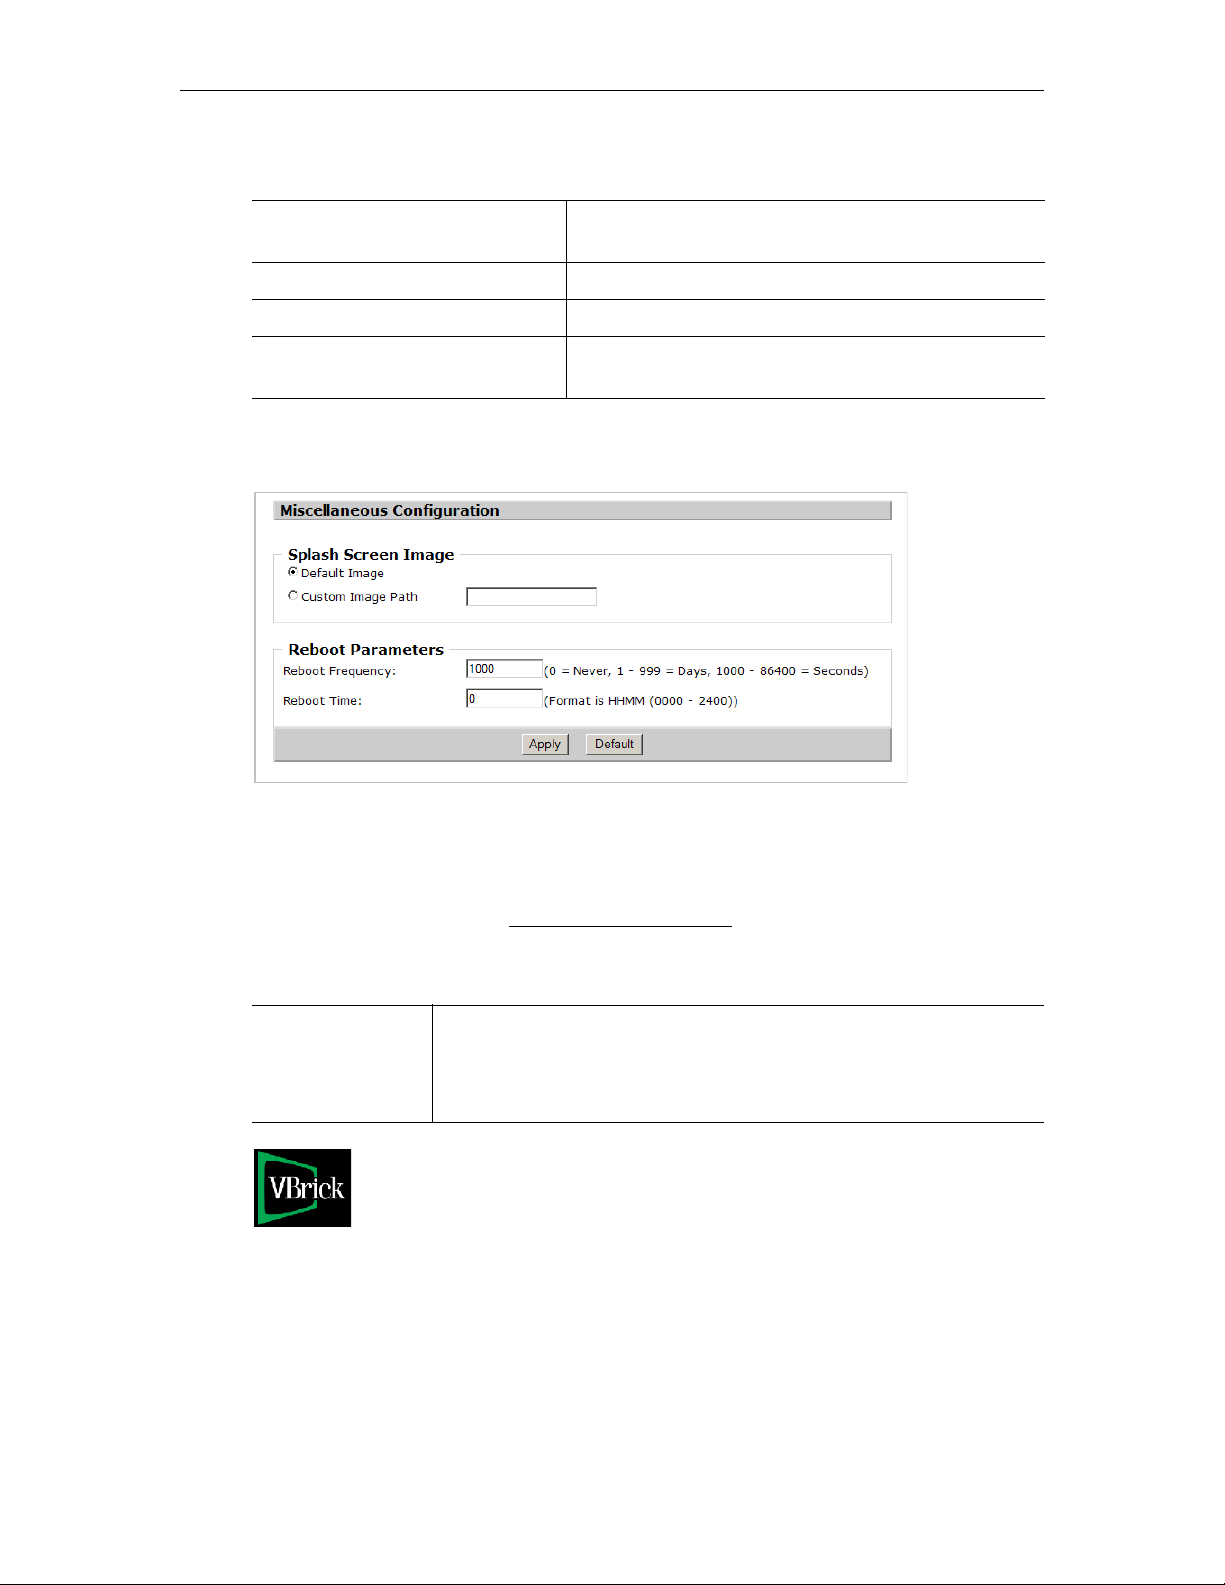
Splash Screen Image
This page lets you change the splash VBrick logo image (see below) that is briefly displayed
during startup or reboot. You can use any .jpg or .gif image. Simply upload the file to the user
FTP directory as explained in Customizing the Interface
image, be sure to test and/or resize as necessary. To view the image, reboot the IPR from the
Maintenance page.
Splash Screen • Default Image – use the default VBrick image file at startup.
• Custom Image Path – use a custom .jpg or .gif image at startup or
reboot. Enter the image path relative to the user FTP directory, for
example:
myImages\mySplash.gif
on page 24. After uploading the
Reboot Parameters
If necessary, you can use this page to configure the IPR for automatic reboot at a specified
interval from 16 minutes to every 999 days. The timing begins when the IPR is turned on and
the IPR will automatically reboot when the defined time has elapsed.
VBrick WM IP Receiver Admin Guide 17
Page 26

Reboot Frequency Default = 0; do not reboot. A number from 1–999 sets the number of
days between automatic reboot. A number from 1000–86400 sets the
number of seconds between automatic reboots. Note: Setting this value
on an IPR that was previously powered on can result in an immediate
reboot (if the value is set to a time smaller than the amount of time that
the device has been running since last reboot).
Reboot time Default = 0300. A four-digit time (HHMM) representing the hour/
minute that the reboot should occur (on a 24-hour clock). This
parameter is only used if the Reboot Frequency is set to days and not seconds.
If the frequency is in days, first the IPR will wait for the elapsed
number of days to pass, and then will wait for the next occurrence of
the specified time before rebooting. For example, if the IPR is
configured to reboot every 1 day at 1130 and is started on 01/01/2008
at 10:00AM. On 01/02/2008 at 10:00am the number of days (1) would
have elapsed however the IPR will wait until 11:30AM before
rebooting. This is useful to prevent the device from rebooting down
during core business hours.
18 © 2007 VBrick Systems, Inc.
Page 27
Chapter 3
Status, Maintenance & Help
Topics in this section
Status . . . . . . . . . . . . . . . . . . . . . . . . . . . . . . . . . . . . . . . . . . . . . . . . . . . . . . . . . . . . . . . . . . . 19
Maintenance . . . . . . . . . . . . . . . . . . . . . . . . . . . . . . . . . . . . . . . . . . . . . . . . . . . . . . . . . . . . . . 20
Help . . . . . . . . . . . . . . . . . . . . . . . . . . . . . . . . . . . . . . . . . . . . . . . . . . . . . . . . . . . . . . . . . . . . 20
Status
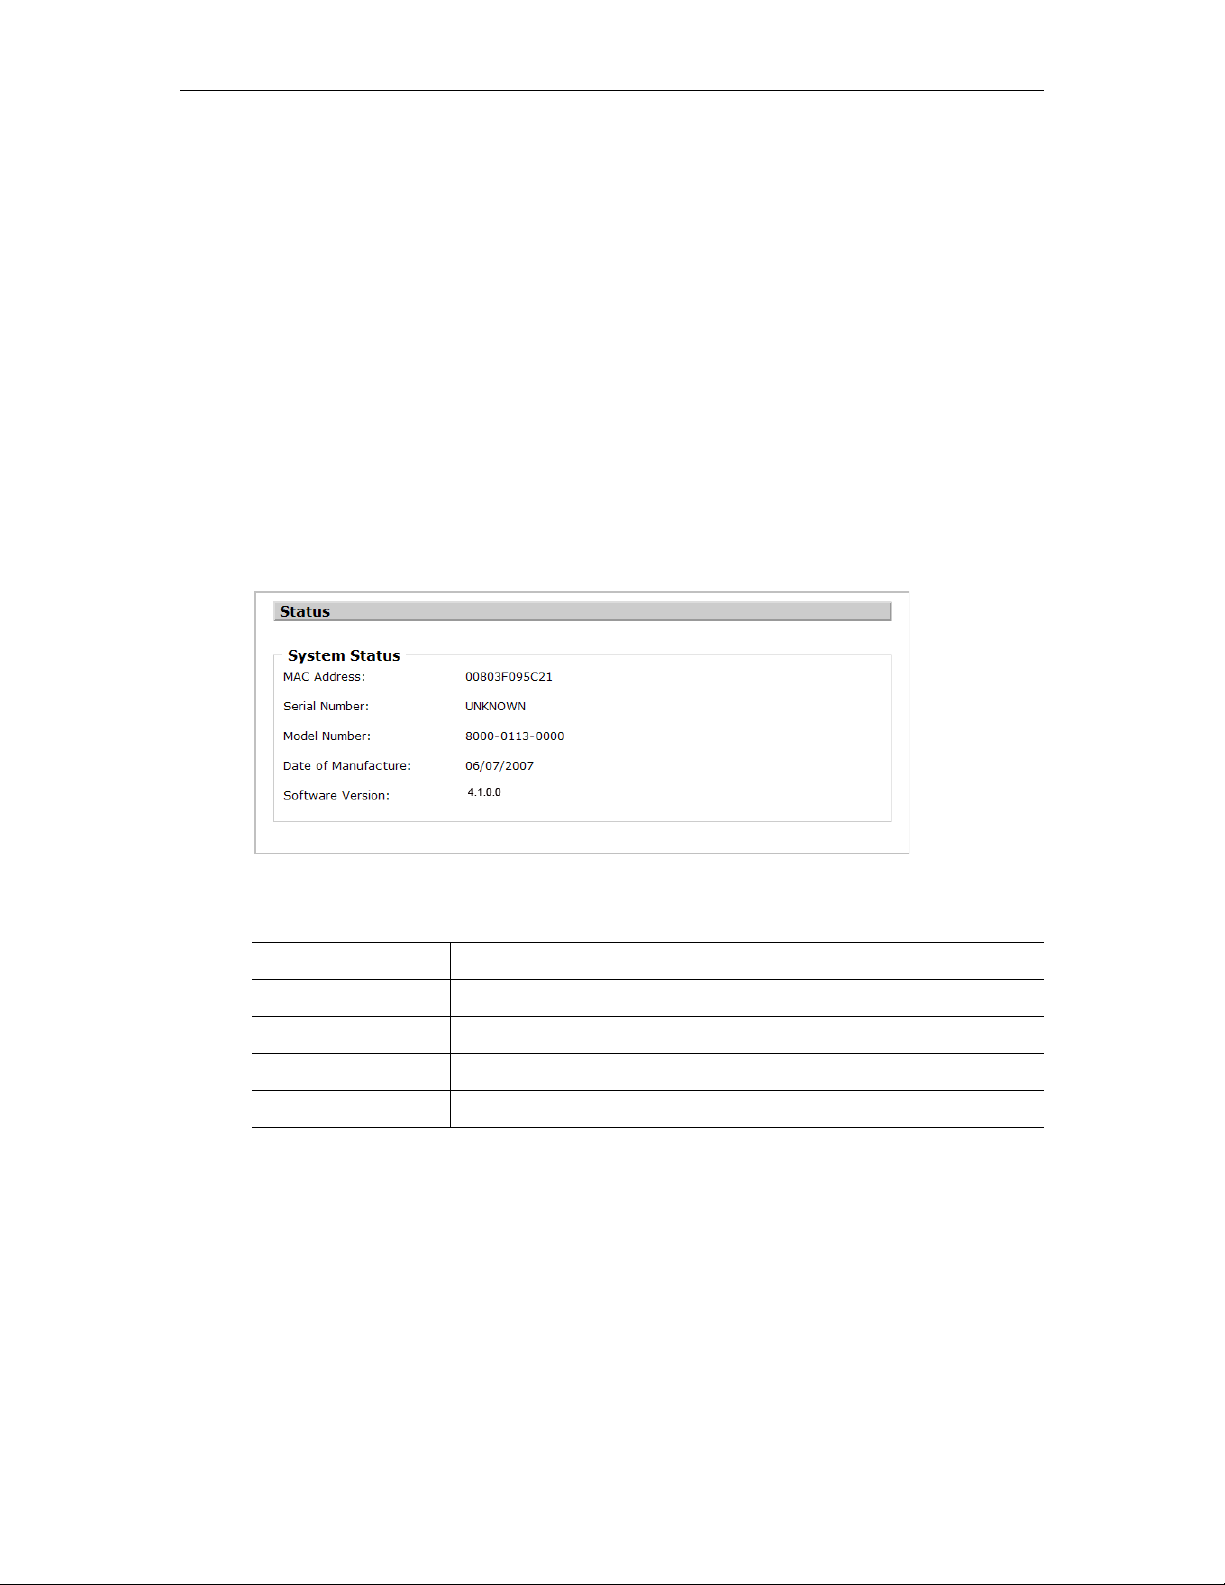
The fields on this screen as described below are read-only.
System Status
MAC Address Unique physical address of the IPR's network interface.
Serial Number VBrick serial number.
Model Number VBrick model number.
Date of Manufacture VBrick manufacture date.
Software Version Current software version of code.
VBrick WM IP Receiver Admin Guide 19
Page 28
Maintenance
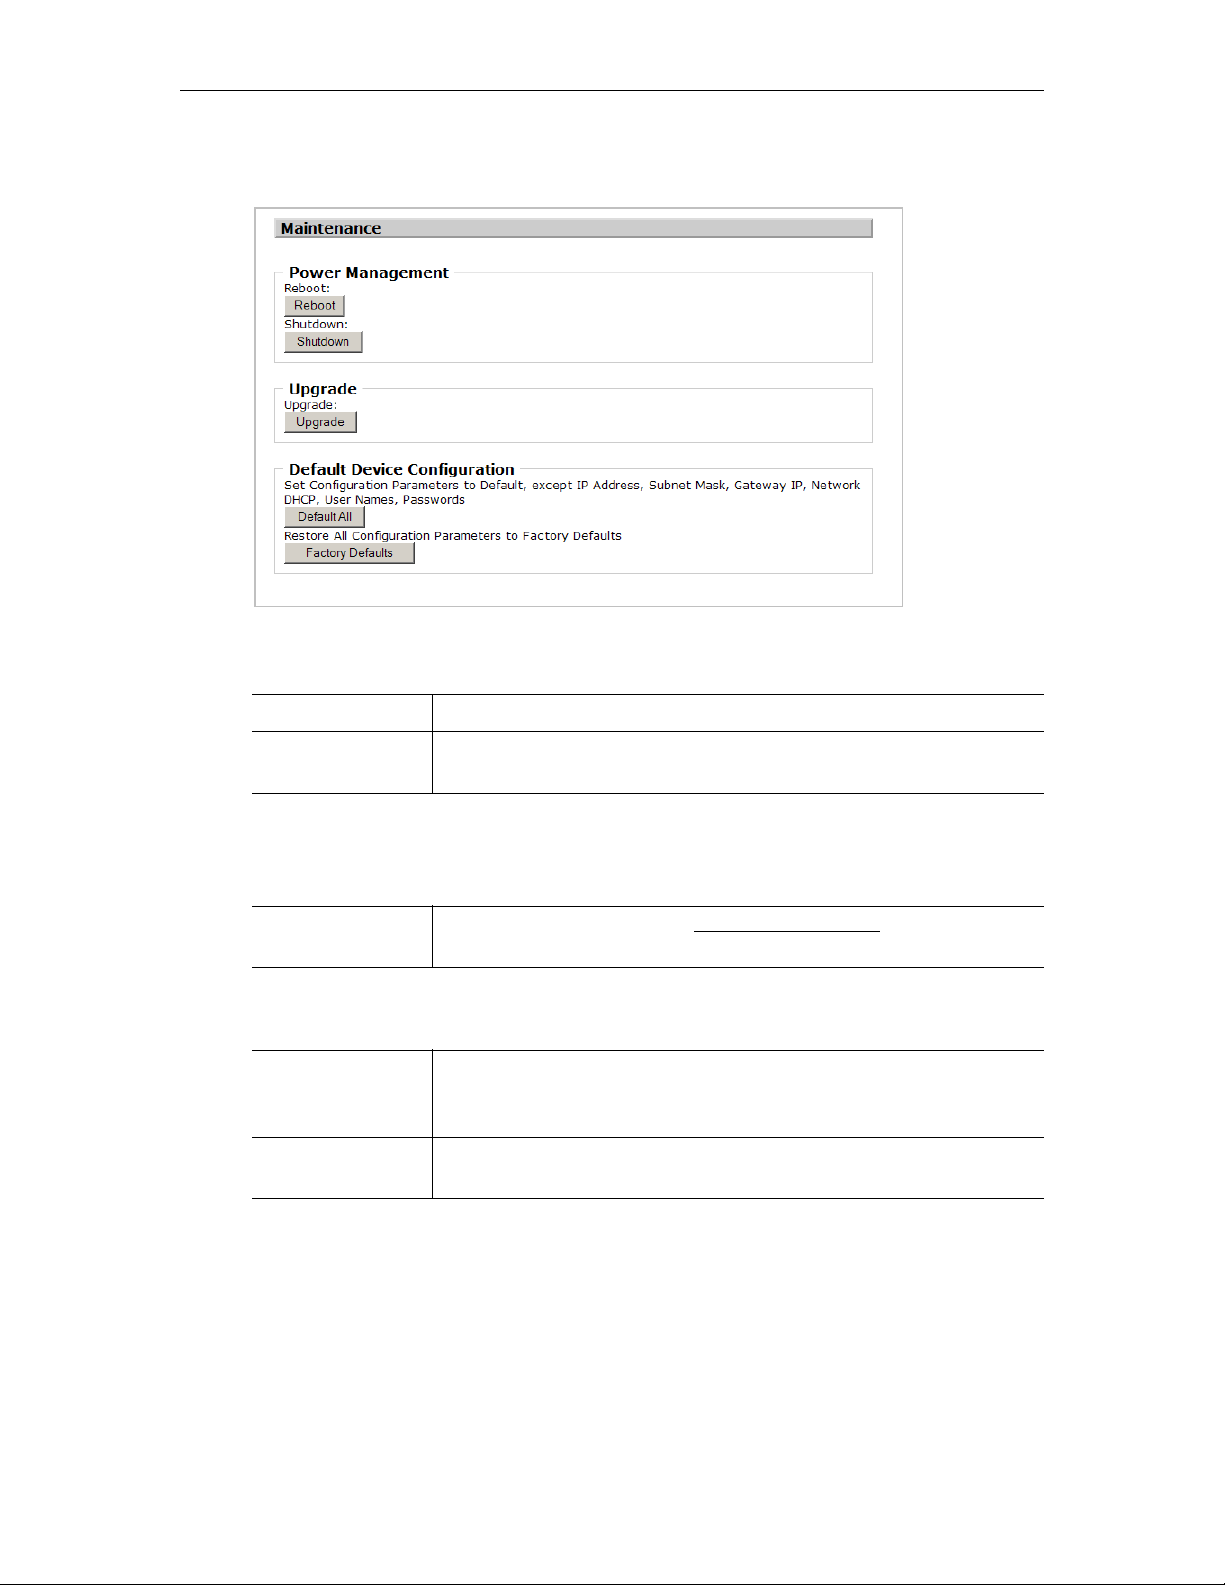
Power Management
Reboot Use to reboot the device. Must be logged in as an administrator.
Help
Shutdown Use to place device in standby mode. Must be logged in as an
administrator.
Upgrade
Pull Upgrade Settings
Upgrade Upgrade the device using the Pull-Upgrade Settings
must be logged in as an administrator.
on page 17. You
Default Device Configuration
Default All Set all configuration parameters to default, except IP Address, Subnet
Mask, Gateway IP, Network DHCP, user names, and passwords. You
must be logged in as an administrator.
Factory Defaults Restore all configuration parameters to factory defaults. You must be
logged in as an administrator.
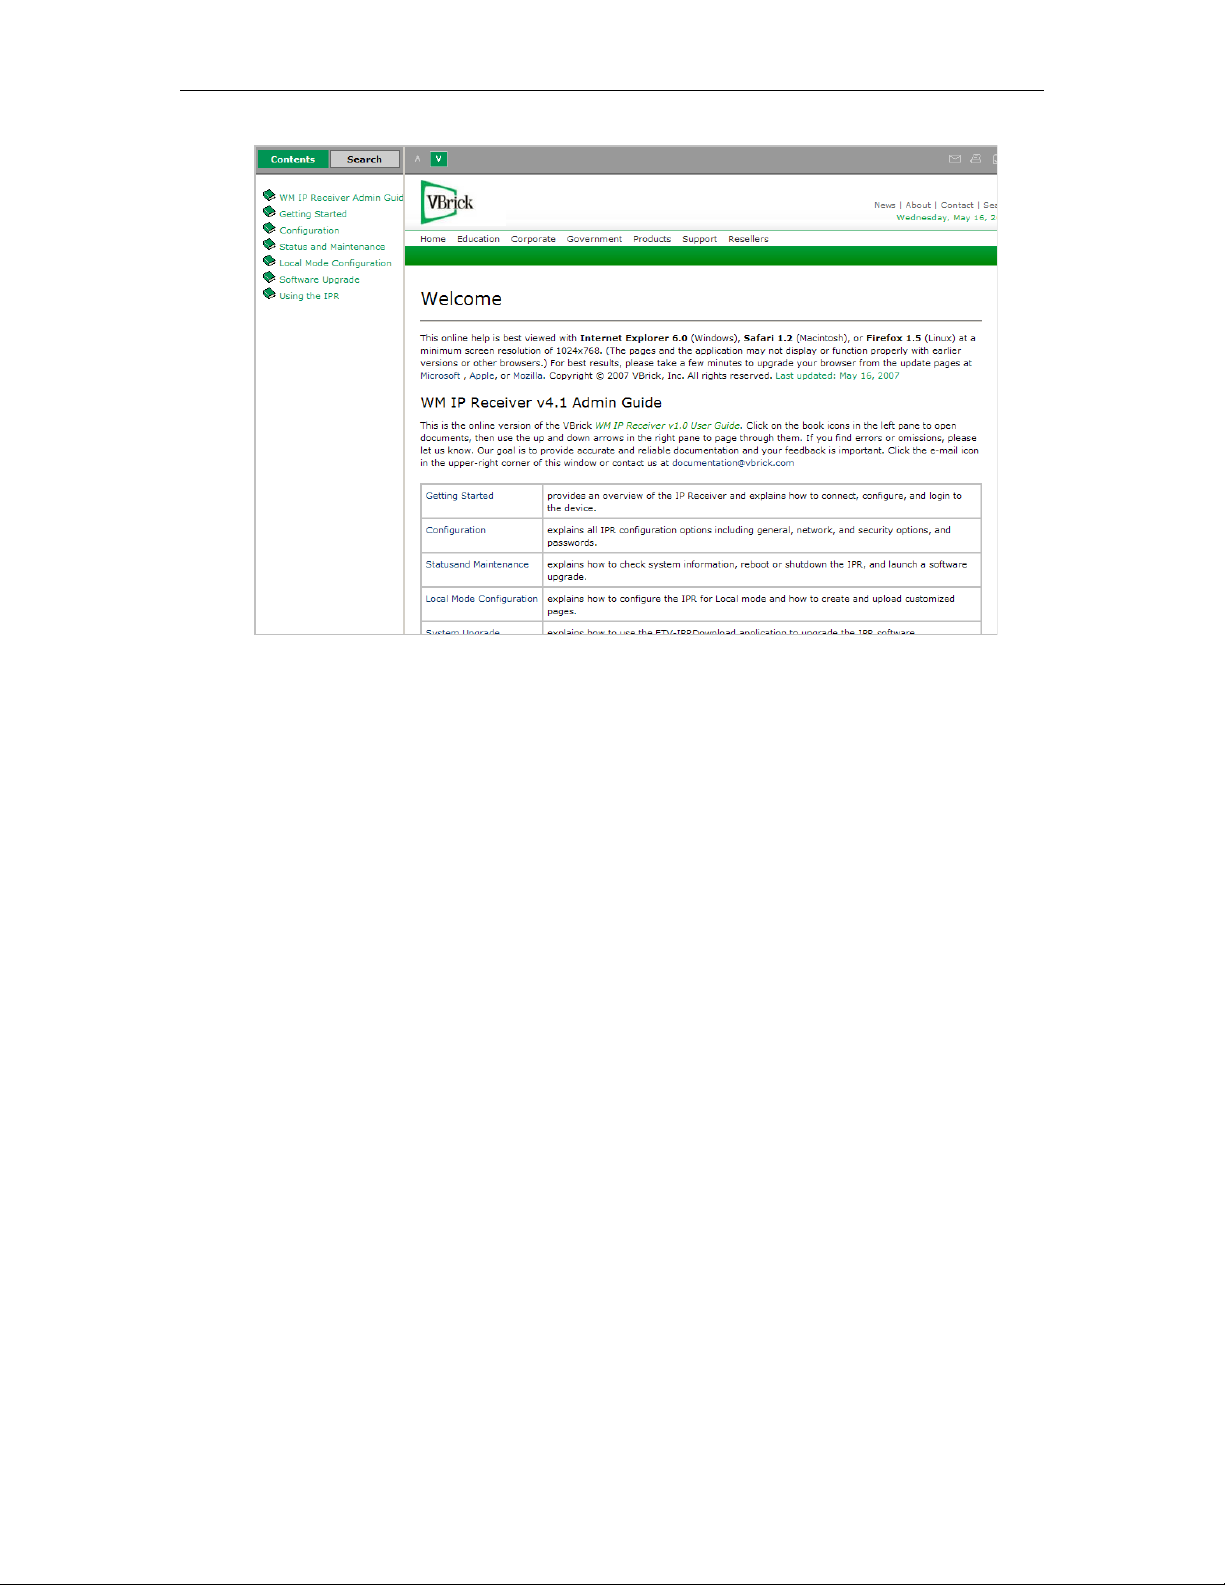
Use this option to display the searchable online help system that launches in a separate
browser window.
20 © 2007 VBrick Systems, Inc.
Page 29
Status, Maintenance & Help
VBrick WM IP Receiver Admin Guide 21
Page 30

22 © 2007 VBrick Systems, Inc.
Page 31

Local Mode Configuration
Topics in this section
Overview . . . . . . . . . . . . . . . . . . . . . . . . . . . . . . . . . . . . . . . . . . . . . . . . . . . . . . . . . . . . . . . . 23
Configuring Streams . . . . . . . . . . . . . . . . . . . . . . . . . . . . . . . . . . . . . . . . . . . . . . . . . . . . . . .23
Customizing the Interface . . . . . . . . . . . . . . . . . . . . . . . . . . . . . . . . . . . . . . . . . . . . . . . . . . . 24
Overview
When the Start mode is configured for Local on the General Configuration page, the IPR will
display a list of all streams that are currently configured on this page. In Local mode, the IPR
user interface is either a pre-configured "default" page or a customized page that you have
designed and FTPed to the IPR web server. The user interface consists of multiple files that
reside at the root level of the web server. Figure 6 below shows the default Local page after it
has been configured to include stream information.
Chapter 4
Figure 6. Default Interface in Local Mode
Configuring Streams
Use the following steps to add streams to the Local interface page. Note that changes to the
Local-Mode URLs are not saved until you press Apply. If you accidentally delete stream, and
did not press Apply, you can simply log out and log back in to recover.
T To add streams to the Local interface
1. Go to the
VBrick WM IP Receiver Admin Guide 23
General Configuration page in IWS.
Page 32
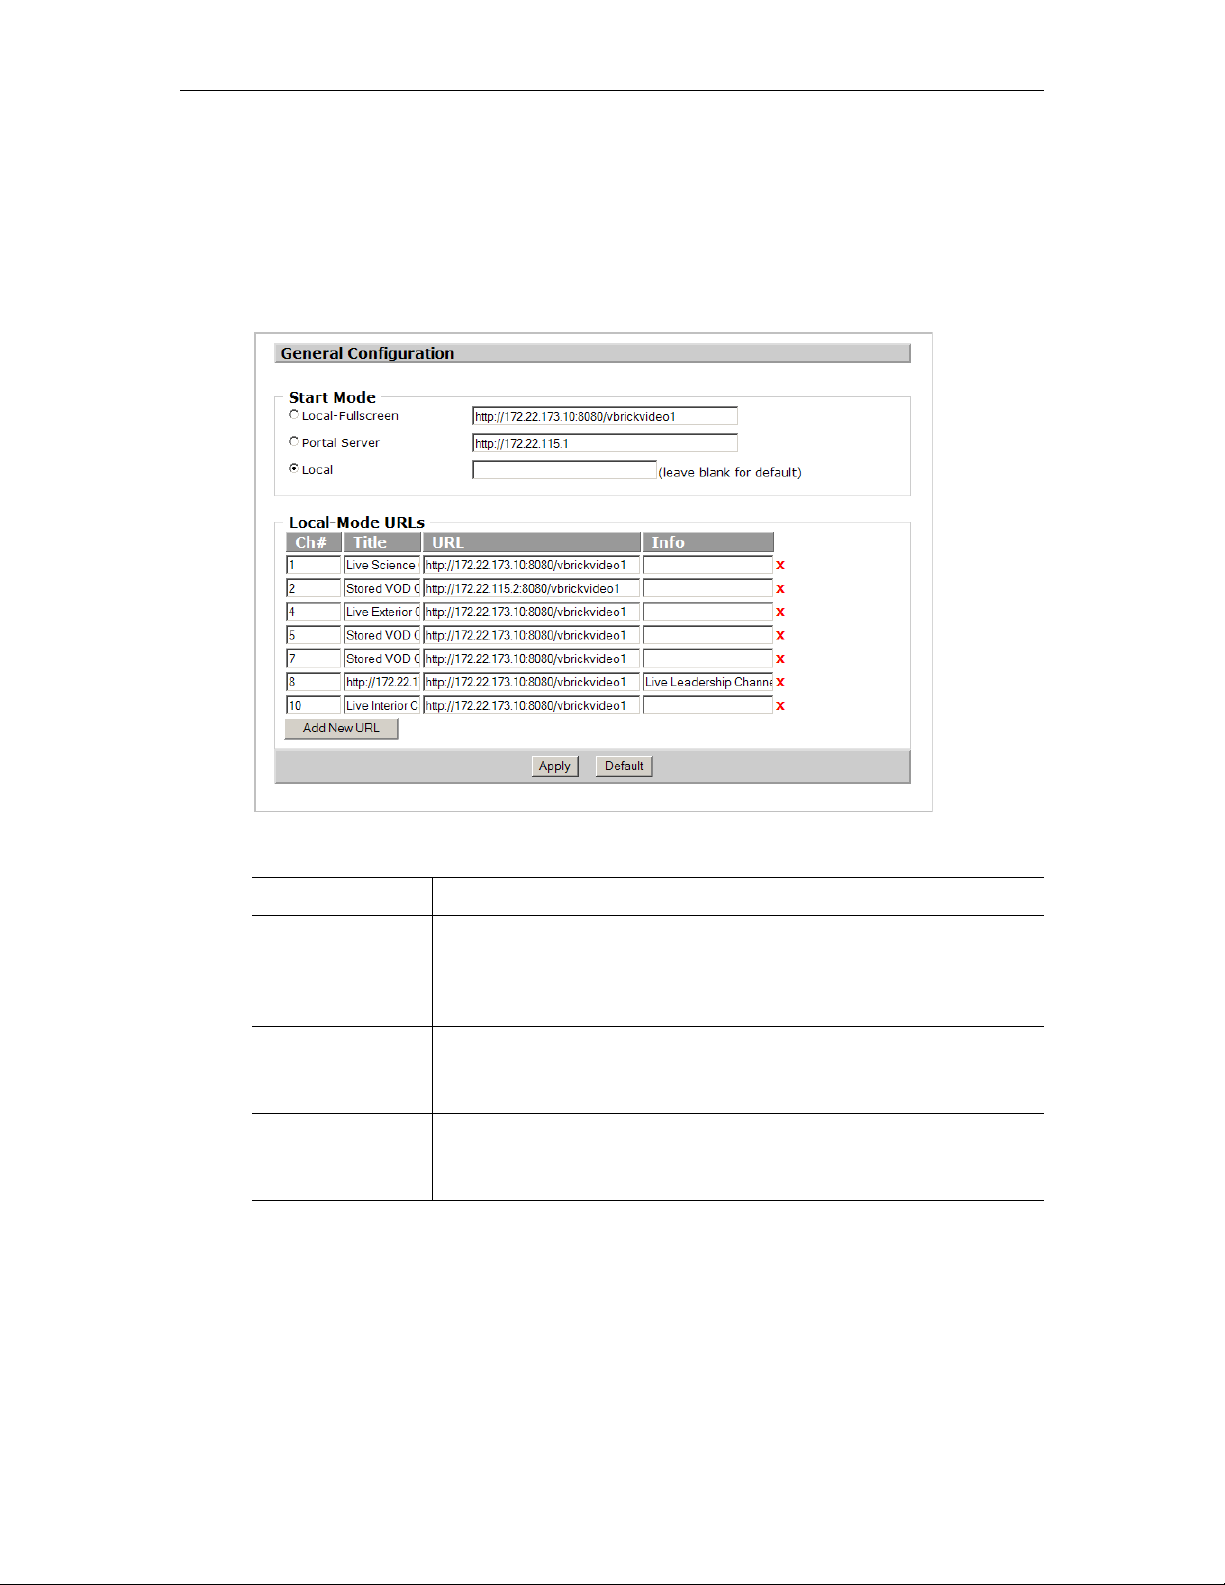
2. Click Add New URL to populate the page with empty fields for the new stream.
3. Complete all fields as explained below.
4. Repeat Steps 2 and 3 until all streams have been added.
5. Click
6. Click the red
Apply when done. No reboot is necessary.
X to remove a previously configured stream. Use carefully—there is no
warning message.
Figure 7. General Configuration Page
Ch# Channel number that will display on the IPR.
Title Channel title that will display on the IPR. This title corresponds to the
content provided by the URL field above. Use any combination
alphanumeric, special characters, and spaces not exceeding 22
characters.
URL This is typically the channel URL with port number in the following
format:
http://172.22.115.2:8080/vbrickvideo1 For a complete list of
valid URL syntax, see Table 3 on page 8.
Info Enter description information. This information is displayed beneath
the preview window. Note: the
is used to view Portal Server data—not Local mode information.
Customizing the Interface
The Local UI files consist of an .asp page and several JavaScript files and .gif images that
reside at the root level of the IPR web server in the sample folder. You can modify or change
these files as necessary to move page elements and/or create a different look-and-feel. You
can copy and modify the samples files on your local computer or you can create your own
user interface using
IPR, you can use Internet Explorer, another GUI-based FTP client, or the command prompt
local.asp as an example. To FTP upload/download files to or from the
Info button on the IPR remote control
24 © 2007 VBrick Systems, Inc.
Page 33

Local Mode Configuration
FTP client. Note that the FTP root folder has 8 MB of writable storage available for local UI
files and images.
The
sample folder at the root level of the FTP server has all the files that are used to create
the default local page. (These files are always available and are rewritten when you reboot the
IPR. For this reason, be sure to copy these files to a different folder if you customize the
interface.) Use these sample files to create your own local files and FTP them to the web
server. When you are done, go to the
General Configuration page, uncheck the Default Local
page, and enter the Custom Local Path to the new files, for example myLocalUI/myUI.asp
It is important to note that the WM IPR does not support anonymous login. When logging in
to the IPR FTP server from the Windows Explorer be sure to include the username and
password in the following format:
ftp://admin:admin@<ipr-IPaddress>
Note Windows Explorer FTP uses Internet Explorer components and works differently
with Internet Explorer 7 than with earlier versions. To view FTP files in the Windows
Explorer, open Internet Explorer 7, then go to
Browsing
logging in, go to the
T
To access the IPR FTP server from Windows Explorer
and check Enable FTP Folder view (outside of Internet Explorer). Then, after
Page menu and select Open FTP Site in Windows Explorer.
Tools > Internet Options > Advanced >
1. If using Internet Explorer 7, be sure you have the browser configured to
Folder view (outside of Internet Explorer)
as explained in note above.
Enable FTP
2. Open Windows Explorer (not Internet Explorer) and enter an FTP command using the
FTP username and password as shown in the following example:
ftp://admin:admin@<IPR-IPaddress>
VBrick WM IP Receiver Admin Guide 25
Page 34

26 © 2007 VBrick Systems, Inc.
Page 35

Software Upgrade
Topics in this section
Upgrading an IPR . . . . . . . . . . . . . . . . . . . . . . . . . . . . . . . . . . . . . . . . . . . . . . . . . . . . . . . . . 27
Using ETV-IPRDownload . . . . . . . . . . . . . . . . . . . . . . . . . . . . . . . . . . . . . . . . . . . . . . . . . . . 29
Upgrading an IPR
IPR upgrades are performed using the standalone VBrick upgrade application ETV-
IPRDownload
ETV-IPRDownload, you can (1) upgrade a single unit, (2) you can upgrade multiple units in
your network using management SAPs, or (3) you can upgrade multiple units in your network
using a manually-created configuration file (MPEG only). In a typical scenario, you use the
setup program provided by VBrick to (1) install the IPR software on an upgrade server and
(2) to install the download application on the same PC or a different PC.
The IP Receiver software is installed locally (usually on a machine with ETV Portal Server)
and then uploaded to target IPRs using the download application. It is important to note that
the download application needs an FTP server to upload files. An FTP server must be
running on the computer where the release files are located. It can be a third-party FTP
server, the FTP server installed with ETV Portal Server, or the FTP server installed with IIS.
For this reason you may wish to install the application on a machine that is hosting ETV
Portal Server (or on any machine that has IIS installed). If necessary, you can install the
download application first and then configure a remote FTP server later.
. This utility can be used to upgrade MPEG IP Receivers or WM IP Receivers. With
Chapter 5
Uninstalling the IPRDownload Application
If you have an existing version of ETV-IPRDownload already installed, you must remove it
using the Control Panel before you can upgrade the IPR with new software.
T To uninstall the Download Application
1. Go to
2. Select
Start > Control Panel > Add or Remove Programs.
VBrick EtherneTV IP Receiver Software and click Change/Remove.
Installing the Download Application
You can have multiple IP Receiver software release packages installed on the same server.
Each release is installed in the default location in a separate folder. You can install the
download application and the software release files on the same machine, or on different
machines. During installation, you are prompted to install the IPR software, the upgrade
application, or both. The IPR software release and the download application can be installed
on any computer running Windows 2000 or higher.
Note Be aware that if you do not already have an FTP server installed, you will need the
installation disks for your operating system.
VBrick WM IP Receiver Admin Guide 27
Page 36
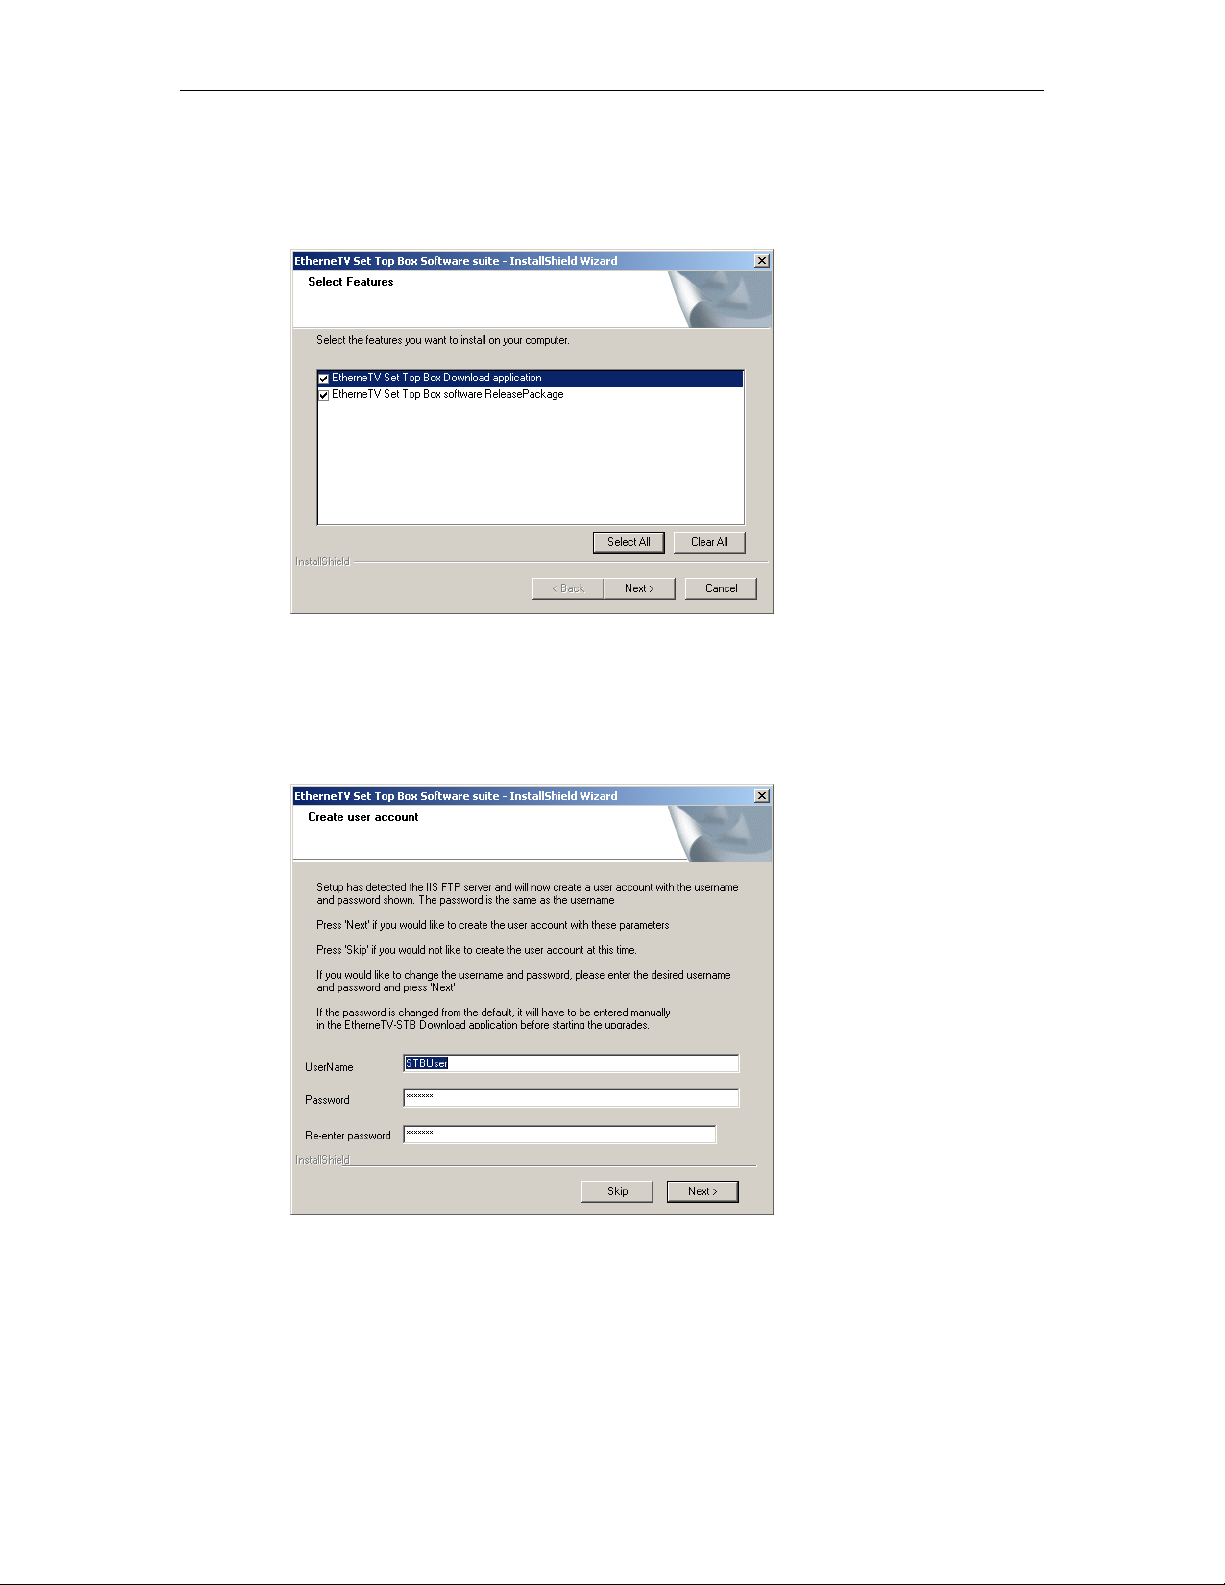
T To install IPR software and/or the download application
1. Double-click on
click
Next to continue.
2. Select the features you want to install: the
Setup_IPR_x_x_x.exe in the installer folder to launch the installer. Then
Download Application, the Release Package, or
both. Then click Next. (If you select only the Download Application, you will not be
prompted to create an FTP user account as explained below.)
3. Select an installation folder for the
C:\Program Files\VBrick\
Download Application and click Next. The default is
4. In this scenario, the installer has detected an FTP server and will create a user account.
STBUser is the default name and password for the FTP account. (If you change the
default user or password, you will have to enter them manually each time you run a
download.) Press
Next, confirm, and press Next again (or Skip this step entirely if you do
not want to create an FTP account at this time). Note that if an FTP server is not
currently installed on the server machine, you may be prompted for the installation disk.
28 © 2007 VBrick Systems, Inc.
Page 37

Software Upgrade
5. Select a destination folder for the Release Package and click Next. The default is
c:\inetpub\ftproot\STBUser\Releasexxxx. (All Release Packages have incremental
numbers in separate folders.)
6. Click
7. Navigate to
Finish when done.
Start > All Programs > VBrick > ETV-IPRDownload to launch the download
application.
Before You Begin
Before you begin an upgrade, be aware of the following:
•If the Release Package files (typically in c:\inetpub\ftproot\STBUser\Releasexxx) are
installed on a computer running Windows XP, you must turn off the Windows Firewall
while running the upgrade. Otherwise the upgrade will fail.
• The download application needs an FTP server running on the computer where the
release files are located. It can be a third-party FTP server, the FTP server installed with
ETV Portal Server, or the FTP server installed with IIS. If you are using the FTP server
installed with IIS and the IP address changes for any reason, make sure you reconfigure
the new IP address in IIS.
Using ETV-IPRDownload
IPR upgrades for MPEG (v3.7.1 and higher) and WM IP Receivers (v4.1.0 and higher) are
performed using the standalone VBrick download application ETV-IPRDownload. With ETV-
IPRDownload
network using the management SAPs (Session Announcement Protocol). These SAPs
identify the presence (and revision level) of all IPRs/STBs on the network (see Table 4, SAP
Information). If you are upgrading multiple IPRs/STBs, it will generally take several minutes
to upgrade each one so plan accordingly. Important: When selecting devices by IP address, be sure
to click in the left column—not on the IP address. Use
multiple units.
Note If the
T To upgrade an IPR using ETV-IPRDownload:
1. Be sure all IPRs are powered on.
2. Select an
a. If you select
b. If you select
, you can (1) upgrade a single unit, or (2) you can upgrade multiple units in your
Release Package files (typically in c:\inetpub\ftproot\STBUser\Releasexxx) are
installed on a computer running Windows XP, you must turn off the
while running the upgrade. Otherwise any upgrade you attempt will fail.
Upgrade preference. There are two ways to upgrade your IP Receivers.
Upgrade using management SAPs, the device list is auto-populated.
Simply select the units to upgrade and click
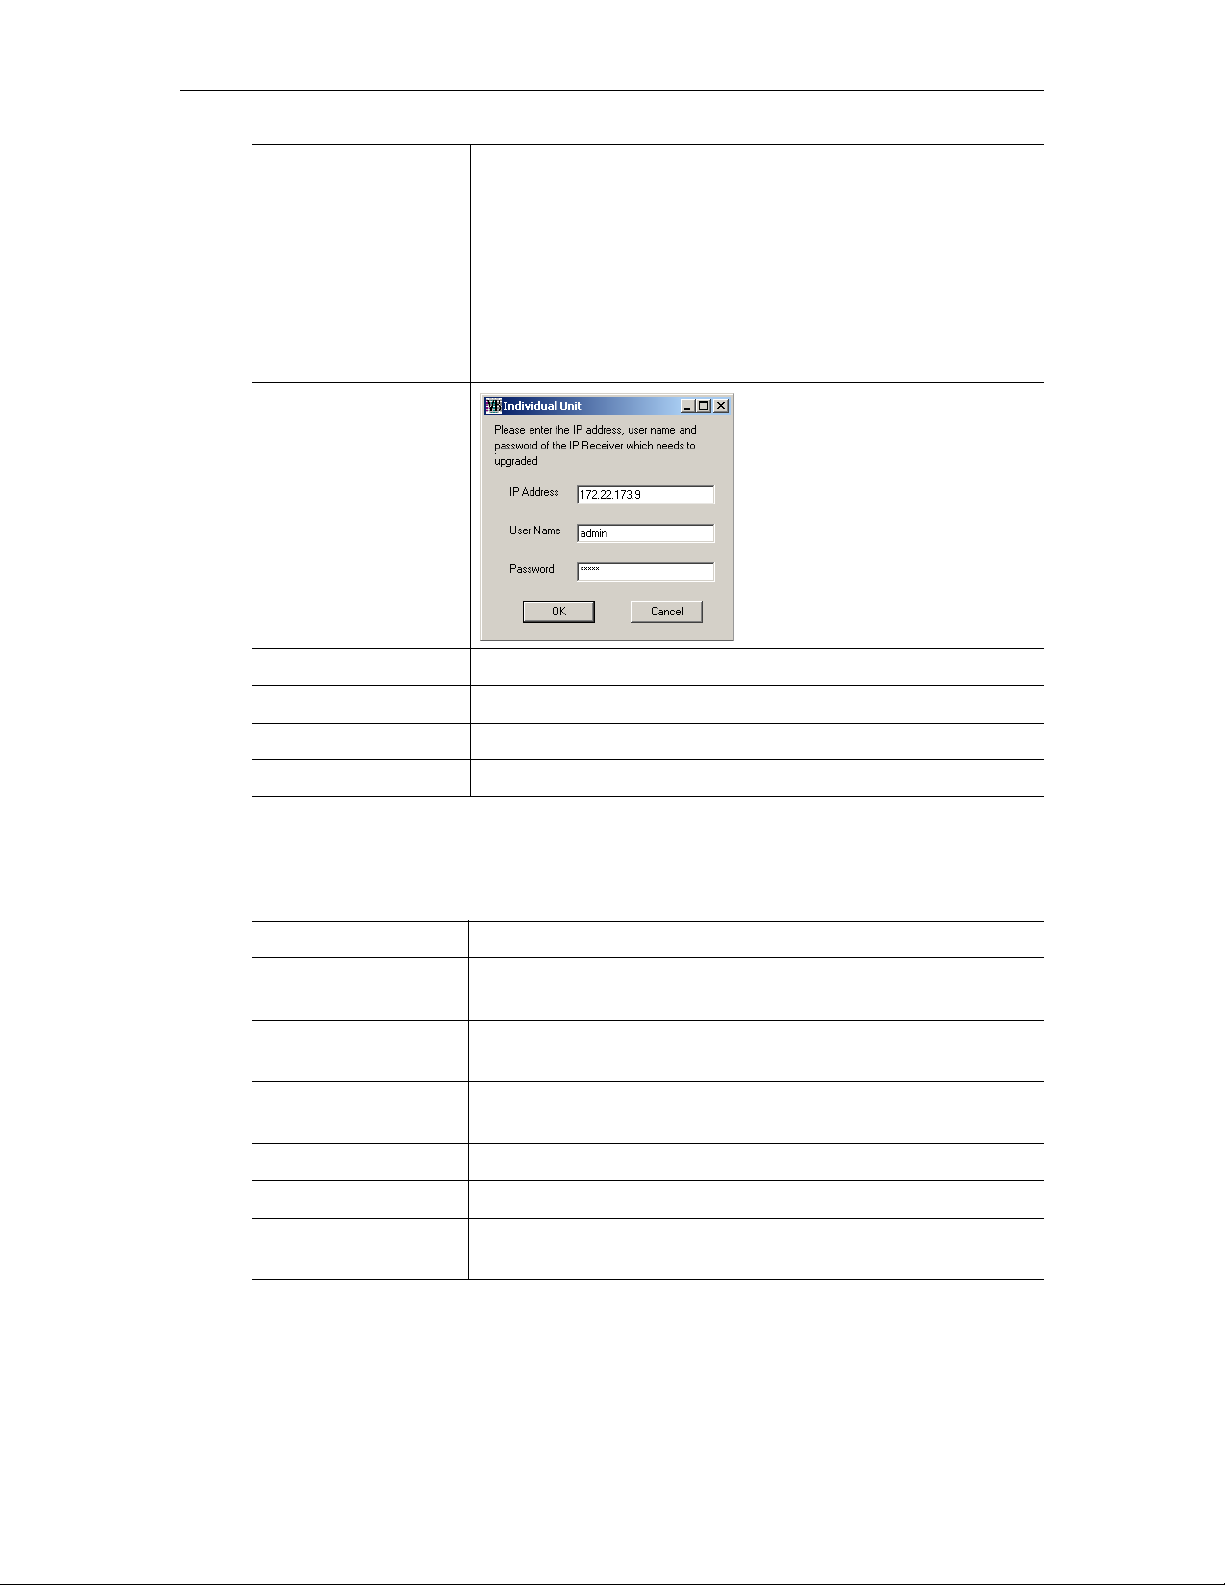
Upgrade individual unit, click Start Upgrade and enter the IP address and
password of the unit to upgrade. Click
Ctrl + Click and Shft + Click to select
Windows Firewall
Start Upgrade.
OK to start.
VBrick WM IP Receiver Admin Guide 29
Page 38
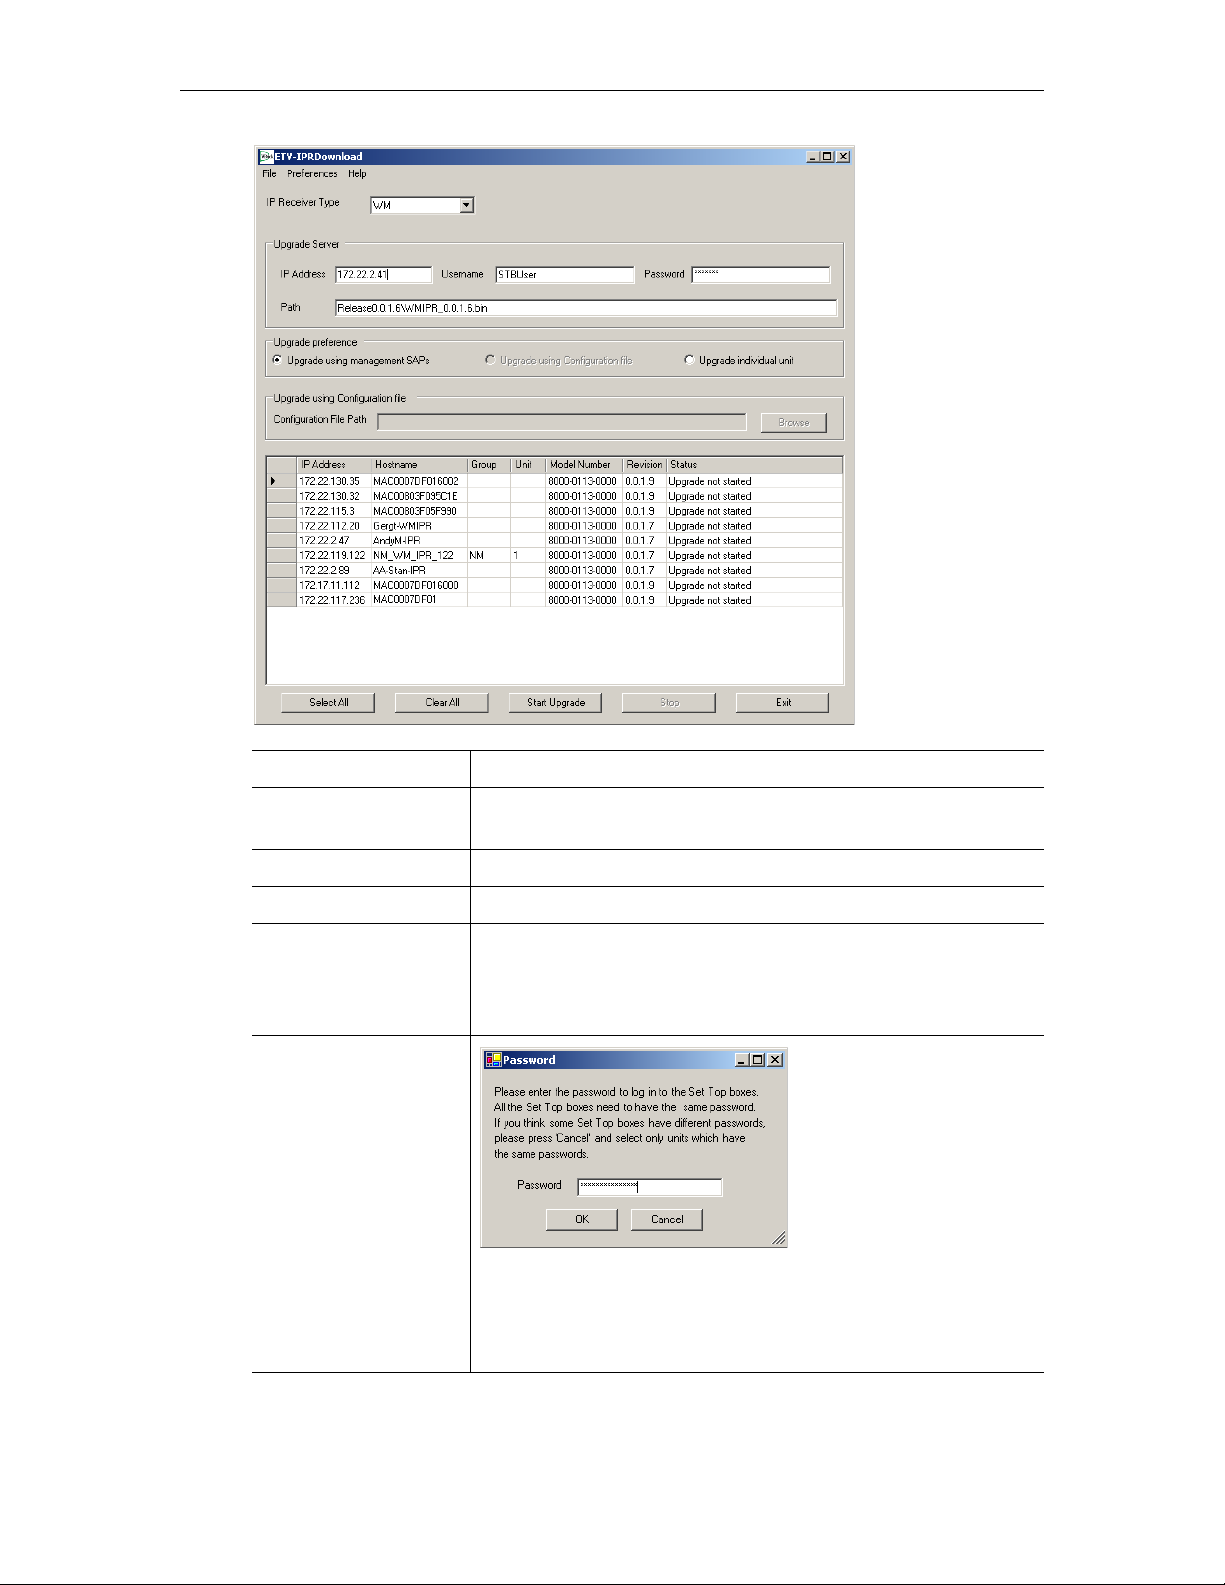
IP Receiver Type Select MPEG or Windows Media.
IP Address IP address of upgrade server where the Release Package files are
located.
Username Name of FTP account on the upgrade server.
Password Password used to login to the FTP server.
Path The relative path to the folder in which Release Package files are
located. Enter a relative path for the configured username. Do not
enter an absolute path. (Note that the Release Packages are
numbered incrementally in separate folders.)
Upgrade using
management SAPs
Upgrade using the SAP
(Session Announcement
Protocol) emitted by the
IPR. This automatically
populates the list box with
all available IPRs. Select
individual units and click
Start Upgrade. A popup
will prompt for Username
and Password. Note that all WM IPRs must have the same user
name and password. If some are different, the upgrade will fail
with a message shown in the
Status column (see Table 4, SAP
Information).
30 © 2007 VBrick Systems, Inc.
Page 39
Software Upgrade
Upgrade using
Configuration file
(MPEG IPRs only. This option is not available for WM IPRs.)
Upgrade using a text file that identifies the IP address and the
password used to login to the IP Receiver. This radio button
activates the
Configuration File Path field and you can Browse to a
configuration file if available. A sample pipe-delimited
configuration file is shown here:
172.22.133.1|admin
172.22.133.2|admin
172.22.133.3|admin
Upgrade individual unit
Upgrade a single unit. Select the
radio button and click
Upgrade
. A popup will prompt
Start
for IP Address, Username, and
Password, and automatically run
the upgrade.
Configuration File Path MPEG IPRs only. Path to a pipe-delimited configuration file.
Select All Selects all IPRs in the list box.
Clear All Deselects all IPRs in the list box.
Start Upgrade Starts an upgrade after you selects units to upgrade.
The following table shows the SAP information displayed in the list box for each IP Receiver
when you select Upgrade using Management SAPs.
Table 4. SAP Information
IP Address IP Receiver IP address.
Hostname The VBrick hostname set in the Configuration: Ethernet >
Management page.
Group The group name the IPR is associated with on the Configuration:
Network > Management page.
Unit The Unit Number of the IPR on the Configuration: Network >
Management page.
Model Number IP Receiver hardware model number.
Revision IP Receiver software revision level.
Status Upgrade status, for example, not started, in progress, failed, unable
to connect, etc.
Once an upgrade starts, do not close the application until the status of all initiated upgrades
changes to
Upgrade not needed, Upgrade successful or Upgrade failed. If you close the
application too soon, the status of some units may not display correctly when the application
restarts. These units may include those which had errors during the upgrade process. The
application can be safely closed after the status of all units has been resolved and you have
corrected any errors.
VBrick WM IP Receiver Admin Guide 31
Page 40

Logging Upgrade Activities
The ETV-IPRDownload application logs all commands and responses between the application
and the upgrade server, and between the application and the IP Receivers. To enable/disable
application logging, go to
records all error codes, success codes, checksums, etc. Since each new upgrade overwrites the
log, be sure to check the log file (and save if necessary) after a failed upgrade. The log.txt
file is saved by default in: C:\Program Files\VBrick\ETV-IPRDownload.
Preferences > Logging. For debugging purposes, the log file
32 © 2007 VBrick Systems, Inc.
Page 41

Using the IPR
Topics in this section
Overview . . . . . . . . . . . . . . . . . . . . . . . . . . . . . . . . . . . . . . . . . . . . . . . . . . . . . . . . . . . . . . . . 33
Local-Fullscreen Mode . . . . . . . . . . . . . . . . . . . . . . . . . . . . . . . . . . . . . . . . . . . . . . . . . . . . . 33
Portal Server Mode . . . . . . . . . . . . . . . . . . . . . . . . . . . . . . . . . . . . . . . . . . . . . . . . . . . . . . . . 34
Local Mode . . . . . . . . . . . . . . . . . . . . . . . . . . . . . . . . . . . . . . . . . . . . . . . . . . . . . . . . . . . . . . 35
Using the WM IPR Remote . . . . . . . . . . . . . . . . . . . . . . . . . . . . . . . . . . . . . . . . . . . . . . . . . . 36
Overview
The user interface of the WM IPR screen depends on the Start mode. Once configured with
an IP address and powered on, the IPR opens in one of three Start modes. In
Local-Fullscreen mode you can view only one channel and it uses the entire screen on the
attached monitor; there are no user controls whatsoever. In
and options of the IPR are controlled through the VBrick Portal Server. In Local mode, the
IPR displays a user interface page that is stored on the IPR web server; the available streams
on this page are configured on the IWS
Remote Control that comes with the IPR to navigate in Portal Server mode and in Local
mode. (You can also plug a USB keyboard and mouse into the back of the IPR to perform
navigation tasks.)
Chapter 6
Portal Server mode, all features
General Configuration page. You can use the IR
Local-Fullscreen Mode
If the IPR Start Mode is set to Local-Fullscreen mode (Figure 8), there will be a (live or
stored) video image on the TV monitor at system startup. This image is controlled by the
system administrator. It covers the entire screen and there are no user controls shown or available.
The IR Remote Control is non-functional in this mode except for
video image is programmed to decode a specific stream. This stream is preset on the General
Configuration
page; the audio output volume is preset on the Decoder Configuration page.
Volume and Mute. The
VBrick WM IP Receiver Admin Guide 33
Page 42

Figure 8. Local-Fullscreen Mode
Portal Server Mode
In Portal Server start mode (Figure 9), the start page is downloaded from a VBrick
EtherneTV Portal Server. The live streams and videos available on the IPR are configured in
the Portal Server. In Portal Server mode, the IPR has optional login authentication to protect
against unauthorized use. If authentication is enabled on the Portal Server, the IPR will
display a login window when powered on. You must use the numeric keypad on the IR
remote control or a USB keyboard to enter a PIN. (PIN numbers are configured in the Portal
Server.) Once logged in, the IP Receiver displays the Portal Server home page. This page is
dynamically updated with a list of live streams and/or stored videos. See the ETV Portal
Server Admin for more about the Portal Server.
Note The ETV Portal Server is outside the scope of this document. For more about how to
configure and use the Portal Server with an IPR, see the Portal Server Admin Guide and
the Portal Server User Guide.
34 © 2007 VBrick Systems, Inc.
Page 43

Figure 9. Portal Ser ver Mode
Using the IPR
Portal Server Menu
The menu shown in Figure 9 is only available in Portal Server mode. Use the Menu button on
the Remote Control to toggle the menu on or off. Note that the menu does not show the currently
selected viewing option. For example, if you are on the
option.
Video Library Show all stored streams available for viewing. Select any folder to view
Live Broadcasts Show all live streams currently in progress. Scroll down to see all.
Scheduled Show all scheduled streams (stored only) currently in progress.
Search Search the current page by Keyword, Description, Title, or All. Use the
Status Shows Record, FTP, and Ingest status. Use
Local Mode
If the IPR is configured for Local mode (Figure 10), the start page (local.asp) is stored locally
on the IPR. The content available on the page (links to either live streams or stored videos) is
added by an administrator using the
Configuration on page 23 explains how to add streams or modify the interface. To change the
available content, you simply add or delete streams.
Video Library page, this is not a menu
contents; select folder
UP to exit a folder. Scroll down to see all.
number keypad for text entry as you would on a cell phone by pressing
one key per letter.
Refresh (click left arrow) to
update the page or
Purge (click right arrow) to remove selected entries
or all entries. Highlight and select any item in progress to abort. After
performing any action, click
General Configuration page in IWS. Local Mode
Refresh to update the page.
VBrick WM IP Receiver Admin Guide 35
Page 44

Figure 10. Local Mode
Using the WM IPR Remote
You can use the IR (infrared) Remote Control in Portal Server mode and in Local mode; it is
non-functional in Local-Fullscreen mode. (You can also plug a USB keyboard and mouse into
the back of the IPR to perform all navigation tasks.) The infrared Remote Control works
basically the same regardless of how the start mode is configured. It is important to note that
many of the controls have slightly different functionality depending on where the focus is.
Also, several of the buttons are not mapped to any item and are non functional. Be sure to
point the remote at the IPR–not at the TV.
36 © 2007 VBrick Systems, Inc.
Page 45

Button Function
Red Unlabeled. Turn power on or off.
Standby Place unit in soft standby.
Mute Mute the audio.
Rew VOD content only: Rewind the current stream.
Play Play the selected stream.
Pause VOD content only: Pause the current playing stream.
FF VOD content only: Fast forward the current stream.
Replay Reserved for future use.
Skip Reserved for future use.
Stop Close the current stream.
Rec Portal Server mode: Record stream. During recording, a
red indicator is shown in lower right area of window.
Back Return to the previous page.
Using the IPR
Info Portal Server mode only. Displays information about the
currently selected stream.
Arrows Change focus to next item; select previous stream.
OK Initiate an action or select an option depending on where
the focus is.
Guide Go to fullscreen; exit fullscreen.
Menu Toggle the Menu on or off in Portal Server mode.
Vol Adjust the audio up or down.
F1–F4 Reserved for future use.
Page Move to top, bottom, next, or previous page.
Live Portal Server mode. Go to Live Broadcasts page.
VOD Portal Server mode. Go to Asset Library page.
Sched Display scheduled streams available for viewing.
Search Portal Server mode. Display the search window. Press
Search again to exit window.
Space Enter a space when using the number keypad for text
entry.
Mark Use to create a bookmark on the Portal Server.
0–9 Portal Server mode. Enter a PIN, or enter a search string
using the number keypad for text entry.
Del Deletes the previous digit or character when entering
search parameters or a PIN.
Enter Press when input complete.
VBrick WM IP Receiver Admin Guide 37
Page 46

38 © 2007 VBrick Systems, Inc.
Page 47

Legacy Models
Appendix A
Note This section explains power state behavior and remote control for IPR Model
0113-0000
number on the splash screen with the VBrick logo. If the model number is
0001
Topics in this section
Model 8000-0113-0000 Power States . . . . . . . . . . . . . . . . . . . . . . . . . . . . . . . . . . . . . . . . . . . 39
Model 8000-0113-0000 Remote Control . . . . . . . . . . . . . . . . . . . . . . . . . . . . . . . . . . . . . . . . 39
. To determine the IPR model type, reboot the IPR and note the Model
, see IPR Power States on page 3.
Model 8000-0113-0000 Power States
For IPR Models 8000-0113-0000, once plugged into an AC power source, the IPR is always
in one of three states: On, Off, or Standby. Standby is a power saving mode in which the
device is neither on or off. There are two triangular silver buttons on the front panel. You can
turn power on or off using the (upper) triangular silver button. The lower button has no
function. You can enter or exit
Button Description
On Turn the IPR on (from the off state) by briefly pressing the Power button on
the front panel or using the Power button on the remote control.
Off Turn the IPR completely off by pressing the Power button on the front panel
for five seconds or more. The IPR is off when unplugged or immediately
after being plugged in.
Standby mode using the power button on the remote control.
8000-
8000-0113-
Standby Put the IPR in Standby (from the on state) by pressing the Power button on
the remote control or by using the Shutdown command on the IWS
Maintenance menu. To exit Standby, press Power on the remote control. In
Standby, there is no network connectivity and the TV will be black.
Model 8000-0113-0000 Remote Control
IPR Model 8000-0113-0000 is shipped with a corresponding IR remote control. You can use
the IR Remote Control in Portal Server mode and in Local mode; it is non-functional in
Local-Fullscreen mode. (You can also plug a USB keyboard and mouse into the back of the
IPR to perform all navigation tasks.) The infrared Remote Control works basically the same
regardless of how the start mode is configured. It is important to note that many of the
controls, for example Ch/Page up or down, have slightly different functionality depending on
where the focus is. Also, several of the buttons are not mapped to any item and are non
functional.
VBrick WM IP Receiver Admin Guide 39
Page 48

Button Description
Mute Mute the audio.
Power Puts the IPR in or out of Standby mode.
Record Portal Server mode only: record the current stream. When a recording
is in progress, a red indicator is shown in lower right area of window.
Stop Close the current stream.
Play Play the selected stream.
Rew VOD content only: Rewind the current stream.
Pause VOD content only: Pause the current playing stream.
FF VOD content only: Fast forward the current stream.
Back Return to the previous page.
Info Portal Server mode only. Displays information about the currently
selected stream.
Arrows Change focus to next item; select the previous stream.
OK Initiate an action or select an option depending on where the focus is.
Volume Adjust the audio up or down.
Menu Display the Menu in Portal Server mode.
Ch/Page Move toward top or bottom of current page.
Guide Got to fullscreen; exit fullscreen.
Live Portal Server mode. Go to Live Broadcasts page.
VOD Portal Server mode. Go to Video Library page.
Sched Display scheduled streams available for viewing.
Mark Create a bookmark on the Portal Server.
0–9 Portal Server mode. Enter a PIN, or enter a search string using the
number keypad for text entry.
Search Portal Server mode. Display the search window. Press Search again to
exit window.
Space Enter a space when using the number keypad for text entry
Clear When entering search parameters or a PIN number, delete the
previously entered digit or character.
40 © 2007 VBrick Systems, Inc.
Page 49

Page 50

VBrick Systems, Inc.
12 Beaumont Road
Wallingford, Connecticut 06492, USA
 Loading...