

Page 1
VBrick 9000 Encoder
Encoder v4.3
Presenter Mode User Guide
August 2015
Page 2

Copyright
© 2015 VBrick Systems, Inc. All rights reserved.
2121 Cooperative Way, Suite 100
Herndon, Virginia 20171, USA
This publication contains confidential, proprietary, and trade secret information. No part of this document may be copied,
photocopied, reproduced, translated, or reduced to any machine-readable or electronic format without prior written
permission from VBrick. Information in this document is subject to change without notice and VBrick Systems assumes no
responsibility or liability for any errors or inaccuracies. VBrick, VBrick Systems, the VBrick logo, StreamPlayer, and
StreamPlayer Plus are trademarks or registered trademarks in the United States and other countries. Windows Media is a
trademarked name of Microsoft Corporation in the United States and other countries. All other products or services
mentioned in this document are identified by the trademarks, service marks, or product names as designated by the
companies who market those products. Inquiries should be made directly to those companies. This document may also have
links to third-party web pages that are beyond the control of VBrick. The presence of such links does not imply that VBrick
endorses or recommends the content of any third-party web pages. VBrick acknowledges the use of third-party open source
software and
opensource.
licenses in some VBrick products. This freely available source code is posted at http://www.vbrick.com/
FCC Part 15
This equipment has been tested and found to comply with the limits for Class A digital device, pursuant to Part 15 of the
FCC rules, Class A for OC-3C Interface, Class A for the SDI Interface. These limits are designed to provide reasonable
protection against harmful interference when the equipment is operated in a commercial environment. This equipment
generates, uses, and can radiate radio frequency energy and, if not installed and used in accordance with the instruction
manual, may cause harmful interference to radio communications. Operation of this equipment in a residential area is likely
to cause harmful interference in which case the user will be required to correct the interference at their own expense. This
Class A digital apparatus meets all requirements of the Canadian Interference-Causing Equipment Regulations. Cet appareil
numerique de la Classe A respecte toutes les exigences do reglement dur le materiel brouilleur du Canada.
VBrick declares that this product conforms to the following certificate standards for electromagnetic emissions
when installed according to the manufacturer's specifications: EN 55022:2006; EN 55024:1998, A1:2001, A2:2003;
EN 61000-3-2:2005; EN 61000-3-3:1995, A1:2001, A2:2005.
About VBrick Systems
Founded in 1998, VBrick Systems is a privately held company that has enjoyed rapid growth by helping our customers
successfully introduce mission critical video applications across their enterprise networks. Since our founding, VBrick has
been setting the standard for quality, performance and innovation in the delivery of live and stored video over IP networks—
LANs, WANs and the Internet. With thousands of video appliances installed world-wide, VBrick is the recognized leader in
reliable, high-performance, easy-to-use networked video solutions.
VBrick is an active participant in the development of industry standards and continues to play an influential role in the
Internet Streaming Media Alliance (ISMA), the MPEG Industry Forum, and Internet2. In 1998 VBrick invented and shipped
the world's first MPEG Video Network Appliance designed to provide affordable DVD-quality video across the network.
Since then, VBrick's video solutions have grown to include Video on Demand, Management, Security and Access Control,
Scheduling, and Rich Media Integration. VBrick solutions are successfully supporting a broad variety of applications
including distance learning and training, conferencing and remote office communications, security, process monitoring,
traffic monitoring, business and news feeds to the desktop, webcasting, corporate communications, collaboration, command
and control, and telemedicine. VBrick serves customers in education, government, healthcare, and financial services markets
among others. VBrick products are manufactured in an ISO certified manufacturing facility.
Page 3

Presenter Mode User Guide
Welcome . . . . . . . . . . . . . . . . . . . . . . . . . . . . . . . . . . . . . . . . . . . . . . . . . . . . . . . . . . . . . . . . .v
Chapter and Topic Organization. . . . . . . . . . . . . . . . . . . . . . . . . . . . . . . . . . . . . . . . . . . . v
1. Presenter Mode Features
Presenter Mode Overview . . . . . . . . . . . . . . . . . . . . . . . . . . . . . . . . . . . . . . . . . . . . . . . . . . . . 7
Presenter Mode Login. . . . . . . . . . . . . . . . . . . . . . . . . . . . . . . . . . . . . . . . . . . . . . . . . . . . 7
Manage an Event . . . . . . . . . . . . . . . . . . . . . . . . . . . . . . . . . . . . . . . . . . . . . . . . . . . . . . . . . . .8
Select a Layout. . . . . . . . . . . . . . . . . . . . . . . . . . . . . . . . . . . . . . . . . . . . . . . . . . . . . . . . . .8
Configure a Layout . . . . . . . . . . . . . . . . . . . . . . . . . . . . . . . . . . . . . . . . . . . . . . . . . . . . . 10
Control a Presentation . . . . . . . . . . . . . . . . . . . . . . . . . . . . . . . . . . . . . . . . . . . . . . . . . . . . . .12
Start and Stop an Event . . . . . . . . . . . . . . . . . . . . . . . . . . . . . . . . . . . . . . . . . . . . . . . . .13
Broadcast an Event . . . . . . . . . . . . . . . . . . . . . . . . . . . . . . . . . . . . . . . . . . . . . . . . . . . . .13
Record an Event . . . . . . . . . . . . . . . . . . . . . . . . . . . . . . . . . . . . . . . . . . . . . . . . . . . . . . . 14
Advanced Status Messages. . . . . . . . . . . . . . . . . . . . . . . . . . . . . . . . . . . . . . . . . . . . . . . . . . . 14
Contents
VBrick 9000 Encoder Presenter Guide iii
Page 4

iv Contents
Page 5
Presenter Mode User Guide
Welcome
This document explains how to use the VBrick 9000 encoder when in Presenter Mode.
Presenter Mode requires the use of a Presenter encoder or activation of a
Feature License on a standard encoder.
Note: When viewing the images in Online help, keep in mind that many of the
configuration options for the encoder are mutually exclusive. This means that,
depending on which options you select, you may see new fields or you may not see
previously existing fields. Although the images may not always show all options, they
are fully explained in the text.
Chapter and Topic Organization
This Online help system provides access to the VBrick 9000 Presenter Mode Encoder
documentation. Topics may be used as reference material or as how-to materials for specific
use cases.
For best results, please take a few moments to familiarize yourself with the way the
information is organized. If you find errors or omissions, click the e-mail icon in the upperright corner of this window or send your feedback to
Presenter Encoder
Presenter Mode Overview Provides an overview of Presenter Mode features and
functionality.
Manage an Event Topics that detail how to manage an event including selecting a
layout, configuring a layout, and controlling a Webcast
presentation.
Control a Presentation More detailed topics on Webcast presentations and how to
understand status bar messages.
Advanced Status
Messages
These topics describe available status messages for
troubleshooting.
VBrick 9000 Encoder Presenter Guide v
Page 6

vi Preface
Page 7
Presenter Mode Features
Presenter Mode Overview
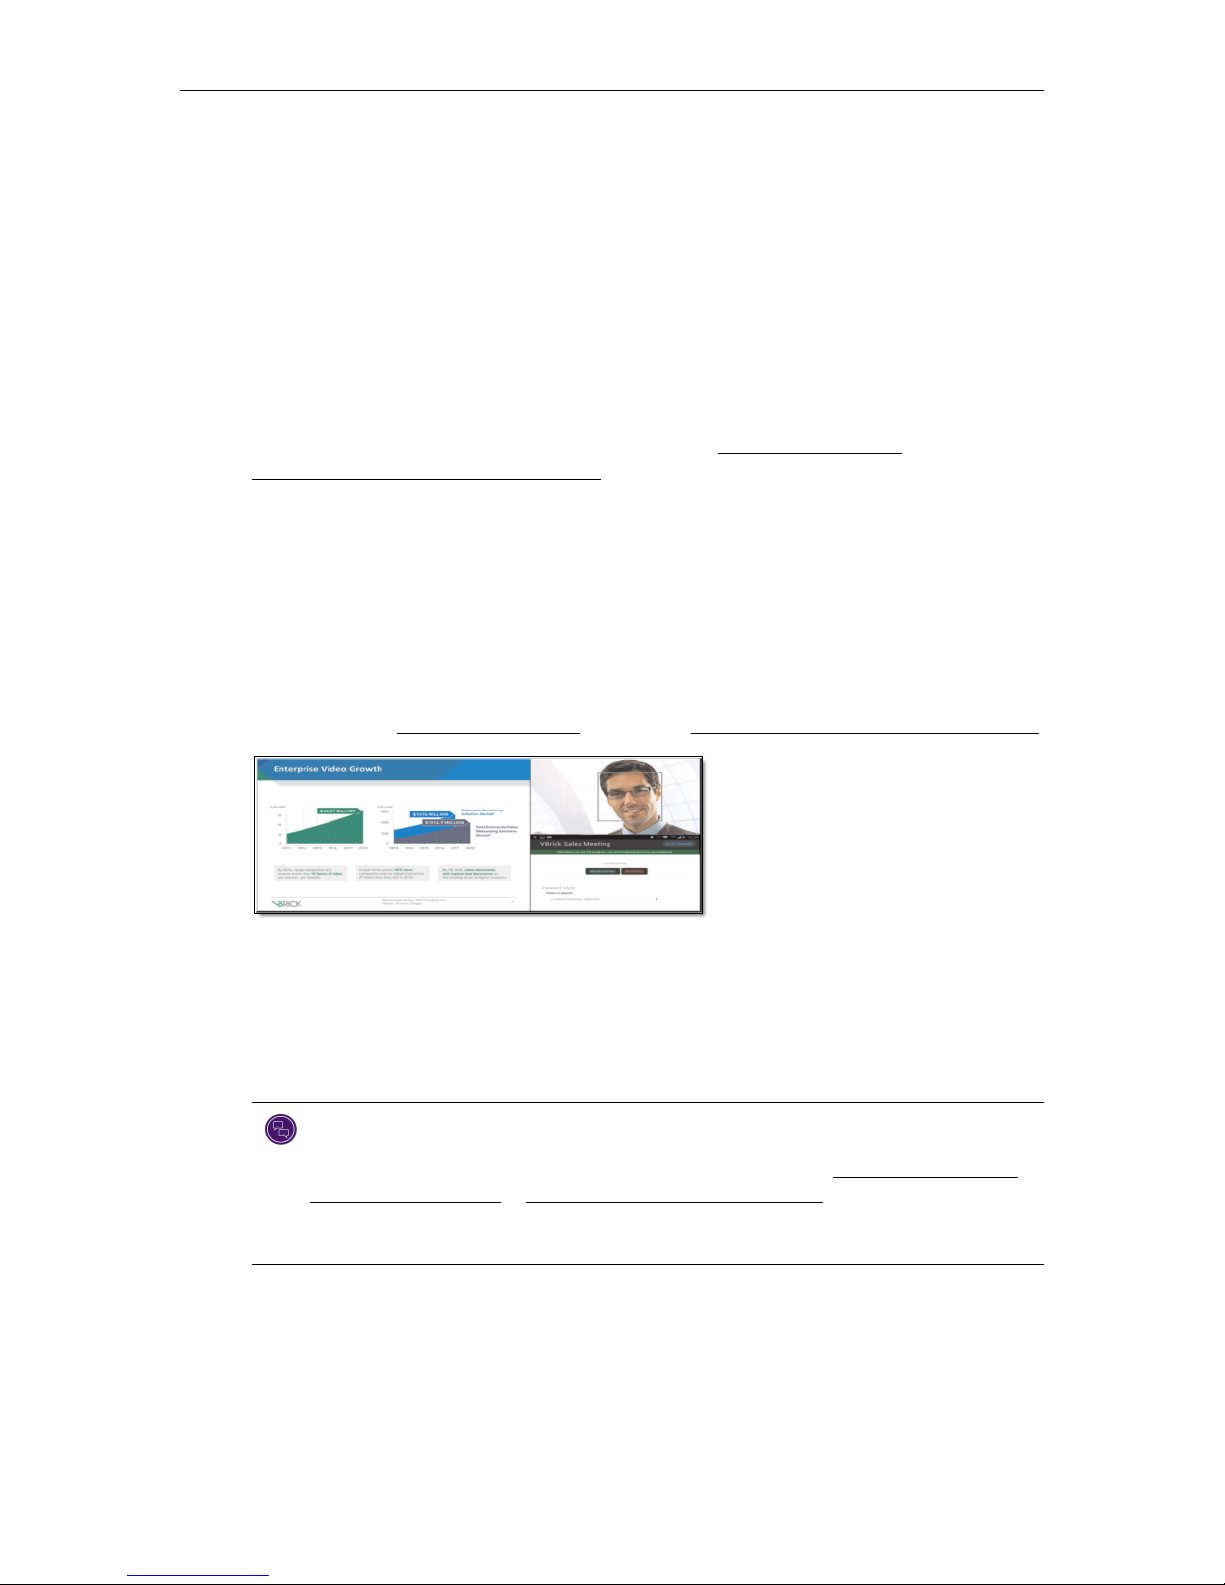
Presentation features support the ability for you to stream video and Webcasts directly from
an encoder using an intuitive Presenter Mode interface. Presenter Mode is based on layouts
defined by an account admin which are covered in the
VBrick 9000 Encoder v4.3 Admin Guide.
When streaming, you may dynamically switch between layouts and video/network inputs
without interruption to the video stream and without the need to restart the player. Layout
configuration values may also be seamlessly switched as well including the background color
and image, borders, and margins. This provides the ability to create very compelling video
Webcasts. Note: These seamless transitions do not apply to changing encoding values within
VBAdmin.
This guide covers how to use Presenter Mode to run a presentation that has been previously
configured by an admin. As noted, how to configure the layouts and set up used in this guide
is covered in the
Presentation Features topic of the VBrick 9000 Encoder v4.3 Admin Guide.
Presentation Features topic of the
Chapter 1
This user guide covers the following topics:
• How to choose and modify a layout for your presentation
• How to start a presentation
• How to broadcast a presentation
• How to record a presentation
Note: The presentation features discussed in this topic are applicable to the Presenter
encoder (number p/n 9311-1612-100) and any standard encoder that has the Presenter
Encoder Feature License (7100-3000) applied (See: Admin >
Manage Configuration > Presenter Encoder Feature License topic for more details on
how to install this license). As a reminder, not all features may be present on encoders
with the Presenter Encoder Feature License installed.
System Configuration >
Presenter Mode Login
If enabled by an admin, the Manage Presentation button will appear on the Login screen
which will enable you to go directly to Presenter Mode without the need to log in to
VBAdmin first.
VBrick 9000 Encoder Presenter Guide 7
Page 8
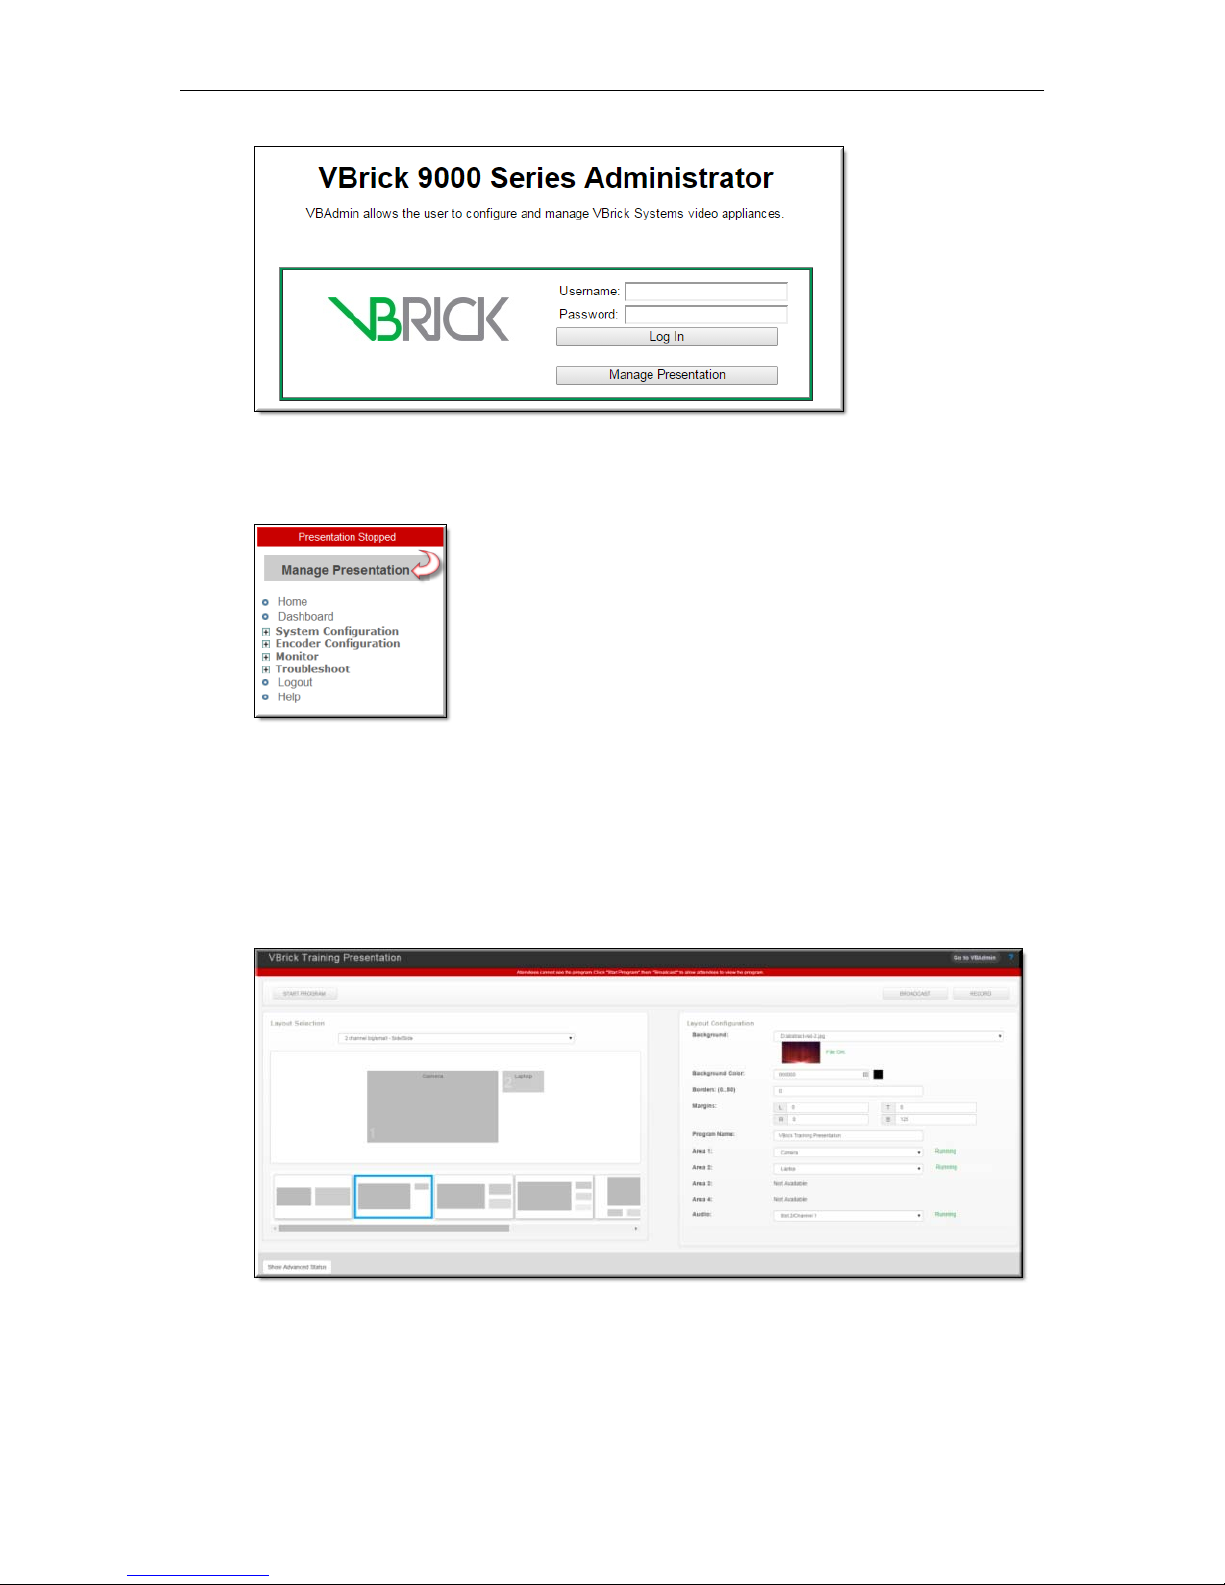
If this button has not been enabled, logging in to VBAdmin will be required first to enter
Presenter Mode. You may then click the
navigation menu to access Presenter Mode.
Manage an Event
There are three steps to managing an event in Presenter Mode:
1. Select a layout(s)
2. Configure a layout(s)
3. Control your event/presentation
Manage Presentation button at the top of the left
Select a Layout
Your admin has enabled and configured up to seven layouts with default video or network
sources and layout (color/border/margin/background image) configurations that you may
choose to use for your presentation.
8 © 2015 VBrick Systems, Inc.
Page 9
Presenter Mode Features
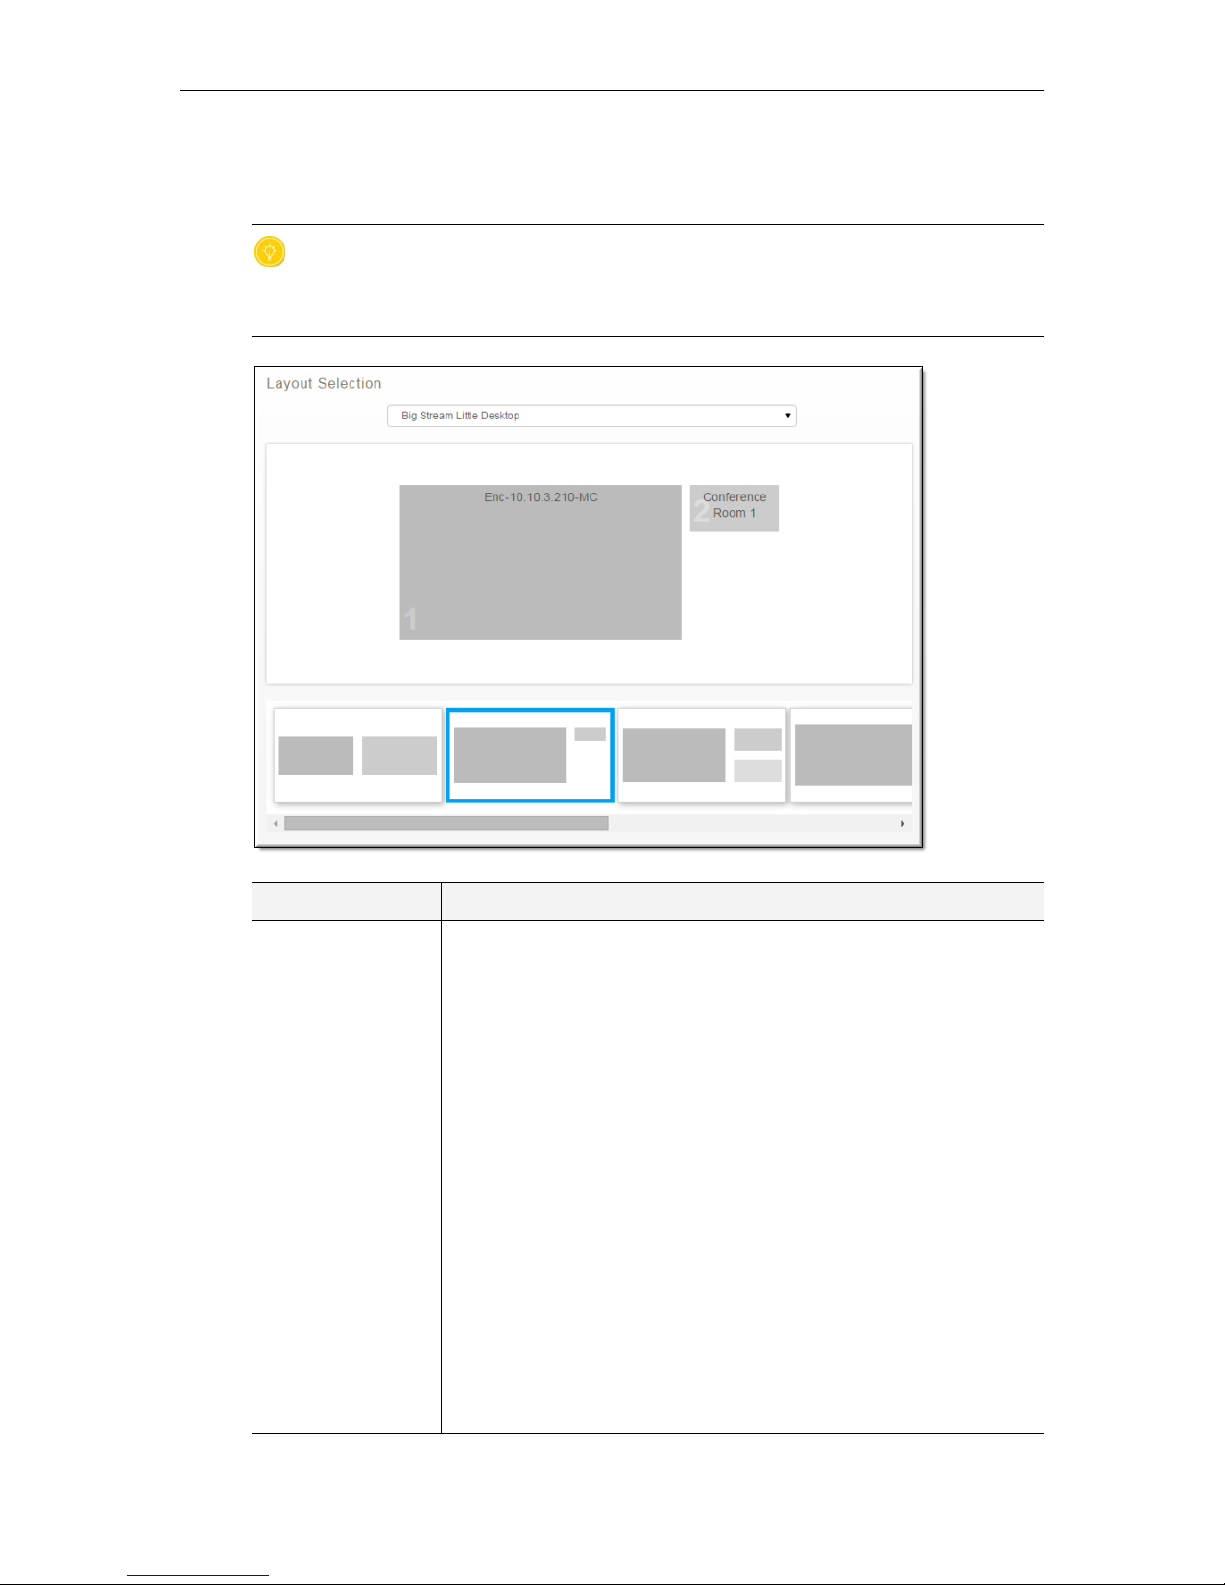
Select a layout from the Layout Selection area and click the Apply button. You may then set
your own values for the selected layout in the
Layout Configuration area if you want to change
the default values your admin has selected.
Tip: Keep in mind that layouts and their configuration values may be switched when
streaming without interruption to the video or layout and without the need for the
audience to restart their players. This provides the ability to create very compelling
video Webcasts.
Field Description
Choose Layout Select from the layouts your admin has enabled for use in your
presentation. If a layout is selected here, it is also selected in the
Layout Scroll bar below the Layout Preview box. If you do not see a
layout that you need, contact your admin to have it enabled.
• Single area layout with the selected video input filling the entire
video image.
• Two area layout with each area approximately the same size,
displayed side by side.
• Two area layout with one large area and a smaller area in the
upper right. This is ideal for a single computer screen capture
with live video of the presenter.
• Three area layout with one large area on the left and two smaller
areas on the right. This is ideal for a single computer screen
capture with two live videos.
• Four area layout with one large area on the left and three smaller
areas on the right.
• Four area layout with one large area on the left and three smaller
areas below.
• Four area layout with areas arranged in a 2x2 grid.
VBrick 9000 Encoder Presenter Guide 9
Page 10
Field Description
Layout Preview Displays the currently selected layout in visual format. Each layout
has predefined, unchangeable video areas. Other items in the layout
are configurable such as background colors and borders and what
video sources are mapped to what areas. You admin has likely given
the video areas a descriptive name such as “Camera 1", “Laptop”, or
“Document Camera” so that you will understand what video will be
visible in each area of the layout.
Layout Scroll Functions the same as the Choose Layout dropdown and selects a
layout to use and set default values for when in Presenter Mode. If a
layout is selected here, it is also selected in the Choose Layout
dropdown.
Configure a Layout
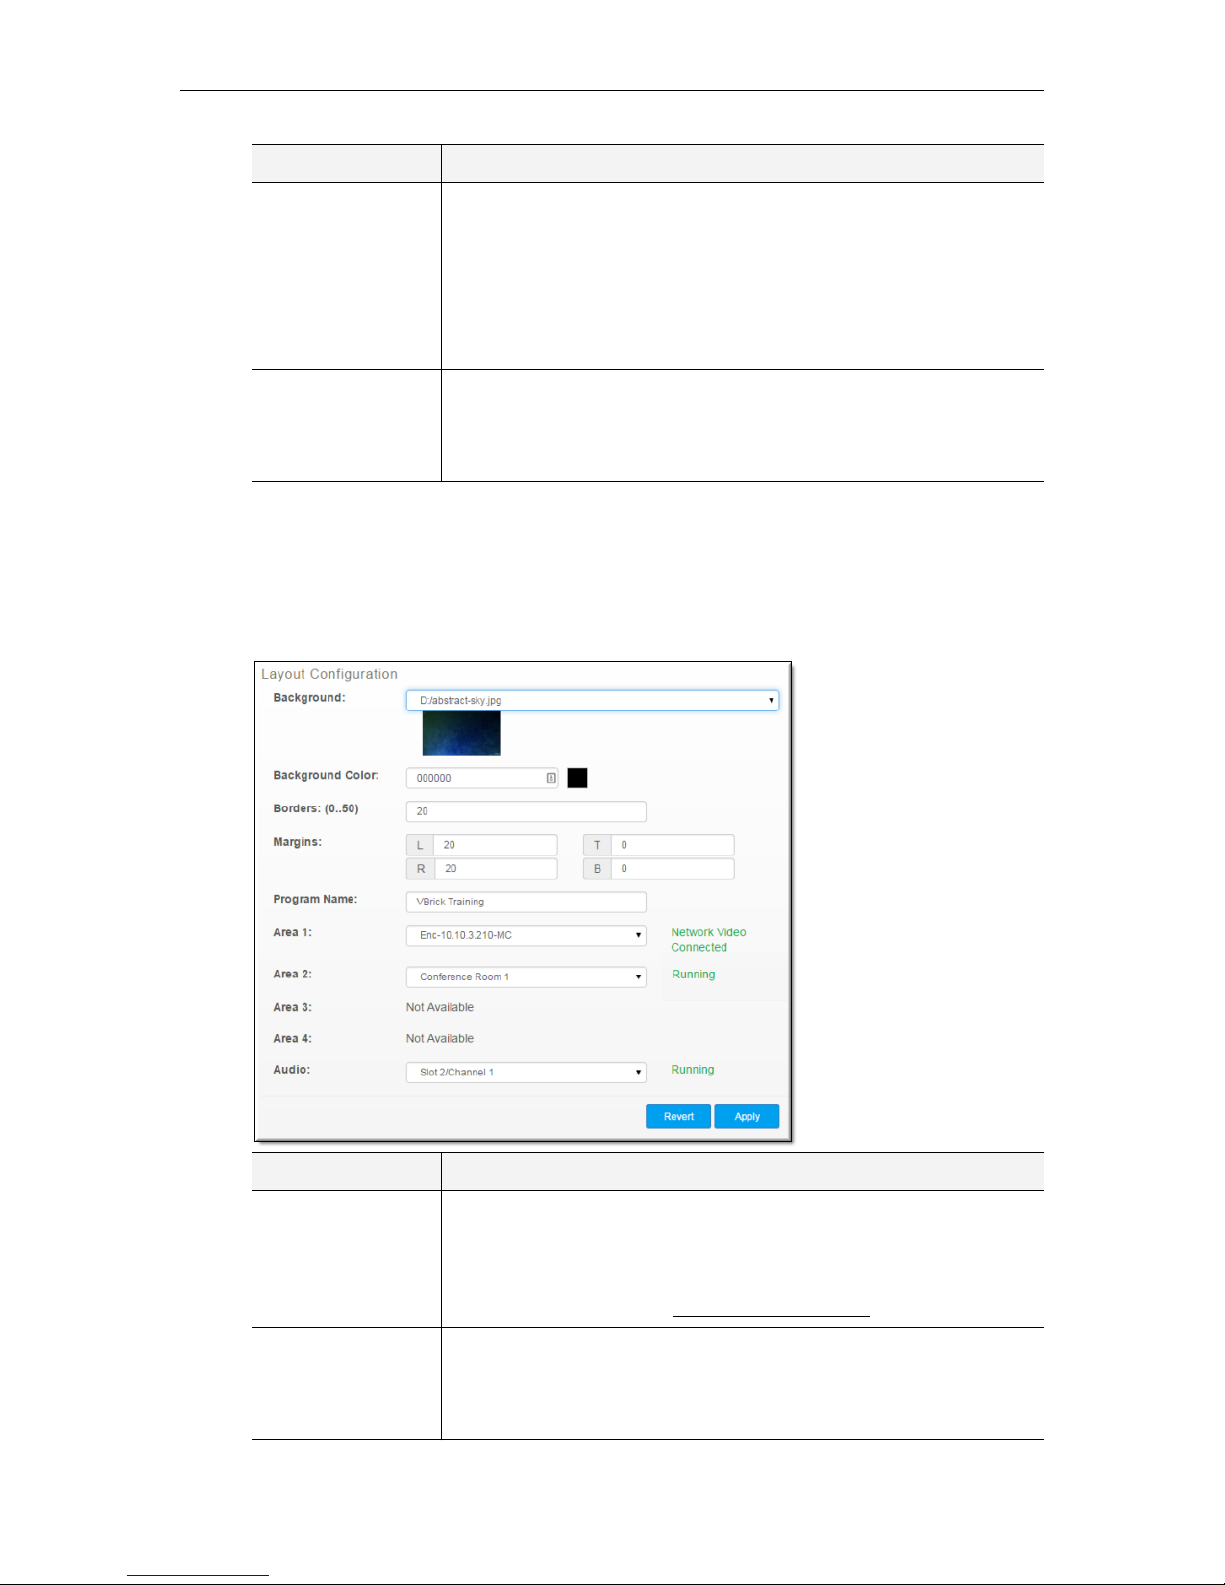
Once you have selected a layout in the Layout Selection area, you may choose to use the
default values selected for it by your admin, or define your own values in the
Configuration section. You must click the Apply button to save any changes you make.
Layout
Field Description
Background If a background image has been uploaded, it may be selected through
Background Color Only solid background colors (or Hexadecimal values) may be
10 © 2015 VBrick Systems, Inc.
Background drop-down to be added to the layout. The current
the
background color may be selected as well by selecting
Background Color. Upload background images by navigating to
Encoder Configuration >
Manage Layout Images.
Use
selected. To select a background color, click on the colored square to
activate a color chooser and either select the desired color or enter
the Hex value for that color.
Page 11

Presenter Mode Features
Field Description
Borders A border value 0-50 may be selected with the default set at 0. If a
border is applied, it will be applied to all video areas in the selected
layout. Video will be scaled down to fit the border with no video lost
due to border size. It should be noted that borders are used in
Presenter Mode to control spacing between video areas and the
background color appears in the border area. Borders are not used to
frame video areas.
Margins Margins are useful when inserting branding. Margins are different
from borders in that borders are applied to all video source areas
whereas the margins define the layout area itself. Margins are
specified in pixels.
Program Name Modifies the title of the Presentation.
Video Area
Mapping
Each area in the layout you have selected is assigned a video input
channel. Only the channel is mapped, not the specific input type. For
example, channel 1 is mapped, not channel 1 VGA. You may remap
each video/audio area as needed. Note the status of each area is
noted to the side of the area.
In addition to video sources, network sources may also be selected
here. However, unlike video sources, only one network source may be
mapped at a time so if you have a network source selected and you
choose another in a different area, the first network source will be
disabled.
The caveats below should be kept in mind when switching between
sources.
If you use an encrypted network source and switch to another
encrypted network source:
• Seamless switching between the two sources occurs if both have
the same encryption.
• Seamless switching between the two sources does not occur if
different encryption methods exist between them or if one is
encrypted and other is not.
VBrick 9000 Encoder Presenter Guide 11
If you switch between a video source and a network source:
• If the network source requires decryption, the switch between
video and network sources is seamless between the local video
input and the decrypted stream.
• However, if the video source is playing first, the first time the
encrypted network source is selected, the switch is not seamless.
Every switch thereafter, is seamless.
Page 12
Field Description
Audio Mapping Similar to video area mapping with the exception that only one audio
channel source is selectable for each layout.
Further, in order to switch audio channels within a presentation and
not reset the stream, all audio channels must have the same sampling
rate and audio rate settings. The easiest way to assure this, and a best
practice, is to create the desired audio configuration for one channel
and then use the
Clone button to copy the Audio Rate settings to
other audio channels. After cloning, you can then manually configure
the setting for
How Audio is Connected for each channel if you have a
mixture of analog and digital audio sources.
You may still change audio channels with different settings, but this
will cause a reset of the stream and attendees/viewers may need to
reset their players as a result.
Note: Changing audio channels during a presentation is not
supported for streams with encryption.
Revert/Apply
Buttons
Click Apply to apply any changes you have made to the layout. Click
Revert to discard any changes you have made.
Tip: Keep in mind that you may switch seamlessly between layouts, configurations,
and video inputs when presenting. (Some caveats apply, see the table above with
regard to Video Area Mapping) As a result, consider a best practice of making border
values, margin values, pause images, and so forth consistent between layouts so you do
not have any odd jumps or glitches when switching between layouts during a
presentation.
Control a Presentation
The Presenter has three methods to controlling a presentation. They are:
• Event start/stop
• Broadcast an event
• Record an event
After selecting and configuring your layout, click
stream will then be available on your network with a graphic displaying the pause message
“The host is not currently broadcasting.”
The image displayed during pauses may be changed by your admin in the
dropdown field by navigating to
Start Program to begin streaming. The
Pause Image
Encoder Configuration > Manage Layout Images.
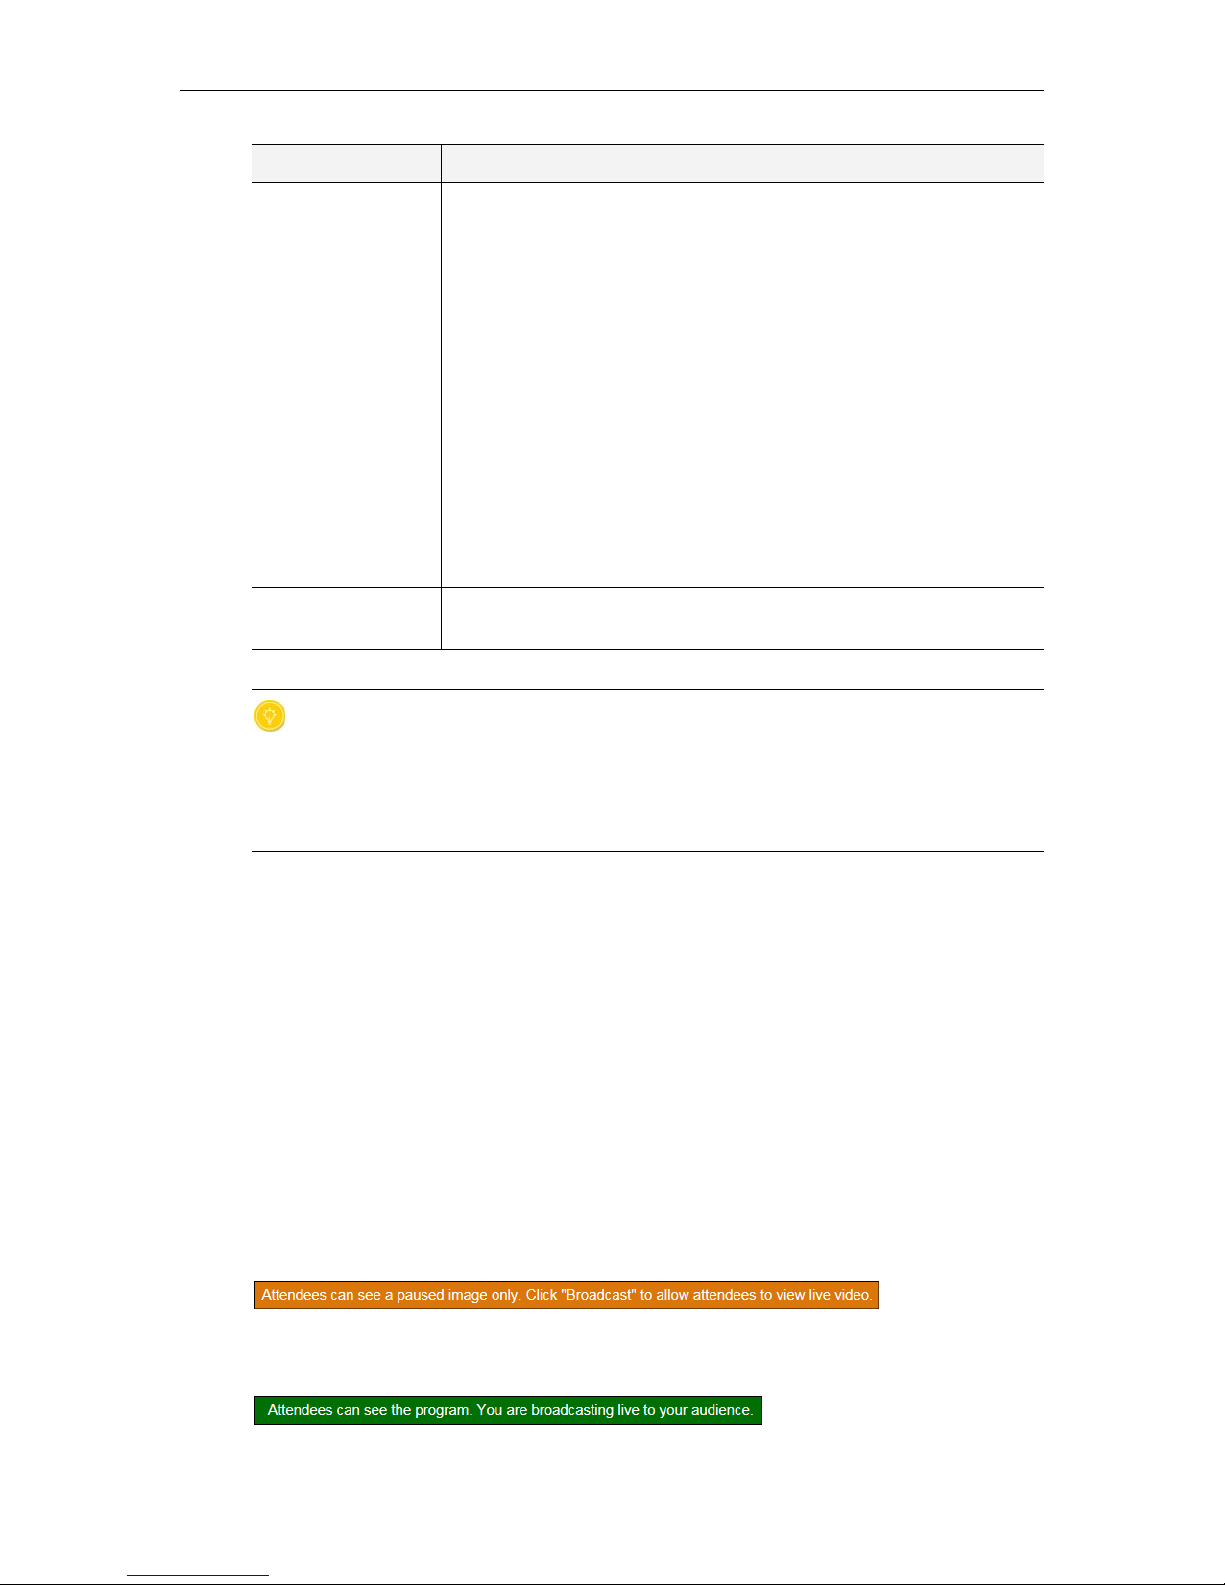
The status bar will change color from red to orange to indicate that you are now streaming
but viewers cannot see your content or hear any audio.
When are ready to go live with your video, click
your video will begin streaming using the layout you have selected.
12 © 2015 VBrick Systems, Inc.
Broadcast. The status bar will turn green and
Page 13
Presenter Mode Features
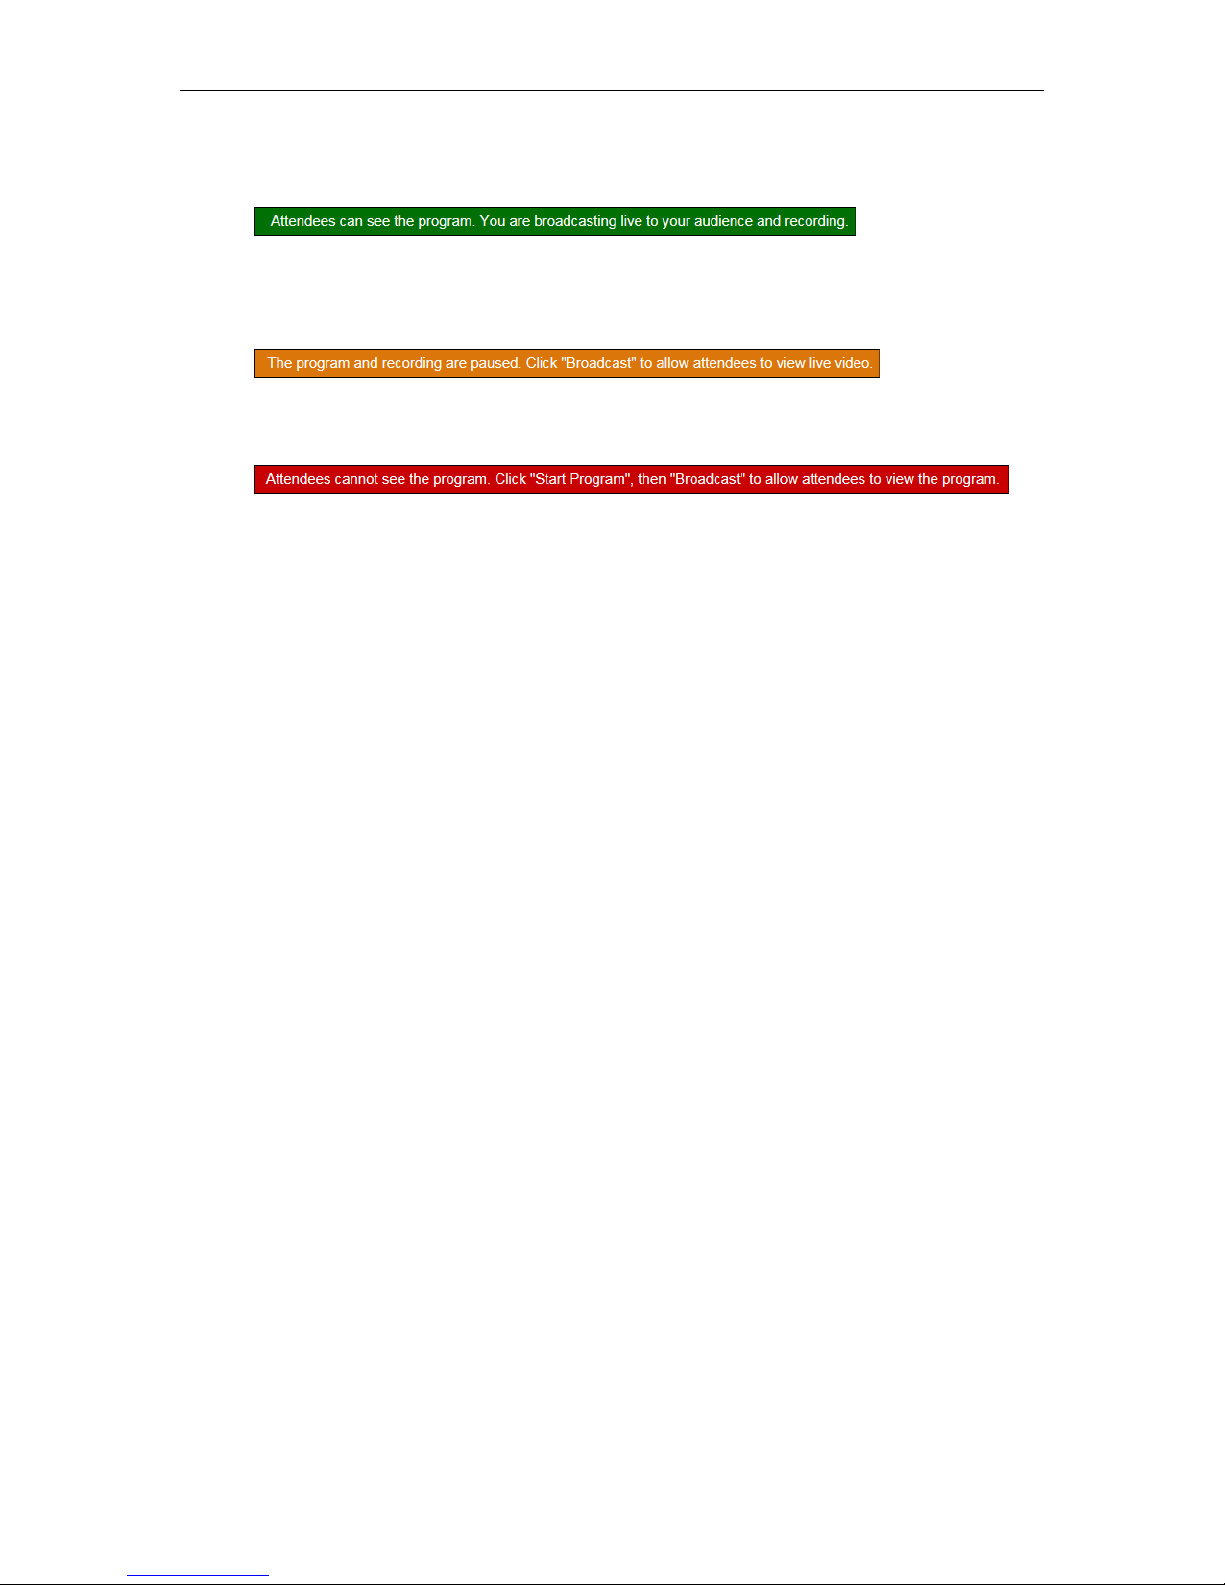
If you’d like to record your presentation, click Record. You will be alerted that you are also
recording your presentation.
At any time during the event, you can mute audio and resend the paused image by clicking
Broadcasting button. You may also stop/restart recording by clicking the Recording
the
button.
When you are finished with your event, click
End Program to shut down the stream and end
the recording.
Each control state is summarized below along with
Advanced Status messages.
Start and Stop an Event
To start an event:
1. Click the
2. To stop the event, click the
When an event has started and Broadcast is off, the following occurs:
• Audio is muted
• Video is replaced with a static pause image.
• Transmitters and Servers will continue to stream the pause image. Connected players and
servers must not close.
• If Record is on, it will be paused. The Archiver will stop writing to the current file. The
file will be left open.
Start Program button. It will change to an End Program button.
End Program button.
Broadcast an Event
To broadcast an event:
1. Click the
2. To stop broadcasting the event, click the
When an event has started and Broadcast is on, the following occurs:
• Audio and Video play as configured
• You may switch the layout at any time and transition will occur seamlessly without the
need to restart the broadcast so long as the layout has been previously configured
correctly.
• If Record is on, the Archiver will resume recording at the next I frame. Timestamps will
be adjusted so the paused portion will be seamlessly skipped by the player
VBrick 9000 Encoder Presenter Guide 13
Broadcast button. It will turn green and display Broadcasting.
Broadcasting button.
Page 14
Record an Event
To record an event:
1. Click the
Record button. It will turn red and display Recording. You must be
broadcasting to record the event.
2. To stop recording the event, click the
Advanced Status Messages
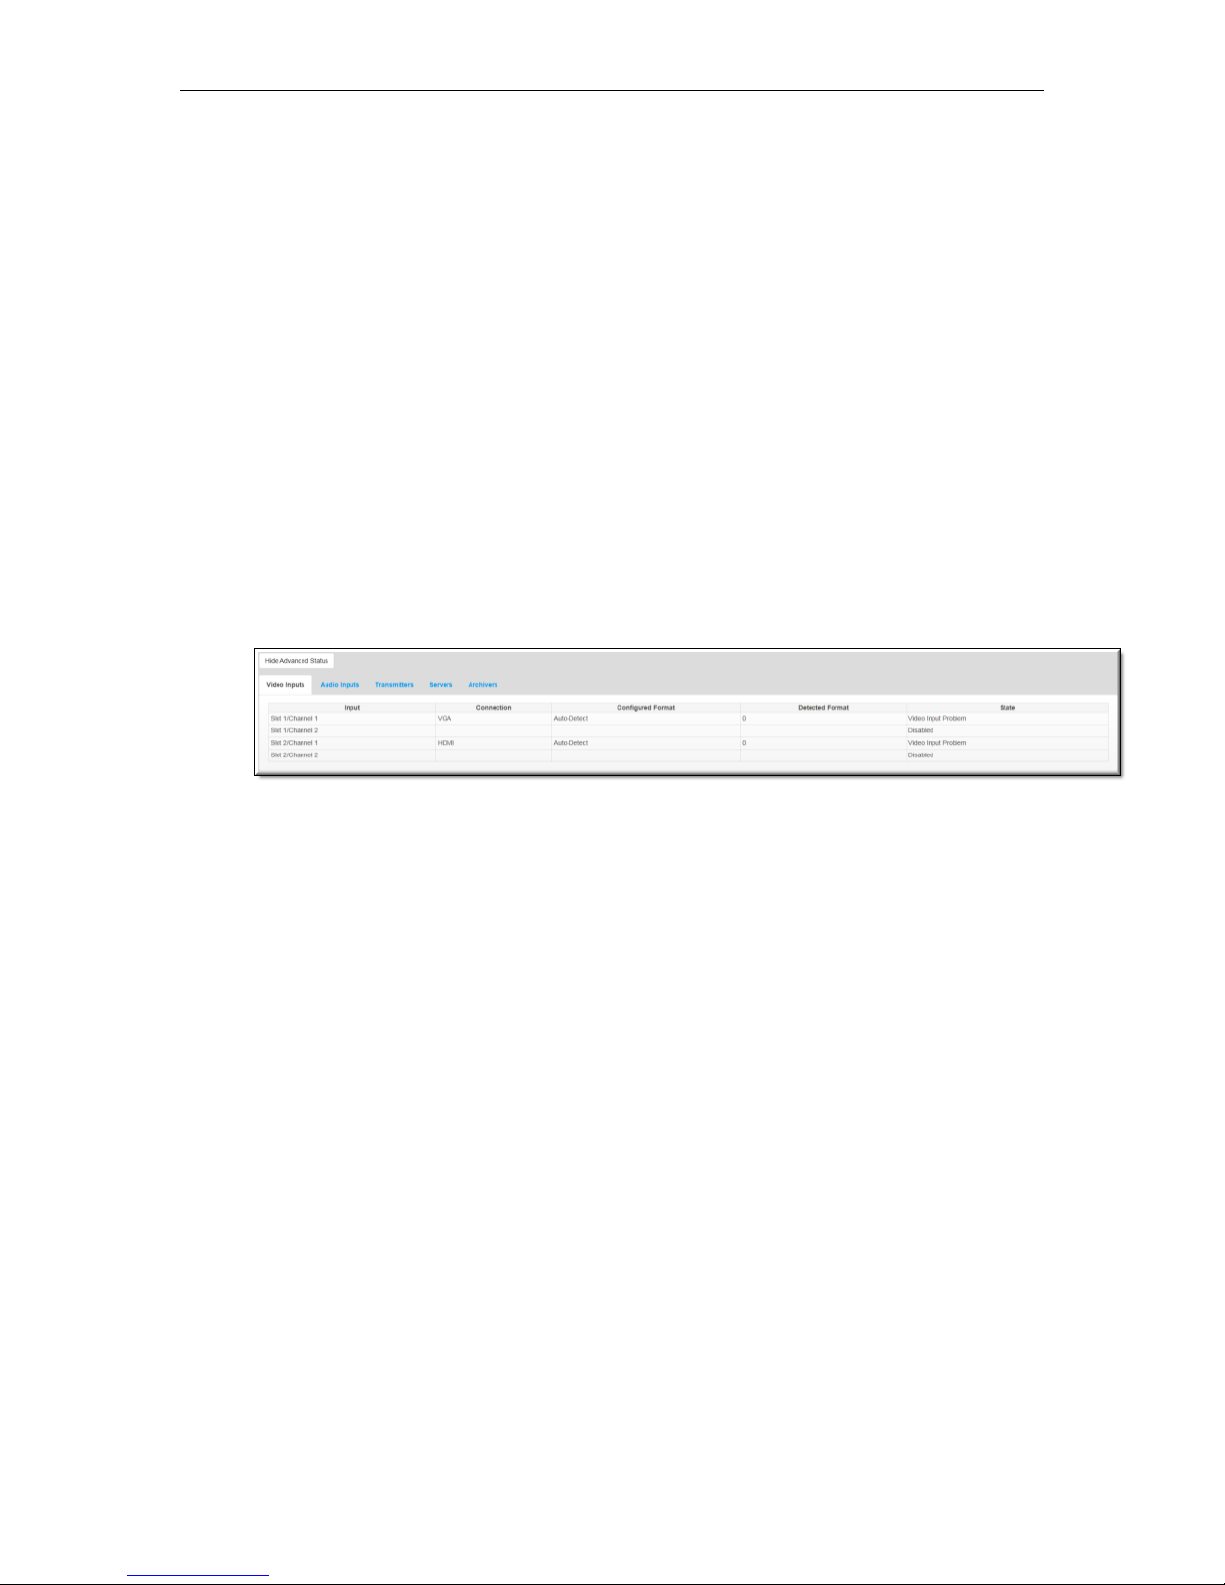
If you receive a message that prompts you to check Advanced Status, you will likely need to
contact your encoder admin for support on troubleshooting your presentation or video
broadcast.
Recording button.
Advanced Status may be checked by clicking the
Advanced Status when it is open) at the bottom of your Presenter Mode window and may be
Show Advanced Status button (Hide
used by your admin to diagnose presentation issues.
Some messages that may be received (and their corresponding color bar) that you may need
to report to your admin are as follows:
GREEN:
Attendees can see the program. You are broadcasting live to your audience, but not
recording. Check advanced status "Archivers".
RED:
Program is started, but not broadcasting or recording. Check advanced status.
RED:
Program is started, but not broadcasting. Check advanced status.
RED:
The program is paused, but cannot be seen by attendees. Check advanced status.
ORANGE:
The program is paused and recording is stopped. Click "Broadcast" to allow attendees to
view live video.
14 © 2015 VBrick Systems, Inc.
Page 15

Page 16
VBrick Systems, Inc.
2121 Cooperative Way, Suite 100
Herndon, Virginia 20171
 Loading...