


Robotic Vacuum Cleaner
with Docking Station
RV-14
Operation Manual
Rev.0808
R

1
TABLE OF CONTENTS
Safety Instructions ----------------------------------------------------------
Special Features --------------------------------------------------------------
Major Components and Attachments of Unit -----------------------
Major Components of Docking Station ------------------------------------
Control Panel of Unit --------------------------------------------------------
Functions of Remote Control --------------------------------------------
Mounting and Dismounting Battery -----------------------------------
Recharging Battery ----------------------------------------------------------
Installing Side Brushes ----------------------------------------------------
General Operation -----------------------------------------------------------
Installing the Docking Station --------------------------------------------
Using Dusting Paper ----------------------------------------------------------
Cleaning and Maintenance -------------------------------------------------
Troubleshooting --------------------------------------------------------------
*
*
* Preparation for Operation
* Starting Operation
* Stopping Operation
* Installing Methods
* Testing
* Starting Operation
* Installing Dusting Paper
* Starting Operation
* Maintenance Method
* Cleaning Dust Bin
* Cleaning Intake
* Cleaning Side Brushes
Control Panel of Docking Station ---------------------------------------
*
Safety Instructions
Battery and Recharging Instructions
Starting Operation
* Setting Present Time
* Setting the time of Cleaning
2S
3S
4M
6M
7C
8
9F
10 M
11 R
12 In
13 G
14 In
16 Us
17 Cl
23
*
*
*P
*S
*S
*In
*Te
*St
*In
*S
*
*
*
*
C
*
S
B
S
*S
*S

2
SAFETY INSTRUCTIONS
Please read through the safety instructions in this Operation Manual before operating
this product and keep this manual handy for your future reference. Observe the basic
safety rules to prevent any occurrence of fire, electric shock and personal injury.
1.Please read through this Operation Manual before operation.
2.Do not operate this unit outdoors.
3.Keep the vacuum away from water, and never use it in any conditions where water
could enter the unit and damage the unit.
4.Before operating the vacuum remove any loose articles on the floor such as clothes,
paper, loose cables and extension cords as well as making sure to lift curtains and
drapes off the floor to avoid any possible accidents. In case the cable is entangled
into this unit, the cable will move around as the cleaner is working and finally topple
down the table, chairs, even cabinet and cupboard.
5.Never stand on the vacuum. Be aware of children or pets while the vacuum is in
operation.
6.Never use the vacuum to pick up lighted smoking or fireplace materials.
8.Make sure exit doors leading outdoors are closed.
9.During operation, care should be taken to avoid the heat vent from becoming
clogged during operation. This could damage the vacuum.
10.If the cleaner is out of work or damaged, never use it regardless whatever the
trouble will be.
11.Be sure the power is off and remove the battery if the unit will not be in use for a
long period of time.
1.The battery is rechargeable. Please use the charger according to the voltage and
current specified on the packing. If you are not sure of the voltage and current of
your house, contact your local power company or a licensed electrician.
2.Use only the battery supplied with your vacuum.
3.Use the charger indoors only.
4.Use only the battery charger supplied with your vacuum.
5.Do not use the battery if the cable or plug is damaged.
6.Never touch the charger, plug or cable with wet hands.
7.If the vacuum requires cleaning, unplug the unit and take out the battery.
8.Before disposing of the unit, the battery pack has to be taken out.
9.Please switch off the unit ,the battery must be taken out of the unit.
10.Please recycle and dispose the waste battery properly.
Safety Instructions
Battery and Recharging Instructions
7.Never use the vacuum to clean combustible or highly volatile liquids such as gasoline.

3
SPECIAL FEATURES
Random
"Z" Type
Spiral
Along the wall
Spiral Spiral
First of all, it is our pleasure you have made a wise choice of this RV-14 Robotic
Vacuum Cleaner with Docking Station.
Its epochal revolutionary automatic vacuum cleaner, professionally designed remote
control and dusting paper make it best suitable for cleaning the house floor, including
wooden tile, synthetic plastic tile, ceramic tile. RV-14 Robotic Cleaner is definitely an
automatic housing helper. Once the RV-14 Robotic Cleaner is started up, it runs in
four courses of movement, random-->spiral-->along the wall-->spiral-->"Z" type-->
spiral-->random... Its movement covers every corner of the room. When it confronts
obstacles such as wall and furniture, it will continue moving along the side of wall or
the furniture. The side brushes will excavate the dust and ashes and collect them in
the dust bin. After finishing one wall, it will repeat running in four courses of movement
to clean another one. This movement ensures a thorough cleaning of the room.
With the docking station, when the battery soon runs out of power, it will automatically
find the docking station to be charged for next mission.

4
1. 2. 3.
4. 5. 6.
7. 8. 9.
10.
MAJOR COMPONENTS AND ATTACHMENTS
1. Cleaner x1
2. Rechargeable battery x1
3. paper holder x1
4. Dusting paper x3
Dusting
5. Side brush x2
6. Adaptor ( d.c. 24V 500mA ) x1
7. Remote controller x1
8. Operation Manual x1
9. Dust bin filter x1
10. Docking station x1
Manual

5
MAJOR COMPONENTS AND ATTACHMENTS
Dust bin
Battery cover
Heat vent
Power switch
Bumper
Control panel
Selection switch
Handle grip
Intake (Automatic up and down)
Wheel
Wheel hood
IR receiver
Side brush
Side sensor
Contact points for automatic charging
*The contact points on the unit are for automatic charging.
Before the unit goes back to the docking station, there is no electrical
hazard to contact two points with any metal items.
d.c. jack

1. 2. 3.
6
MAJOR COMPONENTS OF DOCKING STATION
1. Docking station x1
2. Mounting Bracket x1
3. Pair of Screws x2
Control Panel
Cord Hook
Hook Slot
Contact plates for recharge
*The contact plates on the docking station are for automatic charging.
Before the unit goes back to the docking station, there is no electrical
hazard to contact the two plates with any metal items.
Socket for adaptor
d.c. 24V 500mA
7
Battery Power Indication Lamp
The battery power indication lamp will light only if the cleaner power is turned on.
When not in use, always turn off the power switch on the cleaner.
Power indication lamp color
Power indication
Green
Red flashing
Green flashing
Red
Sufficient
Battery low, requiring recharging
During recharging
Abnormal / lifting up
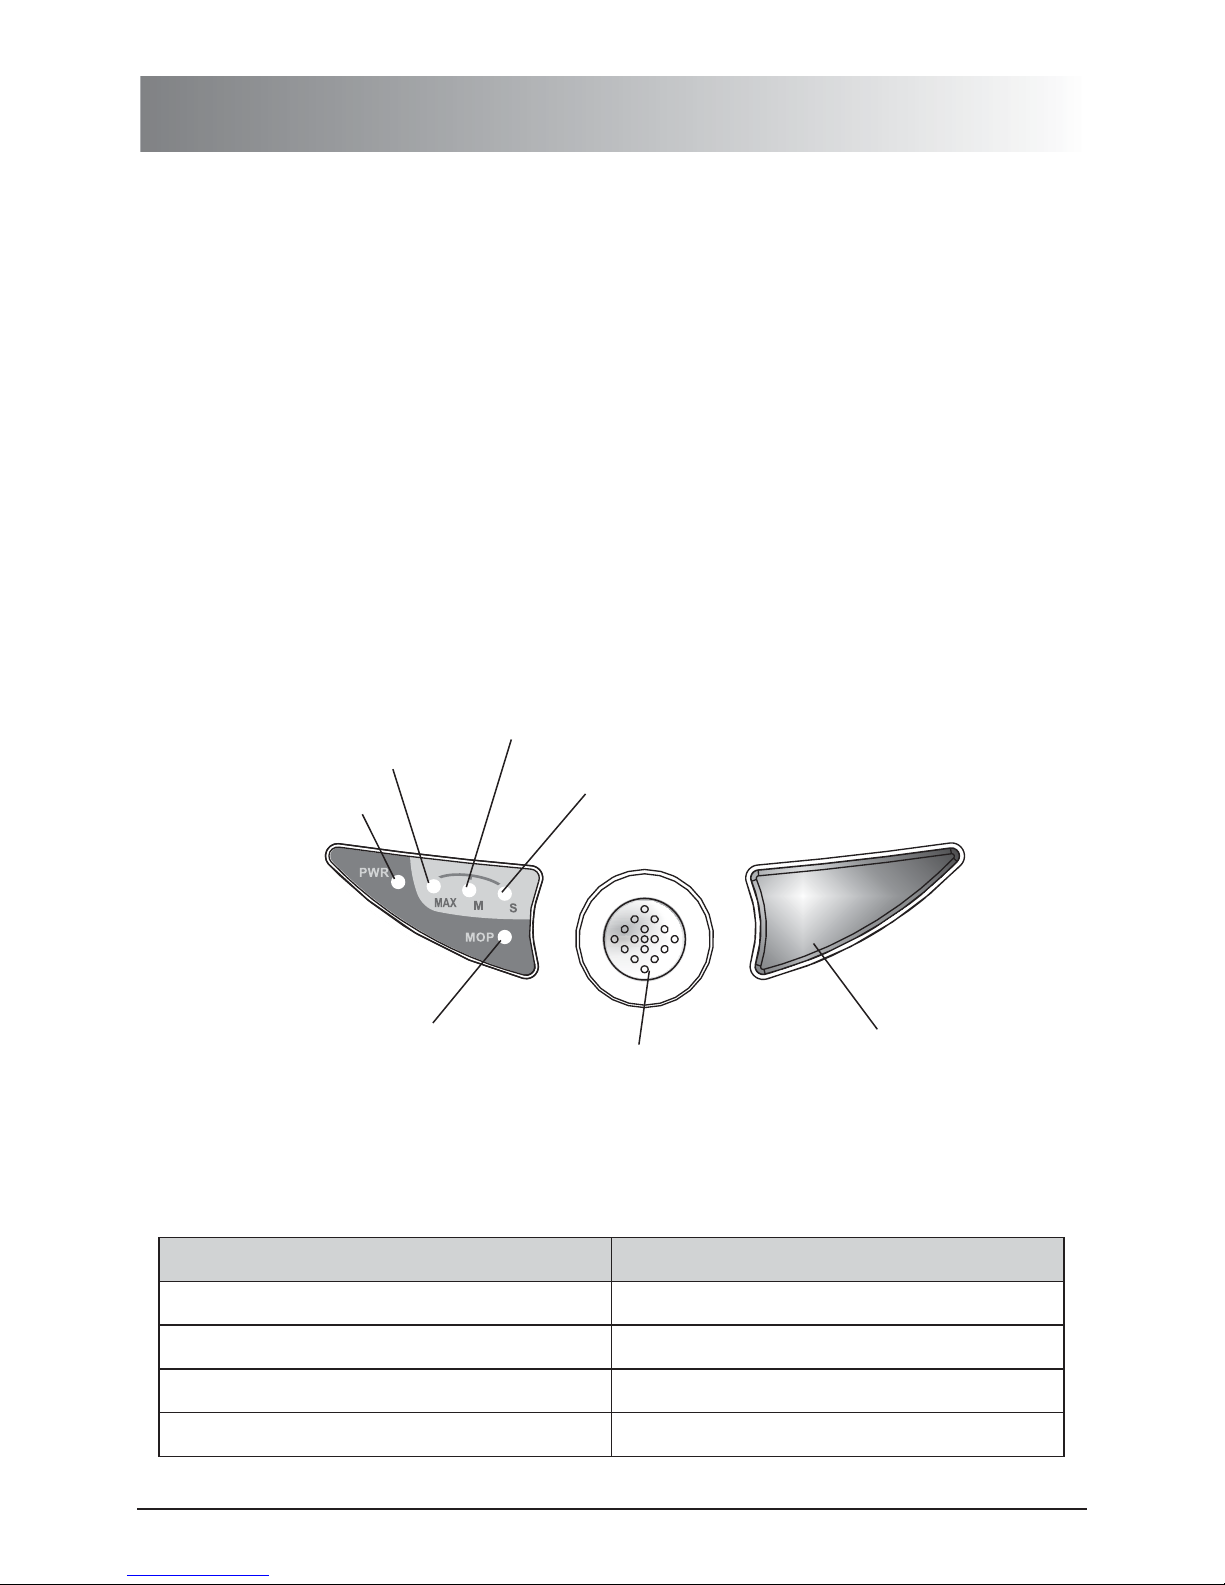
CONTROL PANEL
IR receiver
Power indication lamp
Short working time
indication lamp (green)
Middle working time
indication lamp (yellow)
Max Long working time
indication lamp (red)
MOP (green)
Selection button
1. Power Switch, the green indication lamp lights .
4. When you press VAC (on/off) button on remote control the MOP indicator will light
on and the vacuum motor and sweep motor will stop to allow mopping to proceed
without suction or sweeping.
5
when it is on
2. The selection button is for setting the working time. Press it to shift the indication
lamp to " Max " position (stays in red) <working until the battery is exhausted>, to
"M"position(staysinyellow)<working40minutes>,andto"S"position(staysin
green) <about 20 minutes>.
3. From the fourth time to the sixth time you press the selection button, the indication
lamp will be shifted to " Max " position (flashing red) <exhausted>, to"M"position
(flashing yellow) <about 40 minutes>, and to"S"position(flashinggreen) <about
20 minutes>. The flashing indication lamp means: After the mission is completed,
the unit will not go back to the docking station for charging.
. When the battery runs out of power, the red indication lamp will flash (see battery
power indication lamp).

Full Go
Set Select
+
-
CLK
SET Su WeTuMo Th FrGOSa
1
2
3
4
5
8
MinuteHour Day of Week
Completed setting
for time of cleaning
Present Time Setting
Start
CONTROL PANEL OF DOCKING STATION
Battery Indicator
Starting Operation
Setting Present Time
Setting the time of Cleaning
2. The LCD display will be flashing in the time area.
3. Press Button (1)"Full Go" once, then the start indication "GO" will show at the
underneath right side which means that when the unit is fully charged, it will
automatically start cleaning. The second time you press the button, the start
"GO" indication will vanish and the function is cancelled.
4. Press Button (2)"Set" to switch between the present time and the time of cleaning.
1. Press Button (2) "Set" once, "SET CLK" will flash and you can start setting the time
of day.
2. You can press Button 3 "Select" to switch among the three time setting modes of
Hours, Minutes, and Week. Press button (2) to set each area when completed
and continue onto the next area to set.
3. Press Button (4) (+) and Button (5) (-) to adjust the digits up or down.
1. Press Button (2) "SET" twice, "SET " will flash and you can start the time of
cleaning.
2. Press Button (3)"Select" to switch among the three time setting models of "Hour" /
"Minutes" / "Week" to do the setting. If there's no time setting been done before,
the screen will show -- : --, you just have to press Button (4) and (5) to adjust the
digits up or down.
3. You can do the setting to do the cleaning everyday (Su-Sa) or five days a week
(Mo-Fr) or six days a week (Mo-Sa) or two days a week (Su and Sa) or any
individual day of the week.
4. Press Button (4) (+) or Button (5) (-) to adjust the digits up or down.
5. After completing the cleaning time setting, the " " will show on the left side of
the LCD display.
* When the unit is successfully charged at the docking station, the battery indicator
on LCD display on the docking station will flash, indicating the unit is under charging.
1. Connect the adaptor to the docking station and then plug the adaptor into the wall outlet.

9
SPIRAL
AUTO
STOP
RIGHTLEFT
FORWARD
VAC
ON/OFF
BACK
DOCKING
(9)Docking
FUNCTIONS OF REMOTE CONTROL
(1) Manual/ Auto (Max-M-S)
(3) Turn Left
(7) Spiral
IR transmitter
(2) Forward
(4) Turn Right
(5) Stop
(8) Suction ON/ OFF button
(6) Backward
1. The remote control requires 2 "AAA" batteries.
2. Point the front of the remote control towards the IR receiver of the cleaner.
3. Manually set the working time by shifting the selection button to (Max)-(M)-(S) position.
4. Button functions:
1) Manual / Auto (Max-M-S): Pressing this button will switch from Manual mode to
Auto mode. Pressing it again will switch it to another operation mode (Max->M->S).
2) Forward: Pressing it once makes the cleaner go straight continuously until it
encounter a wall or an obstacles or press remote control" Stop" button to stop.
3) Turn Left: Pressing it once makes the cleaner turn left for one second.
Pressing and holding the button makes it turn left continuously.
4) Turn Right: Pressing it once makes the cleaner turn right for one second.
Pressing and holding the button makes it turn right continuously.
5) Stop: Pressing it once stops cleaner immediately.
6) Backward: Pressing it makes the cleaner go backward for one second.
*Attention: The unit doesn't have the back IR sensor to prevent it from falling from
stairs when backing.
7) Spiral: Pressing it once makes the cleaner spiral until it encounter a wall or an
obstacle. When it encounters one, it will automatically switch into "Auto" mode.
8) VAC ON/OFF button: Press it to stop or activate the operation of suction motor
and sweeper motors.
9) Docking: Pressing it makes the cleaner return to the docking station for recharging.

10
MOUNTING AND DISMOUNTING BATTERY
1. Make sure the cleaner is off before inserting or removing the battery.
2. Press and pull out the battery door in the direction of the arrows as shown in Fig.1.
3. Insert / Unplug the battery plug into the socket (please note the direction) as shown
in Fig.2.
4. Place the battery in the battery reservoir and close the battery door. Make sure the
battery door snap into the slot.
Fig. 2
Fig. 1
Battery socket
Socket for
battery
Battery plug
Rechargeable battery
Click up

11
Fig. 3
Power indication lamp
Adaptor plug
(d.c. 24V 500mA)
d.c. jack
RECHARGING BATTERY
1. It takes 6-8 hours to fully charge the battery.
2. If the power indication lamp on the control panel is flashing red, it indicates that the
battery needs recharging immediately.
3. Make sure the cleaner is switched off and the battery is properly mounted.
4. Plug the d.c. end of the adaptor into d.c. jack at the side of the cleaner first, and
then plug the a.c. end of the adaptor into the a.c. power outlet on the wall.
(Please connent the adaptor to the unit first before connecting to the a.c. power
outlet.) Please refer Fig.3.
5. The power indication lamp on the control panel will flash green.
6. The power indication lamp stays green when the battery is fully recharged.
ATTENTION!!! Recharges the battery without discharging it may cause the
battery malfunctioned.
1. After the battery is fully charge, it should be discharged before recharge.
Discharge: Let unit operate for 20 minutes at least, such operation will discharge
the battery enough for recharge.
2.Recharges the battery more than 3 times without discharging it may cause the
battery malfunctioned. Under such condition, please stop the charging process
and put the unit away from docking station, with its power on for an hour at least,
then re-start the unit.
*

12
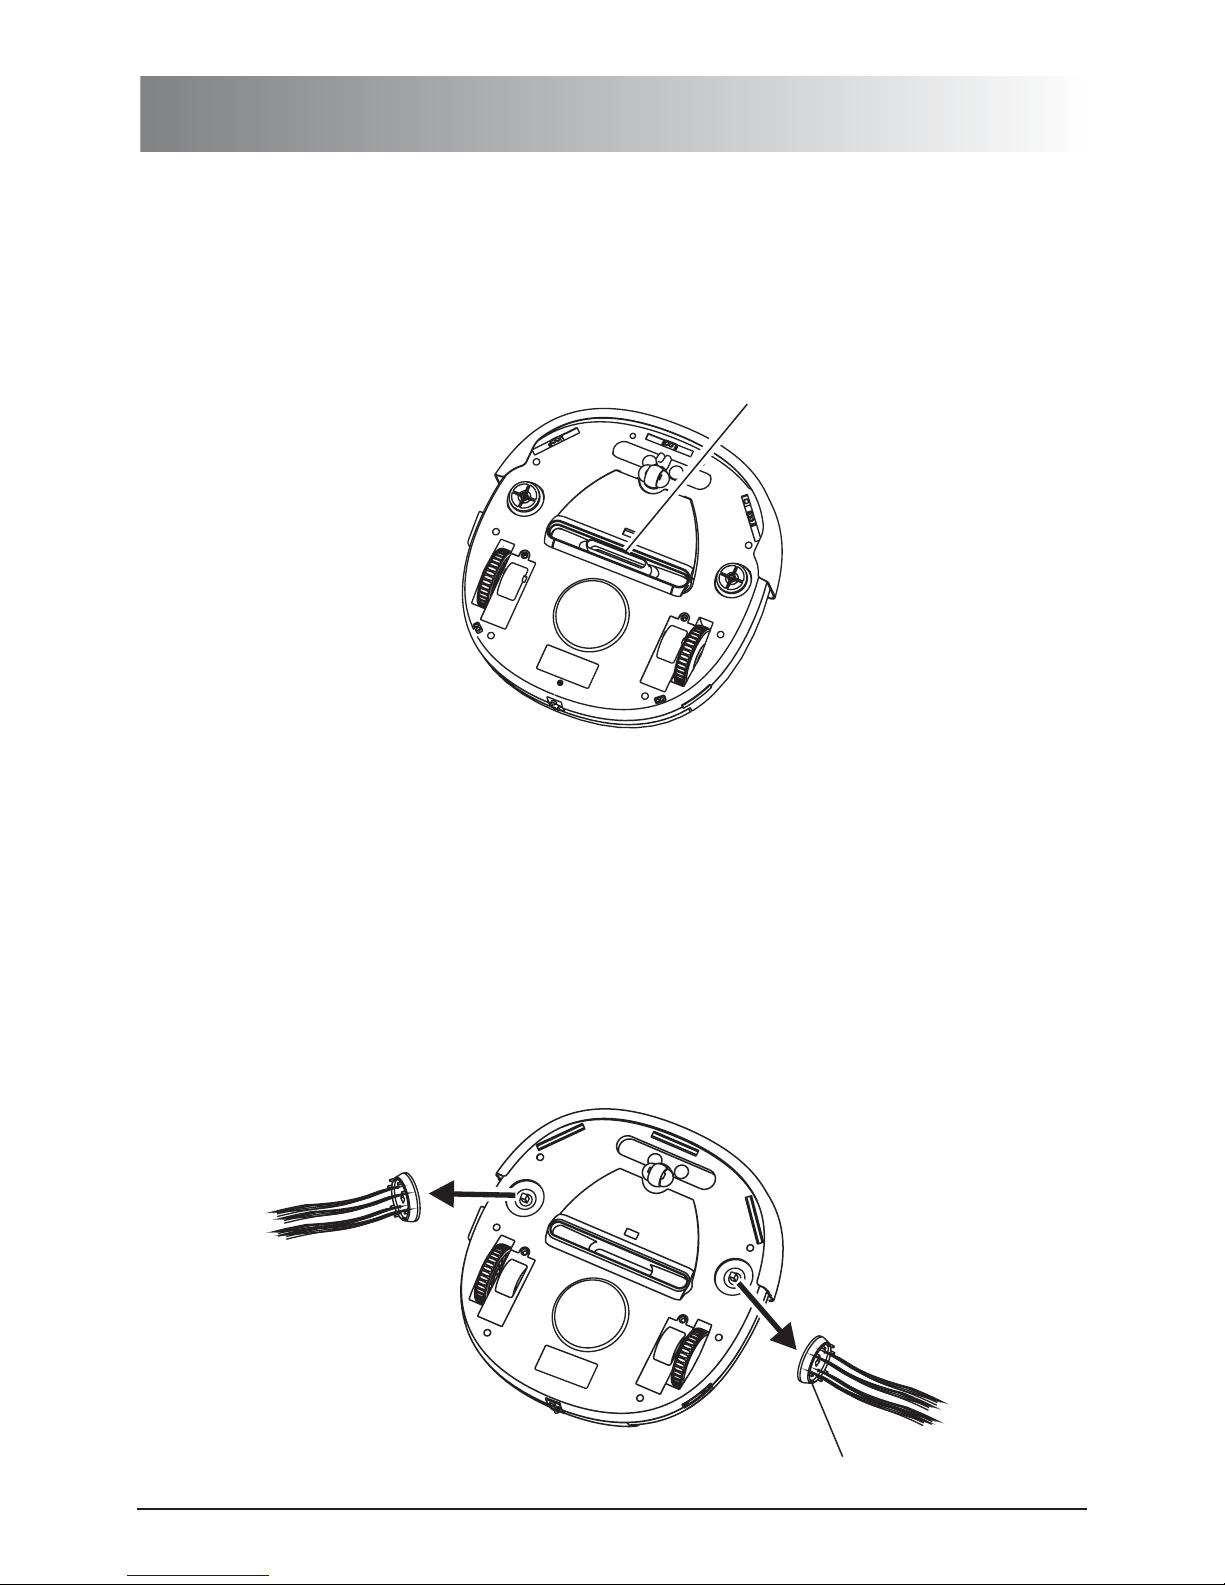
1. Turn counter clockwise to open the brush lids on the bottom of unit as shown in Fig.4.
2. Put the brushes on the holders then mount the brush lids back by turning clockwise
as shown in Fig.5.
3. The brushes will be radiative after completing installation as shown in Fig.6.
Brush lid
Fig. 4
Fig. 6
Fig. 5
INSTALLING SIDE BRUSHES
Side brush
Brush lid

13
GENERAL OPERATION
Preparation for Operation
Starting Operation
1.To ensure the best working efficiency of the unit, first is to remove clothes, paper,
cable, extension cable scattered on the floor, roll up the curtains and drapes if any
to avert the possible accident. In case the cable is entangled into this cleaner, the
cable will move around as the cleaner is working and finally topple down the table,
chairs, even cabinet and cupboard.
2.If it is the first time to use the unit, the whole operation processing should be carefully
monitored to ensure it work smoothly. If it is besieged on under the
furniture or wheels stopped for 10 seconds, the cleaner power
automatically for safety purpose.
1.Clean the dust bin.
2.Place the unit on place with more free space in the room.
3.Turn the power switch on right side of the cleaner.
4.Press the selection button and set up the working time:
"Max"( )-"M"(about 40 minutes) or"S"( ).
5.After 2 seconds, the unit begins cleaning .
6.When the job is completed, the cleaner emits a buzz of warning and stops. If the
power indication lamp turn to Red flashing( Battery low ) at the same time. The unit
will emit a buzz in every minute till you switch off power switch or battery exhausted.
1.If you want to stop the operation of the unit immediately, you can turn off the power
switch on the right of the unit, or lift the unit off the floor, it will stop after 3 seconds.
2.Press the " STOP " on the remote control.
3.If you want the unit continue working, place the unit on the floor and press " AUTO "
button on the remote control.
4.
* Do not use on the shag carpet.
uneven floor or
will cut off the
exhausted about 20 minutes
automatically
The unit is designed with a series protective measure, once it is lifted up off the floor
or stopped at operation, it automatically shut off the power.
Stopping Operation

14
100 cm
30 cm
INSTALLING THE DOCKING STATION
Fig. 7
Fig. 8
Installing Methods:
1.Tear off the adhesive tape from the back of the docking station mounting bracket in
Fig.7. Affix the mounting bracket to the wall, and keep both sides of the wall which
docking station mounted are free of obstacle. The distance to the left and to the right
of the docking station should at least 100 cm and 30 cm. In Fig.8.
2. Take off the docking station from the mounting bracket then plug in the DC jack and
store the excess cord in the back of the docking station.
3. You can secure the docking station to the wall with the screws enclosed.

15
INSTALLING THE DOCKING STATION
Fig. 9
Fig. 10
SPIRAL
AUTO
STOP
RIGHT
LEFT
FORWARD
VAC
ON/OFF
BACK
DOCKING
Power switch
Selection switch
Power switch on
Keep pressing
Press " Docking "
Consumers can test if the docking station is installed well or not by the following two
methods, if the vacuum cannot go back to the docking station and charge successfully,
then please replace the docking station to the proper height.
1. Test by the main unit: Keep pressing the selection button and switch on the power
of the vacuum. After the unit begins moving, release the selection button and the
unit will directly switch to the mode of automatically finding the Docking Station for
charging. Please refer Fig.9.
2. Test by the remote control: Switch on the vacuum, press the button "Docking" on the
remote control, the vacuum will go back to the docking station for recharging.
Please refer Fig.10.
Testing

16
INSTALLING THE DOCKING STATION
1. When the unit has finished cleaning, it will begin searching for the docking station
to begin charging. If the unit cannot locate the docking station and charge
successfully after the power is exhausted, you should manually put the unit back to
the station for charging. Normally the power indication lamp will flash green when
the unit is being charged. But if the power indication lamp doesn't go on, it means
that the unit is exhausted of power and you should charge the unit manually: Switch
off the power and plug the DC adaptor into the unit to do the charging. At this time
the power indication lamp will flash green. No matter if the unit is charged manually
with the adaptor or at the docking station, when the unit is fully charged, the power
indication lamp would stay green.
2. You should switch off power of the unit when you want to charge the unit by your self.
Also you can manually charge the unit for about 5~10 minutes, and then put the unit
back to the docking station to be charged automatically. And there will be two
circumstances for automatic charging:
(1)UNIT POWER SWITCH OFF: No matter what working time mode you've set in the
vacuum, it will not go and clean even when it is fully charged.
(2)UNIT POWER SWITCH ON: When the time of cleaning is up, the unit starts to
clean in mode " Max " After completing the work, the unit would find its way back to
the station and do the charging. And at the next time it starts cleaning, it will also
work in mode " Max ".
3. If you don't want to have the unit do the automatic charging, you could press the
selection button on cleaner (or press the "AUTO" button on the remote control)
until the indication lamp of "MAX", "M" or "S" is blinking.
4.
Starting Operation
When the unit is in docking station for recharge, but the unit has no green light flashing,
it means the battery has no power at all. If this happens, please take the unit out of
docking station and turn the power off and plug the DC inlet directly to the unit for
recharge.

17
USING DUSTING PAPER
NOTE: Do not use mopping function on the carpet. At the same time you
have to remove the side brushes to prevent them from damage.
Installing Dusting Paper
Starting Operation
1. Insert the border of dust paper into the grip slot of the dusting paper holder as
shown in Fig.11.
1. Press " VAC ON/OFF" button on remote control to stop the operation of suction
motor and sweeper motors, it will save energy and keep the noise to a minimum.
2. Start the operation as described in the General Operation (please see page 13).
2.Aim the 2 bolts of the dust mopping paper holder at the 2 holes (inside the 2 big
wheels) and click the holder on the bottom of the cleaner as shown in Fig.12.
Dusting paper
Specially for cleaner
Grip slot
Dusting paper holder
Dust Holder locks into the small hole
Fig. 11
Fig. 12
18
CLEANING AND MAINTENANCE
Maintenance Method
Cleaning Dust Bin
The operation and maintenance of the cleaner is very simple. Clean the dust and dirt
left on the dust bin and on the filter. It is not necessary to clean the intake and the
side brushes every time.
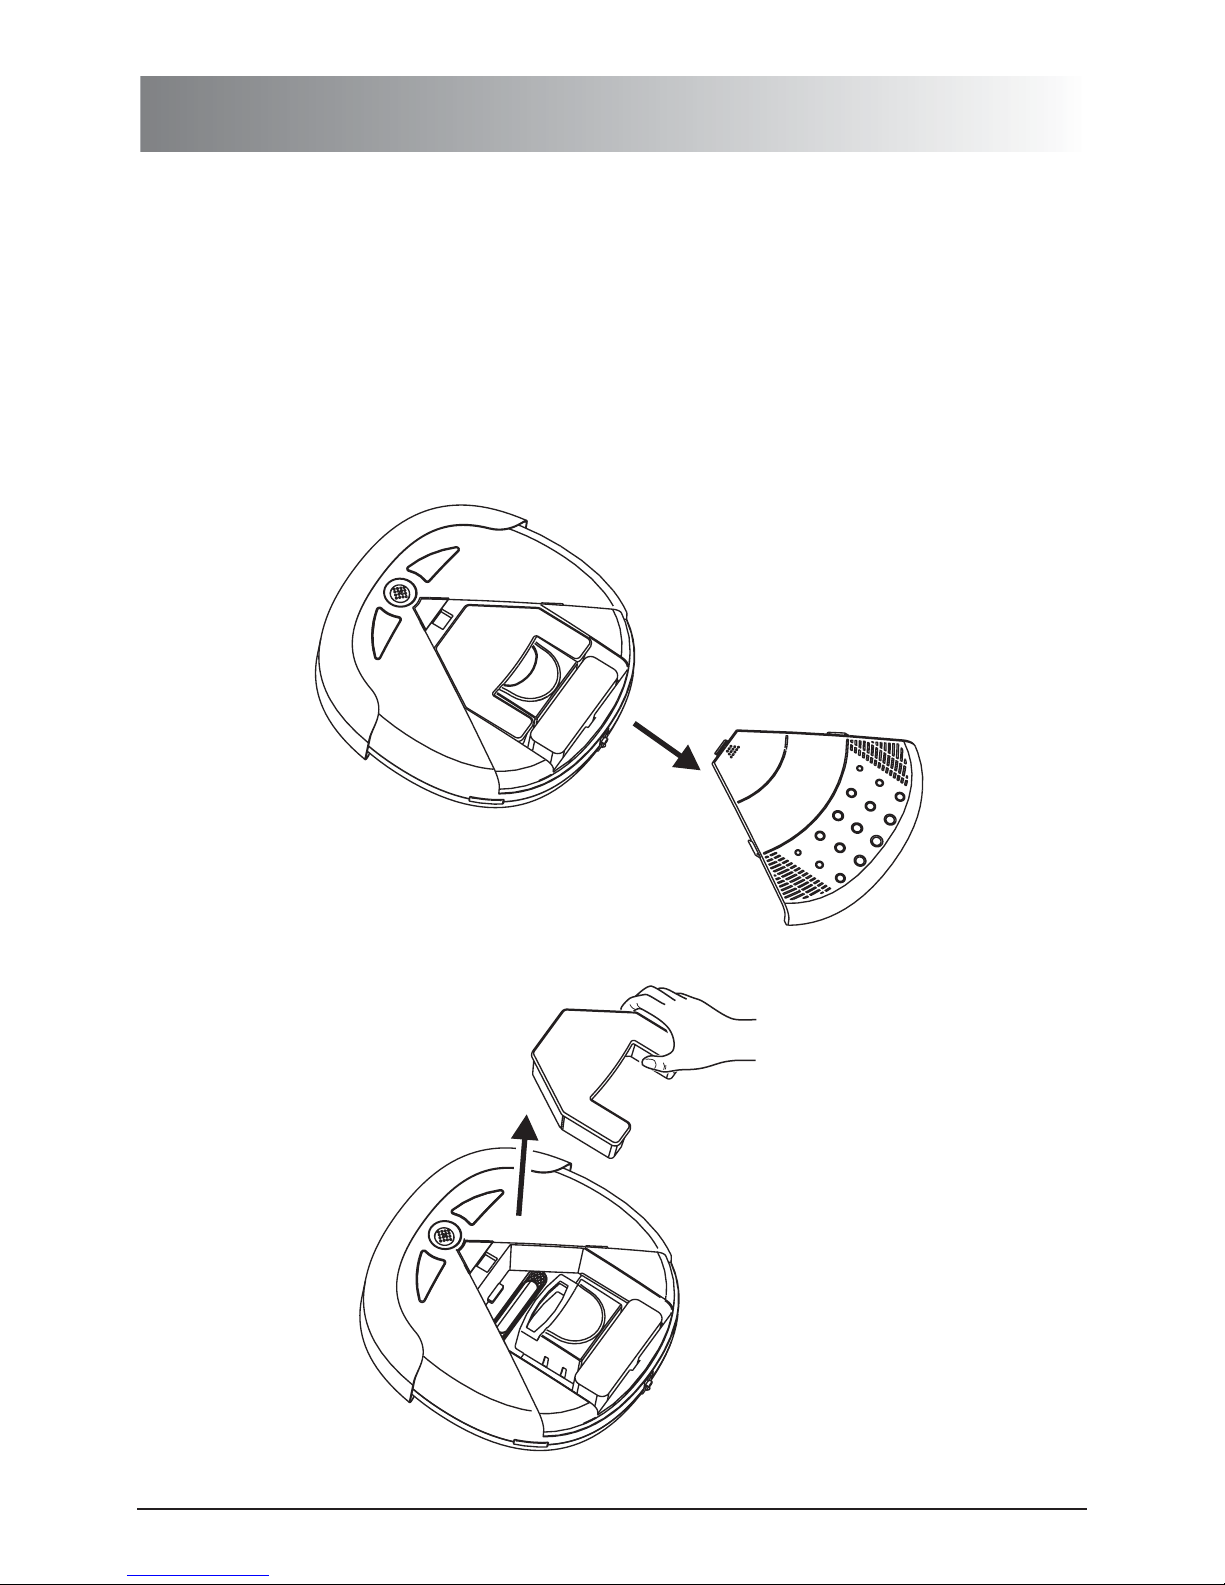
1. Press the ejection button as the arrow shown in Fig.13.
2. Release the dust bin from the grip slot and take out the dust bin as shown in Fig.14.
Fig. 13
Fig. 14

19
CLEANING AND MAINTENANCE
3. Open the upper cover of the dust bin as shown in Fig.15.
4. Lift up and take out the filter as shown in Fig.16.
5. Throw away the dust and dirt from the dust bin as shown in Fig.17.
Fig. 15
Fig. 16
Fig. 17

20
CLEANING AND MAINTENANCE
6. Rinse the dust bin with tap water as shown in Fig.18, it is not necessary to wash
every time.
7. Clean the filter with toothbrush as shown in Fig.19.
Fig. 18
Fig. 19

21
CLEANING AND MAINTENANCE
8. Dry thoroughly, replace the filter and the dust bin lid as shown in Fig.20.
9. Replace the dust bin and ensure it is fastened on the lock bolts as shown in Fig.21.
Fig. 20
Fig. 21
22
Cleaning Intake
To ensure the efficiency and constant airflow of the cleaner, periodically remove the
dust and dirt that will accumulate around the intake. To do this you should
1. Turn off the power of the cleaner.
2. Clean up the dust on the intake Fig.22.
CLEANING AND MAINTENANCE
Intake
Fig. 22
Cleaning Side Brushes
1. Turn off the power, place bottom of the cleaner upward on a flat surface.
2. Rotate and take off the brush lids and side brushes and then clean up the hair or
other matters by hand as shown in Fig.23.
3. Install back the lids and brushes after finishing.
4. After being used for a period of time, the brushes need to be replaced to clean
more effectively.
5. The side brushes can be rinsed and if they become crooked, you can scald them
in hot water to make them return to original shape.
Side brush
Fig. 23

Recharge the unit.
Send the unit to the
factory for repair.
Please open up the
wheel cover and connect
the wires of wheel or
send the unit to the
factory for repair.
Battery Low.
1.check if the battery is
installed or not.
2.power is too low.
The adaptor is broken-down.
The wire of wheel inside the
unit loosens.
The unit cannot go straight,
just circles around.
The unit cannot be
recharged, and the LED
indicator is not lighted.
Cannot start up the unit.
Red LED flashes after the
unit being started up.
1.to install the battery
correctly.
2.to have the battery
full-charged.
Trouble Possible Reason Resolution
4
3
2
1
TROUBLESHOOTING
Please poke the button
and it will work.
The selection button gets
stuck.
Turn on the unit and press
the selection button but the
unit still doesn't start up.
5
10
9
8
7
6
11
Please replace with new
batteries. / Install the
batteries again in correct
direction.
The power of remote control
is exhausted. / The batteries
are not installed in it. / The
batteries aren't installed in
correct direction.
The remote control doesn't
work.
Relocate the station to
proper position and
adjust the height to
ensure the contacting
points of unit can touch
the contacting plates of
the station for recharge.
Check if the station is located
properly according to the
operation manual.
The unit cannot go back to
the docking station for
recharge.
Please turn on the
cleaner.
The unit is not turned on.The unit cannot be started
up after fully charged at
the station.
The unit cannot recharged
through the docking station.
The battery is totally flat and
cannot be charged by docking
station.
Charge the machine using
the adaptor
Setonthe"FULLGO"
function on the docking
station.
The "FULL GO" function has
not been set already.
The unit cannot start up
automatically after fully
charged at the station.
If they become crooked,
you can scald them in
hot water to return them
to their original shape.
BeingusedforalongtimeThe side brushes had
become crooked, not good
to sweep.
12
Put the cleaner back to
the station.
The unit is not at the station.Cannot set "FULL GO"
on the docking station.
13
Please remove the
obstacles.
The obstacles stuck the unit
from going back for recharge.
The unit cannot go back to
station for recharge.
23
 Loading...