

Page 1
Vacuum with Brush
.........................................................................
Operation Manual
P4960
Page 2

TABLE OF CONTENTS
1
Safety Instructions ................................................................2
• Safety Instructions
• Battery and Recharging Instructions
Special Features ....................................................................4
Components and Attachments ............................................4
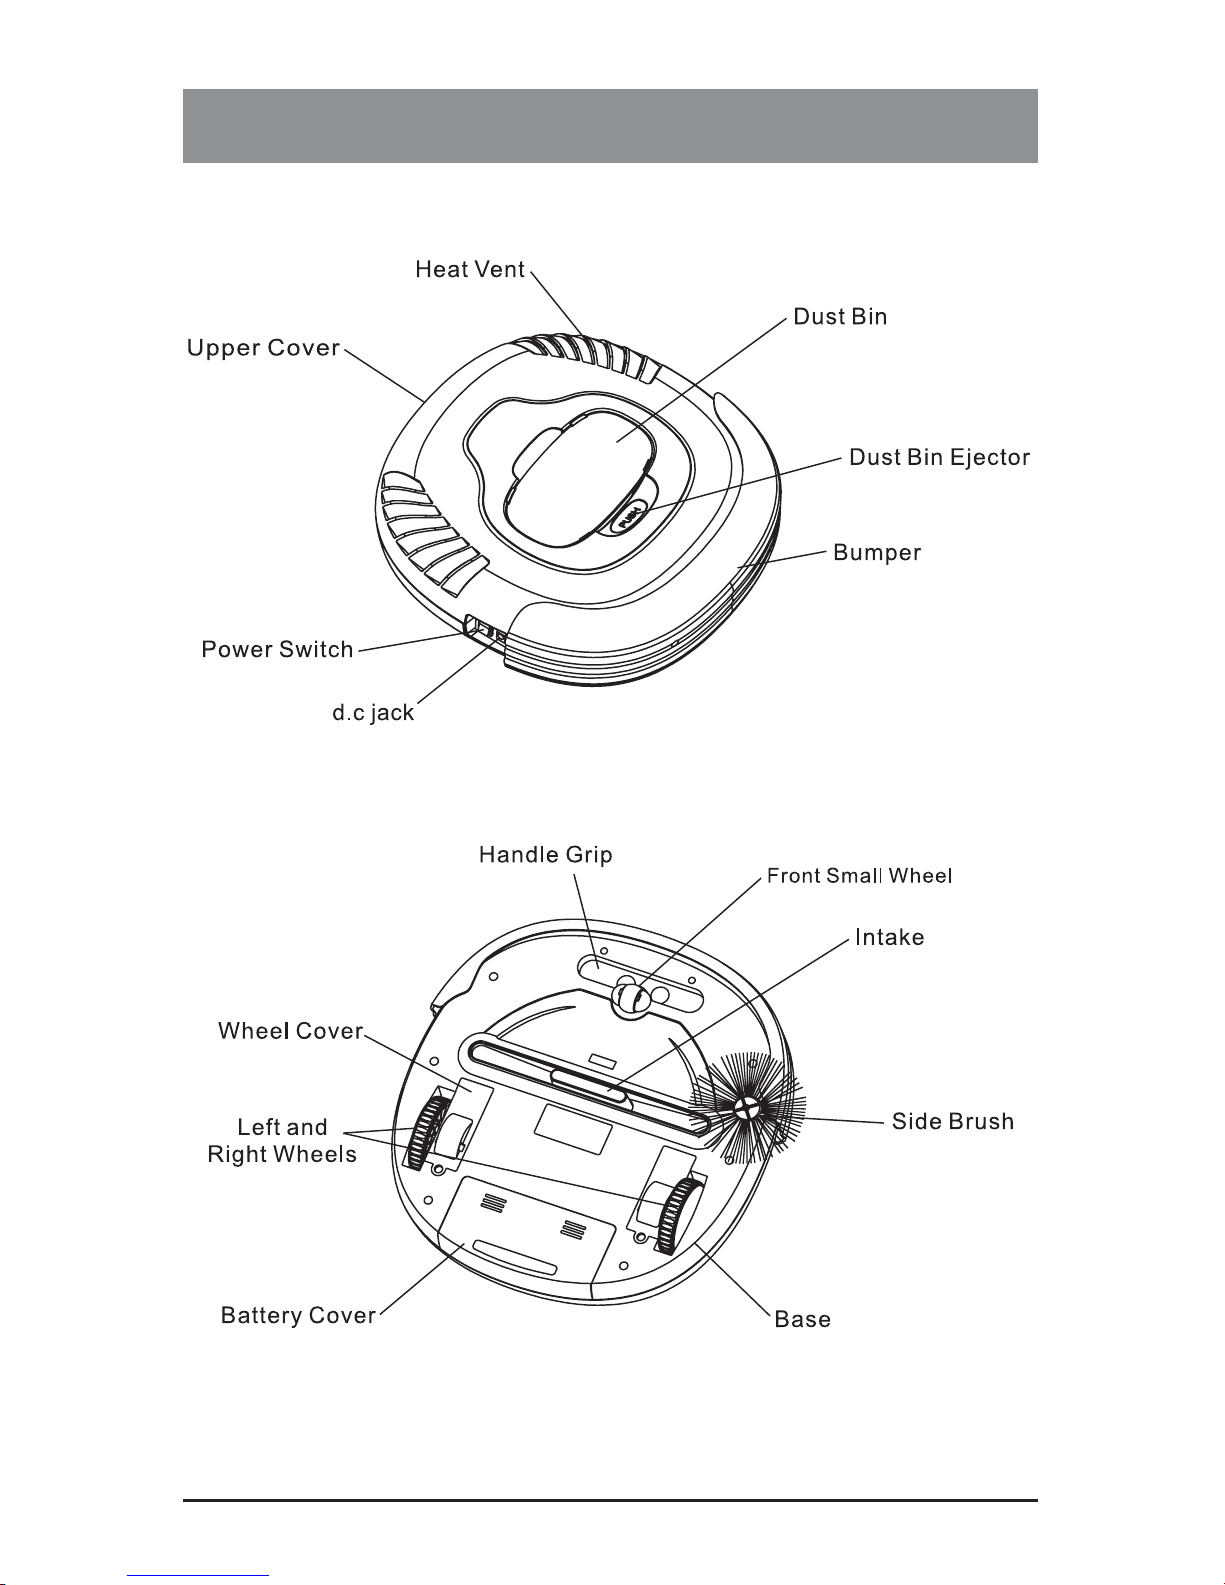
Product Features/Locations .................................................5
Battery Installation and Removal .........................................6
Recharging Battery ...............................................................7
General Operation .................................................................7
• Preparation for Operation
• Starting Operation
Installing Sidebrush...............................................................8
Using Dust Cloths .................................................................8
Cleaning and Maintenance ...................................................9
• Maintenance Procedures
• Removing Dust Bin
• Emptying Dust Bin
• Cleaning Dust Bin
• Cleaning Intake
• Cleaning Side Brushes
Page 3
SAFETY INSTRUCTIONS
2
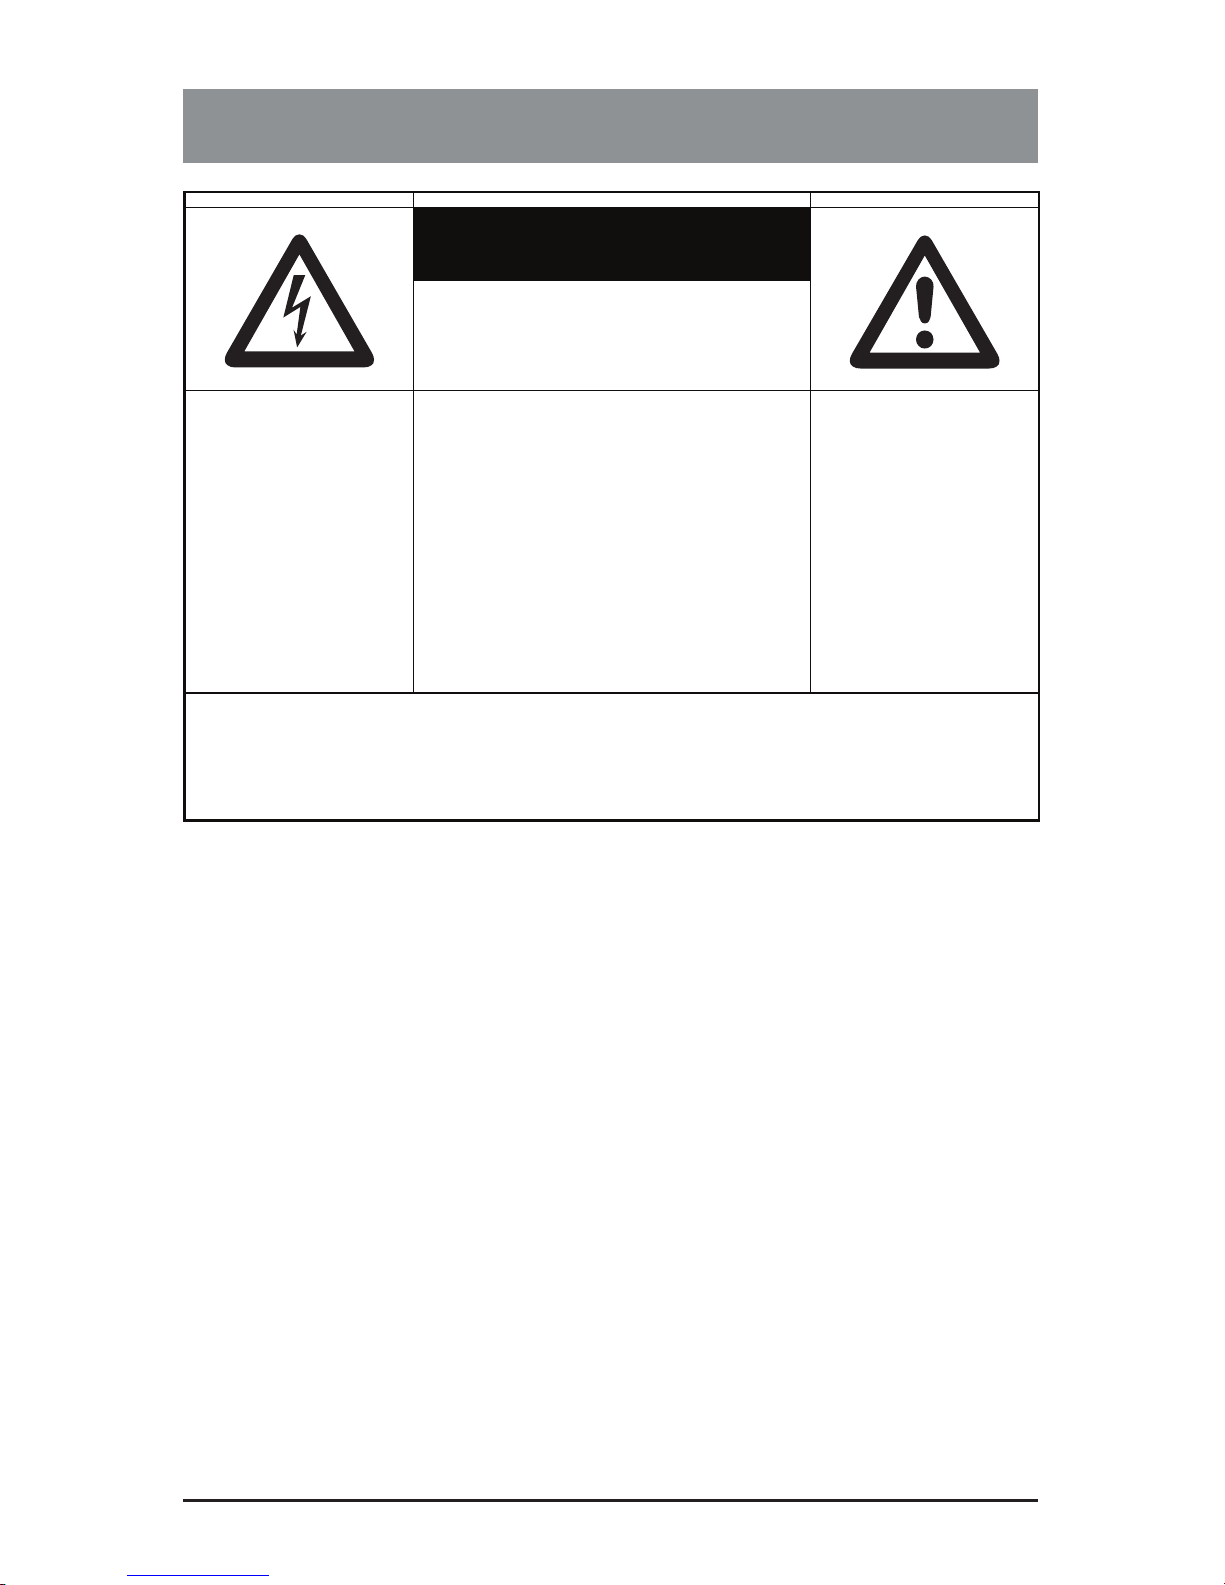
CAUTION
RISK OF ELECTRIC
SHOCK
DO NOT OPEN
The lightning flash with
arrowhead, within an
equilateral triangle, is
intended to alert the user
to the presence of
uninsulated “dangerous
voltage” within the
product’s enclosure that
may be of sufficient
magnitude to constitute a
risk of electric shock to
persons.
CAUTION:
TO REDUCE THE RISK OF
ELECTRIC SHOCK, DO NOT
REMOVE COVER. NO USER-
SERVICEABLE PARTS
INSIDE. REFER SERVICING
TO QUALIFIED SERVICE
PERSONNEL.
WARNING:
TO REDUCE THE RISK OF FIRE OR ELECTRIC SHOCK, DO
NOT EXPOSE THIS APPLIANCE TO RAIN OR MOISTURE.
The exclamation point
within an equilateral
triangle is intended to
alert the user to the
presence of important
operating and maintenance instructions in the
literature accompanying
the appliance.
Page 4

SAFETY INSTRUCTIONS
Please read through the safety instructions in this Operation Manual before
operating this product and keep this manual handy for your future reference.
Observe the basic safety rules to prevent any occurrence of re, electric shock
and personal injury.
Safety Instructions
1. Please read through this Operation Manual before operation.
2. Do not operate this unit outdoors.
3. Keep the vacuum away from water, and never use it in any conditions
where water could enter the unit or it could damage the unit.
4. Before operating the vacuum remove any loose articles on the oor such
as clothes, paper, loose cables and extension cords as well as making
sure to lift curtains and drapes off the oor to avoid any possible accidents. In case the cable is entangled into this unit, the cable will move
around as the cleaner is working and nally topple down the table, chairs,
even cabinet and cupboard.
5. Never stand on the vacuum. Be aware of children or pets while the
vacuum is in operation.
6. Never use the vacuum to pick up lighted smoking or replace materials.
7. Never use the vacuum to clean combustible or highly volatile liquids such
as gasoline.
8. Make sure exit doors leading outdoors are closed.
9. During operation, care should be taken to avoid the heat vent from becom-
ing clogged during operation. This could damage the vacuum.
10. If the cleaner is out of work or damaged, never use it regardless whatever
the trouble will be.
11. Be sure the power is off and remove the battery if the unit will not be in
use for a long period of time.
Battery and Recharging Instructions
1. The battery is rechargeable. Please use the voltage and current specied
on the packaging. If you are not sure of the voltage and current of your
house, contact your local power company or a licensed electrician.
2. Use only the battery supplied with your vacuum.
3. Use the charger indoors only.
4. Use only the battery charger adaptor supplied with your vacuum.
5. Never use the battery again if the cable or plug of the battery becomes
damaged.
6. Never touch the charger, plug or cable with wet hands.
7. If the vacuum requires cleaning, unplug the unit and take out the battery.
8. Before disposing off the unit, the battery pack has to be taken out.
9. Please switch off the unit before taking out the battery.
10. Please recycle and dispose the waste battery properly.
3
Page 5
SPECIAL FEATURES
4
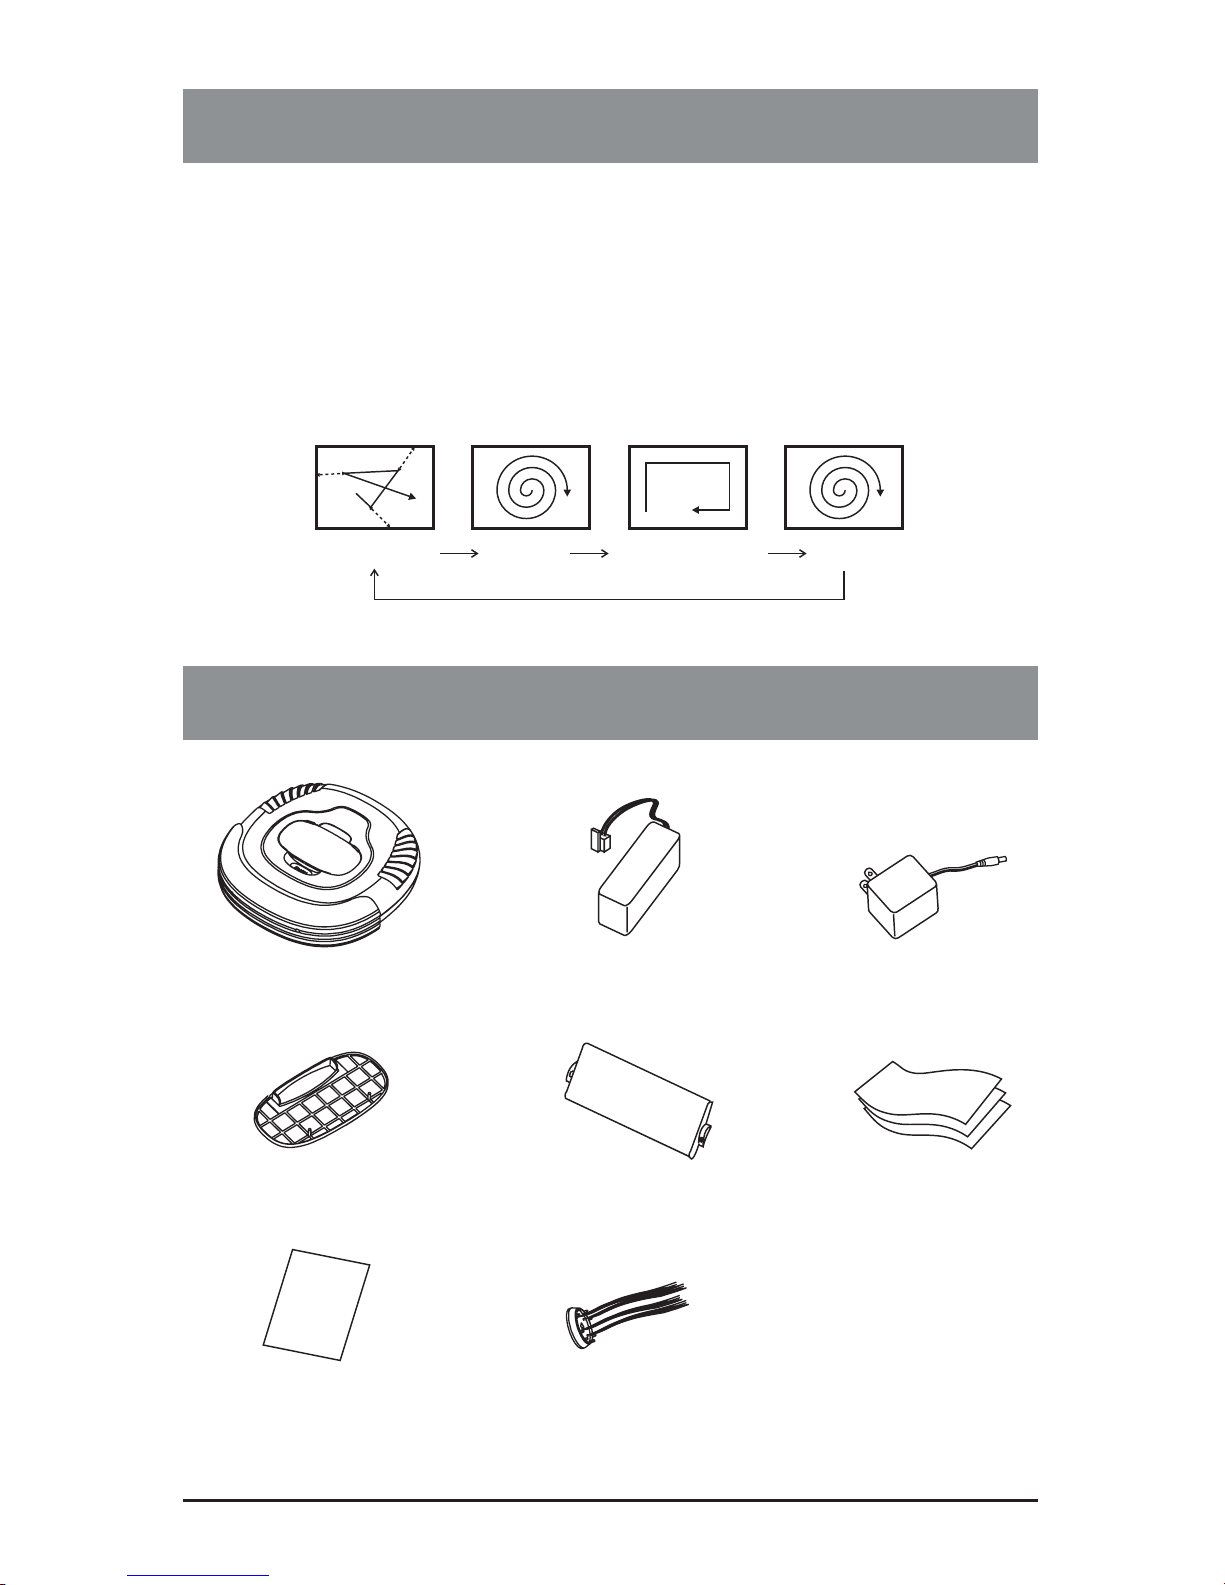
Congratulations on your purchase of the V.Bot® Robotic Vacuum. This revolutionary automatic vacuum is equipped with functions suitable for cleaning
home and ofce oor surfaces such as wood, tile, linoleum, and most low-pile
carpets.
You can also operate this unit with the provided micro ber dust cloths to help
you clean more effectively. The V.Bot® Robotic Vacuum Cleaner is denitely a
household helper.
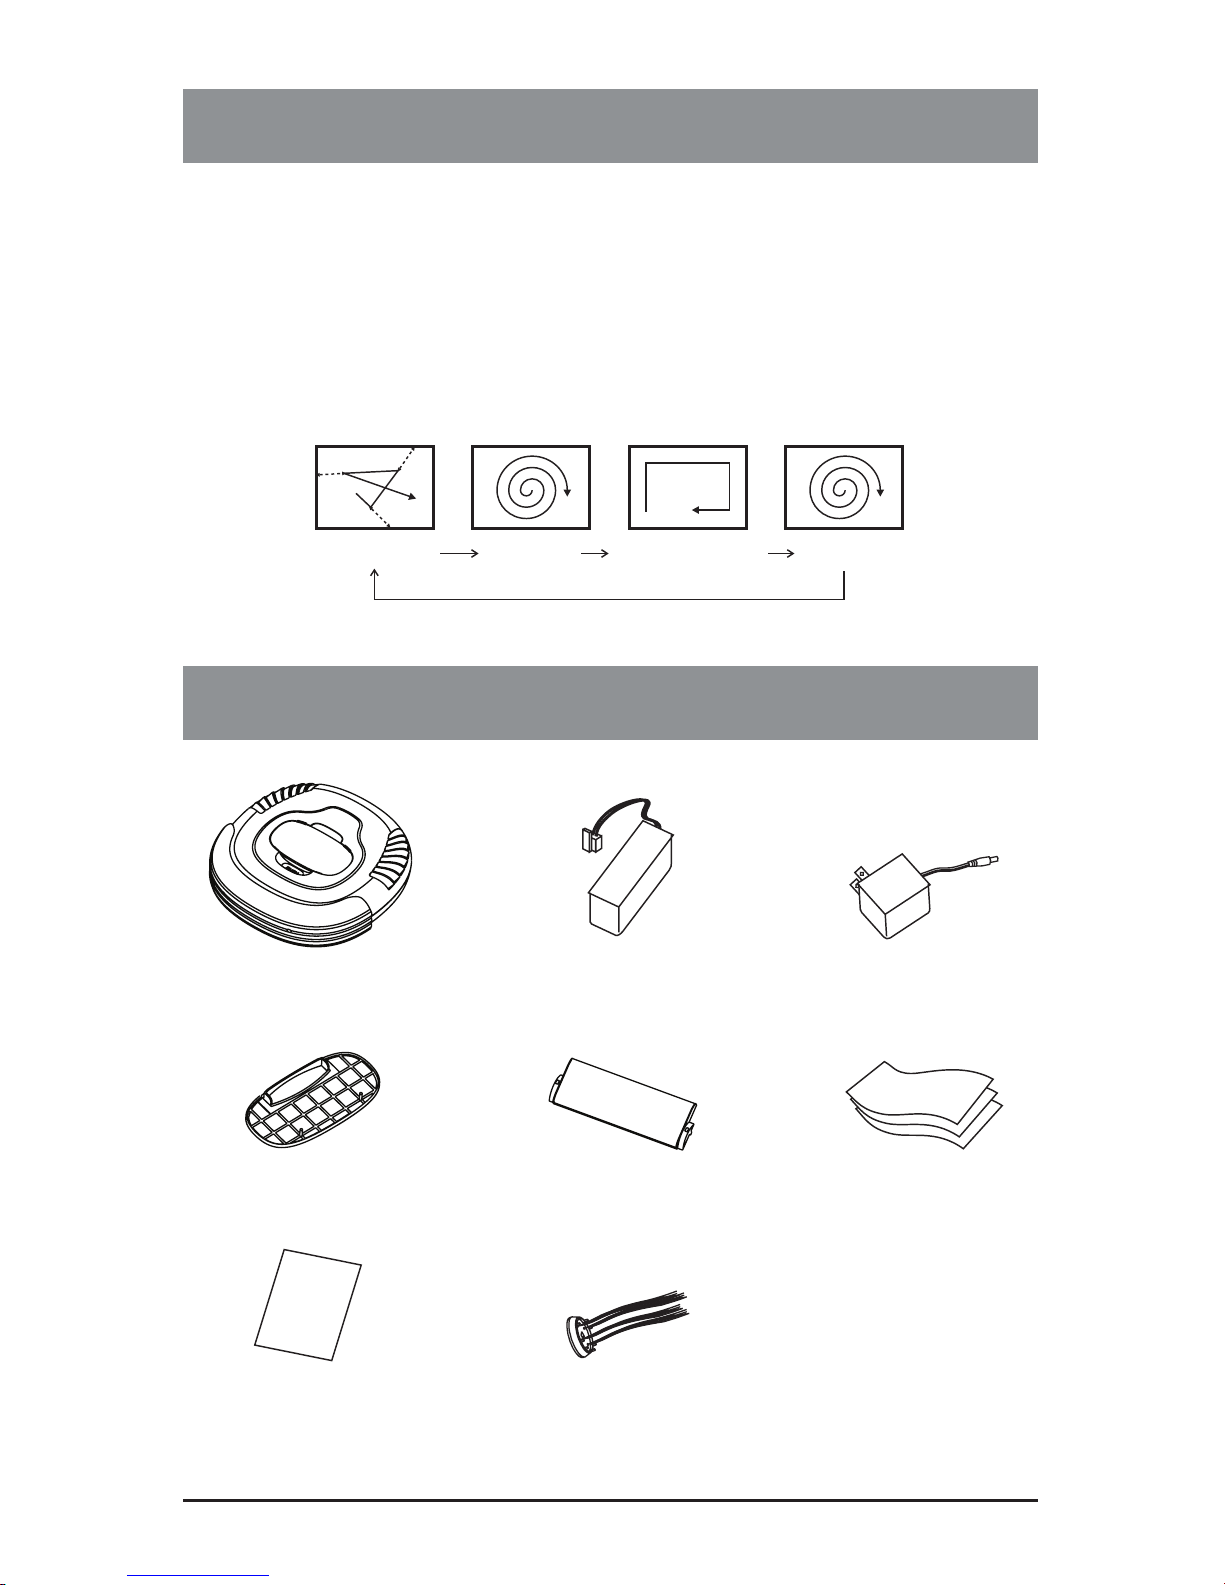
Random
Spiral
Along the wall
Spiral
MAJOR COMPONENTS AND ATTACHMENTS
V.Bot® Vacuum x1
Dusting Paper x3
Rechargeable Battery x1
Dust Bin Filter x1
Dusting Paper Holder x1
Adaptor x1
Operation Manual x1
M
a
n
u
a
l
Side Brushx1
Page 6
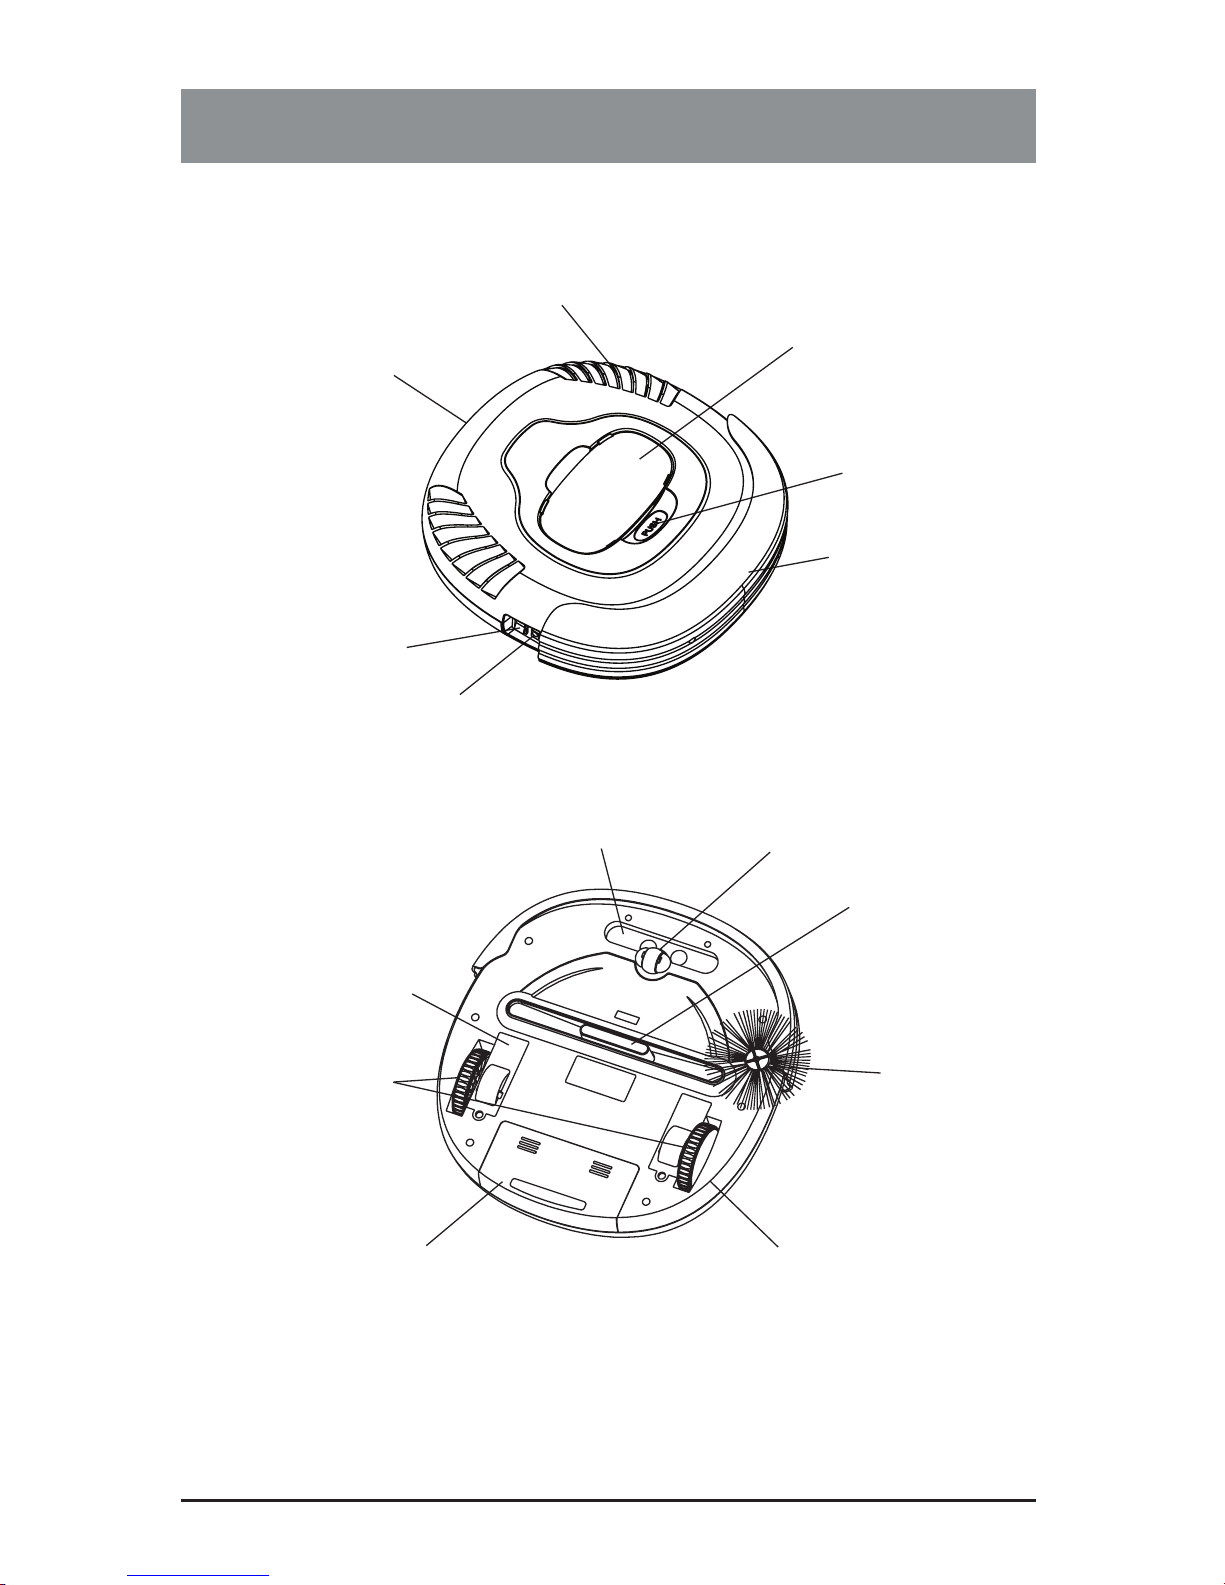
PRODUCT FEATURES / LOCATIONS
5
Page 7
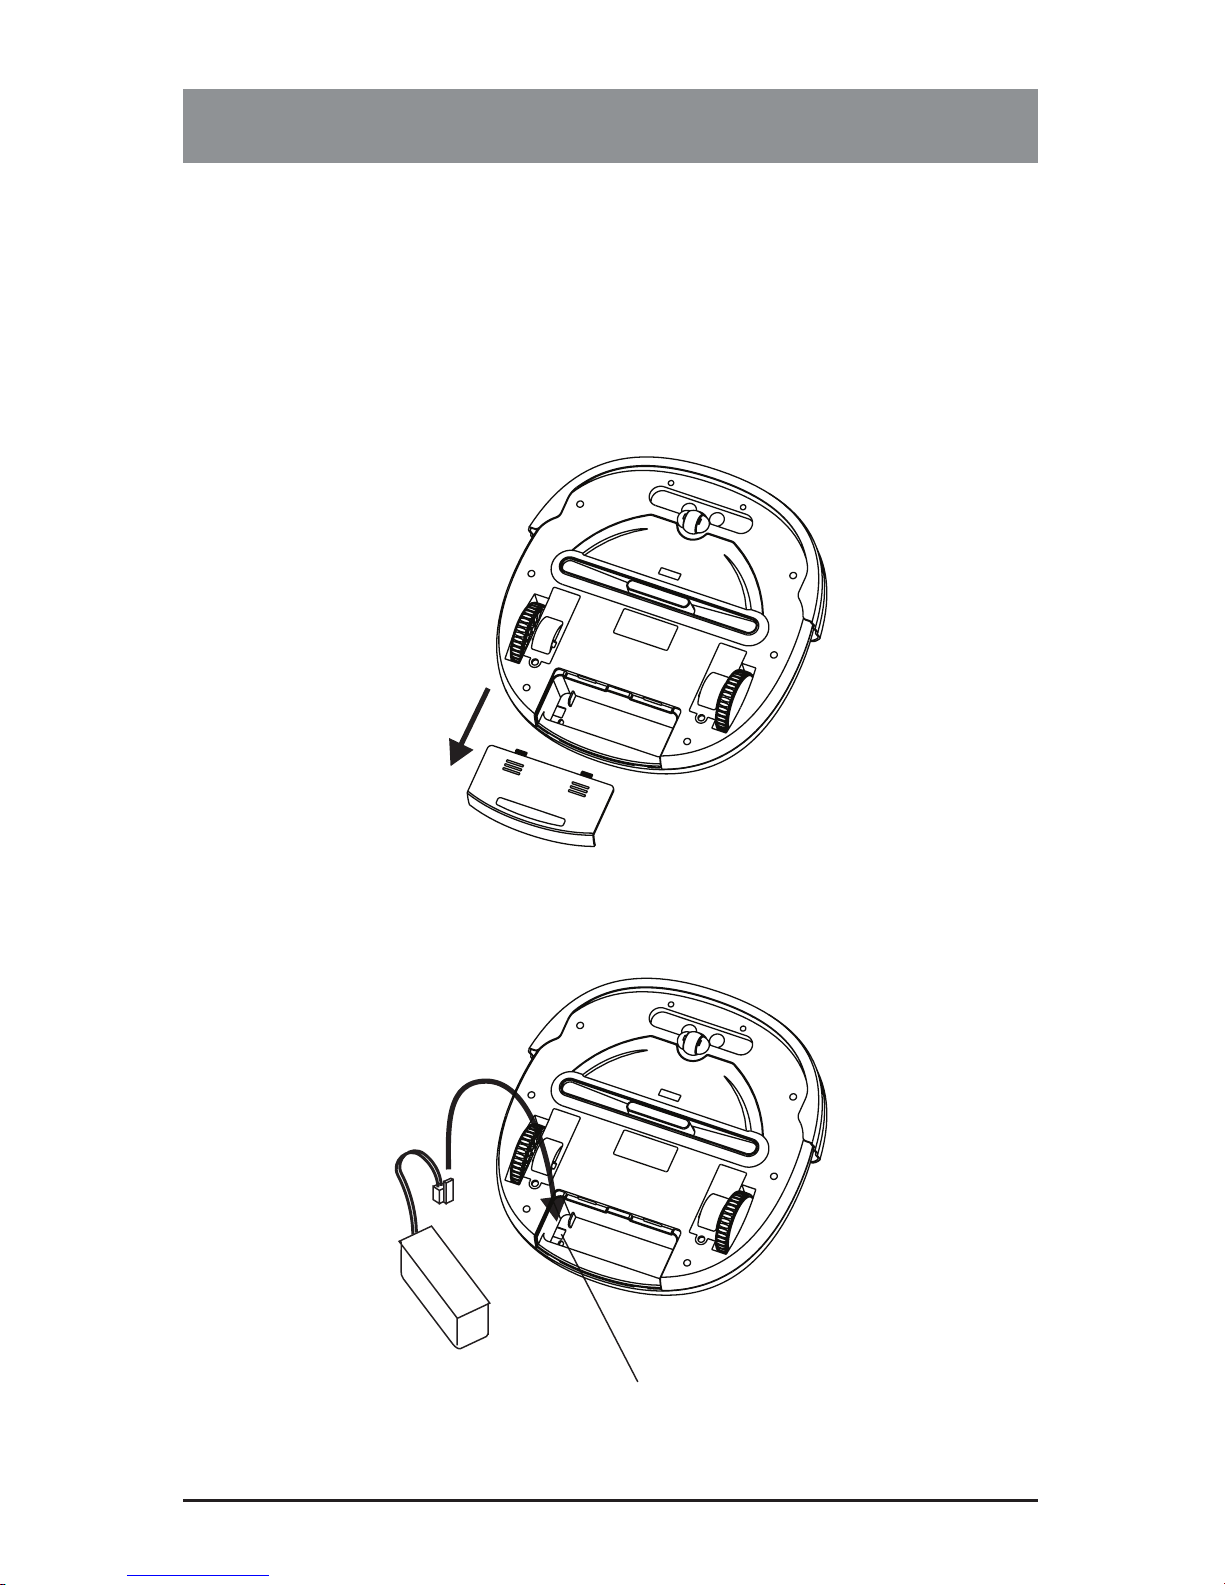
BATTERY INSTALLATION AND REMOVAL
6
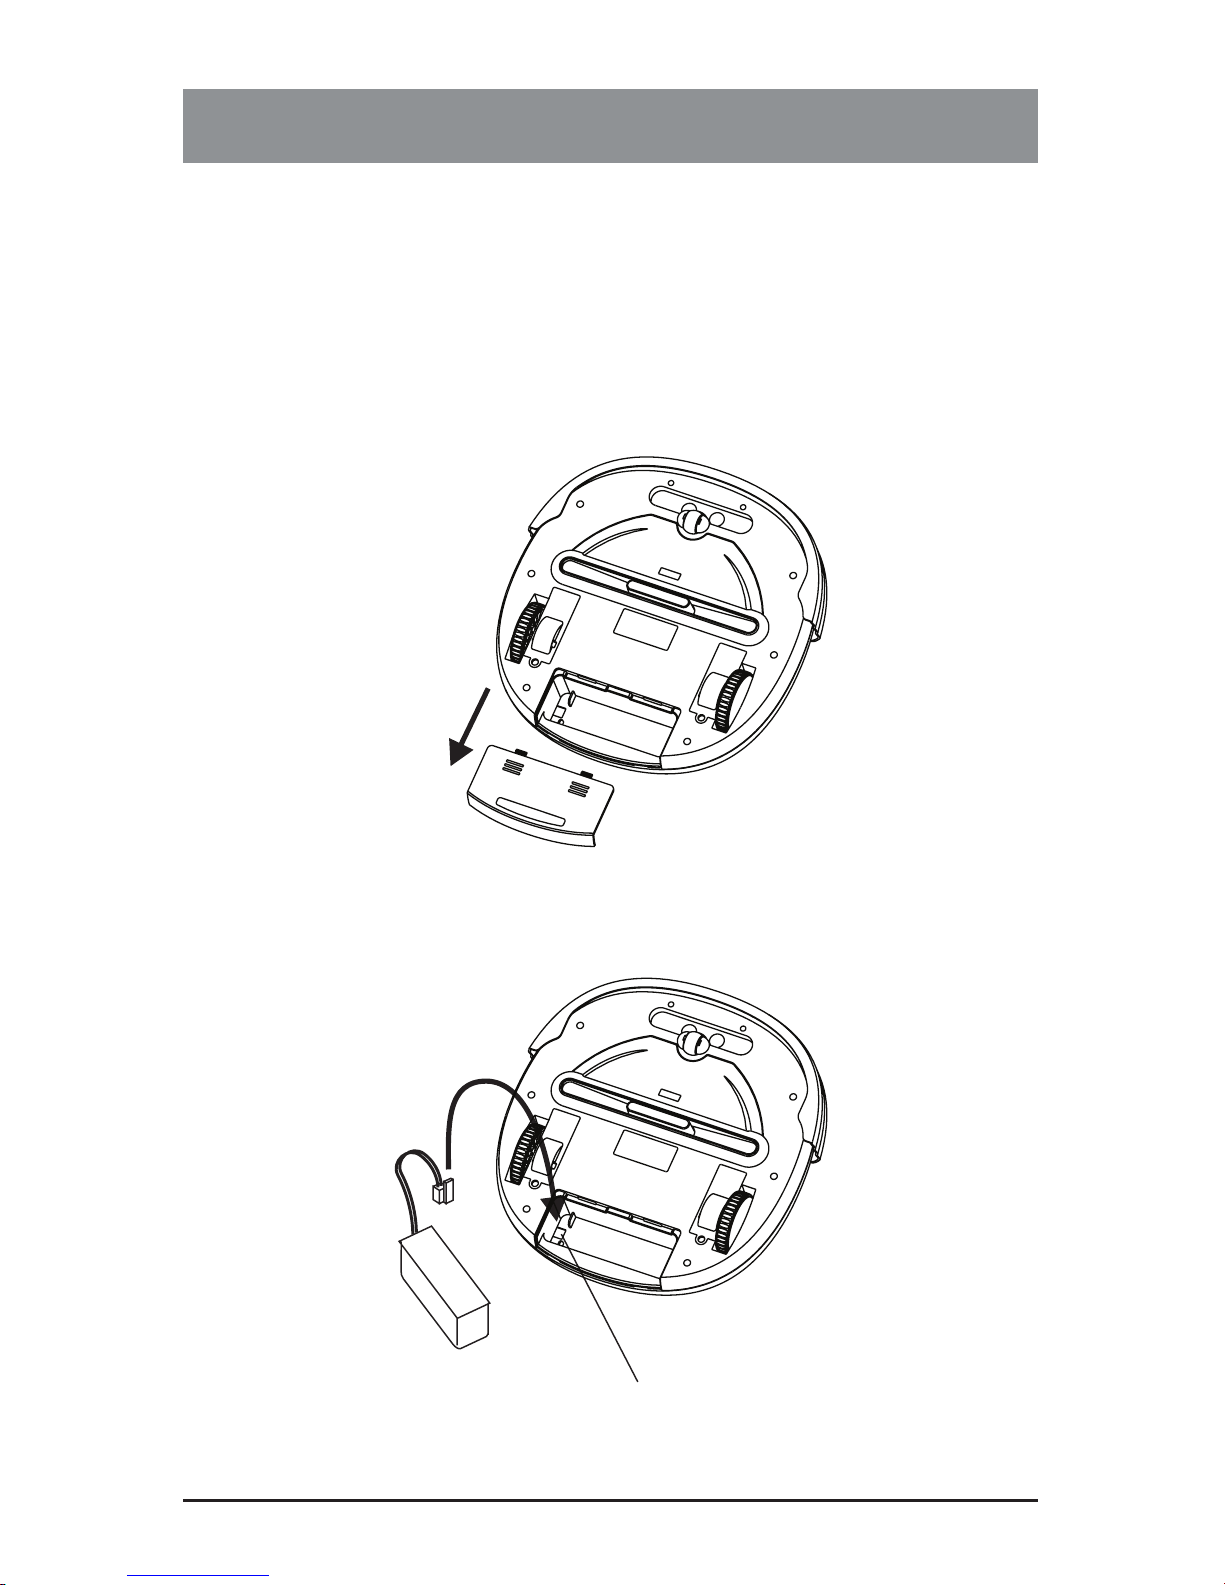
Battery Socket
1. Make sure the vacuum is turned off.
2. Press and slide the battery cover (see diagram below).
3. Insert the battery plug into the socket (please note the direction).
4. Place the battery in the battery reservoir and close the battery cover.
5. To remove the batteries, follow step #3 above in reverse.
Page 8
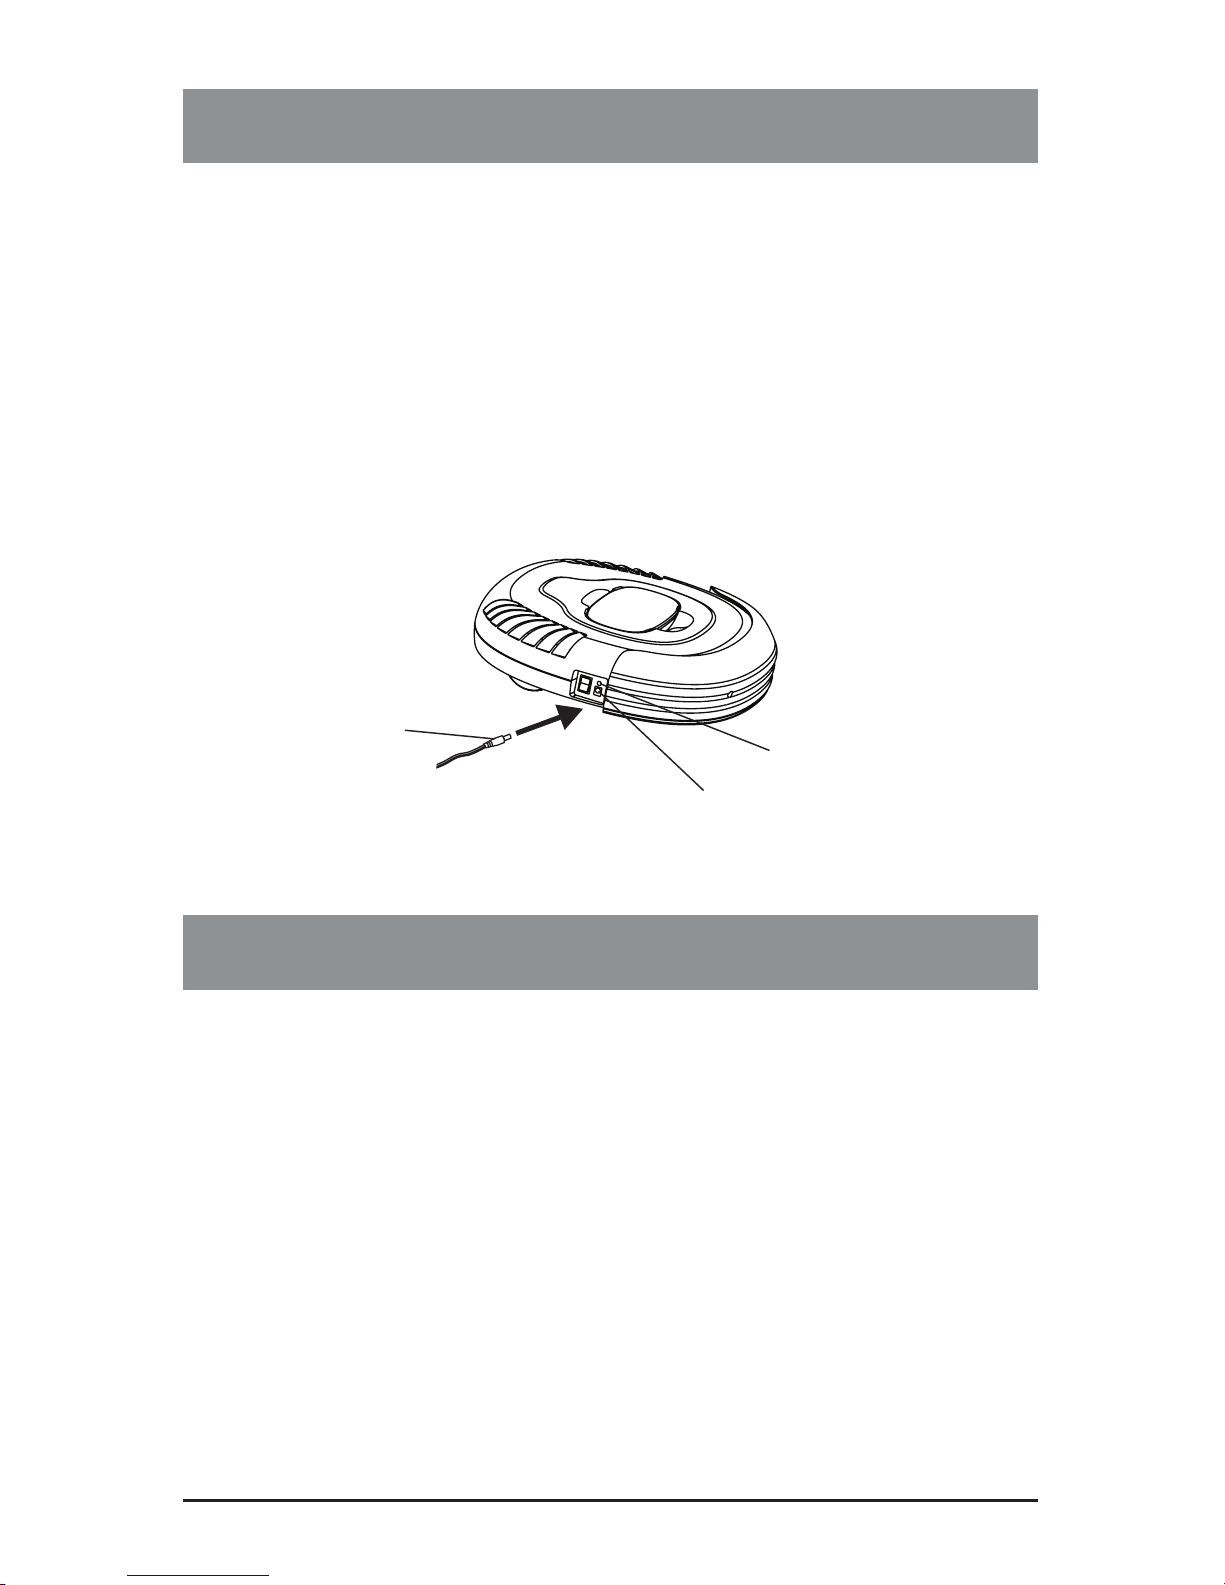
RECHARGING BATTERY
7
1. To protect the rechargeable battery and lengthen its life, after the battery
is charged for 16 hours, the charging function will be cut off automatically.
After 12 hours of charging you may start using the vacuum even if the
power indication lamp is still ashing.
2. If the vacuum emits a warning buzz and stops moving, this indicates that
the battery needs immediate charging.
3. Make sure the vacuum is in the OFF position and the battery is installed.
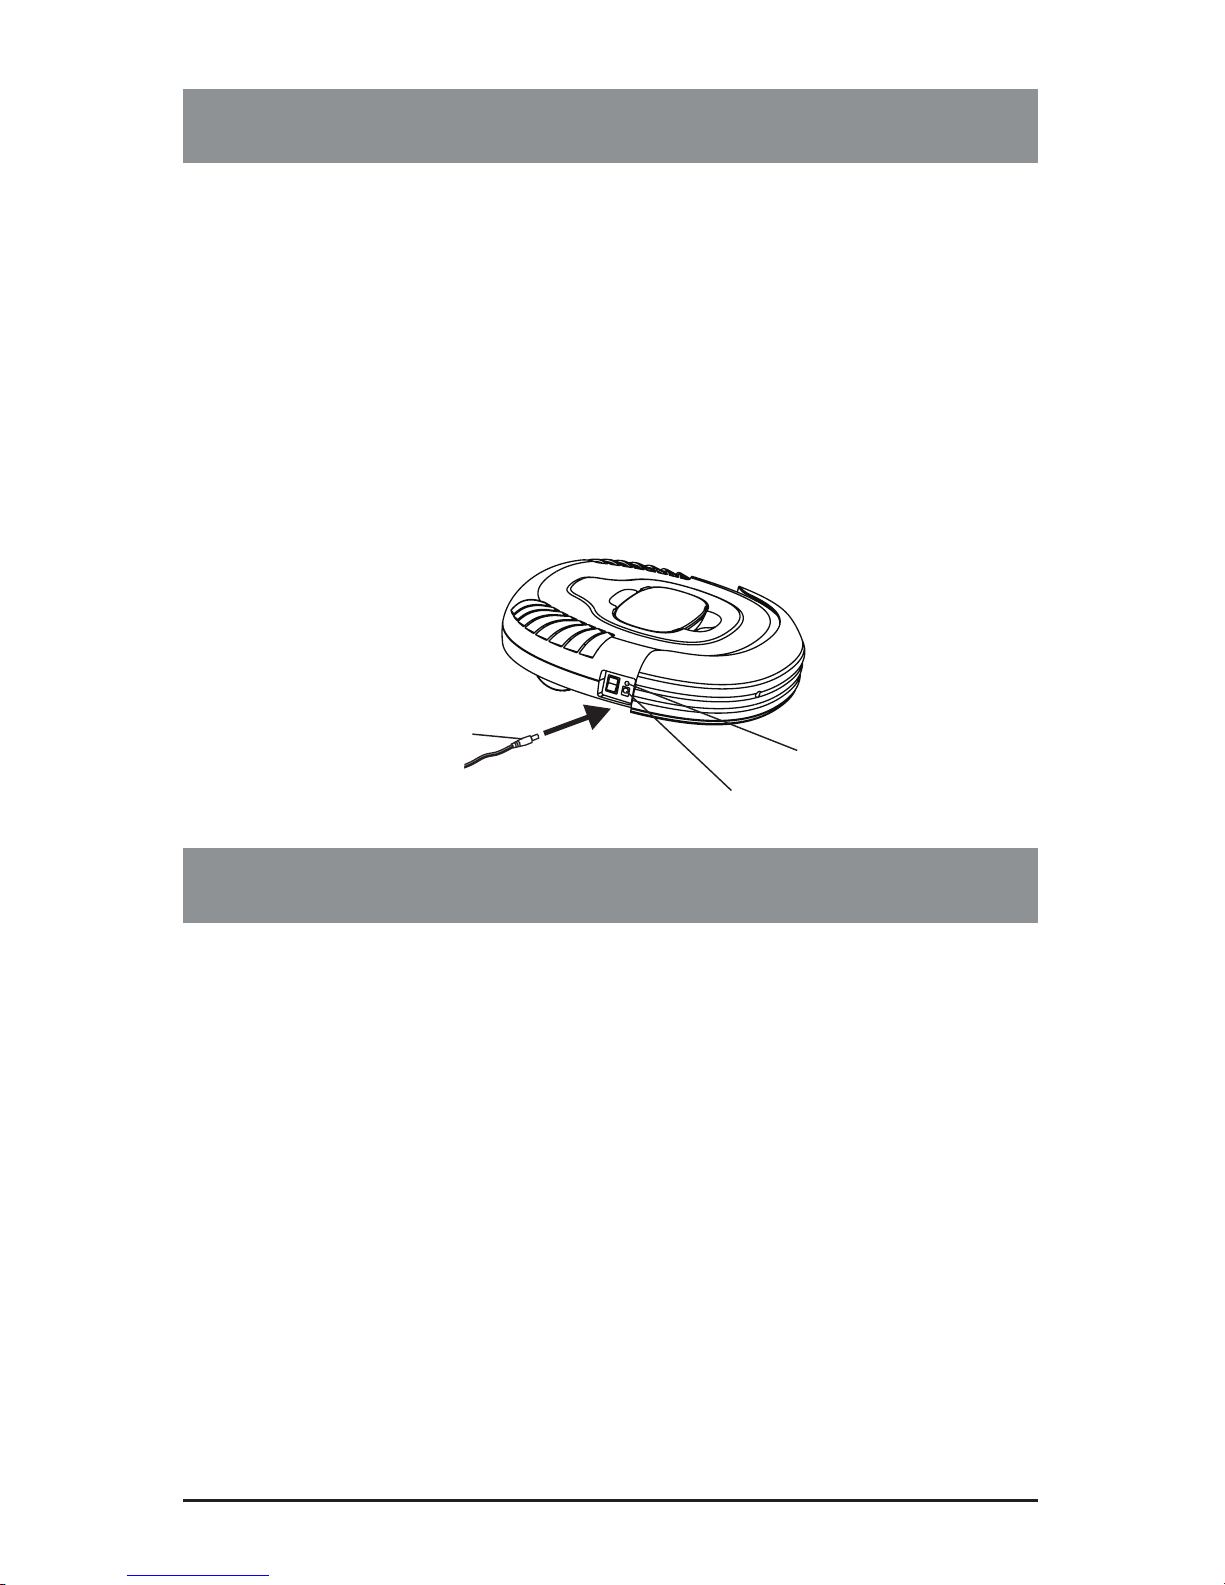
4. Plug one end of the AC adaptor into the jack on the vacuum and the other
end into the wall outlet to charge.
5. When the batteries are fully charged the power indication lamp will stay green.
Power Indication Lamp
Plug of Charger
(d.c 17V 200mA)
Socket for Charger
GENERAL OPERATION
Preparation for Operation
To ensure the best working efciency of the vacuum, make sure to remove
clothes, paper, and electric cords from the oor, and roll up the any curtains or
drapes that might cause the vacuum to become stuck. Should an electric cord
become entangled in the vacuum, the lamp or appliance risks being pulled to
the oor and damaged.
Do not use on the shag carpet.
Starting Operation
1. Clean the dust bin.
2. Place the vacuum on the oor and switch the unit to the ON position.
3. When the vacuum runs out of power, it will emit a buzz and stop automatically.
4. When the vacuum is not in use, or prior to recharging, make sure the
power switch is in the OFF position.
Page 9
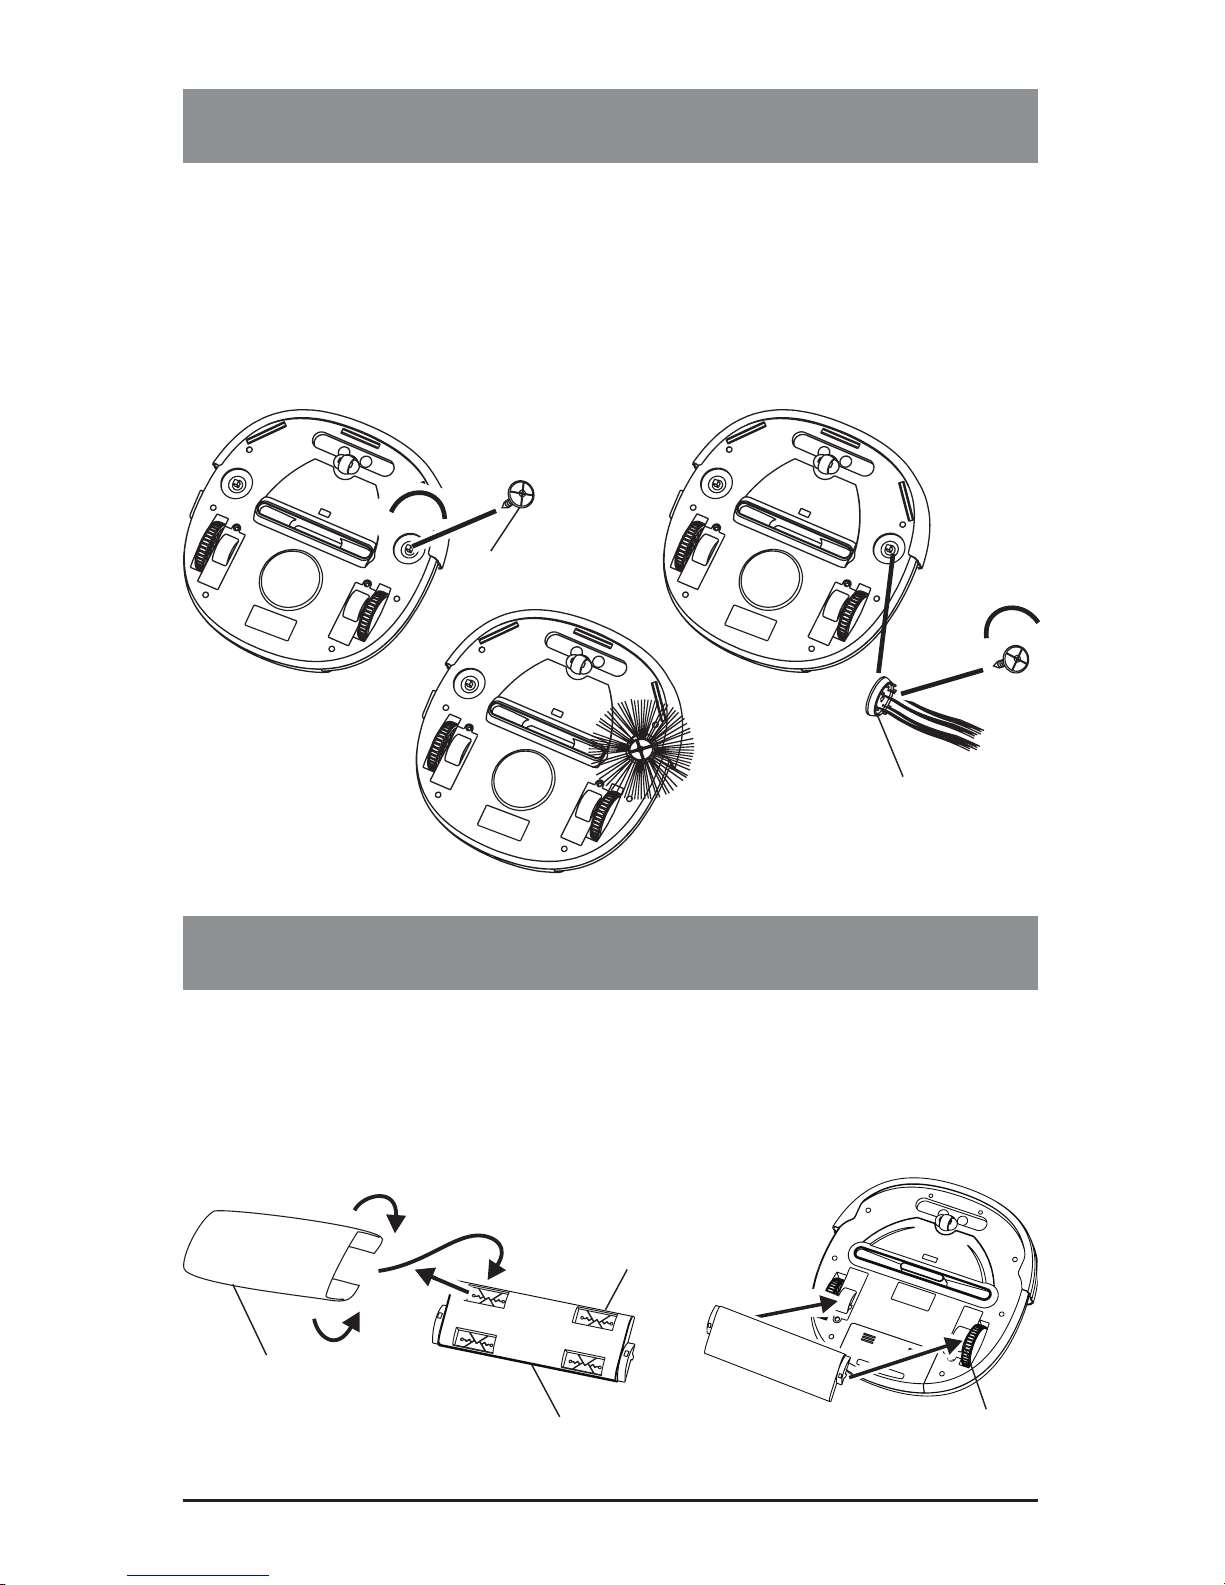
INSTALLING SIDE BRUSH
8
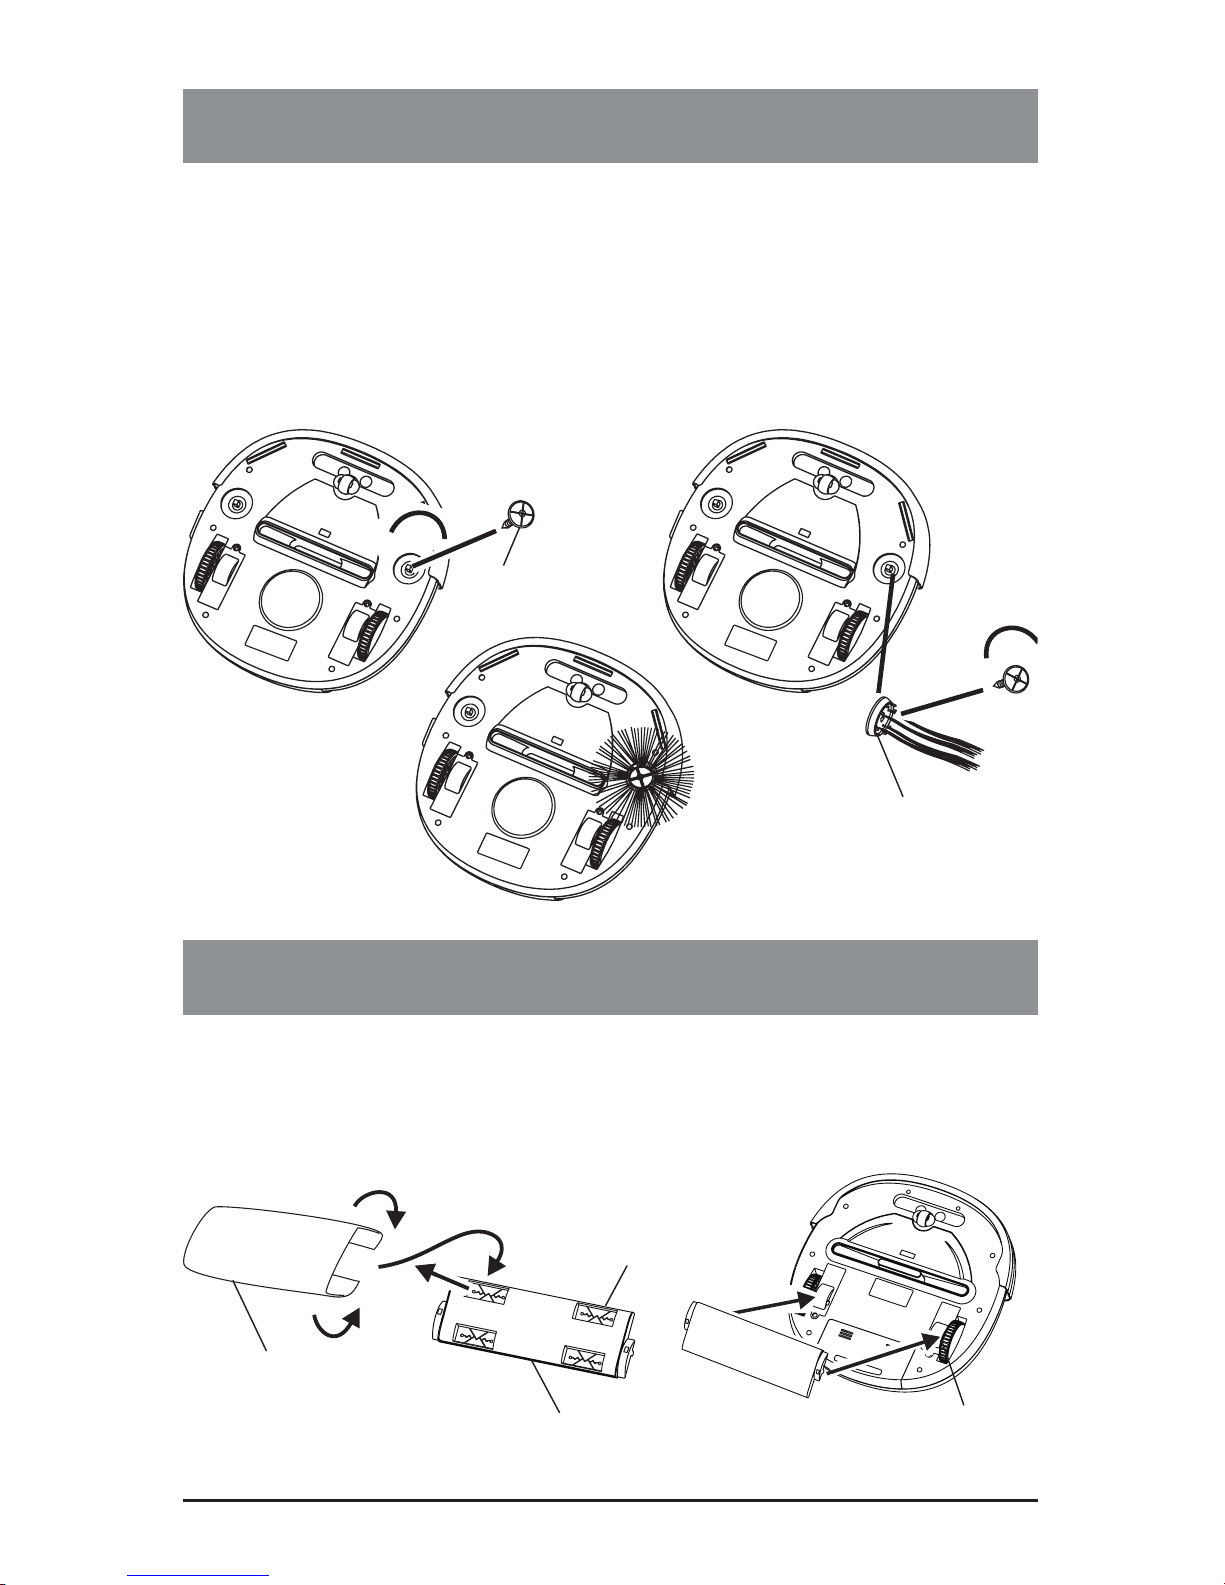
1. Unscrew and remove the brush holder on the bottom of the unit by
turning counter clockwise as shown in the following diagram
2. Place the brush on the brush mount and then put the brush holder back
by turning clockwise
3. Bristles should extend from the center of the brush like the rise of
the Sun.
.
USING DUST CLOTHS
1. Insert the edge of the micro ber dust cloth into the grip slots on the dust
cloth holder.
2. Press the dust cloth holder onto the base of the vacuum as shown below
until it clicks into place.
Grip Slot
Micro fiber dust cloth
Dust cloth holder
Dust cloth holder
clicks into place
Side brush
Brush Holder
Page 10
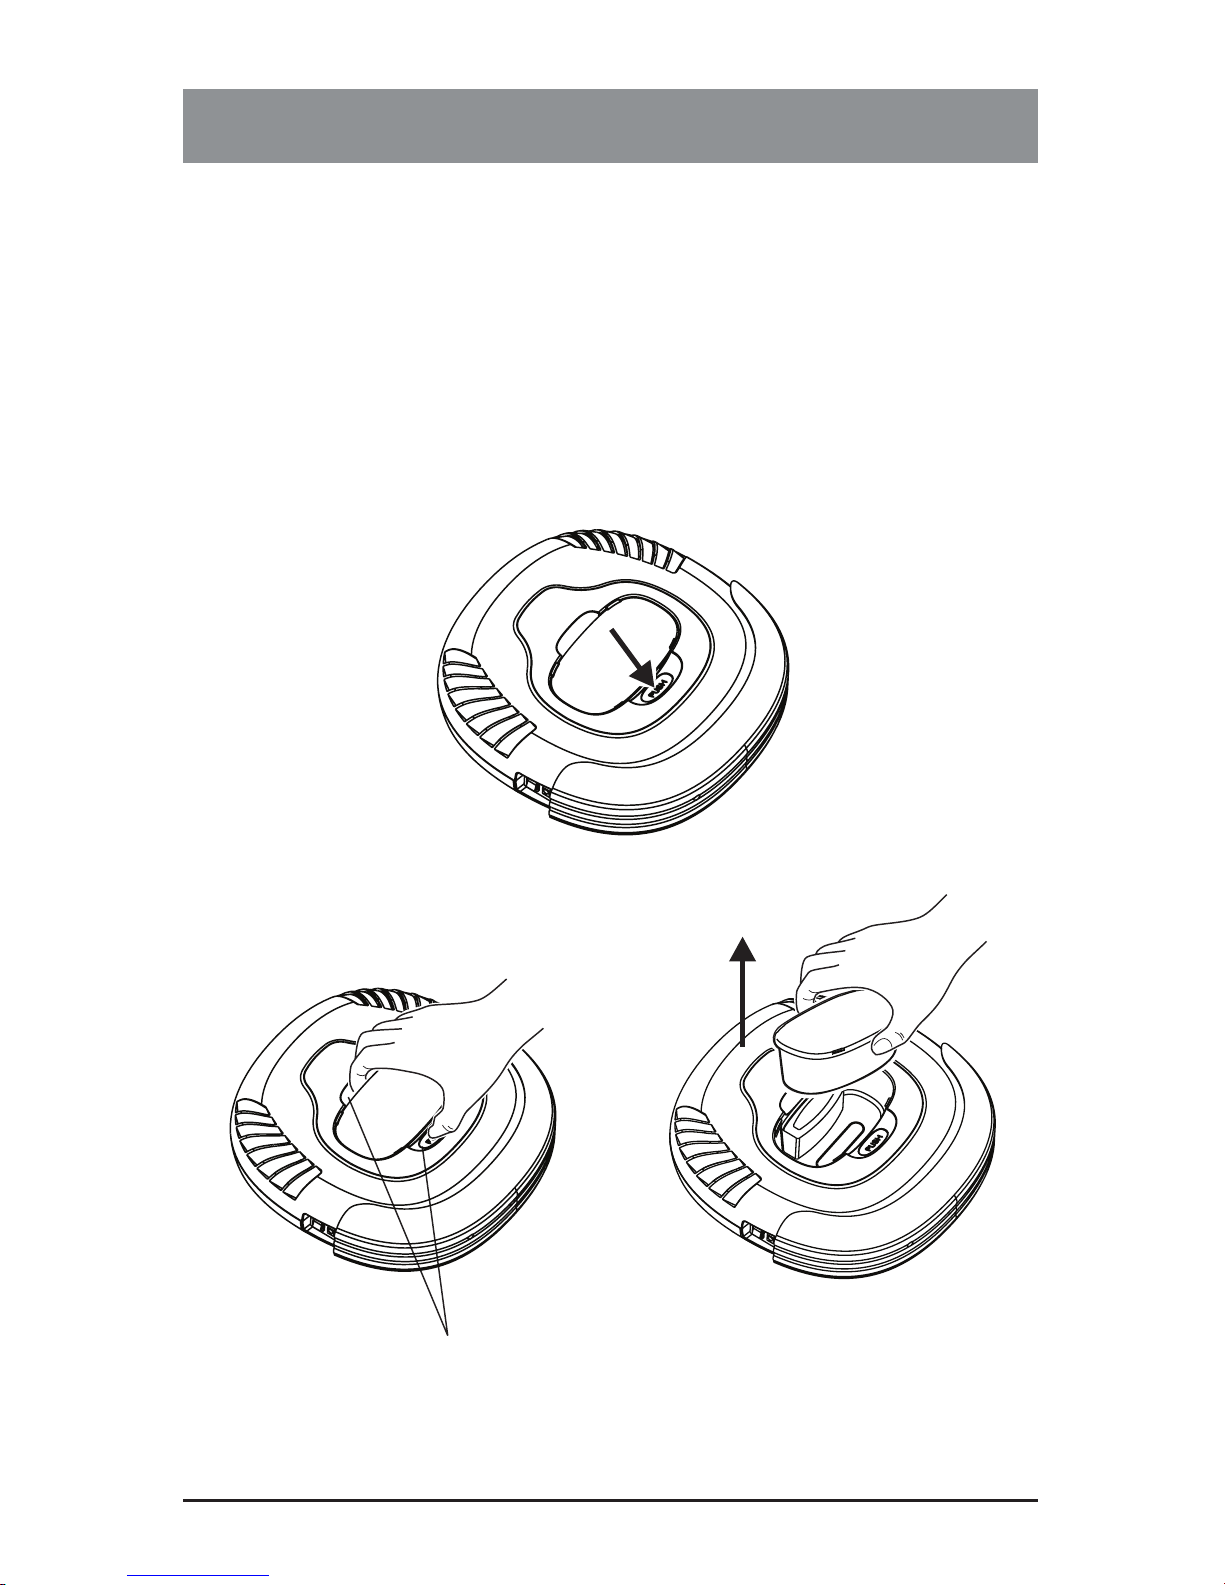
CLEANING AND MAINTENANCE
9
Maintenance Procedures
The operation and maintenance of the V.Bot® Robotic Vacuum is very simple.
After each use, empty any dirt from the dust bin and clean the lter. It is not
necessary to clean the intake after every use.
Removing Dust Bin
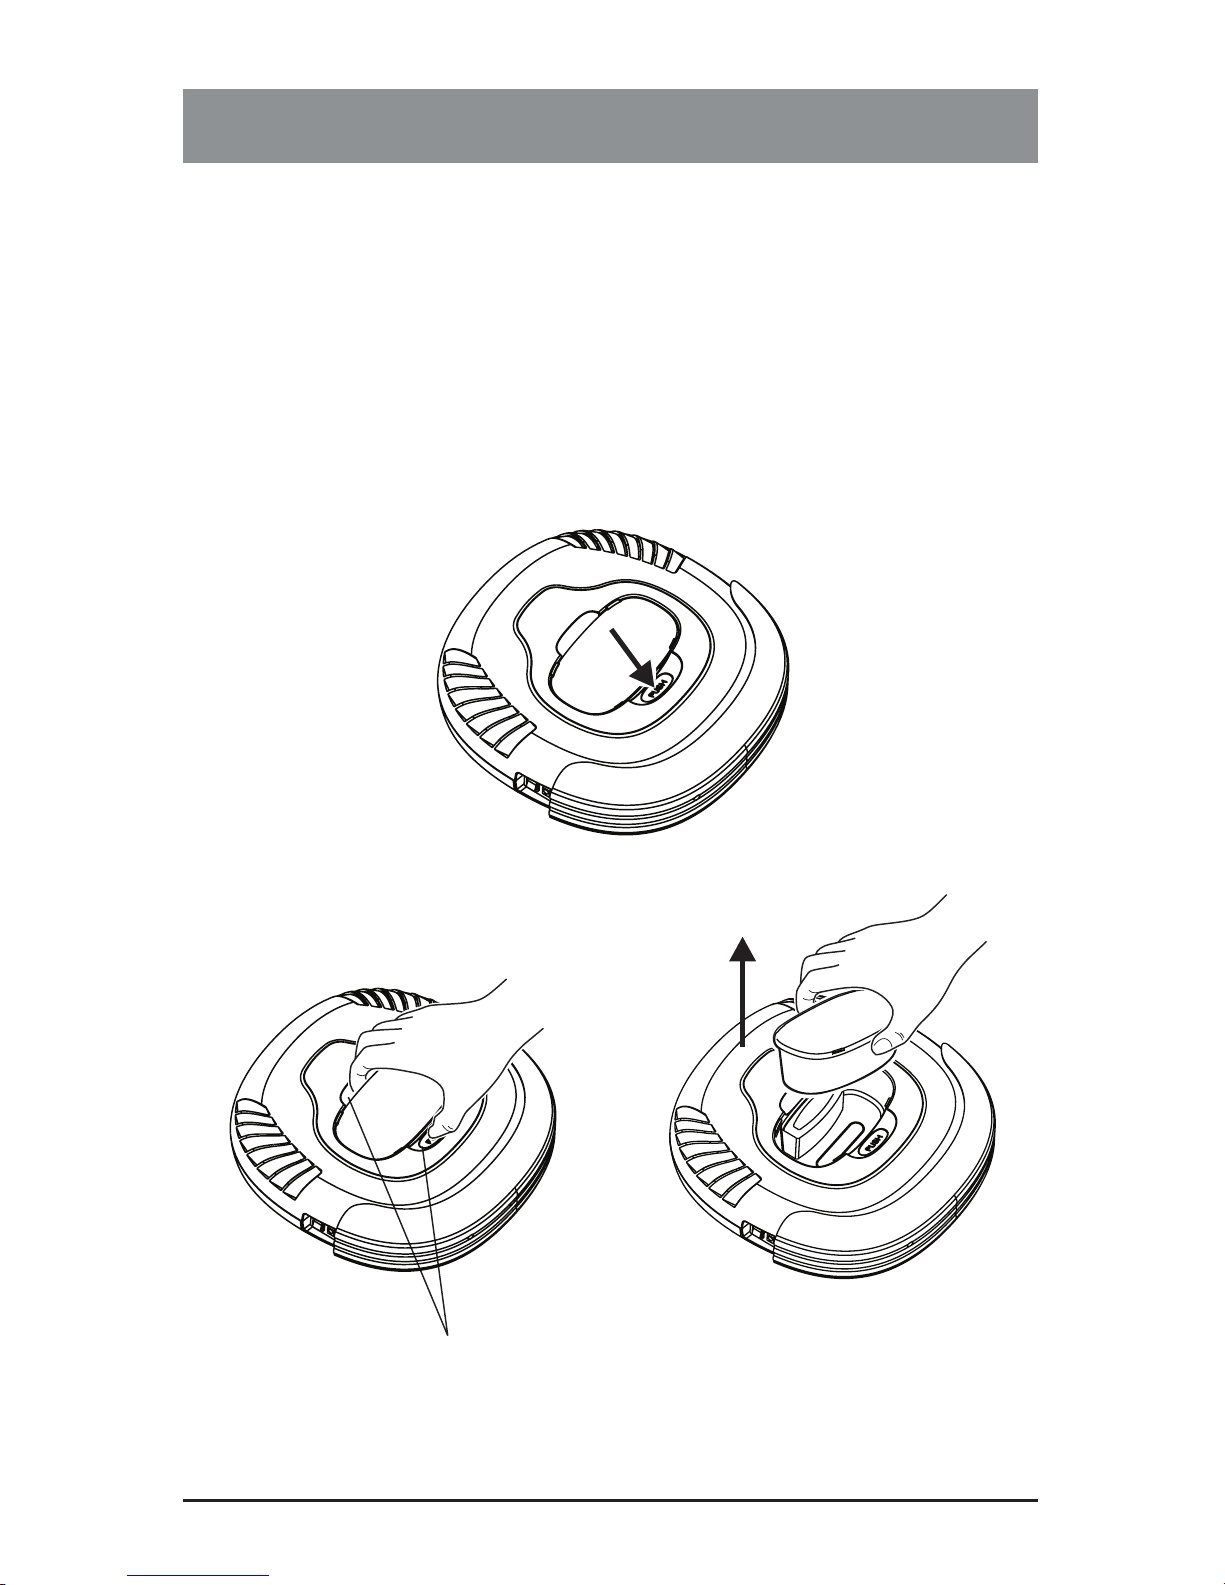
1. Press the dust bin ejector button as shown below.
2. Remove the dust bin by grasping it as shown and gently pulling it up and
out of the vacuum.
Grip slot for the dust bin
Page 11
CLEANING AND MAINTENANCE
10
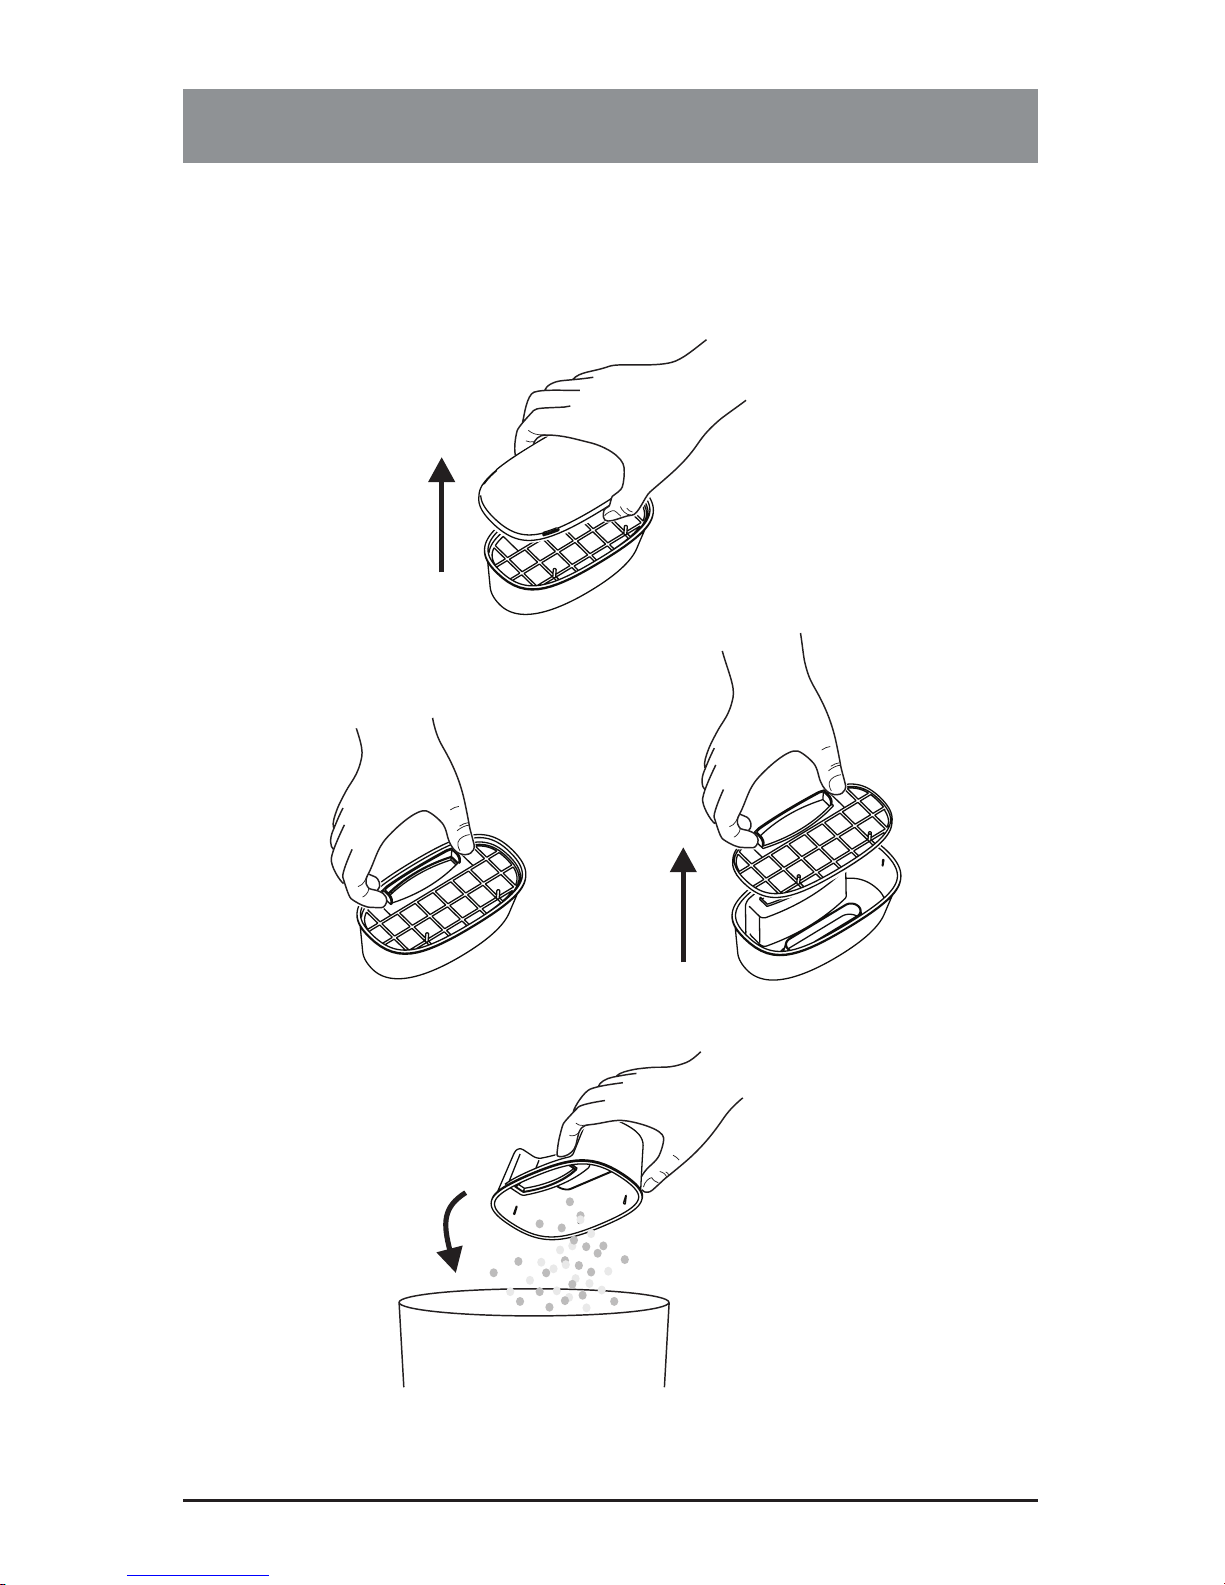
Emptying Dust Bin
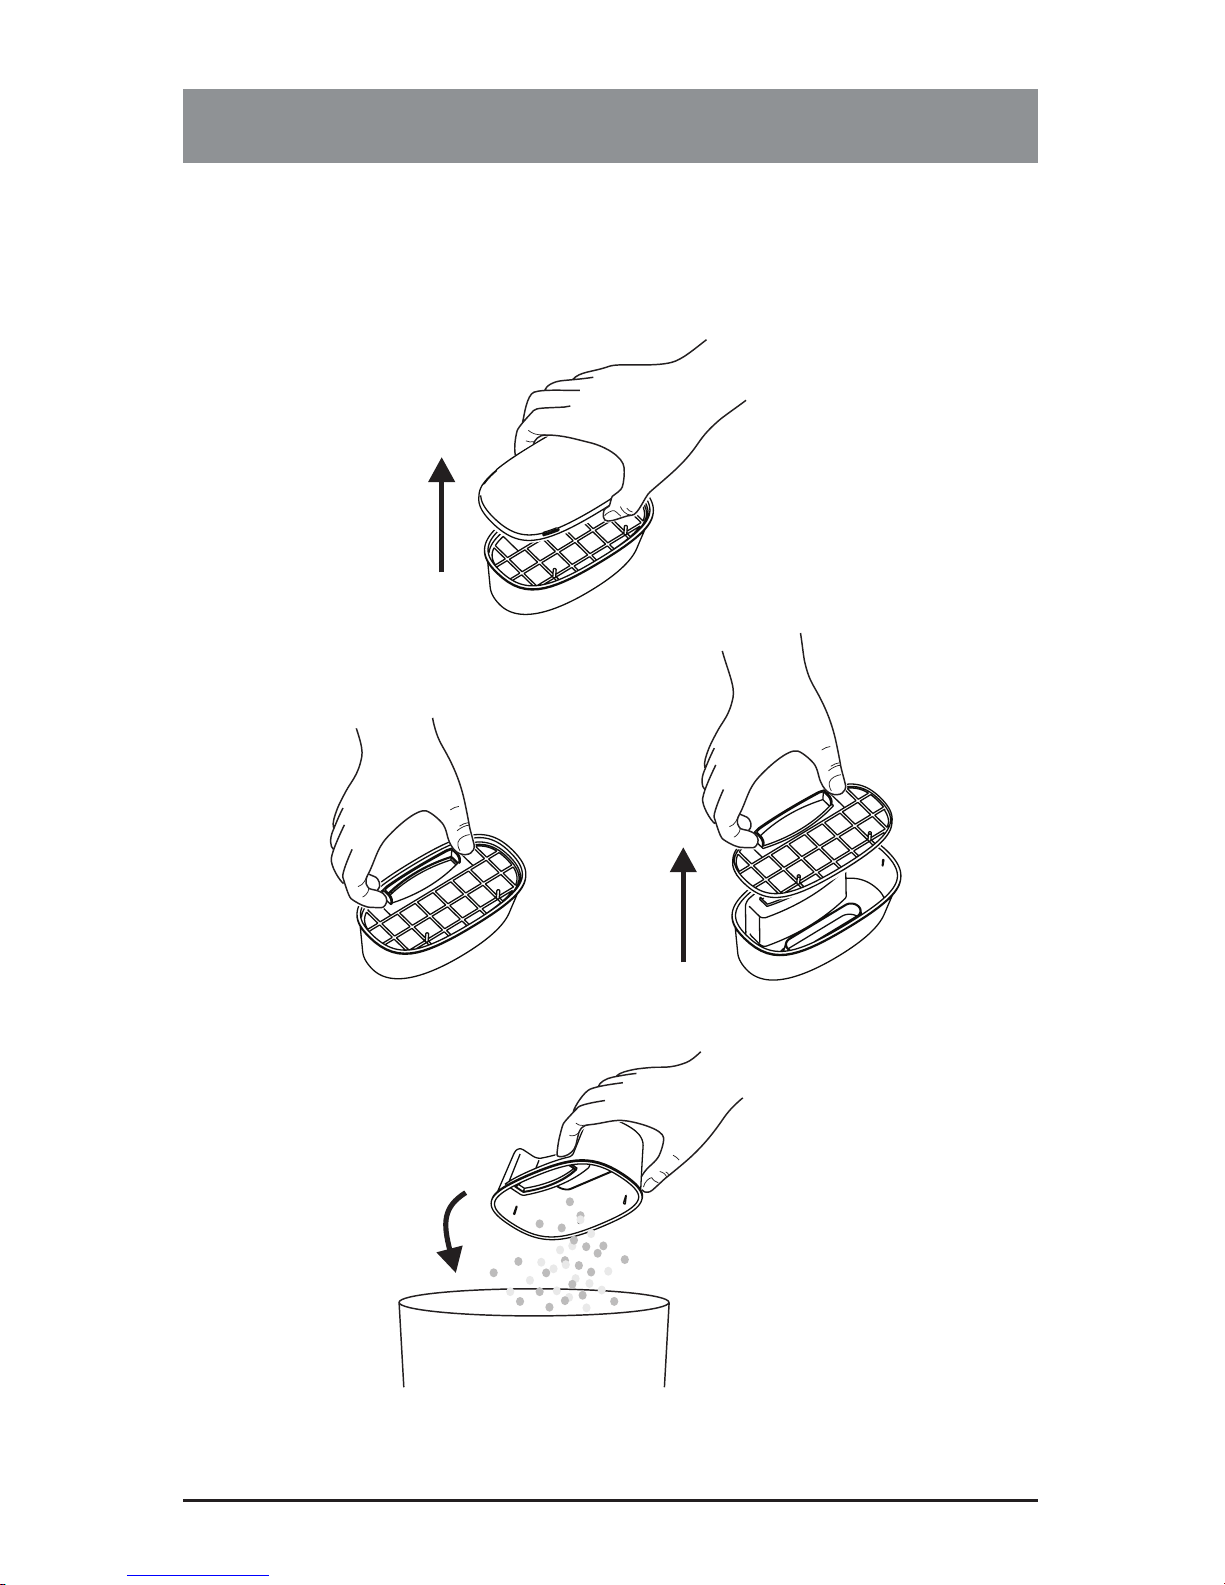
1. Open the upper cover of the dust bin.
2. Remove the lter by lifting it out of the dust bin.
3. Dispose of the dust and dirt which has collected in the dust bin.
Page 12
CLEANING AND MAINTENANCE
11
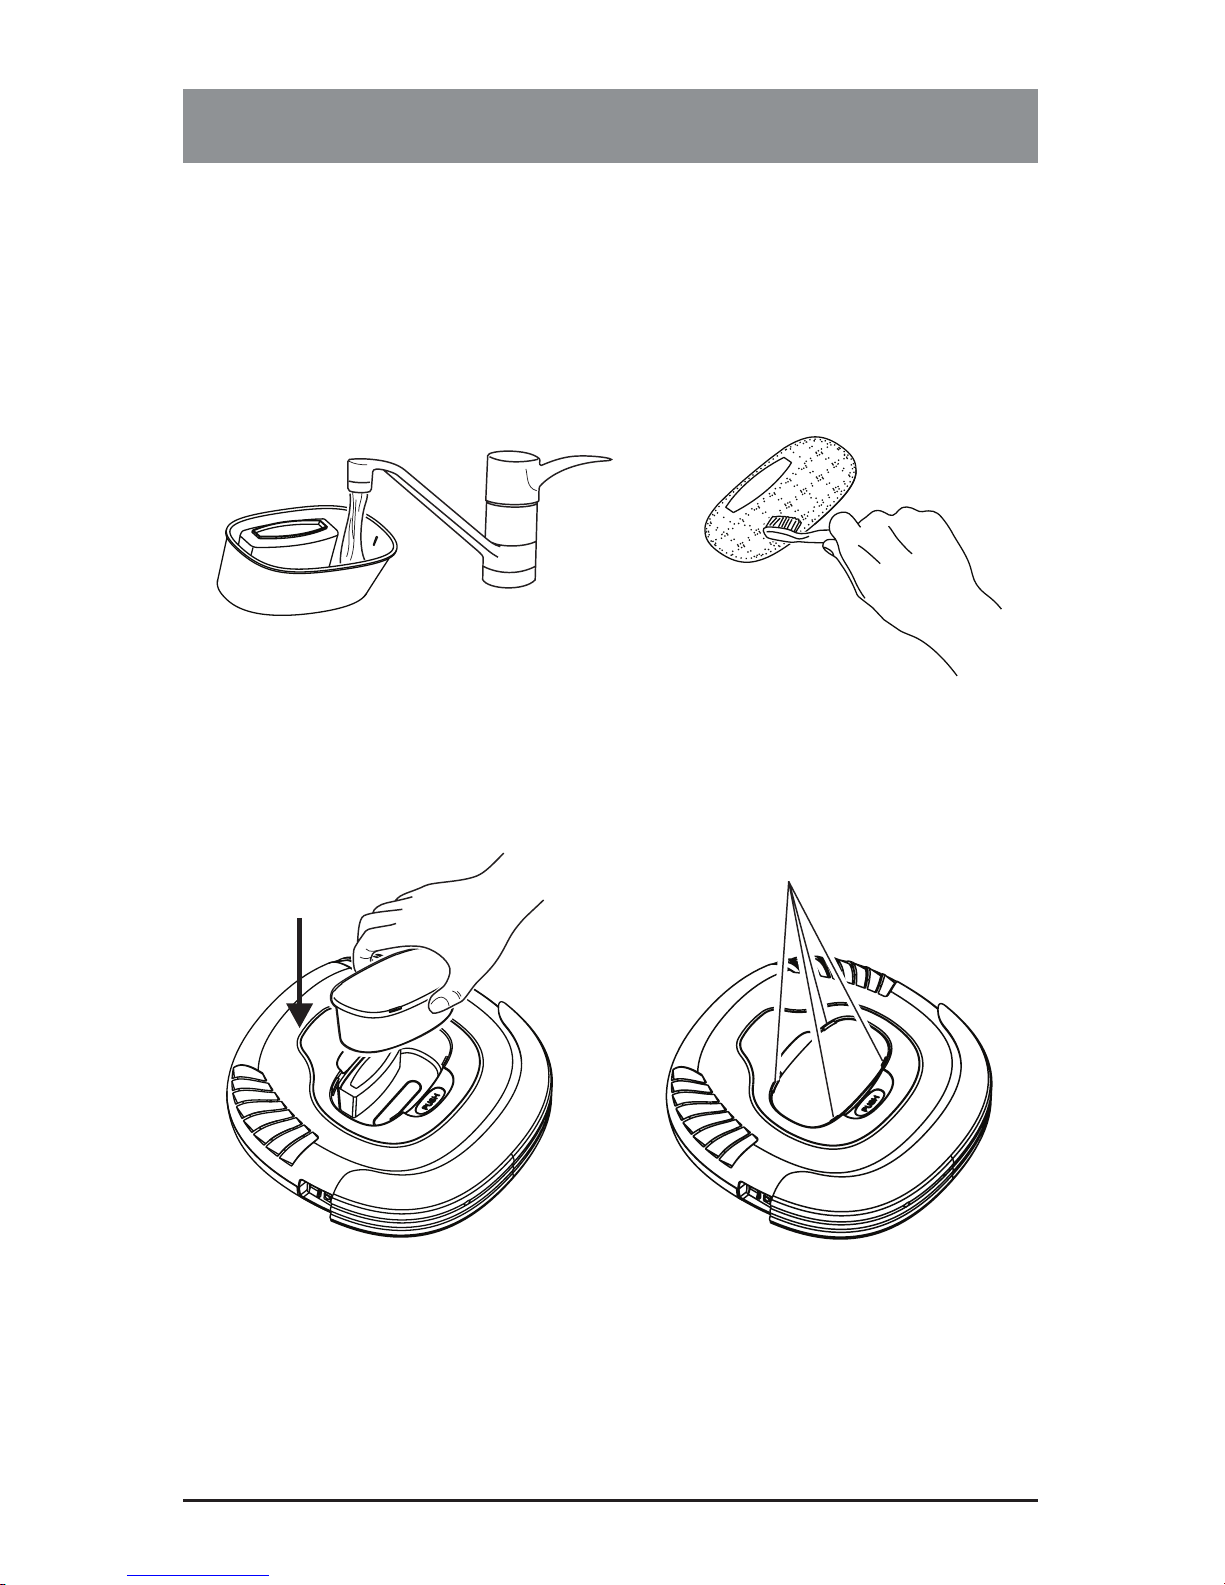
Cleaning Dust Bin
1. Rinse the dust bin with tap water. It is not necessary to wash every time.
DO NOT clean the dust bin by placing it in a dish washing machine.
2. Periodically clean the lter with a soft bristle brush.
3. Once dry, reinstall the lter and the dust bin lid.
4. Place the dust bin back in the vacuum, making sure it is secured by the
locking tabs as shown in the diagram below.
Dust bin locking tabs
Page 13
CLEANING AND MAINTENANCE
12
Cleaning Intake
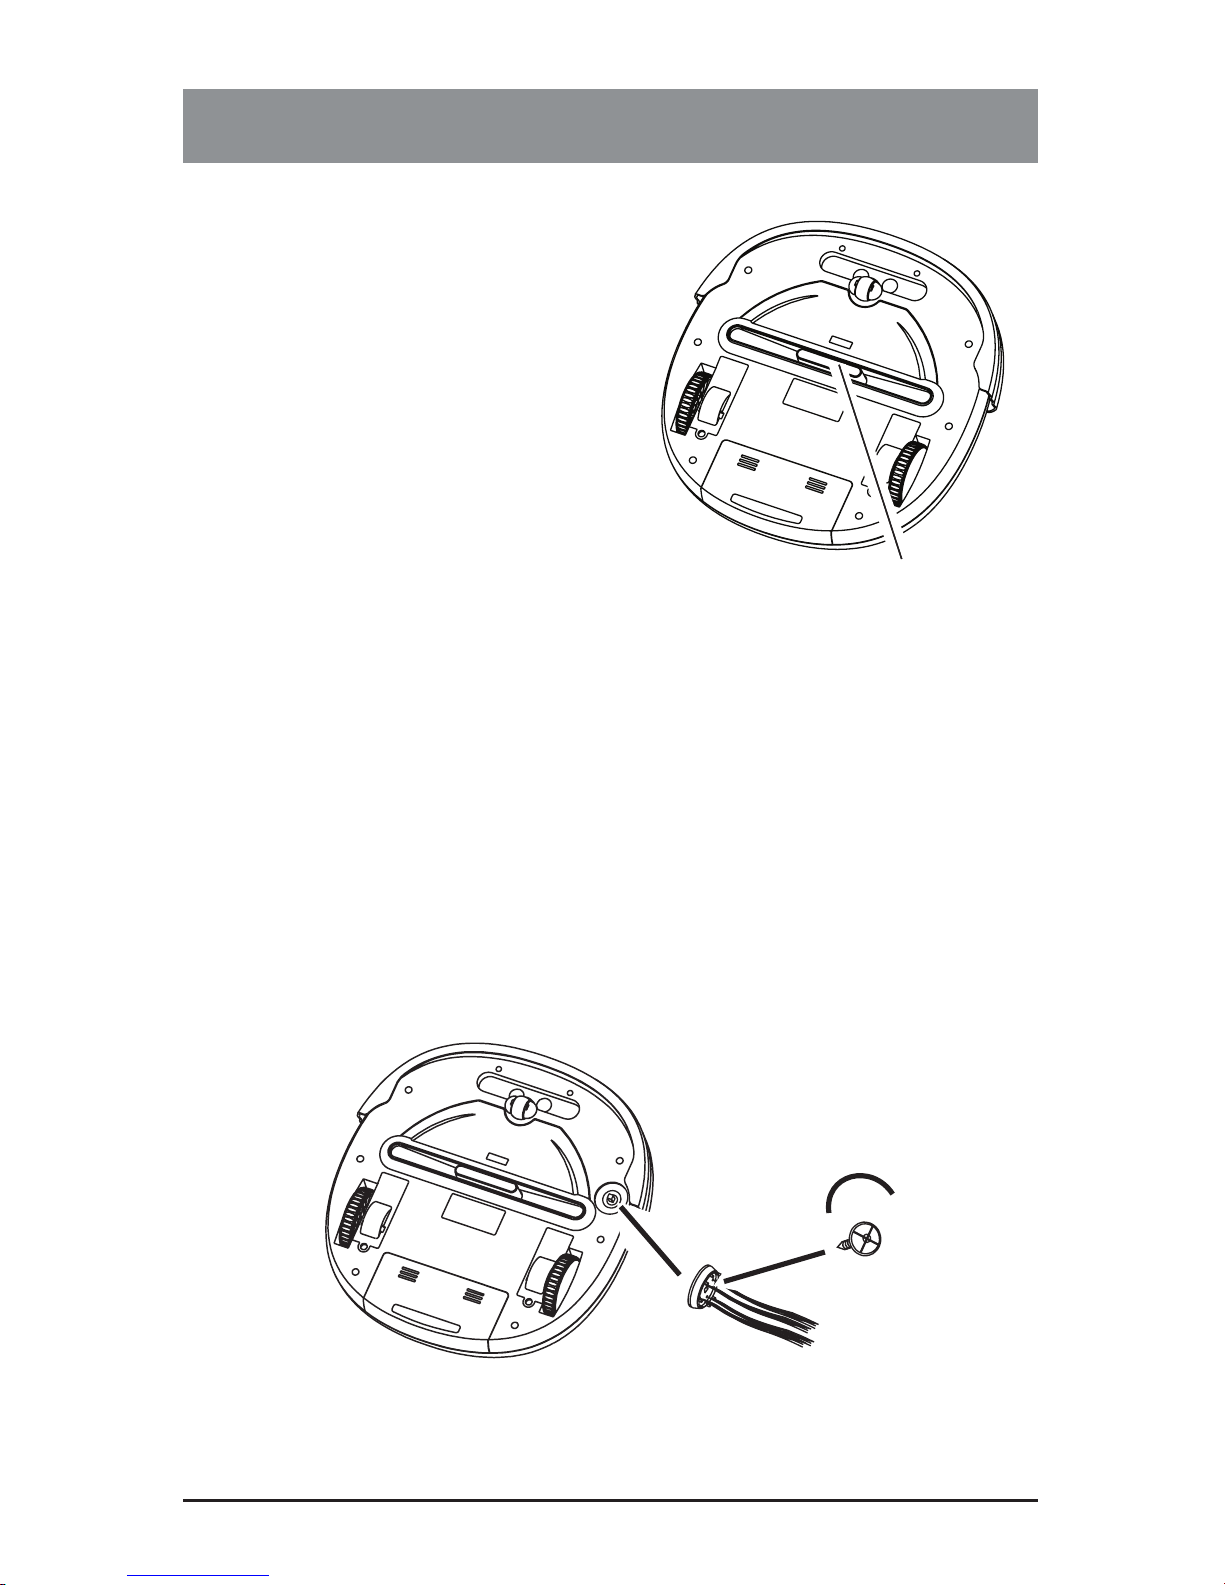
After repeated use, dirt and dust can
accumulate around the intake of the
vacuum and the working efciency can
be reduced. To ensure the best perfor-
mance and constant air ow, the intake
should be cleaned periodically.
1. Turn the power to the OFF position and place the vacuum upside
down on a at surface such as the
oor or a table.
2. Wipe and remove any hair or other
material that may accumulate
around the intake.
Intake
Cleaning Side Brushes
1. Turn off the power, place bottom of the cleaner upward on a at surface.
2. Rotate and take off the brush lid and side brush and then clean up the hair
or other matters by hand.(See diagram below)
3. Install back the lid and brush after nishing.
4. After being used for a period of time, the brush need to be replaced to
clean more effectively.
5. The side brush can be rinsed and if they become crooked, you can scald
them in hot water to make them return to original shape.
Page 14

P3 INTERNATIONAL CORPORATION
LIMITED WARRANTY
P3 INTERNATIONAL CORPORATION (“P3”) warrants to the original retail purchaser only,
that its product is free from defects in material or workmanship under the condition of normal
use and service for a period of six (6) months from the date of purchase. In the event that a
defect, malfunction or failure occurs or is discovered during the warranty period, P3 will repair
or replace at its option the product or component part(s) which shall appear in the reasonable
judgment of P3 to be defective or not to factory specications. A product requiring service is
to be returned to P3 along with the sales receipt or other proof of purchase acceptable to P3
and a statement describing the defect or malfunction. All transportation costs shall be borne
by the owner and the risk of loss shall be upon the party initiating the transportation. All items
repaired or replaced thereunder shall be subjected to the same limited warranty for a period
of six (6) months from the day P3 ships the repaired or replaced product. The warranty does
not apply to any product that has been subject to misuse, tampering, neglect, or accident or as
a result of unauthorized alterations or repairs to the product. This warranty is void if the serial
number (if any) has been removed, altered, or defaced. This warranty is in lieu of all warranties expressed or implied, including the implied warranties of merchantability and tness for a
particular purpose which are expressly excluded or disclaimed. P3 shall not be responsible for
consequential, incidental or other damages, and P3 expressly excludes and disclaims liability
for any damages resulting from the use, operation, improper application, malfunction or defeat
of any P3 product covered by this limited warranty. P3's obligation is strictly and exclusively
limited to the replacement or repair of any defective product or component part(s). Some states
do not allow the exclusion or limitation of incidental or consequential damages, so the above
limitation or exclusion may not apply to you. P3 does not assume or authorize anyone to as-
sume for it any other obligation whatsoever. Some states do not allow limitation on how long
an implied warranty lasts, so the above limitations may not apply to you. It is the owner/user's
responsibility to comply with local, state, or federal regulations, if any, that may pertain to P3
products or their use. This warranty gives you specic legal rights, and you may also have other
rights which vary from state to state.
If you experience difculty in the operation of your unit, or if your unit requires repair please
contact:
P3 INTERNATIONAL CORPORATION
TECHNICAL SUPPORT
Tel: 212-741-7289
Fax: 212-741-2288
Email: [email protected]
Rev. 0507
Page 15
L’ASPIRATEUR
AVEC BROSSE
Notice d’utilisation
P4960
Page 16

GUIDE SOMMAIRE D’UTILISATION
15
Règles de Sécurité ..............................................................16
• Règles de Sécurité
• Notes sur la pile et sa recharge
Caractéristiques principales ..............................................18
Composants Majeurs et Pièces incluses ..........................18
Caractéristiques ..................................................................19
Installation et retrait de la Pile............................................20
Recharger la Pile .................................................................21
Mode d’Utilisation ................................................................21
• Préparation à l’utilisation
• Démarrer l’utilisation
Installation de la brosse latérale ........................................22
Utilisation du papier de dépoussiérage ............................22
Nettoyage et Entretien ........................................................23
• Procédures d’entretien
• Retirer le bac à poussière
• Vider le bac à poussière
• Nettoyage du bac à poussière
• Nettoyage de l’orice d’aspiration
• Nettoyage de la brosse latérale
Page 17
RÈGLES DE SÉCURITÉ
16
ATTENTION
RISQUE DE CHOC
ÉLECTRIQUE
NE PAS OUVRIR
Un signe triangulaire
avec une flèche en forme
d’éclair alerte l’utilisateur
de la présence de
«voltage dangereux»
non isolé dans les pièces
de l’appareil qui peut être
d’une importance
suffisante pour constituer
un risque de choc
électrique sur les
personnes.
ATTENTION:
POUR RÉDUIRE LE RISQUE DE
CHOC ÉLECTRIQUE, NE PAS
ENLEVER LE COUVERCLE. NE
CONTIENT PAS DE PIÈCES
UTILISABLES PAR LES CONSOM-
MATEURS. FAIRE RÉPARER PAR
UN PROFESSIONNEL QUALIFIÉ.
ATTENTION:
POUR RÉDUIRE LE RISQUE DE FEU OU DE CHOC ÉLECTRIQUE,
NE PAS EXPOSER L’APPAREIL À LA PLUIE OU À L’HUMIDITÉ.
Un signe triangulaire
avec un point
d’exclamation indique la
présence de conseils
d’utilisation et de
maintenance importants
dans le manuel
accompagnant l’appareil.
Page 18

RÈGLES DE SÉCURITÉ
Veuillez lire attentivement les règles de sécurité dans cette notice avant l’utilisation
de ce produit, et veuillez conserver ce manuel an de pouvoir vous y référer dans
le futur. Le fabricant n’est pas responsable d’éventuels dommages résultant d’un
emploi non conforme ou d’un maniement incorrect de l’aspirateur. Veuillez donc
respecter impérativement les consignes suivantes.
Règles de Sécurité
1. Veuillez lire attentivement ce mode d’emploi avant l’utilisation de l’appareil
2. L’utilisation est interdite en extérieur
3. Conserver l’appareil loin de l’eau, et ne jamais l’utiliser dans une pièce humide,
comme la salle de bain et la buanderie, car l’appareil peut être endommagé
4. Avant l’utilisation, rangez les vêtements, ôtez et déplacez papier, câbles et
rallonges dispersés au sol, remontez les rideaux an d’éviter un éventuel accident. Au cas où un câble se coincerait dans l’appareil de nettoyage, le câble
va bouger avec l’appareil et pourrait renverser tables, chaises, voire même
meubles et placards.
5. Ne jamais se tenir debout ou s’asseoir sur l’appareil. Attention aux enfants et
animaux domestiques lorsque l’appareil est en marche. L’appareil n’est pas un
jouet. Ne pas laisser les enfants utiliser l’aspirateur.
6. Ne jamais utiliser l’appareil pour nettoyer des cendres de cigarettes ou de
cheminées encore allumées.
7. Ne jamais utiliser l’appareil pour aspirer des liquides combustibles ou inammables telles que l’essence.
8. Veuillez vous assurer que toutes les portes donnant à l’extérieur de votre maison sont fermées.
9. Lorsque l’appareil est en marche, faites attention à ce que l’orice de l’air
chaud ne se bouche pas, ce qui pourrait endommager l’appareil.
10. Si l’appareil ne fonctionne pas ou est endommagé, arrêter l’utilisation quelque
soit le problème.
11. Si l’appareil n’est pas utilisé pendant une longue période, assurez vous qu’il est
éteint et retirez les piles
Notes sur la pile et sa recharge
1. La pile est rechargeable. Veuillez consulter le voltage et le courant mention-
nés sur l’emballage. Si vous n’êtes pas sûrs du voltage et du courant de votre
maison, veuillez contacter le distributeur ou votre compagnie d’électricité
2. N’utilisez que la pile fournie avec l’appareil
3. Ne rechargez qu’à l’intérieur
4. N’utilisez que le cordon de recharge fourni avec l’appareil
5. Ne plus utiliser la pile si le câble ou la prise de la pile sont endommagés
6. Ne jamais toucher le chargeur, la prise et le câble avec des mains mouillées
7. Si l’appareil a besoin d’être nettoyé, arrêtez l’appareil et retirez la pile
8. Avant de jeter l’appareil, les piles doivent être retirée
9. Veuillez éteindre l’appareil avant de retirer la pile
10. Veuillez recycler et jeter les piles comme il faut.
17
Page 19
CARACTÉRISTIQUES PRINCIPALES
18
Félicitations pour l’achat de l’Aspirateur Robotique V.Bot®. Cet aspirateur
automatique révolutionnaire est équipé de fonctions qui permettent de nettoyer
les surfaces de la maison et du bureau telles que le bois, le carrelage, le lino
et la plupart des moquettes et tapis à poils courts.
Vous pouvez également utiliser l’aspirateur avec le tissu en micro bre pour
vous aider à nettoyer plus efcacement.
Aléatoire
en spiral
le long du mur
en spiral
COMPOSANTS MAJEURS ET PIÈCES INCLUS
ES
Papier de
dépoussiérage x3
Aspirateur V.Bot® x1
Piles rechargeables x1
Filtre du bac à
poussière x1
Support du papier de
dépoussiérage x1
Prise électrique
(AC) x1
Manuel d'Utilisation x1
Brosse latérale x1
M
an
u
el
Page 20
CARACTÉRISTIQUES
19
Pare-choc s
bouton retrait pour
bac à poussiè re
Bac à poussiè re
Interrupt eur
Passage de l'air chaud
Couvercle des piles
poignée
Aspiratio n
Roue gauche et
roue droite
couvercle
des roues
Petite roue avant
couvercle supérieur
Base
Douille du chargeur
Brosse
latérale
Page 21
INSTALLATION ET RETRAIT DES PILES
20
douille
1. S’assurer que l’appareil est débranché
2. Appuyer et faire glisser le couvercle des piles (voir dessin)
3. Insérer la prise des piles dans la douille (Noter le sens)
4. Placer les piles dans le compartiment des piles et fermer le couvercle
5. Pour retirer les piles effectuez le point no. 3 en sens inverse.
Page 22
RECHARGER LES PILES
21
1. Pour protéger la pile rechargeable et assurer sa longévité, après que la
pile soit rechargée pendant 16 heures, la recharge s’arrêtera automatiquement. Après 12 heures de rechargement, vous pouvez commencer à utiliser
l’aspirateur même si la lumière d’indication continue de asher
2. Si l’aspirateur se met à émettre des sons d’alarme et arrête de fonctionner,
ceci indique que la pile a besoin d’être rechargée.
3. Assurez vous que l’appareil est sur la position OFF et que la pile est installée
4. Branchez l’extrémité du cordon dans la douille du chargeur de l’appareil et la
prise électrique dans la prise de courant
5. Quand les piles sont totalement rechargées, la lumière électrique d’indication
reste verte.
Lumière d’indication
Prise pour rechargement
(d.c 17V 200mA)
Douille du chargeur
MODE D’UTILISATION
Préparation à l’utilisation
An d’obtenir de meilleurs résultats lors de l’utilisation de l’aspirateur, enlever
d’abord vêtements, papiers, câbles, rallonges et autres obstacles potentiels sur le sol. Si besoin, enroulez les rideaux et voilages pour éviter quel-
conque endommagement possible. Si le cordon d’une lampe ou d’un appareil
s’emmêlait dans l’aspirateur alors que celui-ci est en marche, la lampe ou
l’appareil ménager pourrait tomber et être endommagé.
Ne pas utiliser sur des tapis et moquettes à longs poils.
Démarrer l’utilisation
1. Nettoyez le bac à poussière
2. Placer l’aspirateur robot au sol et mettre l’interrupteur sur ON
3. Lorsque l’appareil est déchargé, il émettra un son et s’arrêtera automatiquement
4. Quand vous n’utilisez pas l’appareil, ou avant de recharger les piles,
veuillez vous assurer que l’aspirateur est éteint.
Page 23
INSTALLATION DE LA BROSSE LATERALE
22
1. Devissez et retirez le support de la brosse qui se trouve en dessous de
l’appareil en tournant dans le sens inverse des aiguilles d’une montre comme
indiqué dans le dessin ci-dessous.
2. Placez la brosse sur le support et revissez en tournant dans le sens des
aiguilles d’une montre
3. Les poils de la brosse vont s’étendre du centre de la brosse dès que celle-ci
est installée.
UTILISATION DU PAPIER DE DÉPOUSSIÉRAGE
1. Insérez le rebord du papier dépoussiérage dans les fentes du support
du papier
2. Poser le support sur la base de l’aspirateur en appuyant jusqu’à ce qu’il y
ait un clic.
Fente
Papier de dépoussiérage
en micro fibre
Support du papier
Le support se met en place sur la
base jusqu'à ce qu’il y ait un clic
Support de
la brosse
Brosse latérale
Page 24
NETTOYAGE ET ENTRETIEN
23
Mode d’Entretien
L’utilisation et l’entretien de l’aspirateur V.Bot® est très simple. Après chaque
usage, videz le bac à poussière et nettoyez le ltre. Il n’est pas nécessaire de
nettoyer le trou d’aspiration après chaque utilisation.
Nettoyage du Bac à Poussière
1. Appuyer sur le bouton « PUSH » pour ouvrir le bac à poussière
2. Retirer doucement le bac à poussière de l’aspirateur en le soulevant
comme dans le dessin ci-dessous.
fente pour bac à poussière
Page 25
NETTOYAGE ET ENTRETIEN
24
Vider le bac à poussière
1. Ouvrez le couvercle supérieur du bac à poussière
2. Retirer le ltre du bac en le soulevant
3. Jetez le contenu du bac dans la poubelle.
Page 26
NETTOYAGE ET ENTRETIEN
25
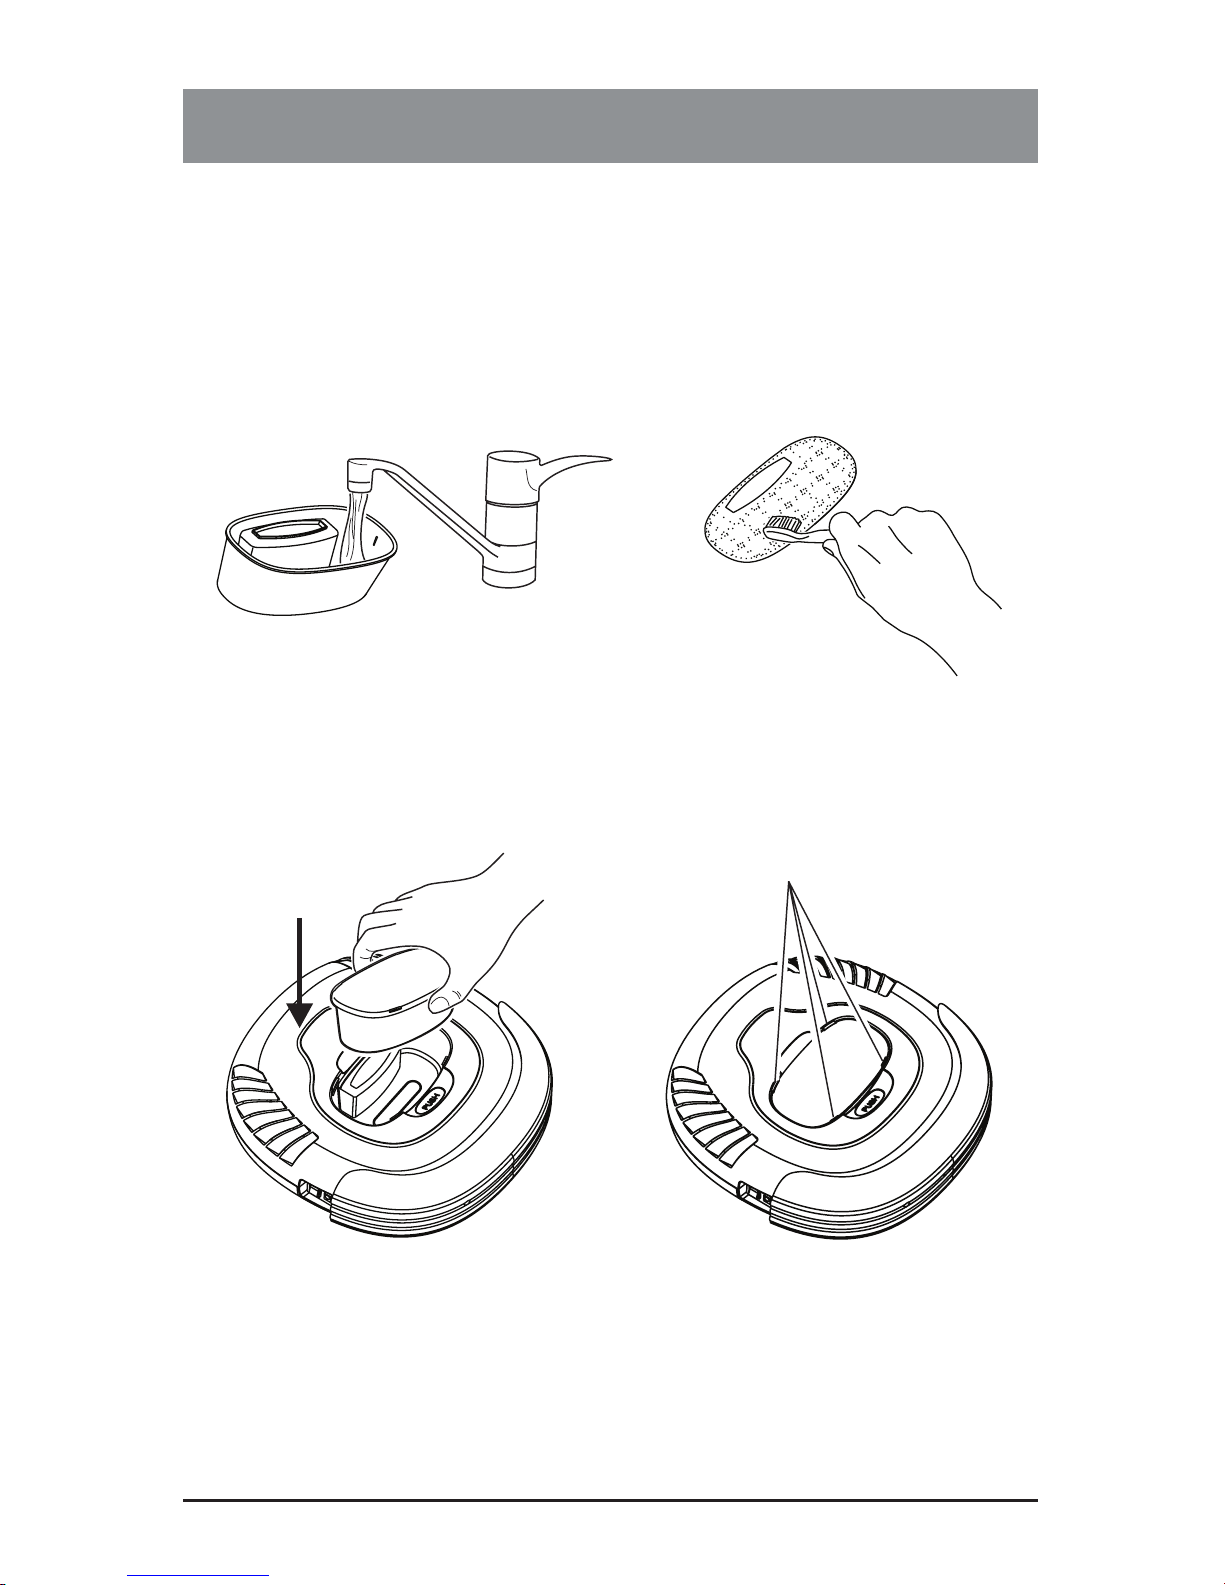
Nettoyer le bac à poussière
1. Rincer le bac à poussière avec de l’eau courante. Il n’est pas nécessaire
de le laver à chaque fois. Ne pas mettre dans le lave-vaisselle
2. Nettoyez de temps en temps le ltre avec une petite brosse souple
3. Une fois sec, réinstallez le bac à poussière et replacez le couvercle
4. Replacez le bac à poussière dans l’aspirateur en vous assurant qu’il est
bien maintenu par les onglets comme indiqués ci dessous.
Onglets pour fermeture du bac à poussière
Page 27
NETTOYAGE ET ENTRETIEN
26
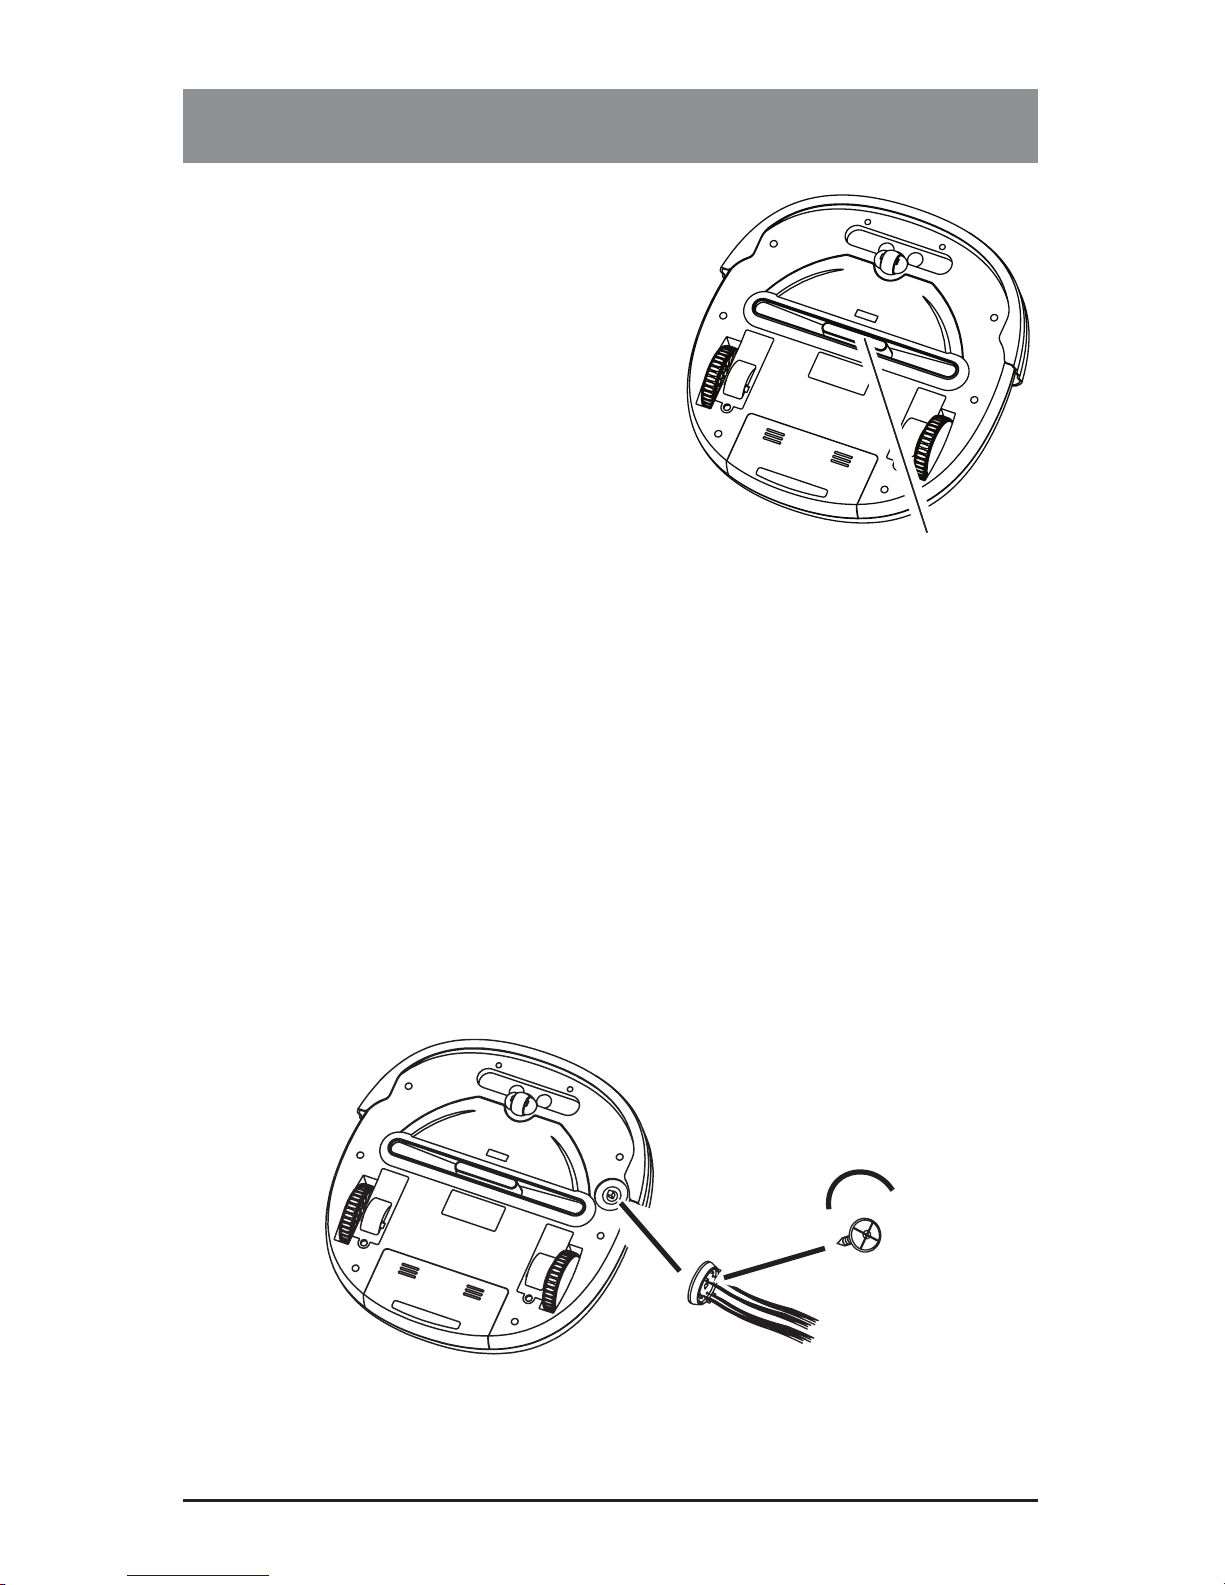
Nettoyage de l’orice d’aspiration
Après plusieurs utilisations, la poussière
et la saleté peuvent s’accumuler
autour de l’orice d’aspiration ce qui peut
de ce fait réduir l’efcacité de l’appareil.
An d’assurer une performance maximale
de l’appareil et une navigation constante
d’air, l’orice devrait être nettoyé de
temps en temps.
1. Mettre l’appareil sur la position OFF
et mettre l’appareil sur le dos sur le
sol ou une table.
2. Nettoyez et enlevez les cheveux ou
n’importe quelle autre éléments qui
bloqueraient l’aspiration.
Nettoyage de la brosse latérale
1. Eteindre l’appareil, le mettre sur le dos sur une surface plate
2. En le tournant, retirer le couvercle de la brosse et la brosse et nettoyez les
résidus.
3. Replacer la brosse et le couvercle
4. Apres l’avoir utilisé pendant une certaine période, il sera utile de remplacer la brosse pour qu’elle encore soit efcace.
5. La brosse peut être rincée. Si les poils sont courbés, passez la brosse à
l’eau chaude et les poils retrouveront leur forme originale.
Orifice d’aspiration
Page 28

 Loading...