

Page 1
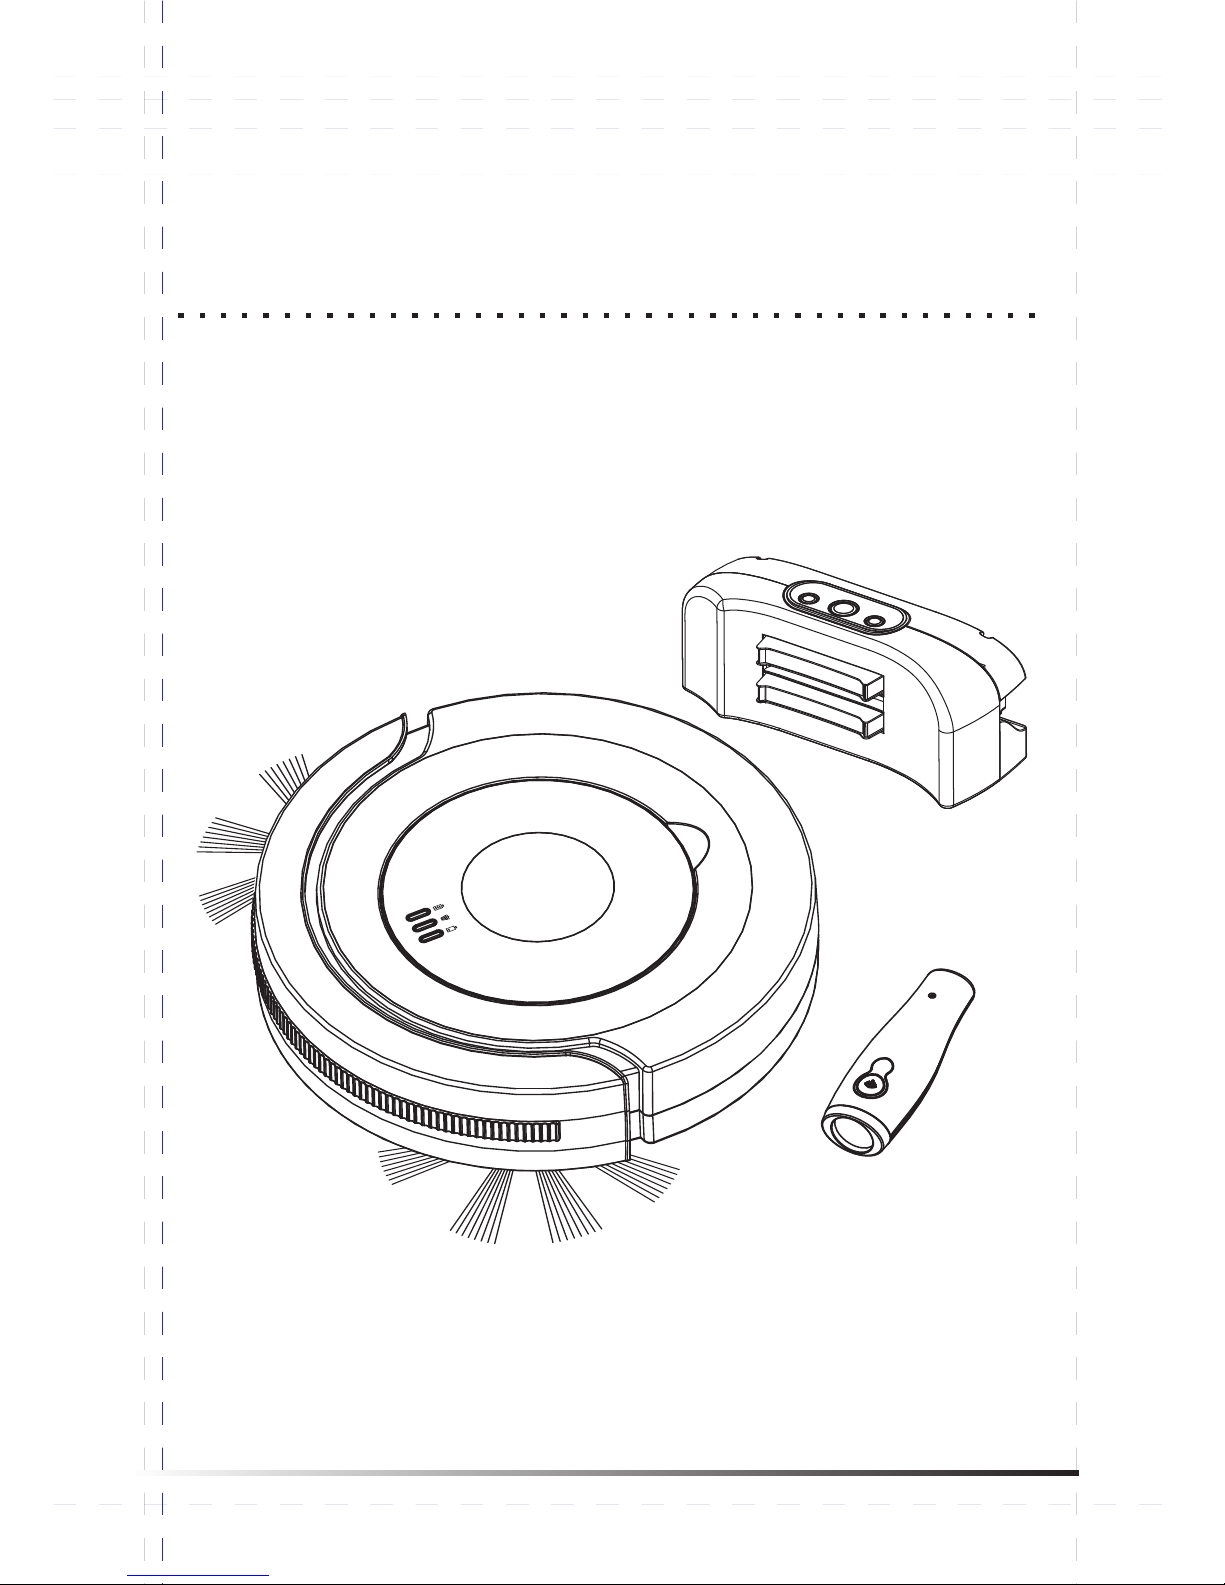
Operation Manual
24H
Full Go
Go
M285DP
Rev.1602
Robotic Vacuum Cleaner
With Docking Station
Page 2

Page 3

TABLE OF CONTENTS
SAFETY INSTRUCTIONS ---------------------------------------------------- 2
* Safety Instructions
* Battery and Recharging Instructions
WARNING ------------------------------------------------------------------------ 6
SPECIAL FEATURES --------------------------------------------------------- 7
MAJOR COMPONENTS AND ATTACHMENTS ------------------------- 7
M285DP OVERVIEW ----------------------------------------------------------- 8
INSTALLATION GUIDE ------------------------------------------------------- 9
* Installing and Removing Side Brush
* Removing Paper Holder
* Installing Dusting Paper and Holder
* Battery Installation and Removal
* Recharging Battery
GENERAL OPERATION ---------------------------------------------------- 14
* Preparation for Operation
* S Pointer
* Point function
* Starting Operation
* Basic Operation
CLEANING AND MAINTENANCE ---------------------------------------- 16
* Maintenance Method
* Cleaning Dust Bin
* Cleaning Intake
* Cleaning Side Brushes
TROUBLE SHOOTING ------------------------------------------------------ 20
WARNING OF BATTERY & ADAPTOR USAGE ----------------------- 21
1
Page 4

SAFETY INSTRUCTIONS
2
Please read the safety instructions in the Operation Manual
before operating M285DP and keep this manual handy for
your future reference. Observe the basic safety rules to
prevent any occurrence of fire, electric shock and personal
injury.
Safety Instructions:
1. Please read the Operation Manual before operating
M285DP.
2. Do not operate M285DP outdoors.
3. Before starting M285DP, be sure to install M285DP
dust bin filter properly in case of any damage of
M285DP.
4. Do not operate M285DP on wet floor or in moisture
conditions, e.g. bathroom. Water and moisture
could damage the circuit board in M285DP.
5. Prior to operate M285DP remove any loose articles
on the floor such as clothes, paper, loose cables,
and extension cords as well as making sure to lift
curtains and drapes off the floor to avoid any
possible accidents. In case of a loose cable is
tangled with M285DP the cable might move around
with M285DP as M285DP works and topple down
the table, chairs, or cabinet and cause property
damage.
6. Never stand or sit on M285DP. Beware of children
or pets while M285DP is in operation.
7. Never use M285DP to clean up sparking cigarette
butts or burning ashes from fireplace.
8. Never use M285DP to clean up combustible or
Page 5

SAFETY INSTRUCTIONS
3
highly volatile liquids such as gasoline.
9. While M285DP is in operation, make sure all doors
leading outside are closed.
10. During operation, the heat vent should avoid being
clogged. If heat vent clogged, M285DP could be
damaged.
11. If M285DP is malfunctioned or damaged by force,
do not operate M285DP regardless the cause.
Please call your local dealer for service
information.
12. Turn off the power and remove the battery from
M285DP if the unit will not in use for a long period
of time.
13. This appliance can be used by children aged from
8 years and above and persons with reduced
physical, sensory or mental capabilities or lack of
experience and knowledge if they have been
given supervision or instruction concerning use of
the appliance in a safe way and understand the
hazards involved. Children shall not play with the
appliance. Cleaning and user maintenance shall
not be made by children without supervision.
---Children should be supervised to ensure that
they do not play with the appliance.
14. WARNING: the plug must be removed from the
socket-outlet before cleaning or maintaining the
appliance.
15. Automatic battery-operated cleaners shall also be
provided with cautionary instructions for room
Page 6

SAFETY INSTRUCTIONS
4
preparation and constant care.
16. Make sure that the appliance can be worked freely
in the room (shall not be blocked or overturned
etc…) and make sure that there is nothing that the
appliance can overturn and create a hazard (clear
all Candle, Vase with or without water and fragile
objects etc…that placed on the floor or furniture).
Battery and Recharging Instructions:
1. Please apply the same model’s battery (D.C.
Nickel-Metal Hydride 14.4V 1500mAh) and
adaptor (19V 600mA) as equipped with the packing.
2. The external flexible cable or cord of this adaptor
cannot be replaced; if the cord is damaged, the
adaptor shall be scrapped.
3. When placing the batteries into the reservoir, please
be sure that the polarity (+/- sign) of the batteries
match with the indication marked inside the battery
reservoir. Otherwise, the power cannot be switched
on.
4. Forbid any un-rechargeable or different type/model
battery. Applying un-rechargeable battery will cause
the machine malfunctions.
5. The battery is rechargeable. Please use the voltage
and current specified on the packing. If you are not
sure of the voltage and current of your house,
please contact your local power company or a
licensed electrician.
6. Use only the battery supplied with your M285DP.
Page 7

SAFETY INSTRUCTIONS
5
7. Charging adaptor is for indoors only.
8. The appliance is only to be used with the power
supply unit provided with the appliance.
9. Do not recharge the battery if the cable or plug of
the battery is damaged.
10. Never touch the charger, plug or cable with damp
hands.
11. If M285DP requires cleaning, unplug the adaptor,
switch off the unit and take out the battery.
12. The battery must be removed from the appliance
before it is scrapped.
13. The appliance must be disconnected from the
supply mains when removing the battery.
14. The battery is to be disposed of safely.
Attention should be drawn to the environmental
aspects of battery disposal. Don't throw used
batteries in dustbin. Please contact your retailer in
order to protect the environment.
15. Leakage from battery pack can occur under
extreme usage or temperature conditions.
If the liquid gets on skin, wash quickly with water.
If the liquid gets into the eyes, flush them
immediately with clean water for a minimum of 10
minutes. Seek medical attention.
Contact a specialist dealer or Customer Services
to replace the battery pack. Never replace the
battery pack yourself.
Page 8

WARNING
6
Following objects are strictly banned, otherwise
the vacuum cleaner will be damaged or fire
calamity will be caused, which bring such
accidents as human body injuries:
- Don’t pick up large or sharp broken such as
glasses.
- Don’t pick up harming or erodent liquids
(solvent, corrosive, detergent…).
- Don’t pick up inflammable or explosive
substance such as gasoline or alcohol.
- Don’t pick up/ vacuum burning or glowing
objects (cigarettes, matches, hot ashes).
Page 9
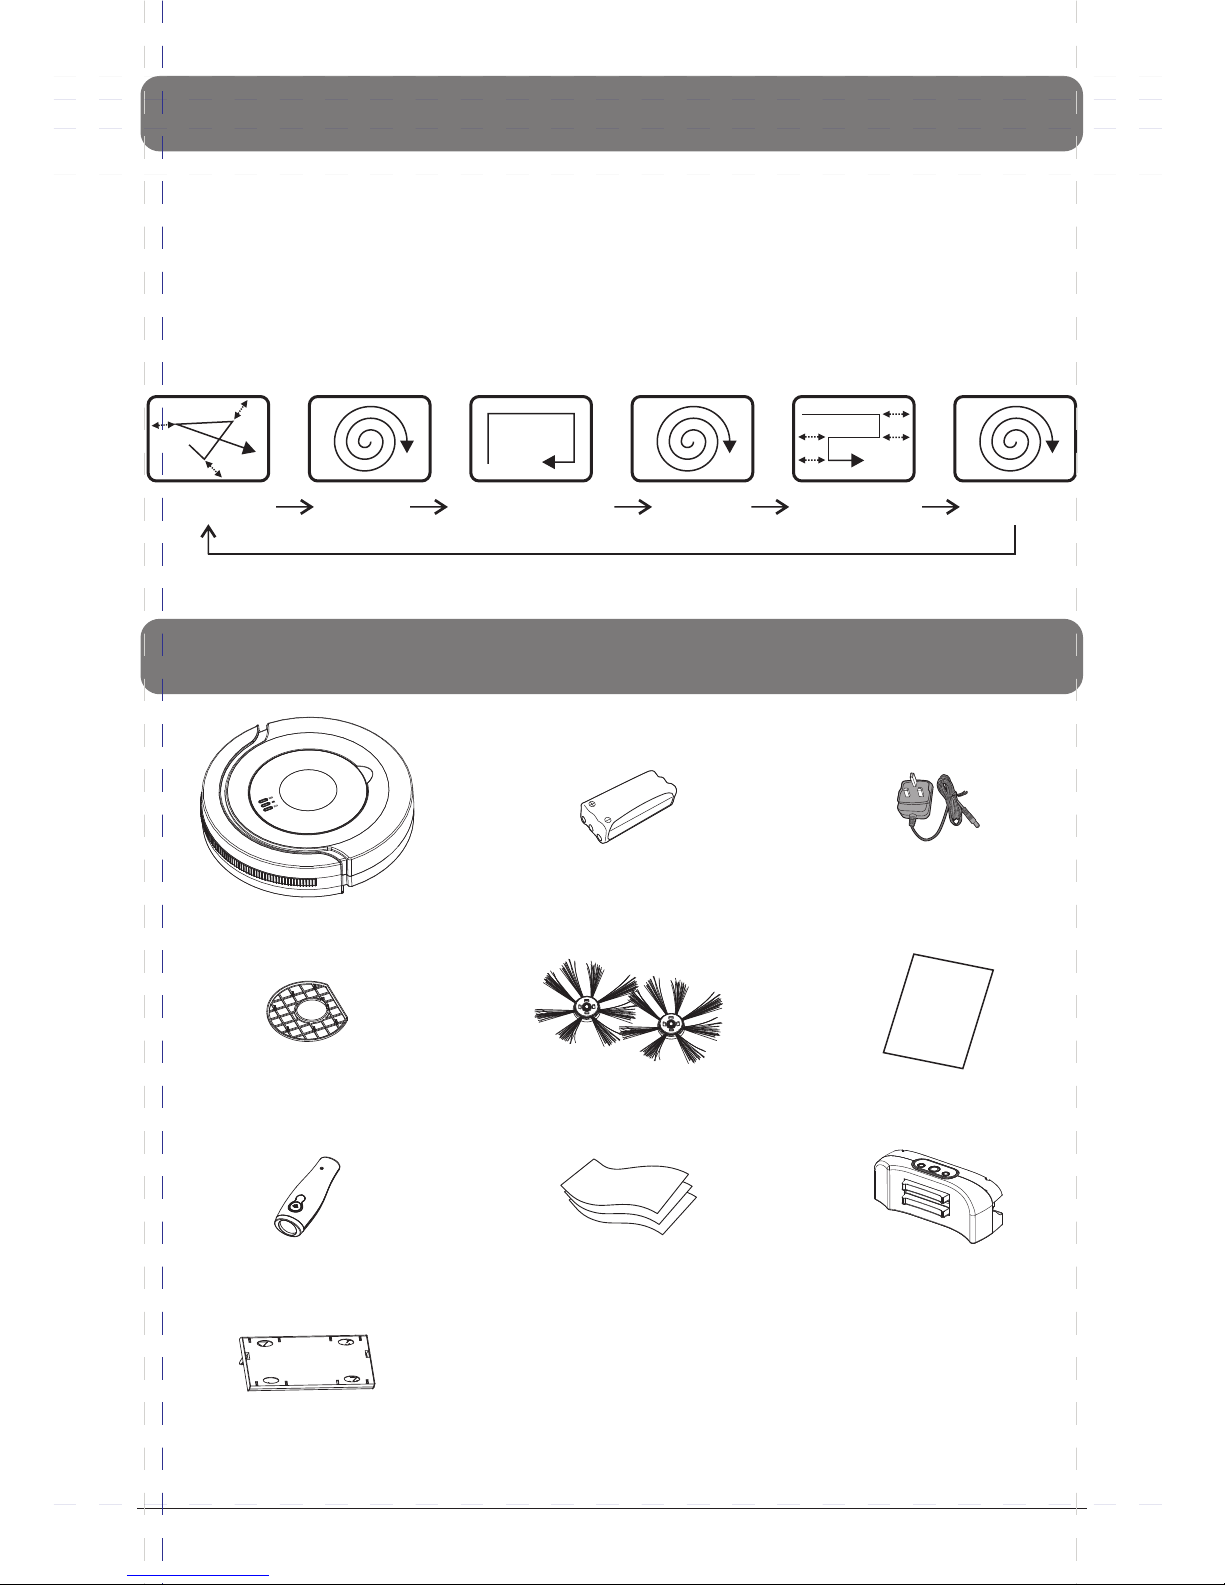
Dusting Paper x3
SPECIAL FEATURES
MAJOR COMPONENTS AND ATTACHMENTS
M285DP Cleaner x1
Rechargeable Battery x1
Dust Bin Filter x2
(1 pc Installed in the dustbin)
Docking Station x1
Adaptor x1
Operation Manual x1
7
Manua
l
Side Brush x 2
Dusting paper holder x1
Random
"Z" Type
Spiral
Along the wall
Spiral Spiral
24H
Full Go
Go
Congratulations on purchasing the M285DP Robotic Vacuum Cleaner With Docking
Station.
This revolution Robotic Vacuum Cleaner is equipped with functions suitable for cleaning up
floor surfaces of home and office such as wood, tile, and linoleum.
M285DP Robotic Vacuum Cleaner With Docking Station is definitely a household helper.
Working Patterns:
S Pointer x1
Page 10
24H
Full Go
Go
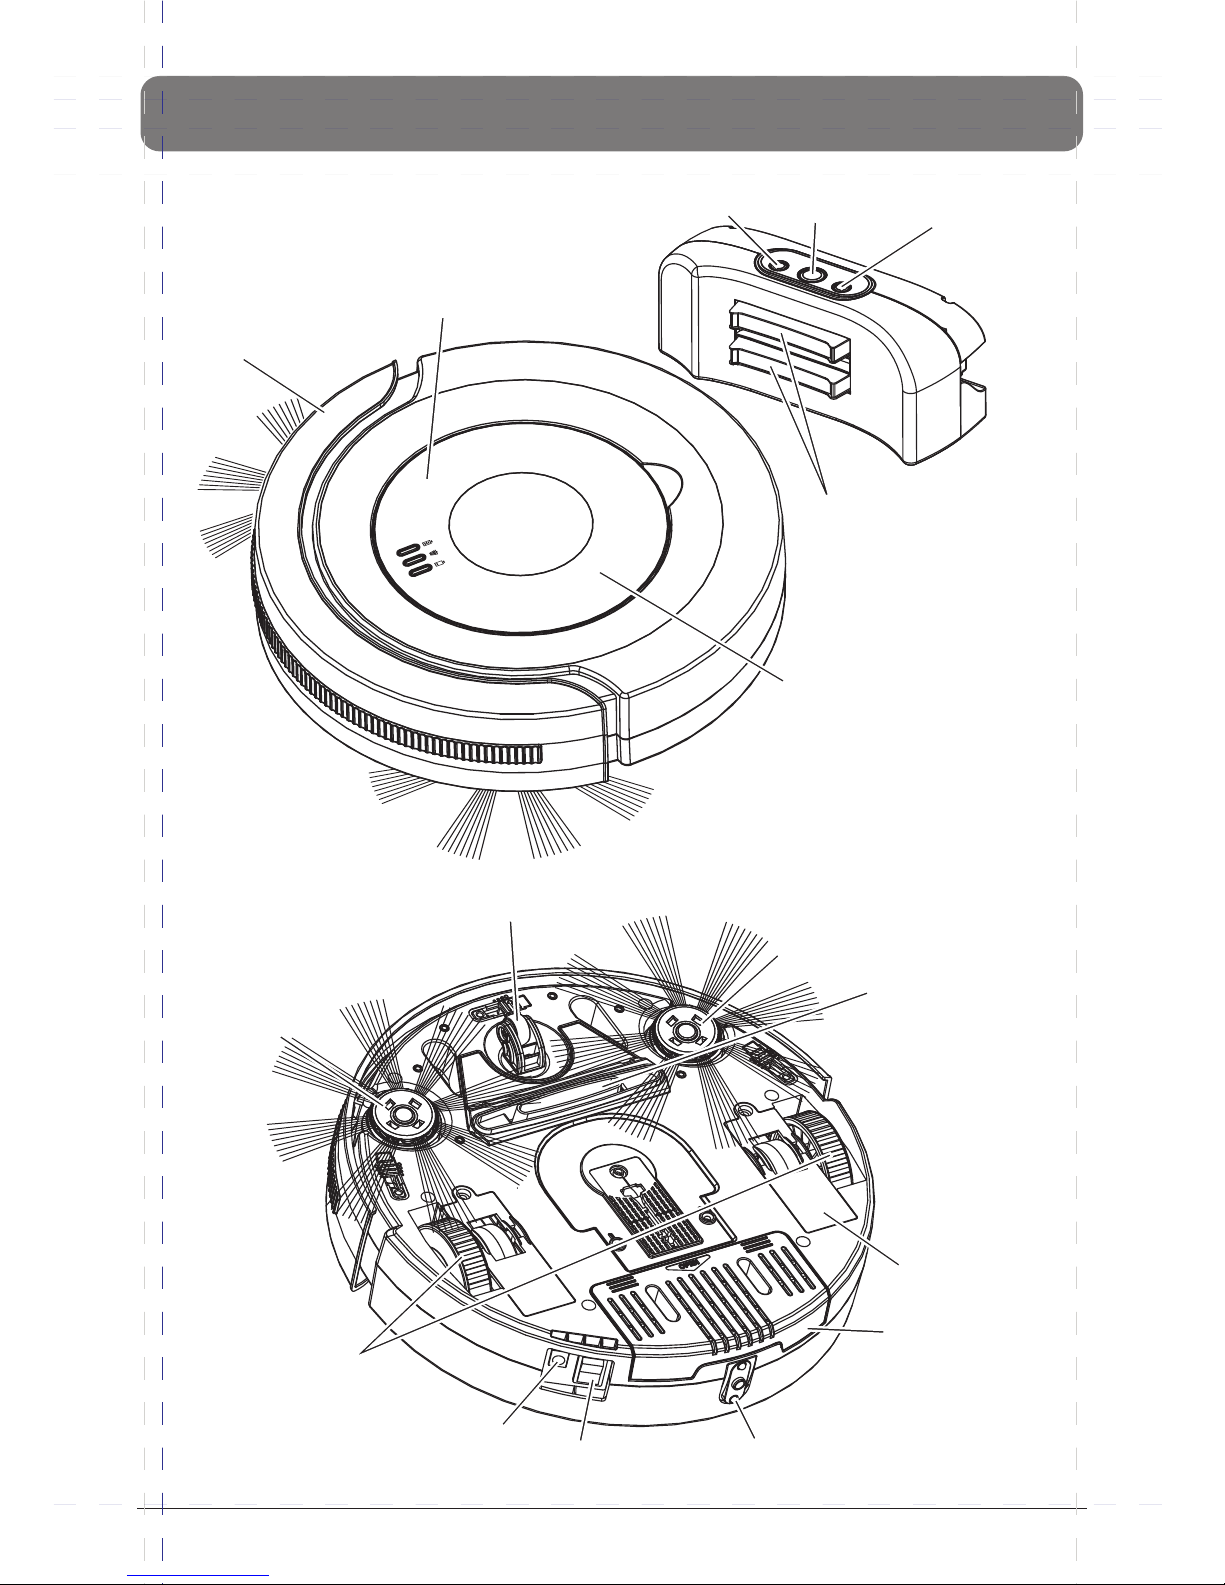
Full Go Button
24H Button
Go Button
M285DP OVERVIEW
Bumper
Plane cover
Contact plates for
automatic charging
Dust Bin inside
Intake Valve
Left and Right Wheels
Power switch
Contact points for
automatic charging
Battery cover
D.C. jack
Wheel Cover
8
Front Small Wheel
Side Brush
Side Brush
Page 11
9
INSTALLATION GUIDE
1
2
Lift up
Push to
the left
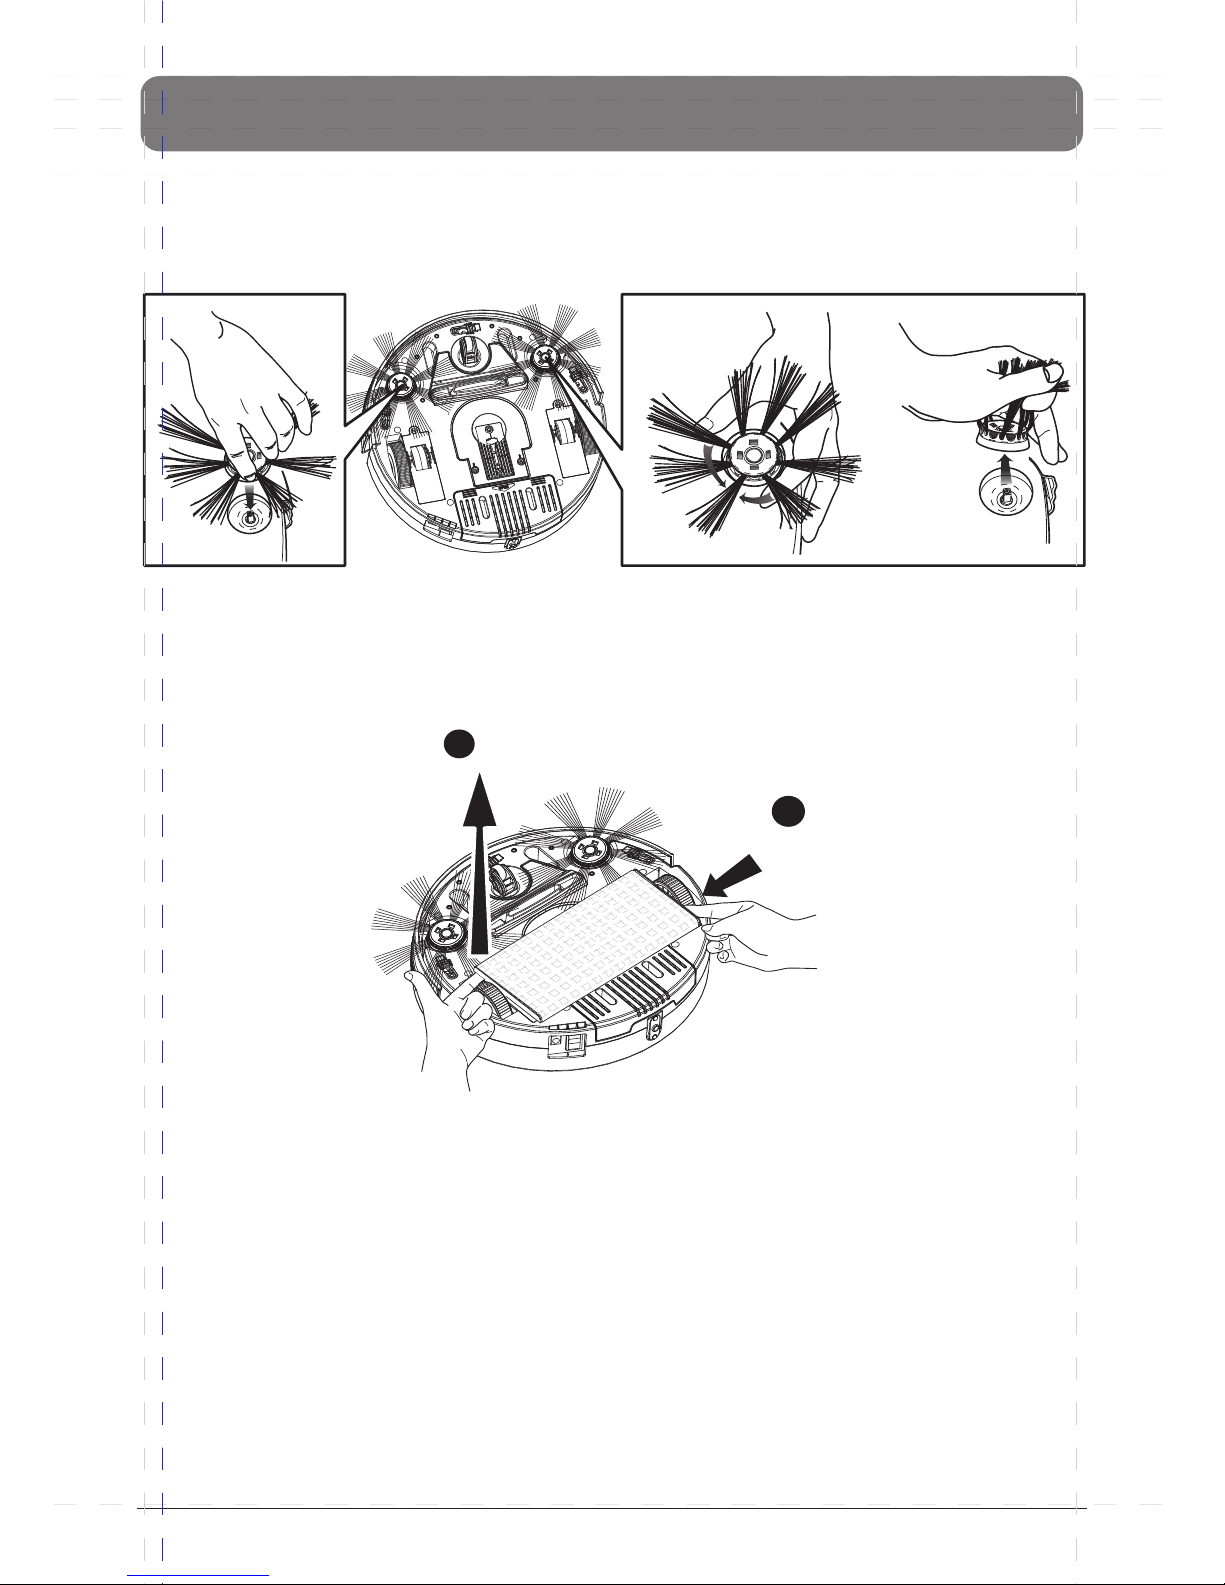
Installing and Removing Side Brush:
To install: Push the brush directly onto the holder.(Fig. 1)
To remove: Hold the brush bristle and pull upward to remove the brush.(Fig. 2)
Removing Paper Holder:
Remove the dusting paper holder following the instruction as below diagram.
PULL UP!
HOLD
PRESS
CLICK!
Fig. 1 Fig. 2
Page 12
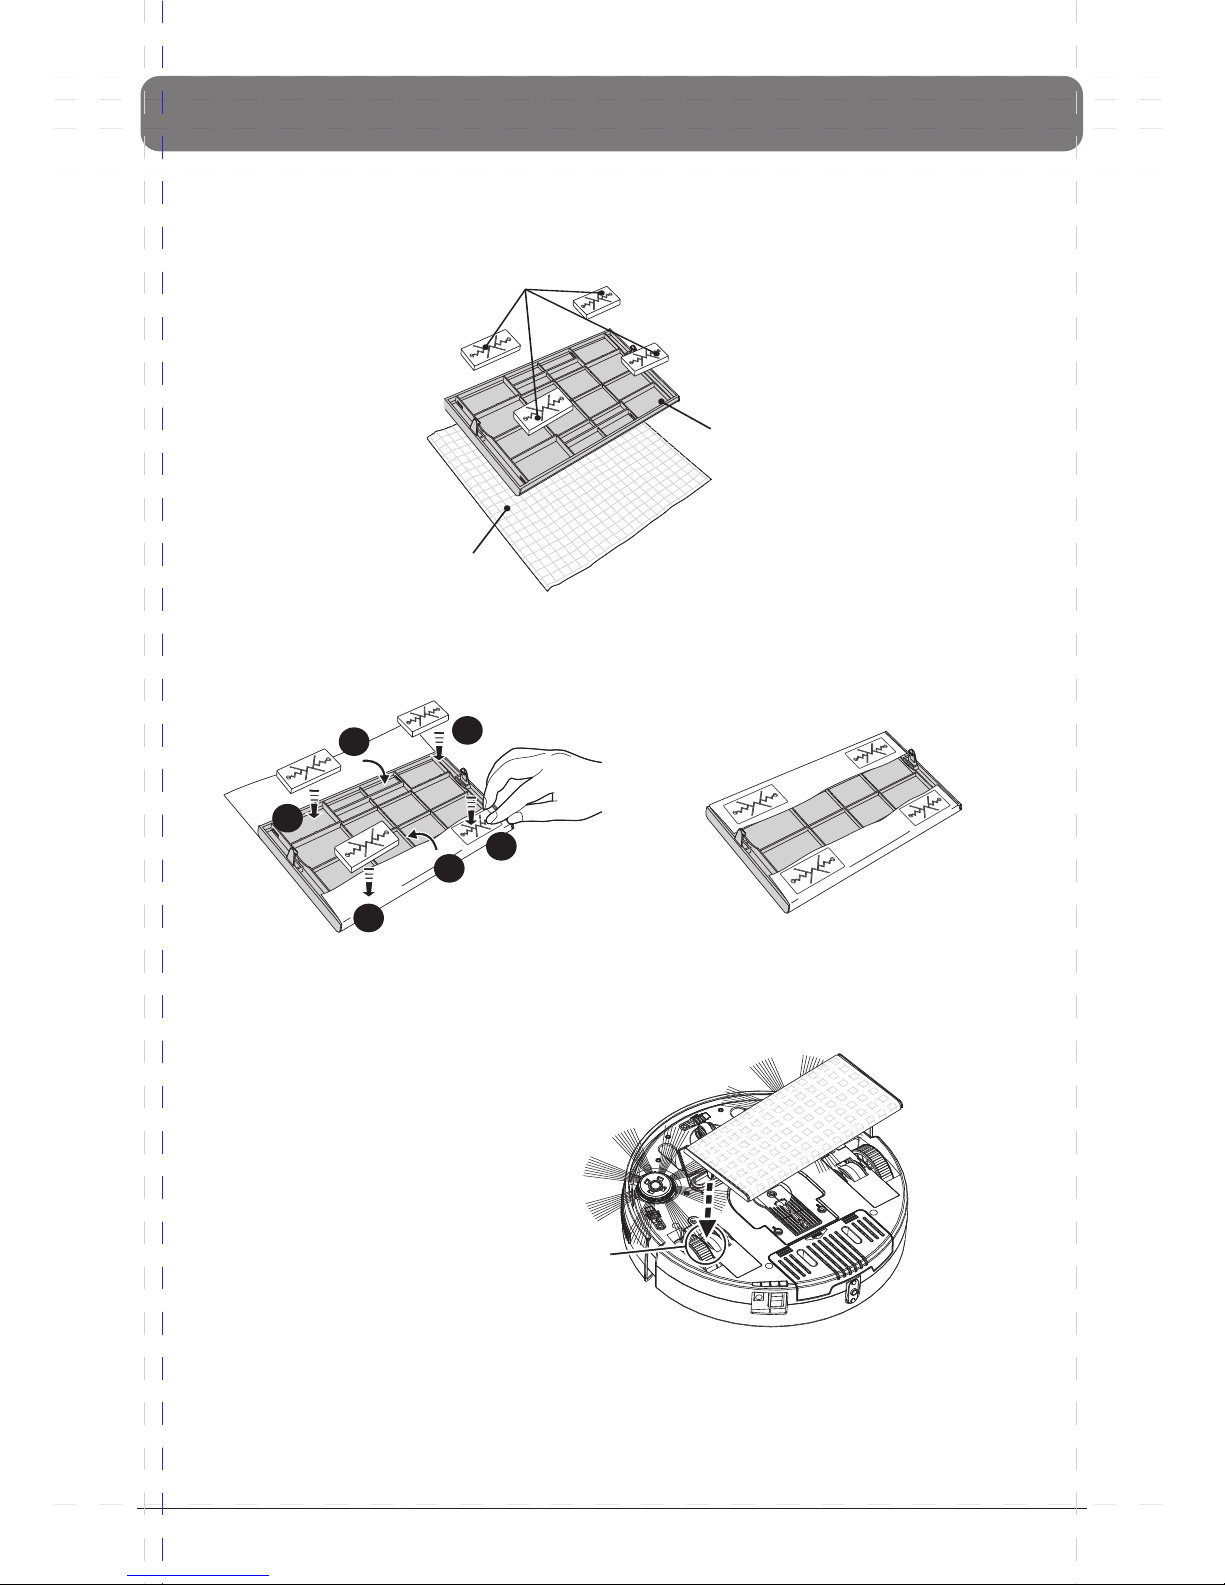
Installing Dusting Paper and Holder:
NOTE:
1. Flat the dusting paper and put it on the floor or table. Then place the holder (the side
with 4 stoppers face up) on the paper at the midpoint as below diagram.
2. Remove 4 stoppers from the holder, fold the hem of dusting paper on two sides back to
the holder, and place back 4 stoppers on top of the paper then press firmly to fix the
paper onto holder as below diagram.
3. Place the dusting paper holder to the bottom of unit by aiming one bolt of holder at the
hole (near the big wheel) on cleaner, click the holder on the cleaner, and then do it again
for the other side.
1. Do not use mopping function on the carpet. At the same time you should remove the
side brushes to prevent it from damaging the brushes.
2. If you don’t need to use mopping function, please remove the dusting paper holder from
the cleaner before you turn it on for cleaning.
10
INSTALLATION GUIDE
Stoppers
Hole for the
stopper
Dust Paper
Finished !
Press
Fold back
Press
Press
6
4
5
Fold back
Press
1
2
3
Press the two bolts on the
dusting paper holder into
the two holes on the bottom
of the cleaner.
Page 13
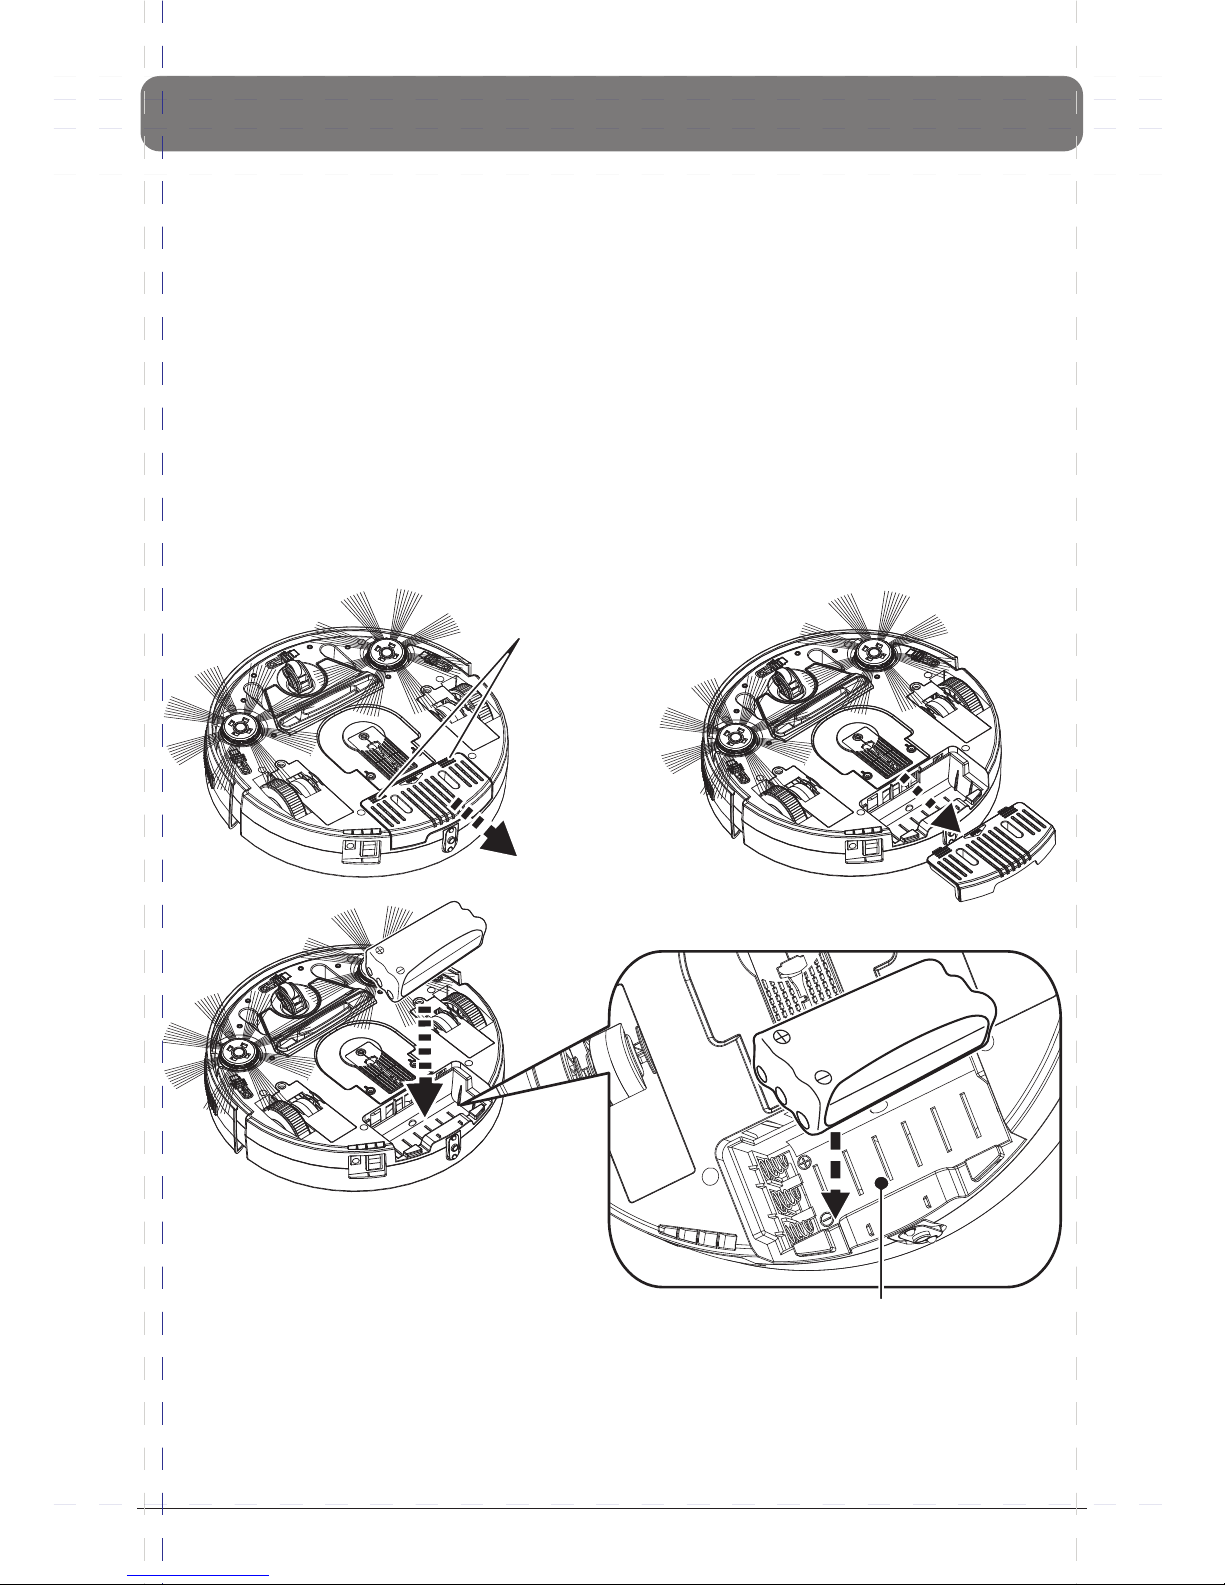
Battery Installation and Removal:
2. The details on how to remove the battery: To open the battery cover first by
pressing the two points “A” (marked in the below diagram) and slide the battery cover
in the direction of arrow “B” (marked in the below diagram). Then push the battery
toward the springs’ side in order to take out the battery easily.
3. The method of replacing battery: To install the new battery in the battery
compartment with correct polarity + and – sign which marked on the battery
compartment. Put to battery connecting dots side down close to the springs mounted
on the battery compartment, then push toward springs for easier inserting the battery.
Be sure to orient the battery contacts with those of the unit.
Slide back the battery cover to close it.
1. Turn off the power switch before installing the battery.
11
INSTALLATION GUIDE
B
A
Battery reservoir
Page 14
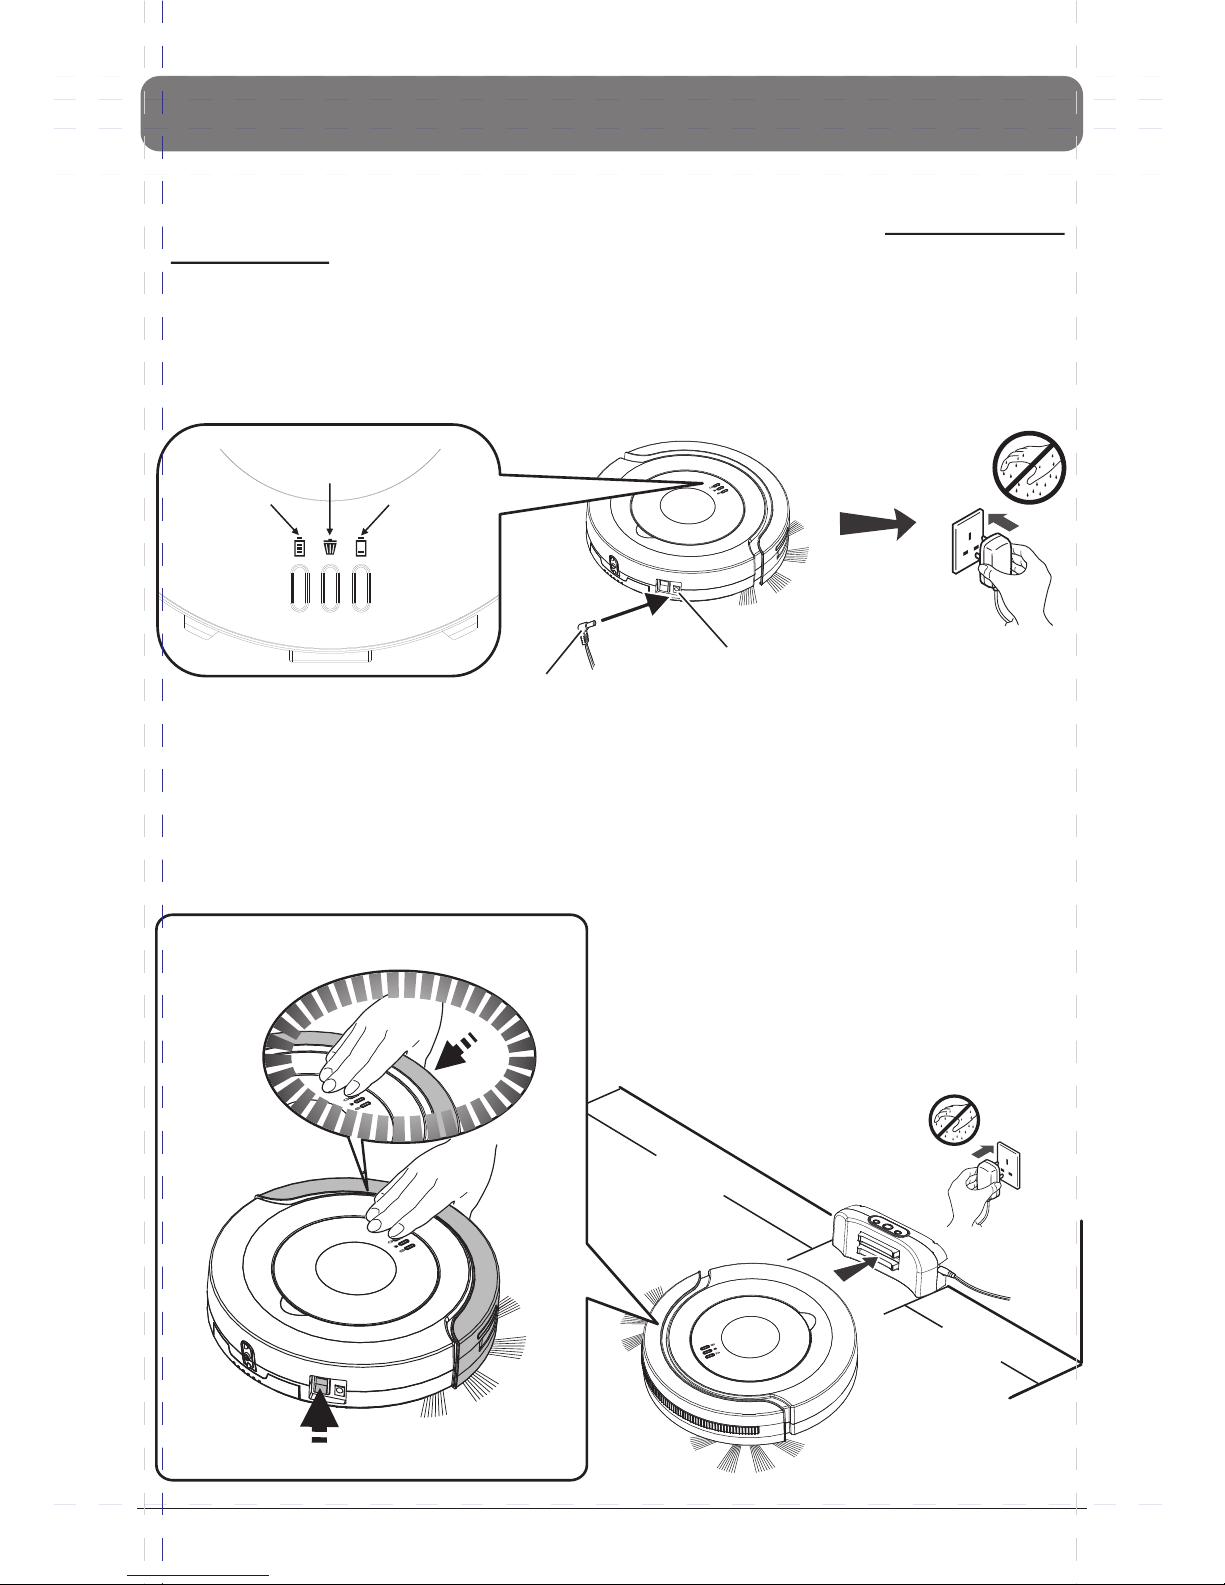
Recharging Battery:
1. Before charging, please check if the battery is properly mounted and turn on the
power switch.
2. Two ways to charge the battery:
A. Push the adaptor plug into d.c. jack at the side of the unit first, and then plug the
a.c end of the adaptor into the a.c. power outlet on the wall. (Please connect the
adaptor to the unit first before connecting to the a.c power outlet.)
B. Make sure the docking station is installed properly, place the unit to the docking
station, make sure the contact points at the back of the unit lean on the contact
plates at the docking station.
※ Pressing on the bumper of the unit to the end, and then turn on the power
switch , to let the unit enter into the mode of searching the docking station
for auto recharge. (refer the illustration below)
12
INSTALLATION GUIDE
Adaptor plug
D.C. jack
Charging
Dust bin full
Battery low
*LED INDICATOR
3
0 cm
1
00 c
m
24H
Full Go
Go
Turn on the switch.
Pressing on the bumper in the end.
Page 15

Charging indication on the panel
>Charging: “ CHARGE “ LED indication lamp with green light flashing.
>Charging done: “ CHARGE “ LED indication lamp with green light on.
***Charging is controlled by timer to be recharged completely it requires 5 hours
continuously. Any interruption occurs; the charging time will be reset.
>Battery Low: “ BATTERY LOW “ LED indication lamp with red light on.
INSTALLATION GUIDE
13
Page 16
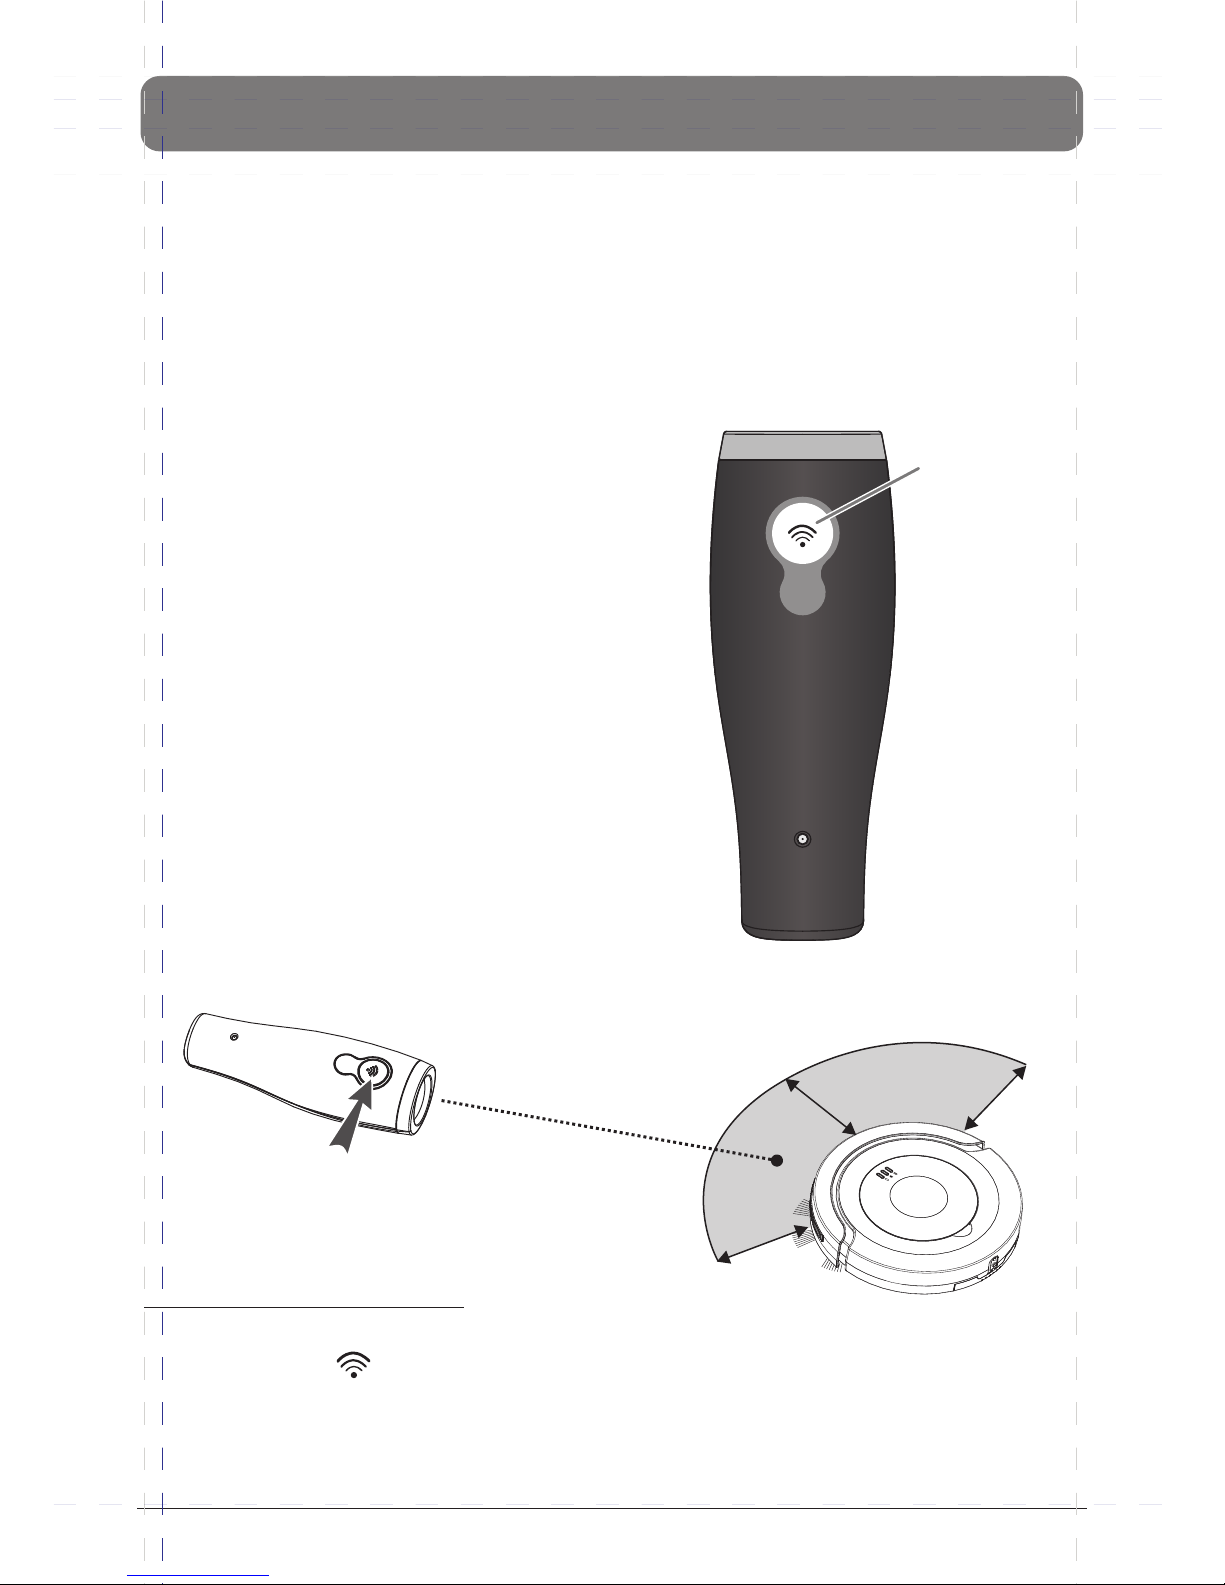
Point function:
IR beam effective range:
1. Turn on the M285DP
2. keep pressing on the button (IR beam) and point to the floor within the effective
range as marked to guide the M285DP moving to the position you want.
3. After release the IR beam button, the M285DP will turn into Auto mode.
Preparation for Operation:
To ensure the best efficiency of M285DP, you have to remove any loose articles on the floor
such as clothes, paper, loose cables and extension cords as well as to make sure rolling up
curtains and drapes off the floor to avoid any possible accidents. In case of a loose cable is
tangled with M285DP, the cable might move around with M285DP as it works and topple
down the table, chairs, or cabinet and cause property damage.
S Pointer:
1. Built-in rechargeable battery.
2. Fully charge time about 30 minutes.
3. Used USB cable to charge the S Pointer.
4. When charging, the LED indicator will be on,
when fully charge, the LED indicator will be off.
GENERAL OPERATION
14
Button (IR Beam)
1
5 cm
1
5 cm
Press
IR beam
e
g
n
a
r
e
v
i
t
c
e
f
f
E
Page 17
GENERAL OPERATION
15
Starting Operation:
→Manual work
※When LED Indicator lights on.
→ Check:
. Dust bin is full.
. Intake Valve is stuck with dirt.
. Wipe out the inner and the outside of Intake Valve.
1. Be sure to clean up the dust bin.
2. Place the cleaner on place with more free space in the room.
3. When M285DP is working, two LED indicators " " and " " will flash one after
the other.
4. When the cleaner runs out of power, the “BATTERY LOW” LED lamp on the unit will be
red and the cleaner will automatically stop. And M285DP will emit a buzz of warning
indicating that the battery needs immediate recharging. The buzzer will sound every
minute until power is exhausted.
5. When the cleaner is not used or prior to recharge, make sure the power switch of
M285DP is in the "OFF" position.
6. When the dust bin is full, the "DUST BIN FULL" LED indicator the " " will light on
in RED.(Please refer to the diagram "LED INDICATOR" in page 12.)
※ Caution: Remove the dusting paper holder and side brushes before using on the carpet.
※ This product is not suitable for long-pile carpets.
Basic Operation:
1. Operation without connecting to the docking station:
Place the cleaner on the floor and turn on the power switch.
2. Operation via the docking station:
Turn on the power switch and connect the unit with the docking station.
A. While the unit connects with docking station, press “Full Go” button on the docking
station(Full Go light on). When M285DP detects the battery is fully charged, it will
leave docking station with Full Go light off and begin to work. Press again to cancel
the setting.
B. Press the “24H” button (24H light on) to set the starting time for the unit. The time user
presses the “24H” button is the daily starting time of the unit. Press again to cancel.
C. Pressing “Go” button on the docking station, the unit leaves docking station and starts
to work right away.
3. When battery low, the unit is programmed to move back to the docking station
automatically for auto recharge.
If the unit fails to return to the docking station, user can put it back to the docking station
manually.
Page 18
Maintenance Method:
The operation and maintenance of the M285DP is very simple. After each use,
clean any dirt left behind on the dust bin and filter and whenever the intake is
stuffed.
Cleaning Dust Bin:
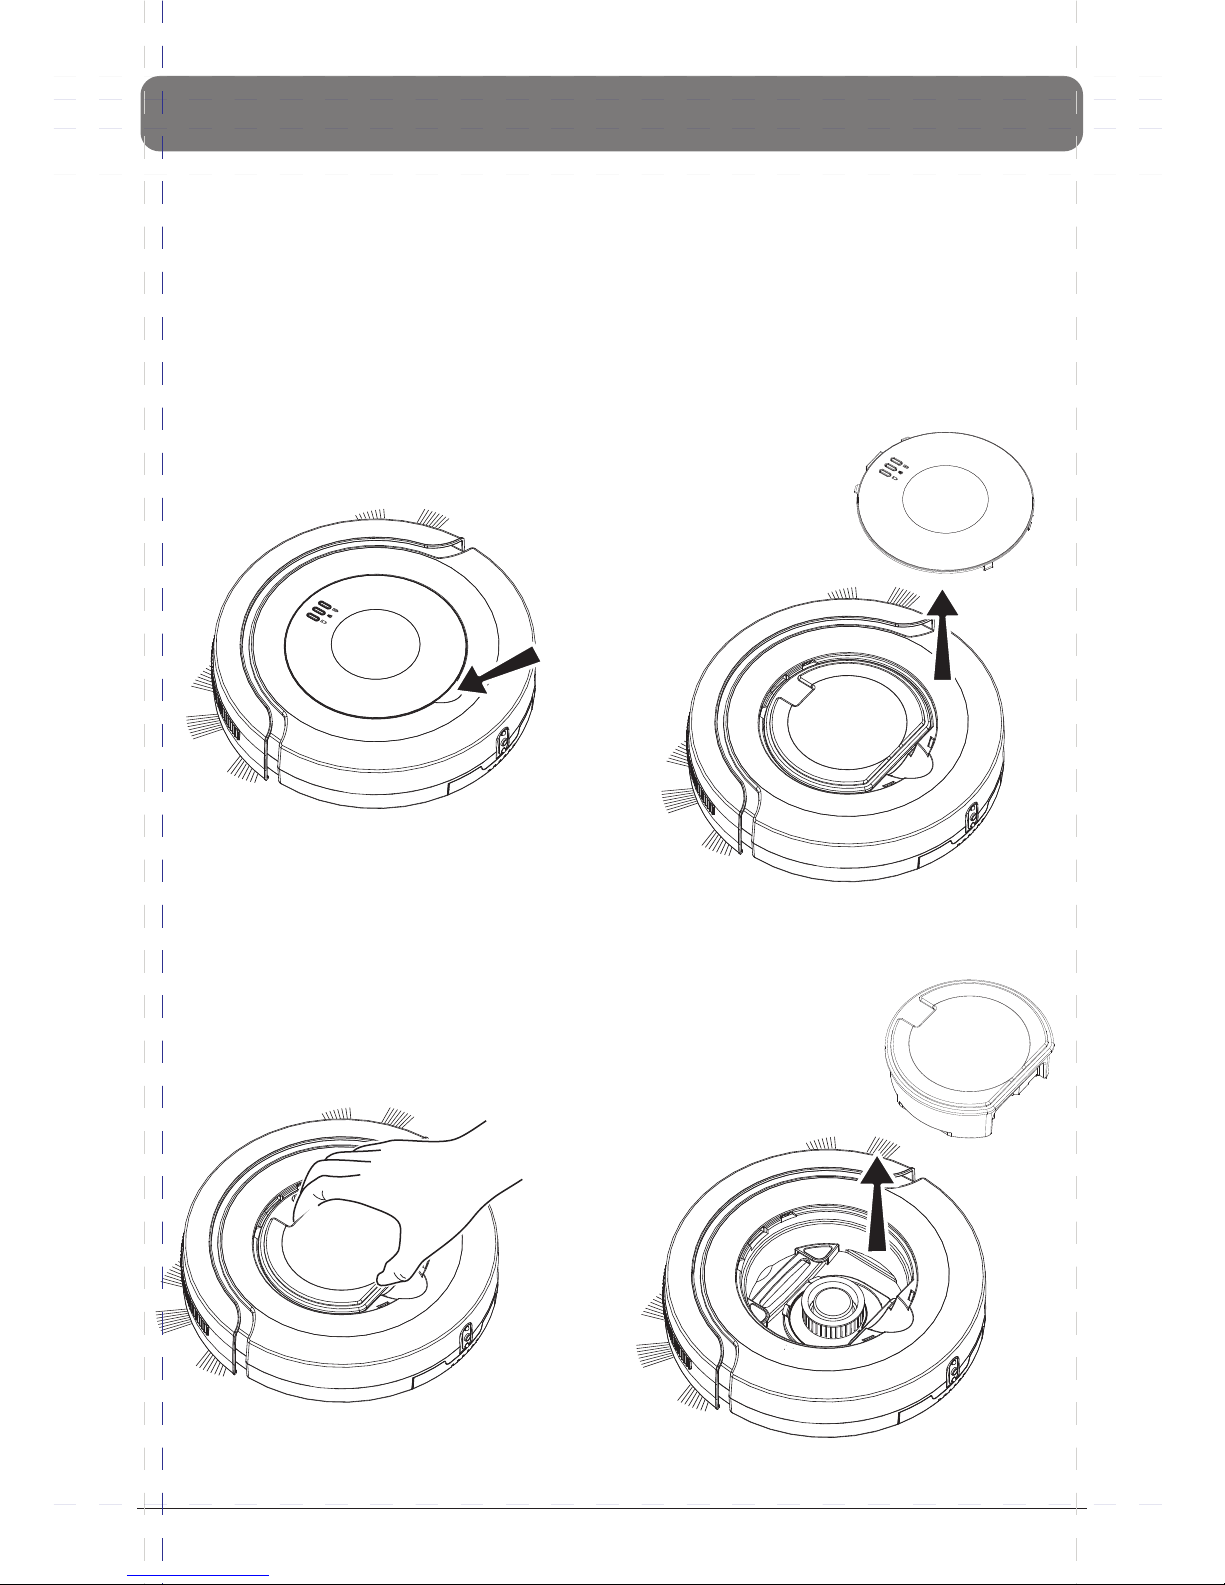
1. Lift up the cover at "A" in the direction as arrow "B" shown in below diagram to
remove the plane cover from the cleaner.
2. Take out the dust bin from the cleaner.
A
CLEANING AND MAINTENANCE
16
Page 19
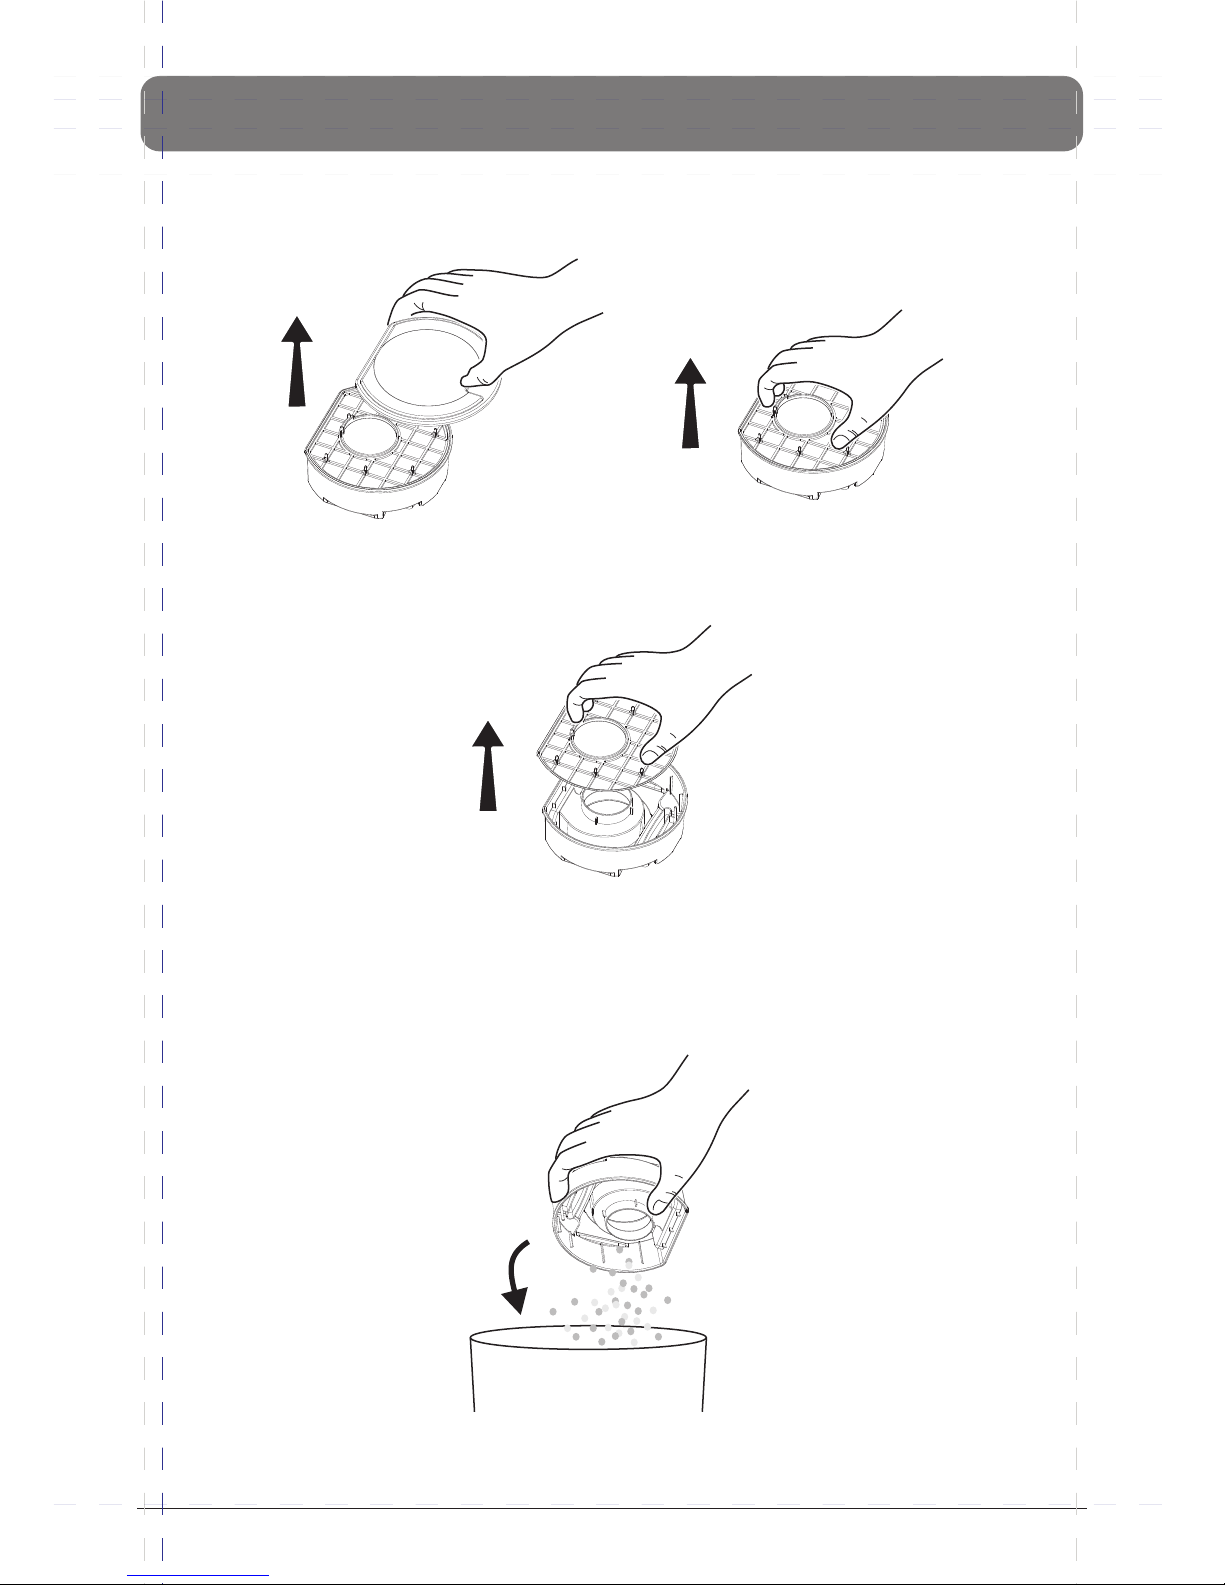
3. Open the upper cover of the dust bin.
4. Lift up and take out the filter.
5. Clear out the dust and dirt from the dust bin.
CLEANING AND MAINTENANCE
17
Page 20
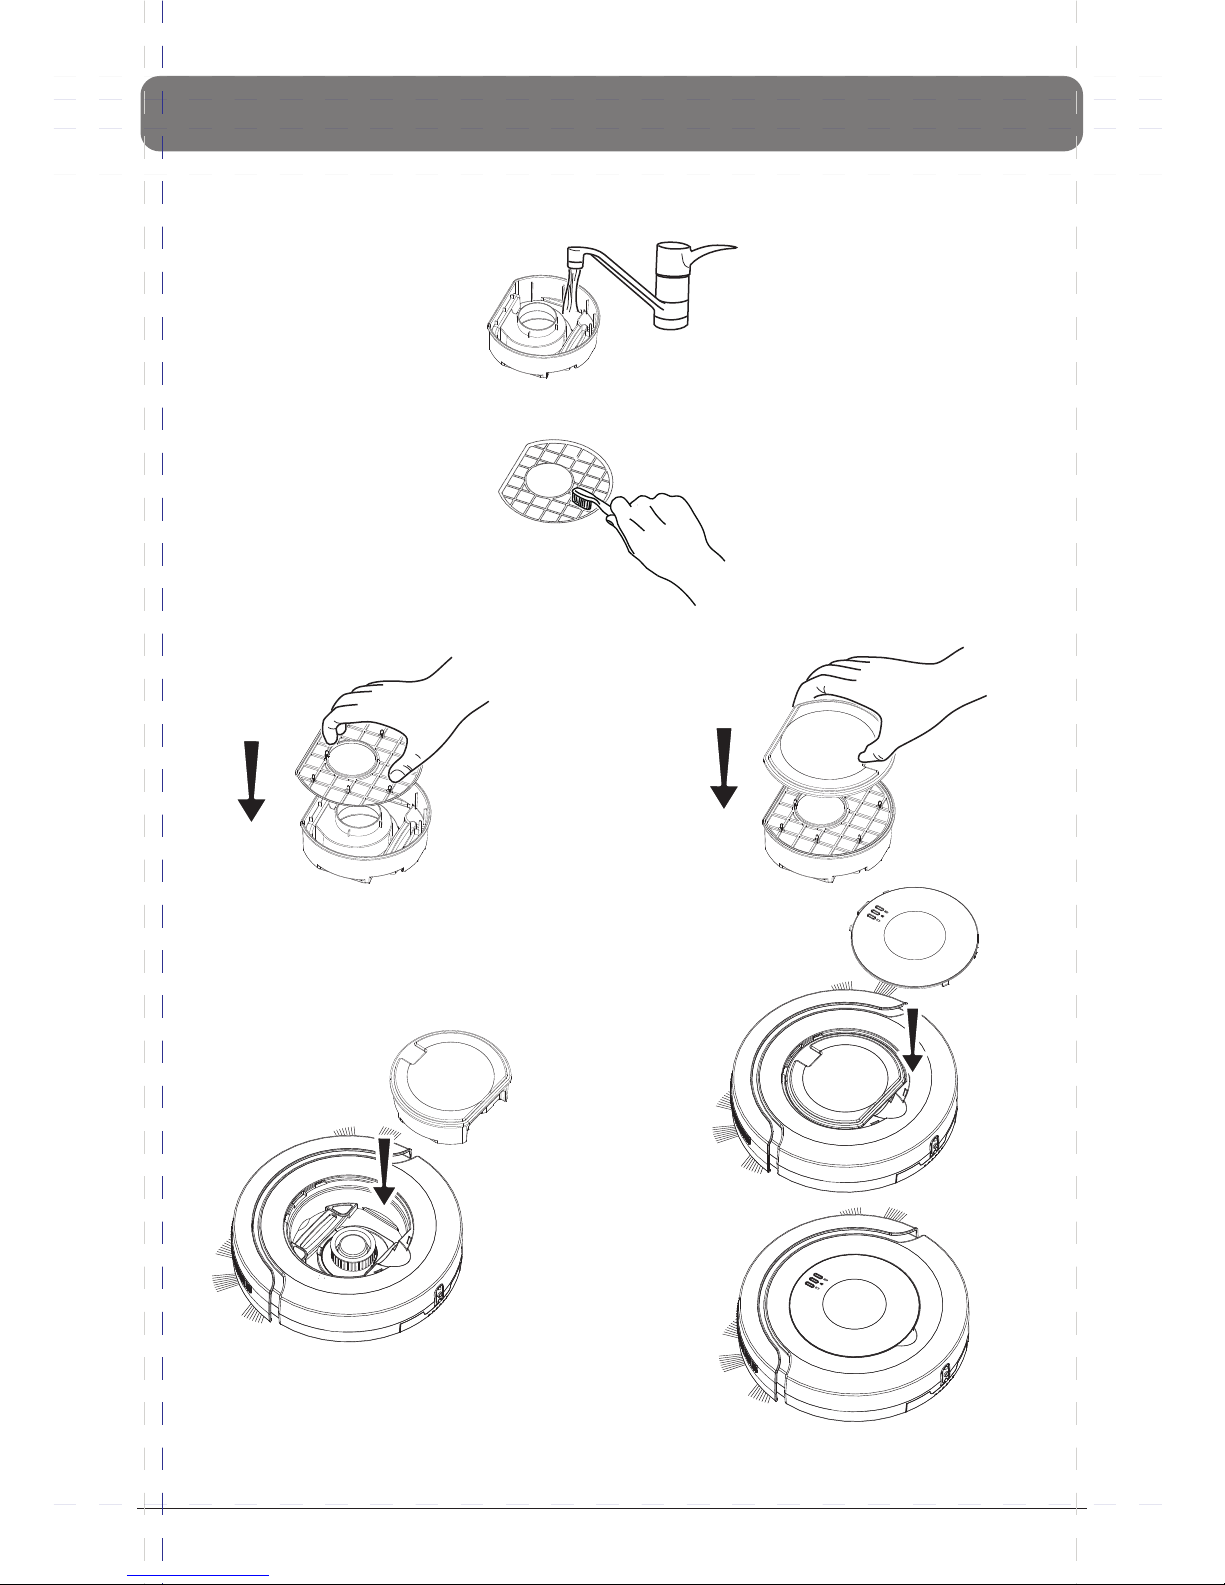
6. Rinse the dust bin with tap water. It is not necessary to wash every time.
Please do not put it into the washing machine to do the cleaning.
7. Periodically clean the filter with a soft bristle brush.
8. When it is dry, reinstall the filter and the dust bin lid.
plane cover.9. Place back the dust bin and the
ATTENTION!! Before starting the cleaner, please be sure the dust bin filter has
properly installed in case any damage occurs.
18
CLEANING AND MAINTENANCE
Page 21
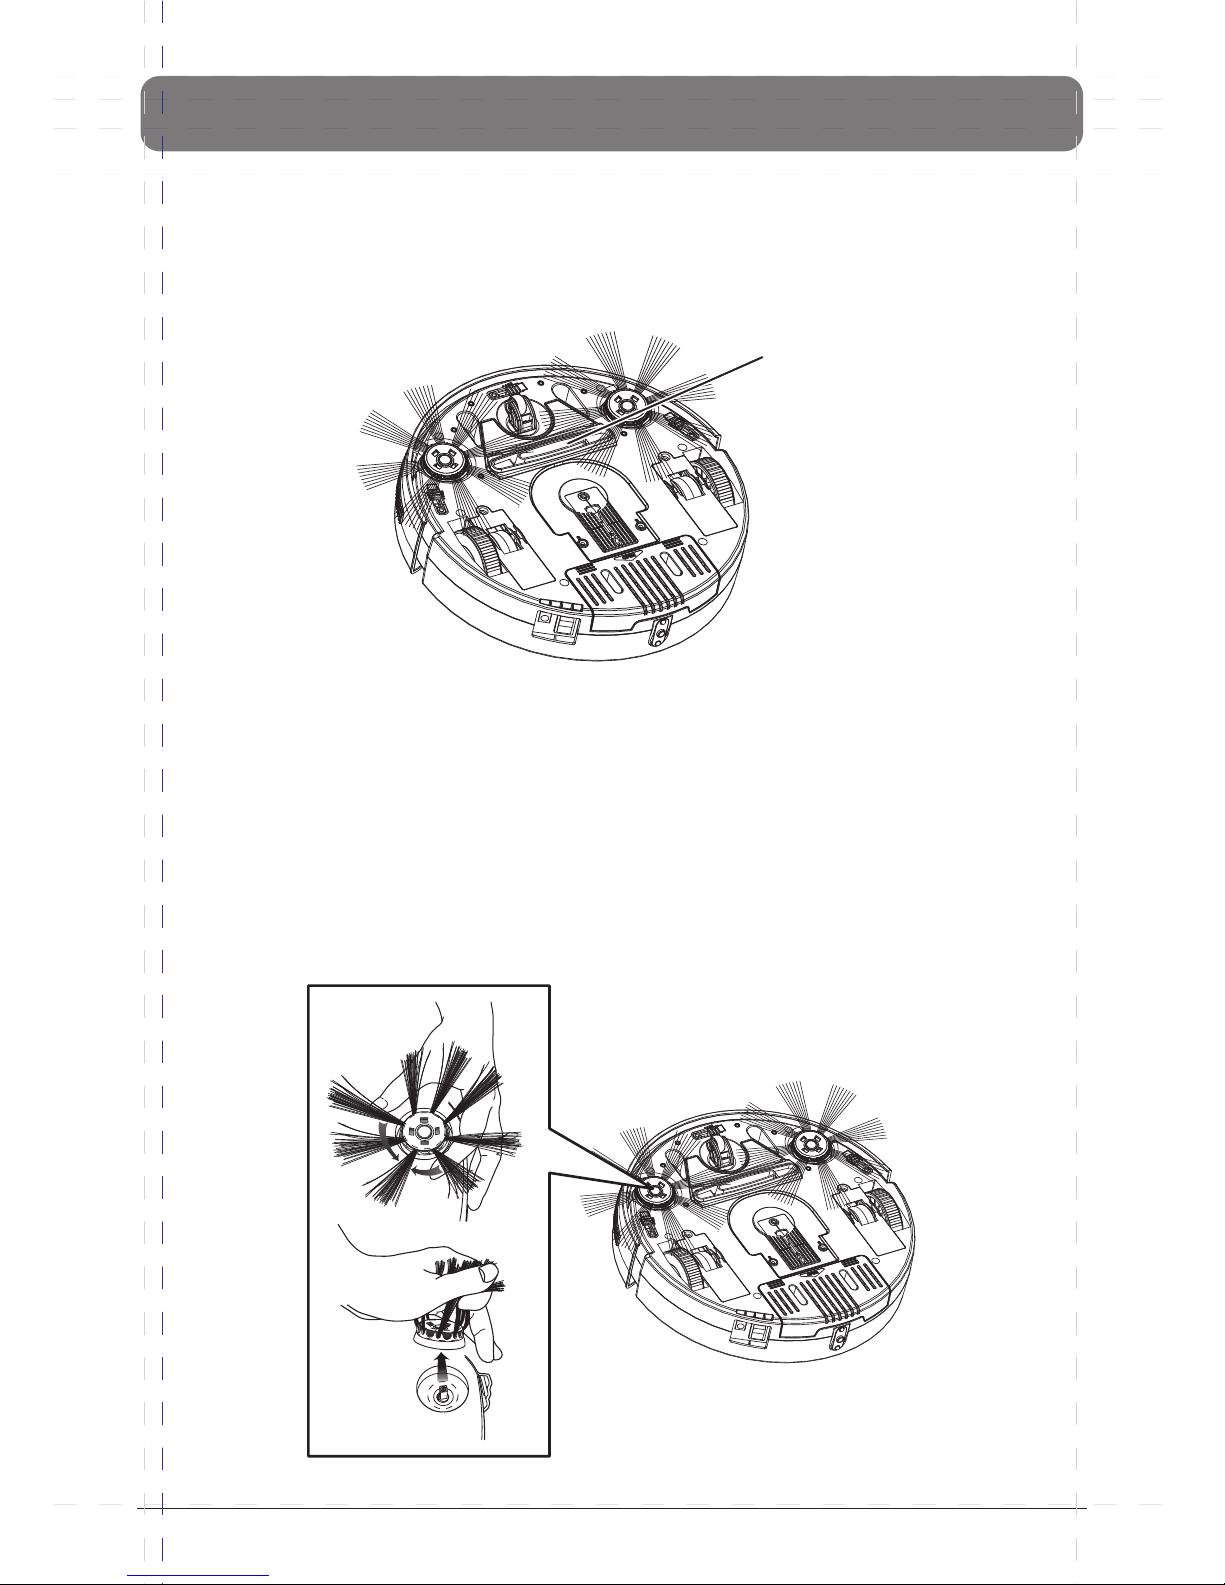
Cleaning Intake:
After repeated use, dirt and dust might clog around the intake of the M285DP and
the working efficiency can be reduced. To ensure the best efficiency and constant
airflow, the intake should be cleaned periodically.
19
CLEANING AND MAINTENANCE
Cleaning Side Brushes:
1. After being used for a period of time, the brushes need to be replaced for working
more effectively.
2. Turn off the power, place bottom of the cleaner upward on a flat surface. Hold the
brush bristle and pull upward to remove the brush.
3. The side brushes can be rinsed and if they become crooked, you can soak them in
hot water to make them recover to the original shape. Install the brushes back after
cleaning.
HOLD
PULL UP!
Intake Valve
Page 22
20
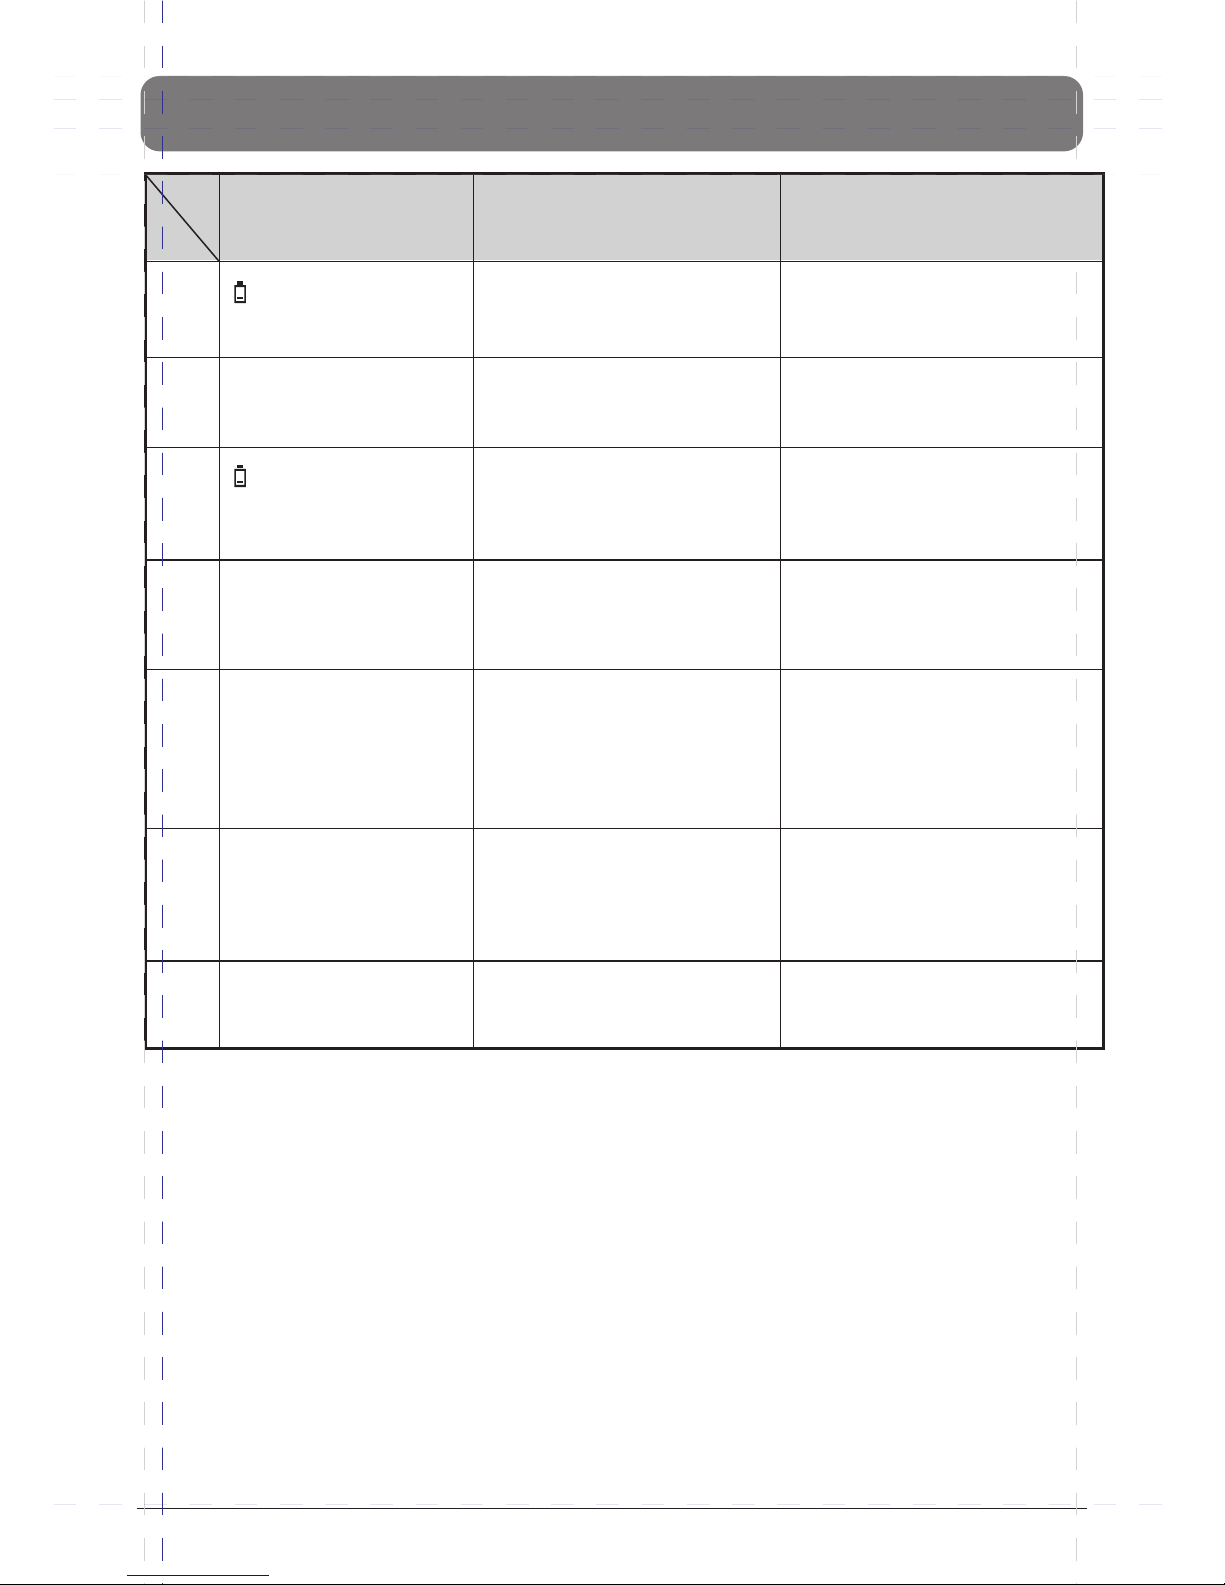
Problem
SolutionPossible Cause
1
2
LED stays red after
power on.
1.In battery Low condition.
2.M285DP is lifted up from
floor.
1.Recharge the cleaner.
2.Place the unit back to the
floor.
M285DP could not
vacuum effectively
when it is turned on.
The dust bin filter is not
properly installed.
Install the dust bin filter
properly.
*** If the solution can not solve the problem, please contact to you local
dealer for service. ***
3
4
5
6
7
LED indicator keeps
blinking GREEN after
5 hours charging.
The power input might be
interrupted during charging.
As long as the total charging
time of this cycle is over 7.5
hours, you could start
cleaning.
The side brush becomes crooked, not
good to sweep.
Cannot start the
M285DP.
M285DP circles
around.
No light on when press
Full Go button.
Being used for a long time.
1.The battery is not installed
properly.
2.Battery power is low.
3.The plane cover is not
installed properly.
One of the wires of the
wheels is loosened.
The unit is not connected
with the docking station.
If it becomes crooked, you
could soak it in hot water to
have it recover to its original
shape. Or change a new one.
1.To install the battery properly,
please refer to page 11 for
battery installation.
2.Have the battery fully charged.
3.Place back the plane cover
correctly and turn it on again.
Open the wheel cover and
properly reconnect the loosen
wire of the wheel set or
contact your local dealer for
service.
Make sure M285DP is
connected with the docking
station.
TROUBLE SHOOTING
Page 23

WARNING OF BATTERY & ADAPTOR USAGE
21
1. The protective devices cannot be reset or
replaced after a short circuit or an overload.
2. Please follow the voltage and current specified
and printed on the packing labels. Check with
salesman or local power company if it is
uncertain.
3. To avoid the hazard from battery short circuit,
please follow the instruction of installing
battery exactly.
4. The adaptor is applied indoors only.
5. Do not keep on using the equipped battery if
the packing cast is broken or the battery is
leaking.
6. If battery is leakage, please handle with rubber
gloves to avoid making contact with skin.
7. Never touch the adaptor, plug and cable with
wet hands.
8. Unplug, stop recharging, and take out the
battery before clean the unit.
9. Remove the battery before dispose the unit.
10. Unplug or turn off the unit before take out the
battery.
11. Recycle the disused battery properly.
12. Keep battery away from inflammable area.
13. Do not soak the battery into water or raindrop.
Page 24

WARNING OF BATTERY & ADAPTOR USAGE
22
14. Do not try to disassemble the battery.
15. Do not disregard kids playing with battery.
16. Do not contact eyes, skin, clothes with battery
leaking fluid, wipe the leaking battery with dry
cloth before recycle it properly.
Page 25

Page 26

Page 27

Page 28

Please register your warranty at
www.v-bot.com.sg
Terms and conditions applied.
Service centre
Blk 34 Whampoa West #01-87
Singapore 330034
Tel: +65 62911200
 Loading...