

Page 1

Domobar
accessories
quick start guide
parts identification
Page 2
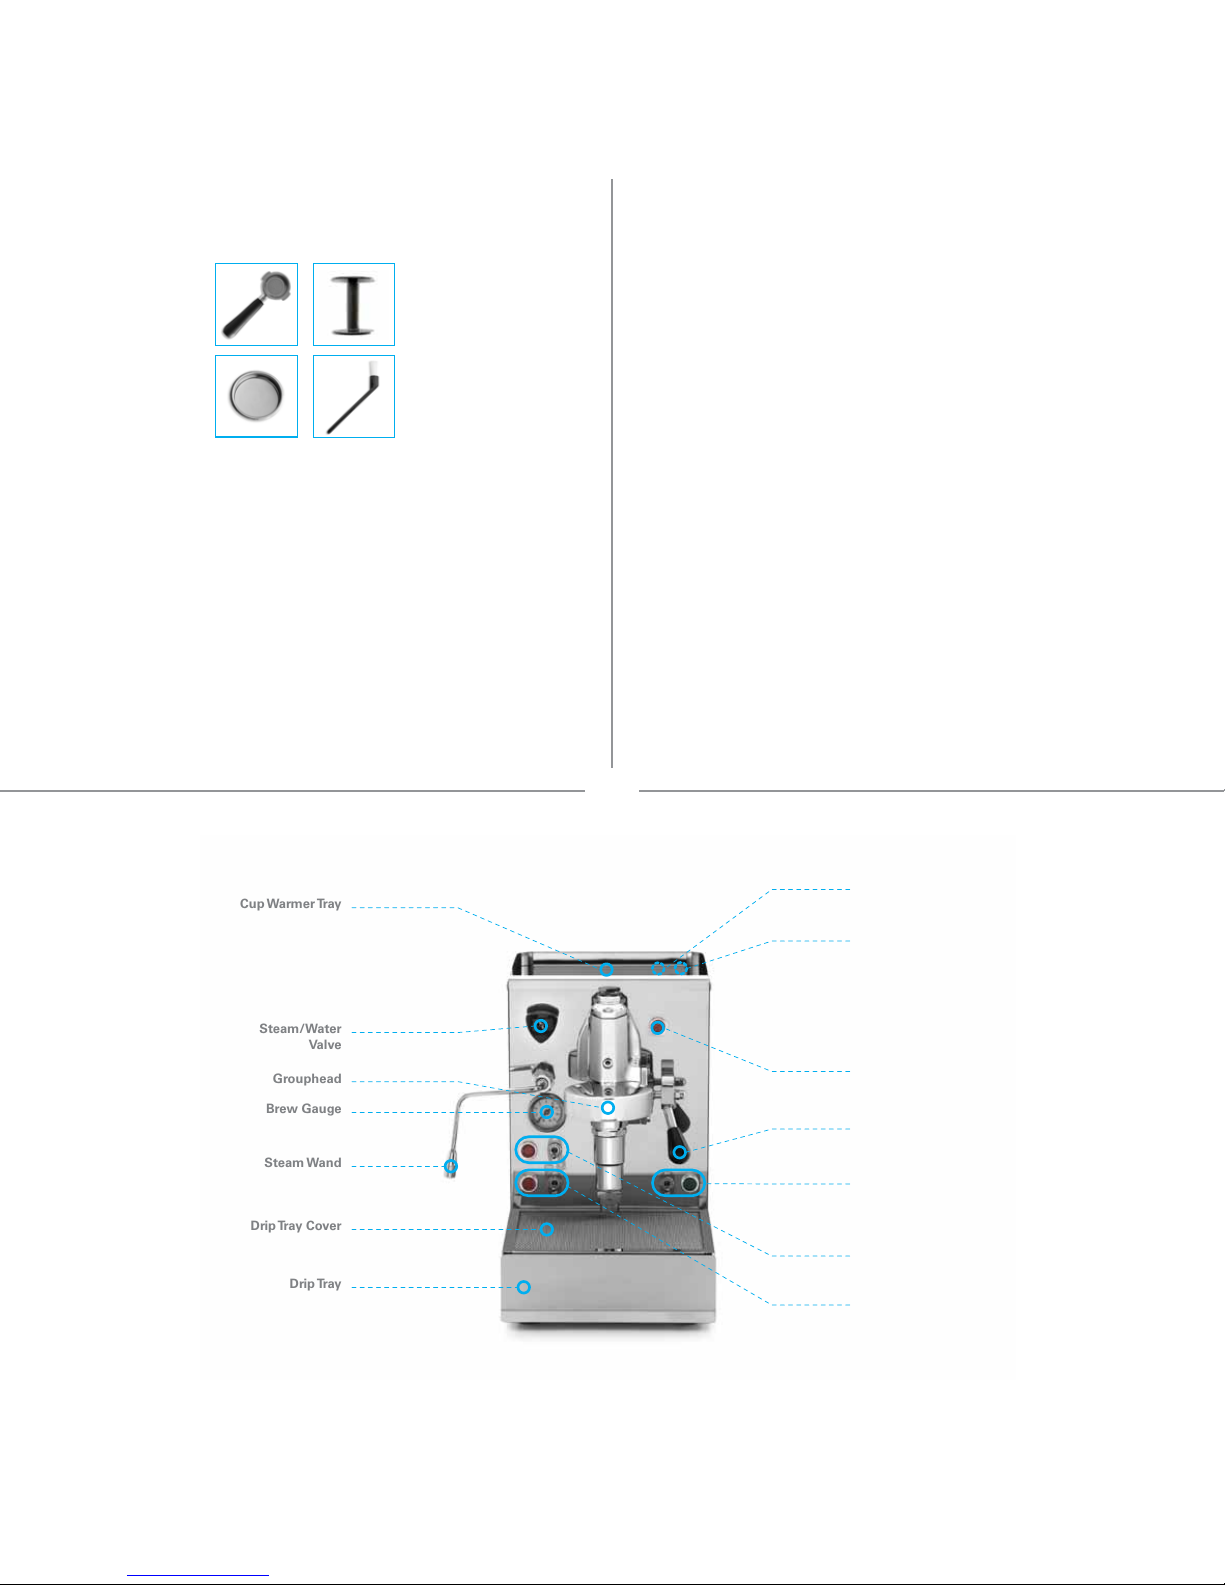
Steam Wand
Steam/Water
Valve
Brew Gauge
Cup Warmer Tray
Water Reservoir
Temperature
Adjustment Screw
Heating Element Activity Lamp
Grouphead
Power Switch/
Power Activity Lamp
Drip Tray Cover
Drip Tray
PARTS IDENTIFICATION
ACCESSORIES QUICK START GUIDE
To get the most out of your Vibiemme Domobar Super espresso machine and for your own personal
safety it is highly recommended that you take the time to read this manual in its entirety.
CAUTION: This quick start guide is meant for those more familiar with the operation of an espresso
machine with a heat exchanger. If this is your first espresso machine, or if it is your first machine with a
heat exchanger system, we recommend reading the manual thoroughly before beginning. Damage done
to the machine due to improper operation is not covered by the warranty.
1 Unpack machine (1)
Remove machine from packaging carton
Turn power switch to position 0FF
Turn Hot water switch to position 0FF
Turn Steam switch to position OFF
Close hot water valve and steam (do NOT fully tighten!)
Remove and save packing and shipping materials
Remove water reservoir and wash thoroughly and reinstall
2 Connect machine (3)
3 Fill reservoir with proper quality water (3)
4 Insert portafilter (4)
5 Turn power switch to Position ON (4.1)
6 Turn coffee switch to Position ON (4.1)
7 Turn steam switch to Position ON (4.1)
8 When pump stops, stand by machine and monitor warm up (4.2)
9 Grind Coffee, fill and tamp coffee in portafilter to prepare it for espresso pull
10 Set temperature (6)
11 Pull espresso shot
12 Steam milk if desired
13 Clean up when done (11)
The numbers in parenthesis following the steps above indicate the chapter where you will find more
detailed information on these procedures.
Tamper
Blind Filter
Portafilter
Gruphead
Brush
Manual Control Lever
Steam Switch/
Steam Activity Lamp
Water Switch/
Water Activity Lamp
Page 3
Domobar
user’s guide
Page 4

2 3
Summary
1. Unpacking and Assembly
2. Water
3. Connect the machine
4. Start up
4.1. Start up: plug the machine
4.2. Start up: boiler warm up
4.3. Start Up: grouphead
4.4. Start Up: brew pressure gauge
5. First use of machine
6. Make coffee: Temperature Adjustment
7. Make steam
8. Make water
9. Hints, Tips, and Tricks
7.1. Maximizing Steaming Power
7.2. Minimizing Temperature Variations During the Pull
7.3. Minimizing Mineral Buildup
10. Troubleshooting
10.1. The machine is not working
10.2. No water can be pumped
10.3. The Grouphead is not getting very warm
10.4. I can pump water, but the water is always cold
10.5. The Machine Stopped Suddenly in the Middle of a Pull
10.6. The Coffee Tastes Bad
11. Cleaning and Maintenance
11.1. After Each Pull
11.2. After Each Session
11.3. Backflushing
11.4. Exterior Cleaning
11.5. Grouphead Gasket Replacement
11.6. Hot Water Wand and Steam Wand
11.7. Long Term Storage
Waste disposal
5
8
9
10
10
11
12
12
13
14
14
15
16
16
17
17
18
18
18
18
19
19
19
21
21
22
23
24
25
26
26
27
Page 5

4 5
1. Unpacking and Assembly
CAUTION: The Vibiemme Domobar espresso machines are quite heavy. The shipping weight is around
70 pounds! We recommend getting assistance whenever the machine has to be moved or relocated.
Open the box and carefully remove the machine. Standing the box up on a carpeted surface or on a large,
soft towel so that the machine has its backside down makes it easier to slide it out of the box (as shown
here, to the left).
CAUTION: The machine ships with the hot water valve closed and the steam valve open DO NOT force
the valves. Moderate pressure is sufficient to open or close the valves. They do not have to be shut tight,
or “seated” like a home faucet to seal properly.
Slip off the large plastic bag and remove the end of the power cord from the parts box. Slide the parts box
sideways to remove it from its shipping location.
Please inspect the machine upon unpacking to be sure it was not damaged during shipping. Report any
shipping damage immediately to the shipper as well as to your reseller/retailer.
WARNING: There are times when a machine will dribble water during shipping. If you notice that
the machine arrives wet or dripping, remove the machine as described in this section, but wait
24 hours to allow excess moisture to evaporate to alleviate any electrical danger or damage from
short circuits. If in doubt, open the case as described later in this manual to assist in the drying as
well as to inspect for accumulated water in the machine.
You may notice that there is a rough area on the right side of the Grouphead where the chrome is
not quite as smooth and shiny as the rest of the Grouphead. This is from the production process
and is not a defect.
Stand the machine upright and remove the five pieces of tape- three holding the top Cup Warmer Tray and
two holding the Drip Tray Cover.
Remove the Cup Warmer Tray and take off the protective plastic wrap and the white, stick-on protective
plastic on the tray itself. Clean an remaining adhesive or bits of plastic from the warming tray with a
cleaning product meant for stainless steel.
Page 6

6 7
Inspect the area of the inner panel under the Cup Warmer Tray. There should be a small black plug
inserted in the panel. If not, it is possible that it fell into the machine during shipping. If the plug is not
visible, remove the six slotted screws (three on each side of the back panel) and slide the panel off to
the rear of the machine. It can help if you spread the front of the panel just enough get it to slide easily.
Replace the back panel when the plug has been retrieved.
To replace the Cup Warmer Tray, hold it at a sloping angle with the front edge lower then the rear.
Lower the front edge in place, then lower the back edge until it hooks the back edge of the machine.
Return the shipping materials, packing, plastic bags, padding, and boxes to their original locations save
them in case the machine needs to be shipped in the future. The machine must be repacked in a original
box for shipping to avoid damage.
CAUTION: Do not plug the machine in at this time!
The Drip Tray Cover has a front and a rear side. The rear side (the edge facing away from you that sits
up against the front of the face of the machine) has a cutout in the corner as shown here.
Where you place your machine is important. The size and weight of Vibiemme Domobar espresso machine
is such that having it in a location where it will not need to be moved is highly recommended. One of the
first considerations is placing the machine where you will have access to the water reservoir. Locating
the machine under an overhead cabinet will make access to the water reservoir nearly impossible. Having
the machine somewhere near a sink for easy disposal of the contents of the drip tray as well as washing
various parts after use is a good idea, but don’t place it so close that washing dishes and other such chores
will cause splattering on the machine which could leave difficult- to-remove stains. You should also allow
room to have the grinder close by the espresso machine. Logically, there needs to be an electrical outlet
that can handle the load from the machines. If you have any doubts, or if the circuit breaker trips when
using the machine you should use another circuit. If you have any doubts, please consult an electrician for
professional advice. The circuit needs to be protected by a GFCI and have surge suppression of 10 amper.
Upon careful inspection you may find some water stains or wet spots on your new Vibiemme Domobar
espresso machines that make the machine appear used. These spots are from testing at the factory to be
sure that the machine is operating properly before shipping.
NOTE: Be aware that once the machine is in place it will be quite difficult to move on
the counter because of the non-skid feet. Carefully chose a location for the machine.
The other items in the box are as follows:
1 - a double Portafilter with double basket
2 - a single Portafilter with single basket
3 - a Blind Filter Basket for cleaning chores
4 - a Grouphead Brush for cleaning the shower screen and grouphead gasket
5 - a Coffee Measure
6 - a Plastic Tamper
It is best to just place the tamper back into the small packing box as it should not be used. We highly
recommend a proper-sized tamper for best results. All Vibiemme Domobar espresso machines use a
commercial-sized 58mm filter basket.
Page 7

8 9
2. Water
All coffee beverages start with two things- coffee and water. Because the majority of espresso is water, it
should come as no surprise that quality water is important to the taste of the espresso. Additionally, using
the wrong water can eventually cause problems for your machine and even cause part failures. So what
water to use? None of the Vibiemme Domobar espresso machines can use distilled or reverse osmosis
(RO) water because these waters contain virtually no minerals. The water level sensor in the boiler needs
a small amount of minerals to sense the water level. Without these minerals the boiler will be overfilled
and that can cause numerous problems, and can even damage the machine. On the other hand, water
too high in mineral content or water containing the wrong minerals can cause rapid buildup of lime and
calcium deposits that can reduce boiler volume, cause poor heating performance, and can eventually lead
to heating element failure.
Water hardness test strips are available that can be used to make sure that the water you are using is safe
for your machine. Inexpensive TDS meters are also readily available for purchase and these can be used
to test the hardness of your water. If you find that your water is too hard, we recommend using either an
in-tank replaceable water softener cartridge that attaches to the inlet hose.!
If you don’t want to deal with filtering water in the pitchers then another solution is to install an in-line,
under-the-sink water filter designed to filter water to be used in espresso machines. Check with your
retailer/reseller for more details on which of these filter systems would work best for you.
3. Connect the machine
To access the reservoir lift the Cup Warming Tray off the machine and place the cover aside. The
Water Reservoir is located in the rear of the machine: pull them out of the tank and lift the reservoir
out of the machine. Use a small amount of mild detergent and warm water to wash the reservoir, and
rinse thoroughly to remove all traces of soap. Never use any abrasive scrubbing pads or brushes on the
reservoir as they will leave scratches in the plastic which may eventually harbor micro organisms. The
water reservoir should be washed in this way every two weeks or so to help prevent the growth of any
undesirable organisms in the water.
Re-place the Water Reservoir in the machine. Be sure that both hoses enter the reservoir correctly
and are not kinked or pinched. Once you have verified that your water quality is appropriate for use in an
espresso machine, fill the Water Reservoir. A funnel is recommended to prevent spilling water into the
machine. Do not overfill. Filling it to just below the level where the hoses enter the reservoir is fine.
Replace the cap on the reservoir. Get into the habit of regularly checking the reservoir’s water level. The
large capacity will not need filling as often as smaller machines, so it can be easy to forget to check the
water level. Don’t worry. The microswitch under the reservoir will temporarily disable the machine, including
the heating element, if the water level gets low. If this occurs, simply refill the Water Reservoir.
Replace the Cup Warming Tray and confirm that the steam - hot water valve are closed. DO NOT
tighten the valves until they stop. Lightly hand tighten only: be sure that the brew lever is in the full down
position.
Page 8

10 11
4. Start up
Locate the Portafilter you wish to use. Your machine came with two- a smaller, single portafilter as well
as the larger, double portafilter (left). The single is meant to create about one ounce of espresso at a time,
and the double creates about two ounces- a double. The double portafilter can also be used to make two
singles at one time.
The first time you lock the portafilter in place, you might find that it takes significant force to get it
tight. The proper position should have the portafilter handle pointing roughly straight towards you,
perpendicular to the front of the machine. This properly seats the gasket and shower screen into place.
Leave the portafilter in place while the machine is warming up. This allows the portafilter to warm up the
same as the rest of the machine.
Place a few cups that you will be using on top of the machine. The heat from the machine’s normal
operation will preheat the cups which will in turn keep your beverage warm as you enjoy it.
CAUTION: Do not place items on the top of the machine that are prone to drip or spill or might be
sensitive to heat. Temperatures on top of the machine reach about 63° C ( 145° F).
4.1. Start up: plug the machine
Plug the machine into a surge suppressor capable of handling 10 amper (not included). The outlet must be
properly grounded and should be protected with a GFCI (ground fault circuit interrupter).
Make sure that the Manual Control Lever if in the fully-down position, pushed back nearly against
the front of the machine. Turn the Power switch to position ON. The Power Lamp will illuminate,
indicating that the machine is getting power and the Heating Element Activity Lamp activity indicate
the element is warming up water boiler.
CAUTION: Electrical surges can damage the Vibiemme Domobar electronics. Surges can also damage
the heating element. Damage caused by electrical surges is not covered by the warranty.
4.2. Start Up: boiler warm up
As the machine begins to warm up you may notice a slight hissing sound coming from inside the machine.
This is normal. It is the antivacuum valve. This valve opens as the machine cooled off the last time it was
used to allow air to be drawn into the boiler to prevent a high vacuum being formed which can damage
the machine. When the machine starts up, it takes a little pressure to close this valve, and until it closes
completely it may hiss slightly.
Wait about five minutes for the boiler to gain some heat.
CAUTION: While the boiler is coming up to pressure for the first time you should stay close by to monitor
its progress to be sure that all is as it should be.
WARNING: The Grouphead and other external parts will get hot enough to cause burns.
Use caution when using the machine and if there are any small children in the home (or adults
not accustomed to such appliances) make sure that they are aware of the dangers. Shiny chrome
surfaces invite curious hands!
Page 9

12 13
4.3. Start Up: grouphead
The Vibiemme Domobar is manual in its function with only one switch controlled by a lever on the
grouphead itself. Grouphead. It is shown in its at-rest position. This is where the lever should be
whenever the machine is not brewing espresso.
When the lever is lifted just past the first click stop, the passive pre-infusion begins. This allows a slight
flow of water onto the coffee. This gentle flow of water wets the puck slightly, which helps with extraction
and can also help eliminate channeling (disruption of the coffee causing a fast flow). It is not necessary to
use this position, but leaving it in this mode for about two or three seconds can be useful.
Lifting the Manual Control Lever to its full up position opens the brewing path between the boiler and
the coffee. At the same time, the cam to which the lever is attached depresses the switch on the front of
the Vibiemme (just to the right of the E-61 grouphead, behind the cam). This switch activates the pump.
When you choose to end the brewing cycle, return the Manual Control Lever to its at-rest, fully down
position. Moving the Manual Control Lever to this position turns off the pump closing the brewing
path opening discharge valve which is built into the grouphead.
This is a path from the grouphead down through the lower portion of the casting, and into the drip tray.
When opened, it allows the pressure remaining in the brewing path to flow into the drip tray. This allows
you to immediately remove the Portafilter without worrying about the “portafilter sneeze”- a spurt of
coffee or hot water from confined pressure as can happen on lesser machines without a 3-way valve.
4.4. Start up: brew pressure gauge
The Brew gauge (scale 0 to 16 bar) displays the pressure in the brewing path during an espresso pull.
This gives a general indication as to what is happening during the brewing cycle. The only time when the
gauge will display any useful information is when the brewing process is underway. At all other times,
even when the pump is refilling the boiler, this gauge is not displaying any useful information and should
be ignored. About 9 BAR is a good place to be brewing as you get started. Each division is .5 BAR.
Important: the brew pressure gauge displays useful details only during the brew cycle, giving no further
information about brewing temperature. The only way to know brewing temperature is to measure water
coming our of the group through a thermometer ( even a digital one) sold by your retailer.
5. First use of machine
For this first use of the Vibiemme Domobar, once the pressure is above about 0.5 you should flush the
boiler to be sure that the machine is working properly. Place a suitable container (like a heat-resistant
glass measuring cup or stainless steel steaming pitcher) under the hot water spout and carefully open
the hot water valve. Water should pour out and the pump should start. Pump out about 6 ounces and
then close the hot water valve. Repeat this two or three times over the next five or ten minutes, and then
check the reservoir level.
WARNING: The water dispensed as described above is hot enough to cause serious burns. Use
caution whenever dispensing or disposing water.
After an additional five or ten minutes of warm-up time, test the steam function. Place a vessel under the
steam wand and slowly open the Steam Valve. Steam should come from the Steam Wand and the
boiler pressure should drop slightly. After a few seconds, close the Steam Valve. It is normal for some
water to spurt out of the Steam/Water Wand when the Steam Valve is first opened after it has been
closed for some time.
WARNING: Steam can easily cause deep and nasty burns. The metal Steam Wand gets very hot.
Always move the Steam Wand by holding the rubber sleeve and take great care whenever using
the steam function.
When using the Steam Wand, the pump may occasionally operate on its own. The steam comes off the
top of the main boiler where it is “stored” all the time, and the pump will only run when the water level
drops to a point determined by the depth of the water-level sensing wire.
Now it’s time to wait!
We mentioned in the other manual that patience is a virtue when it comes to making espresso and here
is our first example. The boiler, that huge brass grouphead, the portafilter, and all the related metal parts
need to come up to temperature. As the boiler comes up to temperature, hot water will circulate through
the system, helping to speed things up, but plan on waiting about twenty or thirty minutes before the
machine is ready for use.
Page 10

14 15
6. Make coffee: Temperature Adjustment
The temperature controls by sensing the thermostat in the boiler. Accessing the thermostat adjustment
is simple. Simply remove the Cup Warming Tray and beneath that you will see a perforated panel with a
black plug. Remove the plug and fit a screwdriver, then turn to adjust the boiler temperature:
CLOCKWISE RAISES THE TEMPERATURE
COUNTERCLOCKWISE LOWERS THE TEMPERATURE
IMPORTANT: the brew pressure gauge displays useful details only during the brew cycle, giving no
further information about brewing temperature. The only way to know brewing temperature is to measure
water coming our of the group through a thermometer ( even a digital one) sold by your retailer.
7. Make steam
To make steam you have to select the relevant function by turning the Steam Switch to its ON position:
when the Steam Activity Lamp is on, it means you have well selected this function.
Once this function is selected, the heating element brings the boiler water temperature up to 100 ° C,
turning water into steam, ready to be brewed by opening the Water/Steam tap.
WARNING: steam function doesn’t charge water in the boiler, so the long term selection of the
steam switch makes water turn into steam. In this case the heating element remains out of the
water, thus overheating itself. The safety circuit will then intervene taking electrical tension off the
whole machine (stand-by phase).
The machine should automatically reactivate: in case the stand-by phase is too long, you should contact
our after sales service.
8. Make water
To brew water you have to select the relevant function by turning the Water Switch to its ON position:
when the Water Activity Light is on, it means you have well selected this function.
Once this function is selected, the heating element brings water to the right temperature, ready to be
brewed by opening the Water/Steam tap.
WARNING: the long term selection of the Water Switch could turn water into steam, making
the heating element remain out of water and thus overheating itself. The safety circuit will then
intervene taking electrical tension off the whole machine (stand-by phase).
The machine should automatically reactivate: in case the stand-by phase is too long, you should contact
our after sales service .
Page 11

16 17
9. Hints, Tips, and Tricks
We have already reviewed some of the ways that you can control the way the Vibiemme Domobar
espresso machines operates. The best example is the cooling flush which allows you equalize and control
the brewing temperature throughout the brewing path as well as eliminate any steam that may have built
up during an extended idling period. There are other procedures that you can use to gain further control
over the way your Vibiemme Domobar espresso machines operates.
9.1. Maximizing Steaming Power
You probably have noticed that the heating element cycles on an off while the machine is in operation
and even when it is idling. That can be seen by watching the Heating Element Activity Lamp on
the control panel. That cycling can be used to your advantage when steaming milk. For the greatest
production of steam throughout the steaming cycle, start steaming just before the heating element turns
off. You can judge this by watching the Heating Element Activity Lamp in conjunction with the
boiler pressure gauge. The goal is to begin steaming when the boiler is as hot as its range allows while
the heating element is still energized. As you draw off steam the pressure in the boiler (and thus the
temperature) will drop slightly which keeps the heating element energized. With a little practice you will
be able to do this without hardly even thinking about it.
9.2. Minimizing Temperature Variations During the Pull
A similar procedure can be used for the brew cycle. The best time to begin pulling a shot is when
the heating element has just turned off. This gives a bit more temperature stability as well because it
eliminates the variable of the heating element coming on during the pull. If the heating element comes
on during a pull you will hear the pump lose a bit of power because the heating element is drawing a large
percentage of the current available on the circuit. If the circuit that feeds electricity to your Vibiemme
Domobar espresso machines is being challenged by the demands of the machine, this procedure will
help lessen that load.
9.3. Minimizing Mineral Buildup
Mineral buildup in the boiler can be minimized by using the proper quality water and by de-scaling as mentioned
previously. Another way to lessen this scale accumulation is to pump water out of the boiler occasionally.
This is particularly important if you rarely use the hot-water function of the Vibiemme Domobar espresso
machines. To refresh the water in the boiler simply place a heat-resistant vessel under the hot water
wand and open the valve. Dispense about 220 grams and then allow the boiler to refill before proceeding.
Repeat this two or three times. Doing so every one or two weeks will help minimize scale build up.
Page 12

18 19
10. Troubleshooting
10.1. The machine is not working
• Be sure it is plugged in and the circuit is working. Try another outlet if in doubt.
• Be sure the Power switchs is turned on position ON.
10.2. No water can be pumped
• Check the Low Water Level Warning Light to see if the Water Reservoir needs to be refilled.
• Check the Water Reservoir to be sure that the tank is properly seated in the machine.
Lift it and set it back into place. You should be able to feel it compress the springs of its platform which
engage the safety switch.
• Be sure the Power switchs is turned on position ON.
10.3. The Grouphead is not getting very warm
• The operating lever on the right side of the Grouphead must be in the fully-down position, pushed
back towards the face of the machine as far as it will go (light pressure is all that is necessary- no need
to force the lever). If it is not in this position, the water path for the thermosyphon is restricted and the
Grouphead will not reach the proper operating temperature.
• Be sure the Power switchs is turned on position ON.
• Check if the reservoir needs to be relled.
10.4. I can pump water, but the water is always cold
• Be sure the Power switchs is turned on position ON.
• Over Temperature Safety Thermostat tripped. This occurs if the pressurestat malfunctions or the water
level is not maintained in the boiler. In either case the boiler can overheat. To save the machine from
damage there is an over-temperature thermostat that protects the machine much like a circuit breaker
or fuse protects the wiring in your home. And much in the same way as a circuit breaker, the overtemperature thermostat can be reset. If you suspect that the thermostat has been tripped it is important
to verify the cause before continuing: please contact our service department.
10.5. The Machine Stopped Suddenly in the Middle of a Pull
• Check the water level in the Water Reservoir.
10.6. The Coffee Tastes Bad
The list of causes is nearly endless. Volumes can be written on what can cause espresso to taste bad.
Here are a few tips to help:
• Be sure that the coffee you are using is fresh
• Try a different brand of coffee.
• Are you using a quality grinder and grind the beans fresh for each use?
• If you know someone who makes espresso, invite them over and let them try making espresso
with your equipment and coffee. Sometimes the smallest change in procedure can make a big
difference in taste.
Page 13

20 21
Bitter coffee can come from:
• Water that is too hot
• Coffee that is over-roasted or stale
• Cheap, low-quality coffee
• Worn burrs or low-quality grinder that makes too much dust
• Brew pressure that is too high
• Not using enough coffee in the portalter.
Sour tastes can come from:
• Brewing temperature that is too cold
• Coffee that is under roasted
• Brew pressure that is too low
• Bad or spoiled coffee
11. Cleaning and Maintenance
As with all fine tools, Vibiemme Domobar espresso machines can give you years of trouble-free service
and better performance if properly maintained. Your Vibiemme Domobar espresso machines does require
a bit of care, but it is not at all difficult.
Although the following guidelines will give you some idea of how often the tasks should be performed,
there is no specific set of rules concerning the frequency of cleaning and maintenance. A machine that is
being used to make two or three drinks each day in a home environment will not need to be cleaned quite
as often as a machine used in an office or restaurant where it is called upon to make fifty drinks a day. If
in doubt, it is better to do cleaning and maintenance chores a little too often than not often enough.
11.1. After Each Pull
KNOCK PUCK After the pull the spent coffee puck in the Portafilter should be knocked out. The best
way is to use a knock box. These feature a cushioned bar with a soft surface that protects the Portafilter
from damage.
QUICK FLUSH As soon as you remove the Portafilter from the Grouphead after a pull, cycle the brew
function for about one second or so. This will help flush out any coffee on or behind the shower screen.
FLUSH PORTAFILTER If you are not immediately going to pull another shot, replace the Portafilter
and repeat the quick flush. Pushing a bit of clean water through the Portafilter will remove most of the
left-over coffee in the Portafilter. Remove and wipe it off after the flush. If the machine is going to be
left on, leave the Portafilter in place so that it can remain warm.
AFTER EACH STRETCHING OF MILK The steam wand must be wiped off immediately after every use
with a damp towel or dish rag after removing the wand from the milk. As soon as the wand is wiped, the
steam valve should be briefly opened and closed to create a blast of steam to force out the remaining
milk that may be in the wand. Allowing milk to sit on (or in) the wand will cause the milk to bake onto the
hot metal. This is not only unsanitary but can also become very difficult to remove. If you do have baked
on milk we do not recommend soaking the wand in a pitcher. This can cause dirty water to be drawn into
the wand, and under certain conditions, possibly into the boiler.
Page 14

22 23
WARNING: The Steam Wand can be very hot. Avoid touching the wand directly and use caution
when wiping the Steam Wand. The heat can cause the water on the rag to turn to steam which
can cause a burn.
11.2. After Each Session
GROUPHEAD The area where the portafilter locks into place gets exposed to a lot of coffee and must be
kept clean. Coffee residue left here will not only degrade performance over time but can also detrimentally
affect the taste of the coffee.
At the end of each session use the grouphead brush which was included with Vibiemme Domobar
espresso machines to clean the screen as well as to give the area in which the grouphead gasket resides
a good scrubbing.
PORTAFILTER At the end of each session the Portafilter should be rinsed under hot, running water and
dried off before storage. While it should be left in place on the Prouphead during use, if the machine is
being turned off, the Portafilter should be stored elsewhere so that the moisture can evaporate from
the grouphead. Otherwise it can stagnate in there.
DAILY BLIND FLUSH At the end of each day (or when you are through using the machine for that day)
you should do a blind flush:
1 - Remove a filter basket from either of the Portafilters and insert the blind Filter basket in its
place. The blind filter basket is the one that has no holes in it.
2 - Lock the Portafilter into place just like you would to make espresso.
3 - Manually engage the brew function
4 - Watch the Brew Pressure Gauge and when pressure builds to about 9 BAR, turn the brew function off.
5 - Repeat steps 3 and 4 two or three times.
6 - Loosen but do not remove the Portafilter and turn on the brew switch again. Wiggle the handle to
loosen the Portafilter a bit so that water can flush the area around the Grouphead.
WARNING: Hot water will spill out and pour onto the drip tray. Use caution to avoid burns from
the splashing hot water.
11.3. Backflushing
This is the process of forcing some special cleaner back though the grouphead. This will remove any
stray coffee left in the places that normal, day-to-day cleaning cannot reach. How often this should be
done depends on how much use the machine gets, the coffee you use, as well as the amount of coffee
you use for each pull. If you are making one or two beverages a day then once every one or two weeks
is probably sufficient. If you are making around four to six doubles a day then once per week is probably
a good idea. If the machine is being used all day (such as in an office or small restaurant) then back flush
every d ay.
Your Vibiemme Domobar espresso machines was supplied with a blind filter to be used to back flush. This
is the basket with no holes in it. To use it, follow these simple instructions:
WARNING: The cleaning agent is quite strong. Follow all safety recommendations on the cleaner’s
packaging. Only use chemicals designated for back flushing. Other cleaners can cause problems
or even damage to your machine.
1 - Insert the Blind Filter into one of the Portafilters.
2 - Place a small amount of espresso machine cleaner into the basket (see manufacturer’s instructions
for specific amounts to be used).
3 - Lock the Portafilter into place just like you would to make espresso.
4 - Manually engage the brew function
5 - Watch the Brew Pressure Gauge and when pressure builds to about 9 BAR, turn the brew function off.
6 - Repeat steps 4 and 5 until you see the suds of the cleaning agent appear in the Drip tray (removing
the drip tray cover during this process can help you see what is going on). Wait about two or three
minutes, then repeat steps 4 and 5 once again.
7 - After two or three cycles like this, loosen but do not remove the Portafilter and turn on the brew
switch again. Wiggle the handle and allow the cleaner to be flushed up into the Grouphead. The cleaner
will overflow the Portafilter and clean the area up inside the grouphead of coffee.
WARNING: Hot water and cleaning agent will spill out. Use caution to avoid burns or exposure to
the cleaner. Wear eye protection to prevent injury.
8 - When the suds coming through the 3-way valve appear to be clean and free from coffee residue, empty
and clean the drip tray and the Portafilter. Replace the Drip tray and run a bit more water through the
Grouphead so it is free from cleaner. Replace the Portafilter and repeat steps 3 through 5 until the
water runs clean into the drip tray. Repeat step 7 to rinse any remaining cleaner from the grouphead.
Page 15

24 25
9 - Remove the Blind filter, rinse the Portafilter assembly, and you are done. It is suggested that
the first pull after backflushing be discarded just in case a bit of cleaner is left that could taint the coffee.
CAUTION: The cleaning products meant for backflushing must NEVER be used in the Water Reservoir.
Using this cleaning agent in any way other than described here can damage your machine and void your
warranty.
11.4. Cleaning the Portafilter and Filter Basket
NEVER use any abrasive cleaners or cleaning pads on your Vibiemme Domobar espresso machines. They
will scratch the surface. A quality glass cleaner sprayed on a rag will usually do a good job of cleaning the
outer surfaces, but do not spray these in the area of the grouphead, and always wait for the machine to
cool before cleaning the exterior.
Coffee. If your machine has painted panels take care to use products that are compatible with powder
coating. No solvents should ever be used as these may permanently damage the powder coating’s
sheen.
11.5. Exterior Cleaning
NEVER use any abrasive cleaners or cleaning pads on your Vibiemme Domobar espresso machines. They
will scratch the surface. A quality glass cleaner sprayed on a rag will usually do a good job of cleaning the
outer surfaces, but do not spray these in the area of the grouphead, and always wait for the machine to
cool before cleaning the exterior.
Coffee. If your machine has painted panels take care to use products that are compatible with powder
coating. No solvents should ever be used as these may permanently damage the powder coating’s sheen.
11.6. Grouphead Gasket Replacement
The thick, rubber gasket that seals the Portafilter in the Grouphead is subjected to a lot of heat and
pressure. Over time it will harden and the portafilter’s action will create a depression in the surface. If it begins
to leak, the first resolution is to give it a good cleaning as mentioned above. If that does not cure the problem
then replacement is the next step. Before attempting this, it is a good idea to have the spare gasket on hand.
The most difficult thing about replacing the grouphead gasket is removing the old one, especially if it has not
been regularly replaced. Just how hard or old the existing gasket is will dictate the difficulty of removing it.
Gently pry it out using a wide, flat-bladed screwdriver or a paint can opener. Take care not to damage the chrome
surface of the grouphead. It is a very good idea to have a spare shower screen on hand when attempting this
job. The screen is held in place by the gasket, and if you have to go at the gasket with vigor, the shower screen
can be damaged. Having a spare on hand will limit downtime.
Once the gasket is out, remove the shower screen and give the area a good cleaning. Be sure that no old gasket
or coffee residue is left in the grouphead. If need be, use a brass-bristle brush to clean the area.
To install the new gasket, assemble the gasket over the shower screen and place them on a portafilter,
Maneuver the assembly into place and then simply lock the portafilter into place as you would when making
espresso. The cam-action of the portafilter locking into place will push the shower screen and gasket into place.
How often this needs to be done depends on many factors, but for in-home use about once every six
months or when leaks occur that are not resolved by other solutions as mentioned above.
11.7. Hot Water Wand and Steam Wand
The tip of the Steam/Water Wand is removable and can be cleaned after removing it from the machine. It
simply unscrews, but do not use pliers or other similar tool that may mar the finish. A small strap wrench
is preferable if a tool is needed.
Here is an image of the parts disassembled so you can see how they go back together. Note the black
O-ring still on the wand. Be sure it is there when reassembling. All parts are shown here with the correct
side facing upwards, and in order of assembly, starting with the part on the right.
The Steam/Water Wand can become clogged if a cleaning is missed after steaming milk. The tip can be
removed by unscrewing. Remove the tip and soak it in cleaner, overnight if necessary. Note the O-ring. It
fits in the slot of the tip. Be sure the O-ring is used when assembling.
Page 16
26 27
11.8. Long Term Storage
The boiler and heat exchanger contain water. Because of that, if your Vibiemme Domobar is not going to
be used for a while or is being placed into storage, some factors must be considered.
The first is temperature. If it can be avoided the machine should never be stored where it will be subjected
to freezing temperatures. If water in the machine is allowed to freeze, a lot of damage can be done as the
water expands when it turns to ice. Try to avoid damage by freezing.
Although there are steps that can be taken to remove some of the water in the boiler, heat exchanger,
brewhead, and all the pipes and hoses, it is very difficult to get all the water out. If you suspect that your
Vibiemme may be left where it could be subjected to freezing conditions, check with your local RV supply
store. They sell antifreeze chemicals designed to be used in drinking water systems. Be sure that the
additives are safe to use on brass, copper, plastic, and chrome parts. Follow the instructions precisely.
After treating with these chemicals, tape over the power plug and tape a note to the machine and the
power cord at the plug end warning of the addition of these chemicals, and add a warning to completely
flush the machine before use! Be sure to completely flush the system before energizing the heating
element when putting the machine back into service.
WARNING: Neither damage from these sorts of chemicals nor damage from freezing are covered
by the warranty. Use of these chemicals and storage in freezing conditions is to be done at your
own risk.
When placing a machine back into service after storage, even if not stored in such extreme conditions as
mentioned above, you must flush out the machine with fresh water to remove any stale water that was
left in the boiler, the heat exchanger, and in the various pipes and hoses. To do so:
1 - First wash the Water Reservoir, then fill it with water.
2 - Turn the Power Switch to position ON. When at the pressure, turn the Water Switch to position ON
then open Steam/ Water Valve and pump about 6 ounces of water into an appropriate vessel. Repeat that
four times, waiting between glasses for the pump to stop which signifies that the boiler has been refilled.
3 - Now pull three or four double shots without using coffee, then do a clean water backflush.
4 - Check the reservoir water level (unless plumbed-in).
5 - Allow the machine to fully warm up and you are ready, once again, to make espresso.
Waste disposal
For the waste management of the used appliances in safety and in respect of the environment, you can
deliver it to the appropriate sites for the differentiated waste collection, managed by the Commune.
In case the appliance has got batteries, take them away before proceeding to the waste disposal.
Since batteries contain substances highly polluting, they also must be disposed in a differentiated
collection site.
Page 17

,
www.lavibiemme.it
VIBIEMME S.p.A. - Via Gounod 25/27, Cinisello Balsamo,
20092 (Milano) . Italy
 Loading...