

Page 1
GM-innovations
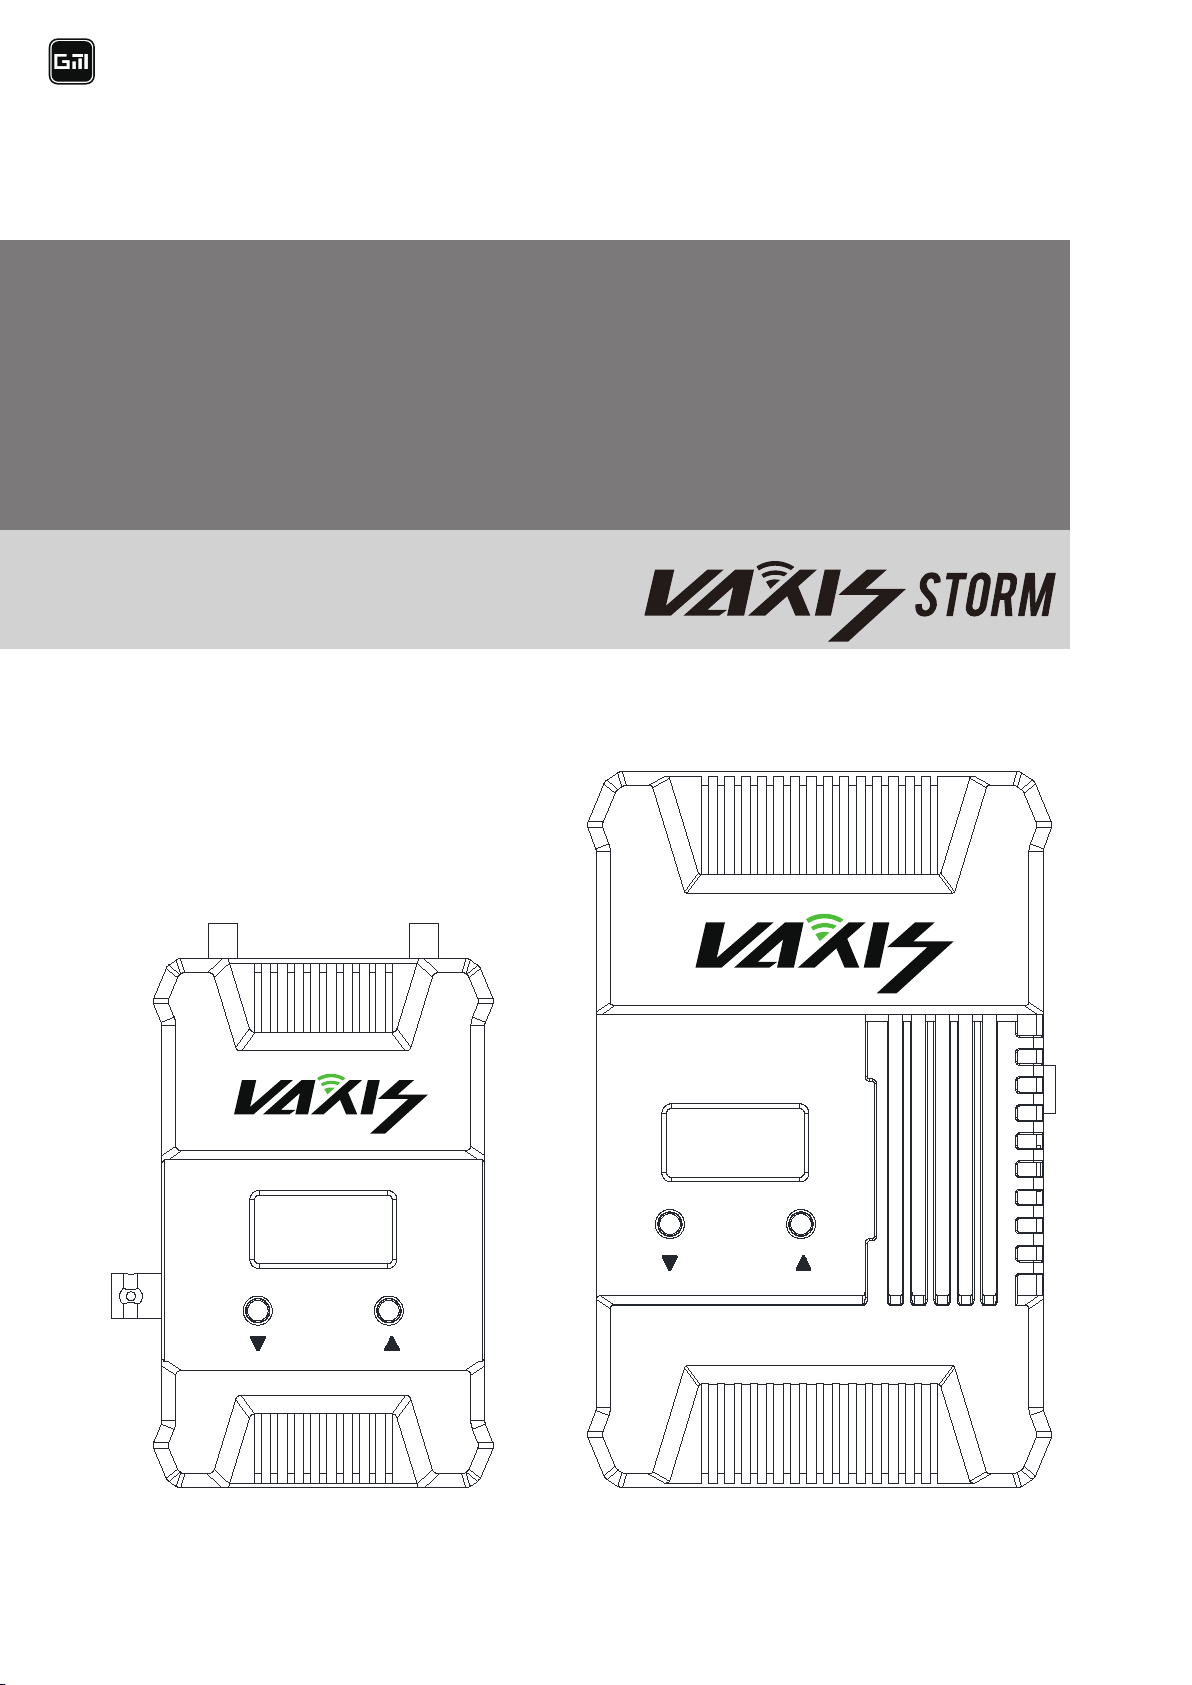
VAXIS STORM 500+
INSTRUCTIONS
Phone: +86 731-83998739
ADD: 8F, N0.2,Huachen Century Square,Wanjiali Street,Yuhua District,Changsha City,Hunan Province,China.
Website: www.vaxis.cn
Page 2

Introduction
.................................................................................................
1
1.Cautions
2.About
3.Installation
...................................................................................................
........................................................................................................
.............................................................................................
4.Operation instruction
5.Maintenance
6.Truble shooting
..........................................................................................
......................................................................................
.............................................................................
2
3
10
12
16
17
Page 3

1
Introduction
Thank you for choosing our long-range wireless HDMI / SDI HD
Due to product version upgrade or other reasons, the contents of this
products. Before you install the product, please read the user manual
carefully and follow the manual of the user manual to avoid product
damaged or other safety accidents.
manual will be updated from time to time. Unless otherwise agreed,
this manual is used only as a guide, and all statements, information
and recommendations in this manual do not constitute any guarantee
either express or implied.
Page 4

2
1. Cautions
Do not use this product in the extreme hot, cold, dusty or humid
Prevent friction with hard objects.
Avoid the product falling down from a high place, or it may damage
The product is not water proofed. So do not get any liquid into the
Do not dismantle, assemble or alter the product arbitrarily.
■Logo and meaning
Careful, warning, dangerous, Pay attend to following items.
■Cautions
environments.
the hardware.
unit please.
Page 5

3
2. About
■Product Model and standard
The VAXIS STORM 500FT+ Wireless HDMI/SDI Transmission Suite
utilize today’s most advanced wireless video transmission technology,
which can realize the broadcast-class and uncompressed 3G SDI/HDMI
HD video signal transmitted with no compression and zero delay. The
suite includes one transmitter and one receiver, both of them provides a
3G/HD SDI interface and a HDMI interface. The transmitter with 2
sword antennas, and 5 antennas built-in receiver, and it can work in
5.1-5.9GHz frequency band and be flexibly software configured to
licensed or ISM band of global different regions. Meanwhile,on the front
of the transmitter and receiver have been installed a control panel with
OLED and channel adjustment button, which provides maximum 10
workable frequency channels. The product supports maximum 4 sets
working simultaneously and in same place(Multi-point to multi-point to
transmit different images).
The wireless suite can accept wide range DC power input, which is
suitable for many kinds of camera battery model. The suite also can
sustain ±4 kV ESD (HBM, contact discharge), the industry class metal
case and professional heat design would guarantee most robust reliability.
Page 6

4
■ Main features:
HDMI 1.3 spec supports
HDMI and 3G SDI input and output
Highest resolution 1080p 60,no delay and no compression
Support audio formats include Dolby True HD, DTS-master, etc.
AES-128 encryption with air interface HD video data stream
Support point to point, and point to multi points network topology
5GHz ISM frequency band,maximum 10 frequency channels selected
Maximum transmission distance 180meters
OLED screen display the current channel,power status,signal stength
Wide range power voltage input , adapt most kinds of camera battery
Transmitter with Sony F97 battery plate,Receiver with V-lock or
Any input and output ports with ±4 kV ESD protection level (HBM,
Industrial metal shell for easy installation
by user knob, coexist with WIFI.
AB-lock,easy to install and replace in the shoot site
contact discharge)
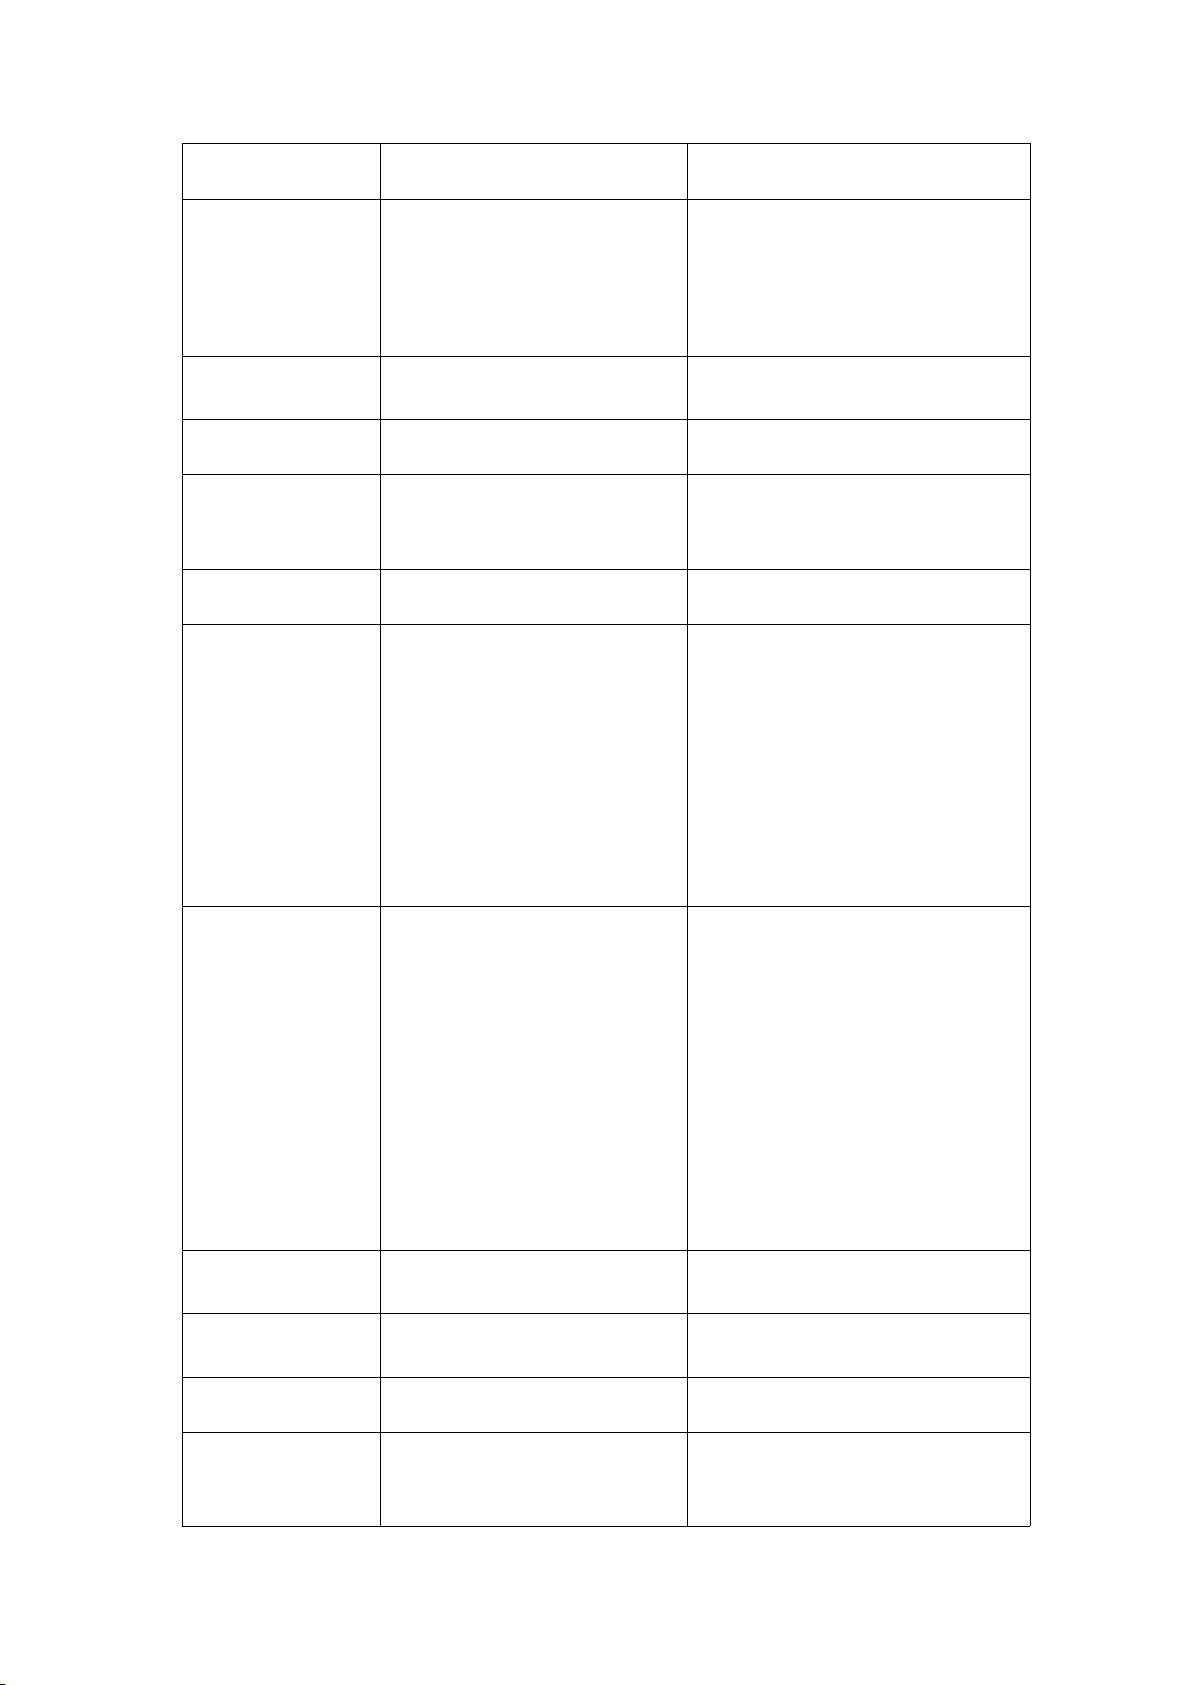
■Parameters:
Page 7
5
Transmitter
Receiver
Interface
SDI Input (BNC Female); HDMI
Input(Type A Female);2 Antenna
Interfaces;DC Input(2 Pin LEMO
Female);Add a USB port to
upgrade
SDI Output (BNC Female); HDMI
Output(Type A Female);2 Antenna
Interfaces;DC Input(2 Pin LEMO
Female);Add a USB port to upgrade
Supply Voltage
Range
6.5-16.8V DC
6.5-16.8V DC
Power consumption
<6W
<6W
Size
(LxWxH):115x67x23mm,Not
including the external antennas
(LxWxH):152x95x23mm
Mass
270g
355g
Input Video Format
HDMI:525i, 625i, 720p
50/59.94/60,1080i
50/59.94/60,1080p23.98/24/25/2
9.9/30/50/59.94/60;HDMI Type
A
SDI : 3G, HD, and SD-SDI
(auto-selected),
SMPTE-259/274/292/296/372/42
4/425;1x BNC
/
Output Video
Format
/
HDMI:525i, 625i, 720p
50/59.94/60,1080i
50/59.94/60,1080p23.98/24/25/29.9
/30/50/59.94/60;HDMI Type A
SDI : 3G, HD, and SD-SDI
(auto-selected),
SMPTE-259/274/292/296/372/424/4
25;1x BNC
Input Audio Format
SDI embedded 4 channel 24
bit/48KHz
/
Output Audio
Format
/
SDI embedded 4 channel 24
bit/48KHz
Signal Indicator
OLED Display
OLED Display
Frequency Band
5.1-5.9GHz,configurable with
China, North American, Europe,
etc
5.1-5.9GHz,,configurable with China,
North American, Europe, etc
Page 8
6
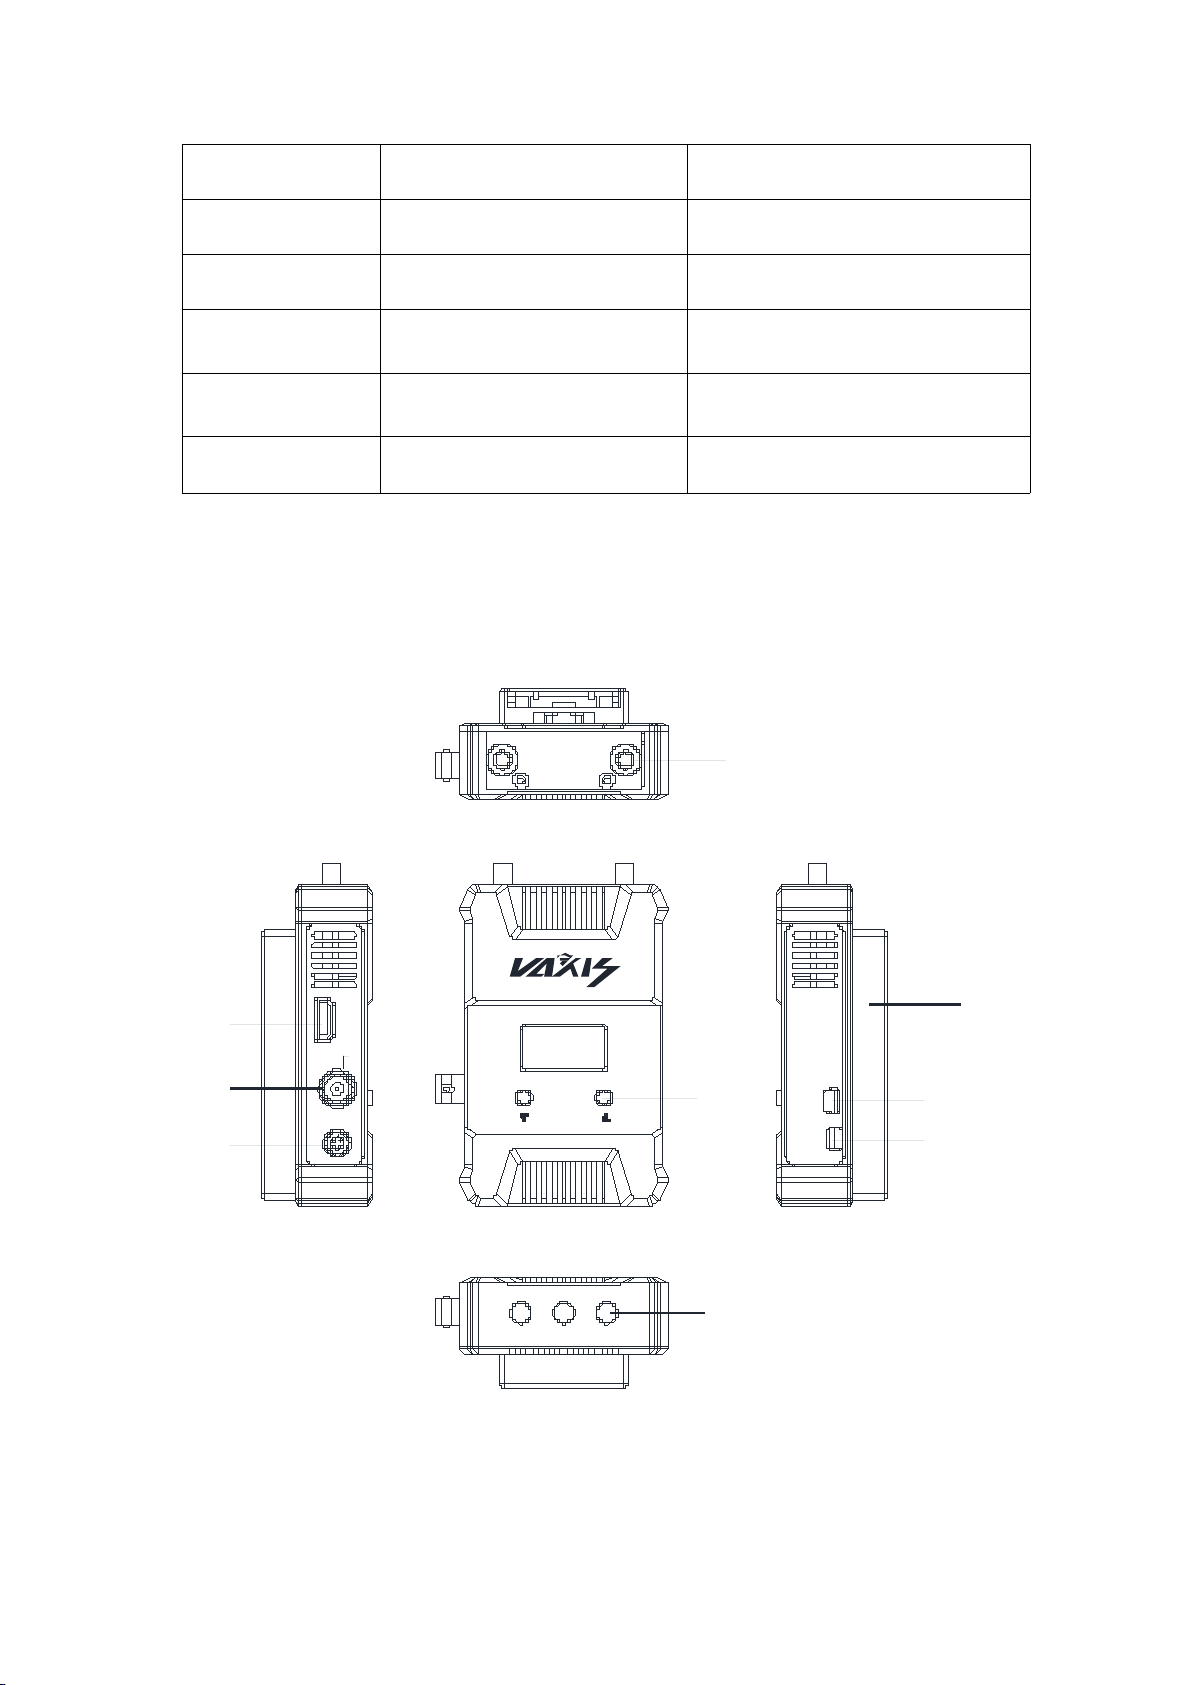
■Name of the product parts
USB ON/OFF
HDMI IN
SDI IN
DC IN
1
9
5
6
7
8
Modulation Mode
OFDM 16QAM
OFDM 16QAM
Transmitted Power
Maximum 20dBm
/
Receive inspiration
/
-75dBm
Occupied
Bandwidth
20/40MHz
20/40MHz
Temperature Range
0~40°C(operating condition);
-20~60°C(Storage)
0 ~ 40°C (operating condition);
-20~60°C(Storage)
Compliance
FCC;CE.
FCC;CE.
Transmitter:
①RP-SMA Antennae connector
②HDMI Input
Page 9

7
SD/HD/3G SDI Input
③
DC Input, LEMO 2 Pin B series connector
④
⑤Screen control button
Optional battery buckles
⑥
USB interface to upgrade
⑦
DC switch
⑧
1/4-20 threaded hole
⑨
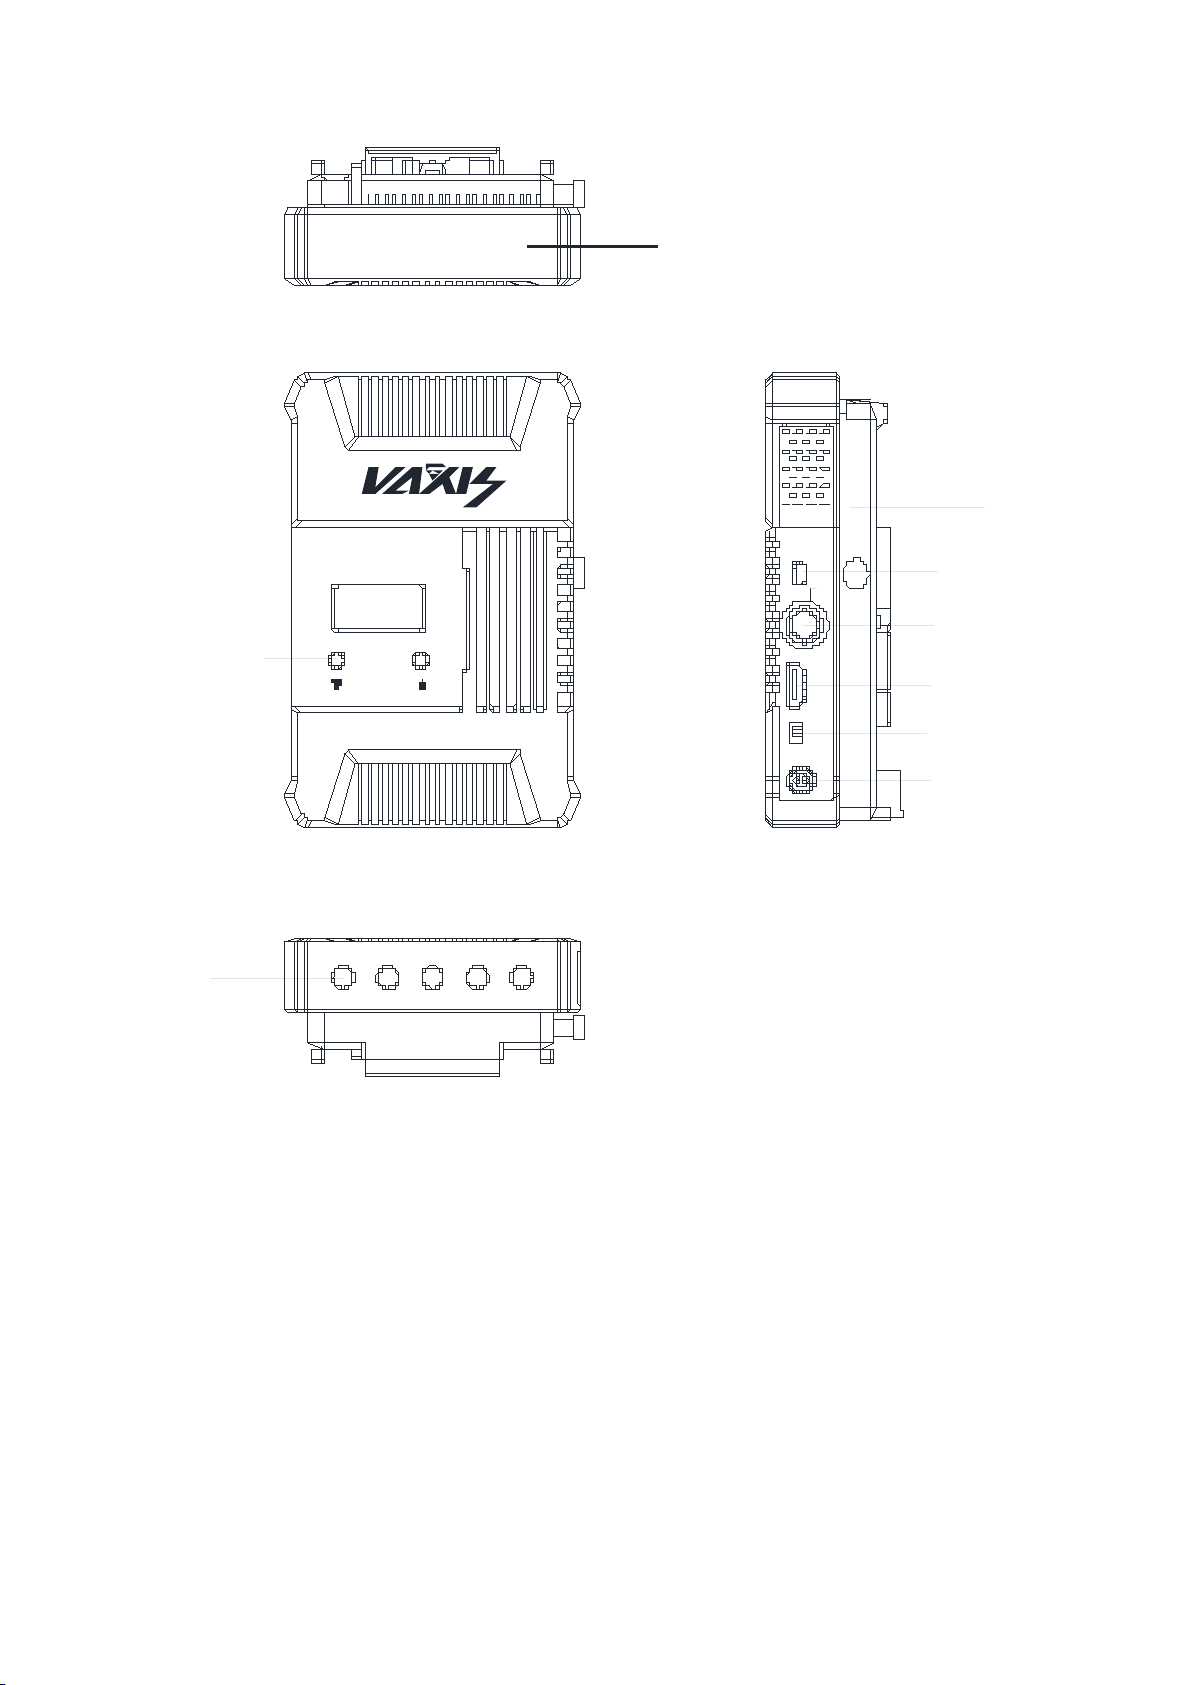
Receiver:
Page 10
8
USB
SDI OUT
HDMI OUTON/OFF
DC IN
1
2
3
4
5
6
7
8
9
①Built-in Antennas
USB interface to upgrade
②
SD/HD/3G SDI output
③
HDMI output
④
DC switch
⑤
DC Input, LEMO 2 Pin B series connector
⑥
V-LOCK or AB-LOCK optional plate
⑦
Page 11

9
Screen control button
1 piece transmitter
1 piece receiver
3 pieces 5GHz polydirectional and high performance sword
2 pieces DC conversion cable (LEMO 2 pin male to D-Type)
1 piece 3G-SDI flexible cable
1 piece Vaxis Blue Noga Arm
1 user Manual
SONY NP-F970 battery plate
V-LOCK battery plate
⑧
1/4-20 threaded hole
⑨
■ Packing list:
antennas(SMA female)
Page 12

10
3.Installation and Debugging
Transmitter Settings
a) Contact 2 pieces sword antennas to Transmitter’s SMA male
b) There are 3 1/4-20 screw nuts in the bottom transmitter metal case,
c) If the product you purchased has a battery plate, you can connect
d) The user also can utilize a subsidiary LEMO 2 pin male to D-Type
Receiver Settings
■Installation details and cautions
antenna connectors
which are located on the bottom. So the user can utilize Vaxis
Noga Arm to fix the transmitter on camera.
the battery corresponding to the battery plate to the transmitter.
Please note: Batteries and battery plates must match, otherwise it
may cause product damage!
receptacle power cable to get power input from an outside power
source.
a) If the product you purchased has a battery plate, you can connect
the battery corresponding to the battery plate to the transmitter.
Please note: Batteries and battery plates must match, otherwise it
may cause product damage!
Page 13

11
b) The user also can utilize a subsidiary LEMO 2 pin male to
Typical connection instruction
D-Type receptacle power cable to get power input from an outside
power source。
Connect camera SDI or HDMI output to transmitter SDI or HDMI
input port, and the transmitter can fixed in hot-shoe port of the
camera. Connect HDMI or SDI output port of the receiver to SDI or
HDMI input port of the HD monitor. Make sure all
antennas ,batteries and Video cable are equipped normally.
Page 14

12
4. Operation instruction
a) Ensure the video source output of the camera is OK, and the HD
b) Ensure all input, output SDI or HDMI cables are connected.
c) Ensure both the transmitter and receiver installed batteries or DC
d) Ensure the transmitter and receiver in same channel(the OLED
e) If the camera is on and video input is OK, TX side ‘video’ screen
f) Before RX finished wireless link with TX, the Receiver’s wireless
■Getting started
After finishing all steps above, system is workable, follow below steps.
monitor is power on and switched to connected video input port.
input ports connected to outside power sources. Then toggle
power switch of transmitter and receiver to ‘ON’ respectively,
then ‘Power’ screen will be light.
screen display the same channel number), and this will make sure
the transmitter and receiver work with same RF frequency.
will be light.
signal strength “RSSI” and the screen “Video” indicator lights are
not light; when wireless link is OK, the Receiver’s wireless signal
strength “RSSI” indicator light will bright, and will indicate the
current signal strength. If the receiver detects normal wireless
video signal from established wireless communication, then the
Page 15

13
“Video”will light. Before the receiver output the normal video
Link Connecting...
g) The system will spend about 10 seconds to complete the
h) For the best wireless transmission performance, it need install the
signal,the monitor will display an OSD of “Link connecting……”
like below picture:
initialization and wireless connection. The actual connection time
will be associated with the wireless environment of the specific
usage scenario. When wireless link is set up, Screen signal icon
will display the current wireless signal strength, as well the
screen “Video” will light, means it had receive the normal signal;
then connected HD monitor will display the HD video and audio
from TX module.
transmitter and receiver more than 1.5m about the ground and
keep the same height, and make sure no obstacles between them;
Moreover, it is the best to keep the transmitter antennas face to
Page 16

14
face, and don’t turn round any sides with too big angle. The real
■
Input video port selection of transmitter
■
RSSI indicators
transmission distance is also relevant to current air
electromagnetic environment, because the system works in ISM
band, it is exposure to all kind od 5GHz band air interference, we
suggest the users should do a manual frequency sweep by
adjusting frequency selection knob with a circle before using the
equipment, then choose the best frequency channel for stable
performance.
The transmitter has a 3G SDI video input port and a HDMI video
input port, and the system will automatically detect the input video
interface. If both SDI and HDMI have valid video inputs, the system will
take 3G SDI input as priority.
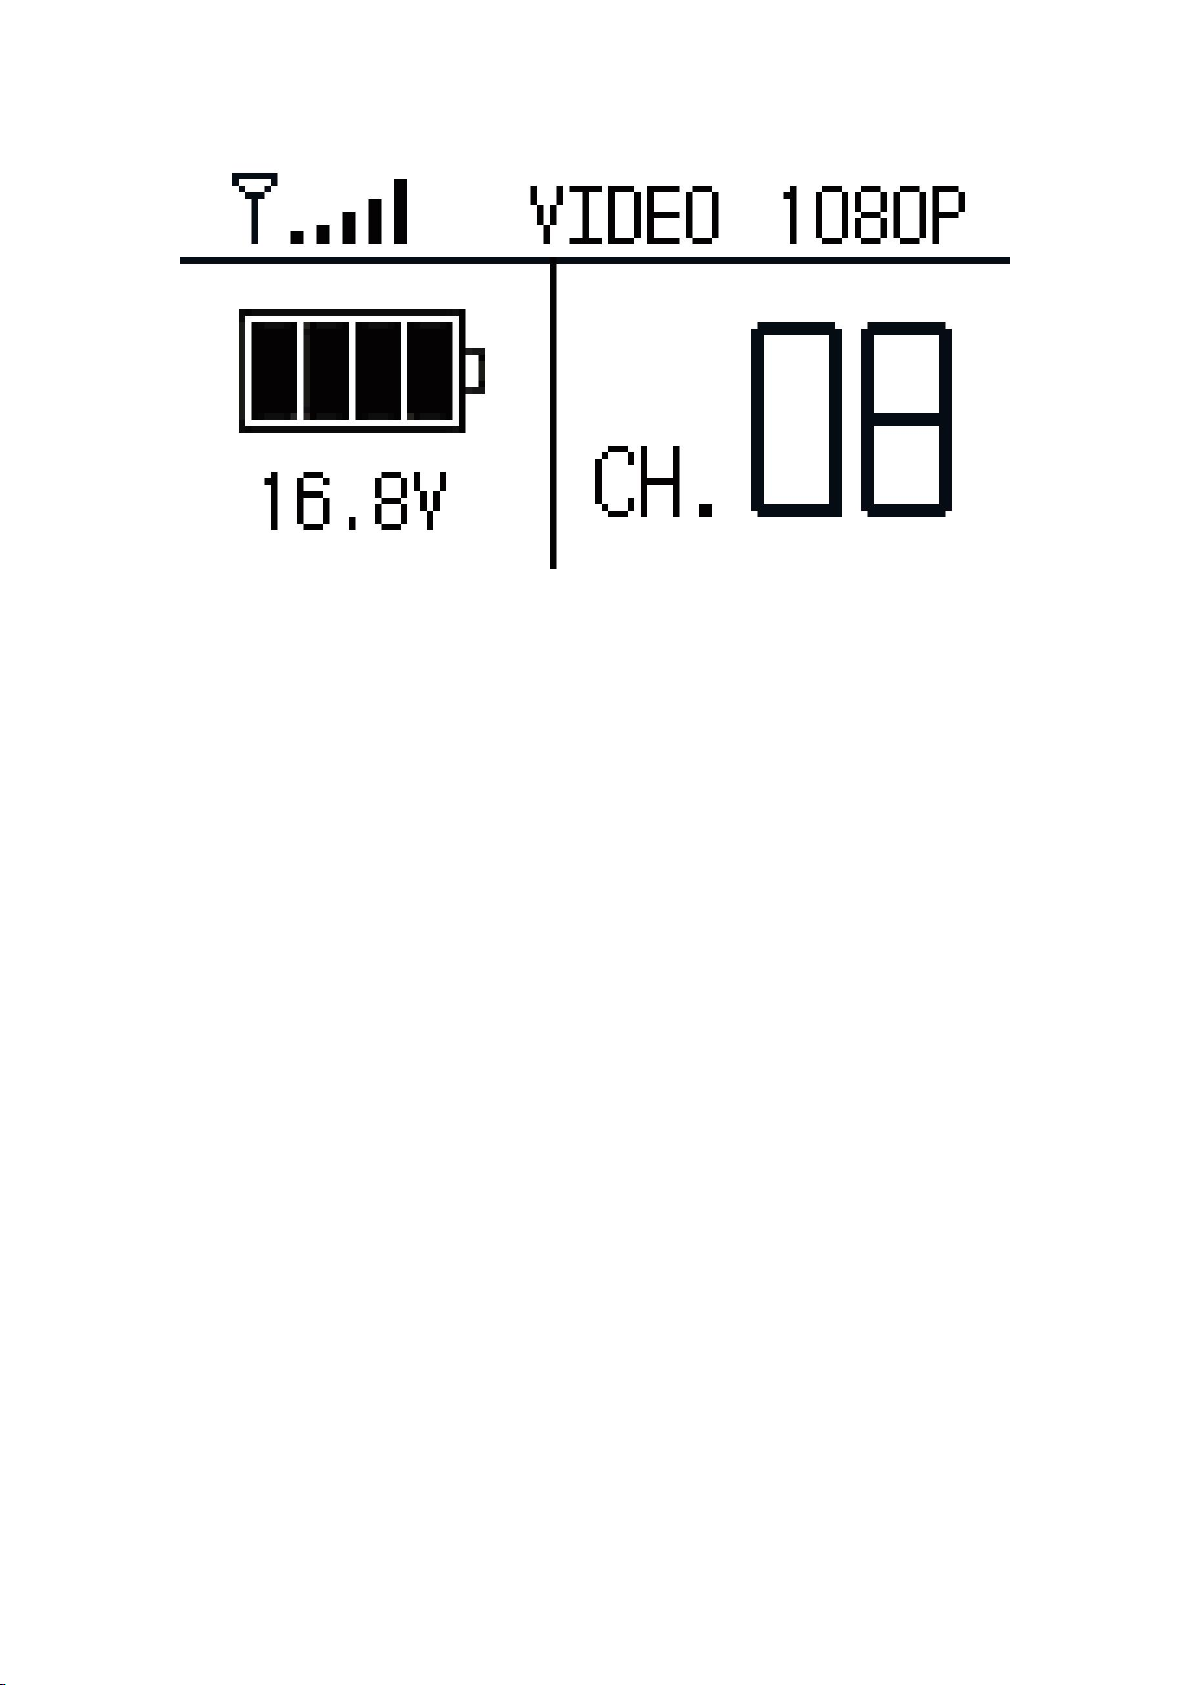
The receiver will calculate received RF signal strength and through
the OLED Screen to display the particular channel,signal strength and the
video format.
Page 17
15
■
Frequency Selection
The wireless suite can work in 5.1-5.9GHz frequency band and be
flexibly software configured to licensed or ISM band of global different
regions. Meanwhile,on the side of both transmitter and receiver Set aside
the manual communication channel selection knob, can use the random
screwdriver to adjust the channel.Please note: Transmitter and Receiver
should keep in the same channel(Similar to the intercom principle).When
working together with multiple sets of products (up to 4 sets of work),
please stagger the communication channels of each product to ensure
performance.Please refer to the following picture:
Page 18

16
5. Maintenance
Warning
■Storage conditions
Products storage temperature should be -20°C~60°C. For long time
storage requirement, please use original carbon boxes, and avoid from
high humid, acid base or dusty place.
■Maintenance
To ensure your safety, place choose well-known brand DC batteries,
and guarantee suitable work conditions that battery manual
mentioned.
Page 19

17
6.Trouble shooting
a) No output on display
b) Poor output video quality
■Normal problems
Please check the TX and RX power first, if TX or RX is powered
from battery or external power,please ensure the battery or external power
source can supply the power.Then check if TX antennas and RX antennas
are installed right. After that, check the Transmitter’s OLED screen, if
haven’t show the signal, then check SDI or HDMI cable is plugged in and
video source is ready please. Finally may check input video format is
compatible with this product.
Please check if SDI or HDMI input or output cable is plugged well,
then checks the OLED screen for wireless signal strength, there should be
at least 2-3 frames lit if the user want to get better video quality.If there is
only 1 frames lit, that means the received wireless signal is weak, and
should shorten the transmission distance or change the wireless
communication channel.
Page 20

 Loading...