

Page 1

www.vax.co.uk
Please read carefully before using this cleaner.
Always fully extend the mains cable before use.
Retain for future reference.
Vax careline
0870 6061248
Bagless upright
5
1
8
7
9
11
10
15
14
12
13
17
18
19
20
21
25
22
23
24
21
16
6
4
3
2
26 27
!
!
Vax model number:
VZL-6015 VZL-6016
VZL-6015A VZL-6016A
VZL-6015AA VZL-6016AA
Page 2

1. Diagram
1 On/Off switch
Ensure that the plug is inserted securely into the
electrical outlet before pressing the on/off switch.
2 Soft Touch handle grip
3 Telescopic handle
4 Handle adjustment button
5 Carrying handle
6 Dirt container release button
Located at the front of the unit, the dirt container
can then be removed for emtying.
7 Dirt container assembly
Locked onto the front of the unit
8 Cord reel window/ Exhaust vent
To rewind the cord, hold onto the plug and press the
button at the top of the cord reel.
9 Headlight
IMPORTANT: Disconnect the cleaner from the
electrical outlet before removing or installing the
headlight.
10 Brush bar shut-off pedal
A foot operated pedal located on the base of the
cleaner
11 Brush bar shut-off indicator
The indicator shows red in the “Brush Bar On”
window then the brush bar is in operation. The
indicator will show red in the “Brush Bar Off” window
when it is switched off.
WARNING: The brush bar must NOT be
rotating when cleaning hard floors. Switch the
brush bar off to prevent damage to lino, parquet and
other hard flooring. See page 5 details.
Vax will not be held responsible for damage to
hard floors, including lino, if the customer fails
to switch the brush bar off on these surfaces.
12 Furniture guard
The guard helps prevent cleaner from marking
furniture
13 Carpet height adjuster
Turn knob to correct setting for height of carpet
being cleaned
14 Post-motor filter
15 Hose handle
16 Hose
17 Hose/tool holder
18 Crevice tool
Can be used in tight spaces, corners and along edges
in such places as upholstered furniture, stairs and
skirting boards.
19 Extension tubes
Used to give extra length to the hose
20 Cord outlet
21 Soft Touch™ wheels
22 Handle release pedal
Step on lever to lower handle to operating or low
positions
23 Cord rewind button
Press button to rewind cord for storage. Hold plug
until cord is rewound
24 2-in-1 tool
Dusting brush: for delicate surfaces
Upholstery tool: for carpet, upholstery and stairs etc.
25 TurboTool
May be used for upholstered furniture, mattresses,
clothing, car interiors and carpeted stairs.
26 Hard Floor Brush (VZL-6016, VZL-6016A and
VZL-6016AA only)
27 Additional stretch hose (VZL-6016, VZL-6016A
and VZL-6016AA only)
www.vax.co.uk
2
parts overview
!
!
!
Page 3

3
V
ax Careline 0870 606 1248
safety information
2. Safety Information
For Household Use Only
When using the vacuum cleaner, basic safety precautions
should always be observed, including the following:
1. Only use the vacuum cleaner indoors on dry
surfaces.
2. Turn off the vacuum cleaner controls before
connecting or disconnecting from the mains supply.
3. Always unplug the vacuum cleaner before
connecting or disconnecting the vacuum hose and
accessories.
4. This appliance is not intended for use by persons
(including children) with reduced physical, sensory or
mental capabilities, or lack of experience and
knowledge, unless they have been given supervision
or instruction concerning use of the appliance by a
person responsible for their safety. Children should
be supervised to ensure that they do not play with
the appliance.
5. Use only as described in this manual.
Use only the manufacturer’s recommended
attachments.
6. Do not use the vacuum cleaner if it has been
dropped, damaged, left outdoors or dropped into
water. Do not use the vacuum cleaner with a
damaged cord or plug. If the supply cord or plug is
damaged, return the vacuum cleaner to a Vax
Authorised Service Agent or suitably qualified
person for examination, repair or adjustment.
7. Do not pull or carry by the cord. Do not use the cord
as a handle, close a door on the cord or pull the cord
around sharp edges or corners. Do not run the
vacuum cleaner over the cord. Keep the cord away
from heated surfaces.
8. Do not handle the plug or vacuum cleaner with wet
hands. Do not use outdoors or on wet surfaces.
9. Do not put any objects into openings. Do not use
with any openings blocked and do not restrict air
flow. Keep all openings free of dust, lint, hair or
anything that may reduce airflow.
10. Keep hair, loose clothing, fingers and all parts of the
body away from openings and moving parts.
11. Do not pick up hot coals, cigarette butts, matches or
any hot, smoking or burning objects.
12. Do not pick up flammable or combustible materials
(lighter fluid, petrol, kerosene, etc) or use in the
presence of explosive liquids or vapours.
13. Do not vacuum up harmful or toxic material (chlorine
bleach, ammonia, drain cleaner, etc).
14. Do not vacuum up hard or sharp objects such as
glass, nails, screws, coins, etc.
15. Do not use without the filters in place.
16. Take extra care when vacuuming on stairs.
17. Keep vacuuming area well lit.
18. Store the vacuum cleaner indoors in a cool, dry area.
19. Turn off the on/off switch before unplugging the
vacuum cleaner.
20. Use only CE-approved 13 amp extension cords. Nonapproved extension cords may overheat. Care should
be taken to arrange the cord so that the cord cannot
be pulled or tripped over.
WARNING: Always switch off and unplug the
vacuum cleaner from the electrical outlet
before assembling, opening or emptying the dirt
container, or before connecting/disconnecting the
attachments.
CAUTION: The vacuum cleaner is a very powerful
unit. Before plugging the cord into the electrical
outlet, make sure the switch is in the ‘off’ position. Hold
the vacuum cleaner firmly when starting and in use.
IMPORTANT: If the inlet, hose or extension tube is
blocked, switch off the vacuum cleaner and
remove the blockage(s) before re-starting the vacuum
cleaner.
IMPORTANT: Cleaning filters regularly improves
vacuum performance. Make sure all filters are
replaced back into the vacuum cleaner before using. This
vacuum cleaner is intended for household use only and
not for commercial or industrial use.
PLEASE KEEP THESE INSTRUCTIONS FOR
FURTHER USE.
!!!
!
Motor Thermostat
IMPORTANT: The motor is equipped with a
thermal cut-out. If for any reason, the vacuum
cleaner should over-heat, the thermostat will
automatically turn the unit off. Should this occur,
unplug the vacuum cleaner from the electrical outlet
and turn off the switch. Remove the dirt container
and empty. Clean the filters. Allow the cleaner to cool
for approximately one (1) hour. To re-start, plug into
an electrical outlet and switch back on.
!
Page 4

www.vax.co.uk
4
assembly
3. How to assemble
Attach Upper Housing
Remove dirt cup (A) from upper housing (B) by pressing
dirt cup release button (C) and pivoting cup out. Set dirt
cup aside (Fig.3/1).
Using a Phillips screwdriver, remove (3) screws from
cleaner base. DO NOT DISPOSE OF SCREWS. Remove
cardboard and discard (Fig.3/2).
Align upper housing over cleaner base and slide down
until upper housing sits securely over base (Fig.3/3).
Using a Phillips screwdriver, fasten (3) screws located at
the bottom of the upper housing (Fig.3/4).
Place bottom of dirt container into cleaner body first.
Pivot container into cleaner body (Fig.3/5).
Press on dirt container release button while firmly
pressing on the container. Release button in order for it
to return to proper position and lock into place. (Fig.3/6).
Attach Hose
Align end of hose with projections (A) over slots on dirt
duct (B). Slide hose into slots and twist hose to lock it
into place (To detach hose, reverse procedure) (Fig.3/7).
Fig.3/1
A
B
c
Fig.3/2
Fig.3/3
Fig.3/4
Fig.3/5
Fig.3/6
Page 5

5
V
ax Careline 0870 606 1248
assembly
Position hose over rack (A) and into hose tube (B)
(Fig.3/8).
NOTE: Hose must be connected at the hose tube and
at the dirt duct on the back of the cleaner for carpet
or floor cleaning. For tool use, refer to next chapter.
Attach Handle
NOTE: DO NOT remove orange tie wrap until the next
step is complete.
Grasp orange tie wrap (A) and pull until the black plug (B)
comes out of the handle cavity (Fig.3/9).
Hold plug (B) with one hand; upper handle (C) with other
hand. Push plug into upper handle, aligning with opposite
end of plug and push firmly UNTIL YOU HEAR A SNAP
OR A CLICK (Fig.3/10).
After ends are connected, pull on plug to make sure it is
securely attached.
NOTE: The plug will only fit together one way. If plug
is not fitting together, check alignment of ends. After
the plug ends are fully connected, the orange tie
wrap must be removed. Use caution so as NOT TO
CUT the black power cord. Discard the orange tie
wrap.
Align the groove on the back of the upper handle with
the small projectionon the back of the handle housing
(Fig.3/11).
Press button at handle base and push handle all the way
down (Fig.3/12).
Fig.3/7
Fig.3/8
Push firmly
until you hear a
snap or click
Fig.3/10
Fig.3/11
Fig.3/12
Fig.3/9
A
A
A
B
B
B
Page 6

www.vax.co.uk
6
assembly / operation
Position Tools
Place smaller diameter end of extension tube (A) into
bottom of rack. Snap extension tube into clip at top.
Repeat with other extension tube.
Crevice tool (B) fits into one of the extension tubes.
Fit combination tool (C) and TurboTool (D) into storage
areas on side of cleaner as shown (Fig.3/13).
4. How to operate
On/Off Switch
Plug cord into electrical outlet. To turn cleaner ON, push
ON/OFF switch once. To turn cleaner OFF, push switch
again (Fig.4/1).
The cleaner is shipped with the brushbar in the OFF
position. To turn the brushbar ON, step on the pedal (A).
The indicator (B) will show red in the “Brushbar on”
window (Fig.4/2).
Cord Rewind
Grasp the end of the plug and pull to release cord from
cord reel. After desired cord length is reached, the cord
will lock into position.
To return cord for storage, hold plug and press on button
(A) at top of cord reel (Fig.4/3).
NOTE: To prevent cord from whipping, hold plug until
cord is rewound.
Fig.3/13
Fig.4/1
Fig.4/2
A
A
B
B
C
D
Page 7

7
V
ax Careline 0870 606 1248
operation
Telescopic Handle
The telescoping handle includes adjustable settings to
various heights for user comfort. The handle is designed
to retract into the body of the cleaner for convenience in
storing or carrying the cleaner.
Lower the handle by depressing the button (A) located at
the handle base and pushing the handle down.
Raise the handle by depressing the button and pulling
the handle upward, locking it into the desired position
(Fig.4/4).
Transporting Cleaner
To move your cleaner from room to room, put handle in
upright position, tilt cleaner back on rear wheels and push
forward (Fig.4/5).
Carrying Cleaner
The cleaner can also be moved by using the carrying
handle (Fig.4/6).
Handle Positions
The handle of your cleaner has three positions; upright
for storage and when using cleaning tools; operating
position for general operation on carpet and floors; low
for reaching under low furniture. Step on handle release
lever to lower handle (Fig.4/7).
Carpet Height Adjustment
The cleaning of carpet and rugs takes place at the nozzle.
When it is necessary to raise and lower the nozzle for
various carpet pile heights, turn the carpet height
adjuster (A) to the desired setting (Fig.4/8).
Fig.4/3
Fig.4/4
Fig.4/5
Fig.4/6
Fig.4/7
Fig.4/8
A
A
A
Page 8

www.vax.co.uk
8
operation
Settings
For maximum
cleaning
performance, the
following carpet
height settings are
recommended
(Fig.4/9):
NOTE: If the cleaner is difficult to push, turn knob to
the next higher setting.
• Higher settings: for very deep pile carpet, where easier
pushing effort is desired, while maintaining good cleaning
performance.
Brushbar Shut-off
The brushbar shuts off automatically for tool use, when
the cleaner is in the upright position.
WARNING: The brush bar must NOT be rotating
when cleaning hard floors. Switch the brush bar
off to prevent damage to lino, parquet and other hard
flooring.
To manually shut off the brushbar for cleaning hard
floors, step on the pedal (A). The indicator (B) will show
red in the “brushbar off” window (Fig.4/10).
To turn the brushbar on, step on the pedal again. The
indicator will show red in the “brushbar on” window.
Cleaning Lightweight Flexible Rugs
Stand on one end of rug and move cleaner toward other
end or edge. Before reaching edge, push down on handle.
This will lift up the nozzle (front of cleaner) as shown and
will prevent rug from clinging to cleaner (Fig.4/11).
Continue to lift up nozzle so that when you have reached
the edge, it is completely off the rug. Move cleaner back
to start again, lower nozzle, and use only forward strokes.
Cleaning Tools
Tools allow for cleaning surfaces above the floor and for
reaching hard to clean areas.
The cleaner is ready for tool use when handle is in
upright position.
CAUTION: The brushbar will not rotate when
the cleaner is in the upright position or the if
the brushbar shut off indicator is in the OFF position
when the handle is lowered.
How to Clean Tools
To clean the hose and TurboTool, wipe off dirt with a
cloth dampened in a mild detergent. Rinse with a damp
cloth. DO NOT submerge TurboTool in water.
Cleaning tools may be washed in warm water with a
detergent. Rinse and air dry before using.
Removing Hose
When using cleaning tools, place cleaner handle in the
upright position. The brushbar will not rotate when the
cleaner is in the upright position.
Also, turn cleaner OFF before disconnecting and
connecting hose to hose tube (A).
To use hose, lift hose end (B) as shown (Fig.4/12).
When you are finished cleaning with the tools, reposition
hose end into tube.
Fig.4/9
Fig.4/11
Fig.4/10
Fig.4/12
A
A
B
B
!
!
Page 9

9
V
ax Careline 0870 606 1248
operation
Align end of hose with projections (A) over slots (B) on
Extra Reach hose. Slide hose into slots and twist hose to
lock it into place. (To detach hose, reverse procedure)
(Fig.4/15).
Attach extension tubes or tools to the other end of hose.
NOTE: Hose must be connected to dirt duct and hose
tube after removing Extra Reach hose for carpet or
floor cleaning.
Attach Extension Tube and Tools
Attach tool or extension tube to the hose.
Attach tool to extension tube by pushing it firmly onto
the tube. Twist extension tube or tool slightly to tighten
or loosen the connection (Fig.4/16).
Select Proper Tool
Combination tool: use with brush for carved furniture,
table tops, books, lamps, lighting fixtures, venetian blinds,
baseboards, shutters, and registers.
Remove brush to clean upholstered furniture, draperies,
mattresses, clothing, and carpeted stairs.
TurboTool: may be used for upholstered furniture,
draperies, mattresses, clothing, automobile interiors, and
carpeted stairs.
Crevice tool: may be used in tight spaces, corners and
along edges in such places as dresser drawers,
upholstered furniture, stairs and baseboards.
Extension tubes: are used to give extra length to your
hose. Use them with any of the above tools.
Floor brush: (Model: VZL-6016/VZL-6016A/
VZL-6016AA only) use on hard surface floors.
Attach extension tube and tools
Attach tool or extension tube to the hose. Attach tool to
extension tube by pushing it firmly onto the tube. Twist
tube or tool slightly to tighten or loosen the connection.
Combination tool
Slide brush to remove. To replace brushes, align bottom of
brush with grooves on tool. Slide brush into place
(Fig.4/13).
Extra Reach Hose
(Model: VZL-6016 / VZL-6016A only)
The Extra Reach hose provides easier cleaning of stairs
and hard to reach places. Follow the steps below for
attaching and detaching the Extra Reach hose.
Turn cleaner OFF before disconnecting
and connecting hose.
Remove hose end from dirt duct (A). Align end of Extra
Reach hose with projections (B) over slots on dirt duct (C).
Slide hose into slots and twist hose to lock it into place
(Fig.4/14).
Fig.4/14
Fig.4/13
A
C
B
Fig.4/15
Fig.4/16
A
B
Page 10
www.vax.co.uk
10
dirt container and filters
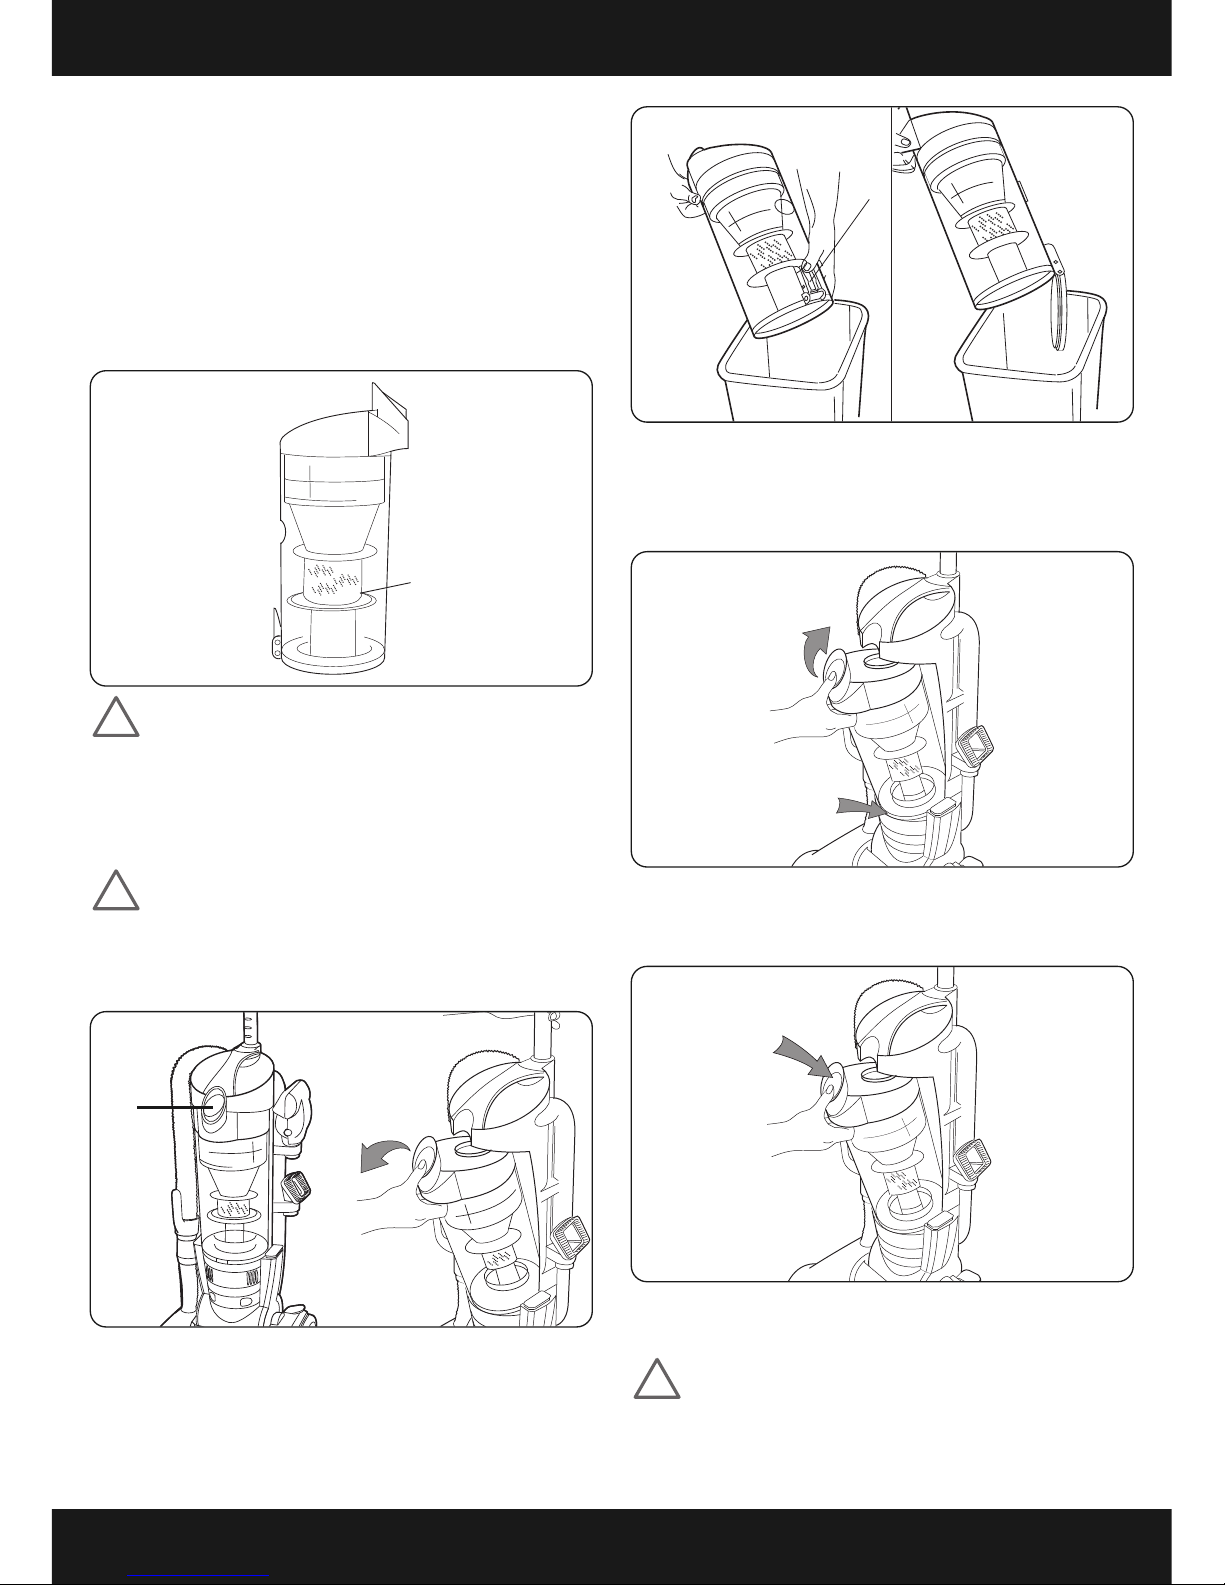
5. Dirt container & filters:
removal & replacement
NOTE: Familiarize yourself with these home
maintenance tasks as proper use and care of your
cleaner will ensure continued cleaning effectiveness.
Emptying the Dirt Container
Empty the dirt cup before the dirt reaches the fill line (A)
(Fig.5/1).
CAUTION: Very fine materials, such as building
dust, may seal the filter and cause a reduction
in performance.
When using the cleaner for this type of dust, empty the
cup and clean the filters often.
How to Empty
IMPORTANT: Disconnect cleaner from electrical
outlet. Do not use the cleaner without dirt cup
or filters in place.
Press dirt cup release button (A) and pivot cup out
(Fig.5/2).
Holding dirt cup over trash receptacle, press dirt cup door
release button (A) to open dirt cup door (Fig.5/3).
Close door and press dirt cup door release button to latch
dirt cup door closed.
Place bottom of dirt cup in first. Pivot cup into cleaner
body (Fig.5/4).
Press on dirt cup release button while firmly pressing on
dirt cup. Release button in order for it to return to proper
position and lock the dirt container into place (Fig.5/5).
Cleaning Filters
Cleaning the Cyclonic Filter Assembly
IMPORTANT: Disconnect cleaner from electrical
outlet. Do not use cleaner without dirt cup or
filters in place.
!!!
Fig.5/1
Fig.5/3
Fig.5/4
Fig.5/5
Fig.5/2
A
A
A
Page 11

11
V
ax Careline 0870 606 1248
dirt container and filters
Remove dirt container as described above. Twist filter
assembly counterclockwise. Remove assembly from dirt
container (Fig.5/6).
Dirt and debris can be cleaned from the filter assembly by
brushing with the cleaner’s combination tool.
Place the filter assembly on the dirt cup, aligning tabs (A)
on either side of filter with slots on dirt cup (B) and twist
it clockwise to secure into position.
Press dirt cup door release button (C) to latch dirt cup
door closed (Fig.5/7).
Replace dirt cup as described above.
Cleaning the Secondary Filter
IMPORTANT: Disconnect cleaner from electrical
outlet. Do not operate cleaner without dirt cup
or filters in place.
Remove dirt cup as previously described.
With thumb, slide latch (A) located at the top of the
housing to the right and pull down to remove gray filter
frame. Remove black foam filter. Rinse filter frame
cartridge and foam filter under cold water.
Allow both filter frame and filter to air dry for 24 hours
before replacing filter into filter frame. Reposition filter
frame cartridge by inserting tabs (B) into slots on back of
housing. Rotate filter cartridge frame up toward top of
housing and snap closed. top of dirt cup cavity and snap
closed (Fig.5/8).
Cleaning the HEPA Final Filter
IMPORTANT: Disconnect cleaner from electrical
outlet. Do not operate cleaner without dirt cup
or filters in place.
Remove dirt cup as previously described.
With fingers in slots, pull filter frame (A) straight out. Dirt
and debris can be cleaned from the filter cartridge by
brushing with the cleaner’s combination tool (Fig.5/9).
NOTE: Filter cartridge can also be washed by rinsing
under cold running water.
Slide back into position on cleaner.
!
!
Fig.5/6
Fig.5/7
Fig.5/9
Fig.5/8
A
A
A
B
B
A
B
C
Page 12

www.vax.co.uk
12
maintenance
6. Maintenance
Replacing the Headlight
Removing lens
Disconnect cleaner from electrical outlet.
Press handle release pedal and place handle in low
position.
Using a Phillips screwdriver, remove the the screw as
shown and lift off lens (Fig.6/1).
Pull old bulb straight out of socket.Push new bulb straight
into socketuntil locked in place (Fig.6/2).
Excessive force is not required.
Reposition lens and secure with the screw.
Belt Replacement
The belts are located under the bottom plate of the
cleaner and should be checked from time to time to be
sure they are in good condition.
The flat (wide) belt is described below; the other belt is
described under “Brushbar”.
IMPORTANT: Disconnect cleaner from electrical
outlet. Brushbar can start suddenly. Unplug
cleaner before turning it over.
To check the flat belt, remove bottom plate as shown
below. Replace belt if it is stretched, cut or broken.
Replacing Flat Belt
Disconnect cleaner from electrical outlet.
Place handle in low position and turn cleaner over so
bottom side is facing up.
Remove the 6 screws as shown with a Phillips
screwdriver. Lift off bottom plate (A). (Fig.6/3).
Remove used belt from large pulley and discard. (Fig.6/4).
With lettering on outside of belt, slide new belt over
motor shaft (A) (Fig.6/5).
Place other end of belt over large pulley (A) while rolling
the pulley in direction shown (Fig.6/6).
Fig.6/1
Fig.6/2
Fig.6/3
Fig.6/4
Fig.6/5
!
A
Page 13

13
V
ax Careline 0870 606 1248
maintenance
Turn brushbar making sure belt turns freely and is not
pinched between a brushbar and shield (Fig.6/7).
Reposition bottom plate and 6 Phillips head screws (as
Fig.6/3). Tighten screws securely.
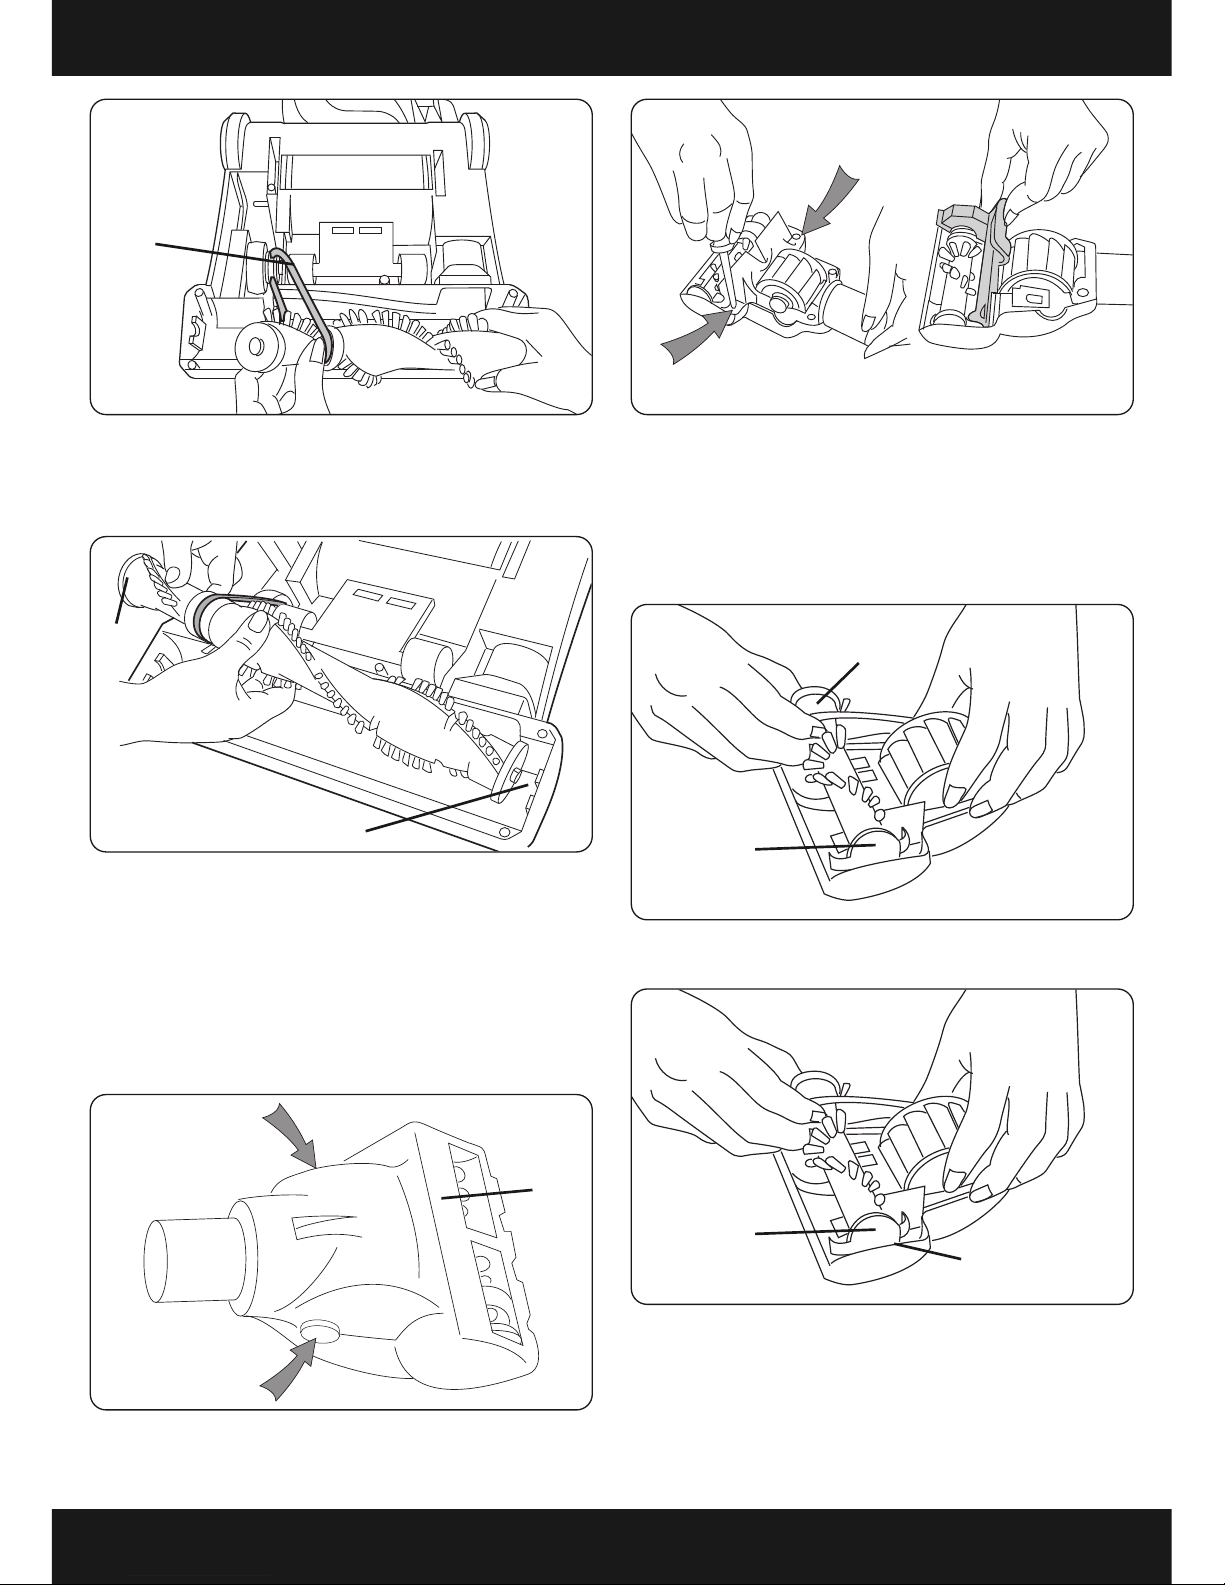
Replacing the Brushbar
When brushbar brushes are worn, the brushbar should be
replaced.
WARNING: Disconnect cleaner from electrical
outlet. Brushbar can start suddenly. Unplug
cleaner before turning it over.
To check condition of brushes, move edge of a card
across bottom plate while turning brushbar. To maintain
cleaning effectiveness, replace brushbar if brushes do not
touch card (Fig.6/8).
Disconnect cleaner from electrical outlet.
Turn carpet height adjustment knob to lowest setting.
Turn cleaner over and remove bottom plate.
Lift up brushbar and slide V-belt (A) off brushbar
(Fig.6/9).
Inspecting the V-belt
The V-belt is designed to last for a long time and is not
normally replaced. However, if the V-belt is cracked,
gouged or broken, it should be replaced.
Slide flat belt off large pulley as shown previously.
To remove V-belt, slide back of belt over pulley (A). Then
firmly pull on belt and “snap” it out. Discard used belt.
To install new belt (with lettering on outside of belt), slide
back of belt over pulley and pull front of belt toward
groove (B) next to pulley. Belt will “pop” into place (Fig.6/10).
Positioning Belt on Brushbar
Before positioning belt onto brushbar, check for debris
accumulation as described in the Clearing Blockages section.
Insert brushbar through belt and position belt in groove (A)
on brushroll (Fig.6/11).
Fig.6/7
Fig.6/9
Fig.6/10
Fig.6/8
Fig.6/6
!
A
A
A
B
Page 14
www.vax.co.uk
14
maintenance
Grasp brushbar firmly and fit it into position by first
sliding end opposite the belt into the rectangular slot (A)
on side of cleaner. Pull other side of brushbar (B) into
place (Fig.6/12).
Belt may fit loosely when properly installed. Reposition
flat belt and bottom plate as described previously.
TurboTool Brush Bar Replacement
When brushbar brushes are worn, the brushbar should be
replaced.
Remove tool from hose and turn it so bottom faces up.
Press the latches on both sides of tool and remove
bottom plate (A) (Fig.6/13).
Unscrew the two Phillips screws and remove belt guard
(Fig.6/14).
Remove brushbar including end plates (A) and discard.
Inspect belt to ensure that it is in good condition. If belt
is cracked, gouged or broken, replace it (see following
section).
Insert brushbar through belt and position belt over gear
teeth (B) on brushbar (Fig.6/15).
With curved ends down, slide end plates (A) of brushbar
into slots (B) on tool (Fig.6/16).
Replace belt guard (A) making sure not to pinch brush
bristles in guard. Turn brushbar, to make sure it rotates
freely (Fig.6/17).
Fig.6/11 Fig.6/14
A
Fig.6/12
Fig.6/15
Fig.6/13
A
A
A
B
B
Fig.6/16
A
B
Page 15

15
V
ax Careline 0870 606 1248
maintenance
Replace and tighten screws.
To replace bottom plate, insert the four tabs on edge of
bottom plate into slots on front of tool.
Pivot bottom plate down and snap closed (Fig.6/18).
TurboTool Belt Replacement
The TurboTool belt is designed to last a long time and is
not normally replaced. However, if the belt is cracked,
gouged or broken, it should be replaced.
Remove tool from hose. The belt can be seen through the
top of the nozzle or by removing the bottom plate and
belt guard (Fig.6/19).
Remove tool from hose. Remove bottom plate, belt guard
and brushbar as described previously.
Grasp turbine (A) and pull firmly to remove. Remove belt
from turbine pulley (B). Replace with new belt (Fig.6/20).
With flat sides of turbine retainers (A) pointing down, slide
retainers into grooves (B) in tool housing and snap into
place (Fig.6/21).
Replace brushbar, belt guard, and bottom plate as
described previously.
Fig.6/17
Fig.6/18
Fig.6/20
Fig.6/21
Fig.6/19
A
A
A
B
B
Page 16

www.vax.co.uk
16
clearing blockages
7. Clearing blockages
IMPORTANT: Disconnect cleaner from electrical
outlet before attempting to clear blockages.
Low suction or pick up may be due to a blockage in the
system. Refer to the following steps to check for blockages
continuing with each step until the blockage is found:
Check fullness of dirt cup; empty if needed.
Checking Airflow Path
Plug cleaner in and turn ON. Check for suction at end of
hose (A) (Fig.7/1). If there is suction, continue with next
step.
Turn cleaner OFF and unplug. Check connection at hose
tube (B); remove any blockage.
Checking Airflow Path Through Hose Inlet Tube on
Back of Cleaner
Turn cleaner OFF and unplug.
If blockage can be seen in tube (A), remove 5 screws using
a Phillips screwdriver. Pull tube from cleaner, remove
blockage (Fig.7/2).
Reposition tube on back of cleaner, replace 5 screws.
Checking Under Hood
Turn cleaner OFF and unplug.
Remove hood, belt and brushbar as described in previous
section. Look into opening (A) for blockages and remove
(Fig.7/3).
Replace belt, brushbar and hood.
If a Blockage Occurs During TurboTool Use
Disconnect TurboTool from hose. Remove bottom plate,
belt guard and turbine as described in previous section.
Remove any blockage from turbine channel (A) (Fig.7/4).
Replace belt turbine, brush roll, belt guard and bottom plate.
!
Fig.7/1
Fig.7/2
Fig.7/3
Fig.7/4
A
A
A
B
Page 17

17
V
ax Careline 0870 606 1248
troubleshooting / uk service & help
8. Troubleshooting
WARNING: To reduce the risk of personal injury,
unplug vacuum cleaner before servicing.
PROBLEM: Cleaner won’t run
Cause: Not properly plugged into wall outlet.
Solution: Plug in firmly.
Cause: No electricity in wall outlet.
Solution: Check fuse or breaker.
Cause: Blown fuse/tripped breaker.
Solution: Reset circuit breaker or replace fuse.
Cause: Motor thermostat tripped.
Solution: Switch off and unplug the vacuum cleaner.
Leave for one (1) hour. See page 3.
PROBLEM: Cleaner/tools won't pick up
Cause: Broken or worn belt.
Solution: replace belt.
Cause: Brushbar worn.
Solution: Replace brushbar.
Cause: Dirt container full.
Solution: Empty dirt container.
Cause: Incorrect carpet height setting.
Solution: Move carpet height adjuster to lower setting.
Cause: Blockage in air flow passages.
Solution: Clear blockage - refer to section 7.
PROBLEM: Cleaner hard to push
Cause: Incorrect carpet height setting.
Solution: Move carpet height adjuster to higher setting.
PROBLEM: Smoky/burning smell detected
Cause: Belt broken or stretched.
Solution: Replace brushbar as described in Section 6.
PROBLEM: Powered Hand Tool brushbar won’t turn
Cause: Too much pressure being applied to tool.
Solution: Continue using tool applying light pressure.
Cause: Blockage in turbine channel.
Solution: Remove blockage - refer to section 7.
Cause: Broken or worn belt.
Solution: Replace belt.
Cause: Low cleaner suction.
Solution: Check items under “Cleaner/tools won’t pick
up” above.
9. UK Service & Help
Vax Care 0870 6061248
Monday-Friday 8.00am to 8.00pm.
Saturday-Sunday 9.00am to 5.00pm.
Any queries or concerns about using the Vax, call the
Vax Careline. Calls are charged at the UK national rate.
Please make a note of the serial number and model
number of the carpet cleaner before calling. There are
over 400 approved Vax Service Agents in the UK. For the
nearest Service Agent, please call the Vax Careline.
www.vax.co.uk
!
Page 18

www.vax.co.uk
18
technical specification
10. Technical Specification
Voltage: 220 – 240V ~50Hz
Wattage: 1500W
Capacity: 2.6l
Filters: Washable pre-motor filter assembly
HEPA post-motor assembly
Cord Length: 8.3m
Weight: 10.68kg
Subject to technical change without notice.
Page 19

19
V
ax Careline 0870 606 1248
This page has been left intentionally blank.
Page 20

EEC STATEMENT OF COMPLIANCE
Manufacturer/EEC importer: Vax Limited, hereby on our own responsibility, declare that the
VZL-6015 Mach 5 range and VZL-6016 Mach 6 range upright vacuum cleaners
are manufactured in compliance with the following Directives:
Safety: 2006/95/EC Low Voltage Directive
EMC: 2004/108/EC Electromagnetic Compatibility Directive
Waste electrical products should not be disposed of with household waste. Please recycle where
facilities exist. Check with your Local Authority or retailer for recycling advice.
Vax Ltd., Kingswood Road, Hampton Lovett, Droitwich, Worcestershire, WR9 OQH, UK
email: info@vax.co.uk - website: www.vax.co.uk
 Loading...