

Page 1

RapideSpringClean
CARPET WASHER
WASHES CARPETS
LEAVING THEM CLEAN
AND FRESH
LET’S GET STARTED.
VCWRS700
Page 2

Let’s talk safety
Basic safety precautions
This Carpet Washer is intended for household use
only and NOT for commercial or industrial use.
READ ALL THE INSTRUCTIONS BEFORE USING
THIS APPLIANCE
• This appliance is not intended for use by persons
(including children) with reduced physical, sensory
or mental capabilities, or lack of experience and
knowledge, unless they have been given supervision
or instruction concerning the use of the appliance
by a person responsible for their safety.
Don’ts
8 Do not leave the carpet washer unattended when
plugged in. Unplug it from socket when not in use.
8 To prevent electric shock do not use outdoors.
8 Not to be used as a toy. Children should be supervised
to ensure that they do not play with the appliance.
8 Do not use the carpet washer if it has been dropped,
damaged, left outdoors or dropped into water. Do not
use the carpet washer with a damaged cord or plug.
If the supply cord is damaged, it must be replaced by
the manufacturer or a recommended Service Agent
to avoid hazard and invalidating the guarantee.
8 Do not pull or carry by cord/hose. Do not use the
cord/hose as a handle, close a door on the cord/hose
or pull cord/hose around sharp edges or corners.
Do not run the carpet washer over the cord/hose.
Keep the cord away from heated surfaces.
8 Do not unplug by pulling on the cord.
8 Do not handle the plug or carpet washer with wet hands.
• Using improper voltage may result in damage to the
motor and possible injury to the user. The correct
voltage is listed on the rating label.
Please keep instructions for further use.
8 Do not put any objects into openings or operate with
openings blocked, keep them free of anything that may
reduce airow.
8 Do not use the carpet washer on any glowing, burning
or smoking particles.
8 Do not use without the solution tank and dirty water
tank in place.
8 Do not use to pick up ammable or combustible
liquids such as petrol, or use in areas where they may
be present.
8 Do not attempt to remove blockages with sharp
objects as they may cause damage.
8 A hazard may occur if the carpet washer runs over
the power supply cord.
8 To prevent dirty water from running into the motor,
do not hold the appliance upside-down or lay on its side.
Use appliance in normal cleaning position.
8 Do not carry appliance while motor is running.
Page 3

Do’s
3 Use only as described in this manual.
3 Keep hair, loose clothing, ngers and all parts of the
body away from openings and moving parts.
3 Turn o all controls before unplugging.
3 Keep the unit on the oor.
3 Store indoors put away after use to prevent
tripping accidents.
WARNING: Always switch o and unplug your machine from the electrical outlet before lling and emptying the clean
water tank, emptying the dirty water tank, before assembling, opening, before connecting/disconnecting the attachments,
or carrying out maintenance or troubleshooting checks and storage.
NOTE: Carpets should be dry vacuumed thoroughly before washing.
IMPORTANT: If the hose or tools are blocked, switch o and unplug the carpet washer and remove the blockage(s)
before re-starting your machine.
3 Use extra care when cleaning on stairs.
3 Use only SAA approved 10amp extension cords.
Non-approved cords may overheat. Care should
be taken to arrange the cord so that the cord cannot
be tripped over.
IMPORTANT: Even with regular cleaning, lters have a limited lifespan and will eventually need to be replaced during the
lifetime of the cleaner. If the performance of your cleaner is compromised and/or the lters are severely discoloured, the
lters may need to be replaced. As a general guide, Vax recommends lters be replaced every 3-6 months depending
on the level of use to ensure optimum performance of your cleaner.
This machine is intended for household use only, and NOT for commercial or industrial use.
PLEASE KEEP THESE INSTRUCTIONS FOR FURTHER USE.
Page 4

Thank you for buying this Rapide Spring Clean.
Taking care of your carpets
The Rapide Spring Clean is designed to make carpet cleaning as quick and convenient as possible
and this user guide will help you get the most out of your machine.
Taking care of your Rapide Spring Clean
Also inside this guide are instructions on maintaining your new machine, so that it’s always ready
when you need it.
We’re here if you need us
For troubleshooting simply visit or call:
Australia: 1300 361 505* New Zealand: 0800 800 900*
vax.com.au vax.co.nz
*Monday – Friday: 8:30am -5:00pm
Calls are charged at the standard local rate. Please make note of the serial
number and model number of the product before calling.
Page 5

Contents
Let’s talk safety
Getting to know your machine
Getting started
Using your machine
Taking care of your machine
What to do if it goes wrong
Rapide Spring Clean
Included with
your machine
Vax Cleaning
Solution Bottle
Getting in touch
Page 6

Getting to know your machine
Handle
Clean water release button
Cord hooks
Clean water tank
Wheels
Dirty water tank
Suction channel
Technical Specication
Name Rapide Spring Clean
Model No VCWRS700
Voltage 220-240V ~ 50Hz
Wattage 700W
Cord hooks
Handle release
pedal
On/o switch
Capacity Clean water tank 2.6L
Dirty water tank 1.8L
Weight 6.2kg
Cord length 6m
Subject to technical change without notice. To purchase consumables and accessories, please visit vax.com.au/vax.co.nz
Page 7
PLEASE READ ‘LET’S TALK SAFETY’ AT THE BEGINNING BEFORE USE
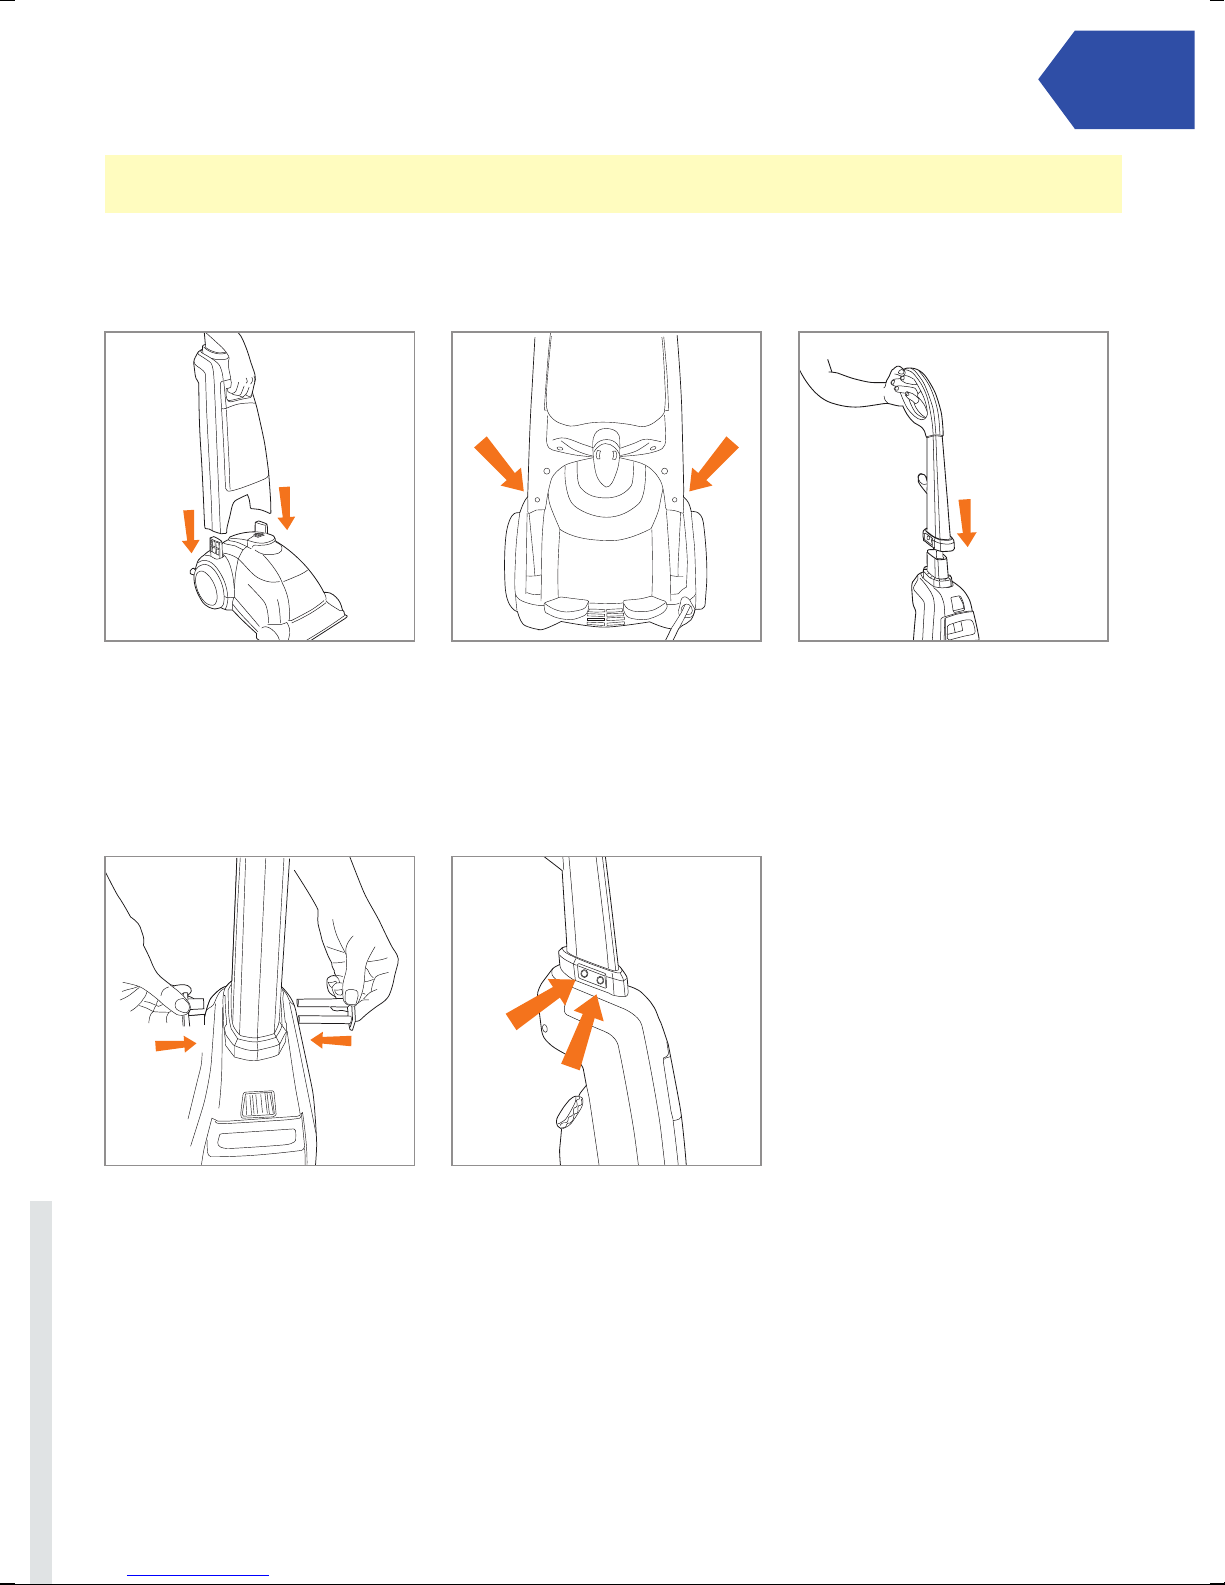
Assembly: Putting your cleaner together
Getting started
Insert middle frame to machine base.
Insert locking pins into either side
of handle.
Insert one screw on either side
of middle frame to secure.
Screw locking pins into handle.
Slide the upper handle down onto
the unit. The handle will click and
lock in place. Run the mains wire
above the upper cord hook and
secure with the cord clip.
Page 8
Using your machine
IMPORTANT: Turn o when emptying and lling the tanks and performing any maintenance.
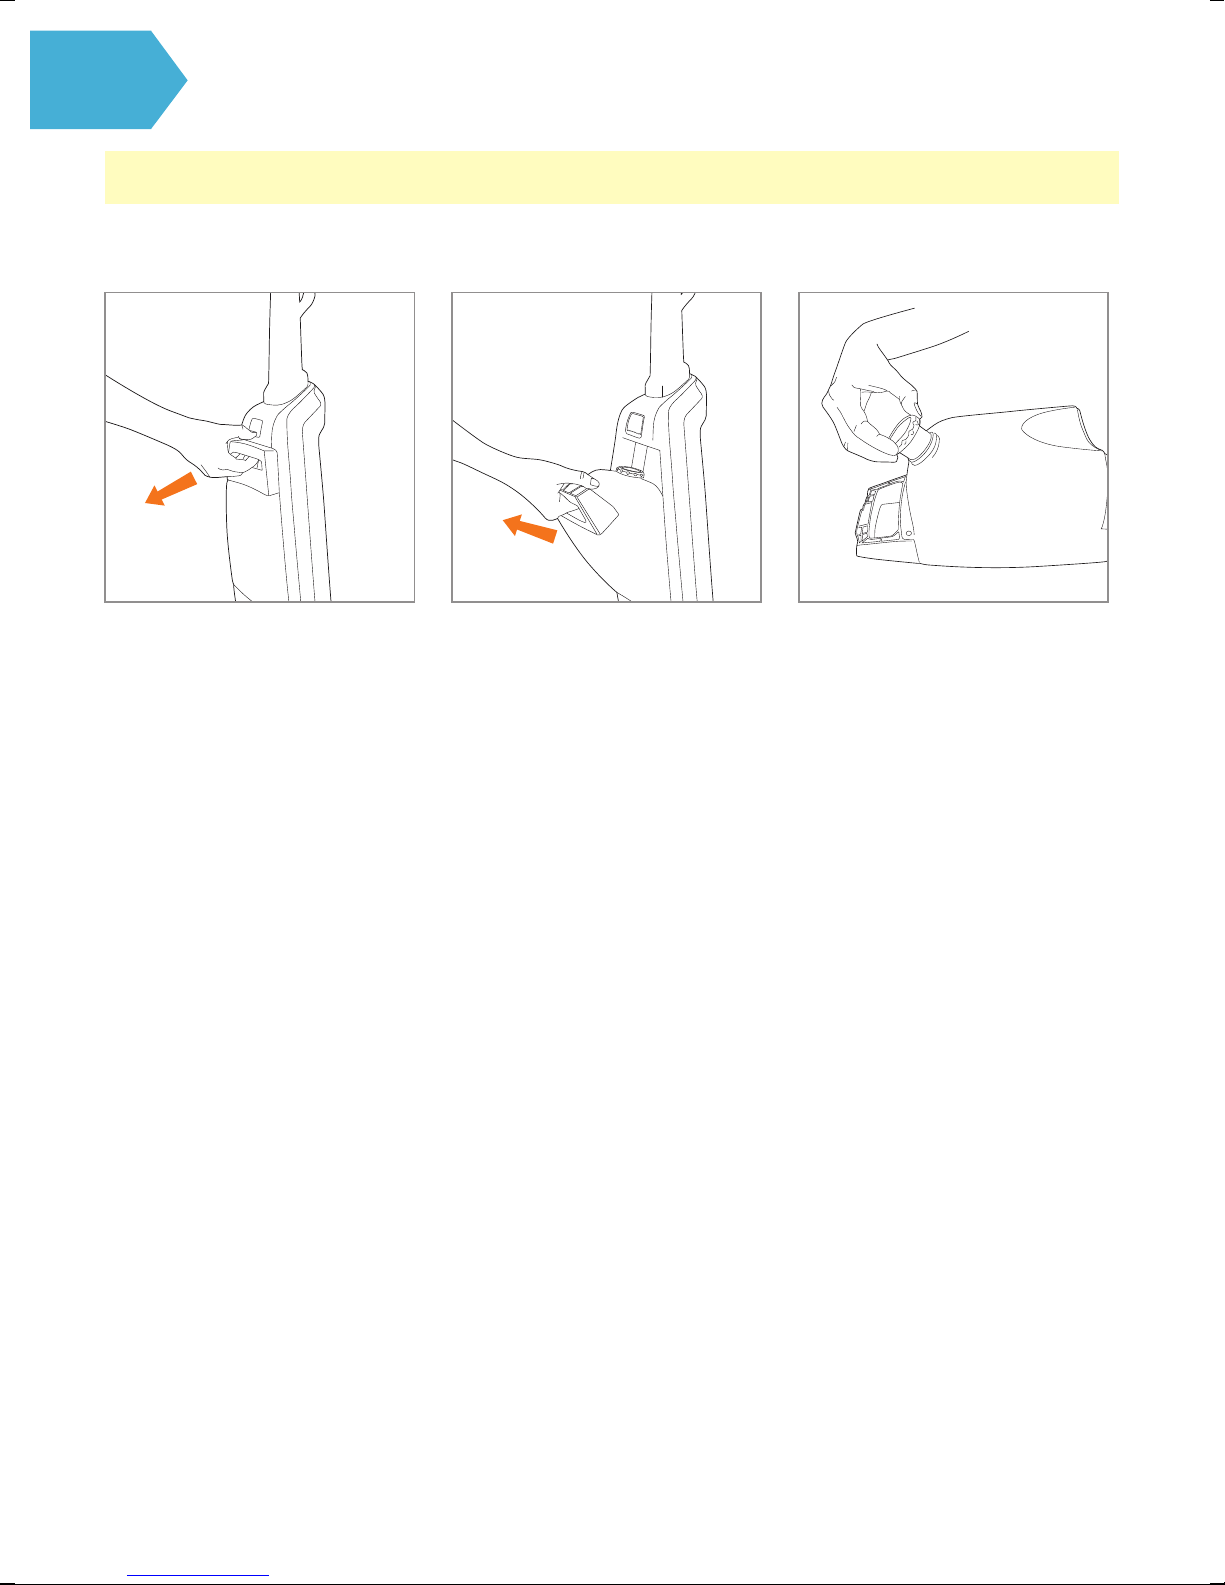
Putting the Vax Cleaning Solution into the machine
Grasp the solution reservoir under
the handle and press the handle
release lever.
Tilt the solution reservoir away
from the cleaner and remove.
Unscrew the cap from the back of
the solution reservoir.
Pour the correct amount of Vax
Solution as directed on the solution
label into the clean water tank.
Page 9

Using your machine
Operation
IMPORTANT: Maximum water temperature 50°C
IMPORTANT: Never leave the cleaner unattended with the power on.
NOTE: Vacuum carpets thoroughly with dry vacuum cleaner before washing.
Fill the remaining space in the
solution reservoir with warm tap
water. Replace the measuring cap.
NOTE: use only Vax Solution, using
other cleaning solutions may cause
excessive foaming. This may cause
the oat to shut o the cleaner
prematurely. Using other cleaning
solutions will invalidate your warranty.
Place the bottom of the solution
reservoir into the cleaner and push
into place. There will be an audible
click when the reservoir is in the
correct position.
Plug the cord into a mains
electricity socket. Turn the power
switch on.
The switch is located on the back of the
cleaner, next to the handle release.
The power switch controls the
vacuum motor. Press on the handle
release pedal and pull the cleaner
back into a reclined position.
Whilst depressing solution spray
trigger, push carpet washer in a
forwards motion. Release trigger
and pull unit backwards in same
path to remove dirty water and
solution from the carpet.
Repeat if necessary, when the dirty
water reaches the max ll line on
the dirty water tank empty the tank.
Page 10

Taking care of your machine
Emptying the dirty water tank
NOTE: The oat in your Rapide is located in the lid of the dirty water tank. It will shut o the suction when the dirty
water tank is full. For best results use a smooth steady motion keeping the nozzle at against the carpet.
Tipping the cleaner and breaking the seal of the nozzle against the carpet will cause the oat to rise cutting o
suction. Once the oat is activated, empty the dirty water tank. If the tank does not appear full turn o the power
switch and wait for the oat to settle. For best results use only Vax Solution.
You will hear a change in motor pitch when the tank is full and needs emptying.
IMPORTANT: Unplug your cleaner before emptying the dirty water tank.
Grasp the top of the dirty water tank
handle and press the release latch.
Pull to remove from the base, take
care to ensure that no dirty water
leaks from the front.
Remove dirty water tank. To empty the water tank grasp the
handle with one hand and nozzle with
the other and empty into the sink.
Page 11

Taking care of your machine
Cleaning the dirty water tank
Rinse the dirty water tank and top thoroughly, with warm water.
You should allow them to dry fully before replacing them on your cleaner to prevent mildew.
Do not use any chemicals in the cleaning process.
Replacing the dirty water tank
Lift the front of the carpet cleaner
base o the carpet with one hand.
Grasp the handle and hook the front
of the dirty water tank into the base,
making sure that the front of the dirty
water tank is resting on the base.
Failure to install the dirty water tank
correctly will result in poor dirty
water pick up.
While making sure the dirty water
tank is resting on the base, place
the rear of the tank into the base
of the cleaner, push down on the
handle until it latches.
Replace top of dirty water tank
by pressing it into place.
Page 12

Taking care of your machine
Brush removal and replacement
NOTE: The plug must be removed from socket outlet before cleaning or maintaining the appliance.
Switch o and unplug carpet washer,
then remove the water tank.
Flip the cleaner on its side to expose
the nozzle base.
Lift out the oating brush bar
by pressing the two latches and
pulling it gently.
Replace oating brushbar.
Page 13

Taking care of your machine
Cleaning the tank lter
IMPORTANT: Do not use any detergents or boiling water to wash the lters. Vax recommends checking the lters.
NOTE: All lters must be in place before using your machine.
Remove the dirty water tank from
the unit.
The lter can be rinsed in warm
water (max. 40°C).
IMPORTANT: Ensure lter is fully dry (allow 24hrs) before replacing back into the machine.
Remove the lter cover from the
back of the tank.
Separate the lter from the
lter cover.
Page 14

What to do if it goes wrong
The cleaner won’t run.
Cleaner won’t pick
up/loss of suction.
SolutionProblem
• Not properly plugged into electrical outlet. Plug in rmly.
• No electricity in electrical outlet. Check fuse or breaker.
• On/o switch not turned on. Push on/o switch to ‘on’.
• Blown fuse/tripped breaker. Reset circuit breaker or replace fuse.
• Dirty water tank is full. Switch o and unplug cleaner. Empty dirty
water tank.
• Dirty water tank not installed correctly. For tting information, refer to
“Replacing Dirty Water Tank” in the “Taking Care of your machine” section.
• Obstruction in hose/nozzle. Solution: Remove hose and clear obstruction.
Liquid escaping from
the carpet washer.
Clean solution won’t
dispense.
• Dirty water tank is full. Switch o and unplug cleaner. Empty dirty water tank
refer to “Emptying the Dirty Water Tank” in the “Taking Care of your machine”
section.
• Dirty water tank not installed correctly. For tting information, refer to
“Replacing Dirty Water Tank” in the “Taking Care of your machine” section.
• Solution tank not installed correctly. Make sure the tank is securely locked in place.
• Solution tank not installed correctly. Make sure the tank is securely
locked in place.
• Solution tank empty. Rell tank. Refer to “Using you machine” section.
• Handle not tted correctly. Solution: Ensure handle is tted correctly.
Page 15

Getting in touch
* Calls are charged at the standard local rate. Please make a note of the serial number and model number of the vacuum cleaner
before calling.
Page 16

Distributed by Techtronic Industries Australia Pty. Ltd.
31 Gilby Road, Mt Waverley, VIC 3149 Australia.
Careline AU: 1300 361 505 www.vax.com.au
Careline NZ: 0800 800 900 www.vax.co.nz
 Loading...